
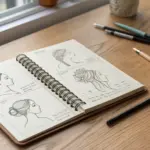
A guitar is one of those classic shapes that’s instantly recognizable, which makes it ridiculously fun to remix in your own style. Here are my favorite guitar drawing ideas—from easy, classic sketches to more imaginative concepts that feel like a whole little artwork.
Classic Acoustic Guitar Shading
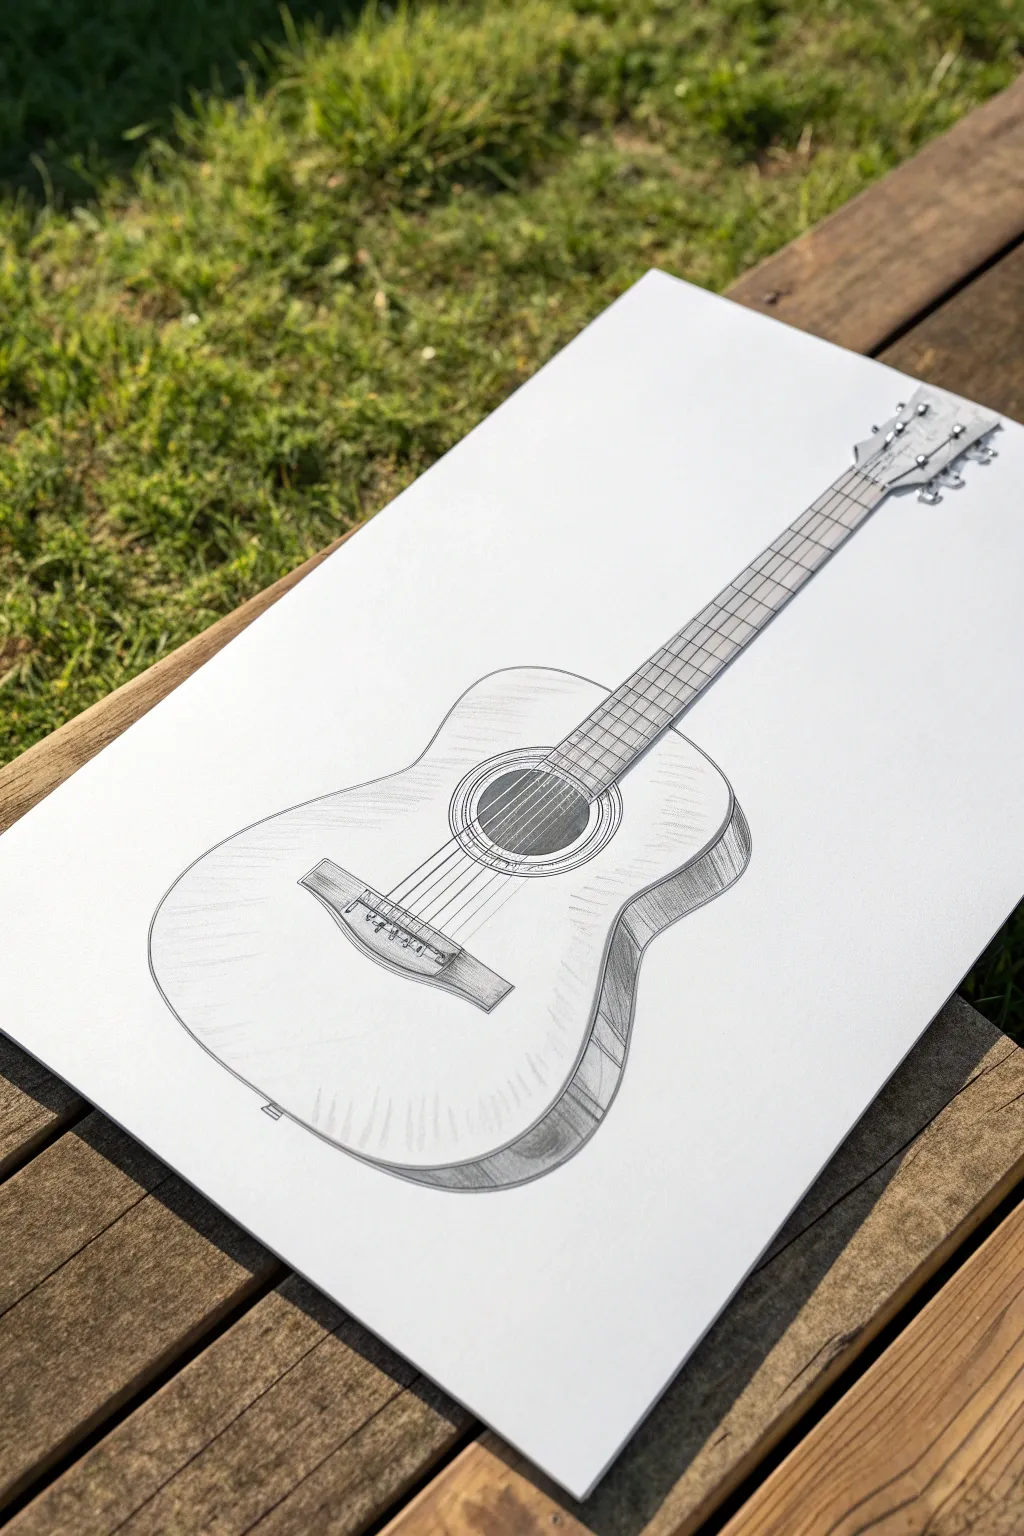
Capture the resonant beauty of a classic acoustic guitar with this detailed pencil study. Focusing on accurate perspective and subtle tonal values, you’ll create a realistic rendering that pops off the page with three-dimensional depth.
Step-by-Step
Materials
- High-quality drawing paper (smooth bristol or hot press watercolor paper)
- Graphite pencils (H, HB, 2B, 4B, 6B)
- Ruler or straight edge
- Kneaded eraser
- Precision eraser (pencil style or mono zero)
- Blending stump or tortillon
- Tissue or chamois cloth
Step 1: Establishing the Perspective Framework
-
Light Guidelines:
Begin with an H pencil and a very light touch. Draw a long diagonal line to represent the center string path of the guitar neck, extending down into where the body will be. -
Sketching the Body Shape:
Create the figure-eight shape of the guitar body. Since the guitar is viewed at an angle, the lower bout (the wide bottom part) should appear slightly larger and closer than the upper bout. Ensure the curves are smooth and symmetrical relative to your center line. -
Defining the Depth:
To give the guitar 3D volume, draw a second outline parallel to the right side of the body curves. This creates the side panel or ‘rib’ of the guitar, which is crucial for the realistic look. -
Mapping the Neck and Headstock:
Extend the neck upwards along your initial guideline, tapering slightly as it reaches the nut. At the top, sketch the rectangular shape of the headstock, flaring it out slightly for that classic acoustic silhouette.
Step 2: Adding Details and Hardware
-
The Sound Hole and Rosette:
Draw the circular sound hole in the upper center of the body. Because of the perspective, this should be drawn as an oval, not a perfect circle. Add concentric rings around it for the rosette detail. -
Constructing the Bridge:
Place the bridge below the sound hole. Use a ruler to keep the rectangular shape crisp, adding the small bridge pins in a neat row. -
Fretboard Markings:
Using your ruler, mark horizontal lines up and down the neck for the frets. Remember that the space between frets gets progressively smaller as you move toward the guitar body. -
Strings and Tuning Pegs:
Carefully draw six parallel lines running from the bridge, over the sound hole, and up the neck to the headstock. Sketch the six tuning pegs on the headstock, three on each side, giving them small oval shapes.
Straight Lines Matter
Use a ruler for the strings and drawing the neck edges. Even slightly wobbly lines on the neck will ruin the illusion of a playable instrument.
Step 3: Shading and Texture
-
Darkest Values First:
Switch to a 4B or 6B pencil to fill in the sound hole. This should be the darkest part of your drawing to create the illusion of a hollow interior. -
Shading the Side Panel:
Use a 2B pencil to shade the side panel (the thickness of the guitar). Apply vertical strokes that follow the curve of the wood. Make the shading darker near the ‘waist’ of the guitar and lighter towards the edges to show curvature. -
Creating Wood Grain:
On the face of the guitar, use an HB pencil to draw very faint, long, wavy lines running vertically. These simulate the spruce top wood grain. Keep these lines broken and subtle rather than continuous. -
Adding Cast Shadows:
To ground the object, add a slight shadow underneath the bottom curve. This separates the guitar from the paper surface. -
Refining the Neck:
Shade the fretboard lightly with a B pencil, leaving the metal frets white (or lift pigment with an eraser). Add small shadows under the strings where they cross the fretboard. -
Metallic Highlights:
For the tuning pegs and bridge pins, use high-contrast shading. Outline firmly, shade the sides dark, and leave a stark white spot in the center of each metal part to represent a reflection.
Make it Personal
Customize the headstock with a unique logo or your initials. You can also sketch a pickguard near the sound hole for a different style of acoustic.
Step 4: Final Polish
-
Deepening Contrast:
I like to go back with my 6B pencil and re-darken the deepest crevices—specifically the edge of the bridge and the very bottom of the side panel shading. -
Cleaning Edges:
Use a precision eraser to clean up any smudge marks around the outer perimeter. A crisp, white background makes the pencil work stand out. -
String Highlights:
If your pencil lines covered the strings, use a sharp edge of your eraser or a white gel pen to re-establish the highlights on the strings, ensuring they look taut and metallic.
Now step back and admire the rhythm and volume of your finished acoustic guitar sketch


Electric Guitar With Bold Angles
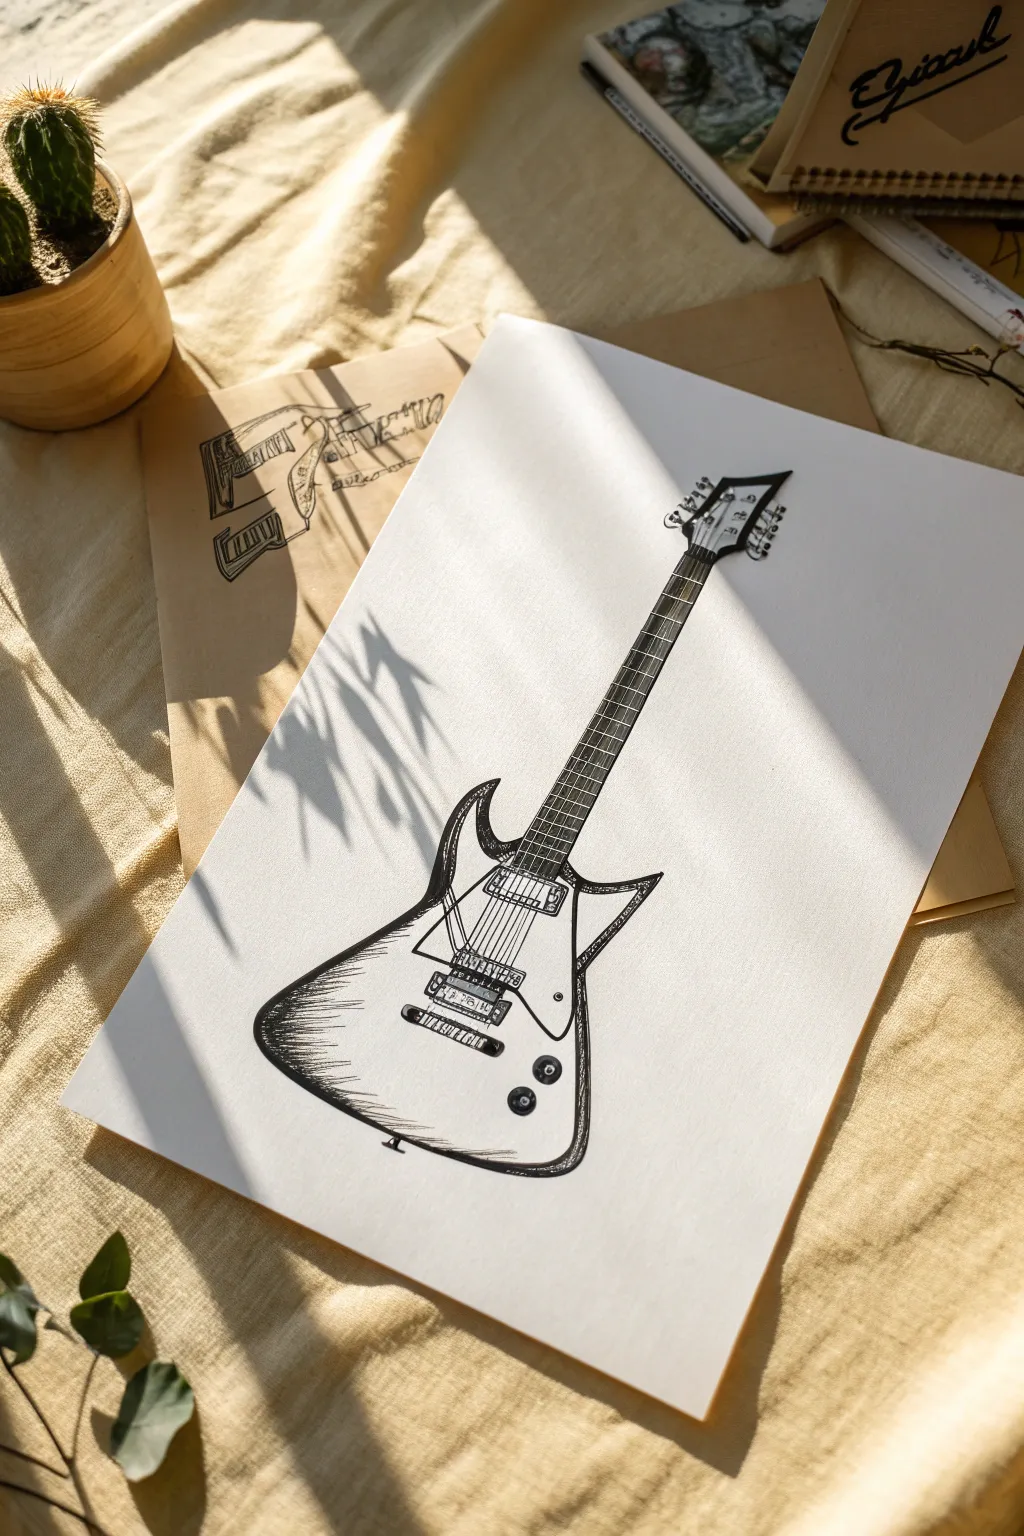
Capture the aggressive energy of rock music with this bold, angular electric guitar illustration. Using clean ink lines and strategic hatching, you will build a drawing that emphasizes the instrument’s sharp silhouette and mechanical details.
Step-by-Step Guide
Materials
- Heavyweight drawing paper or mixed media paper
- HB pencil for sketching
- Fine liner pens (sizes 0.1, 0.3, and 0.5mm)
- Thicker black marker or brush pen (for bold outlines)
- Ruler or straight edge
- Kneaded eraser
Step 1: Constructing the Framework
-
Establish the Center Line:
Begin by lightly drawing a long, diagonal line across your paper using your ruler. This will serve as the central axis for the guitar’s neck and body, ensuring everything stays aligned. -
Outline the Neck:
Sketch a long, narrow rectangle centered over your diagonal guide line. Make it slightly wider at the bottom where it will join the body and narrower at the top where the headstock will sit. -
Draft the Headstock:
At the top of the neck, draw a sweeping ‘V’ shape or a split shape typical of heavy metal guitars. The top should flare out aggressively to matched the angled theme. -
Block in the Body Shape:
Sketch the main body. Unlike a traditional curvy acoustic, focus on sharp points. Draw a large ‘V’ shape for the bottom legs of the guitar, and connect them to the neck with angled shoulders. Keep your pencil strokes light so you can adjust the symmetry.
Wobbly Straight Lines?
If you struggle with straight strings, use a ruler but lift the pen slightly at random intervals. Broken lines often look more organic and artistic than perfect ones.
Step 2: Adding Mechanical Details
-
Placement of Pickups:
In the center of the body, just below the neck joint, lightly sketch two rectangular boxes for the humbucker pickups. They should be parallel to each other. -
Bridge and Tailpiece:
Below the pickups, draw the bridge mechanism as a horizontal rectangle perpendicular to the strings. Add fine lines to suggest the saddles where the strings rest. -
Knobs and Switch:
Sketch three small circles on the lower wing of the body for the volume and tone knobs. Locate a spot near the upper shoulder for the toggle switch. -
Fretboard Markers:
Divide the neck with horizontal lines for the frets. The spacing should get progressively narrower as you move from the headstock down toward the body.
Step 3: Inking and Definition
-
Commit to the Outline:
Switch to your 0.5mm pen or a slightly thicker marker. Trace over your main body and headstock pencil lines. I prefer to make the outer silhouette slightly bolder to make the guitar pop off the page. -
Refining the Lines:
Sometimes a single line isn’t enough; go over the curves of the body a second time loosely to give it a sketched, artistic feel rather than a rigid blueprint look. -
Detailing the Hardware:
Use a 0.3mm pen to ink the pickups, bridge, and knobs. For the pickups, draw rows of tiny circles for the pole pieces. -
Drawing the Strings:
Using a ruler and a 0.1mm pen, draw six straight lines running from the bridge, over the pickups, up the neck, and into the tuning posts on the headstock. -
Headstock Hardware:
Draw the tuning pegs on the sides of the headstock. Keep them simple—just small circles or ovals connected to the posts.
Pro Tip: Line Weight
Use your thickest pen ONLY for the outer silhouette and the shadow side of the object. Keep interior details like strings extremely thin for depth.
Step 4: Shading and Texture
-
Adding Dimension to the Neck:
Use the 0.1mm pen to add hatching between the frets. Darken the fretboard slightly to differentiate the wood types. -
Shadowing the Body:
Apply hatching marks on the left side of the guitar body curves. Short, quick, parallel flicks of the pen create a sense of curvature and metallic sheen. -
Darkening the Hardware:
Fill in the pickups and knobs with heavy black ink, leaving tiny slivers of white paper to represent light reflecting off the plastic or metal surfaces. -
Enhancing Contrast:
Look for areas where parts overlap, like under the strings or around the bridge, and deepen the shadows there with cross-hatching. -
Clean Up:
Once the ink is completely dry, gently erase all the underlying pencil construction lines to reveal the stark black-and-white artwork. -
Final Polish:
Review your drawing for any faint lines. Strengthen the outermost border one last time if needed to ensure the ‘bold angles’ really stand out.
Now you have a striking piece of rock-n-roll art ready to frame or display


Guitar With Floating Music Notes

Capture the melody of music visually with this charming illustration featuring a realistic acoustic guitar and dancing, metallic notes. This project combines precise pen work with warm watercolor washes to create a piece that feels both grounded and magical.
Step-by-Step Guide
Materials
- Cold press watercolor paper (A4 or similar size)
- HB pencil and eraser
- Fine liner pens (Black, 0.1mm and 0.3mm)
- Watercolor paints (Burnt Sienna, Yellow Ochre, Lamp Black, Sepia)
- Metallic watercolor or gouache (Copper or Bronze)
- Small round brushes (Size 2 and 4)
- Ruler (optional)
- White gel pen (optional for highlights)
Step 1: Sketching the Instrument
-
Map out the body shape:
Start by lightly sketching the hourglass shape of the guitar body on the lower right side of your paper. For this specific look, aim for a clear ‘waist’ on the guitar, making the bottom bout slightly wider than the top bout. -
Draw the neck and headstock:
Extend a long, straight neck upwards from the body at a slight angle. Top it off with the headstock, sketching the simple geometric perimeter where the tuning pegs will go. -
Add details and soundhole:
Draw the circular soundhole in the upper center of the body. Sketch the bridge below it—a simple rectangle with rounded edges. Add tiny circles on the headstock for the tuners. -
Refine the perimeter:
Clean up your sketch lines. Add a double line around the soundhole to create the rosette, and a thin double line around the outer edge of the body to represent the binding.
Wood Grain Pro-Tip
For realistic wood texture, lift out some pigment with a damp, clean brush while the first wash is wet. This creates natural highlights in the wood before you add darker grain lines.
Step 2: Inking the Outline
-
Ink the structural lines:
Using a 0.3mm black fine liner, carefully trace the main outline of the guitar body, neck, and headstock. Keep your hand steady for these long curves. -
Detailed pen work:
Switch to a finer 0.1mm pen to draw the tuning pegs and the intricate rosette pattern around the soundhole—tiny zig-zags or dots work well here. -
Draw the strings and frets:
Use a ruler if needed to draw six straight lines down the neck for strings, and perpendicular lines across the fretboard for the frets. Ink the bridge details carefully, ensuring the strings connect properly at the bottom. -
Erase pencil marks:
Wait at least five minutes for the ink to dry completely to avoid smudging. Gently erase all visible pencil lines.
Level Up: Shadow Play
Mix a very watery purple-grey and add a subtle drop shadow to the right side of the guitar body. It lifts the instrument off the page immediately.
Step 3: Watercolor Application
-
Base wash for the body:
Mix a watery blend of Yellow Ochre and a touch of Burnt Sienna. Paint the entire face of the guitar body, avoiding the bridge and fretboard. Keep this layer light and transparent. -
Adding wood grain texture:
While the base is still slightly damp (but not soaking), use a size 2 brush with a slightly stronger mix of Burnt Sienna to paint subtle vertical stripes. This creates a realistic wood grain effect. -
Painting the neck and fretboard:
Mix a dark grey using Lamp Black and plenty of water. Paint the fretboard carefully, coloring in between the fret wires. Use a darker concentration for the soundhole center to give it depth. -
Bridge and headstock details:
Paint the bridge with a rich brown (Sepia). I like to use a very pale grey wash for the headstock face, mimicking a metallic or pearl finish. -
Dry and refine:
Let the paint dry completely. If the wood grain faded too much, you can add a second layer of very thin, dark lines now.
Step 4: The Floating Melody
-
Sketch the musical flow:
Lightly pencil a wavy, ribbon-like path emerging from the soundhole and drifting upward to the left. Sketch various music notes (eighth notes, quarter notes) dancing along this path. -
Paint the golden notes:
Using your metallic copper or bronze paint, fill in the sketched notes. The metallic sheen adds a wonderful contrast to the matte wood tones. -
Add the flowing staves:
With a very fine brush and the metallic paint, draw long, sweeping lines connecting the notes, mimicking a dissolving music staff. -
Final magical touches:
Add tiny metallic dots, stars, or sparkles around the floating notes to enhance the magical atmosphere. Once dry, erase any lingering pencil marks from the music trail.
Now you have a melodic piece of art that looks ready to play a song

Guitar With Wings or a Halo
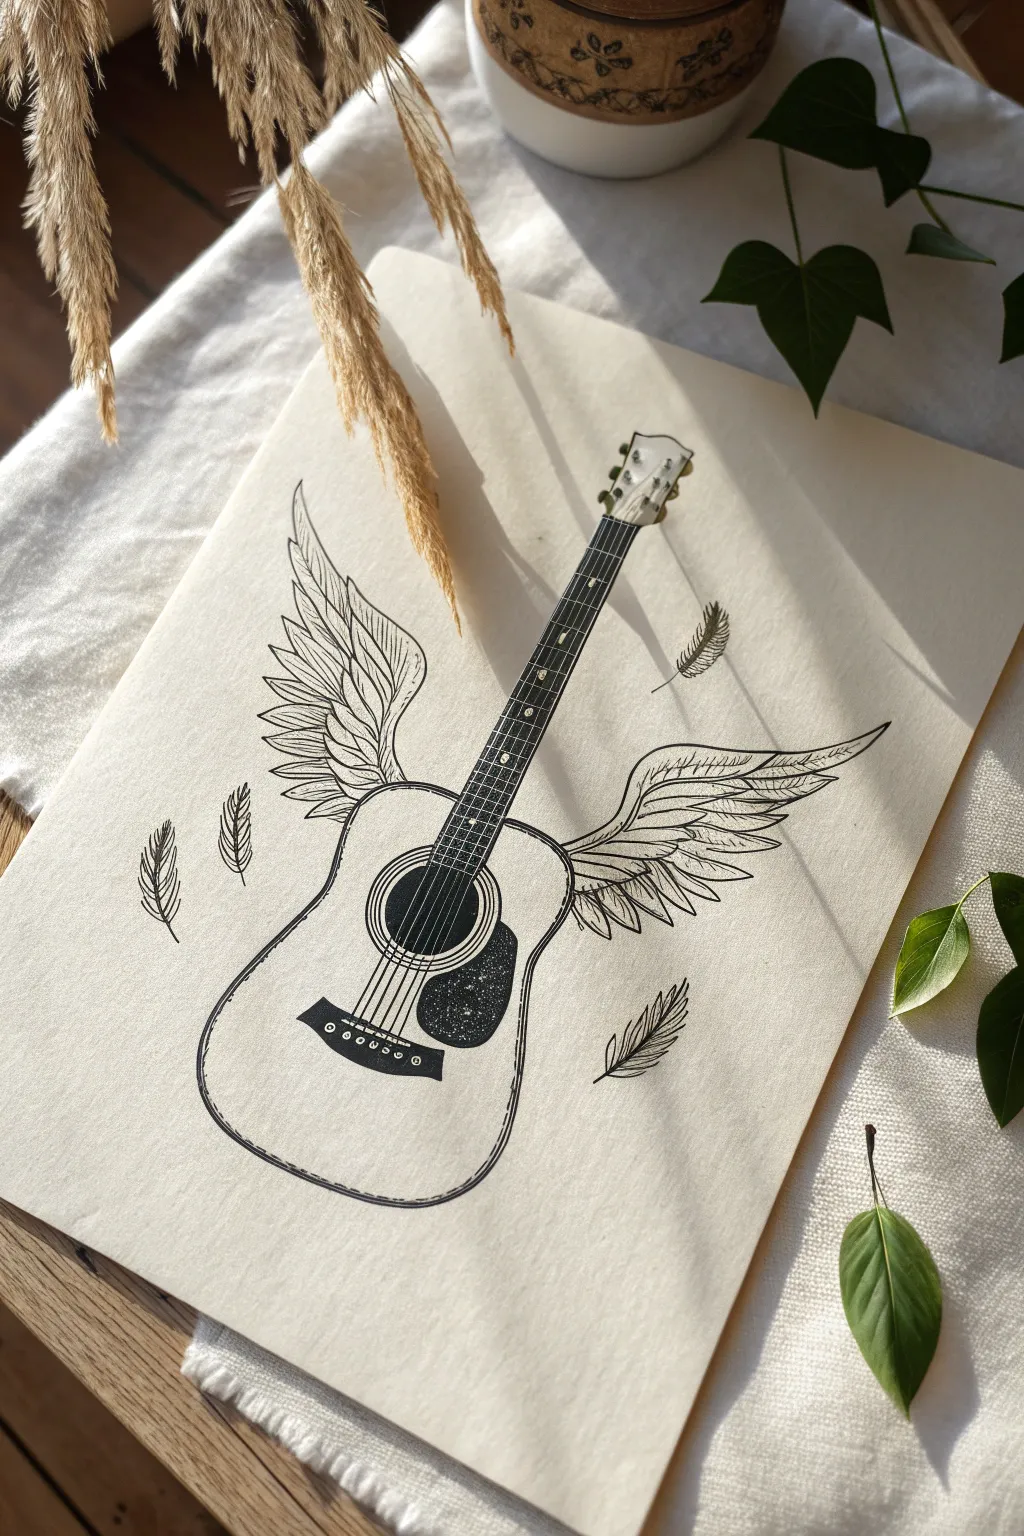
This whimsical project combines the classic silhouette of an acoustic guitar with delicate, feathery wings. It’s a beautifully simple ink illustration that captures the feeling of music taking flight.
Detailed Instructions
Materials
- High-quality bright white or beige drawing paper (smooth bristol or mixed media)
- HB pencil for sketching
- Kneaded eraser
- Fine liner pens (sizes 005, 01, 03, and 05)
- Ruler
- Compass or circular object (optional for the sound hole)
Step 1: Constructing the Guitar Body
-
Sketch the centerline:
Begin by lightly drawing a vertical line down the center of your paper with a ruler. This will ensure your guitar is symmetrical and the neck is perfectly straight. -
Outline the body shape:
Draw the classic figure-eight shape of the acoustic guitar body. The bottom bout should be wider than the top bout. Keep your pencil lines very light so they can be erased later. -
Add the neck and headstock:
Extend a rectangle upwards from the body for the neck. At the top, sketch the flared shape of the headstock where the tuning pegs will go. -
Define the sound hole and bridge:
Use a compass or trace a small cap to draw the circular sound hole in the upper part of the body. Sketch the rectangular bridge below it on the lower bout.
Step 2: Drafting the Wings
-
Establish the wing structure:
From the ‘shoulders’ of the guitar body (where the curve dips in), draw two large curved lines extending outward and upward. These form the top edge of the wings. -
Map out the feathers:
Sketch three rows of feathers. The top row should be short, scale-like coverts. The middle row consists of medium-length feathers, and the bottom row features long, sweeping primary feathers. -
Add floating elements:
Sketch three simple leaf-shaped outlines around the guitar to represent falling feathers—two on the left and one on the right for balance.
Clean Lines Tip
When drawing long strings, turn your paper so you are pulling the pen toward your body rather than pushing it away. This range of motion is much steadier.
Step 3: Inking the Details
-
Outline the main shapes:
Switch to your 03 fine liner. Carefully trace the outer contour of the guitar body and the neck. Use a steady hand to keep the lines smooth. -
Detail the fretboard:
Draw the horizontal fret lines across the neck. Mark the fret markers (dots) at the 3rd, 5th, 7th, and 9th intervals. Fill in the spaces between frets with black ink, leaving the metal fret wires white, or simply outline the neck and draw the strings over it. -
Ink the strings and sound hole:
Use a ruler and an 005 pen to draw six straight strings from the bridge up to the tuning pegs. Darken the inside of the sound hole with an 05 pen, but be careful not to ink over your strings. -
Refine the bridge and pickguard:
Fill in the bridge shape with solid black, leaving small white circles for the bridge pins. If you want a pickguard, outline a teardrop shape next to the sound hole and fill it with a stippling (dotting) texture for contrast.
Make it Metallic
Use a gold or silver gel pen for the tuning pegs and the guitar strings. The subtle shimmer adds a luxurious touch against the matte black ink.
Step 4: Feather Texturing
-
Outline the wings:
Using an 01 pen, go over the outlines of the individual feathers in your wings. Make the tips of the feathers slightly pointed or ragged for realism. -
Add the rachis:
Draw a central line (rachis) down the middle of the larger primary feathers. This gives them structure and direction. -
Texture the barbs:
With your finest 005 pen, draw quick, short, diagonal strokes originating from the central line of each feather. I find that quick flicks of the wrist create the most natural-looking texture here. -
Ink falling feathers:
Repeat the same texturing process on the three floating feathers. Give them slightly bent shapes to show they are drifting in the air.
Step 5: Finishing Touches
-
Erase pencil marks:
Wait until the ink is completely dry (at least 15 minutes) to avoid smudging. Gently erase all visible pencil sketch lines with your kneaded eraser. -
Add final contrast:
Look over your drawing. If the guitar body feels too flat, add a second, thinner line just inside the outer edge to suggest the binding or thickness of the wood.
Now you have a stunning piece of musical art ready to be framed or gifted to a music lover


Have a question or want to share your own experience? I'd love to hear from you in the comments below!