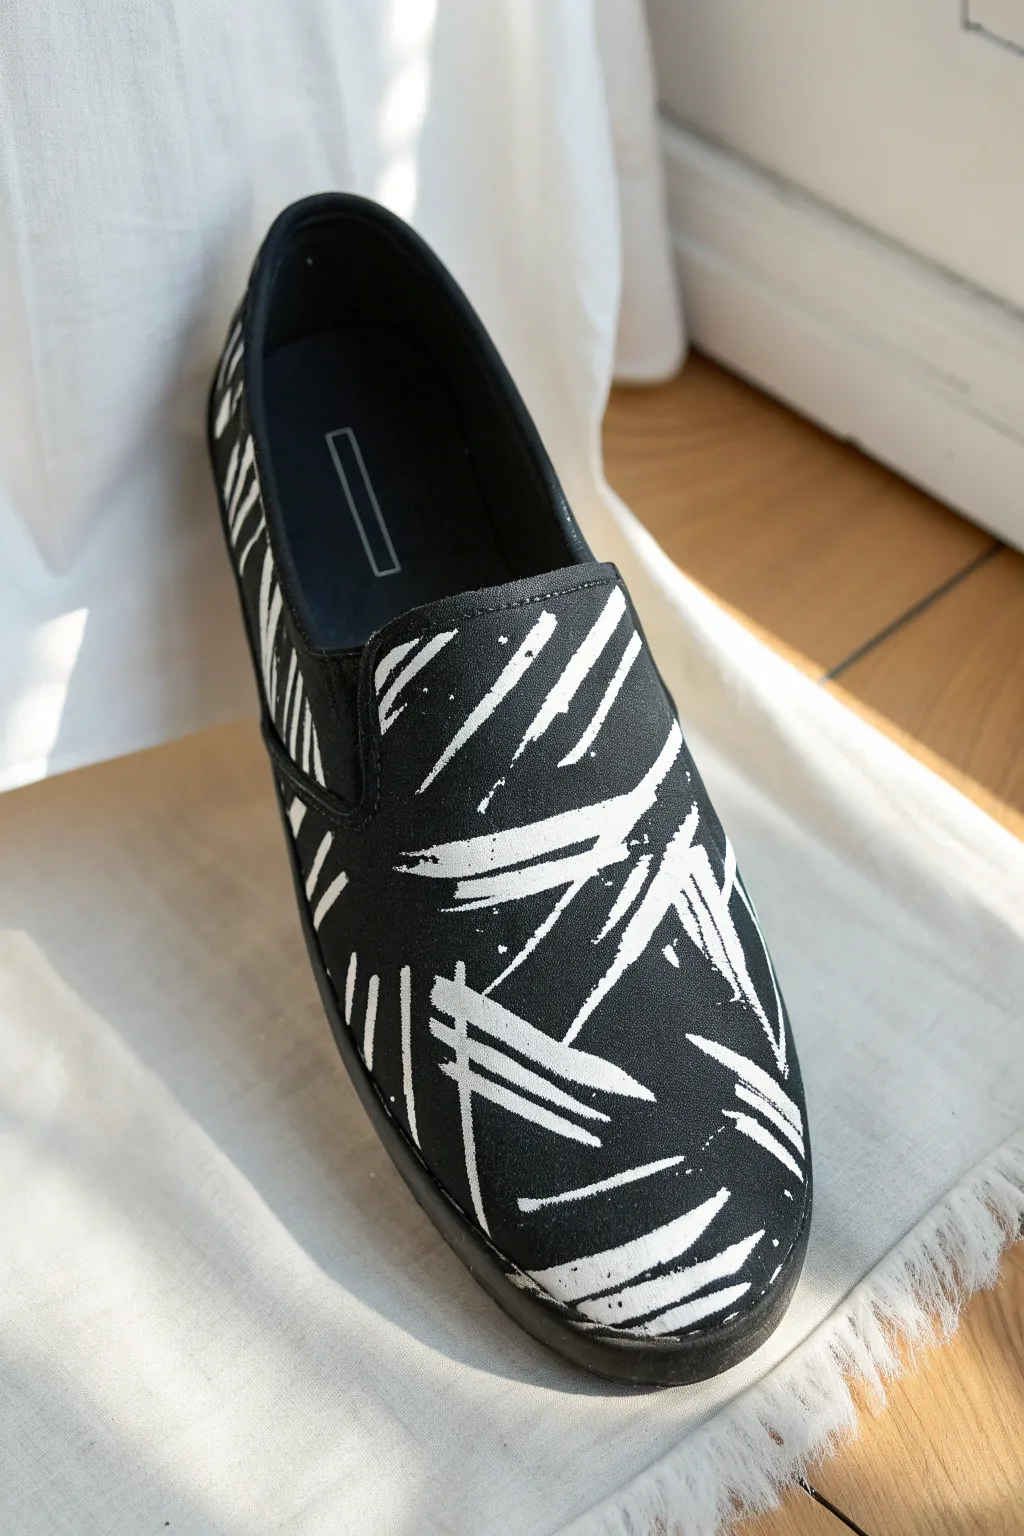
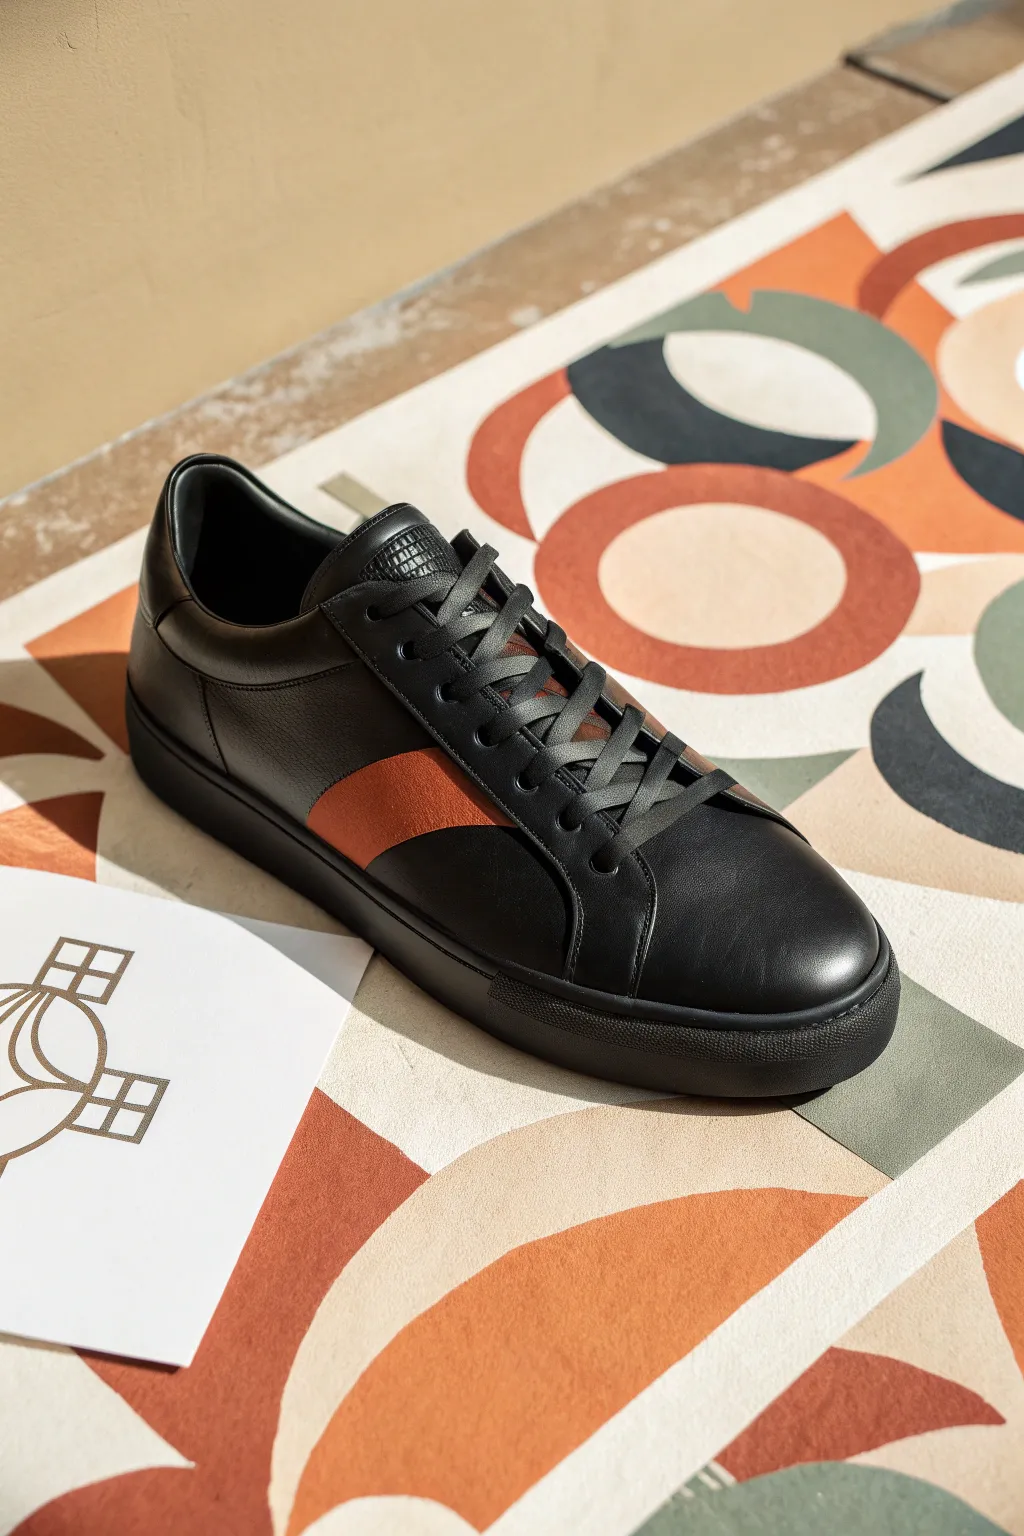
When you paint on black shoes, you’re basically starting with built-in drama—everything bright instantly pops. I love treating that dark base like a stage for high-contrast color, crisp white line art, and little details that catch the light when you move.
White Floral Vines on Black Shoes
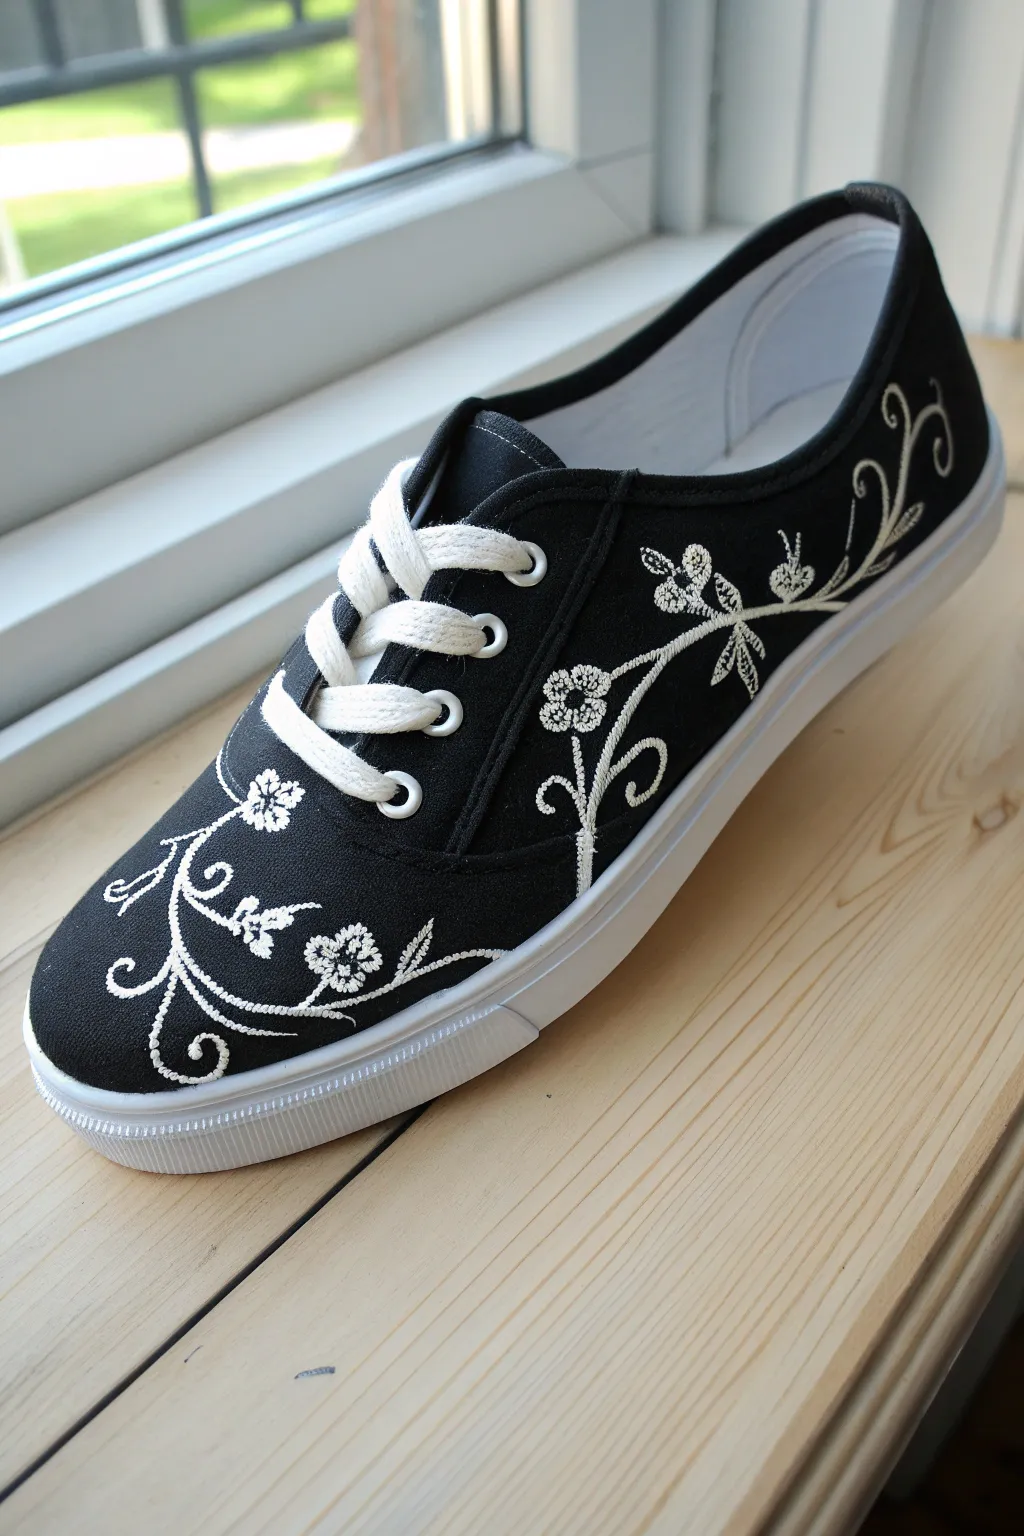
Transform a simple pair of black canvas sneakers into a delicate work of art with this elegant floral vine design. By using high-contrast white fabric paint and fine brushwork, you can mimic the textured look of traditional embroidery without needing a needle and thread.
Step-by-Step Tutorial
Materials
- Black canvas sneakers (cleaned and dried)
- White fabric paint (high opacity)
- Fine liner brush (size 00 or 000)
- Small round brush (size 1)
- White fabric marker or chalk pencil (for sketching)
- Palette or small dish
- Water cup and paper towels
- Hairdryer (optional, for speed drying)
- Fabric sealant or waterproofing spray
Step 1: Preparation and Sketching
-
Clean the canvas:
Before starting, ensure your black shoes are free of dust and dirt. A quick wipe with a damp cloth followed by a lint roller works wonders to give you a pristine surface. -
Plan the vine placement:
Visualize the flow of the vines. This design features two main sections: a sprawling vine on the toe box and a trailing vine wrapping around the heel and side panel. -
Sketch the main stems:
With a chalk pencil or fine-tip white fabric marker, lightly draw the sweeping curves of the main stems. Keep the lines fluid and organic, allowing them to curl slightly at the ends. -
Mark leaf and flower spots:
Add small dashes or circles along the stems where you want the leaves and floral clusters to sit. This doesn’t need to be detailed, just a placement guide.
Paint looking transparent?
Black canvas is thirsty! Don’t glob on thick paint. Instead, paint a thin base layer, let it dry for 10 minutes, then apply a second coat for bright, crisp white lines.
Step 2: Painting the Vines
-
Load the liner brush:
Dip your fine liner brush (size 00 or 000) into the white fabric paint. You want the paint to be fluid but opaque; if it’s too thick, thin it with a drop of water so it glides smoothly. -
Trace the stems:
Carefully paint over your sketch lines for the main stems. Use light pressure to keep the lines thin and delicate. -
Add the curling tendrils:
At the ends of the stems and branching off the sides, paint small, tightly curled decorative flourishes to give the design that whimsical, embroidered feel. -
Thicken the base:
Go back over the bottom portions of the main stems very slightly to add weight, mimicking the thickness of embroidery thread.
Add some sparkle
Mix a tiny amount of silver fabric glitter into your white paint for the flower centers, or glue on tiny rhinestones for a subtle shimmer that catches the sunlight.
Step 3: Detailed Floral Work
-
Paint the leaves:
Using a small round brush or the liner, paint teardrop shapes attaching to the stems. I find it easiest to press down and lift up quickly to create the tapered point. -
Create the flower centers:
For the floral clusters, paint five or six tiny dots in a circle using the very tip of your brush to form the petals. -
Add flower details:
Once the basic flower shape is down, add tiny dots inside the petals or in the center to replicate the texture of french knots often found in embroidery. -
Layer the white:
Canvas absorbs paint, so the first layer might look gray as it dries. Once dry to the touch, re-trace your white lines to ensure they pop brilliantly against the black background. -
Add dotted accents:
Add rows of tiny dots along certain curves of the vines or outlining specific leaves. This stippling effect creates the illusion of stitching.
Step 4: Finishing Touches
-
Clean up edges:
If you made any mistakes or have chalk marks showing, use a damp cotton swab to gently wipe them away. -
Let it cure:
Allow the paint to dry completely. Most fabric paints require 24 hours to cure fully before they are water-resistant. -
Heat set (if required):
Check your paint bottle instructions. Some brands require heat setting with a hairdryer or an iron (with a cloth barrier) to make the design permanent. -
seal the deal:
Finish by spraying a light coat of fabric protector or waterproofing spray over the shoes to protect your handiwork from the elements.
Enjoy walking around in your custom-designed floral kicks that look deceptively like high-end embroidery


Sunny Daisies With Bold Centers
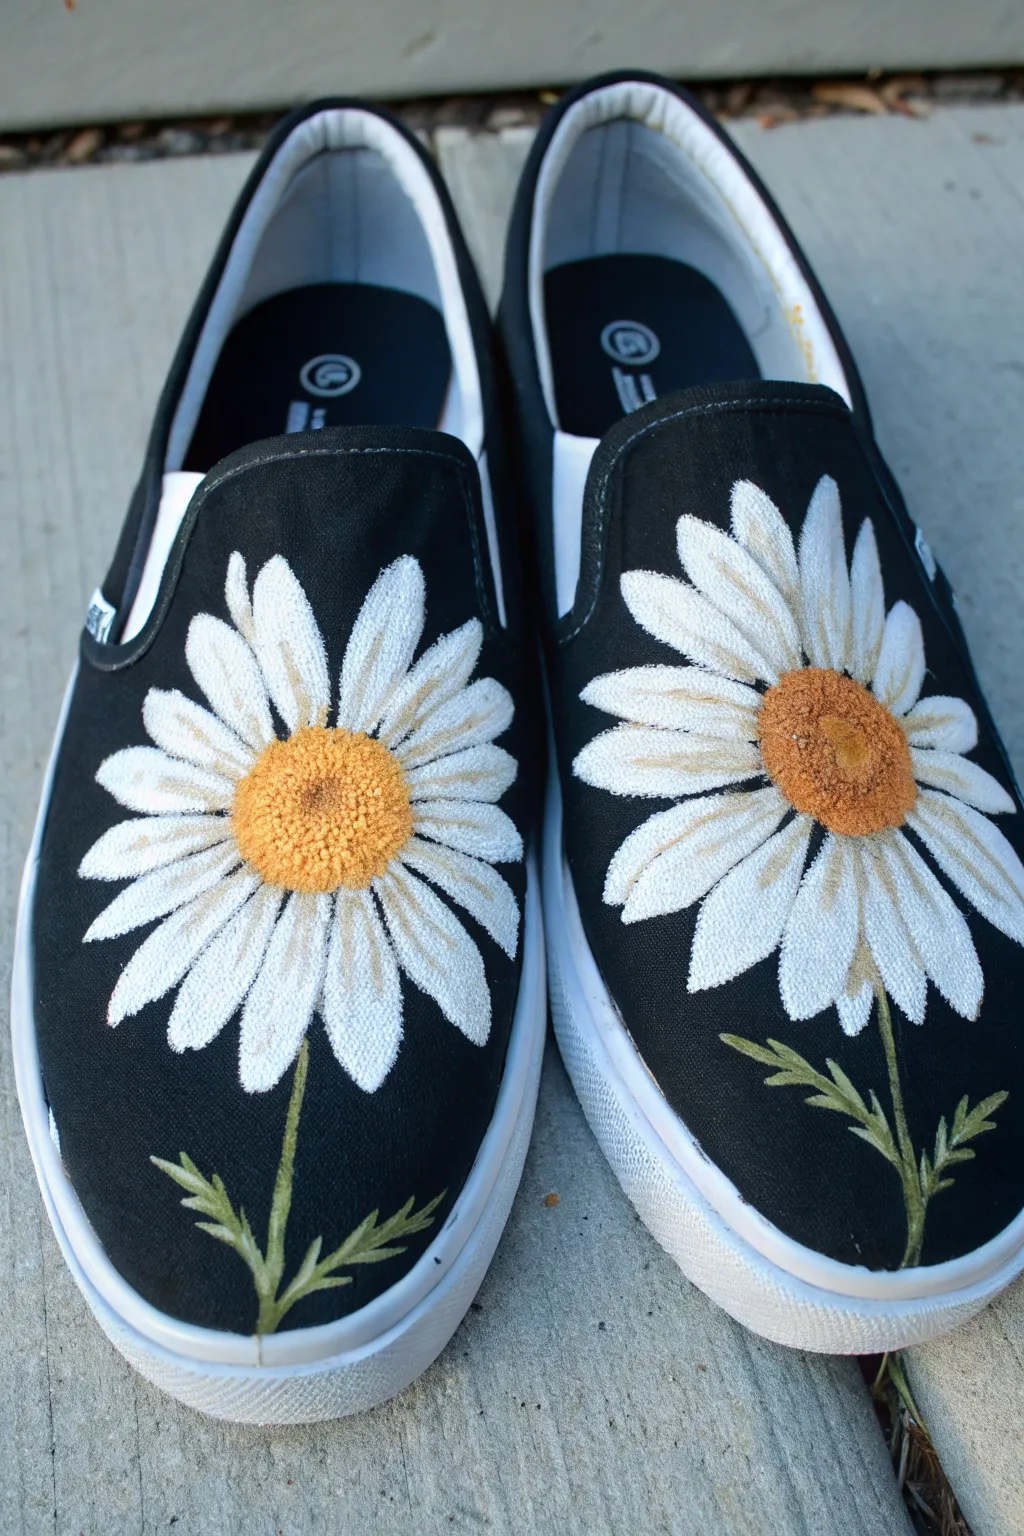
Transform plain black slip-ons into a walking garden with these vibrant, large-scale daisy designs. The contrast between the stark black canvas and the bright white petals creates a striking, cheerful look that is surprisingly achievable for beginners.
Step-by-Step Guide
Materials
- Black canvas slip-on shoes (e.g., Vans or generic brand)
- White fabric paint or acrylic paint mixed with fabric medium
- Yellow fabric paint (golden yellow)
- Orange fabric paint (burnt orange)
- Green fabric paint (olive or sage shade)
- Small flat brush (size 4 or 6)
- Fine liner brush (size 0 or 1)
- Small round brush or stippling brush
- White or chalk pencil for sketching
- Masking tape (optional)
Step 1: Preparation & Sketching
-
Prep the surface:
Before you begin, ensure your shoes are clean and free of dust. If they are brand new, you might want to wipe them with a slightly damp cloth to remove any factory sizing, then let them dry completely. -
Establish the center:
Using a white chalk pencil, lightly mark the center point for your flower. On the left shoe, place the center point lower and slightly to the left so the petals can wrap around. On the right shoe, aim for a similar asymmetrical placement to create visual interest. -
Sketch the circle:
Draw an oval or circle around your center point—this will be the yellow disk of the daisy. Make it generous in size, about the width of a quarter or slightly larger. -
Outline the petals:
Sketch long, tear-drop shaped petals radiating outward from the center circle. Let some petals extend off the edge of the shoe’s vamp and others curve slightly to look natural. Don’t worry about perfect symmetry; real flowers are organic. -
Mark the stem:
Draw a thin line extending from the bottom of the flower down towards the toe of the shoe for the stem. Add two or three small, jagged leaf shapes branching off the stem.
Fixing “Grey” White
If your white looks dull even after drying, don’t keep piling it on thickly. Paint one layer of light grey first, let dry, then top with white. The grey acts as a primer blocking the black canvas.
Step 2: Base Layers
-
Paint the first white layer:
Load your flat brush with white fabric paint. Fill in the petals, stroking from the center outward. The black canvas will show through significantly on this first pass, turning the white somewhat grey. This is normal. -
Let it dry completely:
Wait for the first layer to be dry to the touch. Painting wet-on-wet here will just smear the paint and won’t build opacity. -
Apply the second white layer:
Go over the petals again with white. This layer should make the petals pop against the black background. Repeat a third time if necessary for solid, bright coverage. -
Paint the stem base:
Using your fine liner brush and olive green paint, trace the stem line and fill in the small leaves you sketched earlier.
Step 3: Adding Detail & Texture
-
Create the center texture:
Mix a golden yellow with a tiny drop of orange. Using a small round brush or a stiff stippling brush, dab the paint onto the center circle using an up-and-down pouncing motion. This creates a fuzzy, pollen-like texture. -
Add dimension to the center:
While the yellow is still slightly wet, pick up a tiny bit of pure burnt orange on your brush. Dab this darker color onto the right-hand side or bottom edge of the center disk to create a shadow, giving the center a 3D dome effect. -
Shadow the petals:
Dilute a tiny amount of grey or light tan paint (or use dirty brush water if you’re feeling brave). Identify where petals overlap or sit under the flower center, and paint very thin, sheer lines to separate the petals visually. -
Define the petal texture:
Using a very fine liner brush and slightly watered-down white paint, add quick, fine strokes along the length of each petal. This mimic the ridges found on real daisy petals. -
Highlight the stem:
Mix a little white into your green paint to make a lighter mint green. Paint thin highlights on the upper side of the stem and leaf edges to simulate light hitting the greenery. -
Final clean up:
If you accidentally got white paint on the black canvas outside your lines, use a small brush with black paint to carefully touch up the background and sharpen the petal edges.
Pro Texture Tip
For a truly realistic 3D center, mix a tiny pinch of baking soda or fine sand into your yellow/orange paint. The gritty texture mimics the tiny florets found in the center of real daisies perfectly.
Now you have a stunning, sunny pair of custom kicks ready for a walk in the park


Sunflower Panels That Really Pop
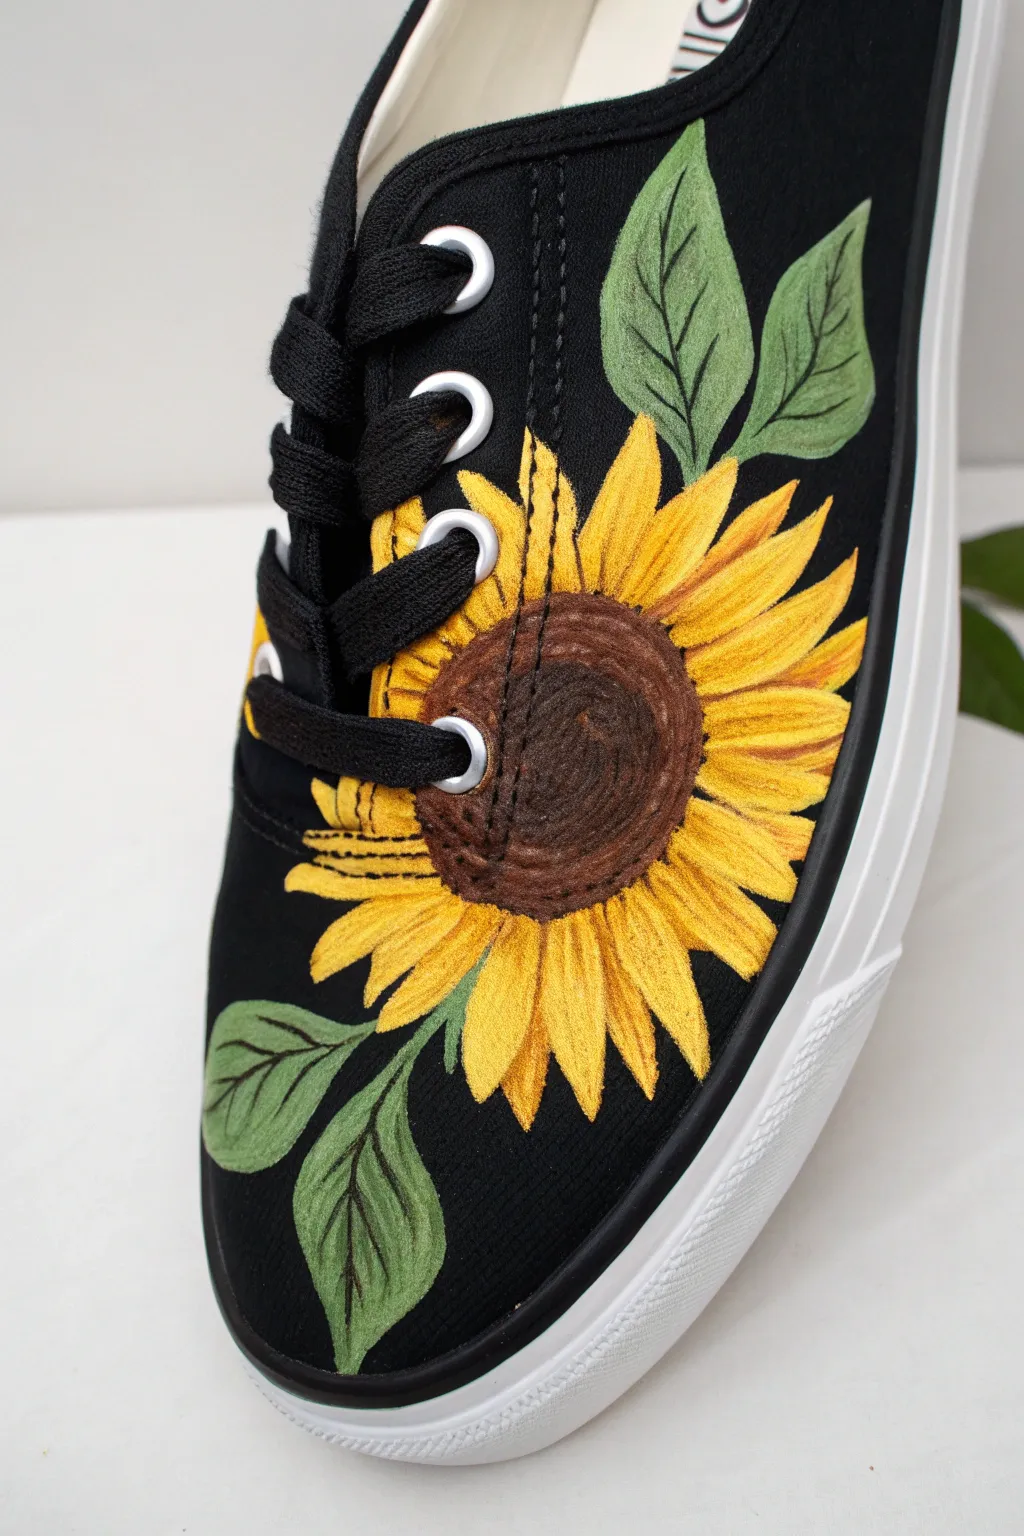
Transform a plain pair of black canvas shoes into a walking garden with this vibrant sunflower design. The natural contrast of the bright yellow petals against the dark fabric makes the artwork instantly pop, creating a bold statement for any sunny day.
Detailed Instructions
Materials
- Black canvas sneakers (cleaned and dried)
- White fabric paint or gesso (for priming)
- Fabric paints: Golden yellow, sunflower yellow, pale yellow, burnt sienna, dark brown, sap green, light olive green
- Fine liner brushes (sizes 00 and 0)
- Small flat brush (size 2 or 4)
- White tailor’s chalk or pencil
- Heat gun or hairdryer
- Acrylic finisher or fabric sealant spray
Step 1: Preparation & Sketching
-
Clean the surface:
Ensure your shoes are completely clean and free of dust. If they are new, give them a quick wipe with a damp cloth to remove any factory sizing, then let them dry fully. -
Tape the soles:
Use painter’s tape or masking tape to cover the rubber soles and eyelets. This protects the non-fabric parts from accidental stray brushstrokes. -
Sketch the placement:
Using a white tailor’s chalk or a white pencil, lightly sketch the outline of a large sunflower circle across the side panel. Position the center of the flower so it intersects with the lacing area for a dynamic look. -
Add leaf outlines:
Draw two leaf shapes curving upward near the collar of the shoe and two more emerging from the bottom of the flower toward the toe cap.
Step 2: Base Layers
-
Prime the shapes:
Since painting yellow on black is notoriously transparent, paint a thin, solid layer of white fabric paint or gesso inside your flower and leaf outlines. This creates a bright base so your colors won’t look muddy. -
Let the primer dry:
Allow the white base layer to dry completely. I like to use a hairdryer on a cool setting here to speed things up so I can get to the color sooner. -
Paint the leaves base:
Fill in the four leaf shapes with a medium sap green. Don’t worry about shading yet; just get a solid block of green color down. -
Paint the petals base:
Using your golden yellow, paint the individual petal shapes over the white primer. Start from the center circle and pull your strokes outward to create tapering tips.
Muddy Yellows?
If your yellow looks green or dull against the black, stop! Let the layer dry completely, re-apply a thin coat of white to that spot, dry again, and then re-apply the yellow.
Step 3: Detailing & Texture
-
Create the center disk:
Paint the large central circle with a dark chocolate brown. While still slightly wet, dab in a bit of burnt sienna around the edges where the petals meet the center to create depth. -
Texture the center:
Using a very fine liner brush and lighter brown paint, add tiny, curved hatch marks in a spiral pattern inside the center disk. This mimics the seed texture. -
Add petal definition:
Mix a small amount of orange or burnt sienna with your yellow. Paint thin lines at the base of each petal (near the center) to show shadowing and separation. -
Highlight the petals:
Switch to a pale yellow or creamy white. Paint fine streaks along the upper edges and tips of the petals to catch the ‘light’ and make them look dimensional. -
Leaf veining:
Take your fine liner brush and dark black or deep green paint. Carefully draw a central vein down each leaf, followed by smaller branching veins. -
Leaf highlights:
Use a light olive or mint green to add strokes between the dark veins on the leaves. This contrast gives the foliage a realistic, textured appearance.
Bee Creative
Add a tiny, detailed bumblebee resting on one of the petals or hovering near the leaves to add a cute, narrative element to your floral design.
Step 4: Finishing Touches
-
Final inspection:
Look over the design for any spots where the black canvas shows through unintentionally or where the primer needs more coverage. -
Clean up edges:
If you went outside the lines, use a tiny bit of black paint to touch up the background and sharpen the edges of your petals. -
Heat set the paint:
Once fully dry (give it 24 hours if possible), use a hairdryer on high heat or an iron on a cotton setting (no steam) over a protective cloth to set the fabric paint. -
Seal for protection:
Apply a thin coat of clear acrylic finisher or water-resistant fabric spray to protect your artwork from dirt and rain.
Lace up your new kicks and enjoy showing off your hand-painted floral masterpiece


Starry Night Splatter Galaxy

Transform ordinary black kicks into a window to the universe with this starry galaxy painting technique. The deep black leather provides the perfect backdrop for vibrant nebulas and twinkling constellations, creating a custom look that is truly out of this world.
Step-by-Step Guide
Materials
- Black leather or faux leather sneakers
- Angelus leather preparer and deglazer (or acetone)
- Cotton rounds or balls
- Acrylic leather paint (White, Purple, Blue, Black)
- Small sponges or makeup sponges
- Detail paintbrush (00 or 000 size)
- Old toothbrush
- Painter’s tape
- Matte or satin acrylic finisher
- Cup of water
Step 1: Preparation
-
Clean the surface:
Before laying down any color, you need to remove the factory finish. Apply some leather preparer and deglazer to a cotton round and scrub the areas you plan to paint. This ensures the paint bonds permanently. -
Masking off:
Remove the laces to keep them clean. Use painter’s tape to cover the rubber soles and any logos or stitching areas you want to remain plain black. Press the edges down firmly.
Step 2: Creating the Nebula
-
Sponge base layer:
Dab a small makeup sponge into your purple leather paint. Offload most of the paint onto a paper towel until the sponge is almost dry. -
Stippling technique:
Gently stipple or dab the purple onto the toe box and side panels in random, cloud-like clusters. Don’t worry about full coverage; transparency looks more like gas clouds. -
Adding depth with blue:
Take a fresh piece of sponge and dip it into a deep blue paint. Dab this over parts of the purple sections and into some of the black negative space to create dimension. -
Highlighting:
Mix a tiny drop of white into your purple or blue to create a lighter pastel shade. Focus this color in the very center of your nebula clouds to make them look like they are glowing. -
Blending edges:
If any edges look too harsh, dip a clean corner of your sponge into a tiny bit of black paint. Gently feather the edges where the nebula meets the original shoe color to soften the transition.
Blob Control
If you accidentally splatter a giant blob of white paint, don’t wipe it! Let it dry completely, then paint over it with black and try again.
Step 3: The Stars
-
Splatter preparation:
Dilute a small amount of white leather paint with a drop of water until it has an inky consistency. -
The flick test:
Dip an old toothbrush into the thinned white paint. Test the splatter on a piece of cardboard first to ensure you aren’t getting huge blobs. -
Splattering stars:
Run your thumb across the toothbrush bristles to flick tiny white specks across the painted areas. Vary your distance from the shoe to get different sizes of ‘distant stars’. -
Hand-painting bright stars:
Uses your finest detail brush and pure, undiluted white paint. Dot a few larger stars randomly throughout the galaxy for variety. -
Adding starbursts:
To create the larger ‘cross’ stars seen in the image, paint a small vertical line, then a horizontal line crossing it. Drag the paint outward from the center to taper the points. -
Final adjustments:
Look at the shoe from a distance. If an area looks too empty, add a few more tiny dots with your brush.
Nebula Nuance
Less is more with the sponge. Build up many thin, dry layers rather than one thick wet layer to get that foggy, realistic space gas effect.
Step 4: Finishing
-
Drying time:
Allow the paint to cure fully. I prefer to let them sit for at least 24 hours to ensure everything is set before sealing. -
Sealing the deal:
Apply an acrylic finisher over the painted areas using a sponge or soft brush. This protects against scuffs and cracking. -
Re-lacing:
Once the sealer is dry to the touch, remove the masking tape and re-lace your sneakers.
Step out in style knowing you are walking on your own personal piece of the cosmos
BRUSH GUIDE
The Right Brush for Every Stroke
From clean lines to bold texture — master brush choice, stroke control, and essential techniques.
Explore the Full Guide
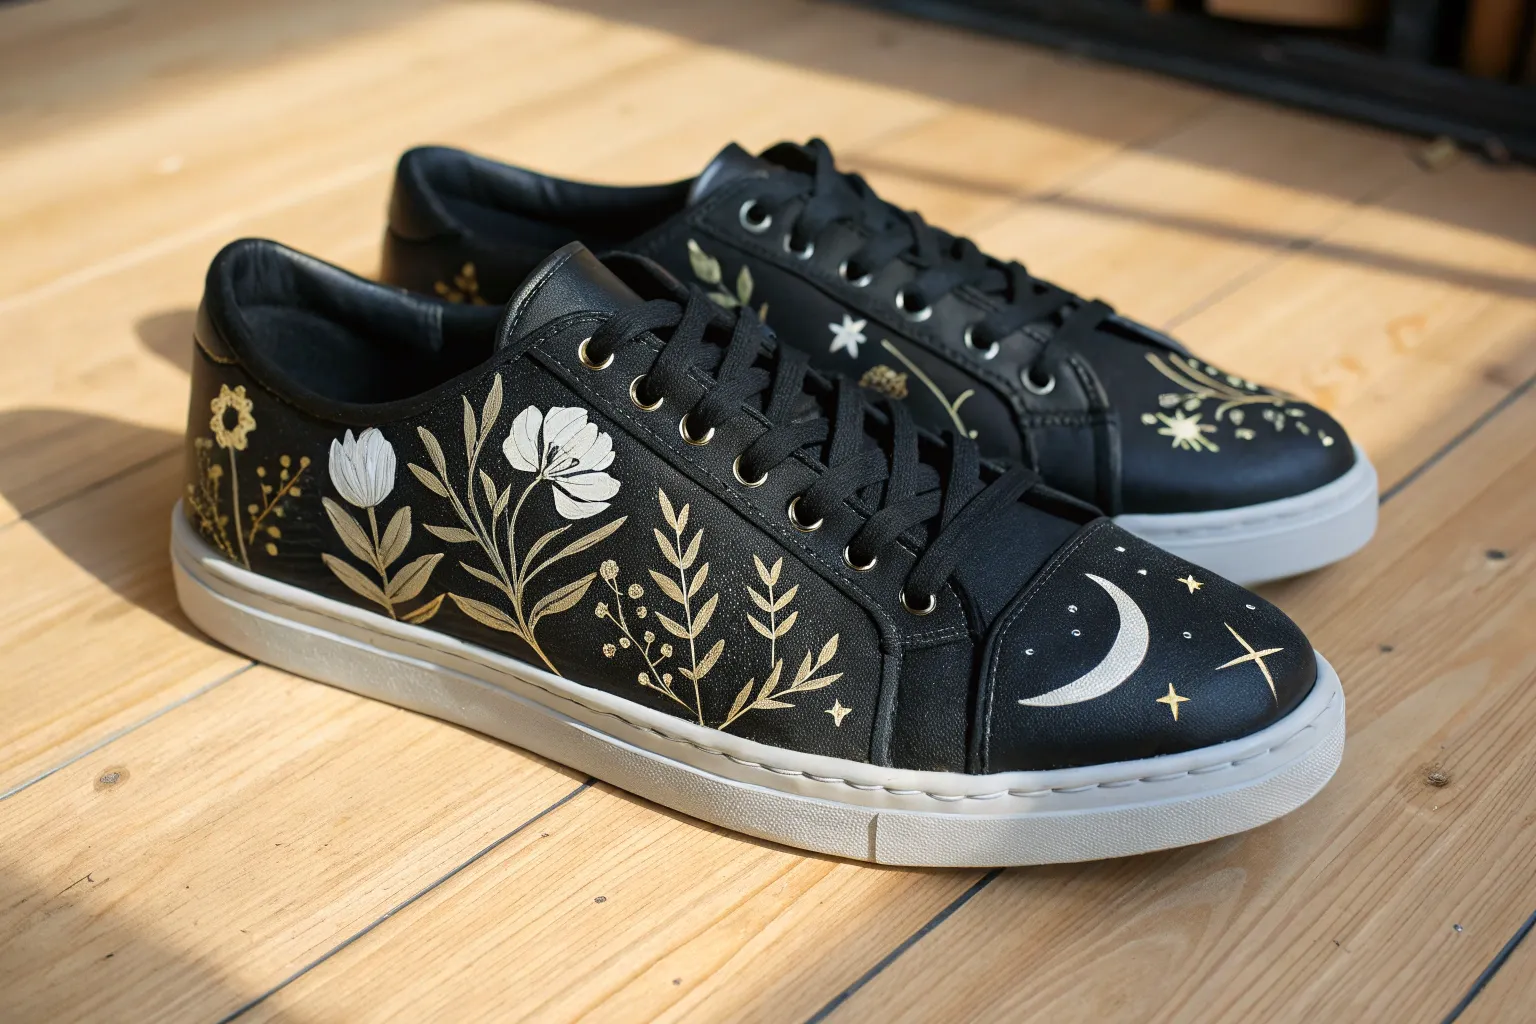
Moon Phases Along the Sides
Transform a simple pair of black canvas sneakers into a wearable piece of the night sky with this striking moon phase design. Using careful shading and masking techniques, you’ll create a realistic, cratered lunar texture that pops beautifully against the dark fabric.
Step-by-Step Tutorial
Materials
- Black canvas sneakers
- White fabric paint
- Black fabric paint
- Grey fabric paint (or mix white/black)
- Small flat paintbrush
- Fine detail paintbrush or stippling brush
- Circular stencil or masking tape/contact paper
- Compass or round object for tracing (approx. 2-3 inches)
- Pencil or white chalk pencil
- Hair dryer (optional for faster drying)
Step 1: Preparation & Mapping
-
Clean surface:
Ensure your sneakers are clean and free of dust. If they are brand new, give them a quick wipe with a damp cloth to remove any factory sizing, then let them dry completely. -
Lace removal:
Remove the shoelaces from both shoes. This prevents accidental paint splatters and gives you full access to the toe area where we will be painting. -
Create the main circular mask:
Using masking tape or a piece of contact paper, trace a circle about 2.5 inches in diameter (adjusting for your shoe size). Cut this circle out neatly. -
Position the circle:
Place the circular stencil or outline directly in the center of the toe box. Instead of filling it in, trace the outline lightly with a white chalk pencil so you have a guide. -
Draw the center voids:
Inside your large circle outline, draw three smaller circles vertically aligned down the center. These will remain unpainted (black) to create the negative space ‘shadow’ effect.
Step 2: Base Layer Painting
-
Fill the outer crescent shapes:
Using your white fabric paint and a small flat brush, begin painting the space inside the large circle but *outside* the three central vertical circles. Be careful to keep the edges sharp. -
Establish opacity:
Canvas absorbs paint, so the first layer might look patchy. Let this base coat dry for about 15-20 minutes. I usually speed this up with a hair dryer on a low setting. -
Second coat:
Apply a second layer of white paint to ensure a solid, bright background. This opaque base is crucial for the grey shading to stand out later.
Sponge Technique
For a more organic moon texture, skip the brush for the grey parts. Tear off a small piece of a kitchen sponge, dip it in grey paint, blot off the excess, and dab gently.
Step 3: Creating Texture & Craters
-
Mix your grey tone:
On a palette, mix a small amount of black into your white paint to create a mid-tone grey. You want it light enough to show contrast but dark enough to look like lunar maria. -
Stippling the surface:
Using a relatively dry stippling brush or an old, stiff brush, dab the grey paint randomly over the white sections. Focus on the edges to give the moon a rounded dimensional look. -
Adding deep craters:
Mix a slightly darker grey. Use your fine detail brush to paint small, irregular circular shapes or blotches. These don’t need to be perfect; irregularity makes them look realistic. -
Highlighting:
Once the grey textures are slightly tacky but not fully dry, take pure white paint on a detail brush and add tiny highlights on one side of your painted craters to simulate light hitting the moon’s surface. -
Softening edges:
If any texture looks too harsh, lightly dab it with a clean, dry brush or fingertip to blur the paint slightly into the background.
Glow in the Dark
Mix a phosphorescent medium or glow-in-the-dark fabric paint into your final white highlight layer. The moon phases will charge in the sun and glow green at night
Step 4: Refining & Border
-
Clean up the center:
If any white paint strayed into the three central vertical circles, use a detail brush and black paint to carefully cover the mistakes and crisp up those round edges. -
Outline the main circle:
To make the design pop, paint a very thin, precise silver or white rim around the entire outer circumference of the large circle. This acts like a ‘glow’ and frames the artwork. -
Final dry:
Allow the painted areas to dry for at least 24 hours before wearing them. If your fabric paint requires heat setting, follow the bottle instructions (usually ironing with a cloth barrier). -
Re-lace:
Once fully cured, lace your sneakers back up. Consider using silver or grey laces if you want to complement the moon theme further.
Step out with your unique lunar kicks and enjoy the subtle mystery they add to your everyday outfit
Crisp White Line Art Doodles
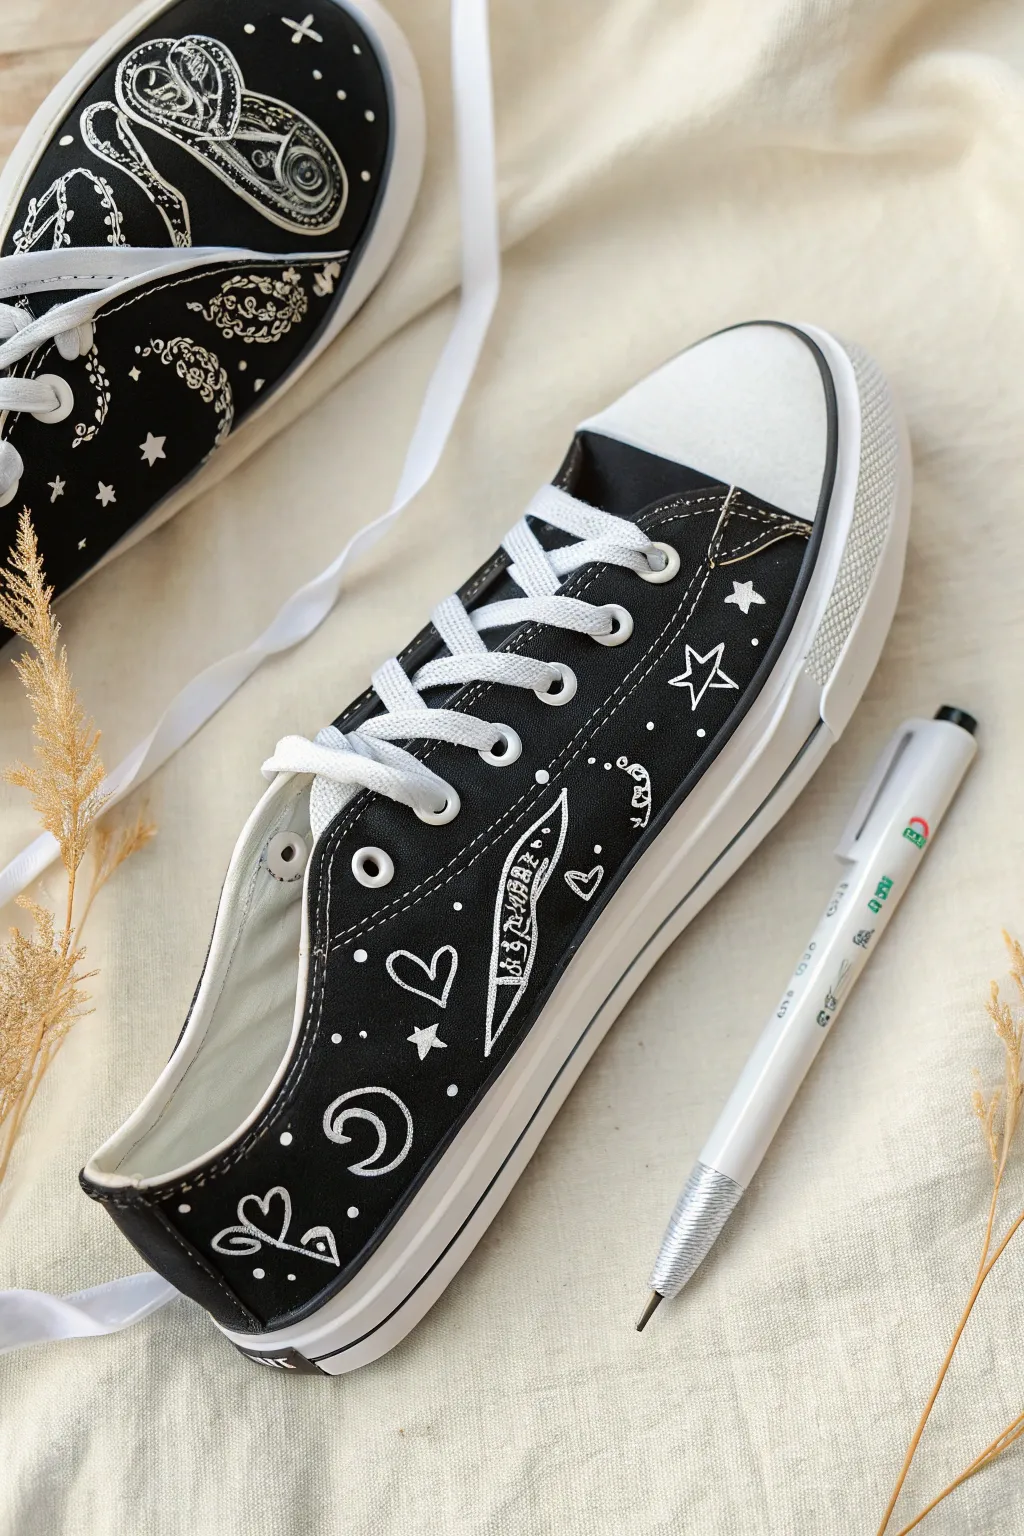
Transform a basic pair of black canvas sneakers into a whimsical night sky with nothing more than a steady hand and a white gel pen. This project focuses on high-contrast, free-flowing doodles like moons, stars, and abstract shapes that pop beautifully against the dark fabric.
Detailed Instructions
Materials
- Black canvas sneakers (cleaned and dry)
- White gel pen (medium or bold tip) for fabric
- Alternatively: White fabric paint marker (fine tip)
- Pencil (optional for sketching)
- Masking tape
- Paper towels
- Waterproofing fabric spray
Step 1: Preparation & Planning
-
Prep the surface:
Before you start drawing, ensure your sneakers are completely clean and free of dust or lint. If they are new, I always recommend giving them a quick wipe with a damp cloth and letting them dry to remove any factory sizing. -
Remove functionality:
Take the laces off the shoes completely. This gives you uninhibited access to all the canvas panels and prevents the laces from getting stained with ink. -
Protect the rubber:
Use small strips of masking tape to cover the rubber soles and the toe cap. This ensures your crisp white lines don’t accidentally stray onto the rubber parts where ink might smudge.
Ink Flow Secret
If the gel pen skips on the rough canvas texture, try moving your hand faster. A swift stroke often rides over the fabric bumps better than a slow, heavy one.
Step 2: Starting the Design
-
Test your flow:
Grab a scrap piece of dark fabric or paper to get the ink flowing in your pen. You want a consistent, opaque white line without skipping. -
The central vine:
Begin on the outer side panel of the shoe. Draw an elongated, pointed leaf shape or a pod-like structure that runs diagonally upwards toward the laces. Keep the outline bold. -
Fill the vine:
Inside that long pod shape, add small details. You can write tiny text, draw a smaller leaf vein, or simply add hatch marks for texture. -
Add floating hearts:
Scatter a few open heart outlines around the central vine. Keep them loose and hand-drawn rather than perfectly symmetrical. -
Draw the crescent moon:
Near the heel area on the side panel, draw a C-shaped crescent moon. To make it pop, double the outline rather than filling it in solid.
Step 3: Filling the Space
-
Starry details:
Move towards the eyelets and upper rim. Draw classic five-point stars. Again, vary the style by leaving some as outlines and filling others in completely white. -
Simple asterisks:
Use simple asterisk shapes (*) to represent smaller, distant stars. These are great fillers for empty black spaces. -
Tiny dot accents:
In between your larger drawings, gently tap the pen tip to create clusters of tiny dots. This stardust effect ties the whole galaxy theme together. -
Abstract squiggles:
Don’t be afraid to add non-celestial shapes. Add small spirals or squiggly lines near the stitching borders to frame the main artwork. -
Mirrored design:
Repeat the process on the other shoe. You don’t need to copy the layout exactly; aim for a balanced look rather than a perfect mirror image.
Glow Up
Trace over your white lines with glow-in-the-dark fabric paint. In daylight, it stays white, but at night, your celestial doodles will actually glow green.
Step 4: Finishing Touches
-
Let it set:
Allow the ink to dry completely. Gel pens on canvas can take longer than on paper, so give it at least 2-4 hours to ensure it won’t smear. -
Second coat (optional):
If any lines look a bit transparent directly against the black, carefully re-trace them to boost the opacity. -
Seal the deal:
Once fully cured (wait 24 hours to be safe), take the shoes outside and spray them with a waterproofing fabric sealant. This protects your art from rain and dirt. -
Re-lace:
Remove the masking tape and lace your sneakers back up with crisp white laces to match your new artwork.
Enjoy walking on sunshine, or rather, moonlight, with your custom galaxy-themed kicks

PENCIL GUIDE
Understanding Pencil Grades from H to B
From first sketch to finished drawing — learn pencil grades, line control, and shading techniques.
Explore the Full Guide
Bold Geometric Color Blocking
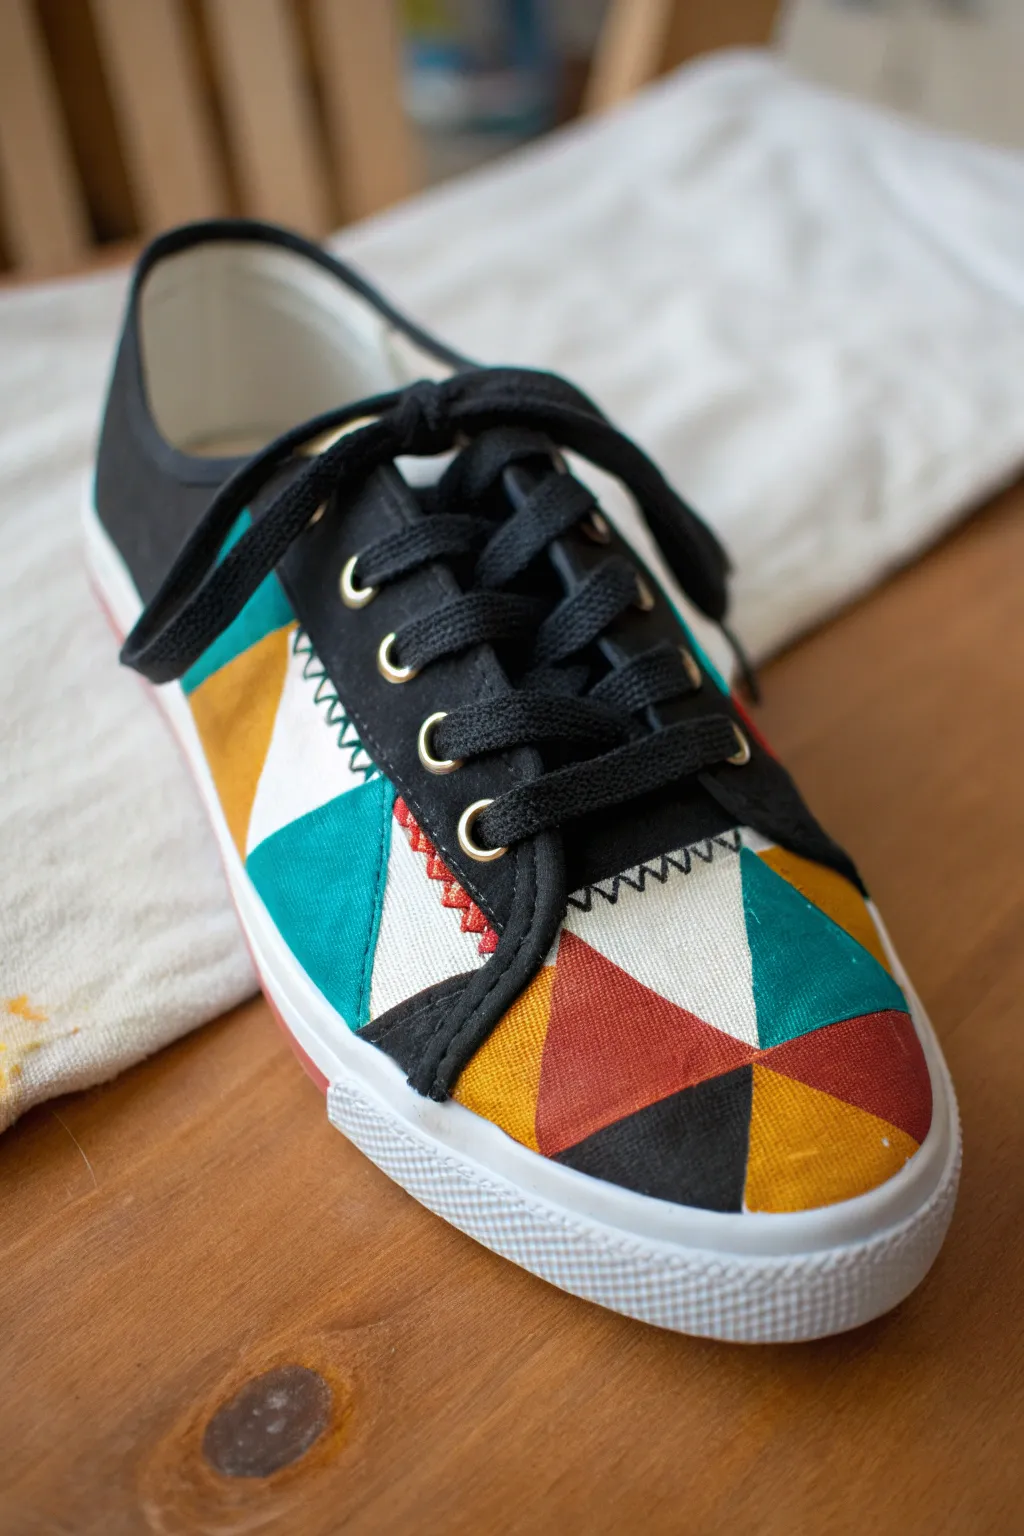
Transform a plain pair of white canvas sneakers into a modern art piece with this bold, geometric design. Featuring sharp triangles in teal, mustard, rust red, and black, this project uses crisp lines and strategic color blocking to create a dynamic look that pops against the shoe’s original texture.
Step-by-Step
Materials
- White canvas sneakers
- Fabric paint (Black, Teal, Mustard Yellow, Rust Red)
- Painter’s tape or masking tape (approx 1/2 inch width)
- Small flat angled brushes
- Fine detail brush (size 0 or 00)
- Black fabric marker or fine-tip paint pen
- Pencil
- Ruler or straight edge
- Fabric medium (optional, if using acrylics)
- Water cup and palette
Step 1: Preparation & Mapping
-
Prep the canvas:
Remove the laces from your shoes completely to avoid getting paint on them and to access the tongue easier. If the shoes are new, give them a quick wipe with a damp cloth to remove any factory sizing, then let them dry fully. -
Tape off the soles:
Carefully apply masking tape along the white rubber sidewalls of the sole. Press the edges down firmly with your fingernail to ensure no paint bleeds onto the rubber later. -
Sketch the grid:
Using a pencil and a ruler, lightly map out your triangle pattern directly onto the canvas. Start by drawing diagonal lines across the toe box and side panels to create a series of intersecting triangles. Don’t worry about being perfect; random sizes add character. -
Plan your colors:
Before dipping your brush, mark each triangle lightly with a letter (e.g., ‘T’ for Teal, ‘B’ for Black) to plan your color distribution. Ensure no two adjacent triangles share the same color for maximum contrast.
Bleeding Edges?
If your lines aren’t sharp, re-outline the triangles with a fine-tip fabric marker in black or white. This creates a bold ‘stained glass’ effect that hides uneven paint edges perfectly.
Step 2: Painting the Design
-
Start with the lightest colors:
Begin painting the mustard yellow sections first. Use a small flat angled brush to get nice straight edges along your pencil lines. Apply thin, even layers. -
Apply the warm tones:
Once the yellow is tacky or dry, move on to the rust red triangles. I find that painting non-adjacent shapes creates a cleaner workflow so wet paint doesn’t smudge. -
Add the cool tones:
Fill in the teal sections next. The flat brush is crucial here for cutting in sharp corners where the triangles meet. Rinse your brush thoroughly between colors. -
Paint the black sections:
Fill in the designated black triangles carefully. Since black is the darkest pigment, it can cover any minor slips from the lighter colors, acting as a cleanup step for your edges. -
Solidify the uppers:
Paint the entire lace guard area (the strip with the eyelets) and the tongue in solid black to anchor the busy geometric design. Be careful around the gold or silver eyelets. -
Let it dry completely:
Allow the first coat to dry for at least an hour. If the colors look streaky or the canvas texture shows through too much, apply a second coat to increase opacity.
Metallic Pop
Swap one of the colors (like the rust red or mustard) for a metallic gold fabric paint. The shimmer adds a luxe touch that catches the sunlight when you walk.
Step 3: Details & Finishing
-
Add stitch detailing:
For a rustic, hand-sewn look, use a fine detail brush or a black fabric marker to draw a zigzag ‘stitch’ pattern along the seams where the patterned canvas meets the solid black lace guard. -
Refine the edges:
Inspect your triangle lines. If any edges look wobbly, use your fine detail brush and the appropriate color to tidy them up and make the points sharp. -
Remove the tape:
Once the paint is fully dry to the touch, slowly peel off the masking tape from the rubber soles. Pull at a 45-degree angle away from the paint to get a crisp line. -
Clean up the rubber:
If any paint seeped under the tape onto the rubber sole, use a cotton swab dipped in rubbing alcohol or nail polish remover to wipe it away immediately. -
Heat set the paint:
To make the design permanent and water-resistant, blast the shoes with a hairdryer on high heat for a few minutes, or follow the specific heat-setting instructions on your fabric paint bottle. -
Relace and wear:
Re-insert your black laces to match the dark accents of the shoe. Your custom geometric kicks are now ready for the street.
Now you have a fully customized pair of shoes that turns every step into a statement of your personal style
Minimalist White Stripes and Chevrons
Transform a plain pair of black sneakers into a striking statement piece with these minimalist white chevrons. This project uses bold geometric lines to create a clean, modern aesthetic that looks professionally manufactured but is surprisingly easy to achieve at home.
Detailed Instructions
Materials
- Pair of smooth black leather or faux leather sneakers
- Angelus white leather paint (or similar high-quality acrylic leather paint)
- Angelus leather preparer and deglazer (or acetone)
- Cotton pads or rounds
- Fine-line painter’s tape or stencil tape (1/8 inch or 3mm width works best)
- Flat synthetic paintbrush (small, size 2-4)
- Fine detail brush (size 0 or 00)
- Ruler or measuring tape
- White pencil or chalk pencil
- Matte or satin acrylic finisher (optional)
Step 1: Preparation
-
Clean surface:
Before you even think about painting, you need to prep the leather. Pour a small amount of leather preparer and deglazer onto a cotton pad. If you don’t have this specific product, acetone works in a pinch. -
Deglaze shoes:
Rub the side panels of the shoes where you plan to paint. You’ll see the factory finish coming off slightly; the black might look a bit duller, which is perfect. This step is crucial because it removes the protective oils that prevent paint from adhering. -
Dry thoroughly:
Let the shoes sit for about 10-15 minutes to ensure all the chemical residue has completely evaporated before moving on.
Step 2: Drafting the Design
-
Mark the center:
Using your white pencil and ruler, lightly mark a vertical centerline on the side panel of the shoe where the chevron point will be. This will act as your guide to keep the V-shapes symmetrical. -
Draft the first chevron:
Draw the largest, outermost V-shape first. Measure an equal distance from the top and bottom of the shoe to ensure it’s centered. I like to make the angle around 90 degrees for a sharp look. -
Add inner lines:
Draw the second and third nested V-shapes inside the first one. Keep the spacing consistent—roughly a finger’s width or about 1 cm apart between each line. -
Check symmetry:
Place the shoes side-by-side to compare your sketches. The pattern on the left shoe should mirror the right shoe as closely as possible.
Bleeding Lines?
If paint seeps under the tape, wait for it to dry fully. Then, use a toothpick to gently scratch the excess paint off the leather surface before sealing.
Step 3: Taping
-
Apply tape borders:
Using your fine-line masking tape, carefully tape off the outside edges of your penciled lines. You represent the ‘negative space’ (the black parts) with the tape, leaving the areas you want to paint white exposed. -
Press edges:
Run your fingernail or a plastic card firmly along the edges of the tape. This is the secret to getting those super crisp lines without paint bleeding underneath. -
Protect surrounding areas:
Add extra bits of tape to cover any black leather immediately adjacent to your painting area, just in case your brush slips.
Metallic Accent
For a luxe variant, use silver or gold leather paint instead of white. Or, paint just the center stripe in a contrasting neon color for a pop of energy.
Step 4: Painting
-
First coat application:
Dip your flat synthetic brush into the white leather paint. Apply a very thin layer. It will look streaky and maybe even a bit transparent—that is completely normal. Do not try to get full opacity yet. -
Dry layer:
Allow this first layer to dry for at least 15-20 minutes. If you’re impatient, a hair dryer on a cool, low setting can speed this up. -
Second coat:
Apply the second coat, painting in the same direction as the first to minimize brush strokes. The white should start looking solid now. -
Build opacity:
Repeat the process for a third or even fourth coat if necessary. Thin layers are key to preventing the paint from cracking when the shoe flexes. -
Remove tape:
While the final coat is still slightly tacky (not fully wet, but not rock hard), carefully peel off the masking tape. Pull slowly at a 45-degree angle away from the paint.
Step 5: Finishing Touches
-
Clean up edges:
If there was any minor bleeding, dip your fine detail brush in a tiny bit of water or black paint (if you have it) to tidy up the straight lines. A toothpick can also gently scrape away tiny white specks while the paint is fresh. -
Seal the paint:
Once the paint has cured for 24 hours, apply a thin layer of matte or satin finisher over the white stripes. This protects your work from scuffs and water damage.
Now you have a custom pair of kicks ready to hit the pavement with style


Metallic Accents That Catch the Light
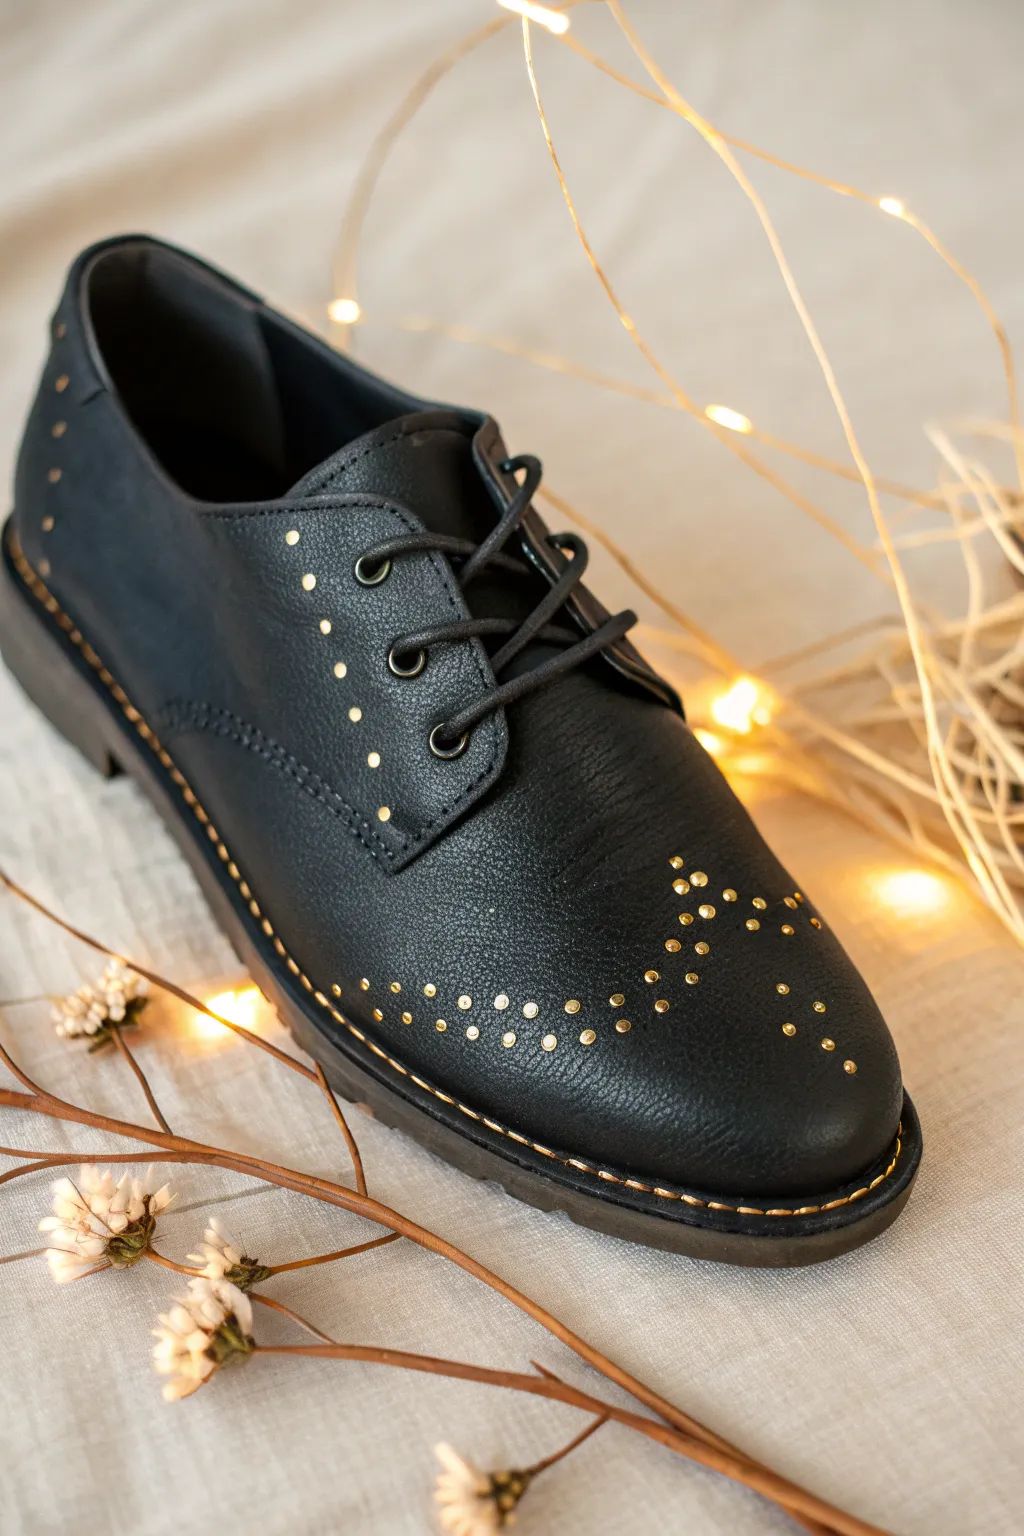
Transform a standard pair of black oxfords into a high-fashion statement piece using nothing but metallic paint. This project mimics the look of expensive studded leather detailing by carefully applying dimensional dots of gold to catch the light.
Step-by-Step Guide
Materials
- Pair of black faux-leather or leather oxford shoes
- Gold puff paint (dimensional fabric paint) or heavy body gold acrylic
- Fine-point dotting tool or toothpicks
- Small fine-tipped paintbrush (0 or 00 size)
- Rubbing alcohol and cotton pads
- Masking tape (optional)
- White chalk pencil or water-soluble fabric marker
- Paper towels
- Acrylic sealer (gloss or matte depending on shoe finish)
Step 1: Preparation & Planning
-
Clean the surface:
Before adding any paint, the shoes need to be impeccably clean. Wipe down the entire leather surface with a cotton pad dampened with rubbing alcohol to remove factory oils, wax, or dirt that might prevent adhesion. -
Map the lacing guard:
Visualize a line of dots running parallel to the edge of the lacing panel. Using your white chalk pencil, lightly mark small dots about 1/4 inch apart along the vertical edge of the panel where the laces sit. -
Plan the heel design:
Move to the back of the shoe. Mark a similar vertical line of dots along the heel cap seam. Keep the spacing consistent with your first section to ensure a cohesive look. -
Sketch the toe burst:
The toe design is the centerpiece. Sketch a V-shape or starburst pattern starting near the center of the toe box and radiating outward. Create small clusters of dots that look like a constellation rather than rigid lines.
Master the Dome
To get that realistic metal stud look, don’t press the applicator tip to the shoe. Hover slightly and let the paint fall into a perfect rounded droplet.
Step 2: Applying the ‘Studs’
-
Test your flow:
Squeeze a small amount of puff paint onto a paper towel first. You want to ensure there are no air bubbles that might cause the paint to splatter or explode onto the shoe. -
Dot the lacing panel:
Holding the puff paint bottle vertically or using a dotting tool dipped in heavy body acrylic, apply small, raised domes of gold paint over your chalk marks on the lacing guard. Try to keep your pressure consistent so every ‘stud’ is the same size. -
Detail the heel:
Repeat the dotting process on the back heel markings. I find it helpful to cradle the shoe in my lap to keep it steady while working on these curved vertical surfaces. -
Create the toe pattern:
Carefully apply dots to your toe cap sketch. For the constellation effect shown in the image, vary the spacing slightly—cluster three or four dots close together, then space others out for an organic feel. -
Clean up mistakes:
If a dot smudges or loses its round shape, quickly wipe it away with a damp Q-tip before it creates a film. Re-clean the spot with alcohol and try again.
Step 3: Stitch & Sole Detailing
-
Load a fine brush:
Squeeze a small puddle of gold acrylic paint onto a palette or scrap paper. Dip your fine-tipped brush, ensuring it isn’t overloaded to prevent drips. -
Highlight the welt stitching:
Locate the actual thread stitching that connects the upper part of the shoe to the sole (the welt). Carefully paint over each individual stitch with gold. -
Work in sections:
Paint the stitching in 2-inch sections. This prevents the paint from drying on your brush and getting clumpy. The goal is to dye the thread gold without painting the black rubber underneath. -
Add side details:
If your shoe has decorative stitching on the side panels (often called quarter stitching), you can create a faux-stitch look there too. Simply paint tiny dashes along that seam line using the very tip of your brush. -
Let the dots cure:
Dimensional puff paint takes significantly longer to dry than standard acrylic. Allow the shoes to sit undisturbed in a safe, dust-free area for at least 24 hours. The dots will shrink slightly as they dry, becoming harder and more durable. -
Remove guide marks:
Once the gold dots are fully hardened, use a barely damp cloth to gently wipe away any visible chalk or marker lines. -
Seal the work:
To protect your new metallic accents from scuffs and moisture, brush a thin layer of acrylic sealer over the painted areas, or spray the entire shoe with a leather-safe finisher.
Metallic Mix-Up
Create a mixed-metal effect by alternating between gold, silver, and copper puff paints. This looks especially striking on dark brown or navy leather.
Lace up your newly customized oxfords and enjoy the subtle sparkle with every step you take
Neon Drip Details Over Black
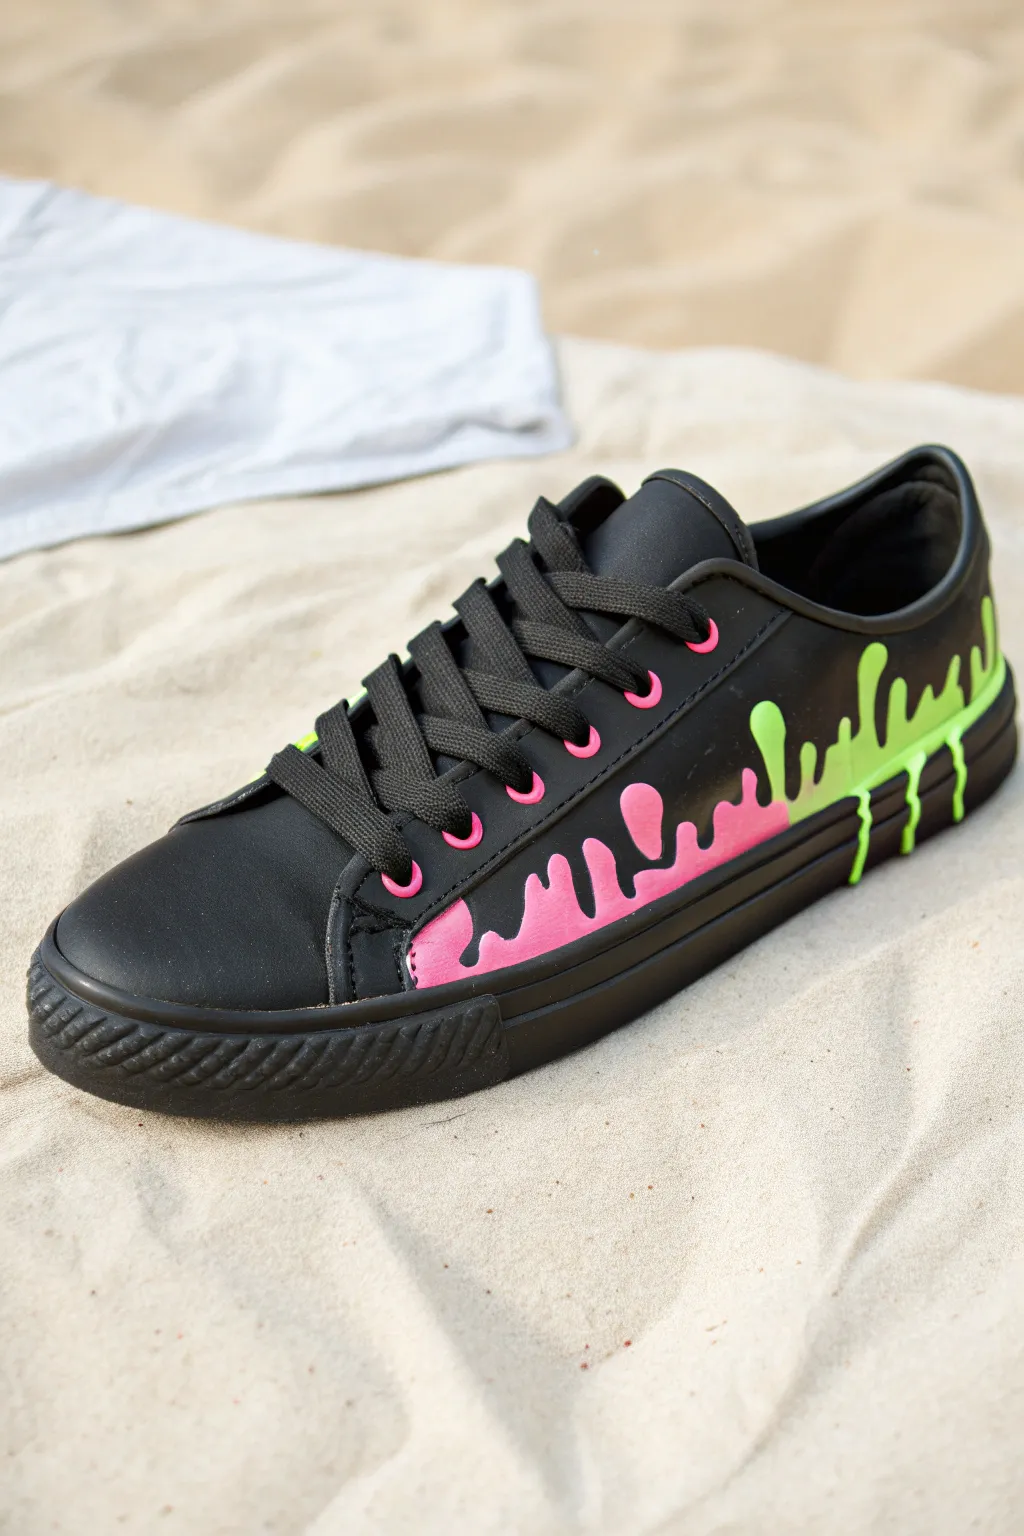
Transform plain black sneakers into an electrifying statement piece with this vibrant neon drip design. The high-contrast pink and green slime effect looks almost 3D against the dark background, giving your shoes a custom streetwear edge.
Detailed Instructions
Materials
- Black canvas or faux-leather sneakers
- Angelus leather preparer and deglazer (or acetone)
- Cotton rounds
- White leather paint (as a primer)
- Neon pink leather paint
- Neon lime green leather paint
- Fine detail paintbrush (size 0 or 00)
- Small flat paintbrush (size 2 or 4)
- Masking tape or painter’s tape
- Matte or glossy acrylic finisher
- Heat gun or hairdryer
Step 1: Preparation
-
Remove laces:
Start by taking the laces completely off both shoes to better access the eyelet area and prevent accidental drips on the fabric. -
Clean the surface:
Apply the leather preparer and deglazer to a cotton round and vigorously scrub the areas where you plan to paint. This removes the factory finish so the paint adheres properly. -
Tape off safe zones:
Use masking tape to cover the rubber toe cap and the very bottom of the sole where you don’t want any paint to land.
Uneven Coverage?
If your neons look streaky, don’t panic. Neons are naturally thin. The key is patience: apply more very thin layers rather than one thick one to fix patchiness.
Step 2: Drafting the Design
-
Sketch the outline:
Using a white charcoal pencil or a very faint touch with the white paint, lightly sketch the wavy outline of your drip pattern along the side panel. -
Plan the color separation:
Decide where the transition from pink to green will happen. In the reference, the pink occupies the front half while the green takes the back, merging near the middle. -
Extend onto the midsole:
Draw the drips extending down past the stitching and onto the rubber midsole itself. Vary the lengths to make the slime look organic and fluid.
Step 3: Painting the Base
-
Apply white primer:
Use your fine detail brush to fill in the entire drip design with flat white paint. Neon colors are translucent, so they need a bright white base to pop against black shoes. -
Smooth coverage:
Apply the white in thin, even layers. Avoid thick globs which can crack later. -
Dry the base:
Use a hairdryer on a low setting or let the shoes sit for 15 minutes until the white base is completely dry to the touch. -
Apply a second white coat:
If the black shoe is still showing through the white paint, create a second thin layer of white primer.
Glow Up
Want these to stand out at a party? Swap the standard neon acylics for UV-reactive paints. Under a blacklight, your drip design will literally glow in the dark.
Step 4: Adding Neon Color
-
Start with pink:
Dip your clean brush into the neon pink paint. Carefully fill in the front section of the drip design, staying strictly within your white base lines. -
Paint the eyelets:
For a cohesive look, use a very small amount of pink paint to carefully color the metal rim of the bottom two or three eyelets. -
Switch to green:
Clean your brush thoroughly, then load it with neon lime green. Paint the rear section of the drips. -
Blend the transition:
Where the pink and green meet, I like to wet the brush slightly to feather the edges together, creating a subtle gradient rather than a harsh line. -
Layer up:
Neon paints often require multiple coats. Apply 3-4 thin layers of color, drying between each one with your heat gun, until the color is solid and opaque.
Step 5: Finishing Touches
-
Clean up edges:
If you went outside the lines, use a small brush dipped in black paint to tidy up the edges and make the drip outline crisp. -
Paint upper eyelets:
Use the pink paint to color the upper eyelets, matching the reference style where pink accents rise above the main design. -
Seal the work:
Apply a clear acrylic finisher over the painted areas to protect your artwork from scuffs and water. -
Re-lace the shoes:
Once everything is fully cured (usually 24 hours), remove the tape and lace up your fresh custom kicks.
Now you can step out with totally unique shoes that look like they’re melting right onto the pavement
Tiny Botanical Sprigs on Toe Caps
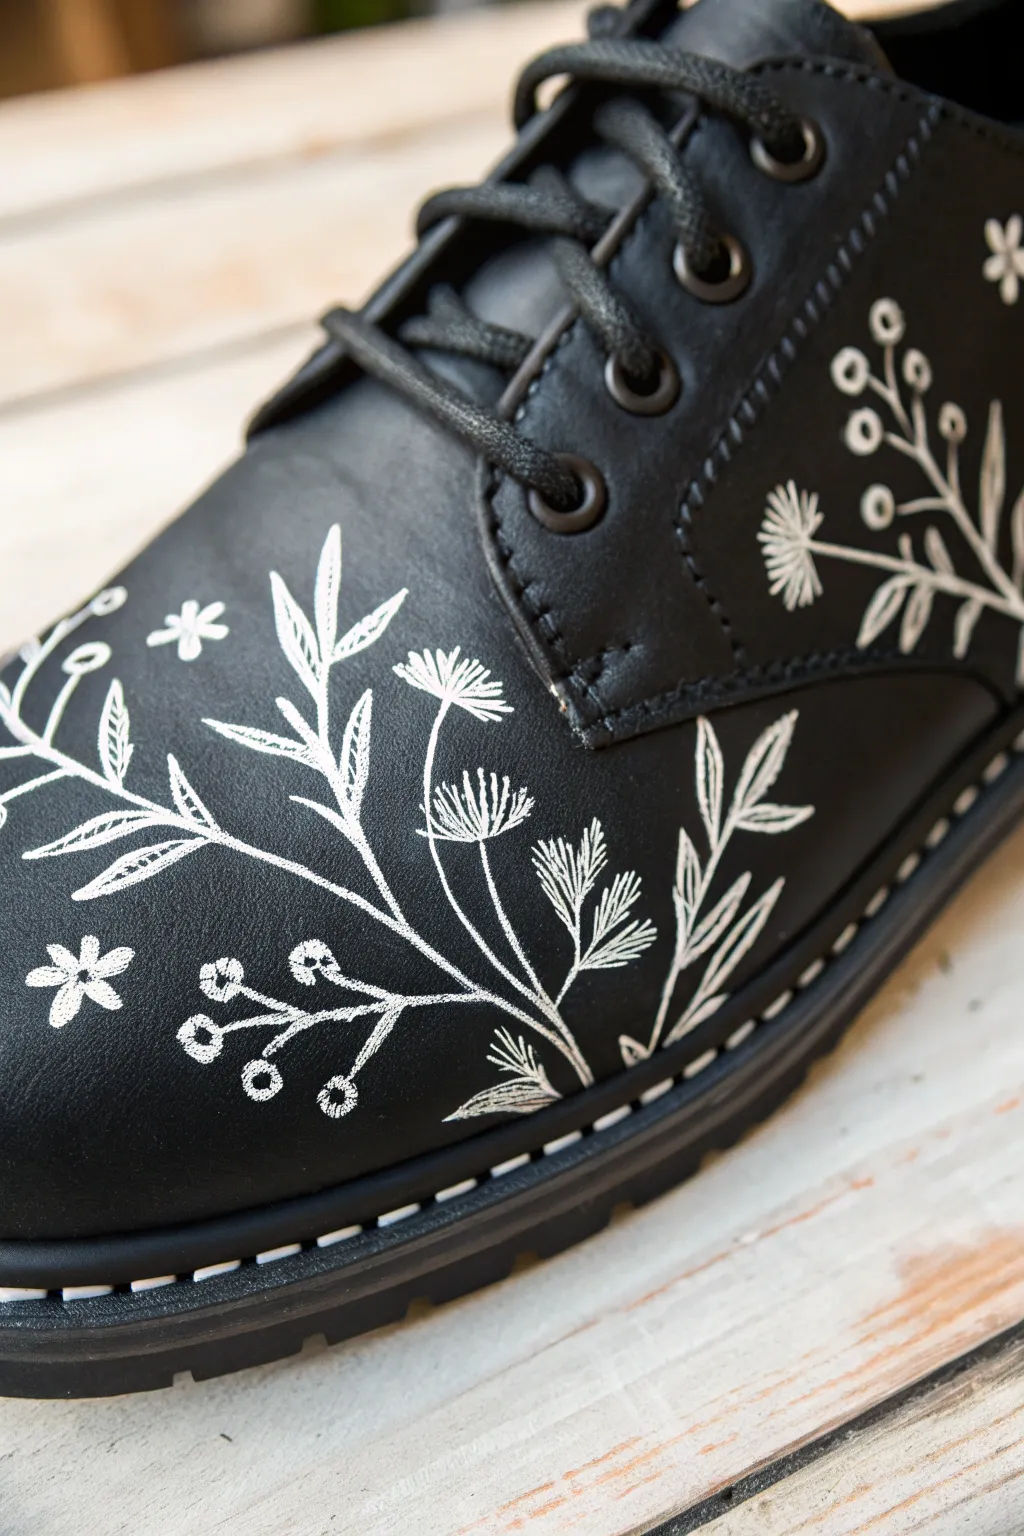
Transform a plain pair of black oxford shoes into a walking garden with these delicate botanical illustrations. Using fine lines and high-contrast white ink, this project creates an elegant, nature-inspired look that pops beautifully against dark leather.
Detailed Instructions
Materials
- Black leather or faux leather oxford shoes (clean and dry)
- White leather paint (e.g., Angelus) or fine-tip white paint marker (oil-based works best)
- Fine detail paintbrush (size 0 or 00) if using liquid paint
- White charcoal pencil or chalk pencil
- Leather preparer/deglazer or rubbing alcohol
- Cotton rounds or balls
- Matte or satin acrylic finisher (sealant)
- Small cup of water (for rinsing brushes)
- Paper towel
Step 1: Preparation & Planning
-
Clean the surface:
Before you make a single mark, ensure the toe cap and side panels are pristine. Use a cotton round dampened with leather preparer or rubbing alcohol to gently wipe down the area where you’ll be painting. This removes factory finishes and oils that prevent paint adhesion. -
Let it dry:
Allow the leather to air dry completely for at least 10–15 minutes. The surface should feel dry and slightly tacky, not slick. -
Sketch the main stems:
Using a white charcoal pencil, lightly sketch the primary curve of your main stems. Start from the bottom edge of the toe cap and sweep upwards toward the laces. Keep the pressure light so it’s easy to wipe away mistakes. -
Map out the foliage:
Mark the positions for the leaves and flower heads along your main stems. You don’t need to draw every detail, just simple lines to ensure the spacing feels balanced and organic.
Step 2: Painting the Botanicals
-
Start with the main stems:
Load your fine detail brush with white leather paint, or prime your paint marker. Trace over your charcoal stem lines with a smooth, confident stroke. I prefer to pull the brush toward me for better control over the curve. -
Paint the elongated leaves:
On the central branch, paint long, thin leaves extending outward. Press the brush down slightly at the base of the leaf to widen it, then lift as you pull away to create a sharp, tapered point. -
Add detail to leaves:
For a sketched look like the original, you can leave the centers of the leaves unpainted or add a tiny central vein line, rather than filling them in completely solid. -
Create the berry sprigs:
Draw small, branching offshoots from the lower section of your main stem. At the end of each tiny branch, paint a small open circle or ‘C’ shape to represent berries. Keep these lines very delicate. -
Paint the dandelion puffs:
For the fluffy flower heads, start at the top of a stem. Paint short, quick dashes radiating outward from a central point, creating a half-circle or fan shape. Make the outer dashes slightly shorter to simulate a rounded flower head. -
Add filler sprigs:
Fill in any empty gaps with tiny fern-like details. These are created by painting a short stem and adding very quick, feather-light strokes on either side. -
Incorporate small stars:
Scatter a few small, five-pointed star flowers or simple asterisks in the negative space around the main plant. This adds a bit of whimsy and balances the composition. -
Repeat on the side panel:
Extend the design to the side of the shoe (the quarter), following the stitching lines as a border. Create a similar branching pattern that angles upward toward the heel.
Paint Consistency Pro Tip
If using bottled leather paint, thin it slightly with water (ratio 4:1) for smoother fine lines. It flows better off the brush, preventing clumpy leaves.
Step 3: Finishing Touches
-
Touch up lines:
Once the first layer is dry to the touch, examine your work. Go back over any lines that look translucent with a second thin coat of white paint to ensure bright, high opacity. -
Remove sketch marks:
After the paint is completely dry (wait at least an hour), gently wipe away any visible charcoal pencil marks with a clean, dry cloth or a barely damp cotton swab. -
Apply the sealer:
To protect your intricate work from scuffs and weather, apply a thin layer of matte or satin finisher over the painted areas using a soft, flat brush. -
Final cure time:
Let the shoes sit for 24 hours before wearing them. This allows the paint and sealer to fully bond with the leather, ensuring your garden stays fresh for miles.
Level Up: Metallic Accents
Once the white is dry, add tiny dots of gold or silver metallic paint to the center of the berries or star flowers for a subtle, magical shimmer.
You now have a custom pair of shoes that brings a touch of nature to every step you take
Abstract Brushstroke “Calligraphy” Marks
Transform plain black slip-ons into bold wearable art using dynamic, high-contrast brushwork. This design mimics the energy of abstract calligraphy with rapid, jagged strokes that create sense of movement and modern texture.
How-To Guide
Materials
- Black canvas slip-on shoes
- White fabric paint or soft-body acrylics mixed with fabric medium
- Flat shader brush (size 6 or 8)
- Small liner brush (optional, for touch-ups)
- Painter’s tape or masking tape
- Newspaper or plastic bags (for stuffing)
- Hair dryer (optional)
- Water cup and paper towels
Step 1: Preparation
-
Clean surface:
Ensure your canvas shoes are free of dust or lint. If they are older, give them a quick wipe with a damp cloth and let them dry completely, as debris can ruin the crispness of your strokes. -
Structure the form:
Stuff the toe box of the shoe tightly with newspaper or plastic bags. This smooths out the canvas wrinkles and gives you a solid, reliable surface to paint against. -
Protect the sole:
Apply painter’s tape carefully along the rubber sole (foxing) where it meets the canvas. Press the edges down firmly to prevent any white paint from seeping onto the black rubber. -
Prepare the paint:
Squeeze a generous amount of white fabric paint onto your palette. If you are using standard acrylics, mix them with fabric medium according to the bottle’s ratio to ensure flexibility. -
Test consistency:
The paint should be fluid but opaque. If it’s too thick, add a drop of water; too thin, and it won’t pop against the black background. Test a stroke on a piece of scrap paper first.
Dry Brush Technique
Don’t wet your brush before dipping in paint. A dry brush creates those jagged, rough ends on the strokes that mimic chalk or distressed calligraphy.
Step 2: Painting the Design
-
Load the brush:
Dip your flat shader brush into the white paint. Don’t overload it; you want enough paint to make a mark, but a slightly ‘dry’ brush helps create those textured, ragged edges visible in the example. -
Practice the motion:
The key to this look is confident speed. Visualize a quick ‘flick’ of the wrist. The stroke should start firmly and lift off at the end to create a tapered trail. -
Start on the side:
Begin on the heel or side panel to get comfortable with the brush drag on the canvas texture before moving to the prominent toe area. -
Establish the main angles:
Paint your first set of parallel strokes on the toe cap. Aim for diagonal orientation, keeping the lines roughly parallel but varying their lengths significantly. -
Create grouping clusters:
Notice how the design isn’t just random individual lines. Paint clusters of 3-4 parallel strokes that interact with other clusters at contrasting angles. -
Overlap the energy:
Introduce a second group of strokes that intersects or abuts your first group at a different angle. This creates the dynamic ‘perpendicular’ tension seen in the reference image. -
Incorporate spatter (optional):
For a grittier look, you can tap your brush handle to add miniscule spatters, though the clean brushstroke look works best if you keep edges mostly defined. -
Vary brush pressure:
Press harder at the beginning of a stroke and lighter at the end. I find this creates that calligraphy-style transition from thick to thin. -
Address the elastic:
When painting over the elastic gore section near the tongue, stretch the elastic slightly with your fingers while painting to ensure the paint penetrates the grooves.
Step 3: Refinement & Sealing
-
Check opacity:
Let the first layer dry for 10-15 minutes. Black canvas soaks up white paint, so you may need to re-trace your boldest strokes a second time for bright, crisp white coverage. -
Sharpen edges:
If any strokes look too blobby, you can use a fine liner brush with a tiny bit of black paint to carefully ‘erase’ or sharpen the edges of your white marks. -
Dry completely:
Allow the shoes to dry for at least 24 hours. Using a hair dryer can speed up the surface dry, but deep drying is essential for durability. -
Heat set:
Once dry, heat set the paint to make it permanent. You can do this by blasting it with a hair dryer on high heat for several minutes or carefully ironing over it with a protective cloth barrier. -
Remove tape:
Slowly peel off the painter’s tape from the soles. If any white paint leaked through, gently scrape it off with a damp toothpick or fingernail while the spot is fresh.
Try Metallic Accents
For a luxe upgrade, paint a few select strokes in silver or gold fabric paint. Add them sparingly as highlights among the white clusters.
Step into your day with confidence knowing your footwear carries a totally unique, artisan flair
Painted Lace Illusion Panels
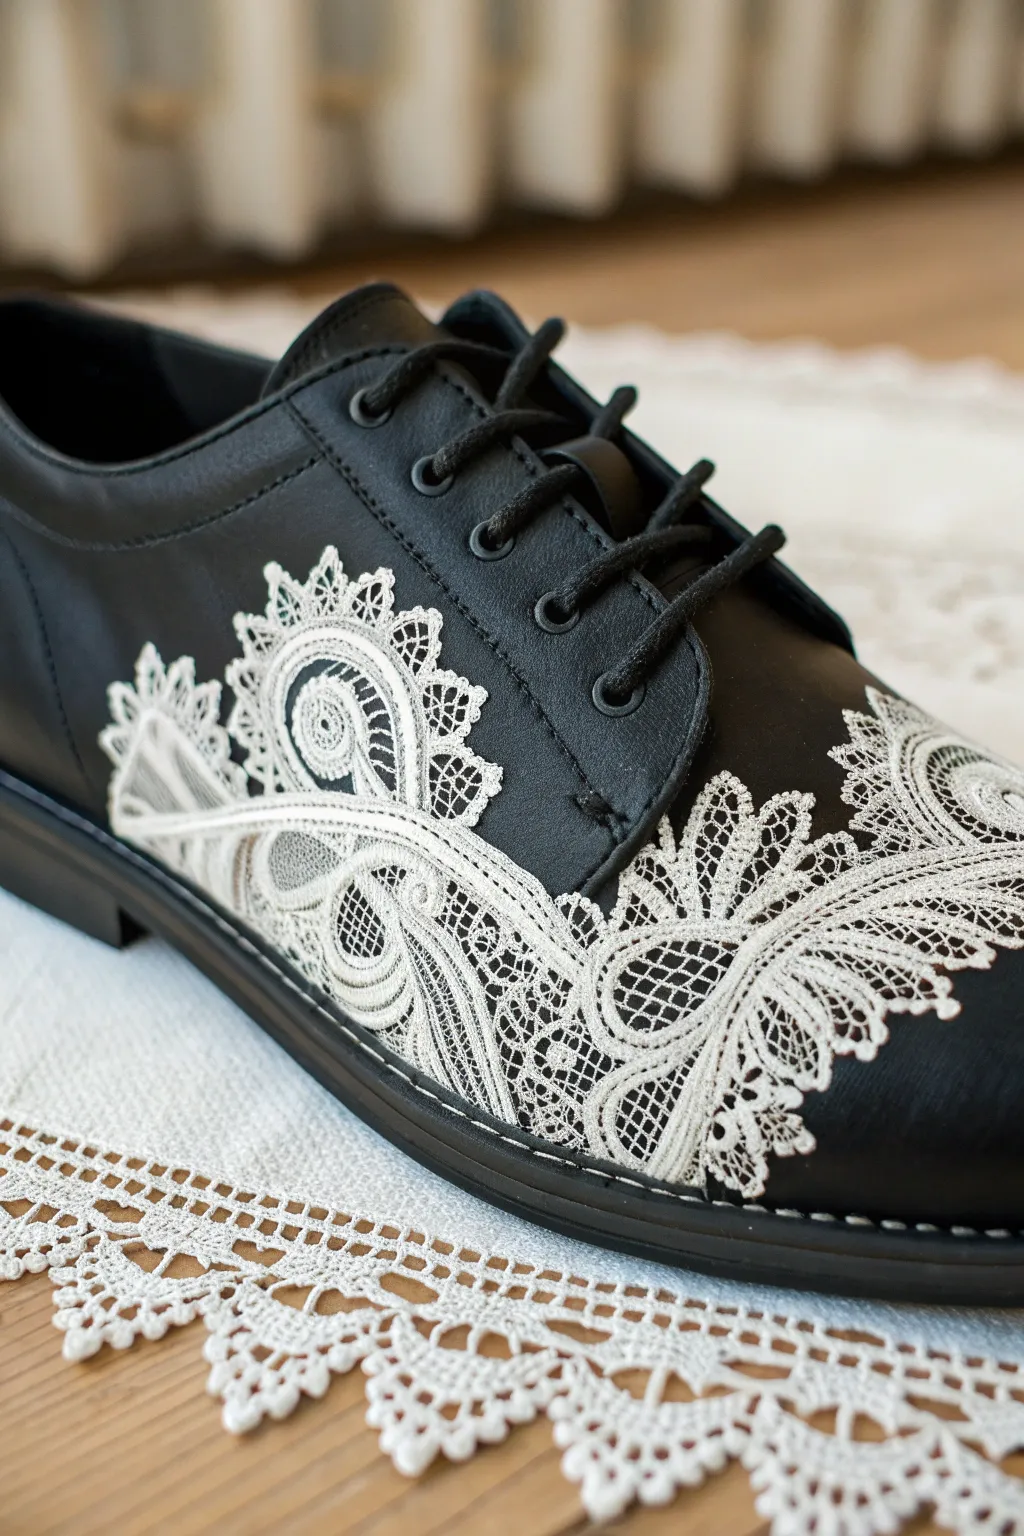
Transform standard black oxfords into a Victorian-inspired statement piece by hand-painting stunningly realistic lace panels. This high-contrast design mimics the delicate loops and netting of real fabric, creating a sophisticated illusion directly on the leather.
Detailed Instructions
Materials
- Black leather oxford shoes
- Angelus High Quality Leather Paint (White)
- Angelus High Quality Leather Paint (Black – for corrections)
- Angelus 2-Hard or generic leather preparer/deglazer
- Cotton rounds or cloth
- Fine detail brushes (sizes 0, 00, and 000)
- White tailor’s chalk or a white charcoal pencil
- Reference photo of lace (optional but helpful)
- Acrylic Finisher (Matte or Satin)
Step 1: Preparation & Planning
-
Clean surface:
Begin by removing the factory finish from the areas you intend to paint. Apply leather preparer and deglazer to a cotton round and scrub the side panel and toe area until the shine dulls slightly. This ensures the paint adheres permanently. -
Plan the composition:
Decide where your lace panels will sit. In this design, the lace flows from the side quarter, sweeping down towards the sole, and reappears on the toe box. Sketch the outer boundaries lightly with white tailor’s chalk. -
Sketch the main curves:
Inside your boundaries, draw the primary ‘skeleton’ lines of the lace. These are the thickest, sweeping curves that define the flow. Don’t worry about the tiny mesh details yet; just establish the big paisley-like shapes and scalloped edges.
Keep it Fluid
Thin your white paint slightly with water (about 10%) for the mesh lines. It helps the paint flow smoothly off the liner brush for crisp, thin netting.
Step 2: Painting the Structure
-
Paint main lines:
Using a size 0 brush and white leather paint, trace over your chalk skeleton lines. Apply the paint in thin, even layers. You want these lines to be solid and opaque, which acts as the ’embroidery’ part of the lace. -
Thicken the borders:
Go back over your main curves to thicken them slightly. Lace often has a raised texture on the edges, so giving these lines a bit more weight helps the illusion. -
Create the scallops:
Along the outer edges of your design, paint connecting semi-circles or ‘scallops.’ These form the decorative border common in Chantilly or Venetian lace styles. -
Add teardrop shapes:
Inside the larger scroll shapes, paint smaller teardrop or petal outlines. These will serve as frames for the finer mesh work coming later. -
Second coat:
Review your main white lines. If the black leather is showing through, apply a second coat of white paint carefully to ensure solid coverage. Let this dry completely before moving to delicate details.
Step 3: Weaving the Mesh
-
Start the netting:
Switch to your smallest brush (size 000). You need to create the ‘netting’ or mesh that fills the negative space. I find it easiest to paint diagonal cross-hatching to simulate this look. -
Fill the petals:
Inside the teardrop shapes you painted earlier, fill the space with a very fine grid pattern. Keep your paint thin here; if the lines are too thick, it won’t look like delicate thread. -
Add connecting threads:
Draw tiny, hair-thin lines connecting your main structural curves to each other. These mimic the ‘brides’ or connecting threads in needle lace. -
Detailing the scallops:
Decorate the scalloped edges with tiny dots or picots. A single dot of white paint at the peak of each scallop adds a believable textile texture. -
Create variation:
Vary your mesh patterns. Some areas can have a simple square grid, while others can be filled with small circles. This variety makes the ‘lace’ look handmade and intricate.
Vintage Patina
Mix a tiny drop of beige or cream into your white paint. Pure white can look stark; an off-white shade mimics the look of antique lace.
Step 4: Refining & Finishing
-
Clean up edges:
Inspect your work for any accidental thick blobs or shaky lines. Use your black leather paint and a clean brush to ‘erase’ mistakes by carefully painting over the white overflow, sharpening the edges of the lace. -
Erase chalk marks:
Once the paint is completely dry, gently wipe away any visible chalk guidelines with a slightly damp cloth or a clean eraser. -
Check symmetry:
If painting both shoes, place them side-by-side. The lace doesn’t need to be identical (real lace often varies), but the visual weight and placement should be balanced. -
Seal the work:
Apply a leather sealer or finisher over the painted areas. A matte or satin finish is best here, as high gloss might make the lace look like plastic rather than fabric. -
Final cure:
Allow the finisher to cure for at least 24 hours before wearing the shoes to ensure maximum durability.
Enjoy the sophisticated flair of your custom footwear design
City Skyline Highlights in White
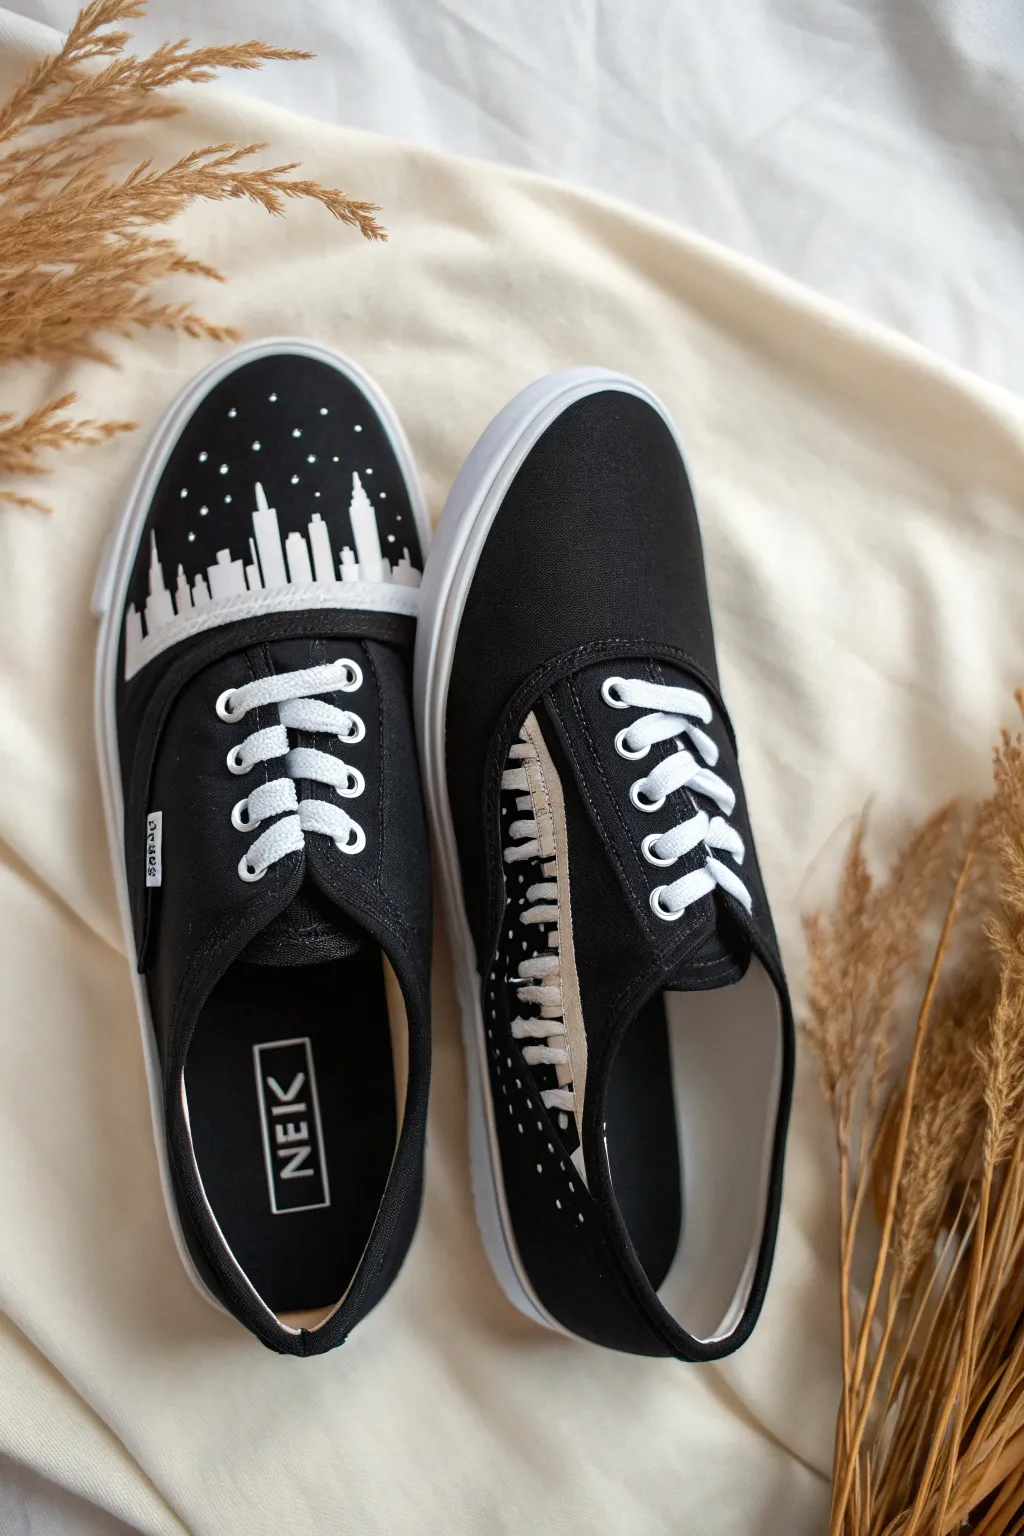
Transform a simple pair of black canvas sneakers into a wearable piece of art featuring a stark, high-contrast city skyline. The design utilizes the shoe’s dark background to create a night sky effect, complete with delicate starlight, perfect for an urban evening look.
Step-by-Step Guide
Materials
- Pair of black canvas sneakers (clean and dry)
- White fabric paint or high-quality acrylic paint mixed with fabric medium
- Fine liner detail brush (size 00 or 0)
- Small flat shader brush (size 2 or 4)
- White fabric marker (fine tip) or toothpick
- Masking tape or painter’s tape
- Hairdryer (optional, for speeding up drying)
- Water cup and paper towels
Step 1: Preparation and Planning
-
Clean surface:
Ensure your sneakers are completely free of dust or dirt. Even new shoes can have a coating, so a quick wipe with a damp cloth followed by thorough drying is a good idea to help the paint adhere. -
Tape the soles:
Apply a strip of masking tape along the white rubber sole of the toe box area. This protects the rubber from accidental paint splatters while you work on the canvas edge. -
Set the horizon line:
Visualize where your skyline will sit. On the left shoe shown in the example, the buildings rise from the seam where the toe cap meets the laces roughly halfway down the toe box.
Step 2: Painting the Skyline (Left Shoe)
-
Paint a base strip:
Using your flat shader brush and white paint, create a solid white horizontal band along the bottom edge of the toe cap area. This serves as the foundation for your buildings and ensures the bottom edge looks clean. -
Outline the tallest towers:
Switch to your fine liner brush. Start by painting the outlines of two or three major skyscrapers. I like to vary the shapes—make some pointed like the Empire State Building and others flat-topped. -
Fill in the shapes:
Once the outlines are dry to the touch, fill them in with solid white paint. You might need a second coat here to ensure the black canvas doesn’t show through. -
Add medium buildings:
Between your tall towers, paint rectangular block shapes of varying heights. These represent the bulk of the city density. -
Create depth with layers:
Add smaller, lower ‘buildings’ in the foreground by painting simple stair-step shapes connecting the larger structures. This prevents gaps and makes the city look crowded. -
Refine the edges:
Go back over the tops of your buildings with the fine brush to sharpen any blurry corners. Crisp 90-degree angles make the silhouette reading much clearer. -
Add architectural details:
On the tallest towers, use the very tip of your brush to add tiny antennas or spire details at the very top for a realistic touch.
Paint Consistency Tip
If your white paint feels too thick or drags on the canvas, mix in a tiny drop of water. It should flow like heavy cream for sharp lines.
Step 3: Creating the Night Sky
-
Prepare the stars tool:
For the stars, you can use a fine-tip fabric marker or simply dip a toothpick into your white paint. A toothpick gives excellent control for tiny dots. -
Map out bright stars:
Place a few larger dots deliberately across the upper black space of the toe box. Don’t arrange them in a perfect grid; randomness looks more natural. -
Fill with distant stars:
Surround the larger dots with tiny pin-prick specks. Concentrate slightly more stars near the horizon line to mimic the glow of city lights reflecting upward.
Level Up: Glow in the Dark
Mix a glow-in-the-dark medium into your white paint for the stars and windows. The city will look normal by day but light up at night.
Step 4: Painting the Side Detail (Right Shoe)
-
Use the side panel:
On the other shoe, create a variation by painting along the side panel near the laces rather than the toe. This asymmetry adds visual interest. -
Paint a vertical strip:
Paint a vertical strip of smaller, abstract rectangular building shapes along the seam of the lace panel. Keep these shapes simpler and more geometric than the detailed skyline. -
Add side patterns:
Use small dots or dashes alongside this vertical strip to echo the starry theme from the first shoe, tying the two designs together without matching perfectly. -
Heat set the paint:
Once all paint is visibly dry (wait at least 24 hours), run a hairdryer over the design or iron it essentially (with a cloth between the iron and shoe) to permanently set the fabric paint.
Wear your new custom kicks with pride knowing you have a unique view of the city right at your feet
Negative-Space Cutout Patterns
Transform a plain pair of black sneakers with a striking, minimalist geometric accent that mimics high-end designer footwear. This project uses negative space principles by adding a bold block of color to create a cutout effect against the dark leather.
Step-by-Step
Materials
- Black leather or faux-leather sneakers
- Angelus leather preparer and deglazer (or acetone)
- Cotton rounds or balls
- High-quality leather acrylic paint (burnt orange/terracotta)
- Masking tape (flexible painter’s tape is best)
- Flat shader brush (size 6 or 8)
- Small detail brush (size 0 or 1)
- Matte acrylic finisher
- Heat gun or hairdryer (optional)
- X-Acto knife or craft blade
Step 1: Preparation and Mapping
-
Clean surface:
Begin by removing the laces to inhibit accidental spills. Take a cotton round soaked in leather preparer and vigorously scrub the side panel where you plan to paint. This removes the factory finish so the paint adheres properly. -
Dry time:
Allow the leather to dry completely for about 5-10 minutes. The surface should feel slightly tacky or dull rather than slick and shiny. -
Position tape:
Apply a strip of wide masking tape diagonally across the side panel of the shoe. You want this line to start low near the arch of the sole and curve upwards toward the lace eyelets. -
Trace curvature:
If you don’t have flexible tape, lay down standard tape and lightly sketch your desired arc shape onto the tape itself with a pencil. -
Cut the stencil:
Using a very sharp craft blade, gently cut along your drawn curve. Be extremely careful to cut only through the tape, not deep into the leather. Peel away the excess tape to reveal the painting area.
Bleeding Edges?
If paint seeps under your tape, let it dry fully, then use a toothpick to gently scratch the excess away. The factory finish on the rest of the shoe makes this easy to clean up.
Step 2: Painting the Design
-
First coat application:
Dip your flat shader brush into the terracotta paint. Apply a very thin, even layer. It will look streaky and semi-transparent against the black leather initially—this is normal, so don’t pile it on thick. -
Force dry:
Use a hairdryer on a low cool setting to speed up drying, or wait 15 minutes. The paint must be dry to the touch before the next layer. -
Build opacity:
Apply the second coat. I like to switch directions with my brush strokes here to ensure distinct coverage. Keep the layers thin to prevent future cracking. -
Edge discipline:
Pay special attention to the edges near the tape. Paint from the tape toward the center of the shape to prevent paint from bleeding underneath the adhesive. -
Final color layers:
Repeat the layering process—usually 4 to 6 thin coats are needed for a bright orange to pop against a black base. Stop when you have a solid, uniform color.
Step 3: Refining and Sealing
-
Peel the tape:
While the final coat is slightly wet (tacky, not soaked), carefully peel back the masking tape at a 45-degree angle. This ensures a crisp, sharp line. -
Clean edges:
If there is any minor bleed, dip your detail brush in a tiny bit of water or rubbing alcohol and gently gently scrape or wipe away the mistake. For larger errors, touch up with black leather paint. -
Apply finisher:
Once the paint has cured for 24 hours, apply a matte finisher over the painted area using a clean brush. This mimics the factory matte leather look and protects the artwork from scuffs. -
Re-lace:
Thread your laces back into the shoe. For a clean look like the photo, try ‘bar lacing’ which hides the crossover knots underneath.
Level Up
Add a second, thinner arc parallel to the main shape using a metallic gold or silver paint for a luxe, double-stripe effect.
Step out in style with your customized, high-contrast footwear creation
Glow-in-the-Dark Secret Details
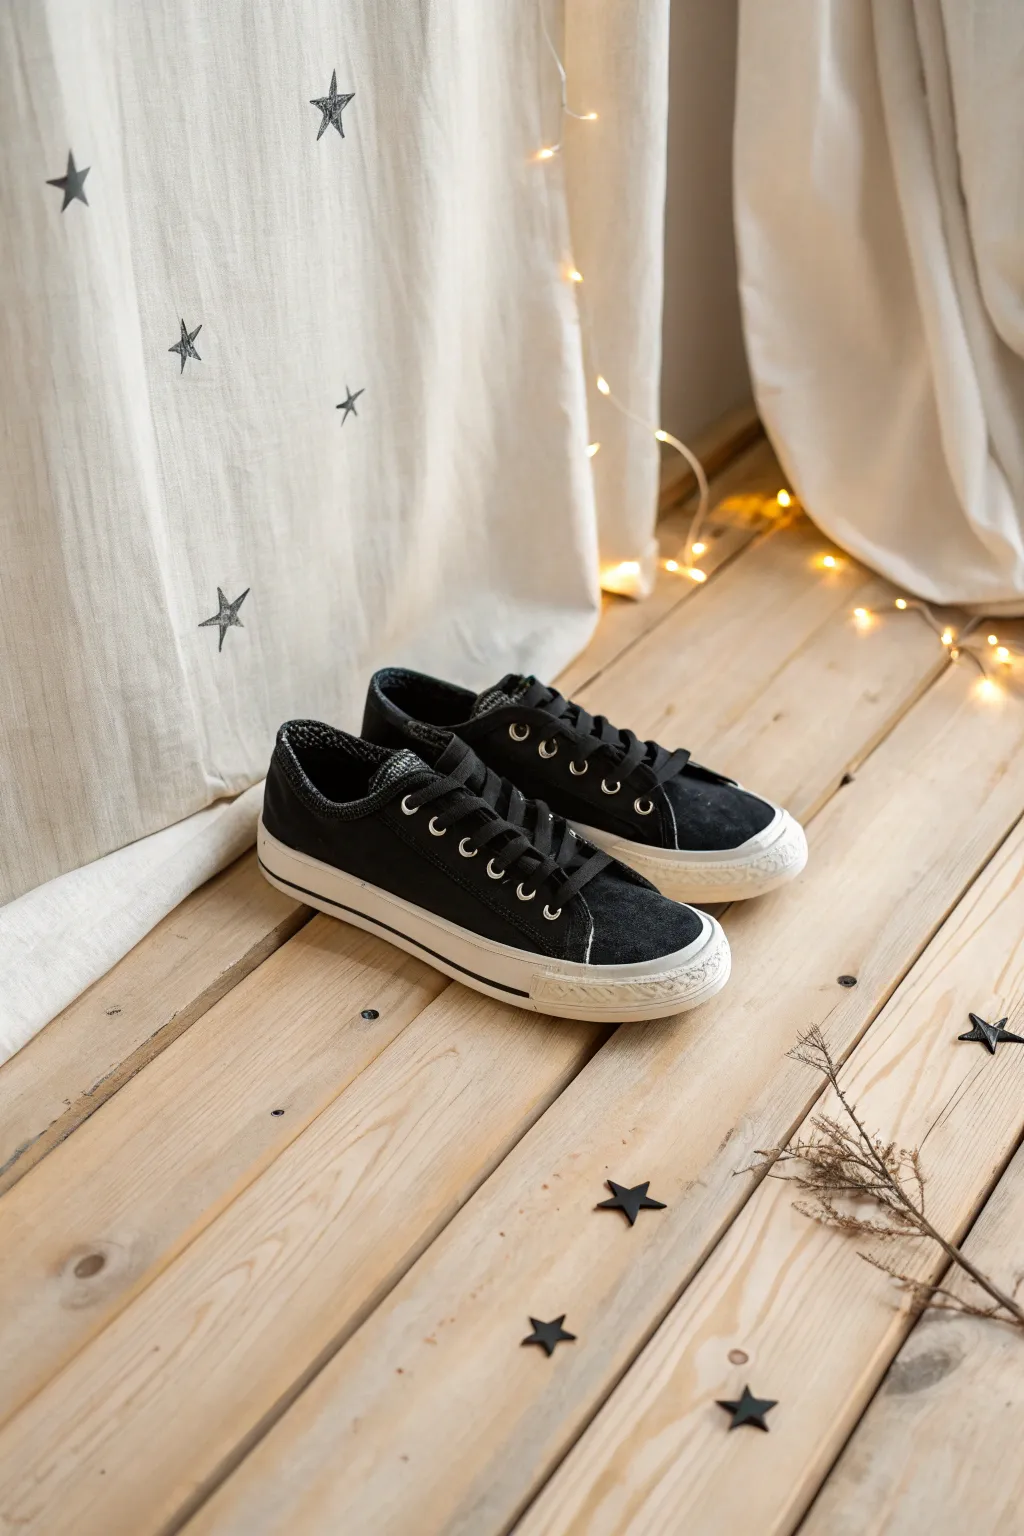
Transform a classic pair of black canvas sneakers into a subtle celestial masterpiece that reveals its true magic when the lights go down. This project focuses on painting delicate stars that blend seamlessly with the shoe’s dark fabric by day but create a captivating glow-in-the-dark effect by night.
Step-by-Step Tutorial
Materials
- Black canvas sneakers (low-top)
- Fabric medium
- Glow-in-the-dark acrylic paint (phosphorescent)
- White fabric paint or soft-body acrylic
- Fine detail brush (size 0 or 00)
- Small flat brush
- Masking tape or painter’s tape
- Palette or small mixing dish
- Water cup
- Hairdryer (optional, for speeding up drying)
- Star stencil (optional, specifically 5-point stars)
Step 1: Preparation and Base
-
Prep the Surface:
Clean your shoes thoroughly. If they are new, wipe them down with a slightly damp cloth to remove any factory dust or coating that might repel paint. Remove the shoelaces to ensure you have unobstructed access to the canvas tongue and eyelet areas. -
Protect the Soles:
Apply masking tape carefully along the rubber foxing (the white rubber strip at the bottom) and the toe cap. This ensures your crisp rubber edges stay paint-free while you work on the canvas body. -
Mix Your Base White:
On your palette, mix a small amount of white fabric paint with a drop of fabric medium. The medium helps the paint flex with the shoe as you walk, preventing cracks later on. You want a thin, creamy consistency.
Pro Tip: Sharper Points
If you struggle painting stars freehand, cut a tiny stencil out of masking tape or sticker paper. Stick it firmly to the canvas, paint the void, and peel it off for razor-sharp edges.
Step 2: Painting the Stars
-
Plan Your Constellation:
Visualize where you want your stars to land. The image shows a sparse distribution—a few on the sides and perhaps one on the tongue. Avoid overcrowding; less is often more for this look. -
Paint First Star Anchors:
Using your fine detail brush and the white mixture, paint small, simple 5-point stars directly onto the black canvas. I find it easiest to paint an inverted ‘V’ first, then cross the arms. -
Refine the Shape:
Go back over your initial star shapes to sharpen the points. The white base layer is crucial because glow paint is translucent; without white underneath, the glow won’t show up against the black fabric. -
Let Dry Completely:
Allow this white base layer to dry fully. It should feel dry to the touch. You can use a hairdryer on a low, cool setting if you are impatient to move to the next step. -
Prepare the Glow Mix:
Shake your glow-in-the-dark paint bottle vigorously. Pour a dime-sized amount onto your palette. Do not mix this with water, as it will dilute the phosphorescent particles.
Step 3: Adding the Glow Effect
-
Apply First Glow Layer:
Carefully trace over your white stars with the glow-in-the-dark paint using the same fine detail brush. The goal is to cover the white entirely so the star looks slightly milky or pale green in daylight. -
Build Up Intensity:
Once the first coat is dry, apply a second layer of glow paint. The more layers you add, the brighter the glow will be in the dark. Three thin layers are usually better than one thick, gloopy one. -
Clean Up Edges:
If any paint strayed outside your star lines, use a clean, slightly damp brush to gently wipe it away before it sets, or touch it up with a tiny dab of black fabric paint later. -
Paint the Tongue Detail:
Don’t forget the tongue of the shoe. Pull the tongue forward and paint a discreet star just below where the laces tie. This becomes a fun hidden detail. -
Add Tiny background dots:
For extra depth, dip the handle end of your brush into the glow paint and dot tiny ‘distant stars’ around the main 5-point stars. Keep these sparse to maintain the minimalist aesthetic.
Level Up: Galaxy Dust
Mix a tiny amount of silver glitter into your glow paint for the final layer. This creates a subtle sparkle during the day that complements the glow effect at night.
Step 4: Finishing Touches
-
Remove Tape:
Once you are happy with the paint coverage and it is semi-dry, carefully peel off the masking tape from the rubber soles. Doing this before the paint is rock-hard helps prevent peeling the design. -
Final Cure:
Let the shoes sit for at least 24 hours before wearing them. If your fabric paint instructions require heat setting, use a hairdryer or an iron (with a cloth barrier) according to the bottle’s directions. -
Charge the Glow:
Place your finished shoes under a bright lamp or in direct sunlight for a few minutes to charge up the phosphorescent paint. -
Re-lace:
Thread your laces back through the eyelets. Clean black laces look sleekest here, keeping the focus entirely on your new celestial artwork.
Step into the dark and watch your new constellation guide you with a soft, ethereal light


Have a question or want to share your own experience? I'd love to hear from you in the comments below!