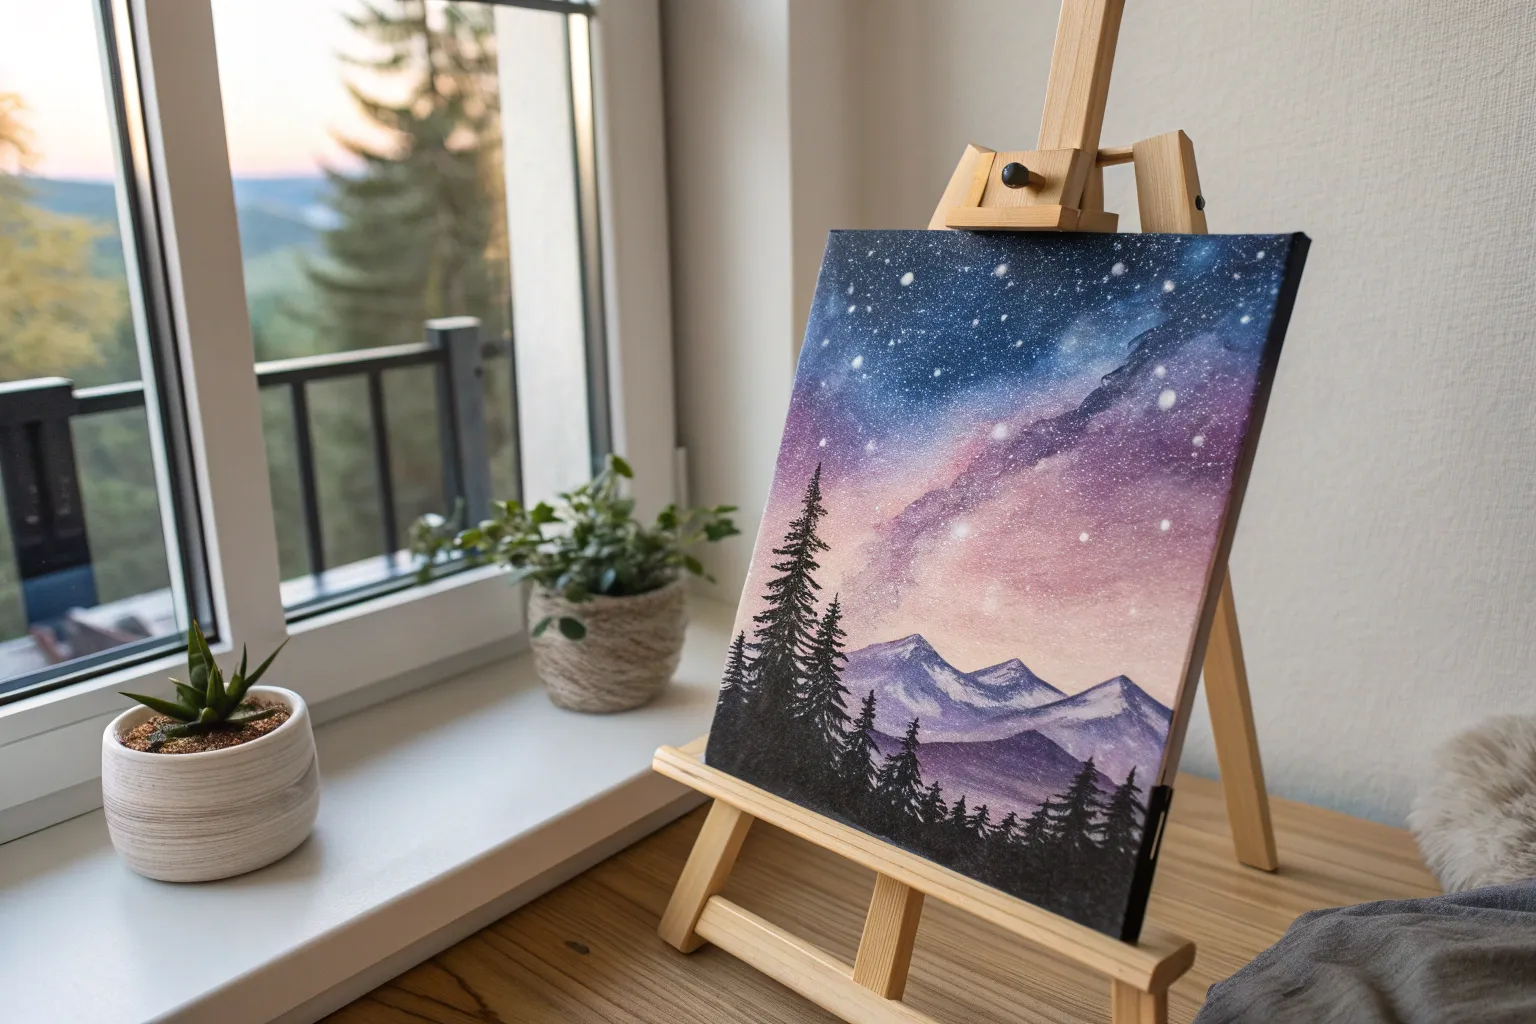
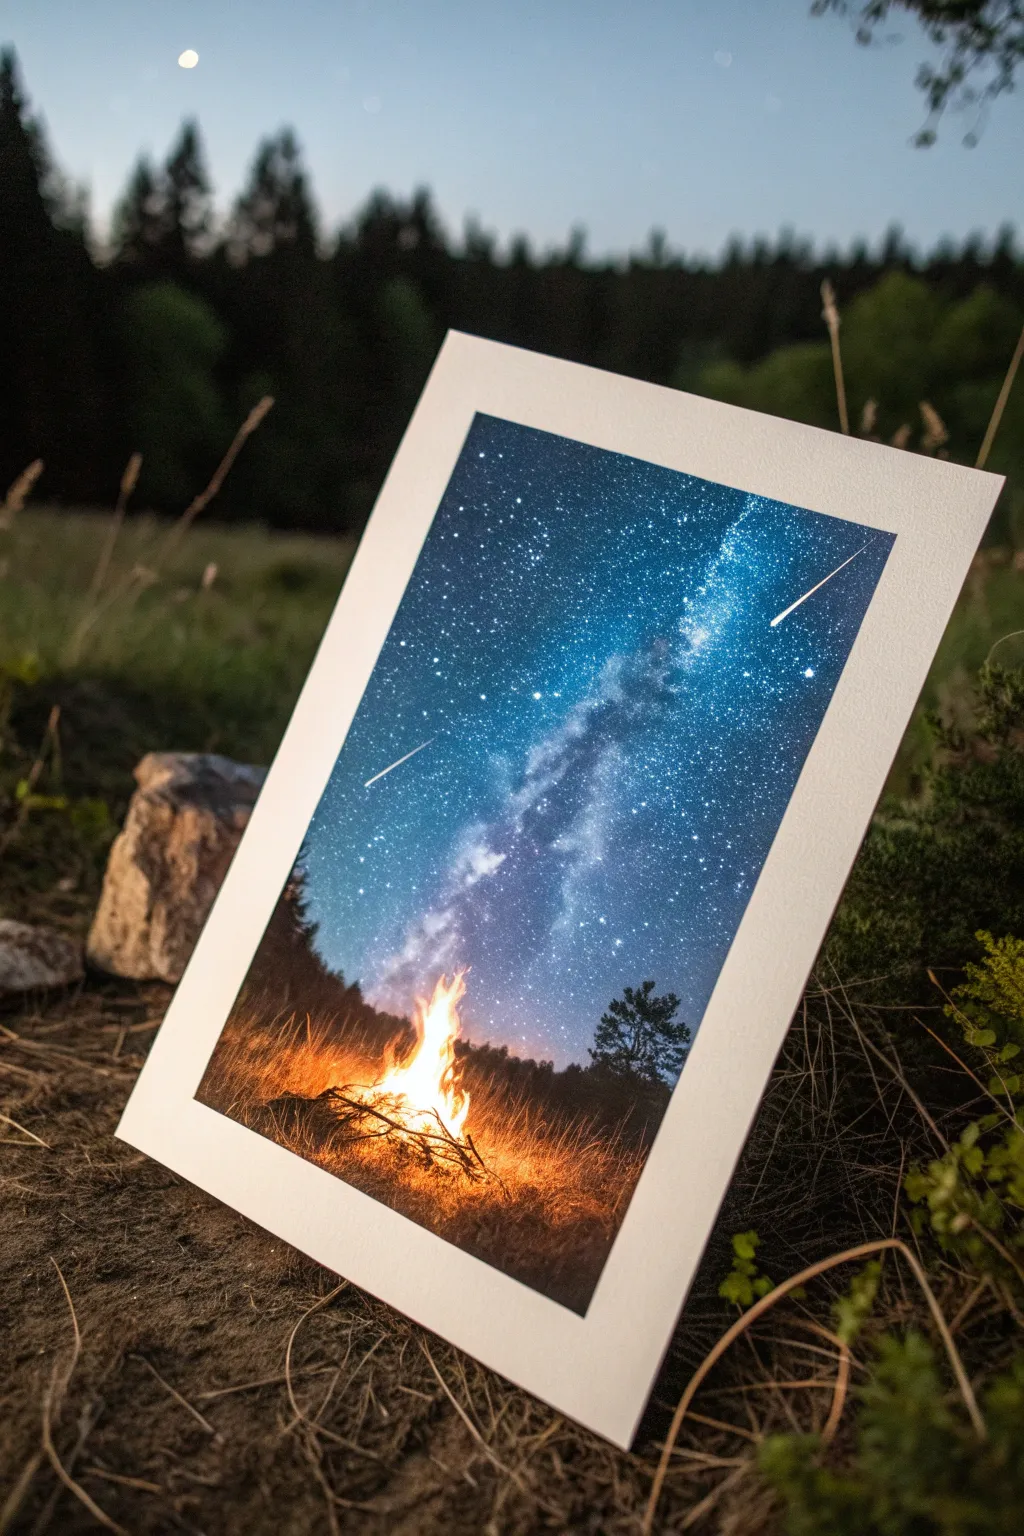
There’s something instantly calming about painting a night sky—it’s basically permission to play with moody color and tiny sparkly details. If you’ve been craving fresh night sky painting ideas, here are my favorite setups that feel doable, even on a small canvas.
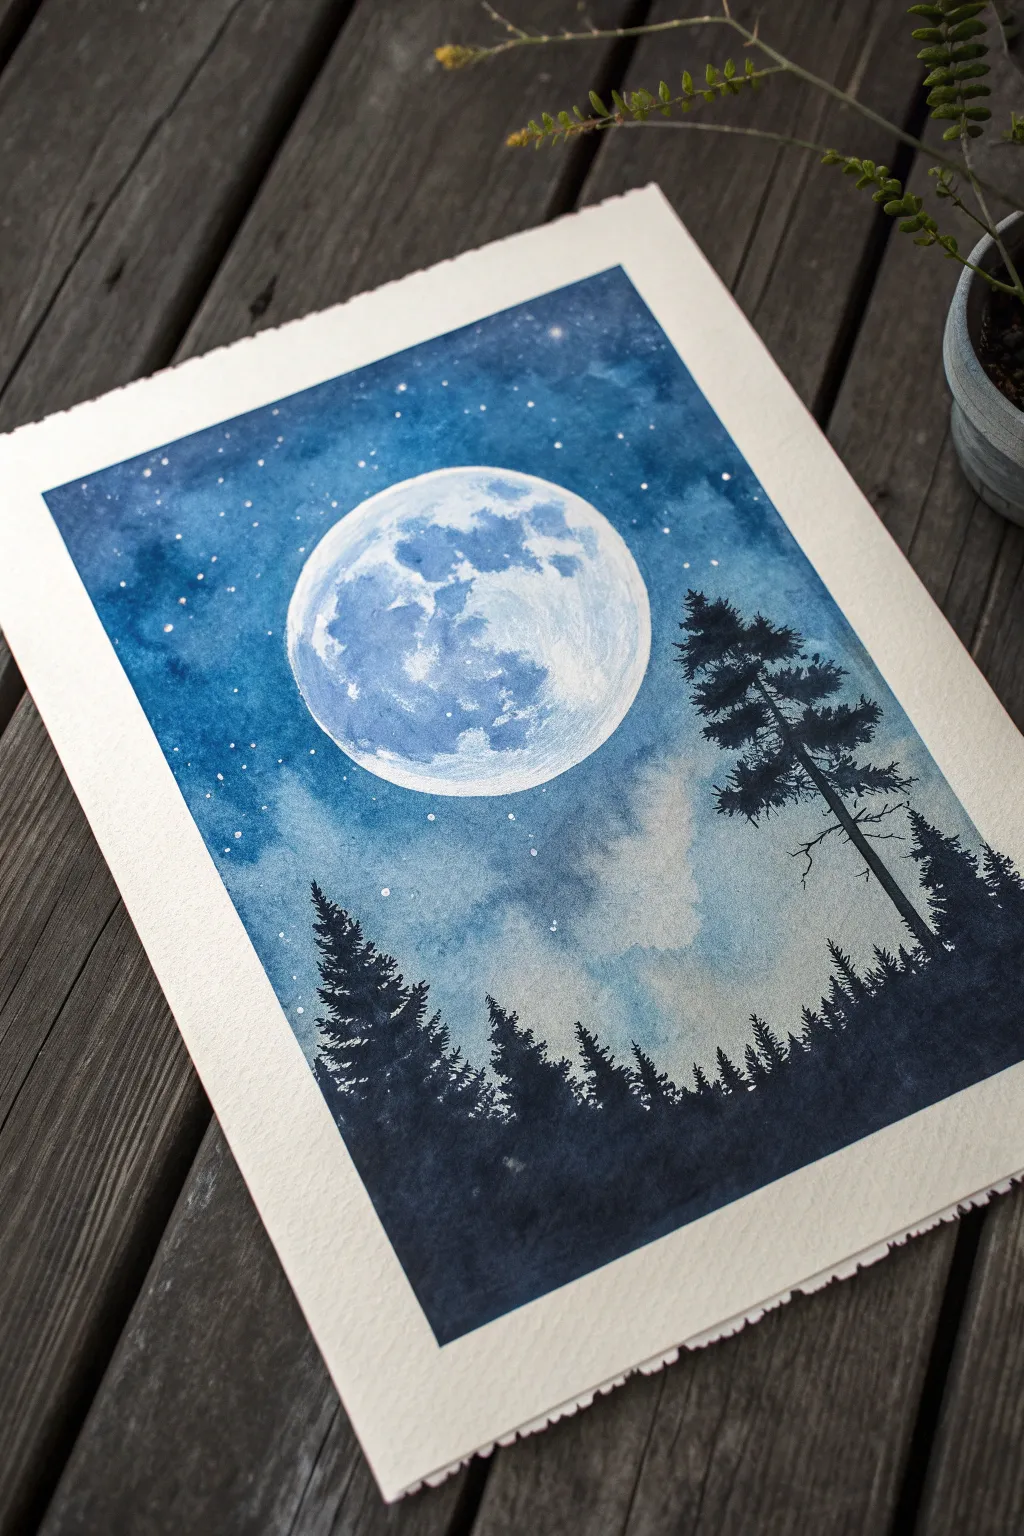
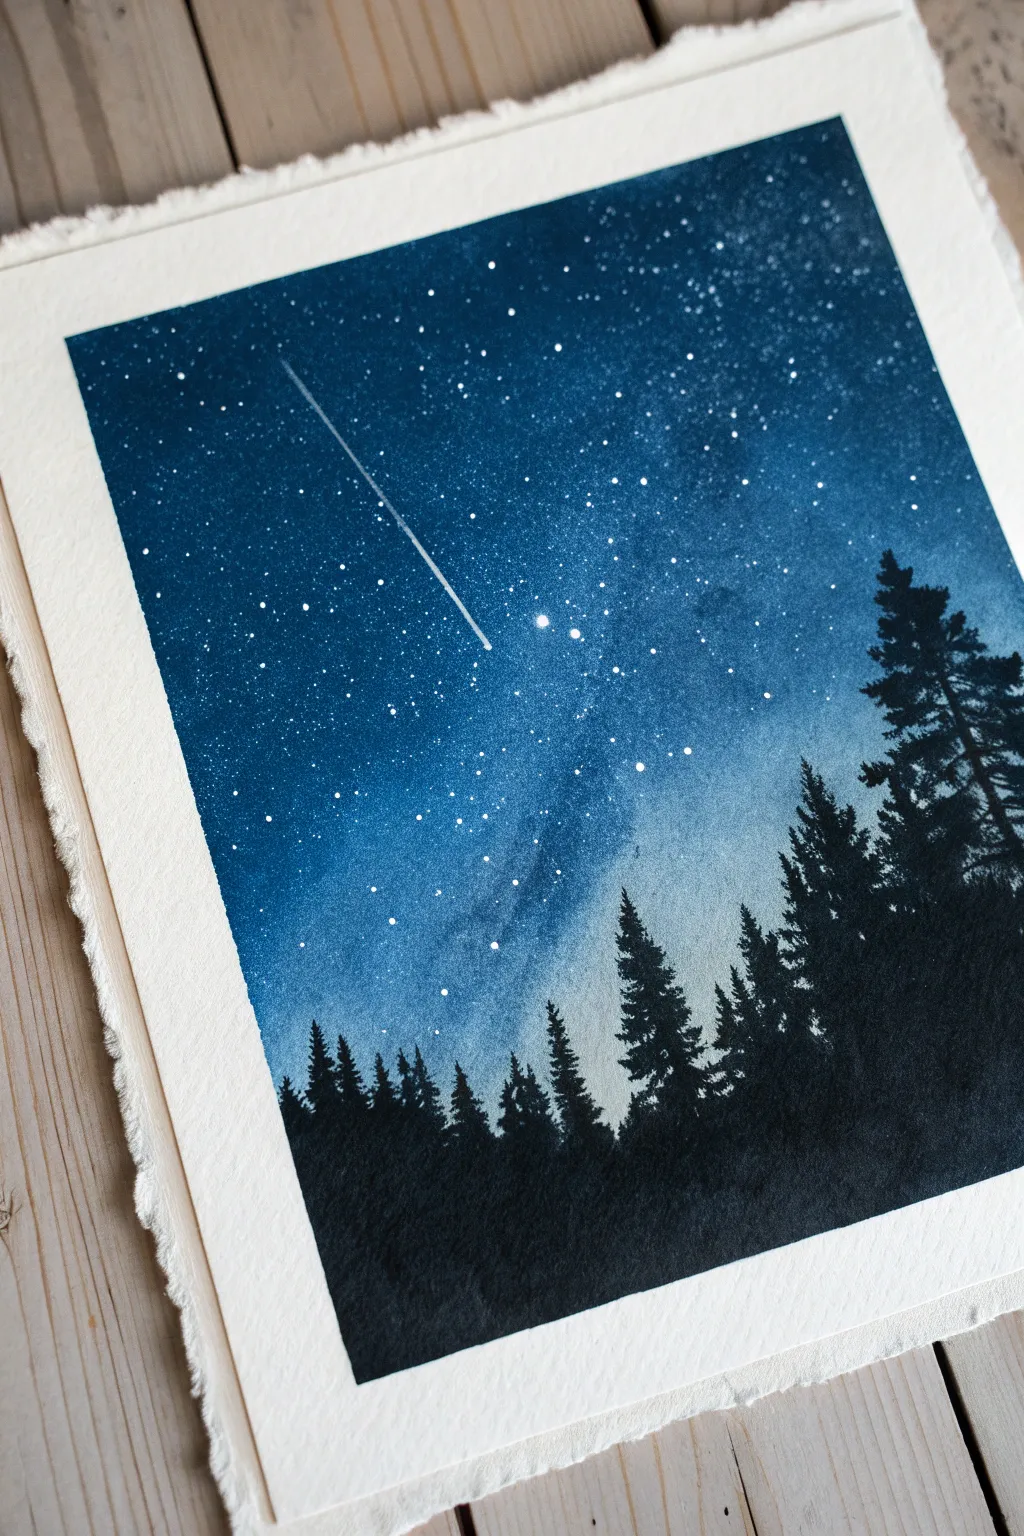
Classic Starry Gradient With Tree Silhouette
Capture the serene beauty of a winter night with this classic watercolor tutorial featuring a seamless celestial gradient and crisp pine silhouettes. This beginner-friendly project teaches essential wet-on-wet blending techniques to create a stunning, dreamy atmosphere.
How-To Guide
Materials
- Cold press watercolor paper (approx. 300 gsm)
- Watercolor paints (Indigo, Prussian Blue, Turquoise, Violet/Purple)
- Black gouache or waterproof black ink
- White gouache or white gel pen
- Flat wash brush (large)
- Round brushes (size 4 and size 0/detail liner)
- Masking tape
- Jar of clean water
- Paper towels
Step 1: Setting the Scene
-
Preparation:
Begin by taping down all four edges of your watercolor paper to a hard board or table surface using masking tape. This creates that crisp, clean border you see in the final piece and prevents the paper from buckling heavily when wet. -
Plan the Horizon:
Mentally divide your paper. The top two-thirds will be the sky, and the bottom third will be the forest. You don’t need to draw a line, but keep this ratio in mind. -
Pre-wet the Sky:
Using your large clean brush, apply a coat of clean water to the entire paper surface. The paper should be glisten with moisture but not have swimming pools of water. This is crucial for the wet-on-wet technique.
Dry Before You Splatter
Make sure your sky gradient is 100% dry before splattering white stars. If the paper is damp, the white dots will feather out and look like snowflakes rather than crisp stars.
Step 2: Painting the Sky Gradient
-
Start with Dark Blue:
Load your brush with a saturated Indigo or dark Prussian Blue. Apply this to the very top edge of the paper, letting the wet surface help the pigment spread downwards naturally. -
Transition to Turquoise:
Rinse your brush slightly and pick up a bright Turquoise or Cerulean Blue. Paint this band just below the dark indigo, slightly overlapping the colors so they bleed together seamlessly. -
Add the Violet Glow:
Clean your brush thoroughly. Load it with a soft Violet or Purple watercolor. Apply this to the lower third of the painting, blending it upwards into the blue. The blue and purple mixes will create a lovely transition shade. -
Soften the Horizon:
As you reach the bottom area where the trees will be, let the purple fade out. You can use a damp brush to lift a little color here if it gets too dark, aiming for a misty look. -
Enhance the Depth:
While the paper is still damp, I like to drop tiny dots of darker blue into the top corners. This adds depth and frames the sky nicely. -
Adding Texture:
If you want a hint of texture like in the reference, you can sprinkle a tiny pinch of salt into the wet blue paint, though this is optional. Otherwise, just let the water create natural blooms. -
The Drying Phase:
Let the background layer dry completely. This is the most important patience test! If you paint the trees too soon, they will bleed into fuzzy blobs. The paper must be bone dry.
Step 3: Creating the Stars
-
Splatter Stars:
Dilute a small amount of white gouache with water until it’s the consistency of heavy cream. Load a brush, hold it over the dry sky, and tap the handle against another brush to splatter tiny white dots. -
Hand-painted Stars:
Using your smallest detail brush or a white gel pen, manually draw larger, specific stars. Add a few cross-shaped ‘twinkling’ stars in the dark upper corners for focus. -
Varying Sizes:
Ensure you have a mix of tiny specks and slightly distinct dots to mimic a real galaxy. Let the white paint dry before moving to the trees.
Metallic Magic
Swap the white gouache stars for metallic silver or gold watercolor. When the light hits your finished painting, the sky will literally shimmer.
Step 4: Silhouetting the Forest
-
Mix the Darkest Tone:
Prepare a very concentrated mix of black gouache or ink mixed with a touch of indigo watercolor. You want an opaque, deep color that won’t look gray when it dries. -
Anchor the Main Tree:
Using a size 4 round brush, paint a vertical line for the trunk of the largest tree on the right side. It should extend up into the purple/blue transition zone. -
Draft the Branches:
Starting from the top of the trunk, use quick, downward-sweeping strokes to create pine branches. Keep the top narrow and widen the tree as you move down. -
Add Texture to Bristles:
Don’t make the branches too solid. Use the tip of the brush to dab jagged edges, simulating pine needles. -
The Background Trees:
Paint smaller, shorter trees to the left. For varied depth, you can dilute your black mix slightly with water for these distant trees, making them look further away. -
Fill the Ground:
Connect the bases of all your trees with uneven, dark strokes to represent the forest floor. Ensure there are no white gaps between the tree bottoms. -
Final Details:
Use your finest brush to add tiny, sharp tops to the trees and fill in any sparse areas in the main silhouette. -
The Reveal:
Wait until everything is absolutely dry. Carefully peel off the masking tape at a 45-degree angle to reveal your crisp white borders.
Frame your new galaxy landscape and enjoy the peaceful vibe it brings to your space


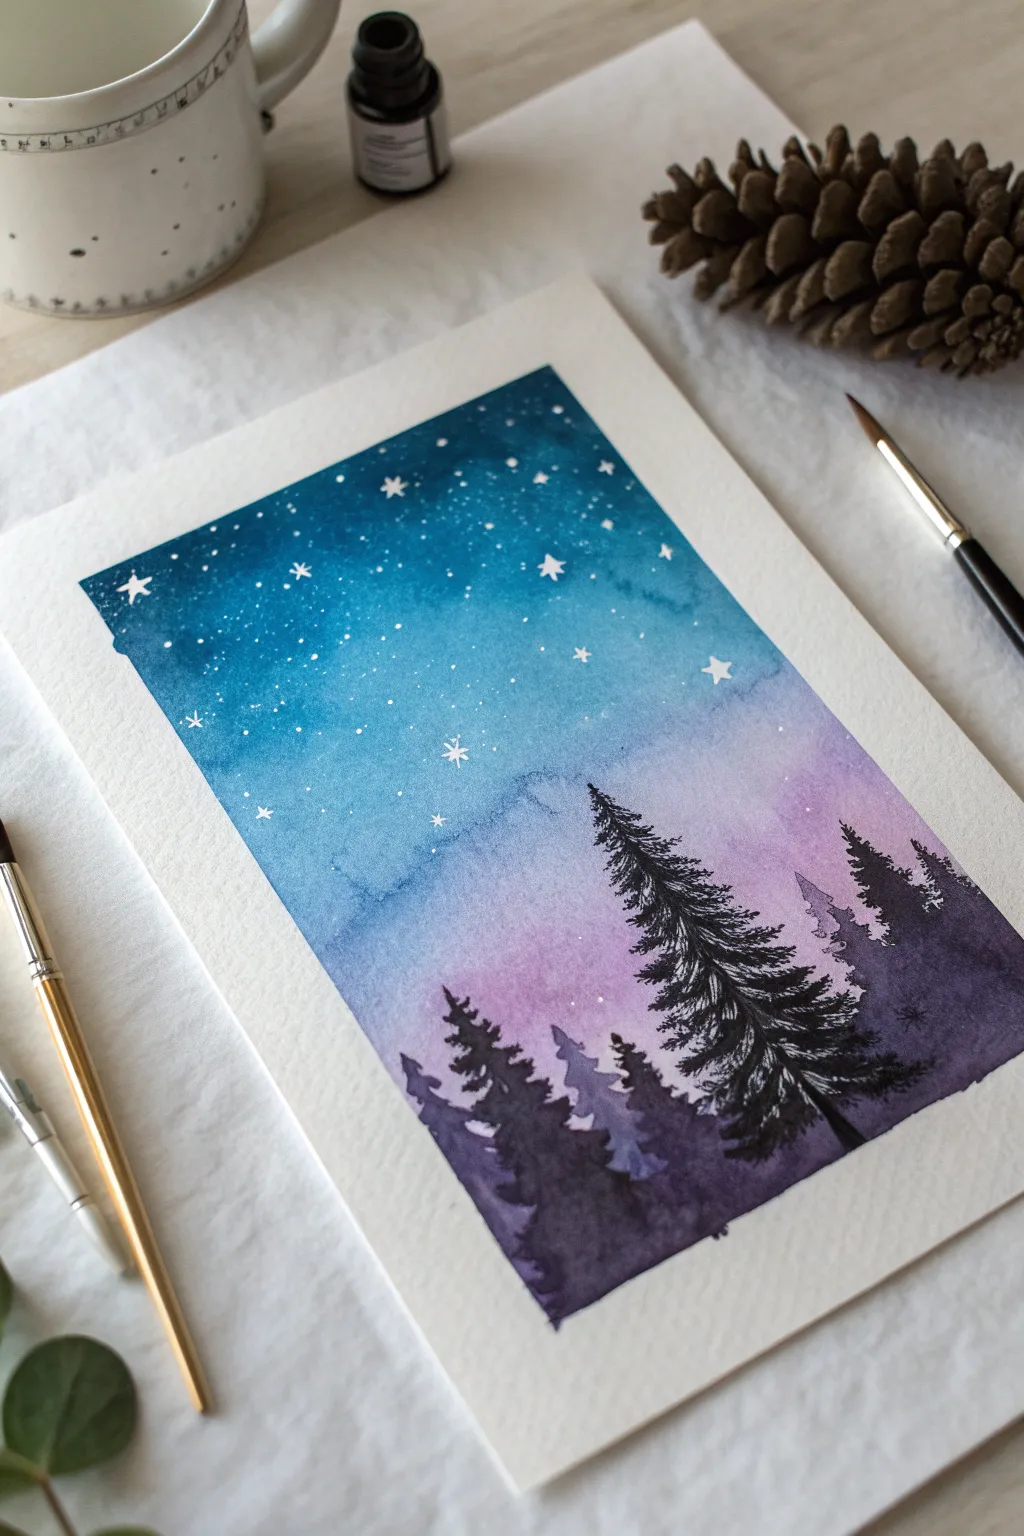
Milky Way Band Over Distant Mountains
Capture the ethereal beauty of a star-filled night overlooking a serene mountain range with this watercolor project. The contrast between the deep indigo sky, glowing galactic core, and stark silhouette of the forest creates a stunning depth that looks professional but is surprisingly achievable.
Step-by-Step Guide
Materials
- Cold press watercolor paper (deckled edge preferred for that rustic look)
- Watercolor paints: Indigo, Prussian Blue, Payne’s Grey, Alizarin Crimson (or a cool violet), Black
- White gouache or opaque white watercolor
- Large wash brush (flat or round)
- Medium round brush (size 6 or 8)
- Small detail brush (size 0 or 1)
- Masking tape (low tack)
- Clean water jars
- Paper towels
- Old toothbrush (optional for stars)
Step 1: Setting the Sky
-
Prepare your paper:
Tape down your watercolor paper to a board. If using paper with deckled edges like the example, tape carefully just inside the edge or use gummed tape around the perimeter to keep it flat without covering the texture. -
Wet-on-wet base:
Using your large wash brush, wet the entire sky area with clean water. Stop roughly 1/3 of the way up from the bottom where the mountains will be. The paper should be glistening but not forming puddles. -
Establish the milky way path:
Leave a diagonal channel roughly through the middle of the sky unpainted or very lightly tinted. This negative space will become the glowing core of the galaxy. -
Deepen the cosmos:
Load your brush with Indigo and Prussian Blue. Start dropping intense color into the upper corners and edges of the sky, letting it bleed toward the center channel but not fully covering it. -
Add warmth to the horizon:
Near the bottom of your sky wash (where the mountains will go), drop in a very faint, watered-down touch of Alizarin Crimson or violet. This mimics the faint atmospheric glow near the horizon. -
Darken the void:
While the paper is still damp, mix Indigo with a touch of Black or Payne’s Grey. Dab this darkest mixture into the upper corners to create deep space contrast against the lighter Milky Way band.
Step 2: Creating the Galaxy
-
Lift and soften:
Clean and dry your brush slightly. Gently lift some pigment along the edges of your central Milky Way channel to create a soft, cloud-like transition between the dark sky and the glowing center. -
Let it dry completely:
This is crucial. The paper must be bone dry before the next step, or your stars will blur. I often use a hairdryer on a low setting here to speed things up. -
Splatter the stars:
Dilute a small amount of white gouache with water until it’s a creamy consistency. Load an old toothbrush or a stiff brush and run your thumb across the bristles to flick tiny specks across the dark sky areas. -
Add major stars:
Using your smallest detail brush and pure white gouache, manually dot a few larger, brighter stars in the dark blue areas to create variation in star magnitude.
Starry Sky Pro Tip
Cover the bottom third of your painting with a scrap piece of paper while splattering stars. This prevents white dots from landing where your dark mountains and trees will eventually be painted.
Step 3: Layering the Landscape
-
First mountain range:
Mix a watery wash of Indigo and Payne’s Grey. Paint the furthest mountain range—a simple, uneven silhouette that overlaps slightly with your sky wash. Keep the bottom edge uneven. -
Dry the first layer:
Allow this first mountain layer to dry completely so the next layer doesn’t bleed into it. -
Second mountain range:
Create a slightly more saturated mix of the same blue-grey color. Paint a second mountain range below the first one, letting the top ridge overlap the previous layer. This establishes atmospheric perspective. -
Third mountain layer:
Repeat the process for a third layer if you have space, making the mix darker and more concentrated than the previous one. Let all mountain layers dry.
Level Up: Color Shift
Add a tiny drop of teal or turquoise into the transition zone between the dark sky and the milky way band to give the galaxy an electrical, vibrant glow.
Step 4: Foreground Details
-
Darkest silhouette:
Mix a strong, thick batch of Black with a little Indigo. Using your medium round brush, paint the undulating ground of the immediate foreground at the very bottom of the paper. -
Painting pine trees:
Switch to your smallest brush or use the fine tip of the round brush. Pull a thin vertical line up from the black foreground to form a tree trunk. -
Adding texture to trees:
Using a stippling or dabbing motion, add branches to the trunk. Start very narrow at the top and widen the branches as you move down, creating that classic triangular pine shape. -
Vary brightness and height:
Create a cluster of trees on the left side, varying their heights significantly. Add a few smaller trees on the right to balance the composition, keeping the silhouettes crisp and opaque.
Once the final tree silhouette is dry, peel off your tape to reveal a crisp window into a breathtaking night scene


Big Full Moon With Soft Night Clouds
Capture the serene beauty of a crisp night with this watercolor project, featuring a glowing, oversized full moon resting above a dark forest line. The delicate interplay of indigo washes creates soft, cloudy textures that make the sky feel vast and deep.
Step-by-Step Tutorial
Materials
- Cold press watercolor paper (300 gsm)
- Painter’s tape or masking tape
- Drawing compass or circle template
- Masking fluid (drawing gum) & old brush
- Watercolor paints: Indigo, Phthalo Blue, Prussian Blue, Paynes Gray
- White opacity paint (gouache or acrylic)
- Round watercolor brushes (size 8 and size 2)
- Clean water and paper towels
- Salt (optional for texture)
Step 1: Preparation and Masking
-
Secure the paper:
Tape your watercolor paper down to a board on all four sides. This creates that crisp white border seen in the final piece and prevents the paper from buckling under heavy washes. -
Outline the moon:
Using a compass or a circular object like a bowl, lightly trace a large circle in the upper center of your paper. Keep the pencil line very faint so it doesn’t show through later. -
Apply masking fluid:
Carefully fill in the entire moon circle with masking fluid using an old brush or a silicon applicator. This protects the white paper so we can paint the dark sky freely without worrying about the edges. -
Let it cure:
Allow the masking fluid to dry completely. It should feel transparent and tacky but not wet. Patience is key here; painting too soon will ruin the seal.
Wet-on-Wet Control
If your sky dries too fast while painting, use a spray bottle to lightly mist the paper. This keeps the edges of your clouds soft and workable for longer.
Step 2: Painting the Night Sky
-
Wet the sky area:
With a large clean brush, apply clear water to the entire sky area around the masked moon, stopping about a third of the way down the paper where the trees will eventually be. -
Start with lighter blues:
Drop in a watery mix of Phthalo Blue and Indigo near the moon. Let the paint bloom into the wet paper to create soft, cloudy transitions. -
Deepen the corners:
While the paper is still impressive wet, load your brush with concentrated Indigo and Prussian Blue. Apply this to the top corners and edges to create a vignette effect, drawing the eye toward the center. -
Add cloud texture:
Use a crumpled tissue to gently lift out a few areas of pigment below and around the moon. This creates the illusion of soft, translucent clouds drifting in front of the moonlight. -
Creating the splatter stars:
While the sky is damp but not soaking, load a small brush with clean water and tap it against a stick over the painting. The water droplets will push the pigment away, creating soft, distant star-like blooms. -
Wait for the sky to dry:
Let the sky layer dry completely. The paper should be flat and warm to the touch before you proceed to the next step.
Make it Glow
After the moon is dry, lightly glaze a ring of very pale yellow or diluted wash around the moon’s outer edge to give it a subtle atmospheric halo.
Step 3: The Moon Detail
-
Reveal the moon:
Gently rub away the masking fluid with your finger or a rubber cement pickup tool to reveal the stark white circle. -
Paint the craters:
Mix a very watery, pale grey-blue using a tiny touch of Paynes Gray and plenty of water. Paint organic, blotchy shapes inside the moon to represent the maria (craters), keeping the edges soft. -
Soften the edges:
I like to take a clean, slightly damp brush and run it along the inner edge of some crater shapes to soften them, ensuring the moon looks spherical and not like a flat sticker.
Step 4: Adding the Forest & Stars
-
Paint the tree line base:
Mix a thick, dark concentration of Paynes Gray and Indigo. Paint a solid, uneven horizon line across the bottom third of the paper, varying the height to suggest rolling hills. -
Detail the pine trees:
Switch to your smallest brush (size 2). Pull vertical lines up from the dark base for the tree trunks. Use a stippling or dabbing motion to add branches, starting narrow at the top and getting wider toward the base. -
Create the hero tree:
Paint one large, tall pine tree on the right side that overlaps the sky and reaches up toward the moon. Make this one more detailed, with distinct branches and a slightly crooked trunk for character. -
Add bright stars:
Once the sky is bone dry, mix white gouache with a little water until it’s a creamy consistency. Dip a toothbrush or stiff brush in it and flick it over the sky to create sharp, bright stars. -
Highlight specific stars:
Use the tip of your smallest brush and the white gouache to manually dot a few larger stars in empty spaces to balance the composition. -
Peel the tape:
Wait for everything to be 100% dry, then peel the tape away slowly at a 45-degree angle to reveal your clean edges.
Frame your moody nightscape to enjoy that peaceful moonlight instantly.


Crescent Moon With Minimal Stars
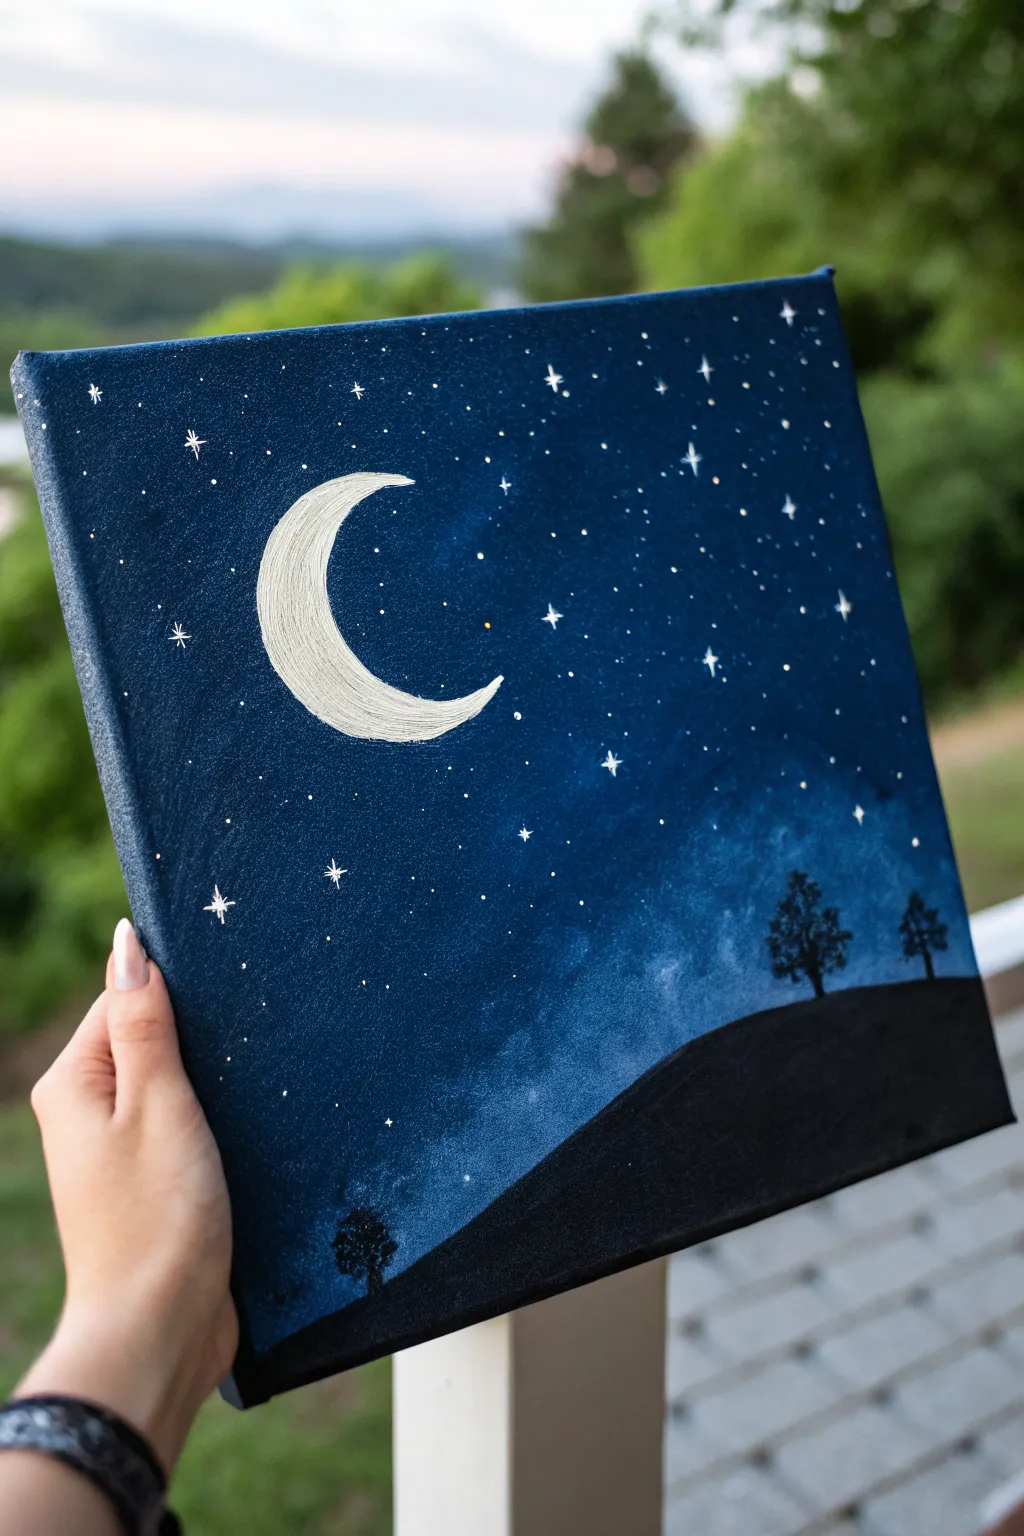
Capture the quiet magic of a crisp evening with this striking crescent moon painting. This piece focuses on high contrast and simple shapes, using deep blues and stark blacks to create a peaceful, dreamy atmosphere perfect for any wall.
Step-by-Step
Materials
- Square stretched canvas (approx. 10×10 or 12×12 inches)
- Acrylic paints: Phthalo Blue (or Navy), Black, Titanium White
- Flat brush (1 inch) for background
- Small round detail brush (size 0 or 1)
- Pencil or chalk for sketching
- Palette for mixing
- Cup of water and paper towels
Step 1: Setting the Scene
-
Prepare the blue base:
Start by squeezing out a generous amount of dark blue paint. If your blue is too bright, mix in a tiny touch of black to deepen it into a navy shade, but keep it distinctly blue rather than black. -
Paint the background:
Using your large flat brush, cover the entire canvas with your dark blue mixture. Use smooth, horizontal strokes to ensure even coverage. Don’t forget to paint the sides of the canvas for a finished look. -
Add subtle depth:
While the blue is still slightly wet, mix a tiny bit of white into your blue on the palette to create a lighter shade. Gently blend this into the lower right quadrant in a soft, cloud-like motion to create a faint milky way effect or atmospheric glow. -
Let it dry completely:
Wait for the background layer to be fully dry to the touch. This is crucial so your white moon and stars don’t turn muddy blue.
Fixing Wobbly Lines
If your moon curve is shaky, wait for the white to dry. Then, take your dark blue background color on a tiny brush and carefully ‘cut back’ into the shape to smooth the edge.
Step 2: Painting the Moon
-
Sketch the outline:
Lightly sketch a large ‘C’ shape for your crescent moon using a pencil or a piece of chalk. Place it slightly off-center in the upper left area. Chalk is great because it wipes away easily if you need to adjust. -
Fill in the moon base:
Load your small round brush with pure Titanium White. painting inside your sketched lines. You might need two coats to get a solid, opaque white against the dark background. -
Add texture:
Instead of smoothing the paint perfectly, I like to use slightly thicker paint and curved brushstrokes that follow the shape of the moon. This adds a subtle crater-like texture that catches the light.
Step 3: Creating the Landscape
-
Outline the hill:
Using black paint and a medium brush, draw a sloping hill line starting low on the left and rising towards the right side of the canvas. It should cover the bottom third roughly. -
Fill the silhouette:
Fill in everything below this line with solid black paint. Ensure it is very opaque; you shouldn’t see any blue peeking through. -
Add tiny trees:
Switch to your smallest detail brush. On top of the black hill, paint two or three very small simple tree shapes. A thin vertical line for the trunk, and small dabbing motions to create the leafy canopy. -
Ground the trees:
Ensure the trunks connect seamlessly into the black hill so they look like they are growing out of it, not floating above it.
Add Some Sparkle
Mix a pinch of fine silver glitter into the white paint for the crescent moon, or apply a clear glitter topcoat over just the moon area once dry for a magical shimmer.
Step 4: Stars and Details
-
Dot the stars:
Dip the tip of your smallest brush (or a toothpick) into white paint. Gently touch the canvas to create random scattered dots for distant stars. Vary the pressure to get different sizes. -
Create twinkling stars:
Select a few spots to painting larger ‘twinkle’ stars. Paint a small cross or distinct plus sign (+), then add a tiny ‘X’ over the center to make an eight-pointed star effect, or stick to a simple four-point diamond shape. -
Refine the moon:
If the moon’s edges got messy during painting, use a clean damp brush or a bit of the background blue carefully to tidy up the curve. -
Final touches:
Step back and look at the balance. If the sky feels empty in spots, add a few more tiny dots. Ensure the black hill is solid and matte.
Hang your new celestial artwork in a cozy corner to enjoy a peaceful night view anytime
BRUSH GUIDE
The Right Brush for Every Stroke
From clean lines to bold texture — master brush choice, stroke control, and essential techniques.
Explore the Full Guide
Shooting Star Over a Quiet Forest
Capture the serene magic of a starlit night with this deep blue watercolor painting featuring a striking shooting star. The contrast between the indigo sky and the sharp black forest silhouette creates a breathtakingly peaceful scene.
Step-by-Step Guide
Materials
- Cold-press watercolor paper (300gsm with deckled edges preferred)
- Painter’s tape or masking fluid
- Watercolor paints: Indigo, Prussian Blue, and Lamp Black
- White gouache or opaque white ink
- Large wash brush (flat or round)
- Medium round brush (size 6 or 8)
- Small detail brush (size 0 or 1)
- Old toothbrush or stiffness bristle brush
- Ruler
- White gel pen (optional)
- Paper towels
- Two jars of water
Step 1: Setting the Sky
-
Prepare your paper:
Since we are using a heavy wash, tape down your watercolor paper to a board on all four sides. If your paper has beautiful deckled edges you want to preserve, you can tape just the very back edges or skip taping, but be prepared for some buckling. -
Wet-on-wet technique:
Using your large wash brush, apply a clean layer of water across the upper three-quarters of the paper, stopping where you want the treeline to begin. The paper should glisten but not have puddles. -
Apply the first wash:
Load your brush with a diluted Prussian Blue. Start at the very top and paint downwards. The color should be darkest at the top and gradually fade as you reach the horizon line just above where the trees will be. -
Deepen the cosmos:
While the paper is still damp, mix Indigo with a touch of Black to get a very deep midnight blue. Drop this concentrated color into the top corners and the upper third of the sky. -
Create the atmospheric glow:
Clean your brush and slightly dampen it. Gently lift some color from the center-right area to create a lighter, milky way-like haze. I find softly dabbing with a crumpled paper towel also works effectively here. -
Let the sky dry:
Allow this first layer to dry completely. This is crucial—if the paper is cool to the touch, it’s still damp. Wait until it’s room temperature.
Starry Splatter Control
cover the bottom area where your trees will go with a scrap piece of paper before splattering stars. This keeps your future forest silhouette pure black.
Step 2: Stars and Details
-
Mix your starlight:
Prepare a mixture of white gouache or opaque white ink with a tiny drop of water. It should have the consistency of heavy cream. -
Splatter the stars:
Dip an old toothbrush or a stiff brush into the white mixture. Hold it over the painting and run your thumb across the bristles to spray fine speckles across the blue sky. -
Refine the constellation:
Use your smallest detail brush or a white gel pen to add a few larger, manual dots for prominent stars. Group a few near the center to suggest a constellation. -
Paint the shooting star:
With a ruler and your white gel pen or fine brush with gouache, draw a swift, straight diagonal line starting from the upper left quadrant towards the center. -
Add the streaking tail:
Make the head of the shooting star slightly thicker and brighter. Feather the tail out slightly so it looks like it’s fading into the atmosphere.
Level Up: Metallic Magic
Swap the white gouache for silver metallic watercolor paint for the shooting star to give the artwork a subtle, magical shimmer when viewed at an angle.
Step 3: The Silent Forest
-
Mix the forest color:
Create a rich, opaque black. You can use straight Lamp Black watercolor, but mixing it with a little Indigo creates a more harmonious, deep shadow color. -
Outline the treeline:
Using your medium round brush, paint an uneven, jagged line across the bottom quarter of the paper where your sky wash faded out. -
Paint the large trees:
On the right side, paint the tallest pine first. Use the tip of the brush to tap in branches, starting narrow at the top and getting wider and heavier near the bottom. -
Vary the heights:
Move across to the left, adding trees of varying heights. Don’t make them uniform; nature is random. Let some overlap. -
Texture the canopy:
For the tree branches, use a stippling or dabbing motion. Don’t paint individual needles; instead, paint the mass of the foliage shapes. -
Fill the silhouette:
Once the tops of the trees are defined, fill in the entire bottom area with solid black to ground the painting.
Peel off your tape to reveal crisp edges and admire your own slice of the infinite night sky
Aurora Glow Behind Tall Pines
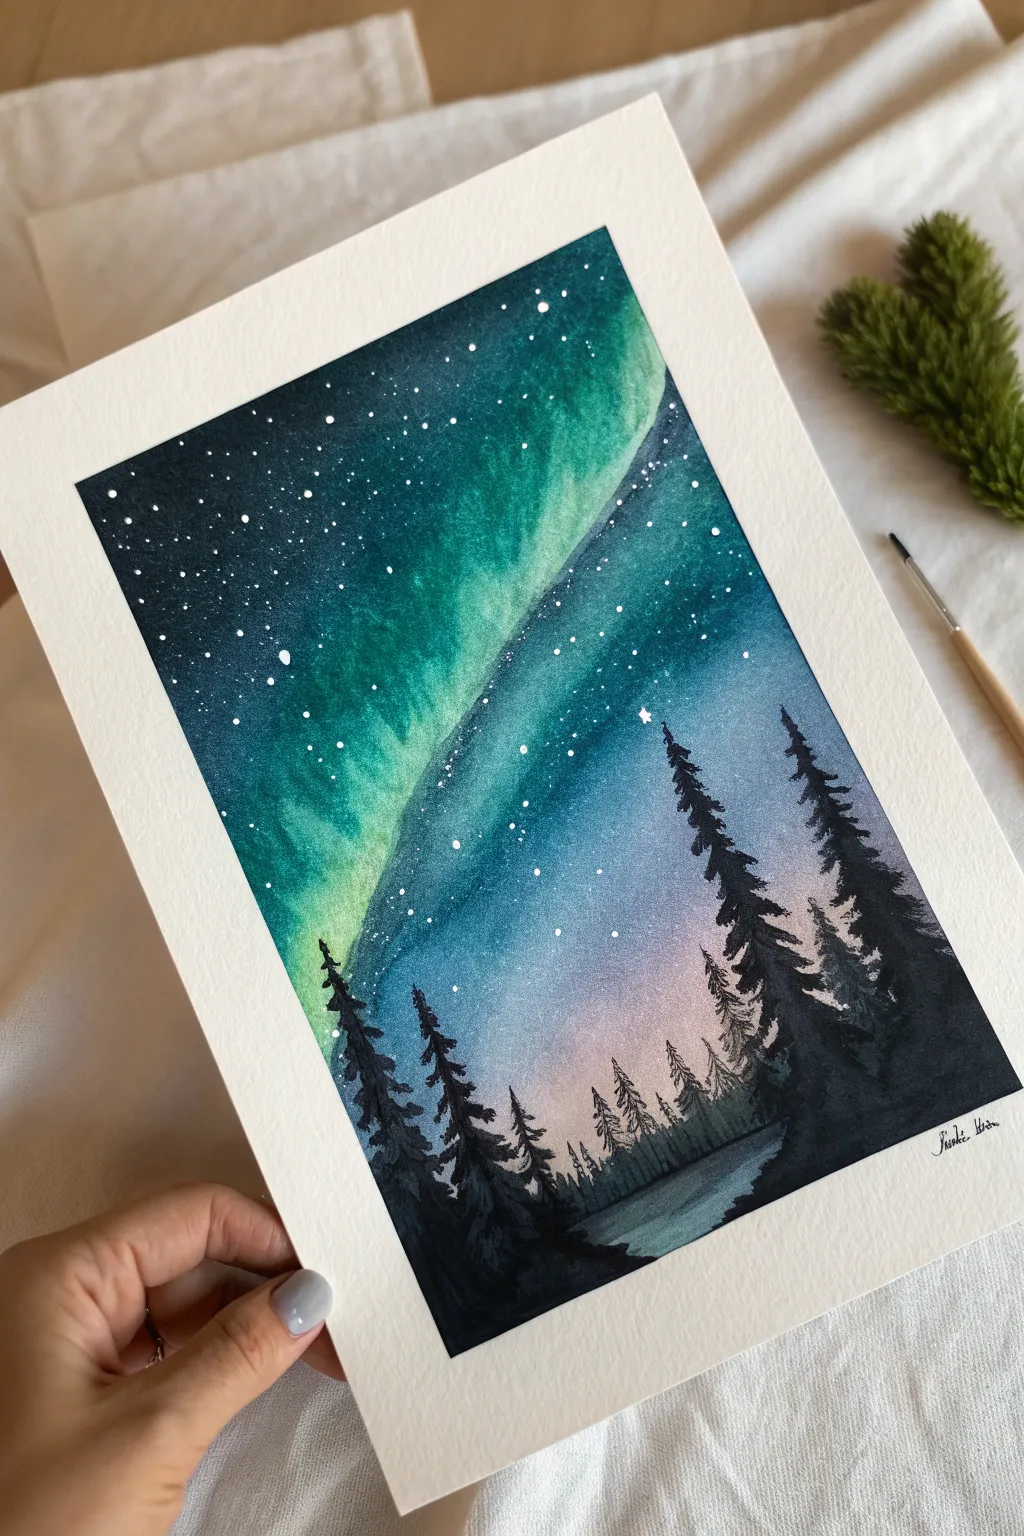
Capture the magic of the aurora borealis with this vibrant watercolor tutorial featuring luminous green skies and silhouetted pines. By layering deep teals against soft pink glows, you will create a stunning atmospheric landscape that looks far more complex than it actually is.
Step-by-Step
Materials
- Cold press watercolor paper (300 gsm or heavier)
- Watercolor paints: Phthalo Green, Prussian Blue, Indigo, Opera Pink (or bright magenta), Payne’s Gray, Lamp Black
- White gouache or white acrylic ink
- Painter’s tape or masking tape
- Large flat wash brush
- Medium round brush (size 6 or 8)
- Small detail brush (size 0 or 1)
- Clean water jars (2)
- Paper towels
- Old toothbrush (optional for stars)
Step 1: Setting the Sky
-
Tape edges:
Secure your watercolor paper to a board or table using painter’s tape on all four sides. This creates that crisp white border seen in the photo and prevents buckling when the paper gets wet. -
Wet the paper:
Using your large flat brush, apply clean water to the upper two-thirds of the paper. We seek a glossy sheen, not puddles, to prepare for a wet-on-wet technique. -
Apply the glow:
Starting just below the middle of the paper, where the horizon meets the sky, drop in a very watery wash of Opera Pink. Let it diffuse upwards softly; this forms the base light behind the trees. -
Paint the aurora band:
While the paper is still damp, mix Phthalo Green with a touch of Prussian Blue. Paint a broad, sweeping diagonal band across the sky, leaving softer edges near the pink area. -
Deepen the cosmos:
Mix a dark, rich color using Indigo and Phthalo Green. Paint the upper left corner and the area just above the main aurora band. Let the dark paint bleed slightly into the lighter green, but keep the transition natural. -
Intensify contrasts:
Add nearly pure Indigo or Payne’s Gray to the very top corners while wet. This intense darkness makes the green aurora pop. If the paper starts drying, stop adding paint to avoid ‘cauliflower’ blooms. -
Dry completely:
Let this layer dry 100%. You can use a hairdryer on a low setting, but be patient—the paper must be bone dry before the next step.
Step 2: Stars & Foreground
-
Splatter stars:
Dilute a small amount of white gouache or ink with water. Load a brush (or an old toothbrush) and tap it over the sky area to create a field of stars. Focus the density on the darker upper corners. -
Add larger stars:
Use your smallest detail brush and pure white gouache to manually dot a few larger, brighter stars in key spots to create variety in the constellation. -
Paint distant trees:
Mix a watery grey-blue using Payne’s Gray and plenty of water. Paint small, faint tree shapes along the horizon line. These should look misty and far away. -
Define the lake:
Below the horizon line, paint horizontal strokes using a dilute mix of the sky colors—green and blue. Leave some white gaps to suggest reflections on ice or water. -
Start the main trees:
Mix a thick, creamy consistency of Lamp Black and Payne’s Gray. Using your medium round brush, draw a vertical line for the trunk of the tallest tree on the right side. -
Build tree branches:
Use the tip of the brush to dab irregular, downward-sloping branches extending from the trunk. Keep the top narrow and widen the tree as you move down. -
Balance the composition:
Paint a similar, slightly smaller dark tree on the left side. I find that varying the heights makes the forest feel more organic and less regimented. -
Fill the mid-ground:
Add medium-sized trees between the foreground giants using a slightly lighter mix of black (add a drop of water). This creates a sense of depth between the closest trees and the distant horizon. -
Ground the scene:
Use the black mix to fill in the bottom edge of the paper completely, connecting the tree bases into a solid dark silhouette representing the shoreline. -
Reveal:
Once the painting is completely dry to the touch, carefully peel away the painter’s tape at a 45-degree angle to reveal your clean, crisp edges.
Pro Tip: Lifting Color
If your sky gets too dark, clean your brush, dampen it slightly with clean water, and gently ‘lift’ paint away in a sweeping motion to bring back the aurora’s light.
Level Up: Reflection Magic
Mirror the exact shape of your aurora band in the ‘lake’ section at the bottom using wet-on-wet technique before painting the dark ground for a realistic water reflection.
Frame your masterpiece in a simple white mat to let those vibrant colors truly shine

PENCIL GUIDE
Understanding Pencil Grades from H to B
From first sketch to finished drawing — learn pencil grades, line control, and shading techniques.
Explore the Full Guide
Galaxy Swirl With Spongey Texture
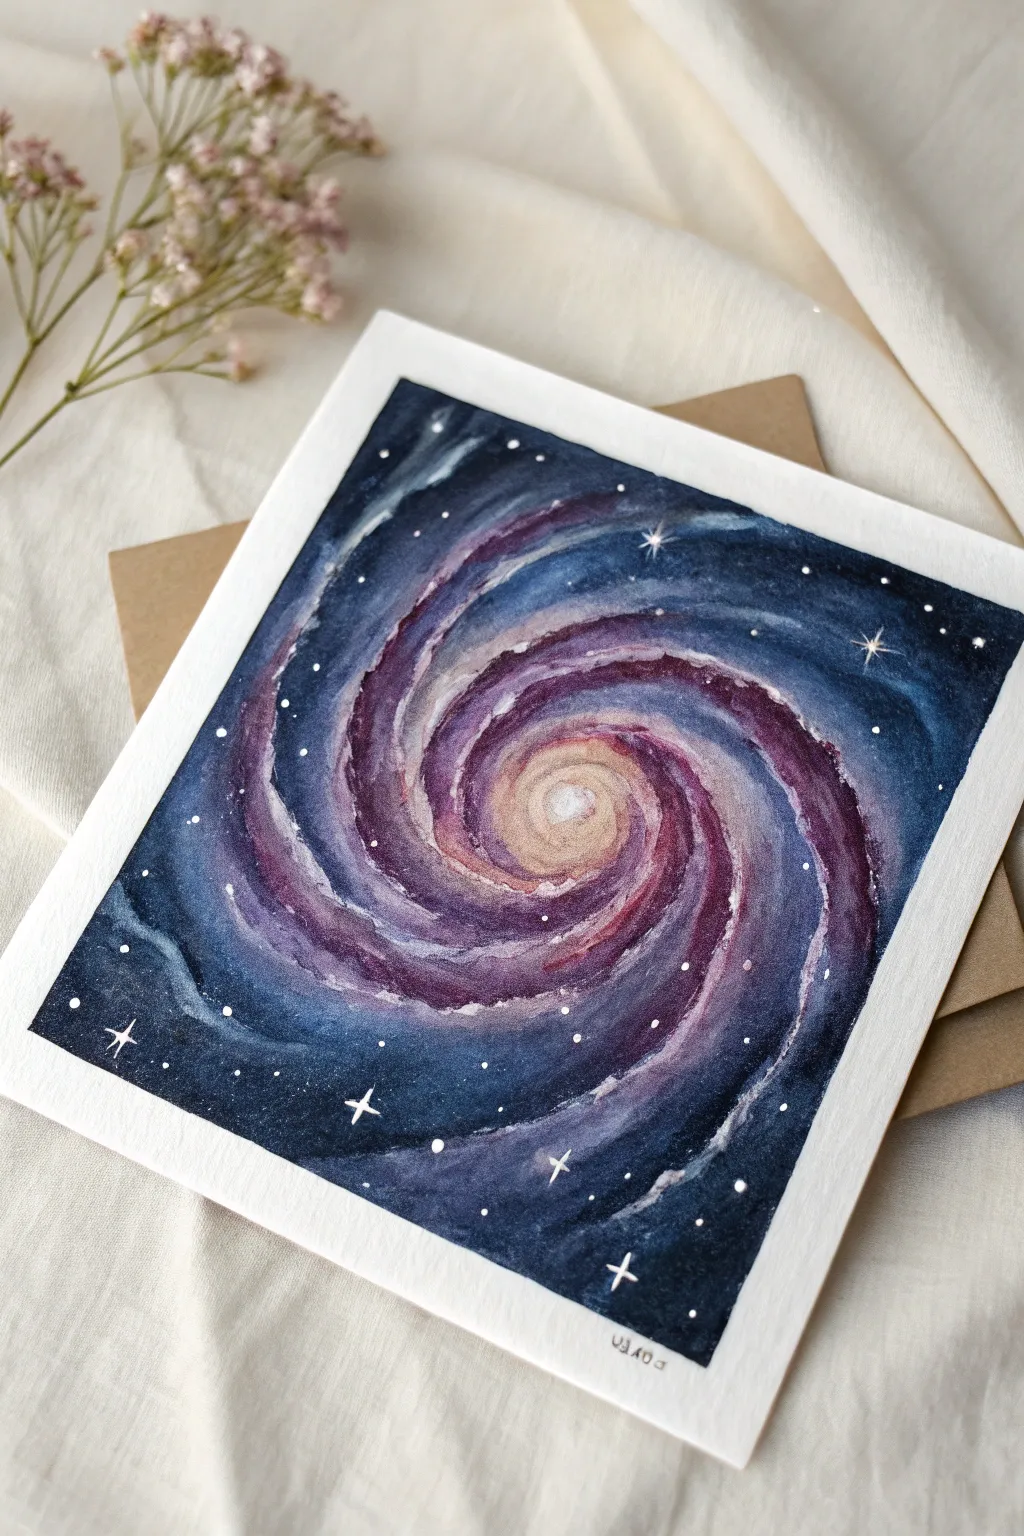
Capture the awe-inspiring movement of the cosmos with this vibrant watercolor galaxy painting. This project focuses on swirling layers of deep indigo and rich violet to create a mesmerizing spiral composition.
Detailed Instructions
Materials
- Cold press watercolor paper (square format, at least 300gsm)
- Watercolor paints (Indigo, Dioxazine Purple, Alizarin Crimson, Yellow Ochre, Cobalt Blue)
- Small natural sponge or sea sponge
- Round brushes (size 4, size 8)
- Small liner brush (size 0 or 00)
- White gouache or white gel pen
- Masking tape
- Paper towels
- Two jars of water
Step 1: Setting the Stage
-
Preparation:
Tape your square watercolor paper down securely to a board or table on all four sides. This prevents buckling when the paper gets wet and creates that crisp white border seen in the final piece. -
Establish the Core:
Begin by lightly wetting the very center of your paper with clean water. Load your size 8 brush with a very watered-down Yellow Ochre or a creamy mix and dab it into the wet center, letting it diffuse softly outward.
Muddy colors?
If your violet and yellow are turning brown where they meet, ensure the first layer is 100% dry before glazing over it, or leave a tiny gap between complementary colors.
Step 2: Building the Spiral
-
First Swirl Layer:
While the center is damp but not soaking, mix a diluted Alizarin Crimson. Starting near the yellow core (but leaving a gap), paint loose, curved strokes that spiral outward. -
Adding Violet Tones:
Introduce Dioxazine Purple to your spiral arms. Paint alongside your pink strokes, allowing the colors to touch and bleed slightly where they meet, but keep the spiral shape defined. -
Deepening the Cosmos:
Switch to Indigo or Paynes Gray. Paint these darker colors on the outer edges of the spiral arms and into the negative spaces between the arms. -
Creating Texture:
This is where the sponge comes in. Dampen your small sponge and squeeze it out thoroughly. Dip it into slightly thicker purple or indigo paint and gently dab along the edges of your spiral arms to create a granular, cloudy nebula effect. -
Mid-process Drying:
Let this first major layer dry completely. If you work over it while wet, you’ll lose the distinct spiral separation and just get a muddy blob.
Sponge Technique
Don’t urge the sponge; dab lightly! Rotate the sponge in your hand between dabs so you don’t repeat the exact same texture pattern over and over.
Step 3: Intensifying the Galaxy
-
Second Layer Saturation:
Once dry, re-wet specific spiral arms with clean water. Drop highly saturated Indigo and Dioxazine Purple into these wet areas to create deep, intense contrast against the lighter first layer. -
Defining Edges:
Use the size 4 brush to sharpen the edges of the spiral arms. You want a mix of hard edges (where the arm is defined) and soft edges (where the gas clouds dissipate). -
Outer Darkness:
Fill the four corners of the paper with your darkest Indigo mix. This acts as a frame and pushes the glowing center forward visually. -
Lifting Highlights:
If any area looks too heavy, take a clean, slightly damp brush and lift paint away from the inner curves of the spiral to suggest highlight ridges on the celestial clouds. -
Blending Transitions:
Smooth out any harsh lines between the deep blue corners and the purple spiral arms. Use a damp brush to gently pull the dark color into the spiral shape.
Step 4: Starlight Details
-
Star Splatter:
Cover the darker outer areas with a loose sheet of paper to protect them slightly. Load a toothbrush or stiff brush with watered-down white gouache and flick the bristles to create a spray of tiny distant stars over the purple spirals. -
Major Stars:
Using your smallest liner brush and thick white gouache (or a white gel pen), dot distinct individual stars in the dark blue corner regions. -
The Cross Flair:
Choose 3-5 larger stars to turn into ‘twinkles.’ Paint a small cross shape (+) over the dot, dragging the lines out very thinly to taper them off. -
Final Adjustments:
Step back and look at the composition. If the center feels too dim, you can carefully re-layer a tiny bit of opaque white or pale yellow mix right in the middle core. -
The Reveal:
Wait until the paper is bone dry—cool to the touch. Gently peel away the masking tape at a 45-degree angle to reveal your clean white border.
Frame your cosmic creation or gift it to a space-loving friend to brighten their wall
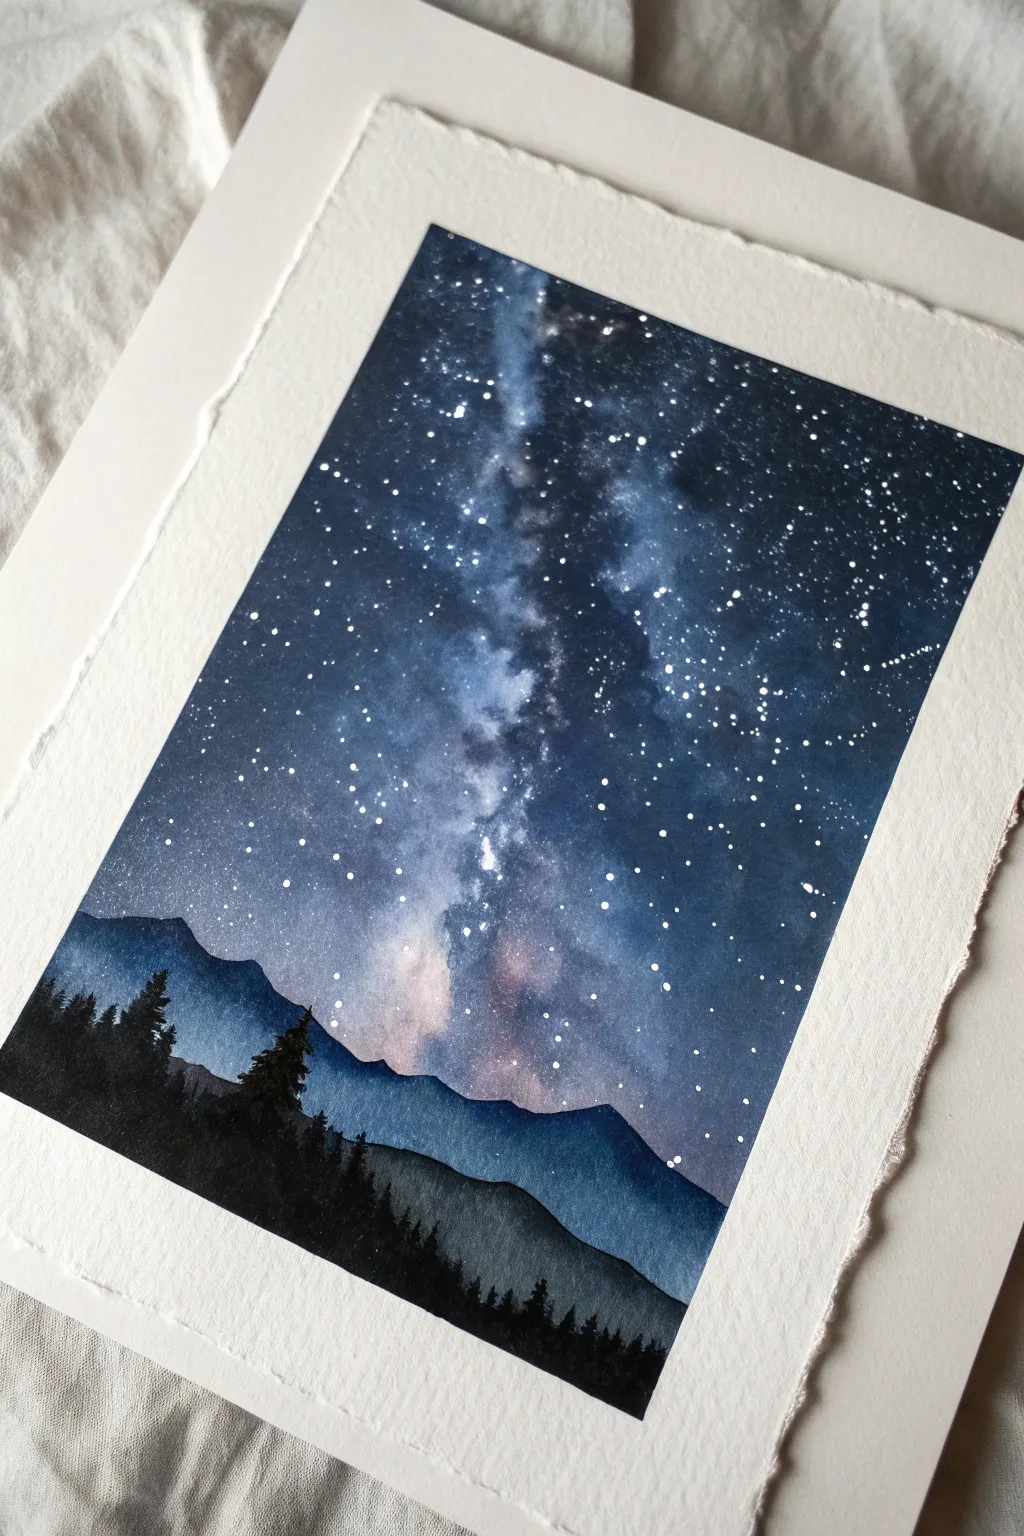
Night Sky Reflected in a Calm Lake
Capture the breathtaking duality of a star-filled galaxy and its mirror image upon a quiet lake. This acrylic painting project balances deep, cosmic teals and golds with the grounding silhouette of a forest shoreline.
Step-by-Step Guide
Materials
- Stretched canvas (16×20 or 18×24 inches)
- Acrylic paints: Mars Black, Titanium White, Phthalo Blue, Dioxazine Purple, Burnt Umber, Cadmium Yellow, Teal
- Large flat brush (1-2 inch) for blending
- Medium filbert brush for clouds
- Small round brush for details
- Old toothbrush or splatter brush
- Cup of water and paper towels
- Palette knife
- Masking tape or painter’s tape
Step 1: Setting the Scene
-
Divide the Canvas:
Apply a strip of masking tape horizontally across the canvas, positioning it slightly below the vertical center. This will create a sharp, distinct horizon line between your sky and the water reflection. -
Prime the Night Sky:
Using your large flat brush, coat the entire upper section (above the tape) with a thin layer of Mars Black mixed with a tiny drop of Phthalo Blue. This dark base will make your stars pop later. -
Prime the Water:
Paint the area below the tape with the same dark mixture, but use horizontal strokes exclusively. Keep these strokes smooth to mimic the calmness of standing water.
Muddied Colors?
If your galaxy colors turn gray or muddy, wait for the black background to fully dry before applying the teals and purples. Wet-on-wet with black can dull vibrancy quickly.
Step 2: Creating the Galaxy
-
Establish the Milky Way Shape:
Load a medium filbert brush with Teal and Phthalo Blue. In the upper section, paint a diagonal band stretching from the top left corner down toward the center right. Use a dabbing, circular motion to create soft, cloud-like textures. -
Add Depth with Purple:
While the blue layer is still tacky, blend in small amounts of Dioxazine Purple along the outer edges of your teal band. This transitions the bright galaxy core into the black background seamlessly. -
Highlight the Core:
Mix Titanium White with a touch of Cadmium Yellow. Apply this to the very center of your galaxy band using a dry brush technique. Dab gently to build up brightness without completely covering the teal underneath. -
Soften the Edges:
Take a clean, dry flat brush and very lightly sweep over the galaxy clouds to blur harsh lines. I like to do this while the paint is still slightly wet for a misty effect. -
Create the Stars:
Dilute white paint with water until it’s inky. Dip an old toothbrush into it and flick the bristles with your thumb to spray tiny stars across the black areas of the sky, concentrating more density near the galaxy band.
Glow Up
Mix a tiny amount of iridescent medium or glow-in-the-dark pigment into your white paint for the stars. The painting will subtly shimmer in low light.
Step 3: The Reflection
-
Remove the Tape:
Carefully peel off the masking tape to reveal your crisp horizon line. Ensure the sky is dry before proceeding to avoid smudging. -
Mirror the Galaxy Colours:
Using the same teal, purple, and white mixtures, paint a reflection in the water area immediately below where the galaxy hits the horizon. Remember to pull your brush strokes strictly horizontally back and forth. -
Distort the Reflection:
While the reflection paint is wet, cut through it with thin lines of the dark background color using the edge of a flat brush. This creates the illusion of ripples breaking up the light on the water’s surface. -
Add Water Glimmer:
Add a few sharp, stronger horizontal streaks of white mixed with yellow in the center of the reflection to show where the light is brightest on the water.
Step 4: Foreground details
-
Paint the Forest Line:
Mix Mars Black with a little Burnt Umber. Using a small round brush or the edge of a flat brush, dab in a tree line right on top of the horizon. Vary the heights to suggest pine trees, keeping the tops pointy and uneven. -
Detail the Shoreline:
On the bottom left corner, paint a curved, rocky shoreline using black. Use a palette knife to scrape a little grey (black mixed with white) onto the top edges of the ‘rocks’ to give them texture and dimension. -
Final Adjustments:
Step back and look at the balance. If the water looks too bright, glaze it with a very watered-down black wash to push it visually behind the foreground rocks. -
Brighten Main Stars:
Use your smallest round brush to manually dot in a few larger, brighter stars in the sky. Placing one or two near the horizon adds a nice sense of scale.
Enjoy the peaceful atmosphere your new cosmic landscape brings to the room


Moonlight Path Across the Water
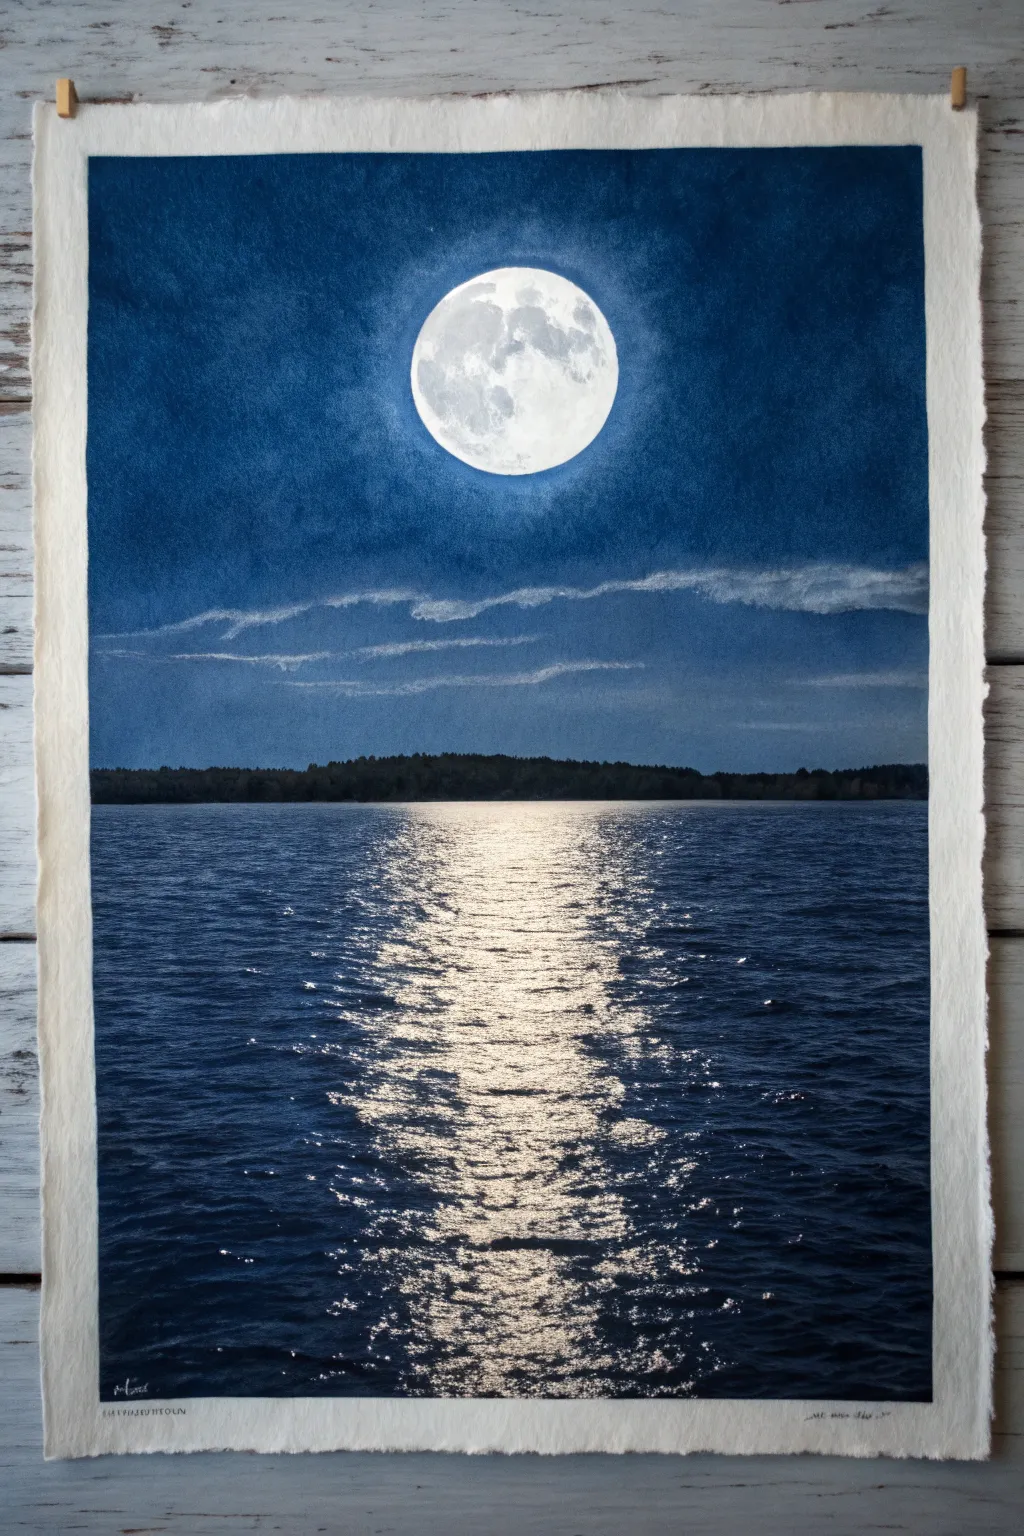
Capture the serene beauty of a full moon reflecting over calm waters with this monochromatic masterpiece. The contrast between the brilliant white moon and the deep indigo surroundings creates a striking depth that draws the viewer in immediately.
Step-by-Step
Materials
- High-quality watercolor paper (cold press, rough texture is ideal)
- Masking tape or gummed tape
- Drawing board
- Watercolor paints: Indigo, Prussian Blue, Phthalo Blue
- Gouache or opaque white ink (essential for the moon and reflection)
- Round brushes (sizes 4, 8, and 12)
- Fine detail brush (size 0 or 00)
- Sea sponge or crumpled paper towel
- Circular stencil or masking fluid
- Clean water
Step 1: Setting the Scene
-
Paper Preparation:
Begin by taping your paper securely to a board. For this piece, allowing a natural, deckled edge to show is lovely, but taping creates a clean boundary. If you want the look in the image, you might float-mount the finished piece later. -
Masking the Moon:
Determine the position of your moon near the top center. Use masking fluid to paint a perfect circle, or carefuly adhere a circle of masking tape. This preserves the pure white of the paper for the glowing orb. -
Horizon Line:
Lightly sketch a straight horizon line about one-third of the way up from the bottom. Keep this very faint so graphite doesn’t muddy your sky later.
Fixing the Glow
If your moon reflection looks too stiff or ladder-like, dry-brush a very thin glaze of blue over the edges of the white paint to soften the transition into the dark water.
Step 2: The Deep Sky
-
Base Wash:
Mix a generous amount of Phthalo Blue and a touch of Indigo. Wet the sky area with clean water first (wet-on-wet technique), then drop in your blue mix, starting darker at the top corners and getting slightly lighter as you approach the moon. -
Creating Atmosphere:
While the sky is still damp, lift out a few horizontal streaks using a thirsty brush or a crumpled paper towel. This creates the subtle, wispy cloud layer floating beneath the moon. -
Deepening the Night:
Once the first layer is dry, glaze a second darker layer of Indigo over the top third of the painting to create a vignette effect, framing the moon’s position.
Level Up: Deckled Edge
For the authentic look shown here, skip taping the edges. Instead, tear your watercolor paper against a ruler before starting to create that rough, handmade deckled border.
Step 3: The Distant Shore
-
Tree Line Foundation:
Mix a very dark, nearly black shade using Indigo and a touch of burnt umber. Paint the silouhette of the distant forest along your horizon line. -
Adding Texture:
Make the top edge of the trees uneven to mimic pine tops. Ensure the bottom of the tree line is perfectly straight against the water line.
Step 4: The Shimmering Water
-
First Water Layer:
Paint the water area with a medium wash of Prussian Blue. Use horizontal strokes to emphasize the liquid surface. -
Establish the Shadow:
While the blue is wet, darken the left and right edges with Indigo, leaving the center column directly under the moon lighter. -
Defining the Ripples:
Once dry, use a smaller brush with concentrated Indigo to paint thin, rhythmic horizontal lines. These lines represent the troughs of the waves.
Step 5: Illumination Details
-
Reveal the Moon:
Gently rub away the masking fluid or peel off the tape to reveal the crisp white circle. -
Moon Texture:
Mix a very dilute grey wash. Carefully dab faint patches onto the white moon to replicate the craters and maria. Keep the edges soft. -
The Reflection Path:
Switch to your opaque white gouache or ink. Using your finest brush, start painting horizontal slivers of light down the center of the water. -
Building Intensity:
Make the strokes denser and wider directly beneath the moon. As you move toward the bottom of the paper, spread the strokes out slightly and break them up. -
Sparkle Effect:
I like to add tiny dots of pure white gouache interspersed among the horizontal lines to make the water look like it is truly sparkling. -
Final Adjustments:
Assess the contrast. If the water looks flat, deepen the dark blue water between your white highlights to make the reflection pop.
Step back and admire the tranquil atmosphere you’ve captured through contrast and light
Night Sky With a Single Lone Tree

Capture the breathtaking beauty of the cosmos with this vibrant night sky painting, featuring a stunning gradient from warm sunset hues to deep indigo starlight. The stark black silhouette of a lone tree anchors the composition, creating a perfect balance between the vast universe and the earth below.
How-To Guide
Materials
- Heavyweight watercolor paper or mixed media paper (at least 140lb/300gsm)
- Watercolor paints or fluid acrylics
- Specific colors: Indigo, Prussian Blue, Violet, Magenta, Orange, Yellow Ochre
- Black ink or high-pigment black gouache
- White gouache or white ink
- Large flat wash brush
- Medium round brush
- Fine detail liner brush (size 0 or 00)
- Old toothbrush or stiff bristle brush (for splattering)
- Masking tape
- Paper towels
- Water cups
Step 1: Setting the Stage
-
Paper Preparation:
Begin by taping down all four edges of your watercolor paper to a board. Use masking tape to create a clean, crisp white border and to prevent the paper from buckling under heavy washes. -
Pre-wetting:
Using your large flat brush, apply a very light coat of clean water over the entire paper surface. You want it damp and glistening, but not forming puddles. This ‘wet-on-wet’ technique is crucial for smooth blending.
Don’t Overwork The Galaxy
When lifting color for the Milky Way, swipe only once or twice. Too much scrubbing damages paper texture. Let the natural water blooms do the work for you.
Step 2: Painting the Sky Gradient
-
The Sunset Glow:
Start at the very bottom third with your yellow ochre and orange. Using horizontal strokes, lay down the color, letting it fade slightly as you move upward. Keep this layer wet. -
Introducing Pinks:
Before the orange dries, blend a band of magenta or pink right above it. Allow the colors to bleed into each other naturally, creating a soft transition rather than a hard stripe. -
Deepening to Purple:
Moving up to the middle of the paper, introduce your violet shades. I like to blend this down into the pink while the paper is still damp to create that hazy, atmospheric look. -
The Night Sky:
For the top third of the painting, use your deepest Indigo and Prussian Blue. Apply this heavily at the top corners and edges to create a vignette effect, drawing the eye toward the brighter center. -
Creating the Milky Way:
While the blue section is still wet, lift out some pigment diagonally across the sky using a clean, slightly damp brush or a thirsty paper towel. This creates the lighter, cloudy band of the Milky Way galaxy.
Step 3: Adding the Stars
-
Total Drying Time:
Stop! This is the hardest part. Let the background dry completely. Passing a hairdryer over it on a low setting can speed this up, but the paper must be bone dry before the next step. -
Mixing the Stars:
Dilute a small amount of white gouache or white ink with water until it reaches a milky consistency. It needs to be fluid enough to fly off a brush but opaque enough to show up against the dark blue. -
Splatter Technique:
Load an old toothbrush or stiff brush with the white mixture. Aiming at the dark blue section, run your thumb across the bristles to flick tiny specks onto the paper. Concentrate the density in the Milky Way band you lifted out earlier. -
Hand-painting Highlights:
Use your finest liner brush to manually dot a few larger, brighter stars in the dark corners. If you accidentally made a blob while splattering, you can turn it into a larger star now.
Signature Touch
Write a tiny signature with a fine pencil in the white border margin for a professional gallery look, rather than signing directly on the paint.
Step 4: The Silhouette Landscape
-
Painting the Hills:
Once the sky is dry again, load a round brush with solid black ink or black gouache. Paint a rolling hill shape at the bottom, covering the lowest part of your orange gradient. Make the hill slightly taller on the right side. -
Trunk Structure:
Using the detail liner brush, paint a vertical line for the main tree trunk on top of the hill’s peak. Ideally, place the tree slightly off-center for better composition. -
Branching Out:
Extend branches outward from the trunk. Remember that trees generally split from thick branches into thinner ones, like veins. Keep your hand loose and slightly shaky to create organic, natural-looking twists. -
Adding Foliage Texture:
To create the leaves, switch to a small round brush or even a dry stipple brush. Dab tiny amounts of black ink in clusters on the ends of the branches. Don’t make it a solid blob; leave ‘sky holes’ so the stars can peek through the leaves. -
Companion Trees:
On the left side of the hill, paint two much smaller tree silhouettes. They provide scale and make the main tree look majestic. Use simple shapes for these, focusing on the outline. -
Grounding Shadows:
If you want more depth, mix a tiny bit of water into your black ink and add subtle shadows or texture to the black hill, implying grass or uneven terrain. -
The Reveal:
Wait for the black ink to dry fully. Carefully peel off the masking tape at a 45-degree angle, revealing your crisp white border.
Hang your finished piece in a well-lit spot to let those starry details really shine
Night Sky Over Desert Cactus Silhouettes
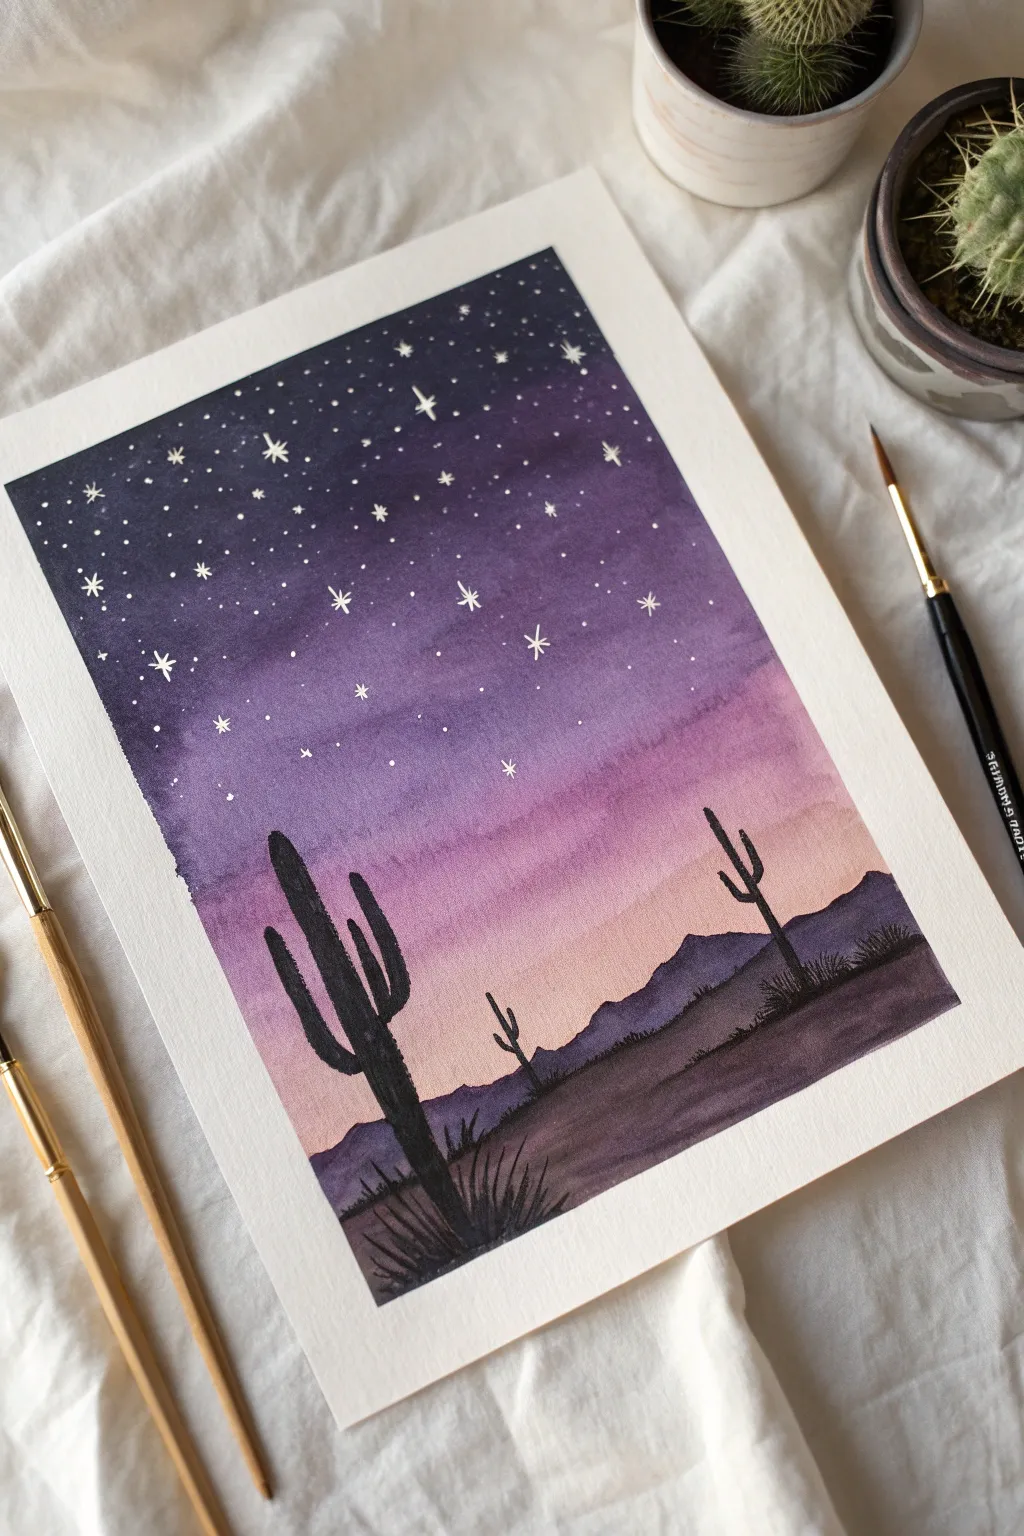
Capture the serene beauty of the desert as day turns to night with this vibrant watercolor project. You’ll create a seamless gradient sky dotted with stars, serving as the perfect backdrop for striking cactus silhouettes.
Step-by-Step Guide
Materials
- Cold press watercolor paper (approx. 5×7 or 8×10 inches)
- Watercolor paints (Indigo, Purple, Magenta, Peach/Orange, Black)
- White opacity medium (white gouache, white ink, or a white gel pen)
- Round brushes (large size 8/10 for wash, small size 0/2 for details)
- Masking tape or painter’s tape
- Clean water cups
- Paper towels
Step 1: Setting the Sky
-
Paper Prep:
Taping down your paper is crucial for this piece because we are using a lot of water. Secure all four edges of your watercolor paper to a hard board using masking tape to prevent buckling and create a crisp border. -
Color Palette Mixing:
Prepare your sky colors before your brush touches the paper. Mix a deep indigo, a vibrant purple, a softer magenta, and a warm peach tone in your palette. Having these ready ensures a smooth blending process. -
Wet-on-Wet Base:
Using your largest clean brush, apply a coat of clean water over the entire sky area, stopping just short of where the ground will begin. The paper should glisten but not have standing puddles. -
Deep Sky Application:
While the paper is wet, load your brush with the indigo mixture. Start painting at the very top edge, letting the pigment flow freely. Bring this dark color down about one-third of the page. -
Mid-Sky Transition:
Rinse your brush slightly and pick up the purple paint. Blend it into the bottom edge of the indigo while it’s still wet, pulling the color downward to create a soft, seamless transition. -
Sunset Glow:
Continue the gradient by blending the magenta into the purple, and finally, finish with the peach tone near the bottom horizon line. Let the colors bleed naturally into one another for that dreamy twilight effect. -
Drying Time:
This is the hardest part—patience! Let the background wash dry completely. The paper must be bone dry before adding stars or silhouettes, or the crisp lines will bleed.
Step 2: Starry Details
-
Tiny Stars:
Once the sky is dry, use a white gel pen or a very fine brush with white gouache to dot small stars throughout the indigo and purple sections. Keep them random and vary the spacing. -
Brighter Stars:
Select a few spots to add larger, brighter stars. paint a slightly larger dot, then carefully pull four tiny lines outward from the center to create a twinkling starburst shape.
Bleeding Lines?
If your black silhouette bleeds into the sky, the background wasn’t dry enough. Let it dry fully, then sharpen the edges with a black fineliner pen.
Step 3: Silhouettes
-
Mountain Range:
Mix a diluted black or very dark purple watercolor. Paint a jagged, uneven line across the bottom of the peach sky to form distant mountains. Fill in the shape below this line with a wash of this dark, transparent color. -
Foreground Ground:
While the mountains are damp but not soaking, paint a darker, more opaque black layer at the very bottom for the immediate foreground. Let the top edge be slightly uneven to mimic desert terrain. -
Main Cactus Outline:
Using your smallest detail brush and thick black paint (or black ink), paint a vertical line for the main cactus trunk on the left side. It should start in the foreground and extend up into the purple sky. -
Adding Arms:
Add the iconic saguaro arms. Paint a curved arm branching out from the left side, reaching upward, and a smaller one on the right. Keep the edges slightly rough to suggest spines. -
Secondary Cacti:
Paint a smaller, simpler cactus silhouette in the distance on the right side. This helps create depth and scale in your desert scene. -
Texture and Spines:
At the base of the cacti, use quick, upward flicking motions with the tip of your brush to create small grassy textures or scrub brush along the ground. -
Final Reveal:
Allow everything to dry completely. Slowly and carefully peel off the masking tape at a 45-degree angle to reveal your crisp, clean white borders.
Add Dimension
While the black paint is wet, drop in a tiny bit of concentrated purple. It adds subtle richness to the silhouettes instead of flat dead black.
Frame your desert nightscape and enjoy the peaceful evening view you’ve created
Constellation Map With Delicate Linework
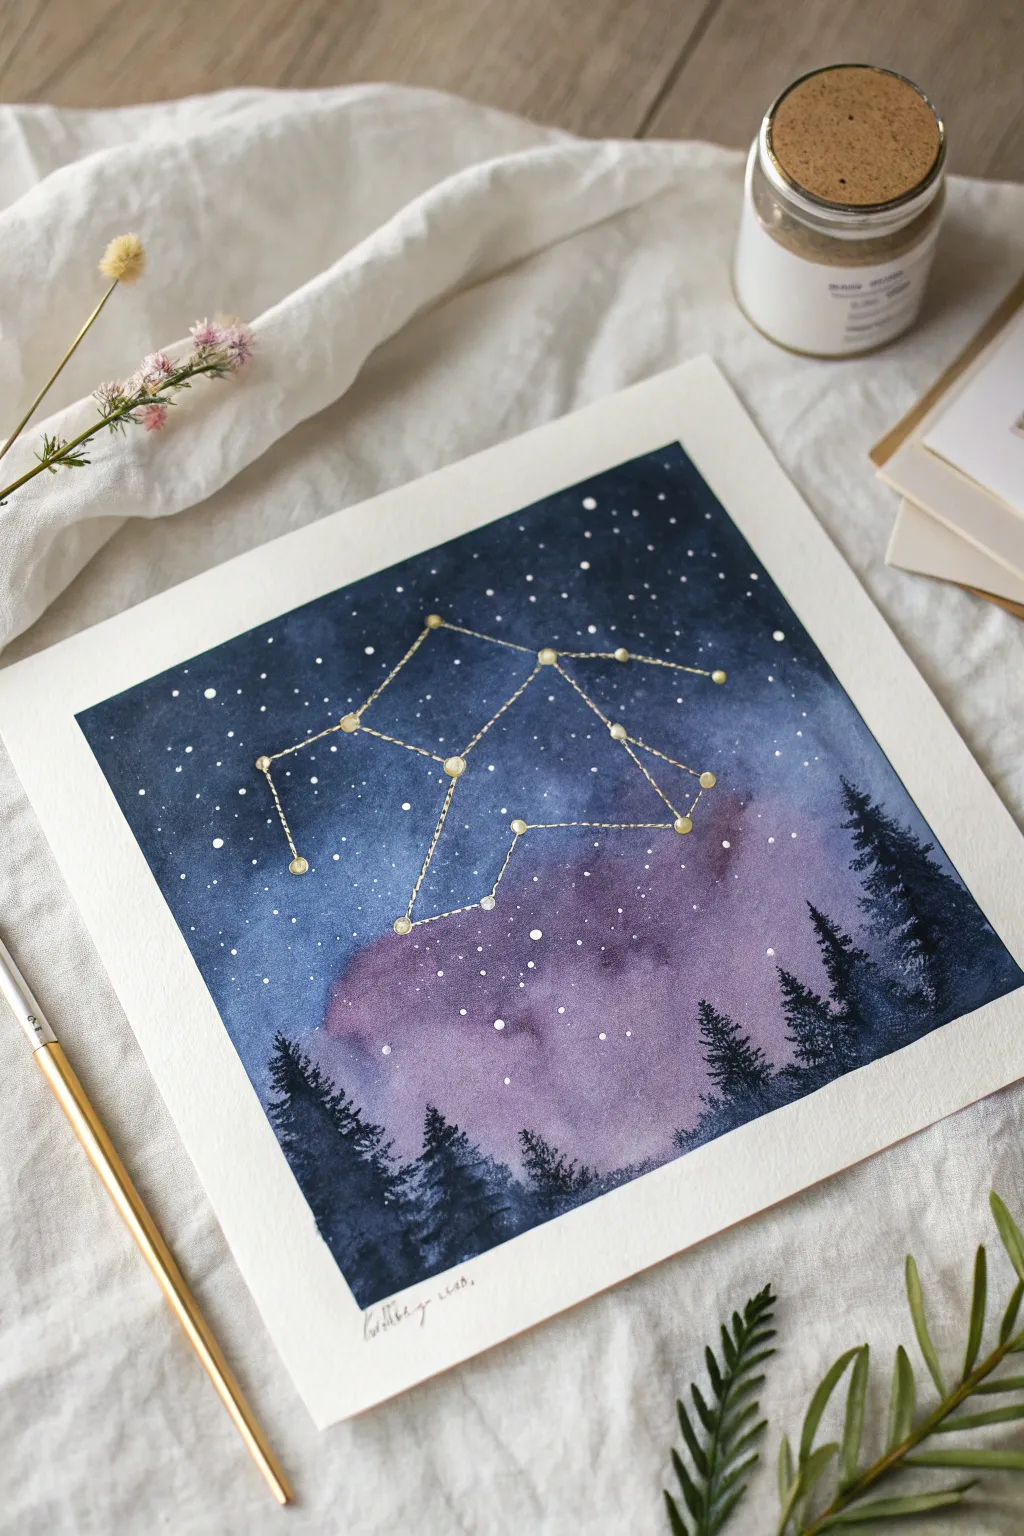
This ethereal constellation map combines the softness of wet-on-wet watercolor with the precision of metallic linework. The result is a moody, magical night sky that frames the Libra scales floating above a misty forest.
How-To Guide
Materials
- Square watercolor block or heavy textured paper (140lb/300gsm)
- Watercolor paints: Indigo, Prussian Blue, Payne’s Gray, Magenta (or Permanent Rose)
- Gold gouache or metallic gold watercolor
- Gold gel pen or fine liner
- White gel pen or gouache for stars
- Large wash brush (round or flat)
- Small round brush (size 2 or 4)
- Fine detail brush (size 0 or 00)
- Drafting tape
- Pencil and ruler
Step 1: Setting the Scene
-
Prep your surface:
Start by securing your paper. If you aren’t using a block, tape down all four edges of your watercolor paper to a board with drafting tape. This ensures a clean white border and reduces buckling during the heavy washes. -
Outline the constellation:
Lightly sketch the constellation structure using a ruler and pencil. For this Libra design, mark the main star points first, then connect them with straight lines. Keep your pencil pressure very light so it doesn’t show through the transparent paint later. -
Wet the sky area:
Load your large wash brush with clean water and coat the entire sky area, stopping just short of where the bottom of the tree line will be. The paper should be glisten with a sheen but not hold puddles.
Don’t Overwork
When blending the purple and blue wet-on-wet, stop sooner than you think. Over-brushing causes the pigments to muddy and turn gray instead of staying vibrant.
Step 2: Painting the Galaxy
-
Lay the purple core:
While the paper is still wet, drop in a diluted wash of Magenta or Permanent Rose in the lower-middle section. Let it spread naturally into the wet surface to create that soft, nebulous glow. -
Introduce the deep blues:
Mix a rich Indigo or Prussian Blue. Start applying this dark color at the very top edge and corners of the paper. Allow the blue to bleed downward toward the purple center, but try not to completely cover the pink tones. -
Deepen the contrast:
While the first layer is damp, add a concentrated mix of Payne’s Gray and Indigo to the upper corners to create a vignette effect. This mimics the vast darkness of space. -
Blend the transition:
Clean your brush and use it slightly damp to soften any harsh edges where the blue meets the purple. You want a gradient that looks like fading twilight. -
Let it dry completely:
This is crucial. Walk away and let the background dry 100%. If you paint the trees too soon, they will bleed into the sky and lose their shape. I usually give this at least 30 minutes.
Zodiac Customization
Personalize this gift by looking up the recipient’s star sign. Complex signs like Aquarius or Sagittarius look especially stunning spanning across the center.
Step 3: Adding the Silhouettes
-
Mix a silhouette shadow:
Combine Indigo and Payne’s Gray with a tiny touch of black to get a very deep, cool dark tone. It shouldn’t be pure black, but close to it. -
Paint the tree line:
Using a small round brush, paint the suggestion of fir trees along the bottom edge. Use upward, dabbing strokes to mimic pine branches. Vary the heights—make the trees on the sides taller to frame the composition. -
Feather the edges:
For the outer edges of the trees, switch to your fine detail brush. Create delicate, jagged tips at the very top of each tree to capture that specific evergreen texture.
Step 4: Detailed Constellation Work
-
Paint the main stars:
Using gold gouache or metallic watercolor, paint small circles over the star points you sketched earlier. Make the primary stars of Libra slightly larger than the others. -
Connect the lines:
Once the gold dots are dry, use a gold gel pen or a very fine brush with gold paint to connect the stars. You can use a ruler here, but a steady hand often produces a more organic, charming line. -
Add gentle dashes:
Instead of solid lines, try using consistent dash-marks for the connectors. This gives the piece a diagrammatic, vintage astronomical map feel.
Step 5: Finishing Touches
-
Splatter the stars:
Cover your tree line with a scrap piece of paper to protect it. dilute some white gouache or white ink, load a brush, and tap it against another handle to splatter fine white mist over the blue sections of the sky. -
Add larger stars:
Use a white gel pen to manually add a few larger, brighter stars in the dark blue corners to create depth. -
Remove tape:
Peel your tape away slowly at a 45-degree angle to reveal those satisfying crisp white edges.
Frame your celestial map in a floating glass frame to show off those crisp deckled edges
Layered Night Clouds With Star Peek-Through
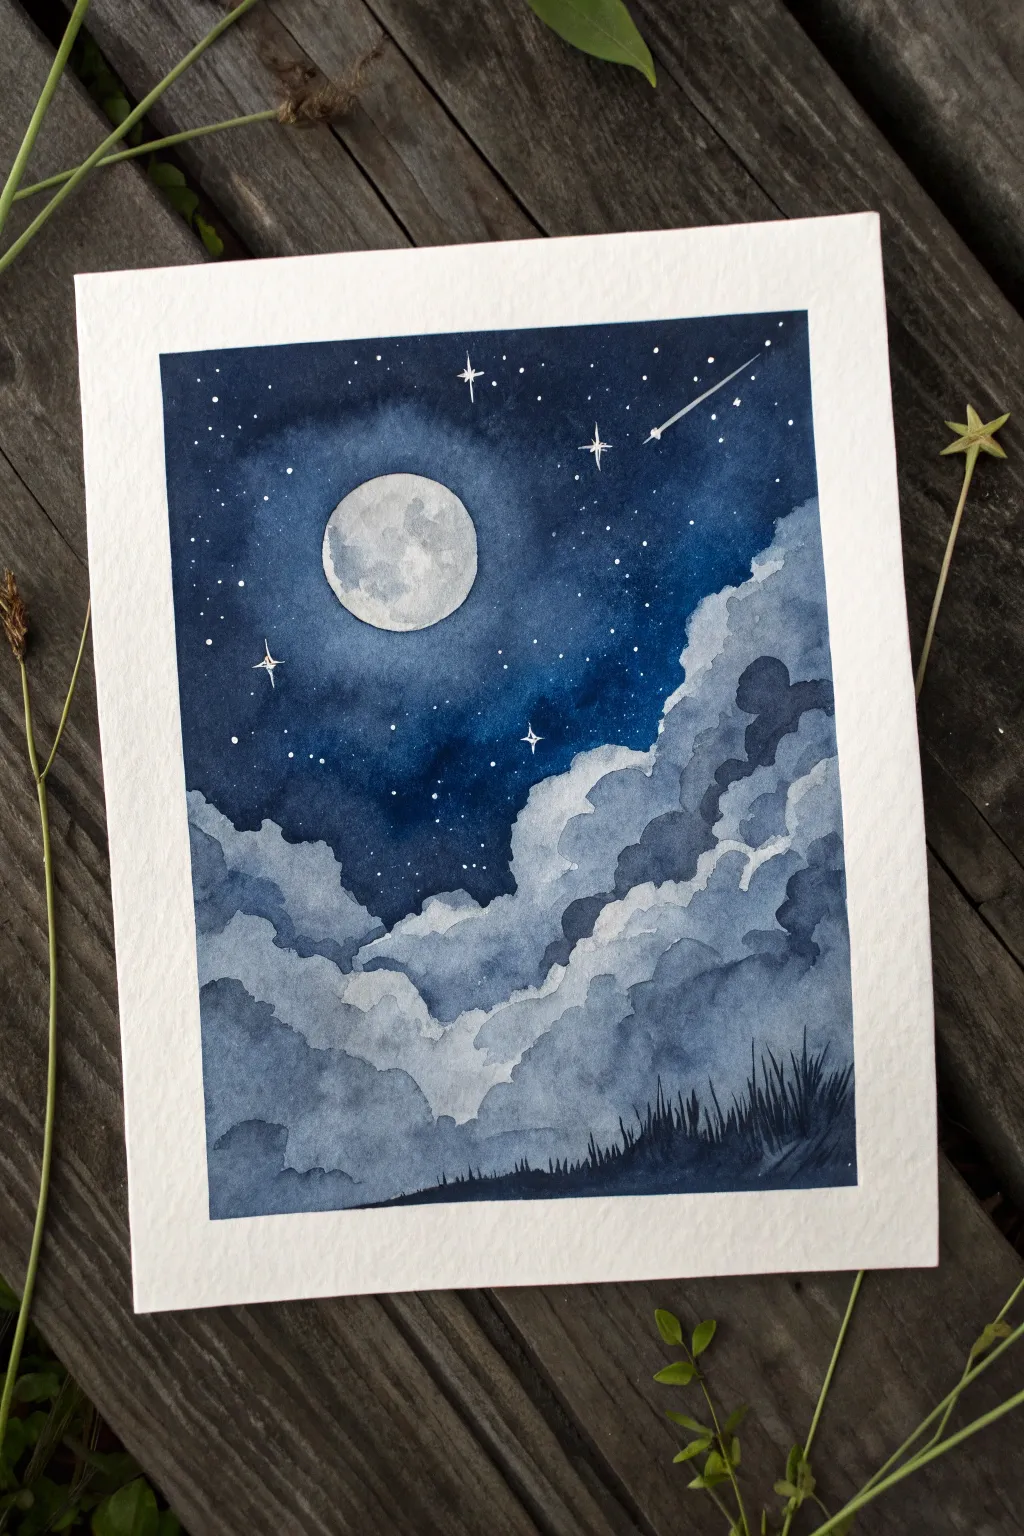
Capture the magic of a clear night sky with this layered watercolor painting featuring billowy clouds and a radiant full moon. Using wet-on-wet techniques and careful negative painting, you’ll build up depth from the glowing horizon to the deep indigo zenith.
Detailed Instructions
Materials
- Cold press watercolor paper (300gsm/140lb)
- Painter’s tape or masking tape
- Watercolor paints (Indigo, Prussian Blue, Payne’s Grey, tiny amount of Black)
- White gouache or white gel pen
- Round brushes (sizes 4, 8, and a fine liner)
- Masking fluid (optional, but recommended for the moon)
- Jar of clean water
- Paper towels
- Pencil and eraser
Step 1: Planning and Protection
-
Tape the border:
Secure your watercolor paper to a board or table using painter’s tape on all four sides. This creates that crisp, clean white border shown in the final piece and prevents the paper from buckling when wet. -
Sketch the moon:
Lightly trace a circle for the moon in the upper-left quadrant using a pencil. You can trace a coin or bottle cap to get a perfect shape. -
Masking the moon:
If you have masking fluid, apply it carefully inside the moon circle and let it dry completely. If you don’t have masking fluid, you will need to paint very carefully around this circle in the next steps to keep the paper white.
Step 2: Painting the Sky
-
Wet the sky area:
Using a large clean brush, wet the paper from the top edge down to roughly the middle of the page, stopping unevenly where the tops of the clouds will be. Do not wet the cloud area yet. -
Apply the darkest blue:
While the paper is wet, drop in your deepest blue (Indigo mixed with a touch of Black) at the very top corners. Let the color flow. -
Create the gradient:
Work your way down the sky using Prussian Blue. As you approach the moon area, dilute the paint with more water to create a lighter ‘halo’ effect around the moon. -
Soften the cloud edge:
Where the blue sky meets the unpainted bottom section, use a damp, clean brush to soften the edges so the transition isn’t a harsh line, but suggests the fluffy tops of clouds. -
Dry completely:
Let this sky layer dry thoroughly before moving on. The paper must be bone dry to prevent the cloud layers from bleeding into the sky.
Hard Lines vs. Soft Clouds
Clouds need soft edges to look fluffy. If a paint edge looks too sharp while wet, quickly run a clean, damp brush along the edge to diffuse the pigment before it dries.
Step 3: Building the Clouds
-
Paint the first cloud layer:
Mix a watery, pale blue-grey wash (Payne’s Grey with lots of water). Paint the rounded, fluffy shapes of the furthest back clouds, letting the bottom of this wash fade out with clear water. -
Layering forward:
Once the previous layer is dry, mix a slightly darker, more concentrated grey-blue. Paint a new row of cloud tops slightly lower than the first set, overlapping them. -
Refining the shapes:
Continue this process of drying and layering. As you move toward the bottom of the paper, make your paint mix progressively darker (adding more Indigo) and the cloud shapes slightly larger. -
Negative space technique:
I find it helpful to focus on painting the ‘shadows’ of the clouds rather than the clouds themselves. Paint the dark space *under* a fluffy top edge to make the cloud in front pop out. -
The darkest base:
For the very bottom strip of clouds, use your darkest Indigo mix to ground the composition, blending it smoothly down to the tape.
Fixing a Bloated Moon
Did paint bleed into your moon circle? Don’t panic. Once dry, use opaque white gouache to touch up the edges and reclaim the perfect circular shape.
Step 4: Celestial Details
-
Reveal the moon:
Rub away the masking fluid to reveal the stark white circle. Paint faint grey craters using a very diluted wash of Payne’s Grey, keeping the texture subtle. -
Add the stars:
Load a toothbrush or stiff brush with white gouache. Flick the bristles to splatter tiny stars across the dark sky area. Be careful not to splatter too much heavily on the clouds. -
Paint distinctive stars:
Using your finest liner brush and white gouache (or a white gel pen), draw a few larger four-pointed stars and a shooting star with a trailing tail. -
Add the grass silhouette:
Using almost dry Indigo or Black paint and a small brush, flick quick, upward strokes at the very bottom right corner to create silhouetted grass blades. -
The final reveal:
Wait until the painting is 100% dry. Peel the tape away slowly at a 45-degree angle to reveal your clean edges.
Frame this serene nightscape or gift it to a friend who loves stargazing
City Skyline Silhouette Under a Star Field
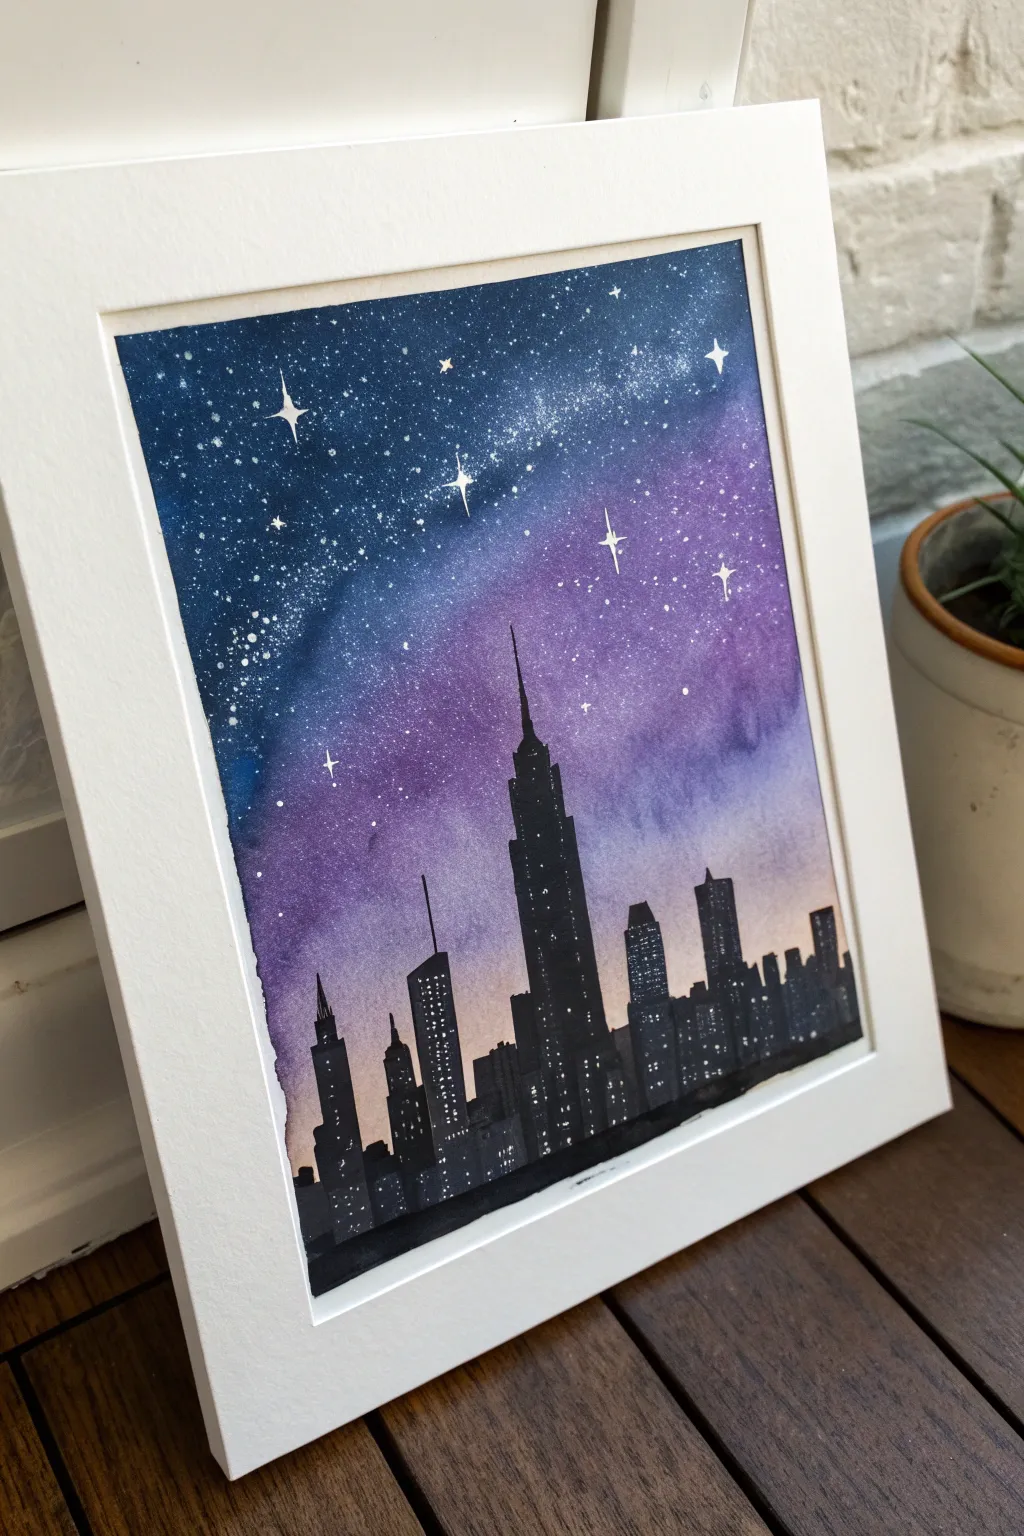
Capture the magic of city lights meeting starlight with this stunning watercolor project. You’ll create a seamless gradient sky that transitions into a crisp, black skyline, finished with a dazzling array of stars.
Step-by-Step Guide
Materials
- Cold press watercolor paper (300 gsm)
- Watercolor paints (Indigo, Purple/Violet, Magenta, Payne’s Grey, Black)
- White gouache or white gel pen
- Painter’s tape or masking tape
- Large flat wash brush
- Medium round brush (size 6 or 8)
- Fine liner brush (size 0 or 00)
- Clean water jar and mixing palette
- Paper towels
- Old toothbrush (optional for splatter)
Step 1: Preparing the Canvas
-
Tape the Edges:
Secure your watercolor paper to a board or table using painter’s tape. Create a heavy border (about 0.5 to 1 inch) to get that crisp white frame seen in the reference image. Press down firmly to prevent paint seepage. -
Pre-wet the Paper:
Using your large flat brush, apply a clean coat of water to the entire paper surface. You want the paper to be shiny and damp (the ‘wet-on-wet’ technique) but not forming puddles.
Pro Tip: Dry vs. Wet
If your stars look like fuzzy snowballs, your background paper was too wet. Wait until the background is totally dry for crisp, bright stars.
Step 2: Painting the Galaxy Sky
-
Apply the Horizon Glow:
Start at the bottom third of the paper with a very diluted mixture of magenta or a soft peach tone. Let it bleed upwards naturally into the wet paper to create the glow of city light pollution. -
Introduce the Purple Layer:
While the paper is still wet, load your medium round brush with a rich purple or violet. Paint horizontally across the middle section, blending it gently into the top of the pinkish horizon layer. -
Deepen the Night Sky:
Mix a strong concentration of Indigo and Payne’s Grey. Apply this dark mixture to the top third of the paper, letting it flow down into the purple. Tilt your board slightly to help gravity blend the colors seamlessly. -
Intensify the Corners:
Dab pure Indigo or even a touch of black into the very top corners of the sky while wet. This vignette effect draws the eye toward the center and adds dramatic depth. -
Create the Milky Way Texture:
While the paint is damp (not soaking wet), blot a clean, crumpled tissue diagonally across the blue section to lift a little pigment. This creates a faint, cloudy path for your galaxy. -
Let it Dry completely:
This is crucial: allow the background to dry 100%. If you touch it and it feels cold, it’s still wet. Use a hair dryer on a low setting if you’re impatient.
Step 3: Creating the Stars
-
Prepare the Splatter:
Dilute a small amount of white gouache with water until it has a heavy cream consistency. Dip an old toothbrush or a stiff brush into the mixture. -
Splatter the Stars:
Hold the brush over the dark blue sections of the painting and tap the handle (or flick the bristles) to shower the sky with fine specks. Aim mostly for the darkest areas. -
Add Major Stars:
Using a fine liner brush or a white gel pen, dot larger individual stars in the purple and blue areas. I like to cluster a few together to emulate constellations. -
Paint the Sparkles:
To create the ‘twinkling’ cross-shaped stars, paint a tiny vertical line and a tiny horizontal line intersecting at a center dot. Keep lines thin and tapered.
Level Up: Metallic Pop
Swap the white gouache for metallic silver or iridescent watercolor for the stars. The sky will shimmer and change as you move past the painting.
Step 4: Painting the Skyline
-
Outline the Buildings:
Using black watercolor (thick consistency) or a black waterproof fineliner, lightly sketch the tops of the buildings. Place the tallest skyscraper (resembling the Empire State Building) slightly off-center for better composition. -
Fill in the Silhouette:
Fill in the building shapes with solid black paint. Ensure the bottom edge is straight and completely opaque. Vary the heights and roof shapes—some flat, some pointed, some slanted. -
Add Building Details:
Use the very tip of your fine liner brush to add tiny antennas or spires to the tops of the buildings. These delicate lines add realistic scale to the skyline. -
Create Windows:
Once the black silhouette is fully dry, use your white gel pen to add tiny rows of dots for windows. Don’t overdo it; random clusters look more natural than perfect grids. -
The Reveal:
Once everything is bone dry, slowly peel off the masking tape at a 45-degree angle away from the painting to reveal your crisp, clean borders.
Now step back and admire your glowing cityscape, perfect for framing or gifting to a star-gazer
Mountain Cabin Window Glow at Night

Cozy vibes abound in this charming nightscape, where glowing cabin windows invite you in from the cold mountain air. The high contrast between the deep indigo sky and the warm yellow light creates a striking focal point on beautiful deckled-edge paper.
How-To Guide
Materials
- Heavyweight watercolor paper with deckled edges (preferably handmade cotton paper)
- Watercolor paints (Indigo, Payne’s Gray, Lamp Black, Burnt Umber)
- White Gouache or bleed-proof white ink
- Yellow ochre and Cadmium Yellow paint (watercolor or opaque gouache)
- Painter’s tape or artist tape
- Flat wash brush (3/4 inch)
- Round brushes (sizes 2 and 6)
- Fine liner brush (size 00 or 0)
- Pencil and eraser
- Paper towel
Step 1: Setting the Scene
-
Tape the borders:
Begin by taping off a clean rectangle in the center of your handmade paper. Since the paper has texture, press the tape edges down firmly with your fingernail to prevent paint from sneaking underneath, ensuring that crisp rectangular border. -
Draft the composition:
Lightly sketch the outlines of two large mountain peaks in the background. In the foreground, draw a simple house shape—a triangle atop a rectangle—centered at the bottom. -
Draw the details:
Add the smaller details like the chimney, the window grid lines, and faint guide lines for where the pine trees will stand on either side of the cabin. Keep your pencil pressure very light so it doesn’t show through the sky later.
Crisp Edges
If your paint bled under the tape, use a small amount of white gouache or white gel pen to tidy up the straight lines after you peel the tape off.
Step 2: Painting the Sky and Mountains
-
Mix the night sky:
Create a deep, rich dark blue by mixing Indigo with a touch of Lamp Black. You want this to be quite opaque, so don’t dilute it too much with water. -
Fill the background:
Using your flat wash brush or larger round brush, paint the entire sky area, stopping carefully at the edges of your mountain peaks. Aim for a solid, even wash without too many streaks. -
Create the stars:
Once the sky is completely bone-dry, mix white gouache with a tiny drop of water. Use a small brush to flick speckles across the sky. Then, use your fine liner brush to paint larger individual stars and two delicate shooting streaks. -
First mountain layer:
For the taller background mountains, mix a watery, pale grey-blue wash. It should be significantly lighter than the sky. Fill in the mountains, letting the natural texture of the paper show through slightly for a snowy effect. -
Second mountain layer:
Mix a medium-tone slate blue (Payne’s Gray is perfect here). Paint the foreground hills that sit in front of the pale mountains, creating a silhouette that the house will eventually rest on.
Step 3: The Cabin and Foreground
-
Paint the cabin base:
Using a mix of Burnt Umber and Black, paint the exterior siding of the cabin. It should be very dark, almost a silhouette, to make the windows pop later. -
Add the roof:
Paint the roof and chimney in solid black or dark charcoal. Make sure the eaves overhang the walls slightly. -
Add the window glow:
This is the magical part. Using pure, opaque yellow gouache or thick watercolor (Cadmium Yellow mixed with a little Yellow Ochre), fill in the window squares. I like to do two coats here to ensure it looks truly illuminated. -
Window pane details:
Once the yellow is dry, use your finest liner brush and the dark cabin color to carefully repaint the grid lines over the yellow windows. -
Paint the pine trees:
Mix a shadowed blue-green using Payne’s Gray and a touch of green. Paint vertical lines for trunks on the sides of the cabin, then dab horizontal strokes getting wider at the bottom to form pine trees. -
Foreground grass:
Use the black/brown mix to paint the very bottom of the painting. Use upward flicking motions with a small brush to create blades of grass silhouetted against the house.
Winter Texture
Sprinkle a tiny pinch of coarse salt onto the wet mountain paint. Brush it off when dry for a crystalline, icy texture on the snowy peaks.
Step 4: Finishing Touches
-
Final dry check:
Let the entire piece dry completely. Touch the paper lightly with the back of your hand; if it feels cool, it’s still damp. -
The reveal:
Slowly peel the tape away at a 45-degree angle. This reveals those crisp, satisfying edges that contrast so beautifully with the handmade paper’s rough texture.
Frame this miniature masterpiece in a floating frame to show off those beautiful paper edges
Campfire Sparks Under the Night Sky
Capture the magic of an evening under the stars with this vibrant painting that juxtaposes the warm, crackling energy of a campfire against the cool serene majesty of the Milky Way. This project blends fire techniques with galaxy painting methods for a striking composition perfect for any nature lover’s wall.
Detailed Instructions
Materials
- Heavyweight watercolor paper or mixed media board (approx. 9×12 inches)
- White mat frame (for presentation)
- Acrylic paints: Indigo, Phthalo Blue, Black, White, Magenta, Orange, Hansa Yellow, Burnt Sienna
- Synthetic paint brushes: ¾ inch flat, medium round, small detail liner
- Old toothbrush (for splatter effect)
- Masking tape
- Paper towels
- Jar of water
Step 1: Setting the Night Stage
-
Secure the borders:
Begin by taping down all four edges of your paper to a hard board. This ensures a crisp white border later and prevents the paper from buckling under heavy acrylic washes. -
Create the base gradient:
Mix Phthalo Blue with a touch of Black to create a deep navy. Paint the upper two-thirds of the canvas, gradually lightening the mix with a little White and Magenta as you move downwards toward the horizon line. -
Establish the Milky Way:
While the background is still slightly damp, mix a lighter, milky blue using White and a tiny dot of Phthalo Blue. Paint a diagonal, cloudy streak stretching from the bottom left quadrant toward the top right. -
Soften the nebula:
Using a clean, dry brush, gently blend the edges of your Milky Way streak into the dark background. You want a soft, misty look rather than hard lines, so use a gentle dabbing motion. -
Deepen the shadows:
Reinforce the darkest parts of the sky at the very top corners with a mix of Indigo and Black, ensuring the center galaxy area remains the focal point of light.
Star Splatter Mess?
If you accidentally splatter big blobs of white paint instead of fine stars, don’t wipe them! Turn them into larger planets or distant galaxies by swirling a tiny drop of blue or pink into the wet blob.
Step 2: Starlight and Shooting Stars
-
Prepare splatter paint:
Dilute pure Titanium White paint with water until it reaches the consistency of heavy cream or ink. It needs to be fluid enough to fly off bristles but opaque enough to show up against the dark blue. -
Create the starfield:
Dip an old toothbrush into the thinned white paint. Test it on a scrap paper first, then use your thumb to flick the bristles, spraying a fine mist of stars across the entire sky portion. -
Add major stars:
Once the splatter is dry, use your smallest liner brush to dot in a few larger, brighter stars. Place some specifically near the Milky Way band to suggest clustered brightness. -
Paint shooting stars:
With the liner brush and thinned white paint, drag two or three straight, swift lines diagonally across the sky. Start with a firm pressure and lift off quickly to create a tapered tail effect.
Glow Up
Make the Milky Way shimmer by mixing a tiny amount of iridescent or pearl medium into your white and light blue paints. It catches the light beautifully when viewed from different angles.
Step 3: Igniting the Campfire
-
Block in the ground:
Mix Burnt Sienna with a little Black to create a dark earthy tone. Paint the bottom third of the canvas, creating an uneven horizon line that dips slightly in the center. -
Paint the silhouette trees:
Using the black-brown mixture and a small round brush, stipple in the silhouettes of distant trees along the horizon line. Keep them loose and jagged to mimic pine tops. -
Start the fire base:
In the center of the foreground, paint a small, irregular patch of pure White. This will be the hottest part of the fire. -
Build the flames:
Surround the white center with Hansa Yellow, blending wet-on-wet. Then, transition into Orange and finally tips of Red or transparent Burnt Sienna as the flames lick upward. -
Create the glow:
I like to use a dry brush with a very small amount of Orange paint to scumble a soft glow onto the surrounding grass and the nearest tree silhouettes. -
Add logs and embers:
Use Black or dark brown to paint thin, charred logs at the base of the fire. Add tiny dots of orange and yellow floating upward from the fire to represent rising sparks. -
Highlight the foreground grass:
Mix a warm yellow-brown and use a liner brush to flick in illuminated blades of grass around the fire pit, showing where the light catches the terrain.
Step 4: Finishing Touches
-
Final contrast check:
Ensure the sky is dark enough to make the stars pop and the fire is bright enough to feel hot. Make small adjustments if needed. -
Reveal the border:
Wait until the painting is completely bone-dry. Carefully peel away the masking tape at a 45-degree angle to reveal clear, clean edges. -
Matting the artwork:
Place your finished painting behind a clean white archival mat to give it a professional gallery look before framing.
Now you have a cozy campfire scene that captures the silent awe of the wilderness right on your desk
Comet Tail and Cosmic Dust Trail
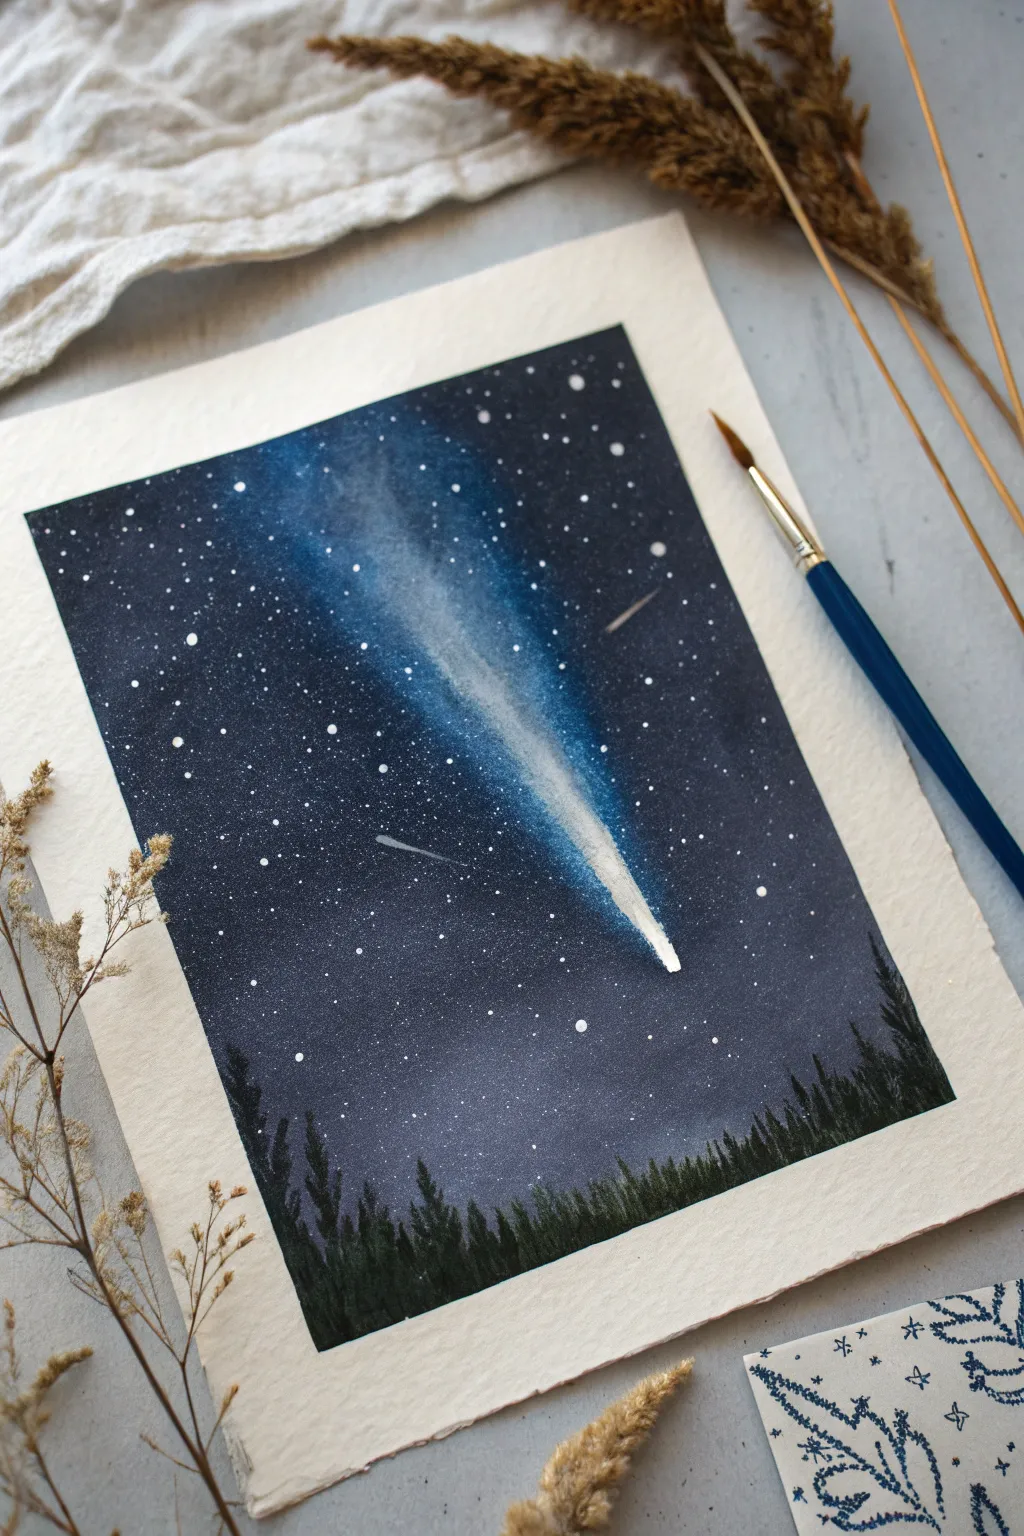
Capture the ethereal motion of a comet slicing through a deep indigo sky with this watercolor project. The prominent blue gradient tail and starry splatter create a dynamic celestial scene grounded by a simple forest silhouette.
How-To Guide
Materials
- Cold press watercolor paper (300 gsm)
- Blue painter’s tape or masking tape
- Watercolor paints (Indigo, Prussian Blue, Black, White Gouache)
- Medium round brush (size 6 or 8)
- Small round or detail brush (size 0 or 2)
- Old toothbrush (for splatter)
- Palette for mixing
- Jar of clean water
- Paper towels
Step 1: Setting the Sky
-
Prepare your surface:
Begin by taping down all four edges of your watercolor paper to a board or table. This creates that crisp, professional white border seen in the example and prevents the paper from buckling during the heavy washes. -
Mix your base colors:
On your palette, prepare a deep, dark mixture using Indigo and a touch of Black. In a separate well, mix a vibrant Prussian Blue. Having these ready is crucial because watercolors dry fast. -
Wet-on-wet start:
Brush a layer of clean water over the entire paper surface. It should be glistening and damp, but not holding puddles. -
Painting the deep space:
Load your medium round brush with the dark Indigo/Black mix. Apply this color heavily to the corners and edges of the paper, leaving a diagonal channel through the middle slightly lighter for now. -
Creating the blue nebula:
While the paper is still wet, drop the Prussian Blue into that diagonal channel you left open. Let it bleed naturally into the dark edges, but keep the center of this blue path fairly bright. -
Adding the comet core:
While everything is still wet, use a clean, damp brush to lift a little pigment from the lower right end of your blue diagonal. This creates a soft, whitish glow where the comet’s head will be. -
The first drying phase:
Allow this background layer to dry completely. The paper must be bone-dry before the next step to prevent the sharp details from blurring.
Step 2: The Comet and Stars
-
Defining the comet:
Mix a semi-opaque version of white gouache with a tiny drop of blue. Using a clean brush, paint the bright white head of the comet in the lower right area of your blue streak. -
Dragging the tail:
While the head is wet, drag the pigment upwards and to the left using a damp brush to feather it out. The tail should be solid white near the head and fade into the blue background as it extends. -
Adding texture to the trail:
Dry brush a little white gouache along the edges of the tail to simulate cosmic dust and gas breaking away. -
Bright shooting stars:
Use your detail brush and white gouache to paint one or two faint, thin lines parallel to the main comet to suggest smaller meteors. -
The star field:
Cover the bottom area (where the trees will go) with a scrap piece of paper. Dip an old toothbrush into watered-down white gouache and flick the bristles to spray fine mist stars across the sky. -
Specific larger stars:
Use your smallest detail brush to manually tap in a few larger, brighter stars scattered randomly to add depth to the galaxy.
Cosmic Texture
Use a dry brush for the comet’s tail. Dragging relatively dry white paint over the textured paper creates a natural ‘dusty’ look ideal for gas trails.
Step 3: The Forest Silhouette
-
Mixing the forest color:
Mix a very thick, opaque black watercolor or gouache. You want this to be dark enough to cover the sky background without showing through. -
Creating the tree line:
At the very bottom of the page, paint a solid uneven strip of black as the forest floor. -
Painting pine shapes:
Using the tip of your small brush, pull varying vertical lines up from the base. I prefer to vary the heights significantly to make the forest look natural. -
Adding branches:
Use a tapping or stippling motion to add branches to your vertical lines. Start wide at the bottom of each tree and taper to a sharp point at the top, creating triangular pine shapes. -
Final reveal:
Once the trees are fully dry, carefully peel away the specialized tape at a 45-degree angle to reveal your crisp white border.
Make it Metallic
Swap the white gouache stars for silver or iridescent metallic watercolor. It catches the light beautifully when viewed from different angles.
Now you have a stunning piece of the cosmos captured right on your desk
Negative Space Stars in a Painted Sky
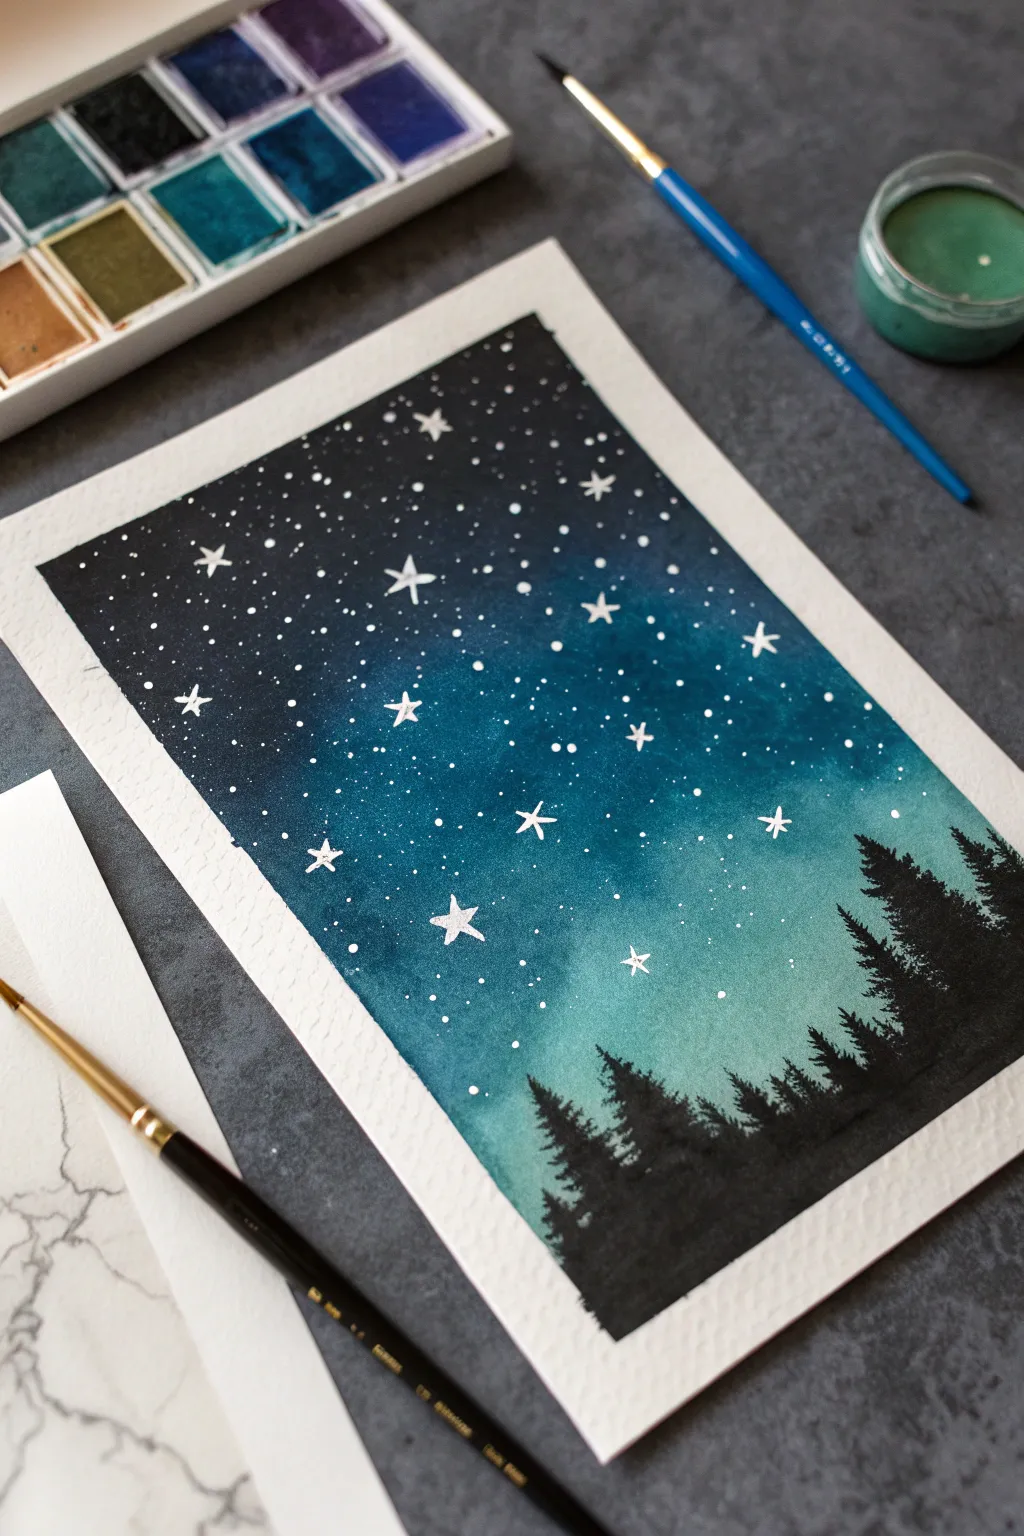
Capture the serene beauty of a crisp winter evening with this watercolor project. By blending deep indigo with vibrant teal, you’ll create a glowing backdrop for delicate stars and a stark evergreen forest silhouette.
Step-by-Step Guide
Materials
- Cold press watercolor paper (approx. 300 gsm)
- Masking fluid (drawing gum) and a detail brush or ruling pen
- Watercolor paints: Indigo, Prussian Blue, Phthalo Turquoise (or Teal)
- Black watercolor or gouache for the trees
- Round watercolor brush (size 6 or 8)
- Washi tape or painter’s tape
- Jar of clean water
- Paper towels
Step 1: Preparation
-
Secure the paper:
Tape down all four edges of your watercolor paper to a board or table. Press the tape firmly to prevent paint from seeping underneath and to create a clean white border later. -
Map out the stars:
Using a fine brush or a specialized tool like a ruling pen, apply small dots of masking fluid scattered across the top two-thirds of the paper. -
Add larger stars:
Paint a few larger, five-pointed star shapes with the masking fluid to create focal points among the dots. Keep these sparse to avoid overcrowding. -
Wait for drying:
Allow the masking fluid to dry completely. It should feel rubbery and non-tacky to the touch before you proceed with any paint.
Sticky Situation
If your masking fluid tears the paper upon removal, your paper was likely still damp or the fluid was old. Ensure the paper is bone-dry and test fluid on a scrap piece first.
Step 2: Painting the Gradient Sky
-
Prepare the wash:
Pre-mix your colors on a palette. You’ll need a deep concentration of Indigo and a separate pool of vibrant Phthalo Turquoise. -
Wet the paper:
Brush a layer of clean water over the entire sky area, stopping about an inch above where you want your tree line to begin. The paper should be glisten, but not hold puddles. -
Start dark:
Load your brush with the concentrated Indigo. Apply it starting at the very top edge, using horizontal strokes to lay down the darkest part of the night sky. -
Introduce mid-tones:
While the paint is still wet, pick up Prussian Blue and blend it into the lower edge of the Indigo, working your way down the paper. -
Transition to teal:
Switch to your Phthalo Turquoise or Teal. Blend this into the blue, pulling the color downwards towards the bottom third of the paper. -
Fade out:
Clean your brush and use just a damp brush to pull the teal further down, letting it fade softly into white near the horizon line. -
Deepen the top:
If the top sky looks too light, gently drop in more Indigo while the paper is still wet to intensify the darkness of space. -
Dry completely:
Let the gradient wash dry thoroughly. This is crucial; if the paper is damp when you remove masking fluid, it will tear.
Make it Shine
For a magical touch, use a silver or gold metallic watercolor pen to add tiny dots to the centers of your largest stars after removing the masking fluid.
Step 3: Details & Trees
-
Reveal the stars:
Once dry, gently rub your finger or a rubber cement pickup eraser over the masking fluid to peel it away, revealing the crisp white paper underneath. -
Mix the black:
Prepare a very thick, opaque mixture of black watercolor or gouache. A creamy consistency works best for sharp details. -
Start the tree line:
Using a smaller round brush, paint a jagged, uneven line of black across the bottom where the teal fades out. This forms the base of your forest. -
paint tree trunks:
Paint vertical lines extending upward from the black base. Vary their heights, making some taller on the sides to frame the composition. -
Add branches:
Use the tip of your brush to tap small horizontal strokes branching out from the trunks. Make the strokes wider at the bottom and narrower at the top to create the evergreen shape. -
Refine the density:
Go back and fill in gaps between trees with solid black to simulate a dense forest, leaving the tops distinct and separate. -
Peel the tape:
Wait for the trees to dry fully, then slowly peel away the tape at a 45-degree angle to reveal your clean edges.
Step back and admire the depth of your personal slice of the cosmos
Surreal Color-Inverted Night Sky Experiment
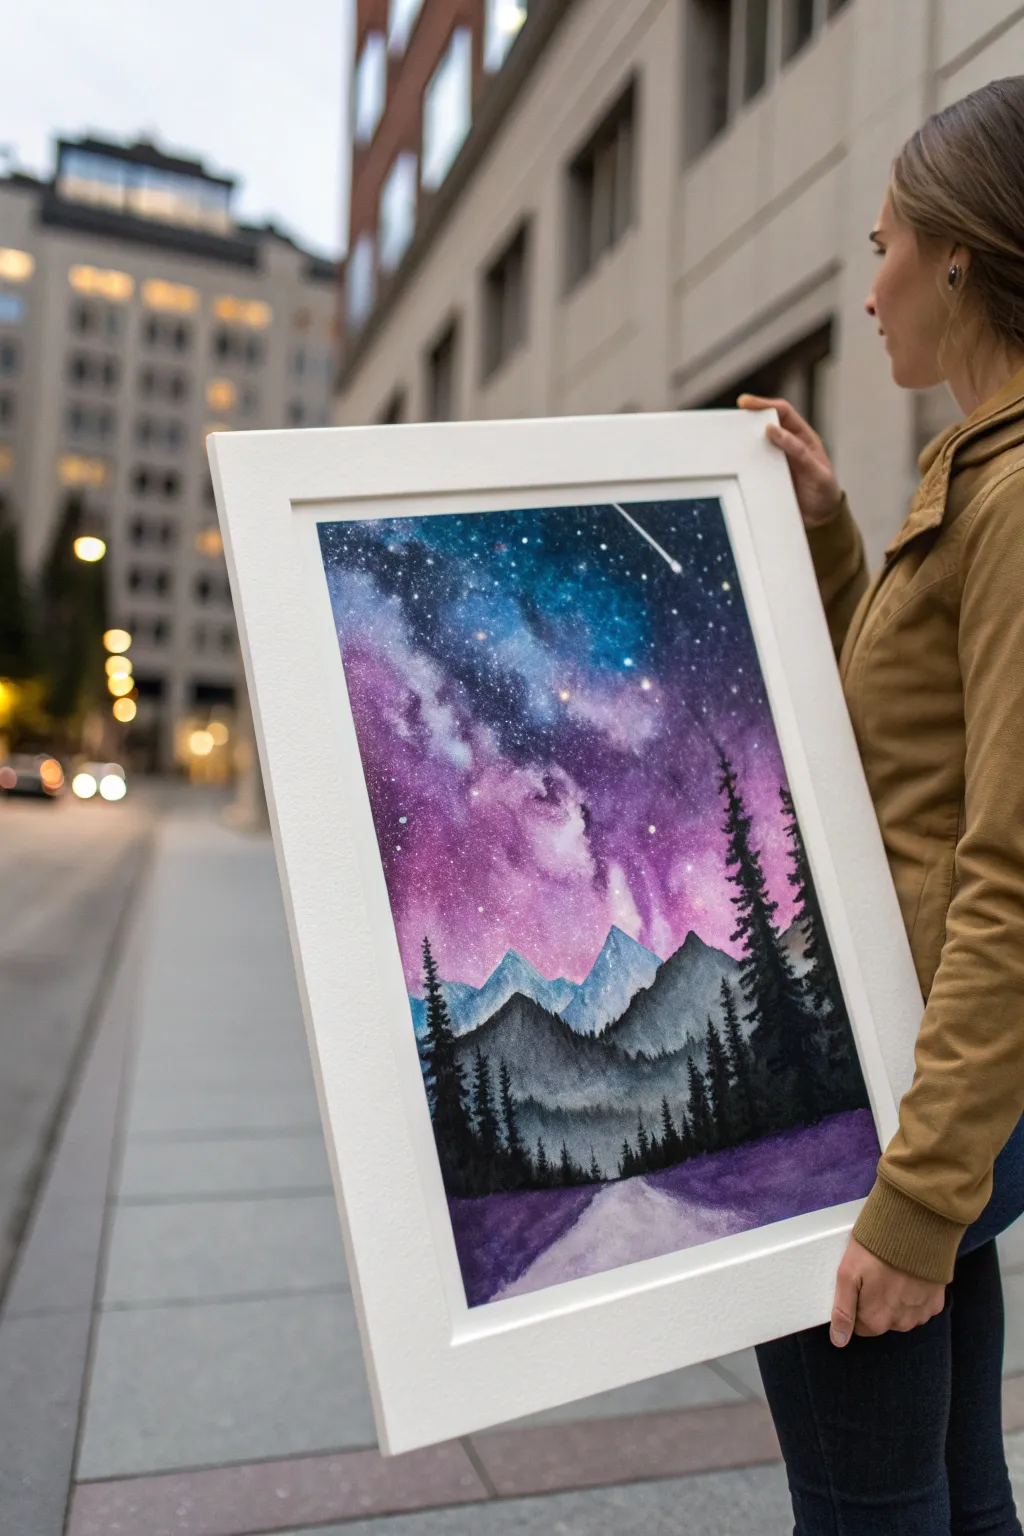
Blend reality with fantasy in this vibrant watercolor piece, featuring a nebula-filled sky that transitions into misty mountains and a dreamlike purple meadow. Bold colors and wet-on-wet techniques create a galactic atmosphere that feels both expansive and grounded.
Detailed Instructions
Materials
- High-quality watercolor paper (cold press, large format)
- Watercolor paints (Indigo, Prussian Blue, Magenta, Opera Pink, Turquoise, Black, Lavender)
- White gouache or white ink
- Large flat wash brush
- Round brushes (sizes 4, 8, and 12)
- Painter’s tape or masking tape
- Old toothbrush (for spattering)
- Two cups of water
- Paper towels
Step 1: Setting the Sky
-
Prep the Surface:
Secure your watercolor paper to a board using painter’s tape to create a crisp white border and prevent buckling. Ensure the tape is pressed down firmly. -
Base Wetting:
Using your large flat brush, wet the top two-thirds of the paper with clean water. The sheen should be glossy but not forming puddles. -
Nebula Colors:
While the paper is wet, drop in Magenta and Opera Pink in a diagonal band stretching from the middle left toward the top right. Let the pigments bloom naturally. -
Deep Space Blues:
Surround the pink areas with Turquoise and Prussian Blue. I like to let these colors touch the pinks gently so they blend into soft purples without getting muddy. -
Darkening the Edges:
Mix Indigo with a touch of Black and apply it to the upper corners and top edge of the sky. This creates depth and makes the brighter nebula colors pop. -
Lifting Clouds:
If the sky looks too heavy, blot a clean, crumpled paper towel into the wet paint to lift color, creating soft, cloud-like nebula effects. -
The Stars:
Dilute white gouache or ink with a tiny bit of water. Dip an old toothbrush into it and flick the bristles with your thumb to spray a galaxy of stars over the drying sky. -
Adding Detailed Stars:
Use a small round brush and pure white gouache to add a few larger, brighter stars. Drag one out into a streak to create the shooting star seen in the upper right quadrant.
Step 2: Mountains and Midground
-
Distant Peaks:
Once the sky is completely dry, mix a watery wash of Turquoise and cooler blue. Paint the jagged silhouette of the furthest mountain range right below the nebula. -
Middle Range:
Mix a slightly darker grey-blue. Paint a second mountain range below the first one while the first is dry, overlapping slightly to show atmospheric perspective. -
Forested Hills:
Switch to a dark mix of Indigo and Black. Using a size 8 brush, paint the rolling silhouette of the foreground hills. Use the brush tip to dab vertical texture along the ridge, implying distant treetops. -
The Tree Line:
With a fine brush saturated in black watercolor, paint distinct pine trees along the darker hills. Make the ones on the right side taller and more detailed to frame the composition.
Starry Control
Cover the mountain area with a piece of scrap paper while splattering stars. This keeps the splatter only in the sky and ensures your mountains stay clean and sharp.
Step 3: Foreground and Finish
-
Purple Fields:
Wet the bottom section of the paper. Apply washes of Lavender and deep purple on either side of the center, leaving a triangular gap for the path. -
The Path:
Fill the central path area with a very diluted wash of pale lavender or dirty white water, keeping the edges soft where it meets the darker field. -
Shadows and Depth:
Before the field dries, drop darker purple concentrated paint near the bottom corners and along the edges of the path to create volume and shadows. -
Final Trees:
Add a few sharp, nearly black pine trees on the far left and right edges of the foreground, overlapping the purple field to bring the viewer into the scene. -
The Reveal:
Wait until the painting is bone dry—touch it with the back of your hand to check. Carefully peel off the tape at a 45-degree angle to reveal your clean white border.
Add Magic
Use iridescent or metallic watercolor paint for the meteor or the brightest stars. It will catch the light and make the galaxy shimmer when viewed from different angles.
Now you have a stunning, surreal landscape ready to frame and brighten any room


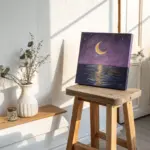
Have a question or want to share your own experience? I'd love to hear from you in the comments below!