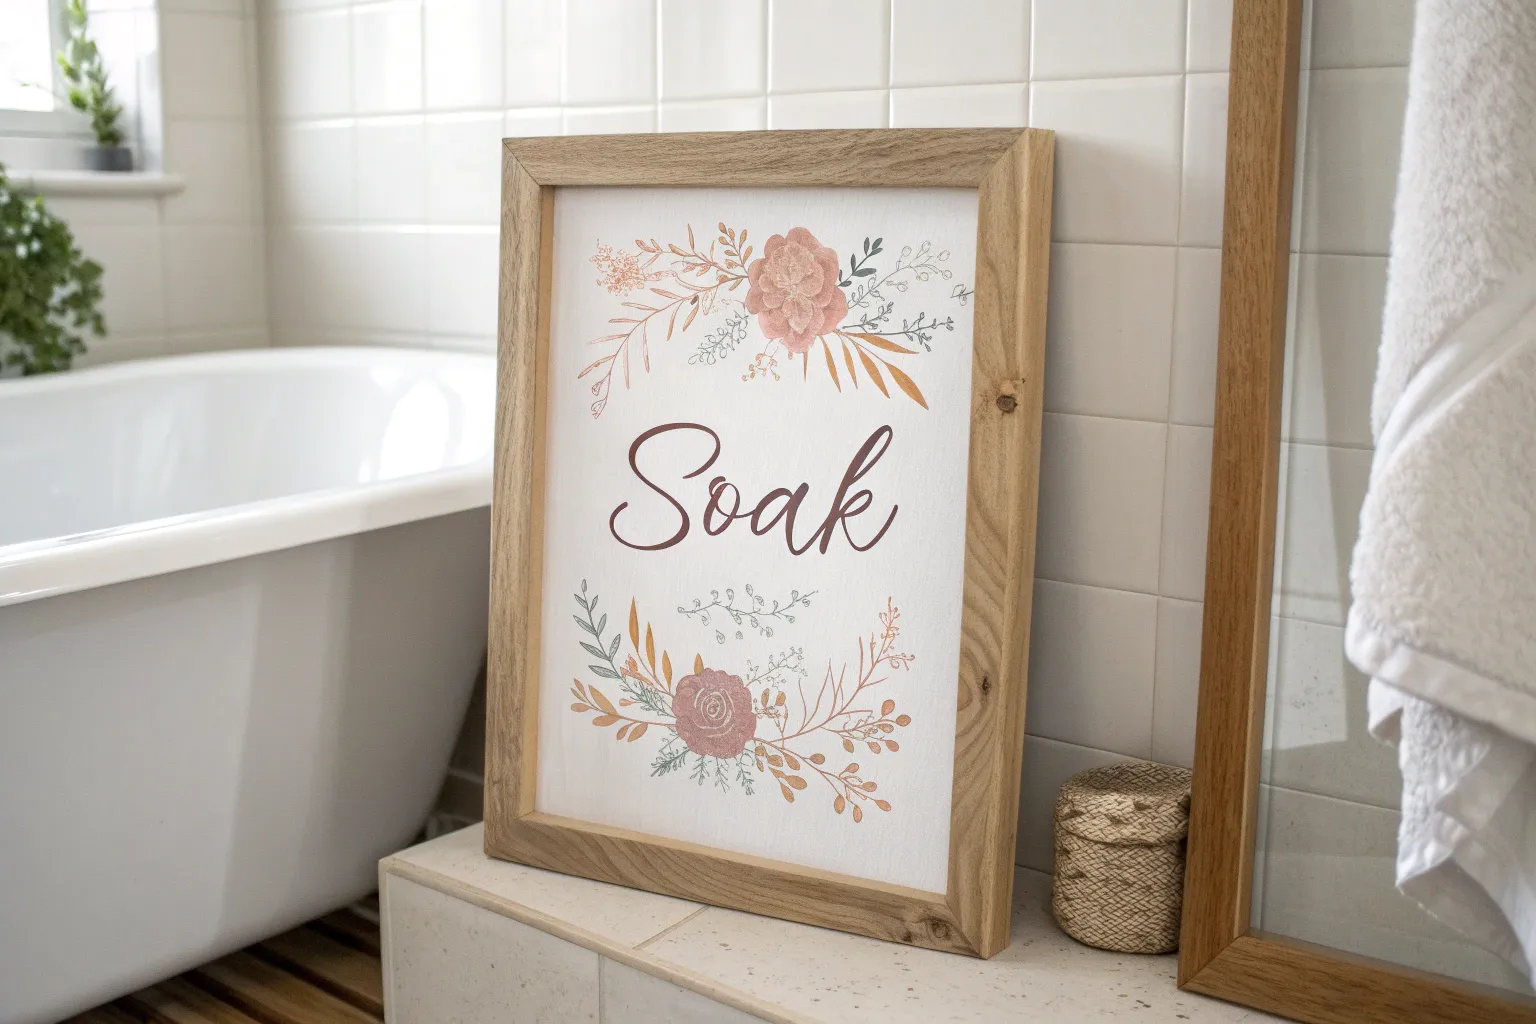
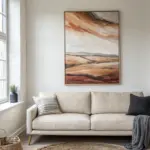
Painting for a bathroom is such a fun little challenge because you’re balancing clean calm vibes with very real, very specific bathroom details. Here are my favorite bathroom canvas painting ideas—from classic spa-style looks to quirky, unexpected concepts that still feel right at home in a bathroom.
Eucalyptus Stem Spa Painting
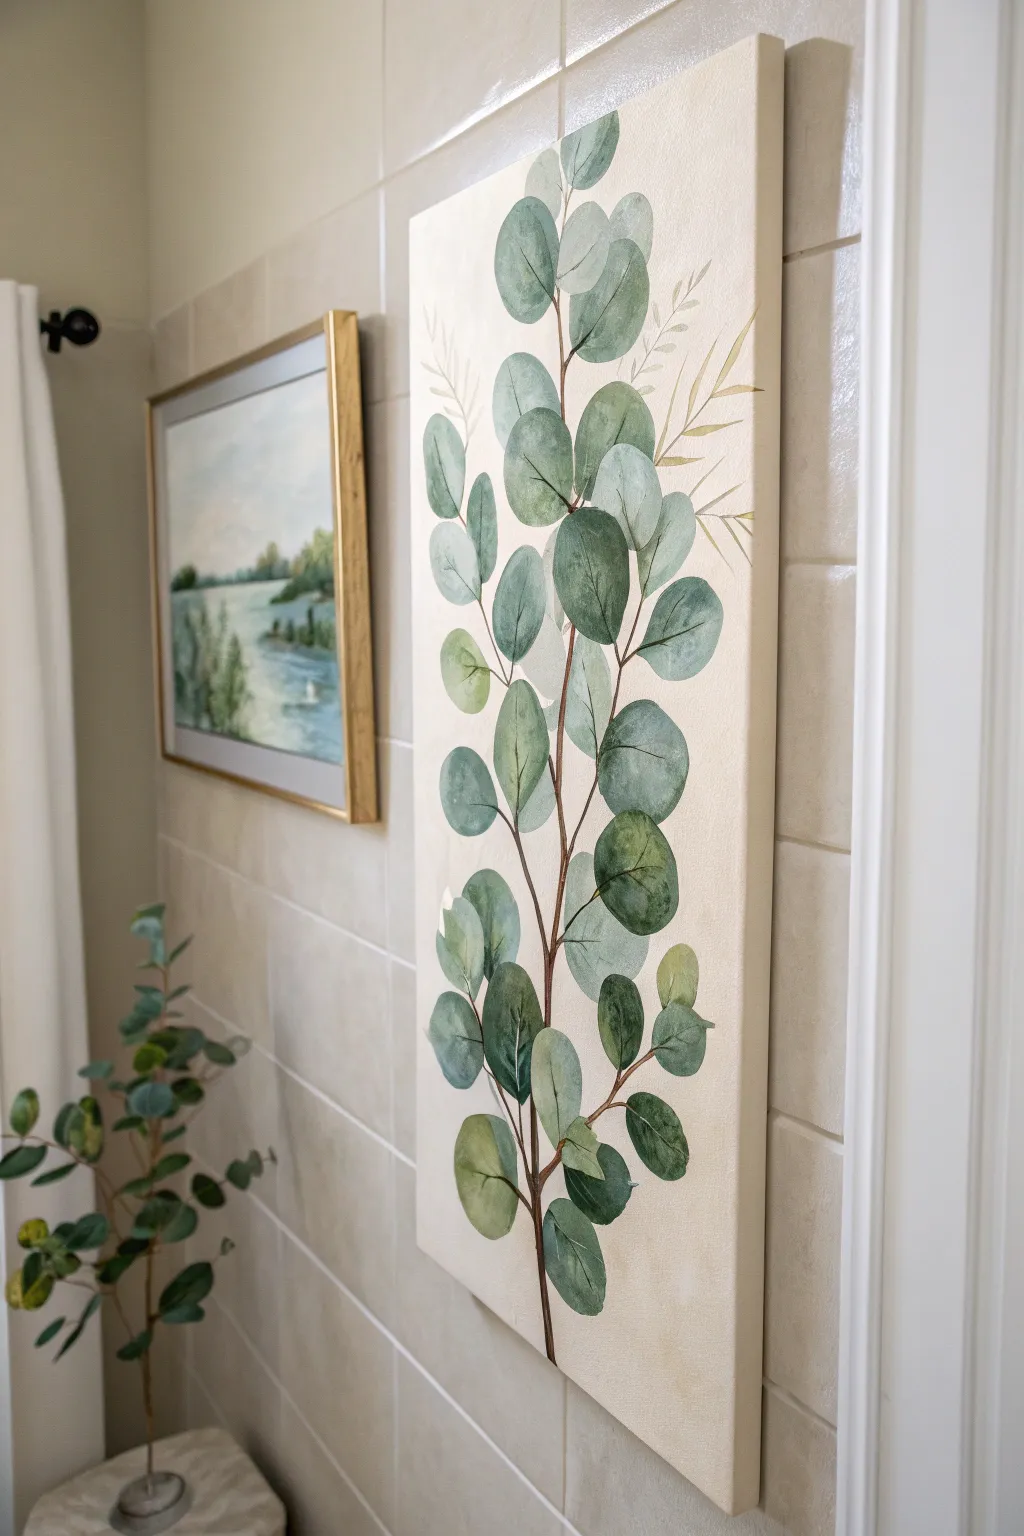
Transform your bathroom into a tranquil retreat with this elegant, vertically orientation canvas featuring stylized eucalyptus stems. The soft sage greens and warm cream background bring an immediate sense of calm and organic beauty to tiled spaces.
Step-by-Step Tutorial
Materials
- Tall rectangular canvas (e.g., 12×36 inches)
- Acrylic paints: Titanium White, Unbleached Titanium (cream), Sap Green, Phthalo Green, Burnt Umber, Paynes Grey
- Acrylic glazing medium or flow improver
- Large flat brush (2-inch)
- Medium filbert brush
- Small round brush (size 2 or 4)
- Liner brush
- Pencil for sketching
- Palette and water water container
- Paper towels
Step 1: Preparing the Backdrop
-
Base Coat Mixing:
Begin by creating a warm, textured background color. Mix a large amount of Titanium White with a dollop of Unbleached Titanium to create a soft, creamy off-white. -
Applying the Background:
Using the large flat brush, cover the entire canvas with your cream mix. Don’t worry about being perfectly smooth; apply the paint in cross-hatch strokes (x-shapes) to build subtle texture that mimics parchment or natural stone. -
Adding Warmth:
While the first layer is still slightly tacky, mix a tiny drop of Burnt Umber into your cream color. Lightly scumble this slightly darker shade around the edges and randomly in the center to create a subtle vintage, aged effect. -
Dry Time:
Let the background dry completely. This is crucial—if the background is wet, your sketch will smudge and the green leaves will become muddy.
Step 2: Sketching the Composition
-
Central Stem Line:
Lightly sketch a single, slightly wavy vertical line running from the bottom center almost to the top. Allow it to meander naturally rather than being perfectly straight. -
Leaf Placement:
Sketch circles and ovals along the stem to represent the leaves. Eucalyptus leaves often grow in pairs, but staggering them creates a more artistic flow. Vary the sizes, keeping larger leaves toward the bottom and smaller ones at the tip. -
Secondary Sprigs:
Add faint lines for the delicate, ghost-like fern sprigs in the background. These should be placed behind the main leaves near the top right and middle left.
Watercolor Effect on Canvas
To get that translucent look with acrylics, use 60% glazing medium to 40% paint. It creates sheer layers that let the background glow through.
Step 3: Painting the Foliage
-
Mixing Greens:
Create a palette of greens. Mix Sap Green with White for a light lime; Phthalo Green with Burnt Umber and White for a deep teal-grey; and Sap Green with Paynes Grey for a shadowy forest green. Add glazing medium to all mixtures to make them semi-transparent. -
Ghost Foliage:
Paint the background fern sprigs first using a very watered-down, pale beige-green mixture. Use the liner brush for these delicate strokes, ensuring they look faint and distant. -
Base Leaf Color:
Using the filbert brush, fill in the eucalyptus leaf shapes with your mid-tone sage green. I find that working with the curve of the leaf, rather than just filling it in flat, adds dimension immediately. -
Color Variation:
While the leaves are wet, drop differnt shades into them. Add the teal-grey mix to the bottom or shadowed side of random leaves, and the lighter lime mix to the tips. -
Softening Edges:
Wipe your brush clean and run it gently along the edges of the painted leaves to soften any harsh lines, mimicking a watercolor look. -
Layering Leaves:
Paint the leaves that appear to be ‘in front’ or overlapping others last. Use a slightly more opaque paint mixture for these to make them pop forward visually.
Fixing Heavy Bloom
If a leaf looks too dark or heavy, wait for it to dry, paint a thin layer of the background cream over it to ‘erase’ it, and try again.
Step 4: Stem and Details
-
Painting the Stem:
Mix Burnt Umber with a touch of fluid medium until it’s inky. Using the liner brush or small round brush, trace your central stem line. Paint right over the connections where the leaves meet the branch. -
Branch Connections:
Add tiny ‘Y’ shapes where the leaves attach to the main stem. These connections should be delicate and tapering. -
Veining:
Mix a pale, milky green-white. Use the liner brush to add very subtle veins to just a few of the larger leaves. Don’t overdo this; suggestion is better than detail here. -
Final Highlights:
Add small touches of the cream background color to the very edges of the uppermost leaves to catch the ‘light’. -
Sealing:
Once fully dry (at least 24 hours), apply a matte varnish to protect the artwork from humidity, which is essential for bathroom decor.
Hang your soothing eucalyptus artwork vertically to add height and a touch of nature’s peace to your bathroom sanctuary


Soft Ocean Waves for a Calm Bath Mood
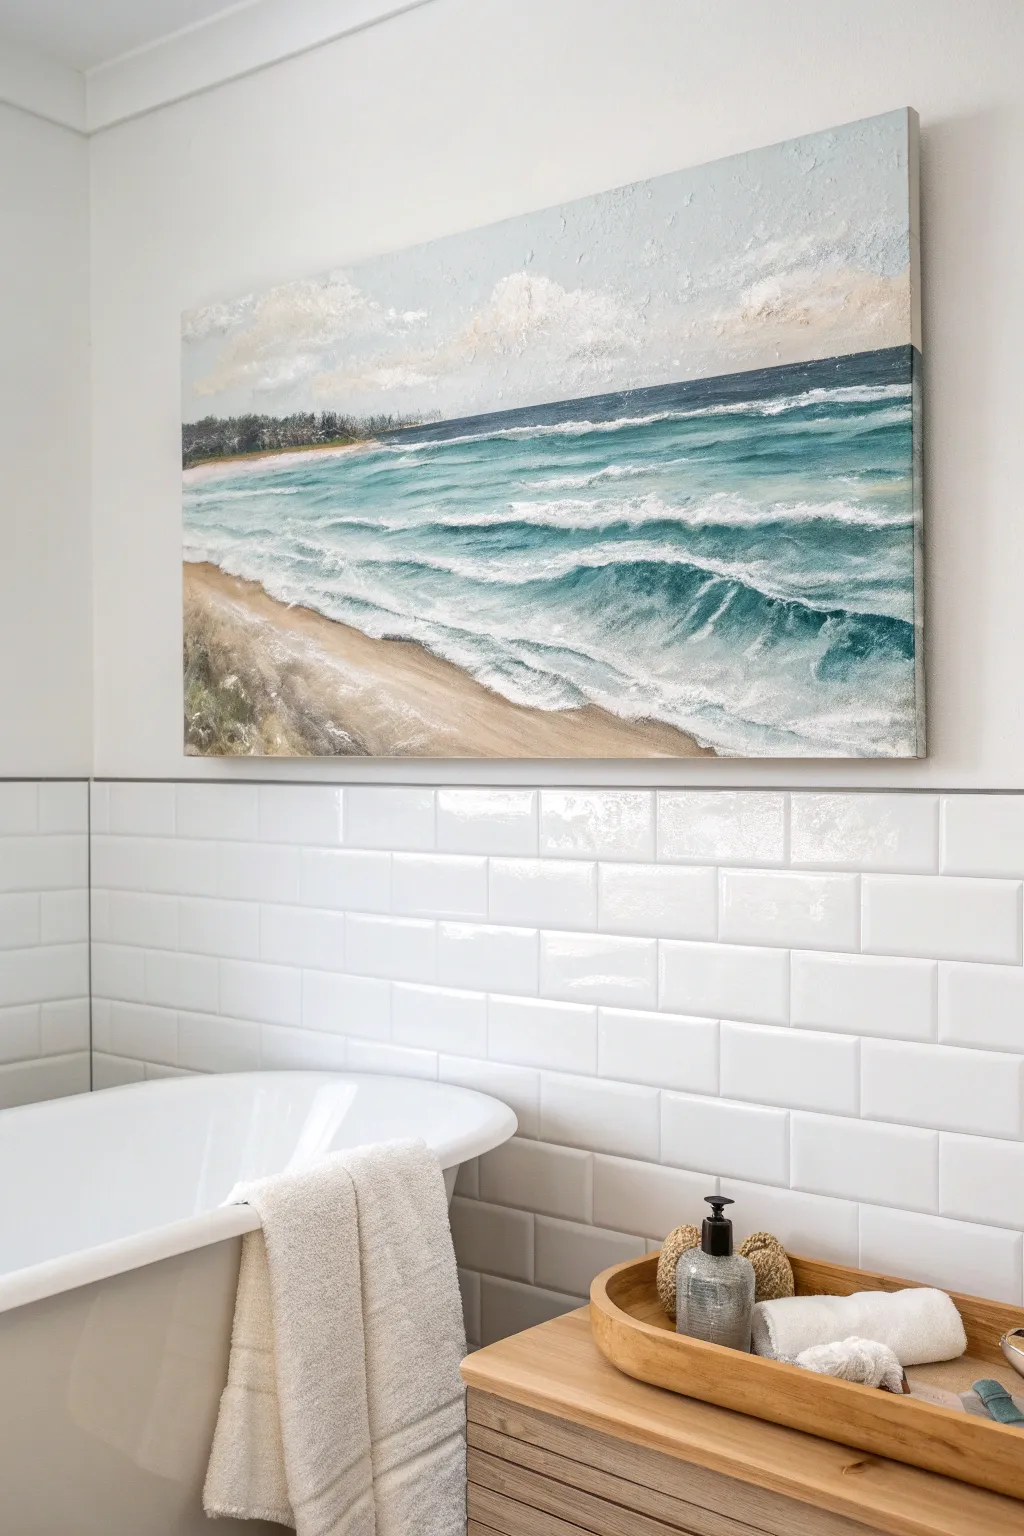
Capture the rhythmic lull of the ocean with this textured seascape painting, perfect for adding a spa-like tranquility to your bathroom. This project focuses on building layers of color and impasto texture to create realistic, crashing waves and soft, sandy shores.
Step-by-Step
Materials
- Large rectangular stretched canvas (e.g., 24×36 inches)
- Heavy body acrylic paints (Titanium White, Phthalo Blue, Turquoise, Burnt Umber, Yellow Ochre, Raw Sienna, Payne’s Gray)
- Texture paste or modeling paste
- Palette knives (various sizes, including a large trowel shape)
- Large flat paintbrush (2-inch)
- Medium filbert brush
- Fan brush
- Palette paper or mixing plate
- Water cup and paper towels
Step 1: Planning and Sky
-
Establish the Horizon:
Begin by lightly sketching a horizon line about one-third down from the top of the canvas using a pencil. This line separates your sky from the ocean. -
Mix the Sky Colors:
On your palette, mix Titanium White with a tiny touch of Yellow Ochre and a speck of Phthalo Blue to create a very pale, warm off-white. -
Paint the Sky Base:
Use the large flat brush to sweep this pale mixture across the entire sky area. Keep the strokes horizontal but relaxed. -
Add Cloud Texture:
While the sky is still slightly wet, mix equal parts Titanium White paint and texture paste. Use a palette knife to scumble thick, irregular patches of white clouds across the upper sky. -
Define the Distant Shore:
Mix Payne’s Gray with a little Burnt Umber to create a dark, muted green-black. Using the filbert brush, tap in a jagged, dark line of trees along the left side of the horizon, fading it out as it moves right.
Step 2: The Ocean Base
-
Block in Deep Water:
Mix Phthalo Blue with a touch of Payne’s Gray. Paint a horizontal band just below the horizon line using the flat brush, representing the deepest, furthest water. -
Create Mid-Ocean Tones:
Add Turquoise and White to your deep blue mix. Paint the middle section of the water, blending it slightly upwards into the deeper blue line while the paint is workable. -
Establish the Shallow Water:
Mix Turquoise with plenty of Titanium White for a translucent aqua color. Apply this to the bottom third of the water area, creating a diagonal sweep where the water will meet the sand. -
Paint the Sand Base:
Mix Raw Sienna, Yellow Ochre, and a lot of White. Paint the bottom left corner in a diagonal wedge shape. Blend the edge where the sand meets the shallow water while wet to create a ‘wet sand’ look.
Muddy colors?
If your ocean blues turn muddy, clean your brush thoroughly before switching to white foam. Don’t over-blend wet layers; let the bottom blue dry before adding crisp white waves on top.
Step 3: Creating the Waves
-
Mix the Wave White:
Prepare a large pile of heavy body Titanium White. I like to mix in a generous amount of texture paste here to ensure the waves stand physically off the canvas. -
Form the Major Waves:
Using a palette knife, load the white texture mix and carve out horizontal ridges across the turquoise section. Press the knife flat and drag it slightly to create the ‘crashing’ top edge. -
Add Shadow to Waves:
Mix a diluted teal (Turquoise + White) and use a small brush to paint directly under the white ridges of your waves. This shadow lifts the foam visually. -
Create Sea Foam:
With a fan brush or an old, splayed bristle brush, tap pure white paint lightly between the wave ridges to simulate churning foam and surface disturbance. -
Detail the Shoreline Break:
Use the palette knife to drag a thick line of white texture along the diagonal edge where water meets sand. Pull the paint seemingly ‘up’ the beach to mimic rushing water. -
Add Beach Texture:
Mix Burnt Umber into your sand color for a darker shade. Dry brush this into the bottom-most corner to suggest dry dunes or vegetation, adding loose strokes for grass. -
Final Highlights:
Once the main waves are tacky, add one final layer of pure white texture paste on the very crests of the waves for maximum 3D impact. -
Seal the Work:
Allow the painting to dry completely for at least 24-48 hours. Since this will live in a bathroom, apply a varnish coat to protect it from humidity.
Pro Tip: Depth
Keep your horizon line perfectly straight (use masking tape if needed). A tilted horizon instantly ruins the realism of a seascape, no matter how good the waves look.
Hang this textured masterpiece in your bathroom and enjoy the sound of imaginary waves every time you step in.


Minimal Line Art Bathtub Sketch
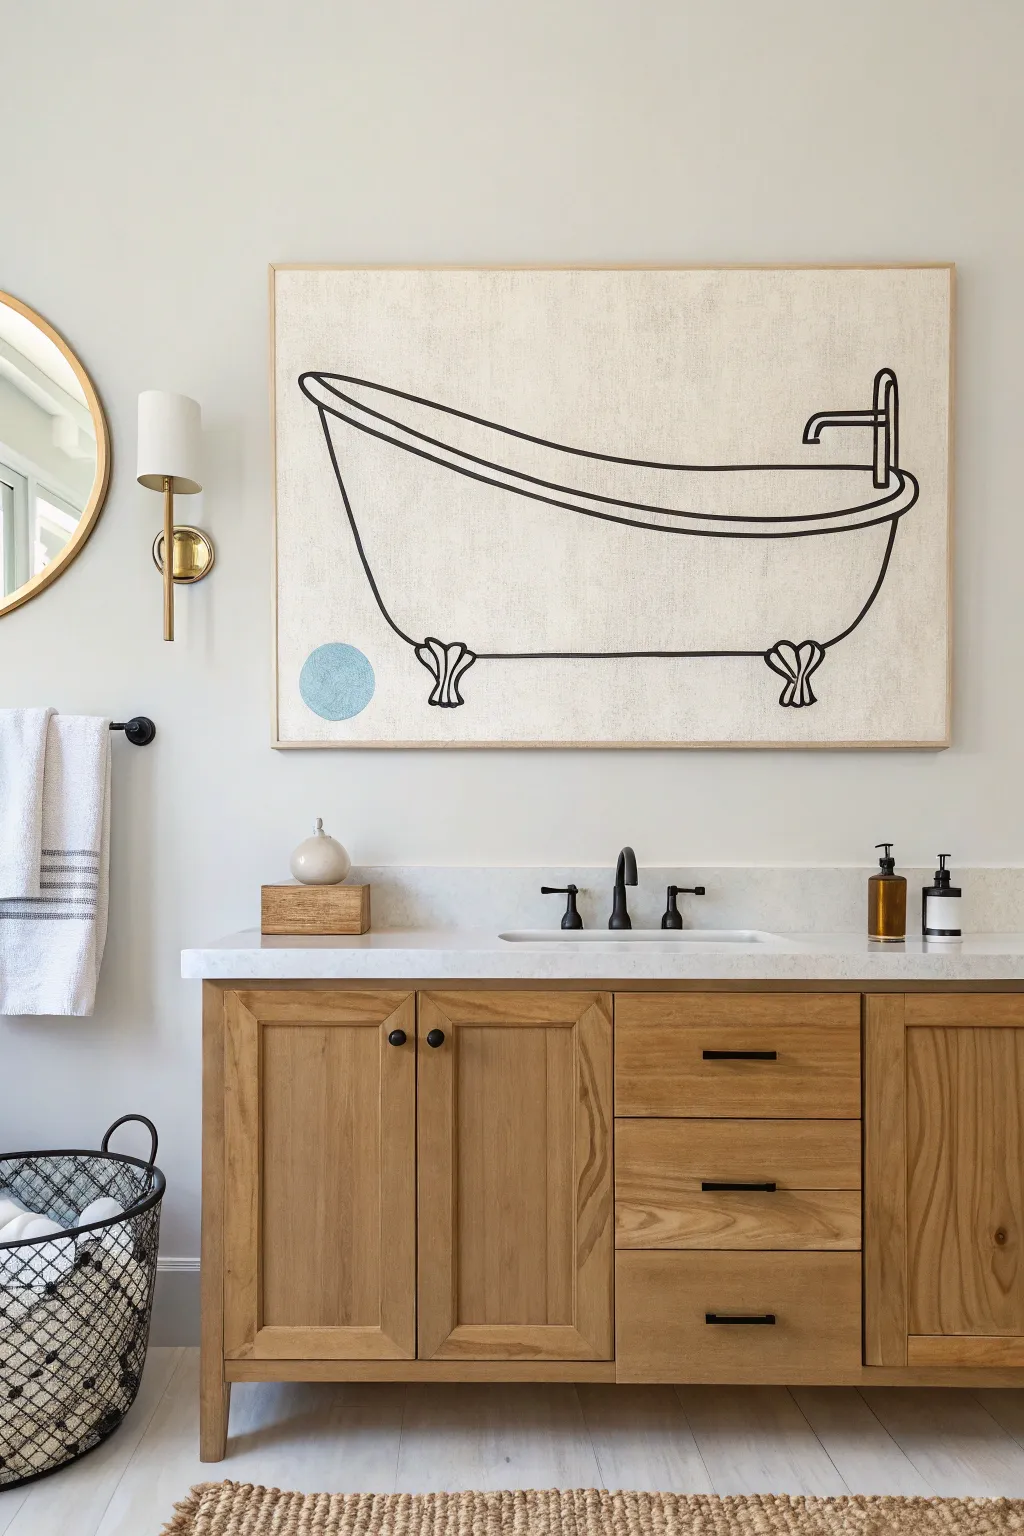
Embrace the elegance of simplicity with this large-scale line art project that adds a touch of whimsy to any bathroom. The raw canvas texture combined with bold black strokes creates a sophisticated, modern focal point.
Step-by-Step Guide
Materials
- Large canvas (approx. 24″ x 36″ or larger)
- Light beige or cream acrylic paint (for background)
- Black acrylic paint
- Soft blue acrylic paint or pastel chalk
- Wide flat paintbrush (2-3 inches)
- Round paintbrush (medium size)
- Fine liner brush
- Pencil and eraser
- Ruler or straight edge
- Thin wood lattice strips (for frame)
- Wood glue or pin nailer
Step 1: Preparing the Canvas
-
Base Coat Application:
Start by mixing your cream or light beige acrylic to create a warm, neutral background. Using your wide flat brush, apply this liberally across the entire canvas to hide the stark white gesso and give it a raw linen look. -
Texture Building:
While painting the background, use crisscross strokes rather than straight horizontal lines. This technique mimics the weave of fabric and adds subtle visual interest. -
Drying Time:
Let this base layer dry completely. I usually give it at least 2-3 hours to ensure no tackiness remains when we start sketching.
Step 2: Sketching the Design
-
Mapping the Dimensions:
Using a pencil, lightly mark the center of your canvas. Decide how wide your tub will be—leave about 3-4 inches of negative space on each side for balance. -
Drawing the Rim:
Sketch the top rim of the tub first. Draw a long, gently curved oval shape. The front line should dip slightly lower than the back line to create perspective. -
Adding the Body:
From the ends of your rim, draw two curved lines downward that slightly taper inward. Connect them at the bottom with a horizontal line that curves just a bit to round out the tub’s belly. -
Detailing the Feet:
Add the claw feet near the bottom corners of the tub body. Simple shapes work best here—think of a small fan shape or three little toes pointing down. -
Plumbing Fixtures:
On the right side of the rim, sketch a vertical pipe sticking up, bending at a 90-degree angle to form the faucet spout. Keep it geometric and simple.
Wobbly Lines?
Don’t stress over perfect lines! If your hand shakes, thicken the line slightly to correct it. A little irregularity adds to the hand-drawn charm.
Step 3: Painting the Artwork
-
Mixing the Black:
Prepare your black acrylic paint. You want a consistency that flows smoothly but is opaque. If it’s too thick, add a drop of water. -
Outlining Principal Lines:
Using your medium round brush, begin tracing over your pencil lines. Start with the main body of the tub. Apply steady pressure to keep the line width consistent. -
Handling Curves:
When painting the curved rim, move your whole arm, not just your wrist, to get a smoother, more continuous stroke. -
Refining the Details:
Switch to your fine liner brush for the faucet details and the intricate lines of the claw feet. These areas need sharpness to look polished. -
Adding the Color Pop:
Locate the bottom left area near the tub leg. Using a round object as a template or freehanding, draw a circle about 3 inches in diameter. -
Painting the Circle:
Fill this circle with a watered-down soft blue acrylic paint. The transparency helps it look like a watercolor stain or a bubble, contrasting nicely with the solid black lines. -
Cleanup:
Once the paint is dry, gently erase any visible pencil marks that weren’t covered by paint.
Level Up: Texture
Mix a pinch of baking soda into your background cream paint. This creates a grainy, limestone-like texture that makes the canvas look high-end and aged.
Step 4: Framing
-
Cutting the Frame:
Measure the outer edges of your canvas. Cut your thin wood lattice strips to match these lengths using a simple saw. -
Attaching the Wood:
Apply a bead of wood glue to the side edge of the canvas. Press the wood strip firmly against it. Secure with clamps or a pin nailer for extra stability. -
Finishing Touches:
Repeat for all four sides. Leave the wood raw for a Scandinavian look, matching the natural aesthetic of the painting.
Hang your new masterpiece to instantly create a spa-like atmosphere in your home


Fresh Botanical Leaves for Bathroom Brightness
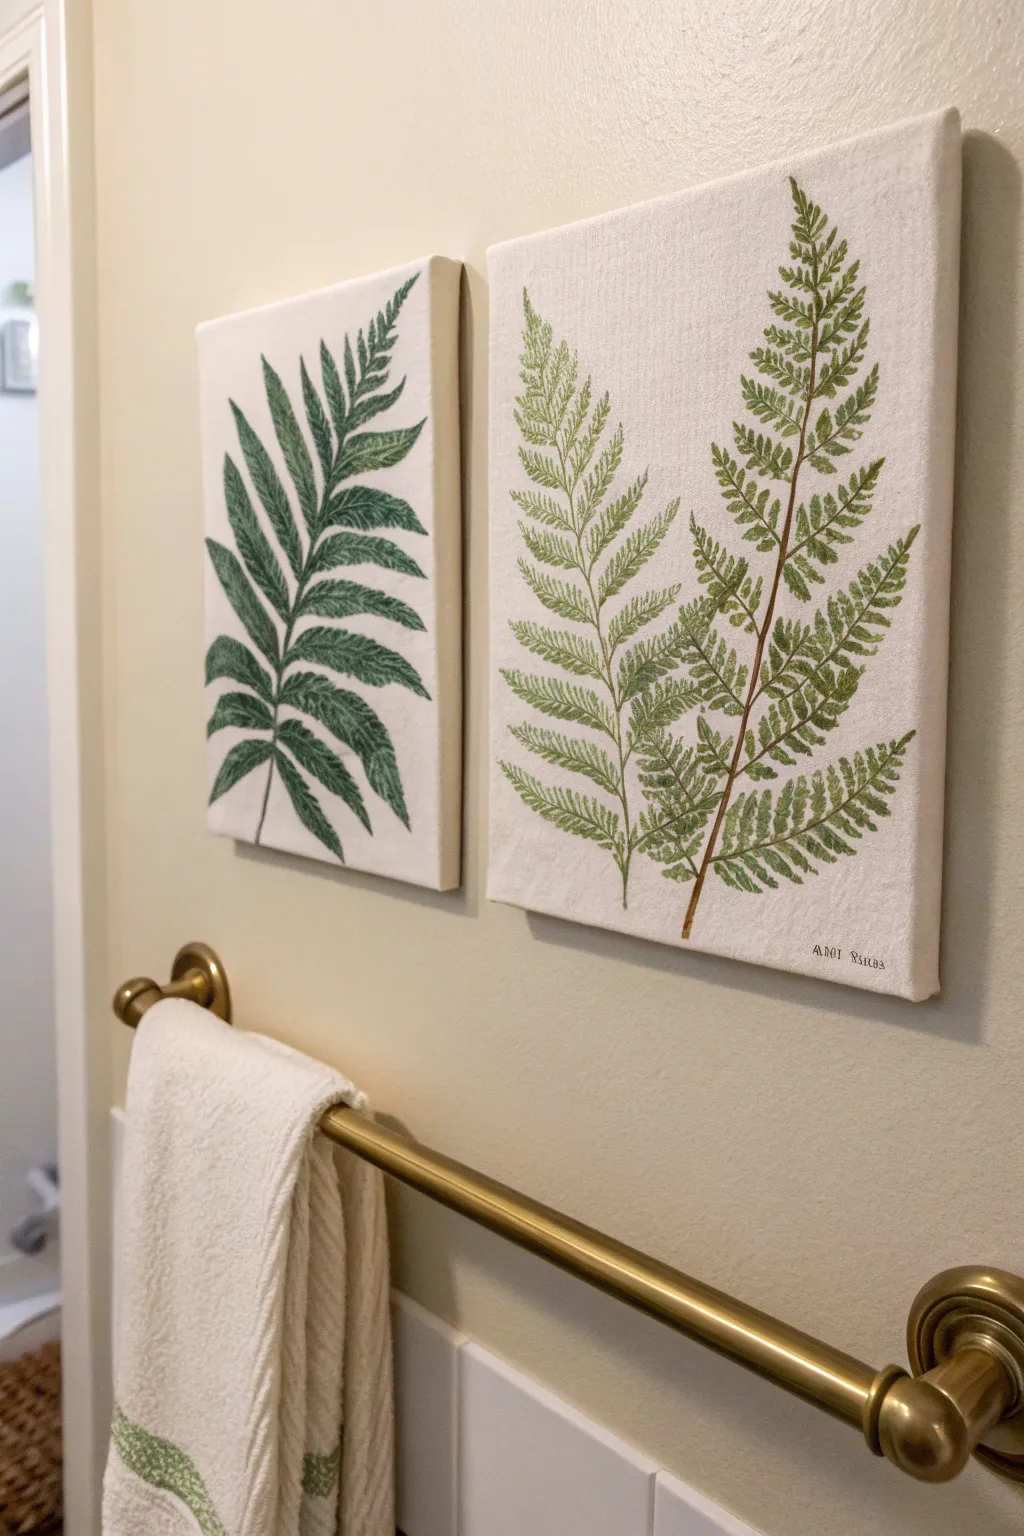
Bring the serene feeling of a spa into your bathroom with these elegant, minimalist fern paintings. This project captures the delicate textures of nature using simple acrylic techniques on stretched canvas for a fresh, organic look.
How-To Guide
Materials
- Two 8×10 or 11×14 stretched white canvases
- Acrylic paints: Sap Green, Hooker’s Green, Burnt Umber (brown), and Titanium White
- Round synthetic brushes: Size 4 (for leaves) and Size 0 or 00 (for stems/details)
- Pencil (HB or lighter) and eraser
- Palette or paper plate
- Jar of water
- Paper towels
- Reference images of ferns (specifically Broad Buckler and Lady Fern varieties)
Step 1: Preparation and Sketching
-
Prime the surface:
Even pre-primed canvases can benefit from a fresh coat of Titanium White slightly thinned with water. This creates a brilliant, smooth base that helps your green tones pop. -
Map the composition:
Lightly sketch the central vein (rachis) of your fern leaves first. For the left canvas, draw one strong central curve. For the right canvas, draw two stems branching out from a lower central point. -
Outline the fronds:
Using very faint pencil strokes, outline the general shape of the leaves. Don’t worry about individual leaflets yet; just block in the triangular or diamond-like overall shapes of the greenery.
Step 2: Painting the Broad Leaf Fern (Left Canvas)
-
Mix your base green:
Create a rich, medium green by mixing Sap Green with a tiny touch of Hooker’s Green. This will be the base color for the broad-leaf fern. -
Paint the stem:
Use your size 0 brush and a mix of green with a speck of brown to paint the central stem line. Keep it thin at the top and slightly thicker at the base. -
Block in leaf pairs:
Switch to the size 4 brush. Starting from the bottom, paint the leaflets in pairs, extending outward from the stem. These leaves should be broad and slightly pointed, with serrated edges. -
Add texture and veins:
While the paint is still wet, you can lift a little color with a dry brush to create highlights, or add deeper green veins once dry for dimension. -
Refine the edgework:
Go back with your smallest brush and ensure the edges of the leaves have that characteristic ‘toothed’ look rather than being perfectly smooth.
Wobbly Lines?
If your stems look shaky, don’t stress. Use a “rigger” or liner brush with long bristles. The length absorbs hand tremors, producing smoother long lines.
Step 3: Painting the Feathery Fern (Right Canvas)
-
Create a delicate stem color:
Mix Burnt Umber with a little water to create an inky consistency. Paint the two main stems, keeping your hand steady to create fine, crisp lines. -
Mix a lighter green:
For this fern, you want a lighter, more yellow-toned green. Mix Sap Green with a little Titanium White and a drop of yellow if you have it, or just stick to a watered-down Sap Green for translucency. -
Start the sub-stems:
Using your finest brush, paint tiny hairlines branching off the main brown stems. These will hold the tiny leaflets. -
Stipple the leaflets:
Here is where patience pays off. Instead of painting full leaves, use small dabbing motions or tiny strokes to create the thousands of tiny distinct leaflets that make up the frond. -
Vary the pressure:
Press harder at the base of each tiny leaflet and lift up quickly to create a feathery, tapered tip. -
Layer for density:
Once your first layer is dry, mix a slightly darker green and add a few more dabbed leaves in the denser areas near the main stem to create depth. -
Final stem touches:
If the green paint covered any of your main brown stem, re-trace it carefully with the brown paint to bring it back to the foreground.
Go Vintage
For an aged botanical chart look, wash the entire canvas background with a very diluted tea stain or watered-down yellow ochre before you start painting.
Step 4: Finishing Touches
-
Clean uphand:
Check the white background for any accidental smudges or paint splatters. Cover them with a dab of opaque Titanium White. -
Add signature:
Sign your work discreetly in the corner using a fine-tipped pen or your smallest brush with watered-down paint.
Hang your new botanical pairing and enjoy the fresh, enduring greenery in your space
BRUSH GUIDE
The Right Brush for Every Stroke
From clean lines to bold texture — master brush choice, stroke control, and essential techniques.
Explore the Full Guide
Salt-and-Watercolor Splash “Bath Bomb” Burst
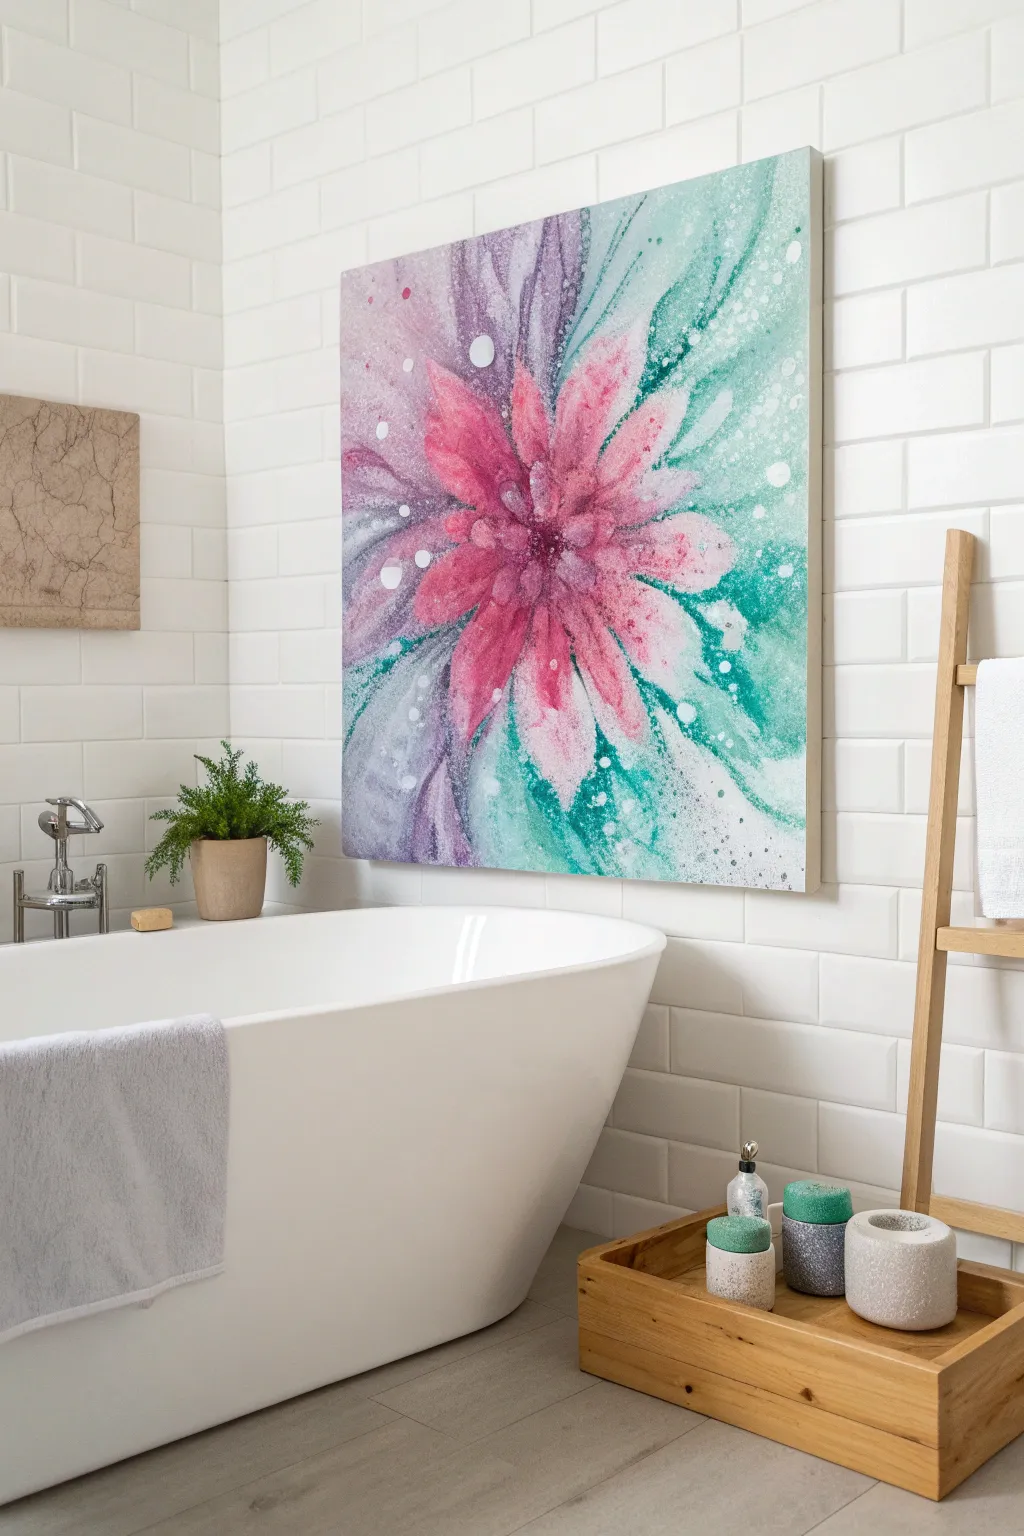
Capture the effervescent energy of a bath bomb dissolving in water with this vibrant, large-scale floral burst. Using fluid watercolor techniques and simple table salt, you’ll create organic textures and soft color bleeds that perfectly complement a relaxing spa atmosphere.
Detailed Instructions
Materials
- Large square gallery-wrapped canvas (approx 24″x24″ or 30″x30″)
- Watercolor ground (gesso specifically for watercolor)
- Medium or soft body acrylic paints: Fuschia/Magenta, Turquoise/Teal, Violet, and Titanium White
- Spray bottle with water
- Large flat brush (1.5 – 2 inch)
- Round brushes (sizes 8 and 12)
- Table salt and coarse sea salt
- Disposable cups or palette for mixing fluid paints
- Paper towels
Step 1: Preparation & Ground
-
Prime the Surface:
Since standard canvasses repel watercolors, coat your entire canvas with two layers of watercolor ground. Allow the first layer to dry completely before applying the second in a cross-hatch direction for better texture adhesion. -
Prepare Fluid Acrylics:
While the ground dries, mix your acrylic colors in separate cups. You want a watercolor consistency, so dilute the magenta, turquoise, and violet with water until they flow freely but retain strong pigment intensity. -
Light Pencil Sketch:
Very faintly sketch a central point slightly off-center on the canvas. Draw loose, radiating lines outward to mark the general direction of your flower petals, keeping the shapes organic and undefined.
Step 2: Creating the Core
-
Wet the Center:
Using a clean brush and clear water, dampen the center area of your flower shape. This ‘wet-on-wet’ technique is crucial for that soft, exploding bloom effect. -
Drop in Magenta:
Load a round brush with your fluid magenta mix. Touch it to the wet center and let the color bleed outward. Don’t paint precise shapes; just let the pigment find its own path along the wet surface. -
Add Deep Violet Accents:
While the magenta is still wet, drop small amounts of violet into the very center and along the inner edges of the petal shapes to create depth and shadow.
Pro Tip: Moisture Control
Work in sections! If the canvas dries too fast, mist it lightly with your spray bottle to keep the edges working and blendable.
Step 3: Petals & Flow
-
Expand the Petals:
Working one section at a time, wet the canvas in a petal shape extending outward. Drag pigment from the center into this new wet area, adding more watered-down magenta as you move toward the tips. -
Introduce Teal Zones:
Around the outer edges of the pink flower, wet large, sweeping areas of the background. Drop in your fluid turquoise/teal mix, allowing it to touch the pink edges slightly so they create soft purple blends where they meet. -
Encourage Drips:
I like to tilt the canvas physically at this stage. Rotate it slowly to let the teal and purple washes run and swirl together naturally, mimicking water movement. -
Saturate the Corners:
Apply stronger, less diluted teal paint to the corners of the canvas, fading it out with water as it approaches the central flower to keep the focus bright.
Level Up: Shimmer Effect
Mix iridescent medium or pearl white acrylic into your final white splatters to make the ‘bubbles’ catch the light like real soap foam.
Step 4: Texture & Details
-
The Salt Technique:
While the paint is still very wet and glistening (timing is key here!), sprinkle a mix of table salt and coarse sea salt over the teal and purple sections. The salt will absorb pigment and create those stunning starburst textures seen in the reference. -
Create White Splatters:
Dilute a small amount of Titanium White acrylic until it’s milky. Load a brush or toothbrush and flick it over the canvas to create bubbles and spray effects. -
Add ‘Ghost’ Bubbles:
Dip the rim of a small cup or bottle cap into the diluted white paint and stamp a few faint circles onto the background for additional geometric interest. -
Enhance Central Definition:
Once the initial wash is damp but not soaking, use a smaller brush with undiluted magenta to redefine a few petal edges near the center, giving the bloom structure amidst the blur.
Step 5: Finishing
-
The Long Wait:
Leave the painting flat to dry completely. This may take overnight due to the amount of water used. It is vital not to disturb the salt while it works its magic. -
Remove the Salt:
Once the canvas is bone dry, gently rub off the salt crystals with a dry cloth or soft brush to reveal the speckled texture underneath. -
Seal the Artwork:
Since this is for a bathroom environment, finish with a spray varnish (matte or satin) to protect the water-based layers from humidity.
Hang your masterpiece near some natural light to watch those watery textures shine throughout the day


Have a question or want to share your own experience? I'd love to hear from you in the comments below!