
Painting a beer mug is one of my favorite ways to turn a simple piece of glassware into something personal, funny, and totally gift-worthy. Here are my go-to beer mug painting ideas, starting with the classic crowd-pleasers and ending with a few playful curveballs.
Classic Monogram and Simple Border
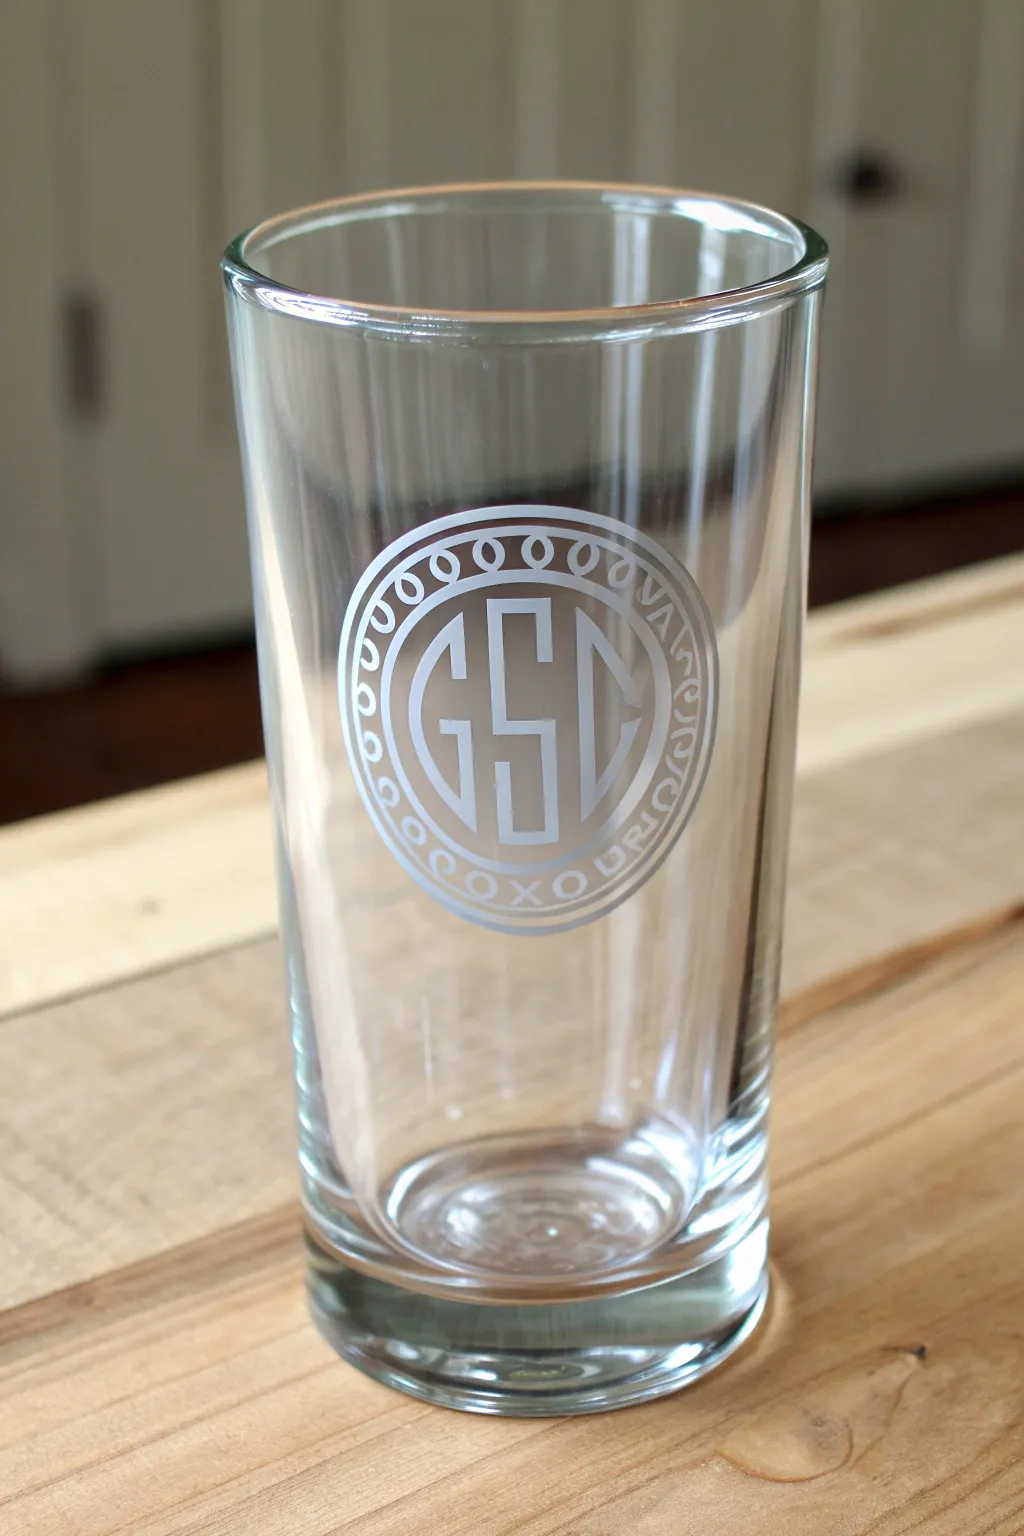
Achieve the sophisticated look of sandblasted glass without any dangerous chemicals or expensive machinery. This project uses frosting medium to create a crisp, personalized monogram that transforms a plain pint glass into a custom barware staple.
Step-by-Step Tutorial
Materials
- Glass pint glass or beer mug
- Rubbing alcohol
- Lint-free cloth
- Adhesive vinyl or stencil material
- Electronic cutting machine (Cricut/Silhouette) or X-Acto knife
- Transfer tape
- Glass frosting paint or etching cream
- Small sponge dabber or soft flat brush
- Detailing tool or tweezers
- Masking tape
Step 1: Design and Stencil Preparation
-
Create your monogram design:
Design a circular monogram on your computer. Place three block letters in the center, stretching the outer two vertically to fit the curve of the circle. -
Add the border detail:
Create concentric circles around the letters. Between two of the rings, add small repetitive shapes like dots, teardrops, or tiny arches to mimic the decorative border seen in the example. -
Size the graphic:
Measure the printable area of your glass. Resize your digital design to be appx. 2.5 to 3 inches in diameter so it sits prominently without wrapping too far around the curve. -
Cut the stencil:
Load adhesive vinyl into your cutting machine and cut the design. If cutting by hand, print the design on paper, tape it over the vinyl, and carefully trace-cut with a sharp X-Acto knife. -
Weed the design:
This step is crucial and reversed from normal vinyl decals. Remove the parts of the design where you want the ‘frosting’ to appear (the letters and the border shapes). Leave the negative space intact.
Bleeding Edges?
If paint bleeds under the stencil, use a toothpick or a cotton swab dipped in rubbing alcohol to quickly clean up the edges while the paint is still wet.
Step 2: Application and Frosting
-
Clean the glass surface:
Wipe the exterior of the glass thoroughly with rubbing alcohol and a lint-free cloth to remove oils or fingerprints that could prevent adhesion. -
Apply transfer tape:
Place transfer tape over yourweeded vinyl stencil. Burnish it firmly with a scraper tool to ensure the small vinyl pieces lift correctly. -
Position the stencil:
Align the stencil on the glass. I find it helpful to look through the clear glass from the back to ensure it’s vertically straight before pressing down. -
Secure the stencil:
Press the center first, then smooth outward to avoid creases. Peel away the transfer tape slowly, ensuring all the tiny vinyl ‘islands’ stay on the glass. -
Seal the edges:
Run your fingernail or a tool firmly over all the cut edges of the vinyl to prevent paint bleed. Tape off the surrounding glass area with masking tape for extra protection. -
Prepare the frosting medium:
Whether using glass frosting paint or etching cream, stir it well. Put a small amount on a palette or scrap piece of cardboard. -
Apply the first layer:
Using a sponge dabber, tap the frosting medium onto the stencil using an up-and-down motion. Do not brush back and forth, as this can force paint under the stencil. -
Let it set briefly:
Allow the first coat to dry just until it’s tacky (usually about 5-10 minutes) or follow the specific manufacturer instructions for your medium. -
Apply a second coat:
Dab on a second layer to ensure opacity and even coverage. If you are using etching cream, apply a thick glob over the area and let it sit for the required time (usually 5-15 mins). -
Dry or Rinse:
If painting: let it dry completely to the touch. If etching: rinse the cream off under running water while the stencil is still on. -
Remove the stencil:
Carefully peel away the main masking vinyl. Use a weeding tool or tweezers to pick off the small inner pieces of the design. -
Cure the design:
If you used glass paint, follow the bottle instructions to cure it—many require baking in a home oven (cool oven start, heat to 350°F, bake 30 mins) to make it dishwasher safe.
Double-Sided Design
Make a matching stencil for the opposite side of the glass featuring a nickname, a significant date (like a wedding anniversary), or a favorite team logo.
Now you have a professional-looking custom glass ready for your favorite cold beverage


Bold Hand-Lettered Beer Quote
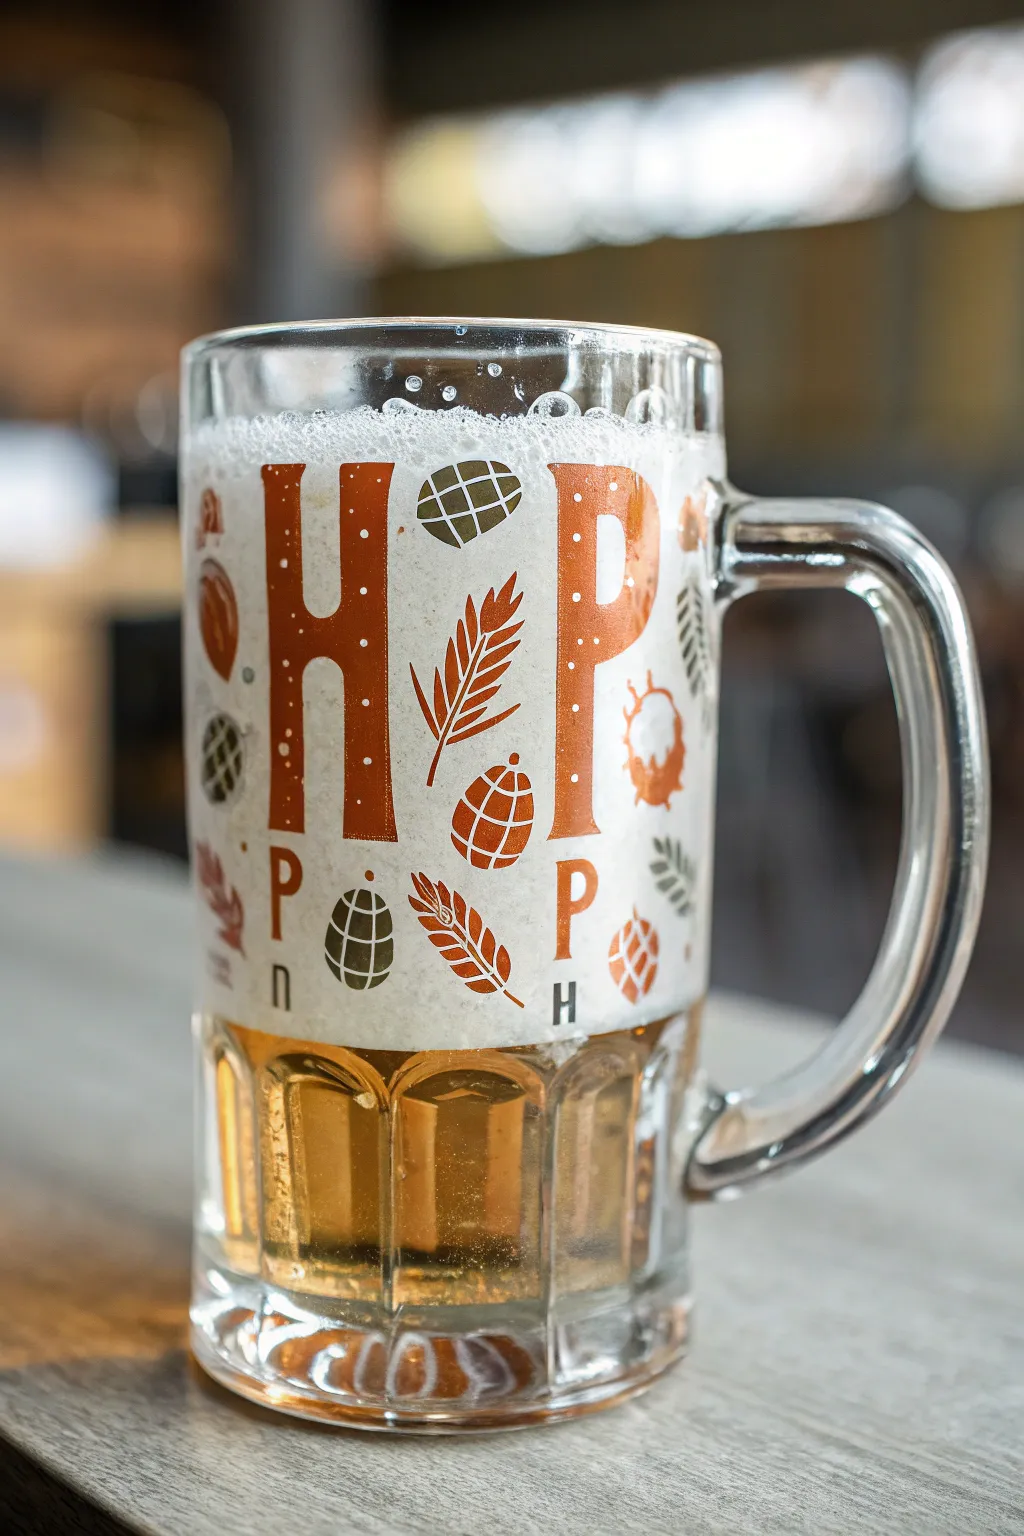
Transform a plain glass beer mug into a brewery-worthy masterpiece with this vintage-inspired lettering project. Featuring bold, rustic typography and stylized botanical elements like hops and wheat, this design brings a warm, autumnal charm to your favorite brew.
Step-by-Step Guide
Materials
- Large glass beer mug (clean and dry)
- Rubbing alcohol
- Cotton pads
- Glass paint markers or enamel paint (Rust Orange, Olive Green, White)
- Fine-point paintbrush (if using enamel paint)
- Printer paper and pencil (for sketching)
- Painter’s tape
- Oven (for curing, if required by paint type)
Step 1: Preparation and Planning
-
Clean the surface:
Before you begin, wipe down the entire outer surface of the mug with rubbing alcohol and a cotton pad. This removes invisible oils and fingerprints that could prevent the paint from adhering properly. -
Draft your design:
On a piece of paper, sketch out the large capital letters ‘H’ and ‘P’. Aim for a blocky, retro serif font style. The ‘O’ is implied by the white space between them, or you can paint it explicitly if you prefer. -
Add botanical sketches:
Practice drawing simple hop cones (oval shapes with cross-hatching or scale patterns) and wheat stalks (a central line with angled grains). Keep the shapes stylized rather than hyper-realistic. -
Create a guide:
Cut your paper sketch to fit inside the mug. Tape it securely to the inside of the glass facing outward. This will serve as your tracing template so you don’t have to freehand on the curved surface.
Step 2: Painting the Typography
-
Outline the main letters:
Using your rust orange glass paint marker or a fine brush with enamel paint, carefully trace the outline of the large ‘H’ and ‘P’ from your template. Keep your hand steady and rest your wrist on a stable surface. -
Fill in the letters:
Once the outlines are tacky or dry (check your paint’s instructions), fill in the bodies of the letters with the orange paint. Apply the paint evenly to avoid streaks, but don’t worry if it looks a bit semi-transparent; that adds to the vintage look. -
Add the smaller letters:
Look closely at the reference: there are smaller ‘P’s and ‘H’s scattered near the bottom. Paint these in using the same rust orange color, keeping them much smaller than the main initials. -
Include decorative dots:
To give the large letters texture, I like to use a white paint pen or a toothpick dipped in white enamel to add tiny, random speckles inside the orange letters. This mimics a weathered, printed texture.
Pro Tip: Texture Trick
Sponge the orange paint on the large letters lightly before it dries to create a naturally distressed, vintage screen-printed texture without extra tools.
Step 3: Adding Graphical Elements
-
Paint the hop cones:
Using your olive green paint, create the oval shapes of the hop cones. Let the basic shape dry slightly before adding the grid-like details or ‘scales’ on top with a fine liner brush or pen tip. -
Add orange hops:
For variety, paint a few hop cones in the rust orange color as well. Place these strategically around the letters to balance the color composition. -
Draw the wheat stalks:
Using the rust orange paint, draw fine lines for the wheat stalks. Start with a central stem and add V-shaped grains extending upward. These fill the negative space nicely. -
Layering details:
If your green hops look too flat, go back in with fine white lines to accentuate the segments of the cone. This adds depth and makes the illustration pop against the amber liquid of the beer.
Troubleshooting: Runny Paint
If paint drips on the vertical glass, lay the mug on its side propped by a towel. Paint one section at a time, letting it dry before rotating to the next.
Step 4: Finishing Touches
-
Review and cleanup:
Rotate the mug and check for any smudges or uneven lines. If the paint is still wet, you can clean up edges with a damp cotton swab. If dry, carefully scrape excess away with a craft knife. -
Remove the template:
Once you are satisfied with your painting, carefully peel the paper template out from the inside of the mug. -
Let it cure:
Allow the mug to dry completely. Most glass paints require 24 hours of air drying before they are ready for the final step. -
Bake to set:
check your paint manufacturer’s instructions. Many require baking the mug in a non-preheated oven at 350°F (176°C) for 30 minutes to make the design dishwasher safe.
Enjoy sipping your favorite craft brew from your custom-designed glassware


Hops and Barley Wraparound Garland
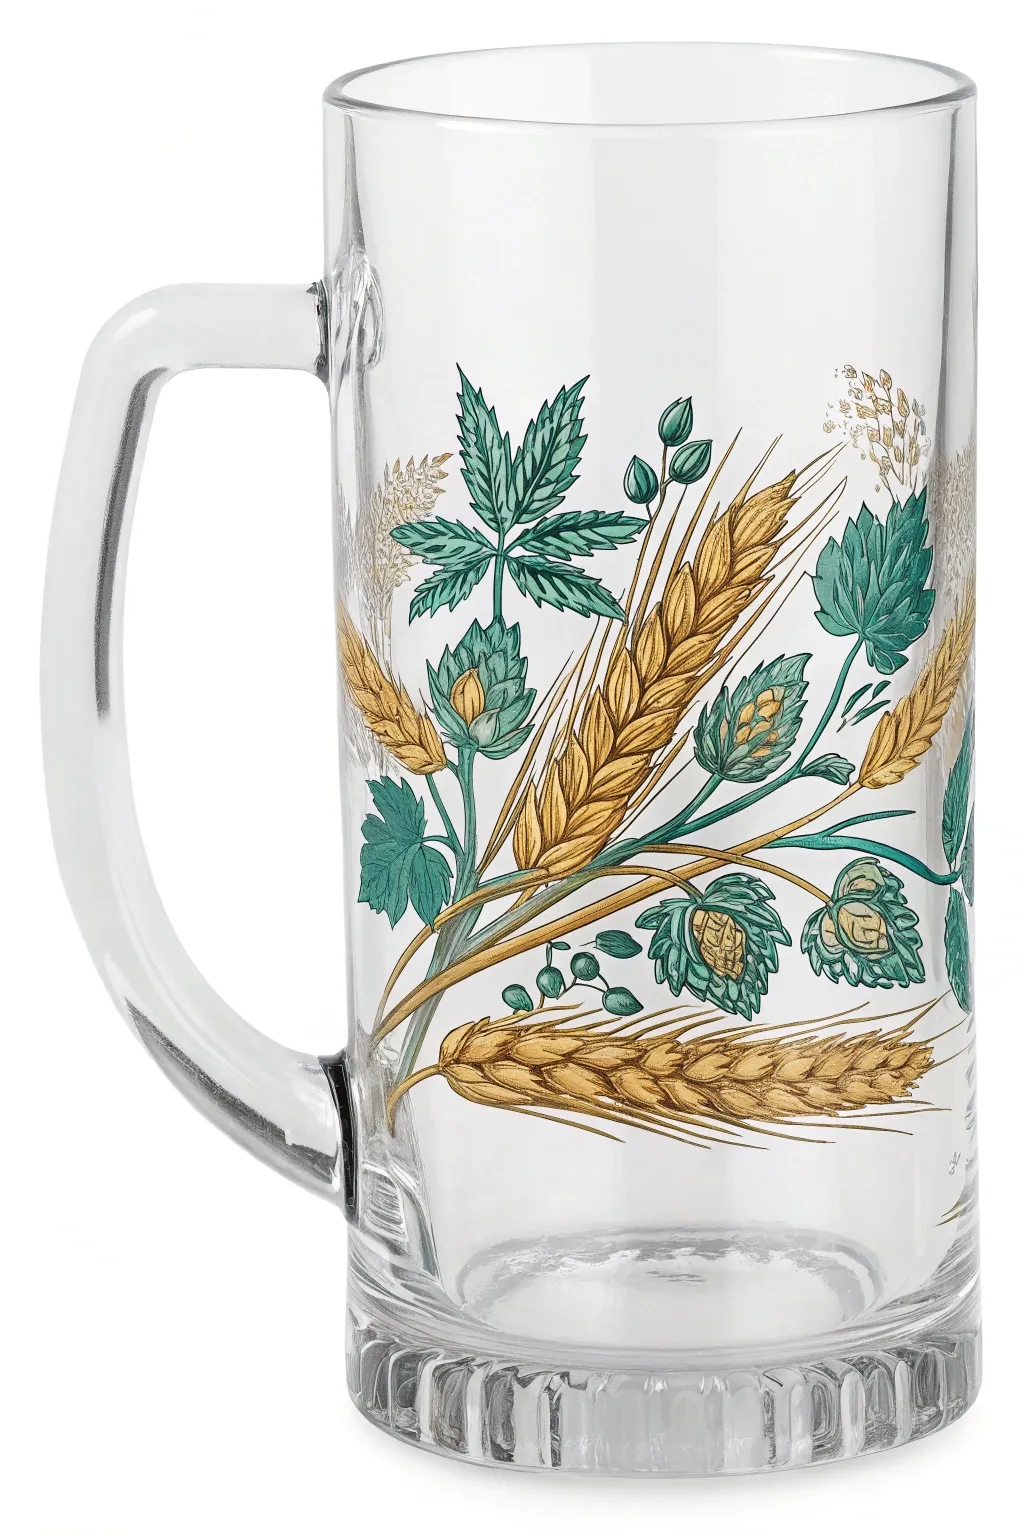
Transform a plain glass tankard into a festive masterpiece with this intricate wraparound design featuring traditional brewing botanicals. The interplay of golden barley stalks and verdant hops creates a timeless look that celebrates the art of brewing.
Detailed Instructions
Materials
- Large clear glass beer mug (thoroughly cleaned)
- Rubbing alcohol
- Cotton pads or paper towels
- Enamel paints suitable for glass (Forest Green, Sage Green, Goldenrod, Wheat/Tan, White, Brown)
- Fine detail brush (size 0 or 00)
- Small round brush (size 1 or 2)
- Painter’s tape (optional, for guidelines)
- Palette or small plate
- Oven (for curing, if paint requires)
Step 1: Preparation & Mapping
-
Prep the surface:
Begin by washing the mug with soapy water and drying it completely. Then, wipe the entire outer surface with rubbing alcohol on a cotton pad to remove any lingering oils or fingerprints, which ensures the paint adheres properly. -
Assess the composition:
Study the design’s flow. Notice how the main central barley stalk leans diagonally from left to right, while the bottom stalk curves horizontally. You can use small pieces of painter’s tape to mark the start and end points of these major stems to keep your proportions correct.
Fixing Translucent Paint
If your yellow or green looks too sheer on the clear glass, let the first layer dry completely (about an hour) before applying a second coat. Don’t overwork wet paint or it will lift.
Step 2: Painting the Foliage
-
Mix your greens:
Prepare two shades of green on your palette. Mix a primary Forest Green for the main leaves and a lighter Sage Green (add a touch of white or yellow to the forest green) for the hops cones. -
Outline the hop leaves:
Using your fine detail brush and Forest Green, paint the jagged, maple-leaf shapes characteristic of hops. Focus on the central leaf arrangement near the top and the side leaves. Keep the lines crisp. -
Fill the leaves:
Fill in the leaf shapes with the same green. Don’t worry about perfect opacity yet; a little transparency can look nice on glass, but you can add a second coat later if needed. -
Add leaf veins:
While the green is still wet, you can carefully drag a clean, dry brush through the paint to create negative space veins, or wait for it to dry and paint fine veins using a darker mix of green and a tiny dot of brown. -
Create the hop cones:
Switch to your Sage Green mix. Paint the oval shapes of the hop cones scattered around the leaves. These should look like layers of small scales. -
Detail the cones:
Once the base sage color is tacky, use a very fine brush with a darker green to outline the individual scales (bracts) on the cones to give them dimension and texture.
Add a Frosty Finish
Sponge a specialized ‘frosted glass’ medium lightly over the background around your design. This makes the clear glass look perpetually chilled and helps the artwork stand out more.
Step 3: Adding the Grains
-
Establish the barley stems:
Using a Goldenrod or deep yellow paint, draw the long, slender stems. Create one strong diagonal stem crossing behind the leaves and a curved stem along the bottom of the mug near the base. -
Paint the kernels:
Along the top of the stems, paint small, V-shaped overlapping kernels using the Goldenrod shade. They should look like a braided pattern moving up the stalk. -
Add the awns:
This is the ‘hair’ of the barley. Use your finest liner brush and a lighter Wheat/Tan color to flick long, very thin lines extending outward from each kernel. I find that quick, confident strokes work best here to keep the lines straight. -
Highlight the grain:
Mix a small amount of White into your Goldenrod. Add tiny highlights to the visible side of each grain kernel to make them pop against the clear glass.
Step 4: Refining & Curing
-
Connect the elements:
Look for any floating elements. Extend thin green stems to connect the hop cones and leaves to the main vine system, intertwining them behind the golden barley stalks. -
Add depth:
Mix a dark brown wash (paint thinned slightly). Carefully add shadows where the stems cross over each other or where leaves sit behind grain to create a sense of depth. -
Clean up edges:
If you made any stray marks or smudges, use a cotton swab dipped in rubbing alcohol or a craft knife to gently scrape away unwanted paint. Do this before the paint fully hardens. -
Final curing:
Follow the specific instructions on your enamel paint bottle. Most require air drying for 24 hours, followed by baking the mug in a non-preheated oven for about 30 minutes to make the design dishwasher safe.
Now your custom glassware is ready to be filled with your favorite brew and enjoyed.


Bavarian-Inspired Blue-and-White Bands
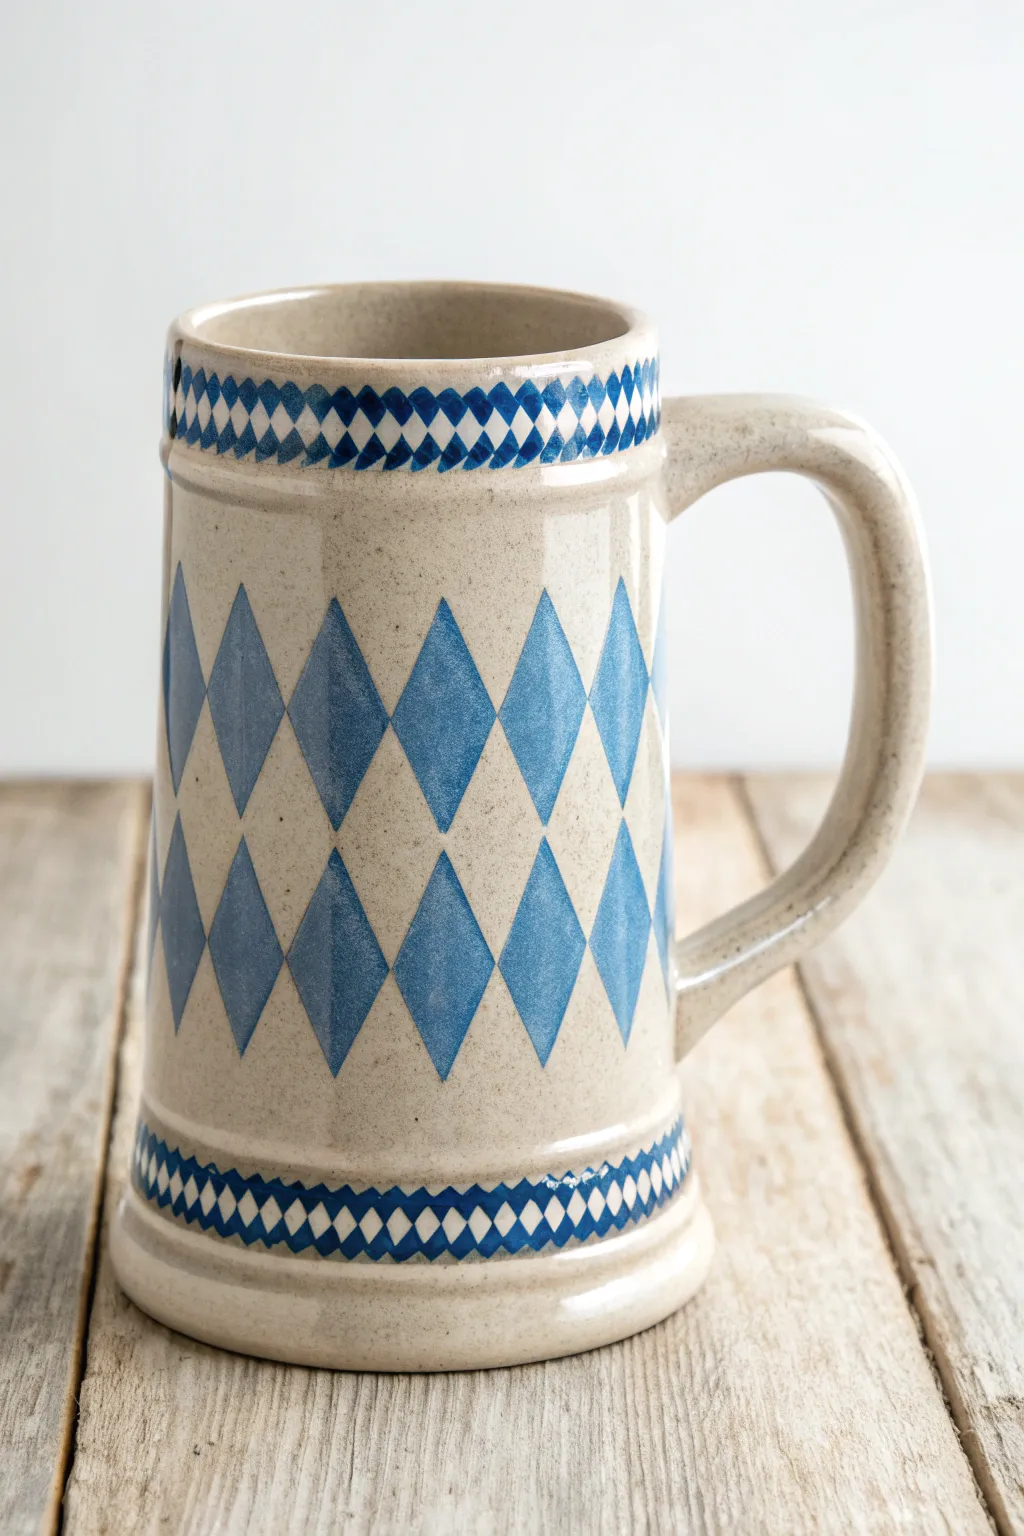
Transform a plain ceramic mug into a festive Oktoberfest centerpiece with this classic Bavarian diamond pattern. The crisp blue and white lozenges create an authentic German look that feels timeless and celebratory.
Detailed Instructions
Materials
- Large, plain ceramic beer stein (beige or off-white base)
- Ceramic or enamel paints (Cobalt Blue, White)
- Painter’s tape (various widths: 1/4 inch and 1/2 inch)
- Ruler or measuring tape
- Pencil
- Flat shader brushes (small and medium)
- Small fine-liner brush
- Rubbing alcohol
- Cotton pads
- Oven (for curing, if using bake-on paints)
Step 1: Preparation and Mapping
-
Clean the Surface:
Before painting, the ceramic surface must be pristine. Wipe the entire exterior of the mug with rubbing alcohol on a cotton pad to remove oils and fingerprints, ensuring the paint adheres properly. -
Mark Horizontal Guidelines:
Using a ruler and a light pencil touch, measure and mark the horizontal zones. You need a narrow band near the top rim (about 1 inch tall), a narrow band near the bottom (about 1 inch tall), and a large central field for the main diamonds. -
Grid the Center Section:
For the large central diamonds, you need a grid. Lightly draw vertical lines spaced evenly around the mug’s circumference. Then, draw horizontal lines to intersect them, creating a grid of rectangles that will guide your diamond shapes. -
Sketch the Large Diamonds:
Connect the midpoints of your grid rectangles to form the diamond (lozenge) shapes. I find it helpful to mark the blue diamonds with a small ‘x’ so I don’t get confused later.
Wobbly Lines?
If your diamond edges look uneven, use a white oil-based paint marker to outline the blue shapes. It sharpens the edges instantly and hides shaky brushstrokes.
Step 2: Painting the Bands
-
Tape the Upper and Lower Borders:
Apply thin painter’s tape horizontally to delineate the top and bottom decorative bands. Press the edges down firmly to prevent paint bleed. -
Create the Mini-Diamond Grid:
Within these narrow bands, use a pencil to quickly sketch a tighter, smaller grid for the tiny diamonds. These patterns are much denser than the central design. -
Paint the Blue Mini-Diamonds:
Using a small fine-liner brush loaded with cobalt blue, carefully fill in alternating diamond shapes in the top band. The pattern should look like a checkerboard turned on its side. -
Repeat for Bottom Band:
Repeat the previous step for the bottom band. Keep your hand steady and brace your pinky finger against the mug for better control on these tiny details. -
Add White Accents (Optional):
If your mug base isn’t perfectly white, use a small brush to paint the ‘white’ diamonds in between the blue ones for a crisp, high-contrast look.
Add a Crest
Leave one side section blank instead of painting diamonds, and paint a faux family crest or initials in that open oval for a personalized souvenir.
Step 3: Painting the Center Motif
-
Outline the Large Diamonds:
Switch to a small flat brush. Carefully outline the edges of the large central diamonds you marked earlier with blue paint. -
Fill the Blue Diamonds:
Fill in the blue diamonds completely. Use smooth, vertical strokes to mimic the texture of the glaze shown in the original image. You may need two coats for opacity. -
Clean Up Edges:
While the paint is still slightly damp, use a damp cotton swab or a clean brush with water to tidy up any lines that went astray. -
Paint the White Diamonds:
Just as with the bands, paint the alternating diamonds white if you want that bright, painted ceramic look, or leave them bare to show the stoneware color underneath.
Step 4: Finishing Touches
-
Add Linear Accents:
Using your finest brush, paint a very thin blue line bordering the top and bottom of the central diamond section to separate it visually from the detailed bands. -
Remove Tape:
Once the paint is tacky but not fully dry, carefully peel away the painter’s tape at a 45-degree angle. -
Dry and Cure:
Let the mug dry for at least 24 hours. If using bake-on ceramic paints, place the mug in a cold oven, set the temperature according to the manufacturer’s instructions, and bake to set the design permanently.
Enjoy your custom stein at your next gathering or display it proudly on your shelf
BRUSH GUIDE
The Right Brush for Every Stroke
From clean lines to bold texture — master brush choice, stroke control, and essential techniques.
Explore the Full Guide
Sports Colors and Icon Pattern
Transform a plain ceramic mug into a game-day essential with this classic sports-themed design. Using a patriotic palette of navy and burnt orange, this repeating pattern captures the energy of the stadium with simplified icons of balls, pennants, and cheers.
Detailed Instructions
Materials
- Large ceramic beer stein (white or cream)
- Porcelain or glass paints (Navy Blue, Burnt Orange/Rust)
- Fine-point detail brushes (sizes 0 and 00)
- Medium flat brush
- Painter’s tape or masking tape
- Graphite transfer paper (optional)
- Pencil
- Rubbing alcohol
- Cotton pads
- Oven (for curing)
Step 1: Preparation and Grid Layout
-
Clean the surface:
Before laying down any color, thoroughly wipe the entire exterior of the mug with rubbing alcohol and a cotton pad. This removes oils and fingerprints that could prevent the paint from adhering properly. -
Establish the bands:
Use painter’s tape to mark off two thick horizontal bands where the navy blue patterns will go—one near the top rim and one near the base. Ensure these bands are level all the way around the mug. -
Rough in the design grid:
Lightly sketch a grid system using a pencil. You’ll need three main horizontal rows for the icons. Mark vertical lines periodically to help space out the balls and pennants evenly. Don’t worry about perfection; pencil marks will wash off later.
Uneven Lines?
If your hand is shaky on the long vertical lines, use a flexible ruler or the edge of a piece of cardstock as a guide. Wipe the guide clean after every single line to avoid smears.
Step 2: Painting the Borders
-
Apply the navy bands:
Using your medium flat brush and Navy Blue paint, fill in the taped-off areas at the top and bottom. You might need two coats for full opacity, allowing about 20 minutes of drying time between layers. -
Add the chevron detail:
Once the blue bands are dry to the touch, use a fine detail brush and the original white of the mug (or white paint if you prefer) to scratch out or paint faint ‘V’ shapes or chevrons inside the blue bands, mimicking the stitching on a baseball or football. -
Paint the bottom stripes:
At the very base of the mug, below the bottom blue band, paint two thin horizontal stripes in Burnt Orange. Use a steady hand or more tape guides to keep them crisp. -
Add the dot borders:
Just inside the main central area, along the top and bottom navy bands, use the back end of your paintbrush dipped in Burnt Orange to stamp a row of evenly spaced dots.
Pro Tip: Sticker method
Can’t freehand the balls? Buy small circular stickers at an office supply store. Place them on the mug, paint over them, and peel them off to reveal perfect circles for your basketballs.
Step 3: Creating the Icon Pattern
-
Outline the pennants:
In the middle horizontal row, paint alternating triangular pennants. Use Navy Blue for the solid triangles pointing down. Space them out so you can fit basketballs in between them. -
Add the basketballs:
Between the blue pennants, paint circles using Burnt Orange. When they are tacky-dry, use your finest brush and white paint (or carefully leave negative space) to add the curved lines of a basketball. -
Paint the top row footballs:
Moving to the top row, paint diagonal football shapes in Navy Blue. Again, leave negative space for the laces or paint them white later. -
Paint the top row baseballs:
Alternate the footballs with circles for baseballs. Paint two curved lines in Burnt Orange on a white circle to represent the stitching area. -
Add the megaphones:
In the spaces between the balls, paint cone-shaped megaphones. Outline them in Navy Blue and add a cross-hatch pattern inside to give them texture. -
Repeat for the bottom row:
Mirror the pattern on the bottom row. I find it helps to align these vertically with the top row icons to keep the pattern feeling cohesive.
Step 4: Details and Finishing
-
Add vertical dividers:
Use your finest liner brush and Navy Blue paint to draw thin vertical lines separating the columns of icons. This gives the design a structured, vintage wallpaper look. -
Paint the stars:
At the top of these vertical divider lines, paint small Burnt Orange stars. This adds a nice celebratory ‘all-star’ touch to the grid. -
Final Cleanup:
Examine your lines. If you have any smudges, clean them up carefully with a damp cotton swab. If pencil lines are still visible, gently wipe them away with a damp cloth only after the paint is completely dry. -
Cure the mug:
Follow the instructions on your specific paint bottle. Most enamels require air drying for 24 hours, followed by baking in a cool oven that heats up to 300-350°F for about 30 minutes to make the design dishwasher safe.
Once baked and cooled, your custom stein is ready to hold your favorite brew for the next big game
Golf Green Mini Landscape Scene
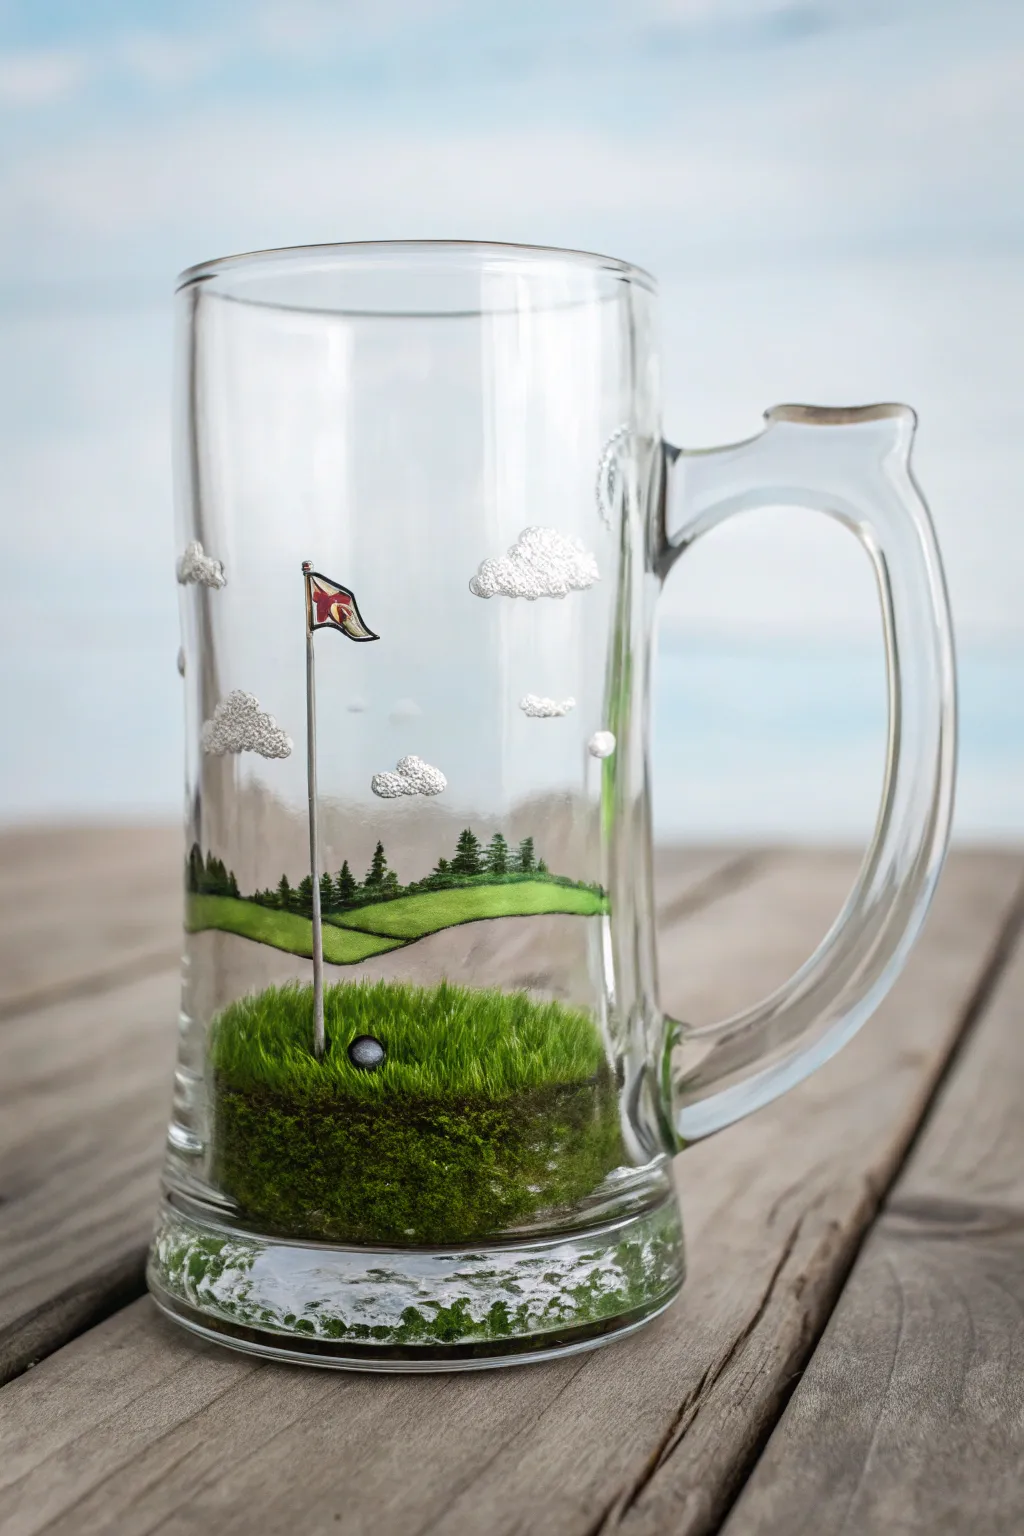
Transform a standard beer mug into a serene golfer’s paradise with this multi-layered landscape project. Using a clever combination of glass paints and textured dimensional effects, you’ll create a realistic cross-section of a putting green right inside the glass walls.
How-To Guide
Materials
- Large clear glass beer mug (smooth sides preferred)
- Rubbing alcohol and cotton pads
- Enamel glass paints (forest green, lime green, white, black, brown, grey)
- Dimensional fabric paint or puff paint (white)
- Fine detail texture paste or modeling paste
- Faux moss flocking powder or fine turf material
- Strong craft glue (clear drying)
- Fine detail brushes (liner brush, small round brush)
- Palette knife or popsicle stick
- Fan brush (optional)
- Oven (for curing paint, if applicable)
Step 1: Preparation & Background
-
Clean the Surface:
Thoroughly wipe down the exterior and interior of the mug with rubbing alcohol to remove any oils or fingerprints, ensuring the paint adheres properly. -
Sketch the Horizon:
Using a dry-erase marker on the outside of the glass, lightly sketch a wavy horizon line about 2 inches from the bottom to mark where the distant treeline will sit. -
Paint the Distant Trees:
Mix a tiny bit of grey into your forest green enamel paint to mute it. Using a fine liner brush, paint tiny, vertical evergreen shapes along your horizon line on the *outside* of the glass, varying their heights for realism.
Fixing Slips
Smudged a tree? Don’t panic. Wet glass paint wipes away easily with a damp Q-tip. If it has already dried, you can gently scrape it off with a razor blade without scratching the glass.
Step 2: The Fairway & Flag
-
Create the Rolling Green:
Paint a sweeping band of lime green below your tree line. To add depth, blend a darker green along the bottom edge of this stripe while the paint is still wet. -
Draw the Flagstick:
With a steady hand and your finest liner brush, paint a thin, vertical silver or grey line rising from the foreground area up towards the middle of the glass. -
Add the Flag:
At the top of the pole, paint a waving flag shape. Outline it in fine black, then fill with red and white, adding small shading lines to suggest fabric ripples. -
Create Clouds:
Dab small amounts of white dimensional puff paint onto the upper sections of the glass to create textured, fluffy clouds. -
Texture the Clouds:
While the puff paint is wet, gently tap it with a stiff brush or toothpick to roughen the surface, making it look more like cloud vapor than a smooth blob.
Miniature Magic
Instead of painting the ball, cut a regular golf ball in half (carefully!) and glue the flat side to the glass for an ultra-realistic 3D effect that pops out at the drinker.
Step 3: The 3D Foreground
-
Base for the Rough:
This is the trickiest part: inside the glass at the very bottom, apply a layer of texture paste mixed with dark green paint. You want this to look like the dirt and heavy rough. -
Apply the Turf:
While the texture paste is tacky, sprinkle the faux moss flocking powder generously into the bottom of the mug. Press it down gently to secure it. -
Paint Grass Blades:
Back on the *outside* of the glass, at the very bottom level, use a fan brush or fine liner with bright green to paint vertical strokes upward, blending the visual transition from the internal moss to the external glass. -
The Golf Ball:
Paint a small white circle nestled in the painted grass near the flagstick line. Use a dot of grey on the bottom right and a tiny dot of pure white on the top left to create a 3D sphere effect. -
Shadowing:
Add a very faint wash of watered-down black paint under the ball and at the base of the flagstick to ground these objects in the scene.
Step 4: Finishing Touches
-
Clean Up:
Use a cotton swab dipped in alcohol to clean up any stray paint smudges or distinct marker lines still visible. -
Curing:
Follow the manufacturer instructions for your specific glass paint. This usually involves letting it air cure for 21 days or baking it in a cool oven that heats up to 350°F. -
Sealing the Base:
If you plan to wash this mug, apply a generous layer of waterproof sealant over the flocking at the bottom, or reserve this mug for display and dry snacks only.
Fill your new mug with a cold brew and enjoy the view of the green from the comfort of your home

PENCIL GUIDE
Understanding Pencil Grades from H to B
From first sketch to finished drawing — learn pencil grades, line control, and shading techniques.
Explore the Full Guide
Music Notes and Rhythm Stripes
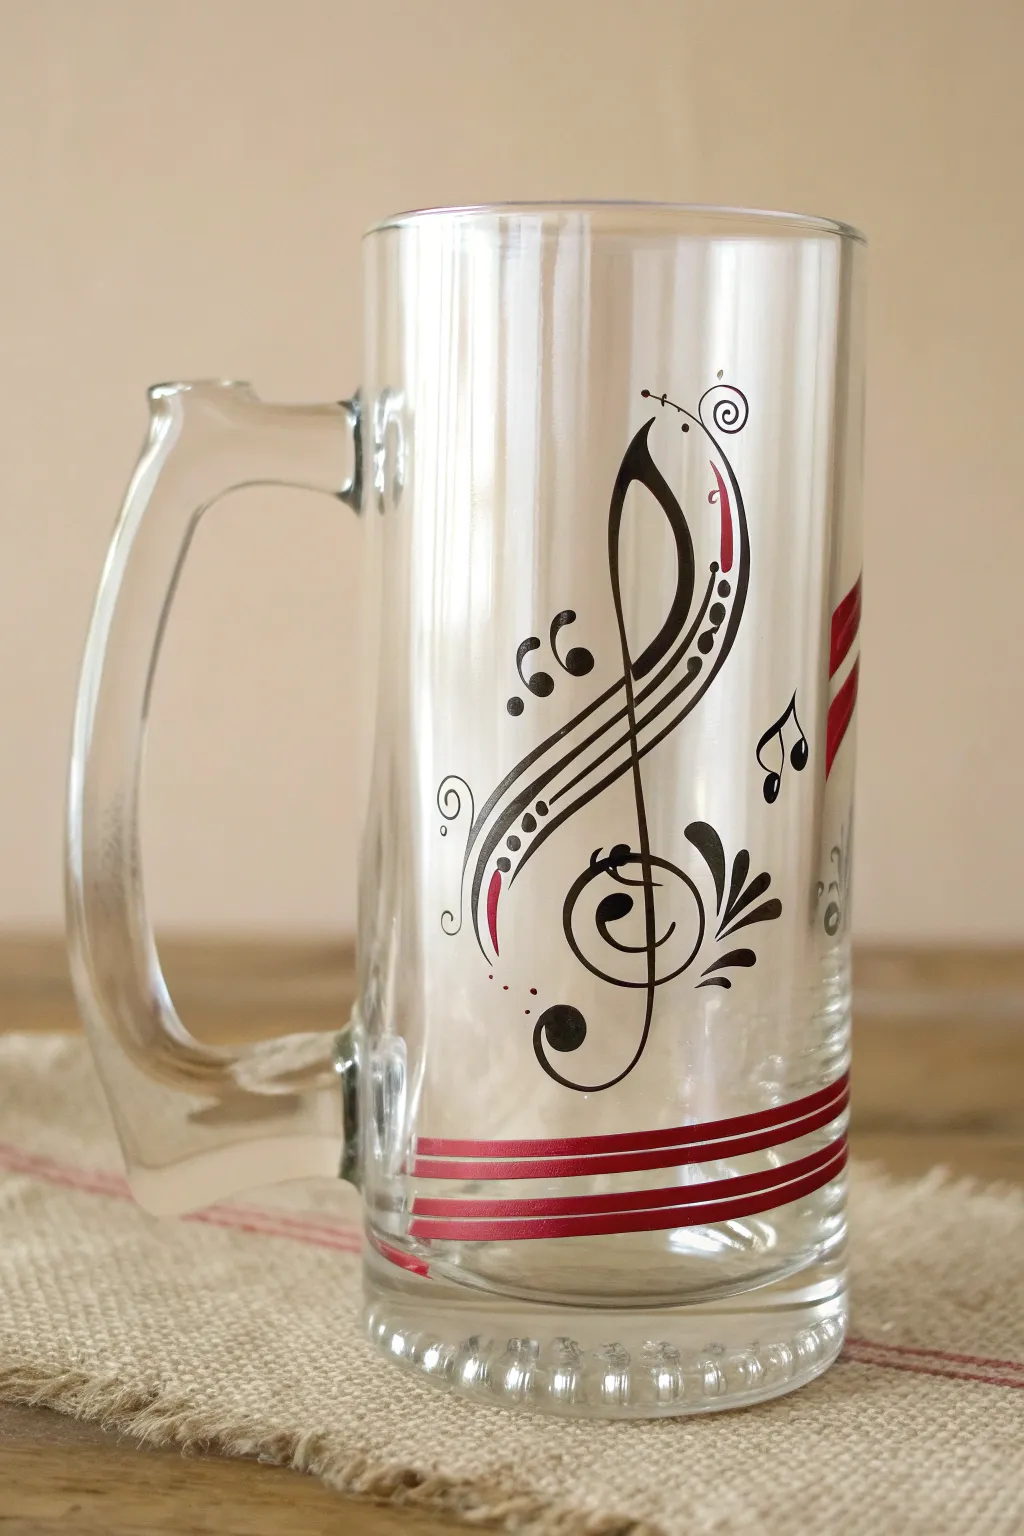
Transform a standard glass beer mug into a melodic masterpiece with elegant black swirls and bold red accents. This design features a stylized decorative treble clef flanked by rhythm lines, perfect for music lovers or as a personalized gift.
Step-by-Step
Materials
- Glass beer mug (clean and dry)
- Rubbing alcohol
- Cotton rounds
- Pebeo Vitrea 160 glass paint (Gloss Black)
- Pebeo Vitrea 160 glass paint (Gloss Red)
- Fine liner brush (size 0 or 00)
- Flat shader brush (size 4 or 6)
- Masking tape or painter’s tape
- Paper towels
- Water container
- Oven (for curing)
Step 1: Preparation & Base Lines
-
Clean surface:
Before you begin, wipe the entire outer surface of the mug with rubbing alcohol using a cotton round. This removes oils and fingerprints that prevent paint adhesion. -
Tape the bottom:
Apply a strip of masking tape horizontally around the base of the mug, about half an inch from the bottom edge. Ensure it is pressed down firmly to prevent leaks. -
Paint the bottom stripe:
Dip your flat shader brush into the Gloss Red paint. Paint a solid band below the tape, following the curve of the glass. Apply a second coat if the first looks streaky. -
Add floating stripes:
Carefully freehand two thinner red lines above your taped section using the fine liner brush. Keep them parallel to your bottom band to create that ‘sheet music’ staff effect. -
Remove tape:
While the paint is still slightly tacky but not wet, gently peel off the masking tape at a 45-degree angle to reveal a crisp edge on your bottom stripe.
Step 2: The Treble Clef Structure
-
Draft the spine:
Using the fine liner brush loaded with Gloss Black, paint a long, vertical line slightly curved at the top. This is the central spine of your treble clef. -
Create the top loop:
Now, start at the top of your spine and pull a swooping line down and to the right, crossing over the spine about a third of the way down. -
Form the bottom swirl:
Continue that line, swooping it down and to the left, circling around the bottom of the spine to create the classic G-clef spiral. -
Thicken main curves:
Go back over the main swoops of the clef. Add pressure to your brush on the downstrokes to thicken the lines, creating a calligraphy-style varying width. -
Add rhythm lines:
Paint three curved, diagonal lines intersecting the middle of the clef, moving from bottom-left to top-right. These mimic the flow of a music staff.
Steadier Strokes
Rest your pinky finger against the glass while painting. This creates an anchor point, giving you much better control for those fine black lines and swirls.
Step 3: Details & Flourishes
-
Add dots and accents:
Using the very tip of your brush or a dotting tool, place small black dots along the diagonal rhythm lines you just painted to add texture. -
Paint decorative flourishes:
Add small, comma-shaped strokes and mini-spirals around the main clef. I like to add a tiny spiral at the very top tip of the clef for a whimsical touch. -
Insert musical notes:
Paint a small pair of eighth notes (two dots connected by a beam) floating to the right of the main design. -
Add red highlights:
Clean your fine liner brush thoroughly. Dip it into the red paint and carefully add thin accent lines inside the loops of the black swirls. -
Incorporate leaf motifs:
Near the bottom spiral of the clef, paint three small teardrop shapes fanning out to resemble a stylized leaf or flower bud. -
Check for errors:
Look over the design. If you spot a smudge, dampen a cotton swab with water (or rubbing alcohol if the paint is dry) and carefully wipe it away.
Fixing Smudges
Paint landed in the wrong spot? Don’t wipe it immediately while wet—it smears. Let it dry for a few minutes, then scrape it off cleanly with a craft knife or toothpick.
Step 4: Curing
-
Dry time:
Allow the painted mug to dry for at least 24 hours. This is crucial as the paint needs to be fully dry before heat setting. -
Baking process:
Place the mug in a cold oven. Set the temperature to 325°F (160°C). Once the oven hits that temperature, bake for 40 minutes. -
Cooling down:
Turn the oven off and open the door slightly, but leave the mug inside to cool down completely with the oven to prevent the glass from cracking.
Once baked, your musical mug is top-rack dishwasher safe and ready for your favorite beverage
Outdoors Silhouette in Black and White
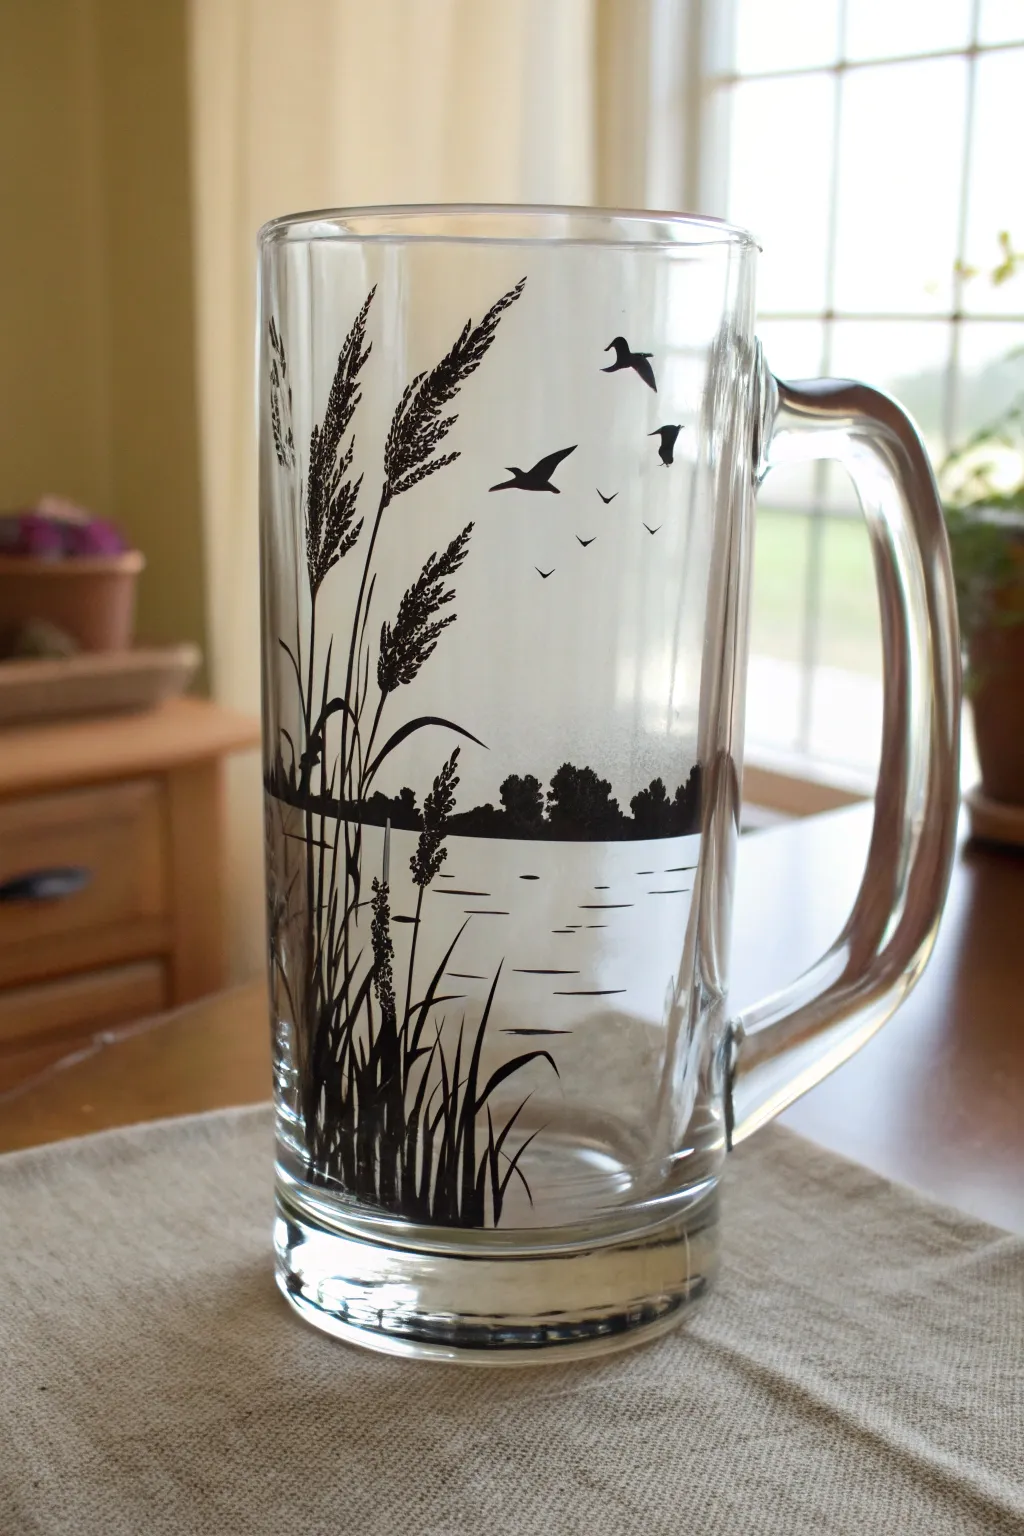
Transform a standard glass beer mug into a serene lakeside escape with this striking black silhouette design. The high-contrast monochromatic look is elegant yet rugged, capturing the peaceful moment of birds taking flight over still water.
Step-by-Step Guide
Materials
- Large clear glass beer mug (tankard style with handle)
- Rubbing alcohol
- Cotton pads or paper towels
- Black enamel paint for glass (gloss or satin finish)
- Fine liner brush (size 0 or 00)
- Small flat brush (size 2 or 4)
- Paper plate or palette
- Cotton swabs (for clean up)
- Oven (for curing, if paint requires)
Step 1: Preparation & Layout
-
Clean surface:
Begin by thoroughly wiping down the exterior of the mug with rubbing alcohol and a paper towel. This removes oils and fingerprints that prevent paint adhesion. -
Visualize the horizon:
Decide where your water line will sit. For this design, aim for the lower third of the mug, wrapping horizontally around the visible front section.
Fixing Smudges
If you smear wet paint, don’t wipe it immediately as it will streak. Wait for it to dry slightly, then use a Q-tip dipped in rubbing alcohol to lift the mistake cleanly.
Step 2: Painting the Landscape
-
Establish the horizon:
Using your small flat brush and black enamel paint, draw a straight horizontal line across the mug to create the separation between sky and water. -
Add distant trees:
Paint small, irregular bumps along the top of that horizon line to represent distant trees. Vary their heights slightly, keeping them connected to form a solid shoreline silhouette. -
Suggest water ripples:
Switch to your fine liner brush. Below the horizon line, paint thin, horizontal dashes of varying lengths. Concentrate them near the shoreline and space them out as you move downward to mimic calm water ripples. -
Start the reeds:
On the left side of the mug, paint long, thin vertical lines stemming from the very bottom of the glass, reaching upwards past the horizon line. These are the stalks of your reeds. -
Thicken the foliage:
At the base of the stalks, add shorter, thicker grass blades curving slightly outward. Let these overlap to create a dense, grassy patch at the bottom left corner. -
Detail the seed heads:
At the top of the tall stalks, switch back to the liner brush. paint tiny stippled dots or small dashes clustered in an oval shape to create the texture of cattails or marsh grass seed heads. -
Angle the details:
Ensure the seed heads lean slightly with the curve of the stalk. I find that adding a few loose ‘strays’ or flying seeds adds realism to the windblown look.
Golden Hour Glow
Add a translucent layer of amber or orange glass paint on the inside of the mug behind the silhouette. When filled with a light beer, it will simulate a sunset.
Step 3: Adding Life & Finishing
-
Paint the ducks:
In the upper right quadrant of the sky, paint silhouette shapes of flying birds. Start with a simple ‘V’ shape for the wings. -
Refine bird shapes:
Thicken the bodies of the larger birds, giving them distinct necks and wing definitions. The main bird should look like a mallard taking flight. -
Add distant flock:
Paint much smaller, simple ‘m’ or ‘v’ shapes further in the distance to suggest a flock flying away. Varying size creates a sense of depth. -
Review and cleanup:
Check your edges. If any paint went where it shouldn’t, use a damp cotton swab to wipe it away while wet. If dry, carefully scrape it off with a craft knife. -
Dry time:
Allow the paint to air dry completely according to the manufacturer’s instructions, usually 24 to 48 hours. -
Cure the paint:
To make the mug dishwasher safe, place the mug in a cold oven. Set the temperature to 350°F (175°C) and bake for 30 minutes. Turn the oven off and let the mug cool down completely inside before removing.
Once cured, pour a cold drink and enjoy your custom rugged scenery


Cozy Cabin Night Sky on the Mug
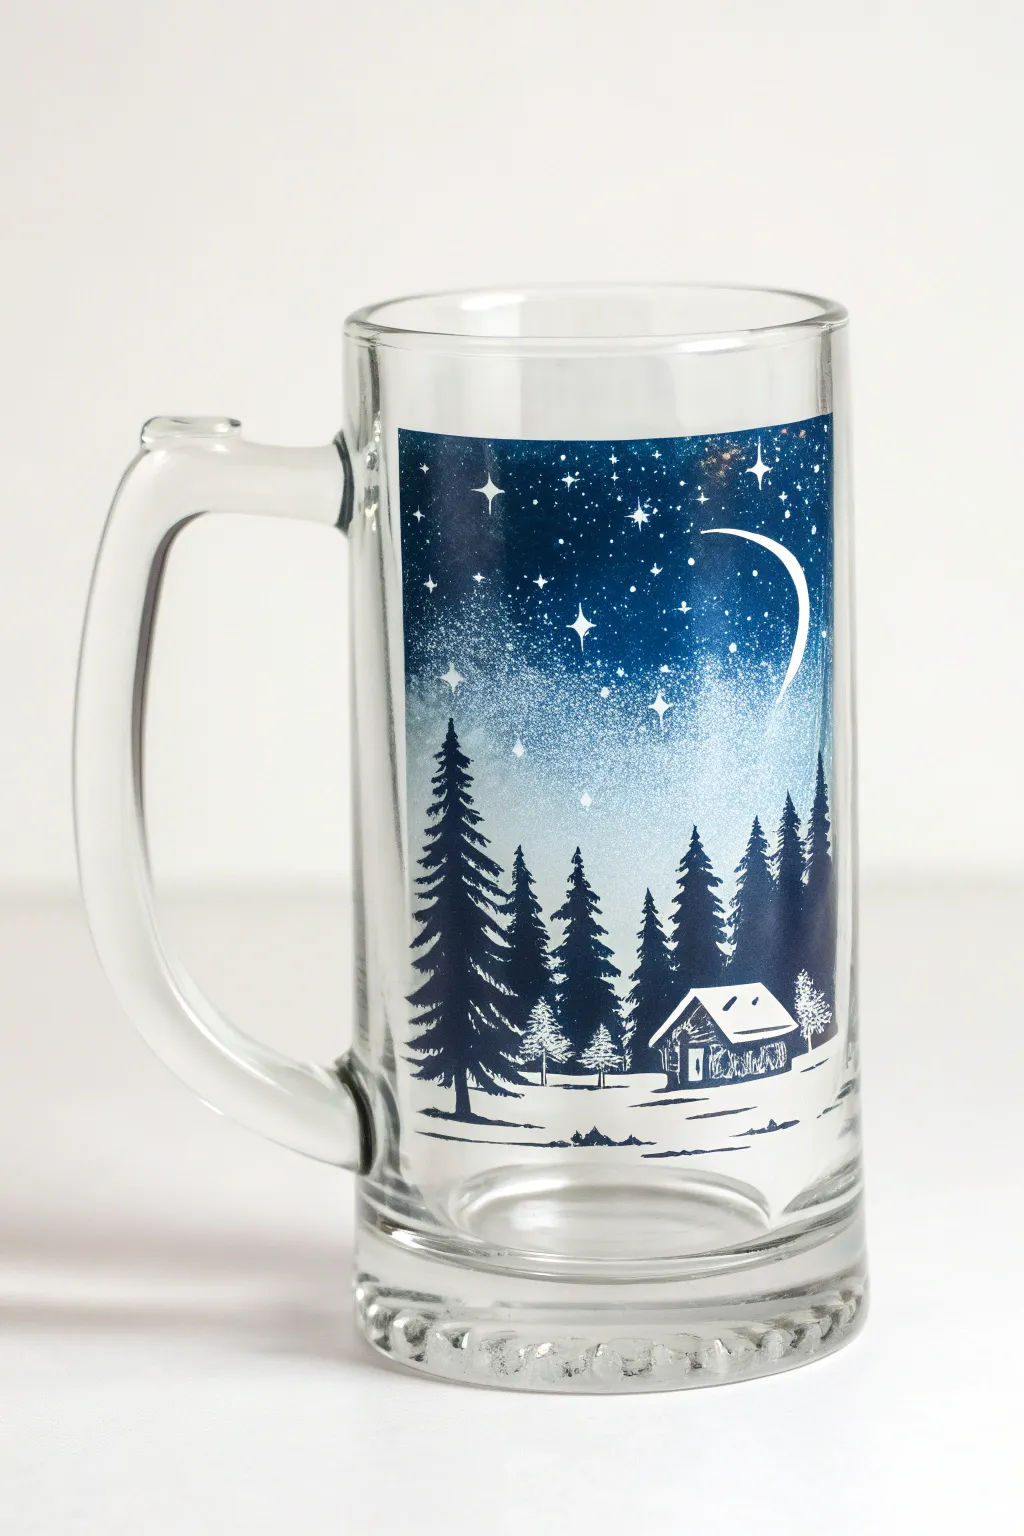
Transform a plain glass mug into a winter wonderland with this serene night sky scene. The deep indigo gradient fades into a snowy landscape, featuring crisp pine trees and a cozy log cabin beneath a sliver of moon.
Step-by-Step Tutorial
Materials
- Clear glass beer mug (clean and dry)
- Rubbing alcohol and cotton pads
- Painter’s tape or masking tape
- Enamel glass paints (Deep Navy Blue, Royal Blue, White, Black)
- Makeup sponges or dabber sponges
- Fine detail brushes (liner brush and small round brush)
- Small flat brush
- Palette or paper plate
- Oven for curing (optional based on paint type)
Step 1: Preparing the Canvas
-
Clean the surface:
Wipe down the entire outside area of the mug where you plan to paint with rubbing alcohol. This removes oils and ensures the paint adheres properly. -
Tape the boundaries:
Apply two vertical strips of painter’s tape to the mug to define the width of your scene. This creates those clean, sharp edges on the left and right sides of the artwork. -
Mask the top and bottom:
Add horizontal tape strips at the top and bottom to frame a rectangular painting area. Press down firmly on all tape edges to prevent paint bleeding.
Step 2: Creating the Night Sky
-
Load the sponge:
Squeeze out Deep Navy Blue, Royal Blue, and White enamel paint onto your palette. Lightly load a makeup sponge with the Deep Navy Blue. -
Start the gradient:
Dab the sponge near the top of the taped rectangle, applying a dense layer of Deep Navy Blue. As you move downward, lighten your touch to let the coverage thin out slightly. -
Blend the blues:
Pick up some Royal Blue on the same sponge without washing it. Dab this into the middle section, blending it upwards into the navy to create a smooth transition. -
Fade to white:
Mix a little White with the Royal Blue on your palette to make a light azure. Sponge this near the horizon line, then finish with pure white at the very bottom area to represent the snowy mist and ground. -
Add stars:
You can splatter white paint with a toothbrush for tiny stars, but for the specific look in the photo, use a detail brush or toothpick to dot white specks into the dark blue sky. Vary the sizes for depth. -
Paint the major sparkles:
Using a fine liner brush and white paint, create a few larger four-point stars. Draw a tiny cross, then elongate the vertical and horizontal lines slightly. -
The crescent moon:
With the liner brush, carefully paint a thin, white crescent moon shape in the upper right quadrant of the sky.
Fixing Smudged Stars
If your stars look like blobs, let them dry completely. Then, use a toothpick to gently scratch away the excess paint until you have a perfect tiny distinct dot again.
Step 3: Painting the Landscape
-
Mix the tree color:
Mix a small amount of Black into your Deep Navy Blue to create a very dark, near-black blue for the silhouette elements. -
Draft the tall trees:
Using a small round brush, paint a vertical line for the trunk of the large left-side tree. Tap the brush horizontally starting from the top, getting wider as you go down, to create the pine branches. -
Fill the forest:
Repeat this technique to create a cluster of trees on the right side and a few smaller ones in the background. Keep the bottoms of the trees roughly aligned with your horizon line. -
Outline the cabin:
Switch to your finest liner brush. Using the dark blue mix, draw the outline of a small cabin nestled near the right-side trees. Keep the structure simple: a box with a slanted roof. -
Detail the cabin:
Fill in the cabin walls with the dark blue, but leave the roof white (negative space) to look like snow. Add a tiny white door and window using white paint once the dark base is dry. -
Add snowy ground:
Use the liner brush with the dark blue mix to paint thin, wavy horizontal lines at the base of the trees and cabin. This creates the illusion of uneven snowy ground and shadows.
Add Dimension
Mix a tiny bit of silver glitter paint into the white used for the snow at the bottom. It gives the ground a subtle, frosty shimmer that catches the light beautifully when filled.
Step 4: Finishing Touches
-
Remove the tape:
While the paint is still slightly tacky (not fully dry), carefully peel away the painter’s tape at a 45-degree angle. This prevents the dried paint from cracking at the edges. -
Clean up edges:
If any paint bled under the tape, use a cotton swab dipped in rubbing alcohol or a craft knife to gently scrape or wipe away the imperfections for a crisp rectangle. -
Cure the paint:
Follow the manufacturer instructions on your specific enamel paint bottle. This usually involves letting it air cure for 21 days or baking the mug in a non-preheated oven for 30 minutes.
Now you have a custom piece of drinkware perfect for enjoying a warm beverage on a cold evening
Pet Portrait Medallion
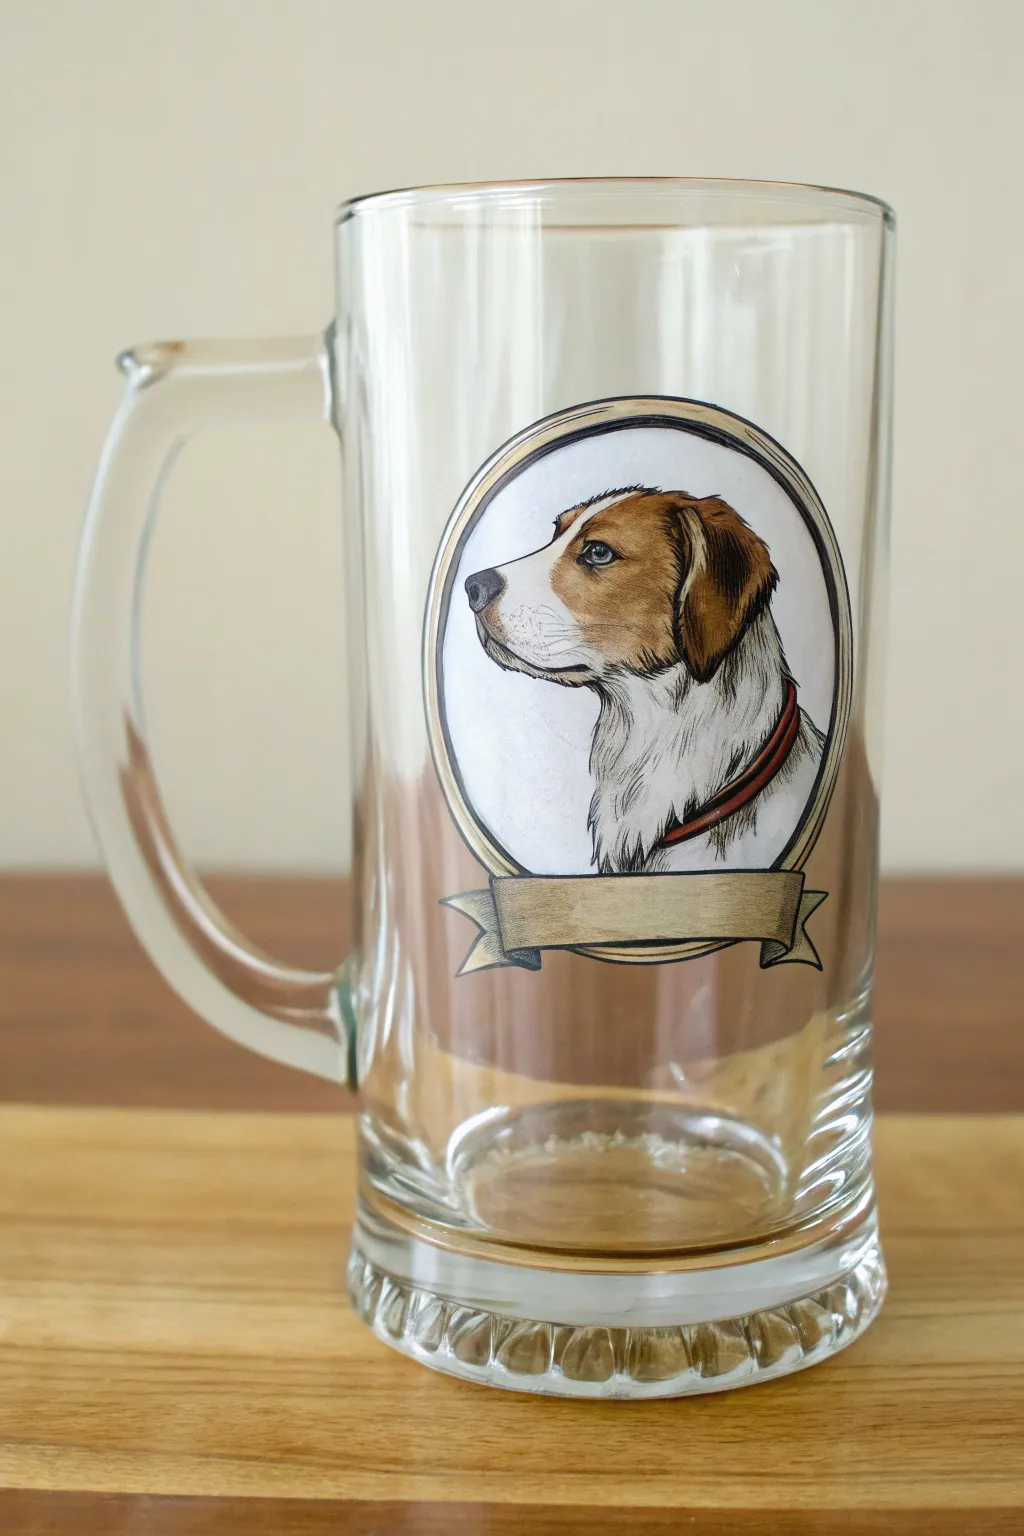
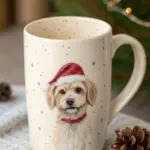
Immortalize your favorite four-legged friend on a custom beer mug with this classic medallion-style portrait. Using glass paints and outlines creates a crisp, sticker-like effect that transforms ordinary glassware into a cherished keepsake.
Step-by-Step
Materials
- Large clear glass beer mug
- Rubbing alcohol and cotton pads
- Printed photo of your pet (sized to fit the mug)
- Tape (painter’s or masking)
- Black glass outliner or relief paste (in a tube)
- Glass paints (solvent-based or glossy acrylic enamel)
- Fine detail brush (size 0 or 00)
- Medium round brush (size 2 or 4)
- Palette or small mixing dish
- Oven for curing (if required by paint brand)
Step 1: Preparation and Outlining
-
Clean the surface:
Before you begin, wipe the entire surface of the mug with rubbing alcohol. This removes any oils or fingerprints that might prevent the paint from adhering properly. -
Position the template:
Take your printed pet photo and tape it securely to the *inside* of the mug. Ensure the image is facing outward so you can trace it from the outside. -
Trace the main oval:
Using the black glass outliner, carefully draw the large vertical oval that frames the portrait. Keep your hand steady and apply even pressure to the tube for a consistent line width. -
Add the banner:
Draw the ribbon banner at the bottom of the oval. Create the folded ends on either side to give it a classic heraldic look. Leave the center empty for now. -
Outline the pet:
Trace the main contours of your pet’s head and neck. Focus on the big shapes—ears, snout, neck ruff—rather than every single hair. Don’t forget the collar if your pet wears one. -
Detail the face:
Add the crucial facial details with the outliner: the eye, the nose leather, and the mouth line. These are the anchors of the likeness. -
Adding texture:
Use broken, feathery lines with the outliner to suggest fur texture along the neck and ears, rather than solid hard lines. Let the outline dry completely (usually 1 hour) before painting.
Fixing Shaky Lines
If your outliner hand is shaky, rest your wrist on a stable object like a book stack next to the mug. If you make a mistake, wipe it instantly with a Q-tip or wait for it to dry and peel it off.
Step 2: Painting the Portrait
-
Base coat the white fur:
Using opaque white glass paint, fill in the white areas of the dog’s coat. Use a fine brush to pull the paint towards the edges to mimic fur direction. -
Paint the background:
Fill the space inside the oval but behind the dog’s head with a plain white or very light cream color. This creates a solid backdrop that makes the portrait pop against the clear glass. -
Add color patches:
Mix a warm brown or amber tone for the dog’s patches (ears and eye mask). Apply this gently next to the white areas; it’s okay if they blend slightly for a softer look. -
Darken the shadows:
While the paint is still workable, add slightly darker brown tones to the shadowed side of the ear and under the chin to create dimension. -
Paint the nose and eye:
Carefully dot in the eye color (usually brown or amber) and fill the nose with a dark grey or black. Leave a tiny speck of unpainted glass or add a white dot for the eye highlight. -
Color the collar:
Fill in the collar with a bright red or your pet’s favorite color. A single stripe of darker red along the bottom edge will make it look round.
Personalize It
Use a super-fine tip permanent marker or a very thin brush to write your pet’s name inside the banner area after the gold paint has dried completely for a true custom finish.
Step 3: Finishing Touches
-
Paint the banner:
Fill the banner area with a gold or beige metallic glass paint. This mimics the look of old parchment or gold leaf. -
Rim the oval:
Use that same metallic gold or beige to paint a thin border inside your outer black oval line, framing the entire piece. -
Clean up edges:
If any paint went outside the lines, use a cotton swab dipped in alcohol or a craft knife to gently scrape it away once it’s tacky but not fully hard. -
Curing:
Allow the mug to dry for 24 hours. If your specific glass paint requires heat setting, place the mug in a cold oven, heat to the specified temperature (often 325°F), bake for 30 minutes, and let it cool inside the oven.
Now you can enjoy a cold beverage in the company of your best friend
City Skyline Line Art
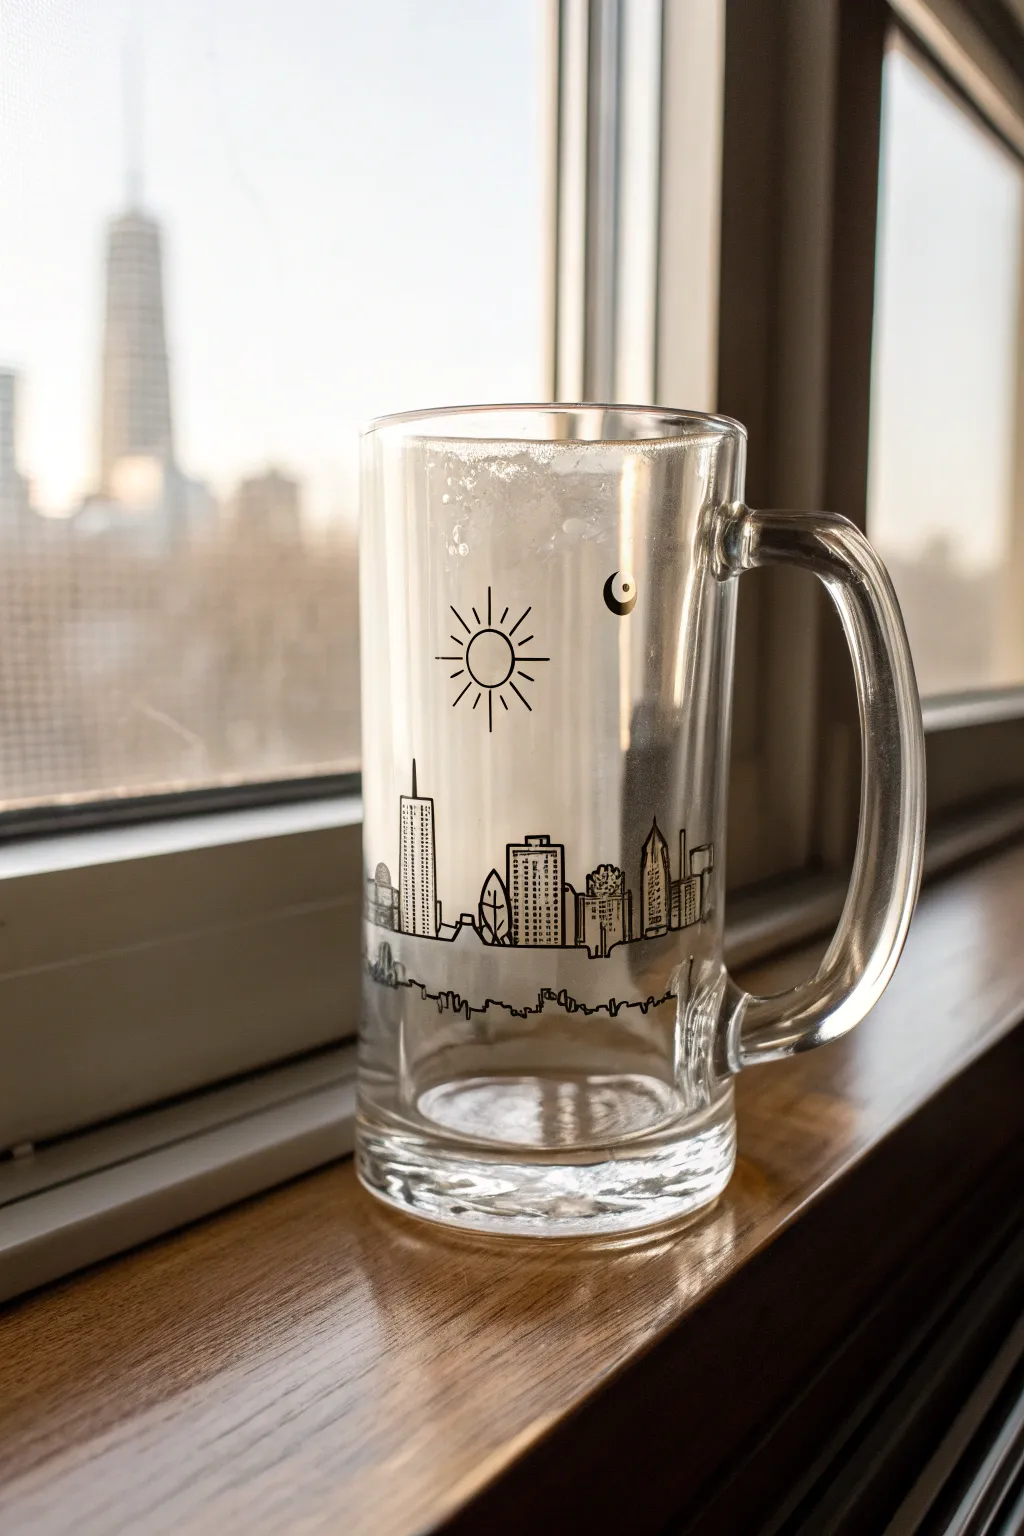
Transform a plain glass mug into a modern piece of drinkware with this crisp, minimalist city skyline design. The stark black lines against clear glass create a sophisticated look that’s surprisingly simple to achieve with the right marker.
How-To Guide
Materials
- Clear glass beer mug with handle
- Oil-based paint marker in black (fine tip)
- Rubbing alcohol
- Cotton pads or paper towel
- Masking tape or painter’s tape
- Printed skyline reference or template (optional)
- Cotton swabs (for cleanup)
- Oven (for curing)
Step 1: Preparation
-
Clean the surface:
Thoroughly wash your glass mug with soap and warm water to remove any factory dust or grease. -
Degrease the glass:
Wait for the mug to dry completely, then wipe down the entire outer surface with rubbing alcohol on a cotton pad. This is the most crucial step to ensure your paint adheres properly. -
Avoid touching:
From this point on, handle the mug by the handle or the rim to keep your finger oils off the main drawing area. -
Set up a guide:
If you aren’t confident drawing freehand, print a small skyline strip and tape it on the *inside* of the mug facing out. This will act as a perfect tracing guide.
Smudge Patrol
If you accidentally smudge wet paint with your hand, let it dry for a minute first. It smears less when tacky, making it easier to scrape off with a craft knife or fingernail.
Step 2: Drawing the Skyline
-
Define the ground line:
Start by drawing a continuous horizontal line near the bottom third of the mug. This doesn’t need to be ruler-straight; a slightly organic, straight-ish line adds character. -
Draft the tallest buildings:
Using your fine-tipped oil paint marker, draw the outline of the tallest skyscraper first to anchor your composition. In the example, this is a tall, needle-like tower on the left side. -
Add variety:
Continue adding building outlines, varying their shapes. Include some with triangular roofs, some flat-topped, and simpler rectangular blocks. -
Detail the windows:
Go back into your shapes and add texture. Use rows of dots for windows on one building, vertical stripes on another, and grid patterns on a third to differentiate them. -
Fill the gaps:
Connect your buildings with lower structures or simple rooflines so the skyline feels continuous and dense. -
Fix mistakes:
If a line goes astray, don’t panic. Quickly dip a cotton swab in rubbing alcohol and wipe the mistake away before the paint sets.
Step 3: Adding Elements
-
Draw the sun:
Above the skyline, roughly centered or slightly to the left, draw a small circle with radiating lines for a stylized sun. -
Add a moon:
On the opposite side or slightly lower, draw a small crescent moon shape. Fill it in with black ink to give it visual weight. -
Create a reflection line:
Near the very bottom of the mug, below your main skyline, draw a wavy, broken line that mimics the reflection of the city on water. Keep this loose and abstract.
Reference Hack
Wrap a piece of graph paper around the inside of the mug. The grid lines help keep your buildings straight and vertical without needing a ruler on the curved surface.
Step 4: Curing
-
Let it dry:
Allow the paint to air dry for at least 24 hours. The marker needs to solvent to evaporate completely before baking. -
Cold oven start:
Place your mug into a cool, unheated oven. You don’t want to shock the glass with sudden heat. -
Bake the design:
Set the oven to 350°F (175°C) and bake for 30 minutes. The timer starts once the oven reaches temperature. -
Cool down slowly:
Turn the oven off and leave the mug inside until the oven is completely cold. This prevents the glass from cracking.
Your personalized skyline mug is now ready for a cold drink or to be gifted to a city-loving friend
Geometric Stained-Glass Look
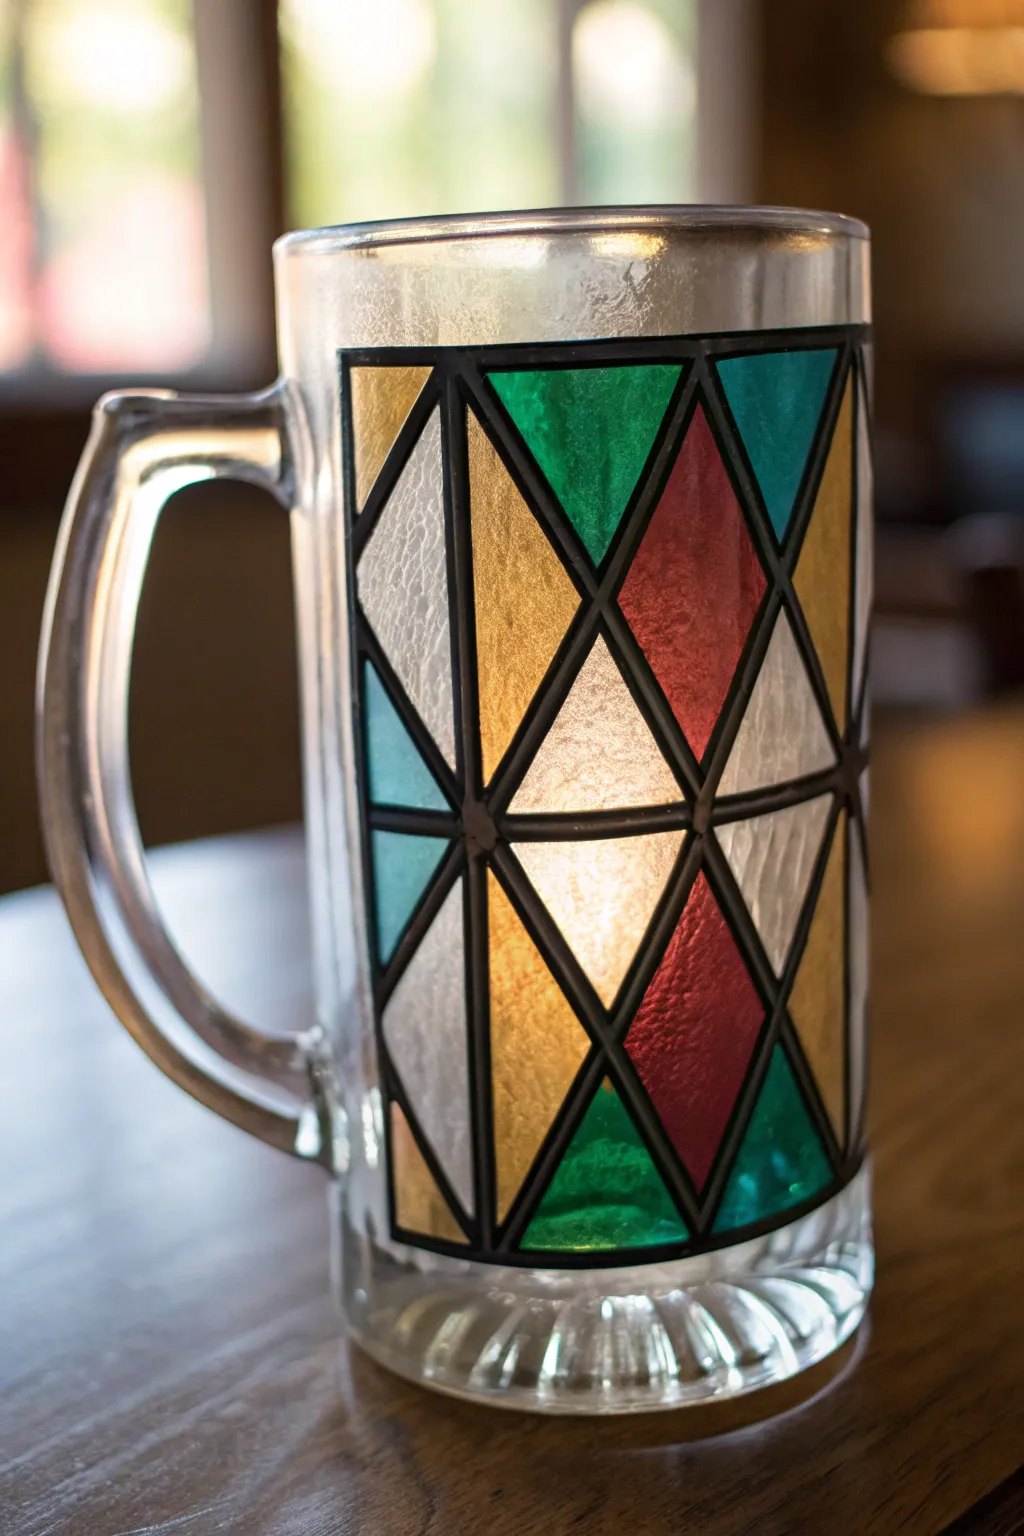
Transform a plain glass beer mug into a medieval-inspired masterpiece with this geometric stained-glass technique. Using dimensional outliners and translucent glass paints, you’ll create a textured, colorful design that glows beautifully when filled with your favorite brew.
Detailed Instructions
Materials
- Heavy glass beer mug (cleaned with alcohol)
- Black glass outline paste or dimensional relief paint
- Solvent-based or fast-drying transparent glass paints (yellow, emerald green, teal, ruby red, white/frosted)
- Fine pointed round brush (size 0 or 1)
- Masking tape or painter’s tape
- Paper, pencil, and ruler (for the template)
- Rubbing alcohol and cotton pads
- Q-tips (for cleanup)
- Scissors
Step 1: Preparation and Pattern
-
Clean the surface:
Before doing anything, wipe the entire exterior of the mug with rubbing alcohol to remove oils and fingerprints, ensuring the paint adheres properly. -
Measure the panel area:
Identify the flat panel area on your mug opposite the handle where you will apply the design. -
Create a template:
Cut a piece of paper to fit that specific panel size. -
Draw the grid:
Using a ruler and pencil on your paper template, draw a series of X-shapes to form stacked diamonds and triangles. Aim for three vertical diamonds in the center column, flanked by triangles on the sides. -
Secure the pattern:
Tape the paper template inside the mug, facing outward, so you can see the lines through the glass as a guide.
Step 2: Creating the Lead Lines
-
Test the flow:
Squeeze a small amount of black outline paste onto a scrap paper to ensure it comes out smoothly without air bubbles. -
Trace the main borders:
Starting with the outer rectangular frame, slowly squeeze the bottle while moving your hand to create a steady, raised black line directly on the glass. -
Trace the interior geometry:
Follow your template pattern to draw the diagonal lines. Try to connect intersections cleanly—I find that stopping briefly at each ‘knot’ helps anchor the line. -
Clean up mistakes:
If a line goes rogue, wipe it away immediately with a damp Q-tip or wait until it’s barely dry and scrape it off with a toothpick. -
Let it cure:
Allow the black outline to dry completely according to the manufacturer’s instructions (usually 1-2 hours) before adding color.
Fixing Shaky Lines
If your black lead lines look shaky or uneven, wait for them to dry completely, then use a craft knife to gently trim the edges straight before painting.
Step 3: Adding the Stained Glass Color
-
Plan your palette:
Look at the reference image: note how colors alternate. The central diamonds are yellow and red, while the surrounding triangles alternate between teal, green, white, and yellow. -
Apply the first color:
Dip your fine brush into the yellow glass paint. Drop the paint into a central diamond rather than brushing it back and forth; you want a pool of color. -
Spread to the edges:
Gently nudge the wet paint right up against the hardened black outlines, ensuring no clear glass gaps remain. -
Continue filling sections:
Move on to the red diamonds. Keep the mug horizontal if possible to prevent the liquid paint from sagging or running before it sets. -
Add cool tones:
Fill the alternating triangles with emerald green and teal paints. Apply enough paint to create a rich, jewel-tone opacity. -
Apply the white sections:
For the white/frosted sections, you can stipple the paint slightly with the brush tip to create extra texture, mimicking rough-hewn glass. -
Check for bubbles:
Inspect the wet paint for tiny air bubbles and pop them with a pin or the tip of your brush before they dry. -
Final drying:
Let the mug sit undisturbed for at least 24 hours. Some paints require oven baking for dishwasher safety, so check your specific paint brand’s instructions.
Personalize It
Swap the geometric pattern for your favorite family crest, guild symbol, or initial. Just print the logo and tape it inside the glass to trace.
Once fully cured, your custom mug is ready to catch the light and add a touch of handcrafted charm to your next beverage


Have a question or want to share your own experience? I'd love to hear from you in the comments below!