Boho painted furniture is where your brushstrokes get to be a little wild, a little layered, and totally you. If you’ve got a plain piece that feels forgettable, I’ve got ideas to turn it into handcrafted color and pattern-rich personality.
Jewel-Tone Dresser With Distressed Edges
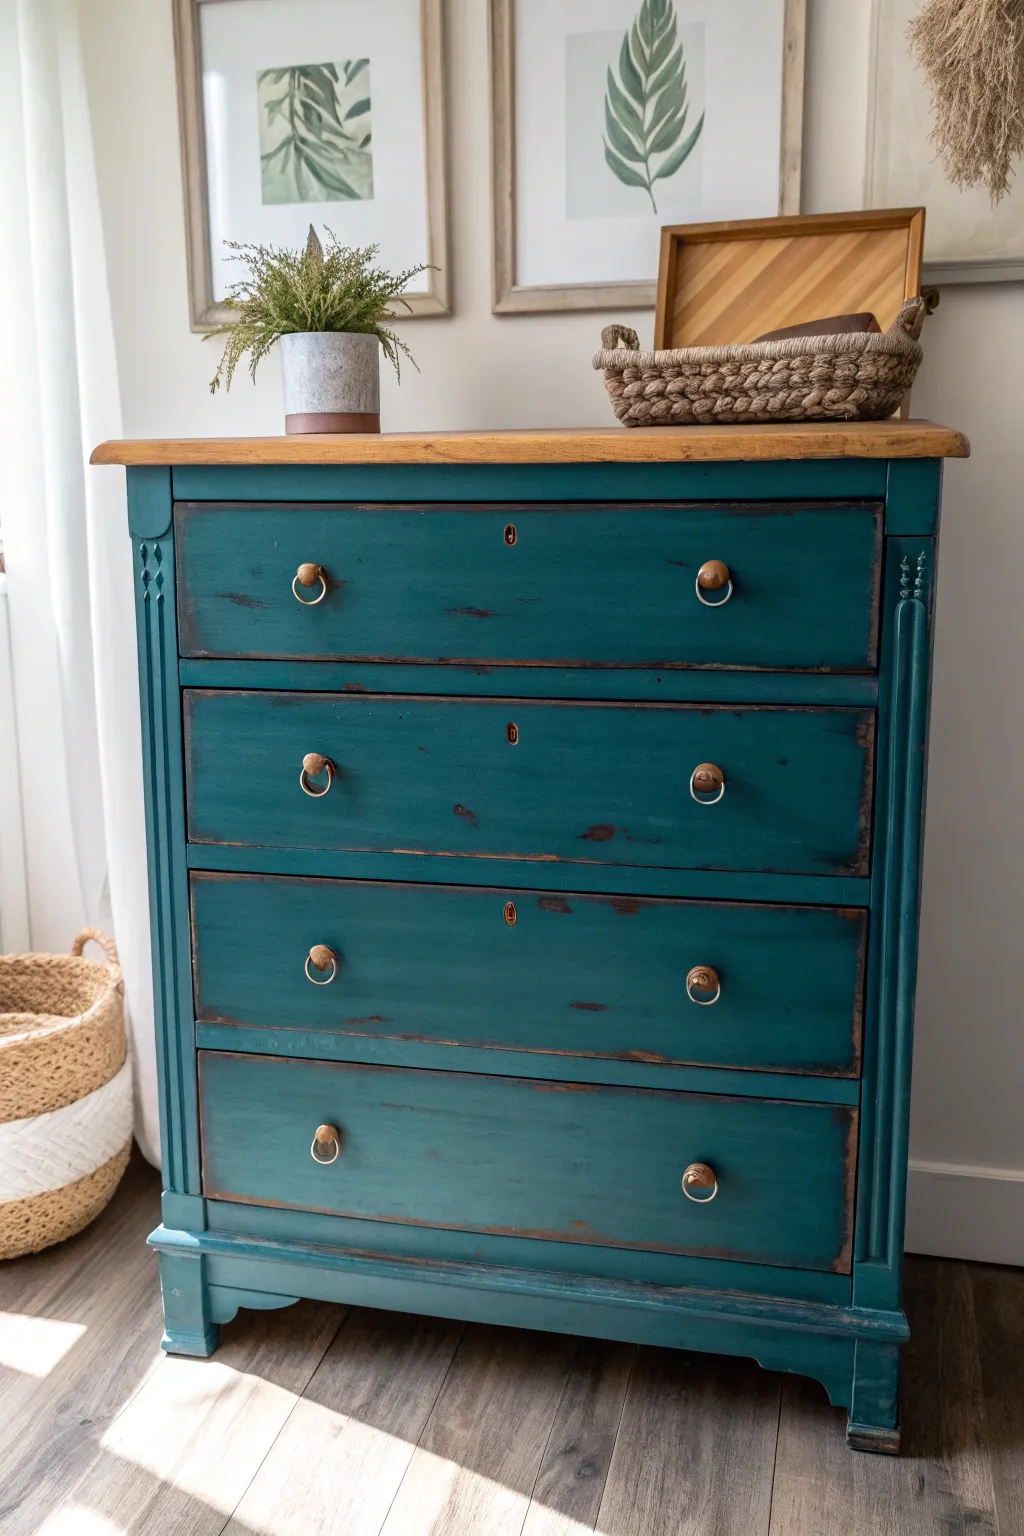
Transform a tired wooden dresser into a stunning boho statement piece featuring rich jewel tones and perfectly aged details. This project balances an elegant teal finish with rustic distressed edges and a warm natural wood top for a look that feels both curated and cozy.
How-To Guide
Materials
- Wooden dresser (solid wood works best)
- Sandpaper (80, 120, and 220 grit)
- Electric orbital sander
- Degreasing cleaner (like TSP or simple green)
- Painter’s tape
- Deep teal chalk mineral paint
- High-quality synthetic bristle paintbrush (oval or angled)
- Dark antique wax
- Clear furniture wax
- Lint-free rags or wax brush
- Wood stain (for the top, optional)
- Polyurethane topcoat (matte or satin)
- Screwdriver
- Drop cloth
Step 1: Preparation & Stripping
-
Hardware removal:
Begin by removing all drawers from the dresser shell. Use a screwdriver to carefully take off all the original handles and pulls. Keep these screws in a labeled baggie so they don’t get lost. -
Clean everything:
Scrub the entire piece down with a degreasing cleaner to remove decades of furniture polish, oil, and grime. A clean surface is critical for paint adhesion. -
Strip the top:
Using your electric sander and abrasive 80-grit paper, sand the top surface down to bare wood. You want to remove all the old shiny varnish and stain. -
Refine the wood grain:
Switch to 120-grit and then 220-grit sandpaper on the top to smooth out the wood grain. Wipe away all sanding dust with a tack cloth or damp rag. -
Scuff sand the body:
For the painted areas (the body and drawer fronts), you don’t need to go to bare wood. Just hand-sand lightly with 120-grit paper to create a ‘tooth’ for the paint to grab onto.
Bleed-Through Blues?
If you see pink or yellow stains seeping through your teal paint, stop! This is tannin bleed. Apply a coat of shellac-based primer to the spots, let dry, and then repaint.
Step 2: Staining & Painting
-
Stain the top:
If the natural wood color is uneven, apply a light coat of stain to the top using a rag. If you love the raw look, you can skip straight to sealing. Let the stain dry completely. -
Seal the top:
Apply 2-3 coats of polyurethane to the wood top for durability, sanding lightly with very fine paper (320+ grit) between coats for a professional finish. -
Tape off edges:
Once the top is fully dry, run a line of painter’s tape underneath the lip of the top to protect your fresh wood finish from the teal paint. -
First coat of paint:
Stir your jewel-tone teal chalk paint thoroughly. Apply the first coat using a synthetic brush, painting in long, smooth strokes in the direction of the wood grain. Don’t worry if coverage isn’t perfect yet. -
Second coat:
After the first coat is dry to the touch (usually 1 hour), apply a second coat for full, opaque coverage. I like to check for drips around the corners before this layer dries. -
Paint the drawers:
Repeat the painting process on the drawer fronts. Be careful not to paint the sides of the drawers, or they might stick when closing.
Step 3: Distressing & Finishing
-
Distress the edges:
Once the paint is completely dry, take 220-grit sandpaper and gently rub the edges, corners, and raised details. The goal is to reveal the dark wood underneath in areas where natural wear would occur. -
Apply clear wax:
Brush fine furniture wax over all painted surfaces to seal the porous chalk paint. Work in small sections and buff off the excess with a lint-free rag. -
Add antique depth:
For that moody, aged look shown in the photo, apply a small amount of dark antique wax into the crevices and corners. Wipe it back quickly so it just sits in the texture and slightly darkens the teal. -
Clean hardware:
If reusing the ring pulls, clean them with warm soapy water. If they are too shiny, you can lightly sand them for a matte look, or replace them with new brass hardware. -
Reassembly:
Reattach your hardware to the drawer fronts and slide the drawers back into the casing. Step back and admire the contrast between the natural wood top and the rich paint.
Pattern Play
Line the insides of the drawers with a vintage floral wallpaper or contact paper. It adds a secret pop of boho pattern every time you open the dresser to grab a shirt.
Enjoy styling your new statement piece with some greenery and textural baskets


Sunset Ombre Nightstand
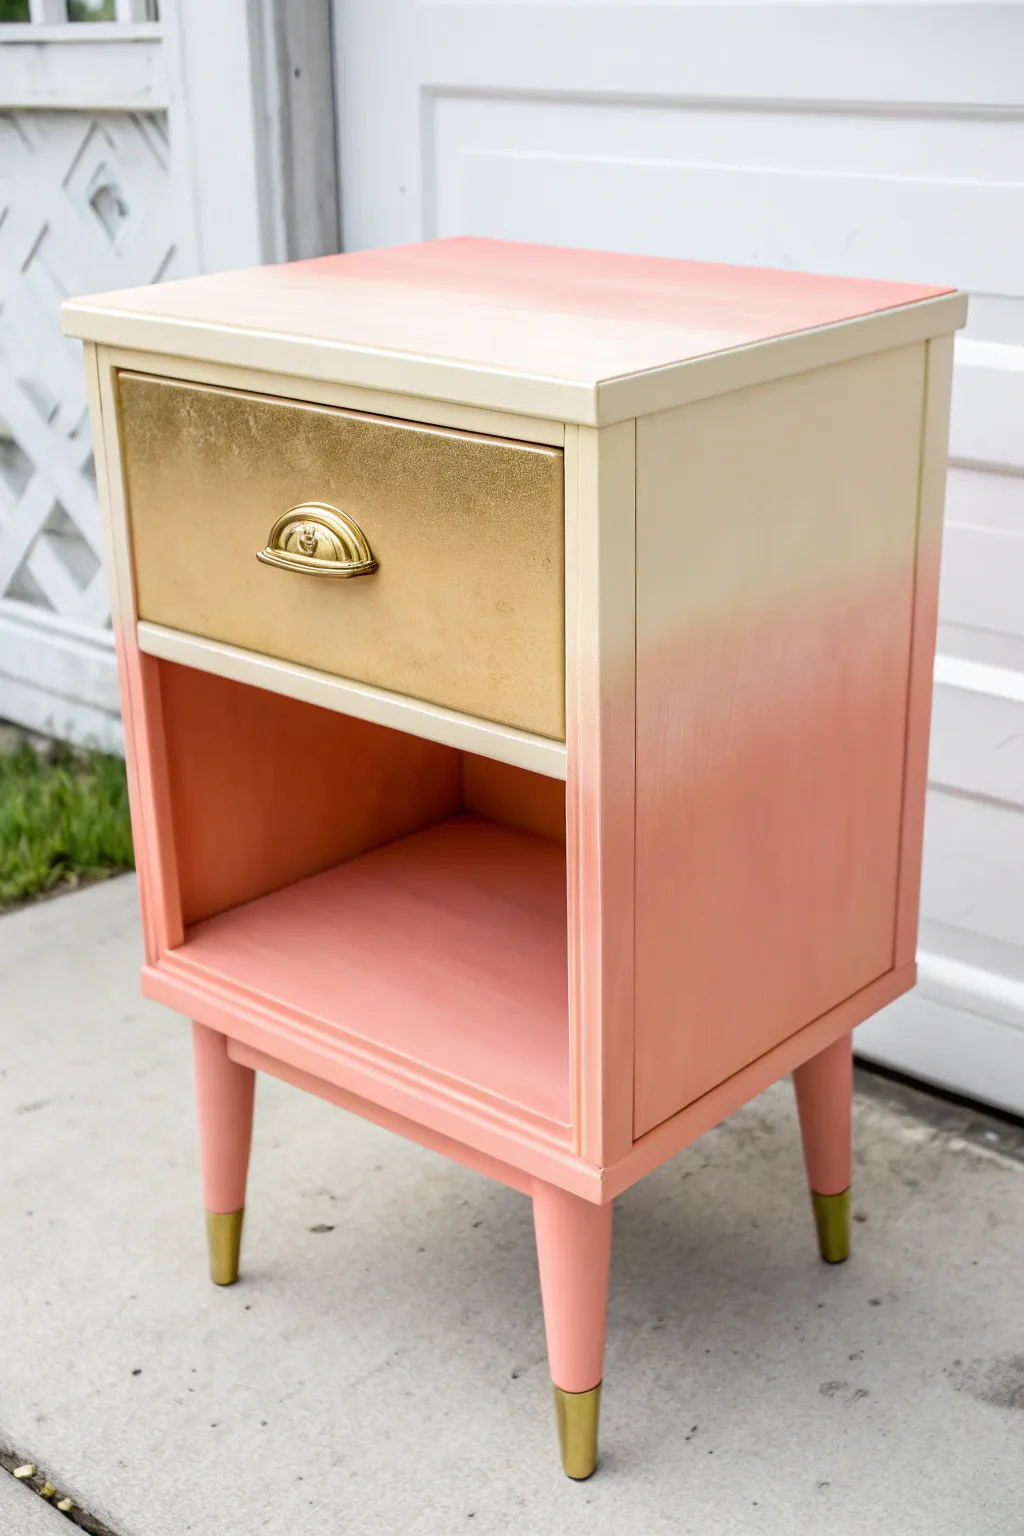
Capture the warmth of a summer evening with this stunning gradient nightstand renovation. The soft blend of cream into coral pink creates a dreamy, boho vibe that perfectly complements the unexpected glamour of a gold-leafed drawer front.
How-To Guide
Materials
- Wooden nightstand with drawer
- Sandpaper (120 and 220 grit)
- Primer (bonding primer recommended)
- Chalk paint or satin furniture paint (Cream/Off-White)
- Chalk paint or satin furniture paint (Coral/Pink)
- Gold spray paint or gold leaf kit
- Painter’s tape
- Gold finish furniture legs (or gold spray paint for existing legs)
- High-quality paint brushes (synthetic)
- Water spray bottle (misting bottle)
- Clean lint-free rags
- Gold cup pull hardware
- Clear topcoat (polyurethane or wax)
Step 1: Cleaning & Prep
-
Hardware Removal:
Begin by removing the drawer from the nightstand. Unscrew the old handle or knob and set it aside, or discard it if you’re replacing it with a new gold cup pull. If the legs screw off, remove them now too; otherwise, tape them off carefully with painter’s tape. -
Sanding:
Give the entire piece a thorough scuff sanding using 120-grit sandpaper. You don’t need to strip it to bare wood, but you do need to remove any glossy finish so the new paint adheres well. Follow up with 220-grit for a smooth base. -
Cleaning:
Wipe down every surface with a tack cloth or a damp rag mixed with a little degreaser to remove all sanding dust and oils. A clean surface is crucial for a flawless ombre blend.
Step 2: Creating the Gold Drawer
-
Base Coat:
If you are using gold leaf, apply a base color like ochre or dark red first. If spraying, take the drawer front to a well-ventilated area. Apply a thin coat of primer specifically for the material (wood or laminate). -
Gilding:
For that textured metallic look seen in the photo, spray the drawer front with a metallic gold spray paint in light, even passes. Alternatively, for a richer texture, apply gold sizing and lay down gold leaf sheets, brushing away the excess once dry. Let this cure completely.
Mist for Magic
Keep a spray bottle of water nearby while blending. A light mist keeps acrylic or chalk paint wet longer, allowing for a smoother, cloud-like gradient without brush marks.
Step 3: Painting the Ombre Effect
-
Priming the Body:
Apply a coat of bonding primer to the main body of the nightstand. This ensures your light cream color won’t be discolored by wood tannins bleeding through. -
Base Layer:
Once primed, paint the bottom third of the nightstand in your solid coral pink color and the top third in your solid cream color. Leave the middle section somewhat bare or thinly coated for now. -
Mixing the Mid-Tone:
On a paper plate or palette, mix your cream and coral paints together to create a 50/50 mid-tone shade. Apply this to the middle section of the nightstand, overlapping slightly into the top cream and bottom pink sections. -
Blending Down:
While the paint is still wet, use a clean, damp brush (keep your misting bottle handy) to feather the transition between the mid-tone and the bottom pink layer. Use long, horizontal strokes or a stippling motion to blur the hard line. -
Blending Up:
Cleaning your brush or switching to a fresh one, repeat the blending process between the mid-tone and the top cream layer. I find misting the paint directly on the furniture lightly helps the colors slide together more naturally. -
Leg Treatment:
Paint the wooden legs in the solid coral color to match the bottom of the stand. For the dipped effect, measure about 2-3 inches from the bottom, apply painter’s tape securely, and paint the tips gold (or spray them) to match the drawer. -
Interior Detail:
Don’t forget the inside niche! Paint the back and sides of the open shelf area. An ombre here can be tricky, so sticking to the solid coral color usually looks cleanest and adds depth.
Luxe Liner
Elevate the project by lining the inside of the drawer with a tropical or geometric patterned contact paper that features gold accents to tie it all together.
Step 4: Finishing Touches
-
Topcoat Application:
Allow the paint to dry for at least 24 hours. Apply two to three coats of a water-based polyurethane topcoat for durability, sanding lightly with a high-grit sponge between coats for a buttery finish. -
Reassembly:
Screw the legs back onto the base. Install your new shiny gold cup pull onto the center of the drawer front. -
Final Polish:
Slide the drawer back into place. Wipe away any fingerprints with a soft cloth to make that gold shine.
Now you have a piece that brings the golden hour permanently into your bedroom decor


Boho Floral Hand-Painted Sideboard
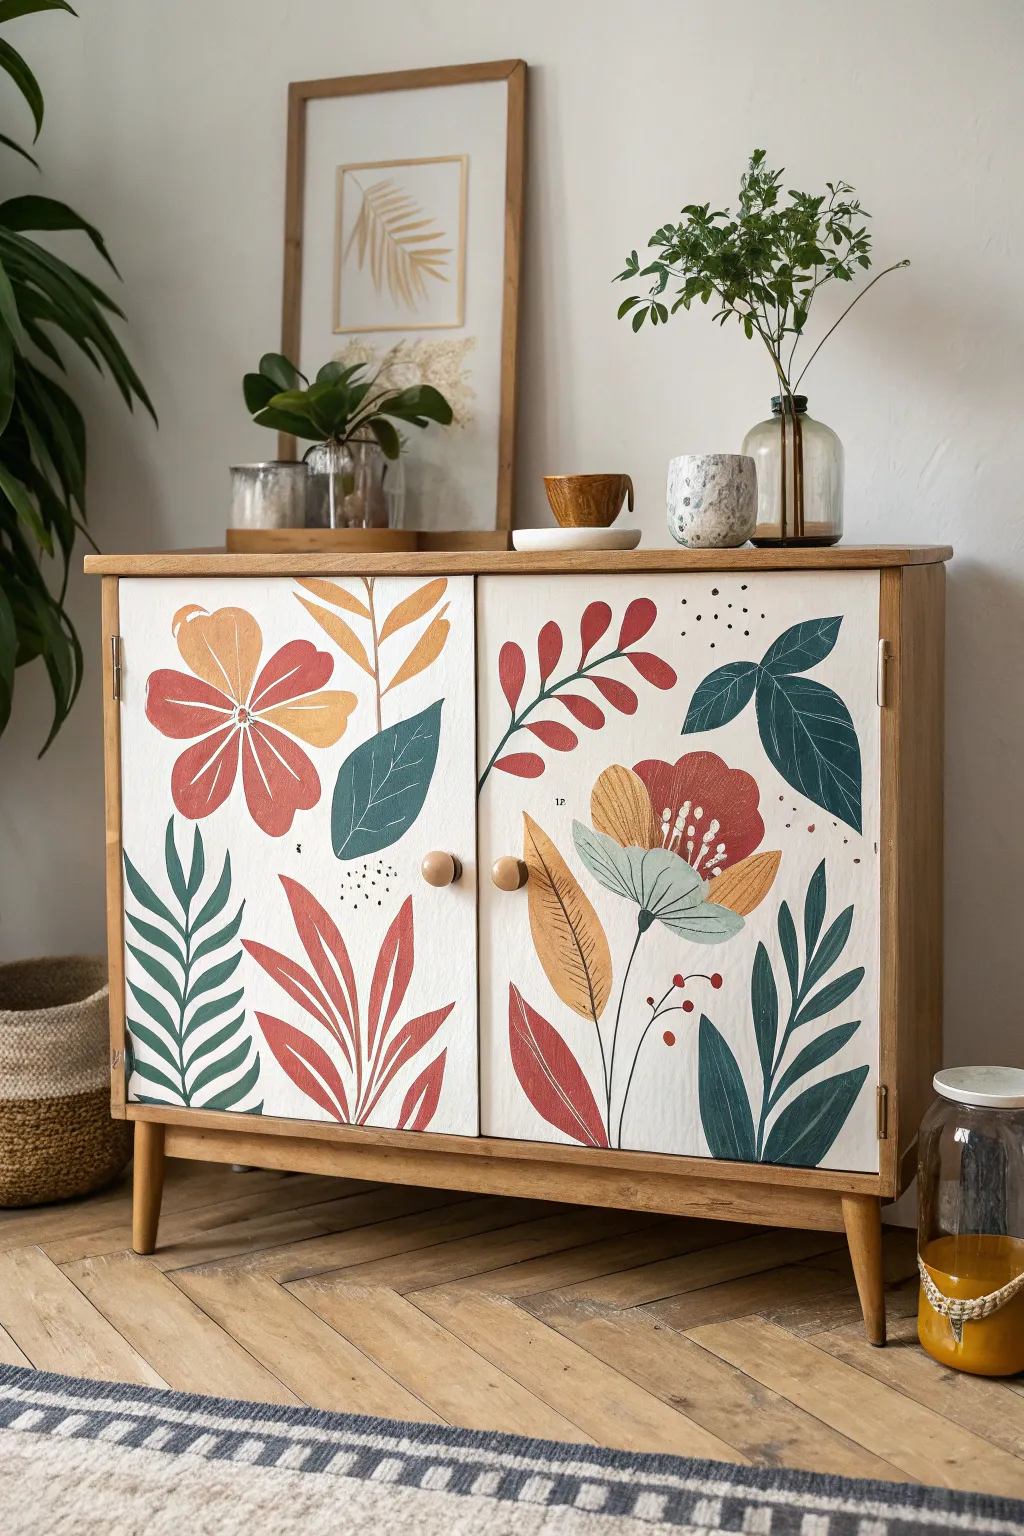
Transform a plain wooden cabinet into a vibrant focal point by embracing organic boho shapes and a warm, inviting color palette. This hand-painted project features oversized floral motifs and sweeping leaves against a crisp white background, bringing nature indoors with a distinctively artistic touch.
Step-by-Step
Materials
- Wooden sideboard or cabinet (clean and lightly sanded)
- White chalk paint or primer (for the base)
- Acrylic craft paints (terra cotta, mustard yellow, deep teal, muted red, olive green)
- Painter’s tape
- Various paintbrushes (1-inch flat brush, medium round brush, fine linear brush)
- Pencil and eraser
- Clear matte or satin polycrylic sealer
- Sandpaper (220-grit)
- Palette or paper plate for mixing
Step 1: Preparation & Base Coat
-
Remove hardware:
Begin by unscrewing and removing the wooden knobs from the cabinet doors. Set them aside in a baggie so you don’t lose the screws. -
Clean the surface:
Wipe down the entire front surface of the doors with a damp cloth and mild soap to remove dust, grease, or oils. Let it dry completely. -
Tape off edges:
Apply painter’s tape carefully along the inner wooden frame edges if you want to keep the natural wood border visible, as seen in the inspiration photo. -
Apply the base coat:
Brush on a coat of white chalk paint or primer onto the door panels. Work in smooth, vertical strokes to minimize texture. -
Sand and recoat:
Once the first coat is dry, lightly sand with 220-grit sandpaper for a super-smooth finish. Wipe away the dust, then apply a second coat of white for full, opaque coverage.
Paint Consistency Tip
Slightly water down your acrylics. They should flow like heavy cream to create smooth leaf curves without drag marks.
Step 2: Sketching the Design
-
Map out the large blooms:
Using a pencil, lightly sketch the placement of the two main flowers. Place a large five-petaled bloom on the upper left door and a stylized cup-shaped flower on the lower right door. -
Add flowing foliage:
Sketch long, sweeping stems and large leaves. Don’t worry about symmetry; aim for an organic flow where leaves curve upward from the bottom and inward from the sides. -
Fill in the gaps:
Draw in smaller details like the rounded berry sprigs, floating leaf clusters, and the simple stem rising from the bottom center.
Step 3: Painting the Florals
-
Paint the main petals:
Start with the large flower on the left. Mix a soft terra cotta red and fill in the petals, leaving a tiny gap of white space between them for definition if you wish. -
Layer the second flower:
For the right-side flower, paint the outer petals in the same terra cotta, but use a mustard yellow for the central petal and a soft blue-green for the lower sepals. -
Add the yellow accents:
Use your mustard yellow to paint the large, fern-like leaf on the upper left and the feather-shaped leaf on the lower right door. -
Paint the teal foliage:
With a deep teal or forest green, fill in the broad leaves on the bottom corners and the large leaf cluster on the upper right. Use a round brush to get smooth curves on the leaf edges. -
Fill in red details:
Using a muted red or rust color, paint the leafy branch crossing the top middle section and the fern-like plant at the bottom left. -
Detail the flower centers:
Once the base colors are dry, use a fine liner brush and white paint to add the stamen details to the right-side flower and the center star shape to the left-side flower.
Fixing Wobbly Lines
If a stem line goes astray, don’t panic. Let it dry, paint over the mistake with your white base color, and try again.
Step 4: Finishing Touches
-
Refine the lines:
Go back in with a liner brush and black or very dark green paint to add thin stems, connecting your floating leaves and flowers to the ‘ground’ of the design. -
Add whimsical dots:
Dip the non-brush end of a paintbrush into black paint and gently dot clusters of spots above the flowers to mimic pollen or seeds floating in the air. -
Seal the artwork:
Allow the paint to cure for at least 24 hours. Then, apply two thin coats of clear matte polycrylic sealer to protect your handiwork from scratches and wear. -
Reattach hardware:
Remove the painter’s tape and screw the wooden knobs back into place to complete the look.
Step back and enjoy the fresh, artistic energy your new sideboard brings to the room


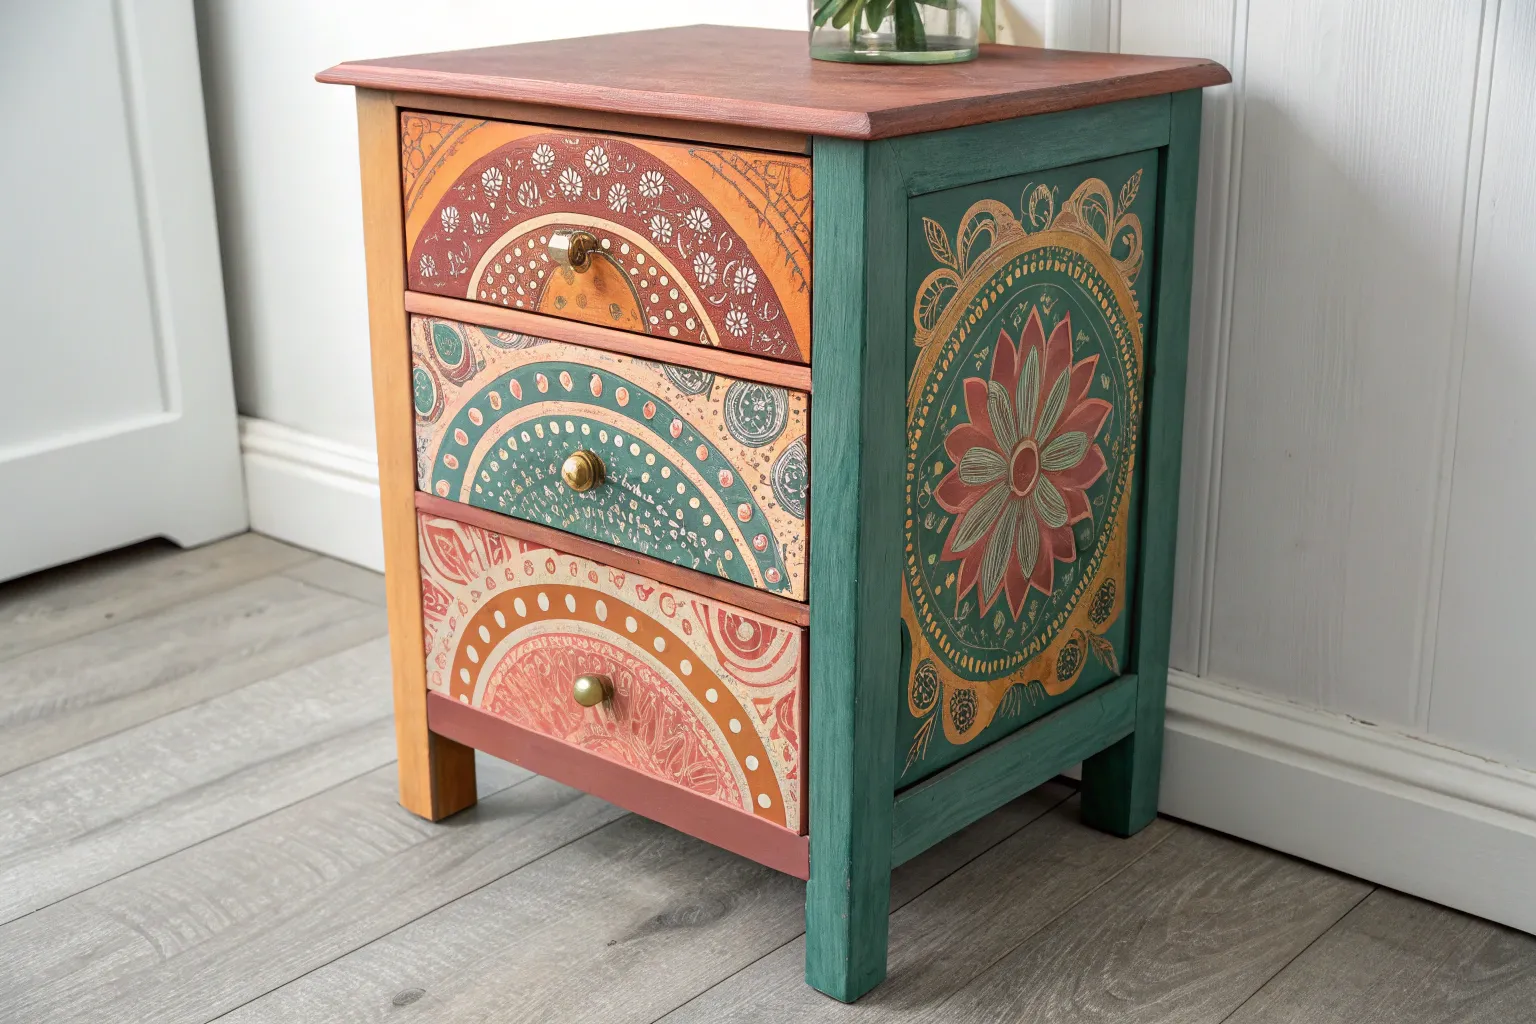
Moroccan-Inspired Geometric Pattern Blocks
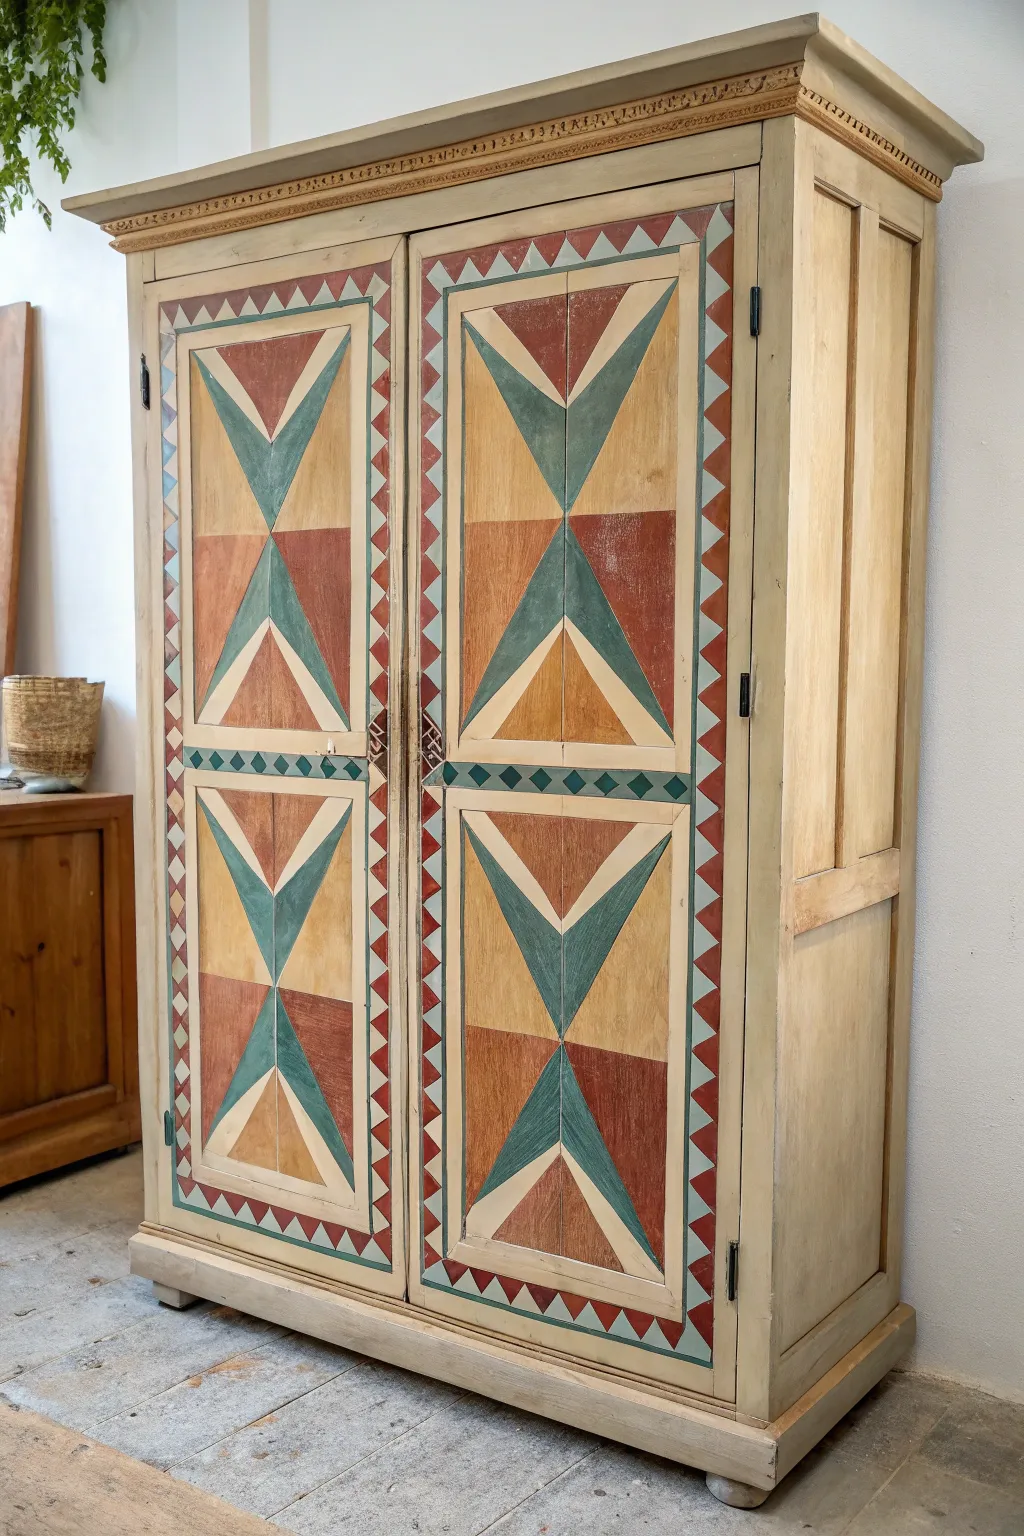
Transform a plain wardrobe into a statement piece with this geometric, Moroccan-inspired design featuring bold hourglass motifs and intricate borders. The interplay of muted terra cotta, teal, and cream creates a warm, travelled look that instantly adds character to any room.
Detailed Instructions
Materials
- Tall wooden cabinet or wardrobe (unfinished or sanded)
- Chalk or mineral paint (Cream, Terra Cotta, Deep Teal/Blue-Green)
- Painter’s tape (various widths: 1 inch and 1/4 inch)
- Ruler and yardstick
- Pencil and eraser
- Small foam rollers
- Artist brushes (flat and angled shaders)
- Clear matte polycrylic or wax for sealing
- Cardstock or stencil acetate (optional for borders)
- Sandpaper (220 grit)
- Damp cloth
Step 1: Preparation & Base Coat
-
Clean and sand:
Begin by removing all hardware, including handles and hinges if possible. Clean the entire piece with a degreaser to remove oils or dirt. Once dry, lightly scuff sand the surfaces with 220-grit sandpaper to ensure adhesion. -
Applying the base color:
Paint the entire exterior with your Cream or light beige chalk paint. Using a small foam roller will give you the smoothest finish on the large flat panels. Apply two coats, letting the first dry completely before adding the second. -
Establish the panel borders:
Once the base is cured (at least 24 hours is best for tape), use your yardstick to measure and mark the inset panels on the doors. These natural indentations in the molding will frame your artwork.
Bleed Patrol
Paint bleeding under tape? Don’t panic. Before applying your color, paint a thin layer of your BASE color over the tape edge first to seal it perfectly.
Step 2: Drafting the Geometric Design
-
Mapping the center points:
Inside each door panel, use a ruler to find the exact vertical and horizontal center. Mark these lightly with a pencil. This crosshair is crucial for symmetry. -
Drawing the large X:
Draw diagonal lines connecting the opposite corners of each rectangular panel section. You should now have a large ‘X’ shape in each section, creating four triangular zones. -
Creating the inner triangles:
Within the top and bottom triangles of your ‘X’, measure about 2-3 inches in from the outer corners and draw lines connecting back to the center point. This creates the radiating ‘starburst’ or hourglass effect seen in the reference photo. -
Drafting the border detail:
Around the perimeter of the door panels, draw a 2-inch wide strip. Inside this strip, mark out zigzag lines to create a continuous chain of small triangles. -
Adding the central belt:
Draw a horizontal band across the middle of the doors where the upper and lower panels meet. Sketch a row of small diamonds inside this band.
Make It Metallic
Swap the beige outlines for gold leaf or metallic copper paint to give the cabinet a touch of Moroccan palace luxury.
Step 3: Painting the Patterns
-
Taping the first color zones:
Tape off the sections destined for Terra Cotta first. Remember, you can’t tape adjacent sections simultaneously. Press the tape edges down firmly with a credit card to prevent bleed. -
Applying Terra Cotta:
Using an artist brush or small sponge, fill in the designated outer triangles and specific border triangles with the Terra Cotta paint. Two thin coats are better than one thick one to avoid ridges. -
Removing tape:
Peel the tape away while the paint is still slightly tacky—this helps keep the lines crisp. Let these sections dry completely before moving on. -
Taping for teal:
Once the red sections are dry, tape off the areas for the Deep Teal, specifically the central vertical triangles and the alternating diamond accents. -
Applying Teal:
Paint the teal sections carefully. I find that using a high-quality angled shader brush helps get into the sharp points of the triangles without needing excessive taping. -
Touching up outlines:
For the light cream triangles within the pattern, you may simply leave the base coat exposed. If you’ve had any bleed, use a tiny liner brush and the base cream color to tidy up the edges.
Step 4: Distressing & Finishing
-
Distressing the edges:
To mimic the aged look of the photo, gently sand the edges of the cabinet and the raised detailing on the cornice. You can also lightly scuff the center of the painted panels to make the pattern look worn. -
Applying a wash (optional):
Mix a tiny amount of brown paint with water (50/50 mix) and brush it over the entire piece, wiping it back immediately with a damp cloth. This ‘glazes’ the bright colors, muting them into that antique boho vibe. -
Sealing the work:
Apply a clear matte polycrylic or furniture wax over the entire cabinet to protect your handiwork from scratches and dust. -
Reassembling:
Once the sealer is fully cured, reattach your hardware. If existing handles look too new, consider rubbing them with a little dark wax to match the aged aesthetic.
Step back and admire how a simple geometry lesson transformed your furniture into a global treasure
BRUSH GUIDE
The Right Brush for Every Stroke
From clean lines to bold texture — master brush choice, stroke control, and essential techniques.
Explore the Full Guide
Whitewashed Base With Color-Pop Details
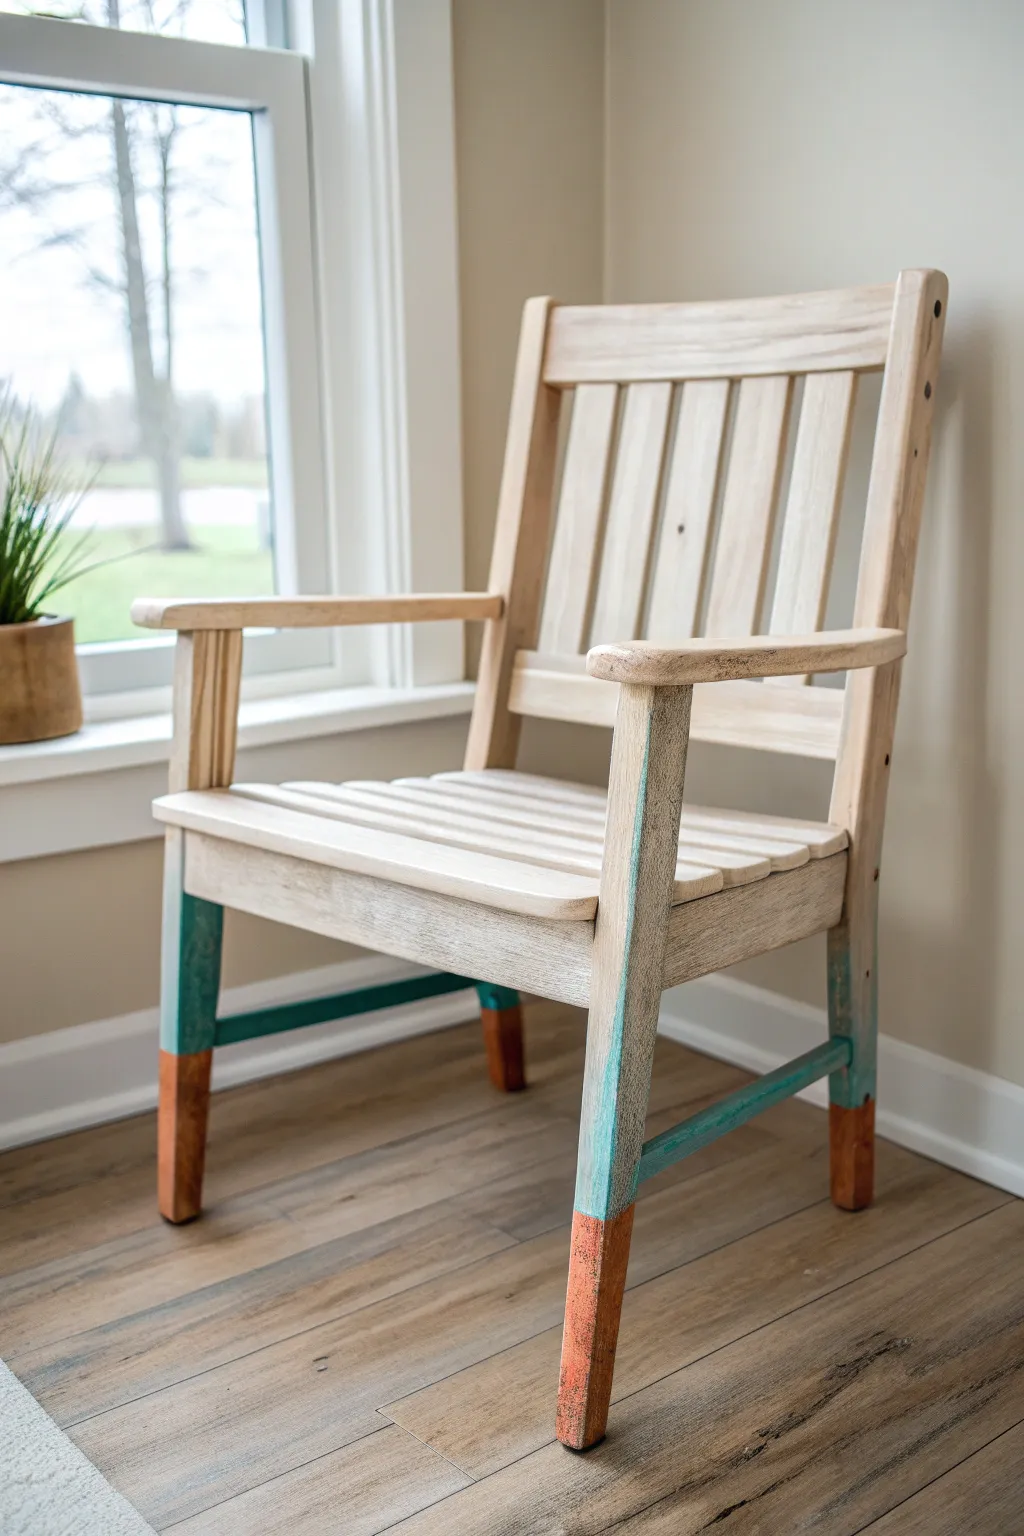
Transform a basic wooden chair into a breezy bohemian statement piece featuring a soft, bleached-wood effect and playful color-blocked legs. This design combines the airy feel of a whitewash with unexpected pops of teal and copper for a look that feels both rustic and modern.
How-To Guide
Materials
- Unfinished wooden chair (or stripped vintage chair)
- Sandpaper (80, 150, and 220 grit)
- White water-based stain or diluted white chalk paint
- Teal chalk paint
- Copper or rust-orange metallic paint
- Painter’s tape
- Clean lint-free rags
- Synthetic bristle brushes (medium and small)
- Clear matte polyurethane or wax sealant
- Drop cloth
Step 1: Preparation & Whitewashing
-
Clean and sand:
Begin by thoroughly cleaning your chair to remove any dirt or oils. Sand the entire surface, starting with 80-grit if the wood is rough, moving to 150-grit, and finishing with 220-grit for a smooth touch. Wipe away all dust with a tack cloth or damp rag. -
Mix your wash:
If you aren’t using a pre-mixed white stain, create your own whitewash. Mix white chalk paint with water in a 1:1 ratio. You want a consistency similar to skim milk so the wood grain shows through. -
Apply the wash:
Dip a rag or brush into the whitewash and apply it generously to the chair, working in small sections like the back slats or armrests. -
Wipe back excess:
Immediately after applying, use a clean, dry rag to wipe off the excess paint. Rub in the direction of the wood grain. The goal is to lighten the wood tone without making it opaque white. -
Detail work:
Ensure the whitewash gets into the crevices between slats, but keep a dry brush handy to clean out drips so they don’t pool in the corners. -
Dry time:
Let the whitewashed base dry completely. Since the mixture is watery, this might take only an hour or two, but ensure it’s dry to the touch before taping.
Step 2: Color Blocking the Legs
-
Measure the dip height:
Decide where you want your color transitions. For this look, the teal section starts about halfway up the front legs, and the copper section covers the bottom 3-4 inches. -
Tape the upper line:
Apply painter’s tape securely around the legs at the highest point where the teal paint will stop. Press the tape edges down firmly to prevent bleeding. -
Apply teal paint:
Paint the legs below the tape line with your teal chalk paint. Extend this color slightly lower than where the copper will eventually start. I find two thin coats give better coverage than one thick coat. -
Check the cross-bars:
Don’t forget to paint the lower structural cross-bars that connect the legs; paint them teal all the way across to create a dipped frame effect. -
Distress the teal (Optional):
Once the teal is dry, use a fine-grit sandpaper to lightly scuff the edges or flat surfaces if you want a more weather-worn, boho vibe. -
Tape for copper:
Once the teal paint is fully cured, apply a new line of painter’s tape over the teal paint, marking off the bottom few inches of the feet. -
Apply metallic accent:
Paint the bottom section of the feet with your copper or rust-orange metallic paint. Metallic paints often require 2-3 coats for full opacity. -
Remove tape:
Peel off the tape carefully while the final coat of paint is still slightly tacky to ensure a crisp, clean line.
Uneven Wash?
If your whitewash looks blotchy, lightly mist the wood with water before applying the paint. This opens the pores and helps the wash absorb more evenly.
Step 3: Sealing & Finishing
-
Final smooth:
Run your hand over the painted areas. If any paint raised the wood grain, lightly sand it with a brown paper bag or super fine finishing pad. -
Apply clear coat:
Using a clean brush, apply a coat of matte clear polyurethane or a clear furniture wax over the entire chair. This protects the whitewash and seals the colorful legs against scuffs. -
Buff if waxing:
If you used wax, wait for it to haze over (usually 15-20 minutes) and then buff it firmly with a soft cloth to create a gentle sheen. -
Cure time:
Allow the sealer to cure fully according to the manufacturer’s instructions before placing cushions on the chair or sitting on it.
Switch It Up
Swap the copper paint for gold leaf sheets applied with sizing. The texture of real metal leaf adds an incredible high-end boho shine to the feet.
Now you have a custom piece of furniture that perfectly balances rustic texture with modern color blocking
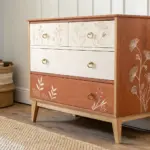
Decoupage Floral Drawer Inserts
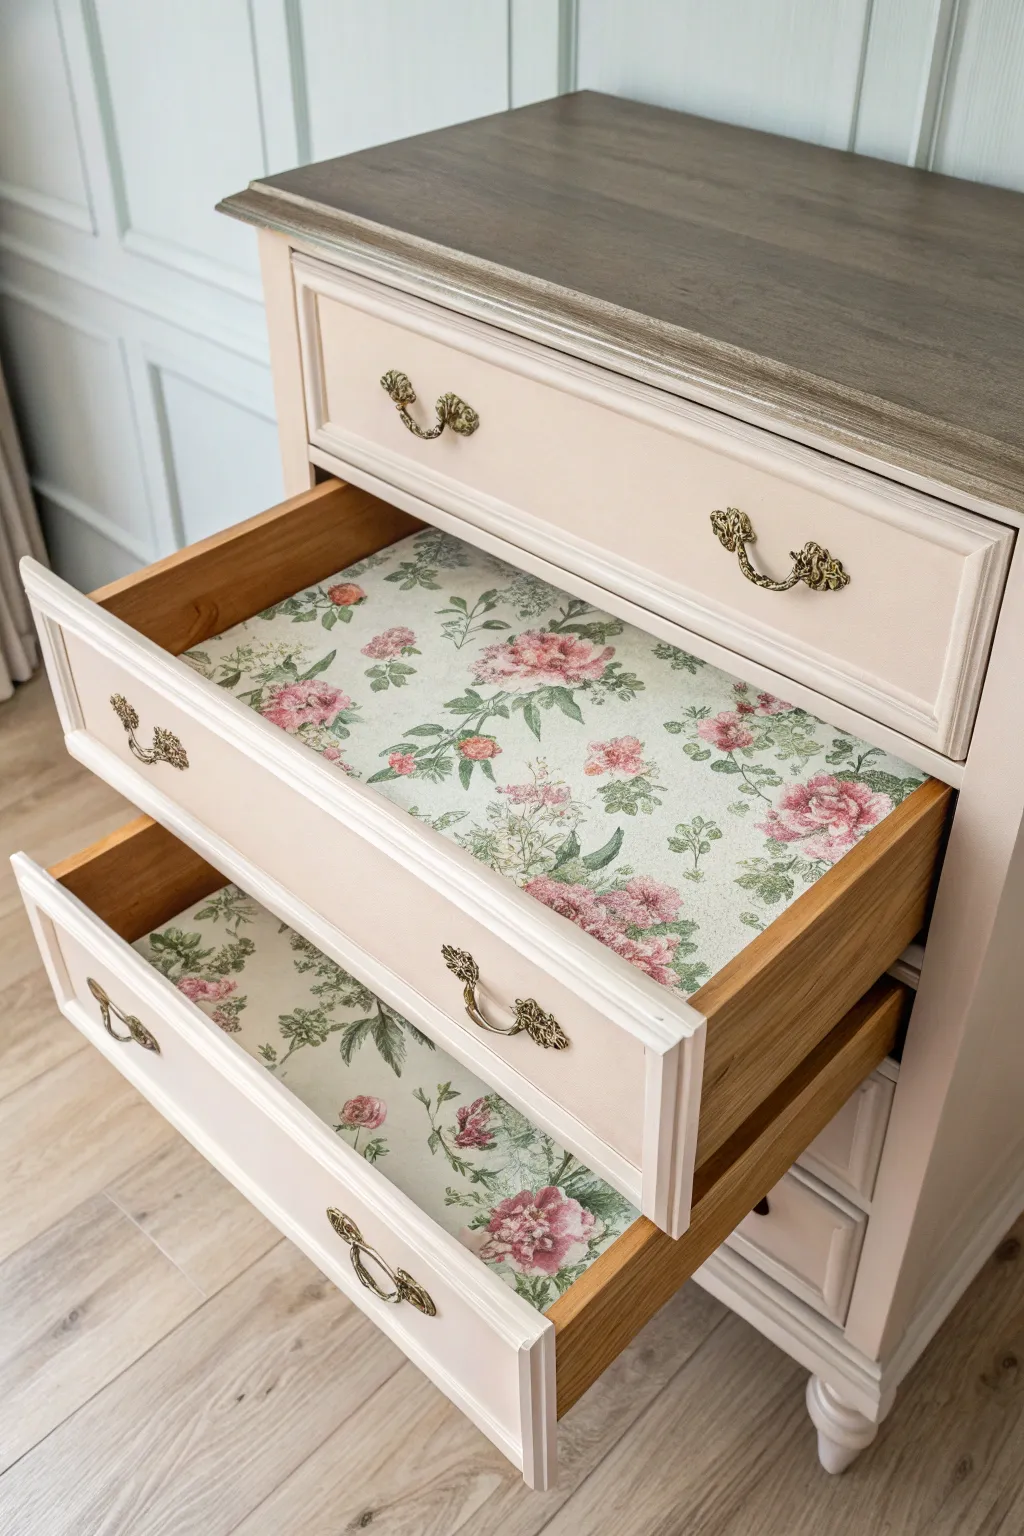
Transform ordinary drawers into a hidden garden with this elegant decoupage project. By combining a soft pink exterior finish with romantic floral paper interiors, you can turn a basic dresser into a bespoke boho statement piece.
Detailed Instructions
Materials
- Dresser or nightstand (wood)
- Sandpaper (120 and 220 grit)
- Tack cloth
- Soft pink chalk or mineral paint
- Grey-brown wood stain (for the top)
- Clear matte polyurethane or wax
- Floral decoupage paper, wallpaper, or gift wrap
- Decoupage medium (like Mod Podge)
- Foam brushes or synthetic bristle brushes
- Smoothing tool or old credit card
- Craft knife (X-Acto)
- Screw driver
- Painter’s tape
Step 1: Preparation & Painting
-
Remove Hardware:
Begin by removing all the drawers from the dresser. Unscrew the handles and knobs and set them aside in a baggie so you don’t lose any screws. If the hardware is looking tarnished, now is a great time to soak it in a mixture of vinegar and water. -
Prep surfaces:
Lightly sand the entire exterior of the dresser and the drawer fronts using 120-grit sandpaper to scuff up the existing finish. This helps the paint adhere. Wipe away all dust thoroughly with a tack cloth. -
Tape and Protect:
If you plan to keep the dresser top natural wood like in the example, tape off the top edges carefully with painter’s tape to protect the wood from the pink paint. -
Paint the Body:
Apply your first coat of soft pink chalk paint to the dresser body and drawer fronts. Use a high-quality synthetic brush for a smooth finish. Let this coat dry completely according to the manufacturer’s instructions. -
Finish Painting:
Apply a second coat of paint for full, opaque coverage. Once dry, lightly sand with 220-grit paper if you want an ultra-smooth finish, then seal with a clear matte wax or polyurethane for durability. -
Refinish the Top:
If your top needs work, sand it down to raw wood. Apply a grey-brown wood stain with a rag, wiping off excess as you go. Seal the top with polyurethane once the stain is fully cured.
Step 2: Creating the Floral Interiors
-
Clean Interiors:
Vacuum out the inside of the drawers to ensure there is absolutely no dust or debris. Wipe them down with a damp cloth and let them dry completely. -
Measure the Base:
Measure the inside bottom of each drawer precisely. It is often helpful to create a paper template using scrap newspaper first to get the corners exactly right before cutting your expensive floral paper. -
Cut the Paper:
Lay your floral paper face down on a cutting mat. Trace your measurements or template onto the back. Cut the paper slightly smaller (about 1/16th of an inch) than the actual measurement to prevent edges from curling up the sides. -
Apply Medium:
Using a foam brush, apply a thin, even layer of decoupage medium to the bottom of the drawer. Make sure to get all the way into the corners, but avoid pooling the liquid. -
Place the Paper:
Carefully lower your cut paper into the drawer. I find it easiest to align one long edge first, then slowly lower the rest of the sheet down to avoid trapping large air pockets. -
Smooth It Out:
Immediately use your smoothing tool or an old credit card to press the paper down. Start from the center and push firmly outward towards the edges to squeeze out air bubbles and excess glue. -
Seal the Edges:
Pay special attention to the corners and edges. Use your finger to press them down firmly. If any paper overhangs, carefully trim it away with a sharp craft knife while the glue is still wet. -
Top Coat:
Once the paper is dry to the touch (usually about 20-30 minutes), apply a top coat of decoupage medium over the entire surface of the paper. This seals it and makes the drawer easy to wipe clean later. -
Reassemble:
Allow the drawers to cure for at least 24 hours so the finish hardens. Reattach your hardware and slide the drawers back into the dresser.
Wrinkle Rescue
If stubborn bubbles appear while smoothing, prick them with a tiny pin and press the air out. The hole will be invisible once the paper dries and shrinks tight.
Make it Scented
For a true multi-sensory experience, place a scented drawer liner sheet underneath your decoupaged paper, or lightly spritz the raw wood sides with essential oil.
Enjoy the secret burst of floral beauty every time you reach for your clothes

PENCIL GUIDE
Understanding Pencil Grades from H to B
From first sketch to finished drawing — learn pencil grades, line control, and shading techniques.
Explore the Full Guide
Painted Hardware Look With Metallic Accents

Transform a tired dresser into a boho-chic statement piece featuring luscious deep teal paint and elegant metallic gold hardware. This project combines a silky matte finish with striking hardware accents for a look that feels both vintage and luxuriously modern.
How-To Guide
Materials
- Wooden dresser or cabinet
- Sanding block (medium and fine grit)
- TSP cleaner or degreaser
- Tack cloth
- Painter’s tape
- High-quality primer (stain-blocking)
- Deep teal chalk or mineral paint
- Gold metallic spray paint or gilding wax
- Synthetic angled brush (2 inch)
- Small artist’s brush
- Clear furniture wax or polyurethane topcoat
- Screwdriver
Step 1: Preparation & Hardware
-
Remove Hardware:
Begin by removing all existing knobs, handles, and pulls from your furniture piece using a screwdriver. Place the screws in a labeled bag so they don’t get lost. -
Clean the Surface:
Scrub the entire piece of furniture thoroughly with TSP cleaner or a strong degreaser to remove years of built-up oils and dust. Let it dry completely. -
Sand the Wood:
Lightly scuff sand the entire surface using a medium-grit sanding block. You aren’t trying to strip it to bare wood, just creating ‘tooth’ for the paint to grab onto. -
Wipe Down:
Remove all sanding dust with a tack cloth or a damp rag. Any leftover dust will create a gritty texture in your final finish. -
Refresh the Hardware:
While your furniture dries, clean the removed hardware. Place the knobs (and screws if the heads show) on a piece of cardboard. -
Paint the Gold Accents:
Spray the hardware with two light coats of metallic gold spray paint. Alternatively, if the original hardware is stuck or you prefer a hand-painted look, you can rub Gold Gilding Wax over them later.
Smooth Finish Secret
Between paint coats, lightly sand with a very high grit (400+) sandpaper or a crumbled brown paper bag. It knocks down nibs for a factory-smooth feel.
Step 2: Painting the Furniture
-
Tape Off Areas:
Apply painter’s tape to any areas you want to keep paint-free, such as the inside of drawers or the back edge. -
Apply Primer:
Brush on a coat of stain-blocking primer. This is crucial for stopping wood tannins from bleeding through your teal paint later. -
Light Sanding:
Once the primer is fully dry, do a very quick pass with fine-grit sandpaper to smooth out any brush strokes. -
First Coat of Color:
Dip your synthetic angled brush into the teal paint. Apply the first coat using long, smooth strokes in the direction of the wood grain. -
Watch for Drips:
Keep an eye on corners and detailed molding areas where paint tends to pool, smoothing them out immediately. -
Dry Time:
Allow the first coat to dry according to the can’s instructions—usually about 2-4 hours for chalk style paints. -
Second Coat:
Apply a second coat of teal paint for full, rich opacity. I find that this second layer really brings out the depth of the color. -
Detail Work:
Use a small artist’s brush to get paint into any intricate grooves or carvings that the larger brush might have missed.
Step 3: Finishing Touches
-
Seal the Surface:
To protect that beautiful matte color, brush on a clear wax or a matte polychrylic topcoat. Apply in thin layers to avoid cloudiness. -
Buff the Wax:
If using wax, wait for it to haze over slightly, then buff it gently with a lint-free cloth to achieve a soft sheen. -
Reattach Hardware:
Once the sealer has cured (wait at least 24 hours if possible so it’s not tacky), screw your freshly gold-painted knobs back onto the drawers.
Sticky Drawers?
If painted drawers stick when closing, rub a plain candle or dedicated furniture wax along the wooden runners to help them glide smoothly again.
Step back and admire how a bold color choice and gleaming gold accents have completely reinvented your space
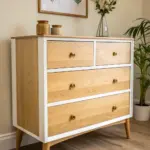
Mismatched Knobs, Unified Paint Palette
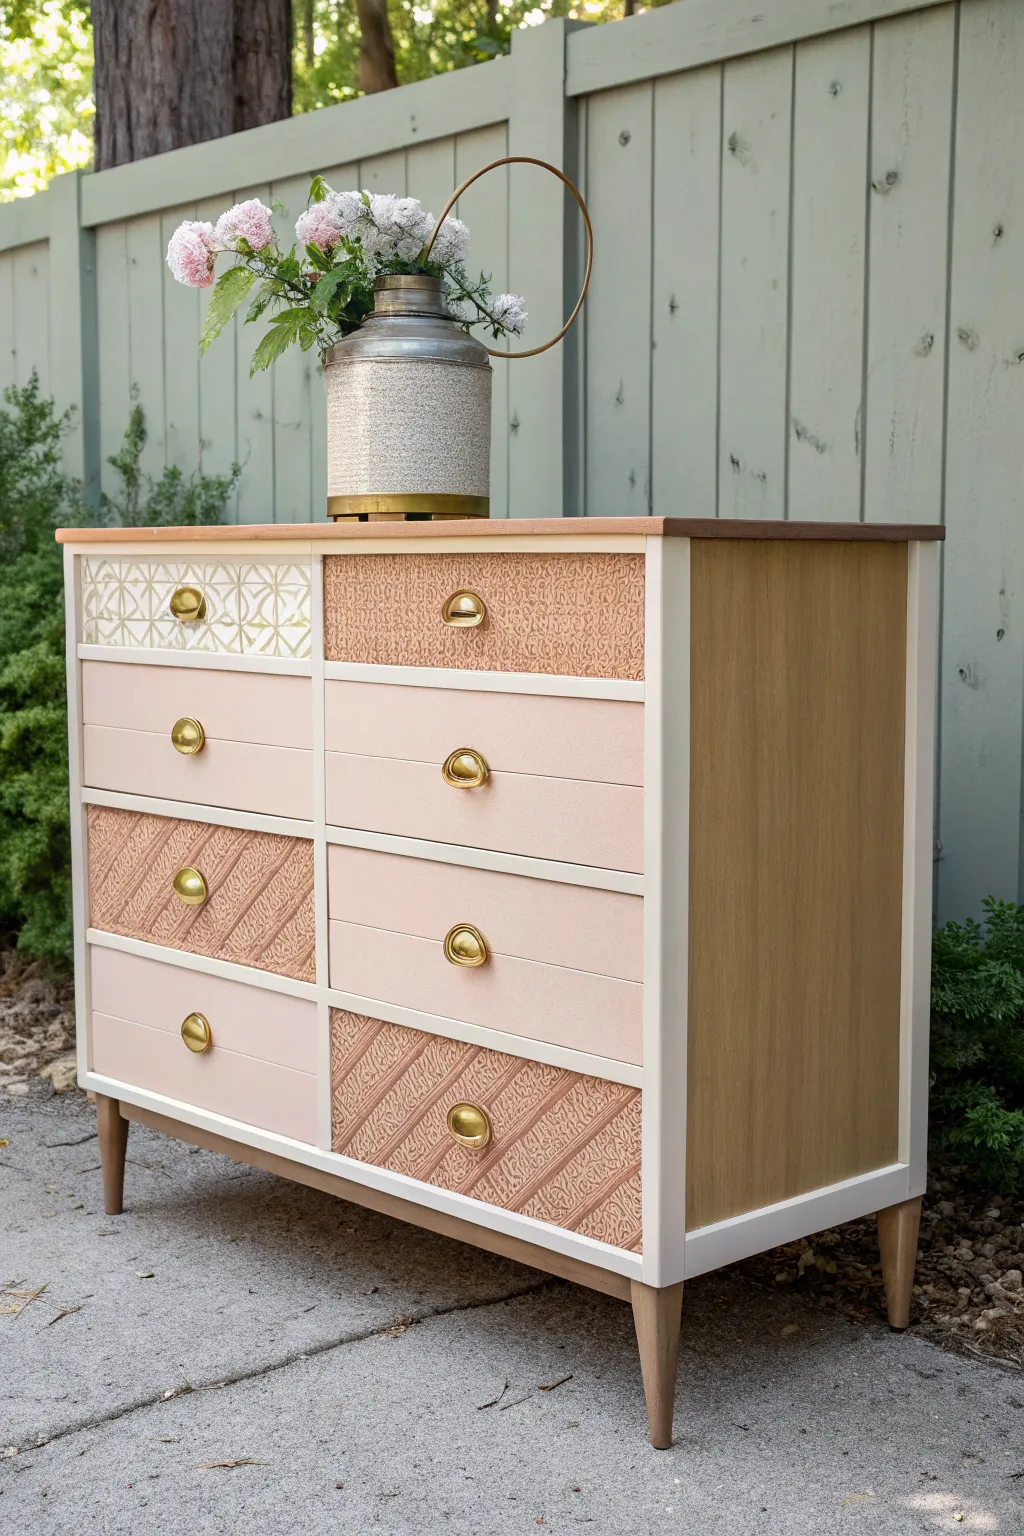
Transform a tired dresser into a eclectic statement piece by blending pale pinks, natural wood tones, and intricate textures. This project plays with mismatched drawer fronts and hardware to create a curated, bohemian look that feels both unified and wonderfully unique.
Step-by-Step Guide
Materials
- Dresser with flat-front drawers (mid-century style works best)
- Sander and sandpaper (120 and 220 grit)
- Painter’s tape
- Primer (bonding primer highly recommended)
- White furniture paint (satin or eggshell finish)
- Pale blush pink furniture paint
- Textured wallpaper or vinyl shelf liner (geometric patterns)
- Clear sealant (polycrylic or similar)
- Decoupage medium (Mod Podge)
- Utility knife or scissors
- Gold drawer pulls (half knobs, half cup pulls)
- Paintbrushes and foam rollers
- Wood stain (light oak or honey tone, optional)
Step 1: Prep and Prime
-
Remove hardware:
Begin by removing all the old knobs and pulls. Keep the screws in a baggie if you plan to reuse them, though for this look, fresh gold hardware is key. -
Clean and sand:
Give the entire piece a good scrub to remove grease. Once dry, sand the entire surface with 120-grit paper to scuff the old finish. Pay special attention to the sides if you plan to re-stain them. -
Strip the sides (optional):
If your dresser has nice wood veneer on the sides like the example, use a chemical stripper or heavy sanding to reveal the raw wood. If not, plan to paint the sides white later. -
Prime the frame:
Tape off the drawer openings. Apply a coat of bonding primer to the main frame of the dresser and the legs if you aren’t leaving them natural. Let this dry completely according to the can’s instructions.
Smooth Seams Tip
When applying wallpaper to drawers, paint the very edges of the drawer front in a matching color first. If the paper shrinks slightly, no bare wood will show through.
Step 2: Painting the Body and Drawers
-
Paint the frame white:
Using a foam roller for a smooth finish, apply your white furniture paint to the outer frame and the dividers between the drawers. You’ll likely need two to three thin coats for solid coverage. -
Select your drawer layout:
Decide which drawers will be painted solid pink and which will get the textured treatment. In the example, they alternate in a checkerboard fashion for balance. -
Paint solid drawers:
For the designated solid drawers, apply the pale blush pink paint. Use long, even strokes with a high-quality brush to minimize texture. Apply 2-3 coats. -
Stain natural sections:
If you stripped the sides or top, apply your light oak stain now. I find using a rag gives more control than a brush. Wipe off excess and let dry.
Step 3: Adding Texture and Pattern
-
Measure for wallpaper:
For the remaining drawers, measure the fronts precisely. Cut your textured wallpaper or liner slightly larger than the drawer front to allow for trimming. -
Apply decoupage medium:
Brush a thin, even layer of Mod Podge or similar adhesive directly onto the drawer front. -
Adhere the paper:
Carefully place your cut paper onto the drawer, smoothing it from the center outward to push out air bubbles. A plastic smoother card is very helpful here. -
Trim the edges:
Once the paper is dry and stiff, use a sharp utility knife to trim the excess paper flush with the drawer edges. Sanding the edges downward with fine-grit paper ensures a seamless transition. -
Seal the paper:
Protect the papered drawers with a top coat of clear sealant. This makes them durable and wipeable.
Level Up: Fabric Inlay
Instead of wallpaper, use actual textured fabric or lace. Adhere it with stiffening fabric glue and paint over it for a subtle, embossed 3D effect that feels luxurious.
Step 4: Assembly and Hardware
-
Seal the whole piece:
Apply a final clear topcoat over the white frame, the pink drawers, and the wood sides to protect your hard work from scratches. -
Drill new holes (if needed):
If your new cup pulls have different hole spacing than the old hardware, fill the old holes with wood filler before painting, and drill new ones now. -
Install diverse hardware:
This is where the ‘mismatched’ magic happens. Install round gold knobs on the pink painted drawers and gold cup pulls on the textured drawers (or vice versa) to differentiate the styles. -
Final assembly:
Slide the drawers back into their tracks, stepping back to admire how the alternating textures and colors play off each other.
Now you have a stunning, customized piece of furniture that perfectly balances modern clean lines with bohemian warmth


Boho Stripes With Softly Imperfect Lines
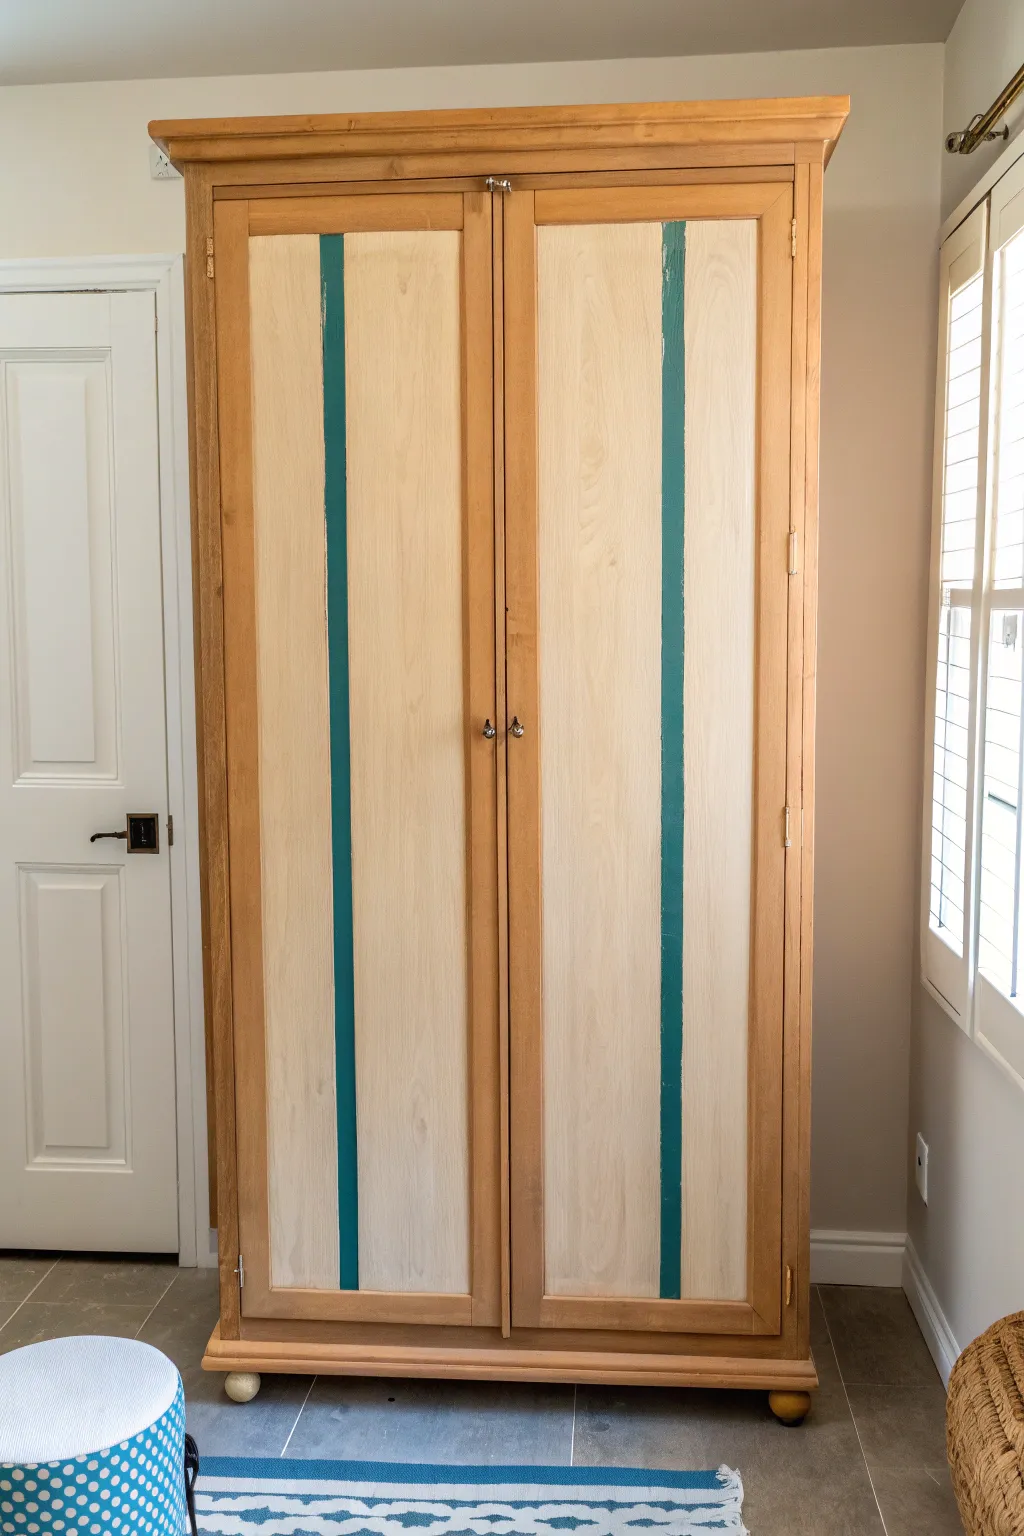
Transform a standard wooden wardrobe into a breezy statement piece with this simple boho-inspired update. Light, creamy panels accented with soft, hand-painted teal stripes give the piece a relaxed, artistic vibe while preserving the warmth of the natural wood frame.
How-To Guide
Materials
- Wooden wardrobe or armoire (preferably with inset panels)
- Sandpaper (120 and 220 grit)
- Tack cloth or lint-free rags
- Painter’s tape (multi-surface)
- Wood primer (water-based)
- Cream or off-white chalk paint or matte acrylic paint
- Teal or greenish-blue chalk paint
- Flat paintbrush (2-inch)
- Smaller artist brush or angled sash brush (1-inch)
- Clear furniture wax or matte polyurethane topcoat
- Wax brush or lint-free cloth (if using wax)
- Screwdriver (for hardware removal)
- Ruler or measuring tape
Step 1: Preparation
-
Remove Hardware:
Begin by unscrewing and removing all knobs, handles, and any decorative hardware from the doors. Store them in a marked bag so you don’t lose any small screws. -
Clean Surfaces:
Wipe down the entire wardrobe with a damp cloth and a mild degreaser to remove dust, oils, and grime. Let it dry completely. -
Sand the Panels:
While preserving the frame’s finish, lightly scuff-sand the interior panels of the doors where you intend to paint. Use 120-grit sandpaper to give the surface ‘tooth’ for the paint to adhere. Wipe away dust with a tack cloth. -
Tape the Frame:
Carefully apply painter’s tape along the inner edges of the wooden frame surrounding the door panels. This ensures the natural wood frame stays clean while you paint the inserts.
Bleed-Through Blues
If paint bleeds under your tape, don’t panic. Wait for it to dry, then use a small stiff brush dipped in water (for acrylics) to gently scrub the excess away, or touch up with the base color.
Step 2: Painting the Base
-
Prime the Panels:
Apply a coat of wood primer specifically to the inset panels. This prevents tannins from bleeding through your light paint color. Allow the primer to dry according to the manufacturer’s instructions. -
Apply First Base Coat:
Using your 2-inch flat brush, paint the panels with your cream or off-white color. Brush in long, vertical strokes following the wood grain for a smooth finish. -
Dry and Repeat:
Allow the first coat to dry fully. If the coverage looks patchy, apply a second coat of the cream paint. I always check for drips in the corners before leaving it to dry. -
Check for Imperfections:
Once dry, inspect the surface. If there are any rough raised grain spots, lightly sand with 220-grit paper and wipe clean.
Step 3: Adding the Boho Stripe
-
Measure Stripe Placement:
Decide where you want your vertical teal stripe. Measure a consistent distance from the outer edge of the panel (e.g., 4 inches in) and make light pencil marks at the top, middle, and bottom. -
Tape the Stripe:
Run two long strips of painter’s tape vertically down the door to define your stripe width (about 1.5 to 2 inches wide). Press the edges down firmly to prevent major bleeding. -
Paint the Stripe:
Using the teal paint and a smaller brush, fill in the space between the tape lines. Don’t worry about being perfectly opaque; a slightly brushed look adds to the boho charm. -
Remove Tape Early:
Carefully peel back the painter’s tape while the teal paint is still slightly wet. This helps prevent the paint from peeling up with the tape. -
Soften the Edges:
To achieve the ‘softly imperfect’ look shown in the photo, take a small, nearly dry artist brush and lightly feather the edges of the teal stripe if they look too sharp or manufactured. You want it to look hand-painted.
Add Texture
Before painting the teal stripe, adhere a strip of lace or textured fabric to the panel, then paint over it. Peel it off to leave a negative-space pattern within your colorful stripe.
Step 4: Finishing Touches
-
Distress (Optional):
If you want a more aged look, use 220-grit sandpaper to lightly distress the painted areas, letting a tiny bit of the wood or primer peek through in random spots. -
Seal the Protection:
Apply a clear furniture wax over the painted panels to seal the work. Use a wax brush to buff it in circular motions, or apply a matte polyurethane if you prefer a harder finish. -
Buff to Sheen:
If using wax, let it cure for a few hours, then buff vigorously with a clean lint-free cloth to achieve a soft, satin sheen. -
Reattach Hardware:
Screw the original knobs and handles back into place. Ensure they are tight and properly aligned. -
Remove Frame Tape:
Peel off the tape protecting the outer wood frame. If any paint seeped under, carefully scrape it away with a fingernail or a damp cloth.
Step back and admire how a simple pop of color has completely refreshed your space
Layered Color Washes for a Worn-In Look
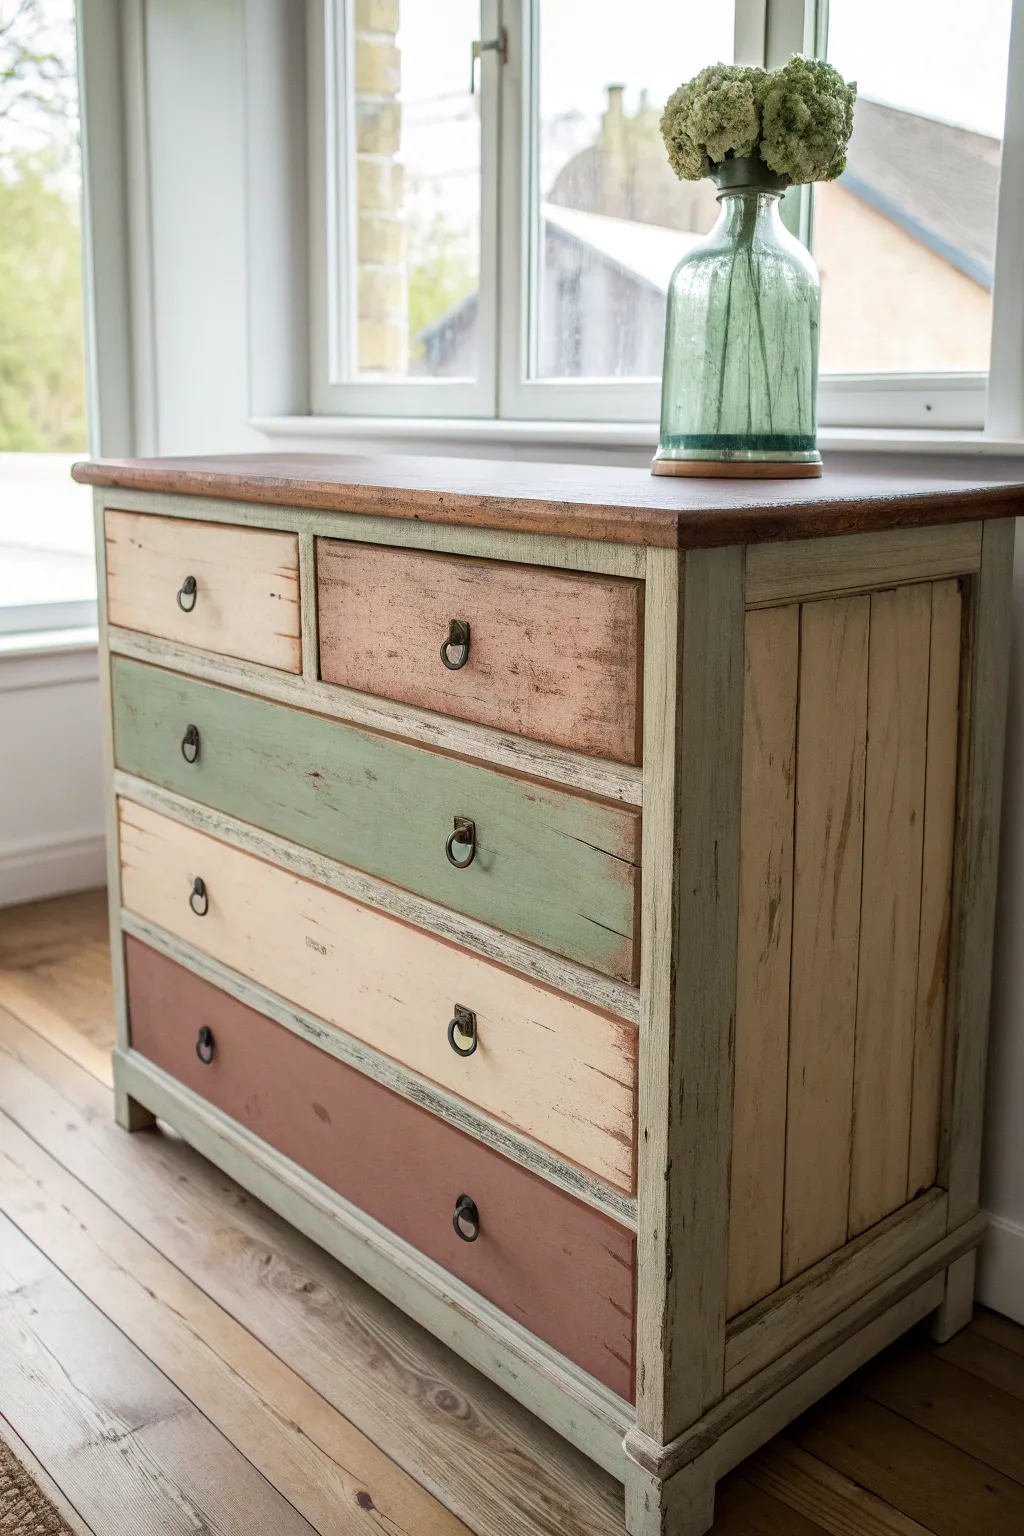
Transform a plain or outdated wooden dresser into a statement piece with this layered color wash technique. The result is a beautifully weathered finish that combines soft pastels, earthy terra cottas, and rustic wood tones for that perfectly imperfect boho vibe.
Step-by-Step Guide
Materials
- Solid wood dresser (cleaned and prepped)
- Chalk-style paints (Sage Green, Terra Cotta, Cream, Mauve/Dusty Rose, Pale Blue-Grey)
- Dark walnut wood stain
- Clear matte varnish or wax
- Dark antiquing wax (optional)
- Medium and fine grit sandpaper (120 and 220)
- Various paint brushes (chip brushes work best for texture)
- Lint-free rags
- Small ring pull hardware (antique brass finish)
- Painter’s tape
- Screwdriver
Step 1: Preparation & Base Staining
-
Remove Hardware:
Begin by removing all existing knobs, handles, and any internal drawer runners if they are removable to protect them. -
Sand the Surfaces:
Scuff sand the entire piece with 120-grit sandpaper to remove old varnish and help the new finishes adhere. Sand the top surface particularly well if you plan to re-stain it. -
Clean Thoroughly:
Wipe down the entire dresser with a damp cloth or a degreaser to remove all dust and oils. Let it dry completely. -
Stain the Top:
Apply the dark walnut stain to the top surface using a rag, following the wood grain. Wipe away excess after a few minutes to achieve a rich, deep tone.
Pro Tip: Vaseline Resist
Before painting, rub small dabs of Vaseline on edges where you want paint to peel. The paint won’t stick there, making distressing effortless later.
Step 2: Painting the Frame & Sides
-
Paint the Frame:
Dip a brush into your Pale Blue-Grey chalk paint. Apply a coat to the main structural frame and legs of the dresser, but avoid the drawers for now. -
Distress the Sides:
For the side panels, apply a thin wash of Cream paint. Create a wash by mixing 50% paint with 50% water. Brush it on roughly, allowing the wood grain to peek through. -
Second Coat on Frame:
Once the first coat on the blue-grey frame is dry, add a second coat for better coverage, but keep your brush strokes loose for texture. -
Sand Back the Edges:
Once the blue-grey paint is fully dry, take 220-grit sandpaper and gently distress the sharp edges and corners to reveal the wood underneath.
Step 3: Creating the Drawer Finishes
-
Plan Your Palette:
Assign a color to each drawer. In our inspiration piece, we use alternating layers of Cream, Terra Cotta (pink/orange), Sage Green, and Mauve. -
Apply Base Colors:
Paint each drawer front solid with its assigned base color. Let this layer dry completely, usually about an hour. -
Dry Brush Technique:
I like to take a dry chip brush with a very small amount of a darker or lighter contrasting shade (like brown over pink, or white over green) and drag it lightly across the surface. -
Heavy Distressing:
Use coarse sandpaper to heavily sand random patches on the drawer fronts, specifically focusing on the centers and edges to mimic natural wear. -
The Wash Layer:
Mix a very watery brown or grey paint wash. Brush this over the colourful drawers and immediately wipe it back with a rag to dirty up the bright colors.
Level Up: Pattern Play
Line the insides of the drawers with vintage floral wallpaper or patterned contact paper for a delightful surprise every time you open them.
Step 4: Finishing Touches
-
Seal the Paint:
Apply a coat of clear matte wax or varnish over the painted frame and drawers to protect the finish. -
Seal the Top:
Apply two to three coats of a more durable polyurethane or tough varnish to the stained wood top, sanding lightly between coats. -
Install Hardware:
Once everything is cured, screw in your antique brass ring pulls. Center them perfectly on each drawer. -
Final Polish:
Give the entire piece a final buff with a soft cloth to bring out a subtle sheen in the wax.
Step back and admire how the layers of colour and texture bring a soulful, travelled history to your room.
Stencil Border Trim Around Doors and Drawers

Transform a simple wooden cupboard into a folk-art inspired masterpiece using geometric stenciling. This project features a striking red and blue star border that frames a central motif, adding a touch of bohemian elegance to your storage.
Step-by-Step
Materials
- Unfinished wooden cabinet or armoire
- Sandpaper (120 and 220 grit)
- Tack cloth
- Pale cream or off-white chalk paint
- Clear matte polycrylic sealer
- Geometric starburst stencil (border pattern)
- Single starburst stencil (for center)
- Small stencil brushes (approx. ½ inch)
- Painter’s tape
- Deep red acrylic craft paint
- Navy blue acrylic craft paint
- Paper plate or palette
- Small artist detail brush
- Measuring tape
Step 1: Preparation & Base Coat
-
Prep the surface:
Remove all hardware, including hinges, knobs, and latches. Keep these safe in a labeled bag so you don’t lose any screws. -
Sand the wood:
Give the entire piece a light sanding with 120-grit paper to remove any existing glossy finish or rough spots. Follow up with 220-grit for a smooth touch. -
Clean deeply:
Wipe down the entire cabinet with a tack cloth to remove every speck of dust. This ensures your paint adheres perfectly without bumps. -
Apply the base color:
Apply a coat of pale cream chalk paint to the entire exterior. For this look, you want a semi-opaque finish that allows a hint of the wood grain to peek through, so one coat might be sufficient. If you prefer full coverage, apply a second coat after the first dries. -
Dry completely:
Let the base coat cure for at least 24 hours. Stenciling on tacky paint can cause peeling, so patience is key here.
Clean Corner Hack
Use a piece of cardboard held at a 45-degree angle at the corners as a movable shield. This creates a crisp mitered look where the vertical and horizontal stencil borders meet.
Step 2: Stenciling the Border
-
Plan the layout:
Measure the width of the frame around the door. Choose a border stencil that fits comfortably within this width, leaving a small breathing room on either side. -
Secure the stencil:
Starting at the top center of the frame, position your stencil. Secure it firmly with painter’s tape to prevent slipping. -
Load the blue:
Dip your stencil brush into the navy blue paint, then offload most of it onto a paper towel until the brush feels almost dry. This ‘dry brush’ technique prevents bleed-under. -
Paint the blue stars:
Stipple the blue paint onto the star shapes that connect the diamonds. Use an up-and-down pouncing motion. -
Switch to red:
Using a fresh brush, apply the deep red paint to the diamond shapes and other filler elements within the stencil pattern, maintaining the dry-brush method. -
Advance the pattern:
Carefully lift the stencil and move it to the next section, aligning the registration marks with your previously painted design. Continue around the entire perimeter of the door frame. -
Handle the corners:
Corners can be tricky. Use painter’s tape to mask off the mitered edge of the corner so your stencil ends cleanly at a 45-degree angle, creating a professional framed look.
Step 3: The Central Motif & Finishing
-
Mark the center:
Measure the door panel to find the exact center point. Make a tiny pencil mark to guide your placement. -
Place the central star:
Position your single large starburst stencil over the center mark. Secure it with tape. -
Paint the motif:
Paint the vertical and horizontal rays in navy blue. Paint the smaller diagonal rays in deep red to match the border scheme. -
Hand-paint details:
Once the stencils are removed and dry, use a fine artist brush to touch up any fuzzy edges or add small connecting lines if your stencil had bridges that broke the pattern. -
Seal the work:
Apply a clear matte polycrylic sealer over the entire cabinet. I prefer doing two thin coats rather than one thick one to ensure durability without yellowing. -
Reassemble:
Once the sealer is fully cured (usually 24-48 hours), reattach your hinges and knobs to complete the transformation.
Add Vintage Depth
Before sealing, lightly sand the painted stencil graphics with very fine grit paper. This distresses the pattern slightly, making it look like it’s been there for decades.
Step back and admire how a little paint and precision have given your furniture a timeless, handcrafted character
Botanical Vines Crawling Up the Legs
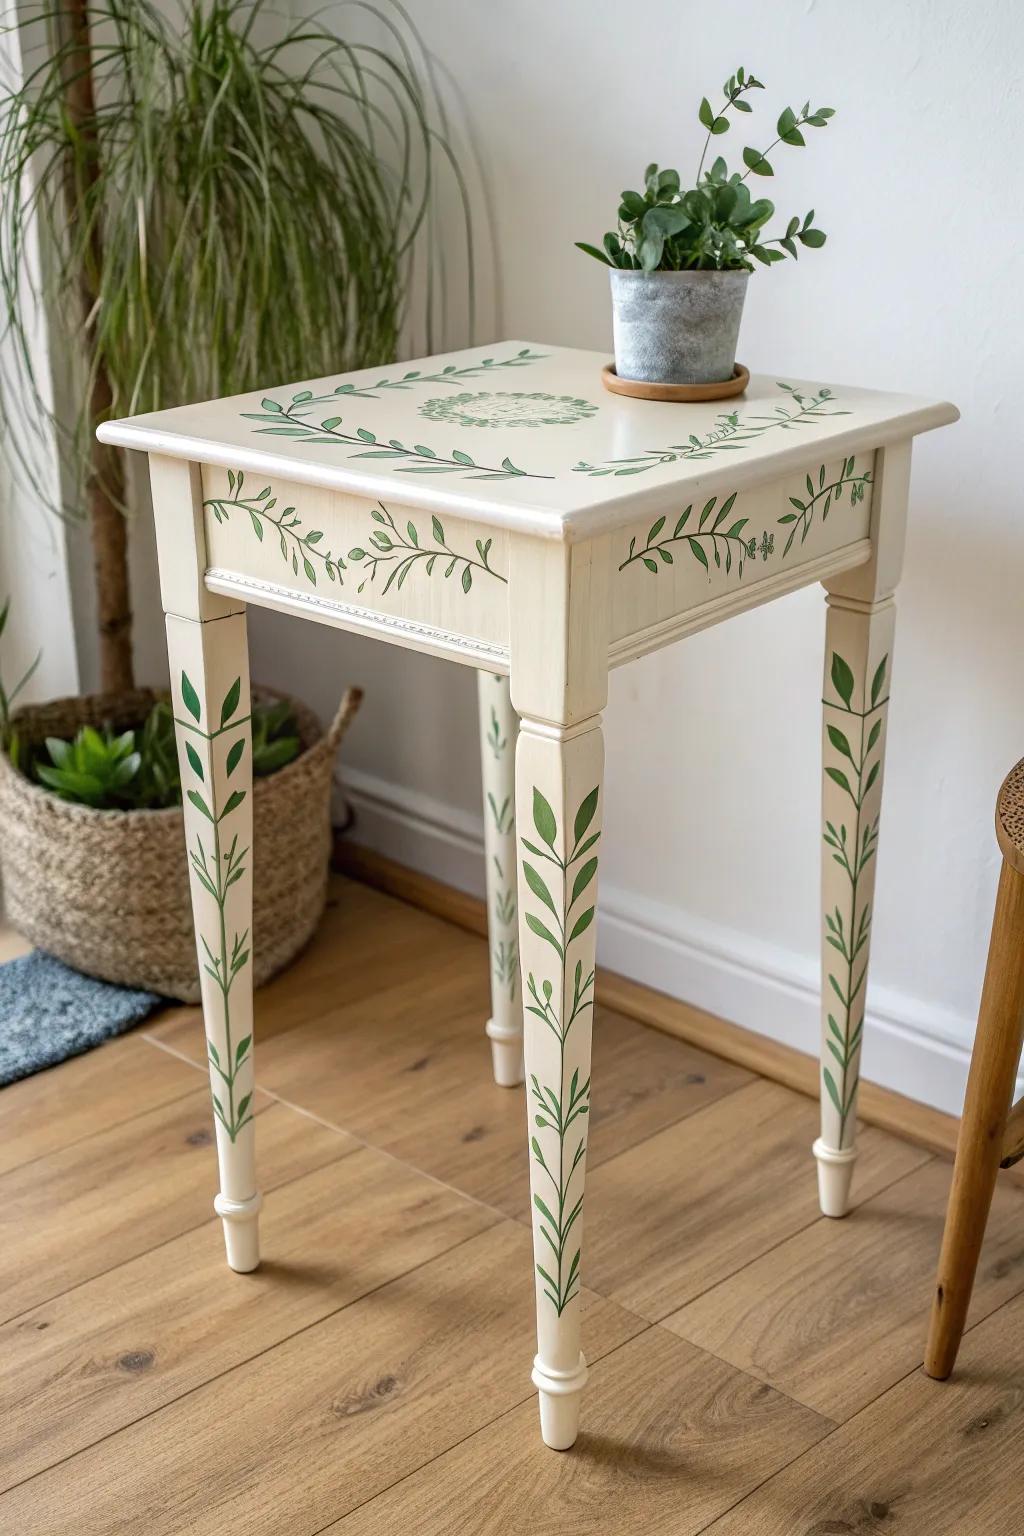
Transform a plain wooden table into a piece of botanical beauty featuring delicate vines that seemingly grow up the legs and across the surface. This soft, creamy backdrop combined with lively green foliage brings a refreshing, organic touch to any corner of your home.
Detailed Instructions
Materials
- Small wooden side table
- Sandpaper (120 and 220 grit)
- Tack cloth
- High-quality chalk mineral paint (Cream/Off-White)
- Acrylic craft paints (Sage Green, Forest Green, Lime Green)
- Clear matte polyurethane topcoat
- Medium flat synthetic brush (for base coat)
- Round detail brushes (Size 4 and Size 0/Liner brush)
- Pencil
- Palette or paper plate
Step 1: Preparing the Canvas
-
Clean surface:
Begin by thoroughly cleaning your table with a degreaser or mild soapy water to remove any oils, dust, or furniture polish residue. -
Scuff sand:
Using 120-grit sandpaper, lightly scuff the entire surface of the table. You don’t need to strip it to bare wood, just create a ‘tooth’ for the paint to grip. -
Wipe down:
Remove all sanding dust with a tacky cloth or a damp rag to ensure a perfectly smooth finish. -
Base coat application:
Apply your creamy off-white chalk paint using the flat synthetic brush. Paint in long, consistent strokes following the grain of the wood. -
Second coat:
Once the first coat is completely dry (usually 1-2 hours), apply a second coat for full opacity. I like to sand very lightly with 220-grit paper between these coats for an ultra-smooth feel.
Steady Hand Tip
Rest your pinky finger on the dry surface of the table while painting fine lines. It acts as an anchor to stabilize your hand for smoother stems.
Step 2: Drafting the Design
-
Map the vines:
Using a pencil very lightly, sketch a vertical wavy line going up the center of each table leg. This will be the main stem for your climbing vines. -
Sketch leg leaves:
Add simple leaf shapes branching off your vertical stem lines. Keep them symmetrical or alternating depending on your preference, spacing them out evenly as you go up the leg. -
Plan the apron:
Draw a horizontal vine wrapping around the side panels (apron) of the table. Let the leaves drape slightly downwards for a natural look. -
Top surface wreath:
On the tabletop, lightly sketch a circular or oval wreath shape in the center, and add corner flourishes that point inward toward the middle.
Add Some Whimsy
Hide tiny painted details among the leaves for a surprise element—try adding a small ladybug, a bumblebee, or tiny white flower buds on the vines.
Step 3: Painting the Botanicals
-
Mix your greens:
Squeeze out your Sage, Forest, and Lime greens onto a palette. Mix a mid-tone custom green as your primary color, but keep the original shades available for variation. -
Line the stems:
Using your thin liner brush (Size 0) and the darkest green mix, carefully trace over your pencil lines to create the thin stems on the legs and apron. -
Fill base leaves:
Switch to a Size 4 round brush. Load it with your main green mix and fill in the leaf shapes on the legs. Press down at the base of the leaf and lift as you reach the tip to create a natural point. -
Add dimension:
While the green paint is still slightly wet, dip the very tip of your brush into a lighter lime or darker forest green and blend it into individual leaves to create depth and shadow. -
Paint the top design:
Repeat the leaf painting process for the wreath and corner designs on the tabletop. Keep your wrist loose to maintain fluid, organic shapes. -
Refine details:
Go back in with your liner brush to sharpen any leaf tips or connect any floating leaves back to their main stems. -
Erase guidelines:
Allow the painted vines to dry fully (at least 24 hours). If any pencil marks are still visible, gently erase them now.
Step 4: Protection
-
Seal the piece:
Stir your clear matte polyurethane topcoat gently to avoid bubbles. Apply a thin, even layer over the entire table to seal the chalk paint and protect your artwork. -
Final cure:
Let the topcoat dry according to the manufacturer’s instructions before placing any heavy objects on the table.
Now you have a charming, nature-inspired accent piece ready to brighten up your room
Color-Blocked Drawers in Eclectic Tones
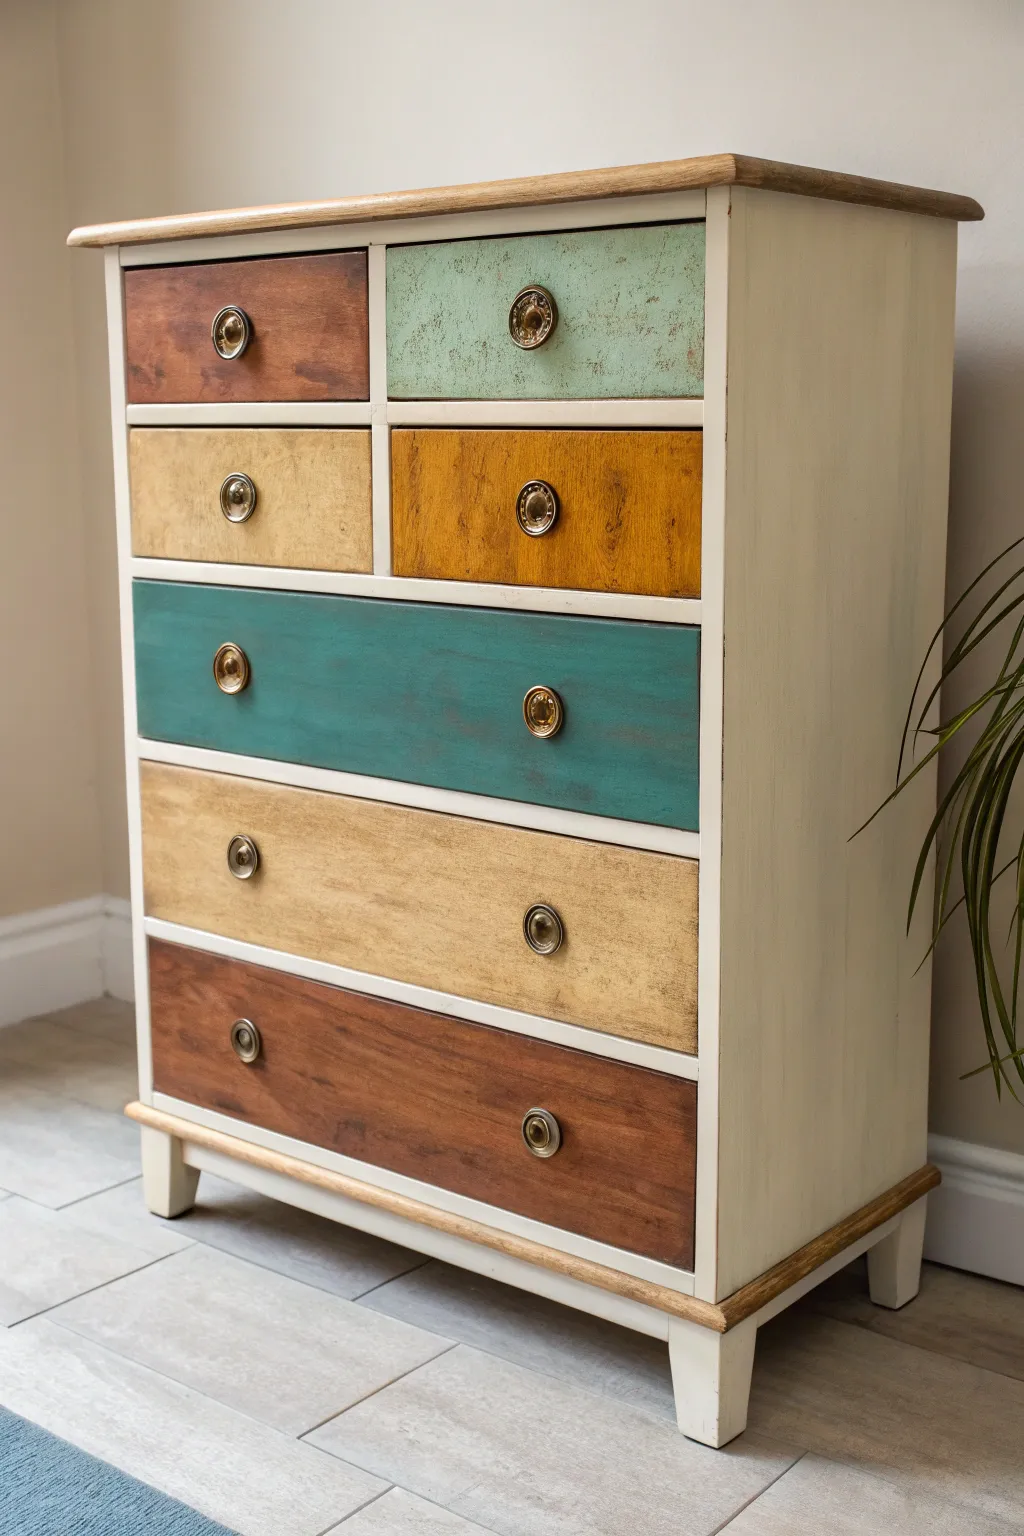
Transform an ordinary chest of drawers into a striking, bohemian statement piece with this color-blocking technique. By combining creamy neutrals, distressed pastels, and rich wood tones, you create a harmonious yet eclectic look that adds instant character to any room.
Step-by-Step
Materials
- Wooden chest of drawers
- Medium and fine grit sandpaper (120 and 220 grit)
- Electric sander (optional but recommended)
- Creamy off-white chalk paint
- Sage green chalk paint
- Mustard yellow paint or stain
- Teal/turquoise chalk paint
- Dark wood stain (Walnut or dark oak)
- Clear furniture wax
- Dark antique wax
- Paintbrushes (synthetic for paint, chip brush for wax)
- Lint-free rags
- Screwdriver
- Painter’s tape
Step 1: Preparation & Sanding
-
Remove hardware:
Begin by removing all drawers from the chest. Unscrew all knobs and handles and set them aside in a labelled bag so you don’t lose any small screws. -
Clean the surface:
Wipe down the entire piece with a degreasing cleaner to remove years of dust, oil, and furniture polish. A clean surface is crucial for good paint adhesion. -
Sand the top:
Since the top will be left as natural wood, sand it thoroughly using an electric sander with 120-grit paper to remove the old finish completely. Follow up with 220-grit for a smooth touch. -
Scuff sand the body:
For the main body and drawer fronts, you don’t need to strip them to bare wood. Just give them a good scuff sand with medium-grit paper to create a ‘key’ for the paint to grip.
Step 2: Painting the Framework
-
Paint the body:
Apply a coat of creamy off-white chalk paint to the main frame of the chest, including the side panels and the dividers between drawers. Avoid painting the very top surface. -
Second coat:
Once the first coat is dry (usually about an hour depending on your climate), apply a second coat for full opaque coverage. I find it helpful to use a brush with synthetic bristles for a smoother finish here. -
Protect the top:
Apply a clear furniture wax or a matte polyurethane varnish to the sanded wooden top and the bottom wooden plinth/legs to seal and protect the raw wood tone.
Wax On, Wax Off
When applying dark wax, always apply a layer of clear wax first. This acts as an ‘eraser’—if the dark wax gets too heavy, you can wipe it away with more clear wax.
Step 3: Creating the Color Block Drawers
-
Plan your palette:
Map out your colors. This design uses pairs and singles: top row is one stained, one green; second row is one beige/light stain, one mustard; middle is full teal; lower two are natural wood tone and dark paint/stain. -
Apply the stains:
For the wood-look drawers (top left, middle left, bottom large drawer), apply your wood stain with a rag. Wipe it on, let it sit for a minute, and wipe off the excess. You want the grain to show through clearly. -
Paint the green drawer:
Paint the top right drawer with your sage green chalk paint. Don’t worry about perfect coverage; a little texture adds to the boho charm. -
Paint the yellow drawer:
Paint the second row, right-side drawer in a mustard yellow tone. If the color feels too flat, mix in a tiny drop of brown to deepen it. -
Paint the large teal drawer:
Paint the entire third drawer front in a deep teal or turquoise. This serves as the bold anchor color for the middle of the piece. -
Paint the beige drawer:
For the fourth drawer down, paint it a creamy beige or light sandy color. You can mix your white frame paint with a touch of the mustard and brown to get this custom shade.
Pattern Play
Add subtle stenciling to one or two drawers using a geometric mandala pattern in a slightly lighter shade than the base color for extra boho texture.
Step 4: Finishing Touches
-
Distress the paint:
Once all drawers are fully dry, take 220-grit sandpaper and gently sand the edges and raised areas of the painted drawers. This reveals a bit of the wood underneath for that aged look. -
Apply clear wax:
Brush a layer of clear furniture wax over all painted surfaces to seal them. Work in small sections and buff off the excess with a lint-free cloth. -
Add antique depth:
To get the dirty, vintage look seen in the green and teal drawers, lightly brush dark antique wax into the corners and over the surface texture. Wipe it back immediately so it just sits in the crevices. -
Reattach hardware:
Screw the original handles back onto the drawers. If your original hardware was too shiny, you might want to rub a little dark wax on them to mat them down first. -
Reassemble:
Slide the drawers back into their corresponding slots, step back, and admire your colorful new creation.
Now your eclectic chest is ready to bring warmth and personality to your space
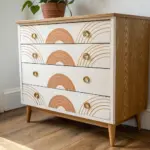
Boho Rainbow Arch Motifs on Cabinet Doors
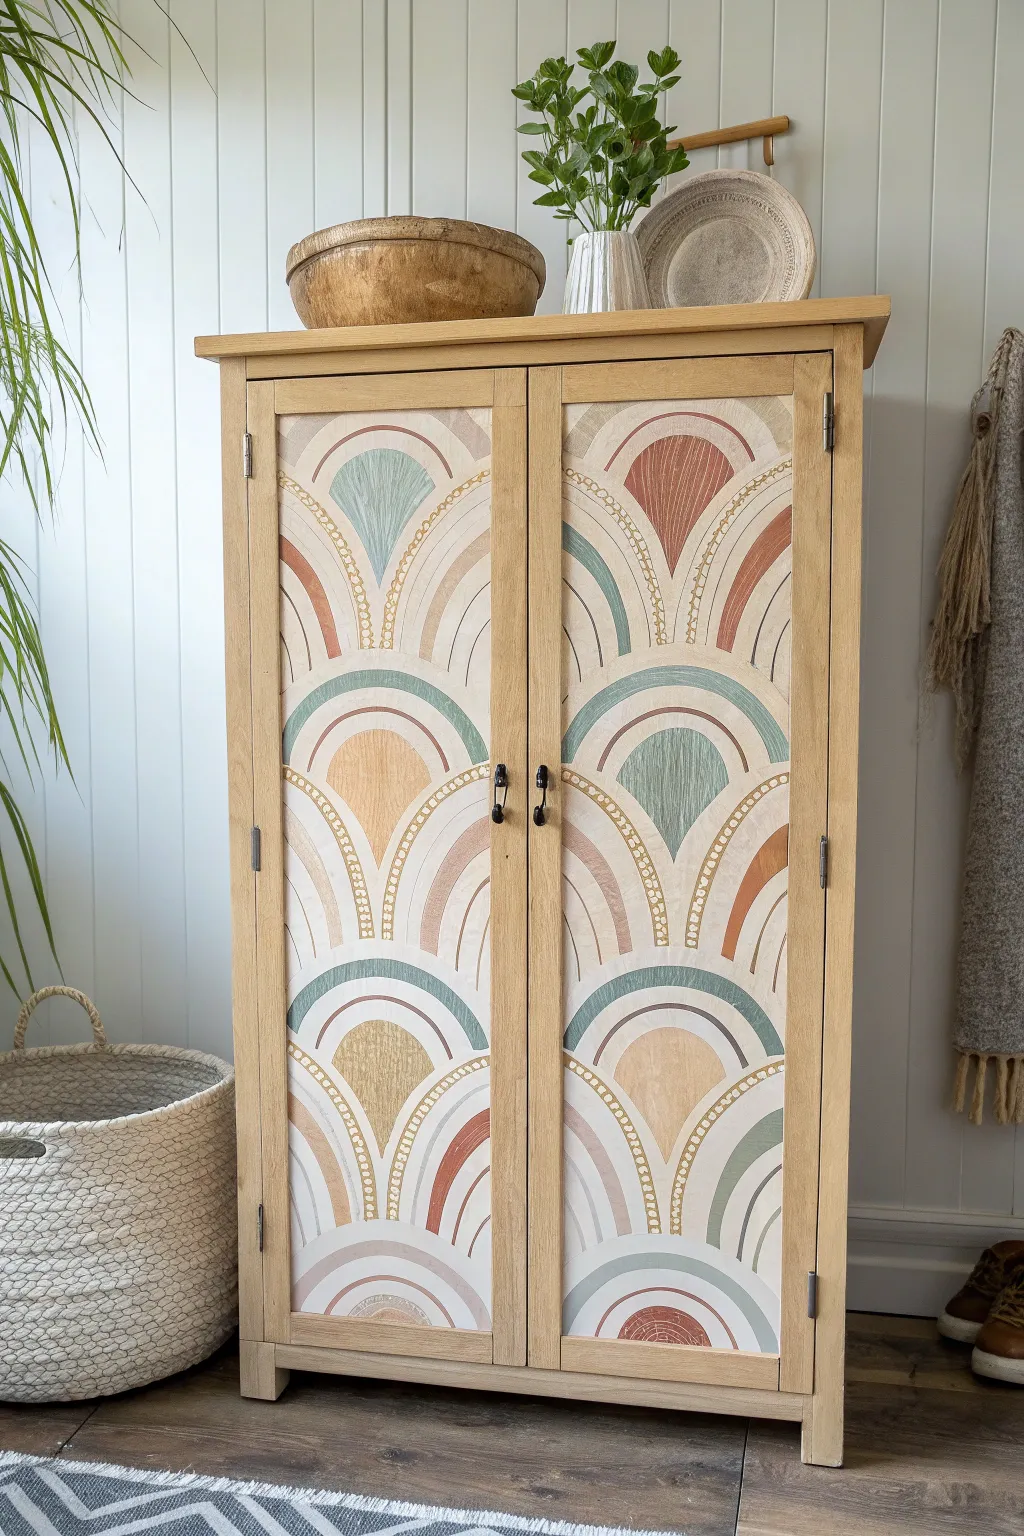
Transform a plain wooden cabinet into a stunning focal point with this rhythmic, earthy rainbow arch design. The repeating motif combines warm terracotta, sage green, and soft neutrals for a polished yet bohemian aesthetic that completely refreshes tired furniture.
Step-by-Step Tutorial
Materials
- Wooden cabinet (unfinished or sanded)
- Sandpaper (120 and 220 grit)
- Primer (if painting over a dark finish)
- Chalk or mineral paints (terracotta, sage green, mustard yellow, cream, white)
- Large circular stencils or a compass tool
- Painter’s tape (various widths)
- Pencil
- Small flat artist brushes
- Fine detail brush or paint pen (gold or cream)
- Clear matte varnish or wax
- Ruler or measuring tape
Step 1: Preparation & Planning
-
Clean and prep the surface:
Remove the doors from the cabinet hinges and take off any knobs or handles. Clean the wood thoroughly with a degreaser to remove oils and dirt. -
Sand the wood:
Lightly sand repeat surfaces with 120-grit sandpaper to give the paint something to grip. If the doors have a glossy finish, scuff them up well. Wipe away all dust with a tack cloth. -
Apply a base coat (optional):
If you want the background to be solid white or cream rather than natural wood, apply two coats of your base color now, letting it dry completely between layers. I prefer leaving some wood grain showing for texture, but a solid base makes colors pop more.
Wobbly Lines?
Don’t panic if your curves aren’t perfect. Use a damp Q-tip to immediately wipe away mistakes, or wait for the paint to dry and use an eraser for pencil marks.
Step 2: Drafting the Design
-
Mark the center lines:
Using a ruler and pencil, lightly draw a vertical line down the exact center of each door panel. This axis will act as the peak for your arches. -
Determine arch spacing:
Decide how many full rainbow sets you want vertically. Measure the height of the panel and divide by that number (e.g., three sets) to find the starting baseline for each main arch. -
Trace the primary curves:
Use a large compass or circular objects (like dinner plates or bowls of various sizes) to trace the concentric arches. Start from the bottom baseline and work upward, ensuring the top of the curve aligns with your vertical center line. -
Create the repeating pattern:
Repeat this tracing process for the middle and top sections. Since the design is scalloped, the ‘valleys’ of the top row should meet the ‘peaks’ of the row below.
Step 3: Painting the Colors
-
Start with the innermost arch:
Using a small flat artist brush, paint the smallest, central arch shape first. A soft washed sage or muted teal works beautifully here as an anchor. -
Paint the second bands:
Move outward to the next band. Use a warm terracotta or rust color. Carefully follow your pencil lines, keeping a steady hand to maintain a smooth curve. -
Add the lighter tones:
For the wider outer bands, switch to a cream or soft beige. This acts as a ‘breathing room’ color between the bolder shades. Apply two thin coats rather than one thick one to avoid visible brushstrokes. -
Fill the remaining shapes:
Continue filling in the alternate arch bands with mustard yellow and secondary green tones until the main block colors are complete. Let this layer dry for at least 2 hours.
Level Up: Gold Leaf
Instead of painted dots, use gold leaf size and foil or a metallic gold paint pen for the dotted accents. This adds a luxe shine that catches the light.
Step 4: Detailing & Finishing
-
Add decorative separation lines:
Once the main colors are dry, use a fine liner brush or a paint pen to draw thin lines between the color blocks. A contrasting white or cream line helps define the shapes cleanly. -
Create the dotted texture:
Dip the non-brush end of a small paintbrush into paint (or use a dotting tool) to create the uniform dotted lines seen on the outer edges of the arches. Space them evenly for a professional look. -
Clean up edges:
If any paint bled or lines look shaky, go back in with your background color or a small detail brush to tidy up the intersections. This step makes a huge difference in the final quality. -
Background wash (optional):
If you left the background as bare wood, consider applying a very diluted whitewash around the painted arches to brighten the overall look without hiding the grain. -
Seal the work:
Apply a clear matte polyacrylic varnish or furniture wax over the entire door. This protects your hand-painted design from scratches and fading. -
Reassemble:
Once the sealer is fully cured (usually 24 hours), reattach your hardware and hang the doors back onto the cabinet frame.
Step back and admire how a simple repeated pattern has turned your storage piece into a work of art
Speckled Paint Effect for Desert Texture
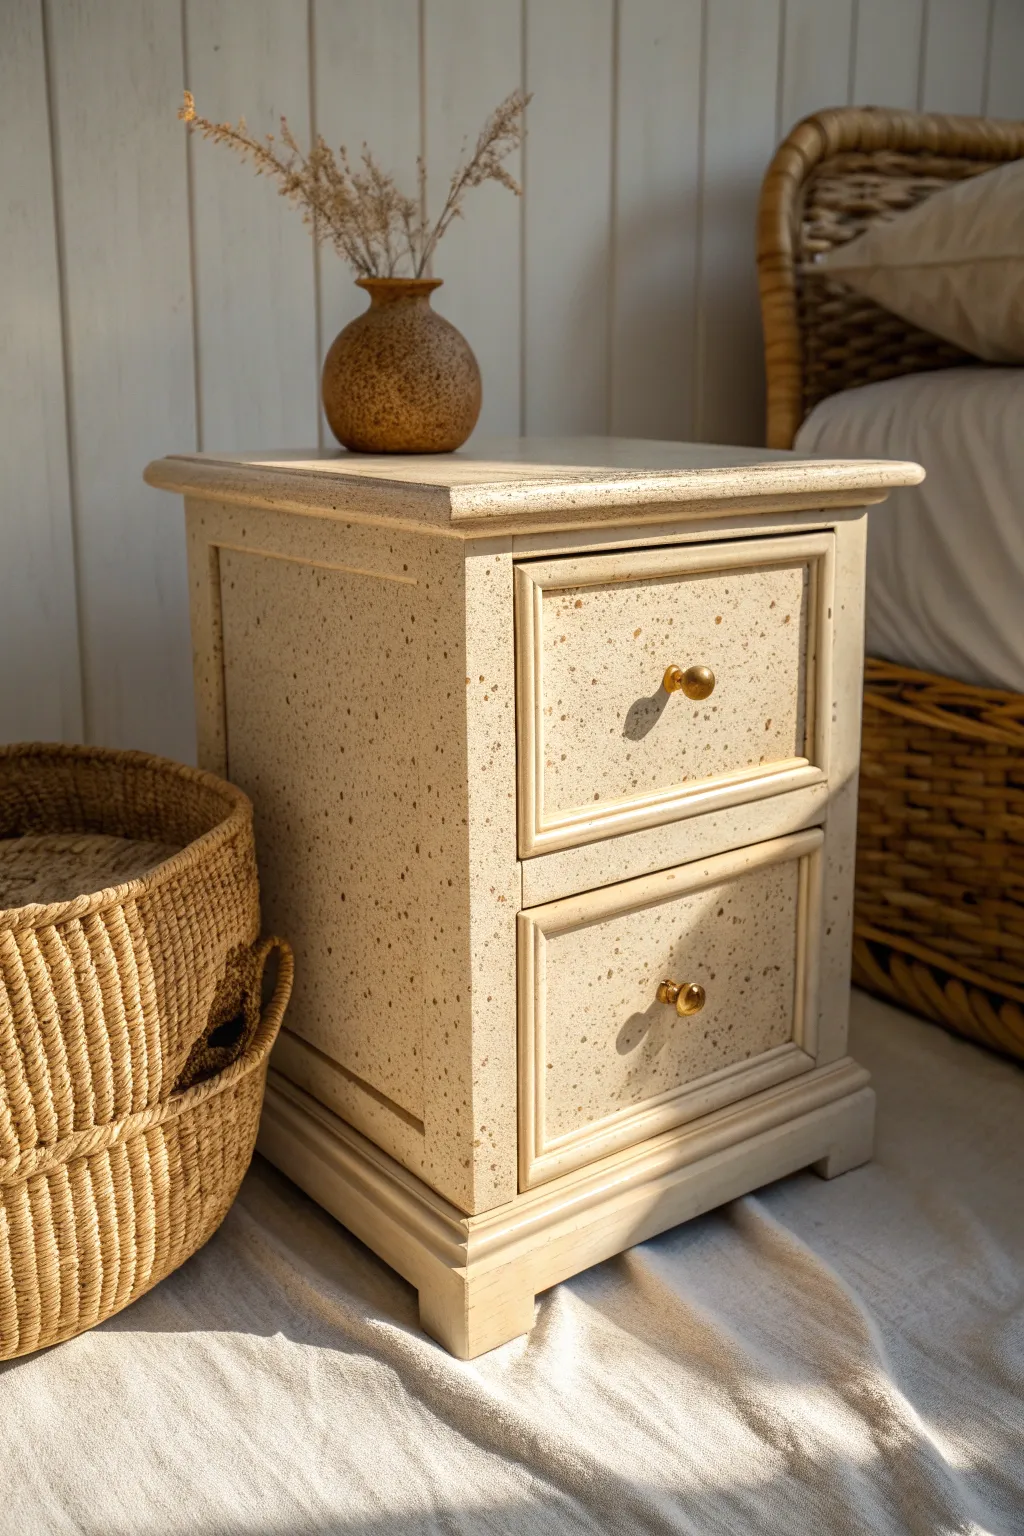
Transform a plain wooden nightstand into a sun-baked beauty with this textured paint technique. The result mimics organic sandstone or desert pottery, adding a warm, earthy element to your bedroom decor.
How-To Guide
Materials
- Wooden nightstand (raw or previously finished)
- Medium and fine grit sandpaper (120 and 220 grit)
- Tack cloth
- Primer (bonding primer specific for furniture)
- Beige or cream chalk-style paint (base coat)
- Warm brown acrylic craft paint
- Darker taupe or coffee acrylic craft paint
- Water
- Old toothbrush or stiff bristle brush
- Small artist detail brush
- Gold drawer knobs
- Protective clear matte sealer (polyurethane or wax)
- Drop cloths
- Protective gloves
Step 1: Preparation & Base Coat
-
Hardware Removal:
Begin by unscrewing and removing all existing drawer pulls or knobs. Store them safely if you plan to reuse them, though new gold hardware really elevates this look. -
Surface Cleaning:
Wipe the entire nightstand down with a mild degreaser or soapy water to remove dust, oils, and grime. Let it dry completely. -
Scuff Sanding:
Using 120-grit sandpaper, give the entire piece a thorough scuff sand. You aren’t trying to strip it bare, just creating ‘tooth’ for the primer to grip. -
Remove Dust:
Use a tack cloth to wipe away all the sanding dust. Any leftover particles will ruin the smooth finish of your base. -
Apply Primer:
Paint a coat of high-quality bonding primer over the entire stand. This ensures your paint sticks and prevents old wood tannins from bleeding through. -
Base Color:
Once the primer is dry, apply your first coat of beige or cream chalk paint. Use long, smooth strokes to minimize brush marks. -
Second Coat:
Let the first coat dry according to the can’s instructions, then apply a second coat for full, opaque coverage.
Splatter Control
Wear gloves! The toothbrush flicking technique is messy. Also, mask off the drawer interiors with painter’s tape so the insides stay clean.
Step 2: Creating the Speckle Effect
-
Prepare the Splatter Paint:
Mix a small amount of warm brown acrylic paint with water. You want a consistency similar to ink or thin cream—runny enough to flick, but pigmented enough to show. -
Test Run:
Before hitting the furniture, test your splatter technique on a piece of cardboard. Practice controlling the density of the dots. -
First Splatter Layer:
Dip an old toothbrush into the thinned brown paint. Hold it near the wood surface and run your thumb across the bristles to flick a fine mist of specks onto the nightstand. -
Vary the Distance:
Now, move your hand slightly further away and flick again to create a more dispersed, natural spray pattern. -
Introduce Depth:
I like to repeat the mixing process with the darker taupe color. This second tone adds dimension so the texture doesn’t look flat. -
Second Splatter Layer:
Apply the darker specks sparingly, focusing a bit more on edges or corners where natural weathering would collect dirt. -
Spot Correction:
If any large globs land accidentally, gently dab them with a barely damp cloth to blend them out before they dry.
Step 3: Finishing Touches
-
Sealing the Work:
Allow the splatter paint to dry fully (usually 1-2 hours). Apply a clear matte topcoat to protect the finish without adding unwanted shine. -
Second Seal:
Lightly sand with 220-grit paper if the first coat feels rough, then apply a final thin layer of sealer for durability. -
Add Hardware:
Screw in your gold knobs. The metallic sheen provides a beautiful contrast against the matte, sandy texture.
Texture Boost
Mix a spoonful of baking soda into your base coat paint. This creates physical grit that enhances the faux-stone look underneath the speckles.
Step back and admire your desert-chic creation as it brings a calm, grounded vibe to your room
Painted Faux Inlay Panels

Transform a plain dresser into a striking statement piece with this faux-inlay technique that mimics expensive woodwork. The geometric pattern, rendered in warm earth tones and slate blues, creates a sophisticated bohemian look that adds instant texture and depth to your bedroom.
Step-by-Step Tutorial
Materials
- Dresser (raw wood or pre-sanded)
- Chalk paint or furniture paint (Cream/Beige base color)
- Acrylic paints (Terracotta, Slate Blue, Sage Green, Dark Brown)
- Painter’s tape (various widths, preferably delicate surface)
- Ruler or framing square
- Pencil
- Small flat artist brushes
- Small angled sash brush
- Clear matte polycrylic sealer
- Gold and black eclectic cabinet knobs
- Sandpaper (120 and 220 grit)
Step 1: Preparation and Base Coat
-
Remove hardware:
Begin by unscrewing all existing knobs or pulls from the drawers. Keep the screws in a labeled baggie so you don’t lose them, but prepare to swap the actual knobs later for that eclectic look. -
Clean and scuff sand:
Wipe down the entire dresser with a degreaser to remove oils. Give the entire surface a scuff sand with 120-grit sandpaper to help the paint adhere, then wipe away all dust with a tack cloth. -
Apply the base color:
Using your angled sash brush and a foam roller for flat areas, paint the entire dresser frame and the drawer fronts in your cream or beige base color. This will serve as the ‘grout’ lines in your faux inlay. -
Apply second coat:
Allow the first coat to dry completely according to the can’s instructions. Apply a second coat to ensure full, opaque coverage, and let this cure for at least 24 hours before taping.
Crisp Line Secret
Burnish tape edges with a spoon, then paint a thin layer of your BASE color over the tape edge before adding the color. This blocks leaks perfectly.
Step 2: Drafting the Pattern
-
Find the center point:
On each drawer front, measure length and height to find the exact center. Mark this lightly with a pencil. This central diamond is the anchor for your entire design. -
Draw the main diamonds:
Using a ruler, draw a large diamond shape in the center of the drawer. Then, draw half-diamonds or triangles radiating out toward the sides. Refer to the reference image to gauge the scale; you want three main focal points across the drawer. -
Subdivide the shapes:
Inside each large diamond and triangle, draw intersecting lines to create the smaller geometric facets (triangles and smaller diamonds). Ensure your pencil lines are distinct but not so dark they’ll show through the paint.
Step 3: Painting the Faux Inlay
-
Tape the first color group:
To keep lines crisp, tape off non-adjacent sections first. For example, tape off all the triangles you plan to paint Terracotta. Press the tape edges down firmly with a credit card to prevent bleed-through. -
Seal the tape edges:
I always paint a thin layer of the *base* cream color over the tape edges first. This locks the seal so any seepage is just the base color, keeping your colored lines razor sharp. -
Paint the warm tones:
Fill in the taped sections with your Terracotta and Dark Brown paints using a small flat artist brush. Use the brown to mimic wood grain in specific segments for that inlay effect. -
Remove tape and dry:
Peel the tape off while the paint is still slightly wet to avoid pulling up dried skin. Let these sections dry completely before moving to the next color group. -
Tape and paint cool tones:
Once the warm sections are dry, tape off the remaining shapes for the Slate Blue and Sage Green colors. Repeat the sealing trick, paint the sections, and remove the tape. -
Touch up lines:
Use a tiny detailing brush and your base cream paint to clean up any ‘grout’ lines that got messy or look uneven. The spacing between the shapes should look consistent.
Level Up: Wood Grain
Instead of solid brown paint, use a chestnut gel stain on bare wood sections or mix glaze into brown paint for a semi-transparent, realistic wood look.
Step 4: Finishing Touches
-
Paint the side accent:
Mask off the rectangular molding detail on the side of the dresser. Paint the inner recessed line with the Terracotta color to tie the side panels into the front design. -
Seal the piece:
Once all paint is cured (wait 24-48 hours), apply two coats of clear matte polycrylic. Use a high-quality synthetic brush and long strokes to avoid brush marks. -
Install mixed hardware:
Install your new knobs. Alternate them for visual interest—place a black round knob in the center diamond and gold cylindrical or round knobs on the outer sections.
Step back and admire how a simple geometric pattern completely elevated your furniture piece into a work of art
Patchwork Pattern Mix on a Single Piece
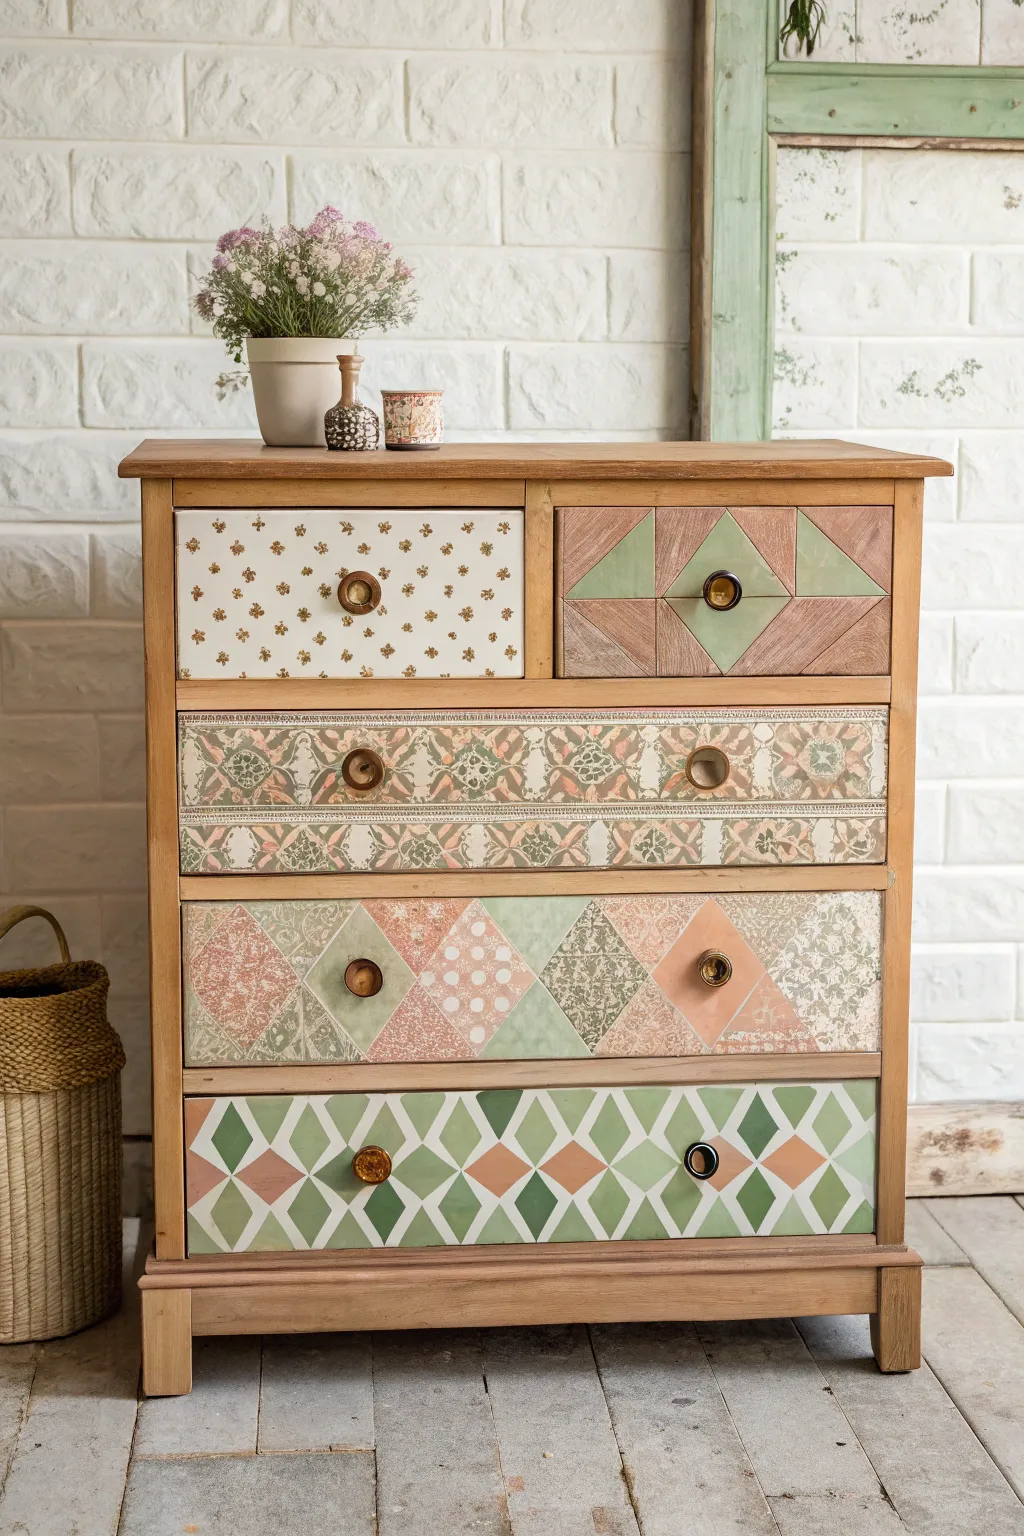
Transform a plain wooden dresser into a statement piece of bohemian charm using paint, pattern play, and decoupage. This project combines geometric precision with whimsical florals to create a delightful patchwork effect that feels curated and unique.
Step-by-Step Guide
Materials
- Unfinished or sanded wooden dresser (5 drawers)
- Wood stain (light oak or pine)
- Chalk paint (cream/off-white, sage green, dusty rose, terracotta)
- Small foam rollers and assorted detail brushes
- Painter’s tape (various widths)
- Patterned decoupage paper or wallpaper scraps (floral, geometric, ornate)
- Mod Podge or decoupage glue
- Self-healing cutting mat and craft knife
- Metal ruler
- Gold stencil cream or metallic paint
- Small floral stencil (optional)
- Clear matte polycrylic sealer
- New knobs (mix of wood and ceramic)
- Sandpaper (220 grit)
Step 1: Preparation & Base
-
Prep the surface:
Begin by removing all existing hardware from the drawers. Sand the entire piece lightly with 220-grit sandpaper to ensure a smooth surface for adhesion, then wipe away any dust with a tack cloth. -
Stain the frame:
Apply a light oak or pine wood stain to the outer frame, the top surface, and the dividing rails between the drawers. Wipe away excess stain with a rag to let the natural wood grain show through. -
Base coat the drawers:
Pull the drawers out. For this patchwork look, we need a neutral base. Roll a thin coat of cream chalk paint onto the drawer fronts. You don’t need full opacity yet, just a grippy surface.
Tape Trickery
Before painting over tape, brush a quick layer of your base color over the tape edge. This seals the gap and ensures your colored lines come out perfectly crisp.
Step 2: Top Drawer Designs
-
Left drawer: Stenciled florals:
Paint the left top drawer front with a solid coat of cream chalk paint. Once dry, use a small floral stencil and gold stencil cream to dab tiny flower patterns across the surface. -
Right drawer: Geometric blocking:
For the right top drawer, use painter’s tape to mark out a large ‘X’ shape, dividing the front into four triangles. Paint the top and bottom triangles in sage green and raw wood (or a faux wood paint effect). -
Adding texture:
On the side triangles of the right drawer, define smaller internal triangles and paint them in dusty rose and a washed-out terracotta to create a faceted, gem-like appearance.
Step 3: Middle Drawers: Decoupage & Pattern
-
Select your papers:
For the wide middle drawer, choose an ornate, vintage-style wallpaper or decoupage paper with a horizontal scroll pattern. Measure the drawer front carefully. -
Cut and paste:
Cut your paper to size using a metal ruler and craft knife. Apply a layer of Mod Podge to the drawer front, press the paper down from the center moving outward to eliminate bubbles, and seal with another top coat. -
Creating the Argyle effect:
On the next drawer down, we are mimicking an argyle or diamond quilt pattern. Lightly pencil a grid of diamonds across the entire width. -
Mix media diamonds:
I like to alternate techniques here. Paint some diamonds in solid sage or dusty pink, and fill others by carefully cutting triangle shapes from leftover patterned paper and gluing them into the grid. -
Detailing the grid:
Once the paint and glue are dry, use a very fine liner brush and cream paint to define the lines between the diamonds, giving it a stitched quilt look.
Wrinkled Paper?
If your decoupage paper bubbles or wrinkles, don’t panic. Lay a piece of parchment paper over the dry surface and run a warm iron over it to reactivate the glue and smooth it out.
Step 4: Bottom Drawer & Finishing Touches
-
Harlequin pattern taping:
For the bottom drawer, tape off a classic harlequin (tall diamond) pattern. Ensure your tape is pressed firmly down to prevent bleed-through. -
Painting the harlequin:
Paint the diamonds in alternating shades of sage green, white, and terracotta. Leave some diamonds unpainted to show the wood or cream base underneath for variety. -
Remove tape:
Peel the tape off while the paint is still slightly tacky to get the crispest lines. Let the entire piece cure overnight. -
Sealing the work:
Apply two coats of clear matte polycrylic sealer over all drawer fronts. This protects your hand-painted designs and the decoupage paper from peeling. -
Hardware installation:
Reattach your hardware. To match the eclectic vibe, use mismatching knobs—perhaps a simple wood knob on the floral drawer and a decorative ceramic one on the geometric drawer.
Enjoy styling your new bohemian centerpiece with some pampas grass or pottery to complete the look
Raised Pattern Texture With Painted Highlights
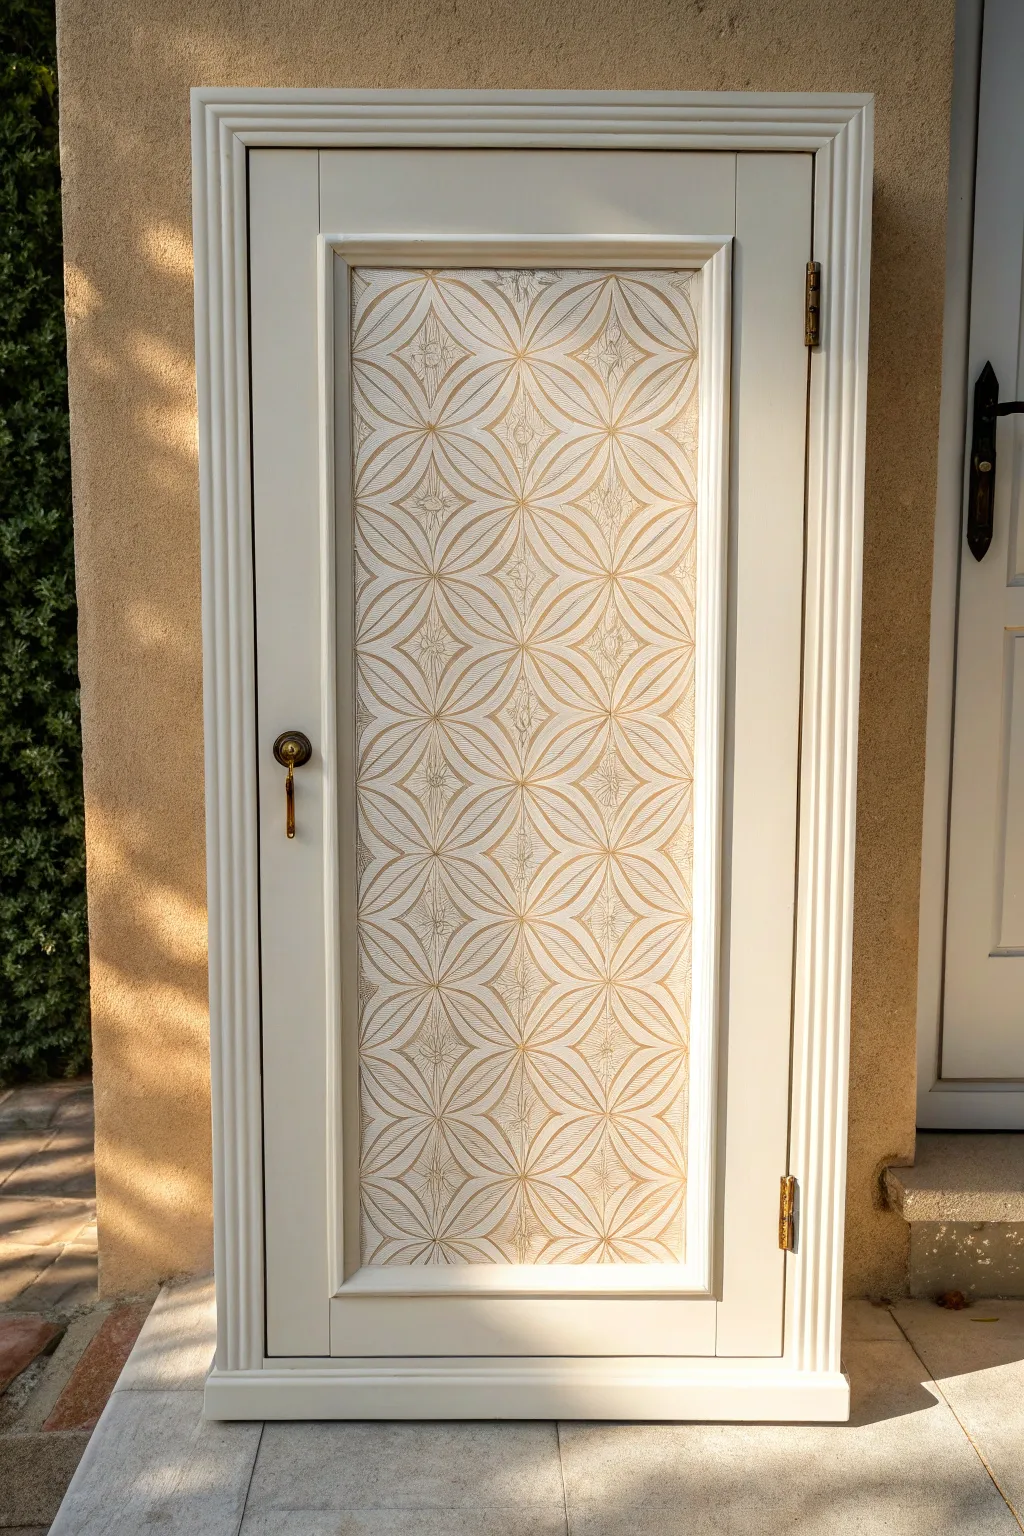
Transform a plain cabinet door into a stunning textural feature using raised stenciling and subtle metallic glazing. This project combines a soft, neutral base with intricate geometric detailing that catches the light beautifully.
Step-by-Step
Materials
- Wood cabinet or armoire
- Sanding block (medium grit)
- Primer (bonding primer recommended)
- Cream or off-white chalk paint
- Large geometric stencil (flower of life or similar repeating pattern)
- Texture paste, embossing paste, or wood filler
- Putty knife or trowel
- Painter’s tape
- Gold metallic wax or gilding wax
- Gold craft paint (translucent glaze consistency)
- Small lint-free cloths
- Clear matte sealer (polycrylic)
- Small artist brush
Step 1: Preparation & Base Coat
-
Clean and prep:
Start by removing all hardware, including the handle and hinges if possible. Clean the entire furniture piece thoroughly with a degreaser to remove oils and dirt. -
Scuff sand:
Give the surface a quick scuff sanding with a medium-grit block. You don’t need to strip it bare, just create enough ‘tooth’ for the primer to stick. -
Prime the surface:
Apply a coat of high-quality bonding primer. This is especially crucial if your original piece has a slick or varnished finish. -
Apply base color:
Paint the entire cabinet, including the trim and the center panel, with your cream-colored chalk paint. Apply two coats for full coverage, letting it dry completely between layers.
Step 2: Creating the Raised Texture
-
Position the stencil:
Lay your cabinet door flat if possible. Center your geometric stencil on the recessed panel. Secure it firmly with painter’s tape on all sides to prevent shifting. -
Apply texture medium:
Scoop some texture paste or slightly thinned wood filler onto a trowel. I find it easiest to work from the outside edges inward. -
Spread smoothly:
Drag the paste over the stencil like you are frosting a cake. Aim for an even layer about the thickness of a dime—not too thick, or it might crack while drying. -
Lift and repeat:
Carefully lift the stencil straight up while the paste is still wet. If your panel is larger than the stencil, wait for the first section to dry, then reposition and repeat the process to fill the panel. -
Sand imperfections:
Once the raised texture is bone dry (usually overnight), lightly sand down any sharp peaks or jagged edges with fine-grit sandpaper to smooth the relief.
Clean Lines
Spray the back of your stencil with a temporary repositionable adhesive spray. This keeps the intricate details flat against the wood better than tape alone.
Step 3: Adding the Gold Highlights
-
Seal the texture:
Apply a thin layer of clear matte sealer over the textured panel. This prevents the porous texture paste from instantly sucking up your paint glaze, giving you more working time. -
Mix a gold wash:
Mix a small amount of gold paint with water or glaze medium to create a translucent wash. -
Apply the wash:
Brush the gold wash over the textured areas. Verify it settles into the recessed lines of the pattern. -
Wipe back:
Immediately use a damp, lint-free cloth to wipe away the excess gold from the high points. The goal is to leave the gold mostly in the valleys and crevices to define the shapes. -
Enhance with wax:
For extra dimension, take a tiny amount of concentrated gold gilding wax on your finger or a small brush. Lightly graze just the very tops of the raised pattern. -
Detail the trim:
Don’t forget the frame. Run a very light amount of gold wax along the edges of the inner molding to frame your artwork. -
Final seal:
Once all paint and wax has cured (check product instructions), apply a final topcoat of matte sealer to protect the finish. -
Reassemble:
Reattach your hinges and handle to complete the restoration.
Bleed-Through Blues
If texture paste bleeds under the stencil, don’t panic. Wait for it to dry completely, then use a toothpick or craft knife to gently chip away the excess bits.
This elegant technique turns standard storage into a customized piece of art with sophisticated boho flair
Outdoor Boho Table With Folk-Art Birds
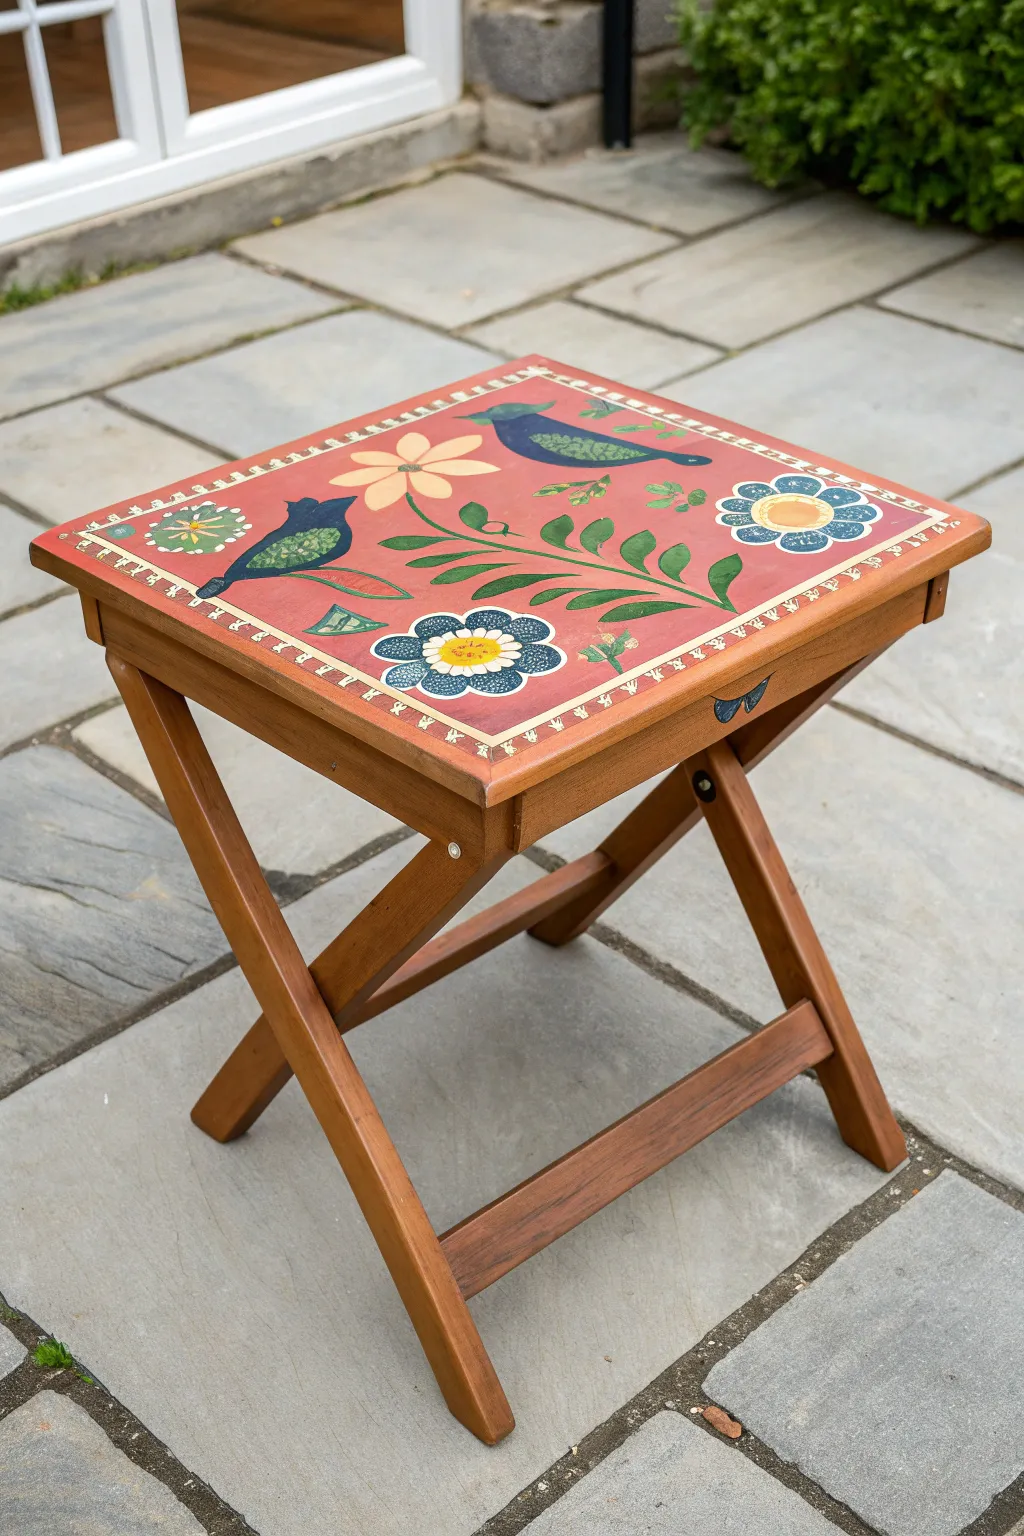
Transform a simple wooden folding table into a charming patio accent with this boho-inspired project. Featuring stylized birds and blooms against a warm terracotta red background, this folk-art design brings a touch of handcrafted whimsy to your outdoor space.
Detailed Instructions
Materials
- Small wooden folding table (square top)
- Sandpaper (120 and 220 grit)
- Tack cloth or lint-free rag
- Primer suitable for wood
- Acrylic craft paints (Terracotta Red, Deep Navy Blue, Teal, Cream/Off-White, Mustard Yellow, leaf Green)
- Set of paintbrushes (flat 1-inch, medium round, fine liner)
- Graphite transfer paper
- Pencil
- Ruler
- Clear outdoor sealer (polyurethane or polycrylic, satin finish)
Step 1: Preparation & Base Coat
-
Clean and sand:
Begin by wiping down your table to remove any dust or grime. Scuff sand the entire surface, especially the tabletop, with 120-grit sandpaper to help the paint adhere. Follow up with 220-grit for smoothness. -
Remove dust:
Use a tack cloth or a damp lint-free rag to thoroughly remove all sanding dust. A clean surface is crucial for a smooth painted finish. -
Apply primer:
Coat the top of the table with a high-quality wood primer. Let this dry completely according to the manufacturer’s instructions. -
Paint the background:
Using a flat 1-inch brush, paint the entire tabletop surface with your Terracotta Red acrylic paint. Ensure you get smooth, even coverage. -
Apply second coat:
Once the first coat is dry, apply a second layer of red to ensure the color is rich and opaque. Let this dry fully, preferably overnight, before starting the detail work.
Step 2: Drafting the Design
-
Mark the border:
Use a ruler and pencil to lightly draw a square border about 1 to 1.5 inches in from the edge of the tabletop. This will house the decorative trim pattern later. -
Sketch the main elements:
Sketch your design onto paper first to get the scale right. You’ll need two large teardrop shapes for birds, a central stem with leaves, and three large circular flowers. -
Transfer the design:
Place graphite transfer paper over the red tabletop, then place your sketch on top. Trace over your lines to transfer the bird and floral outlines onto the wood.
Pro Tip: Chalk Outline
Use white chalk instead of pencil for freehand sketching on the dark red background. It’s easier to see and wipes away effortlessly with a damp cloth before sealing.
Step 3: Painting the Folk Art Motifs
-
Block in the birds:
Use Deep Navy Blue to fill in the body shapes of the two birds. Use a medium round brush for the curves and a smaller brush for the beak and tail details. -
Paint the leaves:
Mix a little Mustard Yellow into your Leaf Green to get a warm, earthy tone. Paint the central vine and the leaves curving around the birds. -
Add floral base layers:
Paint the large flower shapes. Use Deep Navy for the outer petals of the corner flowers and Cream for the central flower. You may need two coats for the lighter cream color to cover the red. -
Detail the birds:
Once the blue bird bodies are dry, use the Leaf Green to paint the wing shapes on their backs. I like to add tiny dots of Cream on the wing for texture. -
Detail the flowers:
Add centers to your flowers using Mustard Yellow. On the blue flowers, add inner petals of Cream or Teal. On the central Cream flower, paint the petals distinctly. -
Add decorative accents:
Using a fine liner brush and Cream paint, add small dots and dashes to the flower centers and leaves to give it that intricate folk-art look.
Troubleshooting: Shaky Lines
If your fine lines look wobbly, thin your acrylic paint with a tiny drop of water. Inky consistency flows better from liner brushes than thick paint.
Step 4: The Border & Finishing
-
create the border strips:
Paint the space between your pencil line and the table edge with Cream paint to create a distinct frame. -
Paint the border pattern:
Using your fine liner brush and the Terracotta Red (or a reddish-brown mix), paint a repetitive pattern of small blocks or zig-zags along the cream border strip. -
Clean up lines:
Look over the entire piece. If any red background paint accidentally got covered, use a small brush to touch it up and crisp up the edges of your shapes. -
Let cure:
Allow the painted design to cure for at least 24 hours. The paint needs to be fully hardened before sealing. -
Seal the table:
Apply 2-3 coats of a clear outdoor polyurethane sealer. Use a satin finish to protect the artwork from UV rays and moisture without making it too glossy.
Now you have a stunning, custom piece of furniture ready for morning coffee on the patio

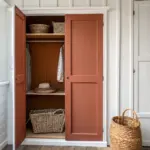


Have a question or want to share your own experience? I'd love to hear from you in the comments below!