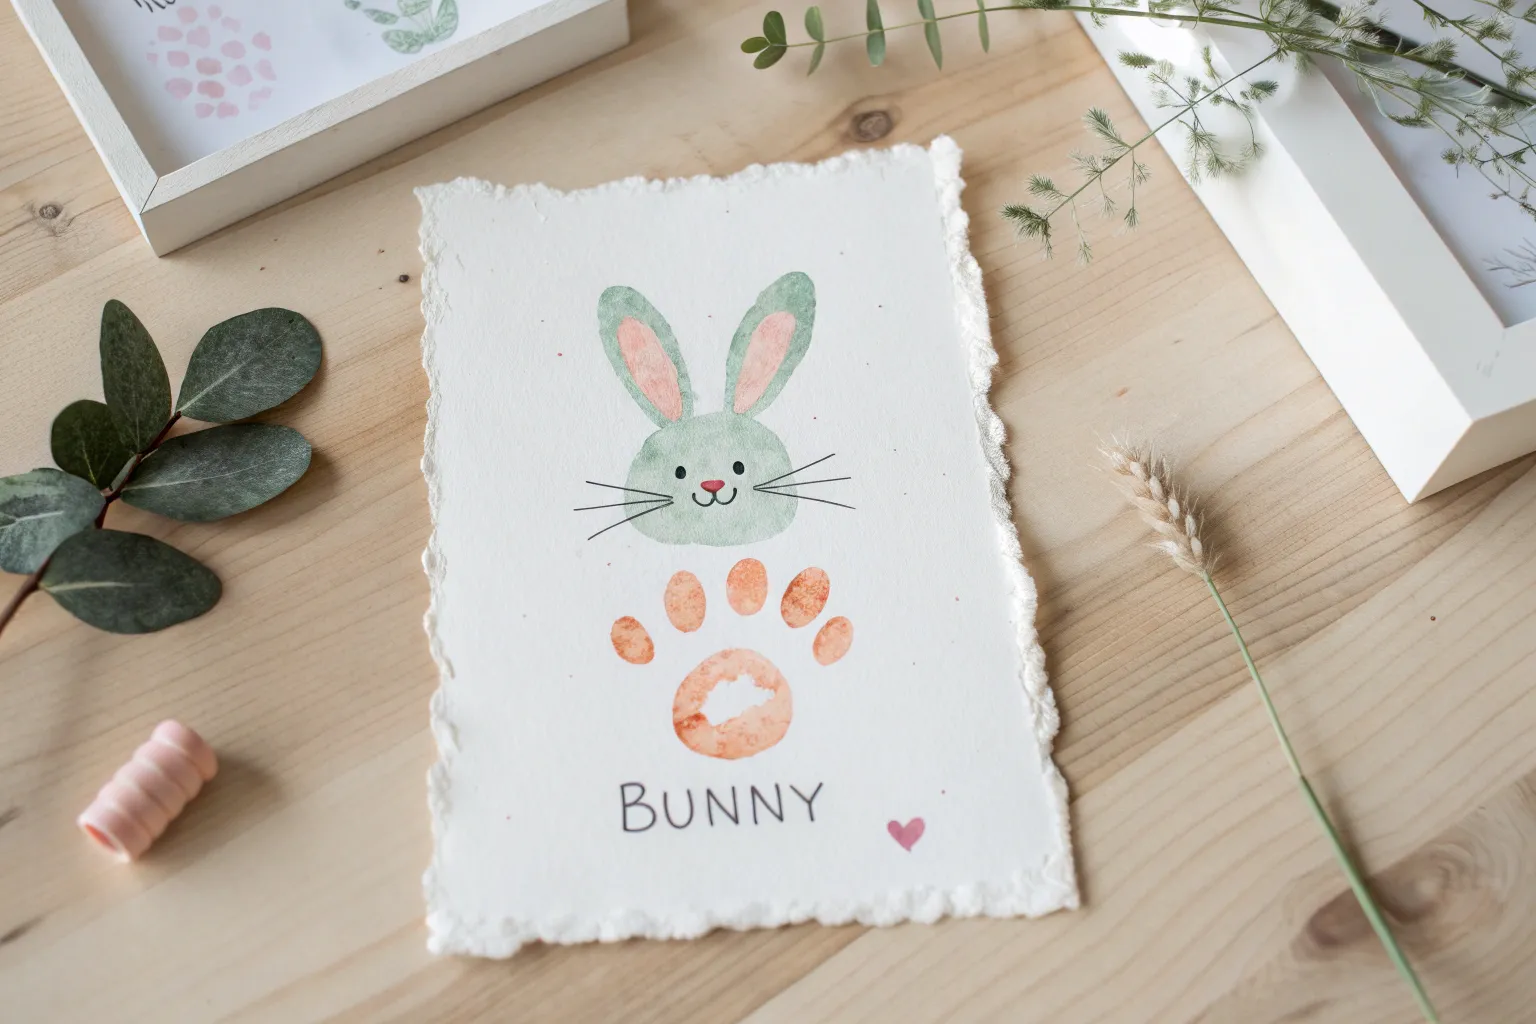
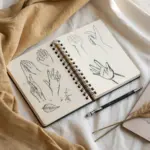
Easter is basically the perfect excuse to get paint on your hands and call it art. I love how a simple handprint can turn into a bunny, chick, or egg that feels instantly festive—and totally keepsake-worthy.
Classic Handprint Easter Bunny
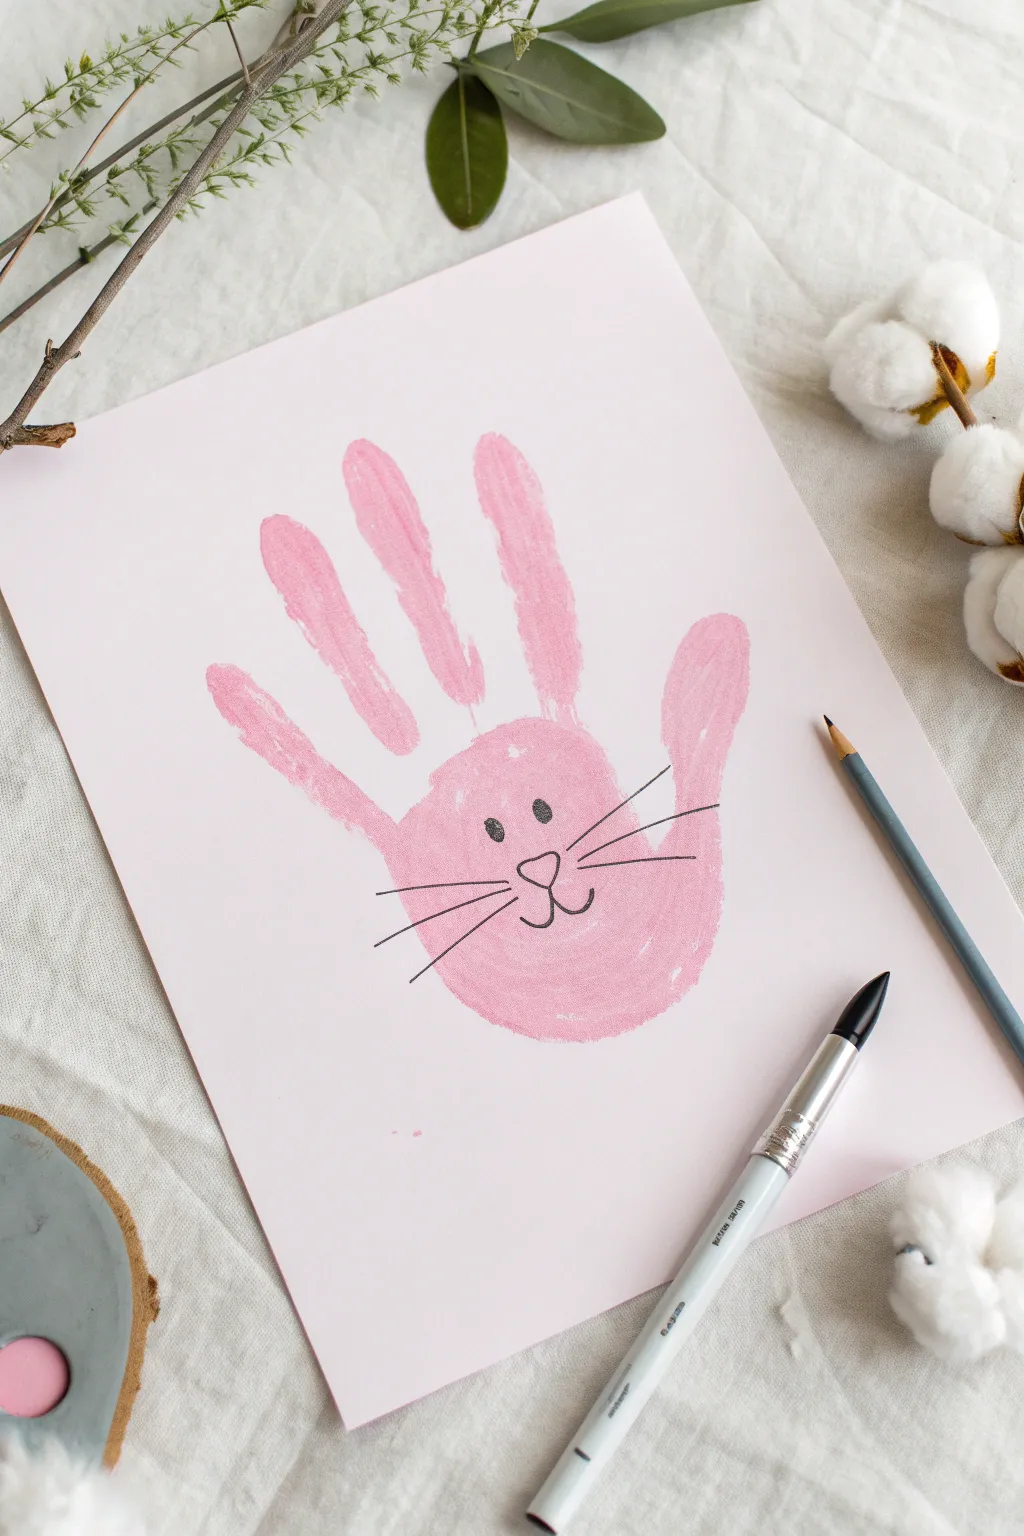
This adorable take on the classic handprint bunny uses a monochromatic palette for a soft, modern look. By stamping pink paint onto pale pink paper, you create a sweet, subtle texture that makes the perfect backdrop for a simple bunny face.
Step-by-Step
Materials
- Light pink cardstock or construction paper
- Washable pink acrylic or tempera paint (slightly darker than the paper)
- Wide foam brush or large flat paintbrush
- Fine-tip black marker or black gel pen
- Paper plate or palette
- Baby wipes or damp paper towels (for cleanup)
- Scrap paper (for testing)
Step 1: Preparing the Print
-
Set up your workspace:
Lay down some protective table covering and have your light pink cardstock ready on a flat surface. Position the paper vertically. -
Prepare the paint:
Squeeze a generous amount of pink paint onto a paper plate or palette. The shade should be a few tones deeper than your paper so it stands out. -
Apply paint to the hand:
Using a wide foam brush or large flat brush, coat the palm and fingers of the hand you intend to print. Apply a thick, even layer, ensuring the paint gets into all the creases of the palm. -
Check for coverage:
Inspect the hand before printing. If the paint looks too thin or dry in spots, add a second coat quickly so the whole hand is wet at once. -
Position the hand:
Guide the hand over the center of the pink paper. Spread the fingers out slightly—the four fingers will be the ears, and the thumb will be a paw or side of the face, though traditionally in this craft, the specific anatomy matters less than the overall shape. -
Press down firmly:
Press the painted hand onto the paper. Apply gentle pressure to the center of the palm and along each finger to ensure a solid transfer. -
Lift straight up:
Hold the paper down with your other hand and carefully lift the painted hand straight up to avoid smudging the edges. -
Let it dry completely:
Set the print aside to dry fully. This is crucial because drawing marker lines on wet paint will ruin your pen tip. I usually give this at least 20-30 minutes.
Step 2: Adding the Details
-
Locate the face area:
Once dry, look at the print upside down or right-side up depending on your preference, but for this specific design, we keep the fingers pointing up like ears. The palm area will serve as the bunny’s face. -
Draw the nose:
Using a fine-tip black marker, draw a small, inverted soft triangle or heart shape in the center of the palm area to form the nose. -
Add the mouth:
Starting from the bottom point of the nose, draw a small vertical line down. From the end of that line, curve outward to the left and right to create the classic ‘J’ hooks for the mouth. -
Sketch the eyes:
Draw two small, solid black circles above the nose for the eyes. Space them wide enough apart to give the bunny a sweet, open expression. -
Add highlights (optional):
If you want extra sparkle, leave a tiny pinprick of white space inside the black eye circles, or go back later with a white gel pen dot. -
Draw the whiskers:
Place your pen tip near the cheek area (beside the nose). Use quick, confident flicks of the wrist to draw three straight whiskers extending outward on the left side. -
Mirror the whiskers:
Repeat the process on the right side, trying to keep the length and angle roughly symmetrical to the first set. -
Final touches:
Check your lines to see if any need thickening. The contrast of sharp black ink against the soft pink paint is what makes this project pop.
Paint Consistency Pro Tip
Don’t add water to your paint! Watery paint makes the hand slide on the paper, creating blurry edges. Use the paint thick right out of the tube for a crisp outline.
Smudged Print?
If the fingers smudge upon lifting, don’t scrap it! Turn the smudge into ‘fluffy fur’ by dabbing it gently with a dry sponge, or simply outline the smudge later to define the ear shape.
Now you have a charming monochromatic keepsake perfect for framing or gifting


Handprint Easter Lamb

Transform a simple handprint into an adorable fluffy lamb with this charming Easter project. Using textured paint, this craft creates a tactile and sweet memento that perfectly captures the softness of spring.
Step-by-Step Tutorial
Materials
- White cardstock or heavy construction paper
- White puffy paint (or mix white glue and shaving cream)
- Pink acrylic paint
- Black acrylic paint or fine brush marker
- Paintbrushes (medium foam brush and fine detail brush)
- Small mixing bowl (if making homemade puffy paint)
- Pencil for light sketching
Step 1: Creating the Lamb’s Body
-
Prepare the fluffy mixture:
If you aren’t using pre-made puffy paint, mix equal parts white school glue and shaving cream in a small bowl until fluffy and stiff. This creates that wonderful cloud-like texture. -
Paint the hand:
Coat your child’s hand generously with the white puffy paint mixture. Ensure the palm and all four fingers are well-covered, but keep the thumb relatively clean or lightly coated as it will be less prominent. -
Stamp the handprint:
Press the painted hand firmly onto the center of the white cardstock. The fingers should point downwards to form the lamb’s four legs, and the palm creates the body. -
Fill in the gaps:
I like to use a brush or dabber to fill in any patchy areas on the stamped impression, ensuring the coat looks thick and wooly. Let this body shape dry completely, which may take a few hours depending on the paint thickness.
Wrinkled Paper?
Using heavy puffy paint can warp thin paper. Always use heavy cardstock or even a canvas board to support the moisture and weight of the textured paint.
Step 2: Adding the Head and Details
-
Paint the head shape:
Using the same white puffy paint, dab a circular or oval shape overlapping the ‘thumb’ area or the top side of the palm (the heel of the handprint). Make it fluffy to match the body. -
Create the ears:
Add two oblong shapes extending horizontally from the sides of the head for ears. Keep the edges soft and textured. -
Add pink ear details:
While the white is still slightly tacky or just after drying, paint a smaller, smooth pink oval inside each white ear shape to create the inner ear. -
Paint the nose:
In the center of the face, paint a soft, inverted pink triangle for the nose. The nose should sit slightly below the center line of the face circle. -
Define the eyes:
Using black paint and a detail brush, add two bold black circles above the nose. Leave a tiny white spec inside each or add a dot of white paint later for a sparkling catchlight. -
Draw the mouth:
With a very fine brush or a black marker (once the texture is fully dry), draw a simple ‘J’ shape curving left and another curving right from the bottom point of the nose to form a smile. -
Enhance the texture:
For the finishing touch, you can dab a little extra texture on top of the head to create a ‘wool tuft’ hairstyle. -
Let it cure:
Allow the entire project to dry overnight. Puffy paint often needs extra time to set so the texture doesn’t flatten when touched.
Sensory Upgrade
While the paint is wet, adhere real cotton balls to the body area for an ultra-soft, 3D sensory experience that toddlers will love to touch.
Display your charming little lamb on the fridge or frame it as a sweet seasonal keepsake


Handprint Bunny With Pom-Pom Tail
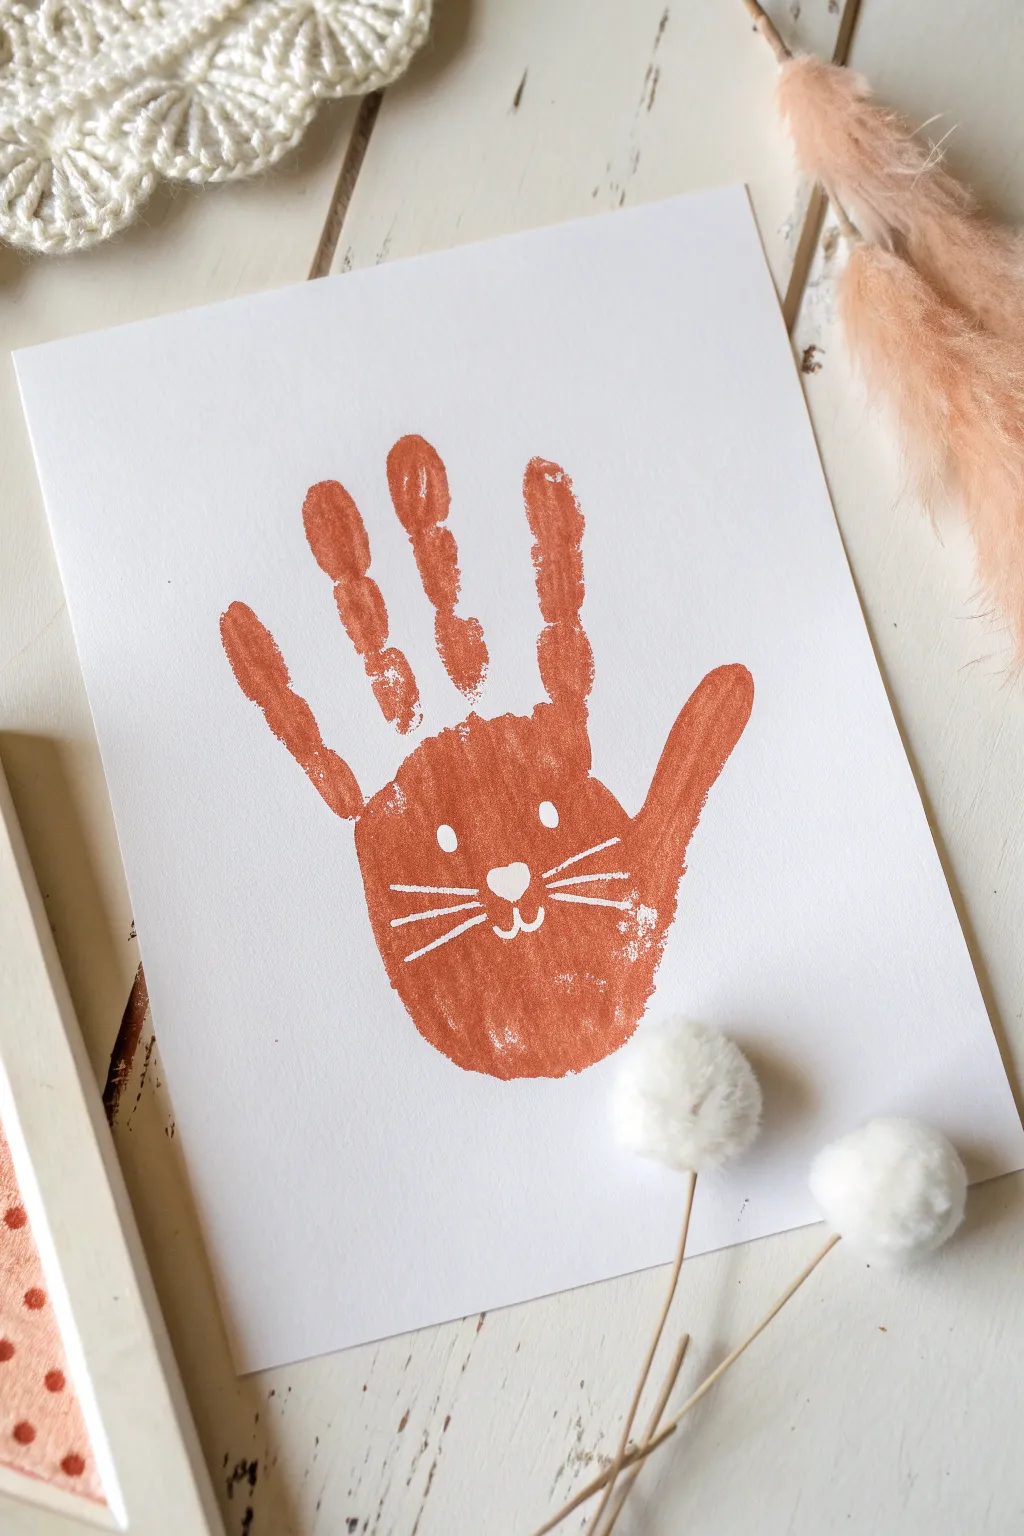
Transform a simple handprint into an adorable long-eared bunny using warm, earthy tones. This minimalist design combines rustic charm with playful details, making it a perfect keepsake or Easter card decoration that looks surprisingly chic.
Step-by-Step Tutorial
Materials
- White cardstock or heavy drawing paper
- Terracotta or burnt orange acrylic paint
- White acrylic paint or a white gel pen
- Medium foam brush or wide paintbrush
- Fine tip paintbrush
- Small white pom-poms (optional for extra flair)
- Glue (if adding pom-poms)
- Paper plate or palette
- Baby wipes or damp cloth for cleanup
Step 1: Preparing the Canvas
-
Set up your workspace:
Lay down a protective covering on your table to catch any accidental drips. Place your white cardstock in the center, ensuring you have enough room to maneuver. -
Prepare the paint:
Squeeze a generous amount of terracotta or burnt orange acrylic paint onto your paper plate or palette. -
Smooth it out:
Use your foam brush to spread the paint on the palette slightly; this helps ensure you don’t get big globs on the hand later.
Clean Edges Trick
If the handprint edges look too messy or smudged, dip a small brush in white paint and carefully trace the outline to clean up the shape
Step 2: Creating the Handprint
-
Coat the hand:
Using the foam brush, apply an even layer of paint to the palm and fingers of the hand you are using. -
Check for coverage:
Ensure the paint covers the entire surface but isn’t dripping wet. A medium coat works best for capturing the unique texture of the skin prints. -
Position the hand:
Hover the painted hand over the paper. You want to separate the fingers slightly—the four fingers will become the bunny ears. -
The thumb position:
Extend the thumb out to the side a bit more than the fingers; this will just add character to the bunny’s face shape. -
Press down firm:
Press the hand firmly onto the center of the cardstock. Apply gentle pressure to each finger and the center of the palm to ensure a solid transfer. -
Lift carefully:
Lift the hand straight up off the paper in one smooth motion to avoid smudging the edges of the print. -
Clean up quickly:
Immediately wipe the painted hand with baby wipes or wash it with soap and warm water while the print begins to dry. -
Let it set:
Allow the handprint to dry completely. This usually takes about 10-15 minutes depending on how thick the paint application was. It must be dry before adding facial details.
Step 3: painting the Bunny Face
-
Prepare the white details:
While the base dries, get your fine tip brush ready or shake your white paint pen to ensure the ink is flowing smooth. -
Orient the bunny:
Look at the handprint with the fingers pointing upwards. The palm is the face, and the fingers are the ears. -
Paint the eyes:
Using white paint or the pen, draw two small, solid white ovals in the upper-middle section of the palm area for the eyes. -
Add the nose:
Just below and between the eyes, paint a small, inverted heart shape or a soft triangle for the bunny’s nose. -
Draw the mouth:
Extend a small vertical line down from the bottom of the nose, then curve it outward on both sides to create a standard ‘w’ mouth shape. -
Whiskers step one:
On the left cheek area, draw three straight horizontal lines fanning slightly outward. -
Whiskers step two:
Repeat the previous step on the right cheek, trying to keep the length and spacing roughly symmetrical. -
Optional detail:
If you want to add a 3D element similar to the inspo image props, you can glue a small white pom-pom off to the side or near the bottom for a tail, though the painted face makes it complete on its own.
Make It Fuzzy
Glue a real cotton ball or white yarn pom-pom to the side of the palm for a 3D tail that pops off the page
Once the white details are dry, you can frame this charming little rabbit or gift it to a loved one for the holiday


Handprint Bunny Family Set
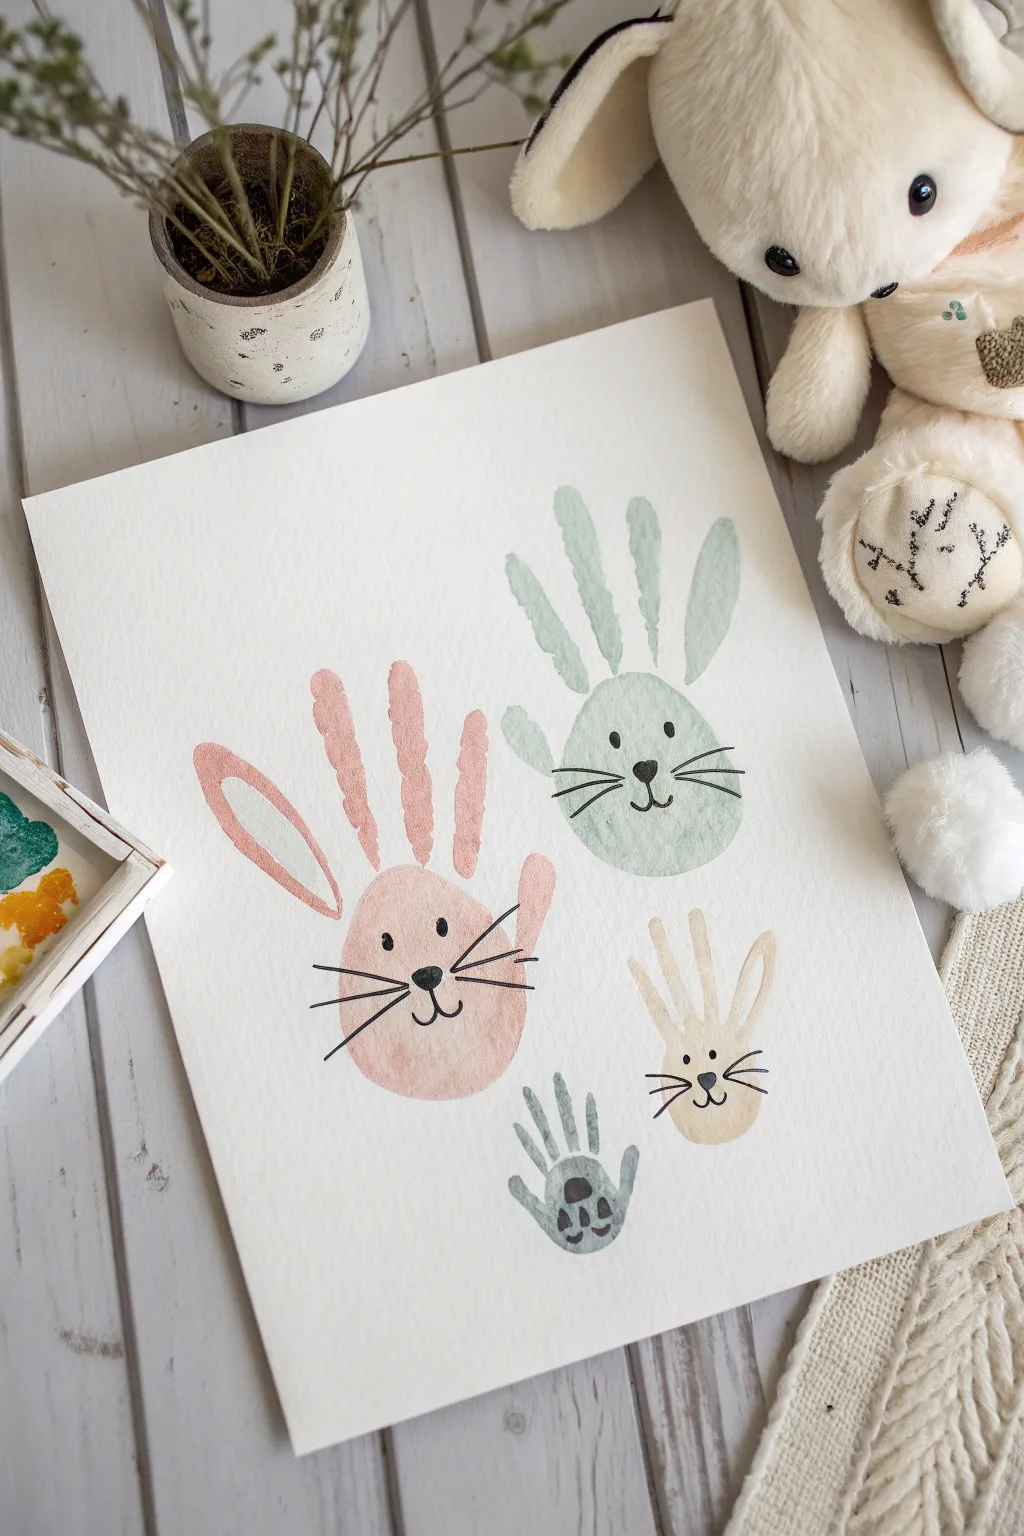
Capture the sweetness of the season with this charming watercolor-style keepsake featuring a warren of handprint bunnies in soft pastel hues. It is a deceptively simple project that turns messy prints into elegant nursery art with just a few mindful details.
Detailed Instructions
Materials
- Heavyweight watercolor paper or cardstock (white)
- Water-based paints (acrylic or tempera in pink, sage green, cream/beige, and grey)
- Paintbrushes (medium flat brush for hands, fine liner brush for details)
- Black fine-point marker or pen
- Paper plate or palette
- Water cup and paper towels
Step 1: Planning & Printing
-
Mix pastel shades:
Begin by preparing your palette. Mix a soft dusty pink, a muted sage green, and a warm cream color. If you are using bright acrylics, mix in plenty of white to achieve that gentle pastel look. -
Prepare the pink bunny:
Coat the largest hand (likely an older child or parent) generously with the pink paint. Ensure the palm and all fingers are covered evenly, but not so thick that it globs. -
Print the first bunny:
Press the pink hand onto the left side of the paper. For this bunny, orient the hand so the fingers point upwards to create the ears. However, keep the thumb tucked in or print it lightly, as we will paint over it later. -
Modify the pink print:
While the paint is wet, use your brush to extend the shape of the thumb and index finger to look more like long, floppy bunny ears, similar to the reference image. -
Prepare the green bunny:
Clean the hand or switch to a second helper. Coat their hand in the sage green mixture. -
Print the green bunny:
Place this handprint on the upper right side of the paper. Orient it straight up so the fingers form four distinct ears. Press firmly on the palm to get a solid round face shape. -
Create the cream bunny:
Using the smallest hand available (or just the first three fingers of a larger hand), apply the cream paint. Press this print below the green one to create the baby bunny of the group. -
Add the grey paw:
For a whimsical touch, paint a very small hand or just a palm-and-fingertips in grey at the bottom center. This acts as a little creative signature or abstract paw print. -
Let it dry completely:
This is crucial; if you try to draw on wet paint, the marker will bleed. I usually give this at least 30 minutes to set fully.
Smudge Control
If a handprint smudges while lifting, turn the smudge into a fluffy tail or extra fur using a small brush, rather than trying to wipe it away.
Step 2: Bringing Bunnies to Life
-
Outline the features:
Once dry, take your fine liner brush with black paint or a black marker. Start with the pink bunny. -
Draw the pink bunny’s face:
Place two small dots for eyes in the center of the palm area. Below them, draw a small rounded triangle nose and a ‘J’ curve mouth. -
Add whiskers:
Draw three long, straight whiskers extending horizontally from each cheek area on the pink bunny. -
detail the green bunny:
For the green bunny, add similar eyes and nose, but place them slightly higher on the palm to give it a curious, looking-up expression. Add the whiskers and a simple mouth line. -
Detail the cream bunny:
Give the smallest cream bunny simple dot eyes and a tiny nose to keep it looking cute and delicate. -
Detail the grey print:
On the grey handprint at the bottom, paint black pads on the fingertips and a larger pad on the palm to transform it into a paw print. -
Final touches:
Check for any gaps in the paint. If the ears (fingers) look too disconnected from the head (palm), you can lightly brush a little diluted paint to bridge the gap.
Family Names
Use a metallic gold pen to write the name and age of each family member underneath their respective bunny for a true time-capsule piece.
Frame this adorable clan of bunnies to create a lasting memory of just how small those hands once were
BRUSH GUIDE
The Right Brush for Every Stroke
From clean lines to bold texture — master brush choice, stroke control, and essential techniques.
Explore the Full Guide
Handprint Bunny in a Flower Meadow

Capture the sweetness of spring with this charming mixed-media painting that combines delicate watercolor techniques with a playful personal touch. The realistic furry texture of the bunny pairs beautifully with a stamped handprint, creating a keepsake that feels both artistic and sentimental.
How-To Guide
Materials
- Heavyweight watercolor paper (300gsm cold press is best)
- Watercolor paints (shades of brown, pink, green, and orange)
- Fine liner brushes (sizes 0 and 2) for details
- Medium round brush (size 6) for washes
- Pencil and kneaded eraser
- Pink washable paint or stamp pad (for the handprint)
- Paper towels and water cup
Step 1: Sketching & The Handprint
-
Light Outline:
Begin by lightly sketching the outline of a sitting rabbit on the left side of your paper using a pencil. Focus on the oval shape of the body, the round head, and the tall, alert ears. Keep your lines faint so they don’t show through the watercolor later. -
Position the Handprint:
Decide where you want the handprint to go. In the example, it floats above the bunny’s eye line on the right side. Apply a generous, even layer of pink washable paint to a child’s hand (or your own). -
Stamp the Print:
Press the painted hand firmly onto the paper. Ensure the fingers are spread slightly apart. Lift the hand straight up to avoid smearing the print, then set the paper aside to dry completely before you start painting near it.
Step 2: Painting the Bunny
-
First Wash:
Mix a watery, pale brown using burnt umber and a lot of water. Apply this wash over the entire body of the bunny, leaving the inside of the ear and the tail white for now. Let this layer dry until it’s just damp. -
Building Form:
While the paper is still slightly cool to the touch, drop in a slightly darker brown mix along the bunny’s back and the curve of the thigh to create volume. The wet-on-wet technique will help the colors bloom softly. -
Adding Fur Texture:
Once the base layers are dry, switch to your size 2 brush. Using a medium-brown tone, start painting short, directional strokes to mimic fur. Follow the contour of the rabbit’s body—curving down the back and around the haunch. -
Darkening Details:
Mix a dark sepia or chocolate brown. Carefully paint the eye, leaving a tiny speck of white paper unpainted for the highlight. Use this same dark color to define the nose and the split of the mouth. -
The Ears:
For the ears, paint the outer rim with your fur strokes. For the inner ear, mix a very diluted watery pink and gently fill the space, blending it slightly into the brown edges for a natural transition. -
Whiskers and Highlights:
With your finest brush (size 0) and the darkest brown paint (or a fine-tip pen if you prefer simplicity), snap your wrist to create long, thin whiskers radiating from the muzzle.
Fur Realism Tip
Don’t overwork the fur texture. Leave small gaps between your brushstrokes where the lighter base coat shows through. This creates visual depth and makes the coat look soft rather than solid.
Step 3: Creating the Meadow
-
Grass Foundation:
Mix a few shades of sap green and olive green. Using the medium brush, paint quick, upward flicking motions at the bottom of the page to create uneven heights of grass blades overlapping the bunny’s feet. -
Stem Structure:
Draw three or four slender stems rising up towards the right side of the paper. Curve them slightly so they look organic rather than rigid sticks. -
Adding Leaves:
Paint elongated oval leaves attached to the stems. Vary the green tones here—maybe add a touch of blue to your green mix for the shadowed leaves to create depth. -
Painting the Blooms:
Using a soft coral or orange watercolor, paint small, circular flower heads atop the stems. I like to dab the brush repeatedly to create a textured, fluffy appearance rather than a solid circle. -
Final Grass Details:
Go back in with your thinnest brush and add very fine, individual blades of grass in the foreground using a darker green. You can also sketch in a few feathery fern-like plants on the far right for variety. -
Splatter Effect:
To give the piece a loose, artistic feel, load a brush with watered-down pink or brown paint and gently tap the handle against your finger to splatter tiny droplets across the background around the handprint. -
Clean Up:
Once absolutely everything is dry, gently erase any visible pencil lines that weren’t covered by paint, particularly around the bunny’s face and paws.
Seasonal Customization
Turn the handprint into a giant flower! Paint a green stem connecting to the bottom of the palm print to make it look like a unique bloom growing in the garden alongside the bunny.
This lovely keepsake captures a moment in time and makes for beautiful seasonal decor
Handprint Cross With Spring Florals
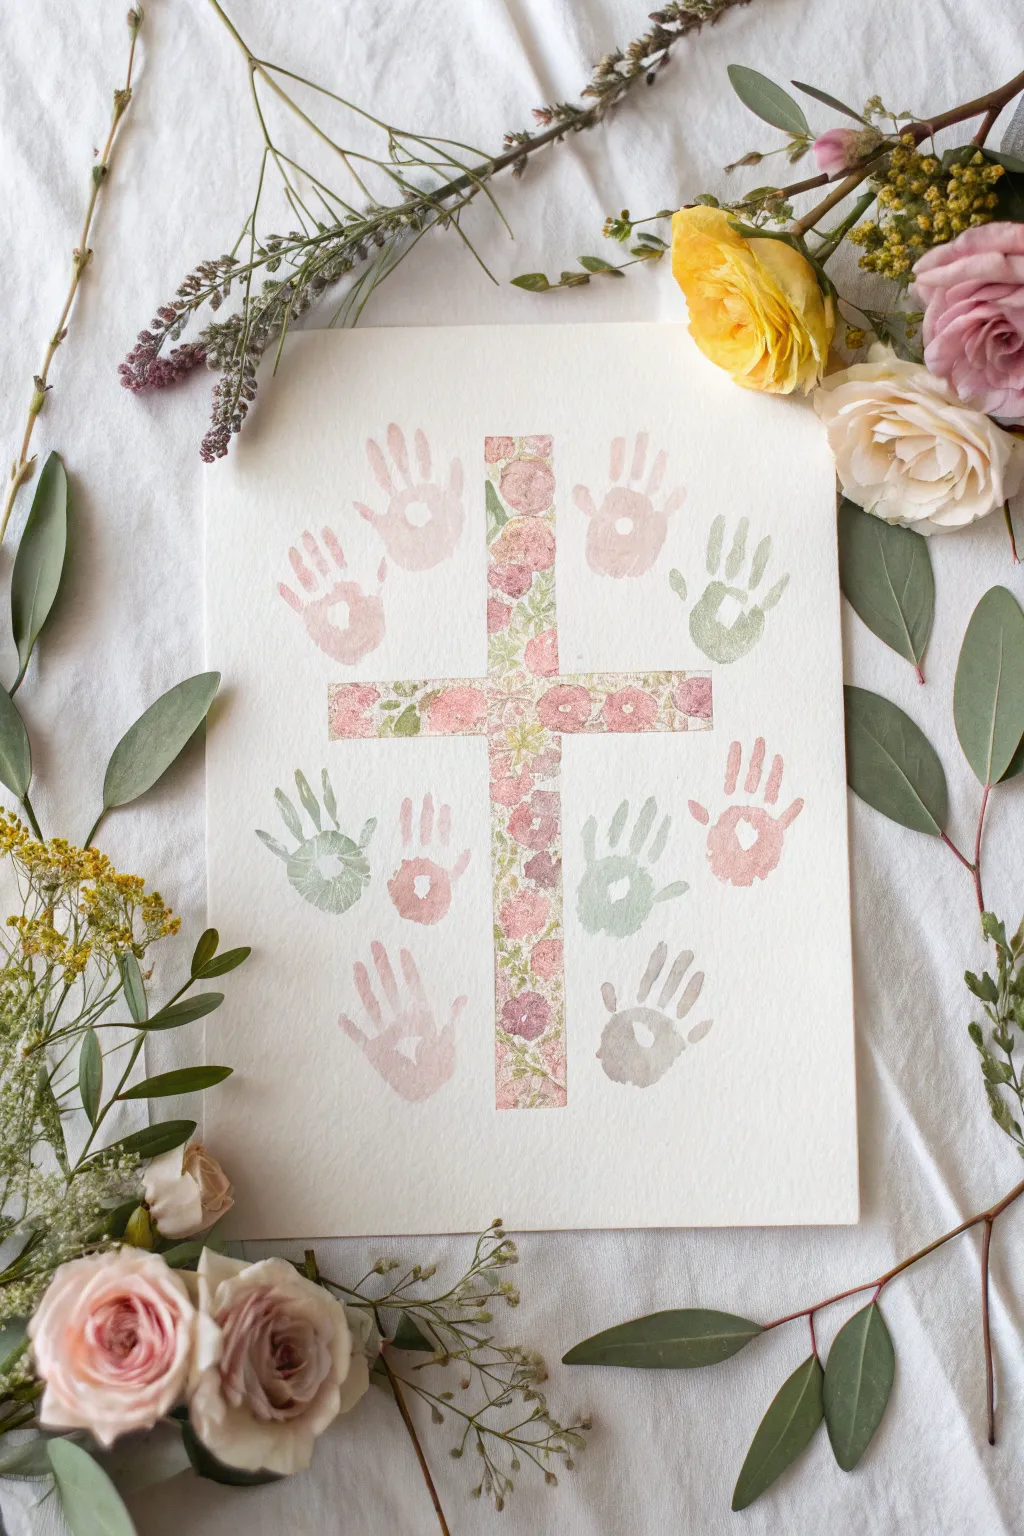
Capture the essence of spring renewal with this delicate artwork that combines painted handprints with a blooming floral cross. The soft pastels and botanical details create a meaningful keepsake perfect for Easter or a springtime celebration.
Step-by-Step Guide
Materials
- Heavyweight watercolor paper or mixed media cardstock (white)
- Floral washi tape or painter’s tape
- Acrylic paints (soft pink, sage green, gray, dusty rose)
- Sponge brushes or large flat paintbrushes
- Paper plate or palette
- Sharp scissors
- Ruler
- Pencil (optional)
- Protective table covering
Step 1: Creating the Floral Cross
-
Prepare your paper:
Start with a clean sheet of heavyweight watercolor paper. A textured paper adds a lovely organic feel to the finished piece. Lay it flat on a protected surface. -
Cut the tape:
Cut two strips of your floral washi tape. For the vertical beam of the cross, cut a longer strip (about 6-8 inches). For the horizontal beam, cut a shorter strip (about 4-5 inches). -
Position the vertical beam:
Place the longer strip of tape vertically in the center of your paper. Use a ruler if you want to ensure it is perfectly straight, though eyeballing it works fine for a handcrafted look. -
Position the horizontal beam:
Place the shorter strip horizontally across the vertical one, roughly one-third of the way down from the top. Press down firmly to adhere the tape securely to the paper. -
Secure the edges:
Run your finger along the edges of the tape to ensure a good seal. This is crucial if you plan to paint over it, but even if using decorative tape as the final element like in this project, it ensures it won’t peel up.
Step 2: Adding the Handprints
-
Mix your palette:
Squeeze dime-sized amounts of your acrylic paints onto the paper plate. Aim for a palette of muted pastels: sage green, soft pink, dusty rose, and a warm light gray. -
Prepare the first hand:
Using a sponge brush, verify the hand is clean and dry first. Then, apply a thin, even layer of the soft pink paint to the palm and fingers of the hand. -
Ideally test the print:
I always recommend doing a quick test print on a scrap piece of paper first to check if you have too much or too little paint. -
Place the first print:
Starting in the upper left quadrant around the cross, gently press the painted hand onto the paper. Ensure the fingers are spread slightly. Press firmly on the palm and each finger. -
Lift carefully:
Lift the hand straight up to avoid smudging the print. Wash and dry the hand immediately or use a baby wipe. -
Alternate colors and positions:
Move clockwise around the cross. Switch to a new color, perhaps the dusty rose, and place the next handprint in the upper right section. -
Continue the circle:
Continue adding handprints in a circular formation around the central cross. Alternate your colors to create a balanced look—using sage green and gray for variety. -
Angle the prints:
As you work around the circle, angle the handprints slightly outward so they radiate away from the cross center, like rays of light. -
Layering check:
Ensure the handprints don’t overlap the central cross tape too much, although a tiny bit of touching is fine. The focus should be framing the cross. -
Let it dry:
Once all handprints are placed (typically 8-10 prints depending on hand size and paper size), allow the entire artwork to dry completely for at least 30 minutes.
Clean Palm Pro Tip
For the clearest prints, apply paint with a sponge brush rather than dipping the hand. This ensures a thin, even coat that captures all the little details without globs.
Step 3: Finishing Touches
-
Assess the tape:
Since we used decorative floral tape for the cross itself, simply check that the ends haven’t curled up during the painting process. Press them down gently if needed. -
Optional paint touch-up:
If any handprints are too faint, you can carefully use a small brush with a tiny bit of water to spread the existing pigment slightly, filling in gaps. -
Flatten the artwork:
If the paint has caused the paper to buckle slightly, place the dry artwork under a heavy book overnight to flatten it out before framing.
Level Up: Masking Technique
Instead of decorative tape, use plain painter’s tape for the cross. Paint over the entire paper, then peel the tape away to reveal a stark white negative-space cross.
Frame your beautiful collaborative masterpiece or hang it proudly to welcome the spring season

PENCIL GUIDE
Understanding Pencil Grades from H to B
From first sketch to finished drawing — learn pencil grades, line control, and shading techniques.
Explore the Full Guide
Handprint Bunny Wreath
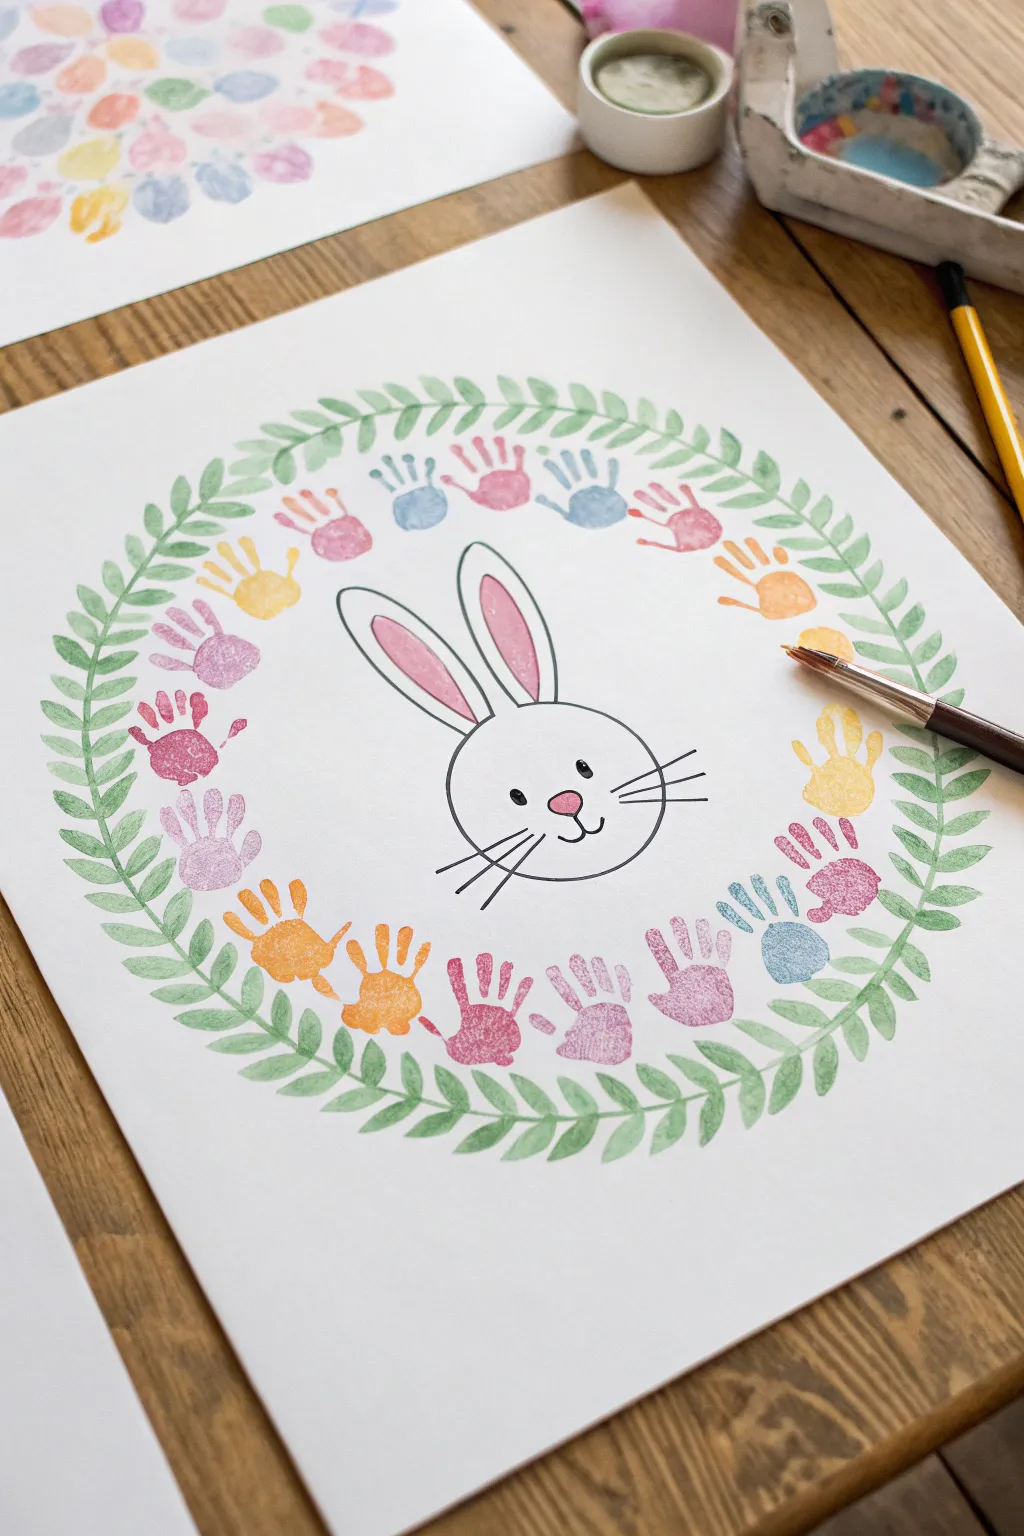
Celebrate spring with this charming artwork that transforms colorful little handprints into a blooming wreath around a sweet bunny face. It combines structured botanical painting with the playful, organic shapes of children’s prints for a keepsake you’ll treasure.
Step-by-Step Tutorial
Materials
- Large white cardstock or heavy watercolor paper (A3 recommended)
- Black fine-liner or marker (medium thickness)
- Pink colored pencil or marker
- Water-based paints (tempera, acrylic, or poster paint)
- Paintbrushes (one fine round brush for vines, one wider brush for hands)
- Plate or palette for mixing colors
- Pencil and eraser
- Paper towels and water cup
Step 1: Drawing the Centerpiece
-
Sketch the bunny’s head:
Start by lightly sketching a simple circle or wide oval in the very center of your paper. Make sure it isn’t too large; you need plenty of room around it for the wreath. -
Add the ears:
Draw two long, narrow oval shapes extending upwards from the top of the head. Keep them relatively close together and slightly angled outward. -
Outline in ink:
Using a black fine-liner, carefully trace over your pencil lines. Add details like three whiskers on each cheek, a small triangular nose, a ‘J’ curve mouth, and two bead-like eyes. -
Add color details:
Use a pink colored pencil or marker to fill in the inner shapes of the ears and add a soft pink nose. Erase any visible pencil marks once the ink is totally dry.
Smudged Print?
If a hand slides and smears, turn it into a ‘shaker’ flower! Paint over the smudge with a slightly darker shade in a flower shape, or use a white gel pen to draw petals over the mistake once dry.
Step 2: Creating the Handprint Ring
-
Prepare your palette:
Squeeze out small amounts of pastel spring colors—think soft pink, baby blue, lavender, light yellow, and peach. -
Test the spacing:
Before painting, visualize a circle around the bunny head. You want the handprints to form a ring about 2-3 inches away from the bunny drawing. -
Apply paint to the first hand:
Using a brush or sponge, coat a child’s palm and fingers evenly with your first color (e.g., pink). It shouldn’t be dripping wet, just covered. -
Press the first print:
Guide the hand onto the paper with fingers pointing outward, away from the bunny. Press firmly on each finger and the palm to get a clear impression. -
Rotate and repeat:
Clean the hand thoroughly. switch to a new color (like blue), and place the next print adjacent to the first, following the circular path. I find it helpful to rotate the paper itself rather than contorting your arm. -
Complete the circle:
Continue adding prints in alternating pastel colors until the circle is complete. Aim for roughly 10-12 handprints depending on the size of the hands and paper. -
Let it dry:
Set the artwork aside for several minutes until the handprints are completely dry to the touch to prevent smearing during the next phase.
Step 3: Painting the Botanical Border
-
Mix your leaf green:
Create a soft, sage green color. If your green is too bright, tone it down with a tiny drop of red or brown for a natural look. -
Paint the vine stem:
With a fine round brush, paint a thin, continuous curved line that circles around the outer tips of the fingers. This acts as the spine for your leaves. -
Add the first leaves:
Start near the top. Press the belly of your brush down and lift up to create small, almond-shaped leaves extending from the vine. -
Create a pattern:
Paint leaves in pairs or alternating sides along the vine stem. Angle them slightly to follow the curve of the circle. -
Fill the gaps:
Work your way entirely around the wreath. If there are large gaps between the handprints and the vine, add a few extra stray leaves dipping inward to connect the elements visually. -
Final drying time:
Allow the green vines to dry completely before framing or displaying.
Make it Sparkle
Once the paint is dry, lightly brush a thin layer of glitter glue over the colored handprints. It adds a magical morning-dew shimmer to the wreath without obscuring the prints.
This blooming bunny wreath captures a moment in time beautifully and makes for perfect seasonal wall art
Glow-Style Neon Easter Handprints
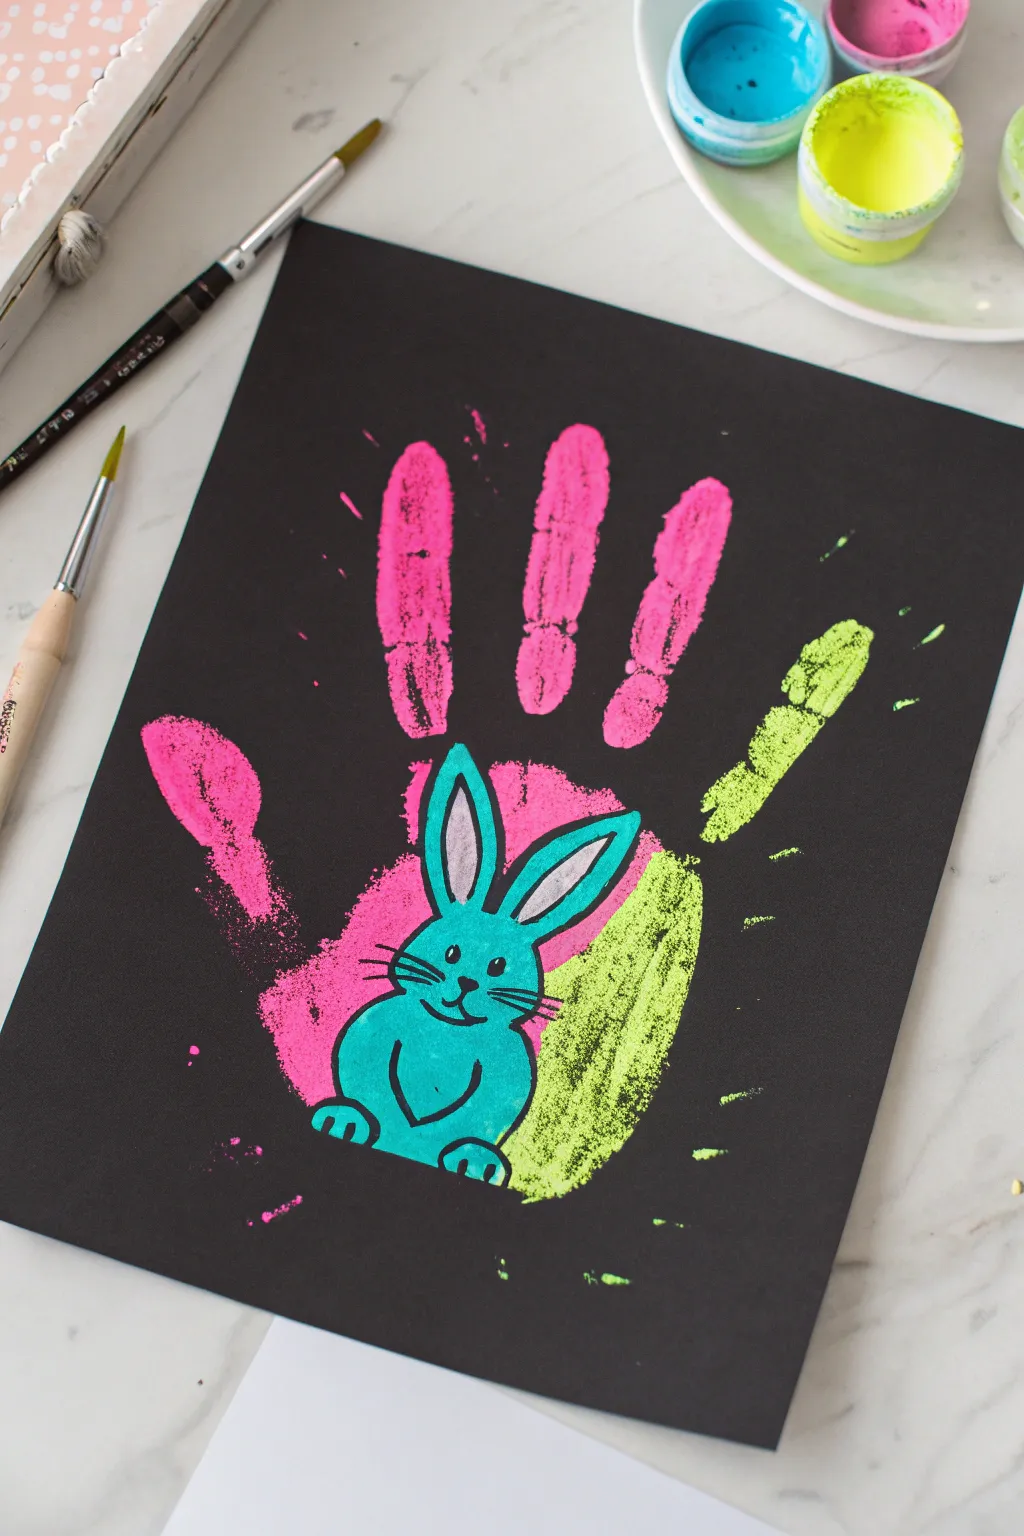
These vibrant handprints pop beautifully against black paper, giving off a fun, glow-in-the-dark vibe without needing special lights. The contrast allows the cute teal bunny nestled in the palm to really stand out.
Step-by-Step
Materials
- Black cardstock or heavyweight construction paper
- Neon acrylic craft paints (pink, lime green, teal)
- White acrylic paint
- Fine liner paintbrush or black permanent marker (sharpie style)
- Small flat paintbrush
- Palette or paper plate
- Water cup and paper towels
Step 1: Creating the Neon Base
-
Prepare your paints:
Squeeze a generous amount of neon pink and neon lime green paint onto your palette. You want the consistency to be thick enough to cover the black paper well. -
Paint the fingers:
Using a brush, coat the four fingers (index, middle, ring, and pinky) and the upper half of the palm with the neon pink paint. Apply a solid, even layer. -
Paint the thumb and heel:
Coat the thumb and the lower section of the palm (the heel of the hand) with the neon lime green paint. It is okay if the pink and green edges touch or slightly overlap on the palm. -
Stamp the handprint:
Firmly press the painted hand onto the center of the black cardstock. Keep the fingers slightly spread apart. Press down on each finger and the palm to ensure good contact with the paper. -
Lift carefully:
Lift the hand straight up off the paper to avoid smudging the print. Wash the hand immediately with soap and water. -
Let it dry completely:
Set the paper aside until the paint is fully dry to the touch. This is crucial because wet paint will mix with the bunny layer we are adding next.
Step 2: Painting the Bunny
-
Outline the bunny shape:
Using your teal paint and a small brush, paint a bunny silhouette directly over the palm area of the handprint. Start with a rounded oval for the body. -
Add the head:
Paint a slightly smaller circle on top of the body for the bunny’s head. -
Paint the ears:
Add two tall, pointed ears extending upwards from the head. I find it easiest to paint these so they nestle between the pink finger prints. -
Fill opacity:
If the neon handprint colors are showing through the teal paint too much, let the first coat dry and apply a second coat of teal for solid coverage. -
Paint inner ears:
Once the teal base is tacky or dry, mix a tiny drop of white into your pink or use plain light grey/white to paint the inner sections of the bunny’s ears.
Paint Thickness Tip
For vibrant neon on black paper, don’t water down your acrylics. Use the paint straight from the tube for maximum opacity and brightness.
Step 3: Adding Details
-
Dry check:
Ensure the teal bunny shape is totally dry before starting the black line work. -
Outline the bunny:
Using a very fine liner brush dipped in black paint (or a black permanent marker), carefully outline the entire bunny shape. -
Draw the face:
Add two small dots for eyes, a little triangle nose, and a curved ‘w’ shape for the mouth. Add three whiskers on each cheek. -
Add paws and body details:
Draw two curved lines near the bottom of the body for the feet, adding toe lines. Draw a small ‘v’ or heart shape on the chest to suggest front paws. -
Final touches:
Add tiny white glints to the black eyes for a spark of life, and splatter a few tiny drops of neon paint around the handprint for extra energy.
Glow-in-the-Dark Twist
Swap standard neon acrylics for actual glow-in-the-dark fabric craft paint. Under a blacklight, the handprint will genuinely glow.
Display your radiant bunny art on the fridge or frame it for a keepsake that truly stands out

Have a question or want to share your own experience? I'd love to hear from you in the comments below!