If you’ve ever stared at a blank wall and thought, “This needs a little more personality,” you’re exactly where the fun begins. Here are my favorite decorative wall painting ideas that turn plain paint into something that feels like art you get to live inside.
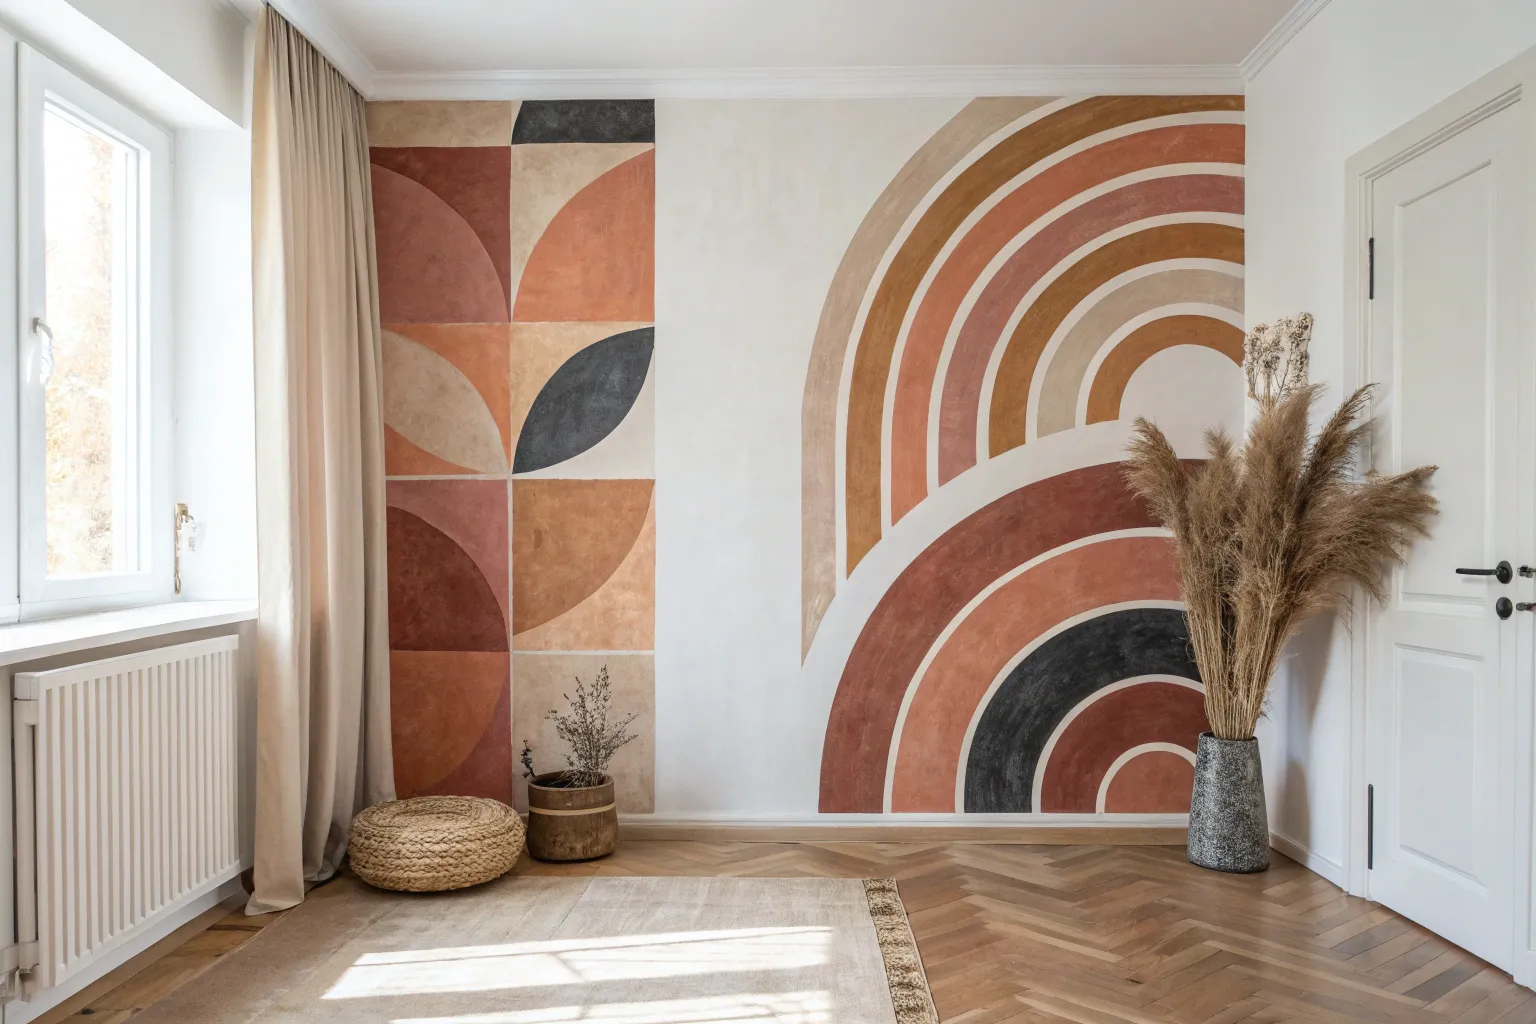
Classic Accent Wall Color Block
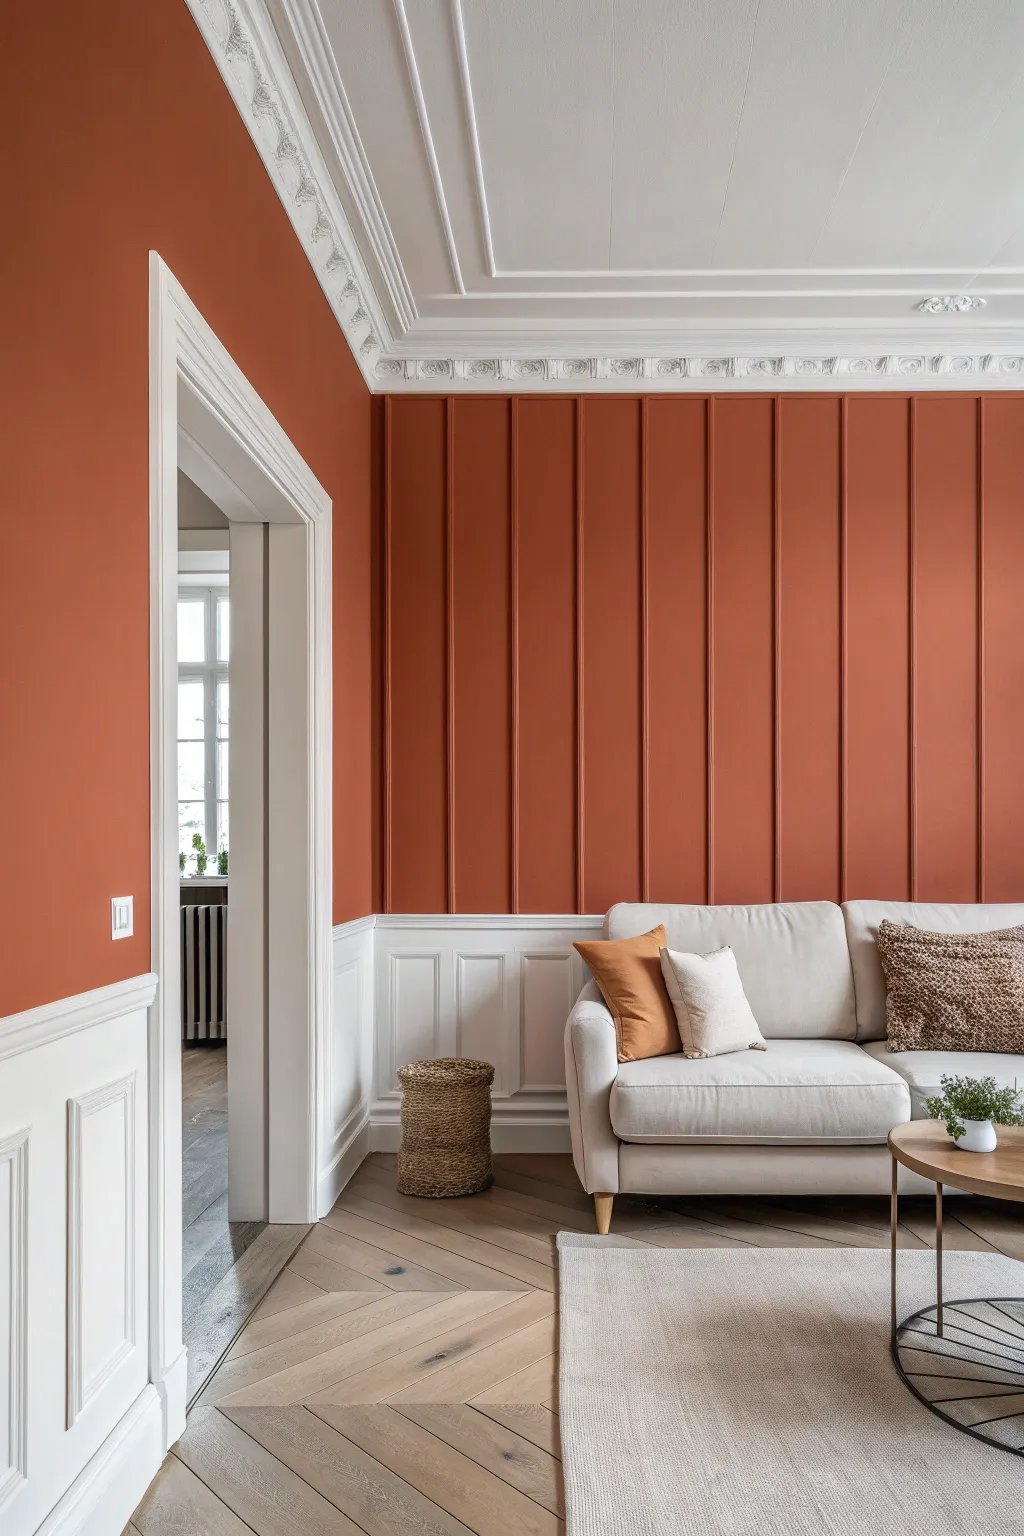
Transform a plain room into a stately interior by combining vertical batten detailing with a rich, two-tone color blocking technique. This project mimics the elegance of historic wainscoting using modern materials and a warm, earthy palette to create sophisticated architectural depth.
Detailed Instructions
Materials
- 1×2 pine battens or MDF strips (primed)
- Chair rail molding (simple profile)
- Construction adhesive (e.g., Liquid Nails)
- Finishing nails and nail gun (or hammer)
- Wood filler
- Sandpaper (120 and 220 grit)
- Caulk and caulking gun
- Painter’s tape
- Deep terracotta matte wall paint
- Crisp white semi-gloss trim paint
- Paint roller with microfiber nap
- 2-inch angled sash brush
- Level and measuring tape
Step 1: Planning & Batten Installation
-
Measure and mark:
Begin by determining the height of your ‘dado’ line (the transition between the white lower paneling and the terracotta upper section). Use a level to draw a continuous horizontal reference line around the room at about 30-36 inches from the floor. -
Calculate spacing:
Measure the total width of the wall for the upper section. Divide this width to find equal spacing for your vertical battens—typically between 12 to 16 inches apart looks best for this classic style. -
Cut the vertical battens:
Cut your 1×2 strips to fit vertically from your horizontal reference line all the way up to the bottom of your crown molding. If you don’t have crown molding, cut them to the ceiling line. -
Install the battens:
Apply a bead of construction adhesive to the back of each vertical strip. Press them onto the wall at your marked intervals, using a long level to ensure they are perfectly plumb. -
Secure the wood:
Reinforce the adhesive by shooting finishing nails through the battens into the drywall or studs. Since we are painting over this, the nail holes will be invisible later. -
Add the chair rail:
Install the chair rail molding horizontally directly over your initial reference line. It should sit flush against the wall, acting as a visual divider between the lower wainscoting and the upper vertical battens.
Use a Spacer Block
Cut a scrap piece of wood to the exact width of your gap calculation. Use this ‘spacer block’ between battens during install to ensure perfect spacing without constant measuring.
Step 2: Prep Work & Seamless Transitions
-
Fill the gaps:
Use wood filler to cover all nail holes on the battens and molding. Overfill slightly, as the putty shrinks when it dries. -
Caulk the seams:
Run a bead of paintable decorators caulk along both sides of every vertical batten where it meets the drywall. This is crucial—I always take extra time here because gaps ruin the illusion of solid paneling. -
Smooth it out:
Once the filler is dry, sand the wood patches flush with 120-grit paper. Follow up with a light 220-grit sanding over the primed wood to ensure a smooth painting surface. -
Prime the repairs:
Spot prime any raw wood areas, filler patches, or dark marks on the wall to ensure your topcoats look even.
Create Lower Panel Depth
To mimic the image precisely, add picture-frame molding rectangles to the lower white wall area. This creates a true ‘wainscoting’ look that balances the vertical lines above.
Step 3: Painting the Color Block
-
Paint the woodwork first:
Start with the lower wainscoting section and the chair rail. Apply your crisp white semi-gloss paint. It’s okay if you get a little on the upper wall, as the darker color will cover it. -
Cut in the terracotta:
Using your angled sash brush and the deep terracotta paint, carefully cut in along the top of the chair rail, the corners of the room, and along the ceiling or crown molding line. -
Paint the battens:
Brush the terracotta paint onto the faces and sides of the vertical battens. Watch for drips pooling in the corners where you caulked. -
Roll the fields:
Switch to a small roller to paint the flat wall sections between the battens. Roll vertically to match the direction of the wood strips. -
Apply second coats:
Let the first coat dry completely according to the can’s instructions. Apply a second coat to the terracotta section for a truly rich, opaque finish. -
Final touch-ups:
Inspect the transition line at the chair rail. If needed, use a tiny artist’s brush to sharpen the line where the terracotta meets the white molding.
Step back and admire how simple strips of wood and a bold color choice have added historic charm to your modern space


Painted Arch Behind Furniture
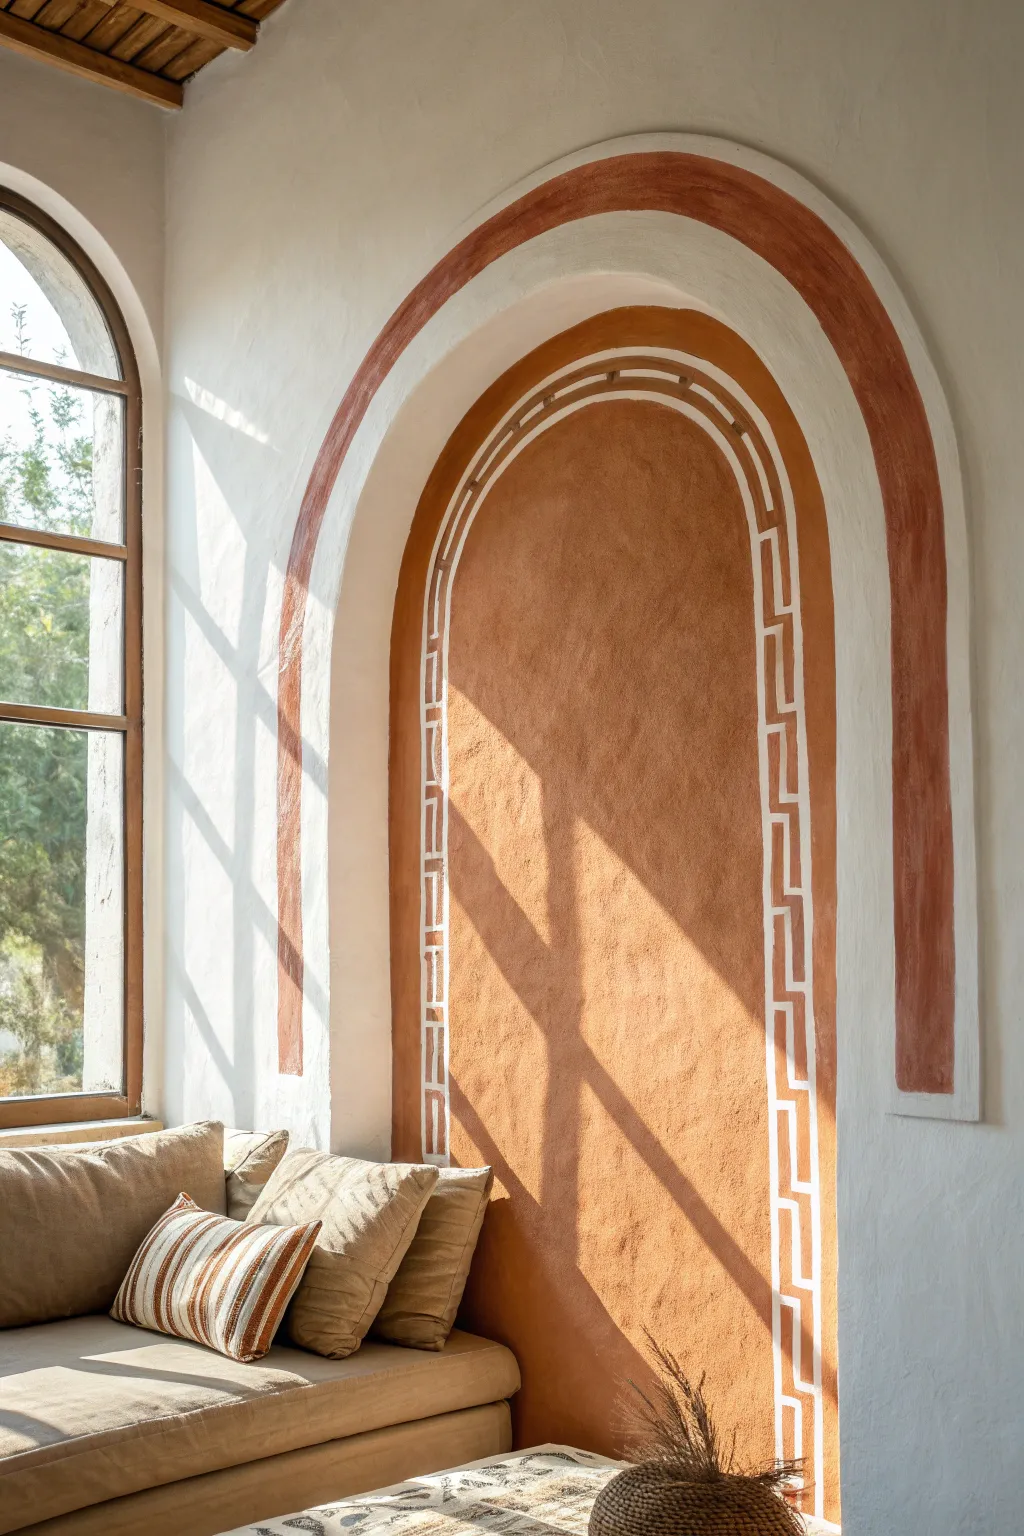
Transform a plain white wall into a Mediterranean-inspired focal point with this textured arch mural. The warm, earthy tones and classic geometric detailing create a stunning backdrop that feels both ancient and modern.
Step-by-Step Guide
Materials
- Latex wall paint (White base)
- Latex wall paint (Terracotta/Burnt Orange)
- Latex wall paint (Reddish-Brown/Rust)
- White acrylic craft paint or interior trim paint
- Pencil
- String and pushpin/nail
- Painter’s tape
- Spirit level
- Medium sash brush (angled)
- Small flat artist brush (size 4-6)
- Small round detail brush (size 2)
- Paint roller (microfiber nap)
- Measuring tape
- Plaster or joint compound (optional for texture)
- Sea sponge (optional)
Step 1: Planning and Marking
-
Determine placement:
Decide where your arch will sit relative to your furniture to ensure it frames the space beautifully; measure the total width you want the arch to span and mark the center point lightly on the wall with a pencil. -
Draw the vertical lines:
Using your level and measuring tape, draw two vertical lines upward from the floor (or baseboard) to represent the straight sides of the wider, outer arch, stopping where you want the curve to begin. -
Create the outer curve:
Tie a string to a pencil, making the string length equal to half the width of your outer arch; secure the other end of the string with a pushpin at the center point between your vertical lines and swing the pencil to draw a perfect semi-circle connecting the tops of your vertical lines. -
Mark the inner arch:
Shorten your string by about 4-5 inches (depending on how thick you want the outer border to be) and draw a second, smaller semi-circle from the same center point; then, use your level to draw vertical lines down from this inner curve to create the interior shape.
Wobbly Lines?
If your hand isn’t steady for the white pattern, create a stencil out of cardstock for the repeated ‘L’ shapes, or use thin 1/4-inch masking tape to block out the pattern before painting.
Step 2: Creating the Base
-
Optional texturing:
To achieve the aged, plaster look seen in the photo, you can lightly sponge on a thin layer of watered-down joint compound or use a textured paint add-in before painting the colors. -
Tape the edges:
Apply painter’s tape carefully along the outer pencil lines of the largest arch to ensure a crisp edge against the white wall. -
Paint the outer border:
Using the angled sash brush, fill in the space between your outer and inner pencil lines with the reddish-brown (rust) paint color. -
Paint the inner fill:
Switch to your terracotta/burnt orange color and fill the entire center arch shape using a roller for the large areas and a brush for the edges; I find two coats usually gives the best depth of color here. -
Add texture to the paint:
While the second coat is still slightly tacky, you can dab it gently with a dry sea sponge or a crumpled rag to create subtle variations in the surface, mimicking stucco. -
Remove tape and dry:
Peel off the painter’s tape while the paint is still slightly damp to avoid peeling, then allow the entire wall to dry completely (at least 4-6 hours) before starting detail work.
Step 3: Detailing the Geometric Pattern
-
Sketch the pattern guide:
Lightly trace a third, faint guideline inside the terracotta shape, about 2 inches from the edge, to act as a track for your white pattern. -
Mark spacing intervals:
Using a flexible measuring tape, make small tick marks along this guideline every 2-3 inches to keep your Greek key pattern even as it rounds the curve. -
Paint the vertical spines:
With your small flat artist brush and white paint, create the main continuous line or the segmented ‘spines’ of the pattern following your curved guideline. -
Add the perpendicular strokes:
Carefully paint the short, perpendicular lines that create the ‘key’ shapes, ensuring the angles remain consistent even as the arch curves. -
Refine edges:
Switch to the small round detail brush to sharpen any corners of the white pattern or touch up messy edges with the background terracotta paint. -
Final erasing:
Once the white paint is fully cured (give it overnight to be safe), gently erase any visible pencil marks with a clean, white eraser.
Aged Patina Finish
For a more authentic ‘ruins’ look, dilute a tiny bit of grey or brown paint with water (glaze) and rag it softly over the dry terracotta to settle into the textures.
Step back and admire how this warm, architectural feature completely redefines the atmosphere of your room


Wide Horizontal Stripes
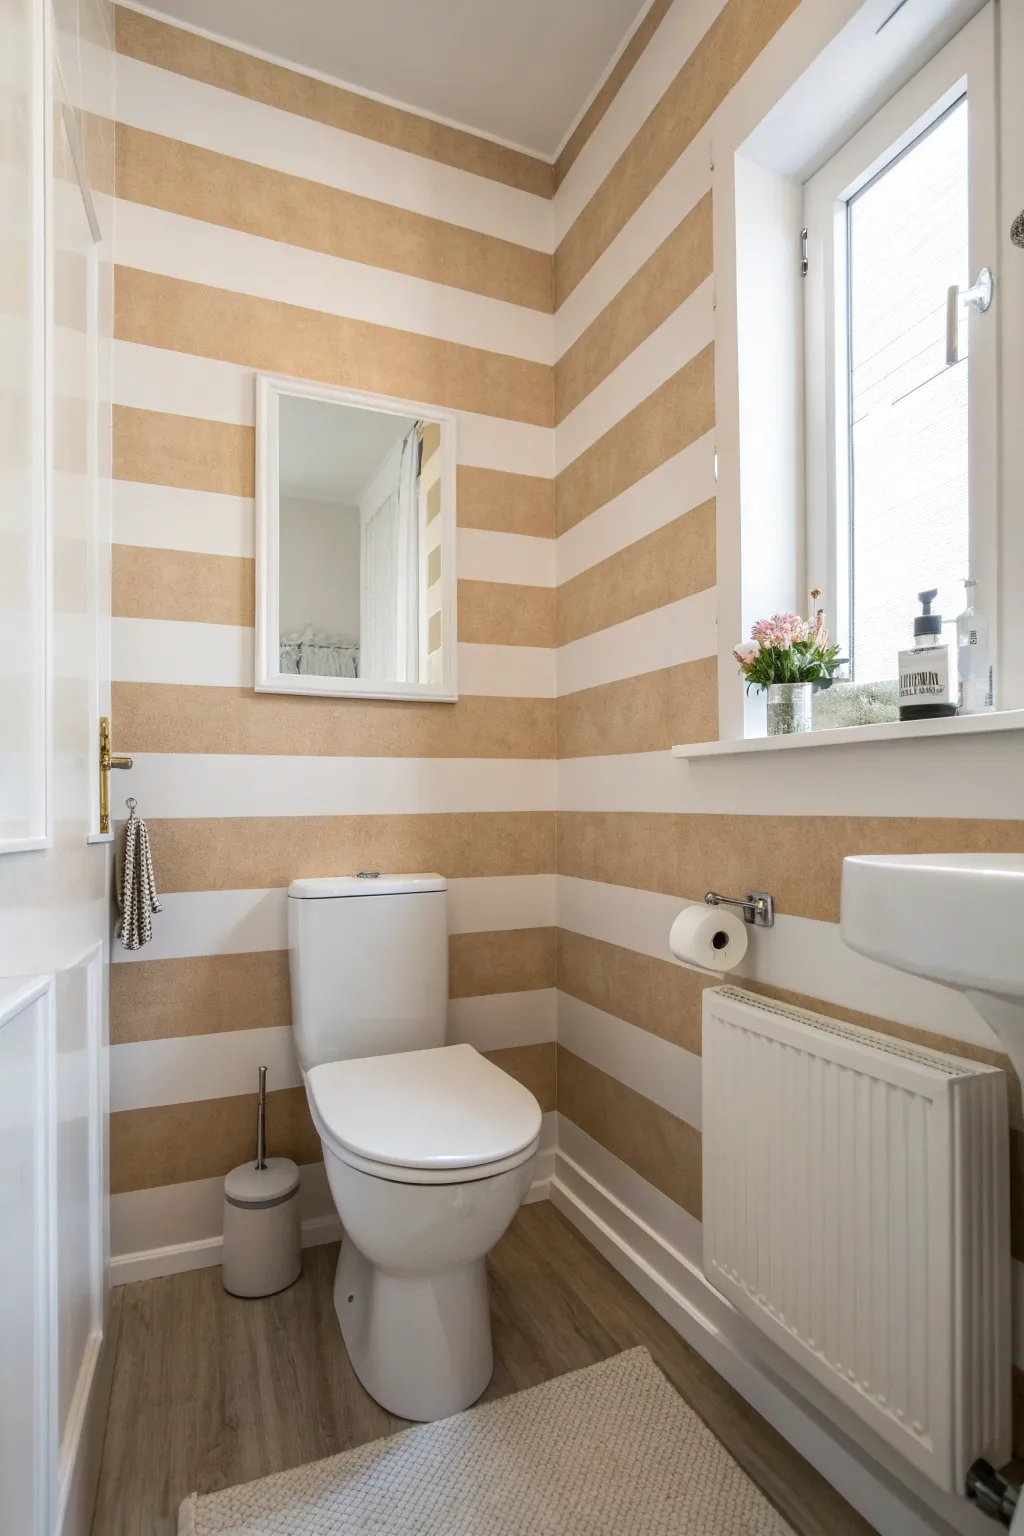
Transform a small space into an elegant retreat with these bold, wide horizontal stripes. The alternation of crisp white and textured metallic beige creates a sense of expanded width and classic sophistication.
Step-by-Step Tutorial
Materials
- White satin or eggshell latex paint (base color)
- Metallic beige or gold shimmer paint
- Painter’s tape (high quality, 1.5 inch width)
- Measuring tape
- Pencil
- 4-foot level or laser level
- Paint roller (medium nap)
- Mini foam roller (for the stripes)
- Paint tray and liners
- Angled sash brush (for cutting in)
- Clean cloth or rag
- Plastic drop cloths
Step 1: Preparation & Base Coat
-
Clear the area:
Remove all wall fixtures, including mirrors, towel hooks, and outlet covers. Move moveable furniture out or cover the toilet and sink with plastic drop cloths to protect them from splatters. -
Clean the walls:
Wipe down the walls with a damp cloth and mild detergent to remove dust and grime, which ensures better paint adhesion. Allow the walls to dry completely before proceeding. -
Apply the base coat:
Paint the entire room with your chosen white satin base color. Use an angled brush to cut in around the ceiling, corners, and baseboards first. -
Roll the walls:
Fill in the large areas using a standard paint roller. I recommend applying two coats for a solid, opaque finish, allowing full drying time between coats as per the manufacturer’s instructions. -
Let it cure:
Allow the base coat to dry for at least 24 to 48 hours. This is crucial because if the paint is even slightly tacky, the painter’s tape used in the next phase will peel it off.
Seal the Deal
Painting a thin layer of your base color over the tape edge before applying the stripe color is the secret to getting those laser-sharp, professional-looking lines.
Step 2: Measuring & Taping
-
Plan your stripes:
Measure the height of your wall and divide it by the number of stripes you want (odd numbers often look best so you start and end with the same color). For this look, aim for stripes about 8-10 inches wide. -
Mark the wall:
Starting from the ceiling, make small pencil marks at your calculated intervals down one corner of the wall. -
Draw level lines:
Using a laser level or a long 4-foot level, extend lightly penciled horizontal lines across the entire room at your marked intervals. Accuracy here is key to the finished look. -
Apply the tape:
Run painter’s tape along your pencil lines. Place the tape *outside* the area intended for the metallic stripe. This ensures the stripe stays the correct width. -
Mark your ‘paint’ zones:
Place a small ‘X’ made of tape or pencil inside the stripes that will be painted metallic. It’s surprisingly easy to lose track and paint the wrong section once you get going. -
Seal the edges:
Run a credit card or putty knife firmly over the tape edges to ensure a tight seal. Then, paint a very thin layer of the *base white color* over the edge of the tape where the metallic stripe will be. This seals the gap and prevents bleeding.
Texture Twist
For added dimension, use a sponge roller for the accent stripes. This adds a subtle stippled texture that catches the light differently than a smooth finish.
Step 3: Painting the Stripes
-
Cut in the metallic:
Once the sealing coat is dry, use a clean angled sash brush to carefully paint the metallic beige along the corners and edges inside your taped-off sections. -
Roll the metallic paint:
Use a mini roller to apply the metallic beige or gold paint. Metallic paints often have a distinct grain, so try to finish with roller strokes all going in the same vertical direction. -
Check for coverage:
Metallic paints can be semi-transparent. Step back and check if a second coat is needed to achieve the rich, textured look shown in the image. -
Remove the tape:
Pull the tape off while the final coat of paint is still slightly wet. Pull slowly at a 45-degree angle away from the painted edge for the sharpest line. -
Touch up:
Inspect your lines. If any paint bled led through, wait for it to dry completely, then use a tiny artist’s brush and the base white paint to correct the error. -
Reinstall fixtures:
Once the walls are fully cured, rehang your mirror, towel hooks, and replace outlet covers to complete your bathroom’s new look.
Enjoy the visually expanded feel these crisp stripes bring to your room


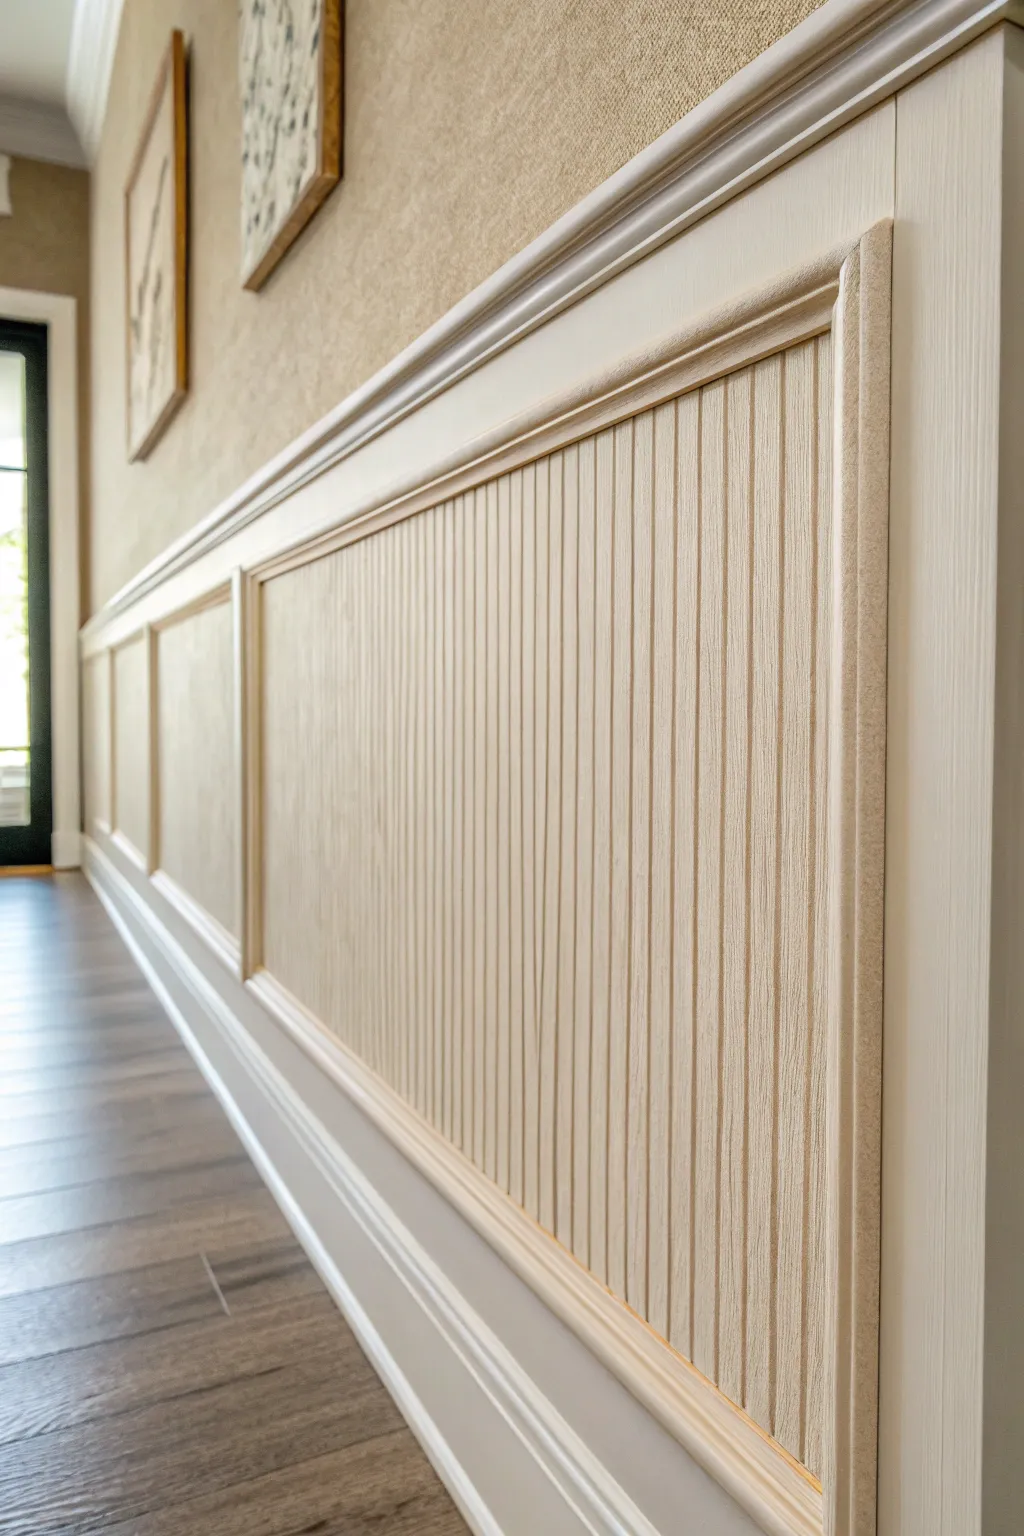
Slim Vertical Stripes for Height
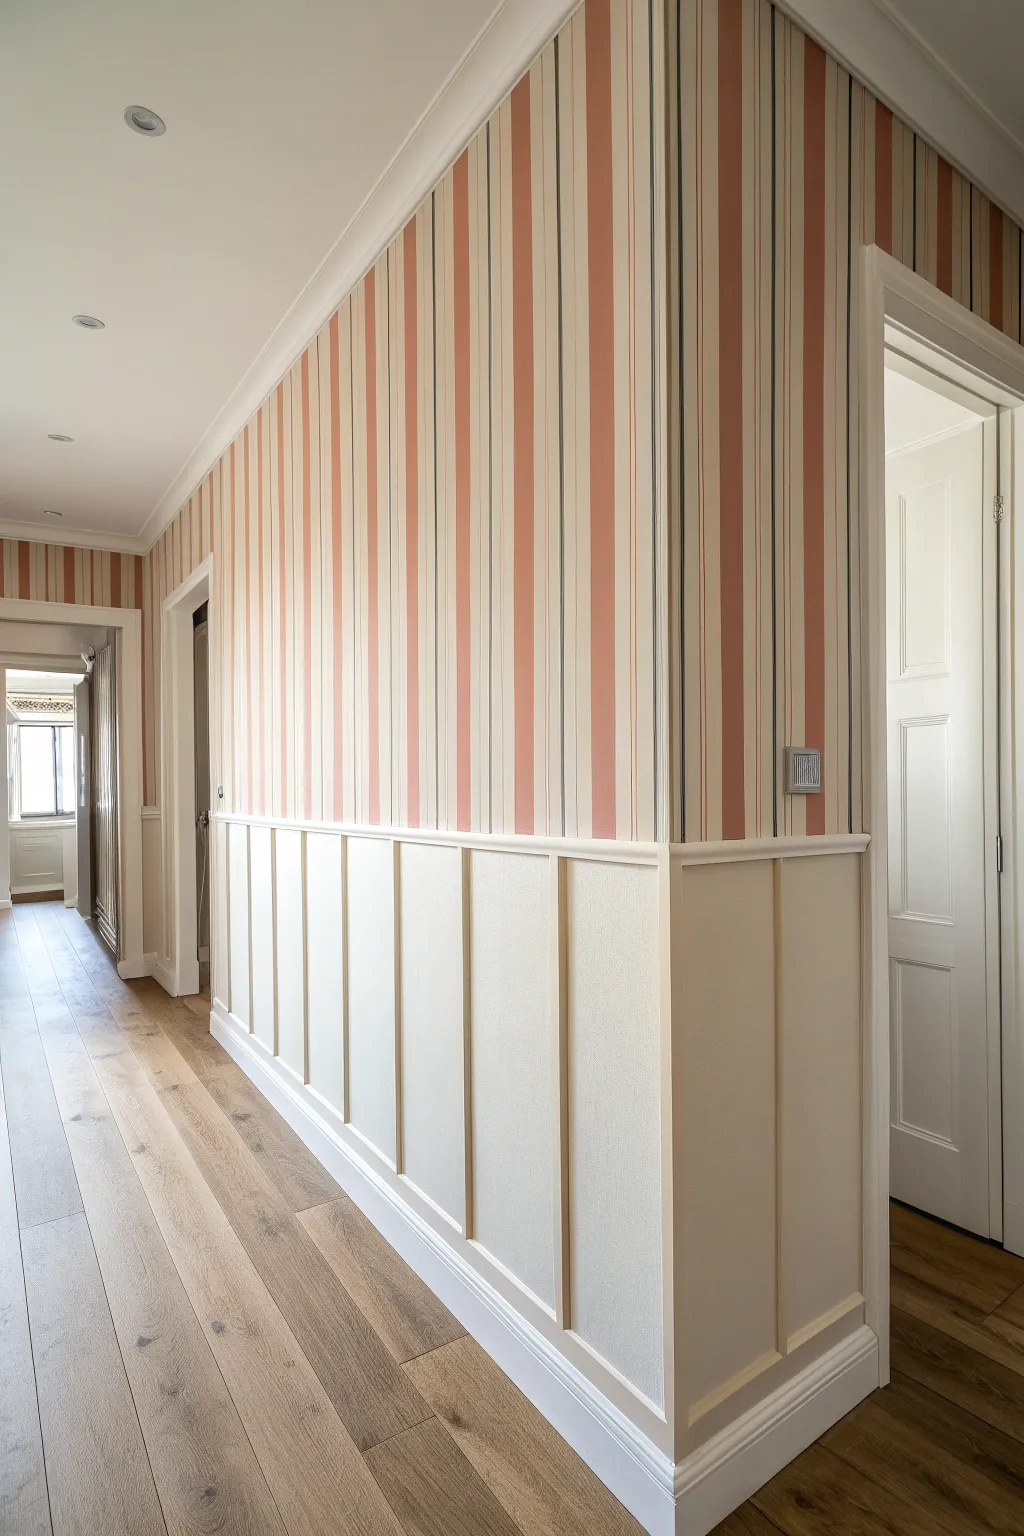
Transform a plain hallway into a sophisticated corridor by combining crisp, architectural wainscoting with elongating vertical stripes. This project marries classic board and batten paneling on the lower wall with a custom-painted striped design above to visually heighten the space.
Detailed Instructions
Materials
- MDF boards (1×3 inch for battens and top rail)
- Baseboard molding (to match existing or new)
- Panel adhesive or construction glue
- Brad nailer and 1.5-inch brad nails
- Wood filler
- Sanding block (medium and fine grit)
- Painter’s tape (high quality, specifically for clean lines)
- Laser level or long spirit level
- Tape measure and pencil
- Primer (high adhesion)
- Interior semi-gloss paint (Cream/White for wainscoting)
- Interior eggshell paint (Cream base for upper wall)
- Interior eggshell paint (Coral/Peach accent color)
- Interior eggshell paint (Grey/Blue thin stripe color)
- Paint rollers (microfiber) and tray
- Angled sash brush (2 inch)
- Artist’s liner brush (for thin stripes)
- Caulk and caulking gun
Step 1: Planning and Base Work
-
Measure and calculate spacing:
Begin by measuring the total length of your wall. Decide on the height of your wainscoting; roughly one-third of the wall height is traditional, often around 32-36 inches. Calculate the spacing for your vertical battens so they are evenly distributed, avoiding awkward small gaps at corners. -
Prep the walls:
Remove existing baseboards if you are replacing them. If keeping them, ensure the top edge is clean and flat. Patch any holes in the wall with spackle and sand smooth. Wipe down the entire wall surface to remove dust and grease. -
Mark layout lines:
Using a laser level or a long spirit level, draw a horizontal line across the wall where the top of the wainscoting rail will sit. Then, mark vertical plumb lines where every batten will be placed to ensure perfectly straight installation.
Step 2: Installing the Wainscoting
-
Install top rail and baseboard:
Cut your horizontal top rail (1×3 MDF) to length. Apply construction adhesive to the back and nail it into the studs along your marked horizontal line. Install your baseboard similarly at the floor level. -
Attach vertical battens:
Measure the distance between the top of the baseboard and the bottom of the top rail for each specific spot (floors can be uneven). Cut your vertical battens to size. Apply adhesive and brad nail them over your marked vertical lines. -
Fill and caulk:
Fill all nail holes with wood filler. Once dry, sand them flush. Apply a bead of paintable caulk along every seam where the wood meets the wall to create a seamless, built-in look. -
Prime and paint woodwork:
Apply a coat of primer to all MDF and bare wood areas. Once dry, paint the entire lower section (boards and the wall space between them) with your semi-gloss cream paint. I usually do two coats for a durable, washable finish.
Bleeding Lines?
If paint bled under the tape despite sealing it, wait for it to fully dry. Then, place a piece of tape over the mistake and scrape away the bleed gently, or use a tiny artist brush to touch up with the base color.
Step 3: Painting the Upper Stripes
-
Apply the base color:
Paint the upper portion of the wall above the wainscoting with your cream base color. Allow this to cure for at least 24 hours so tape won’t peel it off later. -
Map out the stripe pattern:
Decide on your stripe pattern. The image features wide cream bands, medium coral bands, and very thin grey pin-stripes. Lightly mark these intervals along the top rail of your wainscoting using a pencil. -
Tape the wide stripes:
Use your laser level to guide your taping. Mask off the areas that need to remain cream. Press the edges of the tape down firmly with a credit card or putty knife to prevent bleed-through. -
Seal the tape edges:
Lightly brush a small amount of the *base* cream color over the edge of the painter’s tape. This seals the tape line so any paint that bleeds underneath matches the base coat, ensuring a crisp line later. -
Paint the coral stripes:
Using a small roller or brush, fill in the exposed areas with your coral/peach paint. Apply two light coats rather than one heavy one to avoid ridges. -
Remove tape and dry:
Remove the tape while the final coat is still slightly tacky, pulling it away at a 45-degree angle. Let the paint dry completely before moving to the next set of stripes. -
Tape for accent stripes:
Once the coral paint is fully cured (give it a day if possible), tape off the narrow guides for the grey pin-stripes. These sit adjacent to the coral bands. -
Paint thin stripes:
Paint the narrow exposed lines with the grey/blue shade. Because these are thin, a small angled brush or even an artist’s brush gives better control than a roller. -
Final reveal:
Peel off the final tape to reveal the complex multi-stripe pattern. Touch up any minor imperfections with a tiny artist brush.
Pro Tip: Custom Spacer
Cut a scrap piece of wood to the exact width of the gap between your battens. Use this ‘spacer block’ to quickly position each vertical board without measuring every single time.
Step back and admire how the vertical lines draw the eye upward, making your hallway feel grand and timeless.
BRUSH GUIDE
The Right Brush for Every Stroke
From clean lines to bold texture — master brush choice, stroke control, and essential techniques.
Explore the Full Guide
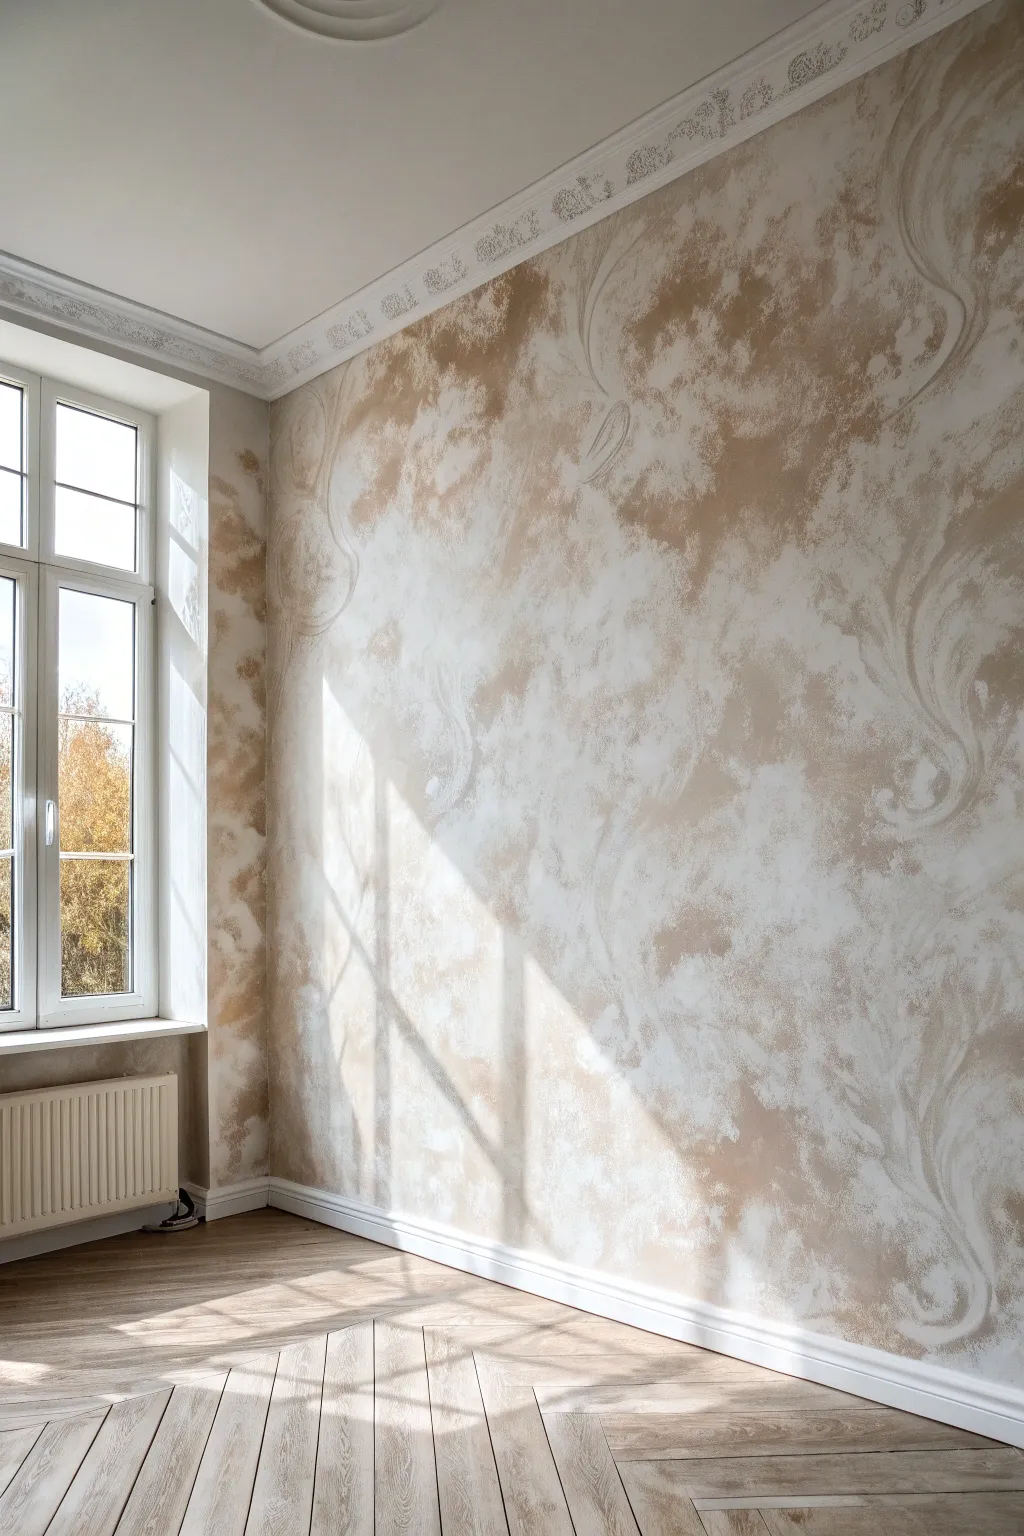
Soft Ombre Gradient Fade

Bring the warmth of a desert sunset into your bedroom with this relaxed, two-tone ombre accent wall. The soft, uneven transition between the warm terracotta and creamy white creates a dreamy, textured effect that feels organic rather than perfectly machine-made.
Step-by-Step
Materials
- Matte latex paint (Terracotta/Rust color)
- Matte latex paint (Cream/Off-white base color)
- Painter’s tape
- Drop cloths
- Large paint roller and tray
- 4-inch paintbrush (high quality)
- Clean spray bottle filled with water
- Sea sponge or large blending brush
- Lint-free rags
- Step ladder
Step 1: Preparation & Base Coat
-
Clear and cover:
Begin by moving all furniture, including the bed and nightstands, away from the wall to give yourself ample working space. Lay down drop cloths to protect your flooring from drips and spills. -
Tape the edges:
Apply painter’s tape along the baseboards, adjacent walls, and ceiling line to ensure crisp edges where the gradient won’t reach. -
Apply the base color:
Roll two coats of your creamy off-white pant onto the entire wall. Allow this to dry completely (usually 4-6 hours) before moving on. This ensures a consistent background for the fade.
Too much water?
If you sprayed too much and drips are running down the wall, don’t panic. Quickly blot them with a dry rag, feathering the edges out immediately to hide the mark.
Step 2: Creating the Color Block
-
Determine the horizon line:
Decide where you want your color transition to happen. In the reference image, the dark color occupies roughly the bottom two-thirds of the wall. Mark this height lightly with a pencil in a few spots. -
Roll the bottom section:
Pour your terracotta paint into the tray. Using the roller, apply the paint from the baseboard up to about 6 inches *below* your marked transition line. Don’t worry about a perfect edge yet. -
Rough in the edge:
Use your 4-inch brush to paint up to your pencil marks. Apply the paint somewhat unevenly here; you don’t want a straight, hard line.
Texture It Up
For an old-world Tuscan plaster feel, mix a paint additive like lime powder or texture sand into the terracotta paint before applying the bottom section.
Step 3: Blending the Gradient
-
Work in sections:
The blending technique works best while the paint is still wet. Divide your wall mentally into 3-foot wide vertical sections and work across the wall one section at a time. -
Mist the transition:
Lightly spray the top edge of the wet terracotta paint with your water bottle. You want it damp, not dripping. -
Apply the wet brush technique:
Dip your 4-inch brush into the terracotta paint, then dab most of it off onto a rag so the brush is ‘dry.’ Use upward, feathery strokes to pull the color from the wet line up into the white space. -
Scumble the border:
Using a circular scrubbing motion (‘scumbling’), work along the transition line to break up any hard edges. The goal is a cloudy, watercolor look. -
Soften with a sponge:
If brush strokes look too harsh, take a damp sea sponge and blot along the fade line. This lifts a little pigment and helps mesh the dark color into the light background. -
Add high peaks:
Looking at the inspiration photo, notice the line isn’t perfectly level. I like to intentionally brush some areas higher than others to create that organic, drifting movement. -
Step back and assess:
Walk to the other side of the room to check the overall balance. If a spot looks too dense, mist it lightly with water and blot with a clean rag to lift the color. -
Continue across:
Repeat this misting, brushing, and blotting process across the remaining sections of the wall, ensuring the sections blend into each other seamlessly.
Step 4: Final Touches
-
Check for opacity:
Once the blended area is looking good, check the solid block of color at the bottom. If it looks streaky, roll a second coat on the lower portion, stopping well below your blended zone. -
Remove tape:
Peel off your painter’s tape while the paint is still slightly tacky to prevent peeling the dry film. -
Dry thoroughly:
Let the wall cure for at least 24 hours before moving your bed back into place.
Now you have a serene, custom backdrop that adds warmth and artistic flair to your space without needing expensive artwork
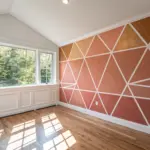
Geometric Tape Triangle Mural

Transform a plain white wall into a striking focal point with this large-scale geometric triangle mural. Featuring a harmonious palette of forest greens, muted terracotta, mustard, and sage, this project uses simple painter’s tape to achieve crisp, professional-looking lines.
Detailed Instructions
Materials
- Interior latex paint (Eggshell or Satin finish) in 5 colors: Forest Green, Sage Green, Terracotta, Mustard Yellow, and Greige
- Base wall paint (White or Off-White) for touch-ups
- High-quality painter’s tape (1-inch width)
- Small foam rollers (4-inch size)
- Paint tray and liners
- Angled sash brush (2-inch)
- Drop cloths
- Ladder or step stool
- Measuring tape
- Pencil
- Straight edge or level
- Razor blade or craft knife
- Credit card or putty knife
Step 1: Preparation & Mapping
-
Prepare the workspace:
Clear the room of furniture or move it to the center. Lay down heavy-duty drop cloths to protect your flooring from potential drips. Remove any outlet covers or switch plates on the wall you intend to paint. -
Base coat check:
Ensure your base wall color is in good condition. Since the lines between the triangles remain unpainted, this base color acts as the ‘grout’ line. If the wall is dirty or scuffed, give it a fresh coat of white paint and let it cure for at least 24 hours. -
Plan the grid:
Visually, this mural is built on a subtle grid structure. Start by marking vertical lines every 24-30 inches across the wall using a pencil and a long level. These don’t need to be heavy lines, just light guides. -
Tape the diagonals:
Create your first large triangles by running long strips of painter’s tape diagonally across your vertical guides. Aim for randomness in size, but keep the angles relatviely consistent. Press the tape down firmly as you go. -
Form the smaller triangles:
Subdivide the larger shapes. Run tape lines intersecting the initial diagonals to create a mix of large, medium, and small triangles. Step back frequently to ensure the pattern feels balanced and not too cluttered in one area. -
Seal the tape edges:
This is the most crucial step for crisp lines. Run a credit card or putty knife firmly over every inch of tape to bond it to the wall. I find this prevents bleeding significantly better than just using fingers.
Bleed-Proof Lines
Painting over the tape edge with the existing wall color first is the ultimate pro move. It creates an invisible seal that guarantees razor-sharp geometric lines every time.
Step 2: Painting the Pattern
-
The white lock-in method:
Paint a thin layer of your *base wall color* (white) over the edges of the tape first. This seals the tape edge; if any paint bleeds under, it will be white-on-white and invisible, creating a perfect barrier for the colors later. -
Let the seal dry:
Allow this sealing coat to dry completely, usually about 30-60 minutes depending on humidity. It should feel dry to the touch before you introduce color. -
Plan your color map:
To avoid having two of the same color touching, lightly mark each triangle with a small piece of colored tape or a pencil code (e.g., ‘G’ for green, ‘R’ for rust). This helps you visualize the balance before opening the paint cans. -
Outline the first color:
Start with your darkest color (Forest Green). Use the angled sash brush to carefully cut in the corners and edges of the triangles designated for this shade. -
Fill the first color:
Use a small 4-inch foam roller to fill in the rest of the green triangles. Foam rollers provide a smooth finish without heavy texture marks. Apply two coats if necessary for full opacity. -
Repeat for remaining colors:
Wash your brush and switch roller heads (or use fresh liners) for the next color, perhaps the Terracotta. Repeat the outlining and filling process. Continue this cycle for the Mustard, Sage, and Greige sections until every triangle is filled. -
Check for coverage:
Inspect the wall from different angles. Some lighter colors like the yellow or sage might need a third light coat to look perfectly solid against the white lines.
Metallic Accent Upgrade
Swap out one of the solid colors (like the mustard or grey) for a metallic gold or copper paint. It adds a surprising shimmer that catches the light beautifully.
Step 3: The Reveal
-
Timing the removal:
Do not wait for the paint to fully cure. Remove the tape while the final coat of paint is still slightly tacky—usually about an hour after the last stroke. This prevents the dried paint film from ripping. -
Peel carefully:
Pull the tape off slowly at a 45-degree angle away from the painted edge. Maintain a steady pace to ensure a clean line. -
Touch ups:
If a tiny bit of paint managed to bleed through, don’t panic. Wait for everything to dry completely, then use a tiny artist’s brush and your base white paint to manually correct the line. -
Reinstall hardware:
Once the wall is fully dry (give it overnight to be safe), screw your outlet covers back in place and move your furniture back.
Enjoy the dynamic energy and modern warmth your new geometric feature wall brings to the space

PENCIL GUIDE
Understanding Pencil Grades from H to B
From first sketch to finished drawing — learn pencil grades, line control, and shading techniques.
Explore the Full Guide
Big Checkerboard Statement Wall
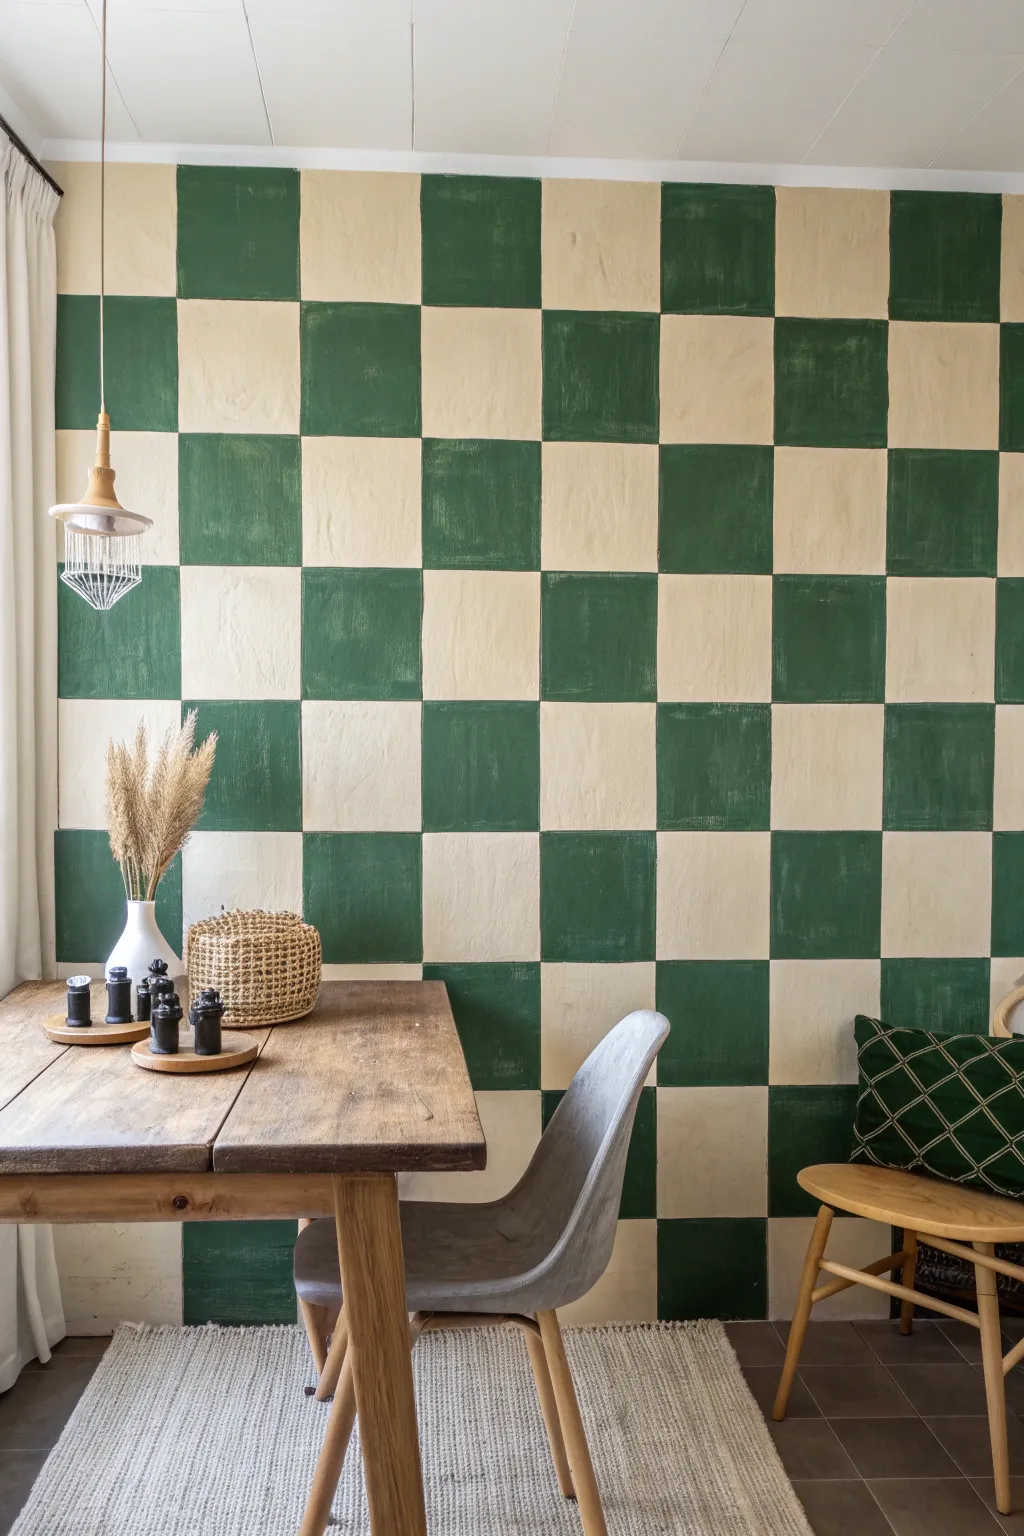
Transform a plain wall into a bold, architectural statement with this classic checkerboard pattern. The interplay between deep forest green and warm cream creates a cozy yet striking backdrop that feels both modern and timeless.
How-To Guide
Materials
- Latex interior wall paint (Forest Green)
- Latex interior wall paint (Cream/Off-White)
- Painter’s tape (high quality, 1-inch width)
- Laser level (highly recommended)
- Long spirit level (24-inch or 48-inch)
- Pencil and eraser
- Measuring tape
- Small foam roller (4-inch)
- Angled sash brush (2-inch)
- Paint tray and liners
- Drop cloths
Step 1: Preparation and Base Coat
-
Clear and Prep:
Begin by removing all furniture, artwork, and outlet covers from the wall you intend to paint. Lay down drop cloths to protect your flooring. -
Clean the Surface:
Wipe down the wall with a damp cloth or a mild TSP solution to remove dust and oils, ensuring the tape will adhere properly later. -
Apply the Lighter Color:
For the crispest results, paint the entire wall with your lighter color first (the cream shade). Use a roller for the main areas and an angled brush for the edges. -
Second Coat:
Allow the first coat to dry completely, then apply a second coat of the cream paint to ensure solid, opaque coverage without streaks. -
Full Cure:
This is crucial: let the base coat dry for at least 24 to 48 hours before applying tape. New paint needs to cure so the tape doesn’t peel it off.
Seal for Sharp Lines
Before painting the green, paint over the tape edge with the CREAM base color first. This fills voids under the tape with the wall color, ensuring the green line stays razor-sharp.
Step 2: Measuring and Grid work
-
Calculate Square Size:
Measure the total width and height of your wall. Divide the width by your desired number of squares (e.g., 8 squares across) to find the perfect dimension for your grid. -
Mark Vertical Guidelines:
Starting from the center of the wall and working outward helps keep things symmetrical. Use a measuring tape to make small tick marks along the top and bottom of the wall at your calculated intervals. -
Set the Laser Level:
Set up your laser level to align with your vertical tick marks. This ensures your lines remain perfectly plumb from floor to ceiling. -
Draw Vertical Lines:
Lightly trace the laser line with a pencil. If you don’t have a laser, use a long spirit level to draw straight vertical lines connecting your top and bottom marks. -
Mark Horizontal Guidelines:
Repeat the measuring process for the horizontal rows, starting from the ceiling down or a specific focal point to ensure the top row looks complete. -
Complete the Grid:
Connect your horizontal marks using the level or laser line, creating a full grid of squares across the wall.
Soft & Hand-Painted
Skip the tape entirely for a rustic, ‘imperfect’ look. Hand-paint the outline of each square with a small brush before filling it in to create softer, organic edges.
Step 3: Taping and Painting
-
Tape Outside the Lines:
This part requires focus. Tape off the squares that will remain CREAM. Place the tape perfectly along the pencil line, but on the *cream* side of the line, leaving the ‘green’ square area fully exposed. -
Mark the Greens:
I always place a tiny piece of painter’s tape or a small ‘X’ inside the squares that need to be painted green. It’s surprisingly easy to get confused once you start working. -
Seal the Tape Edges:
To prevent bleeding, brush a very light layer of the base color (cream) over the edges of the tape. This seals the gap so any seepage matches the base coat. -
Paint the Green Squares:
Once the seal is dry, use a small 4-inch foam roller to fill in the exposed squares with your forest green paint. Rolling in a ‘W’ pattern helps distribute paint evenly. -
Cut in Corners:
Use the angled sash brush to carefully paint square corners that the roller can’t reach, blending the texture to match the rolled areas. -
Apply Second Coat:
Let the green paint dry to the touch, then apply a second coat for deep, rich saturation. -
The Reveal:
Remove the tape while the paint is still slightly tacky (not wet, but not fully cured). Pull the tape slowly at a 45-degree angle away from the painted edge. -
Touch Ups:
Once dry, use a small artist’s brush to tidy up any minor bleeds or imperfections with the appropriate color.
Enjoy the dramatic and structured elegance your new feature wall brings to the room
Tone-on-Tone Grid Pattern
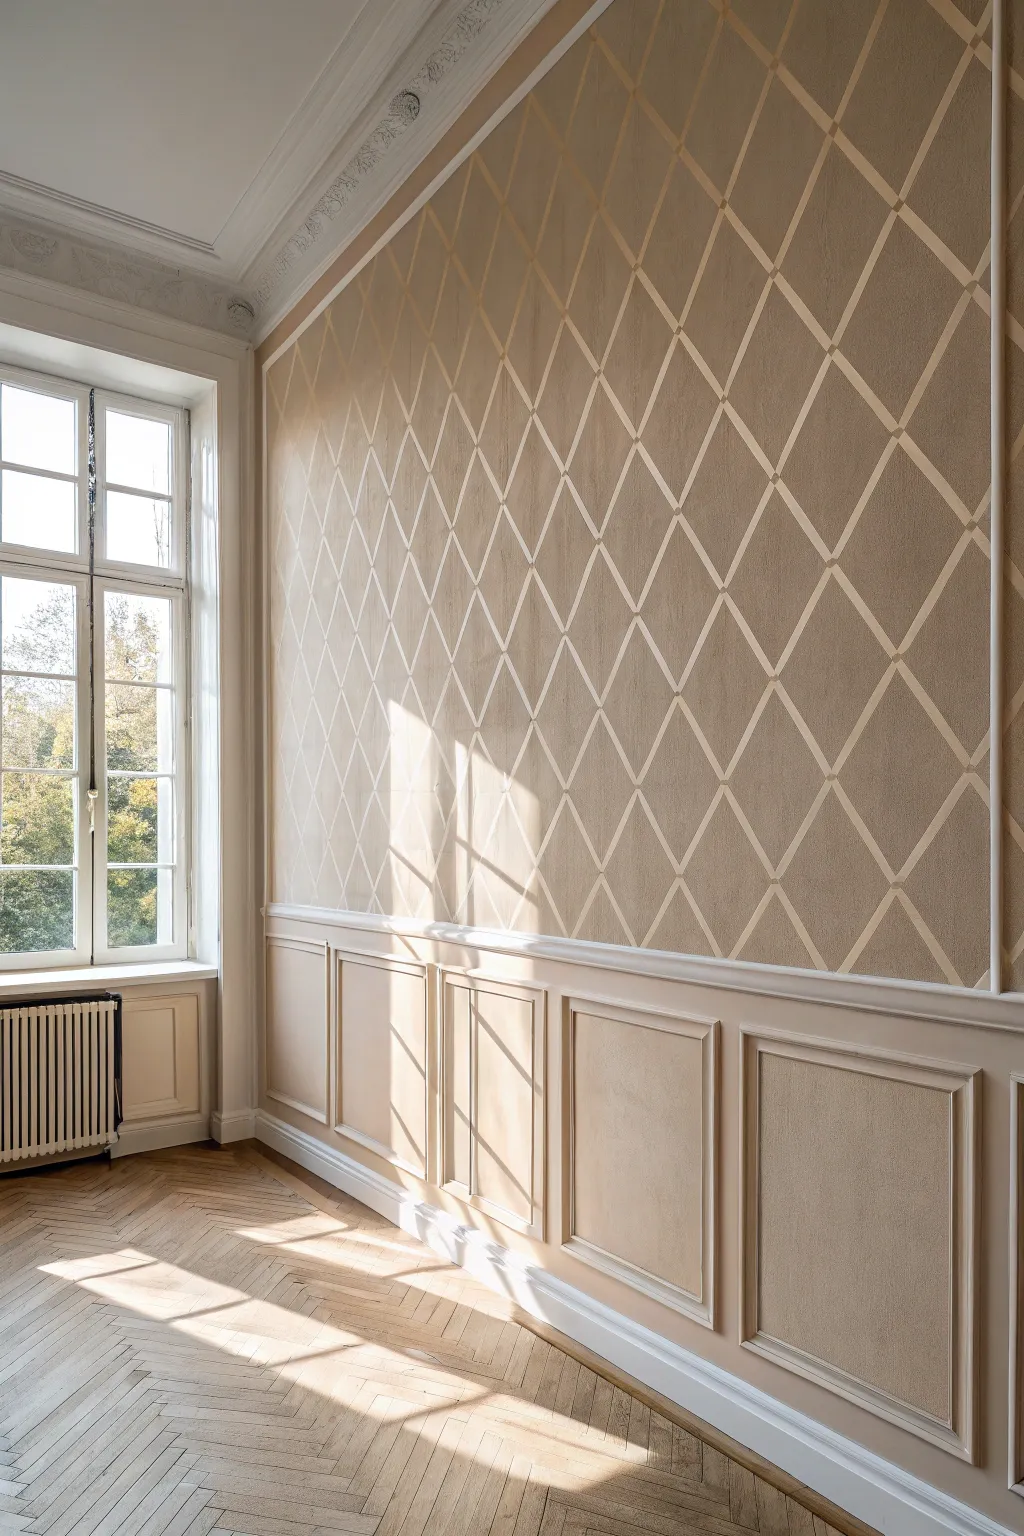
Elevate your space with this sophisticated tone-on-tone diamond pattern that mimics the look of expensive wallpaper or trellis work. By utilizing simple painter’s tape techniques and a muted beige palette, you can add depth and classical structure to any room.
Step-by-Step Tutorial
Materials
- Semi-gloss base paint (light beige/cream)
- Matte or eggshell accent paint (taupe/warm beige)
- Painter’s tape (1-inch width, delicate surface grade)
- Tape measure
- 4-foot box level or laser level
- Chalk line (optional)
- Pencil
- Paint roller with smooth nap covers
- Angled sash brush (2-inch)
- Plastic drop cloths
- Utility knife or scissors
- Putty knife or credit card
Step 1: Preparation and Base Coat
-
Clean surface:
Begin by thoroughly cleaning the wall surface to remove dust and oils. If you are painting over wainscoting like in the reference, protect the top rail with painter’s tape. -
Apply base color:
Roll on the lighter base color (the creamy beige) over the entire wall. This color will eventually become the ‘lines’ of your grid. -
Second coat:
Apply a second coat of the base color to ensure perfection, as you won’t be able to touch this up later. Let this dry for at least 24-48 hours so the tape doesn’t pull it up.
Bleeding Lines?
If paint bleeds under the tape, don’t panic. Wait for it to fully cure, then re-tape along the clean line and touch up the error with the original base color using a small artist brush.
Step 2: Measuring the Grid
-
Calculate diamond size:
Measure the total width and height of your wall. To get the elongated diamond shape shown, your height-to-width ratio for each diamond should be roughly 2:1 (e.g., 24 inches tall by 12 inches wide). -
Mark vertical centers:
Using a tape measure, mark intervals along the wainscoting (or floor) and the ceiling that correspond to your diamond width. -
Establish center lines:
Use a long level or a laser level to lightly draw vertical plumb lines connecting your top and bottom marks. These are guides, so keep the pencil markings faint. -
Mark horizontal intersections:
On your vertical lines, mark the points where the diamond tips will meet. Measure carefully to ensure the height is consistent across every vertical line.
Step 3: Taping the Pattern
-
Connect the diagonals:
Start taping by connecting your grid points diagonally. Run the tape from one intersection mark to the next, creating a series of parallel diagonal lines. -
Complete the cross-hatch:
Repeat the taping process in the opposite direction to close the diamond shapes. The tape represents the lighter grid lines, so place it exactly over your pencil marks. -
Trim edges:
Use a utility knife to cleanly trim the tape ends where they meet the ceiling, corners, or wainscoting rail for sharp start and stop points. -
Seal the tape:
This is crucial: Run a putty knife or credit card firmly over all tape edges to prevent bleed-under. I like to then brush a tiny amount of the *base* color over the tape edges to create a perfect seal.
Pro Tip: Texture
For the slightly aged, plaster-like look seen in the photo, apply the darker paint with a sea sponge or rag rolling technique rather than a solid flat roller application.
Step 4: Applying Accent Color
-
Cut in corners:
Using the darker taupe accent paint and an angled sash brush, carefully paint the edges of the wall and around the wainscoting where the roller might not reach. -
Roll the diamonds:
Using a small roller, apply the darker accent color inside the taped diamonds. Use a dry-rolling technique (less paint) to avoid pushing liquid under the tape. -
Apply second coat:
Once the first pass is dry to the touch, apply a second coat of the taupe accent color for rich, opaque coverage. -
Remove tape:
Remove the tape while the second coat is still slightly tacky, not fully dry. Pull the tape slowly at a 45-degree angle away from the painted edge. -
Clean up:
Gently erase any visible pencil marks remaining in the light grid lines and touch up any small bleeds with a tiny artist’s brush.
Step back and admire how this structured pattern adds instant architectural weight and history to your room


All-Over Stenciled Repeat
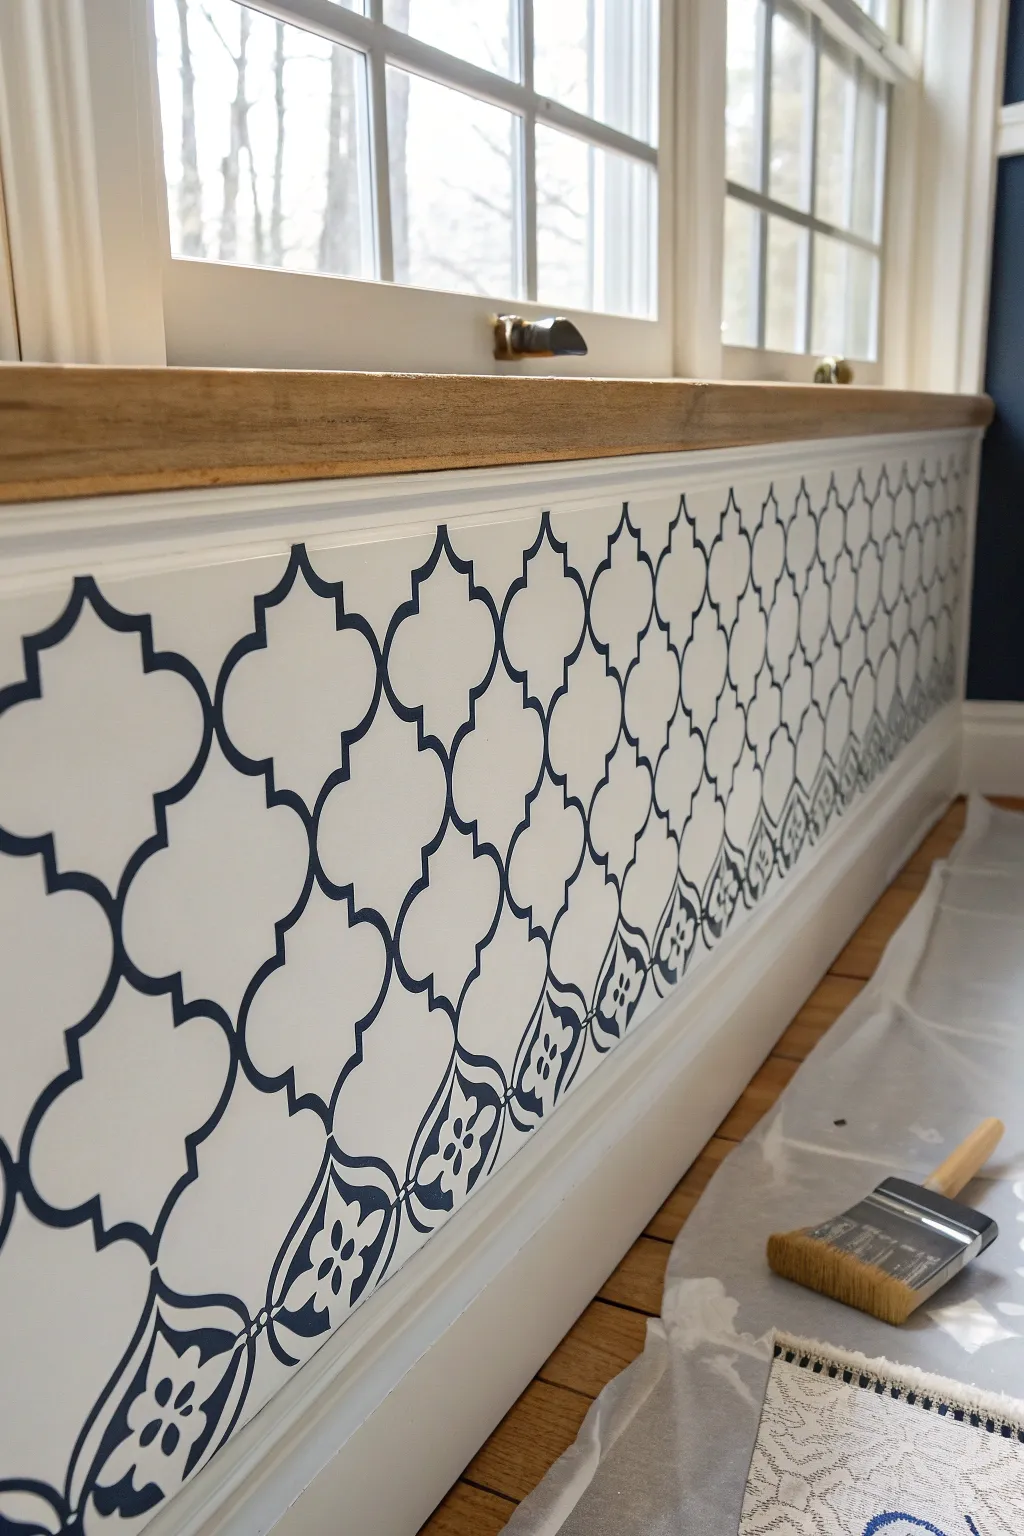
Transform a plain white window seat or knee wall into a custom architectural feature with this elegant high-contrast stencil project. By combining a classic geometric trellis pattern with a detailed border, you can achieve the look of expensive hand-painted tile work for a fraction of the cost.
How-To Guide
Materials
- High-quality painter’s tape (1-inch width)
- Drop cloth or plastic sheeting
- Semi-gloss interior latex paint (White for base, Navy Blue for pattern)
- Large Moroccan Ogee/Trellis wall stencil
- Detailed floral/tile border stencil
- Stencil adhesive spray
- Dense foam roller or stiff stencil brushes
- Paper towels
- Small artist’s brush for touch-ups
- Level
- Measuring tape
Step 1: Preparation & Base Coat
-
Protect the area:
Begin by laying down a plastic drop cloth to protect your flooring. Secure the edges with painter’s tape right up to the baseboard to ensure no paint seeps underneath. -
Clean surface:
Wipe down the wall surface with a damp cloth and mild detergent to remove any dust or grease. A clean surface is crucial for crisp stencil lines. -
Apply base coat:
If your surface isn’t already the desired background color, apply two coats of high-quality semi-gloss white paint. Allow the final coat to cure for at least 24 hours before stenciling.
Sticky Situation
Clean the back of your stencil every 3-4 repetitions. Paint buildup can compromise the adhesive spray, leading to blurry edges.
Step 2: Planning the Layout
-
Determine center point:
Measure the total width of your wall area to find the exact center. Mark this lightly with a pencil. -
Position the main stencil:
Align the center of your geometric trellis stencil with your pencil mark. Use a small level to ensure the pattern is perfectly straight horizontally. -
Secure the stencil:
Apply a light mist of stencil adhesive to the back of the stencil, let it get tacky for a moment, and press it firmly onto the wall. Add painter’s tape to the corners for extra security.
Bleeding Lines?
If paint bleeds under the stencil, your brush is too wet. Offload more paint onto paper towels until barely any color transfers to your hand.
Step 3: Stenciling the Geometric Pattern
-
Load the tool:
Dip your stencil brush or foam roller into the navy blue paint. Offload almost all the paint onto a folded paper towel until the brush feels nearly dry. I find this ‘dry brush’ step is the single most important part of avoiding bleed. -
Apply the paint:
Using a light swirling motion (for brushes) or gentle rolling (for rollers), fill in the open areas of the stencil. Build up color in thin layers rather than one heavy coat. -
Check progress:
Carefully lift one corner of the stencil to check your coverage. If the blue is too faint, lay it back down and add another light layer. -
Remove and reposition:
Peel the stencil off carefully and move it to the next section. Use the registration marks (guides built into the stencil design) to align the pattern perfectly with the previous section. -
Repeat across the wall:
Continue this process across the entire wall surface. Don’t worry about the bottom edge yet, as we will address that with the border. -
Handle corners and edges:
When you reach the edges or corners, tape off the adjacent wall or trim. Bend the flexible stencil into the corner and use a brush to push paint into the crease.
Step 4: Adding the Border Detail
-
Measure the bottom gap:
Assess the space remaining between your geometric pattern and the baseboard molding. This is where your decorative border will sit. -
Align the border stencil:
Position your floral border stencil so that it visually connects with the bottom of the trellis pattern. Secure it with adhesive and tape. -
Stencil the border:
Using the same ‘dry brush’ technique and navy paint, fill in the border pattern. Pay extra attention to the bottom edge where it meets the molding. -
Connect the designs:
If there is a slight gap between the main pattern and the border, use a small artist’s brush to manually extend the navy lines so they flow seamlessly into the border detail.
Step 5: Finishing Touches
-
Inspect for imperfections:
Once all paint is dry, remove all tape. Inspect the lines closely for any ‘bleeds’ where paint seeped under the plastic. -
Touch up with base color:
Dip a small artist brush into your white base paint. Carefully paint over any navy smudges or ragged edges to sharpen the design. -
Clean up:
Wash your stencils immediately with warm soapy water so they are ready for future projects.
Enjoy the sophisticated new look of your custom-stenciled wall feature
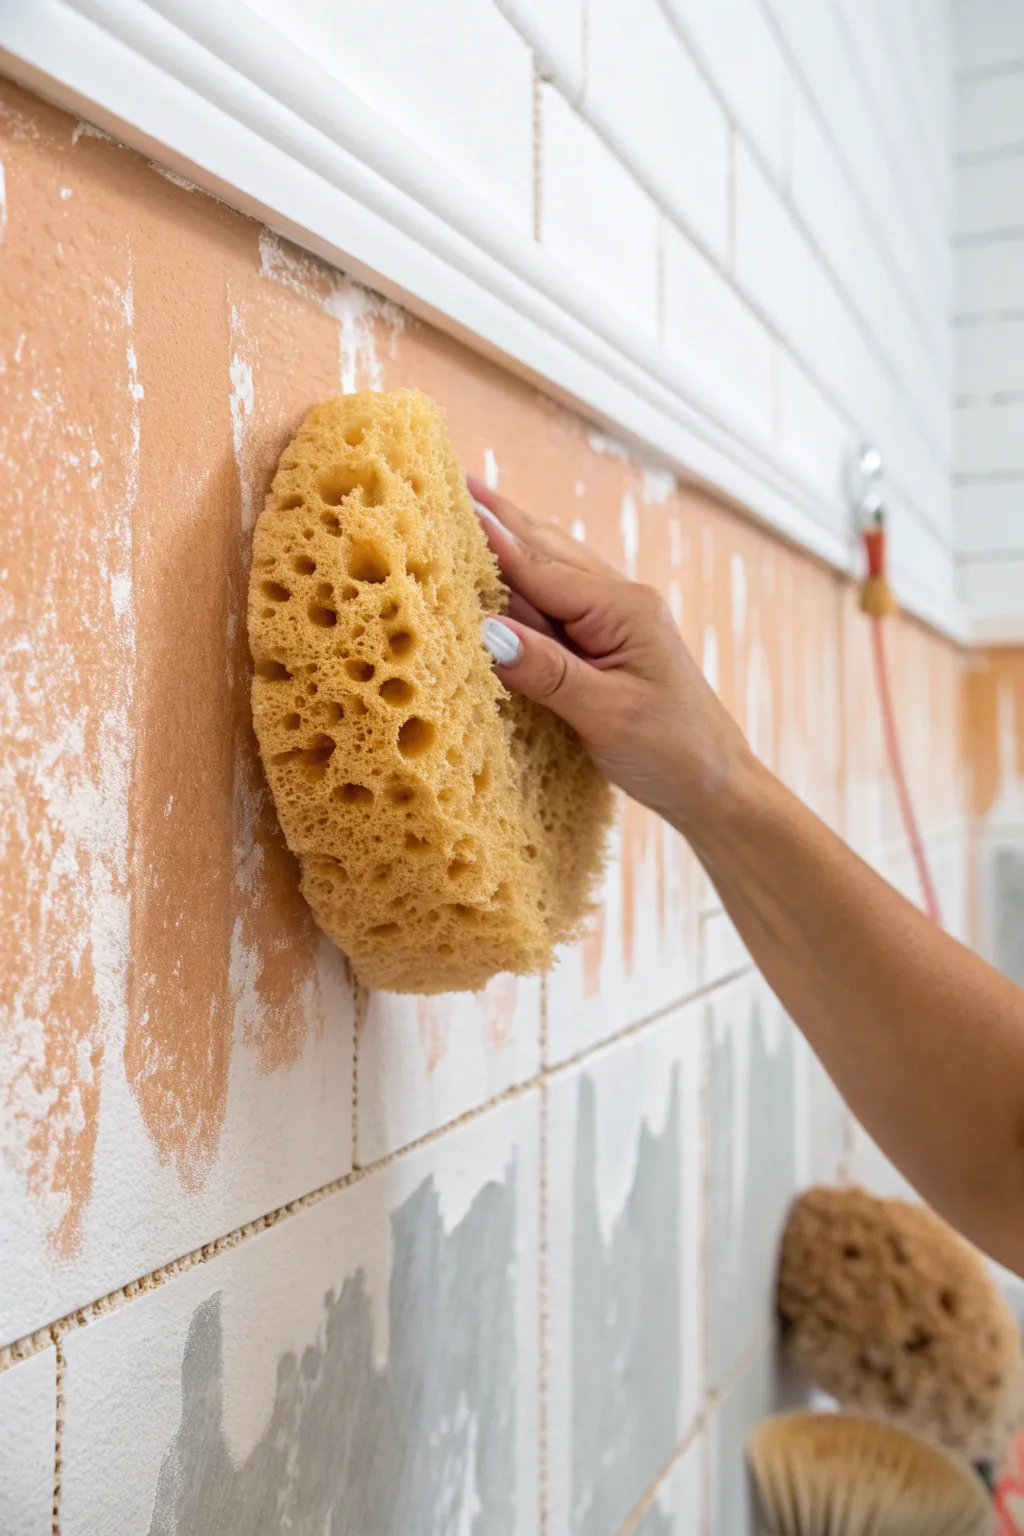
Hand-Stamped Motif Wall
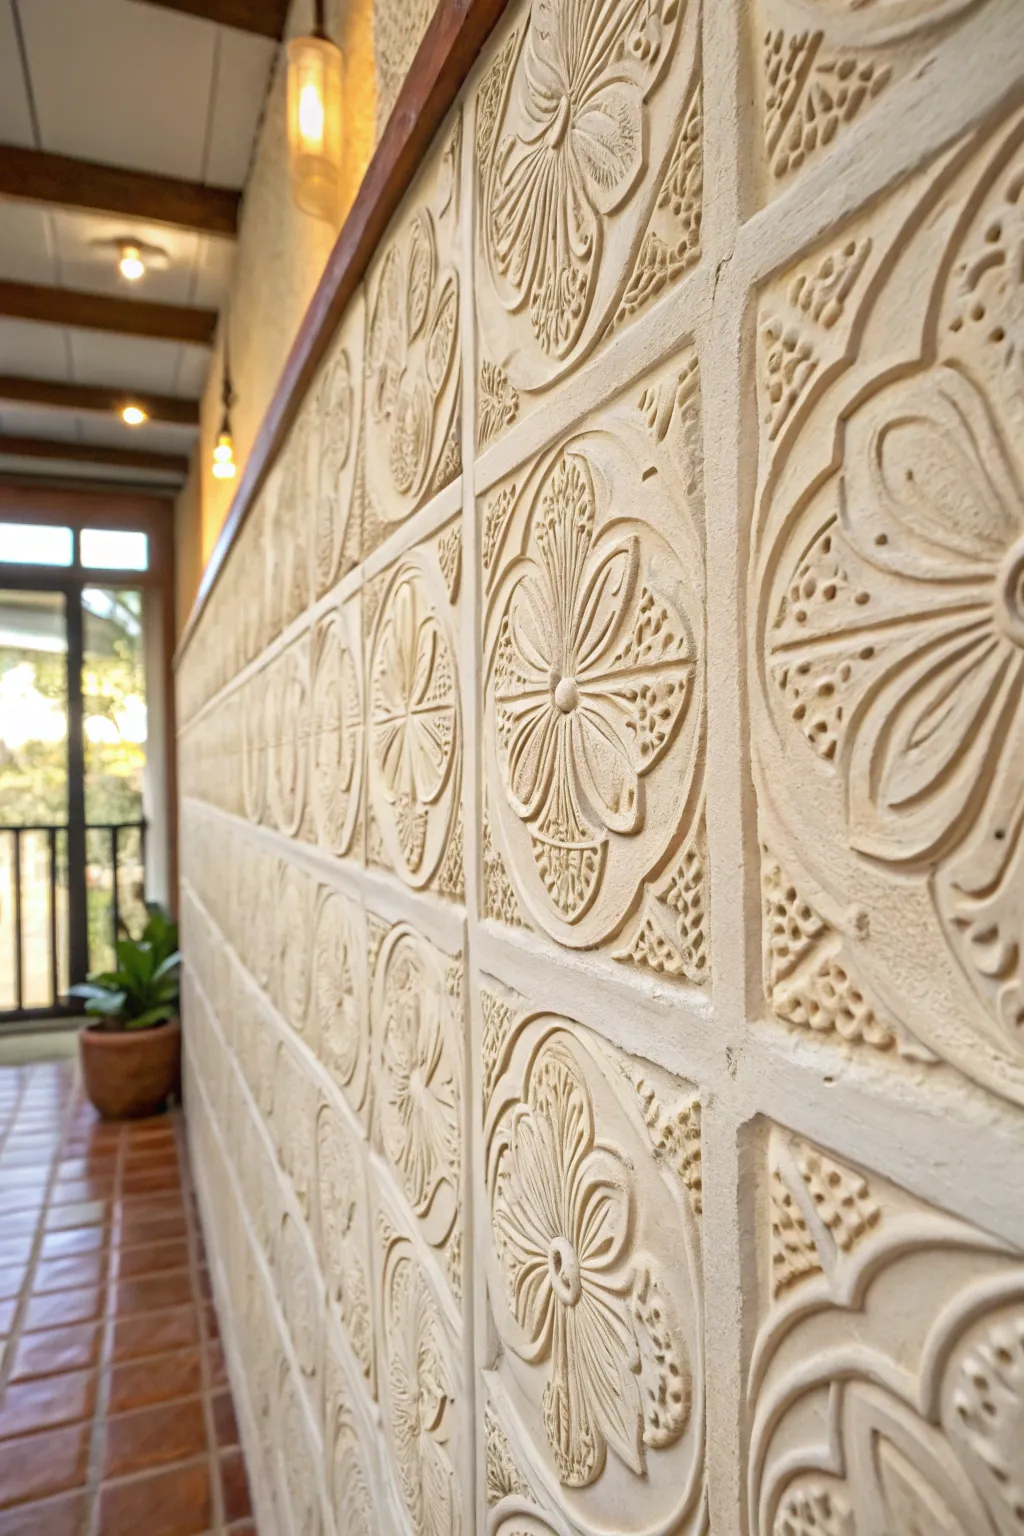
Transform a plain wall into a dimensional masterpiece reminiscent of carved stone or ceramic tiles with this textured relief technique. Using joint compound and a large custom stamp, you can create a sophisticated, tactile surface that adds incredible depth and Old World charm to any hallway or accent wall.
Detailed Instructions
Materials
- Pre-mixed joint compound (lightweight)
- Large rubber or foam stamp (approx. 8-10 inches square, floral/geometric design)
- Wide putty knife or drywall trowel
- Painter’s tape
- Level and chalk line
- Sealant or clear matte topcoat
- Clean sponge and water bucket
- Fine-grit sandpaper
- Drop cloths
- Warm white or cream latex paint (optional, for base coat)
Step 1: Preparation and Mapping
-
Prep the workspace:
Clear the area and lay down drop cloths to protect your flooring, as working with joint compound can get messy. Tape off your baseboards, ceiling line, and any adjacent walls with painter’s tape to ensure crisp edges. -
Clean the wall surface:
Wipe down the wall with a damp cloth to remove dust and grease, which ensures the compound adheres properly. If the wall has a glossy finish, give it a light scuff-sanding first. -
Plan your grid:
Measure your stamp carefully. Using a level and a chalk line, snap a grid onto the wall that corresponds to the size of your stamp. This grid is crucial for keeping your pattern straight, especially over a large surface area.
Step 2: Applying the Texture
-
Apply the first patch of compound:
Scoop a generous amount of joint compound onto your trowel. Starting at the top corner of your grid, spread a layer of compound roughly 1/8 to 1/4 inch thick. Only cover an area slightly larger than one or two stamp squares at a time so it doesn’t dry out before you stamp it. -
Smooth the application:
Use the trowel to smooth the surface of the applied compound. It doesn’t need to be glass-smooth, but try to keep the thickness relatively consistent so the impression depth remains uniform. -
Test the consistency:
I like to wait just a minute or two for the compound to tack up slightly; if it’s too wet, it will stick to the stamp and pull away from the wall. Touch it lightly—it should feel moist but stable.
Stamp Sticking?
If the compound pulls off the wall, it is too wet or your layer is too thick. Let the applied patch sit for 5 minutes to firm up, or mist your stamp with more water as a release agent.
Step 3: Stamping the Motif
-
Prepare the stamp:
Lightly mist your rubber or foam stamp with water or apply a very thin layer of release agent (like vegetable oil spray) to prevent sticking. -
Press the design:
Align the stamp edges with your chalk grid lines. Press the stamp firmly and evenly into the wet compound. Apply pressure to the center and all four corners to ensure the full detail transfers. -
Remove the stamp:
Peel the stamp away straight back—do not slide it. If the suction is strong, wiggle it very gently side-to-side to break the seal before pulling it away. -
Clean the tool:
Immediately wipe any excess compound off the stamp with a wet sponge. A clean stamp is the secret to crisp details. -
Repeat the process:
Move to the next grid square, apply fresh compound, smooth it out, and stamp again. Work in small sections across the wall, checking your alignment frequently.
Seamless Borders
Use a small palette knife or your finger to manually smooth the joint lines between grid squares while the compound is wet. This blends the squares into a single cohesive surface.
Step 4: Refining and Finishing
-
Knock down high spots:
Once the wall is about 50% dry (leathery to the touch), look for any sharp peaks or jagged edges created by the suction of the stamp. Gently press them down with a clean, damp sponge or a soft brush to soften the look. -
Let it cure:
Allow the wall to dry completely. This usually takes 24 hours, but in humid conditions, give it up to 48 hours. The compound must be bone dry before the next step. -
Light sanding:
Using fine-grit sandpaper, very gently whisk over the surface to remove any remaining sharp burrs. Be careful not to sand down the pattern itself. -
Dust off:
Vacuum the wall with a brush attachment or use a tack cloth to remove all fine sanding dust. -
Seal the surface:
Apply a clear matte sealer or a water-based polyurethane. Plaster is porous and absorbs dirt easily; sealing it protects the finish and gives it a slight, subtle sheen similar to ceramic. -
Optional glazing:
If you want to enhance the antique look, you can brush on a translucent beige glaze and wipe it off immediately with a rag, leaving the darker color remaining only in the deep crevices of the pattern.
Step back and admire the tactile elegance of your new feature wall, which now carries the weight and history of artisan relief work
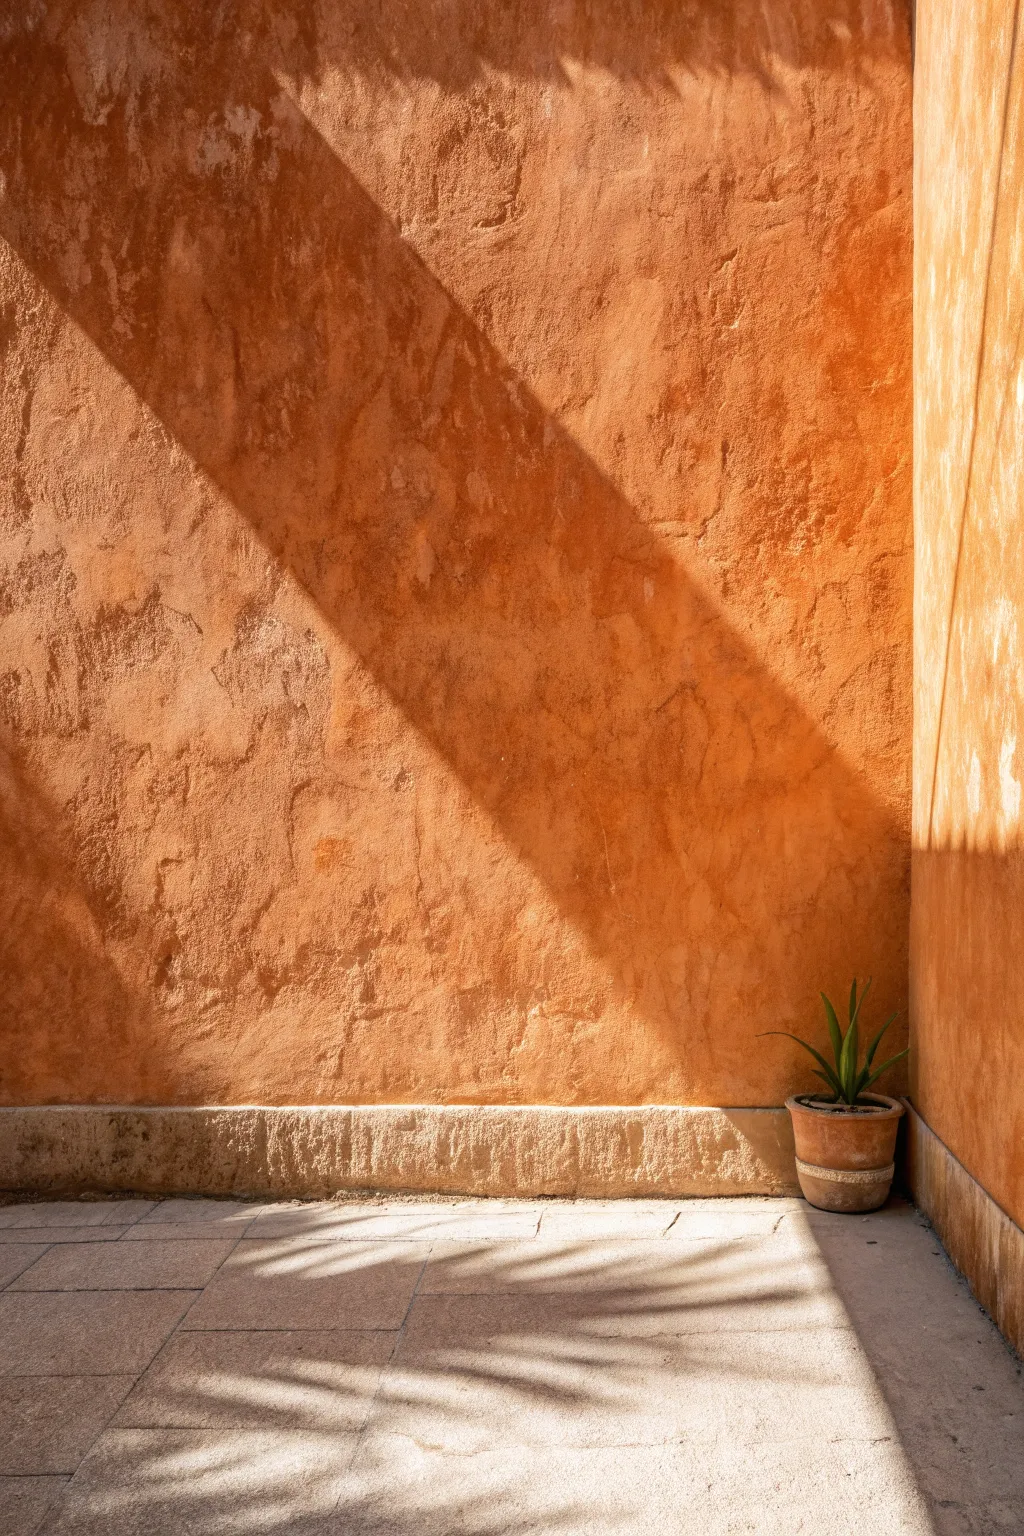
Sponged Mottled Texture Finish
Achieve a warm, rustic Mediterranean look with this classic sponging technique that adds depth and dimension to plain walls. By layering a terracotta glaze over a neutral base, you create a soft, mottled texture that mimics aged plaster or sun-baked stone.
Step-by-Step
Materials
- Satin or eggshell base paint (creamy white or light gray)
- Semi-gloss or satin top coat paint (terracotta or burnt orange)
- Clear acrylic glaze medium
- Large natural sea sponge
- Deep painter’s tray
- Paint rollers and brushes
- Painter’s tape
- Clean rags or lint-free cloths
- Bucket of water
- Paper plate or cardboard (for blotting)
Step 1: Preparation and Base Coat
-
Prepare the Surface:
Begin by cleaning your wall surface thoroughly to remove any dust or grease, as texture finishes highlight imperfections. Patch any holes and sand them smooth once dry. -
Protect the Area:
Apply painter’s tape to baseboards, ceiling edges, and any trim you want to protect. Lay down drop cloths to catch accidental drips during the sponging process. -
Apply the Base Colo:
Roll on your base coat of creamy white or light gray paint. Use a satin or eggshell finish, which provides a good, non-porous surface for the glaze to sit on top of. -
Dry Completely:
Allow the base coat to dry fully, ideally overnight. A completely cured base is crucial so the wet glaze doesn’t lift previous layers.
Sponge selection tip
Always use a natural sea sponge, not a synthetic kitchen sponge. The irregular pores of a real sea sponge create the organic, random pattern needed for this look.
Step 2: Mixing and Prep
-
Create the Glaze Mixture:
In a mixing bucket, combine one part terracotta paint with four parts clear acrylic glaze. Stir thoroughly until the color is consistent. -
Add Water (Optional):
If the mixture feels too thick, stir in a very small amount of water to improve flow, but be careful not to make it runny. -
Prepare the Sponge:
Soak your natural sea sponge in clean water until it is fully expanded and soft. Wring it out extremely well; it should be damp, not dripping wet. -
Load the Sponge:
Dip the face of the sponge lightly into the glaze mixture. You only want the surface texture to pick up paint, not the entire core of the sponge. -
Blot Excess Glaze:
Press the sponge onto a paper plate or a piece of cardboard to remove excess glaze. I find this step critical to prevent big globs of paint from hitting the wall.
Layer for depth
For a richer look, let the first sponge layer dry, then repeat the process with a slightly darker shade or different color to build incredible dimension.
Step 3: Sponging Technique
-
Start int he Corner:
Pick an upper corner of the wall to begin. Press the sponge gently against the wall using a light tapping motion. -
Rotate Your Wrist:
As you move across the wall, constantly rotate your wrist and the sponge itself. This ensures the pattern looks random and avoids a repetitive ‘stamp’ effect. -
Work in Sections:
Work in roughly 3-foot square sections at a time. This keeps a wet edge and allows you to blend areas seamlessly before the glaze dries. -
Reload and Repeat:
Reload your sponge when the impressions become faint, always remembering to blot on the cardboard first. -
Vary Pressure:
Experiment with pressure as you go. Lighter touches create an airy look, while slightly firmer presses deposit more pigment for darker accents. -
Check Edges:
Use a smaller piece of sponge (torn from the main one) to get into tight corners and edges near the tape without smudging.
Step 4: Refining the Finish
-
Step Back:
Periodically step back from the wall to view the overall balance. Look for areas that are too heavy with glaze or too sparse. -
Fill in Gaps:
Lightly dab extra glaze into any bald spots to even out the texture. -
Soften if Needed:
If a spot looks too heavy, take a clean, damp sponge (no glaze) and lightly dab over the area to lift some pigment off. -
Remove Tape:
Once you are satisfied with the texture, carefully peel away the painter’s tape while the glaze is still slightly tacky to prevent peeling. -
Final Cure:
Let the wall dry undisturbed for at least 24 hours. The glaze takes longer to cure than standard latex paint.
Enjoy the warm, Tuscan-inspired atmosphere your new textured walls bring to the room
Rag-Rolled Cloudy Movement
Transform a plain wall into a soft, atmospheric masterpiece with this rag-rolling technique that mimics the movement of shifting clouds. By layering warm beige glazes over a creamy base, you’ll create depth and texture that feels both vintage and refreshingly modern.
Detailed Instructions
Materials
- Base coat paint (Satin or Eggshell finish, Cream/Off-White)
- Top coat paint (Warm Beige/Tan)
- Acrylic Glazing Medium
- Paint roller and tray
- Painter’s tape
- Several clean, lint-free cotton rags (old t-shirts work well)
- Bucket of water
- Sea sponge (optional, for softening)
- Drop cloths
- Small angled brush for corners
Step 1: Preparation and Base Coat
-
Clear the Area:
Remove all furniture from the wall area and lay down drop cloths to protect your flooring. Rag rolling can splatter slightly, so cover adjacent walls with painter’s tape. -
Apply Base Coat:
Roll on two coats of your creamy off-white base paint. Allow the first coat to dry completely before applying the second to ensure a solid, even background. I like to wait at least 4 hours between coats. -
Prepare the Glaze:
In a mixing bucket, combine 1 part of your warm beige paint with 4 parts glazing medium. The high ratio of glaze keeps the paint translucent and gives you a much longer working time. -
Test the Transparency:
Brush a small amount of your glaze mixture onto a piece of cardboard or scrap drywall. You want it to be see-through enough to let the base coat shine through but pigmented enough to show texture.
Patchy Problems?
If dry lines appear where sections join, mist the area lightly with water before applying the next overlapping patch of glaze. This reactivates the edge for smoother blending.
Step 2: Creating the Rag Effect
-
Prepare Your Tools:
Soak a clean cotton rag in water and wring it out thoroughly until it is just damp, not dripping. Crumple it into a loose ball in your hand. -
Cut In Segments:
Work in manageable sections, roughly 3 feet by 3 feet. Use a brush to apply the glaze mixture into the corners and edges of your first section. -
Apply Glaze to Wall:
Use a roller or a large brush to apply the glaze liberally over your first 3×3 foot section. It doesn’t need to be perfectly even; random placement is actually better. -
Start Ragging Off:
Immediately take your crumpled damp rag and press it into the wet glaze. Lift it straight off without dragging. This removes some glaze, revealing the base coat and leaving a distinct organic pattern. -
Rotate Your Hand:
As you press and lift, twist your wrist and change the grip on the rag constantly to avoid a repetitive stamp pattern. You want a random, cloudy look. -
Create Swirls (The Movement):
Looking at the reference image, there is a sweeping movement to the texture. While ragging, occasionally drag the rag very slightly in curved, S-shaped motions rather than just lifting straight up to mimic those ghostly swirls. -
Softening the Edges:
Before the glaze dries, lightly bounce a clean, dry rag or a sea sponge over areas that look too harsh or heavy. This blurs the texture for that ‘cloudy’ effect.
Step 3: Blending and Finishing
-
Maintain a Wet Edge:
Move immediately to the adjacent 3×3 section. Apply glaze, slightly overlapping the wet edge of the previous section. Rag roll this new area, blending back into the first section so no grid lines appear. -
Check for Saturation:
As your rag becomes saturated with paint, it will stop removing glaze effectively. Rinse it out in your water bucket or switch to a fresh rag regularly. -
Step Back Often:
Every few sections, step back 5-10 feet to view the wall as a whole. Look for areas that are too heavy with glaze or too bare, and adjust while the glaze is still workable. -
Detailing Corners:
Use a smaller piece of rag to dab into tight corners and along the skirting boards where the large rag ball might not fit. -
Final Cleanup:
Once the entire wall is covered and dry (usually 24 hours), carefully remove the painter’s tape. Pull the tape at a 45-degree angle away from the fresh paint to ensure a crisp line.
Add Metallic Shimmer
Mix a small amount of pearlescent additive or metallic gold paint into your glaze mixture. It catches the sunlight beautifully and adds a regal, old-world dimension.
Enjoy the gentle, timeless atmosphere your new cloud-swept walls bring to the room
Color Wash for Old-World Depth
Transport your space to a warm Mediterranean villa with this classic color-washing technique. By layering translucent glazes over a textured base, you’ll achieve a glowing, multi-dimensional finish that mimics the charm of aged plaster.
How-To Guide
Materials
- Satin acrylic latex paint (base color: warm beige/sand)
- Satin acrylic latex paint (top color: burnt orange/terra cotta)
- Clear acrylic glaze medium
- Large painter’s rags or lint-free cotton cloths
- 4-inch high-quality paintbrush
- Painter’s tape
- Canvas drop cloths
- Bucket for mixing
- Stir sticks
- Measuring cup
Step 1: Preparation and Base Coat
-
Protect the area:
Begin by removing all furniture and wall hangings. Lay down canvas drop cloths to protect your flooring, ensuring they are flush against the baseboards. -
Tape the edges:
Apply painter’s tape carefully along the ceiling line, baseboards, and any adjacent walls you do not intend to paint. Press the edges of the tape down firmly to prevent bleed-through. -
Clean the surface:
Wipe down the wall with a damp cloth to remove dust or cobwebs. A clean surface ensures the glaze adheres properly and doesn’t trap debris. -
Apply the base coat:
Roll on two coats of your warm beige satin base paint. Allow the first coat to dry completely, usually about four hours, before applying the second. -
Full cure time:
Let the final base coat dry for at least 24 hours. This is crucial because the glazing process involves vigorous rubbing, which could lift uncured paint.
Rag Management
Change your ‘softening’ rag frequently. Once a rag becomes saturated with glaze, it stops lifting texture and starts smearing paint back onto the wall.
Step 2: Mixing and Applying the Glaze
-
Mix the glaze solution:
In your mixing bucket, combine one part of the terra cotta paint with four parts clear glaze medium. Add a splash of water (about half a part) to extend the drying time. -
Test the mixture:
Apply a small amount of your glaze mixture to a piece of cardboard or a hidden corner. I like to check the transparency here; if it’s too opaque, add more glaze. -
Wet the rag:
Take a lint-free cotton rag and crumple it into a loose ball. Dunk it into the glaze mixture and wring it out until it is damp but not dripping. -
Start the wash:
Beginning in a top corner, rub the glaze onto the wall using a circular, figure-eight motion. Imagine washing a window—you want soft, sweeping strokes rather than decisive lines. -
Work in sections:
Focus on a 3×3 foot section at a time. Keep the edges of your working area wet and feathered so you don’t create hard overlap lines as you move across the wall. -
Soften the texture:
While the glaze is still wet, take a clean, dry rag and gently dab or lightly swirl over the applied area. This lifts excess pigment and creates that soft, cloudy depth. -
Vary the pressure:
Apply slightly more pressure in some areas and less in others. This inconsistency creates the natural, aged look of old plaster that makes this finish so convincing.
Step 3: Refining the Finish
-
Inspect from a distance:
Periodically step back five to ten feet to view the whole wall. Look for patterns that are too repetitive or areas that seem unusually heavy with color. -
Handle corners carefully:
Use a small brush to dab glaze into the very corners and edges where the rag won’t reach, then immediately blot it with the rag to match the surrounding texture. -
Layering (Optional):
If you want a deeper, richer color, wait for the first layer of glaze to dry fully, then apply a second, lighter pass. This adds incredible visual depth. -
Remove tape:
Carefully peel off the painter’s tape while the final glaze layer is still slightly tacky to ensure a clean, crisp line against the trim. -
Final drying:
Allow the wall to cure undisturbed for 24 to 48 hours before moving furniture back into place or hanging art.
Add Faux Texture
Before painting the base coat, use a joint compound skim coat to create physical ridges and bumps. The dark glaze will catch in these crevices for an ultra-realistic look.
Enjoy the warmth and character your new walls bring to the room, creating a sun-drenched atmosphere regardless of the weather outside
Dry-Brushed Soft Stripe Texture
Elevate plain hallway walls with this sophisticated wainscoting treatment that mimics the look of textured beadboard using only paint and glaze. The soft, striated finish adds depth and architectural interest without the hassle of installing actual wood paneling.
Step-by-Step Tutorial
Materials
- Satin finish base paint (soft cream/beige)
- Glaze medium
- Tinting color (slightly darker taupe/beige)
- Painter’s tape (low tack)
- Molding trim (chair rail and baseboard)
- Panel molding trim
- Construction adhesive / Finish nails
- Caulk and caulk gun
- Wood filler
- Sandpaper (220 grit)
- Stiff-bristle decorative brush or dragging tool
- 2-inch angled sash brush
- Paint roller and tray
- Level
- Measuring tape
Step 1: Wall Prep & Layout
-
Measure and Mark:
Decide on the height of your wainscoting, usually about 32 to 36 inches from the floor. Use a level and a pencil to mark a horizontal line around the room at your chosen height. -
Clean the Surface:
Wash the lower portion of the wall to remove grease or dust. Ensure any existing holes or deep scratches are filled and sanded smooth, as the texture technique works best on a flat surface. -
Apply Base Coat:
Paint the entire lower wall section (below your line) with your satin base color. Use a roller for even coverage. Apply two coats if necessary for full opacity. -
Allow to Cure:
Let the base paint dry completely, ideally overnight. If the base coat isn’t fully cured, the glazing step might pull up the paint and ruin the finish.
Step 2: Creating the Linear Texture
-
Mix the Glaze:
In a bucket, mix 4 parts glaze medium to 1 part latex paint (your darker tint color). I like to test the transparency on a scrap board first; you want it translucent, not opaque. -
Work in Sections:
Because glaze dries relatively quickly, mark out a manageable 3-foot wide section with painter’s tape or just work mentally in small blocks. -
Apply Glaze:
Brush the glaze mixture onto the first section of the wall using a standard paintbrush. Don’t worry about being neat; just get the product on the wall evenly. -
Drag the Tool:
Immediately take your stiff-bristle brush or dragging tool. Starting at the very top line where the chair rail will go, drag the tool straight down to the floor in one continuous, confident motion. -
Repeat and Overlap:
Make your next pass right next to the first, slightly overlapping the edge to blend the lines. Wipe the excess glaze off your tool onto a rag after every singe pass to keep the grooves clean. -
Check Verticality:
Every few feet, check your lines with a level to ensure your ‘boards’ aren’t starting to slant. Correct gently on the next pass if drifting occurs. -
Complete the Room:
Continue this process around the room. If a section dries before you drag it, re-wet it slightly with a mist of water or apply fresh glaze.
Fixing Wobbly Lines
If your vertical drag lines get wavy, immediately brush horizontally to erase the texture while wet, re-apply a bit of glaze, and drag again. Do not wait for it to tack up.
Step 3: Installing the Trimwork
-
Dry Time:
Wait 24-48 hours for the glaze texture to cure hard. It must be durable enough to withstand the installation of heavy trim. -
Install Chair Rail:
Cut your chair rail molding to fit the perimeter. Install it directly over the top line of your textured area using construction adhesive and finish nails. -
Plan the Panels:
Measure the space between your baseboard and chair rail. Calculate even spacing for your boxes, leaving equal distance between each box (stiles) and the top/bottom rails. -
Cut Panel Molding:
Cut the smaller panel molding into strips with 45-degree mitered corners to create rectangular frames. -
Mount the Frames:
Attach the rectangular frames to the wall over the dried texture. Use a spacer block to ensure every frame is the exact same distance from the chair rail. -
Caulk and Fill:
Fill all nail holes with wood filler. Run a thin bead of caulk along all edges of the molding where it meets the wall to create a seamless, built-in look. -
Paint the Trim:
Once the caulk is dry, paint the chair rail, baseboard, and panel molding frames. Carefully cut in using the base color or a crisp white for contrast against the textured center.
Level Up: Linen Look
For a fabric-like weave instead of beadboard, drag the brush horizontally across the vertical lines once they are semi-dry. This creates a cross-hatched linen effect.
Step back and admire how simple paint techniques have transformed your wall into a textured architectural feature
Faux Plaster With Burnished Glow
Transform a blank canvas into a stunning, minimalist statement piece that mimics the warmth and depth of aged European walls. This project uses layers of joint compound and shimmering glazes to create a faux plaster effect that catches the light beautifully.
Detailed Instructions
Materials
- Large heavy-duty gallery wrapped canvas (36×48 inches or larger)
- Lightweight joint compound (pre-mixed)
- Wide drywall knife (6-inch or larger)
- Small palette knife or putty knife
- Gesso (white)
- Acrylic paint: Warm Beige, Titanium White, Raw Sienna
- Metallic glaze or iridescent medium (gold or pearl)
- Matte gel medium
- Large flat paintbrushes (synthetic)
- Fine-grit sandpaper (220 grit)
- Clean rags or lint-free cloth
- Drop cloth
- Floater frame (optional but recommended)
Step 1: Preparing the Base
-
Protect your workspace:
Lay down a drop cloth underneath your canvas. Since you will be working with heavy plaster, it’s best to work with the canvas laying flat on a table or floor rather than on an easel to prevent sagging while wet. -
Prime the surface:
Apply a generous coat of white gesso over the entire canvas using a large flat brush. This ensures the heavy joint compound adheres properly and doesn’t soak into the fabric. -
Mix the texture base:
Scoop a large amount of lightweight joint compound into a bucket or mixing tray. Stir it briefly to ensure a consistent, creamy texture. -
Add structural integrity:
Mix a dollop of matte gel medium into the joint compound (roughly a 1:10 ratio). This acts as a flexible binder to help prevent the plaster from cracking as the canvas flexes over time.
Cracked Plaster?
If hairline cracks appear while drying, don’t panic! This adds character. If they are too large, fill them with a mix of paint and modeling paste, then smooth over with a finger.
Step 2: Sculpting the Texture
-
Apply the first layer:
Using the wide drywall knife, spread a base layer of the compound mixture across the canvas. Aim for about 1/8 inch thickness, covering the weave completely. -
Create organic ridges:
While the compound is wet, use the edge of your knife to scrape and push the material in random, sweeping directions. Don’t smooth it out; you want peaks and valleys. -
Detail with the small knife:
Switch to your smaller palette knife to create tighter texture clusters. Press flat and lift straight up to create rough peaks, then gently knock them down with a horizontal swipe. -
Dry partially:
Let this thick layer dry for about 24 hours. It should be firm to the touch but doesn’t need to be bone dry before the next step. -
Add a second pass:
Here, I like to apply a thinner, second layer of compound sporadically. Focus on areas that look too flat, creating depth by layering wet plaster over the dry texture. -
Full cure time:
Allow the entire piece to dry completely. This can take up to 48 hours depending on humidity. The plaster will turn a chalky white when fully cured.
Step 3: The Burnished Finish
-
Sand the peaks:
Gently gently run 220-grit sandpaper over the highest ridges of the dried plaster. You aren’t trying to remove texture, just soften the sharpest points to create a worn, aged look. -
Remove dust:
Wipe the surface thoroughly with a dry cloth or use a vacuum attachment to remove all plaster dust. Dust will prevent the paint from adhering. -
Mix the base color:
Combine warm beige acrylic paint with a touch of Titanium White and a tiny drop of Raw Sienna. You want a color that resembles limestone or unbleached linen. -
Apply the wash:
Dilute your paint mix with water (about 50/50 mix) to create a wash. Brush this over the texture, letting the liquid pool into the crevices for natural shadowing. -
Dry brush highlights:
Once the wash is dry, dip a dry brush into pure Titanium White. Offload most of the paint on a paper towel, then lightly drag the brush over the raised textures to highlight them. -
Create the burnish:
Mix a small amount of metallic pearl or gold glaze with water. Using a rag, rub this mixture into specific areas of the canvas in a circular motion, buffing it as you go. -
Final wipe:
Take a clean, slightly damp rag and wipe back the glaze in the center of the canvas. This leaves the ‘glow’ trapped in the texture while keeping the overall look matte and earthy. -
Frame it up:
Finish the look by installing a simple wooden thin frame or floater frame to contain the texture and give it a polished gallery appearance.
Pro Tip: Depth Control
Add a tiny drop of grey paint to your initial plaster mix. When you sand the top layer later, the grey underneath reveals itself, mimicking real aged stone layers.
Hang your masterpiece where the natural light hits it from the side to reveal all those beautiful ridges and shadows.
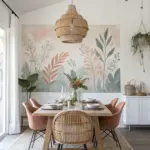
Simple Botanical Vine Border
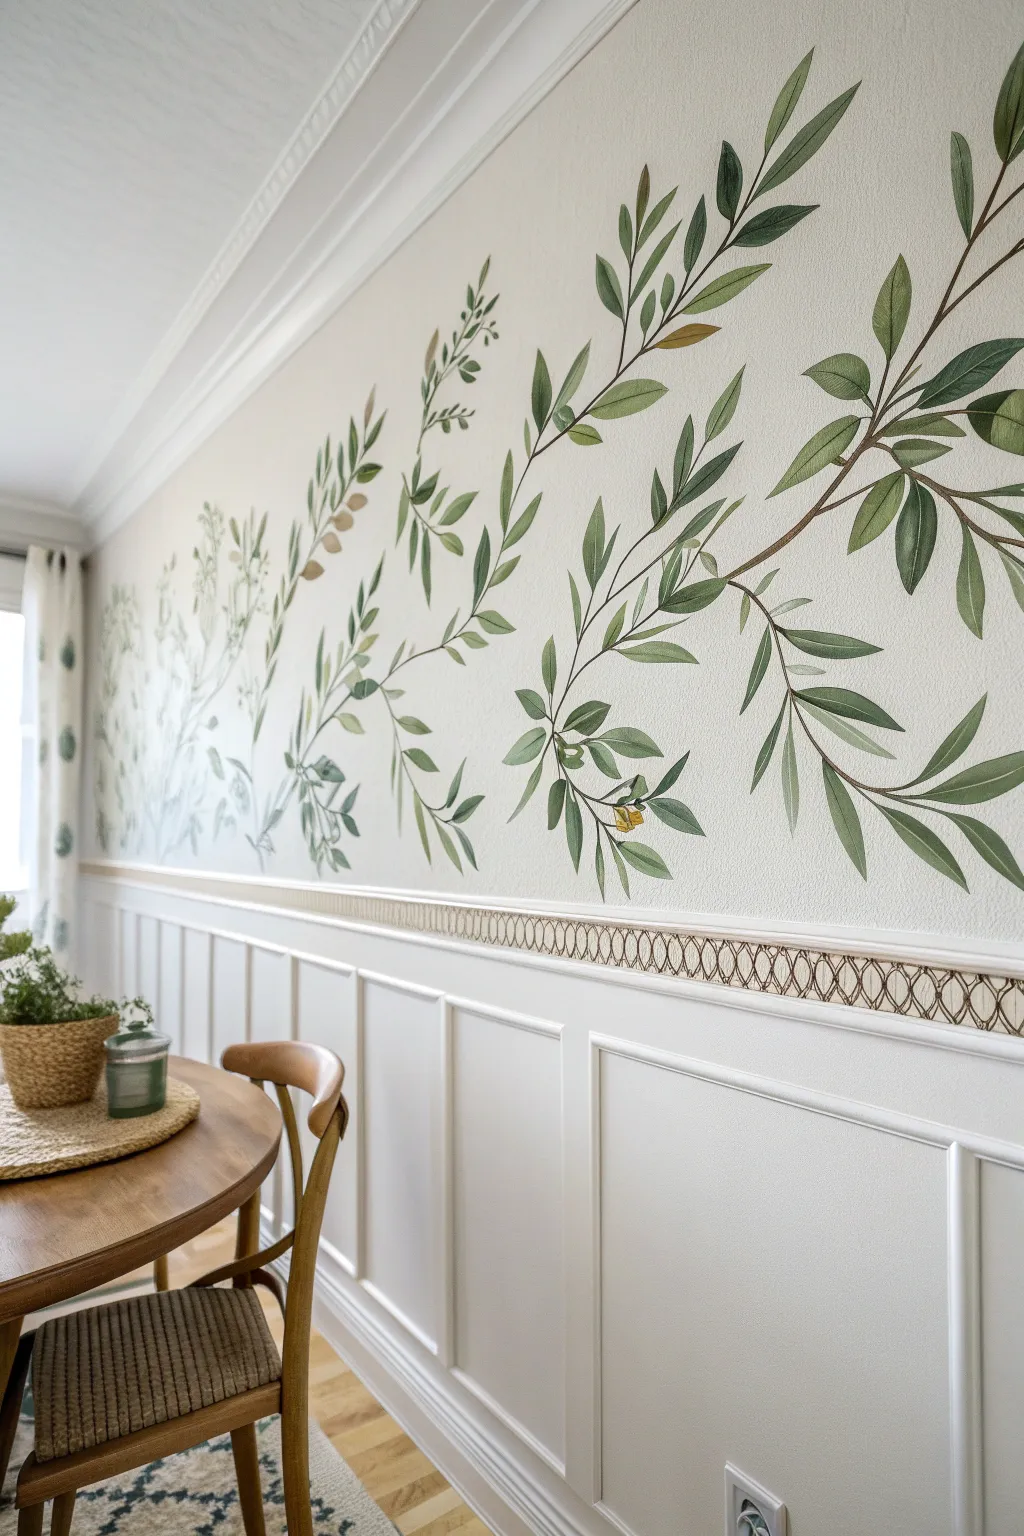
Bring the serene beauty of a Tuscan grove into your dining space with this elegant, freehand botanical mural. Featuring graceful, sweeping olive branches painted in soothing greens, this project adds an organic, sophisticated touch above classic wainscoting.
Step-by-Step
Materials
- Interior latex paint (Eggshell finish, off-white/cream base)
- Acrylic paints or interior flat paints (Olive Green, Sage Green, Hunter Green, Warm Brown, Ochre)
- Assorted artist brushes (Round #4, #8, Liner brush, Flat 1-inch)
- Painter’s tape
- Pencil and large eraser
- Bubble level
- Mixing palette or paper plates
- Clean rag and water cup
- Stepladder
Step 1: Planning and Preparation
-
Prepare the Surface:
Ensure your wall is clean and dry. If you are painting over existing wainscoting like in the image, mask off the top edge of the chair rail with painter’s tape to protect the trim from stray brushstrokes. -
Base Coat Application:
Apply your chosen off-white or cream base color to the wall area above the wainscoting. A textured roller can help mimic the slightly stuccoed look seen in the reference, providing a nice grip for the detail painting. Allow this to dry completely for at least 4-6 hours. -
Sketch the Flow:
Using a light pencil, lightly sketch the main ‘spines’ of your branches. Start from the right side and sweep towards the left to mimic natural growth. Keep the lines fluid and gently curving; avoid stiff, straight lines. -
Mark Leaf Clusters:
Along your main branch lines, make small tick marks or faint ovals where the largest leaf clusters will go. This helps you balance the negative space before you commit to paint.
Natural Variation
Don’t clean your brush thoroughly between green shades. Letting the colors streak and blend naturally on the brush creates realistic leaf texture.
Step 2: Painting the Branches
-
Mix Branch Colors:
On your palette, mix a small amount of Warm Brown with a touch of Hunter Green to create a woody, organic stem color. It shouldn’t be solid brown; a greenish tint looks more natural. -
Paint Major Stems:
Load a #8 round brush with your stem mix. Follow your pencil guides, panting the main branches. Use variable pressure—press down for thicker sections and lift up as the branch tapers toward the end. -
Add Minor Twigs:
Switch to a smaller #4 round brush. Branch off from your main stems with thinner twigs. These should act as the attachment points for your leaves. Keep these strokes quick and light.
Fixing Heavy Stems
If a branch looks too thick, wait for it to dry, then use the wall’s base color to paint over one edge, effectively ‘erasing’ paint to thin the line.
Step 3: Creating the Foliage
-
Prepare Leaf Greens:
Create three distinct pools of green: a dark shadow tone (Hunter Green + touch of black), a mid-tone (Olive Green), and a highlight tone (Sage Green + white). -
Paint Base Leaves:
Using the mid-tone Olive Green and a #8 round brush, paint the basic leaf shapes. Press the belly of the brush against the wall and pull outwards to create a tapered point, mimicking the lance-like shape of olive leaves. -
Vary the Direction:
Ensure leaves aren’t all pointing the same way. Some should droop downwards, while others reach up towards the light. I find that grouping them in clusters of two or three helps maintain a natural rhythm. -
Add Depth with Shadows:
While the base coat is still slightly tacky or just dry, take your dark shadow tone. Paint the underside of select leaves, or the leaves that appear ‘behind’ the main branch, to create depth. -
Highlighting:
With the Sage Green mix, add highlights to the top edges of the leaves that would catch the light. A single quick stroke per leaf is usually enough to give it dimension without looking overworked.
Step 4: Details and Finishing
-
Add Subtle Olives:
If desired, mix a little Ochre into your Olive Green. Paint small ovals here and there among the leaves to represent ripening olives. Add a tiny dot of white near the top of the olive for a shine. -
Refine Connections:
Use a liner brush with your brown stem color to ensure all leaves are visually connected to a twig. Floating leaves ruin the realistic effect. -
Clean Up Edges:
Inspect your work. If any pencil lines are still visible, gently erase them once the paint is fully cured (give it 24 hours). Use a small brush with your wall base color to ‘cut in’ and fix any stray leave tips that look clumsy. -
Seal the Work (Optional):
For high-traffic dining areas, you might want to apply a clear, matte water-based varnish over the painted areas to protect them from scuffs, though standard latex paint is reasonably durable on its own.
Step back and admire how a few simple brushstrokes have transformed your wall into a peaceful garden vista.
Tree Branch Silhouette Feature
Transform a blank bedroom wall into a serene forest escape with this striking black tree silhouette mural. This project uses high-contrast design to create a dramatic focal point that feels organic and grounding without overwhelming the space.
Step-by-Step Tutorial
Materials
- Interior latex paint (black or very dark charcoal)
- Pencil and eraser
- Overhead projector (optional)
- Small angled sash brush (1.5 inch)
- Artist liner brush (size 1 or 2)
- Artist round brush (size 6 or 8)
- Painter’s tape
- Drop cloth
- Step ladder
- Damp rag for mistakes
Step 1: Preparation & Sketching
-
Clear the canvas:
Begin by removing all furniture from the wall you intend to paint. If that isn’t possible, pull the bed and nightstands well into the center of the room to give yourself ample maneuvering space. -
Protect the area:
Lay down a drop cloth flush against the baseboard to catch any drips. Use painter’s tape to mask off the ceiling line, the adjacent wall corner, and the top edge of the skirting board to ensure crisp edges. -
Plan the composition:
Observe the reference image deeply. Notice how the trunk anchors the design in the left corner, while the branches stretch outwards across the ceiling line. Visualize where the main trunk will sit on your wall. -
Optional: Use a projector:
If freehand drawing feels daunting, I like to project a silhouette image of an oak or elm tree onto the wall. Adjust the projector distance until the scale matches your vision, then lightly trace the outline with a pencil. -
Freehand sketching:
To draw freehand, start with the thickest part of the trunk. Sketch loose, flowing lines for the main branches, letting them reach toward the center of the room. Don’t worry about perfect details yet; just get the skeleton in place. -
Refine the twigs:
Step back often to check the balance. Once the main branches are placed, sketch in the smaller, delicate twig structures at the ends of the limbs. Keep your pencil lines light so they are easy to cover later.
Pro Tip: Organic Edges
Avoid making the trunk edges perfectly smooth. Use your brush to create small bumps and irregularities along the silhouette to mimic the natural texture of rough tree bark.
Step 2: Painting the Structure
-
Outline the trunk:
Using your 1.5-inch angled sash brush, carefully cut in the edges of the main trunk and the thickest primary branches. This brush gives you control on long, sweeping curves. -
Fill in the mass:
Once the outline is established, fill in the center of the trunk with solid black paint. Apply two coats if necessary to achieve a deep, opaque finish without streakiness. -
Extend the limbs:
Switch to a medium-sized round artist brush (size 6 or 8) as you move away from the main trunk. Paint the mid-sized branches, tapering the thickness as you extend them outward. -
Create smooth transitions:
Pay special attention to the ‘crook’ where branches split. Thicken the paint slightly at these V-junctions to make the connection look organic and strong rather than stuck-on.
Level Up: Seasonal Swap
Make the mural interactive by painting a few tiny magnetic primer spots on branches. You can then attach magnetic fabric leaves or fabric flowers that you swap out with the changing seasons.
Step 3: Detailing & Finishing
-
Paint the fine twigs:
For the delicate, intricate ends of the branches, switch to your fine liner brush. Load the paint quite fluidly (you can dip the brush tip in a tiny bit of water) so the paint flows smoothly for long, thin lines. -
Use the ‘shake’ technique:
When painting the finest twigs, allow your hand to wobble slightly. Nature rarely produces perfectly straight lines; a little jitter creates a more realistic bark texture. -
Add background depth:
Looking at the bottom right of the inspiration image, you’ll see a faint, foggy forest line. To replicate this, mix a small amount of black into white paint to create a pale grey. -
Paint the distant trees:
Using a dry brush technique with your pale grey, lightly stipple in some vertical shapes near the floorline on the right side. Keep the edges soft and blurry to suggest distance and fog. -
Final inspection:
Step back to the other side of the room. Look for any branches that end abruptly or look too sparse. Add small twigs to fill gaps, ensuring the tree looks balanced and full. -
Clean up:
Once the paint is touch-dry, carefully peel away the painter’s tape at a 45-degree angle. Replace your furniture, letting the bed frame sit just in front of the mural to integrate the art with the room.
Now you have a stunning, permanent piece of nature-inspired art that anchors your room with calm elegance
Oversized Florals in Loose Lines
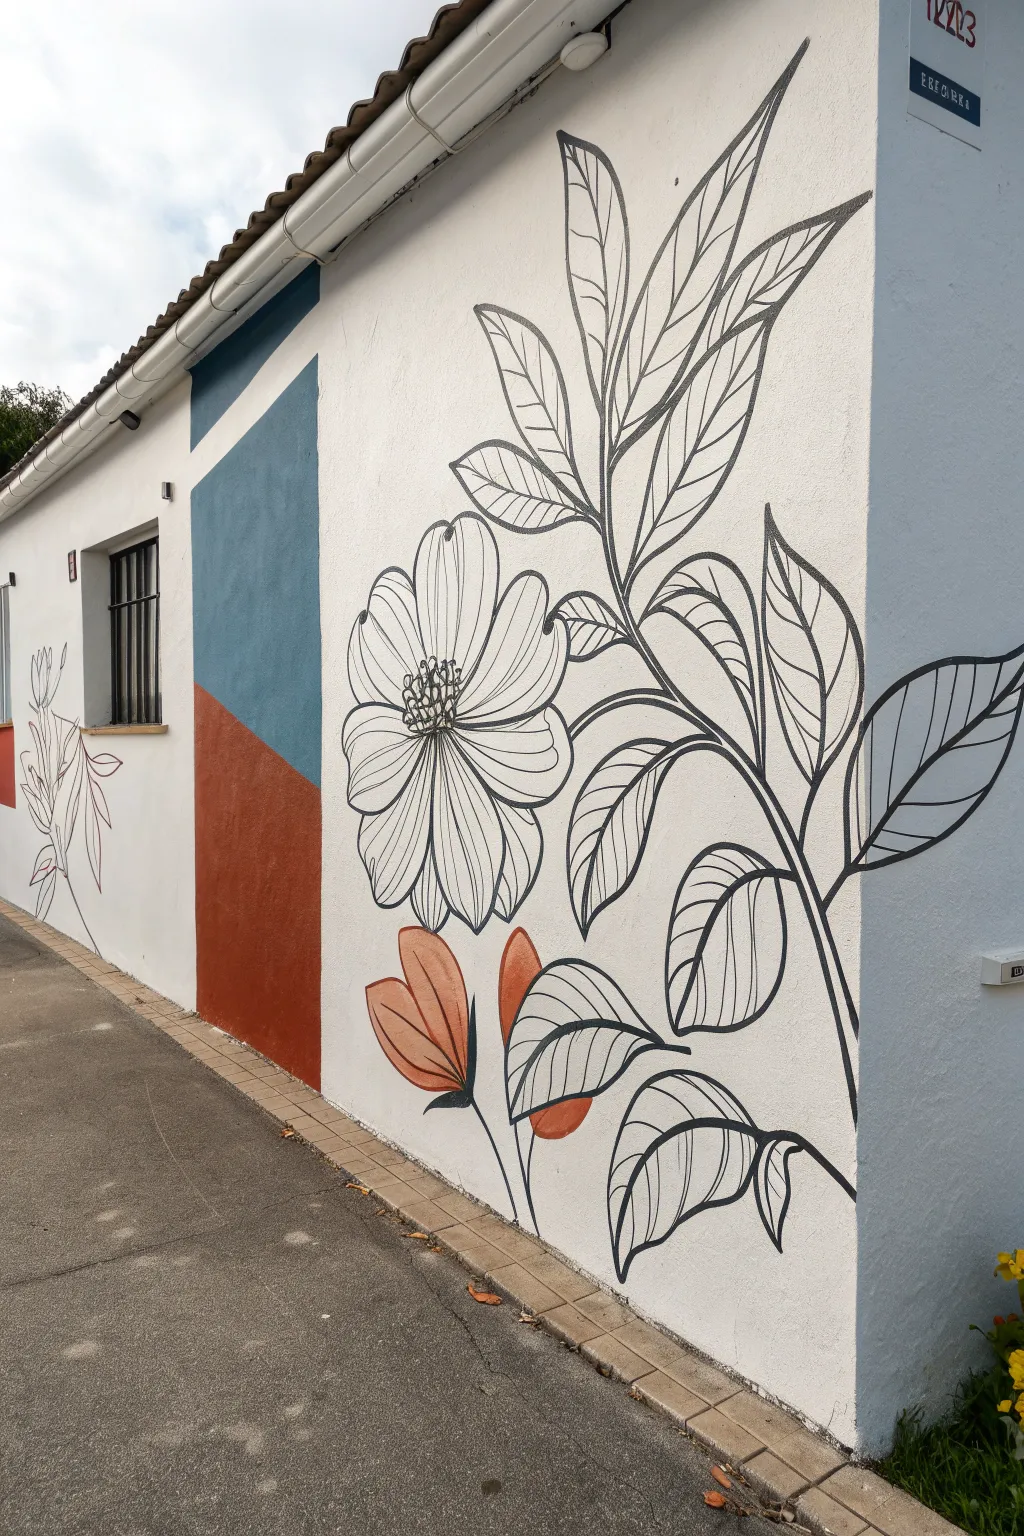
Transform a plain exterior wall into a statement piece with this oversized floral mural that combines bold geometric blocks with delicate, hand-drawn botanical lines. Ideally suited for stucco or concrete surfaces, this project balances structure and organic flow for a contemporary, artistic finish.
Detailed Instructions
Materials
- Exterior masonry primer (white)
- Exterior acrylic latex paint (white, teal-blue, terracotta-orange)
- Black exterior paint or heavy-body acrylic marker paint
- Painter’s tape (2-inch width)
- Chalk snap line
- Pencil or chalk for sketching
- Assorted paintbrushes (large rollers for base, medium angular sash brush, fine liner brush)
- Drop cloth
- Ladder or step stool
- Damp rag for corrections
Step 1: Preparation and Base Layer
-
Clean surface:
Begin by thoroughly cleaning the wall surface. Use a stiff bristled brush or a pressure washer on a low setting to remove dust, dirt, and loose debris from the stucco texture. -
Prime the wall:
Apply a coat of high-quality exterior masonry primer to the entire area you plan to paint. This ensures your colors will adhere properly and pop against the background. -
Apply base white:
Once the primer is dry, roll on two coats of crisp white exterior paint to create a fresh, clean canvas for your line work.
Uneven Lines?
Stucco texture makes straight lines tough. Don’t fight the bumps; embrace a ‘wobbly’ organic look, or use a finer liner brush to slowly fill gaps in the texture.
Step 2: Geometric Color Blocking
-
Mark color zones:
Using a level and pencil, lightly mark out the large rectangular area on the left side of the wall. This section acts as an anchor for the flowing floral design. -
Create the diagonal split:
Use a straightedge to draw a diagonal line cutting through your rectangle. This will separate the teal-blue top section from the terracotta-orange bottom section. -
Tape the boundaries:
Apply painter’s tape firmly along your outer vertical lines and the diagonal dividing line. Press the edges of the tape down firmly to prevent bleed, especially on textured stucco. -
Paint the terracotta block:
Fill in the lower triangle with your terracotta-orange paint. I find using a medium angular brushes helps get into the corners of the tape cleanly. -
Paint the teal block:
Paint the upper inverted triangle with the teal-blue shade. Allow the paint to dry completely before carefully peeling off the tape at a 45-degree angle.
Scale with Confidence
To get proportions right on a huge wall, tape your sketch to a transparency sheet and use a projector at night to trace the design directly onto the primer.
Step 3: Floral Line Work
-
Sketch the composition:
Lightly sketch your floral design using chalk. Draw a large central bloom near the geometric blocks and let a tall stem with leaves curve upward toward the roofline. -
Outline main stems:
Load a round brush with black exterior paint. With a steady hand, paint the main central stem, keeping the line width consistent but organic. -
Detail the main flower:
Paint the petals of the large central flower. Use loose, confident strokes that overlap slightly to create depth, rather than trying to make each petal perfect. -
Add the center details:
In the center of the main flower, dab small circles and stamen lines to create the textured pollen area. -
Draw the leaves:
Outline large, pointed oval shapes for the leaves along the main stem. Vary their sizes, making the ones near the bottom slightly larger than those at the top tip. -
Paint leaf veins:
Inside each leaf outline, paint a central vein line, then add curved, parallel lines branching out to the leaf edges. Keep these interior lines slightly thinner than the outline. -
Create lower buds:
Near the bottom of the mural, sketch two tulip-shaped buds. Paint the outlines in black, overlapping slightly with the white background space. -
Color the accents:
Using a small brush, fill these lower bud shapes with the terracotta-orange paint, leaving the black outline visible. This visually connects the floral element to the geometric block.
Step 4: Finishing Touches
-
Review line weight:
Step back and look at the line consistency. Thicken any lines that feel too flimsy compared to the scale of the wall. -
Clean up edges:
Use a small brush with white paint to touch up any accidental drips or smudges on the background. -
Seal the work:
If your wall is exposed to harsh weather, apply a clear, matte masonry sealer over the painted areas to protect your art from fading.
Step back across the street to admire how the bold geometry and delicate lines work together to brighten the entire building facade
Trompe L’Oeil Painted Niche Illusion
Transform a plain flat wall into a stunning architectural feature with this clever trompe l’oeil technique. By using perspective and shadow play, you will create the convincing illusion of a deep, sun-drenched alcove holding a terracotta pot.
How-To Guide
Materials
- High-quality painter’s tape (multi-width)
- Pencil and eraser
- String and pushpin (for drawing the arch)
- Level and measuring tape
- White or off-white wall base paint
- Terracotta orange acrylic or latex paint
- Dark grey/brown paint (for shadows)
- Light grey paint (for highlights)
- Brick red paint (for faux tiles)
- Off-white paint (for grout lines)
- Assorted brushes: 2-inch angled sash brush, 1-inch flat brush, fine liner brush
- Small roller (for the main orange section)
- Rags or sponge (for texture)
Step 1: Planning and Outline
-
Measure and Mark:
Decide on the height and width of your niche. Use a level and measuring tape to draw two parallel vertical lines for the sides of the opening, leaving space at the top for the arch. -
Create the Arch:
To get a perfect curve, find the center point between your vertical lines. Tape a string to this center point (or use a pushpin if the wall allows). Tie a pencil to the other end so the length reaches the top of your vertical lines, then swing it to draw the arch connecting them. -
Define the Outer Frame:
Draw a second, slightly larger arch and set of vertical lines around the first one (about 4-5 inches wider) to represent the chunky white frame or ‘trim’ of the niche. -
Establish the Perspective:
This is crucial for the 3D effect. Determine your light source (usually top left). Draw diagonal lines connecting the inner corners to the outer corners on the shadow side (usually the left/inner edge) to create the illusion of depth or wall thickness.
Depth Perception Fix
If the niche looks flat, deepen the shadows in the inner corners. A darker glaze in the top curve instantly pushes the ‘back wall’ further away.
Step 2: Painting the Structure
-
Tape the Edges:
Carefully apply painter’s tape along the outer pencil lines of your niche design to protect the surrounding wall. -
Base Color Application:
Paint the deep interior shape of the niche—the ‘back wall’—using the terracotta orange paint. A small roller works best here for even coverage. Let this dry completely. -
Create Texture:
To mimic rough stucco, dab a barely damp sea sponge or a crumpled rag with slightly lighter orange paint over the terracotta base. This mottled effect adds realism. -
Paint the Reveal:
Paint the ‘thickness’ of the wall (the strip between your inner and outer lines). On the side opposite the light source, use a slightly darker shade of white or light grey to simulate a cast shadow within the archway. -
Highlighting edges:
On the side facing the imaginary light source, paint the reveal a bright, crisp white to suggest it is catching the sun.
Step 3: The Faux Tiled Floor
-
Draft the Grid:
At the bottom of your painted niche, pencil in a grid for the ’tiled’ shelf. The horizontal lines should follow the perspective established by the floor. -
Paint Grout Lines:
Using a fine liner brush and off-white paint, retrace your grid lines. Don’t worry about being perfectly straight; a little wobble looks more like rustic handmade tile. -
Fill the Tiles:
Use your brick red paint and a small flat brush to fill in the squares, being careful to leave the grout lines visible. Varying the redness slightly between tiles adds aged character. -
Edge the Shelf:
Paint a row of ‘brick ends’ along the very front bottom edge of the niche opening to make it look like the tiles overhang slightly.
Add Rustic Age
Lightly sand areas of the ‘stucco’ paint once dry to reveal bits of texture underneath, making the niche look like an ancient Mediterranean wall.
Step 4: Shadows and Finishing Details
-
General Shadows:
Mix a glaze of water and dark grey paint. Paint a translucent shadow inside the top curve of the niche and down the side furthest from the light source. -
Plant Placement Mock-up:
Position your real potted plant (if you are placing one on a shelf in front) or sketch your painted plant to see where the cast shadow should fall. -
Paint the Plant Shadow:
Using a soft brush and your dark glaze, paint a diffused shadow on the back terracotta wall and the tiled floor where the pot would block the light. This grounds the object in reality. -
Paint the Plant (Optional):
If painting the plant directly on the wall, use deep greens for the base leaves and bright yellow-greens for tips hitting the light. Keep the strokes loose. -
Final White Touch-up:
Remove the tape. Use your original wall color to touch up any bleed-through and reinforce the bright white ‘frame’ around the niche to make the colored interior pop.
Step back and enjoy your new architectural feature that brings the warmth of the Mediterranean into your home without any renovation dust


Have a question or want to share your own experience? I'd love to hear from you in the comments below!