If you can paint a bold eye, a mischievous grin, and a trusty eyepatch, you can turn any pumpkin into a pirate with tons of personality. I love these pirate pumpkin painting ideas because they’re high-impact, low-stress, and you can keep them as cute or as rugged as you want.
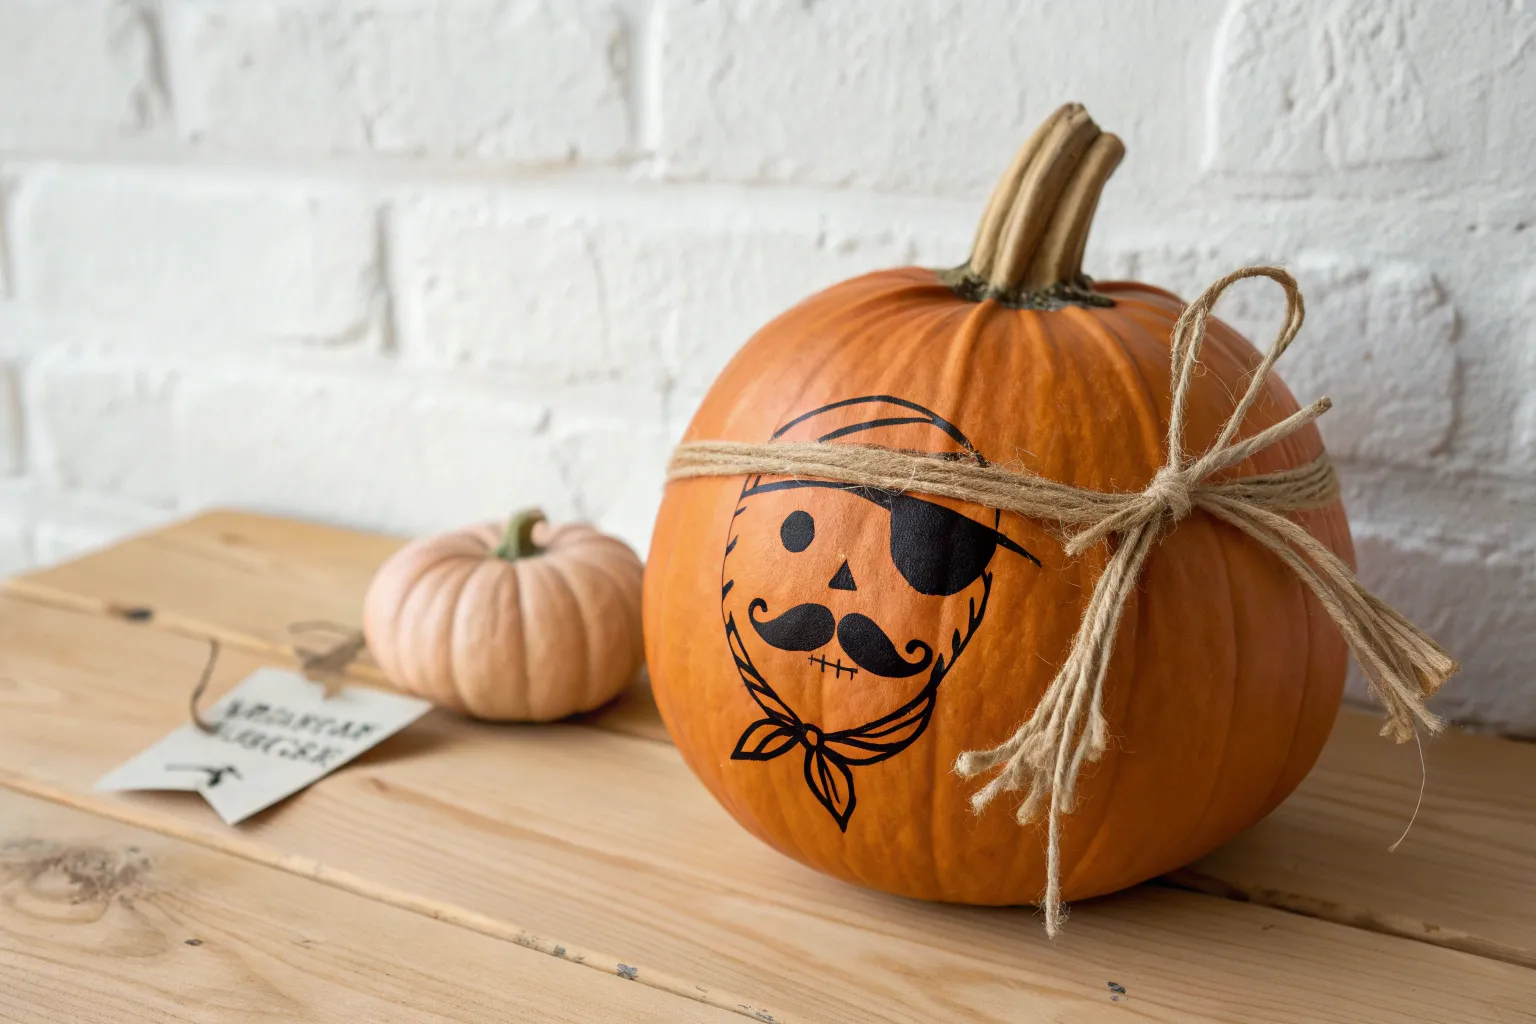
Bandana-Topped Pirate Pumpkin
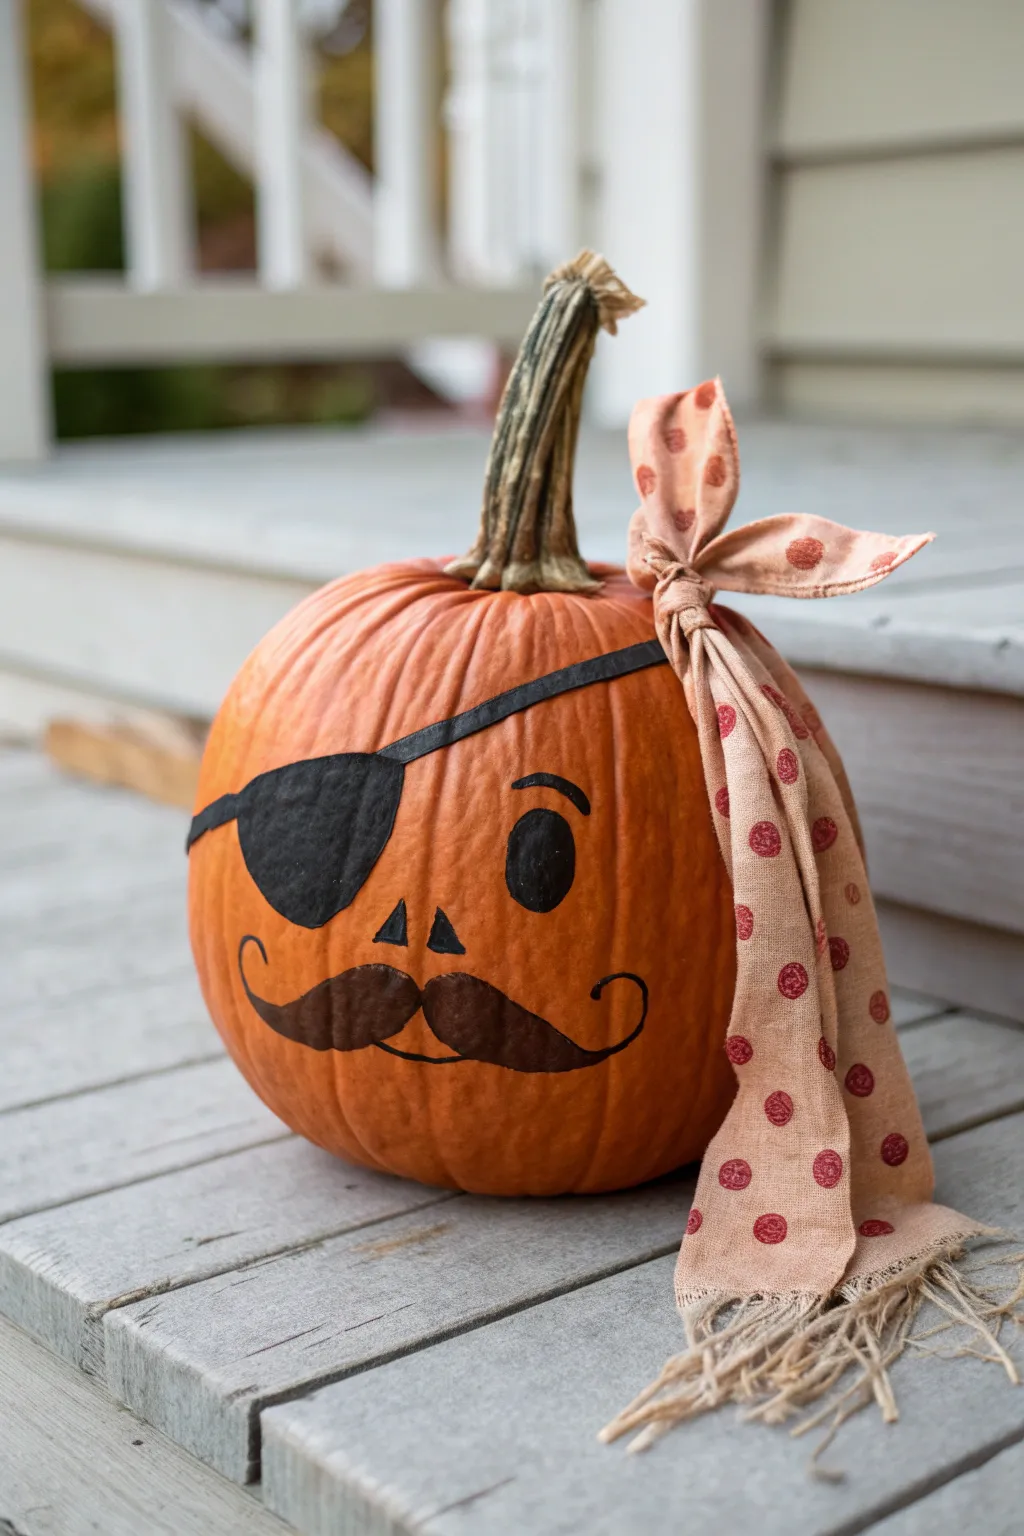
Transform a classic orange pumpkin into a swashbuckling character with just a few simple painted details and a stylish accessory. This no-carve project relies on bold black features and a patterned bandana to create a pirate persona that is more charming than scary.
Step-by-Step Tutorial
Materials
- Medium-sized orange pumpkin (real or faux)
- Black acrylic paint
- Small round paintbrush (size 2 or 4)
- Medium flat paintbrush
- Pencil or erasable marker
- Polka-dot fabric strip or bandana (earth tones)
- Scissors
- Damp cloth (for cleanup)
- Sealer spray (optional)
Step 1: A Clean Start
-
Prep the surface:
Begin by wiping down your pumpkin with a damp cloth to remove any dirt or field dust. If you are using a real pumpkin, ensure the surface is completely dry before applying any paint. -
Find the face:
Rotate your pumpkin to find the best ‘face’ side. Look for a relatively smooth area without deep gouges or blemishes that would interrupt your painted lines.
Step 2: Sketching the Features
-
Outline the eye patch:
Using a pencil, lightly sketch a large, rounded triangle shape on the left side of the pumpkin face for the eye patch. -
Add the strap:
Draw a thin strap line extending from the top corners of the patch, angling upwards toward the bandana line and wrapping around the side of the pumpkin. -
Draw the eye:
On the right side, sketch a simple oval for the visible eye. Position it so it balances with the eye patch. -
Sketch the brow:
Add a single, arched eyebrow floating just above the right eye to give him an inquisitive expression. -
Mark the nose:
Draw two very small triangles in the center of the face to mimic skeletal nostrils. -
Outline the mustache:
Sketch a grand handlebar mustache below the nose. Start with a dip in the center (the philtrum) and curl the ends upwards into spirals on both cheeks.
Clean Lines Hack
Rest your pinky finger on the pumpkin surface while painting fine details like the mustache curls. It acts as a stabilizer for shake-free lines.
Step 3: Painting the Pirate
-
Fill the eye patch:
Load your medium flat brush with black acrylic paint and carefully fill in the large eye patch area. Use smooth strokes to keep the paint opaque. -
Paint the strap:
Switch to a smaller round brush to paint the thin strap line. Keep your hand steady to maintain an even width as it wraps around the curve. -
Fill the eye:
Use the same small brush to fill in the oval eye on the right. Doing this carefully ensures the edges remain crisp. -
Add the brow:
Paint the single eyebrow with a confident, curved stroke. I find slightly tapering the end of the bright adds a nice bit of character. -
Detail the nose:
Carefully dab black paint into the two small nose triangles. Since these are small, use the very tip of your round brush. -
Start the mustache:
Begin painting the mustache from the center, moving outwards. Fill the thickest parts of the ‘hair’ first. -
Curl the ends:
As you reach the tips of the mustache, use the fine point of your brush to create the delicate upward curls on the cheeks. -
Add the smile line:
Paint a very thin, subtle curved line underneath the mustache center to suggest a mouth or chin dimple. -
Let it dry:
Allow the paint to dry completely. Acrylics dry fast, but give it at least 20 minutes to avoid smudging while you add the accessory.
Paint Sheerness?
If your black paint looks streaky or gray after the first coat, let it dry completely and apply a second layer for a solid, deep matte black finish.
Step 4: The Final Touch
-
Prepare the fabric:
Cut a strip of polka-dot fabric about 2-3 inches wide and roughly 24 inches long. You can leave the edges raw for a rugged, seafaring look. -
Attach the bandana:
Wrap the fabric strip around the stem of the pumpkin. Position it so it sits naturally, like a headscarf. -
Tie the knot:
Tie the fabric in a simple double knot on the right side of the stem (opposite the eye patch if possible) so the tails drape down elegantly. -
Adjust the drape:
Fluff the fabric ends and arrange them so they frame the face without covering your freshly painted artwork. -
Optional seal:
If this pirate will be guarding your porch outdoors, consider a light mist of clear sealer over the painted face to protect it from the elements.
Now your charming pirate creates a festive porch greeting without the mess of carving.


Gold Hoop Earring Side Detail
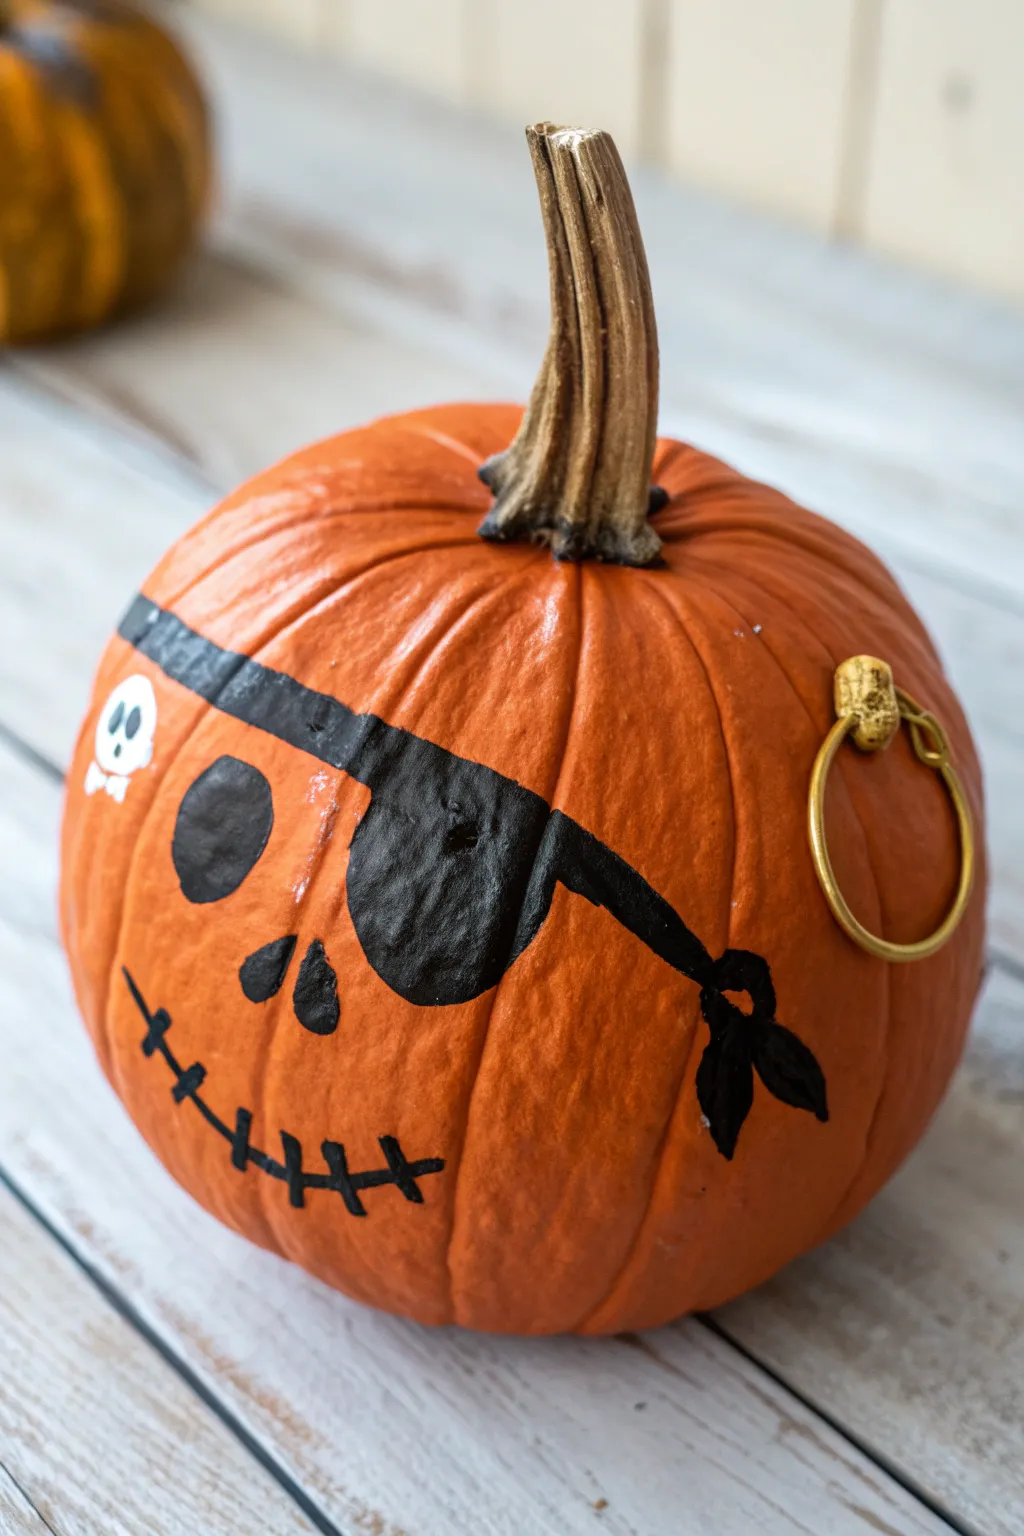
Transform a small pumpkin into a seafaring scallywag with just a bit of paint and a clever jewelry hack. This pirate pumpkin features a classic painted bandana, a stitched smile, and a shiny gold hoop earring that brings the character to life.
How-To Guide
Materials
- Small round orange pumpkin
- Black acrylic paint
- Small flat paintbrush
- Fine liner paintbrush
- Gold hoop earring (clip-on or stud with backing)
- Small skull sticker or white paint pen
- Pencil (optional)
- Paper towel
- Palette or paper plate
Step 1: Planning the Face
-
Clean surface:
Begin by wiping down your pumpkin with a damp cloth to remove any dirt or oils that might prevent the paint from sticking, then dry it completely. -
Sketch the bandana:
Using a light pencil mark, sketch a diagonal line across the upper forehead area of the pumpkin to mark where the bandana will sit. -
Outline facial features:
Lightly sketch a circle for one eye, a pear-shape for the eye patch, a small nose, and a curved line for the mouth.
Clean Lines Hack
Use masking tape to mark the diagonal line for the bandana. Paint over the edge, let it dry slightly, and peel for a crisp, straight line.
Step 2: Painting the Pirate
-
Paint the bandana strip:
Dip your flat brush into black acrylic paint and follow your pencil line across the top of the pumpkin. -
Create the knot:
On the right side of the bandana strip, paint two small hanging shapes to represent the tied knot of the fabric. -
Fill the eye patch:
Switch to a smaller brush and carefully fill in the large, dark shape for the eye patch on the right side of the face. -
Draw the patch strap:
Using the fine liner brush, paint a thin black line connecting the eye patch to the bandana line, looking like a strap going over the head. -
Paint the open eye:
On the left side, paint a simple, solid black circle for the remaining eye. -
Add the nose:
Paint a small, upside-down heart shape or triangle in the center for the nose cavity. -
Stitch the mouth:
Paint a long, curved smile line across the bottom of the face. -
Add stitches:
Make small vertical hatch marks along the mouth line to give it a scarred or stitched appearance. -
Dry time:
Let the black paint dry completely for about 15-20 minutes so you don’t smudge the details while handling it.
Step 3: Adding Details
-
Apply the decal:
Place a small skull-and-crossbones sticker on the upper left side of the black bandana strip as an accent. -
Alternative skull method:
If you don’t have a sticker, you can gently dab a tiny skull shape using a white paint pen once the black paint is bone dry. -
Prepare the earring:
Select a gold hoop earring; inexpensive costume jewelry works perfectly for this. -
Pierce the pumpkin:
Determine where the ‘ear’ would be on the side of the pumpkin and carefully push the earring post through the skin. -
Secure the jewelry:
I find it helpful to wiggle the earring slightly to settle it, then secure the backing if it feels loose, or simply let the pumpkin flesh hold the post in place.
Paint Not Sticking?
If the pumpkin skin is too waxy and the paint beads up, lightly buff the surface with fine-grit sandpaper or steel wool to give it ‘tooth’.
Set your finished pirate on the porch or a mantel to guard your Halloween treasure


Missing Tooth Pirate Grin
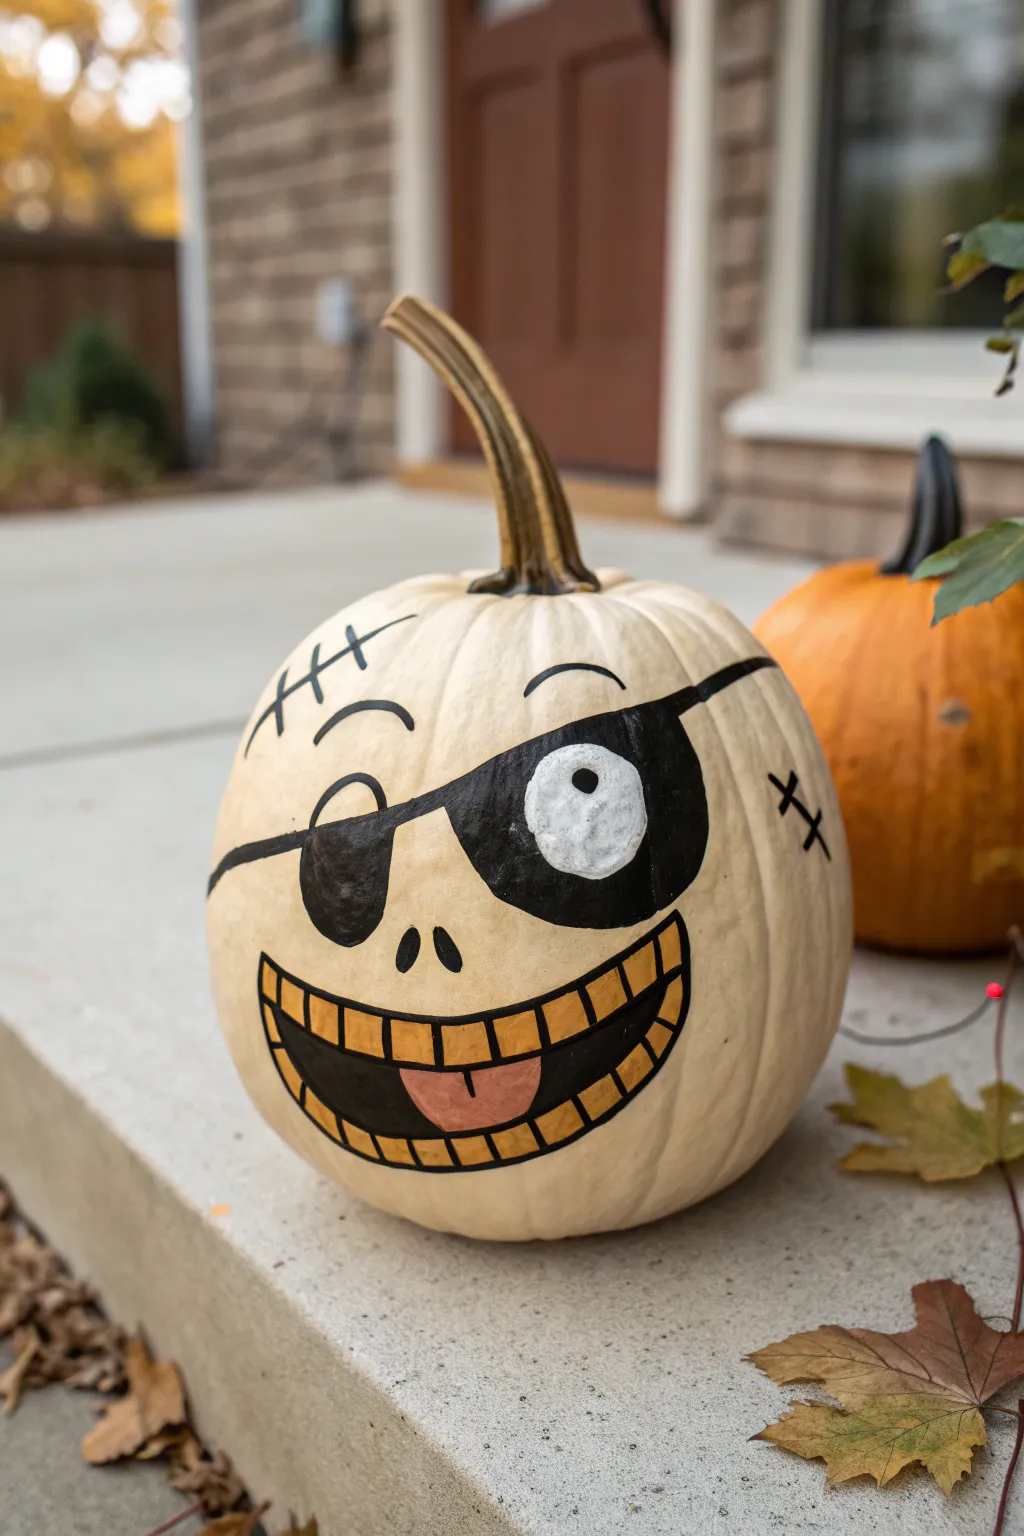
Transform a simple white pumpkin into a mischievous pirate with this clean, high-contrast character design. This project uses bold black outlines and a pop of gold to create a grinning buccaneer that stands out on any porch.
Step-by-Step Tutorial
Materials
- Medium-sized white pumpkin (real or faux)
- Black acrylic craft paint
- White acrylic craft paint
- Gold or yellow ochre acrylic craft paint
- Pink or coral acrylic craft paint
- Pencil
- Medium flat paintbrush
- Fine liner paintbrush
- Black permanent marker (thick tip)
- Clear matte sealer spray (optional)
- Damp cloth for wiping mistakes
Step 1: Sketching the Pirate Layout
-
Clean surface:
Begin by wiping down your pumpkin with a damp cloth to remove any dirt or oils, ensuring a clean canvas for your paint. -
Mark the center:
Locate the most attractive side of your pumpkin. Using a pencil lightly, mark the center point where the nose holes will eventually go. -
Draft the eye patch:
Draw a large, slightly wonky circle on the right side for the eye patch. Extend two parallel lines—one going up towards the stem and one across the face to the left—to form the strap. -
Detail the open eye:
On the left side, sketch an arched eyebrow and a curved line below it to suggest a winking or squinting eye. -
Outline the grin:
Map out a wide, crescent-shaped mouth below the nose area. Inside the crescent, draw a horizontal line for the teeth separation and vertical lines to create individual teeth. -
Add the tongue:
In the center of the bottom row of teeth, sketch a small U-shape to represent the tongue sticking out. -
Final scars:
Add character with pencil lines for stitches: a cross-hatch pattern on the upper left forehead and another on the right cheek.
Paint Slipping?
If acrylic paint beads up on a faux pumpkin skin, lightly sand the surface with fine-grit sandpaper or apply a layer of spray primer first.
Step 2: Blocking in Color
-
Fill the patch:
Using your medium flat brush and black acrylic paint, carefully fill in the large eye patch circle and the strap lines. I prefer to do two thin coats here for solid coverage. -
Painting the single eye:
While the black dries, paint a messy white circle directly on top of the black patch. This creates that cartoonish, popped-out eyeball look. -
Gold tooth detail:
Switch to your gold or yellow ochre paint. Fill in every tooth rectangle carefully, avoiding the black outlines you sketched earlier. -
Pink tongue:
Paint the small U-shape in the mouth with pink or coral paint. -
Nose and background:
Use black paint to fill in the two teardrop shapes for the nose holes. Also, fill the empty spaces inside the mouth (between the teeth if your sketch left gaps) with black.
Add Texture
Make the eye patch 3D! Cut a circle of black felt and glue it onto the pumpkin instead of painting it, then add the white eye on top.
Step 3: Defining the Details
-
The pupil:
Once the white eye circle is completely dry, use the handle end of a paintbrush dipped in black paint to dot a small pupil in the center. -
Refining the mouth:
Using a fine liner brush or a thick black permanent marker, trace over the grid lines of the teeth to make the gold pop. -
Winking eye:
Trace the winking eye arch and the eyebrow on the left side with your black paint or marker. -
Stitching details:
Go over your pencil sketches for the scars. Use short, quick strokes for the cross-hatches to make them look like rough thread. -
Clean up:
Check for any smudges. Use a tiny bit of white paint to clean up edges around the eye patch or teeth if the black lines got too thick. -
Seal it:
If this pumpkin is living outside, give it a quick spray with a matte clear sealer to protect your pirate from the elements.
Now your jaunty pirate pumpkin is ready to greet trick-or-treaters with a golden grin


Curly Mustache and Goatee Combo
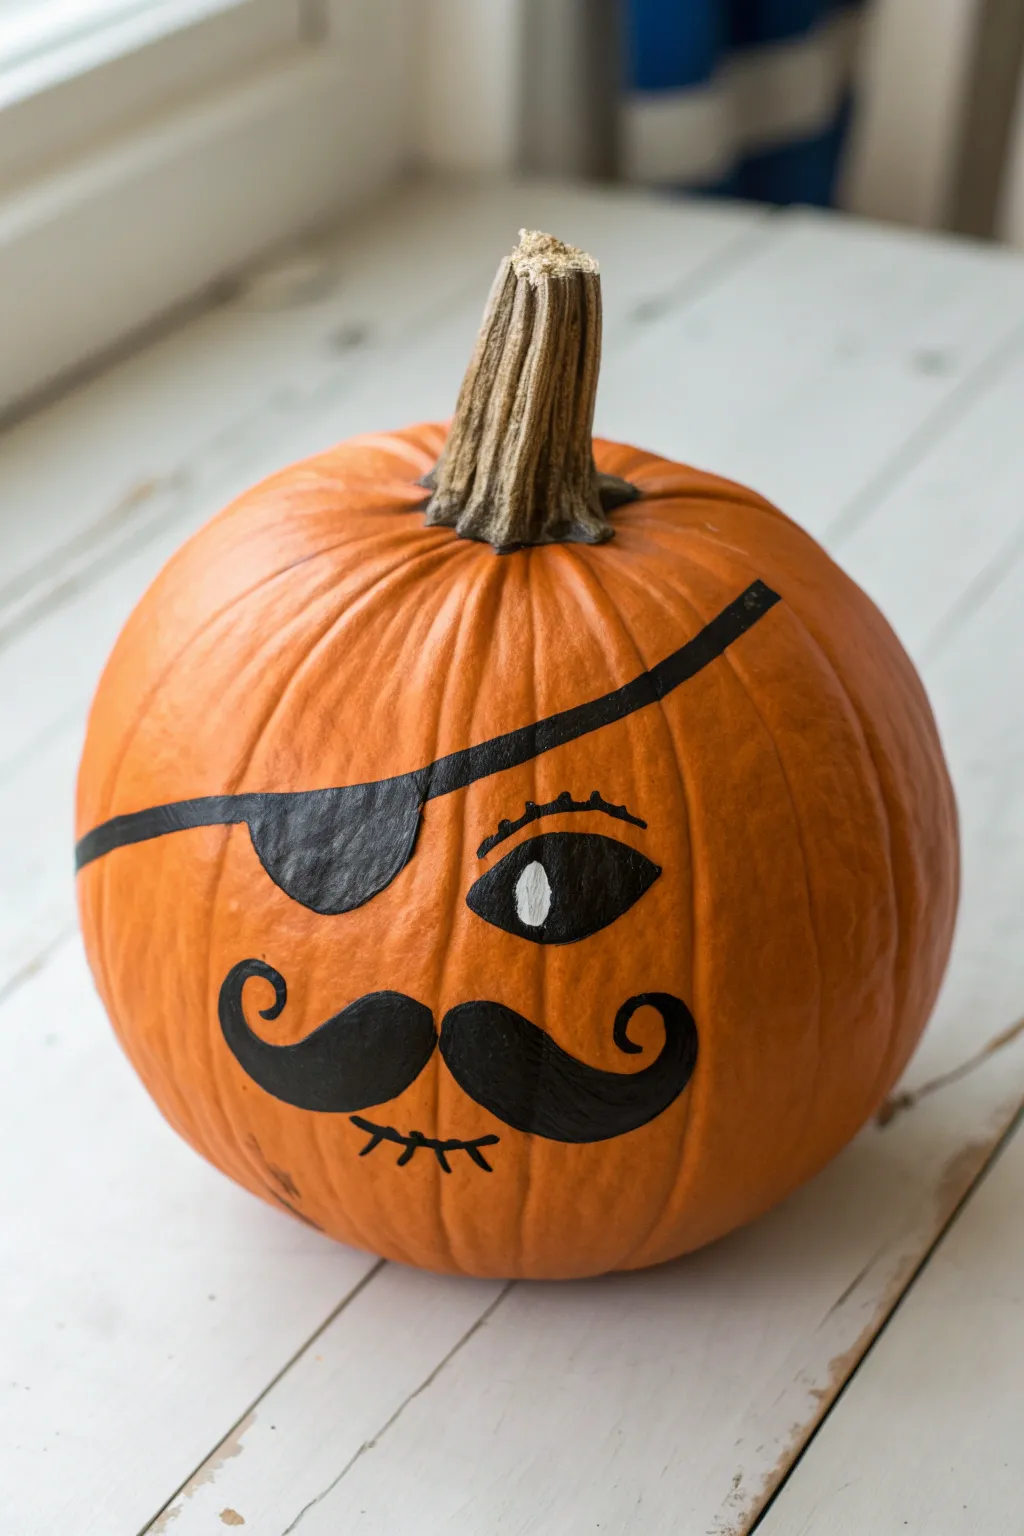
Transform a classic orange pumpkin into a dashing swashbuckler with just a few strokes of black paint. This design features a bold eyepatch, a stylish curly mustache, and a mischievous expression that creates a pirate persona without any carving required.
Step-by-Step
Materials
- Medium-sized orange pumpkin (cleaned and dried)
- Black acrylic paint
- White acrylic paint
- Medium round paintbrush
- Small detail paintbrush
- Pencil or erasable marker
- Cup of water
- Paper towels
- Matte or satin sealer (optional)
Step 1: Face Mapping
-
Clean surface:
Begin by wiping down your pumpkin with a slightly damp cloth to remove any dirt or oils. Let it dry completely so the paint adheres properly. -
Position the face:
Choose the smoothest side of your pumpkin to be the face. Look for a side with relatively even ridges to make drawing straight lines easier. -
Sketch the eye patch:
With a pencil, lightly sketch a large diagonal line starting from the upper left side and swooping down across the middle. Draw a rounded, semi-circle shape below this line on the left side to form the patch itself. -
Outline the eye:
On the right side of the face, opposite the patch, sketch a large almond-shaped eye. Add a curved line above it for the eyelid. -
Draft the mustache:
Below the eye area, lightly draw a large, handlebar-style mustache. Start from the center and curl the ends upward on both sides, making the curls prominent and symmetrical. -
Mark the mouth:
Beneath the mustache, draw a small, slightly curved horizontal line with three or four vertical hash marks crossing it to create a stitched look.
Step 2: Painting the Features
-
Fill the eye patch:
Load your medium round brush with black acrylic paint. Carefully outline the edges of the eye patch shape you sketched, then fill in the center until it is solid black. -
Paint the strap:
Using the same brush, paint a thick black stroke along the diagonal line you drew earlier, connecting the patch to the side of the pumpkin to create the strap. -
Define the eye:
Switch to your smaller detail brush for better control. Outline the almond eye shape in black, then fill in the pupil area, leaving the space intended for the white highlight unpainted if you executed a detailed sketch, or just fill the whole iris black. -
Add eye details:
Paint the curved eyelid line above the eye. Add three or four small, quick flicks extending from the eyelid line to create eyelashes. -
Fill the mustache:
Return to the medium round brush. Carefully outline the curly mustache shape. Fill it in with smooth, even strokes of black paint, ensuring the curls at the ends are thick and bold. -
Paint the stitched mouth:
Using the detail brush again, paint the small horizontal line under the mustache. Add the vertical hash marks to complete the rugged, stitched expression.
Smooth Operator
If your paint looks streaky, don’t overload the brush. Apply one thin coat, let it dry completely, and then add a second coat for solid opacity.
Step 3: Highlights and Sealing
-
Create the eye sparkle:
Dip the handle end of a paintbrush or a clean small brush into white acrylic paint. Dot a crisp circle inside the black eye shape to create a reflections highlight. This brings the character to life. -
Refine edges:
Check for any uneven edges on the black paint. If needed, use the detail brush to smooth out the curve of the mustache or the sharpness of the eye patch strap. -
Allow to dry:
Let the pumpkin sit undisturbed for at least an hour until the black paint is completely dry to the touch. -
Seal the design (optional):
If you plan to display the pumpkin outdoors, apply a thin layer of matte or satin sealer over the painted areas to protect your pirate’s face from moisture.
Wobbly Lines?
If your hand shakes while painting the thin strap, rest your pinky finger on the pumpkin’s surface to stabilize your hand while you drag the brush.
Now your pirate pumpkin is ready to guard the porch with his rugged charm
BRUSH GUIDE
The Right Brush for Every Stroke
From clean lines to bold texture — master brush choice, stroke control, and essential techniques.
Explore the Full Guide
Stubbly Pirate With Rough Beard Texture
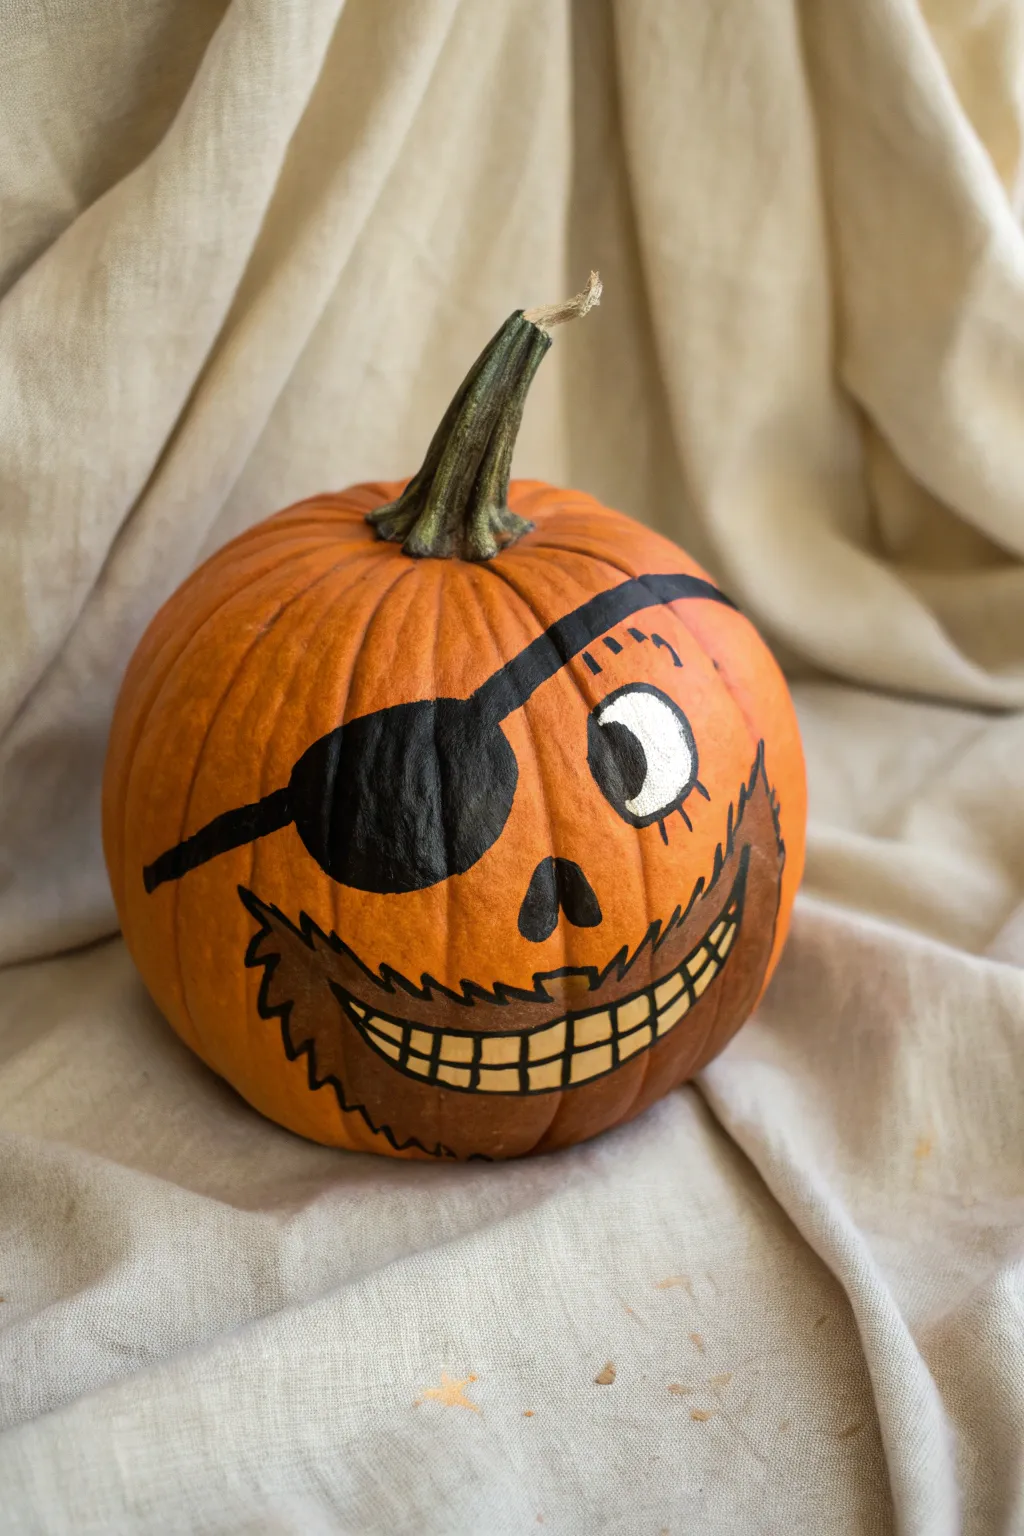
Transform a classic orange pumpkin into a rugged pirate with this expressive painted design. The character features a signature eye patch, a toothy grin, and a distinctively textured beard that looks like days at sea.
Step-by-Step Guide
Materials
- Medium round pumpkin (cleaned and dried)
- Black acrylic paint
- White acrylic paint
- Dark brown acrylic paint
- Light yellow or cream acrylic paint
- Medium flat brush
- Small round detail brush
- Pencil or dry-erase marker
- Cup of water
- Paper towels
Step 1: Mapping the Face
-
Draft the features:
Begin by lightly sketching the pirate’s face directly onto the pumpkin skin using a pencil or a dry-erase marker. Draw a large circle for the right eye and an angled shape for the eye patch on the left. -
Draw the patch strap:
Extend the straps of the eye patch. Draw one line going diagonally up toward the stem and another going straight across toward the left ‘ear’ area of the pumpkin. -
Sketch the nose:
In the center, slightly below the eyes, sketch a triangular nose shape. To give it dimension, make the triangle slightly uneven or split it into two distinct nostril shapes. -
Outline the mouth and beard:
Draw a wide, U-shaped smile that stretches across the bottom half of the pumpkin. Outline the beard area around the mouth, adding jagged, spiky points along the cheek and chin to suggest scruffy hair.
Pro Texture Tip
For a rougher beard look, use a nearly dry brush for the brown paint. Dab it on rather than stroking smoothly to mimic coarse hair.
Step 2: Blocking in Color
-
Paint the eye white:
Using your medium brush, fill in the exposed eye with bright white acrylic paint. You may need two coats to ensure the orange doesn’t show through. -
Fill the eye patch:
Switch to black paint and carefully fill in the main shape of the eye patch. Keep your edges crisp. -
Add the strap:
Continue with the black paint to fill in the straps extending from the patch across the pumpkin’s surface. -
Paint the nose:
Fill in the nose shape with solid black paint. This anchors the center of the face. -
Base coat the beard:
Mix a small amount of black into your brown paint to darken it slightly. Use this dark brown to fill in the entire beard area, being careful to paint around the mouth shape you sketched earlier.
Step 3: Defining the Details
-
Paint the teeth:
Fill in the mouth area with a light yellow or cream color. Don’t worry about individual teeth yet; just create a solid block of color for the smile. -
Outline the eye:
Once the white eye paint is fully dry, use your small detail brush and black paint to outline the eye circle. Add three small lashes at the outer corner. -
Add the pupil:
Paint a large black circle inside the white eye for the pupil. Leave a tiny white dot unpainted (or add a white dot later) to create a lively ‘sparkle’ in the eye. -
Detail the eyebrow:
Above the open eye, paint a short, dashed eyebrow using three or four quick strokes of black paint to give him a surprised or ragged look.
Level Up: Accessories
Hot glue a real piece of twine or rope around the stem, or tie a red bandana around the top of the pumpkin to give him a true captain’s hat look.
Step 4: Texture and Definition
-
Outline the beard:
Using the small brush and black paint, outline the entire brown beard section. Focus on making the jagged edges sharp and distinct to emphasize the stubble texture. -
Create the stubble effect:
Using the small detail brush with black paint, create the grid for the teeth. Draw a horizontal line through the middle of the smile, then add vertical lines to separate the individual teeth. -
Outline the smile:
Finish the mouth by painting a medium-thick black outline around the entire set of teeth to separate them from the beard. -
Final clean up:
Check for any pencil marks that might still be visible and gently wipe them away with a damp cloth or cotton swab once all paint is completely dry.
Place your swashbuckling creation on the porch to guard your Halloween treasure
Scarred Cheek Pirate Character
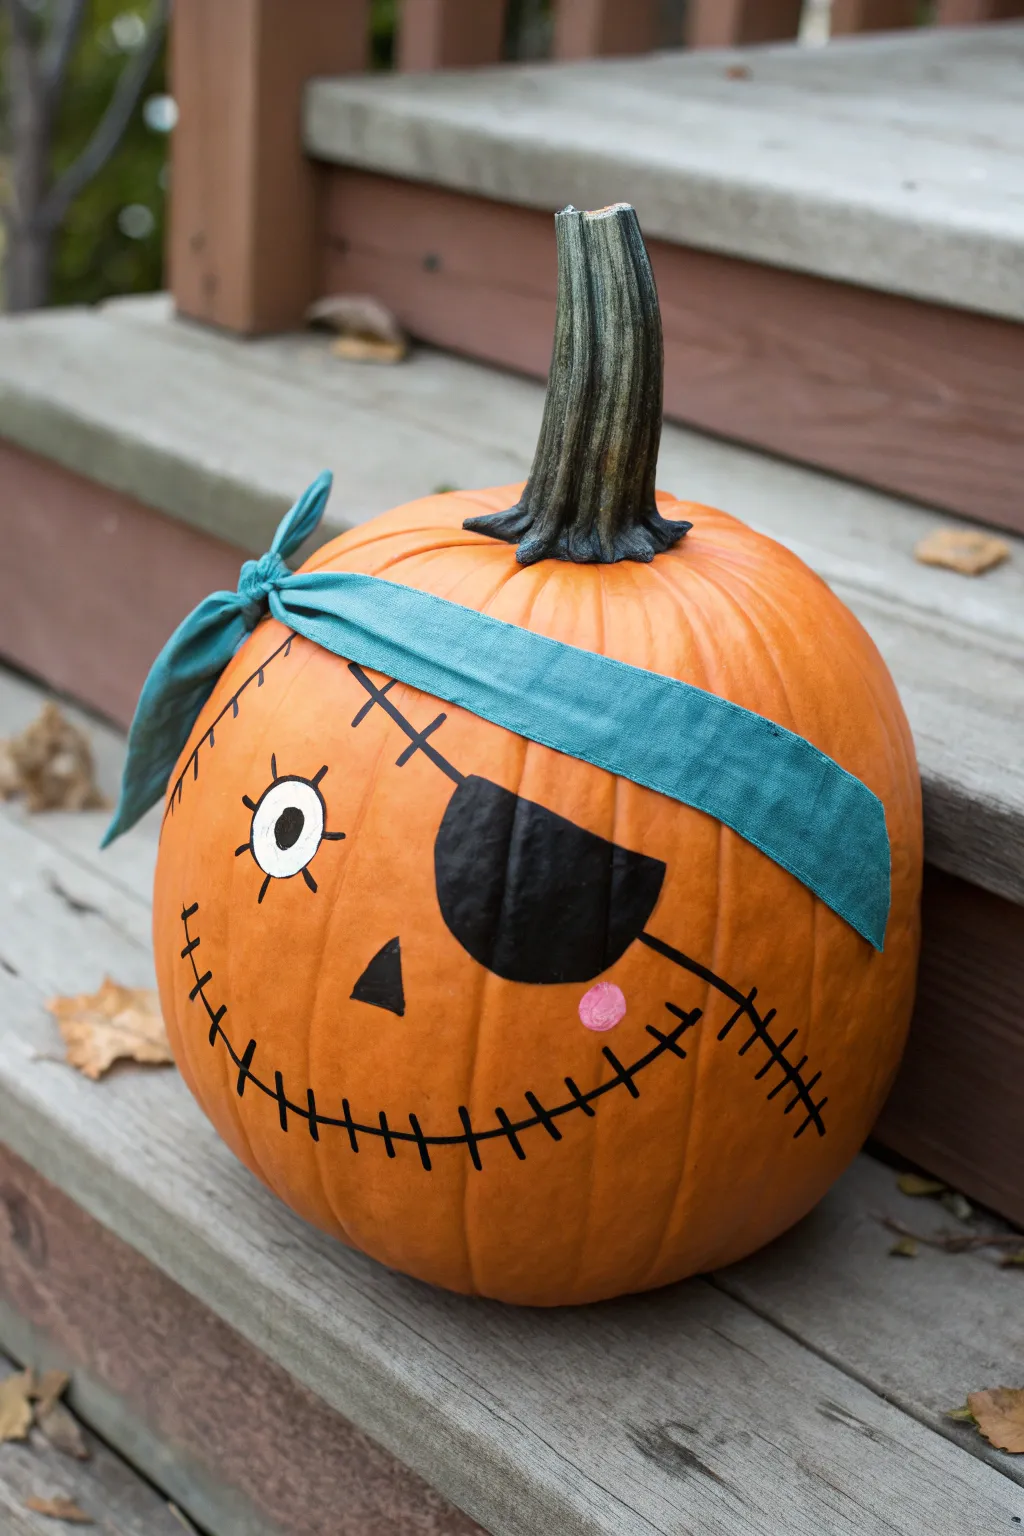
This friendly pirate pumpkin combines fabric and paint for a textured, charming look that avoids the mess of carving. With its distinct stitched smile and playful bandana, it makes a perfect porch guardian for Halloween.
Detailed Instructions
Materials
- Medium orange pumpkin (cleaned and dried)
- Teal or blue fabric strip (cotton or linen blend work well)
- Black acrylic paint
- White paint pen or white acrylic paint
- Pink acrylic paint
- Fine-point paintbrush (round size 1 or 2)
- Medium flat paintbrush
- Scissors
- Pencil or disappearing ink fabric marker
Step 1: Preparing the Bandana
-
Cut the fabric:
Cut a strip of teal fabric about 2-3 inches wide and long enough to wrap around the pumpkin’s diameter with extra length for a knot. -
Weather the edges:
Since pirates aren’t known for pristine clothes, fray the edges of your fabric strip slightly by pulling at loose threads to give it a rugged, worn look. -
Tie the knot:
Position the fabric strip around the upper third of the pumpkin, slightly angled down on the left side. Tie a secure double knot on the left and let the tails hang.
Keep it Clean
Rest your hand on a clean paper towel while painting the lower features to avoid smudging the drying paint on the forehead scar.
Step 2: Planning the Face
-
Determine features:
Look at where your bandana sits; this dictates where the eyes go. Using a pencil, lightly sketch a large circle for the left eye and a triangular nose in the center. -
Sketch the grin:
Draw a wide, U-shaped smile line that stretches well up the sides of the pumpkin’s face. -
Outline the patch:
Sketch the eye patch shape on the right side. It should look like a rounded triangle or half-oval tucked just under the fabric headband. -
Add the scar:
Draw a slightly curved, diagonal line starting from the top left forehead area (near the bandana) down toward the eye.
Make it 3D
For a mixed-media twist, glue real black yarn over the painted mouth line and scar instead of painting the lines, just creating the stitches with paint.
Step 3: Painting the Eye Patch and Nose
-
Fill the patch:
Using black acrylic paint and a medium brush, fill in the large eye patch shape. You may need two coats for opaque coverage. -
Connect the strap:
Paint a thin black line extending from the right side of the patch toward the side of the pumpkin, suggesting the strap continues around the head. -
Paint the nose:
Fill in the small triangular nose with black paint.
Step 4: Creating the Stitched Details
-
Paint the smile line:
Go over your pencil line for the mouth with black paint using a fine-point brush. Keep the line thickness consistent. -
Stitch the mouth:
Paint short, vertical hash marks along the entire length of the smile line to create the signature stitched appearance. Space them evenly, about half an inch apart. -
Detail the scar:
Trace the diagonal scar line on the forehead with black paint, then add similar hash marks across it to match the stitched mouth aesthetic.
Step 5: Adding Character
-
Paint the eye:
Fill the left eye circle with white paint or a paint pen. I find a paint pen offers better control for creating a crisp circle here. -
Add the pupil:
Once the white is completely dry, paint a small black dot in the center for the pupil. -
Add eyelashes:
Paint short, straight lines radiating outward from the white eye to give the character a surprised or wide-eyed expression. -
Create the rosy cheek:
Dip a round sponge or brush into pink paint and dab a circle just under the eye patch on the right side.
Step 6: Final Touches
-
Check opacity:
Look over the black areas. If any orange shows through the eye patch or smile, apply a quick second coat. -
Secure the bandana:
If the fabric feels loose, you can use a dab of hot glue or a small pin to secure the bandana to the pumpkin skin so it doesn’t slip down.
Place your swashbuckling pumpkin on your steps to greet trick-or-treaters with a friendly stitched smile

PENCIL GUIDE
Understanding Pencil Grades from H to B
From first sketch to finished drawing — learn pencil grades, line control, and shading techniques.
Explore the Full Guide
Sideways Pumpkin With Stem Nose Pirate
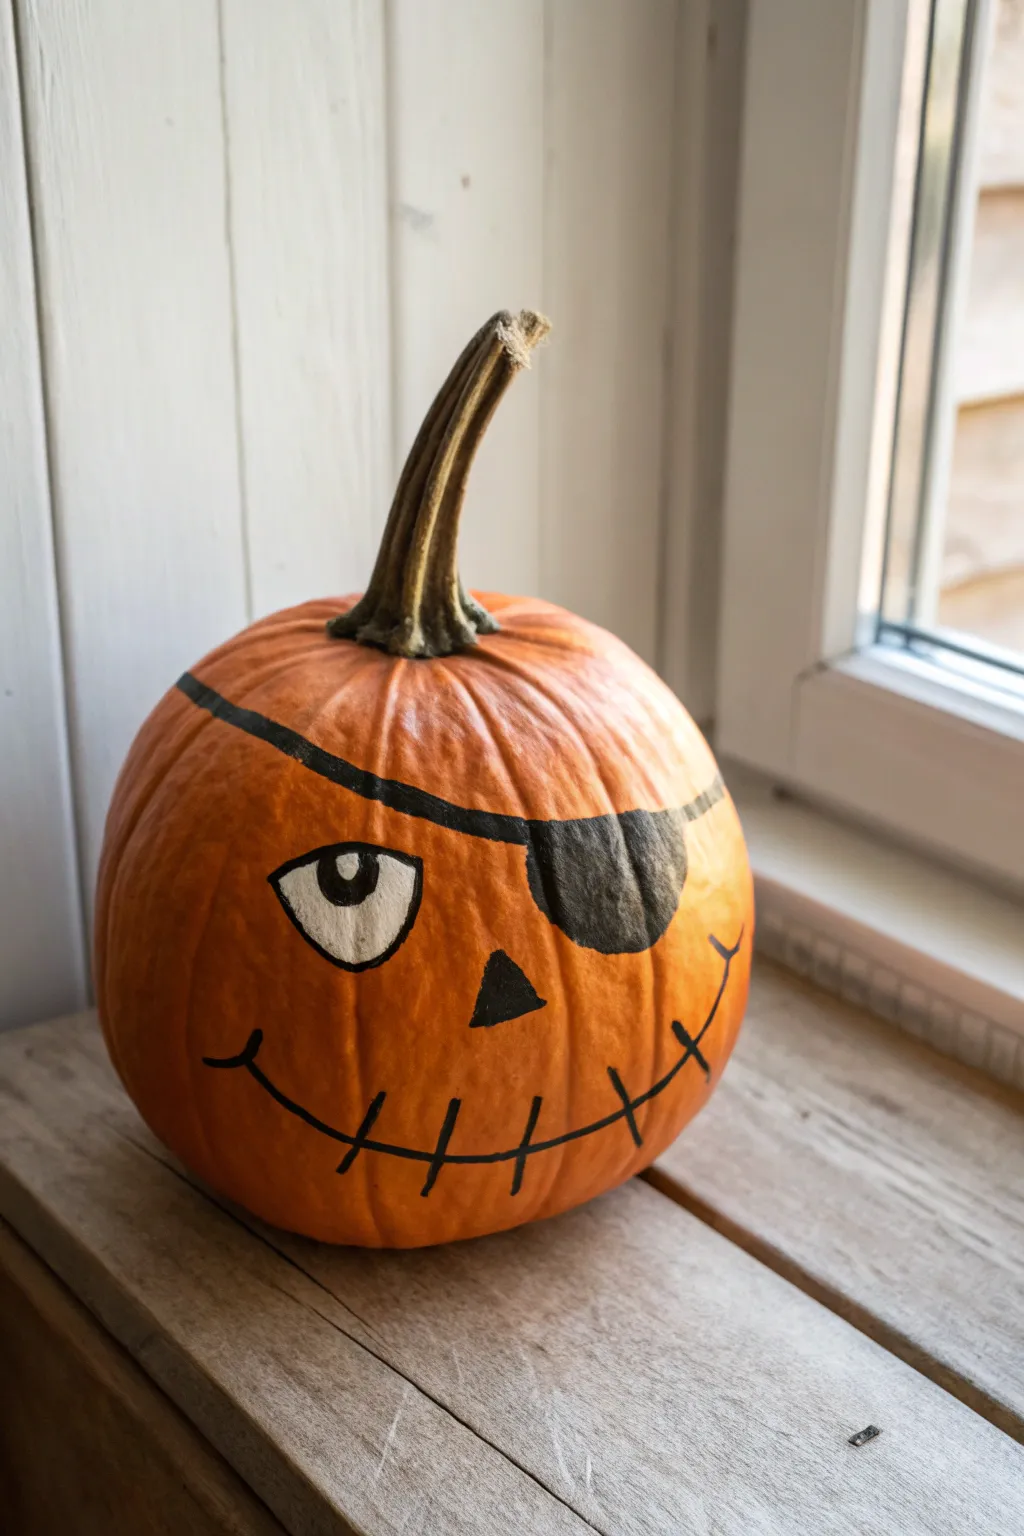
Transform a simple pumpkin into a swashbuckling character by cleverly using the stem as a prominent nose. This design uses bold lines and simple shapes to create a charmingly rugged pirate face that looks great sitting on a windowsill.
Step-by-Step Tutorial
Materials
- One medium-sized orange pumpkin with a long, curved stem
- Black acrylic paint
- White acrylic paint
- Medium flat paintbrush
- Fine detail paintbrush or black paint marker
- Pencil or dry-erase marker (for sketching)
- Cup of water
- Paper towels
- Clear acrylic sealer (optional)
Step 1: Planning and Positioning
-
Choose the orientation:
Turn your pumpkin on its side so the stem faces forward, protruding out like a long, crooked nose. Find a stable spot where it doesn’t roll too much; if it’s wobbly, you can prop it up with small stones or clay underneath. -
Clean the surface:
Wipe down the pumpkin skin with a damp paper towel to remove any dirt or dust, ensuring the paint will adhere properly. Let it dry completely. -
Sketch the eye patch:
Using a pencil or a light dry-erase marker, lightly draw the outline of the eye patch. Place a large, rounded shape over the right eye area (your right, the pirate’s left), and draw the strap line diagonally across the forehead. -
Draft the visible eye:
On the left side, sketch a large, slightly flattened semi-circle for the visible eye. Position it so the flat edge is at the top, giving him a slightly suspicious or relaxed look. -
Outline the mouth:
Sketch a long, curved smile line starting low on the left cheek and curving up towards the right. Add vertical tick marks along the line to create that stitched-mouth appearance. -
Mark the nose detail:
Add a small black triangle directly onto the base of the pumpkin where the stem meets the fruit, centered below the eyes.
Pro Tip: Steady Hands
Rest your pinky finger against the pumpkin surface while painting intricate lines like the stitches. This acts as a stabilizer and prevents your hand from shaking.
Step 2: Painting the Features
-
Fill the eye base:
Check that your sketch lines look balanced. Using the medium brush and white acrylic paint, fill in the large semi-circle for the open eye. Apply this paint smoothly. -
Let the white dry:
Allow the white paint to dry for about 10-15 minutes. It needs to be dry to the touch so your black outlines don’t smear into gray. -
Paint the eye patch:
Switch to your black acrylic paint. Carefully fill in the eye patch shape you sketched earlier. Use steady strokes to keep the edges clean. -
extend the strap:
Continue painting the black strap line extending from the patch across the forehead and disappearing around the curve of the pumpkin.
Step 3: Adding Details and Refining
-
Outline the eye:
Once the white base is fully dry, use a fine detail brush or a black paint marker to outline the entire white eye shape. -
Add the pupil:
Paint a medium-sized black circle inside the white eye. Position it slightly upward and to the side to give the pirate a bit of an attitude. -
Highlight the pupil:
Dip the back end of your paintbrush in white paint and add a tiny dot inside the black pupil for a ‘spark’ of life. -
Paint the nose triangle:
Fill in the small triangle at the base of the stem with black paint. This visually connects the ‘stem nose’ to the painted face. -
Trace the mouth line:
Using your fine brush or paint pen, go over your sketched smile line with a bold black stroke. -
Add the stitches:
Paint the vertical cross-hatches along the mouth line. I usually make the ones in the center slightly longer than the ones at the corners for a more organic look. -
Add cheek creases:
Paint small, curved ‘bracket’ lines at the very ends of the smile to emphasize the cheeks and depth of the grin. -
Seal (optional):
If you plan to display this outdoors, wait 24 hours for the paint to cure, then spray a light coat of clear acrylic sealer over the painted areas.
Level Up: 3D Accessories
Tie a real red bandana around the top of the pumpkin or hot glue a gold curtain ring to the side as an earring for extra textural flair.
Place your finished pirate on a porch or windowsill to guard your home with a rustic charm
Parrot Sidekick Painted on the Shoulder
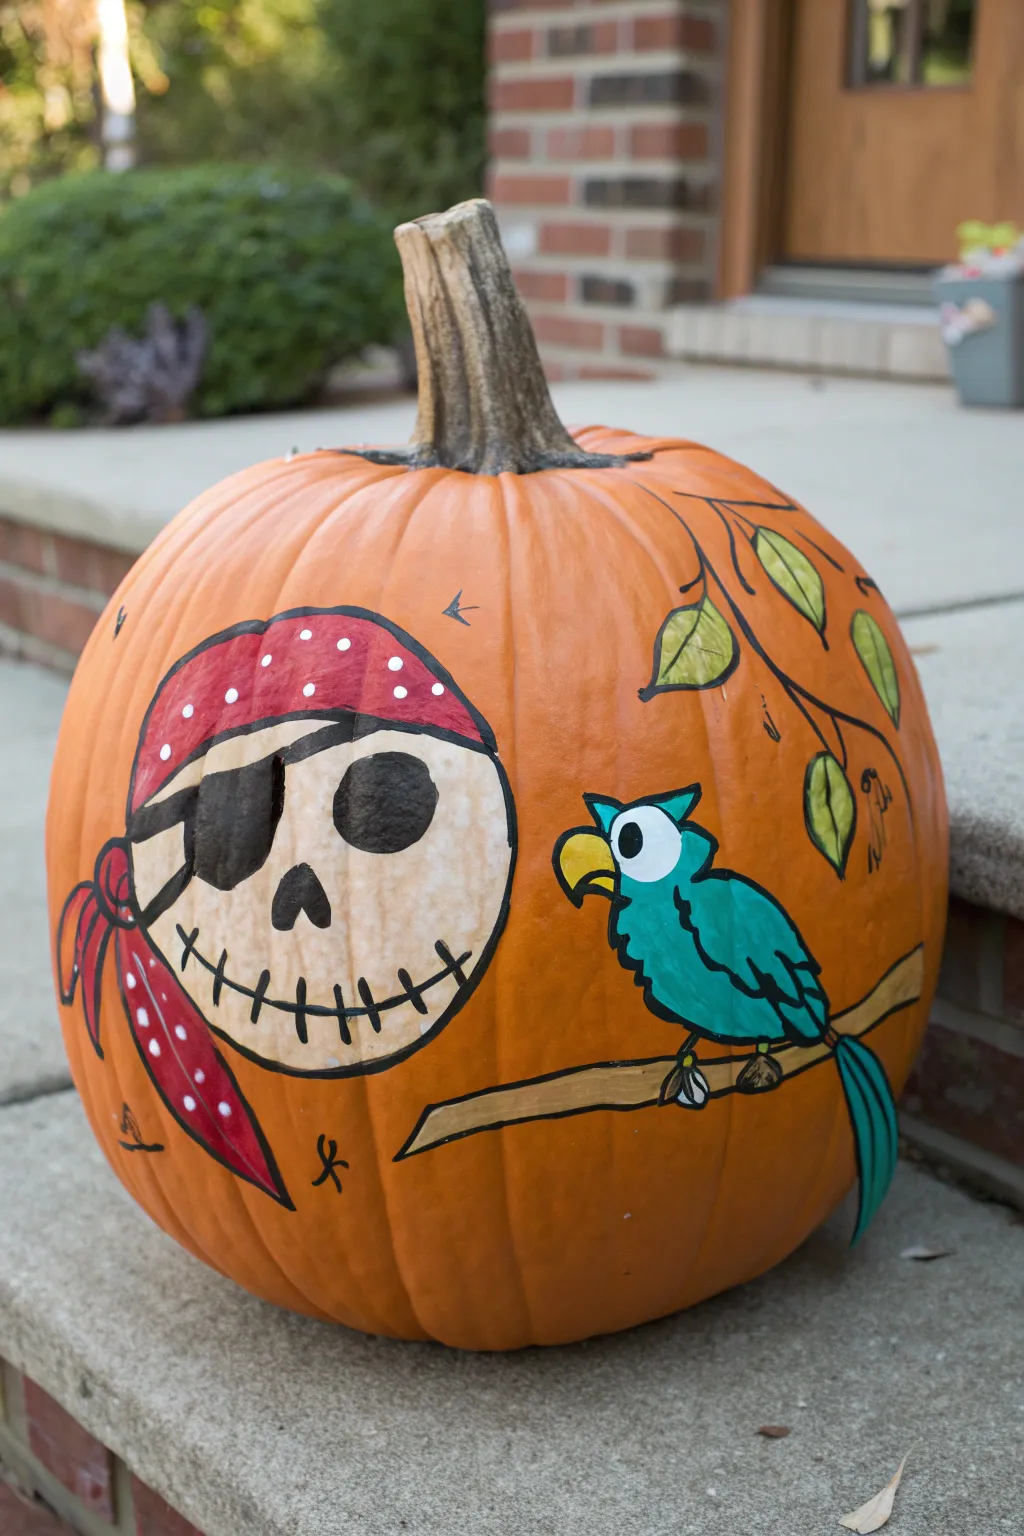
Transform a classic orange gourd into a playful pirate scene featuring a grinning skull and his loyal feathered friend. This no-carve design uses bold acrylics to create a charming duo that looks great on any porch step.
Step-by-Step Tutorial
Materials
- Large orange pumpkin (clean and dry)
- Acrylic craft paints (white, beige, black, bright red, turquoise, yellow, brown, green)
- Pencil for sketching
- Assorted paintbrushes (medium flat brush, small round brush, fine liner brush)
- Cup of water
- Paper towels
- Clear acrylic sealer spray (optional)
Step 1: Sketching the Crew
-
Prepare the surface:
Begin by wiping down your pumpkin with a damp cloth to remove any dirt or oils. Let it dry completely to ensure the paint adheres properly. -
Outline the skull:
Using a pencil, lightly sketch a large, roundish shape on the left side of the pumpkin face. This doesn’t need to be perfectly circular; a slightly lopsided shape adds character to the skull. -
Add the bandana line:
Draw a curved line across the top third of your skull shape to mark where the bandana will sit. Sketch the knot and tails hanging down the left side. -
Position the parrot:
To the right of the skull, sketch a simple bird shape perched on a branch. Use basic ovals for the body and head, and add a tail extending downward. -
Sketch the branch and leaves:
Draw a thick line beneath the parrot for the branch, extending it slightly behind the skull. Add a few curving vines and leaf shapes floating near the top right to fill the space.
Smooth Sailing
If your acrylic paint feels too thick or streaky, mix in a tiny drop of water. This helps the paint glide over the pumpkin’s bumpy ridges more smoothly.
Step 2: Painting the Base Colors
-
Fill in the skull:
Mix a small amount of beige with white paint to get an aged bone color. Paint the entire skull face area below the bandana line. You may need two coats for opaque coverage. -
Paint the bandana:
Use bright red paint to fill in the bandana cap and the ties on the side. Be careful around the edges where it meets the bone color. -
Color the parrot:
Paint the parrot’s body and head with a vibrant turquoise. Use yellow for the beak and white for the large eye circle. -
Paint the branch and leaves:
Use a light brown or tan color to fill in the branch under the parrot. Paint the floating leaves with a light green shade, letting some of the pumpkin’s texture show through if you like a rustic look.
Step 3: Adding Details & Defining Features
-
Create the pirate’s face:
Once the bone color is dry, use black paint to create a large eye socket on the right and a triangular nose cavity. Paint a black eye patch over the left eye area with a strap connecting to the bandana. -
Stitch the mouth:
Paint a long, curved black line for the mouth, adding short vertical hash marks across it to create a stitched skeletal grin. -
Detail the bandana:
Using the handle end of a paintbrush dipped in white paint, stamp small polka dots all over the red bandana area for a classic pirate pattern. -
Refine the parrot:
Add a black pupil to the white eye circle. Paint teal or darker blue wing details on the parrot’s side and long tail feathers. Add little grey or white claws gripping the branch. -
Outline the artwork:
Using a fine liner brush and black paint (or a black paint pen), outline the skull, bandana, parrot, and branch. This ‘cartoon’ outline makes the design pop against the orange background. -
Add leaf veins:
Draw simple veins inside your green leaves and sketch a thin vine connecting them. Add small black tick marks or ‘birds’ in the background for extra texture. -
Final touches:
Check for any patchy areas and touch up as needed. I like to add a tiny white reflection dot in the black eye socket to bring the skull to life.
Treasure Chest Texture
Use a dry brush with a tiny bit of gold paint to lightly dust the edges of the leaves or the parrot’s wings for a shimmering, magical effect.
Place your swashbuckling masterpiece by the door to greet trick-or-treaters


Weathered Pirate With Dry-Brushed Shadows
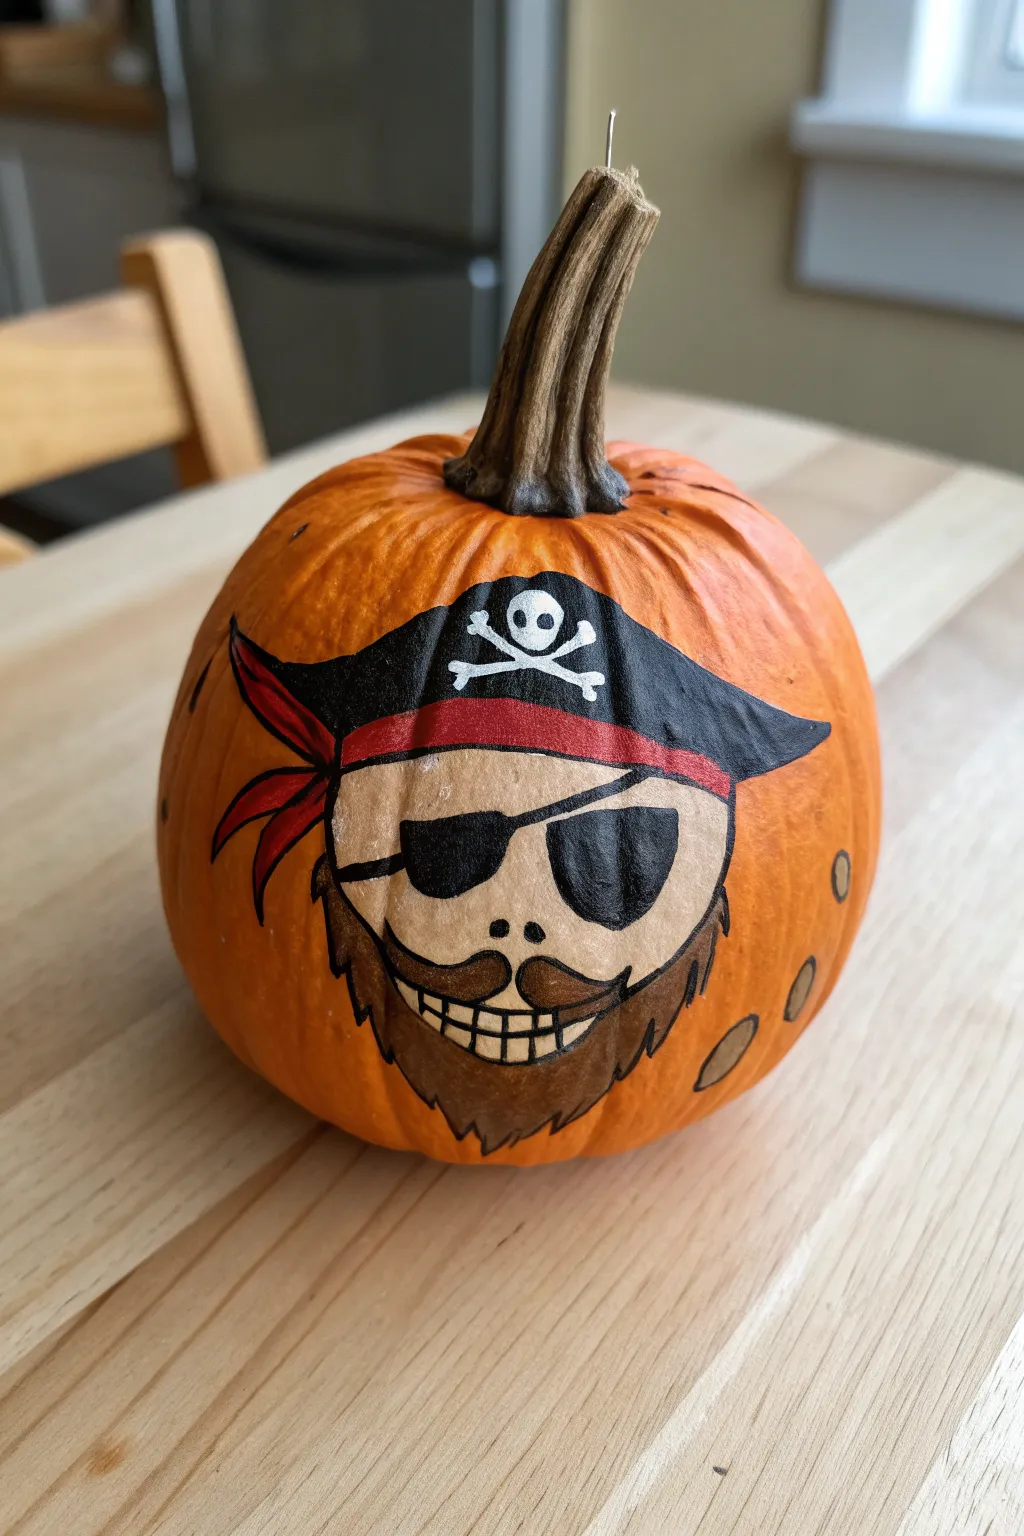
Transform a humble pumpkin into a swashbuckling character with this bold, cartoon-style pirate portrait. Using stark black outlines against vibrant acrylics creates a sticker-like effect that really pops against the orange rind.
Step-by-Step Guide
Materials
- Small to medium round pumpkin
- Pencil or light-colored chalk marker
- Black acrylic paint
- White acrylic paint
- Red acrylic paint
- Light beige/cream acrylic paint
- Brown acrylic paint
- Fine liner brush (size 0 or 00)
- Small flat brush (size 4 or 6)
- Small round brush (size 2)
- Water cup and paper towels
Step 1: Sketching the Scallywag
-
Clean surface:
Begin by wiping down your pumpkin with a damp cloth to remove any dirt or oils, ensuring the paint will adhere properly. Let it dry completely. -
Map the face:
Using a pencil or a light chalk marker, lightly sketch the large U-shape for the pirate’s face in the center of the pumpkin. -
Add the hat:
Sketch a triangle shape sitting atop the face curve for the pirate hat, extending sharp points out to the left and right sides. -
Detail the features:
Draw the bandana strip just under the hat brim, the eyepatch string, the beard outline, and a wide, grinning mouth.
Step 2: Blocking in Colors
-
Paint the face base:
Using your flat brush and beige paint, fill in the skin area. You may need two coats here to cover the bright orange skin, letting the first coat dry for about 10 minutes. -
Fill the hat:
Switch to black paint and carefully fill in the hat shape. Be careful near the edges to keep the lines sharp. -
Paint the bandana:
With a small round brush and red paint, fill in the strip across the forehead. Don’t forget to add the flowing tails of the knot on the left side of the head. -
Beard base:
Mix a medium brown or use straight brown paint to fill in the beard area. I find applying this in downward strokes helps mimic the texture of hair. -
Teeth and Skull:
Using a clean small brush and white paint, carefully fill in the crescent shape of the teeth and paint a small skull and crossbones symbol on the center of the hat.
Pro Tip
Rest your pinky finger on the pumpkin surface while painting fine details. This stabilizes your hand and prevents shaky lines.
Step 3: Details & Outlining
-
The eyepatch:
Paint a large black shape over the left eye area (viewer’s right) for the patch, and paint a simple black oval for the visible right eye. -
Add the mustache:
With dark brown paint (or black mixed with brown), paint a curly mustache right above the mouth area. -
Start the outlines:
Once all base blocks of color are dry to the touch, load your fine liner brush with black paint. Outline the entire face shape first. -
Define the bandana:
Outline the red bandana strip and the tails. Add a few internal black lines on the tails to show folds in the fabric. -
Outline the hat:
Trace the edge of the black hat to crisp up the shape. If your skull symbol is dry, give it a very thin outline to separate it from the black background. -
Facial details:
Draw the string for the eyepatch across the forehead. Carefully outline the teeth grid and add two small dots for the nose. -
Beard texture:
Outline the beard, adding jagged zigzag lines at the edges to look like hair. Add a few black streaks inside the brown area for depth. -
Floating accents:
To balance the design, paint three small floating circles or ‘coins’ in metallic or dull gold on the right side of the pumpkin.
Level Up
Add a tiny white highlight dot to the visible eye and the black eyepatch to make the character look glossy and alive.
Now you have a seafaring decoration ready to greet your guests
Skeleton Pirate Skull on a Pumpkin
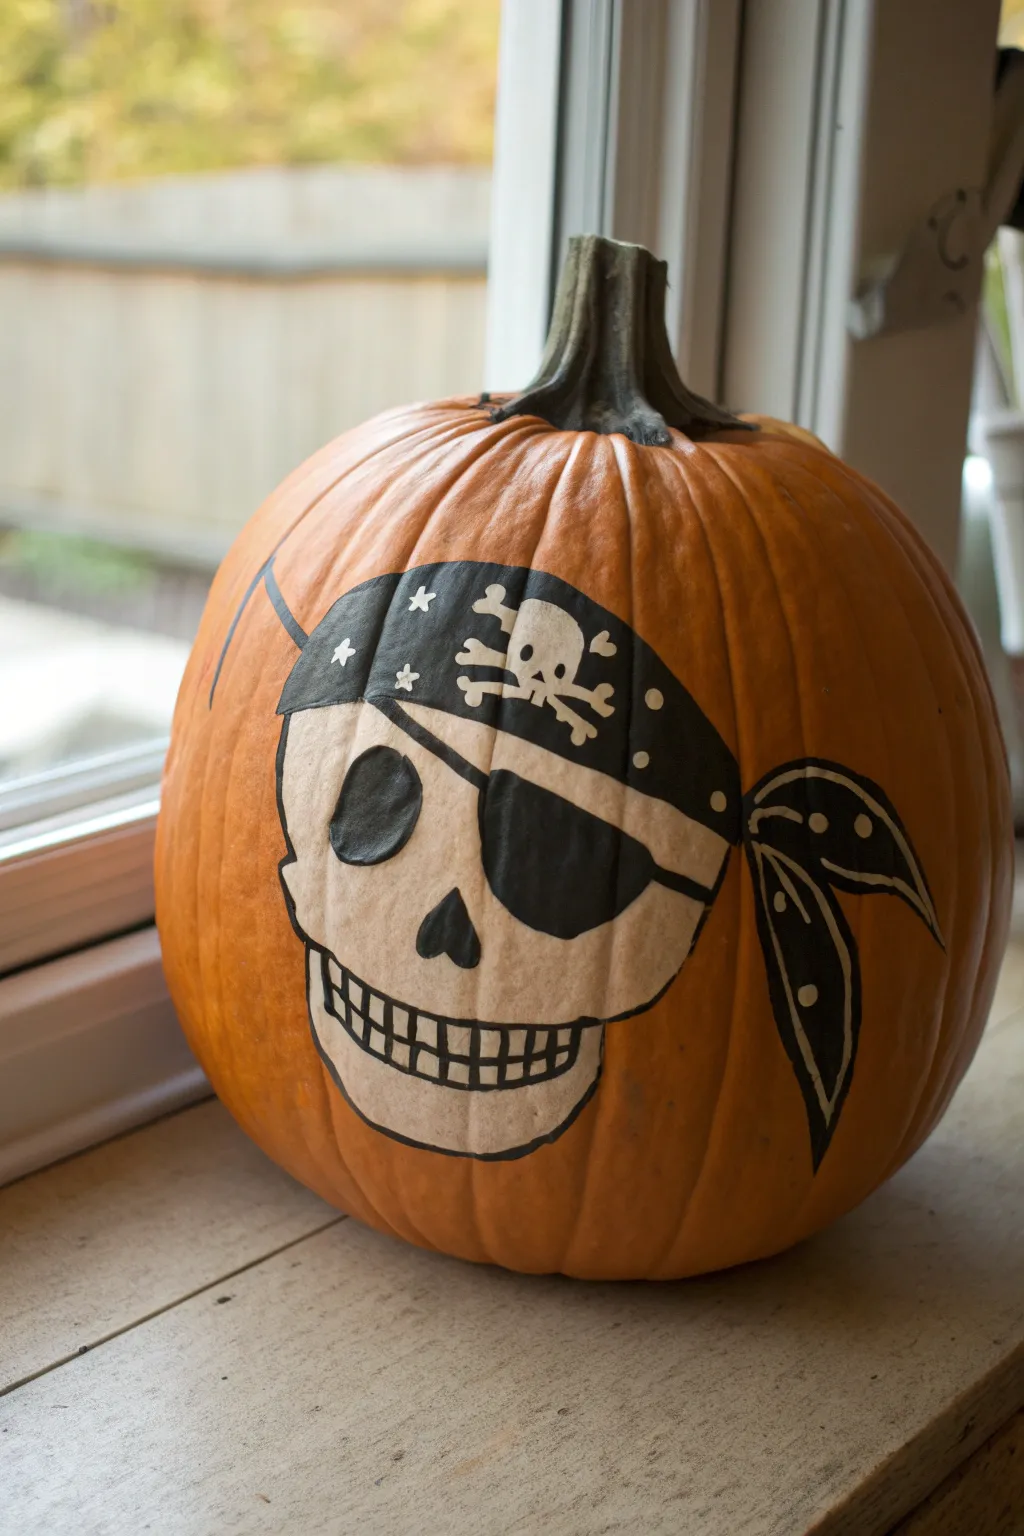
Transform an ordinary pumpkin into a menacing matey with this classic pirate skull design. The high-contrast black and white paint pops beautifully against the orange rind, creating a bold decoration that requires absolutely no carving.
Step-by-Step Tutorial
Materials
- Medium pumpkin (cleaned and dried)
- White acrylic paint
- Black acrylic paint
- Pencil or light-colored washable marker
- Fine-point paintbrush (detail work)
- Medium flat paintbrush (filling in)
- Small round paintbrush
- Paper plate or palette
- Cup of water
- Paper towels
Step 1: Drafting the Design
-
Clean surface:
Ensure your pumpkin is completely clean and dry. Any dirt or oil on the skin will prevent the acrylic paint from adhering properly. -
Outline the skull shape:
Using a pencil or a light washable marker, lightly sketch the large U-shape of the skull’s jaw and the rounded top of the cranium on the flattest side of the pumpkin. -
Sketch the bandana:
Draw a curved line cutting across the forehead of the skull to define the bottom of the bandana. Extend the top of the bandana up over the skull’s curve. -
Add the knot tails:
On the right side of the skull, sketch two leaf-like shapes flowing outward to represent the tied knot of the bandana. -
Mark features:
Lightly outline the eye sockets (one round, one slightly obscured by the patch), the nose cavity, and the grin. Don’t worry about the teeth details yet, just get the placement right.
Paint Slipping?
If the acrylic paint beads up or slides off the pumpkin skin, the surface might be too waxy. Lightly scuff the area with fine-grit sandpaper or wipe with rubbing alcohol before repainting.
Step 2: Painting the Base
-
Fill the skull:
Using your medium flat brush and white acrylic paint, fill in the entire skull shape, avoiding the eye patch area if you prefer, though painting over it is fine too. Don’t paint the bandana yet. -
Apply second coat:
Acrylic white can be translucent on orange pumpkins. Once the first layer is dry to the touch, apply a second coat to ensure a solid, bright bone color. -
Base the bandana:
While the white dries, use black paint to fill in the main bandana shape on the forehead and the two knot tails on the side. -
Let it set:
Allow the entire design to dry completely for about 20-30 minutes. Painting wet-on-wet here will smear the sharp lines we need.
Step 3: Adding the Details
-
Paint the eye patch:
Using black paint and a small round brush, paint the D-shape of the eye patch over the right eye area (viewer’s right). Draw the thin strap line extending diagonally up toward the bandana. -
Fill the eye socket:
Paint the left eye socket as a jagged, somewhat pear-shaped black void. It doesn’t need to be a perfect circle; an irregular shape looks more skeletal. -
Nose and mouth:
Paint an upside-down heart shape for the nose cavity. For the mouth, paint a thin horizontal line with short vertical hash marks to create the teeth. -
Outline the skull:
Switch to your fine-point brush. Carefully outline the entire white skull shape with a thin, steady black line to make it pop against the pumpkin’s skin. -
Bandana decoration:
Dip a detail brush (or the back end of a paintbrush handle) into white paint. Add small stars and dots across the black bandana for a patterned fabric look. -
Mini skull emblem:
I like to add a tiny ‘meta’ skull and crossbones on the center of the bandana using the fine brush and white paint. Keep it simple—just a dot for the head and lines for bones. -
Knot details:
Add white accent lines and dots to the hanging knot tails to simulate folds in the fabric. -
Final touches:
Check your edges. If any orange skin is showing between the black outline and the white skull, touch it up carefully to make the design look like a single sticker-like unit.
Make it Shine
Once fully dry, spray the painted area with a clear acrylic sealer or Mod Podge. This protects the paint from scratching and gives your pirate a professional glossy finish.
Set your finished pirate on the porch to guard your treasure from trick-or-treaters


Have a question or want to share your own experience? I'd love to hear from you in the comments below!