A blank exterior wall can feel like dead space, but a good outdoor wall mural turns it into the most alive part of your yard. I’m sharing my favorite outdoor wall mural ideas—starting with the classic crowd-pleasers and sliding into the artsy, unexpected stuff once you’re warmed up.
Lush Botanical Garden Wall
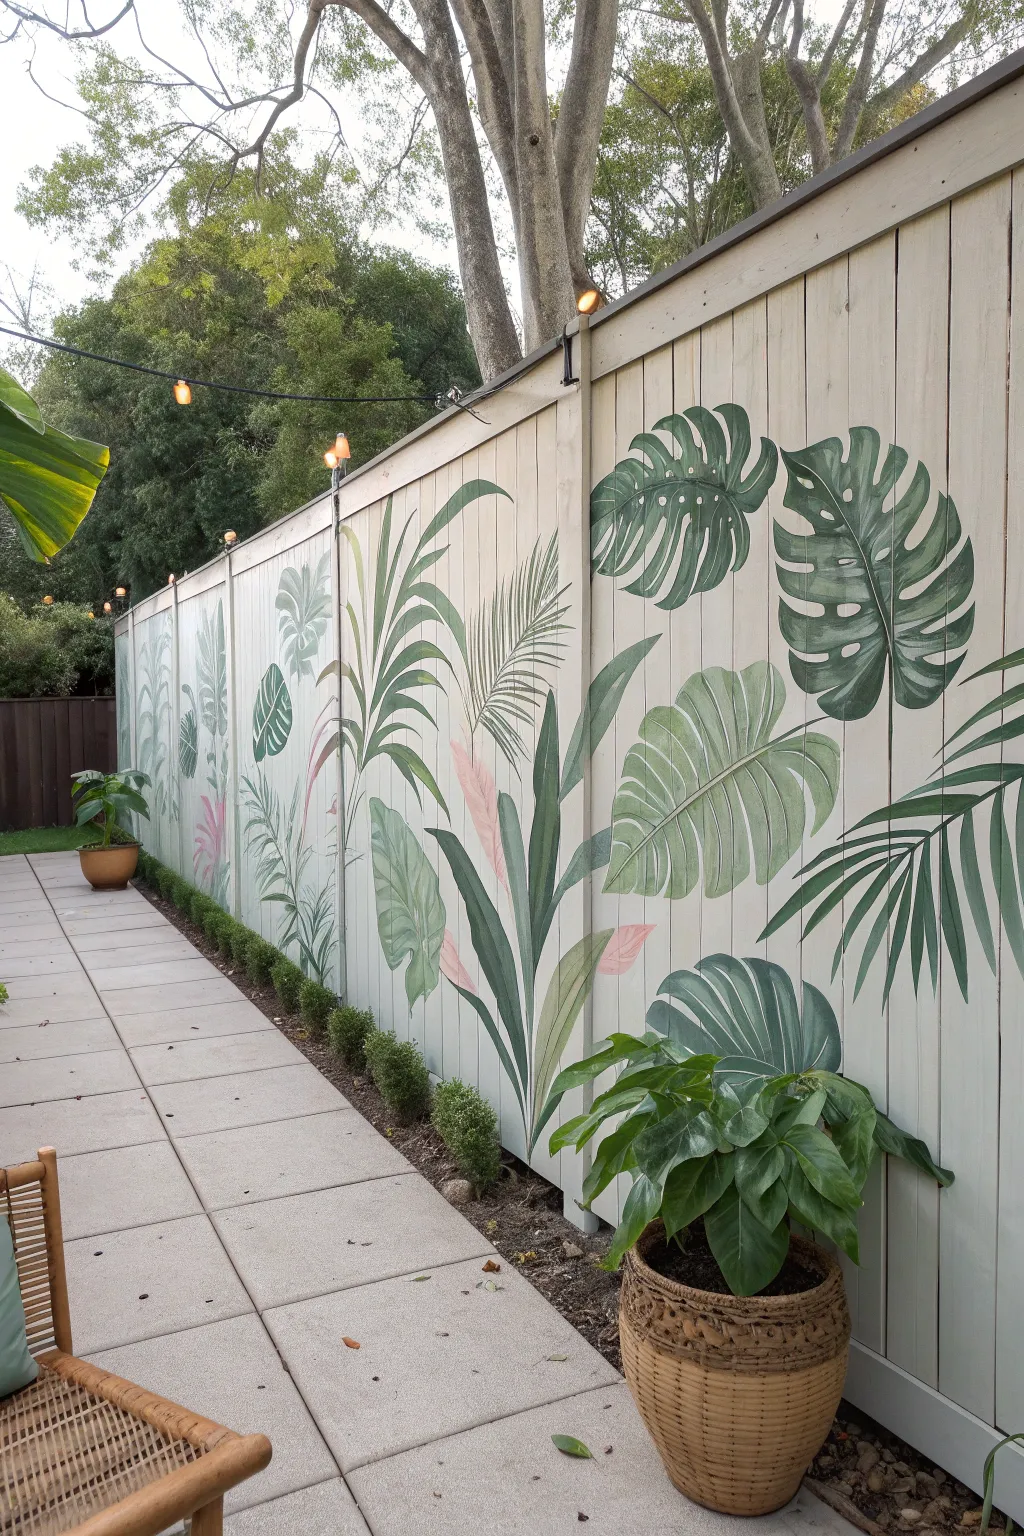
Transform a plain backyard fence into a permanent vacation spot with this lush, botanical mural. Featuring oversized monstera leaves and palm fronds in soothing greens and soft pinks, this project brings vibrant life to your outdoor space even in the depths of winter.
Detailed Instructions
Materials
- Exterior latex primer (white)
- Exterior house paint (white or off-white base)
- Exterior acrylic paints (dark hunter green, sage green, lime green, teal, soft pink)
- Assorted paintbrushes (2-inch sash brush, 1-inch flat brush, round detail brush)
- Chalk or watercolor pencil (light gray)
- Painter’s tape
- Drop cloth
- Paint mixing cups or palette
- Step ladder
- Reference images of tropical leaves
Step 1: Preparation & Base Coat
-
Clean the surface:
Begin by thoroughly cleaning your fence. Use a pressure washer or a stiff scrub brush with soapy water to remove dirt, mold, and moss. Let the wood dry completely for at least 24 hours. -
Protect the area:
Lay down a drop cloth along the base of the fence to protect your patio pavers and garden beds from drips. If your fence has posts or hardware you want to keep unpainted, mask them off with painter’s tape. -
Prime the wood:
Apply a coat of high-quality exterior primer. This is crucial for raw wood fences to prevent the wood tannins from bleeding through your artwork later. -
Apply the background color:
Roll or brush on your white or off-white base coat. This creates a bright, clean canvas that makes the green leaves pop. You might need two coats for full opacity.
Natural Variety
Don’t just use one green! Mix in tiny drops of yellow, blue, or even brown into your main green paint cup as you move from leaf to leaf. This subtle variety mimics real nature.
Step 2: Sketching the Layout
-
Plan your composition:
Before drawing, step back and visualize where the largest leaves should go. Aim for a mix of heights—some leaves reaching the top, others filling the mid-section—to create a natural, organic flow. -
Sketch the outlines:
Use a piece of chalk or a watercolor pencil to lightly sketch the leaf shapes onto the dry wall. Draw large monstera leaves, tall palm fronds, and broad banana leaves. Don’t worry about perfection; the paint will cover these lines. -
Overlap the elements:
Ensure that some leaves overlap others. Draw the foreground leaves (the ones ‘closest’ to you) first, then fill in the gaps behind them with partial leaf shapes.
Chalk Marks Stick?
If your chalk sketch lines are still visible after painting, simply wipe them away with a damp sponge. The paint is permanent, but the chalk will wash right off.
Step 3: Painting the Foliage
-
Mix your greens:
Prepare three distinct green mixtures in your cups: a dark shadow green, a mid-tone true green, and a light highlight green. I like to keep a bit of teal on hand to cool down the shadows if needed. -
Block in base colors:
Start with the mid-tone green. Fill in the main body of the leaves using your 2-inch brush. Don’t paint everything one flat color; vary the shades slightly between different leaf types. -
Add depth with shadows:
While the base coat is still slightly tacky or naturally blended, use the dark hunter green to paint the areas where leaves overlap or where the stem meets the leaf. This creates immediate dimension. -
Add pink accents:
Select a few specific leaves or fronds to paint in soft pink. This adds a whimsical, modern touch and breaks up the sea of green. Paint these just like the green leaves, perhaps blending a little white at the tips. -
Let the first layer dry:
Allow your blocked-in shapes to dry to the touch so you don’t muddy your detail work in the next phase.
Step 4: Details & Veining
-
Paint the veins:
Using your smaller round detail brush and a lighter green (or white mixed with a tiny bit of green), paint the central veins of the leaves first, then branch out with smaller veins. -
Add highlights:
Take your lightest green or a pale mint color and brush it along the top edges of the leaves where the sun would naturally hit. This simulates sunlight filtering through the canopy. -
Refine the edges:
Go back with your background white color and a small flat brush to clean up any messy edges or reshape leaf tips that got too bulky. -
Protect the mural (Optional):
If you live in a harsh climate, apply a clear, UV-resistant exterior sealer over the entire mural once the paint has cured for a few days.
Now step back and enjoy your year-round garden view, rain or shine


Calm Horizon Landscape Scene
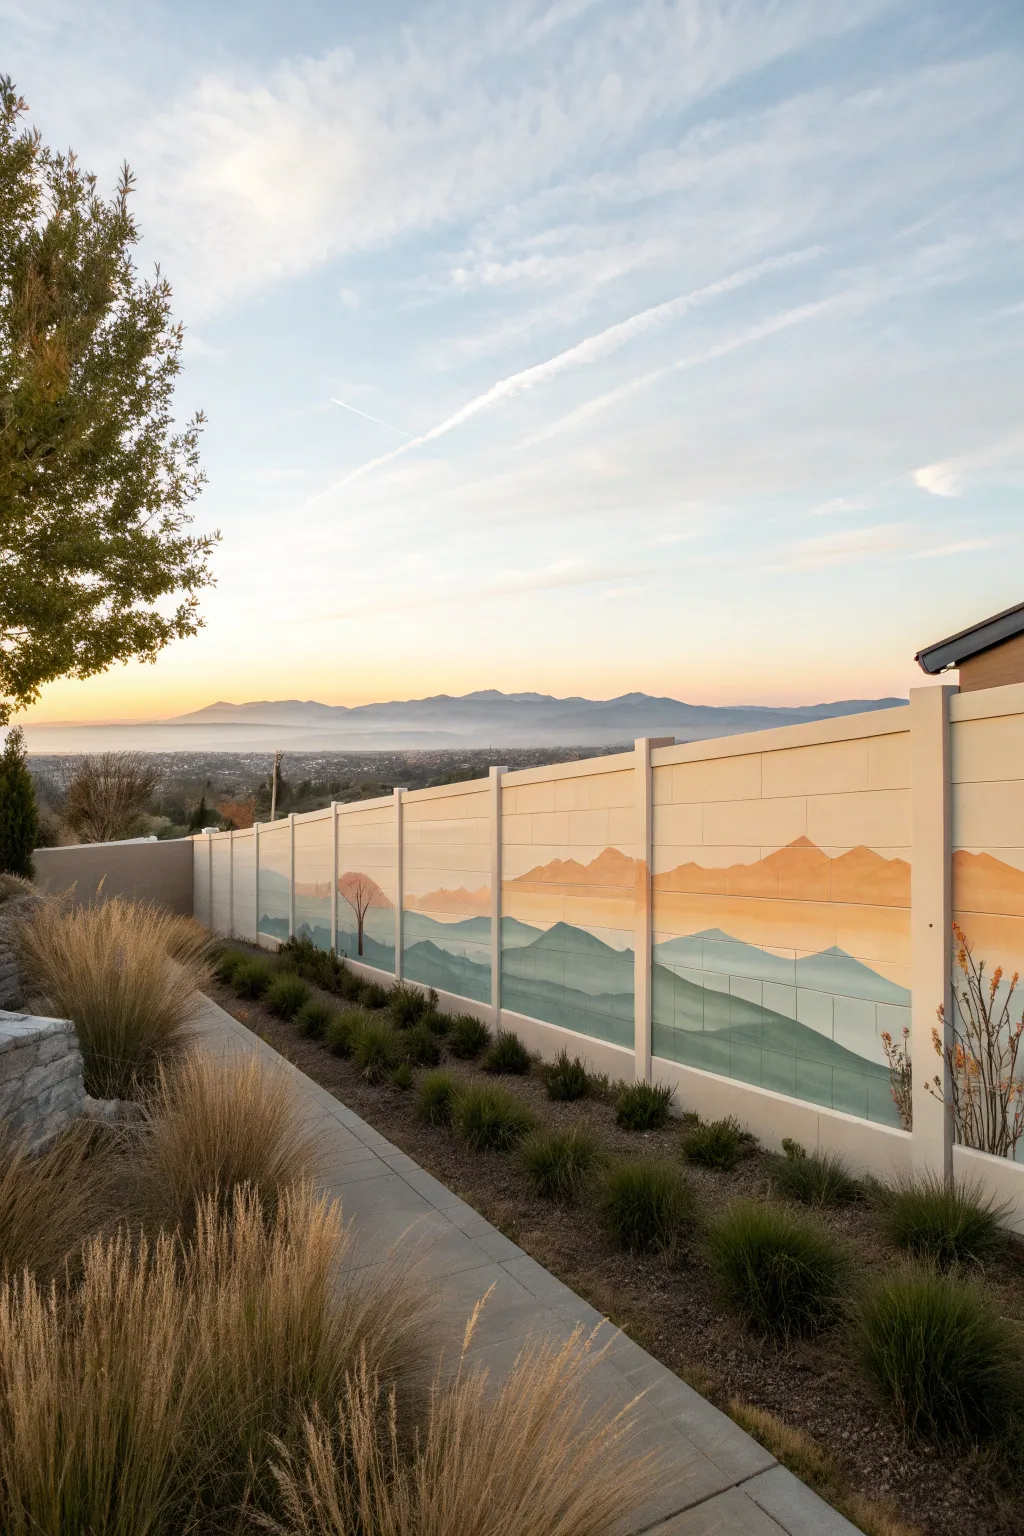
Transform a plain panel fence into a breathtaking vista that merges seamlessly with the horizon. This mural uses soft gradients of teal and peach to replicate the calming effect of distant mountains at sunset, adding incredible depth to your backyard.
Step-by-Step
Materials
- Exterior acrylic latex primer (bonding primer for vinyl/concrete)
- Exterior acrylic latex house paints (White, Teal, Navy Blue, Peach, Burnt Orange)
- Wide painter’s tape (2-inch)
- Assorted paint brushes (2-inch sash brush, 4-inch roller)
- Paint rollers and tray
- Chalk line or level
- Pencil
- Mixing buckets
- Rags for cleanup
- UV-resistant clear topcoat (optional)
Step 1: Preparation and Priming
-
Clean the surface:
Thoroughly wash your fence panels with soap and water or a pressure washer on a low setting. Remove any dirt, moss, or mildew to ensure the paint adheres properly. Let the fence dry completely for at least 24 hours. -
Apply bonding primer:
Since vinyl and smooth composite surfaces can be slippery, apply a high-quality bonding primer designed specifically for plastics or glossy surfaces. Roll it on evenly and use a brush to get into the grooves between panels. -
Establish the horizon line:
Once the primer is dry, decide where your horizon line—the meeting point of the sky and the mountains—will be. Use a chalk line or a level and pencil to lightly mark a straight guide across all fence panels.
Step 2: Painting the Sky and Base Layers
-
Mix the sky color:
In a bucket, mix a very pale, creamy white with a tiny drop of peach to warm it up. This will be your sky color and the background for the upper half of the fence. -
Paint the upper section:
Using a roller, apply this pale sky color from the top of the fence down to just below your marked horizon line. It’s okay if the edge is messy, as the mountains will cover it later. -
Outline the mountain ranges:
With a pencil, sketch out two distinct layers of mountains. Draw a higher, distant range that peaks gently, and a lower, closer range that spans slightly wider. Don’t worry about perfection; natural landscapes are irregular.
Paint Peeling?
Vinyl expands and contracts with heat. If paint cracks, you likely skipped the bonding primer. Sand the peeling spot, re-prime with a plastics-specific primer, and repaint.
Step 3: Painting the Mountains
-
Mix the distant mountain color:
Create a soft peach-orange hue by mixing your peach paint with a little white. This layer represents the sun-hit peaks in the distance. -
Paint the distant peaks:
Fill in the shape of the higher, distant mountain range with your peach mixture. Use a sash brush to cut in the sharp peaks against the sky, ensuring a crisp upper edge. -
Mix the middle ground color:
For the shadowy base of the distant mountains, mix a darker orange or light terracotta. Blend this color slightly into the bottom of the peach mountain shape while the paint is still tacky to create a subtle ombre effect. -
Mix the foreground mountain color:
Mix a teal color by combining your teal paint with a bit of white and a touch of navy to desaturate it. This cool tone will make the mountains look closer and contrast beautifully with the warm sky. -
Paint the foreground range:
Paint the lower mountain range shape with this teal mixture. I like to overlap the bottom of the peach mountains slightly to create a sense of depth and layering. -
Add deep shadows:
Mix a darker version of the teal using more navy blue. Paint the very bottom section of the fence with this color to ground the mural and simulate deep valleys or closer hills.
Soft Gradients
To get that misty look between mountain layers, keep a spray bottle of water handy. Lightly mist the paint on the fence before blending colors together with a dry brush.
Step 4: Adding Details and Finishing
-
Blend the transitions:
While the paint layers are semi-dry, use a dry brush to gently feather the edges where the different mountain colors meet. This softens the lines and makes the landscape look misty. -
Add a focal point tree:
Chose a spot on the foreground range to add a silhouette of a tree. Use a small artist’s brush and dark brown or charcoal paint. Paint a thin trunk and sparse branches to mimic the winter tree in the reference. -
Touch up panel grooves:
Go back with a small brush and ensure paint has fully covered the vertical grooves or indentations between the fence panels, maintaining the continuous line of the mountains across the gaps. -
Check from a distance:
Step back about 20 feet to view the mural as a whole. This is the best way to spot any uneven gradients or distracting brushstrokes that need fixing. -
Apply clear coat:
To protect your artwork from sun fading and weather, apply a layer of clear, UV-resistant exterior sealer over the entire mural once the paint is fully cured (usually after 24-48 hours).
Enjoy the peaceful view of your new horizon line every time you step into your garden


Poolside Ocean Wave Backdrop
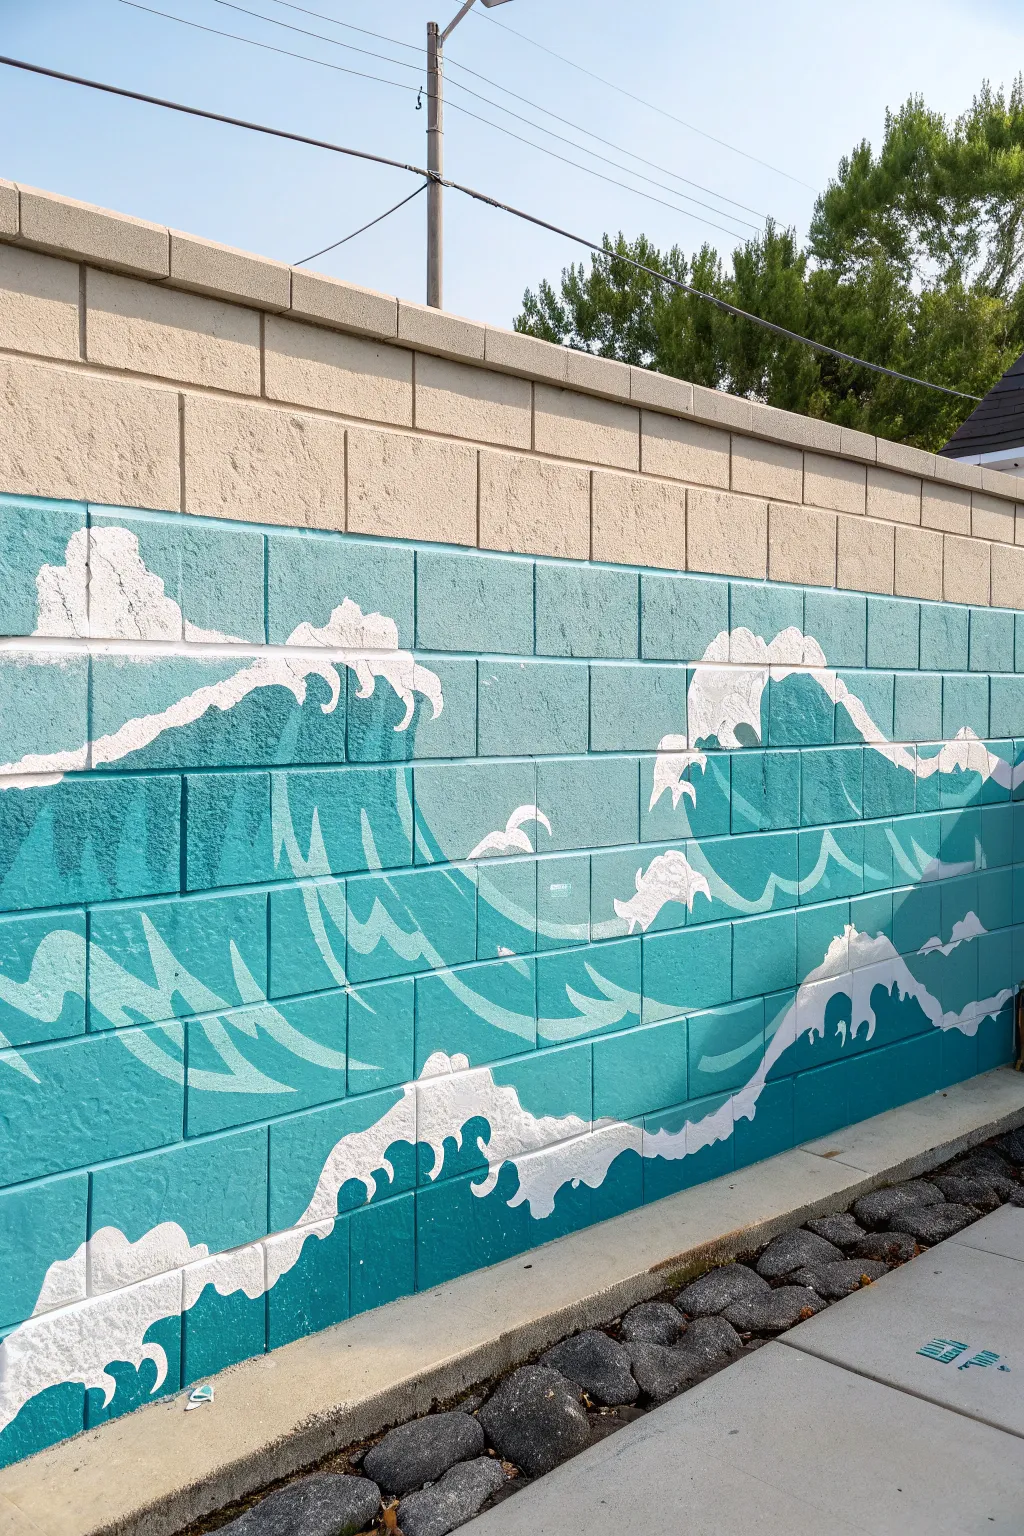
Transform a plain concrete block wall into a refreshing oceanic escape with this stylized wave mural. Using the natural grid of the cinder blocks as your canvas, you’ll create crashing whitecaps and deep teal currents that bring vibrant movement to your outdoor space.
How-To Guide
Materials
- Outdoor primer (masonry compatible)
- Exterior latex paint: Deep teal/turquoise
- Exterior latex paint: Light blue/aqua
- Exterior latex paint: White
- Pressure washer or stiff bristle brush
- TSP substitute cleaner
- Chalk or charcoal stick for sketching
- Painter’s tape (exterior grade)
- Wide paint roller (9-inch with heavy nap for rough surfaces)
- Small roller (4-inch)
- Angled sash brush (2-inch)
- Detail brush (round artist brush, size 6 or 8)
- Drop cloth
Step 1: Preparation & Base Coat
-
Clean surface:
Begin by thoroughly cleaning the concrete block wall. A pressure washer is most effective for removing accumulated dirt and moss from the porous surface, but a stiff brush and TSP substitute will work for smaller areas. Allow the wall to dry completely for at least 24-48 hours. -
Define the area:
Decide how high your waves will go. In the example, the mural stops a few courses down from the top, leaving a natural beige border. Apply a straight line of painter’s tape across the mortar line where you want the painting to stop to ensure a crisp edge. -
Prime the surface:
Apply a coat of masonry primer to the entire painting area. Use a thick-nap roller to get into the crevices of the concrete blocks. This step is crucial for color vibrancy and longevity. -
Apply the main background color:
Once the primer is dry, roll on two coats of your deep teal or turquoise base color. Again, use a heavy nap roller to saturate the porous blocks fully. I like to work the roller vertically and then horizontally to ensure every pit is filled. -
Dry time:
Let the base color cure according to the manufacturer’s instructions, usually overnight, before starting the detail work.
Use the Lines
Use the horizontal mortar lines as guides for spacing your waves. If you peak a wave every 3-4 blocks, you’ll create a balanced rhythm across the wall.
Step 2: Sketching & Mid-Tones
-
Sketch the wave flow:
Using a piece of chalk, lightly sketch the large, sweeping curves of the waves directly onto the teal paint. Focus on creating diagonal movements that rise from left to right. -
Outline the foam caps:
Draw the jagged, frothy shapes at the tops of your wave crests. Think of these like scalloped edges or claw shapes that hook downward. -
Mix your lighter tone:
Create a mid-tone by mixing a little white into your light aqua paint if needed, or use the aqua straight from the can. You want a distinct contrast against the dark teal. -
Paint the inner currents:
Using the 2-inch angled brush, paint the sweeping secondary curves underneath the main crests using the light aqua color. These shapes resemble large shark fins or hooks pointing toward the wave’s direction. -
Refine the strokes:
Feather the ends of these aqua strokes slightly so they feel fluid, tapering them into sharp points.
Step 3: Highlights & Details
-
Fill the whitecaps:
Dip your smaller brush into the exterior white paint. Fill in the main foam shapes at the very top of each wave crest. Do not worry about perfect smoothness; the texture of the block adds character. -
Add floating foam:
Paint smaller, detached bits of foam (splash marks) just behind or in front of the main waves. These look like small birds or ‘u’ shapes. -
Create the bottom churn:
Along the bottom two rows of blocks, paint a jagged, continuous line of white foam to represent the water churning at the base. Make the top edge of this section irregular and splashy. -
Highlight the currents:
Go back over your light aqua sections and add very thin streaks of white along the top edges of those curves. This adds dimension and makes the water look wet and reflective. -
Clean up edges:
Remove the top painter’s tape carefully. Use a small detail brush and your original teal paint to touch up any spots where the white or aqua might have dripped or gone outside your desired lines.
Rough Surface Fix
If the blocks are too pitted for a brush to create sharp lines, dab paint into the holes first, then smooth it out. Don’t drag the brush; push the paint.
Step back and enjoy the cool, coastal vibes your new artwork brings to the backyard


Climbing Vines and Floral Arbors

Transform a plain garden gate into a permanent blooming entryway with this clever trompe-l’œil mural. By painting a realistic green trellis entwined with delicate climbing vines, you create the illusion of a lush garden arbor that stays vibrant in every season.
Detailed Instructions
Materials
- Exterior arched wooden gate (pre-primed or painted cream)
- Sandpaper (120 and 220 grit)
- Exterior acrylic latex paints (Sage Green, Forest Green, Dark Brown, Cream for touchups)
- Artist acrylics for details (Pink, Magenta, White)
- Painter’s tape (1-inch width)
- Long straight edge or yardstick
- Chalk or pastel pencil (light gray)
- Filbert brushes (sizes 4 and 8)
- Fine liner brush (size 1)
- Flat angled brush (1-inch)
- Exterior clear matte sealer
Step 1: Preparation & Layout
-
Clean surface:
Begin by thoroughly cleaning the wooden gate to remove dirt, mildew, or loose paint. If the existing paint is glossy, lightly scuff it with 120-grit sandpaper so your new artwork adheres properly. -
Establish the arch:
Find the vertical center of the gate. Using your chalk or pencil, sketch a large arch shape that mimics the curve of the gate itself, leaving about a 4-inch border from the top edge. -
Draft the trellis structure:
Draw the trellis framework lightly in chalk. Start with two vertical posts on the sides, approximately 3 inches wide. Connect them with the arch you just drew. -
Add cross-hatching:
Sketch the diagonal lattice pattern inside the vertical posts and the arch. Use your straight edge to keep lines parallel. Don’t worry about perfection; slight irregularities make it look more organic.
Step 2: Painting the Trellis
-
Block in base color:
Using a 1-inch angled brush and Sage Green mixed with a touch of Dark Brown, paint the main structure of the trellis. Keep the paint relatively thin so the wood grain texture still reads through slightly. -
Define edges:
Reload your brush with straight Forest Green to darken the edges of the trellis slats. This simple shading technique gives the flat painting 3D dimension. -
Create shadows:
Mix a dark, muddy green-brown and use a smaller #8 filbert brush to paint distinct ‘drop shadows’ just to the right and below each trellis bar. This tricks the eye into thinking the trellis is sitting on top of the wood. -
Highlighting:
Add a thin line of pale green (mix Sage Green with White) along the top and left edges of the trellis slats to simulate sunlight hitting the structure.
Fixing Wobbly Lines
If your trellis lines look shaky, don’t repaint the whole bar. Use the gate’s background cream color to ‘cut’ back into the line and straighten the edge.
Step 3: Adding Flora
-
Sketch vine placement:
Lightly pencil in wandering vine lines. I like to have them start from the bottom corners and weave in and out of the lattice work, crossing over some bars and tucking under others. -
Paint main stems:
Use a #4 filbert brush and brown paint to draw the woody stems. Vary the pressure on your brush—press down for thicker base stems and lift up for whispy tendrils. -
Layering leaves:
Dip a small filbert brush into two shades of green simultaneously. Press the brush down and lift sharply to create leaf shapes. Cluster these along the vines, focusing on areas where the vine ‘touches’ the trellis. -
Painting blossoms:
Mix Pink and Magenta. Stipple small clusters of flowers using the tip of a #4 brush. Keep the clusters loose and airy rather than painting perfect circles. -
Add floral details:
With your fine liner brush and white paint, add tiny centers or highlights to the flowers to make them pop against the cream background. -
Ground the artwork:
At the very bottom of the gate, paint thin, upward vertical strokes using various greens to simulate grass growing up from the base, anchoring your vines.
Level Up: 3D Elements
Attach a real, small hook or nail to the painted trellis and hang a lightweight dried wreath or garden tool to blend reality with your painting.
Step 4: Finishing Touches
-
Erase guidelines:
Once the paint is completely dry to the touch (usually 1-2 hours), gently wipe away any visible chalk or pencil lines with a damp cloth. -
Second shadow pass:
Go back with a translucent dark glaze (watered down dark brown) and deepen the shadows specifically where the vines pass under the trellis bars. -
Seal the work:
Apply two coats of exterior clear matte sealer over the entire gate. This protects your artwork from UV rays and rain, ensuring your garden stays in bloom for years.
Enjoy the charm of your maintenance-free garden gate that greets visitors with perpetual spring blossoms
BRUSH GUIDE
The Right Brush for Every Stroke
From clean lines to bold texture — master brush choice, stroke control, and essential techniques.
Explore the Full Guide
Simple Color-Block Patio Accent
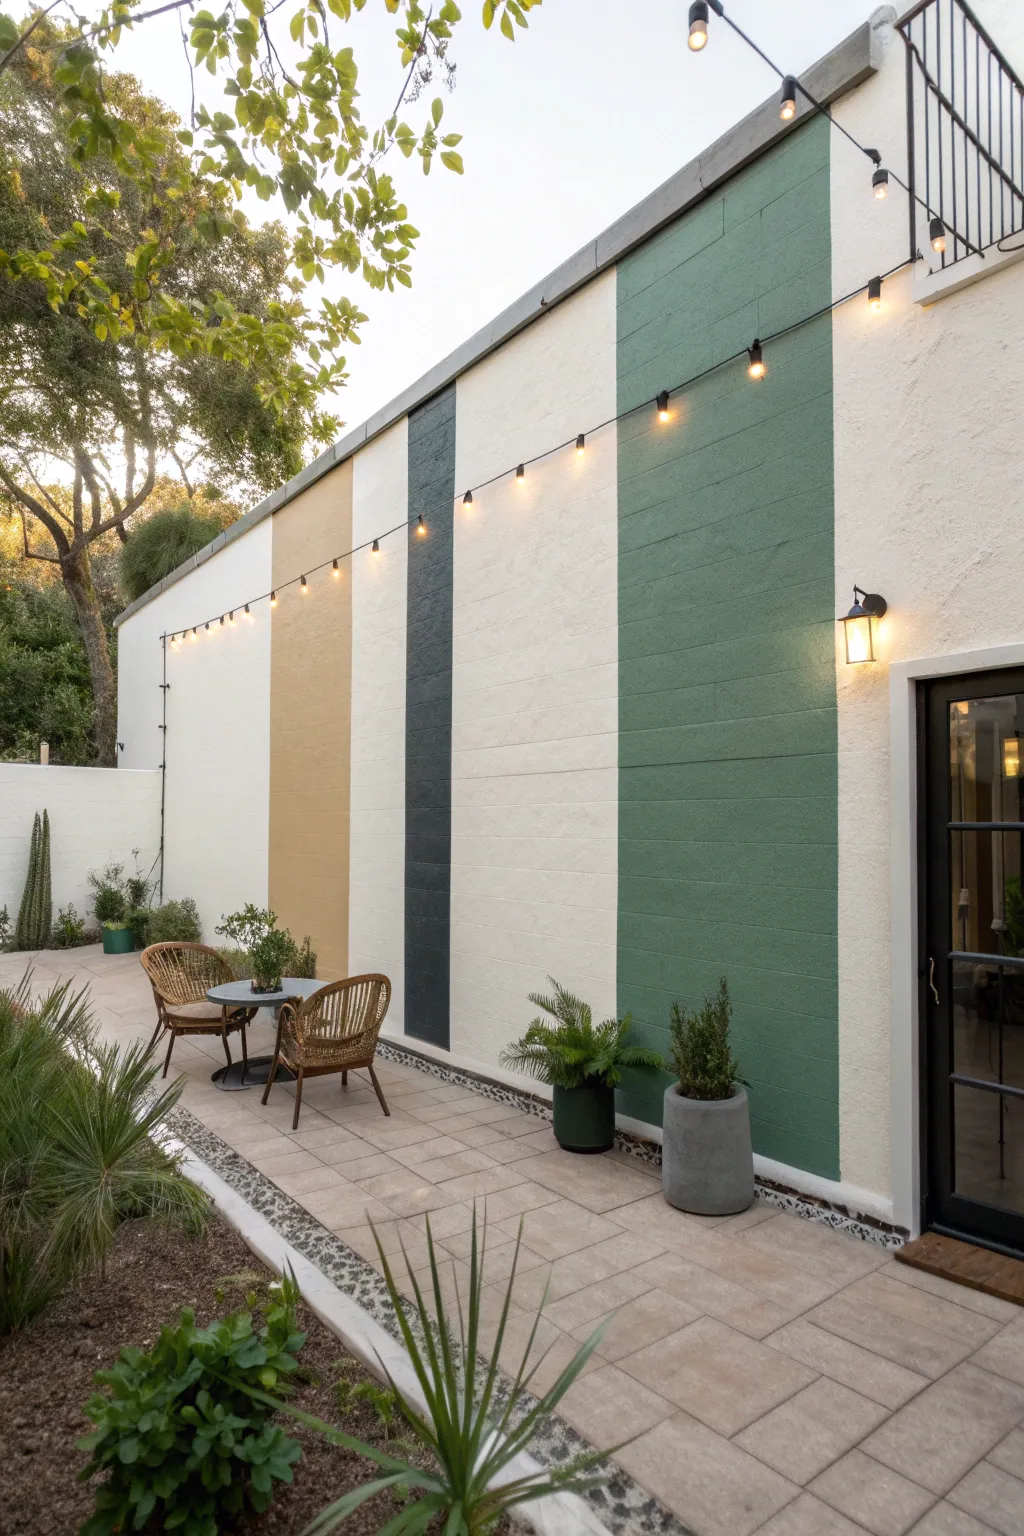
Transform a plain exterior wall into a statement piece with this bold, minimalist color-blocking design. By combining earthy tones like mustard and charcoal with fresh greens, you can create a structured yet organic backdrop for your outdoor patio furniture.
How-To Guide
Materials
- Exterior masonry primer
- Exterior masonry paint (cream/white base)
- Exterior masonry paint (mustard yellow)
- Exterior masonry paint (charcoal grey)
- Exterior masonry paint (sage/forest green)
- Painter’s tape (exterior grade, 2-inch width)
- Soap, water, and scrub brush
- Pressure washer (optional)
- Measuring tape
- Bubble level or laser level
- Pencil or chalk line
- Paint rollers (rough surface nap)
- Angled sash brush (2.5 inch)
- Paint tray and liners
- Drop cloths
Step 1: Preparation
-
Clear the area:
Remove any furniture, planters, or string lights from the wall area. Lay down drop cloths to protect your patio pavers. -
Clean the surface:
Scrub the wall thoroughly with soap and water to remove dirt, moss, and grime. If the wall is particularly dirty, a pressure washer is the most effective tool here. Let the wall dry completely for at least 24 hours. -
Prime the wall:
Apply a coat of high-quality exterior masonry primer to the entire surface. This ensures your colors will apply evenly and adhere properly to the stucco or brick texture.
Bleed-Proof Textured Walls
On rough stucco, clear acrylic caulk is a lifesaver. Run a very thin bead along the tape edge and smooth it with your finger before painting your color to block gaps.
Step 2: Base and Measuring
-
Apply the base color:
Paint the entire wall with your chosen cream or off-white base color using a thick-nap roller designed for rough surfaces. This creates the ‘negative space’ stripes between your colors. -
Apply a second coat:
Once the first coat is dry to the touch, apply a second coat of the base color to ensure solid, opaque coverage. -
Let it cure:
Allow the base coat to cure fully according to the paint can’s instructions—usually overnight—before applying any tape. -
Plan your layout:
Measure the total width of your wall. Decide on the width of your colored stripes. In the image, the stripes vary in width—the mustard and charcoal are medium width, while the green is much wider. -
Mark vertical lines:
Using a measuring tape, mark the positions of your vertical stripes at the top and bottom of the wall with a pencil.
Add Dimension
For a modern twist, add a thin, metallic gold pinstripe between the color blocks and the white space using a narrow brush and outdoor metallic paint.
Step 3: Taping and Painting
-
Draft the lines:
Connect your top and bottom marks. I like to use a long chalk line for this step to snap a perfectly straight vertical guide. -
Apply painter’s tape:
Apply exterior-grade painter’s tape along your guide lines. Press the tape firmly into the texture of the wall to prevent bleed-through. -
Double-check placement:
Remember to place the tape on the *outside* of the area you intend to paint, so the stripe essentially sits ‘inside’ the tape borders. -
Seal the tape edges:
Brush a very light layer of your *base* color over the edge of the tape that faces the stripe area. This seals any tiny gaps in the stucco texture so the colored paint won’t seep under. -
Paint the mustard stripe:
Using a smaller roller, fill in the first designated section with your mustard yellow paint. Cut in the edges carefully with a brush. -
Paint the charcoal stripe:
Move to the next section and apply the dark charcoal grey paint. You may need two coats for this dark color to achieve full opacity. -
Paint the green stripe:
Fill the largest section with your sage or forest green paint. Ensure even coverage from top to bottom. -
Remove tape immediately:
While the finish paint is still slightly tacky (not fully dry), slowly peel off the painter’s tape at a 45-degree angle. This prevents the dried paint from cracking or peeling along the line. -
Touch up:
Inspect your lines. If any paint bled through, use a small artist’s brush and your base color to tidy up the edges once everything is dry.
Once the paint has fully cured, rehang your string lights and arrange your furniture to enjoy your sleek new outdoor living space
Striped Fence in Soft Tones
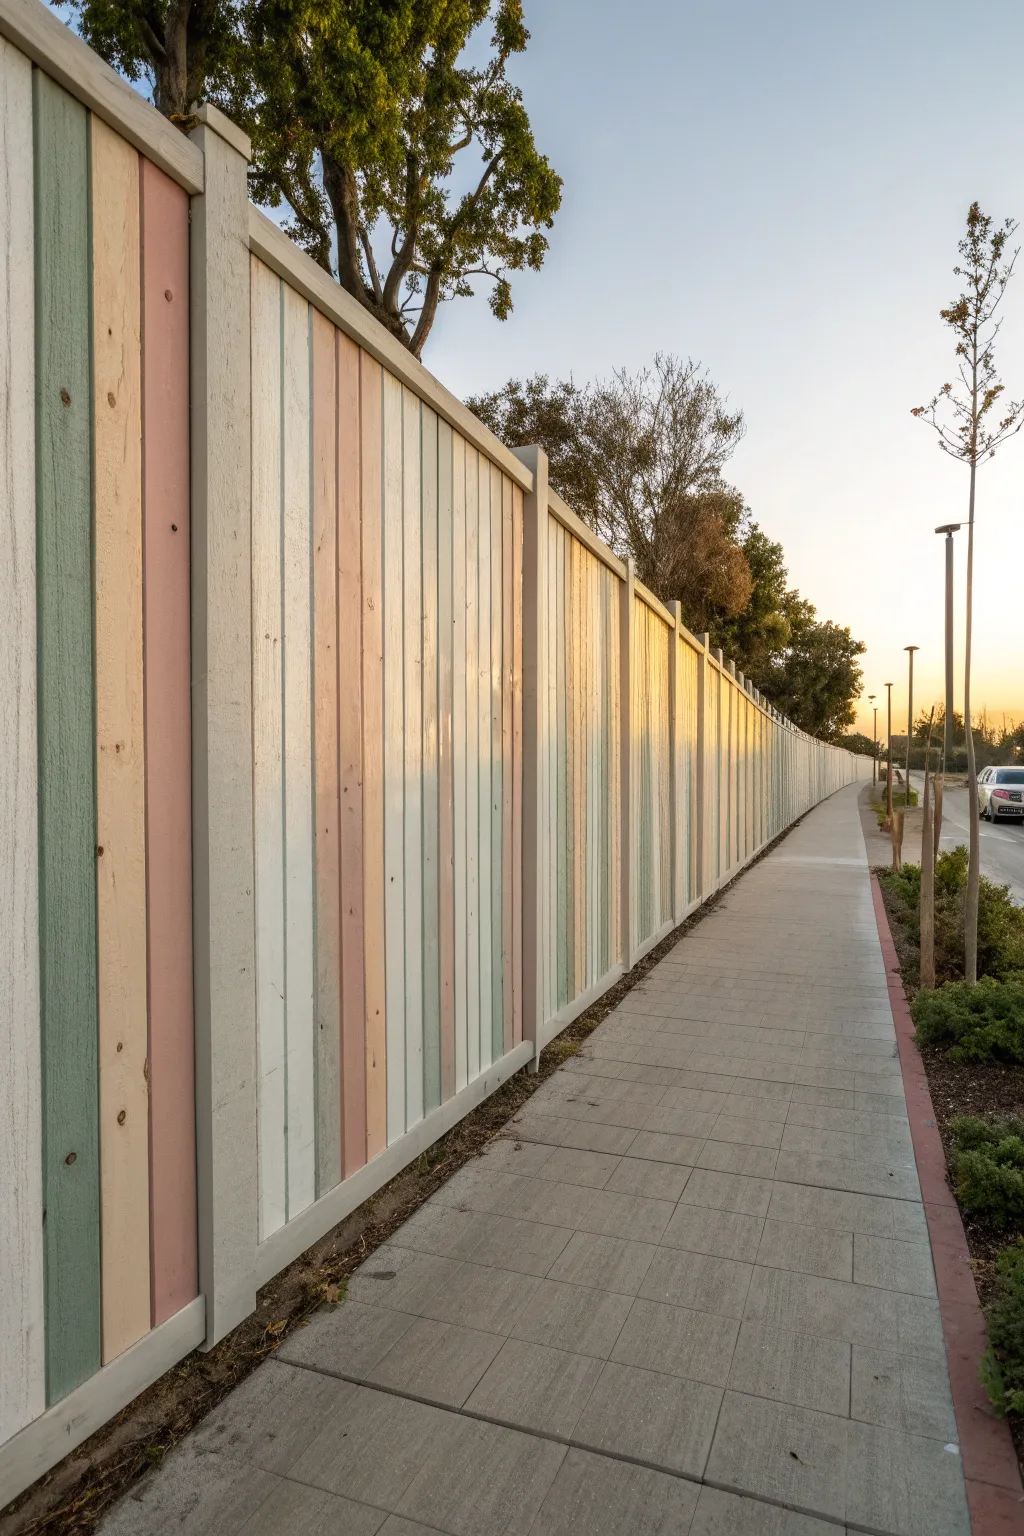
Transform a standard slat fence into a softly glowing architectural feature with this muted vertical stripe technique. By alternating sage, peach, cream, and natural tones, you create a rhythmic, calming visual texture that mimics the fading light of a sunset.
Step-by-Step Tutorial
Materials
- Exterior wood primer (white or clear)
- Exterior acrylic latex paint (Salted Sage)
- Exterior acrylic latex paint (Creamy White)
- Exterior acrylic latex paint (Dusty Peach)
- Exterior acrylic latex paint (Sand/Tan)
- 2-inch angled sash brush (synthetic bristles)
- 4-inch mini roller with microfiber naps
- Paint tray and liners
- Painter’s tape (exterior grade)
- Drop cloths
- Pressure washer (optional) or stiff scrub brush
- Wood filler
- Sanding block (medium grit)
Step 1: Preparation & Planning
-
Clean the surface:
Before putting any paint down, the wood needs to be pristine. Use a pressure washer on a low setting or a stiff brush with soapy water to remove moss, dirt, and old peeling paint. Let the wood dry completely for at least 24-48 hours. -
Repair imperfections:
Inspect the slats for major cracks or rot. Fill any significant holes with exterior-grade wood filler and sand them flush once dry to ensure your stripes look crisp. -
Map out your pattern:
This design relies on a specific repeating sequence. I like to sketch the pattern on paper first: Sage, Tan, Peach, Cream, Sage. Decide if you are painting every single slat individually or grouping two narrow slats as one color block. -
Protect the perimeter:
Lay drop cloths along the base of the fence to protect the sidewalk or landscaping. Use painter’s tape to mask off any horizontal rails or metal posts that should remain unpainted.
Step 2: Prime Time
-
Apply the primer:
Roll or brush a coat of high-quality exterior primer onto every slat. This is crucial for raw wood to prevent tannin bleed-through, especially on the lighter cream and peach stripes. -
Prime the crevices:
Don’t forget the sides of the slats. Use the angled sash brush to jam primer into the gaps between boards so no raw wood peeks through later. -
Let it cure:
Allow the primer to dry according to the manufacturer’s instructions, usually about 4 hours, before starting with your colors.
Bleeding Between Stypes?
If paint drips onto a neighbor slat, wipe it immediately with a damp rag. For dried mistakes, use a small sanding block to remove the spill before touching up with the correct color.
Step 3: Painting the Stripes
-
Start with the lightest color:
Begin with the Creamy White tone. Identify which slats will be this color based on your pattern plan. Paint the face of the slat and both side edges. -
Cutting in the edges:
Use your 2-inch angled brush for the long vertical edges of the slats. A steady hand here saves you from needing to tape every single board. -
Rolling the face:
Once the edges are cut in, use the mini roller to smooth out the face of the slat for an even finish. This helps eliminate brush strokes on the flat surfaces. -
Apply the Peach tone:
Move on to your Dusty Peach slats. I find it helpful to leave a ‘buffer’ slat unpainted between wet colors if possible, but if you must paint adjacent slats, be extremely careful not to touch the wet white edge. -
Paint the Sage slats:
Apply the Salted Sage color to its designated boards. This green tone anchors the natural look, so ensure the coverage is solid and opaque. -
Finish with the Tan tone:
Apply the Sand/Tan color. This neutral shade bridges the colorful stripes and mimics natural wood warmth. -
Check for holidays:
Inspect the fence from different angles to spot any missed patches, especially in the grooves or near the ground.
Add a Weathered Look
For a rustic vibe, dilute a bit of dark brown paint with water (1:4 ratio) and dry-brush it lightly over the finished, dried stripes to create an antique, beach-cottage patina.
Step 4: Finishing Touches
-
Second coat application:
For the most durable and vibrant finish, apply a second coat to all colors once the first is dry to the touch. This deepens the pastel tones significantly. -
Remove tape:
Peel off any painter’s tape while the paint is still slightly tacky to prevent it from pulling up dried paint chips. -
Clean up edges:
If any drips landed on the baseboards or horizontal runners, wipe them immediately or touch them up with the appropriate trim color.
Step back and enjoy the calming rhythm your new fence brings to the landscape

PENCIL GUIDE
Understanding Pencil Grades from H to B
From first sketch to finished drawing — learn pencil grades, line control, and shading techniques.
Explore the Full Guide
Desert Cactus Sunset Wall

Transform a plain garage door into a breathtaking desert vista that glows with sunset warmth. This project uses a striking gradient technique and bold black silhouettes to create depth and drama that will make your home the standout of the neighborhood.
How-To Guide
Materials
- Exterior latex primer (if door is unpainted)
- Exterior latex paint (Deep coral/red)
- Exterior latex paint (Burnt orange)
- Exterior latex paint (Warm yellow/gold)
- Exterior latex paint (Flat black)
- 4-inch roller and tray
- 2-inch angled sash brush
- Artist brushes (round and flat tips)
- Painter’s tape
- Drop cloths
- Chalk or pastel pencil
- Spray bottle with water (for blending)
Step 1: Preparation and Base Coat
-
Clean surface:
Begin by thoroughly cleaning the garage door with TSP or a degreaser to remove dirt and road grime. Rinse well and let it dry completely. -
Mask edges:
Apply painter’s tape around the exterior trim, the bottom rubber seal, and any hardware like handles or windows you want to protect. -
Lay drop cloths:
Spread drop cloths specifically under the door to catch drips, as painting vertical surfaces can be messy. -
Prime (if needed):
If your door is bare metal or peeling, sand lightly and apply a coat of exterior primer. If the existing paint is in good condition, you can skip straight to the colors.
Smooth Blends
Keep a spray bottle of water handy while blending the sunset. A light mist keeps acrylics wet longer, making the gradients much smoother to work.
Step 2: Creating the Sunset Gradient
-
Paint the top section:
Start with your deepest color (the coral/red). Using the roller, paint the top third of the garage door panels. Don’t worry about a perfect bottom edge yet. -
Apply the middle tone:
Pour your burnt orange paint into a clean tray. paint the middle section of the door. I like to bring this color up slightly into the wet coral paint. -
Paint the bottom section:
Apply the yellow/gold paint to the bottom third of the door, bringing it up to meet the orange section. -
Blend the transitions:
While the paint is still wet, use a slightly damp brush to feather the lines where the colors meet. Painting horizontal strokes back and forth creates a smooth ombre effect. -
Second coat:
Allow the first layer to dry according to the manufacturer’s time (usually 2-4 hours). Apply a second coat using the same blending technique to ensure rich, opaque color coverage.
Step 3: Painting the Landscape
-
Sketch the horizon:
Once the sunset background is fully dry, use chalk to lightly sketch the outline of the distant mountains across the lower third of the door. -
Outline the cacti:
Draw the vertical lines for your saguaro cacti. Place the largest ones off-center for better composition, and vary the heights of arms. -
Paint the distant mountains:
Mix a small amount of black into your coral paint to create a muted dusty rose/brown. Fill in the mountain shapes with this color to push them into the background. -
Fill the darker foothills:
Paint the closer hills below the mountains in solid black, or a very dark charcoal, to ground the image. -
Paint the main cacti:
Using the 2-inch angled brush, carefully fill in the tall cactus shapes with solid black exterior paint. Use long vertical strokes to mimic the plant’s texture. -
Add cactus details:
Switch to a smaller artist brush to refine the edges of the cactus arms and add the rounded tops. -
Paint the agave plants:
Near the bottom, paint spiky agave shapes fanning out from the ground. Start strokes from the center and flick outward to get sharp tips. -
Add texture and ground cover:
Dab the tip of your brush along the bottom black horizon line to create the look of uneven rocky ground and small brush. -
Clean up:
Remove the painter’s tape carefully while the final touches are still slightly tacky to prevent peeling dry paint.
Add Dimension
Mix a tiny drop of white into your black paint to create a dark grey. Use this to highlight just the left edges of the cactus for a 3D effect.
Step back and admire how the warm colors completely change the curb appeal of your home
Secret Garden Archway Illusion

Transform a plain exterior wall into a magical portal with this stunning illusion mural, featuring a faux stone archway framing a misty, sun-dappled garden path. This trompe l’oeil technique creates incredible depth, making viewers feel as if they could step right through the wall into another world.
Detailed Instructions
Materials
- Exterior acrylic latex primer
- Exterior acrylic latex paints (flat or eggshell finish)
- Colors: Warm beige, sandstone, slate grey, raw umber, burnt sienna
- Greens: Olive, sap green, pine green, lime green
- Sky colors: Cerulean blue, titanium white, pale yellow
- Chalk snap line and level
- Graphite pencil or charcoal stick
- Assorted brushes: 2-inch angular sash, 1-inch flat, #4 round
- Natural sea sponge
- Painter’s tape
- UV-resistant clear acrylic topcoat (matte)
Step 1: Preparation and Layout
-
Prime the Surface:
Clean the wall thoroughly to remove dirt and mildew, then apply a coat of high-quality exterior primer to ensure your mural adheres properly and lasts for years. -
Base Coat Application:
Paint the entire wall area with a warm beige or sandstone color. This serves as the ‘grout’ color and the base for your faux stucco texture. -
Sketch the Architecture:
Use a chalk line and level to mark the vertical sides of the archway. Find your center point and use a string tied to a pencil to swing a perfect semi-circle for the extensive arch top. -
Define the Stones:
Sketch individual stone blocks around the arch shape. Keep them slightly irregular to mimic old-world masonry, ensuring the keystone at the top center is prominent.
Uneven Wall Texture?
If your exterior wall is rough stucco, don’t fight it. Use the texture to mimic moss or rough stone. Keep brushes drier to skim over high points for a natural weathered look.
Step 2: Painting the Illusion
-
Block in the Sky:
Inside the arch, paint the upper third with a gradient. Start with cerulean blue at the top and blend into titanium white and pale yellow near the horizon line to create a misty, early morning glow. -
Establish the Backdrop Trees:
Using a thinned wash of gray-green, paint ghostly tree silhouettes in the distance. Keep edges soft and blurry to force the perspective backward. -
Lay the Path:
Paint the winding path starting wide at the bottom and narrowing significantly as it curves into the distance. Use a mix of grey and raw umber for the cobblestones. -
Detail the Cobblestones:
Once the path base is dry, use a smaller round brush to outline individual stones. Highlight the top edges with a lighter grey and shadow the bottom edges to give them 3D volume. -
Paint the Mid-Ground Foliage:
Stipple in bushes and shrubs along the path using a natural sea sponge dipped in sap green and olive. I find tapping gently creates the most realistic leaf texture here. -
Add Foreground Trees:
Paint the darker, sharper tree trunks on the left and right sides inside the arch. These should have distinct bark texture using burnt sienna and raw umber.
Step 3: Creating the Stone Arch
-
Texture the Archway:
Sponge a mixture of sandstone and light grey onto the architectural stones you sketched earlier to create a weathered limestone texture. -
Shadow for Depth:
The most crucial step for illusion is the shadow. Paint a distinct, dark grey shadow on the inside edge of the arch (the ‘thickness’ of the wall) to make the opening look recessed. -
Highlight the Edges:
Add thin lines of nearly white paint to the edges of the stones that would catch the sun, usually the top and right sides, to make them pop forward.
Enhance the Reality
Install real trellis or plant a real climbing vine at the base of your painted tree. As the real plant grows and intertwines with the painted one, the illusion becomes seamless.
Step 4: The Outer Wall & Finish
-
Paint Vines and Overgrowth:
Extend the mural outside the arch by painting climbing vines directly onto the ‘real’ wall surface. Use a liner brush for twisting branches and dab on leaves that overlap the stone arch. -
Add Faux Planters:
On the left side, paint a simple stone pedestal or planter box to ground the composition. Ensure its perspective matches the viewpoint of the path. -
Groud with Shadow:
Paint cast shadows under the faux vines and the planter on the main wall surface. This tricks the eye into thinking these elements exist in real space. -
Protective Sealing:
Allow the paint to cure fully for at least 48 hours. Apply a coat of UV-resistant clear matte acrylic sealer to protect your artwork from sun fading and weather.
Step back and enjoy the incredible depth you have added to your garden space with this timeless architectural illusion


Mosaic-Style “Tile” Pattern Wall
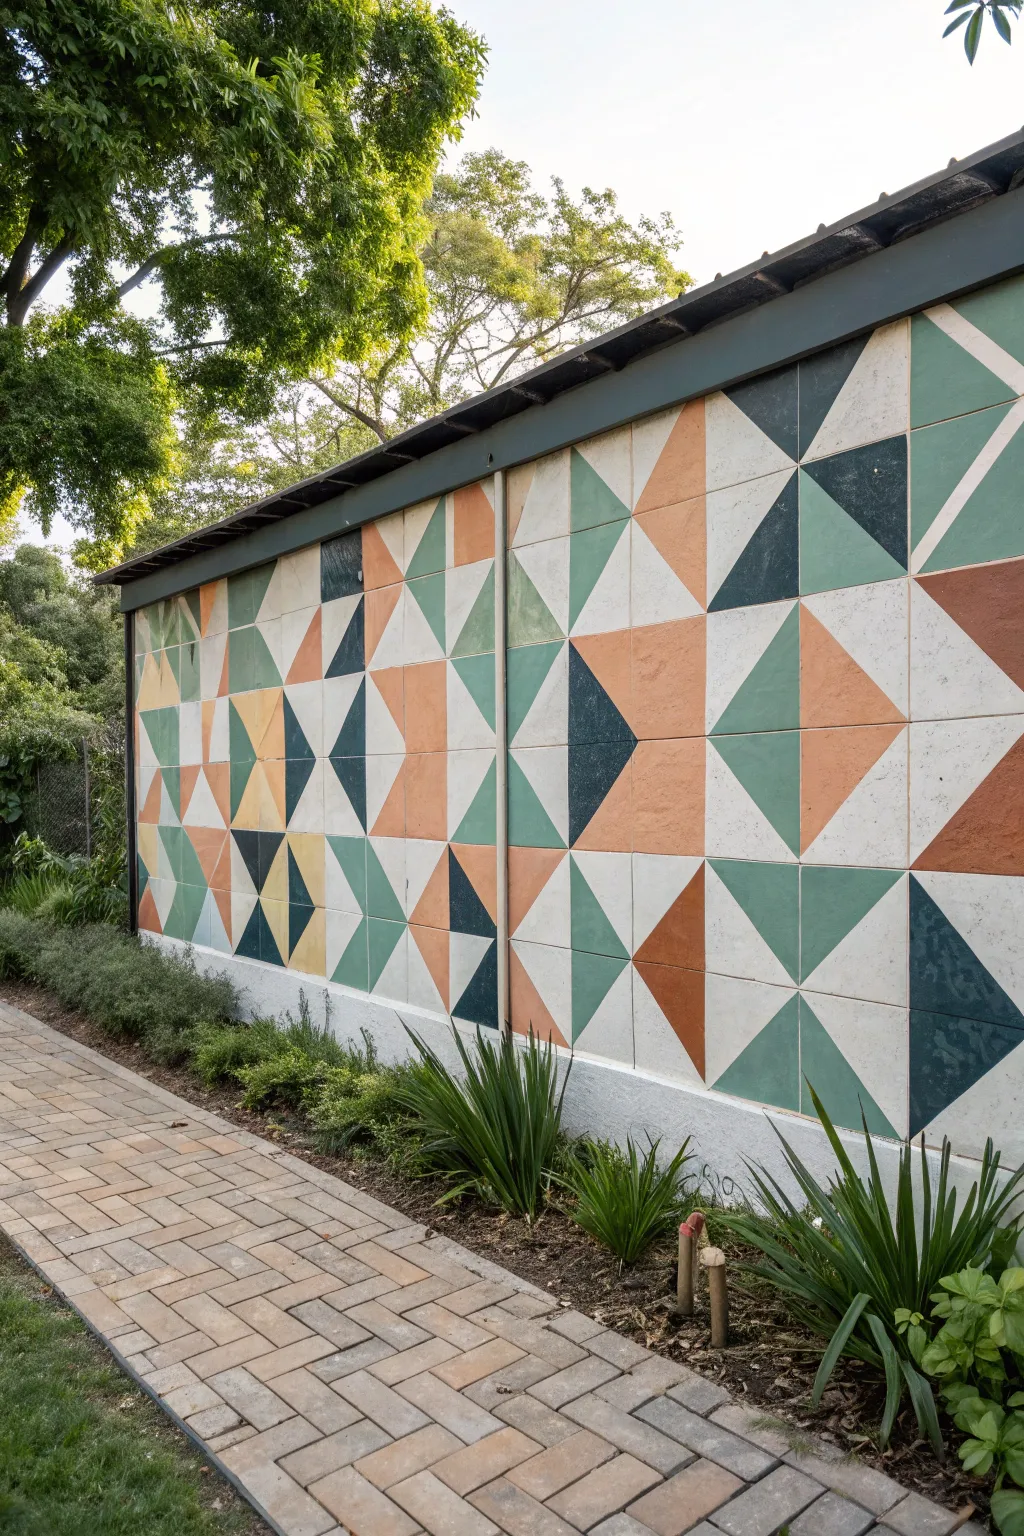
Transform a plain exterior wall into a stunning mid-century modern feature using nothing but paint and tape. By creating crisp triangles in a carefully planned grid, you can mimic the look of expensive ceramic tiles with a custom color palette that perfectly suits your garden.
Step-by-Step Guide
Materials
- Exterior masonry primer (white)
- Exterior latex or masonry paint (white for grout lines)
- Exterior latex paints (terracotta, sage green, forest green, deep teal, mustard yellow)
- Painter’s tape (specifically for textured surfaces/masonry)
- Laser level or chalk line
- Measuring tape
- Pencil
- 4-inch foam rollers
- Small angled sash brush
- Paint tray and liners
- Drop cloths
- TSP or outdoor cleaner
Step 1: Preparation & Grid Layout
-
Clean the surface:
Begin by thoroughly cleaning the wall with TSP or a pressure washer to remove dirt, moss, and loose debris. Let the masonry dry completely for at least 24 hours before applying any product. -
Prime the wall:
Apply a coat of high-quality masonry primer to the entire surface. This ensures your colors will be vibrant and adhere properly to the potentially porous surface. -
Paint the base coat:
Paint the entire wall with your chosen ‘grout’ color (in this case, white or off-white). This will be the color of the lines between your geometric shapes; apply two coats for solid coverage. -
Determine tile size:
Measure the total width and height of your wall to calculate your grid. A 12×12 inch or 16×16 inch square is standard; mark the horizontal and vertical spacing along the edges of the wall. -
Mark the grid lines:
Using a laser level or a snapped chalk line, lightly draw your grid of squares across the entire wall surface with a pencil. Accuracy here is crucial for the faux-tile effect. -
Tape the grid:
Apply 1/4-inch or 1/2-inch painter’s tape over your pencil lines to create the grout lines. Press the tape down firmlly, especially on textured stucco, to prevent bleed-under.
Bleed-Through Blues?
If paint seeps under the tape on rough stucco, don’t panic. Wait for it to dry fully, then use a tiny flat-edged artist brush and your white base color to ‘erase’ the mistake.
Step 2: Creating the Pattern
-
Design the diagonals:
Decide on your pattern layout. In the photo, each square is bisected diagonally to form two triangles. Tape these diagonal lines inside each square grid box. -
Seal the tape edges:
I like to quickly brush a light layer of the white base paint over the tape edges. This locks the tape down and ensures that if any paint bleeds, it will be the white color, keeping your final lines crisp. -
Map your colors:
Mark each triangle with a small dot of the color intended for that space. This creates a ‘paint-by-numbers’ system so you don’t get confused once you start painting. -
Paint the first color group:
Start with your lightest color (mustard or sage). Use a small roller or brush to fill in all the triangles marked for that shade. Avoid soaking the tape; use lighter coats. -
Apply second coats:
Let the first color dry to the touch, then apply a second coat for opacity. Exterior walls soak up paint, so this step ensures depth of color. -
Continue with darker shades:
Move on to the terracotta, deep teal, and forest green sections. Work systematically across the wall to ensure no shapes are missed. -
Detail the edges:
Use the angled sash brush to carefully paint near the tape lines or corners that the roller couldn’t reach perfectly.
Step 3: Finishing Touches
-
Remove the tape:
The most satisfying part: peel off the tape while the final coat of paint is still slightly tacky (not fully cured). This prevents the paint skin from pulling up with the tape. -
Inspect and touch up:
Check for any bleed-through or uneven lines. Use a small artist’s brush and your white base paint to tidy up any ‘grout’ lines that need sharpening. -
Clean the area:
Remove drop cloths and dispose of the large amount of tape waste responsibly.
Make It Glossy
To really sell the ‘ceramic tile’ illusion, apply a coat of high-gloss clear masonry sealer over the colored triangles (but not the grout lines) once the paint is fully cured.
Step back and admire how a simple grid and some paint have completely revitalized your outdoor space with sophisticated geometric flair
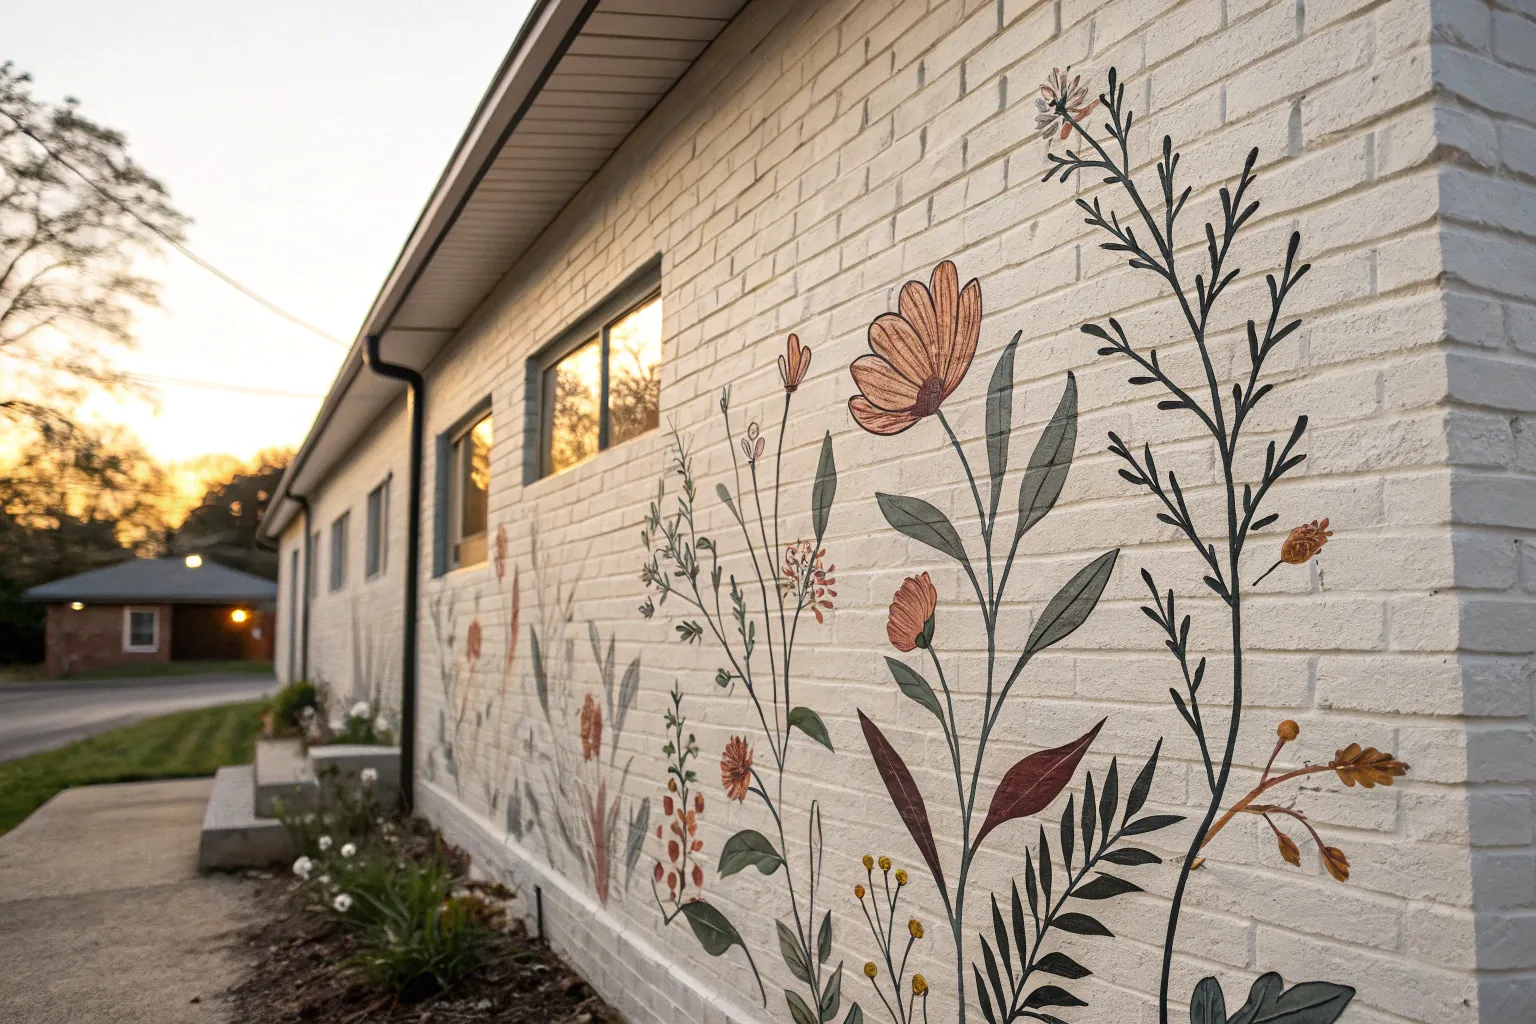
Monochrome Line-Art Botanicals
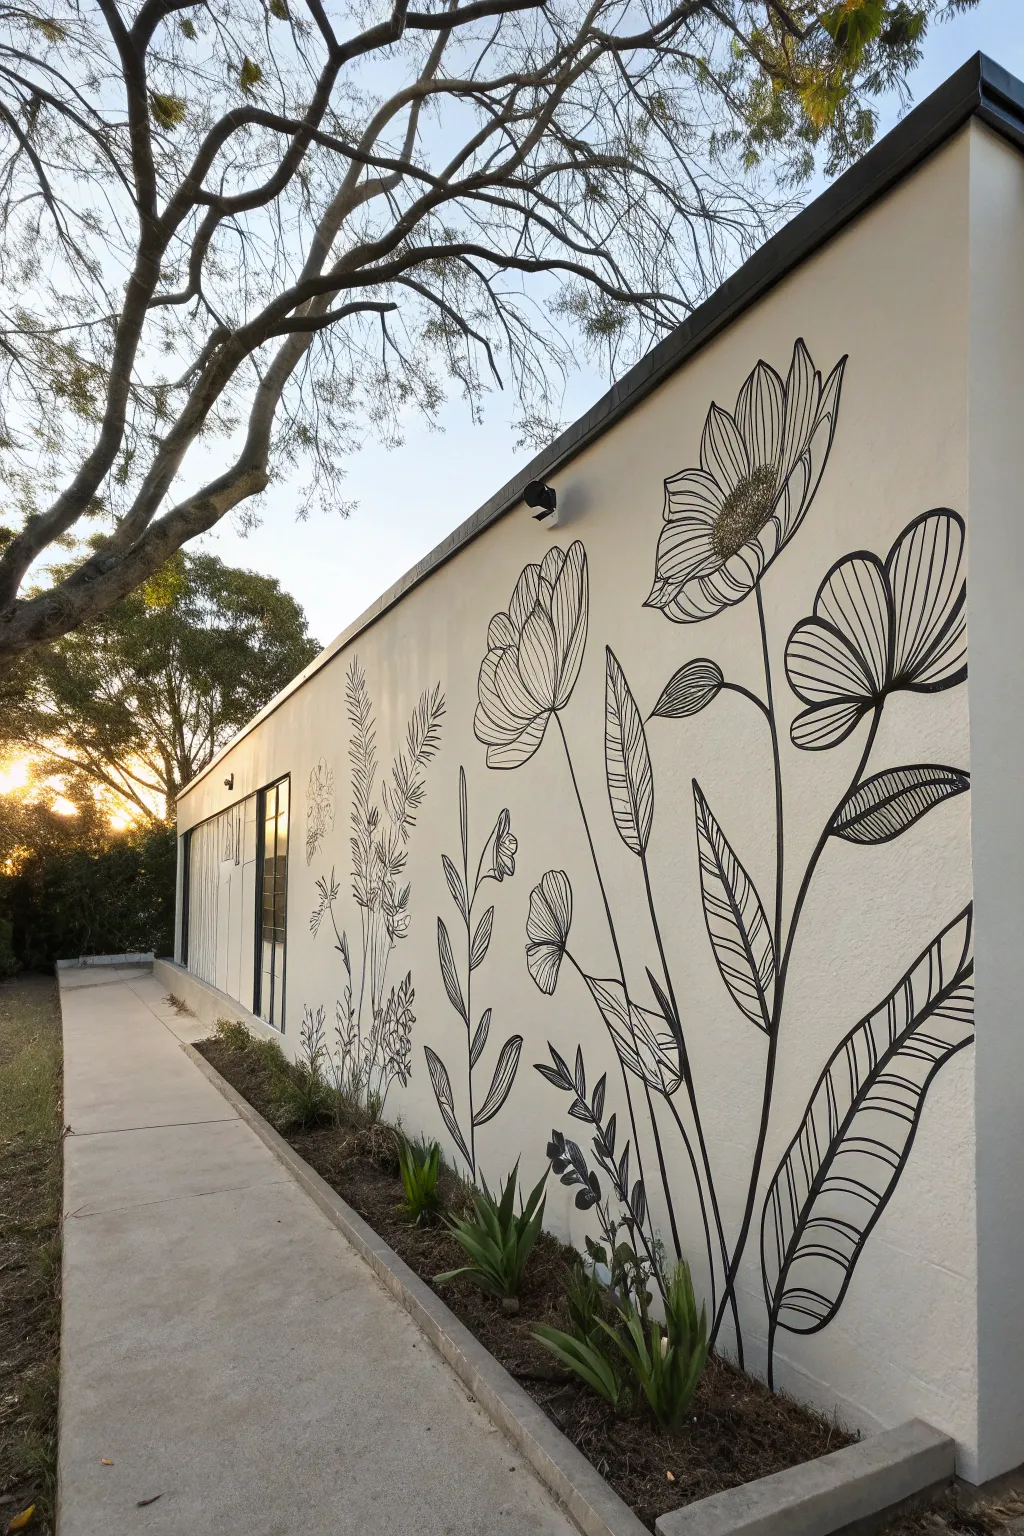
Transform a plain exterior wall into a statement piece with this elegant, monochrome botanical mural. Using simple black lines on a clean white background, this project achieves a modern, illustrative look that feels organic and inviting without requiring complex shading skills.
How-To Guide
Materials
- Exterior masonry paint (white for base coat)
- High-quality exterior paint (black, satin or semi-gloss)
- Small roller and tray
- Assorted angular paintbrushes (1-inch, 2-inch)
- Round artist brushes (sizes 4, 8, and 12 for details)
- Projector (optional but recommended) or sidewalk chalk
- Painter’s tape
- Ladder or step stool
- Drop cloths
- Digital botanical line art references
- Clear exterior sealer (matte or satin)
- Cleaning supplies (TSP or power washer)
Step 1: Wall Preparation
-
Clean the surface:
Before painting, ensure the stucco or concrete surface is completely free of dirt and debris. A power washer works best for textured walls, but a stiff scrub brush with a TSP solution is a great alternative. Let the wall dry completely for at least 24 hours. -
Protect the area:
Lay down drop cloths along the base of the wall to protect the walkway and any existing landscaping. Use painter’s tape to mask off adjacent window frames, trim, or rooflines to ensure crisp edges. -
Apply the base coat:
Roll on a fresh coat of high-quality white exterior masonry paint. Even if the wall is already white, a fresh coat ensures an even, bright canvas for your artwork. I usually apply two coats to get full coverage over rough textures.
Paint Viscosity Tip
Textured walls drink up paint. Thin your black paint slightly with water (for acrylics) to help it flow into deep stucco crevices without skipping.
Step 2: Drafting the Design
-
Select your botanicals:
Choose simple line drawings of flowers like cosmos, echinacea, or poppies, along with fern fronds and tall grasses. Look for designs that emphasize strong silhouettes and internal pattern lines. -
Project the design:
Set up a digital projector at dusk to cast your chosen floral images onto the wall. Positioning is key here—start with the largest flowers on the right side to anchor the composition. -
Trace with chalk:
Using sidewalk chalk or a light pencil, trace the projected lines onto the wall. Don’t worry about capturing every single detail; focus on the main stems, petal shapes, and major leaf veins. -
Freehand the fillers:
Once the main flowers are traced, turn off the projector. Sketch in smaller filler plants, vertical grasses, and stems freehand to connect the larger elements and fill empty negative space naturally.
Add a hidden friend
Personalize the mural by hiding a tiny painted ladybug, bee, or butterfly on one of the leaves for guests to discover.
Step 3: Painting the Outline
-
Start with stems:
Using a 1-inch angled brush and your black exterior paint, carefully paint the long, sweeping lines of the main stems first. Use your whole arm to guide the brush for smoother, more organic curves. -
Outline the blooms:
Switch to a smaller round brush (size 8 or 12) to trace the petals of your main flowers. Keep the paint fluid but not drippy; on stucco, you may need to dab paint into the crevices to get a solid black line. -
Add leaf details:
Paint the outlines of the large leaves. Unlike the stems, these lines can vary in thickness—press harder at the base of the leaf and lift up as you reach the tip to create a tapered effect. -
Fill solid areas:
Some elements, like the centers of certain flowers or specific leaf patterns, need to be filled in completely. Use a small flat brush to block in these solid black areas for contrast.
Step 4: Detailed Line Work
-
Create internal texture:
This is where the mural comes to life. Use your smallest round brush (size 4) to paint the delicate internal lines on the petals and leaves. These lines should mimic the veins and contours of the plant. -
Hatching techniques:
For the larger leaves, use parallel hatching lines or cross-hatching to suggest shading and texture without using gray paint. Vary the spacing of the lines to create visual interest. -
Stippling the centers:
For flower centers like the sunflower or echinacea, use a stippling motion (rapid dots) to create a fuzzy, pollen-heavy texture. Layer the dots densely in the shadow areas and sparsely in the highlights. -
Refine the edges:
Step back about ten feet to view the mural as a whole. Look for any lines that look too thin or ‘wobbly’ from a distance and thicken them up with your angled brush. -
Clean up errors:
If you made any stray marks or drips, wait for them to dry, then touch them up with a small amount of your white base coat paint. It acts like an eraser.
Step 5: Finishing Touches
-
Seal the artwork:
Once the black paint has cured for at least 48 hours, apply a clear exterior sealer over the mural. A matte finish is best to reduce glare and keep the ‘illustration’ look. -
Plant real greenery:
To integrate the mural with the landscape, plant low-growing succulents or grasses like agave or liriope in the dirt bed at the base of the wall. This blurs the line between art and reality.
Step back and enjoy the dramatic elegance your new botanical feature wall brings to your outdoor space
Abstract Leaf Shapes That Echo Plants
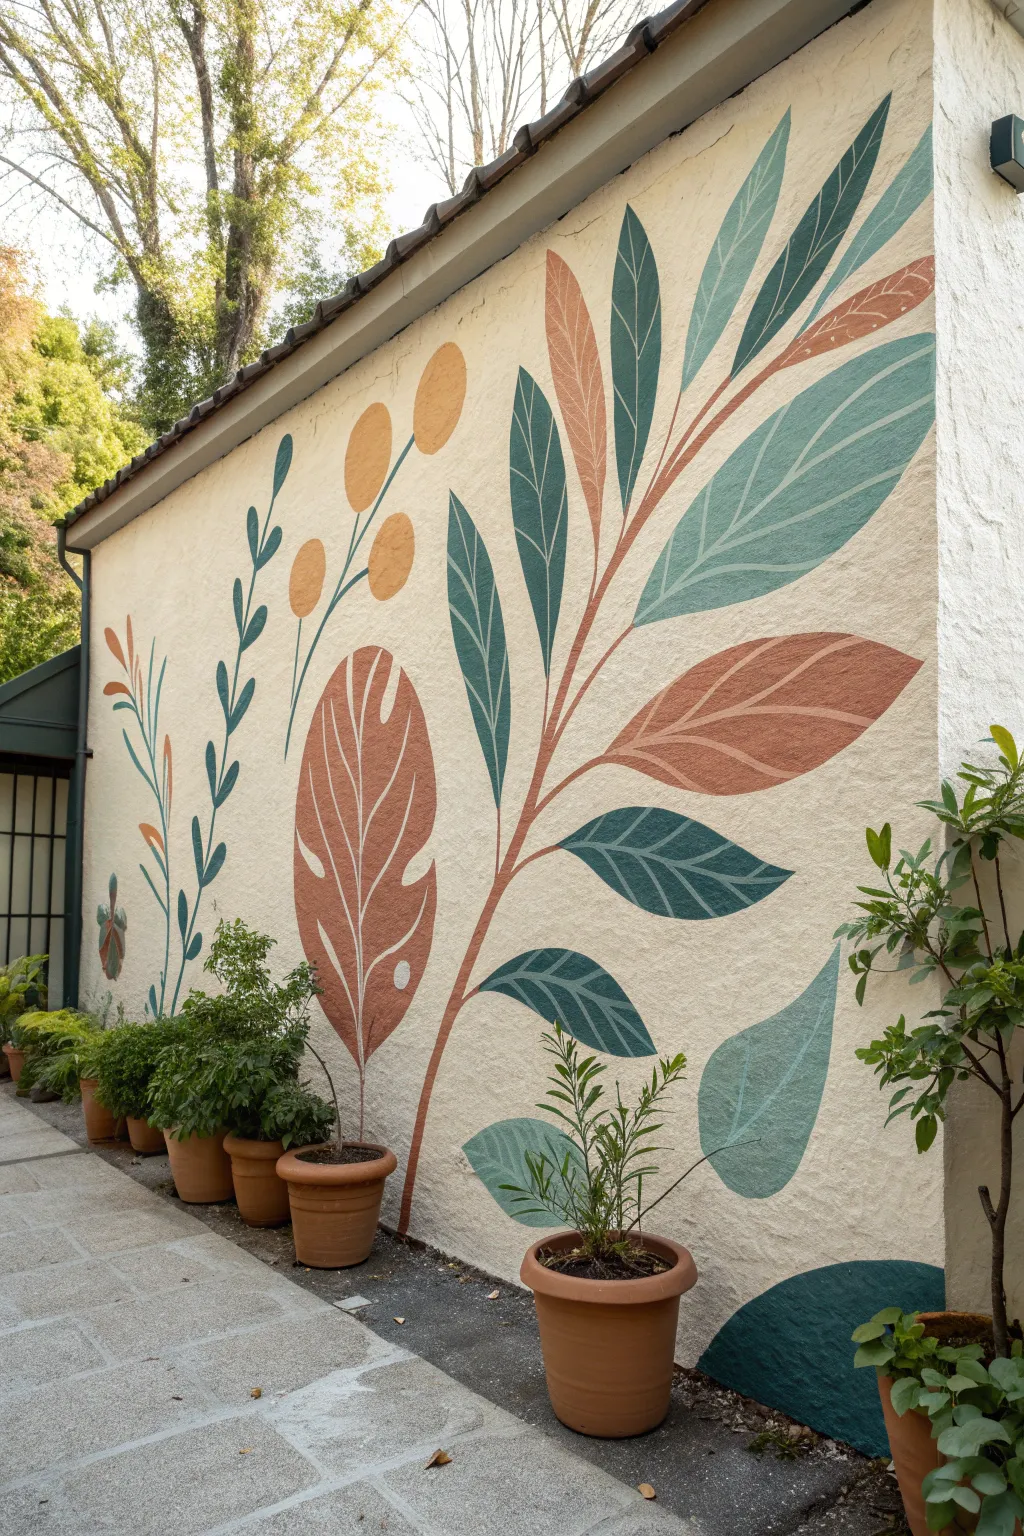
Transform a plain exterior wall into a vibrant garden scene with these oversized, abstract leaf shapes. The soft, earthy palette of sage greens, muted teals, and terracotta creates a welcoming and organic feel that complements real potted plants perfectly.
Detailed Instructions
Materials
- Exterior masonry paint (White/Cream base)
- Exterior acrylic paints (Terracotta, Sage Green, Teal, Deep Green, Ochre/Mustard)
- Wide painter’s tape (1-2 inch)
- Chalk or a light colored pastel pencil
- Assorted paintbrushes (2-inch flat brush, 1-inch angled sash brush, fine round brush)
- Drop cloths
- Ladder (if needed)
- Small roller and tray
Step 1: Preparation & Base Coat
-
Clean the surface:
Start by thoroughly cleaning your exterior wall. Use a stiff bristled brush and water to remove any moss, dirt, or spiderwebs. For tougher grime, a gentle pressure wash might be necessary. -
Protect the area:
Lay down drop cloths along the base of the wall to protect your patio or walkway from drips. Tape off any trim, pipes, or adjacent walls you want to keep clean. -
Apply the background:
Roll on a coat of creamy white exterior masonry paint. The textured stucco will soak up a lot of paint, so I usually plan for two solid coats to get that clean, blank canvas look shown in the photo. -
Let it cure:
Allow the base coat to dry completely according to the manufacturer’s instructions, usually overnight, before sketching your design.
Rough Texture Troubles?
If the stucco is very deep, a brush might miss spots. Use a thick-nap mini roller for the larger leaf bodies to push paint into the deep recesses.
Step 2: Sketching the Design
-
Map out the main stems:
Using a piece of chalk, lightly sketch the primary curved lines for the stems. Start from the bottom and sweep upwards in gentle curves. Notice how the central stem leans slightly right while the left stem curves inward. -
Draw the large leaf shapes:
Sketch the oversized oval and pointed leaf shapes along your stems. Keep them simple and stylized; they don’t need to be biologically accurate. Vary the sizes, placing larger leaves lower down and smaller ones near the top. -
Add detail elements:
Draw the clusters of circular ‘berries’ on the left side, attaching them with thin lines to the main stem. Add the large, split-leaf philodendron shape near the bottom center for visual weight. -
Review composition:
Step back about ten feet to look at the overall balance. This is the time to wipe away chalk and adjust positioning before commit to paint.
Level Up: Color Harmony
Mix a tiny drop of your background cream color into every single leaf color. This unifies the palette and makes the mural look painted ‘on’ the wall, not just stuck ‘to’ it.
Step 3: Painting the Foliage
-
Paint the main stems:
Load a 1-inch angled sash brush with terracotta paint. Carefully follow your chalk lines to paint the central stem and the large split-leaf shape. The angled brush helps get into the textured crevices of the stucco. -
Block in green leaves:
Switch to your sage green and deep green shades. Paint the pointed leaves attached to the terracotta stem. Use long, smooth strokes from the base of the leaf to the tip. -
Add the teal accents:
Using a muted teal or blue-green shade, paint the secondary stem system on the far left and the large sweeping leaves on the upper right. This cool tone balances the warmth of the terracotta. -
Paint the berries:
Fill in the circular berry shapes with an ochre or mustard yellow paint. Use a round brush here to keep the edges crisp against the textured wall. -
Layer the large terracotta leaves:
Go back to your terracotta paint and fill in the large, wide leaves on the right side. Ensure the coverage is solid; you may need a second coat if the white background shows through the texture.
Step 4: Detailing & Refining
-
Add leaf veins:
Once the base colors are dry to the touch, mix a lighter version of each color (by adding a touch of white) to paint the central veins on the leaves. Hand-painting these lines rather than using tape gives them an organic feel. -
Refine the edges:
Use a small, stiff brush to touch up any fuzzy edges where the paint may have bled into the stucco texture. You can use the background cream color to ‘erase’ any mistakes. -
Paint the ground arch:
At the very bottom right, paint the semi-circular dark teal shape that grounds the composition. This acts as a visual anchor for the floating leaves. -
Clean up chalk marks:
Use a damp sponge to gently dab away any remaining visible chalk lines once the paint is fully dry. -
Arrange real planters:
Finish the look by placing real potted plants in front of the mural. Arrange varying heights to blend the painted art with the living garden.
Enjoy your new garden feature that stays perpetually green regardless of the season
Painted “Window” to a Night Sky
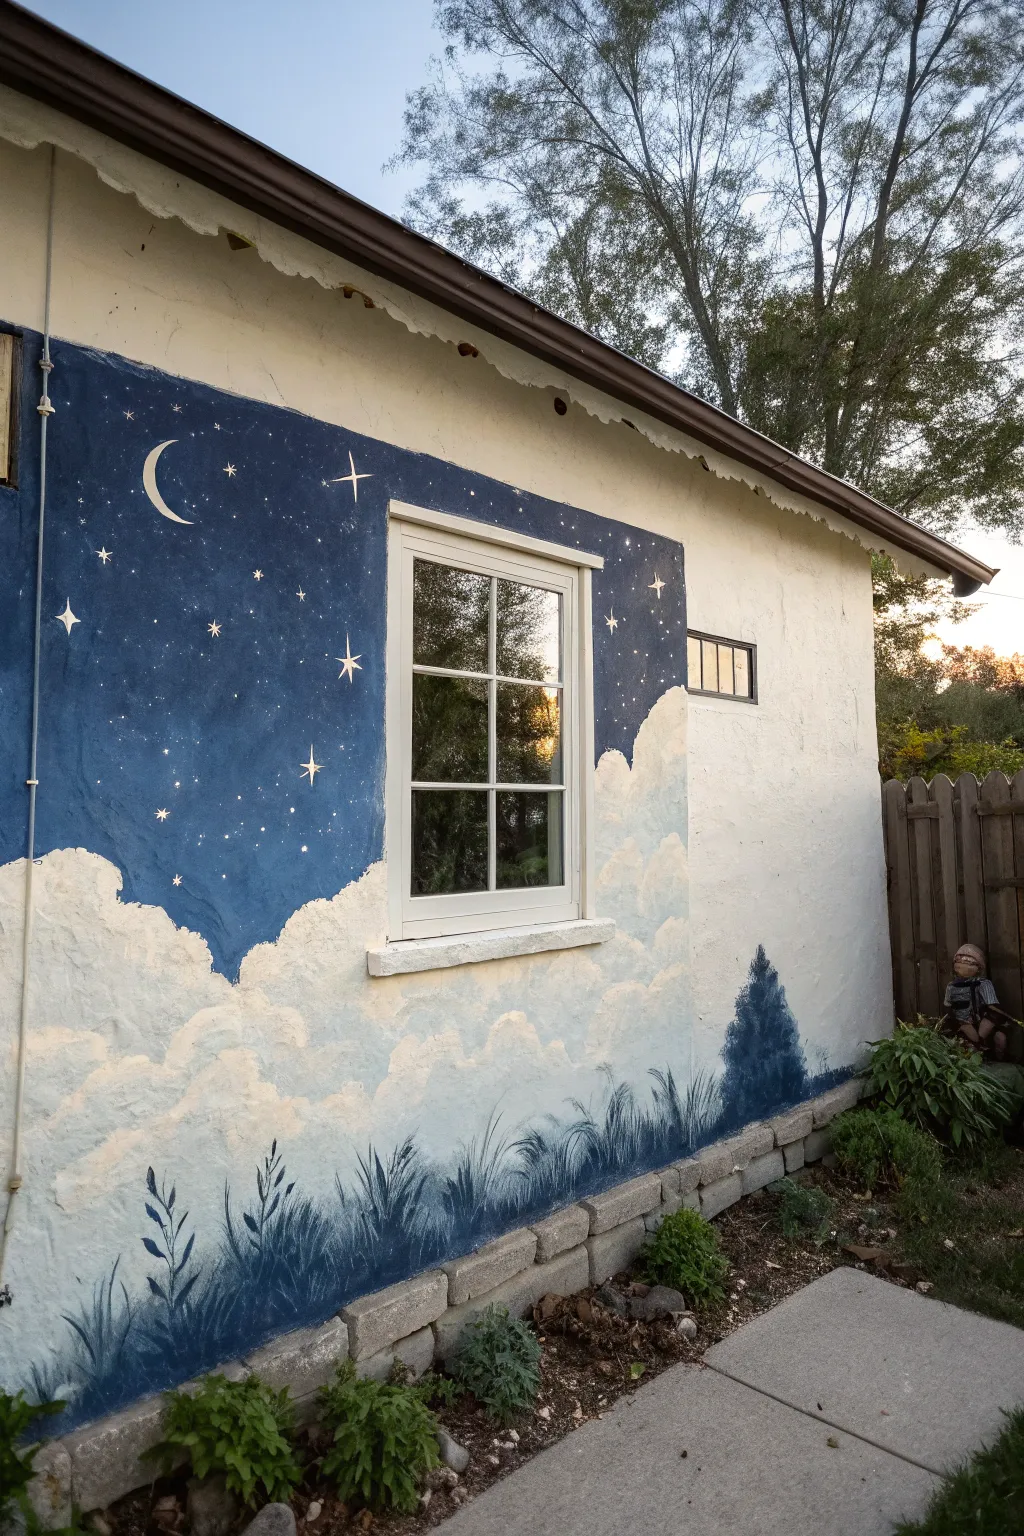
Transform a plain exterior wall into a dreamy evening vista with this layered mural. By framing an existing window with a deep indigo sky, fluffy clouds, and swaying grasses, you create a whimsical portal that blends architecture with art.
Detailed Instructions
Materials
- Exterior masonry primer
- Exterior latex paint (Deep Indigo/Navy Blue)
- Exterior latex paint (Pure White)
- Exterior latex paint (Soft Grey)
- Exterior latex paint (Black or Dark Teal for shadows)
- Painter’s tape (multi-surface)
- Drop cloths
- Large roller and tray
- Assorted synthetic brushes (2-inch flat, 1-inch angled sash, fine detail)
- Natural sea sponge (large)
- Chalk or pastel pencil for sketching
- Bubble level (optional)
Step 1: Preparation and Sky Base
-
Clean the Surface:
Begin by thoroughly cleaning the stucco or masonry wall. Use a stiff brush and water (or a gentle pressure washer) to remove dirt, cobwebs, and loose paint debris so your new layers bind correctly. -
Mask the Area:
Once the wall is completely dry, use painter’s tape to protect the window trim, window sill, and any adjacent conduit pipes. Make sure the tape is pressed firmly into the texture of the stucco to prevent bleed-through. -
Prime the Surface:
Roll on a coat of high-quality exterior masonry primer over the entire area you plan to paint. This step is crucial for porous stucco surfaces to ensure the blue pigment looks rich and true. -
Establish the Horizon:
Decide where your cloud line will be. It doesn’t need to be straight—an organic, wavy line about a third of the way up the wall works best. Use light chalk to mark this rough boundary. -
Paint the Deep Sky:
Apply your Deep Indigo paint heavily at the top and around the window frame. I like to use a brush to cut into the textured crevices first, then follow up with a roller for better coverage. Don’t paint all the way down to your cloud line yet.
Step 2: Painting the Clouds
-
Create the Cloud Base:
Using a 2-inch brush, apply Pure White paint starting at the bottom of the mural area, working upward. Paint in rounded, billowy shapes that eat into the blue sky area you left open. -
Blend the Transition:
While the blue and white edges are still slightly tacky, mix a mid-tone light blue on your palette. Use a sea sponge or a dry brush to stipple this color where the sky meets the clouds, softening the line so it isn’t harsh. -
Add Cloud Volume:
Dip your sea sponge into a mix of White and a tiny drop of Soft Grey. Dab this onto the bottom sections of the cloud mounds to create shadows and depth, making the clouds look three-dimensional rather than flat. -
Refine the Edges:
Go back with pure white on the very tops of the clouds to create crisp highlights against the dark blue sky. This simulates moonlight catching the tops of the cumulus shapes.
Rough Texture Trouble?
Stucco can be tricky. If your brush misses deep pits, use a thick-nap roller or a ‘stippling’ motion (pounding the brush tip flat) to force paint into the crevices for solid coverage.
Step 3: Details: Stars, Moon, and Grass
-
Sketch the Celestial Bodies:
Once the sky serves as a dry, dark canvas, lightly sketch a crescent moon and the position of major stars using a pastel pencil. -
Paint the Moon:
Using a fine detail brush and Pure White, carefully fill in your moon shape. For a sharper look on textured stucco, do two thin coats rather than one thick glob. -
Add the Stars:
Scatter stars around the night sky. Make some simple dots and others larger four-point stars. Varying the size creates a sense of distance. -
Start the Grass Layer:
Mix your Deep Indigo with a little Black or Dark Teal to create a silhouette color. Using an angled sash brush, paint a solid, low band roughly 6-12 inches high along the very bottom edge of the wall. -
Paint Tall Grass Blades:
Switch to a smaller round brush. Flick your wrist upward starting from the solid dark band to create individual blades of grass that overlap the white clouds. Vary the heights and directions for a natural look. -
Add Flora Details:
Intersperse the grass with different shapes mimicking wheat or wildflowers. Small dabs on the ends of some stems create seed heads. -
Create the Tree Silhouette:
If desired, paint a small, triangular evergreen shape in the corner using a stippling motion with your dark mix. This anchors the scene and adds scale. -
Final Touches:
Inspect the mural for any missed spots in the stucco texture. Dab paint into deep pores where white wall might still show through. -
Remove Tape:
Ideally, peel off the painter’s tape while the final paint layer is still slightly damp to get the cleanest edge around the window.
Glow Up
Mix glow-in-the-dark additive or clear coat into the paint used for the stars and moon. During the day it looks normal, but at night, your window will have a subtle, magical luminescence.
Step back and admire your new view, where every evening offers a perfect starry night regardless of the weather
Crack-Camouflage Gold Vein Lines
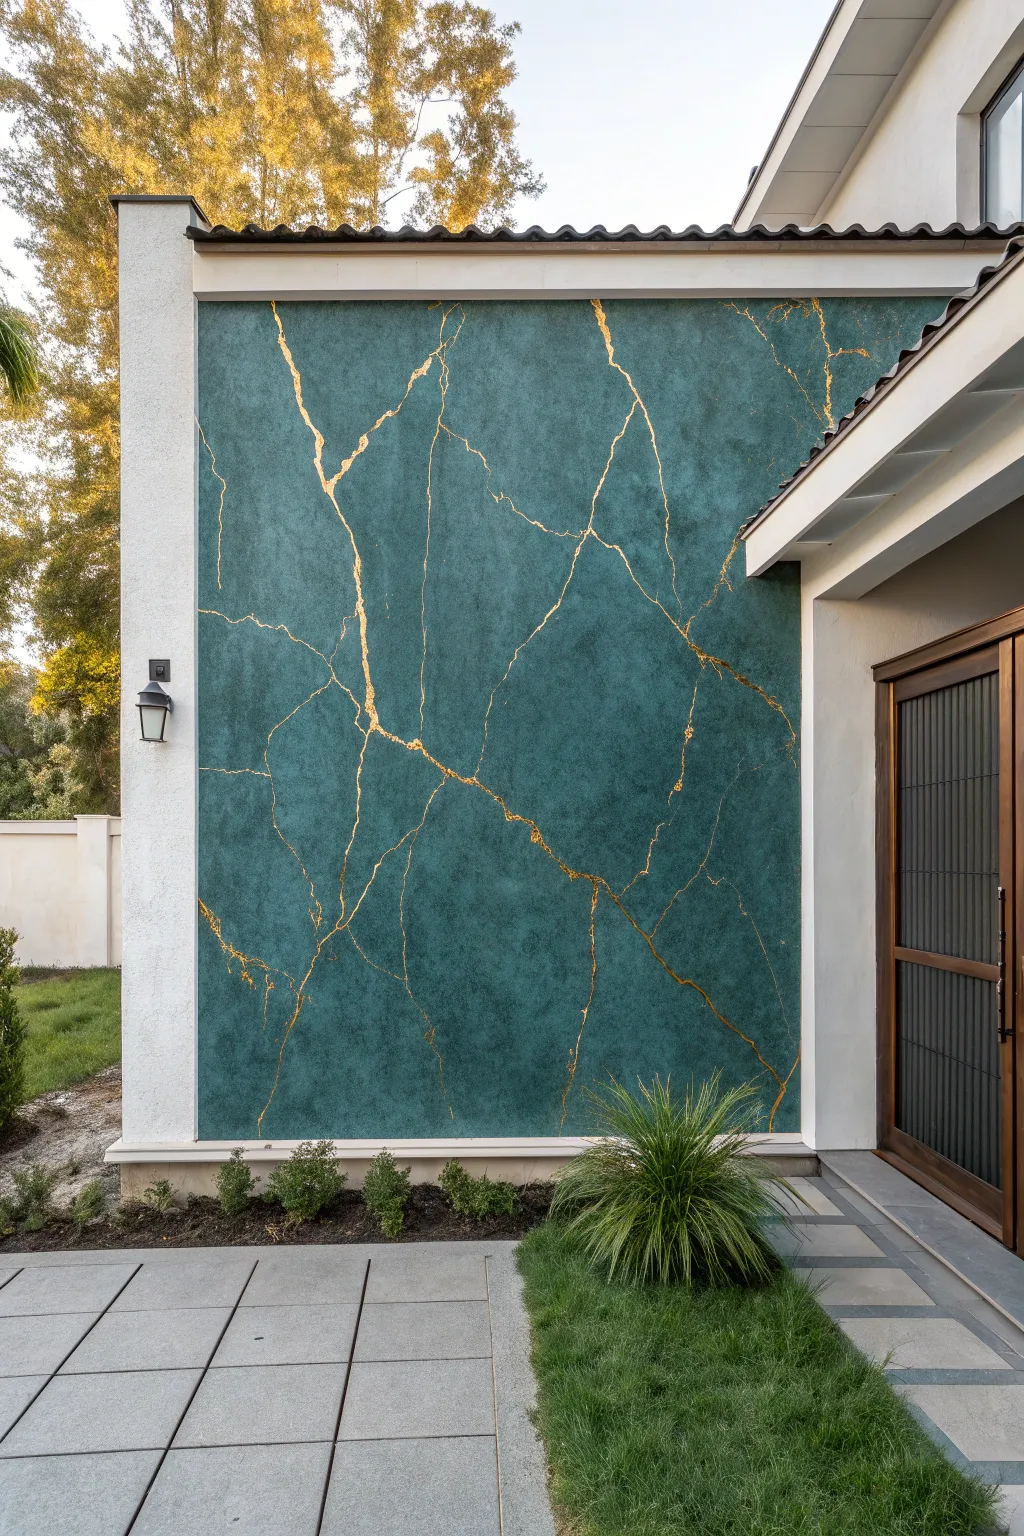
Transform a plain exterior wall into a stunning focal point with this technique inspired by the Japanese art of Kintsugi. By pairing a deep, emerald-teal textured base with striking gold leaf veins, you create an elegant look that turns potential imperfections into artistic features.
Step-by-Step Guide
Materials
- Exterior masonry primer
- Deep teal or emerald exterior latex paint (flat or eggshell)
- Black exterior paint (for wash/texture)
- Faux glaze medium (exterior grade)
- Gold leaf size (adhesive sizing)
- Gold leaf sheets (brass or imitation gold suitable for outdoors)
- UV-resistant clear topcoat (gloss or satin)
- Sea sponge or texturing roller
- Fine liner brushes
- Medium artist brushes
- Soft gilding brush (mop brush)
- Painter’s tape and drop cloths
Step 1: Preparation and Base Coat
-
Surface Prep:
Begin by thoroughly cleaning the exterior wall with a pressure washer or a stiff scrub brush and soapy water to remove dirt, moss, and loose debris. Allow the wall to dry completely for at least 24 hours. -
Prime the Wall:
Apply a high-quality masonry primer to ensure your paints adhere properly. Use a thick nap roller to get into any crevices in the stucco or concrete surface. -
Apply Base Color:
Roll on two coats of your deep teal exterior paint. This rich background is crucial for making the gold pop later, so ensure solid, opaque coverage. -
Create Texture Depth:
To mimic the stone-like appearance in the photo, mix a small amount of black paint with your glaze medium. Using a sea sponge or a rag, lightly dab this dark wash over the dried teal base in random patches to create subtle variation and stone-like texture.
Natural Lines Tip
To avoid stiff drawing, hold your paintbrush at the very end of the handle and twist it slightly as you drag. This creates natural jitters and variations that look like real fractures.
Step 2: Designing the Cracks
-
Map the Veins:
Using a piece of white chalk, lightly sketch your ‘crack’ patterns directly onto the wall. Aim for organic, jagged lines that mimic lightning bolts or natural fissures in marble. -
Review the Composition:
Step back about 20 feet to check the balance of your lines. You want varied spacing—some areas should have dense clusters of veins, while others remain relatively open. -
Define the Path:
Go over your chalk lines with a fine liner brush and the gold size adhesive. Paint the adhesive slightly irregularly—some parts thin, some parts slightly thicker—to look like natural breaks in stone. -
Add Minor Branching:
While applying the adhesive, add tiny little off-shoots from the main veins that fade out. This detail adds realism so the lines don’t look too uniform.
Step 3: Gilding the Veins
-
Wait for Tackiness:
Allow the adhesive size to set until it reaches the ‘tack’ stage. It should feel sticky like masking tape but not wet enough to transfer to your finger. This is the crucial window for applying the leaf. -
Apply Gold Leaf:
Gently press sheets of gold leaf over the tacky adhesive lines. Don’t worry about being messy here; the gold will only stick where the glue is. -
Burnish the Leaf:
Use a soft, dry mop brush to gently rub the back of the gold leaf sheets. This presses the metal firmly into the adhesive and the wall’s texture. -
Clean Up Excess:
Once all lines are covered, vigorously brush away the loose gold flakes with a larger, clean brush. I find saving the larger flakes in a jar is great for future smaller touch-ups. -
Refine Edges:
Inspect your lines. If any edges look too straight or artificial, gently dab a tiny bit of teal paint over the edge to break up the line and integrate it into the background.
Adhesive Troubleshooting
If the gold leaf isn’t sticking, the size might have dried too much. Reapply the adhesive in small sections and test the tackiness frequently with your knuckle.
Step 4: Sealing and Protection
-
Seal the Gold:
Gold leaf (especially imitation leaf) will tarnish outdoors if exposed to air and moisture. Apply a UV-resistant clear coat specifically over the gold lines first using a small brush. -
Final Coat (Optional):
For maximum durability, roll a clear sealant over the entire wall. However, if you want the gold to shine differently than the matte wall, stick to sealing just the lines.
Step back and enjoy the way the sunlight catches the gold veins, bringing a luxurious touch to your outdoor space


Have a question or want to share your own experience? I'd love to hear from you in the comments below!