
If you’re craving a drawing subject that’s instantly lush, layered, and full of movement, the rainforest has your back. I love it because you can keep it super simple with big shapes—or go all-in on tiny textures and wild details.
Canopy Trees With Cloudlike Foliage
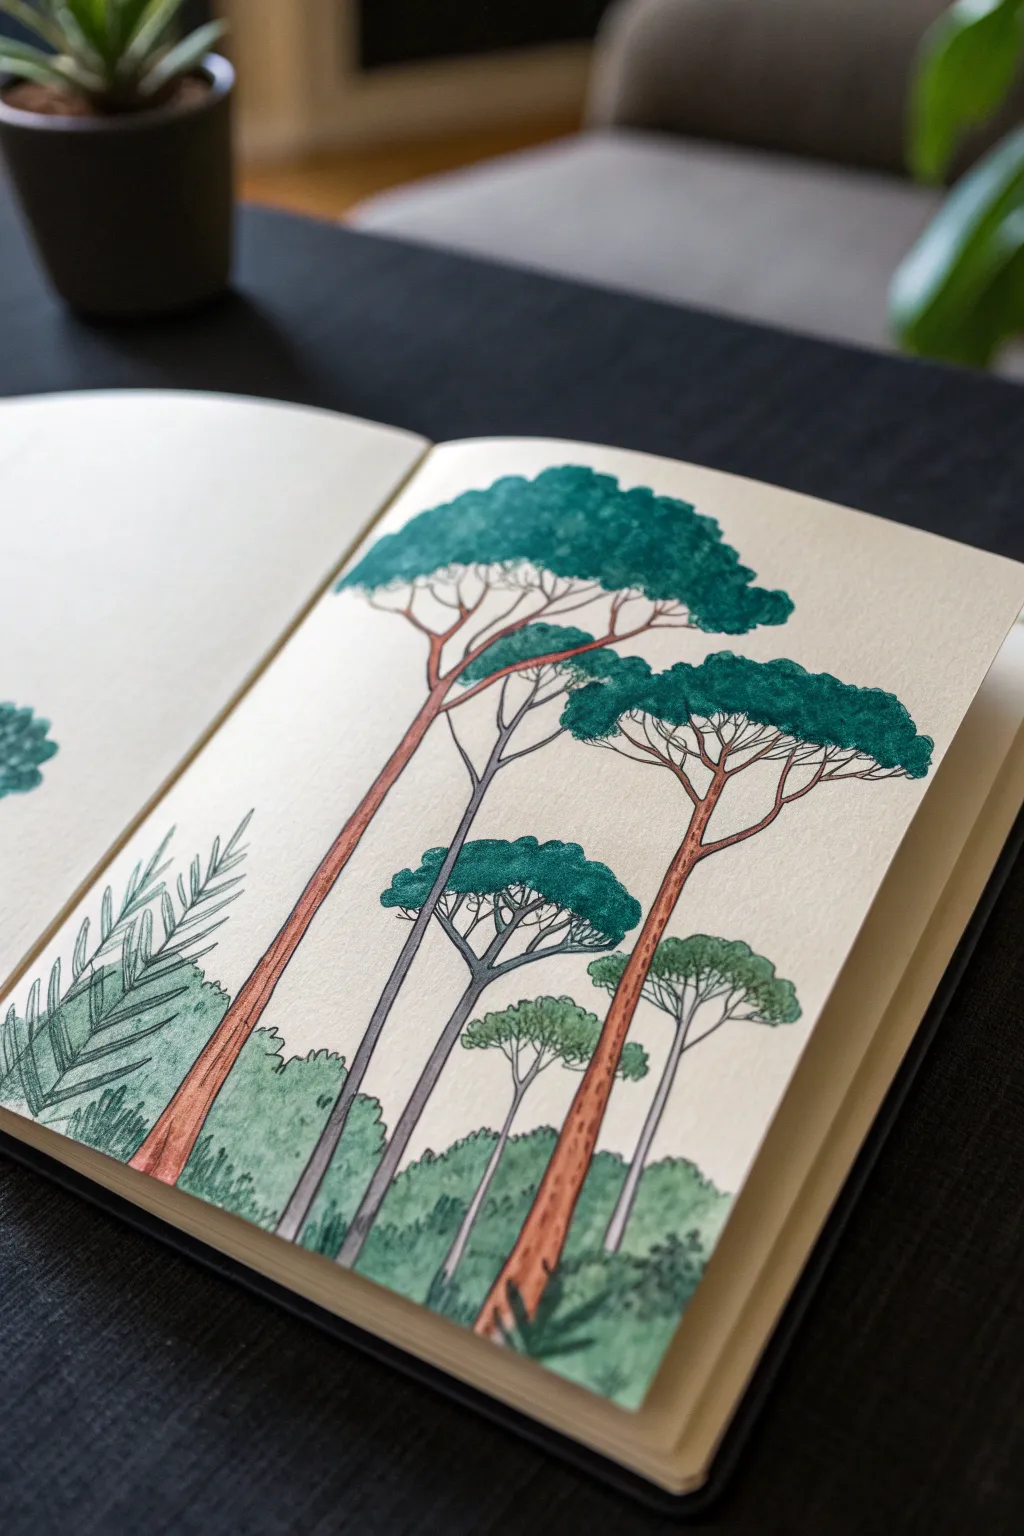
This serene sketchbook spread captures the elegance of umbrella pines with their distinctive, canopy-heavy silhouettes. Using a blend of fine liners and markers, you’ll create a stylized forest scene that feels both organic and delightfully structured.
Detailed Instructions
Materials
- Heavyweight sketchbook (mixed media or bristol paper)
- Fine liner pens (0.1mm, 0.3mm, 0.5mm in black or dark grey)
- Alcohol-based markers (forest green, emerald, terracotta, pale brown, grey-blue)
- Color pencils (dark green, charcoal)
- Pencil and eraser
Step 1: Structuring the Trees
-
Draft the placement:
Begin with a light pencil sketch to establish the composition. Draw three to four tall, slender vertical lines for the main trunks, slightly curving them to avoid stiffness. Vary their heights so the canopies don’t all align on a single horizon line. -
Outline the canopy shapes:
At the top of each trunk line, sketch flattened, cloud-like ovals. These shouldn’t be perfect circles; think of them as wide, sweeping umbrellas that cap the trees. -
Add secondary trees:
Behind your main foreground trees, sketch in faint lines for background trees. These should be thinner and shorter to create depth. -
Define the trunk thickness:
Go back over your vertical lines and create double lines to give the trunks thickness. Make the base slightly wider than the top, tapering gently as you go up.
Uneven marker coverage?
If your marker strokes look streaky, work faster while the ink is wet to blend it, or embrace the texture! Small circular motions often hide streaks better than long lines.
Step 2: Inking the Framework
-
Ink the main trunks:
Using a 0.3mm fine liner, trace your pencil lines for the main trunks. Keep your hand loose; a slight waiver adds to the organic texture of bark. -
Branch out:
As you reach the top third of the trunk, split the main trunk into two or three major branches that reach upward and outward into your canopy guides. -
Create the sub-branches:
Switch to a finer 0.1mm pen. From those major branches, draw a network of delicate, spider-web-like twigs that fan out horizontally to support the foliage ‘clouds’. -
Detail the background:
Ink the background trees with the 0.1mm pen to push them visually into the distance. Keep their branch structures simpler than the foreground trees. -
Erase guidelines:
Wait a moment for the ink to settle, then gently erase all remaining pencil marks to leave a clean black-and-white framework.
Step 3: Adding Color to Foliage
-
Base layer for canopies:
Using an emerald or teal-leaning forest green marker, fill in your cloud shapes. Use small, circular scrubbing motions rather than long strokes to simulate leaf texture. -
Add canopy shadows:
While the marker is still slightly damp, take a darker green coloring pencil and shade the bottom edges of each cloud puff. This gives them volume and weight. -
Color the trunks:
For the distinct Mediterranean pine look, use a terracotta or reddish-brown marker for the main trunks. Leave tiny slivers of white paper showing vertically to act as highlights. -
Tint the background trunks:
Use a cool grey or desaturated violet-grey marker for the trunks of the background trees. This difference in color temperature instantly adds atmospheric perspective.
Depth perception
Make the foreground trees slightly warmer in tone and the background trees cooler and paler. Using a blue-grey wash over the furthest trees pushes them back instantly.
Step 4: Developing the Undergrowth
-
Sketch the floor:
At the bottom of the page, draw jagged, leafy outlines for the bushes and undergrowth. I find it helps to let these overlap the base of the tree trunks to ground them. -
Detail the leaves:
On the left side, draw distinct, elongated fern-like leaves using your 0.3mm pen. In the center, use softer, bumpy lines for general shrubbery. -
Color the shrubs:
Use a lighter, more yellowish-green marker for the undergrowth to differentiate it from the deep teal of the tree canopies. -
Add final texture:
Once the marker ink is dry, use your black 0.5mm pen to add small stippling dots or short hatch marks on the bark of the main trees to suggest roughness.
Close your sketchbook knowing you’ve captured a peaceful moment of nature with just a few colors and lines


Misty Rainforest Mountains Background
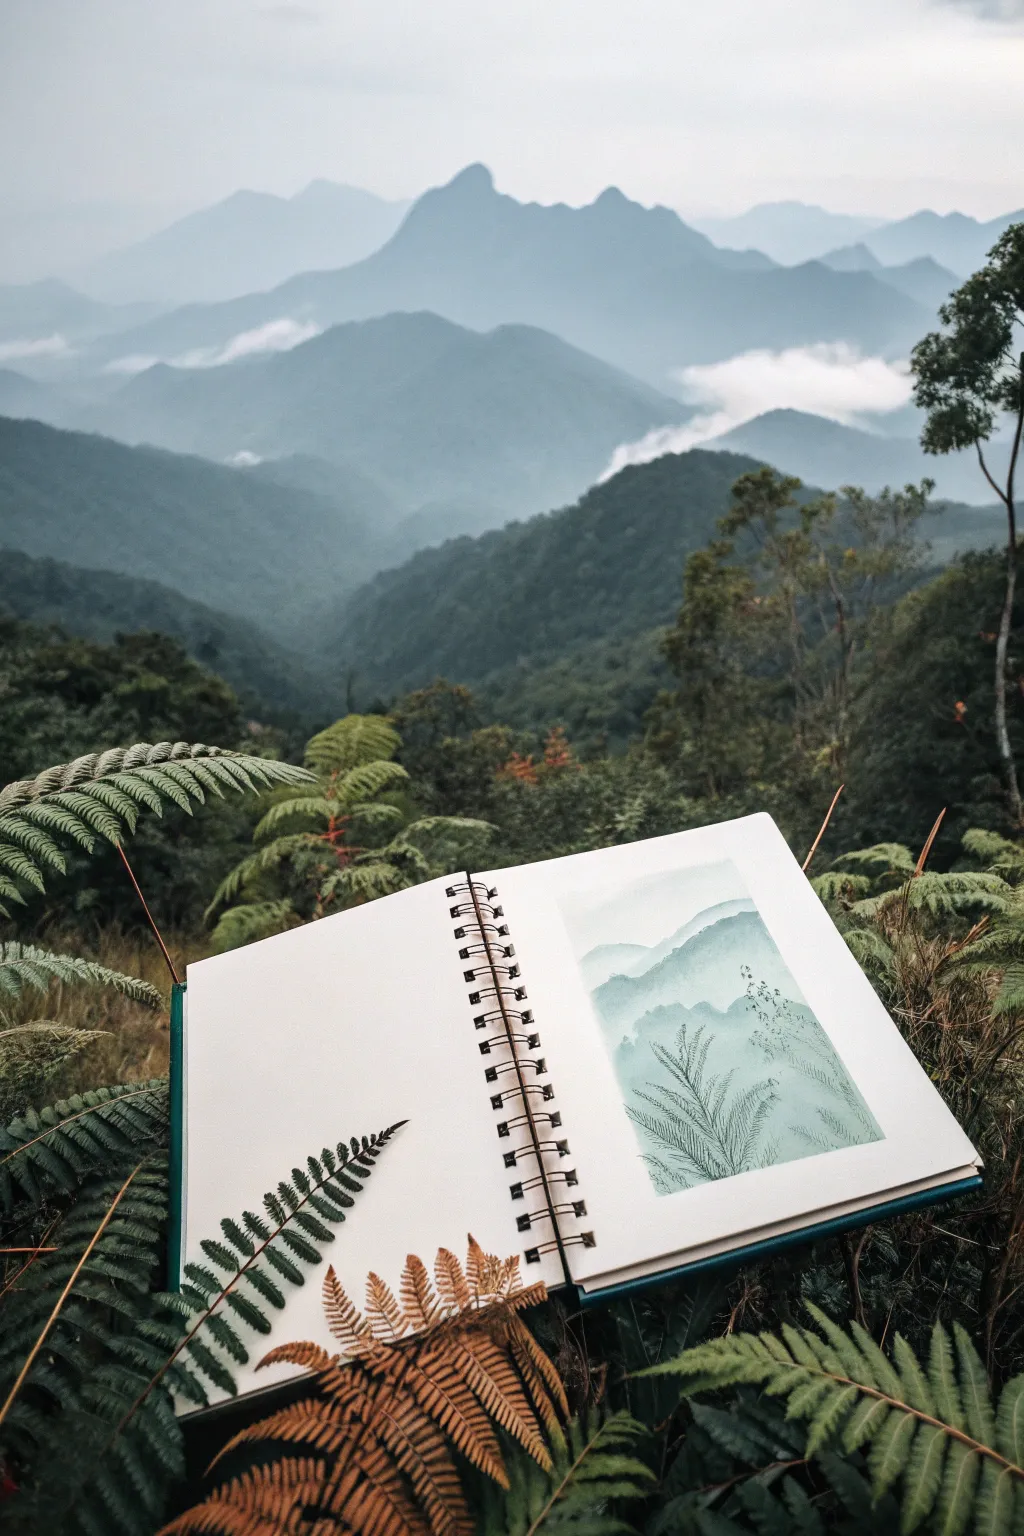
Capture the serene depth of a rainforest landscape in your sketchbook with this atmospheric study. Using soft watercolor washes and fine ink details, you’ll recreate the gentle fade of distant peaks and overlapping fern textures.
How-To Guide
Materials
- Spiral-bound sketchbook (heavyweight paper)
- Watercolor paint set (focus on Payne’s Grey, Indigo, Sap Green, and Teal)
- Round watercolor brushes (sizes 4, 8, and a fine liner)
- Clean water jar
- Paper towels
- Fine-point black or dark green archival ink pen
- Washi tape or masking tape
- Dried fern frond (optional prop)
Step 1: Setting the Scene
-
Isolate the area:
Begin by taping off a clean rectangular border on the right-hand page of your sketchbook using washi tape. This creates that crisp, professional edge seen in the final piece. -
Mix your palette:
Prepare a gradient of colors on your palette. You need a very pale, watery blue-grey for the furthest mountains, a medium teal-grey for the mid-ground, and a deeper, saturated blue-green for the foreground hills. -
Light sketch:
Very faintly sketch the wavy contour lines of the mountain ranges with a hard pencil (like a 2H). You want these lines to be barely visible guides.
Bleeding edges?
If paint seeps under your tape, use a white gouache or a white gel pen to tidy up the edges after the painting is fully dry to restore the rectangle.
Step 2: Layering the Atmosphere
-
The furthest peak:
Load your size 8 brush with the palest blue-grey, ensuring it’s about 80% water. Paint the sky area and the most distant mountain silhouette. -
Softening edges:
While the paint is still wet, gently lift a little color from the bottom of that first mountain shape with a clean, damp brush to create a misty fade. -
The second range:
Once the first layer is touch-dry, paint the next mountain ridge slightly lower down. Use a mix that has just a bit more pigment than the first layer to establish depth. -
Building contrast:
Continue working your way down the paper. Each subsequent mountain range should be painted with slightly less water and more pigment. -
Create the fog:
For the middle layers, I like to drop clear water into the bottom edge of the wet paint shape. This encourages the pigment to bloom upwards, mimicking rising mist. -
The foreground wash:
Paint the final, closest hill shape at the bottom using your darkest, most saturated blue-green mix. -
Final drying time:
Let the entire wash dry completely. The paper must be bone-dry before you add ink details, or the lines will bleed.
Atmospheric depth
Remember the rule of aerial perspective: objects become lighter, cooler (bluer), and less detailed the further away they are.
Step 3: Details & Styling
-
Foreground ferns:
Switch to your fine liner brush or an archival ink pen. In the bottom right corner, sketch delicate fern fronds rising up from the base. -
Varying marks:
Use quick, confident strokes for the fern spines, and tiny, repetitive dabs for the leaves. Allow some ferns to look faint (using diluted paint) and others crisp (using ink). -
Scatter small details:
Add tiny clusters of dots or faint vertical lines in the mid-ground to suggest distant trees or vegetation without drawing too much attention. -
The reveal:
Carefully peel away the masking tape at a 45-degree angle to reveal your crisp white border. -
Add nature:
To complete the aesthetic presentation, place a real, dried fern frond on the opposite blank page, mirroring the angle of your painted ferns.
Close your sketchbook on this tranquil scene and enjoy the piece of calm you have created


Rainforest Animal on a Branch
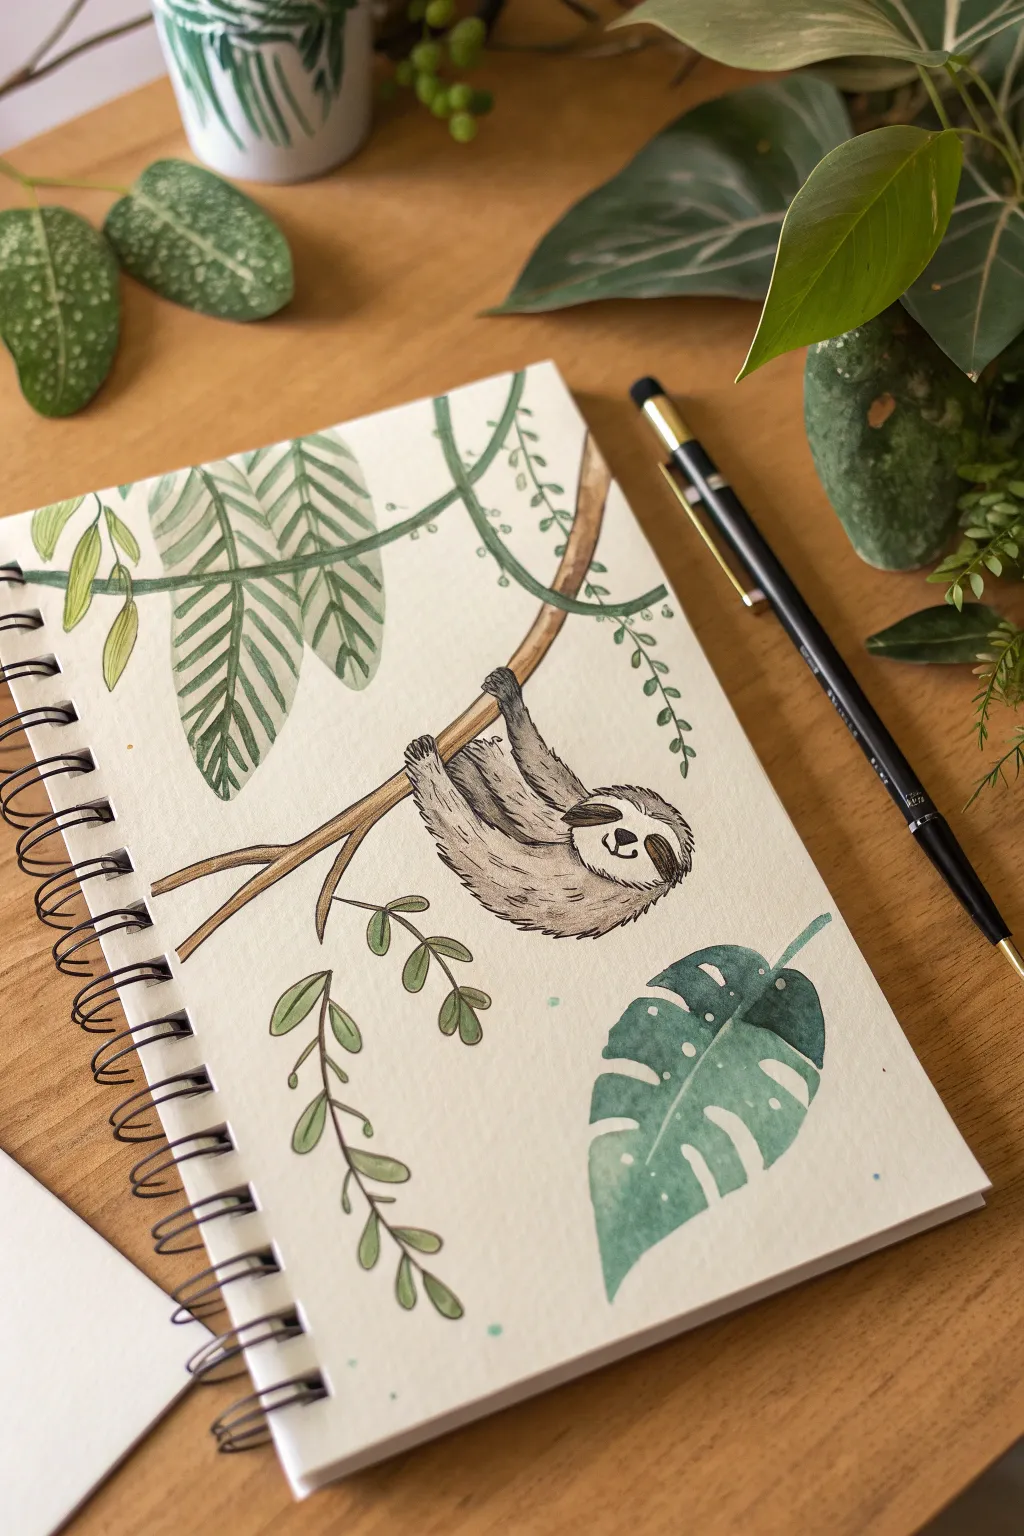
Capture the slow-paced charm of the rainforest with this delightful mixed-media illustration of a sloth hanging from a branch. By combining loose watercolor washes with crisp ink linework, you’ll create a sketchbook page that feels organic and full of life.
Step-by-Step Tutorial
Materials
- Spiral-bound watercolor sketchbook (cold press paper recommended)
- Pencil (HB or H for light sketching)
- Kneaded eraser
- Waterproof fine liner pen (black, 0.3mm or 0.5mm)
- Watercolor paints (shades of brown, warm grey, sap green, viridian)
- Round watercolor brushes (size 4 and size 6)
- Clean water and paper towels
Step 1: Sketching the Layout
-
Map out the branch:
Start by lightly sketching a curved line spanning diagonally across the page, starting from the upper right and dipping down towards the left. Add thickness to create the branch, letting it fork slightly at the end. -
Position the sloth:
Draw the basic shapes of the sloth hanging from the center of the branch curve. Use a rounded oval for the body and a smaller, slightly flattened circle for the head tucked near the shoulder. -
Add limbs and claws:
Sketch the arms reaching up to grip the branch. The claws should hook securely over the wood. Make the back legs dangle slightly or tuck them under the body for a cozy pose. -
Draft the foliage:
Lightly outline surrounding leaves to frame the subject. Place a large Monstera-style leaf in the bottom right corner and trailing vines hanging from the top left and near the branch. Don’t worry about perfect symmetry; organic shapes look best.
Furry Texture Trick
When painting the sloth, try a ‘dry brush’ technique for the second layer. Wipe most paint off your brush to create scratchy texture that looks just like fur.
Step 2: Applying Watercolor
-
Paint the sloth’s base:
Mix a diluted wash of warm grey and light brown. Apply this to the sloth’s body, keeping the face lighter. I like to let the water pool slightly at the bottom of the body to create natural shading as it dries. -
Color the branch:
Use a medium brown for the branch. While the paint is still wet, drop in a slightly darker brown on the underside of the branch to suggest shadow and volume. -
Wash the greenery:
For the leaves, mix sap green with a touch of viridian. Paint the large bottom leaf with a variegated wash, letting some areas be watery and light while others are saturated. Paint the vines and upper leaves with varied green tones to create depth. -
Face details:
Once the initial face wash is dry, paint the characteristic ‘mask’ around the eyes using a darker brown, leaving the snout area pale. -
Let it dry completely:
This is crucial. Wait until the paper is bone dry before touching it with a pen, otherwise, the ink will bleed and ruin the crisp lines.
Step 3: Inking and Details
-
Outline the sloth:
Using your waterproof fine liner, trace the sloth’s outline. Use short, flicking strokes rather than a solid continuous line to simulate coarse fur texture. -
Define the face:
Carefully draw the eyes, nose, and mouth. The eyes should be curved downwards slightly to give that sleepy, happy expression. -
Texture the fur:
Add hatching lines inside the body shape, following the curve of the sloth. Concentrate these marks under the arms and belly to enhance the shadow. -
Ink the branch:
Outline the branch with a steady hand. Add some wood grain lines and small knots to give it a realistic texture. -
Leaf veins and edges:
Outline your painted leaves. For the large bottom leaf, add a central vein and delicate side veins. For the vines, draw the stems clearly connecting the small leaves. -
Add floating details:
Draw small circles or dots around the vines to mimic spores or tiny buds, adding a whimsical touch to the composition. -
Erase pencil marks:
Once the ink is fully dry, gently run your kneaded eraser over the entire drawing to lift any visible graphite lines, leaving just the clean paint and ink.
Ink Smearing?
If your pen smears, the paper wasn’t dry enough. If the paper feels cool to the touch, it’s still damp. Use a hairdryer on low heat to speed things up safely.
Now you have a charming rainforest friend resting peacefully in your sketchbook


Rainforest Window View Framing Trick
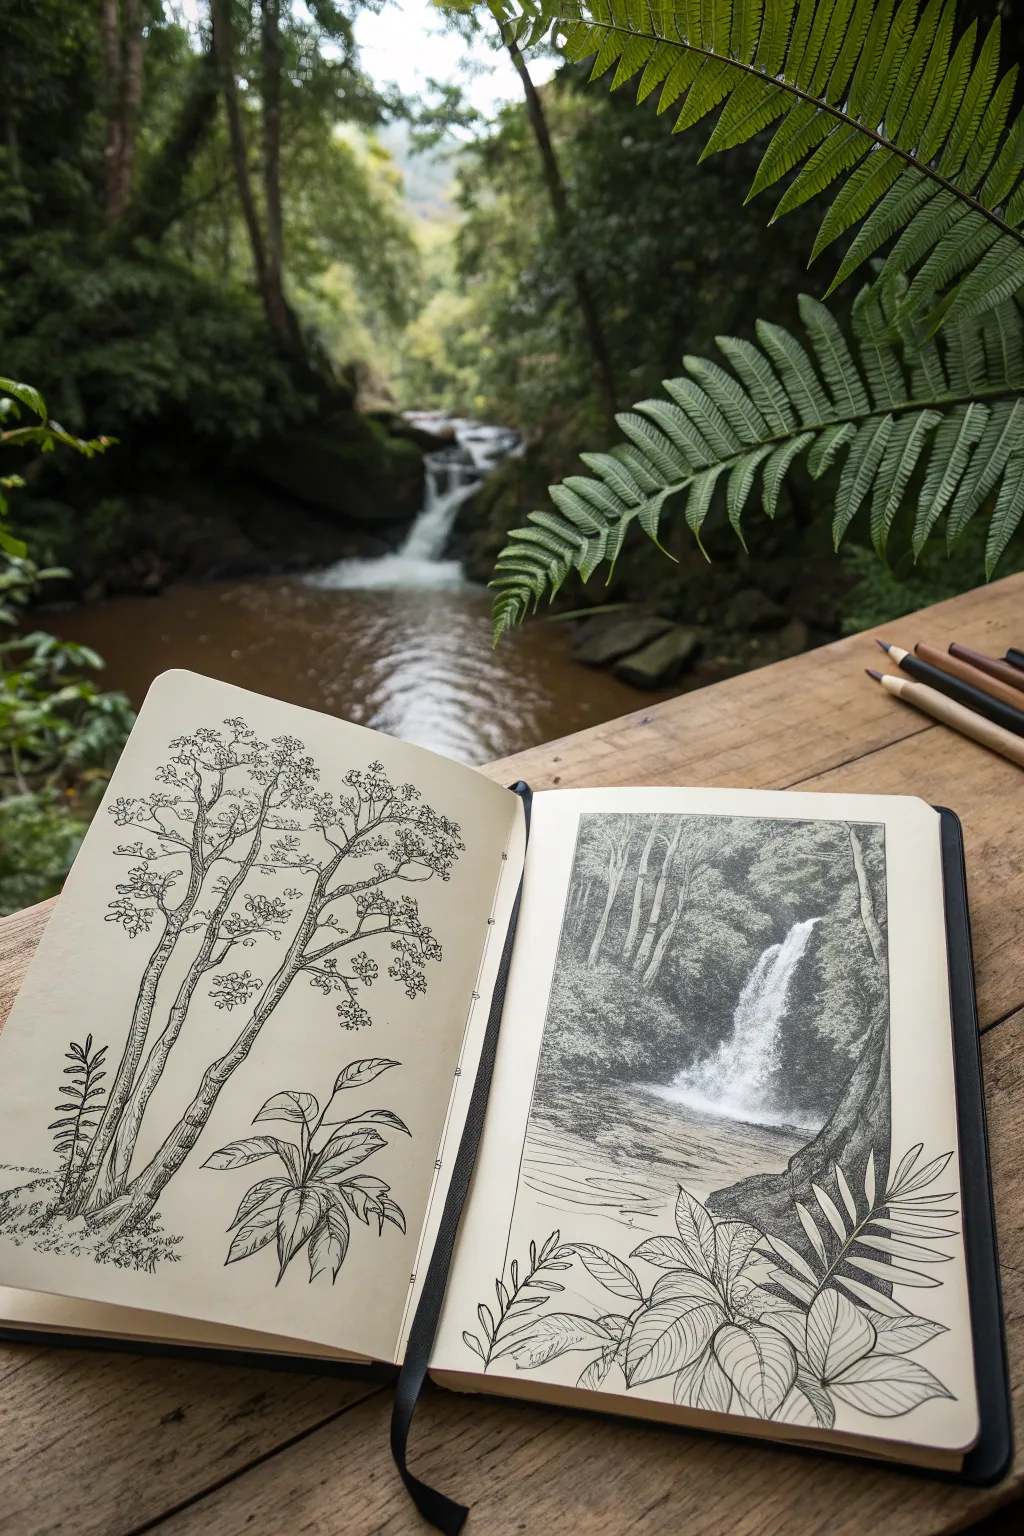
Capture the serenity of a jungle waterfall with this dual-technique sketchbook spread that combines delicate ink line work with atmospheric graphite shading. This project beautifully frames a landscape view while celebrating the intricate details of tropical botany on the facing page.
Step-by-Step Guide
Materials
- A5 or A4 sketchbook (smooth or mixed media paper recommended)
- Fine liner pens (sizes 0.1, 0.3, and 0.5)
- Graphite pencils (HB, 2B, 4B, and 6B)
- Blending stump or tortillon
- Ruler
- Kneaded eraser
- Masking tape (optional)
Step 1: Planning and Framing
-
Establish the horizon:
Begin by lightly marking a horizon line across both pages to keep the perspective consistent, even though the subjects differ. -
Frame the waterfall:
On the right-hand page, use your ruler and an HB pencil to draw a crisp vertical rectangle. This box will contain your waterfall scene. Leave a generous margin of white space around it to create that ‘window’ effect. -
Sketch the focal points:
Lightly sketch the main trunk of the tree on the left page, curving it slightly to give it character. On the right page, within your frame, lightly block in the path of the waterfall and the surrounding rock formations.
Breaking the Fourth Wall
For a dynamic 3D effect, always draw the ‘overlay’ plants in ink first, then draw the rectangular frame behind them. It’s much cleaner than trying to erase the frame line later.
Step 2: The Ink Botanical Page (Left)
-
Outline the tree trunk:
Using a 0.3 fine liner, carefully ink the contours of the tall tree on the left page. Use broken lines to suggest rough bark rather than a solid, cartoonish outline. -
Add bark texture:
Switch to a 0.1 pen for the interior bark details. Use vertical hatching and small squiggles to create a sense of roundness and texture on the trunk. -
Draw the canopy foliage:
Create the leaves at the top using the 0.3 pen. Instead of drawing every single leaf, use clusters of small loops and scribbles to suggest dense foliage clumps. -
Anchor the base:
At the bottom of the tree, draw the large tropical leaves. Use the 0.5 pen for the main veins and outlines to make them pop against the lighter tree trunk. -
Detail the ground plants:
Add smaller fern-like details near the roots using your finest 0.1 pen to create depth without overcrowding the drawing.
Step 3: The Graphite Waterfall (Right)
-
Establish darks:
Switching to graphite, use a 4B pencil to shade the areas flanking the waterfall. These should be the darkest parts of the forest to make the white water stand out. -
Create the water texture:
Leave the paper white for the main body of the falling water. Use an HB pencil to lightly streak downwards at the edges of the water where it meets the rocks, suggesting motion. -
Build the forest backdrop:
Use a 2B pencil to fill in the trees above the waterfall. I like to keep these strokes slightly looser and less defined to push them into the background. -
Blend for atmosphere:
Take your blending stump and gently smudge the graphite in the background trees and the misty area at the bottom of the falls. This softness contrasts beautifully with the sharp ink lines we’ll add later. -
Define the stream:
Draw the water flowing away from the falls using horizontal strokes with an HB pencil. Keep the lines uneven to mimic ripples.
Smudgy Pages?
Graphite loves to transfer to the facing page. To protect your crisp ink drawing on the left, place a sheet of wax paper or tracing paper between the pages when you close the book.
Step 4: Foreground and Finishing Touches
-
Break the frame:
Now, return to your 0.3 or 0.5 ink pen. On the right page, draw large tropical leaves in the bottom right corner. Allow these leaves to overlap and ‘break’ the pencil frame you drew earlier. -
Detail the overlay leaves:
Add distinct veins to these foreground leaves. Since they are closest to the viewer, they should be the crispest elements on the page. -
Erase guidelines:
Once the ink is completely dry, use a kneaded eraser to lift up any visible graphite guidelines from the left page and around the frame specifically. -
Clean up edges:
Use a ruler and a pen to re-trace the rectangular frame lines on the right page, but stop the line strictly where it meets the ink leaves. Do not draw through the leaves. -
Final assessment:
Check the balance between the two pages. If the graphite side feels too light, go back in with a 6B pencil to deepen the deepest shadows near the waterfall base.
Now you have a tranquil scene that captures both the mood and the detail of the wild rainforest
BRUSH GUIDE
The Right Brush for Every Stroke
From clean lines to bold texture — master brush choice, stroke control, and essential techniques.
Explore the Full Guide
Rainstorm Scene With Diagonal Rain Lines
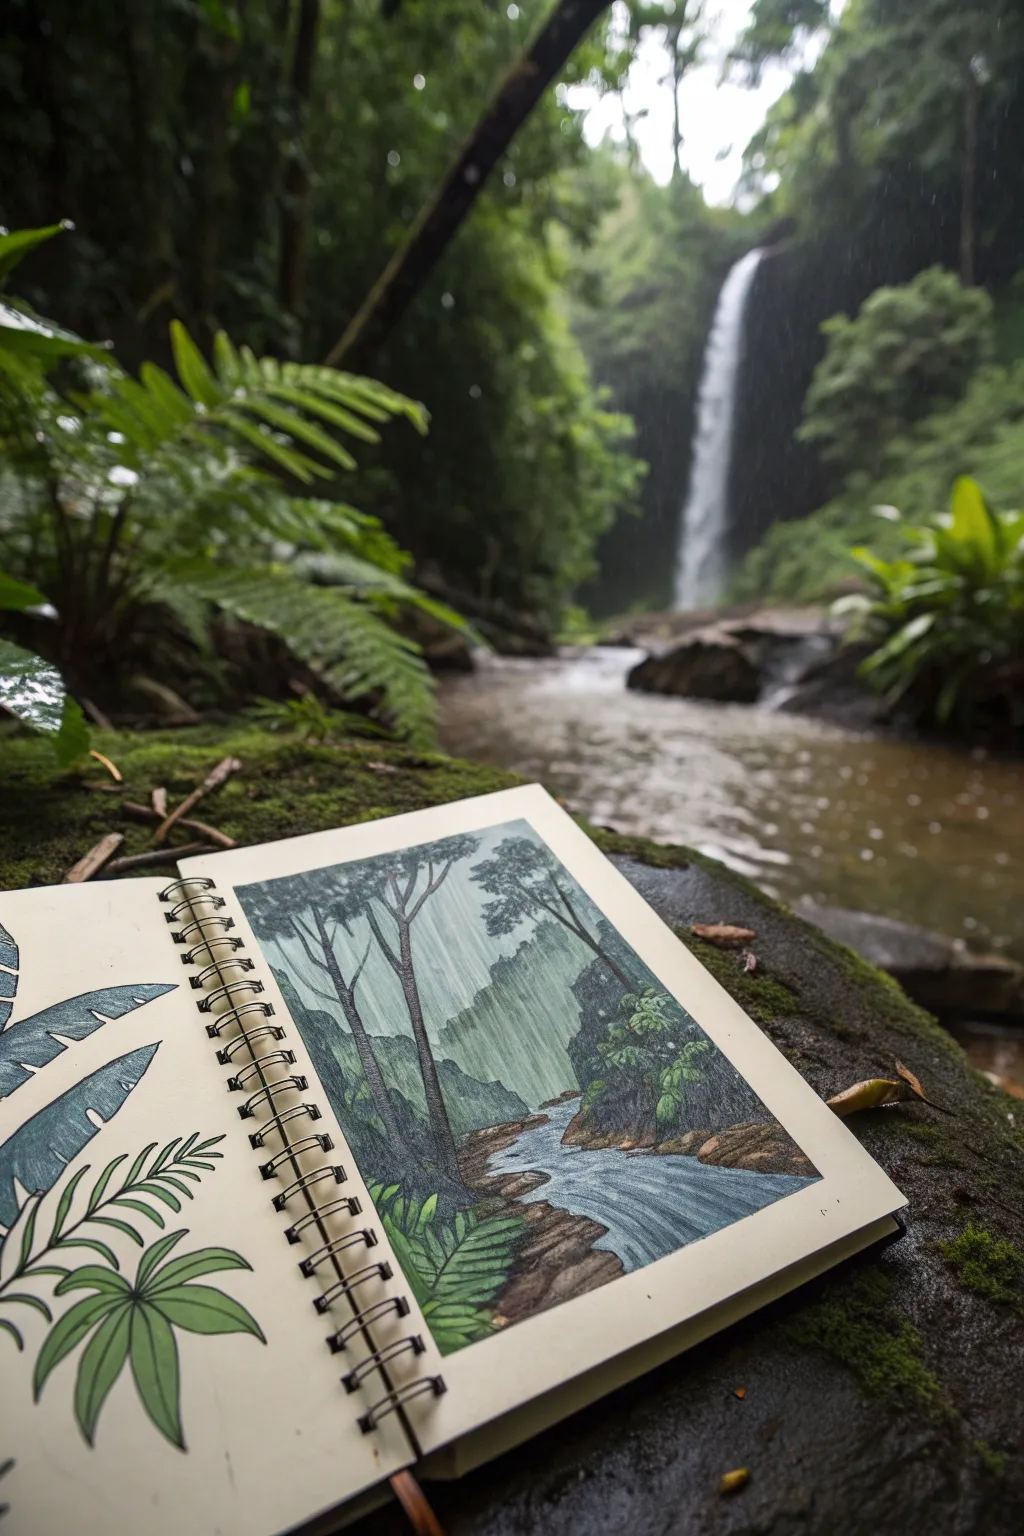
Capture the moody atmosphere of a tropical downpour with this illustrative rainforest scene. Utilizing distinct diagonal strokes to mimic heavy rain, this drawing balances lush greens with cool, misty blues.
Step-by-Step Guide
Materials
- Spiral-bound sketchbook (heavyweight paper)
- Graphite pencil (HB or 2B)
- Fine liner pens (0.1mm, 0.3mm, and 0.5mm, waterproof)
- Colored pencils (greens, blues, browns, greys) OR watercolor set
- White gel pen or acrylic paint pen
- Ruler (optional)
- Eraser
Step 1: Planning the Composition
-
Establish the horizon and stream:
Begin by lightly sketching the path of the stream. Start wide at the bottom foreground and narrow it as it winds upwards towards the center of the page, disappearing into the background. -
Block in the land masses:
Draw loose, organic shapes on either side of the stream to represent the rocky banks and forest floor. Keep these lines rough to suggest moss and uneven terrain. -
Position the main trees:
Sketch two or three tall, slender tree trunks on the left bank. These should be vertical but slightly uneven to look natural. Add a few distant, softer tree shapes in the background to create depth. -
Outline foliage details:
Add clusters of leaves in the foreground corners and on the banks. Use large jagged shapes for ferns near the bottom and smaller scribbles for distant canopy leaves.
Muddy colors?
If your greens and browns are blending into grey mush, let your layers dry completely (if using paint) or use a spray fixative between heavy pencil layers to keep colors distinct.
Step 2: Adding Color and Texture
-
Color the stream:
Using a cool blue-grey pencil or paint, fill in the water. Use horizontal strokes that curve slightly with the flow of the river to suggest movement. -
Layer the greens:
Start with a light yellow-green for the sun-touched areas of the ferns and moss. Then, layer darker forest greens into the shadows and the foliage on the banks to build richness. -
Define the tree trunks:
Color the tree trunks with a mix of dark brown and charcoal grey. Applying more pressure on the sides of the trunks will help give them a cylindrical, 3D form. -
Create the misty background:
For the distant hills and trees, use a very pale, muted green or blue-grey. Keep the pressure light to make these elements look like they are receding into the fog. -
Deepen the shadows:
Go back in with a dark indigo or black pencil to darken the crevices under the rocks and the deepest parts of the forest canopy.
Level Up: Texture
Use the ‘sgraffito’ technique on the rocks. Layer thick dark wax pencil, then scratch through it with a hobby knife to reveal the lighter paper underneath for mossy texture.
Step 3: Creating the Rain Effect
-
Draw the rain lines:
This is the crucial step. Take a ruler (or go freehand for a more organic look) and use a light grey pencil or a white gel pen. Draw sharp, consistent diagonal lines across the entire drawing, focusing especially on the background and sky area. -
Vary line intensity:
Make some rain lines thicker and others thinner. I often press harder near the top of the stroke and lift off quickly to create a tapered ‘falling’ effect. -
Add water interaction:
Where the diagonal rain lines hit the stream surface, add tiny concentric ripples or splashes using your white pen or a fine liner. -
Refine the foreground:
Ensure the rain lines pass *over* the background elements but perhaps stop short of the very closest foreground leaves, which creates a sense of looking out from under a canopy. -
Leaf studies (Left Page):
As a finishing touch, sketch a few crisp, dedicated leaf studies on the opposite page to complement the full scene.
Now you have a serene, rain-soaked landscape ready to transport you to the jungle


Have a question or want to share your own experience? I'd love to hear from you in the comments below!