
A painted round table can completely change the vibe of a room, especially when that circular top becomes your new little stage for color and pattern. I’m sharing my favorite painted finish ideas that play up the curves, hide the wear, and turn an old table into a piece you actually want to show off.
Classic Two-Tone Round Table
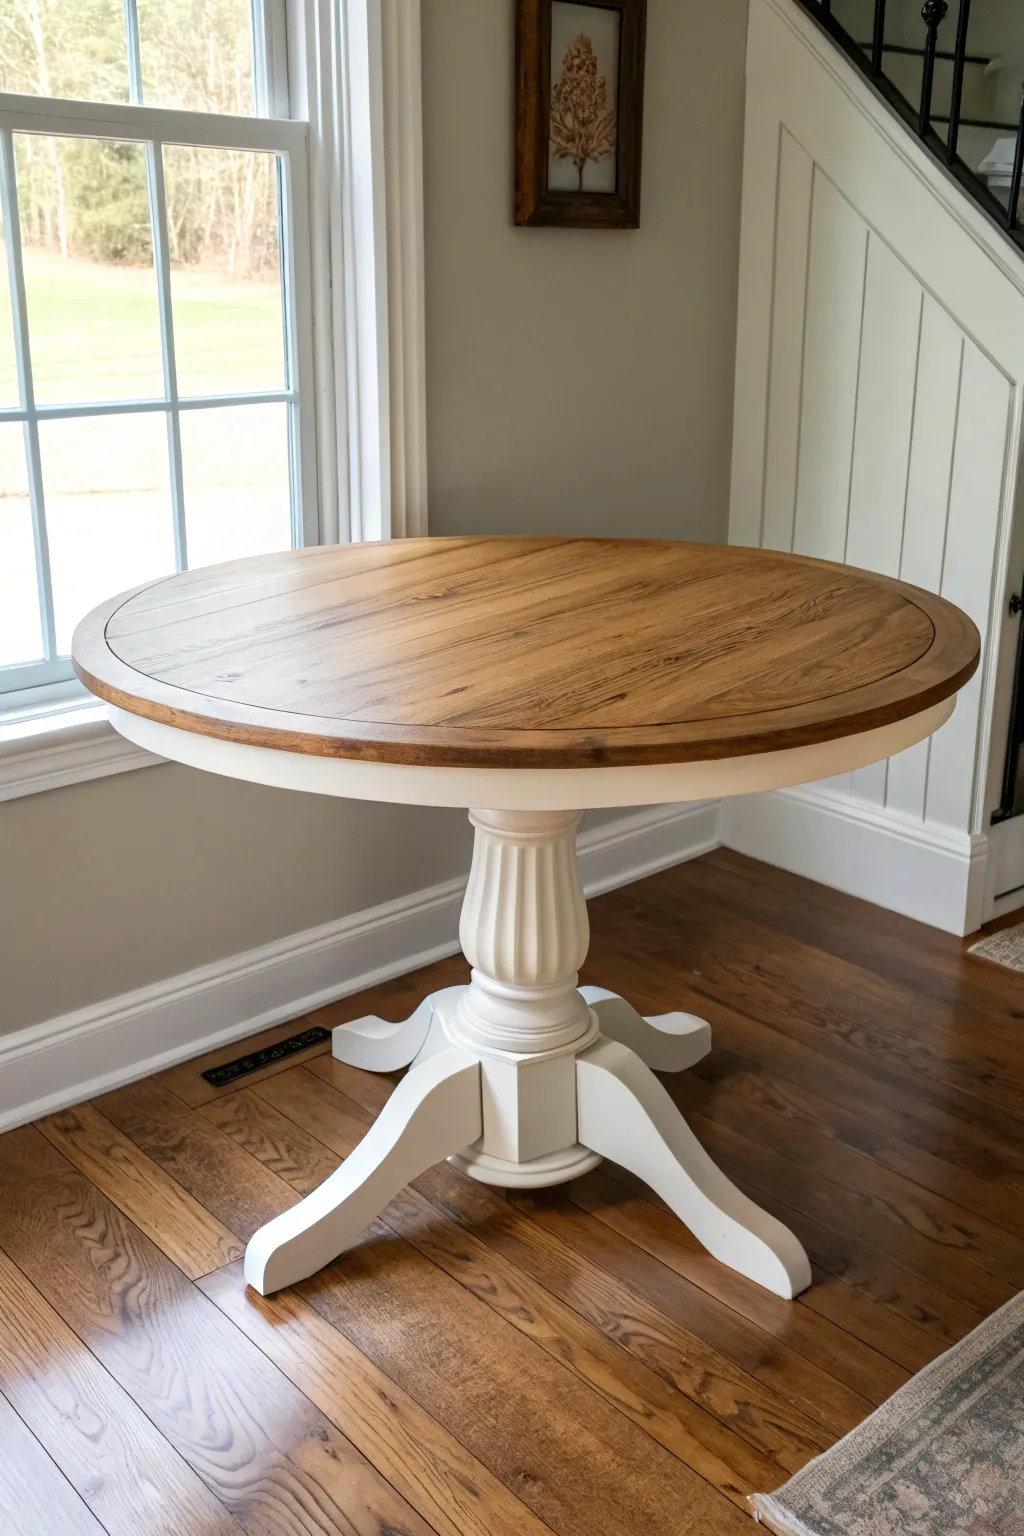
Give your dining area a fresh, classic look with this timeless two-tone table makeover. By pairing a warm, stained wood top with a crisp, white pedestal base, you create a versatile centerpiece that perfectly balances rustic charm with modern elegance.
Detailed Instructions
Materials
- Round wooden pedestal table (thrifted or existing)
- Orbital sander
- Sandpaper (80, 120, and 220 grit)
- Chemical stripper (e.g., Citristrip)
- Plastic scraper
- Wood stain (medium brown like Early American or Provencal)
- Staining pads or lint-free rags
- Oil-based polyurethane (satin or matte finish)
- Bonding primer (high-quality)
- Creamy white chalk paint or latex enamel
- Angled sash brush (2-inch)
- Foam brushes
- Tack cloth
- Painters tape
Step 1: Preparing the Surface
-
Assess the existing finish:
Examine your table to determine if the existing finish is thick varnish or thin paint. If the top has a heavy clear coat, I usually start with a chemical stripper to save time on sanding later. -
Strip the tabletop:
Apply a generous layer of chemical stripper to the table surface. Let it sit according to the manufacturer’s instructions until the finish bubbles, then gently scrape away the residue with a plastic scraper. -
Sand the tabletop:
Using an orbital sander, sand the tabletop down to raw wood. Start with 80-grit sandpaper to remove remaining finish, move to 120-grit for smoothing, and finish with 220-grit for a silky surface. -
Scuff sand the base:
Since the base will be painted, you don’t need to strip it to bare wood. simply scuff sand the entire pedestal and legs with 120-grit sandpaper to give the primer something to grip. -
Clean everything thoroughly:
Vacuum up all sanding dust from the table and the surrounding area. Wipe the entire piece down with a tack cloth or a rag dampened with mineral spirits to ensure specific cleanliness.
Step 2: Staining the Top
-
Condition the wood (optional):
If your table is made of soft wood like pine, apply a pre-stain wood conditioner to prevent blotchiness. Let it penetrate for about 15 minutes before wiping off the excess. -
Apply the stain:
Stir your chosen wood stain well. Using a staining pad or lint-free rag, apply the stain in the direction of the wood grain. Work in sections to ensure even coverage. -
Wipe away excess:
Let the stain sit for 5-10 minutes (depending on how dark you want it), then wipe away all excess stain with a clean rag. Leaving excess stain on the surface will prevent it from drying properly. -
Let it cure:
Allow the stain to dry completely, ideally overnight. If the color isn’t rich enough for your taste, repeat the staining process for a second coat.
Bleed-Through Blocker
If you see pink or yellow stains seeping through your white primer (common with old glossy finishes), switch to a shellac-based primer like BIN to lock those tannins in.
Step 3: Painting the Base
-
Protect the fresh top:
Once the stain is dry, carefully apply painter’s tape underneath the tabletop edge where the apron meets the top, protecting your new wood finish from paint drips. -
Prime the pedestal:
Apply a coat of high-quality bonding primer to the base, focusing on getting into all the grooves and curves of the pedestal. Let this dry completely according to the can’s instructions. -
Apply the first coat of paint:
Using a high-quality angled sash brush, apply your creamy white paint. Use long, smooth strokes on the legs and follow the curve of the pedestal. Watch out for drips in the carved details. -
Sand between coats:
Once the first coat is dry, lightly hand-sand with 220-grit sandpaper to knock down any brush strokes or raised grain. Wipe away the dust. -
Apply the final coat:
Apply a second (and third, if necessary) coat of paint for full, opaque coverage. I find that thin coats dry harder and look better than one thick, gloppy coat.
Whitewash The Grain
For a coastar vibe, brush a very diluted mix of white paint and water over the dry stained top, then immediately wipe it back to let white settle into the wood grain.
Step 4: Applying Protection
-
Seal the base:
If you used chalk paint, apply a clear wax or a matte polycrylic to seal the base. If you used an enamel paint, you can often skip this step as it self-seals. -
Apply topcoat to the table surface:
Using a clean foam brush or high-quality bristle brush, apply a coat of oil-based polyurethane to the stained top. Oil-based finishes are more durable for dining surfaces and add a nice amber warmth. -
Sand and recoat:
After the first poly coat dries (usually 4-6 hours), lightly sand with 220-grit paper, wipe clean, and apply a second coat. Repeat for a third coat if this table will see heavy daily use. -
Final cure:
Remove the painter’s tape carefully. Allow the table to cure for at least 48 to 72 hours before placing any heavy objects or hot dishes on the surface.
Enjoy gathering friends and family around your beautiful new custom table for years to come


Soft White Pedestal Round Table
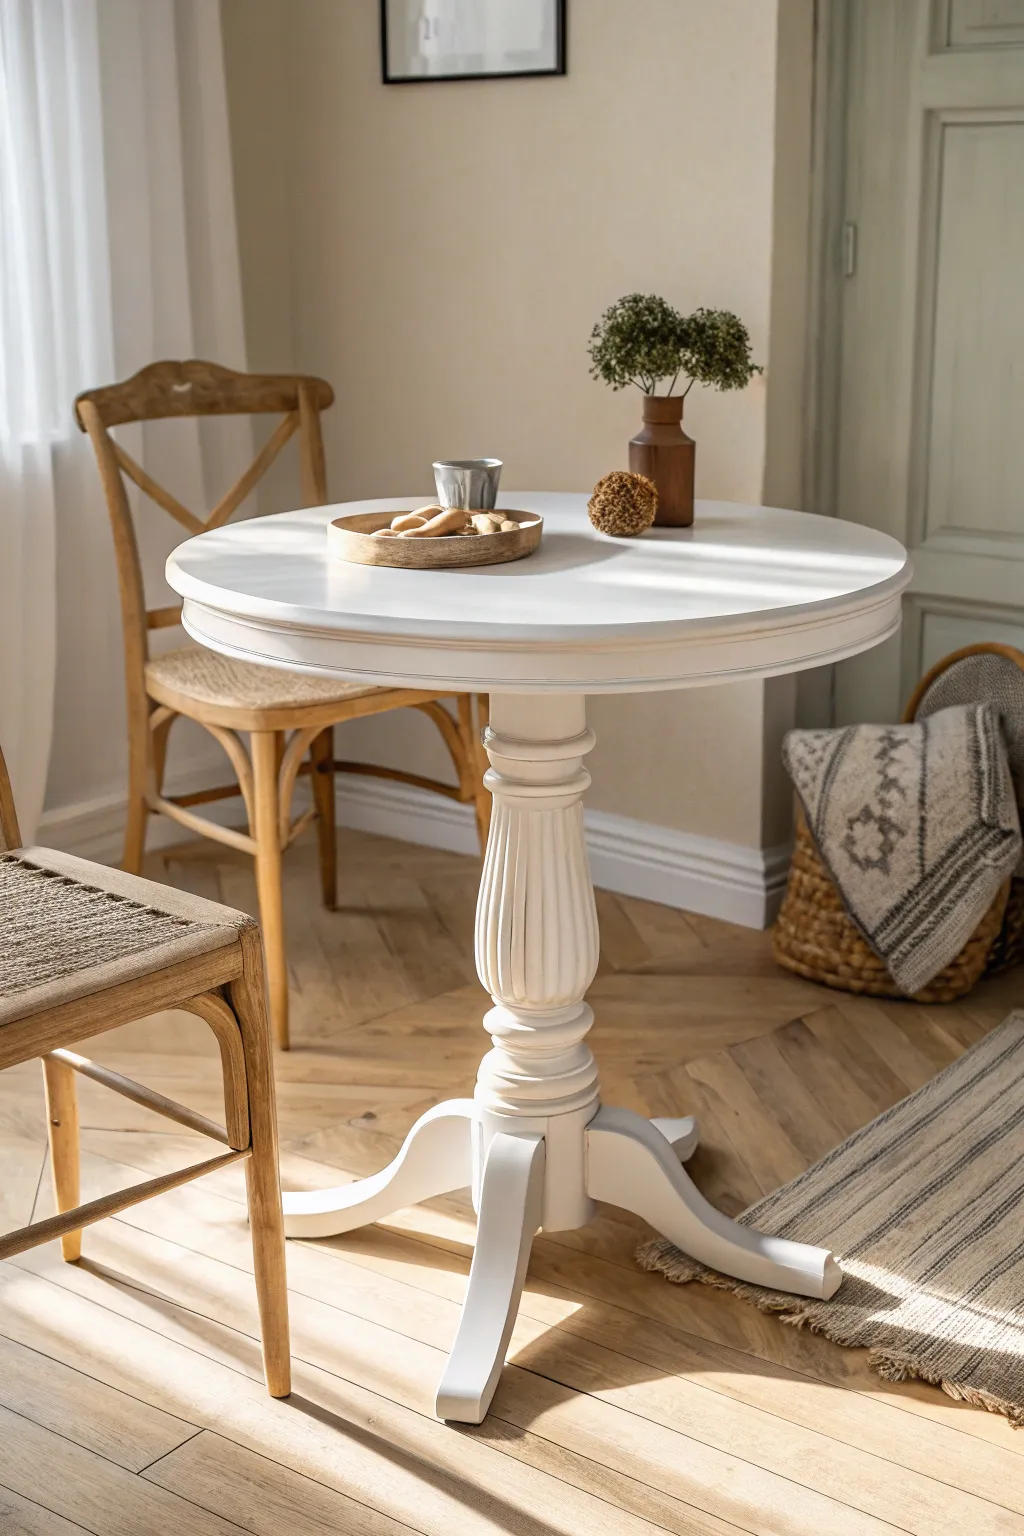
Transform a dated wooden table into a bright, classic centerpiece that fits perfectly in farmhouse or coastal interiors. This tutorial guides you through achieving a smooth, professional soft white finish on a traditional pedestal base.
Step-by-Step
Materials
- Solid wood pedestal table
- Sander (orbital preferred) and sandpaper (120, 220 grit)
- Clean rags or tack cloth
- Liquid deglosser or TSP substitute
- High-quality stain-blocking primer
- Soft white chalk or mineral paint (e.g., ‘Cotton’ or ‘White Linen’)
- Synthetic oval brush (2-inch)
- Small artist brush for intricate carvings
- Matte or satin water-based polyurethane topcoat
- Painter’s tape
- Drop cloth
Step 1: Preparation & Clean Up
-
Set up your workspace:
Place your table on a drop cloth in a well-ventilated area. If you can, elevate the table on blocks to make painting the feet easier without sticking to the floor. -
Clean thoroughly:
Wipe down the entire piece with a TSP substitute or degreaser to remove years of furniture polish, oil, and grime. This step is crucial for paint adhesion. -
Scuff sand the surface:
Using 120-grit sandpaper, give the entire table a vigorous sanding. You don’t need to strip it to bare wood, but you must remove the glossy sheen of the old finish. -
Smooth it out:
Follow up with a quick pass of 220-grit sandpaper to smooth out any scratches created by the rougher grit. -
Remove all dust:
Vacuum the table thoroughly, paying special attention to the grooves in the pedestal. Follow with a tack cloth to pick up remaining fine dust.
Smooth Operator
To get a factory-smooth finish on the tabletop, use a high-density foam roller instead of a brush for the flat surfaces, then quickly ‘tip off’ with a brush.
Step 2: Priming the Wood
-
Tape off hardware:
If your table has metal feet caps or hardware underneath that can’t be removed, apply painter’s tape to protect them. -
Apply the primer:
Brush on a coat of stain-blocking primer. This is essential for older wood tables to prevent tannins (reddish oils) from bleeding through your white paint later. -
Check for bleed-through:
Once the primer dries, look for yellow or pink spots. I almost always spot treat these areas with a second coat of primer just to be safe. -
Lightly sand the primer:
Run a fine 220-grit sanding sponge over the dry primer to knock down any brush strokes or raised wood grain, then wipe clean.
Step 3: Painting & Sealing
-
Start painting the base:
Flip the table upside down if possible to easily paint the underside and feet first. Apply a thin, even layer of your soft white paint. -
Paint the pedestal grooves:
Use your brush to work paint into the fluted details of the pedestal. Watch for drips pooling in the crevices and smooth them out immediately. -
Paint the tabletop:
Flip the table right side up. Paint the top using long, continuous strokes from one edge to the other to minimize stop-and-start marks. -
Apply the second coat:
Allow the first coat to dry completely according to the can’s instructions. Apply a second coat for full opacity, ensuring solid coverage on the edges. -
Check for imperfections:
Inspect the finish for any missed spots or brush hairs stuck in the paint. Touch up lightly with a small brush if needed. -
Prepare the topcoat:
Stir your water-based polyurethane gently; never shake it, as shaking introduces air bubbles that will ruin your smooth finish. -
Seal the table:
Apply a thin coat of polyurethane. For a table used for dining, three coats on the tabletop are recommended for durability, allowing adequate dry time between each. -
Final cure:
Let the table cure for at least 24-48 hours before placing any heavy objects or decor on it to prevent indentations in the fresh finish.
Level Up: Distressed Detail
Once the white paint is dry, gently sand the raised edges of the pedestal grooves with 220-grit paper to reveal a bit of wood for a vintage, aged look.
Enjoy styling your fresh, bright table with natural textures and simple decor


Distressed Cottage Round Table Finish

Transform a standard wooden pedestal table into a piece of lived-in history with this gorgeous distressed finish. By layering whitewash over raw wood and highlighting architectural details with strategic sanding, you’ll achieve that perfectly imperfect French cottage aesthetic.
Detailed Instructions
Materials
- Round wooden pedestal table (preferably with carved details)
- Orbital sender and sanding discs (80, 150, and 220 grit)
- Chalk-style paint (warm white or cream)
- Water for diluting paint
- Paintbrushes (one wide brush, one smaller angled brush)
- Lint-free rags
- Matte water-based polyurethane or clear furniture wax
- Drop cloth
- Tack cloth
- Screwdriver (if disassembling for easier painting)
Step 1: Preparation & Stripping
-
Assess the existing finish:
Before diving in, wipe your table down with a damp cloth to check the current state. If the table has a thick, glossy varnish, you’ll need to be aggressive with sanding. If it’s already raw or lightly finished, a lighter touch will do. -
Sand the tabletop down to raw wood:
Using an orbital sander with 80-grit sandpaper, remove the old finish from the tabletop completely. You want to expose the natural wood grain entirely since the top will feature a translucent wash. -
Refine the tabletop surface:
Switch to 150-grit sandpaper to smooth out the deeper scratches left by the coarse paper. Follow up with 220-grit for a buttery smooth surface that feels nice to the touch. -
Scuff sand the base:
For the legs, pedestal, and apron, you don’t need to strip to bare wood unless the finish is flaking. Use 150-grit sandpaper to scuff the surface thoroughly, giving the new paint something to grip. -
Clean dust thoroughly:
Vacuum up the bulk of the sawdust immediately. Wipe the entire piece down with a tack cloth to catch those micro-particles that can ruin a smooth paint job.
Natural Distress Technique
Before painting the base, rub a candle on edges and carvings. The wax prevents paint adhesion, so when you sand later, the paint flakes off in realistic chips rather than smooth fades.
Step 2: Creating the Whitewash Top
-
Mix the whitewash solution:
In a separate container, dilute your chalk paint with water. I generally prefer a 1:1 ratio—equal parts paint and water—so the mixture has the consistency of skim milk. -
Apply the wash in sections:
Brush the watered-down paint onto the tabletop in manageable sections, working with the direction of the wood grain. -
Wipe back the excess:
Immediately after applying, use a lint-free rag to wipe the paint off. The longer you let it sit, the more opaque the white will be; aim for a translucent haze that lets the grain peek through. -
Repeat for desired opacity:
Let the first coat dry for about 30 minutes. If you want a whiter look, repeat the brush-on and wipe-off process until you reach your preferred shade. -
Sand the rim intentionally:
Once the top is dry, take 150-grit sandpaper and aggressively sand the outer rim of the table to reveal the raw wood underneath, creating that distinct bordered look shown in the image.
Step 3: Painting & Distressing the Base
-
Paint the decorative apron:
Using your undiluted chalk paint and an angled brush, paint the carved apron under the table. Dab the brush into crevices to ensure full coverage in the detailed woodwork. -
Coat the pedestal and legs:
Paint the rest of the base with full-strength chalk paint. Don’t worry about perfect smoothness; brush strokes add to the texture of a rustic piece like this. -
Apply a second coat if needed:
Allow the first coat to dry completely. If you can see too much of the old color bleeding through, apply a second coat for better coverage. -
Carve out the details:
Once the paint is fully dry, grab 220-grit sandpaper. Gently sand over the high points of the carvings on the pedestal and the decorative apron to expose the wood or base layer beneath. -
Distress the feet curves:
Run your sandpaper along the curves of the feet and the edges of the pedestal base. Mimic natural wear patterns by sanding harder on corners where feet would naturally scuff the table over time.
Add Antique Depth
Mix just a drop of brown paint or dark wax into your final clear sealant coat for the base. Brush it into the deepest carvings and wipe away the excess to creating instant aged shadows.
Step 4: Sealing and Protecting
-
Clean up sanding residue:
Wipe everything down with a tack cloth one last time to remove the dusty chalk paint residue from your distressing work. -
Apply the topcoat:
Brush on a matte-finish water-based polyurethane. Apply it in long, smooth strokes. The matte finish is crucial for keeping that authentic, old-world cottage feel without adding modern shine. -
Double-seal the dining surface:
Give the tabletop at least three coats of poly, sanding lightly with very fine 300-grit paper between coats. This ensures your dining surface can withstand spills and daily use.
Now move your stunning new table into the dining light and enjoy the charm it brings to get-togethers.


Moody Matte Black Round Table
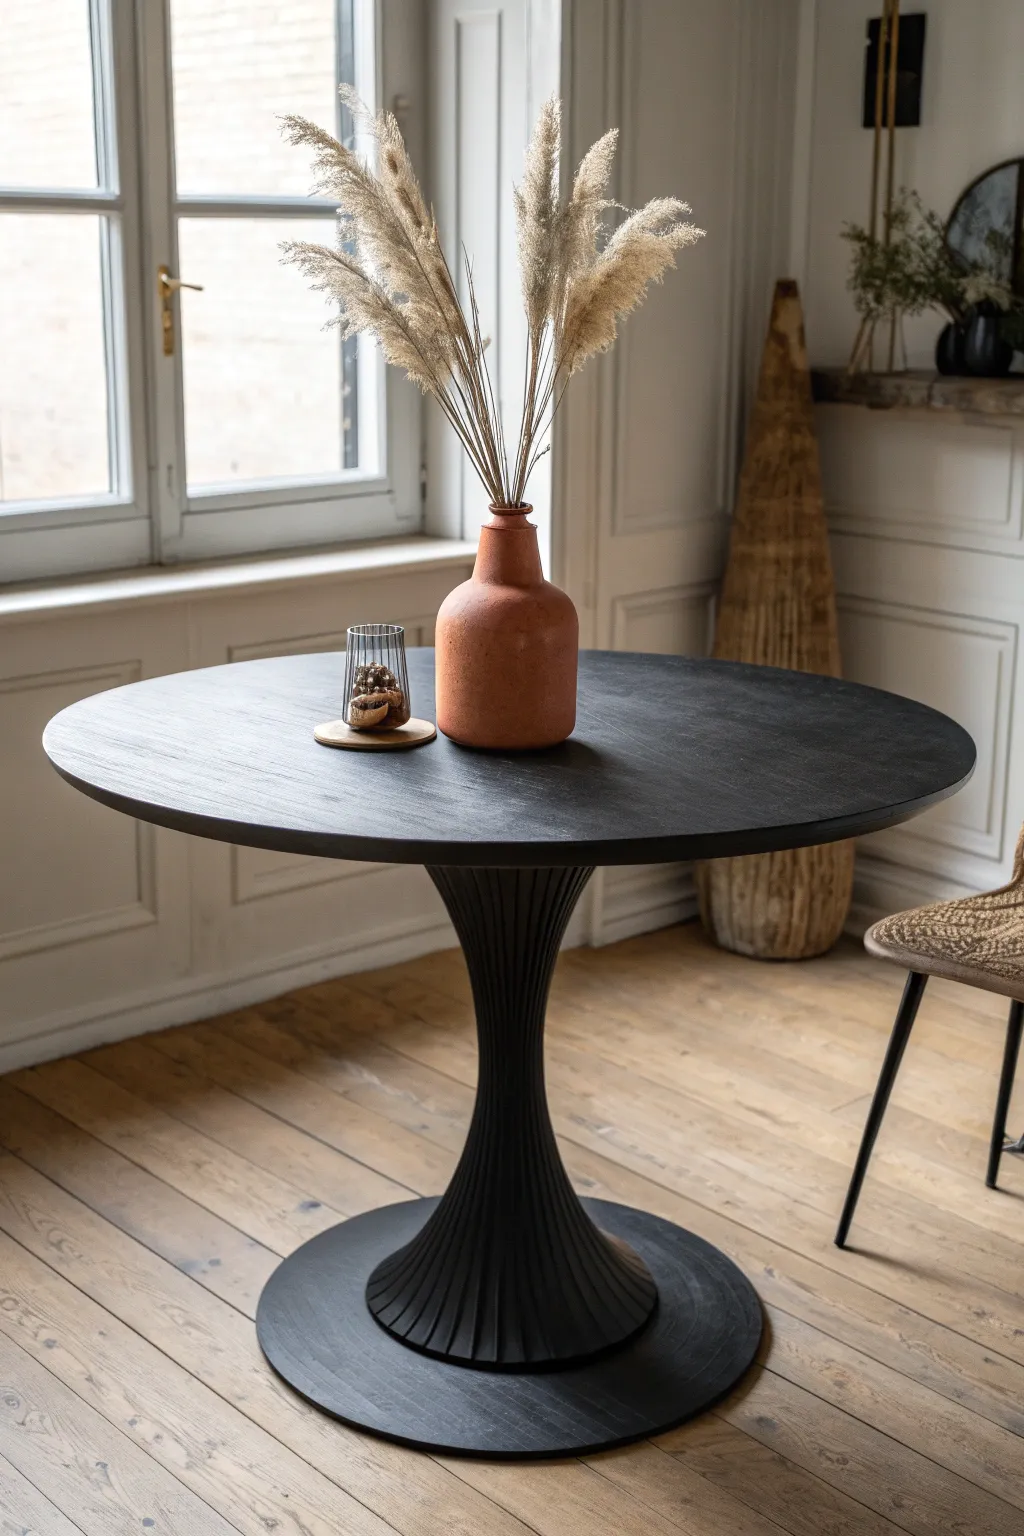
Transform a dated wooden table into a modern sculptural masterpiece with a deep, moody matte black finish. This project focuses on highlighting texture through a monochromatic palette, creating a sophisticated focal point for any dining area.
Step-by-Step Guide
Materials
- Round wooden pedestal table (thrifted or existing)
- Course grit sandpaper (80-100 grit)
- Medium grit sandpaper (150-180 grit)
- Fine grit sandpaper (220 grit)
- Electric orbital sander
- Degreasing cleaner (like TSP or simple green)
- Tack cloth or lint-free rags
- High-quality bonding primer (dark gray or tinted)
- Matte black furniture paint (chalk or mineral paint works best)
- 2-inch angled synthetic paintbrush
- Small foam roller
- Protective topcoat (dead flat or ultra-matte varnish)
- Drop cloth
- Painter’s tape
Step 1: Preparation & Sanding
-
Assess the surface:
Begin by inspecting your table for any deep scratches or loose veneer. If the table has a previous glossy finish, your primary goal is to scour that slick surface so the new paint adheres properly. -
Clean thoroughly:
Wipe down the entire table with a degreasing cleaner to remove years of furniture polish, oil, and dust. Let it dry completely. -
Heavy sanding:
Using your electric sander and coarse 80-100 grit paper, sand the flat tabletop to remove the bulk of the old varnish. Move with the grain to avoid creating swirling scratches. -
Sand the pedestal:
For the fluted or curved pedestal base shown in this style, hand-sanding is essential. Use a folded piece of 100-grit sandpaper to get into the crevices of the fluting. -
Smooth the surface:
Switch to medium grit (150-180) sandpaper for a second pass over the entire piece. This smooths out the roughness left by the coarse paper. -
Final prep sand:
Finish the sanding phase with fine 220-grit paper. The wood should feel incredibly smooth to the touch. Remove all dust with a vacuum and then a tack cloth.
Clean Flutes Trick
Wrap sandpaper around a dowel or a thick marker to easily sand inside the curved flutes of the pedestal base without hurting your fingers.
Step 2: Priming & Painting
-
Apply primer:
Apply a coat of high-quality bonding primer. Using a gray or tinted primer is helpful here, as it makes covering with black paint much easier than using a white base. -
Sand the primer:
Once the primer is fully dry, lightly scuff it with fine sandpaper to knock down any raised grain or brush strokes. Wipe away the dust. -
First coat of black:
Stir your matte black paint thoroughly. Use the angled brush to paint the detailed pedestal base first, working the paint into the vertical grooves without letting it pool. -
Roll the top:
For the tabletop, I prefer using a small foam roller to achieve a seamless, stroke-free finish. Apply a thin, even layer and let it dry according to the manufacturer’s instructions. -
Second coat:
Apply a second coat of black paint to the entire table. The depth of color should be solid and opaque now. If using chalk paint, it will look lighter when wet and dry down darker. -
Check for gaps:
Inspect the fluted base from different angles to ensure no wood tone is peeking through the deep ridges. Touch up with a small artist’s brush if necessary.
Step 3: Sealing & Finishing
-
Choose the right topcoat:
To maintain the ‘moody matte’ look, select a polycrylic or varnish labeled ‘Dead Flat’ or ‘Ultra Matte’. Satin or semi-gloss will ruin the intended effect. -
Apply first seal:
Apply the topcoat in long, even strokes. Be careful not to overwork the product, as this can cause cloudiness in the finish, which is very visible on black. -
Light sanding:
After the first coat of sealer dries (usually 2-4 hours), very gently sand with high-grit sandpaper (300+) just to remove any dust nibs. -
Final coat:
Apply two more thin coats of the matte sealer, allowing proper drying time between each. This build-up provides the durability needed for a dining surface. -
Cure time:
Let the table cure for at least 48 hours before placing any heavy objects or decor on it, ensuring the finish hardens completely.
Texture Enhancement
For a ‘limed’ black look, dry brush a tiny amount of dark grey wax over the ridges of the pedestal to subtly highlight the vertical texture.
Enjoy your sophisticated new dining centerpiece that brings dramatic flair to your home
BRUSH GUIDE
The Right Brush for Every Stroke
From clean lines to bold texture — master brush choice, stroke control, and essential techniques.
Explore the Full Guide
Coastal Blue Round Table Pop
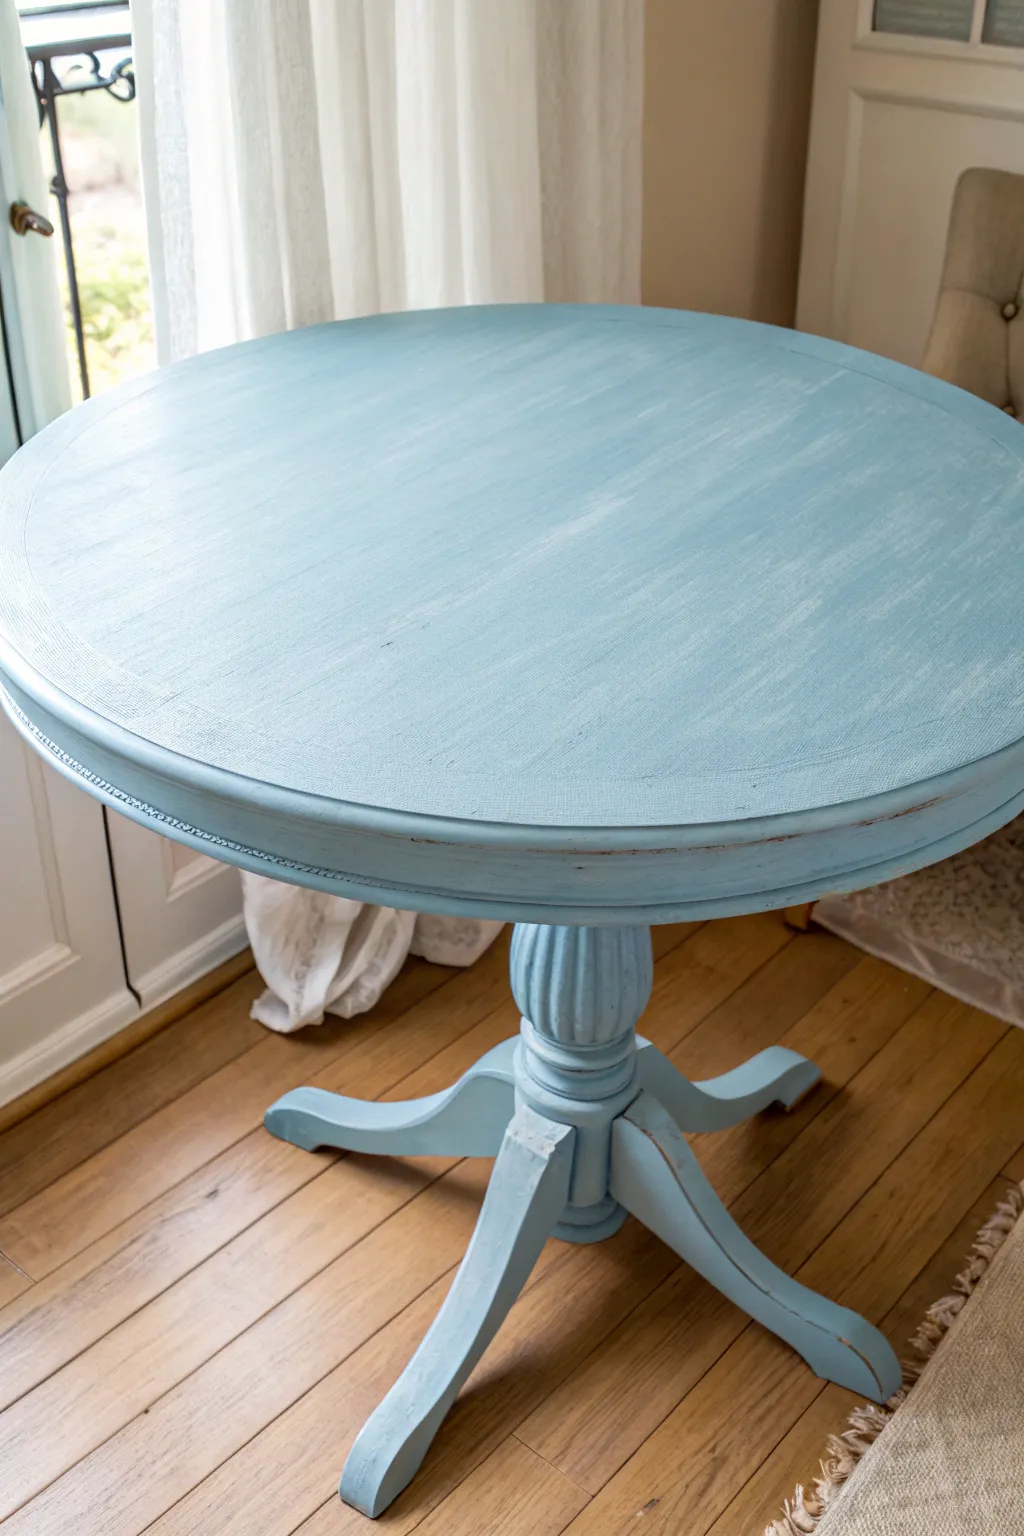
Transform a dated pedestal table into a seaside-inspired centerpiece with this simple layering technique. The finish features a soft robin’s egg blue base accented by subtle whitewashing and distressing that captures the weathered charm of driftwood.
Detailed Instructions
Materials
- Round wooden pedestal table
- Medium grit sandpaper (120-150 grit)
- Fine grit sandpaper (220 grit)
- Tack cloth
- Chalk-style paint (light coastal blue/aqua)
- White wax or diluted white chalk paint
- Clear furniture wax
- Synthetic oval paint brush
- Lint-free cotton rags
- Medium wax brush
- Painter’s tape (optional)
- Drop cloth
Step 1: Prep Work
-
Clean surface:
Begin by thoroughly cleaning the entire table with a degreasing cleaner or a mix of mild dish soap and warm water to remove hidden oils and furniture polish residue. -
Scuff sand:
Once dry, lightly scuff the entire surface using 120-150 grit sandpaper. You don’t need to strip it to bare wood; just create enough ‘tooth’ for the new paint to adhere. -
Dust removal:
Wipe away all sanding dust using a tack cloth or a damp rag, ensuring no particles remain in the crevices of the pedestal base.
Brush Technique
For the tabletop, paint in long, continuous strokes from one edge to the other. Stop-and-start marks show up easily on large flat surfaces, so keep a wet edge.
Step 2: Applying Color
-
First coat:
Flip the table upside down first to easily reach the underside of the pedestal feet. Apply a thin, even coat of your coastal blue chalk paint using a synthetic oval brush. -
Finish base coat:
Flip the table upright and paint the tabletop. Brush in the direction of the wood grain for a natural look. Let this coat dry for approximately 1-2 hours. -
Second coat:
Apply a second coat of blue paint to ensure full opacity. Pay special attention to the routed edges of the tabletop and the fluting on the pedestal. -
Dry time:
Allow the paint to dry completely, preferably overnight, to ensure the finish is hard enough for the distressing phase.
Driftwood Effect
Mix a tiny drop of warm gray paint into your clear wax before sealing. This creates a driftwood-style patina that settles into the grooves and distressing marks.
Step 3: Distressing & Texture
-
Smooth it out:
Lightly run 220-grit sandpaper over the flat surfaces to remove any brush strokes and create a buttery smooth feel. -
Distress edges:
Use 150-grit sandpaper to strategically distress the piece. Target high points where natural wear would occur: the rim of the table, the edges of the pedestal feet, and the ridges of the central column. -
Reveal wood:
Sand firmly enough in these specific spots to reveal a peek of the original wood underneath, adding that aged, vintage character. -
Create texture:
On the flat tabletop, you can lightly cross-hatch sanding in a few random areas to simulate a weathered texture before sealing.
Step 4: Sealing & Whitewashing
-
Prepare white wash:
I like to create a subtle whitewashed effect by mixing a small amount of white paint with water (50/50 ratio) or using a dedicated white wax. -
Apply wash:
Dip a lint-free rag into your white mixture and wipe it across the tabletop in long strokes. Immediately wipe it back off with a clean cloth, leaving just a faint hazy veil of white. -
Seal with clear wax:
Once the wash satisfies you and is dry, apply a layer of clear furniture wax over the entire piece using a wax brush. -
Buff to finish:
Let the wax cure for about 20-30 minutes, then buff vigorously with a clean cotton cloth to achieve a soft, durable sheen.
Place your newly refreshed table near a window to let natural light highlight the beautiful coastal texture you created
Warm Greige Painted Round Table
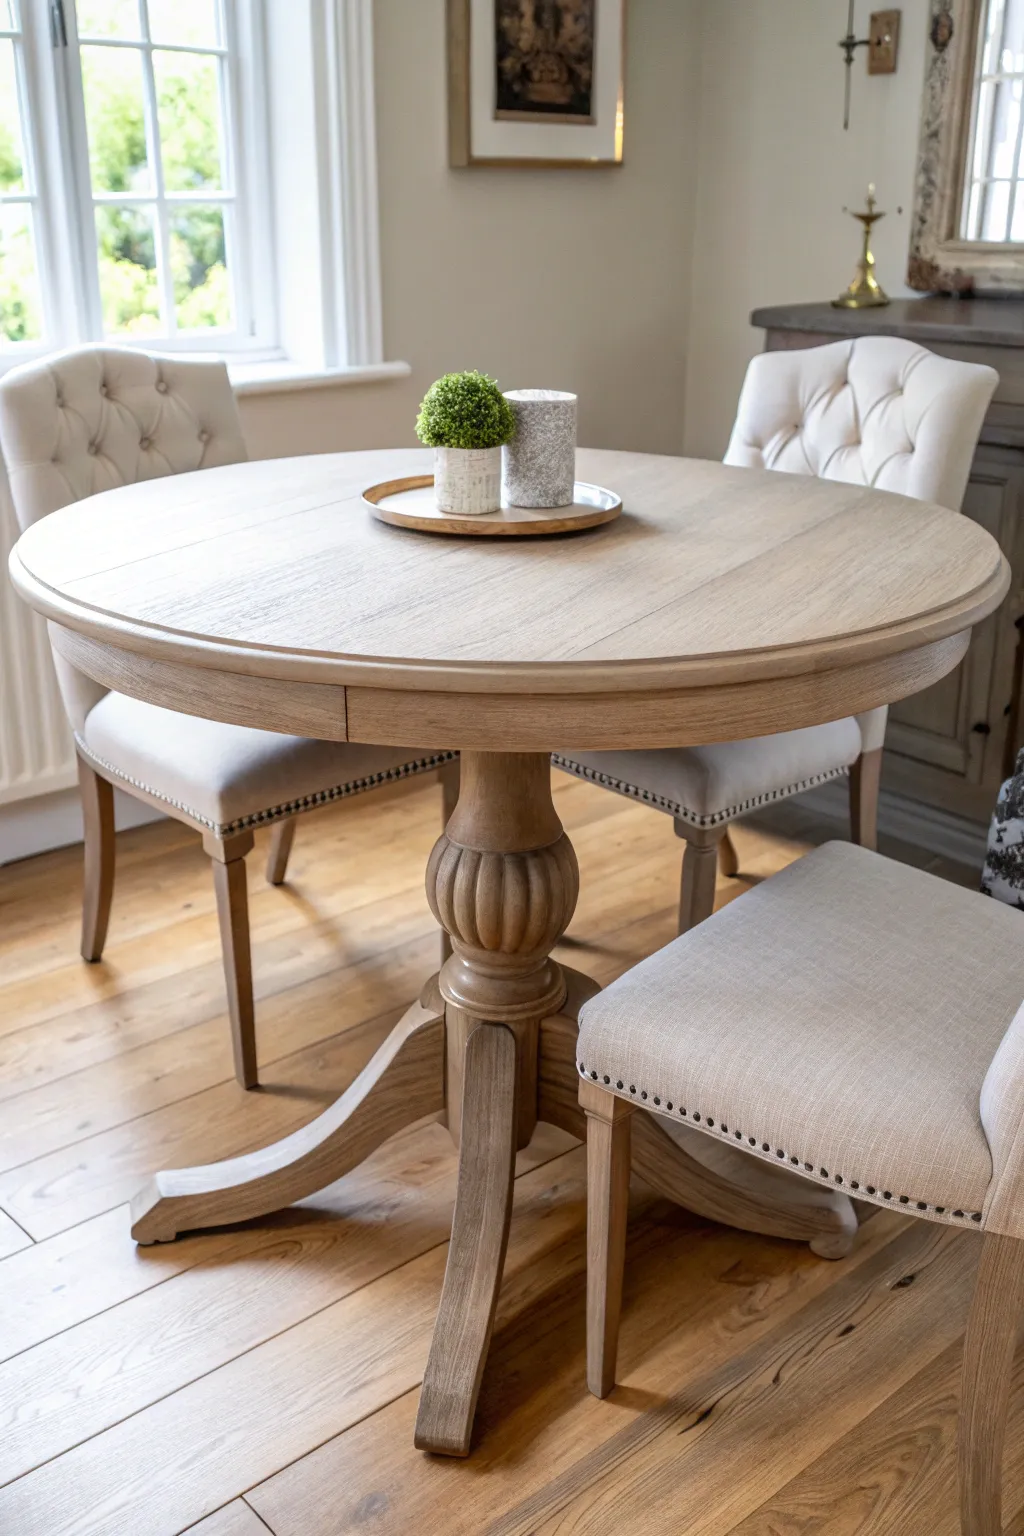
This project transforms a standard wooden dining table into a sophisticated centerpiece with a soft, warm greige finish that highlights the natural grain. The result is a timeless, airy look that perfectly bridges the gap between rustic charm and modern elegance.
Step-by-Step Guide
Materials
- Solid wood round pedestal table
- Orbital sander
- Sandpaper discs (80, 120, and 220 grit)
- Tack cloths
- Pre-stain wood conditioner
- Greige wood stain or diluted latex paint (custom mix of beige and grey)
- Water-based matte polyurethane topcoat
- Synthetic bristle brushes
- Lint-free rags
- Drop cloth
- Painter’s tape
Step 1: Preparation & Sanding
-
Assess the existing finish:
Begin by examining your table’s current state. If it has a thick clear coat or paint, you’ll need to be thorough. Clean the entire surface with a degreaser to remove oils or wax buildup. -
Heavy sanding (80 grit):
Using an orbital sander with 80-grit sandpaper, strip the old finish from the flat top surface. Move slowly in the direction of the grain to avoid deep swirl marks. -
Sand the details:
For the curved pedestal base and intricate legs, hand sanding is often necessary. Use a folded piece of 80-grit paper to get into the grooves and crevices of the turned wood. -
Medium sanding (120 grit):
Switch to 120-grit sandpaper on your orbital sander for the tabletop and hand sand the base again. This smooths out the roughness left by the coarser grit. -
Final smooth sanding (220 grit):
Finish the sanding process with 220-grit paper. This step is crucial for achieving that professional, silky-smooth feel. Run your hand over the surface to ensure no rough patches remain. -
Clean the dust:
Vacuum the table thoroughly to remove all sawdust. Follow up by wiping the entire piece with a tack cloth to pick up fine particles that the vacuum missed.
Step 2: Creating the Greige Wash
-
Condition the wood:
Apply a liberal coat of pre-stain wood conditioner. This prevents blotchiness, especially on soft woods like pine, ensuring your color wash absorbs evenly. -
Mix your wash:
If you can’t find the perfect pre-made stain, I like to create a custom wash by mixing 1 part warm beige latex paint with 1 part water. Test the consistency on a hidden area; it should be runny like milk. -
Apply the wash to the base:
Start with the pedestal base. Brush the wash into the turned details, working in small sections. Immediately wipe off the excess with a lint-free rag, leaving just a hint of color in the grain. -
Wash the tabletop:
Brush the wash onto the tabletop in long strips following the grain. Work quickly to keep a wet edge. Wipe it back with your rag within a minute or two to reveal the wood grain underneath. -
Evaluate the color:
Let the first coat dry for about an hour. If the greige tone is too subtle, apply a second wash coat using the same wipe-on, wipe-off technique until the desired depth is reached. -
Optional dry brushing:
To accentuate the texture, use a dry brush with a tiny amount of undiluted white paint. Lightly whisk it over the raised edges of the pedestal details to highlight the carving.
Grain Direction Matters
Always wipe your stain or wash off in the direction of the wood grain. Wiping across or in circles will leave unsightly streaks that look unnatural.
Step 3: Sealing & Protection
-
Choose the right topcoat:
Select a water-based matte polyurethane. Oil-based products can yellow over time, ruining that perfect cool greige tone you just achieved. -
First coat application:
Apply a thin, even layer of the polyurethane using a high-quality synthetic brush. Long, smooth strokes are key here to avoid bubbles. -
Light sanding between coats:
Once the first coat is completely dry (check the can for times, usually 2-4 hours), very lightly sand with 320-grit sandpaper to knock down any raised grain. -
Remove sanding dust:
Wipe the surface with a clean, damp cloth to remove the fine white dust from the light sanding. -
Final coats:
Apply 2-3 additional coats of polyurethane, repeating the light sanding between each layer (except the very last one). The table top takes heavy wear, so more protection is better. -
Curing time:
Allow the table to cure fully before placing heavy items or hot dishes on it. This can take several days to a week depending on humidity levels.
Create a Whitewash Effect
For a beachier vibe, layer a very thinned-out white wash over your dried greige base coat. It settles into the grain for a lovely two-tone dimension.
Enjoy your beautifully refreshed dining table, now a customized piece perfect for gathering.

PENCIL GUIDE
Understanding Pencil Grades from H to B
From first sketch to finished drawing — learn pencil grades, line control, and shading techniques.
Explore the Full Guide
High-Gloss Color Round Table
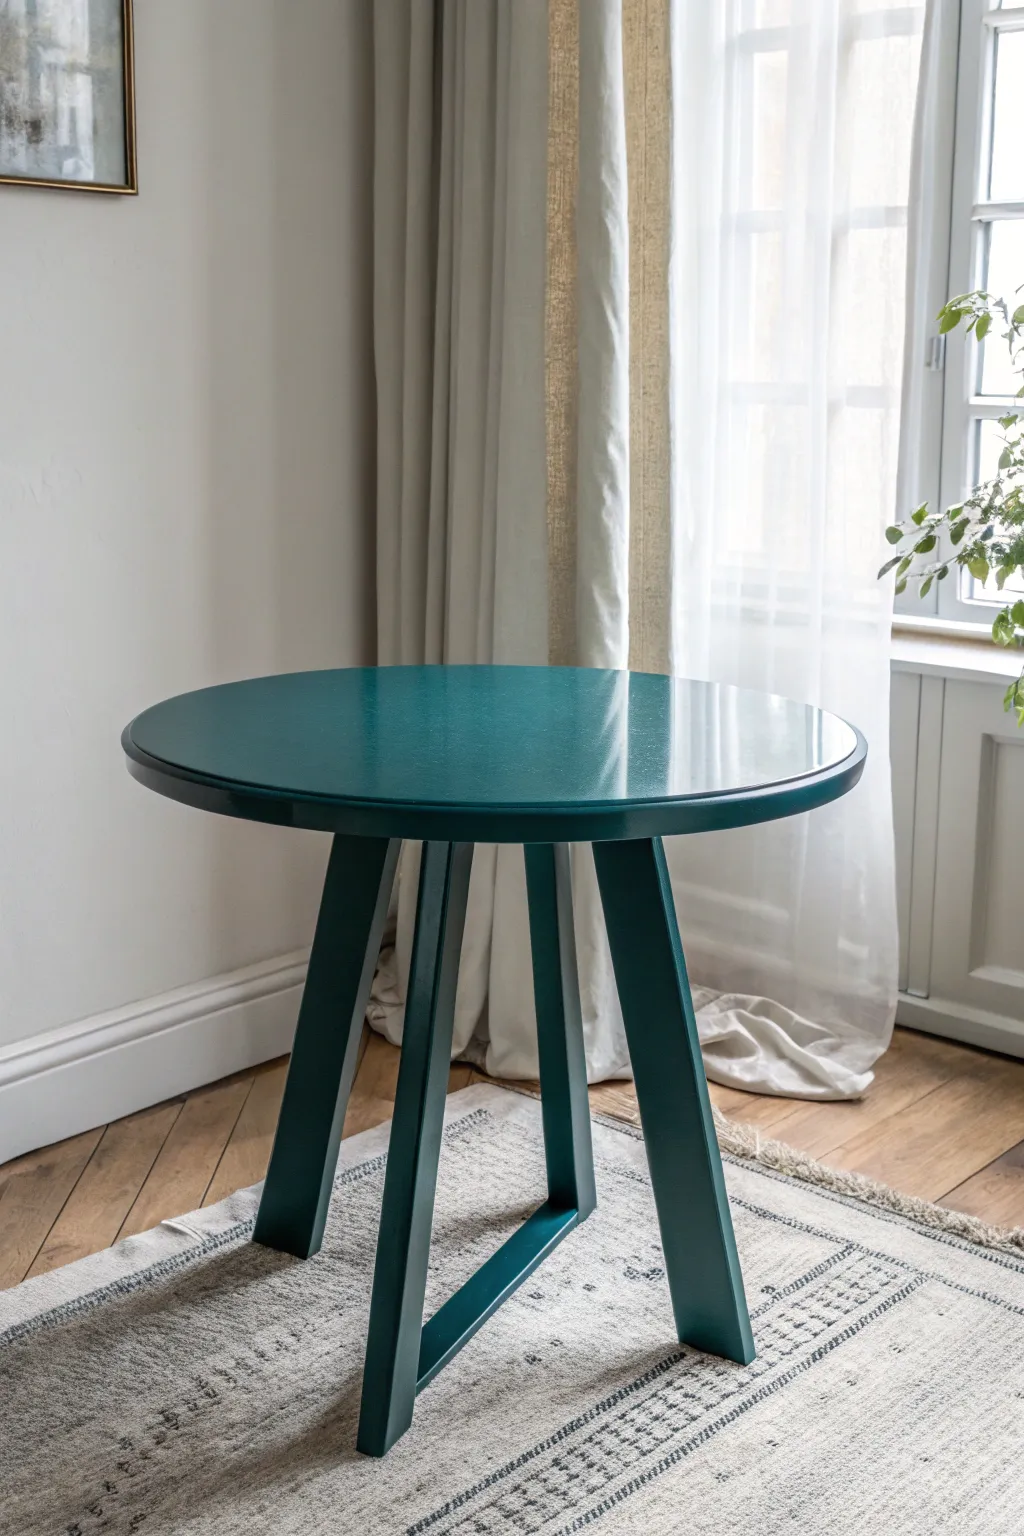
Transform a simple round wooden table into a stunning focal point with a deep, moody emerald green finish. The high-gloss sheen reflects light beautifully, giving the piece a modern, lacquered look that feels incredibly expensive.
Step-by-Step Tutorial
Materials
- Round wooden table (sanded)
- Medium and fine grit sandpaper (120, 220, and 320 grit)
- Tack cloth
- High-quality bonding primer
- High-gloss enamel paint (in a deep teal or emerald green)
- High-density foam roller
- High-quality synthetic angled brush
- Polycrylic topcoat (gloss finish)
- Paint tray
- Drop cloth
- Painter’s tape
Step 1: Preparation and Sanding
-
Clean the surface:
Before you begin, wipe down the entire table with a degreaser or mild soap and water to remove any oils, wax, or dust. Using a clean rag ensures your sandpaper won’t just gum up immediately. -
Initial rough sanding:
Use 120-grit sandpaper to scuff up the existing finish. You don’t need to strip it to bare wood unless the old paint is peeling, but you do need a dull, scratched surface for the new paint to grip. -
Remove sanding dust:
Vacuum the table thoroughly, paying close attention to the joints where the legs meet the top. -
Wipe with tack cloth:
Go over the entire piece with a tack cloth to pick up remaining fine dust particles. This step is crucial for a high-gloss finish, as any speck of dust will show.
Step 2: Priming for Smoothness
-
Apply the first coat of primer:
Using a high-density foam roller for the flat top and a brush for the legs, apply a thin, even coat of bonding primer. -
Allow to dry:
Let the primer dry completely according to the manufacturer’s instructions, usually about 2-4 hours. -
Sand the primer:
Once dry, lightly sand the primed surface with 220-grit sandpaper. This knocks down any texture left by the roller or brush bristles. -
Clean again:
Wipe the table down with a tack cloth again to remove the white primer dust. A clean surface is the secret to that glass-like look.
Pro Tip: The Water Trick
Between coats, wet sanding with 400-grit paper dipped in water can create an unbelievably smooth, car-paint-like surface before your final color layer.
Step 3: Applying the High-Gloss Color
-
Mix your paint:
Stir your emerald enamel paint gently but thoroughly. Avoid shaking the can vigorously, as this introduces air bubbles that ruin a glossy finish. -
Paint the legs first:
Flip the table if possible, or just start low. Use your synthetic angled brush to paint the geometric legs. Apply the paint in long, smooth strokes. -
Roll the table top:
Move to the table top. Pour paint into your tray and load the high-density foam roller. Roll the paint on in a ‘W’ pattern, then smooth it out with long, straight passes from one edge to the other. -
Tip off the finish:
Immediately after rolling a section, lightly drag a dry brush tip across the wet surface to pop any bubbles and smooth out roller texture. I find this really helps achieve that mirror effect. -
Let it cure:
Allow the first coat to dry for at least 24 hours. High-gloss enamels often have longer drying times than standard latex paint. -
Sand between coats:
Very lightly sand the painted surface with 320-grit sandpaper. This should be a gentle polish, just enough to smooth any tiny imperfections. -
Apply the second coat:
Repeat the painting process for a second coat, ensuring full coverage and deep color saturation.
Level Up: Metallic Feet
Tape off the bottom 3 inches of the table legs and paint them with liquid gold leaf or brass spray paint to create a dipped, mid-century modern luxury look.
Step 4: Protection and Final Polish
-
Check coverage:
Inspect the table in good lighting. If the color looks solid and deep, you can stop here. If it looks slightly transparent, add a third thin coat. -
Apply clear topcoat (optional):
For extra durability on a dining surface, apply a clear gloss Polycrylic. Apply it with a foam brush in exceedingly thin layers to avoid milky buildup. -
Final cure:
Let the table cure undisturbed for several days before placing heavy objects on it to prevent specialized dents or tackiness.
Enjoy the sophisticated shine of your restored table in your favorite corner
Border Ring Detail on a Round Top
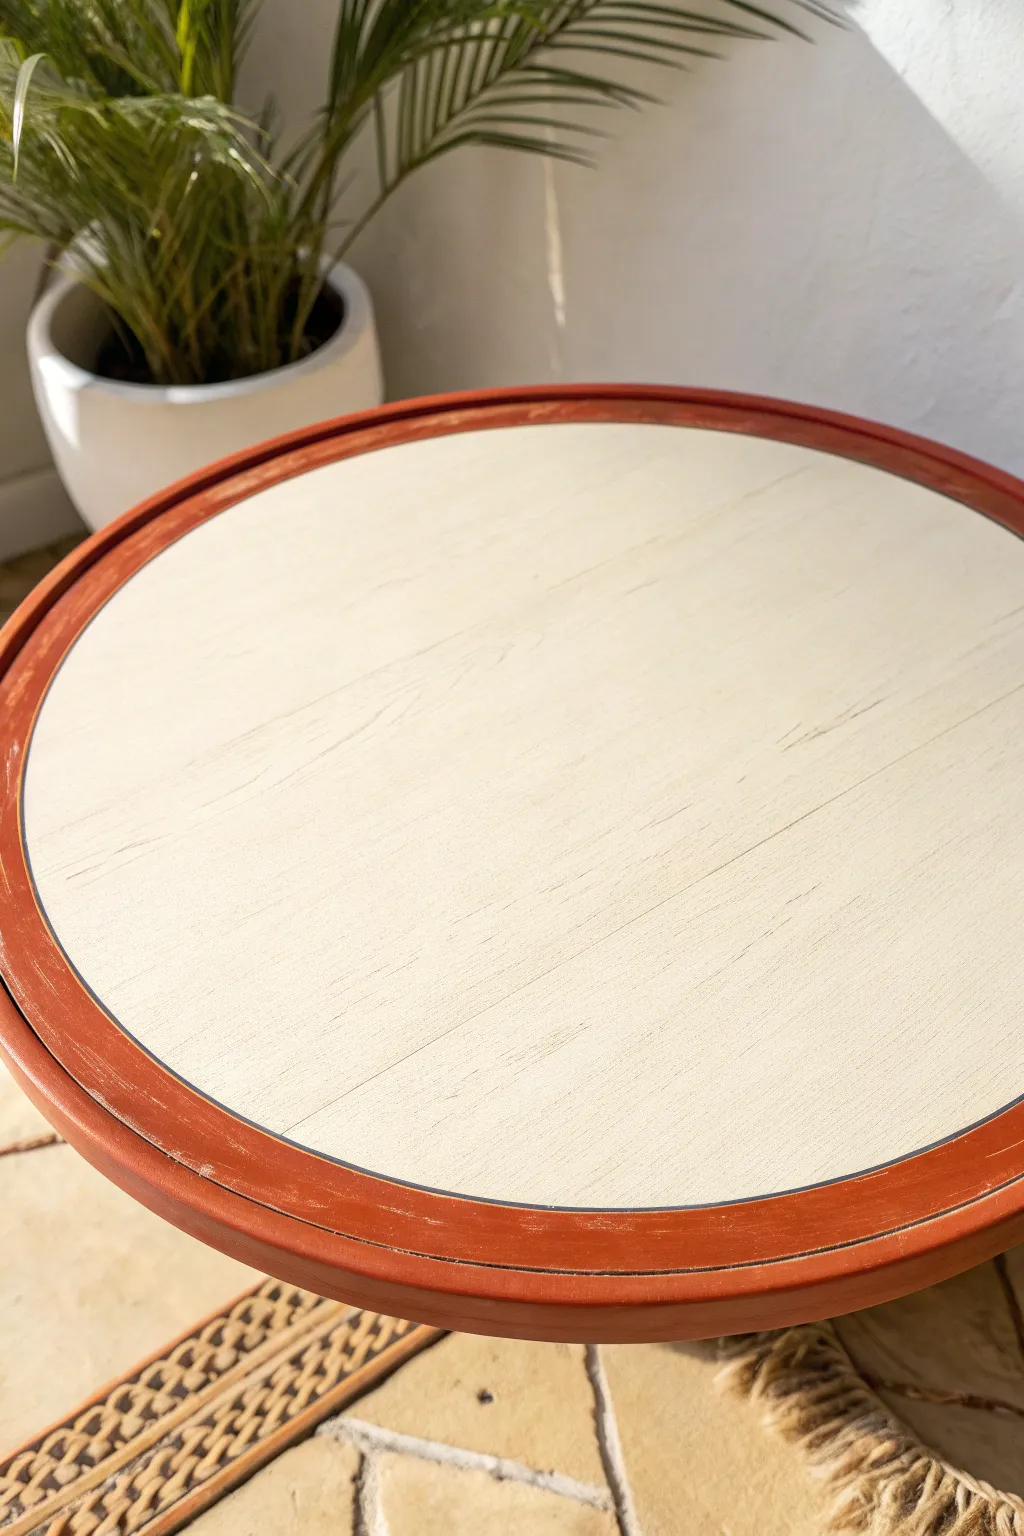
Transform a plain round table into a statement piece with this classic two-tone border technique. By combining a creamy central medallion with a warm, distressed clay-colored rim, you achieve a sophisticated look that highlights the table’s circular shape.
Step-by-Step Guide
Materials
- Round wooden side table
- Orbital sander with 120 and 220 grit discs
- Tack cloth
- Painter’s tape (high quality)
- Measuring tape or ruler
- Pencil
- String and thumb tack (optional for circle drawing)
- Cream chalk paint or mineral paint
- Terracotta or warm reddish-brown chalk paint
- Small artist brush (for touch-ups)
- Medium synthetic paint brush
- Black fine-point paint pen or very thin striping brush
- Clear matte polyurethane or wax topcoat
Step 1: Preparation and Base Coat
-
Clean surface:
Begin by thoroughly cleaning the table surface with a degreaser or mild soap and water to remove any oils, wax, or dust. Let it dry completely. -
Sand the top:
Use your orbital sander with 120-grit sandpaper to remove the old glossy finish. You want to get down to raw wood or at least create a very grippy, scuffed surface. -
Smooth finish:
Switch to 220-grit paper for a quick final pass to ensure the wood is smooth to the touch. -
Dust off:
Wipe the entire table down with a tack cloth to remove every speck of sanding dust. -
Paint the center:
Apply your cream-colored chalk paint to the entire tabletop, including the area that will eventually be the border. It’s often easier to paint the whole thing than to paint in circles. -
Second coat:
Once the first coat is dry (usually 30-60 minutes for chalk paint), apply a second coat for full opacity. Let this cure fully, preferably overnight, so tape doesn’t pull it up.
Step 2: Creating the Border
-
Measure the rim:
Decide on the width of your border. For this look, a 1.5 to 2-inch border works well. Measure in from the edge at multiple points around the circumference and make small pencil marks. -
Connect the marks:
Carefully connect your marks. If you have a steady hand, you can pencil the circle freehand, or use the ‘string and tack’ method from the exact center to draw a perfect guide circle. -
Apply tape:
Apply your painter’s tape along the *inner* edge of your pencil line. Press the edges of the tape down firmly with your fingernail or a credit card to prevent bleed-through. -
Seal the tape:
Brush a very light layer of the *cream* base paint over the edge of the tape. I find this seals the tape line perfectly so the next color won’t bleed under. -
Paint the border:
Using the terracotta/reddish-brown paint, fill in the outer border ring. Use long, sweeping strokes that follow the curve of the table. -
Second border coat:
Apply a second coat of the border color once the first is dry to ensure rich, even coverage. -
remove tape:
While the paint is still slightly tacky (not fully wet, but not rock hard), carefully peel back the painter’s tape at a 45-degree angle.
Bleeding Lines?
If paint bled under the tape, don’t panic. Use a small, stiff angled brush dampened with water to gently scrub away the excess while it’s fresh, or touch up with the base color later.
Step 3: Detailing and Sealing
-
Distress edges:
Take a piece of 220-grit sandpaper and gently distress the outer rim of the table to reveal a bit of the wood or base color underneath, giving it that worn, vintage vibe. -
Add separation line:
To make the design pop, use a black fine-point paint pen to draw a thin line exactly where the cream center meets the terracotta border. Go slow and steady. -
Clean up errors:
If your line wobbles, use a small artist brush with a tiny bit of cream paint to touch up the edges. -
Seal the piece:
Apply a clear matte polyurethane or wax over the entire tabletop to protect your work. Use a high-quality brush or lint-free rag for wax. -
Final cure:
Allow the topcoat to cure according to the manufacturer’s instructions before placing any objects on the table.
Pro Tip: The Lazy Susan
Place the table (or just the top if detachable) on a rotating Lazy Susan during the striping phase. Hold your hand steady and maintain the pen position while rotating the table underneath.
This simple geometric update adds instant character and warmth to any room without requiring advanced woodworking skills


Stenciled Medallion Center on a Round Top
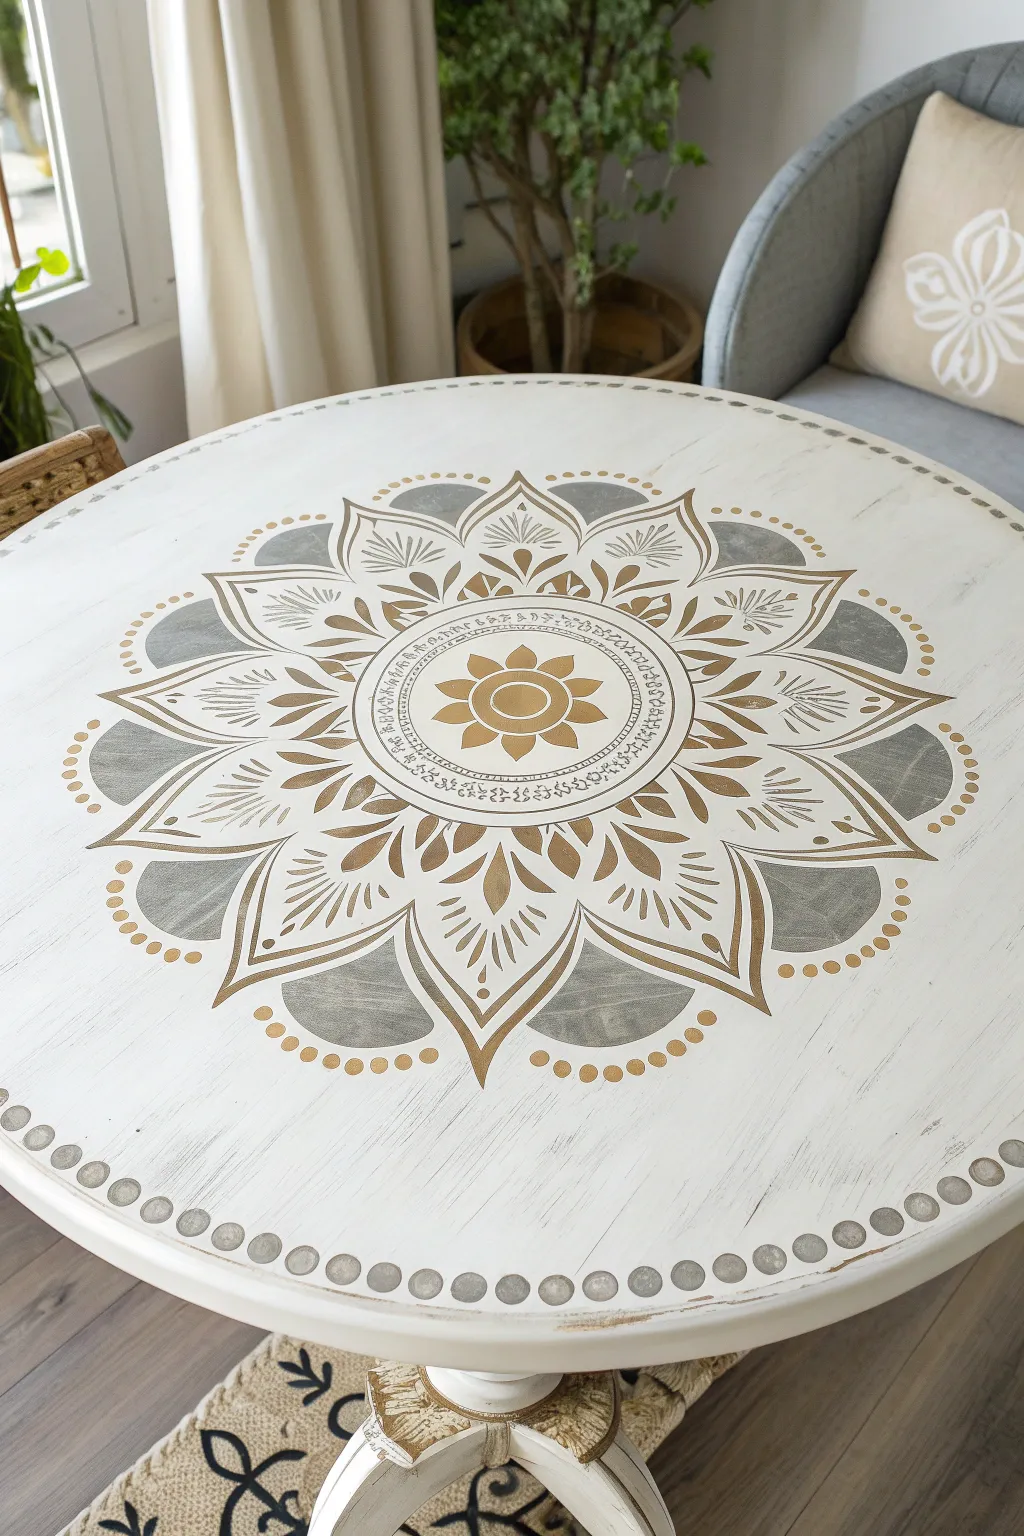
Transform a plain round table into a bohemian masterpiece with this stenciled medallion project. The interplay of white-washed wood, metallic gold, and soft grey creates a stunning, intricate centerpiece that looks hand-painted but is achievable with stencils.
Step-by-Step Guide
Materials
- Round wooden table (sanded)
- Chalk-style paint (Warm White)
- Metallic acrylic paint (Gold/Bronze)
- Acrylic paint (Soft Charcoal Grey)
- Large mandala stencil (sized to fit your table center)
- Painter’s tape
- Stencil brushes (various sizes)
- High-density foam roller
- Sandpaper (220-grit)
- Clear matte polycrylic sealer
- Ruler or measuring tape
- Pencil
- Paper towels
Step 1: Preparation & Base Coat
-
Clean and Prep:
Start by thoroughly cleaning your table to remove grease or dust. If the existing finish is glossy, give it a scuff sand with 220-grit sandpaper to help the new paint adhere. -
Apply Base Color:
Using a brush or roller, apply two coats of warm white chalk-style paint to the entire tabletop. Allow the first coat to dry completely before applying the second. -
Distress the Base:
Once the white paint is fully dry, lightly sand the surface with 220-grit sandpaper. Focus on the edges and follow the wood grain to create a subtle, weathered texture similar to the reference image. -
Find the Center:
Measure across the table diameter in two perpendicular directions to find the exact center. Mark this spot lightly with a pencil; precision here ensures your medallion sits perfectly.
Pro Tip: Less is More
The biggest enemy of stenciling is too much paint. Your brush should feel almost dry to the touch before it hits the table to ensure crisp, sharp edges.
Step 2: Stenciling the Medallion
-
Position the Stencil:
Place your large mandala stencil on the table, aligning its center point with your pencil mark. Secure the stencil firmly on all sides with painter’s tape to prevent shifting. -
Apply the Gold Layer:
Dip a stencil brush into the metallic gold paint, then offload most of the paint onto a paper towel until the brush is almost dry. This ‘dry brush’ technique is crucial to prevent bleed-under. -
Stipple the Gold:
Using an up-and-down stippling motion, apply the gold paint to the central flower, the ornate borders, and the leaf details. I like to do a second pass on the center to make it pop. -
Add Grey Accents:
Using a smaller, clean stencil brush, apply the soft charcoal grey paint to specific sections, such as the large outer petals or background shapes. Be careful not to overlap into the gold areas. -
Outer Ring Details:
If your stencil includes outer decorative dots, apply gold paint to these. If not, you can create the border dots freehand using the round end of a paintbrush handle dipped in gold or grey paint.
Level Up: Texture Pop
Mix a small amount of texture medium or plaster into your gold paint for the center medallion. This creates a raised, embossed effect similar to wood carving.
Step 3: Finishing Touches
-
Remove Stencil:
Carefully lift one edge of the tape and peel the stencil straight up while the paint is still slightly tacky. This helps ensure crisp lines. -
Touch Ups:
Inspect the design for any small bleeds or mistakes. Use a fine artist brush and a tiny bit of the white base paint to correct edges or cover unwanted specks. -
Create the Outer Border:
To mimic the image, create a beaded border near the table’s edge. Use a dotting tool or the back of a brush to stamp alternating grey and gold dots around the perimeter, using a ruler to keep spacing consistent. -
Light Sanding:
Once the design is fully cured (usually 24 hours), very lightly sand over the stenciled area with high-grit sandpaper. This distresses the gold slightly, making it look worn into the wood rather than just sitting on top. -
Seal for Protection:
Apply 2-3 coats of clear matte polycrylic sealer over the entire top. Use a foam roller for a smooth, streak-free finish to protect your artwork from daily use.
Now you have a stunning, custom piece of furniture that brings artistic flair and warmth to your room
Sunburst Lines on a Painted Round Table
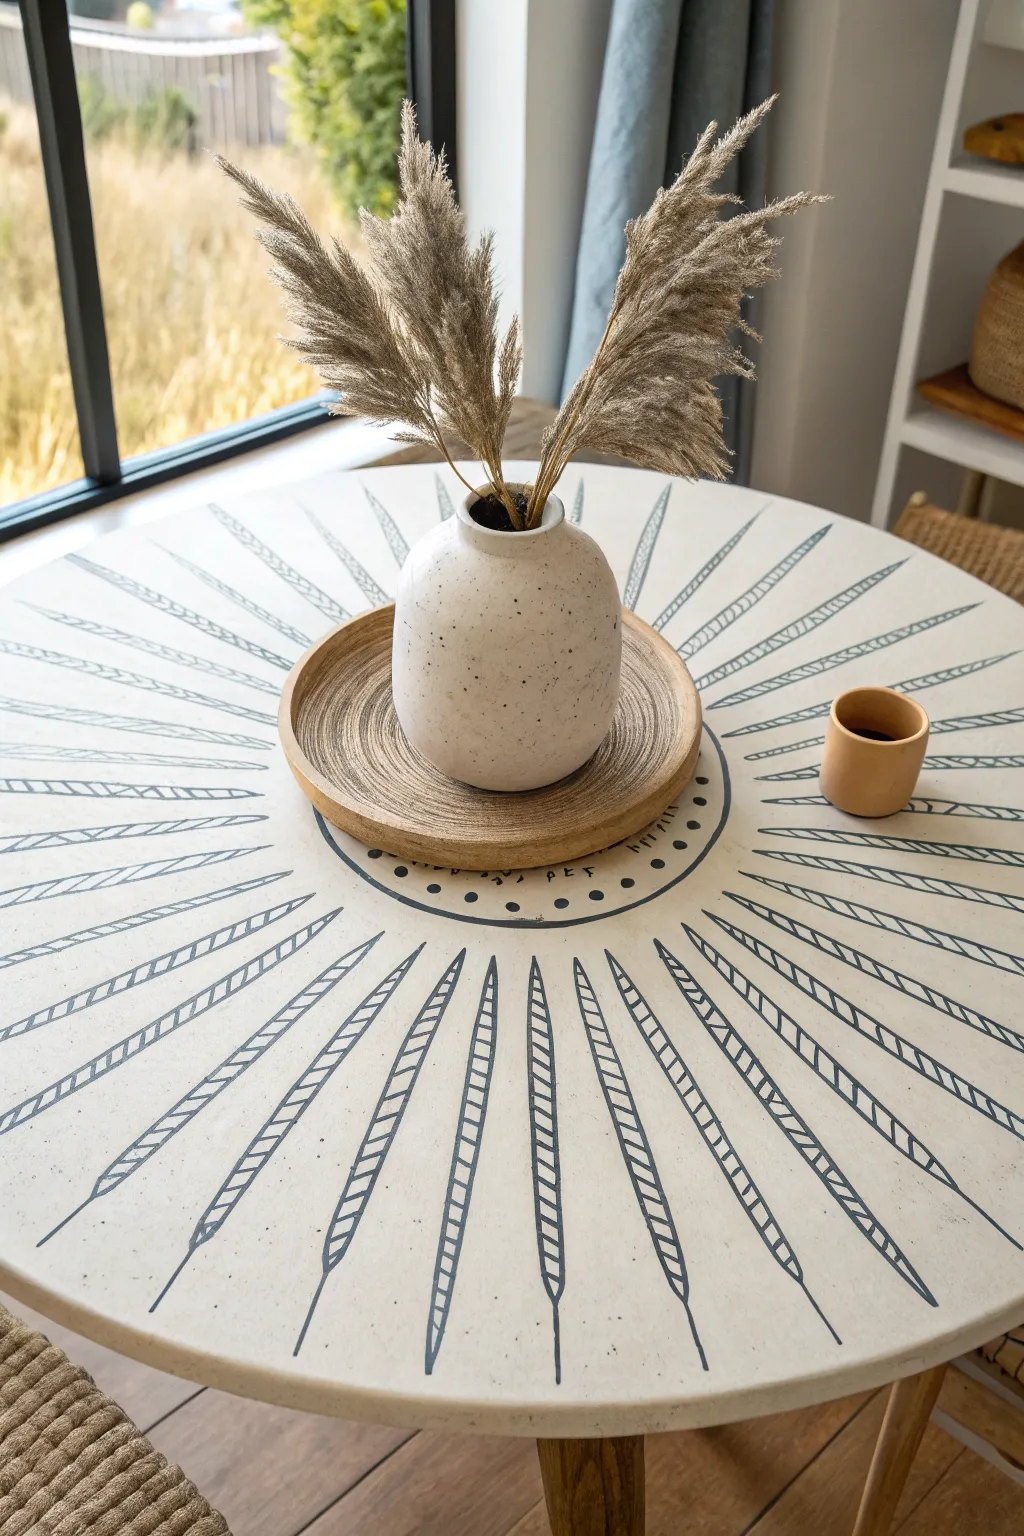
Transform a plain round table into a statement piece with this elegant, nature-inspired sunburst design. Using simple repetitive lines that mimic stylized wheat stalks, you’ll create a sophisticated pattern that draws the eye toward the center and expands beautifully to the edges.
Step-by-Step
Materials
- Round wooden table (sanded and prepped)
- Cream or off-white chalk paint (base coat)
- Dark grey or charcoal acrylic paint (for the design)
- Foam roller and tray
- Fine grit sandpaper (220-grit)
- Clear matte polyurethane sealer
- Pencil
- String and thumb tack (or large compass)
- Long ruler or straight edge
- Fine liner brush (size 1 or 2)
- Round object for tracing (like a small plate, optional)
Step 1: Preparation and Base Coat
-
Clean and sand:
Begin by thoroughly cleaning your table surface to remove any grease or wax. Scuff sand the entire top with 220-grit sandpaper to help the new paint adhere, then wipe away all dust with a tack cloth. -
Apply base color:
Pour your cream or off-white chalk paint into a tray. Using a foam roller, apply a smooth, even coat across the entire tabletop. Let this dry completely according to the manufacturer’s instructions. -
Second coat:
Apply a second coat of the base color to ensure full, opaque coverage. If you prefer a smoother finish, you can lightly sand between coats once the paint is fully dry.
Step 2: Mapping the Design
-
Find the center:
Measure the diameter of your table to locate the exact center point. Mark this tiny spot lightly with a pencil; this will be the anchor for your entire sunburst pattern. -
Draw the central ring:
Create a guide for the central open space. I like to tie a string to a pencil and a thumb tack placed in the center to draw a perfect circle about 6-8 inches in diameter. If you don’t want to use a tack, trace a centered dinner plate instead. -
Mark the rays:
Using your long ruler, lightly draw straight guide lines radiating from the central circle to the table’s edge. Think of it like slicing a pie—start with 12 evenly spaced lines like a clock, then add lines in between until you have roughly 24-30 sections depending on your table size.
Steady Hand Trick
Rest your painting hand’s pinky finger on the table surface as you work. This acts as an anchor, giving you much more control for detailed line work compared to hovering your hand.
Step 3: Painting the Details
-
Paint the central ring:
Dip your fine liner brush into the dark grey acrylic paint. Following your pencil circle guide, paint the inner border. Instead of a solid line, try painting small, evenly spaced dots or short dashes to mimic the texture seen in the photo. -
Start the main stalks:
Using the ruler guide lines as a reference, paint the central spine of each ‘wheat stalk.’ Start from the central circle and pull the brush towards the outer edge, lifting pressure as you reach the end for a tapered look. -
Add the leaf details:
Now for the repetitive pattern. Along one side of a stalk line, paint small, angled dashes that connect to the spine. Keep them consistent in length and angle, almost like the barbs on a feather. -
Complete the stalk:
Repeat the angled dashes on the opposite side of the spine. Try to mirror the first side so they meet at the spine, creating a chevron or V-shape sequence that runs the length of the ray. -
Vary the lengths:
To keep the design dynamic, you don’t have to make every stalk identical. As you work your way around the table, ensure the tips of the stalks end at slightly varied distances from the edge, or keep them uniform for a more structured look. -
Fill the gaps:
Once your main stalks are painted, step back. If the outer edges feel too sparse, you can add shorter, simpler lines or partial stalks in between the main rays near the table edge to fill the negative space. -
Add inner details:
Return to the central ring. Add a second, thinner ring of dots or dashes just inside or outside your original ring to add depth and frame the empty center space where your vase will sit.
Wobbly Lines?
If your lines aren’t perfectly straight, don’t panic. The organic ‘wheat’ style is forgiving. Briefly thicken the line in the wobbly spot to correct it visually.
Step 4: Finishing Touches
-
Erase guides:
Allow the painted design to cure for at least 24 hours. Once the paint is hard and dry, gently erase any visible pencil marks with a soft white eraser. -
Seal the surface:
Protect your hard work with a clear matte polyurethane. Apply a thin coat with a clean high-quality brush or foam roller, moving in long continuous strokes to avoid bubbles. -
Final coat:
After the first coat of sealer is dry, lightly sand with fine grit paper to knock down any raised grain roughly. Wipe clean, and apply a final coat of sealer for a durable, wipeable finish.
Now you have a stunning custom table that brings a touch of artistic flair to your dining area
Graphic Checker Pattern for a Round Table
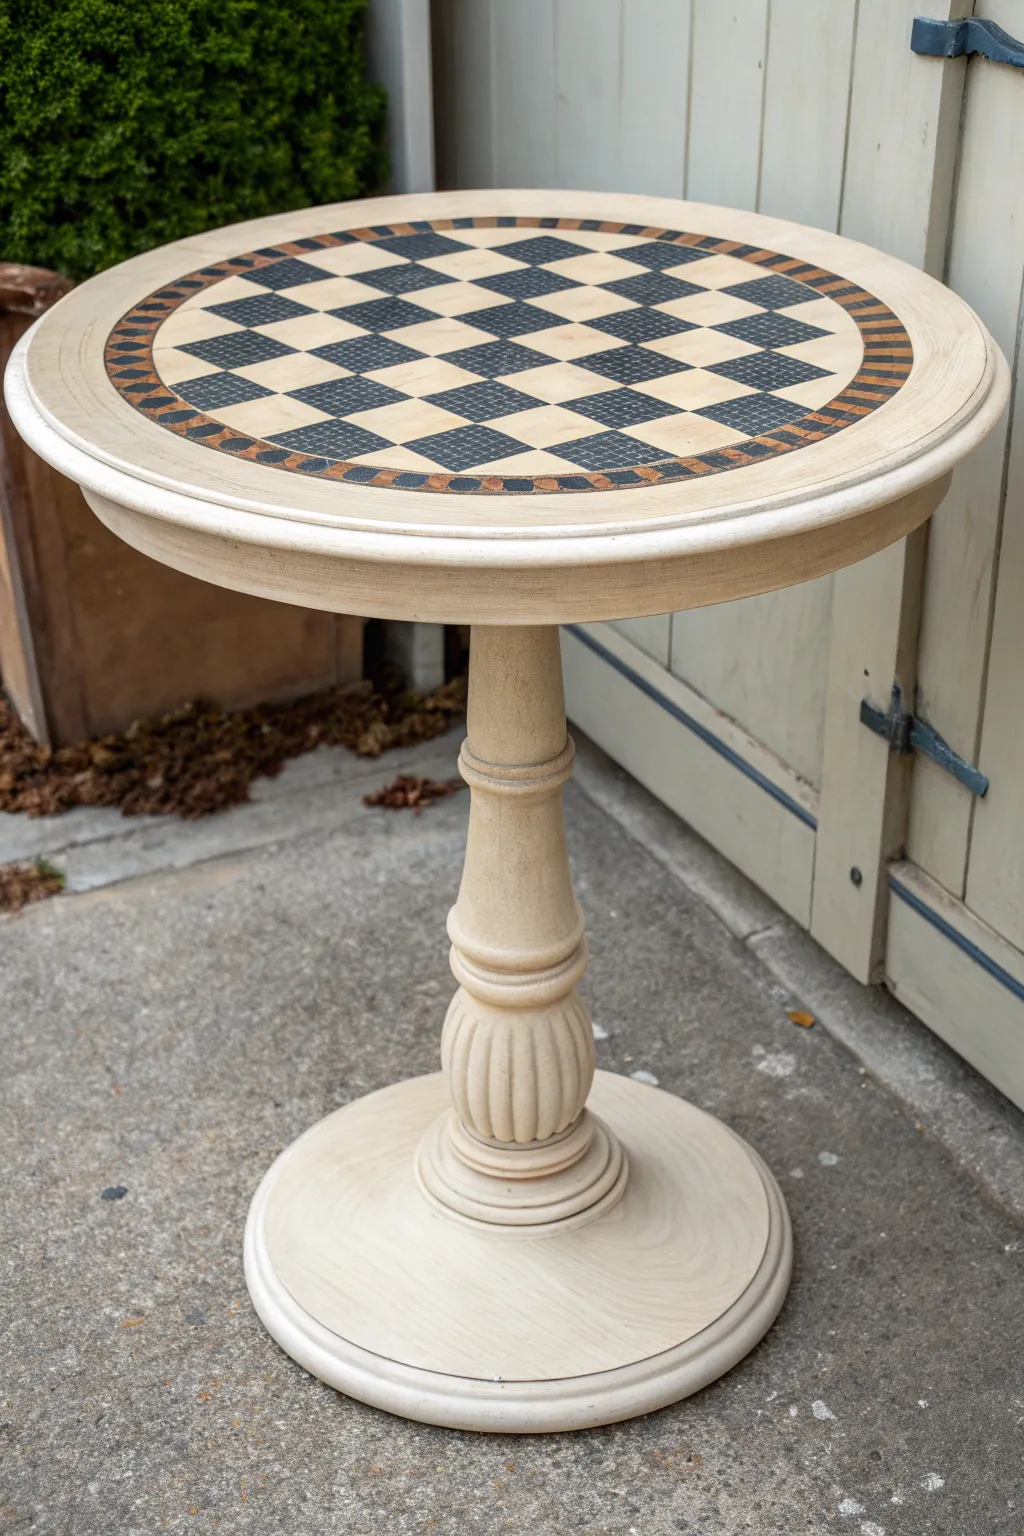
Transform a standard round pedestal table into a functional game board that doubles as a stunning piece of accent furniture. This project combines precise taping techniques with subtle antiquing to achieve a sophisticated, aged look that feels timeless rather than toy-like.
Step-by-Step Guide
Materials
- Round wooden pedestal table (bare or sanded)
- Sandpaper (120 and 220 grit)
- Painter’s tape (high quality, various widths)
- Ruler and pencil
- String and thumb tack (for compass technique)
- Chalk paint or matte acrylic paint (Cream/Off-White)
- Chalk paint or matte acrylic paint (Black or Charcoal)
- Tan/Caramel paint (for border details)
- Small artist brushes (flat and detail)
- Foam roller
- Clear matte polyurethane or wax topcoat
- Antiquing glaze (optional)
Step 1: Preparation and Base Coat
-
Surface Prep:
Begin by thoroughly cleaning your table to remove any oils or dust. If the table has an existing shiny finish, scuff sand the entire piece, including the pedestal base, with 120-grit sandpaper to give the paint something to grip. -
Smooth the Top:
Pay special attention to the tabletop. Sand it with 220-grit paper until it feels silky smooth, as any bumps here will disrupt your geometric pattern later. -
The Base Color:
Apply a base coat of cream or off-white chalk paint to the entire table. Use a foam roller for the top to ensure a brush-stroke-free finish, and a brush for the turned legs of the pedestal. -
Second Coat:
Let the first coat dry completely according to manufacturer instructions. Apply a second coat to ensure full, opaque coverage, then let it cure overnight to prevent tape from peeling it up later.
Tape Removal Tip
Pull painter’s tape away at a 45-degree angle while the paint is still slightly damp. This ‘shearing’ action cuts the paint film cleanly and prevents jagged edges.
Step 2: Drafting the Design
-
Find the Center:
Mark the exact center of your table lightly with a pencil. This is the anchor point for your entire design. -
Draw the Outer Circles:
Create a makeshift compass using a thumb tack placed in the center point and a piece of non-stretchy string tied to a pencil. Draw a large circle where you want the outer edge of your game board to be. -
Create the Border Ring:
Shorten the string slightly—by about 1.5 to 2 inches—and draw a second inner circle. This band between the two circles will become your decorative border. -
Define the Playing Field:
Within the inner circle, draw a large square. This square needs to accommodate an 8×8 grid. Measure the sides to ensure they are divisible by 8 (e.g., if the square is 16 inches, each square will be 2 inches). -
Grid It Out:
Using a long ruler, draw your 8×8 grid inside the square. Measure carefully; precision is key here for a professional look.
Step 3: Painting the Pattern
-
Tape the Grid:
Tape off the ‘black’ squares of your chessboard. You can’t tape them all at once because the corners touch. Start by taping off every other square in the first row, then stagger them for the subsequent rows. -
Seal the Tape:
Here is a trick I always use: brush a tiny amount of your base cream color over the tape edges first. This seals the tape and prevents the black paint from bleeding underneath. -
Paint Dark Squares:
Using a flat artist brush or small foam pouncer, fill in the exposed squares with your black or charcoal paint. Apply two thin coats rather than one thick one. -
Reveal and Repeat:
Remove the tape while the paint is slightly tacky (not fully dry) to keep lines crisp. Once the first set of squares is bone dry, tape off the remaining squares and repeat the process. -
Detail the Border:
For the decorative ring between the circles, use a small detail brush to hand-paint the alternating geometric pattern shown in the image using black and tan paint. It mimics a diamond or rope inlay.
Level Up: Gold Leaf
Instead of tan paint for the decorative border ring, try using size adhesive and imitation gold leaf sheets along the rim for a luxurious, metallic accent.
Step 4: Finishing Touches
-
Distress for Age:
Once the artwork is fully cured, take a piece of 220-grit sandpaper and very gently sand over the checkerboard. Focus on the edges of the table and the raised areas of the pedestal leg to reveal bits of wood or undercoat. -
Apply Glaze:
To tone down the stark contrast between the black and cream, brush on a translucent antiquing glaze working in small sections. Wipe it back almost immediately with a lint-free cloth, leaving residue in the grooves of the pedestal. -
Protect the Surface:
This table will see action, so protection is vital. Apply three coats of a high-quality matte polyurethane, sanding lightly between coats with a brown paper bag or super fine sanding sponge. -
Final Cure:
Allow the topcoat to cure for at least 48 hours before placing any chess pieces on the surface to avoid indentations.
Now you have a classically styled gaming table ready for a quiet evening of strategy
Center-Out Ombre Round Table Fade
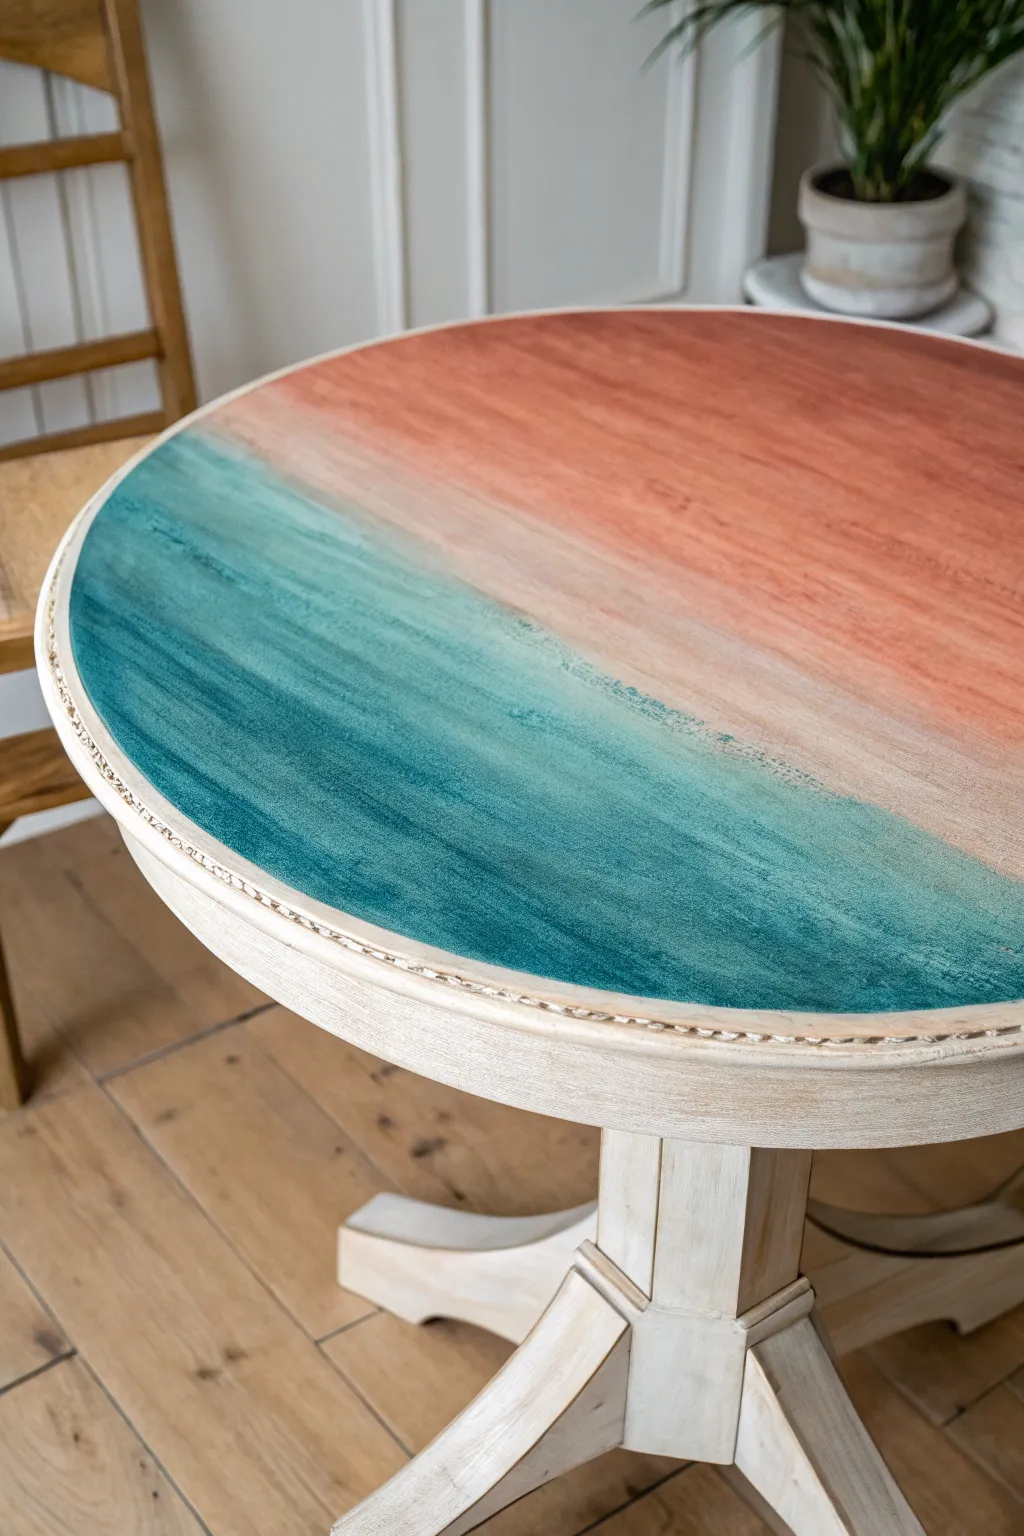
Transform a plain round table into a statement piece with this serene, sunset-inspired gradient. This project uses dry-brushing techniques to seamlessly blend warm terracotta and cool teal, evoking the feeling of sand meeting the sea.
Step-by-Step
Materials
- Round wooden pedestal table
- Sander and sandpaper (120 and 220 grit)
- Chalk mineral paint (Teal/Ocean Blue)
- Chalk mineral paint (Terracotta/Peach)
- White or cream chalk paint (for the base and washing)
- Wide flat synthetic brushes (3-4 inches)
- Small detail brush
- Misting water bottle
- Lint-free rags
- Matte clear topcoat or wax
- Painter’s tape (optional)
Step 1: Preparation & Base Coat
-
Clean and Sand:
Start by thoroughly cleaning your table with a degreaser or TSP alternative to remove oils and dirt. Once dry, scuff sand the entire surface with 120-grit sandpaper to give the paint distinct ‘tooth’ to adhere to. Wipe away dust with a damp rag. -
Whitewash the Base:
For the pedestal legs and apron, mix your white chalk paint with water (about a 50/50 ratio) to create a wash. Apply this mixture with a brush, wiping back excess with a rag as you go to let the wood grain peek through. -
Detail the Rim:
If your table has a decorative rim like the one shown, use a smaller brush to work the whitewash into the crevices. Gently distress the raised ridges with a rag before the paint dries completely to highlight the texture.
Pro Tip: Mist Control
Use a continuous mist bottle rather than a standard pump spray. It creates a finer fog that aids blending without causing large water droplets that might stain the wood.
Step 2: Creating the Ombre Top
-
Map Your Colors:
Visualize the table top divided in half. You don’t need a harsh line, but mentally designate one side for the teal ocean and the other for the terracotta sand. -
Apply the Terracotta:
Pour your terracotta paint onto a plate or tray. Using a wide, dry brush, stroke the paint onto the ‘sand’ half of the table. Keep your strokes long and directional, moving towards the center but stopping just short of the middle line. -
Feather the Edge:
As you get closer to the center where the colors will meet, use less paint on your brush. Feather the edges out lightly so there is no hard stop line. -
Apply the Teal:
With a fresh wide brush, apply the teal paint to the opposite side. Work from the outer edge inward, using long, smooth strokes to build up the ocean color intensity. -
Approach the Middle:
Similar to the first color, lighten your touch as you approach the center. You want the teal to look a bit ‘thirsty’ or dry as it nears the terracotta zone. -
The Blending Zone:
Now for the magic. Lightly mist the center area with your water bottle—just a tiny spritz to reactivate the paint slightly. Take a clean, dry brush and gently drag it back and forth across the meeting point. -
Refining the Transition:
I find it helpful to wipe my blending brush on a rag frequently. Continue cross-hatching or dragging the brush along the seam until the colors merge into a soft, brownish-grey neutral zone. -
Second Layer (Optional):
Let the first coat dry. If the colors feel too transparent, add a second coat to the outer edges only, leaving the blended center semi-transparent to maintain that watercolor look. -
Distress the Top:
Once fully dry, take a fine 220-grit sanding block and lightly sand over the entire top. This softens the brush strokes and reveals hints of the wood grain, unifying the texture.
Step 3: Finishing Touches
-
Rim Cleanup:
If any colorful paint dripped onto the whitewashed rim, touch it up now with a small brush and your white wash mixture. -
Seal the Surface:
Apply a clear matte topcoat or clear wax to the entire table. A water-based polycrylic is best for the top to prevent yellowing over the blue tones. -
Wait and Cure:
Let the sealer cure according to the manufacturer’s instructions before placing heavy items on your new coastal centerpiece.
Level Up: Salt Wash Texture
Mix a texture additive or baking soda into the teal paint before applying. This adds a gritty, sea-salt texture that mimics the look and feel of real ocean waves.
This soothing color palette brings a permanent vacation vibe to your dining space
Speckled Terrazzo Painted Round Top
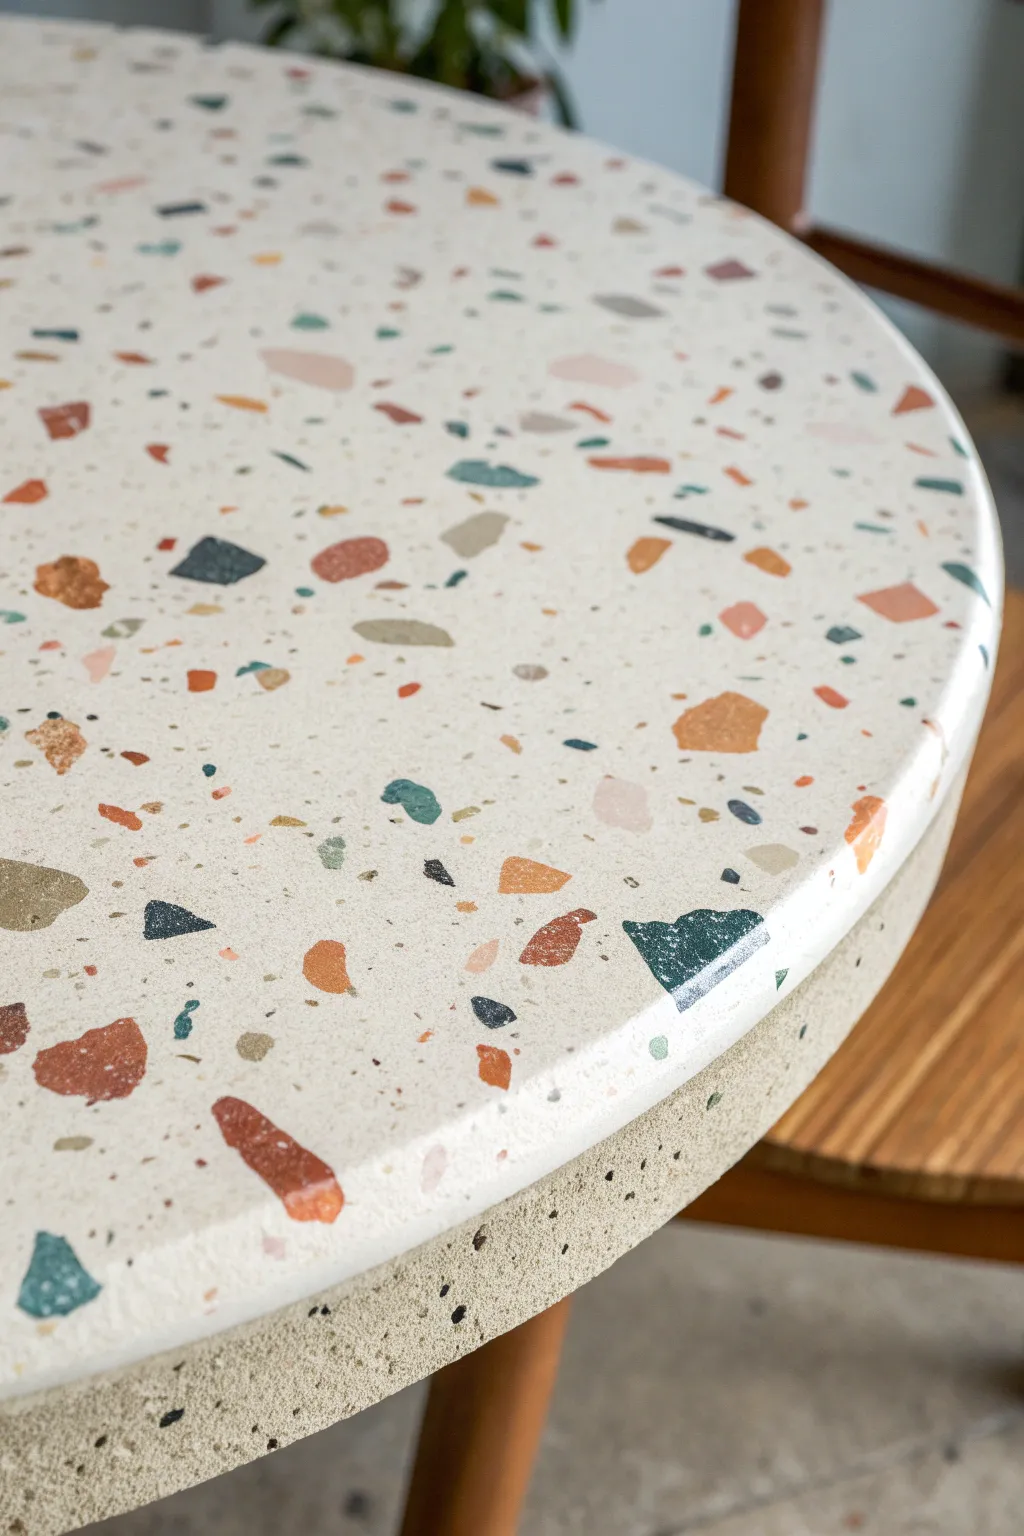
Achieve the high-end look of authentic Italian terrazzo without the heavy price tag or weight of stone. This project transforms a basic round table into a stunning statement piece featuring realistic scattered chips in earthy tones like rust, teal, and slate suspended in a creamy base.
Detailed Instructions
Materials
- Round wooden table (or tabletop)
- Primer suitable for the table surface
- Cream or off-white acrylic latex paint (base color)
- Acrylic craft paints (rust orange, deep teal, slate blue, beige, dark grey)
- Small flat artist brushes (various sizes)
- Sea sponge or stippling brush
- Sandpaper (medium and fine grit)
- Polyurethane sealer (satin or matte finish)
- Small palette or painter’s tape
- Drop cloth
Step 1: Preparation and Base Coat
-
Prep the Surface:
Begin by cleaning your round table thoroughly to remove any grease or dust. Lightly sand the entire top surface and the edges to scuff up the laminate or existing finish, giving the new paint something to grip. -
Prime the Table:
Apply an even coat of high-quality primer across the top and down the sides. Allow this to dry completely according to the manufacturer’s instructions before assessing if a second coat is needed for full coverage. -
Apply the Base Color:
Paint the table with your chosen cream or off-white base color. I like to use a small roller for the top to ensure a smooth, brush-stroke-free finish. -
Second Coat:
Apply a second coat of the base color to ensure the surface is opaque and uniform. Let this dry fully for at least 24 hours so the background is solid before you start the detail work.
Uneven Distribution?
If one area looks too empty or clustered, step back 5 feet to assess. Add tiny ‘aggregate’ dots in empty zones to balance the visual weight without adding heavy shapes.
Step 2: Creating the Terrazzo Chips
-
Mix Your Palette:
Squeeze out small amounts of your accent colors—rust, teal, slate blue, beige, and grey onto a palette. You want these colors to be slightly muted and earthy for a specialized terrazzo look. -
Paint Large Chips – First Color:
Start with your boldest color, perhaps the rust orange. Using a small flat brush, paint random geometric shapes across the surface. Think triangles, rough squares, and irregular shards, keeping them spaced widely apart. -
Paint Large Chips – Second Color:
Switch to your teal paint and repeat the process, painting medium-to-large irregular shapes in available open spaces. Rotate your wrist as you paint to prevent a repetitive pattern. -
Fill with Neutrals:
Use the beige and slate blue paints to add more medium-sized chips. These neutral tones help balance the bold colors and add depth to the faux stone effect. -
Detailing the Edges:
Be sure to carry the pattern over the rounded edge of the table. Painting chips that ‘fold’ over the side adds significantly to the illusion that the tabletop is a solid slab of stone. -
Add Tiny Flecks:
Dip a fine-point brush or the tip of a toothpick into dark grey or black paint. Add very small dots and specks between the larger shapes to mimic the aggregate sand found in real terrazzo. -
Layering for Depth:
Once the first layer of shapes is dry, paint a few new shapes that slightly overlap the previous ones. This creates a convincing 3D effect where stones appear to be sitting at different depths. -
Softening the Shapes:
If any shapes look too perfect or sharp, lightly dab them with a barely damp sea sponge while the paint is tacky to soften the edges and add texture.
Step 3: Finishing Touches
-
Dry Time:
Allow your painted artwork to cure for at least 24 hours. The acrylics need to be completely hardened before sanding or sealing. -
Light Sanding (Optional):
For a truly authentic feel, very lightly run fine-grit sandpaper over the painted surface. This knocks down any raised ridges of paint, making the top feel smooth like polished stone. -
Wipe Down:
Use a tack cloth or a damp microfiber rag to remove all sanding dust. The surface must be perfectly clean for the sealer. -
First Seal Coat:
Apply a thin layer of satin or matte polyurethane. Use a high-quality synthetic brush or foam roller to apply it gently, avoiding overworking which causes bubbles. -
Final Protection:
Once the first coat is dry, sand lightly again with very fine grit, wipe clean, and apply two more coats of sealer. This ensures your beautiful terrazzo art can withstand coffee cups and daily use.
Stone Texture Trick
Mix a teaspoon of baking soda into your base coat paint. This creates a gritty, stone-like texture that feels incredibly real once the final smooth sealer is applied.
Enjoy your stylish, custom-designed table that looks like it came straight from a designer showroom
Paper Collage Under a Painted Round Table Finish
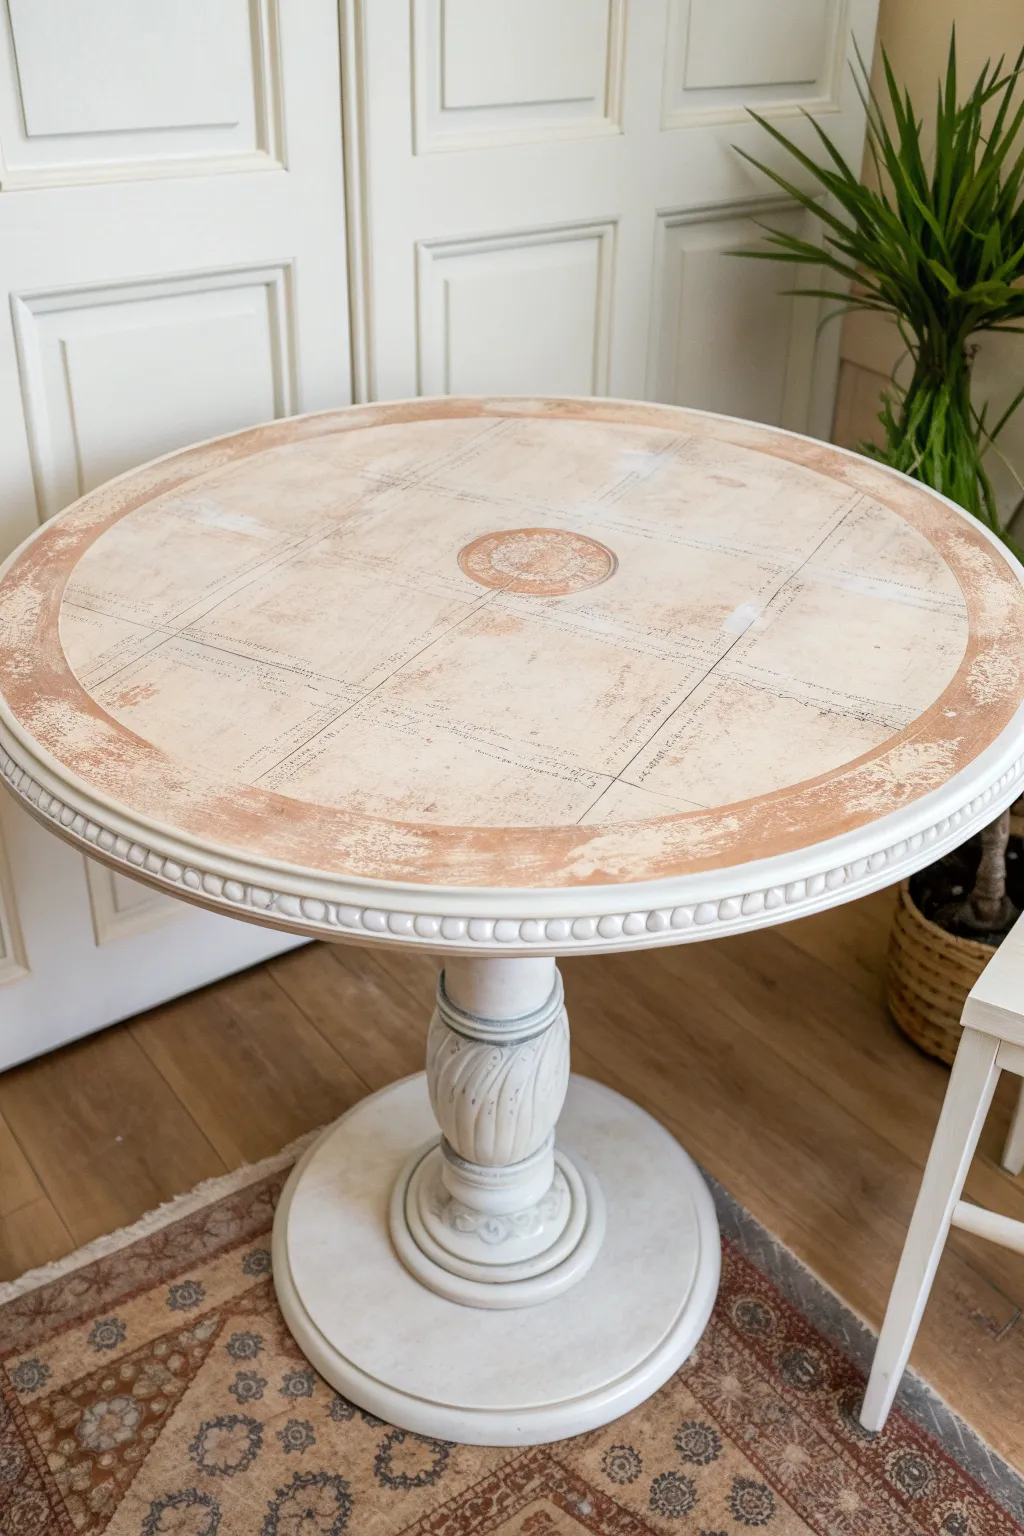
Transform a standard round pedestal table into an explorer’s dream with this layered finish that mimics old-world parchment and maps. By combining decoupage with distressed painting techniques, you’ll create a centerpiece that looks like a treasured antique discovery.
Step-by-Step Tutorial
Materials
- Round wooden pedestal table
- Chalk paint (warm white/cream)
- Chalk paint (terracotta or muted orange)
- Decorative paper (vintage script, maps, or grid patterns)
- Mod Podge or decoupage medium
- Sanding block (medium grit)
- Paint brushes (medium flat brush and small detail brush)
- Clear wax finish
- Dark wax or antiquing glaze
- Ruler and pencil
- Scissors or craft knife
- Damp lint-free cloth
Step 1: Base Preparation & Painting
-
Clean the surface:
Begin by thoroughly wiping down the entire table with a cleaner degreaser to remove any old polish, oil, or dust. Let it dry completely. -
Prime the base:
Apply a base coat of your warm white chalk paint to the pedestal leg and the rim of the table. You don’t need perfect coverage here since we’re going for a distressed look. -
Second coat:
Paint a second coat of white once the first is dry. Focus on getting good coverage on the ornate carvings of the pedestal. -
Highlight the details:
Dip a nearly dry brush into a tiny amount of grey or light blue paint and lightly whisk it over the carved ridges of the pedestal leg to accentuate the texture.
Wrinkled Paper?
If stubborn bubbles appear under your paper while gluing, prick the bubble with a fine needle to release the air, then smooth it down again with your finger while the glue is wet.
Step 2: Creating the Paper Design
-
Mark the center:
Find the exact center of your tabletop using a ruler and mark it lightly with a pencil. -
Cut the paper sections:
Cut your vintage architectural or map papers into varied squares or rectangles. Don’t worry about perfect edges; torn edges can actually add to the aged effect. -
Map out the grid:
Dry-fit your paper pieces onto the table surface. I prefer arranging them in a loose grid pattern around the center point to mimic latitude and longitude lines. -
Adhere the paper:
Apply a thin layer of decoupage medium to the back of a paper piece and smooth it onto the table. Use a brayer or old credit card to push out air bubbles immediately. -
Create the center medallion:
Cut a circle from your paper or paint a small circular motif in the direct center. If painting, use a terracotta shade mixed with water for a translucent effect. -
Seal the paper:
Once all paper is placed and dry, apply a coat of decoupage medium over the entire top surface to seal the design.
Step 3: Adding the Painted Border
-
Outline the rim:
Using the terracotta or muted orange chalk paint, paint a wide band around the outer edge of the tabletop, overlapping slightly onto your paper collage. -
Feather the edges:
While the paint is still wet, use a damp cloth or dry brush to soften the inner edge of the terracotta ring so it fades naturally into the paper center. -
Distress the band:
Once the orange band is dry, take your sanding block and vigorously sand parts of the painted rim to reveal the wood or white base underneath.
Burnished Lines
Draw faint grid lines over your dry decoupage using a gold or bronze metallic marker. Rub over them immediately with your finger to smudge them for an authentic old-map look.
Step 4: Finishing Touches
-
Whitewash the top:
Create a very watery mixture of your white paint (50/50 paint and water). Brush this wash over the entire tabletop, then wipe it back immediately with a rag to mute the colors and unify the collage. -
Apply clear wax:
Protect the entire piece with a layer of clear furniture wax, applied with a soft brush or lint-free cloth. -
Antique the details:
Work dark wax or antiquing glaze into the crevices of the pedestal leg and lightly around the rim of the table to deepen the vintage feel. -
Final buff:
Allow the wax to cure for at least an hour, then buff briskly with a clean cloth to achieve a subtle sheen.
Now you have a stunning, history-inspired table that invites conversation and adds warmth to any corner of your home


Have a question or want to share your own experience? I'd love to hear from you in the comments below!