If you’re craving fresh kayak painting inspiration, you can go two fun directions: paint a scene *of* a kayak, or customize a real kayak hull like it’s your own floating canvas. Here are my favorite ideas to get you started, from classic lake views to bold, artsy finishes that turn heads on the water.
Kayaks on a Rack Color Study
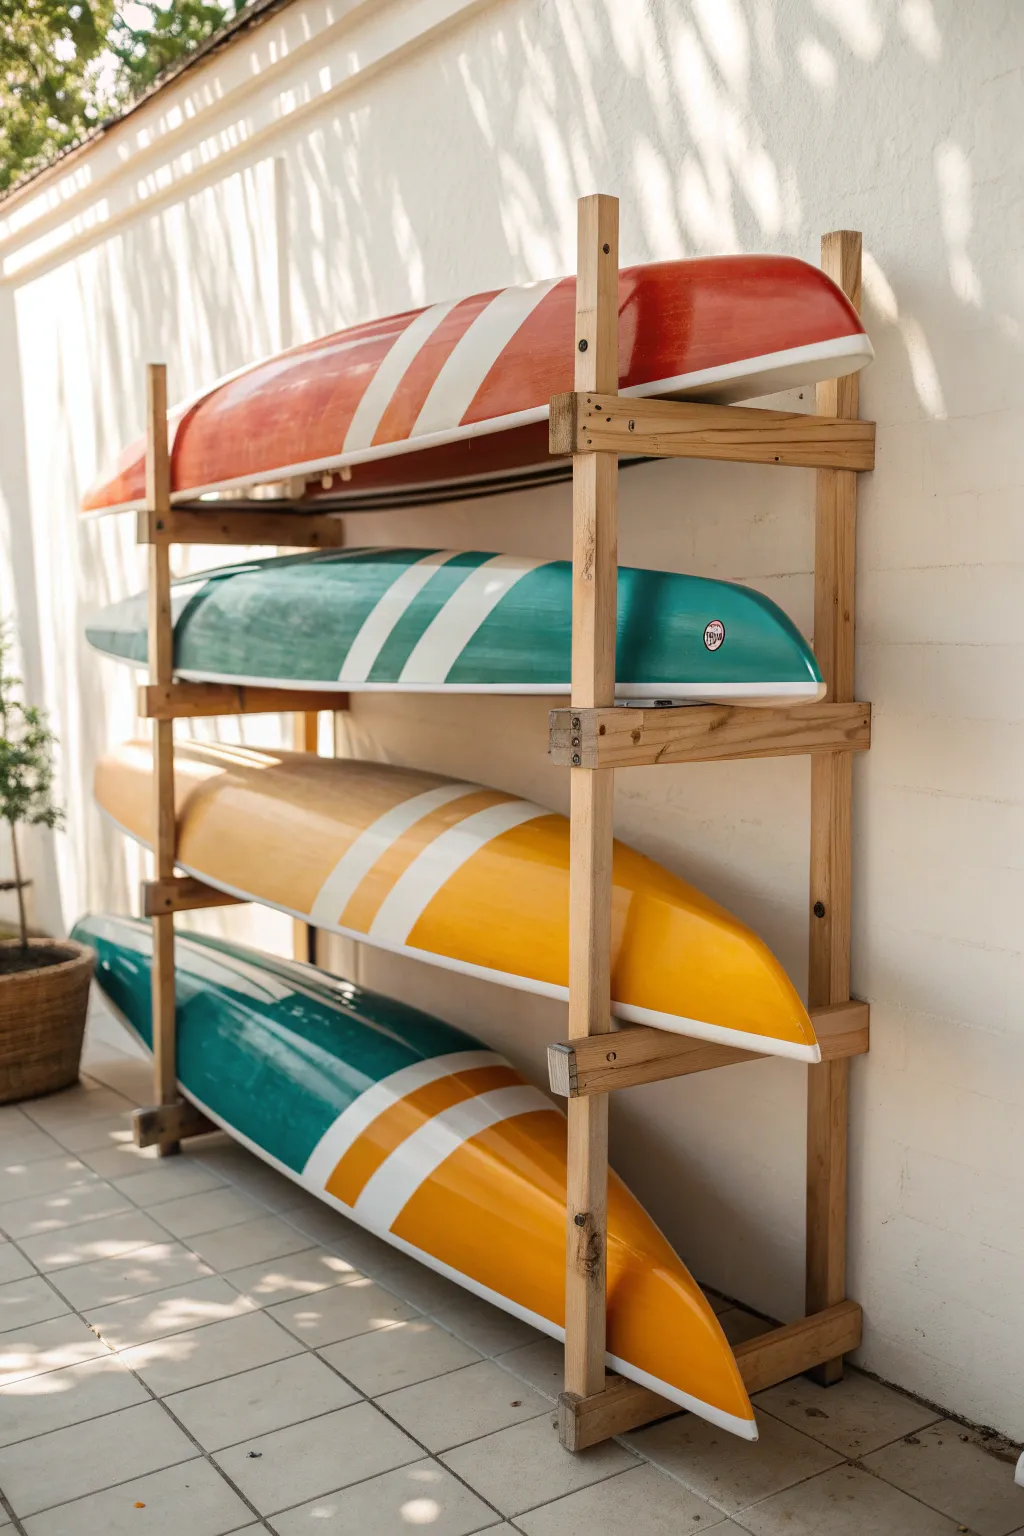
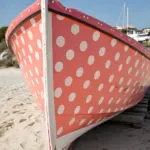
Transform ordinary kayaks into a stunning visual display with this vintage-inspired painting project. By using bold, solid colors and crisp white racing stripes, you can turn functional watercraft into a cohesive, design-forward collection.
Step-by-Step Tutorial
Materials
- Marine-grade polyurethane paint (Red, Teal, Yellow, Orange)
- Marine-grade polyurethane paint (White)
- Sandpaper (120, 220, and 320 grit)
- Acetone or denatured alcohol
- High-quality painters tape (various widths)
- Foam rollers and roller tray
- Sash brush or high-quality bristle brush
- Protective clear coat (marine spar varnish)
- Clean rags
- Primer suitable for plastic or fiberglass
Step 1: Preparation & Priming
-
Clean surface:
Begin by thoroughly cleaning the kayaks with soapy water to remove all dirt, salt, and grime. Rinse well and let them dry completely. -
Sand the hull:
Scuff the entire surface of each kayak using 120-grit sandpaper. This mechanical adhesion is crucial; you aren’t trying to remove material, just dulling the glossy finish so the primer sticks. -
Degrease:
Wipe down the sanded surfaces with a rag soaked in acetone or denatured alcohol to remove sanding dust and any lingering oils. -
Apply primer:
Roll on a thin, even coat of primer suited for your kayak’s material (usually polyethylene or fiberglass). Let it cure according to the manufacturer’s instructions.
Bleeding Lines?
If paint bleeds under the tape, let it dry completely. Then, re-tape the line slightly further in and touch up with the base color, or use a detail brush to meticulously tidy the edge.
Step 2: Base Coat Application
-
First color coat:
Start with your base colors. For the top kayak, apply the red marine paint using a foam roller for smooth coverage. Repeat with teal, yellow, and the orange/teal combo for the others. -
Tip off the paint:
Immediately after rolling, use a dry brush to lightly ‘tip off’ the wet paint. I find this helps smooth out any bubbles left by the roller. -
Sand between coats:
Once dry, lightly sand with 320-grit paper to knock down any high spots. Wipe clean with a tack cloth. -
Second coat:
Apply a second coat of your base colors to ensure full opacity and depth. Allow this to cure fully—often 24 hours—before taping.
Smoother Finishes
For a glass-like finish, use a ‘roll and tip’ method. Roll paint on a small section, then immediately drag a dry, high-quality brush lightly over it to level the texture.
Step 3: Creating the Racing Stripes
-
Measure stripe placement:
Decide on the angle for your diagonal stripes. Use a flexible measuring tape to mark consistent spacing across the hull to ensure the stripes look parallel. -
Tape the design:
Apply high-quality painter’s tape to define the white stripes. Press the edges of the tape down firmly with a credit card or fingernail to prevent bleed. -
Seal the tape edge:
Paint a very thin layer of the *base color* over the tape edge first. This seals the tape so any bleed is the same color as the background, keeping your white lines crisp. -
Paint the white stripes:
Using a small roller or brush, fill in the taped areas with marine-grade white paint. You may need 2-3 light coats for solid white coverage over the darker colors. -
Peel carefully:
Remove the tape while the final coat of white paint is still slightly tacky, pulling it away at a 45-degree angle.
Step 4: Finishing & Display
-
Final cure:
Allow the paint to cure for several days. Marine paints often take longer to harden fully than standard wall paints. -
Clear coat option:
For extra durability against paddle scrapes, apply a final layer of clear marine varnish over the entire hull. -
Build or prep the rack:
While the kayaks cure, prepare your wooden rack. Sand down any rough lumber (like the 2x4s shown) and assemble a simple ladder-style frame. -
Rack consistency:
Ensure the cross-braces on your rack are spaced evenly to accommodate the different hull depths of your fleet. -
Stack and style:
Carefully load the cured kayaks onto the rack, arranging them by color for the best visual impact—red on top, followed by teal, yellow, and the two-tone bottom vessel.
Now you have a stunning, color-coordinated fleet ready for the water or display
Shoreline Kayak Still Life
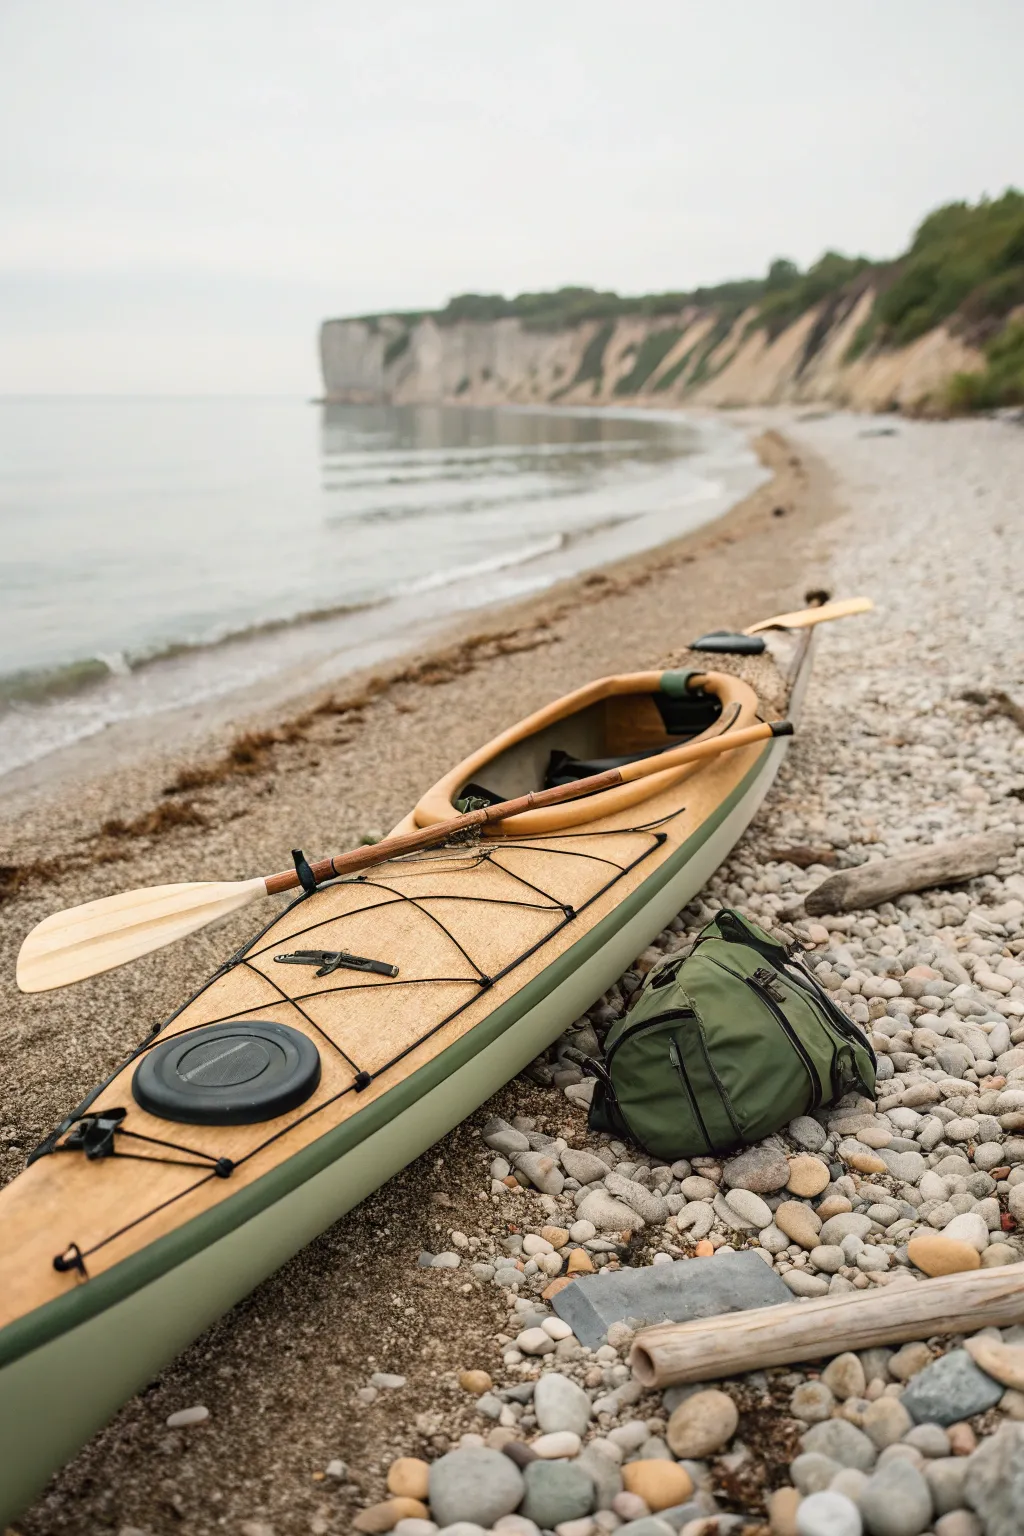
Capture the serene beauty of a coastal adventure with this realistic acrylic painting, featuring a wooden kayak resting on a pebbled beach. You’ll layer soft atmospheric cliffs with crisp foreground details to create a balanced composition that evokes the quiet of early morning.
Step-by-Step Guide
Materials
- Stretched canvas (16×20 inches recommended)
- Acrylic paints: Titanium White, Burnt Sienna, Yellow Ochre, Raw Umber, Hooker’s Green, Sap Green, Phthalo Blue, Neutral Grey
- Assorted brushes: 1″ flat wash, #8 and #4 filbert, #2 round, and a liner brush
- Palette knife
- Natural sea sponge
- Water container and paper towels
- Spray bottle for misting paints
Step 1: Planning and Background
-
Sketch the composition:
Begin by lightly sketching the horizon line just above the middle of the canvas. Outline the curve of the shoreline leading the eye inward, then sketch the elongated shape of the kayak diagonally in the foreground. Don’t worry about perfect details yet; just get the proportions of the cliffs and the backpack right. -
Paint the sky:
Mix Titanium White with the tiniest touch of Neutral Grey and Phthalo Blue. Use your large flat brush to sweep diverse, muted white strokes across the top, keeping the sky overcast and soft. -
Block in the water:
For the sea, use a very watery mix of Neutral Grey and a hint of Phthalo Blue. Apply this in horizontal strokes, fading the color out as you get closer to the shore to mimic shallow water reflecting the white sky. -
Create the distant cliffs:
Mix White, Yellow Ochre, and a touch of Grey. Paint the vertical cliffs in the background using vertical strokes. While the paint is wet, blend the bottom edges into the water line slightly to create a misty, distant look. -
Add cliff vegetation:
Tap in touches of Sap Green and Hooker’s Green along the tops of the cliffs. Keep these edges soft and slightly blurry to maintain atmospheric perspective.
Mastering Water Transparency
To make water look transparent near the shore, paint the rocky bottom first, let it dry, then glaze over it with a very watered-down mix of white and blue.
Step 2: Midground and Foreground Texture
-
Underpaint the beach:
Mix a warm, sandy base color using Yellow Ochre, White, and Burnt Sienna. Cover the entire beach area with this tone. I like to let this dry thoroughly before tackling the stones. -
Create the pebble texture:
Using a natural sea sponge, dab a mix of Grey, White, and Raw Umber over the sandy base. Rotate the sponge constantly to avoid repeating patterns. This creates the illusion of thousands of small stones without painting each one. -
Define individual foreground stones:
Switch to your #4 filbert brush. In the immediate foreground, paint distinct oval shapes using various shades of grey and cool tan. Add highlights to the tops and dark shadows underneath to give them volume. -
Add the shoreline wetness:
Where the water meets the stones, glaze a thin layer of darker, glossy grey-brown. Add horizontal streaks of pure white to show the gentle foam of a receding wave.
Add a Personal Touch
Customize the kayak’s hull color to match your own boat, or paint a specific logo or personalized sticker onto the deck for a custom gift.
Step 3: The Kayak and Details
-
Base coat the kayak:
Mix a rich wood tone using Yellow Ochre and Burnt Sienna. Fill in the top deck of the kayak. For the hull (the side), use a light sage green mixed from White, faint Hooker’s Green, and Yellow Ochre. -
Add wood grain texture:
Once the base is dry, use a liner brush with watered-down Raw Umber to paint fine, flowing lines along the length of the wooden deck to simulate grain. Keep the lines subtle. -
Paint the cockpit interior:
Use a dark mix of Raw Umber and Hooker’s Green to fill the deep shadow of the cockpit. Create a hard edge where the rim catches the light. -
Illustrate the paddle:
Draw the paddle shaft across the boat using Burnt Sienna. Use a lighter cream color (White + Yellow Ochre) for the blade, adding wood grain details similar to the deck. -
Detail the rigging and hatch:
Using a liner brush and black (or very dark grey), paint the thin rigging lines across the deck. Paint the circular hatch cover with dark grey, adding a crescent-shaped highlight to show its matte plastic texture. -
Paint the backpack:
Use Hooker’s Green mixed with a little Grey for the backpack next to the boat. Focus on the folds and creases by adding shadows with dark green and highlights with a lighter, milky green. -
Final shadows:
Anchor the objects to the ground by painting deep, cool grey shadows underneath the kayak, the paddle, and the backpack. These shadows should follow the contours of the rocky ground. -
Highlights and driftwood:
Add final touches of pure white to the wettest looking stones near the water. If you have space, add a piece of driftwood in the corner using greys and tans for compositional balance.
Step back and admire how the stillness of the coast comes to life on your canvas.


Ocean Kayak With Rolling Waves
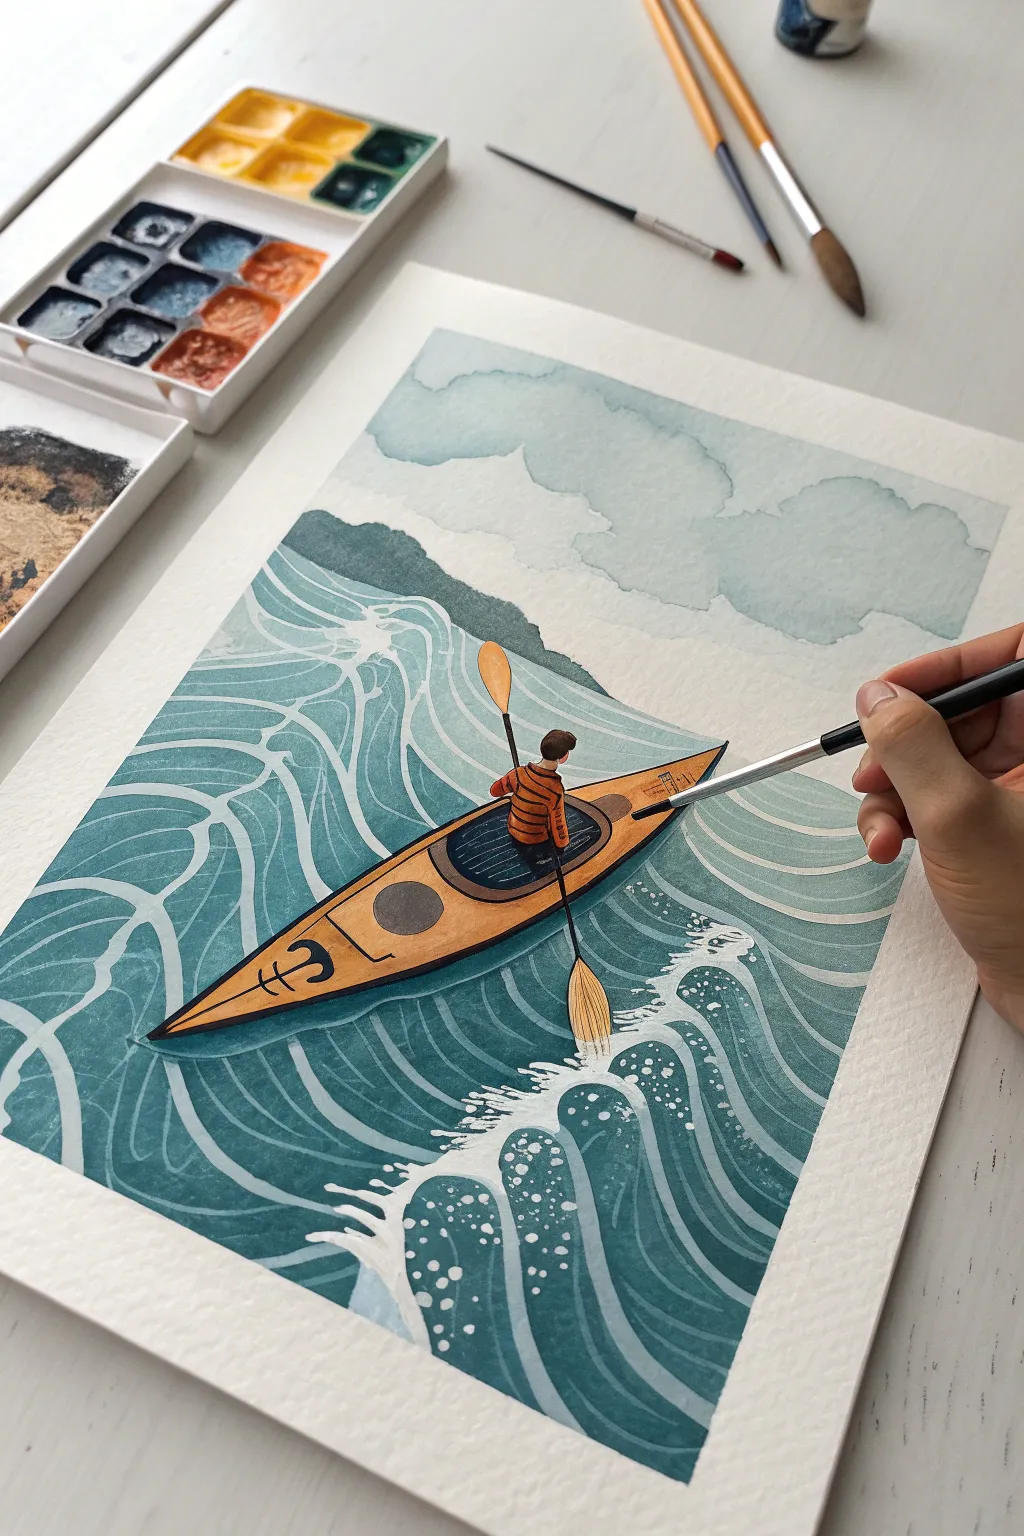
This stylized seascape captures the rhythmic motion of the ocean with bold, graphic waves and a solitary kayaker. Using a blend of gouache and watercolor, you’ll create a striking image that balances calm control with the wild energy of the sea.
Step-by-Step
Materials
- Cold press watercolor paper (approx. 9×12 inches)
- Gouache paints (Teal, Prussian Blue, White, Burnt Sienna, Yellow Ochre, Black)
- Watercolor paints (Light Blue/Grey mix for clouds)
- Flat shader brush (size 6 or 8)
- Round detail brushes (size 0 and 2)
- Masking tape
- Pencil and eraser
- Palette for mixing
Step 1: Sketching and Sky
-
Tape boundaries:
Begin by taping down all four edges of your watercolor paper to a board. This creates the crisp white border seen in the reference and prevents buckling. -
Sketch the composition:
Lightly sketch the scene with a pencil. Draw the horizon line about two-thirds up the page, adding bumpy mountainous shapes slightly below it. Outline the long, tapered shape of the kayak diagonally in the center. -
Add wave guides:
Map out the flow of the water. Don’t draw every ripple yet, but sketch large, swirling curves radiating from the kayak to guide your painting later. -
Paint the sky:
Mix a very watery wash of light blue-grey watercolor. Paint the sky area using a wet-on-dry technique to create ‘blooms’ or cloud-like textures along the top edge. Let this fade out as it reaches the horizon.
Clean Lines
If your white lines feel shaky, dilute your gouache slightly more with water to an ink-like consistency. This helps the paint flow smoothly off a liner brush.
Step 2: The Ocean Layers
-
Base ocean color:
Mix a medium-teal gouache. Using a flat brush, fill in the entire ocean area, carefully painting around the kayak shape. Keep the paint relatively opaque. -
Define the distant land:
While the ocean dries, mix a dark, desaturated green-grey. Paint the distant mountain shapes along the horizon line, ensuring a distinct separation from the sky. -
Darker wave depths:
Once the teal base is dry, mix a deeper variation using Prussian Blue and a touch of black. Paint wide, curving ribbons through the water to represent the troughs between waves. -
Painting the kayak hull:
Mix Yellow Ochre with a tiny bit of Burnt Sienna. Fill in the wooden body of the kayak. While wet, drop slightly darker brown along the edges for a rounded effect. -
Adding the kayaker:
Use a small round brush to paint the kayaker’s figure. An orange striped shirt contrasts beautifully with the blue water. Paint a small circle for the head in brown tones.
Step 3: Details and Linework
-
Kayak details:
Using a size 0 brush and black or dark brown paint, outline the kayak’s rim, the hatches, and the kayaker’s shirt stripes. Add the paddle shape extending into the water. -
Stylized water lines:
This is the most time-consuming but rewarding step. Mix a very fluid, opaque white gouache. Using your finest brush, carefully paint thin, parallel lines following the curves of your teal waves. -
Creating movement:
Vary the white lines—some should be long and sweeping, others short and rhythmic. Leave gaps between them to let the teal and dark blue underneath show through as the water’s color. -
Painting the wake:
At the stern (back) of the kayak and where the paddle hits the water, paint denser clusters of white dots and jagged lines to simulate churning foam and spray. -
Enhancing the foreground:
In the bottom right corner, add larger, more dramatic white bubbles or foam patterns to suggest a crashing wave closest to the viewer. -
Final touches:
Review the painting for contrast. I find adding a tiny highlight to the kayaker’s shoulder or the paddle blade really helps bring the figure to life. -
Reveal:
Wait until the painting is completely bone-dry. Slowly peel away the masking tape at a 45-degree angle to reveal your clean edges.
Fixing Mistakes
Gouache is forgiving! If you paint a white line too thick, let it dry, mix your exact teal background color again, and carefully ‘erase’ the mistake by painting over it.
Frame your finished seascape or gift it to the adventurer in your life


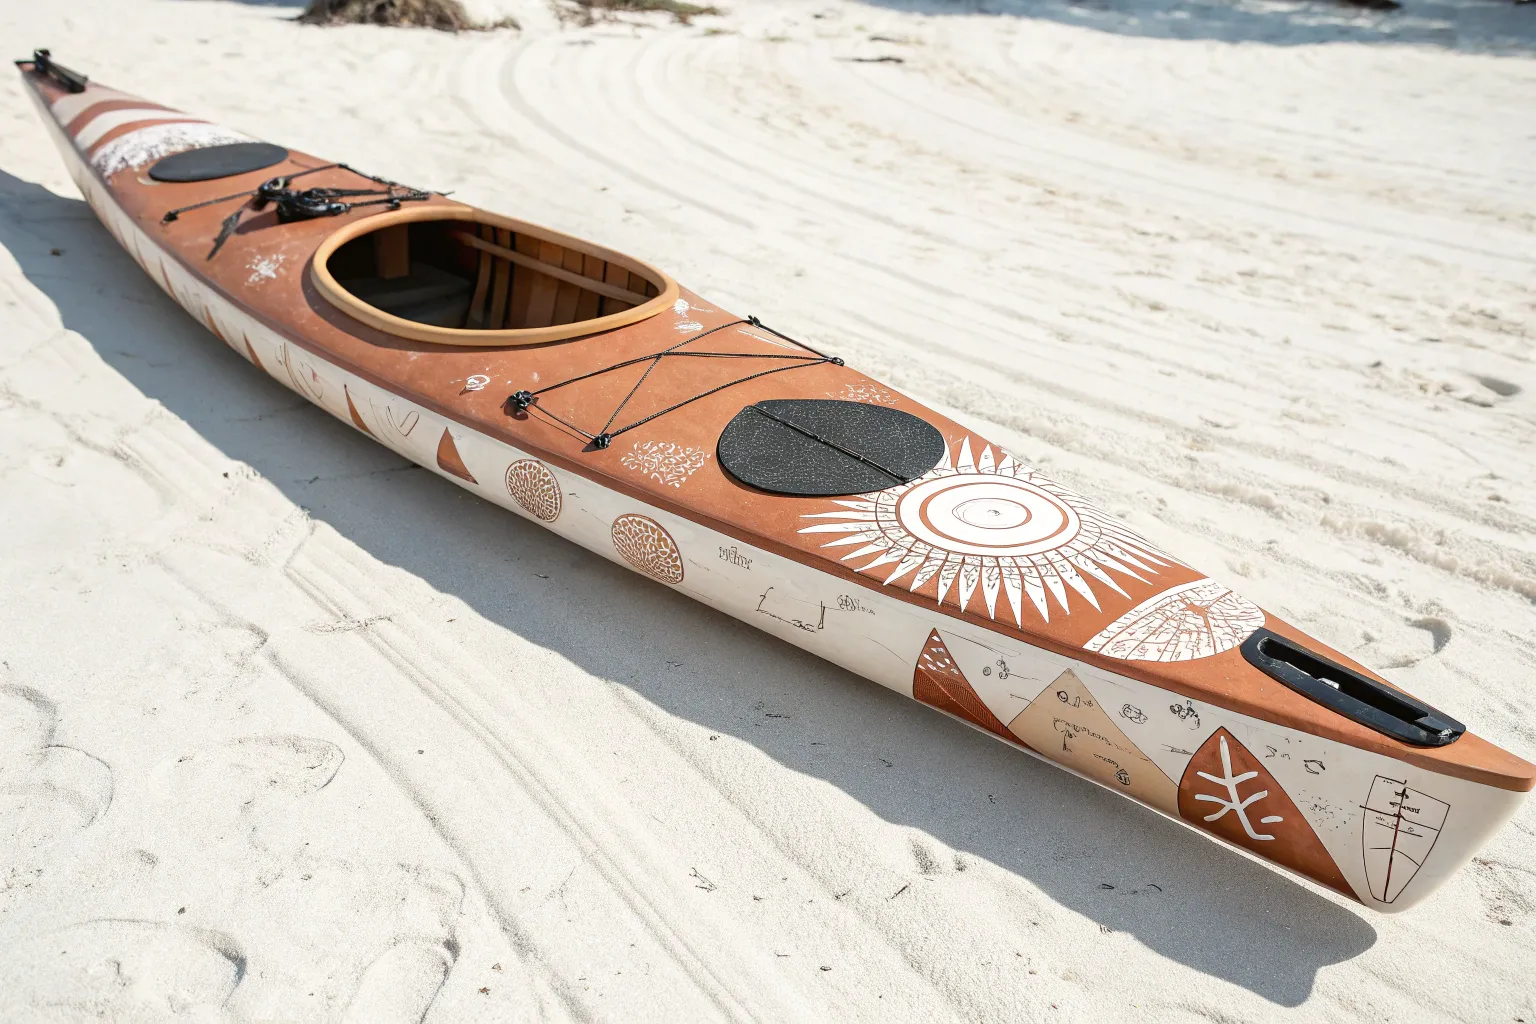
Bold Geometric Kayak Hull Pattern
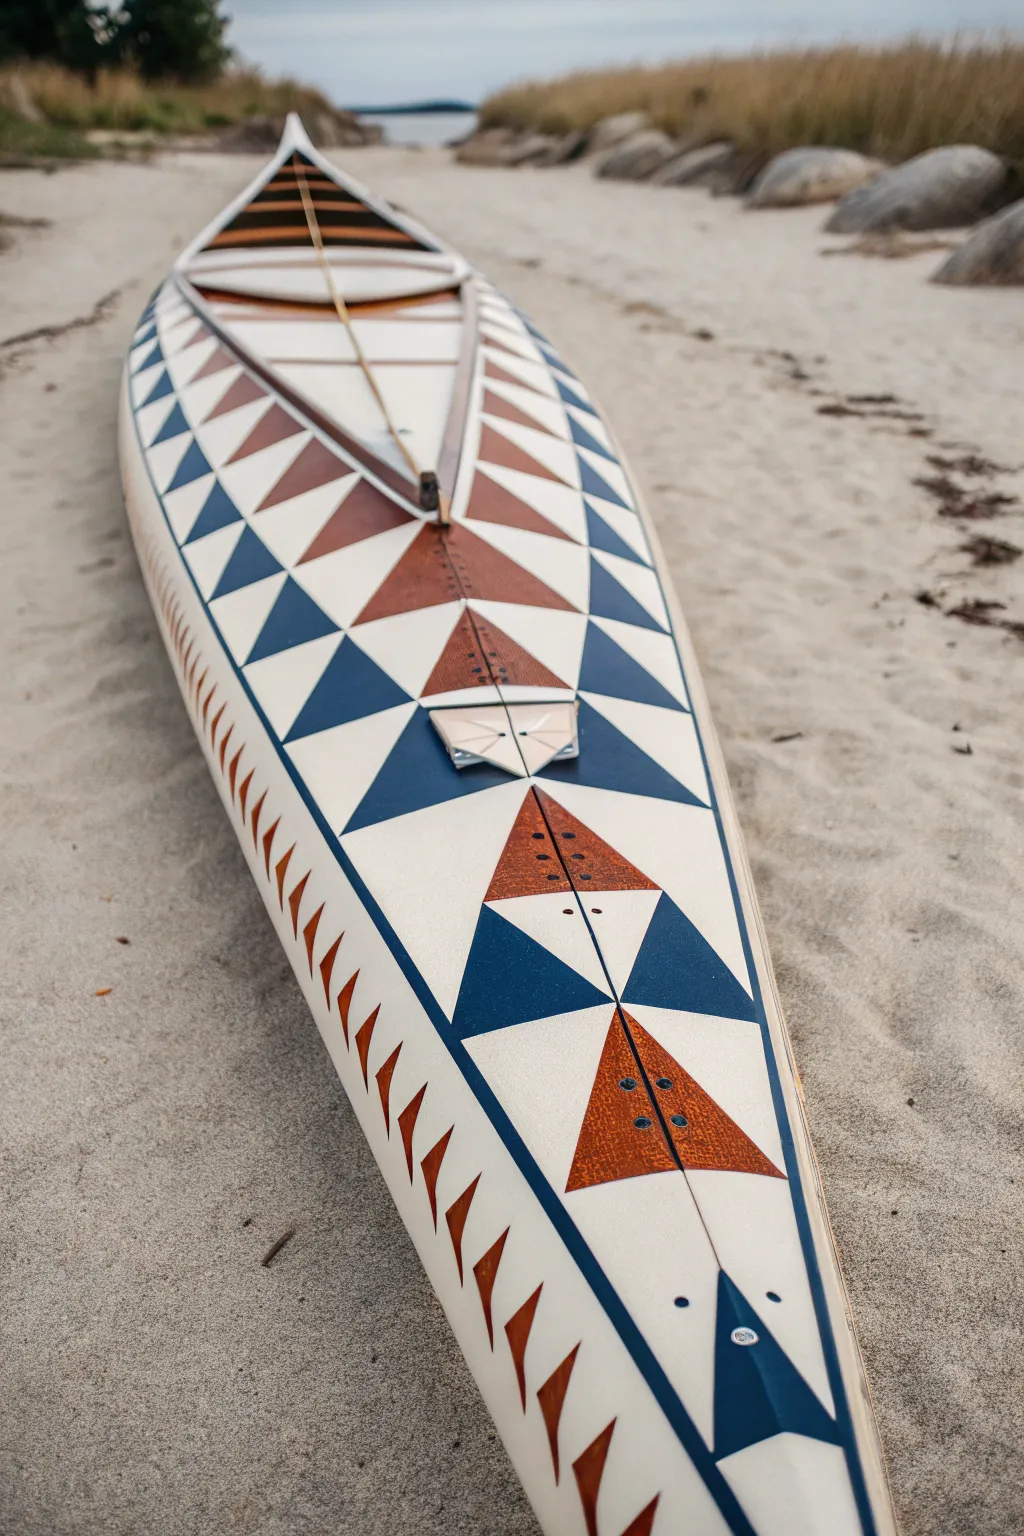
Transform a standard kayak into a stunning piece of functional art with this striking geometric design. Combining deep navy, rustic orange, and crisp cream, this pattern uses sharp triangles and repeating angles to create a look that feels both indigenous and modern.
Step-by-Step Tutorial
Materials
- Kayak (wooden deck or skin-on-frame preferred)
- Marine-grade paint (two-part polyurethane or high-quality enamel)
- Colors: Deep Navy Blue, Burnt Sienna/Rust, Cream/Off-White
- High-quality painter’s tape (various widths, specifically detail tape)
- Ruler or architectural scale
- Pencil and eraser
- Protractor or angle finder
- Sandpaper (220 and 400 grit)
- Tack cloth
- Foam rollers and high-quality synthetic angled brushes
- Clear marine varnish (optional topcoat)
Step 1: Surface Preparation & Base Coat
-
Clean and sand:
Begin by thoroughly cleaning the kayak’s surface to remove any grease, wax, or salt. Once dry, lightly sand the entire deck and hull area with 220-grit sandpaper to create a ‘tooth’ for the paint to adhere to. -
Wipe down:
Use a tack cloth to meticulously pick up every speck of dust. Any debris left behind will show through the paint and affect the crispness of your lines. -
Apply the base color:
Apply the Cream/Off-White paint as your base coat over the entire surface. This serves as the ‘grout’ lines between your colored triangles. Use a foam roller for a smooth finish and let it cure completely according to the manufacturer’s instructions—usually 24 hours. -
Second base coat:
Apply a second coat of the cream paint to ensure solid, opaque coverage. Sand lightly with 400-grit paper between coats if bumps appear.
Step 2: Mapping the Geometry
-
Find the centerline:
Using a flexible ruler, mark the exact centerline of the kayak’s deck from bow to cockpit. This line is crucial for symmetry. -
establish the grid:
Determine the height of your triangle rows. Mark horizontal reference lines across the deck at regular intervals (e.g., every 6-8 inches) perpendicular to the centerline. -
Draw the zig-zag:
Lightly pencil in a zig-zag pattern along the sides of the deck. I usually start at the cockpit and work my way forward to the bow to ensure the pattern terminates cleanly at the front. -
Detail the side trim:
Along the very edge of the gunwales (the side rails), sketch a smaller, repeating sawtooth pattern. These are the small reddish-brown triangles visible on the side of the hull in the reference image.
Tape Sealing Trick
To get laser-sharp lines on textured wood, paint a layer of clear matte medium over the tape edge before applying your color. It seals gaps without adding bulk.
Step 3: Taping and Painting
-
Tape the Navy sections:
Using high-quality detail tape, mask off the triangles distinct for the Deep Navy Blue color. Press the tape edges down firmly with your fingernail or a plastic card to prevent bleed-under. -
Seal the tape:
Brush a very thin layer of the base cream paint over the tape edges. This trick locks the edge; if any paint bleeds under, it will be the base color, rendering it invisible. -
Paint the Navy:
Apply the Navy paint to the exposed triangle sections. two thin coats are better than one thick coat to avoid ridges. -
Remove tape (Round 1):
Carefully peel back the tape while the paint is tacky (not fully dry) to ensure a razor-sharp edge. Let the Navy sections cure completely before moving on. -
Tape the Rust sections:
Once the Navy is hard-dry, mask off the alternate triangles for the Burnt Sienna/Rust color. Be extremely careful not to put tape on fresh paint if it hasn’t cured enough. -
Paint the Rust:
Apply the rust-colored marine paint to the central triangles and the small sawtooth details along the gunwales. -
Add circular details:
The image shows small black dots or circles within the rust triangles. You can create these using a small stencil or a circular foam dabber with black or dark navy paint once the rust color is dry. -
Remove tape (Round 2):
Remove the second round of tape carefully. Check for any minor imperfections and touch them up with a fine artist’s brush.
Metallic Accent
Mix a tiny amount of copper powder into the rust-colored paint or clear coat. It will catch the sunlight on the water and make the design pop.
Step 4: Finishing Touches
-
Cure time:
Allow the entire paint job to cure for several days. Marine paints often require longer cure times to reach maximum hardness. -
Clear coat (optional):
To protect your intricate work from paddle dings and UV rays, apply two coats of clear marine varnish over the entire deck. This unifies the sheen levels of the different paint colors. -
Re-install deck rigging:
Once fully cured, re-attach your deck lines, bungees, and toggles, being careful not to scratch your fresh geometric masterpiece.
Now you have a custom vessel that looks just as fast sitting on the sand as it does gliding through the water
BRUSH GUIDE
The Right Brush for Every Stroke
From clean lines to bold texture — master brush choice, stroke control, and essential techniques.
Explore the Full Guide
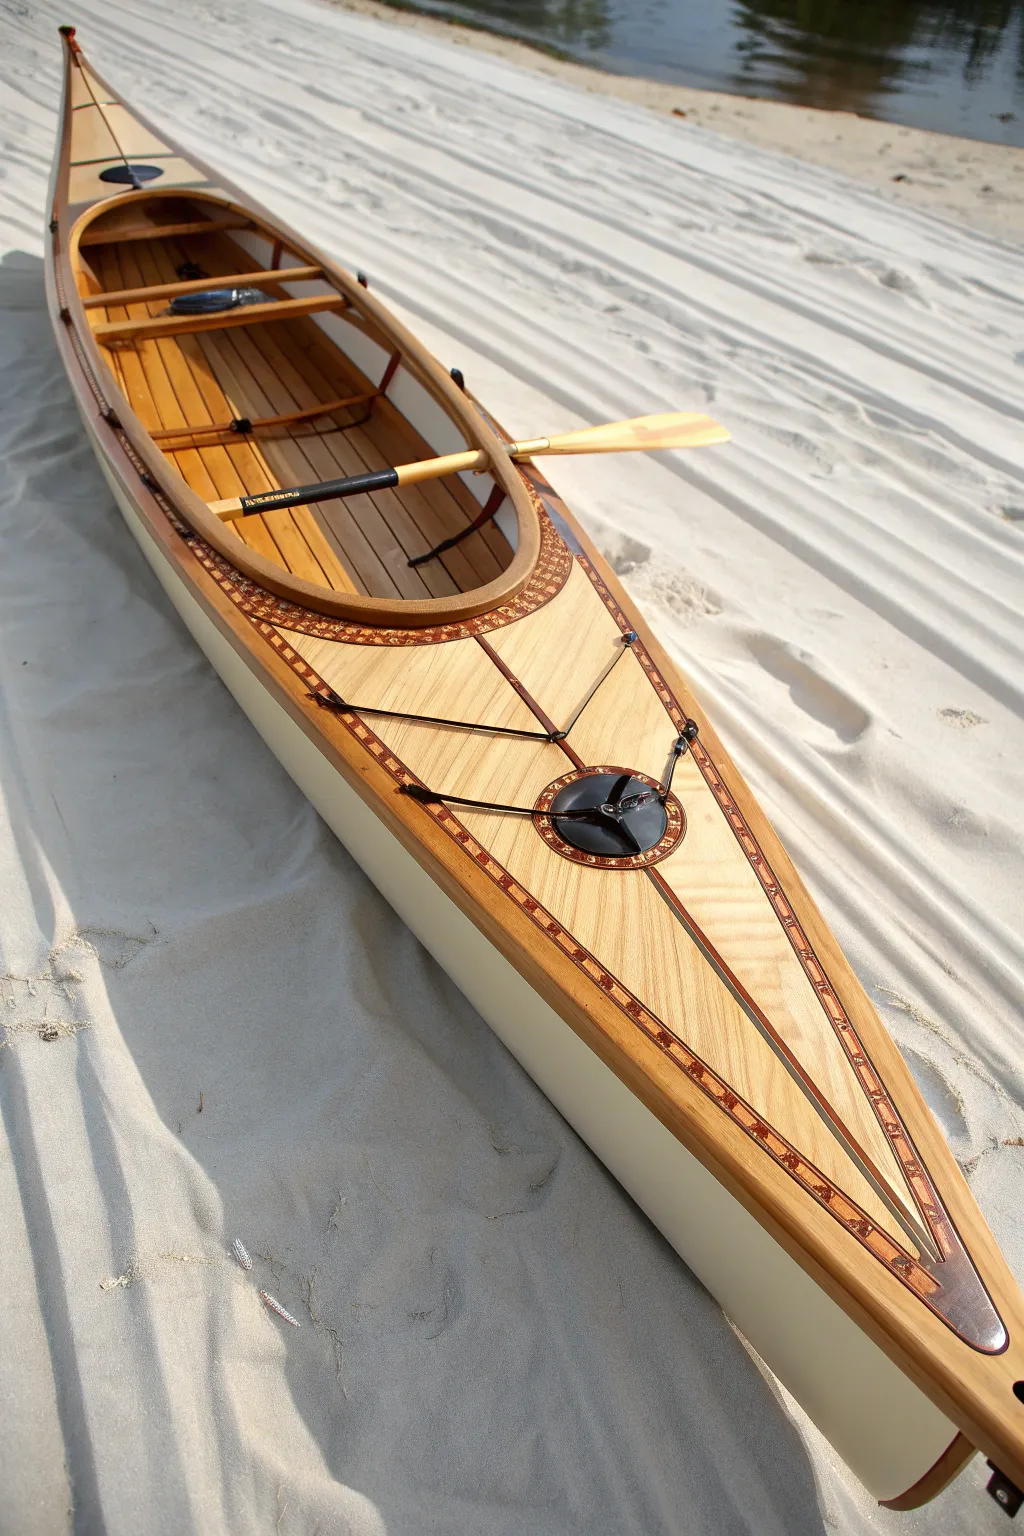
Two-Tone Color-Blocked Kayak Design
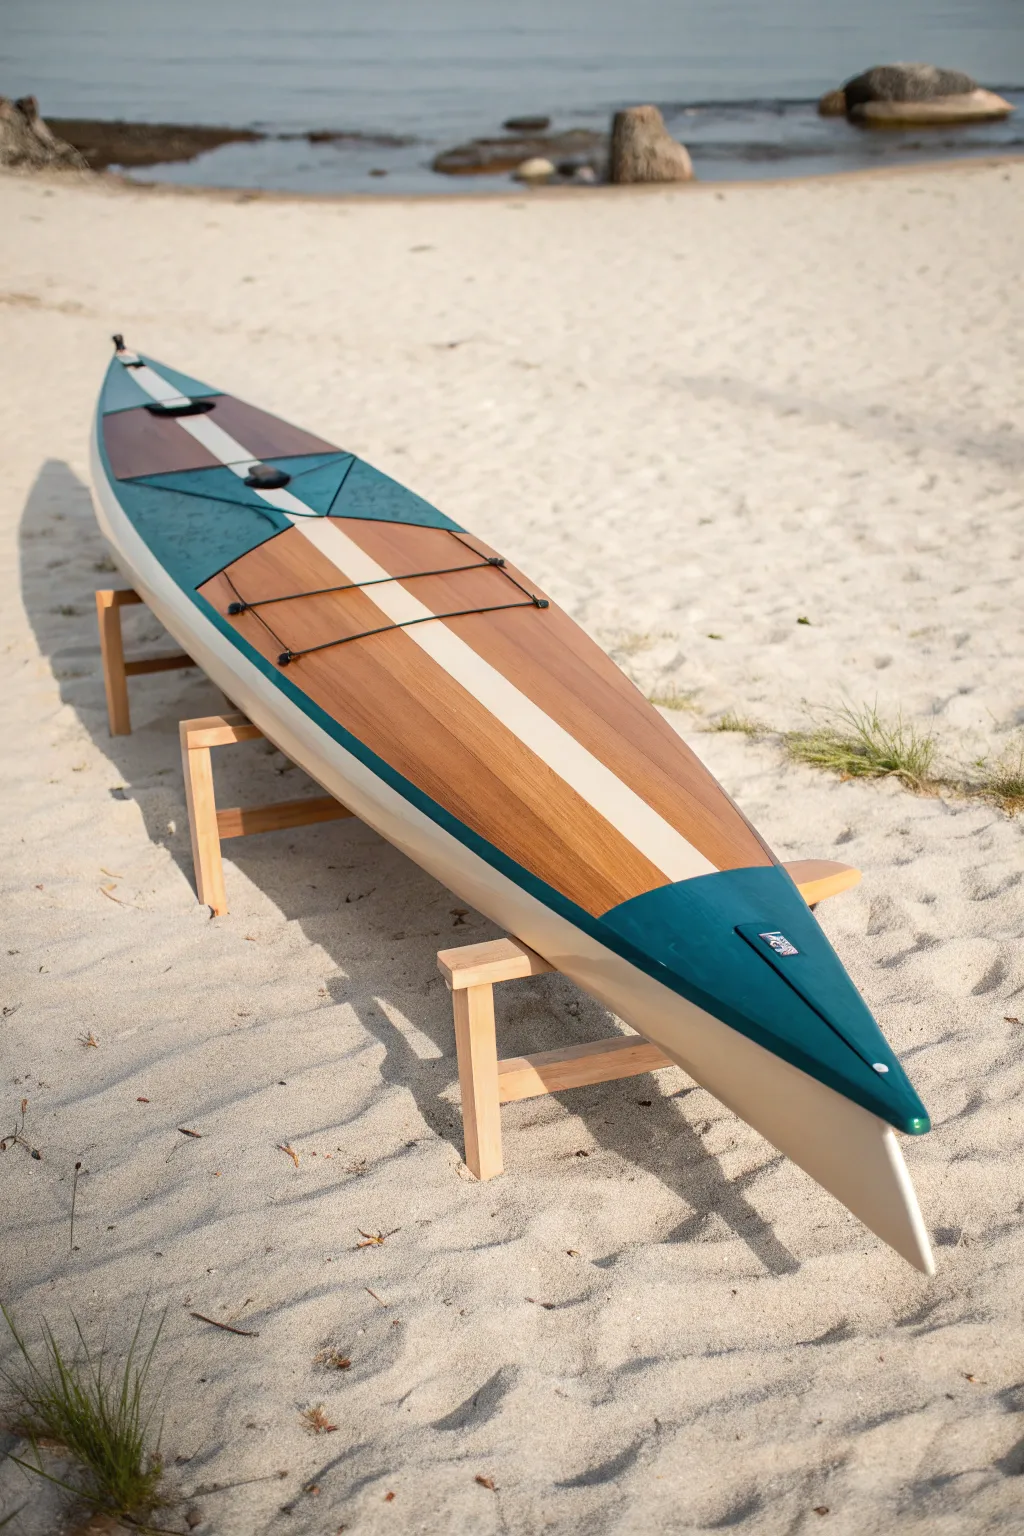
This elegant kayak design combines the natural warmth of wood grain with a striking, modem splash of deep teal and crisp white accents. The result is a sophisticated two-tone aesthetic that highlights the boat’s sleek lines while preserving its organic character.
Step-by-Step
Materials
- Marine-grade topside paint (Dark Teal/Turquoise)
- Marine-grade topside paint (Bright White)
- Marine-grade spar varnish (High Gloss)
- Fine-line masking tape (1/4 inch and 1 inch)
- Blue painter’s tape
- Sandpaper assortment (220, 320, 400 grit)
- Tack cloths
- High-density foam rollers (4 inch)
- Tipping brush (high-quality badger hair or synthetic)
- Epoxy resin (if starting from raw wood)
- Plastic drop cloths
- Pre-paint cleaner or solvent
Step 1: Surface Preparation
-
Establish the Base:
Begin with a fully glassed and sanded kayak hull. If your boat is raw wood, ensure the fiberglass cloth is completely wetted out with epoxy and cured. Sand the entire surface level with 220-grit sandpaper until it has a uniform, matte appearance. -
Clean Thoroughly:
Remove every speck of sanding dust. Vacuum the hull first, then wipe it down with a solvent-dampened rag or tack cloth. Any remaining dust will show up prominently under the varnish. -
Mark the Centerline:
Using a flexible tape measure and a pencil, lightly mark the exact center of the deck from bow to stern. This line is crucial for the symmetry of your racing stripe.
Tape Sealing Trick
Before painting your teal color, brush a tiny amount of clear varnish over the tape edge first. This seals the gap so any bleed-under is clear, keeping the colored line perfectly crisp.
Step 2: Natural Wood Varnish
-
First Coat Application:
Apply your first coat of marine spar varnish to the entire deck. Use the ‘roll and tip’ method: roll the varnish on with a foam roller in small sections, then immediately drag the tipping brush lightly over the wet surface to pop bubbles and smooth ridges. -
Build the Layers:
Allow the varnish to cure according to the manufacturer’s instructions. Sand lightly with 320-grit paper between coats. I like to build up at least 3-4 coats of varnish over the whole boat now, so the wood is fully sealed before we add color. -
Final Cure:
Let the final varnish coat cure for at least 48 hours to ensure it is hard enough to accept masking tape without peeling.
Step 3: Masking & Color Blocking
-
Tape the Center Stripe:
Apply fine-line tape for the central white stripe. The stripe in the image is about 3-4 inches wide. Run two parallel lines of tape down the length of the deck, using your pencil marks as a guide. -
Define the Teal Sections:
Map out the teal triangles at the bow and stern, and the geometric blocks near the cockpit. Use fine-line tape to create these sharp borders. Press the edges of the tape down firmly with your thumbnail to prevent paint bleed. -
Protect the Wood:
Use wider blue painter’s tape and plastic sheeting to cover *all* the areas that will remain natural wood. You don’t want accidental splatters on your fresh varnish. -
Scuff for Adhesion:
Gently scuff the exposed varnish areas (where the paint will go) with 320-grit sandpaper. This mechanical bond helps the paint stick to the glossy varnish.
Custom Inlays
Instead of a painted white stripe, consider using a lighter wood species like maple or ash during the initial strip-planking phase for a truly integrated structural design.
Step 4: Painting
-
Painting the White Stripe:
Apply the bright white marine paint to the center stripe area. Use a small foam roller for even coverage. It may take 2-3 thin coats to achieve full opacity over the darker wood tone. -
Applying the Teal:
Once the white is dry to the touch, apply the dark teal paint to the bow, stern, and side panels. Again, use Thin coats. Thick coats tend to sag and dry unevenly. -
Pulling the Tape:
This is the critical moment. Remove the masking tape slowly at a 45-degree angle while the final coat of paint is still slightly tacky (wet but not runny). This ensures a crisp, razor-sharp edge. -
Curing:
Allow the paint to fully cure for several days. Do not rush this; marine paints can take a week or more to reach full hardness.
Step 5: Final Touches
-
Refining the Edge:
If you have a noticeable ‘step’ or ridge where the paint meets the varnish, you can very carefully wet-sand the transition with 1000-grit paper to smooth it out. -
Hardware Installation:
Once the paint is rock hard, drill your holes and install the deck rigging, bungee cords, and hatch covers. Ensure you bed the hardware with a dab of silicone sealant. -
Final Polish:
Give the entire boat a wipe down with a marine polish or wax to verify the gloss level matches between the paint and varnish sections.
Now you have a stunning, distinctive vessel ready for paddling adventures on calm waters
Abstract Swirl Kayak Deck Finish
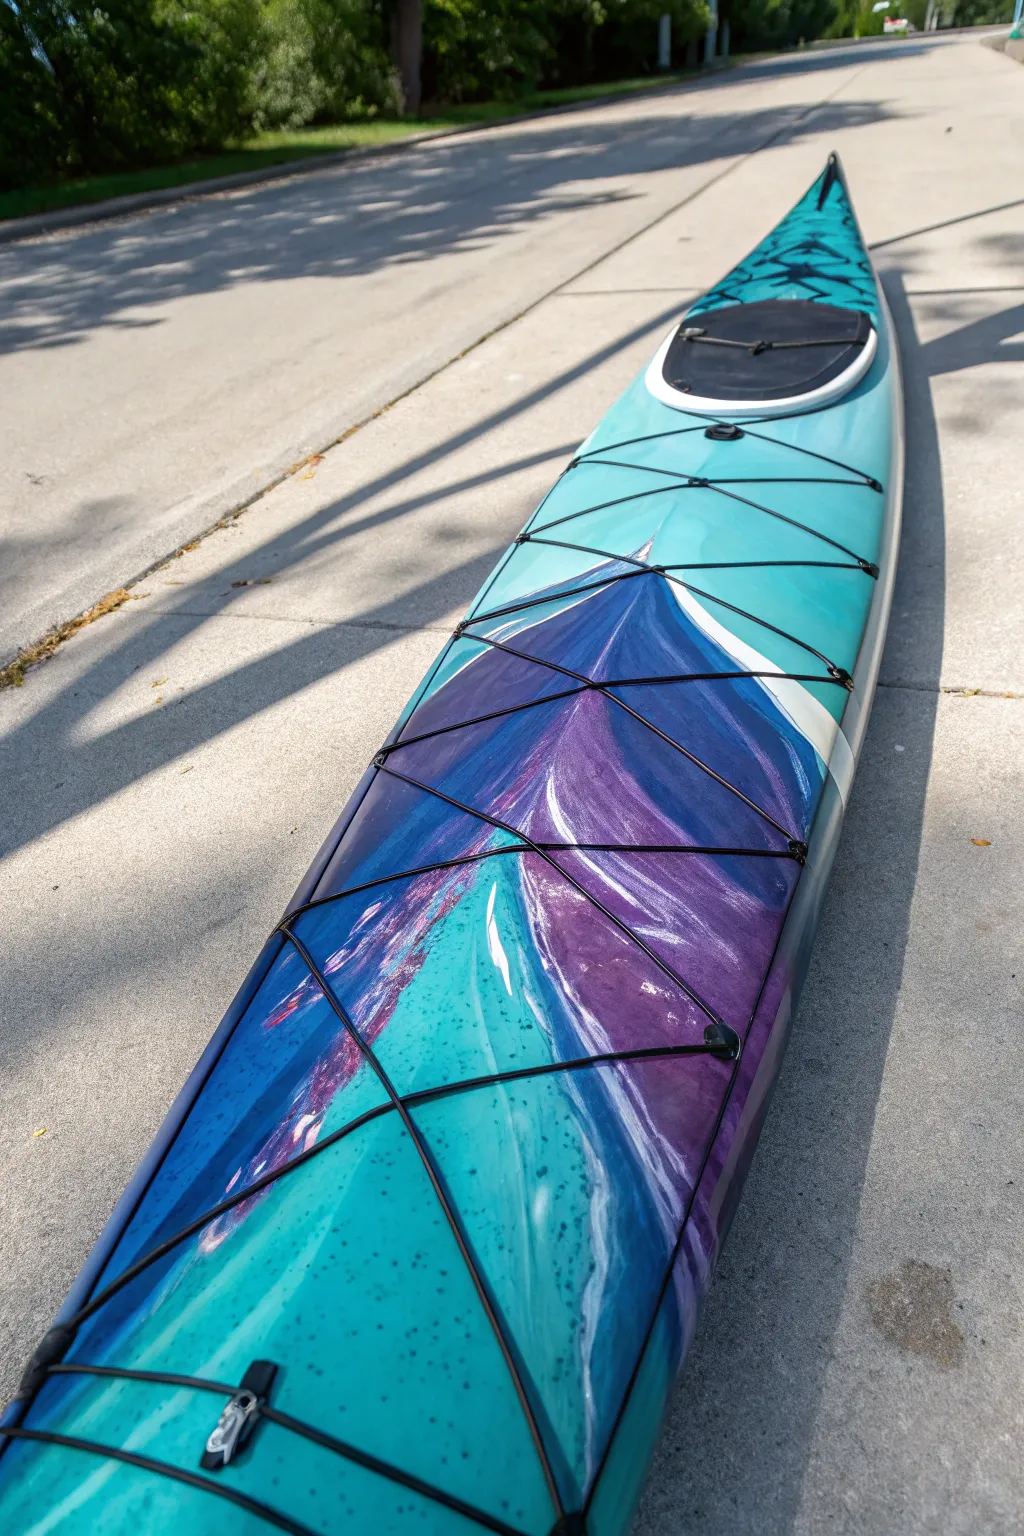
Transform your kayak into a moving piece of oceanic art with this vibrant abstract swirl finish. The design features sweeping currents of turquoise, teal, and deep indigo that mimic the movement of water, all sealed under a high-gloss protective coat.
Step-by-Step Guide
Materials
- Marine-grade sandpaper (120, 220, and 400 grit)
- Isopropyl alcohol or acetone
- Painter’s tape and masking plastic
- Marine-grade spray primer (white or light grey)
- High-quality spray paints (Teal, Turquoise, Deep Purple/Indigo, White)
- Plastic wrap or plastic grocery bags (for texture)
- 2K Clear Coat spray (Marine grade)
- Respirator mask
- Tack cloth
- Screwdriver or wrench (for rigging removal)
Step 1: Preparation & Masking
-
Remove hardware:
Begin by removing all deck rigging, bungee cords, handles, and pad eyes. Label sandwich bags for the hardware to keep everything organized for reassembly later. -
Clean surface:
Wash the entire kayak deck thoroughly with soap and water to remove salt, dirt, or grime. Dry completely. -
Sand the deck:
Scuff sand the area you intend to paint with 120-grit sandpaper. You aren’t trying to remove the old gel coat entirely, just creating a ‘tooth’ for the new paint to grip. Follow up with 220-grit for smoothness. -
Degrease:
Wipe the sanded area down with a tack cloth first, then use a rag soaked in isopropyl alcohol or acetone to remove any remaining dust and oils. -
Mask off areas:
Use painter’s tape to create a crisp line along the seam where the deck meets the hull. Cover the cockpit rim, hatches, and the entire bottom hull with masking plastic to protect from overspray.
Smoother Gradients
For a softer transition between the teal and purple without texture, spray the colors while they are both wet and hold the can further away to ‘mist’ them together.
Step 2: Creating the Base & Swirls
-
Apply primer:
Spray two thin coats of marine-grade primer. White is best as it makes the translucent swirl colors pop. Allow proper drying time between coats according to the can instructions. -
Base color application:
Spray your lightest color first—the teal or turquoise—covering the majority of the deck. Keep the can moving to avoid drips. -
Add secondary colors:
While the base is still slightly tacky but set, spray the deep purple/indigo in large, organic sweeping shapes. Focus these darker colors towards the sides or center to create depth. -
Create the swirl effect:
Immediately spray quick bursts of white and contrasting teal over the wet purple areas. This is where you have to work somewhat quickly. -
Plastic wrap technique:
Crumple a piece of plastic wrap or a plastic bag. Gently press it onto the wet paint and lift it off immediately. I find this creates those vein-like, organic water textures better than painting by hand. -
Layering details:
Repeat the plastic wrap blotting in random areas to blend the harsh edges between the purple and teal. If an area looks too dark, mist a little white over it and blot again. -
Dry thoroughly:
Allow the paint to cure completely for at least 24 hours. This is crucial before clear coating.
Step 3: Finishing & Reassembly
-
Light sanding:
Once fully cured, very lightly wet-sand the painted surface with 400-grit paper to knock down any high ridges from the textured paint. Wipe clean. -
Clear coat application:
Apply the 2K Clear Coat. This two-part spray hardens chemically and is essential for water durability. Apply 2-3 coats, waiting 10-15 minutes between each. -
Remove masking:
Carefully peel away the painter’s tape while the final clear coat is tacky (not fully dry) to ensure a clean edge without chipping. -
Final cure:
Let the kayak sit undisturbed for 48-72 hours to achieve full hardness before taking it near water. -
Re-rigging:
Reattach all your bungee cords, static lines, and deck fittings using the hardware you saved earlier. Consider replacing old bungee cord with black cord for a sharp contrast against the new paint.
Paint Reacting?
If the paint wrinkles or bubbles immediately, the layers are likely incompatible brands or the bottom layer wasn’t fully dry. Sand the area down to bare fiberglass and restart.
Now you have a stunning, custom craft ready to cut through the waves with style

PENCIL GUIDE
Understanding Pencil Grades from H to B
From first sketch to finished drawing — learn pencil grades, line control, and shading techniques.
Explore the Full Guide
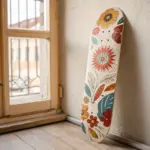
Reeds and Wildlife Kayak Mural
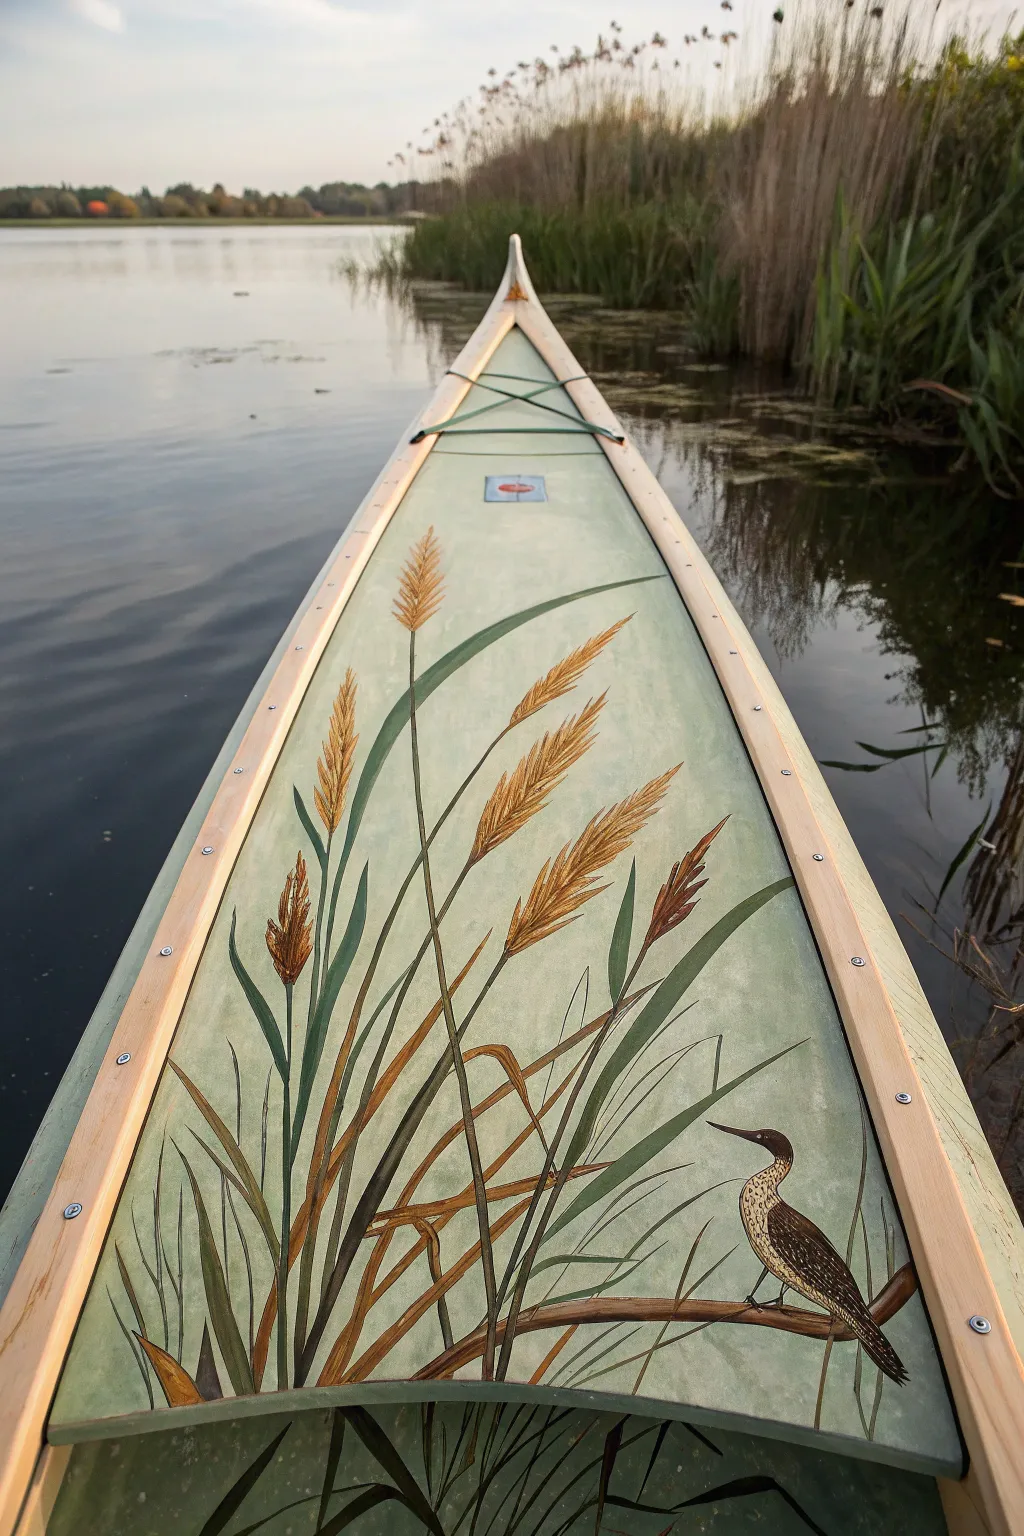
Transform your kayak’s deck into a floating masterpiece inspired by the very waters you paddle. This tutorial guides you through painting delicate reeds, swaying grasses, and a hidden wetland bird on a soft sage green background.
How-To Guide
Materials
- Marine-grade paint or acrylic artist paints (Heavy Body)
- Marine varnish or clear coat (UV resistant)
- Sandpaper (220 grit)
- Painter’s tape
- Pencil or chalk
- Soft sage green paint (Base coat)
- Acrylics: Burnt Umber, Yellow Ochre, Sap Green, Titanium White, Raw Sienna, Black
- Assorted brushes: 2-inch flat (for base), fine liner (0 or 00), small round (2 or 4), flat shader
- Palette or mixing plate
- Clean rag and water cup
Step 1: Preparation and Background
-
Clean and sand:
Begin by thoroughly cleaning the kayak deck to remove any wax, grease, or dirt. Lightly sand the area you intend to paint with 220-grit sandpaper to create a ‘key’ for the paint to adhere to, then wipe away all dust. -
Mask the edges:
Use high-quality painter’s tape to mask off the wooden gunwales, the cockpit rim, and any deck rigging hardware you can’t remove. Press the tape edges down firmly to prevent bleed-through. -
Mix the base color:
Create a soft, atmospheric background color by mixing white with a touch of Sap Green and a tiny drop of Black or Grey. Aim for a pale sage or celadon hue that mimics misty water. -
Apply the base coat:
Using the 2-inch flat brush, apply the sage green paint evenly across the deck panel. Use long, smooth strokes following the length of the kayak. Let this dry completely, then apply a second coat for full opacity.
Paint Flexibility
Add a fabric medium or flexible additive to your acrylics if painting on a skin-on-frame kayak. This prevents cracking when the fabric flexes.
Step 2: Drafting the Composition
-
Sketch the layout:
Once the base is bone-dry, lightly sketch your composition using a pencil or white chalk. Draw tall, sweeping curves for the main reed stems, originating from the cockpit area and reaching toward the bow. -
Position the bird:
Sketch the outline of the bird (a bittern or heron) in the lower right quadrant. I find it easiest to start with simple ovals for the body and head, connecting them with a curved neck before refining the beak and tail. -
Add secondary grasses:
Fill in the lower areas with shorter, crossing grassy shapes to create density at the ‘waterline’ of your mural.
Step 3: Painting the Flora
-
Paint the main stems:
Mix Sap Green with a little Burnt Umber for a brownish-green. Using a round brush, paint the long, thick stems of the cattails or reeds. vary the pressure: press down for the base and lift off as you reach the tip for a tapered effect. -
Add the seed heads:
For the fluffy tops of the reeds, mix Yellow Ochre and Raw Sienna. Use a flat shader brush and a stippling motion (dabbing straight down) to create a textured, fuzzy appearance. Taper them to a point at the top. -
Layering grass blades:
Using a liner brush and varying shades of green (some mixed with yellow for highlights, some with blue for shadows), paint thin, sharp blades of grass weaving through the main stems. -
Detailing the seed heads:
Once the seed heads are dry, take a fine brush with Burnt Umber and add tiny tick marks or dots on the shadowed side (usually the bottom left) to suggest volume and individual seeds. -
Adding dried leaves:
Mix Burnt Umber and White to get a tan color. Paint a few bending, broken, or dried leaves near the bottom of the composition to add realism and contrast against the green stems.
Level Up: Morning Dew
Use a liner brush and pure white paint to add tiny dots on the tips of the grass blades. Add a tiny shadow under each dot for 3D dew drops.
Step 4: Painting the Bird
-
Base coat the bird:
Fill in the bird’s sketch with a creamy mix of White and Yellow Ochre. Keep this layer flat and smooth. -
Feather texture:
Use a liner brush with dark brown paint (Burnt Umber + Black) to create the speckled pattern. Make small ‘U’ or ‘V’ shapes on the wings and back, becoming smaller and closer together near the neck. -
Facial features:
Carefully paint the beak using a dark grey or black. Add a small white dot in the eye to bring the bird to life with a reflection. -
The branch perch:
Paint the branch the bird is standing on with a mix of Burnt Umber and Raw Sienna. Add darker brown on the underside to create a cylindrical 3D form.
Step 5: Finishing Touches
-
Erase guidelines:
Check that all paint is fully cured, then gently erase any visible pencil marks. If you used chalk, a damp cloth will wipe it away. -
Sealing the work:
This is crucial for water durability. Apply at least two coats of UV-resistant marine varnish over the entire painted area. Allow ample drying time between coats according to the manufacturer’s instructions. -
Re-rigging:
Once the varnish has cured for several days, remove the painter’s tape and re-attach any deck bungees or rigging.
Enjoy paddling through the reeds with your artwork perfectly camouflaged against the natural beauty
Faux Wood Grain Kayak Accent
Transform a standard fiberglass or composite kayak into a classic wooden beauty without the weight or maintenance of real timber. By layering stains, glazes, and clever masking techniques, you can mimic the intricate marquetry and warm cedar planks of a traditional boat.
Detailed Instructions
Materials
- Fiberglass or composite sea kayak (clean and prepped)
- Marine-grade epoxy primer (light beige)
- Gel stain (honey oak and dark walnut)
- Artist acrylic paints (burnt sienna, raw umber, black)
- Assorted specialized brushes (fan brush, graining tool, liner brush)
- Fine-line tape (1/4 inch and 1/8 inch)
- Low-tack masking tape
- Marine-grade UV clear varnish (gloss)
- Sandpaper (220 to 600 grit)
- Tack cloth
- Pencil and flexible ruler
Step 1: Preparation and Base Coat
-
Surface Prep:
Begin by thoroughly cleaning the kayak deck with a degreaser to remove any wax or oils. Sand the entire deck area lightly with 220-grit sandpaper to create a mechanical key for the paint to adhere to. -
Apply Primer:
Apply two coats of marine-grade epoxy primer. Choose a light beige or cream color, as this will serve as the lightest tone in your wood grain simulation. Let it cure fully according to the manufacturer’s instructions. -
Initial Sanding:
Once the primer is rock hard, give it a very light scuff sand with 400-grit paper and wipe it down with a tack cloth to ensure a perfectly smooth canvas.
Step 2: Creating the Plank Effect
-
Mapping the Design:
Using a flexible ruler and a soft pencil, lightly sketch your plank lines directly onto the primed surface. Follow the natural curve of the kayak, tapering the lines toward the bow and stern just like real strips would. -
Masking the Seams:
Apply the 1/8 inch fine-line tape directly over your pencil marks. This tape will remain in place until the end to create the simulated ‘caulking’ lines between your faux wood strips. -
Base Grain Color:
Mix a glaze using clear acrylic medium and a honey oak gel stain. Brush this over the entire taped area in long, smooth strokes running parallel to the length of the kayak. -
Adding Texture:
While the glaze is still wet, gently drag a dry fan brush or a specialized graining tool through the paint. Wiggle the tool slightly at intervals to create organic-looking grain patterns and ‘cathedrals’ in the wood.
Bleeding Lines?
If paint bleeds under the tape, let it dry completely. Then, gently scrape the excess away with a sharp X-Acto knife or touch it up with a tiny dab of the base primer color.
Step 3: Detailing the Marquetry
-
Tape for Inlay:
Once the base grain is completely dry, mask off the outer rim of the cockpit and the perimeter rail where you want the intricate border design. Use the 1/4 inch tape to define the boundaries. -
Darkening the Border:
Paint the area between your new tape lines with a darker walnut gel stain. This creates the contrast needed for the inlay pattern to pop. -
Painting the Pattern:
Using a fine liner brush and slightly thinned acrylics (burnt sienna and black), hand-paint the small geometric motifs or ‘rope’ patterns over the dark border. I find steadying my hand on a bridge formed by my other arm helps with these tiny details. -
Highlighting Edges:
Add tiny dots or dashes of the original light beige primer color within the inlay pattern to simulate light catching the edge of inlaid wood pieces.
Pro Tip: Depth of Field
Vary the opacity of your initial wood stain slightly on different ‘planks.’ Real wood boats often have strips that vary in tone, and this subtle difference adds massive realism.
Step 4: Finishing Touches
-
The Reveal:
Carefully peel away all masking tape, including the original fine-line tape acting as plank seams. Pull the tape at a sharp angle away from the paint edge to ensure clean lines. -
Softening the Lines:
If the white seam lines look too stark, run a wash of very diluted raw umber over them to age the look and integrate the ‘planks’ together. -
Protective Clear Coat:
Apply the first coat of UV-resistant marine varnish. Use a high-quality foam brush to avoid bubbles. This layer seals your artwork and gives it depth. -
Sand and Repeat:
Lightly wet-sand the varnish with 600-grit paper once dry. Apply a second and third coat of varnish, sanding in between, until the surface looks deep and glossy like polished furniture.
With that final coat of gloss, your kayak will turn heads on the water, looking every bit the handcrafted masterpiece


Fish-Scale Stenciled Kayak Pattern
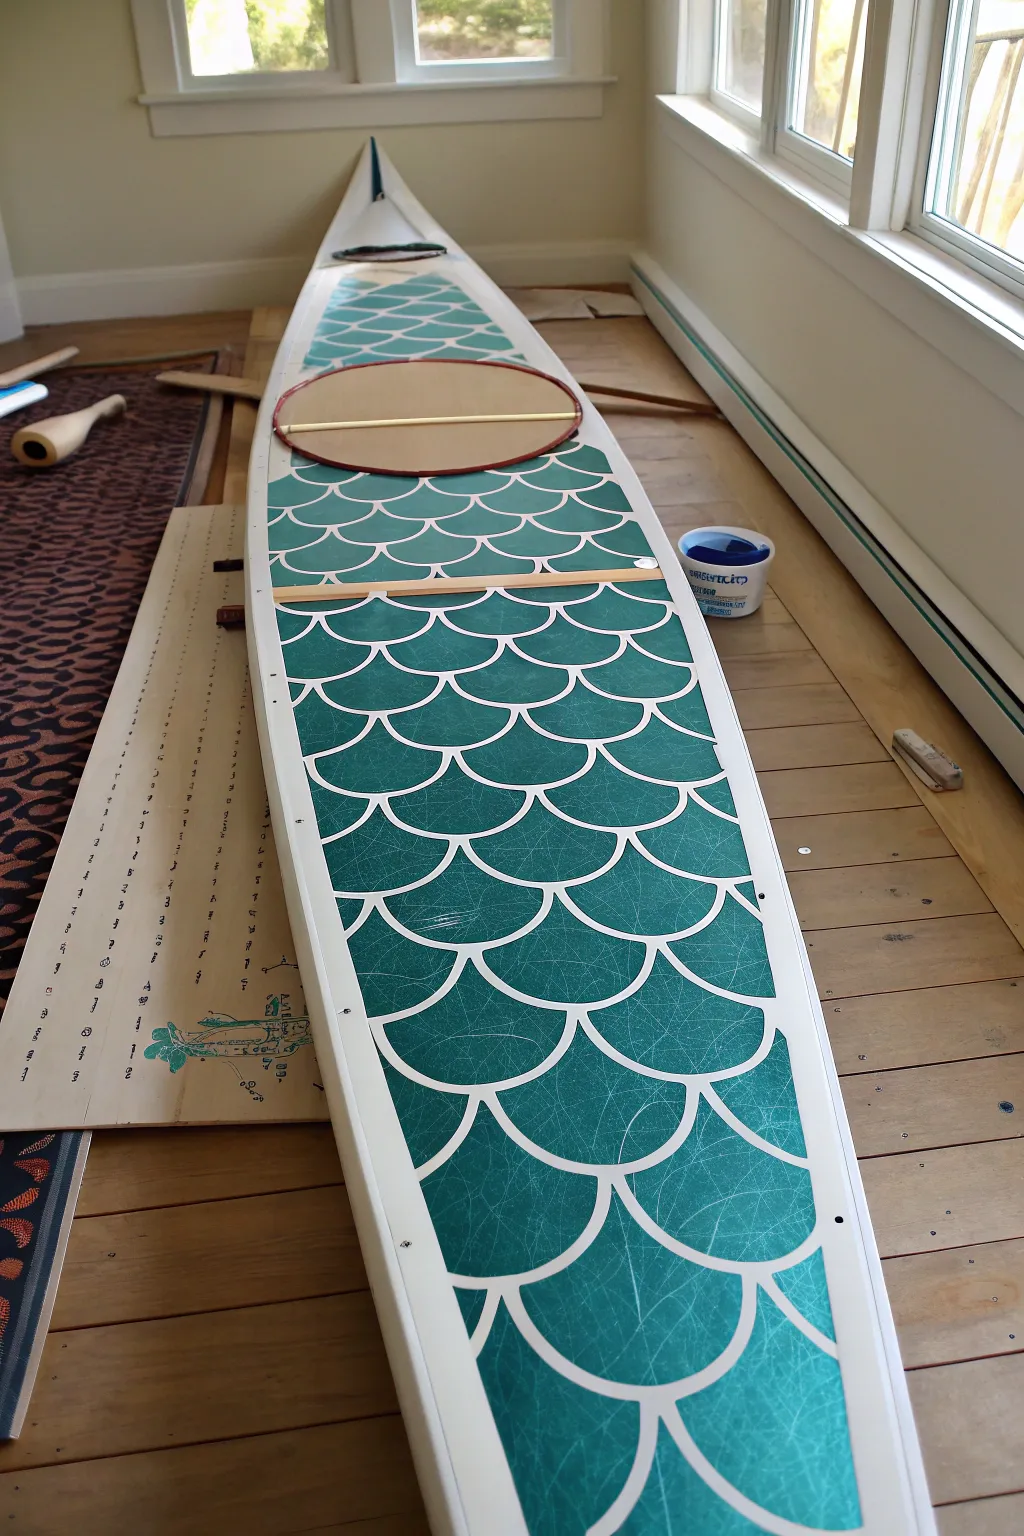
Transform your kayak’s deck into a shimmering aquatic masterpiece with this bold fish-scale design. Using a simple stencil technique and vibrant teal paint, you can give your boat a custom look that stands out on the water.
Detailed Instructions
Materials
- Kayak (skin-on-frame or hard shell)
- Teal marine-grade paint or polyurethane enamel
- White marine-grade paint (base coat)
- Adhesive vinyl sheets or stencil film
- Cutting mat and craft knife (X-Acto)
- Computer and printer (for template)
- Blue painter’s tape
- Paint roller with foam cover
- Small touch-up brush
- Sandpaper (fine grit)
- Tack cloth
- Clear marine varnish (optional topcoat)
Step 1: Prep & Base Coat
-
Clean the surface:
Begin by thoroughly cleaning the deck of your kayak. Remove any wax, grease, or dirt using a mild detergent and water, then rinse and dry completely. -
Light sanding:
Scuff the surface lightly with fine-grit sandpaper to help the paint adhere better. Wipe away all dust with a tack cloth. -
Masking off:
Apply blue painter’s tape to the gunwales, cockpit rim, and any deck fittings you want to protect. Ensure the tape edges are pressed down firmly to prevent bleed-under. -
Painting the base:
Roll on a coat of white marine-grade paint over the entire deck area. This will serve as the ‘grout’ lines between your scales. -
Second coat application:
Allow the first coat to dry fully according to the manufacturer’s instructions. Apply a second coat of white if necessary for full opacity and let it cure completely for at least 24 hours.
Clean Peel Pro Tip
Don’t wait for the top coat to cure 100% before removing the vinyl. Removing it while slightly tacky prevents the paint from chipping along the stencil edges.
Step 2: Stenciling & Scale Design
-
Create the scale template:
Design a scalloped fish-scale shape on your computer. Print this design onto cardstock to verify the size looks proportionate to your kayak’s width. -
Cut the stencils:
Transfer your design to adhesive vinyl sheets or stencil film. carefully cut out the scale shapes, leaving the outlines intact if you are using a negative stencil, or cutting individual scales if doing a positive mask. -
Plan the layout:
Find the center line of your kayak deck. I like to confirm this with a long straight edge or a string line from bow to cockpit. -
Apply the vinyl grid:
In this project, we are masking the white lines. Carefully apply thin strips of vinyl or tape cut into the scalloped shape to create the grid of white lines seen in the image. Alternatively, if you have a vinyl cutter, cut a large sheet of the ‘outline’ pattern and apply it. -
Check adhesion:
Run your finger or a burnishing tool over every edge of the vinyl mask. It is critical that the edges are sealed tight against the white base coat.
Step 3: Painting & Finishing
-
Applying the teal color:
Pour your teal marine paint into a tray. Load a foam roller lightly—you want thin, even coats rather than one thick, drippy one. -
Rolling the paint:
Roll the teal paint over the entire masked area. Work in sections, maintaining a wet edge to avoid lap marks. -
Texture technique:
Notice the subtle texture in the reference image? Achieve this ‘fibrous’ look by using a very dry roller for the final pass, or dab gently with a crumpled plastic bag while the paint is tacky. -
Drying time:
Let the teal paint dry until it is touch-dry but not fully cured. This usually takes about 1-2 hours depending on humidity. -
Peeling the reveal:
Carefully peel away the vinyl masking while the paint is still slightly flexible. Pull the tape at a sharp 45-degree angle to keep the lines crisp. -
Touch-ups:
Inspect the white lines. If any teal paint bled through, use a tiny brush and white paint to clean up the edges. -
Final cure:
Allow the paint to cure fully for several days before taking the kayak out on the water. Applying a clear UV-resistant varnish is a great idea to protect your hard work from scratches.
Level Up: Gradient Scales
Mix a slightly lighter and darker shade of teal. Randomly paint individual scales with these variations to create a shimmering, depth-filled 3D effect.
Once the paint has fully hardened, your custom kayak will be ready to slice through the waves with style
Topographic Map Line Kayak Art
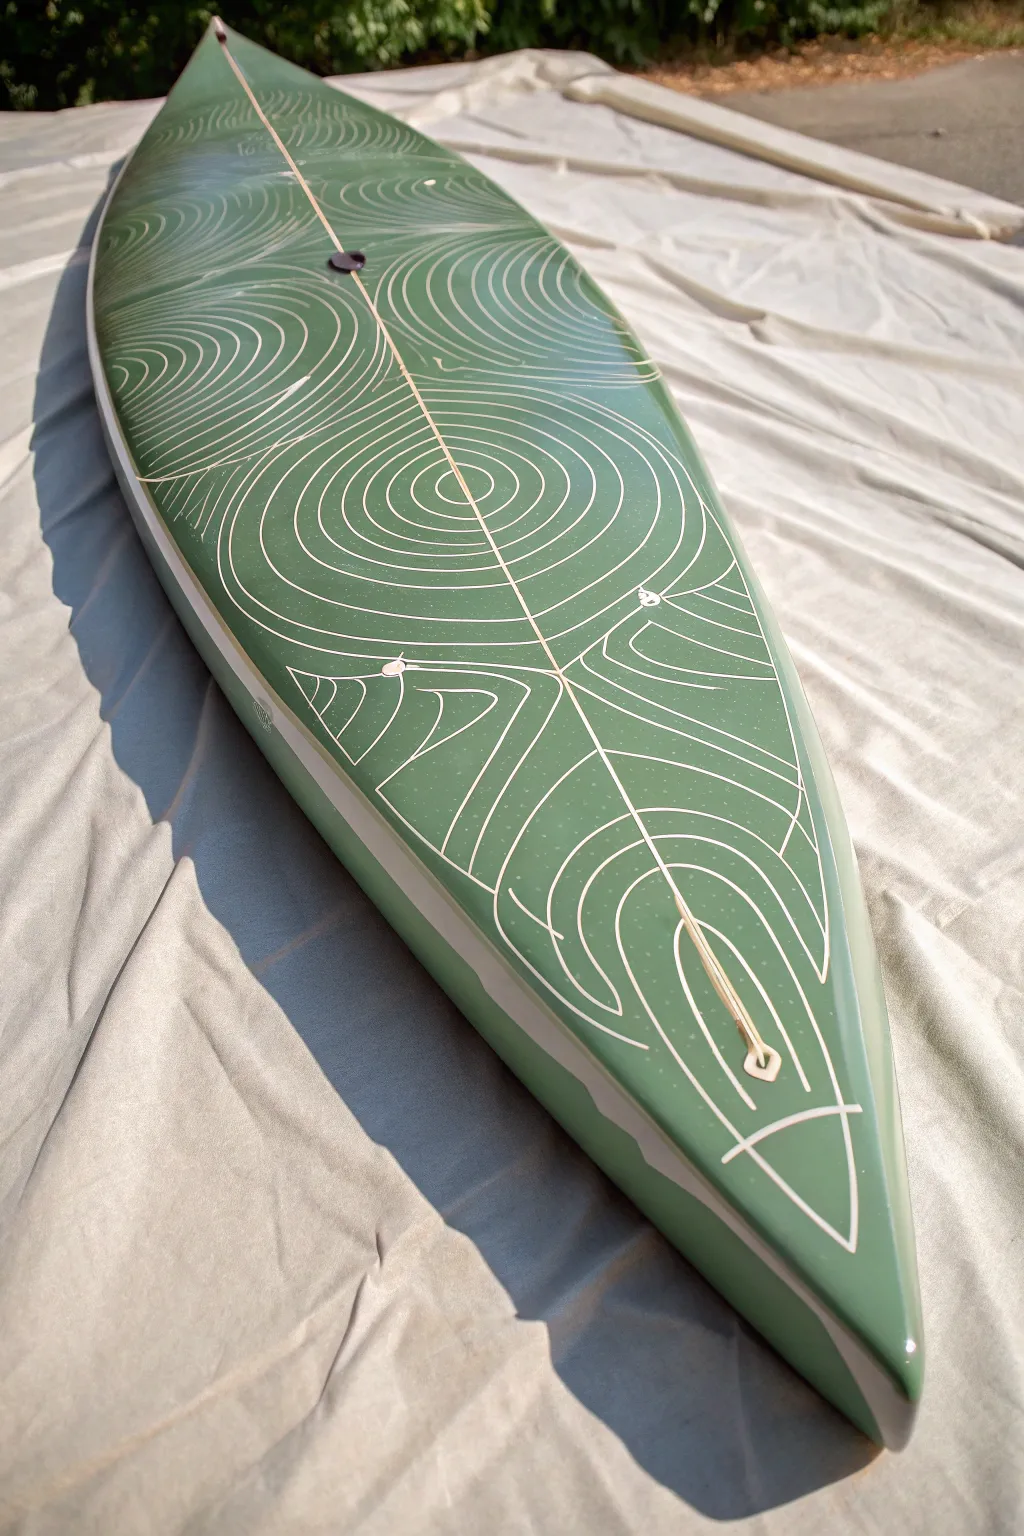
Transform your kayak’s deck into a rolling landscape with this sophisticated topographic line design. Using a muted green base and crisp white linework, this project creates a mesmerizing, rhythmic pattern that mimics elevation maps or ripples on the water.
Step-by-Step Guide
Materials
- Marine-grade paint (Sage Green or Olive)
- White marine-grade pinstriping paint or high-quality paint marker (oil-based)
- Sandpaper (220 and 400 grit)
- Painter’s tape
- Degreaser or acetone
- Flexible ruler or sewing measuring tape
- Chalk pencil or white charcoal pencil
- Fine-tip detail brush (size 0 or 1)
- Clear marine varnish (optional)
- Tack cloth
Step 1: Preparation & Base Coat
-
Clean the surface:
Start by thoroughly washing the kayak deck with soap and water to remove any dirt or grime. Once dry, wipe it down with a degreaser or acetone to remove any invisible oils or wax residues that could prevent paint adhesion. -
Sand for grip:
Lightly sand the entire area you plan to paint using 220-grit sandpaper. You aren’t trying to strip the hull, just scuffing the surface enough to give the new paint a mechanical bond. -
Remove dust:
Wipe away all sanding dust with a tack cloth. This step is crucial for a smooth finish—any leftover particles will show up as bumps under your paint. -
Apply the green base:
Apply your sage green marine paint evenly across the deck. Use long, smooth strokes if brushing, or consistent passes if spraying. Let this first coat dry completely according to the manufacturer’s instructions. -
Second coat:
Lightly sand with 400-grit paper, wipe clean, and apply a second coat for full opacity and depth. Allow this to cure fully—often 24 to 48 hours—before attempting any detail work.
Step 2: Mapping the Design
-
Mark the center line:
Find the exact center running lengthwise down the kayak. Use a flexible measuring tape and your chalk pencil to draw a faint guide line from bow to stern. This ensures your topographic circles stay symmetrical. -
Establish focal points:
Decide where your ‘peaks’ or the centers of your concentric circles will be. In the image, there are three distinct zones. Mark a dot on the center line for each of these apex points. -
Draft the contours:
Using the chalk pencil, freehand sketch the concentric rings around your focal points. Don’t worry about perfect circles; a slightly organic, wobbly quality actually makes it look more like a real map. -
Connect the zones:
Draw the lines where the circular patterns meet. These should curve gently away from the center line, creating a ‘saddle’ effect between the peaks. I usually sketch these connecting lines lightly first to check the flow. -
Add detail lines:
Fill in the remaining negative space with parallel curves that echo the main shapes. Maintain roughly consistent spacing between lines, but allow them to pinch and widen slightly to enhance the 3D effect.
Wobbly Lines?
Steady your hand by resting your pinky finger on a dry part of the kayak while you paint. Like a kickstand, it stabilizes your brush strokes significantly.
Step 3: Painting the Lines
-
Load your brush or pen:
If using a paint marker, shake it well and press the tip to get flow. If using a brush and pinstriping paint, load your fine-tip brush so it’s saturated but not dripping. -
Paint the center line:
Start by painting the long, straight center line. This anchors the whole design. You can use a long strip of painter’s tape as a guide edge if your hand isn’t perfectly steady. -
Trace the contours:
Begin tracing your chalk lines with the white paint. Work from the center of each ‘peak’ outward. This helps prevent you from smudging wet paint with your hand as you expand the pattern. -
Manage line weight:
Try to keep your pressure consistent. The beauty of this design relies on relatively uniform line thickness, similar to a printed map. -
Clean up errors:
If you wobble, quickly wipe it with a damp rag (or a q-tip dipped in solvent) before it sets. It’s much easier to fix wet paint than scrape off dry mistakes. -
Final curing:
Once all lines are painted, let the kayak sit in a dust-free area for the full cure time recommended by your paint brand. This ensures the lines harden enough to withstand paddle drips. -
Optional clear coat:
For extra durability against scrapes, apply a layer of clear marine varnish over the entire design once fully cured.
Add Elevation Depth
Make every 5th line slightly thicker than the others. Maps do this to mark specific elevation intervals, and it adds great visual rhythm.
Now you have a stunning, navigation-inspired vessel ready for your next adventure
Patchwork Panel Kayak Paint Layout
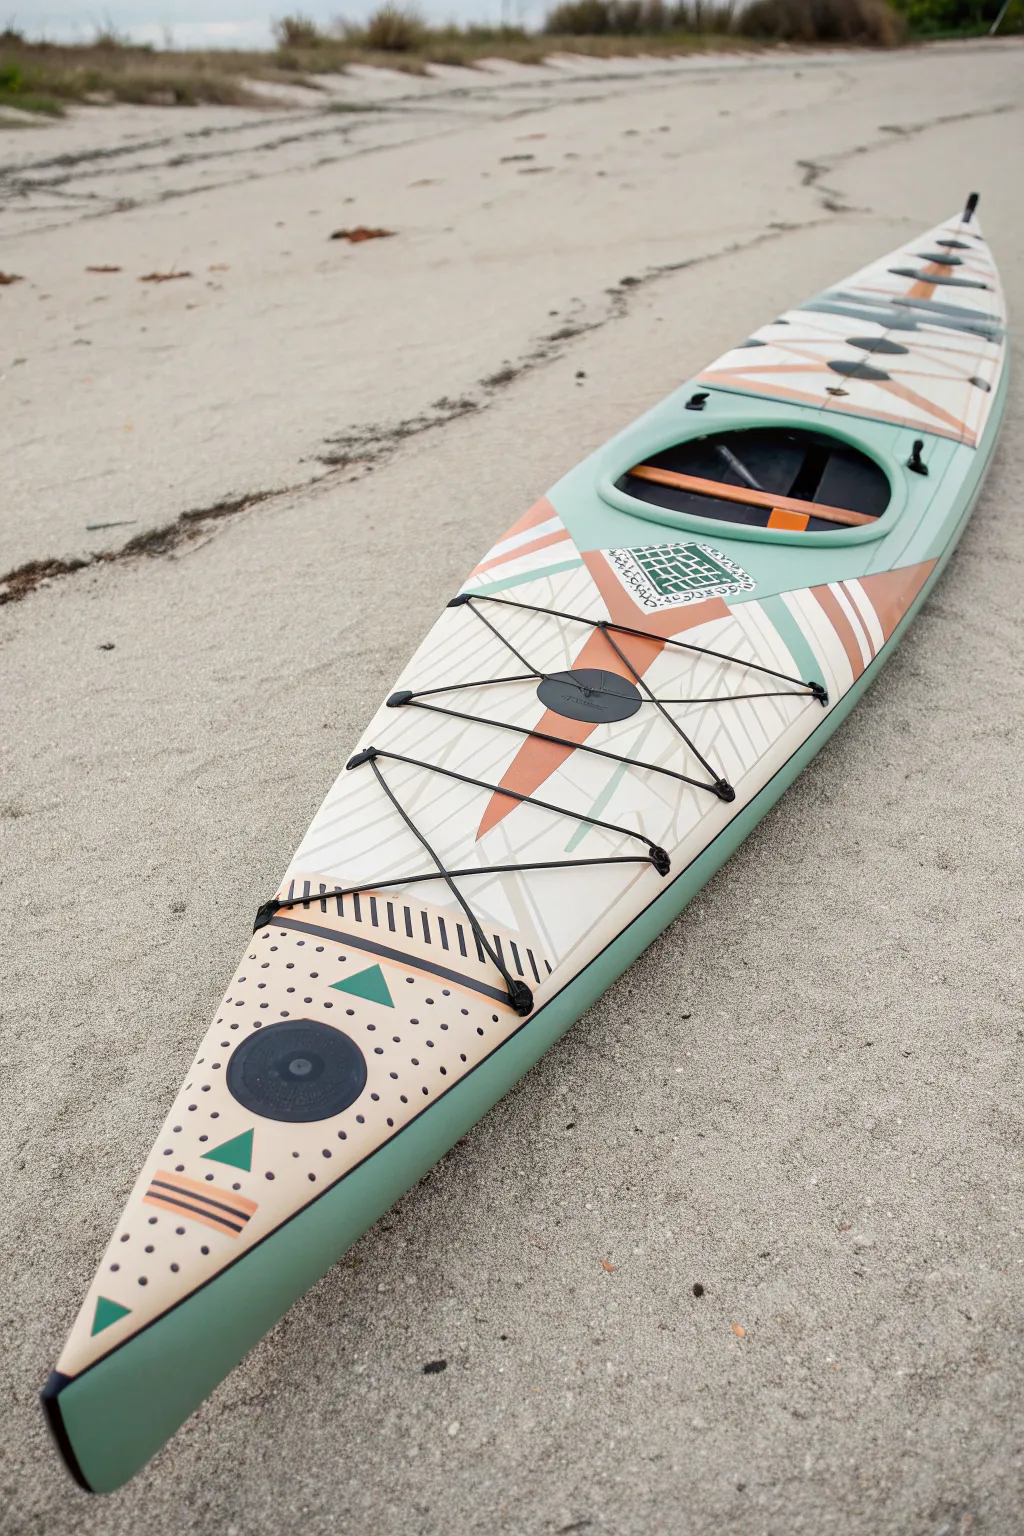
Transform a plain kayak into a floating work of art with this intricate geometric design. Featuring a soothing palette of mint green, cream, and terracotta, this patchwork style uses crisp lines and patterned details to create a modern, bohemian look.
Step-by-Step
Materials
- Fiberglass or plastic kayak (clean and dry)
- Marine-grade paint or high-quality spray paint (Mint Green, Cream, Terracotta/Rust, Black)
- Marine-grade clear coat sealer (spray or brush-on)
- Sandpaper (120 and 220 grit)
- Acetone or alcohol wipes
- Painter’s tape (various widths: 1/4 inch, 1 inch, 2 inch)
- Graphite pencil
- Ruler or long flexible straightedge
- Small craft brushes for details
- Foam rollers (4-inch)
Step 1: Preparation and Base Coat
-
Sand the surface:
Begin by thoroughly sanding the top deck of the kayak. If the kayak has a glossy finish, scuff it up using 120-grit sandpaper to ensure the paint adheres properly. Follow up with 220-grit for a smoother finish. -
Clean the hull:
Wipe down the entire sanded area with acetone or alcohol wipes. This removes all dust, oils, and residue, creating a pristine surface for painting. Allow it to dry completely. -
Tape off hardware:
Carefully apply painter’s tape to the cockpit rim, handles, bungee cords (if not removing them), and any deck fittings you want to keep paint-free. It’s often easier to remove the bungees entirely and reinstall them later. -
Apply the background color:
Roll or spray two coats of the mint green paint over the entire top deck. This serves as your canvas and the border color. Let the first coat dry fully before applying the second.
Sticky Situation
Use ‘delicate surface’ painter’s tape for the second and third layers of masking. Standard tape might peel up your fresh base coats if they haven’t cured for several days.
Step 2: Mapping the Geometric Design
-
Create the central panel:
Using a flexible straightedge and a light pencil, draw a long, tapered panel shape down the center of the foredeck. Leave about a 2-inch border of the exposed mint green paint along the edges. -
Section the panel:
Divide your central panel into varied geometric sections using pencil lines. Think in terms of triangles, trapezoids, and bands. Reference the photo to mimic the ‘patchwork’ layout. -
Tape the first color blocks:
Apply painter’s tape along your pencil lines to isolate the areas that will be Cream or Terracotta. Press the edges of the tape down firmly with your thumbnail to prevent paint bleed. -
Paint the cream sections:
Apply the Cream paint to the large designated blocks. You may need 2-3 thin coats for solid coverage. Peel the tape while the paint is slightly tacky to get the crispest lines.
Add Texture
For the ‘dot’ patterns on the nose, try using the flat end of a drill bit or a pencil eraser stamped into paint. It creates perfectly uniform circles much faster than a brush.
Step 3: Layering Patterns and Details
-
Add terracotta accents:
Once the cream sections are fully dry, re-tape to isolate the Terracotta areas (the stripes, triangles, and angled blocks). Paint these sections carefully. -
Create the nose pattern:
At the very front (bow), map out a triangular section. Use a small detail brush or a stencil to add the repeating pattern of small black dots and the larger green triangles over a cream background. -
Paint the fine stripes:
For the section with thin black vertical stripes, use 1/4-inch tape to mask off even intervals. Paint the exposed slits black. I like to use a very dry brush here to avoid seepage under the tape. -
Add the cross-hatch detail:
Locate the square patch near the cockpit. Paint a dark green or black background square first. Once dry, use a fine liner brush and white or mint paint to freehand the loose grid or ‘netting’ pattern inside it. -
Draw the ‘map lines’:
On the large cream sections, use a very fine brush or a black paint pen to draw faint, intersecting geometric lines. These should look like abstract map lines or cracks, adding texture to the white space.
Step 4: Finishing Touches
-
Detail the perimeter:
Check the border where the central panel meets the mint green base. If the line is messy, use a steady hand and a liner brush to paint a thin black outline to separate the zones clearly. -
Hardware accenting:
If your deck fittings (like the compass mount or hatch covers) look faded, give them a fresh coat of matte black paint to contrast sharply with the pastel design. -
Seal the artwork:
This is crucial for longevity. Apply 2-3 coats of a high-quality marine-grade clear coat over the entire painted area. This protects your hard work from saltwater, UV rays, and paddle scrapes. -
Reassemble:
Wait at least 24-48 hours for the clear coat to cure hard. Re-string your black bungee cords, which will create a bold, functional geometric overlay on your new design.
Now your kayak is ready to cut through the water with a truly unique style
Pattern Under Clear Coat Kayak Look
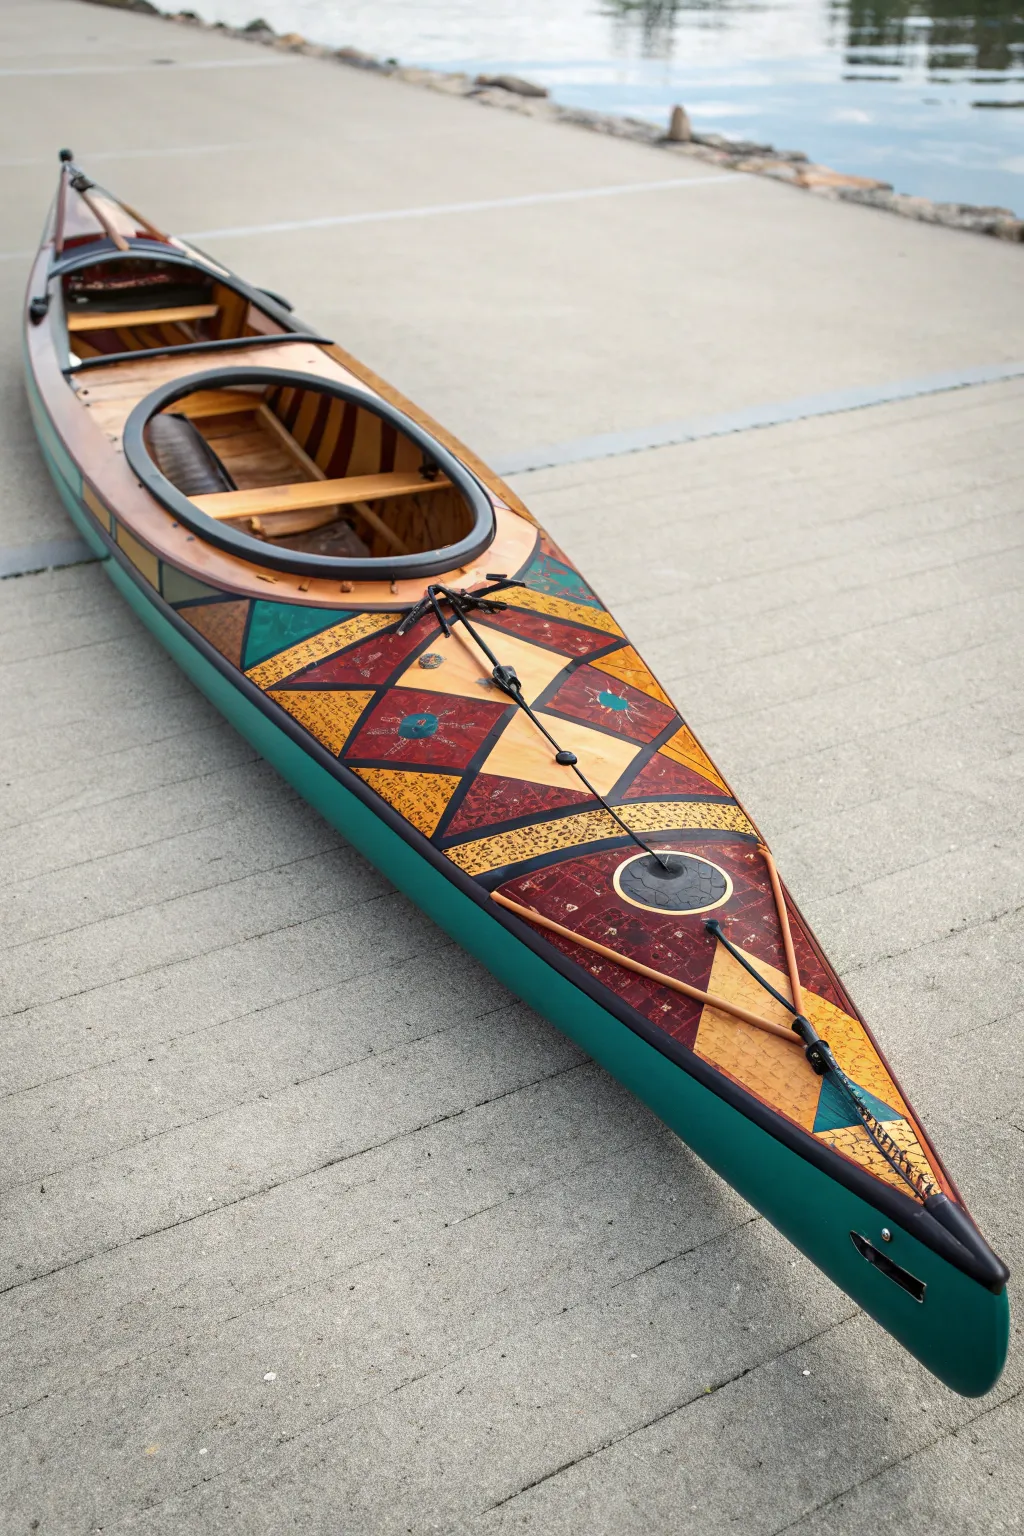
Transform a standard kayak deck into a stunning work of art using geometric patterns that mimic intricate wood marquetry. This project layers rich colors and textures under a glossy clear coat, creating a finish that looks like handcrafted inlay work.
Step-by-Step Guide
Materials
- Kayak (wooden or composite surface prepared for painting)
- Sanding block and sandpaper (220, 320, and 400 grit)
- High-quality painter’s tape (various widths, including thin detail tape)
- Acrylic or marine-grade polyurethane paints (Deep Red, Mustard Yellow, Teal, Black)
- Texturing tools (sponges, crumpled plastic wrap, or mottling brushes)
- Gold or metallic paint for accents
- Compass and ruler
- Graphite transfer paper
- Marine-grade clear coat (epoxy or varnish)
- Foam brushes and fine detail brushes
- Tack cloth
Step 1: Surface Preparation & Design
-
Prepare the substrate:
Begin by ensuring the kayak deck is impeccably smooth. Sand the entire surface with 220-grit sandpaper to create a mechanical bond for the paint. Wipe it down thoroughly with a tack cloth to remove every speck of dust. -
Map out the centerline:
Find the exact center line of the kayak’s foredeck running from the cockpit to the bow. Use a flexible ruler and a light pencil to mark this line, as it will be the anchor for your symmetry. -
Draft the master grid:
Sketch your geometric design on paper first to establish the repeating triangle and diamond motifs. Once happy, transfer key intersection points onto the kayak deck using graphite paper or light pencil marks, measuring carefully to keep things symmetrical. -
Tape the primary lines:
Apply thin painter’s tape along the major dividing lines of your design. These taped lines will eventually become the ‘grout lines’ or separating borders between your colored sections. Make sure to press the edges down firmly to prevent bleed.
Tape Removal Timing
Pull the masking tape off while the paint is still slightly tacky, not fully dry. This prevents the dried paint skin from tearing or lifting at the edges.
Step 2: Applying Color and Texture
-
Base coat the yellow sections:
Identify the triangular sections that will be yellow. Apply a base coat of mustard yellow paint. Don’t worry about perfect opacity yet; we are building layers. -
Add texture to yellow zones:
While the second coat of yellow is wet, dab it gently with a crumpled piece of plastic wrap or a dry sponge. This mottling effect simulates wood grain or stone texture rather than flat plastic. -
Paint the deep red fields:
Move to the diamond shapes and larger color blocks. Paint them a deep, rich oxide red. I find that using a slightly thinned paint here allows for natural variations that look more characterful. -
Create the faux-inlay texture:
On the red sections, use a fine detail brush or a sponge with lighter red or orange paint to create subtle marbling or ‘burl’ effects. This depth distinguishes a high-end look from a simple stencil. -
Incorporate teal accents:
Identify the small corner triangles and circular accents in your design. Fill these with a deep teal color. This cool tone provides a necessary contrast to the warm reds and yellows. -
Add detail motifs:
Using your finest brush, paint the small sun-like starbursts or script-like patterns inside the larger color blocks. Gold or black paint works well here to make these tiny details pop. -
Paint the dividing borders:
Once all block colors are dry, carefully remove the masking tape. You will see the unpainted lines between shapes. Carefully paint these lines black (or a dark wood tone) to simulate the separation between inlaid pieces.
Step 3: Finishing and Sealing
-
Dry and cure:
Allow the paint to cure fully for at least 24 to 48 hours. The paint must be completely hard before you apply any clear coat over it. -
Light sanding:
Very gently pass over the painted surface with 320 or 400-grit sandpaper to knock down any high ridges where tape lines were, aiming for a consistent level without sanding through the color. -
Wipe clean:
Use a tack cloth again to remove sanding dust. Any dust left now will be permanent under the clear coat. -
Apply the seal coat:
Protect your artwork with a marine-grade clear coat. Whether using epoxy or varnish, apply a thin, even coat. Work from the center out to avoid pooling at the edges. -
Build the gloss:
Apply 2-3 additional coats of clear finish, lightly sanding with fine grit between coats if the manufacturer instructions recommend it. This builds that deep ‘lens’ effect that magnifies the pattern underneath.
Level Up: Gold Leaf
Instead of metallic paint, use real gold leaf for the small starburst accents before the clear coat. It catches the sunlight beautifully on the water.
Now you have a fully customized vessel ready to turn heads on your next paddle.


Have a question or want to share your own experience? I'd love to hear from you in the comments below!