
There’s something about a pumpkin patch that just begs to be painted—the color, the cozy chaos, the little story happening in every cluster of gourds. Here are my favorite pumpkin patch painting ideas to help you capture that autumn magic, whether you want simple and bold or a little more “wow.”
Classic Pumpkin Patch Landscape
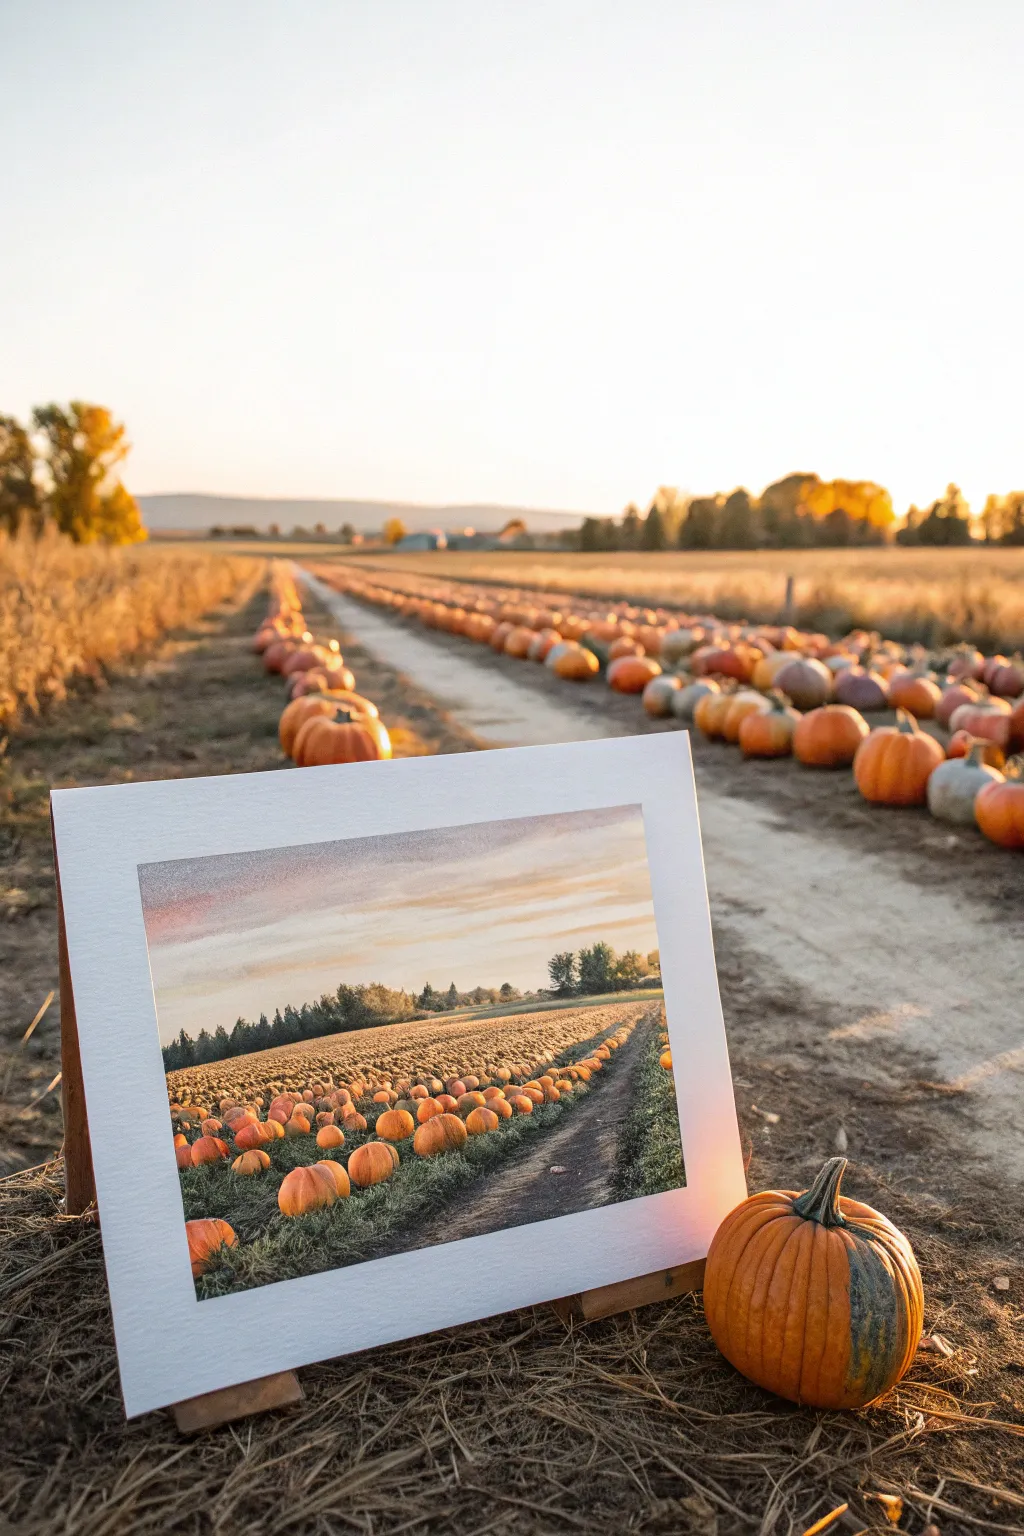
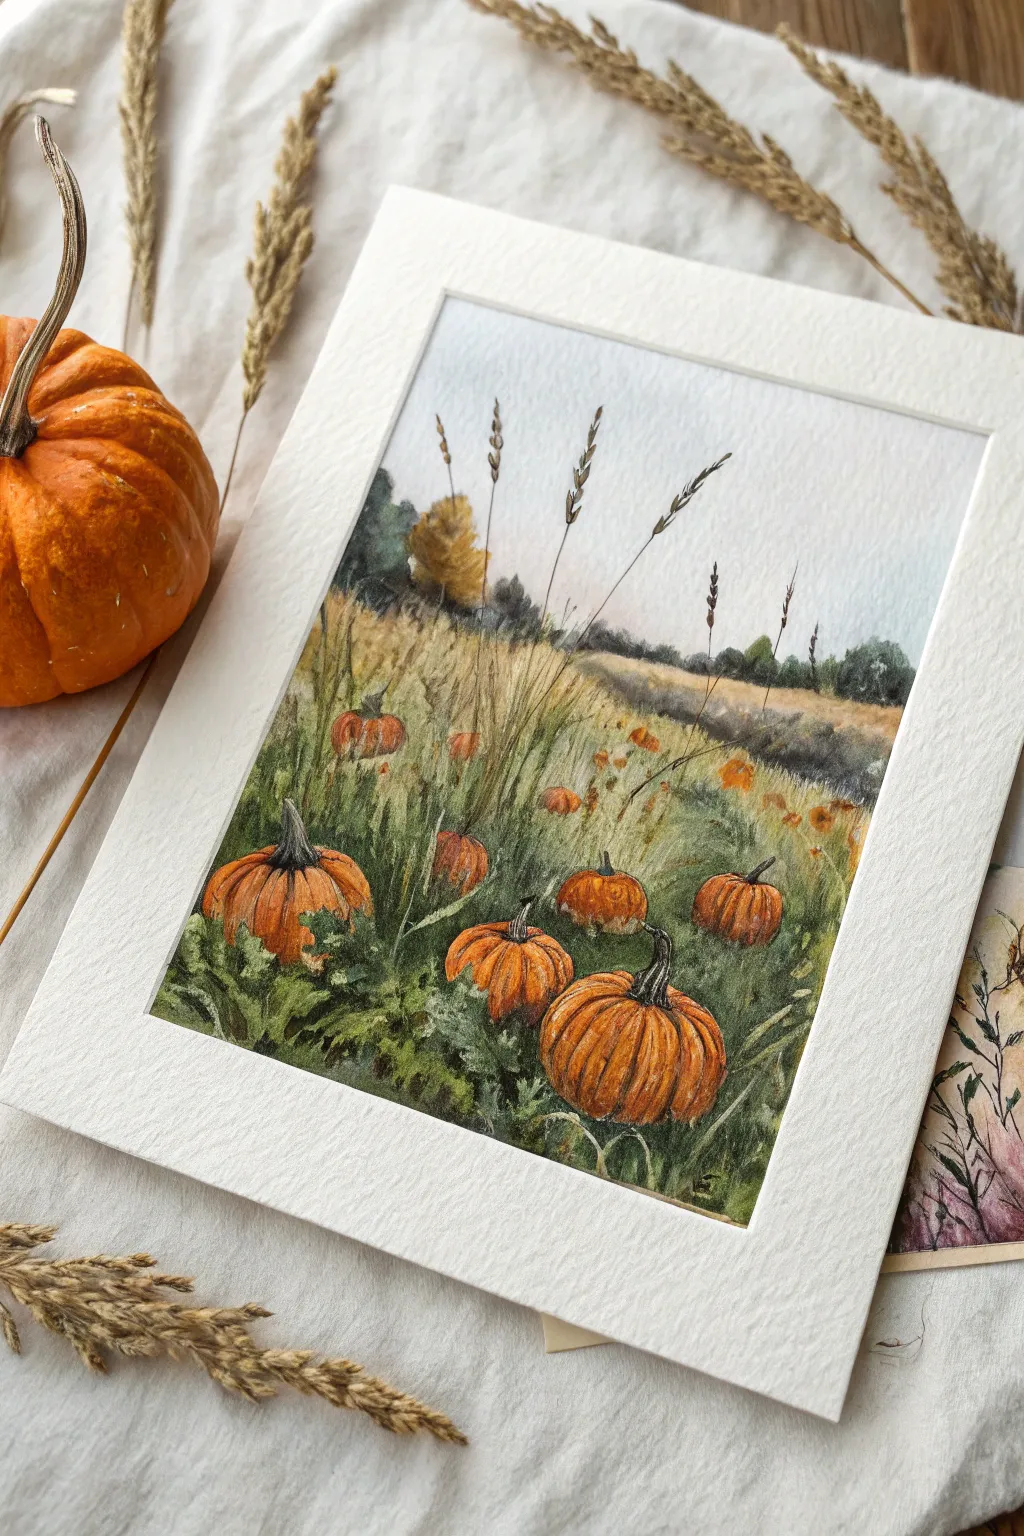
Capture the warmth of an autumn evening with this realistic landscape painting featuring endless rows of pumpkins under a soft, glowing sky. This project focuses on atmospheric perspective and detailed texture to bring a harvest scene to life on your canvas.
Detailed Instructions
Materials
- 11×14 inch canvas panel or stretched canvas
- Acrylic paints: Titanium White, Cadmium Yellow, Yellow Ochre, Burnt Sienna, Burnt Umber, Hooker’s Green, Ultramarine Blue, Cadmium Orange
- Flat shader brushes (1 inch, 1/2 inch)
- Small round detail brushes (size 0, size 2)
- Fan brush
- Palette knife
- Water cup and paper towels
- Easel or flat working surface
Step 1: Sky and Horizon
-
Establish the horizon line:
Begin by lightly sketching your composition with a pencil. Draw a horizon line about one-third of the way from the top of the canvas. Sketch the vanishing point on the right side where your dirt path will disappear into the distance. -
Paint the sky gradient:
Mix Titanium White with a touch of Cadmium Yellow and a tiny dot of Orange. Start painting just above the horizon line using horizontal strokes. As you move upward, gradually mix in very small amounts of Ultramarine Blue and a touch of Burnt Sienna to create a soft, gray-purple haze at the top, mimicking early dusk. -
Add cloud wisps:
While the sky is still slightly tacky, use a dry fan brush with a mixture of White and Yellow Ochre to streak in long, horizontal clouds near the horizon. Keep these soft and blended for a dreamy look.
Paint Looking Chalky?
If your acrylics look dull or chalky after drying, mix in a drop of gloss medium or varnish into your paint. This restores the richness of the dark greens and earth tones.
Step 2: Background Landscape
-
Block in the distant trees:
Mix Hooker’s Green with Burnt Umber and a little Ultramarine Blue to get a dark, shadowed green. Using the tip of a flat brush or a small round brush, tap in the silhouette of the tree line along the horizon. -
Vary tree heights:
Ensure the trees vary in height and density to look natural. The trees on the right side should appear slightly larger as they are closer to the vanishing point of your path. -
Add subtle highlights:
Mix a lighter green using Yellow Ochre and your dark green mix. tap tiny highlights on the tops of the trees where the setting sun would catch them. Keep this subtle; these shapes are far away.
Pro Tip: Atmospheric Haze
To make the distant trees recede realistically, mix a tiny bit of the sky color (pale grey-blue) into your green tree mix. Cool colors push objects visually backward.
Step 3: The Field Foundation
-
Underpaint the ground:
Using a large flat brush, cover the entire field area with a base coat. Use a mix of Burnt Umber and Burnt Sienna for the path area on the right, and a darker, greener mix (Hooker’s Green + Umber) for the pumpkin rows on the left. -
Establish the rows:
Once the base is dry, use a smaller flat brush to paint diagonal stripes radiating from the bottom left corner toward the vanishing point. These lines delineate where your pumpkins will sit. Use a dark, shadowy green-brown for the furrows between rows. -
Texture the dirt path:
On the right side path, use horizontal, choppy strokes with lighter browns (Yellow Ochre + White + Sienna) to suggest tire tracks and dry earth. I like to let this layer dry completely before adding the final dust details. -
Paint the grassy verge:
Use a fan brush with various greens to stipple grass texture along the edge of the dirt path, separating the road from the pumpkin rows.
Step 4: Planting the Pumpkins
-
Map out pumpkin shapes:
Start with the pumpkins closest to the viewer in the foreground. These should be the largest. Used Burnt Orange to paint oval and round shapes nestled into the dark plant rows. -
Create distance through scale:
As you move back along the diagonal rows toward the horizon, make the orange dots progressively smaller and closer together. In the very far distance, they should just be specks of orange. -
Add shadows:
Mix a dark reddish-brown and paint a small shadow crescent at the bottom of each foreground and mid-ground pumpkin to anchor them to the ground. -
Highlight the tops:
Mix Cadmium Orange with Yellow and a bit of White. Dab this on the upper left side of each pumpkin to simulate the light source coming from the sky. This gives them dimension and roundness. -
Paint the stems:
Using your smallest round brush (size 0) and a light green-brown mix, paint tiny, twisted stems on the foreground pumpkins. You don’t need these strictly on the distant ones.
Step 5: Final Details
-
Enhance foliage texture:
Go back in with your stippling brush or fan brush around the pumpkins. Use a mid-tone olive green to suggest leaves covering the vines between the orange shapes. -
Add foreground interest:
In the immediate foreground (bottom left), paint a few distinct, larger pumpkin leaves and perhaps one very large pumpkin partial cut off by the frame to draw the viewer in. -
Glaze the path:
Finally, mix a very watery wash of Burnt Umber and glaze the shadowed side of the dirt path to deepen the contrast against the sunny field rows.
Place your finished piece in a wide white mat to emphasize the panoramic feel of your harvest landscape


Pumpkin Rows With One-Point Perspective
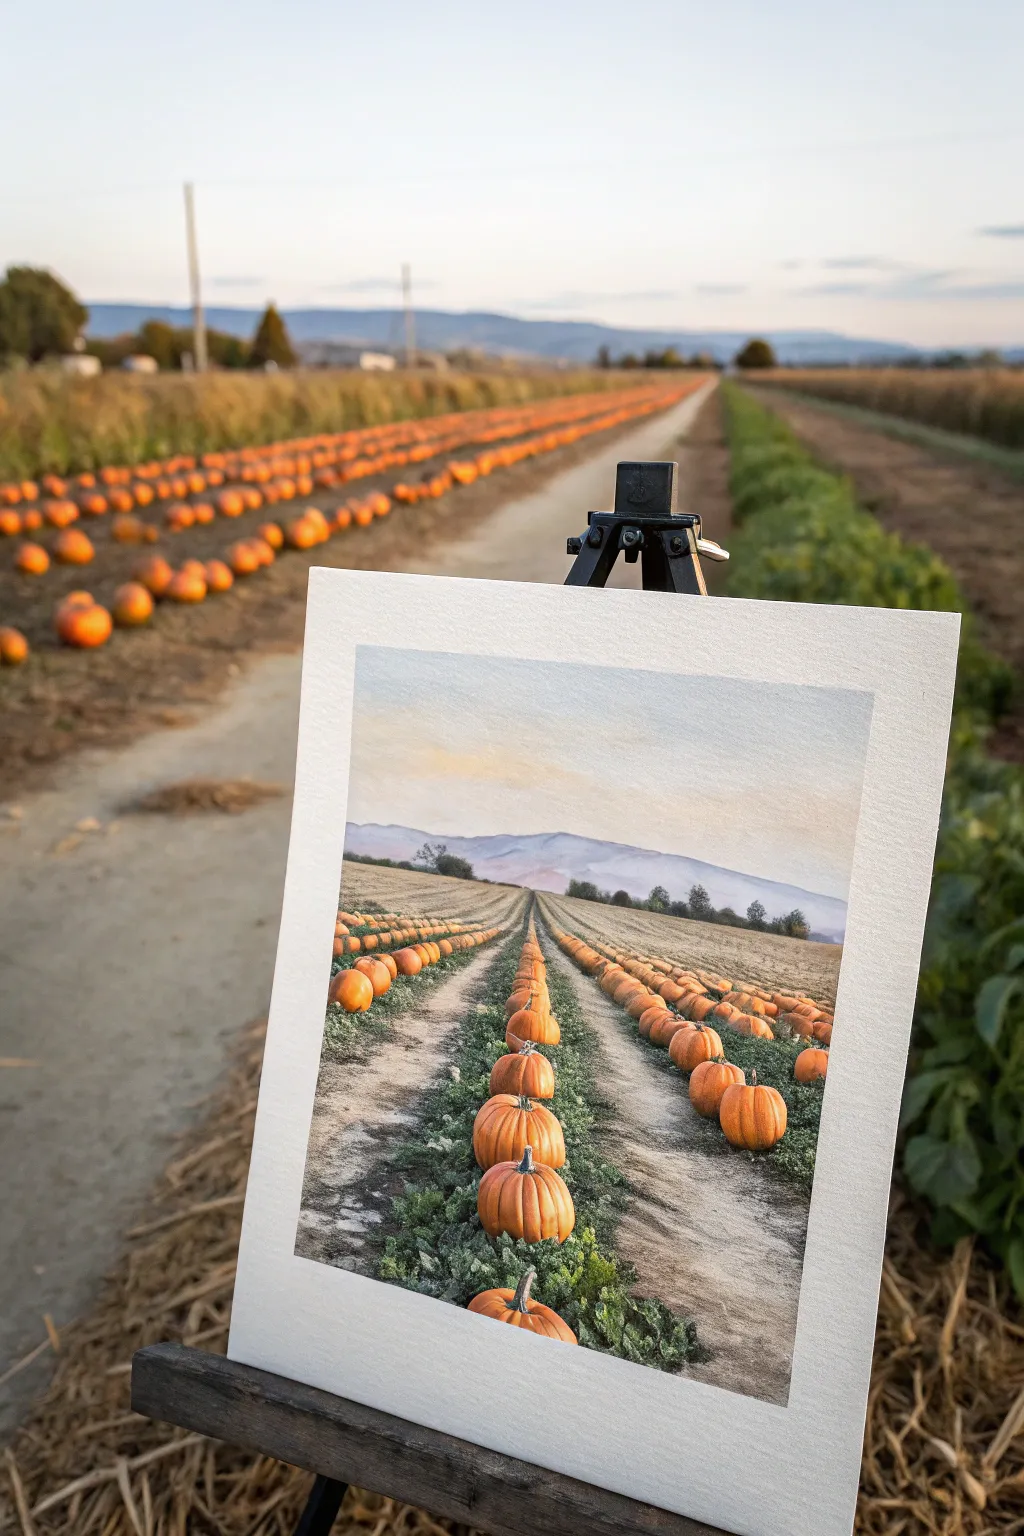
Capture the infinite feeling of a harvest field with this study in one-point perspective. This watercolor painting emphasizes depth by drawing viewers’ eyes straight down rows of bright orange pumpkins toward a soft, misty mountain range.
Step-by-Step
Materials
- Cold press watercolor paper (minimum 140lb)
- Watercolor paints (burnt sienna, cadmium orange, yellow ochre, sap green, ultramarine blue, alizarin crimson)
- Painter’s tape or masking tape
- Pencil and eraser
- Ruler
- Round brushes (sizes 4, 8) and a flat wash brush
- Masking fluid (optional)
- Two jars of water and paper towels
Step 1: Drafting the Perspective
-
Tape the edges:
Begin by taping down the edges of your watercolor paper to a board. This creates the crisp white border seen in the example image and prevents the paper from buckling when wet. -
Establish the horizon line:
Use your ruler to draw a very light horizon line about one-third of the way down from the top of the paper. This leaves plenty of room for the foreground pumpkins. -
Find the vanishing point:
Mark a small dot in the center of your horizon line. Lightly draw diagonal lines radiating from this dot down to the bottom edge of the paper. These lines will be the dirt paths between your pumpkin rows. -
Sketch the pumpkin shapes:
Sketch the pumpkins sitting along the soil rows. I find it helpful to draw the closest pumpkins quite large and detailed, making them progressively smaller and simpler as they recede toward the vanishing point. -
Outline the mountains:
Sketch the faint outline of the mountains sitting just above the horizon line, keeping the shapes organic and rolling.
Scale Trick
Make the foreground pumpkins significantly larger than you think they should be. This exaggerated size difference creates a dramatic sense of depth.
Step 2: Painting the Sky and Mountains
-
Wash the sky:
Wet the sky area with clean water first. Drop in a very dilute mix of yellow ochre near the horizon, blending upward into a faint blue. Let the colors bleed softly to suggest a hazy autumn evening. -
Shoulder the mountains:
Mix a watery purple-grey using ultramarine blue and a touch of alizarin crimson. Paint the mountains while the sky is still slightly damp to keep the edges soft, suggesting distance. -
Detail the mid-ground trees:
Once the sky and mountains are dry, mix a darker, muted green-grey. Use the tip of a small brush to stipple in tiny tree shapes along the horizon line where the field meets the mountains.
Step 3: The Pumpkin Field
-
Base layer for soil:
Mix a light wash of yellow ochre and burnt sienna. Apply this loosely to the dirt paths between the pumpkin rows, painting right over the pencil guidelines but avoiding the pumpkins themselves. -
Shadowing the paths:
While the soil layer is damp, drop in darker brown streaks (burnt sienna mixed with a touch of blue) along the edges of the paths. This adds texture and reinforces the direction of the rows. -
First pumpkin layer:
Paint the pumpkins with a wash of plain cadmium orange. Leave small spots of white paper near the top of each pumpkin to act as a highlight. -
Define the pumpkin forms:
As the orange dries, mix a deeper red-orange. Paint curved vertical strokes on the sides of the pumpkins to create the ribbed texture and roundness. -
Add the stems:
Use a small brush with dark brown-green to paint the stems. Ensure the closest stems have a bit of detail, while the distant ones can just be simple specks. -
Paint the foliage:
Mix a deep sap green. Paint the leafy vines connecting the pumpkins. Use jagged, loose brushstrokes to mimic the rough texture of pumpkin leaves, concentrating the darkest greens directly under the pumpkins to ground them. -
Deepen the shadows:
Mix a dark brown-grey. Carefully paint shadows on the ground underneath each pumpkin, casting them slightly to one side to match your light source. -
Final touches:
Strengthen the nearest pumpkins with one final glaze of vibrant orange if needed. Add final texture to the dirt paths with dry-brush strokes of dark brown. -
The reveal:
Wait until the painting is completely bone-dry, then slowly peel away the tape at a 45-degree angle to reveal your clean edges.
Muddy Pumpkins?
If your orange looks dull, you might be touching the green leaves while the orange is wet. Let the pumpkins fully dry before painting the adjacent green foliage.
Step back and admire how your simple diagonal lines have transformed into a sprawling field ready for harvest


Barn in the Distance Pumpkin Patch Scene
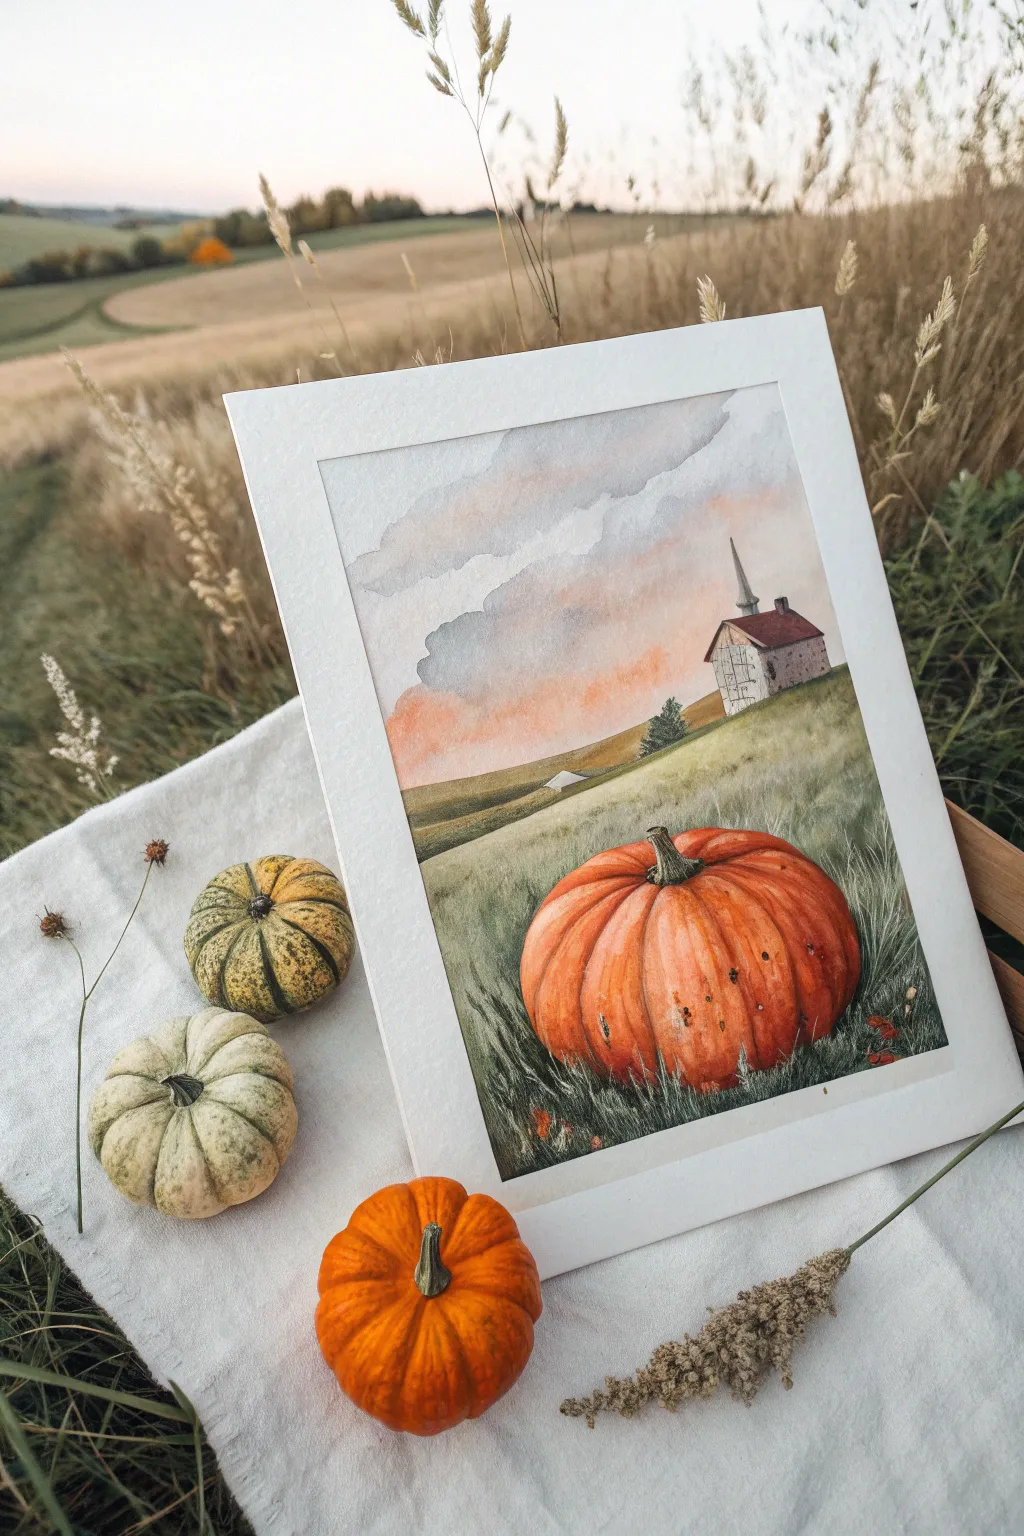
Capture the essence of early autumn with this serene watercolor landscape, featuring a bold foreground pumpkin set against rolling hills and a distant rustic barn. The soft, clouded sky creates a nostalgic atmosphere perfect for seasonal decor.
How-To Guide
Materials
- Cold press watercolor paper (140lb/300gsm)
- Watercolor paints (Payne’s Grey, Burnt Sienna, Cadmium Orange, Sap Green, Yellow Ochre, Alizarin Crimson)
- Round brushes (flats for washes, rounds for detail)
- Pencil (HB for sketching)
- Palsic eraser
- Jars of clean water
- Paper towels
- Masking tape
Step 1: Sketching & Sky Wash
-
Establish the composition:
Tape your paper to a board to prevent buckling. Lightly sketch the horizon line about 2/3 down the page. Draw the outline of the large pumpkin in the bottom right foreground, making it the dominant element. Sketch the small barn structure on the distant hill. -
Wet the sky area:
Using a large flat brush, apply clean water to the entire sky area, stopping at the horizon line but being careful to paint around the roof of the barn. -
Paint the clouds:
While the paper is wet, drop in a mix of Payne’s Grey and a touch of Alizarin Crimson to create soft, moody clouds. Leave patches of white paper showing for highlights. -
Add the sunset glow:
Near the horizon line, blend in a wash of diluted Cadmium Orange and Yellow Ochre to simulate the last light of the day touching the hills.
Step 2: The Middle Ground
-
Base layer for the hills:
Mix Sap Green with a little Yellow Ochre. Apply a flat wash to the rolling hills in the distance, keeping the color lighter as it recedes toward the horizon to create atmospheric perspective. -
Detail the barn:
Once the sky is dry, paint the barn’s roof with a mix of Burnt Sienna and Alizarin Crimson. Use a very pale grey for the walls, adding tiny vertical lines with a liner brush to suggest siding or wooden texture. -
Add distant foliage:
Use the tip of a small round brush to dab in dark green (Sap Green mixed with Payne’s Grey) for the small trees near the barn and along the horizon line.
Muddy colors?
If your pumpkin orange looks dull, ensure the green grass layer is fully dry before painting near it. Orange and green are opposites and mix to make brown.
Step 3: The Foreground Pumpkin
-
Initial pumpkin wash:
Paint the entire pumpkin shape with a light wash of Cadmium Orange mixed with a little water. This serves as the glowing undertone. -
Define the ribs:
While the first layer is still slightly damp, use a stronger concentration of Cadmium Orange and Burnt Sienna to paint the curved lines of the pumpkin ribs, following the contour of the sphere. -
Deepen the shadows:
I like to mix a bit of purple or blue into my orange for the deepest shadows at the bottom of the pumpkin and between the ribs to make the form look truly three-dimensional. -
Paint the stem:
Use a mix of Sap Green and Burnt Umber for the pumpkin stem, creating a textured, woody look. -
Add texture spots:
Splatter or dot tiny flecks of brown and dark orange onto the pumpkin skin to mimic its natural imperfections and earthiness.
Add a flock
Use a liner brush with black ink or concentrated paint to add tiny ‘v’ shapes in the distance, simulating birds flying home toward the barn.
Step 4: Foreground Grass & Details
-
Paint the grass base:
Wash the area around the pumpkin with a desaturated green (Sap Green muted with a tiny bit of red). Don’t make this too dark yet. -
Create individual blades:
Using a rigour brush or a fine liner, flick upwards with varying shades of green and brown to create tall grasses growing up around the base of the pumpkin. -
Add grass shadows:
Paint darker grass blades directly under the pumpkin and in the foreground corners to frame the subject. -
Final highlights:
If you have white gouache or a gel pen, add tiny highlights to the pumpkin’s shoulder or the tips of the grass for extra sparkle.
Now you have a framed piece of the countryside ready to display


Starry Night Pumpkin Patch Swirls
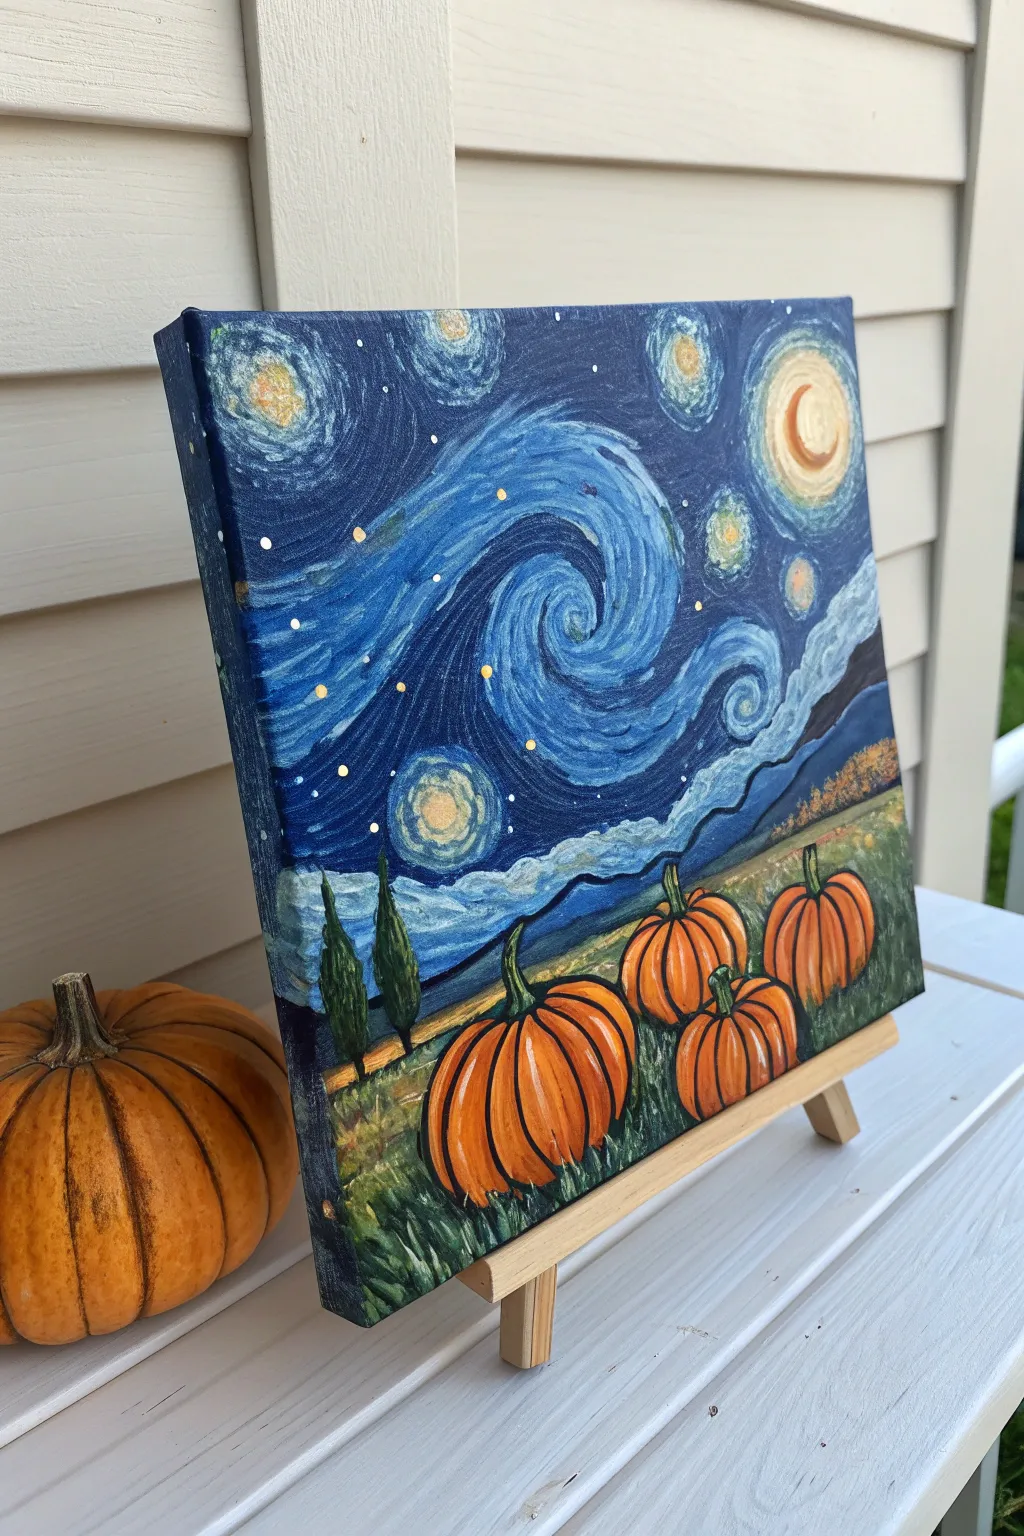
Blend the iconic swirling skies of the post-Impressionist master with the cozy charm of an autumn harvest in this whimsical acrylic painting. By replacing the traditional village with vibrant pumpkins, you create a captivating seasonal twist on a timeless classic.
Step-by-Step Guide
Materials
- Small square canvas (e.g., 8×8 or 10×10 inches)
- Acrylic paints (primary blue, white, yellow ochre, cadmium orange, burnt sienna, sap green, black, gold/metallic yellow)
- Set of brushes (flat brush for background, small round brush for details, fine liner brush)
- Palette or paper plate
- Cup of water and paper towels
- Pencil for sketching
- Easel (optional)
Step 1: Planning and Base Layers
-
Sketch the composition:
Lightly sketch the horizon line about one-third up from the bottom of the canvas. Draw the large, swirling wave shape across the center of the sky. Sketch varying sizes of pumpkins in the foreground and a crescent moon in the upper right. Don’t worry about perfect details yet; these are just guideposts. -
Block in the sky:
Mix a dark blue with a touch of black to create a midnight blue. Using a flat brush, paint the upper two-thirds of the canvas, avoiding the moon and the centers of your stars. Bring this dark color down to the horizon line. -
Paint the pumpkin base:
While the sky dries, mix cadmium orange with a tiny bit of white to make it opaque. Fill in the pumpkin shapes in the foreground. They will need a second coat later, so don’t stress about streaks. -
Underpaint the field:
Mix sap green with a little yellow ochre and burnt sienna for a muddy, autumnal green. Paint the field area around the pumpkins, using short, choppy strokes to suggest grass texture.
Step 2: Creating the Swirling Sky
-
Establish the main wind swirl:
Using a lighter blue (mix primary blue and white), paint the central S-curve swirl. Use long, fluid strokes that follow the path of your initial sketch. This is the backbone of the movement in the piece. -
Add Impressionist dashes:
Switch to a small round brush. Load it with various shades of blue—some lighter, some darker than your base. Paint short, dashed lines that follow the flow of the wind and circle around the stars. This ‘dashed line’ technique is key to the Van Gogh style. -
Layer the clouds:
Near the horizon line, create rolling hills or clouds using lighter blues and whites. Apply the paint in horizontal, wavy strokes to differentiate them from the swirling sky above. -
Illuminate the stars and moon:
Paint the crescent moon and several star circles with yellow ochre. Once dry, add a center dot of bright yellow or metallic gold. Use dashed lines of pale yellow and white to create glowing halos radiating outward from each light source. -
Detail the stars:
Add tiny dots of white or gold scattered throughout the dark blue sections of the sky to represent distant stars.
Muddy colors?
If your blue swirls are turning green when they touch yellow stars, let the blue layer dry completely before painting the yellow halos. Patience prevents unwanted color mixing.
Step 3: The Pumpkin Patch
-
Refine the pumpkins:
Apply a second coat of bright orange to the pumpkins. To make them round, paint curved lines of darker orange (mix orange with a touch of burnt sienna) following the vertical ribs of the pumpkin. -
Add highlights:
Mix white with yellow ochre and paint thin, curved highlights on the top left of each pumpkin rib to show where the moonlight is hitting them. -
Paint the stems:
Use a dark green or brown to paint varied, twisting stems on each pumpkin. Some can curl to the left, others to the right, adding personality to each gourd. -
Create the cypress trees:
On the left side of the horizon, paint two flame-like tree shapes using dark green mixed with black. Use upward, flickering brushstrokes to mimic the texture of cypress trees reaching into the sky. -
Add foreground texture:
Go back into the green field with a small brush. Add strokes of black, dark green, and yellow ochre to create the look of tall grasses and shadows around the base of the pumpkins. -
Wrap the edges:
Don’t forget to extend your painting around the sides of the canvas. Continue the sky swirls and field colors onto the edges for a polished, frameless look. -
Final touches:
Step back and assess your work. Add a few tiny white dots to the centers of the stars for extra sparkle, or deepen the shadows between the pumpkin ribs if they look flat. Sign your masterpiece in the corner.
Glow Up
Use glow-in-the-dark acrylic paint for the stars, moon, and pumpkin highlights. The painting will look traditional by day but magically luminescent when the lights go out.
Display this starry harvest scene on a mini easel to bring a touch of artistic magic to your autumn decor
BRUSH GUIDE
The Right Brush for Every Stroke
From clean lines to bold texture — master brush choice, stroke control, and essential techniques.
Explore the Full Guide
Mini Pumpkins Scattered in Tall Grass
Capture the essence of a late autumn afternoon with this delicate watercolor painting featuring scattered pumpkins nestled in overgrown fields. The soft, hazy background contrasts beautifully with the crisp details of dried grass stalks and vibrant orange gourds, creating a cozy and nostalgic atmosphere.
How-To Guide
Materials
- Cold press watercolor paper (approx. 5×7 inches)
- White artist tape
- Watercolor paints (pans or tubes)
- Specific colors: Burnt Sienna, Cadmium Orange, Yellow Ochre, Sap Green, Olive Green, Indigo, Payne’s Gray, Burnt Umber
- Round brushes (sizes 6, 2, and 00 for details)
- Pencil (HB) and kneaded eraser
- Two jars of water
- Paper towels
- White textured mat board (optional for display)
Step 1: Sketching and Sky
-
Secure the Paper:
Begin by taping down your watercolor paper to a board with artist tape. This creates a clean white border and prevents buckling when the paper gets wet. -
Light Sketching:
Using an HB pencil, lightly sketch the horizon line about two-thirds up the page. Draw oval shapes for the pumpkins scattered in the foreground—vary their sizes and angles to look natural. Gently mark the direction of the tall grasses. -
Wet-on-Wet Sky:
Pre-wet the sky area with clean water using your size 6 brush. Drop in a very dilute mix of Indigo and a touch of Burnt Umber to create a moody, pale grey-blue sky. Keep it lighter near the horizon. -
Distant Trees:
While the sky is still slightly damp, mix Payne’s Gray with Sap Green. Dab this into the horizon line to suggest a blurry, distant tree line. The damp paper will help diffuse the edges for a hazy, atmospheric look.
Brush Control Tip
For the finest grass blades, hold your brush near the end of the handle. This loosens your wrist movement, creating sweeping, natural curves rather than stiff, straight lines.
Step 2: Painting the Pumpkins
-
Base Layer:
For the pumpkins, mix Cadmium Orange with a tiny bit of Yellow Ochre. Paint the base shape of each pumpkin, leaving small slivers of white paper for highlights on the upper curves. -
Adding Form:
While the orange is still damp, drop concentrated Burnt Sienna into the bottom and shadowed sides of the pumpkins to create roundness. -
Defining Ribs:
Once the base layer is dry, use a size 2 brush with a darker orange-brown mix to paint thin, curved lines following the shape of the pumpkin to define the ribs. -
Stems:
Paint the stems using a mix of Olive Green and Burnt Umber. Keep the strokes jagged and dark at the connection point.
Level Up: Splatter Texture
Load an old toothbrush with dark brown paint and flick tiny speckles onto the bottom foreground. This mimics dirt and organic debris for extra realism.
Step 3: Grass and Foreground
-
Underpainting the Field:
Mix a wash of Yellow Ochre and Sap Green. Apply this loosely around the pumpkins in the foreground, letting the colors bleed together to create a varied ground layer. -
Building Texture:
Switch to your size 2 brush. Using short, upward strokes with Olive Green and Payne’s Gray, start painting individual blades of grass that overlap the bottom of the pumpkins. This ‘nests’ them into the scene. -
Tall Stalks:
Mix a dark brown (Burnt Umber + Indigo). With your smallest brush (00 or a liner), paint long, thin stalks rising high above the pumpkins. Make your hand tremble slightly for organic, imperfect lines. -
Seed Heads:
At the top of the tallest stalks, dab small, textured dots or V-shapes to represent wheat or grass seed heads. I find it helpful to vary the pressure here to keep them looking wispy. -
Deep Shifts:
Add your darkest green-black mix into the deepest corners of the foreground and directly under the pumpkins to ground them firmly.
Step 4: Finishing Touches
-
Refining Details:
Check for any lost edges on your pumpkins. You can re-emphasize the dark side of a pumpkin with a glaze of reddish-brown to make it pop against the green grass. -
Final Grass Blades:
Add a few very diluted, pale strands of grass in the background to create depth so not every blade looks like it’s in the front row. -
Matting:
Once fully dry, carefully peel away the tape. Mount your painting behind a textured white mat to give it a professional gallery finish.
Step back and admire your peaceful autumn field, ready to bring a touch of the harvest season into your home
Loose Watercolor Pumpkin Patch Washes
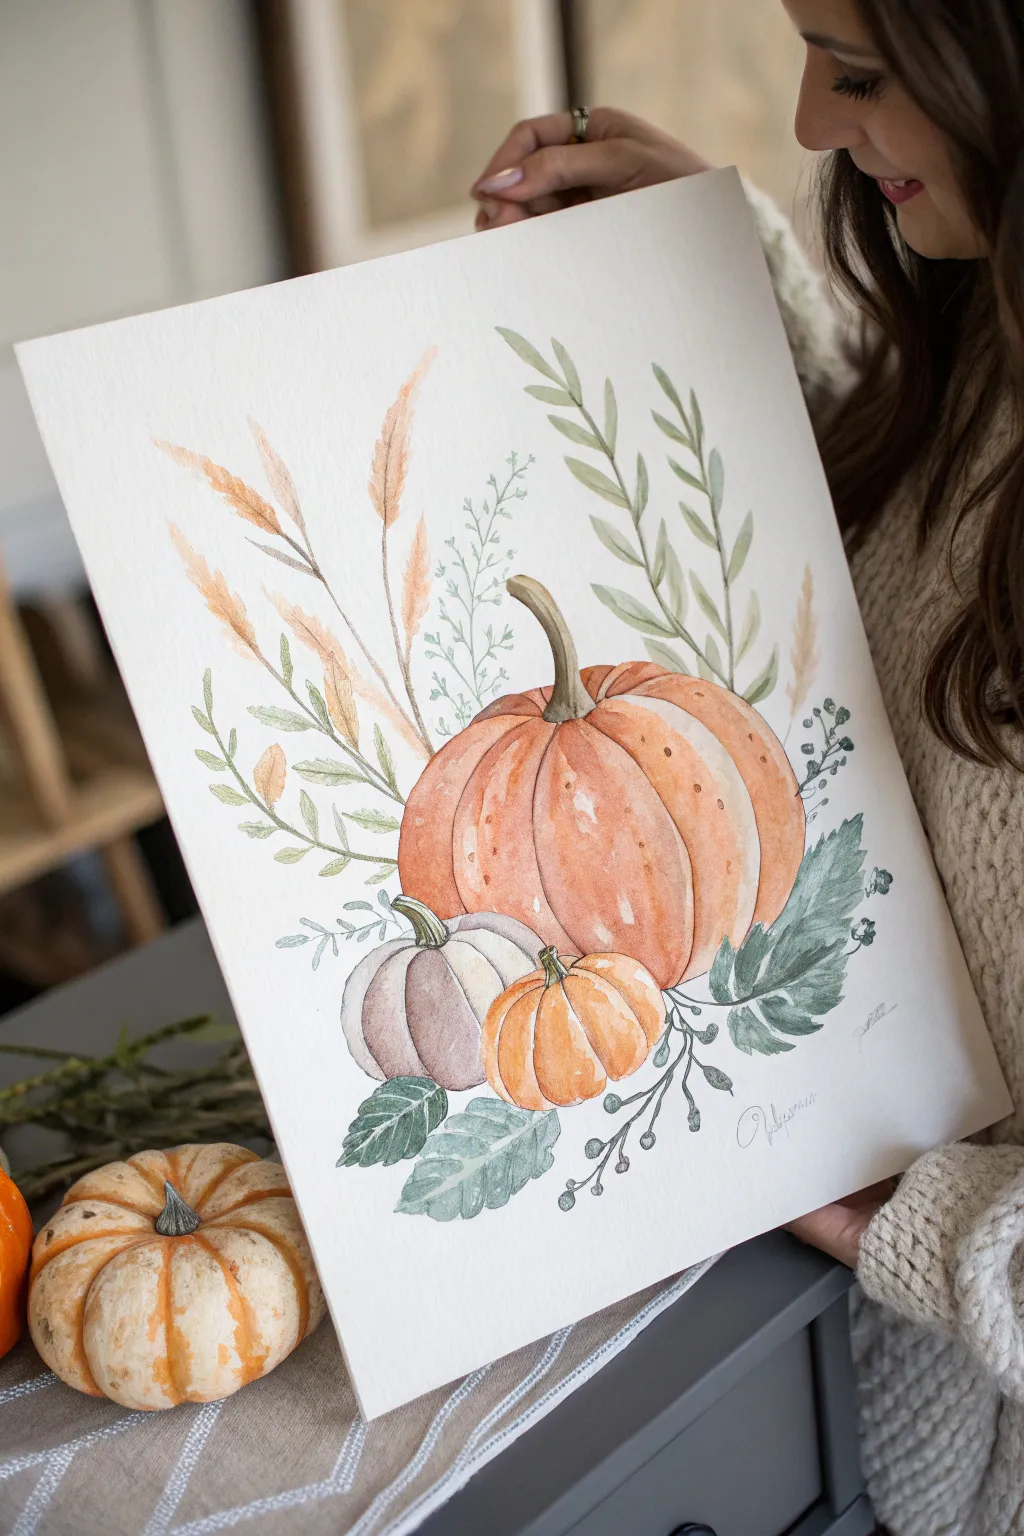
This elegant watercolor study combines the warmth of autumn pumpkins with the delicate linearity of dried grasses and olive-green foliage. The result is a balanced, vertical composition that captures the softness of the season through gentle washes and fine detailing.
How-To Guide
Materials
- Cold press watercolor paper (140 lb/300 gsm)
- Watercolor paints (burnt sienna, yellow ochre, sap green, olive green, indigo, sepia)
- Round brushes (size 2, 6, and 10)
- Pencil (HB or H)
- Kneaded eraser
- Jars of water & paper towels
- Fine liner or rigger brush (optional for stems)
Step 1: Sketching the Elements
-
Placement:
Begin by lightly sketching the large central pumpkin slightly to the right of the center. It should be the dominant shape, roughly oval but flattened at the top and bottom where the ribs curve inward. -
Adding Companion Pumpkins:
Sketch a squat, smaller pumpkin sitting directly in front and to the left of the main one. Draw a third, round ministure pumpkin nestled between them in the foreground. Keep your pencil lines extremely light so they won’t show through the transparent paint later. -
Botanical Outline:
Map out the surrounding foliage. Draw tall stems reaching upward behind the pumpkins for the wheat and leaves. Add large leaf shapes at the base to anchor the composition, and indicate where trailing berry vines will hang off to the right.
Clean Highlights
Don’t worry if you accidentally paint over a highlight. You can lift color while it’s still damp using a clean, thirsty brush, or add it back later with a touch of white gouache.
Step 2: Painting the Pumpkins
-
Base Washes:
Using a size 10 brush, mix a watery wash of burnt sienna and yellow ochre. Apply this to the main pumpkin, painting in curved vertical sections following the ribs. Leave thin slivers of white paper between some ribs to act as natural highlights. -
The White Pumpkin:
For the pale, squat pumpkin, mix a very dilute wash of indigo and sepia to create a shadowy greige. Apply this loosely, keeping the center of the pumpkin segments nearly white to suggest roundness. -
Small Pumpkin Accent:
Paint the smallest pumpkin with a brighter mix of pure orange or burnt sienna. Since it’s in the foreground, you can afford a slightly more saturated color here to bring it forward. -
Stems:
Once the pumpkin bodies are damp but not soaking wet, paint the stems using a mix of olive green and brown. Let the color bleeed slightly into the tops of the pumpkins for a cohesive look. -
Layering Shadows:
When the base layer is completely dry, glaze a darker mix of burnt sienna into the crevices between the ribs of the large pumpkin to deepen the form and add volume.
Level Up: Metallic Touch
For a glamorous fall twist, paint the veins of the leaves or the tips of the wheat stalks with metallic gold watercolor. It catches the light beautifully when framed.
Step 3: Foliage and Details
-
Tall Wheat Stalks:
Switch to a size 6 brush. Mix a warm beige using yellow ochre and a touch of brown. Paint the feathery wheat stalks on the left side, using quick, lifting strokes to create the textured tops. -
Olive Branches:
On the right side, paint the ascending leafy branch. Use a sap green muted with a little red or brown. Press the belly of the brush down and lift up to create the tapered leaf shapes in a single stroke. -
Foreground Leaves:
Paint the large, jagged leaves at the bottom right using a darker, cool green (sap green plus indigo). These anchor the visual weight. While wet, drop in a tiny bit of blue for color variation. -
Fine Berry Sprigs:
Use your smallest brush (size 2) to paint delicate, thin stems trailing downwards on the right. Add small dots for berries using a dark blue-grey mix, keeping them loose and imperfect. -
Leaf Veins:
Once the large green leaves are fully dry, mix a white gouache or a very opaque pale green and paint thin veins over the dark leaf shapes for crisp detailing. -
Final Textures:
Add final touches like small speckles on the large pumpkin skin using a mostly dry brush with dark orange paint. Sharpen any edges that feel too lost with a fine brush.
Allow the entire piece to dry flat overnight before erasing any remaining visible pencil lines for a clean finish

PENCIL GUIDE
Understanding Pencil Grades from H to B
From first sketch to finished drawing — learn pencil grades, line control, and shading techniques.
Explore the Full Guide
Abstract Color-Blocked Pumpkin Patch
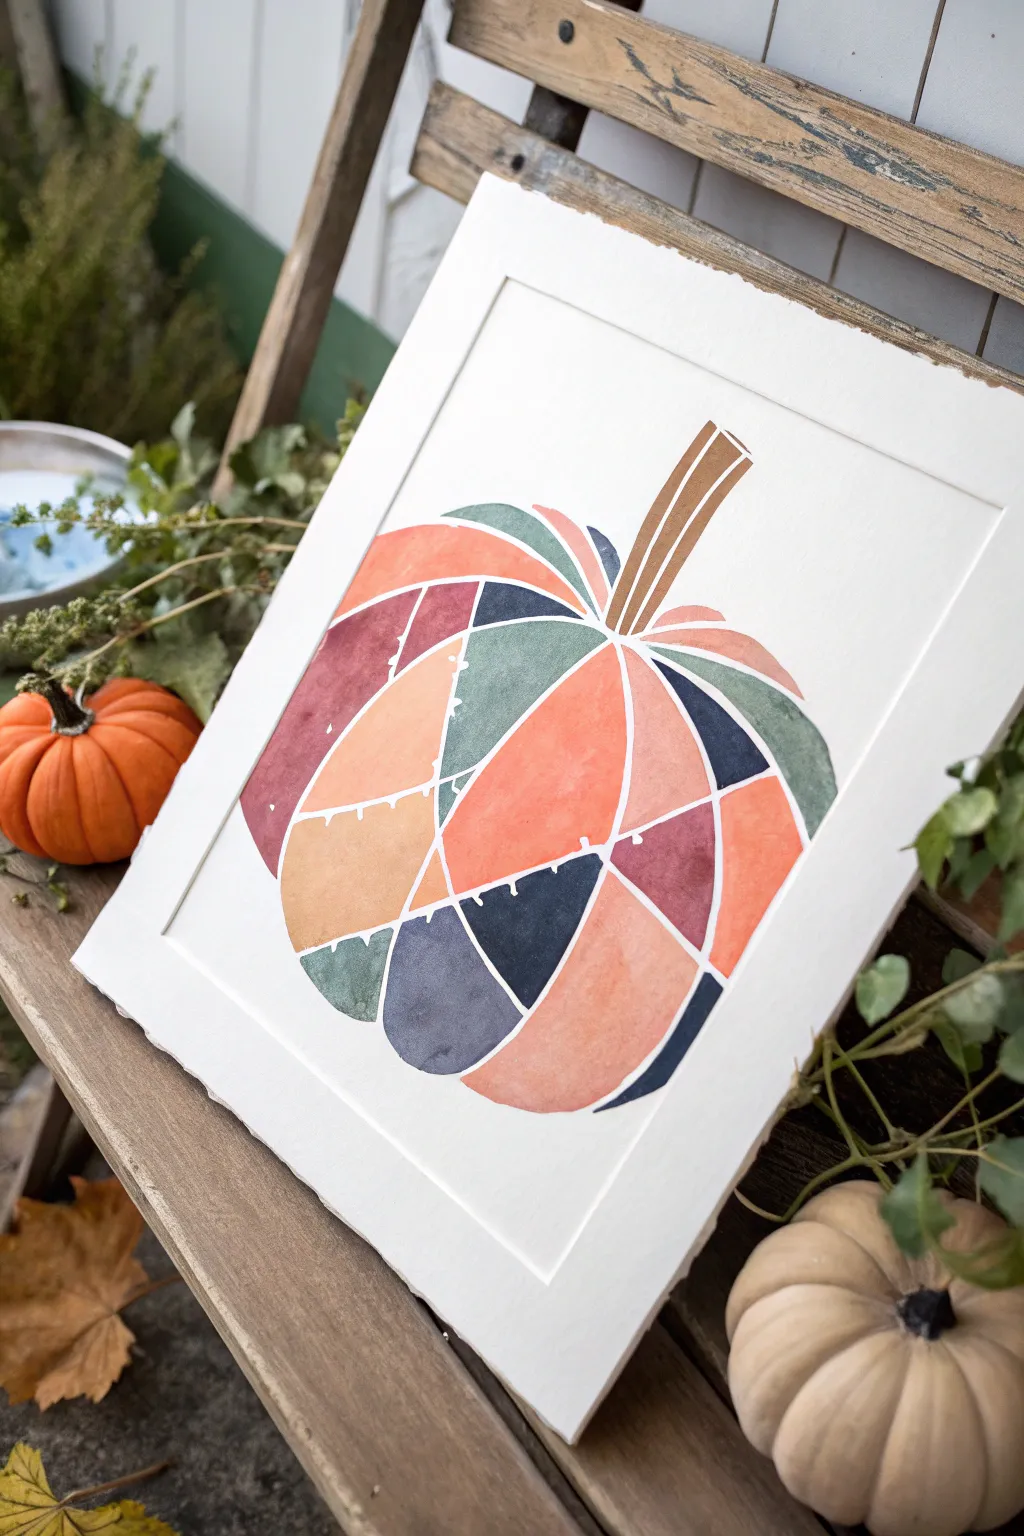
Capture the essence of fall foliage with this modern, abstract take on a classic pumpkin shape. Using a stained-glass effect with distinct color blocks, you’ll blend warm oranges and rusts with unexpected pops of deep teal and navy for a sophisticated seasonal display.
Step-by-Step
Materials
- Heavyweight watercolor paper (300gsm cold press recommended)
- Watercolor paints (pan set or tubes)
- Masking fluid (drawing gum) or white wax crayon
- Fine-point applicator or old liner brush for masking
- Medium round brush (size 6 or 8)
- Small round brush (size 2)
- Pencil and eraser
- Paper towels
- Two jars of water
- Palette for mixing
- Masking tape or painter’s tape
Step 1: Preparation & Sketching
-
Secure the paper:
Begin by taping down your watercolor paper to a rigid board or table using masking tape. This prevents the paper from buckling when it gets wet and creates a clean border. -
Lightly sketch the outline:
Using a pencil, draw the overall shape of a pumpkin. Don’t worry about perfect realism; aim for a slightly squat, wide oval shape with a pronounced stem at the top. -
Draw the interior segments:
Normally, pumpkins have vertical ribs. Instead of realistic ribs, sketch intersecting geometric lines across the pumpkin. Create a mix of triangles, trapezoids, and curved wedges. -
Detail the stem:
Sketch the stem with a few vertical lines dividing it into two or three thin segments. This keeps the geometric style consistent throughout the entire piece. -
Refine the lines:
Go back over your sketch and ensure the lines connect clearly. Think of this like a stained-glass window pattern; the spaces between lines will be your painted areas.
Step 2: Masking & Blocking
-
Apply masking fluid:
Using a fine-point applicator or an old brush dipped in soapy water (to protect the bristles), trace over all your pencil lines with masking fluid. These lines will remain stark white later. -
Add texture marks:
While masking, add tiny perpendicular dashes crossing the main dividing lines, resembling stitches or thorns. This small detail adds significant character to the final piece. -
Let it cure:
Allow the masking fluid to dry completely. It should feel rubbery and not tacky to the touch. Rushing this step can ruin your brushes or smudge the lines.
Stubborn Masking Fluid?
If the fluid won’t peel, you may have left it on too long (days) or the paper is still damp. Let it dry longer, then use a rubber cement pick-up square.
Step 3: Painting & Finishing
-
Prepare your palette:
Mix puddles of autumnal colors. You’ll need a light peach, a vibrant orange, a deep rust red, a muted teal (green-blue), and a dark navy blue. -
Start with the lightest tones:
Begin filling in random segments with your lightest peach and soft orange tones. Keep the colors separated; don’t paint two adjacent sections the exact same shade. -
Add the mid-tones:
Move to the vibrant oranges and rust reds. Fill in larger sections near the center and bottom to give the pumpkin visual weight. -
Introduce cool colors:
Now paint selected segments with your teal and navy blue. Place these dark, cool colors near the edges or bottom to suggest shadow and depth without painting realistic shading. -
Paint the stem:
Use a warm brown or tan for the stem segments. You can vary the saturation slightly between the stem strips to make them distinct. -
Ensure full coverage:
Check that every geometric shape is filled with color. It’s okay if the paint pools slightly near the masking fluid; this creates a nice watercolor edge effect. -
Dry thoroughly:
Let the painting dry completely. The paper should feel room temperature, not cool to the touch. I usually wait at least an hour to be safe. -
Remove the masking:
Gently rub the masking fluid away with your finger or a rubber cement pick-up tool. Do this slowly to avoid tearing the paper surface. -
Erase pencil marks:
Once the masking is gone, use a soft eraser to gently remove any visible pencil lines left in the white negative spaces.
Level Up: Metallic Pop
Swap out the navy blue paint for a gold metallic watercolor paint in a few select triangles. It catches the light beautiful and adds elegance.
Frame your geometric masterpiece in a simple white mat to let those vibrant autumn colors truly shine in your home


Have a question or want to share your own experience? I'd love to hear from you in the comments below!