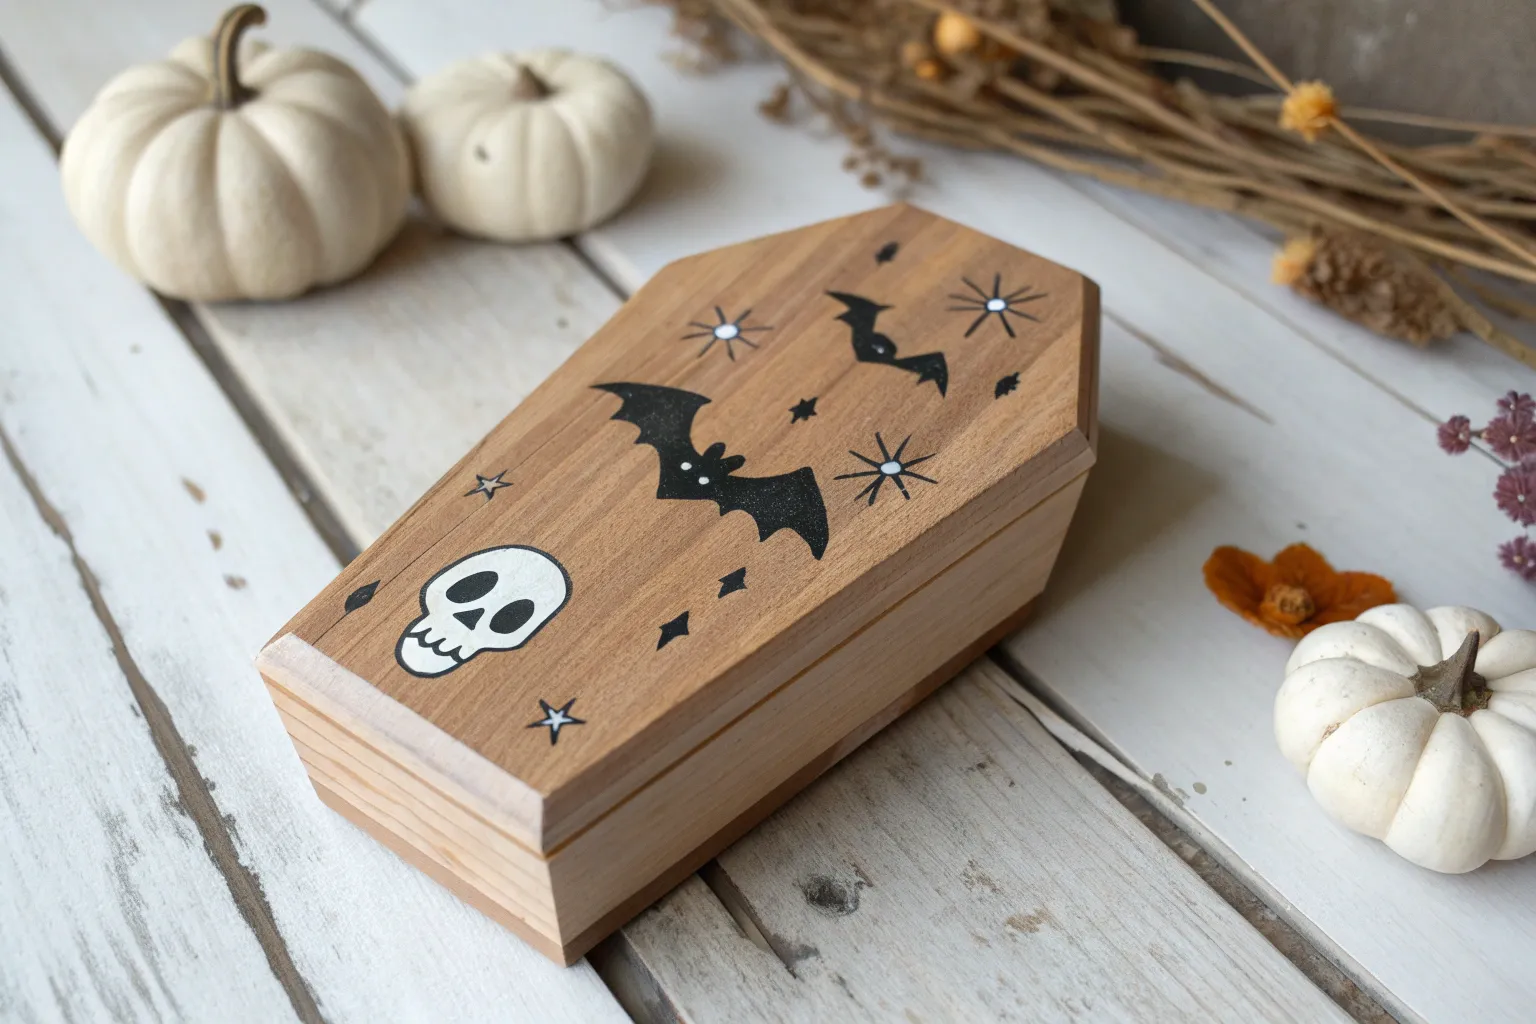
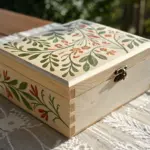
I love painting tiny wooden coffins because that dramatic shape practically begs for a story on the lid and sides. Here are my favorite coffin painting ideas—starting with the classic gothic looks everyone reaches for, then drifting into weirder, more “how did you do that?” territory.
Classic Black Coffin With White Skull
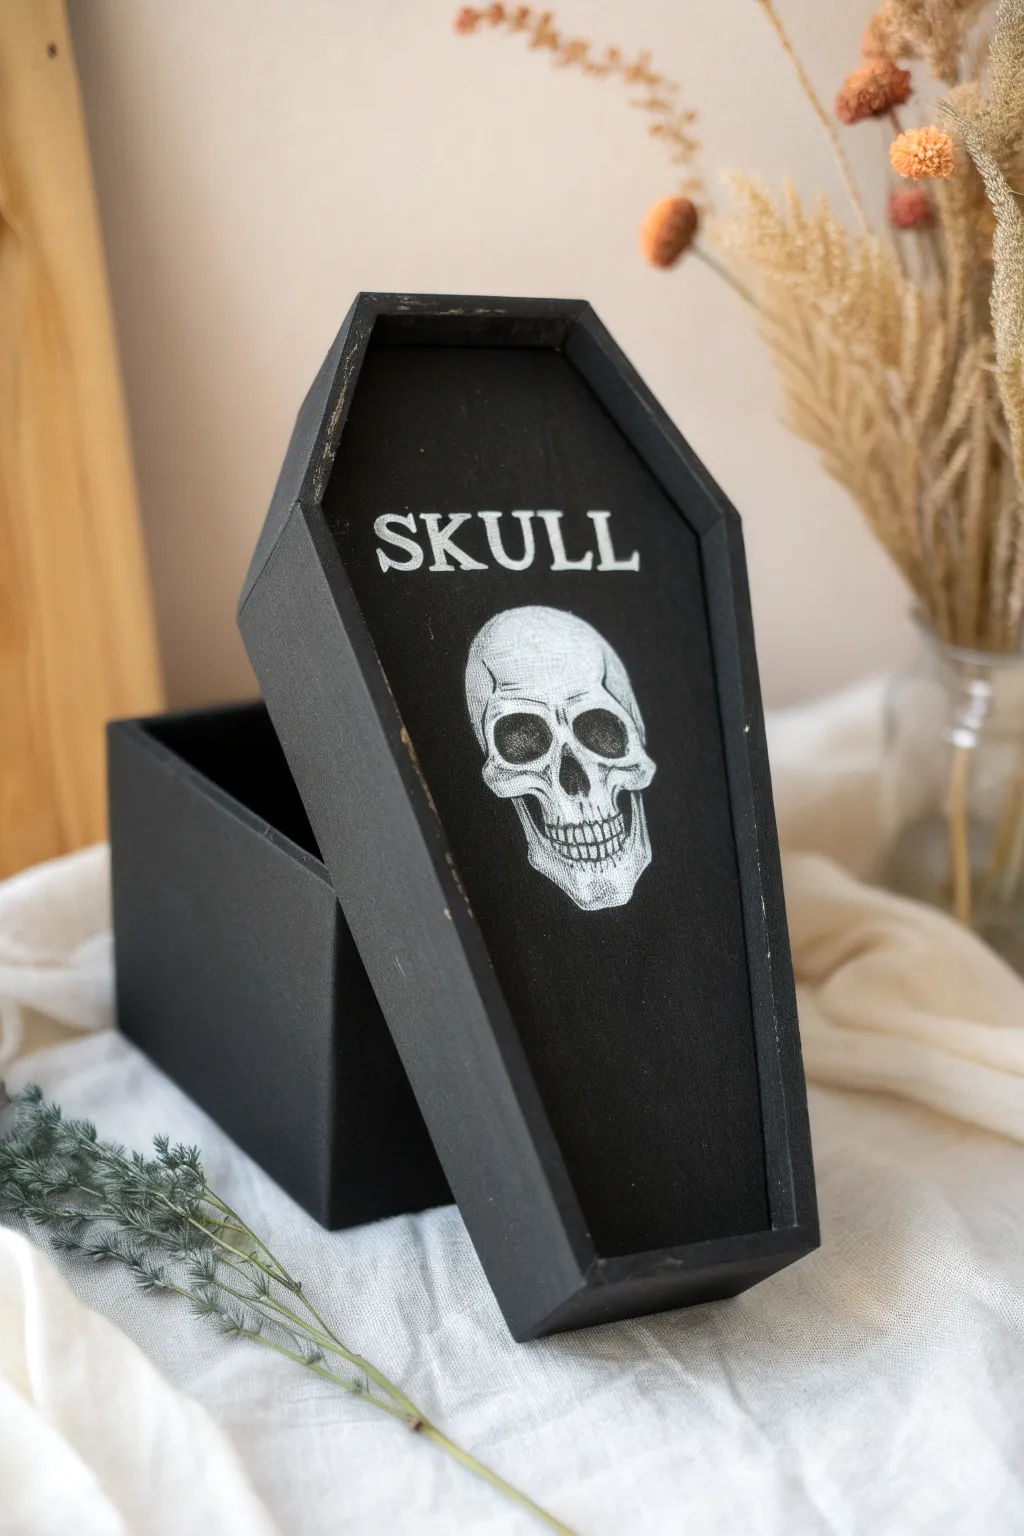
Embrace a stark and classic goth aesthetic with this matte black coffin box features a highly detailed skull illustration. The contrast between the dark base and the white anatomical drawing creates a striking piece perfect for jewelry storage or Spooky Season decor.
Detailed Instructions
Materials
- Unfinished wood coffin box (approx. 6-8 inches)
- Matte black acrylic paint
- White paint marker (fine point)
- White paint marker (medium point)
- White charcoal pencil or chalk
- Wide flat paintbrush
- Small printed skull reference image
- Graphite transfer paper (optional)
- Ruler
- Matte spray varnish
Step 1: Base Preparation
-
Clean the surface:
Wipe down your unfinished wooden coffin box with a dry cloth to remove any sawdust or debris. -
Base coat application:
Using a wide flat brush, apply a smooth layer of matte black acrylic paint to the entire outside of the box, including the lid. -
Painting the interior:
Don’t forget the inside; paint the interior walls and floor black for a seamless, high-quality finish. -
Drying time:
Allow the first coat to dry completely for at least 30 minutes. -
Second coat:
Apply a second coat of matte black to ensure full opacity and hide the wood grain completely.
Step 2: Drafting the Design
-
Positioning guides:
Once fully dry, use a ruler and a white charcoal pencil to very lightly mark the vertical center line of the lid. -
Outline the skull:
Sketch the basic outline of a skull on the lower half of the lid using the charcoal pencil. If you aren’t confident drawing freehand, place a printed image over transfer paper and trace it onto the wood. -
Lettering guides:
Above the skull, lightly sketch two parallel horizontal lines to serve as guides for your text height. -
Drafting text:
Sketch the word “SKULL” in a serif font between your guide lines, ensuring the spacing is centered.
Clean Lines Hack
If your white paint marker drags or skips on the wood grain, apply a thin layer of clear matte sealer over the black base coat before drawing.
Step 3: Inking the Artwork
-
Lettering fill:
Use the medium point white paint marker to carefully fill in the letters. You may need two passes to get a solid, bright white against the black background. -
Skull outline:
With the fine point paint marker, trace over your charcoal sketch of the skull’s main contours. -
Blocking values:
Use the paint marker to block in the whitest areas of the forehead and cheekbones. -
Stippling texture:
For the shading around the eyes and jaw, use a stippling technique—tapping the fine tip repeatedly— to create gradients rather than solid lines. -
Detailing teeth:
Draw the teeth carefully. I like to start with the center two teeth and work outward to keep them symmetrical. -
Cross-hatching:
Add depth to the eye sockets and nasal cavity by using very fine hatching lines around the edges where the bone curves inward.
Shaky Hands?
If your lines look wobbly, go back in with a small brush and the original black background paint to “erase” and tidy up the edges.
Step 4: Finishing Touches
-
Clean up:
Once the paint marker ink is completely dry (give it 15 minutes), gently wipe away any visible charcoal guide lines with a slightly damp cloth. -
Distressing (optional):
If you want the edges to look slightly worn like the reference, lightly sand the sharp corners of the lid with fine-grit sandpaper. -
Sealing:
Take the box outside or to a well-ventilated area and apply a light coat of matte spray varnish to protect the paint without adding unwanted shine.
Place this striking piece on your shelf and enjoy the classic macabre vibe you’ve created


Bat Silhouettes Over a Twilight Gradient
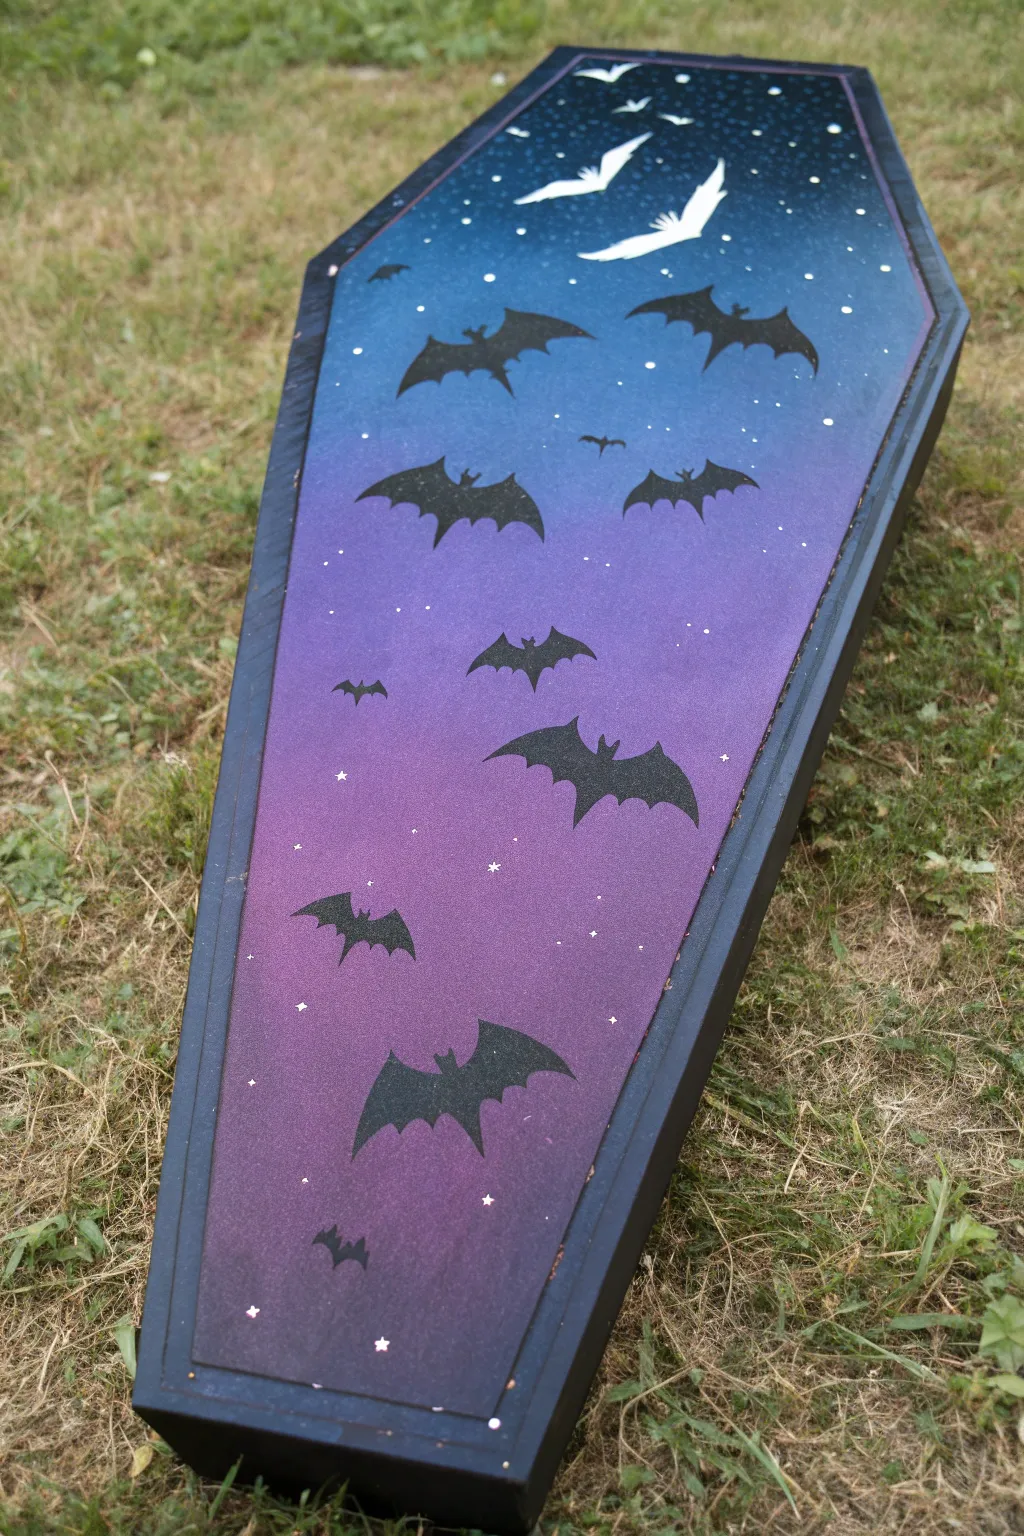
Transform a plain wooden coffin cutout or prop into a spooky masterpiece with this celestial design. You’ll create a seamless ombre sky fading from deep midnight blue to mystical purple, punctuated by a swarm of sharp bat silhouettes.
Detailed Instructions
Materials
- Wooden coffin box or prop
- Sandpaper (medium and fine grit)
- Black acrylic paint or spray paint (for base/edges)
- Acrylic paints: Dark Navy Blue, Royal Blue, Violet/Purple, White
- Sponges or blending brushes
- Bat stencils or sticker decals (various sizes)
- Small detail paintbrush
- Black matte paint (if painting stencils manually)
- Silver paint pen or fine brush (optional for stars)
- Clear matte sealer spray
Step 1: Preparation & Base Coat
-
Prepare the surface:
Start by lightly sanding your wooden coffin shape to ensure a smooth painting surface. Wipe away any dust with a damp cloth or tack cloth. -
Paint the edges:
Using black acrylic paint (or black spray paint for speed), coat the outer sides and the rim of the coffin. This creates a sharp frame for your artwork. -
Prime the top:
Apply a base coat of white or very light gray to the top surface where the gradient will go. This helps the blue and purple colors pop more vibrantly than they would on bare wood.
Smoother Blends
Add a drop of ‘acrylic retarder’ medium to your paints. It slows drying time, giving you longer to blend that perfect ombre sky.
Step 2: Creating the Twilight Gradient
-
Map out your colors:
Squeeze out your Dark Navy, Royal Blue, and Violet paints onto a palette. You visualize the gradient moving from dark at the top (widest part) to lighter purple at the bottom. -
Apply the darkest blue:
Using a sponge or wide brush, apply the Dark Navy paint to the top third of the coffin lid. Don’t worry about a perfect edge at the bottom yet. -
add the mid-tone:
Apply the Royal Blue directly below the darker navy. While both paints are still wet, use your sponge to dab along the line where they meet, blending them into a smooth transition. -
Finish with purple:
Apply the Violet shade to the bottom section. Blend it upward into the Royal Blue using the same dabbing technique. I find a slightly damp sponge helps the acrylics merge seamlessly here. -
Let it cure:
Allow the gradient background to dry completely. This is crucial—if the paint is tacky, your stencils or stickers might peel it off later.
Step 3: Bats & Stars
-
Plan the swarm:
Arrange your bat decals or stencils on the dry surface. Place larger bats near the top and middle, and smaller ones toward the bottom to create a sense of distance. -
Apply the silhouettes:
If using stickers, apply them firmly now. If using stencils, sponge black paint gently over the stencil openings using a vertical dabbing motion to prevent bleed-under. -
Add white bats (optional):
To add depth, paint one or two white bats near the top ‘moonlight’ area. This makes them look like they are caught in a beam of light. -
Create the stars:
Dip a toothbrush or stiff brush into watered-down white paint. Run your thumb over the bristles to flick tiny speckles across the entire piece for a starry effect. -
Hand-paint larger stars:
Use a fine detail brush or a silver paint pen to add a few larger, cross-shaped twinkle stars or distinct dots among the spray of stars.
Stencil Bleeding?
If paint bleeds under your stencil, wait for it to dry, then clean up the edges with the background color using a tiny liner brush.
Step 4: Finishing Touches
-
Clean up edges:
If any gradient paint spilled onto the black rim, touch it up with your black paint for a crisp border. -
Seal the artwork:
Once everything is bone dry, take the project outside and apply a coat of clear matte sealer. This protects the finish and unifies the sheen of the different paint layers.
Display your new gothic decor piece proudly as a spooky seasonal accent or year-round statement


Haunted Cemetery Scene on the Lid
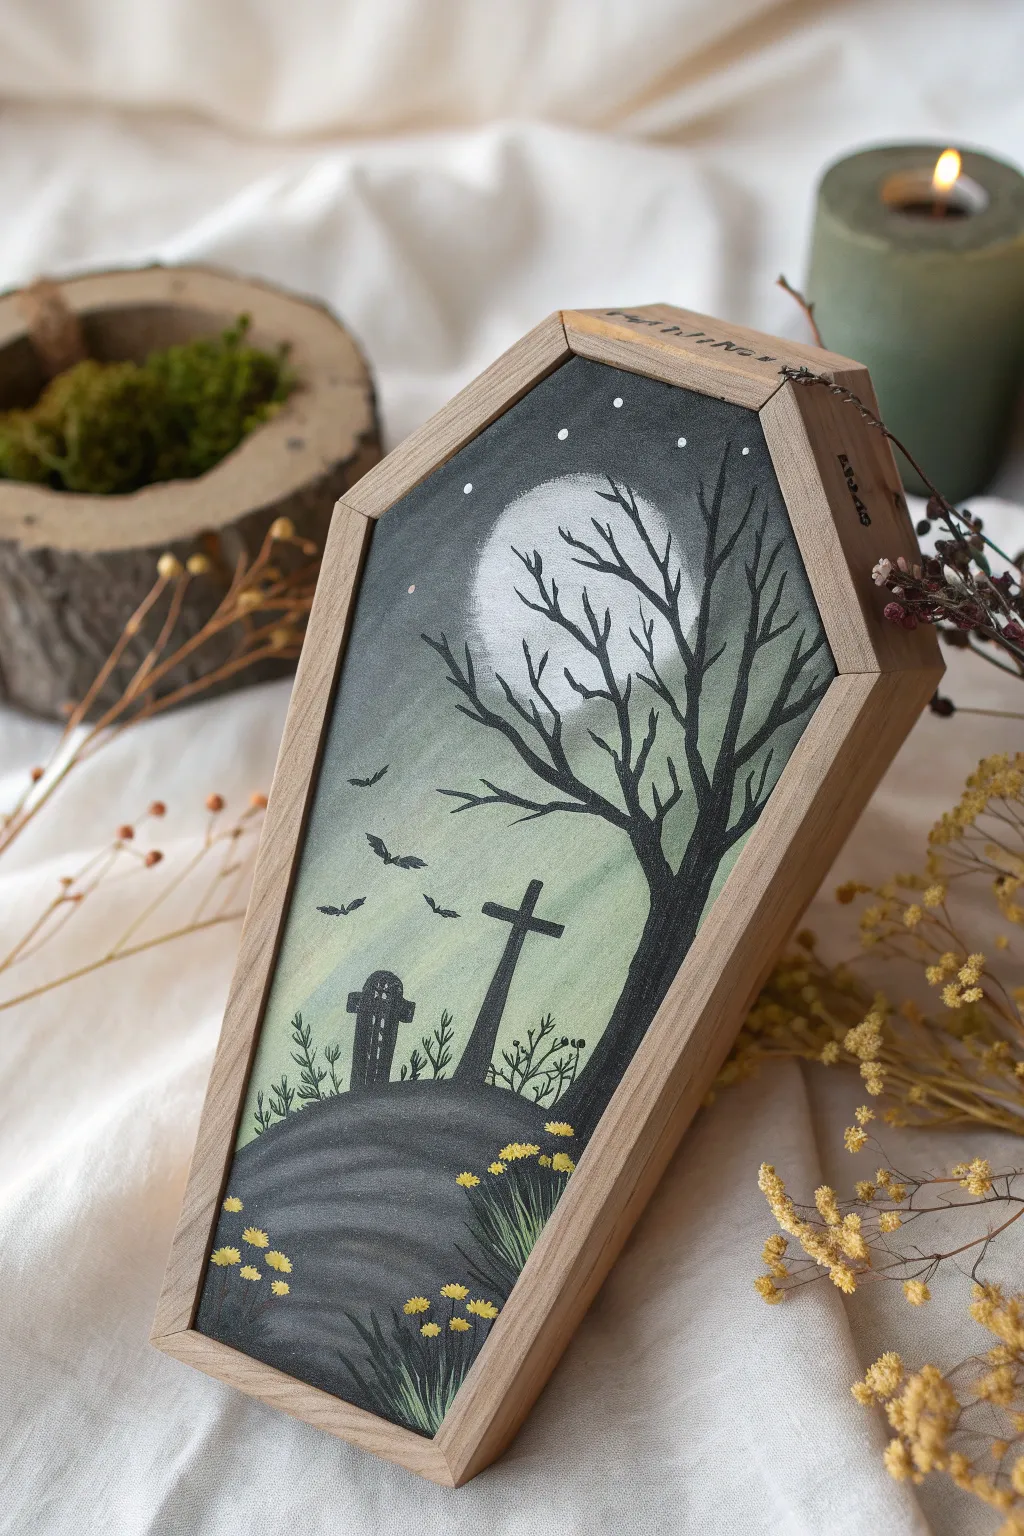
Transform a simple wooden coffin box into a spooky yet charming piece of decor with this moonlit cemetery scene. Dark silhouettes against a glowing, misty background create a haunting atmosphere perfect for Halloween or gothic-style home accents.
Step-by-Step
Materials
- Unfinished wooden coffin box
- Sandpaper (fine grit)
- Acrylic paints (black, white, moss green, pale yellow or cream)
- Blending brush or makeup sponge
- Fine liner brush
- Small flat brush
- Pencil for sketching
- Matte varnish or sealant
Step 1: Preparing the Canvas
-
Surface prep:
Begin by lightly sanding the top of your wooden coffin lid to ensure a smooth painting surface. Wipe away any dust with a damp cloth or tack rag. -
Base coat:
Apply a base coat of pale, misty green paint mixed with a fair amount of white to the entire lid surface. This sets the foggy, ethereal tone for the background sky.
Moon Glow Trick
To get that soft, diffused moon glow, use your finger to smudge the white paint outwards while it is still slightly wet on the wood.
Step 2: Creating the Atmosphere
-
Painting the moon:
While the background is dry, use pure white paint to create a large circle near the top center for the full moon. Don’t worry about making it perfectly round; a slightly organic shape adds character. -
Adding the glow:
Using a dry brush or sponge, lightly dab a mix of white and your pale green around the edges of the moon to create a hazy, glowing halo effect that fades into the background. -
Painting the hills:
Mix a dark grey-green shade. Paint rolling hills at the bottom third of the coffin lid. Use curved, sweeping strokes to suggest the shape of the land. -
Drawing the stars:
Dip the tip of a fine brush or a toothpick into white paint. Add tiny dots scattered across the darker upper sections of the sky to represent distant stars.
Clean Edges
If you accidentally paint over the wood frame edge, use a damp Q-tip immediately to wipe it clean before the acrylic paint can set.
Step 3: The Silhouetted Scene
-
Sketching the tree:
With a pencil, very lightly sketch the main trunk of a large, gnarled tree on the right side. The trunk should curve slightly, following the angle of the coffin’s edge. -
Painting the trunk:
Using black acrylic and a small flat brush, fill in the tree trunk. Make the base wider where it meets the hill and taper it as it goes up. -
Adding branches:
Switch to your fine liner brush. Paint jagged, intricate branches extending from the trunk across the moon. Ensure the tips are thin and sharp for that eerie, skeletal look. -
Adding grave markers:
Paint two black silhouettes on the rising hill: one simple cross and one rounded tombstone. Keep the shapes solid and opaque against the lighter sky. -
Painting bats:
Add three or four small bat silhouettes in the sky on the left side. Use simple ‘M’ shapes with extended wings to imply flight.
Step 4: Finishing Details
-
Adding grass texture:
Using the fine liner brush and black paint, add quick, upward flicking strokes at the base of the tree and along the hill’s edge to simulate tall grass. -
Painting flowers:
Dip the very tip of a small brush into yellow paint. Dot small clusters of flowers onto the black grassy areas to add a pop of color and contrast. -
Adding highlights:
Mix a tiny bit of white into your black paint to create a dark grey. Add subtle highlights to the right side of the tombstones and tree trunk to suggest moonlight hitting them. -
Sealing the work:
Once the painting is completely dry—I usually wait a few hours to be safe—apply a coat of matte varnish to protect your artwork without adding unwanted gloss.
Display your haunted masterpiece on a bookshelf or use it as a unique jewelry box to hold your favorite trinkets


Gothic Cross and Scrollwork Details
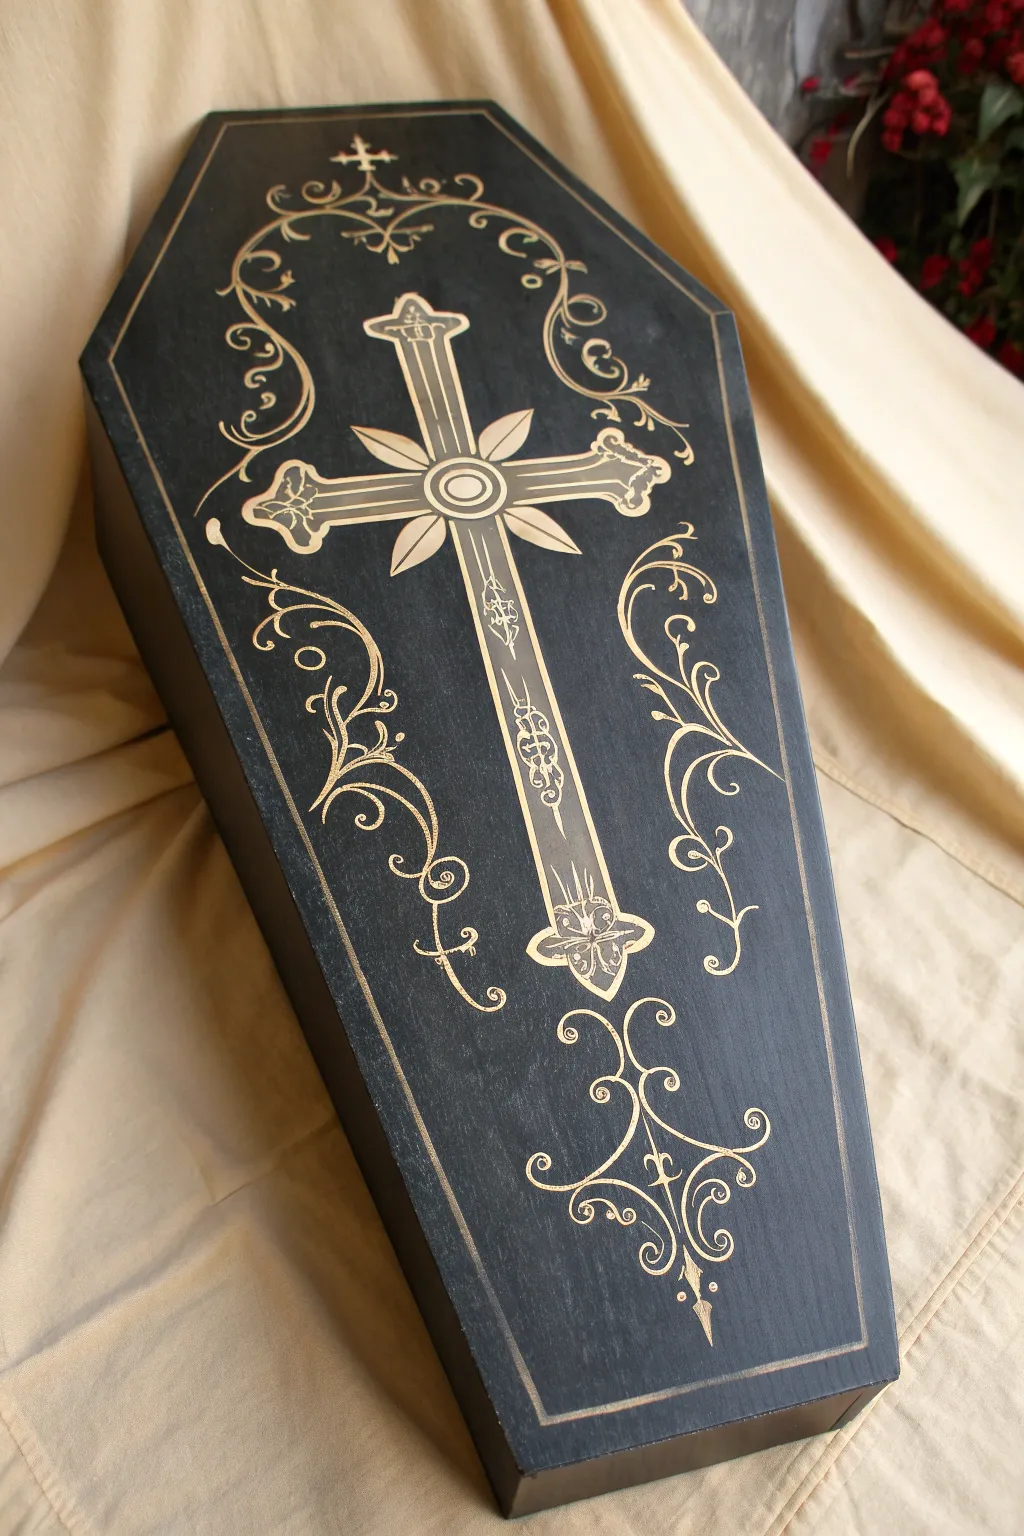
Transform a plain wooden coffin box into a stunning gothic keepsake with this elegant black and gold design. Featuring a central cross and delicate scrollwork, the finished piece has a classic, slightly weathered look perfect for spooky decor or storing precious trinkets.
Step-by-Step Tutorial
Materials
- Unfinished wooden coffin box (approx. 12 inches)
- Matte black acrylic craft paint
- Metallic gold paint marker (fine point)
- Metallic gold paint marker (medium point)
- White chalk pencil or graphite transfer paper
- Ruler or straight edge
- Printed cross and scrollwork pattern (optional)
- Small flat paintbrush
- Matte spray varnish or sealant
- Fine-grit sandpaper (220 grit)
Step 1: Preparation and Base Coat
-
Prepare the surface:
Begin by lightly sanding your wooden coffin box with 220-grit sandpaper. You want to remove any rough splinters or uneven patches to ensure the paint glides on smoothly. Wipe away all dust with a damp cloth or tack cloth. -
Apply the first coat of black:
Using a flat paintbrush, cover the entire exterior of the box (lid and base) with matte black acrylic paint. Brush in the direction of the wood grain for the best finish. -
Let it dry completely:
Allow the first coat to dry for at least 30 minutes. If the wood grain is still showing through, apply a second coat for a deep, opaque black finish. -
Define the borders:
Once the black paint is fully cured, use a ruler and a white chalk pencil to lightly mark a border about 1/4 inch from the edge of the coffin lid. This creates a frame for your artwork.
Smudge Control
If you accidentally smudge the gold ink while it’s wet, quickly wipe it with a damp Q-tip. If it stains, let it dry completely, paint over the mistake with black, and redraw the line.
Step 2: Drafting the Design
-
Mark the center:
Find the vertical center line of the coffin lid using your ruler and mark it lightly with the chalk pencil. This is crucial for keeping the cross symmetrical. -
Sketch the central cross:
Draw the outline of the main cross in the middle of the lid. If you aren’t confident in your freehand drawing, you can print a cross shape, cut it out, and trace it onto the box using transfer paper. -
Add the cross details:
Inside the cross outline, sketch the inner parallel lines and the central circle motif. This layered look gives the design dimension. -
Sketch the scrollwork:
Lightly draw the swirling vines and filigree patterns surrounding the cross. Start from the corners and work inward, ensuring the curves flow naturally towards the center. -
Add the peripheral details:
Don’t forget the smaller details, like the tiny cross at the very top and the decorative anchor-like flourish at the bottom point of the coffin.
Step 3: Painting the Gold Details
-
Trace the border:
Take your medium-point gold paint marker and carefully trace over the border lines you marked earlier. Use a ruler as a guide if you have a steady hand, or just go slowly freehand for a more organic look. -
Outline the cross:
Switch to the fine-point gold marker to outline the main cross shape. I prefer to anchor my pinky finger on the table to keep my hand steady during these long lines. -
Fill in the cross accents:
Draw the internal lines of the cross and the petal-like shapes radiating from the center circle. Use the fine tip to create the delicate hatching or texture inside the cross arms. -
Ink the upper scrollwork:
Work your way from the top down to avoid smudging wet ink. Trace the vines and leaves at the top of the coffin with the fine-point marker. -
Ink the lower scrollwork:
Continue tracing the swirling designs on the bottom half. Vary your pressure slightly; pressing harder creates a thicker line for the main vine, while lighter pressure makes delicate tendrils. -
Clean up sketch lines:
Allow the gold marker to dry for at least an hour to prevent smearing. Gently wipe away any visible white chalk marks with a slightly damp cotton swab or cloth.
Antique Effect
After the gold is dry, lightly dry-brush a tiny amount of black paint over the brightest gold sections to make the design look aged and worn.
Step 4: Finishing Touches
-
Add highlights:
If any gold areas look transparent, go over them a second time with the marker to make the metallic color pop against the dark background. -
Seal the artwork:
To protect your handiwork from scratches, take the box to a well-ventilated area and apply a light coat of matte spray varnish over the lid and sides.
Your finished coffin now has a beautifully ornate, handcrafted aesthetic that balances elegance with gothic charm
BRUSH GUIDE
The Right Brush for Every Stroke
From clean lines to bold texture — master brush choice, stroke control, and essential techniques.
Explore the Full Guide
Blood-Red Roses on Matte Black
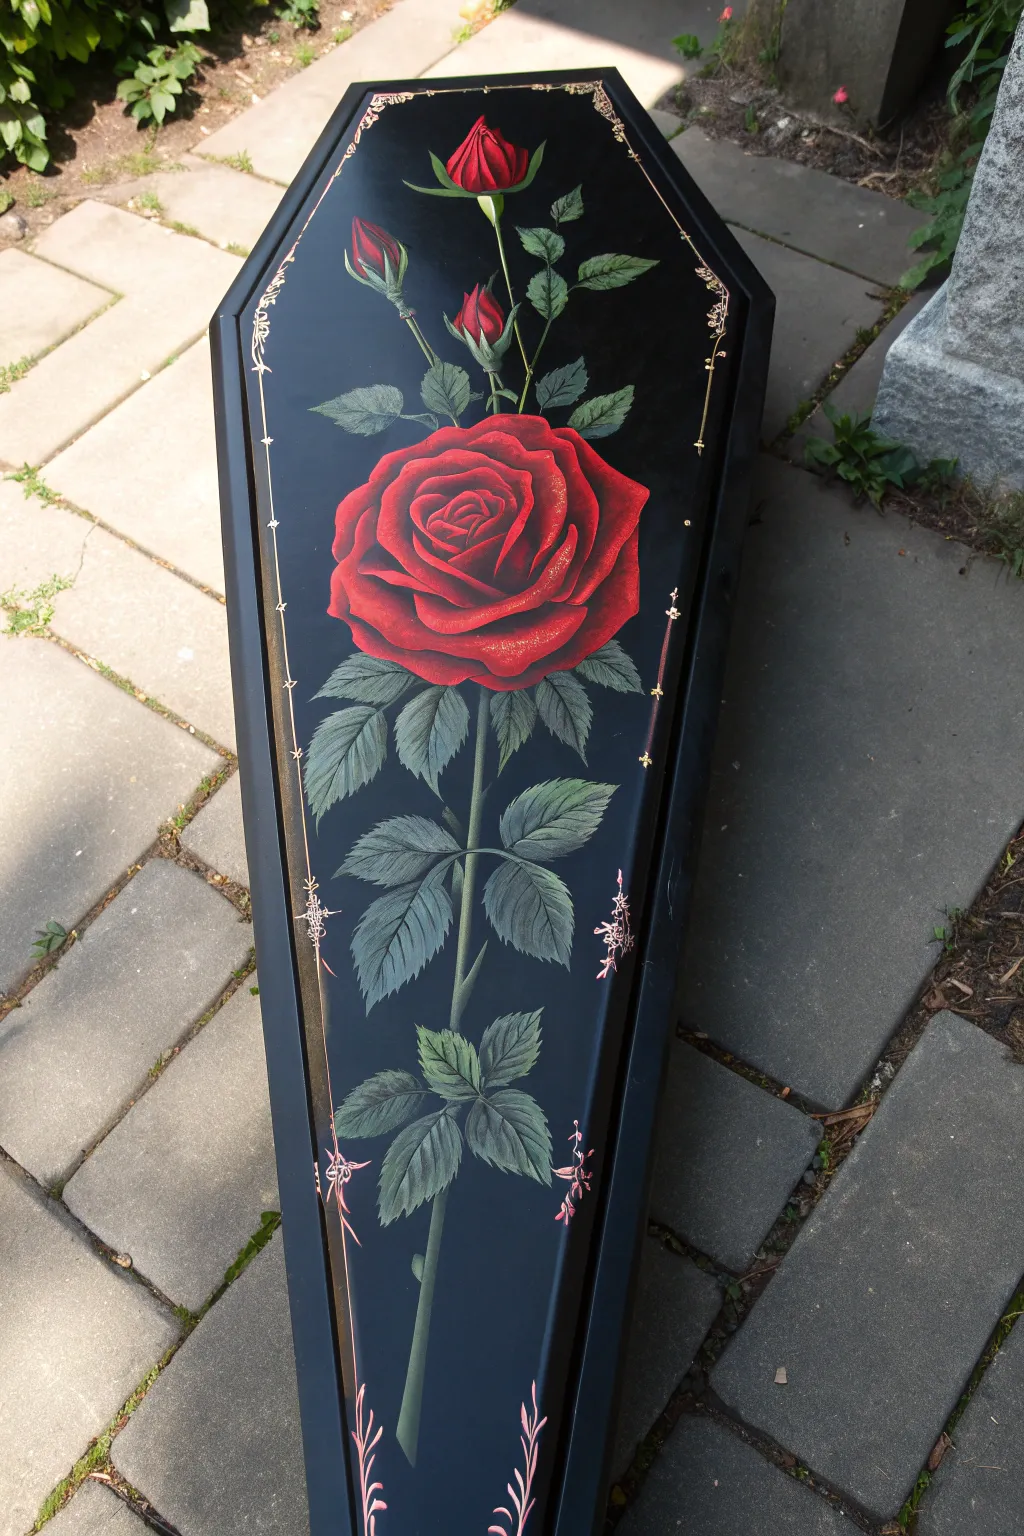
Transform a plain black coffin lid into a stunning piece of gothic art featuring a vibrant, prominent red rose. This project balances the macabre with classical botanical beauty, using dramatic shading and delicate gold filigree to create a show-stopping centerpiece.
How-To Guide
Materials
- Wooden coffin lid (sanded and primed)
- Matte black acrylic or chalk paint
- Titanium White acrylic paint
- Cadmium Red acrylic paint
- Alizarin Crimson acrylic paint
- Sap Green acrylic paint
- Hooker’s Green acrylic paint
- Metallic Gold lining paint or fine paint pen
- Glazing medium
- Assorted brushes: 1″ flat, #4 and #6 filbert, fine liner
- Chalk or graphite transfer paper
- Matte or satin spray varnish
Step 1: Preparation & Base Coat
-
Prepare the surface:
Start by ensuring your coffin lid is perfectly smooth. Sand away any rough patches with fine-grit sandpaper and wipe away the dust with a tack cloth. -
Apply the black base:
Using a wide flat brush or a small roller, apply two to three coats of matte black paint. Allow each coat to dry completely before applying the next to ensure a solid, opaque background. -
Draft the design:
Once the black base is cured, lightly sketch the rose composition using white chalk. Draw a long central stem, a large oval for the main bloom in the upper third, and several triangular shapes for leaf placements. Don’t press too hard; you just need guides.
Step 2: Painting the Rose Bloom
-
Base the rose shape:
Mix Cadmium Red with a tiny drop of Hooker’s Green to deepen it slightly. Fill in the main rose silhouette and the two upper buds with this base red color. -
Define the shadows:
While the base is still slightly tacky, mix Alizarin Crimson with a touch of black. Paint the deepest recesses of the petals—the center swirl and the areas where petals overlap—to create depth. -
Highlight the petals:
Mix Cadmium Red with a little Titanium White to create a vibrant highlight shade. Using a filbert brush, gently stroke the upper edges of the petals, curving your strokes to follow the petal’s natural curl. -
Blend the gradients:
Use a clean, damp soft brush to feather the edges between your shadows and highlights. The transition should be smooth, giving the petals a velvety appearance. -
Detail the rosebuds:
Repeat the highlighting process on the two small buds at the top. Keep the paint fairly tight and controlled here, showcasing the tightly wound petals.
Smooth Gradients
For velvety rose petals, use a retarder or slow-drying medium with your acrylics. This keeps the paint wet longer, allowing for seamless blending.
Step 3: Leaves & Stems
-
Paint the stem:
Using a liner brush and a mix of Hooker’s Green and a touch of black, paint the long central stem and the smaller stems connecting the buds. Keep lines relatively thin but strong. -
Block in the leaves:
Fill in your leaf outlines with Sap Green. Follow the natural growth pattern—sets of leaves branching out from the main stem. -
Add leaf texture:
Mix a lighter green using Sap Green and white. With a small round brush, paint the veins on each leaf. Start with a central vein and feather outward to the serrated edges. -
Deepen leaf shadows:
Glaze a thin layer of Hooker’s Green over the lower halves of the leaves. This pushes them back visually and makes the lighter veins pop forward.
Gothic Gold Leaf
Instead of gold paint, use gold leaf size and real imitation gold leaf for the border filigree. It catches the light dramatically against the matte black.
Step 4: Final Flourishes
-
Clean up edges:
If red or green paint spilled onto the black background, touch it up now with your matte black paint for a crisp silhouette. -
Paint the gold border:
Using a fine liner brush and metallic gold paint (or a gold paint pen for easier control), draw the delicate filigree border. Follow the edge of the lid, adding small ornate twists or ‘thorns’ at regular intervals. -
Add corner details:
Enhance the top and bottom corners with slightly more elaborate gold flourishing to frame the piece elegantly. -
Seal the artwork:
Once all paint is thoroughly dry (give it at least 24 hours), apply a clear spray varnish. A satin finish works beautifully to protect the art without creating distracting glare.
Display your masterpiece proudly as a unique wall hanging or a functional piece of evocative decor
Vampire-Inspired Velvet and Fangs
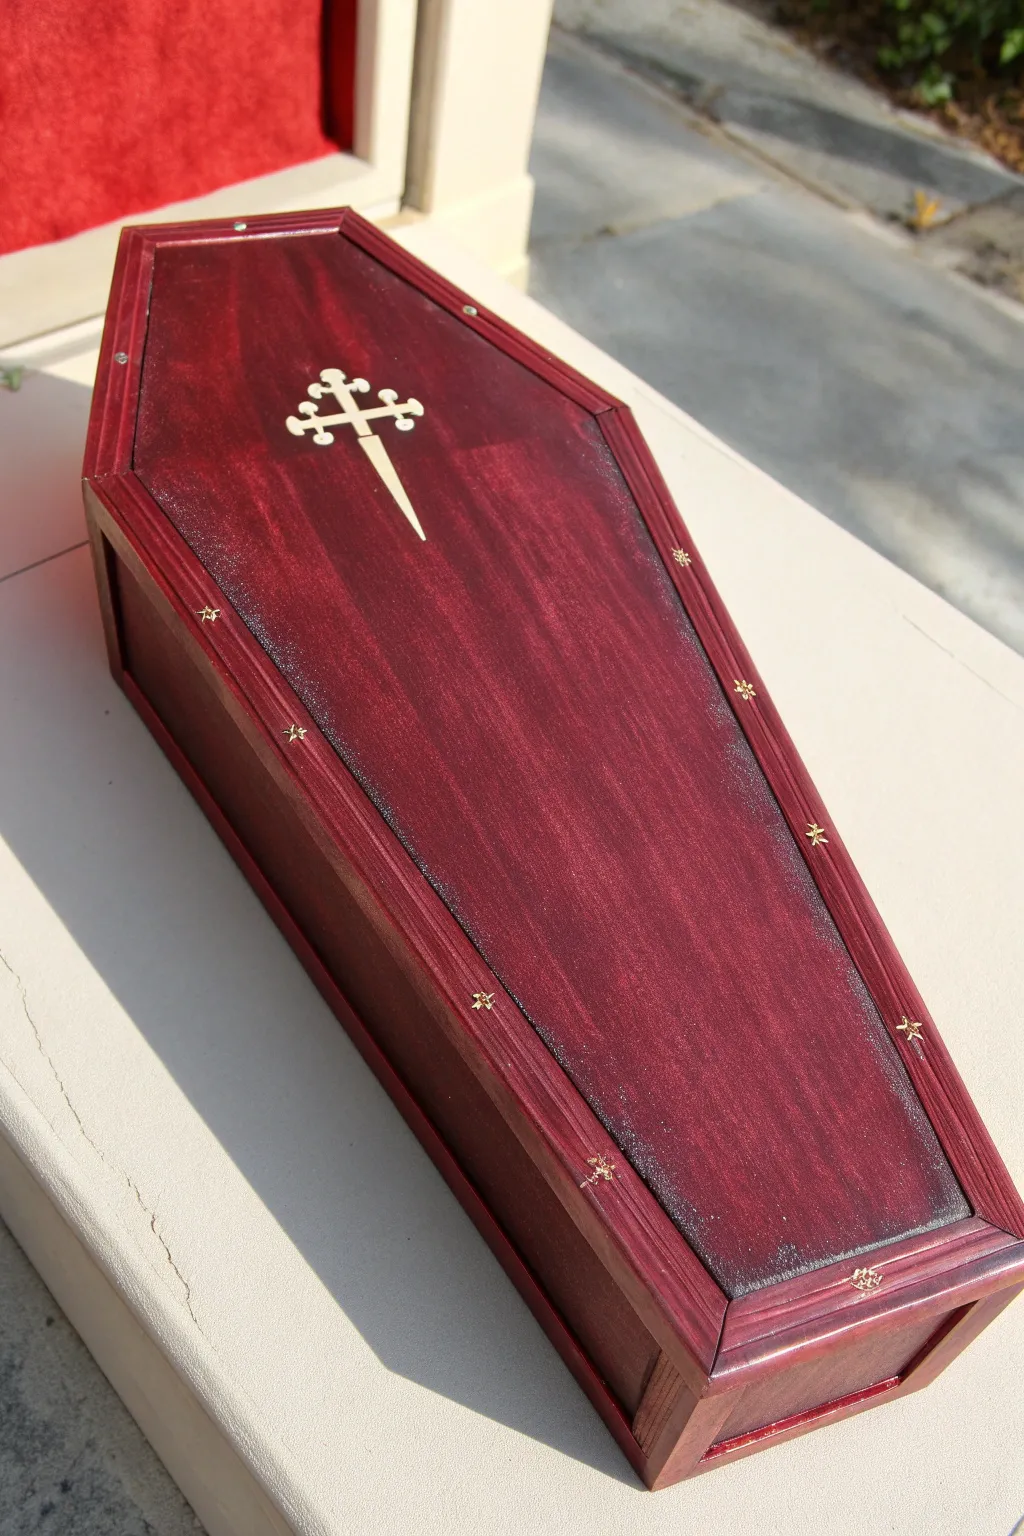
This project transforms a simple wooden coffin box into a gothic masterpiece featuring deep crimson stains, gold accents, and a distinctive blade-cross motif. The result is a luxurious, velvet-inspired container perfect for Halloween décor or year-round gothic storage.
Step-by-Step Tutorial
Materials
- Unfinished wooden coffin box
- Deep burgundy or crimson wood stain (water-based preferred)
- Black acrylic paint (for weathering)
- Gold paint pen or gold acrylic paint
- Fine-grit sandpaper (220 grit)
- Painter’s tape
- Wood glue
- Small wooden star or cross embellishments
- Fine glitter spray or shimmer topcoat (optional)
- Glossy polyurethane varnish
- Stencil vinyl or pre-cut cross-dagger stencil
- Small foam brushes and detail brushes
- Rag or staining pad
Step 1: Preparation and Base Stain
-
Sand the Box:
Begin by lightly sanding the entire wooden coffin box, inside and out. Pay special attention to any rough saw marks on the edges. Wipe away all dust with a tack cloth or slightly damp rag to ensure the stain applies evenly. -
Apply the First Stain Coat:
Using a foam brush or rag, apply a generous coat of deep crimson wood stain to the lid and box body. Work with the grain of the wood. Since pine boxes can be thirsty, I usually let this first coat sit for about 2-3 minutes before wiping off the excess. -
Build the Color Depth:
Allow the first coat to dry according to the manufacturer’s instructions. If the color looks too pink or light, apply a second coat. For that deep, vampiresque blood-red look, you want a very saturated finish. -
Shadow the Edges:
To give the box an aged appearance, lightly dry-brush a tiny amount of black acrylic paint along the very corners and seams while the stain is fully dry. Blend it inward quickly so there are no harsh lines.
Step 2: The Cross Motif
-
Position the Stencil:
Create a stencil for the central design—a cross that tapers into a dagger point. Center this vertically on the coffin lid. Press the stencil vinyl down firmly to prevent paint bleed. -
Paint the Symbol:
Using a small stippling brush or sponge, dab gold acrylic paint into the stencil area. Use very little paint to keep edges crisp. You might need two layers for opaque coverage against the dark wood. -
Remove and Refine:
Carefully peel away the stencil while the paint is still slightly tacky. If any stain bled or lines look fuzzy, use a tiny detail brush and some of your original stain color to clean up the edges.
Bleeding Stencil Lines?
If gold paint bleeds under your stencil, scratch the excess away gently with an X-Acto knife once dry, or touch up with a fine liner brush and the original red stain.
Step 3: Trim and Embellishments
-
Prepare the Trim:
The box in the photo features a raised frame around the lid’s edge. If your box is plain, glue thin strips of balsa wood or molding trim around the perimeter of the lid. Stain these strips to match the box body perfectly. -
Add the Gold Stars:
Take your small wooden star or cross embellishments and paint them a bright metallic gold. Let them dry completely on a separate sheet of paper. -
Attach the Accents:
Using tiny dots of clear-drying wood glue or super glue, affix the gold stars at regular intervals along the decorative trim of the lid. Measurement is key here for a professional look. -
Add Subtle Shimmer:
For that magical, velvet-like sheen seen in the photo, lightly mist the painted lid with a fine glitter spray. You don’t want it to look like a disco ball, just a subtle sparkle that catches the light.
Richness Pro Tip
To get that ultra-deep burgundy without buying new stain, mix a drop of purple acrylic paint into your red stain. It cools the tone and adds a gothic richness.
Step 4: Final Glaze and Assembly
-
Seal the Wood:
Apply a coat of glossy polyurethane varnish over the entire box. The gloss finish deepens the red stain and mimics the look of polished mahogany or lacquered wood. -
Sand Between Coats:
Once the first layer of varnish is dry, lightly sand it with high-grit sandpaper to knock down any bumps, then wipe clean. This step is crucial for a glass-smooth finish. -
Final Coat:
Apply a second, final coat of gloss varnish. Let this cure for at least 24 hours to ensure it is hard and durable. -
Hardware Check:
If your box came with hinges or latches removed for painting, reattach them now. Cleaning any stain off the metal hardware with a bit of alcohol makes them pop.
Now you have a stunning, gothic keepsake box ready to hold your most mysterious treasures

PENCIL GUIDE
Understanding Pencil Grades from H to B
From first sketch to finished drawing — learn pencil grades, line control, and shading techniques.
Explore the Full Guide
Witchy Potion Labels and Apoth Jars
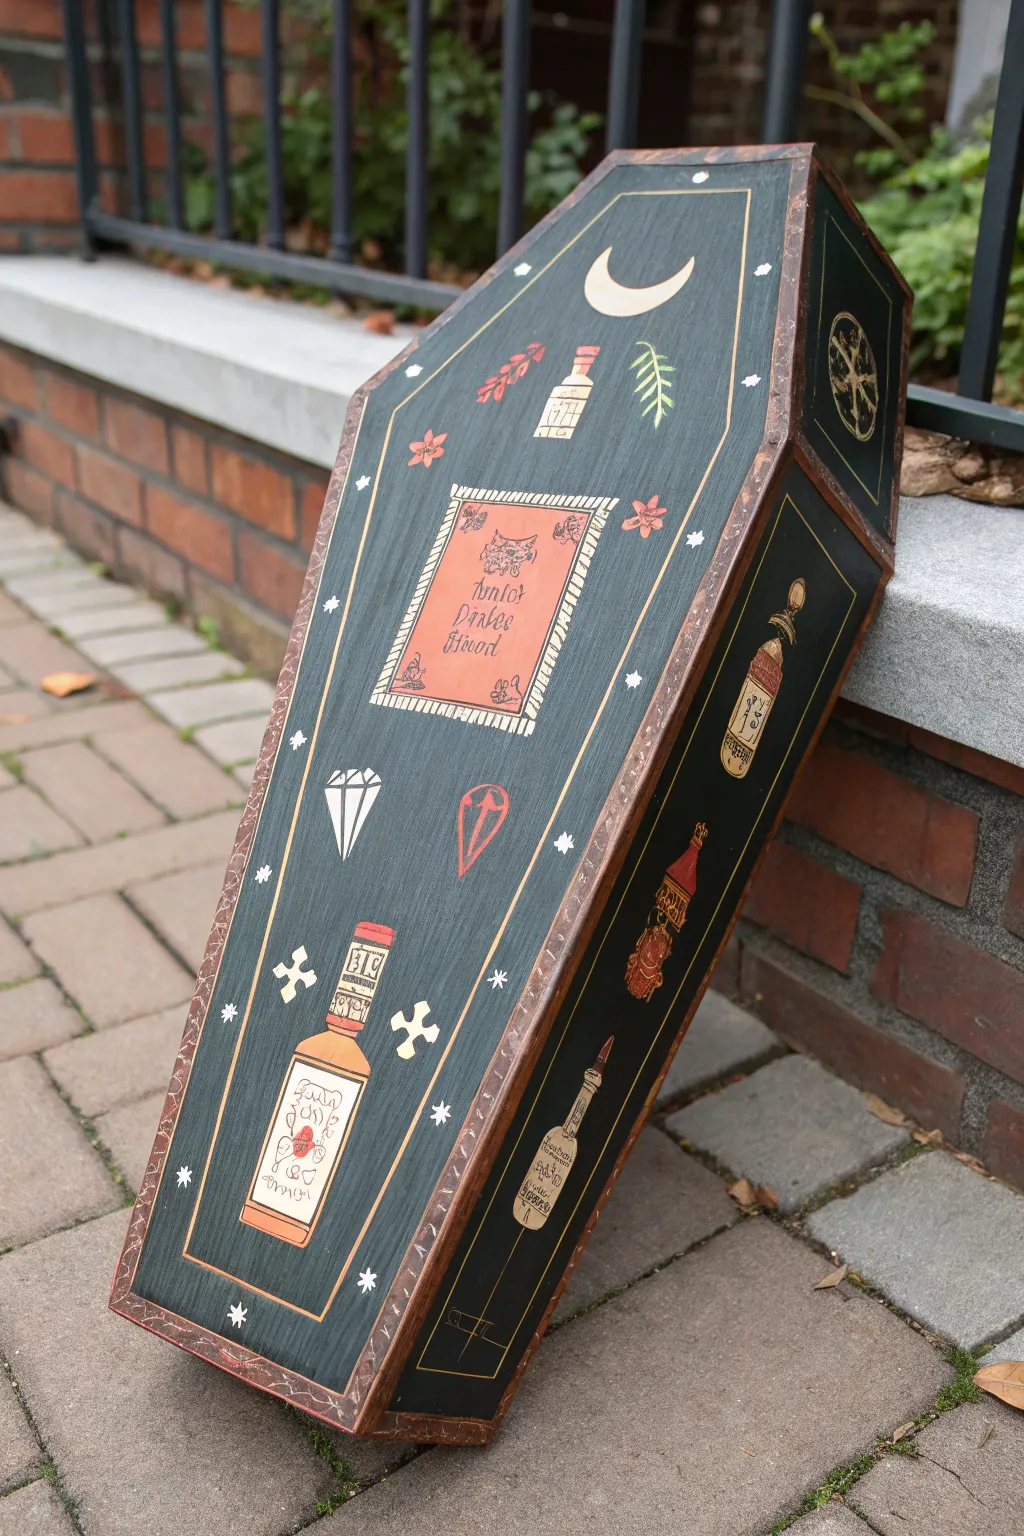
Transform a plain wooden coffin box into a mysterious apothecary storage chest featuring hand-painted potion motifs and folk art details. This project combines deep, moody base colors with whimsical illustrations of bottles, herbs, and celestial symbols for a spellbinding finish.
Step-by-Step Guide
Materials
- Wooden coffin box (pre-made or DIY)
- Sandpaper (medium and fine grit)
- Deep charcoal or greenish-black acrylic paint (base)
- Acrylic paints: warm white, metallic gold, copper/rust, burnt orange, bright red, sage green
- Various paintbrushes (wide flat brush, fine liner brush, small angle brush)
- Painter’s tape
- Ruler and pencil
- Matte finish clear coat or varnish
- Sponge or textured cloth (optional)
Step 1: Preparation and Base Coat
-
Prepare the surface:
Begin by sanding your wooden coffin box to remove any rough splinters or existing finish. Wipe away the dust with a slightly damp cloth to ensure a smooth painting surface. -
Apply the dark base:
Coat the entire exterior of the coffin, including the sides and lid, with a deep charcoal or greenish-black acrylic paint. Apply two thin coats rather than one thick one for better coverage, letting it dry completely between layers. -
Create the rustic border:
Paint the raised outer edge of the lid and the corners with a metallic copper or rust-colored paint. To achieve the weathered texture seen in the photo, I like to dab the wet paint lightly with a sponge or a crumpled paper towel.
Steady Hand Trick
For crisp lines on bottles and text, dilute your acrylic paint slightly with water or flow medium. It should be the consistency of heavy cream to glide smoothly.
Step 2: Lid Layout and Central Motif
-
Mark the pinstripes:
Use a ruler and pencil to lightly draw a rectangle inset about one inch from the edge of the coffin lid. This will guide your pinstriping. -
Paint the golden border:
Using a fine liner brush and metallic gold or pale yellow paint, trace over your pencil lines to create a delicate border that frames the top surface. -
Block in the central label:
In the center of the lid, paint a rectangular patch using a muted burnt orange or peach color. This mimics an old paper label glued to the surface. -
Add the fringe detail:
Once the orange rectangle is dry, use a very fine brush and cream-colored paint to create short, diagonal hatch marks around the label, simulating a decorative fringe or rope border. -
Letter the label:
Carefully paint your chosen text—such as “Juniper’s Potions” or “Dragon’s Blood”—inside the orange box using black paint and a steady hand.
Correction fluid?
Made a mistake on the lettering? Don’t panic. Let it dry completely, then paint over the error with the background orange color before trying again.
Step 3: Illustrating the Potions and Symbols
-
Outline the large bottle:
Near the bottom of the lid, sketch a large, rectangular bottle shape. Fill the outline with black or leave the base color showing, then outline it crisply in white or cream. -
Add bottle details:
Paint a label on the large bottle, adding tiny indecipherable script or symbols in red and black ink. Don’t forget to paint a red stopper or cork at the top. -
Paint the side bottles:
On the side panels of the coffin, paint varied bottle shapes—tall skinny vials and round jugs. Use gold and red accents to make them stand out against the dark background. -
Add the celestial moon:
Paint a crescent moon shape near the top of the lid using a flat cream or pale gold color. -
Scatter small motifs:
Fill the empty negative space on the lid with small witchy doodles. Paint simple red flowers, green fern sprigs, and white diamonds or stars. -
Incorporate mystic symbols:
Add small white crosses and starbursts symmetrically around the main elements to balance the composition and enhance the folk-art feel. -
Detail the side panels:
Paint a large wheel or compass symbol on the upper side panel in gold, giving the piece a sense of arcane geometry.
Step 4: Finishing Touches
-
Review and touch up:
Step back and look at your composition. Use a small brush with the base color to tidy up any messy lines or accidental smudges. -
Add texture to the rust:
If the copper border looks too flat, stipple a tiny bit of dark brown or black over it to deepen the ‘rusted’ metal effect. -
Seal the artwork:
Once all paint is thoroughly dry (give it at least 24 hours to be safe), apply a clear matte varnish over the entire box to protect your detailed work from scratches and dust.
Now you have a wonderfully spooky vessel ready to hold your most precious curiosities
Jack-O’-Lantern Patch on a Coffin Panel
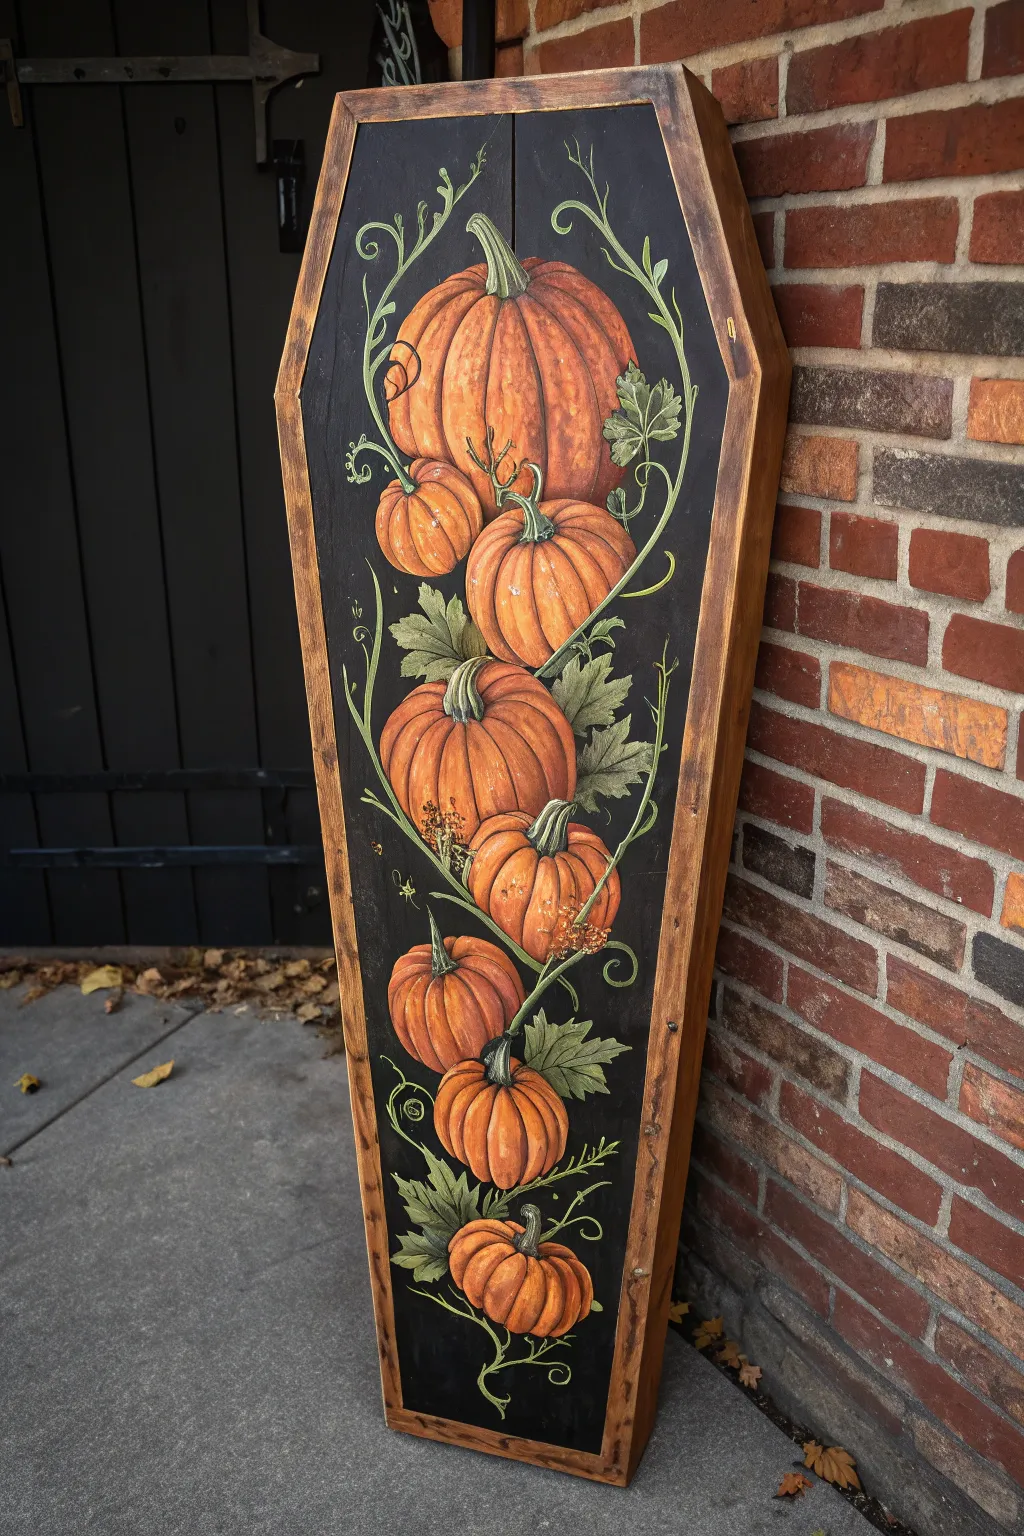
Transform a simple wooden coffin prop into a stunning piece of autumnal porch decor with this stacked pumpkin design. The illustrative style mimics classic tole painting, featuring warm orange gourds tumbling down a stark black background for high contrast.
Step-by-Step Tutorial
Materials
- Wooden coffin panel (around 4-5 feet tall)
- Sandpaper (220 grit)
- Black chalkboard or matte acrylic paint
- Acrylic paints: Pumpkin Orange, Burnt Sienna, Yellow Ochre, Deep Olive Green, Sage Green, White, and Brown
- Large flat brush (for background)
- Assorted round brushes (#4, #8)
- Liner brush (for vines)
- Chalk or white charcoal pencil
- Matte clear sealer spray
Step 1: Preparation & Background
-
Prep the surface:
Begin by lightly sanding the inner panel of your wooden coffin to ensure it’s smooth and ready to accept paint. Wipe away any dust with a damp cloth. -
Base coat:
Using a large flat brush, apply two solid coats of matte black paint to the central panel. Let the first coat dry completely before applying the second to ensure an opaque, chalkboard-like finish. -
Draft the composition:
Once the black paint is bone dry, use a piece of white chalk or a charcoal pencil to lightly sketch eight pumpkins stacked vertically. Start with the largest ones near the top and vary the sizes as you go down, tilting them slightly left and right for a tumbling effect.
Natural Flow
When painting the tendrils, hold the brush at the very end of the handle. This loosens your wrist and creates smoother, more natural-looking curves.
Step 2: Painting the Pumpkins
-
Block in color:
Fill in each pumpkin shape with a base coat of Pumpkin Orange. Don’t worry about shading yet; just get solid coverage within your chalk outlines. You may need two coats here depending on your paint’s opacity. -
Define the ridges:
Mix a little Burnt Sienna with your orange. Use a round brush to paint the curved vertical lines that define the segments (ribs) of the pumpkins. Start from the stem area and curve outward and down toward the bottom center. -
Add shadows:
deepen the shadows between the pumpkin ribs by glazing a thin layer of pure Burnt Sienna or watered-down Brown right along the ridge lines you just painted. -
Highlight the forms:
Mix Yellow Ochre with a touch of White. Dry brush this lighter color onto the center of each pumpkin segment to make them look round and plump. I find using a scruffy, dry brush helps blend the highlight softly into the orange. -
Paint the stems:
Using Deep Olive Green mixed with a little Brown, paint thick, sturdy stems on each pumpkin. Vary the direction—some twisting left, some right. -
Highlight the stems:
Add a thin streak of Sage Green or lightened Brown to the top or side of each stem to show where the light hits the woody texture.
Step 3: Vines & Foliage
-
Sketch the flow:
Plan the movement of your greenery. The vines should weave in and out of the pumpkin stack, connecting them visually from top to bottom. -
Paint main leaves:
Use a #8 round brush and Deep Olive Green to paint large, jagged pumpkin leaves. Place them in gaps between the pumpkins to fill negative space. -
Layer leaf colors:
While the dark green is still tacky, blend in strokes of Sage Green on the tips of the leaves to create dimension and texture. -
Add decorative scrolls:
Load a liner brush with thinned Sage Green paint. Paint delicate, scrolling curlicues and tendrils that extend outward from the vines, filling the black void with elegant swirls. -
Fine details:
Add tiny veins to the leaves using your liner brush and a mix of light green and white.
3D Effect
Make the bottom pumpkins slightly darker and the top ones lighter. This mimics natural lighting and adds visual weight to the base of the stack.
Step 4: Finishing Touches
-
Erase guidelines:
If any white chalk marks are still visible, use a damp Q-tip or a clean, damp brush to gently wipe them away without disturbing the paint. -
Stain the frame:
If the outer wooden rim of the coffin looks too new, apply a diluted brown wash or wood stain to give it an aged, rustic appearance that matches the artwork. -
Seal the work:
Protect your painting from the elements by spraying the entire panel with a matte clear sealer. Apply two light coats rather than one heavy one to avoid drips.
Place your finished coffin masterpiece by the front door to welcome guests with a touch of spooky elegance


Cute Ghosts With Candy Colors
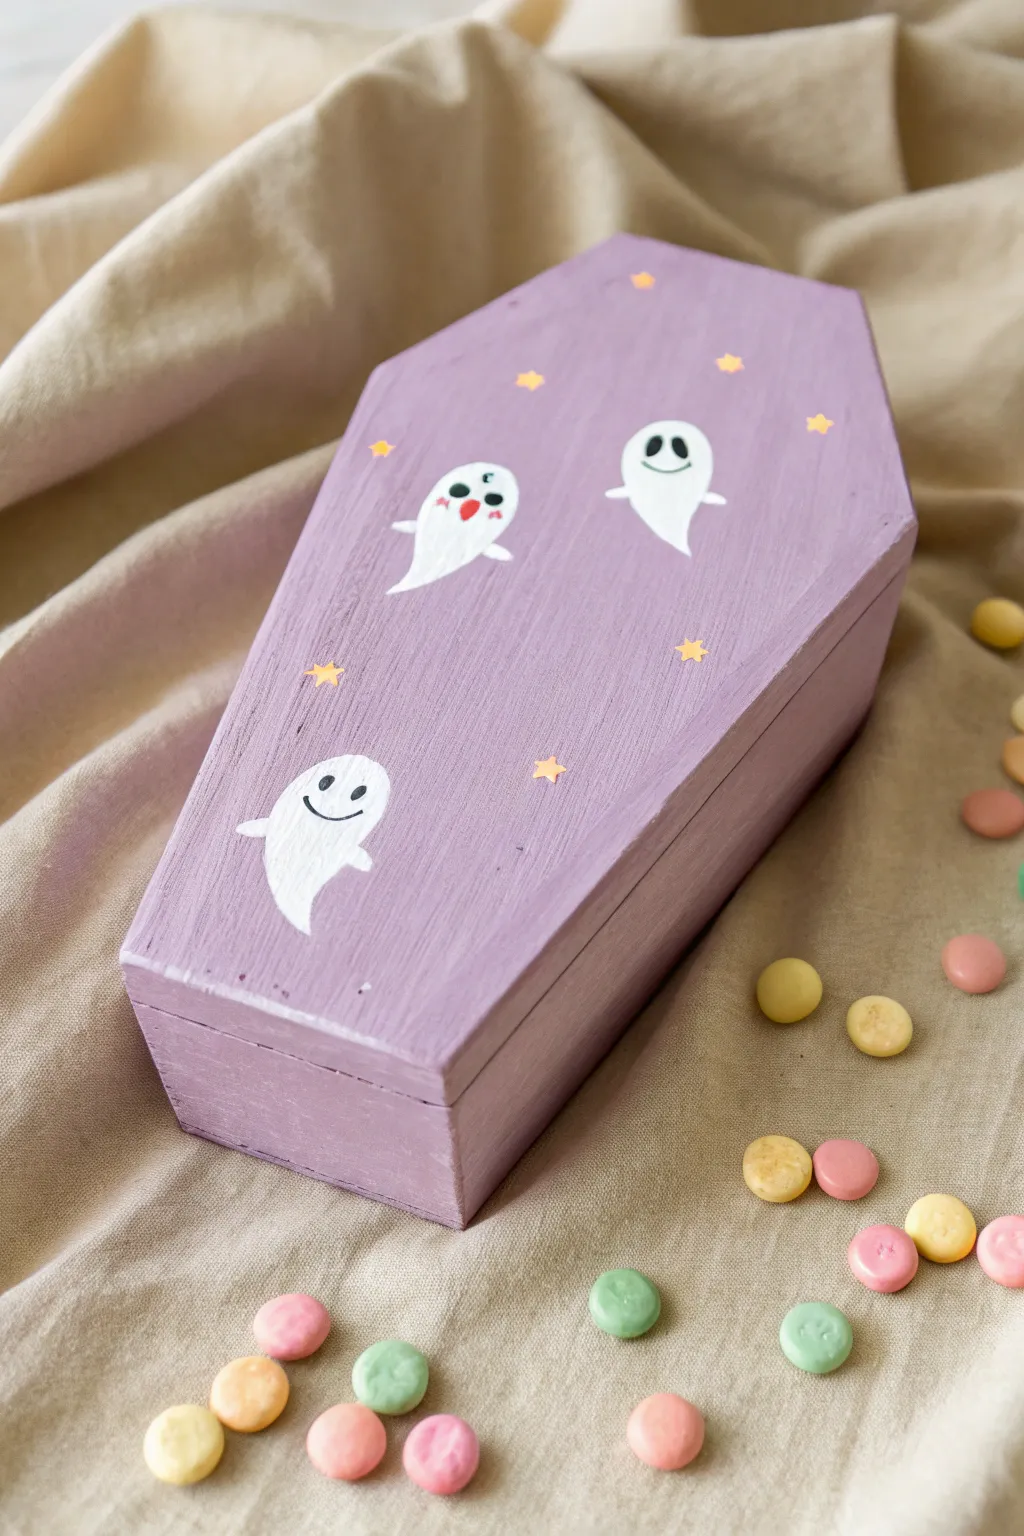
Bring a touch of sweetness to your spooky decor with this charming lavender coffin box featuring friendly ghosts. The soft pastel palette and simple illustrative style make this a perfect beginner project for Halloween enthusiasts who prefer cute over creepy.
Detailed Instructions
Materials
- Unfinished wooden coffin box (small craft size)
- Acrylic paint: Lavender/Light Purple
- Acrylic paint: White
- Acrylic paint: Black
- Acrylic paint: Red or Pink (for cheeks)
- Small star stickers or yellow acrylic paint
- Flat paintbrush (medium size)
- Detail paintbrush (fine point)
- Sandpaper (fine grit)
- Matte or satin sealant spray (optional)
- Pencil
Step 1: Base Preparation
-
Prepare the surface:
Start by giving your unfinished wooden coffin a quick sanding with fine-grit sandpaper. This removes any rough splinters and ensures the paint glides on smoothly. -
Clean the dust:
Wipe the box down with a dry cloth or tack cloth to remove all sanding dust before you open your paint. -
Apply the base coat:
Using your medium flat brush, apply a coat of lavender acrylic paint to the entire outside of the box, including the lid and sides. Don’t forget the rim where the lid meets the base. -
Let it dry:
Allow the first coat to dry completely. Acrylics usually dry fast, but wait until it feels cool and dry to the touch to prevent lifting the previous layer. -
Second coat:
Paint a second layer of lavender to ensure solid, opaque coverage where the wood grain doesn’t show through. Let this dry thoroughly before moving on.
Step 2: Painting the Ghosts
-
Sketch the outlines:
Lightly sketch three ghost shapes onto the coffin lid using a pencil. Position them diagonally or randomly for a playful look—aim for traditional sheet-ghost silhouettes with little arms. -
Fill in the white:
Using a smaller brush, carefully fill in your pencil outlines with white acrylic paint. You will likely need two coats here, as white can be translucent over purple. -
Refine the edges:
Once the white is dry, check your edges. If they look a bit rough, use your fine detail brush to smooth out the curves of the ghosts.
Clean Lines Tip
If you have shaky hands, use a white paint pen instead of a brush for the ghost outlines. It offers much more control and opacity.
Step 3: Details & Decorations
-
Paint facial features:
Switch to your finest detail brush and black paint. Add simple oval eyes and a smiling mouth to each ghost. Keep the expressions simple to maintain that ‘cute’ aesthetic. -
Add rosy cheeks:
For the middle ghost, or all of them if you prefer, mix a tiny dot of red with white to make pink (or use red directly) and paint tiny ovals under the eyes for cheeks. -
Add the tongue:
If you want the middle ghost to look extra playful, paint a small red tongue inside the open mouth area. -
Apply the stars:
Take your small yellow star stickers and scatter them around the empty purple spaces on the lid. Press them down firmly. -
Alternative star method:
I prefer painting the stars manually if stickers aren’t available; just use a small brush and yellow paint to create five-point stars or simple diamond sparkles. -
Seal the deal:
Once all paint is 100% dry, take the box outside and spray a light coat of matte or satin sealant over the top. This protects the paint and keeps the stickers from peeling over time.
Level Up: Hidden Treats
Paint the inside of the coffin a contrasting color like bright yellow or teal, and line the bottom with felt to turn it into a soft jewelry box.
Now fill your adorable spooky box with candies or trinkets to complete the look
Bone Border Frame Around the Lid
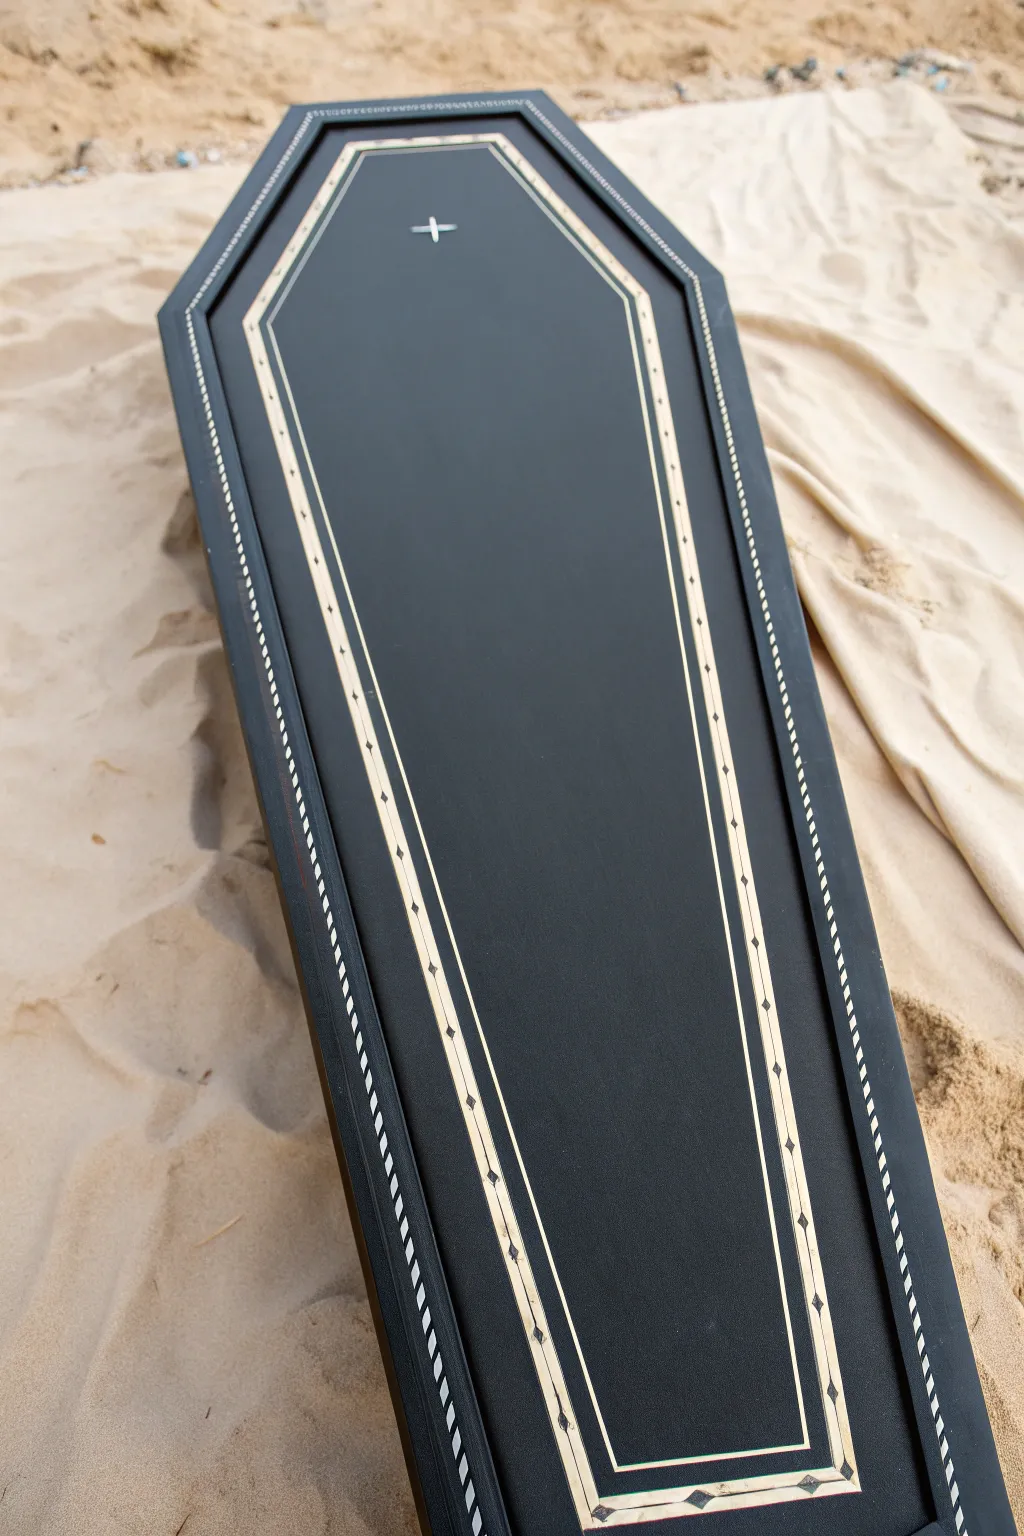
Transform a standard coffin lid into a Victorian masterpiece with this faux bone-inlay design. Using stark contrast and precise geometric patterns, you’ll create a sophisticated border that looks intricate but relies on simple, repeating shapes.
Step-by-Step Tutorial
Materials
- Wooden coffin or coffin-shaped lid
- Matte black exterior paint (latex or chalk paint)
- Cream or off-white acrylic paint (for the ‘bone’ look)
- Painter’s tape (various widths: 1-inch and 1/4-inch)
- Pinstriping brush or size 0 round brush
- Flat shader brush (small)
- Ruler or straight edge
- White or yellow chalk pencil
- Clear matte varnish
- Sandpaper (fine grit)
Step 1: Base Preparation
-
Surface Prep:
Before laying down any color, ensure the coffin lid is completely smooth. Give the entire surface a light sanding with fine-grit sandpaper to remove any rough patches or splinters, then wipe away the dust with a tack cloth. -
Base Coat Application:
Apply your matte black paint to the entire lid. You want a solid, opaque finish to make the white details pop, so I usually apply two or three thin coats rather than one thick one. -
Drying Time:
Allow the base coat to dry completely overnight. If the paint is even slightly tacky, the painter’s tape used in the next steps could pull it up and ruin your smooth finish.
Step 2: Mapping the Borders
-
Outer Rim Marking:
Using your chalk pencil and ruler, measure about 1.5 inches in from the outer edge of the lid. Draw a light guideline all the way around the hexagonal shape to establish the outer boundary of your main design. -
Inner Frame Marking:
Measure inward another two inches from your first line and draw a second parallel guideline. This space between the two lines creates the thick ‘track’ where the diamond pattern will live. -
Define the Diagonal Hatching:
On the very outer raised edge of the coffin (outside your flat design area), use small pieces of painter’s tape to create a ‘candy cane’ striping effect. Place tape strips diagonally every half-inch. -
Painting the Hatching:
Paint the exposed diagonal spaces on the outer rim with your cream paint. Use a dry-brush technique here to keep the lines clean and prevent bleed-under. -
Reveal the Rim:
Carefully peel back the diagonal tape while the paint is still slightly damp to reveal the sharp, bone-colored hash marks along the outer edge.
Clean Lines Pro-Tip
For the crispest lines on wood, paint a thin layer of your *base* color (black) over the tape edge first. This seals the gap, so any bleeding matches the background, keeping the cream layer perfect.
Step 3: Creating the Diamond Inlay
-
Taping the Main Track:
Return to the flat top of the lid. Apply painter’s tape along the outside of your first chalk line and the inside of your second chalk line to protect the black center and the outer border. -
Painting the Solid Borders:
Using a small flat brush, paint two thin, solid cream lines right against the tape edges. These will serve as the rails that hold your diamond pattern. -
Drafting the Diamonds:
Inside the two painted rails, mark a small dot precisely in the center of the black channel every three inches. These dots will be the centers of your diamonds. -
Connecting the Dots:
Using your pinstriping brush or a very fine round brush, paint a diamond shape around each dot. Connect the top and bottom points to the side rails you painted earlier. -
Filling the Shape:
Carefully fill in the diamond shapes with cream paint. You may need two coats here to ensure the black doesn’t show through the light color. -
Adding Center Detail:
Once the cream diamonds are dry, take a tiny dot of black paint and place it back in the absolute center of each diamond for a ‘drilled bone’ effect. -
Clean Up:
Remove the long strips of painter’s tape carefully. Use a damp Q-tip to erase any visible chalk guidelines that remain.
Aged Bone Effect
Instead of plain cream paint, mix a drop of brown glaze into your white. After painting, lightly sand the dried ‘bone’ areas to distress them for an ancient, unearthed look.
Step 4: Finishing Touches
-
Central Motif:
Find the upper-middle section of the lid’s open black space. Use your chalk pencil to sketch a simple cross or starburst geometric shape. -
Painting the Motif:
Paint this central symbol in the same cream color using your fine liner brush to tie the whole design together. -
Sealing the Work:
Once all paint is cured (give it 24 hours), apply a clear matte varnish over the entire lid. This protects your intricate line work from scratches and moisture.
Now you have a stunning, historically inspired lid that balances spookiness with true craftsmanship
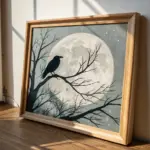
Moonlit Raven on Bare Branches
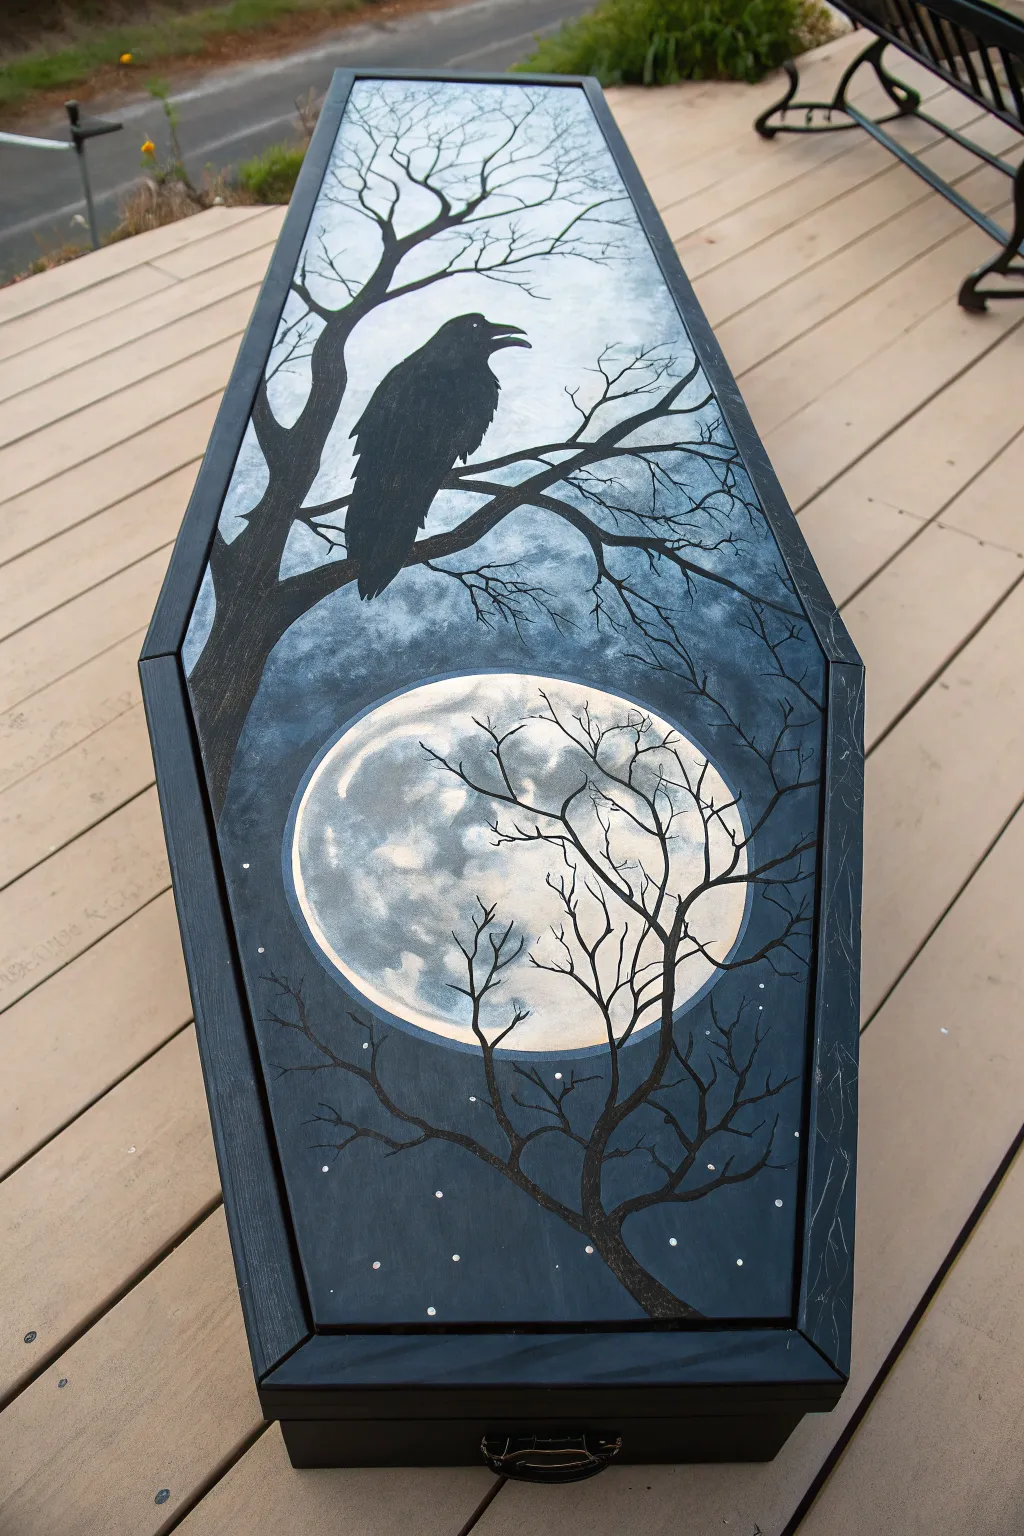
Transform a plain wooden coffin box into a gothic masterpiece featuring a stark raven silhouette against a glowing moonlit sky. This project uses atmospheric blending and sharp silhouette work to create a hauntingly beautiful piece perfect for spooky decor or jewelry storage.
Detailed Instructions
Materials
- Unfinished wooden coffin box (with hardware removed if possible)
- Acrylic paints: Titanium White, Mars Black, Prussian Blue, Payne’s Grey, Silver (metallic)
- Wide flat brush or sponge brush (for base)
- Medium round brush
- Fine liner brush (size 00 or 000)
- Sandpaper (220 grit)
- Circle stencil or a round object to trace (approx. 4-5 inches)
- Pencil
- Palette or paper plate
- Water cup and paper towels
- Spray sealer (matte or satin finish)
Step 1: Preparing the Canvas
-
Prep the surface:
Begin by removing any latch hardware or hinges if they unscrew easily; this makes painting the edges much cleaner. Lightly sand the entire wooden surface with 220-grit sandpaper to smooth out any rough grain. -
Prime the wood:
Wipe away the sanding dust with a damp cloth. Apply a solid coat of black acrylic paint to the entire exterior, including the sides and back. Let this dry completely before moving on. -
Block out the sky:
On the lid, you need to create the gradient background. Start by painting the top two-thirds of the lid with a mix of Prussian Blue and Titanium White to create a medium gloomy blue. While wet, blend in some Payne’s Grey towards the edges to create a vignetted look.
Moon Glow Trick
To make the moon really pop against the raven, paint the moon first, let it dry, and then paint the raven silhouette directly on top of it. This ensures crisp edges.
Step 2: Creating the Moon
-
Position the moon:
Once the blue background is dry to the touch, place your circular object in the lower-middle section of the lid. Lightly trace the circle with a pencil. -
Base coat the moon:
Fill in the circle with Titanium White. It’s okay if it’s not perfectly opaque yet; a slightly streaky look actually helps simulate craters later. -
Add lunar texture:
Mix a tiny drop of Payne’s Grey into your white. Using a dry brush technique/dab motion, sponge this light grey onto the white moon to create shadows and craters. Concentrate the darker spots on the left side and bottom. -
Highlight the glow:
Clean your brush and use pure white to highlight the top right edge of the moon and the distinct crater rims. I like to blend a faint ring of thinned white paint into the blue sky immediately surrounding the moon to make it glow.
Shaky Hands?
If you struggle painting straight lines for branches, don’t worry! Natural branches are crooked. Roll the brush between your fingers as you pull to create organic twists.
Step 3: The Raven and Trees
-
Draft the main branch:
Using thin black paint and your medium round brush, paint a thick, gnarled branch extending from the upper left side, reaching diagonally down towards the center. -
Paint the raven silhouette:
Perched on that main branch, block in the shape of the raven. Start with an oval for the body and a smaller circle for the head, then connect them. Ensure the beak is open slightly for character. -
Feather details:
While still using black, use the tip of your brush to fluff out the chest feathers and tail feathers so the silhouette isn’t perfectly smooth. This suggests texture without needing internal detail. -
Crow the lower branches:
Switch to your fine liner brush. Starting from the bottom right corner, paint a second tree structure reaching upwards. These branches should be thinner and cross in front of the moon. -
Add fine twigs:
Continue adding spindly twigs to both the upper and lower tree structures. Make your hand tremble slightly as you pull the brush to create natural, non-straight organic lines. -
Highlight the branches:
Mix a dark grey (Black + White). Carefully paint extremely thin lines along the top edges of the main branches to show where the moonlight is hitting them.
Step 4: Atmosphere and Finishing
-
Create the stars:
Dip the tip of a toothpick or the very end of your smallest brush handle into white paint. Dot tiny stars scattered across the dark blue and black sections of the sky. -
Add the border:
Paint the beveled edge of the coffin lid (the frame around your painting) in solid black to clean up any messy brushstrokes from the sky painting phase. -
Reattach hardware:
Once the paint is fully cured (give it at least an hour), screw the latches and hinges back onto the box. -
Seal the artwork:
Take the box to a well-ventilated area and apply a clearer sealer. A spray sealer is best here to avoid smearing your fine lines. Matte finish gives a velvety look, while satin adds a slight sheen.
Your haunting coffin box is now ready to hold your darkest secrets or favorite trinkets.
Candle Drips and Melted Wax Illusion
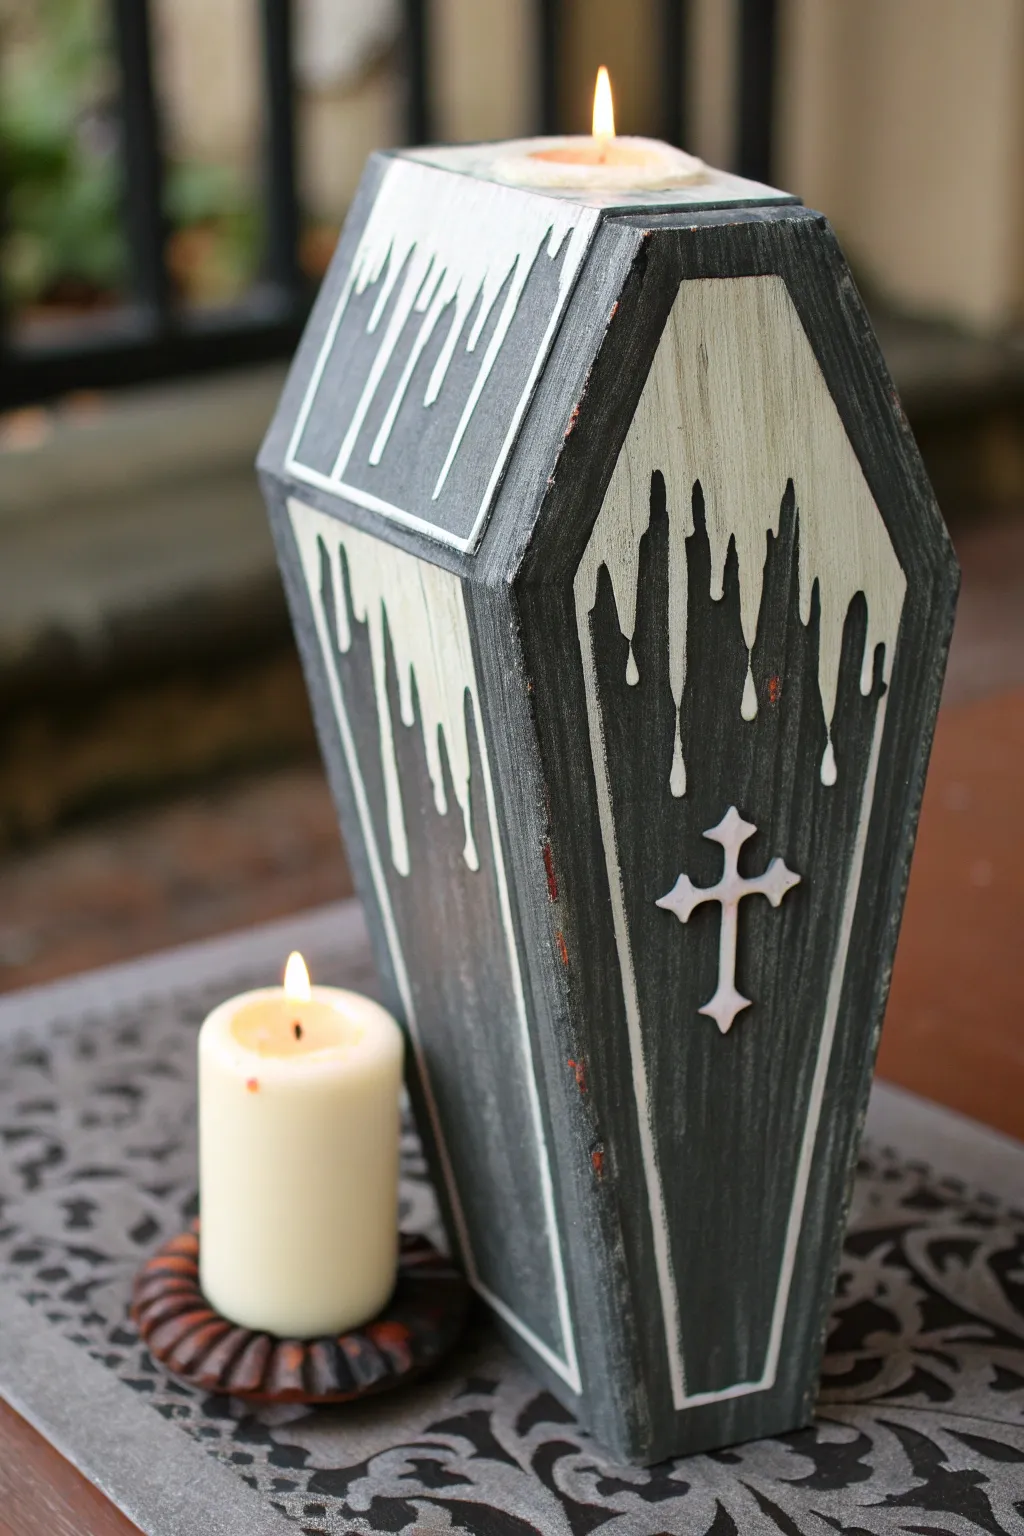
Transform a plain wooden coffin box into a spooky, antique-style centerpiece that looks like it’s been melting in a crypt for centuries. This project uses clever painting techniques to create a convincing illusion of dripping wax cascading down the sides of a distressed dark vessel.
Step-by-Step Tutorial
Materials
- Unfinished wooden coffin box (medium to large size)
- Small wooden cross embellishment
- Matte black acrylic paint
- Dark grey acrylic paint (charcoal shade)
- Titanium white acrylic paint
- Cream or antique white acrylic paint
- Medium flat brush
- Small round detail brush
- Fine grit sandpaper (220 grit)
- Wood glue or heavy-duty craft glue
- Pencil
- Tea light or small pillar candle (battery-operated recommended)
Step 1: Base Preparation and Assembly
-
Sand the Box:
Begin by lightly sanding the entire surface of your wooden coffin box to remove any rough splinters and create a smooth painting surface. Wipe away the dust with a damp cloth. -
Position the Cross:
Take your separate wooden cross embellishment and determine its placement on the center of the coffin lid. Mark the spot lightly with a pencil. -
Glue the Cross:
Apply a small amount of wood glue to the back of the cross and press it firmly onto the marked spot on the lid. Allow this to dry completely before you start painting so it doesn’t shift. -
Base Coat Application:
Using your medium flat brush, paint the entire coffin—including the newly attached cross—with a solid coat of matte black paint. Don’t forget the inside lip where the lid meets the base. -
Wait and Repeat:
Let the first coat dry fully. If the wood grain is still showing through, apply a second coat of black to ensure deep, opaque coverage.
Step 2: Distressing and Weathering
-
Dry Dry Brushing Technique:
Dip a dry flat brush into a small amount of dark grey paint, then wipe almost all of it off onto a paper towel. The brush should have barely any paint left. -
Highlight the Edges:
Lightly drag the brush over the edges and corners of the coffin. This highlights the texture and gives it a weathered, stone-like appearance rather than flat wood. -
Detail the Cross:
Use the same dry brush technique on the raised cross to make it pop against the background without fully painting it grey. -
Create Wear Marks:
For an extra aged look, you can take your sandpaper and gently scuff the edges of the box to reveal a tiny bit of raw wood, simulating years of handling.
Clean Lines
If your hand is shaky on the drip outlines, use a white paint marker instead of a brush for the initial shape, then fill it in with acrylic paint later.
Step 3: Painting the Wax Drip Illusion
-
Sketch the Drips:
Using a pencil, lightly draw the outline of melting wax dripping down from the top edge of the lid. Vary the lengths of the drips—make some long and thin, and others short and blobby for realism. -
Initial White Layer:
Using the small round detail brush and titanium white paint, carefully fill in the drip outlines you just drew. This first layer might look streaky against the black, which is fine. -
Add Drips to the Base:
Continue the pattern onto the sides of the bottom box, ensuring the drips align visually with those on the lid so the flow looks continuous. -
Second Coat for Opacity:
Once the first white layer is dry, apply a second coat of titanium white. I find this creates that solid, waxy look essential for the illusion. -
Paint the Top Surface:
Paint the entire flat top surface of the coffin lid (where the candle will sit) in solid white to represent the pool of melted wax, blending it into the drips over the edge. -
Softening the Color:
To stop the wax from looking too stark and cartoonish, mix a tiny bit of cream or antique white into your titanium white and paint a thin, final layer over the center of the drips. -
Highlighting the Cross:
Carefully paint the cross white as well, but leave a thin black outline around it or do a ‘messy’ paint job so some dark base shows through, making it look embedded in the finish. -
Define the Drip Tips:
Add a tiny dot of pure white to the very bottom rounded tip of each drip. This acts as a highlight and makes the ‘liquid’ look three-dimensional. -
Final Touches:
Inspect your edges. If the white paint looks too flat, you can dry brush a tiny bit of grey at the top of the drips to simulate shadow and depth.
3D Texture
Make it real! Use hot glue to create actual raised drips over your painted design. Once the glue cools, paint over it with the white acrylic for tactile texture.
Place a flickering tea light on top to complete the eerie ambiance of your ancient artifact
Stained-Glass Window Illusion

Transform a plain wooden coffin into a gothic masterpiece with this stunning stained-glass illusion. By combining bold black outlining with vibrant jewel-tone paints and strategic textures, you will create a surface that looks beautifully illuminated from within.
How-To Guide
Materials
- Unfinished wooden coffin (or pre-primed)
- White primer (if unpainted)
- White acrylic paint (base coat)
- Graphite transfer paper
- Pencil
- Ruler or straight edge
- Black liquid leading or dimensional fabric paint
- Black acrylic paint
- Acrylic paints (emerald green, royal blue, crimson red, purple, white, yellow)
- Sponge dabbers or sea sponge
- Fine detail brushes
- Flat shader brush (1 inch)
- High-gloss varnish or epoxy resin
Step 1: Base Preparation & Layout
-
Prime the surface:
Start by ensuring your wooden coffin is clean and smooth. Apply two coats of white primer to the entire exterior, sanding lightly between coats for a flawless finish. The white base is crucial because it will make the translucent colors pop later. -
Establish the borders:
Using a ruler, measure about 1.5 inches in from the edge of the lid to create a frame. Mark this lightly with a pencil. This outer border will remain solid black to anchor the design. -
Draft the central design:
Sketch your stained glass pattern on a separate sheet of paper first to get the symmetry right. For this look, draw a long central diamond shape containing geometric flowers and teardrop shapes. -
Transfer the pattern:
Place graphite transfer paper on the lid, then tape your sketch on top. Trace over your lines firmly with a pencil or stylus to transfer the ‘lead’ lines onto the white surface.
Wobbly Lines?
If your hand shakes while piping the black leading, don’t wipe it! Let it dry completely, then use a craft knife or razor blade to slice off the mistake before trying again.
Step 2: Creating the Lead Lines
-
Apply the faux leading:
Using black liquid leading or dimensional fabric paint, carefully trace over all your transferred lines. Maintain steady pressure to create a raised, consistent bead that mimics real soldering. -
Paint the outer border:
While the leading dries, paint the wide outer border of the lid shape with flat black acrylic paint. I find using a flat shader brush helps keep the edges crisp against the trim. -
Add corner details:
In the black border corners, paint small decorative motifs like trefoils or tiny crosses using white or silver paint for a classic gothic touch. -
Let the leading cure:
Allow the dimensional black lines to dry completely. This usually takes 4-6 hours or overnight depending on the brand, but it must be hard to the touch before you start painting the ‘glass’.
Step 3: Painting the Glass
-
Mix the green texture:
For the outer geometric sections, mix emerald green paint with a tiny drop of water to increase transparency. Apply this using a sponge dabber rather than a brush; the sponge texture mimics the mottled look of cathedral glass. -
Fill the central flower:
Paint the central flower petals using shades of red and purple. Work in layers, starting with a darker wash and adding brighter highlights in the center of each ‘pane’ to suggest light passing through. -
Detail the white motifs:
Fill the circular medallion areas with pure white paint. Keep these strokes smooth and flat to contrast with the textured green areas. -
Add accent colors:
Fill remaining small shapes with secondary colors like royal blue and yellow. Ensure the paint goes right up to the raised black leading lines but try not to paint over them. -
Create distinct shading:
To enhance the depth, mix a very diluted glaze of black or dark grey. Paint a thin line of this shadow along the inside edges of each ‘pane’ right next to the leading. This subtle step makes the glass look thick and seated in the frame.
Pro Tip: Luminosity
Mix a clear glazing medium into your acrylic paints instead of water. This increases transparency without breaking the paint binder, making the colors look deeper and more like real glass.
Step 4: Finishing Touches
-
Clean up the lines:
If any color spilled onto the black raised lines, touch them up carefully with a fine brush and black paint to restore the crisp, industrial look of the lead. -
Paint the box sides:
Paint the lower box portion white to match the lid’s base. You can add simple black pin-striping or molding details to the side panels to tie it visually to the complex top. -
Verify opacity:
Check your colors. If any look too streaky, add a second thin coat. You want rich, saturated color that still feels luminous. -
Seal the deal:
Finish with a thick coat of high-gloss varnish or a pour-on epoxy resin over the entire lid. This is the magic step that turns painted wood into shiny, reflective ‘glass’.
Step back and admire your handiwork as the glossy finish catches the light, bringing your gothic stained-glass illusion to life
Galaxy Nebula With Star Splatter
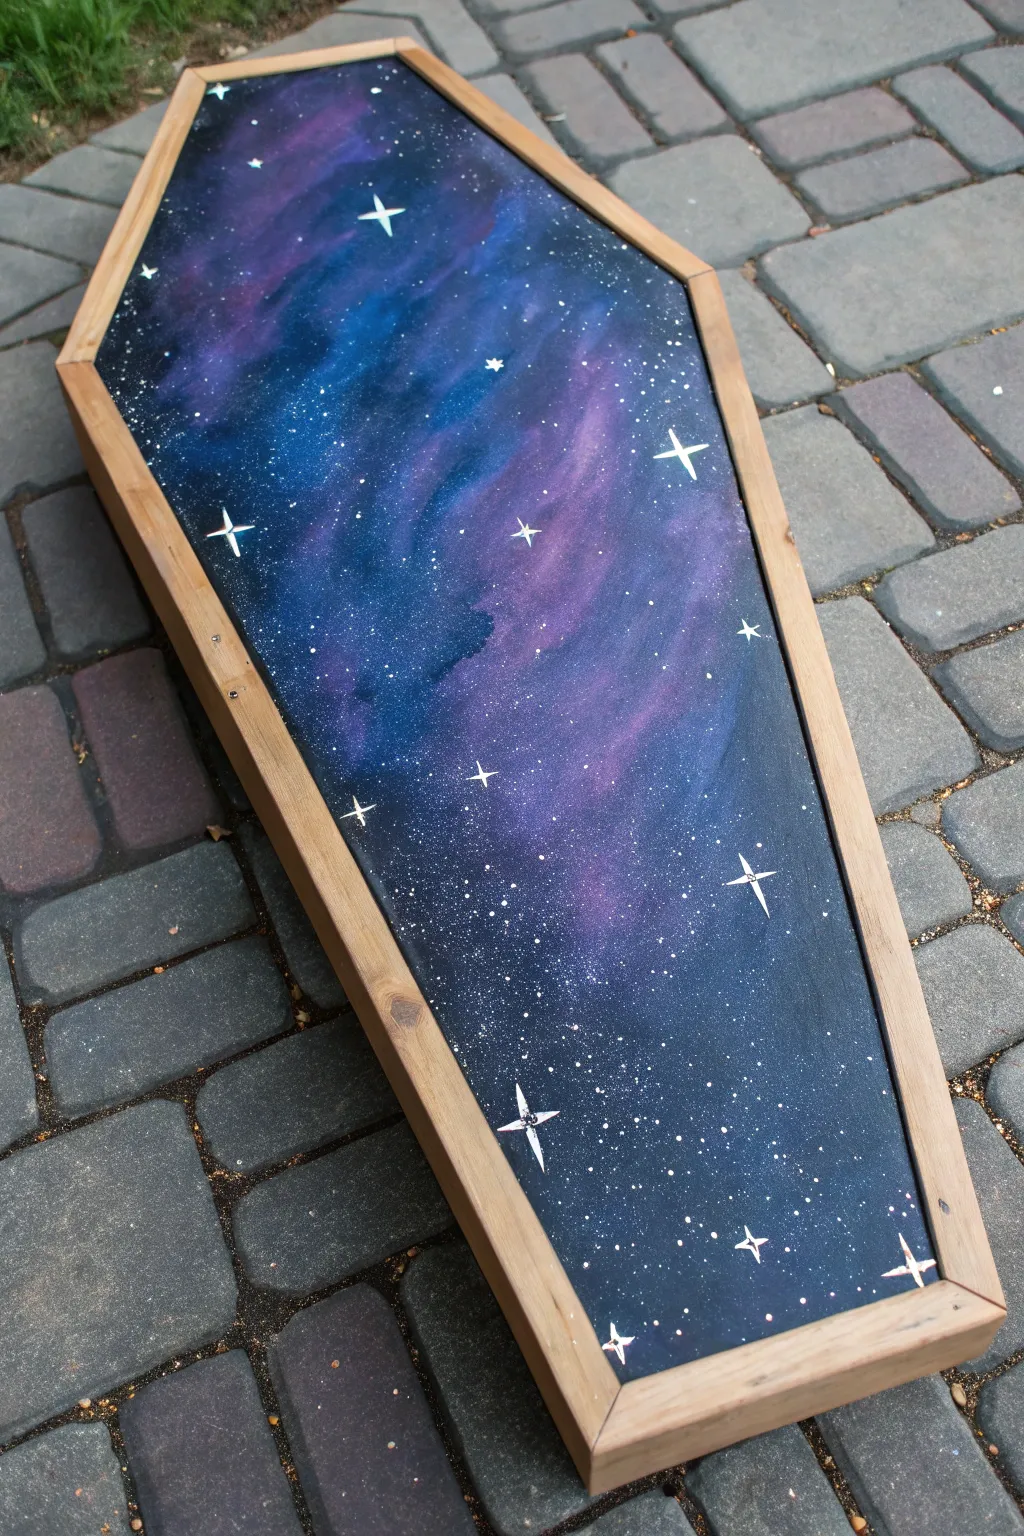
Transform a simple wooden coffin shape into a portal to deep space with this dreamy galaxy painting project. By layering deep blues, vibrant purples, and crisp white stars, you will create a stunning celestial centerpiece perfect for gothic decor or Halloween.
Step-by-Step Tutorial
Materials
- Wooden coffin tray or lid
- Sandpaper (medium and fine grit)
- Painter’s tape
- Acrylic paints (Black, Prussian Blue, Violet, Magenta, Titanium White)
- Small sponges or sponge brushes
- Flat paintbrush (medium)
- Detail liner brush (fine)
- Old toothbrush
- Matte or satin clear sealant spray
- Water cup and paper towels
Step 1: Preparation & Base Coat
-
Sand the surface:
Begin by sanding the inner panel of your wooden coffin shape. Use medium grit sandpaper to smooth out any rough patches, then finish with fine grit for a painting-ready surface. Wipe away all dust with a damp cloth. -
Protect the frame:
Carefully apply painter’s tape along the inner edges of the wooden frame. This ensures your galaxy painting stays strictly on the panel and keeps the natural wood border clean and crisp. -
Apply the abyss:
Using your flat brush, paint the entire inner panel with a solid coat of black acrylic paint. This creates the deep void of space necessary for the colors to pop. Let this base coat dry completely.
Muddy Nebula?
If your colors are turning brown or gray where they overlap, wait for each layer to dry completely before adding the next. Wet-on-wet blending is tricky; layering is safer.
Step 2: Creating the Nebula
-
First nebula layer:
Dampen a small sponge and dip it lightly into Prussian Blue. Dab off the excess onto a paper towel until the intricate texture of the sponge shows, rather than a glob of paint. -
Sponge in the blue:
Gently dab the blue paint onto the black surface in a diagonal, cloud-like formation. Focus on the center and let the edges fade into the black background. Don’t cover the whole surface; leave plenty of negative space. -
Add violet depth:
While the blue is still tacky or just dry, switch a fresh sponge (or a clean corner of the old one) dipped in Violet. Sponge this color alongside and slightly overlapping the blue areas to create a seamless transition. -
Highlight with magenta:
To make the nebula glow, mix a tiny bit of White with Magenta to create a bright pink-purple. Sponge this sparingly into the centers of your purple clouds. This simulates the brightest, most gaseous parts of the nebula. -
Enhance with teal:
Mix a little White with Prussian Blue to make a light teal. Lightly dab this into the center of the blue sections for dimension. I find that less is more here—you just want subtle highlights, not solid blocks of color. -
Blend the edges:
If any paint transitions look too harsh, take a clean, slightly damp sponge and gently tap over the edges to soften them back into the darkness. Allow the nebula layers to dry fully.
Glow Up
Mix glow-in-the-dark pigment or paint into your white star mixture. The galaxy will look normal by day but reveal a secret, glowing star map when the lights go out!
Step 3: Stardust & Constellations
-
Prepare the star paint:
Dilute a small amount of Titanium White paint with water until it reaches an ink-like consistency. It needs to be fluid enough to splatter easily but opaque enough to show up. -
Splatter the stars:
Dip an old toothbrush into your thinned white paint. Hold it over the coffin panel and run your thumb across the bristles to flick a fine mist of paint specks onto the surface. Varing your distance creates different star densities. -
Create major stars:
Using your finest detail liner brush and undiluted Titanium White, paint small crosses to represent larger, twinkling stars. Place them randomly in the empty black spaces or near the nebula edges. -
Define the twinkle:
Refine the crosses by pulling the paint outward into long, thin tapered points—shorter vertical lines and longer horizontal lines often look best. Add a tiny dot in the very center of each cross for brightness. -
Dot in distant planets:
Use the handle end of a paintbrush or a stylus to place single, round dots varying in size throughout the galaxy. These represent medium-sized stars or distant planets that aren’t gleaming.
Step 4: Finishing Touches
-
Remove tape:
Once you are happy with your galaxy and the paint is barely dry to the touch, carefully peel away the painter’s tape. Pulling it away at a 45-degree angle helps prevent peeling up any paint. -
Touch up:
Inspect the wooden frame. If any paint seeped under the tape, carefully scrape it away with a craft knife or lightly sand it off. -
Seal the cosmos:
In a well-ventilated area, spray the entire painted surface with a clear matte or satin sealant. This protects your artwork from scratches and unifies the sheen of the different paint layers.
Step back and admire how a few sponges and splatters have captured the infinite beauty of the universe right on your table.
Sugar Skull Palette With Floral Crowns
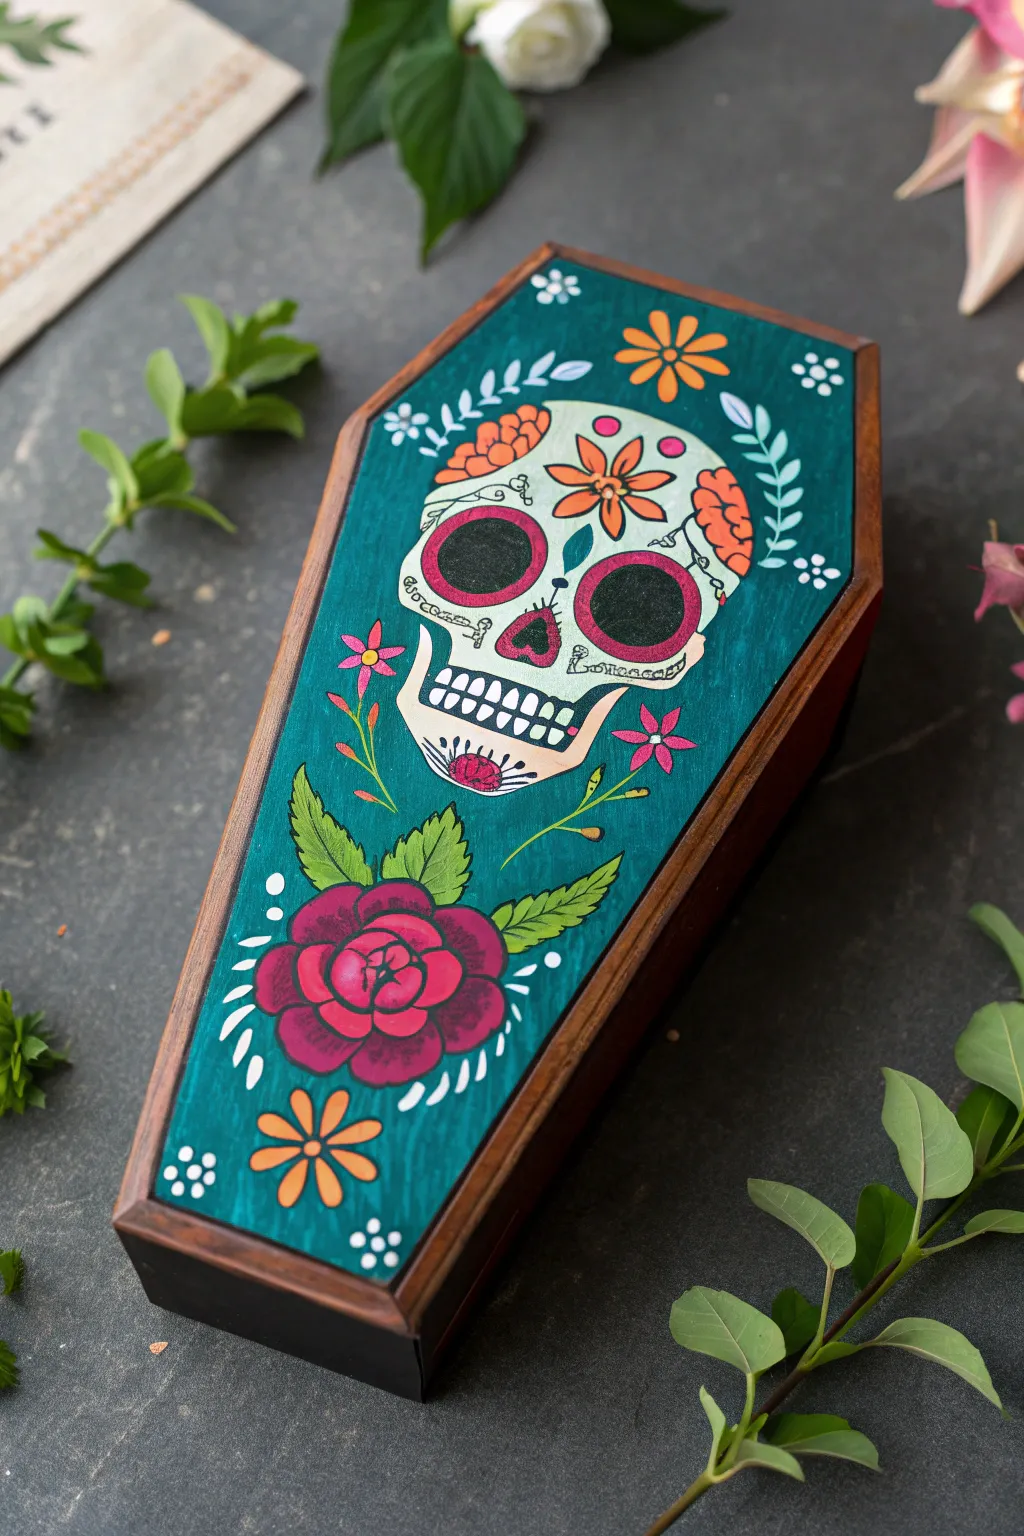
Bring the vibrant spirit of Dia de los Muertos to life with this beautifully painted wooden coffin box. Featuring a deep teal base, bright marigold accents, and a classic sugar skull adorned with floral details, this piece makes for striking seasonal decor or a year-round keepsake.
How-To Guide
Materials
- Unfinished wooden coffin box (approx. 6-8 inches)
- Acrylic paints: Deep teal (background), cream/off-white (skull), magenta, bright orange, lime green, white, black
- Gesso or wood primer (white)
- Pencil and eraser
- Medium flat brush (for base coat)
- Small round brush (size 2 or 4)
- Fine liner brush (size 00 or 000)
- Water cup and palette
- Matte or satin varnish
Step 1: Preparation & Base Coat
-
Prime the Surface:
Since the wood can be porous, start by applying a thin layer of white gesso to the lid and sides of the coffin box. Let it dry completely to ensure your colors pop. -
Apply the Background Color:
Using a medium flat brush, paint the entire top lid in a rich, deep teal color. You’ll likely need two coats to get an opaque, streak-free finish. Paint the sides of the box black or a dark mahogany brown for contrast. -
Sketch the Design:
Once the teal paint is fully dry, lightly sketch your design with a pencil. Place a large skull in the upper center, a large rose at the bottom, and designate spots for corner flowers and vines.
Steady Hands Tip
Rest your pinky finger on a dry part of the box while using the liner brush. This acts as an anchor, giving you much more control for fine details like the teeth.
Step 2: Painting the Main Elements
-
Block in the Skull:
Fill in the skull shape with a cream or off-white acrylic paint. Just get the basic silhouette down first; don’t worry about the details yet. -
Paint the Bottom Rose:
While the skull dries, move to the bottom rose. Paint the base shape in a deep magenta. Add lighter pink swirls towards the center to define the petals. -
Add Greenery:
Using your small round brush and lime green paint mixed with a tiny bit of teal, paint the leaves flanking the rose and the vines curving around the skull. -
Create Corner Marigolds:
Paint simple six-petal flower shapes in the upper right and lower left corners using bright orange paint. These represent marigolds, a staple of the theme.
Step 3: Adding Sugar Skull Details
-
Skull Eyes and Nose:
Using black paint, fill in the large eye sockets and the upside-down heart shape for the nose. Leave them solid black for now. -
Forehead Decoration:
Paint floral elements on the skull’s forehead. Use orange for the central flower and red-orange for side blooms, mimicking a floral crown. -
Eye Socket Accents:
Take a fine liner brush with magenta paint and carefully outline the black eye sockets. Add tiny scallops or dots around the rim for texture. -
Mouth and Jaw:
Use your liner brush and black paint to draw the teeth line. Paint vertical lines for teeth, and define the jawbone structure. Add a small magenta flower motif on the chin. -
Fine Skull Linework:
I prefer to use a slightly watered-down black paint here to add the delicate cracks, swirls, and decorative curlicues on the skull’s cheeks and temples.
Messy Mistakes?
If you smudge a line on the skull, don’t wipe it! Let it dry completely, then paint over the mistake with your cream base color before redrawing the line.
Step 4: Final Flourishes
-
Detail the Rose & Leaves:
Go back to the bottom rose and add dark outlines to separate the petals. Add veins to your green leaves using a darker green shade. -
White Highlights:
Using your finest brush and white paint, add tiny dot clusters (stippling) around the marigolds and rose to fill the empty teal space. -
Accentuate the Leaves:
Paint thin, white fern-like sprigs coming off your green vines to add delicacy to the design. -
Seal the Project:
Once all paint is completely dry (give it at least an hour), apply a coat of matte or satin varnish to protect your artwork from dust and scratches.
Display your vibrant sugar skull coffin on a shelf or side table to add a touch of artistic festivity to your room
Night Garden Botanicals With Moths
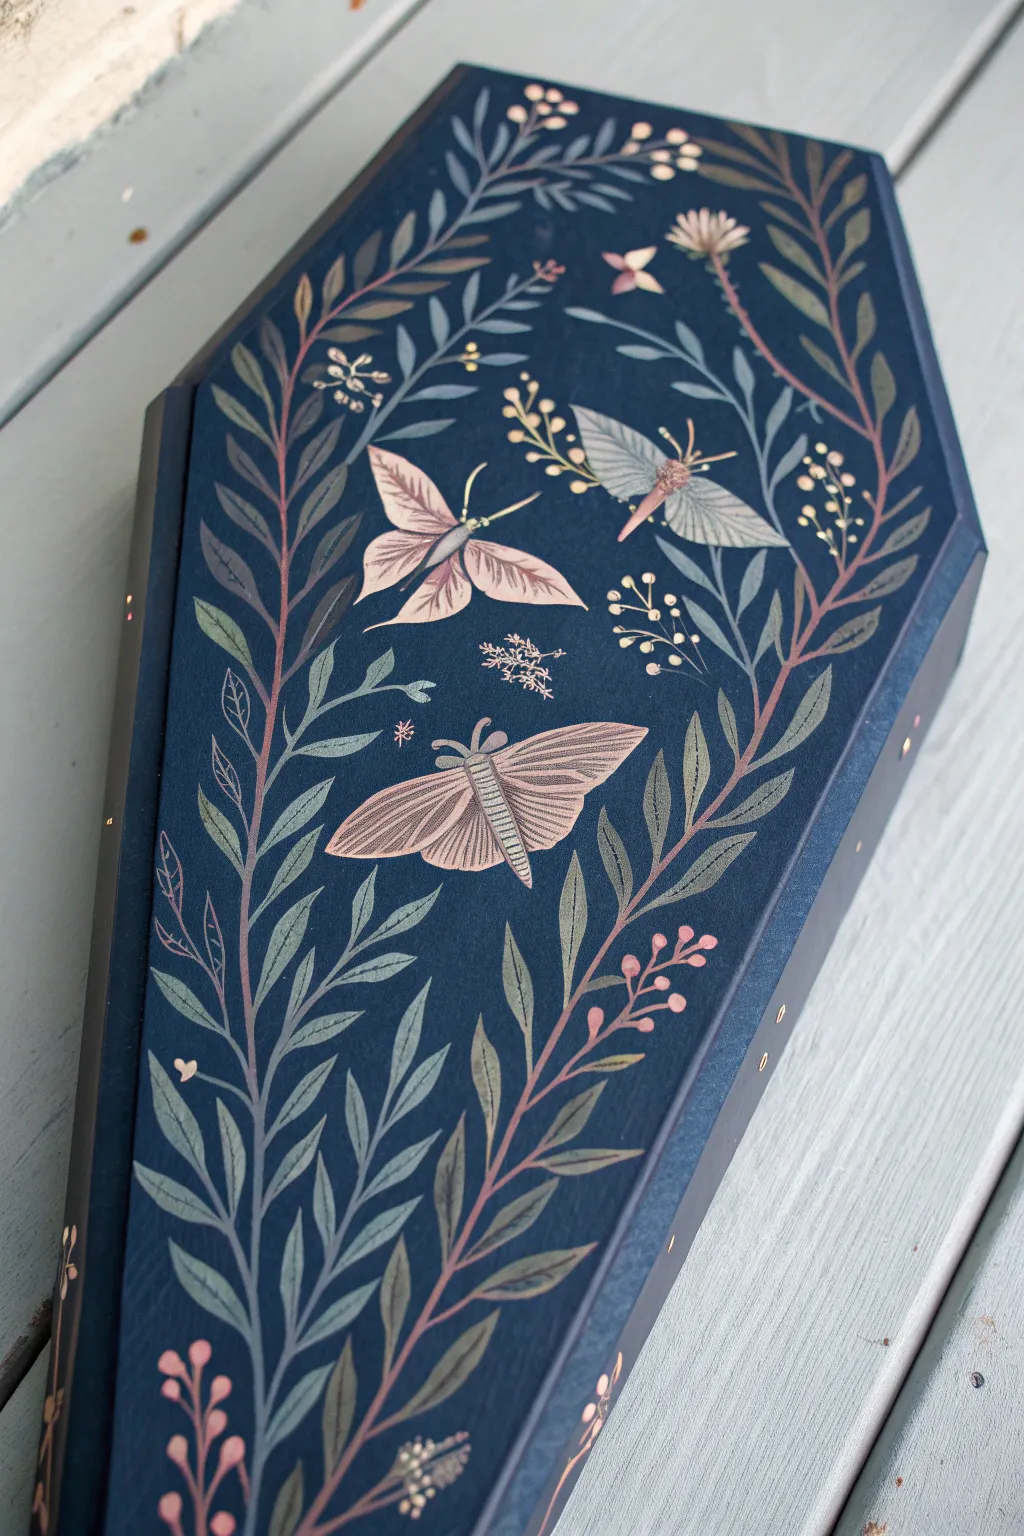
Transform a simple wooden coffin box into a mystical nocturnal garden using metallic paints against a deep matte background. This project features delicate fern fronds, ethereal moths, and tiny floral accents that shimmer beautifully in low light.
Detailed Instructions
Materials
- Unfinished wood coffin box (approx. 12 inches)
- Fine-grit sandpaper (220 grit)
- Deep Navy or Midnight Blue matte acrylic paint
- Metallic acrylic paints: Rose Gold, Champagne Gold, Antique Bronze, Silver
- Flat shader brush (3/4 inch) for base coat
- Detail round brushes (size 0, 00, and 1)
- White charcoal pencil or chalk pencil
- Palette or small dish for mixing
- Spray matte or satin varnish (optional)
Step 1: Preparation & Base Coat
-
Prep the Surface:
Begin by lightly sanding the entire wooden coffin box, paying special attention to the edges and corners to remove any rough splinters. Wipe away all dust with a slightly damp cloth or tack cloth. -
Apply the Base Color:
Using the flat shader brush, apply an even coat of Deep Navy matte acrylic paint to the lid and sides. Use long, smooth strokes that follow the grain of the wood. -
Build Coverage:
Let the first coat dry completely for about 20-30 minutes. Apply a second coat to ensure a rich, opaque dark background without any wood grain showing through. -
Paint the Sides:
Don’t forget the vertical edges of the lid and the base box itself. A dark, consistent background is crucial for making the metallics pop later.
Step 2: Drafting the Design
-
Establish the Center Line:
Using a white charcoal pencil, lightly draw a faint vertical line down the center of the lid. This will help you balance the symmetry of the vines. -
Sketch the Main Vines:
Sketch two long, curving vines starting from the bottom point of the coffin, sweeping up the sides toward the top corners. Add a few smaller, interior branches that curve inward. -
Position the Moths:
Lightly outline the triangular shapes for three moths: one large one near the bottom center, one middle-left, and one near the top right. Capture their general wingspan without worrying about tiny details yet.
Shaky Hands?
If your lines feel wobbly, slightly thin your metallic paint with a drop of water. Ink-consistency paint flows smoother from a liner brush.
Step 3: Painting the Foliage
-
Paint the Stems:
Mix a tiny amount of Antique Bronze with Deep Navy to create a shadowed metallic stem. Use a size 0 brush to trace over your vine sketches with steady, fluid strokes. -
Add Base Leaves:
Dip a size 1 brush into varied metallic greens or mix Silver with a touch of blue. Paint simple, elongated teardrop shapes along the vines to create the fern-like leaves. -
Layering Leaf Details:
While the leaves are drying, mix Rose Gold and Champagne Gold. Use the size 00 brush to add fine veins or highlights to select leaves, giving them dimension. -
Add Floral Accents:
Using the tip of a small round brush and pure Rose Gold paint, create clusters of small dots at the ends of the smaller branches to mimic berries or buds.
Level Up: 3D Elements
Glue tiny flat-back crystals or rhinestones onto the moth bodies or star centers for a design that catches the light even more.
Step 4: Creating the Moths
-
Block in Moth Bodies:
Fill in the sketched moth wings with Champagne Gold or a pale metallic cream color. Apply this thinly so the dark background slightly influences the tone. -
Wing Veins and Texture:
Once the wings are dry, switch to your finest 00 brush. Use thinned Rose Gold or Bronze paint to draw delicate lines radiating from the moth’s body to the wing edges. -
The Large Bottom Moth:
For the prominent bottom moth, use Rose Gold for the main wing color and accent the edges with Silver. Draw a segmented body down the center using Bronze. -
Final Moth Details:
Add tiny antennae to each moth using the very tip of your detail brush. You can add small dots or ‘eyes’ on the wings for extra pattern interest.
Step 5: Finishing Touches
-
Tiny Filler Details:
Look for empty spaces in the composition. Add tiny floating stars (four-point crosses) or small clusters of three dots using Silver or Gold to create a magical atmosphere. -
Side Accents:
Paint small botanical sprigs or simple dots along the vertical side edge of the lid to continue the theme around the box. -
Cleanup:
Once all paint is bone dry, gently wipe away any visible white charcoal lines with a damp cotton swab. -
Sealing:
Protect your artwork with a light spray of matte or satin varnish. I usually prefer satin here to enhance the metallic shimmer without making the dark background too glossy.
Now you have a stunning, gothic-inspired vessel perfect for storing jewelry or dried herbs


Have a question or want to share your own experience? I'd love to hear from you in the comments below!