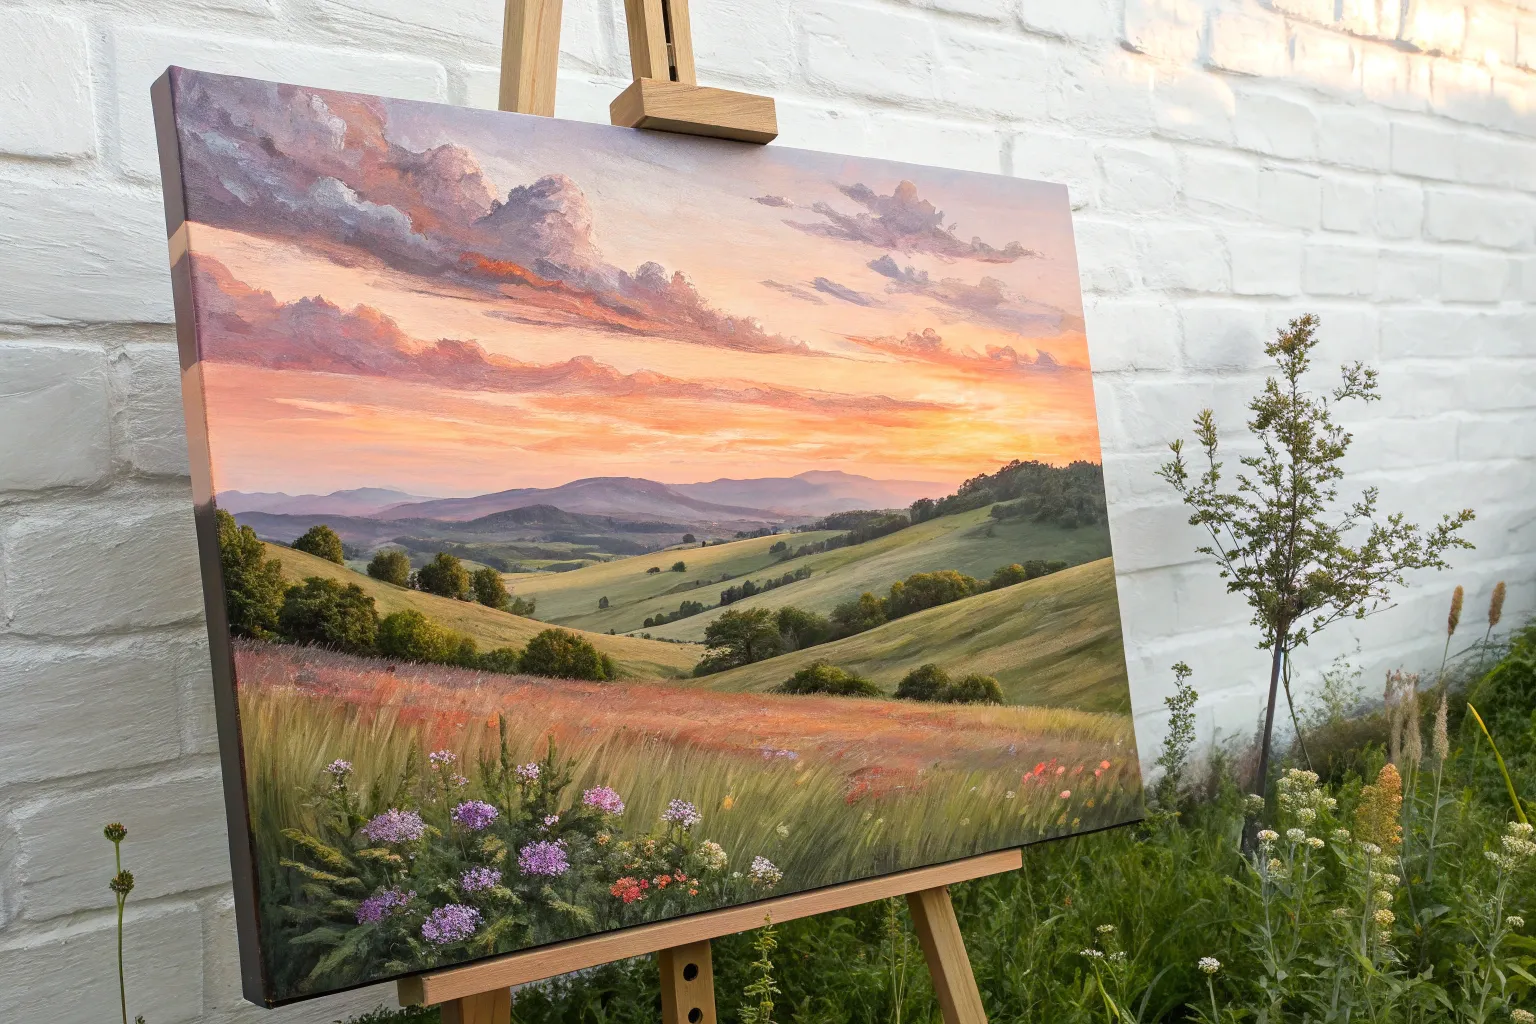
A medium canvas is my favorite sweet spot: big enough for dreamy blends and bold shapes, but not so huge that it feels like a marathon. Here are a bunch of medium canvas painting ideas you can actually finish, hang up, and feel proud of.
Sunset Gradient With a Silhouette
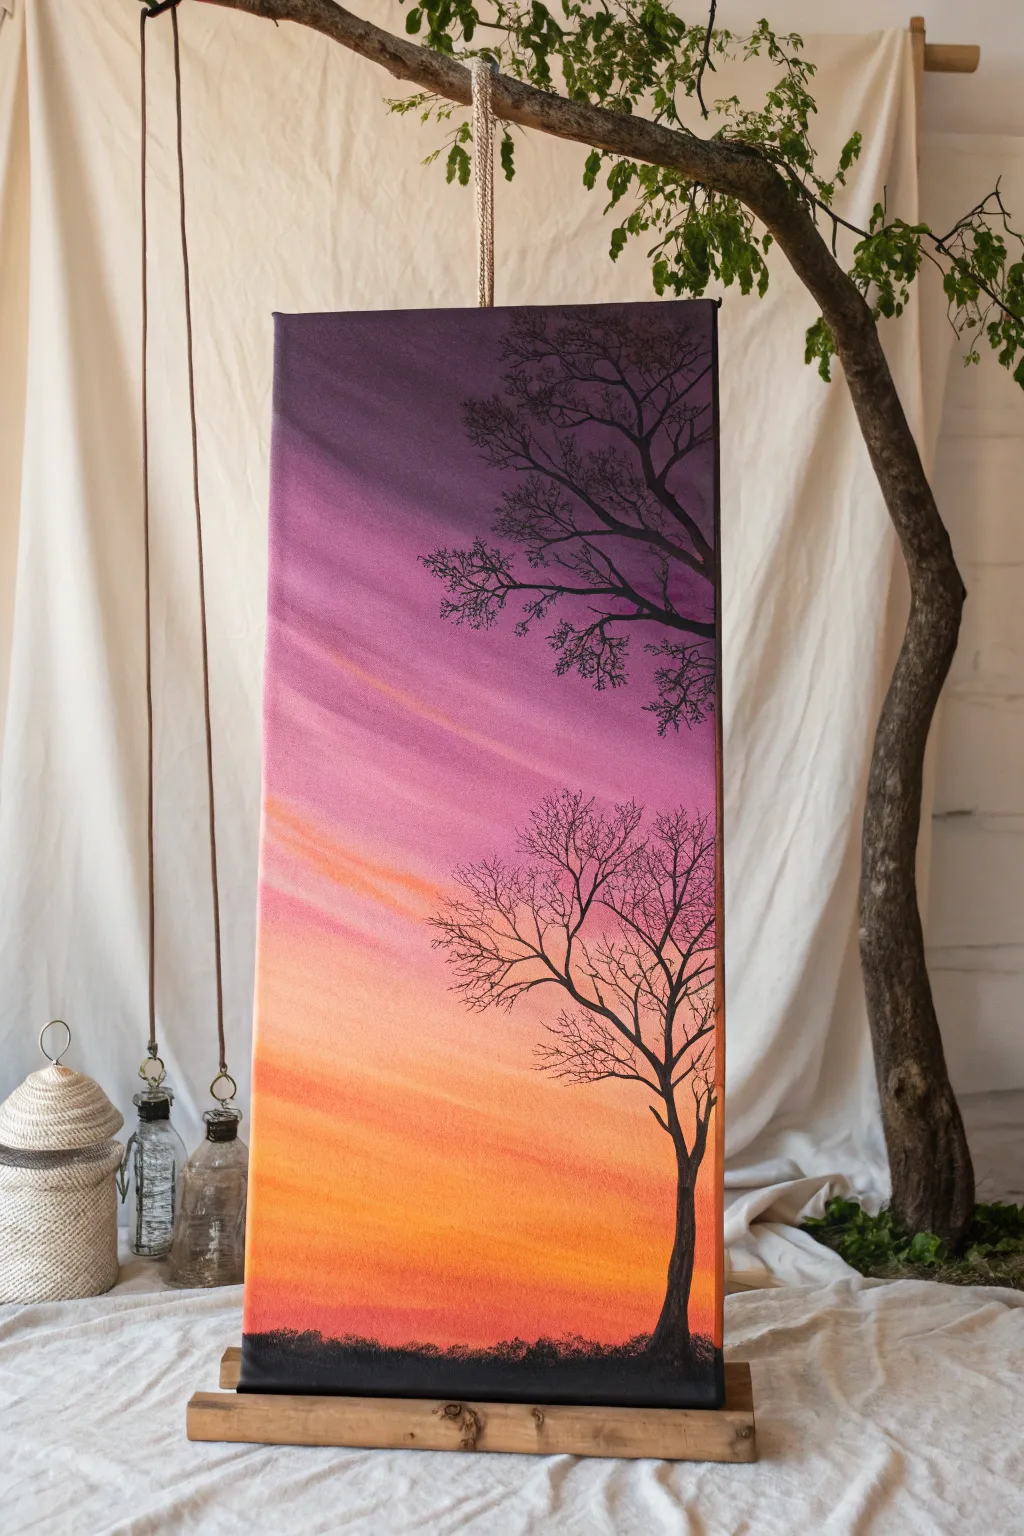
Capture the fleeting beauty of twilight with this striking vertical composition that blends a warm sunset gradient with stark, contrasting silhouettes. The elongated format emphasizes the reach of the tree branches against a spectrum of oranges, pinks, and deep purples.
Detailed Instructions
Materials
- Tall vertical stretched canvas (e.g., 12×24 or 10×20 inches)
- Acrylic paints: Cadmium Yellow, Orange, Magenta, Deep Violet, Black, and Titanium White
- Large flat brush (2-3 inch) for blending background
- Medium round brush
- Fine liner or detail brush
- Palette or paper plate
- Cup of water
- Paper towels
- Easel or flat working surface
Step 1: Creating the Gradient Sky
-
Prepare your palette:
Squeeze out generous amounts of your yellow, orange, magenta, violet, and white paints onto your palette. We will be working wet-in-wet, so having colors ready is essential. -
Start at the base:
Using your large flat brush, apply a band of pure orange mixed with a tiny touch of yellow at the very bottom of the canvas. While still wet, mix in a little white to create a hazy, glowing horizon line. -
Transition to pink:
Without cleaning your brush thoroughly (just wipe off excess), pick up magenta and blend it into the orange section, moving upwards. As you ascend, the color should shift from a fiery orange-pink to a true magenta. -
Add diagonal dynamism:
Unlike a standard horizontal sunset, this sky has movement. Use long, sweeping diagonal strokes from left to right as you blend upwards, rather than perfect horizontal lines. -
Introduce the violet:
As you reach the top third of the canvas, start introducing deep violet into your magenta. Allow the purple to dominate the top edge, creating a dark, moody cap to the sky. -
Create cloud wisps:
While the background is still slightly tacky, use a mostly dry brush with a hint of white and pale pink. lightly drag it diagonally across the pink and orange sections to create soft, streaky cloud suggestions. -
Refine the blend:
Step back and check your gradient. If the transitions look too harsh, use a clean, dry soft brush to lightly feather the boundaries between colors until they look seamless. -
Let it dry completely:
This is crucial. The background must be 100% dry before adding the black silhouette, or you risk muddying the crisp black lines. Wait at least 30-40 minutes or use a hair dryer.
Step 2: Painting the Silhouettes
-
Ground the composition:
Switch to a medium round brush and load it with black paint. Paint a low, uneven horizon line at the very bottom. Keep it textured to simulate grass or distant undulating land. -
Plant the main tree:
Choose a spot on the right side for your main tree trunk. Paint a vertical line that curves slightly as it rises, tapering it thinner as you go up. I like to let my hand wobble slightly here to mimic natural bark texture. -
Branch out:
From the main trunk, extend major branches outward. Remember that branches generally grow upward and outward seeking light, forming ‘V’ or ‘Y’ shapes. -
Add the upper canopy:
In the top purple section, paint a second, partial tree structure coming in from the right edge or top corner. This framing device adds depth and utilizes the vertical space well. -
Switch to the liner brush:
For the delicate twigs at the ends of the branches, switch to your finest liner brush. Add water to your black paint until it has an ink-like consistency. -
Detail the twigs:
With the inky paint, flick the brush lightly to create hundreds of tiny, intricate twigs attached to the main branches. Vary the density; some areas should be sparse, others dense. -
Check balance:
Step back again. Ensure the black elements feel balanced against the colorful sky. The silhouette shouldn’t be too heavy; the openness allows the gradient to shine through. -
Final touches:
Add a few tiny grass blades along the bottom horizon line using the liner brush to break up the flat bottom edge.
Keep it flowing
Add painting medium or a few drops of water to your acrylics during the blending phase. This extends drying time, giving you a smooth, streak-free gradient.
Add life
Once the black paint is dry, paint a tiny silhouette of a bird on a branch or a swing hanging down to add a narrative element to your peaceful scene.
Now hang your vertical masterpiece and enjoy the permanent sunset view
Misty Mountain Layers
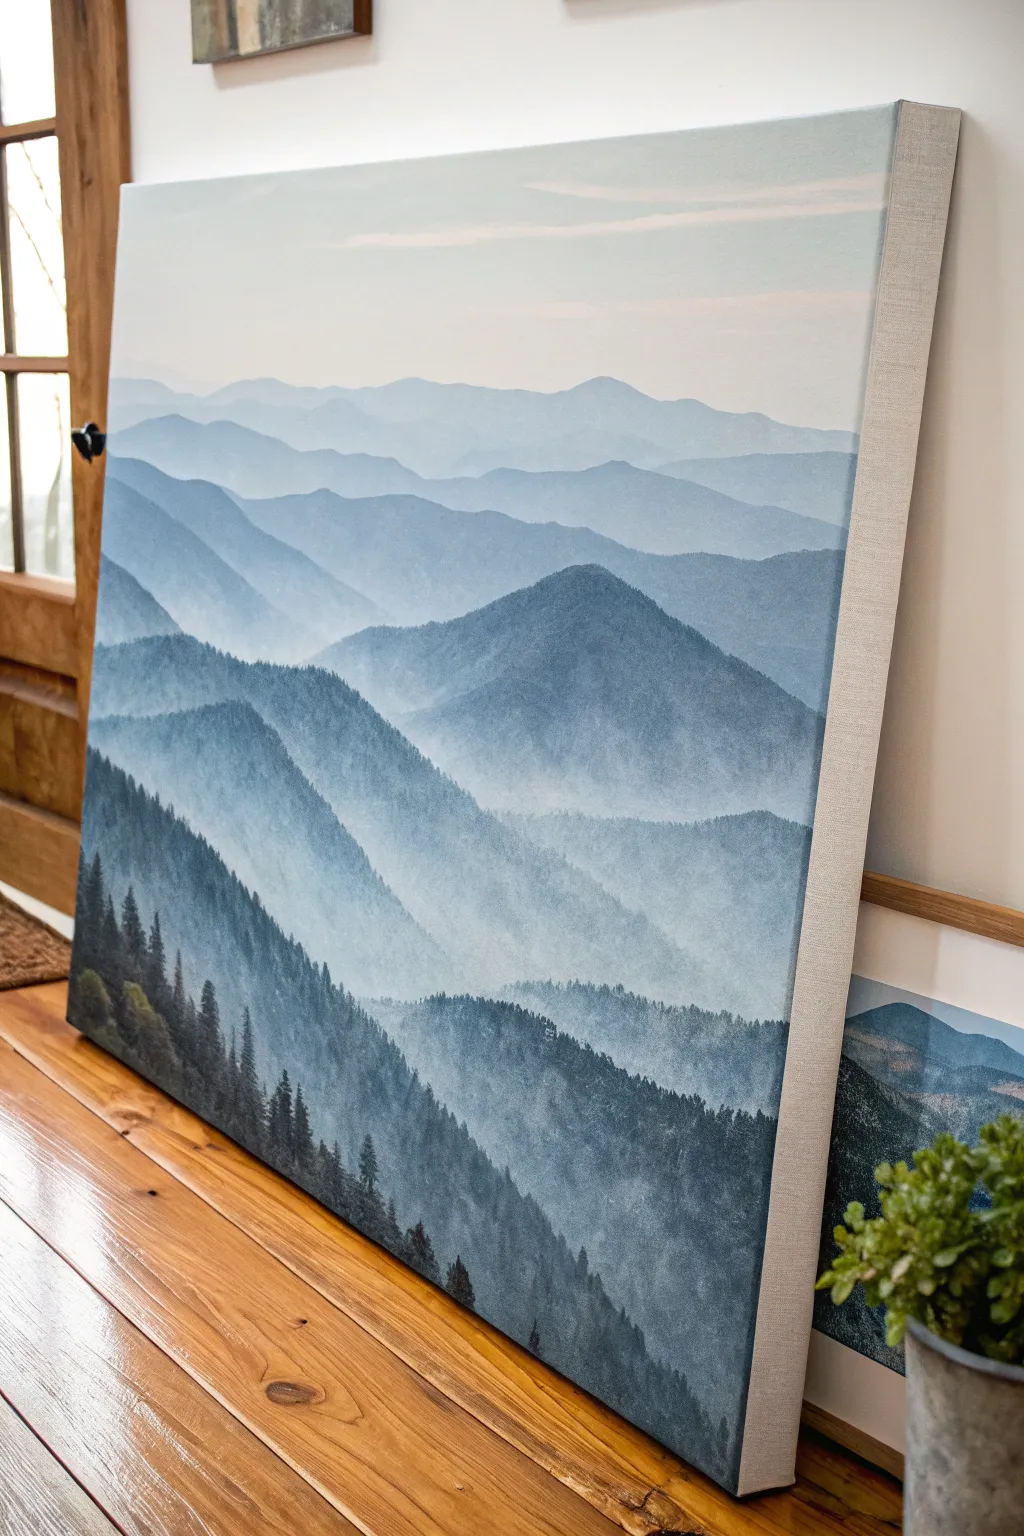
Capture the breathtaking tranquility of a misty mountain range with this atmospheric canvas project. By utilizing simple layering techniques and a monochromatic palette, you’ll create a sense of vast depth and peaceful distance right in your living room.
How-To Guide
Materials
- Large stretched canvas (24×36 or similar)
- Acrylic paints: Titanium White, Phthalo Blue, Mars Black, Burnt Umber
- Large flat wash brush (2-3 inch)
- Medium flat brush (1 inch)
- Small round detail brush
- Fan brush (optional for trees)
- Palette or mixing plate
- Water container and paper towels
- Easel or flat work surface
Step 1: Sky and Background
-
Prepare the gradient:
Begin by squeezing out a generous amount of Titanium White and a very tiny dot of Phthalo Blue. You want a color that is almost white but has a cool tint. Use your large wash brush to paint the top third of the canvas, blending downwards. -
Add the first ridge:
Mix a slightly darker shade by adding just a touch more blue to your white mixture. With the medium flat brush, paint a soft, rolling mountain line about one-third down from the top. Fill in the area below this line down to the halfway point. -
Blend the transition:
Before the paint dries completely, use a clean, slightly damp large brush to gently soften the bottom edge of this first mountain layer into the sky area, creating a misty, uneven look. -
Deepen the hue:
Create your third value by adding more blue and a microscopic dot of black to your white base. Paint the next mountain ridge below the previous one, ensuring the top edge overlaps the lighter layer behind it. -
Vary the shapes:
As you paint this layer, make the mountain peaks slightly more distinct and jagged than the distant ones. This helps establish the illusion that these mountains are getting closer.
Fixing “Flat” Mountains
If your layers blend too much, let each ridge dry completely before painting the next one down. This ensures a crisp edge that clearly defines the distance.
Step 2: Mid-Ground Layers
-
Building the mid-tones:
Mix a medium blue-grey. Use Phthalo Blue, a bit more white, and a small amount of Burnt Umber to desaturate the blue so it doesn’t look too electric. Paint a large range spanning across the middle of the canvas. -
Create mist pockets:
While this mid-tone layer is wet, take a brush with a bit of pure white and lightly scumble (dry brush) it at the valleys and base of the mountains. This mimics fog settling between the ridges. -
Darken the mix:
Add more blue and black to your palette. You want a deep slate blue now. Paint a prominent mountain range that starts on the right side and slopes down towards the left center. -
Add texture:
I like to switch to a smaller flat brush here. Instead of smooth strokes, use short, vertical dabbing motions to suggest the presence of dense forests on these closer mountains without painting individual trees yet. -
Establish the valley:
Paint the next layer in a dark navy tone, effectively the shadow of the valley. Allow the bottom of this layer to remain somewhat transparent or misty by blending it out with water.
Step 3: Foreground Detail
-
Mix the darkest value:
Combine Mars Black with Phthalo Blue and a touch of Burnt Umber. This should look nearly black but have a rich, deep forest green/blue undertone. -
Paint the nearest ridge:
Using this dark mixture, paint the final hill shape in the immediate bottom left foreground. Make the top edge uneven and steep. -
Start the trees:
Switch to your small round brush or a fan brush turned vertically. Along the top ridge of this dark foreground shape, pull small vertical lines up to create the trunks of evergreen trees. -
Foliage details:
Using the tip of the brush, tap in downward-sloping branches on your tree trunks. Keep the trees at the very top of the ridge sharp and distinct against the lighter background. -
Fill the dense forest:
Fill the rest of the bottom left corner with solid dark color, adding texture by stippling the brush to suggest a thick canopy of trees. -
Final highlights:
Mix a slightly lighter olive-green tone and gently tap it onto the tips of a few foreground trees to simulate weak sunlight hitting the nearest branches.
Metallic Touch
Mix a tiny amount of iridescent mixing medium or pearl white into your mist layers for a subtle, shimmering fog that catches the light.
Step back and admire how these simple gradient layers have transformed your canvas into a window overlooking a vast world


Calm Ocean Horizon and Clouds
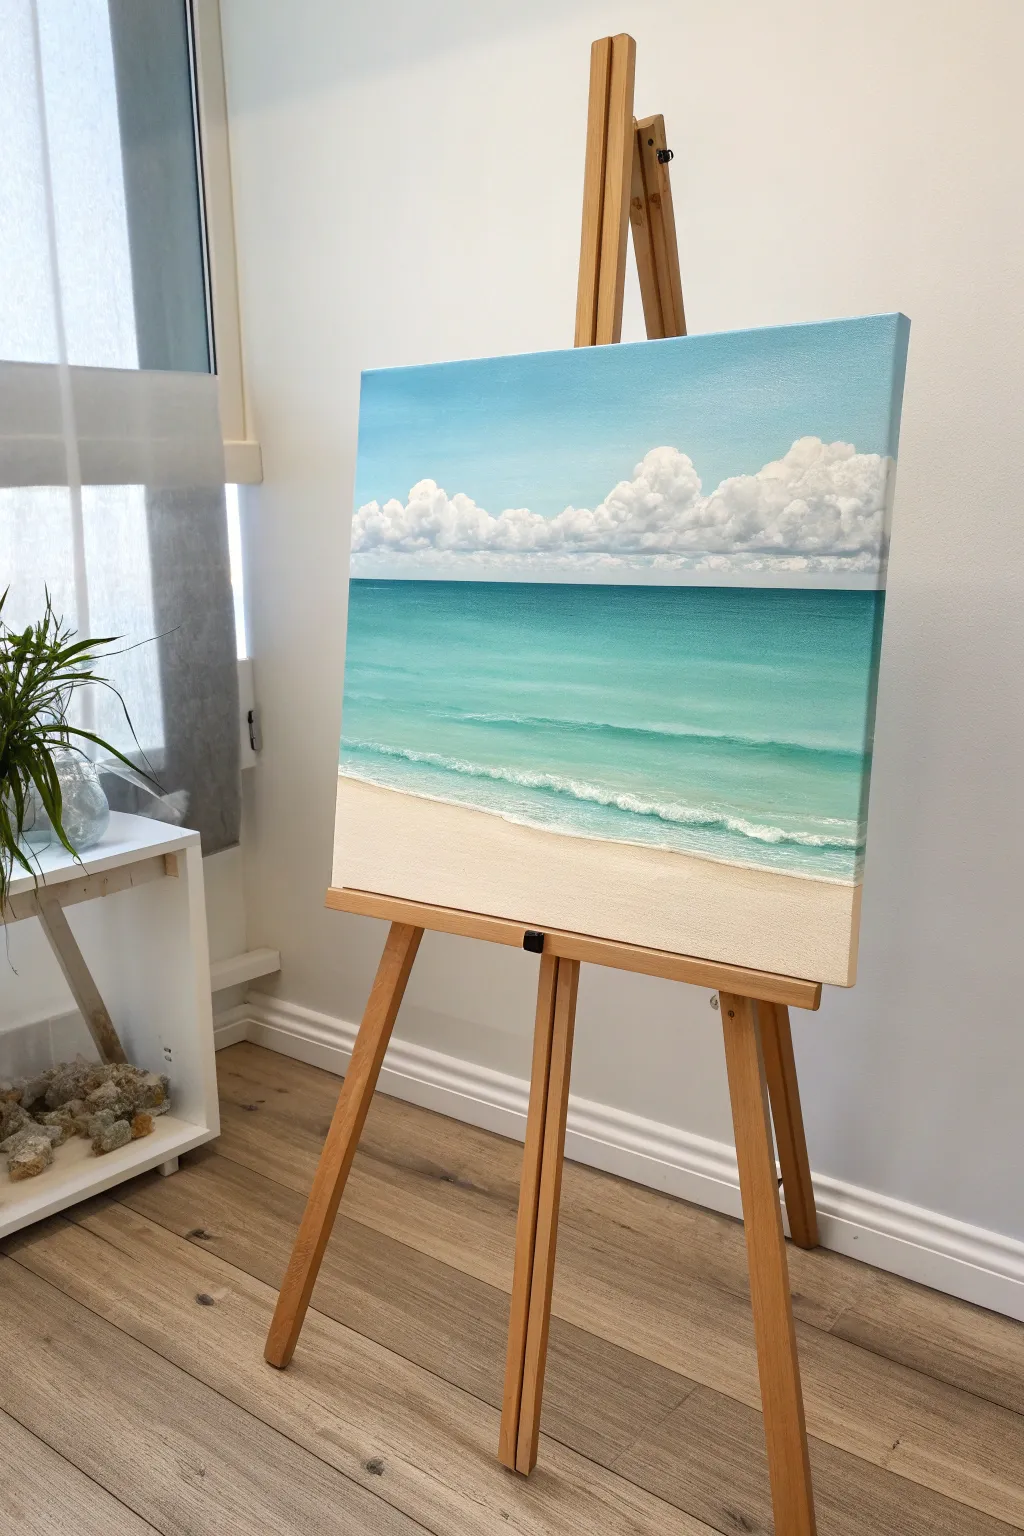
Capture the serene beauty of a tropical beach with this soothing acrylic painting tutorial. You’ll layer soft blues and clean whites to create a realistic transition from sandy shore to rolling clouds.
Step-by-Step Tutorial
Materials
- Medium-sized stretched canvas (e.g., 16×20 inches)
- Acrylic paints: Titanium White, Phthalo Blue (Green Shade), Cerulean Blue, Burnt Umber, Yellow Ochre, Raw Sienna
- Large flat wash brush (1-2 inch)
- Medium flat brush
- Small filbert brush
- Small round detail brush
- Palette knife
- Water cup and paper towels
- Masking tape (optional for horizon line)
Step 1: Setting the Scene
-
Establish the horizon:
Decide on your horizon line placement. For this composition, place it just above the center of the canvas to give equal weight to the sky and the sea. You can use a strip of masking tape to ensure a perfectly straight line. -
mix the sky blue:
Create a gradient for the sky. Mix Titanium White with a small amount of Cerulean Blue. The sky should be lighter near the horizon and gradually deepen in blue as you move toward the top edge. -
Paint the sky:
Using your large flat brush, apply the sky mixture. Start at the top with a slightly darker mix and work your way down to the horizon, adding more white as you go to create a seamless fade. Smooth out brushstrokes with long, horizontal sweeps.
Cloud Control
If your clouds look too flat, don’t over-blend! Keep the bright white paint thick and textured on the top edges to catch the ‘sunlight’ effectively.
Step 2: The Rolling Clouds
-
Block in cloud shapes:
While the sky is dry, mix Titanium White with a tiny touch of Burnt Umber or grey to create a shadow color. Using a filbert brush, loosely dab in the bottom shapes of the cumulus clouds resting on the horizon. -
Build cloud volume:
Load your brush with pure Titanium White. Apply this to the tops of your cloud shapes, using a circular, scrubbing motion to create fluffy, rounded edges. Leave the shadowed bottoms visible to give the clouds dimension. -
Soften the edges:
Clean your brush and wipe it almost dry. Gently dry-brush over the transition between the white tops and shadowed bottoms of the clouds to blend them softly. Keep the top edges crisp against the blue sky. -
Add distant clouds:
Paint a line of smaller, less distinct clouds right at the horizon line using a mix of white and a tiny bit of sky blue to push them into the distance.
Pro Tip: Atmospheric Depth
Add a tiny drop of the sky blue color into your white cloud mix for the clouds furthest away. This ‘haze’ pushes them back, making the foreground pop.
Step 3: The Turquoise Ocean
-
Mix the deep sea color:
Remove the masking tape if you used it. Mix Phthalo Blue with a touch of Titanium White for the deepest part of the ocean right at the horizon line. -
Establish the deep water:
Paint a straight, dark horizontal line against the horizon. As you move down the canvas, gradually add more white and a tiny touch of Yellow Ochre to warm up the green tones. -
Transition to aquamarine:
Blend the color into a lighter turquoise as you approach the shore. Add more white to your Phthalo Blue mix. Use long horizontal strokes to mimic the calm surface of the water. -
Create the shallow water:
For the water nearest the sand, mix a very pale aqua using mostly Titanium White with a hint of Phthalo Blue and Yellow Ochre. This transparency suggests the sand showing through the water. -
Blend the water gradient:
Use a clean, slightly damp brush to blend the transition zones between the deep blue, turquoise, and pale aqua sections so there are no harsh lines.
Step 4: Sand and Surf
-
Mix sand color:
Combine Titanium White with small amounts of Yellow Ochre, Raw Sienna, and a speck of Burnt Umber. You want a warm, creamy beige tone. -
Paint the beach:
Fill in the bottom triangular section of the canvas with your sand mixture. I find it helpful to curve the shoreline slightly upwards towards the left to create a welcoming perspective. -
Add wet sand:
Where the water meets the sand, darken your beige mix slightly to indicate wet sand. Blend this gently into the dry sand color. -
Paint the whitewater:
Using a small round brush and pure Titanium White, paint the foamy edge of the water. Use a stippling (dotting) motion to create the texture of sea foam. -
Detail the waves:
Follow the line of the shore with thin, broken white lines in the shallow turquoise water to suggest small ripples and incoming waves. -
Final highlights:
Add a few extra bright white touches to the thickest parts of the sea foam and the very tops of the clouds to make them pop against the light.
Step back and enjoy the peaceful coastal view you have brought to life


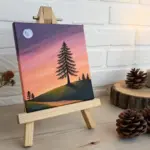
Dreamy Night Sky With Moon Glow
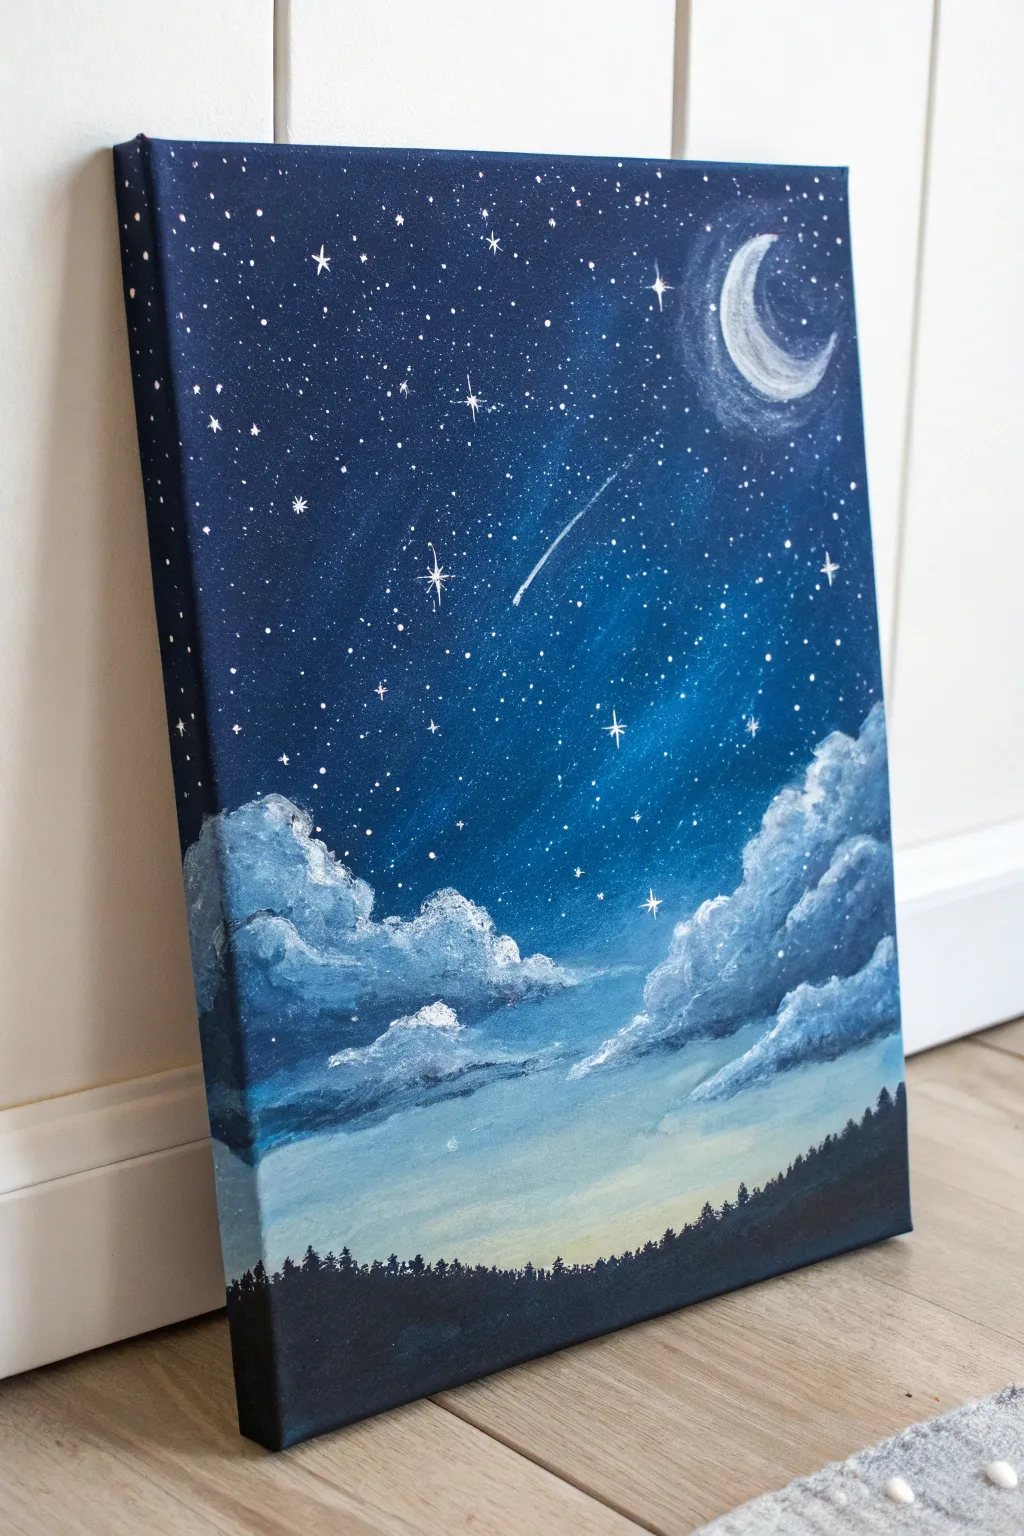
Capture the serene magic of a starlit evening with this beginner-friendly acrylic painting project. The deep blue gradients, glowing crescent moon, and fluffy clouds come together to create a peaceful atmosphere perfect for decorating any bedroom or study.
Step-by-Step Guide
Materials
- Medium-sized stretched canvas (e.g., 11×14 inches)
- Acrylic paints: Ultramarine Blue, Phthalo Blue, Mars Black, Titanium White, Lemon Yellow (tiny amount)
- Flat bristles brushes (large and medium)
- Round detail brushes (small #0 and #2)
- Old toothbrush (optional for stars)
- Palette or paper plate
- Cup of water and paper towels
Step 1: Setting the Scene
-
Prepare the Gradient Base:
Start by mixing a deep midnight blue using Ultramarine Blue and a touch of Black. Apply this to the top third of your canvas, using long horizontal strokes to ensure smooth coverage. -
Blend the Mid-Tones:
Without cleaning your brush, pick up some Phthalo Blue. Paint the middle section of the canvas, blending it upwards into the dark blue while the paint is still wet to create a seamless transition. -
Create the Horizon Glow:
Mix Titanium White with a very small dot of Lemon Yellow and a touch of blue. Paint the bottom third of the sky, blending upward into the mid-blue to mimick the faint glow of twilight near the horizon. -
Paint the Edges:
Don’t forget to wrap your colors around the sides of the canvas gently. This gives the finished piece a professional, gallery-ready look without needing a frame.
Star Spatters Too Big?
If your toothbrush splatters large blobs instead of mist, wait for them to dry completely, then paint over them with the background blue color before trying again.
Step 2: Adding the Moon and Stars
-
Sketch the Moon:
Once the background is dry to the touch, mix a slightly off-white color. Using a small round brush, carefully paint a c-shape curve in the upper right corner to form the crescent moon. -
Create the Moon’s Texture:
While the moon is wet, dab in a tiny bit of pure white and faint gray to give it a cratered texture rather than a flat color. -
Add the Moon’s Halo:
Use a dry brush with a tiny amount of white paint. Gently scrub in a circular motion around the crescent moon to create a soft, glowing halo effect. -
Splatter the Stars:
Dilute some white paint with water until it’s inky. Dip an old toothbrush into it and flick the bristles with your thumb to spray tiny stars across the upper two-thirds of the canvas. -
Paint the Hero Stars:
Using your finest detail brush (size 0), paint a few larger, cross-shaped stars manually to add focal points among the splattered dust. -
Add a Shooting Star:
With the detail brush and watered-down white paint, create a quick, smooth line trailing off into a point to make a shooting star cutting through the center sky.
Step 3: Clouds and Silhouette
-
Form the Cloud Shapes:
Mix a light blue-grey color. Using a rounded brush and a dabbing motion, stamp in the basic shapes of fluffy clouds floating in the lower-middle section. -
Add Cloud Highlights:
Load the tip of your brush with pure Titanium White. Gently dab the top edges of your cloud formations to catch the ‘moonlight’ and give them volume. -
Soften the Clouds:
Wipe your brush clean and dry. Lightly blend the bottom edges of the clouds into the sky background so they look wispy and airy rather than solid. -
Paint the Forest Line:
Mix a solid black color. Using a medium flat brush, paint a solid uneven line across the very bottom of the canvas for the ground. -
Create Tree Details:
Switch to a small round brush or a fan brush used sideways. Tap vertically along the top of your black horizon line to create irregular jagged spikes, mimicking the tops of pine trees. -
Final Touches:
Review your painting. If any stars got covered by clouds, you can add a few fresh sparkles over the cloud edges to create depth.
Add a Constellation
Personalize the night sky by arranging your ‘hero stars’ into a real constellation like the Big Dipper or Cassiopeia for a hidden detail.
Let your masterpiece dry completely before hanging it up to admire your starry creation
BRUSH GUIDE
The Right Brush for Every Stroke
From clean lines to bold texture — master brush choice, stroke control, and essential techniques.
Explore the Full Guide
Wildflower Meadow With Dabbed Petals
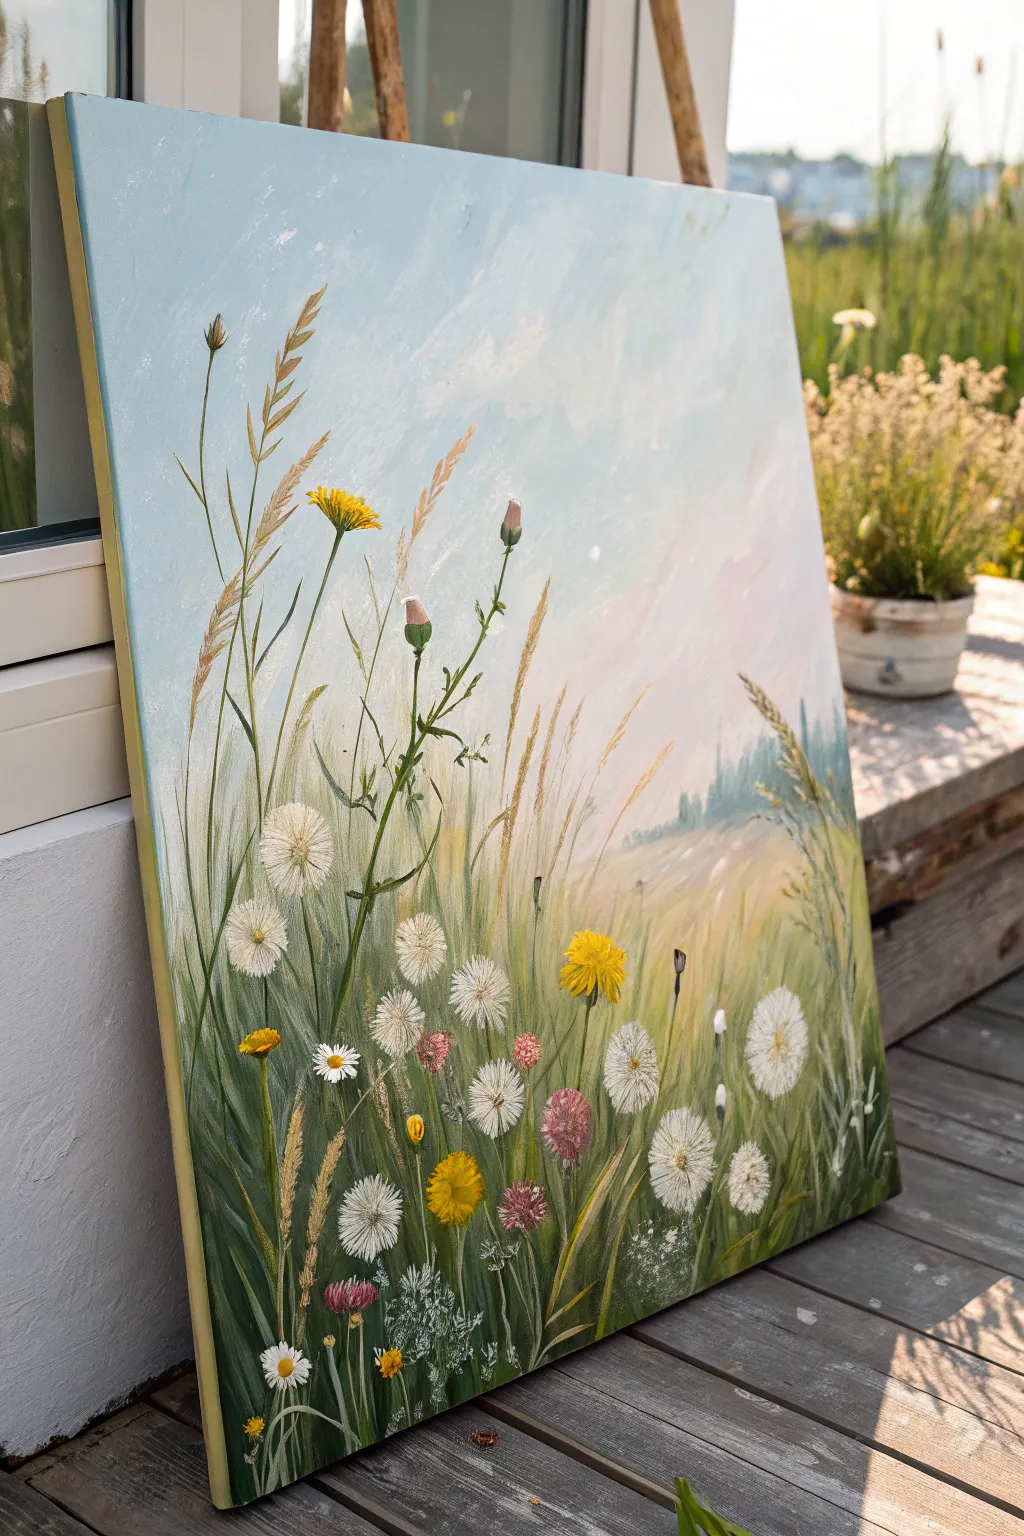
Capture the magic of lying in tall grass on a summer day with this serene wildflower meadow painting. By placing the horizon line low and focusing on detailed stems and blooms in the foreground, you’ll create an immersive sense of depth and tranquility.
Step-by-Step
Materials
- Medium-sized rectangular canvas (e.g., 18×24 or 20×30 inches)
- Acrylic paints: Titanium White, Cerulean Blue, Ultramarine Blue, Hooker’s Green, Sap Green, Yellow Ochre, Cadmium Yellow, Burnt Sienna, Alizarin Crimson
- Large flat brush (2-inch)
- Medium round brush (size 6 or 8)
- Small liner or rigger brush (size 0 or 1)
- Fan brush (optional)
- Palette knife
- Water cup and paper towels
Step 1: Setting the Atmosphere
-
Prime the sky:
Begin by missing a very pale blue using a large amount of Titanium White with a tiny touch of Cerulean Blue. Cover the top two-thirds of your canvas with this mix using your large flat brush. -
Create a gradient:
While the paint is still wet, add a hint of pink (Alizarin Crimson mixed with white) near the middle-right section to suggest a soft, hazy sunset or morning glow. Blend this gently into the blue for a cloud-like effect. -
Establish the horizon:
About one-third of the way up from the bottom, paint a blurred, distant horizon line. Use a mix of white and a tiny bit of Hooker’s Green to create a faded, atmospheric treeline or hill in the background. Keep edges soft. -
Base layer for grass:
Fill the bottom third of the canvas with vertical strokes of Sap Green mixed with a little Yellow Ochre. Don’t worry about detail yet; just get the dark green underpainting established where the dense grass will be.
Muddy Greens?
If your grass blends into a single muddy color, let the bottom layer dry completely before adding lighter stalks. Crisp layers prevent colors from churning together.
Step 2: Building the Grass Textures
-
Adding mid-tones:
Switch to a medium round brush. Mix Sap Green with more Yellow Ochre and a touch of white. Paint long, sweeping vertical lines starting from the bottom edge and reaching up into the sky area. -
Varying the greens:
I like to mix varying shades of slightly cooler greens (using a touch of Ultramarine Blue) for the shadowed areas deep in the grass. Paint these strokes shorter and closer to the bottom edge. -
Golden grasses:
Mix Yellow Ochre with Titanium White to create a wheat-like color. Using a liner brush or the edge of a flat brush, paint tall, thin stalks that extend high into the blue sky area. Vary the angles slightly so they don’t look like soldiers in a row. -
Wheat tops:
For the seed heads on the tall grasses, use a small filbert or round brush to dab a ‘V’ shape pattern in that same golden wheat color, mimicking the texture of wild oats or rye.
Step 3: Painting the Wildflowers
-
Dandelion structure:
Identifiy spots for your white dandelion seed heads. Paint thin, dark green stems using your liner brush first to ensure they are anchored in the ground. -
Fluffy seed heads:
Using a dry, small round brush or a fan brush with very little paint, lightly stipple Titanium White in a circular shape at the top of the stems. Keep the center slightly denser and the edges airy and transparent. -
Refining the fluff:
Go back into the white circles with a tiny liner brush and add delicate radial lines extending outward from the center to mimic the individual seeds. -
Yellow pops:
Mix Cadmium Yellow with a tiny dot of Orange or Sienna. Paint small, jagged bursts for the yellow dandelions or hawkbit flowers. These should be at varying heights—some low in the grass, some higher up. -
Pink clover accents:
Mix Alizarin Crimson with white to make a dusty rose. Paint small oval shapes for clover or thistle heads. Add a darker crimson shadow at the bottom of each oval to give it volume. -
Small filler flowers:
Using pure white on the tip of your smallest brush, dot tiny clusters of baby’s breath or chamomile low in the grass to add density to the foreground.
Add 3D Texture
Mix modeling paste with your white acrylic paint for the dandelion seed heads. Dab it on thick to create actual raised texture that stands off the canvas.
Step 4: Final Details
-
Foreground details:
Mix a very dark green (Hooker’s Green + Burnt Sienna) and paint a few sharp, distinct blades of grass right at the very bottom edge. This sharp focus in the foreground enhances depth. -
Highlights:
Add tiny highlights of pure Yellow Ochre or lemon yellow to the tops of the tallest grass blades where the sun would hit them. -
Review and balance:
Step back and look at your composition. If an area looks too empty, add a floating seed or a bent grass stalk to break up the space.
Now you have a refreshing meadow scene that brings the outdoors inside, regardless of the season
Big Botanical Leaf Study
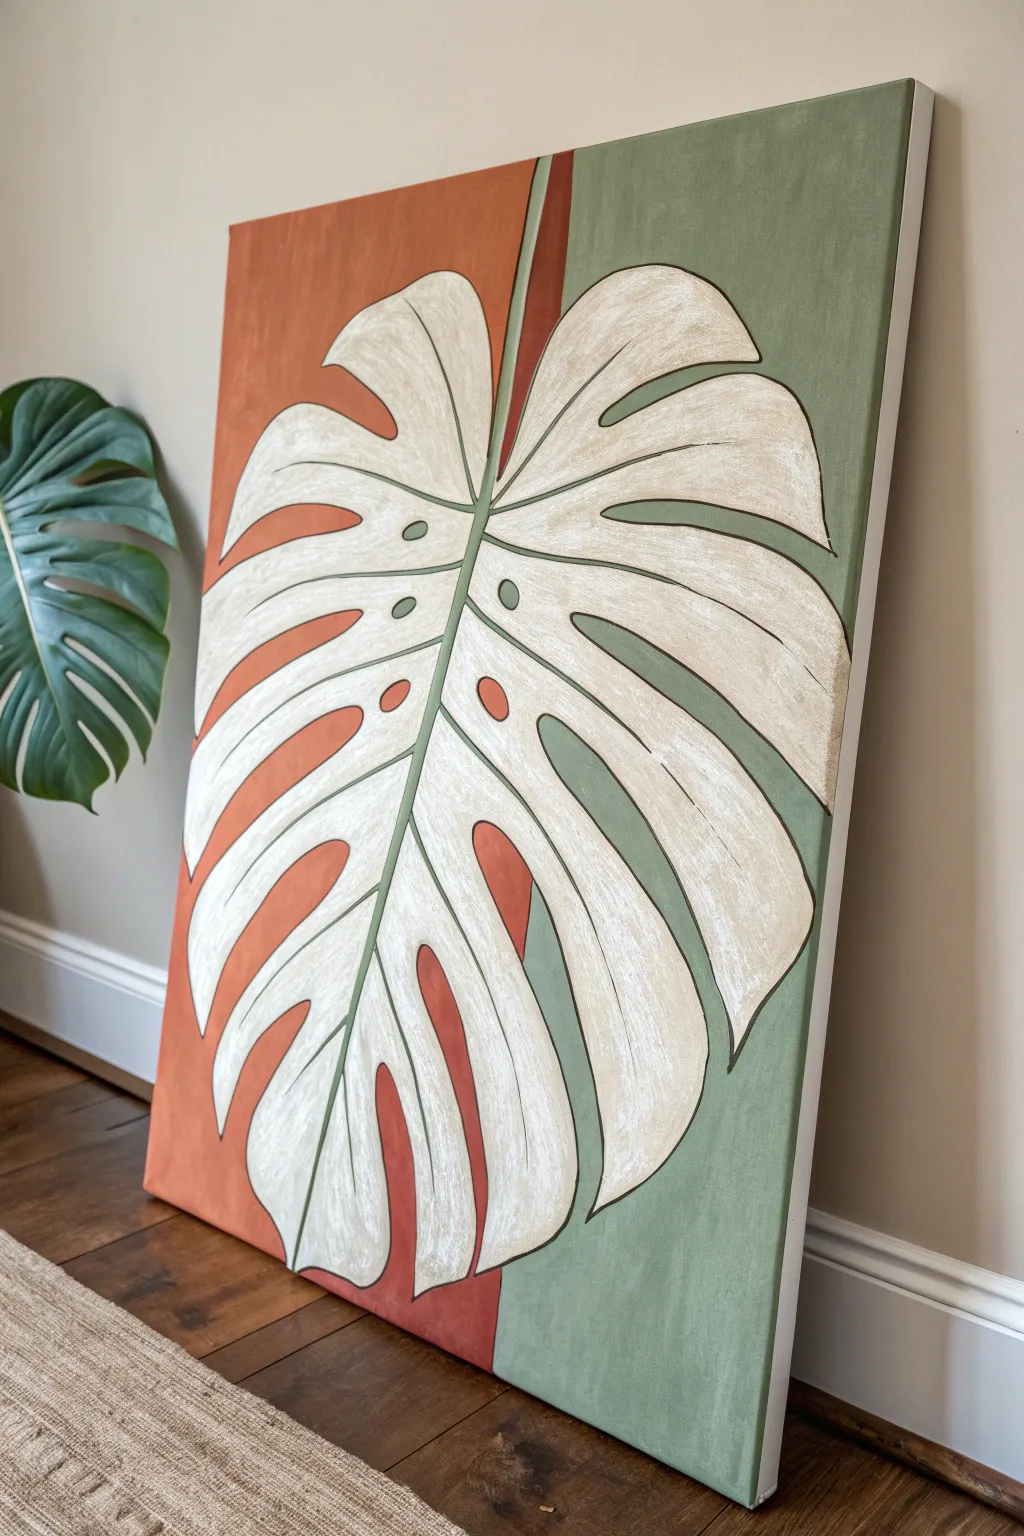
This striking canvas brings a modern botanical vibe to any room by combining a bold, oversized leaf design with a trendy split-background color scheme. By blocking out warm terracotta and cool sage green, you’ll create a graphic backdrop that makes the creamy white Monstera leaf truly pop.
How-To Guide
Materials
- Large rectangular canvas (approx. 24×36 inches or similar)
- Acrylic paints: Burnt sienna or terracotta, Sage green, Titanium white, Unbleached titanium or cream, Carbon black
- Wide flat brush (2-3 inch) for background blocking
- Medium flat brush (1 inch) for filling shapes
- Small round brush (size 2-4) for outlining
- Pencil and eraser
- Ruler or straight edge
- Palette or paper plate
- Cup of water and paper towels
Step 1: Planning and Sketching
-
Divide the background:
Begin by deciding where your background colors will split. Using a ruler and pencil, lightly draw a vertical line slightly off-center to the right. This doesn’t need to be perfectly in the middle; an asymmetrical split adds visual interest. -
Sketch the main stem:
Draw the central vein of the Monstera leaf first. Start from the bottom center-left and curve it gently upwards towards the top right. This single line will anchor the entire leaf structure. -
Outline the leaf shape:
Sketch the overall heart-shaped perimeter of the leaf. Don’t worry about the holes or splits yet; just focus on getting the large scale right so the leaf touches or goes off the edges of the canvas for that magnified look. -
Add the fenestrations:
Now, draw the deep splits (fenestrations) characteristic of a Monstera. Draw curved lines extending from the outer edge inward toward the central vein, leaving a connected spine in the middle. -
Draw interior holes:
Add a few oval-shaped holes near the central vein, typical of mature Monstera leaves. Keep your pencil lines relatively light so they are easy to cover later.
Smooth Lines Pro Tip
To get super smooth outlines, thin your liner paint with a few drops of water until it has an ink-like consistency. This helps the paint flow off the brush without skipping.
Step 2: Painting the Background
-
Mix the terracotta tone:
On your palette, mix burnt sienna with a touch of white to get a soft, matte terracotta color. If it looks too bright, dampen it with a tiny speck of green or brown. -
Paint the left section:
Using your wide flat brush, paint the background area to the left of your vertical line. You can paint right up to your leaf sketch lines, or paint over them slightly if you trust your ability to redraw them later. I usually paint carefully around the sketch to save time. -
Paint the right section:
Switch to the sage green paint. Fill in the background area to the right of your vertical line. Ensure the line where the two colors meet is crisp and straight. -
Refine the edges:
Use a smaller brush to tidy up the paint around the pencil outline of the leaf, ensuring the background colors hug the shape of the leaf perfectly. Let the background dry completely.
Step 3: Painting the Leaf
-
Base coat the leaf:
Mix titanium white with a small amount of unbleached titanium or cream to create an off-white shade. Use the medium flat brush to fill in the entire leaf shape. -
Apply a second coat:
Because light colors over dark or canvas textures can be sheer, apply a second coat of the cream mixture once the first is dry. This ensures a solid, opaque finish. -
Add subtle texture:
While the second coat is still slightly damp, dry-brush a tiny amount of pure white or a slightly lighter cream into the center of the leaf sections. This adds a hint of dimension and avoids the leaf looking like a flat sticker. -
Paint the stem accent:
Identify where the central vein crosses the background split. Paint the portion of the stem on the green side with a slightly lighter green tone, and the portion on the terracotta side with a faint reddish tint if you want transparency, or simply keep the stem a consistent light green for contrast.
Level Up: Texture
Mix a texture medium or modeling paste into your leaf paint before applying it. This will give the Monstera physical ridges and brush marks for a tactile, high-end art feel.
Step 4: Details and Outlining
-
Prepare the outline color:
Mix a dark, muddy green-brown using your black, green, and terracotta paints. Alternatively, plain carbon black works for a starker, illustrative look, but a deep brownish-green feels more organic. -
Outline the perimeter:
Using your smallest round brush with a steady hand, outline the entire outer edge of the leaf. Varying the line thickness slightly can make the drawing feel more dynamic. -
Define the splits:
Carefully outline the inside edges of the deep cuts and the oval holes within the leaf. Keep these lines smooth and continuous. -
Draw the veins:
Paint thin lines for the secondary veins extending from the central stem out toward the leaf edges. These shouldn’t be perfectly straight; give them a slight curve to mimic natural growth. -
Final touch-ups:
Step back and check for any patchy areas in the background or shaky lines on the leaf. Use the appropriate color to touch up edges for a crisp, finished look.
Hang your finished masterpiece in a well-lit spot to enjoy the calming balance of earth tones and organic shapes

PENCIL GUIDE
Understanding Pencil Grades from H to B
From first sketch to finished drawing — learn pencil grades, line control, and shading techniques.
Explore the Full Guide
Geometric Tape Art in Clean Colors
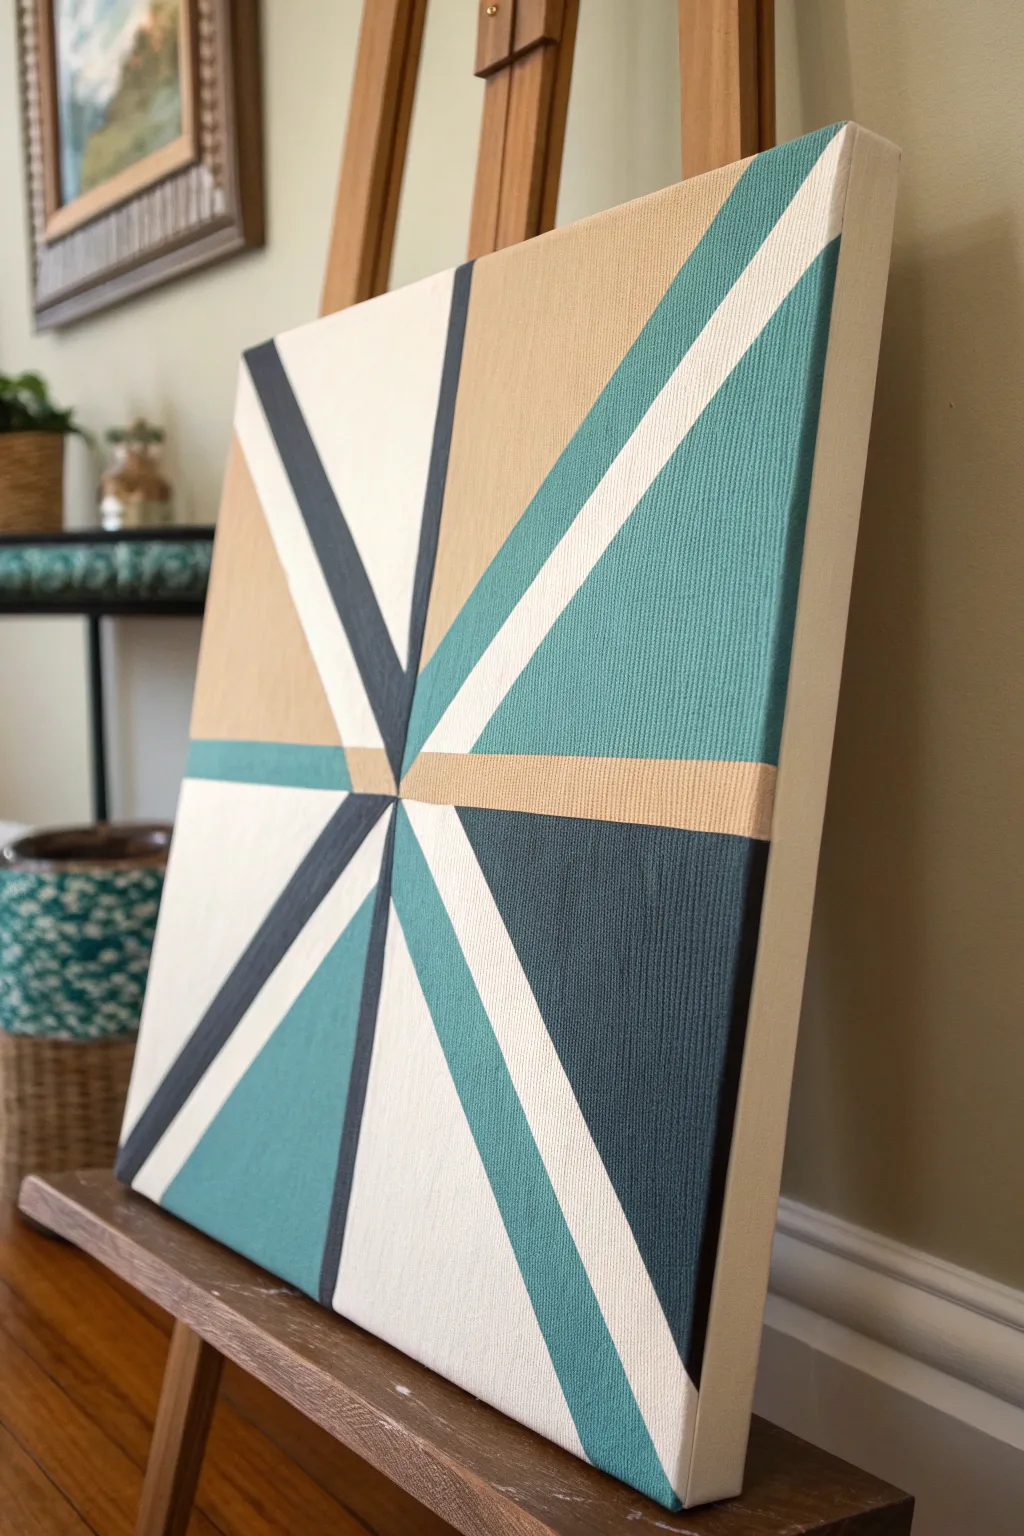
Master the art of clean lines and modern geometry with this striking abstract canvas. This project uses strategic taping to create a sophisticated starburst pattern featuring teals, charcoals, and warm beige tones.
Detailed Instructions
Materials
- Square stretched canvas (approx. 12×12 or 16×16 inches)
- Acrylic paints: Teal/Turquoise, Beige/Tan, Dark Charcoal/Navy, White, Light Grey
- Painter’s tape (various widths if possible, but standard 1-inch works)
- Flat paintbrushes (medium and small sizes)
- Small foam brush (optional, for smooth application)
- Palette or paper plate
- Ruler or straight edge
- Pencil
Step 1: Planning and Foundation
-
Prime the surface:
Begin by painting your entire canvas with a coat of white acrylic paint. This ensures that the white sections of your final design are bright and clean, while providing a uniform base for the other colors. Let this base coat dry completely—overnight is best to prevent tape damage later. -
Mark the focal point:
Decide on your central convergence point. In the example, it’s slightly off-center to the left. Lightly mark this spot with a pencil. -
Map the primary lines:
Using a ruler and pencil, lightly draw lines radiating outward from your focal point to the edges of the canvas. You don’t need a heavy hand here; you just need guides for where your tape will eventually go. -
Design the segments:
Create intersecting lines to form large triangles and trapezoids. Mimic the reference by extending lines from the center to the corners and midpoints of the canvas edges.
Step 2: Taping Strategy
-
First masking phase:
Apply strips of painter’s tape along your pencil lines. The key is to tape *outside* the shape you want to paint first. Since lines intersect, you cannot paint everything at once. Choose non-adjacent sections to start with—for example, the large top-right beige triangle and the bottom-left teal section. -
Seal the edges:
Run your fingernail or a credit card firmly along the edges of the tape to ensure a tight seal. This prevents paint from bleeding under the tape. -
The white paint trick:
For razor-sharp lines, I like to brush a very thin layer of white paint over the tape seams first. This seals any microscopic gaps; if paint bleeds, it will be white-on-white, keeping your colored lines crisp.
Bleeding Lines?
If paint bleeds under the tape, wait for it to dry fully. Then, place a new piece of tape over the ‘good’ area and carefully paint over the bleed with the correct background color to erase it.
Step 3: Painting Application
-
Apply the first colors:
Paint the exposed sections you’ve selected. Use the beige/tan for the large upper section and teal for the corresponding opposite shapes. Apply 2-3 thin coats rather than one thick one for smoother coverage. -
Remove tape while damp:
Carefully peel back the tape while the final coat of paint is still slightly damp. Pull away from the painted area at a 45-degree angle. Let these sections dry completely before moving on. -
Second masking phase:
Once the first shapes are bone dry, re-apply tape. This time, cover the edges of the sections you just painted to protect them. You are now defining the boundaries for the dark charcoal and white shapes. -
Establish the dark contrast:
Paint the dark charcoal or navy sections. These dark values anchor the composition, so ensure opacity is high here. -
Paint the accents:
Fill in the remaining smaller slivers with white and light grey. The white stripes act as negative space that makes the colors pop. -
Peel and reveal:
Remove the second round of tape carefully. Check for any small bleeds or uneven edges.
Make It 3D
Add a metallic gold or silver pinstripe using a paint marker along the borders where two colors meet. This adds a luxurious, modern touch.
Step 4: Finishing Touches
-
Touch-ups:
Use a very small flat brush to fix any jagged edges or areas where the paint might have lifted. You can use a ruler as a hand rest to keep steady. -
Paint the sides:
Don’t forget the edges of the canvas. Carry the lines over the side for a gallery-wrap look, or simply paint the sides a solid white or neutral beige for a clean finish. -
Protective coat:
Once the painting has cured for at least 24 hours, apply a clear varnish (matte or satin works best for this geometric style) to protect the surface and unify the sheen.
Enjoy the satisfaction of peeling back that final piece of tape to reveal your crisp, modern masterpiece
Abstract Waves With Layered Blues
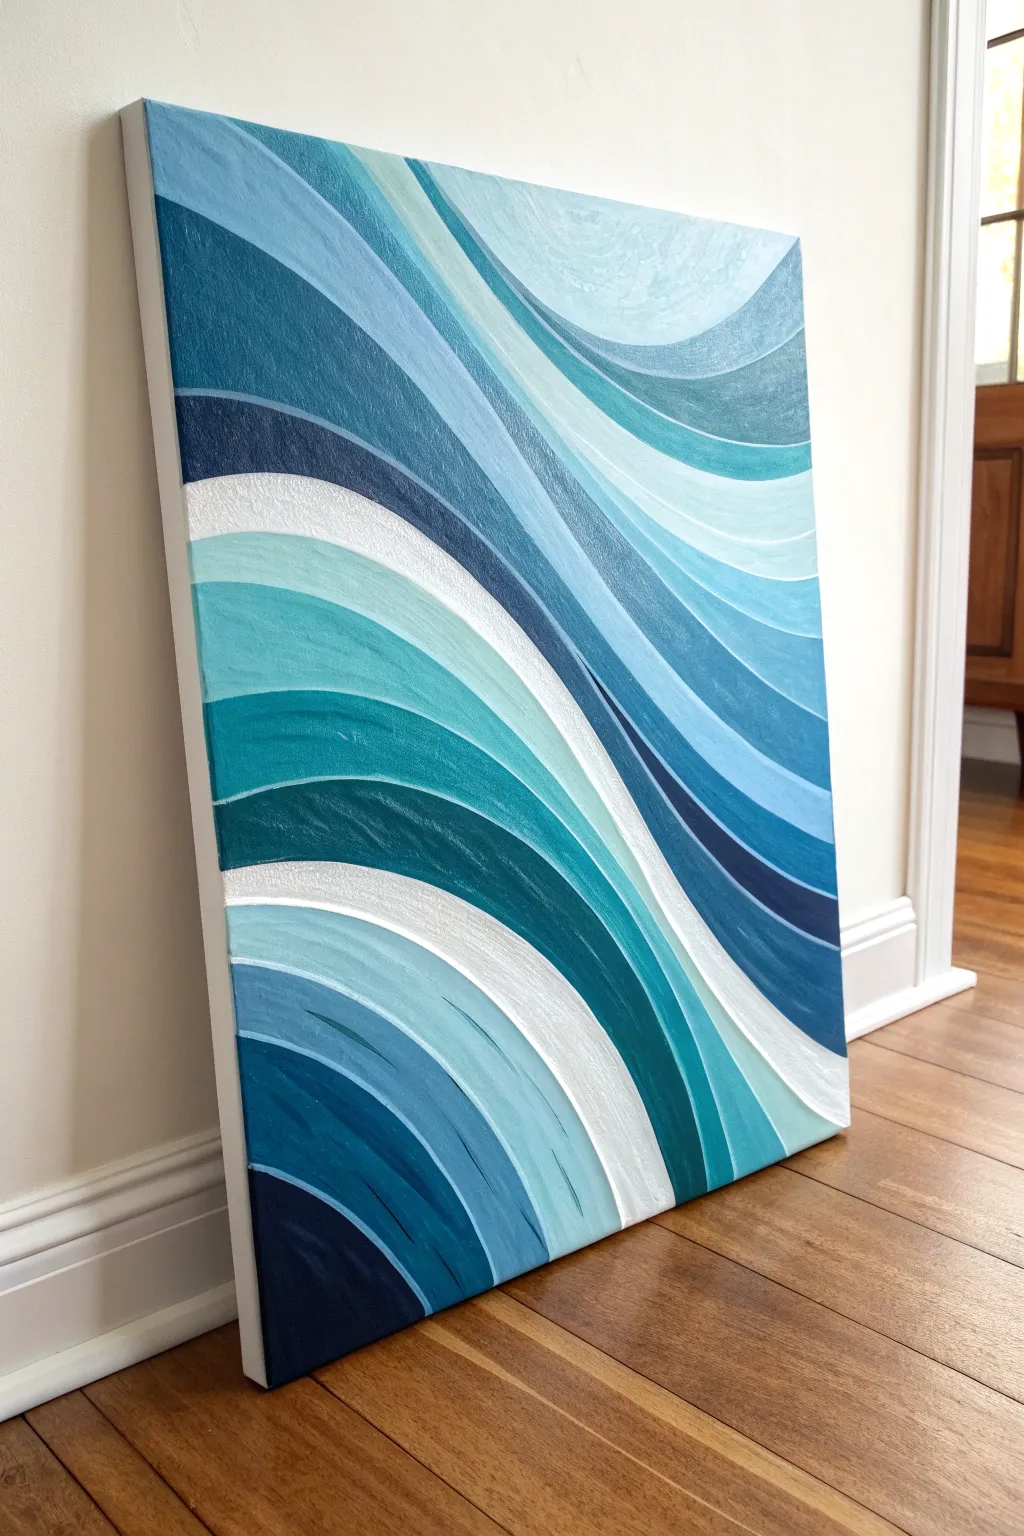
Capture the rhythmic motion of the sea with this soothing abstract wave painting. Using a gradient of cool blues, teals, and crisp whites, you will create overlapping, curved layers that evoke gently rolling tides.
How-To Guide
Materials
- Rectangular stretched canvas (around 16×20 or 18×24 inches)
- Acrylic paints: Phthalo Blue, Ultramarine Blue, Teal, Turquoise, Titanium White, Raw Umber (for darkening)
- Assorted flat synthetic brushes (sizes 1/2 inch to 1 inch)
- Round synthetic brush (size 6 or 8) for finer curves
- Palette or mixing plate
- Cup of water
- Pencil
- Painter’s tape or white chalk (for sketching)
Step 1: Planning and Sketching
-
Observe the Flow:
Before putting brush to canvas, study the reference image. Notice how the waves don’t all go in one uniform direction; they sweep diagonally from the top left and bottom right, meeting and interlocking in the center. -
Map Out the Major Lines:
Using a pencil, very lightly sketch the primary ‘swoops’ or contour lines on your canvas. Start with the largest curves that span the full width to establish the main movement. -
Refine the Sections:
Fill in the secondary curves between your major lines. Aim for variety in width—some bands should be thick and bold, while others weave through as thinner slivers. -
Check the Balance:
Step back and look at your sketch. Ensure you have a good balance of overlapping shapes so the composition feels dynamic rather than static.
Smooth Curves Tip
To get perfectly smooth curves, don’t just move your wrist. Move your entire arm from the shoulder while dragging the brush. This prevents shaky, jagged lines.
Step 2: Mixing the Palette
-
Create a Base Gradient:
Squeeze out generous amounts of your blues, teal, and white. You want to pre-mix 5-7 distinct shades ranging from deep navy to pale, icy blue. -
Mix the Deepest Shadows:
Combine Ultramarine Blue with a tiny touch of Raw Umber or Phthalo Blue to create your darkest, moodiest navy. This will act as the anchor for the lighter colors. -
Create Mid-Tones:
Mix pure Turquoise with varying amounts of Titanium White. Create a second mid-tone by mixing Teal with Phthalo Blue. These vibrant mid-tones will be the primary color of the water. -
Prepare High-Value Tints:
Finally, mix a few very light shades by using mostly Titanium White with just a whisper of Teal or Blue. Keep a pile of pure Titanium White separate for the brightest highlights.
Step 3: Applying the Layers
-
Start with the Darkest Tones:
Identify the sections on your sketch that should be darkest (usually tucked underneath a ‘wave’ crest). Use your flat brush to paint these sections with your deep navy mix. -
Move to Mid-Tones:
Select adjacent sections for your turquoise and teal mixes. When painting next to a wet dark section, be careful to keep the edge crisp, or wait for the dark section to dry slightly if you struggle with steady hands. -
Mind the Brushstrokes:
Paint in the direction of the wave curve. Long, smooth strokes help simulate the movement of water. I find that reloading the brush frequently helps keep this texture smooth. -
Add the Lightest Blues:
Fill in the remaining large sections with your pale blue tints. These lighter colors often look best when placed next to darker bands to create high contrast. -
Paint the Pure White Bands:
Identify the narrowest, crest-like strips in your composition and paint them with pure Titanium White or your very lightest tint. You may need two coats here to ensure opacity over the canvas.
Metallic Accent Level-Up
Swap out the white paint for silver or pearl metallic acrylic for the thinnest wave crests. It adds a shimmering, water-like effect when the light hits it.
Step 4: Refining and Detailing
-
Clean Up Edges:
Once the initial layers are touch-dry, use a smaller round brush with slightly thinned paint to tidy up any ragged edges where two colors meet. The separation should look distinctive and deliberate. -
Add Subtle Texture:
If a section feels too flat, dry-brush a slightly lighter shade of the same hue over the top. Follow the curve to enhance the feeling of flow and volume. -
Enhance Depth:
Conversely, if you need more depth, glaze a thin, watery wash of a darker blue along the bottom edge of a wave band to make it look like it is casting a shadow on the wave below. -
Paint the Canvas Sides:
Don’t forget the edges of the canvas. Extend the lines and colors around to the sides for a professional, gallery-wrapped finish. -
Final Inspection:
Step back about five feet to view the whole piece. Touch up any pinholes of canvas showing through or uneven brush strokes. -
Varnish (Optional):
Once the painting is fully cured (usually after 24-48 hours), apply a satin or gloss varnish to deepen the blues and protect the surface.
Hang your new seascape in a sunny spot and enjoy the calming rhythm of the blue waves


City Skyline at Dusk
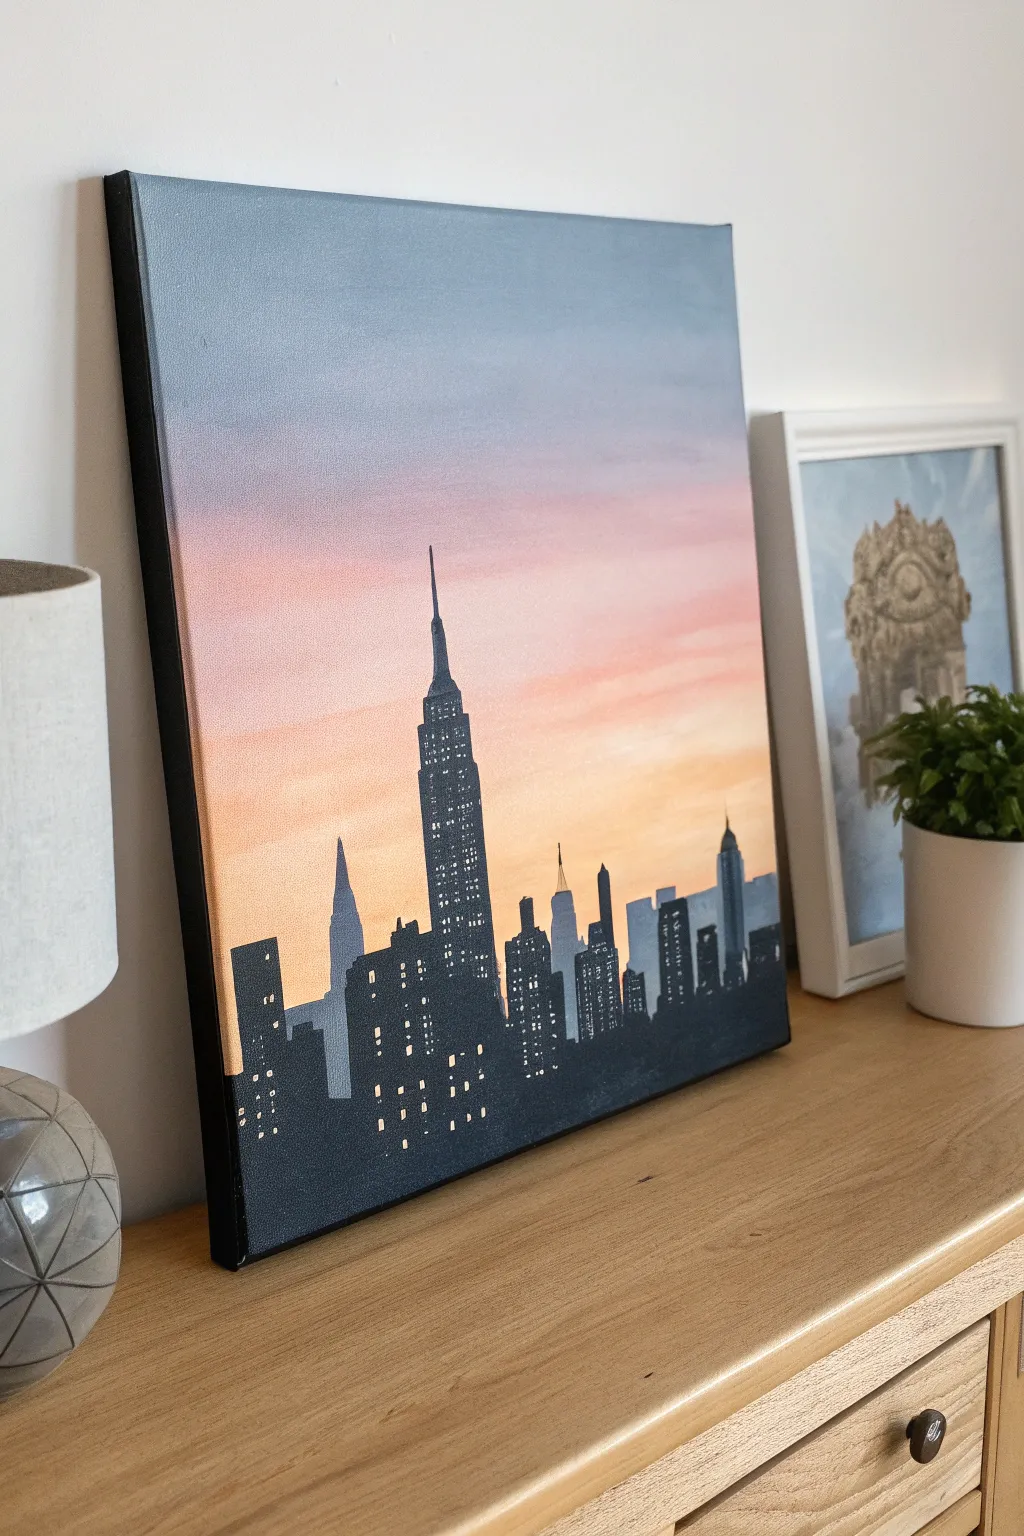
Capture the magic of the city that never sleeps with this atmospheric acrylic painting. You’ll create a smooth, blended gradient sky transitioning from twilight blue to warm coral, setting the perfect backdrop for a striking black silhouette skyline.
Detailed Instructions
Materials
- Medium-sized stretched canvas (e.g., 16×20 inches)
- Acrylic paints: Navy Blue, Titanium White, Magenta or Pink, Orange, and Black
- Large flat brush or foam brush (for the background)
- Medium round brush
- Fine detail brush (liner brush)
- Ruler (optional)
- Pencil
- Cup of water and paper towels
- Palette or paper plate
Step 1: Painting the Gradient Sky
-
Prepare the Canvas:
Start by ensuring your canvas is clean and dust-free. If you want a smoother surface, you can apply a quick coat of gesso and let it dry, though standard pre-primed canvases work perfectly fine. -
Mix the Top Color:
On your palette, mix a slate-blue color using Navy Blue and a touch of Titanium White and a tiny dot of Black to desaturate it slightly. This will be for the very top of your sky. -
Apply the Blue:
Using your large flat brush, paint horizontal strokes across the top third of the canvas. Ensure generous coverage so the paint stays wet for blending. -
Transition to Pink:
Clean your brush quickly. Mix a soft pink using White and Magenta. While the blue edge is still tacky, apply the pink band underneath it, brushing back and forth where the colors meet to create a soft, purple-ish haze transition. -
Add the Horizon Gold:
Clean the brush again. Mix a warm peach or light orange color using White and Orange. Paint the bottom third of the canvas, blending it upward into the pink layer until you have a seamless gradient. -
Let it Full Dry:
This step is crucial. Allow the background to dry completely—usually about 30 minutes to an hour—before attempting to paint over it. If the background is wet, the black city paint will muddy the colors.
Clean Lines Hack
Building edges looking wobbly? Use pieces of masking tape or painter’s tape to mark out the vertical sides of the skyscrapers before painting them black.
Step 2: Creating the City Silhouette
-
Sketch the Skyline:
Lightly sketch the outline of the buildings with a pencil. Place the Empire State Building slightly off-center for visual interest. Don’t worry about perfect architectural accuracy; focus on varied heights and shapes. -
Block in the Paint:
Load a medium round brush with Mars Black or Lamp Black paint. Begin filling in the shapes of the buildings. I prefer using slightly thinned paint here to get sharper edges. -
Refine the Edges:
Switch to a smaller brush to tidy up the tops of the buildings. Add the iconic antenna spire to the Empire State Building and the smaller spires on neighboring skyscrapers. -
Paint the Sides:
Extend the black paint around the edges of the canvas to give the artwork a framed, finished look. This adds a nice professional touch without needing an actual frame. -
Second Coat:
Acrylic black can sometimes look streaky when dry. Apply a second coat of black over the buildings once the first is dry to ensure an opaque, solid silhouette.
Step 3: Illuminating the City
-
Mix Light Colors:
Create a pale yellow by mixing White with a tiny dot of Yellow or Orange. You want a color that looks like warm interior light but stands out against the black. -
Start the Windows:
Using your finest detail brush (a 00 or liner brush is best), start dabbing tiny rectangular dots onto the taller buildings. Keep your hand steady and your touch light. -
Create Patterns:
Don’t just do random dots—create grids. For the Empire State Building, create vertical columns of lights. Leave some ‘floors’ dark to make the buildings look occupied and realistic. -
Add Variation:
Mix a pure white or a slightly cooler white-blue color. Add a few dots of this new color scattered among the yellow lights to suggest different types of office lighting. -
Final Touches:
Step back from the painting to see if the balance of light feels right. Add a tiny highlight to the very tip of the main spire if it gets lost against the darker blue sky.
Level Up: Reflections
To make it a waterfront view, mirror the black shapes loosely at the bottom and glaze over them with the water color, adding horizontal ‘ripple’ lines.
Hang your metropolitan masterpiece in a spot where it can catch the evening light
Cozy Campsite Under Stars

Capture the magic of a peaceful night outdoors with this atmospheric acrylic painting. You’ll create a glowing tent and campfire set against a vast, sparkling galaxy that feels miles away from civilization.
How-To Guide
Materials
- Medium-sized stretched canvas (e.g., 16×20 inches)
- Acrylic paints: Phthalo Blue, Ultramarine Blue, Black, Titanium White, Burnt Umber, Hooker’s Green, Cadmium Yellow, Cadmium Orange, Burnt Sienna
- Large flat wash brush (1-2 inch)
- Medium filbert brush
- Small round detail brush (size 0 or 1)
- Old toothbrush (for stars)
- Palette knife (optional for texture)
- Cup of water and paper towels
- Chalk or pastel pencil for sketching
Step 1: Setting the Night Sky
-
Establish the background:
Start by mixing Phthalo Blue, Ultramarine Blue, and a touch of Black to create a very deep, rich midnight blue. Cover the top three-quarters of the canvas with this mixture using your large flat brush. -
Create the atmospheric fade:
While the paint is still wet, blend in a slightly lighter blue (add a tiny bit of White to your mix) near the horizon line where the mountains will sit. This creates an atmospheric glow. -
Paint the distant mountains:
Mix Black with a little Hooker’s Green and Blue to make a dark, shadowy color. Using a filbert brush, paint a rolling mountain silhouette across the horizon line, overlapping the sky slightly. -
Add the Milky Way:
Mix a very thin, translucent glaze of Titanium White and water. Use a scruffy brush or sponge to dab a diagonal, cloudy band across the sky. Soften the edges with a clean, dry brush to make it look like distant gas clouds. -
Splatter the stars:
Dilute Titanium White paint with water until it’s ink-like. Dip an old toothbrush into it, then flick the bristles with your thumb to spray tiny stars across the blue sky area. Focus more density near the Milky Way band. -
Detail bright stars:
Use your smallest round brush to dot in a few larger, brighter stars. For the ‘twinkle’ effect, use the tip of a palette knife or fine brush to drag tiny cross shapes on the biggest stars.
Step 2: Groundwork and Tent
-
Block in the foreground:
Mix Burnt Umber, Hooker’s Green, and a bit of Black. Paint the bottom quarter of the canvas to create the grassy field. Use upward, flicking strokes to simulate tall grass blades rather than a solid block of color. -
Sketch the tent placement:
Once the background is dry, use a piece of chalk to lightly outline the triangle shape of the tent and the small figure sitting inside. -
Paint the tent base:
Fill in the tent shape with a mix of Titanium White and a tiny drop of Burnt Sienna to make a cream canvas color. Keep the edges relatively sharp. -
Add the inner glow:
The inside of the tent needs to look illuminated. Glaze the interior section with Cadmium Yellow and Cadmium Orange. Allow the yellow to be brightest in the center where the light source would be. -
Define the tent structure:
Using a thin brush and watered-down Brown or Grey, paint the fold lines of the fabric and the tent poles. These lines should curve slightly to show the tension in the fabric. -
Paint the camper:
Silhouette the small figure sitting in the tent opening using dark grey or blue. You don’t need distinct features; just the shape of the head and shoulders is enough to tell the story.
Starry Night Tip
Test your toothbrush splatter on a piece of scrap paper first. If the paint is too thick, you get blobs; too thin, and it runs. Aim for an inky consistency.
Step 3: Details and Illumination
-
Create the campfire base:
Paint a small, dark pile of logs using Burnt Umber and Black near the tent entrance. -
Ignite the fire:
Start with Red at the base of the fire, blending up into Orange and finally Yellow at the tips. Use quick, upward flicking strokes to mimic dancing flames. -
Add firelight reflection:
The most crucial step for realism is the cast light. Dry brush some Cadmium Orange and Yellow onto the grass immediately surrounding the fire and the front of the tent. -
Paint the treeline:
On the left and right sides of the horizon, use a fan brush or the corner of a flat brush to dab in dark pine tree silhouettes. Keep them dark to frame the scene. -
Highlight the grass:
Mix a lighter ochre or yellow-green. Using your small round brush, paint individual blades of grass in the foreground that are catching the light from the campfire. -
Final shooting star:
With a steady hand and watered-down White, paint a single, thin diagonal line in the sky for the shooting star. Start with a firm dot and lift your brush as you drag the tail to make it fade out.
Level Up: Real Light
Make this truly magical by poking tiny holes through the biggest stars and the campfire center, then mounting small battery-operated LED lights behind the canvas.
Step back and enjoy the peaceful warmth of your painted campfire under the infinite sky
Planet Cluster on a Galaxy Background
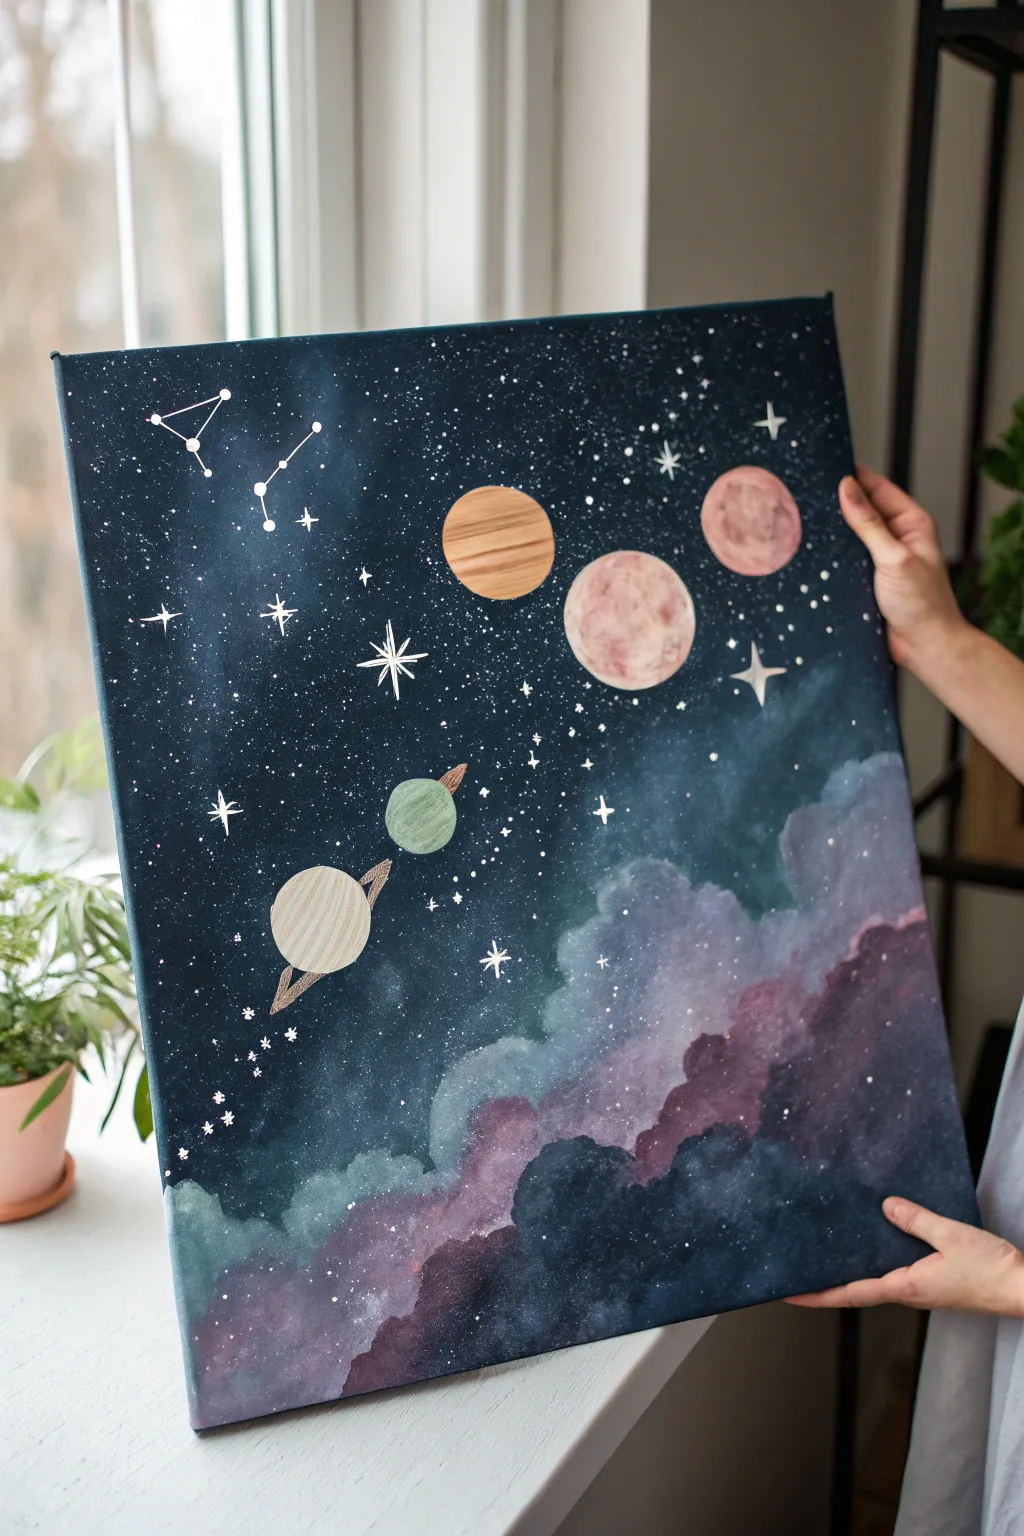
Capture the magic of outer space with this stunning deep blue galaxy painting featuring a playful diagonal lineup of textured planets. The piece combines soft, clouded nebulas with crisp starry details and stylized celestial bodies for a dreamy, illustrative finish.
Detailed Instructions
Materials
- Medium-sized stretched canvas (approx. 16×20 inches)
- Acrylic paints: Navy blue, black, Prussian blue, titanium white, rose pink, muted red/terracotta, beige, sage green, and violet
- Sponge or sea sponge for cloud textures
- Flat shader brushes (various sizes)
- Fine liner or detail brush (size 0 or 00)
- Gold paint or gold leaf pen (optional for planet rings)
- Palette and water cup
- Compass or round objects for tracing circles
Step 1: Setting the Stage
-
Prime the Background:
Begin by covering the entire canvas in a deep, dark base coat. Mix navy blue with a little black to create a midnight sky color. Ensure full coverage, painting the edges of the canvas as well for a polished look. -
Map the Composition:
Once the base is dry, visualize a diagonal line running from the top right to bottom left. This will be the path for your planets and cloud formations. -
Start the Nebula Base:
Load a sponge with a mix of Prussian blue and a tiny touch of white. Gently dab along the bottom right corner, building up the dark, smoky foundation of the galaxy clouds.
Use a Stencil Trick
Cut circles out of sticky notes or masking tape to mask off your planets before sponging the background. This keeps the planet spaces perfectly clean and white.
Step 2: Creating the Galaxy Clouds
-
Layer Violet Tones:
While your blue layer is still slightly tacky, sponge on subtle patches of violet and deep rose pink near the bottom edge. Blend the edges softly into the dark background so there are no harsh lines. -
Add Cloudy Highlights:
Mix a lighter shade of blue-grey using titanium white and a drop of navy. Sponge this onto the upper edges of your cloud formation to create volume and fluffiness. -
Intensify the Contrast:
Go back in with your darkest navy/black mix and carefully dab around the bottom of the clouds to deepen the shadows, making the lighter nebula parts pop forward.
Step 3: Painting the Planets
-
Outline the Orbs:
Using a compass or by tracing round household objects (like caps or cups), lightly sketch five circles in a diagonal line across the dark sky. Vary the sizes for visual interest. -
Base Coat the Planets:
Paint the base color for each planet. Use sage green for the smallest, beige for the ringed one, terracotta for the striped one, and shades of pink for the larger textured ones. Apply two coats if necessary for opacity. -
Texture the Pink Moon:
For the large pink planet, mix a little white and darker rose on your palette but don’t blend them fully. Dab this marbled mix onto the circle to create craters and surface texture. -
Detail the Striped Planet:
Using a small flat brush and a darker brown or rust shade, paint horizontal bands across the terracotta planet. I like to keep these lines slightly uneven to mimic gas giant storms. -
Create the Ringed Planet:
Paint the small beige planet. Once dry, use a fine brush with metallic gold or a light tan paint to draw a thin ellipse around it, creating its ring system. -
Add Shadow and Depth:
Mix a glaze using water and a tiny drop of black paint. Apply a thin crescent shape along the bottom-left edge of each planet to give them a 3D spherical form.
Add Metallic Details
Use metallic gold or copper leaf for the planet rings or the constellation lines. It catches the light beautifully and adds a premium feel.
Step 4: Stars and Constellations
-
Splatter the Stars:
Thin down some white paint with water until it’s inky. Load an old toothbrush or stiff brush and flick the bristles to spray a fine mist of stars across the top left section and faintly over the clouds. -
Paint Major Stars:
Using your finest detail brush and pure white paint, create larger distinct stars. Paint a few four-pointed ‘sparkle’ stars to act as focal points in the open space. -
Connect Constellations:
Choose a spot in the upper left corner and paint small dots in the shape of a constellation (real or invented). Connect them with incredibly fine lines to mimic a star chart. -
Add Final Highlights:
Place a tiny dot of pure white on the top-right curve of the larger planets to represent the light source reflecting off them. -
Refine Edges:
Check the edges of your planets. If the background paint covered any outlines, use your fine brush to neaten up the circles with the appropriate planet color.
Hang your masterpiece near a window to let the natural light play off those dreamy galaxy textures
Split-Scene Cutaway Landscape
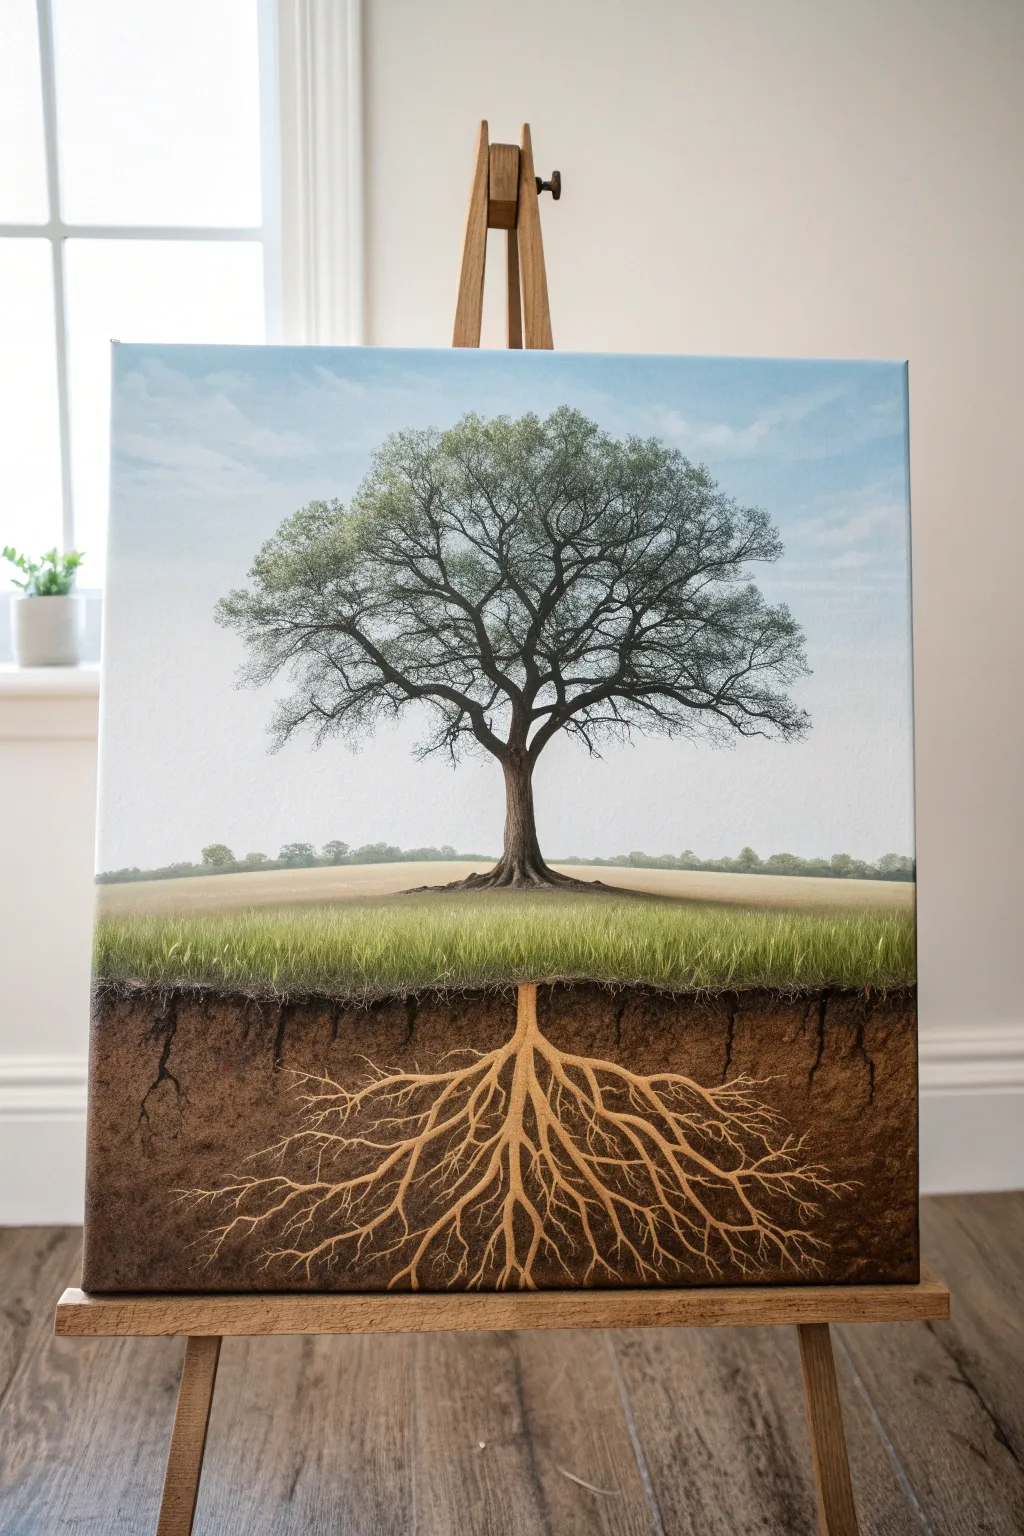
Visualizing what lies beneath the surface adds a profound layer of storytelling to a standard landscape. This acrylic painting balances a classic countryside scene with an intricate, cross-section view of the earth and root system below.
Detailed Instructions
Materials
- Medium-sized stretched canvas (approx. 16×20 inches)
- Acrylic paints: Titanium White, Burnt Umber, Raw Sienna, Yellow Ochre, Sap Green, Phthalo Blue, Mars Black
- Gesso (optional, for priming)
- Painter’s tape or masking tape
- Assorted brushes: 1-inch flat, medium filbert, fine liner script brush, fan brush
- Palette knife
- Water cup and paper towels
- Pencil for sketching
Step 1: Setting the Horizon
-
Divide the canvas:
Begin by measuring roughly one-third of the way up from the bottom of your canvas. Place a strip of painter’s tape horizontally across this line. This will separate your underground soil layer from the open air above. -
Paint the sky gradient:
Mix Titanium White with a tiny touch of Phthalo Blue. Start painting at the very top edge, using long horizontal strokes. As you move down toward the tape, add more white to create a soft fade, simulating atmospheric perspective. -
Add gentle clouds:
While the sky is still slightly tacky, use a dry filbert brush with pure Titanium White to scumble in faint, wispy cloud shapes. Keep them subtle so they don’t distract from the tree. -
Create the distant tree line:
Mix a muted gray-green using Sap Green, a touch of Black, and White. With a small round brush, dab in a very low, distant tree line right above where your horizon will be. Let the top half dry completely.
Step 2: The Visible Landscape
-
Block in the field:
Remove the painter’s tape. Paint the area immediately above the soil line with Yellow Ochre and White to create a dry grass field. Blend this upward toward the distant tree line. -
Paint the tree trunk:
Using Burnt Umber and a medium filbert brush, paint the main trunk in the center. Taper it upward as it branches out. Keep the base of the trunk resting precisely on the horizon line you created. -
Detail the branches:
Switch to a liner brush. Mix Burnt Umber with a little water to improve flow (inky consistency). Paint intricate branches extending outward and upward, getting thinner at the tips. -
Add the foliage canopy:
Using an old, splayed brush or a sponge, tap in the leaves using a mix of Sap Green and Olive. Don’t make it a solid block; leave ‘sky holes’ so the branches show through. -
Highlight the canopy:
Mix a lighter green with Yellow and White. Lightly tap this onto the top-left edges of the leave clusters to simulate sunlight hitting the canopy.
Pro Tip: Use Gravity
To get natural-looking roots, turn your canvas upside down when painting the underground section. This allows your hand to pull the brush strokes ‘upward’ just like tree branches.
Step 3: The Underground World
-
Establish the soil base:
Paint the entire bottom third (the cutaway section) with a mix of Burnt Umber and Mars Black. This dark foundation represents the deep, nutrient-rich earth. -
Texture the dirt:
While the dark base is still wet, take a sponge or scrunched paper towel dipped in Raw Sienna and dab it randomly over the area. This creates the texture of soil and sediment. -
Paint the grass edge:
Where the field meets the dirt, use a fan brush with Sap Green and Yellow to flick upward, creating individual blades of grass that ‘grow’ out of the soil line. -
Start the main taproot:
Using a light mixture of Raw Sienna and White, paint the thick central taproot directly beneath the main tree trunk. It should look like a mirror image of the trunk but slightly more jagged. -
Extend the root network:
With your liner brush and the light brown mix, paint the lateral roots branching out. I find it helpful to make these lines more erratic and angular than the branches above to distinguish them as roots. -
Add fine root hairs:
Use a very watery, pale cream color to paint the tiniest hairline roots at the tips of the larger roots. These should be delicate and spread wide into the dark soil. -
Create depth with shadow:
Mix a dark glaze (Burnt Umber + water) and paint a thin line along the bottom edge of the larger roots. This gives them volume so they look round rather than flat.
Troubleshooting: Flat Roots
If your roots look like stickers on top of the dirt, lightly glaze a thin layer of Burnt Umber over the root tips to push them back into the soil visually.
Step back and admire how the mirrored composition creates a feeling of balance and hidden depth in your artwork


Have a question or want to share your own experience? I'd love to hear from you in the comments below!