If you love a bright, playful vibe, preppy pumpkin painting ideas are such a fun way to swap spooky for sweet. In my studio, I think of these as pastel pumpkins with crisp patterns, cute icons, and just enough glam to feel extra.
Pastel Pink Base Coat Pumpkin
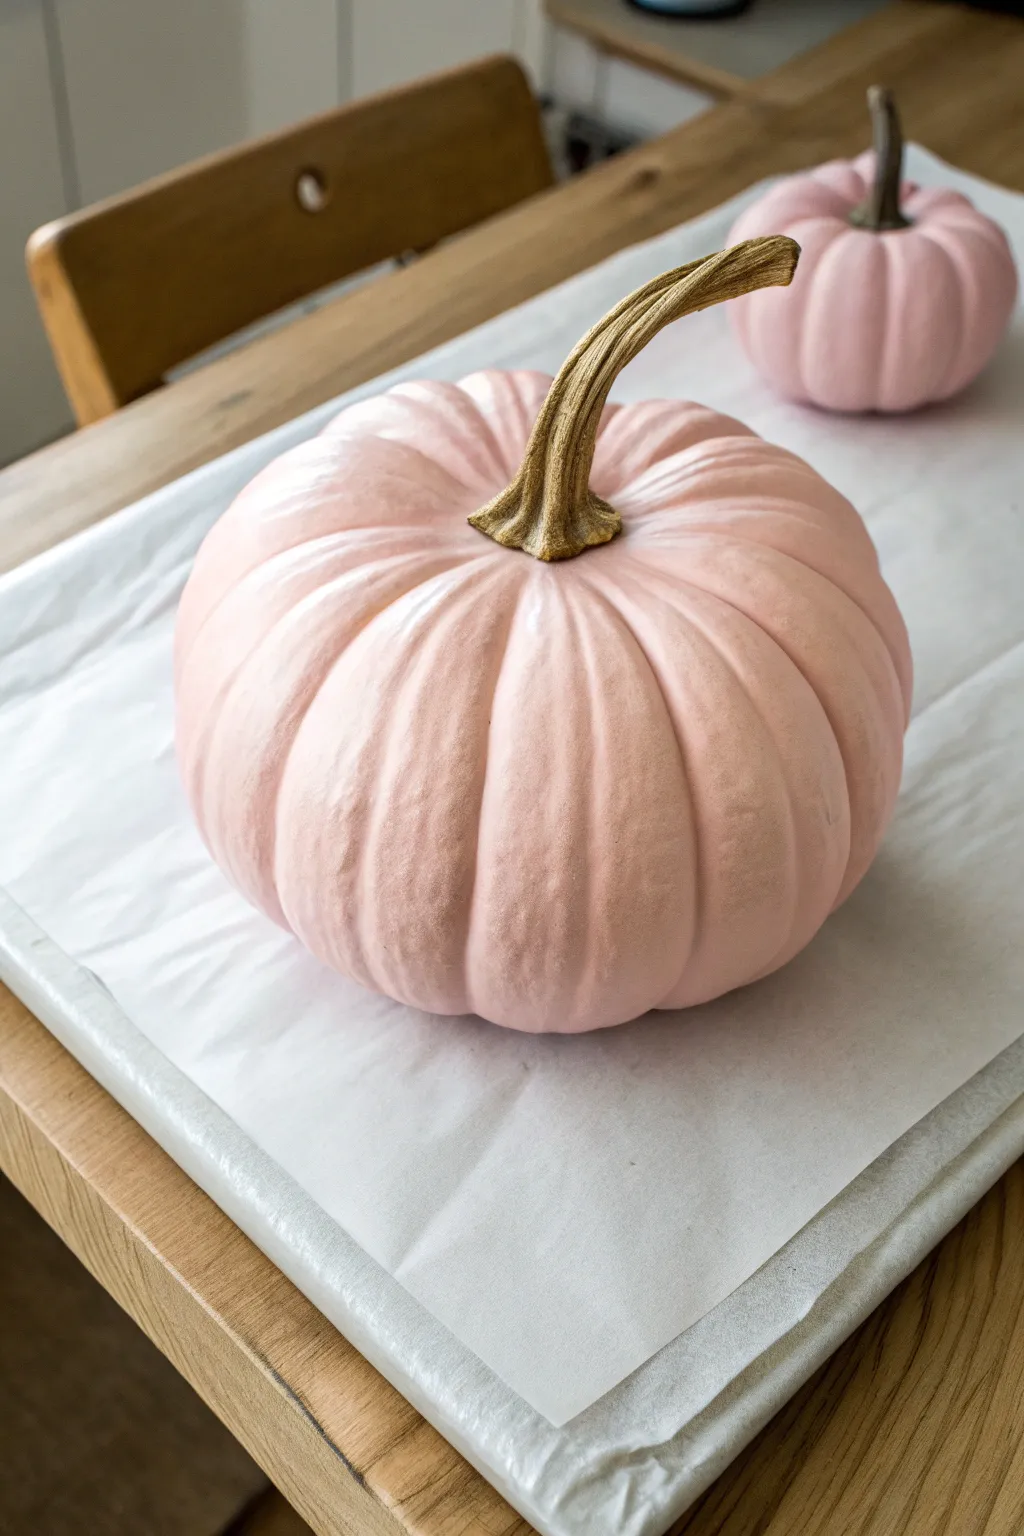
Achieve the ultimate preppy aesthetic with this sweet and simple pastel pink pumpkin project. By combining a soft, matte base with a glamorous gold stem, you create a sophisticated piece that looks straight out of a designer catalog.
Detailed Instructions
Materials
- Medium-sized pumpkin (real or faux)
- Pastel pink acrylic paint (matte or satin finish)
- Gold metallic liquid gilding or heavy-body acrylic paint
- White acrylic paint (priming optional)
- Medium flat paintbrush
- Small detail paintbrush
- Painter’s tape
- Mild dish soap and water
- Clean cloth or paper towels
- Parchment paper or drop cloth
- Clear matte sealer spray (optional)
Step 1: Preparation
-
Clean surface:
Begin by thoroughly washing your pumpkin with mild dish soap and water to remove any dirt or oils that might prevent paint adhesion. -
Dry completely:
Use a clean cloth to dry the pumpkin completely, paying special attention to the deep crevices in the ribs and around the base of the stem. -
Protect stem:
Carefully wrap painter’s tape around the very base of the stem where it meets the pumpkin skin. This ensures you keep a crisp line later when painting the metallic accent. -
Create workspace:
Lay down a sheet of parchment paper or a drop cloth on your table to protect the surface and provide a clean drying area.
Pro Tip: Texture Trick
Mix a teaspoon of baking soda into your pink acrylic paint. This creates a velvety, chalk-paint texture that hides brush strokes perfectly.
Step 2: Base Coating
-
Apply primer (optional):
If using a real orange pumpkin, apply a thin coat of white acrylic paint first. This neutralizes the orange undertone so your pink comes out true to color. -
Mix pink shade:
Check your pastel pink. If it’s too vibrant, mix in a small drop of white to soften it into that delicate ‘ballet slipper’ hue seen in the photo. -
First pink coat:
Using the medium flat brush, apply the first layer of pink paint. Paint in vertical strokes following the natural ribs of the pumpkin for a smoother finish. -
Flip and paint base:
Once the top is dry to the touch, gently turn the pumpkin upside down to painting the bottom. Don’t forget this part, or the orange will show when it’s sitting on a table. -
Dry time:
Allow the first coat to dry for at least 30 minutes. The paint should feel completely dry, not tacky. -
Second pink coat:
Apply a second coat of pink paint, again following the vertical ribs. This layer provides full opacity and richness. -
Check coverage:
Inspect the deep grooves between ribs. Use the tip of your brush to dab paint into any missed crevices so no original color peeks through. -
Final dry:
Let the pink base coat cure fully. I like to give it about an hour just to be safe before moving to the stem.
Step 3: The Gold Stem
-
Remove tape:
Gently peel off the painter’s tape from the base of the stem. -
Paint lower stem:
Dip your small detail brush into the gold metallic paint. Carefully cut in the edge where the stem meets the pink skin. Take your time here for a professional look. -
Coat the stem shaft:
Work your way up the stem, filling in all the ridges and texture of the wood with the gold paint. -
Cap the top:
Dab gold paint onto the very tip of the stem where it was cut from the vine to seal the look. -
Second gold coat:
Most metallic paints need two thin coats rather than one thick gloppy one. Apply a second layer once the first is dry for maximum shine. -
Seal (optional):
If you plan to keep this pumpkin outside or for several years, finish with a light misting of clear matte sealer spray over the pink areas.
Level Up: Preppy Patterns
Once the pink is dry, add navy blue polka dots or thin horizontal white stripes for a classic Ralph Lauren-inspired preppy look.
Now you have a chic centerpiece ready to brighten up your autumn table decor


Crisp White Pumpkin With Gold Stem
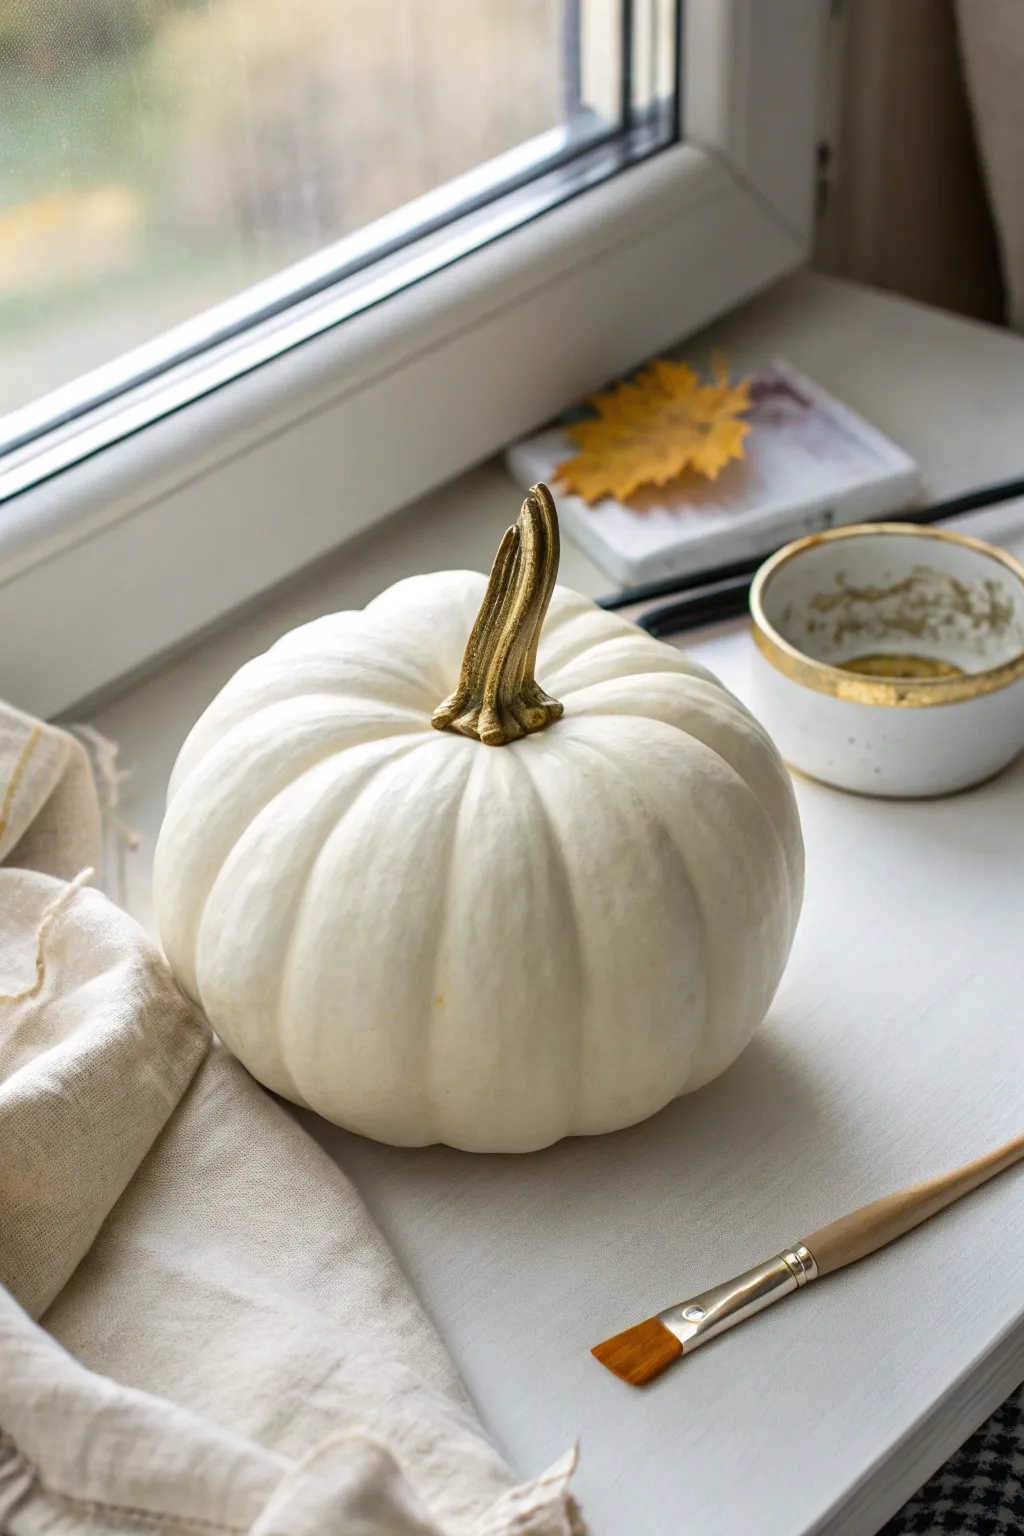
Elevate a simple gourd into a chic, gallery-worthy piece with this understated design. By contrasting a matte, creamy white body with a striking metallic gold stem, you create a sophisticated decoration perfect for a modern autumn vignette.
How-To Guide
Materials
- Small to medium pumpkin (real or faux)
- Matte white acrylic paint or chalk paint (warm white/cream)
- Metallic gold liquid gilding or high-pigment acrylic paint
- Synthetic flat brush (approx. 1 inch)
- Small detail brush (round or liner)
- Painter’s tape or masking tape
- Drop cloth or palette paper
- Paper towels
- Mild soap and water (if using a real pumpkin)
Step 1: Preparation & Base Coat
-
Clean surface:
Begin by thoroughly cleaning the pumpkin. If it’s real, wash it gently with mild soapy water to remove dirt and oils, then dry completely. For faux pumpkins, give them a quick wipe with a damp cloth to remove dust. -
Protect the stem:
Carefully wrap the entire stem with painter’s tape. Press the edges of the tape firmly into the base where the stem meets the pumpkin skin to ensure a clean line later. -
Set up workspace:
Lay down your drop cloth or palette paper to protect your working surface from drips and spills. -
First coat application:
Using your flat synthetic brush, apply the first layer of matte white paint. Start from the top near the taped stem and brush downwards, following the natural vertical ribs of the pumpkin. -
Paint the bottom:
Don’t forget the underside. Once the top is touch-dry, flip the pumpkin carefully and paint the bottom to ensure full coverage. -
Dry and assess:
Let this first coat dry completely. This usually takes about 20-30 minutes for acrylics, though chalk paint dries faster. You’ll likely see streaks, which is normal. -
Second coat:
Apply a second coat of white paint. I like to brush in the same vertical direction to mimic the pumpkin’s texture, ensuring the color is opaque and solid. -
Touch-ups:
Inspect for any thin spots where the original orange might be peeking through. Dab a little extra paint on these areas and feather it out for a seamless finish before letting the pumpkin dry fully.
Use Liquid Gilding
For a truly reflective, high-end look like the photo, skip standard craft acrylics and use ‘liquid leaf’ or gilding paint. The shine level is unmatched.
Step 2: Gilding the Stem
-
Remove tape:
Once the white paint is perfectly dry, gently peel away the painter’s tape from the stem. Do this slowly to avoid lifting any of your fresh white paint. -
Fix imperfections:
If any white paint bled onto the stem, wipe it off with a damp cloth immediately, or wait for it to dry and scrape it gently. -
Prepare the gold:
Shake your liquid gilding or gold paint thoroughly. Metallic pigments settle quickly, so you need them well-mixed for that brilliant shine. -
Paint the stem:
Dip your small detail brush into the gold. Paint the stem, working from the tip down to the base. -
Refine the edge:
This is the critical step: carefully paint the very base of the stem where it meets the white skin. You can extend the gold just slightly onto the pumpkin shoulder (about 1-2mm) to create a deliberate, ‘dipped’ look if the natural transition is messy. -
Add texture:
Work the gold paint into the nooks and crevices of the stem’s texture. A second coat might be needed here to cover dark stem material. -
Final drying:
Liquid gilding often has a strong odor and needs good ventilation. Let the stem dry untouched for at least an hour to avoid tacky fingerprints.
Streaky White Paint?
If your white paint looks streaky after drying, try pouncing (dabbing) the paint on with a sponge brush instead of stroking it. This builds opacity faster.
Place your elegant new creation on a windowsill or mantle for an instant touch of autumn sophistication


Preppy Gingham Painted Pumpkin
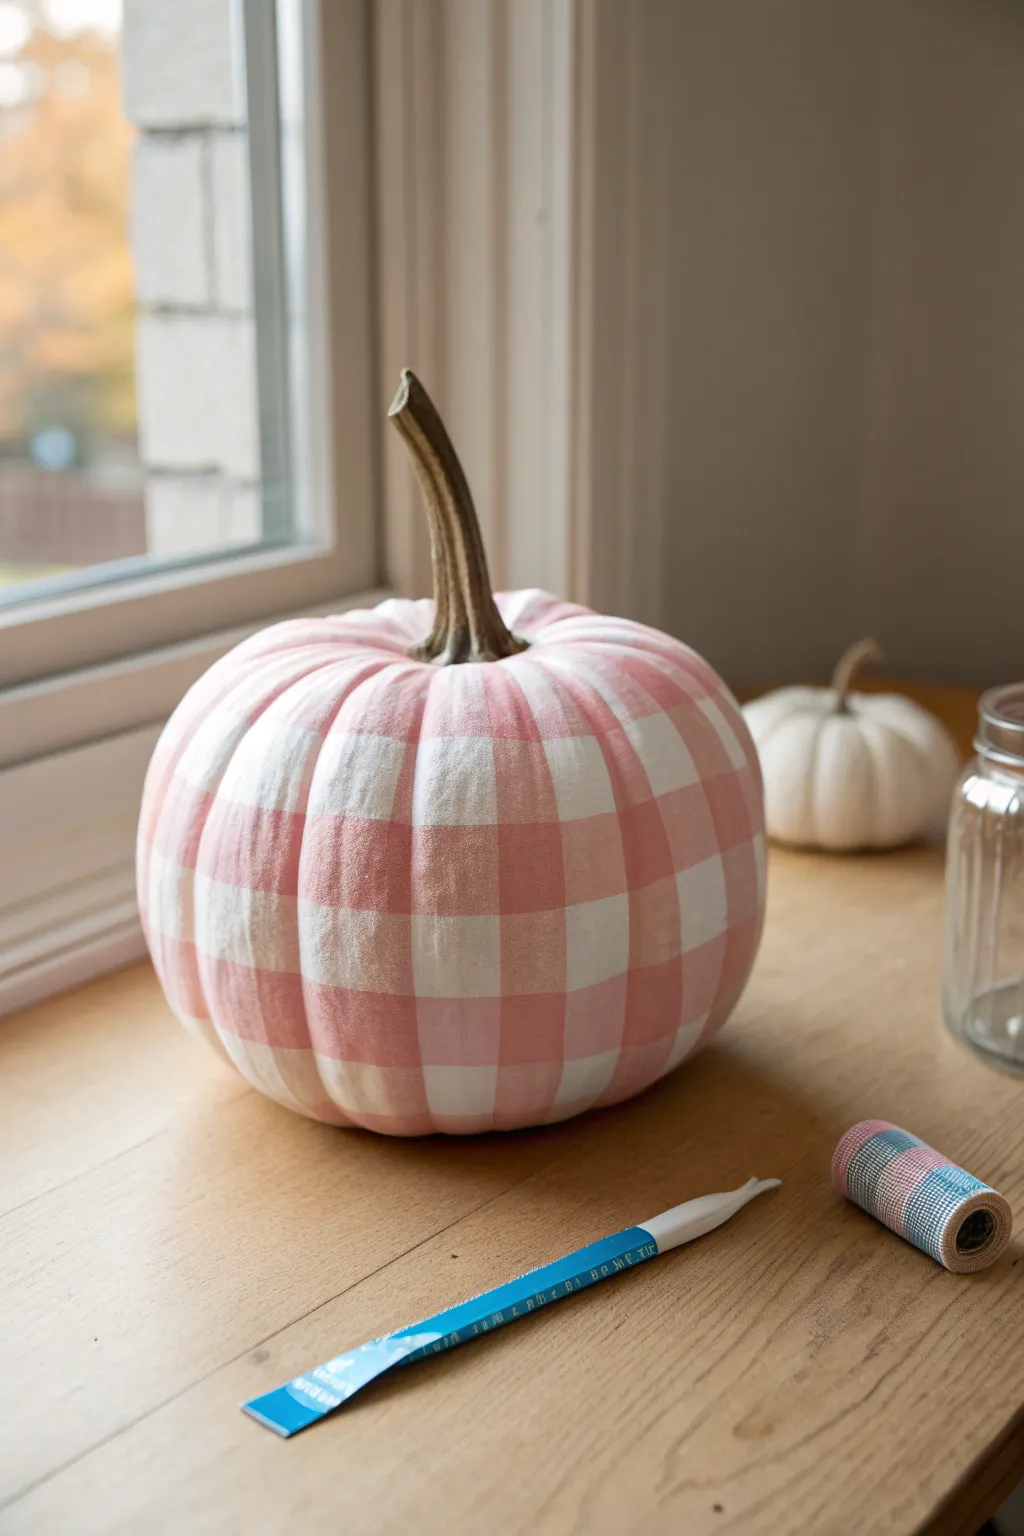
Transform a plain white pumpkin into a preppy fall statement piece with this charming gingham design. The soft pink and white grid pattern adds a classic, tailored look that feels both cozy and sophisticated.
Step-by-Step Guide
Materials
- Faux or real pumpkin (white is best)
- Light pink acrylic paint (base shade)
- Darker/hot pink acrylic paint (for intersections)
- White acrylic paint (if starting with an orange pumpkin)
- Flat shader brush (approx. 1/2 inch to 1 inch wide)
- Fine detail brush
- Pencil
- Flexible measuring tape
- Painter’s tape or masking tape (optional but helpful)
- Matte clear sealant spray
Step 1: Base Preparation
-
Clean the Surface:
Begin by wiping down your pumpkin with a damp cloth to remove any dirt or oils. If using a real pumpkin, ensure it is completely dry before starting. -
Prime the Base:
If your pumpkin isn’t already a pristine white, apply 1-2 coats of white acrylic paint to create a blank canvas. Let this dry completely so your pink tones stay true. -
Plan Your Grid:
Using a flexible measuring tape, lightly mark vertical lines from the stem to the base. Space them evenly based on how wide you want your checks to be; about 1.5 inches works well for medium pumpkins. -
Mark Horizontal Lines:
Lightly sketch horizontal rings around the pumpkin’s circumference, matching the spacing of your vertical lines to create a rough grid. Don’t worry if the curves make perfect squares impossible; just aim for visual consistency.
Step 2: Painting the Vertical Stripes
-
Mix Your Light Pink:
Create a soft, pastel pink by mixing a tiny dot of your darker pink into a large amount of white paint. You want a very light, airy shade for the main stripes. -
Paint Vertical Columns:
Using your flat shader brush, paint every other vertical column with your light pink mixture. I find it helpful to follow the natural ribs of the pumpkin if they align with your grid. -
Refine Edges:
While the paint is wet, tidy up the edges of your vertical stripes. If you have a steady hand, freehand is faster, but you can use tape for crisp lines if you let the base coat cure fully first. -
Allow to Dry:
Let the vertical stripes dry completely. Acrylics dry fast, but give it at least 20 minutes to prevent smudging.
Wobbly Lines?
Don’t panic if your varied pumpkin surface makes straight lines hard. Use a flat brush the exact width of your desired check, lay it flat, and pull down in one stroke.
Step 3: Creating the Checkered Pattern
-
Paint Horizontal Rings:
Using the same light pink shade, paint horizontal stripes around the pumpkin, skipping every other row just like you did with the verticals. -
Observe the Overlap:
You will now see a grid forming. Where the vertical and horizontal pink stripes cross, you get a ‘double layer’ effect, which is key to real gingham. -
Mix the Key Shade:
Mix a medium-tone pink that is slightly darker than your stripes but lighter than the pure dark paint. This color represents where the fabric threads would weave together. -
Fill Intersection Squares:
Identify every square where a vertical painted stripe crosses a horizontal painted stripe. Paint these specific intersections with your medium-tone pink. -
Check Consistency:
Step back and look at the pattern. You should have white squares (unpainted), light pink rectangles (single stripe), and medium pink squares (intersections).
Level Up: Fabric Texture
Before painting, gently sand the pumpkin surface or mix a pinch of baking soda into your paint. The gritty texture makes the finish look more like real linen or cotton fabric.
Step 4: Finishing Touches
-
Touch Up White Areas:
If any pink paint strayed into the white squares, use a small detail brush and white paint to clean them up for a crisp finish. -
Enhance the Stem:
If the stem looks messy from painting, dry brush a little bit of brown or gold paint over it to give it an elegant, natural definition. -
Veining Detail (Optional):
For a textured fabric look like in the photo, you can use a very dry brush with a whisper of white paint to lightly drag over the pink areas, mimicking woven threads. -
Seal the Work:
Once fully dry, spray the entire pumpkin with a matte clear sealant. This protects the paint from chipping and gives it a professional, non-shiny finish.
Place your lovely gingham creation on a windowsill or mantle for an instant touch of classic autumn charm


Candy Stripe Ribbon-Look Pumpkin
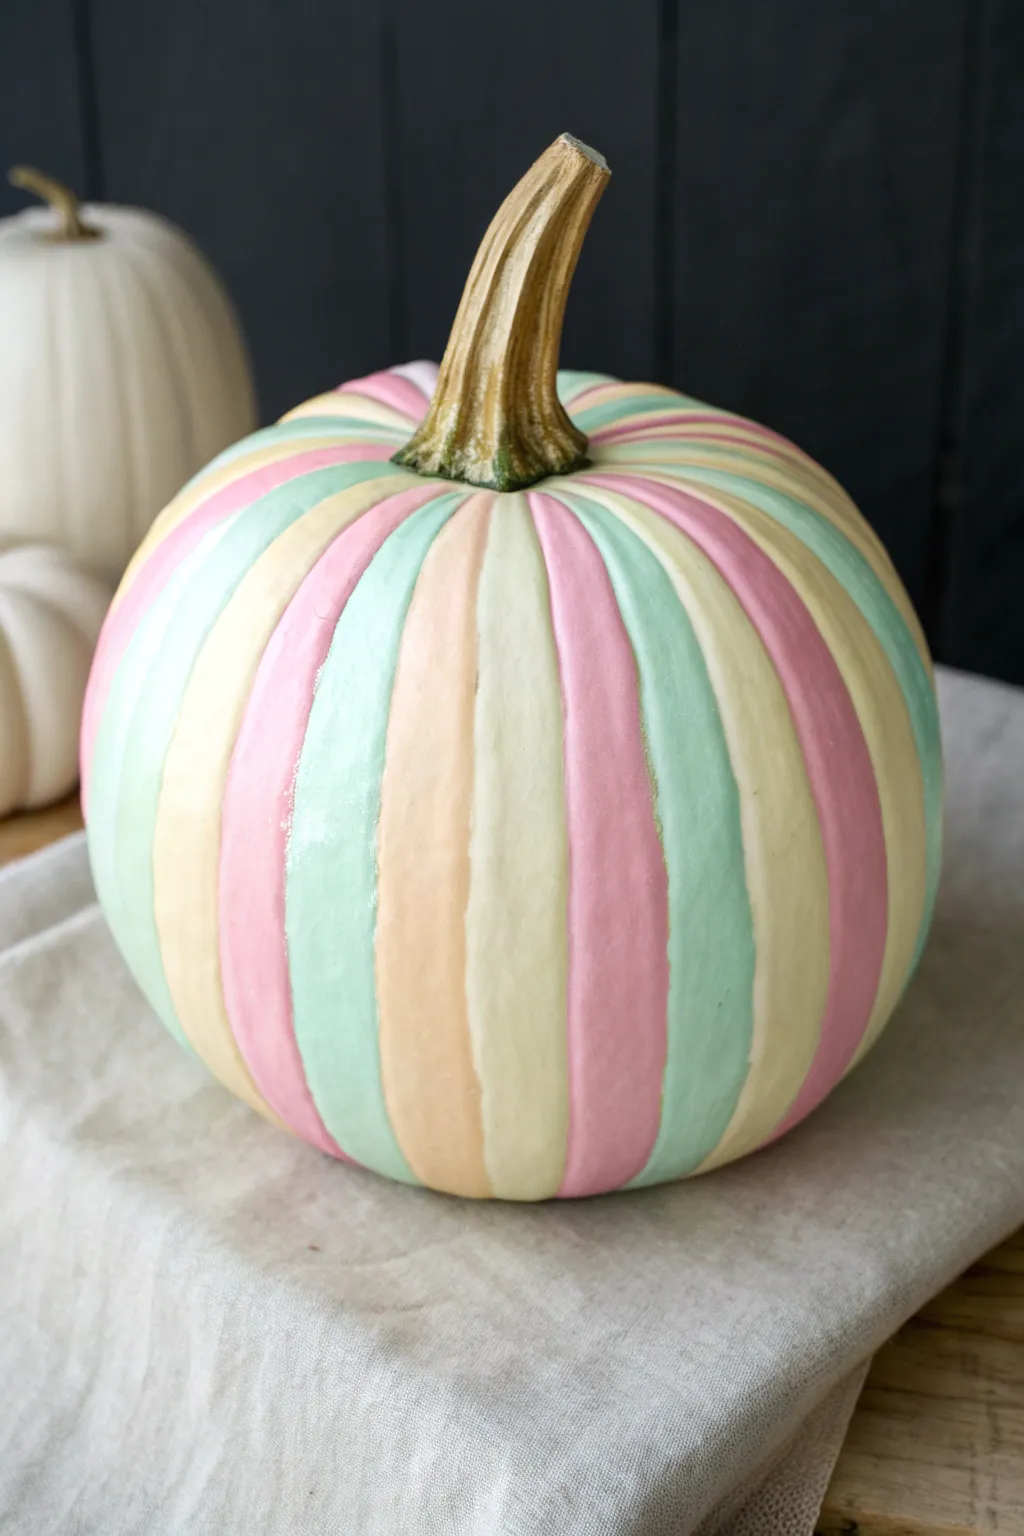
Transform a classic autumn gourd into a sweet confection with this candy stripe design. By following existing ribs of the pumpkin with alternating soft pastels, you create a tailored, ribbon-like effect that feels both festive and chic.
Step-by-Step
Materials
- Faux craft pumpkin (white or cream base)
- Acrylic craft paints (pastel pink, mint green, pale yellow, peach/coral)
- Metallic gold acrylic paint
- Flat shader paintbrush (medium width)
- Small round detail brush
- Palette or paper plate
- Damp paper towel or rag
- Clear matte or satin sealer spray (optional)
Step 1: Preparation & Base Coat
-
Clean surface:
Begin by wiping down your faux pumpkin with a damp cloth to remove any dust or manufacturing residue. If you are using a real pumpkin, ensure it is washed and completely dry. -
Inspect the color:
If your pumpkin isn’t already a creamy white, apply a base coat of white acrylic paint over the entire surface. This ensures your pastel topcoats will pop and appear true to color rather than being translucent. -
Map your strategy:
Count the natural ribs or ridges on your pumpkin. Plan a repeating color pattern (e.g., pink, mint, yellow, peach) so you know which color goes where before you start painting.
Uneven Stripe Widths?
Don’t stress if ribs vary in size. Paint wider sections in the center of the rib and let the color taper naturally into the grooves. The shadow in the groove hides imperfections.
Step 2: Painting the Stripes
-
Load the brush:
Start with your first color, perhaps the pastel pink. Squeeze a small amount onto your palette and load your flat shader brush generously but evenly. -
Paint the first rib:
Select a distinct ridge on the pumpkin. starting from the top near the stem connection, pull the brush straight down to the base, following the natural curve of the segment. -
Fill the segment:
Use the width of the rib as your guide. You want to paint the raised section or the ‘hill’ of the rib. Don’t worry about perfect edges yet, but try to stay generally within the natural boundaries of that segment. -
Skip and repeat:
Instead of painting the neighbor rib immediately, count forward in your pattern sequence (skipping three ribs if you have four colors) and paint the next pink section. This prevents wet paint colors from touching and smearing. -
Continue the first color:
Go all the way around the pumpkin, filling in every fourth rib (or whatever matches your pattern) with pink until complete. -
Apply the second color:
Clean your brush thoroughly or switch to a fresh one. Pick up your mint green paint. Locate the rib directly to the right of your pink stripes and paint them using the same top-to-bottom stroke method. -
Add the third color:
Move on to the pale yellow sections. I find painting in non-adjacent sections is the safest way to keep lines crisp, so let the previous colors tack up slightly if the ribs are very close together. -
Finish the pattern:
Fill in the remaining empty ribs with your final color, the soft peach. At this stage, the pumpkin should be fully covered in vertical stripes. -
Touch up edges:
Once the initial coat is dry to the touch, inspect the valleys—the dips between the ribs. Use your small round brush to tidy up the lines where colors meet, ensuring deep coverage in the crevices. -
Apply a second coat:
Pastels can sometimes be streaky. Go back individually over each color with a second coat to build opacity and create that smooth, candy-shell finish.
Step 3: The Crowning Touch
-
Paint the stem:
While the stripes dry, dip a small brush into your metallic gold paint. Carefully paint the entire stem, getting into all the textured grooves of the plastic or natural handle. -
Refine the connection point:
Create a clean line where the gold stem meets the pastel pumpkin skin. You don’t need to be surgically precise, but a neat junction makes the piece look high-end. -
Let it cure:
Allow the entire project to dry undisturbed for at least an hour. -
Seal (Optional):
If you plan to display this outdoors or want extra durability, lightly mist the pumpkin with a satin or matte clear spray sealer.
Pro Tip: Buttery Smooth
Mix a tiny drop of white paint into each of your colored acrylics. This increases opacity instantly, helping you cover the pumpkin with fewer coats.
Place your colorful creation on a mantel or sideboard for an instant pop of cheerful fall decor
BRUSH GUIDE
The Right Brush for Every Stroke
From clean lines to bold texture — master brush choice, stroke control, and essential techniques.
Explore the Full Guide
Perfect Polka Dot Preppy Pumpkin
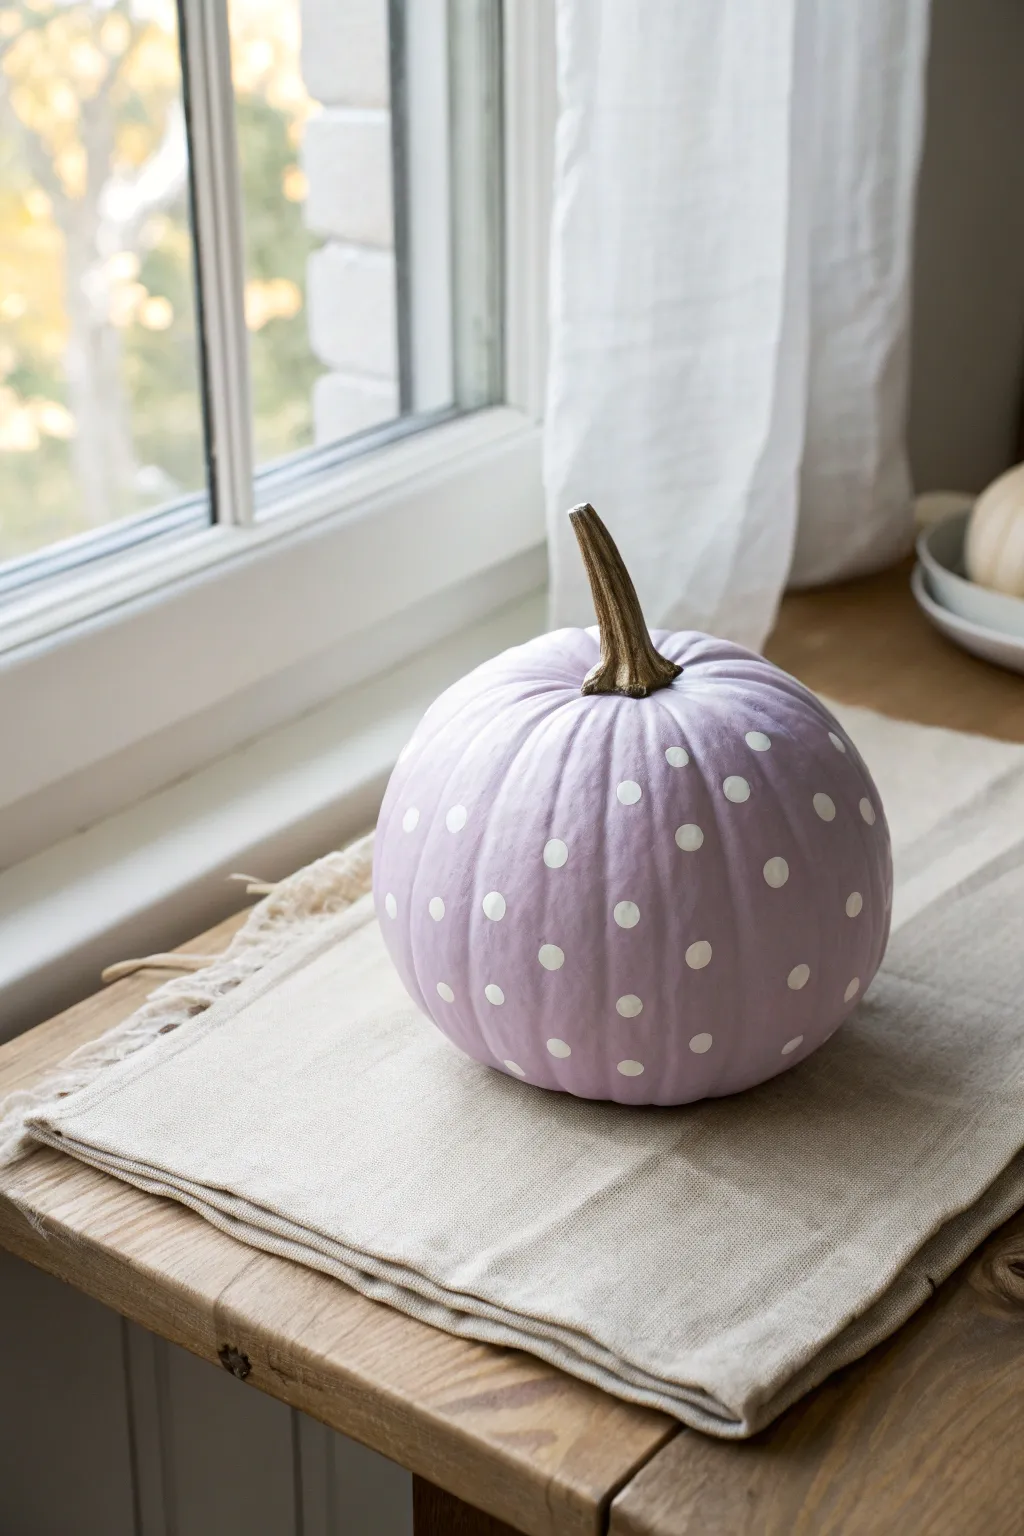
Soft pastels meet playful geometry in this preppy-chic pumpkin design that instantly brightens any autumnal corner. The combination of muted lilac paint, crisp white dots, and a dash of metallic gold on the stem creates an upscale look perfect for indoor decor.
Detailed Instructions
Materials
- Faux craft pumpkin (medium size)
- Lavender or lilac acrylic craft paint
- White acrylic craft paint
- Metallic antique gold acrylic paint
- Medium flat synthetic paintbrush
- Small round detail brush
- Round foam pouncer (small size) or pencil eraser
- Paper plate or paint palette
- Paper towels
- Matte spray sealer (optional)
Step 1: Base Coating
-
Prepare the surface:
Wipe down your faux pumpkin with a slightly damp paper towel to remove any dust or manufacturing residue. Let it dry completely before beginning. -
Apply the first coat:
Using your medium flat brush, apply a layer of lavender paint to the entire body of the pumpkin. Don’t worry about perfect opacity yet; the goal is coverage. -
Let it dry:
Allow the first coat to dry for about 20-30 minutes. Acrylics dry darker, so you’ll get a better sense of the true color once the moisture evaporates. -
Add a second coat:
Apply a second layer of lavender paint. Use smooth, vertical strokes that follow the natural curve of the pumpkin’s ribs to minimize visible brush marks. -
Touch up lightly:
Inspect the pumpkin for any streaks or thin spots. If necessary, I like to dab a tiny bit of paint on stubborn areas for a solid, opaque finish. -
Dry thoroughly:
Ensure the base coat is perfectly dry to the touch before moving on to the next phase, usually waiting at least an hour.
Step 2: Stem Detailing
-
Base the stem:
Switch to your metallic gold paint. Carefully paint the stem, starting from the top and working your way down. -
Define the edge:
Use the small round detail brush to paint the very base of the stem where it meets the pumpkin, creating a clean line between the gold and the lavender. -
Layer the gold:
Metallic paints can sometimes be sheer. Only once the first layer is dry, apply a second coat to achieve a rich, solid gold luster.
Clean Circle Hack
For perfectly uniform dots without a specialized tool, dip the flat end of a new drill bit or a flat-head nail into the paint. It creates a crisp circle every time.
Step 3: Adding the Polka Dots
-
Prepare the tool:
Pour a small puddle of white acrylic paint onto your palette. Dip your round foam pouncer or the flat end of a pencil eraser into the paint. -
Test your stamp:
Press the dotting tool onto a scrap piece of paper first. This removes excess globbiness and ensures you get a clean circle shape. -
Start the pattern:
Begin stamping dots near the top of the pumpkin. Space them somewhat randomly but evenly to maintain a relaxed, organic look rather than a rigid grid. -
Work vertically:
Move down the pumpkin’s ribs, adding dots as you go. Try to place dots both on the ridges and in the crevices for natural dimension. -
Rotate and repeat:
Turn the pumpkin slowly, continuing to stamp dots all the way around toward the bottom. -
Refine the edges:
If any dots look uneven or faint after stamping, use your small detail brush to gently fill them in with white paint.
Dotted Too Much?
If you smudge a white dot or place one incorrectly, let it dry completely, then paint over it with a small dab of the lavender base color to erase the mistake.
Step 4: Finishing Touches
-
Final cure:
Let the polka dots dry completely, making sure not to smudge any wet white paint. -
Seal the work:
If you plan to keep this pumpkin for years, lightly mist it with a matte spray sealer to protect the paint from chipping.
Place your lovely lavender creation by a window or on a mantle to enjoy a fresh, sophisticated take on seasonal decor
Neutral Leopard Print Pumpkin
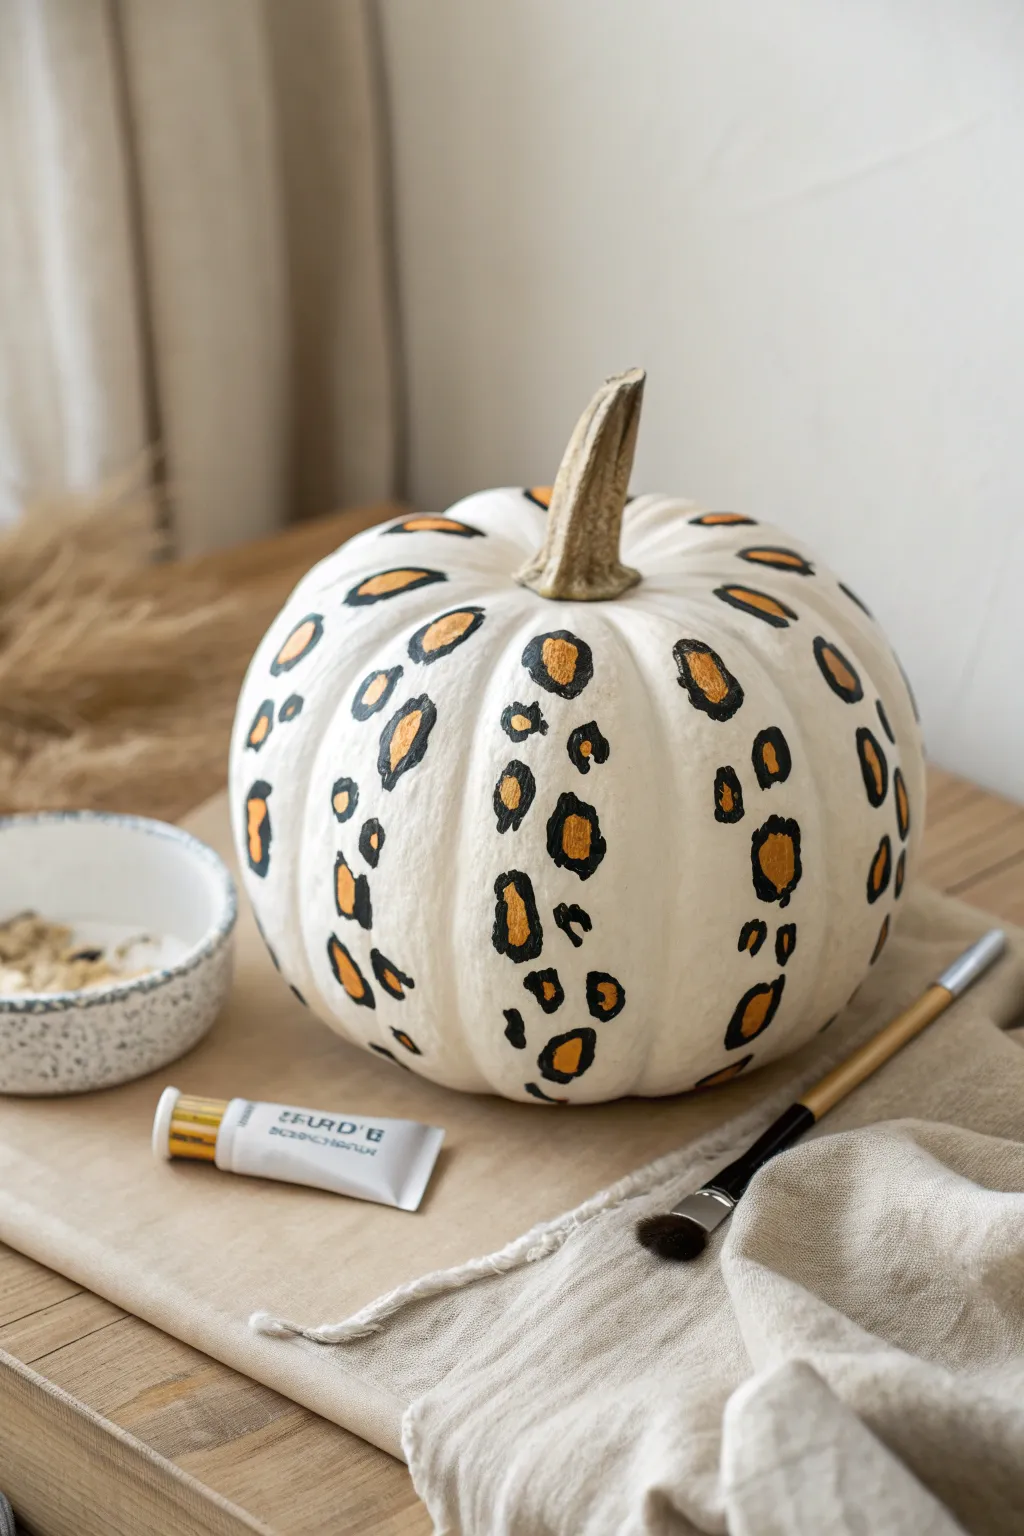
Elevate your fall decor with a touch of chic sophistication by transforming a plain pumpkin into a stylish statement piece. This project combines a crisp matte white base with glamorous gold-filled leopard spots for a look that is equal parts wild and refined.
How-To Guide
Materials
- Faux pumpkin (medium size)
- White matte acrylic paint or chalk paint (if pumpkin isn’t already white)
- Black acrylic paint
- Metallic gold or bronze acrylic paint
- Small round detail brush (size 2 or 4)
- Fine liner brush (size 0 or 1)
- Paint palette or small dish
- Paper towels
- Water cup
Step 1: Base Preparation
-
Clean surface:
Before shrinking any paint, wipe down your pumpkin with a damp cloth to remove any dust or manufacturing oils. Let it dry completely. -
Check the color:
If you are starting with an orange or plastic-looking pumpkin, apply two coats of matte white acrylic or chalk paint. Allow full drying time between coats to ensure a smooth, opaque foundation.
Pro Tip: Organic Flow
To make the leopard print look natural, group spots in clusters of three and avoid creating straight lines. Let the pattern curve with the pumpkin’s ridges.
Step 2: Leopard Spot Basics
-
Plan your placement:
Visualise the flow of the pattern. Leopard spots shouldn’t be uniform rows; aim for a scattered, organic arrangement that wraps naturally around the pumpkin’s curves. -
Mix the gold:
Squeeze a small amount of metallic gold or bronze paint onto your palette. If the paint feels too thick, dip your brush in a tiny drop of water to improve flow. -
Paint the centers:
Using your small round brush, paint organic, irregular blobs of gold. Think of them as soft, misshapen ovals or triangles rather than perfect circles. -
Vary the sizes:
Create visual interest by painting some spots larger (about the size of a thumbprint) and others smaller (fingertip size). Leave plenty of white space between them. -
Let centers dry:
Allow the gold paint to set for about 10-15 minutes. It doesn’t need to be bone dry, but it shouldn’t smear when you add the outlines.
Troubleshooting: Shaky Lines
If your black outlines look too shaky, rest your pinky finger on the pumpkin surface (on a dry spot!) to stabilize your hand while painting detail work.
Step 3: Defining the Print
-
Load the liner brush:
Switch to your fine liner brush and load it with black acrylic paint. You want a creamy consistency for smooth lines. -
Outline technique:
Paint black borders around your gold spots. The key is imperfection—never enclose the gold spot completely in a solid circle. -
Break the lines:
Frame each gold blob with two or three separate black strokes. For example, paint a ‘C’ shape on one side and a bracket shape on the other. -
Vary line thickness:
As you paint the black strokes, press down slightly at the start and lift up at the end to create lines that taper naturally. -
Fill the gaps:
Look at the white spaces between your main spots. Use the black paint to add tiny, standalone dots or small ‘C’ curves to fill large empty areas. -
Check the spacing:
Rotate the pumpkin frequently. I like to step back every few minutes to ensure the pattern density looks balanced from all angles. -
Refine the stem:
If the pumpkin’s stem looks too plasticky, give it a quick dry-brush of beige or soft brown paint to make it look more realistic against the elegant pattern. -
Final touches:
Review your spots. If any gold areas look too transparent, dab a little extra metallic paint inside the black outlines for a richer finish. -
Seal the work:
Once fully dry (give it at least an hour), you can optionally spray a clear matte sealer over the pumpkin to protect the paint from chipping.
Set your stunning creation on a mantle or entryway table to welcome guests with wild elegance

PENCIL GUIDE
Understanding Pencil Grades from H to B
From first sketch to finished drawing — learn pencil grades, line control, and shading techniques.
Explore the Full Guide
Smiley Face Preppy Pumpkin
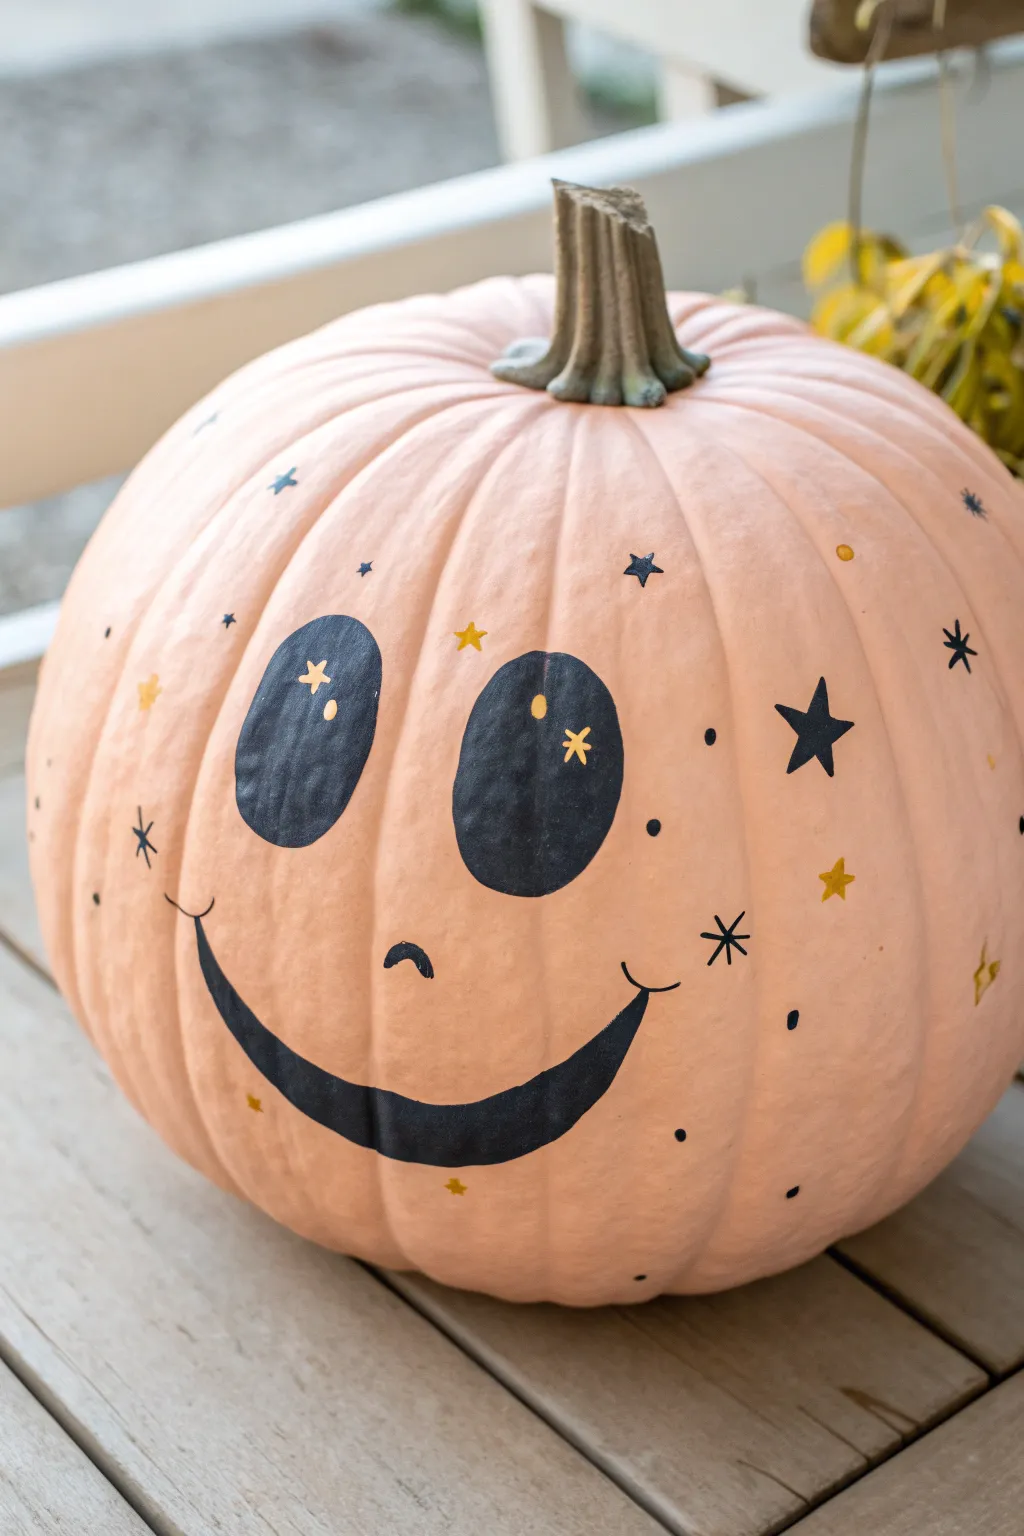
Transform a traditional orange gourd into a sweet, pastel centerpiece with this cheerful DIY design. Featuring a soft blush pink base adorned with celestial doodles and a classic happy face, this pumpkin brings a trendy, preppy aesthetic to your seasonal decor.
Step-by-Step
Materials
- Faux or real pumpkin (medium to large size)
- Blush pink matte craft paint or spray paint
- Carbon black acrylic paint (or black paint pen)
- Metallic Gold acrylic paint (or gold paint pen)
- Medium flat paintbrush (for base coat)
- Small round detail brush (size 1 or 2)
- Very fine liner brush (size 0 or 00)
- Pencil (optional, for sketching)
- Painter’s tape (for the stem)
- Clear matte sealant spray (optional)
Step 1: Base Preparation
-
Clean surface:
Begin by wiping down your pumpkin with a damp cloth to remove any dirt or oils, ensuring a smooth painting surface. -
Protect the stem:
Wrap the stem carefully with painter’s tape to keep it natural and paint-free. -
Apply base color:
Coat the entire pumpkin in blush pink paint using the medium flat brush. Depending on the pumpkin’s original color, you may need 2-3 coats for full opacity. -
Wait for drying:
Allow the pink base to dry completely between coats—usually about 20-30 minutes—so the texture stays smooth and doesn’t get tacky. -
Remove tape:
Once the final pink coat is totally dry to the touch, gently peel off the painter’s tape from the stem.
Paint Slipping?
If acrylic paint beads up on a faux pumpkin, lightly sand the surface with fine-grit sandpaper first to give the paint something to grip.
Step 2: Designing the Face
-
Sketch the layout:
Lightly sketch large oval eyes and a wide, U-shaped mouth using a pencil. Position them centrally on the smoothest side of the pumpkin. -
Outline the eyes:
Use your small round brush loaded with black paint (or a black paint pen) to carefully trace the large oval outlines for the eyes. -
Fill the eyes:
Fill in the rest of the eye ovals with solid black paint, keeping your strokes smooth to avoid ridges. -
Create the smile:
Paint the main curve of the smile with a thicker line in the center that tapers off at the ends. -
Refine the mouth:
Add small, upward-curved tick marks at the corners of the mouth and a tiny nose arc in the center for that classic happy face look.
Sharper Lines
Swap the paintbrushes for oil-based paint pens for the detailed stars and face. They offer more control and dry faster than liquid acrylics.
Step 3: Adding Galaxy Details
-
Add eye sparkles:
Dip the fine liner brush into metallic gold paint and add a small starburst or dot inside the black of each eye for a twinkle effect. -
Draw large stars:
Using black paint, draw several five-pointed stars scattered randomly across the pumpkin’s surface. -
Intersperse gold stars:
Switch to gold paint and add smaller five-pointed stars in the empty spaces between the black ones. -
Create starbursts:
Draw simple eight-pointed ‘sparkle’ shapes (a cross with an X over it) using the fine liner brush in black paint. -
Add dots:
Use the tip of your brush handle or a dotting tool to place small black dots randomly to fill any negative space. -
Layer tiny details:
I like to add a few tiny gold dots or miniature stars near the larger black features to create depth and variety. -
Seal the work:
If this pumpkin will live outside, give it a light mist of clear matte sealant spray once all paint is completely dry.
Place your finished pumpkin on the porch or a mantle to add a cheerful pop of pink to the autumn season
Retro Daisy Cluster Pumpkin
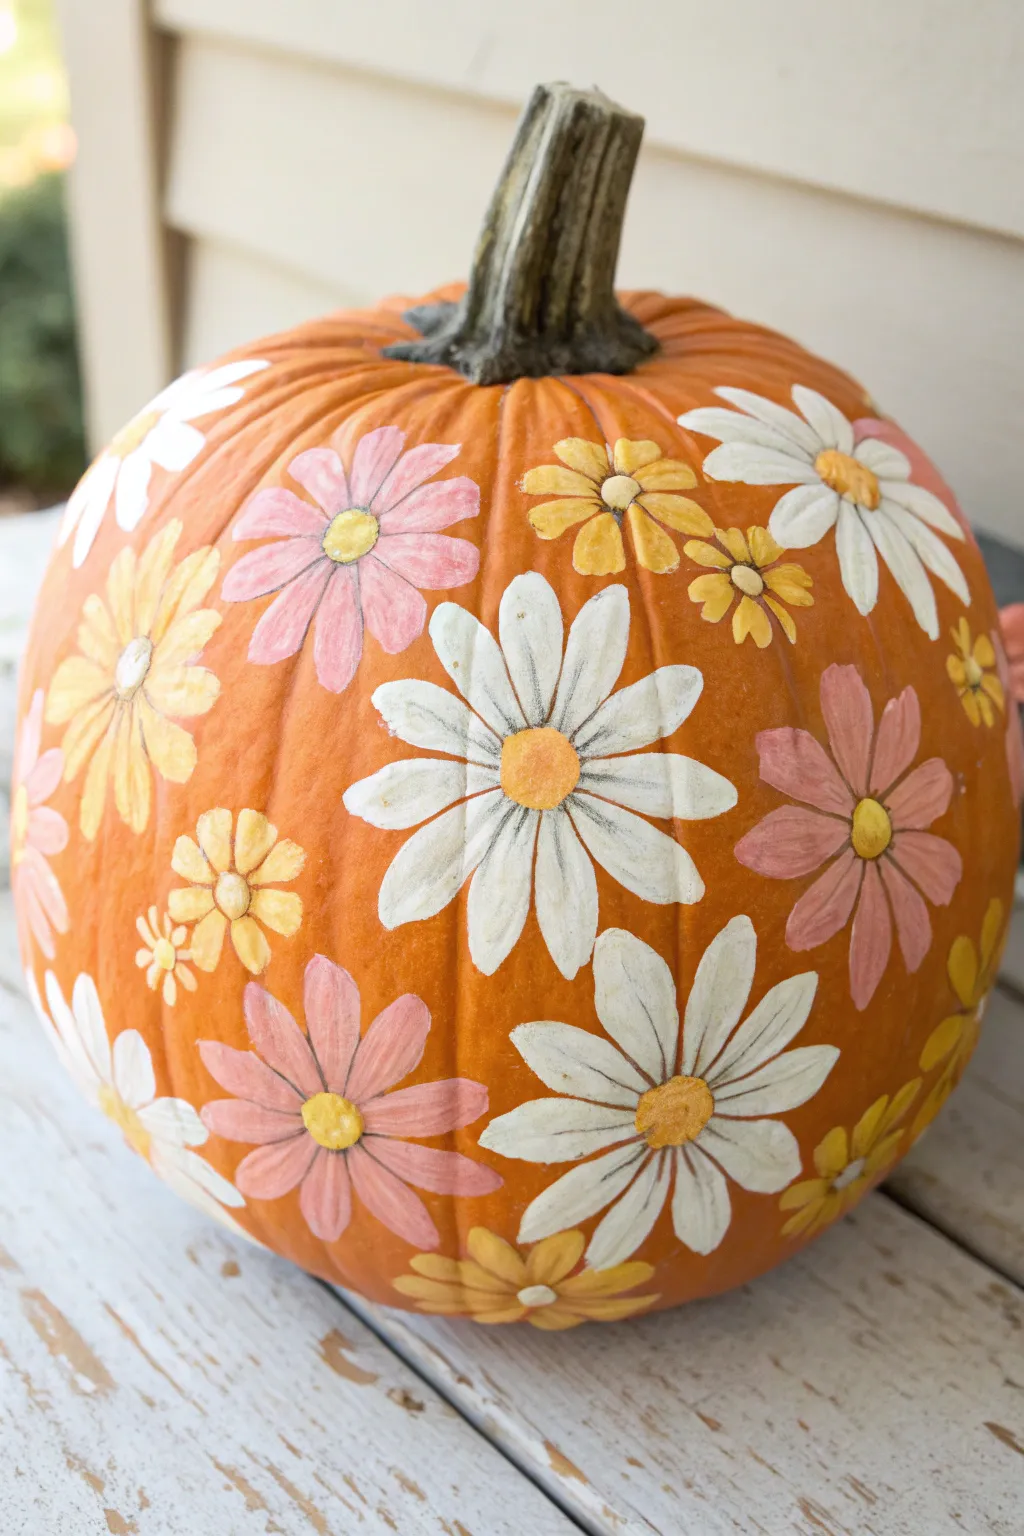
Bring a burst of groovy floral charm to your porch with this delightful daisy-covered pumpkin. The mix of soft pink, creamy white, and mustard yellow blooms creates a warm, retro aesthetic that feels both nostalgic and fresh.
Step-by-Step Tutorial
Materials
- Medium orange pumpkin (real or faux)
- Acrylic craft paints: Creamy white, muted pink, mustard yellow, and golden yellow
- Paintbrushes: Small round brush (size 2 or 4) and a detail liner brush
- Pencil or chalk (optional)
- Paper plate or palette
- Cup of water and paper towels
- Clear matte acrylic sealer spray (optional)
Step 1: Planning and Base Petals
-
Clean surface:
Begin by wiping down your pumpkin with a damp cloth to remove any dirt or oils. If you are using a real pumpkin, ensure it is completely dry before starting so the paint adheres properly. -
Plan placement:
Visualize where your largest flowers will go. It helps to stagger them around the curve of the pumpkin rather than lining them up in rows. If you’re nervous about freehanding, lightly sketch circular guides with a pencil or chalk. -
Paint large white petals:
Start with the creamy white paint. Using your round brush, press down and pull outward to create elongated teardrop shapes for the petals. Aim for about 8 to 10 petals per flower. -
Space them out:
Paint three or four large white daisies evenly spaced around the pumpkin. Leave plenty of room between them for the other colored flowers. -
Add pink blooms:
Switch to your muted pink paint. Using the same press-and-pull technique, paint slightly smaller daisies between the white ones. Vary the number of petals slightly for a natural look. -
Insert yellow flowers:
Using the mustard yellow shade, paint smaller, five-petal flowers in the remaining larger gaps. These should look more like traditional simple daisies. -
Fill empty spaces:
Look for any remaining awkward gaps. Use the mustard yellow again to create tiny ‘filler’ flowers—just four or five very small dots or short strokes arranged in a circle.
Uneven Petals?
Don’t stress over symmetry! If a petal looks wonky, wait for it to dry and paint over the edge with the pumpkin’s background color (orange) to reshape it before trying again.
Step 2: Adding Details and Centers
-
Dry check:
Let all your petals dry completely to the touch. This prevents the colors from muddying when you add the overlapping details in the next steps. -
Paint white centers:
Dip your round brush into the golden yellow paint. Dab a solid circle into the center of the large white daisies. -
Paint pink centers:
Use the mustard yellow or a slightly lighter yellow mix for the centers of the pink flowers, creating a soft contrast. -
Paint yellow centers:
For the mustard yellow flowers, use a tiny dot of the creamy white or a lighter yellow to make the center pop. -
Outline preparation:
Thin down a small amount of dark grey or black paint with a drop of water. You want an ink-like consistency that flows smoothly off a liner brush. -
Detail the white petals:
Using the liner brush, paint a very thin line down the center of each white petal. Start from the center and flick outward, lifting pressure as you go to taper the line. -
Detail colored petals:
Repeat this center-line process for the pink flowers. For the yellow flowers, you can skip the center line or keep it very subtle. -
Outline the yellow centers:
I prefer to loosely outline the yellow center circles on the white and pink flowers to give them definition. Don’t make the circle perfect; a broken line looks more artistic. -
Final touches:
Check for any petals that need a second coat of paint to be fully opaque. Once satisfied and everything is bone dry, you can mist it with a clear matte sealer to protect your work.
Level Up: 70s Vibe
Mix a tiny amount of glitter into your center yellow paint for a subtle disco sparkle, or use puff paint for the centers to add actual 3D texture.
Step back and admire your groovy garden of everlasting blooms


Sweet Cherry Pattern Pumpkin
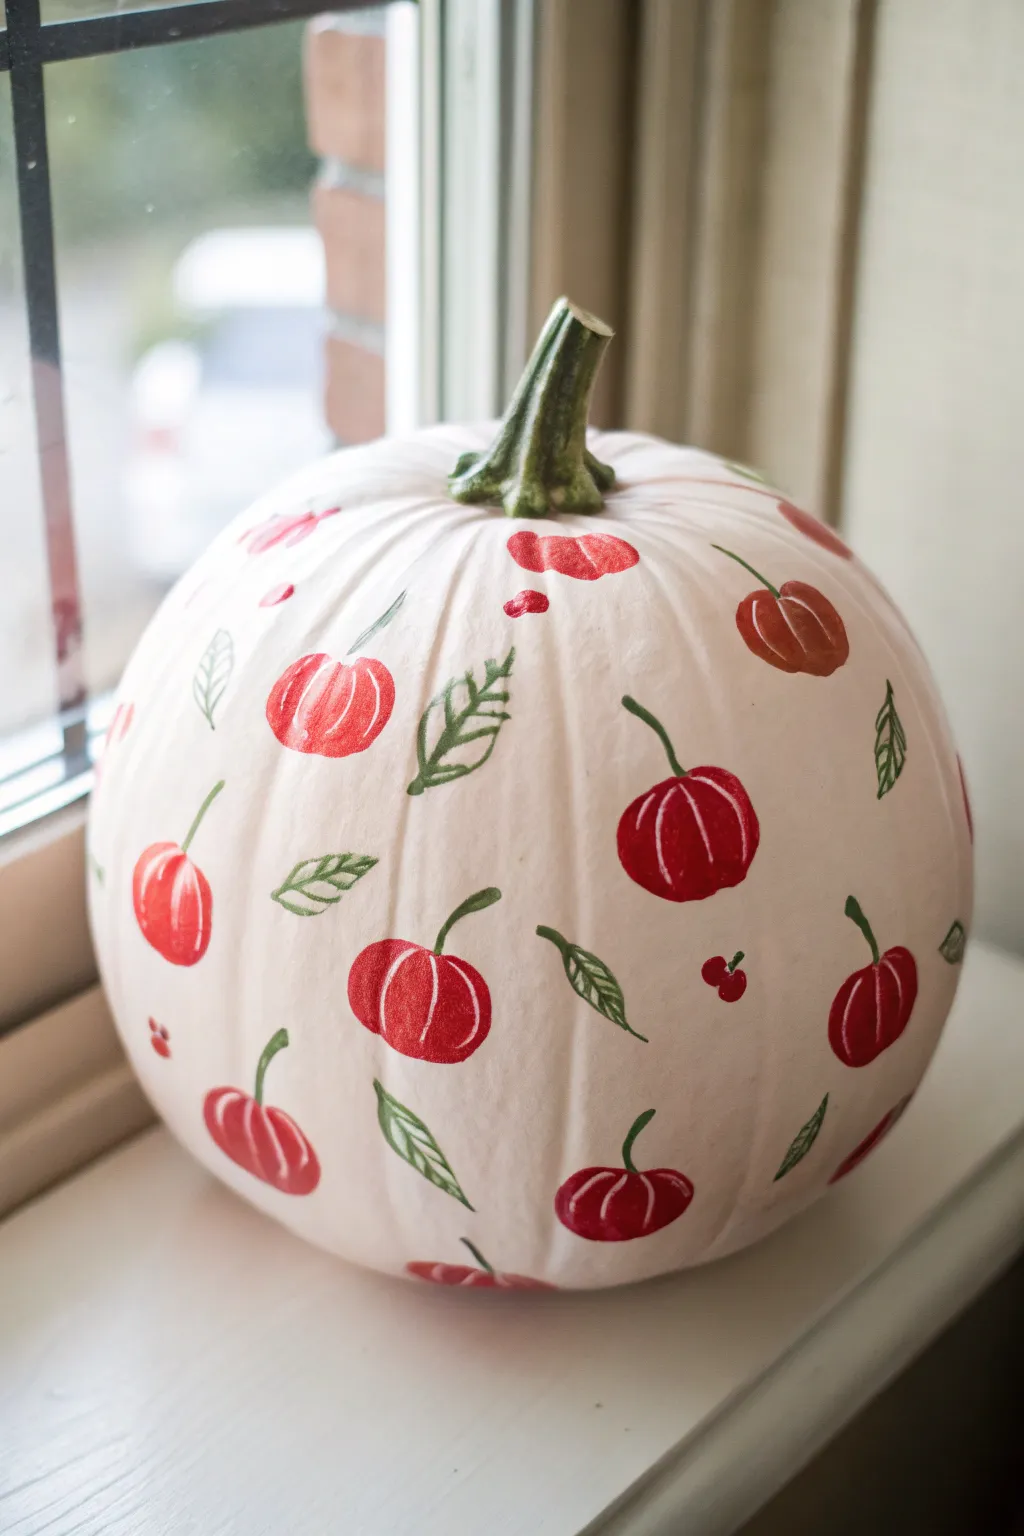
Transform a plain white pumpkin into a preppy, whimsical centerpiece with this charming cherry pattern. The scattered red fruits and simple green leaves create a delightful motif that feels fresh and playful for the autumn season.
Step-by-Step
Materials
- Medium-sized white pumpkin (real or faux)
- Acrylic craft paint: Bright cherry red
- Acrylic craft paint: Dark forest green
- Acrylic craft paint: Medium leaf green
- Small round paintbrush (size 2 or 4)
- Fine liner paintbrush (size 0 or 00)
- White gel pen or fine white paint marker
- Clear acrylic sealer spray (matte or satin)
- Paper plate or palette
- Cup of water
- Paper towels
Step 1: Preparing the Canvas
-
Clean and Dry:
Wipe down your pumpkin surface with a damp cloth to remove any dust or waxy residue. If using a real pumpkin, ensure it is completely dry before you begin painting. -
Plan placement:
Visualize a random, scattered pattern across the surface. You want the cherries to look tossed, not perfectly aligned in a grid, so keep the spacing organic and loose.
Paint Consistency Tip
If your acrylics are too thick, mix in a singular drop of water. This helps the liner brush glide smoothly for crisp stems and veins.
Step 2: Painting the Cherries
-
Outline the shape:
Using your small round brush and bright red paint, create small, slightly flattened circle shapes. They should be roughly the size of a quarter or slightly smaller. -
Fill in the base:
Fill in these red circles completely. Don’t worry about perfect opacity yet; a slightly textured look adds charm, but you can add a second coat later if needed. -
Add dimension lines:
While the red paint is still wet or just tacky, you can gently drag your brush to create slight vertical ridges, mimicking the segments of a pumpkin or the roundness of a cherry. -
Create variety:
Rotate the orientation of your cherries slightly as you move around the pumpkin so they aren’t all facing the same direction. -
Paint smaller cherries:
In the gaps between larger fruits, add a few tiny single red dots or smaller cherries to fill negative space without overcrowding the design. -
Let the red dry:
Allow the red paint to dry completely to the touch. This prevents the green stems from muddying the bright red color.
Level Up: Gold Accents
Swap the white gel pen highlights for a metallic gold paint marker. This adds a chic, upscale shimmer perfect for display.
Step 3: Adding Greenery
-
Paint the stems:
Switch to your fine liner brush and dark forest green paint. Draw thin, curved stems emerging from the top center of each red cherry. -
Curve the stems:
Make the stems varying lengths and curve them in different directions to enhance the organic feel of the pattern. -
Outline the leaves:
Using the dark green paint, draw simple leaf outlines floating near the cherries or attached to the stems. A pointed oval shape works best. -
Fill the leaves:
Fill in the leaf shapes with your medium leaf green paint, leaving the dark green loop visible as an outline if possible, or just paint over it for a solid look. -
Add leaf veins:
Once the green fill is dry, use the fine liner brush and dark green paint again to draw a center vein and small diagonal veins on each leaf.
Step 4: Final Details
-
Highlight the cherries:
Take your white gel pen or a very fine brush with white paint. Add thin, curved vertical lines inside each red cherry to define segments and add a pop of highlight. -
Highlight the leaves:
Add tiny touches of white on the leaves to suggest shine or texture. Keep these minimal so they don’t overpower the green. -
Check for gaps:
Step back and look at the pumpkin from a distance. If there are large empty white spaces, add a tiny red bud or a small floating leaf to balance the composition. -
Paint the main stem:
For a cohesive look, paint the actual stem of the pumpkin with a mix of your green paints to match the painted leaves. -
Seal the artwork:
Once all paint is thoroughly dry (give it at least an hour), spray the entire pumpkin with a clear acrylic sealer to protect your design from scratching or fading.
Now you have a beautifully patterned pumpkin that brings a fresh pop of color to your decor
Squiggles and Confetti Shapes Pumpkin
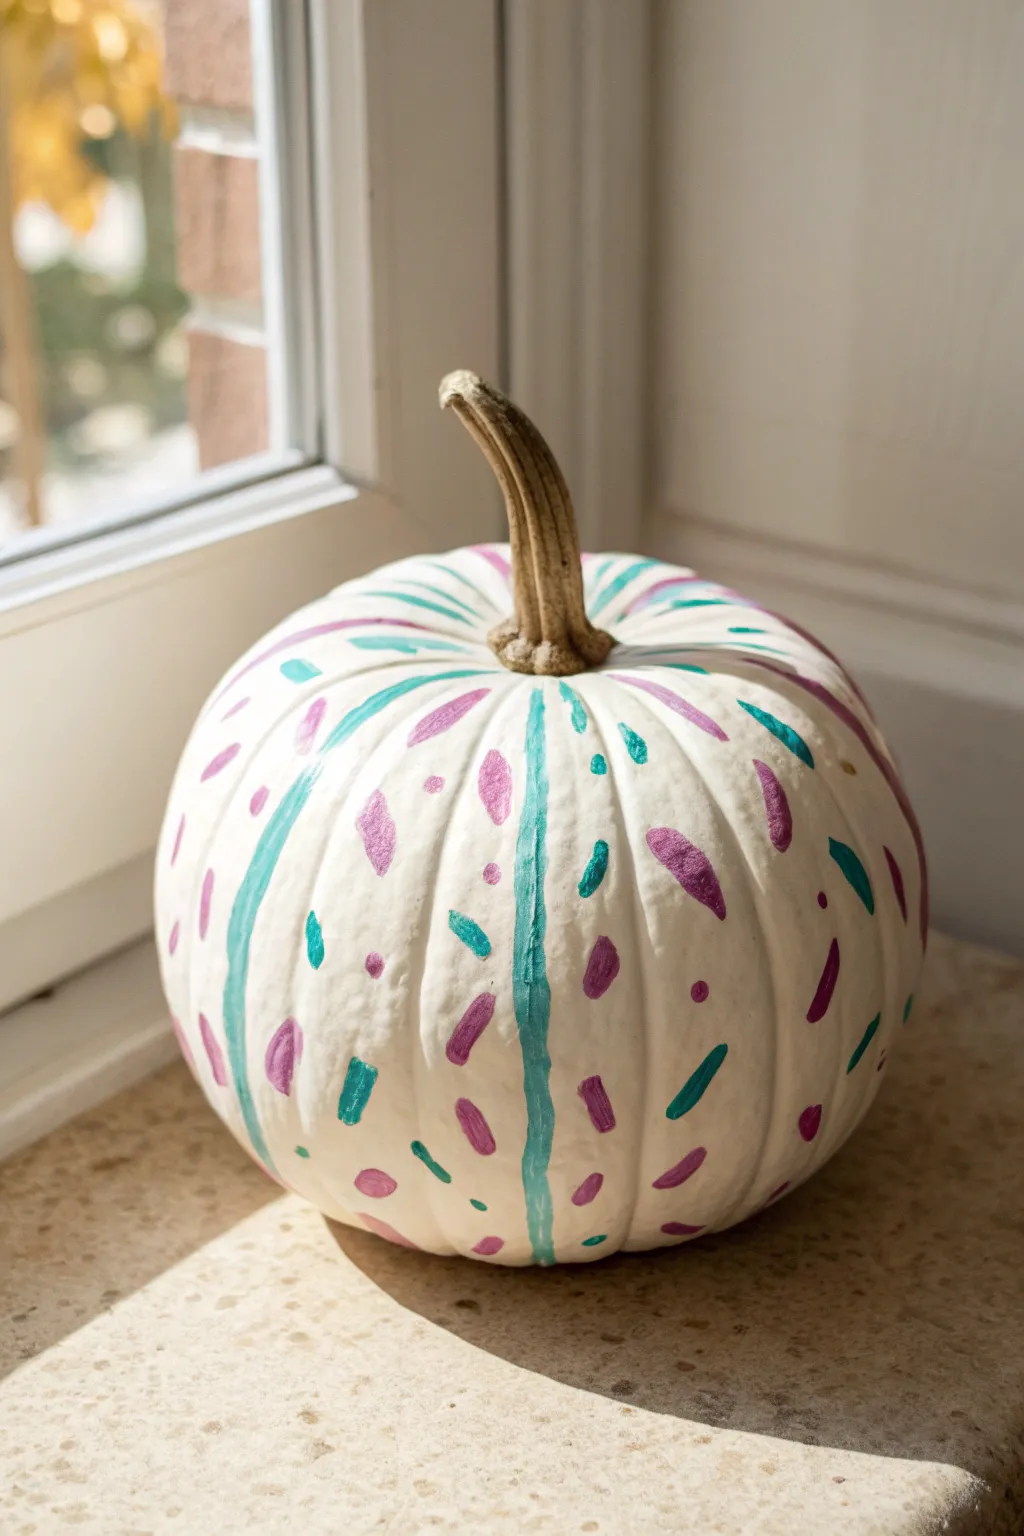
This playful project transforms a simple white pumpkin into a festive piece of decor using a fresh palette of teal and amethyst. The design combines structured vertical lines with loose, confetti-like dashes for a look that is both preppy and fun.
Step-by-Step Guide
Materials
- White craft pumpkin (or a real white pumpkin, cleaned and dried)
- Teal acrylic paint
- Purple or amethyst acrylic paint
- Small round paintbrush (size 2 or 4)
- Medium round paintbrush (size 6)
- Paper plate or paint palette
- cup of water
- Paper towels
- Pencil (optional)
Step 1: Preparation and Base Lines
-
Clean surface:
Begin by wiping down your pumpkin with a slightly damp paper towel to remove any dust or debris. If using a real pumpkin, ensure the skin is completely dry before starting to help the paint adhere properly. -
Plan your stripes:
Observe the natural crevices and ribs of your pumpkin. These indented lines will serve as the guide for your teal stripes. You don’t need to paint every single crease; choosing every other main rib often creates a nice balance. -
Load the teal:
Squeeze a small amount of teal acrylic paint onto your palette. Dip your medium round brush into the paint, ensuring it’s well-coated but not dripping. -
Paint vertical stripes:
Starting near the stem (but not touching it), drag your brush down along the natural rib of the pumpkin all the way to the base. The line doesn’t need to be perfectly straight or uniform thickness—a hand-painted look adds charm. -
Stripe finishing:
Continue painting these teal vertical lines around the entire circumference of the pumpkin. If you notice any sheer spots, wait for the first layer to dry and add a second coat for opacity. -
Let it set:
Allow the teal stripes to dry completely. This usually takes about 15-20 minutes depending on how thick the paint application is. You don’t want to accidentally smudge a stripe while adding the confetti details.
Uneven Stripes?
Don’t panic! Wobbly lines are part of the charm. If a line gets too wide, wait for it to dry and touch it up with white paint to sharpen the edge.
Step 2: Adding the Confetti
-
Prepare the purple:
Clean your brush thoroughly or switch to the smaller size 2 brush. load it up with your purple or amethyst paint. -
Create dashes:
In the white spaces between your teal stripes, begin painting small, loose dashes. Think of these as grains of rice or sprinkles falling randomly. -
Vary the direction:
To keep the pattern dynamic, paint your purple dashes at different angles. Some can slant left, some right, and others can be more vertical. -
Add dots:
Interspersed among the dashes, add small polka dots using the tip of your brush. These help fill empty voids without making the design look too cluttered. -
Introduce teal accents:
Once you have a good amount of purple confetti, clean your brush and switch back to the teal paint. Add a few teal dashes and dots into the mix. -
Fill the gaps:
Rotate the pumpkin and look for any large white spaces that feel empty. Add a final few marks using either color to balance the composition, keeping the distribution random but even. -
Check the bottom:
Don’t forget to paint the curved area near the base of the pumpkin so the design looks complete when sitting on a table. -
Dry completely:
Set the pumpkin in a safe spot to dry fully, preferably overnight if you applied thick textured strokes.
Pro Tip: Texture
For a raised, embossed effect, mix a tiny bit of baking soda into your acrylic paint before applying the dashes. It creates a cool 3D texture.
Place your finished pumpkin on a sunny windowsill or mix it into a centerpiece for a pop of modern color
Color-Block Pastel Pumpkin Panels
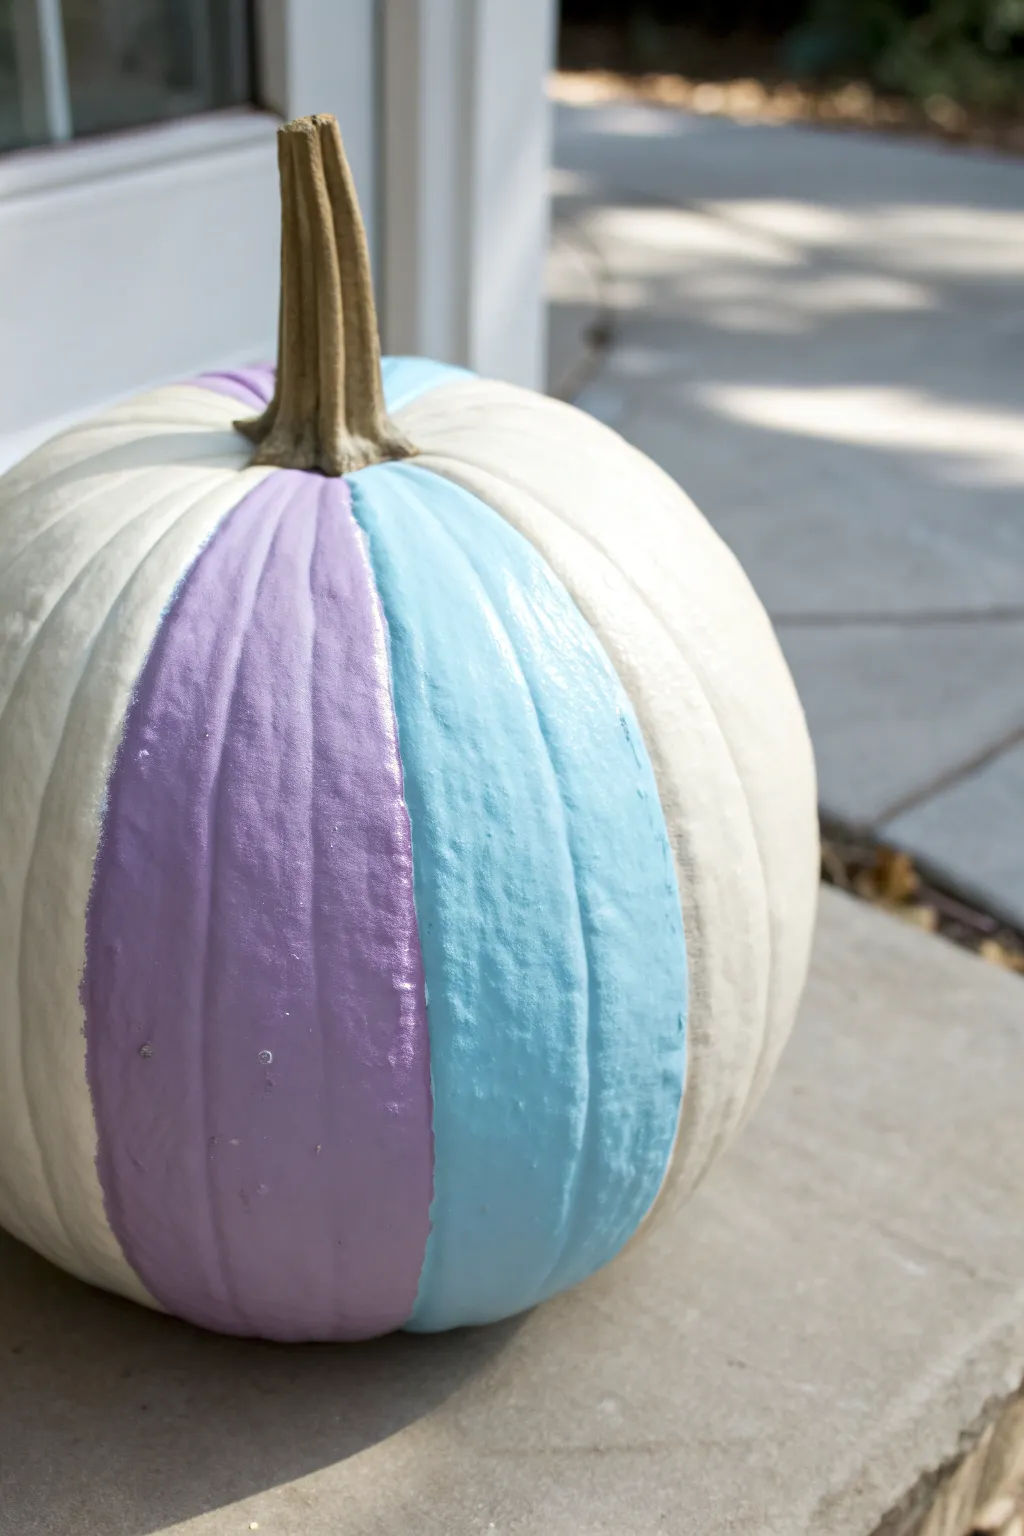
Transform a simple white pumpkin into a preppy, pastel masterpiece by highlighting its natural shape with bold color blocking. This project uses the pumpkin’s own ribs as a guide to create smooth, satisfying panels of lavender and sky blue.
Step-by-Step Tutorial
Materials
- White pumpkin (faux or real)
- Lavender acrylic craft paint (satin or gloss finish)
- Sky blue acrylic craft paint (satin or gloss finish)
- Medium flat paintbrush (approx. 1/2 inch)
- Small round detail brush
- Painter’s tape or Washi tape (optional)
- Paper plate or palette
- Damp paper towel
- Clear acrylic sealer spray (optional)
Step 1: Preparation
-
Clean surface:
Begin by wiping down your pumpkin thoroughly with a damp paper towel to remove any dust or dirt. If using a real pumpkin, ensure it is completely dry before you start painting. -
Inspect the ribs:
Take a moment to rotate the pumpkin and look at the natural vertical indentations (ribs). You plan to paint specific panels between these lines, leaving others white. -
Plan the pattern:
Decide on your pattern sequence. This design features alternating painted panels with white space left in between, so visualize which sections will be purple, which will be blue, and which will remain white. -
Protect the stem:
If you want to keep the stem completely paint-free, wrap a small piece of painter’s tape around the very base where it meets the pumpkin skin.
Step 2: Painting the Panels
-
Load the lavender:
Squeeze a dollop of lavender paint onto your palette. Dip your medium flat brush in, ensuring it’s well-coated but not dripping. -
Start the first stripe:
Choose a prominent panel to start with. Begin at the top, just below the stem base, and carefully drag your brush down following the natural curve of the panel. -
Define the edges:
Use the edge of your flat brush to create a crisp line along the natural indentations on either side of the panel. I prefer to do these border lines first before filling in the center. -
Fill in the color:
Once the edges are defined, fill in the rest of the panel with smooth, vertical strokes to minimize brush marks. -
Check opacity:
Pastel paints can sometimes be sheer. Let this first layer of purple dry for about 10 minutes, then apply a second coat for that vibrant, solid look shown in the photo. -
Skip a section:
Leave the next natural panel completely unpainted to serve as your white spacer. -
Switch to blue:
Clean your brush thoroughly or switch to a fresh one. Load up the sky blue paint. -
Paint the blue panel:
Move to the next panel (after the white space) and repeat the painting process: outline the vertical grooves first, then fill the center with blue. -
Repeat pattern:
Continue working around the pumpkin in this rhythm: Color, White Space, Color, White Space. You can alternate colors (Purple, White, Blue, White) or do blocks of colors together depending on your preference. -
Detail work:
If you have trouble getting close to the stem or the very bottom with the flat brush, switch to your small round detail brush to neaten up the top and bottom edges of each stripe.
Smoother Stripes Idea
If you have a shaky hand, run narrow Washi tape down the deep grooves of the pumpkin ribs first. Paint inside the lines, let dry slightly, then peel for crisp edges.
Step 3: Finishing Touches
-
Inspect edges:
Look closely at the vertical lines where the paint meets the white pumpkin skin. If any lines look wobbly, use a clean, slightly damp brush to gently push the wet paint back into line or wipe away mistakes. -
Final drying:
Allow the pumpkin to sit undisturbed for at least an hour. Thick layers of acrylic paint can feel dry to the touch but still be soft underneath. -
Optional sealing:
If this pumpkin will sit on a porch, spray it lightly with a clear acrylic sealer to protect the paint from moisture and chipping. -
Remove tape:
If you taped the stem, carefully peel it off now to reveal the clean, natural finish.
Fixing Streaky Paint
Pastels are notoriously streaky. If the first coat looks patchy, don’t overwork it while wet. Let it fully dry to the touch, then apply a second, thicker coat.
Now you have a chic, custom-painted pumpkin that adds a soft pop of color to your seasonal decor
Soft Ombré Sunset Pumpkin
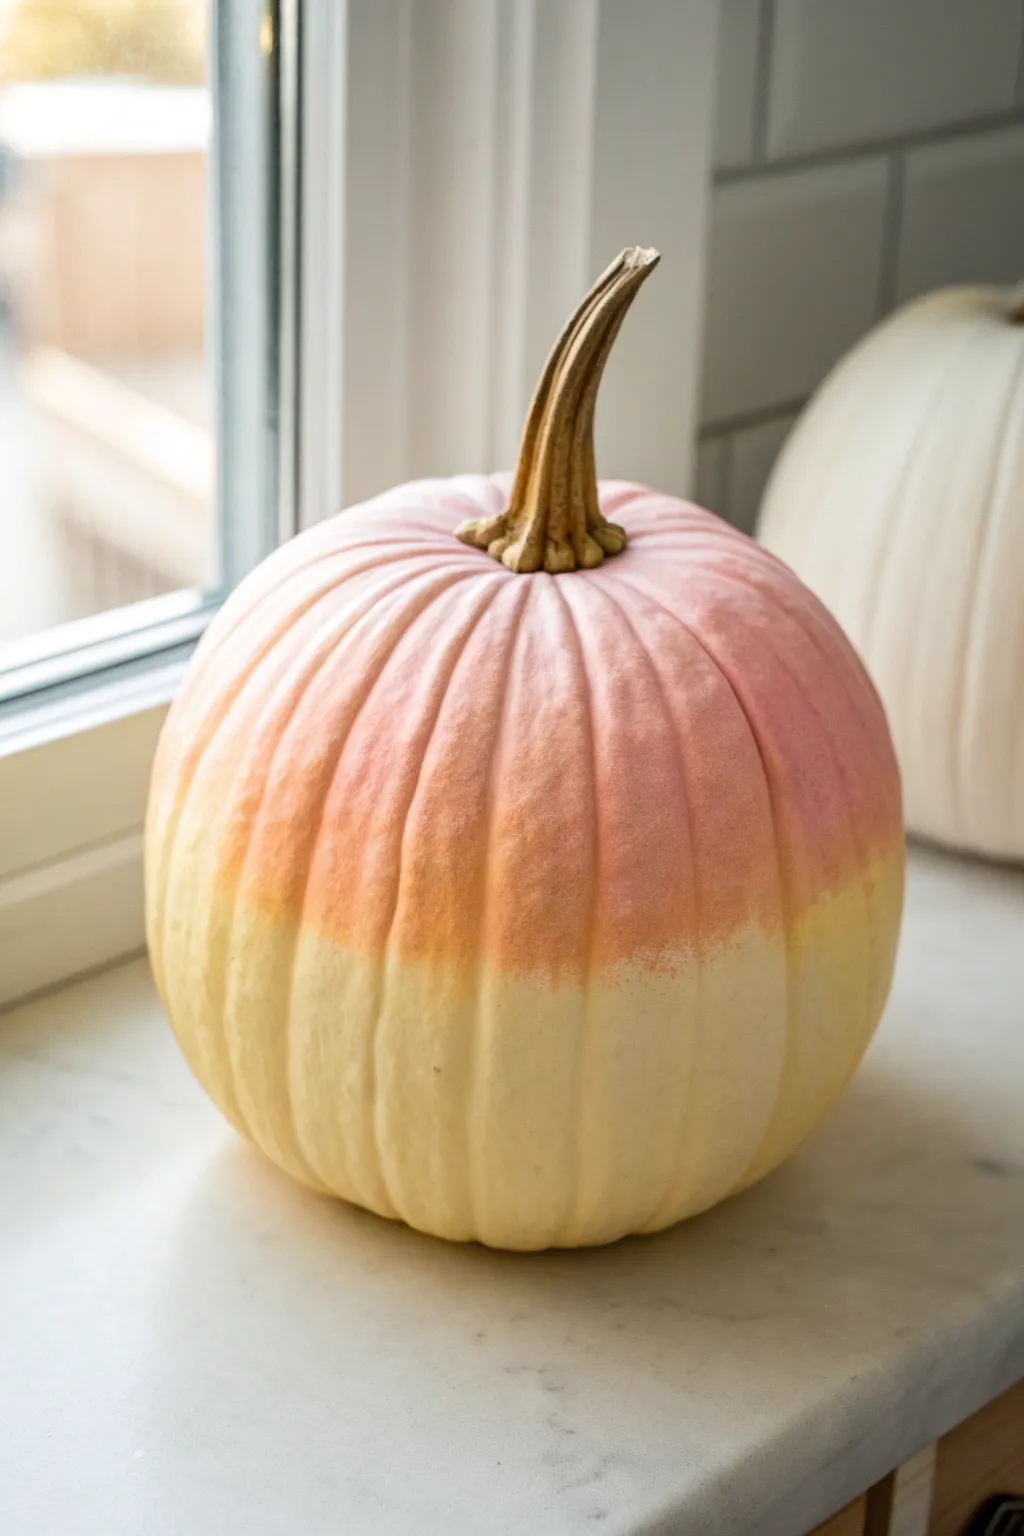
Capture the fleeting beauty of dusk with this gentle gradient pumpkin that feels both modern and romantic. The seamless transition from blush pink to creamy yellow creates a sophisticated glow that brightens any window ledge or centerpiece.
Step-by-Step Guide
Materials
- Medium-sized faux pumpkin (cream or white)
- Matte spray paint (soft coral pink or blush)
- Matte spray paint (pale butter yellow or warm cream)
- Painter’s tape
- Cardboard or drop cloth
- Gloves and mask (for ventilation)
- Gold craft paint (optional for stem)
- Small detail brush
Step 1: Preparation
-
Clean surface:
Begin by wiping down your faux pumpkin with a damp cloth to remove any manufacturing dust or oils that might repel the paint. -
Protect the stem:
Carefully wrap the stem entirely in painter’s tape. Since spray paint is harder to control than brush-on acrylics, you want to ensure the natural stem color stays preserved. -
Set up workspace:
Lay down your cardboard or drop cloth in a well-ventilated area, preferably outdoors. Set the pumpkin in the center.
Sputtering Nozzle?
If the spray paint spits large droplets, the nozzle is clogged. Turn the can upside down and spray until clear gas comes out, or wipe the tip with thinner.
Step 2: Creating the Base Gradient
-
Check the can:
Shake your spray paint cans vigorously for at least one minute to ensure the pigment is perfectly mixed. -
Apply the bottom coat:
Starting with the paler yellow or warm cream color, spray the bottom half of the pumpkin. Hold the can about 8-10 inches away. -
Feather upward:
As you spray the lower section, let the paint mist naturally float upward toward the middle, but don’t aim directly at the top half. This creates the first part of the fade. -
First drying period:
Wait about 15 minutes for the light color to become tacky but not fully cured. This helps the next layer adhere without running.
Gilded Edges
Make it glam by painting just the very ridges of the pumpkin with liquid gold leaf or metallic wax to accentuate the vertical lines.
Step 3: Building the Sunset
-
Apply the top color:
Take your coral or blush pink spray paint. Aim the nozzle at the top of the pumpkin, spraying downward from above. -
The blending zone:
This is the crucial moment. Lightly mist the middle section where the pink meets the yellow. I find that pulling the can further away—maybe 12 inches—helps deposit a very fine mist that blends seamlessly rather than creating a harsh line. -
Assess the gradient:
Step back and look at the transition. If the line looks too sharp, do a very quick, light pass with the lighter yellow color again in the middle zone to soften it. -
Inspect coverage:
Walk around the pumpkin to check for any missed spots in the grooves of the ribs. -
Let it cure:
Allow the pumpkin to dry completely according to the spray paint manufacturer’s instructions, usually at least an hour.
Step 4: Finishing Touches
-
Remove tape:
Once the paint is dry to the touch, gently peel away the painter’s tape from the stem. -
Stem detail:
If the original stem looks dull against your fresh paint, use a small brush and a touch of gold craft paint to dry-brush highlights onto the ridges of the stem. -
Final smooth:
Check the texture. If spray sputtering caused any rough bumps, you can very gently rub them with a soft cloth to smooth them out without removing pigment. -
Seal (optional):
For extra durability, especially if placing outdoors, give the whole pumpkin a coat of clear matte sealer.
Place your creation in soft lighting to really let those gradient hues shine.
Cute Pastel Jack-o’-Lantern Face
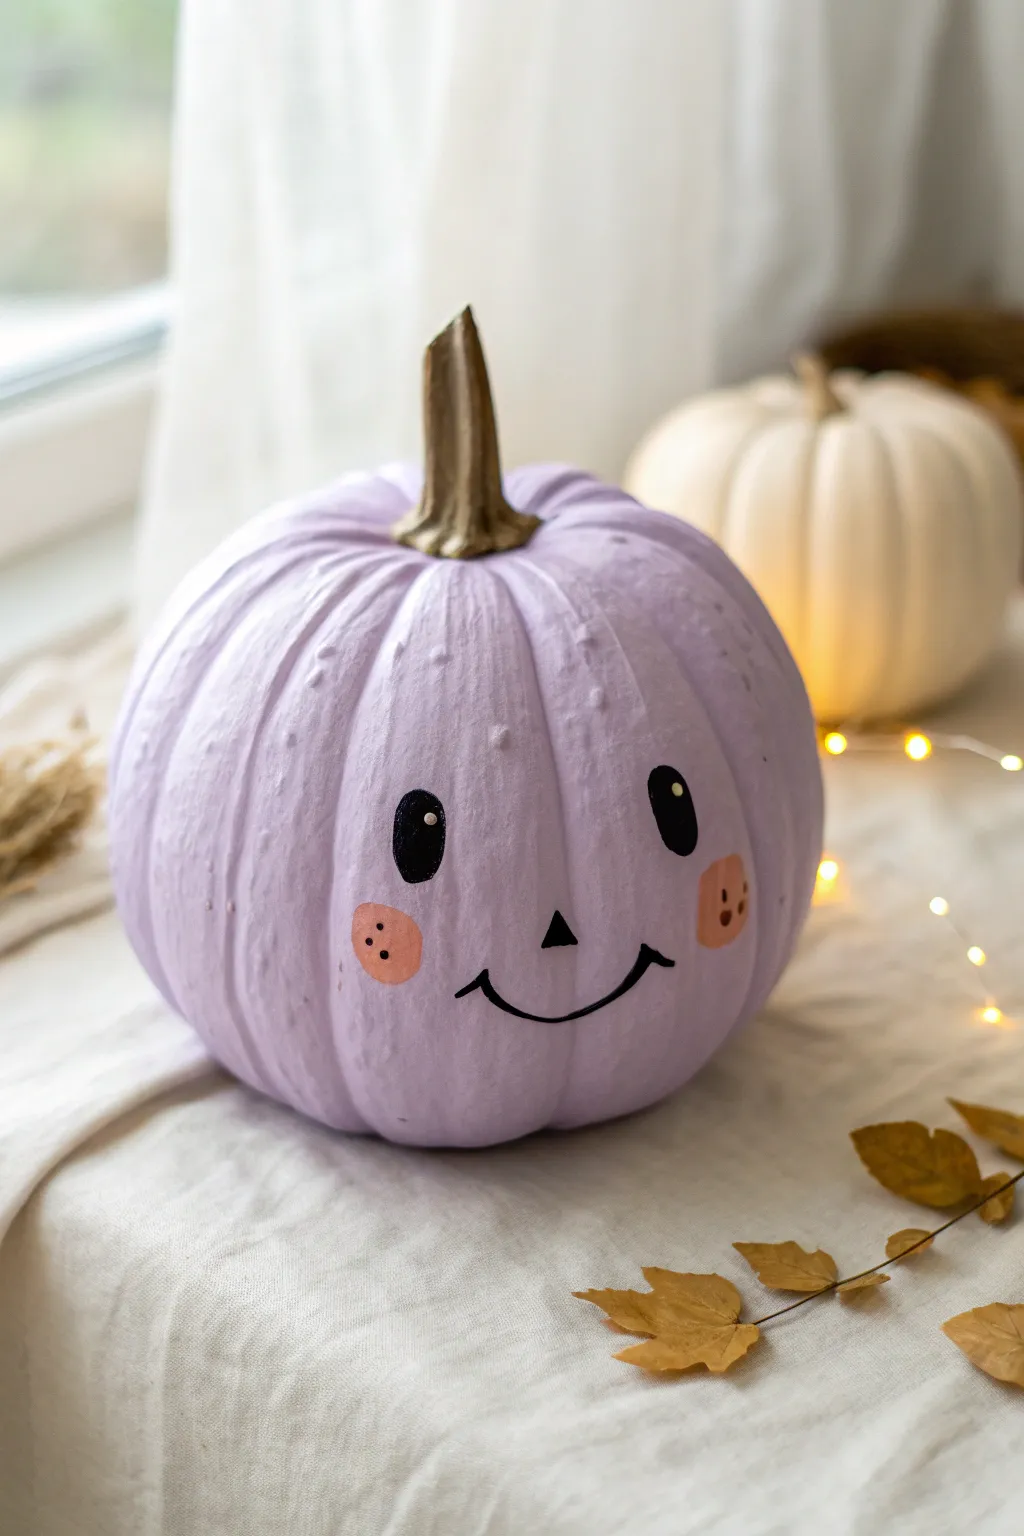
Soft pastels and a sweet expression take the spooky right out of this Halloween classic. This gentle lilac pumpkin with metallic accents is perfect for brightening up a shelf or adding a touch of whimsy to your fall decor.
Step-by-Step
Materials
- Faux or real pumpkin (medium size)
- Pastel lilac or lavender chalk paint (or matte acrylic)
- Metallic gold acrylic paint
- Carbon black acrylic paint
- Coral or peach acrylic paint
- White acrylic paint
- Wide flat paintbrush
- Small round paintbrush (size 2 or 4)
- Fine liner brush (size 00 or 0)
- Pencil
- Dotting tool or toothpick
- Palette or paper plate
Step 1: Setting the Base
-
Prepare your pumpkin:
Wipe down your pumpkin with a damp cloth to remove any dust or dirt. If you are using a real pumpkin, ensure it is completely dry before starting. Lay down newspaper or a drop cloth to protect your workspace. -
Apply the base coat:
Using a wide flat brush, apply a generous coat of pastel lilac paint to the entire body of the pumpkin. Don’t worry about the stem just yet. Chalk paint works beautifully here for that velvety, matte finish. -
Let it dry completely:
Allow the first coat to dry fully to the touch. Depending on your paint brand, this might take 20-30 minutes. A second coat is usually necessary to get full, opaque coverage without streaks. -
Add a second coat:
Apply a second layer of lilac paint. Use smooth, vertical strokes following the natural ribs of the pumpkin to hide brush marks. Let this layer dry overnight or at least for several hours to ensure a hard shell. -
Gild the stem:
Once the body is dry, use a smaller round brush to paint the stem with metallic gold acrylic. Be careful around the base where the stem meets the purple. You may need two coats for a rich, solid gold look.
Step 2: Painting the Face
-
Sketch the features:
Lightly sketch the facial features onto the pumpkin using a pencil. Draw two wide-set oval eyes, a small triangular nose, and a simple curved smile. Add two round circles on the cheeks for blush. -
Fill the eyes:
Using your small round brush and black acrylic paint, carefully fill in the oval shapes you sketched for the eyes. Take your time to keep the edges smooth and rounded. -
Paint the nose:
Switch to a fine liner brush if needed, or use the very tip of your round brush, to fill in the small black triangle nose. -
Draw the smile:
With the fine liner brush loaded with slightly thinned black paint (add a drop of water if needed for flow), trace your pencil line for the smile. Add small upward ticks at the ends of the mouth for a happier expression. -
Add the rosy cheeks:
Clean your round brush and pick up the coral or peach paint. Fill in the circular cheek spots you sketched earlier. You might need two layers here if the lilac base shows through too much. -
Add freckles:
Once the coral cheeks are dry to the touch, dip a toothpick or a very fine dotting tool into black paint. Add three tiny dots in a triangular pattern on top of each cheek spot for freckles. -
Highlight the eyes:
This step brings the pumpkin to life. Dip the handle end of a paintbrush or a large dotting tool into white paint. Place a single white dot in the upper right area of each black eye. -
Final touch-ups:
Step back and look at your pumpkin. If any pencil marks are still visible, gently erase them once the paint is 100% cured. Clean up any stray paint edges with a small brush and the appropriate background color.
Chalk Paint Texture
To get that trendy matte finish shown in the photo, mix a teaspoon of baking soda into your acrylic paint if you don’t have chalk paint on hand.
Add Some Sparkle
Before the gold stem paint dries, sprinkle a pinch of gold glitter on top. It catches the light beautifully and matches the magical vibe.
Enjoy the cozy charm this adorable little pumpkin brings to your autumn display
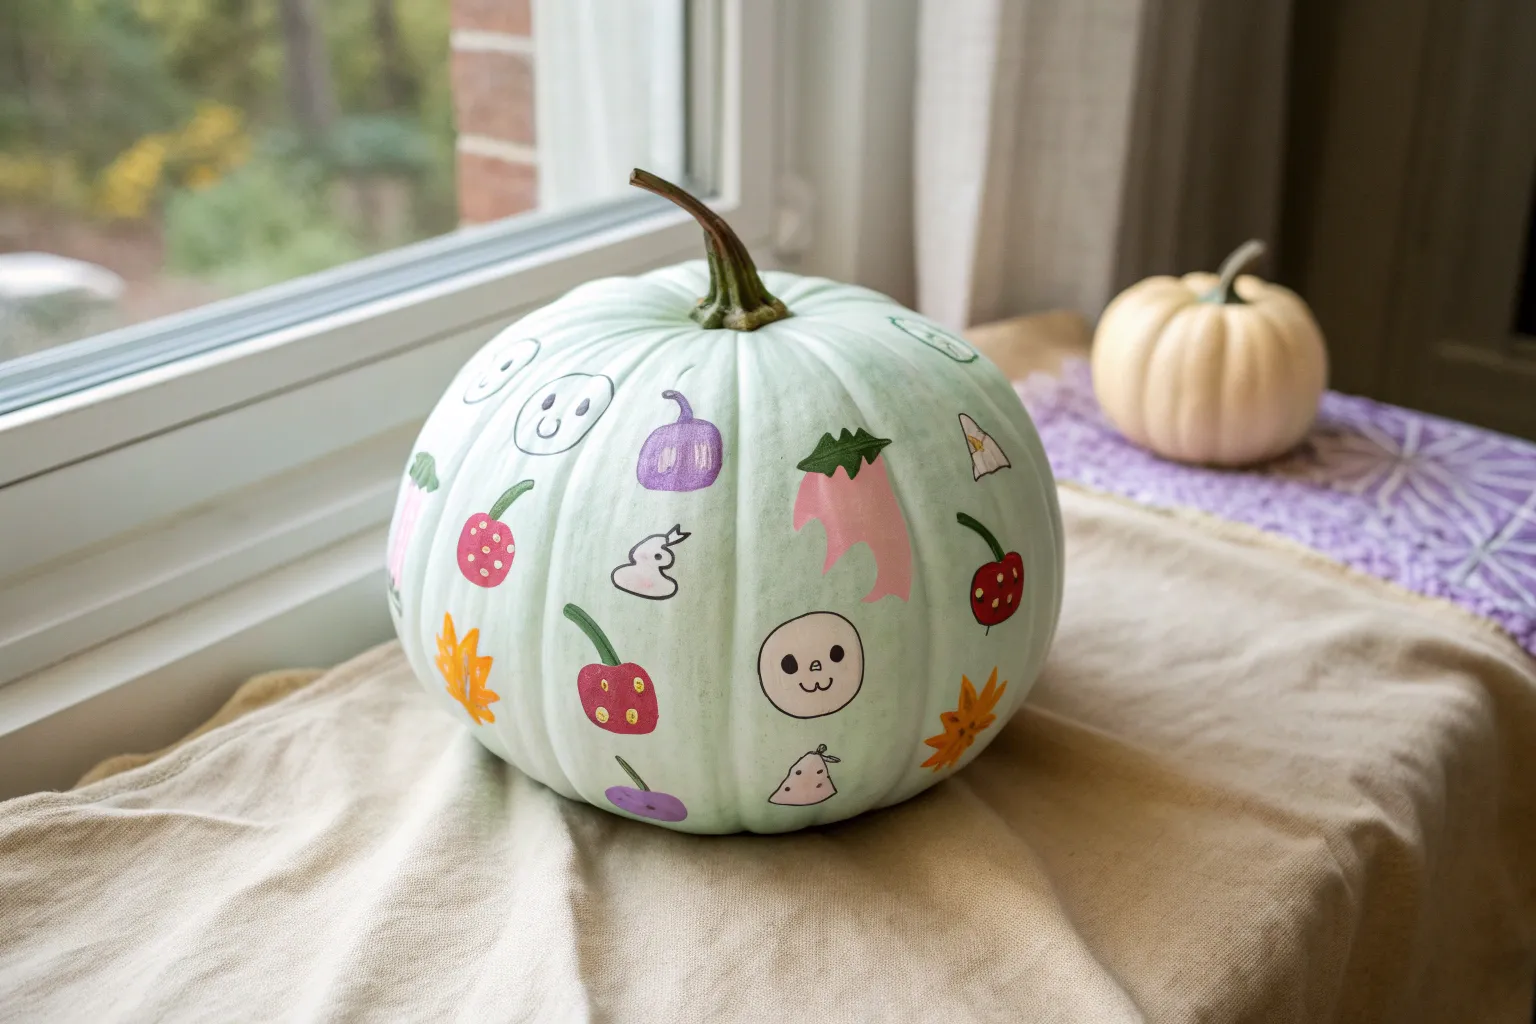
Friendly Pink Ghosts Pumpkin
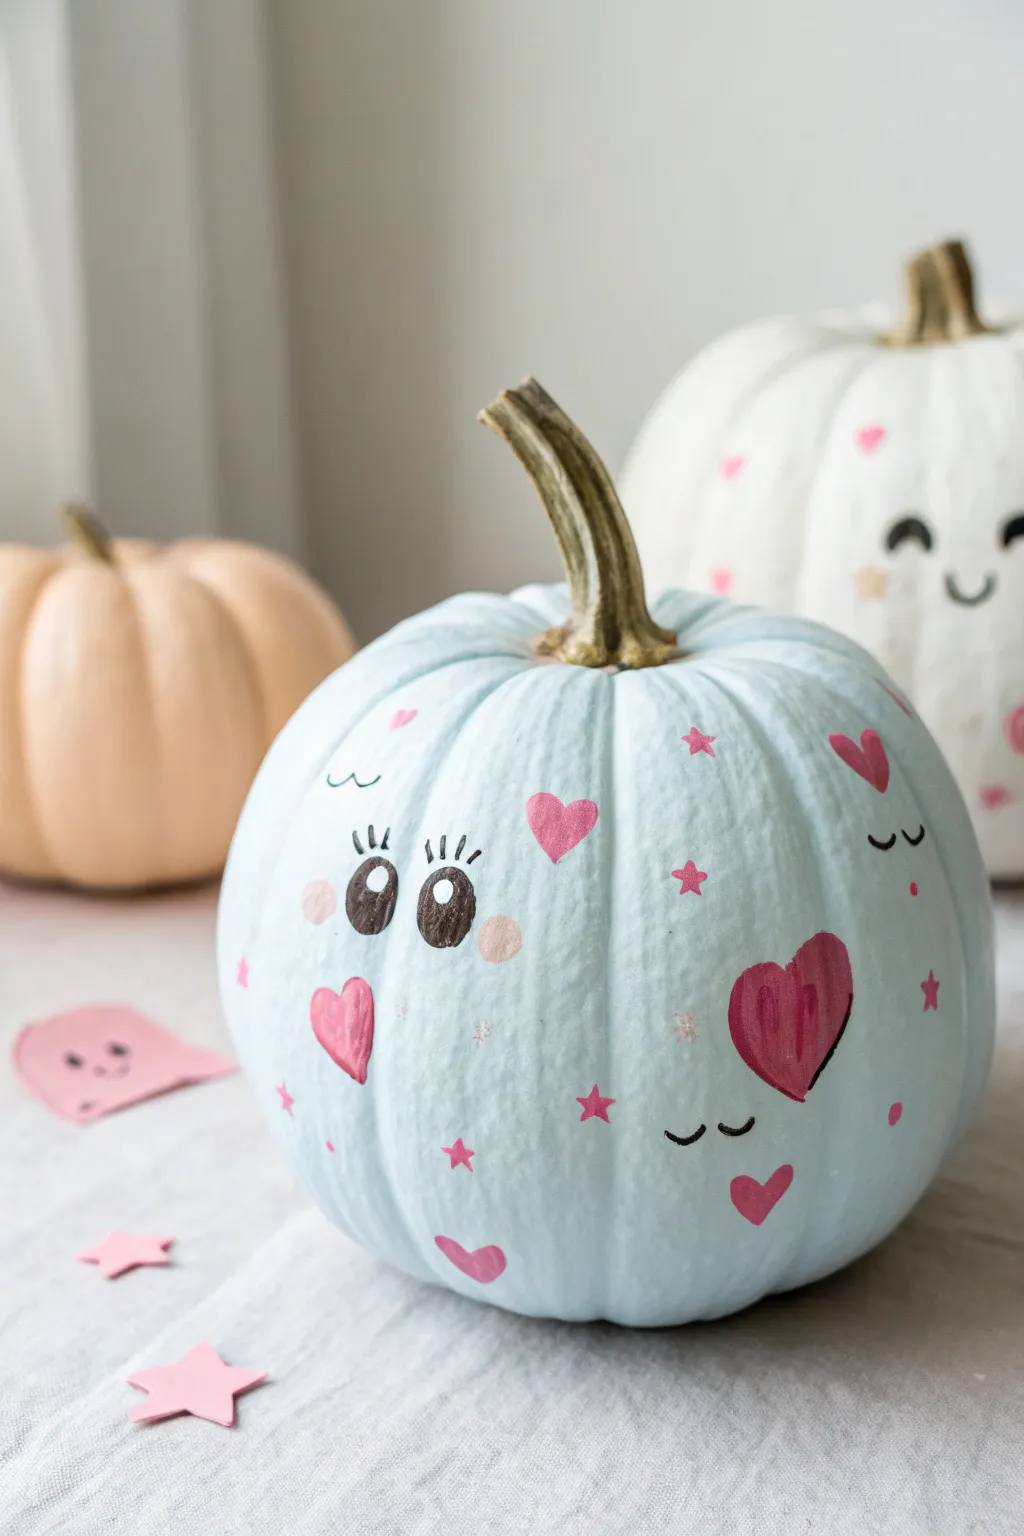
Transform a plain pumpkin into an adorable, pastel-themed decoration featuring sweet Kawaii-style faces and playful heart motifs. This project combines a soft baby blue base with vibrant pink accents for a truly preppy and charming look.
How-To Guide
Materials
- Medium-sized pumpkin (real or faux)
- Light baby blue acrylic paint
- Bubblegum pink acrylic paint
- Darker berry pink acrylic paint
- Black acrylic paint or paint pen
- White acrylic paint
- Soft pink paint (for cheeks)
- Flat paintbrush (medium width)
- Fine detail paintbrush or liner brush
- Sponge dabber (optional)
- Matte finish sealer (spray or brush-on)
- Pencil for sketching
Step 1: Base Coat Application
-
Prepare the surface:
Begin by wiping down your pumpkin with a damp cloth to remove any dirt or oils, ensuring the paint adheres properly. If using a real pumpkin, make sure it is completely dry. -
Apply the first coat:
Using the medium flat brush, apply an even layer of light baby blue acrylic paint over the entire pumpkin, excluding the stem. -
Let it dry:
Allow the first coat to dry completely for about 20-30 minutes. The blue needs to be opaque to hide the orange or white skin underneath. -
Add a second coat:
Apply a second layer of blue paint to ensure rich, solid coverage. I like to brush in vertical strokes following the pumpkin’s ribs for a natural texture. Let this dry fully before moving on.
Step 2: Painting the Main Face
-
Sketch the features:
Lightly sketch the large, oval eyes and mouth placement with a pencil. Position them centrally on the smoothest side of the pumpkin. -
Fill in the eyes:
Using a small round brush or a black paint pen, fill in the large oval shapes with solid black paint. Keep the edges smooth and rounded. -
Add eye highlights:
Once the black is dry, use a detail brush or a toothpick to add two small white dots to the top corners of each eye. This gives the face that signature sparkling anime look. -
Draw the lashes:
Carefully paint three distinct eyelashes extending from the top outer corner of each eye using your finest liner brush or a fine-tip black paint marker. -
Add rosy cheeks:
Dip a sponge dabber or a round brush into the soft pink paint. Gently press or paint circular blush marks just below the outer corners of the eyes.
Uneven Coverage?
If the blue paint looks streaky, try dabbing the paint on with a sponge rather than brushing. This builds opacity faster without brushstrokes.
Step 3: Adding Decorative Motifs
-
Create scattered hearts:
Mix up your pink shades. Paint small to medium-sized hearts randomly around the pumpkin using the bubblegum and berry pink paints. Vary the angles so they look like confetti. -
Detail the hearts:
For added dimension on larger hearts, you can paint one half slightly darker or outline one side with a thin black line for a doodled effect. -
Paint tiny stars:
Using the fine tip brush and bright pink paint, add small five-point stars in the empty spaces between the hearts. -
Add sleepy eyes:
In the spaces towards the sides of the pumpkin, paint small, curved ‘U’ shapes with lashes (closed, sleepy eyes) to create secondary cute faces around the pumpkin’s circumference. -
Incorporate extra dots:
Fill any remaining large gaps with tiny pink polka dots using the handle end of a paintbrush dipped in paint.
Vary Keep It Random
Don’t create a perfect pattern! Rotate the pumpkin as you work and place hearts and stars at different angles for a playful, tossed-confetti look.
Step 4: Finishing Touches
-
Paint the stem:
You can leave the stem natural for contrast or brush it with a metallic gold or a muted brown wash to tidy it up. -
Clean up lines:
Check your work for any smudges. Use a tiny bit of the blue base color to touch up edges around the hearts or eyes if needed. -
Seal the artwork:
Once everything is completely dry (wait at least an hour), apply a matte sealer spray. This protects the paint from chipping and gives it a professional ‘soft’ finish.
Place your finished pumpkin alongside pastel paper confetti or other painted gourds for a sweet seasonal vignette


Have a question or want to share your own experience? I'd love to hear from you in the comments below!