When you’re painting for a church festival, VBS, Easter, or a Christmas program, a little faith-based face art can feel both meaningful and fun. Here are my favorite Christian face painting ideas—starting with the classic go-tos and moving into more creative, story-driven designs.
Simple Cheek Cross With Soft Glow
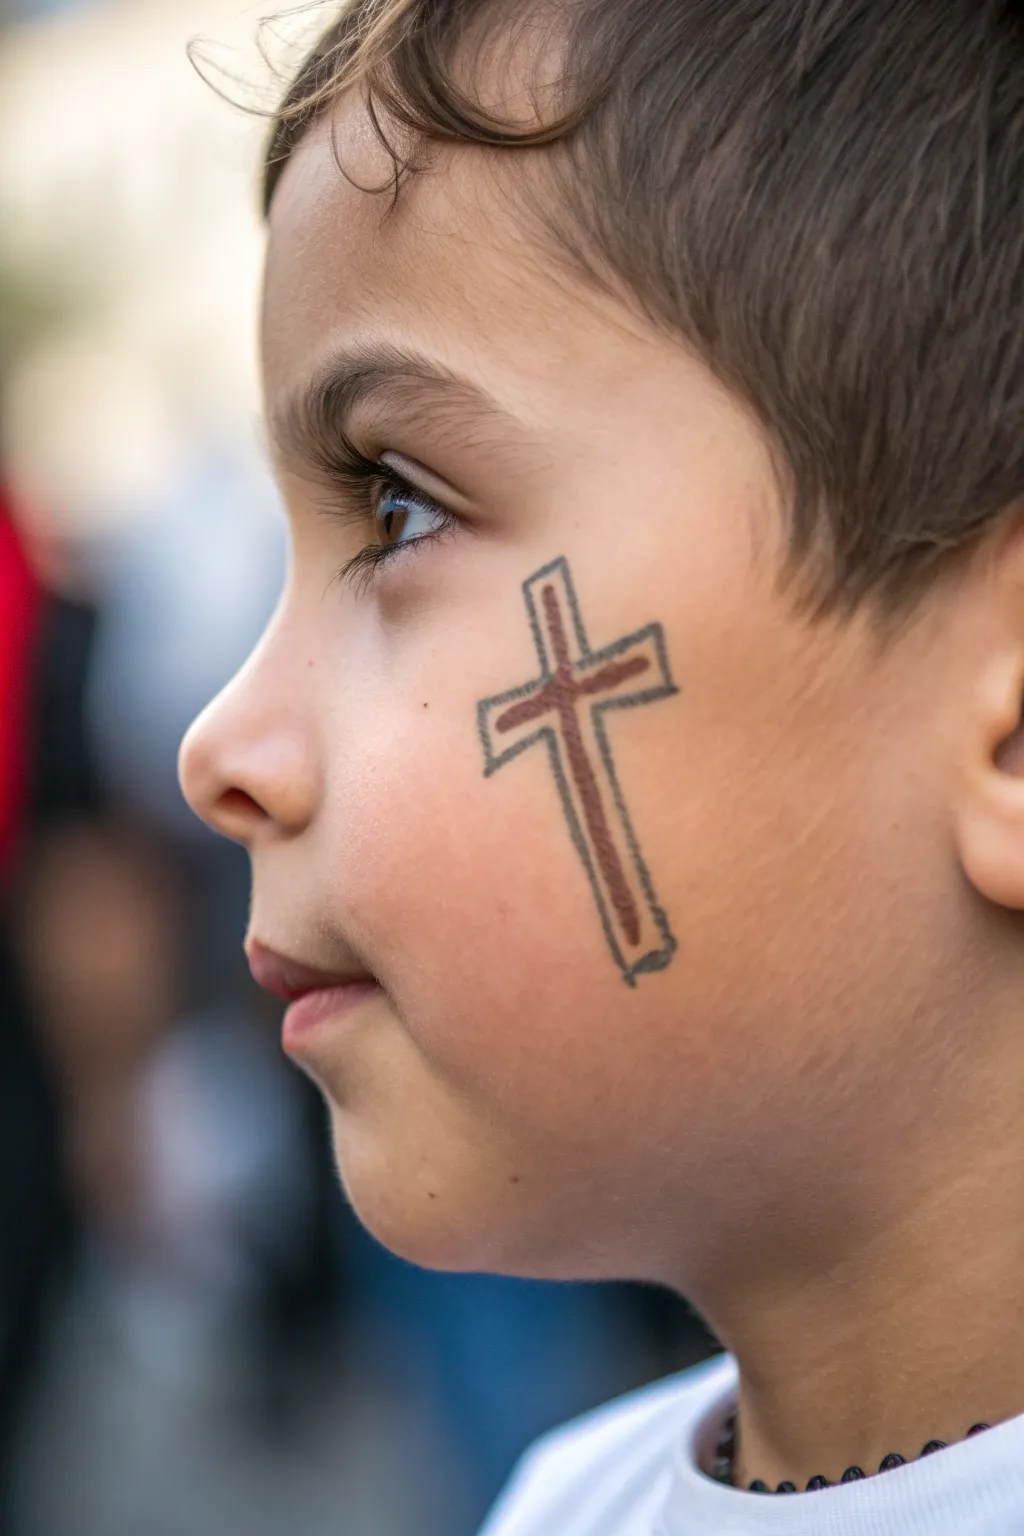
For a subtle yet poignant expression of faith, this design features a clean, outlined cross positioned gently on the cheek. Its rustic brown interior and sharp borders create a classic look that stands out without overwhelming the face, perfect for quick application during events.
Step-by-Step
Materials
- Face paint: Dark brown or bronze (water-activated)
- Face paint: Black or charcoal grey (water-activated)
- Small round brush (size 1 or 2)
- Fine liner brush (size 0 or 00)
- Cup of water
- Paper towels
- Cotton swabs (for cleanup)
Step 1: Preparation and Positioning
-
Clean the area:
Begin by ensuring the child’s cheek is clean and dry. Use a slightly damp cloth or a baby wipe to remove any oils or food residue, which helps the paint adhere better. -
Visualize the placement:
Identified the ‘apple’ of the cheek or just slightly back towards the ear. Imagine where the vertical and horizontal bars will intersect so the design sits naturally on the curve of the face.
Clean Lines
If your black outline looks shaky or too thick, your paint is likely too dry. Add a tiny drop of water to improve flow, or switch to a ‘script’ liner brush for longer strokes.
Step 2: Painting the Vertical Bar
-
Load the brown paint:
Wet your small round brush and swirl it into the brown or bronze face paint. You want a creamy consistency—not too watery, or it will drip. -
Paint the main stroke:
Draw a vertical line about 2 inches long. Start with light pressure and maintain a steady hand to keep the width consistent. -
Fill the shape:
If your first stroke was thin, add a second stroke right next to it to thicken the line slightly. The goal is a solid bar of color, roughly the width of a pencil.
Metallic Shine
Swap the matte brown center for a metallic gold or copper face paint. This catches the light beautifully when the child moves and adds a special, celebratory quality.
Step 3: Adding the Horizontal Bar
-
Cross the vertical line:
Load more brown paint if necessary. Determine the upper third of the vertical line and paint a horizontal bar across it. -
Balance the proportions:
Ensure the horizontal bar is shorter than the vertical one. The left and right arms should look roughly equal in length. -
Refine the edges:
Use the tip of your brush to square off the ends of the cross so they look neat rather than rounded or tapered.
Step 4: Creating the Outline
-
Prepare the liner brush:
Switch to your fine liner brush. This tool is crucial for the crisp detail seen in the reference photo. -
Load the black paint:
Get the black paint to an inky consistency. I find that rolling the brush on the edge of the palette helps create a super sharp point. -
Outline the top:
Start at the very top of the vertical bar. Draw a thin line outlining the top edge, keeping a tiny bit of space between the brown paint and your black outline if you want an ‘airy’ look, or touch them directly for a solid look. -
Outline the right arm:
Carefully trace down the right side of the upper vertical bar, turn the corner, and outline the right horizontal arm. Keep your hand anchored on the child’s chin for stability. -
Outline the bottom section:
Continue painting the line down the long vertical stem. Create a squared-off bottom edge and travel back up the left side. -
Finish the left arm:
Outline the left horizontal arm, connecting back to your starting point. Try to keep the line thickness consistent throughout.
Step 5: Final Touches
-
Inspect the lines:
Check for any breaks in the outline. Gently dab close to the eye or fix any wobbly bits with a very steady hand. -
Strengthen the contrast:
If the brown paint has dried too light, you can carefully layer a tiny bit more pigment over the center, being careful not to disturb the black outline. -
Clean edges:
If any paint smudged outside the outline, use a damp cotton swab to wipe it away for a professional finish. -
Allow to set:
Ask the child to keep still for just 30 seconds to let the design fully dry so it doesn’t smear immediately.
This simple yet respectful symbol serves as a beautiful conversation starter and wears comfortably all day


Three Crosses on a Hill Silhouette

This serene face painting design captures the poignant scene of three crosses on a hill with a beautifully blended sunset background. The evocative silhouette style is perfect for Easter celebrations or church events, creating a striking yet simple statement piece.
How-To Guide
Materials
- Face paint pallet (purple, peach/orange, black, dark purple)
- High-density face painting sponges (cut in half)
- Round brush (size 2 or 3)
- Small filbert brush or angle brush
- Cup of water
- Paper towels
Step 1: Creating the Sunset Background
-
Load the sponge:
Start by dampening your sponge slightly and loading the rounded edge with a soft purple face paint. You want a creamy consistency, not too watery. -
Apply the top arch:
Gently dab the purple paint onto the upper cheek area, forming the top curve of a circle. Keep the edges soft by using a stippling motion rather than dragging the sponge. -
Transition to orange:
Flip your sponge to a clean side or grab a fresh one. Load it with a warm peach or soft orange color. This will create the glowing sunset effect beneath the purple sky. -
Blend the gradient:
Apply the peach color immediately below the purple, allowing them to overlap slightly. Gently dab over the seam where the two colors meet to create a seamless, soft blend. I like to tap lightly until the transition looks blurry and natural. -
Shape the circle:
Continue filling in the bottom half of your circular background with the peach tone, maintaining that round shape. Let this base layer dry completely for a minute so your next layers don’t muddy.
Clean Lines Tip
Rest your pinky finger gently on the model’s chin or cheekbone to stabilize your hand while painting the fine black lines of the crosses.
Step 2: Painting the Hill
-
Mix the hill color:
For the hill, you need a darker shade to ground the image. You can use a dark purple paint directly, or mix a little black into your original purple on your pallet. -
Outline the mound:
Using a small filbert or angle brush loaded with the dark purple, paint a curved line across the lower third of your sunset circle. This line represents the top of the hill. -
Fill the hill:
Fill in the area below your line with the dark purple paint. Don’t worry about the bottom edge being perfect just yet. -
Add grassy texture:
To make the hill look organic, use the tip of your brush to flick tiny, short strokes downward along the bottom edge of the hill. This creates a textured, grassy look rather than a hard line.
Step 3: Adding the Crosses
-
Load the detail brush:
Switch to your round brush (size 2 or 3) and load it with black face paint. Ensure the paint is inky and smooth for sharp lines. -
Paint the center cross vertical:
Start with the central cross, which should be the largest. Paint a straight vertical line rising from the top center of the dark purple hill, extending up into the purple sky area. -
Paint the center crossbar:
Add the horizontal crossbar about two-thirds of the way up the vertical line. Keep it proportionate to the height. -
Position the side crosses:
Visualize where the two smaller crosses will go on either side. They should be slightly lower down the hill and smaller in size to create perspective. -
Paint the right cross:
Paint the vertical line for the cross on the right, making it shorter than the center one. Add its small horizontal crossbar. -
Paint the left cross:
Repeat the process for the cross on the left side, matching the size of the right cross as closely as possible for balance. -
Refine the edges:
Check your black lines. If any edges look ragged, carefully smooth them out with the very tip of your round brush. The stark black silhouette against the soft sunset is what makes this design pop.
Starry Night Upgrade
Once the paint is dry, use a tiny brush to add minuscule white dots in the purple section of the sky for subtle stars.
Now you have a moving piece of art that beautifully conveys the Easter story right on the cheek


Empty Tomb With Rolled Stone
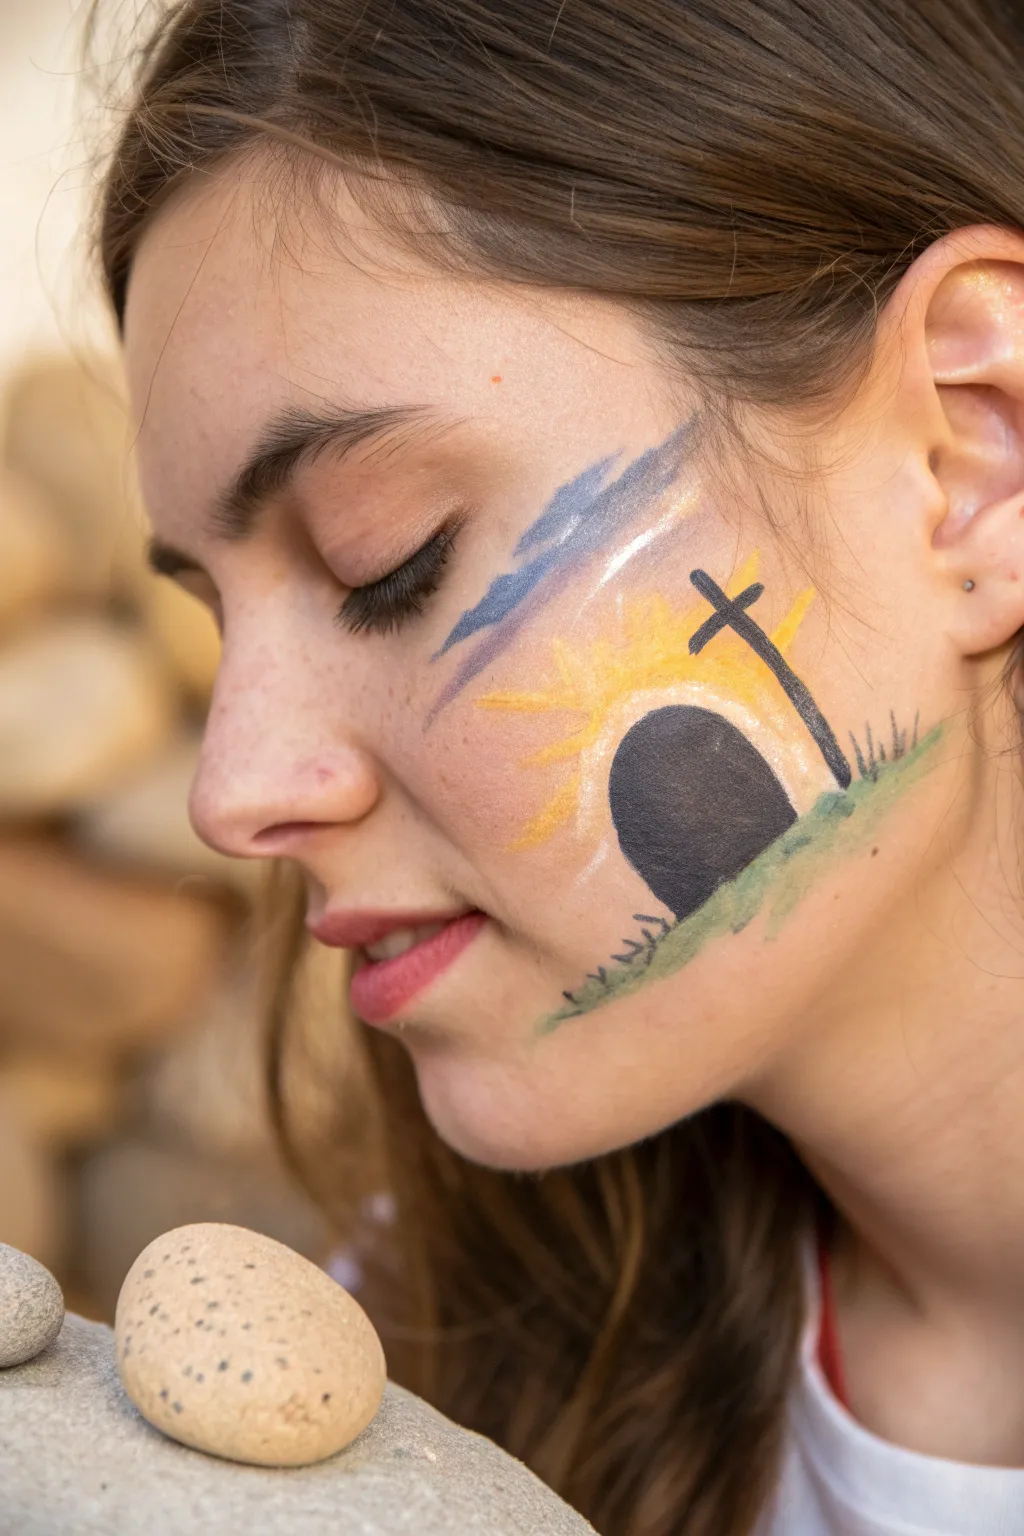
Celebrate Easter with this meaningful and scenic face paint design that tells the story of the resurrection right on the cheek. Using a soft blend of colors, this look captures the hope of the empty tomb with a radiant sunrise and a bold cross silhouette.
Step-by-Step
Materials
- Face paint palette (black, white, yellow, orange, light blue, dark blue, green)
- Round brush (size 4 or integrated kit brush)
- Flat brush (small to medium)
- Small blending sponge or high-density foam wedge
- Cup of water
- Paper towels
Step 1: Setting the Scene
-
Position the stone:
Start by visualizing where the tomb entrance will be. Using a round brush with a very light wash of gray or white, lightly sketch a rounded arch shape on the apple of the cheek. This acts as a guide for the dark cave interior. -
Paint the tomb entrance:
Dip your round brush into black face paint. Ensure the paint is creamy, not too watery. Fill in the arch shape you just sketched to create the dark opening of the empty tomb. Keep the bottom edge relatively flat. -
Add the grassy hill:
Clean your brush and pick up some green paint. Starting from the bottom right of the black tomb entrance, paint a sloping line of grass moving upwards towards the ear. Use short, flicking motions along the top edge of this line to simulate grass blades. -
Extend the ground:
Continue the green line under the tomb entrance and slightly to the left, grounding the image. Vary the pressure on your brush to create uneven tufts of grass for a natural, earthy look.
Step 2: Creating the Sunrise
-
Base the sun:
Switch to a bright yellow paint. Using a clean brush or the edge of a small sponge, dab a semicircle of yellow around the top of the black tomb arch. This glow represents the rising sun behind the tomb. -
Paint the rays:
With a fine round brush and the same yellow paint, draw rays extending outward from the yellow semicircle. Make these lines radiate in all directions—upwards and sideways—varying their length slightly. -
Add warmth:
Mix a tiny bit of orange into your yellow or pick up a dedicated orange hue. Add a few accent streaks between the yellow rays to give the sunrise depth and warmth. -
Highlight the entrance:
Using white paint and a very fine brush, carefully outline the top curve of the black tomb entrance. This highlights the stone edge catching the morning light and separates the tomb from the sun behind it.
Smudge Control
If black paint bleeds into the yellow sun, wait for it to dry completely. Then, simply dab fresh yellow over the mistake—opaque face paint layers easily.
Step 3: Sky and Details
-
Create the sky:
Load a flat brush or sponge with light blue paint. Gently sweep a line or two diagonally above the sun rays, moving from the temple area down toward the inner eye. -
Deepen the clouds:
While the light blue is still tacky, add a streak of darker blue right next to or slightly overlapping it. This creates a dimensional cloud effect. I like to keep these strokes loose and painterly. -
Add cloud highlights:
Add a thin streak of white along the top edge of the blue clouds to make them pop against the skin tone. -
Position the cross:
Visualize where the cross stands on the hill. It should be on the right side of the design, planted in the green grass you painted earlier. -
Paint the cross:
Using black paint and a steady hand with your round brush, paint the vertical beam of the cross first. Then, add the horizontal crossbar near the top. Make the ends slightly imperfect to look like rough wood. -
Connect to the ground:
Ensure the bottom of the cross touches the green grass line so it doesn’t look like it’s floating.
Glitter Finish
While the paint is still slightly damp, poof a small cloud of cosmetic-grade iridescent glitter over the sunrise area for a magical, holy glow.
Now you have a beautiful piece of wearable art that shares a joyful message


Dove of Peace With Radiant Beams
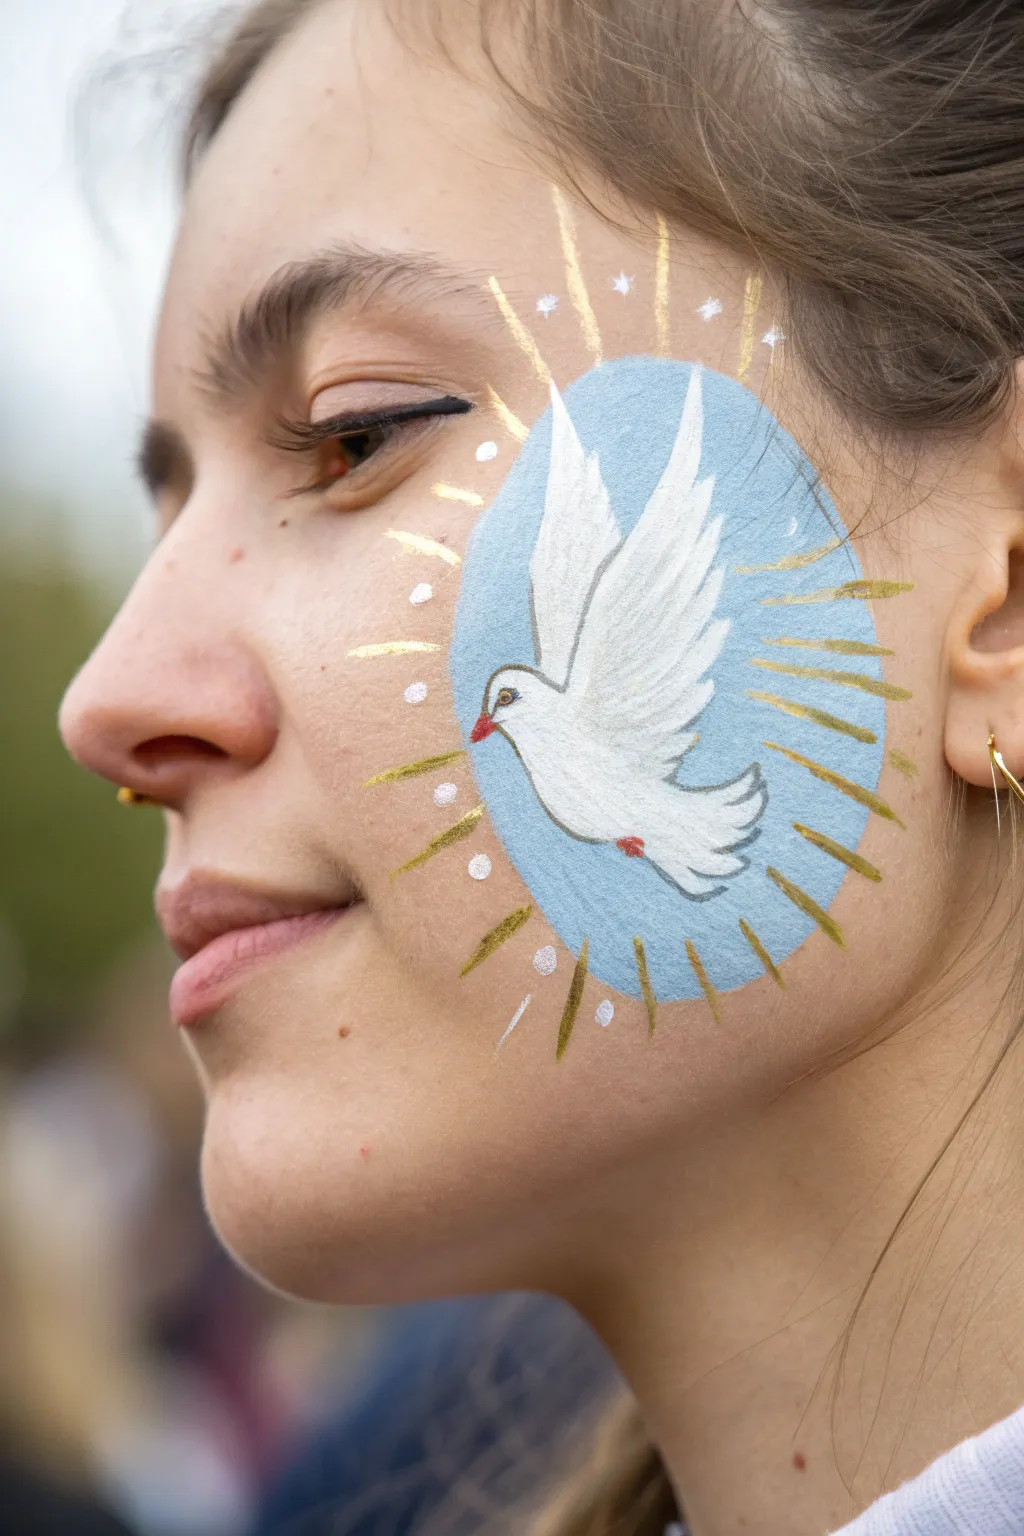
Capture the serenity of peace with this elegant face painting design featuring a soaring white dove against a soft blue sky. Surrounded by radiant gold beams and delicate starlight, this artwork creates a beautiful, spiritual focal point on the cheek.
Step-by-Step Tutorial
Materials
- Face paint: Light blue, titanium white, bright red, black
- Metallic face paint: Gold
- High-density sponge or dauber
- Round brush (size 4 or 6)
- Fine liner brush (size 1 or 0)
- Small cup of water
- Paper towel
Step 1: Setting the Sky
-
Create the oval base:
Dip a dampened high-density sponge or a large round brush into your light blue face paint. Gently dab or paint a smooth, vertical oval shape on the cheek, extending from the cheekbone down toward the jawline. Aim for opacity here, but keep the edges relatively soft. -
Establish the dove’s silhouette:
Load a size 4 round brush with a creamy consistency of titanium white paint. Start by painting the main body of the dove in the center of the blue oval, creating a curved teardrop shape that angles upward. -
Form the wings:
Using the same white brush, sweep upward to create the first, larger wing. Think of it as a tall, curved leaf shape. Add the second wing slightly behind it, making it narrower to show perspective.
Step 2: Feather Details & Definition
-
Define the wing feathers:
While the white is still slightly workable, use the tip of your brush to drag the paint outward at the top of the wings, creating individual feather tips rather than a smooth line. -
Add the tail:
Paint a small, fan-shaped tail at the bottom of the body, again using short strokes to mimic the texture of feathers. -
Layering for brightness:
I find that going back over the center of the wings with a second coat of white really makes the bird pop against the blue background, so apply another layer if your first one looks a bit transparent. -
Outline the dove:
Switch to a fine liner brush with a very watered-down grey (mix a tiny dot of black into white) or a very thin black. Carefully outline the underside of the wings and the belly to separate the bird from the sky. -
Feather texture:
Use that same thin liner brush to add faint, curved lines inside the wings to suggest layers of feathers. Keep these lines very delicate.
Smudgy Lines?
If your grey outlines look messy or too thick, wait for them to dry completely, then use a clean, damp angled brush to gently ‘erase’ or tidy up the edges.
Step 3: Face & Beak Features
-
Paint the eye:
Using the tip of your smallest brush and black paint, place a tiny dot for the eye on the head of the dove. You can add a microscopic speck of white inside it for a glint of life. -
Add the beak:
Clean your fine brush and pick up a small amount of bright red. Paint a tiny triangle for the beak. Extend a thin red line slightly back onto the face for detail. -
The feet:
Add tiny red accents near the tail to suggest tucked feet in flight.
Add Sparkle
Before the gold paint dries fully, gently press cosmetic-grade gold glitter onto the rays. This adds a physical texture that catches the light beautifully.
Step 4: Radiance & Highlights
-
Start the gold rays:
Load a round brush with metallic gold paint. Starting from the edge of the blue oval, paint lines radiating outward onto the skin. Vary the lengths—some short, some long. -
Thicken the beams:
Go back over the gold rays, pressing harder at the base (near the blue) and lifting off as you go outward to create a tapered, sunbeam effect. -
Add starbursts:
Using white paint and a fine brush, add small cross-shaped stars or dots between the gold rays on the skin, and a few overlapping the blue background for depth. -
Final highlights:
Add a few pure white dots around the perimeter of the blue oval to integrate the design with the skin.
Now you have a radiant symbol of hope that brightens up any occasion
BRUSH GUIDE
The Right Brush for Every Stroke
From clean lines to bold texture — master brush choice, stroke control, and essential techniques.
Explore the Full Guide
Fish Symbol With Ocean Blues
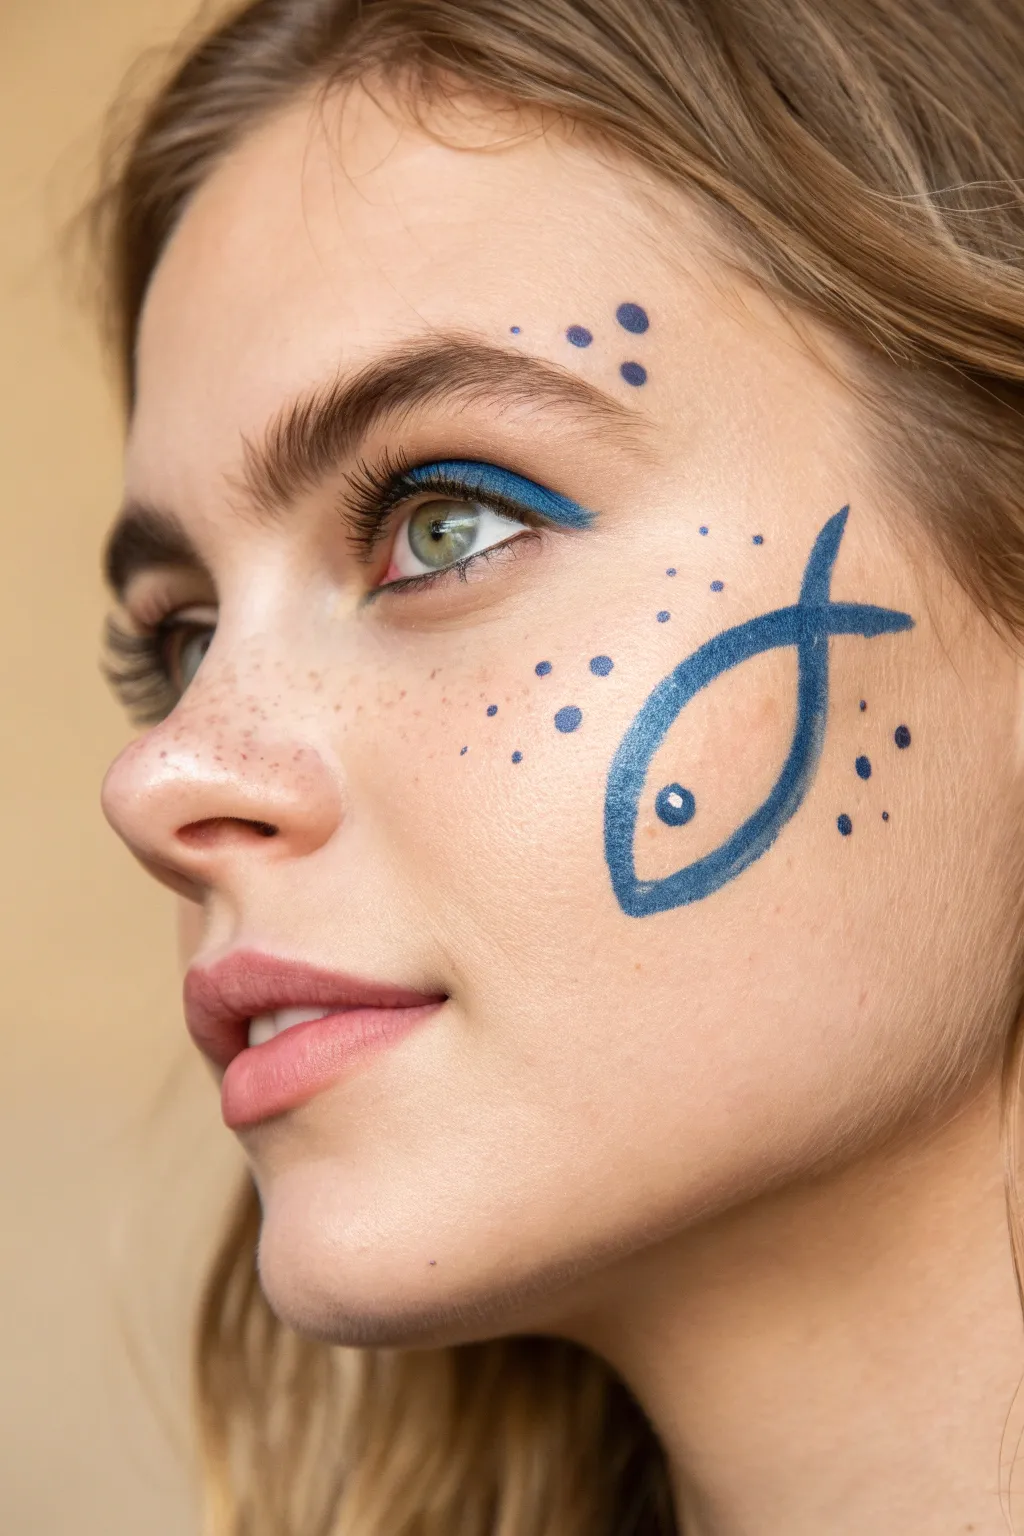
This elegant face painting design combines a classic Christian fish symbol with contemporary makeup techniques for a look that is both meaningful and artistic. Using shades of ocean blue, the design features a sweeping, stylized fish on the cheek accented by playful dots and striking eyeliner.
Step-by-Step Guide
Materials
- Water-activated face paint (Royal Blue)
- Water-activated face paint (Light Blue or Teal)
- Round synthetic brush (size 2)
- Small detail brush (size 0 or 00)
- Angle brush (small)
- Cup of water
- Spray bottle (optional)
- Makeup sponge
- Paper towels
Step 1: The Eyeliner Foundation
-
Load the Angle Brush:
Begin by dampening your small angle brush and loading it with a rich royal blue face paint. You want a creamy consistency, not too watery, to ensure the line is opaque. -
Map the Wing:
Start at the outer corner of the upper lash line. Draw a sharp wing extending outward and slightly upward towards the end of the eyebrow. -
Fill the Lash Line:
Connect the wing back to the inner corner of the eye, keeping the line thickest at the outer corner and tapering it thinly as you move inward. -
Add a Second Layer:
If the blue looks transparent, I like to let this dry briefly and add a second coat for maximum vibrancy.
Paint Too Runny?
If lines are bleeding into wrinkles or pores, your paint is too wet. Blot the brush on a paper towel and work the paint on the lid until it feels creamy.
Step 2: Painting the Fish Symbol
-
Outline the Upper Curve:
Switch to your size 2 round brush loaded with the same royal blue. Starting on the apple of the cheek, paint a curved line arching upward and to the right, creating the top half of the fish body. -
Create the Tail Cross:
Extend that upper line down to form the bottom part of the tail. The tail should point towards the ear. -
Outline the Lower Curve:
Starting from the nose side of the fish’s nose, draw the bottom curve, sweeping under and crossing over your first line to form the top part of the tail. -
Thicken the Outline:
Go back over your fish outline. Gently press the brush down harder on the curves to vary the line weight, making the belly of the fish slightly thicker than the tail tips. -
Add the Eye:
Using a small detail brush, paint a small open circle near the front (nose) of the fish to represent the eye.
Step 3: Atmospheric Details
-
Mix a Lighter Shade:
Clean your size 2 brush or grab a fresh one. Load it with a slightly lighter blue or mix a tiny bit of white into your royal blue. -
Place Large Accent Dots:
Press the tip of your round brush firmly onto the skin above the eyebrow to create three distinct, larger dots. Place them in a diagonal line following the brow arch. -
Add Medium Dots:
Add a few medium-sized dots around the tail of the fish and near the nose area. Vary the pressure; lighter pressure makes smaller dots. -
Create Tiny Splatters:
Switch to your smallest detail brush (size 0). Dip into the royal blue and gently touch the tip to the skin to create tiny, freckle-like specks scattered around the main fish shape. -
Balance the Composition:
Step back and look at the design. Add a few more tiny blue specks between the eyeliner wing and the fish to visually connect the two elements. -
Group the Dots:
Try clustering two or three tiny dots together near the tail for a more organic, bubbly underwater feel. -
Clean and Dry:
Ensure all paint is fully dry before the model touches their face. If you made any mistakes, use a slightly damp cotton swab to erase them essentially like an eraser.
Highlight Hack
For a glossy finish, add a tiny dot of white paint inside the fish’s eye and on the largest blue dots to make them look like wet bubbles.
This serene blue design is perfect for church events or youth groups, offering a subtle yet distinct statement of faith.
Praying Hands With Gentle Shading
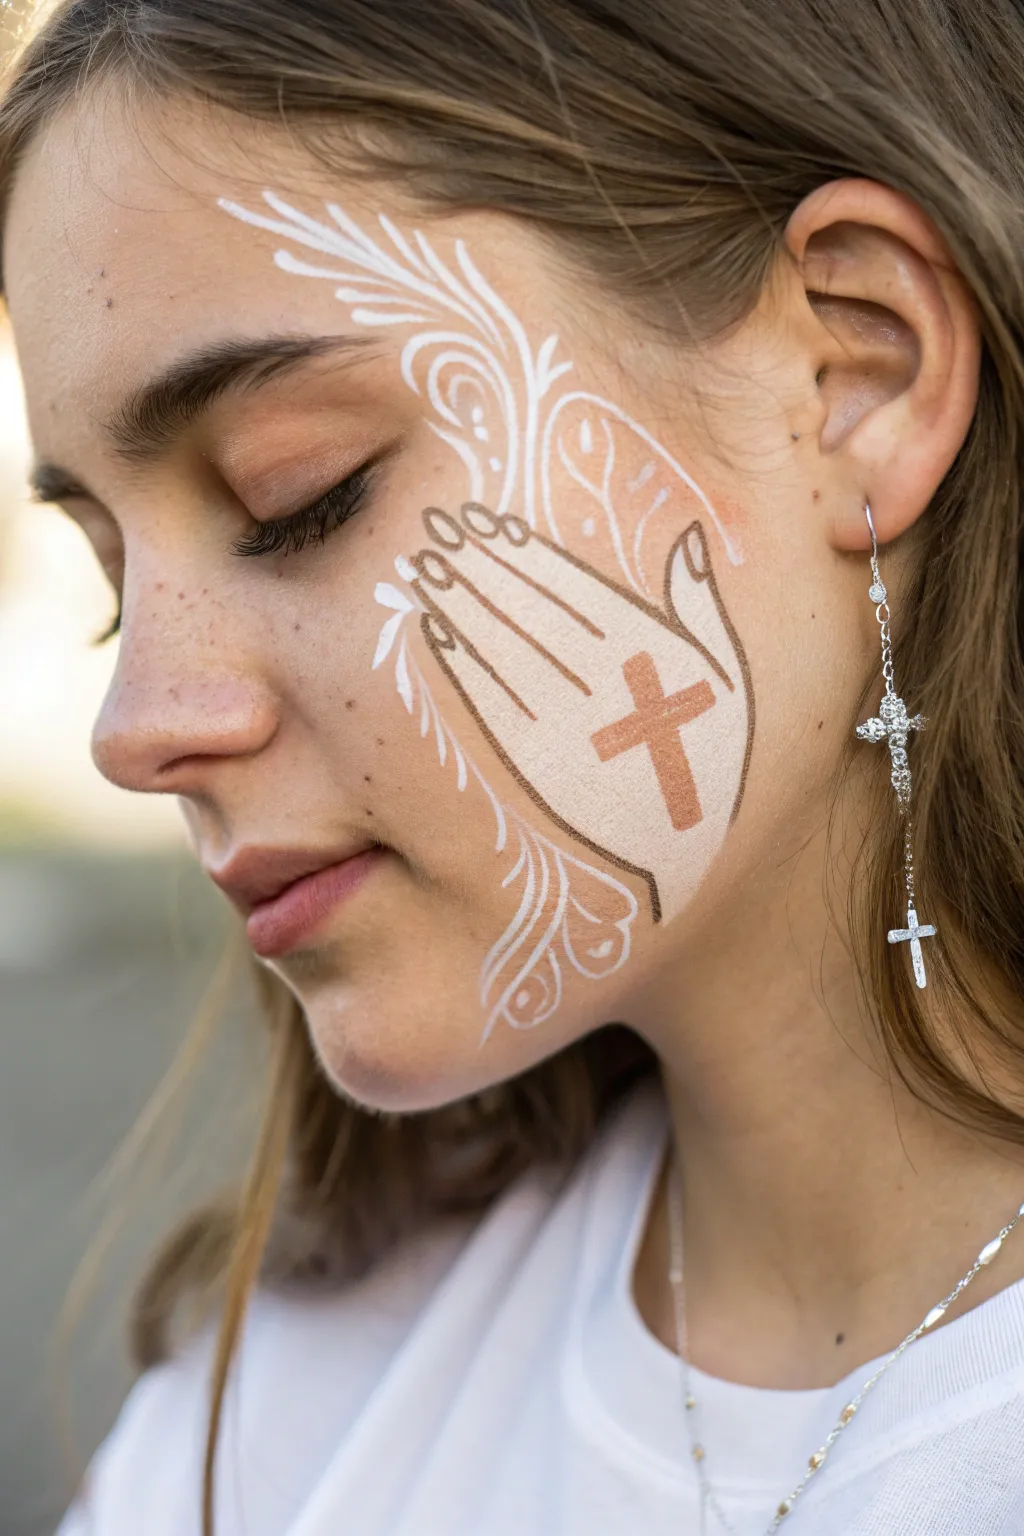
This serene face painting design combines delicate linework with soft shading to create a stunning symbol of faith. The artwork features stylized praying hands adorned with a simple cross, framed by elegant white flourishes that curve naturally around the eye and cheekbone.
Detailed Instructions
Materials
- Face paint: Dark brown
- Face paint: White
- Face paint: Warm beige or soft terracotta
- Round brush (size 1 or 2 for outlining)
- Round brush (size 4 for filling)
- Filbert brush or small flat brush (for shading)
- Face painting sponge (optional)
- Small cup of water
- Paper towels
Step 1: Base Structure
-
Positioning the design:
Visualize where the hands will sit on the cheek. The wrist should angle towards the jawline, while the fingertips point towards the ear, just below the temple area. It helps to have the model look slightly down to keep the skin smooth. -
Sketch the outline:
Using a size 1 round brush loaded with a thin consistency of brown face paint, lightly sketch the outline of two hands pressed together in prayer. Focus on the simple shapes first—draw the thumb separate from the block of fingers. -
Refining the fingers:
Add the details to the fingers. Draw three curved lines at the top of the hand shape to suggest the separation of the fingers, giving them rounded tips for a softer illustrative style. -
Adding the wrist cuff:
Create a distinct line at the base of the palm to indicate a sleeve or cuff. This grounds the design and prevents the hands from looking like they are floating aimlessly.
Step 2: Color and Shading
-
Fill the interior:
Switch to a size 4 round brush. Load it with a creamy beige or diluted white paint mixed with a tiny drop of brown to create an off-white, skin-tone highlight. Gently fill in the entire hand shape, avoiding the brown outlines as much as possible. -
Soft blending:
If the fill color is too opaque, I like to use a slightly damp, clean brush to feather the edges while the paint is still wet, letting some of the natural skin tone show through for a softer look. -
Painting the cross:
Once the base fill is dry to the touch, load your size 2 brush with the warm beige or soft terracotta color. Paint a simple cross right in the center of the hand. Make the vertical bar slightly thicker than the horizontal one. -
Re-outlining:
Go back over your initial brown outlines with a fresh load of dark brown paint on your size 1 brush. Keep the lines varying in thickness—press down a bit harder on curves and lift off for thinner ends to create dynamic line weight.
Oops! Shaky lines?
If your brown outlines are wobbly, don’t wipe the whole thing! Let it dry, then use a damp cotton swab to erase just the mistake. Re-paint the line quickly and confidently.
Step 3: Flourishes and Details
-
Temple flourishes:
Clean your brush thoroughly and load it with bright white face paint. Starting above the eyebrow, paint a series of long, sweeping teardrop shapes that curvaceously flow upwards toward the hairline. These mimic fern leaves or angel wings. -
Cheek accents:
Mirror the style of the upper flourishes on the lower cheek. Paint shorter white swirls and teardrops curving down from the wrist area towards the chin. Use a light hand to keep the tips of the strokes sharp and delicate. -
Connecting the elements:
Intersect the white designs slightly with the brown outline of the hands, or weave them behind the fingers to create depth. This integrates the flourish with the main focal point. -
Inner details:
Using the dark brown paint again, add tiny definitive lines to the fingernails on the main hand. Just a small curve near the tip of each finger is enough to suggest a nail without cluttering the design. -
Highlighting the cross:
Add a tiny speck of white or a very thin line to the edge of the terracotta cross. This gives it a small pop of dimension so it doesn’t look completely flat against the hand. -
Fading the background:
If desired, take a very watery white paint and add faint, translucent petal shapes behind the hands. This creates a subtle ‘glow’ or halo effect without overpowering the sharp brown lines. -
Final inspection:
Step back and check the balance. If the white flourishes look too sparse, add a few small intricate dots or tiny curved lines to fill empty spaces near the temple.
Level Up: Add Sparkle
Apply cosmetic glitter fix gel over the white flourishes and tap on iridescent white glitter. This adds an angelic shimmer that catches the sunlight beautifully.
This graceful design offers a beautiful way to wear one’s faith with elegance and artistic flair

PENCIL GUIDE
Understanding Pencil Grades from H to B
From first sketch to finished drawing — learn pencil grades, line control, and shading techniques.
Explore the Full Guide
Wordless Colors Heart Story
This elegant face painting design uses the symbolic colors of the Wordless Book to tell a story of faith through a simple, striking heart shape. The sweeping curves of red, white, and green create a dynamic look that sits beautifully on the cheekbone.
How-To Guide
Materials
- Red face paint (high pigment water-activated)
- White face paint (dense, creamy consistency)
- Green face paint (emerald or forest shade)
- Flat brush (3/4 inch or 1 inch)
- Small round brush (size 2 or 4)
- Sponges (optional for base)
- Water container
- Paper towels
- Setting spray (optional)
Step 1: Preparation and Planning
-
Clean the canvas:
Start with a clean, dry face. Ensure the cheek area is free of oils or heavy moisturizer so the paint adheres properly. -
Visualizing the placement:
Visualize where the heart will sit. Ideally, the top curve of the heart follows the natural ridge of the cheekbone, angling slightly upward towards the temple.
Brush Pressure is Key
For the tapered ends of the heart, start with firm pressure at the top and gradually lift the brush as you pull down to create a sharp point.
Step 2: Painting the Red Section
-
Load the brush:
Load your flat brush or a medium filbert brush with bright red face paint. Ensure the consistency is creamy, not too watery, to prevent drips. -
Create the first curve:
Place the brush near the center of the cheek. Press down and sweep upward and outward to the left to form the rounded top of the heart’s left lobe. -
Fill the shape:
Pull the brush stroke downward, tapering it slightly as you approach the center point of the heart. This creates the left half of the heart shape. -
Refine the edge:
If the edge is jagged, use the tip of your round brush to smooth out the curve of the red section.
Add Some sparkle
While the paint is still slightly damp, gently press biodegradable chunky glitter onto the white stripe for a festive, reflective element.
Step 3: Adding the White Strip
-
Clean your tools:
Thoroughly rinse your brush or switch to a fresh one to avoid turning your white paint pink. -
Load white paint:
Load a flat brush generously with intense white paint. You want full opacity here. -
Start the center stripe:
Position your brush right next to the inner edge of the red section. You want them to touch but not blend. -
Follow the flow:
Sweep the white paint downward in a diagonal line, mimicking the angle of the red section but extending it slightly longer down the cheek. -
Create the texture:
Don’t over-smooth this layer. I prefer to leave distinct brush strokes visible in the white to give it a slightly textured, artistic feel.
Step 4: Painting the Green Section
-
Prepare the green:
Load a clean flat brush with your emerald green paint. -
Position the brush:
Start at the top right of the white stripe. This section creates the right lobe of the heart shape. -
Execute the sweep:
Press and sweep downward, hugging the right side of the white stripe. This stroke should be the longest, tapering off into a sharp point further down the cheek. -
Check the shape:
Step back and ensure the three colors together suggest a stylized, elongated heart shape.
Step 5: Finishing Touches
-
Tidy up edges:
Use a damp cotton swab or a clean, wet brush to wipe away any stray paint marks or perfect the outer edges. -
Eye makeup coordination:
While the face paint dries, you can coordinate eye makeup. A soft pink shadow on the lid complements the red heart nicely. -
Add a wing:
Apply a simple black winged eyeliner to balance the graphic nature of the cheek design. -
Set the design:
Once the paint is fully dry to the touch, lightly mist with a setting spray if the design needs to last all day.
Now you have a bold, meaningful design ready to share its story without saying a word
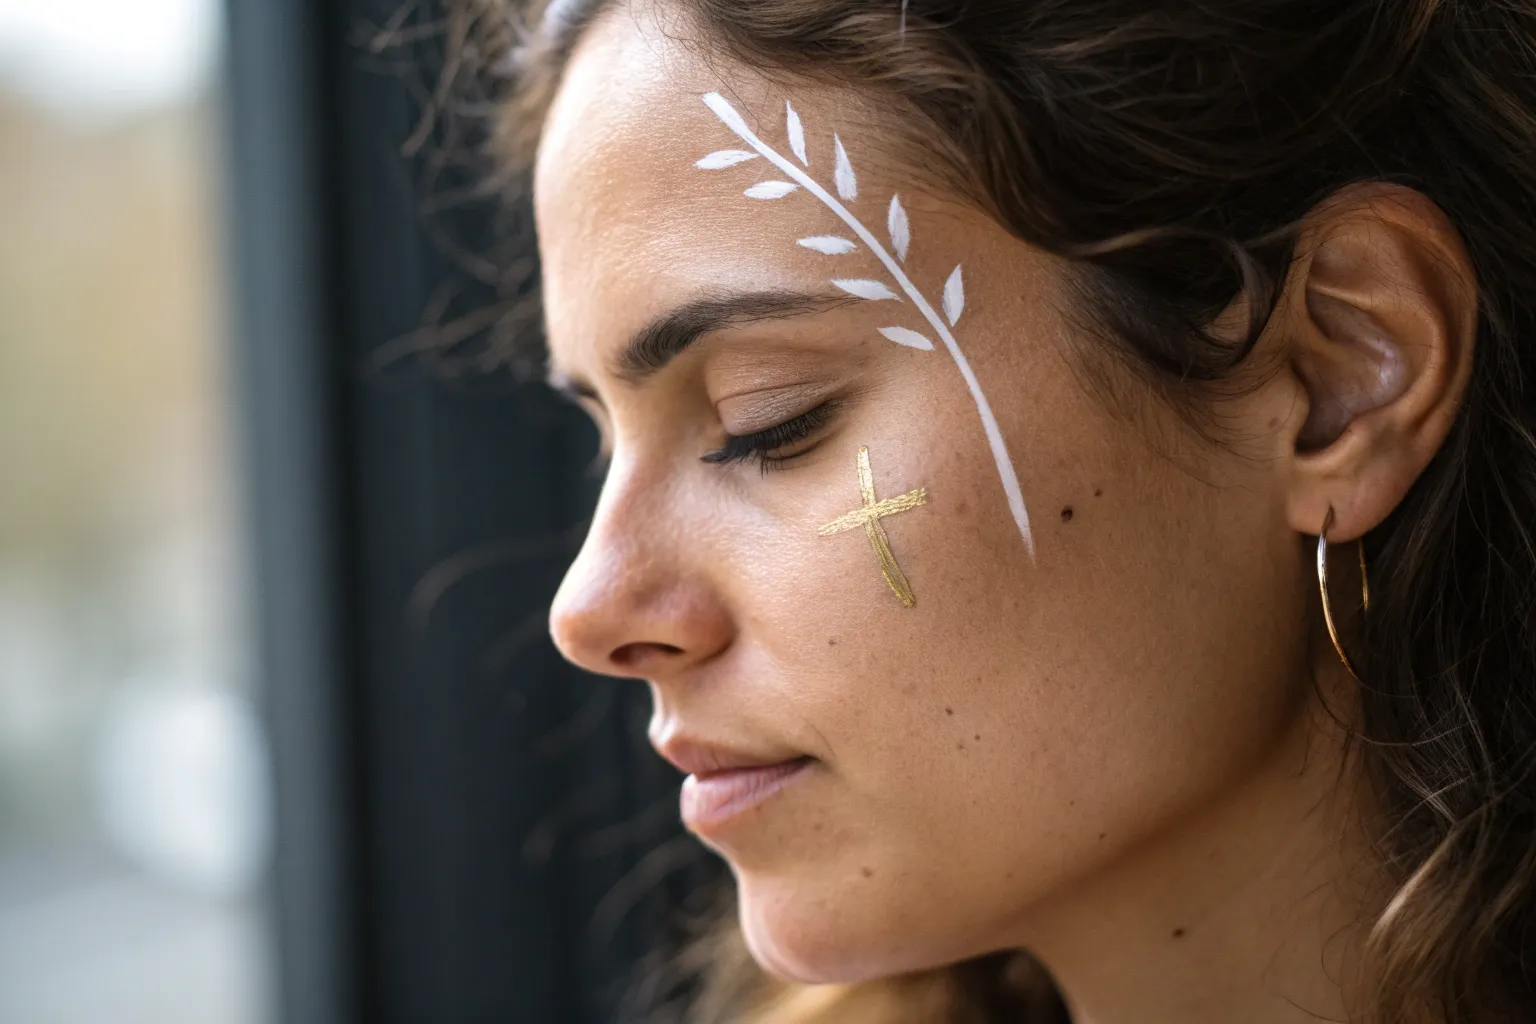
Floral Cross Wreath Frame
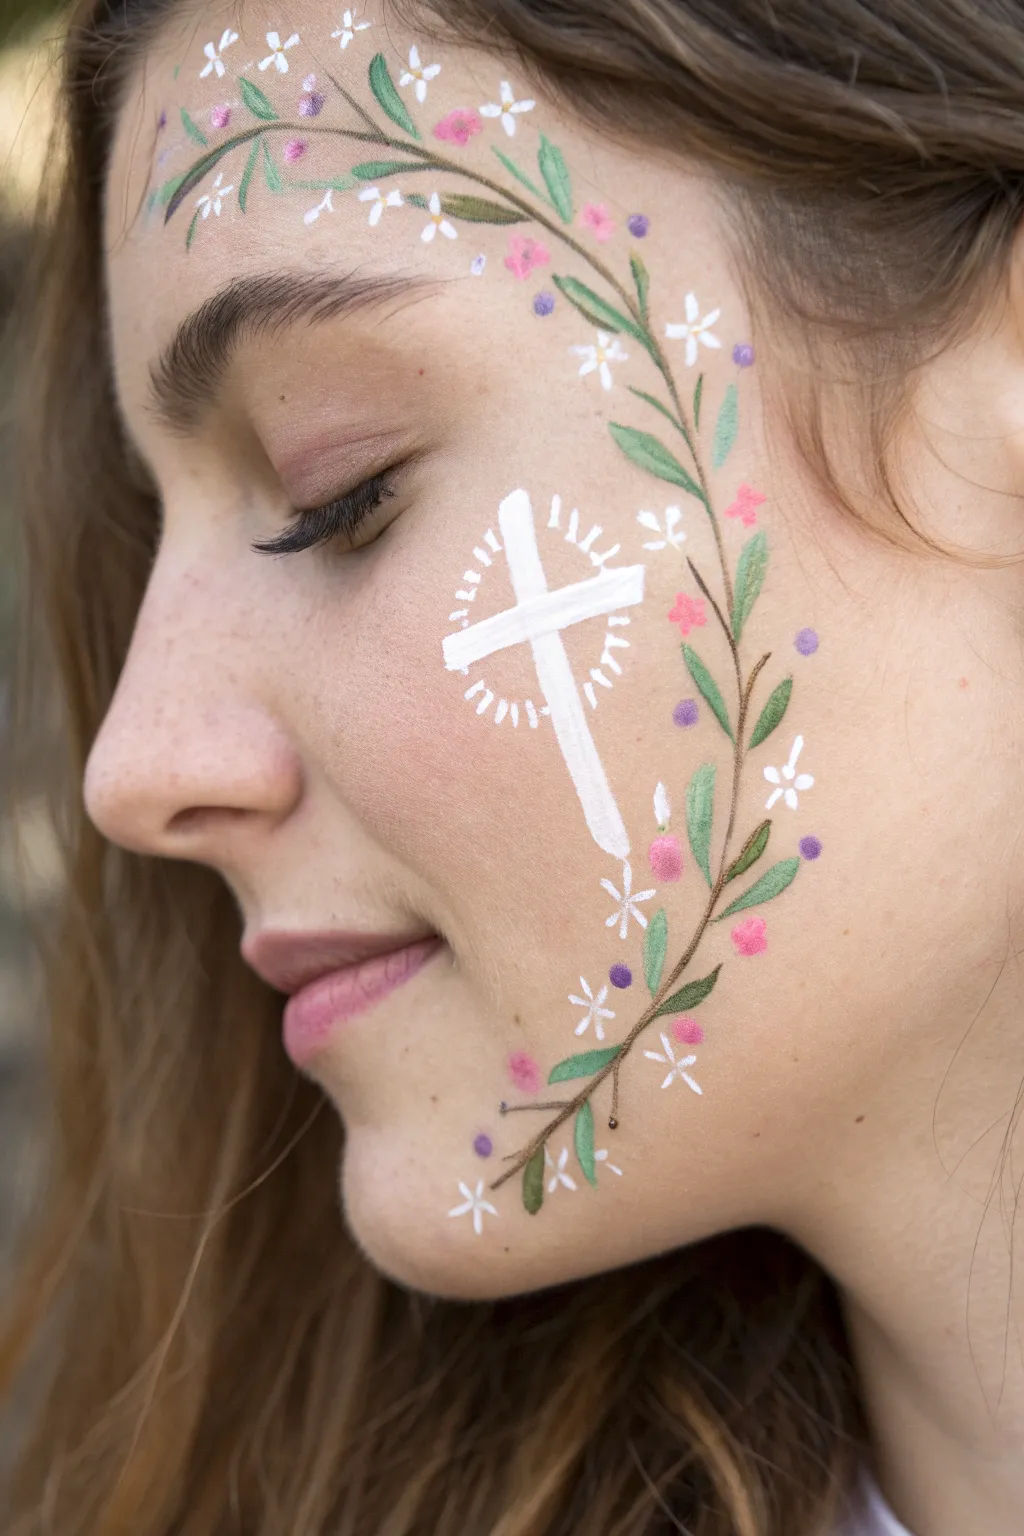
This gentle, nature-inspired face paint design frames the face with delicate greenery while placing a glowing white cross as the focal point. The soft vines and scattered blossoms create a peaceful, organic look perfect for spring celebrations or church events.
Step-by-Step
Materials
- White face paint
- Light green face paint
- Dark green face paint
- Pink face paint
- Purple face paint
- Round brush (size 2 or 3)
- Liner brush (size 1)
- Small cup of water
- Paper towels or sponge
Step 1: Painting the Cross
-
Outline the cross:
Load a round brush with creamy white paint. In the center of the cheek, paint a vertical line for the main post of the cross, angling it slightly to follow the natural contour of the cheekbone. -
Add the crossbar:
Paint a shorter horizontal line intersecting the first line about one-third of the way down to complete the basic cross shape. -
Refine the shape:
Go over the lines again to make the white opaque and bright, slightly thickening the ends of the cross to give it a softer, hand-painted feel. -
Create the radiance:
Switch to a fine liner brush with the same white paint. Paint short, small dash marks radiating outward from the center of the cross. -
Vary the rays:
Alternate the length of these radiance lines slightly to create a dynamic, glowing effect that surrounds the entire holy symbol.
Step 2: Creating the Vine Framework
-
Start the vine at the forehead:
Using a thin round brush and a mix of light and dark green, start a thin vine line near the hairline on the forehead. -
Curve down the face:
Follow the natural curve of the face, bringing the brown or dark green stem line down past the temple, curving behind the cross, and ending near the chin. -
Paint the first leaves:
Load your round brush with green paint. Press down and lift up quickly to create teardrop-shaped leaves along the forehead section of the vine. -
Continue adding foliage:
Add leaves along the cheek section of the vine, alternating sides. I find that mixing a little white into the green creates lovely highlights on the leaves. -
Vary leaf direction:
Ensure some leaves point upward and some downward to make the vine look organic and flowing rather than stiff.
Fixing Smudges
If a line goes astray, wait for it to dry completely. Then, use a slightly damp cotton swab to gently lift the unwanted paint without smearing the base.
Step 3: Blossoms and Details
-
Paint white flowers:
Clean your round brush and load it with white paint again. Create small five-petal flowers scattered along the vine—place some on the forehead and some near the chin. -
Add flower centers:
Once the white petals are dry, add a tiny dot of yellow or gold in the center of each flower for dimension. -
Add pink accents:
Dip the tip of a small brush or a dotting tool into pink paint. Add small clusters of pink dots or tiny bud shapes near the leaves to add warmth. -
Include purple berries:
Using purple paint, add small, singular dots sporadically along the vine to represent berries or small accent flowers. -
Highlight the vine:
With a very fine brush and watery white paint, add tiny highlight lines to the largest green leaves to make them pop. -
Final touches:
Add a few stray white dots or ‘star’ sparkles near the cross and the ends of the vine to magic the design together.
Add Some Sparkle
Before the white paint on the cross dries, tap a small amount of cosmetic-grade iridescent glitter over it to make the design truly shine in the light.
This serene design beautifully combines faith and nature for a look that feels both personal and artistic


Crown and Cross for King of Kings
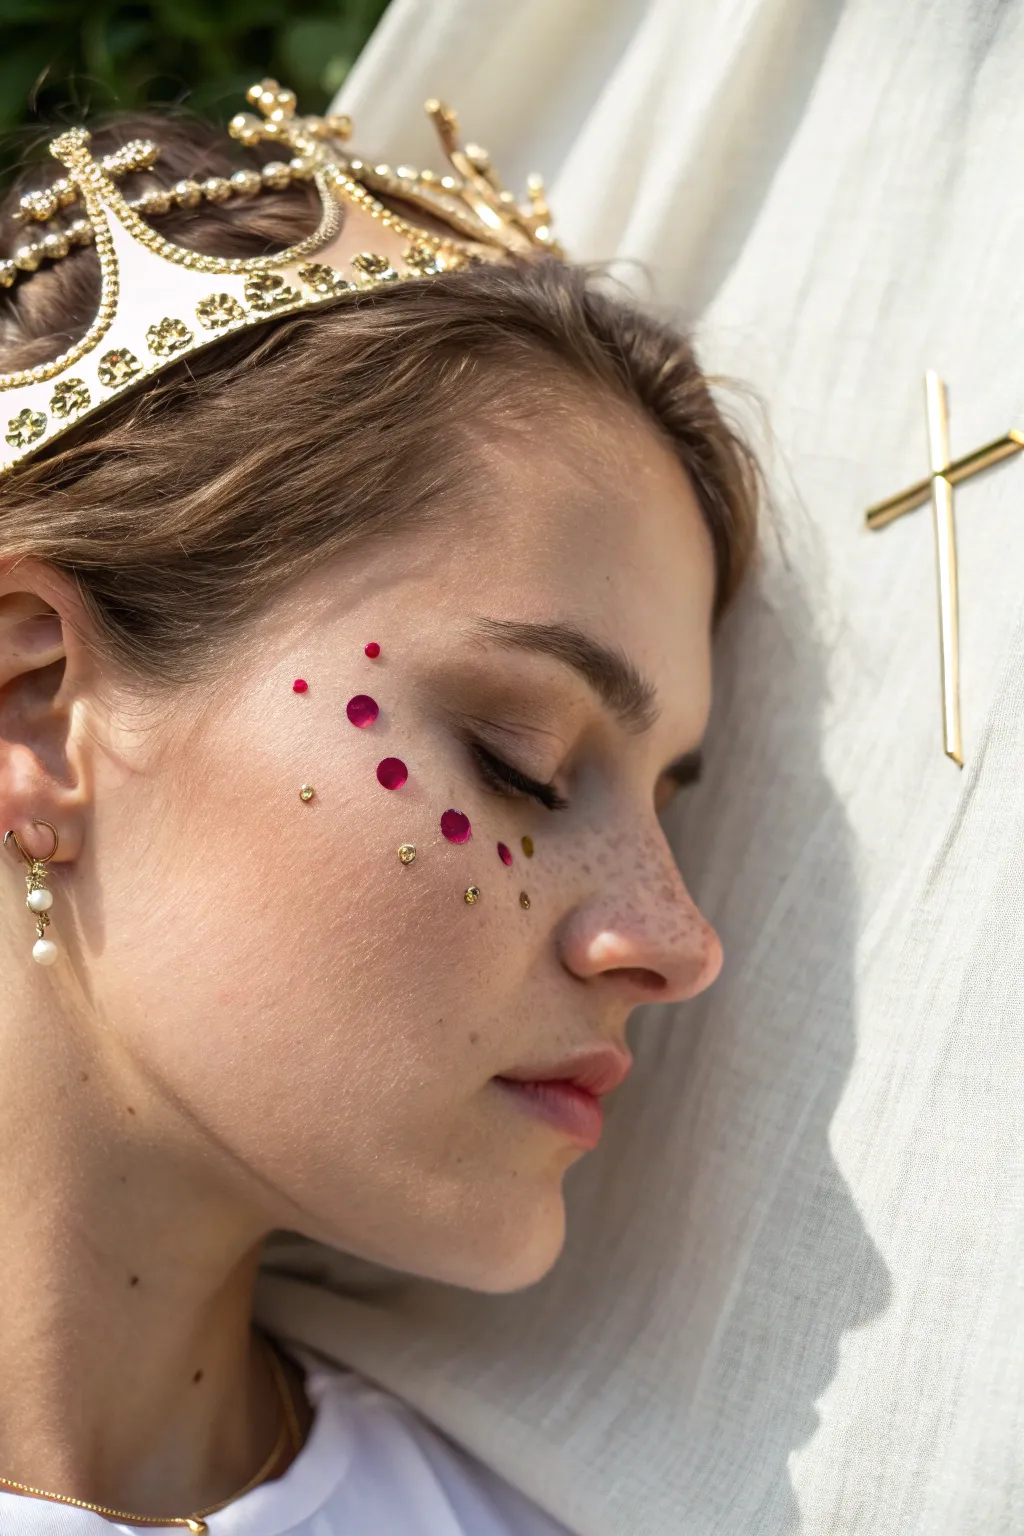
This elegant look combines a regal golden crown with delicate face embellishments to symbolize royalty and faith. Instead of heavy face paint, the design relies on strategically placed gems and sequins for a sophisticated, ethereal appearance.
How-To Guide
Materials
- Gold crown with pearl or rhinestone details
- Self-adhesive flat-back rhinestones (ruby red, various sizes)
- Small gold sequins or nail art studs
- Eyelash glue or skin-safe cosmetic adhesive
- Tweezers
- Gold cross pin or charm
- Simple pearl drop earrings (optional)
- Setting spray (optional)
Step 1: Setting the Royal Stage
-
Prepare the skin:
Begin with a clean, dry face. If you are applying foundation or concealer, do so now and set it lightly with powder to ensure the gems adhere well to the skin without sliding. -
Position the crown:
Place the gold crown on the head. Adjust it so it sits comfortably on the forehead or just behind the hairline, ensuring the intricate details are visible from the profile view. -
Secure the hair:
You might want to sweep the hair back slightly or pin it behind the ears to create a clear canvas on the cheekbone and temple area for the embellishments.
Step 2: Designing the Gem Constellation
-
Plan the placement:
Before gluing, visualize a curved line sweeping from the outer corner of the eye down towards the cheek. This arc mimics the natural contour of the cheekbone. -
Apply the focal gems:
Using tweezers, pick up the largest ruby-red rhinestone. Apply a tiny dot of eyelash glue to the back. -
Place the anchor gem:
Place this largest red gem on the high point of the cheekbone, roughly an inch below the outer corner of the eye. -
Add medium accents:
Select two slightly smaller red rhinestones or sequins. Glue one slightly above and inward from your anchor gem, and another slightly below it, maintaining that diagonal flow.
Adhesive Pro Tip
Allow eyelash glue to get tacky for about 30 seconds before placing the gem on skin. This prevents it from sliding down your cheek.
Step 3: Adding Golden Dust
-
Scatter the gold:
Take your tiny gold sequins or nail art studs. I find using a wax-tipped tool or tweezers essential here for handling these tiny pieces. -
Fill the gaps:
Apply small dots of adhesive in the spaces between your red gems. Press the gold studs onto these spots to create a ‘scattered stardust’ effect. -
Extend the design:
Place a few stray gold studs further down the cheek or closer to the temple to make the design look organic and less rigid. -
Let it set:
Allow the adhesive to dry completely for a few minutes. Avoid smiling broadly or scrunching the face during this time to keep the gems in place.
Level Up: Gilded Skin
Dust a sheer layer of gold highlighter on the cheekbones before applying gems to make the skin glow divinely behind the jewels.
Step 4: Final Touches
-
Add the earrings:
Insert simple pearl drop earrings to complement the pearls in the crown without overpowering the delicate face art. -
Position the cross:
For a photoshoot setup, pin a gold cross to a white fabric backdrop near the face. If this is for live wear, you could wear the cross as a necklace or incorporate a small painted gold cross on the neck. -
Checking the profile:
Turn your head to the side in a mirror to ensure the gems catch the light and follow the natural bone structure pleasingly. -
Mist for longevity:
Optionally, close your eyes tight and mist the face lightly with a setting spray to lock in any makeup underneath.
Now you have a stunning, dignified look that celebrates majesty with subtle sparkle
Armor of God Shield Emblem
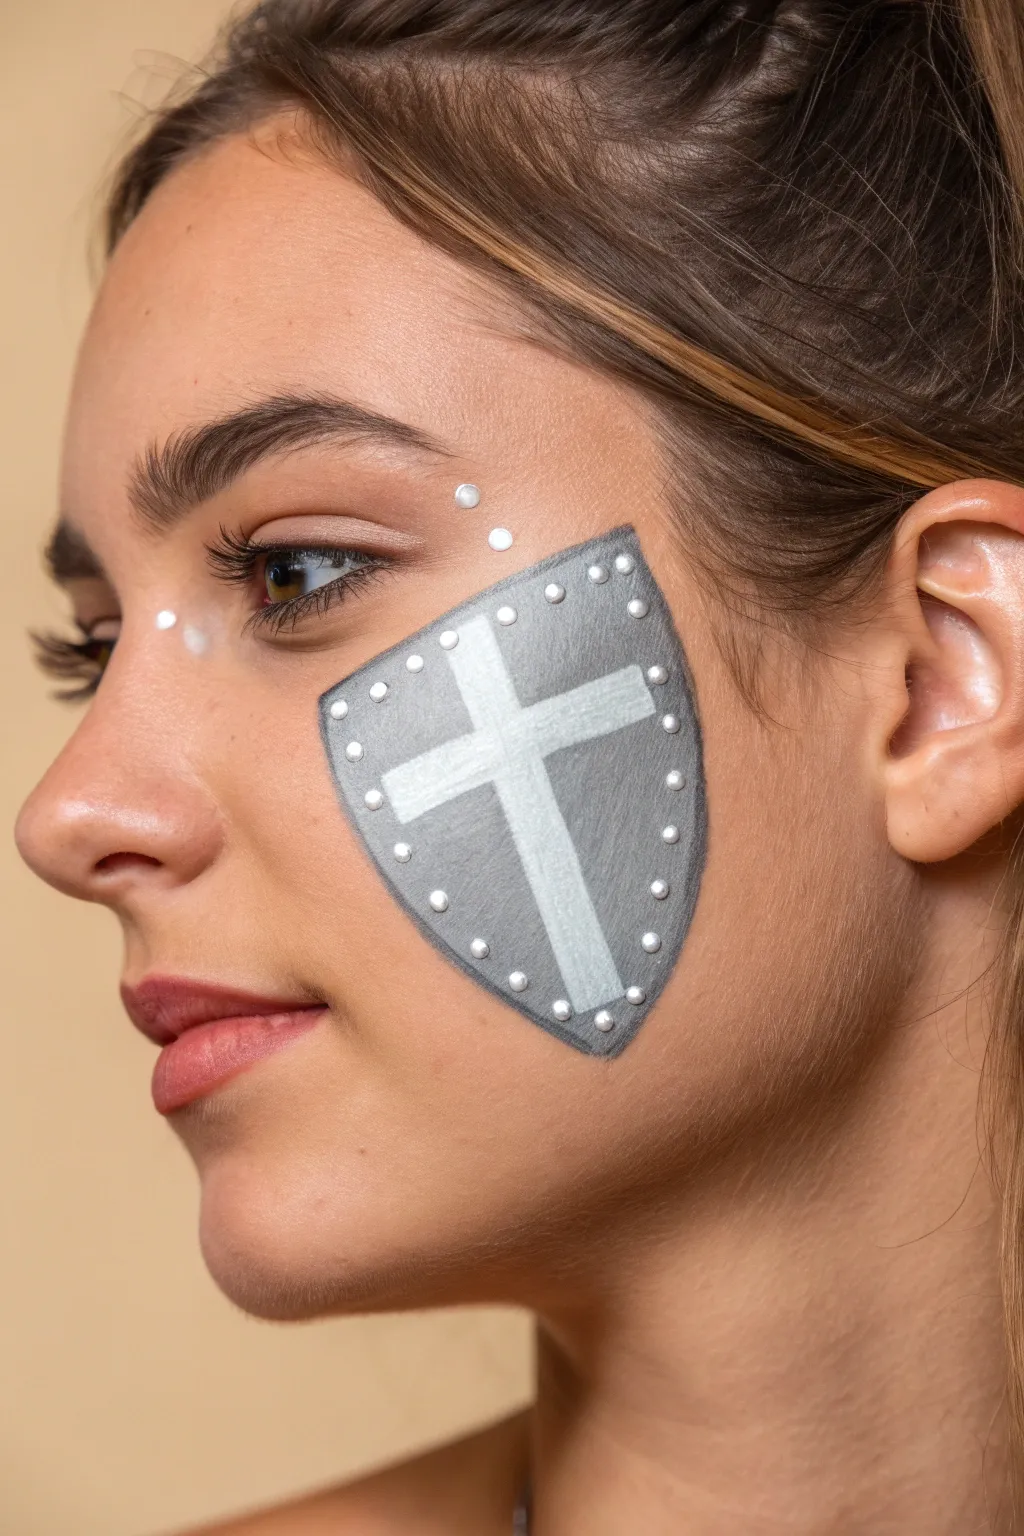
Embody strength and faith with this striking cheek design that features a medieval-style shield emblazoned with a bold cross. The metallic silver-grey finish and studded details give it a realistic, armored appearance perfect for church plays or events.
Detailed Instructions
Materials
- Grey face paint (water-activated)
- White face paint (highly pigmented)
- Black face paint (for shading)
- Flat brush (small to medium)
- Round brush (detail size, No. 1 or 2)
- Dotting tool or the back of a thin brush handle
- Cup of water
- Spray bottle (optional)
Step 1: Base Shield Shape
-
Plan the placement:
Visualize where the shield will sit on the cheek. Aim for the center of the cheek area, aligning the top edge roughly with the bottom of the nose for balance. -
Outline the shield:
Load a small round brush with grey paint. Draw the outline of a heater shield shape—straight across the top, curved sides coming down to a point near the jawline. -
Fill the interior:
Switch to your flat brush and dampen it slightly. Pick up the grey paint and fill in the entire shield shape, ensuring solid, opaque coverage without streaks. -
Let it dry:
Allow the grey base layer to dry completely for a minute. If the paint is still wet, the next layers will blend together and look muddy.
Uneven Coverage?
If the grey looks streaky, don’t keep brushing over wet paint. Let it dry fully, then pat a second layer on top using a slightly drier brush or sponge.
Step 2: The Cross Emblem
-
Map the cross:
Using a clean flat brush loaded with creamy white paint, visualize a central cross. The vertical bar should run from nearly the top to nearly the bottom point. -
Paint the vertical bar:
Press the flat edge of your brush against the skin and drag it downwards to create a crisp, straight vertical line for the cross. -
Paint the horizontal bar:
Reload your white paint if needed. Paint the horizontal crossbar, positioned slightly above the vertical center, intersecting the first line cleanly. -
Refine edges:
If your lines look a little fuzzy, use the edge of your flat brush to sharpen the corners of the cross where the two bars meet.
Step 3: Adding Depth and Detail
-
Create the studded border:
This is my favorite part for adding realism. Dip the dotting tool or the back end of a thin brush into thick white paint. -
Apply the dots:
Stamp small, evenly spaced dots all around the perimeter of the grey shield, just inside the edge, to mimic metal rivets. -
Subtle shading:
Take a very small amount of black or dark grey on a fine round brush. Gently underline the shield’s outer edge to give it a 3D lifted effect. -
Highlighting the shield:
Add tiny touches of white to the top left corner of the shield background (avoiding the cross) to simulate light reflecting off metal. -
Accent dots:
To tie the look together, place three small white dots in a diagonal line near the outer corner of the eye, following the brow bone. -
Bridge accent:
Add two or three tiny white dots on the bridge of the nose or inner corner of the eye area for extra flair. -
Final check:
Step back and check for symmetry or any smudges. Use a damp cotton swab or sponge edge to tidy up the outer perimeter if lines traveled too far.
Make it Metallic
Swap the standard grey base paint for a metallic silver face paint. This instantly adds a realistic shine that catches stage lights beautifully.
Now you have a powerful symbol of faith ready to display.
Bible and Bookmark Mini Illustration

This minimalist face painting design features a stylized open Bible adorned with a colorful ribbon bookmark and delicate celestial accents. It creates a subtle yet meaningful statement piece perfect for church events or youth group gatherings.
How-To Guide
Materials
- Black face paint (water-activated cake or liquid liner)
- Fine liner brush (size 0 or 00)
- Teal or seafoam green face paint
- Orange or amber face paint
- Small round brush (size 1 or 2)
- Spray bottle with water
- Makeup sponge
- Cotton swabs (for cleanup)
Step 1: Outlining the Book Structure
-
Mix the black liner:
Activate your black face paint with a small spritz of water until it reaches an inky consistency suitable for crisp line work. -
Draw the center spine:
Start by painting a short vertical line in the center of the cheek; this will be the spine where the book’s pages meet. -
Create the top edges:
From the top of your vertical line, draw two lines angling slightly upward and outward to create the top edge of the open pages. -
Add the side pages:
Draw vertical lines coming down from the outer ends of your top edges, angling them slightly inward to suggest perspective. -
Close the book shape:
Connect the bottom of the side lines back toward the center spine area, mimicking the angle of the top lines. -
Add page depth:
Draw a second, slightly curved line just below the bottom edge of the left page cluster to show the thickness of the book block. -
Darken the spine base:
Fill in the small triangular gap at the bottom center where the pages meet the binding to ground the image.
Fixing Shaky Lines
If your black outlines look shaky, your paint might be too dry. Add a drop of water to improve flow, or use a cotton swab to erase and retry the line.
Step 2: Adding Details & The Ribbon
-
Suggest text lines:
Using the very tip of your fine liner brush, add short, horizontal dashes across both pages to represent text, keeping them uneven for a stylized look. -
Paint the teal ribbon segment:
Switch to your small round brush and teal paint. Create a curved stroke dropping from the book’s center, looping slightly to the right. -
Paint the orange ribbon segment:
Clean your brush and pick up the orange paint. Draw a second ribbon strand that intertwines or lays next to the teal one. -
Outline the ribbons:
Once the color is dry, return to your black liner brush and carefully outline the colored ribbon shapes to make them pop. -
Add the ribbon shadow:
I like to add a tiny tick mark of black where the ribbons overlap to create a sense of dimension.
Pro Choice: Line Weight
Vary your pressure on the brush. Press harder for the outside book edges and extremely lightly for the interior text lines to keep the design delicate.
Step 3: Final Accents
-
Paint the cross:
Above the book, slightly to the right, paint a simple, tiny cross using your black liner brush. -
Add starry dots:
Add three or four tiny dots scattered around the cross and book corners to act as sparkles. -
Create a starburst:
Draw a tiny four-point star or diamond shape near the cross for extra visual interest. -
Clean up edges:
Use a damp cotton swab to sharpen any lines that may have smudged during the process.
Enjoy wearing this meaningful symbol of faith
Nativity Silhouette With Star of Bethlehem
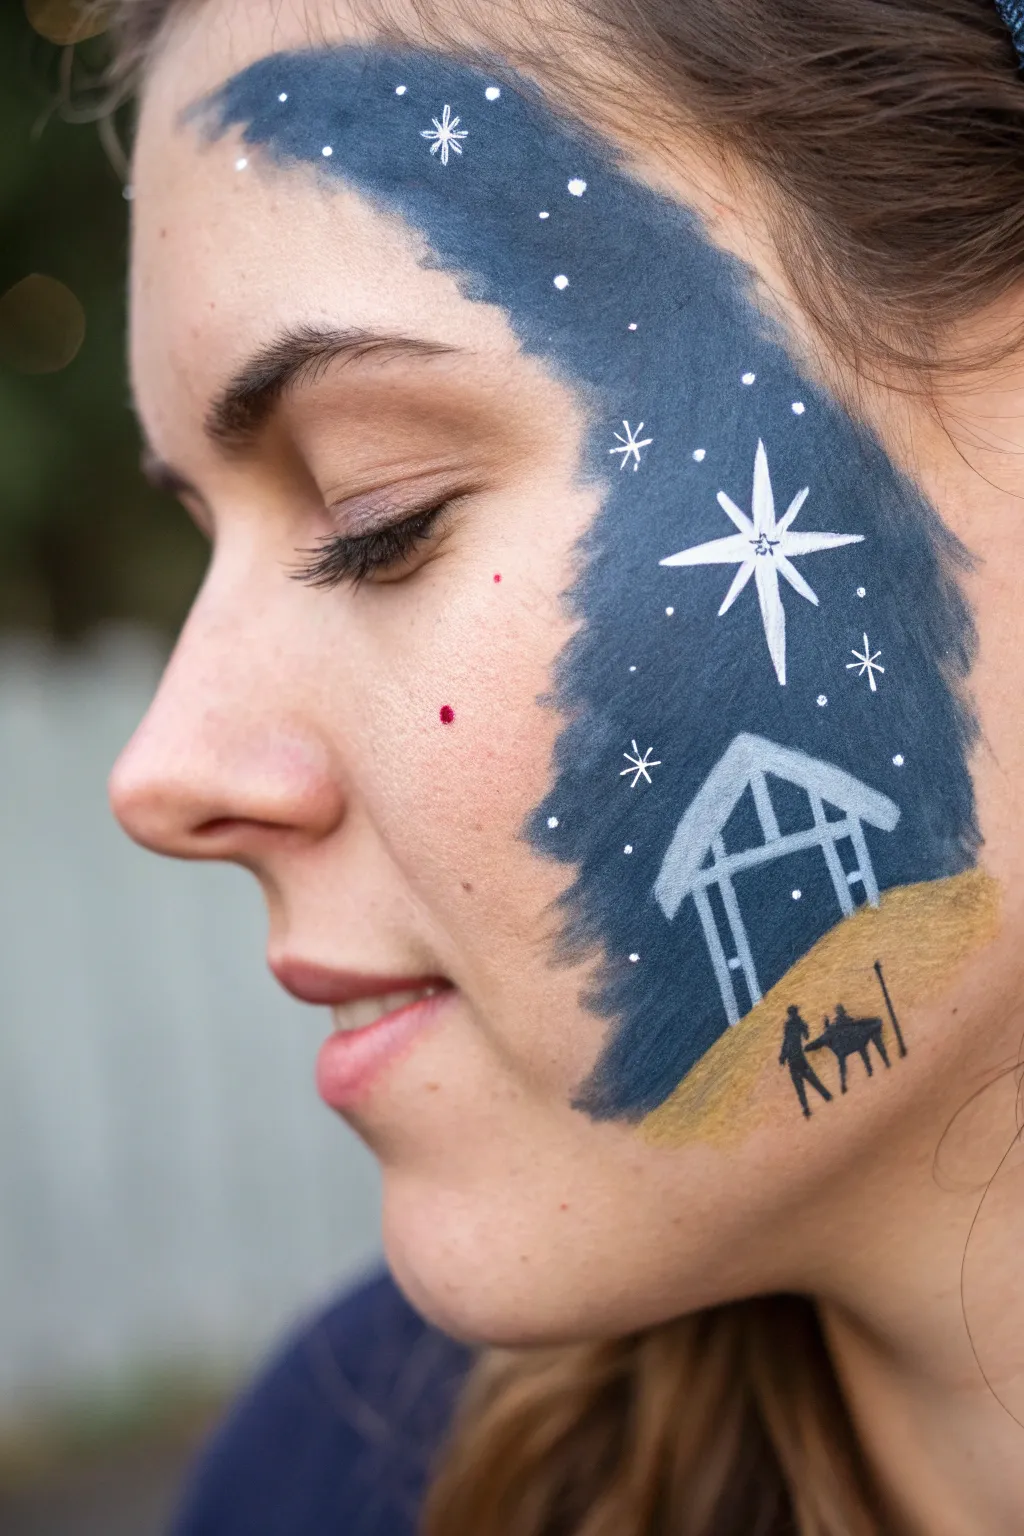
This serene face painting design captures the essence of the Christmas story with elegant simplicity. The sweeping dark blue sky creates a dramatic backdrop for the white stable and delicate black silhouettes, making it a perfect choice for holiday pageants or church events.
Step-by-Step Tutorial
Materials
- Face paint: Dark navy blue or midnight blue
- Face paint: White (high density/opaque)
- Face paint: Golden yellow or beige
- Face paint: Black
- Flat brush (medium width, ¾ inch)
- Round brush (size 2 or 3 for stars and lines)
- Fine liner brush (size 0 or 00 for silhouettes)
- Small sponge (optional for blending)
- Water cup and paper towels
Step 1: Creating the Night Sky
-
Outline the shape:
Visualize a sweeping curve that starts high on the forehead near the hairline and curves down onto the cheek. Using your medium flat brush loaded with dark navy blue, paint this curved shape. The edge facing the center of the face should be somewhat organic and soft. -
Fill the background:
Fill in the shape with the dark blue paint. Use smooth, downward strokes to ensure even coverage. If the paint looks streaky, wait a few seconds and apply a second thin coat. Keep the edges feathering slightly outward rather than making a hard line. -
Add the sandy ground:
Clean your flat brush thoroughly. Load it with golden yellow or beige paint. Create a small hill shape at the very bottom of the blue swoosh on the cheek. Blend the top edge of this hill slightly into the blue if it’s still damp, or just let them meet neatly.
Step 2: Painting the Stable and Star
-
Rough in the stable roof:
Switch to a round brush (size 2 or 3) loaded with opaque white paint. Draw the peaked roof of the stable first. It should be positioned in the lower-middle section of the blue sky, hovering above the yellow ground. -
Add the support beams:
Paint the support beams of the stable. Draw two vertical lines coming down from the roof corners, and one shorter vertical line from the peak. Add a horizontal beam connecting them. Keep your lines slightly thick and rustic looking. -
Paint the Star of Bethlehem:
Above the stable roof, create the main star. Start with a vertical line and a horizontal line crossing in the middle. Then, pull diagonal lines out from the center to create an eight-pointed star. Make the bottom vertical ray the longest, pointing down toward the stable. -
Highlight the star center:
I like to add a tiny dot of extra thick white paint right in the center of the star to make it pop. You can also thicken the inner parts of the rays slightly to make the star look glowing.
Fixing Smudges
If the white stable paint picks up some underlying blue and turns gray, let it dry completely and dab a fresh layer of white on top.
Step 3: Adding the Holy Family
-
Outline the figures:
Using your finest liner brush and black paint, carefully outline the small figures on the yellow holy ground. You’ll want a figure standing on the left (Joseph) and a slightly lower figure (Mary) or a manger shape. -
Fill the silhouettes:
Fill the silhouettes in with solid black. These shapes are very small, so focus on general forms rather than details—just the suggestion of heads and cloaks is enough. -
Add a staff:
Draw a thin vertical line next to the figure on the right to represent a staff or structural pole.
Sparkle Upgrade
While the blue paint is still tacky, tap cosmetic-grade holographic glitter over the sky area for a magical starry effect.
Step 4: Final Details
-
Sprinkle the stars:
Reload your round brush with white paint. Add small dots and tiny crosses scattered throughout the upper blue section to represent distant stars. -
Create variation:
Vary the size of your stars. Some can be simple dots, while two or three can be small four-pointed glimmer shapes. -
Clean up edges:
Check the outer edges of your blue swoosh. If any paint has smudged, use a clean damp q-tip or the edge of a wipe to tidy up the line. -
Add forehead accents:
Extend a few white dots up into the highest part of the blue swoosh on the forehead to draw the eye upward and balance the design.
This peaceful design is a beautiful way to share the holiday spirit on any face.
Angel Wings Corner Highlight
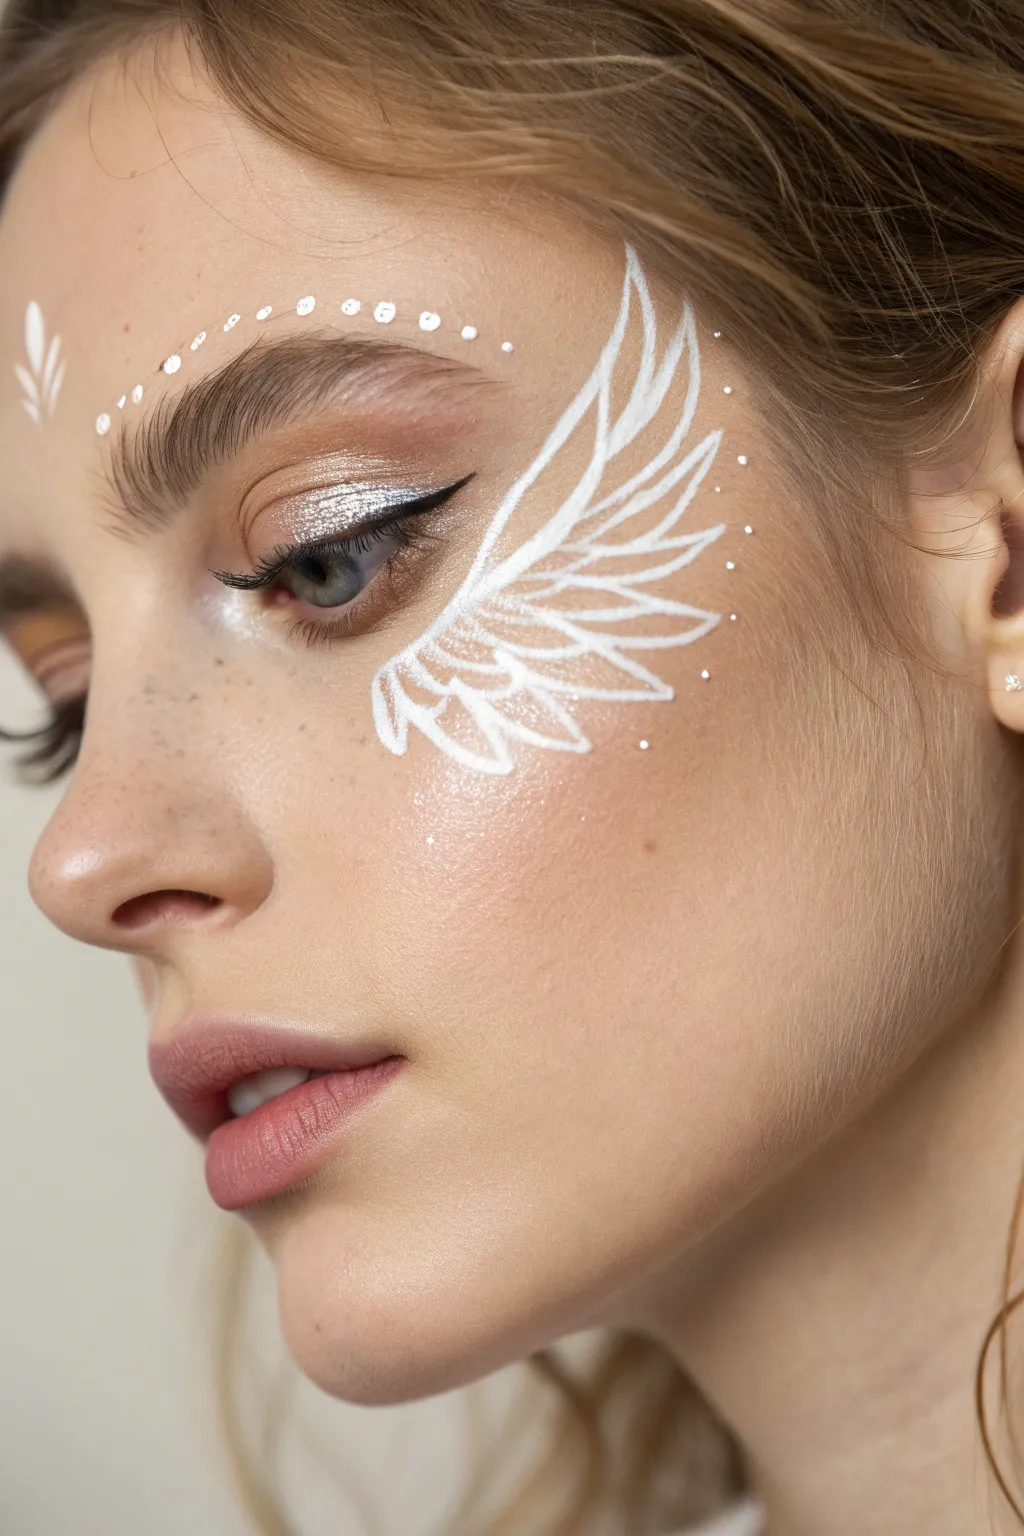
This ethereal design captures the grace of an angel with delicate white wing strokes sweeping from the outer eye corner. Paired with soft, shimmering eyeshadow and dainty dotted accents, it creates a serene and uplifted look perfect for spiritual events.
Detailed Instructions
Materials
- White face paint (water-activated or cream)
- Fine liner brush (size 0 or 00)
- Small round brush (size 1)
- Champagne or soft gold eyeshadow
- Silver glitter eyeshadow or pigment
- Black liquid eyeliner
- Mascara
- Fluffy blending makeup brush
- Setting spray (optional)
Step 1: The Eye Base
-
Prime the eyelid:
Begin by applying an eye primer or a dab of concealer to the eyelid to ensure the shadows stick well and the colors pop. -
Apply base shadow:
Sweep a warm champagne or soft light brown eyeshadow across the entire lid, blending it slightly up into the crease for a natural contour. -
Add the shimmer:
Pack a dense layer of silver glitter eyeshadow onto the center of the mobile lid. I like to press this on with a fingertip to minimize fallout. -
Create the winged liner:
Draw a sharp black cat-eye along the upper lash line. Keep the wing extending outward, following the natural curve of the lower lash line toward the temple. -
Define the lashes:
Finish the eye makeup with a coat of black mascara on the upper lashes to frame the look.
Brush Control Pro Tip
Rest your pinky finger on the cheekbone while painting. This creates a stable anchor, preventing shaky hands and ensuring your feather lines remain crisp and fluid.
Step 2: Painting the Wings
-
Prepare the paint:
Load a fine liner brush with white face paint. Ensure the consistency is creamy—like melted ice cream—so the lines flow smoothly without dripping. -
Draw the main spine:
Start near the outer corner of the eye, just below your black eyeliner wing. Draw a long, curved line extending diagonally upward toward the temple to act as the top edge of the wing. -
Paint the first feather:
From the same starting point near the eye, paint a second line below the first, curving it slightly less so it creates a ‘V’ shape. -
Build the outer feathers:
Continue adding curved strokes below the previous ones, making each subsequent feather slightly shorter and more curved downward to mimic the shape of a wing. -
Refine the tips:
Make sure each feather stroke ends in a sharp, tapered point. You can achieve this by lifting the brush pressure gradually as you reach the end of the stroke. -
Fill the inner feathers:
Create a second, smaller tier of feathers inside the wing structure, closer to the cheekbone, to add density and detail. -
Add detail highlights:
Use extremely light pressure to add tiny connecting lines or extra wisps inside the larger feather outlines for a textured look. -
Balance the shape:
Step back and check the symmetry. The wing should cup the cheekbone area gently.
Step 3: Celestial Accents
-
Dot the brow bone:
Reload your fine brush or use a dotting tool. Place a series of small white dots following the arch above the eyebrow. -
Vary dot sizes:
Start with slightly larger dots near the center of the brow and make them progressively smaller as the line extends outward for a trail effect. -
Add the wheat accent:
On the forehead or temple area opposite the wing (or center), paint a small stylized wheat or leaf motif using three simple teardrop strokes. -
Scatter stardust:
Place a few tiny, random white dots around the outer edges of the wing to simulate floating sparkles or stardust. -
Highlight the inner corner:
Dab a tiny amount of shimmery white highlight or face paint on the inner corner of the eye to connect the painted elements with the makeup. -
Set the look:
Once the paint is fully dry, you can lightly mist with a setting spray to keep everything in place for the duration of your event.
Level Up: Heavenly Glow
Dust a pearlescent highlighter over the cheekbone before painting the white wings. The subtle glow underneath will make the matte white paint pop and look truly angelic.
Now you have a breathtaking, spirit-filled design that radiates light and joy
Full-Face Calvary Sky With Dramatic Light
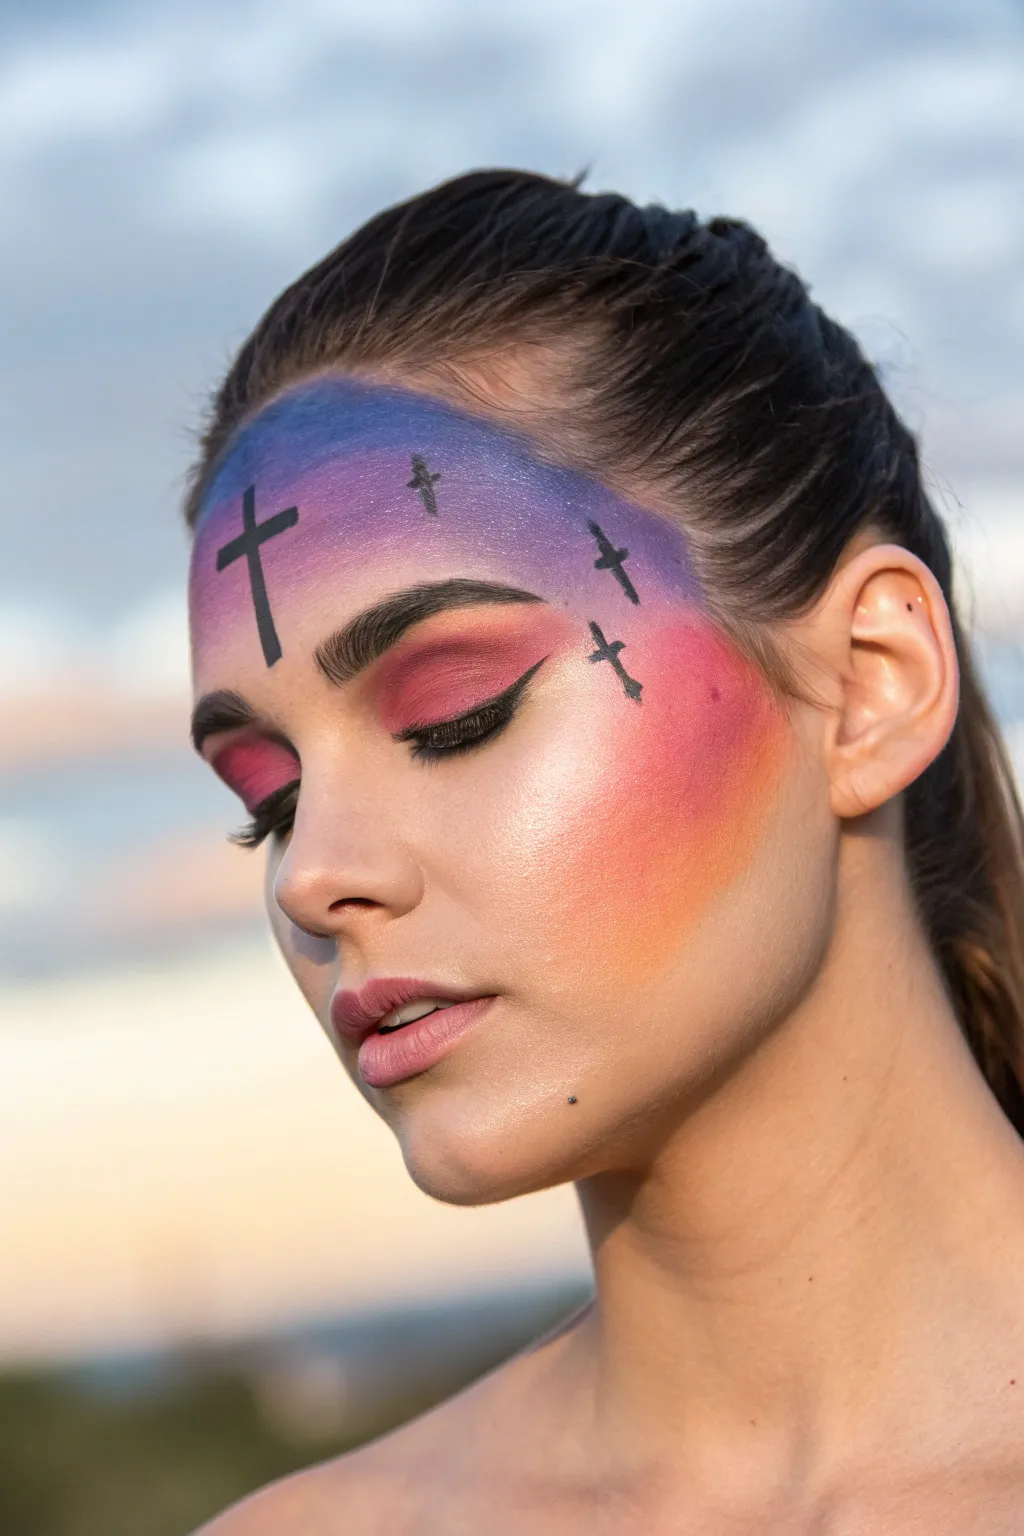
Capture the solemn beauty of dusk with this vibrant, spiritual face paint design that transforms the forehead into a canvas of color. Blending dramatic purple and orange hues creates a stunning backdrop for the silhouetted crosses, perfect for Easter plays or worship events.
Detailed Instructions
Materials
- Face paint palette (matte royal blue, violet)
- Face paint palette (matte orange, warm pink/magenta)
- Black face paint (liquid or cake)
- High-density face painting sponges
- Flat brush (small, approx. #4)
- Fine liner brush (size #1 or #2)
- Liquid eyeliner (black)
- Deep pink/mauve eyeshadow
- Highlighter powder or cream (champagne or gold)
- Fluffy eyeshadow blending brush
- Setting spray (optional)
Step 1: Creating the Sunset Gradient
-
Prep the canvas:
Begin with clean, dry skin. Tie hair back securely so the forehead is completely exposed, as this will be your primary painting surface. -
Apply the twilight blue:
Load a damp sponge with royal blue face paint. Tap it gently along the very top of the forehead, right at the hairline, keeping the color concentrated in the center and fading slightly as you move outward. -
Blend in the violet:
Using a fresh side of the sponge or a new one, pick up a violet purple shade. Dab this directly underneath the blue, blending the two colors where they meet to create a seamless transition. -
Add the sunset warmth:
Load a sponge with a bright, warm pink or magenta. Apply this below the purple layer, bringing it down towards the eyebrows and the bridge of the nose. -
Extend the glow:
Switch to an orange hue on your sponge. Pat this color onto the temples and the upper cheekbones, blending the pink downwards so the sunset appears to wrap around the side of the face. -
Refine the fade:
Use a clean, barely damp sponge to soften the edges of the orange on the cheek, ensuring it fades naturally into the skin tone rather than leaving a harsh line.
Gradient Smoothness
For the smoothest ombre effect between the blue, purple, and pink, keep your sponge slightly moist—not soaking wet—and use a rapid tapping or stippling motion.
Step 2: Eyes and Dramatic Highlights
-
Apply eyeshadow base:
Take a fluffy brush and apply a deep pink or mauve eyeshadow across the entire eyelid, extending it up into the crease to meet the face paint gradient. -
Create the winged liner:
Using black liquid eyeliner, draw a sharp, dramatic wing along the upper lash line. I find it helpful to start thin at the inner corner and thicken the line as you move outward. -
Highlight the high points:
Dip a small brush or finger into a champagne highlighter. Apply it generously to the inner corner of the eye, the tip of the nose, and the highest point of the cheekbone over the orange fade. -
Blend the under-eye:
Lightly smudge a bit of the pink eyeshadow along the lower lash line to balance the heavy color on the lid.
Fixing Wobbly Lines
If your cross lines aren’t straight, wait for the black paint to dry completely. Then use a damp angle brush like an eraser to gently tidy up the edges.
Step 3: Painting the Silhouettes
-
Paint the central cross:
Load a small flat brush with black face paint. On the forehead (slightly off-center if you prefer styling it that way), paint a vertical line starting in the purple section. -
Form the crossbar:
Paint a shorter horizontal line across the vertical one to complete the main cross shape. Keep the edges sharp. -
Add distant crosses:
Switch to a fine liner brush. Paint two or three smaller crosses further back on the forehead or near the temples to create depth and perspective. -
Introduce birds:
Using the very tip of the liner brush, paint tiny ‘v’ or ‘m’ shapes around the crosses to represent birds flying in the distance. -
Create textured ground (optional):
If you want to ground the crosses, lightly stipple a tiny amount of black at the very base of the main cross to suggest a hilltop. -
Final touches:
Check your symmetry and blending. If the black paint looks streaky, carefully go over it with a second coat once the first is dry.
Now you have a breathtaking, evocative work of art that beautifully reflects the sentiment of the season.


Have a question or want to share your own experience? I'd love to hear from you in the comments below!