If you’ve ever looked at a smooth stone and felt like it’s secretly hiding a tiny world, you’re my kind of artist. These fairy rock painting ideas are all about turning ordinary rocks into little moments of magic—doors, cottages, characters, and the enchanted details that make them feel real.
Toadstool Cottage Rock
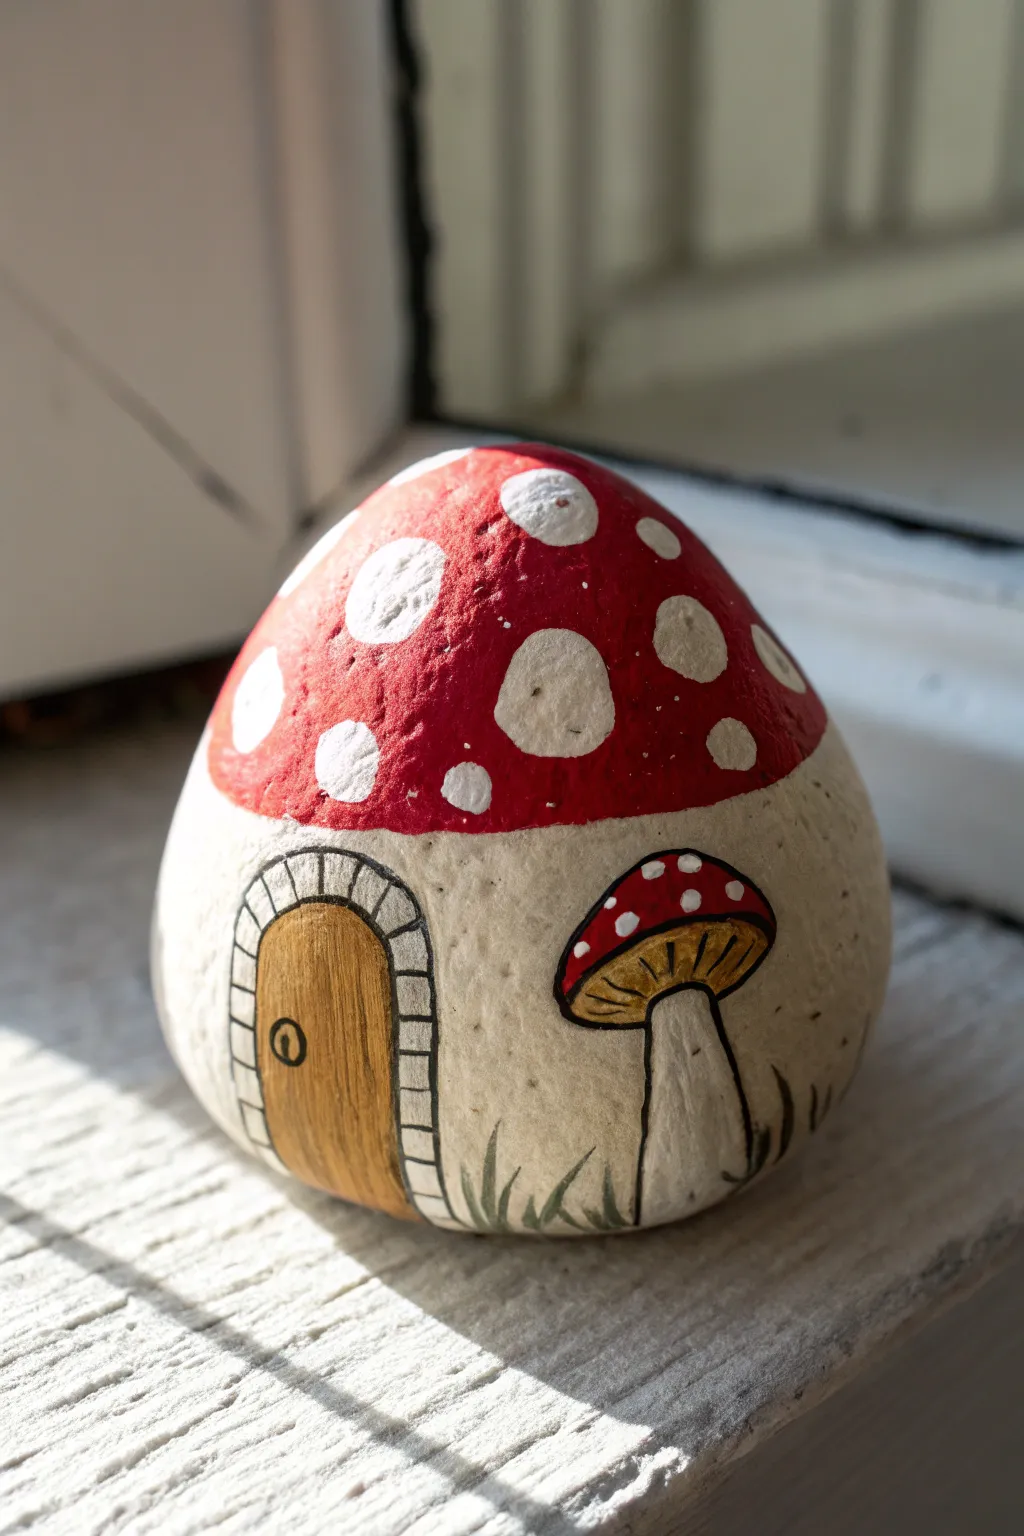
Transform an ordinary garden stone into an enchanting tiny dwelling for a fairy garden with this simple project. This design features a classic red-and-white spotted roof, a rustic wooden door, and delicate details that bring the miniature scene to life.
Step-by-Step
Materials
- Smooth, egg-shaped rock (approx. 3-4 inches tall)
- Acrylic paints: Red, White, Titanium Buff (or light beige), Burnt Sienna (dark brown), Yellow Ochre (light brown), Black, Green
- Paint brushes: Medium flat brush, small detail brush (size 0 or 00)
- Pencil and eraser
- Matte or glossy circular sealant spray
Step 1: Base and Roof
-
Clean your canvas:
Begin by scrubbing your rock with soap and warm water to remove any dirt or oils. Let it dry completely in the sun or use a hairdryer to speed things up. -
Outline the roofline:
Using a pencil, lightly draw a horizontal line dividing the rock. Aim for roughly the top 1/3 for the roof and the bottom 2/3 for the house base, curving the line slightly downward at the edges to mimic a mushroom cap shape. -
Paint the base coat:
Using the medium flat brush, paint the entire bottom section with Titanium Buff or a creamy off-white color. You will likely need two coats to get solid coverage over the grey stone. Let each coat dry fully. -
Paint the red roof:
Paint the top section of the rock with bright red acrylic paint. Carefully follow the pencil line where it meets the cream base. Apply a second coat to ensure the red is vibrant and opaque. -
Add the roof spots:
Once dry, paint large, irregular white circles onto the red roof. Vary their sizes for a natural look—some can be quite large, while others are small dots near the edge. Don’t worry about making them perfect circles; organic shapes look better.
Natural Texture Hack
Don’t paint the texture of the rock completely flat. If your stone has small pits or bumps, let the paint settle into them naturally to give the cottage an aged, organic stucco look.
Step 2: Doorway Details
-
Sketch the door:
Lightly sketch an arched door shape on the front of the cream base. Draw a second arch outline around the door to create the space for the stone frame. -
Paint the door:
Fill in the inner arch with Yellow Ochre. While the paint is still slightly wet, I like to streak in a tiny bit of Burnt Sienna to create a wood grain texture. -
Create the stone arch:
Paint the frame around the door white/grey. Once dry, use your finest liner brush and black paint (thinned slightly with water) to outline individual stones within the arch. -
Outline the door:
Using the fine liner brush and black paint, outline the wooden door shape. Add a small circle for a knob and sketch a tiny keyhole inside it.
Step 3: Garden Accents
-
Sketch the side mushroom:
To the right of the door, sketch a smaller mushroom. It should have a curved cap and a thick stem. -
Paint the small mushroom cap:
Paint the small cap red. Once dry, add tiny white dots using the tip of your smallest brush or a toothpick. -
Detail the underside:
Under the red cap, paint a thin crescent shape in Yellow Ochre. Use black or dark brown to paint tiny vertical lines for the gills. -
Paint the stem:
Paint the stem of the small mushroom using white mixed with a tiny drop of grey to give it some shadow and dimension. -
Outline the mushroom:
Outline the entire small mushroom with the fine black liner to make it pop against the background. -
Add grassy tufts:
Mix a dark green paint and use short, flicking upward strokes along the very bottom edge of the rock to create grass blades growing up around the house and the small mushroom stem. -
Seal the artwork:
Allow the rock to cure for at least 24 hours. Finish by spraying a clear UV-resistant sealer over the entire rock to protect it from weather if you plan to place it outdoors.
Shaky Hands?
If you struggle with the fine black outlines, switch to an extra-fine tip permanent marker or a paint pen. Just ensure the base paint is perfectly dry first to avoid ruining the nib.
Place your finished cottage among some moss or near a tree root to invite the fairies in


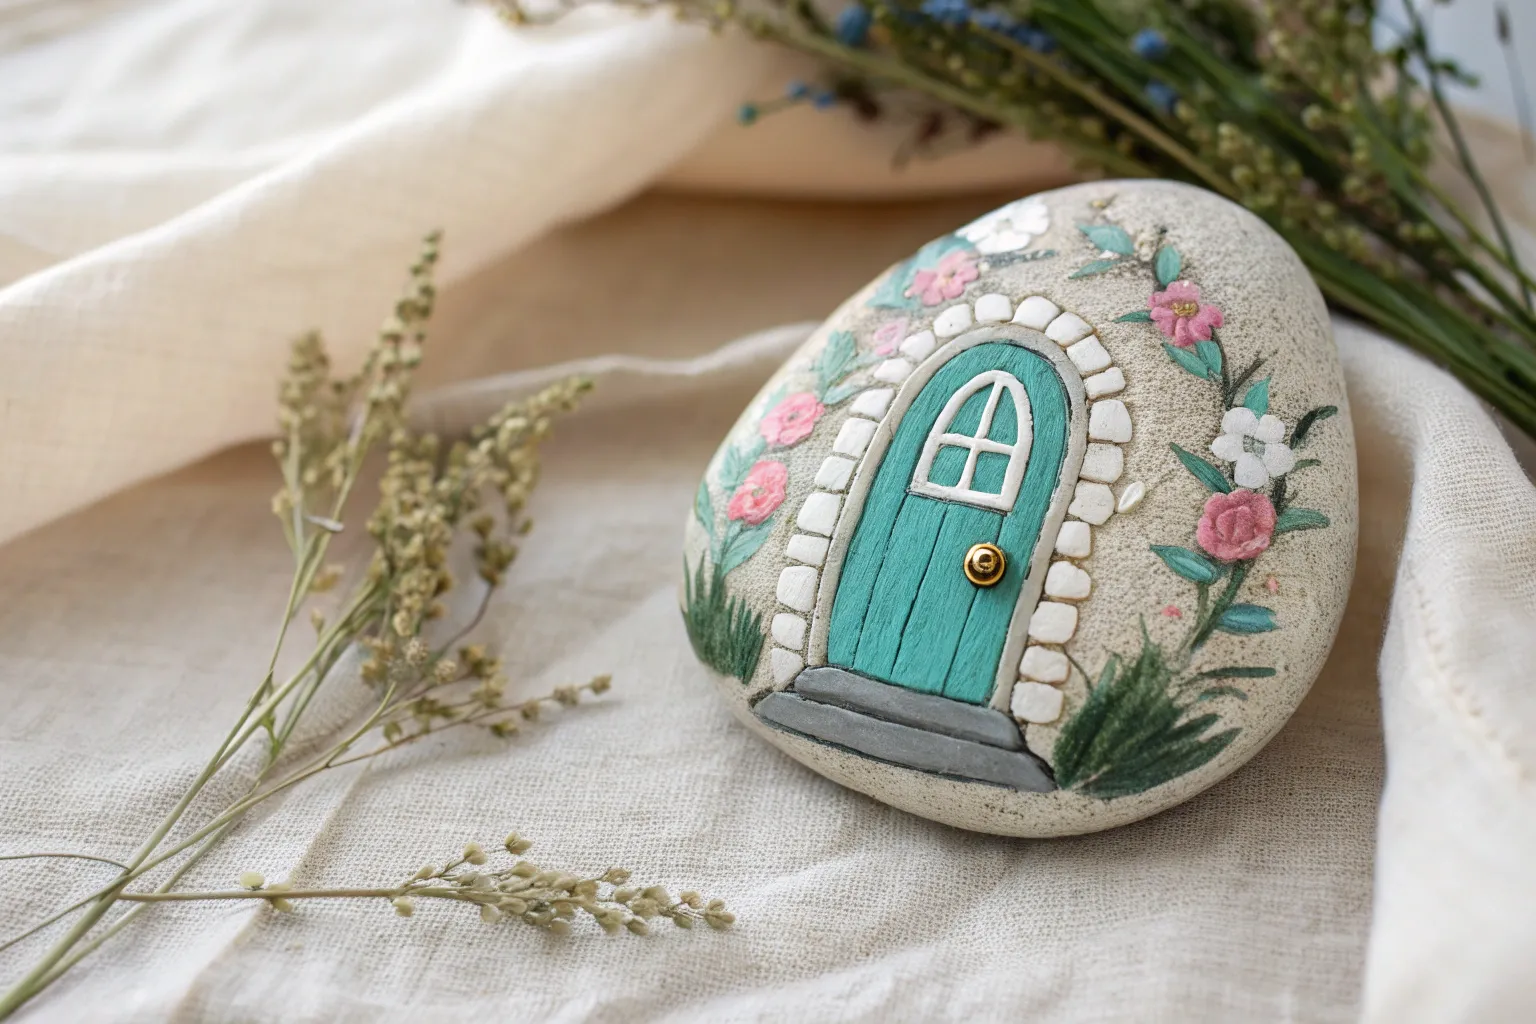
Woodland Door With Stone Steps
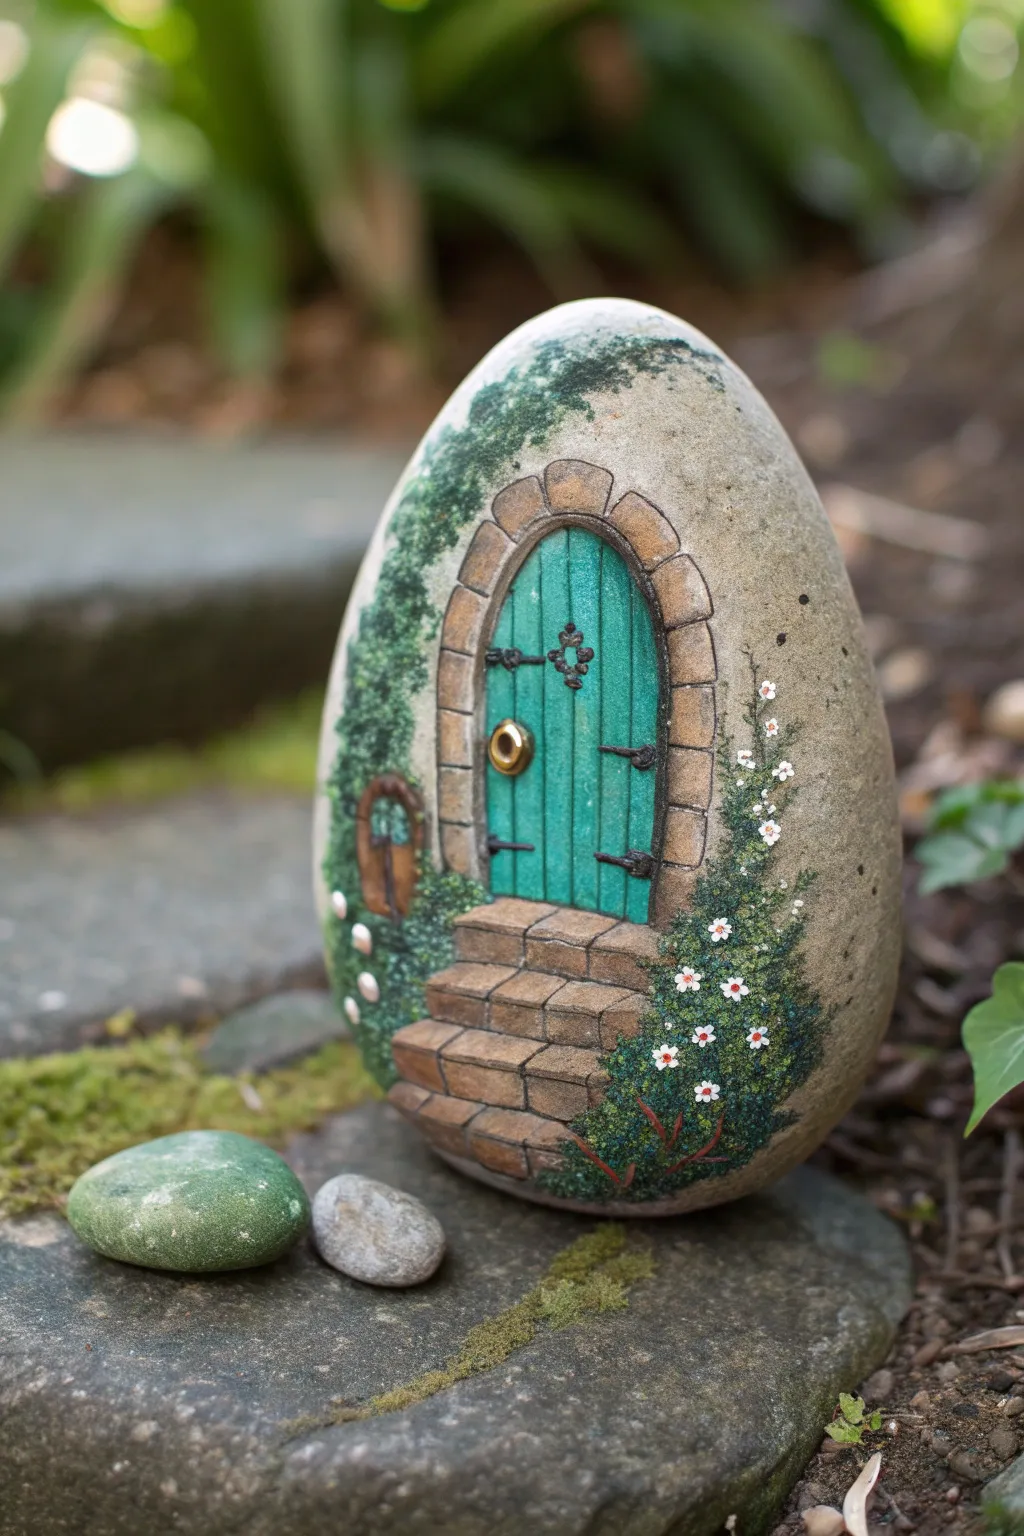
Transform a simple egg-shaped stone into a magical portal with this charming fairy door project. Featuring weathered stone steps, a rustic teal door, and creeping ivy, this painted rock brings a touch of whimsy to any garden path or shelf.
Step-by-Step Guide
Materials
- Smooth, egg-shaped river rock (approximately 4-6 inches tall)
- Acrylic paints: Teal/Turquoise, Brown (dark and light), Grey, Black, White, Green (forest and olive), Gold
- Pencil for sketching
- Fine detail brushes (sizes 0, 00, and 1)
- Small flat brush
- Sponge or stippling brush
- Acrylic sealer (matte or satin finish)
- Water cup and palette
Step 1: Sketching and Base Layers
-
Select and prep the stone:
Choose a rock that stands upright on its own if possible, or one that leans nicely. Wash it thoroughly with soap and water to remove dirt and oils, then let it dry completely. -
Sketch the outline:
Using a pencil, lightly draw the arched doorway in the center. Sketch the stone arch frame around it and outline the perspective of the steps leading up to the door. -
Block in the door color:
Paint the inner door shape with a solid coat of teal or turquoise acrylic paint. You may need two thin coats to get full opaque coverage. -
Lay the stone foundation:
Mix a light brown with a touch of grey. Paint the basic shapes of the steps and the archway stones. Don’t worry about detailing the cracks yet; just get the base color down.
Step 2: Creating Texture and Depth
-
Add wood grain texture:
Dilute a darker teal or black paint slightly with water to make a glaze. Using your finest liner brush, paint thin vertical lines on the door to simulate wooden planks. -
Shadowing the planks:
To make the planks look three-dimensional, paint a very fine line of black along one side of each ‘plank’ line, and a thin highlight of white or light teal on the other side. -
Define the stonework:
Switch to a dark brown or black paint. Carefully outline each individual stone in the archway and the steps. Vary the line thickness slightly to make the rocks look natural and uneven. -
Highlight the stones:
Mix a lighter beige or cream color. Dry brush the centers and top edges of the steps and arch stones to create a weathered, sun-lit effect. -
Deepen the shadows:
Paint the vertical risers of the stairs a slightly darker brown than the horizontal treads. This contrast is crucial for creating the illusion of depth.
Natural Texture
Don’t paint the background. Leaving the natural stone surface visible around the door makes the painted elements look like they were carved directly into the rock.
Step 3: Foliage and Hardware
-
Paint the hinges:
Using black paint and a size 00 brush, draw two ornate horizontal hinges across the door. Add a small decorative diamond shape near the top center for extra flair. -
Install the doorknob:
Paint a small circle for the doorknob plate in gold or brass color. Once dry, add a tiny dot of black in the center for the keyhole and a white highlight on the rim to make it shine. -
Stipple the base greenery:
Mix a dark forest green. Use a small sponge or an old scruffy brush to stipple irregular patches of moss and ivy up the sides of the stone arch and around the base of the steps. -
Layering the leaves:
I like to add a lighter olive green over the dark green stippling while it’s tacky. This creates volume and makes the moss look more lush. -
Add climbing vines:
With a liner brush and brown paint, draw tiny, wiggly lines connecting some of the green patches, suggesting vines crawling up the rock face. -
Detailed leaf work:
Paint tiny individual leaf shapes near the edges of your moss clumps using a bright green to define the foliage.
Glow in the Dark
Mix a tiny amount of glow-in-the-dark medium into the white paint for the tiny flowers or the doorknob highlight. Your fairy house will gently sparkle at night.
Step 4: Finishing Touches
-
Bloom the flowers:
Dip the back end of your paintbrush (the handle) into white paint. Dot tiny clusters of flowers onto the greenery, primarily on the right side. -
Flower centers:
Once the white dots are dry, use a toothpick or fine brush to add a minuscule red or orange dot in the center of each white flower. -
Final heavy shadows:
Use a watered-down black to glaze the deep corners where the steps meet the rock and under the bottom step to ground the structure. -
Seal the magic:
Allow the rock to dry for at least 24 hours. Apply two coats of outdoor-safe acrylic sealer to protect your detailed work from the elements.
Place your finished rock in a flowerbed or near a tree root to invite fairies into your garden


Fairy Window Glow Rock
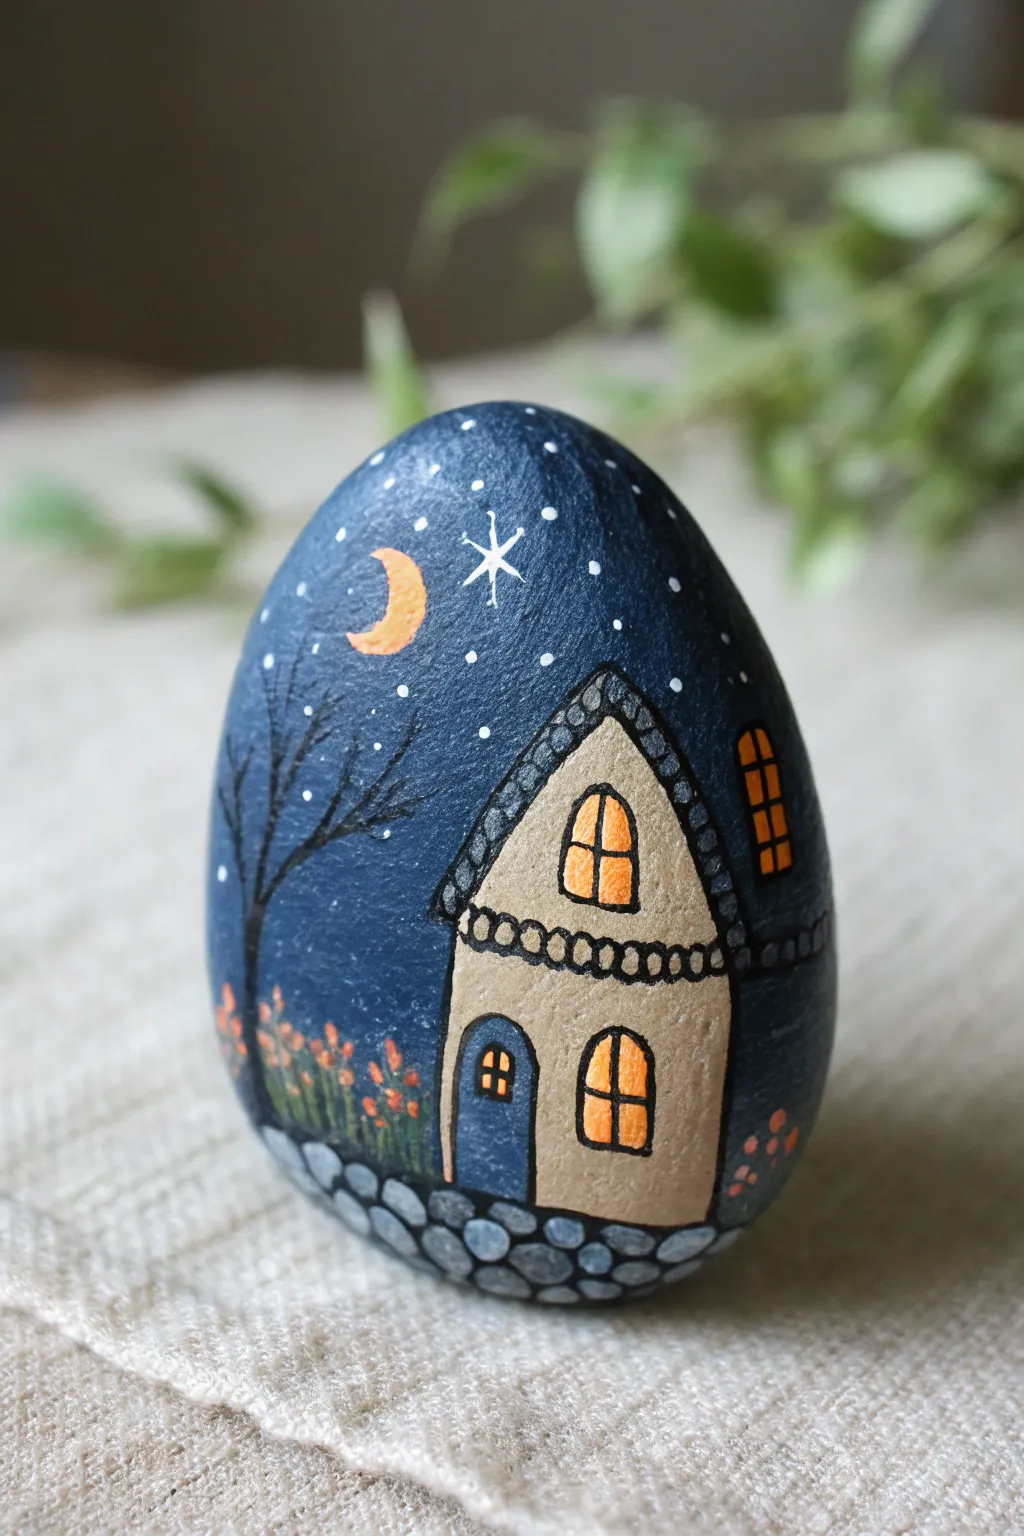
Capture the magic of a cozy evening with this charming painted stone featuring a glowing little cottage under a starry sky. The dark blue background makes the warm orange windows pop, creating a scene that feels like a tiny world held in the palm of your hand.
How-To Guide
Materials
- Smooth, egg-shaped river rock
- Acrylic paints (dark navy blue, beige/tan, warm orange, white, dark grey, black)
- Fine detail paintbrushes (liner brush and small round brush)
- Pencil for sketching
- Matte or satin varnish/sealer
- Cup of water and paper towels
- Paint palette or plate
Step 1: Base Coat and Sketch
-
Clean the surface:
Begin by washing your rock with soap and water to remove any dirt or oils, and let it dry completely to ensure the paint adheres properly. -
Apply the background:
Paint the entire front surface of the rock with a deep navy blue acrylic paint. You may need two coats to get a solid, opaque night sky color. Allow this base to dry fully. -
Sketch the outline:
Using a pencil, lightly sketch the outline of the house, the roofline, the windows, and the ground line. Keep the pressure light so you don’t scratch the base paint.
Starry Sky Hack
Instead of painting every dot individually, dip an old toothbrush in watered-down white paint and flick the bristles to create a natural, random spray of distant stars.
Step 2: Building the Cottage
-
Paint the house walls:
Fill in the main shape of the house with a beige or light tan acrylic paint. Use your small round brush to carefully paint around the arched doorway and window shapes. -
Add the roof texture:
Paint the roof area with a dark grey. Once the grey is dry, use a lighter grey or thinned white to add small curved lines that mimic roof shingles or tiles. -
Detail the trim:
Create the decorative scallop trim under the roofline. Paint a row of small beige semi-circles where the roof meets the house wall, and outline them later for definition. -
Paint the door:
Fill in the arched door with a medium blue shade that is slightly lighter than your night sky background but darker than the house walls.
Step 3: Creating the Glow
-
Fill the windows:
Using a warm orange or golden yellow paint, fill in all the window shapes. Don’t forget the tiny window on the door and the sneaky window on the right side of the roof. -
Add light reflection:
For an extra glowing effect, you can mix a tiny bit of white into the center of your damp orange paint to make the windows look brighter in the middle. -
Paint the moon:
Using the same orange and yellow mix, paint a crescent moon in the upper left of the sky. Add a tiny touch of texture with darker orange to mimic craters.
Add Real Sparkle
Mix a tiny pinch of gold glitter or shimmer powder into your clear sealer before applying the final coat. This gives the night sky a magical twinkle when the light hits it.
Step 4: Fine Details and Atmosphere
-
Outline the architecture:
Switch to your finest liner brush and black paint. Carefully outline the house, the door, the roof scallops, and the window frames. Add a cross-hatch pattern to the windows to create panes. -
Create the cobblestones:
Along the bottom edge, paint rounded grey shapes to form a cobblestone path. Outline these with black and add a few white highlights for dimension. -
Paint the silhouette tree:
On the left side of the house, paint a delicate, leafless tree using black paint. Extend the bare branches up into the blue sky area. -
Add landscape details:
Dab small orange spots near the base of the house and tree to represent wildflowers, adding tiny green stems beneath them if you have a steady hand. -
Paint the stars:
Using a toothpick or a very fine brush tip, dot white paint across the blue sky. Create a few larger four-point stars by crossing two thin lines.
Seal your miniature world with a clear varnish to protect the details and display it on a shelf or in a garden pot


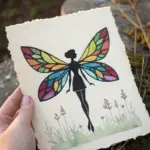
Silhouette Fairy at Sunset
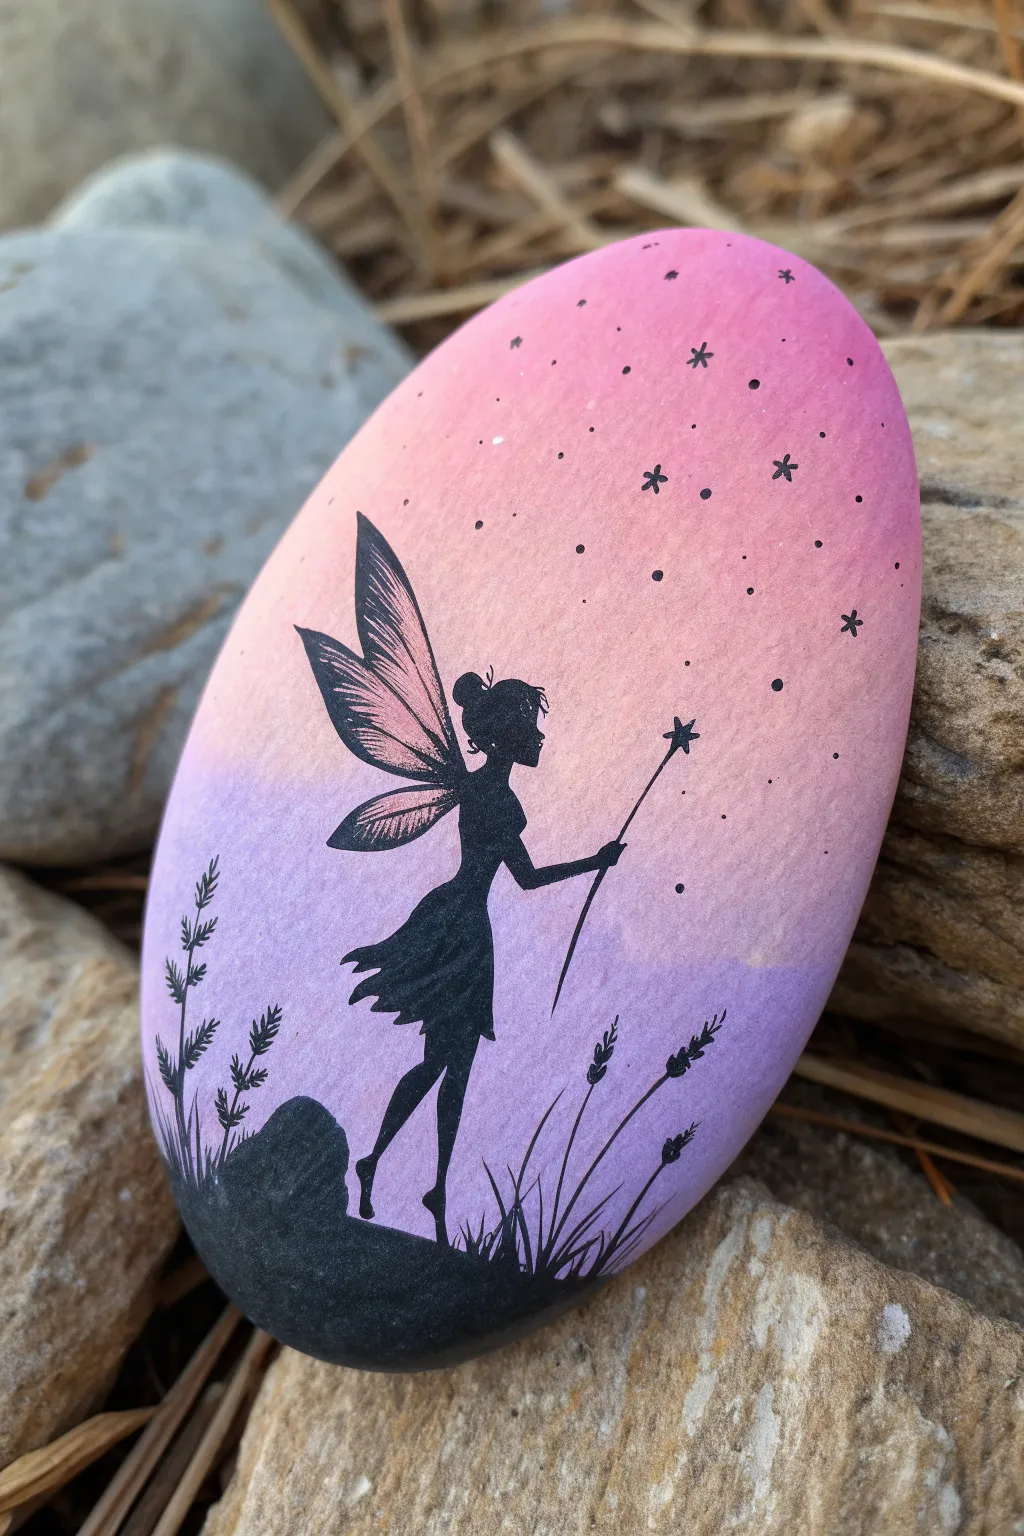
Capture magic in the palm of your hand with this enchanting sunset fairy silhouette. The soft gradient background creates the perfect dreamy atmosphere for the crisp, detailed silhouette to stand out against.
Step-by-Step Tutorial
Materials
- Smooth, oval river rock
- Acrylic paints: Titanium White, Light Pink, Peach/Coral, Lavender/Light Purple, Black
- Flat brush (medium size)
- Fine detail liner brush (size 0 or 00)
- Black fine-point paint pen (optional but recommended for details)
- Pencil for sketching
- Acrylic matte or gloss sealer (spray or brush-on)
- Palette for mixing
- Cup of water and paper towels
Step 1: Preparing the Sunset Background
-
Surface Prep:
Begin by washing your rock thoroughly with soap and water to remove any dirt or oils. Let it dry completely before starting; a slightly warm rock (from the sun) can help the base coat dry faster. -
Base Coat:
Paint a solid coat of Titanium White over the entire front surface of the rock. This step is crucial because it ensures the sunset colors will pop and look vibrant rather than muddy against the grey stone. -
Applying the Pink:
Once the white is dry, load your flat brush with light pink paint. Apply this to the top third of the rock, brushing horizontally. -
Adding the Peach:
While the pink is still slightly wet, pick up your peach or coral color. Apply this to the middle section of the rock, overlapping slightly with the pink edge to encourage blending. -
Painting the Purple:
Paint the bottom third of the rock with your lavender or light purple shade. Again, overlap slightly with the peach section above it. -
Creating the Ombré:
Clean your flat brush and leave it barely damp. Gently sweep horizontally back and forth over the transition lines between the colors to smooth them out. I find using a very light touch here prevents the colors from becoming muddy. -
Drying Time:
Allow the background gradient to dry completely. If you proceed too soon, the black paint will bleed into the background.
Paint Pen Flow
If your paint pen tip gets clogged or dries out while working, press it gently onto a scrap piece of paper to pump fresh paint into the nib.
Step 2: Painting the Silhouette
-
Sketching the Outline:
Using a pencil, lightly sketch the outline of the fairy, the ground hill, and the grass blades. Keep the lines faint so they don’t show through later. -
Blocking the Ground:
Using black acrylic paint and a small round brush, fill in the bottom hill shape. Make the curve smooth and solid black. -
The Fairy’s Body:
Carefully paint the fairy’s body using your fine detail brush or black paint pen. Start with the torso and skirt, ensuring the edges are crisp. -
Delicate Limbs:
Add the arms and legs. Pay close attention to the pointed toe and the hand holding the wand; these fine lines are easier to control with a paint pen. -
Facial Profile:
Paint the head in profile. Don’t worry about facial features; just focus on the shape of the bun and the nose/chin profile.
Smoother Gradients
For a seamless sky blend, mix a tiny bit of white paint into your transition colors. This helps bridge the gap between hues more naturally.
Step 3: Adding Magical Details
-
Wing Structure:
Draw the outline of the wings extending from the fairy’s back. The upper wing should be larger and more pointed, while the lower wing is smaller and rounded. -
Translucent Effect:
Instead of filling the wings solid black, use very thin, wispy black lines inside the wings to mimic veins. This allows the sunset color to show through, creating a transparent effect. -
Grasses and Wand:
Paint tall, thin blades of grass rising from the black hill. Add small texture dabs at the tops to resemble wheat or wildflowers. Draw a straight line for the wand. -
Stars and Sparkles:
Using the very tip of your detail brush or a fine pen, add tiny dots and small asterisks (*) across the upper sky to represent stars and magic dust trailing from the wand. -
Sealing:
Once the artwork is absolutely dry (wait at least 24 hours to be safe), apply a layer of clear sealer to protect your painting from the elements.
Place your finished rock in a garden or on a windowsill to catch the light
BRUSH GUIDE
The Right Brush for Every Stroke
From clean lines to bold texture — master brush choice, stroke control, and essential techniques.
Explore the Full Guide
Flower Fairy With Petal Skirt
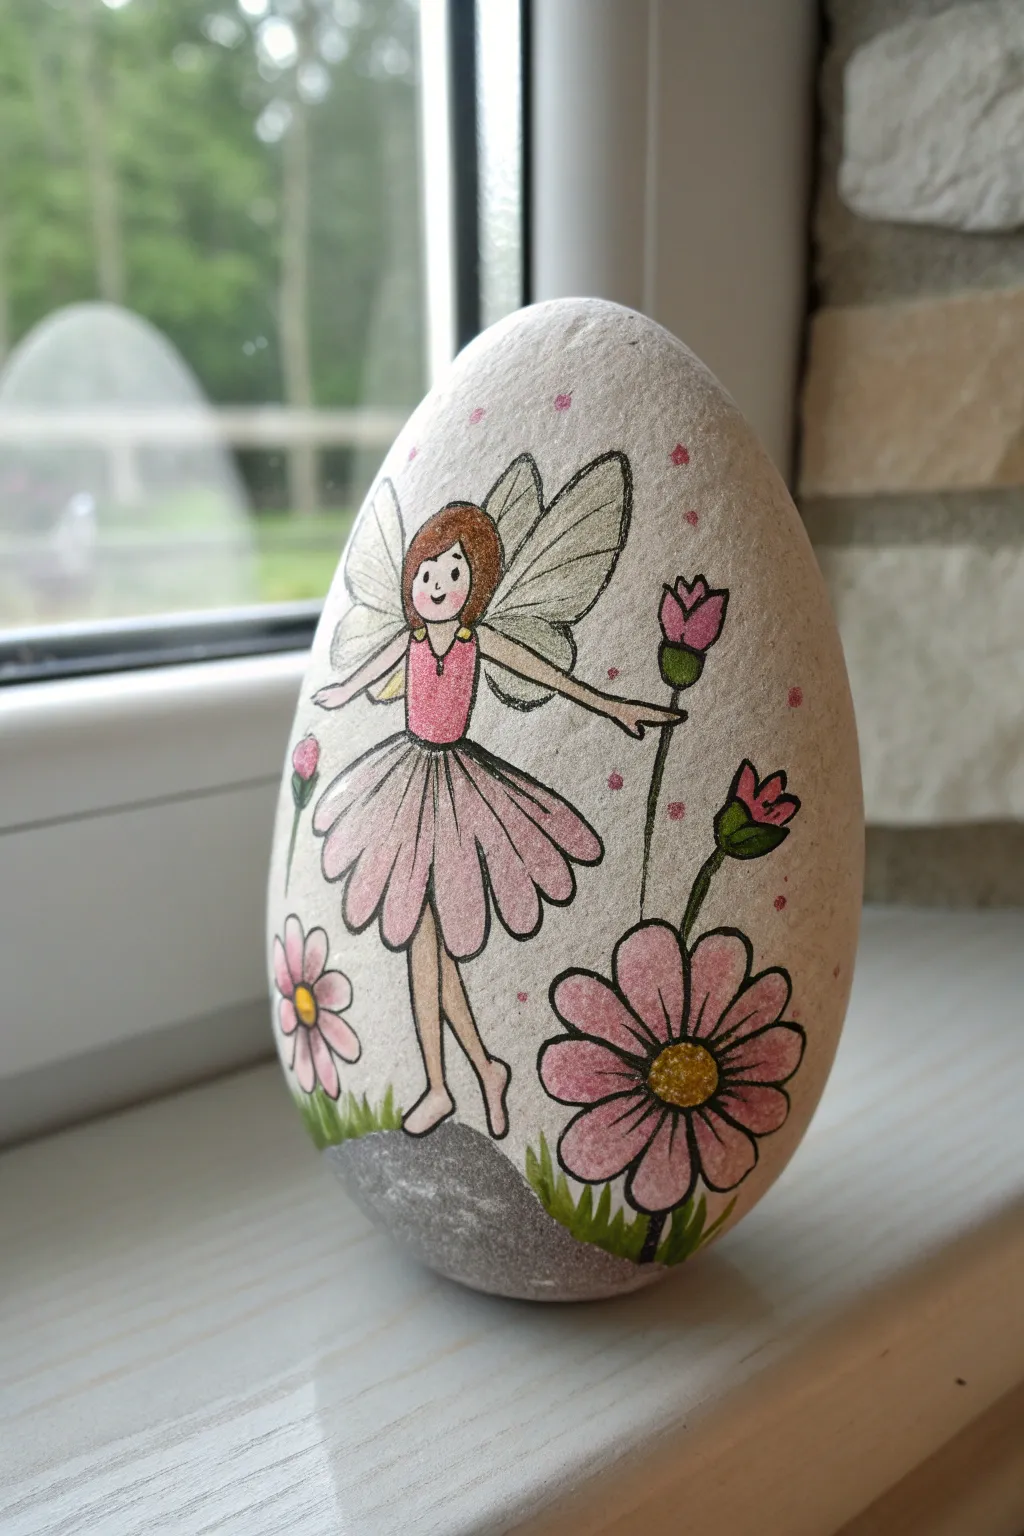
Transform a smooth river stone into an enchanting garden scene featuring a delicate fairy with a petal skirt. This project leaves much of the natural stone visible, creating a lovely organic backdrop for the bright pink flowers and whimsical character.
Detailed Instructions
Materials
- Smooth, egg-shaped river rock (light grey or white works best)
- Pencil and eraser
- Technical drawing pens (black, waterproof, sizes 0.1 and 0.5)
- Acrylic paint markers (pink, green, yellow, white, brown, beige)
- White colored pencil or white gel pen (optional for wing details)
- Clear spray sealant or varnish (matte or satin finish)
Step 1: Planning and Sketching
-
Clean your canvas:
Before starting, ensure your rock is scrubbed clean and completely dry. Any dust or oils will prevent the ink from adhering properly. -
Outline the fairy:
Using a pencil, lightly sketch the fairy’s body in the center-left area of the rock. Draw a simple oval for the head, a small torso, and long, thin legs. Don’t press too hard; you want the lines to be barely visible. -
Sketch the petal skirt:
Draw the skirt as a series of elongated, teardrop-shaped petals radiating from her waist. This flower-like skirt is the centerpiece of her outfit. -
Add wings and flowers:
Sketch two sets of wings behind her back. Then, draw a few tall flower stems to her right and small daisy-like blooms near her feet.
Step 2: Inking the Lines
-
Trace with ink:
Once you are happy with the sketch, use your finer black technical pen (0.1 or 0.3) to carefully trace over all your pencil lines. The waterproof ink is crucial so it doesn’t bleed when we add color later. -
Refine the details:
Add small details like the fairy’s facial features—two small dots for eyes and a small smile. Draw veins on the leaves and lines on the wings to give them texture. -
Erase guidelines:
Wait at least 10 minutes for the ink to dry completely to avoid smudging. Then, gently erase all visible pencil marks to leave a clean black outline.
Ink Control
If your markers bleed on the porous stone, coat the drawing area with a thin layer of clear matte varnish or Mod Podge BEFORE coloring to seal the surface.
Step 3: Adding Color
-
Color skin tones:
Use a beige or pale peach paint marker to color in the fairy’s face, arms, and legs. If the marker tip is too thick, pool some paint on a palette and use a fine brush. -
Paint the hair:
Fill in her hair with a medium brown paint marker. I like to let this dry and then add a second coat for opacity. -
Dress the fairy:
Color her bodice with a bright pink marker. For the skirt petals, use a lighter pink or dilute the bright pink slightly to make it translucent if possible, though a solid pale pink looks great too. -
Color the wings:
The wings should look delicate. You can leave them uncolored (showing the stone) or tint them very lightly with a watered-down white paint or a very pale grey marker. -
Bring the garden to life:
Color the large flower petals in pink, matching the fairy’s skirt. Use a yellow paint marker for the flower centers and add small dots of orange or brown for texture. -
Add greenery:
Fill in the stems, leaves, and the grass at the bottom with a fresh green marker. Vary the height of the grass blades for a natural look.
Glitter Magic
While the paint on the fairy’s wings is still wet, sprinkle a tiny pinch of extra-fine iridescent glitter on them for real magical sparkle.
Step 4: Finishing Touches
-
Add highlights:
Use a white gel pen or a very fine white paint marker to add small reflection highlights on the hair, the skirt petals, and the flower petals. This makes the image pop. -
create wing texture:
Add tiny white lines or dots inside the wings to suggest sparkle or transparency. -
Add background sparkle:
Draw tiny pink dots or small stars scattered in the background around the fairy to act as ‘pixie dust’ or pollen floating in the air. -
Re-outline if needed:
Sometimes painting over lines can dull them. Quickly go over key outlines—like the edges of the skirt or flowers—with your black pen again to crispen the image. -
Seal the artwork:
Place the rock in a well-ventilated area and spray with a clear matte sealant. This protects the paint from chipping and keeps the colors vibrant.
Now you have a charming garden guardian ready to hide among your flowerbeds or gift to a friend
Fairy Wings Pattern Rock
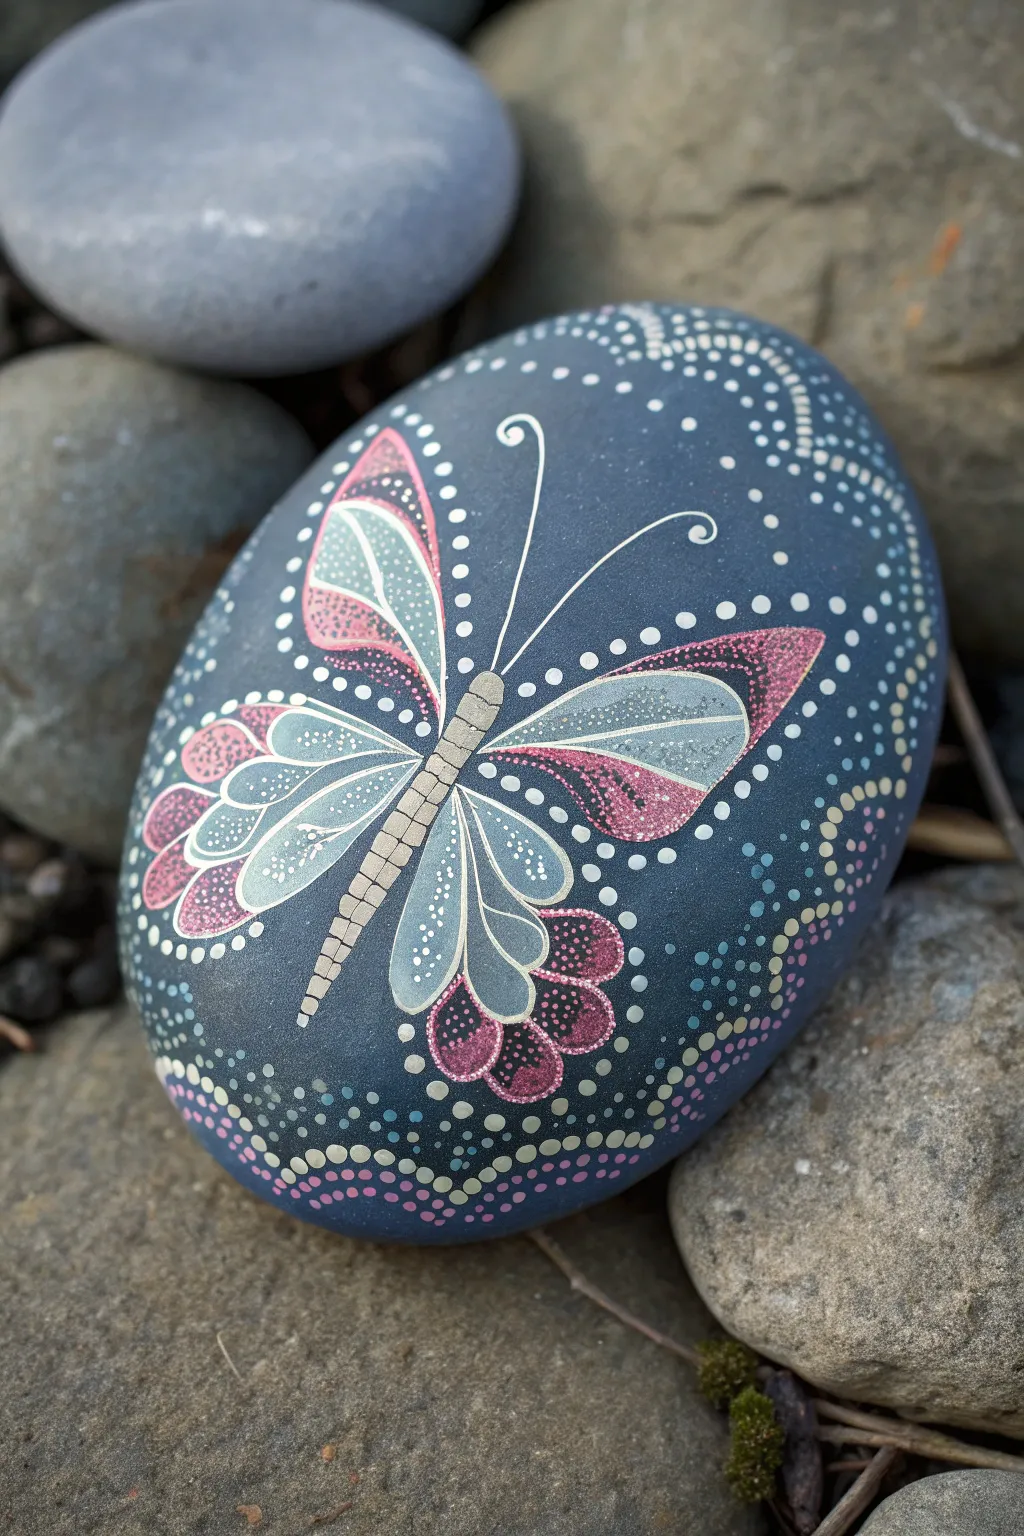
Capture the magic of an enchanted garden with this stunning blue stone featuring a stylized butterfly. By combining delicate line work with classic dot mandala techniques, you’ll create a mesmerizing fairy-winged creature that seems to flutter right off the rock.
How-To Guide
Materials
- Smooth, oval river stone (approx. 4-6 inches wide)
- Matte acrylic paints: Deep indigo/navy blue, white, soft pink, light blue, and metallic gold
- Fine detail paintbrush (size 00 or 000)
- Set of dotting tools (various sizes)
- Acrylic paint markers (optional, for fine lines)
- Spray sealer or varnish (matte or satin finish)
- Palette for mixing colors
- Pencil for sketching
Step 1: Preparation and Base
-
Clean the canvas:
Begin by thoroughly washing your stone with soapy water to remove any dirt or oils, then let it dry completely. This ensures the paint adheres properly. -
Apply the background:
Paint the entire top surface of the rock with a deep indigo or navy blue acrylic paint. You may need two coats for full opacity, allowing the first layer to dry before adding the second. -
Light sketching:
Once the base is perfectly dry, use a pencil to very lightly sketch the central axis for the butterfly’s body. Then, outline the general teardrop shapes of the four main wings to ensure symmetry.
Dot Consistency Pro-Tip
For perfectly round dots, reload your tool with fresh paint for every single dot. If the paint gets tacky on the tool, wipe it off completely before dipping again.
Step 2: Painting the Butterfly
-
Draw the body:
Using a fine brush and light beige or metallic gold paint mixed with a touch of white, paint the segmented body down the center. Create small, horizontal rectangular segments that taper slightly at the tail. -
Outline the wings:
With white paint slightly thinned with water (or a white paint pen), carefully outline the four main wing sections. Add the decorative antenna curling outwards from the top of the head. -
Fill the inner wings:
Mix a very pale, translucent blue. Fill in the upper and lower wing sections, leaving a small gap between this fill and the white outline to create a double-border effect. -
Add pink accents:
Using a soft pink shade, paint the outer tips of the upper wings and the bottom flourishes of the lower wings. Blend this slightly into the pale blue for a soft gradient if possible, or keep the blocks of color distinct. -
Detail the veins:
Switch back to your finest brush and white paint. Draw delicate veins inside the wing sections, branching out from the body heavily in the lower wings to mimic stained glass.
Add Some Sparkle
Mix a tiny amount of iridescent medium or glitter glaze into the pink wing paint. When the light hits the rock, the fairy wings will have a genuine magical shimmer.
Step 3: Dotting and Decoration
-
Outline the wings with dots:
Using a small dotting tool dipped in white paint, create a chain of tiny dots tracing the very outer edge of the upper wings. -
Add wing texture:
Inside the pink sections of the wings, use your smallest tool to add tiny stippled dots in white or light pink to give the wings a shimmery, dusted texture. -
Create the aura:
Surround the entire butterfly with a halo of dots. Use larger white dots spaced further apart for the outer ring, and smaller dots closer to the butterfly’s body. -
Swooping dotted accents:
At the bottom of the rock, create swooping curves using a gradient of dots. Start with pink, transition to pale yellow or gold, and finish with blue dots. -
Top corner swirls:
Mirror the bottom curves by creating dotted swirls at the top of the rock using white paint. Vary the pressure to make the dots gradually smaller as the line trails off. -
Fill the negative space:
Add scattered clusters of tiny dots in light blue and white around the butterfly to look like magical fairy dust floating in the night sky.
Step 4: Finishing Touches
-
Highlight the body:
Add a tiny highlight line of pure white to the top of each segment of the butterfly’s body to give it dimension. -
Allow to cure:
Let the rock sit undisturbed for at least 24 hours to ensure all layers, especially the thick dots, are completely hardened. -
Seal the artwork:
Finish by applying a clear spray sealer. A matte or satin finish works best here to preserve the soft look of the wings without creating distracting glare.
Now you have a magical stone that brings a touch of enchantment to any garden corner or desk

PENCIL GUIDE
Understanding Pencil Grades from H to B
From first sketch to finished drawing — learn pencil grades, line control, and shading techniques.
Explore the Full Guide
Pixie Dust Swirl Trail

Capture the magic of a forest sprite with this elegant silhouette design. Painted on a smooth, natural stone, the shimmering gold fairy trails a sparkling swirl of white pixie dust.
Step-by-Step Guide
Materials
- Smooth, oval river rock (light beige or tan)
- Metallic bronze or dark gold acrylic paint
- White acrylic paint or paint pen (fine tip)
- Fine liner brush (size 0 or similar)
- Detail brush (size 00 or similar)
- Gold star stickers or gold paint pen
- Clear sealant (matte or satin finish)
- Pencil for sketching
- Eraser
Step 1: Preparation & Sketching
-
Clean the stone:
Begin by washing your stone with warm soapy water to remove any dirt or oils. Let it dry completely before starting. -
Plan the composition:
Visualize where your fairy will float. She should be positioned on the right side of the rock, facing left, leaving room for her magical trail to swoop behind her. -
Sketch the fairy:
Lightly sketch the fairy’s silhouette with a pencil. Draw a simple head, a slender torso, and a flowing skirt that kicks out slightly at the back. Add simple lines for her arms, one extending forward as if casting a spell. -
Outline the wings:
Sketch two distinct wing shapes extending from her back—a larger upper wing and a slightly smaller lower wing, pointed at the tips like leaves. -
Map the swirl:
Gently draw a curved swoosh starting from her wand hand or just behind her, looping down and to the left, curling up at the end like a wave.
Uneven Lines?
If your fine lines are shaky, try thinning your acrylic paint slightly with water. It should be the consistency of heavy cream to flow smoothly off a liner brush.
Step 2: Painting the Fairy
-
Fill in the silhouette:
Using your fine detail brush and metallic bronze paint, carefully fill in the body of the fairy. Keep your edges crisp. Depending on your paint’s opacity, you might need a second coat after the first dries. -
Define the wings:
Outline the wings with the same bronze paint. Instead of filling them in solid, paint a central vein and delicate lines radiating out to the edges, keeping the design airy and transparent. -
Add wing details:
Thicken the outer edges of the wings slightly to give them definition against the light stone background.
Step 3: Creating the Magic Trail
-
Paint the main swoosh:
Load a liner brush with white paint (or use a white paint pen). Paint the broad, curved stroke you sketched earlier. You can make this slightly translucent by watering down the paint just a touch for a ghostly effect. -
Add the inner swirl:
Inside the white swoosh, paint a thinner, more opaque white line that curls tightly at the end, emphasizing the movement. -
Create the sparkle dots:
Using the tip of a toothpick or a very fine dotting tool, add a trail of tiny black or dark bronze dots following the curve of the white swoosh. Gradate their size from small to tiny. -
Paint the large star:
Near the top of the swirl, paint a bright white starburst. Start with a simple cross, then add smaller diagonal lines in between to make it shine. -
Add white accents:
Scatter tiny white dots around the main star and the fairy’s wings to represent floating dust motes.
Pen Precision
For the tiniest details like the starburst and dot trail, skip the brush and use an extra-fine acrylic paint marker (0.7mm tip) for maximum control.
Step 4: Golden Touches & Finishing
-
Apply gold stars:
If using gold star stickers, place three or four small ones randomly within the magic trail. Alternatively, draw tiny five-point stars using a gold paint pen. -
Highlight the swirl:
I find that adding a very thin line of gold or bronze alongside the white swirl helps tie the magic trail back to the fairy’s color scheme. -
Clean up sketch lines:
Once you are absolutely certain all paint is bone dry, gently erase any visible pencil marks from your initial sketch. -
Protect your art:
Apply a coat of clear sealant. A matte or satin spray works best here to avoid too much glare, keeping the focus on the metallic gold paint.
Now you have a shimmering piece of fairy magic to brighten your garden or desk
Mushroom Cluster Doorstep
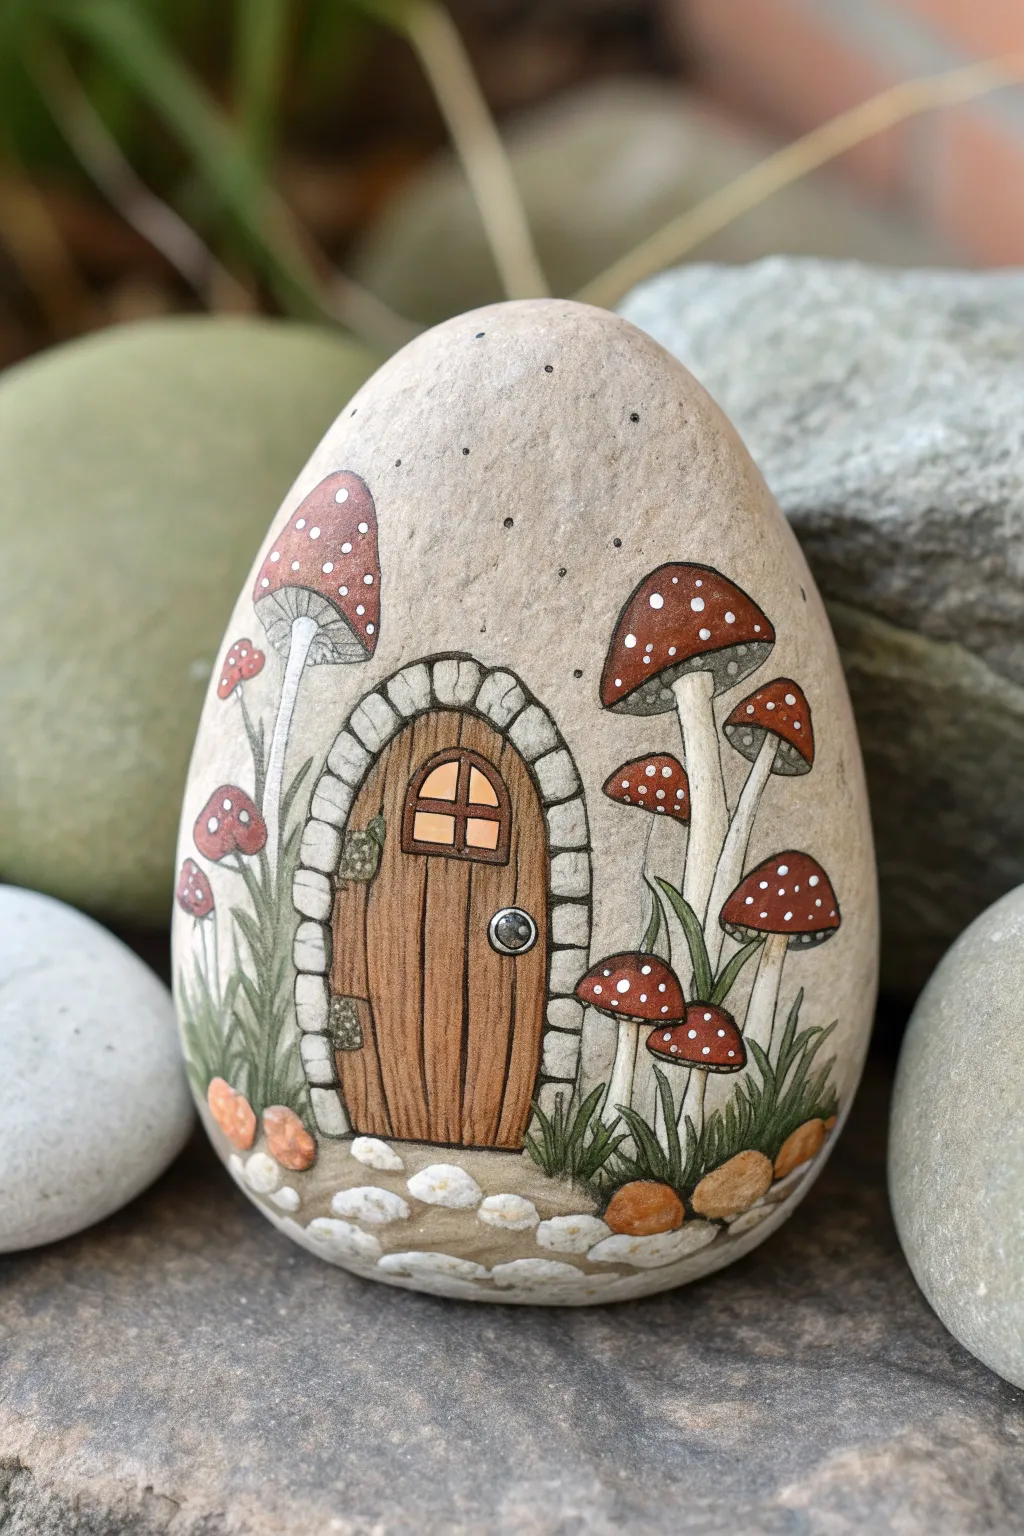
Transform a simple garden stone into a magical abode with this delightful fairy door painting. This design features a rustic wooden door framed by stone, flanked by clusters of charming white-spotted red mushrooms, creating the perfect entryway for woodland sprites.
Step-by-Step
Materials
- Smooth, egg-shaped rock (clean and dry)
- Acrylic paints (Titanium White, Burnt Sienna, Burnt Umber, Oxide Black, Cadmium Red, Yellow Ochre, Dark Green, Light Grey)
- Fine liner brushes (sizes 00 and 000)
- Small flat brush
- Pencil and eraser
- Paint markers (optional, for fine details)
- Sealant (matte or satin finish)
Step 1: Sketching the Layout
-
Prepare the surface:
Ensure your rock is scrubbed clean and completely dry. If the natural stone color is too dark, you may want to apply a very light wash of beige paint to create a uniform canvas, though the natural texture works beautifully for this rustic look. -
Draw the door outline:
Using a pencil, lightly sketch a central arch shape for the door. It should be slightly taller than it is wide. -
Sketch the stonework:
Draw a border around the door arch to represent the stone frame. Divide this border into individual rectangular stones. -
Add mushroom placement:
Sketch clusters of mushrooms on either side. Place taller ones in the back and smaller buttons in the front. Add a mix of open caps and closed buds for variety.
Paint Pen Rescue
If you struggle with shaky hands while outlining with a brush, switch to an ultra-fine tip acrylic paint marker (0.5mm or 0.7mm). It offers much more control for crisp black outlines.
Step 2: Painting the Doorway
-
Base coat the door:
Paint the interior of the arch with a solid coat of opaque brown (mix Burnt Sienna with a touch of White). Let it dry completely. -
Paint the stone frame:
Fill in the stones surrounding the door with a light grey paint. If you want more depth, mix a tiny drop of brown into your grey. Leave the spaces between the stones unpainted for now. -
Create wood grain texture:
Using your finest brush and a darker brown (Burnt Umber), paint thin vertical lines down the door to simulate wood planks. Vary the thickness slightly for realism. -
Add door details:
Paint a small arched window near the top using a warm yellow mixed with a little orange. Once dry, use black to paint a cross-hatch frame over the yellow. Add a small silver or grey circle for the doorknob.
Glow in the Dark
Mix a small amount of glow-in-the-dark medium into the yellow window paint or the white mushroom spots. Your fairy house will light up magically when the sun goes down.
Step 3: Bringing the Mushrooms to Life
-
Paint the stems:
Use an off-white or cream color to paint the mushroom stems. Make them slightly wider at the base and curved for a natural look. -
Color the caps:
Paint the mushroom caps in a deep, earthy red. For the underside of the caps (the gills), use a dark grey or diluted black. -
Add the spots:
Dip the back end of your paintbrush or a dotting tool into white paint. Carefully dab dots onto the red caps, varying the sizes. I like to cluster a few smaller dots near the edges. -
Detail the gills:
Use your 000 liner brush with diluted white paint to draw incredibly fine lines on the underside of the large mushrooms, radiating from the stem to the cap edge.
Step 4: Finishing Touches
-
Outline everything:
This is the most crucial step for the illustrative style. Use a fine liner brush with black paint (or a fine-tip black paint pen) to outline every element—the door, the individual stones, the mushrooms, and the stems. -
Add greenery:
With dark green paint, flick upward strokes at the base of the mushrooms and door to create grass blades. Mix in a lighter green for highlights on a second layer. -
Paint the path:
At the very bottom, paint small, rounded shapes in white or light grey to create a cobblestone path leading to the door. Outline these in black as well. -
Add subtle splatters:
To mimic the speckled texture of the stone in the background, consider flicking a tiny amount of diluted brown or black paint from an old toothbrush over the empty spaces. -
Seal the rock:
Once the paint is fully cured (give it at least 24 hours), apply a clear matte or satin sealant to protect your miniature masterpiece from the elements.
Place your finished fairy cottage in a potted plant or a hidden garden nook to surprise visitors


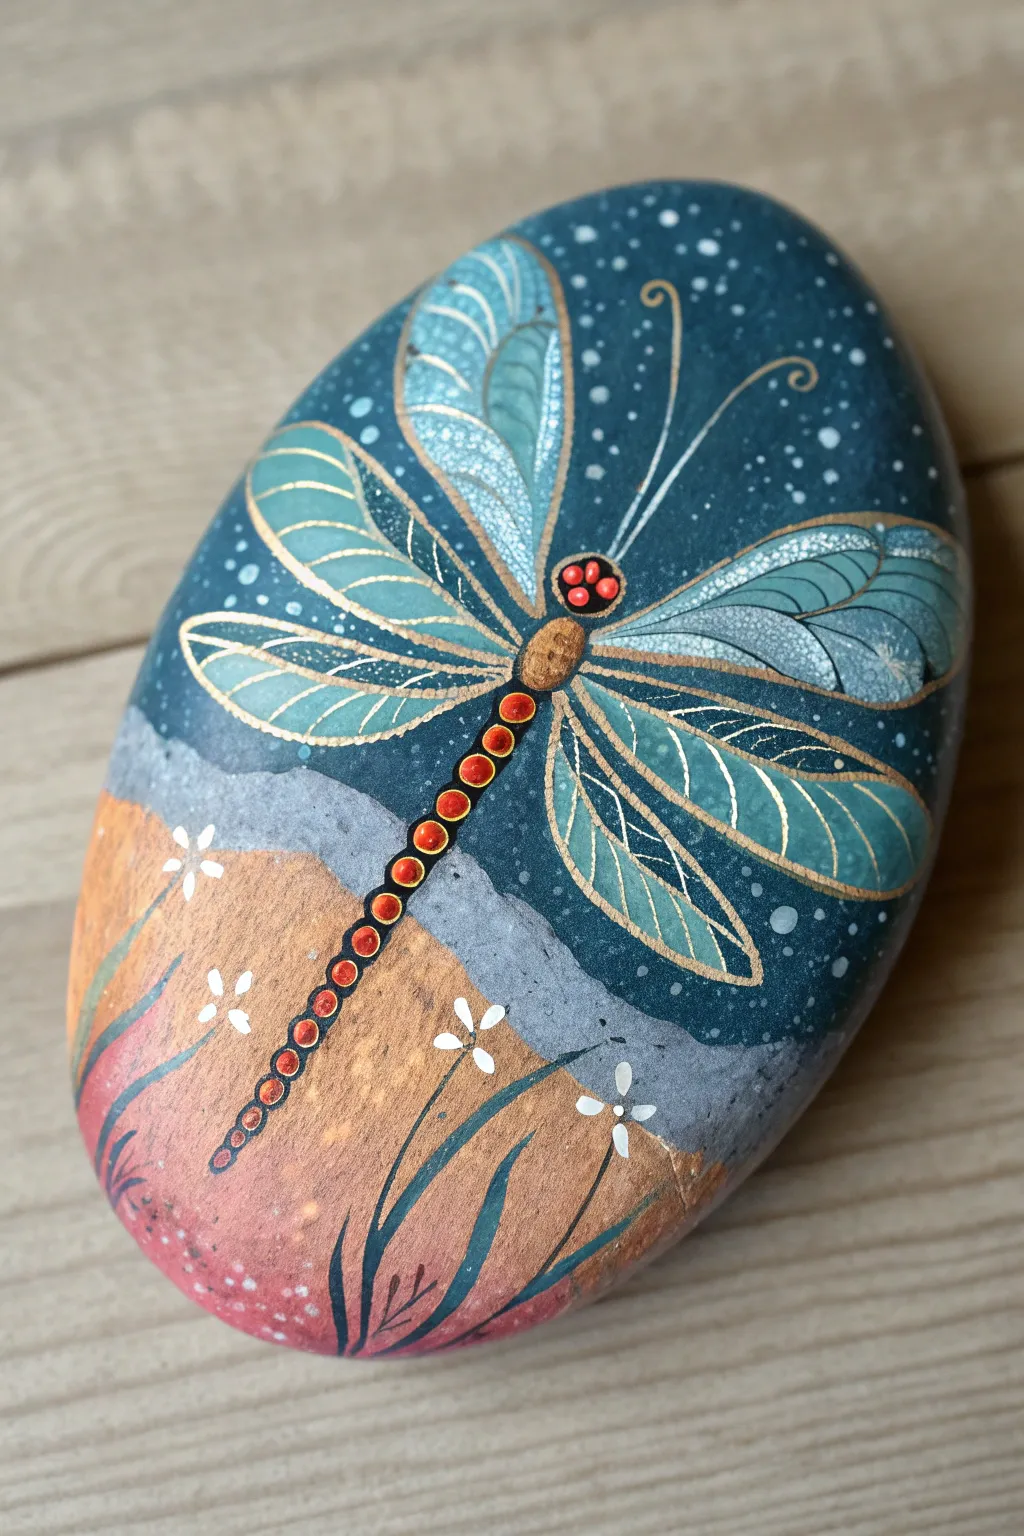
Dragonfly Companion Rock
Transform a simple garden rock into a magical totem featuring an elegant dragonfly soaring over a twilight landscape. This project combines smooth blending techniques with precise gold detailing for a finish that shimmers beautifully in the light.
How-To Guide
Materials
- Smooth, oval river rock (cleaned and dried)
- Acrylic paints: Midnight Blue, Teal, White, Burnt Sienna, Metallic Gold
- Paint pens (Posca or similar): Fine tip Black, White, Gold, Red/Orange
- Sponge dabbers or makeup sponges
- Detail brushes (liner brush and small round brush)
- Dotting tools (various sizes)
- Gloss varnish or clear sealer
Step 1: Setting the Scene
-
Base Coat:
Begin by painting the top two-thirds of your stone with a deep midnight blue or dark teal acrylic paint. This represents the night sky. Let this layer dry completely before moving on. -
Creating the Ground:
Paint the bottom third of the rock with Burnt Sienna or a warm sandy brown. Don’t worry about a perfectly straight horizon line; a slight curve feels more organic and natural. -
Blending the Horizon:
Using a slightly damp sponge or brush, gently blend a lighter blue-grey color where the sky meets the ground to create a misty horizon. I find that dabbing softly helps integrate the two zones without making the colors muddy. -
Adding Texture:
While the ground paint is still slightly tacky, dab in touches of lighter tan and muted pink near the bottom edge to simulate texture and depth int the terrain.
Clean Lines?
If your gold lines feel shaky or thick, wait for them to dry completely. Then, use the background blue color to carefully paint over and trim the edges back to a thin line.
Step 2: Drafting the Dragonfly
-
Body Outline:
Using a very fine liner brush or a gold paint pen, draw a long, slightly curved line down the center for the dragonfly’s tail. Add a small oval for the thorax (chest) and a tiny circle for the head. -
Wing Structure:
Sketch the four large wings using thin gold lines. The top pair should be larger and reach upward, while the bottom pair angles downward. Aim for a teardrop shape for each wing. -
Wing Filling:
Mix a small amount of teal with white to create a pale, translucent blue. Fill inside the gold wing outlines, but leave the paint sheer enough that the dark background peeks through slightly. -
Adding Veins:
Once the wing fill is dry, use your gold pen or liner brush to draw delicate veins inside the wings. A few curved lines following the shape of the wing will create a realistic effect. -
Highlighting Wings:
Add tiny dashes of white inside the top edges of the wings to make them look iridescent and shiny.
Step 3: Details & Decoration
-
The Jeweled Tail:
Using a medium dotting tool and reddish-orange paint, create a line of graduating dots down the tail segment. Start with larger dots near the body and get smaller toward the tip. -
Gilded Outline:
Carefully outline each red tail dot with gold to make them pop against the background. Painting these tiny rings requires a steady hand, so brace your pinky on the table. -
Thorax Details:
Paint the thorax gold, then add three small red dots in a triangle pattern on top for extra decoration. -
Antennae:
Draw two long, curling antennae extending from the head using your finest gold pen or brush. -
Starry Sky:
Dip a toothbrush or stiff brush in watered-down white paint and flick it over the blue sky area to create distant stars. Add a few larger white dots with a tool for brighter stars.
Magical Shimmer
Mix a tiny pinch of iridescent glitter or mica powder into your clear varnish before applying the final coat. This gives the entire stone a subtle, fairy-dust sparkle.
Step 4: Foreground Flora
-
Grass Blades:
Using a dark teal or black paint, paint sweeping, curved lines at the very bottom of the rock to represent tall grass blades swaying in the breeze. -
Tiny Blossoms:
Using a small dotting tool and white paint, add clusters of three or four dots at the ends of some grass blades to create simple white flowers. -
Final Varnish:
Allow the stone to dry for at least 24 hours. Once fully cured, apply a coat of gloss varnish to seal the paint and give the dragonfly a wet, gem-like shine.
Place your finished dragonfly rock among your potted plants to add a hidden touch of whimsy to your garden
Crystal Cave Fairy Hideout
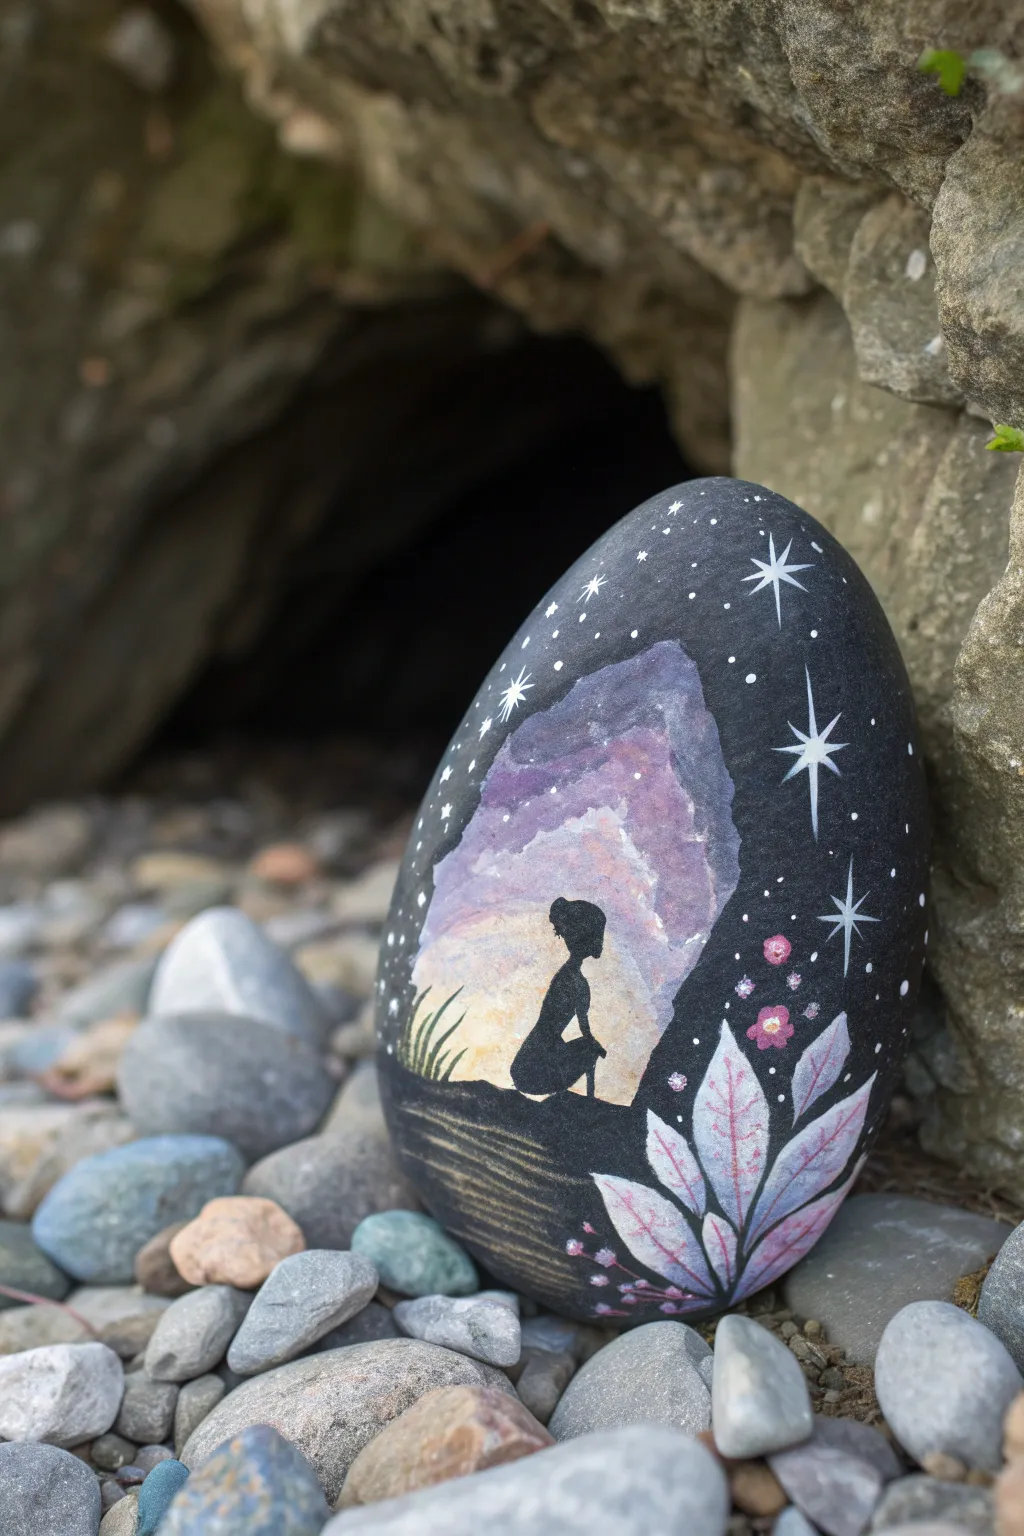
Transform an ordinary stone into a magical portal with this celestial fairy cave design. The contrast between the deep, starry void and the soft, pastel sunset inside the cave creates a stunning depth effect that draws the viewer in.
Detailed Instructions
Materials
- Smooth, oval-shaped river rock (medium to large size)
- Black acrylic paint (matte or satin)
- Titanium white acrylic paint
- Pastel acrylic paints (lavender, soft pink, pale peach/yellow)
- Metallic silver or pearl white paint
- Fine detail brushes (size 00 or 000)
- Small flat brush (size 2-4)
- Round paint sponge or blending brush
- Spray sealer (matte or gloss)
Step 1: Base and Cave Shape
-
Clean canvas:
Begin by washing your rock with soapy water and drying it completely to ensure the paint adheres properly. -
The midnight void:
Using a flat brush, coat the entire surface of the rock with black acrylic paint. You may need two coats to get a solid, opaque coverage. Let this dry completely. -
Mapping the cave:
With a white charcoal pencil or very thinned white paint, lightly outline an irregular, jagged shape in the center of the rock. This will be the opening of your crystal cave. -
Base layer:
Fill in the cave shape with a solid coat of white paint. This primer layer is crucial so your pastel sunset colors will pop against the black background.
Smooth Blends
To get that perfect sunset gradient, mix a tiny bit of slow-drying medium into your acrylics. It keeps the paint workable longer for seamless blending.
Step 2: Sunset and Silhouette
-
Sky gradient:
Start at the top of the white cave area with lavender paint, blending down into pink, and finally pale peach or yellow at the bottom. Use a damp brush to blur the lines between colors for a soft, dreamy transition. -
Cloud details:
While the paint is still slightly tacky, dab in tiny amounts of white or lighter pink to create wispy cloud textures within the cave sky. -
The floor:
Paint a small, wavy horizon line of black at the very bottom of the cave opening to create the ground the fairy sits on. -
Fairy form:
Using your finest detail brush and black paint, carefully draw the silhouette of the fairy. Start with a simple oval for the head and teardrop shape for the body. -
Character details:
Refine the silhouette by adding the bun hairstyle, the knees pulled up to the chest, and the arm resting on the knees. Keep the lines crisp. -
Grassy textures:
Add a few tiny upward flicks of black paint on the left side of the silhouette to represent grass blades silhouetted against the light. -
Ripples:
Beneath the black ground line, paint horizontal, wavy lines using a mix of diluted black and dark grey to suggest water or rocky terrain under the cave floor.
Glow in the Dark
Paint over the white stars and the cave’s moon/sun area with phosphorescent paint. When the lights go out, the cave will actually glow.
Step 3: Celestial Details
-
Starry border:
Switch back to the black area outside the cave. Dip a detail brush or toothpick into white paint and dot tiny stars all around the cave border. -
Major stars:
Create a few larger ‘North Star’ shapes by painting a small cross and adding an X through the center, elongating the vertical and horizontal lines. -
Mystical flora:
In the bottom right corner, paint several elongated leaf shapes using white paint mixed with a tiny drop of lavender. Arrange them in a fan pattern. -
Leaf definition:
Once the leaves are dry, use a fine liner brush with black or dark purple paint to draw a central vein down each leaf for definition. -
Floral accents:
Add small clusters of pink dots near the leaves to create magical floating flowers or pollen spores. -
Final sparkle:
Add tiny dots of metallic silver or pearl white to the centers of the stars and the tips of the leaves for a magical shimmer. -
Protection:
Allow the artwork to cure for at least 24 hours, then spray with a clear sealer to protect your miniature world from the elements.
Now you have a captured moment of twilight magic to keep in your pocket or hide in the garden
Underwater Sea Fairy Rock
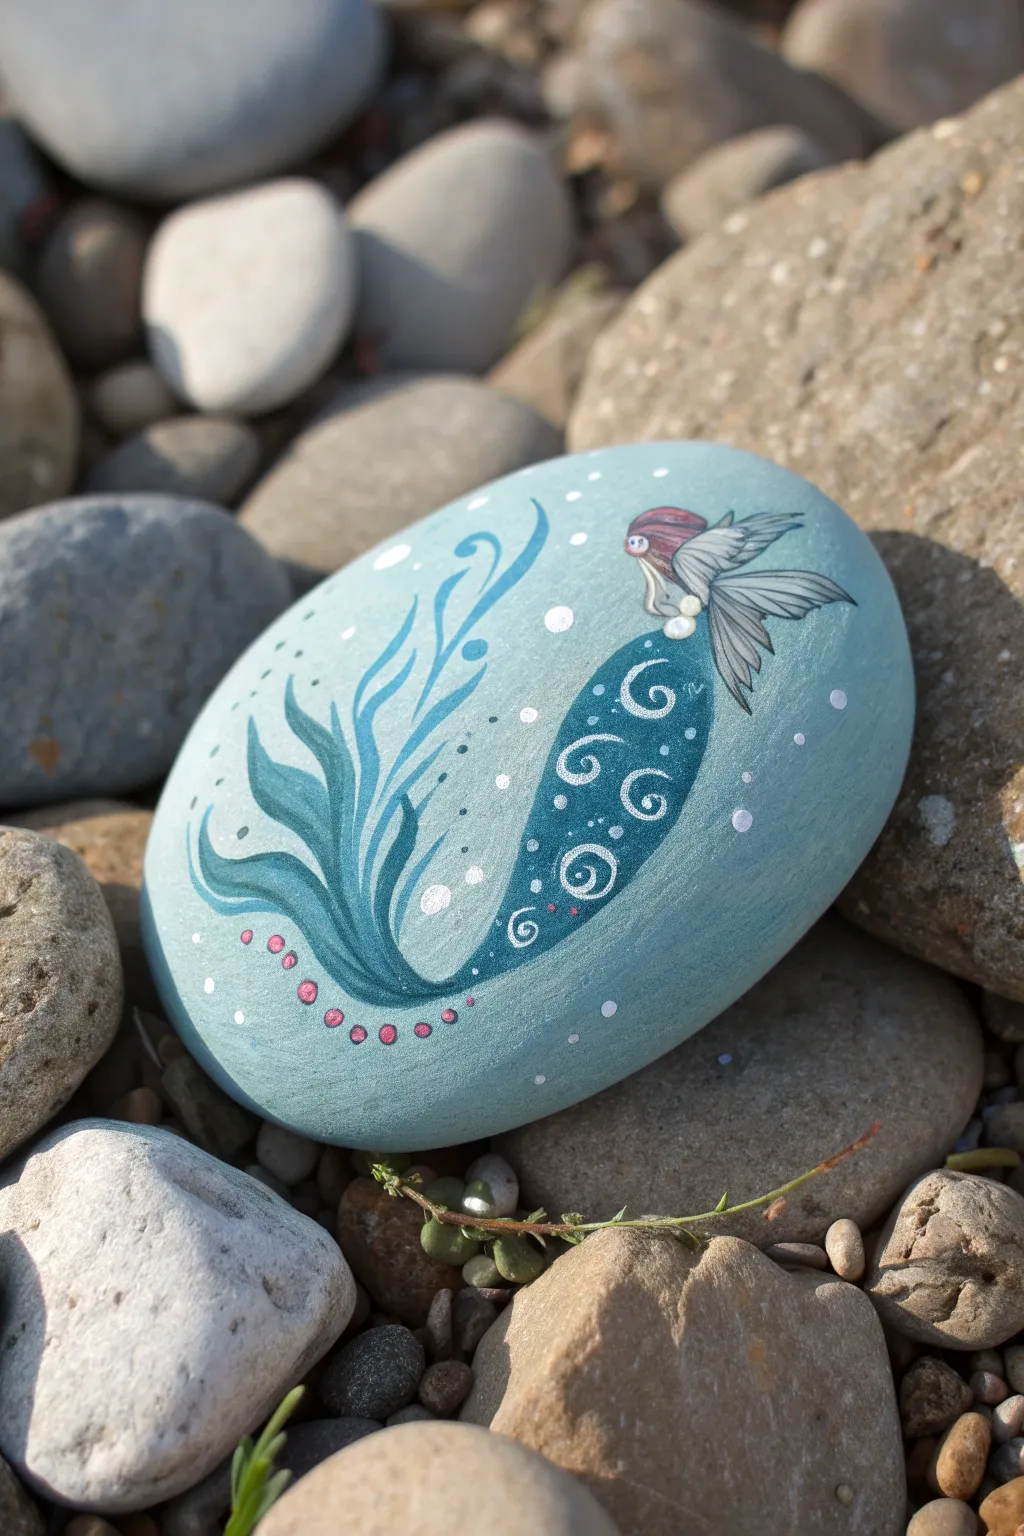
Capture the magic of the ocean depths with this serene sea fairy painted on a smooth river rock. The soothing blue palette and delicate swirling details create an enchanting underwater scene perfect for garden decor or hidden surprises.
Step-by-Step Tutorial
Materials
- Smooth oval river rock (palm-sized)
- Acrylic paints: Light blue (base), Teal/Dark Blue, White, Pink, Flesh tone, Grey/Silver
- Flat brush (medium size)
- Fine liner brush (size 0 or 00)
- Dotting tools (various sizes)
- Pencil for sketching
- Clear acrylic sealer (spray or brush-on)
- Palette or paper plate
- Water cup and paper towels
Step 1: Base Preparation
-
Clean the stone:
Before starting, scrub your rock with warm soapy water to remove any dirt or oils. Let it dry completely in the sun or use a hairdryer to speed things up. -
Apply base coat:
Using a flat brush, paint the entire top surface of the rock with a soft, light blue acrylic paint. You may need two coats to get full, opaque coverage. Let the first coat dry fully before adding the second.
Smooth Operator
Add a drop of water to your white paint before doing the fine liner work. Inky consistency paint flows much better for swirls than thick paint.
Step 2: Sketching and Main Shapes
-
Outline the figure:
Once the blue base is bone-dry, lightly sketch the curve of the sea fairy’s body with a pencil. Draw a sweeping ‘J’ shape for the tail and body, placing the head near the top right. -
Paint the body curve:
Mix a teal or medium-dark blue shade. Using a smaller round brush, fill in the main body section, following your ‘J’ curve. Taper the shape so it’s wider at the hips and thinner toward the tail fin. -
Create the leafy tail:
Instead of a traditional fin, paint organic, leaf-like shapes extending from the end of the tail. Use the same teal color and let the strokes flow naturally upward and to the left, mimicking seaweed. -
Add the head and hair:
Paint a small oval for the face using a flesh tone. Above it, add a sweep of reddish-pink for the hair cap or hairstyle keeping it compact against the head.
Step 3: Wings and Fine Details
-
Paint the wings:
Using a very diluted grey or silver paint, carefully add the wings behind the figure’s back. They should look delicate and semi-transparent, pointing towards the right side of the rock. -
Detail the wings:
Switch to your finest liner brush and black or dark grey paint. Outline the individual feathers of the wings with thin, crisp lines to give them definition. -
Paint the swirls:
Load your liner brush with white paint. On the dark blue body section, paint delicate spiral patterns. Start the pressure a bit heavier and lift off as you curl inward to get a nice tapered line. -
Add body accents:
While you have the white paint, add tiny highlight dots around the swirls on the body to add texture and sparkle. -
Detail the face:
Very carefully add a tiny white dot for the eye within the face oval. You can outline the jawline slightly if you want more definition, but keep it subtle.
Oops, Smudged It?
If you smudge a line, don’t wipe it! Let it dry completely, then paint over the mistake with your base background blue. It’s like a magical eraser.
Step 4: Magical Embellishments
-
Create large bubbles:
Using a medium dotting tool dipped in white, place scattered ‘bubbles’ around the figure. Put a significant one right at the fairy’s hand area, as if she is holding a pearl. -
Add pink accents:
Dip a small dotting tool into pink paint. Create a curved line of dots underneath the tail fin area, graduating the size from large to small for a playful decorative element. -
Finishing bubbles:
Fill in the empty negative space around the fairy with varied sizes of small white dots. I usually cluster a few tiny ones near the tail and wings to suggest movement. -
Final drying:
Allow the entire design to dry for at least 24 hours to ensure the thick dots harden completely. -
Seal:
Protect your artwork with a layer of clear acrylic sealer. A glossy finish works particularly well here to make the blues look wet and oceanic.
Place your finished sea fairy among your potted plants to add a splash of magical color
Mixed-Media Fairy Collage Rock
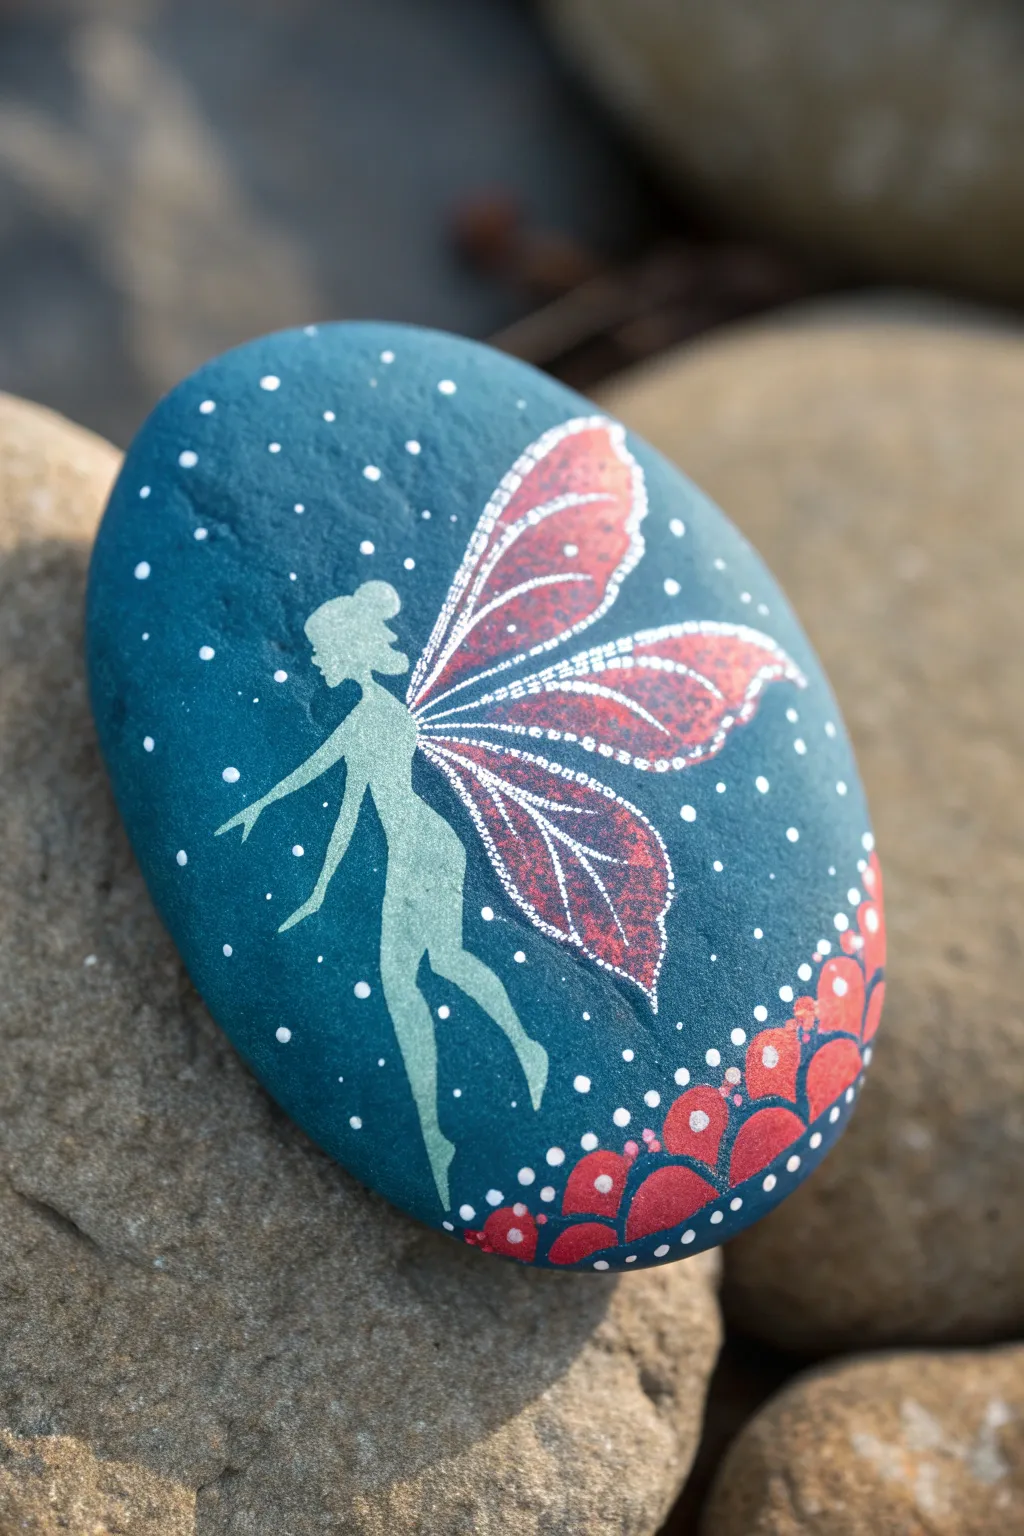
This enchanting rock combines painting and simple collage techniques to create a magical scene without needing advanced drawing skills. The result is a striking silhouette of a fairy floating against a starry teal sky, anchored by whimsical floral details.
How-To Guide
Materials
- Smooth oval river rock
- Deep teal or turquoise acrylic paint
- Light green or silver metallic paint (for the fairy silhouette)
- Red acrylic paint
- White extra-fine tip paint pen or detail brush
- Paper fairy cutout or a fairy silhouette stencil/sticker
- Mod Podge or decoupage glue
- Small flat brush
- Detail round brush (0 or 00 size)
- Sealer (spray or brush-on varnish)
Step 1: Preparing the Canvas
-
Clean the stone:
Begin by scrubbing your rock with warm, soapy water to remove any dirt or oils. Let it dry completely in the sun or use a hairdryer to speed things up. -
Base coat application:
Apply a base coat of deep teal or turquoise acrylic paint. Cover the entire top surface. Depending on your paint’s opacity, you might need two thin coats for solid coverage. -
Dry thoroughly:
Allow the base coat to dry fully before moving on to the next step. This prevents the colors from muddying when you add details.
Collage Shortcut
Can’t paint a fairy? Print an image on tissue paper. Decoupage it onto the rock; the tissue becomes transparent when glued, leaving just the image.
Step 2: Creating the Fairy
-
Fairy placement:
If you are using a paper cutout (decoupage method), cut it out meticulously, especially around the delicate wings. Brush a thin layer of decoupage glue on the back and press it firmly onto the center of the rock. -
Painting the silhouette:
Alternatively, if hand-painting or stenciling, lightly sketch the outline with a pencil. Fill in the body shape with a pale green or metallic silver paint. Keep the lines smooth and fluid. -
Wing base color:
Paint the basic shape of the wings using a deep red or maroon. Don’t worry about the lines yet; just block in the color. -
Adding wing structure:
Using your extra-fine white paint pen or a tiny brush with white paint, draw the veins of the wings. Start with the main spine of the wing and branch out with delicate, curving lines. -
Wing outlining:
Outline the entire wing shape with small, closely spaced white dots. This stippled effect gives the wings a magical, shimmering quality.
Step 3: The Magical Atmosphere
-
Painting the flower mounds:
At the bottom right edge of the rock, paint several semi-circles overlapping each other using red paint. These represent stylized flower petals or mushroom caps. -
Layering petals:
Once the red layer dries, you can add a lighter red or pink wash near the top of each semi-circle to create a sense of dimension. -
Dotting the flowers:
Use your white paint pen to outline the tops of these red mounds with dots. Add a few dots inside the shapes for texture. -
Creating the starry sky:
Now for the background magic. Randomly place white dots of varying sizes across the teal background. Cluster a few together to resemble constellations. -
Connecting the elements:
Continue the dotting pattern down toward the red flowers so the background blends seamlessly with the foreground elements. -
Final touch-ups:
Check your fairy silhouette. If the edges look a bit rough, clean them up with a tiny bit of the teal background paint.
Add Some Sparkle
Before sealing, apply a very thin coat of glitter glaze over the fairy’s wings to make them catch the light like real insect wings.
Step 4: Finishing
-
Seal the artwork:
Once the paint is completely cured (I like to wait overnight just to be safe), apply a clear sealer. A spray sealer works best to avoid smearing the fine white ink details.
Place this magical stone in a garden pot or windowsill where the light can catch the delicate details


Have a question or want to share your own experience? I'd love to hear from you in the comments below!