
If you’re craving Fourth of July face paint that screams celebration without feeling fussy, you’re in the right place. I pulled together a mix of classic red, white, and blue staples and a few artsy twists so you can match the vibe—parade-cute, firework-glam, or full-on bold.
Classic Stars And Stripes Cheek Flag
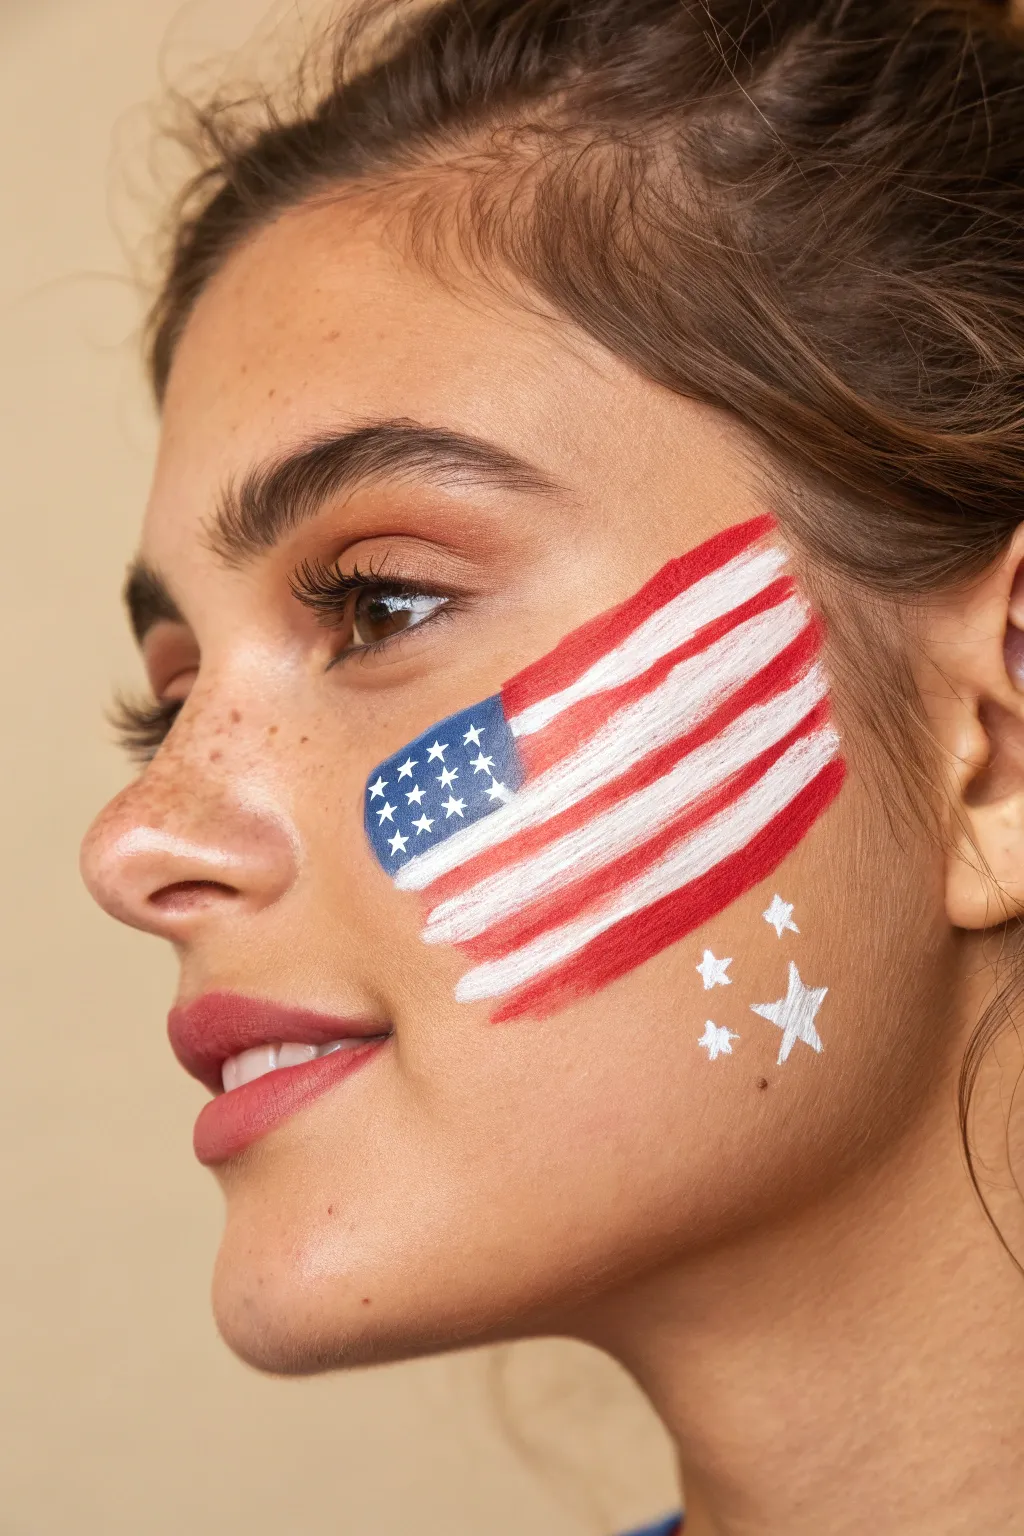
Capture the spirit of Independence Day with this beautifully stylized, windswept flag face paint design. Instead of rigid lines, this look uses organic brushstrokes to create the illusion of a banner fluttering in the breeze right on your cheek.
Detailed Instructions
Materials
- White water-activated face paint
- Red water-activated face paint
- Royal blue water-activated face paint
- Flat shader brush (medium width, approx 1/2 inch)
- Small round detail brush (size 1 or 2)
- Cup of clean water
- Paper towels or cloth
- Setting spray (optional)
Step 1: Setting the Stripes
-
Load the white paint:
Begin by dampening your flat shader brush and loading it generously with white face paint. You want a creamy, opaque consistency, not too watery, to ensure the white stands out against the skin. -
First white stripe:
Starting near the apple of the cheek, pull the brush upwards and diagonally towards the hairline. Let the stroke tamper off naturally at the end to create a sense of movement. -
Create the stripe pattern:
Continue painting alternating white stripes. Leave a gap roughly the same width as your brush between each white stroke. I usually aim for three distinct white stripes as the base. -
Clean and switch colors:
Rinse your flat brush thoroughly in the water and dry it on a paper towel. Load it up with the red face paint, aiming for that same creamy texture. -
Fill the red stripes:
Paint red stripes in the gaps you left between the white ones. Follow the same diagonal, wavy path to maintain the fluttering effect. -
Add the bottom red edge:
Don’t forget to add a final red swoosh at the very bottom of the flag shape to frame the design properly. -
Refine the edges:
If the ends of your flag look too blocky, use the very tip of the brush to feather the ends slightly, reinforcing the windswept look.
Smudge Control
If colors mix muddy on the skin, you’re pressing too hard or the bottom layer is wet. Apply the top color with a light, dabbing touch.
Step 2: The Blue Field of Stars
-
Prepare the blue field:
Clean your flat brush again and load it with royal blue paint. Locate the top left corner of your flag design (closest to the nose). -
Paint the canton:
Paint a rectangular shape over the top few stripes (usually covering the first two or three). Use a gentle dabbing motion to deposit the color solidly without dragging the red and white underneath too much. -
Dry time:
Pause for a moment to let the blue paint set. It needs to be dry to the touch so the white stars we add next won’t turn light blue. -
Load the detail brush:
Switch to your small round detail brush. Load it with white paint, rolling the bristles on your palette to create a sharp, fine point. -
Dot the stars:
Carefully paint small, five-pointed stars onto the blue field. I find it easiest to make a tiny ‘A’ shape and cross it, or simply use five tiny dots for a simpler approach if you are rushing.
Step 3: Floating Accents
-
Placement for extra stars:
Look at the empty space on the cheek below the flag design. This negative space is perfect for balancing the composition. -
Paint the largest star:
Using the white paint on your round brush, draw a larger star slightly lower and to the right of the flag. -
Add trailing stars:
Paint two smaller stars near the large one, creating a small cluster or a trailing effect as if they are falling from the flag. -
Highlighting (Optional):
For extra dimension, you can add thin, translucent white streaks over the red stripes to look like fabric folds, but this is totally optional. -
Set the look:
Once everything is completely dry, you can lightly mist with a setting spray to keep the design smudge-proof throughout your celebration.
Brush Technique
For the ‘windswept’ ends of the flag, flick your wrist quickly at the end of the stroke. This tapers the paint naturally.
Now you have a patriotic masterpiece that looks like it’s dancing in the summer breeze


Star-Spangled Eye Mask
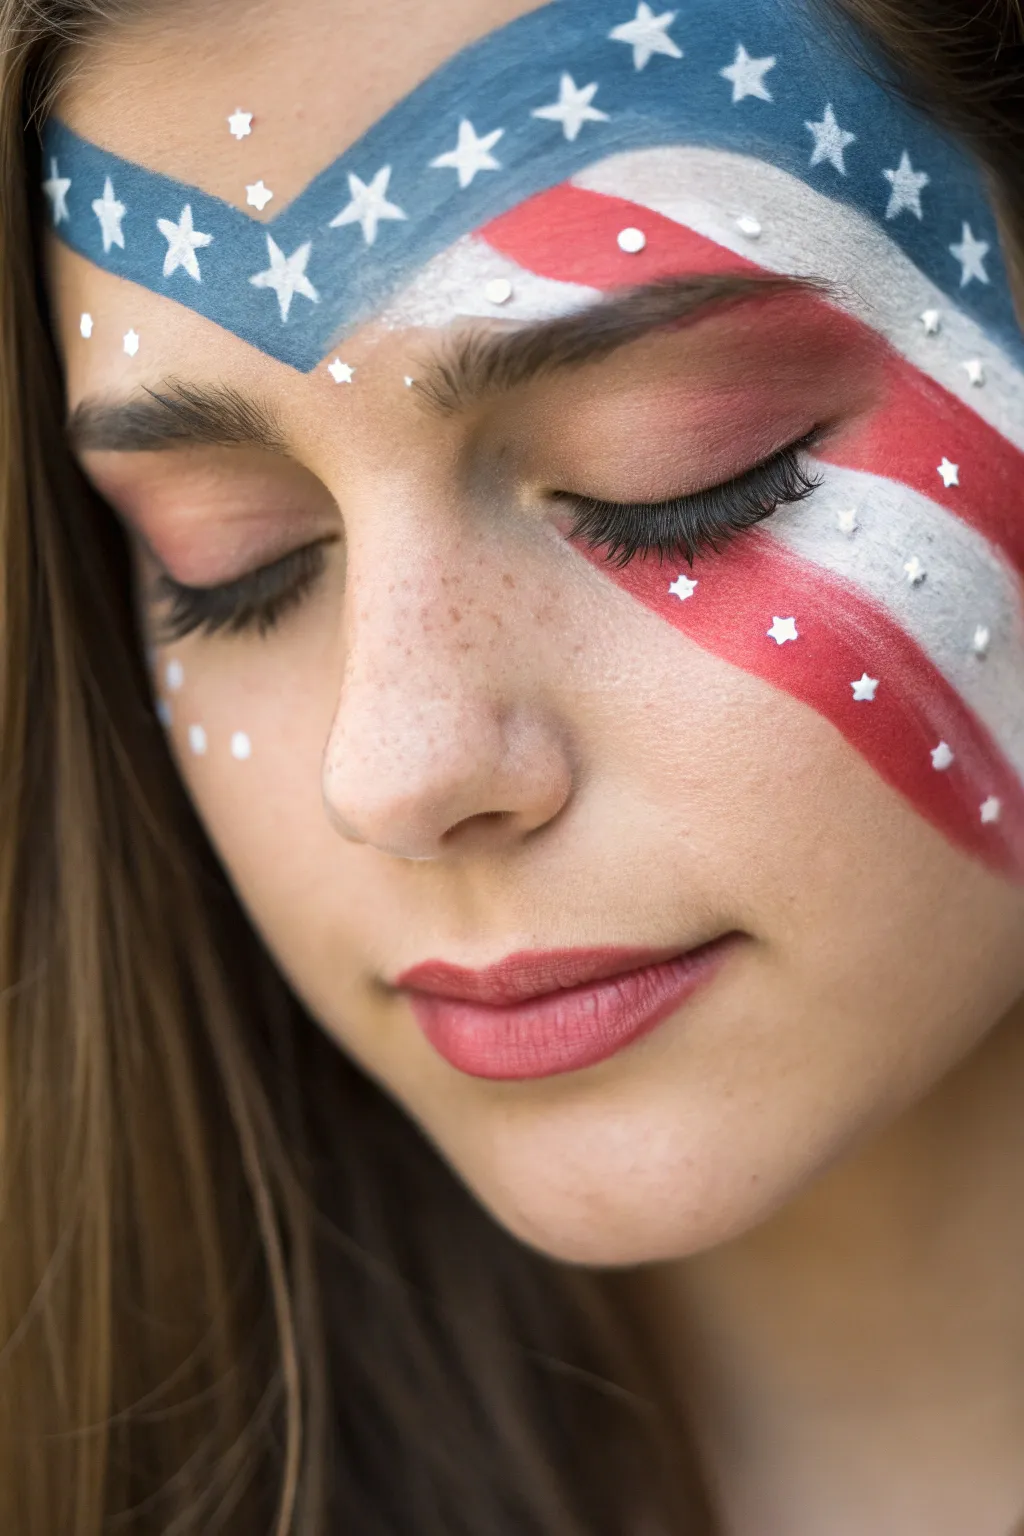
Transform your look for Independence Day with this elegant, mask-style face paint design that sweeps across the forehead and cheeks. Using a classic red, white, and blue palette, this tutorial guides you through creating crisp stripes and delicate stars for a festive yet sophisticated finish.
How-To Guide
Materials
- Face paint palette (Red, Royal Blue, White)
- Medium flat brush (approx. 1/2 inch)
- Fine liner brush (size 0 or 1)
- Small round brush (size 2)
- Cosmetic sponge
- Cup of water
- Paper towels
- Small adhesive star gems (optional)
- Setting spray (optional)
Step 1: Base Structure
-
Clean and prep:
Begin with a clean, dry face free of moisturizers or oils, as these can make water-activated paints slide around. -
Map the blue field:
Load your medium flat brush with royal blue paint. Start above the right eyebrow (your left when looking in a mirror) and sweep a curved band upwards towards the center of the forehead. -
Create the peak:
Bring the blue band down to a point right between the eyebrows, creating a distinct V-shape or chevron peak in the center of the forehead. -
Fill the blue section:
Using the same flat brush, fill in the area above the right eyebrow completely, extending slightly onto the temple to create a solid blue background.
Step 2: Adding the Stripes
-
First white stripe:
Clean your flat brush thoroughly and load it with bright white paint. Starting from the central V-point where the blue ended, paint a wide stripe curving over the left eyebrow and out toward the hairline. -
First red stripe:
Load the flat brush with red paint. Directly underneath the white stripe, paint a parallel red stripe that follows the curve of the eyebrow bone. -
Second white stripe:
Switch back to white. Paint another stripe directly under the red one, passing over the eyelid and onto the upper cheekbone area. -
Second red stripe:
Add a final red stripe below that, sweeping across the cheekbone and angling down towards the ear. -
Check symmetry:
Step back and ensure the flow of the stripes balances with the blue section on the other side. They should look like a continuous waving flag.
Keep it Crisp
For the sharpest lines on stripes, ensure your paint consistency is creamy, not watery. Too much water causes bleeding edges.
Step 3: Details and Stars
-
Paint large stars:
Load a fine liner brush with white paint. On the blue background section, carefully paint 5-pointed stars. I find it easiest to paint a small ‘A’ shape first, then cross the arms. -
Vary star sizes:
Make some stars larger near the center and others smaller near the edges for a dynamic look. -
Add stripe details:
Using the very tip of your small round brush or the back end of a brush handle, dot small white circles randomly across the red stripes to mimic scattered stars or sparkles. -
Highlight the center:
Add a few tiny white starbursts or dots right at the bridge of the nose where the blue and stripes meet to bridge the two sections. -
Cheek accents:
On the cheek below the blue section (the unpainted skin), add three or four small white dots in a cluster for extra decoration. -
Apply gems:
If you want extra sparkle, use cosmetic glue to adhere small star gems over some of the painted white stars on the blue field.
Smudge Fix
If red bleeds into white, wait for it to fully dry. Then, re-apply a thick layer of white over the mistake rather than wiping it off.
Step 4: Final Touches
-
Clean edges:
Take a slightly damp cotton swab or a clean angled brush with a tiny bit of water to sharpen the edges of your stripes if any paint feathered out. -
Lashes:
Apply mascara or false lashes to finish the eyes, ensuring the lashes don’t smudge the wet paint on the eyelids.
Enjoy showing off your patriotic spirit with this artistic and festive face paint design


Firework Burst On The Cheek
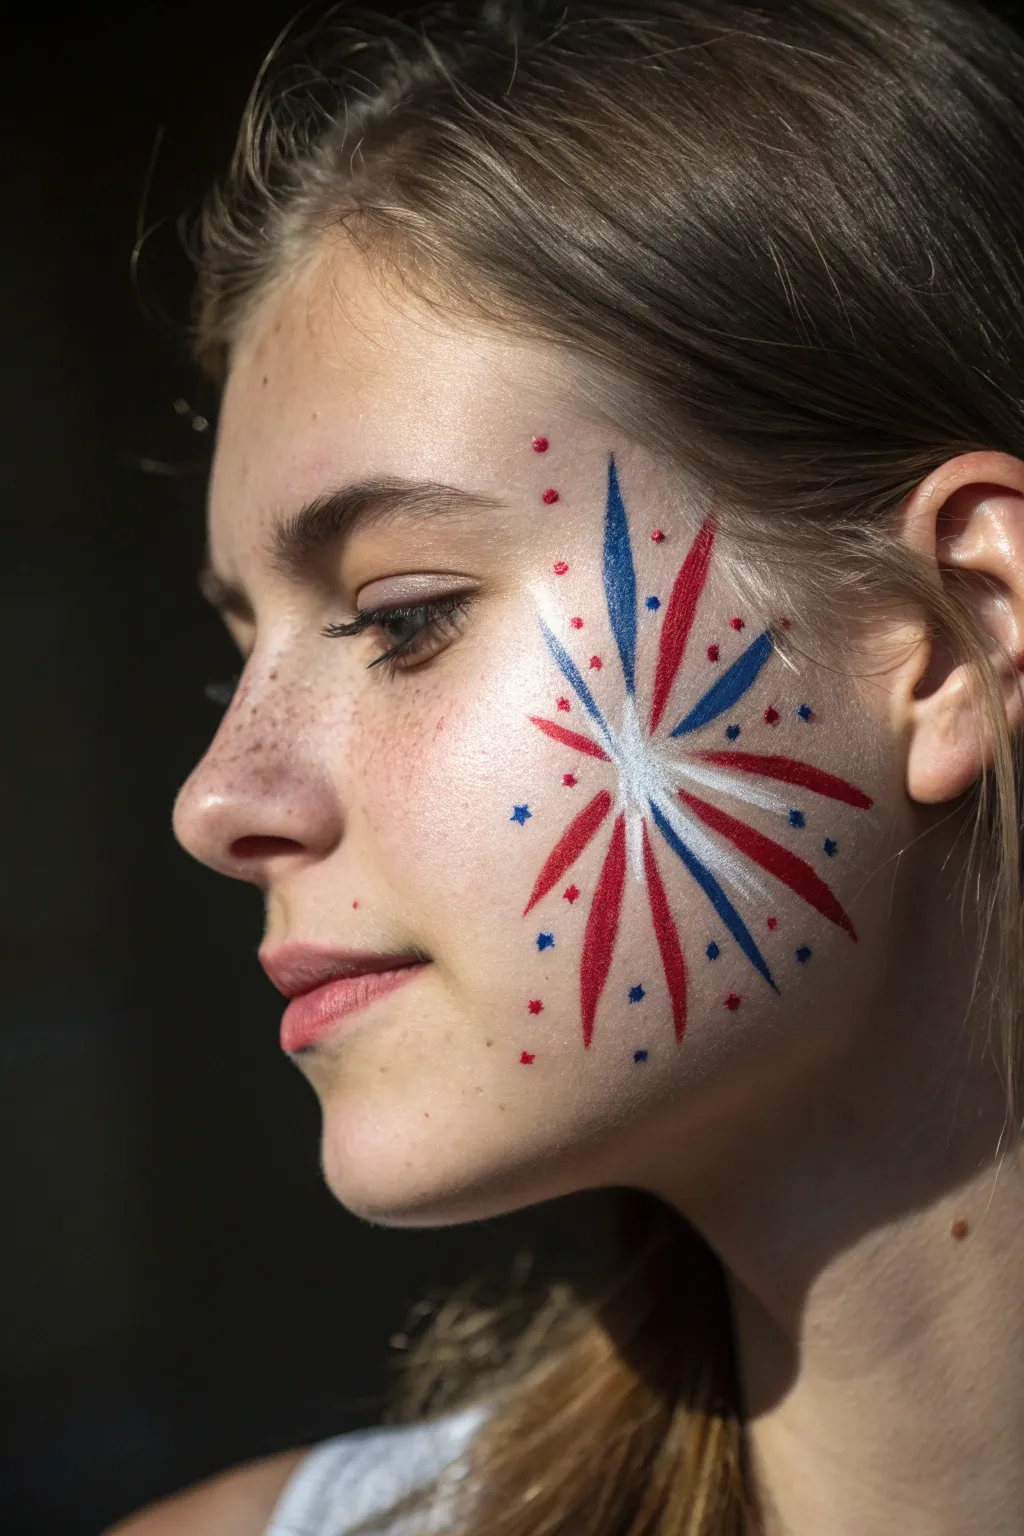
Capture the explosive energy of Independence Day with this elegant yet festive cheek design. By combining sweeping teardrop strokes with delicate stars and dots, you’ll create a sophisticated firework display right on the skin.
Step-by-Step
Materials
- White face paint (water-activated)
- Red face paint (water-activated)
- Blue face paint (water-activated)
- Round brush (size 4 or 5)
- Fine detail brush (size 1 or 2)
- Cup of water
- Paper towels or sponge
Step 1: Setting the Center
-
Load the brush:
Start by dipping your medium round brush into water and swirling it into the white face paint until you have a creamy, opaque consistency. -
Find your focal point:
Visualize a center point high on the cheekbone, slightly towards the outer corner of the eye. This will be the heart of your explosion. -
Create the white burst:
Paint 5-6 short, tapered strokes radiating outward from that center point. Press down to start the stroke wide and lift the brush while pulling outward to create a sharp point, like a sunburst.
Fixing Shakey Lines
If your teardrop shapes look wobbly, your paint is likely too dry. Add a drop of water to your brush to help it glide smoothly across the skin.
Step 2: Adding the Color Rays
-
Prepare the blue:
Clean your brush thoroughly and load it with bright royal blue paint. Ensure the paint isn’t too runny, or it might drip. -
Paint blue rays:
Paint long, sweeping teardrop shapes extending from the white center. Start the pressure near the white center (without covering it completely) and pull outward, tapering to a fine point. I like to place these randomly—maybe one pointing up, one diagonal, and one down. -
Add floating blue elements:
Paint a few smaller, detached blue rays further out, mimicking pieces of the firework flying away. -
Switch to red:
Rinse your brush well and load it with a vibrant red. You want a strong pigment load so it stands out against the skin tone. -
Paint red rays:
Fill in the gaps between the blue rays with long red teardrop strokes. Vary the lengths; make some longer than the blue ones and some shorter to create a dynamic, uneven burst effect. -
Direction matters:
Ensure all your strokes radiate from that single imaginary center point on the cheekbone to keep the perspective correct.
Add Some Glamour
Apply a cosmetic-grade glitter gel over the wet paint or specifically on the white center burst to make the firework truly sparkle in the sun.
Step 3: Finer Details
-
Switch to the detail brush:
Pick up your fine detail brush (size 1 or 2) and reload with blue paint. -
Paint tiny stars:
Scatter 3-4 tiny five-pointed stars around the outer edges of the design. Keep them small and delicate. -
Red dots:
Clean the detail brush and switch to red. Add clusters of small dots in the empty spaces between the rays. -
Vary dot sizes:
Make some dots tiny and others slightly larger by varying how hard you press the tip of the brush to the skin. -
White highlights (optional):
For extra dimension, you can add a tiny streak of white on top of the widest part of the largest blue and red rays once they are dry. -
Final check:
Step back and look at the overall balance. If there’s a large gap, add a small floating teardrop or a couple of extra dots to fill the space.
Now you have a dazzling display of patriotism ready for the parade or barbecue


Sparkler Trail Swirls
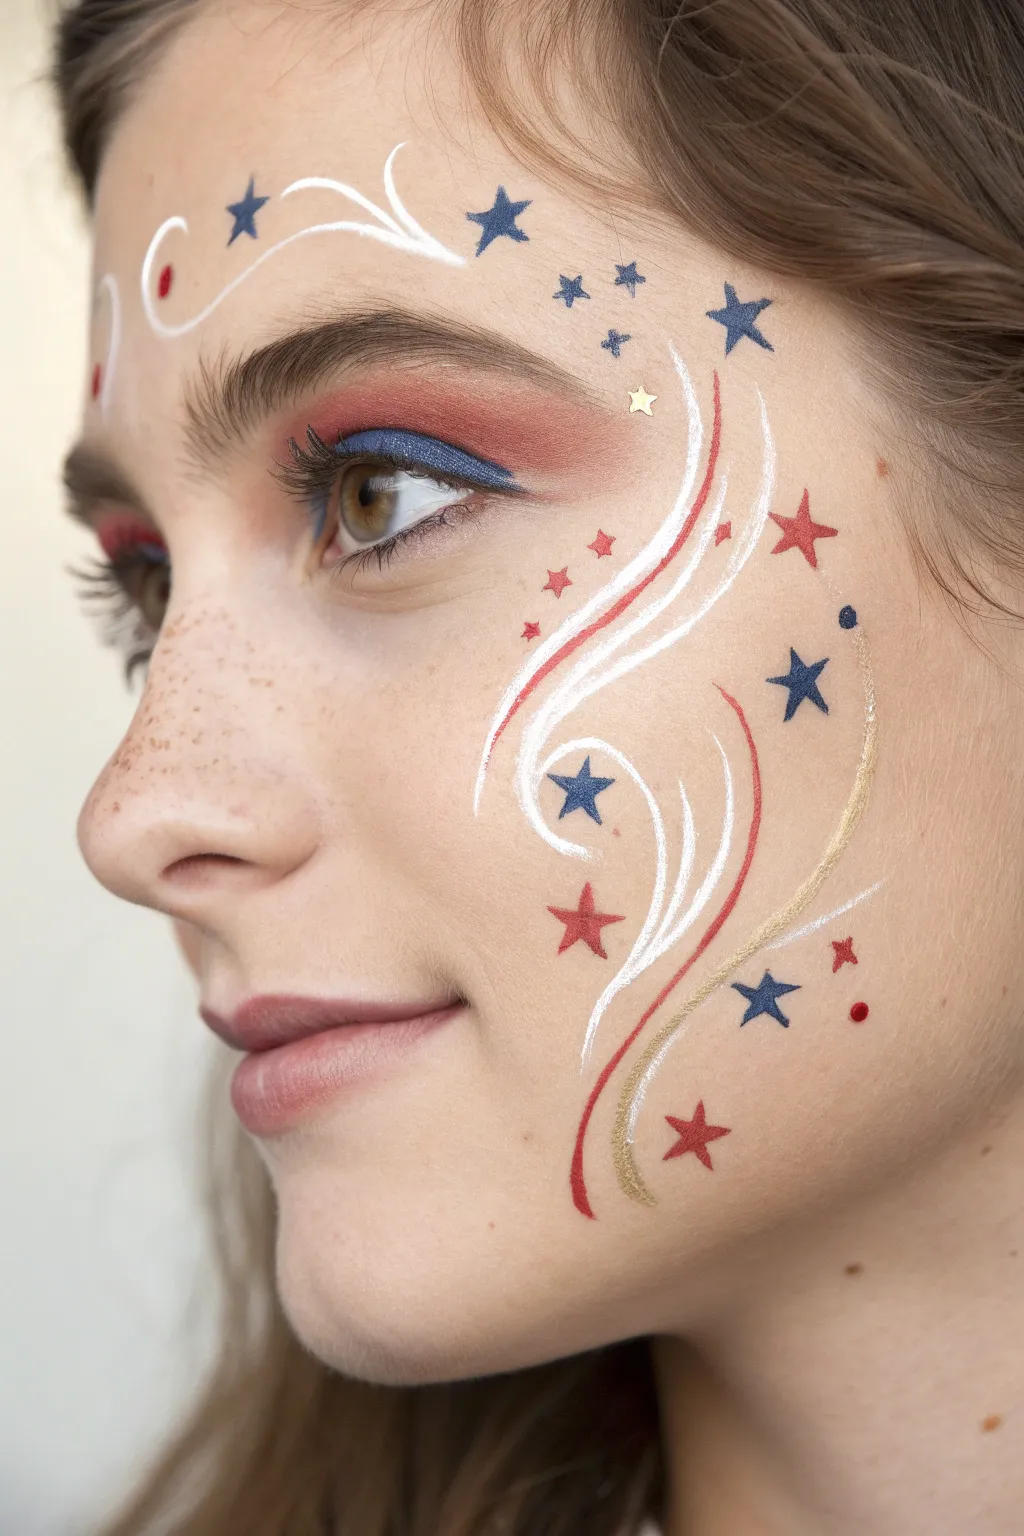
Capture the magic of fireworks with this elegant and celebratory face paint design that flows beautifully along the contours of the face. Combining patriotic colors with delicate stars and swooping lines, this look mimics the trailing light of a sparkler in motion.
Step-by-Step Guide
Materials
- Matte eyeshadow primer
- Eyeshadow palette (Warm red/rust, cool brown)
- Blue liquid or gel eyeliner
- Detail face paint brushes (Fine liner and round size 1)
- Water-activated face paint (White, Red, Navy Blue)
- Liquid glitter eyeliner (Gold)
- Small star stickers or stencils (optional)
- Setting spray
- Mascara
Step 1: Patriotic Eye Base
-
Prime the lids:
Begin by applying a thin layer of matte eyeshadow primer over the entire eyelid to ensure your festive colors stay vibrant and don’t crease. -
Apply the wash of red:
Using a fluffy blending brush, sweep a warm red or rust-colored eyeshadow into the crease and slightly above it, blending outward towards the temple for a soft, diffused look. -
Define the upper lash line:
Take your blue liquid or gel eyeliner and draw a clean line along the upper lashes. Extend it slightly into a small, subtle wing at the outer corner to lift the eye. -
Finish the lashes:
Apply a coat of black mascara to top and bottom lashes to frame the eyes before moving on to the face painting.
Shaky Lines?
If your swirl lines look jagged, try thinning your face paint slightly with more water. The consistency should be like ink so the brush glides without dragging on the skin.
Step 2: Painting the Sparkler Trails
-
Map the flow:
Visualize a curve starting from the temple, swooping down the cheekbone, and curling back up towards the ear. This ‘S’ shape will guide your main lines. -
Start with white lines:
Load a fine liner brush with white face paint. Draw three distinct, flowing lines starting high on the temple. I find it easiest to paint these quickly to help the lines look smooth and fluid. -
Create the main swoop:
Continue the white lines down past the outer corner of the eye, curling them inward toward the center of the cheek before flicking them back out toward the jawline. -
Add red accents:
Clean your brush and load it with red face paint. Paint a single, bold red line parallel to your white swirls, hugging the outer curve of the design to add depth. -
Incorporate the gold:
Using the liquid gold glitter liner or gold face paint, add a thin, shimmering trail that follows the bottom curve of your design, intertwining slightly with the red and white lines.
Glitter Glam
Apply cosmetic glitter glue over the still-wet blue stars and tap on loose blue glitter. This makes the stars catch the light brilliantly.
Step 3: Forehead Florish
-
Create forehead swirls:
Move to the forehead area above the eyebrow. Paint two white curved lines that branch out from the center, resembling the top of a fountain or firework burst. -
Add a center star:
Paint a small, five-pointed blue star right where the forehead swirls originate or slightly below them.
Step 4: Starry Details
-
Place the large stars:
Dip a small round brush into navy blue paint. Carefully hand-paint a few medium-sized five-pointed stars along the path of your swirls—one near the cheek spiral and another higher up on the temple. -
Painting red stars:
Switch to red paint and add complementary red stars scattered amongst the blue ones. Vary the sizes, keeping some quite small for variety. -
Fill the gaps:
Look for empty spaces within your swirl pattern. Use the very tip of your brush to add tiny dots in red and blue to simulate sparks flying off the trail. -
The golden touch:
If you have a tiny star stamp or a very steady hand, add one or two minuscule gold stars near the eye or forehead for extra sparkle.
Step 5: Finishing Touches
-
Add freckles (optional):
If you want to enhance the natural look shown in the photo, lightly dot a brown brow pencil or freckle pen across the nose and upper cheeks. -
Set the look:
Close your eyes tight and mist the entire face with a setting spray to lock the water-activated paints and eyeshadow in place for the holiday festivities.
Step back and admire your patriotic masterpiece, ready to outshine the fireworks display
BRUSH GUIDE
The Right Brush for Every Stroke
From clean lines to bold texture — master brush choice, stroke control, and essential techniques.
Explore the Full Guide
USA Lettering With Star Accents
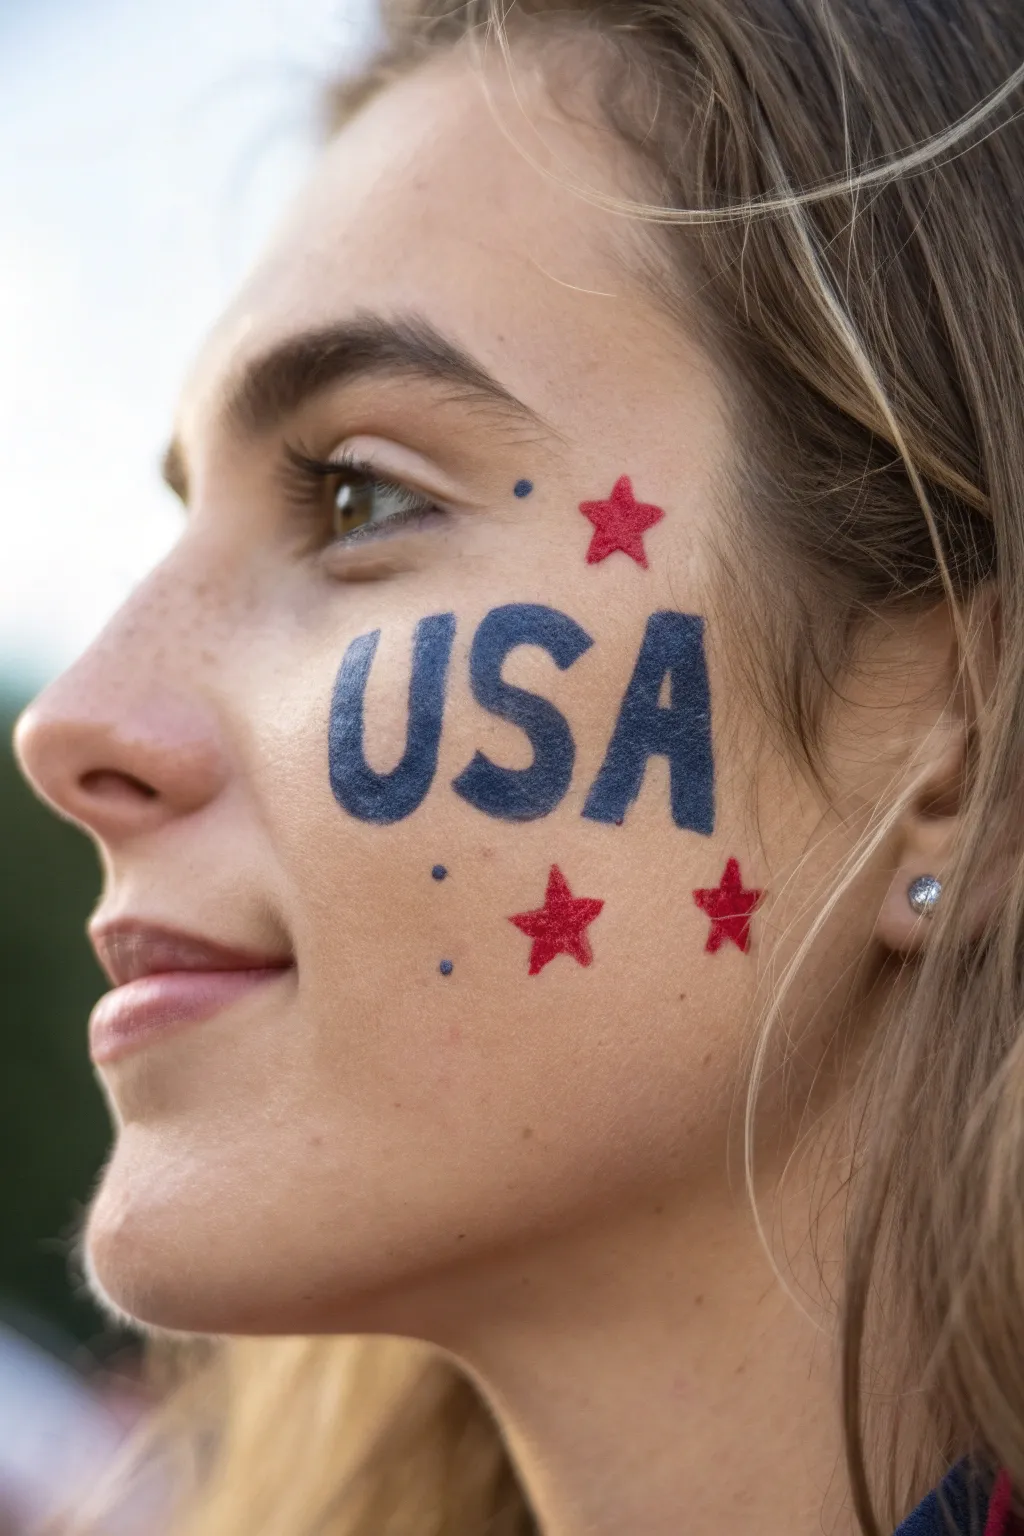
Show off your patriotic spirit with this classic, bold cheek design featuring clean block lettering and festive star accents. The look combines striking navy blue text with pop-art style red stars for a design that stands out in any Fourth of July crowd.
Step-by-Step Tutorial
Materials
- Face paint (Navy Blue)
- Face paint (Bright Red)
- Flat shader brush (small/medium)
- Small round detail brush (size 1 or 2)
- Dotting tool or end of a brush handle
- Makeup sponge (optional for prep)
- Setting spray (optional)
Step 1: Planning the Layout
-
Clean the canvas:
Start with clean, dry skin on the cheek area. If the subject is wearing foundation, ensure it is set with powder so the face paint doesn’t slide around. -
Visualize placement:
Visualize where the letters ‘USA’ will sit. They should be centered on the apple of the cheek, following the natural curve of the cheekbone slightly for a flattering look. -
Mark the boundaries:
Using a very faint amount of blue paint on your small round brush, mark tiny guide dots for the top and bottom of the letters to ensure they stay the same height.
Clean Lines Hack
If you struggle with freehand block letters, use the straight edge of a piece of cardstock as a stencil guide while painting the sides of the ‘U’ and ‘A’.
Step 2: Lettering the USA
-
Start with the S:
Begin with the middle letter ‘S’ to center the design perfectly. Load your flat shader brush with navy blue paint; you want a creamy consistency, not too watery. -
Form the S curve:
Create the top curve of the ‘S’, then the bottom curve. Use the flat edge of the brush to keep the ends of the letter squared off and blocky rather than tapered. -
Thicken the S:
Go back over the ‘S’ to thicken the strokes, ensuring the width is consistent throughout the letter. -
Paint the U:
Move to the left side to paint the ‘U’. Start with two vertical parallel lines, leaving space at the bottom for the curve. -
Connect the U:
Connect the two vertical lines with a U-shaped curve at the bottom. Again, keep the top edges flat and squared off. -
Create the A:
On the right side of the ‘S’, paint an inverted ‘V’ shape for the ‘A’. Make sure the legs match the width of the other letters. -
Cross the A:
Add the horizontal crossbar to the ‘A’. This should be slightly lower than the midpoint of the letter for a modern block-letter style. -
Refine edges:
Switch to your small round detail brush to sharpen any fuzzy edges on the letters and fill in any patchy spots for solid opacity.
Step 3: Adding Accents
-
Position the first star:
Load a small round brush with bright red paint. Place the first star slightly above and to the right of the letters, near the outer corner of the eye. -
Paint the star shape:
Paint a simple five-point star. I find it easiest to paint an inverted ‘V’ first, then cross the arms, filling in the center last. -
Add lower stars:
Paint two more red stars below the lettering. Place one under the ‘A’ and another slightly lower and to the left under the ‘S’ to create a scattered effect. -
Create blue dots:
Dip a dotting tool or the back end of a slim paintbrush handle into the navy blue paint. -
Place detail dots:
Press gently to add three small dots: one above the ‘S’, and two vertically aligned between the ‘U’ and the cluster of bottom stars.
Add Some Sparkle
Before the red paint on the stars dries completely, tap a small amount of cosmetic-grade silver or red glitter onto the center of each star for immediate impact.
Step 4: Final Touches
-
Check symmetry:
Step back and look at the design. If any star points look uneven, carefully extend them with the very tip of your detail brush. -
Set the paint:
Once the paint is fully dry to the touch, lightly mist with a setting spray to keep the design crisp neatly all day long.
You now have a spirited, clean design ready for the festivities
Fast Triple-Star Temple Accent
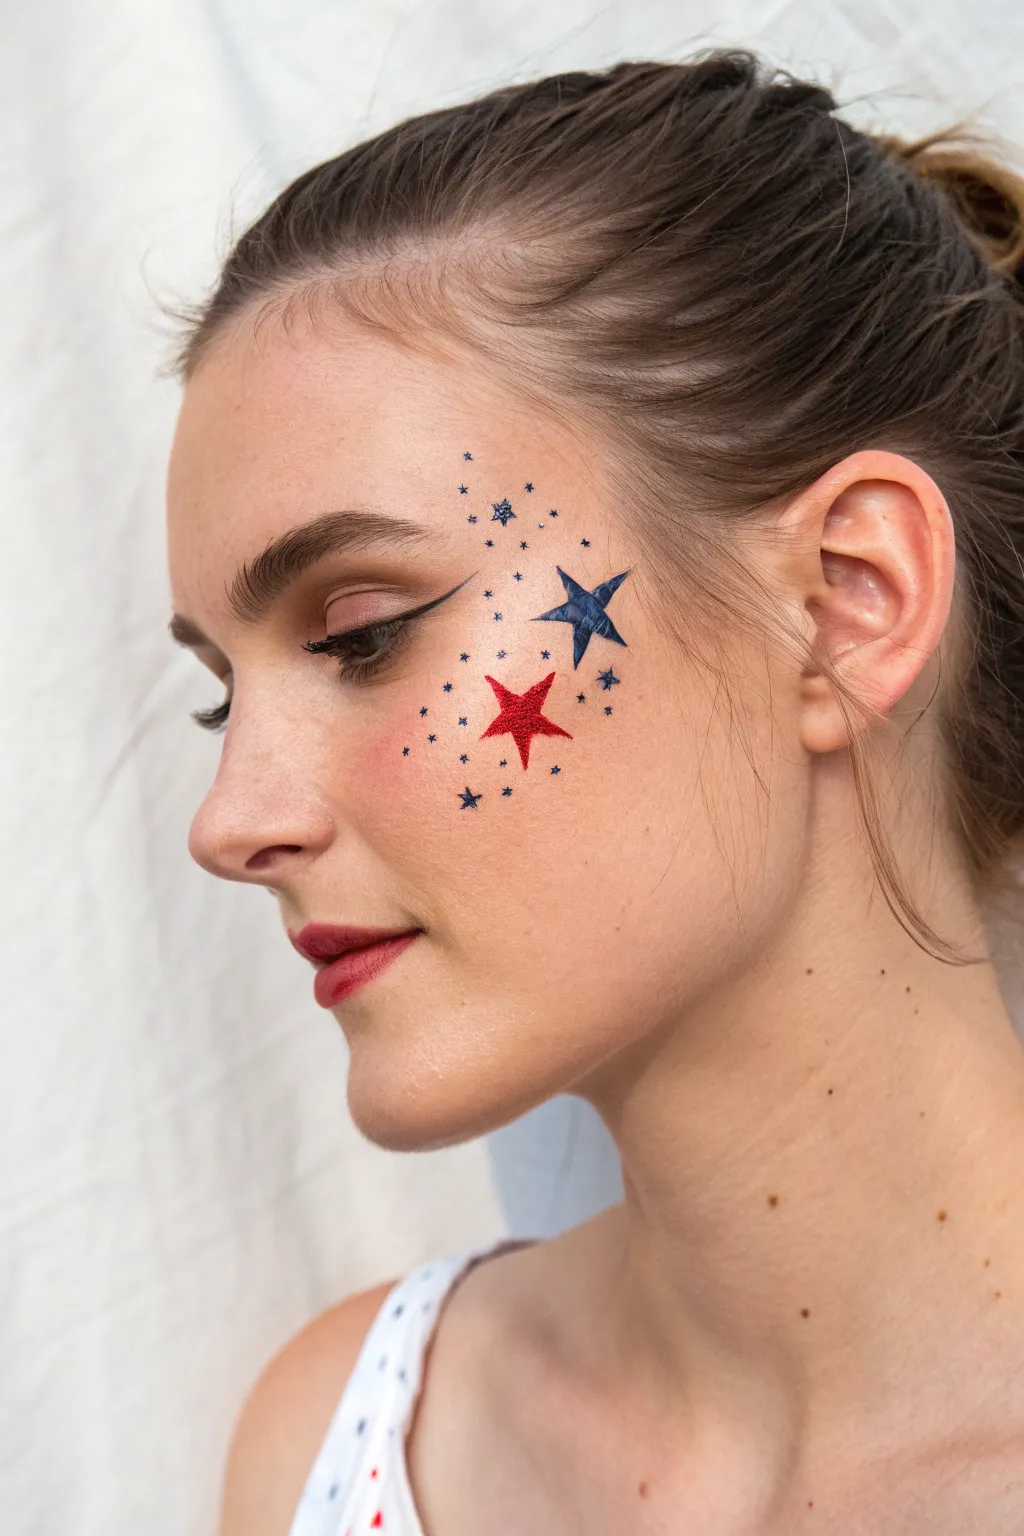
Add a patriotic shimmer to your holiday look with this elegant cheek design that balances bold stars with delicate constellations. It’s a quick yet striking way to celebrate the Fourth of July without committing to a full-face mask.
Detailed Instructions
Materials
- Red face paint (water-activated or cream)
- Dark blue face paint (water-activated or cream)
- Fine detail brush (size 0 or 1)
- Small flat or angled brush (optional for larger stars)
- Cosmetic grade glitter (red and blue)
- Setting spray or fixing gel
- Liquid eyeliner (black)
- Cleansing wipes (for corrections)
Step 1: Preparation & Base
-
Cleanse the canvas:
Start with clean, dry skin on the temple and upper cheekbone area. If you are wearing foundation, ensure it has been set with powder so the face paint adheres properly without sliding. -
Positioning check:
Visualize the placement before painting. The design should flow from the outer corner of the eye up towards the hairline and down slightly onto the cheekbone.
Use Stencils for Speed
If freehanding stars is tricky, use a small adhesive stencil or a star-shaped hole punch on masking tape to get perfect points instantly.
Step 2: Painting the Main Stars
-
Star #1: The Red Centerpiece:
Load your brush with red face paint. Locate the spot just below the outer eye corner on the upper cheekbone. Carefully outline a medium-sized five-pointed star. -
Fill in the red:
Once the outline feels right, fill in the center of the red star completely. Keep the edges sharp and defined. -
Star #2: The Blue Major:
Clean your brush or switch to a new one for the blue paint. Position a slightly larger blue star above and behind the red one, closer to the temple. -
Fill in the blue:
Fill this blue star completely, ensuring the points are crisp. This star anchors the upper part of the design. -
Star #3: The Blue Minor:
Paint a third, smaller blue star situated higher up near the hairline, slightly tucked away. This creates a pleasing visual triangle with the first two stars.
Step 3: Creating the Constellation
-
Switch to fine detail:
Using your finest detail brush (size 0 works best here), load it with the dark blue paint. You want a creamy, inky consistency for tiny dots and shapes. -
Tiny star scatter:
Begin painting miniature five-pointed stars around the main trio. Keep them very small—some can just be simple crosses or asterisks to imply a star shape. -
Adding micro-dots:
Between the stars, gently tap the tip of your brush to create tiny dots. Vary the pressure slightly so the dots aren’t all uniform, mimicking a distant galaxy. -
Placement strategy:
Concentrate these tiny details in the negative space between the large stars and extend them slightly outward to fade the design into the skin. -
Red accents:
Clean your fine brush and dip into the red paint again. Add just a few tiny red dots or micro-stars among the blue constellation to tie the color scheme together.
Make It 3D
Swap the glitter for small self-adhesive rhinestones on the center of the painted stars for extra texture and sparkle under the fireworks.
Step 4: Finishing Touches
-
Glitter application:
While the paint is still slightly tacky (or using a dab of fixing gel), gently press red cosmetic glitter onto the center of the red star. -
Blue shimmer:
Repeat the process with blue glitter on the two larger blue stars. I find tapping the glitter on with a finger gives the densest payoff. -
Enhance the eyes:
Apply a sharp winged eyeliner in black. The wing should run parallel to the flow of the stars, harmonizing the makeup with the face paint. -
Set the look:
Mist a setting spray over the area from a distance to lock the design in place and prevent smudging throughout the day.
With your stars aligned and shimmering, you are ready to light up the festivities

PENCIL GUIDE
Understanding Pencil Grades from H to B
From first sketch to finished drawing — learn pencil grades, line control, and shading techniques.
Explore the Full Guide
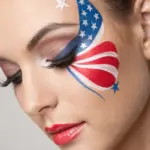
Red, White, And Blue Butterfly Eyes
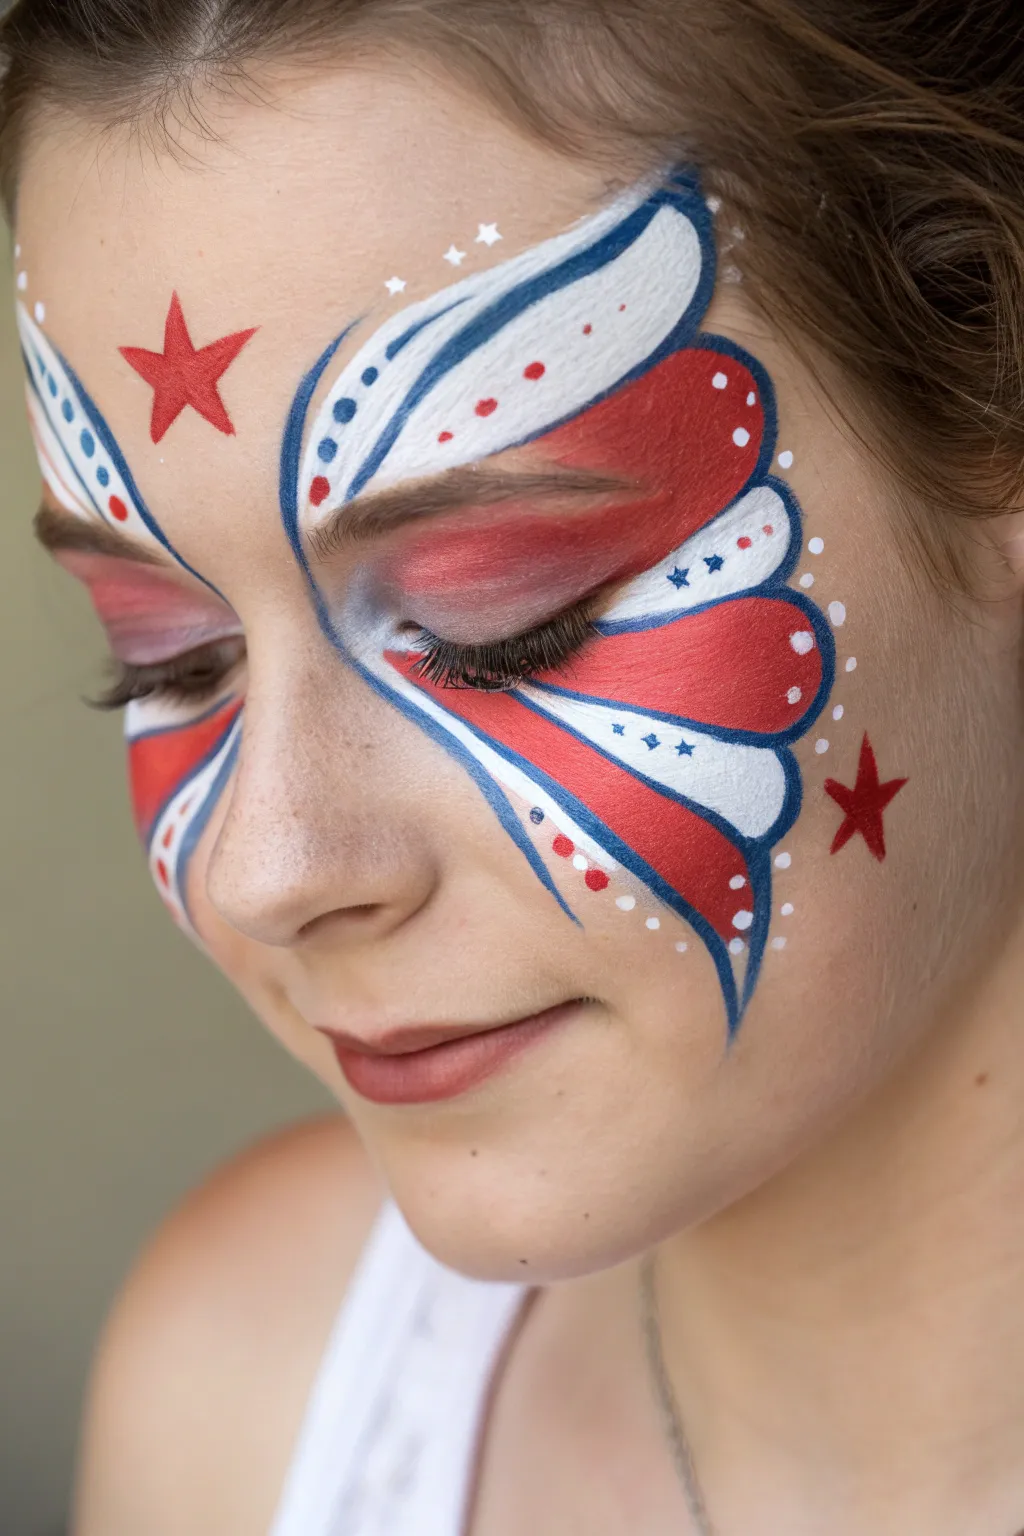
Transform your look for the Fourth of July with this elegant butterfly eye design that sweeps red, white, and blue across the face in delicate petals. This intricate style combines bold face paint with soft eyeshadow for a stunning, patriotic masquerade effect.
Step-by-Step Tutorial
Materials
- Red face paint (high opacity)
- White face paint
- Dark blue face paint
- Red eyeshadow
- White or shimmer eyeshadow
- Flat brush (small to medium)
- Fine liner brush
- Round brush (size 2 or 4)
- Makeup sponge
- Setting spray (optional)
- Small gems (optional)
Step 1: Eyeshadow Base
-
Prep the eyelid:
Begin with a clean, dry face. Apply an eyeshadow primer or a thin layer of concealer to the eyelids to help the pigment pop and stay put all day. -
Apply red shadow:
Using an eyeshadow brush, press vibrant red eyeshadow onto the entire mobile eyelid. Blend the color upwards slightly into the crease and fade it outward towards the temple, creating a soft wing shape. -
Add dimension:
Take a touch of dark blue eyeshadow or face paint on a smaller brush and gently smudge it into the outer corner of the eye and along the lower lash line to deepen the gaze.
Smudge Control
If you make a mistake with the blue outline, wait for it to dry completely. Then, use a damp Q-tip to lift the error away without smearing it into the skin foundation.
Step 2: Painting the Wings
-
Outline the top wing:
Load a fine liner brush with blue paint. Start from the inner corner of the eyebrow, arching up onto the forehead and curving down towards the temple to define the top of the butterfly wing. -
Draw the lower wing:
Continue the blue outline from the outer corner of the eye, sweeping down onto the cheekbone and curling back up towards the nose to create the bottom teardrop shape. -
Fill the white sections:
Using a clean flat brush loaded with white paint, fill in the upper section of the top wing. Make your strokes follow the curve of the outline for a smooth texture. -
Add the red stripes:
Switch to a round brush with red paint. Paint a thick, curved teardrop shape filling the middle section of the wing design, right over the temple area. -
Create the lower stripes:
On the cheek, paint alternating stripes of red and white inside your blue outline. I like to start with the white center stripe first to ensure the spacing is even. -
Define the segments:
Reload your liner brush with blue paint. Carefully outline each colored segment (the red and white painted shapes) to separate them clearly, just like the veins of a butterfly wing.
Step 3: Details & Highlights
-
Add interior dots:
Dip the handle end of a small brush into red paint. Dot along the white section of the top wing. Do the same with blue paint on the white stripes on the cheek. -
Paint exterior dots:
Using white paint and a detail brush or dotting tool, create a series of small dots following the outside edge of the blue wing outline, trailing off near the temple. -
Draw the stars:
Use a fine brush and red paint to draw a sharp five-pointed star on the forehead above the eyebrow. Add a smaller red star on the cheekbone. -
Detail with blue stars:
Inside the white stripe on the cheek, use your tiniest liner brush and blue paint to add two or three miniature stars. -
Highlight the wing tips:
Add tiny teardrop strokes or dots of white paint at the very tips of the red sections to add dimension and make the wings look glossy. -
Mascara application:
Carefully apply black mascara to top and bottom lashes to frame the eye without smudging your fresh paint.
Level It Up
Press small crystal rhinestones into the center of the painted stars or along the outer edge of the wing using eyelash glue for 3D sparkle.
Finish with a setting spray to lock in your patriotic masterpiece for the whole celebration
Patriotic Eagle-Inspired Eye Design
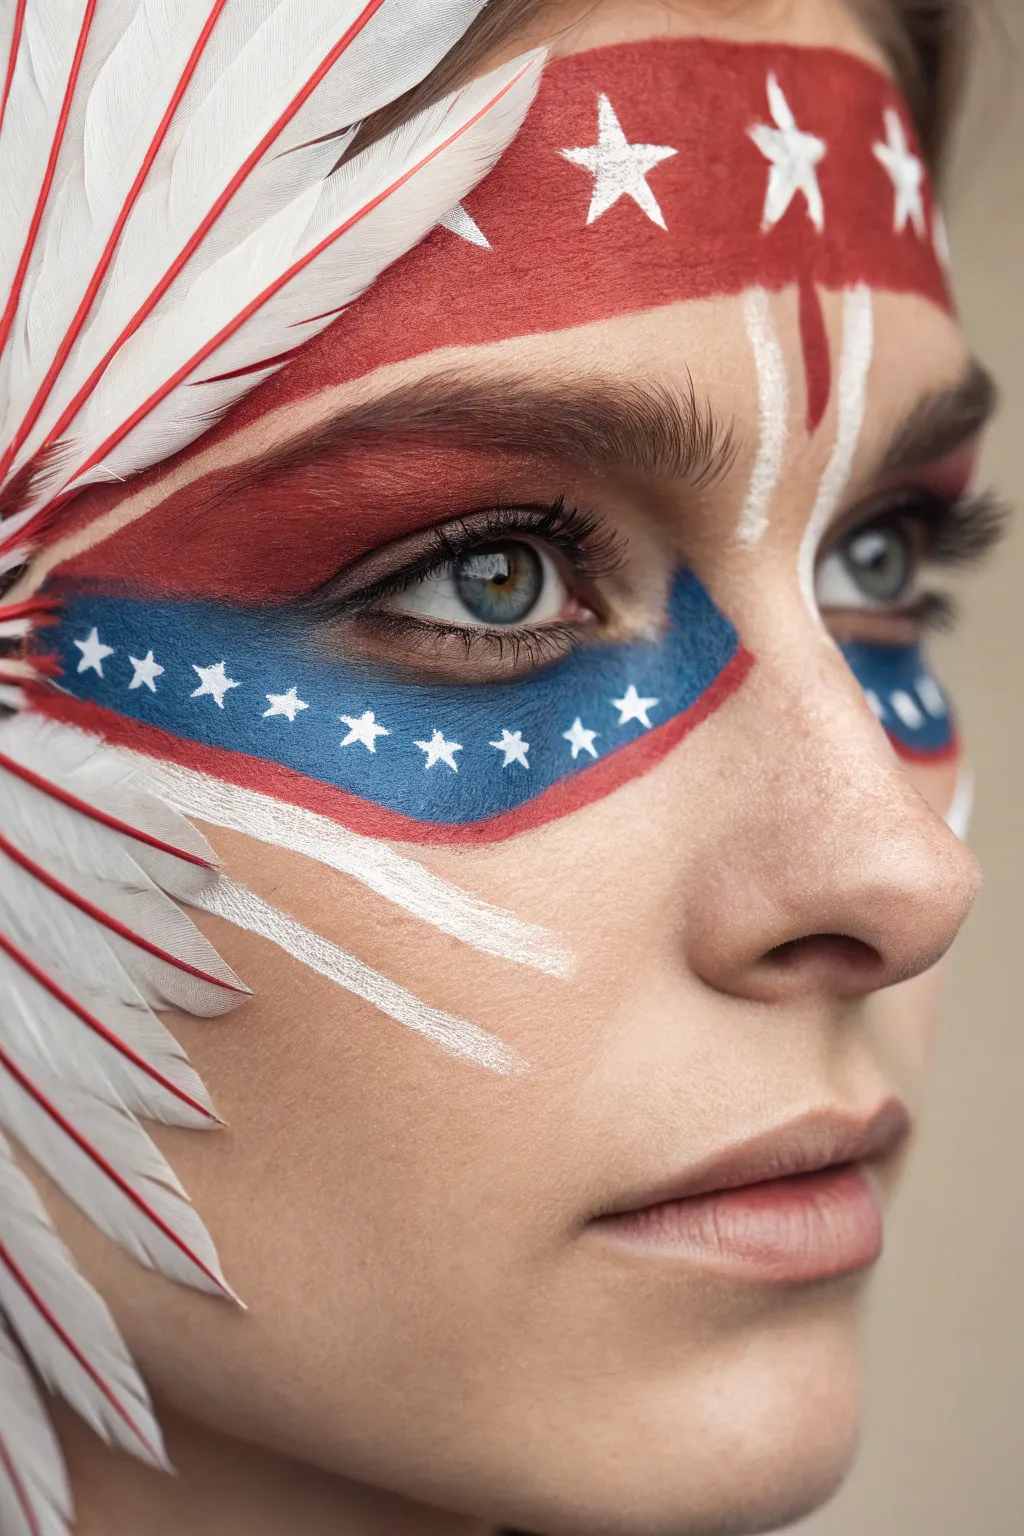
Transform into a symbol of freedom with this intricate, eagle-inspired design that merges classic face painting with festive patriotism. The striking combination of a starry red forehead band and sweeping blue feathered under-eyes creates a majestic look perfect for parades or festivals.
Step-by-Step
Materials
- High-quality face paint palette (Red, White, Royal Blue)
- Flat brush (medium width)
- Fine detail brush (round tip)
- Small angled brush
- Makeup sponge
- Setting spray
- Small cup of water
- Paper towels
Step 1: Forehead Foundation
-
Paint the Red Band:
Load a medium flat brush with bright red face paint. Create a broad, horizontal band across the forehead, positioning it just above the eyebrows. -
Shape the Edges:
Before the paint dries, gently soften the upper edge of the band to give it a slightly organic, feathered feel rather than a harsh straight line. -
Add the Center Detail:
Using the edge of your flat brush or a smaller round brush, extend a red vertical mark down the center of the forehead, stopping right between the eyebrows to anchor the design.
Star Stencils
Struggling with freehand stars? Use a small stick-on nail art stencil. Stick it on the dry base paint, dab white paint over it with a sponge, and peel off immediately for perfect shape.
Step 2: Starry Sky Details
-
Create the Stars:
Switch to your fine detail brush and load it with opaque white paint. Carefully paint five-pointed stars across the red forehead band. -
Placement Strategy:
I like to start with the center star to ensure symmetry, then add the stars on either side, spacing them evenly toward the temples. -
Sharpen the Points:
Go back over the star tips with a tiny amount of fresh white paint to make them crisp and sharp against the red background.
Step 3: The Eagle Eye Mask
-
Outline the Blue Wing:
Using a small angled brush and royal blue paint, outline a sweeping shape under the eye. Start from the inner corner, sweep down across the cheekbone, and flick upward toward the temple. -
Fill the Blue Field:
Fill in inside your outline with the royal blue paint using a flat brush. Ensure the coverage is solid and opaque. -
Under-Eye Lining:
Carefully bring the blue paint right up to the lower lash line for a dramatic, defined look, being gentle around the sensitive eye area. -
Add the Red Accent:
Clean your angled brush and pick up red paint. Draw a thin, precise line underneath the blue shape, following its curve perfectly. -
Starry Cheeks:
Return to your fine detail brush and white paint. Add small white stars in a row across the blue field, following the curve of the shape.
Add Some Sparkle
Before the blue paint fully dries, tap a tiny bit of cosmetic-grade silver glitter onto the center of the stars on the cheeks to catch the sunlight.
Step 4: Feathered Accents
-
Bridge of the Nose:
Using a liner brush and white paint, draw two vertical lines down the bridge of the nose. Start from the forehead and fade them out slightly as you move down. -
Cheek Feathers:
On the cheekbone below the eye design, paint two long, sweeping white strokes that mimic feathers. Angle them downward and outward toward the jawline. -
Texture the White:
For a realistic feather effect, use a slightly drier brush for these white strokes so the edges look wispy and textured rather than solid blocks. -
Define the Eyes:
Apply a coat of mascara to upper and lower lashes to frame the eyes and make the blue paint pop. -
Set the Look:
Close your eyes and lightly mist the entire face with a makeup setting spray to prevent smudging throughout the day.
You are now ready to celebrate with a stunning and artistic tribute to independence


Bold Full-Face Flag Mask
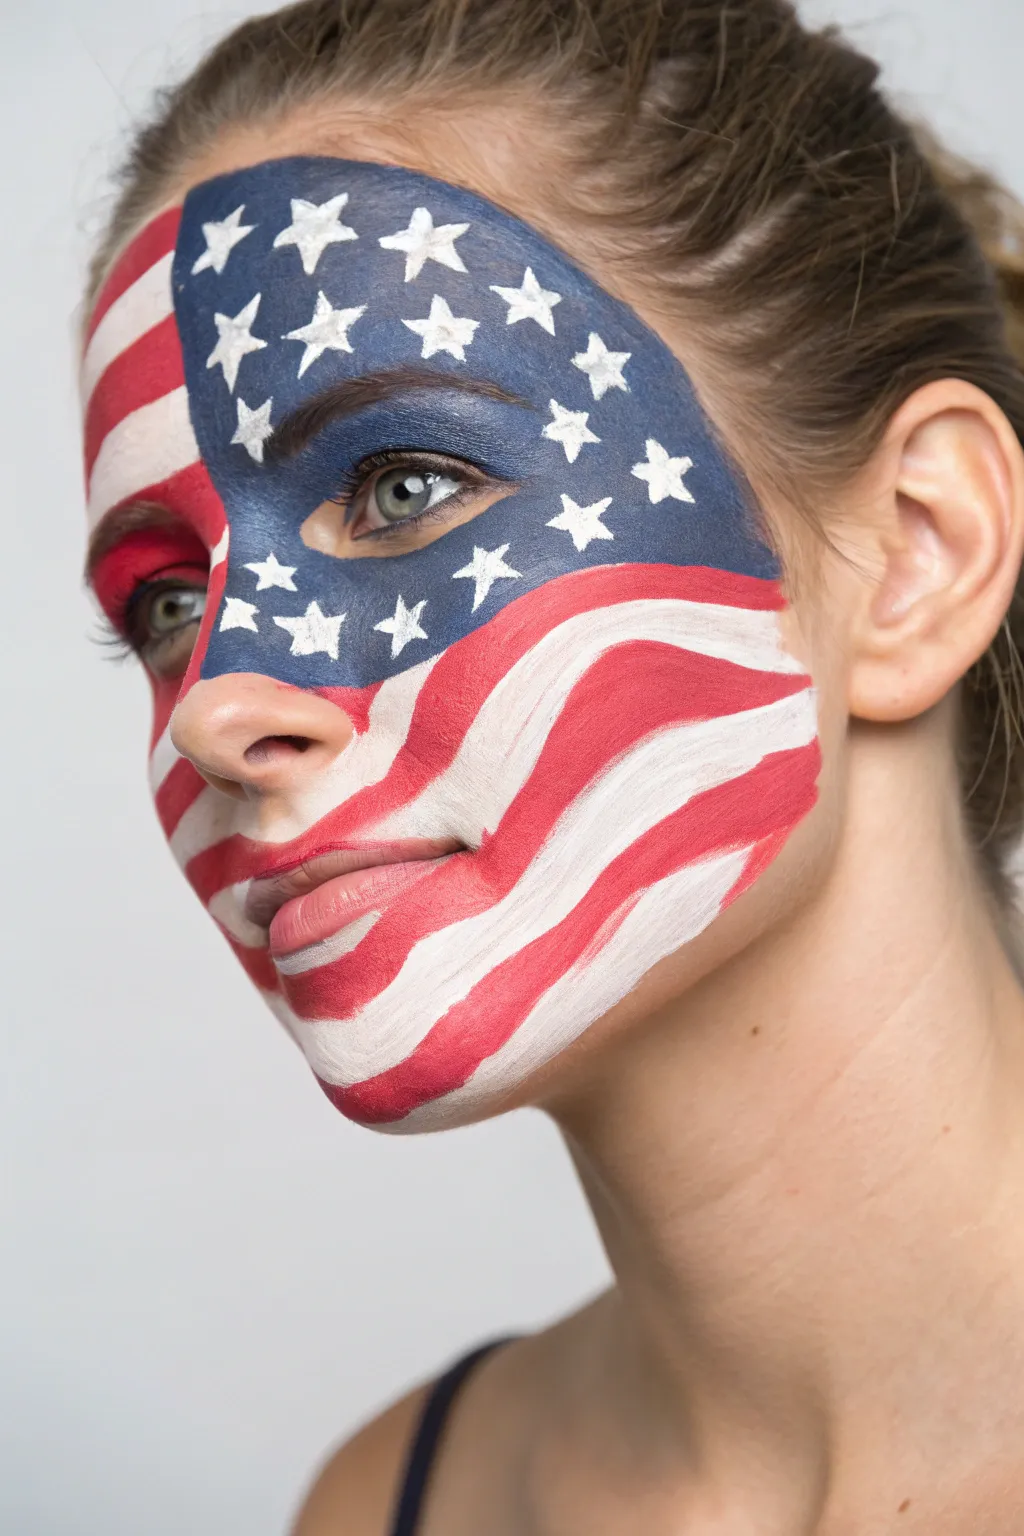
Transform your face into a stunning tribute to Old Glory with this bold, full-face design that mimics the natural ripples of a flag. The look combines a defined blue field of stars across the eyes and forehead with striking red and white stripes that contour the cheeks and jawline.
How-To Guide
Materials
- High-quality water-activated face paints: Royal Blue, Bright Red, and opaque White
- Flat brush (medium width, approx 1/2 inch)
- Small round detail brush (size 2 or 3)
- Fine liner brush (size 0 or 00)
- Wedge makeup sponges (optional for base application)
- Cup of water for rinsing
- Paper towels
- Setting spray (optional)
Step 1: Laying the Starry Foundation
-
Map the Blue Field:
Start by identifying the area for the blue union. Visualize a diagonal swooping shape that covers the forehead and comes down over the right eye (your left if painting someone else) and bridge of the nose, ending just below the cheekbone. -
Apply the Base Blue:
Using your medium flat brush or a dampened sponge loaded with Royal Blue, fill in this mapped area. Ensure the edges are somewhat organic and wavy rather than perfectly straight to mimic fabric movement. -
Smooth the Coverage:
Go over the blue area a second time if needed to ensure solid opacity, especially around the eyebrows and eyelids. Be gentle around the sensitive eye area. -
Create the Stars:
Switch to your small round detail brush and load it with opaque White paint. Begin painting five-pointed stars on the blue field. I like to start with the largest stars in the center of the forehead to establish spacing. -
Vary Star Sizes:
Paint smaller stars towards the edges of the blue shape and near the bridge of the nose. This size variation helps create the illusion that the ‘flag’ is wrapping around the contours of the face. -
Define the Edges:
Use your fine liner brush with white paint to sharpen the points of your stars, making them look crisp against the dark background.
Smudged edges?
If red bleeds into white, wait for it to dry completely. Re-apply opaque white over the mistake rather than wiping, which can smear it further.
Step 2: Painting the Stripes
-
Plan the White Stripes:
Load a clean medium flat brush with White paint. Plan your stripes to flow diagonally downwards from the blue field across the left cheek and jawline. -
First White Stripe:
Paint a thick, wavy white stripe immediately adjacent to the bottom edge of the blue field, running from the nose bridge out toward the ear. -
Continue the Pattern:
Leave a gap for red, then paint the next white stripe lower down on the cheek. Keep the lines wavy to maintain that fluttering fabric effect. -
Detailing the Bridge:
Add a small section of white stripe on the tip of the nose and the opposite temple if the blue field doesn’t cover that area completely. -
Fill the Red Stripes:
With a clean flat brush loaded with Bright Red, fill in the gaps between your white stripes. Start with the stripe that runs directly under the eye and over the cheekbone. -
Connect to the Lip:
Carefully paint the red stripe that crosses the lips. Use the flat edge of the brush to create a clean line across the mouth, blending the paint slightly into the natural lip color. -
Jawline Definition:
Add the final red stripes along the jawline and chin, ensuring they follow the same wavy, diagonal direction as the ones above. -
Refine the Boundaries:
Use a liner brush with the appropriate color to touch up any areas where the red and white stripes meet, ensuring distinct separation without muddying the colors. -
Check Symmetry:
Step back and look at the overall flow. The stripes should feel like a continuation of the flag pattern emerging from behind the blue field.
Step 3: Final Touches
-
Clean Up Edges:
Use a damp cotton swab or a clean brush with a tiny bit of foundation to clean up the outer edges of the design for a polished silhouette. -
Set the Design:
Allow the paint to dry completely—usually just a minute or two. If you expect a long day, mist lightly with a setting spray to keep the colors vibrant.
Add some sparkle
While the blue paint is still slightly tacky, dab cosmetic-grade silver glitter onto the blue field between the stars for a festive, shimmering finish.
You are now ready to showcase your patriotic spirit with a face paint design that is sure to turn heads at any celebration
Parade Confetti Dots And Streamers

Capture the festive spirit of a Fourth of July parade with this minimalist yet striking design. Featuring elegant sweeping streamers on the cheek and a whimsical scattering of confetti dots across the forehead, this look balances celebration with sophistication.
Step-by-Step Tutorial
Materials
- Red face paint (water-activated or cream)
- Blue face paint (royal or navy shade)
- White face paint (highly opaque)
- Medium round brush (size 4 or 6)
- Small detail brush (size 1 or 2)
- Dotting tool or the back of a thin brush handle
- Cup of clean water
- Paper towels
- Setting spray (optional)
Step 1: Preparation
-
Clean and Dry:
Start with a freshly washed and thoroughly dried face to ensure the paint adheres smoothly without oils interfering. -
Activate Paints:
If using water-activated cakes, spray a fine mist of water onto your red, white, and blue paints. Let them sit for a moment to become creamy.
Fixing Smudges
If lines bleed or smear, wait until the paint is bone dry. Then, use a slightly damp Q-tip to erase the mistake cleanly without ruining the base.
Step 2: Painting the Streamers
-
Load the Red:
Thoroughly load your medium round brush with red paint. Look for a consistency like melted ice cream to ensure opaque, sharp lines. -
First Streamer Line:
Starting near the top of the cheekbone, just under the outer corner of the eye, paint a curved line sweeping down towards the jawline. Taper the end by lifting pressure as you finish the stroke. -
Second Red Streamer:
Paint a second, longer red curve slightly behind the first one, closer to the ear. This line should parallel the first but extend a bit further down the neck. -
Clean Your Brush:
Wash the red paint out of your brush completely and dry it on a paper towel before switching colors. -
Add the White Streamer:
Load the medium brush with white paint. Place this stroke between the two red lines, following the same downward curve but keeping it slightly distinct so the colors don’t muddy. -
Add the Blue Streamer:
Finally, load up with blue paint. Draw a thin, sweeping line right next to the white streamer, nestled between the white and the rear red line. This creates a layered, flowing ribbon effect.
Step 3: Creating the Confetti
-
Prepare for Dots:
Switch to your small detail brush or a dotting tool. If you don’t have a dotting tool, the rounded handle end of a paintbrush works perfectly for uniform circles. -
Blue Dot Cluster:
Dip into the blue paint. Start placing dots in a concentrated arc around the top of the eyebrow and the temple area. -
Vary sizes:
I find it looks best if you vary the pressure to create blue dots of slightly different sizes, mimicking falling confetti. -
Scattered Blue Dots:
Continue adding smaller blue specks moving inward toward the center of the forehead and slightly down onto the upper cheekbone near your streamers. -
Add Red Confetti:
Clean your tool and load it with red paint. Place larger red dots interspersed among the blue ones on the forehead. -
Fill the Gaps:
Fill in any empty spaces on the temple with smaller red dots, extending them slightly lower than the blue ones to create a sense of movement. -
Check Symmetry:
Step back and check the balance. The dots should look random but clustered, like a snapshot of a confetti popper exploding. -
Refine Edges:
If any of your streamer lines look jagged, use the small detail brush with a tiny bit of paint to carefully smooth out the edges. -
Set the Look:
Once everything is completely dry to the touch, you can lightly mist with a setting spray to help it last through the heat of the day.
Add Some Sparkle
While the confetti dots are still wet, press cosmetic-grade biodegradable glitter onto them. Silver glitter on the white streamer adds magic.
You are now ready to celebrate the holiday with a spirited and artistic look
Retro Rocket And Firework Trail
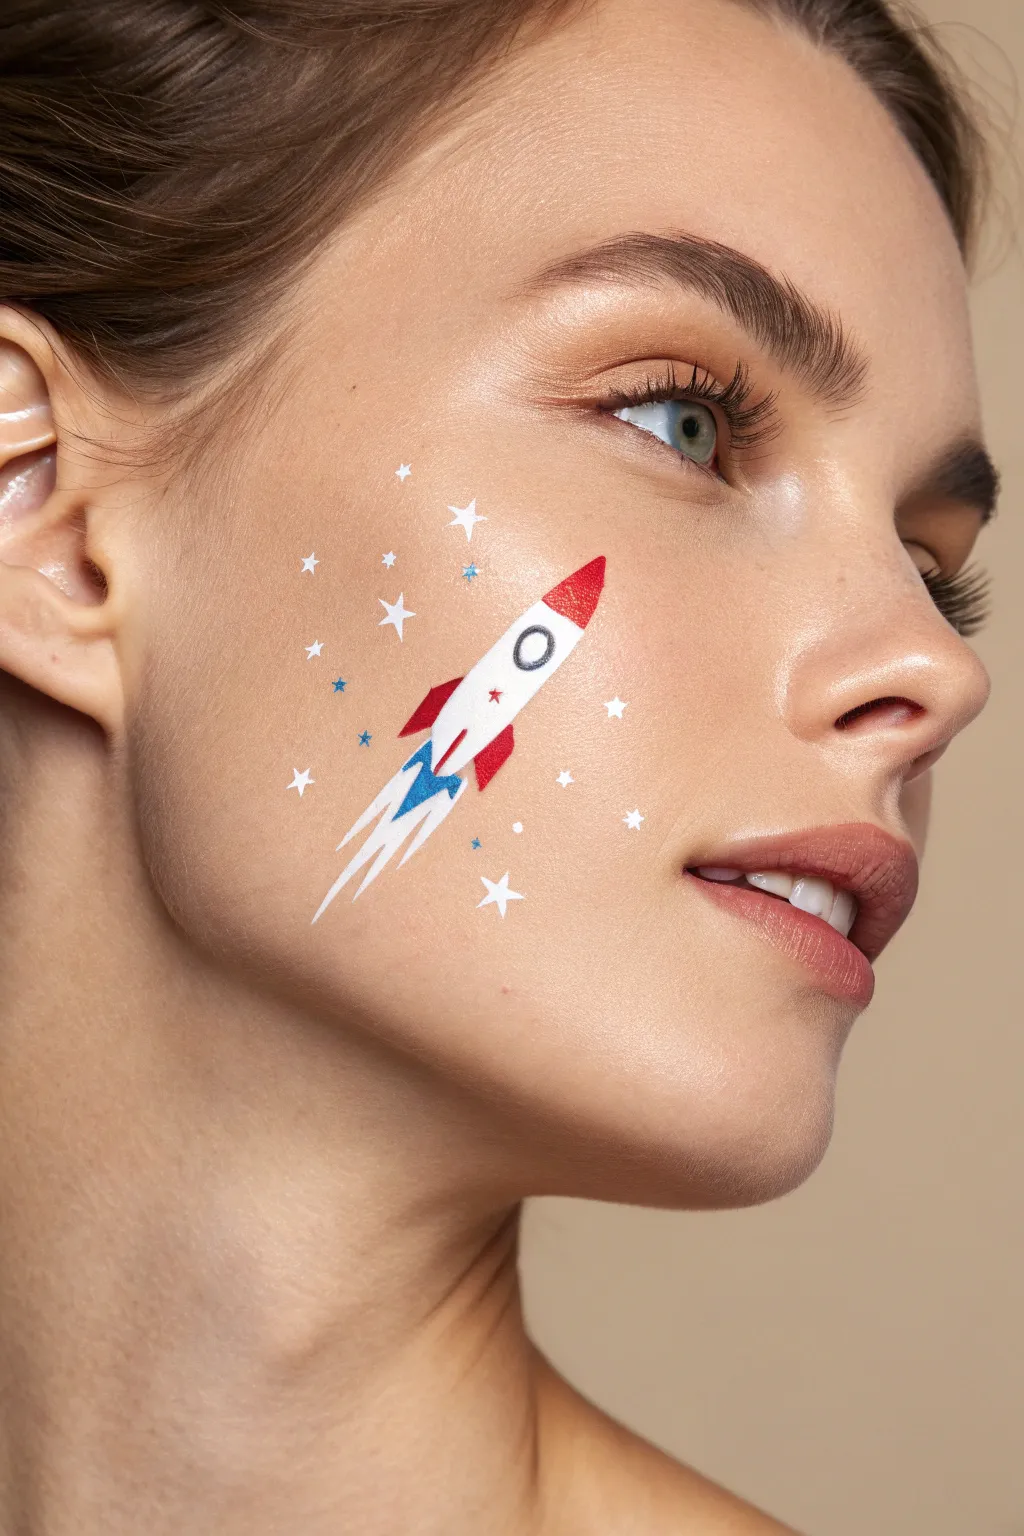
Blast off with this charmingly vintage rocket ship design that adds a playful touch to your Fourth of July look. The crisp white silhouette paired with classic red and blue accents creates a clean, graphic style that pops beautifully against the skin.
Step-by-Step Guide
Materials
- White face paint (high opacity)
- Red face paint (flat matte)
- Blue face paint (royal or shimmer)
- Fine round brush (size 1 or 2)
- Detail liner brush (size 0 or 00)
- Flat angled brush (optional for crisp edges)
- Small cup of water
- Paper towels
Step 1: Painting the Rocket Hull
-
Outline the body:
Start by loading a fine round brush with white face paint. Sketch the main body of the rocket on the cheekbone, tilting it diagonally upward toward the temple. Create a long, slender torpedo shape with a pointed nose and a slightly wider base. -
Fill in the white:
Using the same white paint, fill in the outline you just created. Apply the paint smoothly to ensure solid coverage. If your white looks streaky, let the first layer dry for a minute before adding a second coat for full opacity. -
Add the shark fins:
With the white paint still on your brush, paint the two side fins at the bottom of the rocket body. They should sweep backward slightly. Add a third, smaller fin shape right in the center bottom. -
Create the window:
Switch to a clean detail brush with black or dark grey paint (or mix a tiny amount of black into your white for a soft grey). Carefully paint a small circle in the upper third of the rocket body for the porthole window. -
Fill the window center:
Rinse your brush and dab a tiny dot of white paint directly in the center of the grey circle to make it look like a reflective glass window.
Step 2: Adding Patriotic Details
-
Paint the nose cone:
Load a clean round brush with bright red face paint. Carefully paint a small triangular cap over the very top tip of the white rocket body to create the nose cone. -
Color the fins:
Using the red paint, fill in the two outer fins you sketched earlier. Leave the center fin white for now, or prepare to color it blue in the next step. -
Add the central detail:
Switch to blue face paint on a fine liner brush. Paint the central fin at the bottom of the rocket blue. You can also add a small blue stripe or detail just below the fins where the exhaust would be. -
Add a star accent:
With a very fine tip and red paint, add a tiny star or a simple dot on the white body of the rocket, just below the window, for a cute decorative touch.
Sharpen Your Lines
For ultra-crisp star points and rocket edges, use a script liner brush. The long bristles hold more paint and minimize patchiness compared to shorter brushes.
Step 3: Trails and Stars
-
Start the exhaust trail:
Reload your brush with white paint. Starting from the bottom of the rocket, paint three or four jagged, flame-like strokes trailing downwards and backwards towards the jawline. -
Layer the blue flame:
While the white is drying, take your blue paint and add a smaller, inner flame shape directly touching the bottom of previous blue rocket details. Let it overlap slightly with the white trail for depth. -
Paint largers stars:
Clean your fine liner brush thoroughly and load it with fresh white paint. Paint a few larger, five-pointed stars around the rocket. Place one near the nose cone and another below the exhaust trail. -
Add medium stars:
Scatter a few medium-sized white stars further out in the distinct ‘galaxy’ area around the cheek. Keep the edges sharp by pressing lightly and flicking outward for the points. -
Sprinkle tiny stars:
Using the very tip of your smallest brush, dot tiny specks of white paint around the larger stars to simulate distant stars. This creates a magical, clustered effect. -
Incorporate blue stars:
To tie the color scheme together, paint two or three tiny blue stars mixed in among the white ones. I find this really helps balance the blue from the rocket. -
Final touches:
Check your edges. If any red or blue bled into the white, use a slightly damp clean brush to wipe away the mistake, or touch it up with a bit of fresh white paint once fully dry.
Fixing Smudges
If you smudge a star, don’t wipe it! Let it dry completely, then use a wet q-tip to erase the mistake precisely without ruining your base foundation.
Now you are ready to shine at any Independence Day celebration with this stellar design


Have a question or want to share your own experience? I'd love to hear from you in the comments below!