
If you love that crisp, cheerful preppy aesthetic, rock painting is basically the cutest little canvas you can hold in your hand. I pulled together my favorite preppy rock painting ideas—starting with the classics everyone reaches for, then drifting into some fun, unexpected twists.
Classic Smiley Face Pop
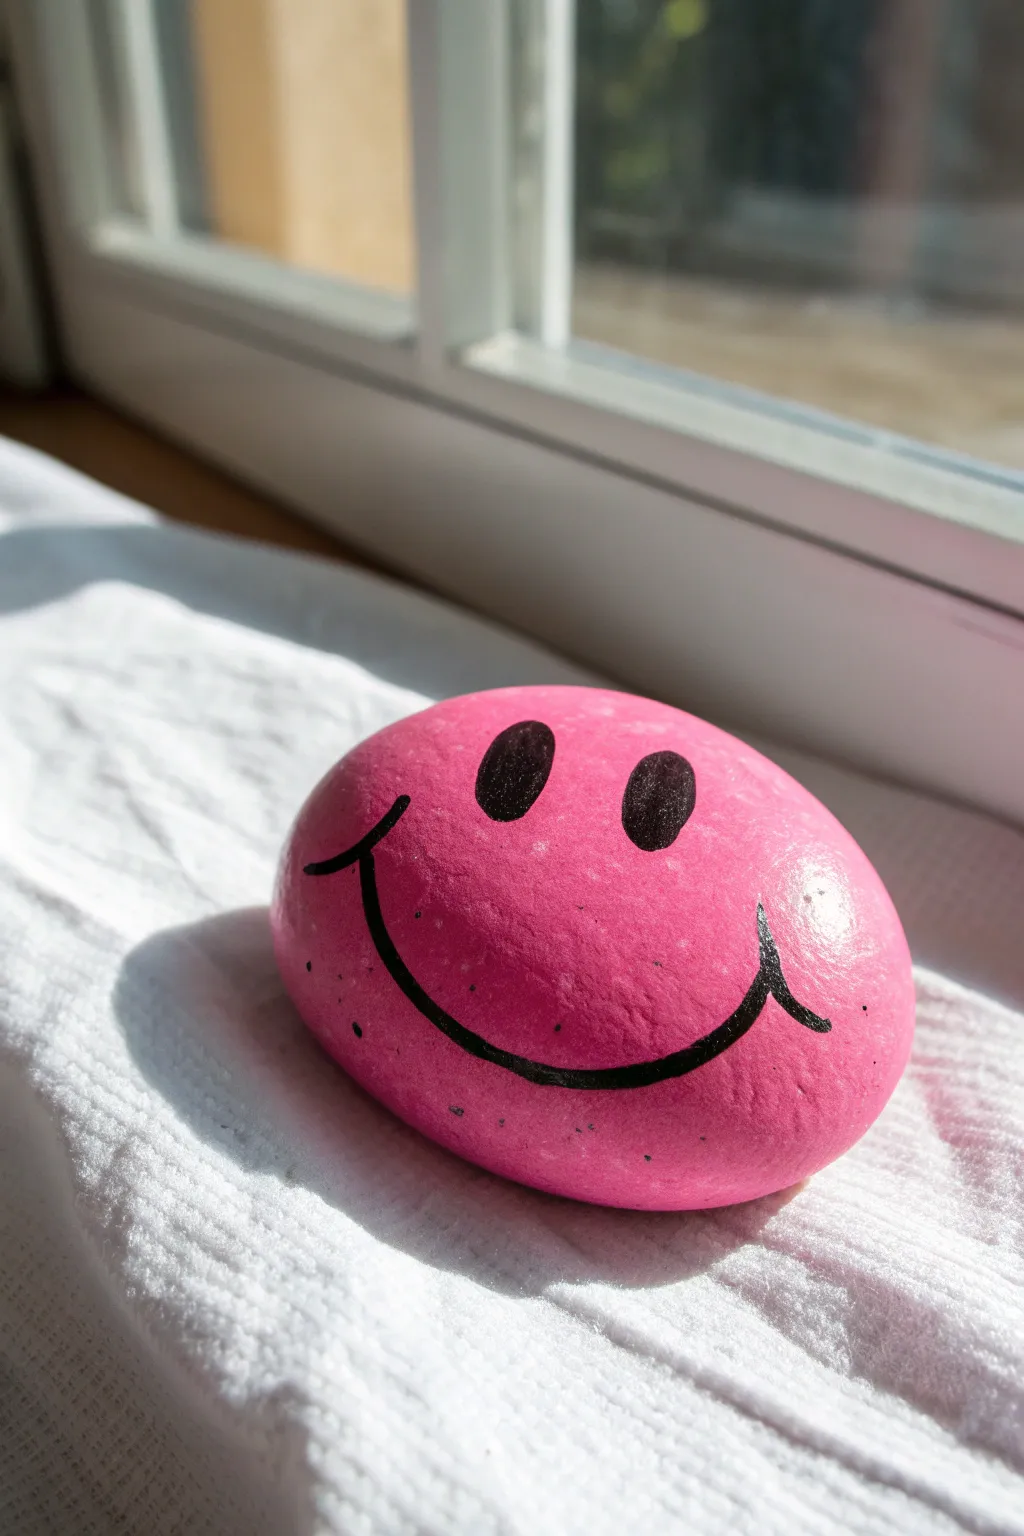
Brighten up any corner with this vibrant, nostalgia-inducing smiley face rock that practically radiates positivity. The bold black features against the punchy hot pink background create a classic preppy aesthetic that is simple to execute but high impact.
Step-by-Step Guide
Materials
- Smooth, flat oval river rock (medium size)
- Acrylic paint in hot pink/magenta
- Glossy black acrylic paint or a black POSCA paint pen (medium tip)
- White gesso or primer (optional but recommended)
- Flat paintbrush (medium width)
- Fine detail paintbrush (if painting features manually)
- Spray gloss varnish or Mod Podge
- Water cup and paper towels
Step 1: Prepping the Base
-
Clean and Dry:
Start by scrubbing your river rock with warm soapy water to remove any dirt or grit. Dry it completely with a towel or let it sit in the sun for an hour. -
Prime the Surface:
For the most vibrant pink, apply a thin layer of white gesso or white acrylic paint first. This neutralizes the grey tone of the rock so the next color really pops. -
First Pink Coat:
Using your flat brush, apply a smooth, even base coat of hot pink acrylic paint. Cover the entire top surface and the sides where they curve down. -
Dry and Repeat:
Let the first coat dry fully. If the rock’s natural color is still peeking through, add a second thin coat of pink for solid, opaque coverage. -
Check for Texture:
Look closely at the surface; if there are big brush strokes, you can lightly sand them down before adding a final thin pink layer for a super smooth finish. -
Full Cure:
Allow the pink base to dry completely. I prefer to leave it for at least 30 minutes so the black paint won’t accidentally blend or streak.
Uneven Coverage?
If the pink looks streaky, paint in a cross-hatch pattern (horizontal then vertical layers) to create a solid, opaque finish without heavy texture.
Step 2: Designing the Face
-
Visualize the Placement:
Before painting, visualize where the features will go. The eyes should be in the upper third, and the smile should swoop down into the lower third. -
Outline the Eyes:
Using your black paint pen or a fine brush with black paint, draw two tall, vertical ovals for the eyes. Space them evenly apart near the top center. -
Fill the Eyes:
Carefully color inside your oval outlines until they are solid black. If using a paint pen, avoid pressing too hard to prevent paint puddles. -
Start the Smile:
Find the center point below the eyes. Draw the bottommost curve of the smile first to establish the lowest point of the mouth. -
Extend the Curve:
Extend the smile line upwards on both sides, aiming for the outer edges of the eyes. Keep the line thickness consistent. -
Add Smile Lines:
At the very tips of the smile, add short, slightly curved tick marks (smile lines) to give the face a classic happy expression. -
Thicken the Lines:
If your lines look too thin, carefully go over the mouth loop again to embolden the expression. The boldness is key to the pop art look. -
Fix Stray Marks:
If you make a small error with the black, let it dry completely, then dot a tiny bit of hot pink over the mistake to conceal it.
Step 3: Finishing Touches
-
Let Features Set:
Give the black paint plenty of time to dry. Putting sealer over wet black paint is the easiest way to accidentally smear your hard work. -
Apply Sealer:
Coat the entire rock with a glossy spray varnish or a layer of gloss Mod Podge. This gives it that shiny, polished look seen in the photo. -
Inspect Coverage:
Make sure you sealed the sides properly as well. Once dry, your cheerful stone is ready to be displayed.
Glossy Effect
For that ‘wet look’, use a spray-on clear gloss rather than brush-on. Brush-on sealers can sometimes drag the black paint if not 100% cured.
Place your shiny new friend on a windowsill or desk to add a permanent pop of cheer to your day


Pastel Color-Blocked Stripes
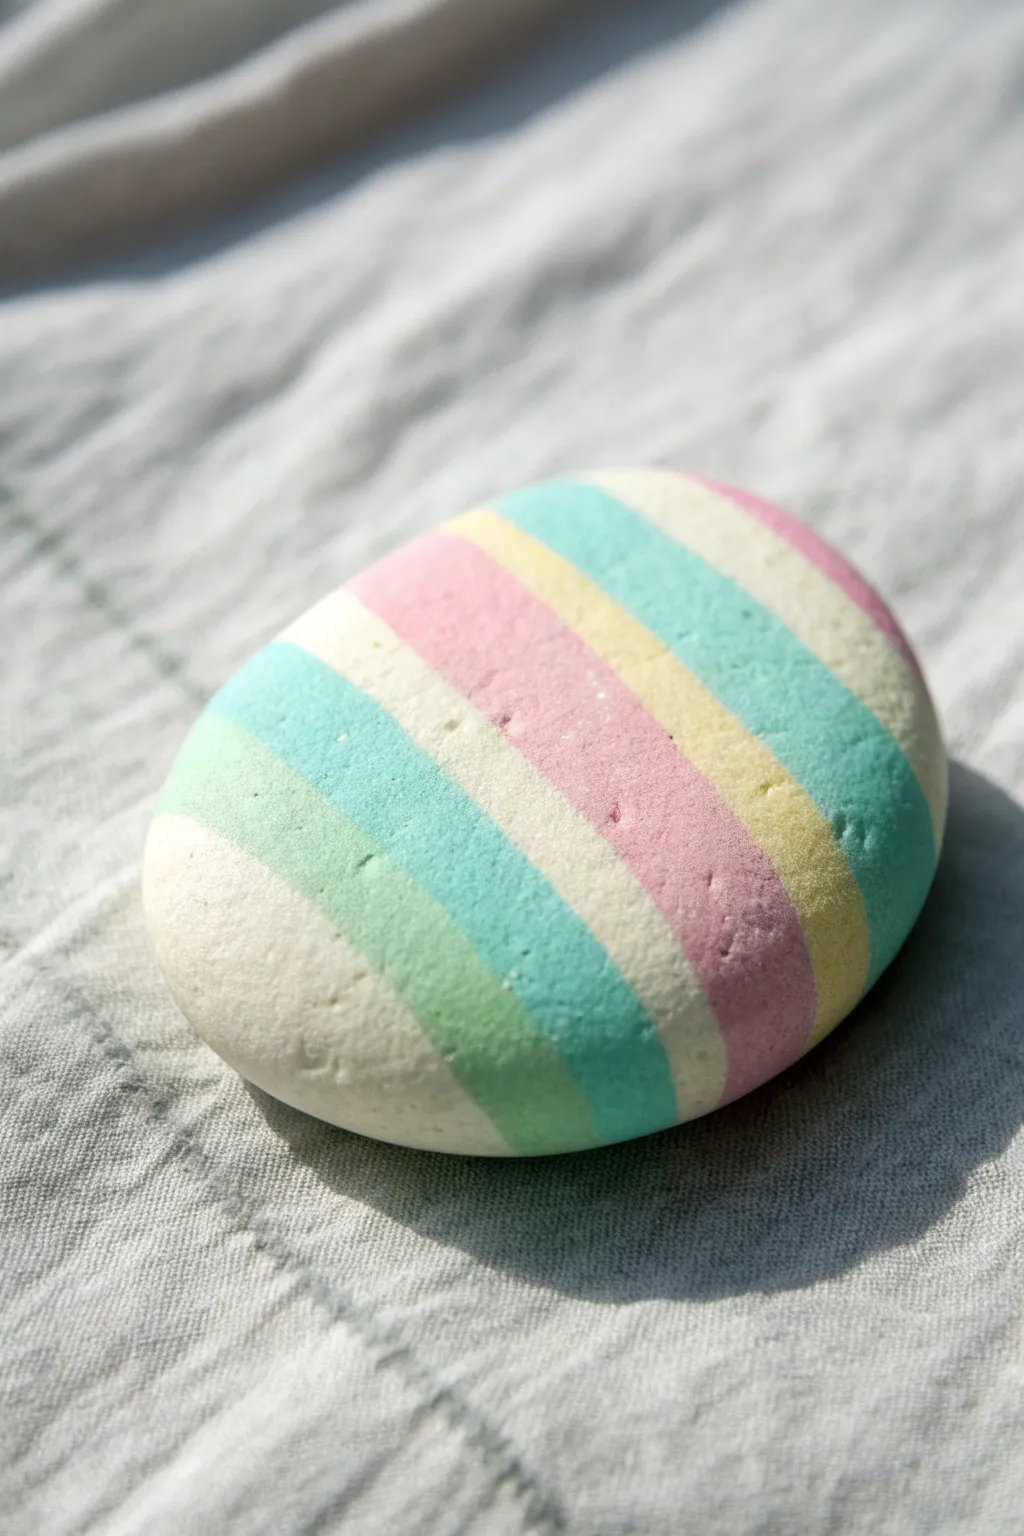
Achieve a soft, preppy aesthetic with this simple yet striking stripe design. Using a palette of creamy yellow, mint, pink, and teal creates a harmonious look that turns an ordinary garden stone into a chic piece of decor.
Step-by-Step Tutorial
Materials
- Smooth river rock (flat and rounded)
- White acrylic paint (base coat)
- Pastel acrylic paints: Mint Green, Baby Pink, Creamy Yellow, Teal
- Flat shader brush (small size like #4 or #6)
- Fine liner brush
- Pencil
- Washi tape or masking tape (optional)
- Matte finish sealant
Step 1: Preparation & Base
-
Clean Your Canvas:
Begin by thoroughly washing your rock with soap and water to remove any dirt or oils. Let it dry completely before starting. -
Apply the Base Coat:
Paint the entire surface of the rock with white acrylic paint. This step is crucial because it makes the pastel colors pop later. -
Add a Second Layer:
Once the first coat is dry, apply a second coat of white to ensure full, opaque coverage. Let this dry fully.
Clean Lines?
If your hand is shaky, rest your wrist on the table while painting. Alternatively, use painting tape, but ensure the base paint is 100% dry first or it will peel.
Step 2: Mapping the Stripes
-
Sketch the Guides:
Using a pencil, lightly sketch diagonal lines across the rock to mark where your stripes will go. Keep the spacing relatively even, but variation adds charm. -
Plan Your Palette:
Decide on your color order. For this look, aim for a sequence like white, mint, yellow, pink, teal, yellow, pink. -
Tip for Straight Lines:
If you struggle with freehand painting, you can use thin strips of washi tape to mask off the areas you aren’t painting yet.
Step 3: Painting the Colors
-
Paint the Mint Stripe:
Start with your mint green paint. Use the flat shader brush to fill in the first colored section, carefully following your pencil line. -
Add the Creamy Yellow:
Skip the white section (leaving the base coat visible) and move to the next stripe. Paint a band of creamy yellow. -
Apply the Baby Pink:
Paint the next designated stripe with baby pink. I find that pink sometimes needs two thin coats to look truly opaque. -
Introduce the Teal:
Add the teal or darker turquoise stripe. This deeper color anchors the pastel palette and adds visual weight. -
Repeat Colors:
Continue the pattern towards the other edge of the rock, repeating stripes of pink and yellow as space allows. -
Refine the Edges:
Use your fine liner brush with the appropriate color to clean up any wobbly edges where two colors meet. -
Let It Dry:
Allow the paint to dry completely. Pastel acrylics can sometimes look streaky while wet but dry down smoothly.
Go Geometric
Instead of straight diagonal stripes, try using chevron patterns or intersecting lines with the same pastel palette for a striking geometric variation.
Step 4: Finishing Touches
-
Check Coverage:
Inspect your stripes. If you can see the rock texture too much through the paint, apply a second coat to those specific colored bands. -
Protect Your Art:
Once fully dry, apply a layer of matte sealant. A matte finish keeps the soft, fabric-like look of the inspiration stone.
Place your finished rock on a desk or shelf for an instant touch of soft, colorful charm


Neon Daisy Sprinkle Pattern
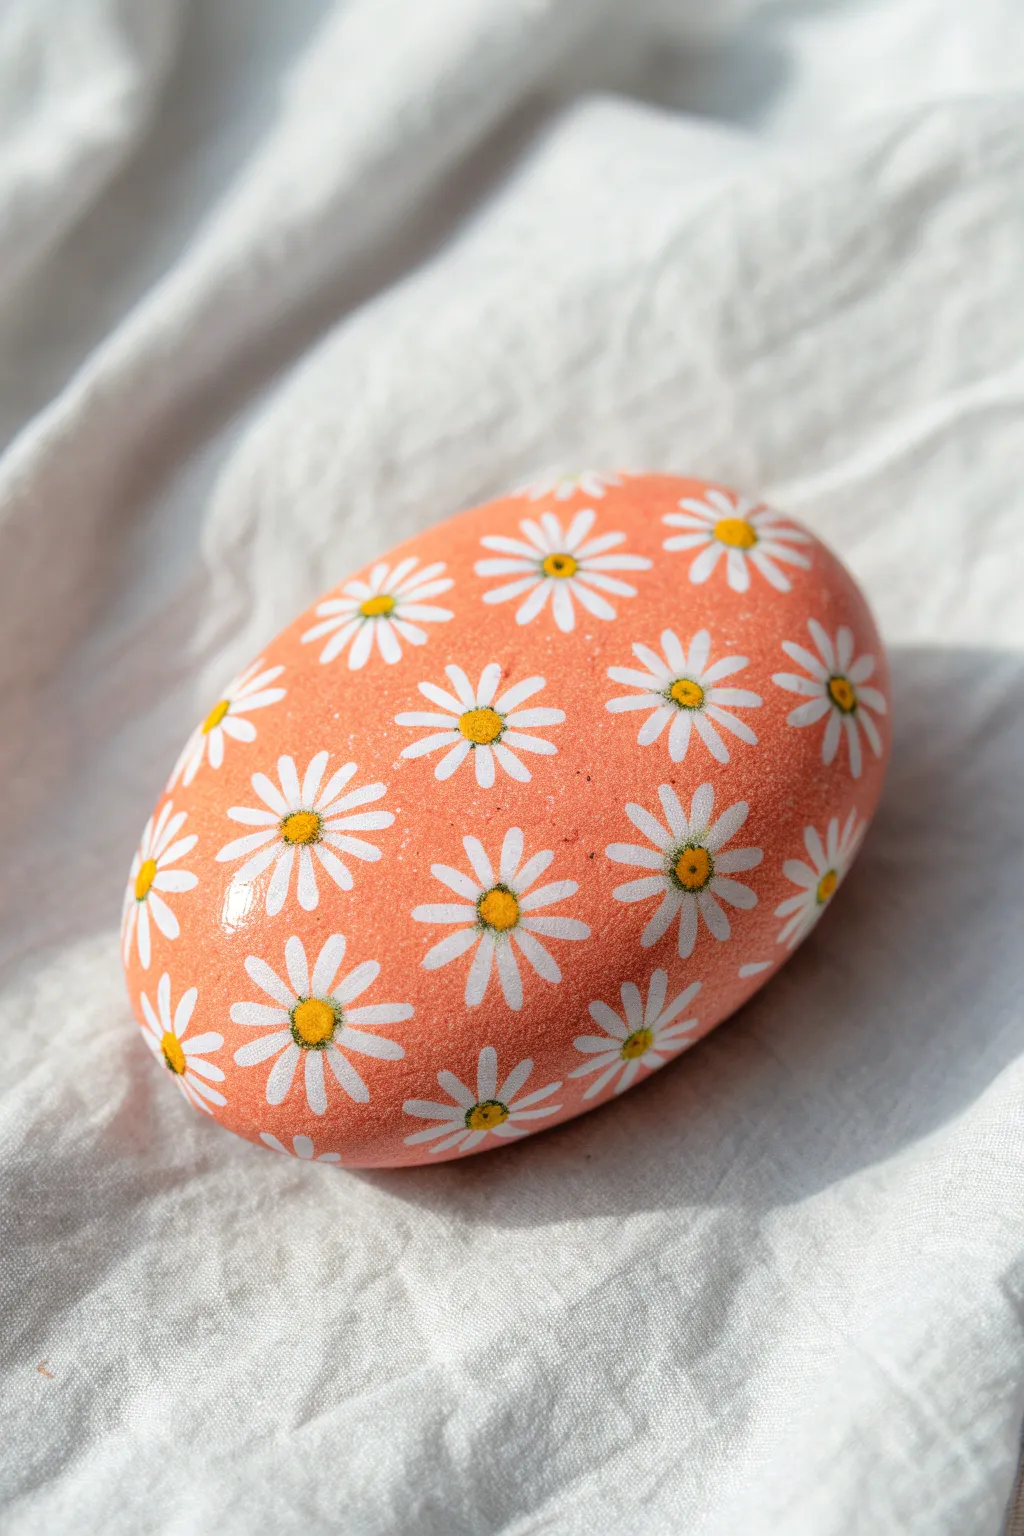
Transform a simple stone into a slice of summer with this cheerful daisy pattern set against a warm coral background. The repetition of the white blooms creates a pleasing, textile-like print that feels both retro and endlessly preppy.
How-To Guide
Materials
- Smooth, oval-shaped river rock
- Coral or peach acrylic paint (matte finish)
- White acrylic paint
- Golden yellow acrylic paint
- Flat paintbrush (medium)
- Small round detail brush (size 0 or 1)
- Dotting tool or toothpick
- Matte spray varnish or brush-on sealer
- Palette or paper plate
- Water cup and paper towels
Step 1: Base Coat Preparation
-
Clean Your Canvas:
Begin by washing your rock with mild soap and warm water to remove any dirt or oils. Scrub it gently and let it dry completely before you start painting, ensuring a smooth surface for the acrylics to adhere to. -
First Coat of Coral:
Squeeze a dollop of coral or peach acrylic paint onto your palette. Using the medium flat brush, apply a smooth, even layer over the top surface and sides of the rock. -
Check for Coverage:
Depending on the rock’s natural color, the first coat might look streaky. Let it dry for about 10-15 minutes. This base color needs to be solid and opaque, so patience is key. -
Second Layer Application:
Apply a second coat of the coral paint. Use long, unidirectional strokes to minimize brush marks. Allow this layer to dry fully until it is no longer cool to the touch. -
Optional Third Coat:
If you can still see the dark stone underneath, I sometimes add a quick third coat just to make that peach tone really pop.
Uneven Petal Coverage
If your white paint looks translucent over the coral, don’t glob it on thick. Apply multiple thin layers instead, drying in between, to keep the petal surface smooth.
Step 2: Painting the Daisy Pattern
-
Plan the Spacing:
Visualize a grid on your rock. You want the flowers to be evenly spaced but staggered slightly, like a wallpaper print. Start with a central flower to anchor your design. -
Start the Petals:
Dip your small round detail brush into white acrylic paint. For the first flower, paint a small asterisk shape (*) or a simple cross (+). This acts as a guide for your petal placement. -
Flesh Out the Shape:
Go over your asterisk lines, widening them into teardrop shapes that meet in the center. A classic daisy usually has between 8 to 12 thin petals. -
Create the Grid:
Move about an inch away from your first flower and paint the next one. Continue this process to fill the main surface of the rock, keeping the size of the flowers consistent. -
Handle the Edges:
Now, fill the empty spaces near the edges. Paint partial daisies appearing to ‘fall off’ the side of the rock. This creates the illusion of a continuous textile pattern. -
Second Petal Pass:
The coral background might show through the white paint as it dries. Go back over each white petal with a second layer of paint to make them bright and crisp. -
Refine the Shapes:
While adding the second layer, tidy up the tips of the petals so they are rounded and distinct.
Pro Tip: Consistent Patterns
Rotate the rock constantly while painting the edge flowers. Viewing the pattern from different angles ensures the spacing looks natural all the way around.
Step 3: Adding Centers and Sealing
-
Prepare the Yellow:
Dispense a small amount of golden yellow paint. You want a warm, sunny yellow rather than a neon lemon shade for this specific look. -
Dot the Centers:
Dip a dotting tool or the blunt end of your paintbrush handle into the yellow paint. Gently press it into the center of each white flower to create a perfect circle. -
Texture the Centers (Optional):
To add a tiny bit of separation, you can take a toothpick and lightly stipple the yellow dot while it’s wet, giving it a pollen-like texture. -
Final Drying Time:
Let the entire design cure for at least an hour. The thick dots of yellow paint will take the longest to dry. -
Apply Sealer:
Finish by applying a matte spray varnish or a brush-on sealer. A matte finish keeps the rock looking natural and velvety, while a gloss would change the vibe entirely.
Place your finished floral stone on a desk or shelf for a permanent burst of spring cheer


Beach Waves With a Quote
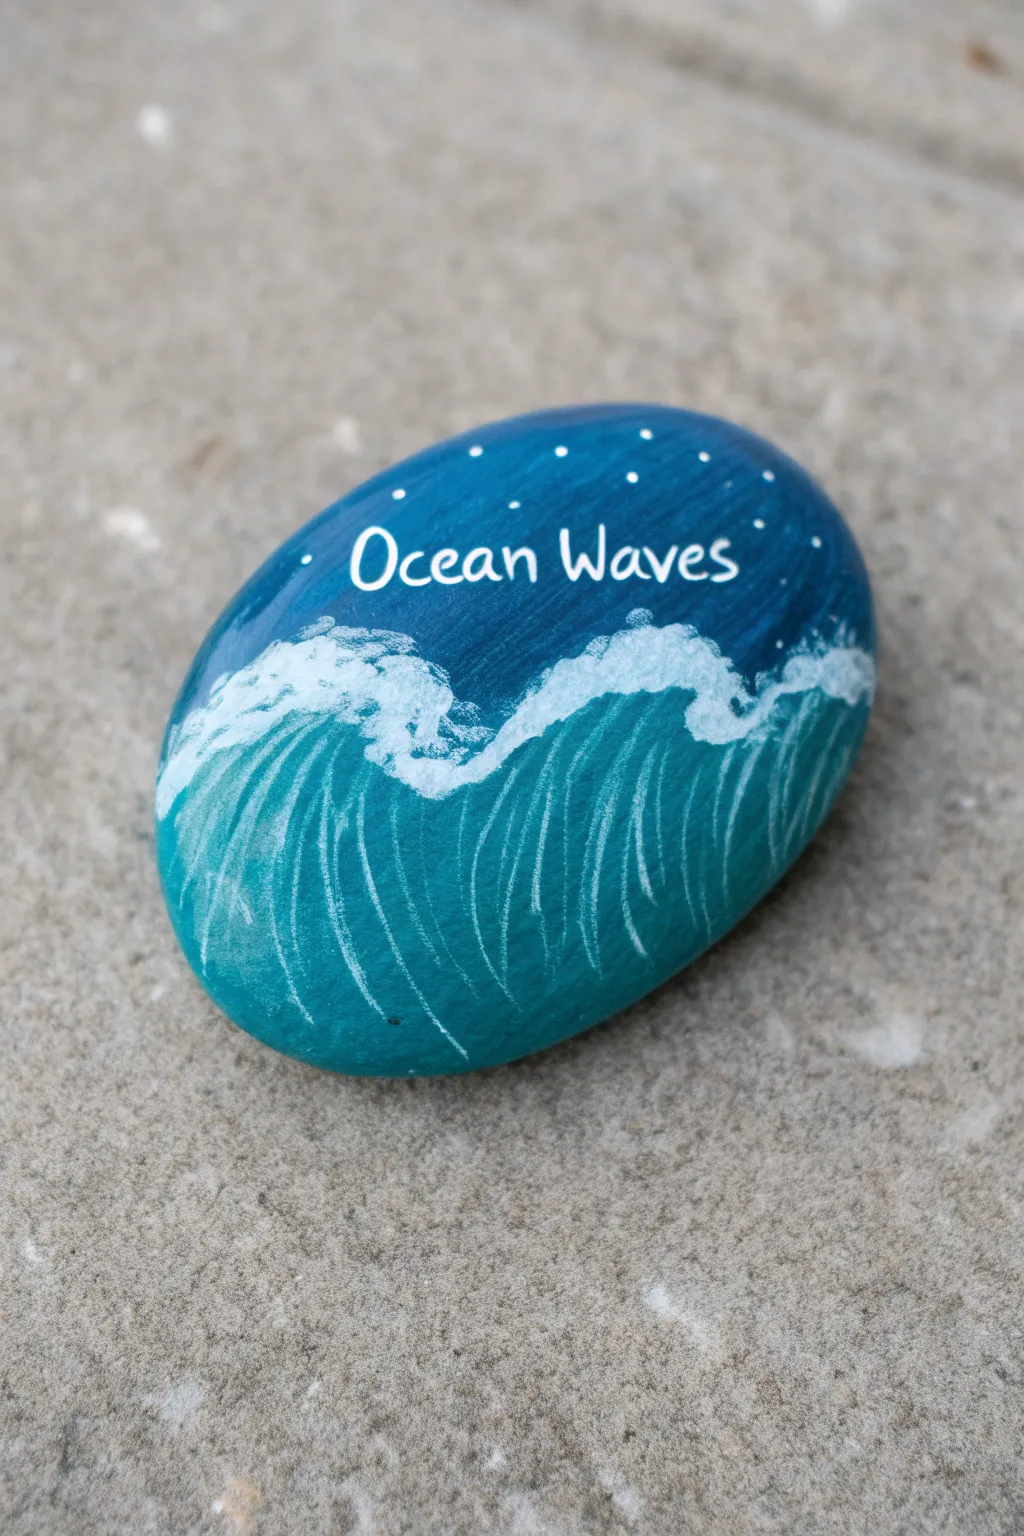
Capture the rhythm of the sea with this soothing rock painting project, featuring rolling teal waves beneath a starry night sky. This design combines simple blending techniques with crisp lettering to create a charming piece of coastal decor that fits perfectly in a preppy collection.
Step-by-Step Tutorial
Materials
- Smooth oval river rock (clean and dry)
- Acrylic paints: Dark navy blue, teal (turquoise), and titanium white
- Flat brush (medium)
- Small round detail brush or liner brush
- Posca paint pen (white, fine tip 0.7mm)
- Cup of water and paper towels
- Clear spray sealant (glossy or matte)
Step 1: Setting the scene
-
Clean your canvas:
Ensure your rock is completely free of dirt and dust. Wash it with mild soap and water, then let it dry fully before starting. -
Paint the upper sky:
Using your flat brush, load up the dark navy blue paint. Cover the top half of the rock’s surface, creating a curved horizon line slightly above the middle point. -
Paint the ocean base:
Rinse your brush thoroughly. Now, apply the teal or turquoise paint to the bottom half of the rock, meeting the navy blue line. Don’t worry about blending them perfectly yet; just get the color down. -
Blend the horizon:
While the paints are still slightly wet where they meet, gently brush back and forth horizontally to soften the transition between sky and sea. If the paint has dried, use a tiny bit of water on your brush to reactivate it. -
Let it dry completely:
Allow this base layer to dry fully. This is crucial—if you try to paint over wet base colors, you’ll end up with a muddy mess.
Muddy colors?
If your white wavelines are turning light blue instead of staying crisp white, your teal base layer wasn’t dry enough. Let it dry longer or apply a second coat of white.
Step 2: Creating the waves
-
Draft the wave shape:
With a thin round brush and white paint (or your paint pen), lightly sketch a wavy line across the middle where the two colors meet. Make it undulating—high peaks and low valleys. -
Thicken the foam caps:
Using the white acrylic paint and a small brush, dab and stipple paint along the top edge of your wave line. You want a fluffy, textured look here to mimic sea foam. -
Add movement lines:
Switch to your finest liner brush or use a very light touch with the paint pen. Draw thin, curved vertical lines extending downward from the foam caps into the teal water. -
Create flow:
Curve these white lines slightly to the right or left to show the movement of the water. Vary the pressure so some lines are bold and others fade out near the bottom. -
Dry break:
Pause for a moment to let the white wave details set completely. I like to check my phone or fix a snack during this time to avoid accidental smudges.
Step 3: Lettering and details
-
Write the quote:
Shake your white Posca pen well. Carefully write ‘Ocean Waves’ in the center of the navy blue sky area. Use a casual, handwritten style font. -
Thicken the text:
Go over your letters a second time if needed to make the white pop against the dark background. -
Add the stars:
Using the paint pen or the handle end of a paintbrush dipped in white paint, dot small stars scattered across the navy sky around the text. -
Add sparkle details:
Place a few tiny white dots near the crashing foam of the waves to represent water spray. -
Seal the artwork:
Once absolutely everything is dry (give it at least an hour), take the rock outside and spray a light, even coat of clear sealant over the top to protect your work.
Text Tip
Practice writing your quote on a piece of paper first to get the spacing right before committing to the rock surface. It saves a lot of frustration.
Place this tranquil stone on your desk or bookshelf as a gentle reminder of the beach
BRUSH GUIDE
The Right Brush for Every Stroke
From clean lines to bold texture — master brush choice, stroke control, and essential techniques.
Explore the Full Guide
Watermelon Slice Cutie

Transform a simple oval stone into a refreshing slice of summer with this vibrant watermelon design. The combination of bright greens, soft pinks, and crisp white lines creates a preppy, eye-catching piece perfect for garden decor or a fun paperweight.
Step-by-Step
Materials
- Smooth, oval-shaped river rock
- Acrylic paints: Dark green, light green (or white to mix), bright red/pink, white, black
- Medium flat paintbrush
- Small round detail brush
- Fine-point black paint marker (optional but helpful)
- Sealer (Mod Podge or spray varnish)
- Palette or paper plate
- Water cup and paper towels
Step 1: Prepping the Canvas
-
Clean the stone:
Begin by scrubbing your rock with warm, soapy water to remove any dirt or oils that might repel the paint. Let it dry completely in the sun. -
Base coat application:
Using your medium flat brush, paint the entire top surface of the rock with a solid coat of white acrylic paint. This primer layer is crucial so your red and green colors pop later. -
Second coat:
Once the first white layer is dry to the touch, add a second coat to ensure full opacity. You shouldn’t see the grey stone underneath anymore.
Fixing Wobbly Lines
If your white rind line isn’t smooth, don’t stress. Use a white paint pen instead of a brush to re-trace that crucial separation line for a crisp, clean edge.
Step 2: Painting the Fruit
-
Outline the rind:
Switch to your green paint. Carefully paint a wide border around the entire outer edge of the white oval. Leave a generous white oval shape unpainted in the center. -
Define the pith:
Refine the inner edge of your green border. You want a distinct band of white (the pith) separating where the green rind ends and the pink fruit will begin. -
Mixing the melon color:
For the fruit center, mix a bright red with a tiny dot of white to create a soft, summary watermelon pink. If you have a ‘watermelon pink’ straight from the tube, that works too. -
Fill the center:
Paint the inner white oval with your pink mixture. Be careful not to touch the green paint; leave that crisp white band in between the two colors. -
Create depth:
I like to add a subtle gradient here. While the pink is still wet, mix a slightly lighter shade of pink and blend it gently into the very center of the fruit area for a highlighted effect.
Make It Sweet
Make it a bitten slice. Leave one rounded section of the pink area unpainted (white), and paint small teeth marks into the pink edge for a playful look.
Step 3: Adding Details
-
Seed placement:
Visualize where your seeds will go. They should radiate outward from the center, pointing towards the rind like spokes on a wheel. -
Painting seeds:
Using a very small round brush or a black paint pen, create teardrop shapes for the seeds. Start with the rounder bottom of the seed near the center and pull the brush outward to a point. -
Varying seed size:
Keep the painting natural by making some seeds slightly larger and others smaller. Regularity can look too artificial here. -
Rind texture:
To make the green rind look realistic, mix a lighter shade of green (or dip a dry brush in white). Lightly stipple or dab this lighter color onto the dark green border. -
Adding dings:
You can add tiny white specks or thin scratches on the green rind to simulate the natural texture of a watermelon skin.
Step 4: Finishing Touches
-
Clean up lines:
If your white band got messy, use your small brush with fresh white paint to carefully neaten up the edges between the pink and green. -
Wait for dry time:
Let the rock sit undisturbed until the thickest parts of the paint are completely dry. This prevents smearing during the sealing process. -
Seal the rock:
Apply a coat of clear sealer or varnish. A glossy finish mimics the wet, juicy look of fresh fruit perfectly.
Place your juicy watermelon rock in a sunny spot to add a permanent splash of summer color
Gingham Picnic Pattern
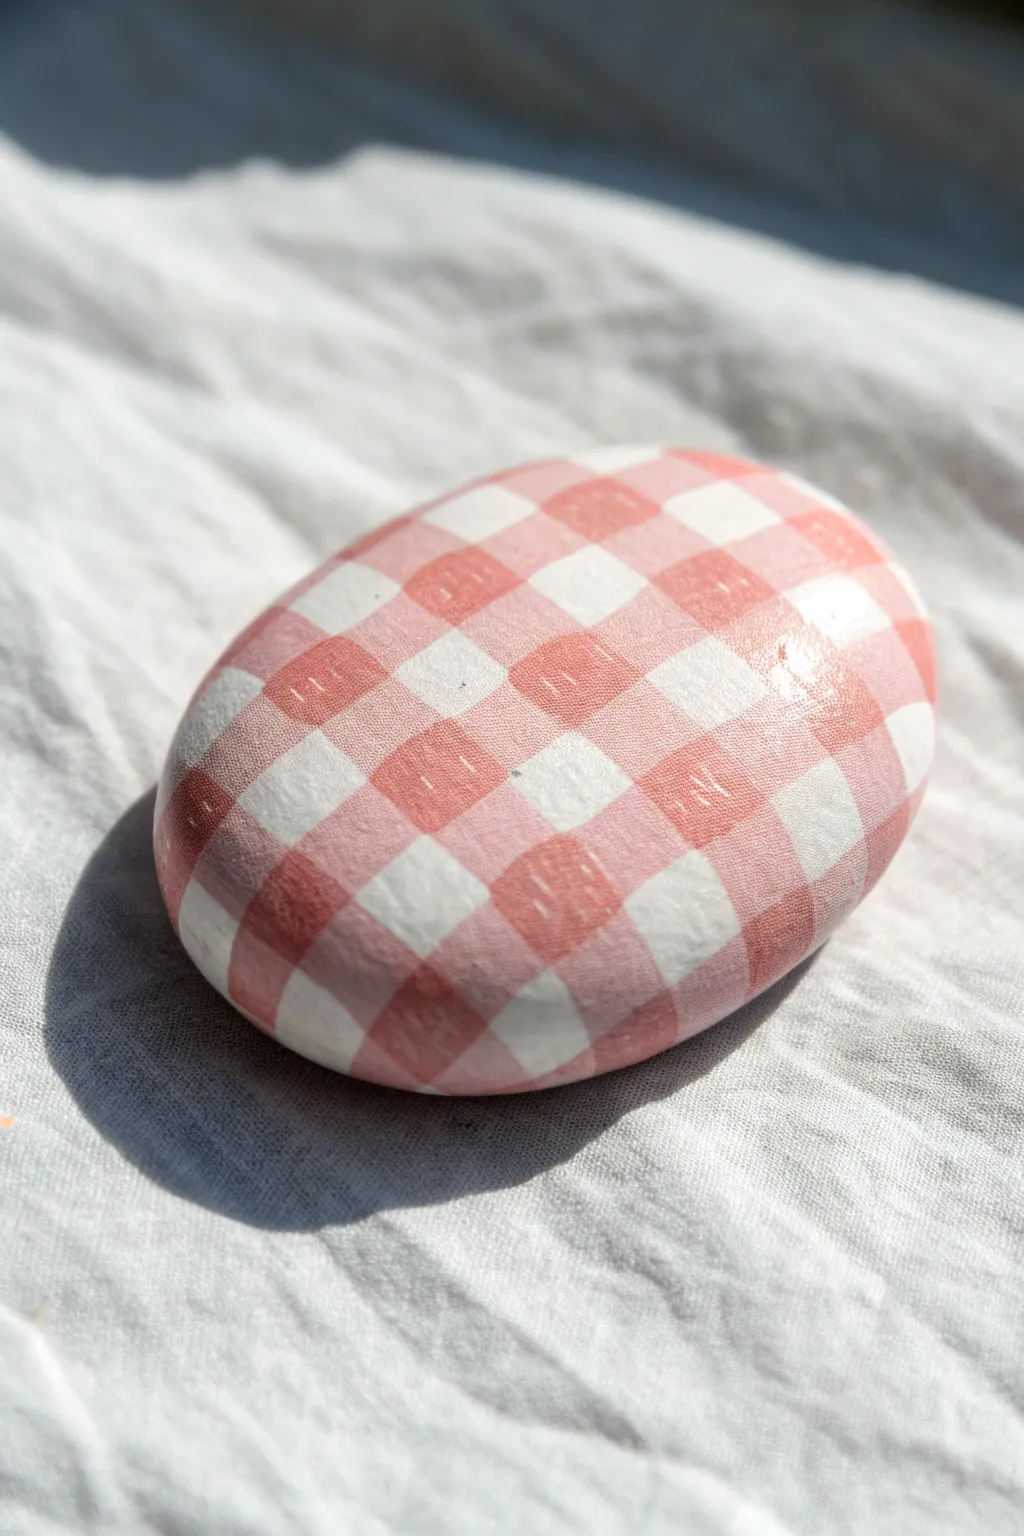
Transform a smooth garden stone into a charming piece of picnic-inspired decor with this classic gingham pattern. The soft pink and white grid looks deceptively intricate, but it comes together easily with just a structured layering process.
Step-by-Step Tutorial
Materials
- Smooth, oval river rock (cleaned and dried)
- White acrylic paint (high opacity)
- Pink acrylic paint (medium shade)
- Light pink acrylic paint (or mixing white with the medium pink)
- Flat shader brush (small, approx. 1/4 inch or 6mm)
- Fine liner brush
- Pencil
- Matte or satin sealant spray
Step 1: Preparation and Base Coat
-
Clean the canvas:
Begin by scrubbing your rock with soapy water and drying it thoroughly to ensure no dirt affects the paint adhesion. -
Apply the white base:
Paint the entire top surface of the rock with bright white acrylic paint. You will likely need two or three thin coats to get a solid, opaque coverage without brushstrokes showing. -
Deep dry:
Allow the white base layer to cure completely. It needs to be bone-dry so the pencil lines in the next step don’t dig into soft paint.
Step 2: Drawing the Grid
-
Mark width guides:
Using a pencil very lightly, make small tick marks along the center vertical axis of the rock to establish how wide your stripes will be. Aim for about 1cm width depending on your rock size. -
Sketch vertical stripes:
Draw faint vertical lines extending from your tick marks. Allow these lines to curve slightly near the edges of the rock to follow its 3D form, rather than being perfectly straight like on paper. -
Sketch horizontal stripes:
Draw perpendicular horizontal lines across the vertical ones, creating a grid of squares. Again, let lines wrap naturally around the stone’s curvature.
Wobbly Lines?
If you struggle with straight lines on a curved surface, use thin washi tape or painter’s tape to mask off the stripes before painting each layer.
Step 3: Painting the Vertical Stripes
-
Mix the light pink:
Create a light pink shade by mixing a small amount of your main pink with plenty of white. This should be a soft, pastel tone. -
Fill vertical columns:
Using your flat brush, paint every other vertical column with this light pink mix. Stay neatly inside your pencil lines. -
Let it set:
Wait for these vertical stripes to dry to the touch before moving on, as you’ll be painting over them shortly.
Textural Detail
After the pink dries, use a dry brush with white paint to lightly streak the pink squares, mimicking the weave of real linen fabric.
Step 4: Painting the Horizontal Stripes
-
Fill horizontal rows:
Using the same light pink mixture, paint every other horizontal row. This will cross over the vertical stripes you just painted. -
Observe the intersections:
At this stage, you will have white squares (untouched base), light pink squares (single layer), and intersection squares where the horizontal and vertical stripes overlap. -
Dry completely:
Let this layer dry fully. The intersections might lock a bit darker already due to double layering, but we will emphasize this manually next.
Step 5: Creating the Checkered Depth
-
Prepare the darker pink:
Load your brush with the medium/darker pink paint straight from the tube (or slightly thinned for flow). -
Identify intersections:
Look for the specific squares where a painted vertical stripe crosses a painted horizontal stripe. -
Fill the darker squares:
Carefully paint only these intersection squares with the darker pink. This mimics the fabric effect where threads overlap to create a deeper color. -
Refine edges:
Use your fine liner brush with white paint to touch up any messy edges or corners where the pink might have bled onto the white squares.
Step 6: Finishing Touches
-
Erase guidelines:
Once the paint is cured hard (give it a few hours), very gently erase any visible pencil marks remaining in the white sections. -
Seal the rock:
Take the rock outside and apply a coat of matte or satin spray sealant. This protects the paint from chipping and gives it that finished, ceramic-like sheen visible in the photo.
Place your finished gingham rock on a stack of books or use it as a sweet paperweight to brighten your desk

PENCIL GUIDE
Understanding Pencil Grades from H to B
From first sketch to finished drawing — learn pencil grades, line control, and shading techniques.
Explore the Full Guide
Tennis Club Vibes
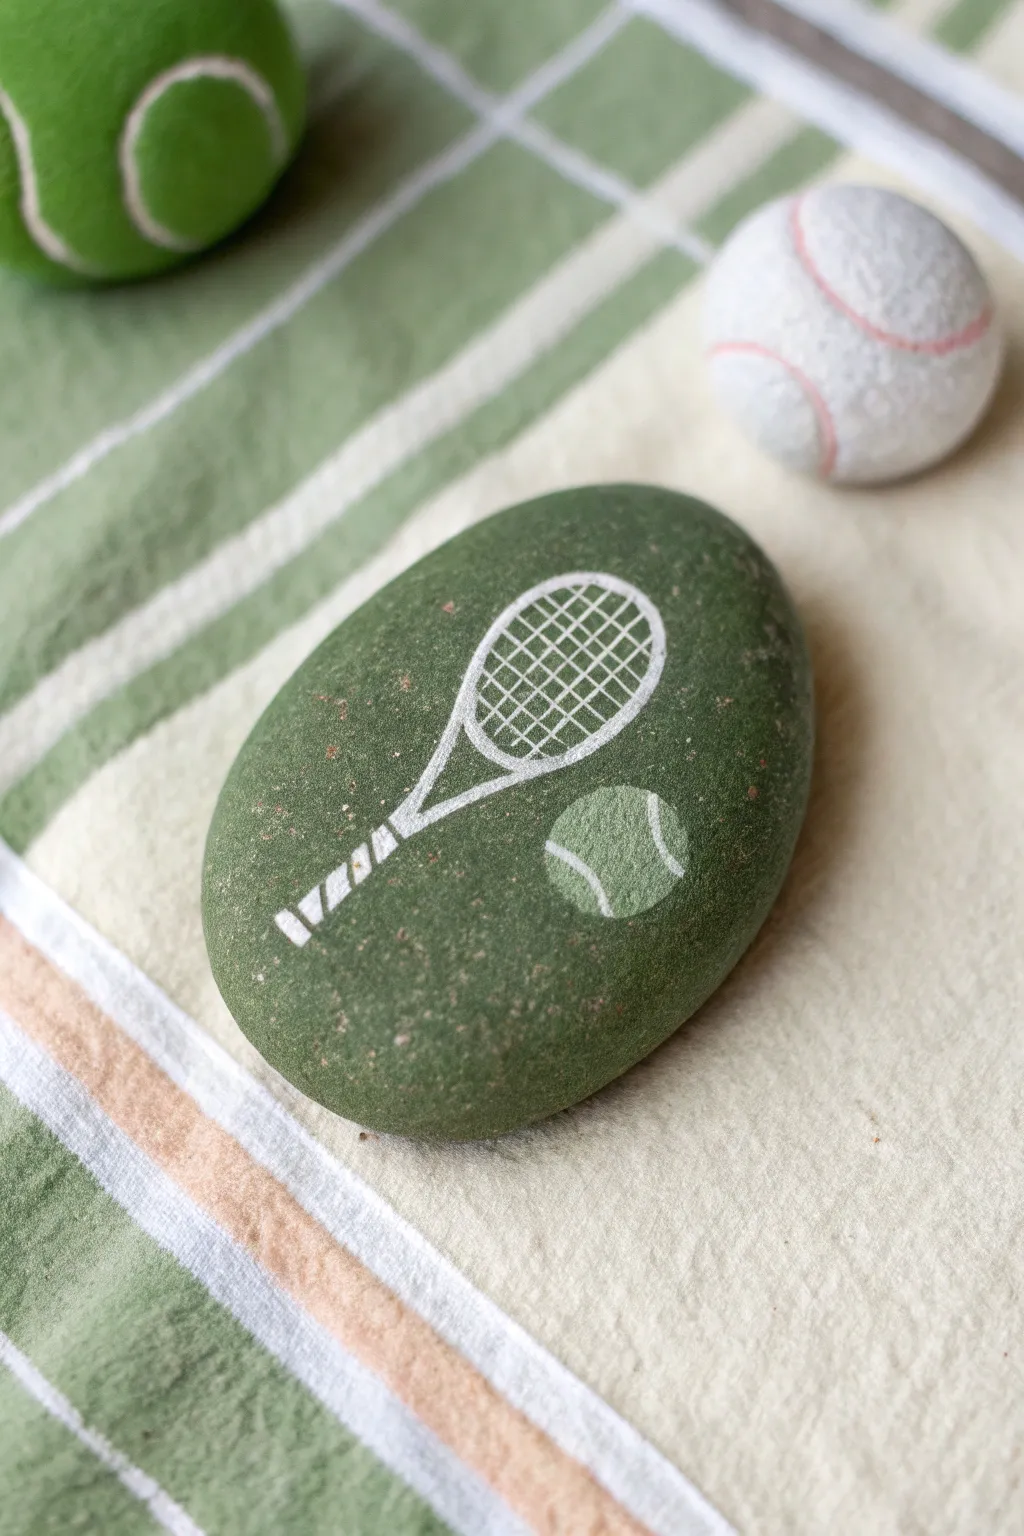
Channel those country club aesthetics with this clean and classic rock painting design. The deep mossy green background allows the crisp white linework of the racquet and ball to pop, creating a sophisticated piece of pocket-sized decor.
Detailed Instructions
Materials
- Smooth, oval river rock
- Moss green acrylic paint (matte finish)
- White extra-fine tip paint pen (0.7mm or 0.5mm)
- Light olive green acrylic paint (for the ball)
- Small flat paintbrush
- Pencil
- Matte spray sealer
Step 1: Setting the Background
-
Clean the canvas:
Start by washing your rock with warm soapy water to remove any dirt or oils. Pat it dry completely with a clean towel before you begin. -
Apply the base coat:
Using a small flat brush, cover the entire top surface of the rock with your moss green acrylic paint. Aim for a rich, dark forest tone. -
Let it dry:
Allow the first coat to dry completely. If the stone’s natural color is showing through, apply a second coat for solid, opaque coverage. -
Sketch the layout:
Once the green base is bone dry, lightly sketch the outline of a tennis racquet and a small circle for the ball using a pencil. Keep the lines faint so they don’t dig into the paint.
Uneven Lines?
If your paint pen skips or creates jagged edges, dip a toothpick in the background green paint and carefully ‘erase’ or reshape the white lines from the outside in.
Step 2: Drawing the Tennis Racquet
-
Outline the head:
Take your white extra-fine tip paint pen and carefully trace the oval shape of the racquet head. Go slowly to keep the curve smooth and consistent. -
Add the inner rim:
Draw a second oval just inside the first one to create the thickness of the racquet frame. Leave a very small gap between these two lines. -
Draw the throat:
Extend two lines down from the bottom of the racquet head, angling them inward to form the ‘throat’ or open triangle section of the racquet. -
Create the handle:
Continue the lines down to form the straight handle grip. Close off the bottom with a flat or slightly curved line. -
Detail the grip:
Draw jagged, diagonal white blocks along the handle to represent the wrapped grip tape. Leave small gaps of green between the white blocks to create texture. -
String it up involved:
Draw a series of parallel diagonal lines across the racquet face, all slanting one way. Spacing is key here, so try to keep them evenly apart. -
Cross the strings:
Draw a second set of diagonal lines in the opposite direction, crossing over the first set to create a grid pattern that looks like mesh strings.
Add Dimension
Mix a tiny drop of white into your light olive paint and dab it on the top curve of the tennis ball to create a highlight, making the ball look rounder.
Step 3: Painting the Ball
-
Fill the ball shape:
Using a tiny detail brush or paint pen, color in the circle you sketched earlier with the light olive green paint. This should be lighter than your background but distinct. -
Dry the circle:
Let this small circle dry completely. I like to give it a few extra minutes just to be safe, so the next layer doesn’t smudge. -
Add the seams:
With your white paint pen, draw two curved lines on the ball to mimic the classic tennis ball seam pattern. -
Highlight the fuzz:
If you want extra detail, gently stipple a few tiny dots on the light green area to suggest the fuzzy texture of the ball.
Step 4: Finishing Touches
-
Clean up lines:
If any green paint is showing where it shouldn’t, or if your white lines look weak, go over them one last time to crisp everything up. -
Seal the artwork:
Take the rock to a well-ventilated area and spray it with a matte sealer. This protects the paint from chipping without adding an unnatural shine.
Place this sporty little stone on your desk or bookshelf for a perfect touch of athletic elegance
Sailboat and Anchor Mini Scene
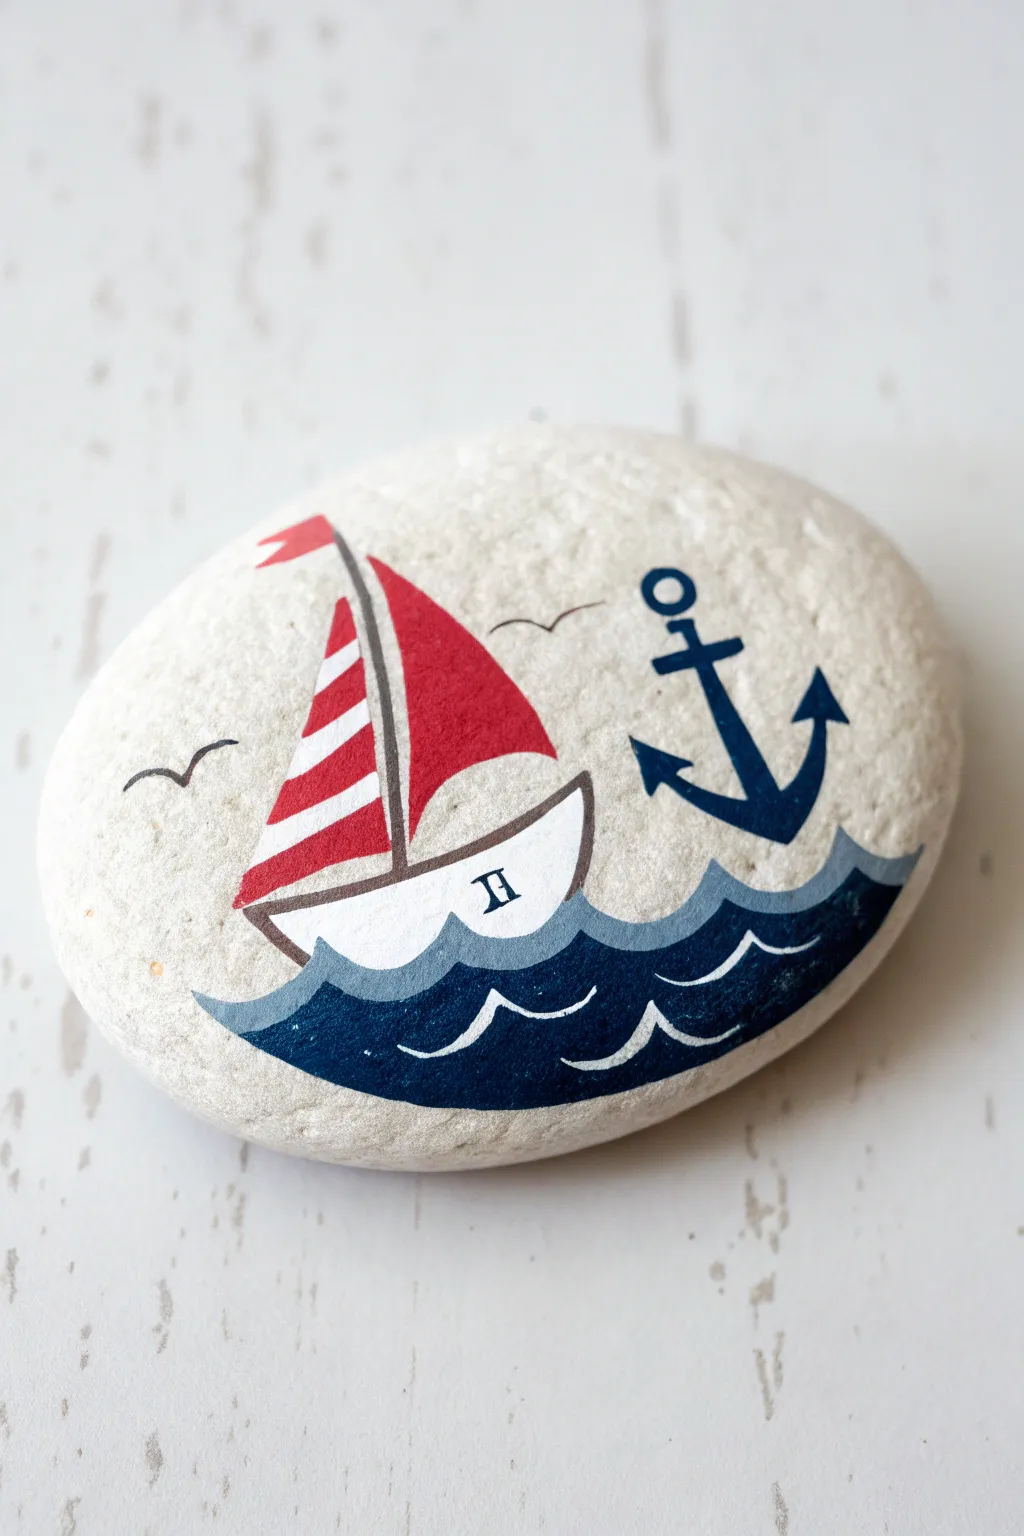
Capture the spirit of the sea with this crisp and classic sailboat scene painted on a smooth white stone. The design features a charming red-sailed boat riding gentle waves alongside a bold navy anchor, making it a perfect preppy accent for a desk or shelf.
Step-by-Step Guide
Materials
- Smooth, flat river rock (preferably white or light beige)
- Pencil for sketching
- Acrylic paints: Navy blue, light grey-blue, bright red, pure white, dark brown
- Fine detail brushes (sizes 0 and 00)
- Small flat brush (size 2)
- Black fine liner paint pen or very fine brush
- Matte or satin varnish
Step 1: Sketching the Scene
-
Select the Stone:
Choose a rock that is naturally light in color and has a fairly flat, smooth surface. If your rock isn’t white, you may want to apply a base coat of white acrylic paint first and let it dry completely. -
Position the Waves:
Using a pencil, lightly sketch a wavy horizon line across the bottom third of the rock. Make the waves curve slightly upward on the right side to frame the composition. -
Outline the Boat:
On the left side, above the waves, sketch a simple boat hull shape. It should look like a curved bowl resting on the water. -
Draw the Sails:
Add a vertical mast rising from the center of the hull. Sketch a triangular sail on the right side of the mast and a slightly smaller, curved triangular sail on the left side. -
Anchor Placement:
To the right of the boat, sketch an anchor sitting at a slight angle. Draw the top loop, the crossbar, the central shank, and the curved arms ending in arrow-like flukes.
Wobbly Lines?
If painting the anchor’s straight lines is tricky, use small pieces of painter’s tape or sticky notes to mask off the rock surface around the shape for crisp edges.
Step 2: Painting the Ocean
-
Base Wave Layer:
Mix a light grey-blue color. Paint the top section of the waves with this shade, following the scalloped edge of your sketch. Keep the bottom edge of this band wavy as well. -
Deep Sea Layer:
Fill the rest of the bottom area with navy blue paint. Ensure the top edge of this dark blue section mirrors the wavy pattern of the light blue layer above it. -
Whitecaps:
Once the blue paint is dry, use your finest brush or a white paint pen to add thin, curved lines inside the navy blue section. These should mimic the scalloped wave shapes to look like sea foam or movement.
Pro Tip: Depth
Add a tiny highlight of light blue mixed with white to the top-right curve of the anchor to make it look metallic and three-dimensional, rather than just flat.
Step 3: Painting the Boat
-
Fill the Hull:
Paint the hull of the boat with pure white paint. You might need two layers to make it opaque. Let it dry. -
Detail the Hull:
Outline the bottom and sides of the white hull with brown paint. Add a small ‘II’ or similar detail on the side if desired, using a tiny brush or pen. -
Main Sail:
Paint the large right-hand sail with bright red acrylic. Ensure the edges are crisp and straight. -
Striped Sail:
For the left sail, paint horizontal stripes. Alternate between bright red and white curved bands. I find it easiest to paint the whole sail white first, then add the red stripes over top. -
Mast and Rigging:
Use grey or brown paint to draw the thin vertical mast between the sails. Extend a thin line from the top of the mast to the tip of the left sail to suggest a flag or pennant.
Step 4: Final Details
-
Solidify the Anchor:
Paint the anchor with the same navy blue used for the deep ocean waves. Use a steady hand to keep lines straight and the arrow points sharp. -
Add Birds:
Using a black fine liner pen or the very tip of your smallest brush with black paint, draw a few simple ‘m’ shapes in the sky to represent seagulls. -
Cleanup:
Check your edges. If any paint went outside the lines, use a little white paint to touch up the background stone color. -
Seal the Rock:
Once all paint is thoroughly dry, apply a coat of matte or satin varnish to protect your artwork from chipping and give it a finished look.
Place your finished nautical stone on a stack of books or use it as a paperweight to bring a bit of seaside calm to your space


Seashells in Pastel Ombre
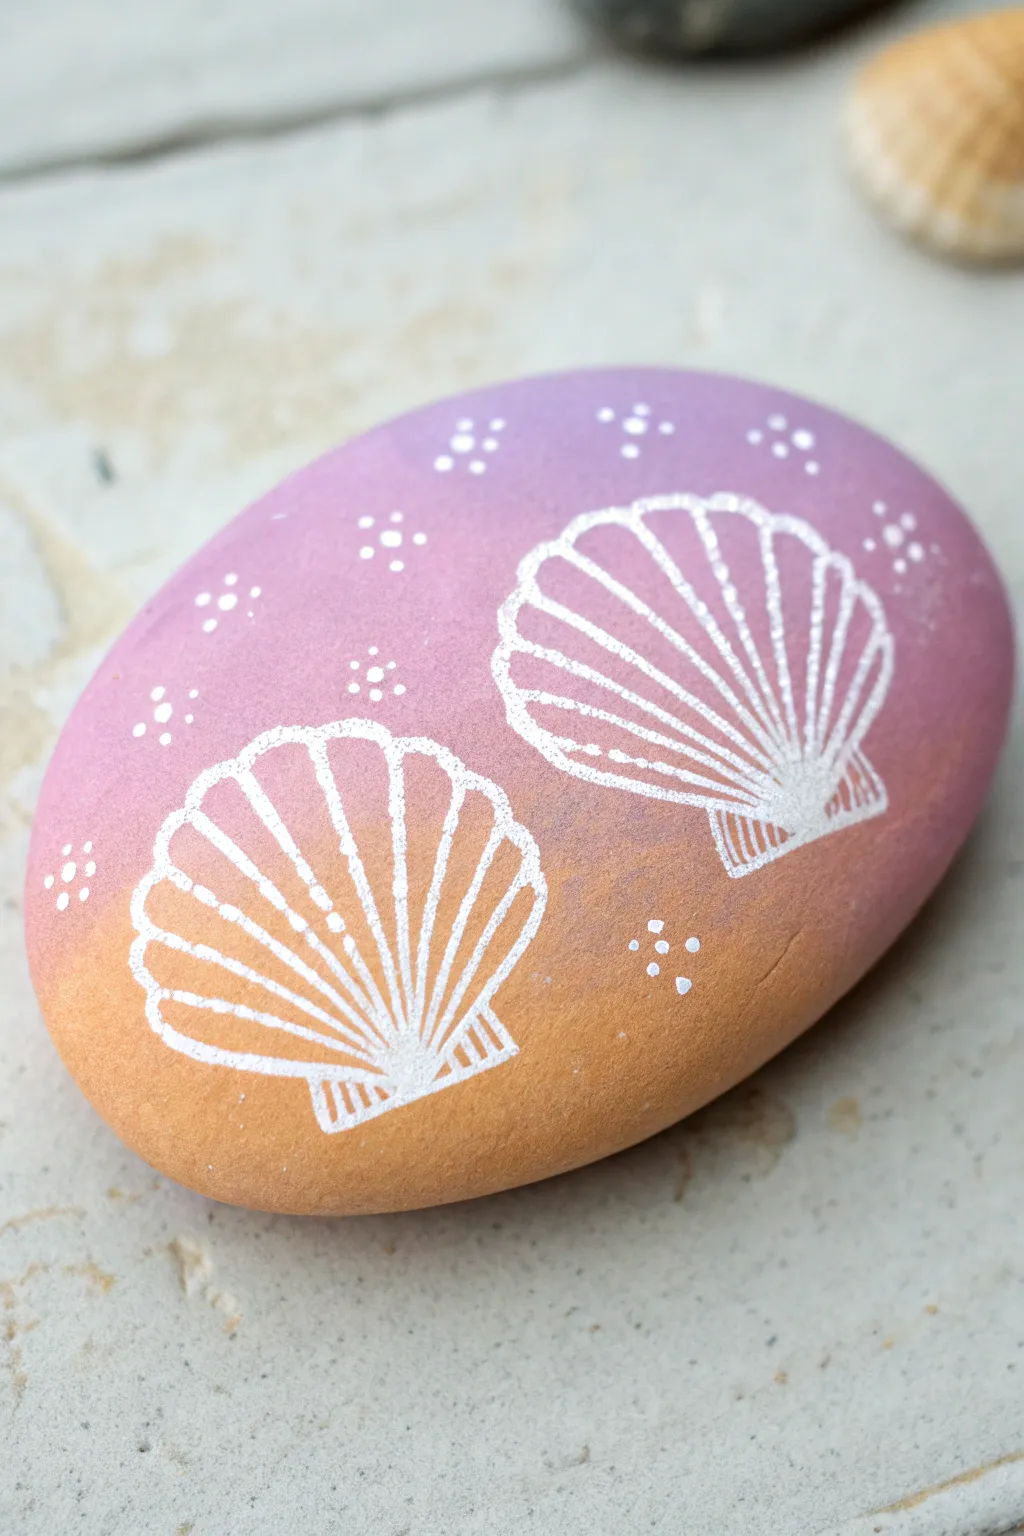
Capture the essence of a summer sunset on the beach with this dreamy, rock painting project. The soft gradient backdrop combines beautifully with crisp white shell outlines for a chic, preppy coastal decor piece.
Step-by-Step
Materials
- Smooth, oval river rock
- Acrylic paints: Lavender/Light Purple, Peach/Light Orange, White
- Makeup sponge or small wedge sponge
- Fine detail brush (size 00 or 0)
- White paint pen (optional, thicker tip)
- Dotting tool or toothpick
- Palette or paper plate
- Water cup and paper towels
- Spray gloss varnish or sealer
Step 1: Creating the Ombre Background
-
Prepare the stone:
Begin by washing your rock with soapy water to remove any dirt or oils. Let it dry completely before starting. -
Base coat application:
Paint the entire top surface of the rock white first. This primer layer ensures your pastel colors will pop and look vibrant rather than muddy against the dark stone. -
Load the sponge:
Squeeze a small amount of lavender paint and peach paint onto your palette. Take a slightly damp makeup sponge and dab one end in purple and the other end in peach. -
Sponge the gradient:
Dab the sponge onto the rock, keeping the purple at the top and the peach at the bottom. Use a gentle bouncing motion to press the paint onto the surface. -
Blend the middle:
Where the two colors meet in the center, lightly tap over the transition line repeatedly. This ‘pouncing’ action blends the wet paint to create a seamless fade. -
Apply second coat:
Allow the first layer to dry until it feels chalky. Repeat the sponging process with a second layer of paint to deepen the opacity and smooth out the gradient. -
Dry completely:
Let the ombre background dry thoroughly for at least 20-30 minutes. If the paint is even slightly wet, your white lines might smear later.
Step 2: Painting the Scallop Shells
-
Outline the shape:
Using your fine detail brush and white paint, create the outline of two fan-shaped scallop shells. Place the right one slightly higher than the left for a natural composition. -
Add the ridge lines:
Start from the bottom center hinge of the shell and paint straight lines fanning out toward the top edge. I like to paint the center line first to help guide the symmetry. -
Detail the edges:
At the top of each radiating line, add a tiny curved line connecting them to create the scalloped edge of the shell. -
Draw the hinge:
Paint the small rectangular base at the bottom of the fan shape. Add 3-4 vertical lines inside this rectangle to mimic the texture of a real shell hinge. -
Thicken main lines:
Go over your main fan lines again to brighten the white. Vary the pressure slightly so the lines have a natural, hand-drawn character. -
Add accent dots:
Dip a dotting tool or a toothpick into white paint. Add clusters of 4-5 tiny dots scattered around the empty purple and peach spaces to look like bubbles or sand.
Fixing Ombre Mistakes
If the gradient looks patchy or the transition is too harsh, let it dry fully. Then, apply a very thin, watery layer of white over the middle seam before re-sponging your colors.
Step 3: Finishing Touches
-
Check opacity:
Look closely at your white lines. If the background color shows through, trace over the shells one final time for a crisp, opaque finish. -
Apply varnish:
Once all paint is completely bone dry, take the rock outside and apply a light coat of spray gloss sealer to protect the artwork and give it a polished look.
Make It Sparkle
Mix a tiny pinch of fine iridescent glitter into your final varnish coat, or use a metallic silver paint pen for the shell outlines instead of white for extra glam.
Place your finished rock on a stack of books or a vanity tray for a perfect touch of coastal charm
Bubble-Letter Good Vibes Rock

Capture the ultimate positive energy with this trendy rock painting project. Featuring bold bubble letters in a classic preppy color palette of pinks, reds, and soft blues, this design is finished with sparkly star accents for a cheerful touch.
Detailed Instructions
Materials
- Smooth, oval river rock (approx. 3-4 inches wide)
- White acrylic paint or gesso (for base coat)
- Wide flat paintbrush
- Fine tip paint brushes (size 0 or 00)
- Acrylic paints: Light pink, darker raspberry pink, soft teal/baby blue, yellow
- Black acrylic paint marker (ultra-fine or fine tip)
- Pencil and eraser
- Clear spray sealant (matte or gloss)
Step 1: Base Preparation
-
Clean surface:
Begin by washing your rock with warm, soapy water to remove any dirt or oils. Scrub it gently and let it dry completely in the sun. -
Whiten the canvas:
Apply a base coat of white acrylic paint to the top surface of the rock. Use a wide flat brush for smooth coverage. -
Second coat:
Once dry, apply a second layer of white if the natural rock color is still showing through. Aim for a solid, opaque background.
Uneven Coverage?
If your pinks or blues look streaky, don’t pile on thick paint. Let the first thin coat dry fully, then apply a second thin coat for a smooth, opaque finish.
Step 2: Sketching the Letters
-
Draft the layout:
Lightly sketch the words ‘GOOD’ on the top half and ‘VIBES’ on the bottom half using a pencil. Curve the ‘GOOD’ slightly upward to follow the rock’s shape. -
Bubble effect:
Go over your sketch to thicken the letters into a bubble font style. Keep the letters close together but try not to let them overlap too much. -
Star placement:
Sketch two four-point stars on the left and right sides of the word ‘VIBES’ to balance the composition.
Step 3: Painting the Colors
-
Top row colors:
Paint the letters ‘G’, ‘O’, and ‘D’ in the top row with light pink acrylic paint using a fine tip brush. -
Top row accent:
Paint the second ‘O’ in ‘GOOD’ with the darker raspberry pink for a fun variation. -
Bottom row pattern:
For ‘VIBES’, start with the raspberry pink on the ‘V’ and the middle ‘E’. Use the light pink for ‘I’ and ‘B’. -
Blue accent:
Finish the bottom word by painting the ‘S’ in that soft teal or baby blue color. -
Star details:
Carefully fill in the diamond-shaped stars with yellow paint.
Add Some Shine
After sealing, add small dots of glitter glue over the yellow stars or apply a glossy Mod Podge just to the letters to make them look like raised stickers.
Step 4: Outlining & Details
-
Drying time:
Allow the colored paint to dry completely. If the paint is even slightly wet, the marker in the next step will snag. -
Outline letters:
Using a black paint marker, carefully trace the outline of every letter. Keep your hand steady and rest your wrist on the table for stability. -
Internal gaps:
Don’t forget to outline the inner holes of the letters ‘O’, ‘D’, and ‘B’. -
Shadow detailing:
To give the letters depth, thicken the black outline specifically on the right side and bottom curves of each letter. I find this simple step instantly makes the design pop. -
Outline stars:
Trace the yellow stars with the black marker, using thin, sharp lines at the points. -
Clean up:
Once the ink is dry, gently erase any visible pencil marks remaining around the design. -
Seal:
Finish by spraying the rock with a clear sealant to protect your artwork from chipping or fading.
Place this cheerful rock on your desk or hide it in the neighborhood to spread some positivity
Rainbow Swirl With Sparkle Doodles
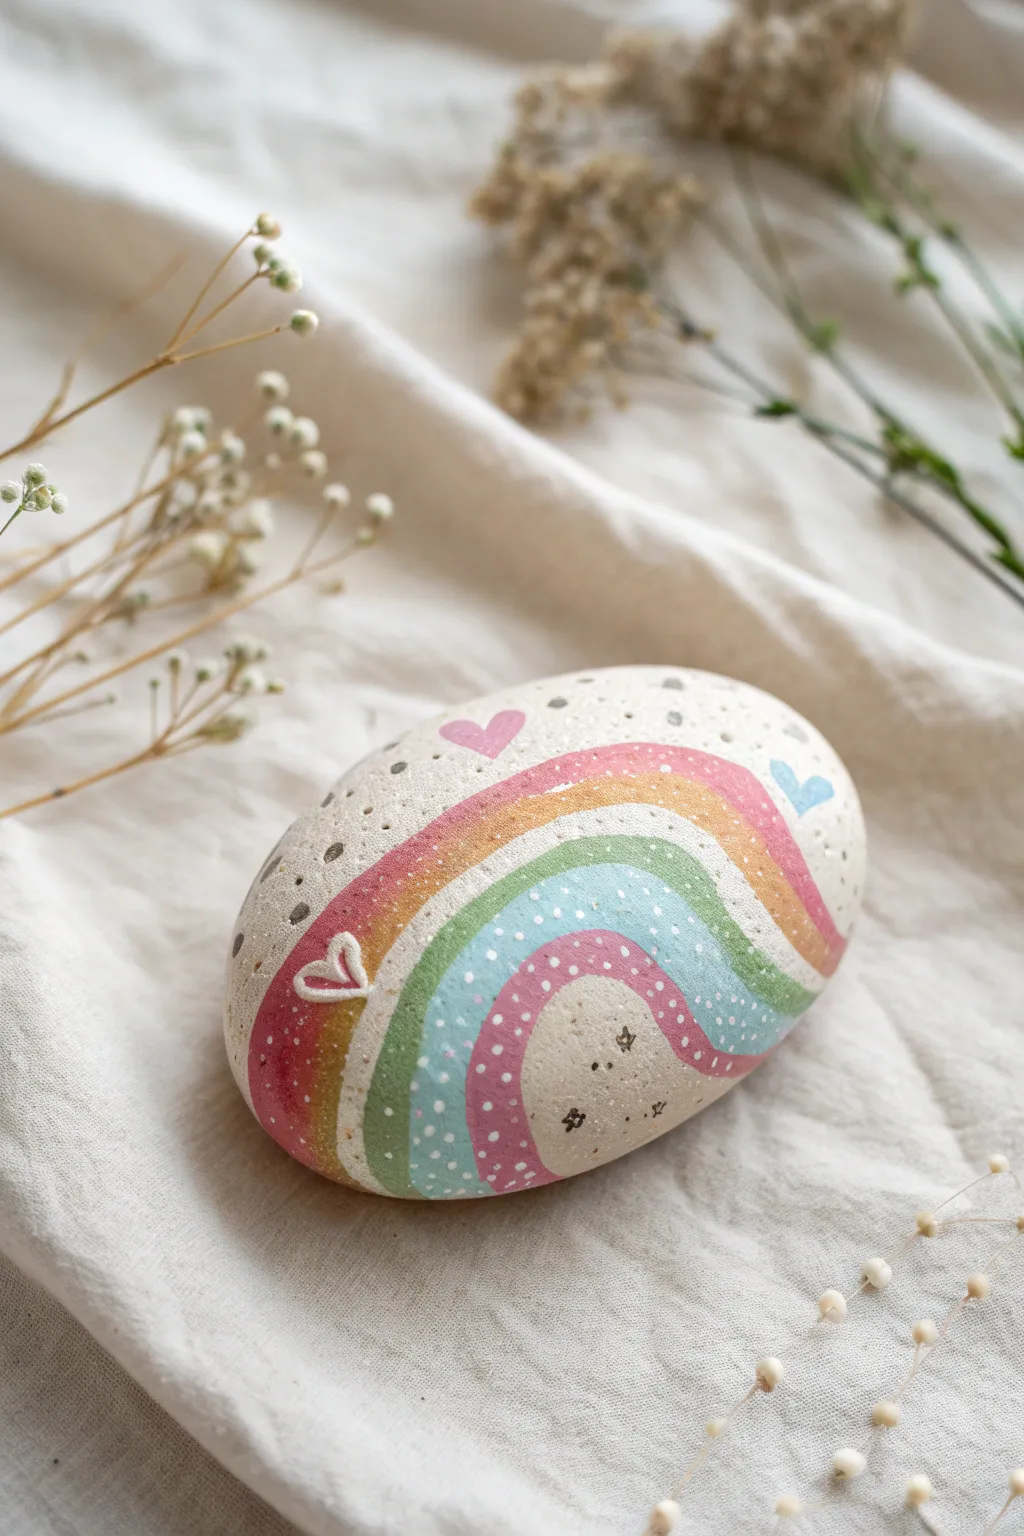
Embrace a soft and dreamy aesthetic with this muted rainbow design painted on a smooth river stone. Featuring gentle pastel arcs, delicate stippling, and sweet heart accents, this project is perfect for adding a touch of whimsy to your desk or garden.
How-To Guide
Materials
- Smooth, oval river rock (cleaned and dried)
- Acrylic paints (Cream/Off-White, Muted Pink, Mustard Yellow, Sage Green, Sky Blue)
- Fine grit sandpaper (optional for prepping)
- Small flat brush
- Extra-fine detail brush (size 0 or 00)
- Dotting tool or toothpick
- Matte spray varnish or sealer
- Old toothbrush (for splattering)
Step 1: Base and Prep
-
Clean the canvas:
Start by washing your rock with soapy water and letting it dry completely. If the surface is rough, give it a quick rub with fine-grit sandpaper to create a smoother painting surface. -
Apply the base coat:
Using a flat brush, paint the entire top surface of the rock with a cream or off-white acrylic paint. This neutral background mimics the natural stone look but provides a consistent canvas for the colors to pop. -
Ensure opacity:
Let the first coat dry fully. Apply a second or third coat of the cream paint until you have a solid, opaque coverage without streaks.
Fixing Wobbly Lines
If your rainbow stripes touch or smudge, wait for them to dry completely. Then, use the cream base color to carefully paint over the mistake and reshape the line.
Step 2: Painting the Rainbow Arcs
-
Draft the shape:
Lightly sketch the rainbow shape with a pencil if you’re nervous about freehanding. The arc should start low on the left and curve over to the right side of the stone. -
First arc: Muted Pink:
Mix a soft, muted pink. Using your small flat brush or a round brush, paint the outermost arc of the rainbow. Keep the edges relatively clean but don’t worry about perfection; a hand-painted look is part of the charm. -
Second arc: Muted Mustard:
Next, apply a band of mustard yellow immediately below the pink arc. Try to keep the width of the stripe consistent with the pink one. -
Third arc: Sage Green:
Paint the third stripe using a sage green shade. Ensure it hugs the yellow line closely so there are no gaps between the colors. -
Fourth arc: Sky Blue:
Add a sky blue stripe under the green. This color adds a nice cool-toned balance to the warmer outer rings. -
Inner arc: Deep Pink:
Finish the rainbow structure with a final, smaller inner semi-circle of the muted pink tone. This creates a cohesive bookend to the design.
Pro Tip: Better Flow
Add a tiny drop of water or flow medium to your acrylics when doing the fine line work. It helps the paint glide smoothly for crisper hearts and stars.
Step 3: Adding Details and Sparkle
-
Create the white dots:
Once the colored stripes are dry, dip a fine detail brush or a toothpick into white paint. Add tiny, random dots over the sage green and the inner pink arc to simulate a starry or speckled texture. -
Paint the hearts:
Using the muted pink paint and a detail brush, carefully paint a small heart floating above the rainbow on the left side. Paint another small heart in blue on the right side. -
Add the outline heart:
On the left side of the rainbow, overlapping the pink and yellow stripes slightly, use white paint to draw a small, open heart outline. I find a liner brush works best for these thin lines. -
Draw simple stars:
underneath the rainbow arch in the cream space, use a dark brown or grey paint to draw tiny five-point stars or simple cross-hatched sparkles. -
Add texture speckles:
To give the stone an organic, speckled egg appearance, dip an old toothbrush into diluted grey or brown paint. Run your thumb over the bristles to flick tiny specks of paint across the entire stone, focusing on the white background areas. -
Final dark dots:
Add a few larger, intentional dark grey dots around the outer edges of the stone to frame the composition. -
Seal the artwork:
Allow the rock to dry overnight to ensure all thick paint layers are set. Spray with a matte varnish to protect your work without making it too shiny.
Place this charming stone on a bookshelf or gift it to a friend as a pocket-sized token of joy
Checkerboard Hearts Remix
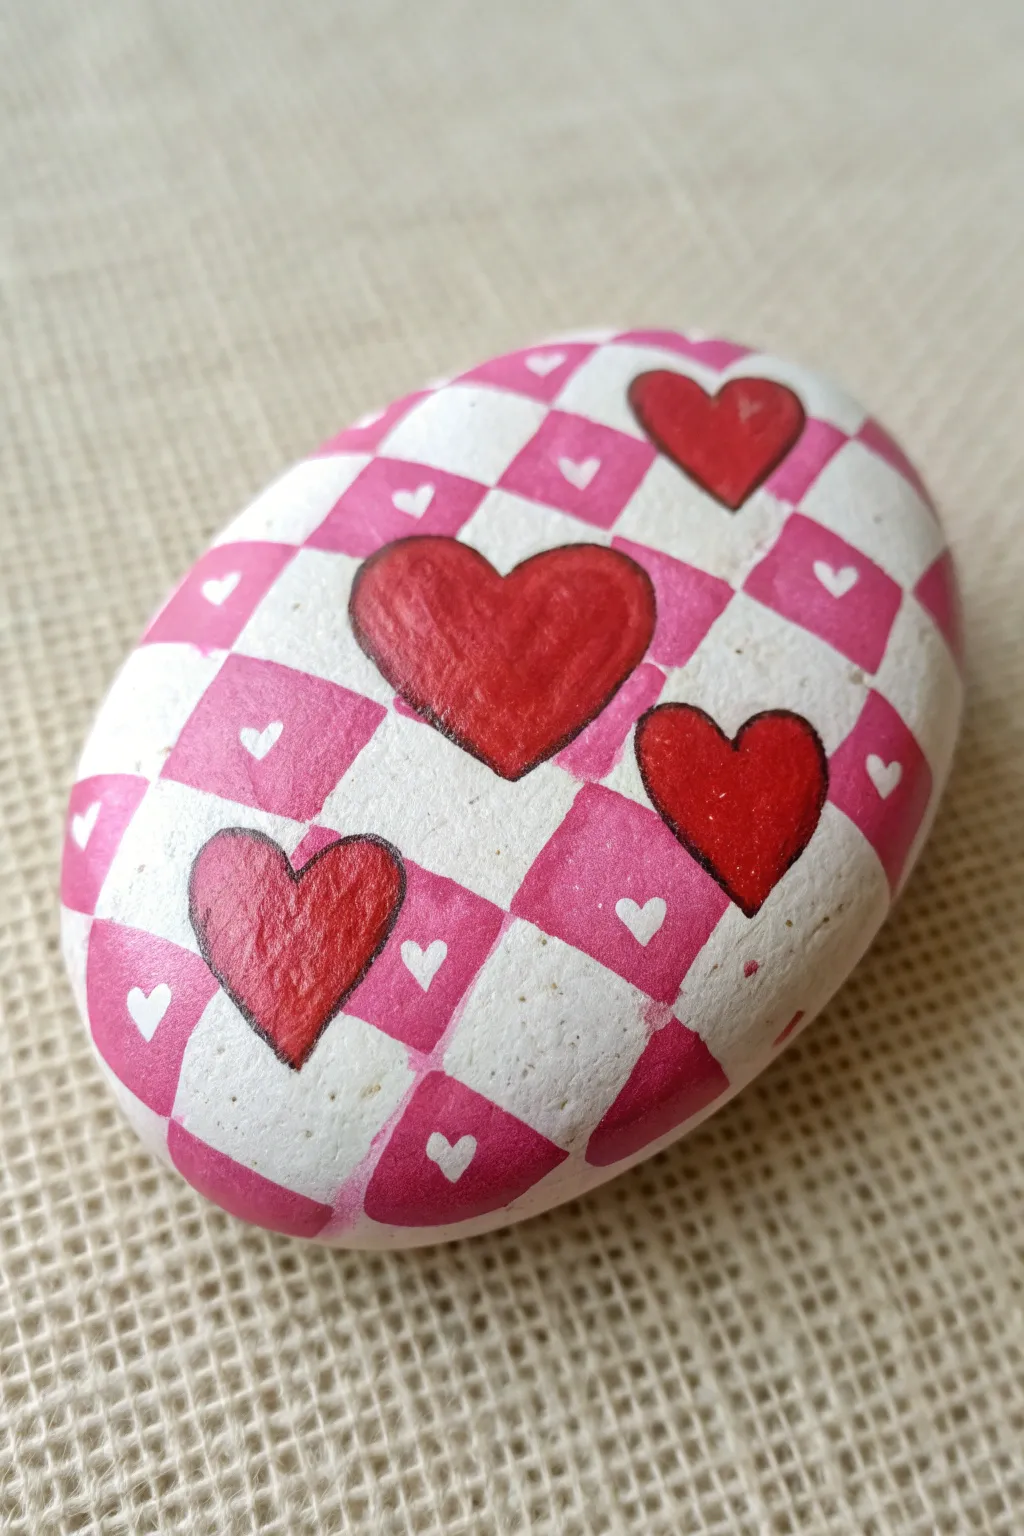
Give the classic Vans aesthetic a sweet twist with this pink-and-white checkerboard rock. Featuring bold focal hearts and dainty details, this design perfectly balances preppy geometrics with soft romantic vibes.
Step-by-Step Guide
Materials
- Smooth, oval-shaped river rock
- White acrylic paint (base coat)
- Pink acrylic paint (mid-tone)
- Red acrylic paint (for focal hearts)
- Black fine-tip paint pen or liner brush
- Small flat brush (for squares)
- Fine detail brush (for tiny hearts)
- Pencil and eraser
- Gloss varnish or sealer
Step 1: Base & Grid
-
Prime the Surface:
Begin by washing and drying your rock thoroughly. Apply two coats of white acrylic paint to create a solid, opaque canvas, letting the first coat dry completely before adding the second. -
Map Out the Grid:
Once the white base is bone dry, use a pencil to lightly sketch a wavy grid across the rock. The lines don’t need to be perfectly straight rulers; a slight curve mimics fabric and looks more organic. -
Plan the Squares:
Lightly mark every other square with a small ‘x’ in pencil. This simple trick saves you from the frustration of accidentally painting two adjacent squares the same color later.
Step 2: Checkerboard Painting
-
Fill Pink Squares:
Using your small flat brush and pink acrylic paint, carefully fill in the squares you marked with an ‘x’. -
Clean Edges:
Take your time near the lines to keep the square shapes distinct. If you go over the line, wait for it to dry and touch it up with a bit of white paint. -
Second Coat:
Pink paint can sometimes be translucent. I usually find that a second thin coat of pink makes the checkerboard pattern really pop against the white.
Grid Master Tip
Use narrow masking tape (or cut washi tape into thin strips) to mask off your grid lines before painting. Peel it off while wet for crisp squares.
Step 3: The Focal Hearts
-
Sketch the Big Hearts:
With a pencil, lightly draw three or four large hearts scattered across the rock. Let them overlap the grid lines freely—this creates depth. -
Paint the Red Base:
Fill these large heart shapes with bright red acrylic paint. You will likely need 2-3 coats to ensure the checkerboard pattern underneath is completely covered. -
Outline with Black:
Once the red paint is fully dry, use a black fine-tip paint pen to slowly trace the outline of the large red hearts. This separation lifts them off the background pattern visually. -
Add Subtle Shading:
For a little dimension, you can lightly feather a tiny bit of darker red or paint-pen shading on one side of the hearts.
Level Up: glitter
Mix a tiny pinch of iridescent glitter into your sealing varnish, or use a glitter topcoat just on the large red hearts to make them sparkle.
Step 4: Micro Details
-
Tiny Heart Placement:
Switch to your finest detail brush or a white gel pen. Inside each pink square, paint a miniature white heart. -
Vary the Angles:
Don’t worry about making them uniform. Let these tiny hearts tilt and turn slightly to keep the pattern playful. -
Clean Up:
Check the white squares for any smudges or stray pencil marks. Gently erase pencil lines or touch up with white paint where needed. -
Seal the Deal:
Finish the project by applying a coat of gloss varnish. This protects the paint from chipping and gives the rock that polished, ceramic look.
Display your charming checkerboard rock on a desk or gift it to a friend for a burst of preppy color
Preppy Leopard in Bright Colors
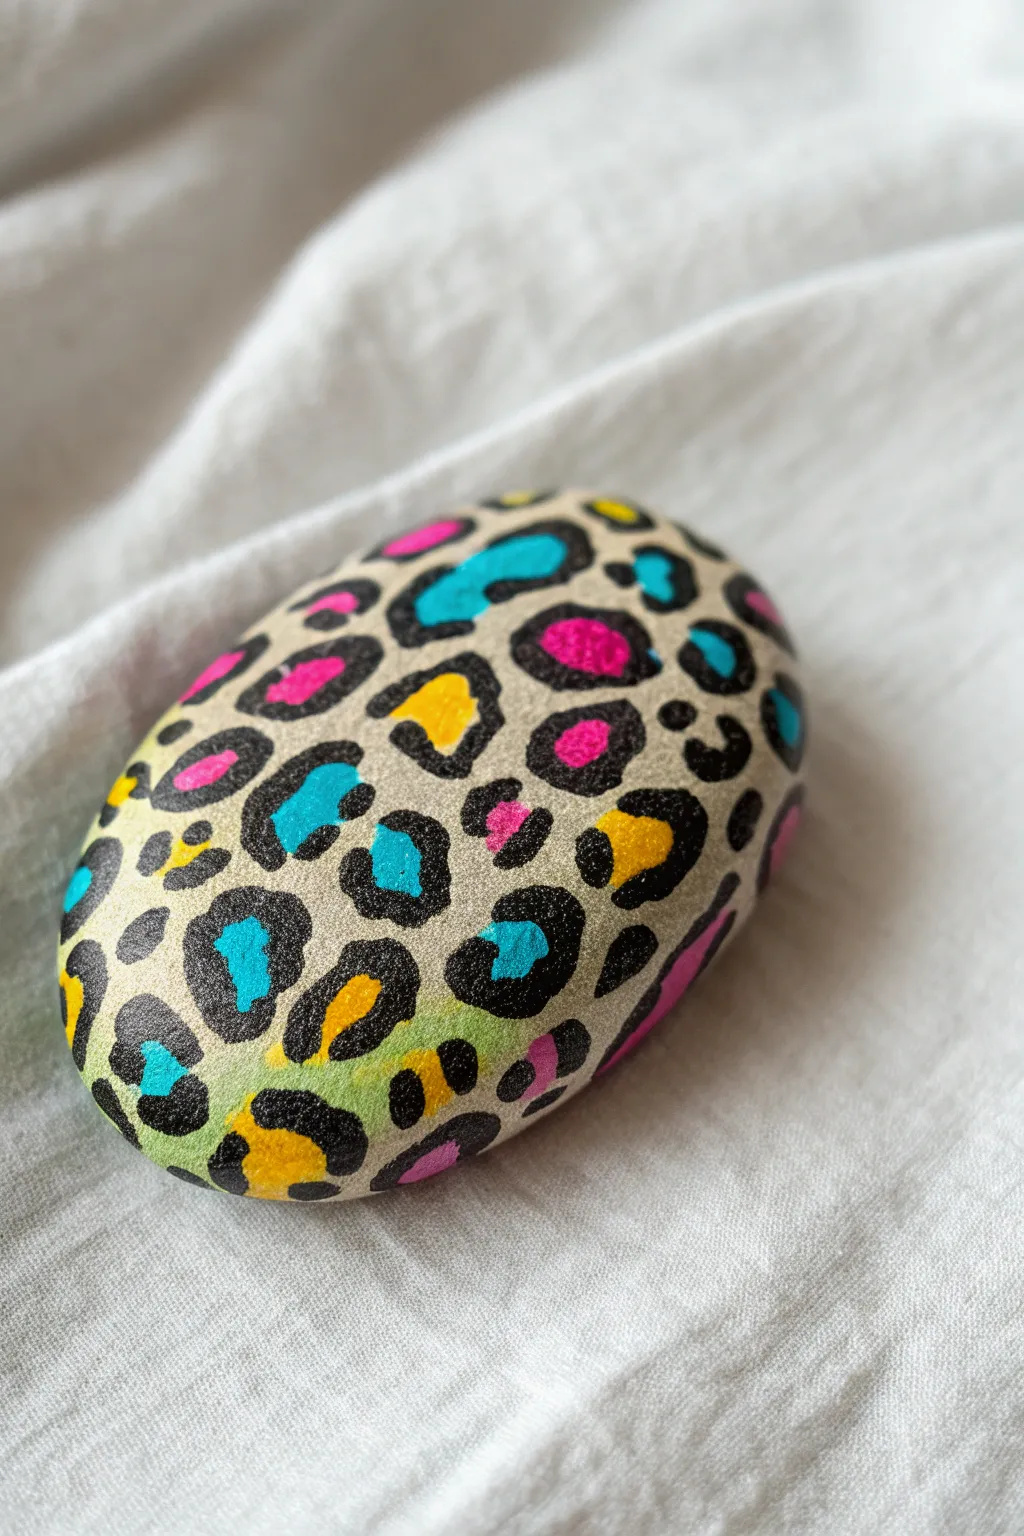
Transform a smooth river stone into a preppy statement piece with this high-contrast leopard print design. The combination of bright neon hues against a neutral background gives this classic animal print a fun, modern update perfect for desk decor or garden accents.
Step-by-Step Tutorial
Materials
- Smooth oval river rock (about 3-4 inches)
- Acrylic paints: Light beige/cream, bright pink, cyan blue, mustard yellow, and black
- Paintbrushes: Medium flat brush for base, fine liner brush (size 0 or 00) for details
- Dotting tool or toothpick (optional)
- Sealer (glossy or matte spray varnish)
- Palette or paper plate
- Water cup and paper towels
Step 1: Prepping and Base Coat
-
Clean the surface:
Before you start, wash your rock thoroughly with soap and water to remove any dirt or oils. Let it dry completely in the sun or use a hairdryer to speed things up. -
Apply the base color:
Using your medium flat brush, paint the entire top surface of the rock with the light beige or cream acrylic paint. Apply smoothly to minimize brush strokes. -
Add a second coat:
Once the first layer is dry to the touch, apply a second coat of beige to ensure full opacity. You shouldn’t see any of the natural stone color peeking through. -
Dry thoroughly:
Allow the base coat to dry completely. This is crucial because painting wet-on-wet will cause your colors to muddy.
Smooth Moves
If your black paint feels draggy or sticky while outlining, mix in a tiny drop of water or flow medium. Inky paint creates much sharper leopard spots.
Step 2: Adding the Color Spots
-
Start with pink spots:
Select your bright pink paint. Using a small round brush or a large dotting tool, dab random, uneven blobs onto the rock. Keep them organic—they shouldn’t be perfect circles. -
Add blue accents:
Rinse your brush and switch to the cyan blue paint. Place these blue spots in the empty spaces between the pink ones, varying the sizes slightly. -
Finish with yellow:
Finally, add the mustard yellow or gold spots in the remaining larger gaps. Try to distribute the three colors evenly across the surface so no single color dominates one area. -
Fill small gaps:
If there are large empty beige areas, add very tiny dots of just the colors (without outlines later) to fill the space. -
Let the colors set:
Wait about 10–15 minutes for these colored spots to dry completely before moving on to the black outlines.
Level Up: Gold Glam
Swap the mustard yellow paint for metallic gold acrylic. The shimmer adds a glamorous touch that catches the light beautifully.
Step 3: Creating the Leopard Print
-
Prepare your fine brush:
Load your finest liner brush or a size 0 round brush with black acrylic paint. I find thinning the paint slightly with a drop of water helps it flow smoother for outlines. -
Outline technique:
Paint black borders around your colored spots, but do not enclose them fully. Instead, paint two or three separate C-shapes or brackets around each color blob. -
Vary line thickness:
As you paint these brackets, vary the pressure on your brush to create lines that go from thick to thin. This gives the print a more authentic, natural look. -
Add solid spots:
In the beige spaces between the large colored spots, paint small, solid black irregular dots or clusters of dots to fill the negative space. -
Wrap the pattern:
Continue painting the pattern all the way to the edges of the rock so the design looks like it wraps around naturally.
Step 4: Finishing Up
-
Final drying:
Allow the black paint to cure fully. If the black is thick in places, give it extra time to ensure it won’t smear during sealing. -
Seal the rock:
Apply a coat of spray varnish to protect your work. A glossy finish makes the bright preppy colors pop, while matte gives a more natural stone feel. -
Sign your work:
Don’t forget to flip the rock over once it’s dry and sign or date the bottom with a paint pen.
Enjoy displaying your vibrant little piece of pop art on your desk or bookshelf
Sticker-Collage Illusion Rock
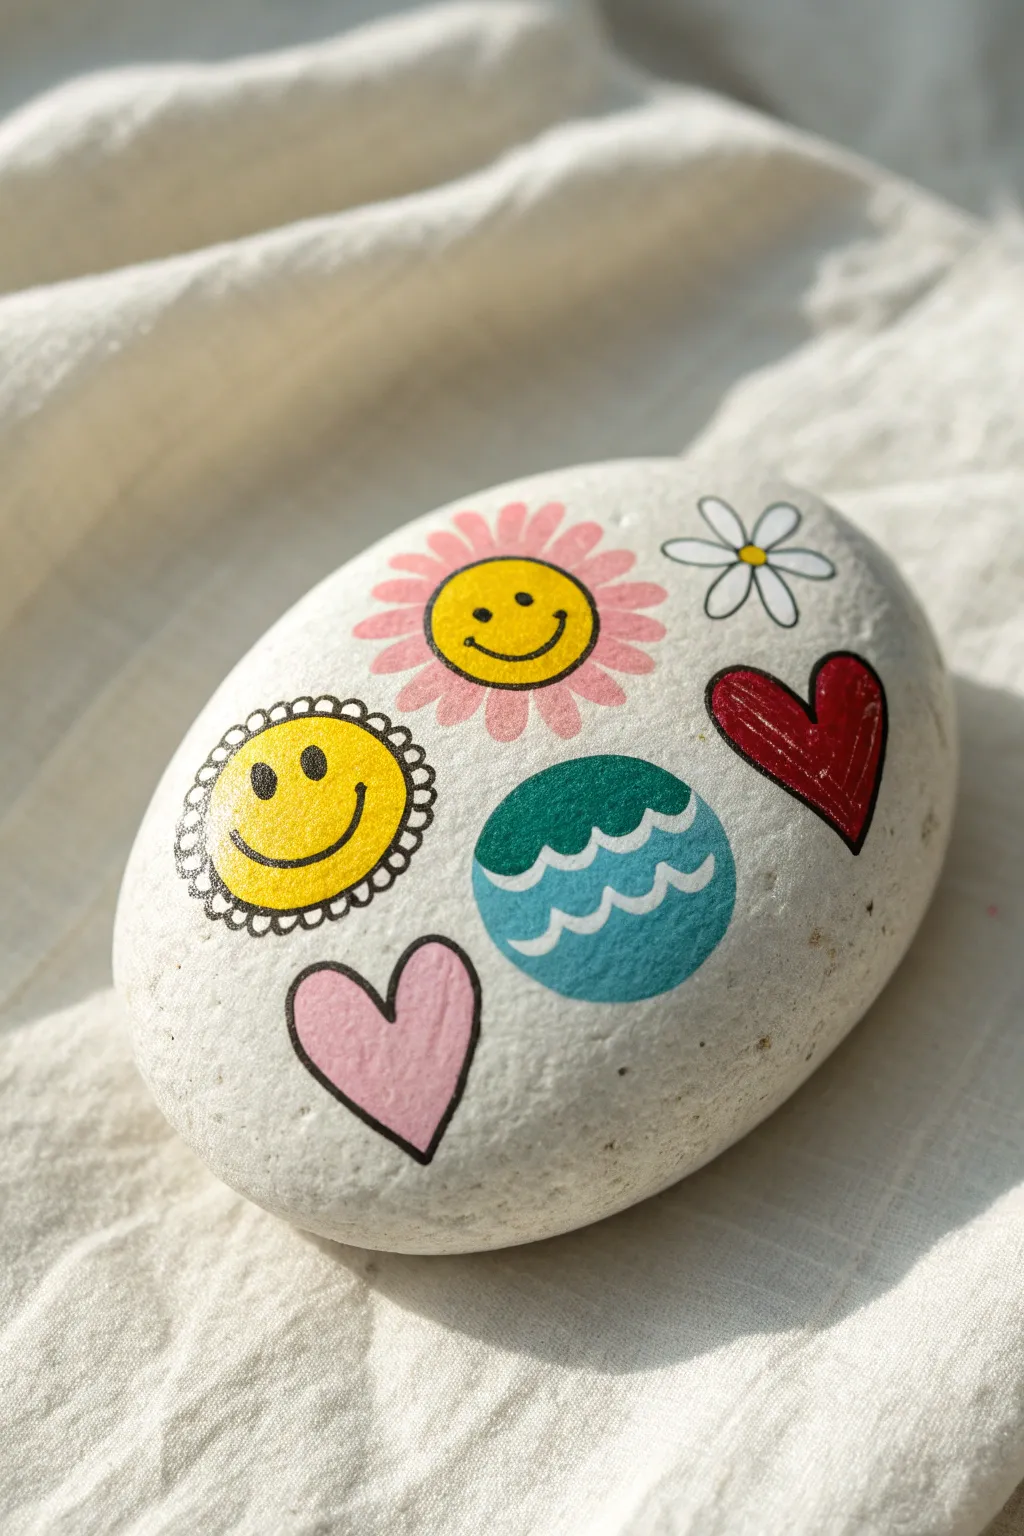
Achieve the trendy look of a sticker-bomb collection without using a single adhesive. This project involves painting crisp, distinct doodles on a white background to create the illusion of overlapping and individual die-cut decals.
Detailed Instructions
Materials
- Smooth, oval river rock (approx. 3-4 inches wide)
- White or cream matte acrylic paint (for base coat)
- Acrylic paint markers (fine and extra-fine tips) in: yellow, pink, red, teal, white, and black
- Flat paintbrush (medium size)
- Spray sealer (matte or gloss finish)
Step 1: Base Preparation
-
Clean the canvas:
Start by scrubbing your river rock with warm soapy water and a stiff brush to remove any dirt or oils that might prevent the paint from sticking. -
Apply the base coat:
Using your flat paintbrush, cover the top surface of the rock with white or cream acrylic paint. The goal is a solid, opaque background. -
Layer for opacity:
Let the first coat dry completely. Apply a second or third coat if the stone’s natural gray color is still showing through, ensuring a smooth, sticker-backing-like finish.
Smudgy Lines?
Paint pens can smear if layered too quickly. If your black outlines bleed into the colors, wait longer between steps or switch to a permanent ultra-fine Sharpie for final details.
Step 2: Painting the Motifs
-
Draft the layout:
Lightly sketch the placement of your six main icons using a very light pencil touch so you don’t scratch the base paint. -
Start the yellow smiley:
Using a yellow paint marker, fill in a solid circle for the sun/smiley face on the left side. -
Create the pink flower:
With a pink marker, draw petals radiating from a center point near the top. Leave the center empty for now or fill it with yellow immediately if your markers are opaque enough. -
Add the wave circle:
Draw a perfect circle in the center-right area using a teal or turquoise marker. Fill it in completely solid so no brushstrokes show. -
Paint the hearts:
Draw a solid red heart on the right side. Then, draw a light pink heart outline and fill it in near the bottom left area. -
Draw the daisy:
For the white daisy in the top right, sketch five simple petal shapes. If your base coat is already white, you might just need to outline them later, but adding a layer of fresh white paint makes them pop.
Level Up: White Borders
To really sell the sticker illusion, paint a slightly thicker white border around each individual doodle after the black outlines dry, creating a ‘die-cut’ edge.
Step 3: Adding the ‘Sticker’ Details
-
Outline the smiley:
Once the yellow circle is dry, use a fine-tip black marker to draw the scalloped (bumpy) edge around it. This mimics a specific type of die-cut sticker. -
Add smiley features:
Draw the two oval eyes and the wide smile on the yellow circle. Add a smaller smiley face inside the center of the pink flower. -
Detail the red heart:
Outline the red heart boldly with black ink. Add a second, thinner black line just inside the red shape to give it a dimensional, doodle style. -
Outline the pink heart:
Trace the edge of the light pink heart with a confident black line. Keeping the line weight consistent helps selling the ‘sticker’ effect. -
Define the daisy:
Outline the white daisy petals in black and add a small yellow dot for the center. -
Create the waves:
Using a white paint pen, draw two wavy lines across the teal circle. The lines usually look best if they are slightly thicker than the black outlines. -
Final clean up:
Check the edges of your doodles. If any black lines look shaky, you can carefully touch them up with the neighboring color once the ink is dry.
Step 4: Sealing
-
Let it cure:
Allow the paint markers to dry for at least an hour to prevent smearing during the sealing process. -
Seal the deal:
Take the rock outside and apply a light coat of spray sealer. A matte finish looks more like paper stickers, while gloss looks like vinyl decals.
Now you have a durable piece of art that looks like a casual collection of trendy stickers
Glossy Jelly Finish With Highlights
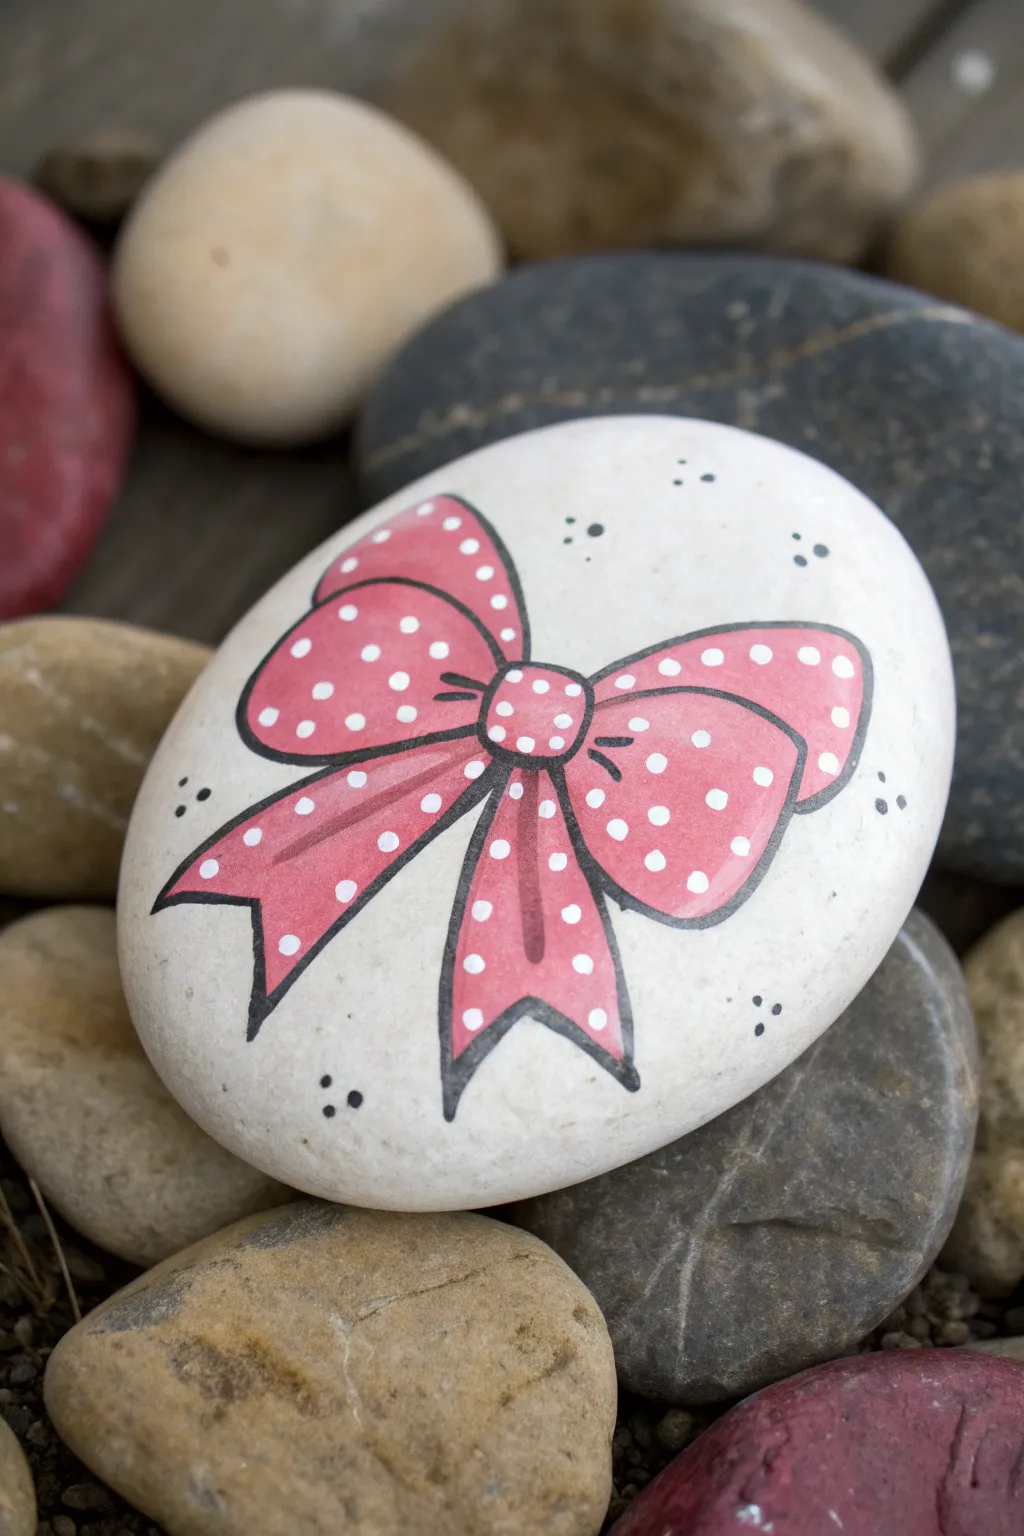
This adorable painted rock features a classic preppy pink bow adorned with white polka dots, perfect for adding a touch of sweetness to your garden or desk. The key to this look is the clean black outlining and the shiny, jelly-like finish created by clever highlighting.
Step-by-Step
Materials
- Smooth, oval river rock (about palm-sized)
- White acrylic paint (base coat)
- Pink acrylic paint (bow color)
- Black fine-liner paint pen (0.7mm or similar)
- Small round paintbrush
- Detail paintbrush or dotting tool
- Pencil and eraser
- Clear gloss varnish or sealant
Step 1: Base Preparation
-
Clean the surface:
Begin by washing your rock with warm soapy water to remove any dirt or oils. Let it dry completely before starting. -
Apply the white base:
Paint the entire top surface of the rock with white acrylic paint. You will likely need 2-3 coats to get a solid, opaque coverage where the rock color doesn’t show through. -
Let it cure:
Allow the white base coat to dry thoroughly. If the paint is even slightly wet, your pencil sketch in the next step might dig into the surface.
Clean Lines Pro Tip
If your black pen skips over the rough rock texture, press the tip on a scrap paper to get the ink flowing again, but never press hard directly on the painted rock surface.
Step 2: Sketching and Blocking Color
-
Sketch the bow:
Lightly sketch the outline of the bow using a pencil. Start with a rounded square for the knot in the center. -
Draw the loops:
From the center knot, draw two large loops extending outward to the left and right. Make them slightly wider at the ends. -
Add the tails:
Draw two ribbon tails hanging down from behind the knot. Give them a ‘V’ notch at the bottom for that classic ribbon look. -
Fill with pink:
Using your small round brush and pink acrylic paint, carefully fill in the bow shape. Stay within your pencil lines as best as possible. -
Apply a second coat:
Pink can be semi-transparent, so once the first layer is dry to the touch, add a second coat of pink to ensure the color is vibrant and solid.
Step 3: Detailing and Outlining
-
Outline the shape:
Once the pink paint is completely dry, use a black fine-liner paint pen to trace the outline of the entire bow. Keep your hand steady and rest your wrist on the table for stability. -
Add dimension lines:
Draw short, curved black lines coming out from the center knot into the loops and tails. These ‘crease lines’ make the fabric look bunched and realistic. -
Create the polka dots:
Dip a mechanical pencil tip, a toothpick, or a very small dotting tool into white paint. Gently dot the white paint over the pink areas to create the polka dot pattern. -
Add external accents:
Using the black paint pen again, add groups of three small dots floating around the outside of the bow on the white background for a whimsical touch.
Level Up: 3D Glitter
Instead of white matte paint for the polka dots, use a white or iridescent glitter paint pen. It adds actual sparkle that catches the light differently than the painted highlights.
Step 4: The Jelly Finish
-
Prepare for highlights:
Wait for the black ink and white dots to be fully dry. This is crucial so you don’t smear the crisp lines. -
Paint the ‘jelly’ reflection:
Dilute a tiny drop of white paint with water so it is semi-transparent. Paint a soft, curved stroke on the upper right of the bow loops to mimic a glossy reflection. -
Add crisp highlights:
Take pure, undiluted white paint on your finest detail brush. Paint thin, sharp white lines on top of the ‘jelly’ reflection spots and along the upper edges of the knot. -
Seal tightly:
Once artwork is cured, apply a coat of high-gloss varnish. This protects the stone and enhances that wet, jelly-like appearance we painted in the previous step.
Place this charming stone in a sunny spot where the painted highlights can really shine


Have a question or want to share your own experience? I'd love to hear from you in the comments below!