Half face paint is my favorite kind of transformation because you get that instant “two worlds in one” effect without committing to full coverage. Here are my go-to half face paint ideas—starting with the classics everyone asks for, then drifting into the fun, weird, artsy stuff I love to experiment with.
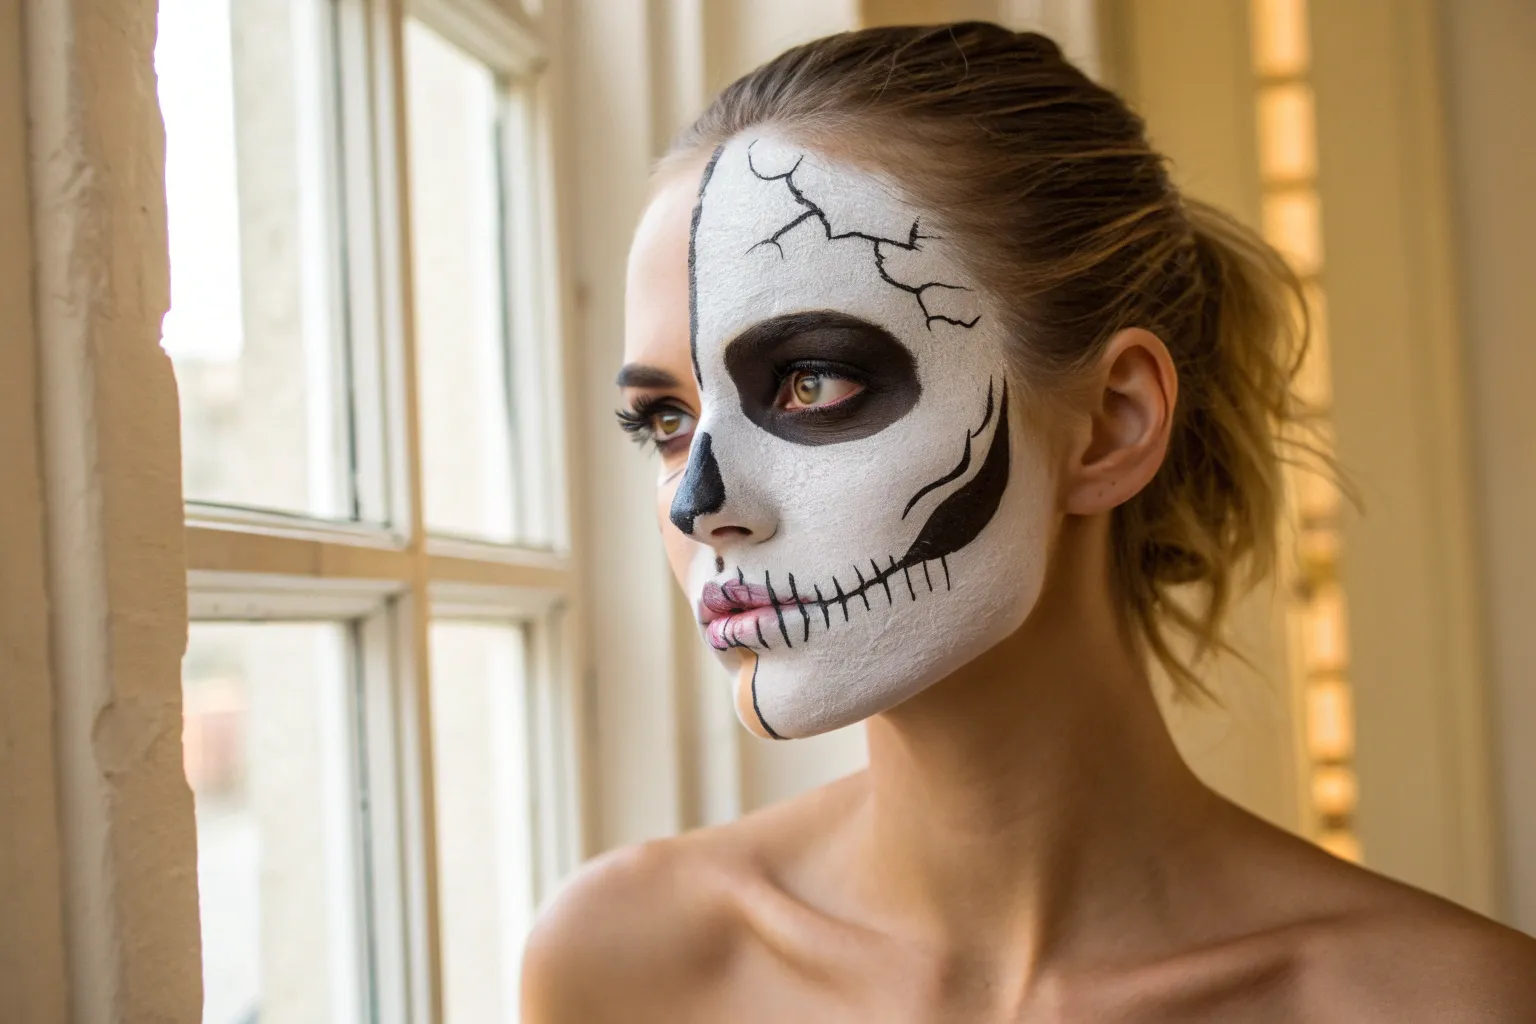
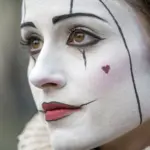
Half Skeleton Split
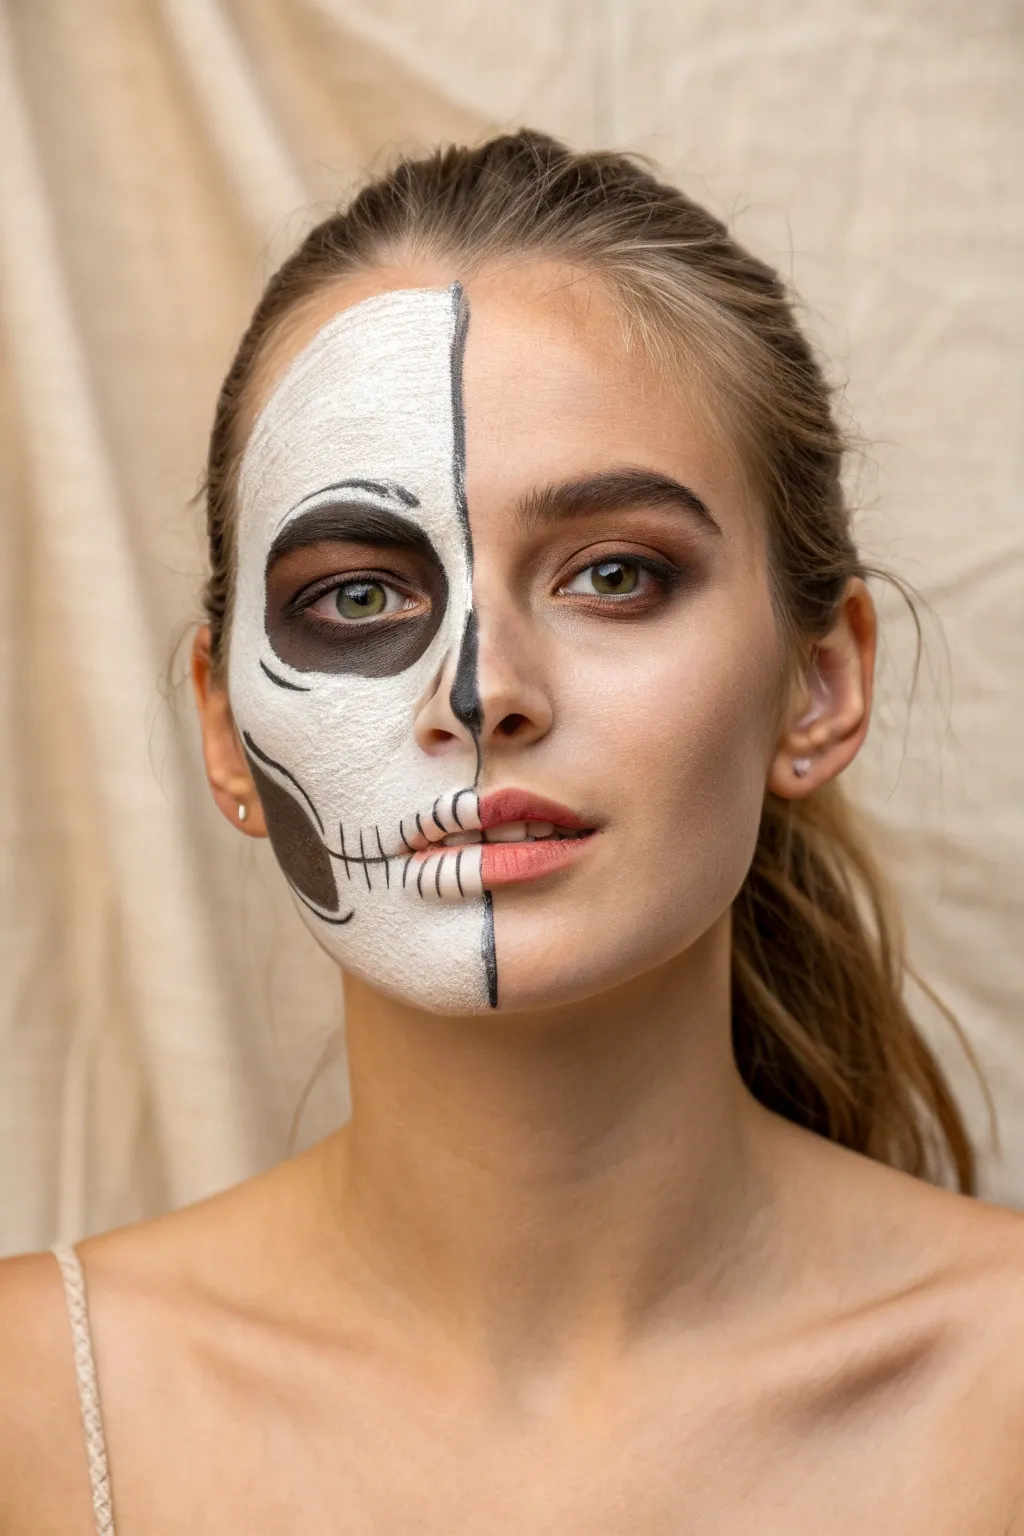
Strike a stunning balance between eerie and elegant with this clean split-face makeup design. By keeping one side beautifully natural and transforming the other into a stark black-and-white skeleton, you create an eye-catching contrast perfect for Halloween or costume parties.
Step-by-Step Tutorial
Materials
- White face paint (cream or water-activated)
- Black face paint or gel eyeliner
- Flat foundation brush (medium)
- Fine detail brush (liner size)
- Small angled brush
- Translucent setting powder
- Black eyeshadow
- Brown contour powder or bronzer
- Standard makeup kit (foundation, mascara, brow pencil)
- Micellar water and cotton swabs (for cleanup)
Step 1: The Natural Canvas
-
Prepare the base:
Start with a clean, moisturized face. Apply your regular foundation and concealer to the entire face to create an even skin tone, which helps the face paint grip better later. -
Define the brows:
Fill in both eyebrows as you normally would. On the side destined to be the skeleton, you can choose to leave the brow lighter or block it out with glue stick if you want a rimless skull look, though this specific design keeps the natural brow intact for a structured appearance. -
Glam the living side:
Complete a soft, smoky eye look on the right side (your ‘living’ side). Use warm browns in the crease and a dark liner along the lash line. -
Contour and highlight:
Apply bronzer and highlighter to the living cheekbone to emphasize the facial structure that contrasts with the skeletal side.
Patchy White Paint?
If your white base looks streaky, apply a second thin layer after the first is 100% dry. Using a damp mesmerizing sponge instead of a brush can also help stamp on specific areas more evenly.
Step 2: Creating the Divide
-
Mark the center line:
Using a fine brush and black paint, draw a thin, vertical guide line straight down the center of your face, moving from the forehead, over the nose bridge, through the cupid’s bow, and down the chin. -
Outline the skeletal area:
Carefully trace the perimeter of the skull side. Follow your hairline and jawline to encompass exactly half the face.
Pro Tip: Lip Longevity
Face paint on lips wears off quickly while talking. Use a long-wear liquid matte lipstick (black or nude) for the mouth area, then paint the teeth details over it for all-night staying power.
Step 3: The Skeletal Base
-
Apply white paint:
Use a flat foundation brush to fill in the left side of your face with white face paint. Pat the product onto the skin rather than dragging it to get solid, opaque coverage without streaks. -
Avoid the eye socket:
Leave a large circle around the left eye bare of white paint. This negative space will become the hollow socket later. -
Set the white base:
Once the white paint is tacky or dry, gently press translucent setting powder over it using a puff. This prevents the black details from smudging into the white.
Step 4: Sculpting Shadows
-
Fill the eye socket:
Fill the empty circular space around your left eye with black face paint. Extend the black slightly above the natural crease but below the eyebrow. -
Soften the edges:
Take a fluffy brush with black eyeshadow and blend the edges of the black eye socket outward slightly. This creates a softer, recessed look rather than a harsh sticker effect. -
Carve the nose:
Paint half of the nose tip black. On the skeleton side, draw a small upward point resembling a teardrop to mimic the nasal cavity. -
Create the cheek hollow:
Draw a thick, curved black line starting from the ear area moving toward the mouth, hooking slightly upward at the end. I find using a contour brush with black shadow first helps map this out before committing to paint.
Step 5: Teeth & Details
-
Extend the mouth:
Draw a thin horizontal black line from the corner of your mouth outward across the white cheek, following the natural jaw alignment. -
Mark the vertical teeth:
Using your finest liner brush, draw short vertical lines across the lip area and the extended mouth line. Space them evenly to represent teeth. -
Refine the teeth shape:
At the top and bottom of each vertical line, add tiny ‘V’ shapes or lightly taper the ends. This makes the lines look like individual teeth roots rather than simple hash marks. -
Define the center split:
Go back over your central dividing line with fresh black paint or liquid liner to ensure the separation between ‘flesh’ and ‘bone’ is razor-sharp. -
Add subtle cracking:
If desired, use the finest tip of your brush to add tiny, wiggly cracks radiating from the eye socket or temple for texture. -
Final shading touch:
Use a small brush with grey or black eyeshadow to lightly shade inside the temple and along the hairline on the white side to give the skull dimension and roundness.
Pair this striking split-face look with a simple black outfit to let your artwork take center stage


Half Spiderweb Eye
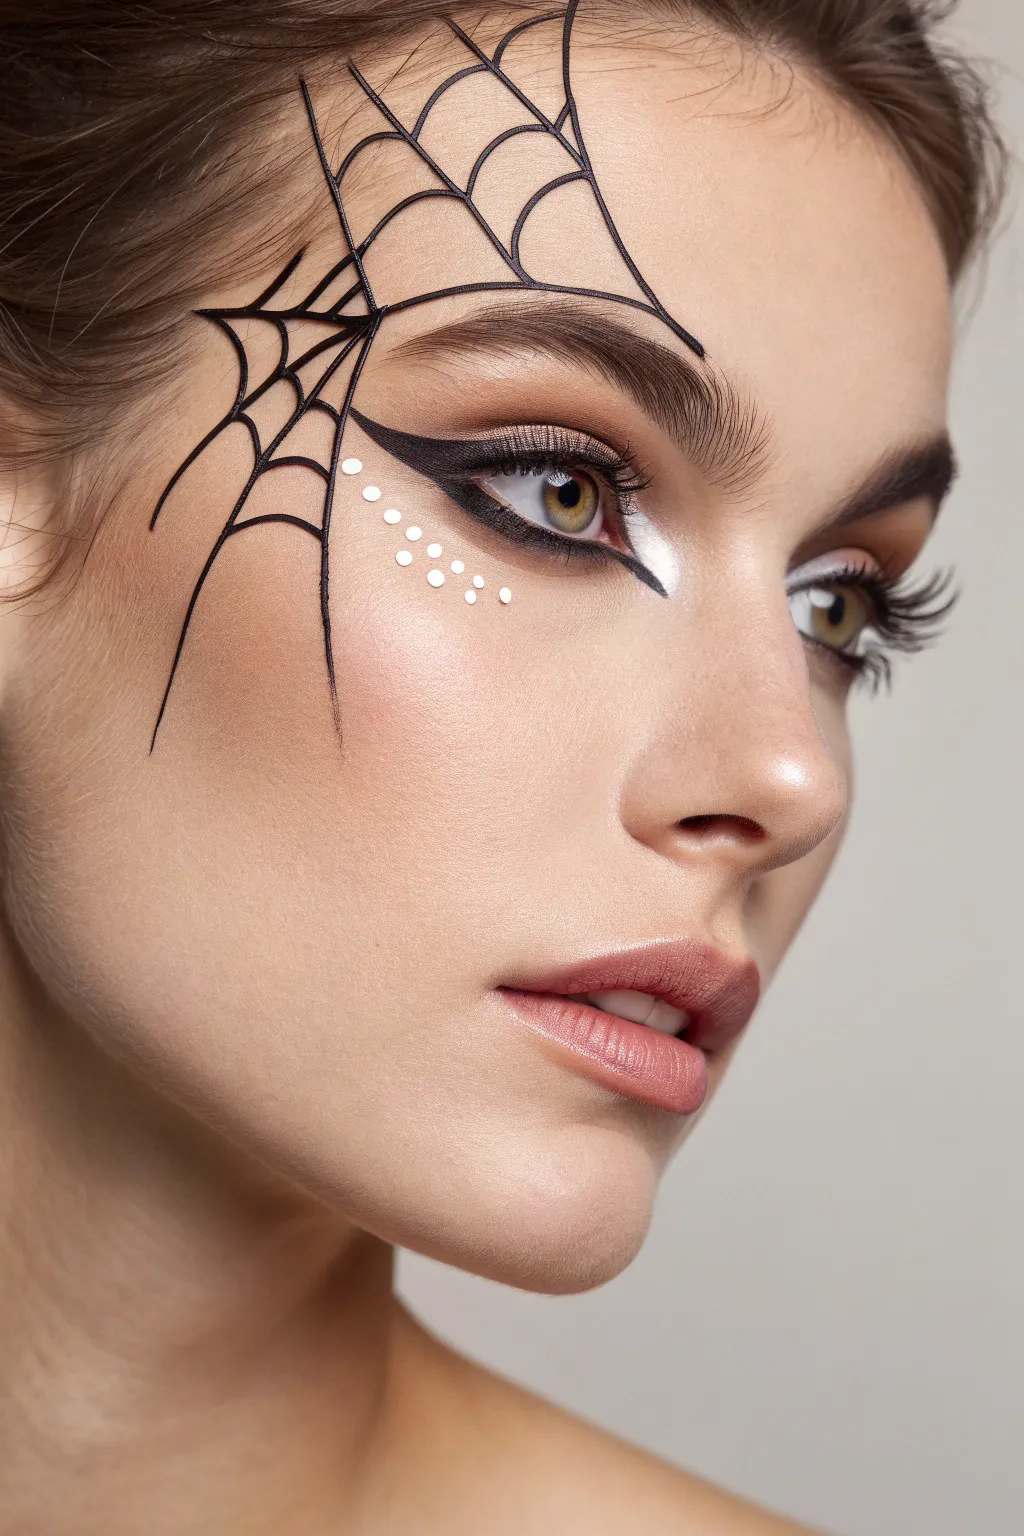
This sophisticated take on Halloween makeup combines high-fashion glamour with a spooky motif, proving that creepy can also be incredibly chic. The look features a precise spiderweb graphic extending from a dramatic winged liner, accented by delicate white dots for a magical finishing touch.
Step-by-Step
Materials
- Full coverage foundation
- Concealer
- Setting powder
- Bronzer/contour powder (cool tone)
- Black liquid eyeliner (pen or gel pot with fine brush)
- Black pencil liner (khol)
- White or pearlescent cream eyeshadow stick
- White liquid eyeliner or face paint
- Neutral brownish-mauve eyeshadow palette
- Mascara
- False eyelashes (wispy style)
- Nude-rose lipstick
- Brow pencil and gel
- Fine detail art brush (if using gel liner)
Step 1: The Canvas & Base
-
Create a flawless base:
Start by applying your foundation and concealer to create an even, perfected skin tone. Set the T-zone with translucent powder, but keep the cheeks slightly dewy for a natural glow. -
Sculpt the face:
Using a cool-toned contour powder, softly define your cheekbones and jawline. Keep the blush minimal or skip it entirely to maintain the crisp, graphic focus of the eyes. -
Groom the brows:
Brush your brows upward with a spoolie. Fill in any sparse areas with a pencil using small, hair-like strokes, then set them in place with a clear brow gel for a fluffy, laminated look.
Steady Hands Pro-Tip
Rest your pinky finger against your cheek while drawing the web lines. This creates a stable anchor point, preventing shaky hands and ensuring your curved lines remain fluid and precise.
Step 2: The Dramatic Eye
-
Add lid definition:
Sweep a soft, neutral brown eyeshadow across the entire eyelid, blending it into the crease to add subtle depth without overpowering the graphic lines. -
Draft the wing:
Using your black liquid liner, draw a sharp, dramatic wing extending outward from the outer corner of your eye. The line should be thickest at the outer corner and taper to a razor-sharp point. -
Line the lower lash line:
Run a black pencil liner along your lower lash line, stopping about halfway across. Smudge it slightly into the winged liner for a smoky connection. -
Create the inner corner highlight:
Apply a bright white or pearlescent cream shadow to the inner corner of the eye. Extend this white pigment slightly outward in a sharp triangle shape to mirror the outer wing. -
Add lashes:
Curl your natural lashes and apply mascara. Apply a pair of wispy false lashes to the upper lash line to open up the eye.
Step 3: Weaving the Web
-
Plan your anchor lines:
With a steady hand and your fine-tip liquid liner, draw the long ‘spokes’ of the web first. Start from the top of your winged liner or just above the crease. -
Draw the main vertical lines:
Extend a long, curved line upward from the brow bone toward the hairline. Draw a second line curving down toward the cheekbone, and a third extending diagonally toward the temple. -
Connect the curves:
Begin connecting the main spokes with small, U-shaped curved lines (scallops). I find it easiest to start close to the eye and work my way outward. -
Build the second tier:
Draw a second row of larger U-shaped curves further out on the spokes. Ensure the lines are opaque black; go over them a second time if the first pass looks patchy. -
Extend the web:
Continue adding curved connectors until the web reaches high onto the forehead and down onto the upper cheekbone, following the natural contours of your face. -
Refine the edges:
Check the ends of your main spokes—they should taper off cleanly into nothing, rather than ending abruptly.
Fixing Wobbly Lines
If a web line gets crooked, don’t wipe it! Wait for it to dry completely, then use a flat brush with a tiny bit of concealer to ‘carve’ out the mistake and sharpen the edge.
Step 4: Final Details
-
Dot the details:
Dip a small dotting tool or the back of a brush into while liquid liner or face paint. Place a series of small white dots following the curve of the lower web line on the cheekbone. -
Vary dot sizes:
To add dimension, make the dots closer to the nose slightly larger, tapering to smaller dots as they move outward toward the ear. -
Finish the lips:
Complete the look with a creamy nude-rose lipstick. A satin finish works best here to balance the matte graphic liner. -
Set the look:
Mist your face with a setting spray to lock the makeup in place, being careful not to squint until the spray dries to avoid smudging the web lines.
You now have a striking, high-contrast look that perfectly balances spookiness with sophistication for your next event


Half Cracked Porcelain Doll
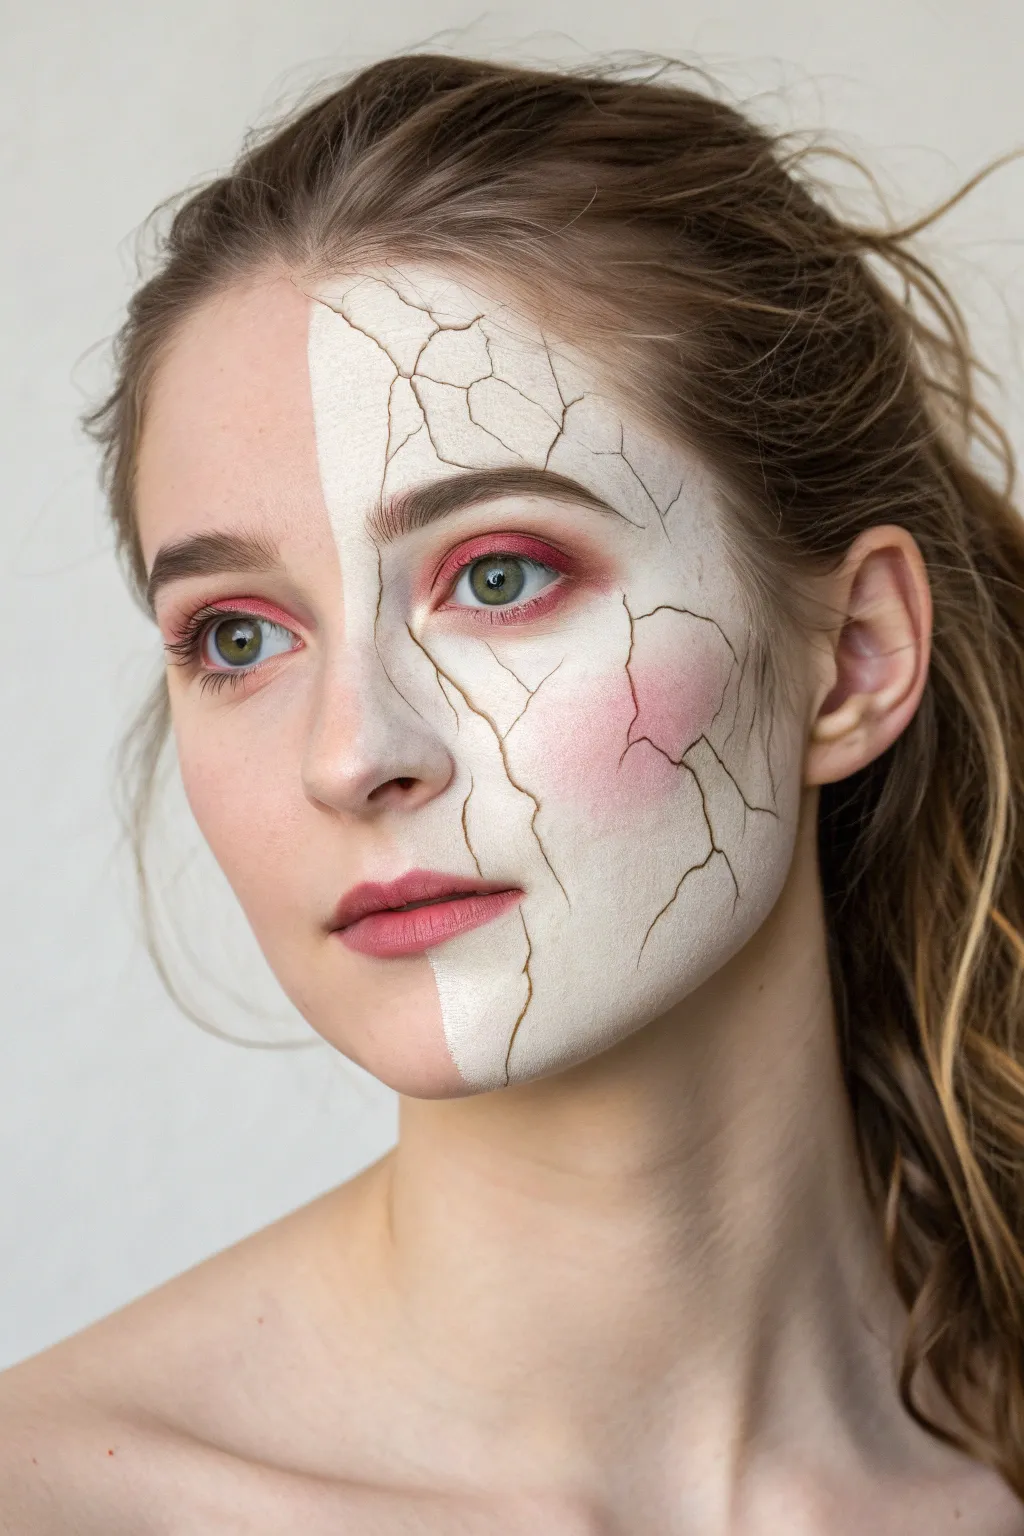
Transform half your face into a fragile, vintage doll with this striking split-face design. The contrast between soft, natural beauty and the stark, shattered white surface creates a hauntingly beautiful effect perfect for Halloween or avant-garde photoshoots.
Step-by-Step Tutorial
Materials
- Matte white face paint (water-activated or cream)
- Black eyeliner (liquid or gel)
- Brown eyeliner or eyeshadow
- Pink or berry eyeshadow
- Rosy pink blush
- Setting powder (translucent)
- Foundation matching your skin tone
- Mascara
- Flat synthetic brush (medium)
- Fine detail liner brush
- Fluffy blending brush
Step 1: Base Preparation
-
Prep and prime:
Begin with a clean, moisturized face. Apply a primer suitable for your skin type to ensure the makeup adheres smoothly and lasts longer. -
Establish the dividing line:
Using a light-colored pencil or the edge of a brush, faintly mark a vertical line down your face, slightly off-center. This guide will help you keep the ‘normal’ side separate from the ‘doll’ side. -
Apply everyday foundation:
On the left side of your face (the natural side), apply your regular foundation and concealer. Blend carefully right up to the dividing line, but don’t worry about a perfect edge yet. -
Set the natural side:
Lightly dust translucent powder over the natural side to lock the foundation in place and prevent it from migrating into the paint you’ll apply later.
Step 2: The Porcelain Canvas
-
Apply white base:
Load a flat synthetic brush with matte white face paint. Apply an opaque layer to the right side of your face, covering the forehead, cheek, nose, chin, and neck areas designated for the doll look. -
Refine the edges:
While the paint is wet, clean up the center line. Instead of a straight line, create a jagged, broken edge where the white paint meets your natural skin. This mimics the shell of the doll breaking away. -
Solidify the coverage:
Once the first layer is dry, apply a second coat if necessary to ensure the white is solid and not streaky. A sponge can help smooth out brush strokes for that flawless ceramic finish. -
Set the paint:
Gently press translucent powder onto the white paint using a puff. This is crucial to remove shine and achieve that matte, bisque-doll texture.
Fix Broken Lines
If your crack lines look too thick or messy, dip a clean, damp angled brush into the white face paint and carefully carve out the edges to sharpen them back up.
Step 3: Features and Details
-
Create symmetrical eyes:
On both eyes, apply a warm pink or berry eyeshadow into the crease and lid. Blend it out softly. The goal is to have the eye makeup match the color palette on both the human and doll sides. -
Define the brows:
Fill in your natural brow on the left side. On the white side, define the brow clearly using a brown pencil or powder, making it look slightly more drawn-on and perfect than a natural hair brow. -
Add doll-like blush:
Taking a fluffy brush, swirl a rosy pink blush onto the apple of the cheek on the white side. Keep it circular and concentrated to mimic the painted flush of an antique doll. -
Apply mascara:
Coat lashes on both sides with black mascara. For an extra doll-like effect, focus on the center lashes to open up the eye.
Add Texture
Use a stipple sponge with grey paint lightly over the white areas to create a dirty, antique porcelain look, or add clear gloss to the ‘eyes’ of the doll side for a glass effect.
Step 4: Cracking the Surface
-
Map out the cracks:
Using a fine detail brush and brown eyeshadow or a light brown liner, faintly sketch the main fissures. I usually start these from the broken edge in the center and radiate them outward. -
Deepen the cracks:
Go over your sketch lines with a black liquid or gel liner. Keep your hand shaky; uneven, jagged lines look more realistic than smooth curves. -
Add dimension:
To make the cracks look 3D, trace a very thin line of white or light concealer along just one side of the black cracks. This acts as a highlight where the light would catch the broken edge. -
Shadowing the fragments:
Use a small brush and matte brown eyeshadow to gently shade inside some of the larger cracked areas or along the jagged center line. This creates the illusion that the porcelain piece is lifting away from the skin.
Step 5: Finishing Touches
-
Paint the lips:
Apply a soft pink lipstick to your natural side. On the white side, you can either paint the lip shape smaller (doll-like) or follow your natural lip line, ensuring the white base goes right up to the lip color. -
Final blend check:
Review the center jagged line. Ensure the shadow creates depth, making it look like the white ‘shell’ is sitting on top of your real skin. Add more dark brown shadow under the white edge if needed.
Now you have a hauntingly beautiful mask that reveals the human beneath


Half Galaxy Nebula Fade
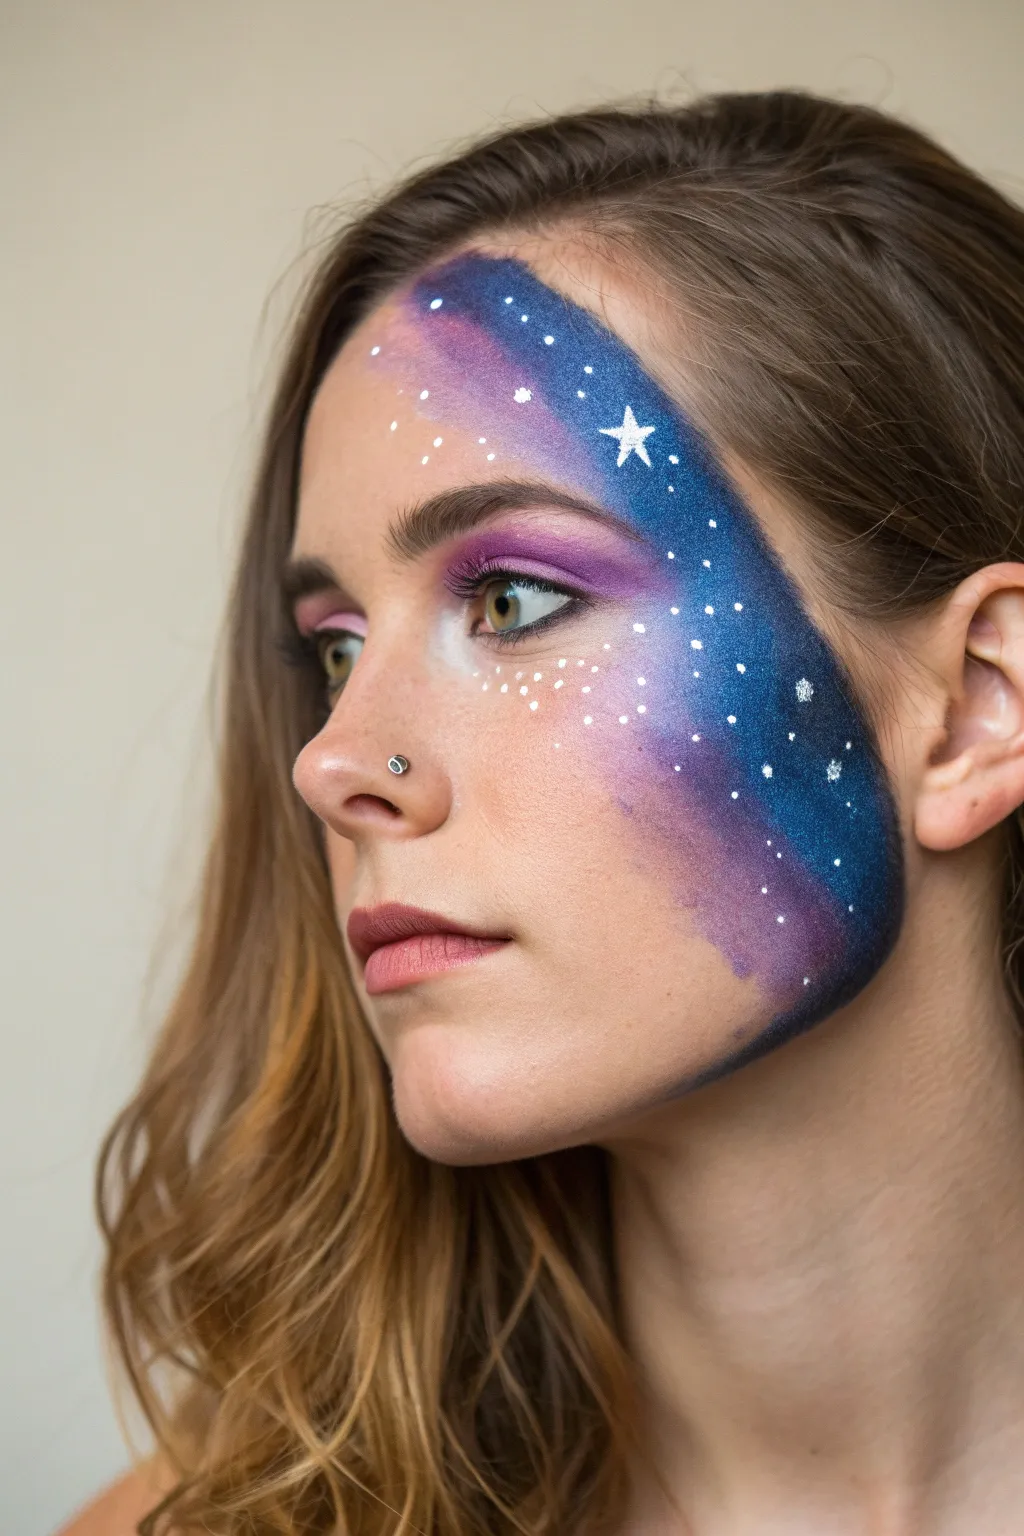
Transform one side of your face into a breathtaking deep space vista with this galaxy nebula fade. This look combines soft blended gradients of cosmic purple and blue with sharp, bright starlight for a mesmerizing effect.
Step-by-Step
Materials
- Face paint palette (must include: dark blue, purple, light blue, black, white)
- Purple eyeshadow (deep plum and lighter lilac shades)
- Foundation and concealer (skin tone specific)
- Eye primer
- Setting powder
- Makeup sponge/wedge
- Fluffy blending brush (for eyeshadow)
- Small flat brush (for defining edges)
- Fine detail brush or eyeliner brush (for stars)
- Mascara
- Small nose stud jewel (optional)
- Setting spray
Step 1: Base and Eyes
-
Prep the Canvas:
Start with a clean, moisturized face. Apply your regular foundation and concealer to create an even skin tone, paying special attention to the under-eye area and any redness around the nose. -
Prime the Eye:
Apply an eyeshadow primer to the eyelid on the side you plan to paint. This ensures the purple shadow pops and stays vibrant against the face paint later. -
Purple Shadow Base:
Using a fluffy blending brush, sweep a medium purple or lilac eyeshadow across the entire lid, extending it slightly above the crease and outward towards the temple. -
Deepen the Crease:
Load a slightly smaller brush with a deep plum or dark purple eyeshadow. Work this into the crease and the outer corner of the eye to add dimension. -
Under-Eye Smoke:
Take a small amount of the lighter purple shadow and gently smudge it along the lower lash line, connecting it to the outer corner color. -
Inner Corner Highlight:
Apply a touch of shimmering white or very pale silver shadow to the inner corner of the eye to open it up.
Patchy Paint?
If the galaxy looks patchy, your sponge might be too wet. Squeeze it out thoroughly or let the first layer dry completely before dabbing a second layer on top.
Step 2: Creating the Galaxy
-
Map the Shape:
Visualize a diagonal swoosh shape that starts high on the forehead and curves down past the eye to the jawline. You don’t need to outline it, just keep this flow in mind. -
Sponge on Purple:
Dampen a makeup sponge and load it with bright purple face paint. Stipple this color onto the temple, the top of the cheekbone, and part of the forehead. -
Add Cosmic Blue:
On the same sponge (or a fresh side), load up a royal blue or dark blue face paint. Dab this around the edges of the purple, blending them where they meet to create a new indigo tone. -
Deepen with Black:
To create the depth of space, take a very small amount of black face paint on the edge of your sponge. I find it works best to dab this only on the very outer perimeter of the design, near the hairline and jawline. -
Blend the Fade:
Use a clean, slightly damp side of the sponge to soften the inner edge of the design where it meets your natural skin. You want a gradient fade, not a harsh line. -
Refine the Edges:
If the blending got messy, use a flat brush with a tiny bit of foundation to clean up the inner boundary of the nebula.
Step 3: Stars and Details
-
Mix Star Paint:
Activate your white face paint with water until it reaches a thin, creamy consistency—like melted ice cream. This texture is crucial for crisp dots. -
Paint the Main Star:
Using your finest detail brush, paint a five-point star on the forehead area within the blue paint. Start with a cross and add the diagonal points. -
Create Constellations:
Dip the tip of the brush or a dotting tool into the white paint. Place varied sizes of dots throughout the galaxy, concentrating some clusters near the eye and fading them out toward the edges. -
Add Distant Stars:
For the tiniest, most distant-looking stars, you can lightly flick the bristles of a toothbrush loaded with white paint over the area (protect your eye first!). -
Cross-Stars:
Select a few random larger white dots and carefully pull the paint outward in four directions with a very fine brush to create a ‘twinkle’ cross shape. -
Final Touches:
Apply mascara to define your lashes. If you have a facial piercing like the nose stud in the image, ensure it’s clean and sparkling. -
Set the Look:
Close your eyes and mist the painted area lightly with a setting spray to prevent the water-activated paints from smudging throughout the day.
Cosmic Glow Up
Add real dimension by pressing cosmetic-grade holographic glitter onto the wet paint in the darkest areas, or glue on tiny rhinestones for 3D stars.
Now you are ready to shine with your own piece of the universe painted right on your skin
BRUSH GUIDE
The Right Brush for Every Stroke
From clean lines to bold texture — master brush choice, stroke control, and essential techniques.
Explore the Full Guide
Half Stained Glass Pattern
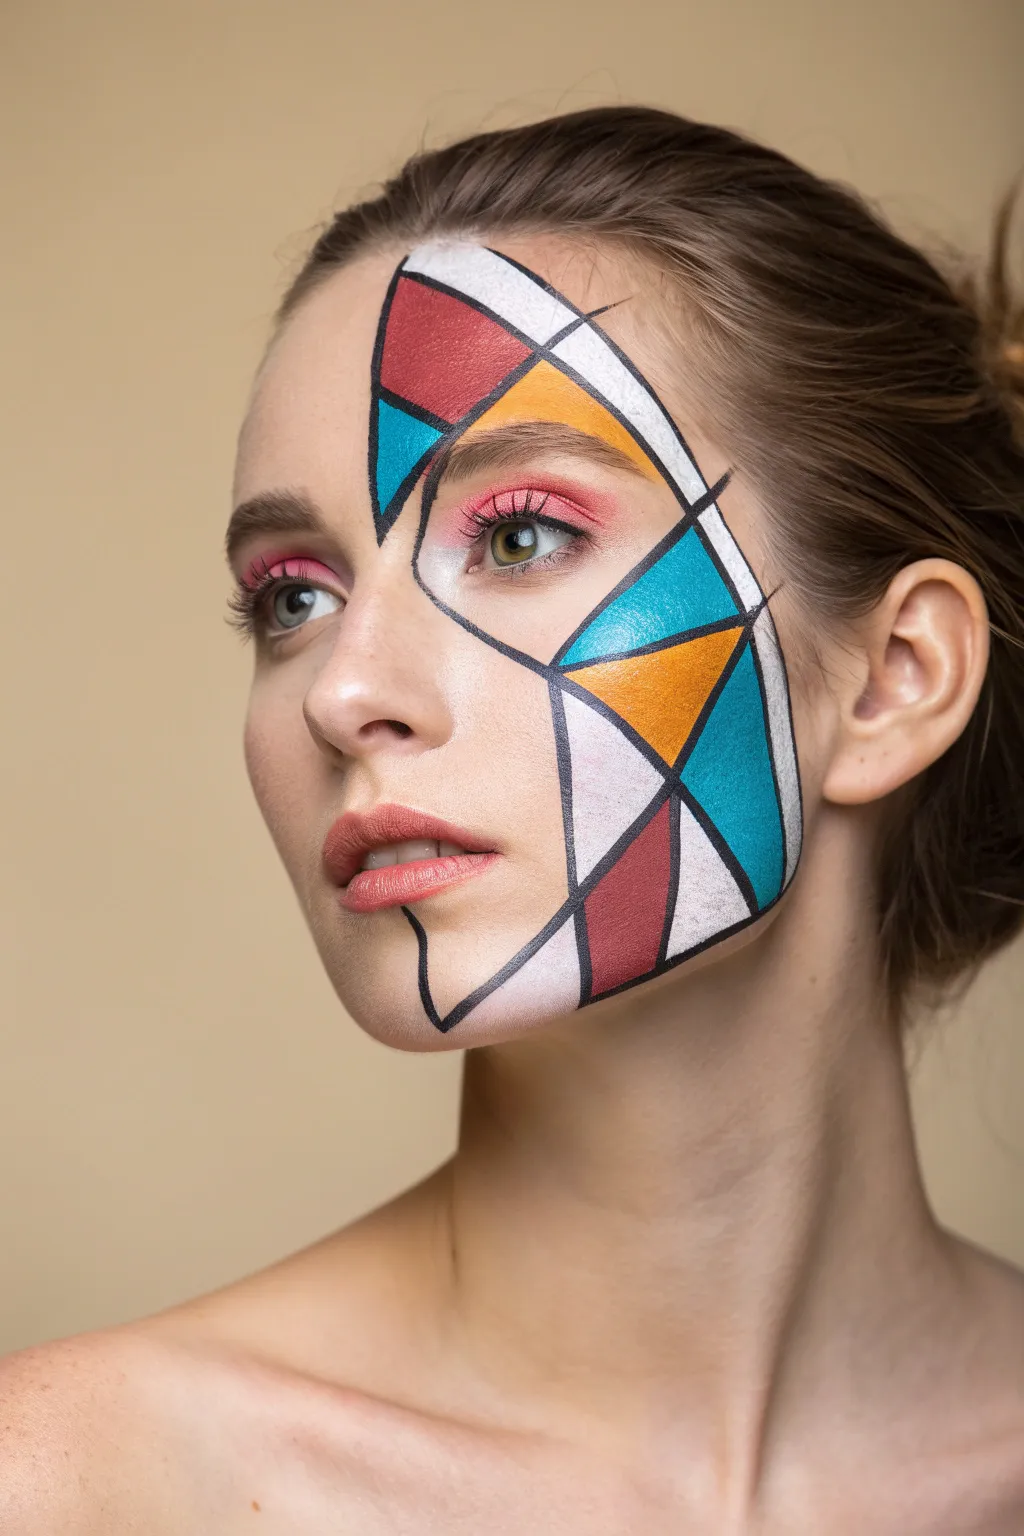
Transform your face into a living work of art with this bold stained glass concept that plays with geometry and vibrant primary colors. The sharp black outlines contrast beautifully against the matte fills, creating a stunning 3D effect that looks deceptively complex but is built on simple shapes.
Step-by-Step Guide
Materials
- Water-activated face paints (black, white, red, deep teal/blue, mustard yellow/gold)
- Fine liner brush (size 0 or 00)
- Flat shader brush (small)
- Medium round brush
- Pink eyeshadow
- Mascara
- Setting spray (optional)
- Small cup of water
- Paper towels
Step 1: Planning and Outlining
-
Map the anchor points:
Start by visualizing the main arc of the design. Using a very faint amount of white face paint or a light eyeliner pencil, mark a curved boundary that sweeps from the center of your forehead, down past the temple, and ends just below the cheekbone. -
Draw the main structural lines:
Load your fine liner brush with black face paint. Create the primary dividing lines first: draw a line slicing through the eyebrow area and another intersecting it to form the large central shapes. -
Create the geometric segments:
Continue using the fine liner to subdivide the area into triangles and irregular quadrilaterals. Keep the lines crisp and vary the size of the shapes—some large ones near the cheek, smaller ones near the eye. -
Define the outer boundary:
Firmly trace the outer curved edge of the entire design with the black liner brush to seal the pattern. Ensure the lines connect perfectly at the intersections; stained glass looks best with unbroken ‘lead’ lines.
Crisp Lines Secret
For the steadiest black lines, rest your pinky finger on your chin or cheek (use a powder puff if base is wet) to anchor your hand while drawing.
Step 2: Filling with Color
-
Fill the white sections:
Using a clean flat shader brush, fill specific segments with white face paint. Looking at the reference, focus on the top curve and the lower jaw section. Apply two thin layers for opacity rather than one thick gloopy one. -
Apply the deep red:
Rinse your brush thoroughly. Load up a deep red or burgundy shade. Fill in the top-left triangle on the forehead and the bottom-most shape on the jawline. Keep the paint slightly away from the black lines initially to avoid smudging. -
Add the teal accents:
Switch to a vibrant teal or deep cyan color. Fill the triangular segments near the temple and the outer cheek. Use the edge of the flat brush to get crisp lines against your black borders. -
Insert the gold tones:
With a clean brush, apply the mustard yellow or gold paint to the central triangular section on the cheekbone and the segment just above the eyebrow. This warm tone brings the whole look together. -
Refine the edges:
Once the color fills are dry, I like to go back over the black outlines with the fine liner brush. This cleans up any areas where the color might have overlapped the black ‘lead’ lines, making the whole design pop.
Step 3: Finishing Touches
-
Apply contrasting eyeshadow:
On the bare eye (and lightly on the painted eye if desired), apply a soft wash of bright pink eyeshadow to the crease and lid. This softens the look and adds a nice color contrast to the strict geometry. -
Define the lashes:
Apply a coat of black mascara to both eyes. For the painted side, be careful not to smudge the design near the lash line. -
Add highlights:
For a glossy glass effect, take a tiny dot of white paint on your finest brush and add a small ‘reflection’ line or dot inside the colored shapes, usually near the top corner of each polygon. -
Set the makeup:
Close your eyes and mist a lightweight setting spray over the face to prevent the water-based paints from cracking or transferring throughout the day.
Glossy Upgrade
To make the ‘glass’ look real, dab a tiny bit of clear lip gloss or eye gloss over the center of the colored shapes (avoiding the black lines).
Enjoy wearing this striking modern art piece that turns every angle of your face into a new discovery
Half Watercolor Drip Portrait
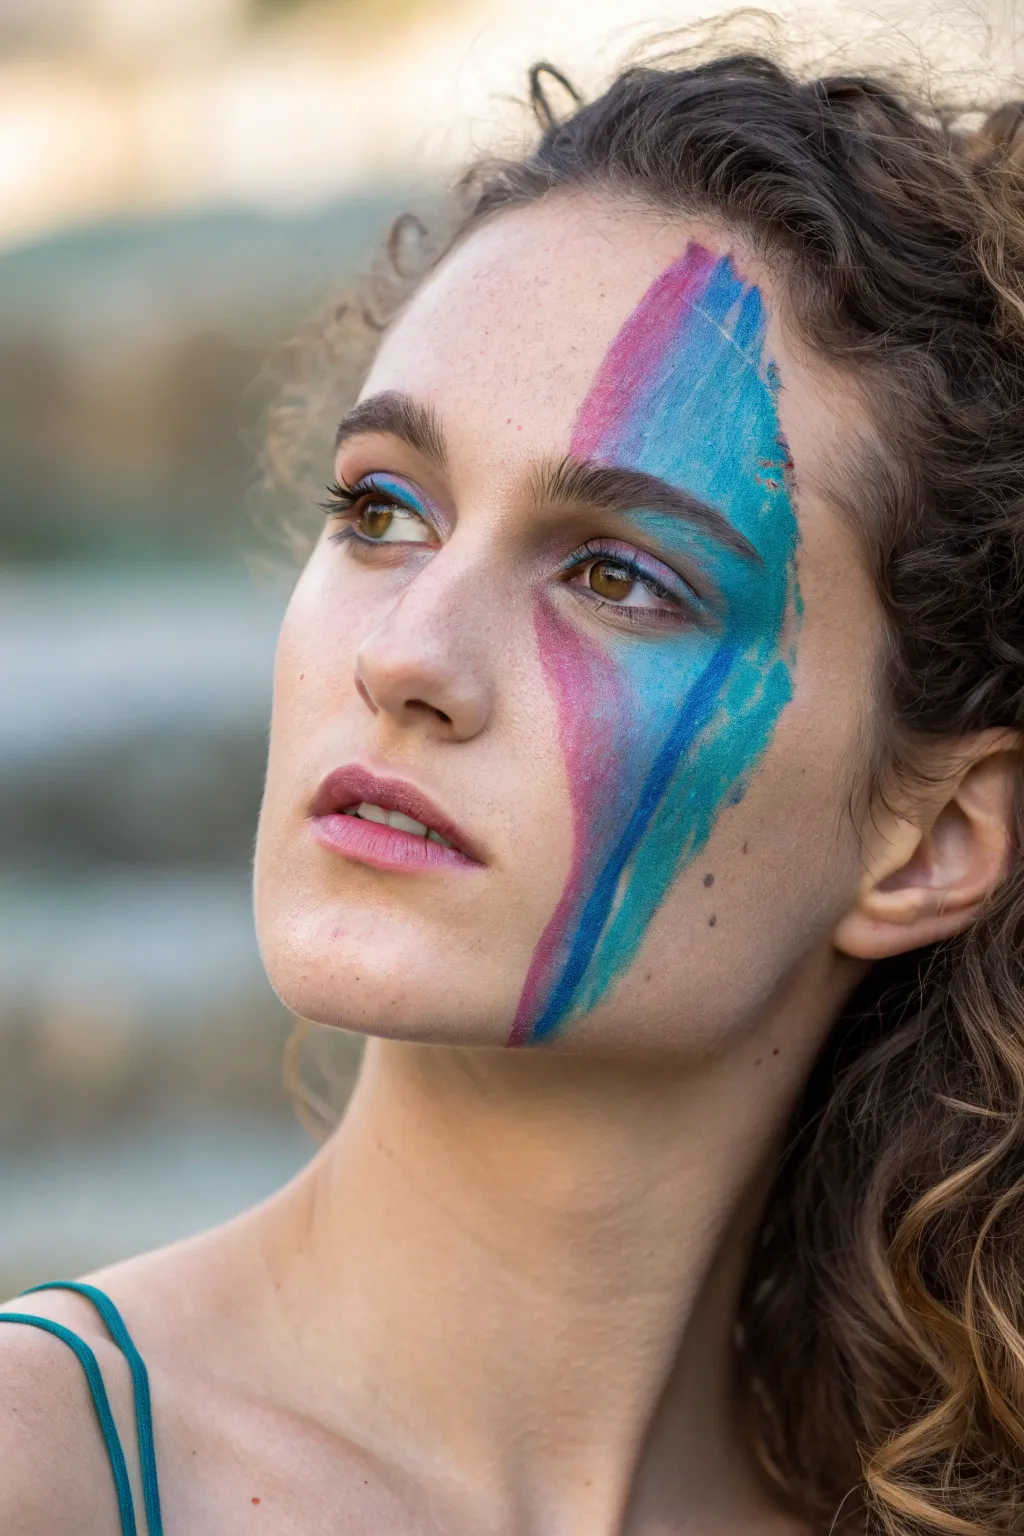
Capture the ethereal beauty of watercolor painting directly on the skin with this striking half-face design. By blending teal and magenta face paints with a loose, painterly technique, you’ll create a dynamic look that feels both artistic and emotive.
Step-by-Step Tutorial
Materials
- Water-activated face paints (teal/cyan and magenta/pink)
- Wide flat brush (approx. 1 inch)
- Medium round brush
- Small spray bottle or water cup
- Setting spray
- Makeup sponge (optional for blending)
- Paper towels
Step 1: Preparation and Base Layer
-
Cleanse the canvas:
Start with a freshly washed and dried face. If you plan to wear foundation on the unpainted side, apply it now, but leave the right side of the face bare so the water-activated paints adhere properly to the skin. -
Activate the teal paint:
Spray your teal face paint cake with water until the surface is creamy. Load your wide flat brush heavily with pigment; you want the opacity to be high for the initial strokes. -
Apply the main stroke:
Starting near the top center of the forehead, pull the wide brush down diagonally across the right eyebrow and temple. Let the bristles naturally separate slightly at the edges to create a texture that mimics dry-brushing on paper. -
Extend the color:
Continue bringing the teal tone down the cheekbone, tapering it off as you reach the jawline. Leave some gaps or lighter areas where the magenta will later intersect. -
Soften the edges:
Before the paint dries completely, use a slightly damp (but clean) sponge or brush to feather the outer edges towards the hairline, ensuring the paint doesn’t look like a solid sticker but rather a washed-on stain.
Natural Texture
Don’t aim for perfect opacity. Allowing the skin to show through in patches mimics the transparency of real watercolor paper.
Step 2: Adding Depth and Complexity
-
Introduce magenta:
Clean your flat brush thoroughly and load it with the magenta or deep pink paint. Start a new stroke parallel to the teal one, beginning above the inner eyebrow. -
Intersect the colors:
Drag the magenta paint downwards through the inner corner of the eye and along the side of the nose. Where it meets the teal, allow the brushes to overlap; the wet paints will mix slightly to create a lovely deep purple transition. -
Enhance the eye area:
Take a medium round brush with teal paint and gently sweep it over the eyelid and under the lower lash line. This ties the eye into the larger abstract shape and adds intensity to the gaze. -
Create the drip effect:
Load a round brush with very watery magenta paint. Press the brush tip against the cheek where the main color block ends and let gravity (or a gentle squeeze of the brush) help a bead of colored water run down toward the chin. -
Add a second drip line:
Repeat the previous step with the blue tone, starting the drip slightly higher up on the cheekbone so it runs parallel to the pink line. I find slightly tilting the head back helps control the speed of the run.
Step 3: Fine Details and Finishing
-
Splatter texture:
For that authentic artistic feel, load a toothbrush or stiff brush with watery teal paint. Use your thumb to flick the bristles, spraying tiny speckles onto the forehead and temple area. -
Define the brows:
If your natural brow got lost under the paint, use an angled brush with a dark brown or black shadow to sketch hair-like strokes back over the painted area, restoring definition to the face. -
Refine the lip:
Lightly dab a bit of the magenta paint onto the lips for a stained look, or use a coordinating lipstick, blending it out for a soft, bitten effect rather than a hard line. -
Dry brush highlights:
Using a nearly dry brush with white face paint, lightly drag it over the highest points of the teal section (like the brow bone) to add a sense of texture and dimension. -
Lock it in:
Once you are happy with the composition and the drips have dried, close your eyes and mist the entire face with a setting spray to prevent smudging.
Runny Paint Fix
If a drip runs too far or gets messy, don’t wipe it! Dab it gently with a dry cotton bud to lift the liquid without smearing the pigment.
Step back and admire your living canvas, where bold strokes and delicate drips combine for a truly unique portrait


Have a question or want to share your own experience? I'd love to hear from you in the comments below!