If you’ve got plain glassware sitting around, Halloween is the perfect excuse to turn it into something spooky-cute and totally party-ready. I love how glass painting lets you go as simple or as extra as you want, from bold icons to moody night scenes.
Jack-o’-Lantern Wine Glass
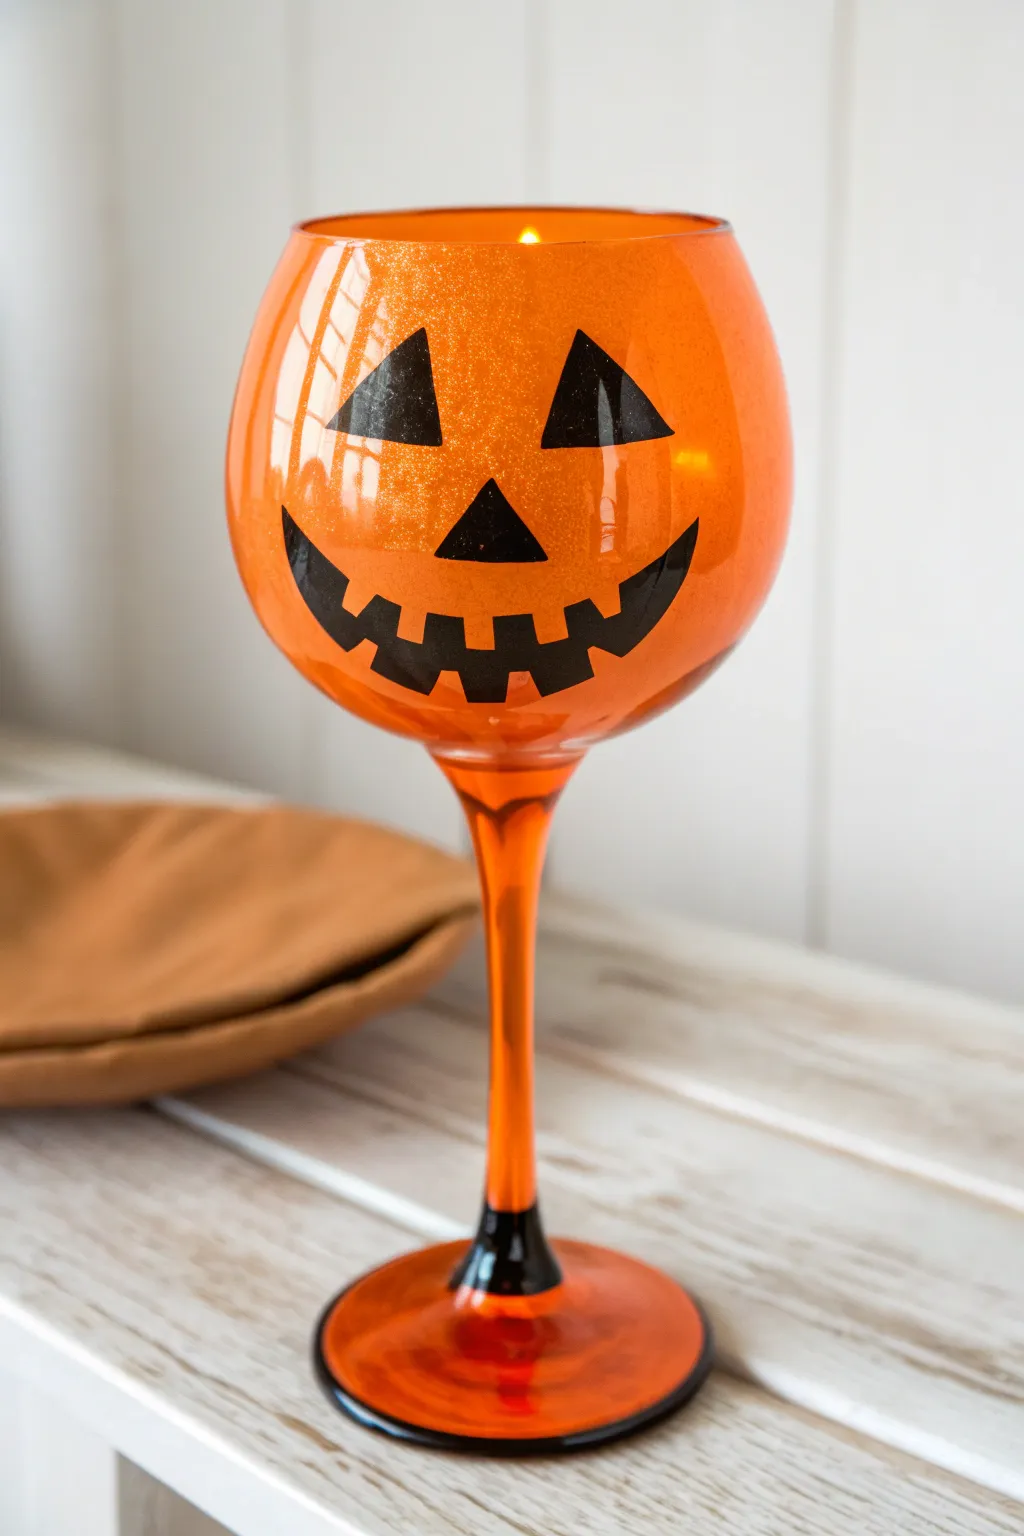
Transform a plain glass into a festive pumpkin face that shimmers in the candlelight. This project is surprisingly simple but yields a high-impact, professional-looking decoration that’s perfect for Halloween parties.
Step-by-Step
Materials
- Large balloon wine glass or gin glass
- Rubbing alcohol
- Cotton pads
- Orange glitter paint (glass-safe) OR Mod Podge mixed with fine orange glitter
- Glossy black enamel craft paint (glass-safe)
- Soft foam brush or wide flat brush
- Small flat brush (for the face)
- Small round detail brush
- Black glass liner or Sharpie (optional for outlining)
- Masking tape or painter’s tape
- Paper plate or palette
- Oven (optional, for curing paint)
Step 1: Prepping the Surface
-
Clean the glass:
Thoroughly wash your wine glass with warm soapy water and dry it completely. To ensure the best paint adhesion, wipe down the entire outer surface with rubbing alcohol on a cotton pad to remove any lingering oils or fingerprints. -
Tape the stem base:
Look closely at the photo: the stem is orange, but there is a distinct black ring at the very bottom where it meets the foot. Apply a strip of painter’s tape around the stem, just above the foot of the glass, to mark off where the orange color will stop.
Step 2: Adding the Pumpkin Glow
-
Mix your base:
If you are using a clear medium like Mod Podge mixed with loose orange glitter, combine them now on your palette. You want a high glitter-to-glue ratio for maximum sparkle. If using ready-made glitter glass paint, pour a generous amount onto your plate. -
Apply the first coat:
Using a soft foam brush, apply the orange mixture to the bowl of the glass and down the stem. Use long, smooth strokes to minimize streaks. Don’t worry if it looks slightly transparent; we will build layers. -
Let it dry:
Allow this first coat to dry completely. This usually takes about an hour, depending on your paint thickness. It must be dry to the touch before adding more. -
Build opacity:
Apply a second and possibly a third coat of the orange glitter mix. You want a rich, dense orange color that still lets light pass through, just like a real glowing pumpkin. Let the final coat dry for several hours or overnight to harden.
Pro Tip: Inner Glow
To keep the outside perfectly smooth, try coating the INSIDE of the glass with the glitter mixture instead. This leaves the outer surface glass-smooth for painting the face.
Step 3: Painting the Face
-
Outline the triangles:
Once the orange base is fully dry and stable, switch to your black enamel paint. Start by lightly outlining two triangles for eyes and a smaller one for the nose. I find it easiest to use a fine liner brush or even a black marker first to get the placement right. -
Fill the eyes and nose:
Using a small flat brush, carefully fill inside your triangular outlines with the glossy black paint. Ensure the edges are crisp and sharp. -
Draft the smile:
Locate the center point below the nose triangle. Draw a wide, curved ‘U’ shape for the mouth. Add little tick marks where you want the teeth to be carved out. -
Create the teeth:
Paint the classic jack-o’-lantern grin. Instead of a smooth curve, paint squared-off ‘teeth’ along the upper and lower lip of the smile. The teeth should alternate—a tooth on top, a gap, then a tooth. -
Refine the edges:
Go back over the black features with your detail brush to sharpen any blurry edges. The contrast between the sharp black paint and the glittery orange background makes the design pop.
Level Up: Stem Detail
Before the paint on the stem dries, wrap a green fuzzy pipe cleaner or a small green ribbon around the top of the stem to mimic a pumpkin vine.
Step 4: Finishing Touches
-
Paint the stem accent:
Remove the tape from the bottom of the stem carefully. Using your black enamel paint and a small brush, paint the section connecting the stem to the foot base black, creating that elegant dark collar seen in the image. -
Outline the foot:
For a cohesive look, carefully paint the rim of the glass foot with a thin line of black paint, or paint the entire foot orange if you prefer a solid base. -
Allow to cure:
Most glass paints require significant drying time (often 21 days for air curing) or heat curing in an oven to become permanent. Follow the specific instructions on your paint bottle. -
Heat set (optional):
If your paint allows, place the glass in a cool oven, set temperature to 350°F (175°C), bake for 30 minutes, and let it cool down inside the oven. This makes the design durable and hand-wash safe.
Place a battery-operated tealight inside to watch your shimmering pumpkin come to life safely


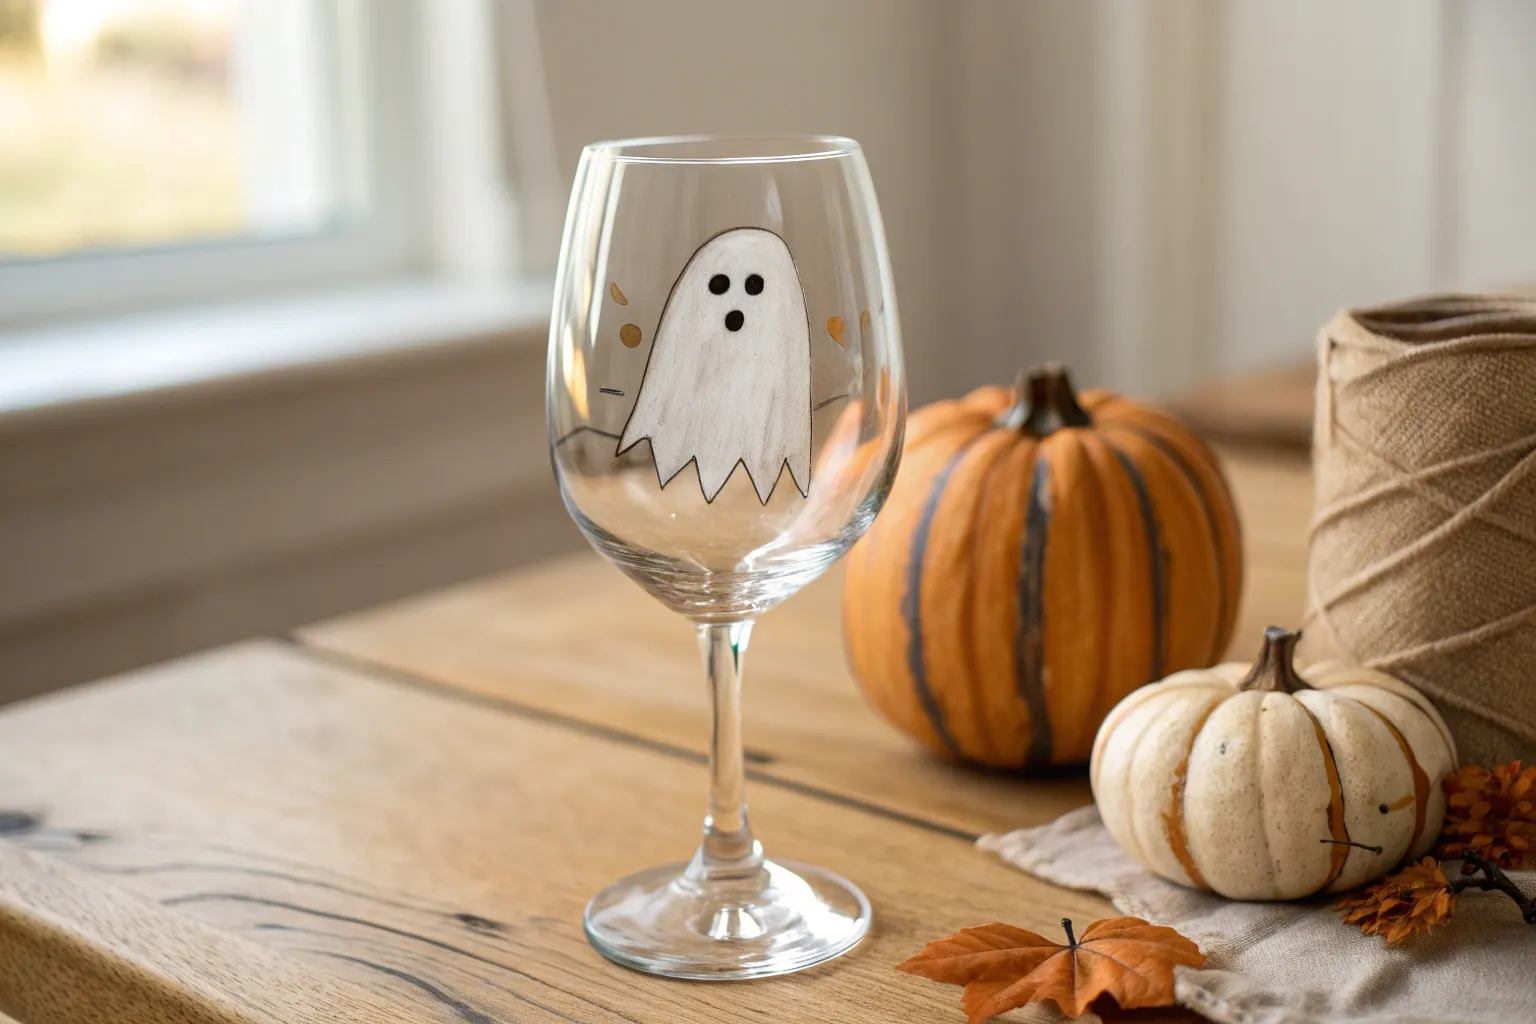
Floating Ghosts on Clear Glass
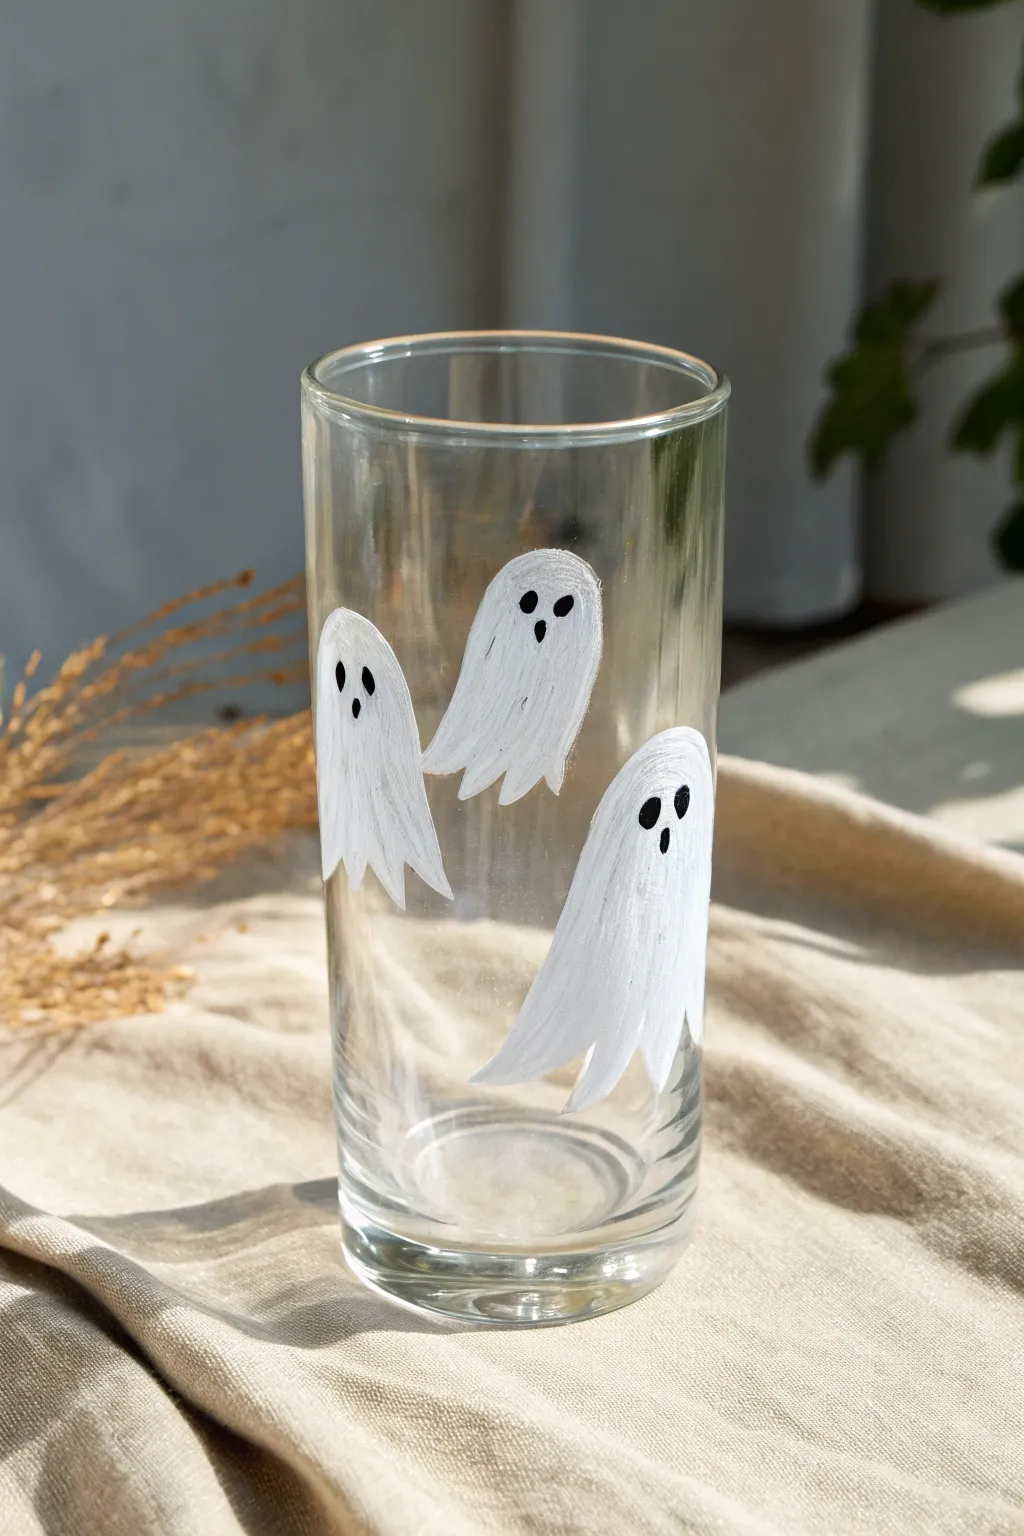
Transform a plain drinking glass into Halloween décor with these delightfully simple floating spirits. The visible brushstrokes give each ghost a textured, wispy appearance that makes them look like they are truly drifting across the surface.
Detailed Instructions
Materials
- Tall, clear drinking glass (tumbier style)
- Rubbing alcohol
- Cotton pads or paper towel
- White enamel craft paint (suitable for glass)
- Black enamel craft paint (suitable for glass)
- Small flat brush (size 6 or 8)
- Fine detail brush or dotting tool
- Parchment paper or palette
Step 1: Preparation
-
Clean the surface:
Before putting any paint on the glass, dampen a cotton pad with rubbing alcohol and thoroughly wipe down the entire exterior. This removes oils and fingerprints that could prevent the paint from sticking. -
Let it dry:
Allow the glass to air dry completely for a minute or two. Avoid touching the area where you plan to paint with your bare hands after cleaning. -
Prepare your palette:
Squeeze a generous dolt of white enamel glass paint onto your palette or parchment paper. You want enough paint to create slightly thick, textured strokes.
Pro Tip: Stroke Texture
Don’t over-blend the white paint! Letting the ridges of the brushstrokes remain visible mimics the fabric wrinkles of a sheet, adding depth to your simple ghost shapes.
Step 2: Painting the Bodies
-
Load the brush:
Load your small flat brush with white paint. Don’t smooth it out too much; having a bit of extra paint on the bristles helps create that textured, ghostly look. -
Start the first ghost:
Choose a spot on the upper third of the glass. Press the brush down gently to create the rounded top of the ghost’s head. -
Pull downward:
Drag the brush downward in a curved sweep to form the left side of the body. Lift the brush slightly as you reach the bottom to create a tapered, uneven hem. -
Form the right side:
Return to the head area and pull another stroke downward to form the right side of the body, curving it slightly to imply movement. -
Fill the center:
Fill in the middle of the ghost shape with additional vertical strokes. Don’t worry about making it perfectly smooth; visible brush lines act as ‘folds’ in the sheet. -
Create the tail:
At the bottom of the ghost, flick your brush gently to create jagged points or a trailing tail, giving the illusion of floating. -
Repeat for second ghost:
Rotate the glass slightly. I find it looks best to place the next ghost at a slightly different height, perhaps lower down, to create dynamic composition. -
Add the third ghost:
Add the final ghost in the remaining space, varying the curve of its body so they aren’t all identical clones. Let the white paint dry completely (usually 1 hour). -
Apply a second coat:
Review your ghosts. If the glass shows through too much, apply a second layer of white paint over the same shapes to increase opacity, keeping those brushstrokes vertical.
Step 3: Adding Details
-
Prepare black paint:
Place a small drop of black enamel paint on your palette. -
Paint the first eye:
Using a fine detail brush or the handle end of a paintbrush, dip into the black pant. Dot a small oval onto the upper part of the first ghost’s head. -
Paint the second eye:
Add a second black oval right next to the first one. Spacing them slightly closer together makes the ghost look cute rather than scary. -
Add the mouth:
Paint a slightly larger, vertical oval below and between the eyes to create an unnerved ‘O’ shaped mouth. -
Complete the faces:
Repeat the face process for the remaining two ghosts. Vary the mouth shapes slightly—maybe one is smaller or rounder—to give them individual personalities. -
Final cure:
Allow the painted glass to cure according to your specific paint bottle’s instructions. This often involves air drying for 21 days or baking in a cool oven.
Troubleshooting: Dripping Paint
If your paint starts to run down the glass, your application is too thick. Wipe it off immediately with a wet paper towel, dry the spot, and try again with less paint on your brush.
Enjoy using your new spooky glassware for festive autumn drinks


Mummy Wrap Stripes and Eyes
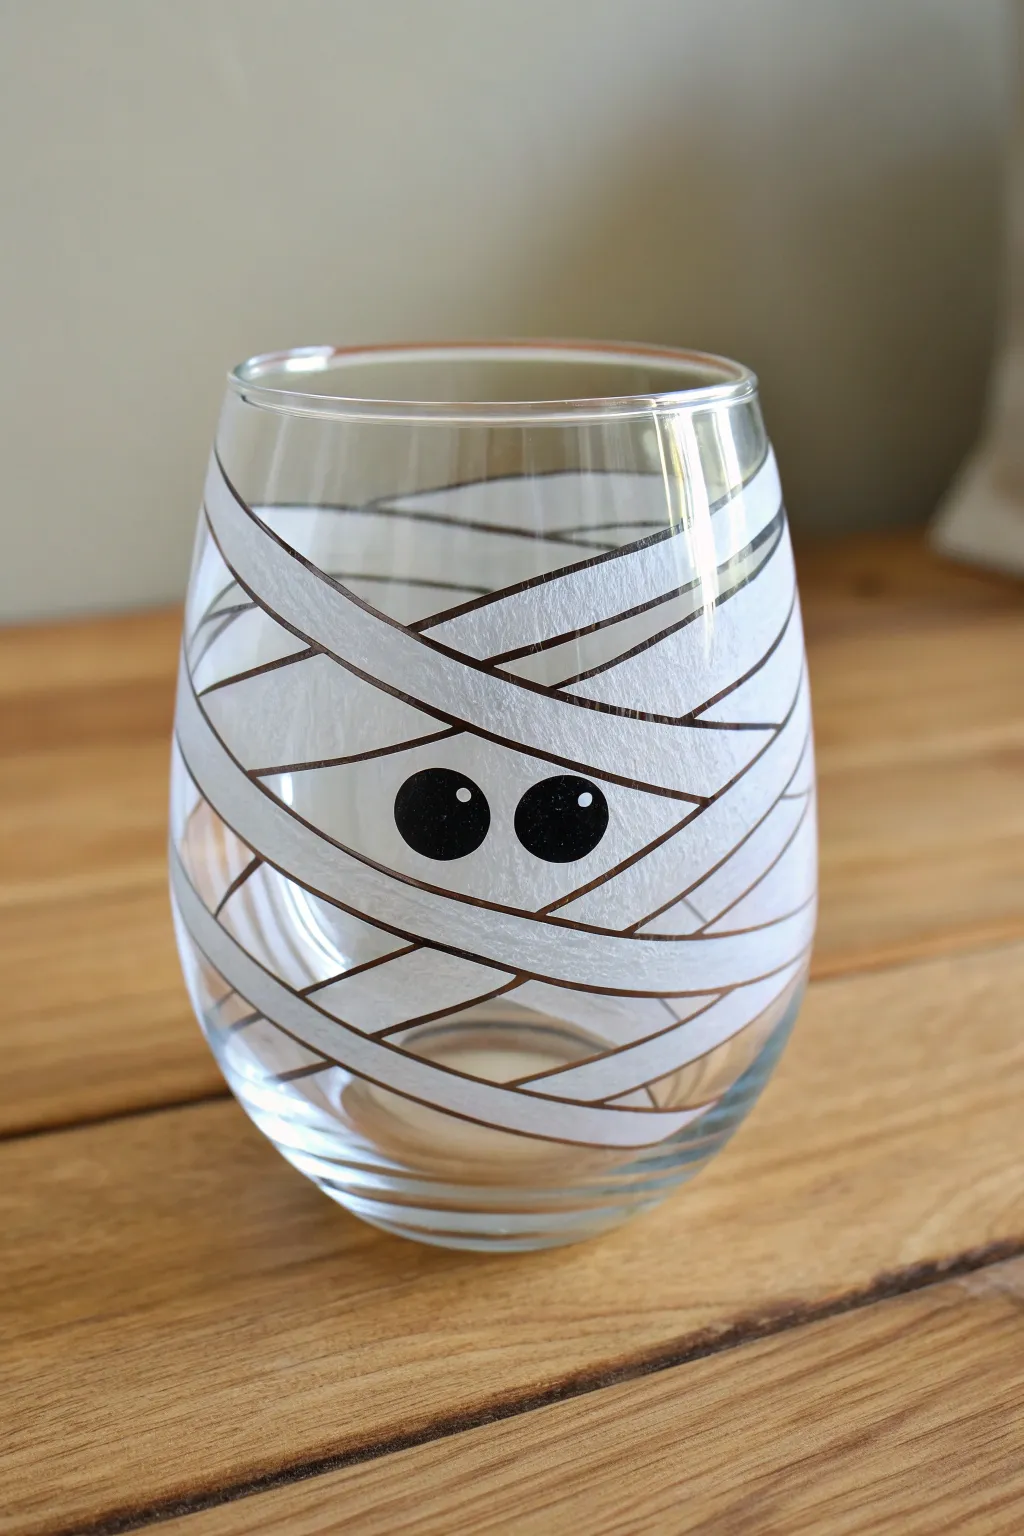
Turn a simple stemless wine glass into a festive Halloween character with this charming mummy design. The clever use of negative space creates a layered bandage effect, making your drinkware look perfectly wrapped up for the spooky season.
How-To Guide
Materials
- Stemless wine glass (clear, thoroughly cleaned)
- Rubbing alcohol
- Cotton pads or paper towel
- White painter’s tape or masking tape (approx 0.5-0.75 inch width)
- Frosted glass spray paint
- Black acrylic enamel paint (specifically for glass)
- Small round paintbrush
- Toothpick or dotting tool
- Craft knife or scissors
- Oven (for baking/curing, optional)
Step 1: Preparation and Taping
-
Clean the surface:
Before starting, wipe the entire exterior of the glass with rubbing alcohol and a cotton pad. This removes oils and fingerprints that could prevent the paint and tape from adhering properly. -
Plan the eyes:
Decide where you want the mummy’s face to be. Leave a roughly 1-inch horizontal gap free of tape in the middle of the glass; this negative space is where you will paint the eyes later. -
Cut tape strips:
Cut several lengths of your painter’s tape or masking tape. Varied lengths are fine since mummy wrappings are rarely perfect. -
Apply the bottom wraps:
Start applying tape strips near the bottom of the glass. Place them at slight diagonal angles rather than perfectly straight, overlapping them occasionally to mimic messy bandages. -
Wrap the top section:
Repeat the taping process on the upper half of the glass, angling pieces downward and across. Ensure you maintain that clear gap in the center for the eyes. -
Secure edges:
Press down firmly on all tape edges with your fingernail or a credit card tool. It is crucial that the tape is sealed tight to prevent the spray paint from bleeding underneath.
Step 2: Frosting Effect
-
Set up your workspace:
Move to a well-ventilated area, preferably outdoors or near an open window, and protect your surface with newspaper or a drop cloth. -
Apply first coat:
Hold the can of frosted glass spray paint about 8-10 inches away. Spray a light, even coat over the entire glass, focusing on the taped areas and the gaps between them. -
Let it dry:
Allow this first layer to dry for about 15-20 minutes, or as directed by your specific spray paint brand’s instructions. -
Apply second coat:
Apply a second light coat to ensure an even, frosty opacity. I usually find two coats are sufficient, but add a third if it looks patchy. -
Wait for curing:
Let the paint dry until it is tacky but not fully hardened, usually about 30 to 45 minutes. You want it dry enough not to smudge, but peeling tape is easier before it fully cures.
Tape Texture Hack
For a truly ragged ‘mummy cloth’ look, tear the edges of your masking tape strips by hand instead of cutting them with scissors. The rough edges create a more authentic bandage texture.
Step 3: The Big Reveal
-
Peel the tape:
Carefully peel off the tape strips one by one. Pull slowly at a diagonal angle away from the painted edge to get crisp lines. -
Clean up edges:
If any frost paint bled under the tape, use a toothpick or a craft knife to gently scrape the excess away while the paint is still relatively fresh.
Bleeding Lines?
If paint seeped under the tape, dampen a cotton swab with a tiny bit of rubbing alcohol or acetone and gently wipe the unwanted paint away. Do this immediately after peeling.
Step 4: Painting the Eyes
-
Paint the pupils:
Inside the clear horizontal gap you preserved, use your small round brush and black glass enamel paint to create two solid ovals or circles. These should sit on top of the clear glass, flanked by the frosted ‘bandages’. -
Dry the black paint:
Allow the black ovals to dry completely. This might take an hour, so be patient to avoid smearing. -
Add highlights:
Dip the tip of a toothpick or a dotting tool into white paint (or use a tiny drop of the frost spray pooled on a palette). Make two small dots in the upper right corner of each black eye for a cute, lively reflection. -
Cure the project:
Follow the instructions on your enamel paint bottle for curing. Many glass paints require baking in a non-preheated oven for 30 minutes at 350°F to become dishwasher safe.
Once baked and cooled, your spooky new glassware is ready to be the hit of your Halloween party

Stitched Green Monster Face
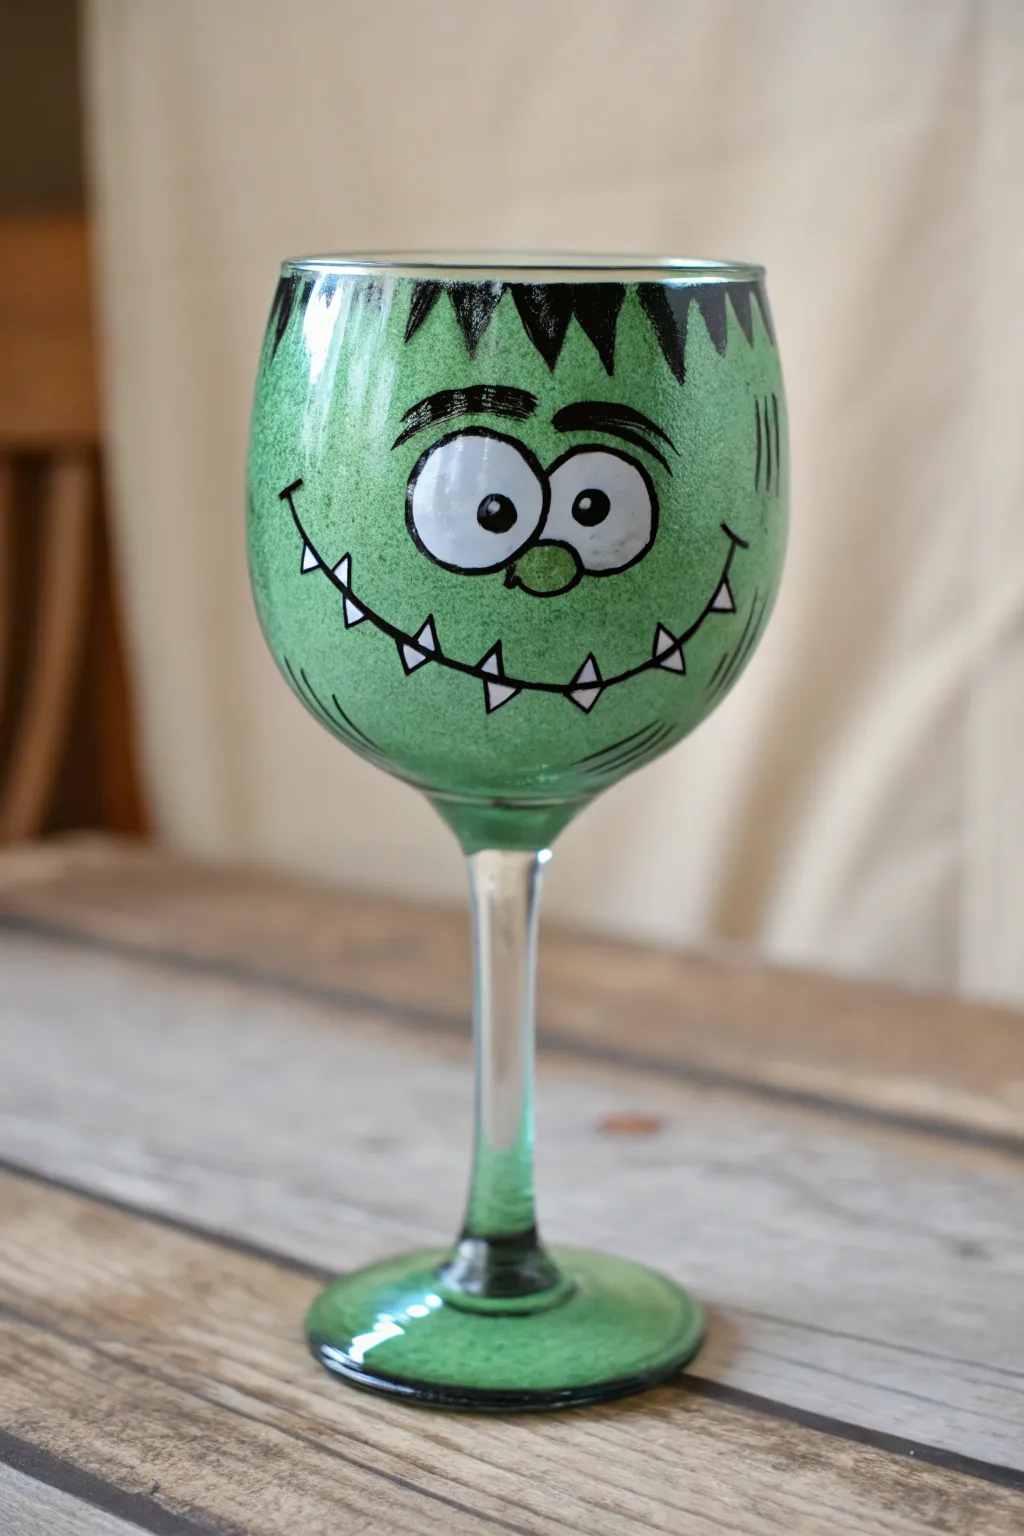
Bring a classic monster to life on your glassware with this charmingly spooky project. Featuring a textured green base, jagged hair, and a signature stitched smile, this wine glass is perfect for serving potions at your next Halloween gathering.
Step-by-Step Guide
Materials
- Large wine glass
- Rubbing alcohol and cotton pads
- Green acrylic enamel paint (or glass paint)
- Black acrylic enamel paint
- White acrylic enamel paint
- Sponge dauber or cosmetic sponge
- Fine detail brush (size 0 or 00)
- Medium flat brush
- Paper plate or palette
- Oven (if baking for permanence)
Step 1: Base Coat and Texture
-
Clean the surface:
Before painting, wipe the entire surface of the wine glass with rubbing alcohol on a cotton pad. This removes oils and fingerprints, ensuring the paint adheres properly. -
Load the sponge:
Squeeze a generous amount of green enamel paint onto your palette. Dab your sponge dauber into the paint, offloading any excess onto a clean part of the plate so it isn’t dripping. -
Stipple the green base:
Using an up-and-down pouncing motion, cover the entire bowl of the wine glass with the green paint. This stippling technique creates the textured, slightly translucent look seen in the photo. -
Paint the stem and base:
While you have the green paint out, continue stippling down the stem and cover the flat foot of the glass as well. I find holding the glass by the rim carefully creates the least mess during this step. -
Let it dry:
Allow this first layer to dry completely according to the manufacturer’s instructions, usually about one hour. If the coverage is too sheer, repeat the stippling process for a second coat.
Fixing Smudges
Make a mistake with the black liner? Use a damp cotton swab or a toothpick to gently scrape away the unwanted paint before it dries completely on the glass.
Step 2: Adding the Features
-
Outline the hairline:
Using a fine detail brush and black paint, draw a jagged, zigzag line around the top rim of the glass to create the monster’s hairline. -
Fill the hair:
Switch to a medium flat brush to fill in the triangles of the hair with solid black paint. Paint all the way up to the rim edge for a clean finish. -
Draft the eyes:
With a clean detail brush and white paint, create two large ovals in the upper center of the glass. They should overlap slightly in the middle. -
Fill the eyes:
Fill these ovals in with white paint. You may need two coats here to make them opaque enough to stand out against the green background. -
Add the pupils:
once the white is dry, use the handle end of a paintbrush dipped in black paint to dot the pupils. Place them slightly cross-eyed or pointing different directions for a goofy look. -
Outline the eyes:
Carefully trace the outer edge of the white eyes with your fine liner brush and black paint to define them. -
Paint the nose:
Just below the eyes where they join, paint a small, rounded ‘U’ shape or oval in a slightly darker green (or mix a tiny dot of black into your green) to create a subtle nose. -
Draw the brows:
Paint thick, expressive eyebrows floating above the eyes using black paint. Give them a slight arch to add character.
Step 3: The Stitched Smile
-
Create the mouth line:
Starting from the left side, paint a long, thin black curve that dips down and comes back up on the right side, forming a wide smile. -
Add the vertical stitches:
Along the smile line, paint short vertical dashes crossing the main line. Space them out evenly, leaving room for the teeth. -
Paint the teeth:
In the spaces between some of the stitches, paint small white triangles pointing upwards from the smile line. -
Outline the teeth:
Once the white triangles are dry, give them a very thin black outline so they look sharp and distinct. -
Add final details:
Add small black curved lines at the corners of the mouth and perhaps a scar or two on the cheek for extra detail. -
Cure the paint:
Follow your specific paint’s instructions for curing. This usually involves air drying for 21 days or baking in a cool oven that heats up to 350°F for 30 minutes.
Pro Tip: Translucency
Keep the green layer slightly sheer. When you put a candle or light inside, the texture will glow beautifully, enhancing the spooky monster effect.
Once baked and cooled, your custom monster glass is ready to be the life of the party
BRUSH GUIDE
The Right Brush for Every Stroke
From clean lines to bold texture — master brush choice, stroke control, and essential techniques.
Explore the Full Guide
Haunted Tree Silhouette Scene

Transform a plain glass bowl into a haunting centerpiece perfect for holding Halloween candy. This project features a stark black silhouette of a gnarled tree and flying bats, which looks striking against a solid background or filled with treats.
Step-by-Step Guide
Materials
- Clear glass bowl (clean and dry)
- Rubbing alcohol
- Cotton pads or paper towels
- Black enamel paint for glass (or multi-surface acrylic suitable for glass)
- Fine liner brush (size 0 or 00)
- Small round brush (size 1 or 2)
- Paper plate or palette
- Printed tree silhouette pattern (optional)
- Tape (optional)
- Oven (for curing, if paint requires)
Step 1: Preparation
-
Clean the surface:
Before painting, distinctively clean the outside of the bowl with rubbing alcohol and a cotton pad. This removes any oils or fingerprints that could prevent the paint from adhering properly. -
Dry thoroughly:
Let the alcohol evaporate completely. Do not touch the surface with your bare hands after cleaning; try to hold the bowl from the inside rim or place your hand inside designed like a claw to stabilize it. -
Plan your design:
Decide where your main tree will sit. If you aren’t confident freehanding, you can tape a printed silhouette image to the *inside* of the bowl facing outward to use as a tracing guide.
Pro Tip: Steady Hands
Rest your pinky finger against the glass surface as a stabilizer while you paint the fine twigs. This pivot point prevents your hand from shaking.
Step 2: Painting the Tree Base
-
Create the ground line:
Dip your small round brush into the black enamel paint. Near the bottom curve of the bowl, paint a slightly uneven, horizontal line to represent the ground. It doesn’t need to be perfectly straight; undulating bumps act as grassy knolls. -
Add grass texture:
Using the tip of the brush, flick small, upward strokes along the ground line to create the appearance of grass blades. Vary the height and direction slightly for a natural look. -
Paint the trunk:
Start painting the main tree trunk rising from the center of your ground line. Make the base wide and taper it as you go up, stopping about halfway up the bowl’s height. -
Thicken the roots:
Widen the very bottom of the trunk where it meets the ground, creating a flared root system that anchors the tree visually.
Step 3: Adding Branches
-
Start primary branches:
Switch to your fine liner brush for better control. Extend three or four main thick branches out from the top of your trunk, reaching toward the rim of the bowl. -
Create distinct forks:
From each main branch, split the line into two smaller branches. I find it helpful to think of the letter ‘Y’ when splitting the wood. -
Add twist logic:
Give the branches a ‘gnarled’ look by adding slight kinks and bends rather than painting perfectly straight lines. This adds to the spooky, old-tree aesthetic. -
Paint secondary twigs:
Continue dividing the branches into thinner and thinner twigs as you move upward and outward. Use the very tip of your liner brush and light pressure. -
Fill empty spaces:
Look for large gaps in the canopy area and add small, stray twigs to fill them in, ensuring the tree looks full and intricate. -
Check opacity:
Hold the bowl up to the light. If the black paint on the trunk looks streaky or translucent, carefully apply a second coat over the thickest areas once the first layer is touch-dry.
Troubleshooting: Paint Drips
Does the paint drip on the vertical surface? You’ve loaded too much paint on the brush. Wipe excess on the palette and work in thin layers.
Step 4: Finishing Details
-
Add first bat:
Locate an open area of ‘sky’ above the tree. Paint a small ‘M’ shape with elongated sides to form the wings of a bat. -
Thicken the bat body:
Add a tiny speck in the center of the wings for the body and thicken the wing arches slightly so they read clearly as a silhouette. -
Add distant bats:
Paint one or two smaller bats in the distance. Varying the sizes helps create a sense of depth in your scene. -
Clean up edges:
If you made any stray marks or smudges, use a damp cotton swab or a toothpick to gently scrape away the mistake while the paint is still relatively fresh. -
Cure the paint:
Follow the instructions on your specific paint bottle. Most glass enamels require either 21 days of air drying or baking in a home oven to become durable and dishwasher safe.
Once baked and cooled, your haunted forest bowl is ready to be filled with treats for a spooky display
Haunted House on a Hill
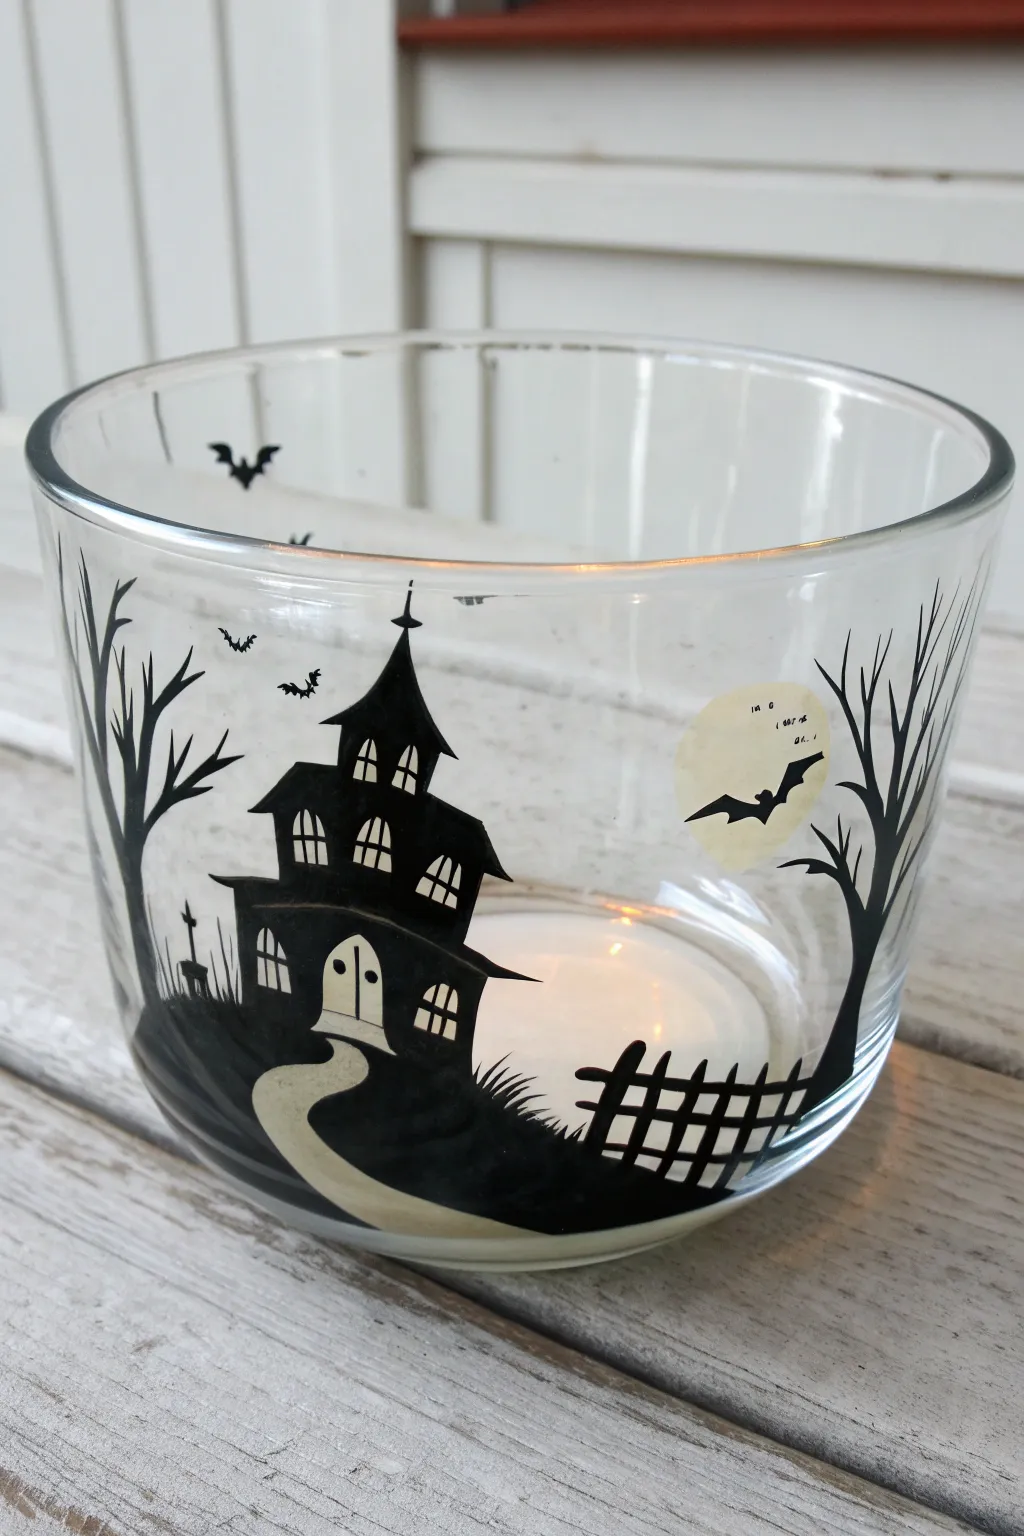
Transform a simple glass vessel into a eerie Halloween luminary with this detailed haunted house scene. Using primarily black silhouette work against the clear glass creates a striking, shadowy effect when illuminated from within.
Step-by-Step
Materials
- Clear glass jar or wide vase (smooth surface)
- Rubbing alcohol and cotton pad
- Black glass paint or multi-surface acrylic paint
- Cream or pale yellow glass paint
- Fine liner brush (00 or 000 size)
- Small flat brush
- Medium round brush
- Paper palette or plate
- Pattern or reference image (optional)
Step 1: Preparation and Background
-
Clean surface:
Begin by thoroughly wiping down the exterior of your glass jar with rubbing alcohol and a cotton pad. This removes any oils or fingerprints that would prevent the paint from glowing smoothly. -
Position the moon:
Using a dime or nickel as a rough size guide, paint a circle near the upper right side of the jar using cream or pale yellow paint. It doesn’t need to be a perfect circle; a slightly wavy edge adds character. -
Base sketch:
If you aren’t confident painting freehand, you can sketch the basic shapes of the house and hill using a dry erase marker on the glass, or tape a printed image inside the jar to trace.
Clean Lines Pro-Tip
If you make a mistake or a line gets too thick, use a toothpick or a cotton swab dampened with rubbing alcohol to gently ‘erase’ the wet paint and reshape edges.
Step 2: Painting the Landscape
-
Create the hill:
Load your medium round brush with black paint. Start at the bottom left and sweep upwards and across to the right, creating a rolling hill shape that serves as the foundation for your house. -
Leave a path:
While painting the black hill, leave a curving, negative space (unpainted glass) winding from the bottom edge up toward the center of the hill. This will become your pathway. -
Fill the path:
Once the black hill is tacky or dry, mix a tiny drop of yellow into white or use plain cream paint to fill in that winding pathway, making it wider at the bottom and narrowing as it reaches the house door. -
Add texture:
Using the very tip of your brush, flick small strokes of black paint upward along the top edge of the hill to simulate patches of grass.
Paint opacity issues?
If the black looks streaky or translucent after the first coat, let it dry completely (about an hour) and apply a second thin layer. Don’t overwork wet paint.
Step 3: Constructing the House
-
Main structure:
Switch to a small flat brush. Paint the main rectangular body of the house sitting atop the hill, slightly off-center to the left. -
Add the roof:
Paint a sharp, triangular roof on top of the main rectangle. Add a second, smaller wing to the house on the left side with a slanted roof for architectural interest. -
Windows and doors:
Use your finest liner brush to carefully paint arched window shapes in cream or yellow on the black house silhouette. Add a double door at the base where the path meets the building. -
Window panes:
Once the yellow window paint is fully dry, go back with your fine liner brush and black paint to add the crossbars or grids inside the tiny windows. -
Roof details:
Extend the very top of the roof into a sharp spire. You can add tiny horizontal lines along the roofline to suggest shingles or eaves.
Step 4: Atmospheric Details
-
Spooky trees:
On the far left and right sides of the jar, paint tall, spindly trees. Use the fine liner brush to pull branches outward and upward, ensuring they taper to very thin points. -
The fence:
On the bottom right side of the hill, paint a crooked fence. Start with two horizontal rails, then add vertical pickets that slant in different directions to look dilapidated. -
Bat silhouette:
Paint a small, black bat flying directly over the yellow moon. The contrast creates an immediate focal point. -
More bats:
Add two or three smaller V-shaped bats flying in the distance on the upper left side of the jar. -
Grave marker:
Paint a small cross or tombstone shape on the far left side of the hill, nestled near the base of the tree. -
Final cure:
Allow the jar to dry for at least 24 hours. If your paint instructions require baking to set the design for washing, follow the manufacturer’s specific temperature and time guidelines.
Place a tea light or battery-operated candle inside to see your haunted scene come to life in the dark

PENCIL GUIDE
Understanding Pencil Grades from H to B
From first sketch to finished drawing — learn pencil grades, line control, and shading techniques.
Explore the Full Guide
Skull Motif in White and Gray
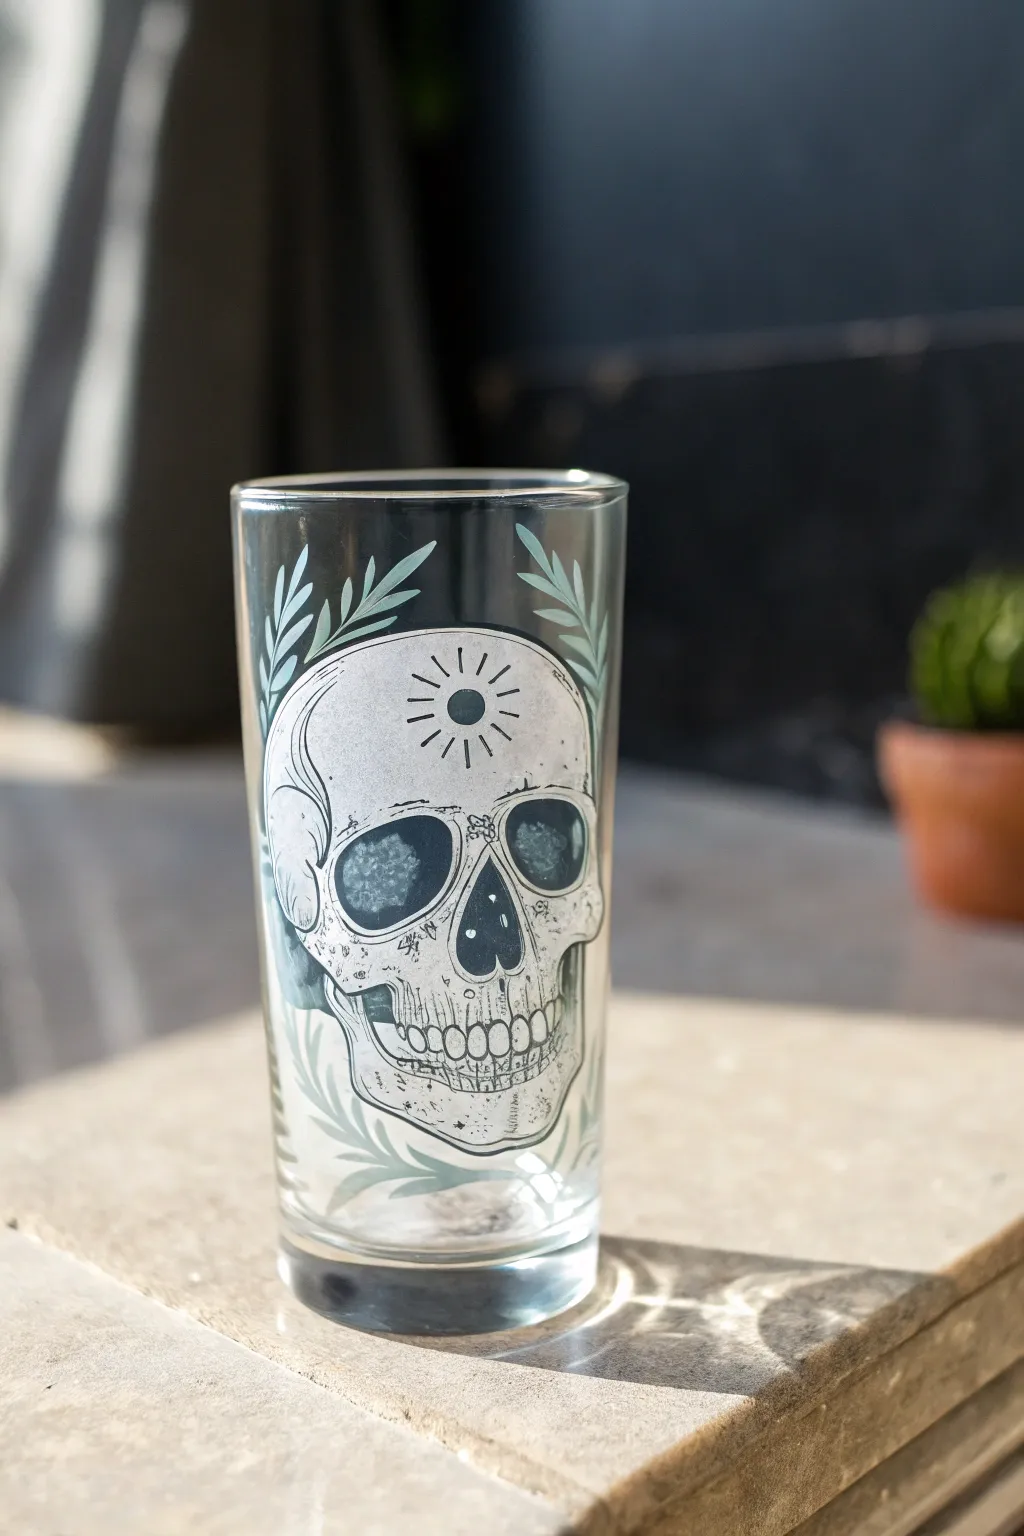
Transform plain drinkware into gothic-chic décor with this detailed skull motif featuring botanical accents. The design combines crisp black linework with translucent white fill and soft sage greenery for an elegant, not-too-spooky look.
Step-by-Step Guide
Materials
- Clear highball glass or tumbler
- Rubbing alcohol and cotton pads
- Enamel paint for glass (White, Black, Sage Green)
- Fine liner brush (size 0 or 00)
- Small flat shader brush
- Carbon transfer paper (optional)
- Printed skull template
- Painter’s tape
- Oven for curing (if using bake-to-set paints)
Step 1: Preparation and Base Outline
-
Clean the Surface:
Begin by thoroughly wiping down your glass with rubbing alcohol and a cotton pad. This removes any oils or fingerprints that could prevent the paint from adhering properly. -
Prepare the Template:
Print or draw a skull design sized to fit your glass. Tape the paper pattern to the *inside* of the glass, facing outward, so you can see the lines through the clear wall. -
Outline the Skull:
Dip your fine liner brush into black enamel paint. Carefully trace the main outline of the skull, following the template you placed inside. -
Detail the Features:
Continuing with the liner brush, add the eye sockets, nose cavity, and the teeth. Keep your hand steady and your lines consistent. -
Add Mystical Symbols:
Paint the small sunburst or star symbol on the skull’s forehead using very delicate strokes. Add any other fine details like the cracks or sutures on the cranium. -
Initial Drying Time:
Let these black outlines dry completely before moving on. This usually takes about an hour, depending on your brand of paint, to prevent smearing.
Clean Lines Hack
If you make a mistake with the liner brush, use a toothpick to gently scrape away the wet paint without smearing the rest of the design.
Step 2: Adding Color and Texture
-
Fill in the Skull:
Using a small flat brush, apply the white enamel paint inside the skull outline. I like to use a slightly thinned layer here so it remains semi-translucent rather than fully opaque. -
Create Depth:
While painting the white, avoid painting over your dried black lines. If you accidentally cover them, you can gently scratch the white paint away once dry or re-trace them later. -
Shade the Eyes:
For the eye sockets and nose, apply a very thin wash of dark grey or black to create a hollow, shadowed effect inside the boundaries. -
Texture the Bone:
Use a dry brushing technique with a tiny amount of grey paint to add subtle shading around the jawline and cheekbones for a weathered bone look. -
Wait for Opacity:
Allow the white fill layer to dry firmly. If it looks too streaky, apply a second thin coat for better coverage.
Paint Slipping?
If the paint slides around too much, the glass might still be oily. Wipe the area again with alcohol and let the first layer dry longer between coats.
Step 3: Botanical Borders and Finishing
-
Paint the Stems:
Switch back to your liner brush and the sage green paint. Draw wispy, curved stems rising up from the base of the skull on both sides. -
Add Leaves:
Paint small, elongated leaves attaching to the stems. Vary their angles to make the foliage look organic and natural. -
Refine Details:
Look over your design one last time. If any black lines were obscured by the white fill, carefully go back over them with the liner brush to make the design pop. -
Remove Template:
Peel the paper template off the inside of the glass. Check for any smudges and clean them up with a damp cotton swab. -
Curing Process:
Follow the manufacturer’s instructions for your specific paint to cure the glass. This often involves baking the glass in a non-preheated oven to make the design dishwasher safe.
Enjoy your custom creation for a spirited toast at your next gathering
Dripping Slime Rim Effect
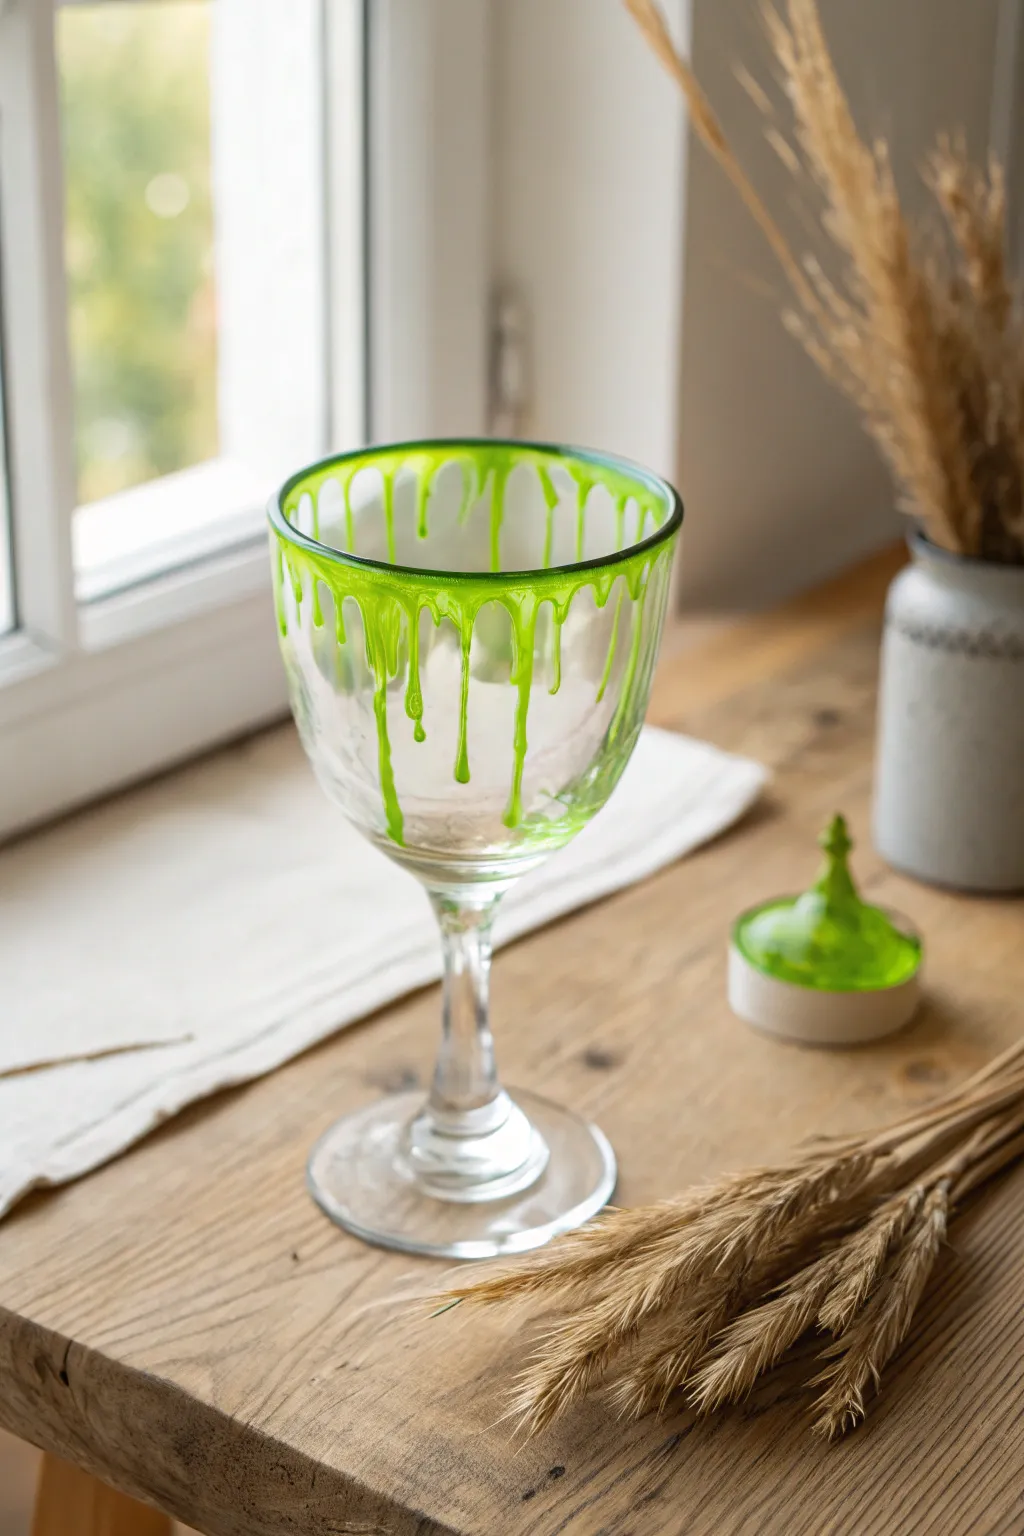
Transform ordinary stemware into a spooky Halloween centerpiece with this striking dripping slime effect. The translucent green paint catches the light beautifully, creating the illusion of fresh, oozing ectoplasm straight from a haunted laboratory.
Step-by-Step
Materials
- A clear glass goblet or wine glass
- Rubbing alcohol
- Cotton pads or paper towels
- Lime green glass paint (transparent or glossy finish)
- Darker green glass paint (optional, for depth)
- Fine-tipped paintbrush or script liner brush
- Toothpicks
- Glass paint outliner or relief paste (clear or matching green, optional)
- Small mixing palette or plastic lid
- Baking sheet and parchment paper (if baking is required for the paint)
Step 1: Preparation
-
Clean the surface:
Begin by thoroughly cleaning your glass goblet with warm soapy water to remove any dust or sticker residue. -
Degrease with alcohol:
Moisten a cotton pad with rubbing alcohol and wipe down the entire upper rim and the top third of the glass bowl. This removes invisible oils from your fingers that could repel the paint. -
Dry completely:
Allow the glass to air dry for several minutes. Ensure no lint or fibers remain on the surface. -
Prepare your workspace:
Lay down parchment paper or newspapers to protect your table, and make sure your glass is stable on a flat surface.
Gravity is Your Friend
For ultra-realistic drips, tilt the glass slightly while painting. Let a heavy bead of paint run down naturally, then freeze it in place with a hair dryer on a low, cool setting.
Step 2: Creating the Rim
-
Load the rim:
Using a generous amount of lime green glass paint on a medium brush, apply a thick, uneven band of paint directly along the very top edge of the glass rim. -
Establish the anchor line:
Paint a slightly wavy horizontal line about 1/8 inch below the rim. This connects to your top rim paint and serves as the source for your drips. -
Add paint volume:
Go back over that initial band and add more paint so it forms a gentle pool or ridge. You need excess wet paint here to help pull the drips down naturally.
Glow-in-the-Dark Magic
Mix a small amount of phosphorescent medium or use glow-in-the-dark acrylic enamel for the final topcoat. Your slime will radiate a ghostly green light when the room goes dark.
Step 3: Dripping Techniques
-
Start the first drip:
Dip your fine-tipped brush into the paint pool on the rim and slowly drag a vertical line downward. -
Form the droplet:
When you reach the desired length of your drip, deposit a slightly larger bead of paint at the bottom to mimic gravity gathering the liquid. -
Vary the lengths:
Move about half an inch along the rim and create another drip. I find it looks most realistic if you alternate between long, dramatic drips and shorter, hesitant ones. -
Connect the tops:
Use the brush to soften the connection point where the vertical drip meets the horizontal rim line, creating a curved, webbed shape rather than a hard right angle. -
Create variation:
For some drips, lift your brush pressure midway to make the stream thinner, then press down at the end for a teardrop shape. -
Add stray droplets:
Paint a few tiny, isolated dots of green near the longer drips to look like splatter or separated slime. -
Correction time:
If a drip looks too straight, use a toothpick to gently nudge the wet paint into a more organic, wiggly path.
Step 4: Adding Depth and Finishing
-
Highlight the slime:
If you have a slightly lighter yellow-green or white, add tiny streak highlights to the roundest part of the drip bottoms while the main paint is still tacky, blending slightly. -
Simulate thickness:
To make the slime look 3D, wait for the first layer to dry to the touch (usually 20-30 minutes), then carefully apply a second layer known as ‘overpainting’ just on the main drips. -
Check for gaps:
Hold the glass up to a light source to check for unintentional thin spots in the rim coverage and daub in more paint where needed. -
Initial dry:
Let the glass sit undisturbed for at least 24 hours (or per the manufacturer’s instructions) to allow the paint to cure fully. -
Baking (if applicable):
If your glass paint requires heat setting, place the glass in a cold oven, heat to the specified temperature (often 325°F/160°C), bake for the required time, and let it cool completely inside the oven.
Now your spooky glassware is ready to serve potions or simply stand as a haunting decoration


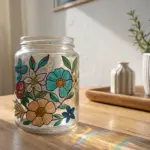
Faux Stained-Glass Halloween Icons
Bring a touch of eerie elegance to your windowsill with this faux stained-glass project featuring floating Halloween icons. Using a simple glass frame and specialty paints, you can mimic the textured, luminous look of traditional leaded glass without the soldering iron.
Detailed Instructions
Materials
- Picture frame with glass (approx. 5×12 inches) or custom cut glass pane
- Wooden stand or slotted base block
- Gallery Glass or liquid lead outlining paint (Black)
- Gallery Glass or translucent glass paints (Orange, Purple, Teal, Yellow)
- Isopropyl alcohol and paper towels
- Printed pattern of Halloween shapes (bat, moon, stars, orb)
- Toothpicks or a scribe tool
- Tape
- Scissors
Step 1: Preparation and Design
-
Clean the Glass:
Remove the glass pane from your frame or prepare your custom cut piece. Clean both sides thoroughly with isopropyl alcohol and a paper towel to remove any oils or fingerprints, ensuring the paint adheres perfectly. -
Prepare the Pattern:
Print or sketch your design of choice. For this look, create a composition with a central bat, a large crescent moon, a teal orb, and various stars. Scale the images to fit your glass dimensions. -
Secure the Template:
Place the paper pattern underneath the glass pane. Use small pieces of tape at the corners to secure the glass to the paper so the design doesn’t shift while you work.
Fixing Wobbly Lines
If your ‘lead’ lines look shaky, let them dry slightly until they form a skin. Then, use a craft knife to trim the edges straight without smearing wet paint.
Step 2: Creating the outlines
-
Test the Lead Paint:
Squeeze a small amount of the black liquid lead onto a scrap paper first. You want to ensure the flow is smooth and get a feel for the pressure needed before touching the glass. -
Outline the Moon:
Start with the orange crescent moon at the top. Hold the bottle tip slightly above the glass—don’t drag it—and let the line of paint ‘fall’ onto the pattern lines. -
Trace the Bat:
Move on to the central bat figure. Pay close attention to the scalloped edges of the wings. Ensure you close the shapes completely; gaps will let the colored paint leak out later. -
Outline Remaining Shapes:
Continue tracing the teal orb and the various stars. For the orb, draw the internal grid lines that give it that mosaic appearance. -
Add Details:
Don’t forget the tiny details, like the bat’s eyes. You may need a finer tip or just a very light touch for these small enclosed areas. -
Touchups:
If you make a mistake or a line is wobble, wait a few minutes for it to skin over, then use a toothpick to gently nudge it back into place or lift it off entirely. -
Deep Drying:
Allow the black outlines to dry completely. This usually takes at least 8 hours or overnight. The lines must be hard so the wet colored paint doesn’t dissolve them.
Add Extra Sparkle
While the colored paint is still wet, sprinkle a tiny pinch of super-fine iridescent glitter into the stars or the moon for a magical shimmering effect.
Step 3: Adding Color
-
Fill the Moon:
Apply the orange glass paint to the crescent moon. Start near the edges and work inward. Apply enough paint so it looks milky; it will clear up as it dries. -
Texture the Bat:
Fill the bat’s body and wings with black glass paint (or leave it clear if you used a dark opaque). I like to tap the wet paint with a toothpick to create a pebbled texture while it’s wet. -
Paint the Orb:
Use teal or turquoise paint for the orb segments. Fill each section individually rather than flooding the whole shape, which helps mimic the look of separate glass pieces. -
Color the Stars:
Fill the stars with alternating yellow, orange, and teal paints. A toothpick is very helpful here to drag the paint into the sharp points of the stars without overflowing the lead lines. -
Create the Background Texture:
To get that frosty, textured look on the clear glass around the icons, apply a layer of ‘Crystal Clear’ gallery glass paint to the negative space. Swirl it with a toothpick or brush to create a rippled effect. -
Pop Bubbles:
Inspect your work closely for tiny air bubbles in the paint. Pop them immediately with a sharp pin or toothpick before the paint begins to set.
Step 4: Assembly
-
Final Cure:
Let the entire piece dry flat in a dust-free area for 24 to 48 hours. The milky look will disappear, leaving vibrant, translucent color. -
Frame It:
Carefully slide the finished glass pane into your wooden frame. If you are using a slotted base like the photo, gently press the glass into the groove ensuring it sits vertically.
Place your creation in a sunny window to watch the spooky colors dance across your room
Smoky Ombre Night Sky Wash
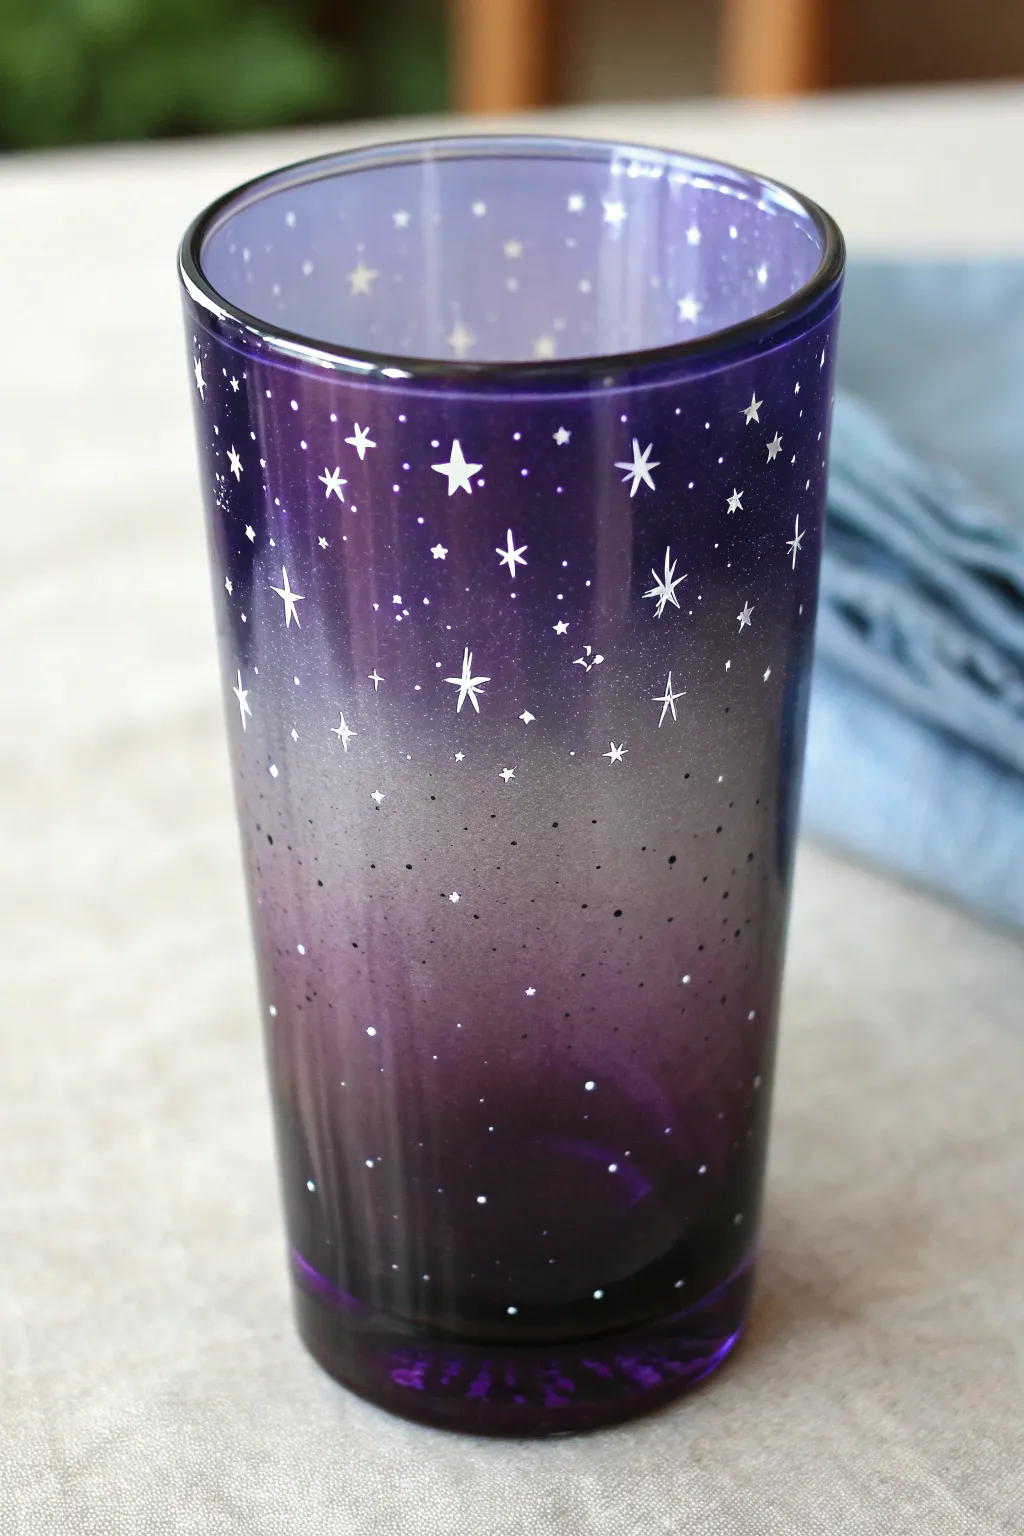
Capture the mystic beauty of a twilight sky with this enchanting ombre glass project. Using a simple sponge technique and fine detailing, you’ll transform plain drinkware into a celestial masterpiece featuring fading purple hues and delicate starlight.
Step-by-Step
Materials
- Clear glass tumbler
- Rubbing alcohol
- Cotton pads or paper towel
- Glass-safe purple acrylic paint (gloss or enamel)
- Glass-safe white acrylic paint (gloss or enamel)
- Makeup sponge wedges
- Fine detail paintbrush (size 0 or 00)
- Small dotting tool or toothpick
- Palette or paper plate
- Oven (for curing, if required by paint)
Step 1: Preparing the Base
-
Clean surface:
Begin by thoroughly cleaning the outside of your glass with rubbing alcohol on a cotton pad. This removes oils and fingerprints that could prevent the paint from adhering properly. -
Prepare palette:
Squeeze a generous amount of dark purple paint onto your palette. Next to it, mix a lighter shade of purple by blending a small drop of white into your dark purple. -
Load sponge:
Dip the flat bottom of a makeup sponge wedge into the dark purple paint. Dab off the excess onto the palette; you want the sponge loaded but not dripping. -
Apply top dark layer:
Starting at the rim of the glass, dab the sponge firmly to create a solid band of dark purple. Don’t paint the very edge where lips will touch; leave a tiny clear margin for safety. -
Fade downwards:
As your sponge runs out of paint, continue dabbing downwards to create a naturally fading effect. This starts the ombre transition. -
Apply bottom dark layer:
Using a fresh side of the sponge (or a new one), load up more dark purple paint and repeat the process at the very bottom of the glass, dabbing heavily to create an opaque base. -
Fade upwards:
Work the sponge upwards from the bottom, lightening your touch as you reach the middle section to meet the upper fade. -
Create the milky center:
Mix a very pale, milky lavender-grey by adding a tiny touch of purple to a larger dollop of white. Use a clean sponge to lightly dab this into the middle section of the glass, blending the top and bottom fades together. -
Layering for opacity:
Let the first coat dry for about 15-20 minutes. It will look translucent. Repeat the sponge steps to build up opacity, ensuring the top and bottom remain the darkest points. -
Dry completely:
Allow the ombre background to dry completely before starting the stars. This usually takes at least an hour; wet paint will smear if you try to detail over it too soon.
Step 2: Adding Celestial Details
-
Practice stars:
Before touching the glass, practice painting small four-point and five-point stars on a piece of paper using your fine liner brush and white paint. -
Paint large stars:
Using the fine detail brush, paint scattered four-pointed stars (cross shapes with tapered ends) primarily in the darker purple sections near the top rim. -
Add medium stars:
Intersperse smaller five-point stars or simple ‘x’ shapes through the mid-section of the ombre gradient. -
Dotting technique:
Dip a dotting tool or the tip of a toothpick into the white paint. Gently touch the glass to create tiny, perfect circles representing distant stars. -
Vary dot sizes:
Create depth by varying the pressure on your dotting tool. Combine clusters of tiny dots with standalone larger dots. -
Fill the void:
Focus the densest cluster of stars and dots near the top rim, letting them become more sparse as they travel down into the misty middle area. -
Bottom details:
Add just a few sparse dots near the dark bottom base to balance the design without making it look cluttered. -
Curing:
Once you are happy with your night sky, refer to your paint manufacturer’s instructions for curing. This often involves baking the glass in a non-preheated oven to make the design dishwasher safe.
Sponge Tactics
Don’t drag the sponge! Use a strict up-and-down dabbing motion. Dragging will streak the paint and ruin the soft, smoky texture needed for the background.
Level Up: Constellations
Instead of random stars, look up real star charts and paint recognizable constellations like the Big Dipper or Orion’s Belt for a hidden detail.
Your finished glass will look like you’ve captured a piece of the midnight sky right in your hand
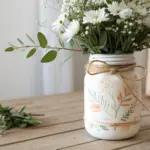
Glow-in-the-Dark Accent Details
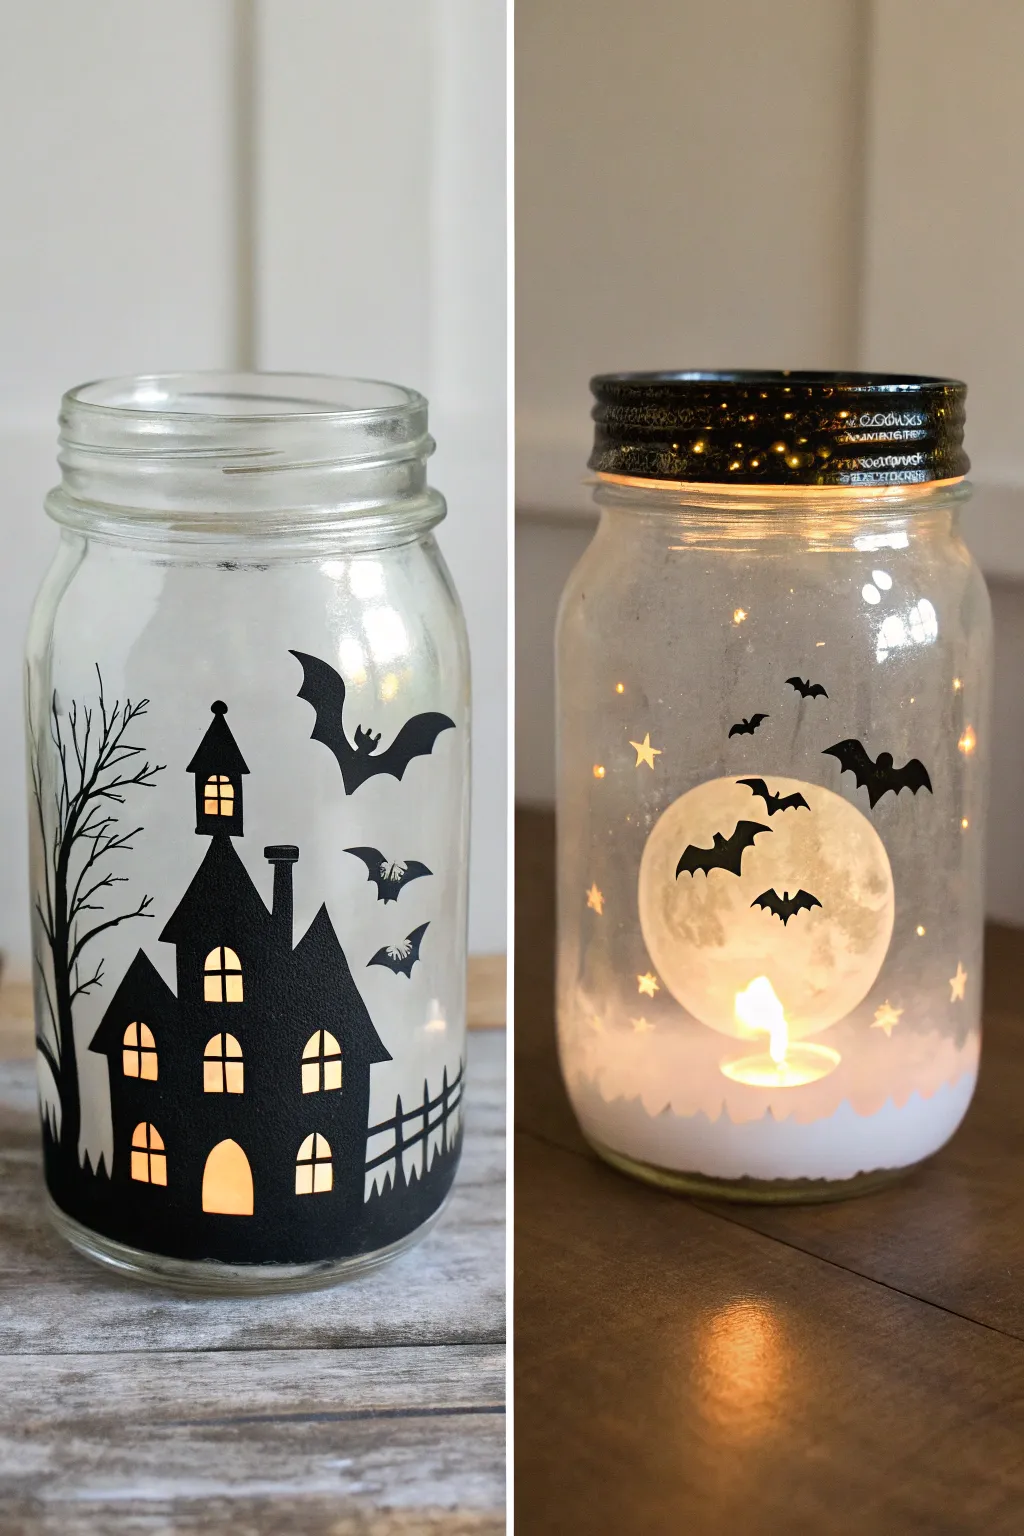
Transform plain glass jars into eerie glowing scenes that capture the spooky spirit of Halloween. These lanterns feature striking silhouettes against glowing backgrounds, perfect for lighting up a dark porch or mantle.
Step-by-Step Tutorial
Materials
- Clean, empty mason jars (pint or quart size)
- Black vinyl sheets or black acrylic paint
- Cricut machine or craft knife
- Transfer tape (if using vinyl)
- Frosted glass spray paint or white tissue paper and Mod Podge
- White acrylic paint (for the moon)
- Sponge dabbers
- Fine detail paint brushes
- LED tea lights or battery-operated fairy lights
- Rubbing alcohol
- Cardstock or sticky notes (for stencils)
- Pencil
Step 1: Preparation & Base
-
Clean the Glass:
Start by thoroughly washing your mason jars with soap and water. Once dry, wipe the exterior with rubbing alcohol on a lint-free cloth to remove any oils or fingerprints, ensuring your paint or vinyl adheres perfectly. -
Choose Your Background Style:
Decide on the look you want. For the ‘Haunted House’ jar (left), keep the glass clear. For the ‘Moonlit Bat’ jar (right), apply a light coat of frosted glass spray paint to the exterior to create a hazy, diffused glow. Alternatively, decoupage a thin layer of white tissue paper inside for a similar effect. -
Create the Moon (Right Jar):
If making the bat jar, punch or cut a circle from a sticky note or cardstock to use as a mask. Place it inside the jar or on the outside depending on your painting method, or simply freehand a large circle on the outside using white acrylic paint and a sponge dabber for a textured, lunar look.
Sticky Situation
Vinyl refusing to stick to rounded glass? Use a hair dryer on low heat to warm the vinyl slightly. This makes it pliable enough to smooth over curves without creasing.
Step 2: Creating the Silhouettes
-
Design Your Scene:
Sketch out your spooky elements. For the haunted house, you’ll need a tall, crooked structure with window cutouts, a fence, and a bare tree. For the bat jar, you need various sizes of bats and small stars. -
Cut Out Vinyl Shapes:
The easiest way to get crisp lines is using a cutting machine like a Cricut to cut your designs from black adhesive vinyl. If you don’t have one, print your design on paper, tape it over the black vinyl sheet, and carefully cut it out using a sharp craft knife. -
Painting Alternative:
If you prefer painting over vinyl, use black acrylic paint or glass paint. Tape your sketch inside the jar as a guide, then paint the design on the outside surface using a fine liner brush for tree branches and house details. -
Weeding:
If using vinyl, carefully remove the excess vinyl (‘weeding’) from your backing sheet, paying special attention to the small window panes in the haunted house so the light can shine through.
Step 3: Assembly & Details
-
Applying the Haunted House:
Use transfer tape to lift the vinyl house design. Wrap it carefully around the bottom of the clear jar. Start from the center of the design and smooth it outwards to prevent air bubbles, pressing firmly to adhere the fence and tree branches. -
Adding Flying Bats:
For the right-hand jar, stick your vinyl bats in a scattered formation, making them look like they are flying out from the moon. You can also paint these by hand for a more organic feel. -
Adding Stars:
Using a tiny brush or a toothpick dipped in gold or yellow paint, dot small stars around the bats on the frosted jar. You can also use small star-shaped vinyl cutouts. -
Creating the Mist:
To create the misty ground effect on the bat jar, dab white paint along the very bottom rim using a sponge. Feather the paint upward slightly so it fades into the frosted glass, creating a fog bank. -
Touch Ups:
Inspect your silhouettes. If any vinyl edges are lifting, press them down firmly with a credit card edge. For painted designs, clean up any smudges with a damp cotton swab before the paint fully cures. -
Lid Decoration:
Don’t forget the lid! I like to paint the rim black to match the silhouette theme. You can even add a strip of washi tape or glitter around the band for extra sparkle. -
Lighting It Up:
Place an LED tea light inside the haunted house jar to make the windows glow warm yellow. For the bat jar, a small string of fairy lights works beautifully to illuminate the ‘stars’ and the frosted glass evenly.
Clean Lines Only
If you painted your design and the edges look messy, wait for it to fully dry. Then, gently scrape away excess paint with a toothpick to sharpen the silhouette edges.
Place your completed jars on a windowsill and watch the shadows dance as the lights flicker
Metallic Moon and Star Accents
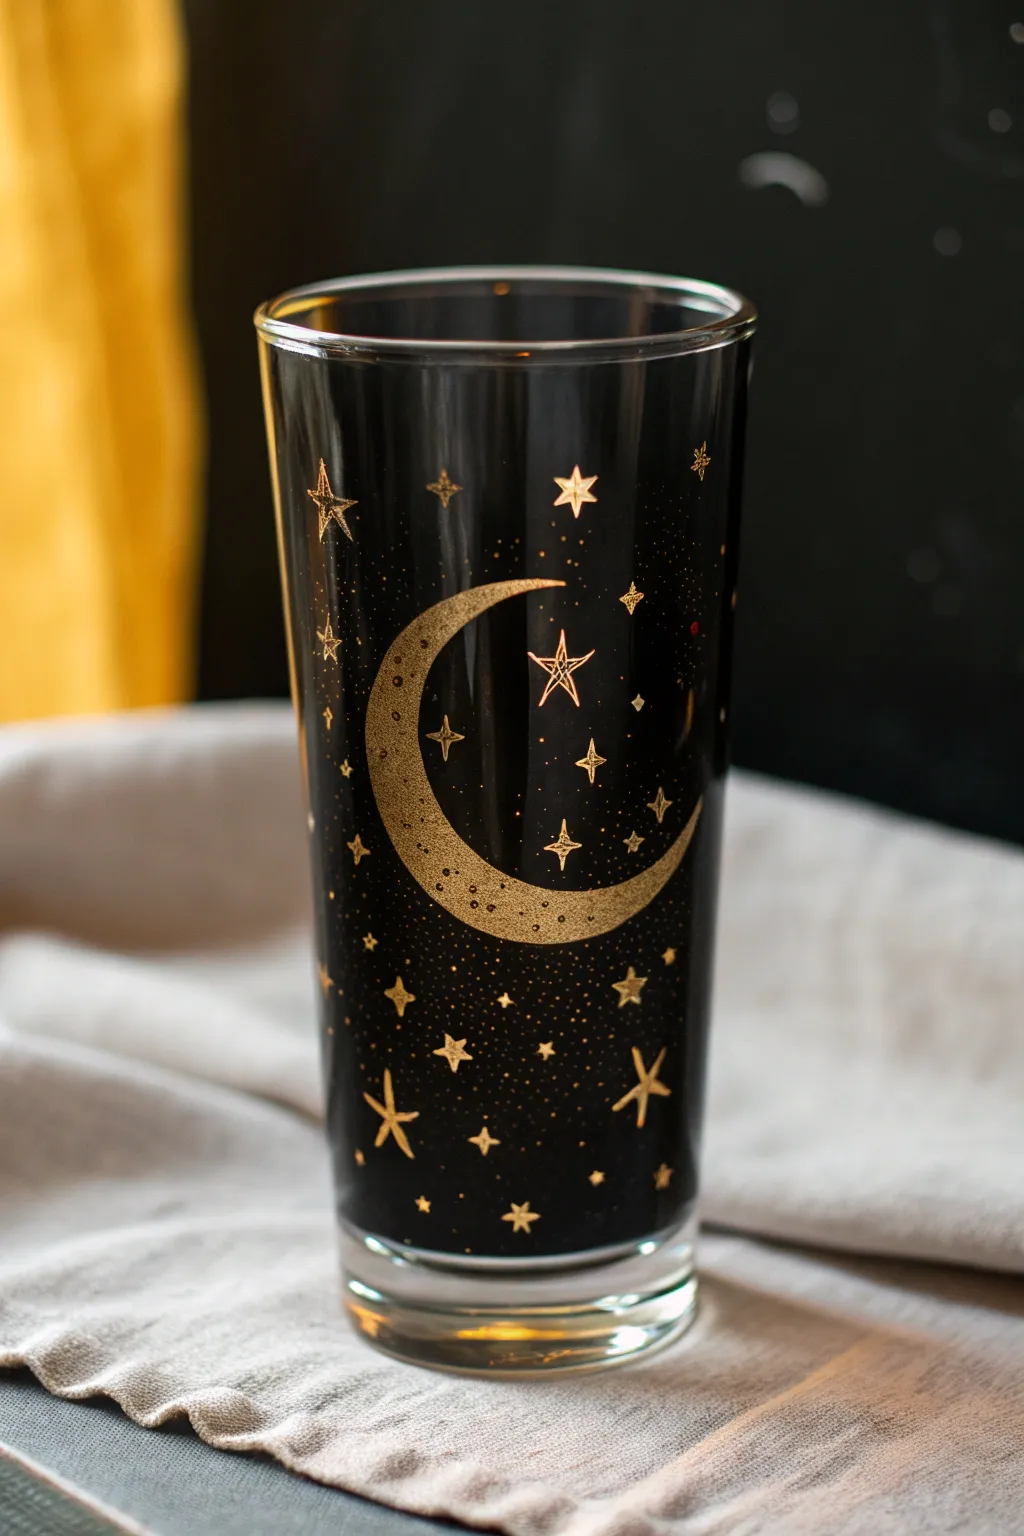
Transform a plain drinking vessel into a mystical, starry night scene with this striking silhouette design. The deep black background makes the metallic gold moon and twinkling stars pop for a sophisticated, witchy Halloween aesthetic.
Step-by-Step
Materials
- Tall clear drinking glass (straight-sided)
- Black multi-surface acrylic paint or glass paint
- Metallic gold glass paint or oil-based paint marker
- Rubbing alcohol and cotton pads
- Sponge pouncer or soft flat brush
- Fine detail paint brush (liner brush)
- Small round brush
- Toothpick
- Paper plate or palette
- Painter’s tape (optional)
Step 1: Preparation and Base Layer
-
Clean the surface:
Begin by thoroughly cleaning the outside of your glass with rubbing alcohol and a cotton pad. This removes any oils or fingerprints that could prevent the paint from adhering properly. -
Define the rim:
If you want a clean, unpainted rim like the example, wrap a strip of painter’s tape around the top edge of the glass, about half an inch down. -
Apply the dark base:
Pour a small amount of black glass paint onto your palette. Using a sponge pouncer or a soft flat brush, apply the paint to the outside of the glass. A sponge applies a smooth texture that minimizes brush strokes. -
Create opacity:
Allow the first coat of black to dry completely according to the manufacturer’s instructions. Apply a second or third coat until the glass is fully opaque and no light shines through the black areas. -
Remove tape:
Carefully peel away the painter’s tape while the final coat is still slightly tacky to ensure a crisp line at the rim.
Step 2: Painting the Moon
-
Outline the crescent:
Using your fine detail brush loaded with metallic gold paint, or a gold paint pen, lightly sketch the outline of a large crescent moon in the center of the glass. -
Refine the shape:
Thicken the outline, ensuring the curves are smooth and taper gracefully to sharp points at the top and bottom. -
Fill the moon:
Fill in the crescent shape with your gold paint. You may need two coats of metallic paint to get that solid, gleaming finish. -
Add moon texture:
Once the gold base is dry, take a toothpick dipped in a tiny amount of black paint (or use the black background showing through if you leave negative space) to create tiny dots or craters on the moon’s surface for density and texture.
Uneven Gold Paint?
Metallic paints can be semi-transparent. Let the first layer dry fully before adding a second. Don’t overwork wet paint, or you’ll lift the layer beneath.
Step 3: Adding the Stars
-
Paint major stars:
Select 3-5 spots around the moon for your largest stars. Use a small round brush to paint simple five-pointed star shapes. -
Draw medium stars:
Switch to your fine liner brush. Draw several four-pointed stars (diamond shapes with elongated points) scattered across the glass. -
Create distinct star types:
I like to vary the designs, so add a few open-outlined stars—just drawing the perimeter of the star shape without filling it in—to add visual interest. -
Add simple crosses:
Fill smaller gaps with simple ‘X’ or cross-shaped stars using the very tip of your liner brush.
Pro Tip: Liquid Gold
For ultra-crisp lines on the stars, use an oil-based metallic paint marker instead of a brush. It gives better control for those sharp star points!
Step 4: Details and Curing
-
Add stardust speckles:
Dip a stiff bristle brush or a toothbrush into the gold paint. Run your thumb over the bristles to flick tiny splatters of gold across the black background, creating a distant galaxy effect. -
Hand-dot clusters:
For more control, use the end of a toothpick dipped in gold to place specific clusters of tiny dots around the moon and larger stars. -
Review and touch up:
Check your work against a light source. If any black background paint got scratched, touch it up carefully with a small brush. -
Initial dry:
Let the glass sit undisturbed for at least 24 hours (or as directed by your paint brand) to let the design set. -
Bake to cure:
To make the glass washable, place it in a cool oven. Set the temperature to 350°F (175°C) and bake for 30 minutes. Turn the oven off and let the glass cool completely inside before removing.
Now you have a stunning piece of glassware that captures the magic of a clear autumn night sky
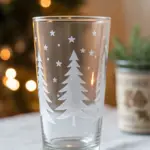
Frosted Fog and Shadow Silhouettes

Transform a plain glass jar into a mysterious misty forest scene with this atmospheric Halloween project. The combination of frosted glass spray and crisp black silhouettes creates a hauntingly beautiful lantern that glows warmly when lit.
Step-by-Step Tutorial
Materials
- Clean glass jar (mason jar or recycled pickle jar)
- Rubbing alcohol and cotton pad
- Frosted glass spray paint
- Black acrylic craft paint or multi-surface paint
- Fine detail paintbrush (size 0 or 1)
- Small flat shader brush
- Jute twine or burlap ribbon
- Pencil and scrap paper (for sketching)
- Scissors
- Black permanent marker (optional)
- Battery-operated tea light or fairy lights
Step 1: Prepping the Canvas
-
Clean the glass:
Thoroughly wash your jar with soap and water to remove any labels or glue residue. Dry it completely with a lint-free cloth. -
Degrease with alcohol:
Wipe the entire exterior surface with rubbing alcohol on a cotton pad. This removes invisible oils from your fingerprints that can prevent the frosting spray from adhering evenly. -
Apply the frost:
Take the jar to a well-ventilated area or outdoors. Shake your frosted glass spray paint can vigorously according to the manufacturer’s directions. -
Spray thin coats:
Hold the can about 10-12 inches away and apply a very light, misty coat. Don’t try to get full opacity immediately; it’s better to do multiple thin layers. -
Build the fog:
Allow the first coat to dry for about 10-15 minutes until it looks matte. Apply a second or third coat until the glass has a uniform, cloudy white appearance. Let this cure completely for at least an hour before handling.
Clean Lines Hack
If you are nervous about freehand painting, draw your design lightly on the frosted glass with a pencil first. The graphite will mark the texture easily and can be painted over.
Step 2: Designing the Shadows
-
Plan your scene:
On a piece of scrap paper, sketch out a rough idea of your tree’s shape. Focus on creating gnarly, twisted branches that reach upward and outward. -
Start the trunk:
Using your small flat shader brush and black acrylic paint, establish the main trunk of the tree. I like to place mine slightly off-center for a more dynamic look. Paint the base wider and taper it as you go up. -
Anchor with grass:
While the trunk wetness is manageable, paint small, flicking strokes along the very bottom rim of the jar to simulate wild grass blades. This grounds the tree so it isn’t floating. -
Branch out:
Switch to your fine detail brush. Paint the main branches extending from the trunk. Press harder at the connection point and lift pressure as you pull away to create tapered tips. -
Add twiggy details:
From the main branches, add smaller twigs splitting off in different directions. The more erratic and jagged these lines are, the spookier the tree will look.
Make it Glow
Instead of a white light, try an amber or flickering orange LED tea light inside. The warm color intensifies the ‘foggy’ effect of the spray paint instantly.
Step 3: Adding Life to the Darkness
-
Paint the owl:
Choose a sturdy horizontal branch for your owl perch. Paint a small oval shape sitting upright, adding two small tufts at the top for ears to create a silhouette. -
Create flying bats:
In the open ‘sky’ area on the left side of the jar, paint a few bat silhouettes. Start with a wide ‘V’ shape for the wings and add a small body in the center. -
Refine the edges:
Go back over your black painted areas. If the frosted texture made the paint skip, dab a little extra paint to ensure the silhouettes are solid black and opaque. -
Let it dry completely:
Allow all the black paint to dry fully. Since the surface is textured, this might take slightly longer than painting on smooth glass. -
Wrap the rim:
To finish the rustic look, wrap jute twine around the threaded neck of the jar three or four times. Tie it off securely and trim the ends, or tuck them under the wrapping.
Place a tea light inside and watch your spooky forest come to life with eerie shadows
Mix-and-Match Halloween Glass Set
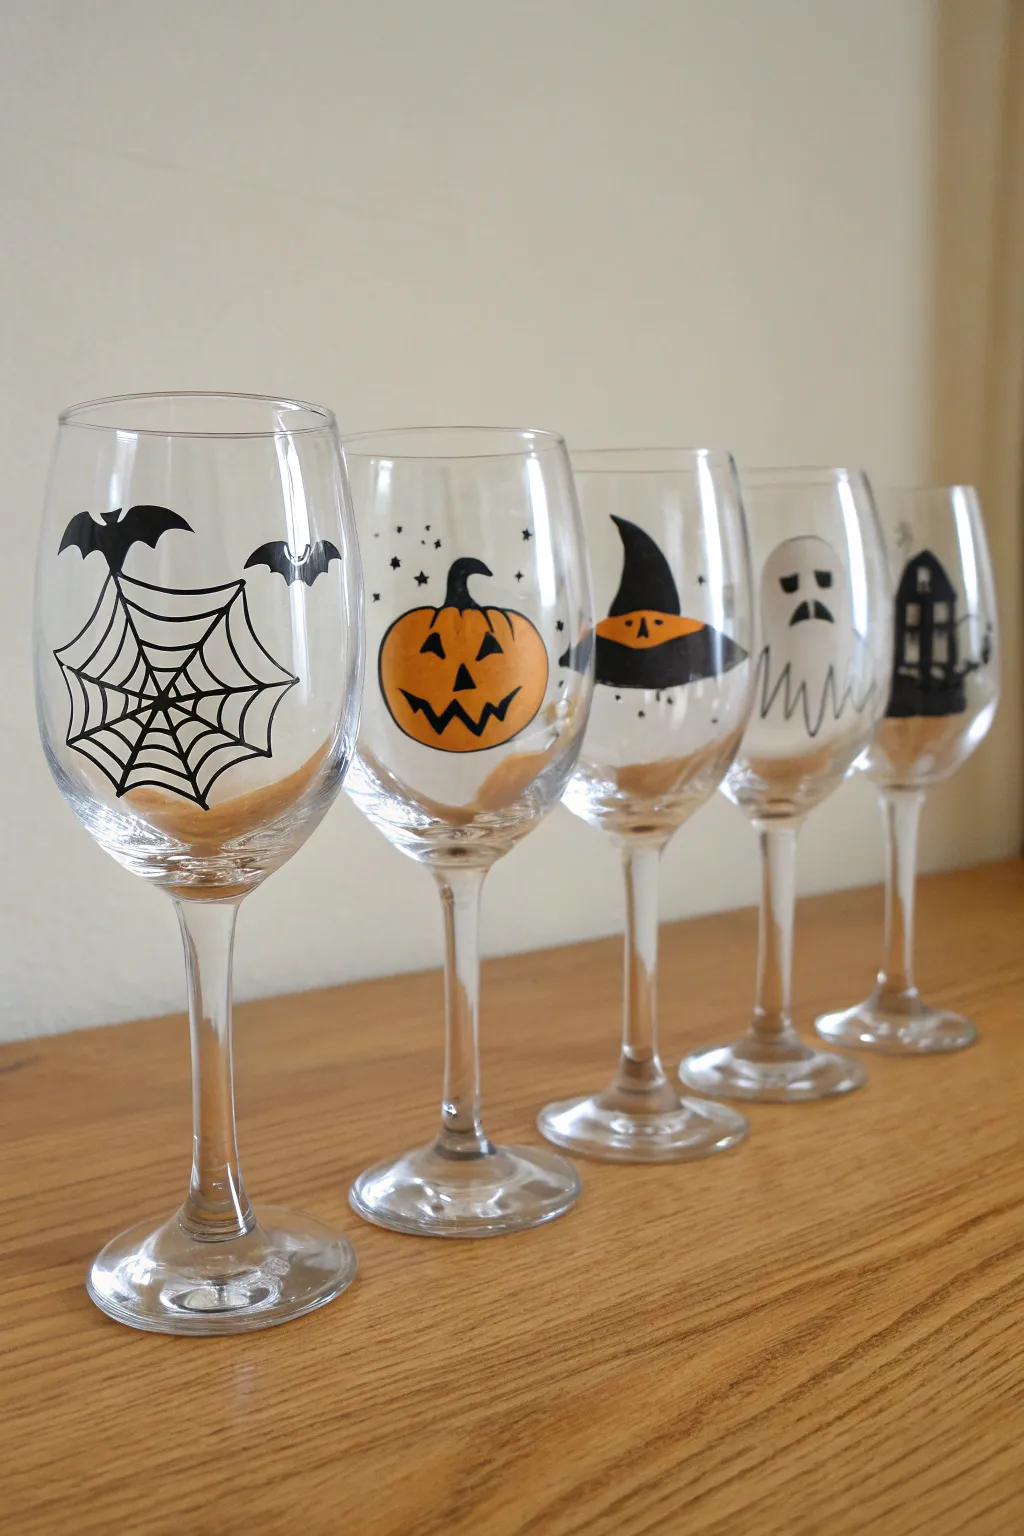
Transform ordinary stemware into a festive lineup of Halloween characters that are perfect for your spooky tablescape. This mix-and-match set features five distinct designs—from spiderwebs to ghosts—painted in simple black and orange for a cohesive, classic look.
Detailed Instructions
Materials
- 5 clear wine glasses (white wine shape works best)
- Rubbing alcohol
- Cotton pads or paper towels
- Enamel paint for glass (Gloss Black)
- Enamel paint for glass (Pumpkin Orange)
- Enamel paint for glass (White)
- Fine detail paintbrush (size 0 or 00)
- Medium round paintbrush (size 2 or 4)
- Pencil and paper (for sketching)
- Tape and scissors (optional, for stenciling)
- Cotton swabs (for cleanup)
- Oven (for curing)
Step 1: Preparation & Planning
-
Clean the Surface:
Before painting, wipe down the exterior of all five wine glasses thoroughly with rubbing alcohol and a cotton pad. This removes oils and fingerprints that could prevent the paint from adhering properly. -
Sketch Your Designs:
Draw your five icons on paper first to gauge the size: a spiderweb, a pumpkin, a witch, a ghost, and a haunted house. Cut these sketches out and tape them to the inside of the glass as a guide if you aren’t comfortable freehanding.
Clean Lines Hack
Rest your painting hand’s pinky finger on the glass surface (not on wet paint!) to stabilize your hand while drawing fine details like the spiderweb lines.
Step 2: The Spiderweb Glass
-
Outline the Web:
Using the fine detail brush and black enamel paint, start by painting a central point on the side of the glass. Draw 6-8 straight lines radiating outward from this center. -
Connect the Strands:
Connect the radiating lines with scalloped, curved horizontal lines to create the webbing effect. Keep your hand steady and reload the brush frequently for crisp lines. -
Add the Bats:
Above the web, paint two small bat silhouettes. Start with a small oval for the body and extend two jagged wings outward. I find it easiest to paint the top arch of the wing first, then the scalloped bottom.
Step 3: The Pumpkin Glass
-
Paint the Base Shape:
Switch to your medium round brush and the orange paint. Create a plump, slightly flattened circle for the pumpkin body. Don’t worry about it being perfectly round; a little irregularity adds character. -
Let it Dry:
Allow the orange layer to dry completely according to your paint manufacturer’s instructions. If you try to add the face too soon, the black will bleed into the orange. -
Add the Face and Stars:
Once dry, use your fine brush and black paint to add two triangle eyes, a triangle nose, and a jagged, toothy grin. Add a curvy stem on top and sprinkle a few tiny black stars and dots around the pumpkin for magic.
Glow Up
Once the paint is cured, verify the designs are translucent enough, then drop a battery-operated tea light inside each glass to turn them into glowing spooky lanterns.
Step 4: The Witch Glass
-
Paint the Hat Brim:
Using the black paint, draw a wide, curved shape for the brim of the witch’s hat roughly halfway up the glass bowl. -
Form the Cone:
Paint a tall, crooked triangle rising from the brim. Give the tip a little curve to make it look worn and authentic. -
Add the Face Detail:
Paint a semi-circle of orange just beneath the hat brim for the face. Once the orange is dry, use the finest tip of your brush to add two tiny black eyes and a triangular nose.
Step 5: The Ghost Glass
-
Create the Ghost Body:
Using white enamel paint, create a tall, vertical pill shape that widens slightly at the bottom. The paint might need two coats for opacity; let the first coat dry before adding the second. -
Detail the Bottom:
At the bottom of the white shape, use the fine brush with black paint to outline wavy lines creating the ‘sheet’ folds. -
Give Him Expression:
Paint two vertical ovals for eyes and a downward-curved mouth in black. Add slanted eyebrows to give him a slightly worried or moaning expression.
Step 6: The Haunted House Glass
-
Construct the Illusion:
For the final glass, use black paint to create a tall, looming house silhouette. Start with a rectangle base and add a peaked roof. -
Add Windows:
Paint small squares or arched shapes inside the silhouette but leave them unpainted (clear glass) to represent lit windows. Alternatively, paint the whole shape black and go back later with white or yellow for the windows. -
Final Details:
Add a crooked chimney or a spooky tree branch extending from the side of the house.
Step 7: Finishing Up
-
Cleanup Edges:
If you made any mistakes, use a damp cotton swab to wipe away wet paint or a craft knife to gently scrape away dry paint. -
Cure the Paint:
Follow the instructions on your specific glass paint bottle. Most require air drying for 24 hours, followed by baking in a cool oven that heats up to 350°F (176°C) for 30 minutes to make the design dishwasher safe.
Once baked and cooled, your custom glassware is ready to serve up the potion of your choice at your next Halloween gathering

Have a question or want to share your own experience? I'd love to hear from you in the comments below!