I treat nails like tiny canvases, and a good painted manicure feels like carrying a little artwork with you all day. Here are my favorite painted nails ideas, starting with the classics and drifting into the fun, artsy stuff.
Classic French Tips
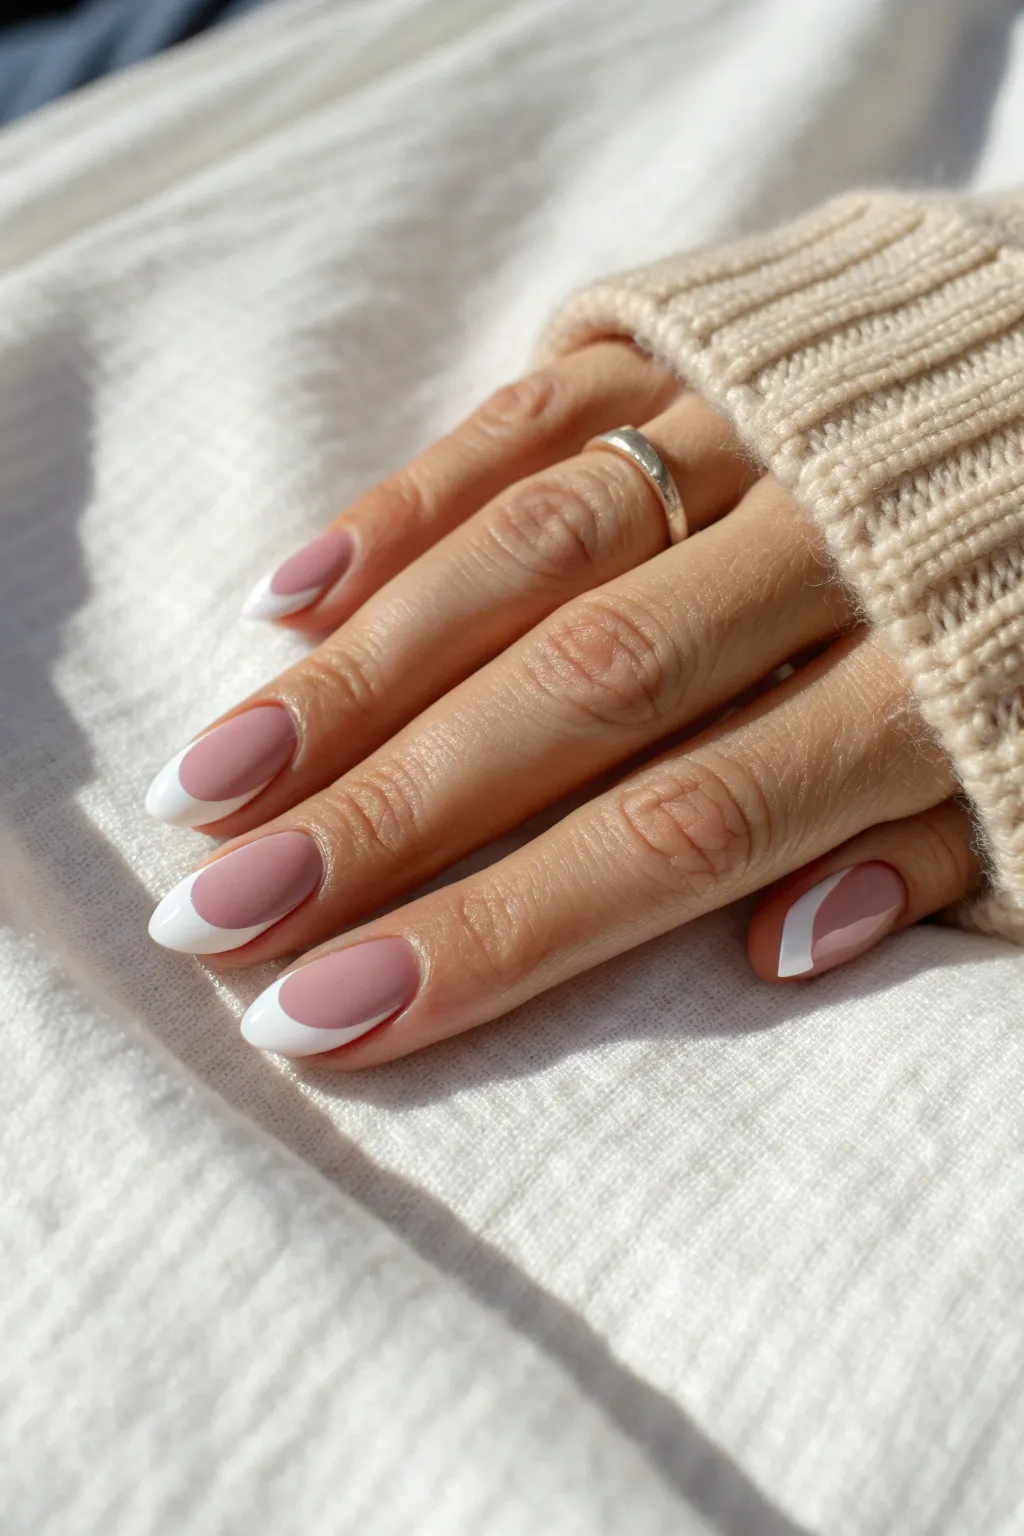
This elegant update on the classic French manicure pairs a soft, muted mauve pink base with crisp, bright white tips. The deep, curved smile lines elongate the nail bed, creating a sophisticated look perfect for cozy sweater weather.
Step-by-Step
Materials
- Nail file (180/240 grit)
- Buffer block
- Rubbing alcohol or nail cleanser
- Lint-free wipes
- Base coat
- Dusty rose or mauve pink crème polish
- Opaque bright white polish
- Fine liner nail art brush
- Cleanup brush dipped in acetone
- High-gloss top coat
- Cuticle oil
Step 1: Prep and Shape
-
Clean Slate:
Begin by removing any old polish completely. Wash your hands thoroughly to remove oils. -
Shape the Almond:
File your nails into an almond shape. Focus on tapering the sides in towards a rounded point at the center to mimic the elegance of the reference photo. -
Buff and Cleanse:
Lightly buff the surface of your nails to smooth out ridges. Wipe each nail down with rubbing alcohol on a lint-free wipe to dehydrate the plate for better adhesion. -
Base Layers:
Apply a thin, even layer of base coat to all nails and let it dry completely.
Steady Hands Pro-Tip
Rest your pinky finger on a stable surface (or your other hand) while painting the white lines. This anchors your hand and prevents shaking for sharper lines.
Step 2: The Pink Foundation
-
First Coat of Pink:
Apply your dusty rose pink polish. Start slightly away from the cuticle and push the brush back gently before sweeping down to the tip. -
Check Coverage:
Allow the first coat to dry for about 2-3 minutes. If the pink looks streaky, apply a second thin coat to ensure full, opaque coverage. -
Dry Completely:
It is crucial to let this pink base layer dry thoroughly before attempting the white tips, or you risk dragging the color.
Level Up: Matte Finish
Swap the glossy top coat for a matte top coat. The velvet-like texture makes the dusty rose color feel even cozier and more modern for autumn.
Step 3: Sculpting the Tips
-
Outline Step 1:
Dip your fine liner brush into the white polish. Locate the center point of your nail tip—this will be the highest point of your white arch. -
Draw the Wings:
Starting from the sidewall about halfway down your nail bed, draw a curved line connecting up to that center tip point. I find it easier to do one side, then overlap slightly from the other side. -
Check Symmetry:
Look at the nail straight on. The ‘wings’ of the white tip should start at the same height on both sides of the nail. -
Fill in the Tip:
Once you are happy with the outline, use the bottle brush or your liner brush to fill in the rest of the tip with white polish. -
Refining the Curve:
Use the liner brush to smooth out the interior curve (the smile line) so it is crisp and sharp against the pink base. -
The Thumb Detail:
For the thumb shown in the image, extend the white line further down one side to create an asymmetrical swirl effect if you want to match the reference exactly. -
Cleanup:
Dip a small cleanup brush in acetone and carefully swipe around the cuticles and sidewalls to remove any polish that touched the skin.
Step 4: Finishing Touches
-
Seal it In:
Once the white tips are dry to the touch, float a generous bead of glossy top coat over the entire nail. -
Cap the Edge:
Run the top coat brush along the very free edge of the nail to seal the design and prevent chipping. -
Hydrate:
Apply cuticle oil to the skin around your nails to rehydrate and achieve that salon-fresh glow.
Enjoy your sophisticated and timeless manicure that looks great with any outfit


Colorful French Tips
This playful nail design reinvents the classic French tip with a kaleidoscope of soft pastels and vibrant accent curves. The look combines asymmetrical color-blocking with a glossy finish for a modern, artistic vibe that feels like wearing little abstract paintings on your fingertips.
Detailed Instructions
Materials
- Base coat (clear)
- Pastel yellow nail polish
- Lilac/lavender nail polish
- Periwinkle blue nail polish
- Mint green nail polish
- Bright peach or coral nail polish
- Fine nail art liner brush
- Cleanup brush dipped in acetone
- High-gloss top coat
Step 1: Preparation & Base
-
Prep the nails:
Start with clean, dry nails filed into your preferred shape; an oval or almond shape works particularly well to complement the curves of this design. -
Apply base coat:
Apply a thin, even layer of your favorite clear base coat to protect the natural nail and help the polish adhere. -
Let it dry:
Allow the base coat to dry completely before moving on to the color application to prevent dragging.
Wobbly Lines?
If your French tip lines are shaky, use a clean eyeliner brush dipped in nail polish remover to gently “carve” the line back into a perfect curve before it dries.
Step 2: The Pinky Finger
-
Paint the yellow section:
On the pinky nail, lay down a pastel yellow stripe vertically on the right side of the nail tip. -
Add the blue accent:
Next to the yellow, add a sliver of periwinkle blue. -
Finish the tip:
Complete the pinky tip with a swipe of peach on the very edge for a fun contrast.
Matte Magic
Swap the glossy finish for a matte top coat to give these pastels a soft, velvety texture that looks incredibly chic and modern.
Step 3: The Ring Finger
-
Apply the main color:
Paint the entire nail bed of the ring finger with two coats of lilac polish for an opaque, solid look. -
Clean the edges:
Use a cleanup brush dipped in acetone to tidy up the cuticle line if any polish strayed.
Step 4: The Middle Finger
-
Paint the base color:
Coat the middle finger nail entirely in a soft periwinkle blue. -
Add the tip detail:
Using your fine liner brush and the bright peach polish, carefully paint a very thin French tip along the free edge. -
Define the curve:
Ensure the peach line is consistent in thickness from one side of the nail to the other.
Step 5: The Index & Thumb
-
Index finger base:
Paint the index finger nail with a solid coat of pastel yellow. -
Thumb design:
For the thumb, create a diagonal tip using mint green on one side and a stroke of periwinkle on the other, blending slightly or keeping them distinct based on your reference.
Step 6: Finishing Touches
-
Dry time is key:
Wait at least 5-10 minutes for all the varied layers to set so you don’t smear the designs. -
Seal heavily:
Apply a generous layer of high-gloss top coat, floating the brush over the nail rather than dragging it. -
Cap the edge:
Run the top coat brush along the very front edge of each nail to seal the color and prevent chipping.
Now you have a refreshing splash of color right at your fingertips that is perfect for any sunny day


Glossy Single-Color Nails
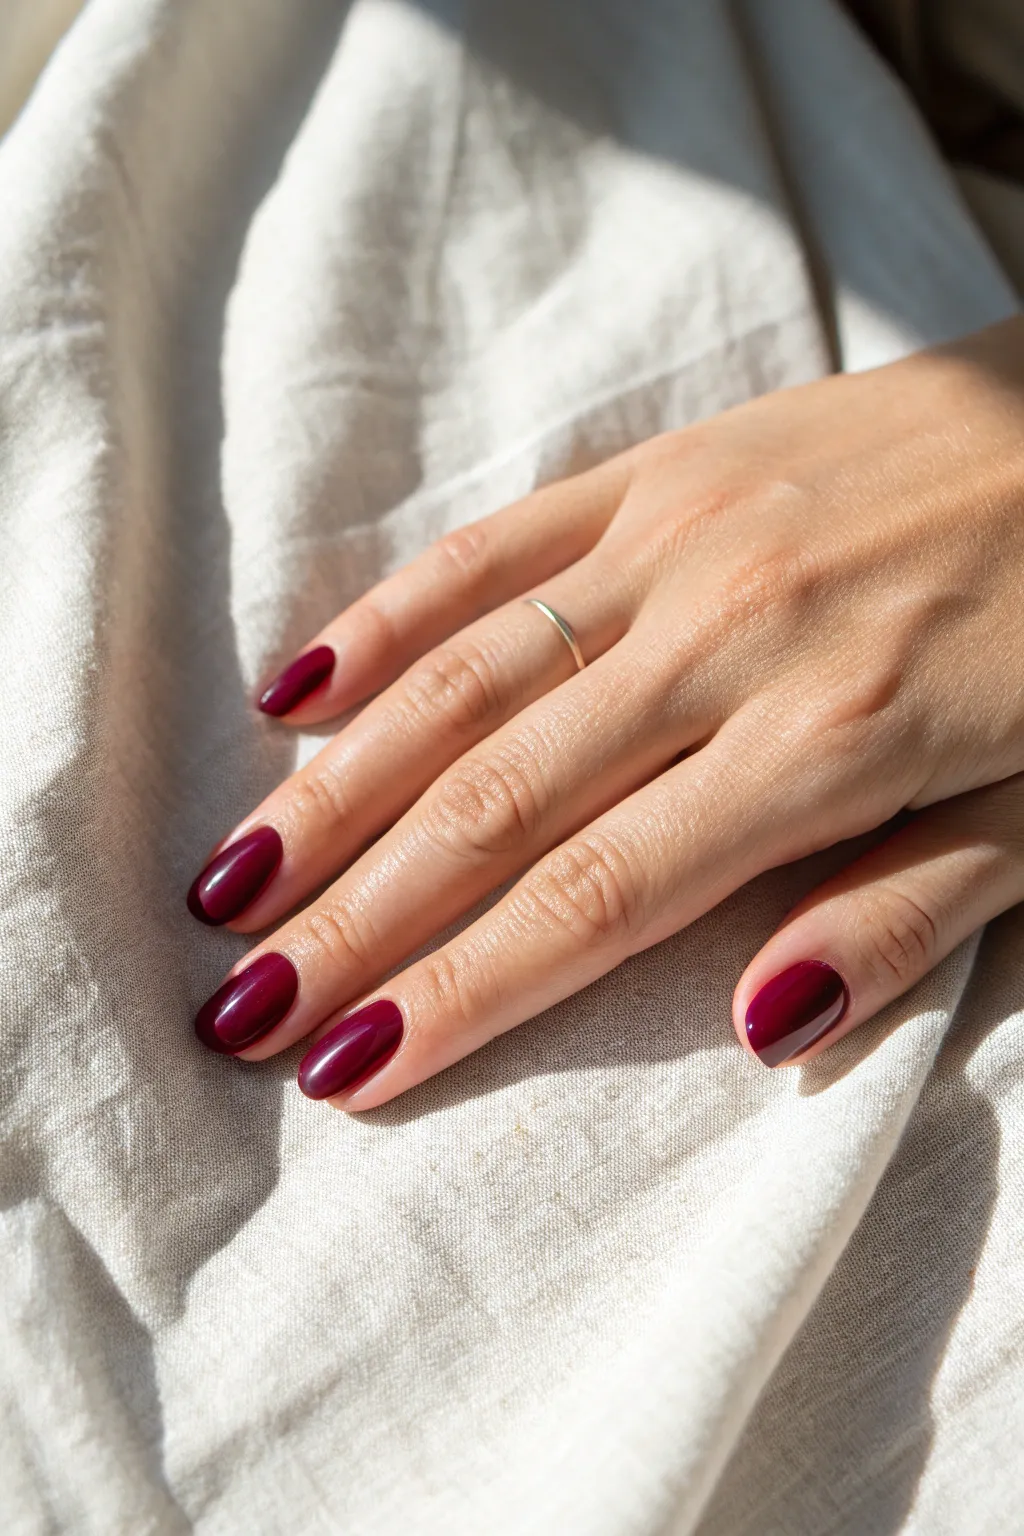
Achieve a sophisticated and timeless look with this deep burgundy manicure that boasts a mirror-like shine. This single-color application highlights the beauty of simplicity while delivering a rich, polished finish perfect for any occasion.
Step-by-Step
Materials
- Nail polish remover
- Cotton pads
- Glass nail file
- Buffing block
- Cuticle oil
- Cuticle pusher
- Rubbing alcohol or nail cleanser
- Base coat
- Deep burgundy/berry red nail polish
- High-gloss top coat
- Cleanup brush dipped in acetone
Step 1: Prep and Shape
-
Remove old polish:
Start with a clean slate by removing any existing nail polish using a remover and cotton pads. Ensure no residue remains around the edges. -
Shape the nails:
Using a glass nail file, shape your nails into a soft oval or ‘squoval’ shape. Mirror the natural curve of your cuticle line for the most flattering look. -
Soften cuticles:
Apply a small amount of cuticle oil or remover to the base of your nails. I find letting it sit for about a minute really helps soften the skin. -
Push back cuticles:
Gently push back your cuticles using a cuticle pusher or an orangewood stick to create a clean, open nail bed. -
Buff surface:
Lightly buff the surface of your nails to smooth out any ridges. This uneven texture can ruin the glossy finish later, so don’t skip this. -
Cleanse the nail:
Wipe down each nail with rubbing alcohol or a specialized cleanser to remove oils and dust. This step is crucial for long-lasting wear.
Pro Tip: The Gap Method
Leave a tiny, hair-thin gap between the polish and your cuticle. It prevents flooding and looks cleaner as it grows out.
Step 2: Application
-
Apply base coat:
Paint a thin, even layer of base coat on all nails. This protects your natural nail from staining, especially important with dark red pigments. -
First color coat:
Load your brush with the deep burgundy polish. Place a bead of polish near the cuticle without touching the skin and push it gently toward the base. -
Swipe down center:
Drag the brush straight down the center of the nail to the free edge. -
Cover the sides:
Return to the base and swipe down the left and right sides of the nail, ensuring full coverage. -
Cap the edge:
Run the brush horizontally along the very tip of the nail to seal the edge and prevent premature chipping. -
Dry time:
Let this first coat dry for about 2-3 minutes. It might look slightly streaky, but the second coat will fix that. -
Second color coat:
Apply a second coat of the burgundy polish just like the first. This layer adds depth and opacity to the color. -
Check opacity:
If the color isn’t quite deep enough yet, a third thin coat can be applied after another drying period. -
clean up edges:
Dip a small cleanup brush into acetone and carefully trace around the cuticle line to remove any polish that strayed onto the skin.
Step 3: Finishing Touches
-
Apply top coat:
Apply a generous layer of high-gloss top coat. Float the brush over the wet polish rather than dragging it to avoid streaks. -
Seal the deal:
Don’t forget to cap the free edge with the top coat as well for maximum protection. -
Final dry:
Allow your nails to dry completely. For a rock-hard finish, wait at least 15-20 minutes before using your hands heavily. -
Rehydrate:
Once fully dry, massage cuticle oil into the skin around your nails to restore moisture and add to the overall polished look.
Troubleshooting: Bubbles?
Bubbles often happen if you shake the bottle. Roll the polish between your palms instead to mix the pigment smoothly.
Enjoy your sleek, salon-quality manicure that radiates elegance with every gesture


Milky White Minimal Nails
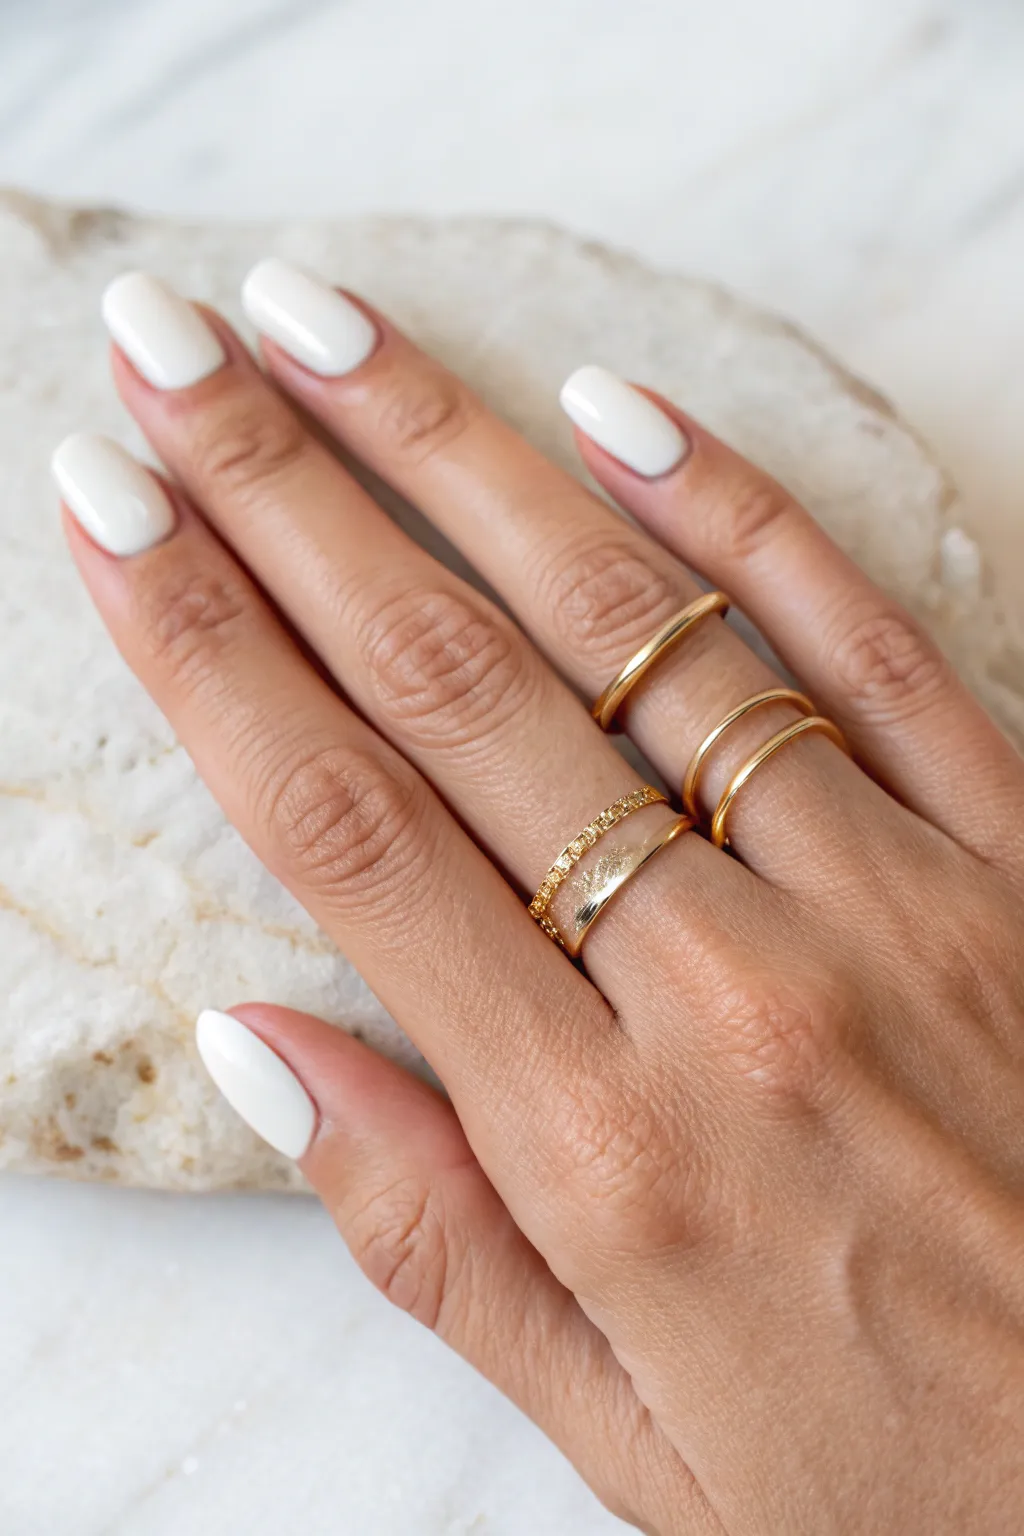
Achieve a timeless and sophisticated look with this milky white manicure that feels soft rather than stark. This understated style features an elegant oval shape and a creamy finish that pairs perfectly with gold jewelry for everyday luxury.
Step-by-Step Tutorial
Materials
- Nail polish remover
- Cotton pads
- Glass nail file
- Buffing block
- Cuticle pusher
- Cuticle oil
- Rubbing alcohol or nail cleanser
- Base coat
- Milky white nail polish (creamy, opaque formula)
- High-gloss top coat
- Clean-up brush (small angled synthetic brush)
Step 1: Prep & Shape
-
Clean Slate:
Begin by removing any old polish completely using nail polish remover and a lint-free cotton pad. Even if your nails look clean, this step ensures no oils remain. -
Shape the Tips:
Using a glass nail file, shape your nails into a soft oval or almond shape. File in one direction towards the center to prevent splitting, mirroring the curve of your cuticle line. -
Smooth the Surface:
Gently buff the surface of your nail plate with a buffing block. This removes ridges and creates a matte texture that helps the polish adhere better. -
Care for Cuticles:
Apply a drop of cuticle softener if needed, then gently push back your cuticles using a cuticle pusher. This step is crucial for elongating the nail bed visually. -
Final Cleanse:
Swipe each nail with rubbing alcohol or a nail cleanser on a lint-free wipe. This removes dust and natural oils, acting as a primer for your polish.
Streak-Free Whites
White polish is notorious for streaking. Ensure your first coat is thin and dry, then float the second coat on thicker without pressing down hard.
Step 2: Lacquer Application
-
Apply Base Coat:
Apply a thin, even layer of base coat to all ten nails. I like to cap the free edge (the tip of the nail) first to prevent chipping later. -
First Coat of White:
Take your milky white polish and wipe one side of the brush on the bottle neck. Apply a broad stroke down the center of the nail, starting slightly away from the cuticle. -
Fill the Sides:
With the remaining polish on the brush, gently curve the bristles to coat the left and right sides of the nail, overlapping slightly with the center stroke. -
Let it Set:
Allow the first coat to dry for at least 2-3 minutes. White polish can serve as a canvas for streaks if the second coat is applied too recklessly over a wet layer. -
Second Coat Opacity:
Apply a second coat using the same three-stroke method. This layer should provide full opacity and smooth out any streakiness from the first pass. -
Check Coverage:
Inspect the nails. If the white still looks a bit sheer or uneven, you can apply a very thin third coat, but usually two generous coats suffice for this creamy look.
Choosing the Shade
Avoid ‘correction fluid’ white. Look for shades labeled ‘marshmallow,’ ‘coconut,’ or ‘soft white’ for that creamy, expensive look.
Step 3: Finish & Perfect
-
Glossy Seal:
Wait a few minutes for the color to settle, then apply a generous layer of high-gloss top coat. Float the brush over the nail rather than dragging it to avoid smudging the white. -
Clean the Edges:
Dip a small angled brush into nail polish remover. Carefully trace around the cuticle line and sidewalls to remove any polish that strayed onto the skin for a salon-crisp edge. -
Hydrate:
Once the top coat is touch-dry, massage a rich cuticle oil into the skin surrounding the nail to rehydrate and add a healthy glow to your fingers.
Enjoy the clean, crisp elegance of your new manicure
BRUSH GUIDE
The Right Brush for Every Stroke
From clean lines to bold texture — master brush choice, stroke control, and essential techniques.
Explore the Full Guide
Tiny Polka Dots
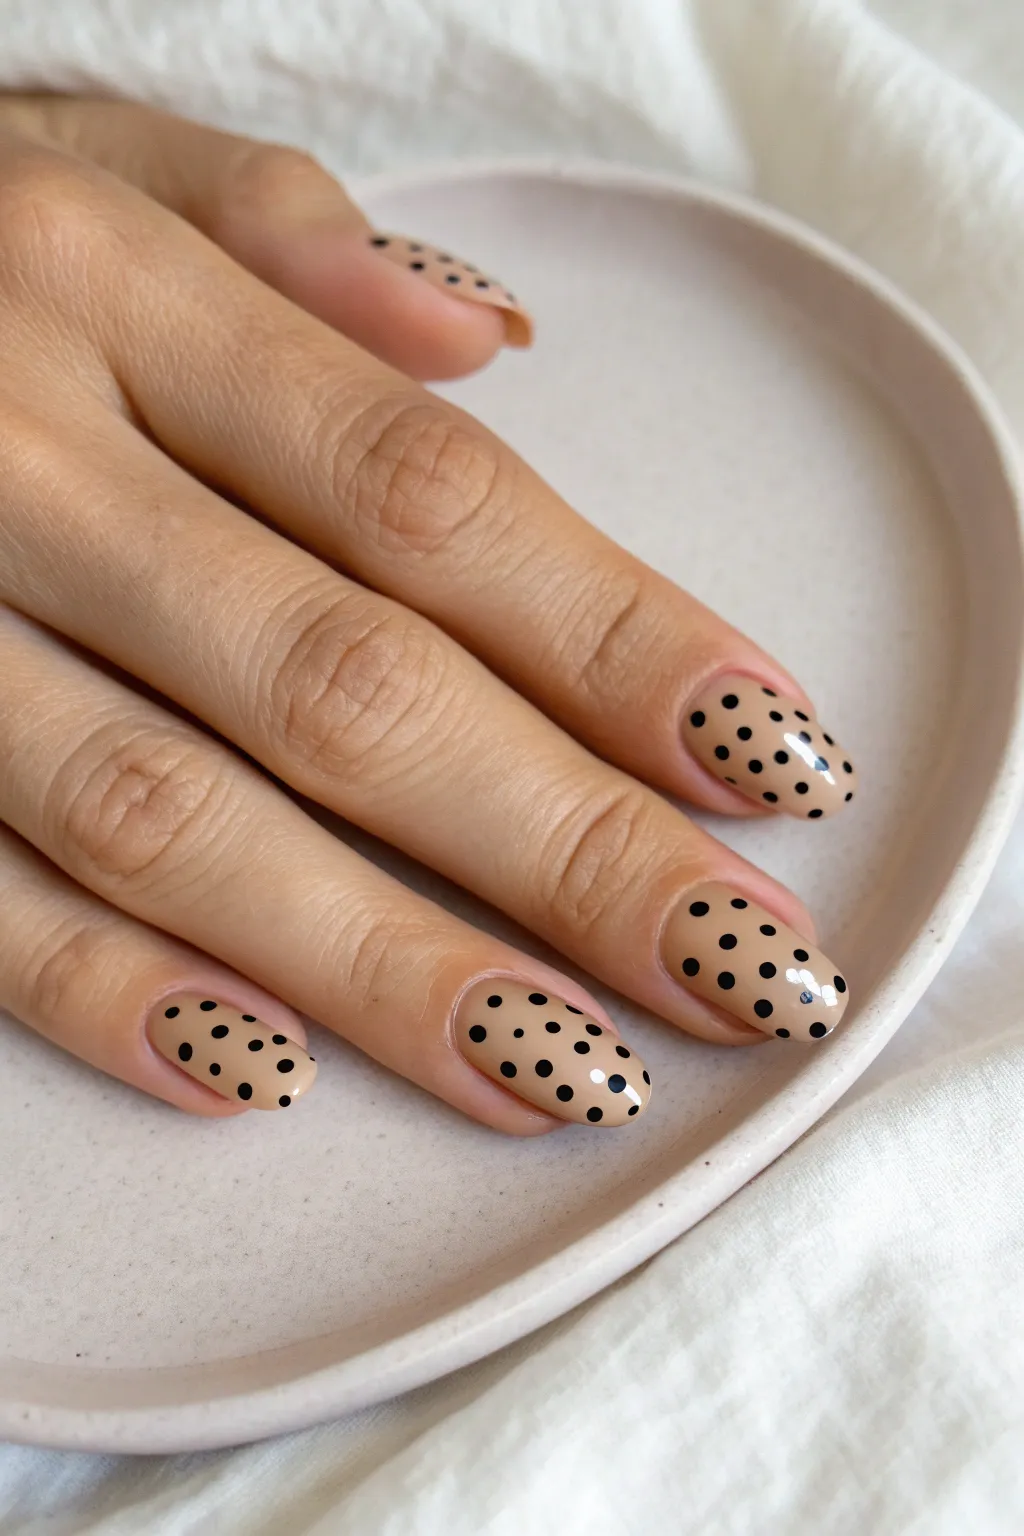
Embrace the beauty of simplicity with this elegant nude manicure featuring perfectly petite black polka dots. This look balances modern minimalism with a classic pattern, creating a versatile style that works for both casual days and formal events.
Step-by-Step Guide
Materials
- Nude or beige gel nail polish (opaque)
- Black gel nail polish (opaque)
- Base coat
- Top coat (high gloss)
- Dotting tool (small/fine size)
- A small piece of foil or a mixing palette
- UV/LED nail lamp
- Nail file (180/240 grit)
- Isopropyl alcohol and lint-free wipes
Step 1: Preparation and Base
-
Shape the nails:
Begin by filing your nails into a soft almond shape to match the elegance of the reference photo. Round the tips gently while keeping the sides tapered. -
Prep the nail plate:
Gently push back your cuticles and buff the surface of each nail to remove shine. Wipe them down thoroughly with isopropyl alcohol to remove any oils or dust. -
Apply base coat:
Paint a thin, even layer of base coat on all ten nails. Cure this layer in your UV/LED lamp according to the manufacturer’s instructions, usually for 30-60 seconds. -
First layer of color:
Select a creamy nude or beige polish that complements your skin tone. Apply the first coat thinly, making sure not to flood the cuticles. -
Cure and repeat:
Cure the first color coat. Apply a second coat of the nude polish to ensure full opacity and richness of color, then cure again.
Step 2: Creating the Polka Dots
-
prepare your palette:
Place a single drop of opaque black gel polish onto your foil or mixing palette. You’ll work from this pool of color rather than dipping directly into the bottle to control the amount of product. -
Load the dotting tool:
I like to lightly dip just the very tip of a small dotting tool into the black polish. You want a tiny bead of polish on the end, not a large glob. -
Start the center row:
Begin on your middle finger or ring finger to test your spacing. Gently touch the tool to the nail surface to deposit the first dot near the cuticle area, right in the center. -
Continue the center line:
Place 2-3 m dots down the vertical center of the nail. Aim for consistent spacing between each dot. -
Add side dots:
Now, place dots in the spaces between your center row, but moved to the left and right sides. This creates a staggered, diamond-like grid pattern. -
Check edge spacing:
Ensure dots near the side walls of the nail aren’t too close to the edge; leaving a tiny margin makes the nail look cleaner. -
Repeat on all fingers:
Continue this staggered pattern on every nail. Wipe your dotting tool clean periodically to prevent the polish from drying and clumping on the tip. -
Clean up mistakes:
If a dot looks elongated or smudged before curing, quickly wipe it away with a cleanser-soaked brush and re-dot that spot. Don’t stress too much about microscopic imperfections. -
Flash cure:
Once you are happy with the design on a few fingers, flash cure for 10-15 seconds to lock the dots in place so you don’t accidentally smudge them while working on the rest of the hand. -
Final cure:
When all dots are placed and perfect, do a full cure under the lamp for 60 seconds.
Dots looking like Hershey’s Kisses?
If your dots have pointy peaks, your polish is too thick. Gently tap the nail upside down before curing to help gravity flatten the polish out.
Step 3: Finishing Touches
-
Seal the design:
Apply a generous layer of glossy top coat. Float the brush gently over the nail to avoid dragging the black dots, although curing them first usually prevents this. -
Final cure and wipe:
Cure the top coat for a full 60 seconds. If your top coat has a sticky inhibition layer, wipe it off with a lint-free wipe soaked in alcohol. -
Hydrate:
Finish the manicure by massaging cuticle oil into the skin around your nails to restore moisture.
Pro Tip: Consistent Sizing
Reload your tool with fresh polish for every single dot. This ensures that every dot contains the same amount of product and remains the same size.
Now you have a timeless, spotted manicure that looks professionally done without leaving home
Soft Ombre Gradient Fade
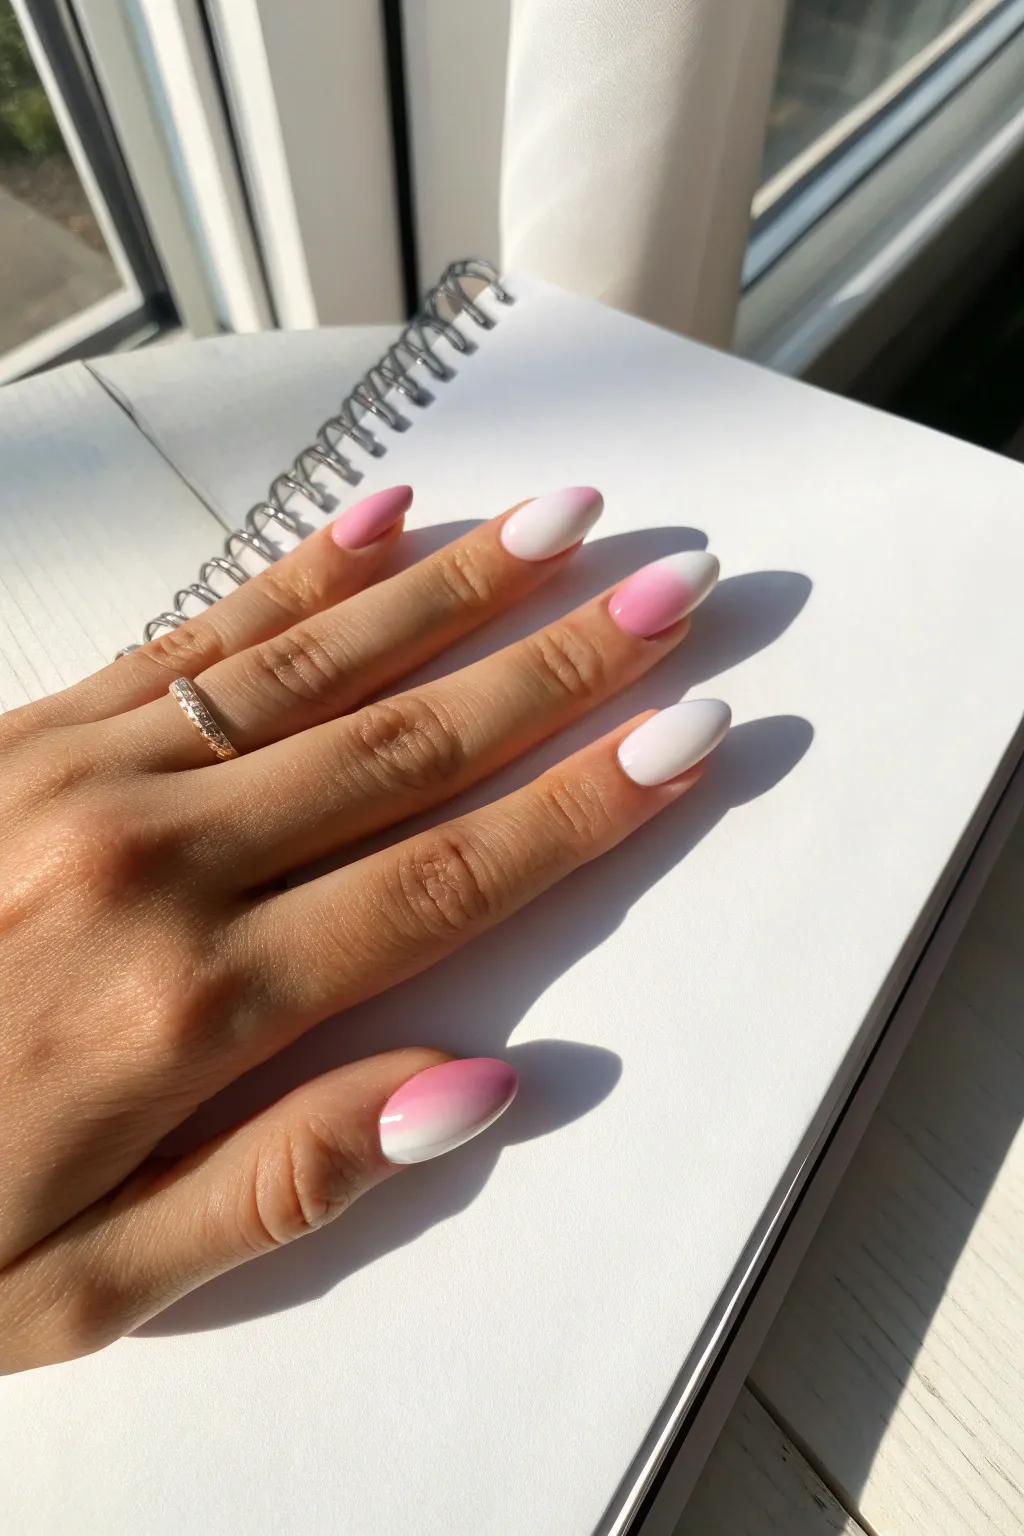
Achieve an ethereal, ultra-soft look with this mismatched gradient set that mimics the hues of a sunrise. Combining solid accent nails with delicate ombre fades creates a modern and romantic manicure perfect for everyday wear.
How-To Guide
Materials
- Base coat
- Soft milky white polish
- Pastel bubblegum pink polish
- Makeup wedge sponges (latex-free preferred)
- Liquid latex or cuticle barrier
- Clean-up brush dipped in acetone
- High-gloss jelly top coat
- Nail file (180/240 grit)
- Small piece of foil or plastic palette
Step 1: Prep & Base Application
-
Shape the Nails:
Begin by filing your nails into a classic almond shape. Taper the sides gently toward a rounded peak to elongate the fingers, matching the elegance of the design. -
Apply Base Coat:
Apply a thin, even layer of your favorite base coat to protect your natural nails and ensure the polish adheres smoothly. -
Protect the Cuticles:
Since we will be sponging, paint a layer of liquid latex around the skin surrounding your cuticles. Let it dry completely until it turns transparent.
Step 2: Creating the Solid Accents
-
Paint the Pinky:
Apply two thin coats of the pastel bubblegum pink to your pinky nail. Allow the first coat to dry slightly before applying the second for full opacity. -
Paint the Index Finger:
Paint your index nail (pointer finger) with two coats of the soft milky white polish. This acts as a palate cleanser in the mismatched set.
Fixing Texture
Is the sponge leaving rough texture? Your polish might be drying on the sponge. Apply more polish to the wedge and work faster, or use a damp sponge for a smoother transfer.
Step 3: Designing the Gradient Nails
-
Base Color for Gradients:
For the thumb, middle, and ring fingers, apply one coat of the white polish as a base. This makes the pink pop brighter later on. -
Prepare the Sponge – Ring & Thumb:
On a small wedge sponge, paint two horizontal stripes: white on top and pink on the bottom. Overlap the lines slightly in the middle to start the blending process. -
Sponge the Design:
Gently dab the sponge onto your ring finger and thumb. Move the sponge up and down slightly in tiny increments to blur the line between the colors. -
Build Opacity:
Let the first layer dry for a minute. Reload the sponge with fresh polish and dab again until the pink tip fades smoothly into the white base. -
Reverse Gradient – Middle Finger:
For the middle finger, we want the reverse look. Paint your sponge with pink on top (cuticle side) and white on the bottom (tip side). -
Apply the Reverse Fade:
Dab this sponge onto the middle nail, concentrating the pink near the cuticle and fading into a white tip. -
Check the Blend:
I usually do about three rounds of sponging to get that really creamy, seamless transition where you can’t see any individual bubbles.
Add Subtle Sparkle
Before the final top coat, brush a very sheer layer of holographic shimmer or ‘fairy dust’ over just the white parts of the gradient for a magical, hidden glow.
Step 4: Finishing Touches
-
Remove Barrier:
Use tweezers to peel off the liquid latex barrier while the polish is still slightly tacky. -
Detailed Cleanup:
Dip a small angled brush into acetone and carefully clean up any stray polish near the sidewalls or cuticles that the latex missed. -
Seal with Top Coat:
Float a generous bead of high-gloss top coat over every nail. This is crucial for smoothing out the texture left by the sponge and melting the colors together. -
Hydrate:
Once the nails are fully dry to the touch, massage cuticle oil into the skin to rehydrate after the acetone cleanup.
Enjoy your soft, dreamy manicure that looks like fluffy clouds at sunset

PENCIL GUIDE
Understanding Pencil Grades from H to B
From first sketch to finished drawing — learn pencil grades, line control, and shading techniques.
Explore the Full Guide
Pastel Skittle Manicure
Embrace the joy of color with this soft yet vibrant Skittle manicure, featuring a gradient of sweet pastel shades across your fingertips. It creates a playful, candy-coated look that pairs beautiful almond shaping with a creamy, high-gloss finish.
Step-by-Step
Materials
- Nail polish remover
- Cotton rounds
- Glass nail file
- Nail buffer
- Base coat (clear)
- Pastel yellow nail polish
- Pastel lilac/purple nail polish
- Pastel mint green nail polish
- Pastel pink nail polish
- Pastel periwinkle/lavender nail polish
- Top coat (high gloss)
- Cleanup brush or small angled brush
- Cuticle oil
Step 1: Preparation & Shaping
-
Clean the nail plate:
Begin by removing any old polish or lotions from your nails using a cotton round soaked in remover. This ensures your pastel colors will adhere properly without bubbling or peeling prematurely. -
Shape the nails:
Using a glass nail file, shape your nails into an almond silhouette. File the sides at an angle towards the center, then round off the tip to create a soft, tapered peak. -
Buff the surface:
Gently run a buffer block over the surface of each nail. This removes natural ridges and creates a smooth foundation, which is especially important for pastel polishes that can sometimes look streaky. -
Push back cuticles:
Soften your cuticles and gently push them back. A clean cuticle line is essential for this look since the solid colors draw attention to the base of the nail. -
Cleanse and dehydrate:
Do a final wipe with remover or alcohol to strip any oils left from buffing. I like to let this dry for just a moment to ensure maximum adhesion for the base coat. -
Apply base coat:
Apply a thin, even layer of clear base coat to all ten nails. Cap the free edge to prevent chipping later on.
Step 2: Color Application
-
Paint the pinky:
Start with your pastel butter yellow polish. Apply it carefully to the pinky nail, staying just slightly away from the cuticle to avoid flooding the skin. -
Paint the ring finger:
Next, apply the periwinkle or light lavender shade to your ring finger. -
Paint the middle finger:
Move to the middle finger using your pastel mint green or soft aqua polish. -
Paint the index finger:
Apply the pastel pink shade to your index finger. Try to keep your brush strokes parallel to minimize streaks. -
Paint the thumb:
Finish the first coat by applying the lilac or light purple polish to your thumb. -
Second coat application:
Pastels and neons often need two or three coats for full opacity. Repeat the color application on each nail in the same order, floating the brush to avoid dragging the previous layer. -
Check for coverage:
Inspect the nails for any patchy areas. If necessary, apply a very thin third coat to specific nails to ensure the color is perfectly opaque and creamy.
Streak-Free Pastels
Pastels can be notoriously streaky. To fix this, apply a layer of matte top coat *between* your color layers. It creates a grippy surface that helps the next layer of pastel glide on smoothly.
Step 3: Finishing Touches
-
Clean up edges:
Dip a small angled cleanup brush into acetone. Carefully trace around the cuticle line and sidewalls to remove any errant polish for a professional, crisp finish. -
Apply top coat:
Once the color is dry to the touch, apply a generous layer of high-gloss top coat. Glide the brush over the wet polish without pressing down too hard to avoid smudging the design. -
Seal the tips:
Run the top coat brush horizontally along the very edge of your nail tip. This ‘wrapping’ technique helps your manicure last days longer. -
Moisturize:
After the top coat is fully hardened, massage a drop of cuticle oil into the skin around each nail to rehydrate and add a final glow to your hand.
Flooded Cuticles?
If polish pools in your cuticle, use a dedicated cleanup brush dipped in acetone immediately while wet. Don’t wait for it to dry, or it will likely peel off in a chunk later.
Enjoy your fresh, candy-colored fingertips that are perfect for brightening up any day
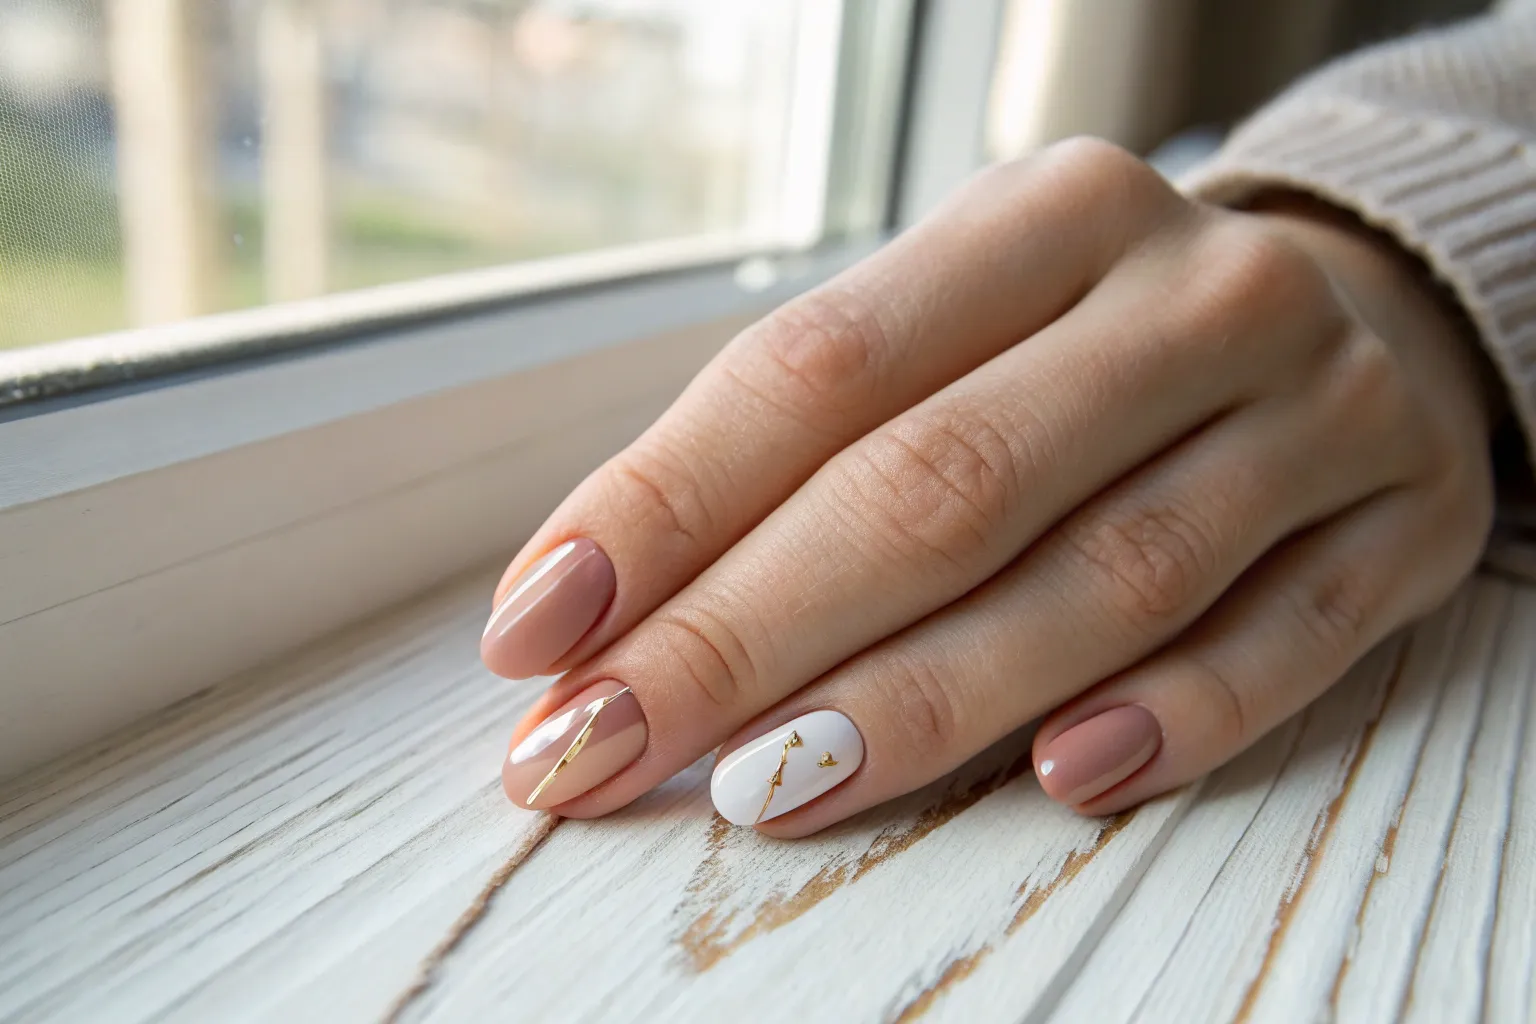
Accent Nail With Simple Detail
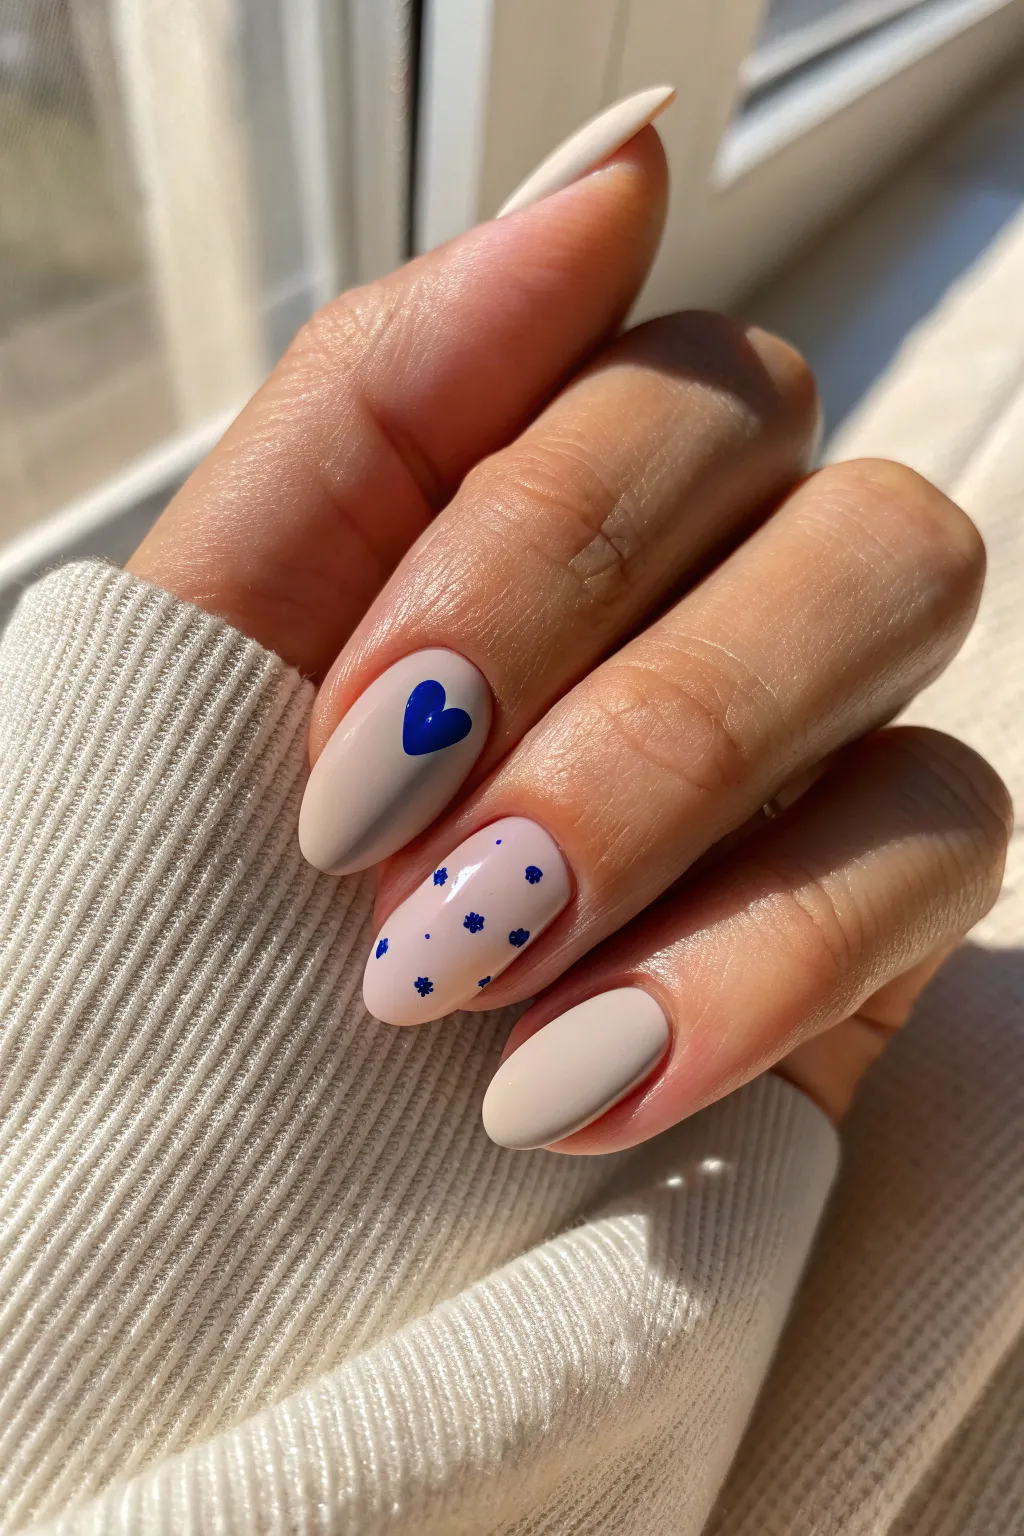
This chic and minimalist manicure combines a creamy nude base with delicate royal blue details for a sweet, everyday look. Featuring a bold heart accent and a dainty floral pattern, it’s the perfect way to add a pop of color while keeping things elegant.
Step-by-Step Tutorial
Materials
- Creamy nude or beige nail polish
- Royal blue nail polish
- Base coat
- Glossy top coat
- Fine detail nail art brush
- Dotting tool (small size)
- Nail polish remover
- Cleanup brush or cotton swabs
Step 1: Preparation & Base
-
Shape and Prep:
Start by filing your nails into a soft almond shape, tapering the sides gently towards a rounded point. Buff the surface lightly to ensure a smooth canvas and wipe away any dust with nail cleanser. -
Apply Base Coat:
Apply a thin, even layer of clear base coat to all your nails. This protects your natural nail and helps the polish adhere better for longer wear. -
Apply Nude Polish:
Paint all your nails with your chosen creamy nude polish. Apply thin layers to avoid streaking. -
Second Coat:
Once the first coat is dry, apply a second coat of nude polish to achieve full opacity. Let this base color dry completely before starting on the art to prevent smudging.
Don’t rush the dry time
Blue is highly pigmented and loves to streak. Ensure your hearts and flowers are 100% dry before top coating to avoid blue smears on your nude base.
Step 2: The Heart Accent (Middle Finger)
-
Create the Dot Base:
Dip a medium-sized dotting tool or the rounded end of a bobby pin into the royal blue polish. Place two dots side-by-side near the center of your middle finger nail. -
Form the Shape:
Using a fine detail brush, drag the wet polish from the bottom of each dot downwards to meet in a V-shape, forming the point of the heart. -
Refine the Heart:
Carefully fill in the center of the heart and smooth out the curves at the top. I like to continuously check the symmetry as I work to keep it balanced.
Step 3: The Floral Pattern (Ring Finger)
-
Start the Daisies:
On your ring finger, use your smallest dotting tool dipped in royal blue polish to create the flower centers. Place 4-5 tiny groupings of dots randomly across the nail. -
Create Petals:
For each flower, arrange five tiny dots in a circle to create a simple daisy shape. You can leave the centers nude or fill them in solid blue like the reference photo for a monochrome look. -
Add Filler Dots:
To fill the empty space and create a cohesive pattern, add singular, tiny blue dots sporadically between the flowers. -
Check Density:
Look at the nail and see if any areas look too sparse. Add another tiny dot or partial flower near the edge if needed to balance the composition.
Switch up the palette
Swap the royal blue for a deep espresso brown or a forest green for a moodier, autumn-inspired version of this same design.
Step 4: Finishing Touches
-
Clean Up:
Dip a small cleanup brush in acetone and carefully gently trace around your cuticles to remove any stray polish or mistakes. -
Seal with Top Coat:
Wait for the blue art to be completely dry to touch—usually at least 5-10 minutes. Then, apply a generous layer of glossy top coat. Float the brush over the nail rather than dragging it to keep the design crisp. -
Cap the Edge:
Run the brush horizontally across the very tip of each nail to seal the free edge. This helps prevent chipping and extends the life of your manicure. -
Cuticle Oil:
Once the top coat is fully hardened, massage a drop of cuticle oil into the skin around each nail to rehydrate and add a salon-finish shine.
Now you have a trendy, hand-painted manicure that looks professionally done without leaving home


Fine-Line Stripe Art
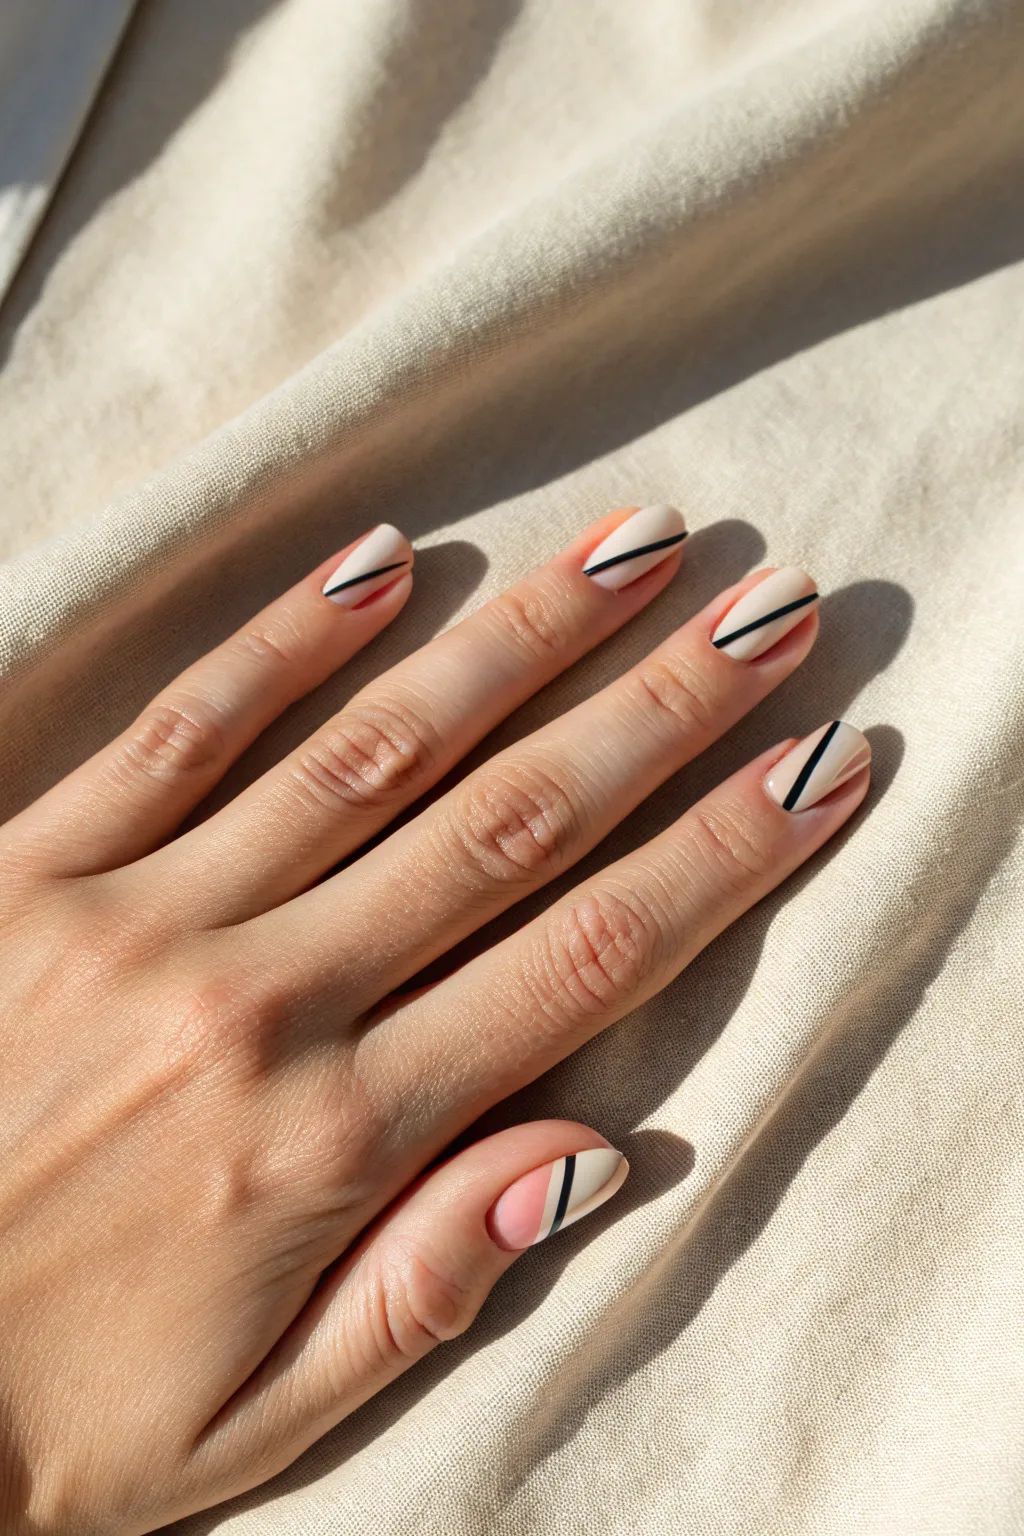
This chic nail art design combines negative space, creamy neutrals, and sharp black lines for a modern, geometric look. The matte finish adds a sophisticated touch, making these abstract stripes feel intentional and high-fashion.
How-To Guide
Materials
- Base coat
- Light pink or nude nail polish
- Creamy beige or oatmeal-colored nail polish
- Black nail art striper or fine liner brush
- Black acrylic paint (optional alternative to polish)
- Matte top coat
- Nail cleanup brush
- Acetone
Step 1: Prep and Base
-
Clean and shape:
Start with clean, dry nails. Gently file your nails into a rounded almond or oval shape to match the soft geometry of the design. -
Apply base coat:
Apply a single, even layer of your favorite base coat to protect your natural nails and help the design adhere smoothly. -
Neutralize the nail bed:
Paint a sheer coat of a very natural nude or soft pink polish over the entire nail. This acts as a ‘foundation’ to even out your nail tone without covering the lunula completely.
Use Acrylic Paint
For the black lines, try black acrylic paint instead of polish. It doesn’t get stringy, dries slower on the palette, and wipes away with water if you mess up.
Step 2: Color Blocking
-
The beige swoop:
Using the creamy beige polish, paint a diagonal block across the top 2/3 of your nail. Don’t worry about a perfectly straight line yet; focus on opaque coverage. -
Clean the edge:
While the polish is still wet, use a clean brush dipped in acetone to refine that diagonal line if it looks too messy. -
Pink accent (Thumb):
On the thumb specifically, create a two-tone block. Paint the bottom half of the diagonal section in soft pink and the top half in beige, creating a split look. -
Corner accents:
For the index finger, add a tiny sliver of that soft pink just under the beige diagonal near the cuticle for a subtle pop of color. -
Second coat:
Apply a second coat of the beige (and pink accents) to ensure the color is solid and not streaky. Let this dry completely before moving on.
Lines Are Smearing?
If your black lines streak when applying top coat, you likely didn’t wait long enough. Give it 5-10 extra minutes or float a larger bead of top coat.
Step 3: The Fine Lines
-
Load your brush:
Dip a fine liner brush into black polish or black acrylic paint. I find acrylic paint easier to work with because you can scratch it off if you make a mistake. -
Test the flow:
Drag your brush on a piece of paper first to ensure the line is thin and the product isn’t glooping on the tip. -
Draw the separator:
Carefully draw a thin black line right over the seam where your beige color block meets the natural nail (or the pink accent). -
Angle consistency:
Try to keep the angle of the diagonal consistent across all fingers for a cohesive look. -
Refine the line:
If your line is shaky, gently use a clean brush with a tiny bit of remover to tidy up the edges, making it look sharp. -
Vertical stripe (Ring finger):
On the ring finger, switch up the angle slightly so the line runs more vertically down the center-right side of the nail for variety.
Step 4: Finishing Touches
-
Dry time:
Let the black lines dry completely. If you used acrylic paint, this will be fast; polish will take a few minutes. -
Matte magic:
Apply a generous layer of matte top coat. Float the brush over the nail rather than dragging it to avoid smearing the black lines. -
Final cleanup:
Use a cleanup brush dipped in acetone to remove any stray polish from your skin or cuticles. -
Hydrate:
Finish by applying cuticle oil to bring life back to your skin, especially since matte nails look best with well-moisturized hands.
Your modern, art-gallery-worthy nails are now ready to be shown off
Negative Space Half-Moons
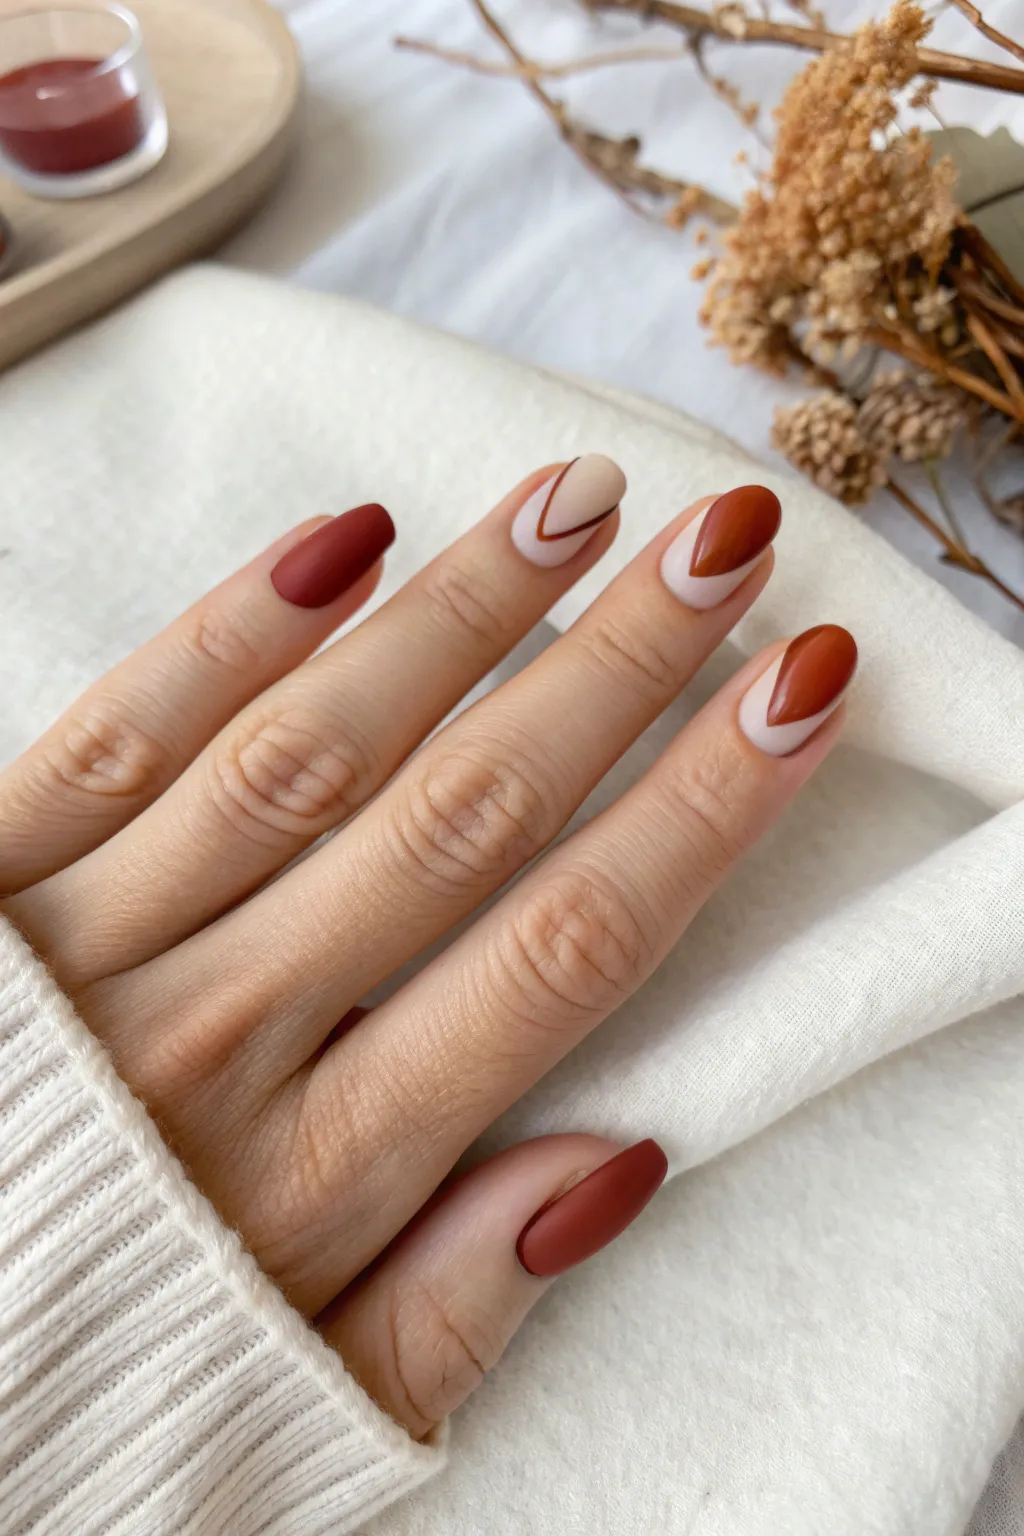
Embrace the warmth of autumn with this chic manicure featuring rich terracotta tones and modern geometric accents. The combination of solid colors and negative space chevrons creates a balanced, sophisticated look that is perfect for sweater weather.
Step-by-Step Guide
Materials
- Base coat
- Light beige or nude crème polish
- Deep terracotta or burnt orange raving polish
- White or black striping tape (optional)
- Fine detail nail art brush
- Acetone and cleanup brush
- Matte top coat
Step 1: Preparation & Base Color
-
Prepare the canvas:
Start with clean, dry nails. Gently buff the surface and push back your cuticles to ensure a smooth application area. -
Shape the nails:
File your nails into a soft almond or oval shape. This curvaceous silhouette complements the angular chevron design we will be adding later. -
Apply base coat:
Apply a thin, even layer of your favorite base coat to all ten nails. This protects your natural nail and helps the polish adhere longer. -
The solid nails:
Identify your thumb, index finger, and pinky finger. Paint these nails entirely with the deep terracotta polish. You may need two coats for full opacity, letting the first dry completely before applying the second. -
The accent nails:
On your middle and ring fingers, apply two coats of the light beige or nude polish. Ensure this base is fully opaque and, most importantly, 100% dry before moving to the next phase.
Wobbly Lines?
If you struggle with hand-painting straight lines for the V-shape, use striping tape as a stencil. Apply it over the dry nude base, paint the tip, and peel immediately while wet.
Step 2: Painting the Chevrons
-
Map the chevron:
For the geometric tips on the middle and ring fingers, visualize a V-shape starting from the sidewalls and meeting at a point towards the center of the nail bed. -
Draw the outline:
Dip a fine detail brush into the terracotta polish. Carefully draw two diagonal lines starting from the side of the nail (about 1/3 down from the cuticle) meeting at a sharp point in the center to create the ‘V’ outline. -
Fill it in:
Using the bottle brush or your detail brush, fill in the area from your outline down to the free edge of the nail with the terracotta color. -
Refine the Middle Finger:
For the middle finger design shown in the inspiration, add a second, thinner ‘V’ line in dark brown or black floating just above the terracotta tip for extra dimension. -
Clean up:
Dip a small cleanup brush in acetone and carefully swipe around the cuticles and sidewalls to remove any stray polish marks.
Step 3: Finishing Touches
-
Let it set:
Allow your design to dry for at least 15 minutes. Nail art layers can be thicker than normal polish, so patience is key here to avoid smudging. -
Apply matte top coat:
Once dry, apply a high-quality matte top coat over every nail. The matte finish softens the look and gives it that velvet-like texture seen in the photo. -
Seal the free edge:
Remember to swipe the brush horizontally across the very tip of your nail to seal the color and prevent premature chipping. -
Hydrate:
Finish by massaging cuticle oil around the skin to rehydrate your fingers after the acetone cleanup.
Pro Tip: Top Coat Trick
Apply a regular glossy top coat first to smooth out any bumps from the nail art layers. Let it dry, then apply the matte top coat as the final step for a perfectly smooth finish.
Now you have a stunning, salon-quality matte manicure ready for any occasion
Glittery Fade Accent
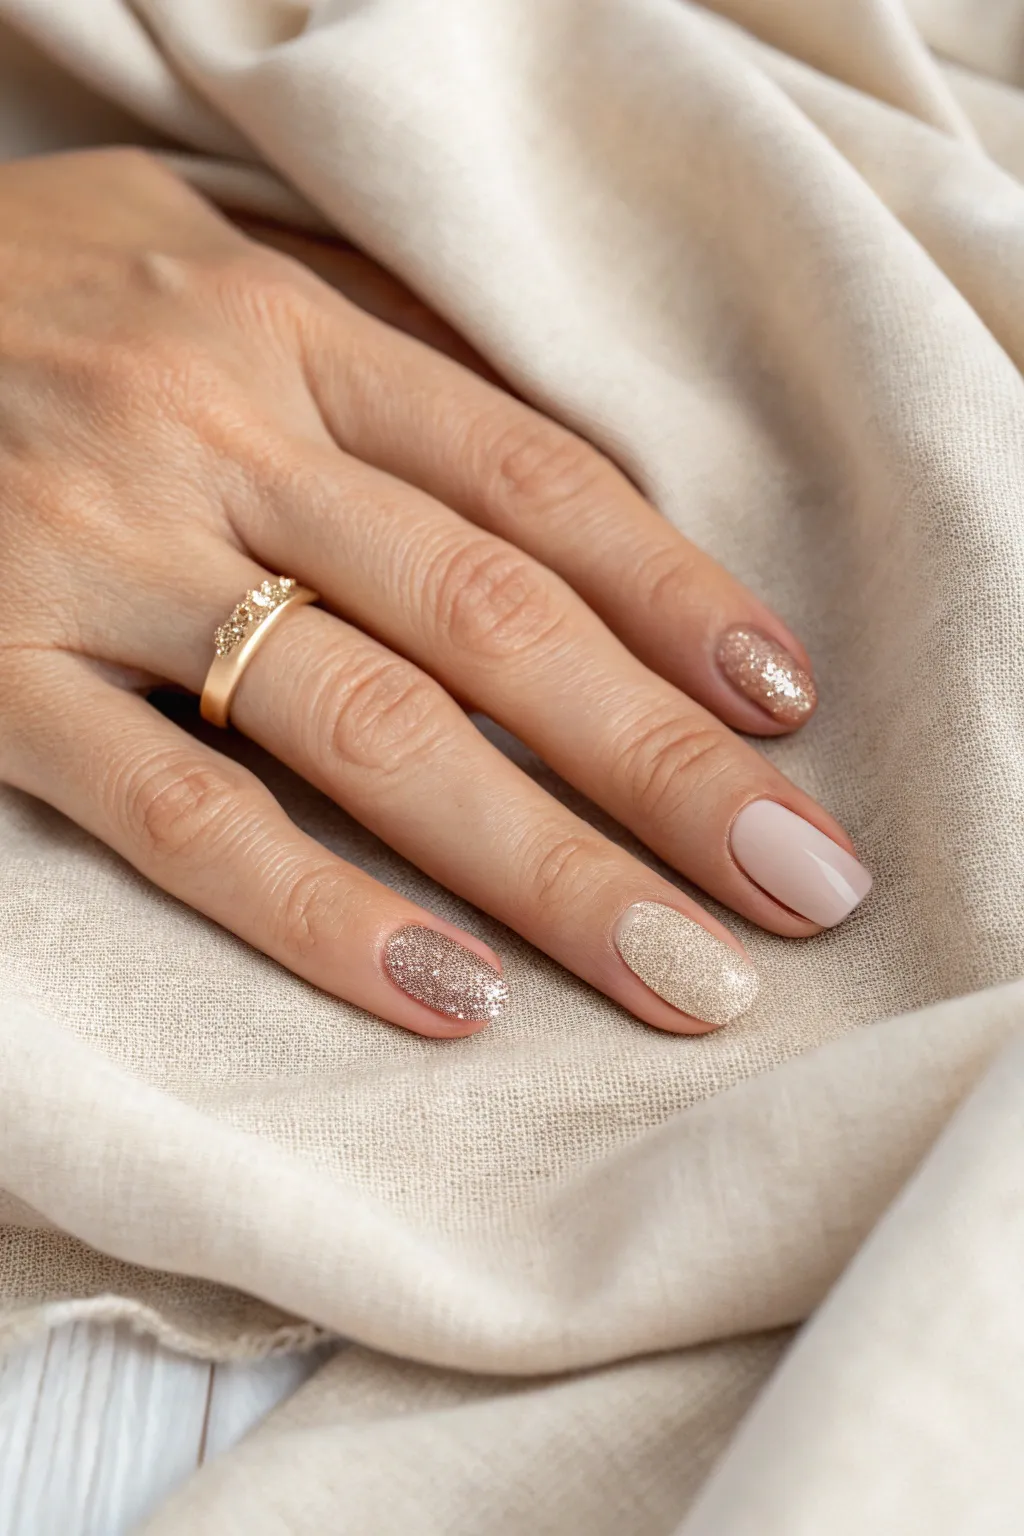
This elegant manicure combines different textures and finishes for a sophisticated yet sparkly look, perfect for everyday wear or special occasions. By mixing a solid neutral cream with two complementary glitter shades, you create a dynamic style that catches the light beautifully without being overwhelming.
Step-by-Step
Materials
- Base coat
- Nude pink or beige cream nail polish (opaque)
- Rose gold loose glitter or glitter polish
- Champagne gold loose glitter or glitter polish
- High-gloss top coat
- Clean-up brush
- Acetone or nail polish remover
- Nail file and buffer
- Cuticle oil
Step 1: Preparation
-
Shape and Prep:
Begin by shaping your nails into a soft “squoval” or rounded square shape, which works beautifully with this design. Gently buff the surface to remove ridges and ensure the polish adheres smoothly. -
Clean the Nail Plate:
Swipe each nail with a lint-free wipe soaked in remover or alcohol. This removes natural oils and dust from filing, which is crucial for a long-lasting manicure. -
Apply Base Coat:
Apply a thin, even layer of sticky base coat to all ten fingernails to protect your natural nails and give the color something to grip onto.
Sponge Technique
For a smoother fade, dab the glitter onto a makeup sponge first, then press it onto the nail base. This absorbs excess clear polish and leaves more sparkles.
Step 2: Applying the Colors
-
The Middle Finger:
Start with your middle finger. Apply two smooth coats of the nude-pink cream polish. Allow the first coat to dry slightly before adding the second to prevent streaking. -
The Pinky Finger:
For the pinky, reach for your rose gold glitter. Apply two to three coats depending on the opacity of the polish. If using loose glitter, paint a clear coat and dip the finger whilst wet. -
The Ring Finger:
Paint the ring finger with the champagne gold glitter. This slight variation in tone from the pinky adds depth. Ensure full coverage, dabbing the brush near the cuticle if necessary to fill gaps. -
The Pointer Finger Fade:
This nail features the hero element: the glitter fade. Start by painting the entire nail with your nude-pink base color and letting it dry completely. -
Start the Gradient:
Take the rose gold glitter polish. Wipe most of the product off the brush so it’s fairly dry. Gently dab a concentration of glitter at the very base of the nail near the cuticle. -
Blend the Fade:
Before the glitter dries, lightly drag the brush upward toward the middle of the nail. You want the glitter to be dense at the cuticle and disappear completely before reaching the free edge. -
The Thumb Fade:
Repeat the fade technique on your thumb. Apply the nude base, let it dry, and then stroke a small amount of the rose gold glitter starting from the cuticle and fading up.
Mattify It
Swap the glossy finish for a matte top coat. The contrast between the matte nude base and the subtle sparkle of the glitter creates a velvety, modern texture.
Step 3: Finishing Touches
-
Cap the Edges:
Go back over every nail and run your brush horizontally along the free edge (the tip). This ‘capping’ technique is my favorite way to prevent premature chipping. -
Apply Top Coat:
Once the colors are dry to the touch, float a generous bead of high-gloss top coat over every nail. Be especially generous over the glitter nails to smooth out the texture. -
Clean Up:
Dip a small, angled clean-up brush into acetone. Carefully trace around the cuticles and sidewalls to melt away any stray polish or rogue glitter specs. -
Hydrate:
Wait for the top coat to fully harden, then massage a drop of cuticle oil into the skin around each nail to rehydrate the area for a photo-ready finish.
Now you have a chic, coordinated manicure that looks professionally done right at home
Daisy Nails on a Sheer Base
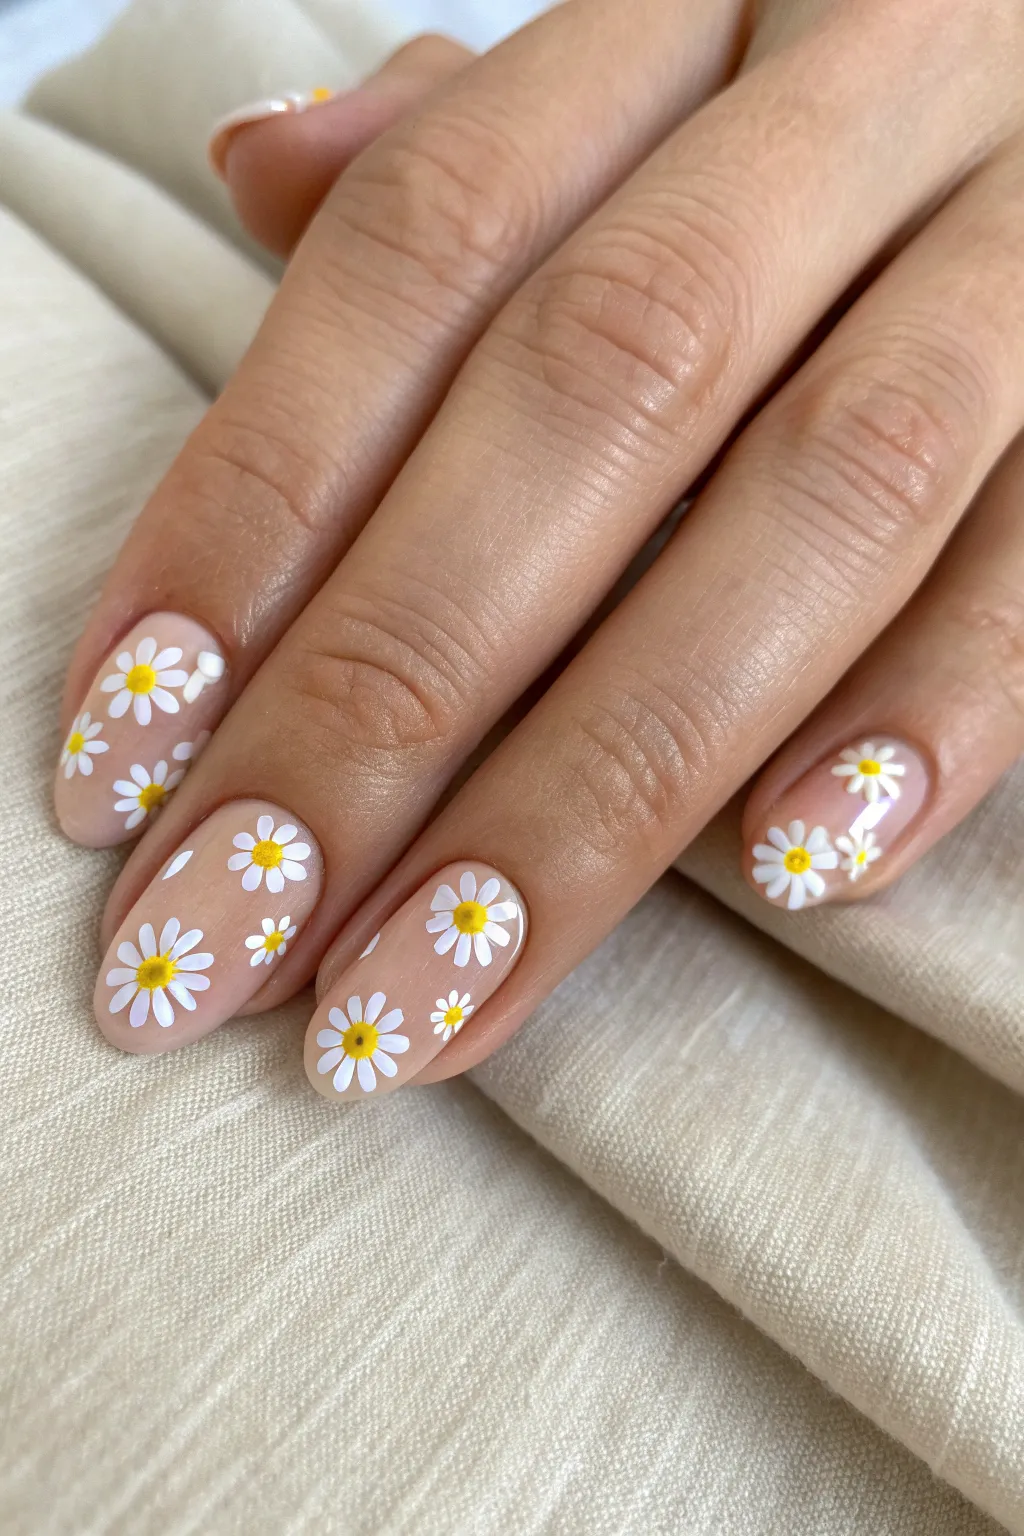
Embrace a sense of playful innocence with this delicate nail art design featuring scattered daisies on a sheer base. The translucent background mimics the look of healthy, bare nails while the crisp white petals and sunny yellow centers add a fresh, spring-like touch.
Step-by-Step Guide
Materials
- Sheer nude or translucent pink gel polish (or regular polish)
- Opaque white nail polish
- Mustard yellow or sunny yellow nail polish
- Dotting tool (small and medium sizes)
- Fine detail nail art brush (optional)
- Base coat
- High-gloss top coat
- Acetone or nail polish remover
- Cleanup brush
Step 1: Preparation & Base
-
Prep the canvas:
Begin by shaping your nails into a soft oval or rounded almond shape to match the gentle vibe of the flowers. Push back cuticles and wipe the nail plate clean with acetone to remove oils. -
Apply base coat:
Apply a thin layer of your favorite base coat. This protects the natural nail and ensures your sheer polish adheres smoothly. -
Create the sheer backdrop:
Apply one or two coats of a sheer nude or translucent pink polish. You want the natural nail line to be faintly visible, creating a ‘your nails but better’ effect. Let this dry completely before starting the art.
Uneven Petals?
If your petals look blobby, wipe off your dotting tool frequently. Dried polish buildup on the tool distorts the dot shape.
Step 2: Painting the Daisies
-
Load your palette:
Place a few drops of opaque white polish onto a piece of foil or a palette. This makes it easier to pick up the right amount of product. -
Place the petal centers:
Visualize where you want your flowers to sit. I like to plan for about 2-3 full flowers and a few partial ones peeking in from the edges per nail. -
Draft the first flower:
Dip a small dotting tool or the very tip of a fine brush into the white polish. Gently touch the nail to create five or six small dots arranged in a circle. These dots will become your petals. -
Refine the petal shape:
While the white dots are still wet, lightly drag the dotting tool from the outer edge of the dot inward toward the empty center. This creates a slight teardrop shape for a more realistic petal look. -
Scatter the blooms:
Repeat the petal process across the nail. Vary the sizes slightly—make some flowers larger with bigger dots and others tiny with just a speck of polish. -
Add partial flowers:
For a natural, printed fabric look, add half-flowers along the cuticle line and the free edge. Just paint 2 or 3 petals sticking out from the side of the nail. -
Repeat on all fingers:
Continue this pattern on all remaining nails. Don’t worry about symmetry; random placement looks more organic and fun. -
Let the white dry:
Allow the white petals to dry for a few minutes. If you add the yellow too soon, the colors might bleed together and look muddy.
Step 3: Finishing Touches
-
Add the sunny centers:
Dispense a drop of yellow polish. Using a clean, small dotting tool, pick up a tiny bead of yellow. -
Dot the centers:
Gently place the yellow dot right in the middle of your petal circles. Keep these dots slightly raised for a bit of texture if you like, or flatten them for a smooth finish. -
Wait for complete dryness:
This step is crucial—wait until the flowers, especially the potentially thicker yellow centers, are fully dry to the touch. -
Seal the deal:
Apply a generous layer of glossy top coat. Float the brush over the nail rather than dragging it to avoid smearing the nail art design. -
Clean up:
Dip a small cleanup brush in acetone and carefully trace around the cuticle area to remove any rogue polish for a salon-quality edge. -
Oil up:
Finish by massaging cuticle oil into the skin around your nails to rehydrate and make that sheer base glow.
Pro Tip: Placement
Avoid placing two identical flowers right next to each other. Putting a large flower next to a tiny partial one creates better visual balance.
Enjoy your fresh and cheerful manicure that brings a little bit of spring with you everywhere you go
Delicate Floral Vines
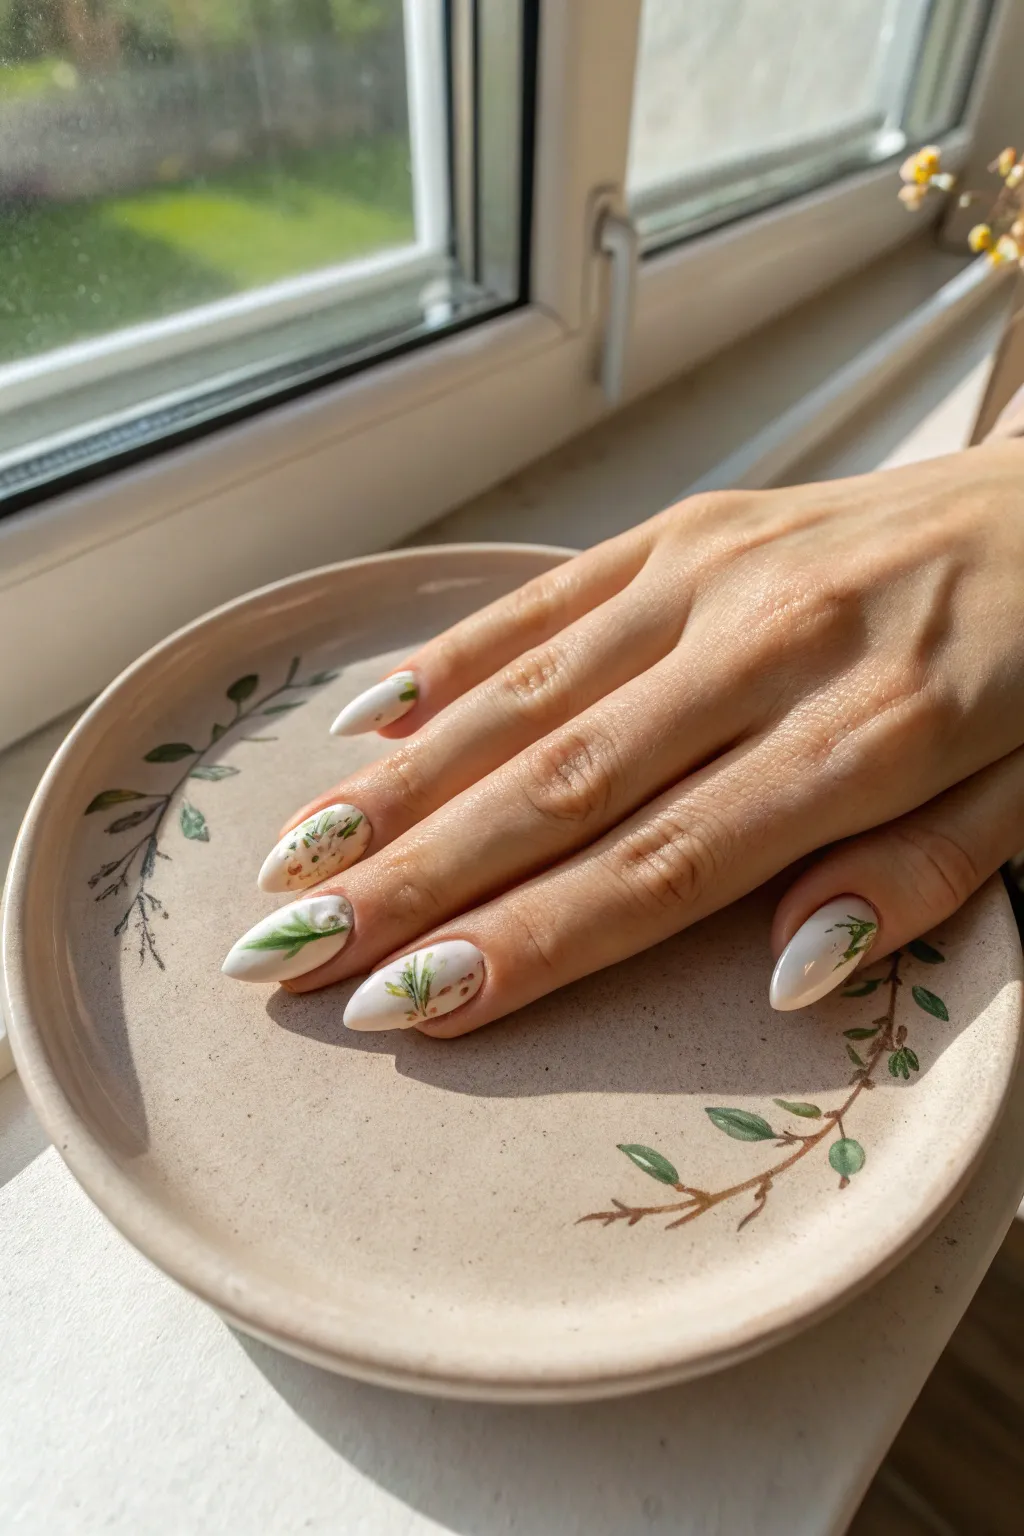
Embrace the effortless charm of cottagecore with this delicate floral vine manicure. Featuring a soft milky white base adorned with dainty hand-painted greenery and subtle speckles, this design mimics the rustic beauty of ceramic pottery.
Step-by-Step
Materials
- Milky white gel polish (sheer white)
- Base coat and shiny top coat
- Muted sage green gel paint or polish
- Deep forest green gel paint or polish
- Warm brown or terracotta gel paint
- Fine liner nail art brush (7mm to 9mm length)
- Dotting tool or toothpick
- Lint-free wipes and cleanser
- LED/UV Lamp
Step 1: Preparation & Base Application
-
Shape the nails:
File your nails into a defined almond shape, tapering the sides gently towards a rounded point to match the elegant silhouette in the photo. -
Apply base coat:
Apply a thin layer of base coat to all nails and cure under your LED/UV lamp for 30-60 seconds. -
Create the milky canvas:
Apply a coat of semi-sheer milky white polish. You want a soft, clouded look rather than opaque correction fluid white. -
Build opacity:
Apply a second coat of the milky white to even out any streaks while keeping that translucent, porcelain effect. Cure fully according to your lamp’s instructions.
Step 2: Painting the Vines
-
Load your brush:
Dip your fine liner brush into the sage green polish. Wipe excess product off on the palette so the bristles are coated but not dripping. -
Draw the main stems:
Starting from either the cuticle area or the free edge (vary this placement per nail), draw thin, curved lines to act as the main vine stems. -
Keep lines organic:
Don’t worry about perfect straight lines; a slight wobble adds to the natural, organic look of the vines. -
Add primary leaves:
Using the same sage green, press the belly of your brush down gently and lift up quickly to create teardrop-shaped leaves attached to the stems. -
Add depth:
Switch to the deep forest green. Add tiny, darker lines along the base of the stems or layer a few smaller leaves over the lighter green ones for dimension. -
Flash cure:
Pop your hand into the lamp for a quick 10-second flash cure to lock the design in place so you don’t smudge the wet vines.
Steady Hands Pro-Tip
Anchor your pinky finger against your other hand or the table while painting. This creates a stable bridge and stops your painting hand from shaking during line work.
Step 3: Adding Rustic Details
-
Create the speckle effect:
Dispense a small amount of warm brown polish onto a palette. Use a toothpick or a very fine brush to pick up the tiniest amount. -
Dot the design:
Gently stipple tiny brown dots around the leaves and randomly on the negative space. This mimics the flecks found in natural ceramic glazes. -
Anchor the plants:
Add a faint touch of the brown at the very base of your stems to ground the plants and add warmth to the color palette. -
Final cure:
Cure the entire design for the full 60 seconds to ensure all layers of art are completely set.
Fixing Smudges
If you smudge a vine before curing, clean it up with a brush dipped in rubbing alcohol. The cured milky base won’t be affected, letting you try again instantly.
Step 4: Finishing Touches
-
Apply top coat:
Apply a generous layer of glossy top coat. Float the brush over the nail rather than dragging it to avoid smearing the delicate lines. -
Seal the edges:
Cap the free edge of each nail with the top coat to prevent premature chipping. -
Final cure:
Cure for 60 seconds one last time. -
Clean up:
Wipe away any inhibition layer with a lint-free wipe and cleanser if using a wipe-off top coat, then apply cuticle oil to hydrate the skin.
Now you have a set of nails that perfectly captures the serene beauty of nature
Bold Color-Block Geometry
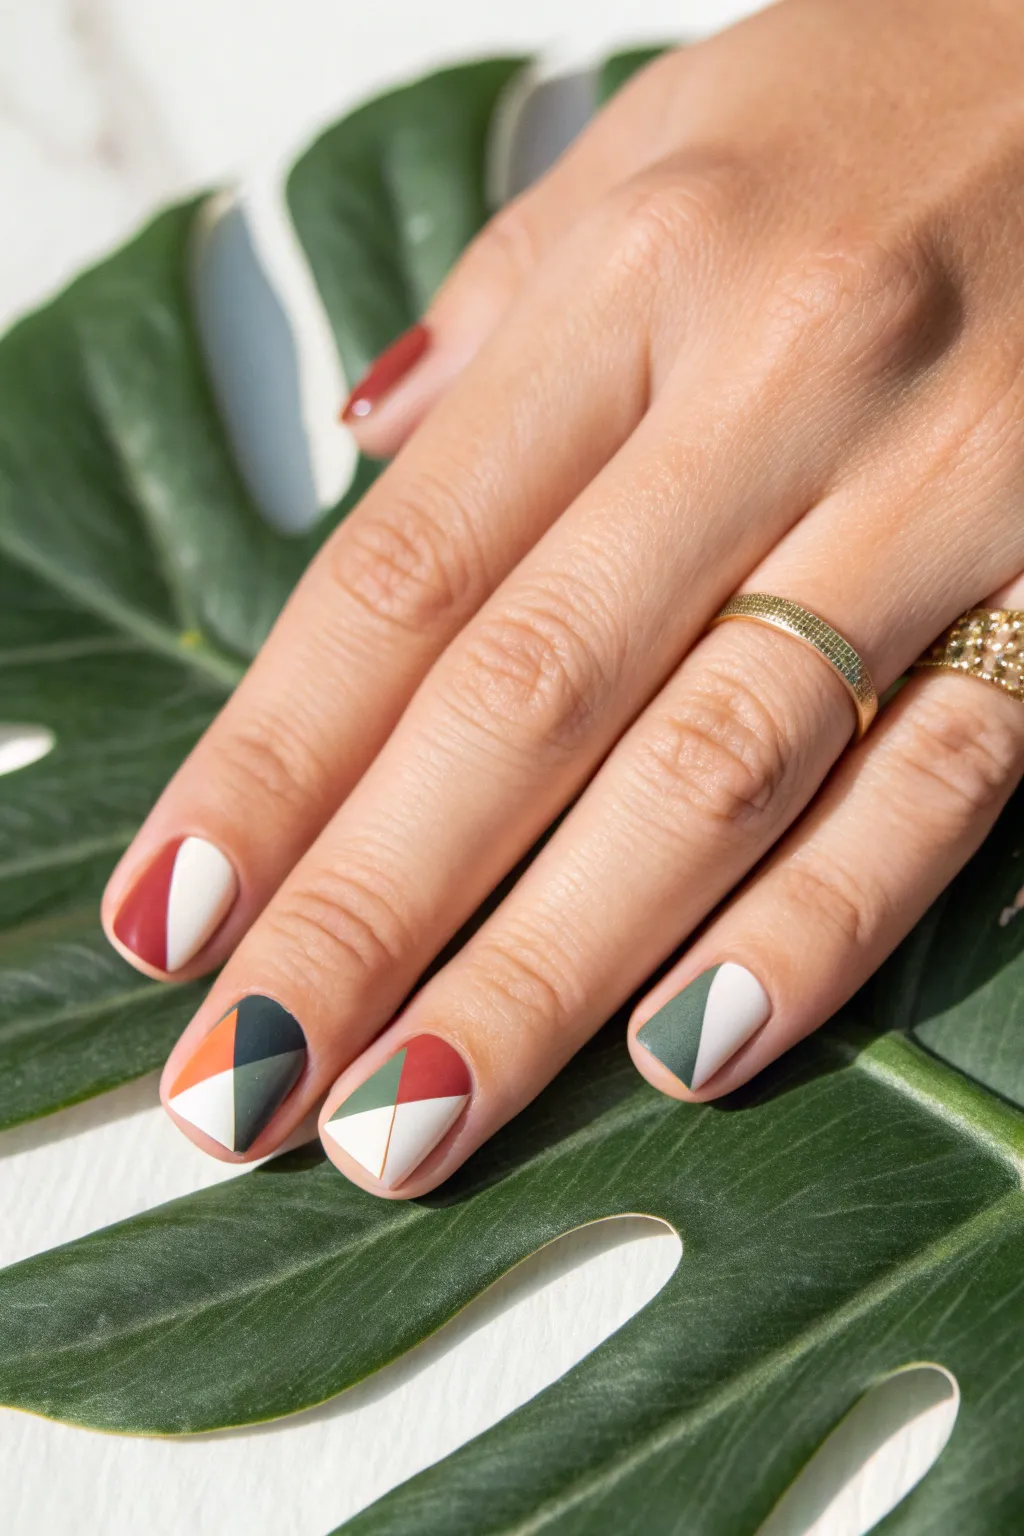
Embrace the beauty of sharp lines and earthy tones with this striking geometric nail art design. Featuring a sophisticated palette of burnt sienna, deep forest green, and crisp white, this manicure uses bold triangles and gold detailing to create a clean, modern look.
Step-by-Step Guide
Materials
- Base coat
- Creamy white nail polish
- Burnt sienna or terracotta nail polish
- Deep forest green nail polish
- Mustard yellow or ochre nail polish
- Thin striping tape (gold or plain)
- Fine liner brush
- Acetone and clean-up brush
- Matte top coat
Step 1: Preparation and Base
-
Prep the canvas:
Begin by removing any old polish and shaping your nails into a soft squoval shape to mirror the reference image. Gently buff the surface to ensure smooth adhesion. -
Protect the nail:
Apply a single, even layer of your favorite base coat. Let this dry completely to prevent staining and ensure your manicure lasts longer. -
The blank slate:
Apply two thin coats of creamy white polish to the pinky and ring fingers. For the other fingers, you will be painting directly over the bare nail or a sheered-out nude base, so apply a very sheer nude coat there if your natural nail plate needs color correction.
Uneven Lines?
If painting straight lines freehand is too difficult, apply striping tape to dry base nails first, paint inside the masked areas, and peel off immediately while paint is wet.
Step 2: Geometric Construction
-
Map out the index finger:
On the index finger, you will create a split design. Use a thin detail brush to paint a vertical diagonal line from the center cuticle to the left free edge using white polish. -
Fill the index shapes:
Fill the right side of the index nail with the white polish. Then, carefully fill the left side with the burnt sienna shade, ensuring the line where they meet is crisp. -
Start the middle finger:
This nail features a complex four-triangle design. Start by visualizing an ‘X’ shape. Paint the bottom quadrant (near the cuticle) with white polish. -
Add deep green:
Paint the right-hand triangle section of the middle finger with the deep forest green polish. I like to stabilize my hand on a table to keep the lines steady. -
Complete the middle finger:
Fill the left-hand triangle with a mustard or ochre shade, and paint the top triangle (at the tip) with the deep green shade again, or a dark charcoal grey for contrast. -
Ring finger geometry:
For the ring finger, create a large triangle pointing towards the cuticle. First, block out the bottom right section with white polish. -
Ring finger accents:
Paint the top right section with burnt sienna and the left section with a muted olive or sage green tone, creating a distinct three-color junction. -
Pinky finger simplicity:
Keep the pinky simple to balance the look. Paint a diagonal line separating the nail in half. Leave the right side (or paint it) white. -
Pinky color pop:
Fill the left side of the pinky nail with the sage green polish used on the ring finger.
Gloss vs. Matte
While the reference is matte, you can use a high-gloss top coat instead. It will make the colors pop more vividly, though you lose the soft, velvety texture.
Step 3: Refining and Finish
-
Clean the boundaries:
Dip a small clean-up brush in acetone and carefully swipe along the edges of your geometric shapes if any lines look wobbly. Sharpness is key here. -
Gold detailing:
Using a very fine liner brush and metallic gold polish (or ultra-thin gold striping tape), carefully trace the lines where the colors meet on the ring finger for that luxe separation effect. -
Thumb accent:
Don’t forget the thumb. Replicate the two-tone split from the index finger, perhaps swapping the burnt sienna for the deep green to tie the palette together. -
Total dry time:
Allow the entire design to dry for at least 15 minutes. Thick layers of geometric shapes can take longer to cure than a standard manicure. -
Matte magic:
Apply a generous layer of matte top coat over every nail. This step transforms the design, removing the shine and giving it that velvety, modern finish shown in the photo. -
Hydrate:
Once the top coat is dry to the touch, apply cuticle oil to the skin around the nails to rehydrate after the acetone cleanup.
Now you have a gallery-worthy piece of modern art right at your fingertips
Classic Leopard Spot Nails
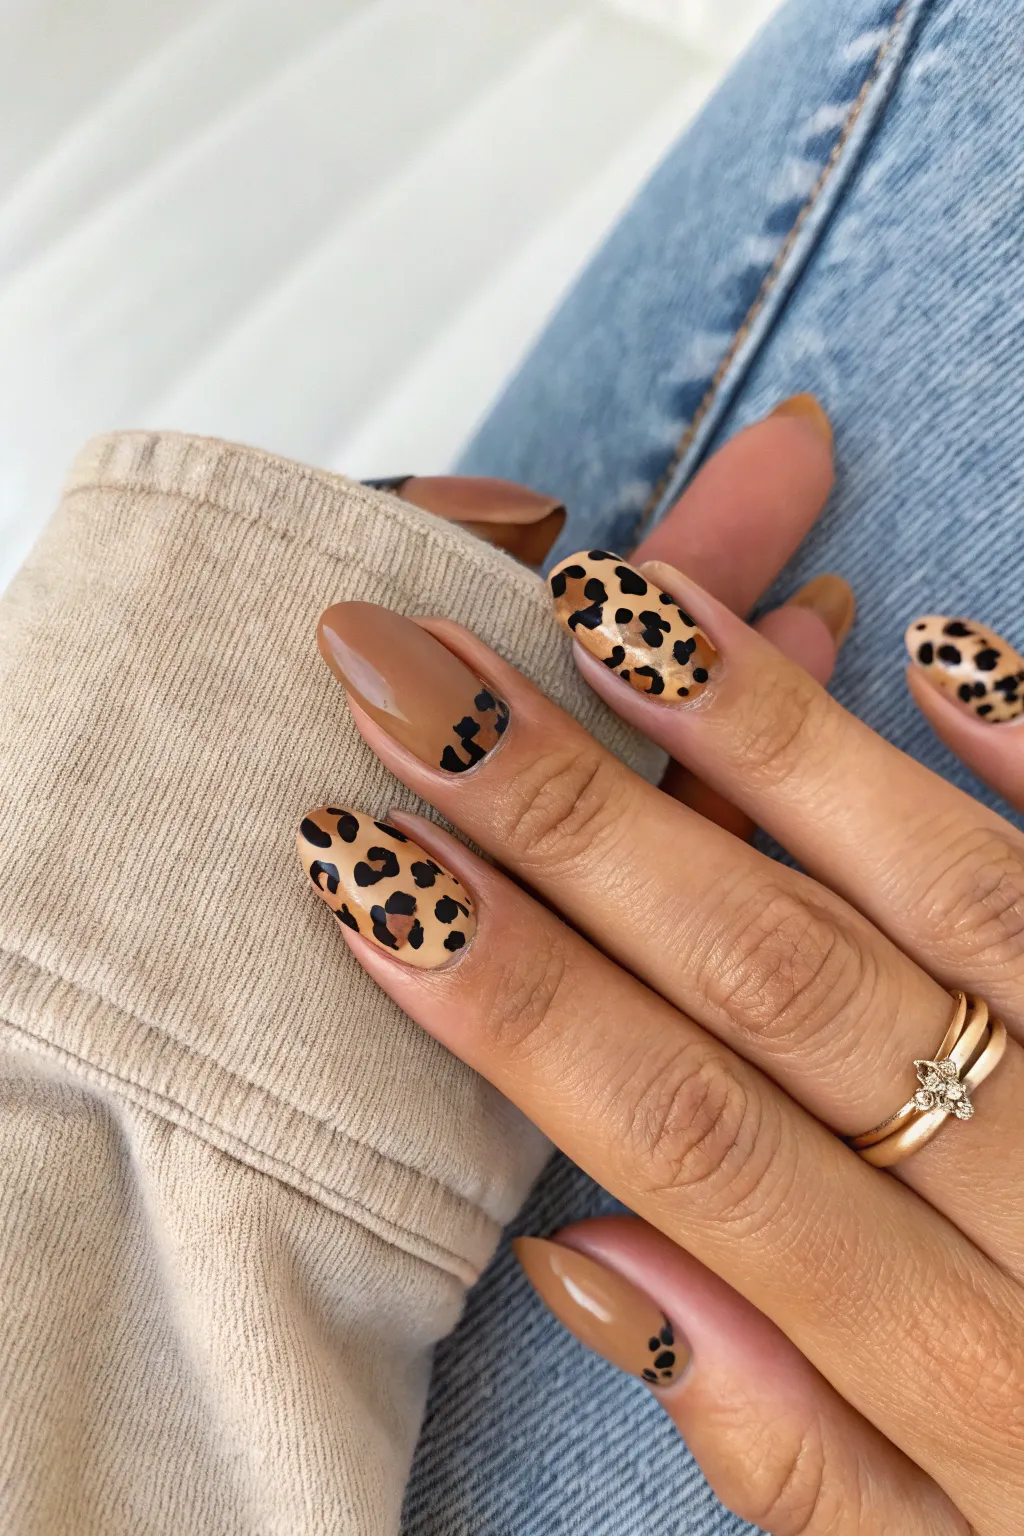
Embrace your wild side with a sophisticated twist on the classic animal print. This design pairs a warm, caramel-latte base with delicate leopard spots, alternating between full-coverage statement nails and subtle, minimalist accents for a chic, modern finish.
How-To Guide
Materials
- Caramel or dark beige gel polish (base color)
- Dark chocolate brown gel polish (spot centers)
- Black gel art paint or highly pigmented polish
- Base coat
- Glossy top coat
- Fine liner brush (7mm or 9mm)
- Dotting tool (small to medium size)
- UV/LED Lamp
- Lint-free wipes and alcohol
Step 1: Preparation & Base Application
-
Prep the canvas:
Begin by shaping your nails into a soft almond or oval shape, which complements this design beautifully. Gently buff the surface to remove shine and wipe clean with alcohol. -
Apply base coat:
Apply a thin, even layer of base coat to all five nails. Cure under your UV/LED lamp for 30-60 seconds, ensuring you cap the free edge. -
Apply the caramel color:
Paint all nails with your caramel or dark beige base color. Keep your layers thin to prevent wrinkling. -
Second coat:
Apply a second coat of the caramel polish to ensure full opacity. Cure fully according to your polish brand’s instructions.
Step 2: Creating the Leopard Spots
-
Map out the centers:
Starting with the ring nail (a full pattern nail), dip a small dotting tool or brush into the dark chocolate brown polish. -
Dab the spots:
Create organic, irregular blobs across the nail surface. Avoid perfect circles; wiggle the tool slightly for natural variation. Space them out somewhat randomly. -
Flash cure:
Flash cure these brown spots for 10-15 seconds to freeze them in place so they don’t spread while you work on the other fingers. -
Minimalist accents:
For the pinky and thumb, repeat the brown spot process but only near the tip or base of the nail, creating a sparse, floating cluster rather than covering the whole nail. -
Half-moon accent:
On the middle finger, place your brown spots only near the cuticle line and slightly down one side, leaving the center and tip solid caramel. -
Full cure:
Once all brown base spots are placed on all fingers, do a full cure in your lamp.
Natural Variety
Don’t outline every brown spot exactly the same way. Do two brackets on one, three tiny dashes on another, and a single C-curve on the next for a realistic look.
Step 3: Detailing & Finishing
-
Prepare the black liner:
Load a fine liner brush with black gel paint. I prefer using a palette to work the paint into the bristles so it’s not gloopy. -
Bracket the spots:
Draw thin, erratic black lines around the brown spots. Think of drawing brackets: ( ) or C-shapes. Don’t close the circle completely. -
Vary the pressure:
Press down slightly at the start of a stroke and lift up at the end to create tapered lines that look more like natural fur markings. -
Fill the gaps:
In the empty tan spaces between the large spots, add tiny black dots or small tick marks to balance the composition. -
Check the accents:
On the minimalist nails (pinky, middle, thumb), ensure the black outlining stays delicate and follows the placement of the brown spots you created earlier. -
Cure the art:
Cure the black detailing for a full 60 seconds to ensure the dark pigment is completely hardened. -
Top coat application:
Float a generous layer of glossy top coat over the design. Be gentle to avoid dragging any uncured pigment if you used regular polish, though gel won’t drag. -
Final cure:
Cure the top coat for 60 seconds. If your top coat has a sticky inhibition layer, wipe it off with alcohol. -
Hydrate:
Finish by massaging cuticle oil into the skin around your nails to rehydrate after the curing process.
Thick Lines?
If your black outlines look too chunky, switch to a longer, thinner liner brush and ensure you possess very little paint on the brush tip.
Now you have a fierce, salon-quality manicure that proves animal print can be both fun and elegant
Speckled Dalmatian Dots
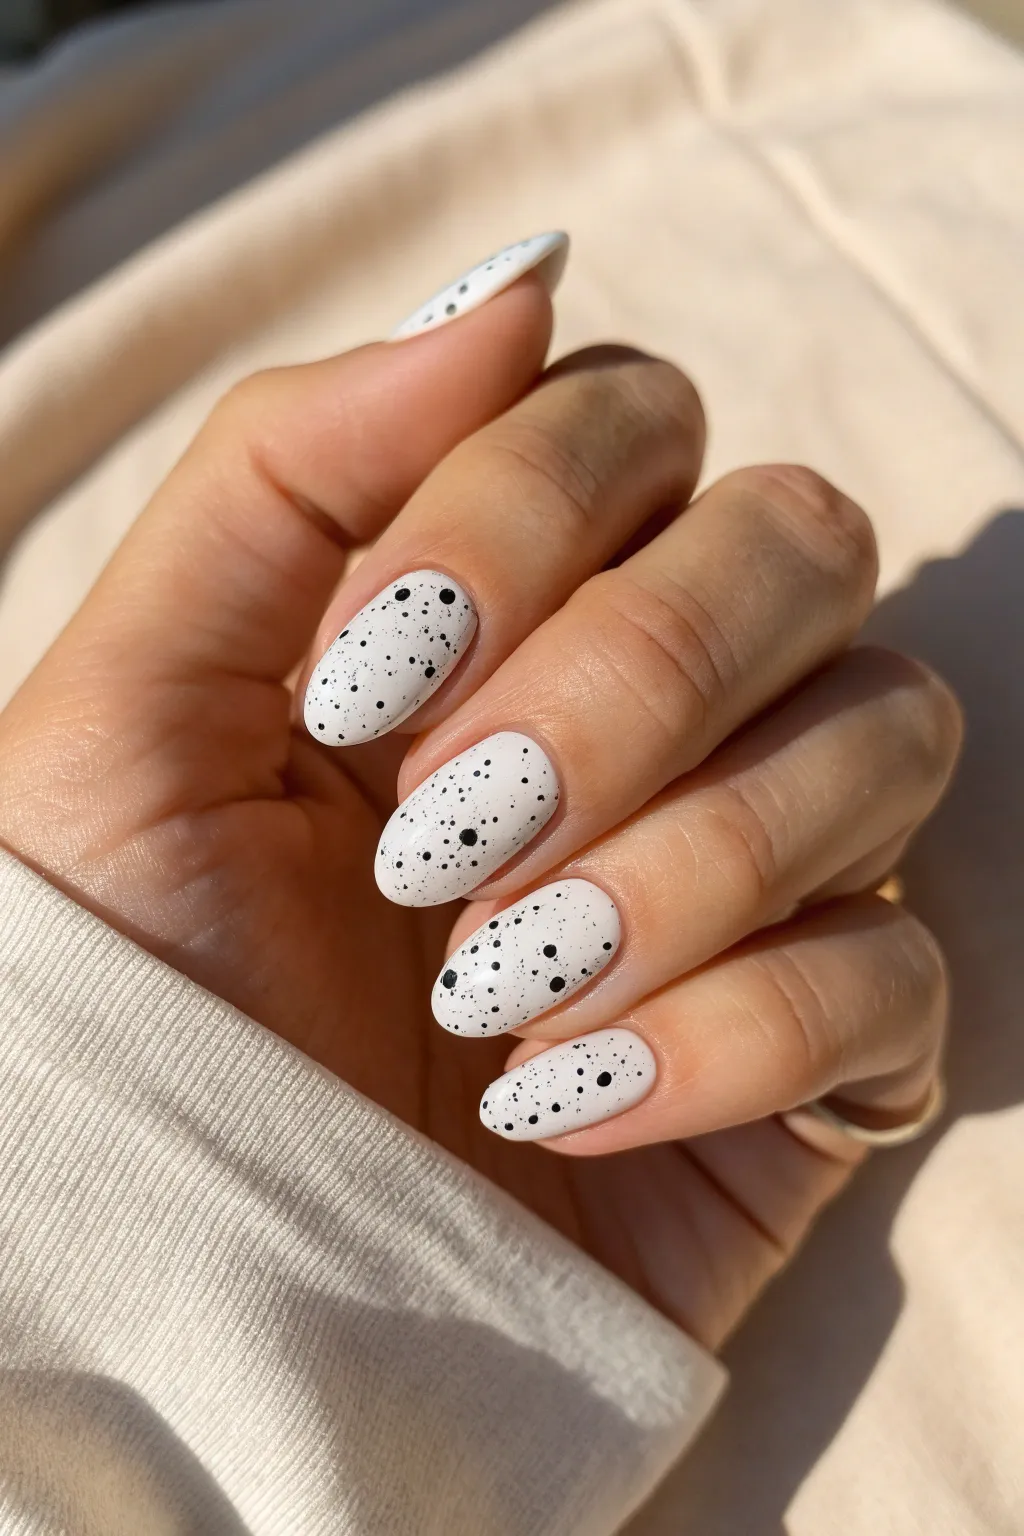
Achieve a chic and playful speckled look that mimics the charm of a Dalmatian’s coat or a delicate bird’s egg. This minimalist design combines a creamy off-white base with scattered black flecks for an understated yet artistic statement.
Detailed Instructions
Materials
- Nail file (180/240 grit)
- Buffer block
- Base coat
- Creamy white gel polish or nail lacquer
- Specialized black speckle top coat OR black gel polish and a detailing brush
- Glossy top coat
- LED/UV lamp (if using gel)
- Cuticle oil
- Isopropyl alcohol and lint-free wipes
Step 1: Prep & Shape
-
Shape the nails:
Begin by filing your nails into a soft almond or oval shape. Gently round the sides towards the center tip to elongate the finger’s appearance. -
Buff the surface:
Lightly buff the surface of each nail to remove natural shine. This step is crucial for adhesion, ensuring your manicure lasts longer. -
Cleanse:
Wipe down each nail with isopropyl alcohol on a lint-free wipe to remove any dust and natural oils. -
Apply base coat:
Apply a thin, even layer of base coat to all nails. Cap the free edge to prevent chipping later. -
Cure or dry:
If using gel, cure under your LED/UV lamp for 30-60 seconds. If using regular lacquer, allow it to dry until tacky.
Bumpy Texture?
If the glitter pieces make the nail feel rough, apply a second layer of top coat. This “floats” over the grit, burying the texture for a smooth, glass-like finish.
Step 2: The Creamy Base
-
First coat of white:
Paint a thin layer of creamy white polish. Don’t worry if it looks slightly streaky on the first pass; thin layers build better opacity. -
Cure or dry:
Cure for 60 seconds (gel) or let dry completely (lacquer). -
Second coat of white:
Apply a second coat of the white polish to achieve full, opaque coverage. Ensure the color is solid and smooth. -
Final color cure:
Cure or dry this second layer thoroughly before moving to the art phase.
Pro Tip: Custom Mix
Make your own speckle polish! Mix loose black matte glitter (hex or sand style) into a clear top coat bottle. Now you have a custom topper ready anytime.
Step 3: Speckling Effect
-
Option A: Speckled Polish:
The easiest way to get this look is using a pre-mixed translucent top coat containing black matte glitter of varying sizes. Apply one coat over your white base. -
Option B: Hand-painted Dots:
If you don’t have a speckled polish, pour a tiny drop of black polish onto a palette. Using a fine dotting tool or toothpick, gently tap random dots onto the nail. -
Vary the sizes:
For Option B, ensure some dots are tiny specks while others are slightly larger irregular blobs to mimic a natural stone texture. -
Check the density:
Inspect your nails. You want a balanced distribution—not too crowded, but enough to create the texture. Add tiny specs in empty areas if needed. -
Cure the art:
Once satisfied with the placement, cure the speckled layer or let your hand-painted dots dry completely to prevent smearing.
Step 4: Finish & Shine
-
Top coat application:
Apply a generous layer of glossy top coat. This will smooth out any texture from the glitters or dots and seal the design. -
Self-leveling moment:
I like to flip my hand palm-side up for a few seconds before curing; this helps the top coat self-level for that perfect glass-like reflection. -
Final cure:
Cure for a full 60 seconds to ensure a hard, scratch-resistant finish. -
Clean up:
Wipe away any inhibition layer (sticky residue) with alcohol if your top coat requires it. -
Hydrate:
Finish by massaging cuticle oil into the skin around your nails to rehydrate and frame your new manicure beautifully.
Enjoy your sophisticated, nature-inspired nails that pair perfectly with any outfit
Plaid Crosshatch Pattern
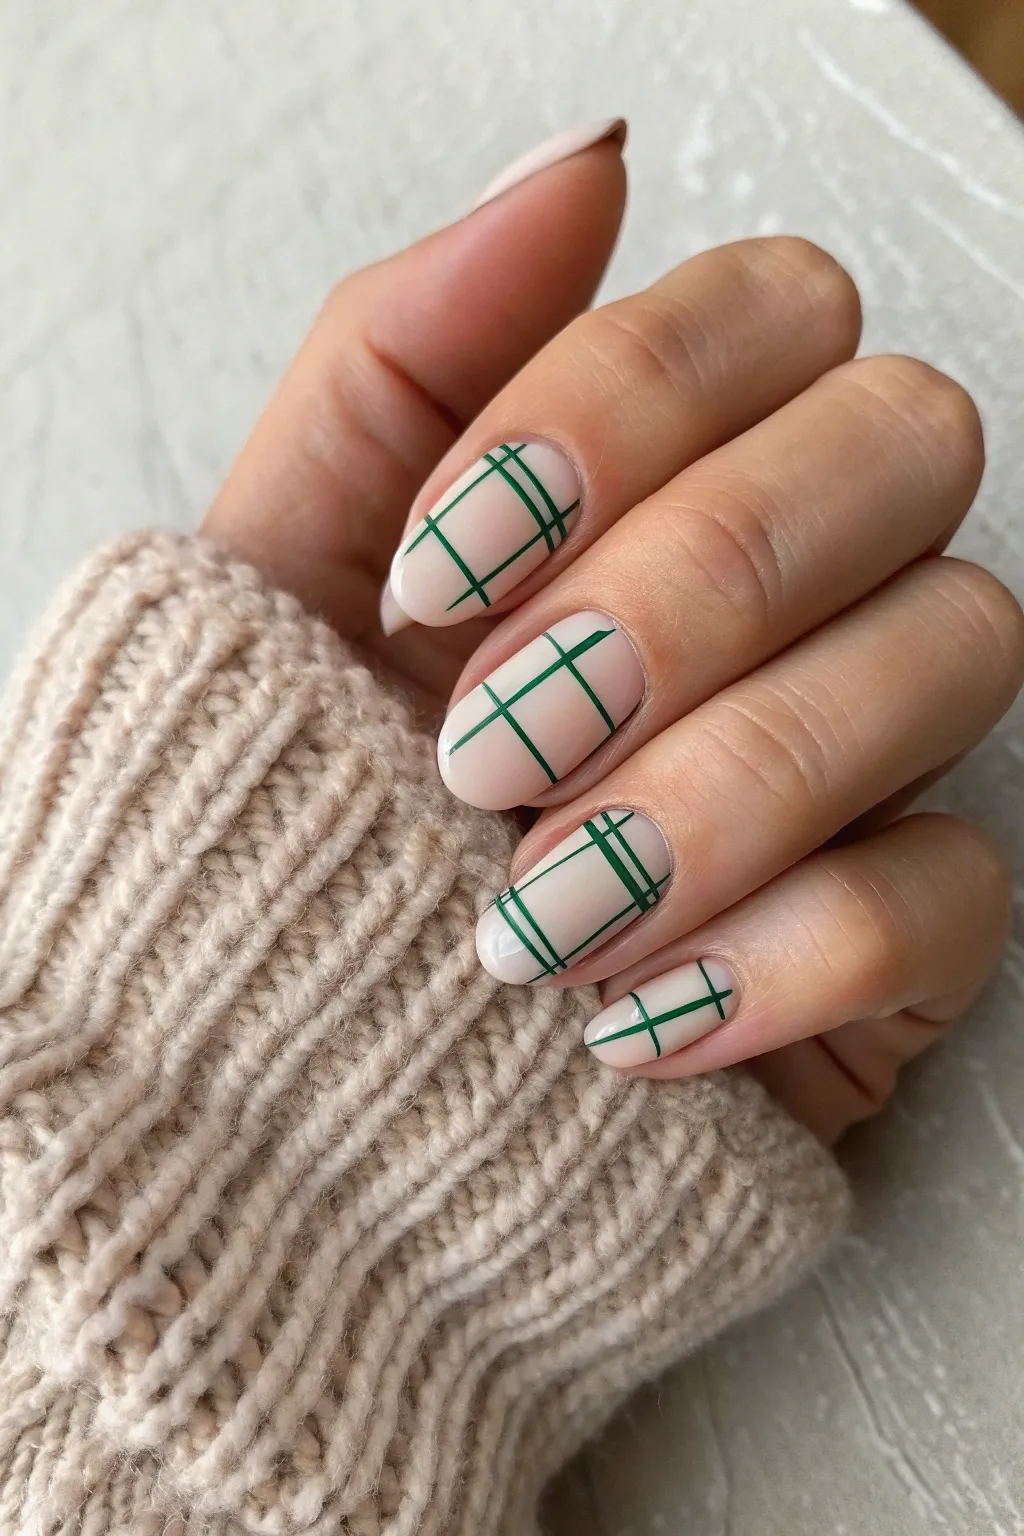
Embrace simplicity with this chic, modern nail art design that combines a soft, milky base with crisp evergreen lines. The uneven crosshatch pattern creates a relaxed yet sophisticated plaid effect perfect for cozy sweater weather.
Step-by-Step Guide
Materials
- Milky nude or sheer pale pink gel polish
- Deep forest green gel polish or highly pigmented nail art paint
- Base coat
- Glossy top coat
- Ultra-fine nail art liner brush (7mm – 11mm length)
- Isopropyl alcohol and lint-free wipes
- UV/LED Nail Lamp
- Palette or piece of foil
- Acetone and clean-up brush
Step 1: Base Preparation
-
Prep the canvas:
Begin by shaping your nails into a soft almond shape to match the elegance of the design. Push back cuticles and gently buff the nail plate to remove shine. -
Cleanse:
Wipe every nail thoroughly with isopropyl alcohol and a lint-free wipe to remove oils and dust, ensuring perfect adhesion. -
Base coat:
Apply a thin, even layer of base coat to all nails. Cure for 30-60 seconds in your LED or UV lamp. -
Apply the sheer color:
Brush on your first coat of milky nude polish. Keep it thin to avoid pooling in the cuticles. Cure for 60 seconds. -
Build opacity:
Apply a second coat of the milky nude to get that soft, semi-opaque look. I like to let this layer self-level for a few seconds before curing to ensure a perfectly smooth surface. Cure for 60 seconds. -
Remove inhibition layer:
Since we need precise lines, wipe the sticky layer off the cured color with alcohol. Paint glides smoother on a tack-free surface.
Step 2: Drafting the Design
-
The vertical anchor:
Dispense a small drop of forest green polish onto your palette. Saturate your long liner brush, then pull it through the polish to taper the bristles to a point. -
First vertical line:
Starting on the index finger, paint a straight vertical line slightly off-center. Unlike traditional plaid, we aren’t aiming for symmetry. Flash cure for 10 seconds to lock it in place. -
Adding variation:
On the middle finger, paint two vertical lines close together—one slightly thicker than the other. Varying the line weight adds visual interest. -
Complete verticals:
Continue painting your vertical lines on the remaining nails. Keep the placement distinct for each finger; for example, place the pinky finger’s line further to the right. -
Full cure:
Once all vertical lines are painted and you are happy with the straightness, cure the full hand for 60 seconds.
Steady Hands Trick
Anchor your pinky finger against your other hand or the table while painting. This creates a tripod effect, stabilizing your hand for shake-free lines.
Step 3: Completing the Crosshatch
-
The horizontal cross:
Reload your fine liner brush. On the index finger, paint, a horizontal line that crosses the vertical one near the top third of the nail. -
Double crossing:
On the ring finger, create a ‘hashtag’ effect by painting two horizontal lines that intersect your vertical lines. Keep them crisp and parallel. -
Random placement:
Finish the remaining horizontal lines. Don’t overthink the placement; some can be lower, some higher. This asymmetry is key to the modern look. -
Clean up edges:
If any lines went onto the skin, dip a clean-up brush in acetone and carefully tidy the sidewalls before curing. -
Pattern cure:
Cure the completed green design for a full 60 seconds to ensure the pigmented lines are fully hardened.
Matte It Out
Swap the glossy finish for a matte top coat. This transforms the look entirely, making the design feel more like actual fabric texture.
Step 4: Finishing Touches
-
Encapsulate:
Apply a generous layer of glossy top coat. Float the brush over the nail rather than dragging it to ensure you don’t smear the green lines. -
Final cure:
Cure the top coat for 60 seconds. This seals the design and smooths out any texture from the painted lines. -
Hydrate:
After the nails have cooled down from the lamp, massage cuticle oil into the skin around the nails to restore moisture.
Now you have a sophisticated, modern manicure that looks great with any cozy outfit
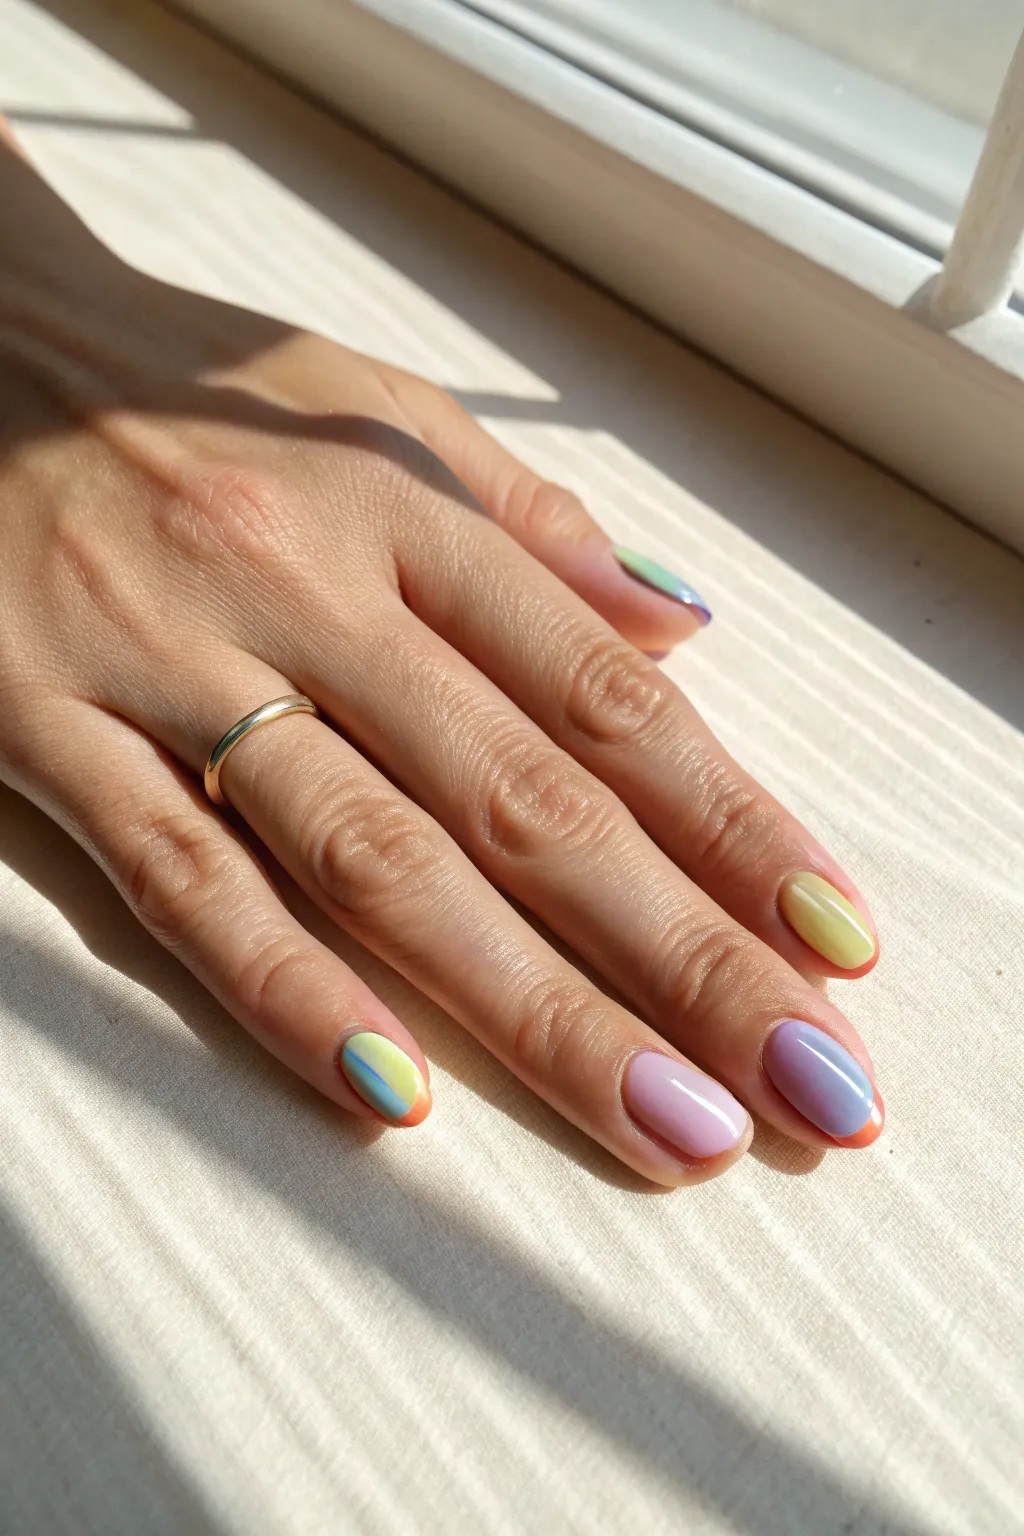
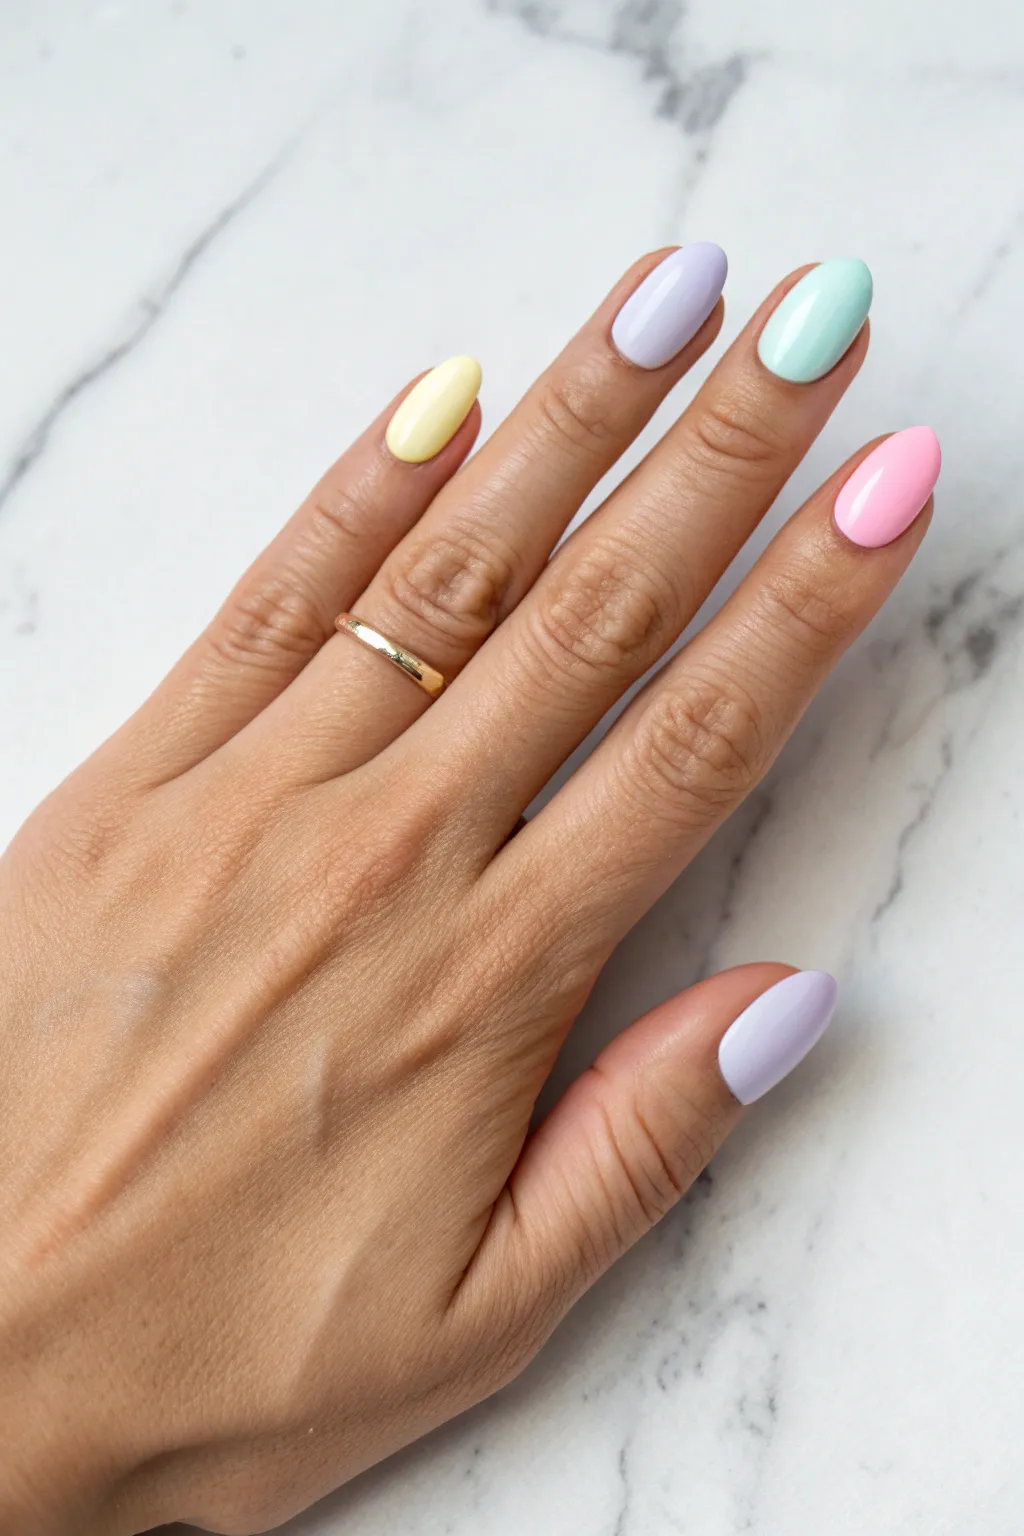
Seasonal Palette Story Set
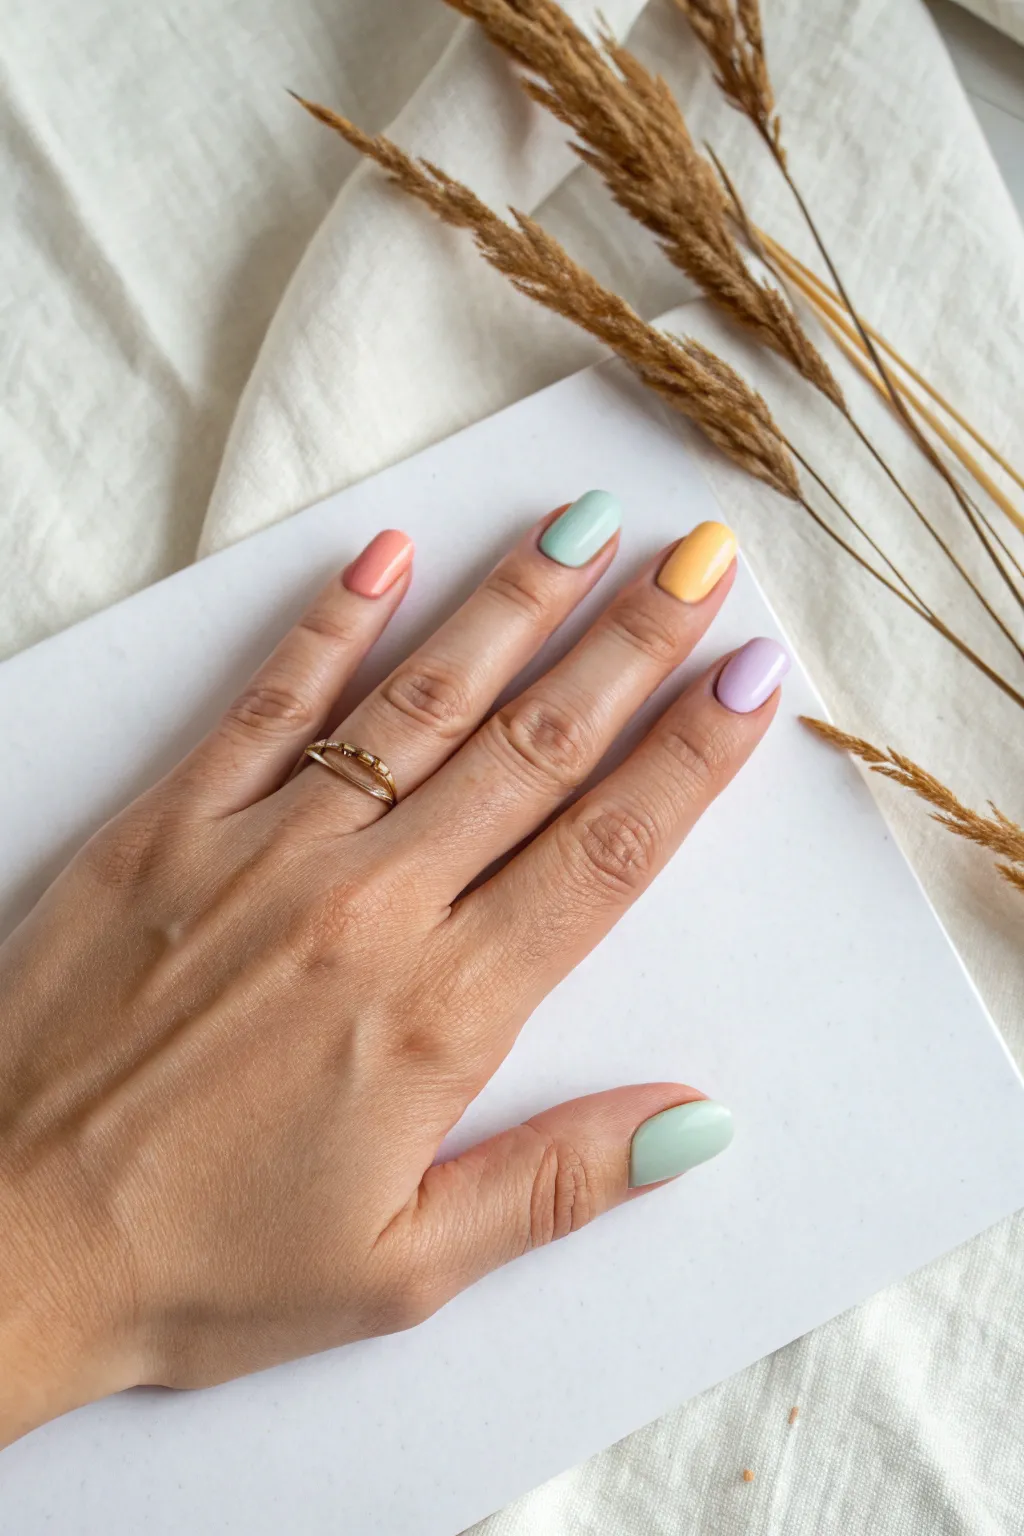
Embrace a soft and cheerful aesthetic with this multicolored pastel manicure. Each nail features a different delicate shade, creating a harmonious gradient effect that feels fresh and perfect for any season.
How-To Guide
Materials
- Base coat
- Pastel lilac nail polish
- Pastel yellow nail polish
- Pastel mint green nail polish
- Pastel coral or peach nail polish
- Glossy top coat
- Nail file
- Cuticle stick
- Nail polish remover
- Cleanup brush
Step 1: Preparation
-
Shape the nails:
Begin with clean, dry nails. Use a nail file to gently shape your free edge. The look in the image features a ‘squoval’ shape—flat across the top with softly rounded corners. File in one direction to prevent splitting. -
Buff the surface:
Lightly buff the surface of your nails to remove ridges and create a smooth canvas for the polish. wipe away any dust with a lint-free wipe and a bit of polish remover. -
Apply base coat:
Apply a thin, even layer of base coat to all ten nails. This protects your natural nail from staining and helps the pastel colors adhere better for longer wear.
Step 2: Applying Color
-
Paint the pinky finger:
Start with your smallest finger. Apply a coat of pastel lilac polish. Use the ‘three-stroke method’: one stroke down the center, then one on each side to fill in the curves. -
Paint the ring finger:
Move to the ring finger and apply your pastel yellow shade. I find yellow pigments can sometimes be streaky, so aim for a very thin first coat and don’t worry about full opacity yet. -
Paint the middle finger:
Apply the pastel mint green polish to your middle finger. Keep a tiny gap between the polish and your cuticle line for a professional, clean finish. -
Paint the index finger:
Coat your index finger with the pastel coral or peach shade. This warm tone provides a nice contrast to the cooler mint and lilac shades. -
Paint the thumb:
Finish the first pass by painting your thumb with the mint green shade again to tie the look together, or choose a slightly lighter variation of teal if you have five distinct colors. -
Allow to dry:
Let this first layer dry for at least 5 minutes. Pastels are notoriously thick, so patience here prevents bubbling later. -
Apply second coats:
Repeat the process for a second coat on all nails. This layer will provide the true, opaque color. Float the brush gently over the nail to avoid dragging the first layer. -
Check opacity:
Inspect the yellow and mint nails specifically. If they still look slightly sheer or streaky, a very thin third coat might be necessary after the second has dried completely.
Milk It Up
If you don’t have pastel polish, mix a drop of your standard bright colors (red, blue, purple) into a puddle of white polish on a piece of foil to create custom pastels.
Step 3: Finishing Touches
-
Clean up edges:
Dip a small cleanup brush or an angled eyeliner brush into nail polish remover. Carefully trace around the cuticle line and sidewalls to remove any stray polish on the skin. -
Apply top coat:
Once the color is dry to the touch, apply a generous layer of glossy top coat. Seal the free edge by running the brush horizontally across the tip of the nail to prevent chipping. -
Hydrate cuticles:
After your nails are fully hard and dry (usually about 20-30 minutes), apply a drop of cuticle oil to the skin around each nail to rehydrate and add a salon-quality glow.
Streaky Yellows?
Pastel yellow is tricky. If it looks uneven, apply a coat of matte top coat between your color layers. The matte texture helps the next layer of polish grip evenly.
Enjoy your fresh and colorful fingertips as they brighten up your day
Stained-Glass Outline Nails
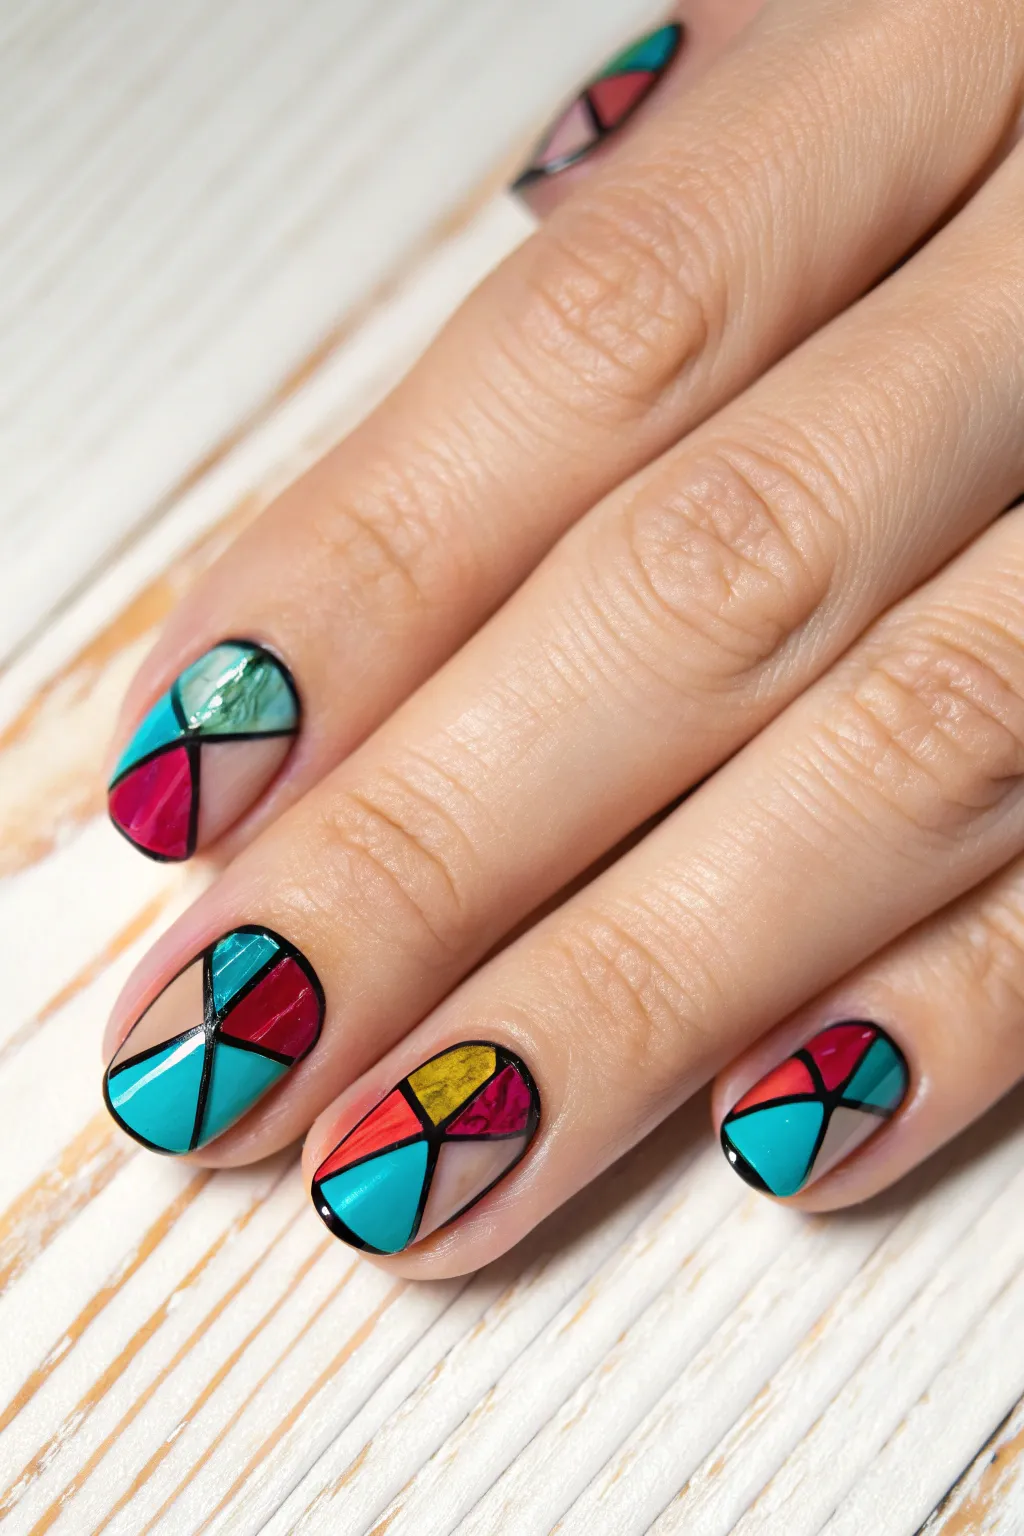
Bring the elegance of cathedral windows to your fingertips with this striking geometric nail art. This abstract stained-glass design combines bold black outlines with pops of vibrant jewel tones for a modern, artistic manicure.
Step-by-Step Tutorial
Materials
- Base coat
- Sheer nude or negative space polish
- Teal or turquoise opaque polish
- Deep berry red or magenta opaque polish
- Metallic gold foil or glitter polish
- Fine nail art liner brush (essential)
- Black highly pigmented gel paint or polish
- Dotting tool (optional)
- Glossy top coat
- Cleanup brush and acetone
Step 1: Preparation and Base
-
Prep the canvas:
Begin with clean, shaped nails. Push back your cuticles gently to ensuring you have the maximum surface area for your design. -
Apply base coat:
Apply a single layer of your favorite base coat to protect your natural nails and help the design adhere. -
Create the background:
Since parts of this design utilize negative space, apply one or two thin coats of a sheer nude polish. This evens out the nail bed tone without covering it entirely.
Steady Hands Secret
Rest your pinky finger on a table or against your other hand while painting the black lines. This anchor point eliminates shakes for crisper lines.
Step 2: Drawing the Framework
-
Load the liner brush:
Dip your fine liner brush into the black polish or gel paint. You want just enough product to create a smooth line, but not so much that it globs. -
Draw the central intersection:
Start by drawing two crossing lines near the center or bottom third of the nail to create a large ‘X’ shape. This acts as the anchor for your stained-glass pattern. -
Connect the edges:
Extend lines from your central ‘X’ out to the sidewalls and cuticle area. Vary the angles slightly on each nail so the pattern feels organic rather than stamped on. -
Refine the lines:
Go back over your lines if needed to ensure they are solid opaque black. Keep the lines relatively thin but distinct. -
Flash cure (if using gel):
If you are working with gel polish, flash cure for 10-30 seconds now to lock the black framework in place before adding color.
Make it Matte
Swap the glossy finish for a matte top coat. This transforms the look from shiny glass to a modern, velvety geometric art piece.
Step 3: Filling the Panes
-
Fill the first section:
Select a triangular section created by your black lines—usually a larger one near the free edge—and carefully fill it in with your teal polish. Use the liner brush for precision near the black borders. -
Add deep contrast:
Choose an adjacent or opposite section and fill it with the deep berry red polish. The contrast between the cool teal and warm red is key to this look. -
Incorporate texture:
Pick a smaller section for the gold accent. Using a metallic gold or a foil-effect polish adds that touch of light-catching dimension typical of stained glass. -
Leave negative space:
Crucially, leave one or two sections unpainted (showing the sheer nude base). This ‘negative space’ keeps the design airy and authentic to the reference image. -
Repeat the pattern:
Continue this filling process on all nails, randomizing which colors go into which geometric ‘pane’ so no two nails look identical. -
Tidy up errors:
If you accidentally paint over a black line, don’t panic. Simply use your fine liner brush with a tiny amount of black polish to re-trace and crisp up that border once the color is dry.
Step 4: Sealing the Look
-
Allow to dry:
Wait for all color sections to dry completely. If you apply the top coat too soon, you risk smearing the black lines into the lighter colors. -
Apply top coat:
Float a generous bead of glossy top coat over the nail. Floating means dragging the liquid, not the bristles, across the surface. -
Cap the free edge:
Run the brush horizontally across the very tip of your nail to seal the design and prevent chipping. -
Final hydration:
Once the nails are fully dry or cured, massage cuticle oil into the skin around the nails to rehydrate your fingertips.
Now you have a sophisticated, gallery-worthy manicure that looks far more complicated than it actually is
Mini Painted Masterpieces
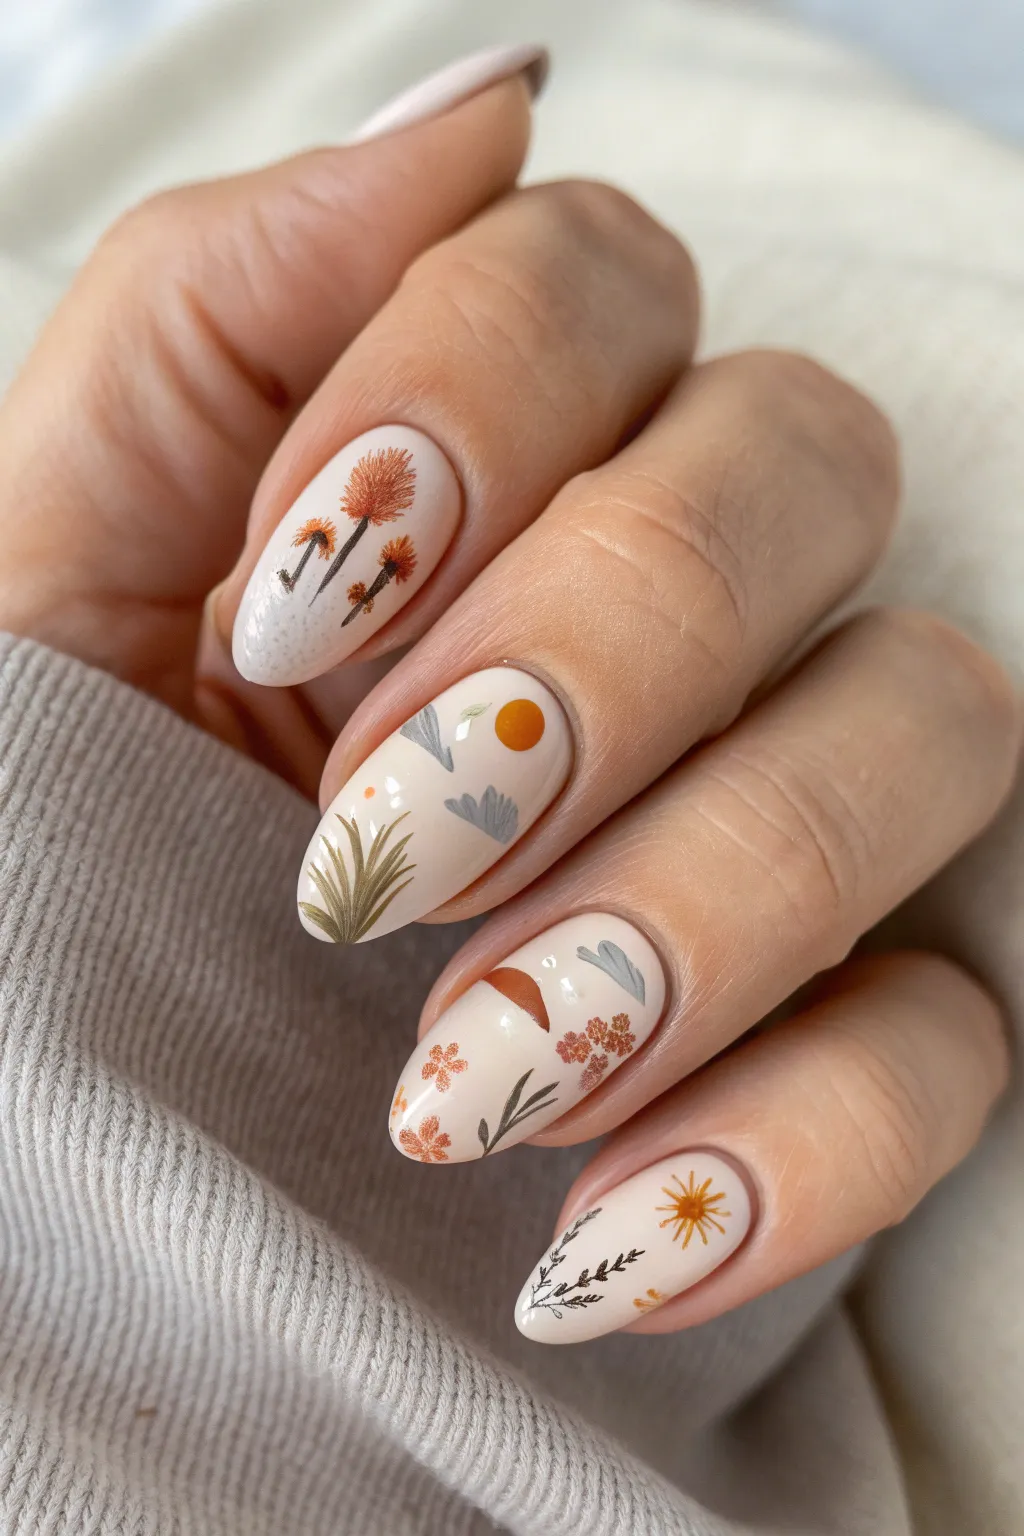
Capture the serene beauty of a desert landscape right on your fingertips with this intricate nail art design. Featuring a soft nude base adorned with tiny suns, abstract plants, and warm earth tones, this look is like wearing a mini painted masterpiece.
How-To Guide
Materials
- Creamy nude gel polish (opaque)
- Base coat and matte top coat
- Fine liner nail art brush (size 00 or 000)
- Detailing brush
- Gel paints: Burnt orange, rust red, sage green, olive green, muted grey-blue, dark brown, mustard yellow
- Lint-free wipes
- Isopropyl alcohol or cleanser
- LED/UV lamp
Step 1: Base Preparation
-
Prep the Canvas:
Start by shaping your nails into an almond shape, which complements this organic design perfectly. Push back cuticles and gently buff the nail surface to remove shine. -
Apply Base:
Apply a thin layer of base coat to all nails and cure for 30-60 seconds under your LED/UV lamp. -
Lay the Foundation:
Paint two coats of your creamy nude gel polish. Ensure each coat is thin and even, curing between layers. This neutral background is crucial for making the earth tones pop.
Shaky Hands?
Anchor your pinky finger against your other hand or the table for stability. Exhale slowly while drawing the finest lines to reduce trembling.
Step 2: Index Finger: Fuzzy Flora
-
Draw Stems:
Using your fine liner brush and dark brown paint, draw three thin, slightly uneven vertical lines starting from the middle of the nail. These will be the stems for your desert plants. -
Create Texture:
Take a small amount of rust-red or burnt orange paint. Instead of painting a solid shape, use a dry-brush stippling technique to dab fluffy tops onto the stems, mimicking the look of pampas grass or desert blooms. -
Add Depth:
While the paint is wet (or after a flash cure if you prefer safety), dab a tiny bit of darker brown near the base of the fluffy tops to add dimension. -
Cure:
Cure the index nail for 60 seconds.
Step 3: Middle Finger: Abstract Landscape
-
Paint the Sun:
Dip a dotting tool or the back of your brush into burnt orange paint and place a perfect circle near the top right cuticle area for the sun. -
Sketch Mountains:
With the muted grey-blue paint, sketch rough, triangular shapes resembling distant mountains or clouds. Keep them asymmetrical for an organic feel. -
Draw Agave:
At the tip of the nail, use olive green to paint spiky, grass-like strokes fanning upward. I like to flick the brush quickly here to get those tapered, sharp points naturally. -
Detail and Cure:
Add a tiny speck of orange near the mountains for balance, then cure fully.
Pro Tip: Custom Colors
Mix your gel paints on a palette before starting. Adding a tiny dot of white to your burnt orange or olive green creates softer, earthier pastels.
Step 4: Ring Finger: Floral Scene
-
Create Focal Points:
Paint a small semi-circle arch in rust red near the cuticle area. Below it, add irregular grey-blue shapes similar to the middle finger. -
Paint Tiny Blooms:
Using the tip of your smallest brush, dot clusters of small flowers in burnt orange. Group four or five tiny dots together to form each bloom. -
Add Greenery:
Draw delicate stems with sage green connecting to the flowers, and add a few standalone leaves near the free edge. -
Lock it In:
Once satisfied with the placement, cure the design.
Step 5: Pinky Finger: Sunburst & Twigs
-
Draw the Sunburst:
Paint a small mustard yellow circle in the upper middle of the nail. Carefully pull thin lines outward from the center to create sun rays. -
Sketch Delicate Twigs:
Using your finest liner brush and dark brown or black paint, draw a very thin twig silhouette climbing up from the tip of the nail. Add tiny V-shapes along the line for branches. -
Final Cure:
Cure the pinky nail completely.
Step 6: Finishing Touches
-
Seal the Art:
Apply a coat of matte top coat over all nails. A matte finish softens the design and gives it that trendy, artistic porcelain look. -
Final Cure and Clean:
Cure for a full 60 seconds. Wipe off the inhibition layer with cleanser if your top coat requires it, and apply cuticle oil to rehydrate the skin around your nails.
Now you have a gallery of miniature desert scenes right at your fingertips to admire all day long


Have a question or want to share your own experience? I'd love to hear from you in the comments below!