If your fridge works fine but looks blah, a little painted fridge makeover can turn it into the most charming piece in your kitchen. I love how a good bonding primer plus a playful finish can make an everyday appliance feel totally custom—like it finally matches your personality.
Classic Solid-Color Refresh
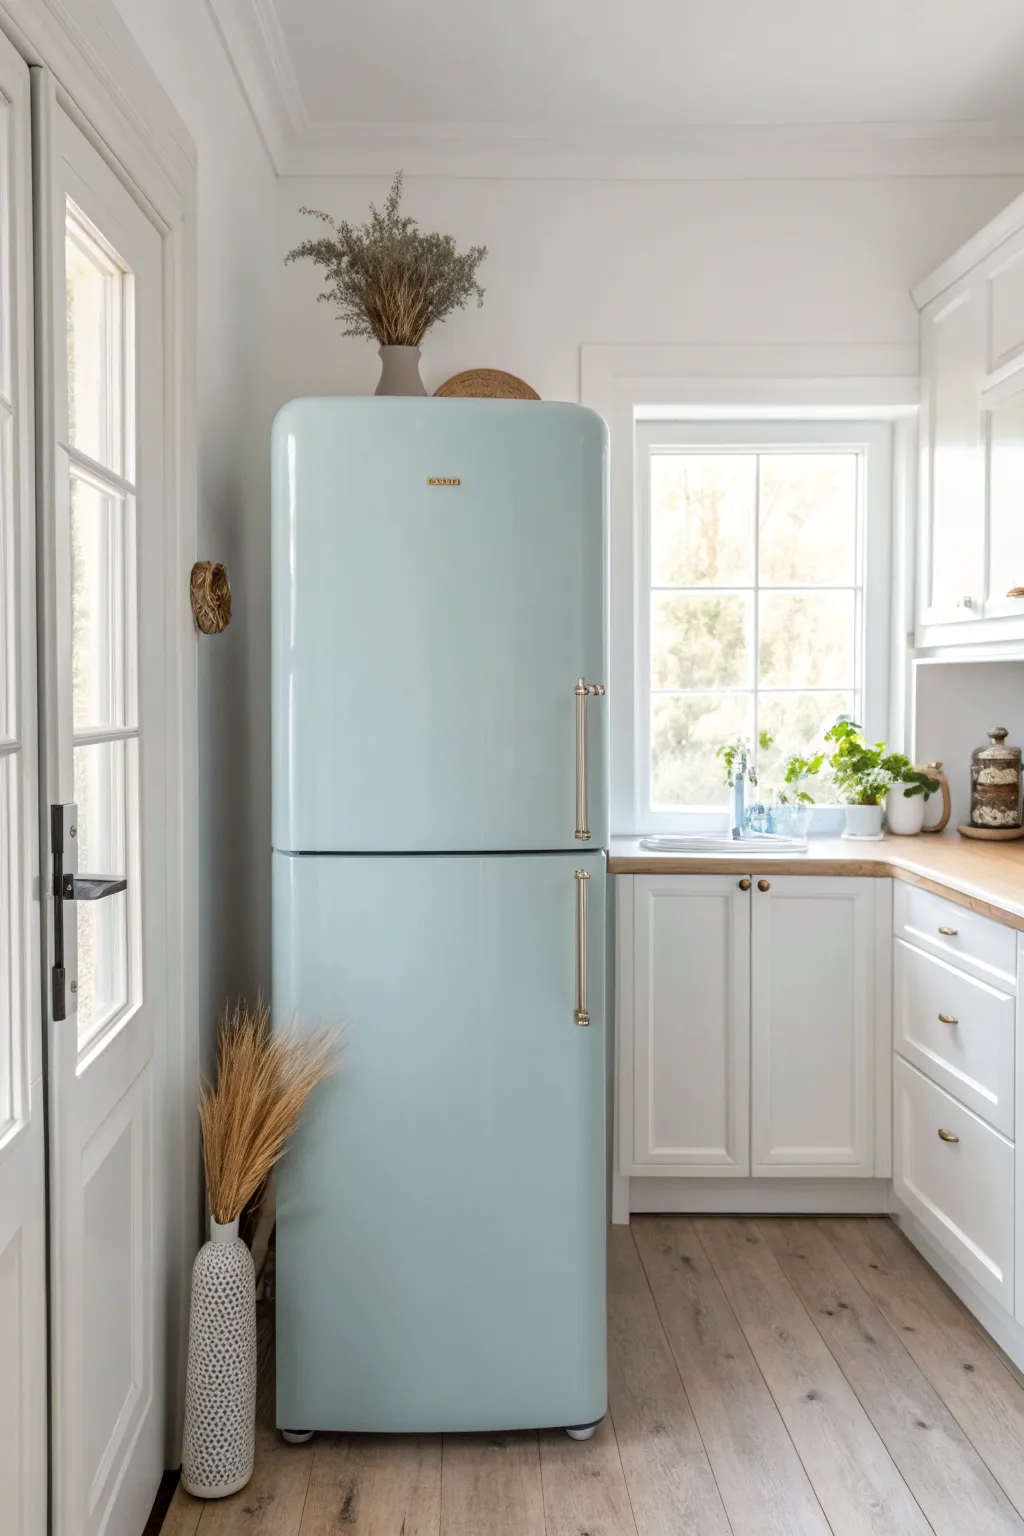
Transform a standard or dated white refrigerator into a charming focal point with a soft, vintage-inspired blue finish. This project delivers a high-end, custom appliance look without the designer price tag, perfect for adding character to any cottage or farmhouse kitchen.
Step-by-Step
Materials
- Refrigerator (existing unit)
- High-quality appliance epoxy paint or enamel (in a soft pastel blue)
- Sandpaper (120-grit and 220-grit)
- Painter’s tape
- Degreaser cleaner
- Metal primer (spray or brush-on)
- High-density foam roller
- Small angled sash brush
- Plastic drop cloths
- Screwdriver (for handle removal)
- Gold or brass spray paint (optional, for handles)
- Clear sealant (optional topcoat)
Step 1: Deep Cleaning & Prep
-
Clear and unplug:
Start by emptying the refrigerator completely and unplugging it from the wall outlet. Pull it away from the wall to give yourself ample 360-degree access to the sides and front. -
Remove hardware:
Using a screwdriver, carefully remove the door handles and any exterior badging or logos. Keep the screws and hardware together in a labeled baggie so nothing gets lost during the process. -
Protect the area:
Spread plastic drop cloths on the floor around the fridge. Use painter’s tape to mask off any rubber gaskets, hinges, or vents that you absolutely do not want painted. -
Degrease the surface:
Kitchen appliances accumulate invisible oils. Scrub the entire exterior surface down thoroughly with a heavy-duty degreaser or TSP alternative to ensure the paint will bond.
Step 2: Sanding & Priming
-
Scuff sand:
Using 120-grit sandpaper, go over the entire glossy surface of the fridge. You aren’t trying to strip the old finish, just creating a dull, ‘toothy’ texture for the primer to grab onto. -
Wipe down:
Remove all sanding dust with a damp microfiber cloth or tack cloth. Any leftover dust will create bumps in your final finish, so be thorough here. -
Apply first coat of primer:
Apply a thin, even coat of metal primer. If using a roller, use long vertical strokes. If using spray primer, keep the can moving to avoid drips. -
Sand the primer:
Once the primer is fully dry (check the can’s instructions), lightly sand it with finer 220-grit sandpaper to smooth out any brush strokes or texture. -
Wipe clean again:
Give the appliance another wipe down with a tack cloth to ensure a perfectly smooth base for your color.
Sticky Situation?
If the paint feels tacky, humidity is likely too high. run a dehumidifier or fan in the room. Don’t touch it! Let it cure for an extra 24-48 hours before testing again.
Step 3: Painting the Finish
-
Cut in the edges:
Dip your angled sash brush into the pastel blue appliance enamel. Carefully paint the difficult corners, around the hinge areas, and along the taped gasket lines first. -
Roll the first coat:
Using a high-density foam roller, apply the blue paint to the large flat surfaces. Roll in long, continuous vertical columns from top to bottom to minimize lap marks. -
Allow deep drying:
Appliance paint often takes longer to cure than wall paint. Let this first coat dry for at least 6 to 8 hours, or whatever the manufacturer specifically recommends. -
Light sanding:
I find that a very gentle pass with wet-dry sandpaper between color coats makes the final result look factory-sprayed. Wipe away the dust afterwards. -
Apply the second coat:
Repeat the rolling process for the second coat. This should provide full opacity and a rich, solid color color depth. -
Check for coverage:
Inspect the fridge in different lighting. If you see streaks or thin spots, a third light coat may be necessary once the second is dry.
Level Up: Retro Logo
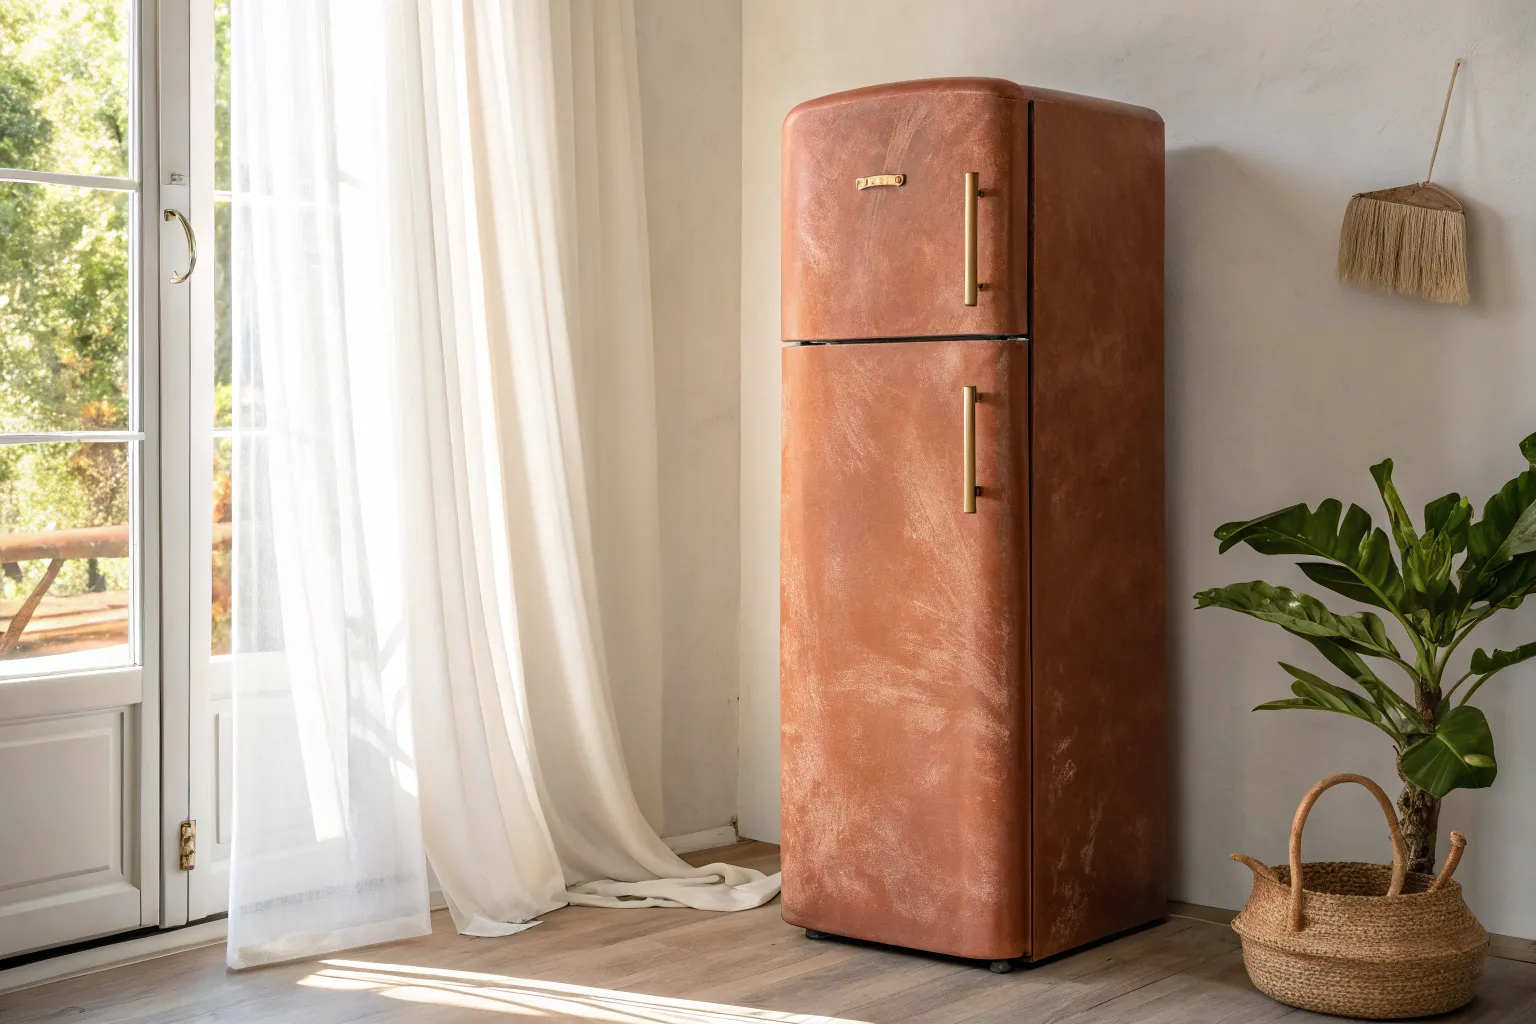
Order a custom vintage-style brass emblem online (like the one in the photo) and attach it to the upper door with strong adhesive for an authentic mid-century look.
Step 4: Reassembly
-
Update handles:
While the fridge dries, spray paint your removed handles with a metallic gold or brass finish to match the retro aesthetic shown in the photo. -
Remove tape carefully:
Score the edge of the painter’s tape with a utility knife before pulling it off. This prevents the tape from peeling up your fresh paint along with it. -
Reattach hardware:
Once the fridge has cured for at least 24 hours (longer is better to avoid scratching), screw the newly painted handles back into place. -
Final cure:
Wait the full cure time indicated on your paint can (sometimes up to 7 days) before scrubbing the surface or attaching heavy magnets.
Enjoy the cool, custom vibe your new retro-style refrigerator brings to the kitchen


Retro Pastel Pop
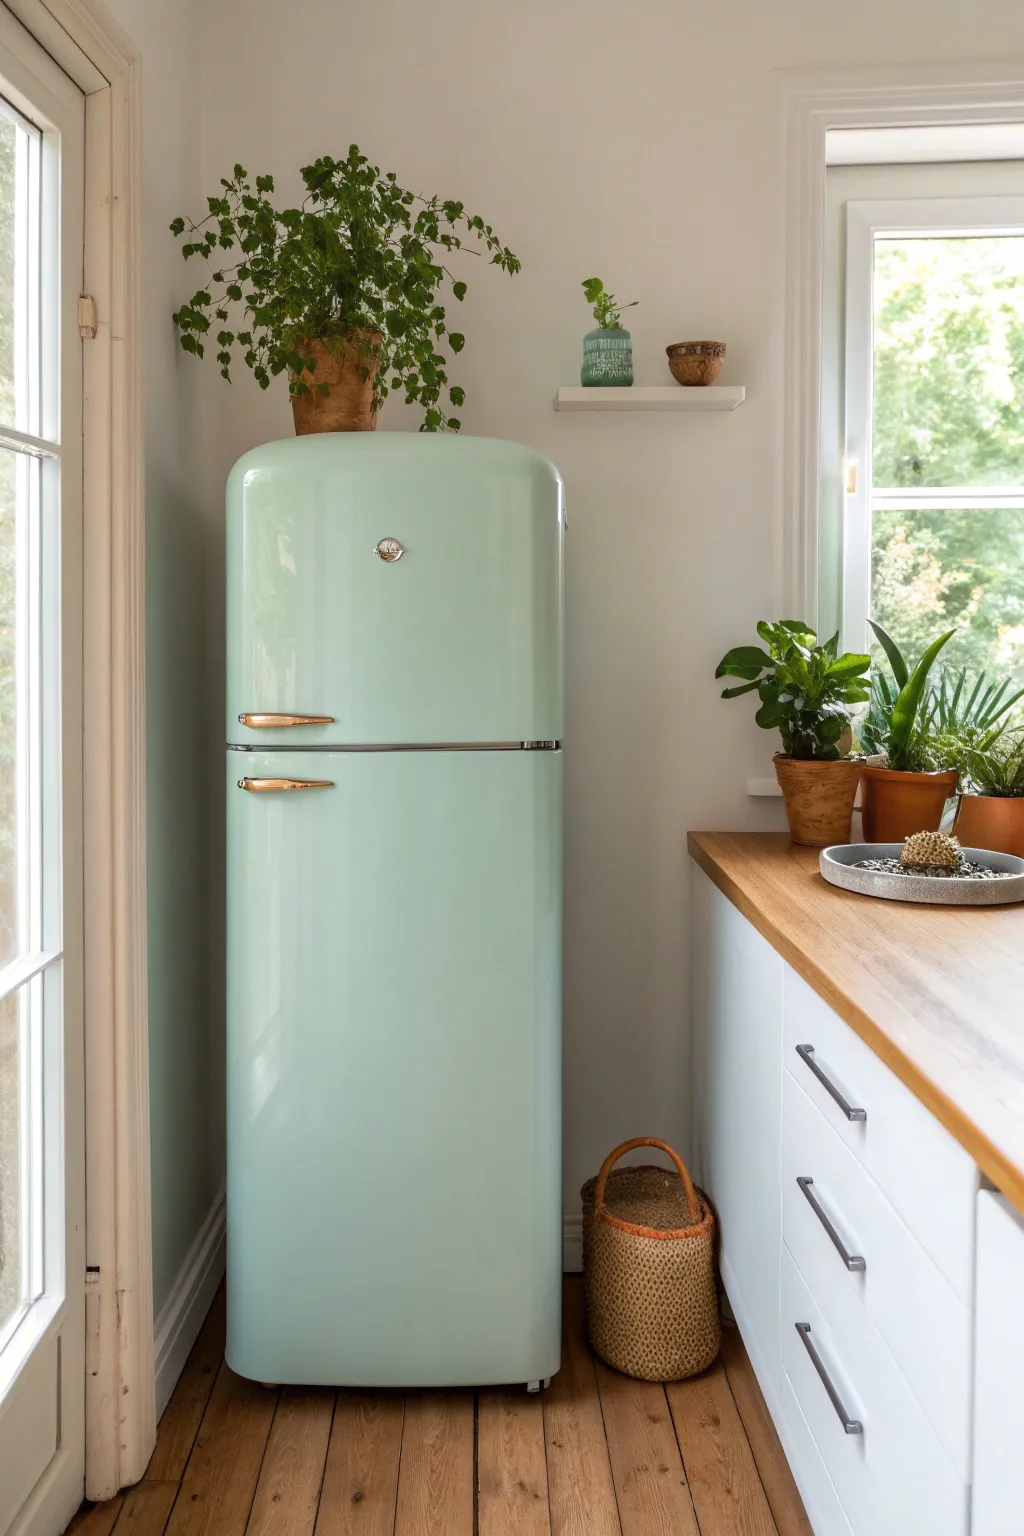
Transform a standard, boxy refrigerator into a vintage-inspired centerpiece with this soft pastel mint finish. By adding retro hardware and a high-gloss sheen, you’ll achieve that coveted mid-century aesthetic without the vintage appliance price tag.
Step-by-Step Tutorial
Materials
- Working refrigerator
- TSP substitute cleaner or degreaser
- Fine-grit sandpaper (220-320 grit)
- Clean lint-free cloths
- Painters tape
- Metal primer (spray can or roll-on)
- High-quality enamel paint (Pastel Mint Green)
- Foam roller and tray
- High-quality synthetic angle brush
- Clear gloss polyurethane topcoat (optional but recommended)
- Retro-style refrigerator handles (gold or copper finish)
- Drill with metal drill bits
- Screwdriver
- Small round decal or vintage-style car emblem (optional)
Step 1: Preparation & Dismantling
-
Clean surface:
Unplug the refrigerator and empty it completely. Wash the entire exterior surface thoroughly with a TSP substitute or strong degreaser to remove years of kitchen oils and grime. -
Remove hardware:
Unscrew and remove the existing factory handles. If there is a brand logo badge, gently pry it off or plan to paint over it. -
Scuff sand:
Using fine-grit sandpaper, lightly scuff the entire surface of the fridge. You aren’t trying to remove the original paint, just dulling the glossy finish to give the new primer something to grip. -
Wipe down:
Wipe away all sanding dust with a damp cloth, followed by a tack cloth to ensure the surface is perfectly clean. -
Masking:
Use painter’s tape to carefully mask off the rubber gaskets (seals) around the doors. This is crucial as paint on the gaskets can prevent the door from sealing properly. -
Protect floor:
Lay down a drop cloth or old cardboard around the base of the fridge to catch any drips.
Sticky Situation?
If the paint peels when removing tape, score the edge where the tape meets the paint with a sharp craft knife before pulling. This breaks the seal for a clean line
Step 2: Priming & Painting
-
Prime the surface:
Apply a coat of high-quality metal primer. A spray primer offers the smoothest base, but a foam roller works well indoors for better control. Let this dry completely according to the can’s instructions. -
First color coat:
Pour your pastel mint enamel paint into a tray. I find that using a high-density foam roller creates the smoothest, most ‘factory-like’ finish. -
Rolling technique:
Apply the paint in thin, even layers. Avoid overloading the roller to prevent drips. Work in long, vertical strokes from top to bottom. -
Brush work:
Immediately use your angled brush to catch any tight spots near hinges or edges that the roller missed, smoothing out brush marks as you go. -
Dry time:
Allow the first coat to dry fully. Don’t rush this; tacky paint will ruin the next layer. -
Second coat:
Apply a second coat of mint paint just like the first. This should provide full opacity. If streaks remain, a third thin coat may be necessary. -
Gloss topcoat:
Once the color is fully cured (give it at least 24 hours), apply a clear gloss polyurethane coat to mimic that high-shine vintage porcelain look and add durability.
Step 3: Hardware & Finishing Touches
-
Measure for handles:
Identify where you want your new retro handles to sit. They should generally be horizontal for a true mid-century look. -
Mark holes:
Measure the distance between the screw holes on your new handles and mark these spots on the fridge door with a pencil. Double-check levelness. -
Drill sheet metal:
Carefully drill through the metal door skin at your markings. Use a metal bit and apply steady pressure, being careful not to push through into the insulation too aggressively. -
Attach handles:
Secure the new handles using the screws provided, usually screwing them in from the outside or using self-tapping screws depending on the handle design. -
Add emblem:
Place a small round decal or a vintage chrome car emblem near the top center of the fridge to simulate the branding found on vintage appliances. -
Clean up:
Remove the painter’s tape from the gaskets very slowly to avoid peeling any paint. Plug the fridge back in and admire your work.
Go Extra Retro
For maximum 1950s flair, find a chrome ‘temperature gauge’ part from old machinery or a clock face and adhere it to the front door as a decorative element
Enjoy the cool, custom vibe your new retro appliance brings to the kitchen


Sleek Matte Black Moment
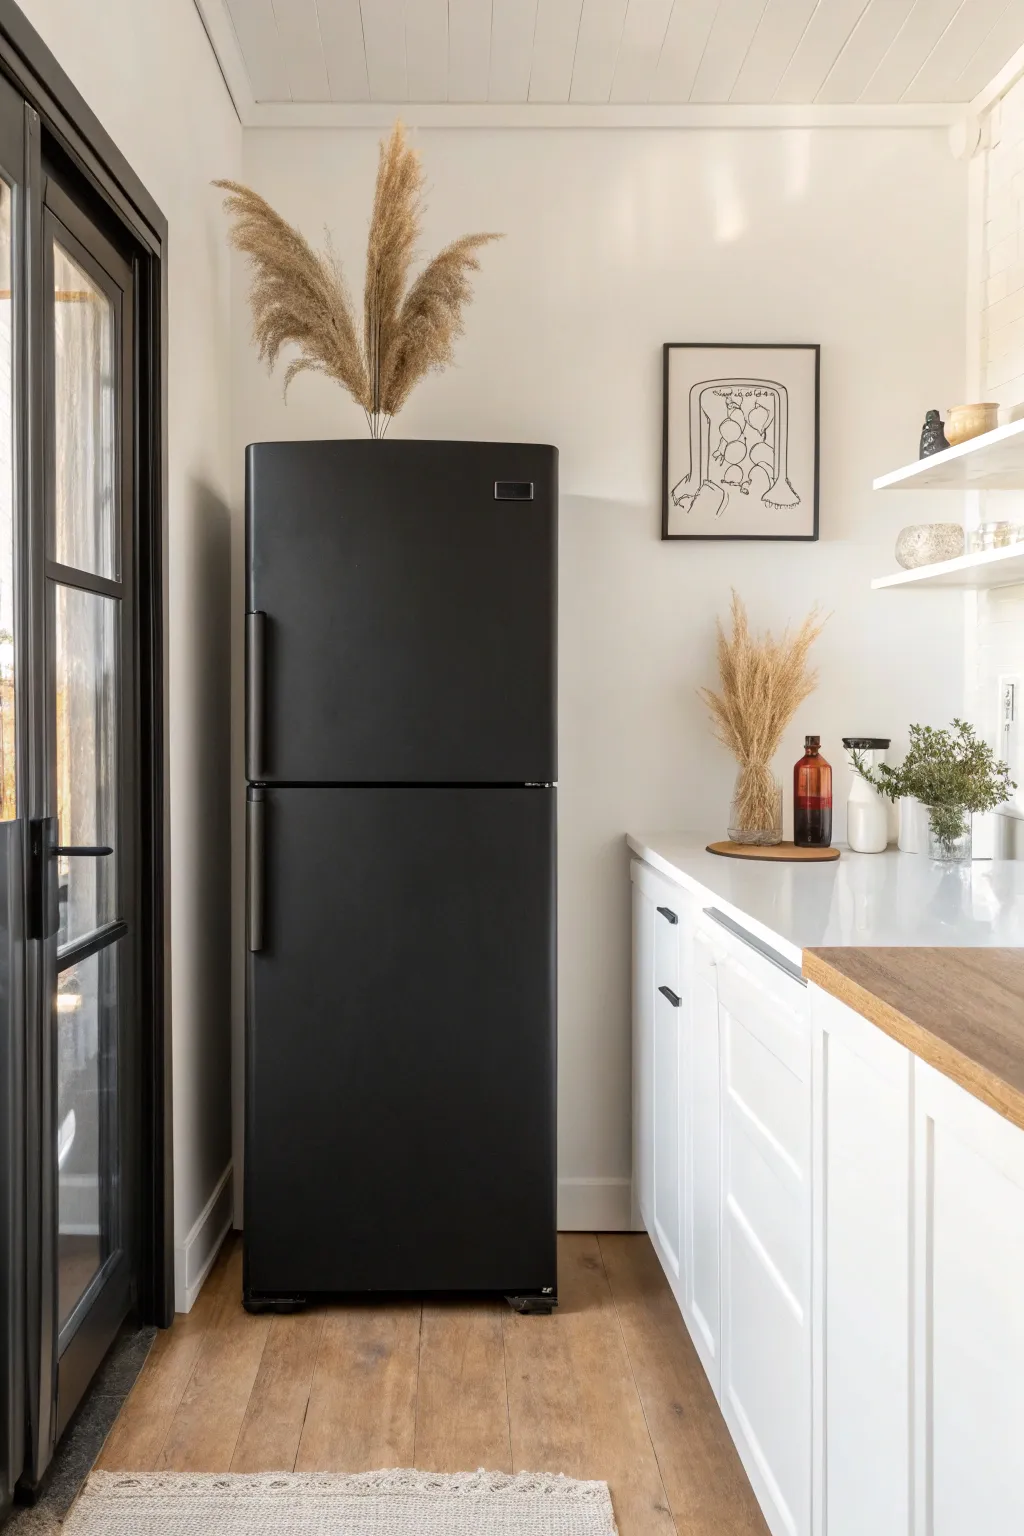
Transform a dated or basic white appliance into a high-end statement piece with just a few coats of paint. This project delivers a sophisticated, velvety matte black finish that looks custom-made rather than DIY.
How-To Guide
Materials
- High-quality bonding primer (oil-based works best for appliances)
- Matte black appliance epoxy or high-heat enamel spray paint
- Alternatively: Matte black chalkboard paint (for a brush-on texture)
- Medium-grit sandpaper (120-150 grit)
- Fine-grit sandpaper (220 grit)
- Foam rollers and tray (if brushing)
- Painter’s tape
- Plastic drop cloths
- Degreasing cleaner (TSP or heavy-duty kitchen cleaner)
- Lint-free microfiber cloths
- Screwdriver (for handle removal)
- Face mask and ventilation
Step 1: Preparation & Cleaning
-
Clear and unplug:
Start by completely emptying the refrigerator and unplugging it from the wall outlet. Move the unit into a well-ventilated area like a garage or open patio if possible, or protect your kitchen floors extensively with heavy-duty drop cloths. -
Remove hardware:
Using a screwdriver, carefully remove the refrigerator handles. If there are any logo badges or plastic trim pieces that can be popped off, remove those as well to ensure a seamless professional finish. -
Degrease the surface:
Scrub the entire exterior of the fridge with a heavy-duty degreaser or TSP solution. Kitchen appliances accumulate invisible layers of grease that will repel paint, so I really take my time here to ensure it’s squeaky clean. -
Sand for adhesion:
Scuff the entire glossy surface using medium-grit (120-150) sandpaper. You aren’t trying to strip the old paint off, but rather creating a rough texture for the new primer to grip onto. -
Wipe down:
Remove all sanding dust with a damp lint-free cloth, followed by a dry cloth. Ensure absolutely no dust remains. -
Masking time:
Apply painter’s tape carefully around the rubber gaskets (seals) of the doors so they don’t get painted, which could cause them to crack later. Tape off any hinges or digital displays you couldn’t remove.
Don’t Rush the Cure
Even if the paint feels dry to the touch in an hour, appliance paint takes days to fully ‘cure’ and harden. Treat the surface very gently for the first week to avoid permanent scratches.
Step 2: Priming & Painting
-
Apply bonding primer:
Apply a thin, even coat of bonding primer. If using a spray can, hold it 8-10 inches away and use sweeping motions. If rolling, use a high-density foam roller to minimize texture. -
Wait and sand:
Let the primer dry completely according to the can’s instructions. Once dry, lightly sand with fine 220-grit sandpaper to smooth out any bumps, then wipe away the dust. -
First coat of black:
Apply your first coat of matte black paint. Keep this layer light; it might look streakier than you expect, but thin layers prevent drips and cure harder than thick ones. -
Dry and inspect:
Allow the first coat to dry fully. Check for any drips or runs; if you find any, sand them gently before proceeding to the next step. -
Second coat application:
Apply the second coat of matte black. This should provide full opacity. If you are rolling paint, finish with long, vertical strokes from top to bottom to maintain a uniform sheen. -
Optional third coat:
If the finish looks uneven or the original color is peeking through, apply a third thin coat. Matte finishes show flaws easily, so patience with multiple thin layers is key. -
Handle treatment:
While the fridge dries, spray or paint your handles. You can match them in matte black for a monochrome look, or use a metallic brass or copper spray paint for contrast.
Metallic Accent
For a truly luxe industrial look, swap the standard plastic handles for real metal pulls. You can often adapt heavy-duty cabinet hardware to fit existing fridge handle holes.
Step 3: Finishing Touches
-
Remove tape:
Carefully peel away the painter’s tape while the final coat is still slightly tacky to prevent the dried paint from peeling off with the tape. -
Curing time:
Let the refrigerator cure for at least 24 to 48 hours before handling it heavily. The paint needs to harden fully to resist scratching. -
Reattach hardware:
Screw the handles back into place carefully. It helps to put a small piece of felt or tape behind the screw points to avoid scratching your fresh paint job during installation. -
Clean up edges:
If any paint bled onto the rubber seal, gently scrape it away with a fingernail or use a cotton swab with a tiny bit of paint thinner.
Enjoy the sleek, modern focal point you’ve created for your kitchen.


Bold One-Color Statement
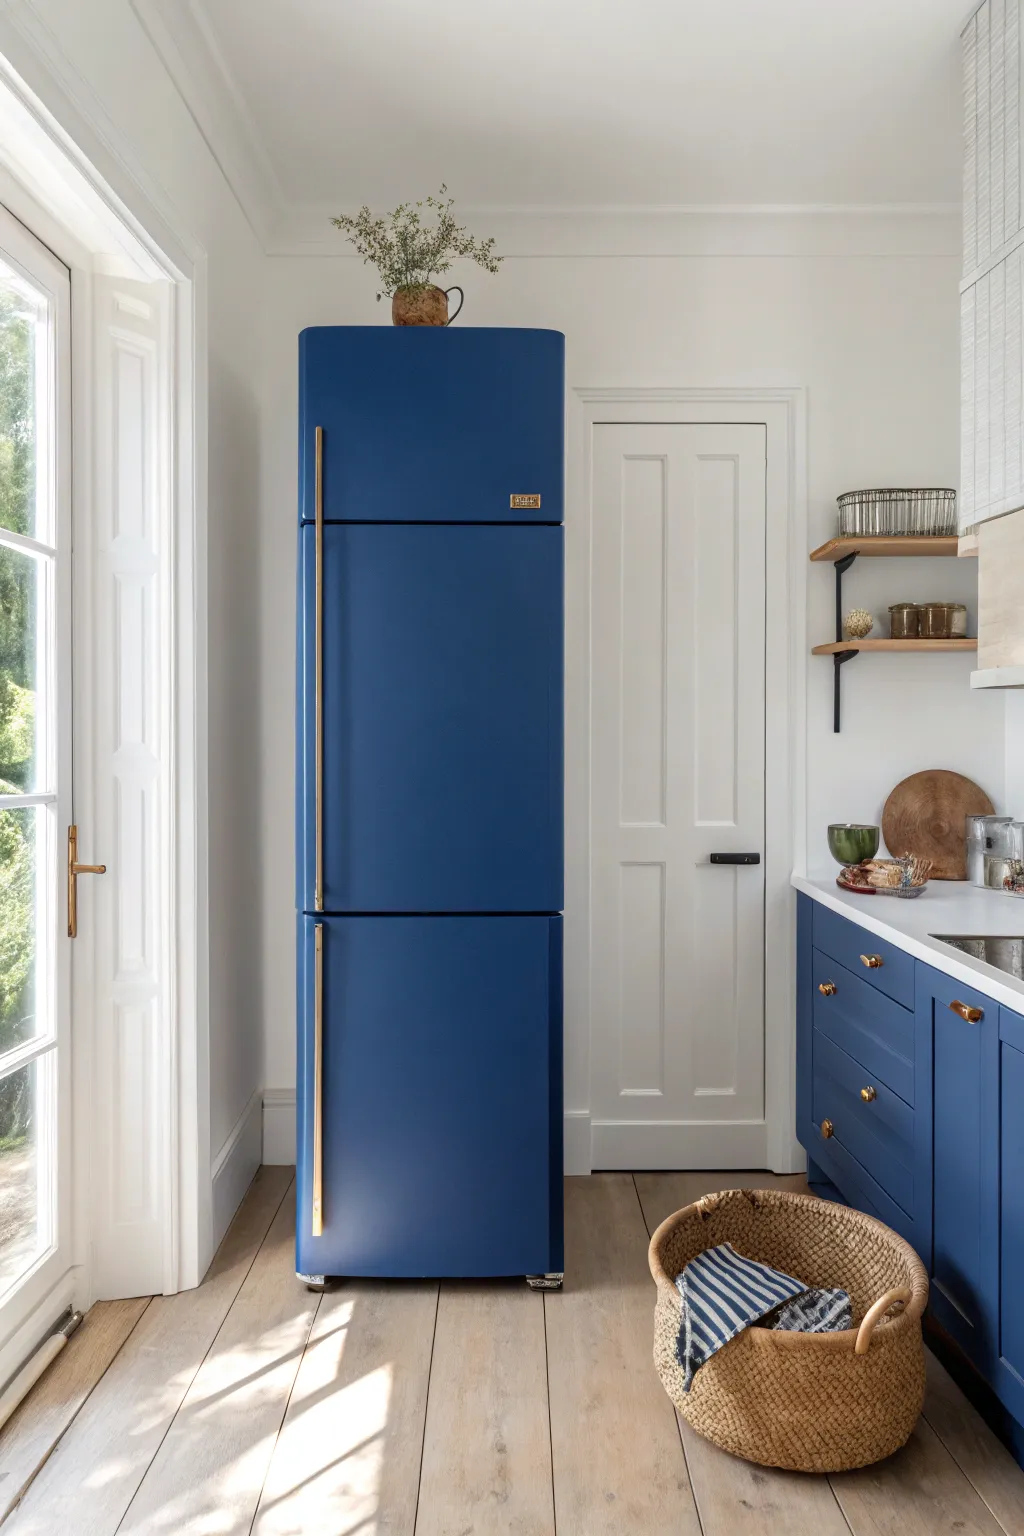
Transform a standard appliance into a high-end designer statement piece with a rich, velvety finish that demands attention. This project turns a basic white refrigerator into a stunning focal point using a deep, matte blue paint and upgraded hardware.
Step-by-Step Tutorial
Materials
- Refrigerator (existing or second-hand)
- Heavy-duty degreaser or TSP substitute
- Medium (120-grit) and fine (220-grit) sandpaper
- Painter’s tape
- Metal-bonding primer (high quality)
- Matte finish enamel paint (Deep Royal or Navy Blue)
- Foam roller (4-inch or 6-inch) for smooth surfaces
- High-quality angled sash brush
- Gold or brass appliance handles (long bars)
- Drill and metal bits
- Drop cloths
- Clear matte polyurethane (optional topcoat)
Step 1: Preparation
-
Disconnect and clear:
Unplug your refrigerator and move it to a well-ventilated workspace, preferably a garage or outdoors if weather permits. Remove all food and interior shelves if you want to be thorough, though leaving shelves in is fine if taped off. -
Remove hardware:
Unscrew the existing handles and any removable trim pieces. If there are visible logos or emblems you want to hide, carefully pry them off or plan to fill over them. -
Deep clean:
Scrub the entire exterior using a heavy-duty degreaser or TSP substitute. Kitchen appliances accumulate invisible grease layers that will repel paint, so be extremely diligent here. -
Scuff sanding:
Sand the entire surface with 120-grit sandpaper. You aren’t trying to strip the old finish, just creating ‘tooth’ for the new primer to grip. Wipe away all dust with a damp tack cloth. -
Tape edges:
Apply painter’s tape carefully to gaskets (the rubber seals), interior edges, and hinge mechanisms. Take your time pressing the tape down firmly to prevent bleed-through.
Step 2: Priming & Painting
-
Apply primer:
Roll on a coat of high-quality metal-bonding primer. Use the foam roller for the large flat doors and the brush for tight corners near the hinges. Let this dry completely according to the can’s instructions. -
Light sanding:
Once the primer is dry, quickly run over it with 220-grit sandpaper to knock down any bumps or texture, then wipe clean. -
First coat of color:
Stir your matte blue enamel thoroughly. I prefer to start with the difficult spots, brushing the edges and hinges first, then immediately rolling the large flat areas to blend the brush strokes before they dry. -
Drying time:
Allow the first coat to cure for at least 6 to 12 hours. Matte paints can be touch-sensitive when wet, so patience is key. -
Second coat:
Apply the second (and likely final) coat using the same technique. Maintain a ‘wet edge’ with your roller to avoid lap marks. If the blue looks slightly uneven, a third thin coat might be necessary. -
Optional topcoat:
For extra durability in a high-traffic kitchen, you can apply a clear matte polyurethane sealer once the paint has cured for 24 hours.
Smooth, Factory Finish
Add a paint conditioner like Floetrol to your latex-based enamel. It extends drying time and helps the paint self-level, eliminating brush marks.
Step 3: Hardware Upgrade
-
Measure for handles:
Since the new long gold bars likely won’t match the old holes, measure carefully where the new mounts should go. Use a level to ensure the long vertical bar sits perfectly straight. -
Drill pilot holes:
Using a metal drill bit, carefully drill pilot holes into the refrigerator door. Go slowly and use firm pressure to punch through the metal skin without denting it. -
Fill old holes:
If the old handle holes are visible, fill them with Bondo or automotive body filler, sand flush, and touch up with paint carefully before installing the new handles. -
Install gold bars:
Secure the new brass or gold handles into place. The contrast of the metallic gold against the matte blue is what gives this project its sophisticated look. -
Remove tape:
Score the edge of the painter’s tape with a utility knife before peeling it away to ensure you don’t pull up any dried paint.
Paint Peeling Off?
This usually means grease was left behind. You must spot-sand the peeling area down to bare metal, re-clean with degreaser, re-prime, and then paint again.
Now step back and admire how a simple can of paint completely reinvented the character of your kitchen
BRUSH GUIDE
The Right Brush for Every Stroke
From clean lines to bold texture — master brush choice, stroke control, and essential techniques.
Explore the Full Guide
Two-Tone Top-and-Bottom Split
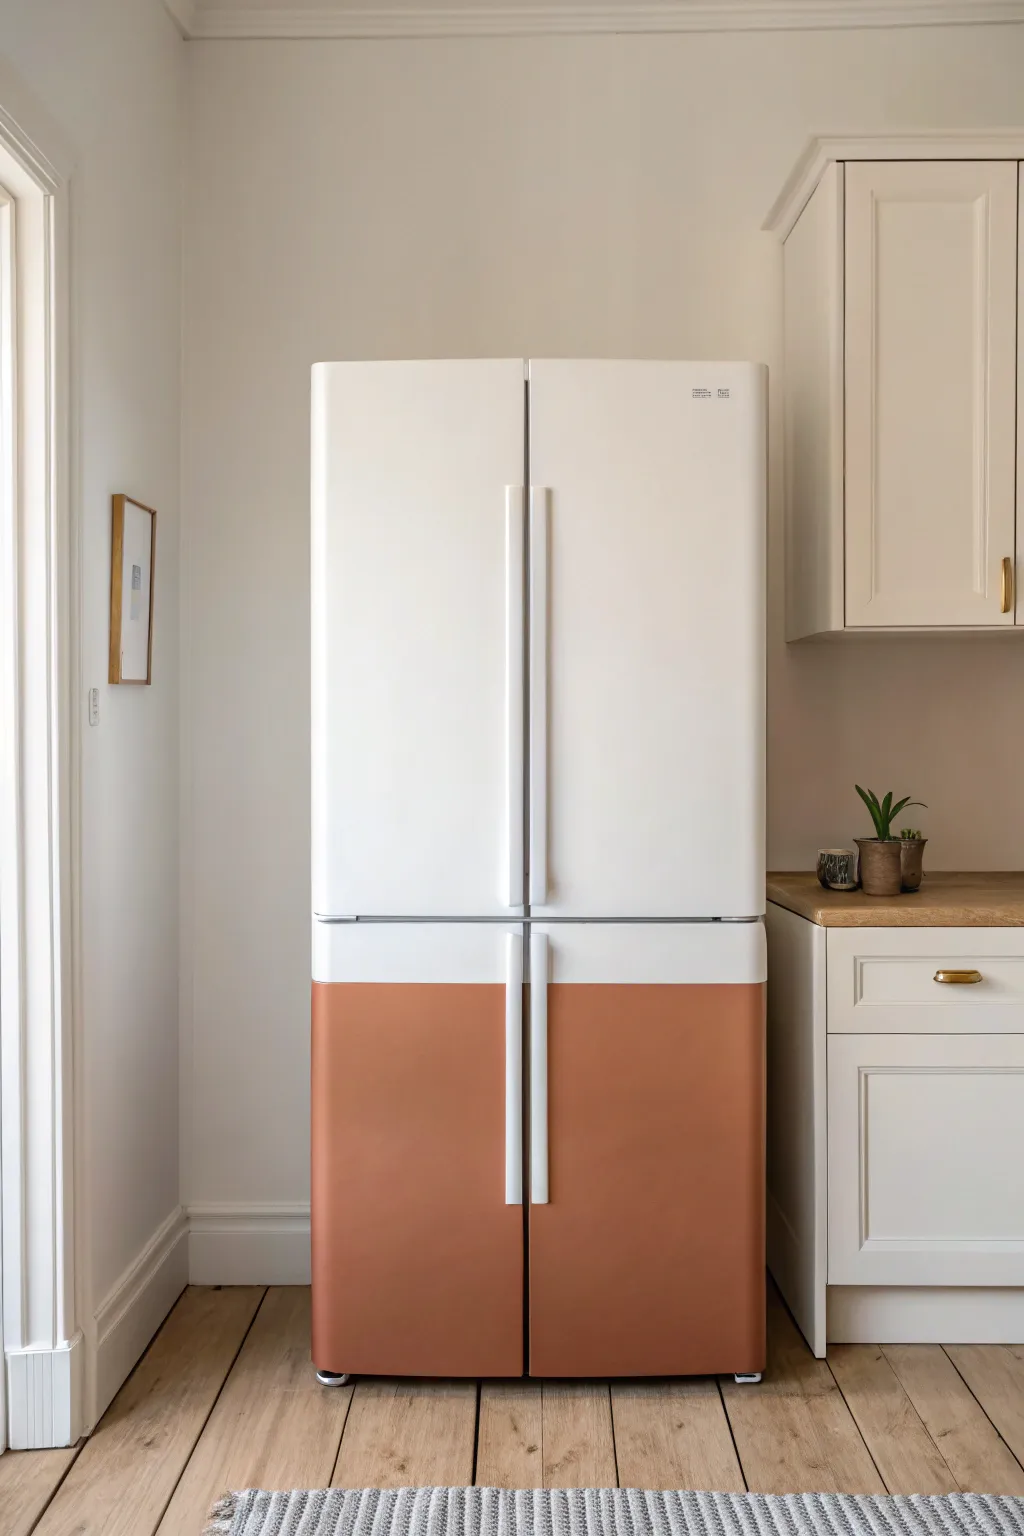
Transform a standard white refrigerator into a bespoke design feature with this elegant two-tone look. By adding a metallic copper finish to just the bottom doors, you create a sophisticated split design that mimics high-end appliances without the price tag.
How-To Guide
Materials
- White appliance epoxy paint (if the original fridge needs a refresh)
- Metallic copper or bronze spray paint (appliance-safe or suitable for metal)
- High-grit sandpaper (400-grit)
- Fine sanding sponge
- Painter’s tape (high quality)
- Plastic drop cloths or masking film
- Degreaser or TSP substitute
- Microfiber cloths
- Screwdriver set
- Clear sealant spray (optional, for durability)
- Cardboard or large workspace protection
Step 1: Preparation & Disassembly
-
Unplug and empty:
Before doing anything else, unplug your refrigerator and remove all food items. If you are painting the entire unit, move it to a well-ventilated area like a garage; if painting in place, open all windows for airflow. -
Remove hardware:
Use your screwdriver to carefully remove the door handles. While it’s tempting to tape around them, taking them off ensures a much cleaner, professional finish where the handle meets the door. -
Clean thoroughly:
Wipe down every exterior surface with a degreaser or TSP substitute. Kitchen appliances accumulate invisible grease layers that will repel paint, so really scrub well and let it dry completely. -
Surface sanding:
Lightly scuff the surfaces you intend to paint with 400-grit sandpaper. You don’t need to strip the original finish, just create enough ‘tooth’ for the new paint to adhere. Wipe away the dust with a damp microfiber cloth.
Uneven Spray Texture?
If the metallic paint looks textured or ‘dusty,’ you are likely spraying from too far away. The paint dries in the air before hitting the fridge. Move closer and keep a wet edge.
Step 2: Masking the Design
-
Detailed masking:
This is the most critical step for this specific look. Locate the horizontal gap between the upper and lower doors. This natural line will be your guide. -
Protect the top section:
Apply painter’s tape along the bottom edge of the upper doors to protect the white finish. Ensure the tape is pressed down firmly to prevent bleed-through. -
Cover the surroundings:
Use plastic drop cloths to completely cover the upper half of the fridge, taping it securely at the waistline. Also, cover the floor and nearby cabinets generously, as metallic spray paint particles tend to travel. -
Handle preparation:
If you are keeping the handles white (as shown in the photo), set them aside. If they need a refresh, prep them separately.
Step 3: Applying the Copper Finish
-
Prime the surface:
Apply a thin coat of metal primer to the bottom doors. This promotes adhesion and ensures the metallic color looks rich and even. -
First coat of copper:
Shake your metallic copper spray can vigorously for at least one minute. Hold the can 8-10 inches away and spray in smooth, sweeping motions, overlapping each pass slightly. Keep this coat very light; it shouldn’t be opaque yet. -
Wait and observe:
Let the first coat dry for about 15-20 minutes. I usually take a step back during this time to check for any potential drips before they harden. -
Build the color:
Apply a second and third coat, allowing drying time in between. Metallic paints often require multiple thin layers to achieve that deep, solid luster without looking streaky. -
Seal the finish:
Once the final color coat is dry to the touch, apply a clear topcoat. This protects the finish from daily wear and tear, which is important for lower doors that might get kicked or bumped.
Add a Luxe Touch
Swap the original white plastic handles for actual brass or copper hardware bars. You may need to fill old screw holes and drill new ones, but it elevates the look endlessly.
Step 4: Finishing Touches
-
Remove tape carefully:
Don’t wait for the paint to cure completely tailored hard. Remove the tape while the paint is still slightly tacky to ensure a crisp, sharp line without peeling. -
Curing time:
Let the fridge sit untouched for at least 24 hours. The paint may feel dry, but it needs time to harden fully before you reinstall hardware. -
Reattach handles:
Screw the white handles back onto the doors. The contrast between the white handle and the new copper background is what really makes this design pop. -
Final clean up:
Remove all drop cloths and slide the fridge back into position. Plug it in and admire your custom appliance makeover.
Enjoy the warmth and custom style your new two-tone fridge brings to the kitchen
Color-Blocked Doors and Panels
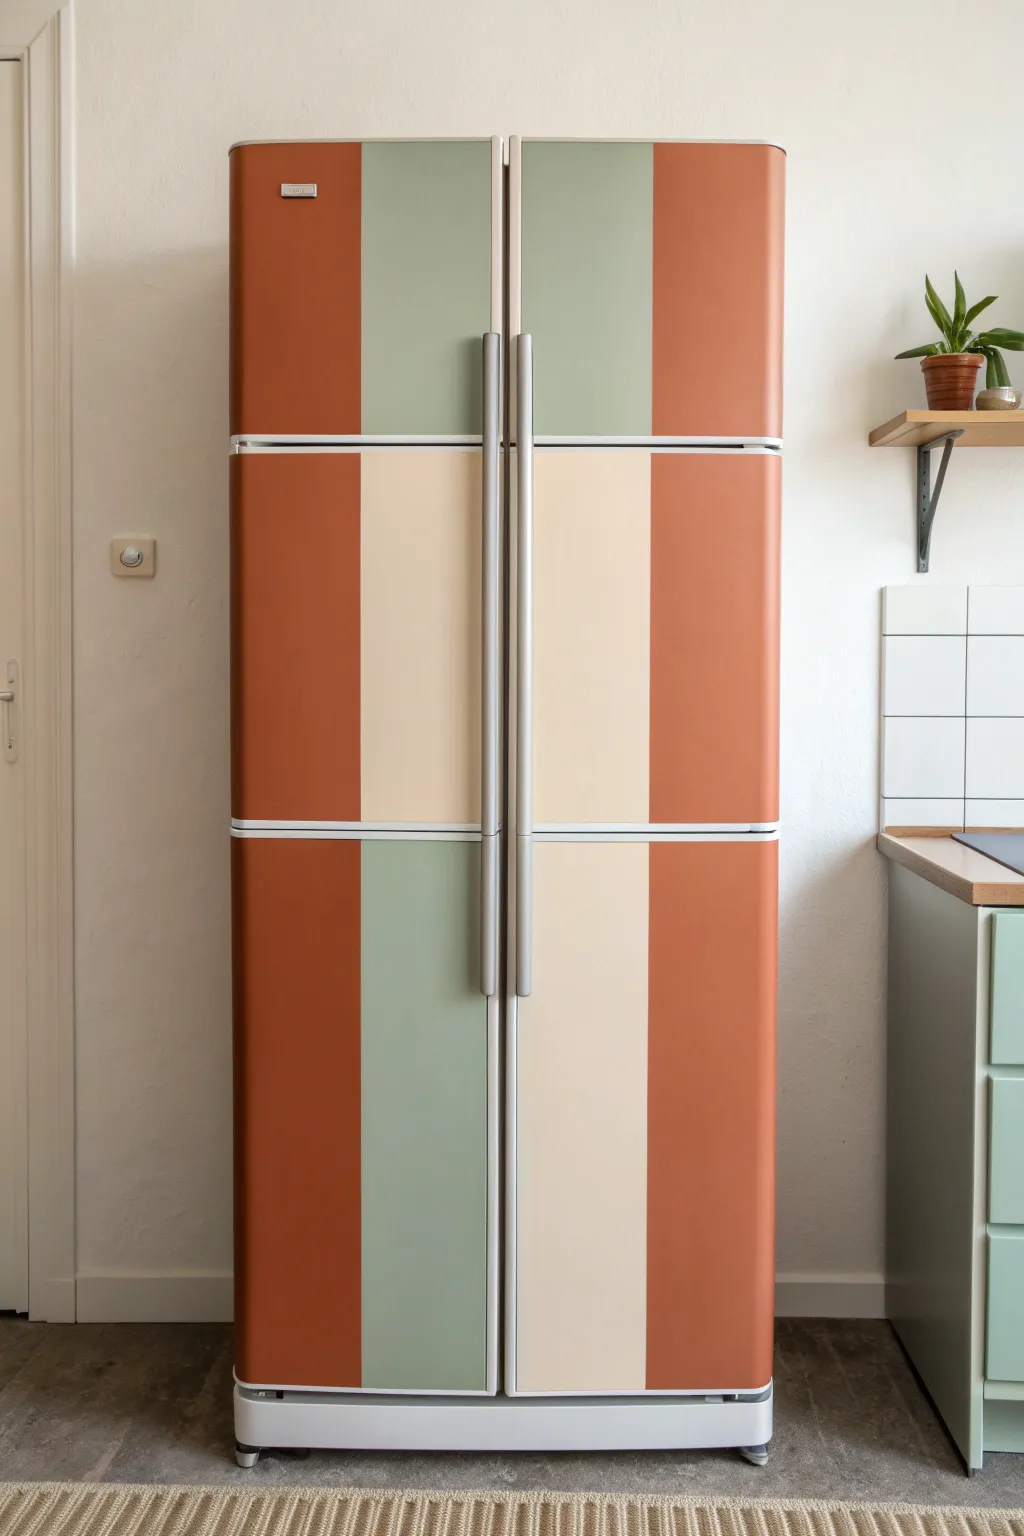
Transform a plain white refrigerator into a mid-century modern statement piece with this bold color-blocked design. Using a warm palette of terracotta, sage, and cream, distinct rectangular sections create a custom look that feels both vintage and fresh.
Detailed Instructions
Materials
- Appliance-grade spray paint or enamel paint (Terracotta/Burnt Orange)
- Appliance-grade spray paint or enamel paint (Sage Green)
- Appliance-grade spray paint or enamel paint (Cream/Off-White)
- High-quality painter’s tape (frog tape recommended)
- Fine-grit sandpaper (220-400 grit)
- Liquid deglosser or TSP substitute
- Clean lint-free rags
- Clear spray sealant (matte or satin finish)
- Screwdriver (for handle removal)
- Drop cloths and plastic sheeting
- Measuring tape
- Level or straight edge
- Primer designed for metal/plastic surfaces
Step 1: Preparation & Planning
-
Unplug and empty:
Begin by unplugging the refrigerator and removing all food items. If possible, move the fridge to a well-ventilated area like a garage or open patio for easier painting. -
Remove hardware:
Using your screwdriver, carefully remove the door handles. If there are plastic logo badges or trim pieces that can be popped off, remove those as well to ensure a clean finish underneath. -
Clean thoroughly:
Wash the entire exterior surface with soapy water to remove kitchen grease. Follow this up with a liquid deglosser or TSP substitute on a rag to ensure absolutely no residue remains. -
Sand the surface:
Lightly scuff the shiny factory finish using fine-grit sandpaper. You aren’t trying to remove the paint, just taking the gloss off so the new primer adheres better. -
Wipe down:
Use a damp, lint-free cloth to remove all sanding dust. Let the surface dry completely before moving forward.
Tape Removal Trick
If paint seems to be bridging over the tape line, lightly score the edge with a very sharp craft knife before peeling to prevent ripping your new color blocks.
Step 2: Base Coat & Mapping
-
Apply primer:
Spray or roll on a bonding primer suitable for appliances. This is crucial for durability. Apply one thin, even coat and let it dry according to the manufacturer’s instructions. -
Paint the lightest color:
It’s easiest to start with the cream color as your base. Apply the cream paint to the entire fridge, or at least the areas that will remain cream. I prefer doing the whole door to ensure an even texture. -
Let it cure:
Allow this base coat to dry thoroughly. Wait at least 24 hours; if the paint is soft, the tape you apply next will peel it right off. -
Measure the grid:
Using a measuring tape and level, lightly mark your vertical division lines with a pencil. Based on the design, you need a central vertical split where the doors meet, and horizontal splits aligned with the door gaps. -
Tape the first sections:
Apply painter’s tape to block off the areas that should remain cream. Press the edges of the tape down firmly with your fingernail or a credit card to prevent bleed-through.
Step 3: Adding Color Blocks
-
Apply terracotta paint:
Cover the sage and cream areas with plastic sheeting and tape. Spray or roll the terracotta paint into the designated outer vertical rectangles. Apply 2-3 light coats rather than one heavy one to avoid drips. -
Remove tape while slightly wet:
Carefully peel back the tape while the terracotta paint is still slightly tacky but not wet. This helps create a crisp line without pulling up dried chips of paint. -
Dry and re-tape:
Allow the terracotta sections to dry completely (another 24 hours is safest). Once dry, tape over the edges of your new terracotta lines and the cream sections to expose only the areas for the green paint. -
Apply sage green:
Apply the sage green paint to the remaining designated rectangular blocks. Again, use multiple light coats for the smoothest finish. -
Reveal the design:
Gently remove all remaining tape and plastic masking. Move slowly at a 45-degree angle to ensure clean edges between your three distinct colors.
Make it Matte
For an ultra-modern look, skip the glossy finish usage. Use chalk paint sealed with wax, or a flat-matte spray sealer to get that trendy, soft-touch texture.
Step 4: Finishing Touches
-
Seal the surface:
Once the paint has cured for a few days, apply a clear topcoat sealant. This protects your artwork from magnets, fingerprints, and daily cleaning. -
Reinstall hardware:
Screw the handles back into place. If the handles looked worn, you might have spray painted them a metallic silver or matte black while they were off. -
Final clean:
Wipe down the finished fridge with a soft cloth to remove any lingering dust from the process before plugging it back in.
Enjoy the vibrant, custom look of your new kitchen centerpiece

PENCIL GUIDE
Understanding Pencil Grades from H to B
From first sketch to finished drawing — learn pencil grades, line control, and shading techniques.
Explore the Full Guide
Soft Neutral, Cozy Kitchen Blend

Transform a standard or dated refrigerator into a warm, vintage-inspired focal point with a soft ‘latte’ beige finish. This project proves that you don’t need to buy expensive retro appliances to achieve that cozy, high-end look in your kitchen.
Detailed Instructions
Materials
- Refrigerator (cleaned and defrosted)
- High-grit sandpaper (400-600 grit)
- Medium-grit sandpaper (120-220 grit)
- Bonding primer (specifically for metal/glossy surfaces)
- Appliance epoxy or enamel paint (Warm Beige/Latte color)
- High-density foam roller
- Small angled sash brush
- Detail brush
- Painter’s tape
- Plastic drop cloths
- Screwdriver (for handle removal)
- Mild degreaser or TSP substitute
- Tack cloth
- Liquid sandpaper/deglosser (optional)
Step 1: Preparation Station
-
Handle Hardware First:
Begin by removing all hardware from the fridge. Use your screwdriver to take off the handles and set them aside with their screws in a labeled baggie so nothing gets lost. -
Clean Slate:
Scrub the entire exterior surface thoroughly with a mild degreaser or TSP substitute. Kitchen appliances accumulate invisible grease layers that repel paint, so be meticulous. -
Scuff Sanding:
Using the medium-grit sandpaper (120-220), sand the existing finish to remove the glossy sheen. You aren’t trying to strip it to bare metal, just creating ‘teeth’ for the new paint to grab onto. -
Dust Removal:
Wipe down the entire fridge with a damp cloth to remove sanding dust, followed immediately by a pass with a tack cloth to pick up fine particles. -
Masking Tape Master:
Apply painter’s tape carefully over the rubber gaskets (seals) around the doors. Paint on the seals can cause them to crack or lose suction, so take your time here. -
Protect the Zone:
Lay down your plastic drop cloths around the base of the fridge and tape off any hinges or logos you wish to keep original.
Smooth Operator Tip
For a truly glass-like finish without spray equipment, use a leveling additive (like Floetrol) in your enamel paint. It relaxes brush marks as the paint dries.
Step 2: Prime Time
-
Apply Bonding Primer:
Pour your bonding primer into a tray. Use the high-density foam roller to apply a thin, even coat over the large flat surfaces. -
Cut in Corners:
While the main surfaces are wet, use your small angled brush to smooth out the primer in tight corners, around hinge areas, and near the masked gaskets. -
Dry and Inspect:
Allow the primer to dry completely according to the manufacturer’s instructions. Once dry, check for any drips or rough patches. -
Smooth the Base:
Lightly sand the primed surface with high-grit sandpaper (400-600) to ensure a glass-smooth base. Wipe away the dust with a tack cloth.
Fixing Drips
If you spot a drip while painting, don’t brush over it if it’s tacky! Wait for it to fully dry, sand it smooth with 600-grit paper, and then recoat that area.
Step 3: Painting the Finish
-
First Coat Application:
Stir your beige appliance enamel thoroughly. Load your foam roller lightly—too much paint causes texture—and apply the first coat in long, vertical strokes. -
Feather the Edges:
Immediately follow up with a dry-brush technique or very light roller pressure to feather out any lap lines before the paint begins to tack up. -
Detailed Areas:
Use the detail brush to carefully paint around the hinge caps and complex curves where the roller can’t reach, blending these brushstrokes into the rolled wet edge. -
Patience is Key:
Let this first coat dry fully. I usually wait 24 hours between coats on appliances to ensure the finish hardens properly, even if the can says it dries faster. -
Second Coat Sanding:
Very lightly sand the first coat with your high-grit paper if you feel any bumps. Wipe clean again before proceeding. -
Final Coat:
Apply the second coat just like the first. Two thin coats are always better than one thick one for durability and a factory-like finish. -
Remove Tape:
While the final coat is still slightly tacky (not wet, but not fully cured), carefully peel away the painter’s tape at a 45-degree angle to ensure a crisp line. -
Reassembly:
Once the paint has cured for at least 48 hours, reattach the handles. If desired, you can polish the chrome handles before putting them back on for extra shine.
Enjoy your customized, budget-friendly appliance that brings a warm and sophisticated touch to your kitchen space
Stenciled Floral Border
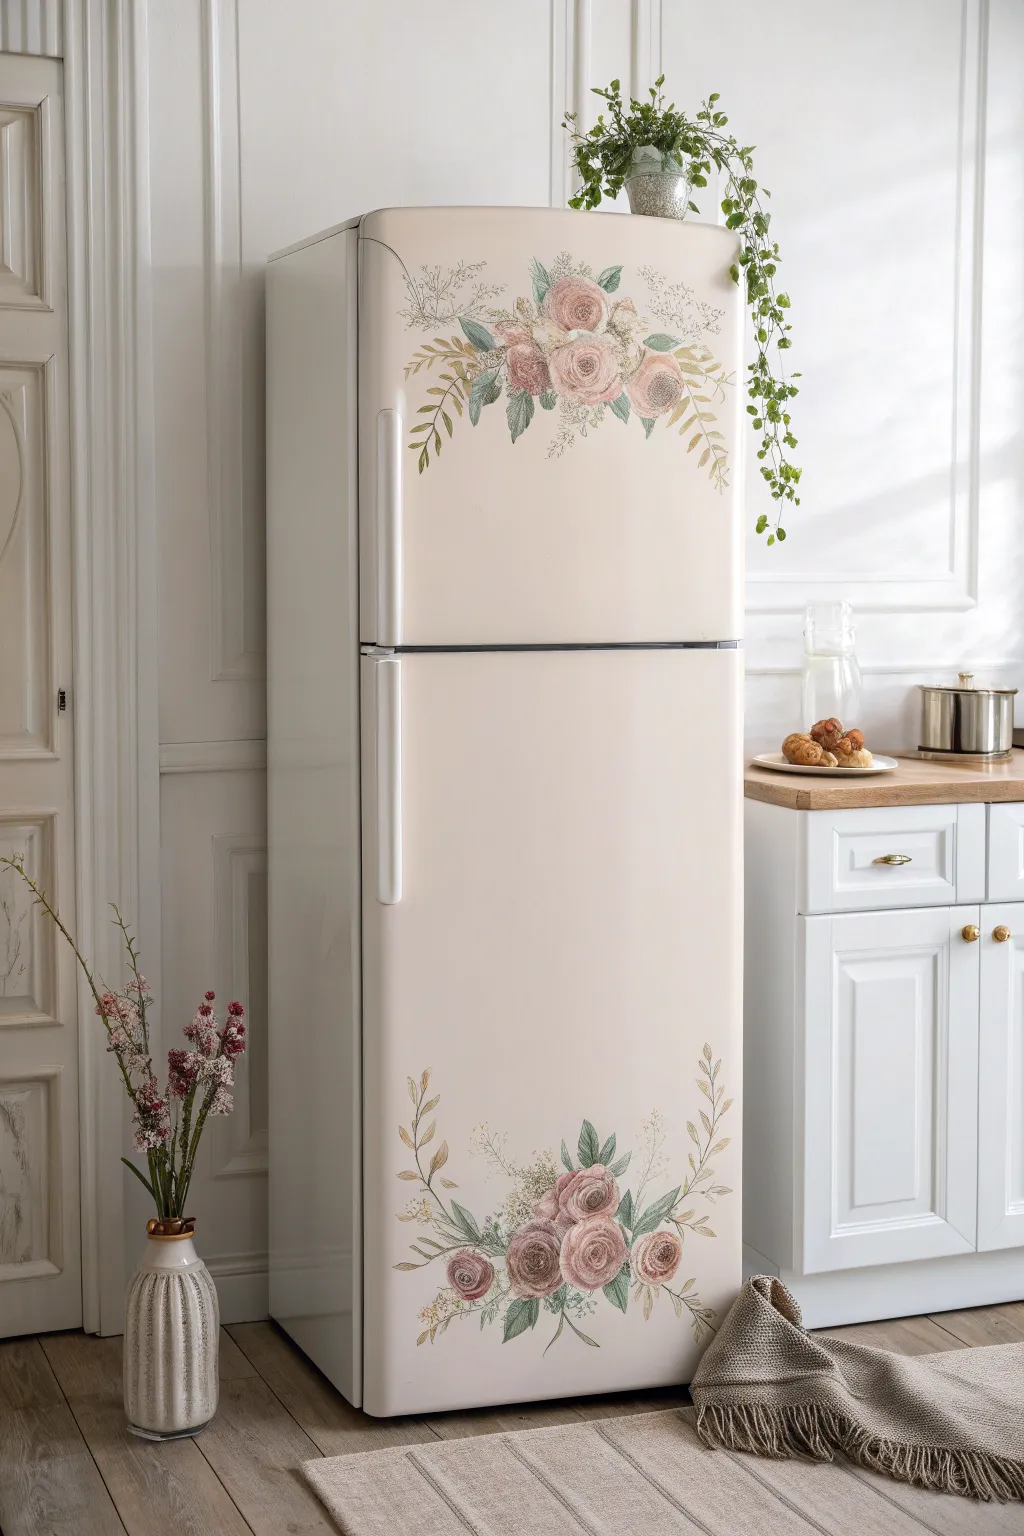
Transform a plain kitchen appliance into a romantic focal point with this delicate stenciled floral design. By using muted pink and sage tones on a creamy beige base, you can achieve a hand-painted watercolor look that adds instant charm to your kitchen.
Step-by-Step
Materials
- Refrigerator (cleaned and prepped)
- Cream/beige appliance paint or chalk paint (for base)
- Fine-grit sandpaper (220-400 grit)
- Large floral stencil (rose bouquets with leaves)
- Stencil adhesive spray
- Acrylic paints (Dusty Rose, Muted Peach, Sage Green, Olive, White)
- Spouncer sponges or stencil brushes
- Small liner brush (size 0 or 1)
- Paper towels
- Painter’s tape
- Clear matte or satin polycrylic sealer
Step 1: Preparation & Base Coat
-
Clean the surface:
Thoroughly clean the refrigerator exterior with a heavy-duty degreaser to remove any kitchen oils or fingerprints. This is crucial for paint adhesion. -
Light scuffing:
Using fine-grit sandpaper, lightly scuff the factory finish of the fridge. You aren’t trying to remove the paint, just taking off the shine to give the new paint something to grip. -
Protect handles and trim:
Use painter’s tape to carefully mask off the door handles, hinges, and the rubber seal gaskets to keep them paint-free. -
Apply base color:
Roll on your cream or beige base coat using a high-density foam roller for a smooth finish. I find thin coats work best here to avoid drips. -
Finish the base:
Allow the first coat to dry completely, then apply a second or third coat until you have opaque, solid coverage. Let the final coat cure for at least 24 hours.
Step 2: Stenciling the Roses
-
Plan placement:
Decide where your floral sprays will go. The design looks best with a large cluster centered at the very top and a mirrored cluster at the bottom. -
Secure the stencil:
Spray the back of your floral stencil with a light mist of repositionable stencil adhesive. Wait 60 seconds for it to get tacky, then press it firmly onto the top center of the fridge door. -
Load the sponge:
Dip your stencil sponge into the Sage Green paint for the leaves first. Offload almost all the paint onto a paper towel until the sponge feels dry. -
Apply leaf color:
Lightly tab the sponge over the leaf sections of the stencil. Use a gentle up-and-down motion rather than brushing side-to-side to prevent seepage. -
Paint the blooms:
Switch to a fresh sponge for the flowers. Start with your darkest Dusty Rose in the center of the flowers, fading out to Muted Peach towards the petal edges. -
Add depth:
While the stencil is still in place, gently dab a tiny bit of darker Olive green at the base of the leaves and White highlights on the tips of the rose petals. -
Remove and repeat:
Carefully peel back the stencil while the paint is still slightly damp. Clean the stencil completely, let it dry, and repeat the process for the bottom floral cluster.
Paint Bleeding?
If paint bleeds under the stencil, wait for it to dry fully. Then, use a small angled brush and your base beige color to ‘erase’ and tidy up the edges.
Step 3: Hand-Painted Details & Sealing
-
Soften edges:
Once the stenciled areas are dry, take a slightly damp sea sponge and very lightly tap over the edges of the design to give it that soft, worn vintage look. -
Add fine lines:
Using your small liner brush and watered-down green paint, hand-paint delicate stems and wispy vines extending out from the main bouquet to break up the rigid stencil shape. -
Enhance details:
I like to add tiny dots or ‘baby’s breath’ details with white paint on the tip of a toothpick or small brush around the bouquet perimeter. -
Final drying time:
Allow your artwork to dry for a full 48 hours to ensure the paint fully hardens before sealing. -
Seal the surface:
Apply 2-3 coats of clear polycrylic sealer using a soft synthetic brush or a spray can. This protects your art from daily cleaning and wear.
Add Dimension
Mix a little glazing medium into your acrylics. This creates transparency, allowing you to layer petal colors for a realistic watercolor effect.
Enjoy the gentle elegance your new floral refrigerator brings to the heart of your home


Geometric Tape Pattern
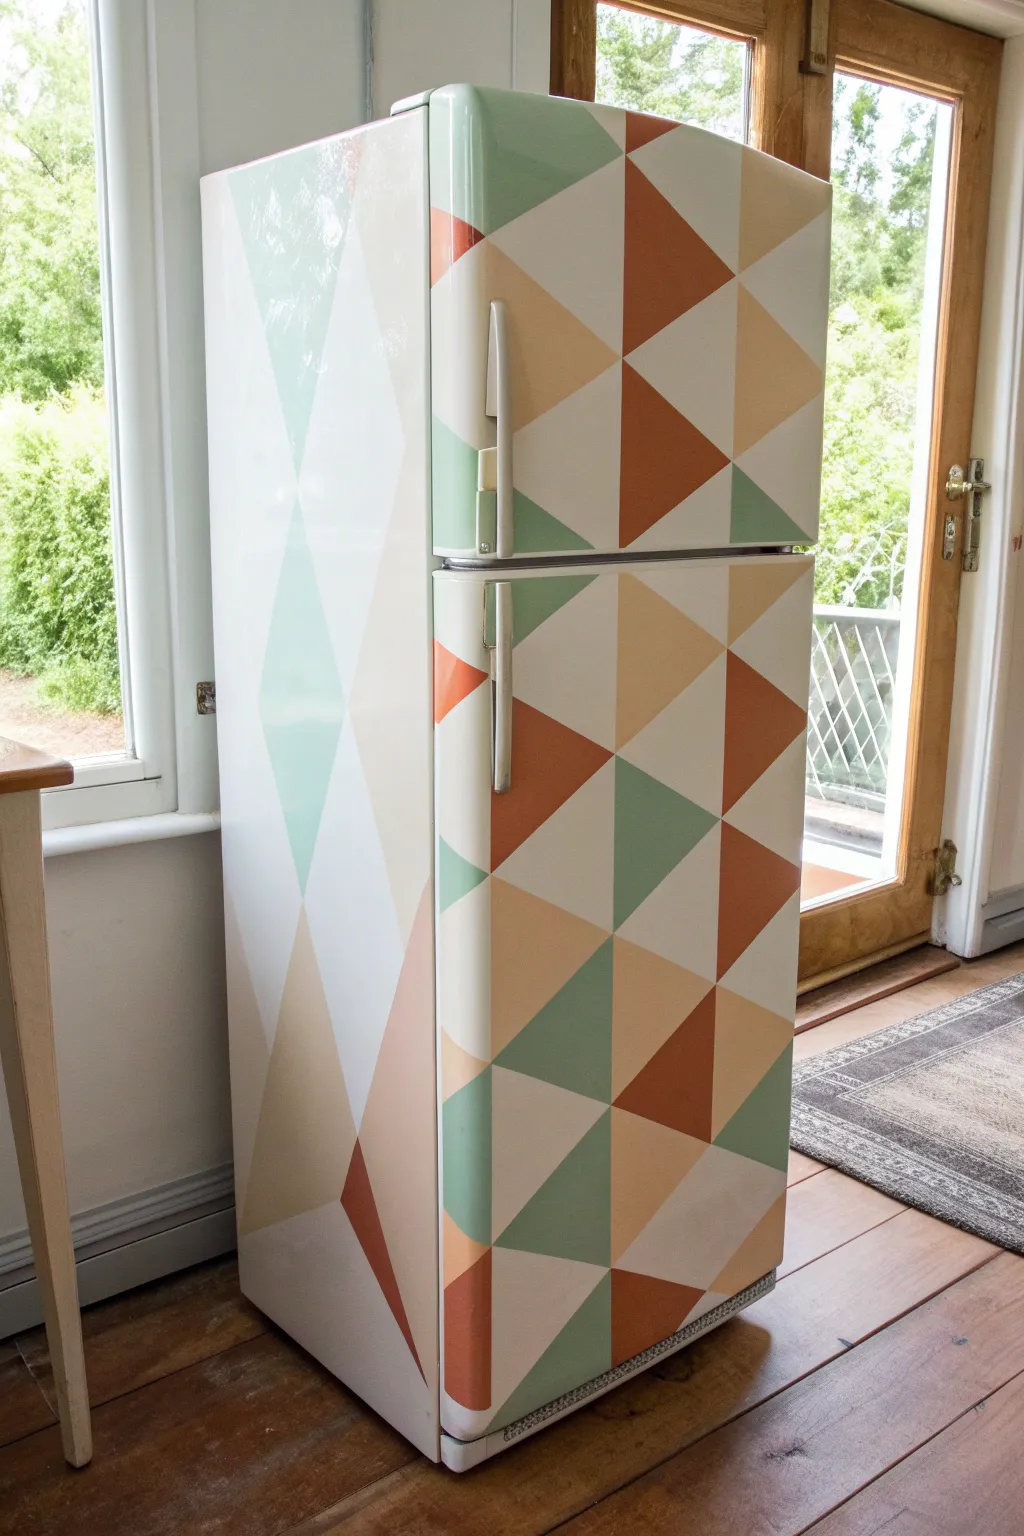
Transform a boring white appliance into a statement piece with this custom geometric paint job. Using earthy tones like sage green, terracotta, and soft neutral creams, this triangle-based design brings a warm, contemporary feel to any kitchen.
Step-by-Step Guide
Materials
- Sanding block (medium-fine grit)
- Painter’s tape (high quality, 1-inch width)
- Small foam roller
- Synthetic angled detail brush
- Clean rags or tack cloth
- Liquid deglosser ortsp substitute
- Rust-Oleum appliance epoxy or chalk paint (in base white colors)
- Furniture sealant or clear polycrylic coat
- Paint samples or quart jars in: Sage Green, Terracotta/Rust, Light Peach, Cream/Off-White
Step 1: Preparation
-
Clean surface thoroughly:
Begin by removing any magnets, stickers, or residue from the fridge. Wash the entire exterior with a degreasing cleaner or TSP substitute to ensure no oils remain. -
Rough up the finish:
Take your sanding block and lightly scuff the factory finish of the fridge. You aren’t trying to strip the paint, just removing the shine to give the new paint ‘teeth’ to grip onto. -
Wipe down dust:
Use a tack cloth or a damp rag to remove every speck of sanding dust. This is crucial for a smooth final finish. -
Remove or tape hardware:
If possible, unscrew the handles. If they are permanently attached like the ones in the image, carefully wrap them entirely in painter’s tape to protect them from splashes.
Clean Lines Secret
Work in batches. If you tape the whole fridge at once, you might get confused. Tape and paint a few large sections, let dry, then tape over those to do the adjacent shapes.
Step 2: Base Coating
-
Apply primer (optional):
Depending on your paint choice, apply a bonding primer designed for slick surfaces. If using chalk paint, you can often skip this, but it adds durability. -
Roll on the base color:
Using a foam roller for the smoothest finish, apply your base color (the lightest off-white or cream) over the entire front and sides. I like to do two thin coats rather than one thick one to avoid drips. -
Let it cure:
Allow the base coat to dry completely, preferably overnight. The paint needs to be hard enough to withstand tape being pulled off it later.
Go Metallic
For a glamorous twist, swap out the neutral cream triangles for touches of metallic gold or copper leaf paint to catch the kitchen light.
Step 3: Creating the Pattern
-
Establish diagonal lines:
Start applying painter’s tape in long diagonal lines across the fridge face. Creating a large ‘X’ shape or series of parallel diagonals is a good way to start the grid. -
Create the triangles:
Add intersecting tape lines to break your initial shapes into various triangles. Look at the reference image; notice how some triangles are small and others are larger, but they all fit together in a cohesive grid. -
Seal the tape edges:
To get crisp lines, lightly brush a tiny amount of your *base* color over the edges of the tape. This seals the gap so any bleed-through matches the background perfectly.
Step 4: Painting the Design
-
Plan your palette:
Before painting, visualize where each color will go. Try to avoid having two of the same color touching effectively. You are balancing Sage Green, Terracotta, Peach, and keeping some triangles the original Cream base. -
Paint individual sections:
Using your small brush or mini foam roller, fill in the triangles. Use a pouncing motion (up and down) rather than dragging the brush to minimize ridges. -
Apply second coats:
Lighter colors like the peach might need a second pass to be fully opaque. Wait for the first layer to become tacky before adding the second. -
Remove tape while damp:
Here is the critical moment: carefully peel off the tape while the final coat of paint is still slightly wet. Pull the tape away from the painted edge at a 45-degree angle.
Step 5: Finishing
-
Touch up imperfections:
Once the tape is gone, use a tiny artist’s brush to fix any small bleeds or jagged edges. -
Seal the surface:
Apply two coats of a clear, non-yellowing polycrylic sealer over the entire fridge. This protects your hard work from kitchen grease and heavy daily use. -
Reattach hardware:
Once the sealant feels rock hard (usually 24 hours), remove the tape from the handles or screw them back into place.
Enjoy the fresh, artistic vibe your new appliance brings to the heart of your home
Ombre Fade Finish
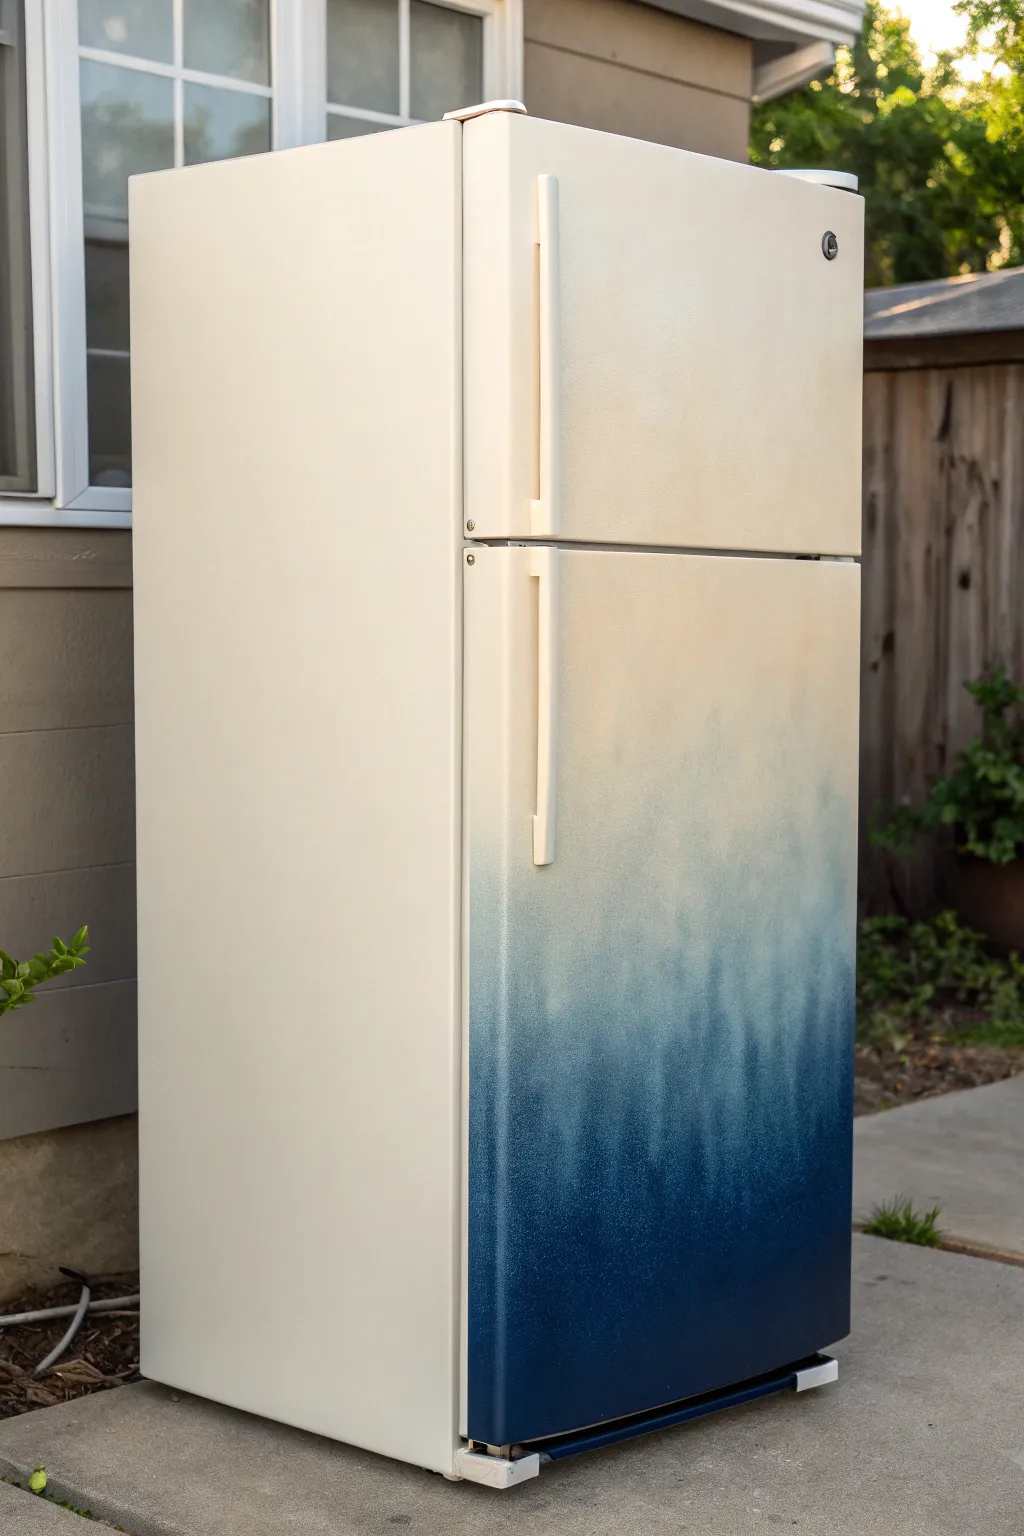
Transform a dated or plain refrigerator into a stunning statement piece with this dreamy ombré fade technique. By blending deep ocean blues into a soft cream base, you create a gradient effect that feels modern, artistic, and refreshingly unique.
Step-by-Step
Materials
- Refrigerator (cleaned and defrosted)
- Sandpaper (120 and 220 grit)
- Painter’s tape
- Plastic drop cloths or sheeting
- Multi-surface primer (spray or roll-on)
- Cream or off-white spray paint (base color)
- Navy blue spray paint
- Medium blue spray paint (optional, for transition)
- Clear protective sealant spray (matte or satin)
- Respirator mask
- Tack cloth
- Cleaning degreaser (like TSP)
Step 1: Preparation & Cleaning
-
Set up your workspace:
Move the refrigerator to a well-ventilated area, preferably outdoors or in an open garage. Lay down drop cloths to protect the floor from overspray. -
Remove hardware:
Unscrew and remove the door handles. If possible, remove any logos or badges. Keep all screws in a labeled bag so you don’t lose them. -
Clean thoroughly:
Scrub the entire exterior with a degreaser like TSP. This removes years of kitchen grease and fingerprints, which is crucial for paint adhesion. -
Sand the surface:
Lightly sand the entire fridge with 120-grit sandpaper to scuff up the glossy finish. You don’t need to strip the paint, just create a grippy surface. -
Wipe down:
Remove all sanding dust with a damp rag followed by a tack cloth to ensure the surface is perfectly clean. -
Mask off areas:
Use painter’s tape and plastic sheeting to meticulously cover the rubber seals (gaskets), hinges, and any internal areas you don’t want painted.
Mastering the Fade
To get the smoothest gradient, start squeezing the nozzle before you hit the fridge and stop after you pass the edge. This prevents blotchy start-stop marks.
Step 2: Priming & Base Coat
-
Apply primer:
Spray an even coat of multi-surface primer over the entire fridge. I usually do two light coats rather than one heavy one to avoid drips. -
Sand the primer:
Once the primer is fully dry, lightly sand with 220-grit paper for an ultra-smooth base. Wipe away dust again. -
Apply the top color:
Spray the upper two-thirds of the fridge with your cream or off-white paint. This will be the lightest part of your gradient. -
Ensure full coverage:
Apply a second or third coat of the cream color as needed until the coverage is solid and opaque.
Splotchy Transition?
If the fade looks uneven, don’t panic. Wait for it to dry, lightly sand the rough spots with high-grit paper, and mist again from a greater distance.
Step 3: Creating the Ombré Fade
-
Start the dark base:
Shake your navy blue spray can vigorously. Begin spraying the bottom quarter of the fridge with solid coverage. -
Begin the transition:
As you move upwards from the bottom, pull the spray can slightly further away from the surface. This creates a lighter mist rather than a solid blocks of color. -
Feather the edge:
Spray in sweeping horizontal motions, aiming slightly below where you want the fade to end. Let the overspray create the transition naturally. -
Layer the mist:
If the transition looks too harsh, hold the Navy can about 12-18 inches away and gently mist the middle section to blend the speckles upward. -
Blend downward (optional):
If you lose too much cream color, take the cream spray paint and mist it downward into the blue to soften the line.
Step 4: Finishing Touches
-
Let it cure:
Allow the paint to dry completely according to the can’s instructions, usually at least 24 hours. -
Seal the finish:
Apply two coats of clear protective sealant to protect your work from scratches and magnets. -
Reassemble:
Once fully cured, carefully remove all tape and plastic. Reattach the handles (paint them first if you want them to match or contrast).
Now you have a custom, art-piece appliance that anchors your kitchen with color and style
Terrazzo Speckle Party
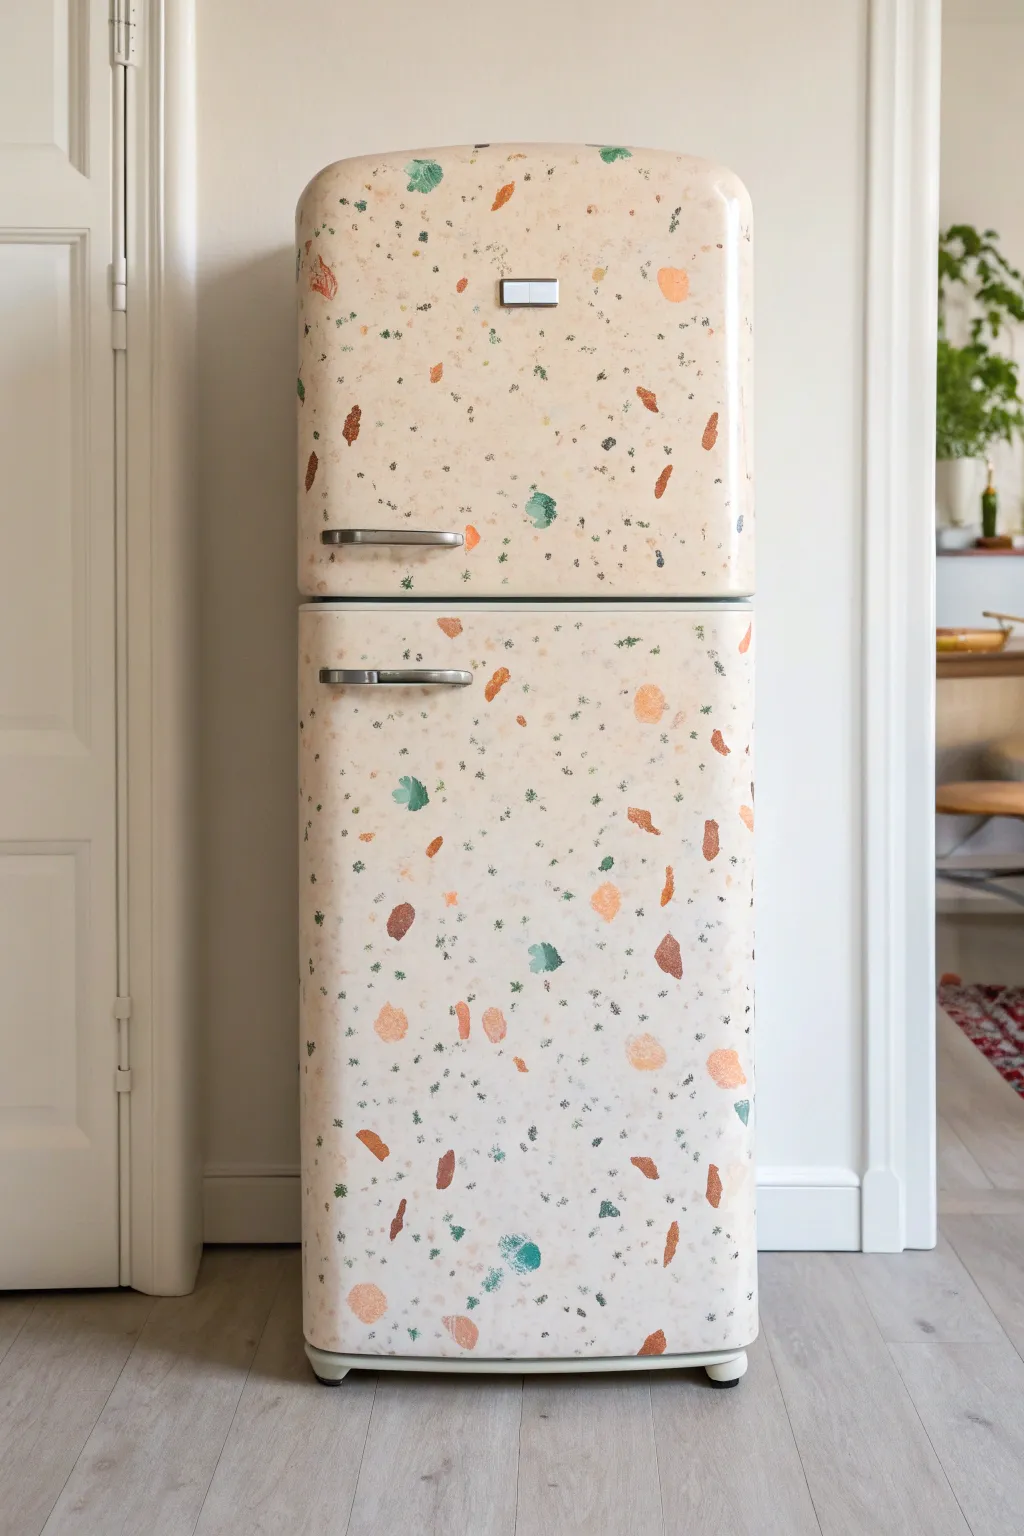
Transform a boring kitchen appliance into a playful statement piece with this faux-terrazzo technique. By layering irregular shapes and tiny speckles over a creamy base, you’ll achieve that classic Italian composite look without the heavy lifting.
Detailed Instructions
Materials
- Refrigerator (cleaned and prepped)
- Sandpaper (120 and 220 grit)
- Painter’s tape
- Metal primer (spray or paint-on)
- Cream or off-white epoxy refrigerator paint (or durable appliance enamel)
- Acrylic paints (terracotta, sage green, mustard yellow, charcoal grey)
- Assorted brushes (small flat brushes, round detail brushes)
- Sponges (natural sea sponges and dense kitchen sponges)
- Clear sealant (polyurethane or appliance-safe gloss topcoat)
- Paper plate or palette
- Pencil (optional)
Step 1: Preparation & Base Coat
-
Scrub it down:
Thoroughly clean the fridge exterior with degreaser or TSP to remove any kitchen oils, dirt, or stickers. This is crucial for adhesion. -
Sand the surface:
Lightly scuff the entire surface with 120-grit sandpaper. You aren’t trying to strip it bare, just creating a rough texture for the primer to grip. -
Tape off hardware:
Apply painter’s tape carefully around the handles, logo plates, and rubber seals. If the handles are removable, unscrewing them is even better. -
Prime the metal:
Apply a coat of high-quality metal primer. Use smooth, even strokes or steady spray passes to prevent drips. -
Apply the base color:
Roll or spray on your creamy off-white appliance enamel. This usually requires two coats; let the paint dry completely according to manufacturer instructions between layers.
Paint sliding off?
If acrylics bead up on the base coat, the surface is too slick. Lightly sand the base paint with 220-grit paper or use a primer mixed into your acrylics for better grip.
Step 2: Creating the Terrazzo Pattern
-
Plan your palette:
Squeeze your acrylic colors onto a palette. For this look, focus on earthy tones like terracotta, sage, and deep grey, keeping the colors somewhat muted rather than neon bright. -
Paint large shards:
Using a small flat brush, paint irregular, angular shapes—think ‘shards’ of stone. Distribute these larger geometric chunks (roughly 1-2 inches) randomly across the surface. -
Rotate constantly:
As you paint the shards, rotate your brush angle constantly so the shapes don’t all look identical or directional. -
Add medium stones:
Switch to a round brush and a second color (like the sage green). Paint slightly smaller, rounded blobs or oval shapes in the empty spaces between the large shards. -
Create texture with sponges:
Tear a piece of kitchen sponge into a small, jagged chunk. Dip it lightly into your terracotta paint and dab it to create textured, porous-looking ‘rocks’ for variety. -
Layer the colors:
Ensure you have a good mix of colors distributed evenly. Avoid clustering all the red shapes in one spot; step back frequently to check the balance. -
The speckle technique:
Load a stiff-bristled brush or an old toothbrush with dark grey paint. Run your thumb across the bristles to flick tiny speckles of paint across the fridge. I prefer to practice on cardboard first to control the spray. -
Fill the gaps:
Look for any large empty areas of cream background. Use a tiny detail brush to add very small dots or dashes of color to bridge these gaps. -
Overlap slightly:
For a realistic stone look, it helps if a few tiny speckles overlap the larger painted shapes, creating depth.
Natural Variation
Real terrazzo isn’t perfect. Intentionally make some shapes jagged and others smooth. Mix a tiny bit of white into your stone colors for a marbled effect inside the shapes.
Step 3: Sealing & Finish
-
Dry thoroughly:
Allow the terrazzo artwork to cure for at least 24 hours. Acrylics need to be fully hardened before sealing. -
Apply topcoat:
Roll or brush on a clear, non-yellowing polyurethane or gloss sealant. This protects your art from magnets, cleaning, and daily wear. -
Remove tape:
Carefully peel away the painter’s tape while the topcoat is still slightly tacky to ensure a crisp edge. -
Reattach hardware:
Once fully cured (check your sealant can), screw the handles back on and plug it in.
Enjoy your bespoke, retro-inspired appliance that brings instant artistic flair to the kitchen
Hand-Painted Mural Fridge
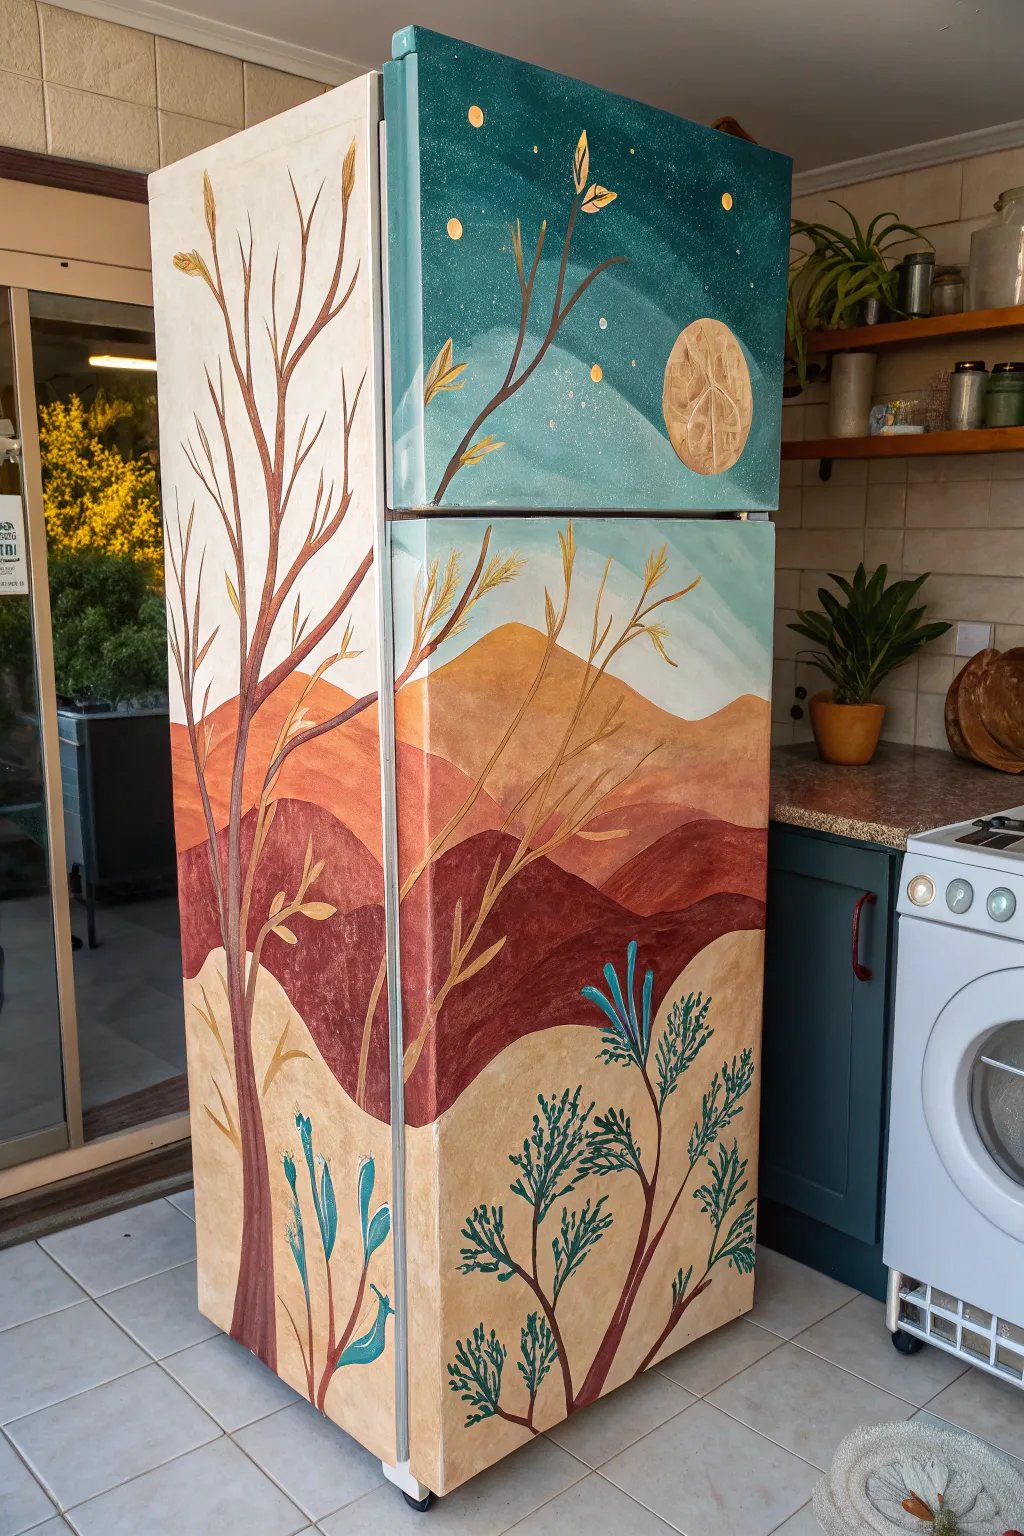
Transform a standard white appliance into a breathtaking focal point with this desert-inspired mural project. By layering warm earth tones against a cool, starry night sky, you will create a stunning piece of functional art that brings the serene beauty of the outdoors right into your kitchen.
Step-by-Step Guide
Materials
- Sanding block (medium grit)
- White primer (bonding primer suitable for glossy surfaces)
- Acrylic paints (teal, navy blue, gold metallic, cream, light ochre, terracotta, maroon, dark brown)
- Large flat paintbrushes (for background)
- Medium round brushes (for mountains)
- Fine detail brushes (for leaves and stars)
- Clear protective topcoat (polycrylic or similar sealant)
- Painter’s tape
- Pencil for sketching
- Drop cloth
Step 1: Preparation & Priming
-
Prepare the surface:
Begin by thoroughly cleaning the exterior of the fridge to remove any grease or kitchen oils effectively. Once dry, lightly scuff the entire surface with a medium-grit sanding block; this creates a ‘tooth’ for the paint to grip without damaging the appliance. -
Mask off key areas:
Use painter’s tape to carefully cover the handles, rubber seals, hinges, and any brand logos you wish to preserve. Lay a drop cloth underneath the fridge to catch drips. -
Apply the primer base:
Roll or brush on a coat of high-quality bonding primer designed for slick surfaces like metal or plastic. Let this cure completely according to the can’s instructions before moving on to colors.
Smooth Operator
Use a foam roller for the large blocks of color (like the sky and mountains) instead of a brush. This eliminates visible brushstrokes and gives the fridge a smoother, more factory-finished texture.
Step 2: Painting the Night Sky (Freezer Section)
-
Create the gradient base:
For the freezer door, mix a deep teal with a touch of navy blue. Paint the entire upper section, blending the color so it is slightly darker at the top right corner and lighter towards the bottom left to mimic atmospheric depth. -
Add the celestial texture:
While the blue paint is still tacky, stipple in some lighter teal or white washes in a diagonal swooping motion to create a milky way or cloud effect. -
Paint the moon:
Using a gold metallic or warm beige paint, create a circle for the moon. Don’t make it perfectly flat; dab in darker gold or light brown shadows to give it a cratered, textured surface. -
Dot the stars:
With a fine detail brush or the end of a paintbrush handle, dot small gold stars across the teal sky. Vary their sizes for a natural look.
Glow Up
Mix a tiny amount of glow-in-the-dark medium into your white or gold star paint. Your kitchen will have a magical, subtle luminescence when you turn the lights out for a midnight snack run.
Step 3: Layering the Desert Landscape (Main Door & Side)
-
Sketch the horizon lines:
Lightly sketch wavy, overlapping lines across the main door and wrapping around the side panel to map out your mountain ranges. Plan for about four distinct layers. -
Paint the distant sky:
At the very top of the main door (just under the handle gap), paint a pale blue sky strip that fades into the top mountain layer. -
Block in the highest peaks:
Paint the furthest mountain range (the top layer) in a light ochre or warm yellow-orange tone. Ensure the edges are smooth and clean. -
Add the middle ranges:
Moving downward, paint the next layer in a terracotta or dusty orange shade. The layer below that should be a deep maroon or rust color to suggest shadow and depth. -
Finish the foreground:
Paint the bottom-most section in a light cream or sandy beige color to represent the immediate foreground ground. -
Connect the side panel:
Continue these color bands around the side of the fridge, ensuring the lines match up perfectly at the corner edge for a seamless 3D effect.
Step 4: Detailing & Sealing
-
Outline the main tree structure:
Using dark brown paint and a thin round brush, paint a large, spindly tree trunk rising from the foreground on the left side, extending all the way up into the freezer door’s night sky. -
Branch out:
Add smaller branches extending from the main trunk. Let your hand shake slightly to give the wood a natural, organic gnarl. -
Add golden leaves:
Use your gold metallic paint to add simple, elongated leaf shapes to the tips of the upper branches against the teal sky. -
Paint foreground foliage:
In the bottom right corner, paint smaller shrub shapes. Use a striking teal or blue color for the leaves to tie the bottom of the mural back to the sky color at the top. -
Highlight the stems:
Add thin maroon or dark brown stems to these teal plants to ground them in the sandy beige layer. -
Seal the artwork:
Once the paint is fully dry (I prefer to wait at least 24 hours), apply two to three thin coats of clear polycrylic sealer to protect your mural from kitchen wear and tear.
Now your kitchen has a completely custom centerpiece that turns a boring appliance into a conversation starter


Have a question or want to share your own experience? I'd love to hear from you in the comments below!