If you’re craving a cozy, creative project, mug painting with flowers is the sweet spot—quick to start, but you can take it as detailed as you want. I’ve rounded up my favorite floral mug ideas, from classic blooms to playful, artsy twists that look amazing on a ceramic mug.
Simple Wildflower Stems
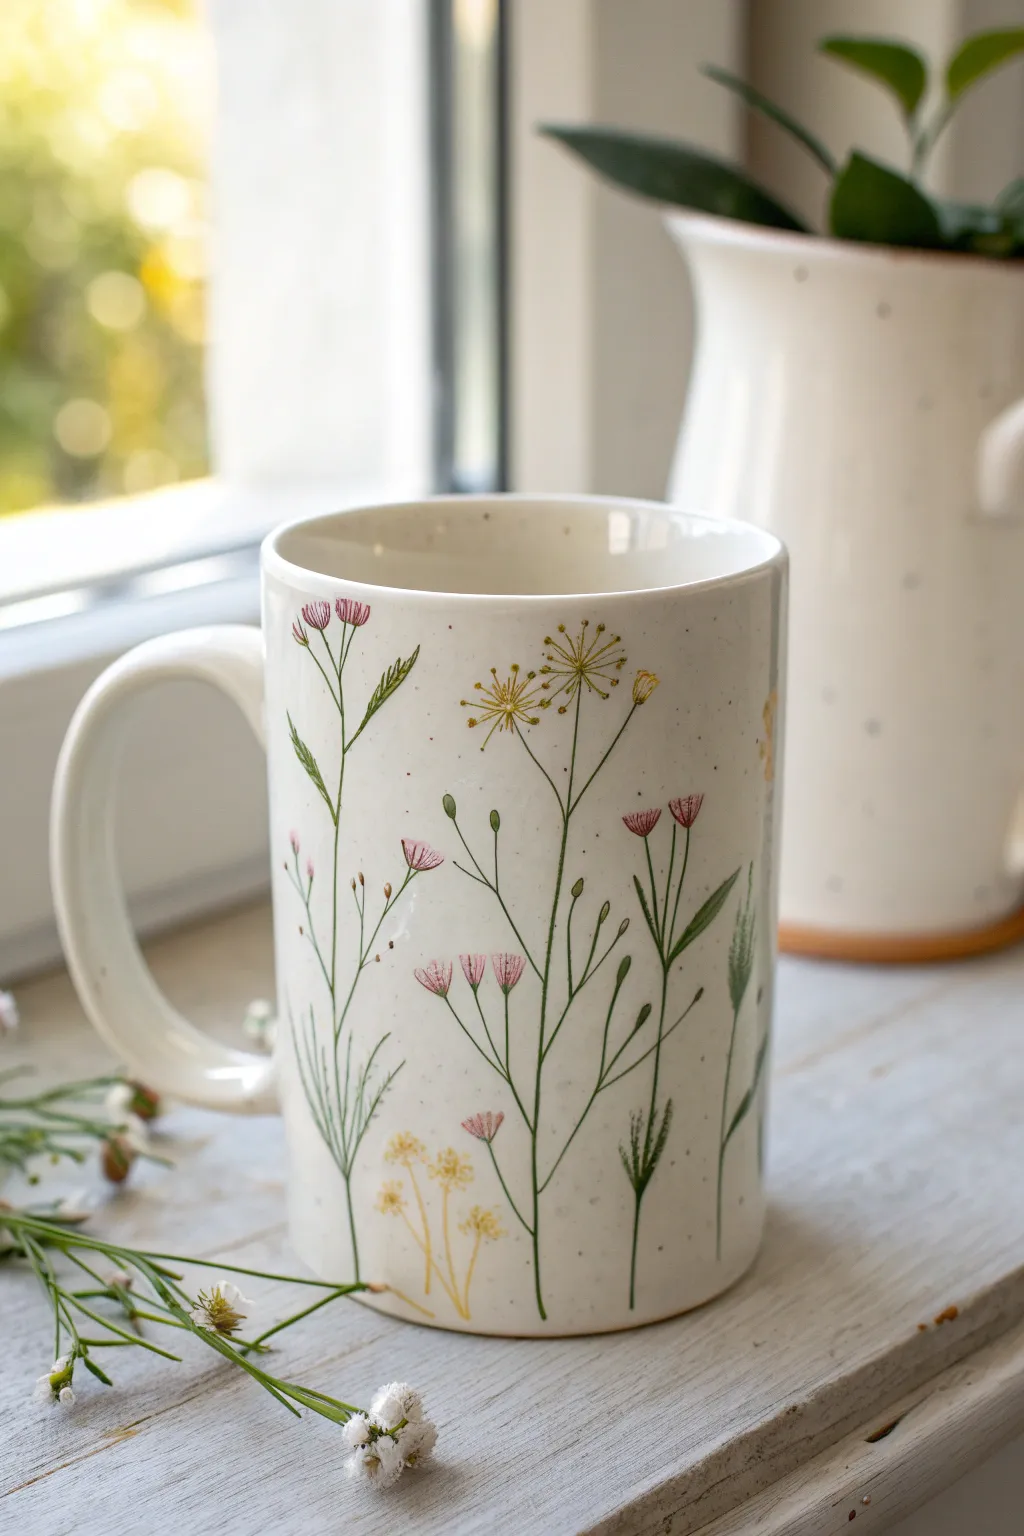
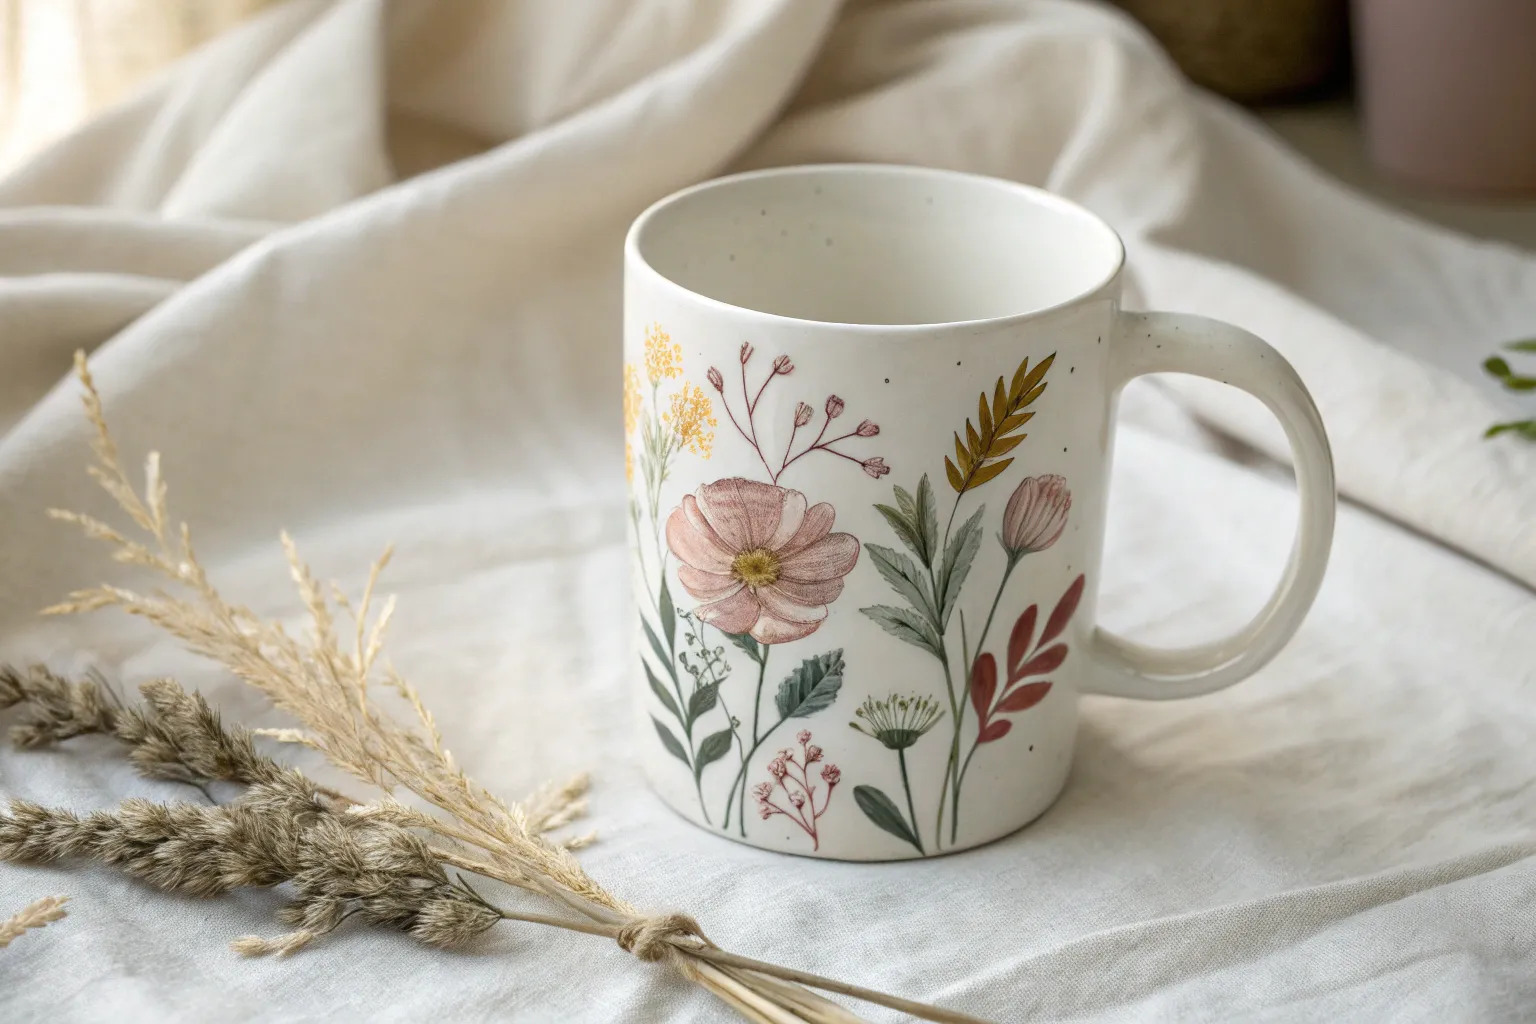
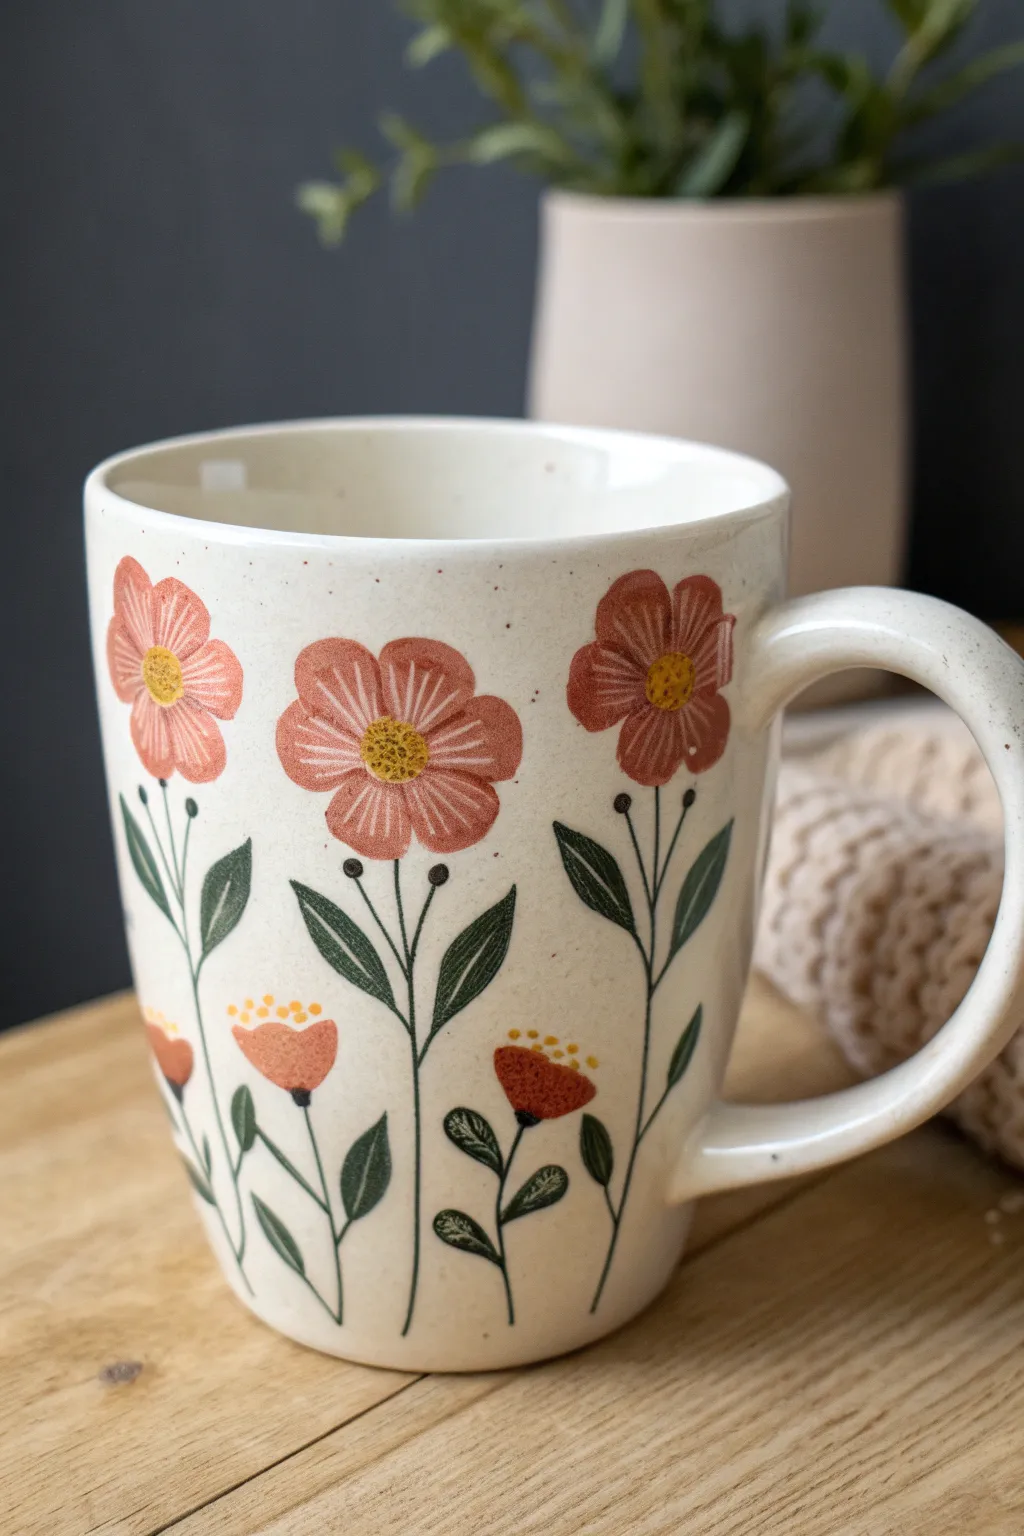
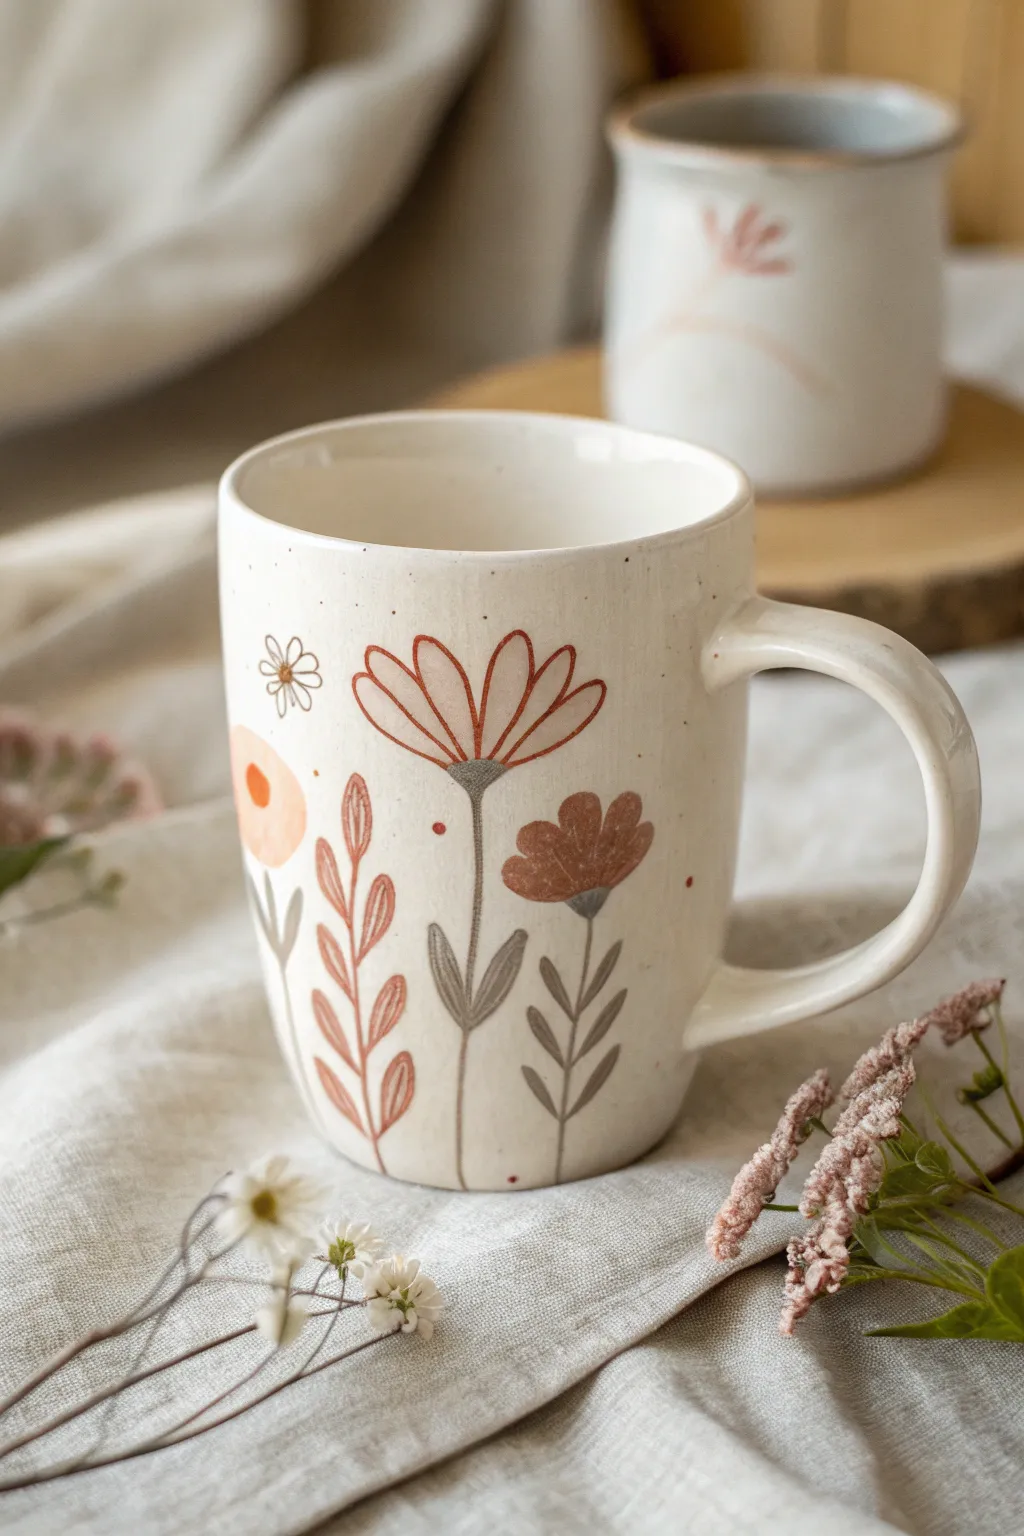
Capture the ethereal beauty of a summer meadow on your morning coffee cup with this delicate wildflower design. Using fine lines and soft, muted colors, you’ll create a serene botanical pattern that looks effortlessly organic against a creamy background.
Step-by-Step
Materials
- White or cream ceramic mug (clean and dry)
- Pebeo Porcelaine 150 paints (or similar high-quality ceramic paint)
- Colors: Olive Green, Sap Green, Deep Yellow, Antique Pink, and Deep Red
- Fine liner brush (size 0 or 00)
- Small round brush (size 2)
- Mixing palette
- Rubbing alcohol and cotton pads
- Oven for baking (if required by paint type)
Step 1: Preparation & Planning
-
Clean surface:
Before even opening your paints, wipe the entire exterior of the mug with rubbing alcohol on a cotton pad. This removes invisible oils from your fingerprints that can prevent the paint from adhering properly. -
Plan your layout:
Visualize three to four main vertical stems rising from the bottom edge of the mug. Vary their heights so they don’t look like a picket fence—some should reach near the rim, others lower.
Uneven Lines?
If your brush drags or lines look shaky, your paint is likely too thick. Mix in a drop of water or paint thinner to improve flow for silky, continuous stems.
Step 2: Painting the Greenery
-
Mix your greens:
On your palette, create two shades of green. Use the Olive Green as your base, and mix a tiny bit of darker paint or brown into a portion of it to create a secondary, deeper shadow shade for variety. -
Anchor stems:
Load your fine liner brush with the lighter green. Paint thin, slightly wavering vertical lines starting from the absolute bottom of the mug. I like to lift the brush pressure as I go up to make the tips whisper thin. -
Add variance:
Intersperse a few stems using your darker green mixture. Keep the lines delicate; if your paint feels thick or drags, dilute it slightly with the medium that belongs to your paint brand. -
Create branches:
From the main vertical lines, pull out tiny side shoots at 45-degree angles. Some stems should branch out multiple times to support flower heads, while others remain singular. -
Paint sparse leaves:
Add narrow, lance-shaped leaves near the base of the stems. Use a ‘press and lift’ motion: touch the brush tip to the mug, press down slightly to widen the stroke, and lift quickly to create a point.
Step 3: Adding the Blooms
-
Dandelion puffs:
Mix a muted yellow. For the dandelion-style flowers, paint a central point at the top of a stem, then radiate tiny dashes outward in a full circle to create a starburst effect. -
Baby’s breath clusters:
Using a very pale yellow or cream, dab tiny, irregular dots in clusters on the lower branching stems to mimic baby’s breath or wild mustard flowers. -
Pink buds:
Switch to your Antique Pink. At the tips of single straight stems, paint small, teardrop-shaped buds. Keep them closed and tight for a youthful wildflower look. -
Open blossoms:
For the larger pink flowers, paint three to four small, upward-facing brushstrokes that fan out slightly, resembling a small carnation or cornflower. -
Deepen the details:
Take a tiny amount of Deep Red. Add the smallest possible dot at the very base of the pink flower heads where they meet the green stem to add depth and dimension.
Brush Maintenance
Rinse your fine liner brush thoroughly every few minutes. Considering acrylic paints dry quickly, dried buildup near the ferrule will cause the bristles to splay.
Step 4: Final Touches & Curing
-
Speckle effect:
To mimic the ceramic texture in the photo, dilute a tiny bit of brown or grey paint. Load an old toothbrush or stiff brush and very gently flick a subtle spray of speckles over the empty white spaces. -
Cleanup:
If you made any stray marks or speckles you don’t like, use a damp cotton swab or toothpick to gently scrape or wipe them away before the paint sets. -
Dry time:
Allow the mug to dry completely for at least 24 hours. This is crucial—don’t rush it, or the paint may bubble during baking. -
Bake to set:
Place the mug in a cool oven, then turn the heat to 300°F (150°C) or the temperature specified by your paint manufacturer. Bake for 30-35 minutes. -
Cool down:
Turn the oven off and leave the mug inside until it is completely cool. Removing it while hot can cause the ceramic to crack due to thermal shock.
Now you have a piece of handmade art that brings a touch of nature to every sip you take


Classic Daisy Petals and Yellow Centers
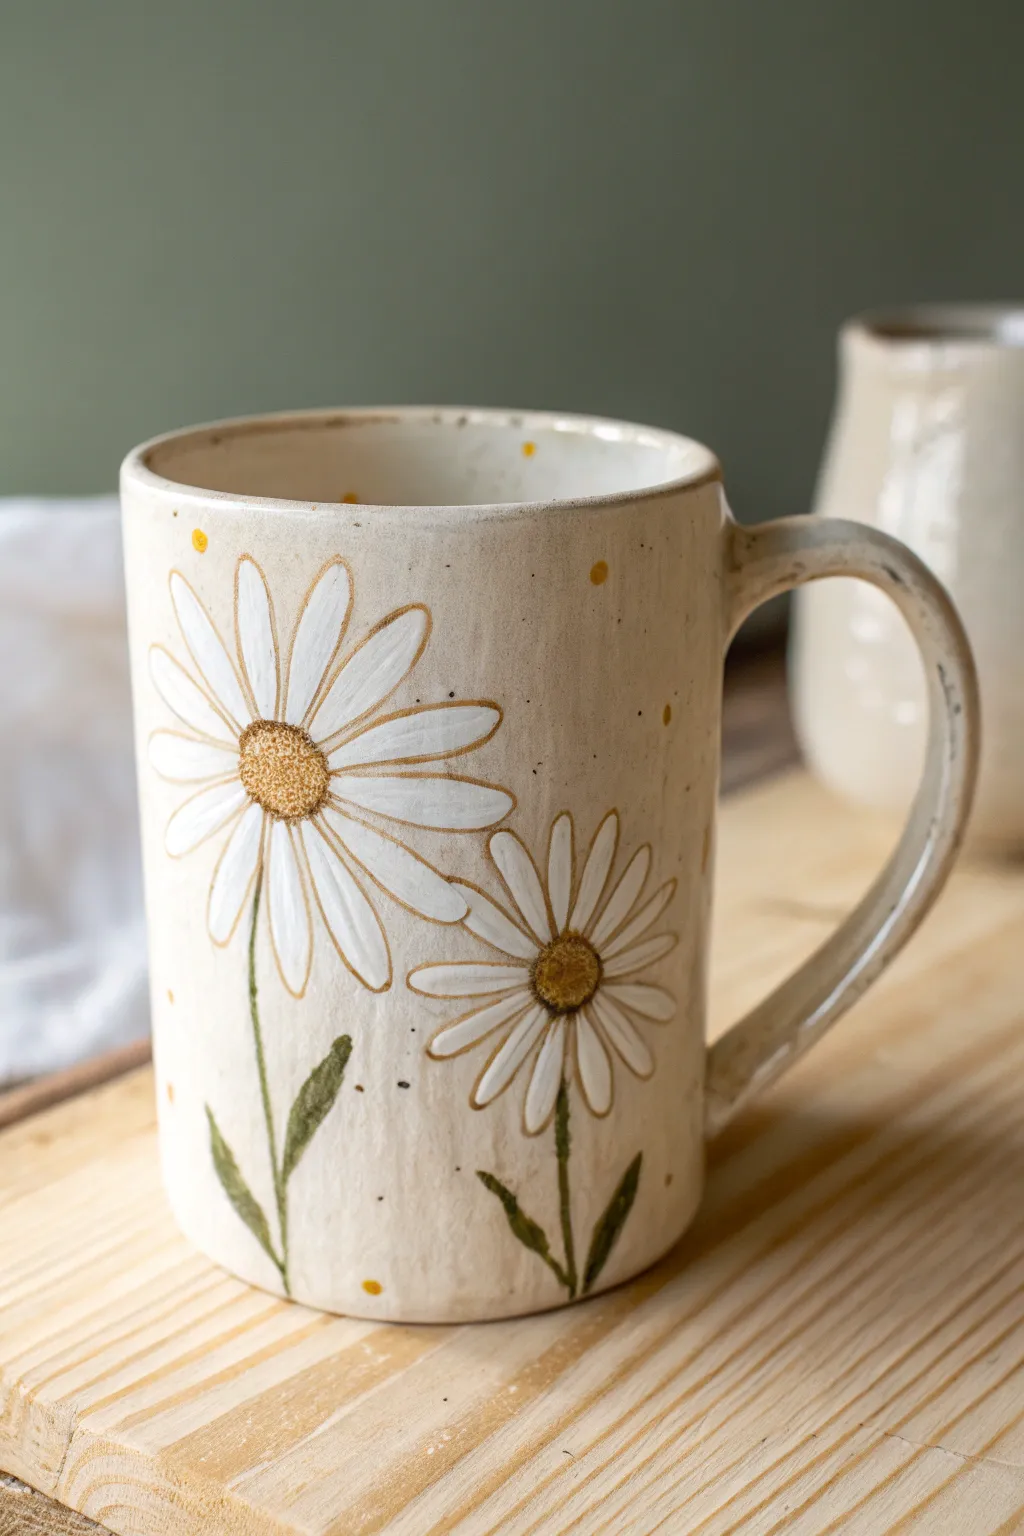
Capture the simple elegance of a meadow with this charming mug design, featuring large white daisies with textured yellow centers. This project embraces a slightly imperfect, hand-crafted aesthetic that makes drinking your morning coffee feel extra cozy.
Detailed Instructions
Materials
- Bisque-fired ceramic mug (or a standard glazed mug if using pebeo paints)
- Ceramic underglazes: White, Golden Yellow, Olive Green, Dark Brown
- Clear dipping glaze (if using bisque method)
- Small round paintbrushes (sizes 2 and 4)
- Fine liner brush (size 0 or 00)
- Ceramic pencil or standard pencil
- Palette for mixing
- Water cup and paper towels
Step 1: Planning the Layout
-
Clean surface:
Begin by wiping down your mug with a damp sponge to remove any dust or oils, ensuring a clean surface for the best adhesion. -
Sketch placement:
Lightly sketch two large circles for the flower heads using a pencil. Place one slightly higher than the other to create a natural, asymmetrical balance. -
Add stems:
Draw faint lines extending downwards from the flower heads to indicate where the stems will go, allowing them to curve gently rather than being perfectly straight.
Glaze Tip: The Scratch Through
For sharper outlines, paint a solid patch of white first, then use a needle tool to scratch through the paint to reveal the clay underneath before firing.
Step 2: Painting the Blooms
-
Base coat white:
Load a size 4 round brush with White underglaze. Paint long, teardrop-shaped petals radiating outward from your sketched centers. -
Build opacity:
Allow the first layer of white to dry until it’s chalky to the touch, then apply a second coat. You want the white to stand out against the mug’s background color. -
Paint the centers:
Using a smaller brush, fill the center circles with Golden Yellow. Don’t worry about being perfectly neat; a little irregularity adds to the rustic look. -
Texturize the center:
While the yellow is still slightly damp, dab tiny dots of a slightly darker yellow or light brown on top to create that seeded texture found in real daisies.
Step 3: Adding Definition and Greenery
-
Outline the petals:
Mix a very small amount of water into your Dark Brown underglaze to improve flow. Using your fine liner brush, outline each white petal with thin, delicate strokes. -
Define the layers:
Make sure to outline where petals overlap. I prefer to break the line occasionally rather than making it continuous, which keeps the drawing feeling organic. -
Paint stems:
Switch to Olive Green and paint the stems following your initial sketch lines. Vary the pressure on your brush to make the stem slightly thicker at the bottom and thinner near the flower head. -
Add leaves:
Paint simple, pointed leaves branching off near the base of the stems. Keep these loose and painterly. -
Final dots:
Dip the handle end of a paintbrush into yellow or gold paint and dot small accents randomly around the background of the mug for a whimsical confetti effect.
Fixing Wobbly Lines
If your brown outlines get too thick or shaky, wait for them to dry completely, then gently scratch away the excess width with a wooden toothpick.
Step 4: Finishing Touches
-
Inspect and clean:
Look over the mug for any unwanted smudges. You can gently scrape these away with a crafting knife or wipe them with a damp cotton swab. -
Glaze application:
If working on bisque, dip the entire mug into a clear transparent glaze. Ensure the glaze doesn’t pool too heavily over the texture of the flower centers. -
Fire the piece:
Place the mug in the kiln and fire according to the glaze manufacturer’s instructions (usually Cone 06 or Cone 6 depending on your clay).
Once fired, you’ll have a delightful, permanent piece of art ready for your favorite tea or coffee


Sunny Sunflower Statement Bloom
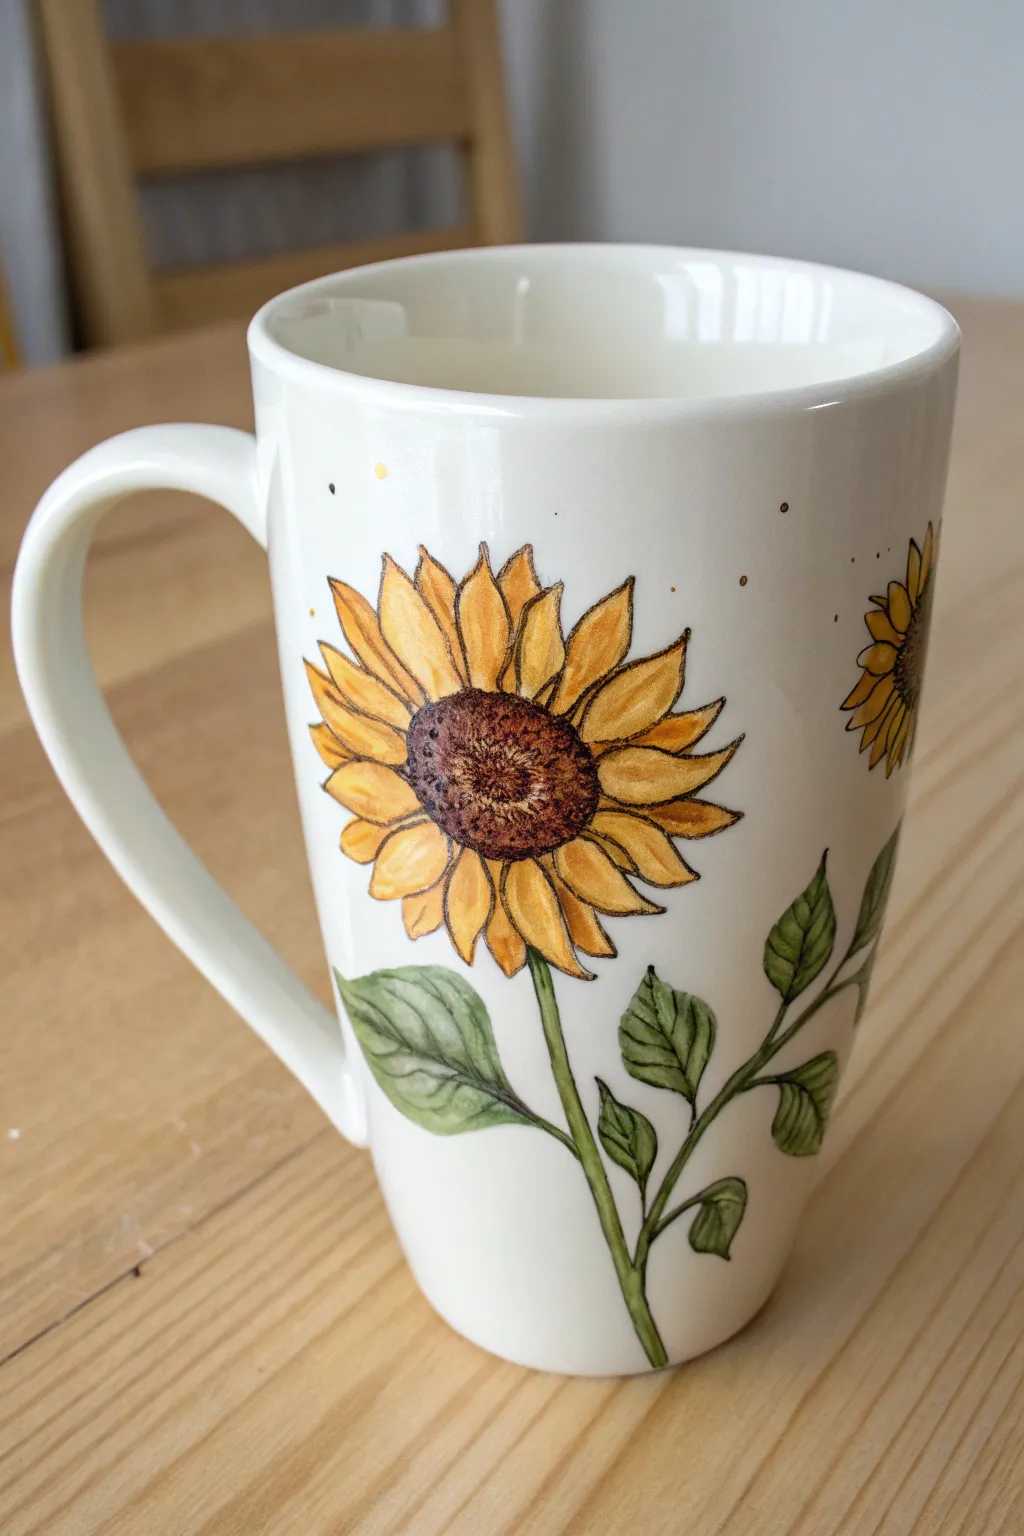
Bring a burst of late-summer sunshine to your morning coffee with this hand-painted sunflower mug. The design features bold, illustrative outlines filled with warm gradients of yellow and ochre, creating a charmingly rustic look.
Step-by-Step Guide
Materials
- Tall white ceramic mug (smooth glaze)
- Black fine-tip porcelain marker or oil-based paint pen (0.7mm)
- Pebeo porcelain paints (Sun Yellow, Orange/Ochre, Burnt Sienna, Leaf Green)
- Fine detail paintbrush (size 0 or 00)
- Rubbing alcohol and cotton pads
- Paper towel
- Oven (for baking/curing)
Step 1: Preparation & Outline
-
Clean surface:
Before you begin, wipe the entire mug surface with rubbing alcohol on a cotton pad. This removes invisible oils or fingerprints that could prevent the paint from adhering properly. -
Mark the center:
Using your black porcelain marker, draw a slightly flattened oval near the center of the mug face. This will be the seed head. Gently stipple neat dots inside this oval to create a textured, seeded look. -
First petal layer:
Draw the first layer of petals radiating outward from the seed head. Keep these shapes triangular but with soft, rounded tips. Don’t worry about perfect symmetry; natural variance adds character. -
Second petal layer:
Fill in the gaps between the first set of petals with a second layer, depicting petals that are tucked behind the front ones. These should only show their tips peeking out. -
Stem and leaves:
Draw a thin, slightly curved line extending downward for the stem. Add two or three leaves branching off, drawing the central vein lines inside them for detail. -
Add a neighbor:
If you have space on the side, sketch a partial second sunflower head peeking around the curve, using the same dot-center and petal technique. -
Let ink dry:
Wait at least 15-20 minutes for the black outline to set completely. If you paint over it too soon, the black might bleed into your yellow.
Paint Consistency
If your porcelain paint feels too thick or gloopy, don’t use water to thin it, as this weakens the bond. Use a specific paint medium or thinner designed for that brand.
Step 2: Adding Color
-
Base yellow:
Using your fine brush, fill in the petals with Sun Yellow porcelain paint. I like to leave a tiny sliver of white space next to the black outlines to keep the drawing crisp. -
Shading petals:
While the yellow is still slightly tacky, mix a tiny drop of Orange or Ochre into the base of the petals near the center. Pull this darker color gently outward to create a gradient. -
Color the center:
Fill the seed head area with a wash of Burnt Sienna or dark brown. The black stippling you did earlier will show through, providing texture. -
Darken the core:
Dab a little extra dark brown right in the very center of the seed head effectively creating a vignette effect that makes the flower look concave. -
Greenery:
Paint the stem and leaves with Leaf Green. For depth, you can add a touch of brown to your green mix for the lower parts of the leaves where shadows would fall. -
Final specs:
Dip a toothpick or the very tip of your brush into brown or gold paint and add tiny, random specks in the negative white space around the flowers for a whimsical pollen effect. -
Cleanup:
Check for any smudges. Use a damp cotton swab or a craft knife to gently scrape away any stray paint before it cures.
Golden Hour Glow
Once the main colors are dry but before baking, use a gold metallic porcelain marker to trace just the tips of the petals for a subtle, shimmering highlight.
Step 3: Curing
-
Air dry:
Allow the mug to dry for 24 hours. This is crucial—don’t rush this step or the paint may bubble in the oven. -
Bake to set:
Place the mug in a cold oven. Turn the heat to 300°F (150°C) and bake for 35 minutes once it reaches temperature. Turn the oven off and let the mug cool completely inside before removing.
Now you have a dishwasher-safe masterpiece ready for your favorite hot drink


Loose Poppy Blooms With Soft Edges
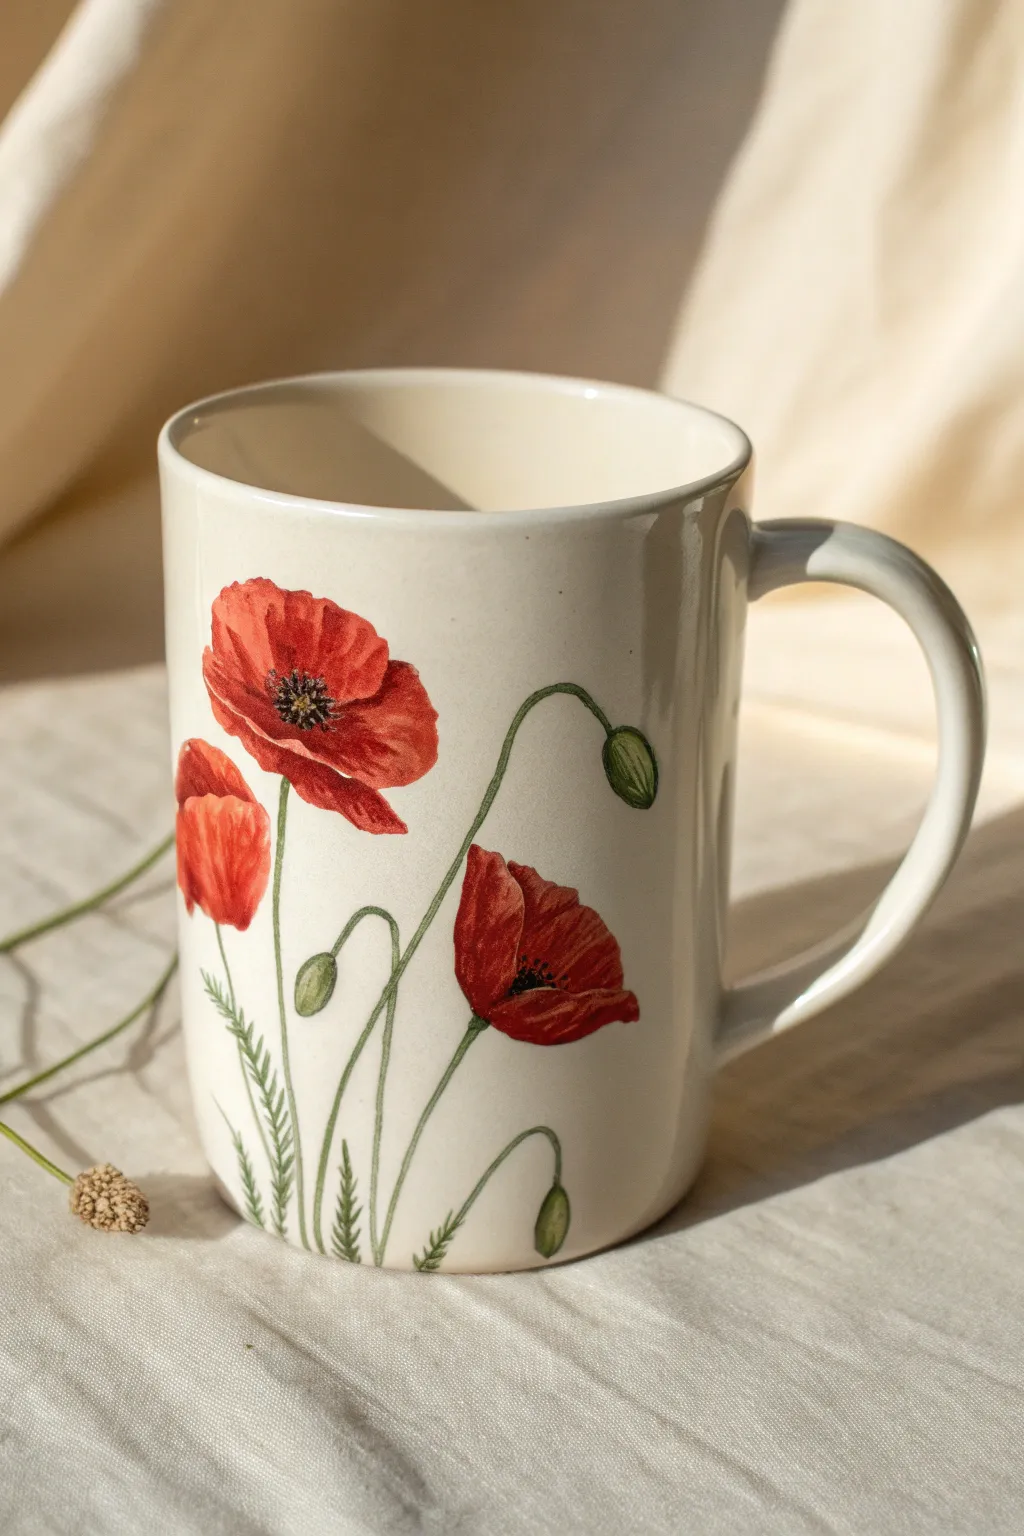
Capture the delicate beauty of a summer meadow on your morning coffee cup with this painted poppy design. The soft, layered red petals and slender green stems create an elegant botanical illustration that feels both classic and fresh.
Step-by-Step Tutorial
Materials
- Plain white or cream ceramic mug
- Ceramic paints or enamel paints (gloss finish)
- Colors: Bright red, deep crimson/maroon, olive green, sap green, black, white
- Small round brushes (sizes 0, 2, and 4)
- Fine liner brush (size 00 or 000)
- Rubbing alcohol and cotton pads
- Palette or small plate
- Oven (for curing, if required by paint type)
Step 1: Preparation and Planning
-
Clean the surface:
Before you even pick up a brush, wipe down the entire outer surface of the mug with rubbing alcohol. This removes any invisible oils or fingerprints that could prevent the paint from adhering properly. -
Plan the composition:
Visualize where your main flowers will go. In the reference, there is one large open bloom near the top center-left, a smaller side-view bloom below it, and a third open bloom lower down on the right. Sketching lightly with a pencil can help guide you, though the paint will cover it.
Petal Perfection
Don’t over-blend your red layers. Leaving the brushstrokes slightly visible mimics the delicate, crinkled texture that poppies are famous for.
Step 2: Painting the Blooms
-
Base layer for petals:
Load a size 4 round brush with bright red paint. Start with the large upper poppy, painting broad, curved shapes for the petals. Keep the edges slightly uneven to mimic the crepe-paper texture of real poppy petals. -
Add the second flower:
For the poppy on the lower right, paint a similar open shape. Notice how the petals overlap slightly; don’t worry about perfect separation yet, just get the main red color down. -
Create the side profile:
Paint the third flower on the left as a semi-circle or cup shape, representing a poppy seen from the side. This adds lovely dimension and variety to your bouquet. -
Let the first layer dry:
Allow the red base to dry to the touch so your next layers don’t muddy the color. This usually takes about 15-30 minutes depending on your paint brand. -
Add shadows:
Mix a tiny bit of deep crimson or maroon into your red. Using a size 2 brush, gently paint near the center of the flowers and under the overlapping petal edges. This shadow creates the illusion of depth. -
Highlighting edges:
Mix a touch of white into your bright red to make a soft coral-pink. Very sparsely, dry brush this lighter color onto the very tips of the upper petals to show where the sunlight hits them.
Step 3: Stems and Greenery
-
Paint the main stems:
Switch to your size 0 or liner brush and load it with olive green. Paint long, slender, slightly curved lines extending from the bottom of each flower head down toward the base of the mug. I find that pulling the brush toward you creates a smoother line. -
Add the buds:
Draw a few extra stems that end in oval shapes for the poppy buds. Paint the bud itself in green, perhaps adding a tiny slit of white or lighter green on one side to show roundness. -
Detailing the stems:
Poppy stems are hairy. Once the green stems are dry, take your finest liner brush with a slightly darker green mixture and add tiny, barely-there texture lines or dots along the stems. -
Painting the leaves:
At the base of the stems, add the distinctive jagged poppy foliage. Use the tip of your round brush to flick outward, creating fern-like, serrated leaves in a mix of olive and sap green.
Go Wild
Add a few scattered ‘flying’ petals floating away from the main composition to create movement, as if a gentle breeze is blowing through the flowers.
Step 4: Finishing Details
-
Create the centers:
For the open flowers, use black paint and a fine liner brush to stipple small dots in the very center. This mimics the stamens. -
Add center highlights:
Once the black dots are dry, add a few extremely tiny white or yellow dots on top of the black ones to make the center texture pop. -
Clean up:
If you made any mistakes or have stray paint marks, use a damp cotton swab or a toothpick to gently scrape them away before final curing. -
Cure the paint:
Follow the instructions on your specific paint bottle. Most ceramic paints require air drying for 24 hours followed by baking in a home oven to make the design dishwasher safe.
Enjoy your beautiful new floral mug with a warm drink or gift it to a nature lover
BRUSH GUIDE
The Right Brush for Every Stroke
From clean lines to bold texture — master brush choice, stroke control, and essential techniques.
Explore the Full Guide
Lavender Sprigs in Vertical Strokes
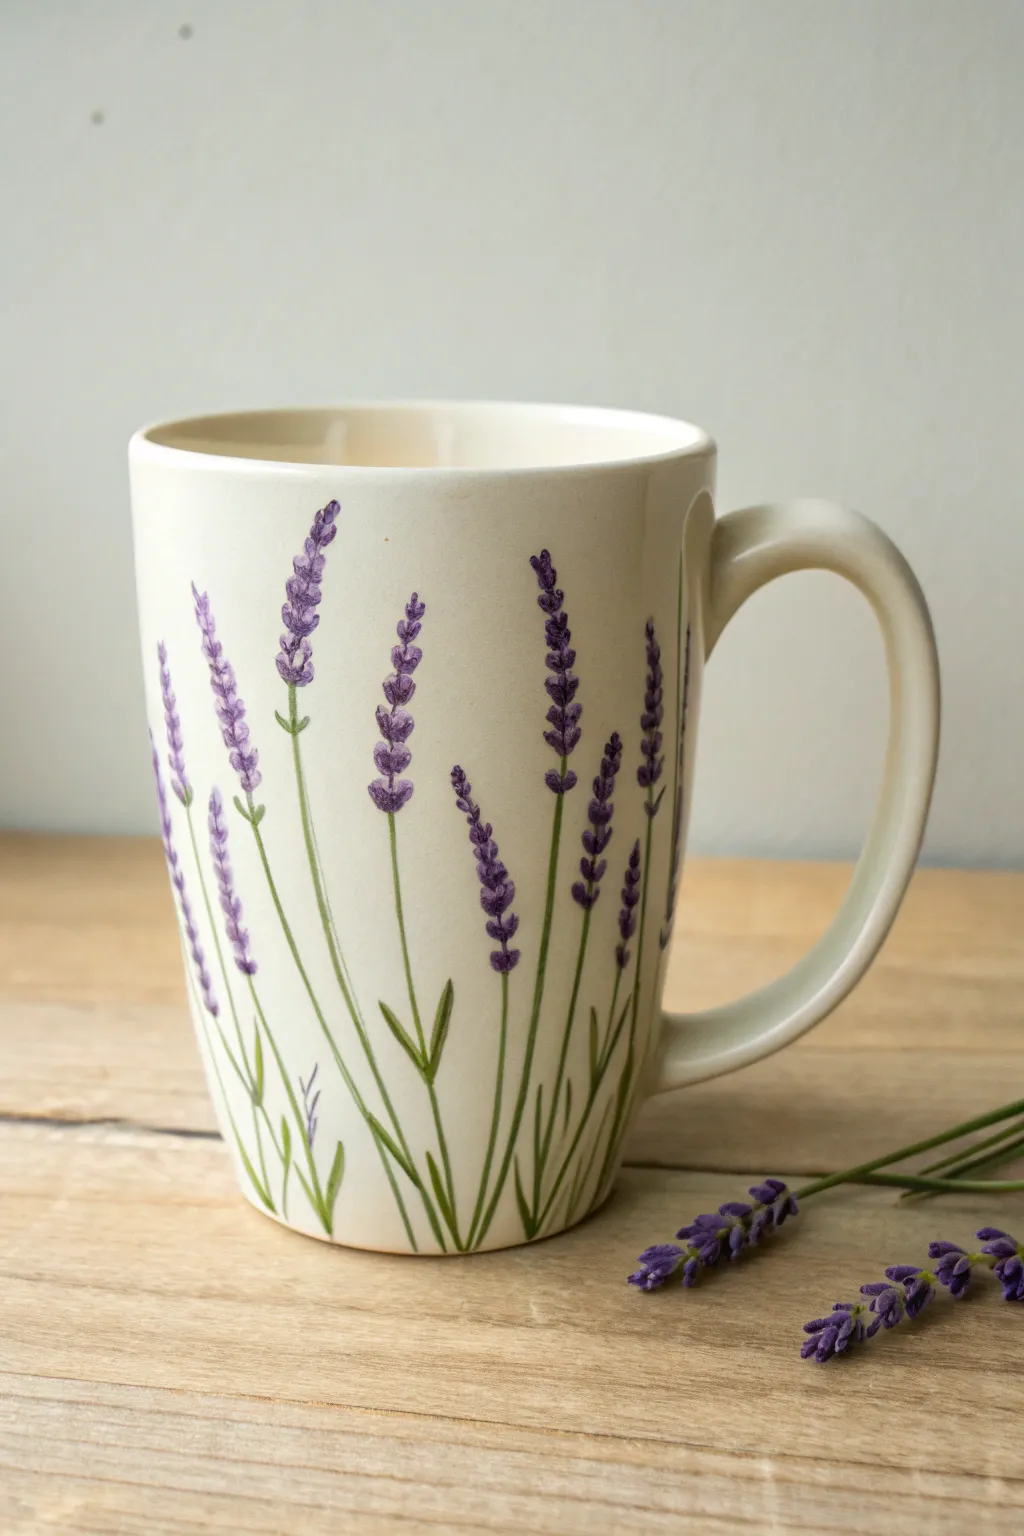
Transform a plain ceramic mug into a botanical keepsake with these graceful, vertical lavender stalks. This design relies on simple, rhythmic dabbing motions to create the iconic purple blooms, resulting in an elegant and peaceful morning companion.
Step-by-Step
Materials
- Plain white or cream ceramic mug
- Ceramic or porcelain paints (amethyst purple, deep violet, sage green, olive green)
- Small round paintbrush (size 0 or 2)
- Fine liner brush (size 00 or 000)
- Rubbing alcohol and cotton pads
- Palette or small plate for mixing
- Oven (for baking the paint, if required by brand)
Step 1: Preparation & Stems
-
Clean surface:
Before dipping your brush, wipe the entire exterior of the mug with rubbing alcohol. This removes oils and fingerprints that could prevent the paint from adhering properly. -
Plan the spacing:
Visualize where your main stems will go. You want them to start from the very bottom edge and reach up towards the rim, varying in height to look natural. -
Mix your greens:
On your palette, mix a touch of sage green with olive green to get a natural, herbal tone. Add a tiny drop of water if the paint feels too thick to glide. -
Paint main stems:
Using the fine liner brush, paint long, thin vertical lines starting from the base of the mug. I like to keep a slightly shaky hand here—perfectly straight lines look artificial, while a slight curve mimics nature. -
Add side branches:
From the main stems, extend short, thin offshoot stems on the upper third. These will hold the flower clusters later. -
Paint base leaves:
Near the bottom of the mug, paint thin, grass-like leaves that curve away from the main stems. Keep these strokes long and tapering to a point. -
Let greens set:
Allow the green stems to dry for about 10-15 minutes. This prevents muddy colors when you start adding the purple blooms.
Paint sliding off?
If the paint beads up or slides, the ceramic surface is too slick. Wipe it again with rubbing alcohol or lightly sand the area with fine-grit sandpaper for better grip.
Step 2: Painting the Blooms
-
Prepare purples:
Squeeze out your amethyst and deep violet paints. Do not mix them completely; leaving them separate allows you to dip into both for natural color variation. -
Start the tops:
Using the small round brush (size 0), load the tip with a mix of light and dark purple. Touch the very tip of the highest stem to create the top bud. -
The dabbing technique:
Work your way down the stem using a ‘press and lift’ motion. The shape should look like a small tear-drop or a grain of rice. -
Create distinct whorls:
Lavender grows in clusters (whorls) with gaps in between. Paint small groups of 3-5 purple dabs, leave a tiny gap of visible green stem, and then paint another cluster below it. -
Vary direction:
Angle your dabs slightly upward and outward. The buds shouldn’t just stick straight out; they should look like they are reaching for the sun. -
Add depth:
Go back over a few of the dry purple buds with the darker violet color. Add just a few dots near the base of the clusters to create shadow and dimension. -
Highlighting:
If you have white paint, mix a tiny amount with the purple to make a lilac shade. Add tiny highlights to the tips of the upper buds.
Step 3: Finishing Touches
-
Review the composition:
Spin the mug slowly. If a space looks too empty, add a short, low sprig or a few extra grass leaves at the bottom to fill it out. -
Clean edges:
If any paint smudged or a line went astray, use a damp cotton swab or a toothpick to gently scrape or wipe it away while the paint is still tacky. -
Dry time:
Let the mug sit undisturbed for at least 24 hours to ensure the paint creates a solid skin before baking. -
Bake to cure:
Follow the instructions on your specific paint bottle. Typically, place the mug in a cool oven, heat to 300°F-350°F (150°C-175°C), bake for 30 minutes, and let it cool completely inside the oven.
Add a buzz
Paint a tiny, simple bumblebee near one of the flowers using a small yellow oval with black stripes and delicate grey wings for a charming garden detail.
Enjoy sipping your favorite herbal tea from your new hand-painted botanical masterpiece.
Rosebud Clusters With Tiny Leaves
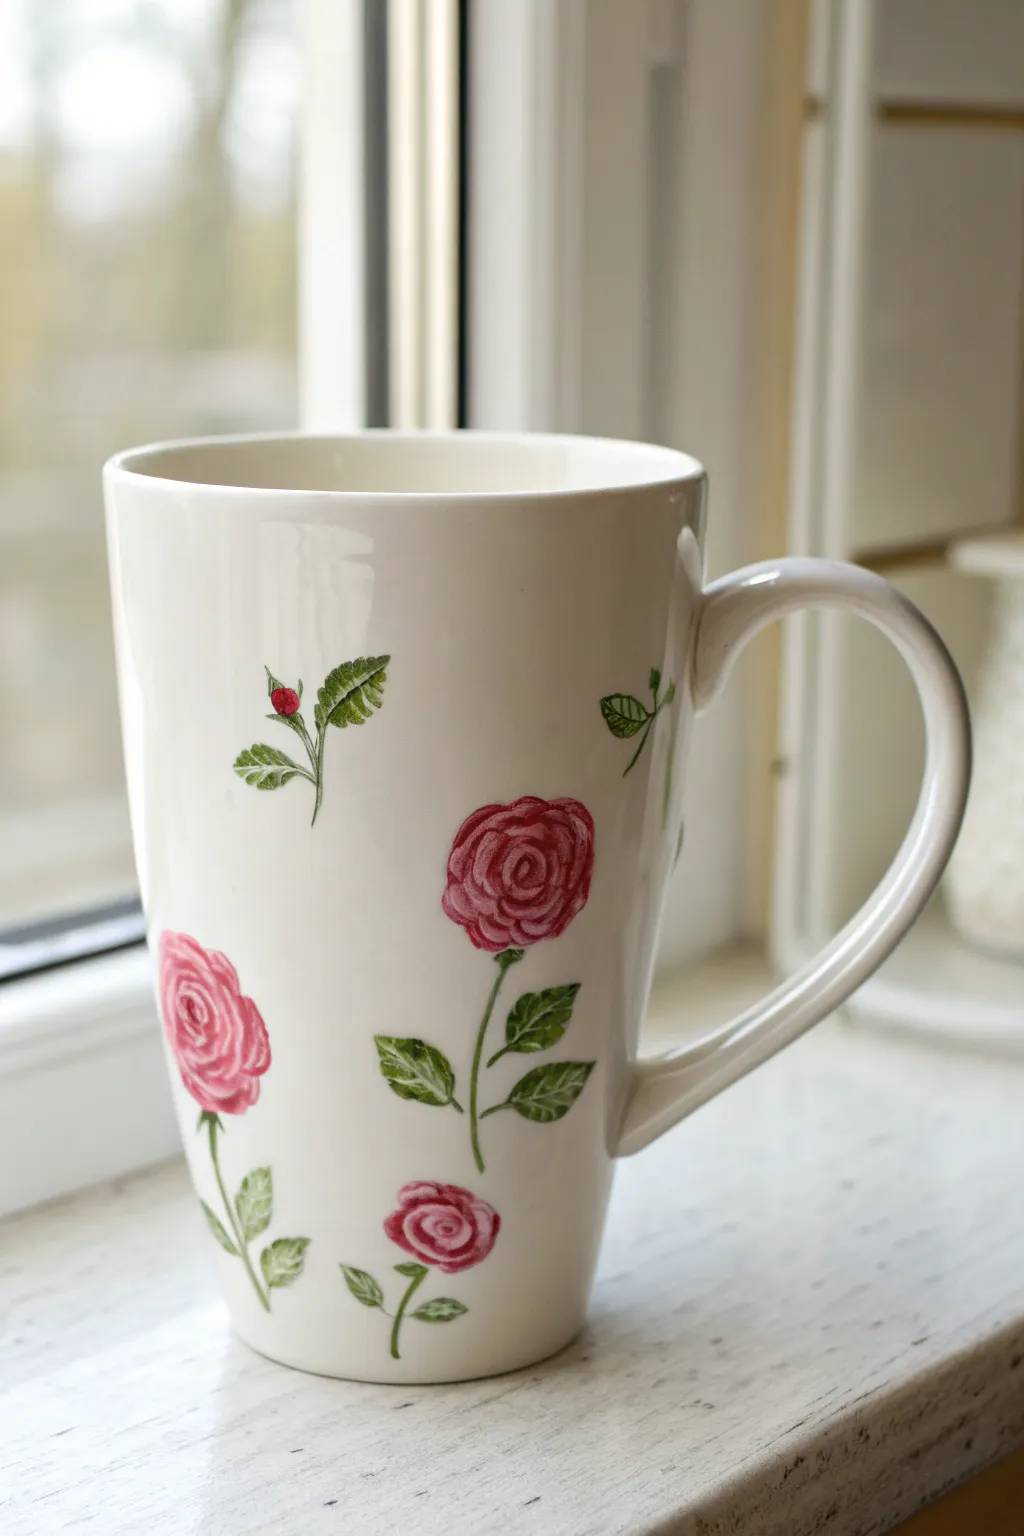
Transform a plain ceramic mug into a vintage-inspired piece with these elegant rose illustrations. Using fine lines and soft washes of color, you’ll create a scattered garden of blooming roses and dainty buds that feels both classic and handcrafted.
Detailed Instructions
Materials
- Tall white or cream ceramic mug
- Porcelain paints (Pink, Deep Red, Sap Green, Deep Green)
- Rubbing alcohol and cotton pads
- Fine detail paintbrush (size 0 or 00)
- Round paintbrush (size 2)
- Palette or small dish for mixing
- Paper towels
- Oven (for curing, if required by paint type)
Step 1: Preparation and Planning
-
Clean the surface:
Before you begin painting, it is crucial to remove any oils or fingerprints from the mug. Wipe the entire outer surface thoroughly with rubbing alcohol on a cotton pad and let it air dry completely. -
Plan your layout:
Visualize where your flowers will go. The design features a mix of fully opened roses, smaller buds, and wandering leaves scattered vertically across the mug. You don’t need to sketch, but mentally mapping out three main vertical areas helps maintain balance.
Step 2: Painting the Blooms
-
Create the main rose shape:
Start with the largest open rose. Load your round brush with pink paint and dab a rough, circular shape onto the mug. Keep the edges slightly uneven to mimic petals rather than a perfect circle. -
Add petal definition:
While the base pink is still wet, dip the tip of your fine detail brush into the deep red paint. Starting from the center of the pink circle, paint a tight spiral that loosens as it moves outward. -
Layer the outer petals:
Continue adding curved C-shaped lines around the spiral using the deep red. These lines should become shorter and more disconnected as you reach the outer edge of the pink shape, creating the illusion of overlapping petals. -
Paint a medium rose:
Repeat the process lower down on the mug for a second rose. I usually make this one slightly smaller or tilted to add variety to the composition. -
Create a tiny rosebud:
For the bud, paint a small, tight oval shape near the top of the design area using the deep red paint directly. You don’t need the pink base here; just a solid punch of color. -
Add a lower bloom:
Place a third, smaller bloom near the bottom. Use the same technique—pink base, red spiral center—but keep the overall size petite to anchor the design.
Pro Tip: Sheer Petals
Mix a tiny drop of painting medium or water (for water-based paints) with your pink base color. This translucency mimics real watercolors and lets ceramic shine through.
Step 3: Adding Greenery
-
Paint the main stems:
Switch to your fine detail brush and the sap green paint. Draw thin, delicate lines extending downwards from each flower head. Give these stems a gentle curve rather than drawing them perfectly straight. -
Detail the bud sepal:
Go back to your red rosebud. Paint small green strokes at the base of the red oval, sweeping slightly upward to cup the bud. -
Add leaf outlines:
Along the stems, paint the outlines of small, serrated leaves using the sap green. Keep the shapes almond-like with pointy tips. -
Fill the leaves:
Gently fill in your leaf outlines with a wash of sap green. You don’t need solid, opaque coverage; a slightly translucent look adds to the watercolor effect. -
Add leaf veins:
Dip the very tip of your detail brush into the deep green paint. Carefully draw a central vein down the middle of each leaf and tiny diagonal lines branching off it for texture. -
Create floating greenery:
To fill empty spaces, paint a few standalone sprigs of leaves or naked stems that don’t have flowers attached. This makes the design feel like a natural, growing garden.
Troubleshooting: Shaky Lines?
If your stems are wobbling, try resting your pinky finger on the mug surface for stability as you pull the brush downward. It acts as an anchor for your hand.
Step 4: Finishing Touches
-
Review and refine:
Step back and look at the mug. If any red definition lines on the roses look too faint, carefully re-trace them to ensure the spiral pattern is visible. -
Dry completely:
Let the mug sit undisturbed for at least 24 hours to allow the paint to surface-dry fully. -
Bake to set:
Place the mug in a cold oven and set the temperature according to your paint manufacturer’s instructions (usually around 300°F or 150°C). Bake for the recommended time (often 30-40 minutes), then turn the oven off and let the mug cool down completely inside before removing.
Now you have a charming custom mug perfect for sipping your morning tea in the garden

PENCIL GUIDE
Understanding Pencil Grades from H to B
From first sketch to finished drawing — learn pencil grades, line control, and shading techniques.
Explore the Full Guide
Wraparound Floral Vine Garden
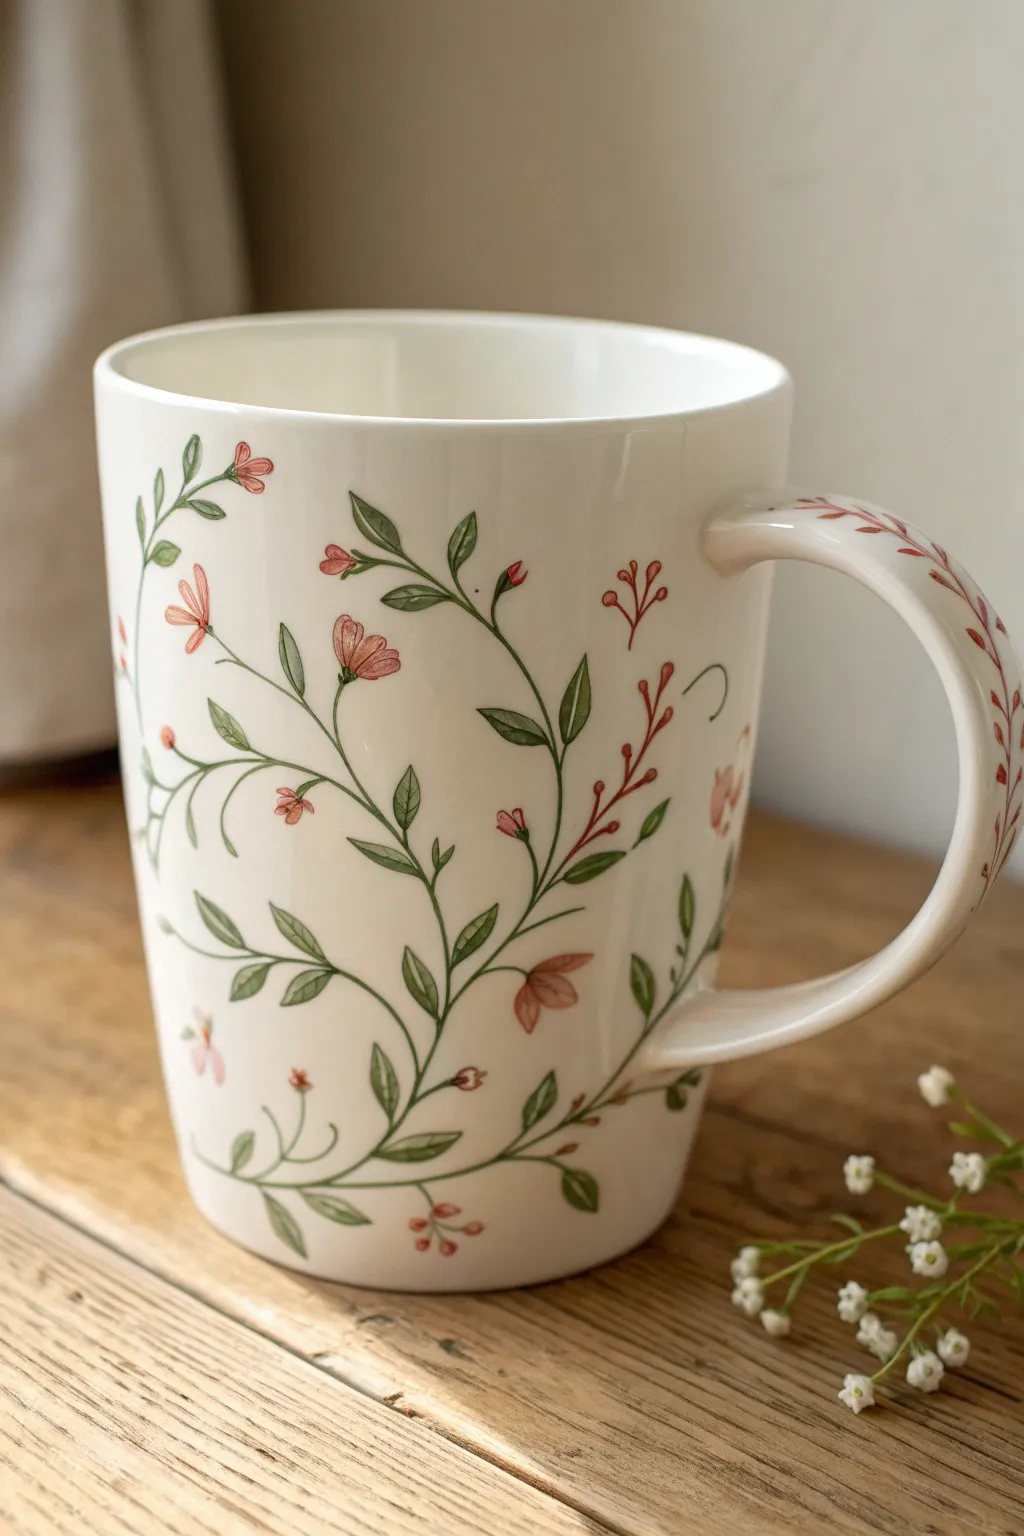
Transform a plain white mug into a botanical masterpiece with this delicate, climbing vine design. The finished piece features airy tendrils reaching across the surface and handle, accented by soft pink blossoms for a vintage garden feel.
Step-by-Step Guide
Materials
- White porcelain or ceramic mug (clean and dry)
- Pebeo Porcelaine 150 paints (or similar bake-on ceramic paint)
- Paint colors: Olive Green, Sap Green, Soft Pink, Coral/Peach, Deep Red
- Fine liner brush (size 00 or 000)
- Small round brush (size 1 or 2)
- Rubbing alcohol and cotton pads
- Palette or small ceramic tile for mixing
- Paper towels
- Oven (for curing)
Step 1: Preparation & Planning
-
Clean surface:
Begin by thoroughly wiping down the entire exterior of the mug, including the handle, with rubbing alcohol. This removes invisible oils or fingerprints that prevent paint adhesion. -
Plan the flow:
Visualize a ‘S’ curve or meandering line that starts low on one side and winds its way up. You don’t need to sketch it perfectly, but having a mental map helps the composition feel organic.
Clean Edges Only
Make a mistake? Don’t worry. Use a Q-tip dampened with rubbing alcohol (not water) to erase wet paint cleanly without smearing it across the ceramic surface.
Step 2: Painting the Vines
-
Mix your greens:
On your palette, create a natural vine color by mixing a touch of Olive Green with Sap Green. Adding a tiny dot of Deep Red can desaturate the green slightly for a more realistic, earthy tone. -
Establish the main stems:
Using your finest liner brush (000), paint thin, sweeping lines starting from the base of the mug. Let your hand stay loose to create natural curves rather than stiff, straight lines. -
Extend the reach:
Continue these main stems upward, allowing some to branch off towards the rim and others to curl horizontally. The lines should taper off to be whisper-thin at the ends. -
Add secondary tendrils:
Paint smaller, shorter offshoots from the main vines. Add tiny, curling ‘pigtail’ shapes near the ends of lines to mimic climbing pea vines or heavy garden overgrowth. -
Address the handle:
Extend a vine specifically to crawl onto and up the handle. This connecting element is crucial for the ‘wraparound’ effect seen in the photo.
Step 3: Adding Foliage
-
Paint base leaves:
Switch to your size 1 round brush. Load it with the green mix and press gently against the vine stems to create almond-shaped leaves. Vary the pressure: push down for width, lift up for a point. -
Vary leaf placement:
Paint leaves in pairs or alternating patterns along the stems. Leave some gaps where the flowers will sit later. -
Add detail veins:
Once the base green is tacky or dry, use the liner brush with a slightly darker green (mix more Deep Red in) to add a very fine central vein to the larger leaves. -
Incorporate delicate sprigs:
Using the liner brush again, add tiny clusters of leaves that look almost like needles or small ferns for textural variety.
Gilded Touch
Once the main design is baked and cooled, add touches of gold porcelain outliner to the leave tips or flower centers for a luxurious, shimmering finish.
Step 4: Blooming Details
-
Mix floral shades:
Prepare a Soft Pink and a Coral/Peach shade. Keep the paint fluid but not watery to ensure opaque coverage. -
Paint main blossoms:
Identify open spots on your vines. Paint small, 3-to-5 petal flowers using the tip of the round brush. Keep them loose and watercolor-style rather than perfectly geometric. -
Add buds:
At the very tips of some vines, paint small teardrop shapes in pink or coral to represent unopened buds. -
Create berry accents:
Dip the handle end of a brush or a detail tool into Deep Red or Coral paint. Dot small clusters of ‘berries’ near the delicately curling tendrils. -
Detail the flowers:
I like to wait a few minutes for the petals to set, then use the liner brush with a darker reddish-pink to add tiny stamen lines or center dots to the open flowers.
Step 5: Finalizing
-
Review and refine:
Rotate the mug and look for any bald spots. Fill them with a tiny leaf or an extra curling tendril to balance the visual weight. -
Dry time:
Allow the mug to air dry for at least 24 hours. The paint needs to be completely moisture-free before baking. -
Bake to set:
Place the mug in a cool oven. Set the temperature to 300°F (150°C) or according to your specific paint instructions. Bake for 35 minutes, then turn the oven off and let the mug cool completely inside.
Now you have a durable, botanical mug ready for your morning tea or coffee
One-Sided Bouquet Panel
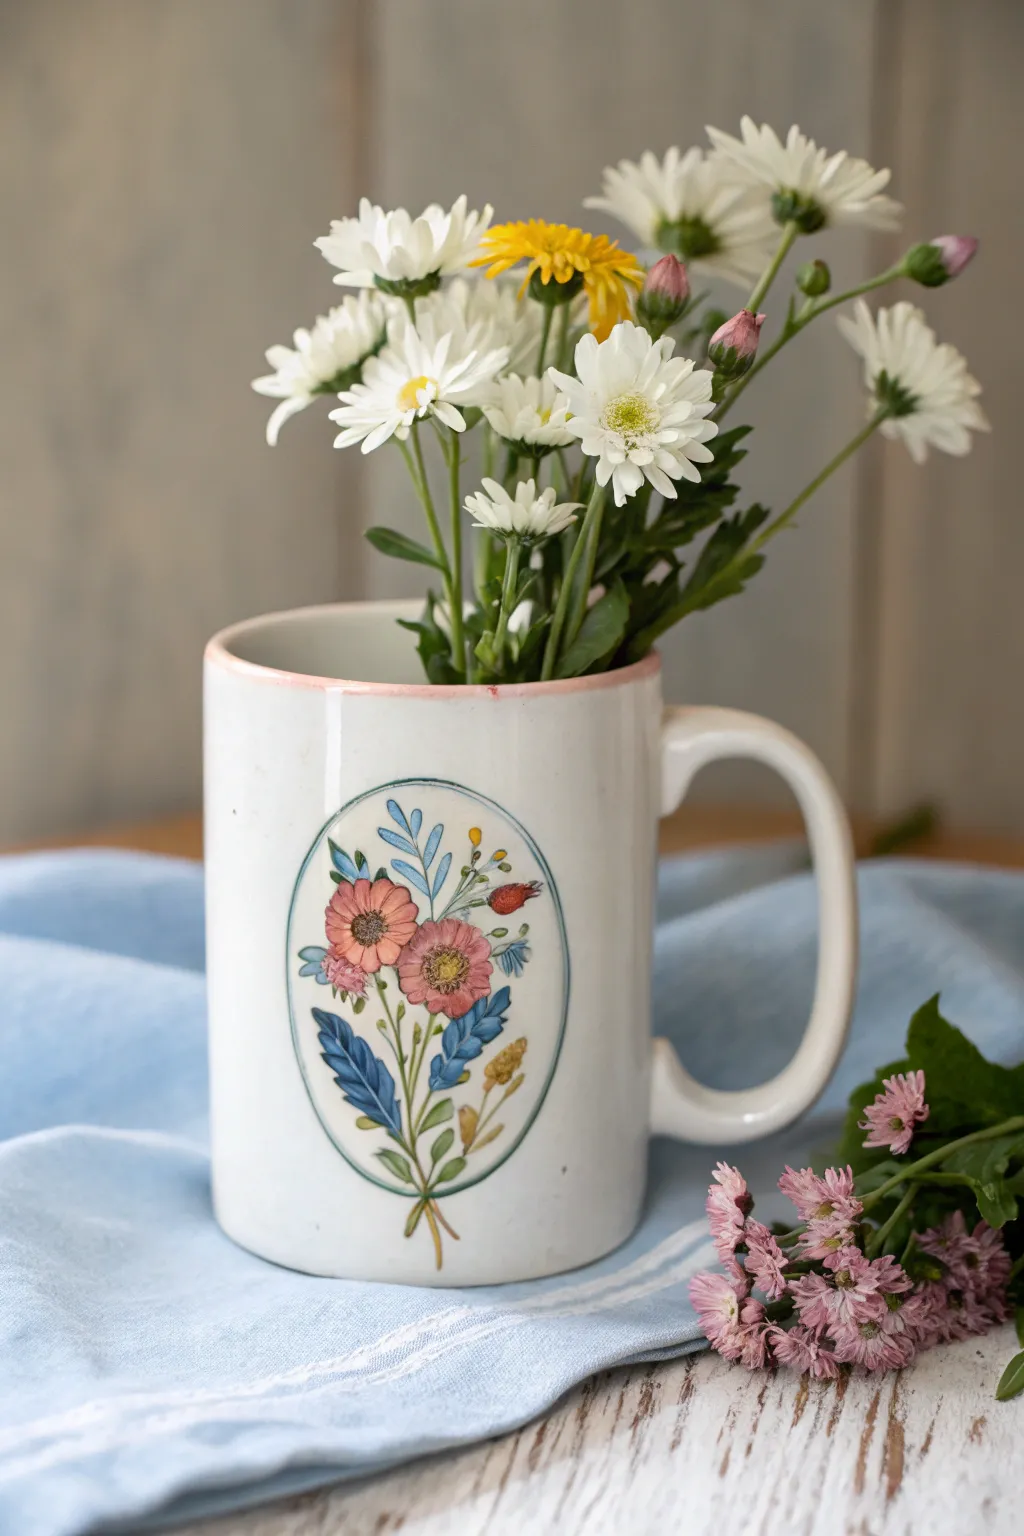
Transform a plain white mug into a nostalgic keepsake with this delicate floral panel design. Featuring soft pink and orange blooms enclosed in a charming oval frame, this project captures the essence of classic botanical illustrations.
Detailed Instructions
Materials
- Plain white ceramic mug
- Ceramic or porcelain paints (Soft Pink, Terracotta/Orange, Deep Blue, Sage Green, Mustard Yellow)
- Fine detail paintbrush (size 0 or 00)
- Small round paintbrush (size 2)
- Pencil (HB or lighter) or transfer paper
- Rubbing alcohol
- Cotton pads
- Painter’s tape or oval stencil (optional)
- Ceramic clear glaze (optional, check paint instructions)
- Oven for baking (if using bake-to-set paints)
Step 1: Preparation & Outline
-
Clean surface:
Begin by thoroughly cleaning the mug surface with rubbing alcohol on a cotton pad. This removes any finger oils or dust that might prevent the paint from adhering properly. -
Create the oval frame:
Lightly sketch a vertical oval shape on the side of the mug using your pencil. If you don’t feel confident drawing this freehand, cut an oval shape from paper and trace around it, or use a flexible stencil. -
Paint the border:
Using a size 0 brush and sage green paint mixed with a tiny bit of blue for a dusky look, carefully paint over your pencil line to create the oval frame. Keep the line thin and delicate. -
Interior sketching:
Inside the oval, lightly sketch the main elements: two central round flowers, two large feathery leaves at the bottom, and a few vertical stems rising up.
Uneven Oval Lines?
If your oval border looks shaky, don’t panic. Wait for it to dry, then use a toothpick to gently scratch away the excess paint and straighten the line.
Step 2: Painting the Blooms
-
Base coat for flowers:
Dip your size 2 brush into the soft pink paint. Fill in the upper left flower shape with gentle, petal-like strokes. Wash the brush and use a muted terracotta or coral shade for the lower right flower. -
Add flower centers:
Once the base petals are slightly tacky or dry, dab a small circle of mustard yellow in the center of both flowers. -
Enhance the centers:
To give the centers depth, add tiny dots of brown or dark orange around the edge of the yellow circles using the very tip of your detail brush. -
Define petals:
With a slightly darker shade of pink (mix a little red into your base pink), paint thin lines radiating from the center of the pink flower to define individual petals. Repeat this process for the coral flower using a darker orange.
Paint Consistency
Ceramic paint can be thick. Mix a single drop of water or thinning medium into your paint puddle to help it glide smoother for those fine stems.
Step 3: Leaves & Details
-
Main foliage base:
Load your brush with deep blue paint. Create the two large, fern-like leaves at the bottom left and right of the bouquet. Use a pressing motion to create the leaf segments. -
Stem structure:
Switch back to the sage green. Paint thin lines connecting your flowers and blue leaves, bringing them all together at a single point near the bottom of the oval. -
Upper filler leaves:
At the top of the bouquet, paint delicate, airy blue leaves. These should look like sprigs of lavender or wheat, reaching upward. -
Adding texture:
I like to add contrast here by painting the veins on the large blue leaves using a lighter blue or white mixture. -
Yellow sprigs:
Add a small sprig of mustard yellow grains or buds on the right side, tucked between the coral flower and the blue leaf. -
The rose hip:
Paint a small, reddish-orange oval shape near the top right to represent a rose hip or bud, connecting it to the main stem with a thin green line. -
Bottom stems:
Paint the cut ends of the stems protruding slightly below where the bouquet is ‘tied’ together near the bottom of the oval.
Step 4: Finishing Touches
-
Clean up edges:
Check the perimeter of your oval frame. If any paint went outside the line, use a damp cotton swab or toothpick to gently scrape it away. -
Allow to cure:
Let the mug sit undisturbed for at least 24 hours (or as directed by your specific paint brand) before handling. -
Bake to set:
Place the mug in a cold oven. Set the temperature to 350°F (175°C) and bake for 30 minutes. Turn the oven off and let the mug cool completely inside the oven to prevent cracking.
Enjoy your beautiful new mug with your morning coffee or tea, knowing you’ve created a piece of usable art


Minimal Line-Art Flowers With One Color Pop
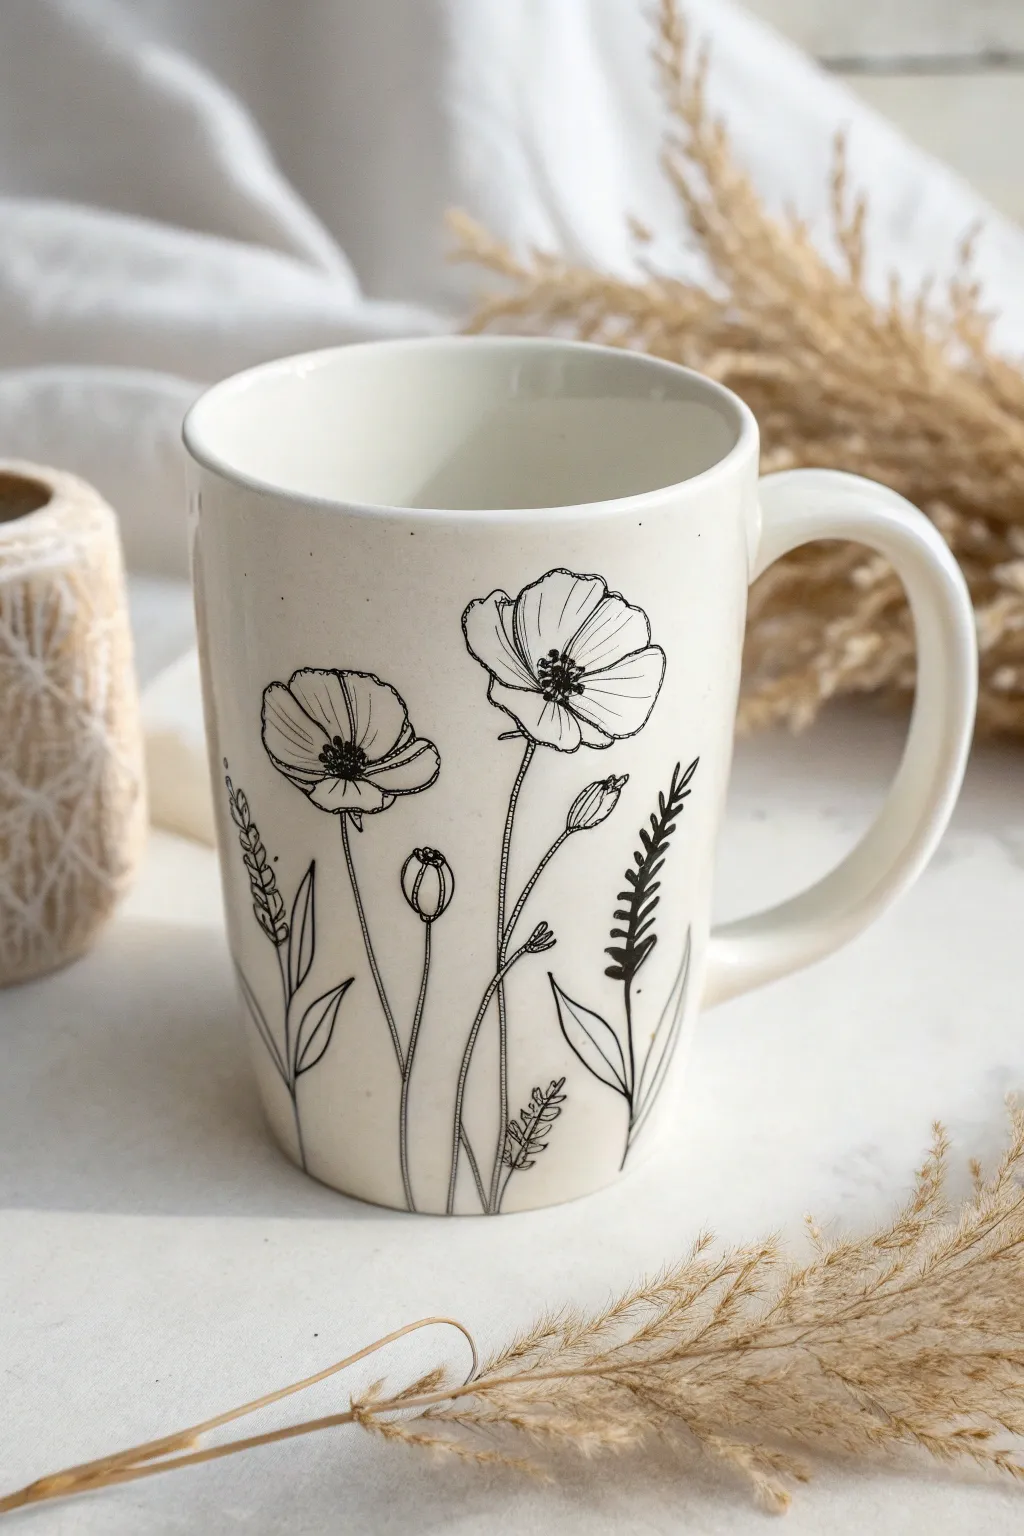
Embrace the elegance of minimalism with this striking black and white botanical mug design. Featuring finely detailed poppies and wildflowers, this project transforms a plain ceramic vessel into a piece of functional modern art.
Step-by-Step Tutorial
Materials
- Plain white ceramic mug (smooth surface)
- Rubbing alcohol and cotton pads
- Pebeo Porcelaine 150 fine tip marker (Anthracite Black) or similar oil-based ceramic marker
- Soft graphite pencil (B or 2B)
- Tracing paper (optional)
- Masking tape
- Paper towels
- Oven (for curing)
Step 1: Preparation & Planning
-
Clean the Surface:
Before you begin, wipe the entire outer surface of the mug with rubbing alcohol on a cotton pad. This removes invisible oils or fingerprints that could prevent the ink from adhering properly. -
Avoid Handling the Painting Area:
Once cleaned, try to hold the mug by the handle or the rim to keep the main surface pristine. -
Sketch Layout on Paper:
Grab a piece of scrap paper and roughly sketch out your composition first. Plan for two main poppy flowers—one fully open and facing forward, and one slightly turned—flanked by tall grasses and smaller buds.
Step 2: Drafting the Design
-
Light Pencil Sketch:
Using your soft graphite pencil, very lightly draw the main stems onto the mug. Graphite usually burns off in the oven, so don’t worry about faint lines remaining. -
Position the Main Blooms:
Draw the basic circles or oval shapes where the poppy heads will sit. Place the largest bloom slightly higher on the right side and the second bloom lower on the left. -
Add Vertical Guides:
Sketch vertical lines for the accompanying wheat stalks and smaller flower buds. Vary the heights to create a natural, organic flow that moves upward from the base.
Fixing Smudges
Make a mistake? While the ink is wet, a cotton swab dipped in rubbing alcohol acts like an eraser. If dry, carefully scrape excess ink away with a toothpick.
Step 3: Inking the Flowers
-
Prime the Marker:
Shake your porcelain marker well and press the tip on a scrap piece of paper until the ink flows smoothly and consistently. -
Outline the Petals:
Starting with the large right-side poppy, draw the outer edges of the petals. Use a slightly shaky or wavy hand here; perfect circles look artificial, while irregular lines mimic delicate petals. -
Detail the Centers:
In the center of the open poppy, create a cluster of tiny dots and small, dark stamens radiating outward. This dark center anchors the flower. -
Ink the Second Poppy:
Repeat the process for the left-side poppy, drawing the petals cupped upward. Add a few lines inside the petals to suggest veins or folds.
Level Up: Color Pop
After baking the black outline, fill just the petals with a sheer wash of diluted ceramic paint (yellow or red) for a watercolor effect, then bake again.
Step 4: Adding Foliage & Stems
-
Draw the Stems:
Draw long, slender stems extending down from the flower heads to the bottom of the mug. I find it helps to pull the pen toward you in one confident stroke to keep the line straight but organic. -
Create the Wheat Stalks:
For the decorative grasses, use short, rapid hatching marks along a central stem. These V-shapes should get smaller as they reach the tip. -
Add Flower Buds:
Draw the smaller, unbloomed buds. These should look like small, tight teardrops on top of long stems. Add subtle texture lines to the bud casing. -
Fill in Leaves:
Add long, lance-shaped leaves near the base of the stems. Keep the lines thin and crisp to match the rest of the aesthetic.
Step 5: Finishing Touches
-
Cleanup:
Check for any smudges. If the ink is still wet, you can quickly wipe mistakes with a damp Q-tip. If it’s dry, you might need a bit of alcohol or a scratch tool. -
Drying Time:
Let the mug sit undisturbed for at least 24 hours. The ink needs to air-dry completely before heat setting to prevent bubbling. -
Baking:
Place the mug in a cold oven. Set the temperature to 300°F (150°C) or the specific temperature instructed by your marker manufacturer. Once preheated, bake for 30-35 minutes. -
Cool Down:
Turn off the oven and leave the mug inside until it cools down completely to room temperature. This gradual cooling prevents cracking.
Now you have a stunning, dishwasher-safe piece of pottery that looks professionally illustrated
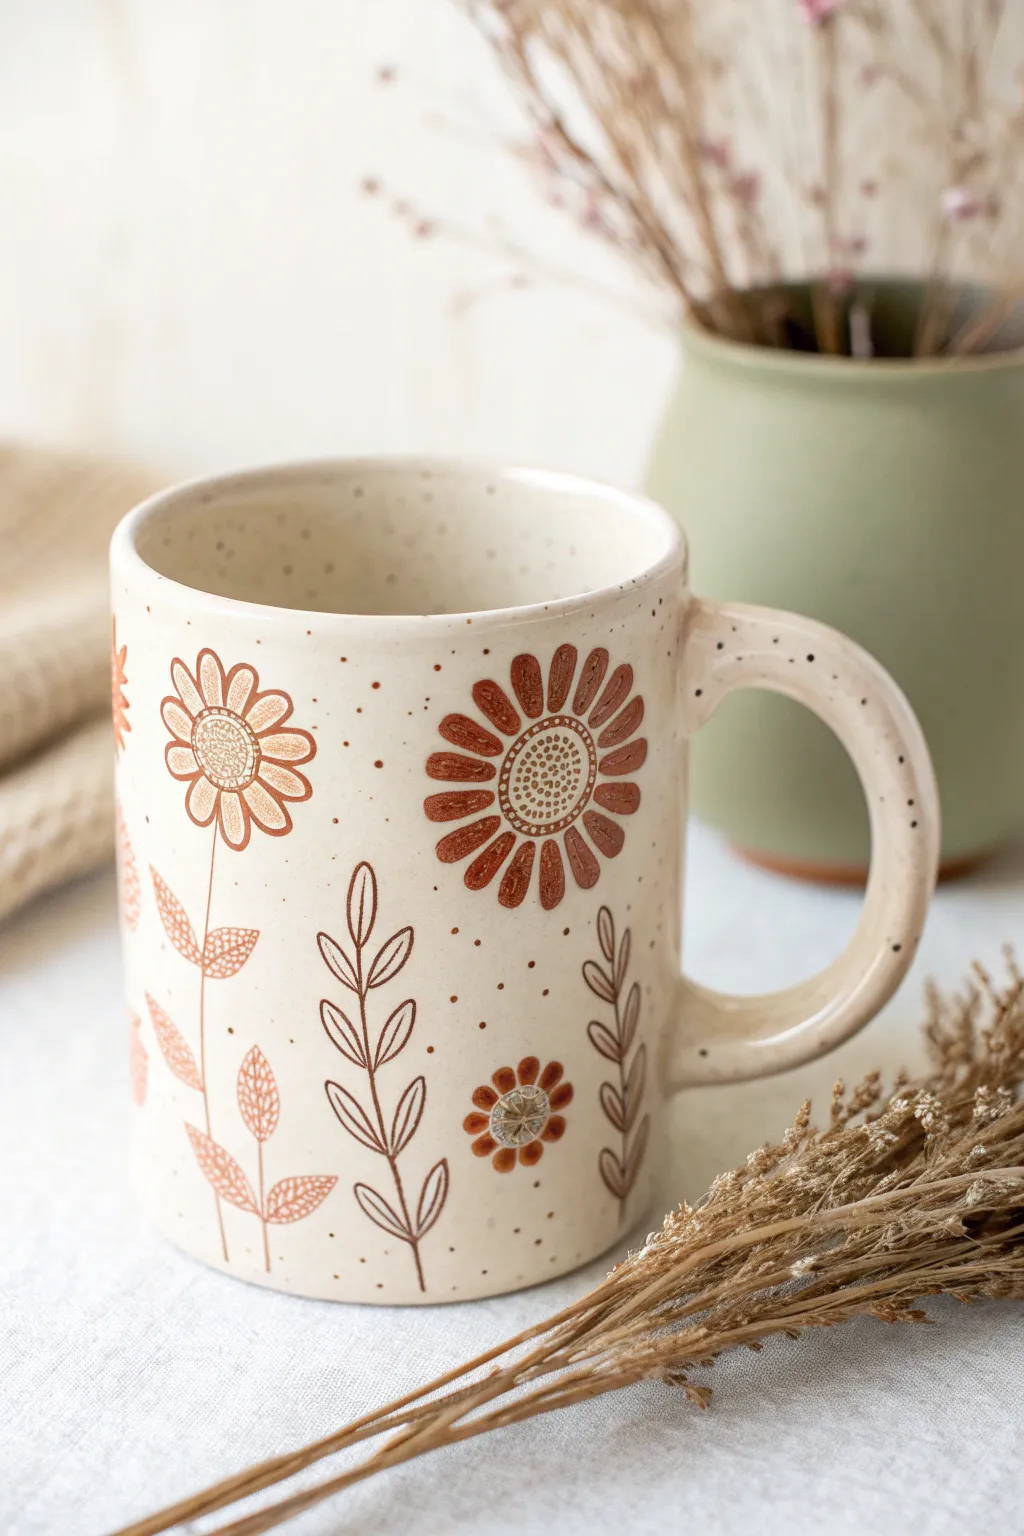
Tiny Flower Border Along the Rim
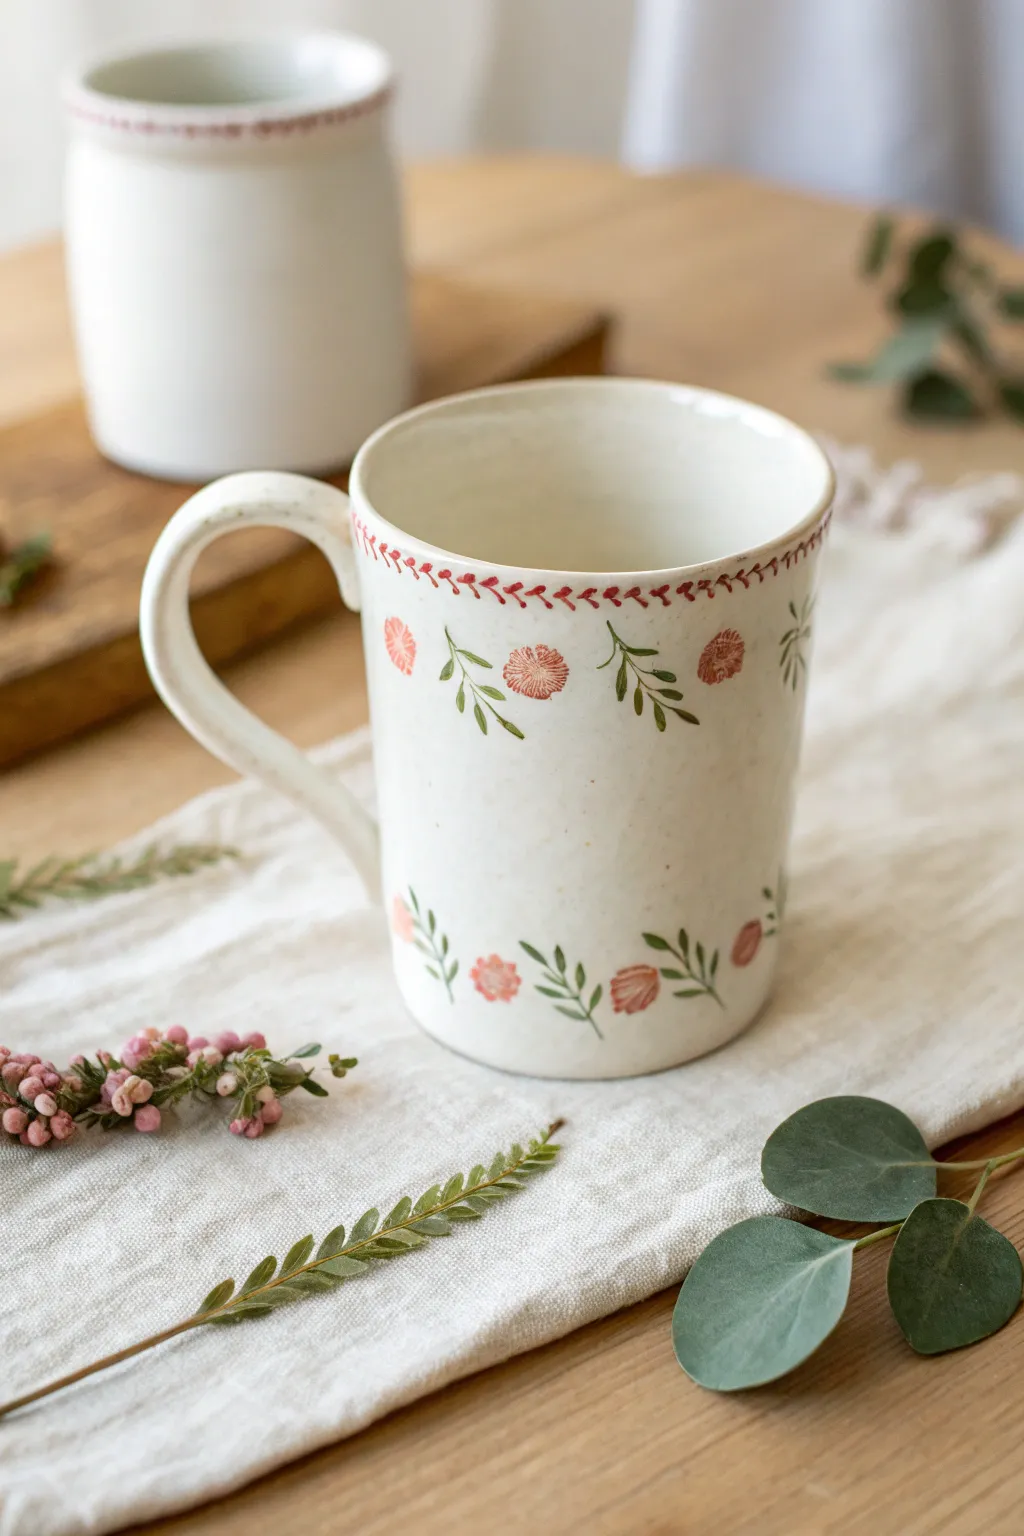
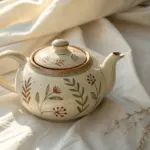
Transform a plain ceramic mug into a rustic masterpiece inspired by folk art with this delicate flower border design. Using simple repetitive brushstrokes, you’ll create a charming pattern that wraps around the rim and base, evoking the feeling of a sun-drenched meadow.
How-To Guide
Materials
- White or cream ceramic mug (bisque or glazed, depending on paint type)
- Ceramic paints (Rust red/Terracotta, Sage green, darker Forest green)
- Fine detail paintbrush (size 0 or 00 liner brush)
- Small round paintbrush (size 1 or 2)
- Glazed ceramic surface cleaner (rubbing alcohol)
- Palette for mixing
- Pencil (optional for guidelines)
- Paper towels
- Oven (for baking/setting paint if required)
Step 1: Preparation & Rim Detail
-
Clean the surface:
Before starting, ensure your mug is completely free of oils or dust. Wipe the entire surface down with rubbing alcohol and let it air dry for a perfectly clean canvas. -
Sketch guidelines:
If you’re worried about spacing, lightly mark a faint pencil line about half an inch below the rim and another half-inch above the bottom. These lines will disappear when you bake the paint or can be wiped off later. -
Load the liner brush:
Dip your fine liner brush into the rust red or terracotta paint. You want the consistency to be fluid but not watery, ensuring crisp lines. -
Paint the herringbone rim:
Start painting the herringbone pattern directly on the rim’s edge. Create small, slanted V-shapes that connect in a continuous line. -
Keep the rhythm:
Continue these small chevron strokes all the way around the rim. Don’t worry if they aren’t perfectly identical; subtle variations add to the hand-painted charm. -
Clean up edges:
If any red paint smudged onto the inner lip of the mug, wipe it away quickly with a damp cotton swab before it dries.
Wobbly Lines?
If your hand shakes while doing the rim border, rest your pinky finger on the mug surface for stability. This anchors your hand and gives you much smoother control.
Step 2: Painting the Flora
-
Start the top floral row:
Switch to your size 1 round brush. Load it with the rust red paint to create the main flower heads for the upper border. -
Create scalloped blooms:
Paint small, radiating lines in a semi-circle shape to mimic fan-like flower heads. Space them out generously around the upper part of the mug, angling them slightly differently for a natural look. -
Add smaller buds:
In between the larger fan flowers, dab small, irregular circles or ovals to represent closed buds using the same red hue. -
Mix your greens:
On your palette, place your sage green and forest green. I prefer to mix a tiny bit of the rust red into the green to mute it, giving it that earthy, vintage tone. -
Paint the stems:
Using the liner brush and your green mix, draw thin, curving stems extending downwards from your red flowers. Let them wave and curve naturally rather than drawing straight sticks. -
Add the leaves:
With the liner brush, press gently and lift to create small, almond-shaped leaves along the stems. Cluster two or three leaves together for a fuller appearance. -
Create the bottom border:
Repeat the floral process near the base of the mug. Paint another row of red fan-flowers and buds, but this time, angle the stems upwards. -
Vary the bottom foliage:
For the bottom row, add a few standalone sprigs of leaves without flowers to fill in any large gaps, creating a lush, garden-bed effect. -
Add center details:
Once the red flowers are dry to the touch, use your finest brush to add tiny, darker red or brown lines radiating from the base of each flower for extra definition.
Step 3: Finishing Touches
-
Check for gaps:
Rotate the mug slowly and look for any uneven spacing. Add a tiny floating leaf or a speck of red pollen in empty spots to balance the composition. -
Let it cure:
Allow the paint to dry completely according to the manufacturer’s instructions. This usually takes at least 24 hours before baking. -
Bake to set:
Place the mug in a cool oven, then turn the heat to the temperature specified on your paint bottle (usually around 300°F-350°F). Bake for the required time, then turn the oven off and let the mug cool completely inside the oven to prevent cracking.
Vintage Texture
For a rustic look, use a ‘dry brush’ technique on the flowers. Load very little paint so the texture of the ceramic shows through the petals slightly.
Now you have a lovely, custom piece of pottery that looks like it came straight from a cozy cottage kitchen
Floral Garland Around the Handle
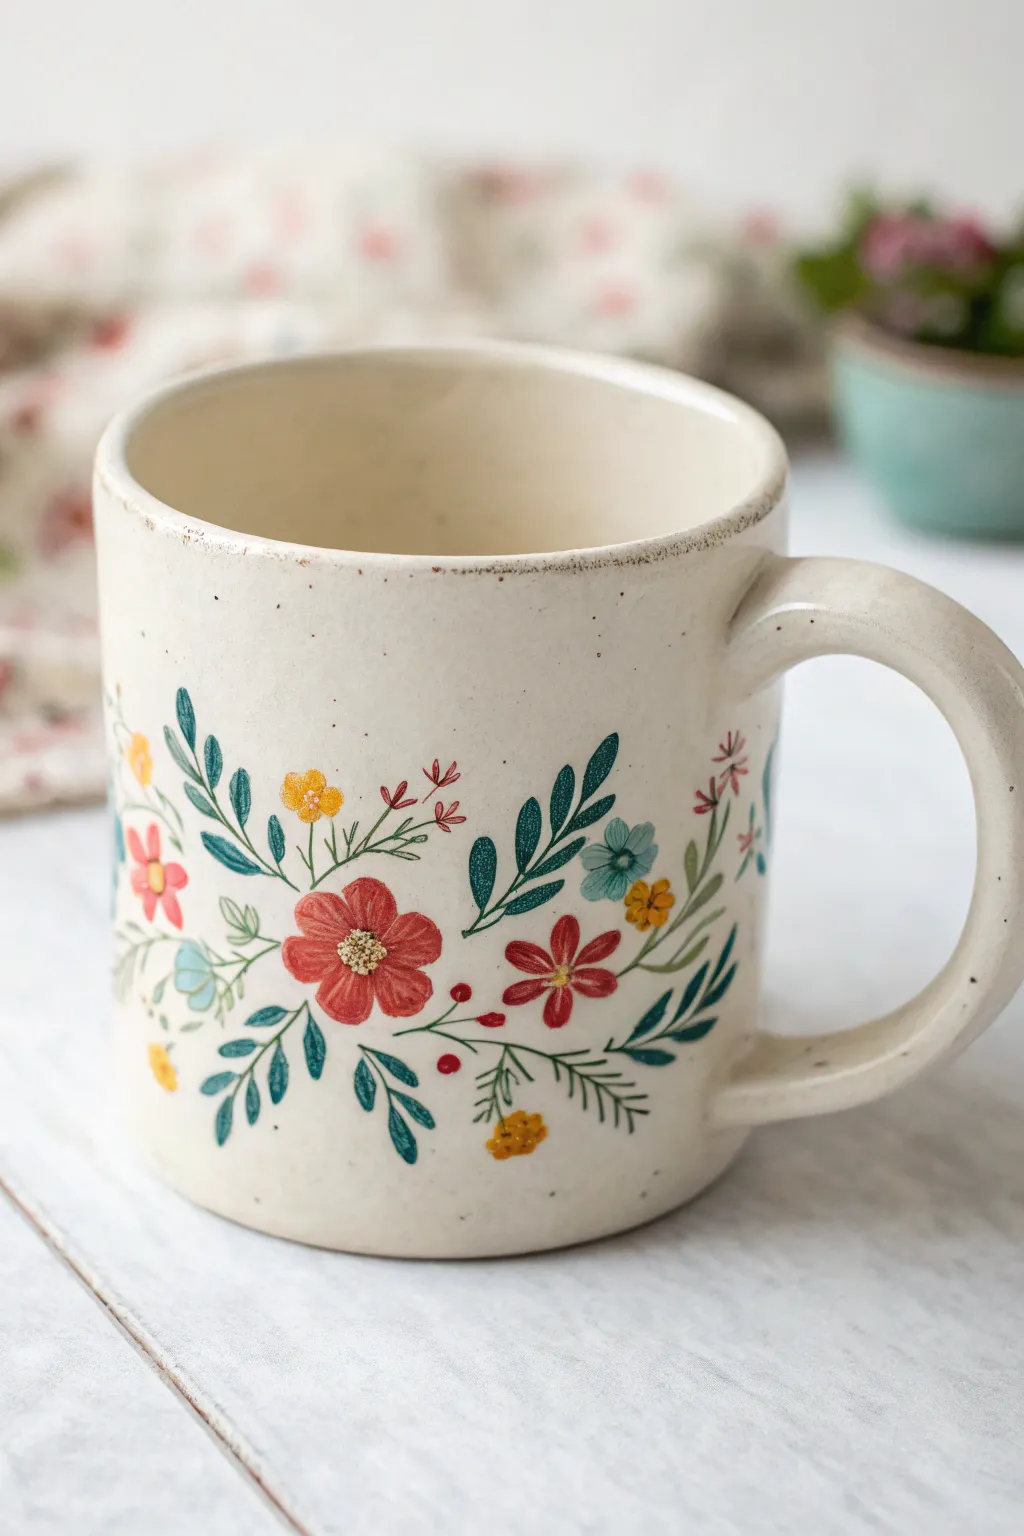
Bring a touch of cottagecore charm to your morning coffee with this hand-painted ceramic mug design. Featuring a delicate garland of red, yellow, and blue wildflowers on a speckled cream base, this project is perfect for beginners wanting to practice fine botanical details.
Step-by-Step Tutorial
Materials
- blank ceramic mug (cream or off-white)
- ceramic paints (baked-on or air-dry type)
- paint colors: deep red, mustard yellow, teal blue, sage green, forest green, light pink
- fine liner brushes (sizes 00 and 0)
- small round brush (size 1)
- rubbing alcohol and cotton pads
- palette or small plate
- pencil (optional)
- oven (for curing, if required by paint type)
Step 1: Preparation & Base Layer
-
Clean the Surface:
Before laying down any color, wipe the entire outer surface of the mug with rubbing alcohol to remove oils and fingerprints. This ensures the paint adheres properly and lasts longer. -
Adding Texture (Optional):
The mug in the image has a lovely speckled stoneware look. If your mug is plain white, you can mimic this by mixing a tiny amount of brown paint with water and flicking it sparsely onto the surface using an old toothbrush. Let this dry completely. -
The Rim Detail:
Create the rustic, weathered rim by taking a mostly dry brush with a mix of brown and grey paint. Gently dab and drag it along the very top edge of the mug to create an uneven, earthy border.
Step 2: Painting the Greenery
-
Establish the Flow:
Start by painting the main stems using your liner brush and forest green paint. Create curved, sweeping lines that start from the bottom center and reach upwards and outwards towards the handle and the opposite side. -
Add Leaf Variety:
Using sage green, paint small, teardrop-shaped leaves along some of the stems. Vary the pressure on your brush: press down for the belly of the leaf and lift up for the tip. -
Darker Foliage:
Switch back to the forest green or a teal-green mix. Paint longer, slender leaves that curve dramatically, similar to fern fronds, to fill in empty spaces between the main stems. -
Pine Sprigs:
For a bit of textural contrast, add a few pine-needle sprigs. Draw a central line and use quick, short flicks with your 00 brush to create the needles on either side.
Oops! Blobs happen
If you apply too much paint and it creates a raised blob, don’t wipe it while wet! Let it dry slightly, then use a craft knife to gently lift the excess off cleanly.
Step 3: Adding the Blooms
-
The Main Red Flowers:
Identify two or three focal points for the largest flowers. Using the deep red paint and a size 1 round brush, paint five simple petals radiating from a center point. Don’t worry about perfect symmetry. -
Detailing the Red Flowers:
Once the red base is tacky or dry, use a lighter pink or white to add tiny lines radiating from the center of the petals perfectly mimicking the texture of a real blossom. -
Yellow Accents:
Load your brush with mustard yellow paint. scattered around the red flowers, paint small clusters of three or four dots to represent buds, or small five-petal flowers. -
Blue Posies:
Using teal blue, add small four-petal flowers tucked behind the green leaves. These should look like forget-me-nots peeking through. -
Red Berries:
With the handle end of a paintbrush or a dotting tool, dip into the red paint and place small, perfect dots at the ends of thin brown or green stems for scattered berries.
Extend the Garden
Don’t stop at the outside! Paint a single tiny yellow flower or a small green leaf on the inside rim of the mug for a sweet surprise while drinking.
Step 4: Refining Details
-
Flower Centers:
Go back to your main red flowers. Use yellow or white paint and a very fine tool to stipple tiny dots in the very center, creating the pollen area. -
Adding Veins:
This is where I find the design really comes to life. Use your diluted dark green paint and the thinnest liner brush to add a central vein to the larger sage green leaves. -
Wispy Fillers:
Look for any awkward gaps in your garland. Fill them with tiny, whispy stems in a reddish-brown color, topped with microscopic buds. -
Cleanup:
If you made any smudges, use a damp cotton swab or a toothpick to gently scrape away unwanted paint before curing. -
Curing:
Follow the specific instructions on your paint bottle. Most ceramic paints require air drying for 24 hours followed by baking in a cool oven that heats up to 300°F (150°C) for about 30 minutes.
Once baked and cooled, your custom floral mug is ready for a cozy cup of tea
Negative-Space Petals and Clean White Space
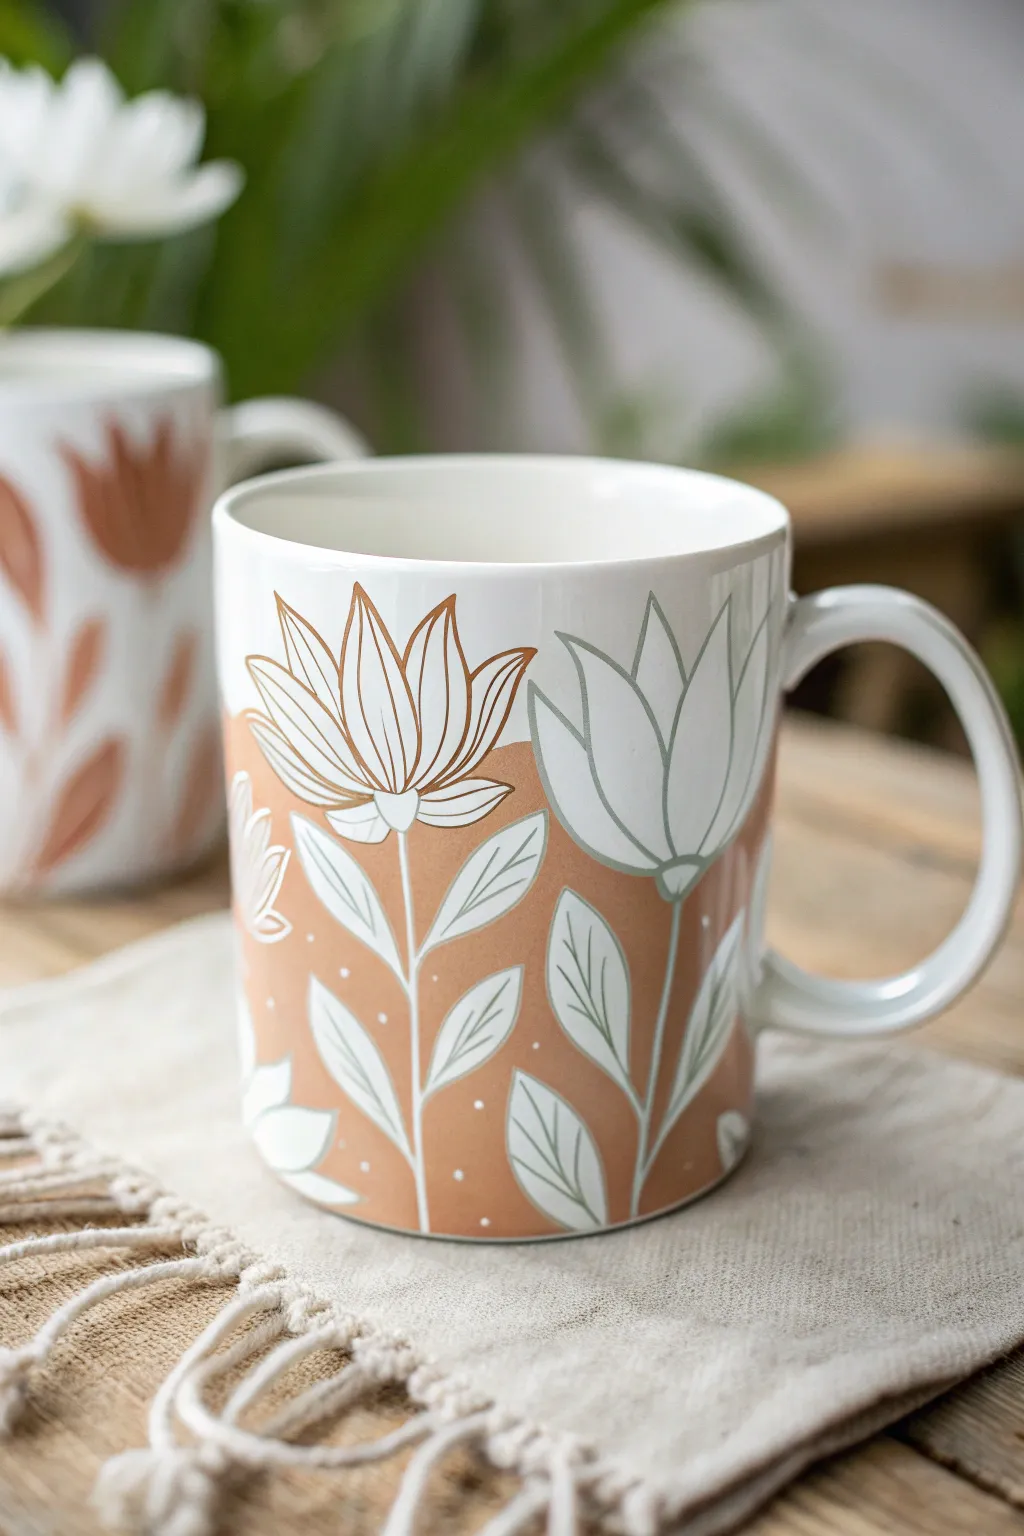
Capture the earthy warmth of terracotta without giving up the crisp brightness of your porcelain mug. This design uses a smart negative space painting technique where the white ceramic itself forms the delicate petals, surrounded by a rich, dusty orange background.
Step-by-Step
Materials
- White ceramic mug (clean and dry)
- Pebeo Porcelaine 150 paint (Terracotta or Dusty Orange)
- Pebeo Porcelaine 150 paint (Sage Green)
- Fine liner paintbrush (size 0 or 00)
- Small flat shader brush (size 4)
- Pebeo Porcelaine 150 Outliner (White or Gold – here it looks like thin brown/gold outlines)
- Rubbing alcohol
- Cotton pads
- Oven for curing
Step 1: Preparation & Outlining
-
Clean the surface:
Before you start, wipe the entire outer surface of the mug with rubbing alcohol on a cotton pad. This removes invisible oils from your fingers that could prevent the paint from adhering properly. -
Plan your composition:
Visualize three main flowers around the mug. They should be large, open blooms resembling tulips or lotus flowers, spaced evenly. I like to keep the tops of the petals clear of any background color. -
Draw the main outlines:
Using a fine liner brush dipped in a thin mixture of terracotta paint (or a specialty outliner tube for steadier lines), sketch the outline of your flower petals. Keep the lines very thin. -
Add the stems and leaves:
Draw simple, curved stems extending downward from each flower head. Add large, pointed oval leaves branching off the stems. Draw the internal vein lines on the leaves now as well. -
Let the outlines set:
Allow these skeletal outlines to dry for about 15-20 minutes. They act as the boundaries you will carefully paint around in the next phase.
Step 2: Negative Space Painting
-
Mix the background color:
Prepare your terracotta or dusty orange paint. Ensure it is opaque enough to cover well but fluid enough to glide off your brush without clumping. -
Start filling the voids:
Using your small flat brush, begin painting the negative space *around* the flower petals and leaves. This is the crucial step: you are painting the background, not the flower itself. -
Define the petals:
Carefully bring the orange paint right up to the petal outline, but do not cross it. The white ceramic inside the outline becomes the petal color. -
Work around the leaves:
Repeat this process around the leaves. The leaves themselves will remain white (unpainted) for now, or just faintly tinted later. The background color should fill the gaps between stems. -
Create the horizon:
Instead of painting the entire mug orange, stop the background color about halfway up the flower petals. Create a wavy, organic edge that dips and rises, giving it a loose, modern feel. -
Paint the leaf interiors (Optional):
Looking at the reference, some leaves are filled with a very pale sage green, while others are left white. If you want color, mix a very diluted green and wash it inside the leaf outlines.
Clean Edges?
If your hand shakes while outlining, try using a specific ‘ceramic pen’ or marker instead of a brush for the initial lines. It offers more control for beginners.
Step 3: Details & Curing
-
Add white dots:
Dip the handle end of your paintbrush into white paint. Gently dot small specks onto the orange background areas to add texture and whimsy. -
Refine the lines:
Go back over your initial outlines with a slightly darker shade (burnt orange or brown) using your finest brush. This sharpens the look and separates the white petals from the orange background clearly. -
Check for errors:
If you accidentally got orange paint on a white petal, use a damp Q-tip or a toothpick to scrape it away immediately while wet. -
Dry time:
Let the finished mug sit untouched for 24 hours. The paint needs to fully air-dry before the baking process. -
Load the oven:
Place the mug into a *cold* oven. Do not preheat. -
Bake carefully:
Turn the oven to 300°F (150°C). Once it reaches temperature, bake for 35 minutes. -
Cool down:
Turn the oven off and leave the mug inside until the oven is completely cool. This prevents the ceramic from cracking due to thermal shock.
Two-Tone Effect
Mix a second background color, like mustard yellow, and blend it wet-on-wet into the terracotta at the bottom of the mug for a subtle ombre effect.
Now you have a stunning piece of custom drinkware that feels both earthy and elegant for your morning coffee routine
Bold Folk-Art Florals With Simple Shapes
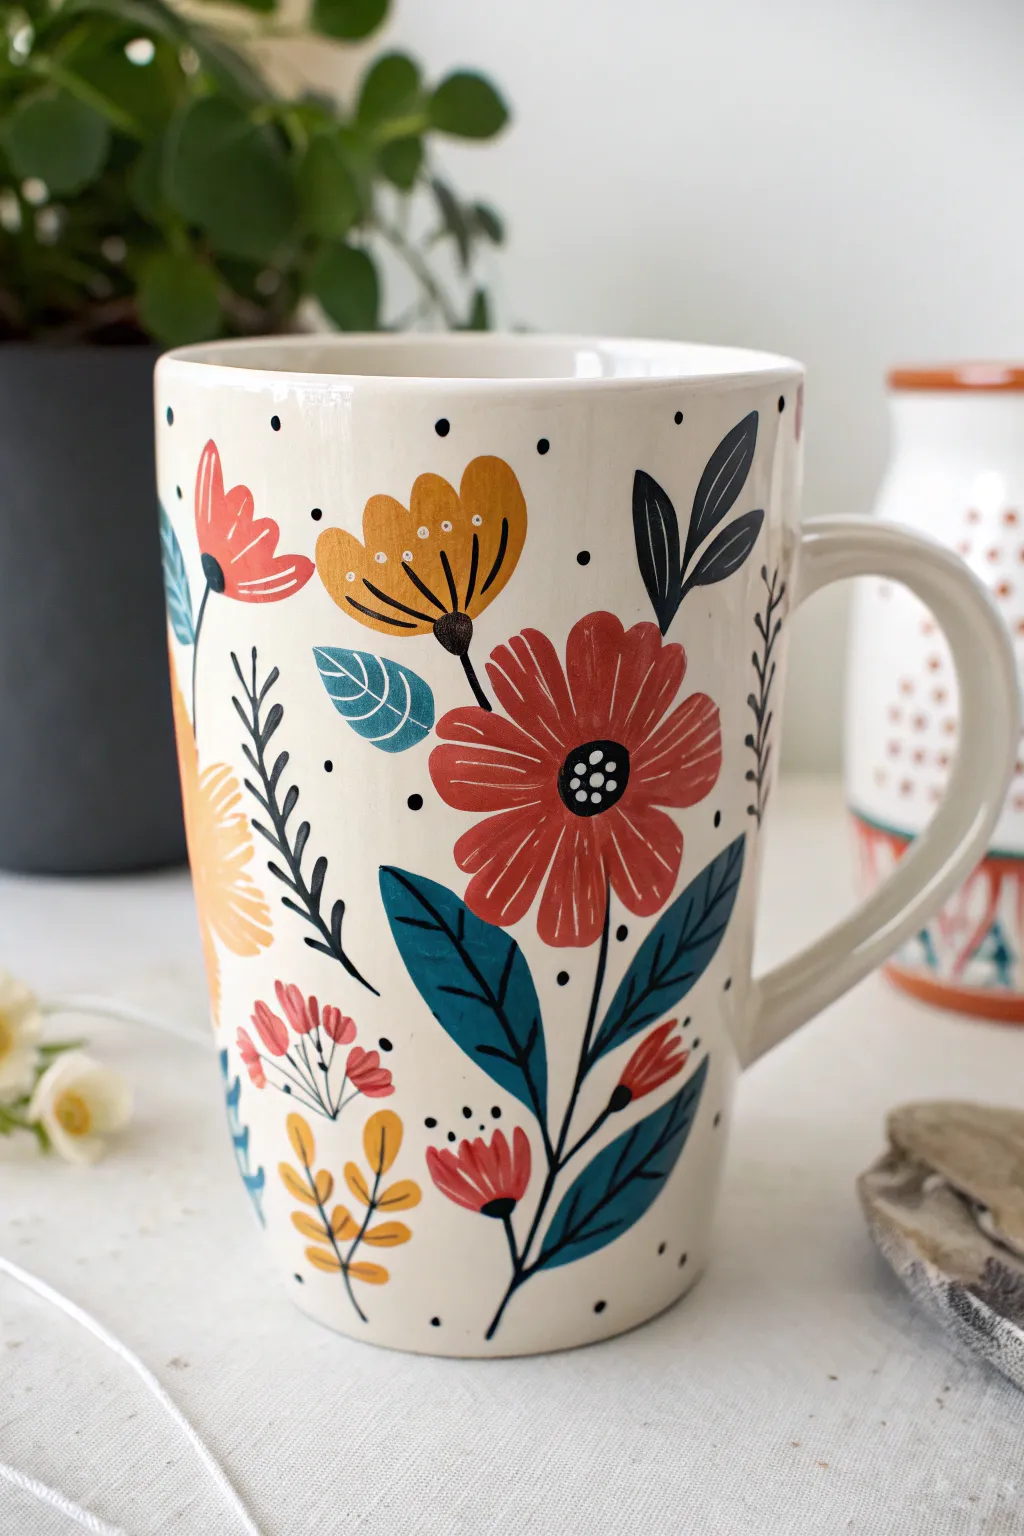
Capture the charm of traditional folk art with this cheerful mug design, featuring bold floral shapes and striking color contrasts. The combination of rich reds, mustards, and navy blues creates a cozy, hand-painted aesthetic that feels both timeless and modern on creamy ceramic.
How-To Guide
Materials
- White or cream ceramic mug
- Ceramic paints or multi-surface acrylics (Red, Mustard Yellow, Navy/Dark Blue, Teal, Black, White)
- Round paintbrushes (Sizes 2, 4, and 6)
- Fine liner brush (Size 0 or 00)
- Small dotting tool or toothpick
- Rubbing alcohol and cotton pads
- Oven (for baking/curing if required by paint type)
Step 1: Preparation & Base Stems
-
Clean the surface:
Before painting, wipe the entire outer surface of the mug with rubbing alcohol. This removes fingerprints and oils, ensuring your paint adheres perfectly. -
Plan the composition:
Visualize three main floral clusters. You’ll want a large red flower as the focal point, a mustard yellow tulip-shape nearby, and smaller sprigs filling the gaps. -
Paint main stems:
Using your liner brush and black paint, draw thin, curving stems. Start from the bottom of the mug and sweep upward. Don’t worry about being perfectly straight; organic curves look more natural. -
Add leaf branches:
From your main black stems, paint smaller offshoot lines where your leaves will eventually go. Let this black framework dry completely before adding color nearby.
Step 2: Painting the Large Blooms
-
Create the red focal flower:
Load a size 6 round brush with red paint. Paint teardrop-shaped petals radiating from a central point to form the large daisy-like flower. Leave a small empty circle in the very center. -
Paint the mustard tulip:
Switch to clean mustard yellow paint. Paint a wide U-shape for the base of the tulip-style flower, then add three scalloped points at the top. Fill it in solidly. -
Add secondary red blooms:
Using a smaller size 4 brush, paint smaller red blooms. Some can be simple three-petal shapes (like a tulip profile), and others can be small clusters of red dashes. -
Paint the pale orange flower:
Mix a little white into your mustard or orange paint to get a softer peach tone. Paint a large, half-flower shape peeking in from the side of the mug for variety. -
Let the blooms dry:
Pause here. It is crucial that these large color blocks are dry to the touch before we add details on top of them so the colors don’t muddy.
Uneven Lines?
If your black outlines look shaky, wipe them away quickly with a damp Q-tip before they dry. You can also thin the paint slightly with water for smoother flow.
Step 3: Leaves & Accents
-
Paint navy leaves:
Use navy blue paint and a size 4 brush to add bold, leaf shapes. Press down at the base of the leaf and lift as you pull away to create a sharp point. -
Add teal accent leaves:
For variety, paint a few single leaves using teal paint. I like to place these near the red flowers to make the warm colors really pop. -
Detail the fern sprigs:
Find those thin black branch lines you painted earlier. Use the liner brush to add tiny, quick black dashes along the sides to create fern-like foliage. -
Add yellow sprigs:
Paint small, simple stems with oval leaves using your mustard yellow paint to fill in any large white spaces.
Make It a Set
Paint a matching saucer using the navy blue for the rim and the mustard yellow for the center, tying the whole breakfast set together visually.
Step 4: Fine Details & Dots
-
Detail the red flower center:
Paint a solid black circle in the center of your large red flower. Let it dry, then use a dotting tool to add 5-6 tiny white dots on top of the black. -
Outline the tulip:
Use your finest liner brush and black paint to carefully outline the mustard tulip shape. Create a grid-like center with three lines fanning out. -
Add leaf veins:
Using the liner brush, paint a thin black center line and V-shaped veins inside the teal and navy leaves. Keep the touch very light. -
Decorate with white elements:
Add tiny white lines to the navy leaves for contrast. Put three small white dots near the top of the mustard tulip petals. -
Sprinkle background dots:
Dip the handle of your brush or a dotting tool into black paint. Add random black polka dots in the open cream spaces to banish emptiness and add whimsy. -
Final cure:
Follow the manufacturer instructions on your paint bottle to cure the mug, which usually involves baking it in a cool oven that heats up gradually.
Enjoy sipping your morning coffee from a masterpiece that celebrates the beauty of folk art
Dot-Painted Flower Bursts
Bring an earthy, handmade warmth to your morning coffee with this nature-inspired design. Featuring terracotta tones and delicate line work on a speckled base, this mug combines filled floral shapes with airy botanical illustrations.
Detailed Instructions
Materials
- White or beige ceramic mug (preferably with a speckled glaze)
- Pebeo Porcelaine 150 paints (Terracotta, Red-Brown, Deep Brown)
- Fine detail paintbrush (size 00 or 0)
- Medium round paintbrush (size 2)
- Paint palette or glazed tile
- Rubbing alcohol and cotton pads
- Oven (for curing)
- Paper towels
Step 1: Preparation & Base Work
-
Clean the Surface:
Thoroughly wipe down the outside of your mug with rubbing alcohol to remove any fingerprints, oils, or dust. This ensures the best paint adhesion. -
Plan the Layout:
Mentally map out where your three main elements will go: the large daisy-like flowers, the tall leaf sprigs, and the smaller filler flowers.
Paint Bead
If paint is beading up and not sticking, the mug’s glaze is too slick. Lightly sand the area with fine grit sandpaper to give it ‘tooth’.
Step 2: Painting the Large Blooms
-
Start the Center:
Using your medium round brush and the Terracotta paint, create a simple circle for the center of your first large flower. -
Paint the Petals:
Switch to a Red-Brown shade. Paint elongated oval petals radiating outward from the center circle. Leave a tiny gap between the petals and the center for a stylized look. -
Second Flower Variation:
For the second large flower, use a lighter Terracotta wash for the petals. Instead of solid petals, outline the petal shape and add faint veins inside for visual variety. -
Add Dots to Centers:
Once the centers are dry to the touch, use the fine tip of your brush (or a dotting tool) with a contrasting brown to stipple tiny dots inside the flower centers. I like to cluster them densely at the edges and space them out toward the middle.
Faux Speckle Trick
Add extra dimension by flicking a toothbrush loaded with watered-down brown paint over the design before baking for more speckles.
Step 3: Adding Botanical Sprigs
-
Draw the Stems:
Load your fine detail brush (size 00) with Deep Brown paint. Paint thin, vertical lines rising from the bottom edge of the mug to serve as stems. -
Paint Outline Leaves:
On some stems, paint simple leaf outlines in pairs, curving gently upward. Keep the lines consistent and unbroken. -
Paint Filled Leaves:
For other stems, switch back to the Terracotta color and paint small, solid leaf shapes. Use a ‘press and lift’ motion with the brush to get a tapered point. -
Create Texture:
On the solid leaves, wait until the paint is tacky, then use a clean, dry brush tip or a toothpick to gently scratch small patterns or veins into the paint to reveal the mug color underneath.
Step 4: Finishing Details
-
Add Filler Flowers:
Look for empty spaces near the bottom. Paint tiny, simple flowers with just a small brown center and 4-5 short, thick petal strokes. -
Sprinkle the Dots:
Using the Deep Brown paint, add scattered dots of varying sizes into the negative spaces around your flowers. This mimics pollen or seeds floating in the air. -
Check for Mistakes:
If you smudge anything, quickly wipe it away with a damp cotton swab before it sets. -
Dry and Cure:
Let the mug dry for 24 hours. Once fully dry, bake it in a non-preheated oven at 300°F (150°C) for 35 minutes to cure the paint and make it dishwasher safe.
Enjoy your cozy new mug that looks like it came straight from a pottery studio
Sponge-Stamped Petal Clusters
Bring the charm of a sun-drenched meadow to your morning coffee with this hand-painted ceramic mug. Featuring bold, stylized blooms in warm terracotta and coral hues, this design uses simple brushstrokes to create a sophisticated yet playful botanical pattern.
Step-by-Step Tutorial
Materials
- Plain white ceramic mug (smooth surface)
- Ceramic paint or porcelain paint pens (terracotta/coral, dusty pink, mustard yellow, dark forest green)
- Small round paintbrush (size 2 or 4)
- Fine liner brush (size 0 or 00)
- Rubbing alcohol and cotton pads
- Paper palette or small dish
- Oven (for baking the paint, if required by manufacturer)
Step 1: Preparation & Planning
-
Clean the surface:
Before asking your brush to touch the ceramic, wipe the mug down thoroughly with rubbing alcohol and a cotton pad. This removes invisible oils and fingerprints that could prevent the paint from adhering properly. -
Visualize the spacing:
Look at your mug and imagine three main focal points just below the rim. You want the three large flowers to be spaced evenly around the circumference, leaving enough room below them for the stems and smaller buds.
Paint Won’t Stick?
If paint beads up, the glaze is too slick. Wipe again with alcohol. If it persists, lightly sand the area with very fine-grit sandpaper (400+) to give the paint ‘tooth’ to grip onto.
Step 2: Painting the Main Blooms
-
Mix your petal color:
Create a warm, dusty coral shade. If you only have primary colors, mix red with a touch of yellow and a tiny dot of brown or white to soften the intensity. It should feel earthy, not neon. -
Draft the center petals:
Using your small round brush, paint the first large flower. Start by painting five to six teardrop shapes radiating from a central point. Keep the petals slightly separate so they don’t blob together. -
Add petal details:
While the paint is still wet or tacky, you can use a clean, dry brush or a toothpick to gently streak through the petals from the center outward, creating a slight texture that mimics natural veins. -
Repeat around the rim:
Paint two more identical flower heads around the upper portion of the mug. I find it helpful to turn the specific side I’m painting flat against the table (resting on a towel) to keep my hand steady. -
Create the flower centers:
Once the petals are dry to the touch, dip the back end of your paintbrush handle into mustard yellow paint. Dot this firmly into the center of each flower to make a perfectly round disc. -
Add texture to centers:
Use your fine liner brush to add tiny stippling dots of a slightly darker yellow or light brown on top of the yellow centers for depth.
Step 3: Adding Greenery & Buds
-
Paint the main stems:
Switch to your dark forest green paint and the fine liner brush. Draw a thin, vertical line dropping down from each large flower, curving slightly near the bottom to look organic. -
Add side branches:
From the main stems, pull out two symmetrical branches about halfway down. These should curve upward, acting as the arms that will hold the main leaves. -
Paint the large leaves:
On those side branches, paint elongated, almond-shaped leaves. Press down with the belly of the round brush to widen the leaf, then lift up as you drag to create a sharp point. -
Add distinct leaf veins:
For that illustrative look shown in the photo, use a very fine tool or a white paint pen to scratch or draw delicate vein lines inside the green leaves once they are semi-dry. -
Create the lower buds:
In the spaces between the large stems, paint smaller, tulip-shaped buds near the bottom of the mug using a deep orange or rust color. -
Connect the buds:
Paint shorter, winding stems for these buds using your green liner brush. Add smaller, simpler leaves—just simple dashes of green—attached to these lower stems. -
Add decorative pollen dots:
Enhance the design by adding two tiny black lines floating above the main leaves, topped with small black dots. This adds a whimsical, mid-century modern illustrative style to the piece.
Make It Speckled
To mimic the stonewear look in the photo, dilute brown paint with water. Dip an old toothbrush in it and run your thumb over the bristles to flick tiny specks onto the white background.
Step 4: Finishing Touches
-
Review and refine:
Check your work for any accidental smudges. Since ceramic paint can be scraped off while wet, use a damp cotton swab or toothpick to tidy up edges. -
Let it cure:
Allow the mug to dry completely for at least 24 hours. This is crucial before baking or sealing. -
Bake to set:
Place the mug in a cool oven, then turn the heat to the temperature specified on your paint bottle (usually around 300°F-350°F). Bake for 30-40 minutes, then let it cool completely inside the oven to prevent cracking.
Fill your new custom mug with your favorite warm beverage and enjoy the handmade view
Raised 3D Flower Centers for Texture
Transform a plain ceramic mug into an artisanal masterpiece with this whimsical wildflower design. The soft earth tones and delicate linework create a cozy, hand-painted aesthetic that feels professionally crafted.
Step-by-Step
Materials
- Plain cream or off-white ceramic mug
- Ceramic paints (terracotta/rust, sage green, cream/beige, peach)
- Pebeo Porcelaine 150 outliner (brown or dark grey)
- Fine detail paintbrush (sizes 0 and 00)
- Flat shader brush (size 2)
- Dimensional fabric paint or puff paint (orange/rust)
- Rubbing alcohol and cotton pads
- Palette or small plate
- Oven (for curing)
Step 1: Preparation & Planning
-
Clean the Surface:
Before laying down any color, thoroughly wipe the entire outer surface of the mug with rubbing alcohol on a cotton pad to remove oils and fingerprints. -
Plan placement:
Visualize three main floral elements: a tall central daisy-like flower, a smaller rounded bloom to its right, and a leafy stem to the left. You can lightly sketch the placement with a pencil if desired, as graphite usually burns off in the oven.
Step 2: Foliage Foundation
-
Mix leaf shades:
Prepare a muted sage green and a warm terracotta on your palette. For the stems, you want a very thin, fluid consistency. -
Paint main stems:
Using your finest liner brush and the sage green, paint vertical, slightly wavy lines for the flower stems. Vary the heights to create a natural, organic rhythm. -
Add sage leaves:
On the central and right-hand stems, paint small, teardrop-shaped leaves using the sage green. Keep the pressure light at the start of the stroke and press down gently to widen the leaf belly. -
Paint the decorative vine:
To the left of the central flower, paint a separate vine using the terracotta paint. Create small, alternating almond-shaped leaves climbing up this stem.
Clean Lines Tip
If you make a mistake with the ceramic paint, wipe it away immediately with a damp Q-tip or a bit of rubbing alcohol before it sets.
Step 3: Blooming Colors
-
Central flower petals:
For the main focal flower, use the terracotta paint or a diluted rust shade. Paint long, open loops for petals that radiate from the top of the central stem, leaving the inside of the petals the color of the mug. -
Right-side bloom:
Mix a darker, more opaque rust or brown-red. Paint a solid, rounded bloom shape on the right stem, somewhat scalloped at the top edges to mimic petals. -
Peach accent:
On the far left, create a soft, solid circle or oval using a pale peach color, representing a bud or abstract floral shape.
Creative Twist
Swap the terracotta palette for cool blues and lavenders for a ‘winter garden’ version, maintaining the same simple line style.
Step 4: Details & Texture
-
Outline work:
Once the base shapes are dry to the touch, use a very fine brush with dark grey or brown outliner paint to add stems to the colored flowers if they need definition. -
Fine line details:
Draw delicate vertical lines inside the solid rust flower and the peach bud to suggest texture and form. -
Tiny filler flowers:
Use a dark liner to draw a tiny, simple five-petal daisy outline floating near the top left to fill negative space. -
Speckled effect:
To mimic the pottery look in the photo, dip an old toothbrush into diluted brown paint and gently flick it (splatter technique) over the mug for a faux-ceramic speckle. -
The 3D Center:
This is crucial for the tactile finish: Using the dimensional paint or puff paint in a rust tone, squeeze a small dot directly onto the center of the peach flower and scattered dots between the stems for texture.
Step 5: Finishing
-
Dry thoroughly:
Allow the mug to dry for at least 24 hours. Don’t rush this, as moisture can cause bubbling during baking. -
Bake to cure:
Place the mug in a cold oven. Set the temperature to 300°F (150°C) and bake for 35 minutes. Turn the oven off and let the mug cool completely inside before removing.
Now you have a cozy, custom mug ready for your morning coffee or tea.
Bright Florals on a Dark Background
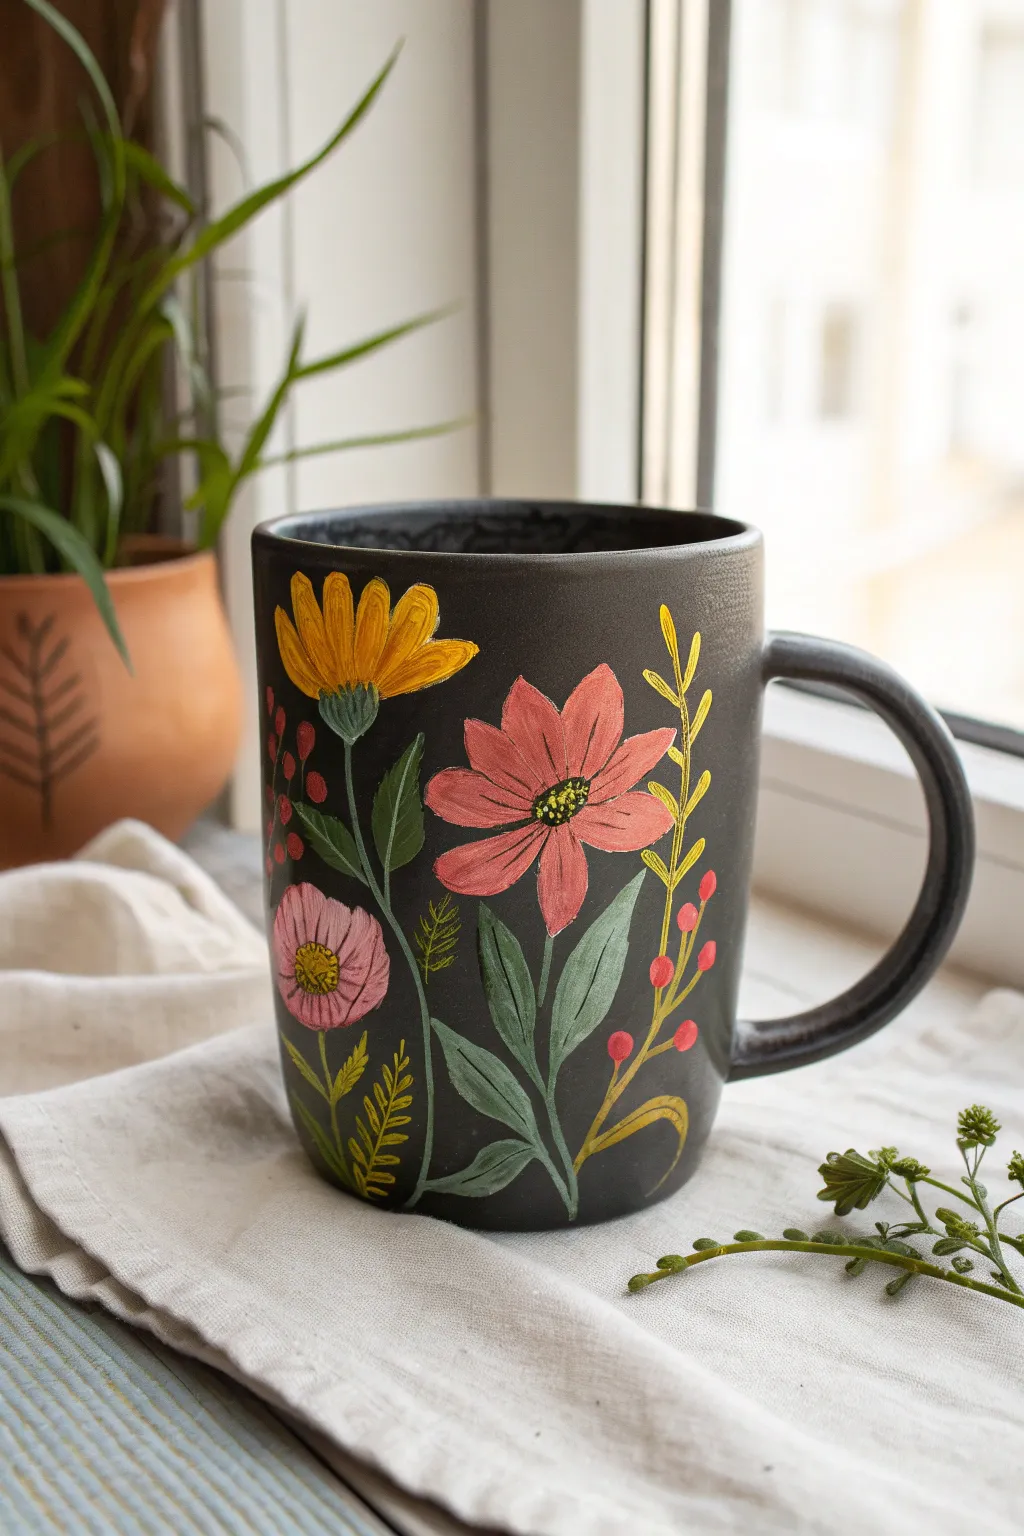
Transform a plain black mug into a lush, botanical keepsake with this striking floral design. The high contrast of vivid pinks and yellows against the dark ceramic creates a modern folk-art aesthetic that is surprisingly simple to achieve.
How-To Guide
Materials
- Black or charcoal ceramic mug (matte finish preferred)
- Enamel acrylic paints or ceramic paints (Pink, Yellow, Forest Green, Sage Green, Red, White)
- Small round paintbrushes (sizes 0, 2, and 4)
- Detail liner brush
- Rubbing alcohol and cotton pads
- Palette or small plate
- Oven (for baking the design based on paint instructions)
Step 1: Preparation and Base Layer
-
Prep the surface:
Clean the exterior of your mug thoroughly with soap and water to remove any grease or oil. Once dry, wipe the entire surface with rubbing alcohol on a cotton pad to ensure perfect paint adhesion. -
Map the composition:
Visualize three main floral elements: a large yellow bloom near the top left, a central pink cosmos-style flower, and a smaller pink bud on the lower left. Leave space for flowing stems and leaves. -
Paint the yellow flower base:
Using a size 4 brush and yellow paint, create the upper left flower. Start from a semi-circle center and pull brushstrokes outward to create long, slightly curved petals. Don’t worry about opacity yet; the first layer might be streaky. -
Block in the central pink flower:
Mix a touch of white into your pink paint to brighten it against the dark background. Paint the large central flower with broad, tear-drop shaped petals radiating from a center point. Aim for about 7-8 petals. -
Add the lower bud:
Paint a simple circle or oval shape in pink near the bottom left handle side to represent the smaller, closed bloom.
Step 2: Stems and Foliage
-
Draw the main stems:
With a liner brush and forest green paint, draw thin, flowing lines connecting your flower heads to the base of the mug. I find that pulling the brush toward you helps create smoother curves. -
Add sage green leaves:
Switch to a lighter sage green. Paint robust, ovate leaves attached to the central flower’s stem. Press the brush down and lift as you pull away to create tapered tips. -
Paint darker leaves:
Use the forest green to add smaller, darker leaves around the yellow flower stem and tuck some behind the lighter sage leaves for depth. -
Create fern-like details:
Using your finest liner brush and a mix of yellow and green, paint delicate, fern-like fronds growing upwards from the bottom. Use very light pressure to keep these lines crisp. -
Add berry sprigs:
On the right side of the composition, paint a branching stem structure in ochre or muted yellow. Add small red dots at the tips using the back handle of your paintbrush for perfect circles.
Paint looking transparent?
Don’t panic! Dark mugs swallow color. Let layers dry fully (15 mins), then apply a second coat. A thin white base coat under bright colors makes them pop.
Step 3: Details and Highlights
-
Layer the petals:
Once the first coat is dry to the touch, add a second layer of paint to the flower petals. This is crucial for that solid, opaque look against the black ceramic. -
Detail the flower centers:
For the pink flower, paint a small yellow center. Once dry, stipple tiny dots of black or dark green over it for texture. For the yellow flower, paint a green semi-circle cup at the base of the petals. -
Add petal definition:
Mix a slightly darker shade of pink and paint thin lines down the center of each pink petal to show the crease. Do the same for the yellow flower using a touch of orange or ochre. -
Highlight the leaves:
Mix a very pale green or white and add thin, singular strokes down the center of your largest leaves to mimic veins. -
Final touches:
Inspect your work. If any edges look messy, you can tidy them up carefully with a damp cotton swab or a brush with black paint if you made a mistake on the background. -
Cure the paint:
Let the mug dry for 24 hours. Then, place it in a cool oven and heat to 350°F (or per your paint’s instructions) for 30 minutes. Let it cool completely in the oven before removing.
Pro Tip: Texture Trick
For the berry dots, dip the handle end of your paintbrush into the paint instead of the bristles. It acts like a stamp, creating perfectly round, raised berries.
Now you have a stunning, hand-painted mug perfect for cozy mornings or gifting to a plant-loving friend
Botanical Flowers With a Tiny Dragonfly Accent

Transform a plain ceramic mug into an elegant botanical piece featuring a delicate pink wildflower, budding stems, and a softly sketched dragonfly. This project uses fine lines and subtle washes to create a vintage scientific illustration look right on your kitchenware.
Step-by-Step Guide
Materials
- White or cream ceramic mug (clean and dry)
- Pebeo Porcelaine 150 paints (or similar high-quality ceramic paint)
- Colors: Anthracite Black (for outlining), Olive Green, Tender Pink, Warm Yellow
- Fine liner brush (size 00 or 000)
- Small round brush (size 2)
- Small flat brush (for blocking in shapes)
- Mixing palette
- Rubbing alcohol and cotton pads
- Graphite transfer paper (optional)
- Oven (for baking/curing)
Step 1: Preparation & Planning
-
Clean the Surface:
Wipe the entire mugs surface with rubbing alcohol on a cotton pad. This removes any invisible oils or fingerprints that would prevent the paint from adhering properly. -
Handle with Care:
Try to handle the mug by the handle or the rim from now on to keep your painting area pristine. -
Sketch or Transfer:
If you aren’t confident freehanding, sketch your design on a piece of paper first. Tape graphite transfer paper behind your sketch and trace the main stems and flower heads lightly onto the ceramic surface.
Clean Lines
Keep a Q-tip dipped in rubbing alcohol nearby while painting. If you make a mistake with a stem line or dragonfly wing, you can wipe it away instantly like an eraser.
Step 2: Painting the Main Stems
-
Mix Your Green:
Create an earthy green by mixing Olive Green with a tiny drop of Black or Brown. You want a natural, not artificial, stem color. -
Paint the Vertical Stems:
Using your fine liner brush (size 00), paint three main vertical stems. Make the central stem the tallest and slightly curved for the main flower. -
Add Leaf Foundations:
Branch off small, thin lines where leaves will go. Keep your touch very light; botanical illustrations rely on crisp, delicate lines rather than heavy strokes. -
Paint the Leaves:
With the size 2 round brush, fill in the leaves. Notice the leaves near the bottom are more serrated and fern-like, while the upper leaves are simpler and more lance-shaped. Paint these with the olive green mix.
Vintage Varnish
After the main paint dries but before baking, splash tiny speckles of watered-down brown paint using an old toothbrush to give the ceramic an aged, parchment-paper look.
Step 3: Adding the Blooms
-
Paint the Center Flower:
Mix a watery wash of Tender Pink. Using the small round brush, paint the petals of the main flower. Start from the center and pull outward, leaving the tips slightly translucent. -
Layer the Petals:
Once the first pink layer is tacky, add a slightly darker pink (mix pink with a speck of black) to the center of the petals to create depth and shadow. -
Create the Bud:
On the shorter stem to the right, paint a tight oval bud using the pink mix. Add green sepals hugging the bottom of the pink bud. -
Add Tiny Yellow Accents:
For the lower right floral sprig, use Warm Yellow to paint small, star-shaped flowers. Keep these very simple and small.
Step 4: Detailing & The Dragonfly
-
Outline the Petals:
Using the Anthracite Black and your finest liner brush, very gently outline the pink petals. Don’t make the line solid; broken, sketchy lines look more organic. -
Detail the Leaves:
Add central veins to your green leaves using a slightly darker green mix or a very thin black line. I find resting my pinky on the mug helps distract tremors for these tiny details. -
Draft the Dragonfly:
To the right of the main flower, use the fine liner with a diluted black or grey mix to paint the dragonfly’s body—a long, thin needle shape. -
Paint Delicate Wings:
Draw the four long wings extending from the dragonfly body. Focus on the ‘netting’ pattern inside the wings using extremely fine, cross-hatching strokes. -
Tint the Wings (Optional):
If you like, add an almost invisible wash of green or blue to the wings, just to give them a shimmering effect.
Step 5: Curing
-
Dry Time:
Let the mug sit untouched for at least 24 hours to ensure all layers are fully dry. -
Bake:
Place the mug in a cool oven. Set the temperature to 300°F (150°C). Once the oven reaches temperature, bake for 35 minutes. -
Cool Down:
Turn the oven off and leave the mug inside until it is completely cool. This gradual temperature change prevents cracking.
Now you have a dishwasher-safe piece of functional art that brings the garden to your morning coffee routine


Have a question or want to share your own experience? I'd love to hear from you in the comments below!