There’s just something magical about turning a plain ceramic piece into a little tribute to your favorite cat energy—sweet, sassy, sleepy, or downright chaotic. Here are my go-to cat pottery painting ideas that look impressive but still feel totally doable, even if you’re painting in a busy studio setting.
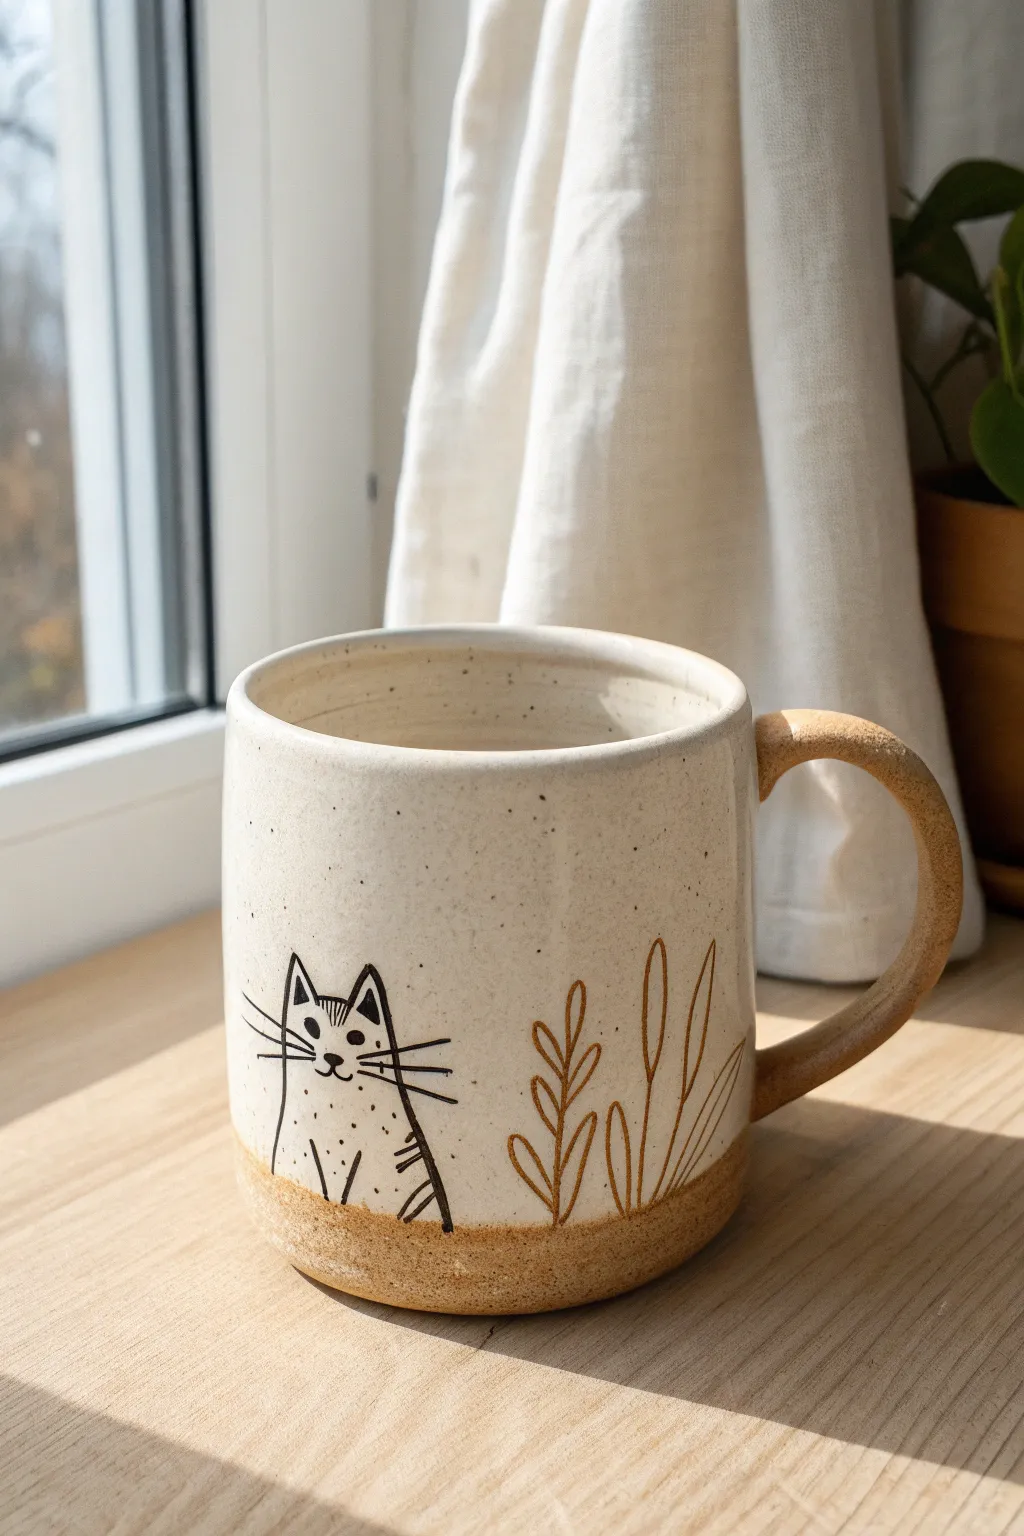
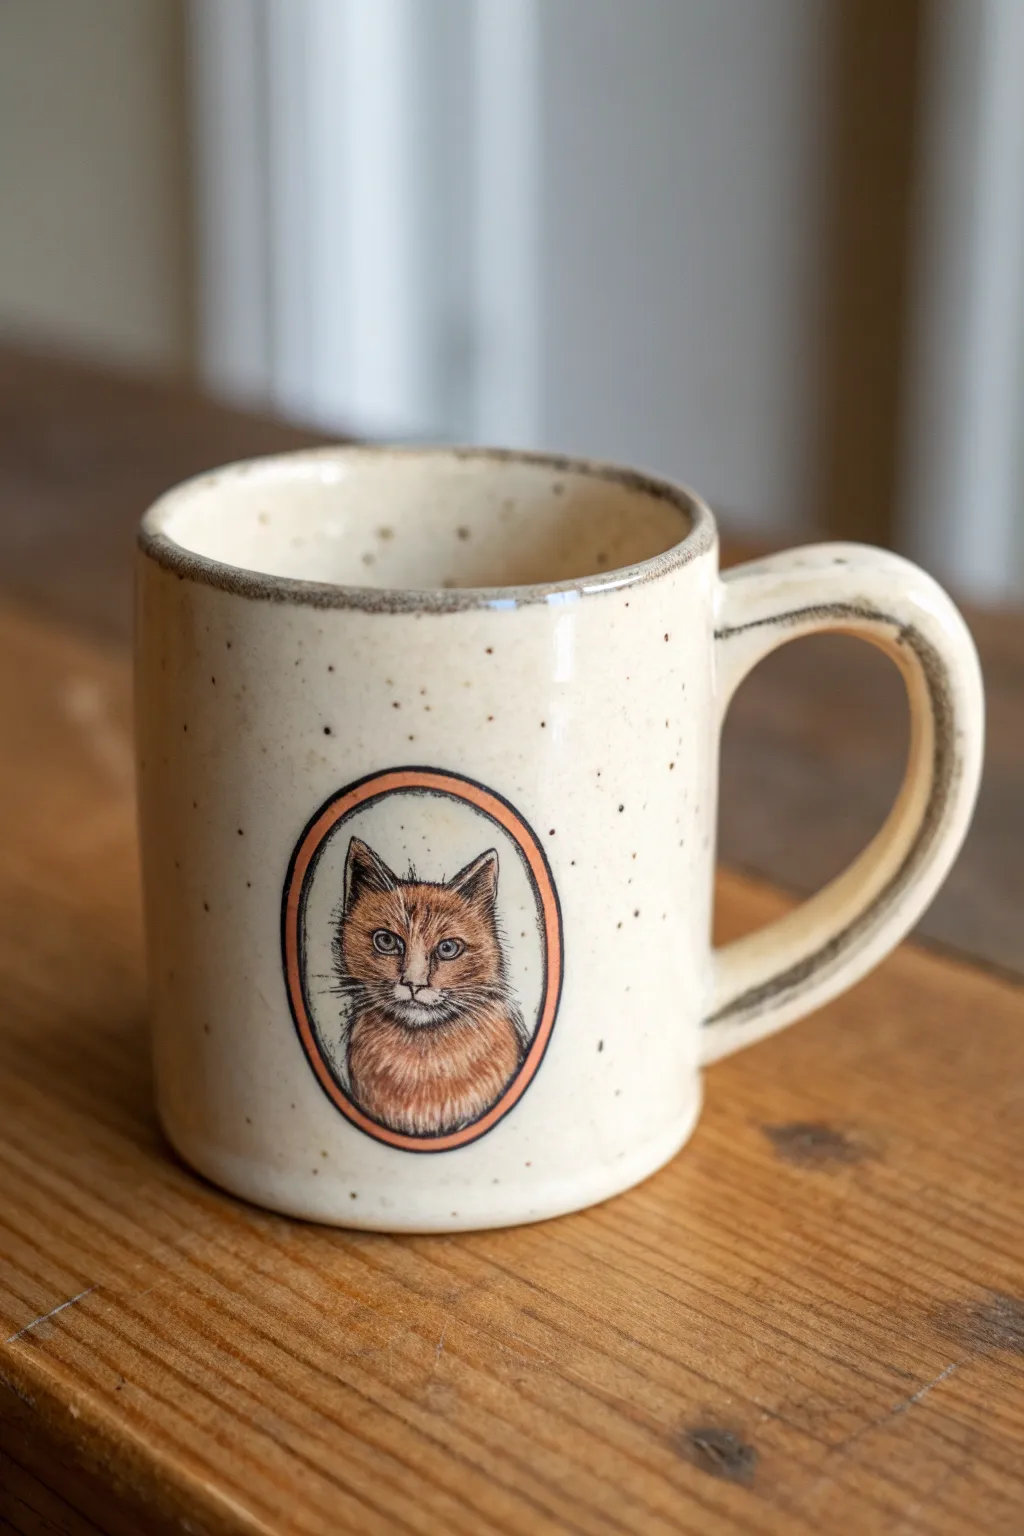
Classic Black Cat Silhouette
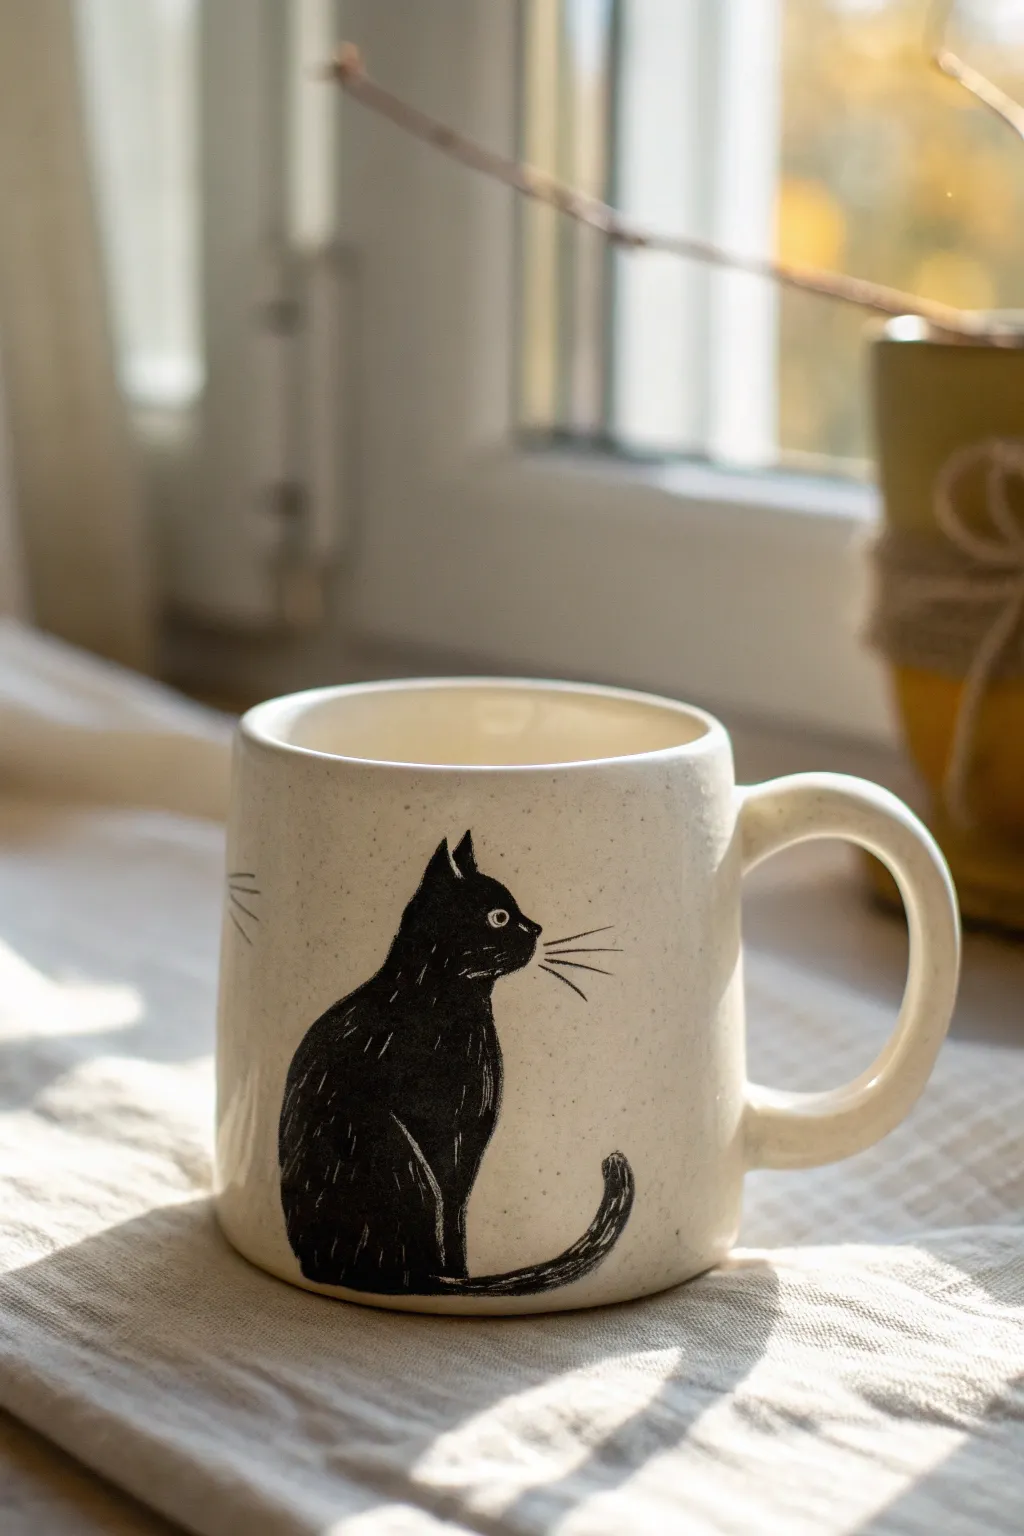
Capture the elegant charm of a feline friend with this understated yet striking mug design. Featuring a bold black cat silhouette against a creamy speckled background, intricate scratched details bring the fur texture and whiskers to life.
Step-by-Step
Materials
- Bisque-fired ceramic mug (plain shape)
- Cream or off-white speckled ceramic glaze (underglaze or dipping glaze)
- Black underglaze
- Pencil for sketching
- Small flat paintbrush
- Fine liner brush or detail brush
- Needle tool or sgraffito tool
- Clear transparent glaze (for finishing)
- Kiln access (for firing)
Step 1: Preparation & Base Coat
-
Clean the bisque:
Start by wiping down your bisque mug with a damp sponge. This removes any dust or oils from your hands that might prevent the glaze from adhering properly. -
Apply the base color:
Using a soft, wide brush, apply 2-3 even coats of your cream or off-white speckled underglaze to the entire outside of the mug. Allow each coat to dry until it’s no longer shiny before applying the next. -
Dry completely:
Let the base color dry completely. It should feel chalky and room temperature to the touch before you attempt to draw on it.
Step 2: Sketching the Silhouette
-
Lightly sketch the outline:
With a regular pencil, lightly sketch the outline of a sitting cat on the side of the mug. Focus on the triangular ears, the curve of the back, and the tail wrapping around the front. Don’t worry about pencil marks; they will burn off in the kiln. -
Refine the shape:
Adjust the proportions now. The cat should look alert, with a slightly elongated neck and a solid base. Ensure the tail has a nice, swooping curve.
Oops! Smudged Black?
If you smudge black onto the cream background, wait for it to dry completely. Then, gently scrape the smudge off with an X-Acto knife or needle tool instead of wiping it wet.
Step 3: Painting the Cat
-
Outline with black:
Dip your fine liner brush into the black underglaze. Carefully trace over your pencil outline to define the cat’s shape. Keep your hand steady and use the tip of the brush for a crisp edge. -
Fill in the body:
Switch to a small flat brush to fill in the body of the cat. Apply the black underglaze solidly, but try not to make it too thick or raised. You want opaque coverage without lumps. -
Second coat:
Once the first layer of black is dry to the touch, apply a second coat to ensure a deep, solid black color after firing. Patchy black can look grayish later. -
Paint the eye:
For the eye, you have two options. You can leave a small negative space unpainted (showing the cream base) shaped like a circle with a dot in the middle. Alternatively, paint the whole head black and scratch the eye out later. -
Refine edges:
Check the edges of your silhouette. Use a damp clean breath or a rubber tipped tool to clean up any smudges outside the lines.
Pro Tip: Whisker flick
For natural-looking whiskers, start your scratch near the nose with a slightly heavier hand and lift off quickly as you move outward to create a tapered, fine end.
Step 4: Adding Details (Sgraffito Technique)
-
Wait for semi-dryness:
Wait until the black paint is almost dry but still has a tiny bit of moisture—leather hard is perfect for scratching. -
Scratch the whiskers:
Using a needle tool or a very sharp sgraffito tool, gently scratch through the black layer to reveal the cream color underneath. Draw three long, slightly curved whiskers extending from the muzzle. -
Detail the eye:
If you painted the head solid black, carefully scratch out a small circle for the eye. Leave a tiny dot of black in the center for the pupil to give the cat focus. -
Create fur texture:
I like to add subtle texture by making short, quick scratches on the cat’s body. Focus on the chest, the curve of the back, and along the tail to simulate fur catching the light. -
Secondary whiskers:
If you want to balance the design, scratch barely-visible whisker hints on the other side of the face or near the ears for extra character. -
Clean up debris:
Gently blow away the little crumbs of dried underglaze created by scratching. Do not wipe them with your hand, or you might smear the black pigment into the cream background.
Step 5: Finishing & Firing
-
Final dry:
Let the mug sit until it is bone dry. Any moisture trapped under the clear glaze can cause issues during firing. -
Apply clear glaze:
Dip the entire mug into a clear transparent glaze, or brush on 2-3 coats if using a brush-on variety. Ensure the coating is even so the black cat remains sharp. -
Fire:
Load the mug into the kiln and fire according to the glaze manufacturer’s instructions (usually Cone 06 or Cone 6 depending on your clay body).
Once cooled, fill your new handmade mug with warm tea and enjoy the cozy company of your painted feline friend


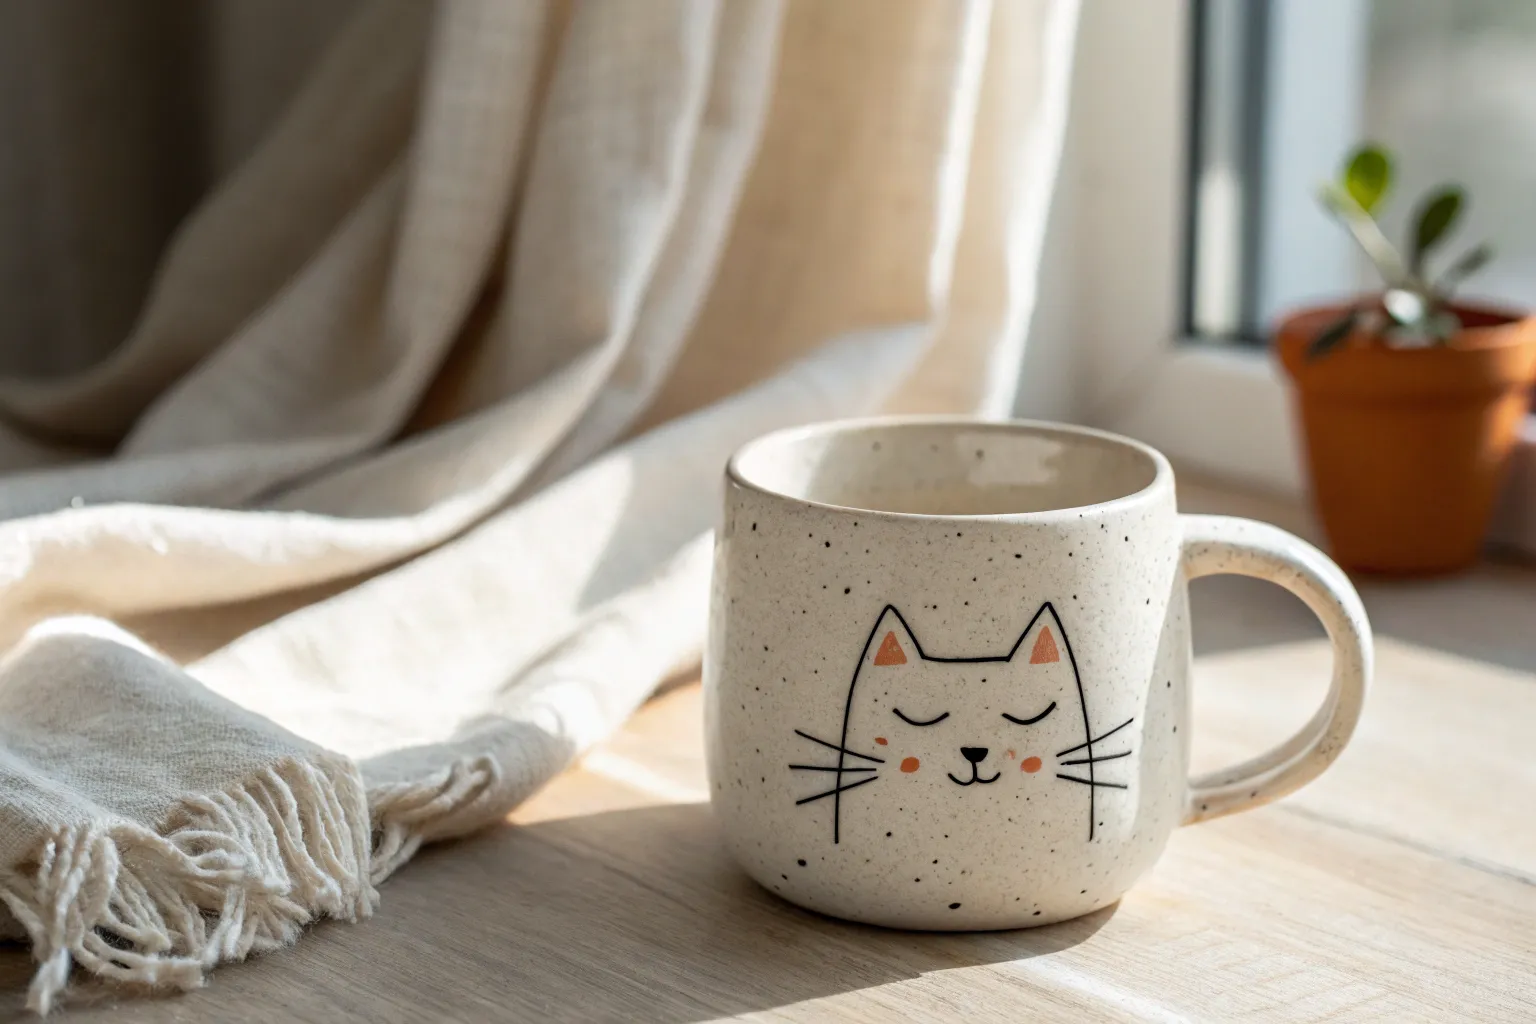
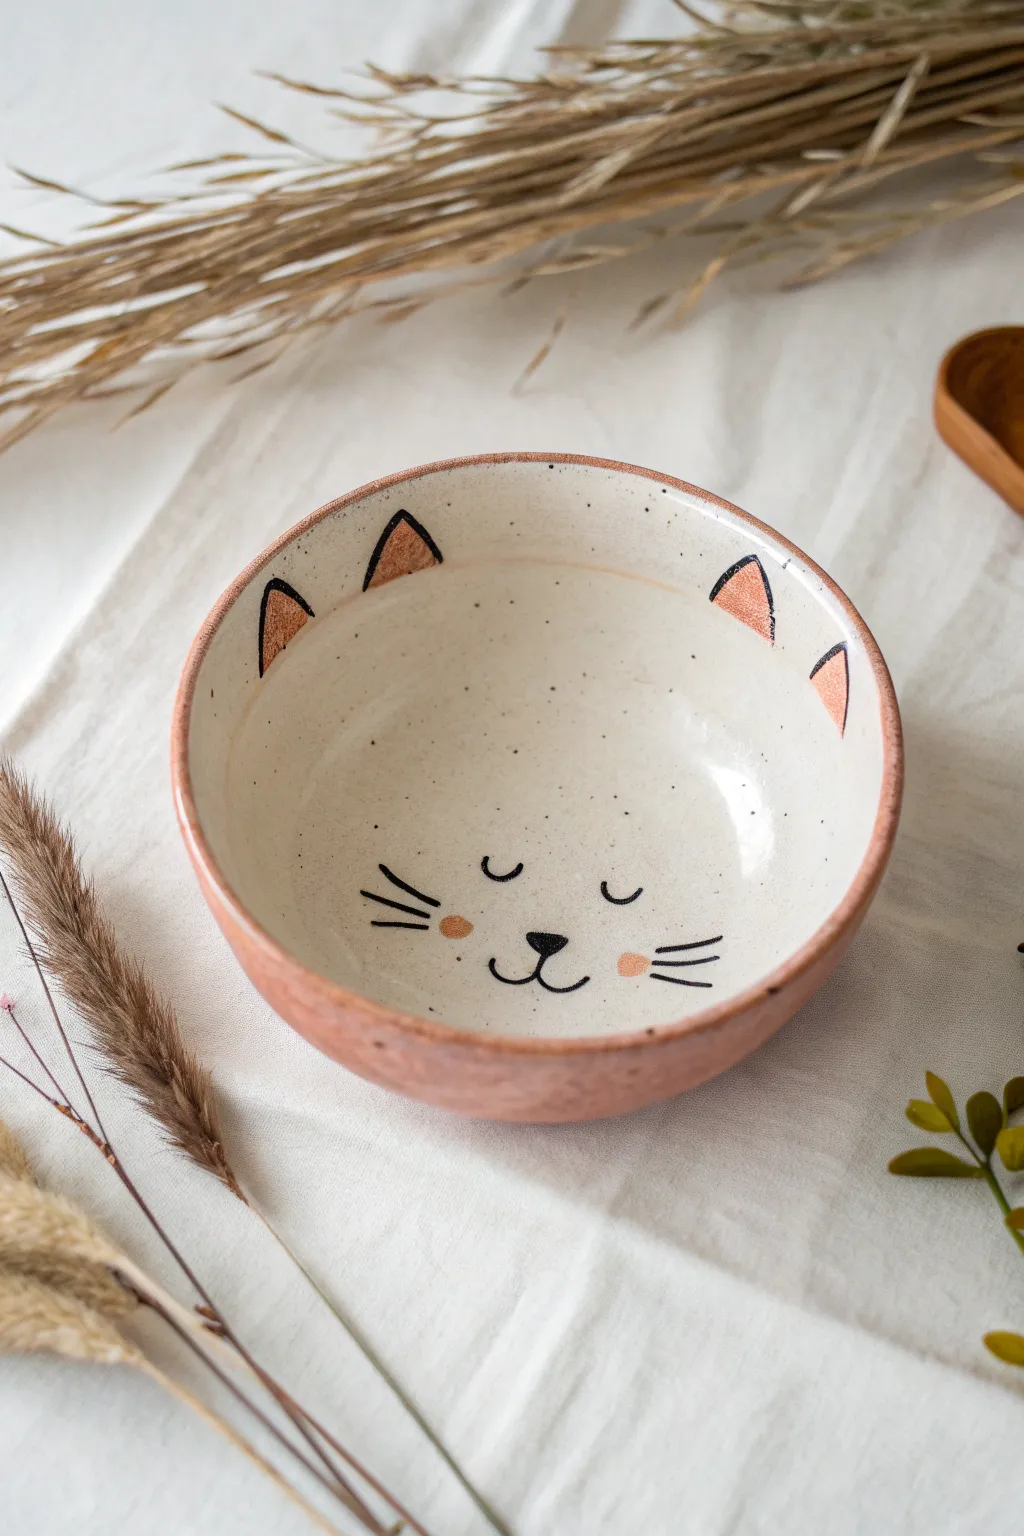
Cat Face With Whiskers and a Pink Nose
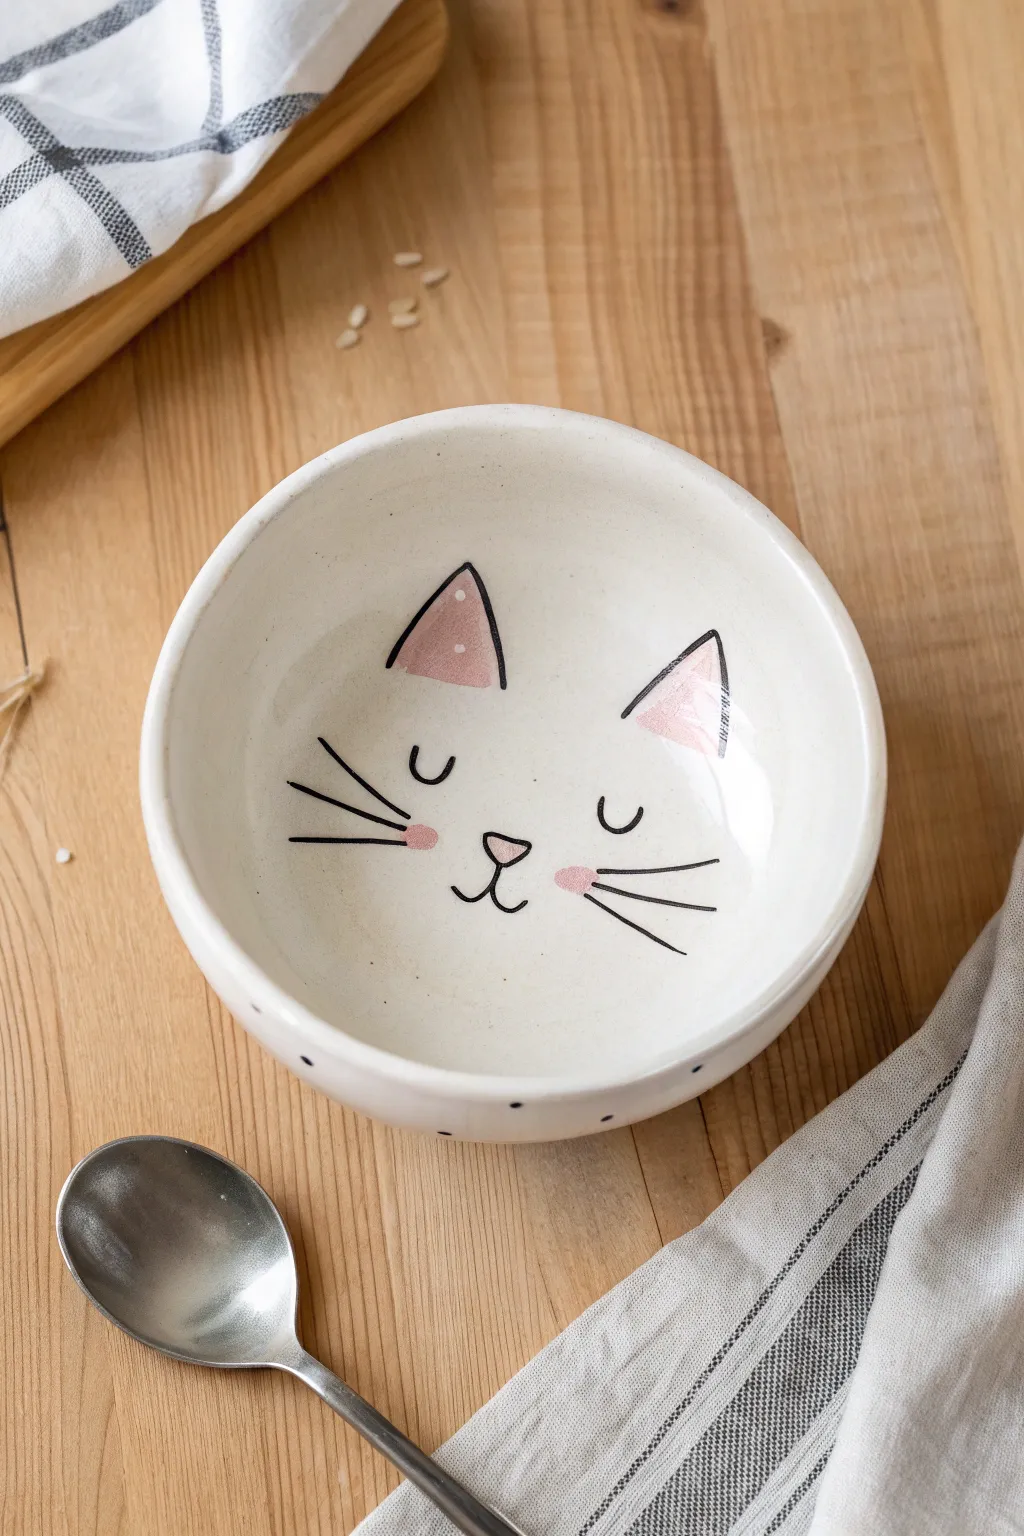
Transform a plain bisqueware bowl into a charming feline friend with this wonderfully simple design. Featuring a sketchy, hand-drawn style with sweet pink accents, this project relies on clean lines and negative space to create a delightful eating companion for your morning cereal.
Step-by-Step Tutorial
Materials
- White bisqueware bowl (medium size)
- Black underglaze (or ceramic paint)
- Pastel pink underglaze
- Fine liner brush (size 0 or 00)
- Small round brush (size 2 or 4)
- Pencil (for sketching)
- Clear dipping glaze
- Damp sponge
- Kiln (or oven if using oven-bake paints)
Step 1: Preparation & Sketching
-
Clean the surface:
Start by wiping down your bisque bowl with a damp sponge. This removes any dust that might prevent the glaze from adhering properly to the clay body. -
Map out the face:
Visualize the center of the bowl’s interior. Using a pencil, lightly sketch the placement of the eyes, nose, and mouth. The nose should sit just below the center point to give the cat a cute proportion. -
Sketch the ears:
Draw two large triangles near the upper rim of the bowl interior. Keep them slightly rounded at the tips for a softer look. -
Add the details:
Lightly mark where the whiskers will go—three on each side—and sketch small oval shapes for the cheeks right next to the whiskers.
Step 2: Painting the Features
-
Mix your black:
Prepare your black underglaze. If it feels too thick, add a tiny drop of water to improve flow, which is crucial for achieving those thin, sketchy lines. -
Outline the nose:
Using your fine liner brush, trace the outline of the small inverted triangle nose. Don’t fill it in yet; just define the shape. -
Create the mouth:
From the bottom point of the nose, paint a small vertical line down, then curve outward to the left and right to create the classic ‘w’ mouth shape. -
Paint the eyes:
For the sleepy eyes, paint two small ‘U’ shapes above the nose. Keep the lines relatively thin but distinct. -
Outline the ears:
Tracing over your pencil marks, paint the triangular outlines of the ears. I find it helpful to rotate the bowl as I paint to keep my hand at a comfortable angle. -
Add the whiskers:
With a steady hand, flick three lines outward from the cheek area on each side. Varying the length slightly adds to the hand-drawn charm.
Shaky Hands?
If your lines are wobbling, rest your painting hand’s pinky finger on the bowl surface for stability, or support your wrist with your other hand.
Step 3: Adding Color & Finishing
-
Fill the ears:
Switch to your small round brush and the pastel pink glaze. Gently fill the inside of the ear triangles. It doesn’t need to be perfectly opaque; a slightly washed look works well here. -
Fill the nose:
Carefully dab pink glaze into the nose triangle. Use just enough paint to cover the bisque without obscuring your black outline. -
Add rosy cheeks:
Paint small pink ovals right at the base of the whiskers. These should be soft and subtle additions. -
Paint the exterior dots:
For a little extra detail, use the back end of your paintbrush dipped in black glaze to stamp small polka dots randomly around the outside of the bowl. -
Dry thoroughly:
Let the underglaze dry completely. The pencil lines you sketched earlier will burn off in the kiln, leaving only your painted design. -
Glaze and fire:
Dip the entire bowl into a clear glaze to seal the design and make it food-safe. Fire it in the kiln according to the clay and glaze specifications.
Pro Tip: Line Quality
Don’t aim for perfection. The charm of this design is the ‘sketchy’ look. Slightly broken lines or uneven thickness make it look more artistic.
Enjoy your customized kitty bowl for breakfast or display it as a functional piece of art


Peeking Cat Over the Rim
This charming project combines the raw, earthy beauty of exposed stoneware with delicate line work to create a cozy, nature-inspired piece. The design features a sweet, wide-eyed cat sitting amongst simple botanical sprigs, perfect for a calm morning coffee.
Detailed Instructions
Materials
- Bisque-fired speckled stoneware mug
- Wax resist (liquid wax)
- Sponge or brush for wax application
- Underglaze pencil (black)
- Small liner brush (size 0 or 00)
- Black underglaze
- Tan or warm ochre underglaze
- Clear or semi-transparent creamy white glaze (speckled optional)
- Pencil for sketching
- Clean water and sponge
Step 1: Preparation & Masking
-
Clean surface:
Begin with your bisque-fired mug. Wipe it down gently with a slightly damp sponge to remove any kiln dust or oils from handling, which ensures the glaze adheres properly. -
Mark the wax line:
Decide how much raw clay you want exposed at the base. Us a pencil to lightly mark a loose, slightly wavy horizon line about 1.5 inches up from the bottom of the mug. -
Apply wax resist:
Using a dedicated wax brush or sponge, apply a coat of liquid wax resist to the bottom section of the mug, below your pencil line. Be sure to coat the underside (foot) of the mug as well. -
Let it dry:
Allow the wax resist to dry completely. It should feel firm to the touch and effectively repel water before moving on.
Choosing Clay Body
To exactly match this aesthetic, choose a speckled stoneware clay body (like Laguan speckle). The iron flecks in the clay will show through the cream glaze for that authentic look.
Step 2: Drawing the Designs
-
Sketch the cat:
Lightly sketch your cat design directly onto the bisque using a regular pencil. Following the image, draw a simple triangular ear shape, an oval head, and a sloping body that widens toward the base. -
Add detail lines:
Mark positions for the eyes, the small triangle nose, and the whiskers. I like to keep the lines loose and illustrative rather than perfectly geometric. -
Sketch botanicals:
To the right of the cat, sketch a few vertical stems. Draw simple leaf shapes coming off the stems—some rounded, some more elongated like blades of grass. -
Review placement:
Step back and check your composition. The pencil lines will burn off in the kiln, so don’t worry about making mistakes—just erase or redraw until you are happy.
Shaky Hands?
If brushwork is tough, use a black underglaze applicator bottle with a fine needle tip. It works like a pen for more control over thin lines.
Step 3: Painting the Linework
-
Outline the cat:
Using your fine liner brush loaded with black underglaze, carefully trace over your cat sketch. Keep the pressure light to maintain a thin, consistent line. -
Add facial features:
Fill in the pupils of the eyes solid black, leaving a tiny speck of white if possible for a highlight. Add the whiskers with quick, confident flicks of the brush. -
Add stripes and texture:
Paint small dash marks along the cat’s side to suggest tabby stripes. You can also add a few tiny dots on the chest for texture. -
Paint the leaves:
Switch to your tan or warm ochre underglaze. Using the same liner brush (cleaned thoroughly), trace the botanical stems and leaves. The lines can be slightly thicker here for contrast. -
Check for smudges:
Inspect your work for any accidental underglaze smudges. If you find one, you can usually gently scrape it away with a cleanup tool or a stiff brush.
Step 4: Glazing & Finishing
-
Dip or pour glaze:
Once the underglaze is fully dry, dip the top portion of the mug into your clear or cream glaze. Stop exactly where your wax resist line begins. -
Clean the resist area:
The wax should repel the glaze, but small beads of glaze might sit on top of the wax. Use a damp sponge to wipe the waxed bottom section completely clean. -
Protect the handle:
The example image shows a raw clay handle. If you want this look, wipe away any glaze that got onto the handle, or wax the handle beforehand in the preparation phase. -
Final inspection:
Ensure the rim is smooth and the foot is free of glaze so it doesn’t stick to the kiln shelf. -
Fire the piece:
Load the mug into the kiln and fire to cone 6 (or whatever temperature your specific clay and glaze body requires) to vitrify the stoneware.
Enjoy your cozy new mug once it has cooled completely from the kiln


Sleepy Curled-Up Cat on a Plate
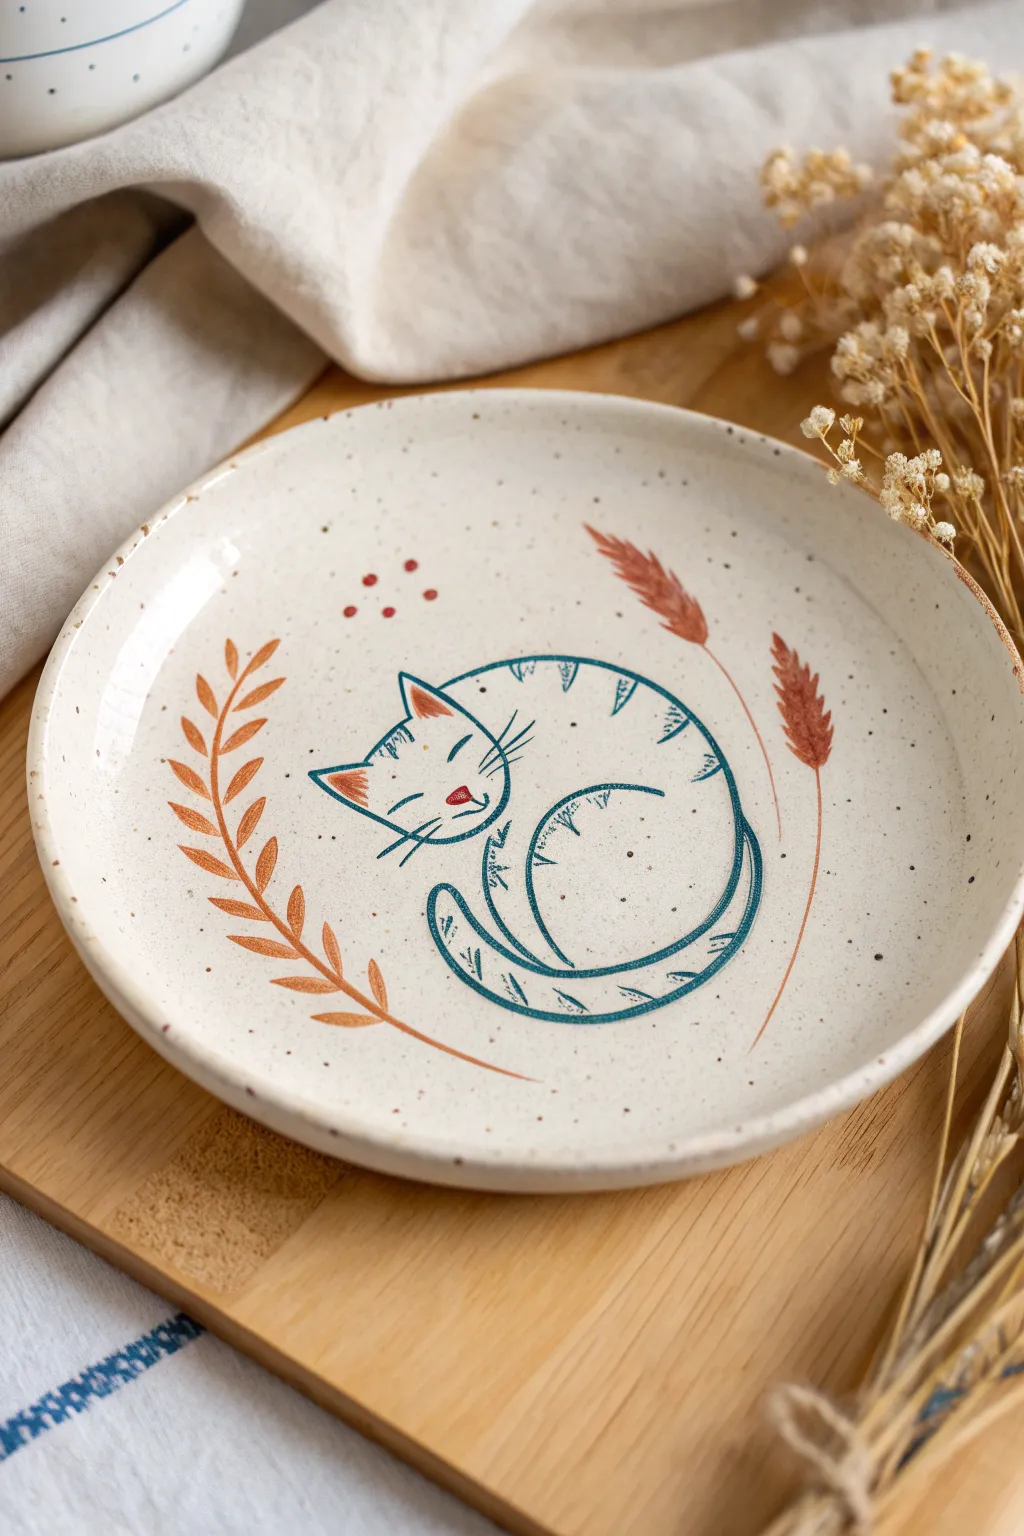
Capture the serenity of a peaceful afternoon with this charming plate design featuring a curled-up tabby cat surrounded by rustic foliage. The minimal line work paired with earthy tones on a speckled cream background creates a warm, inviting piece perfect for any cat lover’s home.
Step-by-Step Guide
Materials
- Bisque ceramic plate (salad or dessert size)
- Speckled cream or oatmeal underglaze
- Deep teal or navy blue underglaze liner pen (or fine liner brush)
- Rust orange/terracotta underglaze
- Burnt sienna or reddish-brown underglaze
- Small round brush (size 2 or 4)
- Fine liner brush (size 0 or 00)
- Pencil (HB or lighter)
- Clear transparent glaze
- Sponge and water bowl
Step 1: Preparing the Base
-
Clean the bisque:
Start by wiping down your bisque plate with a damp sponge. This is crucial as it removes any kiln dust or oils from your hands that might repel the glaze. -
Apply the base coat:
Using a wide, soft brush, apply three even coats of the speckled cream or oatmeal underglaze to the entire top surface of the plate. If your underglaze doesn’t have specks, don’t worry—we’ll add those later. Allow each coat to dry until it’s matte before adding the next. -
Sketch the design:
Once the base is bone dry, lightly sketch the outline of the curled cat and the surrounding wheat stalks using a pencil. Keep your pressure very light so you don’t scratch through the base coat. Remember, the pencil lead will burn off in the kiln, leaving just your painted lines.
Steady Hands
Rest your pinky finger on a dry part of the plate while painting fine lines. This acts as an anchor, giving you much more control over the liner bottle or brush.
Step 2: Painting the Cat
-
Outline the body:
Using your deep teal underglaze liner pen or a very fine brush, carefully trace the main circle of the cat’s body. Start from the head and curve around to the tail. The line quality should be consistent but slightly organic to match the rustic feel. -
Add the face details:
Draw the sleepy triangular ears, the curved eyes (like upside-down U’s), and the whiskers. I find that doing the whiskers in quick, confident strokes prevents them from looking shaky. -
Create the stripes:
Paint small, triangular notches along the back curve and the tail to represent tabby stripes. These don’t need to be perfectly symmetrical; a little variation adds character. -
Fill the accents:
Switch to your rust orange color and a small detail brush. Gently fill in the inside of the ears and add a tiny dab of color for the nose. -
Define the paws:
Use the blue liner again to draw the subtle curve of the folded front paw tucked under the chin and the suggestion of the back leg near the tail.
Clogged Nozzle?
If your underglaze writer bottle stops flowing, don’t squeeze harder! Use a thin needle or pin to clear the metal tip, or rinse the cap in warm water.
Step 3: Adding Flora and Finishing Touches
-
Paint the wheat stem:
Using the rust orange or a lighter terracotta shade, paint a long, curved line sweeping up the left side of the plate. This is the stem for the leafy wheat stalk. -
Add the leaves:
Paint small, teardrop-shaped leaves alternating up the stem. Start broad at the stem and lift your brush as you pull away to create a sharp point. Aim for a mirrored effect where leaves curve outward. -
Create the decorative stalks:
On the right side of the cat, paint two feathery stalks using a burnt sienna or reddish-brown to create contrast. Use short, dashed strokes radiating from a central stem to mimic the texture of dried grass or grains. -
Add floating dots:
Dip the end of a paintbrush handle into the rust underglaze and dot three or four small circles above the cat’s head for a playful, decorative touch. -
Splatter effect:
If your base glaze wasn’t pre-speckled, load a stiff brush with watered-down brown or grey underglaze. Run your thumb across the bristles to flick tiny specks across the entire plate for that pottery studio look. -
Clear glaze application:
Once your design is completely dry (give it at least 20 minutes), dip or brush on a clear transparent glaze over the entire piece. Ensure you don’t smear the linework. -
Final wipe:
Wipe the foot (bottom rim) of the plate clean with a sponge so it doesn’t stick to the kiln shelf.
Fire your plate according to the clay and glaze specifications and enjoy your cozy new creation
BRUSH GUIDE
The Right Brush for Every Stroke
From clean lines to bold texture — master brush choice, stroke control, and essential techniques.
Explore the Full Guide
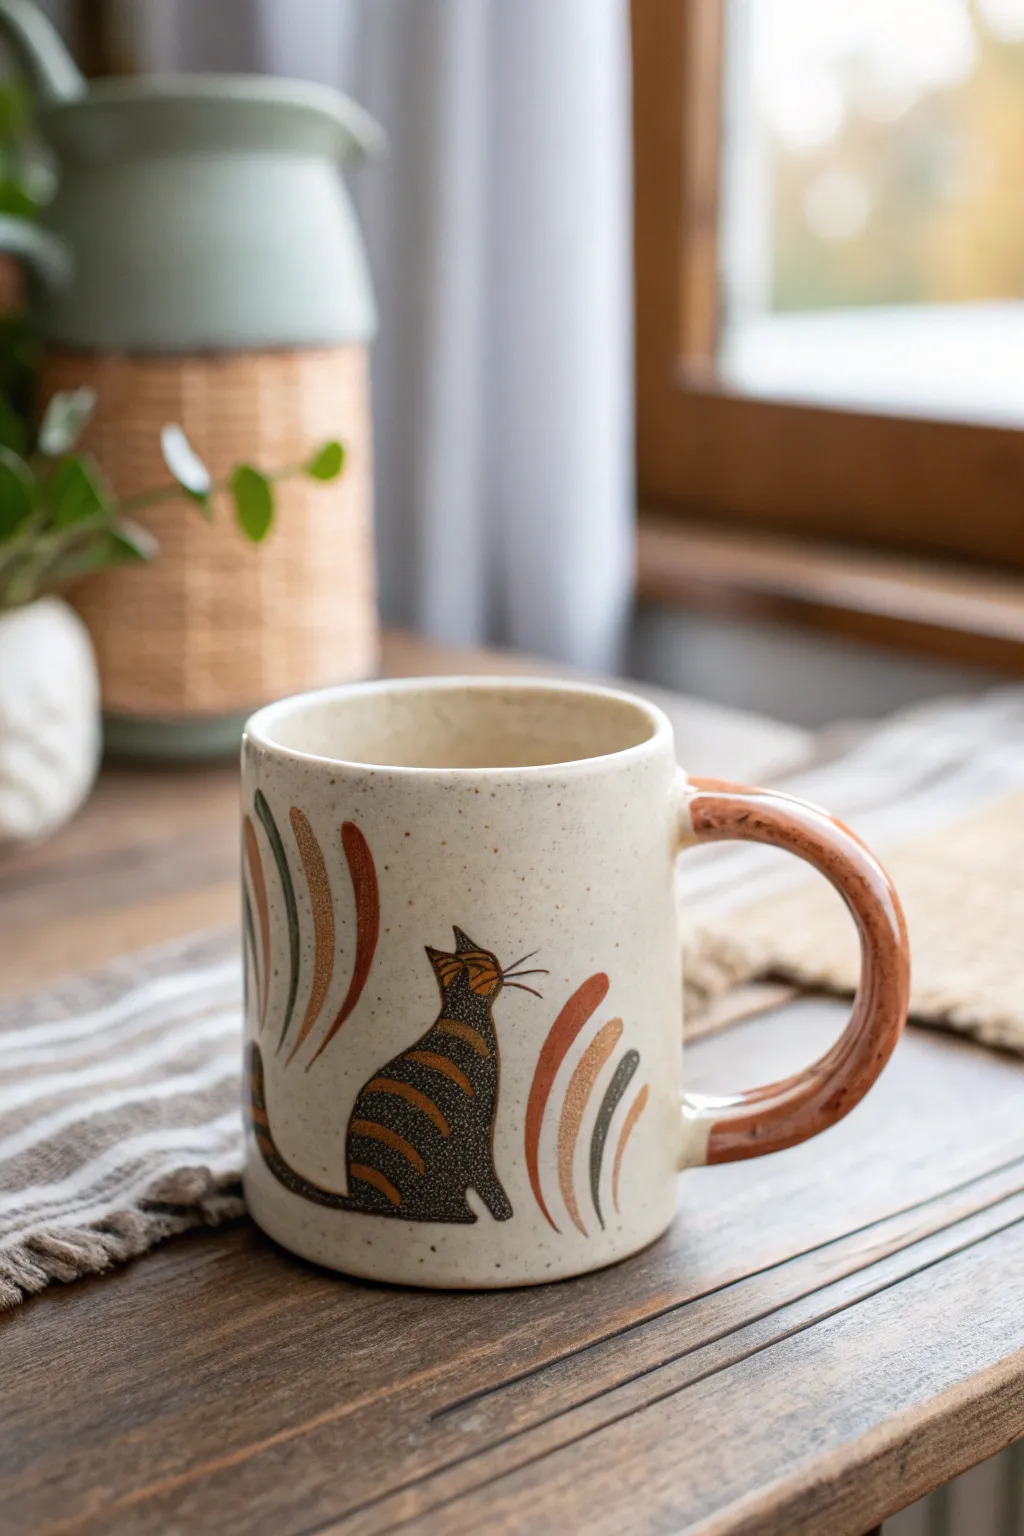
Minimal Cat Line Art
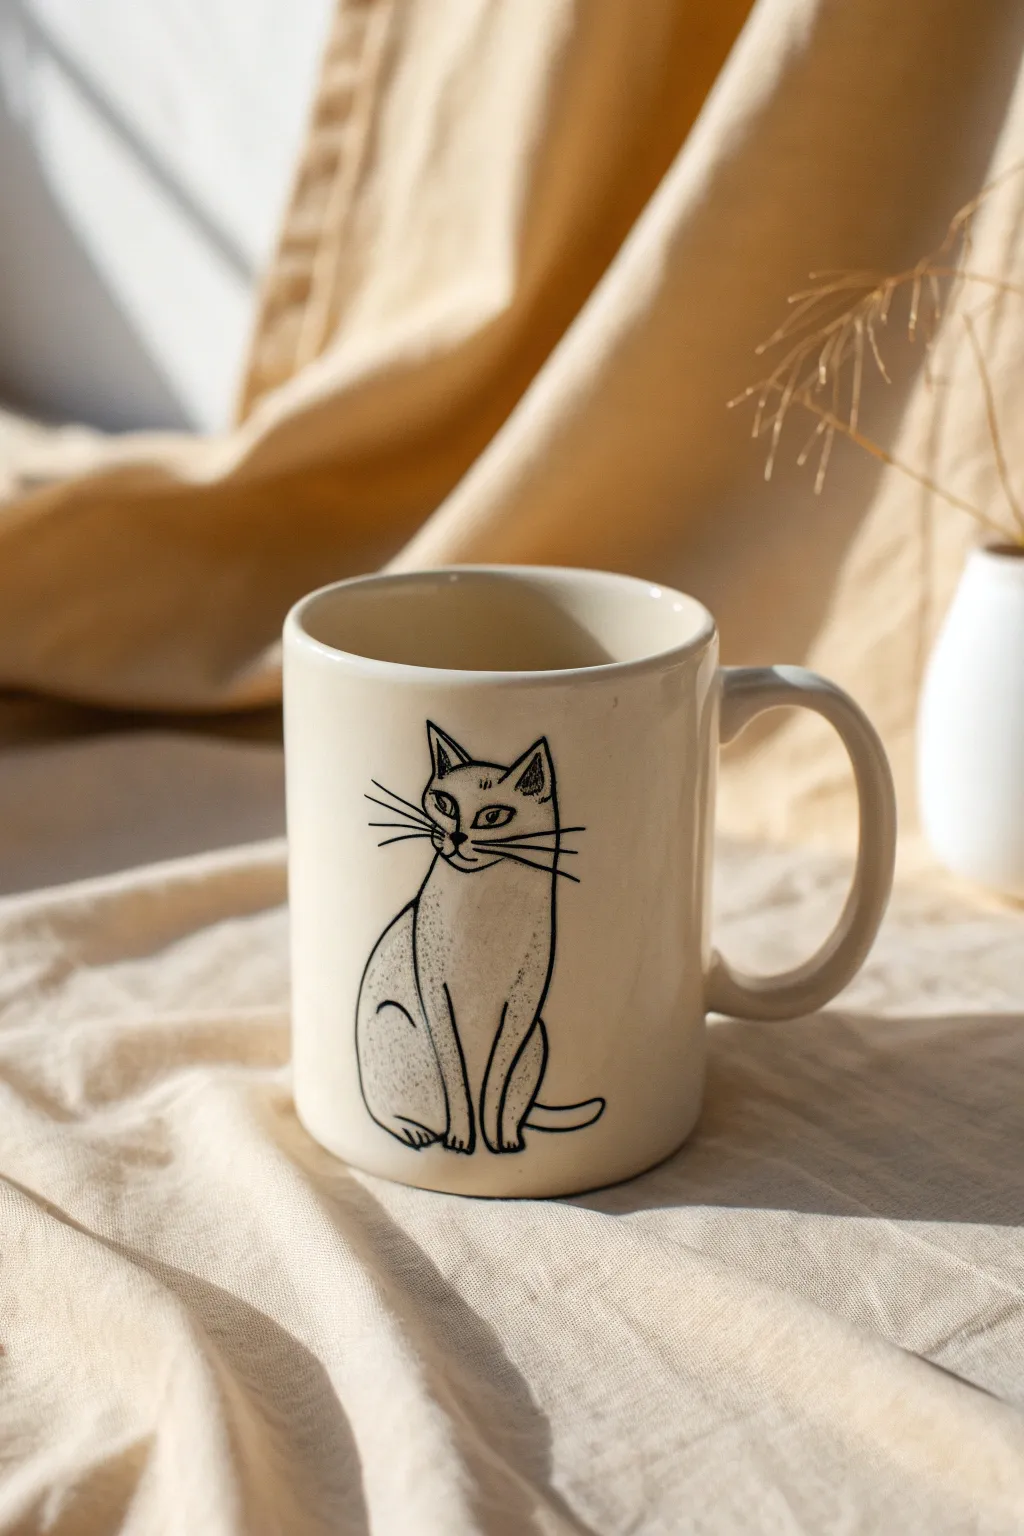
Capture the essence of a serene cat with this elegant line art design on a classic cream mug. This project proves that sometimes less is truly more, using simple strokes to create a sophisticated and charming piece of drinkware.
How-To Guide
Materials
- Bisque ceramic mug (smooth cylindrical shape)
- Pencil (No. 2 or HB suitable for bisque)
- Underglaze pencil or fine liner bottle (black)
- Black underglaze (if using brush)
- Detail liner brush (size 00 or 000)
- Clear transparent dipping glaze
- Clean sponge and water bowl
- Damp cloth
- Tracing paper (optional)
Step 1: Preparation & Sketching
-
Clean the bisque:
Start by wiping down your bisque mug with a damp sponge. This removes any kiln dust or oils from your hands that might prevent the glaze from adhering properly. -
Analyze the pose:
Study the cat’s posture. Notice how it’s an elongated oval shape for the body, with a slightly smaller oval for the head. The tail wraps neatly around existing lines rather than sticking out. -
Plan placement:
Decide where the cat will sit. Center the design opposite the handle if you want it visible to others while drinking, or facing you for a personal touch. -
Draft the outline:
Using a regular pencil, lightly sketch the basic shapes directly onto the bisque. Don’t worry about mistakes; the graphite will burn off in the kiln. -
Refine features:
Draw the ears as triangles sitting high on the head. Add the almond-shaped eyes and the distinctive ‘M’ shape often found on tabby foreheads. -
Add gentle details:
Sketch the legs. Note how the front legs are straight, while the back haunch is a curved line indicating a sitting position.
Clean Lines Only
Line looking shaky? Use a ‘writer bottle’ with a metal tip instead of a brush. It works exactly like a pen, giving you much more control over fine details.
Step 2: Inking the Design
-
Prepare your black:
If using liquid underglaze, pour a small amount onto a tile and water it down slightly until it has an ink-like consistency for smooth flow. -
Start the main lines:
Using a detail liner brush or a fine tip applicator bottle, begin tracing your pencil lines. I find it easiest to start with the ears and work downward to avoid smudging. -
Vary line weight:
Try to keep your hand steady but allow for natural variation. The charm of this style comes from the hand-drawn feel, so perfectly uniform lines aren’t necessary. -
Detail the face:
Carefully paint the eyes. Leave the centers empty or add a tiny dot for the pupil, giving the cat an attentive expression. -
Whiskers and texture:
Add the whiskers with quick, confident flicks of the brush. Then, add small stippling dots on the chest and haunch to suggest fur texture without drawing every hair. -
Clean up edges:
If you made a stray mark, wait for it to dry completely, then gently scratch it off with a toothpick or a stiff, clean brush.
Graphite Ghosting
Draw confidently with pencil! Graphite burns away completely in the kiln, so you don’t need to erase your sketch marks before glazing.
Step 3: Glazing & Finishing
-
Final dryness check:
Ensure your black underglaze is completely dry to the touch. It should look matte and chalky. -
Clear glaze application:
Dip the entire mug into a clear transparent glaze using dipping tongs. A quick 1-2 second dip is usually sufficient. -
Shake off excess:
Gently shake the mug as you pull it out to remove drips, paying special attention to the rim. -
Wipe the foot:
Use a damp sponge to meticulously wipe all glaze off the bottom foot of the mug so it doesn’t fuse to the kiln shelf. -
Fire:
Your piece is now ready for the kiln. Follow the specific firing cone instructions for your clay and glaze combination.
Once fired, you’ll have a delightful minimalist companion for your morning coffee routine
Tabby Stripes Made Simple
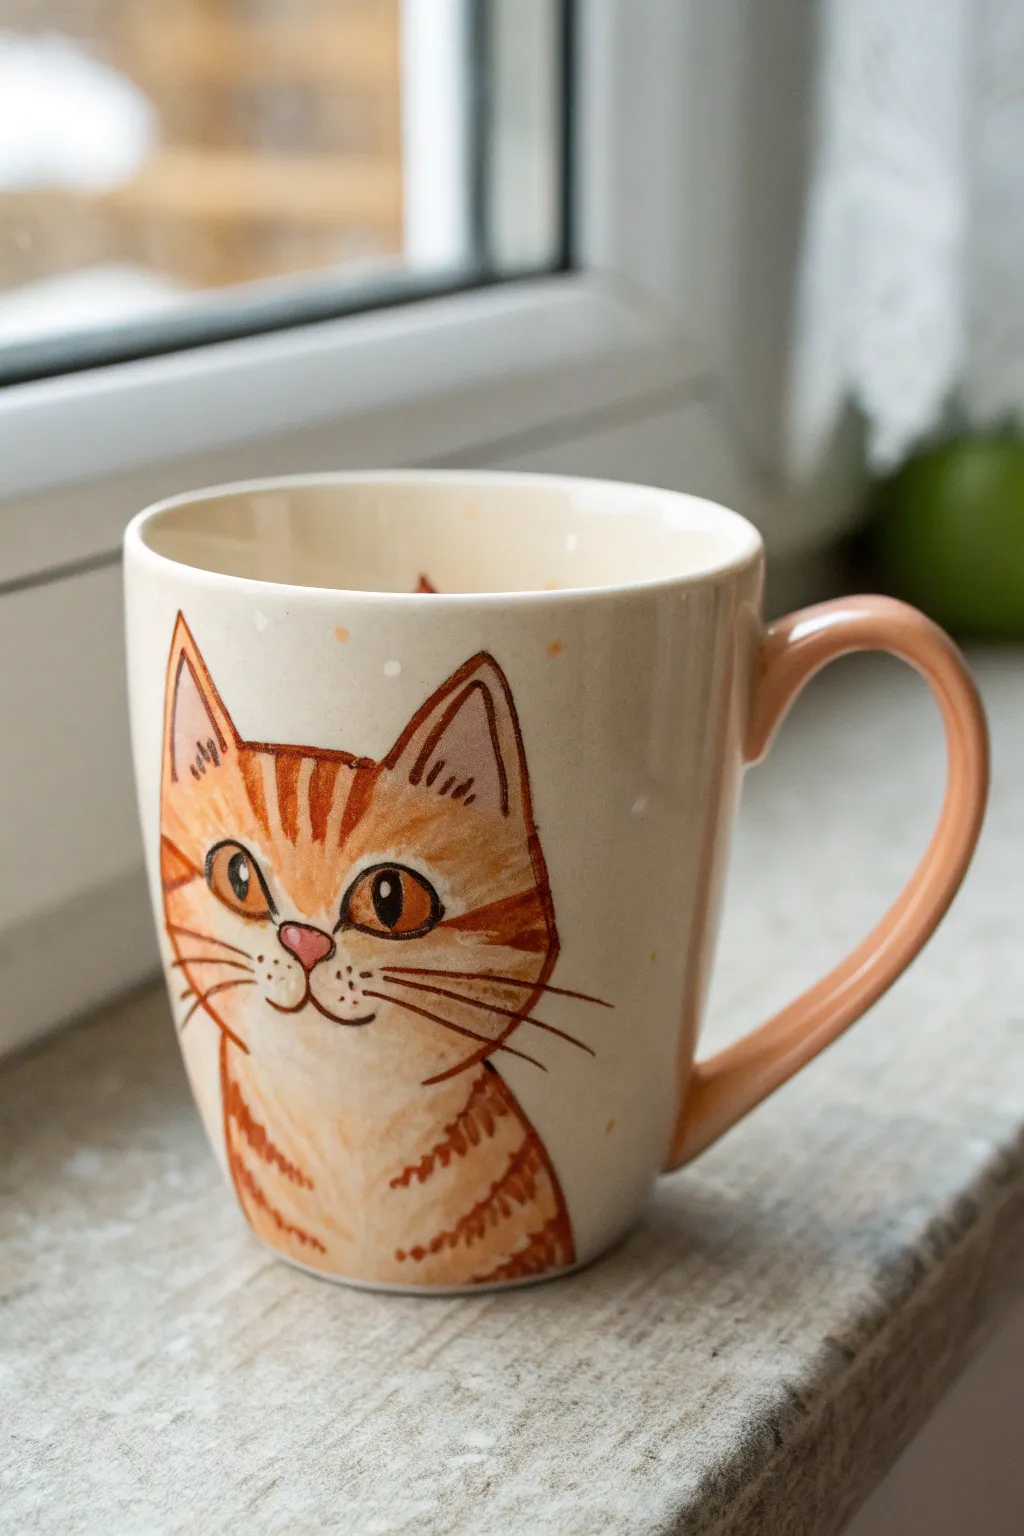
Capture the charm of a classic orange tabby with this delightful mug project. Using simple brushwork and a warm color palette, you’ll create a cozy companion for your morning coffee that features distinct stripes and expressive eyes.
Step-by-Step
Materials
- Bisque ceramic mug (smooth surface preferable)
- Ceramic underglazes: Cream/Off-white, light orange, dark rust/burnt orange, solid black, pale pink, white
- Pencil for sketching
- Round brush (size 4 or 6) for filling
- Fine liner brush (size 0 or 00) for details
- Palette
- Water cup
- Clear dipping glaze
Step 1: Sketching and Base Layers
-
Sketch the silhouette:
Begin by lightly sketching the outline of the cat’s head and upper chest directly onto the bisque mug with a pencil. Focus on large triangular ears and a rounded chin area. Don’t worry about erasing; the pencil marks will burn off in the kiln. -
Block in the base color:
Load your medium round brush with a cream or very pale peach underglaze. Fill in the entire shape of the cat’s head and body. Apply two to three smooth coats, allowing each to dry until matte before adding the next, to ensure opaque coverage. -
Add the orange wash:
Mix a light orange underglaze with a tiny bit of water to create a semi-transparent wash. Apply this freely over the top of the head, the ears, and the chest area, leaving the muzzle and chin lighter to create dimension.
Step 2: Defined Features
-
Paint the nose:
Using a small brush and pale pink underglaze, paint a small, inverted triangle for the nose. Position it centrally between where the eyes will go. -
Outline the eyes:
Switch to your fine liner brush and black underglaze. Carefully outline two large almond shapes for the eyes. They should be slightly angled upwards at the outer corners. -
Fill the irises:
Fill the eye shapes with an amber or deep honey-colored underglaze. Once dry, add the black vertical slit pupils in the center. -
Add catchlights:
This is crucial for life: dip the very tip of a brush handle or a dotting tool into white underglaze and place a tiny dot in the upper corner of each pupil. -
Define the mouth:
From the bottom point of the pink nose, draw a thin black line straight down, then curve it outwards to the left and right to create the mouth’s anchor shape.
Fur Texture Trick
Don’t paint solid lines for stripes. Use a ‘dry brush’ technique with minimal paint to create scratchy, tapered ends that mimic real hair.
Step 3: Stripes and Details
-
Create forehead markings:
Using a rust or dark orange underglaze and a liner brush, paint the classic ‘M’ shape on the forehead. Break the lines slightly to simulate fur texture rather than solid blocks. -
Cheek stripes:
Add three distinct stripes on each cheek radiating from the outer eye area towards the ears. Keep the strokes tapered—thicker near the face and pointed at the ends. -
Ear definitions:
Outline the inner triangles of the ears with a dark brown or rust line. Add a few quick, wispy strokes inside the ears to suggest fluff. -
Chest texture:
Moving down to the chest area, paint curved, broken stripes that follow the imagined roundness of the cat’s body. I find that staggering these strokes makes the fur look more organic. -
Final outlining:
Take your finest brush with slightly watered-down black or dark brown underglaze. Very lightly outline the main shape of the head and ears to separating the cat from the background. -
Whiskers:
With a steady hand and your thinnest liner brush, pull long, quick strokes outwards from the muzzle for whiskers. Don’t overthink this—speed helps create a smooth line. -
Freckles:
Add a few tiny dots on the muzzle area just beside the nose for whisker pores.
Make it Yours
Customize the mug by painting a small mouse or a ball of yarn on the back side, or hide a little paw print inside on the bottom.
Step 4: Finishing Touches
-
Background speckles:
To integrate the design, dip an old toothbrush or stiff brush into watered-down orange underglaze and flick a faint spray of speckles around the cat’s head. -
Handle detail:
Paint the handle of the mug a solid, coordinating color like a soft dusty pink or light terracotta to frame the piece. -
Clear glaze application:
Once all paint is bone dry, sponge or dip the entire mug in clear glaze. Ensure the foot is wiped clean before firing.
Your personalized tabby mug is now ready to bring a touch of warmth to your kitchen cabinet

PENCIL GUIDE
Understanding Pencil Grades from H to B
From first sketch to finished drawing — learn pencil grades, line control, and shading techniques.
Explore the Full Guide
Tuxedo Cat With Bold Patches
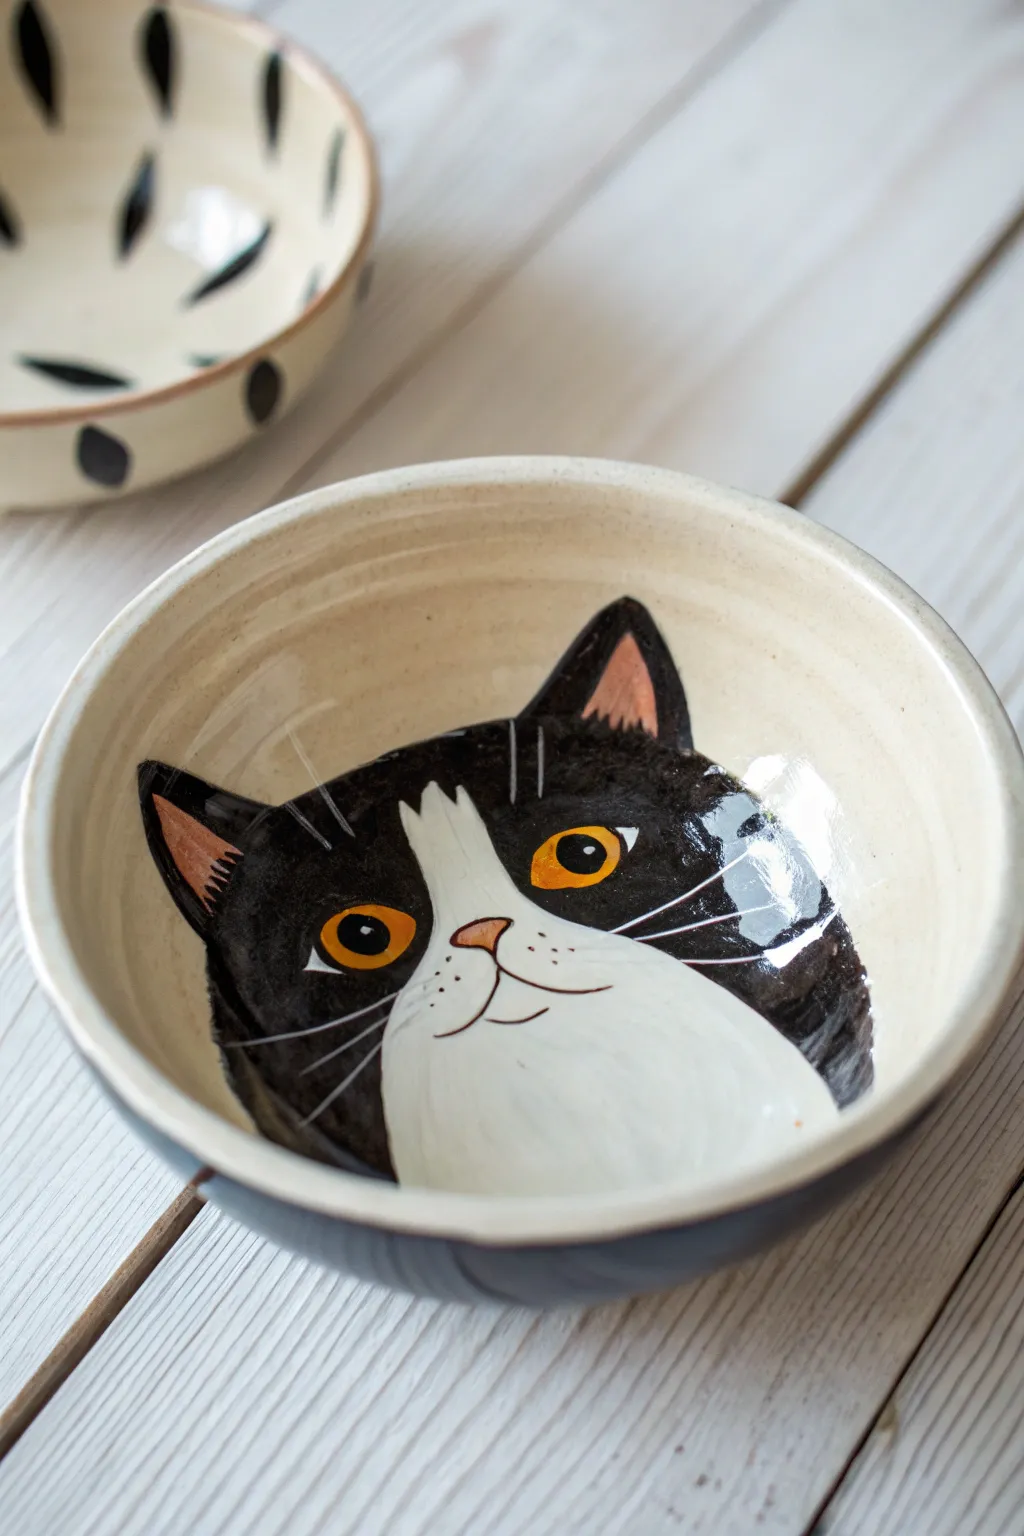
Surprise yourself every time you finish a meal with this charming tuxedo cat face painted at the bottom of a simple ceramic bowl. The bold contrast of black and cream makes the cat’s cheerful expression pop, turning ordinary dinnerware into a delightful piece of art.
Step-by-Step Guide
Materials
- Bisque ceramic bowl (cereal or soup size)
- Underglaze (Black, White, Orange/Amber, Pink)
- Clear dipping glaze (food safe)
- Pencil (No. 2 or specific ceramic pencil)
- Round brushes (sizes 2, 6, and 10)
- Detail liner brush (size 0 or 00)
- Sponge
- Water container
- Palette or tile
Step 1: Preparation & Sketching
-
Prep the surface:
Begin by wiping down your bisque bowl with a damp sponge. This removes any dust that could prevent the glaze from adhering properly to the clay. -
Map out the face:
Lightly sketch the outline of the cat’s head directly inside the bowl using a pencil. Start with a wide U-shape for the chin and cheeks, then add two triangular ears near the rim. -
Add facial features:
Draw the distinguishing tuxedo markings. Sketch a vertical blaze running up the nose and forehead, separating the face into two dark sides and a light center. -
Refine the sketch:
Mark the positions for two large oval eyes within the black sections, and a small triangular nose within the white blaze. Don’t worry about pencil lines; they burn off in the kiln.
Step 2: Blocking Colors
-
Isolate the white blaze:
Using a size 6 round brush, carefully fill in the central blaze, muzzle, and chest area with 2-3 coats of white underglaze. Let each coat dry until chalky before adding the next. -
Paint the black coat:
Switch to a size 10 brush for larger coverage. Paint the sides of the face and the ears with black underglaze, being careful to paint around the eyes and the white blaze so the colors don’t muddy. -
Second black coat:
Apply a second and third coat of black to ensure solid, opaque coverage without brushstrokes showing through. I find that cross-hatching your strokes helps achieve a smoother finish -
Fill the ears:
Using a smaller size 2 brush, paint the inner triangles of the ears with a soft pink underglaze.
Clean Lines Pro-Tip
If you struggle with shaky hands for whiskers, try a scratching technique (sgraffito). Paint the area solid, let it dry, then scratch through the top layer to reveal the color underneath.
Step 3: Details & Features
-
Paint the eyes:
Fill the oval eye shapes with a bright orange or amber underglaze. Depending on the opacity of your glaze, you may need 3 coats to make them really shine against the dark fur. -
Add the nose:
Paint the small triangular nose with the same pink used for the ears, or mix a tiny bit of orange into the pink for a coral tone. -
Pupils and outlines:
Once the orange eyes are completely dry, use your finest liner brush and black underglaze to paint vertical slit pupils and narrowly outline the eyes for definition. -
Mouth and muzzle details:
With the liner brush and black glaze, gently paint a ‘W’ shape extending from the nose to create the mouth. Add small dots for whisker pads on the white muzzle. -
The whiskers:
For the whiskers over the black fur, use white underglaze on a liner brush. Paint quick, confident strokes outward. Do the same with black glaze over the white muzzle area for contrast. -
Clean up:
Check the rim of the bowl. If you want a solid color outside, apply it now, or simply wipe the rim clean with a damp sponge for a crisp edge.
Level Up: Exterior Pattern
Don’t leave the outside blank! Mimic the background bowl in the image by painting simple black dashes or paw prints on the exterior to tie the design together.
Step 4: Glazing & Firing
-
Dry completely:
Allow the underglaze to dry fully, ideally overnight, to ensure the detailed whisker lines don’t smear during the glazing process. -
Clear glaze application:
Dip the entire bowl into a clear, food-safe dipping glaze. Shake off excess gently to prevent drips. -
Fire the piece:
Fire the bowl in a kiln according to the clay and glaze specifications (typically cone 06 or cone 6 depending on your materials) to make it glossy and food-safe.
Once fired, fill your new bowl with milk or soup and enjoy seeing your tuxedo cat friend appear as you finish your meal
Calico Color Blocking
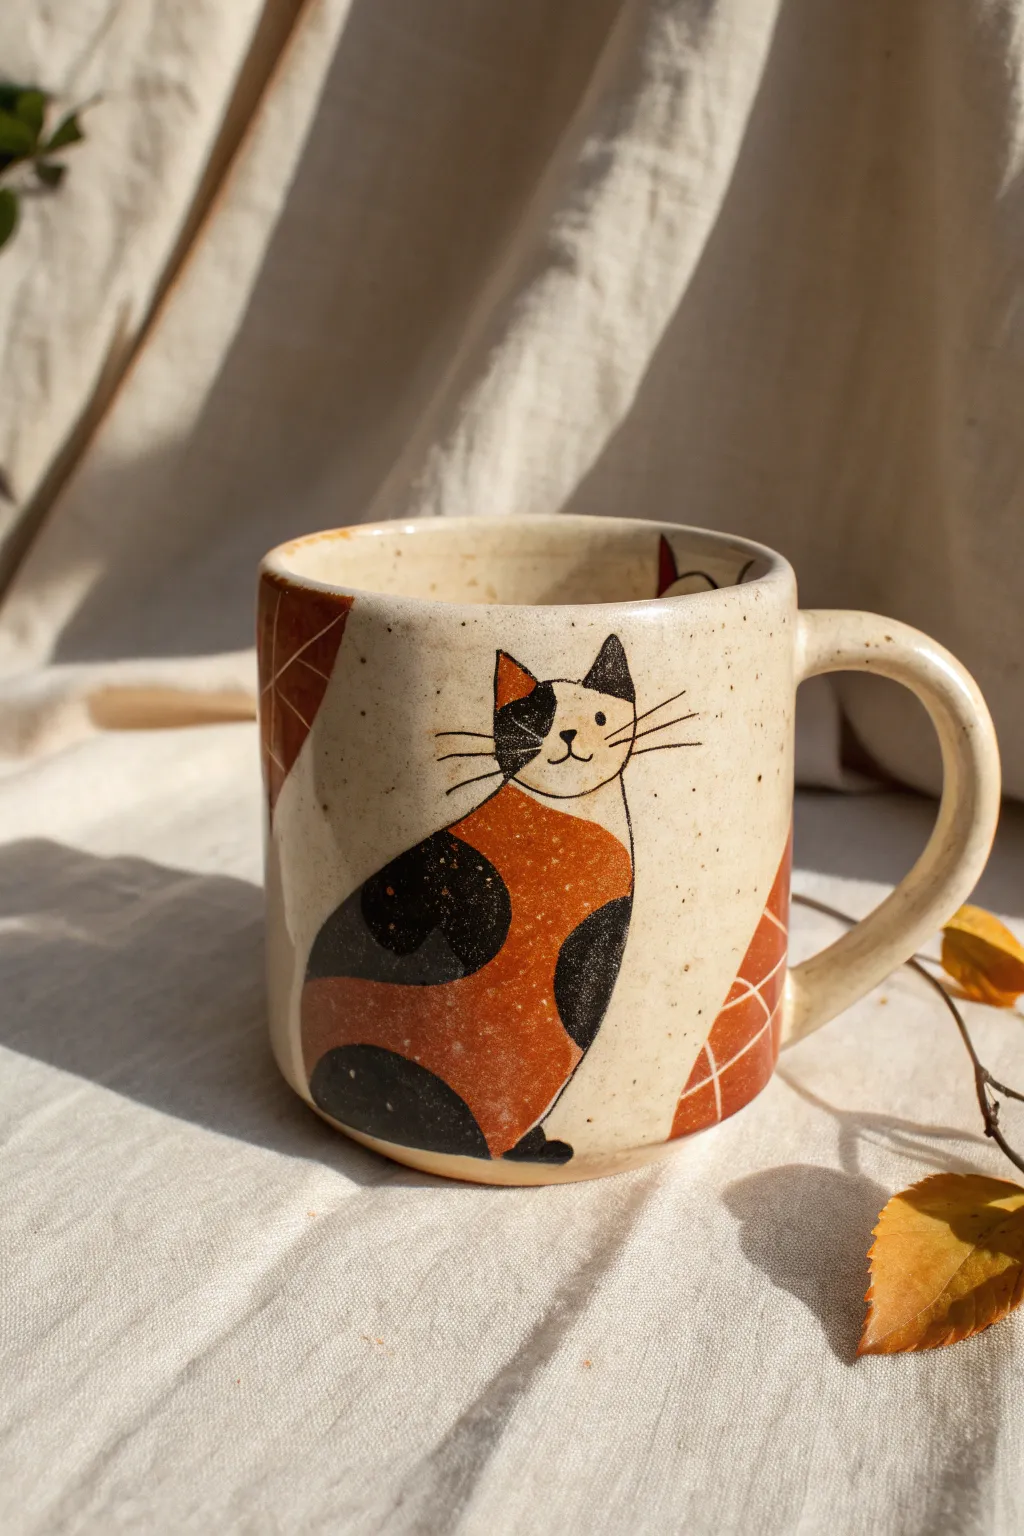
Embrace the charming imperfection of hand-painted ceramics with this folk-art inspired calico cat design. The bold blocks of burnt orange and black against a speckled cream background give this mug a cozy, timeless autumnal feel.
Step-by-Step Tutorial
Materials
- Bisque-fired ceramic mug (cylindrical shape preferred)
- Underglazes: Burnt Orange (or Terracotta), Jet Black, Cream/Oatmeal (speckled if possible)
- Fine liner brush (size 0 or 00)
- Small round brush (size 2 or 4)
- Pencil (HB)
- Clear dipping glaze
- Sponge and water bowl
- Underglaze applicator bottle (optional for fine lines)
Step 1: Planning and Sketching
-
Surface Preparation:
Begin by wiping down your bisque mug with a damp sponge. This removes any kiln dust or oils from your hands that might repel the glaze, ensuring a smooth application. -
Sketch the Cat Outline:
Using a light pencil, sketch a simple, rounded pear shape for the cat’s body on the front of the mug. The shape should be bottom-heavy to look like a sitting cat. -
Add the Head:
Draw a smaller oval on top of the body for the head. Add two triangular ears at the top. Don’t worry about perfection; a slightly quirky shape adds to the folk-art aesthetic. -
Divide the Colors:
Lightly sketch curved lines across the body and face to map out where your color blocks will go. Create distinct sections for the calico patches—think of it like a puzzle.
Clean Lines Tip
Use a slightly damp, stiff angled brush to ‘erase’ any wobbly edges while the underglaze is still powdery. It acts like a precise eraser.
Step 2: Applying the Background
-
Background Glazing:
Before tackling the cat, paint the entire rest of the mug’s exterior with your cream or oatmeal underglaze. Use your round brush and carefully paint around the cat shape. -
Second Coat:
Apply a second and third coat of the background color, allowing the glaze to dry to a chalky finish between each layer. This ensures solid coverage without streaks. -
Creating Speckles:
If your cream underglaze isn’t pre-speckled, load an old toothbrush with a watered-down brown or iron oxide wash. Use your thumb to flick fine bristles at the mug, splattering tiny dots over the background area.
Step 3: Painting the Calico
-
Orange Patches:
Identify the sections you marked for orange. Using your small round brush, fill these areas with the burnt orange underglaze. I find that three coats usually give that rich, opaque pumpkin color shown in the photo. -
Black Patches:
Once the orange is dry, move on to the black sections. Carefully fill in the large patch on the back, the tail area near the bottom, and the specific ear or face patch. -
Refining Edges:
Use your fine liner brush to crisp up the edges where the orange and black meet. They should touch perfectly but not bleed into each other. -
Interior Details:
If you want to match the reference, add a small partial cat silhouette or just a splash of the burnt orange color on the inside rim of the mug for a hidden surprise.
Make it Personal
Customize the patches to match a real cat! You can easily swap black for grey or add tabby stripes over the orange patches using a darker rust color.
Step 4: Detailing and Finishing
-
Facial Features:
Switch to your finest detail brush (size 00) or an applicator bottle with a needle tip. With black underglaze, dot two eyes, draw a small ‘V’ for the nose, and add a simple ‘W’ shape for the mouth. -
Whiskers:
With a steady hand, pull three quick, straight lines outward from the cheeks for whiskers. Quick, confident strokes prevent wavy lines. -
Sgraffito Texture (Optional):
If you notice adjacent decorative shapes (like the leaves in the background), you can paint a solid block of orange and use a needle tool to scratch thin white lines through it to reveal the clay underneath. -
Clear Glazing:
Once all underglaze is bone dry, carefully dip the entire mug into a clear glaze. Shake off the excess gently. -
Firing:
Fire the mug in the kiln according to your clay and glaze specifications (typically Cone 5 or 6 for stoneware) to make it food-safe and shiny.
Enjoy your morning coffee in a mug that carries the warmth of a purring friend


Tiny Cats All Over Pattern
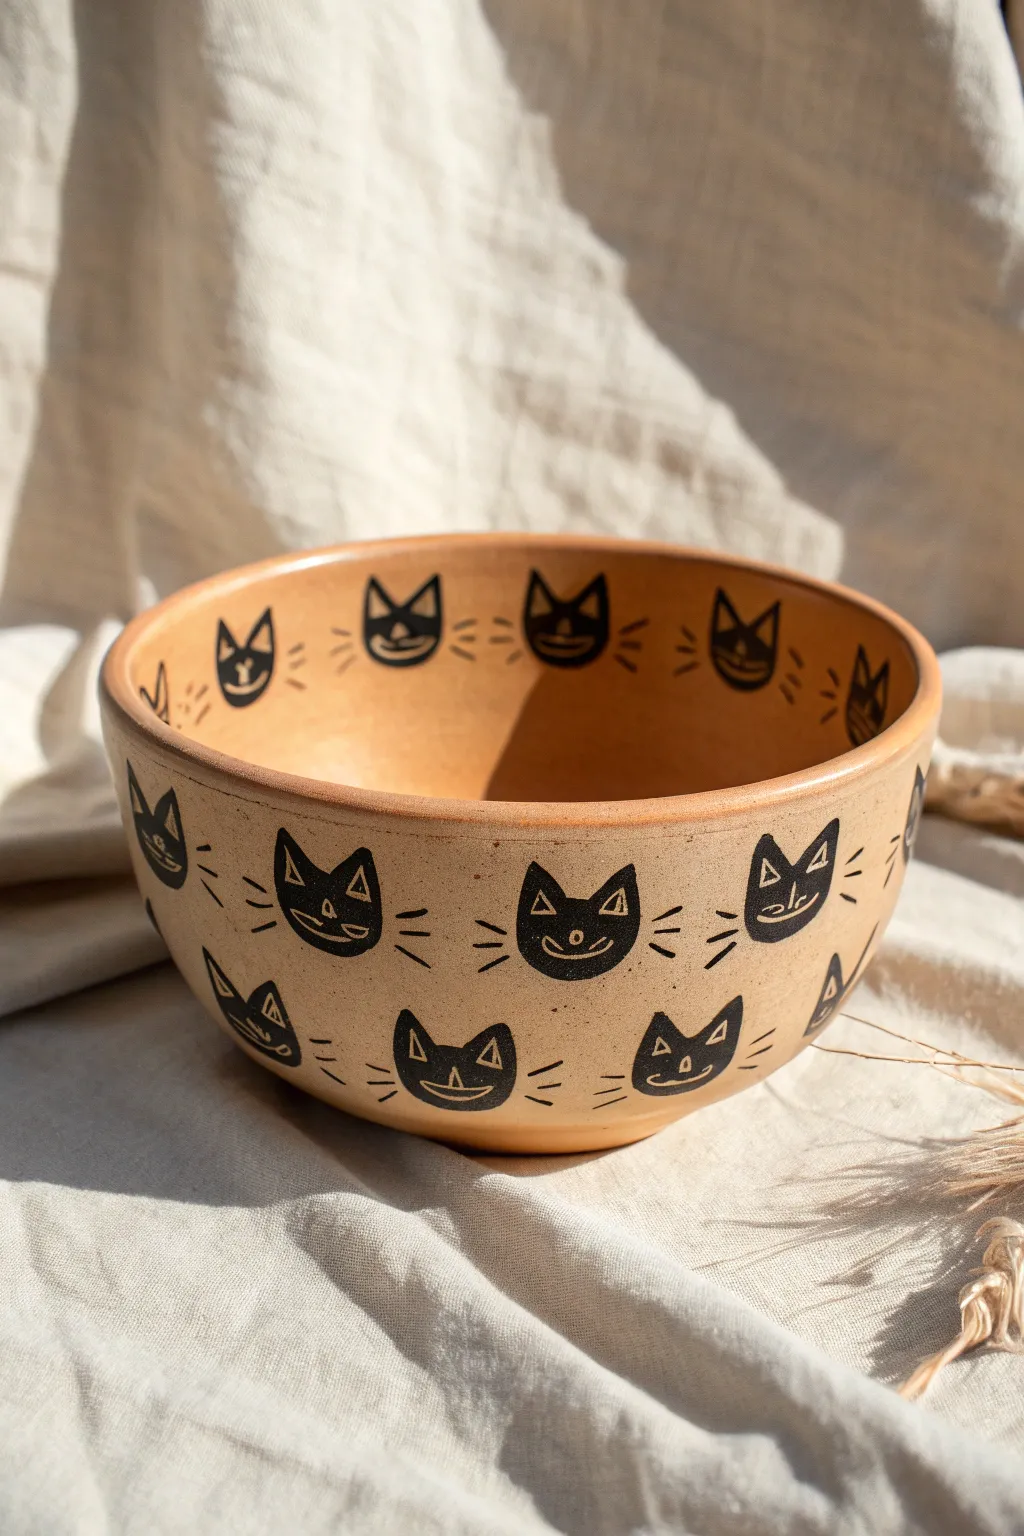
Transform a simple bisque bowl into a delightful piece of functional art with this warm, repeating cat pattern. The design uses bold black lines against a raw or matte ceramic finish to create a look that feels both modern and playfully handmade.
How-To Guide
Materials
- Bisque fired ceramic bowl (buff or terracotta clay body works best)
- Black underglaze (viscous consistency)
- Small flat brush (size 2 or 4)
- Fine liner brush (size 00 or 0)
- Pencil for sketching
- Clear matte pottery glaze (zinc-free recommended)
- Sponge and water bucket
- Self-adhesive foam sheets (optional for stamping)
- Scissors (optional)
Step 1: Preparation & Planning
-
Clean the surface:
Begin by wiping down your bisque bowl with a slightly damp sponge. This removes any kiln dust or oils from your hands that might resist the underglaze application. -
Map out your spacing:
Using a light pencil, lightly mark horizontal guidelines around the bowl. You’ll want two main rows on the exterior and one single row just inside the rim. Don’t worry about the pencil marks; they burn off in the kiln. -
Establish the grid:
Mark vertical tick marks where the center of each cat head will sit. Stagger the rows—if a cat in the top row is at 12 o’clock, the cat below it should be between 12 and 1.
Smudge Control
Work from the top of the bowl down to the bottom to avoid resting your hand on wet underglaze. If you mess up a line, let it dry, scratch it off gently, and retry.
Step 2: Creating the Cat Design
-
Decide on method: Hand-paint or Stamp:
You can either hand-paint each cat for a loose, organic look or create a simple foam stamp for uniformity. Given the slight variations in the photo, hand-painting is encouraged. -
Outline the head shape:
Using your small flat brush loaded with black underglaze, paint the basic silhouette of the cat head. It’s essentially a soft inverted trapezoid with triangle ears on top. -
Fill the silhouette:
Fill in the shape solidly with the black underglaze. Ensure you have good coverage; two thin coats are better than one thick, goopy coat which might flake off. -
Repeat the pattern:
Continue painting these silhouettes around the entire exterior bowl, following your staggered grid. Let the underglaze dry until it’s chalky and matte. -
Paint the interior rim:
Repeat the process on the inside rim of the bowl. Be careful with your hand placement so you don’t smudge the exterior work.
Level Up: Carved Texture
Instead of just painting whiskers, use a needle tool to gently carve the whisker lines into the clay body before the first firing for a tactile, recessed feel.
Step 3: Adding the Details
-
Switch to sgraffito or fine line:
For the facial features, you have two choices. You can scratch through the dry black paint (sgraffito) to reveal the clay below, or carefully paint the negative space with a wax resist before glazing. The easiest method for beginners, however, is to simply leave the facial features unpainted within the black silhouette. -
Correction: Paint the details:
Looking closely at the style, use your fine liner brush with the *same clay body color* underglaze (or just leave spaces clear if you have steady hands) to define the eyes and mouth. Alternatively, use a sgraffito tool to scratch out the simple triangle nose, curve of the mouth, and triangle ears. -
Refining the face:
Ensure each cat has a wide, U-shaped smile and distinct triangular eyes. The charm here is in the slight irregularity, so they don’t need to be clones of one another. -
Add the whiskers:
Using your finest liner brush and black underglaze, paint three floating whiskers on each side of every cat head. Keep these lines quick and confident to avoid wobbles. -
Check density:
Inspect your black areas. If any look streaky or thin, carefully dab a little more underglaze on top to ensure a solid, deep black after firing.
Step 4: Glazing & Finishing
-
Final drying time:
Allow the bowl to dry completely. The underglaze should be bone dry to the touch before moving to the glazing step. -
Apply clear matte glaze:
Dip the entire bowl into a clear matter glaze. A matte finish preserves that rustic, earthy texture seen in the photo better than a high gloss would. -
Wipe the foot:
Use a wet sponge to wipe all glaze off the very bottom (foot ring) of the bowl so it doesn’t stick to the kiln shelf. -
Fire the piece:
Fire the bowl in the kiln according to the clay and glaze specifications (usually Cone 5 or 6 for stoneware).
Once fired, fill your new bowl with treats or display it proudly to show off your custom kitty artwork
Cat Paws Around the Base
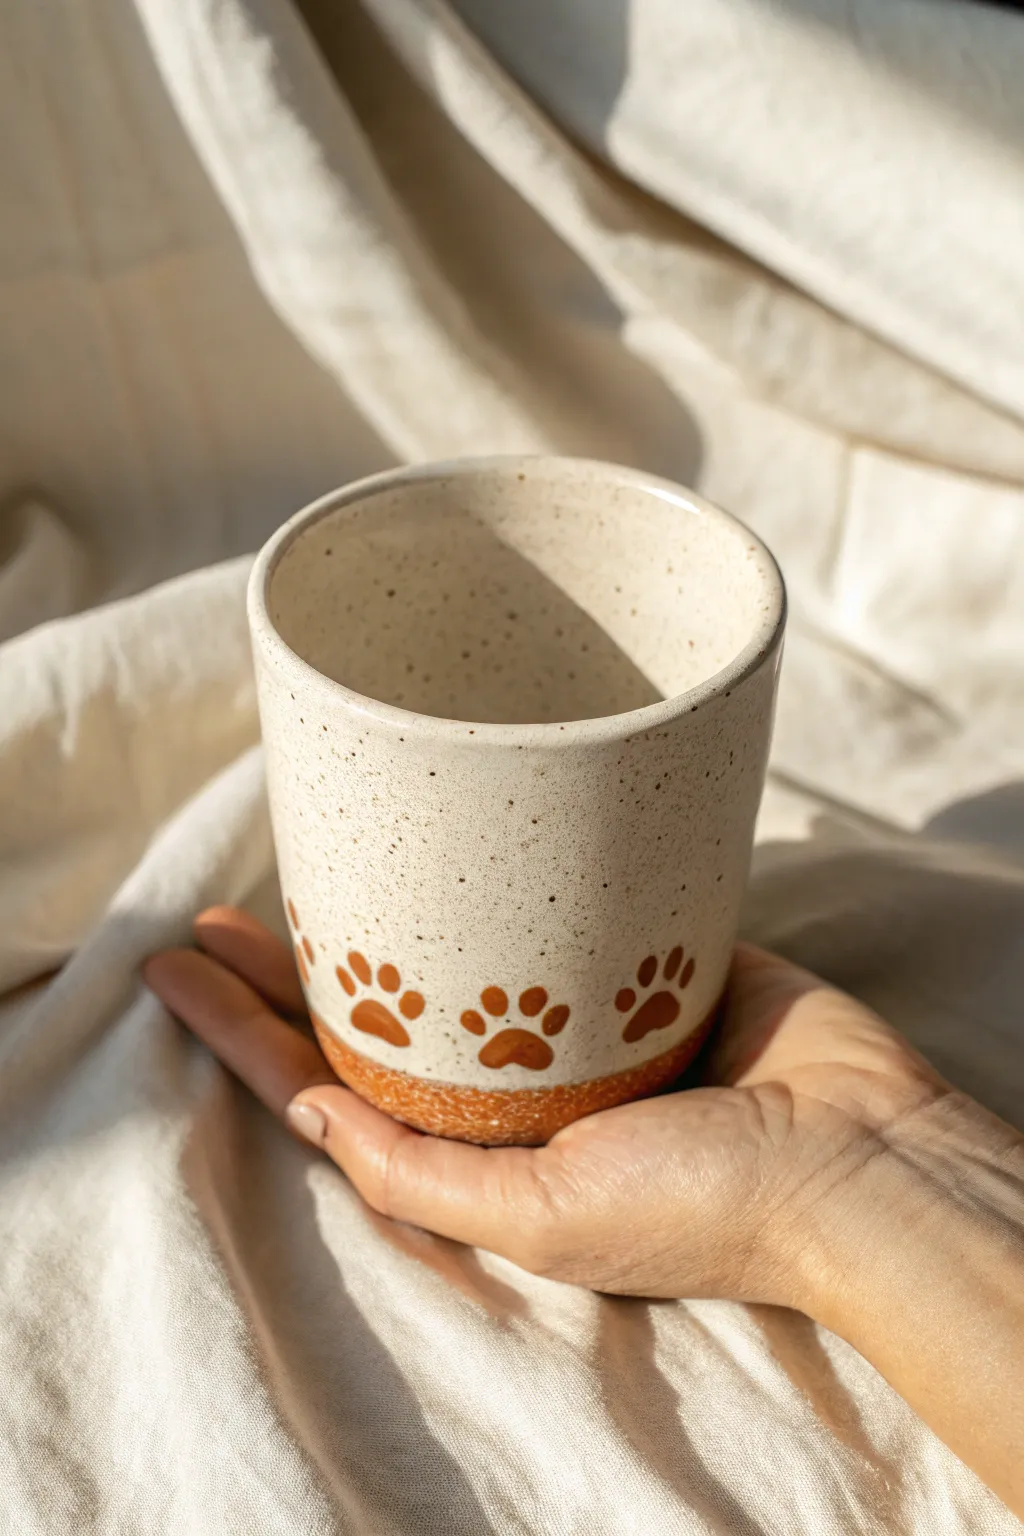
This charming project features a minimalist repeating paw print pattern circling the base of a speckled cream tumbler. The warm, earthy tones of the paw prints and textured bottom rim create a cozy, rustic feel perfect for your morning brew.
Step-by-Step
Materials
- Bisque-fired ceramic tumbler or cup
- Speckled cream or ‘oatmeal’ ceramic glaze
- Reddish-brown ceramic glaze (terra cotta tone)
- Fan brush or wide soft brush
- Small round detail brush (size 2 or 4)
- Sponge
- Water container
- Pencil (optional)
Step 1: Base Glazing
-
Prepare the Bisque:
Start by wiping down your bisque-fired tumbler with a damp sponge. This removes any dust or oils from handling that might prevent the glaze from adhering properly. -
Apply the Speckled Base:
Using a fan brush or wide soft brush, apply a coat of speckled cream glaze to the entire inside of the cup. Make sure to get all the way to the bottom. -
Coat the Exterior:
Apply the first coat of the same speckled cream glaze to the outside of the cup. Brush in long, smooth strokes to avoid ridges. -
Dry and Repeat:
Allow the first coat to dry until it’s chalky to the touch. Apply a second coat, and then a third coat if your specific glaze instructions recommend it for full opacity. I find three layers usually gives the best depth for speckled glazes. -
Clean the Rim:
Check the drinking rim for any drips or uneven spots and gently smooth them out with your finger.
Step 2: Creating the Pattern
-
Mark the Base Line:
Visualize a line about one inch up from the bottom of the cup. You can lightly sketch this with a pencil if you need a guide, but freehanding keeps it organic. -
Paint the Bottom Rim:
Dip your wide brush into the reddish-brown glaze. Paint the bottom section of the cup, creating a solid band that covers the bottom edge and rises up about a half-inch. -
Dab for Texture:
While the bottom band is still wet, gently dab it with a sponge or the tip of your brush to give it a slightly textured, rustic appearance similar to the photo. -
Plan the Paw Placement:
Decide where your paw prints will go. They should sit just above the reddish-brown band you just painted, spaced evenly around the circumference. -
Paint the Main Pad:
Project the shape of the main paw pad. Using the reddish-brown glaze and your detail brush, paint a soft, upside-down heart shape or a rounded triangle. -
Add Toe Beans:
Above the main pad, paint four small ovals for the toes. Let them naturally curve around the top of the main pad. -
Repeat Around the Cup:
Continue painting paw prints around the mug, trying to keep similar spacing between each one. Don’t worry if they aren’t identical; variation adds character. -
Second Coat on Details:
Once the paw prints are dry to the touch, carefully apply a second layer of reddish-brown glaze over them to ensure the color comes out rich and opaque after firing.
Uneven Spacing?
If you end up with a weird gap at the end, just wipe off the last 2-3 paws with a damp sponge and repaint them slightly further apart to fill the space.
Step 3: Finishing Up
-
Clean the Foot:
Use a damp sponge to wipe any glaze off the very bottom of the cup (the foot ring) where it will touch the kiln shelf. This prevents it from sticking during firing. -
Final Inspection:
Check for any pinholes or missed spots in your base glaze and touch them up. -
Fire the Piece:
Load the piece into the kiln and fire according to the glaze manufacturer’s instructions (typically Cone 5 or 6 for stoneware).
Stamp It Out
Cut a small sponge into a paw shape to use as a stamp. This ensures uniform size and speeds up the process if you’re making a matching set.
Once fired, you will have a delightful custom mug ready for a warm drink
Cat Tail Handle Illusion
Create a clever visual trick with this mug design where the painted tail seamlessly extends from the handle base. The warm, speckled cream background and abstract botanical accents give it a cozy, retro-modern feel that perfectly complements the playful cat silhouette.
How-To Guide
Materials
- Ceramic bisque mug (straight-sided cylinder shape)
- Speckled cream underglaze (like Mayco speckled almond or similar)
- Black underglaze (for outline and cat body)
- Warm brown/rust underglaze (for handle and stripes)
- Forest green underglaze (for leaf accents)
- Detail brush (size 0 or 00 liner)
- Small flat brush (size 4 or 6)
- Fan brush (for base coat)
- Graphite paper and stylus (optional for tracing)
- Clear dipping glaze
Step 1: Base Coat Application
-
Prepare the mug:
Wipe down your bisque mug with a damp sponge to remove any dust or oils from your hands, which helps the glaze adhere properly. -
Apply the background:
Using a fan brush, apply three even coats of the speckled cream underglaze to the entire exterior of the mug, including the handle. Allow each coat to dry until it loses its sheen before applying the next. -
Dry thoroughly:
Let the final coat of the background color dry completely; it should be cool to the touch but not wet.
Curve Control
To get a smooth tail line, lock your pinky finger against the mug for stability and pull the brush toward you in one long stroke.
Step 2: Painting the Handle Illusion
-
Define the handle limit:
Use the warm brown underglaze to paint the entire handle. Stop exactly where the handle meets the mug body at the top joint. -
Extend the tail base:
At the bottom handle joint, paint the brown color onto the handle, but this time, extend the paint slightly onto the mug body, curving it to the left to start the ‘tail’ shape. -
Refine the tail curve:
Using a small round brush, continue that brown line from the handle base, curving it upward and to the left to form a long, swooping tail. -
Sketch the cat silhouette:
Lightly sketch the cat’s seated body shape with a pencil or trace your design. The cat should be sitting with its back to the handle, so the tail connects naturally.
Step 3: Creating the Cat Design
-
Outline the cat:
Using your finest liner brush and black underglaze, carefully outline the cat’s body, head, and pointy ears over your sketch. -
Fill the body:
Fill in the cat’s silhouette with the black underglaze, but—crucially—leave gaps for the stripes. I find it easier to leave negative space for stripes rather than painting light colors over dark. -
Paint the stripes:
Fill the negative spaces you left on the cat’s back with the warm brown hue, blending the edges slightly into the black for a textured look. -
Add detail texture:
Tip your brush with black and stipple (dot) over the brown stripes gently to mimic fur texture and integrate the colors. -
Connect the tail:
Ensure the black outline of the cat’s body connects smoothly to the brown tail you painted earlier. Outline the tail in black to match the body. -
Add facial features:
Paint three long, sweeping whiskers extending from the cat’s cheek using thin, confident strokes.
Stripe Trouble?
If you accidentally covered the stripe area in black, don’t worry. Let it dry, then scrape the paint away gently to reveal the light base before adding brown.
Step 4: Final Flourishes
-
Paint abstract leaves:
Around the cat, paint long, curved teardrop shapes using forest green, warm brown, and a lighter beige/grey tone. Place them vertically like tall grass or feathers. -
Add movement lines:
Paint very thin lines inside or next to the abstract shapes to give them movement and direction. -
Check the handle connection:
Double-check the bottom of the handle. The transition from the 3D handle to the 2D tail painting needs to be clean and fully opaque. -
Clean up:
Use a damp brush or a scratch tool to clean up any smudges on the cream background. -
Glaze and fire:
Once fully dry, dip the mug into a clear glaze and fire according to the clay and glaze manufacturer’s cone specifications.
This playful mug creates a delightful surprise every time someone notices where the tail truly begins
Cat Ears on the Rim Accent
Transform a simple ceramic bowl into a whimsical feline friend with this understated design featuring charming ears peeking over the rim. The combination of speckled cream glaze and raw terracotta-colored details gives this piece a warm, modern artisanal feel perfect for cozy meals.
Detailed Instructions
Materials
- Bisque-fired ceramic bowl (medium depth)
- Speckled cream or ‘oatmeal’ ceramic glaze
- Underglaze pencil or fine liner brush (black)
- Terracotta or warm burnt orange underglaze
- Clear transparent glaze (for sealing)
- Small round brush (size 2 or 4)
- Fine detail brush (size 0 or 00)
- Pencil for sketching
- Damp sponge
- Fan brush or wide glaze brush
Step 1: Base Glazing
-
Preparation:
Begin by wiping down your bisque bowl with a damp sponge to remove any dust that might interfere with glaze adhesion. -
Outside Color:
Using a wide brush or fan brush, apply three even coats of terracotta or burnt orange underglaze to the exterior of the bowl. -
Rim Detail:
As you paint the exterior, gently bring the terracotta color just over the lip of the rim, creating a thin, defined band of color visible from the inside. -
Interior Base:
Pour speckled cream glaze into the interior of the bowl. Roll the bowl carefully to coat the entire inside surface evenly, pouring the excess back out. -
Cleaning the Rim:
If the cream glaze splashed onto your terracotta rim, use a damp sponge to carefully wipe it back so the terracotta line remains crisp. -
Drying Time:
Allow the base coats to dry completely until they are chalky to the touch before attempting any detail work.
Steady Tip
Rest your painting hand’s pinky finger on the bowl’s rim or a stable surface. This acts as an anchor, giving you much smoother control for fine lines like whiskers.
Step 2: Painting the Cat Face
-
Sketching Placement:
Lightly sketch the position of the ears near the rim and the face in the center using a graphite pencil. The pencil marks will burn off in the kiln. -
Ear Outlines:
Using a fine liner brush and black underglaze, paint four small triangles near the top rim—two on the left and two on the right—to represent the ears. -
Filling the Ears:
Paint the inside of each triangle with the terracotta underglaze. I find a small round brush works best here to get a solid fill without going over the lines. -
Cheek Blush:
Dip a round brush or a sponge dauber into the terracotta color and create two small, soft circles in the lower center of the bowl for the cheeks. -
Drawing the Eyes:
With the black underglaze and your finest brush, paint two small ‘U’ shapes for the closed, sleeping eyes. -
Nose and Mouth:
Paint a small inverted triangle for the nose between the eyes, then draw two curved lines extending downwards to form the mouth anchor shape. -
Whiskers:
Add three quick, confident strokes on either side of the cheeks for whiskers. Varying the length slightly adds to the charm. -
Adding Speckles:
If your cream glaze isn’t pre-speckled, dip a stiff toothbrush into thinned black underglaze and flick it lightly over the interior to create tiny random dots.
Step 3: Finishing Touches
-
Final Clear Coat:
Once the underglaze details are totally dry, apply a coat of clear transparent glaze over the painted details to seal them and make the bowl food-safe. -
Foot Ring Clean-up:
Flip the bowl over and sponge off any glaze from the bottom foot ring to prevent it from sticking to the kiln shelf. -
Firing:
Fire the piece in the kiln according to the specific temperature requirements of your chosen clay and glaze combination.
Oops! Smudged Line?
Don’t panic if a line goes wonky. Let the underglaze dry completely, then gently scratch the mistake off with a pin tool or wooden stick before repainting.
Now you have a purr-fectly adorable bowl ready for your morning cereal or afternoon snacks
Cat Eyes in the Dark Glaze Look
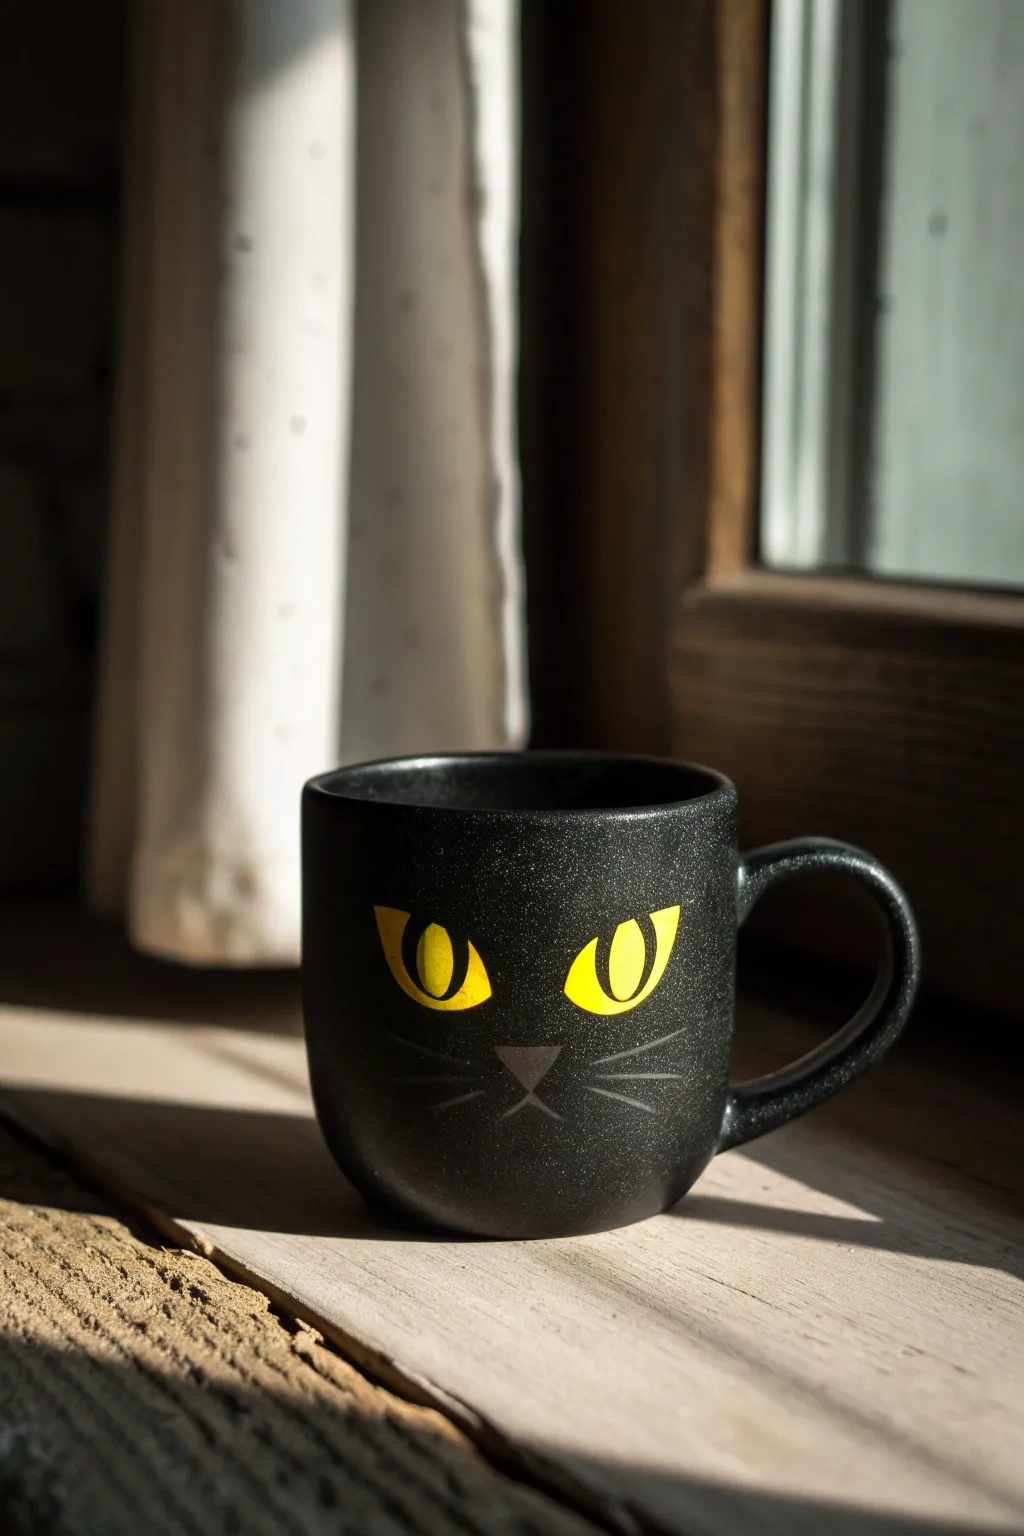
Transform a simple piece of bisque ware into a sleek, mysterious feline companion for your morning coffee. This technique uses a speckled matte black glaze to create a “fur-like” texture that makes the bright yellow eyes truly pop against the darkness.
Step-by-Step
Materials
- Bisque mug (smooth, rounded shape preferred)
- Matte black speckle glaze (or ‘starry night’ style underglaze)
- Bright opaque yellow underglaze
- Deep black underglaze (for pupils)
- Medium grey or charcoal underglaze (for nose/whiskers)
- Clear matte or satin glaze (optional, depending on black glaze choice)
- Pencil (graphite burns off in kiln)
- Fine liner brush (size 0 or 00)
- Small round brush (size 2 or 4)
- Fan brush or soft glaze brush
- Damp sponge
Step 1: Preparation & Sketching
-
Clean the Bisque:
Start by wiping down your bisque mug with a damp sponge. This removes any dust that could prevent the glaze from adhering properly. -
Map the Eyes:
Using a pencil, lightly sketch two large almond shapes in the center of the mug. Position them slightly higher than the vertical midpoint. Don’t worry about marks; the graphite will burn away in the kiln. -
Add Details:
Sketch a small inverted triangle for the nose centered below the eyes. Then, draw faint lines extending outward for the whiskers to guide your brush later. -
Wax Resist (Optional):
If you are worried about the black background glaze covering your sketch, paint a thin layer of wax resist over the eye and nose shapes. I find this helps keep the edges crisp, though you can also paint the eyes on top if your yellow is opaque enough.
Pro Tip: Eye Depth
Add a tiny dot of white underglaze near the top of the black pupil to create a ‘catchlight.’ This small detail adds life and dimension to the stare.
Step 2: Painting the Features
-
Yellow Base Layer:
Using your small round brush, fill in the almond eye shapes with bright yellow underglaze. Apply it smoothly. -
Build Opacity:
Let the first coat dry until chalky, then apply a second and likely a third coat. Yellow is notoriously translucent, so you need solid coverage for it to stand out against the black. -
Pupil Placement:
Once the yellow is completely dry, use the fine liner brush and black underglaze to paint vertical slit pupils in the center of each eye. -
Nose Application:
Mix a small amount of black with white to create a charcoal grey, or use a pre-mixed grey underglaze. Paint the small inverted triangle nose. -
Whisker Work:
With the finest liner brush and the same grey shade, carefully paint three thin whiskers extending from each side of the imaginary muzzle area. -
Mouth Detail:
Paint two small curved lines extending downward from the bottom point of the nose to suggest the mouth.
Step 3: The Dark Glaze
-
Protect the Art:
If you didn’t use wax resist earlier, carefully apply wax resist over the fully dried yellow eyes, nose, and whiskers now to protect them from the background glaze. -
Background Application:
Stir your matte black speckle glaze thoroughly. Using a fan brush, apply the first coat to the entire exterior of the mug, working around the features if you didn’t wax them. -
Drying Time:
Allow the black background to dry completely. It should lose its sheen. -
Second Coat:
Apply a second coat of the black glaze. Ensure you get into the handle area and around the rim. The speckles in this glaze will create that subtle texture visible in the photo. -
Interior Glazing:
Glaze the inside of the mug. You can use the same black for a seamless look, or a contrasting color if you prefer. -
Cleanup:
If any black glaze got onto the yellow eyes (and you didn’t use wax), gently scratch it off with a toothpick or wipe carefully with a dampened swab. -
Finishing Touches:
Wipe the bottom foot of the mug clean with a damp sponge to prevent it from sticking to the kiln shelf. -
Firing:
Fire the piece according to the glaze manufacturer’s instructions (usually cone 06 or cone 6).
Level Up: Hidden Texture
Before glazing, use a needle tool to gently scratch short fur marks into the greenware clay around the face. The glaze will break over the texture for 3D realism.
Enjoy sipping your morning brew under the watchful gaze of your new shadowy friend
Kitten and Yarn Ball Doodle Scene

Capture the whimsical energy of a kitten mid-pounce with this delightful minimalist plate design. Using fine line work on a creamy speckled background, this project creates a timeless piece of pottery that feels like a page from a storybook.
How-To Guide
Materials
- Bisque-fired ceramic plate (shallow, dinner or salad size)
- Cream or speckled white underglaze (background)
- Black underglaze (fine detail)
- Wide softness fan brush
- Fine liner brush (size 00 or 000)
- Underglaze applicator bottle with needle tip (optional but recommended)
- Graphite paper and pencil (for tracing)
- Clear dipping glaze
- Sponge and water
Step 1: Preparing the Canvas
-
Clean the bisque:
Start by wiping down your bisque plate with a damp sponge. This removes any kiln dust that might interfere with glaze adhesion and ensures a smooth surface for your base coat. -
Apply base color:
Pour out a small amount of your cream or speckled white underglaze. Using a wide fan brush, apply the first coat in long, smooth strokes across the entire face of the plate. -
Layering for opacity:
Let the first coat dry until it’s chalky to the touch. Apply a second and then a third coat, alternating the direction of your brushstrokes (horizontal, then vertical) to ensure solid, streak-free coverage. -
Final smooth:
Once the final base coat is dry, lightly brush your clean fingertips over the surface to brush away any tiny crumbs of dried glaze, creating a pristine surface for drawing.
Step 2: Sketching the Scene
-
Drafting the design:
If you aren’t confident freehanding, sketch the cat pouncing and the ball on a piece of paper first. The cat should be elongated, stretching towards the bottom left. -
Transfer the image:
Place a piece of graphite paper over the dried plate, graphite side down. Position your sketch on top and gently trace the main outlines—the cat’s spine, the paws, and the circle for the ball. -
Refine the sketch:
Lift the paper. You should see faint grey lines. If you need to fix anything, you can gently scratch away the mistake or simply paint over the correct line later; the graphite will burn off in the kiln.
Fixing Smudges
If you smear black glaze, let it dry completely. Then, scratch the mistake off gently with a toothpick or a stiff brush. Don’t wipe it wet, or it will stain the cream base.
Step 3: Detailing with Line Work
-
Prepare the black underglaze:
Shake your black underglaze well. I prefer to put a small amount into a needle-tip applicator bottle for the steadiest lines, but a very fine liner brush works too. -
Outline the body:
Start with the cat’s back. Draw a fluid line starting from the ears, curving down the spine, and extending up into the tail. Keep the line weight consistent. -
Draw the legs:
Add the front paws reaching forward toward the ball. Then, sketch the back legs kicking out behind, capturing that mid-air action pose. -
Face details:
Carefully dot the eyes and add tiny triangles for ears. Use very light pressure to add whiskers and a small nose. These tiny details bring the personality to life. -
Texture the fur:
Instead of coloring the cat in, use small, dashed lines or stippling along the belly and back to suggest fur texture without making the image heavy. -
Create the yarn ball:
Draw the ball at the bottom left. Use curved vertical lines inside the circle to mimic the wrapping of yarn strands. -
Grounding shadows:
Add a few stippled dots or tiny scratches underneath the yarn ball to ground it, so it doesn’t look like it’s floating in space. -
Action lines:
To show movement, add a trail of dashed lines behind the cat. Start near the back right edge and curve them toward the cat’s tail, indicating the path of the jump.
Add a Pop of Color
Make the design pop by painting the yarn ball a bright color like red or mustard yellow, leaving the cat in simple black and white line art contrast.
Step 4: Finishing Touches
-
Clean up:
Check for any smudges of black glaze. If you find any, you can often gently scratch them off with a toothpick once dry. -
Clear glaze application:
Once the underglaze design is bone dry, dip the entire plate into a clear dipping glaze. Ensure you shake off excess drips for an even finish. -
Kiln firing:
Fire the plate in the kiln according to the clay and glaze specifications (usually Cone 06 or Cone 5/6 depending on your studio).
Once fired, you’ll have a beautifully subtle piece of art that perfectly captures the joy of a playful kitten.
Cat Portrait Medallion
Transform a simple ceramic mug into a vintage-inspired keepsake with this charming cat portrait. Using a cameo-style oval frame and delicate underglaze techniques, you’ll create a detailed, speckled piece that feels both rustic and refined.
Detailed Instructions
Materials
- Bisque-fired ceramic mug (preferably speckle clay)
- Black underglaze pencil or fine liner brush
- Underglaze colors: Burnt Orange, Saddle Brown, Cream/White
- Clear dipping glaze (ensure compatibility with your clay)
- Small round brushes (size 0 and size 2)
- Pencil (standard graphite)
- Paper oval template (optional)
- Damp sponge
Step 1: Planning and Sketching
-
Prep the Surface:
Begin with a clean bisque-fired mug. Wipe it down gently with a damp sponge to remove any kiln dust, which ensures your underglaze will adhere properly. -
Draft the Medallion:
Lightly sketch a vertical oval on the center of the mug using a regular graphite pencil. Don’t worry about marks; the graphite will burn off in the kiln. If you aren’t confident freehanding, cut a paper oval template and trace around it. -
Sketch the Kitty:
Inside the oval, lightly sketch the cat’s features. Start with a simple circle for the head, triangles for ears, and position the eyes about halfway down the face. Focus on capturing the main shapes rather than tiny details at this stage.
Step 2: Painting the Portrait
-
Apply Base Color:
Load a size 2 brush with a watered-down wash of cream or white underglaze. Paint the entire background inside the oval, avoiding the cat sketch if possible, though a light layer over the cat is fine too. This brightens the portrait against the speckled clay. -
Block in Fur Colors:
Using the Burnt Orange underglaze, paint the main shape of the cat’s head and chest. Dilute the underglaze slightly with water to create a watercolor effect, allowing for varied transparency. -
Add Shading:
While the orange is still damp, dab tiny amounts of Saddle Brown into the darker areas: under the chin, inside the ears, and around the edges of the face. Blend gently for a soft fur texture. -
Outline the Frame:
Mix a solid, opaque consistency of the Burnt Orange underglaze. Carefully paint a thick, even band around your oval sketch to create the medallion’s frame. -
Let it Dry:
Pause here and let all damp underglaze dry completely to the touch. The surface should look chalky and matte before you proceed to the line work.
Smudged Pencil?
If you smudge the black underglaze pencil, don’t wipe it! It smears easily. Instead, scratch the mistake off gently with a needle tool or an X-Acto knife.
Step 3: Detailing and Glazing
-
Define the Outline:
This is the most critical step for the ‘illustration’ look. sharpen your black underglaze pencil to a fine point. Trace the outer edge of the orange frame and the inner oval line. -
Draw Facial Features:
Using the underglaze pencil or a liner brush with black underglaze, draw the cat’s eyes, nose, and mouth. Keep the lines thin. -
Add Fur Texture:
Use short, quick strokes with the pencil to mimic fur texture on the cheeks and chest. I find that varying the pressure creates a more natural, sketchy look. -
Highlight the Eyes:
Add a tiny dot of white underglaze to the pupil of each eye. This ‘catchlight’ brings the character to life instantly. -
Rim and Handle:
For a rustic finish, sponge a light wash of brown or black underglaze along the rim of the mug and the ridges of the handle to accentuate the clay’s form. -
Clear Glaze:
Once all underglaze design work is brutally dry, dip the entire mug into a clear glaze. Shake off excess gently to prevent pooling. -
Final Fire:
Fire the mug in the kiln according to your clay and glaze specifications (usually Cone 5 or 6 for stoneware). The speckles in the clay will pop through the clear glaze alongside your portrait.
Add a Nameplate
Paint a small horizontal ribbon banner under the oval portrait and write your own cat’s name in cursive using the black liner brush for a personalized touch.
Enjoy your morning coffee with a personalized piece of art that celebrates your favorite feline friend
Cat Planter With Leafy Hair
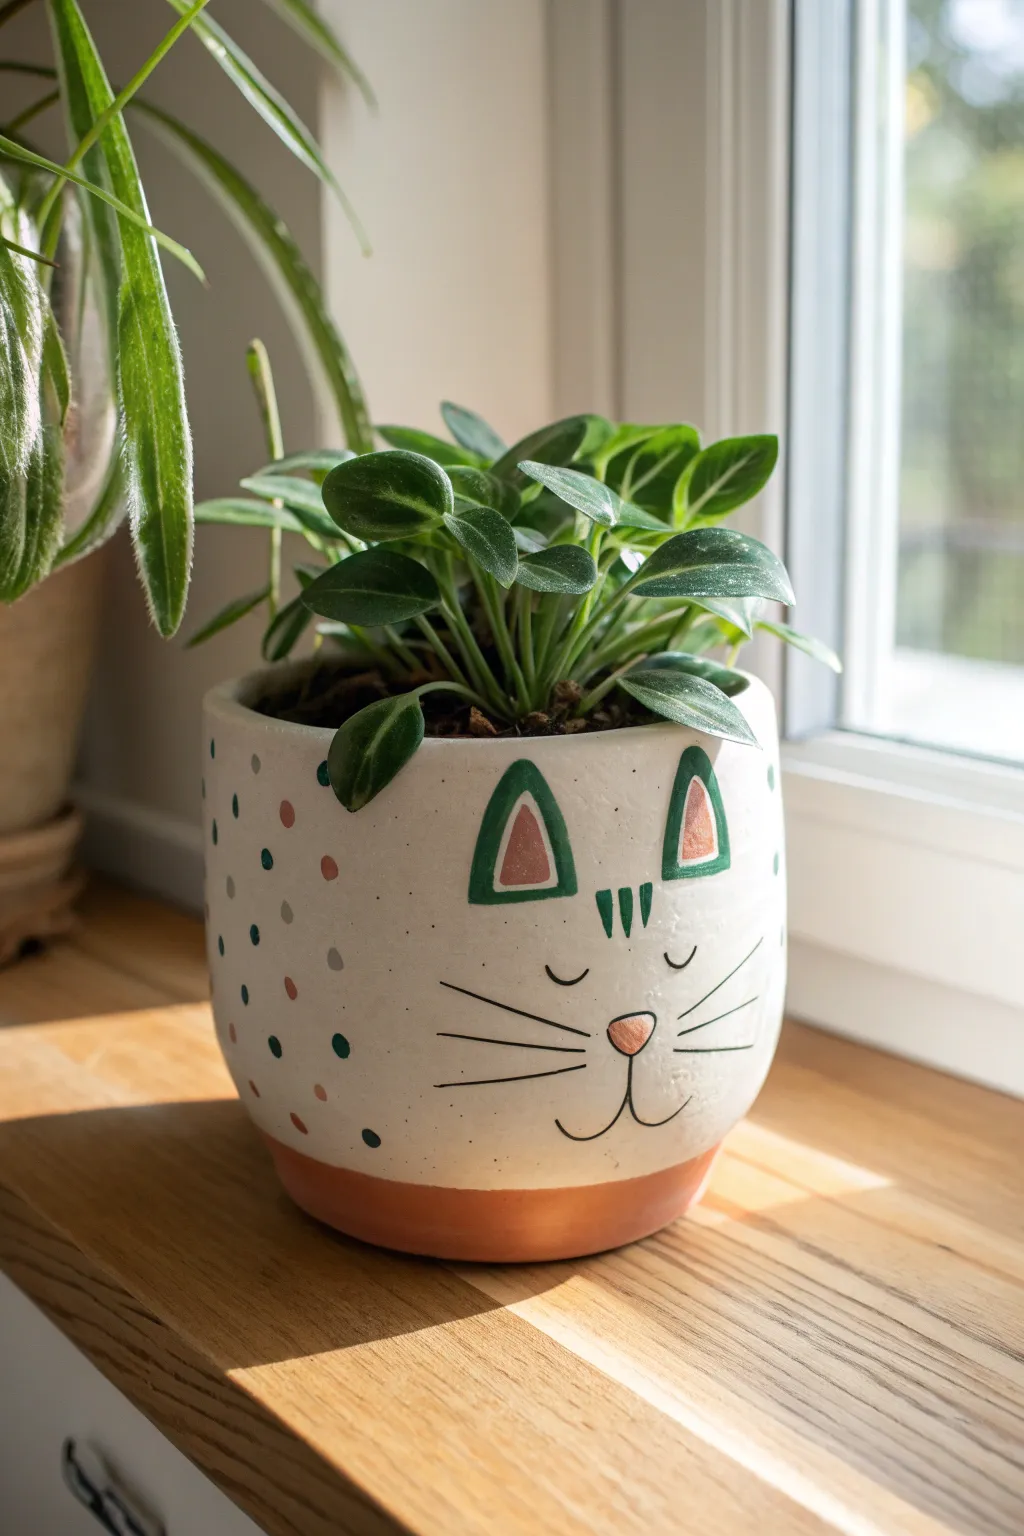
Transform a plain ceramic pot into a whimsical, sleeping cat character with this adorable painting project. The design uses earthy tones and simple geometric shapes to create a peaceful fella that perfectly complements leafy green houseplants.
Step-by-Step
Materials
- Plain ceramic or terra cotta planter (white or cream glazed preferred)
- Acrylic craft paints (terra cotta/rust, forest green, soft pink, black)
- Small round paintbrush
- Fine liner brush
- Medium flat brush
- Pencil for sketching
- Matte or satin sealant spray (optional)
- Painter’s tape (optional)
Step 1: Base Prep
-
Clean the surface:
Begin by wiping down your planter with a damp cloth to remove any dust or oils. If you are using an unglazed terra cotta pot, you might want to apply a base coat of white acrylic paint first to get that creamy background shown in the photo. -
Mark the base line:
Decide how tall you want the colored base to be. I usually aim for about an inch or so from the bottom. You can use a pencil to lightly mark this line, or apply painter’s tape around the circumference for a crisp edge. -
Paint the bottom tier:
Using your flat brush and the terra cotta or rust-colored paint, fill in the bottom section of the pot. Apply smooth horizontal strokes. -
Apply a second coat:
Let the first layer dry to the touch, then apply a second coat to ensure the color is solid and opaque. Remove the tape gently while the paint is still slightly damp to avoid peeling.
Keep it Steady
Rest your painting hand on a heavy book or coffee mug while doing the fine black lines. This anchor helps eliminate shakes for crisp whiskers.
Step 2: Sketching the Face
-
Find the center:
Before painting, identify the ‘front’ of your pot. Lightly sketch a vertical centerline with your pencil to help keep the features symmetrical. -
Draw the ears:
About an inch down from the top rim, sketch two triangles for the ears. Make sure they are evenly spaced from your centerline. -
Sketch eyes and nose:
Below the ears, draw two small ‘U’ shapes for the sleepy closed eyes. In the middle, sketch a small inverted triangle with rounded corners for the nose. -
Add mouth and whiskers:
Draw a ‘J’ shape curving left and a reverse ‘J’ curving right from the bottom of the nose to create the mouth. Lightly mark where the three whiskers on each side will go.
Step 3: Painting Details
-
Outline the ears:
Switch to your small round brush and forest green paint. Carefully trace the outer triangular outline of the ears. -
Fill the inner ears:
Once the green lines are dry, fill the inside of the triangles with a soft pink or muted terra cotta color. -
Add forehead stripes:
Using the green paint again, create three small, vertical dashes in the center of the forehead, right between the ears. These should taper slightly at the bottom. -
Paint the nose:
Fill in the nose shape with the same pink or terra cotta shade you used for the inner ears. -
Line the eyes and mouth:
Using a fine liner brush and black paint, carefully trace over your pencil lines for the sleepy eyelids and the mouth. Keep your hand steady and use light pressure for thin lines. -
Add little lashes:
Paint tiny little flicks at the outer corners of each eye for eyelashes. -
Draw the whiskers:
With the liner brush still loaded with black paint, quickly pull the brush outward to create three whiskers on each cheek.
Paint Blobs?
If your painted dots have peaks in the center, wet your finger slightly and gently tap them down while the paint is still wet to flatten them out.
Step 4: Polka Dot Texture
-
Plan the pattern:
The sides and back of this planter feature a scattered confetti pattern. You don’t need a strict grid; random placement looks more organic. -
Dot the green:
Dip the handle end of a paintbrush into your forest green paint. Press it onto the pot to create perfect small dots. Scatter these around the sides, avoiding the main face area. -
Dot the pink/rust:
Wipe the handle clean and repeat the process with your pink or terra cotta paint, filling in the spaces between the green dots. -
Final dry and seal:
Allow the entire project to dry for at least 24 hours. To protect your artwork from water damage when watering plants, spray a clear matte sealant over the entire exterior.
Pop in a spider plant or peperomia to give your new feline friend a wild, leafy hairstyle
Pop Art Neon Cat Color Palette
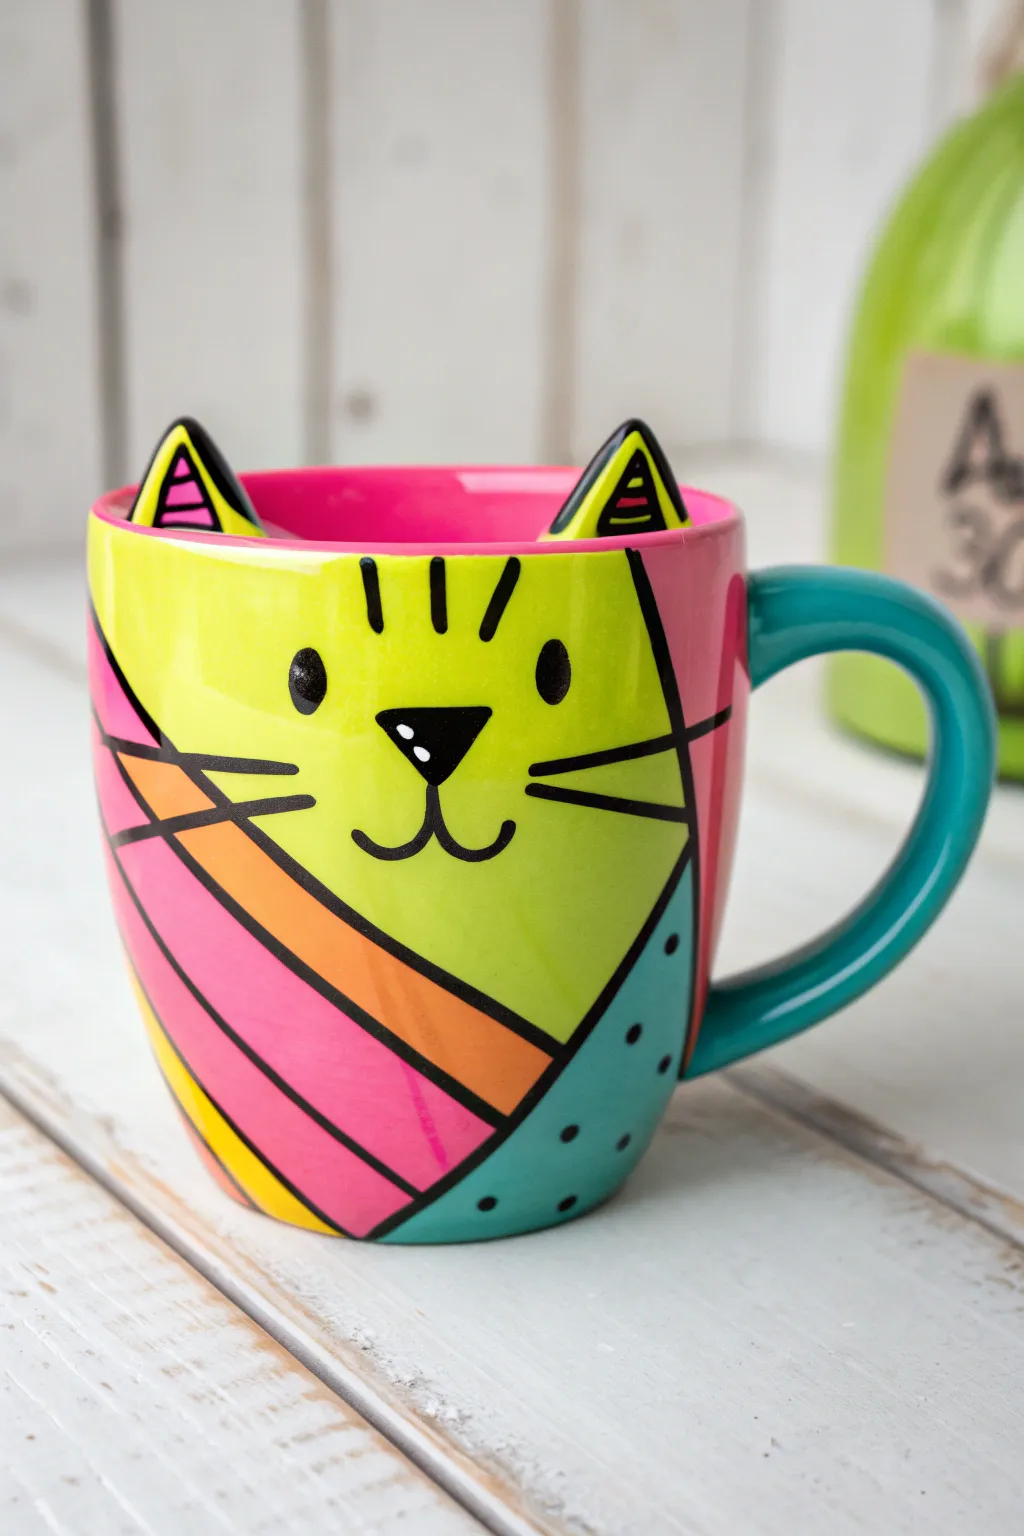
Transform a simple ceramic mug into a bold statement piece with this vibrant, geometric cat design. Featuring neon lime, hot pink, and striking black outlines, this project captures the energy of Pop Art in a functional everyday item.
How-To Guide
Materials
- Bisque ceramic mug (cat-shaped with ears on rim)
- Underglaze paints: Neon Lime Green, Hot Pink, Bright Orange, Teal/Turquoise
- Jet Black underglaze (or a fine-tip underglaze writer bottle)
- Pencil for sketching
- Small flat shader brush
- Medium round brush
- Fine liner brush (size 0 or 00)
- Clear dipping glaze
- Damp sponge
Step 1: Planning and Sketching
-
Prep the surface:
Begin by wiping down your bisque mug with a damp sponge. This removes any ceramic dust that could prevent the glaze from adhering properly. -
Map the face:
Using a pencil, lightly sketch the main facial features. Draw a sweeping diagonal line starting from the left side (near the ear) down towards the bottom right to separate the face color from the body pattern. -
Add geometric details:
Sketch additional diagonal stripes on the bottom left side of the mug for the collar area. Also, mark out triangles inside the ears. -
Draft the features:
Place the eyes, triangular nose, and mouth lightly with your pencil. Don’t worry about mistakes; the pencil lead will burn off in the kiln completely.
Step 2: Color Blocking
-
Paint the face base:
Load a medium round brush with Neon Lime Green. Apply this to the main face area, carefully painting around the eyes and nose. Apply 2-3 coats, letting each layer dry until matte. -
Fill the interior and accents:
Paint the entire inside of the mug with Hot Pink. I also like to use this same pink for one of the large diagonal stripes on the ‘body’ section of the design. -
Add the orange stripe:
Use your flat shader brush to fill the middle diagonal stripe with Bright Orange. Painting in the direction of the stripe helps keep the edges clean. -
Create the teal zone:
Paint the handle and the bottom right corner (the shoulder area) with Teal/Turquoise. This cool tone balances the hot neon colors perfectly. -
Detail the ears:
Carefully paint the inside triangles of the ears. One side often looks great with a pink/orange split, while the other can mirror the lime green.
Smudged the black?
If you smudge a black line, wait for it to dry completely. Then, scratch the mistake away gently with a toothpick or a stiff clean brush before reapplying the base color.
Step 3: Line Work and Details
-
Outline the shapes:
Using a fine liner brush or an underglaze writer bottle with Jet Black, slowly trace over your pencil lines. The black lines should be bold and deliberate to mimic a comic book style. -
Define the whiskers:
Paint three firm, horizontal strokes on each cheek for whiskers. Keep the lines thick at the base and slightly tapered at the ends if possible. -
Fill the facial features:
Color in the oval eyes within their outlines using solid black. Do the same for the nose, leaving a tiny white speck (unpainted bisque) for a highlight if you have a steady hand. -
Add forehead stripes:
Paint three small vertical dashes between the ears on the forehead to suggest tabby markings. -
Pattern the teal area:
On the teal section at the bottom right, use the handle of your paintbrush dipped in black paint to stamp small, evenly spaced polka dots. -
Ear details:
Add horizontal ladder-like stripes inside the ear triangles using your finest brush. -
Glaze and Fire:
Allow the mug to dry completely, preferably overnight. Dip the entire piece in clear glaze and fire according to your clay body’s instructions (usually cone 06).
Add Pop Art Texture
Instead of solid neon lime for the face, paint the base white first, then apply neon lime ‘Benday dots’ (comic book dots) over the top for a true vintage pop art look.
Once fired, fill your masterpiece with your favorite beverage and enjoy the colorful company
Surprise Cat Inside the Cup
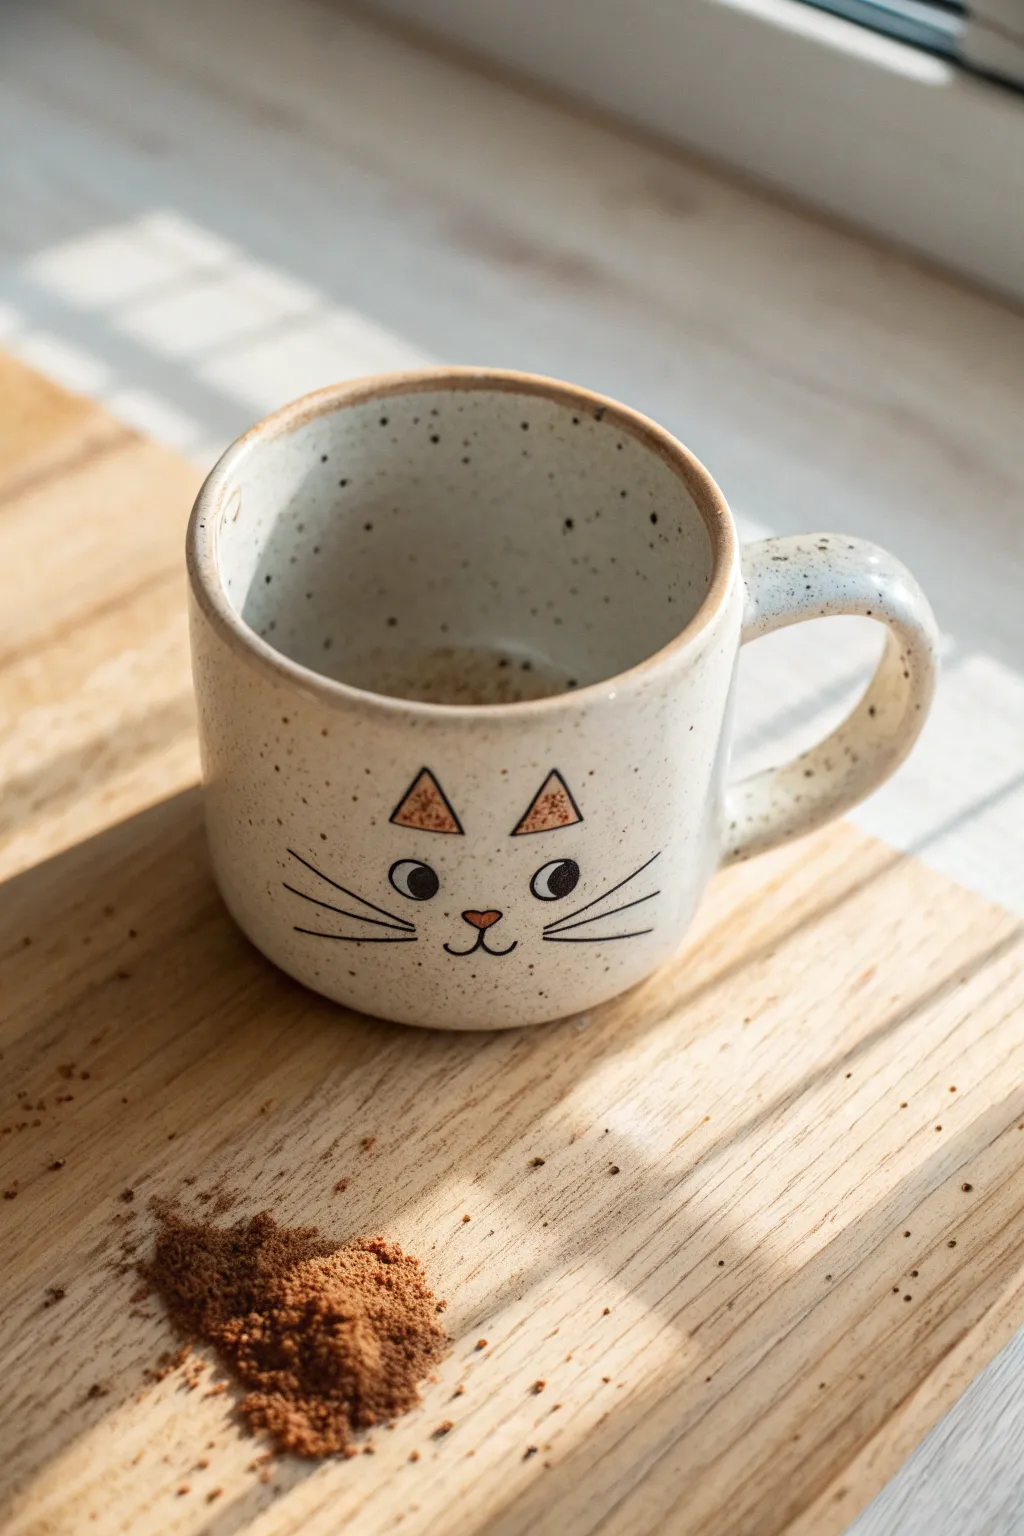
This charming project transforms a plain ceramic mug into a cozy, speckled feline friend. The design features a minimalist cat face with perky ears and a simple line-art expression, all set against a warm, speckled cream background.
Detailed Instructions
Materials
- Bisque ceramic mug (plain, handled)
- Cream or off-white underglaze
- Black underglaze (fine tip applicator or liner brush)
- Terra cotta or warm brown underglaze
- Clear dipping glaze
- Old toothbrush or stiff bristle brush
- Small round brush (size 1 or 2)
- Pencil
- Damp sponge
Step 1: Planning and Base Coat
-
Clean the bisque:
Start by wiping down your bisque mug with a damp sponge to remove any dust or oils from your hands, ensuring the glaze adheres properly. -
Apply the base color:
Using a wide, soft brush, apply three even coats of your cream or off-white underglaze to the entire exterior and interior of the mug. -
Smooth the layers:
Allow each coat to dry until it’s chalky to the touch before applying the next layer. I find crossing the brush strokes in different directions helps achieve a solid, opaque finish. -
Dry completely:
Let the final coat of cream underglaze dry fully before moving on to the Speckling phase.
Step 2: Creating the Speckles
-
Prepare the speckle mix:
Dilute a small amount of black underglaze with a drop or two of water. It should be fluid but not completely watery. -
Test the spatter:
Dip your old toothbrush into the diluted black glaze. Test the spray on a piece of paper first by running your thumb over the bristles. -
Splatter the mug:
Hold the toothbrush about 6 inches from the mug and gently flick the bristles to create a random pattern of fine black dots all over the surface. -
Rotate and repeat:
Rotate the mug continuously to ensure even coverage, making sure to get inside the rim and on the handle as well. -
Clean up large drips:
If any large, unwanted blobs land on your surface, carefully lift them off with the corner of a damp sponge or scaping tool once slightly dry.
Smudged whiskers?
If you smudge a black line, let it dry completely. Then, gently scratch the mistake off with a toothpick or crafting knife instead of wiping it, which spreads the pigment.
Step 3: Painting the Cat Face
-
Sketch the placement:
Lightly sketch the position of the eyes, ears, nose, and whiskers using a standard pencil. Don’t worry, the graphite will burn off in the kiln. -
Paint the ear triangles:
Using the warm brown or terra cotta underglaze and a small round brush, paint two small triangles for the inner ears. -
Outline the ears:
With a very fine liner brush or a glaze writer bottle filled with black, carefully outline the brown triangles to define the ears. -
Add the eyes:
Paint two circles for eyes using black underglaze. Leave a tiny speck of the cream background unpainted in each circle for the ‘catch light’ or shine. -
Draw the nose:
Paint a small, inverted triangle or heart shape for the nose using the same brown used for the ears. -
Add the mouth:
From the bottom point of the nose, draw two small curves growing outward to form the classic cat smile anchor. -
Whiskers and details:
Using quick, confident strokes with your liner brush, add three long whiskers on each cheek. -
Rim detail:
For a rustic touch, you can lightly sponge a thin line of the brown glaze along the very top rim of the mug to frame the design.
Hidden surprise
Paint a tiny matching paw print or a small fish bone at the very bottom of the inside of the mug as a cute surprise revealed only when the drink is finished.
Step 4: Finishing
-
Final dry:
Allow all your detailed paint work to dry completely for at least an hour. -
Clear glaze application:
Dip the entire mug into a clear dipping glaze. Shake off excess gently to prevent thick drips. -
Kiln fire:
Fire the mug in the kiln according to the specific temperature requirements of your chosen clay and glaze (usually cone 06 or cone 6).
Enjoy sipping your morning brew from this adorable personalized face mug
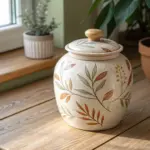

Have a question or want to share your own experience? I'd love to hear from you in the comments below!