If your brick fireplace feels heavy or dated, paint can flip the whole mood of the room in a single weekend. I think of a painted brick fireplace as a big, gorgeous textured canvas—so here are my favorite ideas, starting classic and getting more playful as we go.
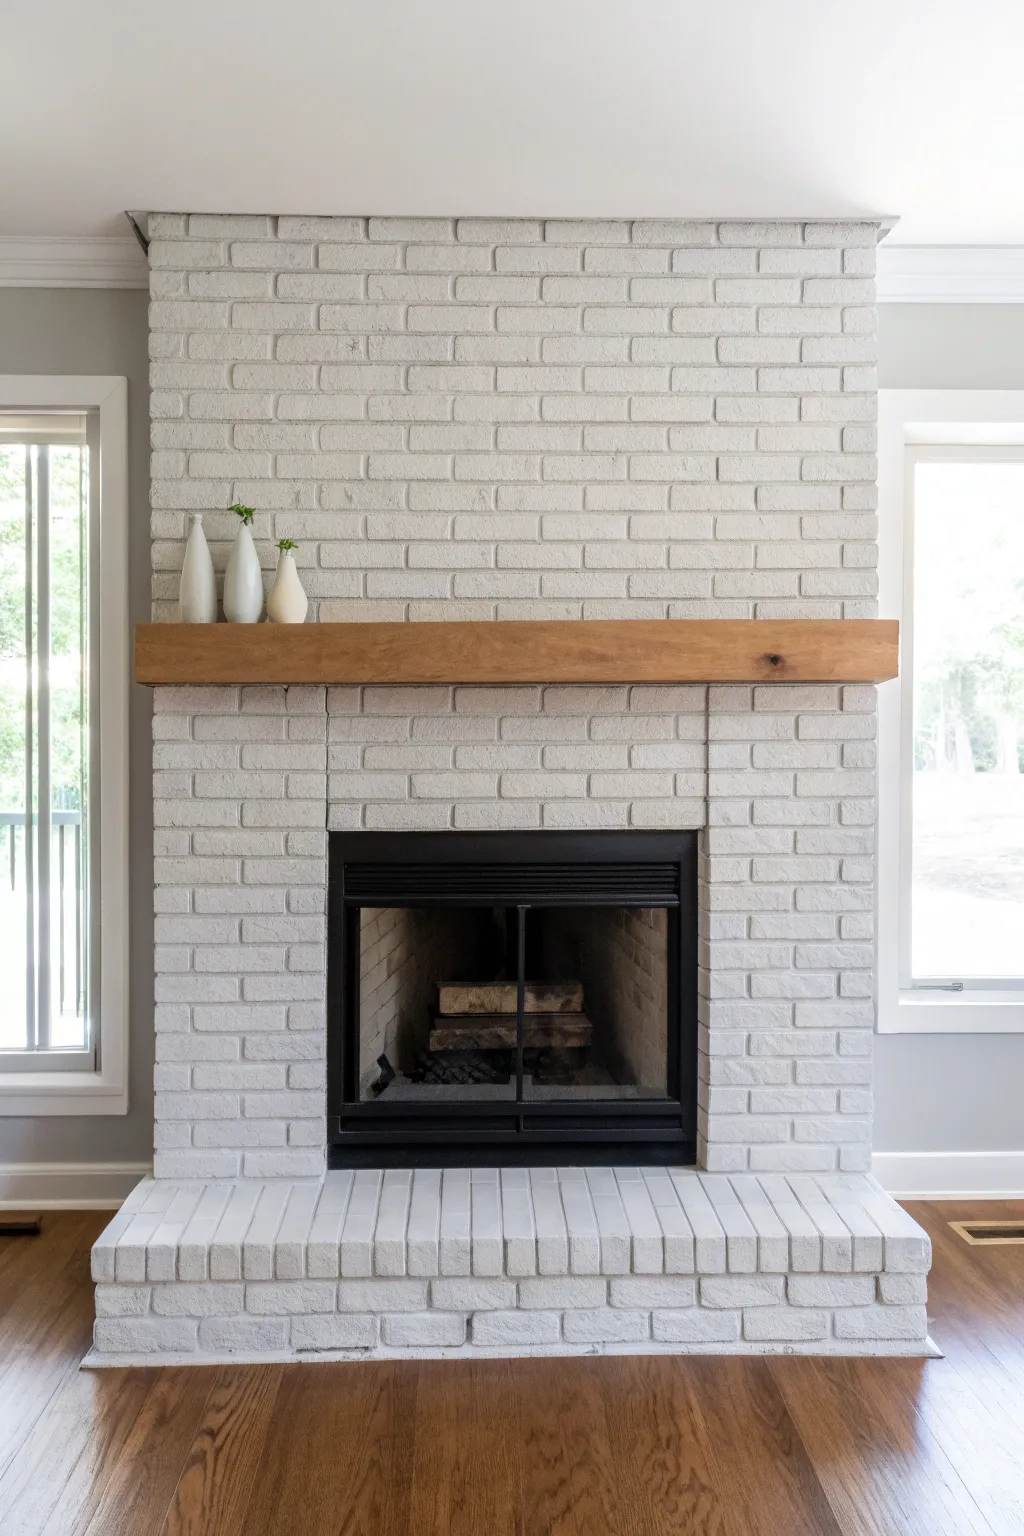
Classic Crisp White Makeover
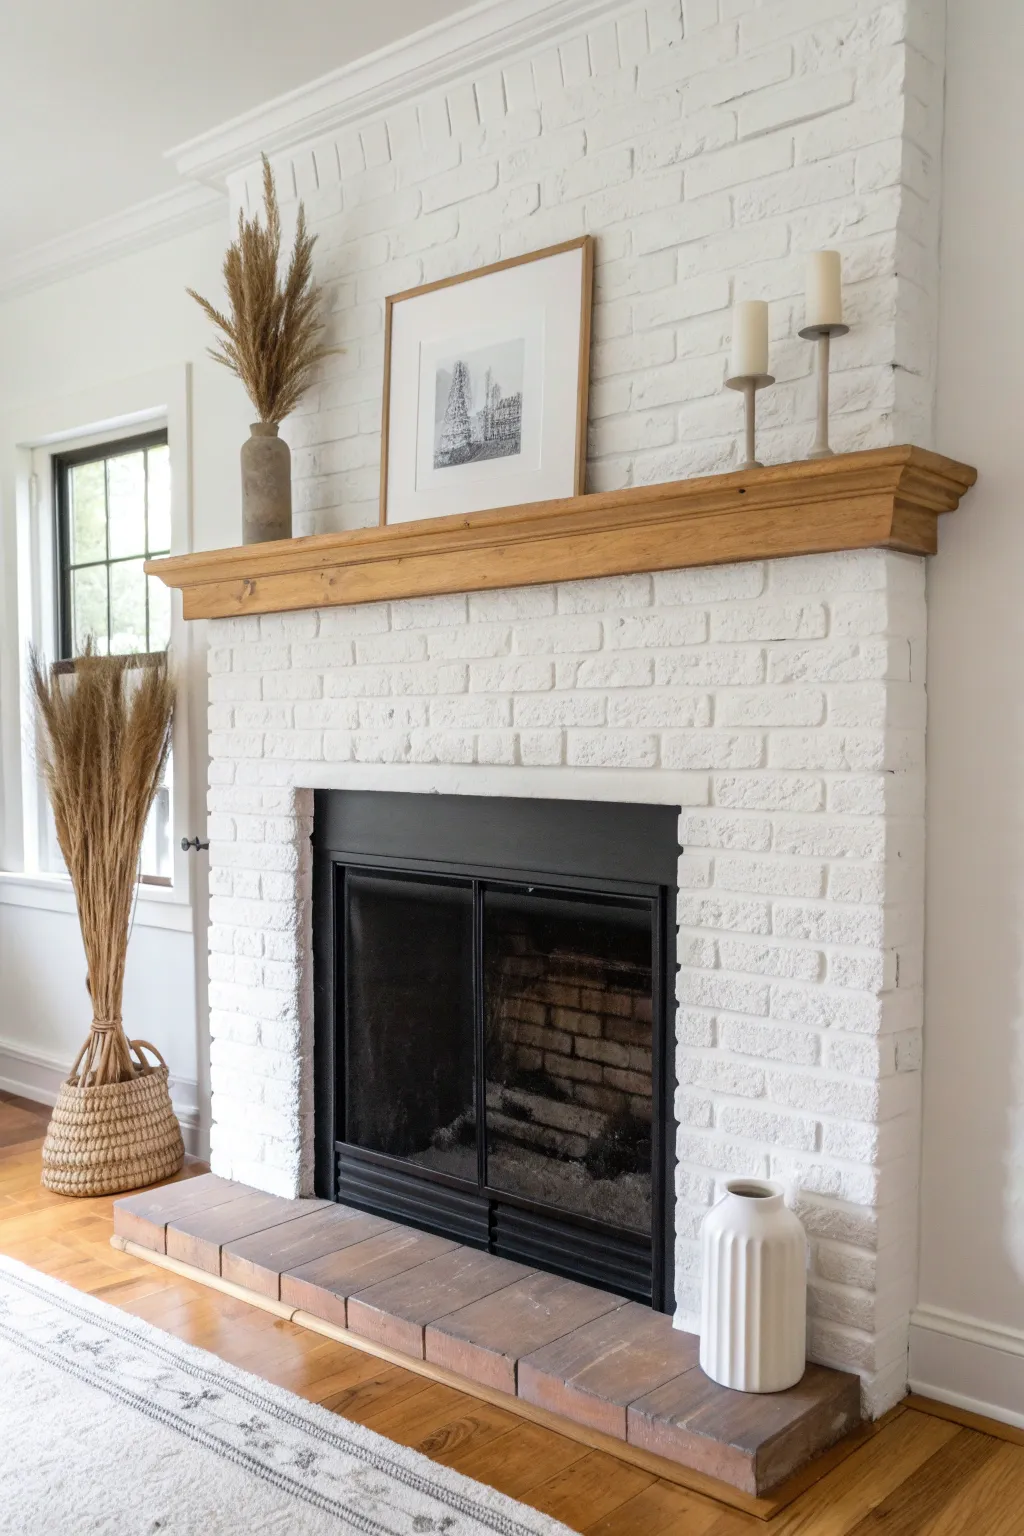
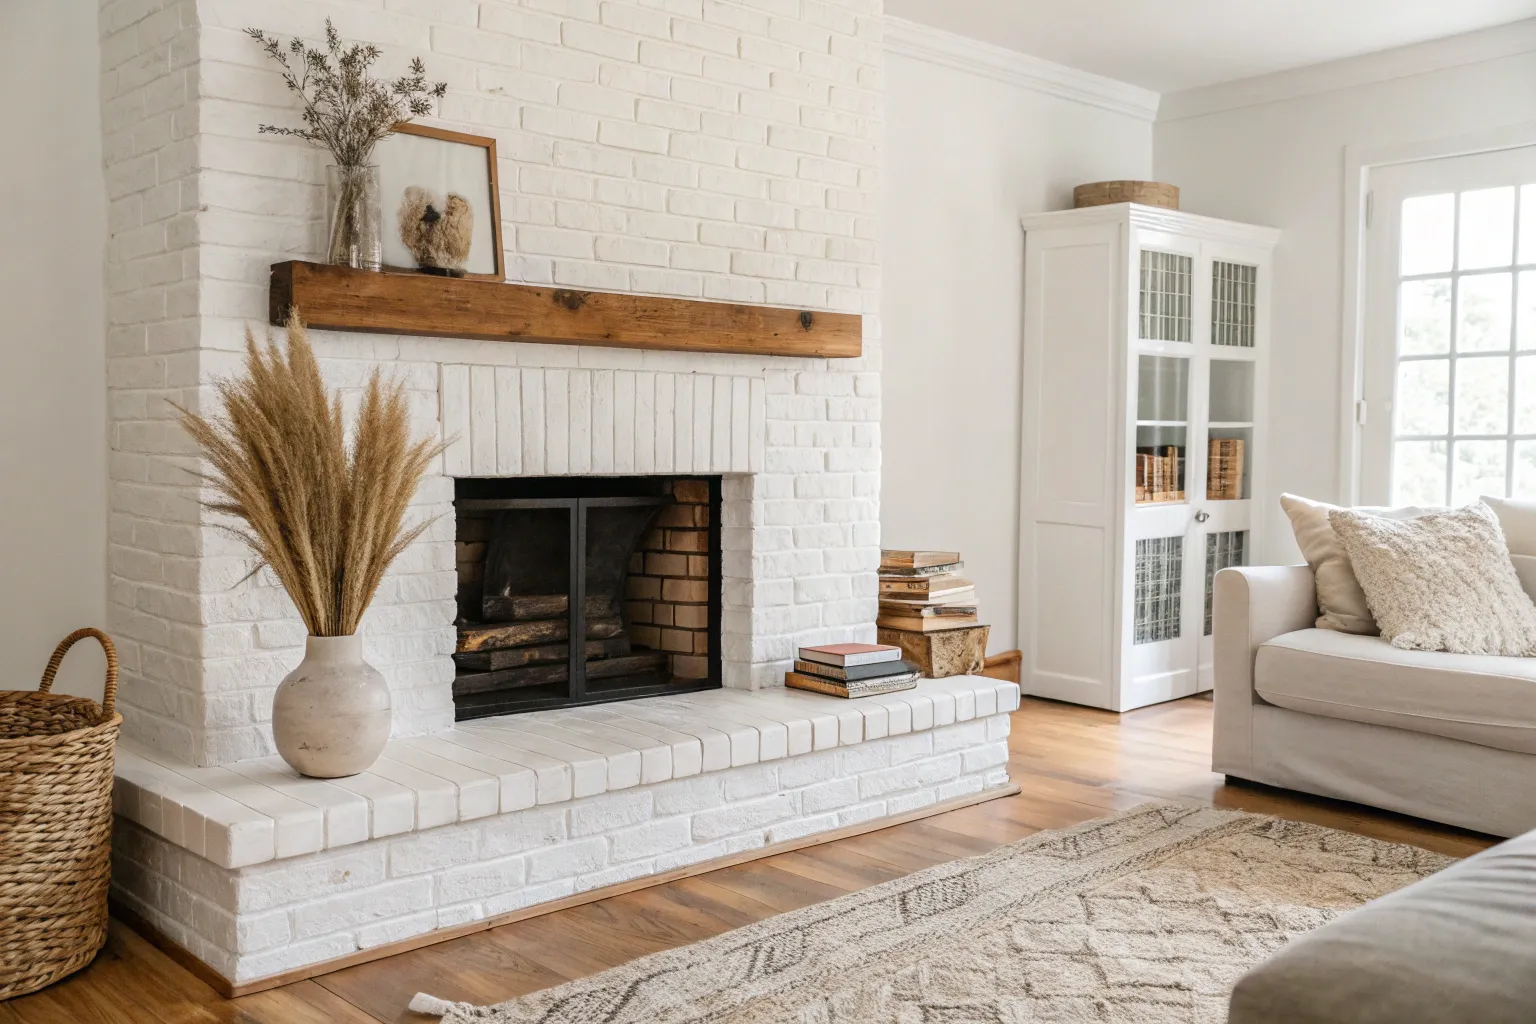
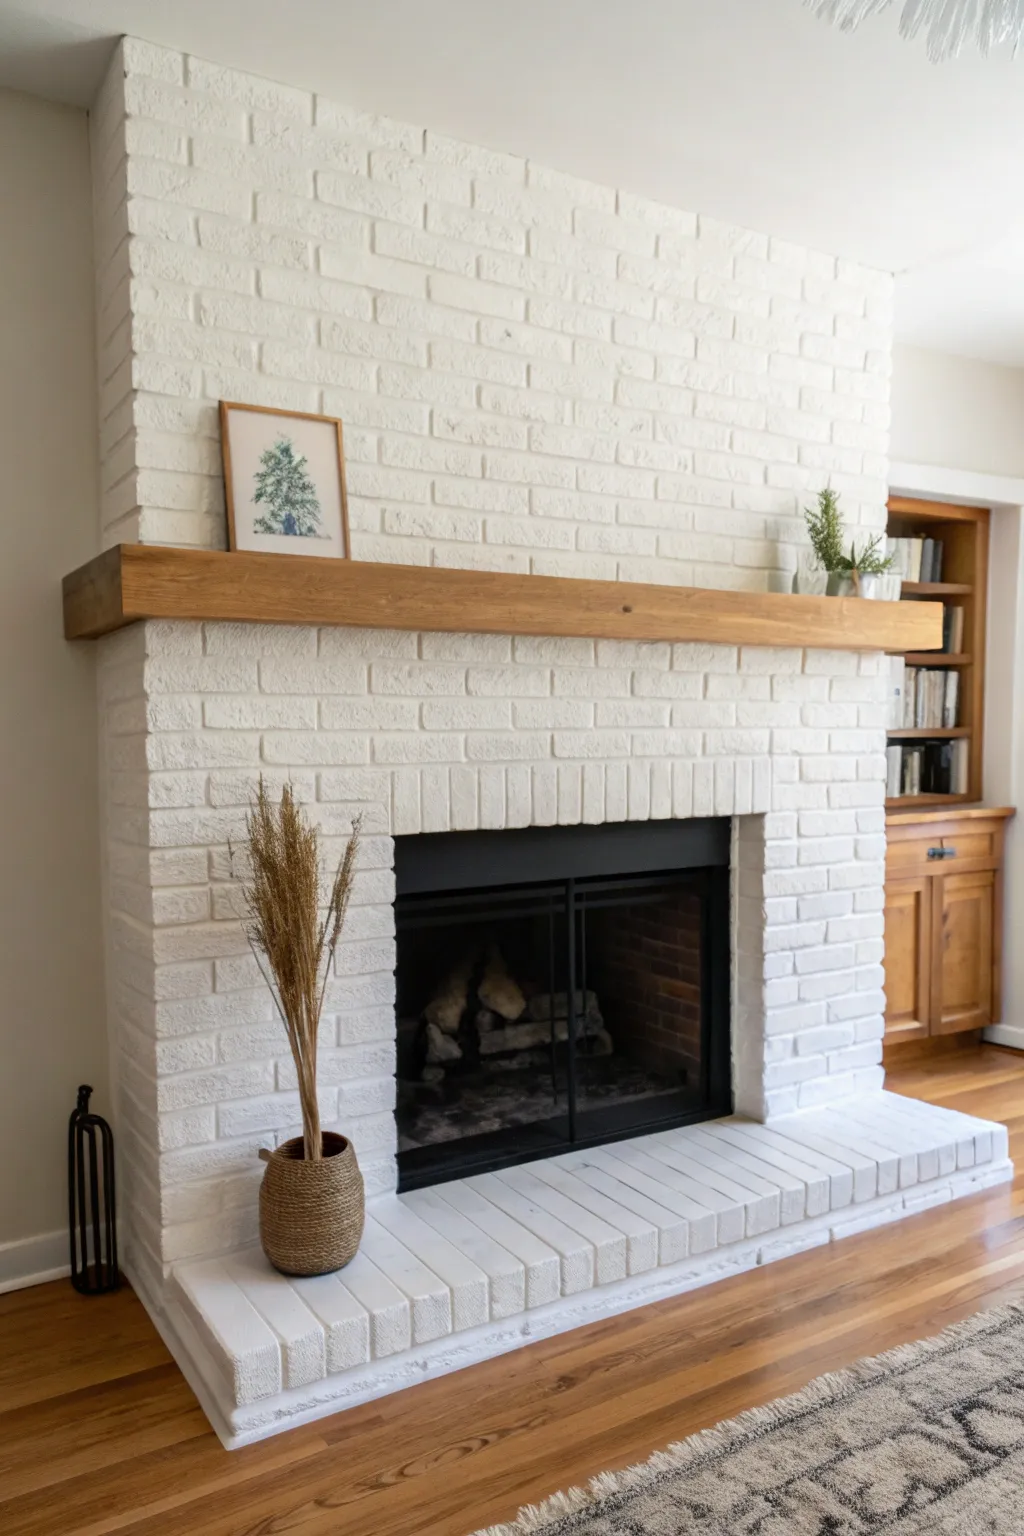
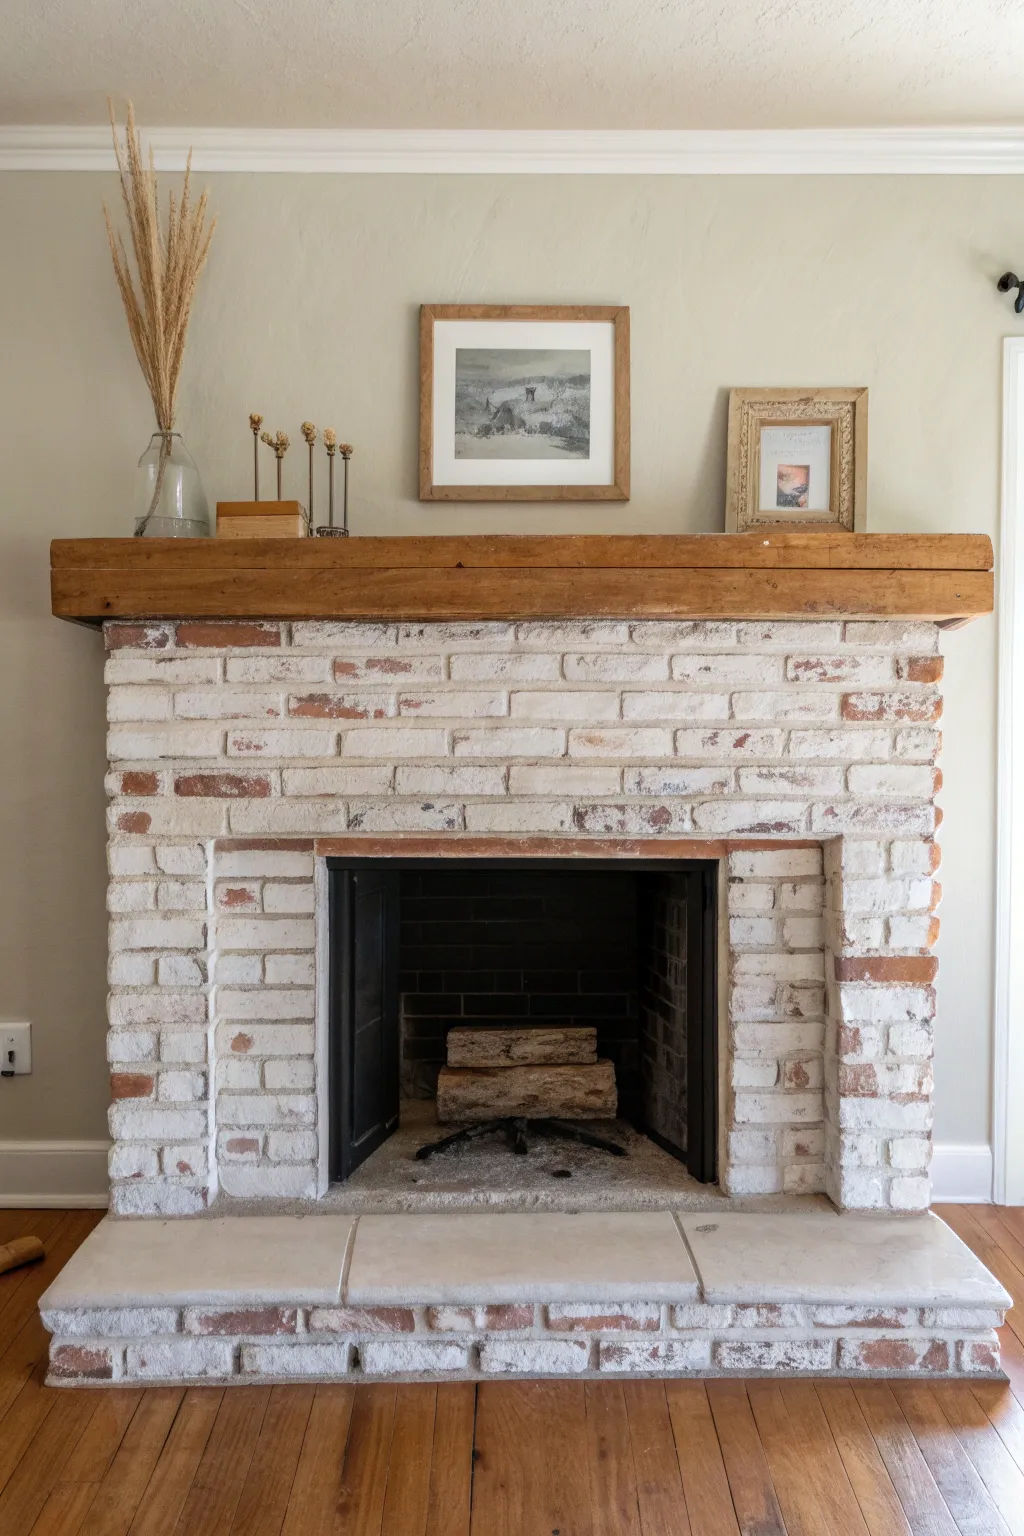
Transform a dated, dark brick fireplace into a bright focal point with this crisp white makeover. This project creates a clean, texture-rich backdrop that beautifully highlights natural wood elements and modern decor.
Detailed Instructions
Materials
- TSP (Trisodium Phosphate) or heavy-duty degreaser
- Wire brush
- Scrub brush and sponge
- Painter’s tape (multi-surface)
- Drop cloths
- High-quality masonry bonding primer
- Interior latex paint (heat-resistant if needed, satin or semi-gloss finish recommended)
- High-nap roller (3/4 inch or higher) with extension pole
- 3-inch angled sash brush
- Old stiff paintbrush (for poking into crevices)
- Small paint tray
Step 1: Preparation & Cleaning
-
Protect the area:
Begin by clearing everything off the mantel and hearth. Lay down drop cloths extensively around the base of the fireplace, taping them securely to the floor to prevent shifting. -
Clean out the soot:
Use a vacuum with a brush attachment to remove loose dust, cobwebs, and soot from the brick face and the hearth. Get deep into the mortar lines. -
Scrub the brick:
Mix TSP or a degreaser with warm water according to the package instructions. Wearing gloves, scrub the brick vigorously with a wire brush to remove years of built-up soot and grime. This step is crucial for paint adhesion. -
Rinse thoroughly:
Wipe down the entire surface with clean water and a sponge to remove any cleaning residue. Let the brick dry completely for at least 24 hours; trapped creates adhesion problems later. -
Tape off edges:
Apply painter’s tape carefully along the walls, the mantel (if you aren’t removing it), and the floor where it meets the hearth. Tape around the metal firebox insert as well.
Step 2: Priming the Surface
-
Choose the right primer:
Select a primer specifically formulated for masonry. Brick is porous and thirsty, so a standard drywall primer usually won’t cut it. -
Cut in the mortar:
Start by using a sash brush to push primer deep into the mortar lines and any deep pits in the brick face. I find it helpful to work in small 2-foot sections so I don’t miss spots. -
Roll the face:
Use a thick-nap roller to apply primer to the faces of the bricks. The thick nap helps get paint into the rough texture without excessive pressure. -
Check for gaps:
Inspect the primed area from different angles. If you see bare spots in deep pores, use an old, stiff paintbrush to stipple primer directly into those holes. -
Let it cure:
Allow the primer to dry completely according to the manufacturer’s instructions. If the original brick color is still bleeding through significantly, apply a second coat of primer.
Don’t skimp on the roll
Use a roller with a nap of at least 3/4 inch or even 1 inch. Brick is extremely uneven, and a standard wall roller will barely touch the recessed areas, doubling your work time.
Step 3: Painting & Finishing
-
Brush the mortar first:
Just like with priming, start your topcoat by brushing paint into the mortar joints. Keep a wet edge and don’t let the paint dry in the grooves before rolling. -
Roll on the first coat:
Apply the first coat of your white latex paint using the high-nap roller. Use a ‘W’ or ‘M’ pattern to distribute the paint evenly across the rough surface. -
Watch for drips:
Brick texture can cause drips to pool on the undersides of individual bricks. Check constantly and smooth them out with your brush before they tack up. -
Apply the second coat:
Once the first coat is dry to the touch, apply a second coat for full, opaque coverage. This ensures that crisp, clean look shown in the inspiration photo. -
Paint the hearth:
If you are painting the hearth bricks (the floor section), use a durable floor or porch paint if possible, or seal your standard latex paint with a clear matte polyurethane for durability. -
Remove tape:
Carefully score the edge of the painter’s tape with a utility knife before pulling it up to prevent peeling any fresh paint.
Add warmth with wood
To get the exact look in the photo, contrast the new white brick by wrapping an existing thin mantel with a chunky pine or oak box beam stained in a medium tone.
Once the paint has fully cured, style your fresh white fireplace with simple greenery and warm wood accents to complete the transformation


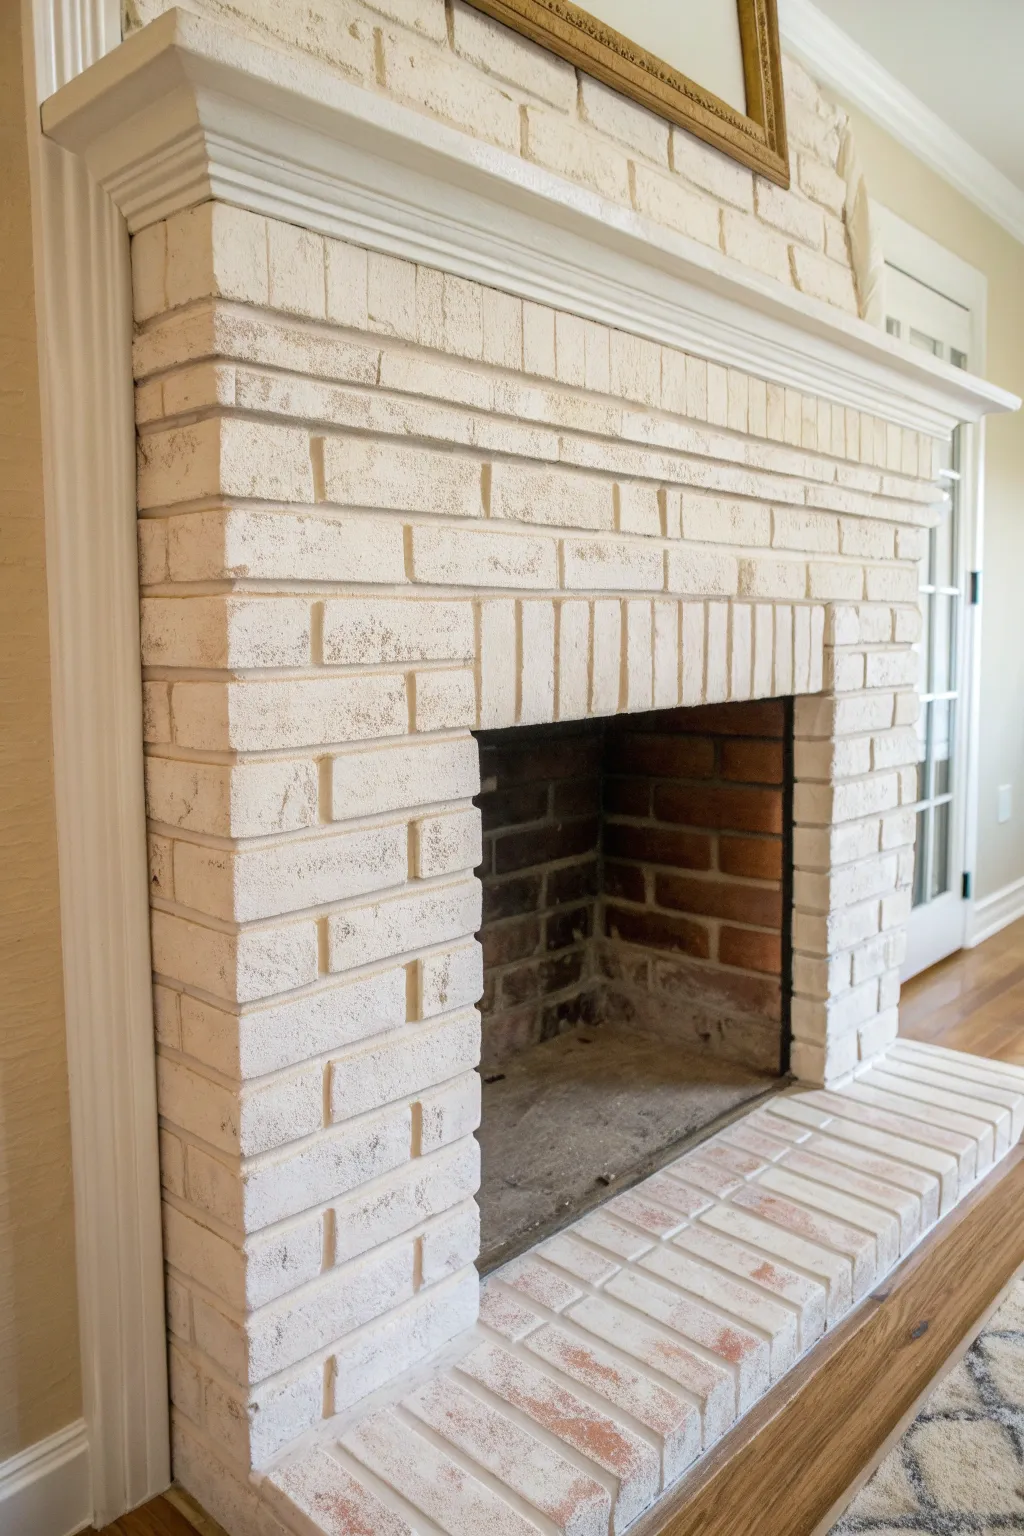
Soft Cream for Cozy Warmth
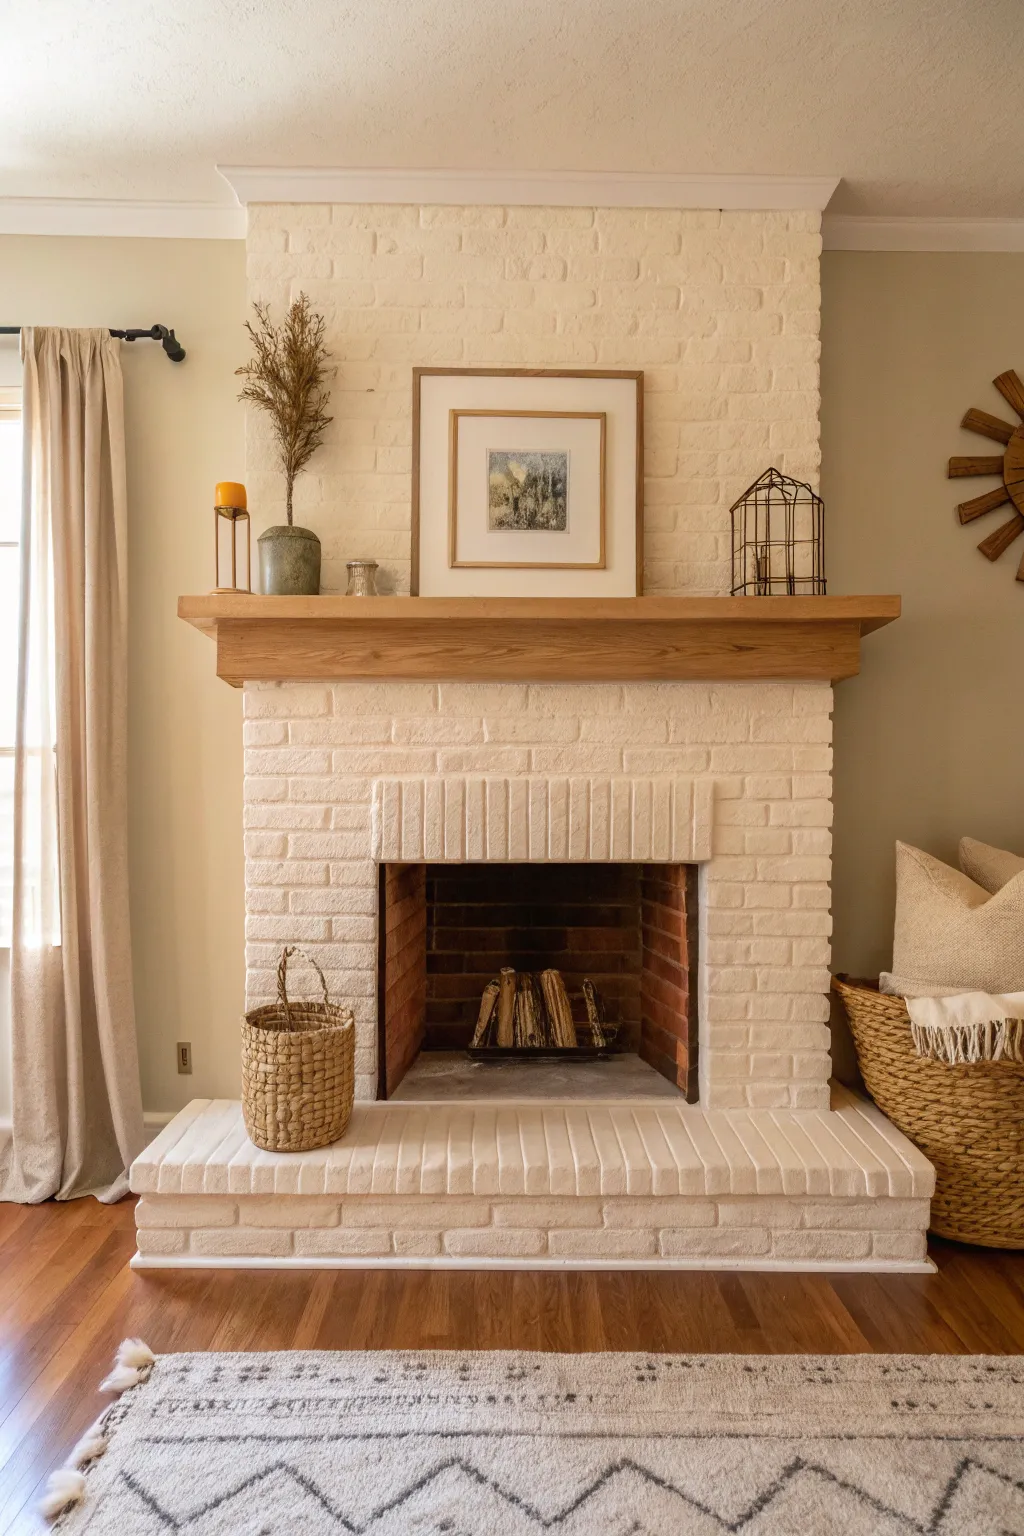
Transform a dark or outdated brick fireplace into a warm, inviting focal point with a coat of soft cream paint. This project brightens the entire room while maintaining the rustic texture of the original masonry.
Step-by-Step
Materials
- TSP (Trisodium Phosphate) or heavy-duty degreaser
- Scrub brush with stiff bristles
- Painter’s tape (1.5 to 2 inch width)
- Drop cloths or plastic sheeting
- Wire brush
- Masonry primer (high-quality, stain-blocking)
- Interior latex paint (soft cream color, eggshell or satin finish)
- High-nap roller (3/4 inch to 1 inch nap)
- Angled sash brush (2.5 inch)
- Small craft brush (for deep crevices)
- Vacuum with hose attachment
Step 1: Preparation & Cleaning
-
Protect the Area:
Begin by clearing the mantel and hearth completely. Lay down drop cloths generously to protect your flooring, taping them down at the edges so they don’t shift while you work. -
Clean the Brick:
Mix TSP or a degreaser with warm water according to the package instructions. Scrub the brick vigorously with a stiff brush to remove decades of soot, dust, and grease, as paint won’t adhere well to dirty masonry. -
Rinse and Dry:
Wipe down the bricks with clean water and a sponge to remove any cleaning residue. Allow the fireplace to dry completely, which usually takes at least 24 hours depending on humidity. -
Prep the Surface:
Inspect the mortar and brick for loose debris. Use a wire brush to gently knock away any crumbling bits. Follow up with a vacuum using a hose attachment to suck dust out of the pores and crevices. -
Tape Off Edges:
Apply painter’s tape carefully along the walls, the floor, and where the brick meets the mantel. Press the tape edges down firmly to prevent bleed-through.
Bleed-Through Blues?
If soot stains seep through your primer, stop painting. Spot-prime the affected areas with an oil-based primer or shellac-based blocker, let dry, then resume with latex.
Step 2: Priming
-
Cut in the Primer:
Start applying masonry primer with your angled sash brush. Focus on the mortar lines and deep crevices first, dabbing the brush to ensure the primer penetrates the porous surface. -
Roll the Faces:
Pour primer into a tray and load up a high-nap roller. Roll the primer over the faces of the bricks. The thick nap is essential here to get into the uneven texture of the brick. -
Check for Missed Spots:
Masonry is thirsty and rough, so you will likely miss spots with the roller. Go back with a smaller brush to dab primer into any deep pinholes or stubborn recesses. -
Let it Cure:
Allow the primer to dry completely according to the manufacturer’s instructions. A second coat of primer may be necessary if the original brick was very dark or had heavy soot stains.
Step 3: Painting
-
Select the Shade:
Choose a soft cream paint rather than a stark white to achieve the cozy look in the photo. An eggshell or satin finish offers a subtle sheen that is easier to wipe clean than flat paint. -
Paint the Mortar Lines:
Just like with the primer, use your brush to cut in the mortar joints first. Work in small sections of about 2 feet by 2 feet so the paint doesn’t dry before you can roll the surface. -
Roll the Paint:
Use the high-nap roller to apply paint to the brick faces, blending it into the wet brushwork you just did in the mortar lines. -
Watch for Drips:
Brick texture can cause paint to pool and drip. Keep a close eye on your work and smooth out any runs immediately with your brush. -
Apply Second Coat:
After the first coat is fully dry, assess coverage. I almost always find a second coat is needed to get that rich, solid cream color without the old brick showing through. -
Final Touches:
Once the final coat is tacky but not fully dry, carefully peel away the painter’s tape at a 45-degree angle to ensure a crisp line.
Textural Depth
To keep the brick looking natural, don’t overfill the deepest pores. A slightly thinner coat allows the shadow of the texture to remain, enhancing the character.
Step back and enjoy the fresh, airy transformation that brings a modern yet timeless warmth to your living space


Moody Matte Black Statement
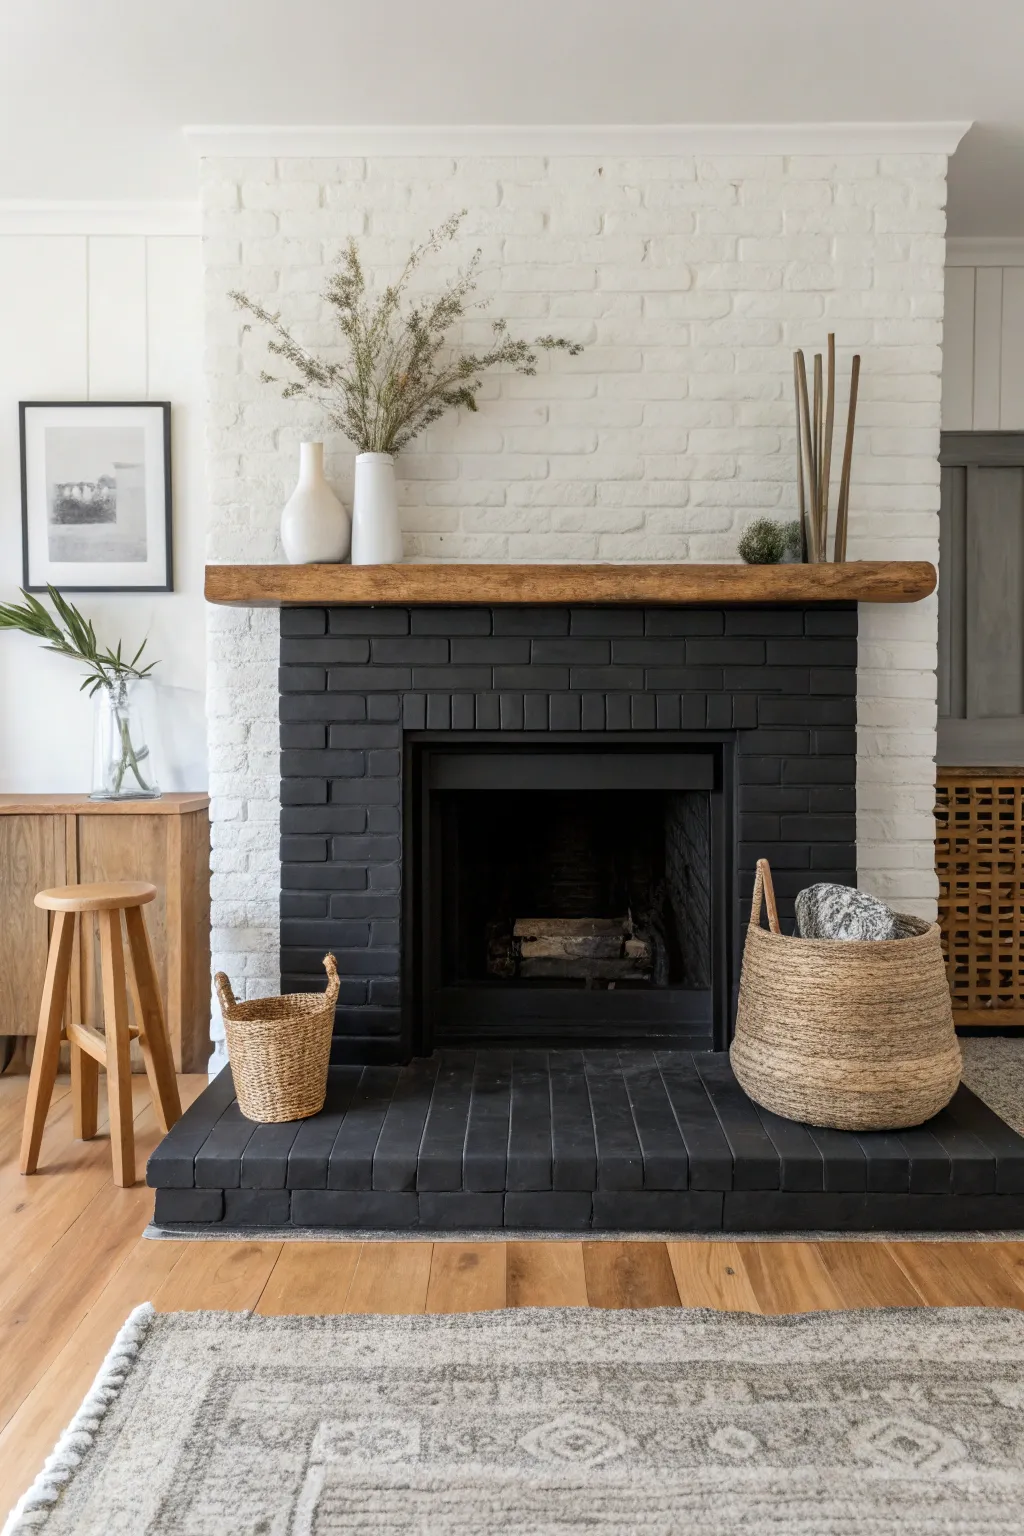
Transform a dated brick fireplace into a stunning modern farmhouse feature with this high-contrast makeover. By combining crisp white brick with a moody matte black base and hearth, you create a sophisticated anchor for your living room that feels both classic and contemporary.
Step-by-Step Guide
Materials
- High-heat matte black paint suitable for masonry
- High-quality white masonry paint (brick white)
- Painter’s tape (extrawide for crisp lines)
- Drop cloths or plastic sheeting
- Wire brush or stiff scrub brush
- Vacuum with brush attachment
- TSP substitute or heavy-duty degreaser
- Bucket and sponge
- Angled sash brush (2.5 inch)
- Medium nap roller (3/8 or 1/2 inch) for textured surfaces
- Small roller tray
- Paint stir sticks
Step 1: Cleaning & Prep
-
Assess the Brick:
Begin by inspecting your brickwork for any loose mortar or major cracks. While paint can hide small imperfections, significant structural issues should be repaired with masonry filler before you start. -
Clear the Area:
Remove the fireplace grate, screens, and any surrounding decor. Lay down drop cloths generously to protect your beautiful hardwood floors from potential splatters. -
Scrub It Down:
Use a heavy-duty wire brush or stiff scrub brush to loosen soot, dust, and loose mortar bits from the brick face. This step is crucial for adhesion. -
Vacuum Thoroughly:
Take your vacuum with a brush attachment and go over every mortar line and brick face to remove the debris you just loosened. -
Wash with Degreaser:
Mix TSP or a strong degreaser with water in a bucket. Scrub the brick thoroughly, paying extra attention to the hearth area where soot accumulates. Let the brick dry completely for at least 24 hours.
Brush Before Rolling
Always ‘cut in’ the deep mortar joints with a brush before rolling the brick face. The roller glides over the surface but often misses the deep divots in rough brick.
Step 2: Painting the Upper White Section
-
Protect the Mantel:
Apply painter’s tape carefully along the edges of your wooden mantel where it meets the brick. Press the tape edges down firmly to prevent bleed-through. -
Cut In the Edges:
Using your angled sash brush and the white masonry paint, cut in around the ceiling, the mantel, and the side walls. Work the paint into the mortar lines first. -
Roll the Mortar:
Before rolling the brick faces, use your brush to dab paint deep into the mortar joints of the main upper section. This ensures no dark shadows remain. -
Apply White Base Coat:
Load your roller with white paint and apply it to the upper brick section. Use a ‘W’ motion to distribute paint evenly, pushing it into the brick’s texture. -
Second Coat for Coverage:
Once the first coat is dry to the touch, apply a second coat of white. Brick is porous and often drinks up the first layer, so this second pass will give you that solid, clean finish.
Spotty Black Coverage?
If the black paint looks patchy or grey in spots after drying, the brick was likely very porous. A third light coat usually fixes the saturation and evens out the sheen.
Step 3: Creating the Moody Black Base
-
Tape the Transition:
Tape off the bottom of the wooden mantel to protect it from the black paint. Ensure the floor around the hearth is doubly protected. -
Brush the Mortar Lines:
Start with the black section by using your angled brush to get deep into the mortar grooves. Black paint is unforgiving if you miss spots, so be thorough here. -
Paint the Firebox Surround:
Carefully paint the brick immediately surrounding the firebox opening. Take your time near the metal insert to keep a clean line without needing tape on the metal itself. -
Roll the Black Facade:
Use a fresh roller cover for the black paint. Roll the vertical brick face below the mantel. I find thin coats work best here to avoid drips running down the dark surface. -
Tackle the Hearth:
Move down to the horizontal hearth. Brush out the mortar lines first, then roll the top surface. This area sees foot traffic and firewood baskets, so apply paint generously but evenly. -
Inspect for Holidays:
Check for ‘holidays’ or missed spots from different angles. The matte black can sometimes look lighter if the coverage isn’t fully opaque. -
Add a Second Black Coat:
Apply a second coat of black paint to the entire lower section and hearth. This deepens the color and ensures a true, rich matte finish.
Step 4: Finishing Touches
-
Remove Tape Carefully:
While the final coat is still slightly tacky but not wet, slowly peel away your painter’s tape at a 45-degree angle. This helps keep your lines perfectly crisp. -
Touch Up:
Use a small artist’s brush to touch up any tiny spots where the tape might have pulled paint or where coverage is light. -
Cure Time:
Allow the paint to cure fully according to the manufacturer’s instructions (usually a few days) before placing heavy baskets or using the fireplace. -
Style the Space:
Complete the look by adding texture—place a woven basket with firewood on the hearth and arrange ceramic vases with dried botanicals on the mantel.
Now you have a bold, architectural statement piece ready to warm up your home


Modern Light Gray Blend
Transform a dated, dark brick fireplace into a bright, modern focal point with this straightforward painting project. The result creates a clean, airy aesthetic that perfectly contrasts with natural wood elements.
How-To Guide
Materials
- TSP or heavy-duty degreaser
- Scrub brush
- Wire brush
- Painter’s tape
- Drop cloths
- High-quality masonry primer (stain-blocking)
- Heat-resistant interior latex paint (Eggshell or Satin finish)
- 3/4-inch to 1-inch nap roller covers
- Angled sash brush (2.5 inch)
- Paint tray and liners
- Vacuum with brush attachment
- Small artist brush (for deep crevices)
Step 1: Preparation & Cleaning
-
Protect the area:
Before touching the brick, clear the room and lay down drop cloths. Tape off the walls, floor, and mantel heavily, as brick painting can splatter easily. -
Vacuum debris:
Using the brush attachment on your vacuum, thoroughly clean the entire surface to remove loose mortar, cobwebs, and dust from every nook. -
Initial scrub:
Use a wire brush to knock off any loose bits of old mortar or efflorescence (white powdery deposits) that might flake off later. -
Deep clean:
Mix TSP or a heavy-duty degreaser with water according to package directions. Scrub the brick vigorously with a stiff nylon brush to remove years of soot and grime, which is crucial for paint adhesion. -
Rinse and dry:
Wipe the surface down with clean water and a rag to remove any residue from the cleaner. Allow the brick to dry completely; I usually wait a full 24 hours to ensure no moisture is trapped.
Step 2: Priming the Surface
-
Cut in the primer:
Start with your masonry primer. Use an angled brush to ‘cut in’ around the edges, the mantel, and the firebox perimeter. -
Hit the mortar lines:
With that same brush, jam primer into the deep mortar lines. Rollers often miss these spots on the first pass, so getting them wet now helps. -
Roll the primer:
Load a roller with a thick nap (at least 3/4 inch) and apply the primer to the faces of the bricks. The thick nap helps conform to the rough texture. -
Check for bleed-through:
Once the primer dries, inspect for any soot stains bleeding through. If you see discoloration, spot-prime those areas again.
Soot Stain SOS
If soot stains persist through standard primer, switch to an oil-based or shellac-based primer specifically for the stained areas. It seals odors and stains better than water-based options.
Step 3: Applying the Finish Coat
-
Stir the paint:
Mix your heat-resistant latex paint thoroughly. A warm white or very soft gray works best for this modern look. -
Brushing the joints:
Just like with the primer, start by using your brush to work paint into the recessed mortar joints. It’s tedious, but necessary for full coverage. -
Rolling the first coat:
Use the thick nap roller to apply paint to the face of the bricks. Maintain a wet edge and work in small sections. -
Dabbing crevices:
Keep a brush handy while rolling. If the roller misses a deep pore or pit in the brick, immediately dab it with the brush before the paint sets. -
Dry time:
Let the first coat dry according to the can’s instructions, usually 4-6 hours. -
Second coat application:
Repeat the rolling process for a second coat to ensure a solid, opaque finish. The brick is thirsty and often needs this second layer for true color depth. -
Detail work:
Inspect the fireplace from different angles. Use a small artist brush to fill any tiny pinholes or missed spots. -
Remove tape:
Carefully score the edge of the painter’s tape with a utility knife before pulling it off to prevent peeling any fresh paint.
High-Temp Update
Does the black metal firebox look dull? Spray paint the metal insert (masking everything else off!) with High Heat black spray paint to make it look brand new against the white brick.
Enjoy the fresh, updated atmosphere your new fireplace brings to the living space
BRUSH GUIDE
The Right Brush for Every Stroke
From clean lines to bold texture — master brush choice, stroke control, and essential techniques.
Explore the Full Guide
Greige Brick for a Calm Neutral

Transform a dated or dark brick fireplace into a soothing focal point with this simple painting technique. By utilizing a soft greige tone and adding a custom wood mantel, you’ll achieve a clean, modern aesthetic that brightens the entire room.
Detailed Instructions
Materials
- Wire brush or stiff scrub brush
- TSP (Trisodium Phosphate) substitute or heavy-duty degreaser
- Bucket and sponge
- Painter’s tape
- Drop cloths
- High-quality acrylic latex primer (masonry compatible)
- Masonry or acrylic latex paint (Greige color like Sherwin Williams ‘Agreeable Gray’ or similar)
- 3/4-inch to 1-inch nap roller cover
- Roller frame and extension pole
- 2-inch angled sash brush
- Rough-sawn lumber (for mantel wrapper)
- Wood stain (medium oak tone)
- Polyurethane sealer
- Construction adhesive
- Brad nailer and nails
Step 1: Preparation & Cleaning
-
Clear the area:
Remove all decor, the fireplace grate, and fireplace screens. Lay down drop cloths to protect your flooring, taping them securely at the edges. -
Scrub the brick:
Using a wire brush or a stiff scrub brush, vigorously brush the entire brick surface to knock off any loose mortar or existing debris. -
Deep clean:
Mix your TSP substitute with water according to package directions. Scrub the brick thoroughly to remove soot, dust, and oils. This step is critical for paint adhesion. -
Rinse and dry:
Wipe down the bricks with clean water to remove any cleaning residue. Allow the brick to dry completely, ideally for at least 24 hours. -
Tape edges:
Apply painter’s tape around the firebox insert, along the walls where they meet the brick, and along the floor line.
Soot Stain SOS
If soot bleeds through your primer coat, stop painting. Apply a specific stain-blocking primer (like an oil-based or shellac-based one) just over the soot stains before resuming with latex paint.
Step 2: Priming & Painting
-
Cut in primer:
Using your angled sash brush, apply the masonry primer to the mortar recessed joints and corners that a roller can’t reach. -
Roll the primer:
Load your roller with the thick nap cover. Roll the primer over the face of the bricks, pressing firmly to get into the crevices. Visualizing the brick as small sections helps ensure you don’t miss spots. -
Dry primer:
Let the primer dry completely according to the manufacturer’s instructions, usually overnight for masonry surfaces. -
Cut in the paint:
Just like with the primer, start by using your angled brush to paint the mortar joints with your chosen greige color. -
Roll the first coat:
Apply the greige paint to the brick faces using the thick nap roller. Work in varied directions to ensure even coverage over the texture. -
Assess and recoat:
Allow the first coat to dry. Inspect for any ‘pinholes’ or missed spots in the brick texture and apply a second coat for a solid, opaque finish.
Step 3: Mantel Installation
-
Measure the existing ledge:
Measure the width, depth, and height of your existing brick shelf or mantel support to build a hollow box beam that slides over it. -
Cut lumber:
Cut your rough-sawn lumber to create a three-sided box (front face, top, and bottom) that fits snugly over the brick ledge. -
Assemble the box:
Glue and nail the three pieces of wood together to form a U-shape channel. A mitered edge looks cleanest, but a butt joint works for a rustic look. -
Stain the wood:
Apply a medium oak stain to the wood beam. I like to wipe it off quickly to keep the grain visible but not too dark. -
Seal the mantel:
Once dry, apply a coat of matte or satin polyurethane to protect the wood. -
Install the mantel:
Test fit the box over the brick ledge. Secure it in place using construction adhesive on the brick and a few discreet finish nails if there is wood framing underneath. -
Clean up:
Remove all painter’s tape carefully and replace the fireplace screen and accessories.
High-Heat Zone
For the metal firebox interior or immediate surround, use High-Heat spray paint rated for 1200°F instead of normal latex paint to ensure safety and durability.
Enjoy the calmness of your refreshed living space with this airy, updated focal point
Sheer Whitewash to Let Texture Show
This technique transforms a dark, heavy brick fireplace into a bright focal point without losing all of its original character. By using a diluted paint mixture, you create a soft, sheer finish that highlights the unique texture of the masonry while muting the color.
Step-by-Step Guide
Materials
- Latex interior paint (white or off-white)
- Water
- Stiff-bristle scrubbing brush
- Bucket or mixing container
- Painter’s tape
- Drop cloths
- TSP (Trisodium Phosphate) or heavy-duty cleaner
- 2-inch angled sash brush
- 3-inch or 4-inch paintbrush (for larger areas)
- Clean, lint-free rags
- Vacuum with brush attachment
Step 1: Preparation & Cleaning
-
Protect the area:
Begin by clearing everything off the mantel and hearth. Lay down drop cloths to protect your flooring, ensuring they are taped down securely at the edges. -
Vacuum thoroughly:
Using the brush attachment on your vacuum, go over every inch of the brick. Pay special attention to the mortar lines and deep crevices where soot and dust tend to hide. -
Scrub the brick:
Mix TSP or a heavy-duty degreaser with hot water according to the package instructions. Dip a stiff-bristle brush into the solution and scrub the brick vigorously to remove soot stains and oils. -
Rinse and dry:
Wipe down the bricks with a rag soaked in clean, warm water to remove any cleaning residue. Let the fireplace dry completely, ideally overnight, as wet brick won’t absorb the whitewash properly. -
Tape off edges:
Apply painter’s tape to the walls, floor, mantel, and firebox insert to ensure crisp lines and prevent the runny whitewash from dripping where it shouldn’t.
Uneven Absorption?
If some bricks suck up paint faster, keep a spray bottle of water handy. Mist the thirsty bricks lightly before painting to help the whitewash glide over the surface evenly.
Step 2: Mixing & Application
-
Mix the whitewash:
In a bucket, combine equal parts white latex paint and water (a 1:1 ratio). Stir thoroughly until the consistency resembles whole milk. -
Test a small area:
Find an inconspicuous spot, like the side near the floor, and test your mixture. If it’s too opaque, add more water; if it’s too sheer, adhere to the original ratio or add a splash more paint. -
Start with mortar lines:
Dip your angled sash brush into the mixture and paint the mortar lines in a small 2×2 foot section first. Getting the mortar coated first helps blend the overall look later. -
Apply to bric faces:
Using the larger brush, apply the whitewash to the faces of the bricks in that same 2×2 section. Don’t worry about perfect coverage; the unevenness is part of the charm. -
Blot immediately:
While the paint is still wet, take a damp rag and dab or wipe the surface of the bricks. This removes excess paint and exposes the texture and some original color underneath. -
Work in small sections:
Move to the next 2×2 foot area and repeat the process—paint mortar, paint brick faces, and blot. Working in small patches ensures the paint doesn’t dry before you can distress it. -
Address the hearth:
When moving to the hearth (the floor section), apply slightly less paint initially. Foot traffic can wear this area differently, so a lighter application often looks more natural here. -
Check for drips:
Continually scan your work for runs or drips, especially in the mortar lines. Use your dry brush to feather these out immediately so they don’t dry as solid streaks.
Add Warmth
Instead of stark white, mix your water with a creamy off-white or ‘greige’ paint color. This creates a softer, aged limestone look that feels less modern and more Old World.
Step 3: Refining the Finish
-
Evaluate coverage:
Step back and look at the fireplace as a whole once the first coat is dry to the touch (usually 30-60 minutes). Identify areas that look too dark or inconsistent. -
Layer up if needed:
If you want a whiter look, apply a second, very light coat to the darker areas. I find distinct ‘spot treating’ works better than a full second coat to keep that dimensional feel. -
Distress further:
For a more rustic, worn look, you can take a dry scrubbing brush to specific bricks while the second layer is tacky to pull off even more pigment. -
Remove tape:
Carefully peel away the painter’s tape while the final touches are still slightly damp to prevent peeling the paint film. -
Final dry:
Allow the fireplace to cure fully for at least 24 hours before placing any decor back on the mantel or lighting a fire.
Now you have a beautifully refreshed fireplace that brightens the room while honoring its structural history

PENCIL GUIDE
Understanding Pencil Grades from H to B
From first sketch to finished drawing — learn pencil grades, line control, and shading techniques.
Explore the Full Guide
Chalky Mineral Wash for an Old-World Feel
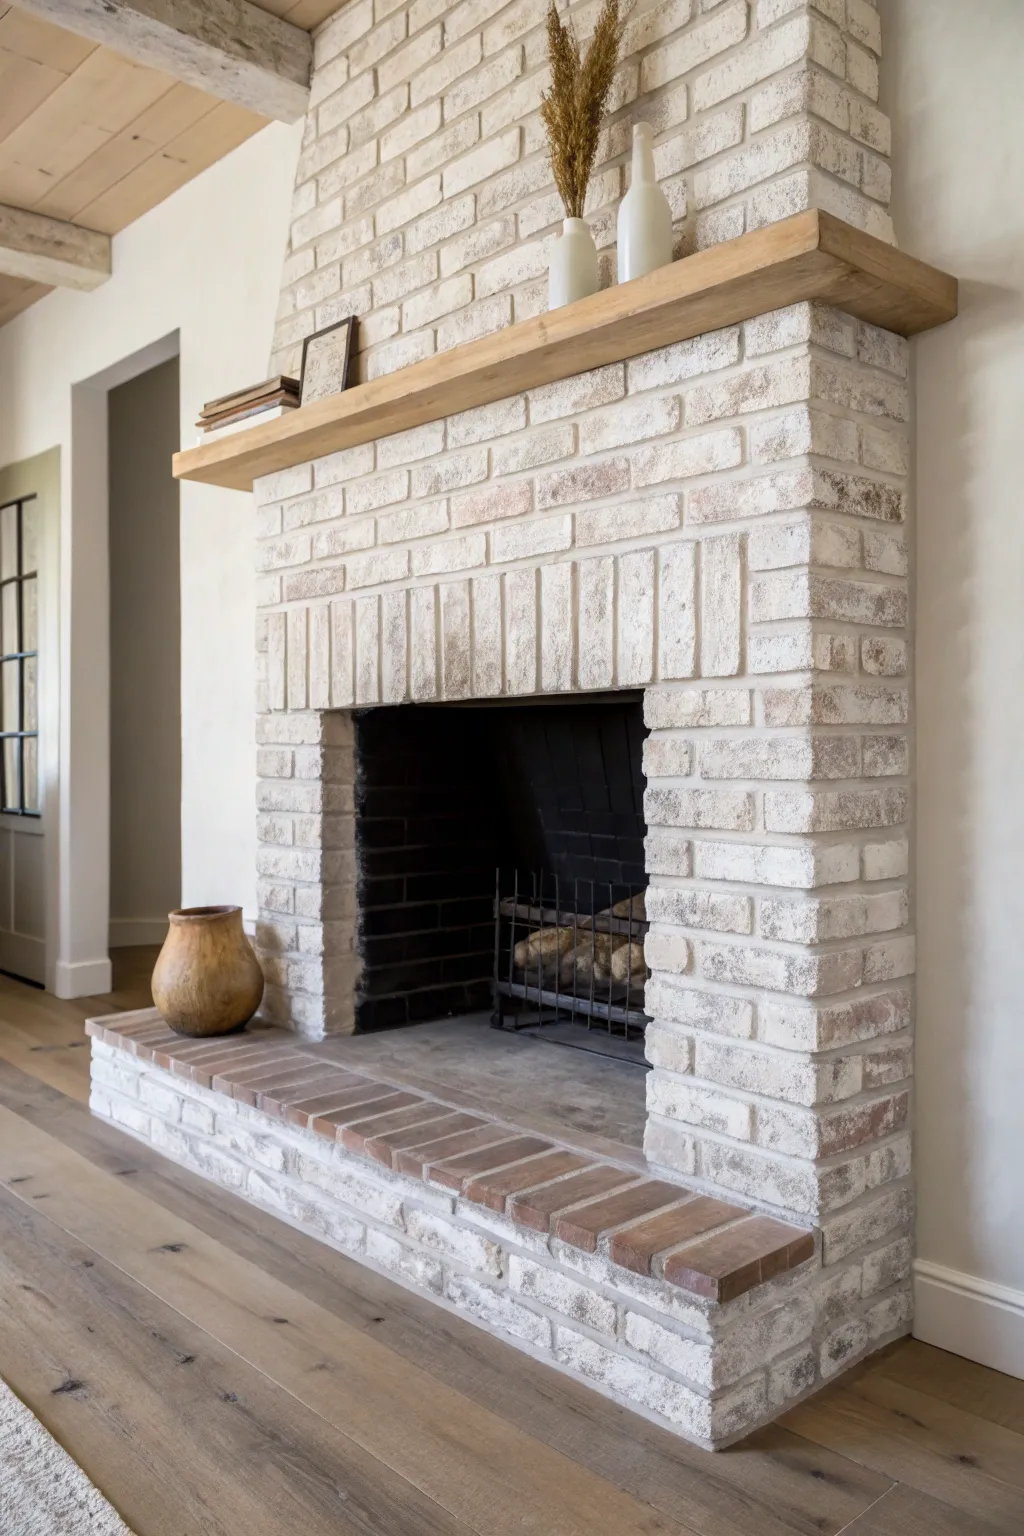
Transform a standard red or brown brick fireplace into a stunning, old-world focal point using a chalky mineral wash technique. This method softens the masonry’s color while preserving its rugged texture, resulting in a finish that feels both historic and freshly modern.
How-To Guide
Materials
- Romabio Classico Limewash or similar mineral-based masonry paint (Avorio White or similar warm white)
- Large masonry brush or block brush
- Clean water in a bucket
- Spray bottle filled with water
- Clean rags or lint-free towels
- Drop cloths and painter’s tape
- Wire brush or stiff-bristle scrub brush
- TSP substitute cleaner
- Small artist brush for tight edges
Step 1: Preparation & Cleaning
-
Protect the area:
Begin by laying down drop cloths generously around the base of the fireplace. Secure them with painter’s tape to the floor if necessary to prevent slipping. -
Mask off adjacent surfaces:
Run painter’s tape along walls, mantels, and the firebox insert to ensure crisp lines where the brick meets other materials. -
Scrub the brick:
Mix a TSP substitute cleaner with warm water. Using a stiff-bristle brush, scrub the brick vigorously to remove soot, dust, and loose mortar. A clean surface is essential for mineral paint to bond correctly. -
Rinse thoroughly:
Wipe down the bricks with a wet rag or sponge to remove any cleaning residue. Allow the surface to dry until just damp, but not soaking wet.
Step 2: Applying the Mineral Wash
-
Dilute the paint:
Pour your mineral masonry paint into a bucket. Based on the manufacturer’s instructions for a ‘wash’ effect, dilute it with water. I usually start with a 50/50 mix for a semi-transparent look, but you can add more water for a sheerer wash. -
Dampen the first section:
Before painting, mist a small 2-foot section of the brick with your spray bottle. Damp brick accepts the mineral wash more evenly and allows for longer manipulation time. -
Apply the wash:
Dip your masonry brush into the diluted mixture and apply it to the dampened brick section. Use circular motions to work the paint into the pores and crevices of the mortar joints. -
Work top to bottom:
Start at the top of the fireplace and work your way down to manage drips. Don’t worry about perfect coverage yet; the variation is part of the charm. -
Distress immediately:
While the paint is still wet (within 10-20 minutes depending on humidity), use a clean, damp rag to wipe away some of the paint from the high points of the brick. -
Expose the texture:
Adjust your pressure as you wipe. Press harder to expose more of the original brick color underneath, or wipe gently to leave a heavier white veil.
Too Opaque?
If you applied too much paint and it looks solid white, spray the area heavily with water and scrub aggressively with a stiff nylon brush within the first hour to remove layers.
Step 3: Refining the Finish
-
Assess the coverage:
Step back and look at the fireplace as a whole. You might notice areas that look too uniform or too bare compared to the rest. -
Layer for depth:
If certain areas are too dark, re-wet them slightly and apply a second, lighter coat of the wash. Dab it on rather than brushing to build opacity. -
Handle the hearth:
For the hearth (the floor section), use a slightly more diluted wash if you want the rugged darker brick color to ground the design, as seen in the inspiration image. -
Clean up mortar lines:
Use a small brush to touch up deep mortar joints that the large brush might have missed, ensuring no raw dark spots remain unless intended. -
Final drying:
Allow the mineral wash to dry fully. As it dries, the calcification process will occur, turning the finish chalky and opaque, generally lightening significantly from its wet color. -
Inspect the edges:
Remove the painter’s tape carefully. Use a small artist brush to fix any bleed-through or missed spots along the wall and mantel edges.
Level Up: Aged Patina
Mix a tiny amount of grey or beige acrylic into a small cup of your wash. Dab this darker tint randomly onto a few bricks to mimic centuries of soot and natural weathering.
Enjoy the sophisticated, airy atmosphere your new fireplace brings to the room
Painted Brick and Wood Mantel Contrast
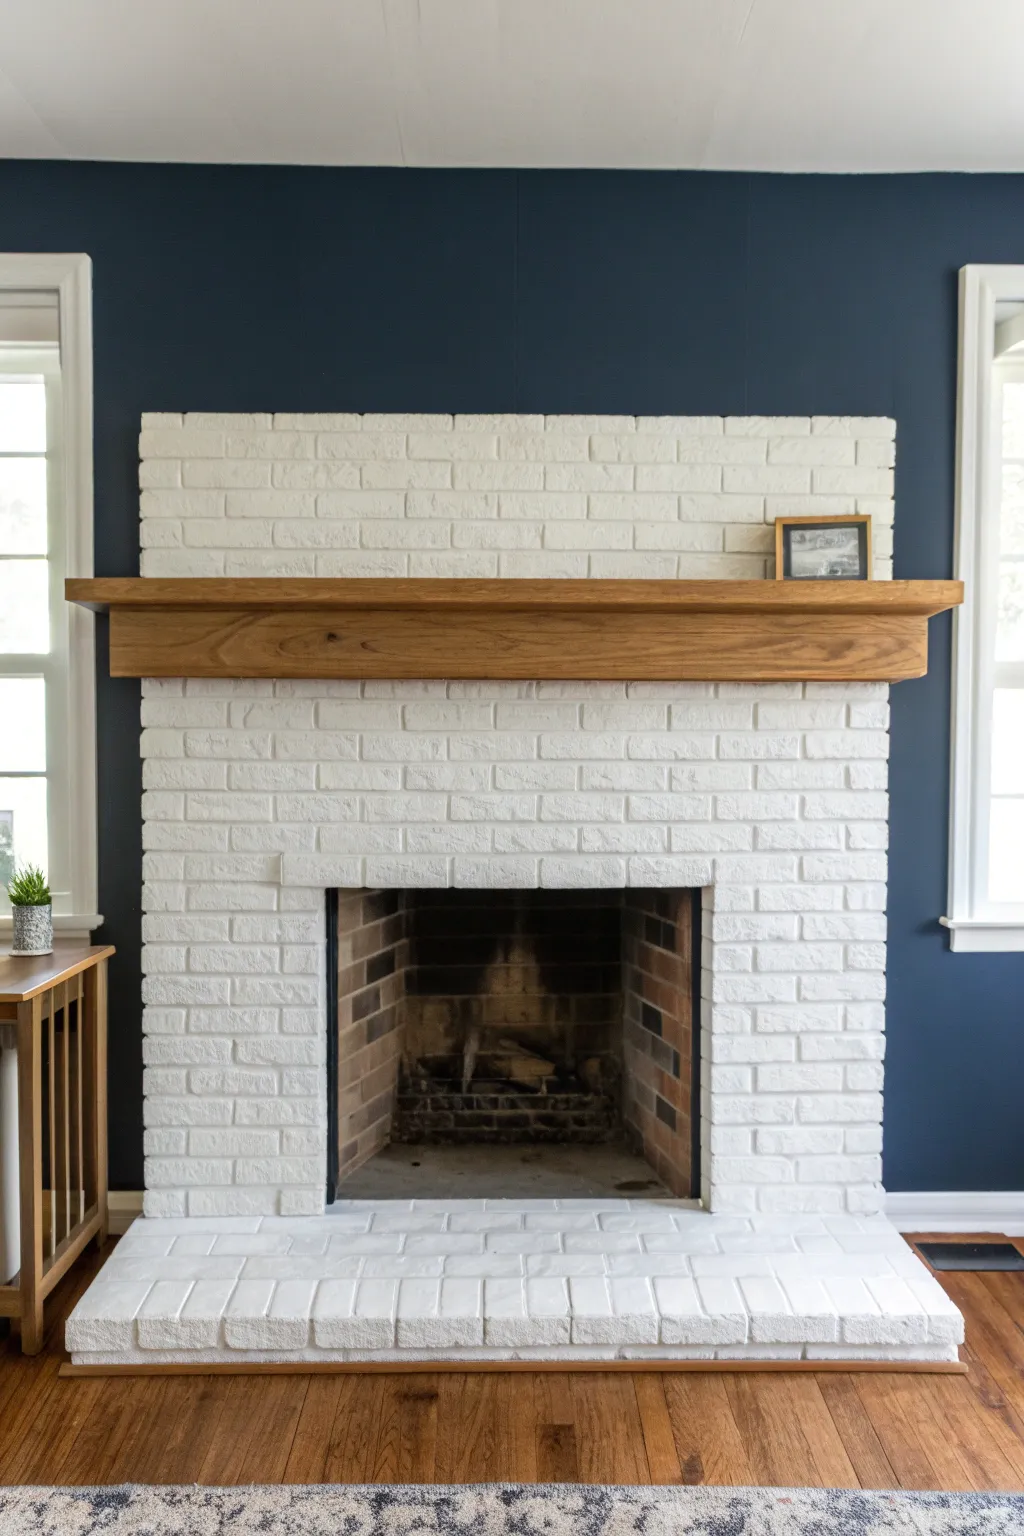
This project transforms a dated fireplace into a crisp, modern focal point by pairing bright white painted brick with a warm, natural wood mantel. The deep navy wall color creates a stunning backdrop that makes the white brick pop.
Detailed Instructions
Materials
- TSP substitute (Trisodium Phosphate) cleaner
- Wire brush
- Heat-resistant painters tape
- Masking paper or drop cloths
- High-quality stain-blocking masonry primer (oil-based recommended for soot)
- Interior latex paint (Satin or Eggshell finish, White)
- Thick-nap roller (3/4 inch to 1 inch)
- 2.5-inch angled sash brush
- Solid Oak beam or box mantel
- Wood stain (Golden Oak or Early American)
- Polyurethane sealer (Matte or Satin)
- Construction adhesive
- Mantel mounting hardware (french cleat or lag bolts)
- Drill and masonry bits
- Vacuum with brush attachment
Step 1: Cleaning & Prep
-
Clear the area:
Remove any existing mantel, grate, or decor from the fireplace. Lay down drop cloths extensively, as brick painting can splatter. -
Scrub the brick:
Mix your TSP substitute with warm water. Using a stiff wire brush, scrub every inch of the brick and grout to remove soot, dust, and grime. This is crucial for paint adhesion. -
Vacuum debris:
Once the scrubbing loosens the dirt, use a vacuum with a brush attachment to remove all dust and loose mortar from the crevices. -
Protect surfaces:
Apply painter’s tape to the walls where they meet the brick. Cover the firebox opening and the floor hearth edges completely with masking paper and tape.
Step 2: Priming & Painting the Brick
-
Apply primer to grout:
Start with your angled brush and work the stain-blocking primer deep into the mortar lines first. I find doing the grout lines before the faces ensures no missed spots. -
Roll the brick faces:
Use the thick-nap roller to apply primer to the faces of the bricks. The thick nap helps get paint into the textured surface. -
Inspect and touch up:
Check for any bleed-through from old soot stains. If you see discoloration, apply a second coat of primer to those specific spots. -
Cut in the paint:
Once the primer is fully dry (check manufacturer times), use your clean angled brush to paint the grout lines with your white latex paint. -
Roll the final color:
Roll the white paint over the brick faces. Use a ‘W’ motion to distribute paint evenly, then smooth it out. -
Apply second coat:
Allow the first coat to dry completely. Apply a second coat to ensure a solid, opaque white finish.
Stain Selection Tip
Test your stain on the back of the mantel first. Wood species absorb stain differently, and this ensures you get the exact warm contrast you want.
Step 3: Preparing & Installing the Mantel
-
Sand the wood:
Sand your oak beam or box mantel with 120-grit sandpaper, followed by 220-grit for a smooth finish. Wipe away all dust. -
Apply stain:
Using a rag or sponge brush, apply your chosen wood stain. Wipe off excess stain after a few minutes to reveal the wood grain. -
Seal the wood:
Apply two thin coats of polyurethane sealer, lightly sanding with very fine sandpaper between coats for a professional feel. -
Mark mounting height:
Determine the desired height for your mantel. Use a level and painter’s tape to mark the exact placement line on the brick. -
Drill pilot holes:
Using a masonry bit, drill holes into the brick (not the mortar, which is weaker) corresponding to your mounting hardware or french cleat. -
Attach the hardware:
Secure the mounting cleat or lag bolts into the brick using appropriate anchors or construction adhesive for extra stability. -
Mount the mantel:
Slide the finished wood mantel onto the mounting hardware. Check for level one last time and secure it in place. -
Final touches:
Remove all painter’s tape and drop cloths. Place simple decor items like a framed photo or small plant to complete the look.
Add Hidden Storage
Build a hollow box mantel instead of using a solid beam. Incorporate a flip-down front panel to hide tv remotes or cables inside.
Enjoy the fresh, bright atmosphere created by your new fireplace centerpiece


Same-Color Brick and Built-Ins

Transform a dated or dark brick fireplace into a bright, cohesive focal point by pairing a soft brick limewash with color-matched built-ins. This technique unifies the textures of wood and masonry under a single, sophisticated taupe-beige palette, creating a seamless and airy look.
Step-by-Step Tutorial
Materials
- Limewash paint (in a warm beige/taupe tone)
- Masonry paint brush (large block brush)
- Spray bottle with water
- Satin or semi-gloss interior trim paint (color-matched to the limewash)
- Bonding primer (for the wood cabinets)
- Painter’s tape
- Drop cloths
- Sandpaper (120 and 220 grit)
- Tack cloth
- Paint rollers (foam for cabinets, nap for walls)
- Angled sash brush
- Cabinet hardware (black pulls)
Step 1: Preparation & Priming
-
Protect the area:
Begin by clearing the shelves and mantle completely. Lay down heavy-duty drop cloths over your flooring and secure them with painter’s tape right up to the base of the hearth and cabinets. -
Clean the brick:
Vacuum the brick thoroughly to remove loose mortar, dust, and cobwebs. Scrub any soot stains on the firebox surround with a wire brush and a degreasing cleaner, then rinse with a damp sponge. -
Prep the cabinets:
Remove all cabinet doors and hardware. Lightly sand the wood surfaces (shelves, frames, and doors) with 120-grit sandpaper to scuff the existing finish, which helps the new paint adhere. -
Clean and tape:
Wipe down all sanded wood surfaces with a tack cloth to remove dust. Apply painter’s tape to the walls where the built-ins meet the drywall to ensure a crisp line. -
Prime the built-ins:
Apply a high-quality bonding primer to all wood surfaces. Use a brush for corners and grooves, and a foam roller for flat surfaces to avoid brush marks. Let this dry according to the manufacturer’s instructions.
Wet-on-Wet Technique
Keep a bucket of clean water and a rag nearby. If the limewash dries too opaque, you can scrub it with a wet rag up to 30 minutes later to reveal more brick texture.
Step 2: Painting the Built-Ins
-
First coat on woodwork:
Once the primer is dry and lightly sanded with 220-grit paper, apply your first coat of satin interior paint. This color should be an exact match or a slightly darker tonal coordinate to your limewash color. -
Detail work:
Pay special attention to the beadboard backing of the shelves. Use an angled sash brush to get paint into the vertical grooves without letting it pool at the bottom. -
Finish the cabinets:
Apply a second coat of paint to the frames, shelves, and doors. I find that thin, even coats are much better than one thick one to prevent drips on vertical surfaces. Let the cabinets cure for at least 24 hours before reattaching doors.
Step 3: Limewashing the Brick
-
Dampen the brick:
Working in sections of about 2-3 square feet, lightly mist the raw brick with water using your spray bottle. Damp brick absorbs the limewash more slowly, giving you more control over the opacity. -
Apply the limewash:
Dip your masonry brush into the limewash and apply it to the damp brick. Use a cross-hatch (X) motion to work the paint into the heavy texture and mortar lines. -
Distress immediately:
While the limewash is still wet, decide how much coverage you want. For a more distressed look, dab areas with a wet rag to pull some product off, exposing hints of the original brick color. -
Work top to bottom:
Continue this process from the ceiling down to the hearth. This prevents drips from ruining finished lower sections. Be sure to mix your limewash bucket frequently as the minerals can settle. -
Address the hearth:
Paint the horizontal hearth bricks last. Since this is a high-traffic spot, you might opt for slightly fuller coverage here to hide future soot or dust.
Mantel Upgrade
Instead of painting the mantel, strip or sand it down to raw wood and apply a whitewash stain. This ties it to the brick texture while keeping a distinct wood grain.
Step 4: Final Styling
-
Install hardware:
Once the cabinet doors are fully cured, reattach them to the frames. Install sleek black handles to create a modern contrast against the soft beige paint. -
Dress the hearth:
Clean the glass doors of the firebox or the screen. If the metal looks tired, you can spray it with high-heat matte black paint for a fresh look that grounds the airy fireplace. -
Style the shelves:
Bring life back to the built-ins with minimalist decor. Use neutral items like woven baskets, stacks of books with spines turned inward, and small succulents to complement the natural aesthetic.
Now step back and enjoy the warmth and elegance of your newly revitalized living space.
Blackened Firebox for Instant Depth
This project transforms a dated or dark brick fireplace into a bright, modern focal point using crisp white paint and a rich wood mantel. The high-contrast black firebox adds incredible depth, making the entire structure pop against the neutral walls.
How-To Guide
Materials
- TSP (Trisodium Phosphate) or heavy-duty degreaser
- Scrub brush and bucket
- Painter’s tape
- Drop cloths
- High-heat black spray paint (matte finish)
- Masonry primer (white)
- Interior latex paint (white, eggshell or satin finish)
- 3/4-inch nap roller and roller frame
- Angled sash brush (2.5 inch)
- Rough-sawn wood beam or box beam kit
- Construction adhesive (heavy duty)
- Lag bolts and masonry drill bit (if mounting solid beam)
Step 1: Preparation & Cleaning
-
Protect the area:
Begin by laying down drop cloths generously around the base of the fireplace. Secure them with painter’s tape to the floor to prevent shifting. This is a messy job, so covering nearby furniture is also a smart move. -
Deep clean the brick:
Mix TSP or a heavy-duty degreaser with water in a bucket. Using a stiff scrub brush, vigorously scrub every inch of the brick surface. Pay special attention to soot stains near the firebox opening. -
Rinse and dry:
Wipe down the brick with clean water and a sponge to remove any chemical residue. Allow the masonry to dry completely for at least 24 hours; painting damp brick can trap moisture. -
Masking off:
Apply painter’s tape to the walls directly adjacent to the brick and along the floor if you want a precise line where the hearth meets the hardwood. Be meticulous here to save cleanup time later.
Uneven Coverage?
Deep mortar joints can be tricky. If the roller misses spots, keep a cheap 2-inch chip brush handy to dab paint into deep crevices as you roll, blending it out immediately.
Step 2: Painting the Brick
-
Prime the masonry:
Roll on a coat of high-quality masonry primer. The brick is porous and thirsty, so don’t be shy with the application. Use the angled brush to jam primer into the mortar lines where the roller can’t reach. -
Check for bleed-through:
Once the primer is dry, inspect the surface. If you see old soot stains or dark brick color bleeding through, spot-prime those areas again. -
Cut in the edges:
Starting with your interior latex paint, engage your sash brush to ‘cut in’ around the ceiling, walls, and floor. I also like to brush paint into the deep mortar grooves before rolling the faces. -
Roll the first coat:
Using a 3/4-inch nap roller, apply the first coat of white paint. The thick nap allows the paint to get into the texture of the brick without excessive pressure. -
Apply the second coat:
After the recommended drying time, apply a second coat for full opacity. Step back occasionally to ensure you haven’t missed any angled crevices in the mortar.
Add Rustic Charm
For a ‘German Schmear’ effect instead of solid white, wipe wet paint off diverse bricks with a damp rag immediately after rolling. This lets some raw brick texture peek through.
Step 3: Blackening the Firebox
-
Clean the interior:
Vacuum out the firebox thoroughly. Use a wire brush to remove clear loose rust or flaking metal from the doors or interior walls. -
Mask the exterior:
Tape plastic sheeting or paper over your freshly painted white brick surrounding the opening. You really don’t want black overspray on your new white finish. -
Spray the interior:
Shake your high-heat matte black spray paint can vigorously. Apply light, even coats to the interior brick and metal surround. Several thin coats prevent drips better than one heavy one.
Step 4: Installing the Mantel
-
Determine placement:
Decide on the height of your mantel. Standard placement is often 54 to 60 inches from the floor, but ensure you check local fire codes regarding clearance from the firebox. -
Mount the cleat:
If using a box beam (which is lighter), mount a wooden cleat to the brick using masonry screws. The cleat should be slightly smaller than the inside dimension of your box beam. -
Attach the beam:
Slide the wood beam over the cleat. Secure it by drilling pilot holes and screwing through the top of the mantel into the cleat so the screws are hidden. -
Style the finish:
Once the adhesive or screws are set, remove all tape. Style simply with a framed print and some greenery to let the texture of the white brick shine.
Enjoy the fresh, clean atmosphere your modernized fireplace brings to the room
Painted Hearth to Match the Surround
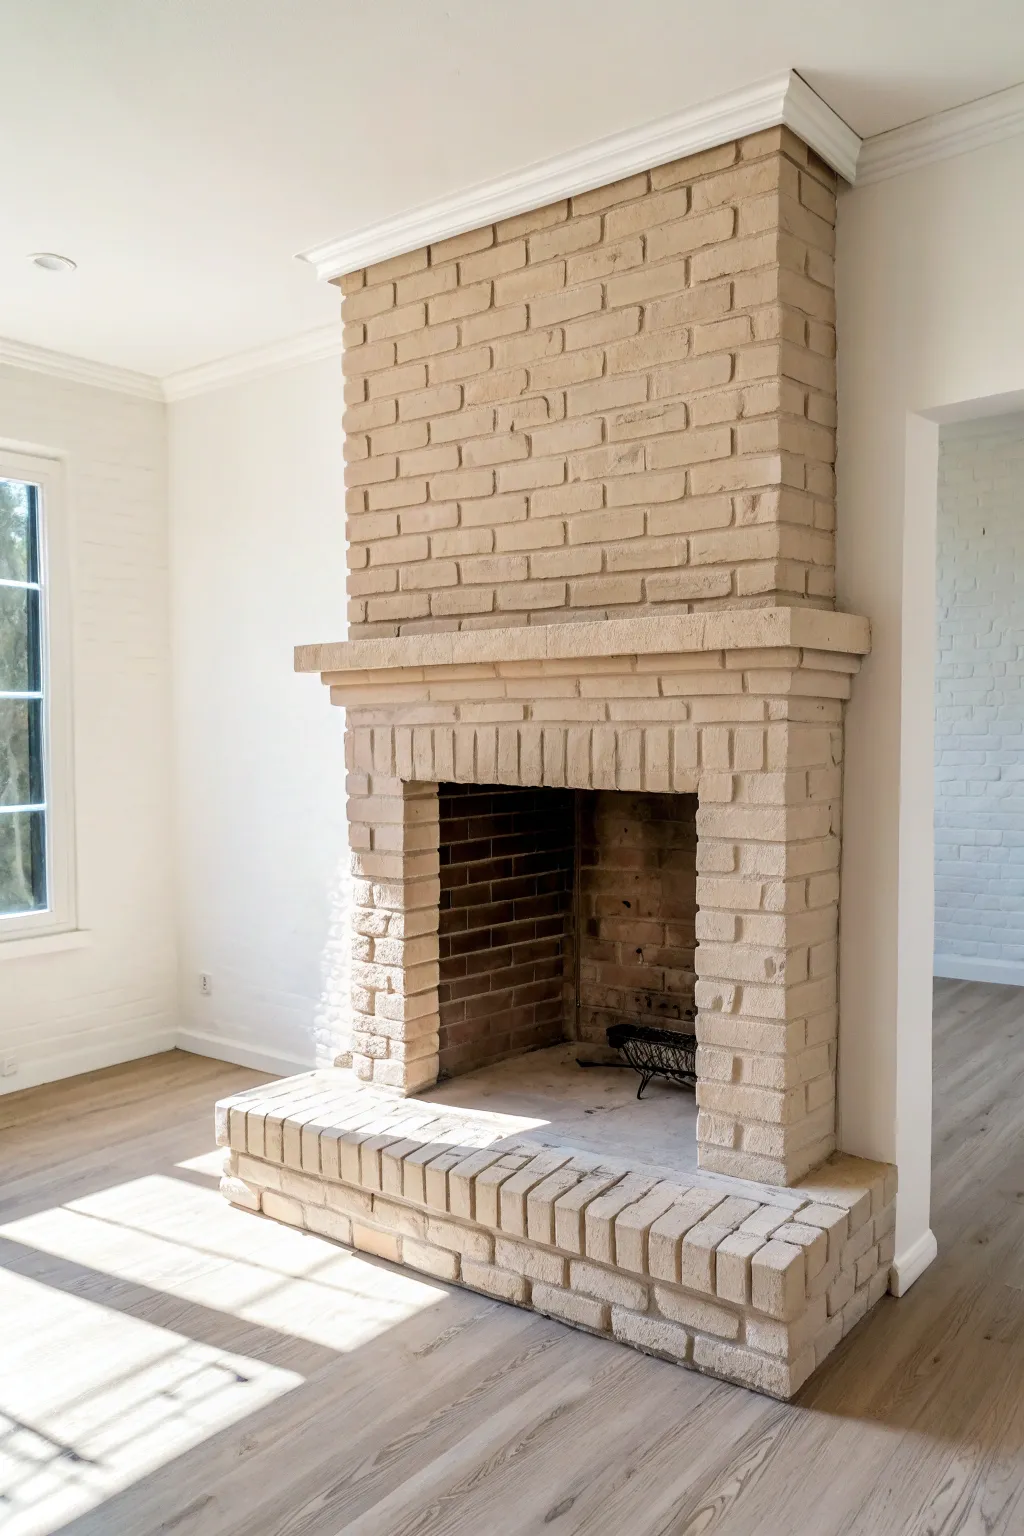
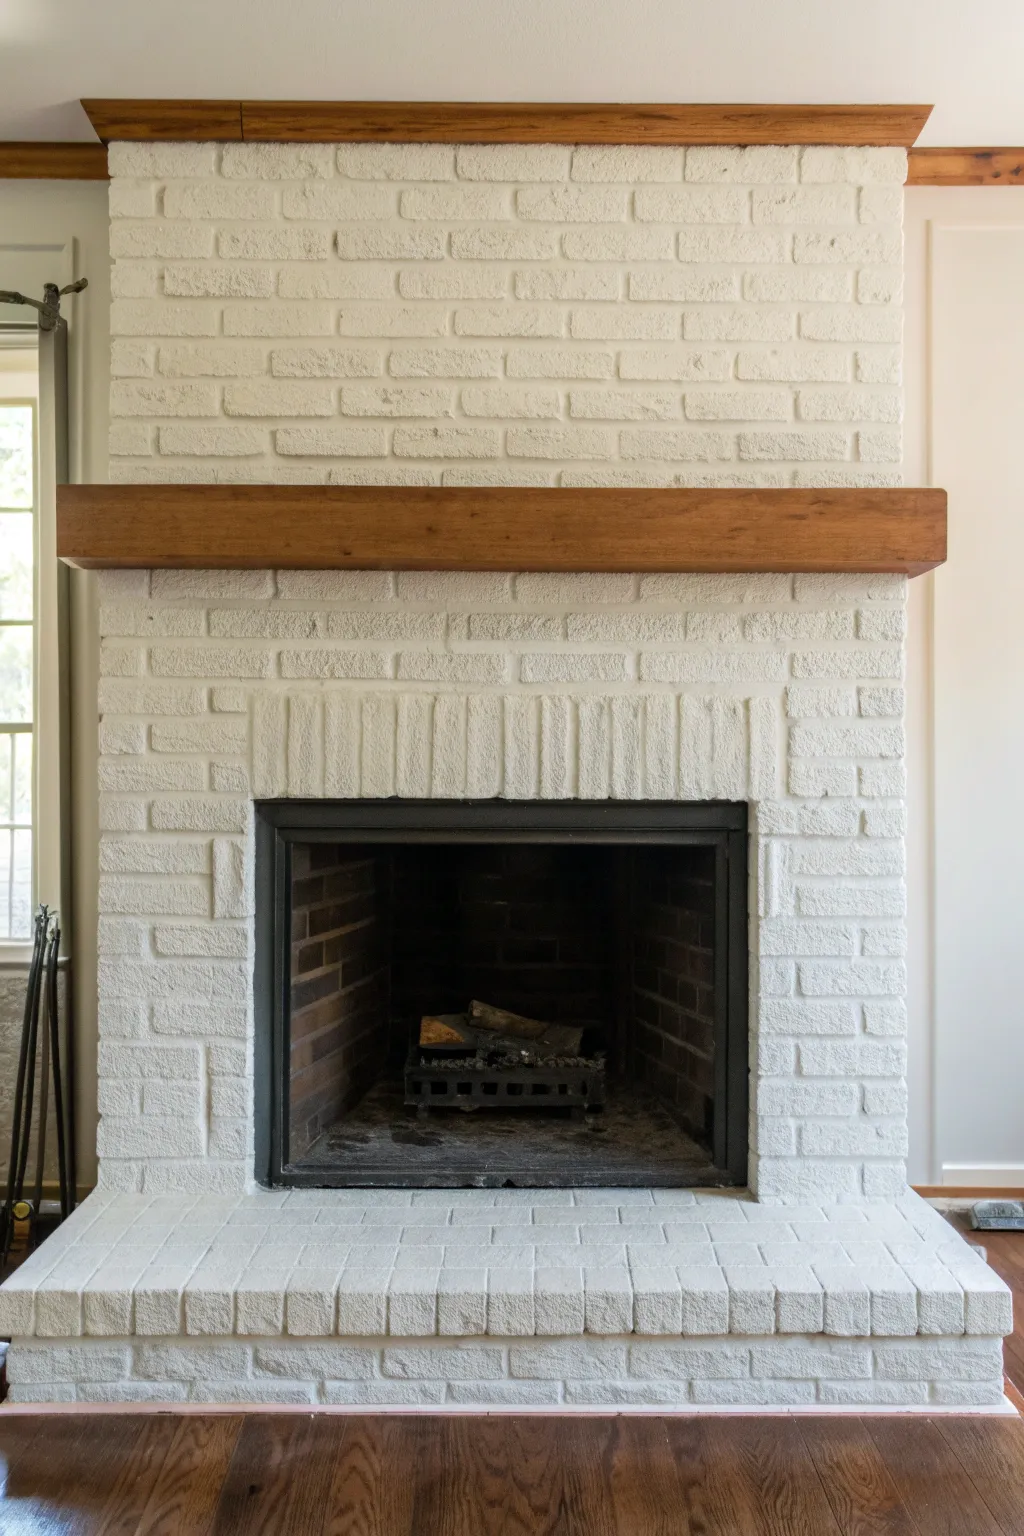
Transform a dated or dark brick fireplace into a modern, serene focal point with a uniform coat of creamy beige paint. This project creates a cohesive, monolithic look by matching the hearth to the surround, brightening the entire room while retaining the beautiful texture of the masonry.
Step-by-Step
Materials
- TSP substitute (Trisodium Phosphate) cleaner
- Stiff bristle scrub brush
- High-quality bonding primer (masonry compatible)
- Interior latex or acrylic paint (creamy beige/tan color, matte or eggshell finish)
- Thick-nap roller (3/4 inch to 1 inch nap) for rough surfaces
- Angled sash brush (2.5 inch)
- Painter’s tape
- Drop cloths or plastic sheeting
- Small craft brush (for deep crevices)
- Vacuum with brush attachment
Step 1: Preparation & Cleaning
-
Clear the area:
Remove any fireplace screens, tools, or decorations. Lay down heavy-duty drop cloths to protect your flooring, ensuring they are taped down securely at the edges. -
Vacuum the brick:
Using the brush attachment on your vacuum, thoroughly go over the entire fireplace surface. Pay special attention to the mortar lines and the deep recesses of the hearth to remove loose dust, soot, and cobwebs. -
Scrub the masonry:
Mix your TSP substitute with water according to package directions. Dip your stiff brush into the solution and vigorously scrub the brick. -
Rinse and dry:
Wipe down the bricks with clean water and a sponge to remove any cleaner residue. Let the masonry dry completely, preferably for at least 24 hours. Masonry absorbs moisture, and painting damp brick can trap water. -
Tape boundaries:
Apply good quality painter’s tape along the walls, ceiling molding, and floor edges where the brick meets other surfaces. Press the tape edge down firmly to prevent bleed-through.
Step 2: Priming the Surface
-
Cut in the edges:
Start with your angled sash brush and the bonding primer. Paint the perimeter where the brick meets the wall and ceiling, and carefully outline the firebox opening. -
Prime the mortar joints:
Before rolling, use your brush to dab primer into the deep mortar lines. I find it easiest to work in small sections here, ensuring the deep grooves are coated before the surface gets painted. -
Roll the surface:
Load your thick-nap roller with primer. Roll vertically over the face of the bricks. The thick nap should help push paint into the brick’s rough texture. -
Check for gaps:
Inspect the primed surface for missed pinholes or deep crevices. Use a small craft brush or dab with your sash brush to fill these stubborn spots. -
Let primer cure:
Allow the primer to dry fully according to the manufacturer’s instructions. A solid prime coat is crucial for blocking stains, especially soot.
Deep Pores Tip
If the brick has extremely deep craters, don’t just brush—jab the bristles straight into the holes. This stippling motion forces paint into voids a simple stroke misses.
Step 3: Painting
-
Mix your paint:
Stir your creamy beige paint thoroughly. If you are using multiple cans, box them (mix them together) in a large bucket to ensure perfect color consistency. -
Paint the mortar first:
Similar to the priming stage, use your brush to paint the mortar lines in a 2-foot by 2-foot section. Don’t worry about being too neat, as you’ll roll over the face of the brick immediately after. -
Roll the section:
While the mortar paint is still wet, roll over the section with your thick-nap roller. This ‘wet edge’ technique helps blend brush marks and roller texture seamlessly. -
Work top to bottom:
Continue this brush-then-roll method, starting from the top of the chimney breast and working your way down to the mantle, then the surround, and finally the hearth. -
Detail the hearth:
For the hearth floor and steps, apply paint carefully. Since this area sees traffic or items placed on it, ensure an even, slightly thicker application, but watch for drips. -
Assess coverage:
Let the first coat dry completely (usually 4-6 hours). Brick often soaks up paint unevenly, so a second coat is almost always necessary for that uniform, solid finish shown in the photo. -
Apply second coat:
Repeat the painting process for the second coat. This layer will go on much faster since the brick is now sealed. -
Remove tape:
While the final coat is still slightly tacky (not fully dry), carefully peel away the painter’s tape at a 45-degree angle to get a crisp line.
High-Heat Upgrade
For the interior firebox, use specialized high-heat black spray paint to create a crisp, dark contrast against your new creamy surround.
Enjoy the fresh, modern atmosphere your newly painted fireplace brings to the room.
High-Gloss Brick for a Sleek Twist
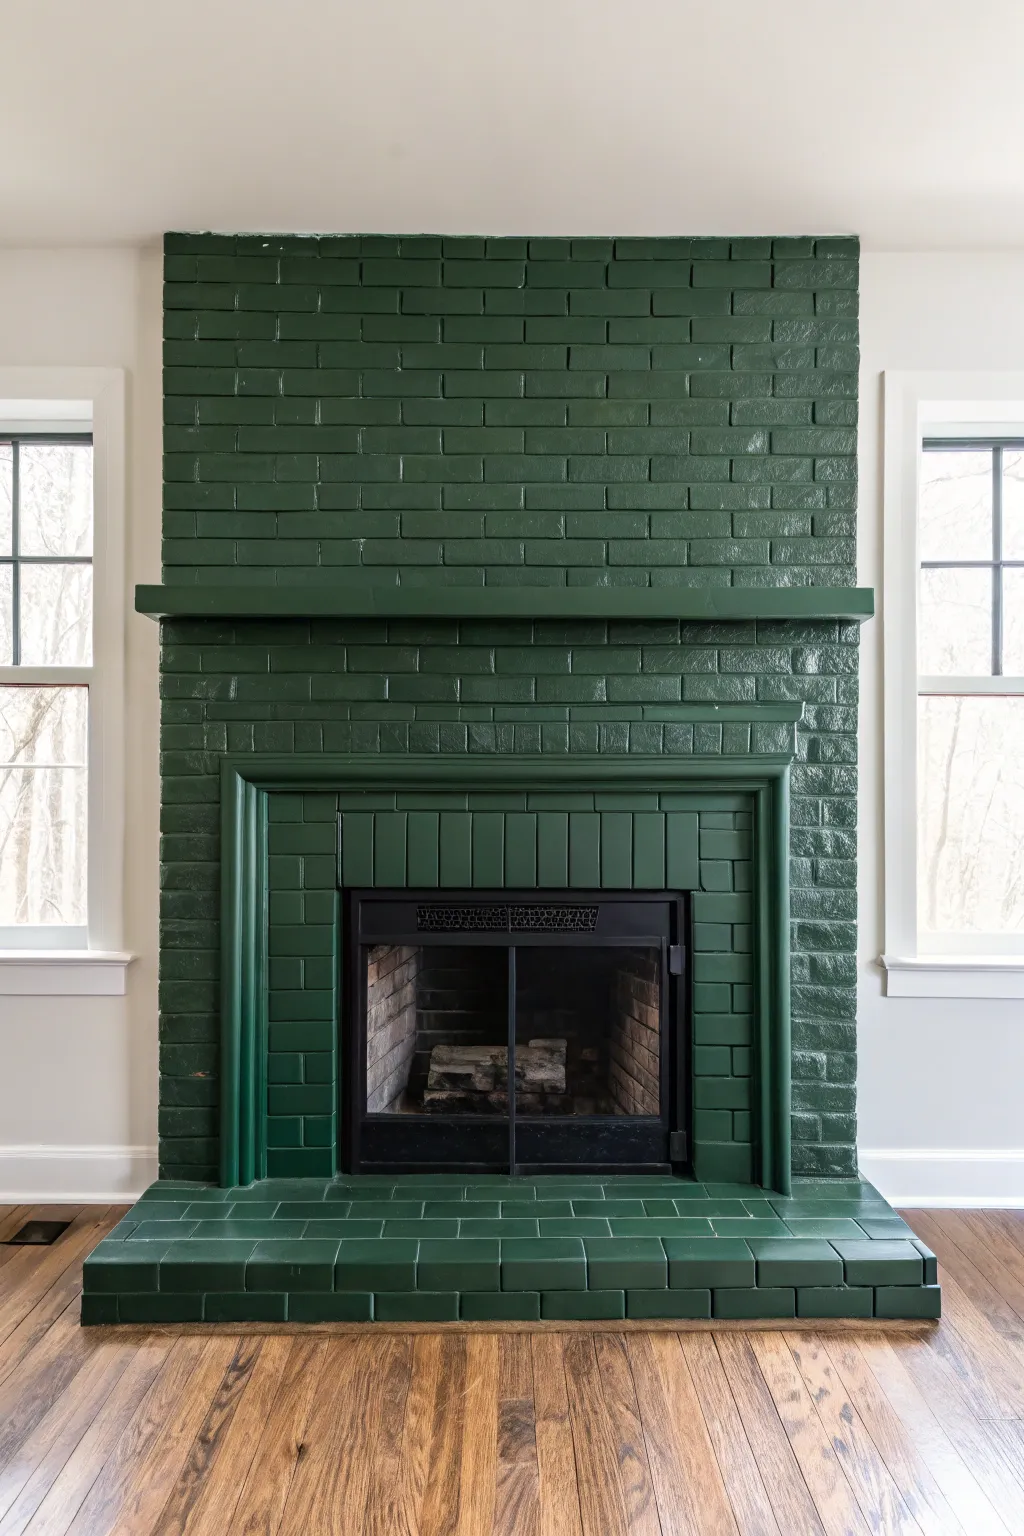
Transform a dated brick fireplace into a stunning, moody focal point with this bold high-gloss paint project. The deep forest green finish adds modern sophistication while reflecting light to keep the room feeling airy and bright.
Detailed Instructions
Materials
- High-quality bonding primer suitable for masonry
- High-gloss latex or enamel paint (Hunter Green or Deep Forest Green)
- TSP (Trisodium Phosphate) or heavy-duty degreaser
- Stiff bristle scrub brush
- Painter’s tape
- Drop cloths or plastic sheeting
- Wire brush (optional, for loose mortar)
- High-density foam roller (4-inch or 6-inch)
- Angled sash brush (2-inch or 2.5-inch)
- Paint tray and liners
- Caulk and caulk gun (paintable masonry caulk)
- Heat-resistant spray paint (High-heat matte black)
- Vacuum with brush attachment
Step 1: Preparation & Cleaning
-
Clear and protect:
Begin by removing any existing fireplace screens, grates, or decorations. Lay down drop cloths thoroughly around the base of the fireplace, taping them to the floor to prevent any drips on your hardwood. -
Inspect the masonry:
Check the brick and mortar for any loose debris or crumbling areas. If you find loose bits, use a wire brush to gently scrape them away so you have a solid foundation. -
Deep clean the brick:
This is crucial for adhesion. Mix TSP or a heavy-duty degreaser with water according to package directions. Scrub the entire surface vigorously with a stiff bristle brush to remove soot, dust, and oils. -
Rinse and dry:
Wipe down the bricks with clean water and a sponge to remove any cleaning residue. Allow the fireplace to dry completely—usually at least 24 hours—before moving to the next step. -
Tape off edges:
Apply painter’s tape carefully along the walls, ceiling, and floor where they meet the brick. Take your time here to ensure crisp, professional lines later.
Sticky Situation?
If the tape pulls paint off the wall, score the edge gently with a utility knife before peeling. This breaks the paint seal for a clean line.
Step 2: Priming & Refinishing the Firebox
-
Spray the firebox:
Before painting the exterior, refresh the metal insert and doors. Mask off the surrounding brick and glass, then apply 2-3 coats of high-heat matte black spray paint to the metal frame for a factory-new look. -
Cut in the primer:
Once the firebox is dry, start priming. Use your angled sash brush to work the masonry primer into the deep mortar lines and crevices. I advise doing this continuously in small sections so you don’t miss spots. -
Roll the primer:
Use a high-density foam roller or a thick-nap roller (depending on brick texture) to apply primer to the faces of the bricks. The goal is a sealed surface, not full opacity yet. -
Fill gaps (optional):
After priming, cracks or gaps become very visible. Use paintable masonry caulk to fill unwanted holes or cracks between the mantel and the brick for a seamless look.
Step 3: Applying the High-Gloss Color
-
First coat: Mortar lines:
Open your high-gloss deep green paint. Just like with priming, start by brushing the paint into the mortar joints first. The gloss finish shows drips easily, so watch for runs and smooth them out immediately. -
First coat: Brick faces:
Follow up immediately with the roller on the brick faces. Apply a thin, even coat. Don’t try to get full coverage in one go; thin coats are key to a smooth, glass-like finish. -
Dry time check:
High-gloss paint can be tacky. Check the manufacturer’s instructions for recoat times and follow them strictly—rushing this step can ruin the sheen. -
Second coat application:
Apply the second coat using the same method: brush joints, then roll faces. This layer will deepen the hunter green color and start building that reflective shell. -
Inspect for holidays:
Look at the fireplace from different angles. The shine will highlight any missed spots (holidays). Touch these up lightly with your brush. -
Third coat (if needed):
For the deepest, richest color and highest shine, a third coat is often necessary. Apply it lightly and let it cure fully. -
Remove tape:
While the final coat is still slightly tacky (not wet, but not fully cured), carefully peel away the painter’s tape at a 45-degree angle to avoid peeling finish paint.
Boost the Shine
For an ultra-reflective, lacquer-like finish, apply a coat of clear high-gloss polyurethane over your dried paint. It adds depth and extra durability.
Step back and admire how the light dancing off your new green fireplace adds drama to the entire room
Distressed Painted Brick for Vintage Charm
Achieve a timeless, old-world aesthetic by softening red brick with a distressed whitewash technique commonly known as a German smear. This method allows the character of the original brick to peek through while brightening the overall space with a soft, textural finish.
How-To Guide
Materials
- White mortar or thin-set mortar (for better adhesion)
- Water
- Large 5-gallon bucket
- Mixing drill with paddle attachment
- Heavy-duty rubber gloves
- Grouting sponge
- Stiff bristle brush or wire brush
- Trowel or putty knife
- Drop cloths
- Painter’s tape
- Mild detergent or TSP substitute
Step 1: Preparation & Cleaning
-
Protect the area:
Begin by laying down drop cloths to protect your flooring. Use painter’s tape to meticulously mask off any adjacent walls, the mantel, and the firebox insert to prevent mortar from staining them. -
Clean the brick:
Scrub the entire surface of the brick with a stiff brush and a solution of mild detergent or TSP substitute. Removing soot, dust, and grime is crucial for the mortar to adhere properly. -
Rinse thoroughly:
Wipe down the brick with clean water and a sponge to remove any soap residue. Let the surface dry completely before moving forward.
Too Much White?
If you applied too much mortar and it dried hard, spray the area with a water-vinegar mix (1:1) and scrub vigorously with a stiff wire brush to expose the brick beneath.
Step 2: Mixing the Mortar
-
Add powder to bucket:
Pour a portion of your white mortar or thin-set into the 5-gallon bucket. Start with a smaller batch until you get a feel for the application speed. -
Create a slurry:
Gradually add water while mixing with the drill paddle. You are aiming for a consistency similar to heavy cream or pancake batter—loose enough to spread but thick enough to cling. -
Test the consistency:
Apply a small test patch in an inconspicuous lower corner. If it drips too much, add more powder; if it’s clumping, add a splash of water.
Step 3: The Smear Application
-
Wet the brick again:
Lightly mist the section of brick you are about to work on with water. This prevents the dry brick from sucking the moisture out of the mortar too quickly, giving you more working time. -
Apply with a trowel:
Load your trowel or putty knife with the wet mortar mix. Smear it aggressively over the bricks, pressing it into the grout lines first. -
Spread over faces:
Drag the mortar across the faces of the bricks. Don’t worry about even coverage; the goal is variation. -
Work in small sections:
Focus on a 2×2 foot area at a time. This ensures the mortar doesn’t set before you have a chance to distress it.
Tone It Down
For a softer, less opaque look, mix latex paint with water (1:1 ratio) instead of mortar. This creates a subtle whitewash stain rather than a textured plaster finish.
Step 4: Distressing & Finishing
-
Wait for the haze:
Let the applied mortar sit for approximately 10 to 20 minutes until it becomes slightly tacky and stiff, but not fully hardened. -
Wipe back:
Using a damp grouting sponge or gloved hands, verify the look. Wipe away more mortar from the high points of the bricks to reveal the original red color. -
Customize the texture:
I like to use a wire brush at this stage to scour off dried bits if unsuspecting chunks look too heavy. Focus on exposing edges and corners for that aged effect. -
Check for balance:
Step back frequently to look at the fireplace as a whole. Ensure you haven’t left any patches too white or too bare compared to the rest. -
Clean up grout lines:
If the grout lines became too obscured, gently run a finger or tool along them to redefine the brick shapes, though keeping them partially filled adds to the rustic charm. -
Final cure:
Allow the fireplace to cure for at least 24 hours. The color will lighten significantly as the water evaporates. -
Remove tape:
Carefully peel away your painter’s tape and clean up any stray dust.
Enjoy the cozy transformation of your living space with your new fireplace focal point
Two-Tone Brick: Surround vs. Chimney
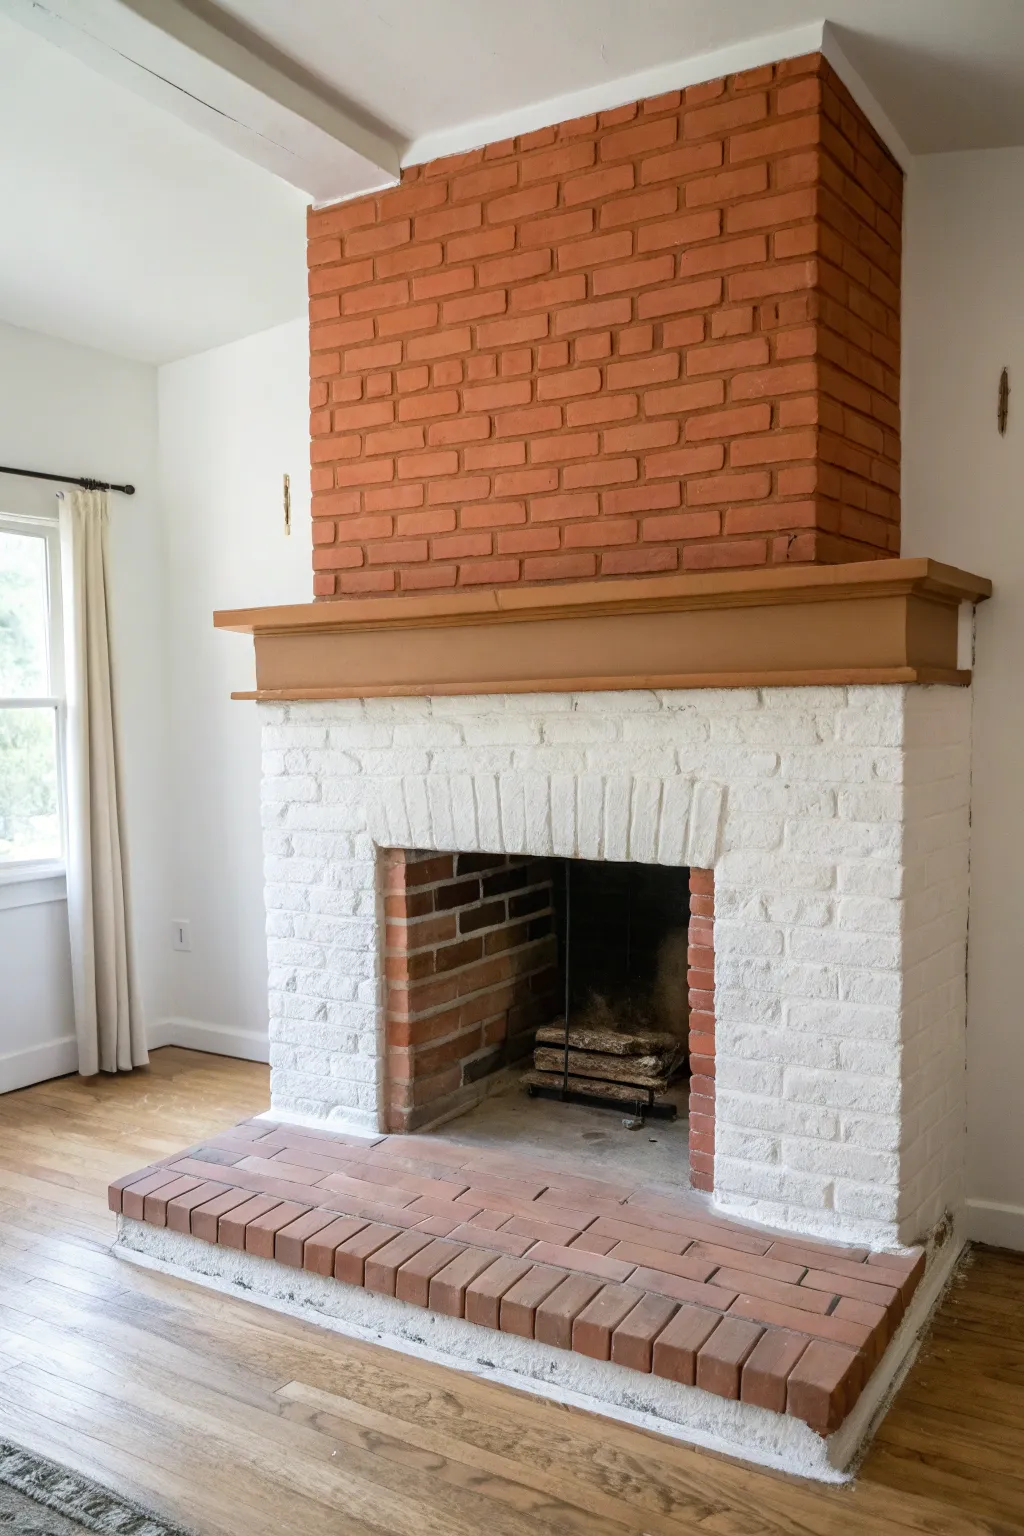
Updates don’t always mean covering everything up; this project celebrates the best of both worlds by pairing a crisp white painted surround with a warm, original red brick chimney. This high-contrast look anchors the room while brightening the lower visual field.
Step-by-Step Guide
Materials
- High-quality masonry primer (latex-based)
- White masonry or latex paint (eggshell or satin finish)
- Painter’s tape (multi-surface)
- Drop cloths or plastic sheeting
- Wire brush
- Shop vacuum
- TSP (Trisodium Phosphate) or heavy-duty degreaser
- Bucket and sponge
- Paint roller with thick nap (3/4 inch)
- Angled sash brush (2.5 inch)
- Warm water and mild soap
Step 1: Preparation & Cleaning
-
Protect the area:
Begin by laying down drop cloths to protect your hardwood floors. Secure the edges with painter’s tape to prevent any slipping or paint seepage. -
Dust deeply:
Using a stiff wire brush, vigorously scrub the brick on the lower surround to dislodge any loose mortar or crumbling brick bits. Follow up immediately with a shop vacuum to remove all dust and debris from the pores. -
Wash the brick:
Mix TSP or a heavy-duty degreaser with water in a bucket. Scrub the lower brick area thoroughly with a sponge to remove soot and oils, which can prevent paint adhesion. Let this dry completely, ideally for 24 hours. -
Tape the boundaries:
Carefully apply painter’s tape along the walls where the brick meets the drywall. More importantly, run a precise line of tape underneath the wooden mantel shelf to protect it. -
Protect the hearth:
Since the hearth will remain natural brick, apply tape along the bottom edge of the vertical surround where it meets the floor bricks. I like to double-check this line to ensure no white paint drips onto the red hearth. -
Mask the firebox opening:
Tape off the interior edge of the firebox opening so your white paint stops cleanly at the edge, leaving the interior firebox brick natural.
Bleed-Through Blues
If soot stains bleed through your white primer, spot-treat those areas with a shellac-based stain-blocking primer before applying your final topcoat.
Step 2: Painting the Surround
-
Prime the mortar joints:
Dip your angled sash brush into the masonry primer. Work the primer into the deep mortar lines first, using a dabbing motion to ensure every nook is covered. -
Prime the brick faces:
Once the joints are wet, use the thick nap roller to apply primer to the faces of the bricks. The thick nap helps reach into the texture without excessive pressure. -
Check for gaps:
Inspect the primed surface for any pinholes or missed spots. Use the brush to touch up these areas while the primer is still tacky. Allow the primer to dry according to the manufacturer’s instructions. -
Paint the first coat (Edges):
Just like with the primer, start your topcoat by cutting in the edges near the wall, floor, and mantel with your brush. Paint the mortar joints by hand again if the roller misses deep spots. -
Roll the first coat:
Apply the white masonry paint using the roller in manageable 2-foot by 2-foot sections. Roll in different directions (up, down, and diagonal) to get paint into the irregular surface. -
Let it cure:
Allow the first coat to dry fully. Brick is porous and soaks up a lot of paint, so don’t be alarmed if the coverage looks uneven at this stage. -
Apply the second coat:
Repeat the rolling process for a second coat to achieve a solid, opaque white finish. This coat usually goes on much faster than the first.
Step 3: Finishing Touches
-
Remove tape:
While the paint is slightly tacky (not fully dry), carefully peel away the painter’s tape at a 45-degree angle. This prevents the dried paint from peeling off with the tape. -
Clean the upper brick:
The original red brick on the chimney might look dusty compared to the fresh white paint. Gently wipe the upper bricks with a damp cloth and mild soap to brighten their natural color without painting them. -
Clean the hearth:
Perform a similar gentle cleaning on the red brick hearth to ensure the red tones match the upper chimney. -
Touch ups:
Inspect the line where the white paint meets the red hearth. If any paint bled through, use a small wire brush or a damp rag immediately to scrub it off the unfinished brick.
Level Up: German Smear
For less contrast, instead of solid white paint for the bottom, try a heavy German Smear technique. It leaves hints of red showing through to tie in the top section.
Enjoy the balanced, airy feel your new fireplace brings to the living space
Subtle Ombré Across the Bricks
Transform a standard brick fireplace into a modern focal point by blending crisp white paint into the natural brick tones. This subtle ombré effect lightens the visual weight of the structure while preserving its original character and warmth.
Detailed Instructions
Materials
- Latex interior paint (white or off-white)
- Water
- Mixing bucket
- Stiff-bristle paint brush (2-3 inch)
- Spray bottle filled with water
- Clean rags or lint-free cloths
- Drop cloths
- Painter’s tape
- Scrub brush
- Mild detergent or TSP substitute
Step 1: Preparation and Cleaning
-
Clear the area:
Remove all decorative items, tools, and grates from the fireplace and hearth area. -
Protect surroundings:
Lay down heavy-duty drop cloths over your flooring to protect wood or carpet from watery paint drips. -
Tape edges:
Apply painter’s tape along the walls where they meet the brick, and carefully tape off the wooden mantel to keep it paint-free. -
Clean the brick:
Brick is porous and holds dust. Use a stiff scrub brush and mild detergent (or TSP substitute) to scrub the brick surface, paying attention to soot marks. -
Rinse and dry:
Wipe down the brick with clean water to remove soap residue and let it dry completely before painting.
Too Much White?
If you applied too much paint near the top, spray the wet brick heavily with water and scrub aggressively with a rag to lift the pigment back to a natural tone.
Step 2: creating the whitewash mixture
-
Mix the paint:
In your bucket, combine your white latex paint with water. A standard starting ratio is 50% paint to 50% water. -
Test consistency:
Stir thoroughly until the mixture is uniform. It should be runny, similar to milk consistency. -
Spot test:
Find an inconspicuous spot (like the side of the hearth base) to test the opacity. If it’s too solid, add more water. If it’s too sheer, add a touch more paint.
Add Depth
For a richer look, mix a tiny drop of warm gray or beige into your whitewash. This kills the harsh blue undertones of bright white paint against red brick.
Step 3: Fading the Paint
-
Start at the bottom:
Dip your stiff brush into the whitewash mixture and begin applying it to the very bottom rows of the fireplace base. You want the heaviest coverage here. -
Work the grout lines:
Press the bristles into the deep grout lines first, then brush over the face of the bricks. -
Move upward:
Work your way up the fireplace. As you get closer to the mantel, apply less paint to your brush. -
Start the transition:
About 12-18 inches below the mantel, change your technique. Brush the paint on, then immediately wipe some off with a damp rag. -
Feather the edges:
For the bricks directly under the mantel, use a ‘dry brush’ technique. Dip the brush, wipe most paint off on the bucket rim, and lightly graze the brick surfaces. -
Mist for blending:
I like to use the spray bottle of water here. Mist the transition area while the paint is wet to help the white drip and blur naturally downward into the heavier coats. -
Leave the top natural:
Stop painting completely at the mantel line. Leave the bricks above the mantel unpainted to create the stark contrast shown in the project image. -
Address the hearth:
For the flat hearth bricks, you can choose to leave them natural for contrast or permit a very light wash that wipes away almost instantly. -
Final touches:
Step back and assess your gradient. If the bottom doesn’t look solid enough, apply a second coat of the wash to the lower third only. -
Clean up:
Remove the painter’s tape while the paint is still slightly tacky to prevent peeling, and let the fireplace cure for 24 hours.
Enjoy the airy, updated feel this gradient finish brings to your living space
Painted Brick Border to Frame the Firebox
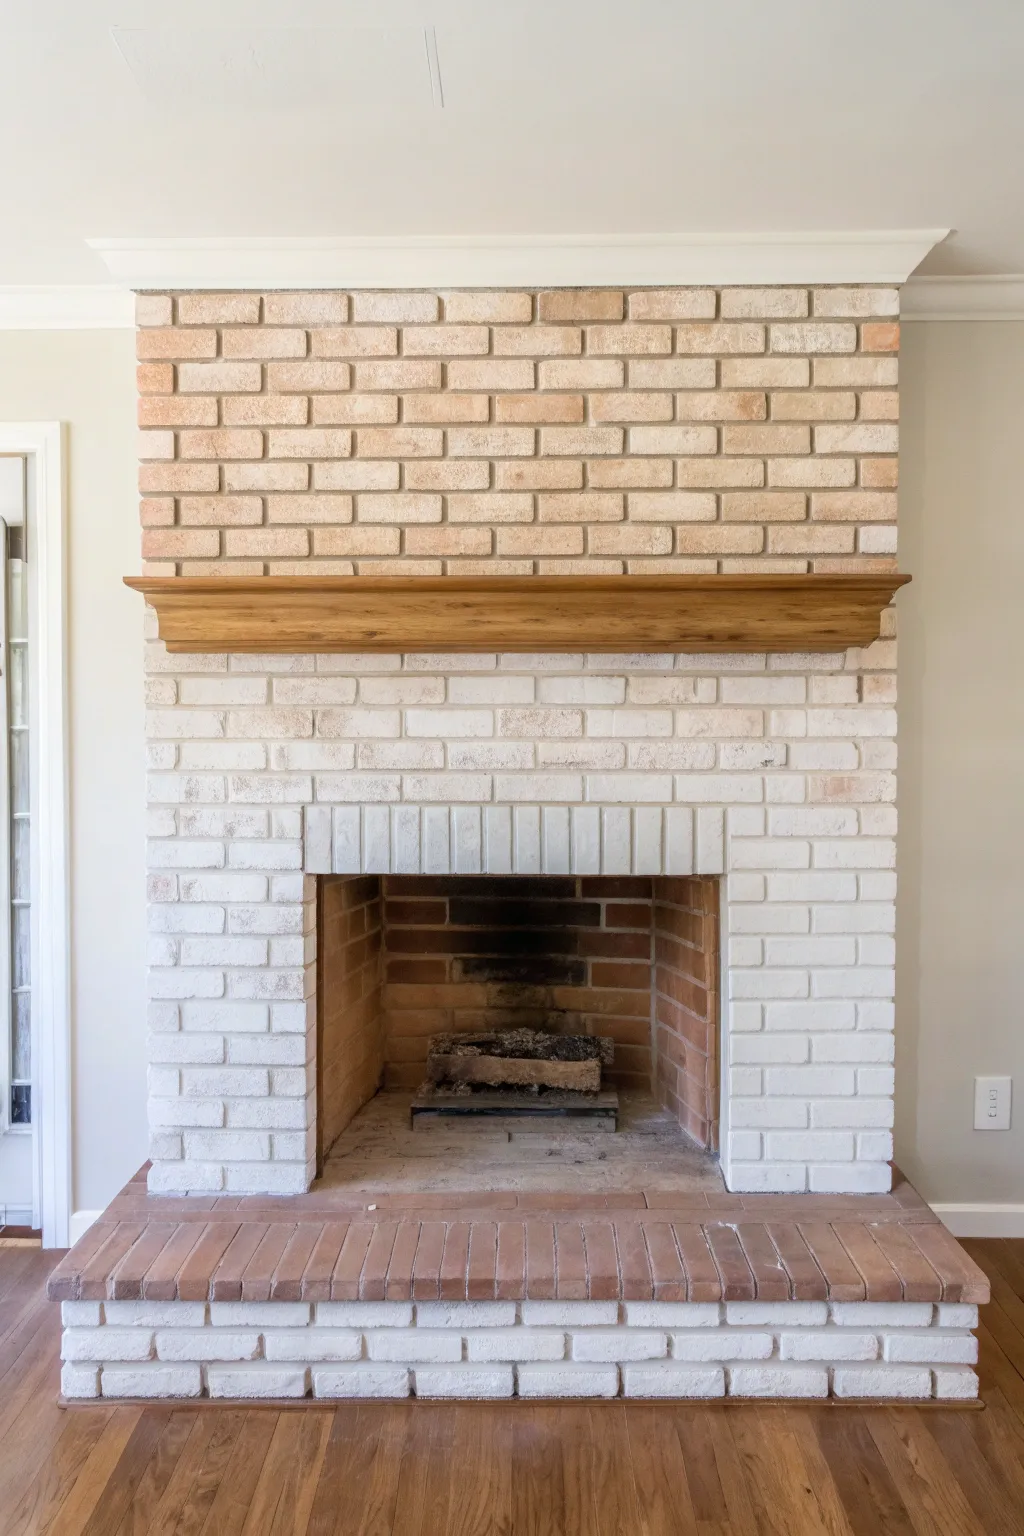
Transform a dated or dark brick fireplace into a bright, modern focal point with this comprehensive painting guide. The result is a clean, creamy white finish that highlights unique architectural details like the vertical soldier course framing the firebox.
Step-by-Step Tutorial
Materials
- Wire brush
- Heavy-duty degreaser or TSP (Tri-Sodium Phosphate)
- Painter’s tape
- Drop cloths
- High-quality acrylic latex primer (stain-blocking)
- Heat-resistant interior paint (satin or eggshell finish)
- 3/4-inch to 1-inch nap roller
- Angled sash brush (2.5 inch)
- Small craft brush (for deep crevices)
- Vacuum with brush attachment
Step 1: Preparation & Cleaning
-
Clear the area:
Remove all fireplace grates, screens, and decorative items. Lay down heavy drop cloths to protect your flooring, ensuring they are taped down securely at the edges. -
Scrub the brick:
Take a stiff wire brush to the entire surface of the brick. Scrub vigorously to remove any loose mortar, soot, or peeling old paint. -
Vacuum thoroughly:
Using a vacuum with a brush attachment, go over every inch of the brickwork to suck up the dust and debris dislodged during brushing. Pay special attention to the deep mortar joints. -
Deep clean with TSP:
Mix TSP or a heavy-duty degreaser with water according to package directions. Scrub the brick down with a sponge or scrub brush to remove soot and oils. This step provides the crucial ‘tooth’ for paint adhesion. -
Rinse and dry:
Wipe the surface down with clean water to remove any cleaning residue. Allow the brick to dry completely for at least 24 hours; trapped moisture can cause paint failure later. -
Tape off boundaries:
Apply painter’s tape carefully around the firebox insert, the wooden mantel, the top molding, and where the brick meets the wall and floor.
Bleed-Through Blues?
Soot stains still showing? Don’t just paint over them. Use a shellac-based primer directly on the stain first to seal it completely before top-coating.
Step 2: Priming the Surface
-
Cut in the mortar:
Dip your angled brush into the stain-blocking primer. Start by ‘cutting in’ the deep mortar grooves, dabbing the brush into the recesses to ensure full coverage. -
Prime the soldier course:
Pay specific attention to the vertical bricks (the soldier course) above the firebox. Use the brush to get into the tight vertical joints between these bricks. -
Roll the faces:
Pour primer into a tray and load up a thick-nap roller (3/4 inch or thicker). Roll over the faces of the bricks. The thick nap helps push primer into the pitted texture of the brick. -
Touch up missed spots:
While the primer is wet, scan for missed pores or deep pits. I use a small craft brush here to poke primer into any stubborn little holes the roller missed. -
Let it cure:
Allow the primer to dry fully according to the manufacturer’s instructions. If you see bleed-through from soot, apply a second coat of primer to those specific areas.
Step 3: Painting the Finish Coat
-
Apply the first topcoat to joints:
Just like with priming, start with your brush work. Paint the mortar joints first. Work in sections of about 2 feet by 2 feet so you can maintain a ‘wet edge’. -
Roll the topcoat:
Use the thick-nap roller to apply your chosen paint color to the brick faces. Use a ‘W’ pattern to distribute paint evenly, then smooth it out with vertical strokes. -
Detail the edges:
Carefully paint tightly around the wooden mantel and the ceiling trim. A steady hand and a high-quality angled sash brush are your best friends for these clean lines. -
Dry and assess:
Let this first coat dry for 4 to 6 hours. Brick is porous and often soaks up the first coat unevenly, so don’t worry if it looks patchy. -
Apply second coat:
Repeat the brushing and rolling process for a second coat. This layer will provide the true color depth and the solid, creamy finish seen in the inspiration image. -
Remove tape:
Score the edge of the painter’s tape with a utility knife before pulling it off. This prevents dry paint from peeling away with the tape. -
Final inspection:
Check the soldier course and deep crevices one last time. Use your small brush to fill any tiny pinholes that are still showing the raw brick color.
Make It Pop
For added dimension, consider painting the soldier course bricks (the vertical ones) in a slightly different shade or finish (like high gloss) for a subtle accent.
Now step back and admire how a fresh coat of paint has completely revitalized the room’s atmosphere
Stenciled Pattern on Painted Brick
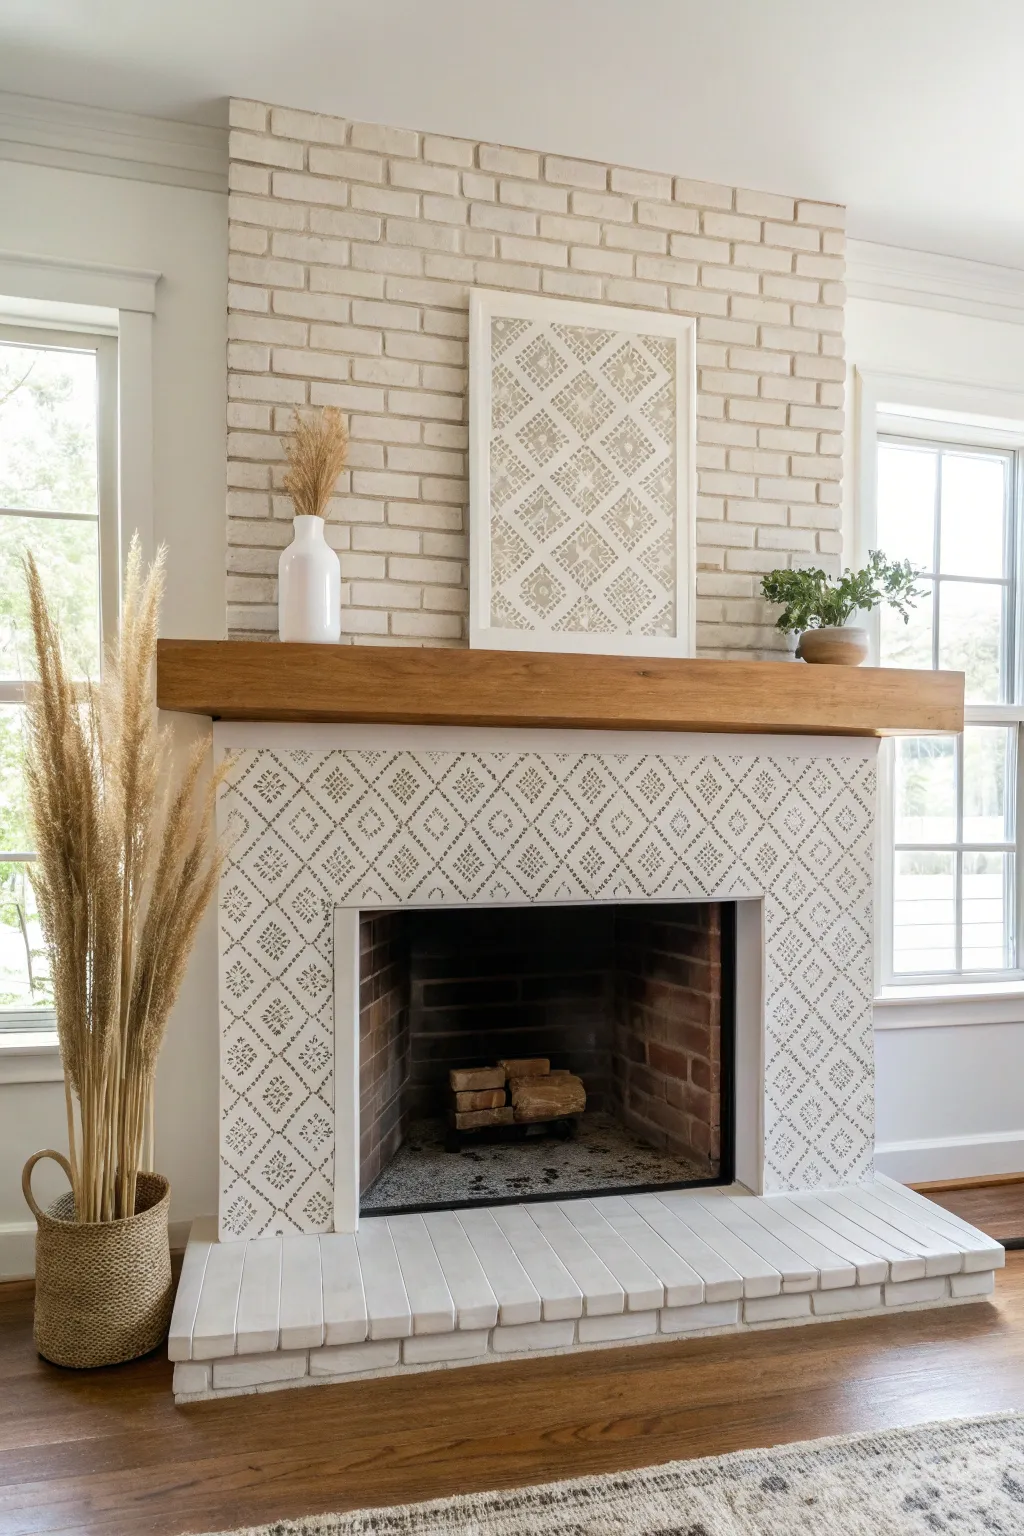
Transform a dated brick fireplace into a modern focal point using nothing but paint and a strategically placed stencil. This project mimics the high-end look of patterned tile with a soft, neutral palette that keeps the space feeling airy and light.
Detailed Instructions
Materials
- High-quality bonding primer (suitable for masonry)
- White latex paint (satin or semi-gloss finish)
- Gray or taupe craft paint (for the stencil)
- Geometric stencil (diamond or tribal pattern)
- Stencil brush or high-density foam roller
- Painter’s tape
- Drop cloths
- Cleaning supplies (TSP or degreaser, wire brush)
- Paint tray and liners
- Paper towels
- Optional: Clear matte sealer
Step 1: Prep and Prime
-
Clean the Brick:
Begin by thoroughly cleaning the brick surface. Use a wire brush to remove any loose debris or soot, then scrub with a TSP solution or a heavy-duty degreaser. Rinse well with water and let the brick dry completely for at least 24 hours. -
Protect Surroundings:
Apply painter’s tape to the walls, floor, mantel, and firebox insert to protect them from stray paint marks. Lay down drop cloths to catch any drips. -
Apply Primer:
Roll on a coat of high-quality bonding primer designed for masonry surfaces. Use a thick-nap roller to get into the crevices and mortar lines, and use a brush for the edges. Let this cure according to the manufacturer’s instructions.
Adhesion Insurance
Use spray adhesive on the back of your stencil, not just tape. A light misting helps the stencil stick flat against the uneven brick texture, significantly reducing paint bleed.
Step 2: Base Coat Application
-
Paint the Base Color:
Once the primer is dry, apply your white base coat. You will likely need two coats to get full coverage over the porous brick texture. -
Detail the Mortar:
Don’t forget the mortar joints. I like to use an angled sash brush to ensure the white paint fully coats the recessed areas between bricks before rolling the faces. -
Dry Time:
Allow the base coat to dry completely, preferably overnight. The surface needs to be hard and cured so the stencil tape doesn’t peel up the fresh paint.
Mirror the Look
Create matching art for the mantel! Simply stencil the same pattern onto a piece of cardstock or canvas, frame it in white, and lean it against the upper brick for a cohesive design moment.
Step 3: Stenciling the Pattern
-
Plan the Layout:
Find the center point of your fireplace surround directly under the mantel. Measure and mark this spot lightly with a pencil. -
Position the Stencil:
Align the center of your stencil pattern with your center mark. Secure the stencil firmly to the brick face using painter’s tape. Ensuring it is level is crucial for the first placement. -
Load the Brush:
Dip your stencil brush into the gray or taupe paint, then offload almost all of the paint onto a paper towel. The brush should feel almost dry to the touch to prevent bleeding. -
Apply the Pattern:
Use a straight up-and-down dabbing motion (stippling) to apply the paint through the stencil openings. Do not brush back and forth, as this forces paint under the stencil edges. -
Navigate Mortar Lines:
When stenciling over deep mortar lines, you may need to press the stencil down into the groove with your fingers while dabbing to ensure the pattern continues seamlessly. -
Move and Repeat:
Carefully peel back the stencil and reposition it next to your completed section. Most stencils have registration marks (parts of the previous design) to help you align it perfectly. -
Corner Techniques:
When you reach the edges or corners, tape off the adjacent wall or mantel. You may need to bend the flexible stencil into the corner to get the pattern right up to the edge. -
Touch Ups:
Once the entire pattern is complete and the stencil is removed, use a small artist’s brush and your white base paint to correct any small bleeds or smudges.
Step 4: Final Steps
-
Optional Sealing:
If your fireplace sees heavy use or you want easier cleaning, apply a coat of clear matte sealer over the stenciled area once the paint is fully cured. -
Remove Tape:
Gently remove all painter’s tape while the sealer or final touch-ups are still slightly tacky to ensure clean lines. -
Style the Mantel:
Complete the look by adding coordinating decor. In the example, a framed piece of artwork using the same stencil pattern ties the whole look together beautifully.
Step back and enjoy the custom, tiled look of your new fireplace surround without the hassle of actual renovation
Color-Pop Back Panel Inside the Firebox
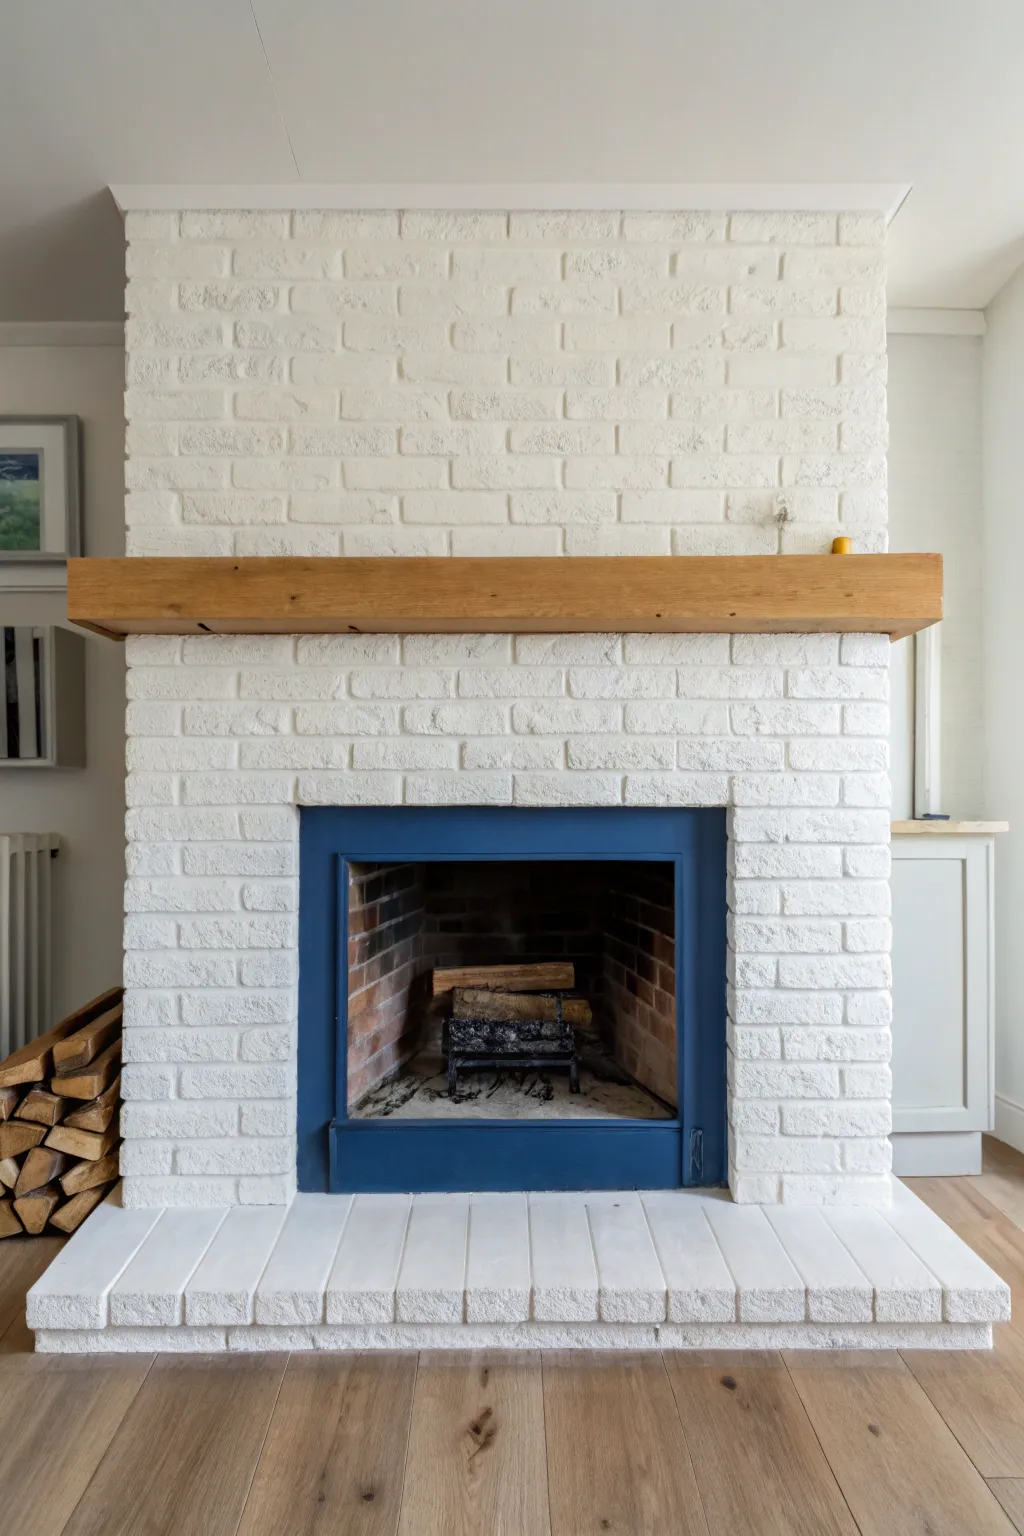
Transform a standard fireplace by giving the metal firebox surround a bold, colorful update that contrasts beautifully against white brick. This project creates a striking focal point using high-heat paint for a finish that is both durable and stylish.
Step-by-Step
Materials
- High-heat spray paint (matte black)
- High-heat brush-on paint (deep blue shade)
- Painter’s tape or masking tape
- Drop cloths or plastic sheeting
- Wire brush
- Medium-grit sandpaper (120-150 grit)
- Degreaser or TSP substitute
- Clean rags
- Small foam paint roller
- Angled sash brush (synthetic bristles)
- Warm soapy water
- Protective mask and gloves
Step 1: Cleaning and Prep
-
Protect the area:
Lay down drop cloths extensively around the hearth and tape off the surrounding white brick with painter’s tape to prevent any accidental splashes or overspray. -
Remove loose debris:
Use a wire brush to scrub the metal surround vigorously, removing any rust flakes, loose old paint, or soot buildup that could affect adhesion. -
Sand the surface:
Go over the entire metal frame with medium-grit sandpaper to scuff the surface. This mechanical abrasion gives the new paint something to grip onto. -
Degrease thoroughly:
Clean the metal using a degreaser or TSP substitute and a rag. It is crucial to remove every trace of soot and oil, or the high-heat paint will peel later. -
Final rinse:
Wipe the surface down one last time with plain water on a clean cloth to remove chemical residue, then let the metal dry completely.
Clean Lines
For the sharpest line between the metal and the rough brick, run a bead of clear caulk over your tape edge before painting to seal any gaps.
Step 2: Priming and Base Coat
-
Tape interior brick:
If you want to keep the inner firebox brick natural (as shown), carefully tape off the edge where the metal meets the interior brickwork. -
Apply a base layer:
If the metal is bare or rusty, apply a coat of high-heat primer. I like to use a matte black high-heat spray as a base because it covers imperfections well and heat-proofs the metal. -
Ventilate the room:
Ensure windows are open and fans are running while spraying or painting, as high-heat enamels often have strong fumes. -
Let the base cure:
Allow this initial base coat to dry according to the manufacturer’s instructions, usually at least 1-2 hours before re-coating.
Step 3: Adding the Color
-
Stir the high-heat color:
Open your can of deep blue high-heat paint and stir it thoroughly, ensuring all pigments at the bottom are fully incorporated. -
Cut in the edges:
Use an angled sash brush to carefully paint the corners and edges of the metal frame where a roller can’t reach. -
Roll the flat surfaces:
Use a small foam roller to apply the blue paint to the flat sections of the surround. This helps achieve a smooth, brush-stroke-free finish. -
Inspect for coverage:
The first coat might look streaky or slightly transparent over black; don’t worry, this is normal for deep colors. -
Apply second coat:
Once the first coat is dry to the touch, apply a second coat using the same method to achieve a rich, opaque blue. -
Remove tape promptly:
While the final coat is still slightly tacky (not fully dry), carefully peel away the painter’s tape. This prevents the dried paint from peeling off with the tape. -
Cure time:
Let the paint cure for at least 24-48 hours before lighting a fire. Some high-heat paints require a ‘heat cure’—lighting a small fire to set the paint—so check your can’s label.
Matte vs. Satin
A flat or matte finish hides soot and surface dings better than satin. If your metal is pitted, steer clear of glossy high-heat paints.
Enjoy the dramatic pop of color your newly painted firebox adds to the room
Metallic Dry-Brush Highlights on Painted Brick
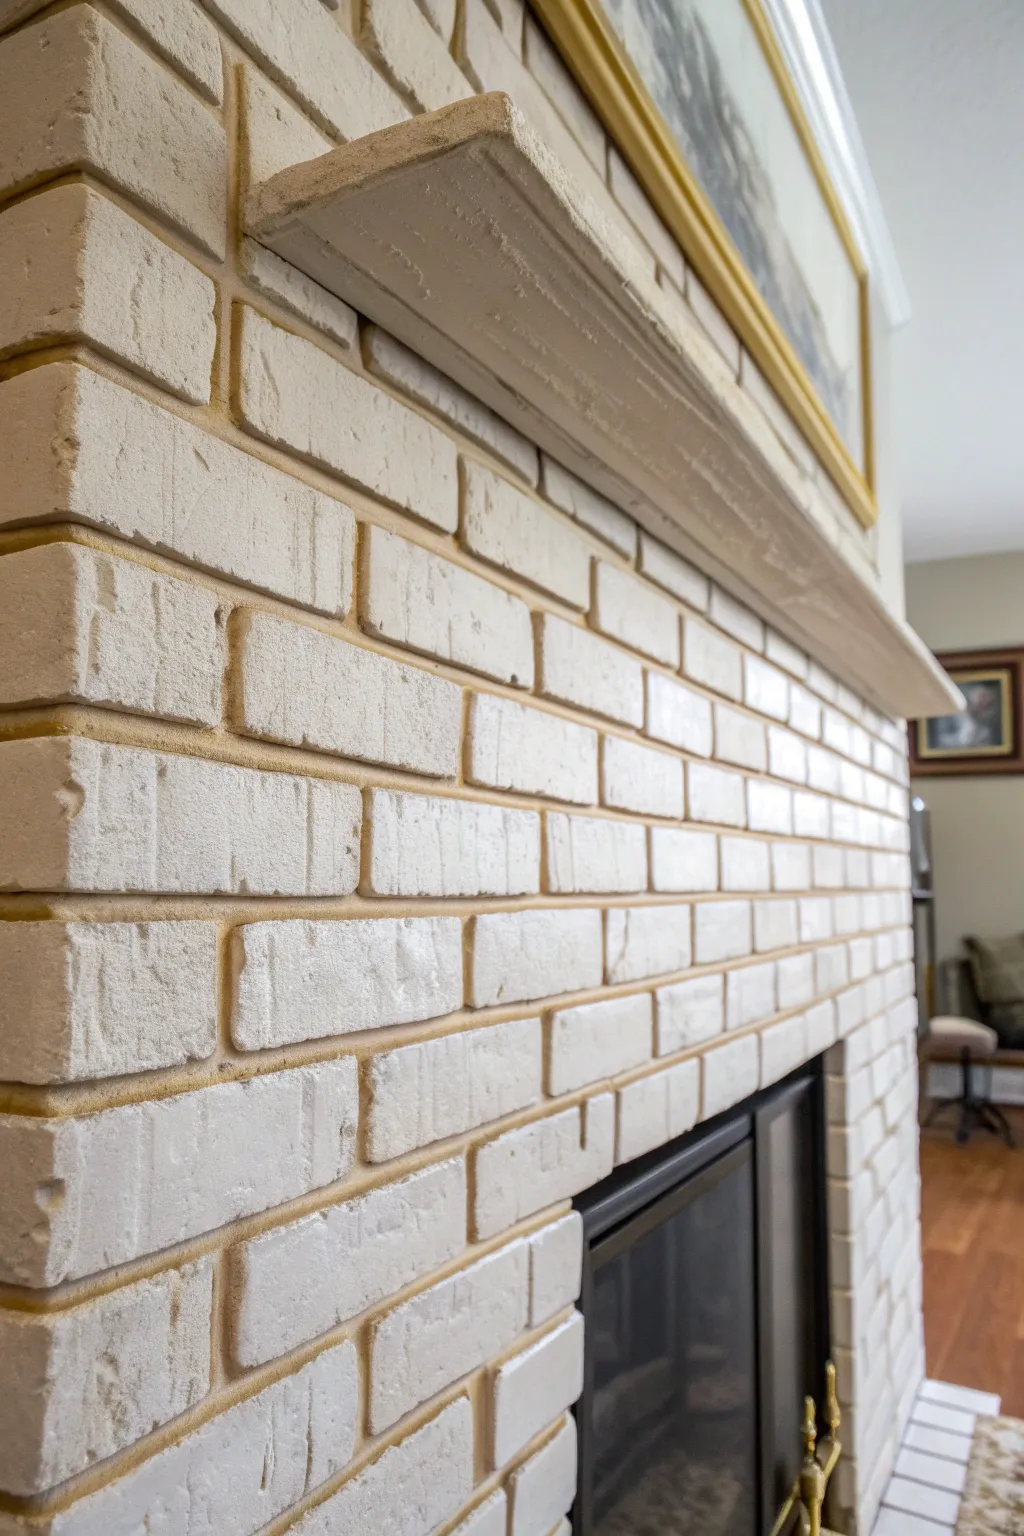
Transform a standard brick fireplace into a sophisticated focal point by highlighting the mortar lines with warm metallic tones. This technique combines a clean, painted brick face with striking gold or copper grout, creating a luxurious depth that catches the light beautifully.
Step-by-Step Guide
Materials
- High-quality latex primer (masonry specific)
- Creamy white latex paint (satin or eggshell finish)
- Metallic gold or copper acrylic paint
- Small angled craft brush (1/2 inch)
- Medium sash brush (2 inch)
- Small detail brush (round tip)
- Painter’s tape
- Canvas drop cloth
- Wire brush or stiff scrub brush
- TSP (Trisodium Phosphate) cleaner substitute
- Rags or sponge
Step 1: Preparation and Base Coat
-
Clean the surface:
Before any paint touches the brick, you need a pristine surface. Scrub the entire fireplace face vigorously with a wire brush to remove loose mortar, soot, and dust. -
Wash the brick:
Mix a TSP substitute with warm water in a bucket. Use a large sponge to wash down the bricks, removing stubborn grime that could prevent adhesion. Let the brick dry completely for at least 24 hours. -
Protect the area:
Lay down your canvas drop cloth to protect the flooring. Use painter’s tape to mask off the walls, the mantel (if you aren’t painting it yet), and the firebox insert. -
Prime the masonry:
Apply a coat of masonry-specific primer to the entire fireplace using the medium sash brush. Work the primer deep into the textured crevices of the brick and the mortar lines. -
Apply the base color:
Once the primer is dry, stir your creamy white latex paint thoroughly. I like to start painting from the top corner and work my way down to avoid drips ruining finished sections. -
Coverage check:
Apply a second coat of the base color if the brick tone is still bleeding through. Allow this base layer to cure fully—wait overnight to ensure the surface is hard and ready for detail work.
Step 2: The Metallic Grout Technique
-
Prepare the metallic paint:
Pour a small amount of your metallic gold or copper paint into a disposable cup or palette. If the paint is very thick, thin it slightly with a drop of water to help it flow smoothly into the mortar lines. -
Test a hidden spot:
Find an inconspicuous area, perhaps near the floor, to test your color and brush size. This helps determine exactly how much paint to load onto your brush. -
Begin the grout lines:
Using the small angled craft brush, carefully paint the recessed mortar lines between the bricks. Hold the brush steady and use long, deliberate strokes. -
Clean edges immediately:
Keep a damp rag handy. If any metallic paint strays onto the face of the white brick, wipe it away instantly before it sets. -
Refine the corners:
Switch to your small detail brush (round tip) to get into the tight corners where bricks meet the wall or the firebox frame. This ensures the metallic line looks crisp and intentional. -
Dry-brushing option:
For a softer look seen in some areas of the photo, you can lightly ‘dry brush’ a tiny amount of the cream base paint back over the edges of the metallic grout if the contrast feels too harsh.
Steady Hand Trick
Rest your pinky finger against a dry section of the brick while painting the grout. This anchors your hand, giving you significantly more control for straight lines.
Step 3: Mantel and Final Touches
-
Address the mantel:
If your mantel is stone or concrete like in the image, paint it with the same cream base color used on the bricks to create a seamless, built-in appearance. -
Create texture on the mantel:
While the mantel paint is still tacky, stipple it slightly with a dry brush to mimic the rough texture of the stone beneath. -
Highlight the shelf:
Consider adding a very subtle wash of the metallic paint to the underside or edges of the mantel shelf to tie it visually to the grout lines below. -
Final inspection:
Step back and view the fireplace from a distance. Look for any skipped mortar spots or uneven paint lines and touch them up with the appropriate small brush. -
Remove tape:
Carefully peel away the painter’s tape while the final touch-ups are still slightly damp to prevent peeling up any dry paint film.
Aged Patina Effect
Mix a tiny drop of burnt umber acrylic into your gold paint. This dulls the shine slightly, making the metallic grout look like aged antique brass rather than new foil.
Enjoy the warm glow your new metallic accents bring to the room
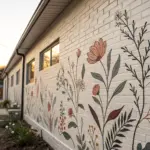
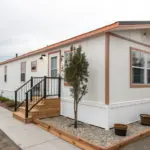


Have a question or want to share your own experience? I'd love to hear from you in the comments below!