When I need a cheerful, low-pressure project, I always come back to painting reindeer because they’re instantly recognizable and ridiculously fun to stylize. Below are my favorite reindeer painting ideas, starting with the classic crowd-pleasers and moving into more unexpected, artsy twists.
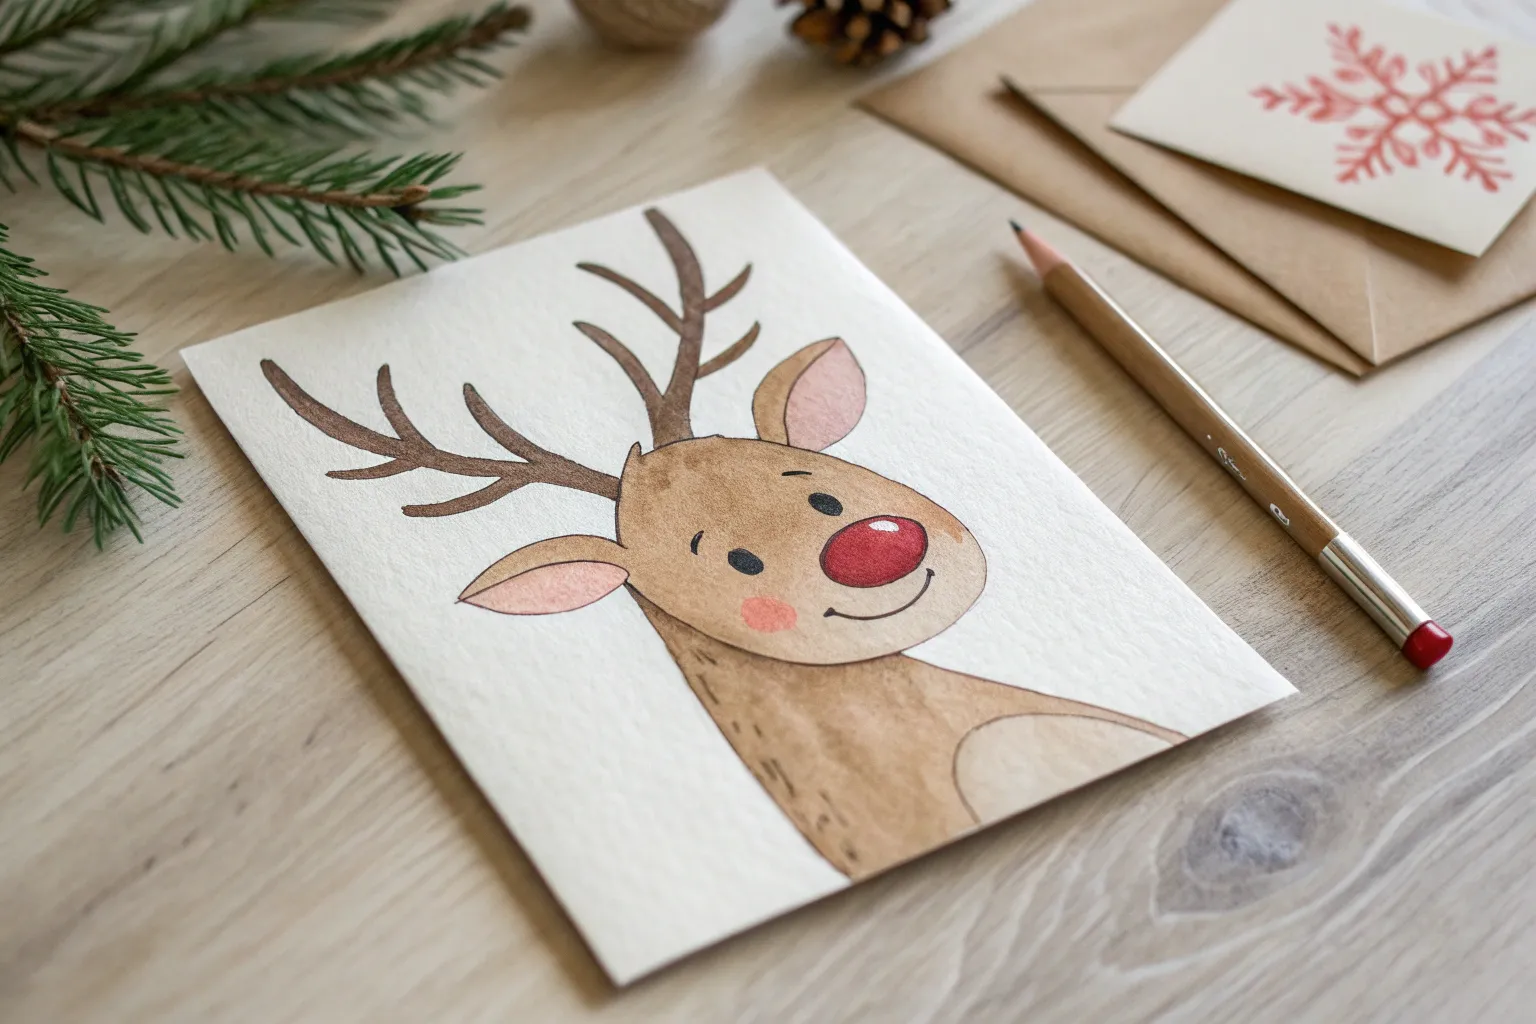
Classic Red-Nosed Reindeer Portrait
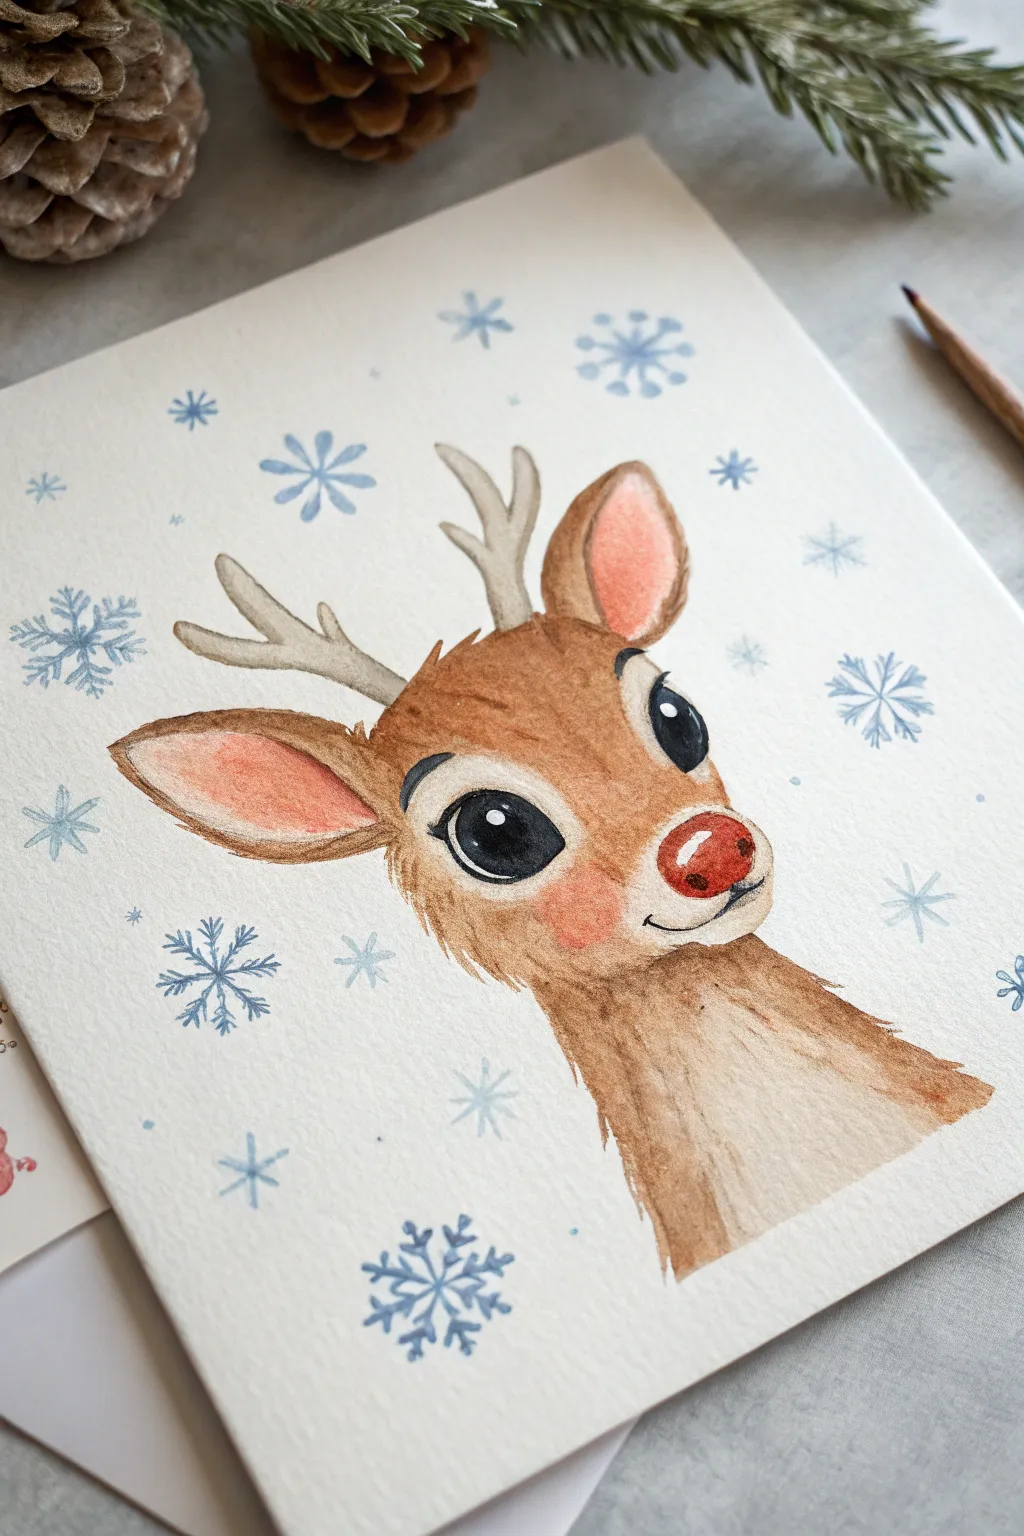
Capture the magic of the season with this charming watercolor portrait of a bright-eyed reindeer featuring a signature red nose. The soft textures and surrounding snowflakes make this piece perfect for holiday cards or festive wall art.
Step-by-Step Tutorial
Materials
- Cold press watercolor paper (300 gsm)
- Watercolor paints (Burnt Sienna, Yellow Ochre, Lamp Black, Cadmium Red, Cerulean Blue)
- Round watercolor brushes (Size 2, 4, and 6)
- HB pencil and kneaded eraser
- White gel pen or gouache (optional highlights)
- Two jars of water
- Paper towels
Step 1: Sketching the Outline
-
Map out the head shape:
Begin lightly with your HB pencil. Draw an inverted pear shape for the head, keeping the bottom rounder for the muzzle and the top slightly narrower. -
Add facial features:
Sketch two large oval eyes spaced widely apart. Add a smaller oval for the nose right at the tip of the muzzle, and draw a gentle curve for the mouth. -
Ears and antlers:
Draw large, leaf-shaped ears extending from the sides of the head. Add two small, branching antlers at the top center, keeping the lines soft and rounded rather than sharp. -
Refine the sketch:
Lightly trace over your lines to ensure they are visible but faint. Use a kneaded eraser to roll over the paper, picking up excess graphite so it doesn’t muddy the paint later.
Preserve the Sparkle
For the crispest eye highlights, use masking fluid before you start painting. If you forget, a dab of opaque white gouache or a white gel pen works perfectly at the end.
Step 2: Painting the Base Layers
-
First wash for the fur:
Mix Burnt Sienna with a touch of Yellow Ochre and plenty of water. Using a size 6 brush, apply a light, wet wash over the entire head and neck, carefully avoiding the eyes and nose. -
Soften the edges:
While the paint is still damp, rinse your brush and run clean water along the edges of the neck fur to create a soft, feathery transition into the white paper. -
Inner ears:
Mix a very dilute wash of Cadmium Red with a tiny bit of brown to make a soft pink. Paint the insides of the ears, blending it gently into the surrounding brown fur while wet. -
Antler base:
Use a very pale, watered-down grey-brown mix to paint the antlers. Keep this layer expressly light, as these should look like bone or velvet texture.
Make It Shimmer
Mix a tiny pinch of cosmetic-grade biodiversity glitter or iridescent medium into your blue paint for the snowflakes to give the card a magical, frosty shine.
Step 3: Adding Depth and Detail
-
Darkening the fur:
Once the first layer is dry, mix a more concentrated Burnt Sienna. Use a size 4 brush to add short, flicking strokes around the forehead and cheeks to simulate fur texture. -
Shadows and contours:
Apply a slightly darker brown mix under the chin and around the base of the ears to create dimension. I like to soften these shadow edges with a damp brush so they aren’t too harsh. -
Rosy cheeks:
While the cheek area is dry, glaze a very thin, watery circle of red/pink on the cheek to give the reindeer a festive flush. -
Painting the eyes:
Switch to your size 2 brush and Lamp Black paint. Carefully fill in the large pupil area, leaving a crisp white circle unpainted for the reflection highlight. This spark of light is crucial for a lively expression. -
The iconic nose:
Fill the nose shape with bright Cadmium Red. While wet, drop a tiny bit of darker red on the bottom edge for shading, and leave a tiny white sliver near the top for a highlight.
Step 4: Final Touches and Background
-
Defining details:
Use your smallest brush with a dark brown-black mix to outline the eyes, add eyelashes, and define the mouth and nose bridge. -
Fur texture refinement:
Add tiny, dry-brush flicks of dark brown along the edges of the ears and neck to make the silhouette look fuzzy and soft. -
Primary snowflakes:
Mix a light, watery Cerulean Blue. Paint simple six-point star shapes scattered around the background. Vary the sizes, making some larger and some tiny. -
Snowflake details:
Once the blue stars are dry, use the tip of your brush to add little branching details to the ends of the snowflake arms. -
Atmospheric specks:
Dot tiny spots of the blue mixture in the empty spaces to look like distant falling snow.
Let your painting dry completely before framing or folding it into a heartwarming holiday card


Reindeer in a Snowy Meadow
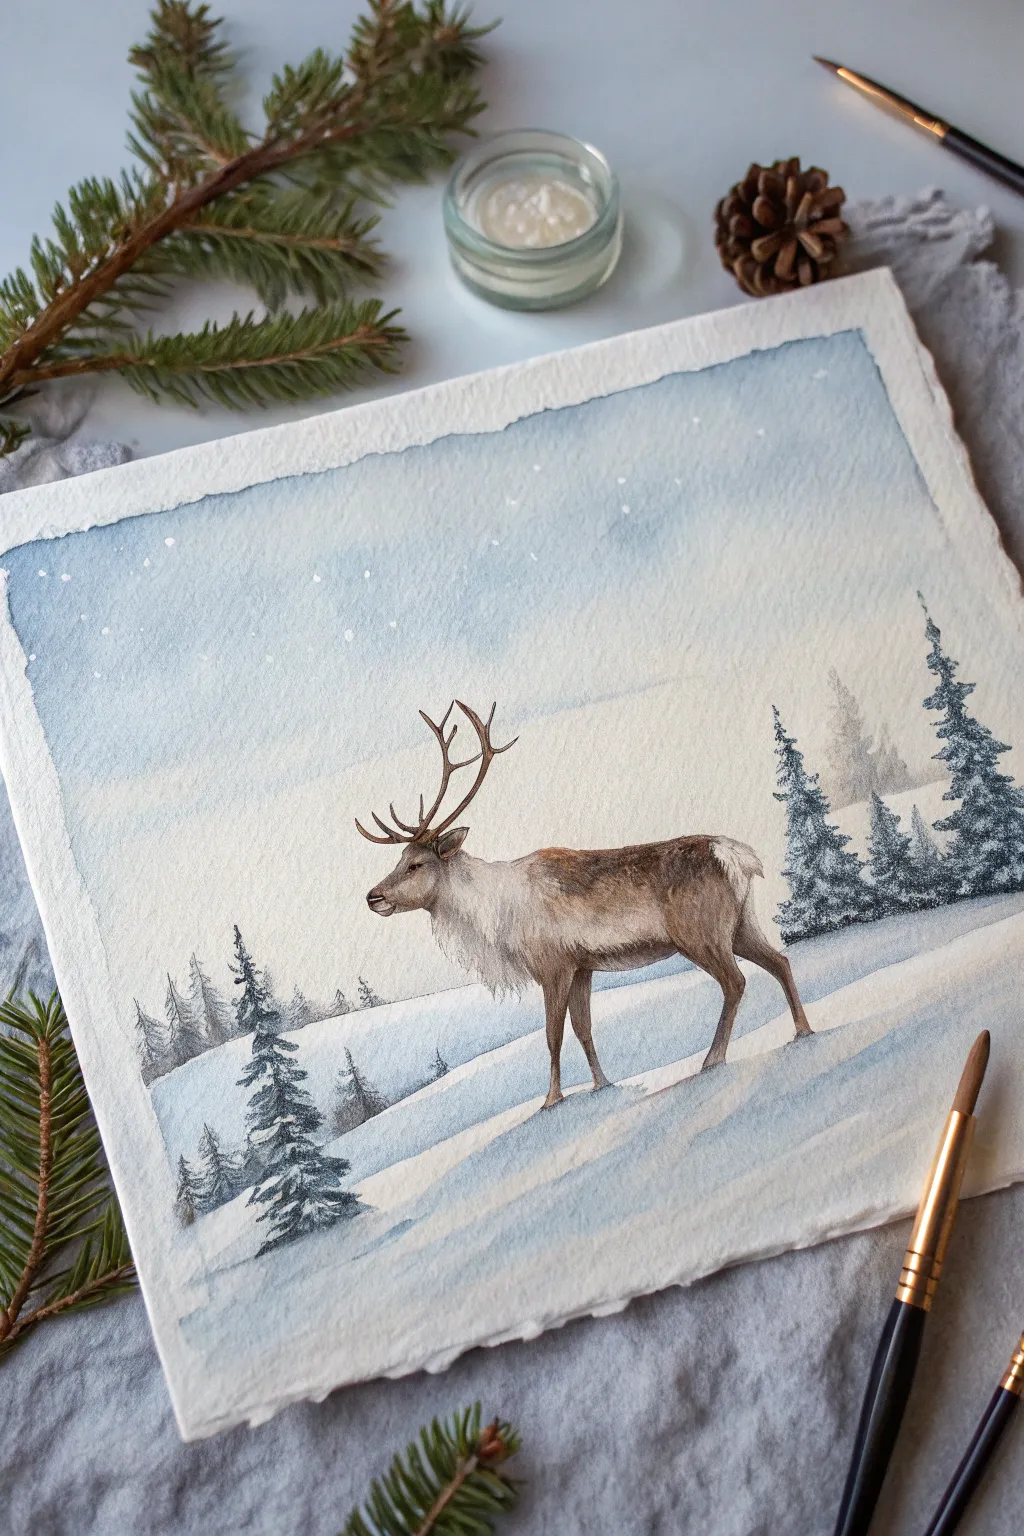
Capture the serene beauty of the arctic tundra with this delicate watercolor painting featuring a majestic reindeer. You will learn to balance soft, atmospheric washes for the snowy background with detailed dry-brush techniques for the animal’s fur.
Detailed Instructions
Materials
- Cold press watercolor paper (300 gsm, heavy texture preferred)
- Watercolor paints (Indigo, Burnt Umber, Sepia, Yellow Ochre, Payne’s Grey, White Gouache)
- Round brushes (sizes 2, 6, and 10)
- Rigger or liner brush for fine details
- Masking fluid (optional)
- Pencil (HB or 2H)
- Kneaded eraser
- Palette for mixing
- Two jars of water
- Paper towels
Step 1: Planning and Sketching
-
Prepare the paper:
If you want the textured, antique look shown in the reference, tear your watercolor paper carefully against a ruler to create deckled edges before you begin taping it down to your board. -
Sketch the horizon:
Lightly draw a sloping line about one-third of the way up the paper to establish the snowy ground. Add a second, fainter line higher up for the distant hills. -
Outline the reindeer:
Sketch the reindeer’s form in the center foreground. Focus on the large shapes first—the barrel chest, the strong neck, and the sweeping curve of the antlers. Keep your pencil lines very light so they don’t show through the paint later. -
Mark tree positions:
Briefly indicate where your pine trees will go—a few small ones in the distance on the right, and a prominent one in the foreground on the left.
Muddy Fur?
If fur texture looks muddy, let the layer dry completely. Switch to a smaller brush and dry paint (less water). Crisp strokes over dry paper create distinct hair lines.
Step 2: Atmospheric Background
-
Wet-on-wet sky wash:
Generously wet the sky area with clean water using your size 10 brush. While wet, drop in a very diluted wash of Indigo and Payne’s Grey, concentrating the color slightly at the top and letting it fade into white near the horizon. -
Create distant trees:
While the background is still slightly damp (but not soaking), use a size 6 brush to dab in faint, ghostly pine shapes on the right horizon using a watery mix of Payne’s Grey. The damp paper will soften the edges automatically. -
Paint the snow base:
For the snowy ground, use a very watery wash of Indigo. Paint sweeping, diagonal strokes that mimic the drift on the ground, leaving plenty of dry white paper to represent the brightest snow highlights. -
Add snow shadows:
Once the first snow layer is dry, mix a slightly stronger blue-grey. Paint shadows under where the reindeer stands and on the shadowed side of the hills to create volume.
Magical Glow
For a ‘Golden Hour’ look, glaze a very thin, watery layer of yellow or pale pink over the horizon line before painting the trees, warming up the snowy scene.
Step 3: Painting the Reindeer
-
Base coat for the fur:
Mix a light wash of Yellow Ochre and Burnt Umber. Apply this over the reindeer’s body, avoiding the neck area where the fur is white. -
Building fur texture:
Switch to a size 2 brush and a mix of Sepia and Burnt Umber. Use short, flicking strokes to create the texture of the coat. Follow the muscle structure, darkening the belly and the back leg. -
Detailing the neck:
For the thick, white neck fur, use a very pale grey wash to define shadows between the tufts, leaving the majority of the paper white. I find using negative painting here—painting the shadows rather than the hair itself—works best. -
Hooves and antlers:
Paint the antlers with a mix of Burnt Umber and a touch of Sepia, keeping the tips lighter. Use dark, concentrated Sepia for the hooves and the eye.
Step 4: Foreground and Finishing Touches
-
Paint foreground trees:
Mix a dark, cool green using Indigo and Green or Sepia. Using the tip of your size 6 brush, paint the detailed pine trees in the foreground with distinct, sharp branches. -
Add tree shadows:
Use diluted Indigo to pull soft shadows away from the base of the trees and the reindeer’s hooves, anchoring them to the ground. -
Falling snow effect:
Load a toothbrush or stiff brush with white gouache. Gently flick the bristles to splatter tiny white dots over the sky and dark trees to create a snowfall effect. -
Final highlights:
Use a small brush and white gouache to add bright highlights to the top of the antlers and the tips of the pine branches where snow would settle.
Step back and admire your quiet, snowy landscape


Reindeer Under a Starry Night Sky
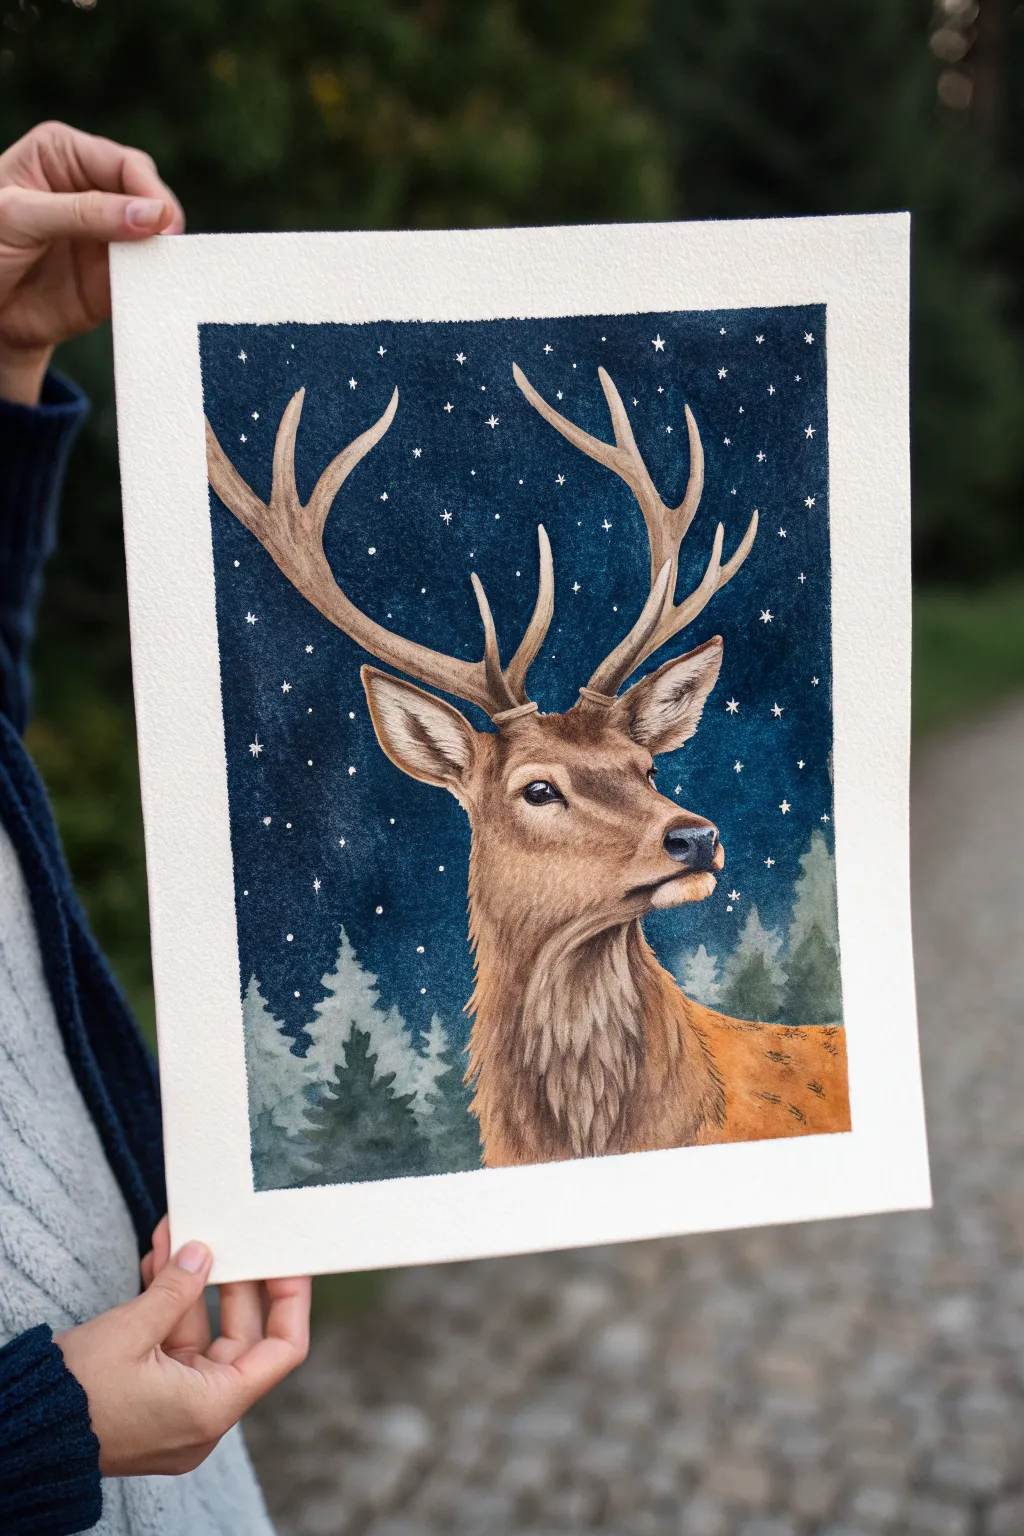
Capture the majestic silence of the forest at night with this intricate watercolor portrait. This piece contrasts the warm, detailed fur of a reindeer against a deep indigo sky filled with twinkling stars and gentle evergreens.
Step-by-Step Tutorial
Materials
- Cold press watercolor paper (300 gsm)
- Masking tape
- Watercolor paints (Indigo, Payne’s Grey, Burnt Sienna, Yellow Ochre, Burnt Umber, Sap Green)
- White gouache or white gel pen
- Round brushes (sizes 2, 4, and 8)
- Small detail brush (size 0 or 00)
- Pencil (HB or 2H)
- Kneaded eraser
- Masking fluid (optional)
Step 1: Sketching and Preparation
-
Tape the borders:
Begin by taping down all four edges of your watercolor paper to a board. This creates the crisp white border seen in the final piece and prevents the paper from buckling under heavy washes. -
Outline the subject:
Lightly sketch the stag’s profile. Focus on the triangular shape of the nose, the large attentive ears, and the curvature of the antlers. Keep your pencil lines very faint so they don’t show through the final paint. -
Mark the horizon:
Sketch a jagged, uneven line near the bottom third of the paper to indicate where the treeline meets the sky. You don’t need to draw individual trees yet; just establish the boundary. -
Protect the details:
If you are using masking fluid, apply it carefully over the deer and its antlers. This allows you to paint the dark sky freely without worrying about ruining the pristine paper reserved for the animal.
Step 2: Painting the Night Sky
-
Prepare the sky wash:
Mix a generous amount of Indigo and Payne’s Grey. You want a very saturated, dark blue mix. I find preparing two puddles—one slightly more watery than the other—helps manage the flow. -
Apply the background:
Using your largest round brush, wet the sky area with clean water first (wet-on-wet technique). Then, drop in your dark blue mix, working from the top down. Let the color pool and settle naturally to create a subtle texture. -
Deepen the cosmos:
While the paper is still damp, drop in concentrated pigment (Indigo or even a touch of Black) into the upper corners and random spots to create depth. Avoid the very bottom edge where the trees will be. -
Let it dry completely:
This is crucial. The sky must be bone dry before you proceed. If you applied masking fluid, gently rub it off with your finger or a rubber pick-up tool once the paper is dry.
Pro Tip: Fur Texture
Don’t overblend your fur layers. Letting the strokes sit on top of each other creates the illusion of density. Wait for the base layer to dry before adding the darker ‘hairs’ on top.
Step 3: Bringing the Deer to Life
-
Base layer for the fur:
Dilute Yellow Ochre and lightly wash over the deer’s face and body. This warm undertone will glow through the darker fur layers later. Leave the area around the eye and the muzzle slightly lighter. -
Building the coat:
Switch to Burnt Sienna. Using a size 4 brush, apply strokes that follow the direction of hair growth—down the neck, sweeping back across the cheek. Use a ‘flicking’ motion to create the texture of fur. -
Painting the antlers:
Mix a pale wash of Burnt Umber and faint Grey. Paint the antlers, keeping one side lighter to suggest moonlight hitting them. Darken the ridges and the base where they connect to the skull. -
Adding shadows:
Mix Burnt Umber with a touch of Indigo to create a cool shadow tone. Apply this under the jawline, inside the ears, and around the eye socket to give the head three-dimensional form. -
Detailing the eye and nose:
Using your smallest brush and concentrated Black or dark Grey, carefully paint the eye, leaving a tiny pure white speck for the highlight. Paint the nose dark, fading it slightly at the top for a soft, velvety look.
Level Up: Metallic Touch
Use a metallic gold watercolor paint or a gold pen for the stars instead of white. This adds a magical, festive warmth that shifts beautifully when the light hits the paper.
Step 4: Foreground and Finishing Touches
-
Painting the distant trees:
Mix Sap Green with Indigo for a misty, dark forest color. Using a diluted version of this, paint the silhouettes of pine trees in the background. Keep the edges soft; these should look slightly out of focus. -
Refining the mane:
Go back to the deer’s neck with your size 0 brush. Use a dry-brush technique with dark brown paint to create distinct, individual hairs in the thick mane area. -
Adding stars:
Use white gouache or a white gel pen to place stars in the sky. Make some simple dots and transform others into tiny four-point crosses for a twinkling effect. -
Final highlights:
Add a few tiny white strokes to the deer’s whiskers and the tips of the ear fur to make them pop against the dark background. -
The reveal:
Once everything is completely dry, slowly peel away the masking tape at a 45-degree angle to reveal your clean, crisp borders.
Step back and admire the serene atmosphere you’ve captured in your winter wildlife portrait


Cozy Scarf Reindeer
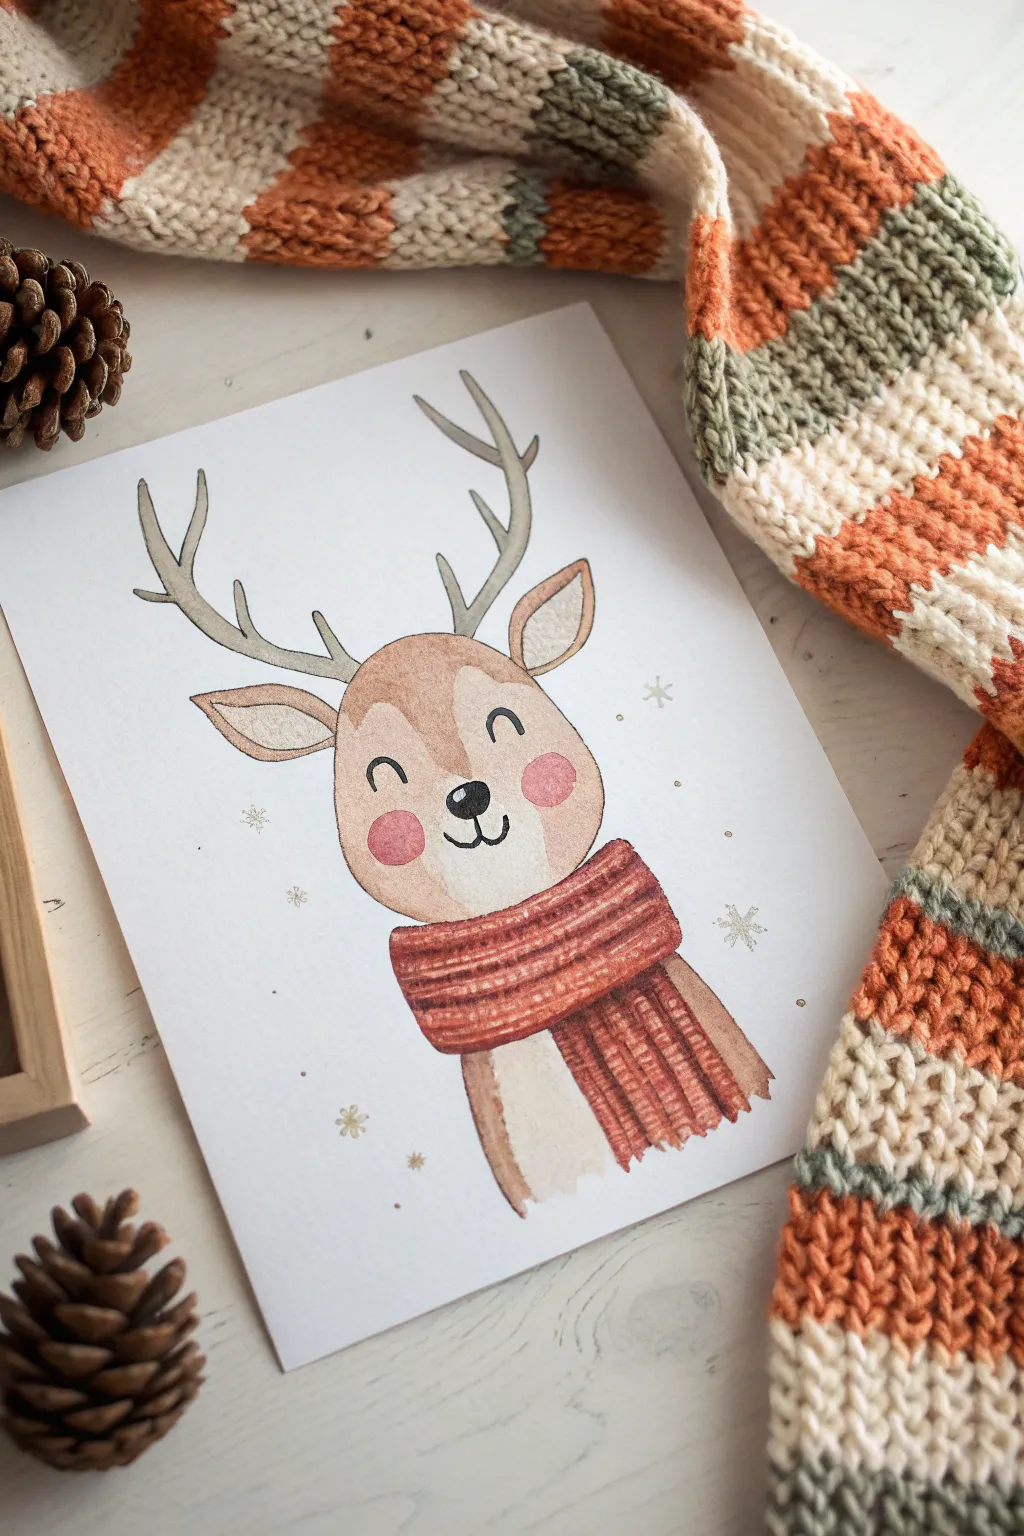
Wrap up your painting session with this heartwarming reindeer sporting a chunky knit scarf. This tutorial captures the softness of watercolor washes to create a sweet, illustrated character perfect for holiday cards.
Detailed Instructions
Materials
- Cold press watercolor paper (A5 size)
- Watercolor paints (Browns: sienna, umber; Red/Orange; Cream/Beige; Grey)
- Round watercolor brushes (Size 2 and 6)
- Fine liner pen (Black, waterproof, 0.3mm)
- Pencil (HB)
- Kneadable eraser
- White gel pen (optional)
- Clean water and paper towels
Step 1: Drawing the Base Form
-
Head shape:
Start directly in the center of your paper with a light pencil sketch. Draw a rounded U-shape for the bottom of the face, topping it with a shallower curve to create a soft oval head. -
Ears and antlers:
Position two leaf-shaped ears on either side of the head, just below the top curve. From the center top, sketch two large, branching antlers that curve outwards and upwards. -
Facial features:
Lightly mark a nose line in the lower third of the face. Above this, sketch two curved arches for the closed eyes. Add a small rounded triangle for the nose. -
Add the scarf:
Just below the chin, draw a thick, looping shape for the scarf collar. Allow one end to hang down vertically on the right side, sketching in lines for fringe at the bottom.
Step 2: Layering Watercolors
-
Base skin tone:
Mix a watery wash of burnt sienna and plenty of water. Paint the entire head shape, carefully avoiding the white of the eyes if you want them open, though our design has them closed. Keep this wash very pale. -
Darkening the fur:
While the first layer is still slightly damp, drop a more saturated brown into the top of the forehead and the outer edges of the ears to create a soft, furry gradient. -
Antler wash:
Mix a pale grey-beige color. Using your smaller brush, carefully fill in the antlers. I like to keep the tips slightly darker to give them some dimension. -
The warmth of the scarf:
Mix a rusty red or burnt orange color. Paint the scarf area, using horizontal strokes for the neck loop to suggest the knit texture. Use vertical strokes for the hanging tail piece. -
Rosy cheeks:
Dilute a small amount of red or pink. Apply two soft circles on the cheeks. Soften the edges with a clean, damp brush so they blend naturally into the brown fur. -
Inner ear detail:
Use a very pale cream or pink wash to fill the inner sections of the ears, which we left unpainted in the first step.
Bleeding Colors?
If your red scarf bleeds into the brown fur, your paint was too wet. Let the head shape dry completely (touch it—it should feel room temp, not cool) before painting the scarf next to it.
Step 3: Adding Details & Texture
-
Defining the scarf:
Once the scarf paint is dry, use a slightly darker, thicker mix of your rust red. Paint thins horizontal stripes across the neck loop and vertical lines down the hanging part to mimic a rib-knit pattern. -
Refining the face:
Take your black waterproof pen. Carefully trace the closed eye arches, adding a tiny lash or two. Outline the nose and fill it in black, leaving a tiny white speck for a highlight. -
Drawing the mouth:
From the bottom point of the nose, draw a small vertical line down, splitting into two small upward curves to create a sweet smile. -
Outlining:
Go over your main pencil lines with the fine liner pen. Keep the lines somewhat loose and broken in places—especially on the fur—to maintain that hand-drawn, illustrative charm. -
Snowflake accents:
Mix a very watery grey or grab a metallic silver pen if you have one. Draw tiny, simple star-shaped snowflakes scattered around the background.
Make It Sparkle
Once the painting is totally dry, use glitter glue or a metallic gold pen to trace the snowflake centers and add little dots to the scarf pattern for a magical festive shimmer.
Your adorable reindeer is now ready to bring a touch of woodland warmth to your home
BRUSH GUIDE
The Right Brush for Every Stroke
From clean lines to bold texture — master brush choice, stroke control, and essential techniques.
Explore the Full Guide
Ornaments Dangling From Antlers
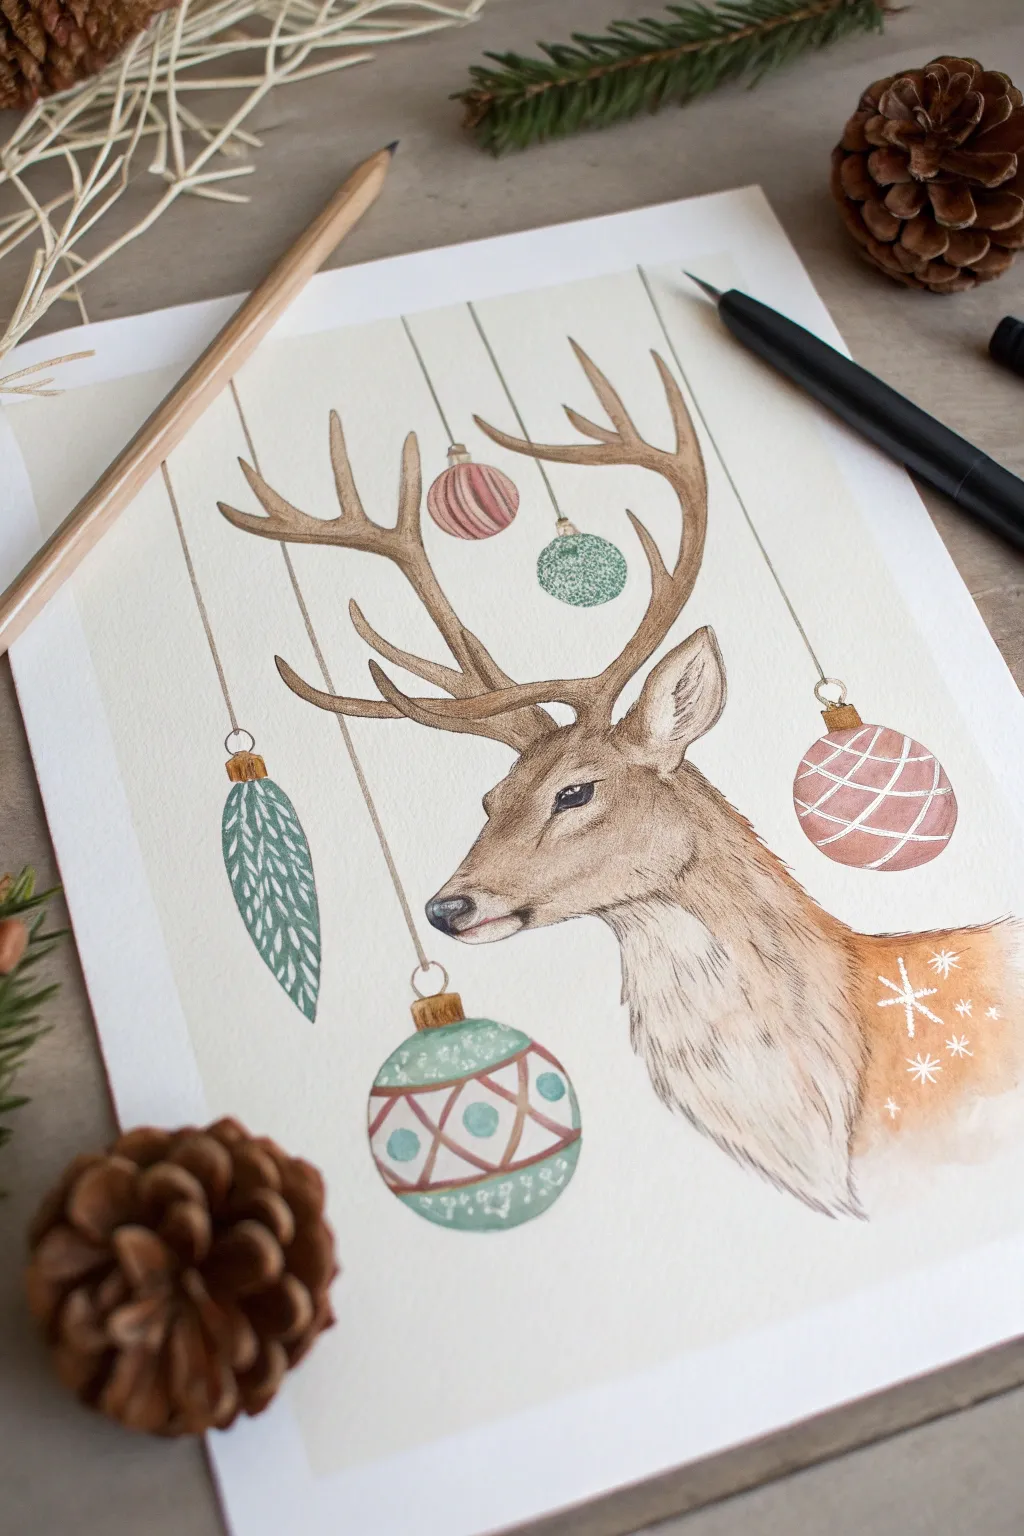
This charming watercolor study features a realistic profile of a stag, offset by playful, dangling Christmas ornaments. The contrast between the detailed fur texture and the graphic, patterned baubles makes for a uniquely festive piece of art.
Detailed Instructions
Materials
- Hot press watercolor paper (smooth finish)
- HB pencil and kneaded eraser
- Watercolor paints (burnt umber, raw sienna, payne’s gray, sap green, alizarin crimson)
- Small round brushes (size 0, 2, and 4)
- White gel pen or white gouache
- Fine liner pen (brown or sepia)
- Ruler
- Masking tape
Step 1: Sketching the Elements
-
Map out proportions:
Begin by lightly sketching the reindeer’s head profile on the right side of your paper. Use simple shapes: an oval for the head and a thick curve for the neck. Leave plenty of space above the head for the antlers. -
Refine the features:
Draw the antlers branching upwards and slightly backwards. Add the large ear, the almond-shaped eye, and the soft curve of the muzzle. Keep your pencil lines extremely faint so they don’t show through the paint later. -
Add the ornaments:
Use a ruler to draw vertical straight lines coming down from the top edge of the paper. At the end of each line, draw various bauble shapes—teardrops, spheres, and ovals—staggering them at different heights around the antlers.
Step 2: Painting the Reindeer
-
Base wash:
Mix a watery wash of raw sienna and burnt umber. Apply this light brown tone to the entire head and neck, but leave the area around the eye and under the chin lighter to suggest highlights. -
Define the face:
Once the first layer is dry, mix a darker brown using burnt umber and a touch of payne’s gray. Use a size 2 brush to paint the nose, the dark pupil of the eye, and the deep shadows inside the ear. -
Build fur texture:
Using your smallest brush (size 0) and a medium brown mix, start adding short, flicking strokes. Follow the direction of hair growth—down the neck, sweeping back from the nose, and up the ears. -
Deepen the shadows:
Layer darker fur strokes under the jawline and at the base of the neck to create volume. I like to let the previous layers dry fully so my new strokes stay crisp. -
Paint the antlers:
Wash the antlers with a flat pale brown. While slightly damp, drop darker brown pigment into the undersides of the branches to create distinct rounding and dimension.
Muddiness Prevention
If your fur texture looks like a blob, your brush is too wet. Blot it on a paper towel before painting those fine hairs to ensure distinct, individual strokes.
Step 3: Painting the Ornaments
-
Base colors:
Select a festive palette—muted reds (alizarin crimson) and soft greens (sap green mixed with a little gray). Paint the base shape of each ornament, leaving small white gaps if you want natural paper highlights. -
Add patterns:
Wait for the ornaments to dry completely. Carefully paint patterns like stripes, grids, or zig-zags. For the teal teardrop ornament, paint faint scale-like strokes. -
Metallic accents:
Use a yellow ochre or gold paint to fill in the ornament caps at the top of each bauble.
Make it Sparkle
Mix a tiny pinch of metallic watercolor or iridescent medium into the paint for the ornaments. They will catch the light subtly when viewed from an angle.
Step 4: Final Details
-
Strings and lines:
Using a very steady hand or a ruler with a fine liner pen (or thin brush), trace over your pencil lines for the hanging strings. Keep these lines extremely thin. -
Whiskers and eyelashes:
With your finest brush or a dark sepia pen, add delicate eyelashes and a few long whiskers near the muzzle. -
Snowflake details:
Using a white gel pen or opaque white gouache, draw simple snowflake stars on the reindeer’s back. -
Ornament highlights:
Add tiny dots or lines of white gel pen to the shiny parts of the ornaments to make them look glossy and reflective.
Frame your festive reindeer in a simple wood frame to complement the natural tones of the fur
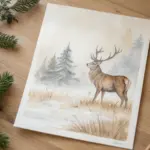
Holly and Berries Reindeer Frame
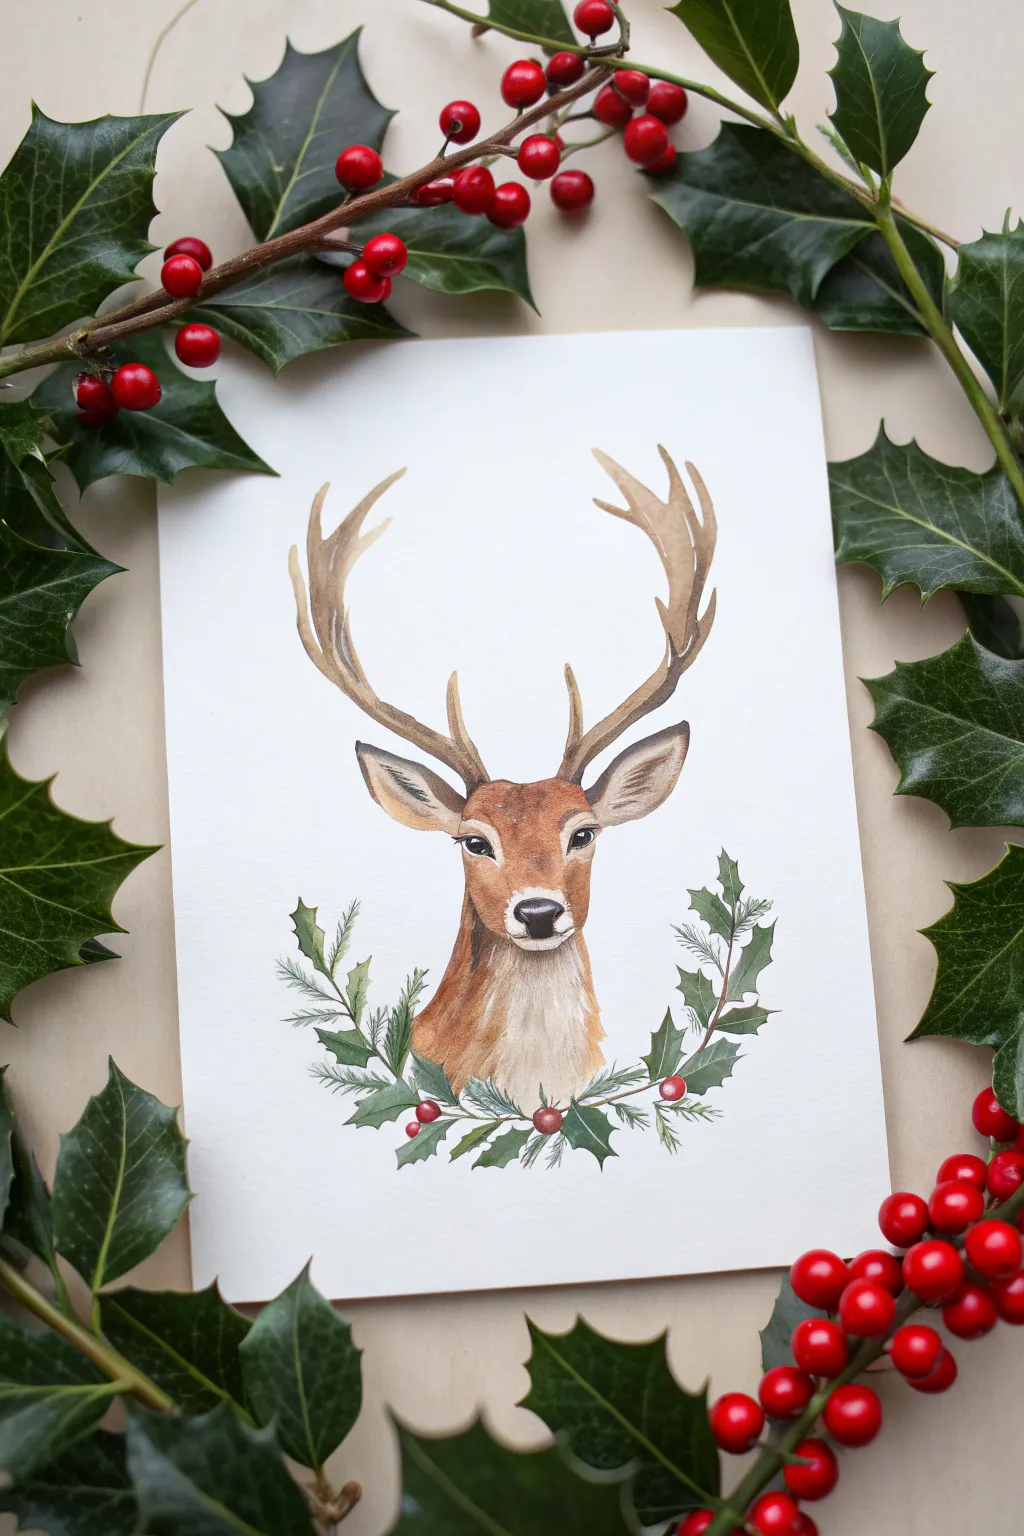
This elegant watercolor project features a gentle stag portrait encircled by a festive wreath of holly and evergreens. The soft, naturalistic shading of the deer contrasts beautifully with the crisp greenery, making it a perfect holiday card design.
Step-by-Step
Materials
- Hot press watercolor paper (for smooth detail)
- Pencil (HB or H)
- Kneaded eraser
- Watercolor paints (Burnt Sienna, Yellow Ochre, Burnt Umber, Sap Green, Alizarin Crimson, Lamp Black)
- Fine detail brushes (Sizes 0, 2, and 4)
- Clean water and mixing palette
- White gouache or gel pen (for highlights)
Step 1: Sketching the Portrait
-
Outline the head shape:
Begin by lightly sketching an inverted teardrop shape for the stag’s head. Add the long, elegant neck extending downwards. -
Position facial features:
Mark the eye line about halfway down the head. Sketch large, almond-shaped eyes set wide apart and a soft, rounded muzzle at the bottom. -
Add antlers and ears:
Draw the largelars on the sides of the head. Sketch the antlers rising tall and branching out gracefully, ensuring they look balanced but not perfectly symmetrical. -
Draft the wreath:
Lightly sketch a U-shaped arrangement of leaves and berries at the base of the neck, creating a semi-circle frame.
Step 2: Painting the Stag
-
Base wash:
Mix a watery wash of Yellow Ochre and a touch of Burnt Sienna. Apply this loosely to the head and neck, leaving the muzzle area and around the eyes white. -
Deepen the fur tones:
While the paper is slightly damp, drop in stronger Burnt Sienna and Burnt Umber on the forehead, sides of the neck, and tips of the ears to start building volume. -
Detailing the antlers:
Use a mix of Burnt Umber and a tiny bit of blue to create a grayish-brown. Paint the antlers, keeping the edges crisp. -
Refining the face:
With a size 2 brush and concentrated Burnt Umber, paint the dark patches inside the ears and the markings on the forehead. -
Painting the eyes and nose:
Use Lamp Black (or a very dark brown) for the eyes and nose. Leave a tiny speck of white paper for the catchlight specific to the eyes to give them life. -
Adding texture:
Once dry, use a size 0 brush with semi-dry paint to flick tiny hair strokes on the neck and cheeks, following the direction of fur growth.
Muddy Fur?
If fur colors turn muddy, let the paper dry completely. Paint fresh, distinct strokes over the top layer rather than scrubbing wet paint.
Step 3: The Botanical Wreath
-
Base leaves:
Mix Sap Green with a touch of blue for a cool evergreen shade. Paint the sharp, spiky holly leaves, lifting slightly at the tips for variation. -
Layering greenery:
Add wispy pine needles using quick, flicking strokes with your finest brush to fill gaps between the holly leaves. -
Painting berries:
Use bright Alizarin Crimson to paint small round berries. I like to leave a tiny white dot on each sphere to represent a shiny highlight. -
Adding stems:
Connect the leaves and berries with thin, brown stems using the tip of your brush. -
Final leaf shadows:
Mix a darker green and add shadows where leaves overlap or tuck under the stag’s neck to create depth. -
Final highlights:
Use white gouache or a gel pen to sharpen the highlights in the stag’s eyes and add a few frosty touches to the leaf tips.
Pro Tip: Eye Placement
Place the eyes slightly wider than you think they should be. This emphasizes the ‘prey animal’ look and adds to the gentle expression.
Allow your beautiful winter portrait to dry flat before framing or gifting this classic piece of seasonal art

PENCIL GUIDE
Understanding Pencil Grades from H to B
From first sketch to finished drawing — learn pencil grades, line control, and shading techniques.
Explore the Full Guide
Snowflake Resist Behind a Reindeer
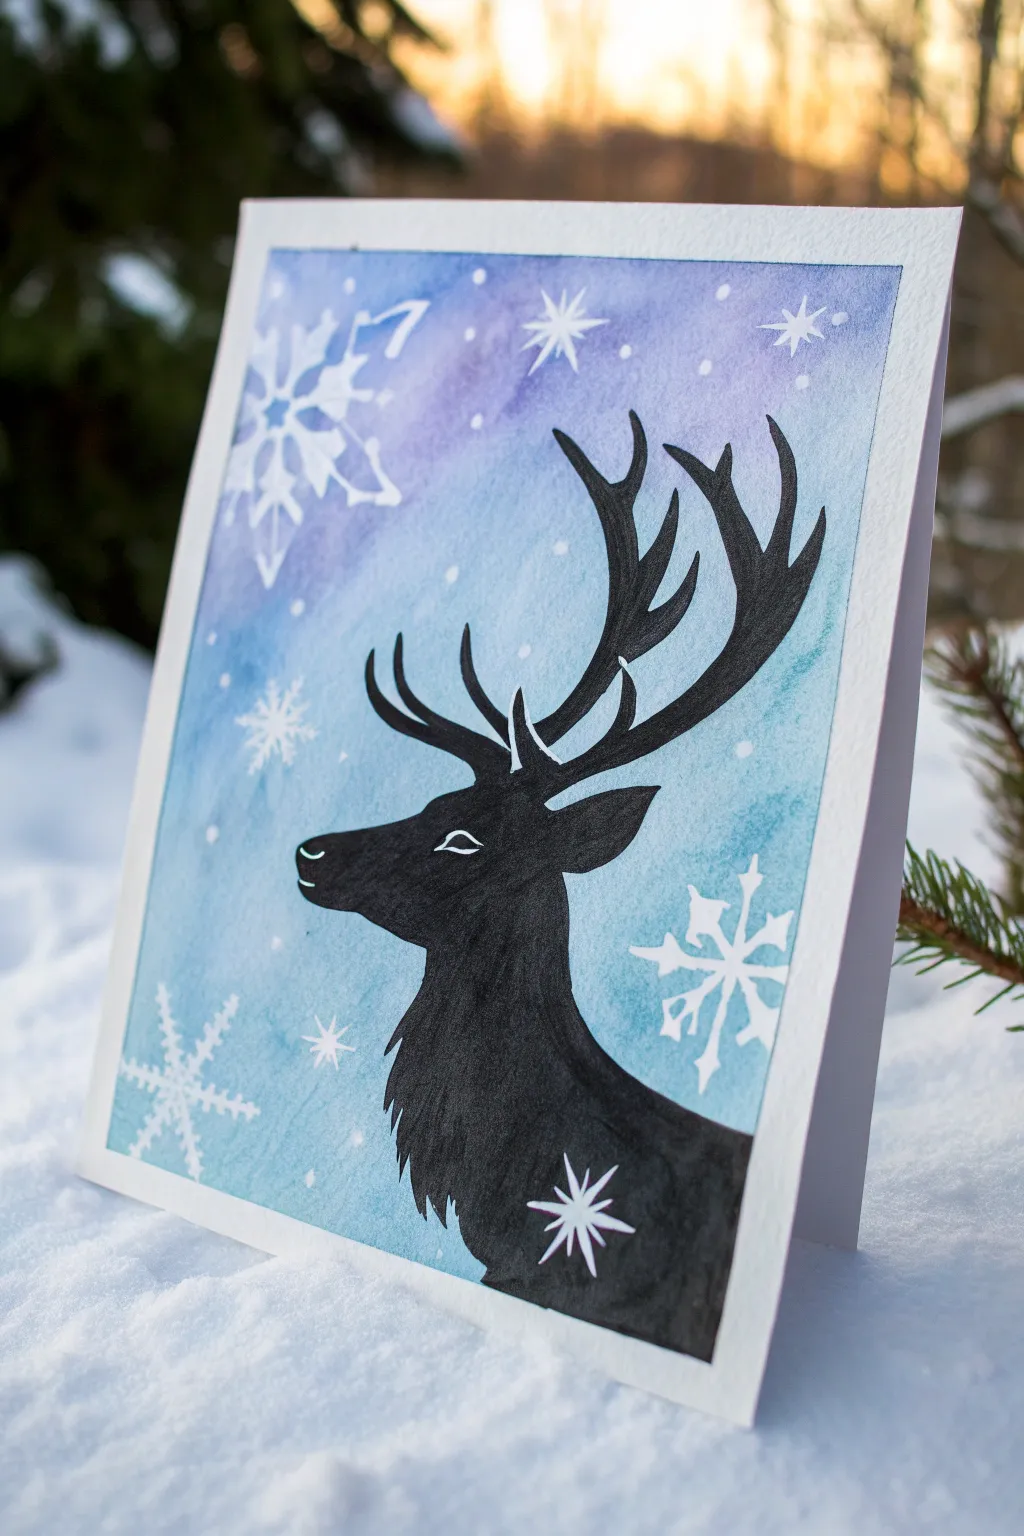
Create a striking contrast between a crisp black reindeer silhouette and a soft, snowy watercolor sky using a simple resist technique. Ideally suited for handmade holiday cards, this project combines masking fluid magic with bold ink work for a professional finish.
How-To Guide
Materials
- Watercolor paper (cold press creates nice texture)
- Masking fluid (drawing gum)
- Fine-point paintbrush or dedicated masking fluid applicator
- Watercolor paints (Cerulean Blue, Prussian Blue, Purple/Violet)
- Black waterproof ink or black acrylic paint
- Small round brushes (size 2 and 4)
- Detailed liner brush (size 0 or 00)
- Pencil and eraser
- Painter’s tape
Step 1: Preparation and Resist
-
Secure the paper:
Begin by taping down the edges of your watercolor paper to a rigid board using painter’s tape. This prevents the paper from buckling when wet and creates a clean white border around the final image. -
Sketch the snowflakes:
Lightly sketch several snowflake shapes scattered across the background. Vary their sizes, placing a large, detailed one in the upper left corner and smaller, simpler stars elsewhere to create depth. -
Apply masking fluid:
Shake your masking fluid bottle gently. Using an old brush or a dedicated applicator tool, carefully paint over your snowflake sketches. Don’t worry about being perfectly geometric; slightly organic shapes look beautiful. -
Add falling snow:
Dip the handle end of a paintbrush into the masking fluid and dot random spots around the paper to create tiny falling snowflakes. -
Let it dry completely:
Allow the masking fluid to dry fully. It should feel hard and tacky to the touch, not wet. Patience is key here to avoid tearing the paper later.
Sticky Situation?
If masking fluid tears your paper upon removal, the paper might have been too damp or the fluid too old. Always wait for 100% dryness and pull gently at a low angle.
Step 2: Painting the Winter Sky
-
Wet the paper:
Using a clean, wide brush, apply a layer of clean water over the entire paper surface (wet-on-wet technique). The paper should glisten but not have standing puddles. -
Apply the blue wash:
Load a round brush with diluted Cerulean Blue. Sweep it across the paper, allowing the color to spread naturally. -
Deepen the colors:
While the paper is still wet, drop in stronger Prussian Blue and touches of Purple near the top and edges to suggest a twilight sky. -
Let colors blend:
Tilt the board slightly to help the colors merge. The paint will flow over the masked snowflakes, leaving the paper underneath white. -
Dry the background:
Let the watercolor layer dry completely. You can use a heat tool or hairdryer on a low setting if you need to speed this up.
Step 3: The Reindeer Silhouette
-
Remove the masking:
Once the paint is bone dry, gently rub your finger or a rubber cement pickup eraser over the masked areas to reveal the crisp white snowflakes underneath. -
Sketch the outline:
Lightly pencil the outline of the reindeer head and antlers. Position the neck at the bottom center, with the antlers reaching up towards the right side. -
Outline with ink:
Switch to your black waterproof ink or black acrylic paint. Using your finest liner brush, carefully trace the outline of the reindeer, paying special attention to the curves of the antlers. -
Fill the silhouette:
Using a slightly larger round brush loaded with black ink/paint, fill in the body of the reindeer. Work consistently to ensure a solid, opaque black coverage. -
Refine the details:
Use the liner brush again to sharpen the antler tips and add small jagged texture to the fur on the neck. -
Add facial definition:
Leave a tiny, thin line of white unpainted (or go back with a white gel pen later) to define the closed eye and the nostril slit within the black shape.
Add Winter Shimmer
Mix a tiny amount of mica powder or iridescent medium into your blue watercolor wash. Your sky will sparkle subtly when the card catches the light.
Once the ink is fully dry, peel off the painter’s tape to reveal your clean edges and enjoy the peaceful winter scene you’ve created
Reindeer Silhouette Against a Full Moon
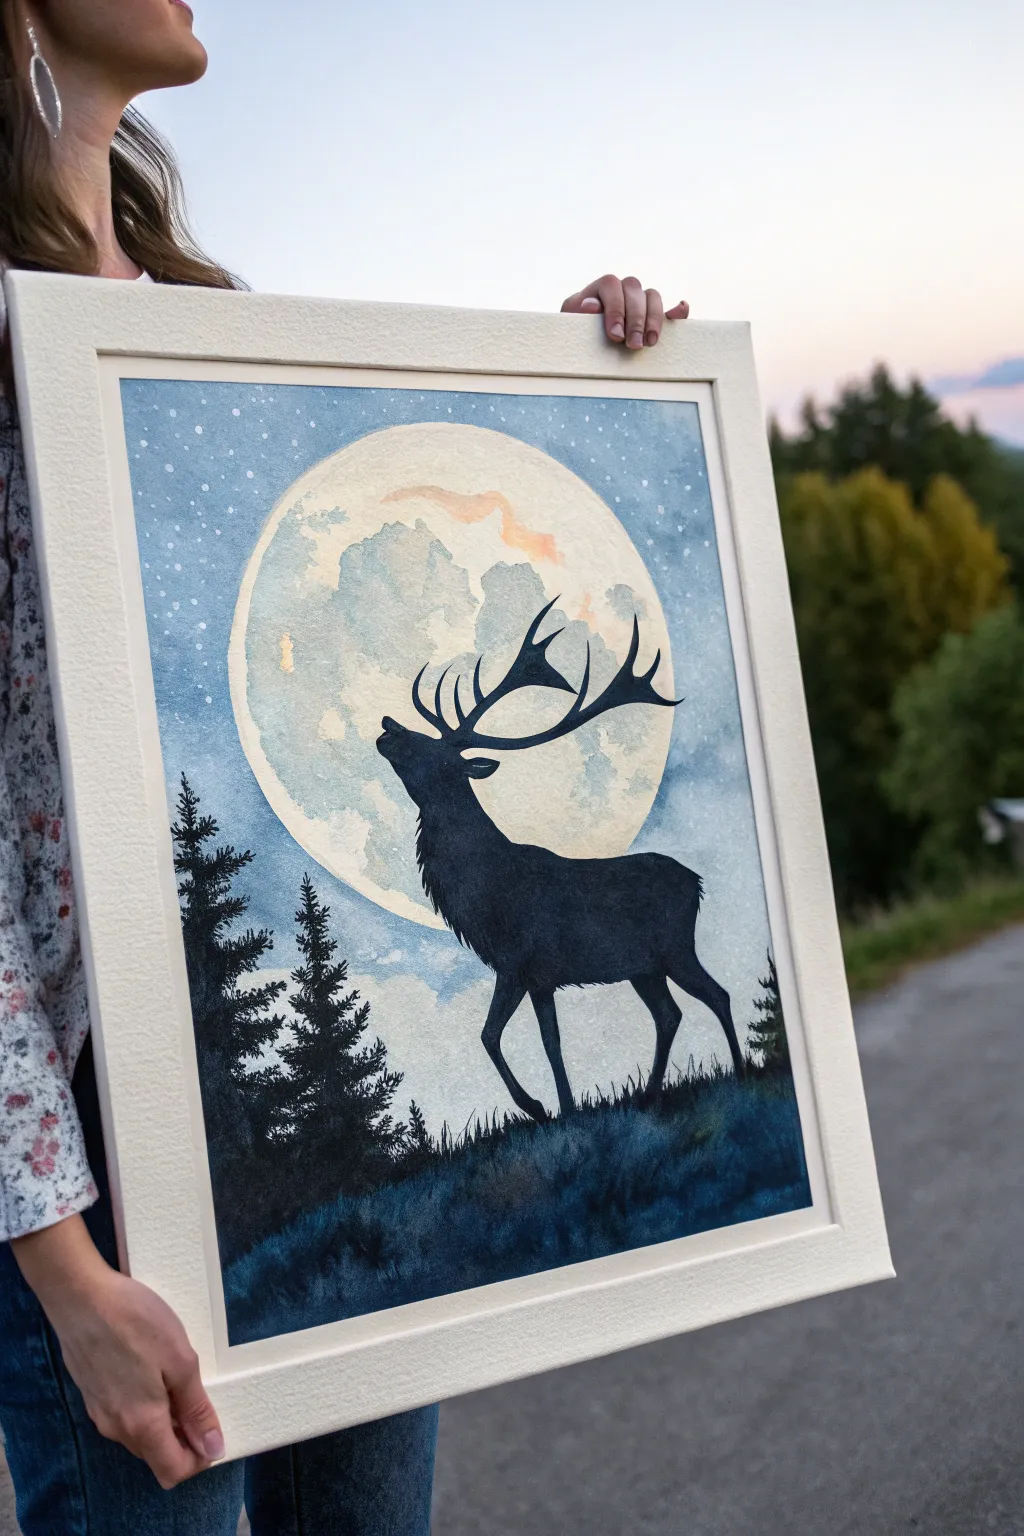
Capture the majestic solitude of nature with this striking watercolor composition featuring a bugling stag silhouetted against a luminous full moon. This project balances the crisp, opaque black of the wildlife with soft, lunar textures and a starry night sky.
Step-by-Step
Materials
- Cold press watercolor paper (minimum 140lb/300gsm)
- Watercolor paints (Indigo, Prussian Blue, Paynes Gray, Lamp Black, Yellow Ochre, Burnt Sienna)
- White Gouache or White Gel Pen
- Masking fluid (drawing gum) and old brush
- Round brushes (sizes 2, 6, and 10)
- Flat wash brush (size 1 inch or larger)
- Circular object or compass for tracing
- Pencil and eraser
- Palette
- Two jars of water
- Paper towels
- Pencil crayons (optional for detailing)
Step 1: Preparation & Drawing
-
Trace the moon:
Begin by lightly tracing a large circle in the upper center of your paper using a bowl, plate, or compass. Ensure it is large enough to frame the stag’s antlers later. -
Sketch the silhouette:
Lightly sketch the stag’s outline. Focus on the posture—head thrown back, chest puffed out slightly. Don’t worry about filling it in yet, but make sure the antlers overlap the moon area significantly for contrast. -
Add landscape elements:
Sketch a sloping hill at the bottom and rough triangular shapes for the pine trees on the left and right sides to anchor the composition. -
Mask the moon:
Using an old brush (one you don’t care about, as masking fluid ruins bristles), carefuly apply masking fluid to the entire interior of the moon circle. This preserves the white paper while we paint the night sky.
Pro Tip: Masking Fluid
Coat your brush bristles in bar soap before dipping into masking fluid. This creates a barrier that makes cleaning the rubbery fluid off your brush much easier.
Step 2: The Night Sky
-
Prepare the wash:
While the masking fluid dries completely, mix a large puddle of diluted Indigo or Prussian Blue. You want a cool, night-sky tone that isn’t pitch black yet. -
Apply the background:
Using your large flat brush, apply a graded wash across the entire page (right over the masked moon). Start darker at the top corners and add more water as you move down towards the horizon line to create atmosphere. -
Create stars:
While the sky is still slightly damp but not soaking wet, load a brush with clean water or white gouache and splatter tiny droplets across the sky area. This creates natural-looking stars and texture. -
Let it dry:
Allow the sky layer to dry completely. This is crucial—if the paper is cool to the touch, it’s still wet.
Step 3: Painting the Moon
-
Remove the mask:
Gently rub away the masking fluid with your finger or a rubber cement pickup to reveal the crisp white circle. -
Paint lunar craters:
Wet the moon area with clean water. Drop in very diluted Paynes Gray and touches of Yellow Ochre or Burnt Sienna. Let the colors bleed naturally to form ‘craters’ and shadows. Keep it subtle; the moon should remain mostly pale. -
Soften the edges:
If the edge of the moon looks too sharp against the sky, use a clean, slightly damp brush to gently soften the rim in a few places to make it glow.
Level Up: Gold Accents
Mix a tiny amount of metallic gold watercolor into the moon’s craters or use gold leaf for a few specific stars to give the piece a magical, shimmering quality.
Step 4: The Silhouette & Foreground
-
Mix the darkest black:
Mix a very thick, creamy consistency of Lamp Black. You can add a touch of Indigo to make the black feel richer and cool-toned rather than flat. -
Paint the stag:
Using a size 6 round brush, carefully fill in the stag’s body. Switch to a smaller size 2 brush for the delicate antlers. Ensure the edges are crisp against the moon. -
Detail the fur:
Before the black paint dries completely on the neck area, use a dry brush tip to pull tiny wisps of paint outward, simulating the thick fur texture of the reindeer’s mane. -
Anchor the ground:
Paint the sloping hill in the foreground using the same dark black mixture. I like to vary the pressure here to create an uneven, natural terrain. -
Add grass texture:
While the hill is wet, use the tip of a detailing brush to flick upward strokes along the top edge of the hill to create the look of tall grass. -
Paint the pines:
Fill in the pine trees on the sides. Use a stippling motion or short horizontal dabs to mimic pine needles. Make the trees darkest at the bottom and distinct against the lighter sky. -
Final touches:
Once everything is dry, assess the contrast. If the stars faded too much, use a white gel pen or white gouache to add a few bright, specific stars near the top of the painting.
Frame your moonlit masterpiece and enjoy the serene atmosphere it brings to your space.


Northern Lights Reindeer Scene
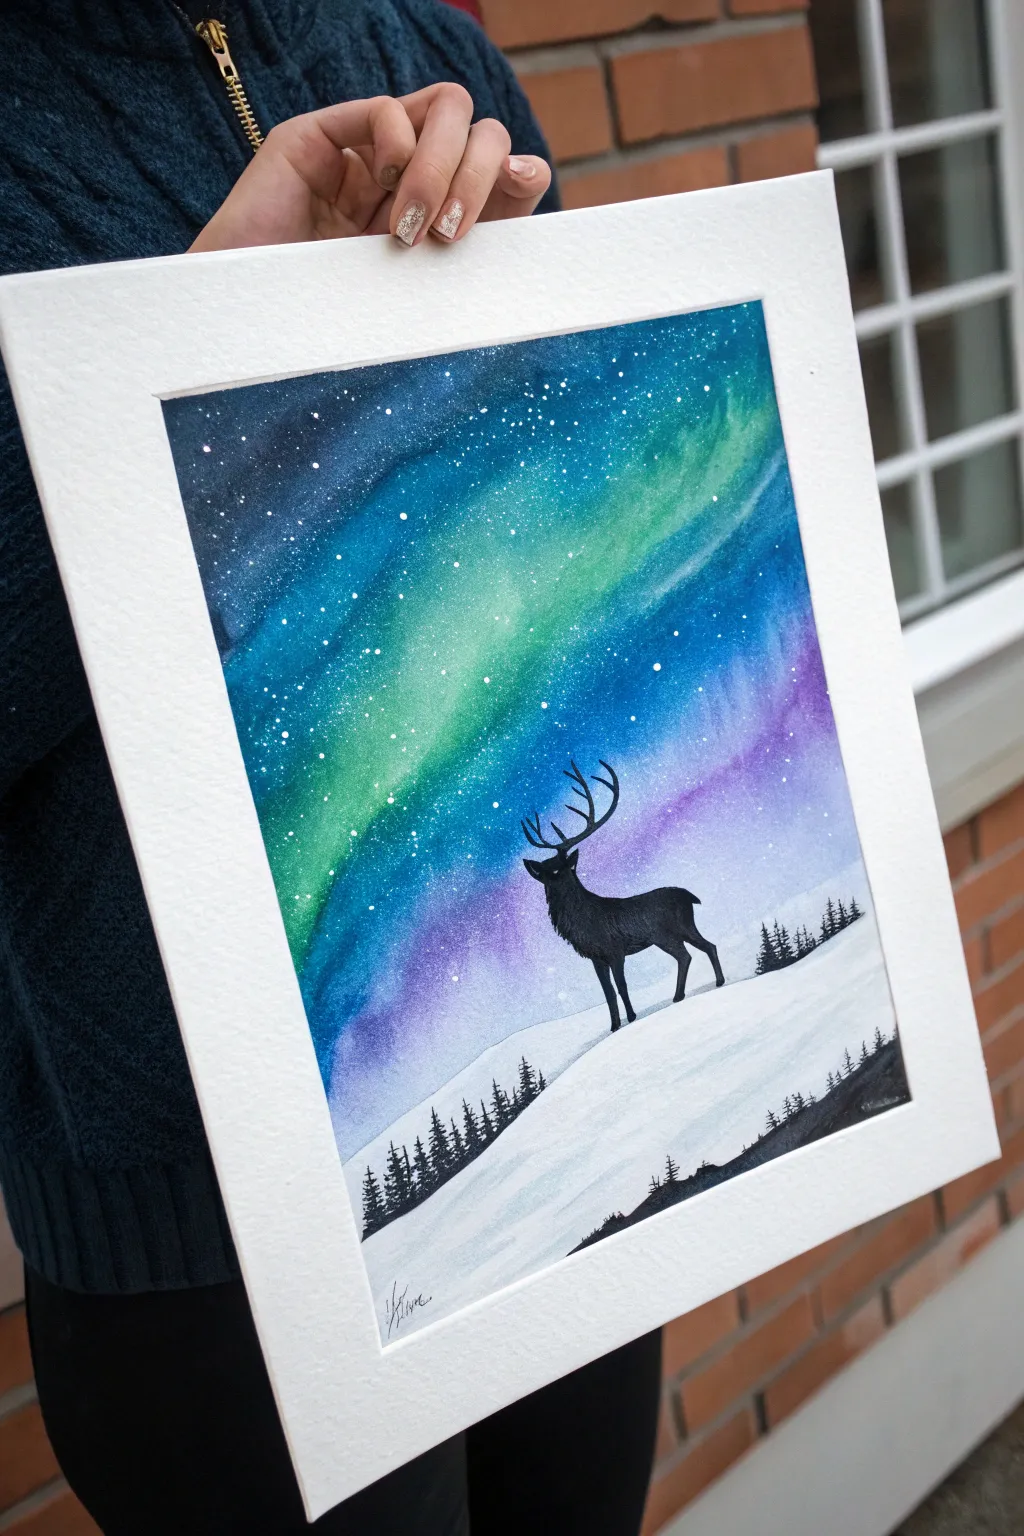
Capture the magic of the Arctic night with this vibrant watercolor piece featuring a majestic stag silhouetted against a shimmering display of the Northern Lights. The interplay between the deep, starry sky and the stark white snow creates a breathtaking winter scene perfect for holiday framing.
Detailed Instructions
Materials
- Cold press watercolor paper (block or taped down)
- Watercolor paints (phthalo blue, indigo, violet, ultramarine, viridian/emerald green, black)
- White gouache or white ink for stars
- Soft round brushes (size 8 or 10 for washes)
- Fine detail brush (size 00 or 0 for silhouettes)
- Masking tape
- Pencil and eraser
- Water cups and paper towels
- Old toothbrush (optional for splattering stars)
Step 1: Setting the Sky and Snow
-
Tape and sketch:
Begin by taping down the edges of your watercolor paper to create a clean white border. Lightly sketch the rolling hill line about a third of the way up from the bottom. -
Wet-on-wet preparation:
Generously wet the entire sky area above your pencil line with clean water. The paper should have a glistening sheen but not hold puddles. -
Lay the aurora base:
While the paper is wet, load your brush with a bright viridian or emerald green. Paint a diagonal, wavy streak across the middle of the sky, letting the pigment flow naturally. -
Add the deep blues:
Around the green streak, drop in deep phthalo blue and indigo. Focus the darkest indigo at the very top left corner to create depth. -
Blend the transition:
Adding a touch of violet or purple to the lower right sky creates a lovely transition. Gently tilt the paper to encourage the colors to bleed into each other without becoming muddy. -
Initial drying phase:
Let this layer dry completely. If you move to the next steps while the sky is damp, the crisp silhouettes will bleed. -
Create the starry night:
Once dry, load a toothbrush or stiff bristle brush with white gouache or ink. Running your thumb across the bristles, flick tiny white specks across the darkest parts of the sky to create stars.
Aurora Brightness Tip
To make the green aurora really pop, lift out a little pigment with a thirsty (damp, clean) brush while the sky is still wet, then drop clear neon green into that lighter space.
Step 2: Painting the Foreground
-
Define the snow line:
Mix a very dilute wash of blue-grey. Paint faint, sweeping shadows along the curve of the hill to give the snow volume and dimension, rather than leaving it stark white. -
Sketch the reindeer:
Lightly sketch the outline of the reindeer standing prominently on the highest point of the hill. Focus on getting the proportions of the antlers and chest correct. -
Fill the silhouette:
Using your smallest detail brush and concentrated black watercolor (or black ink), carefully fill in the reindeer shape. Ensure the edges are crisp against the background. -
Detail the antlers:
For the antlers, use the very tip of your brush. Paint slow, deliberate curved lines extending upward, mimicking the natural branching structure. -
Ground shadows:
Add small, faint grey shadows directly beneath the reindeer’s hooves to ground it to the snow. -
Add distant trees:
along the horizon line on the right side, paint tiny vertical strokes to suggest a distant pine forest. These should be small and less detailed than the foreground. -
Foreground foliage:
Paint a few jagged pine trees on the lower left and right slopes. Use short, downward strokes to mimic pine needles, keeping them stark black like the reindeer. -
Final touches:
Check the painting for balance. I sometimes add a few larger, manually painted stars with a fine brush if the splatter didn’t provide enough focus. -
Reveal the border:
Wait until the paper is bone dry, then slowly peel away the masking tape at a 45-degree angle to reveal your crisp white edges.
Metallic Magic
Mix iridescent medium into your white gouache for the stars, or use silver watercolor paint for the reindeer’s antlers to catch the light beautifully when hung.
Frame this serene winter landscape in a wide white mat to emphasize the striking contrast of the night sky
Loose Watercolor Reindeer With Soft Edges
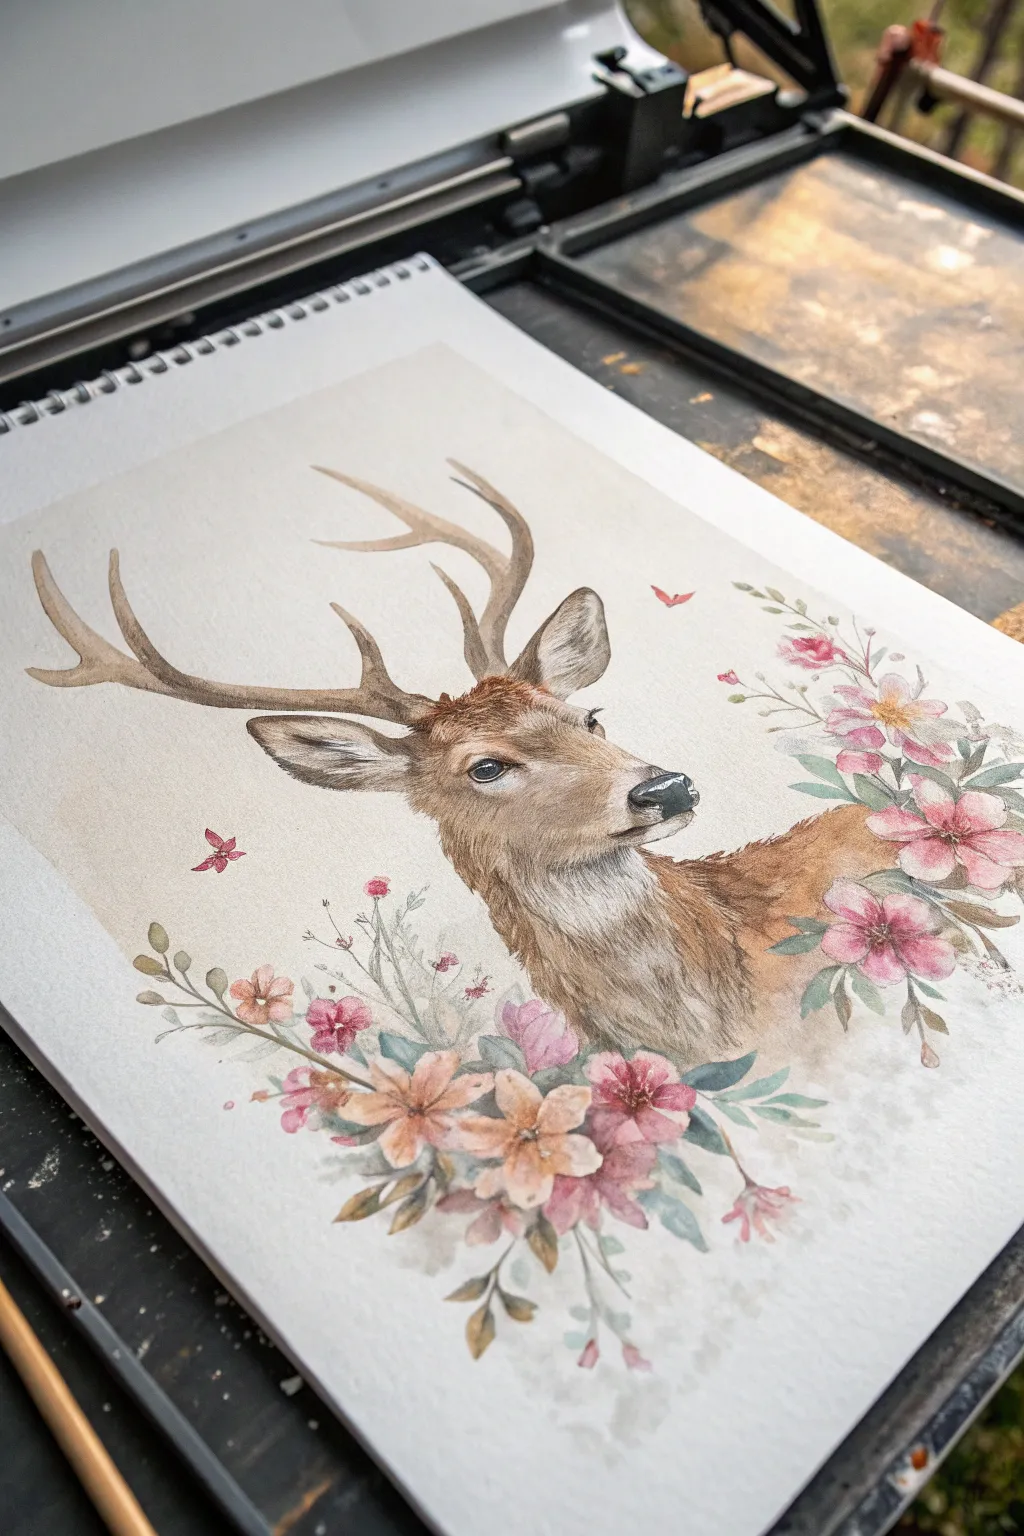
This project combines the delicate precision of a wildlife portrait with the loose, romantic flow of botanical illustration. You’ll create a stunning buck nestled in a wreath of soft pink blossoms, balancing fine fur textures with watery, diffused edges.
Step-by-Step Guide
Materials
- Cold press watercolor paper (300 gsm)
- Watercolor paints (burnt umber, raw sienna, burnt sienna, sepia, payne’s grey, alizarin crimson, sap green, olive green)
- Round brushes (sizes 2, 6, and 10)
- Fine liner brush (size 0 or 00)
- HB or 2B pencil for sketching
- Kneaded eraser
- Two jars of water
- Paper towels
- Masking fluid (optional)
Step 1: Sketching the Composition
-
Outline the head:
Begin by lightly sketching the deer’s head in the center of your paper. Focus on the main shapes: the wedge of the muzzle, the oval of the cheek, and the placement of the eye. Don’t press too hard with your pencil. -
Add the antlers:
Draw the main beams of the antlers extending upward and outward. Add the tines branching off, ensuring they taper naturally at the tips. The antlers should frame the head nicely. -
Map the florals:
Lightly indicate where the floral wreath will sit at the base of the neck and to the right side. You don’t need detailed petals yet, just loose circles for flowers and lines for stems. -
Refine features:
Refine the shape of the eye, nose, and ears. Erase any unnecessary construction lines with your kneaded eraser until you have a clean, faint guide.
Step 2: Painting the Deer
-
First wash:
Mix a watery wash of raw sienna and burnt umber. Apply this to the head and neck area, avoiding the white patch on the throat and around the eye. Let the colors bleed slightly into each other for a soft base. -
Darkening the shadows:
While the paper is still slightly damp, drop in stronger burnt umber and sepia tones along the shadowed side of the neck, under the jawline, and inside the ears. -
Painting the eye:
Using your smallest brush and a mix of sepia and payne’s grey, carefully paint the eye. Leave a tiny speck of white paper for the catchlight to give the animal life. -
Nose details:
Paint the nose with a dark grey/black mix. While wet, lift a small highlight on the top edge with a clean, damp brush to make it look wet and dimensional. -
Fur texture:
Once the base layer is bone dry, use a size 2 brush to create fur texture. Use short, flicking strokes with partially dry pigment (sepia and burnt umber) following the direction of hair growth on the neck and cheeks. -
Antler colouring:
Wash the antlers with a pale raw sienna. While wet, drop in burnt umber at the base near the skull and along the undersides of the tines to create roundness.
Muddy Colors?
If your fur looks muddy, you’re likely reworking damp layers too much. Let each layer dry completely before adding texture strokes on top.
Step 3: Floral Wreath & Finishing Touches
-
Base flowers:
Mix a soft pink using alizarin crimson and plenty of water. Paint loose, five-petal shapes for the main flowers at the bottom and right side. Keep the edges ragged and watery. -
Adding centers:
While the pink petals are damp, drop a concentrated mix of crimson or purple into the very centers. I like to let this bleed naturally into the petals for a soft look. -
Greenery accents:
Using olive green and sap green, paint leaves tucked between the flowers. Vary the values—some pale and watery, others dark and crisp—to create depth. -
Softening edges:
Where the deer’s fur meets the flowers, use clean water to soften the boundary. The fur should seem to fade or merge slightly into the floral arrangement. -
Small filler flowers:
Add tiny buds or smaller flowers in a peachy-orange tone to balance the pinks. Paint delicate stems connecting these floating elements to the main wreath. -
Butterflies:
Paint a few tiny, simple butterfly silhouettes around the deer using a reddish-pink tone, adding a whimsical touch to the composition. -
Final fur details:
Return to the deer with your liner brush. Add the darkest hairs inside the ears, define the eyelashes, and deepen the contrast under the chin.
Pro Tip: Fur texture
For realistic fur, use a ‘dry brush’ technique. Wipe your brush slightly on a paper towel before painting so the bristles separate and create multiple hair lines at once.
Once dry, you’ll have a gentle, nature-inspired portrait perfect for framing or holiday cards
Fork-Painted Fuzzy Reindeer
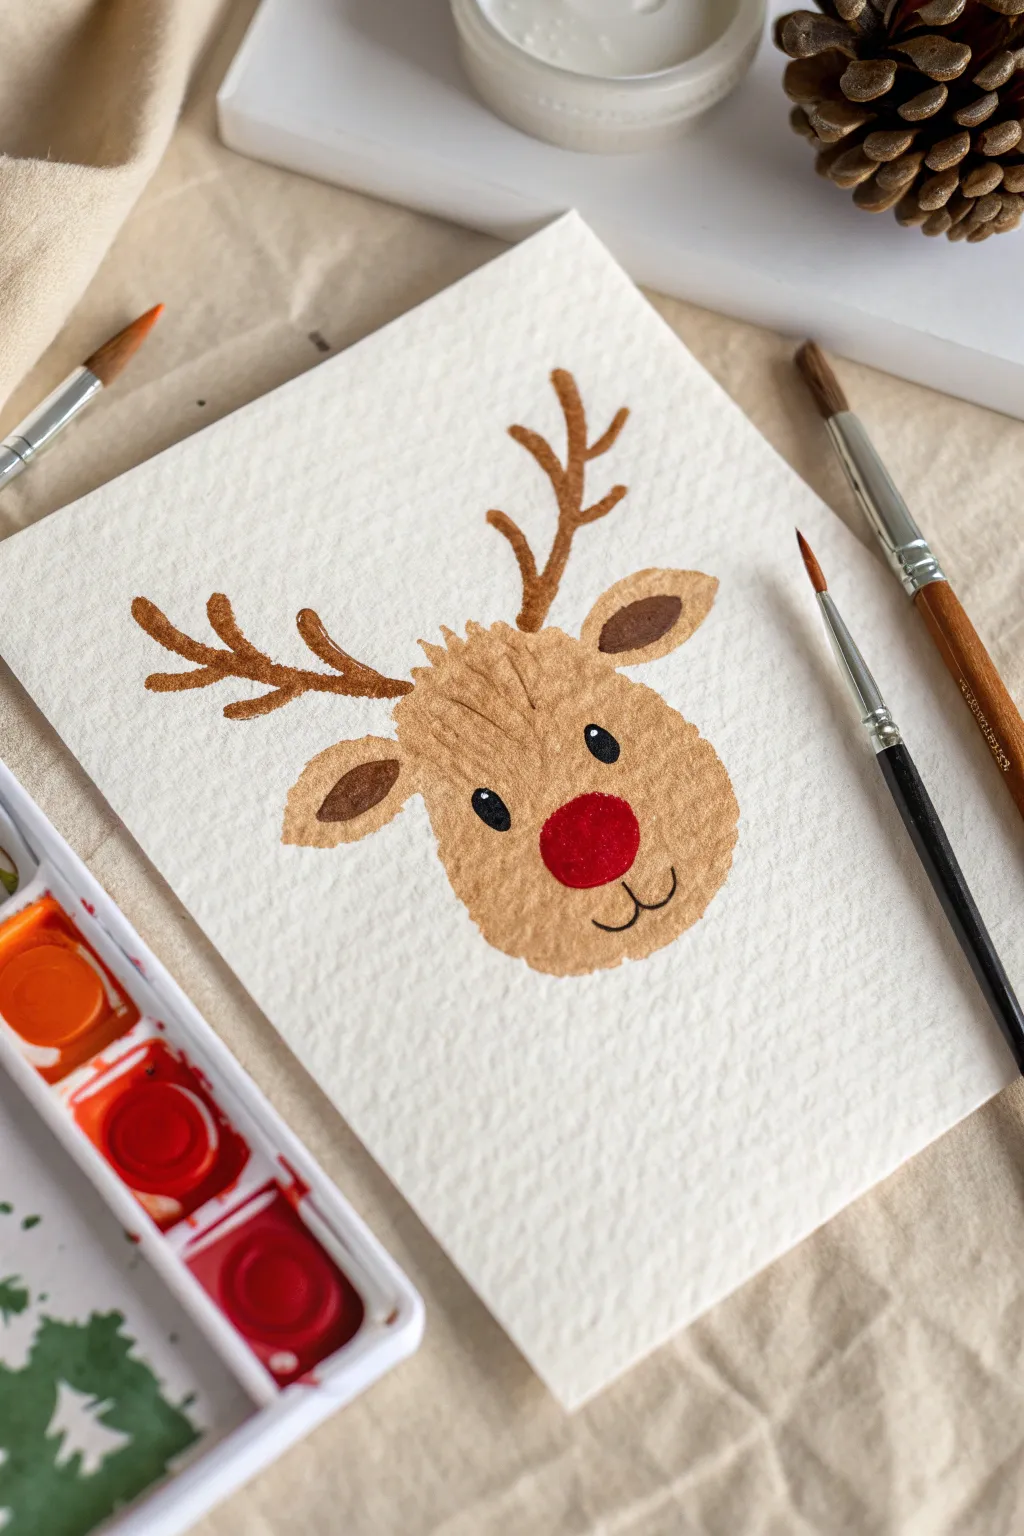
This charming reindeer painting uses a clever texturing technique to create a fuzzy, warm fur effect that pops off the page. The simple composition focuses on the sweet expression, making it perfect for holiday cards or seasonal wall art.
Step-by-Step Guide
Materials
- Heavyweight watercolor paper (300gsm cold press recommended)
- Watercolor paints (Light brown/ochre, dark brown, red, black)
- Small round paintbrush (size 2 or 4)
- Fine liner brush (size 0 or 00)
- Clean fork (optional, for alternative texture)
- Water cup and paper towels
- Pencil for light sketching
Step 1: Planning the Face
-
Establish the shape:
Begin by lightly sketching a wide oval shape in the center of your paper using a pencil. This will be the main head. It should be slightly wider at the bottom than the top. -
Mark the ears:
Sketch two leaf-shaped ears extending from the upper sides of the head. Keep your pencil lines extremely faint so they disappear under the paint later. -
Position the features:
Lightly mark where the antlers will go, stemming from the top of the head. Mark a spot for the nose in the lower center and two small circles for eyes.
Fur Texture Tip
For even more texture, gently scratch the wet brown paint with a dry fork or toothpick to create physical fur lines.
Step 2: Creating the Fur Texture
-
Mix the base color:
Prepare a warm, light brown shade on your palette. If using watercolors, keep the mixture relatively pigmented rather than too watery to help hold the texture. -
Start the texturing technique:
Instead of brushing smoothly, dab your brush repeatedly onto the paper to fill the head shape. This stippling motion creates the rough, fuzzy fur look. -
Add directional fur:
At the top of the head (between the ears), create small, upward flicks with your brush to simulate a tuft of hair standing up. -
Fill the ears:
Use the same stippling technique to fill the outer shape of the ears with the light brown paint, leaving the inner centers empty for now. -
Let it dry completely:
Wait until the light brown base is fully dry to the touch. Painting wet-on-wet here would cause the distinct fur texture to bleed into a muddy blob.
Fixing Muddy Textures
If your fur looks like a solid blob, your paint was too watery. Let it dry, then layer thicker, drier paint on top.
Step 3: Adding Details
-
Paint the inner ears:
Mix a darker brown shade. Carefully paint the almond-shaped interiors of the ears, keeping the edges smooth to contrast with the fuzzy outer fur. -
Form the antlers:
Using the same dark brown and a steady hand, paint the main beams of the antlers extending upward and outward. I find it easier to pull the brush stroke from the head outward. -
Add antler branches:
Paint smaller tines branching off the main beams. Vary their lengths to make them look organic and natural. -
Paint the nose:
Load a clean brush with bright red paint. Carefully fill in a distinct oval shape for the nose in the lower third of the face. -
Create the eyes:
Using black paint and a fine brush, fill in the two eye circles. Leave a tiny speck of white paper showing in each eye as a highlight, or add a dot of white gouache later. -
Draw the mouth:
With the finest brush or a liner, paint two small curved lines extending downward from the center of the nose to form the smile.
Now you have a wonderfully textured reindeer friend ready to spread some cheer
String-Pull Antlers With Surprise Swirls
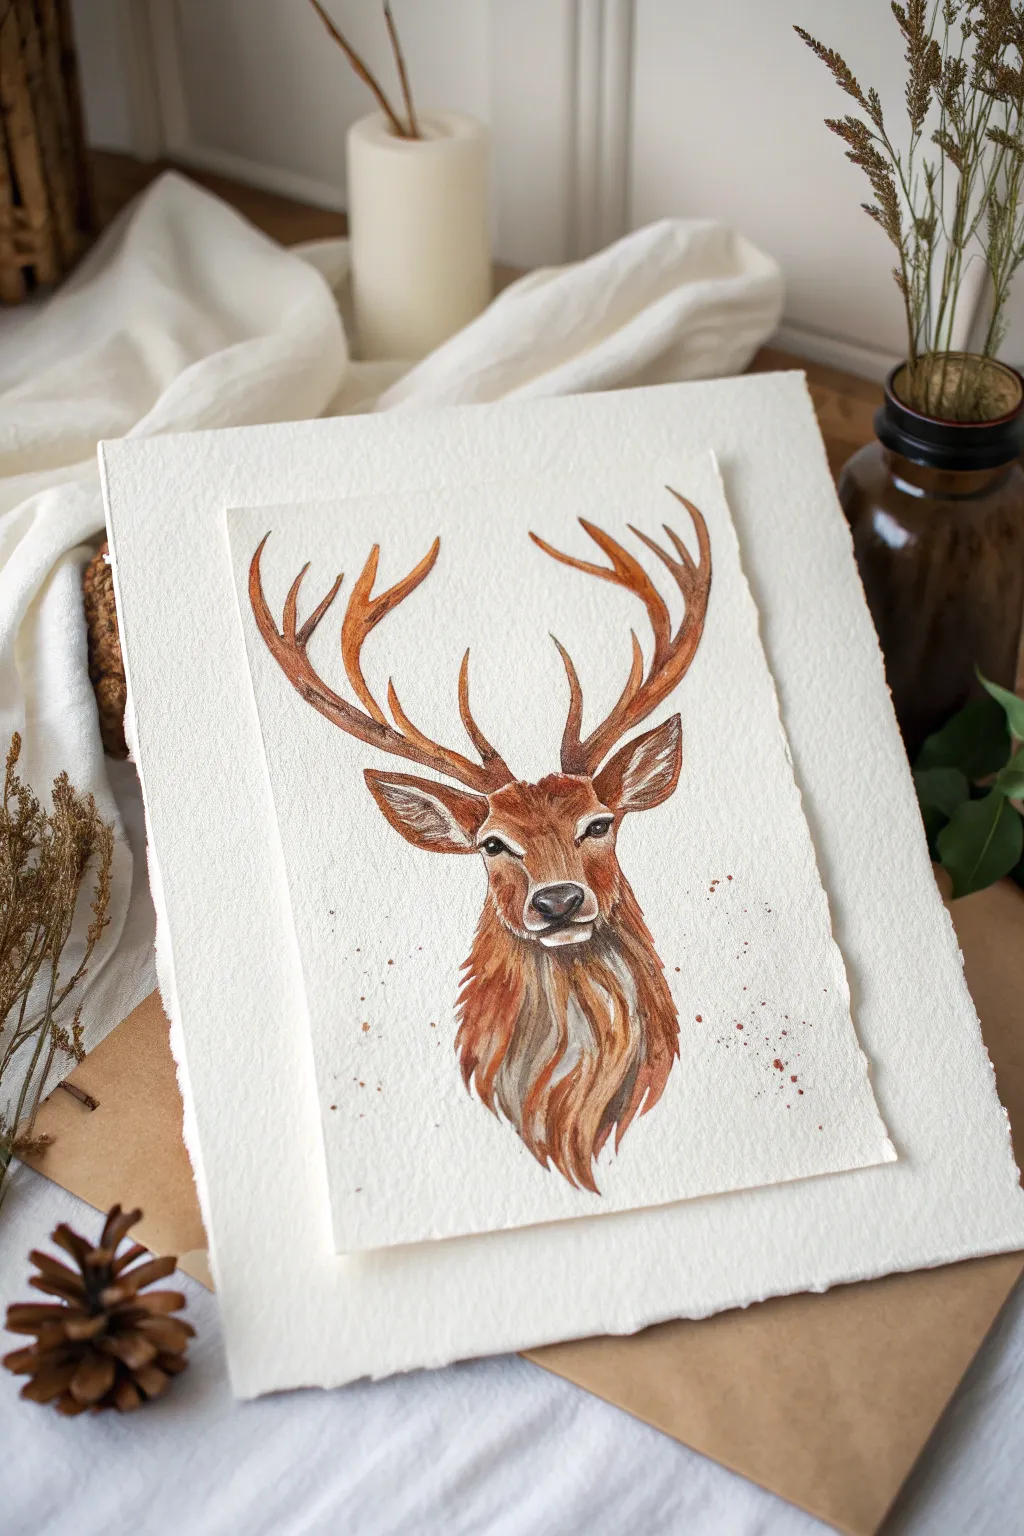
Capture the noble spirit of the forest with this detailed watercolor portrait of a red deer stag. By layering warm browns and burnt siennas on textured paper, you’ll create a piece that feels both rustic and refined.
How-To Guide
Materials
- Heavyweight cold-press watercolor paper (300 gsm or heavier) with deckle edge
- Watercolor paints (Burnt Sienna, Raw Umber, Sepia, Yellow Ochre, Payne’s Grey)
- Round watercolor brushes (sizes 2, 4, and 8)
- Small liner brush (size 0 or 00)
- Graphite pencil (HB or 2H)
- Kneaded eraser
- Palette for mixing
- Two jars of water
- Paper towels
- Masking fluid (optional)
Step 1: Sketching and Preparation
-
Paper selection:
Choose a high-quality, textured watercolor paper. For the authentic look in the example, tear the edges carefully against a ruler or use specialized deckle-edged paper. You will need a smaller rectangular piece for the painting itself. -
Basic outline:
Using an HB pencil, lightly sketch the central axis of the deer’s face to ensure symmetry. Draw the general triangular shape of the head and the large, sweeping curves of the antlers. -
Refining features:
Flesh out the details, marking the position of the eyes, the nose pad, and the ears. Sketch the direction of the fur clumps on the neck, but keep lines faint so they won’t show through the paint.
Step 2: Base Layers and Washes
-
First wash:
Mix a watery wash of Yellow Ochre and a touch of Burnt Sienna. Apply this loosely to the entire head and neck area, avoiding the eyes and the highlight on the nose. -
Antler base:
While the face dries, paint the antlers with a light wash of Raw Umber mixed with Burnt Sienna. Keep the tips slightly lighter than the base. -
Building depth:
Once the first layer is dry, mix a stronger concentration of Burnt Sienna. Begin adding shadows around the eyes, under the chin, and inside the ears to establish the form.
Muddy Fur?
If your fur looks muddy, let the paper dry completely between layers. Wet-on-wet is great for base layers, but crisp fur texture needs dry paper to keep strokes distinct.
Step 3: Fur Texture and Details
-
Neck fur texture:
Switch to a size 4 round brush. Using a mix of Burnt Sienna and Sepia, paint the thick neck fur using quick, downward strokes. Leave some of the lighter under-layer showing to create volume. -
Facial details:
Darken the area around the muzzle and the forehead. I find that lifting out a tiny bit of pigment with a damp brush on the cheekbone helps create a nice highlight. -
Painting the eyes:
Use Sepia mixed with Payne’s Grey for the eyes. Paint them dark but leave a tiny white speck of paper bare for the reflection, which brings life to the animal. -
Nose and mouth:
Paint the nose pad with a dark, cool brown. Soften the top edge slightly so it blends into the muzzle, but keep the nostrils sharp and dark. -
Ear details:
Add fine strokes inside the ears to suggest fluffiness, using a darker brown for the inner shadows and leaving the edges pale.
Keep it Loose
Don’t overwork the neck fur. Allow the white of the paper and the initial light wash to show through between darker strokes. This negative space reads as light hitting the fur.
Step 4: Antlers and Final Touches
-
Antler texture:
Return to the antlers with a size 2 brush and a mix of Raw Umber and Sepia. Paint linear, branching textures along the tines to mimic the ridges found on real bone. -
Deepening shadows:
Glaze a transparent layer of Sepia where the antlers meet the skull to anchor them visually. -
Fine hairs:
Using your smallest liner brush (size 0), add tiny, individual dark hairs around the eyes and lashes. Add crisp white gouache whiskers if you have them, or simply use negative painting if you planned ahead. -
Splatter effect:
Load a brush with watery Burnt Sienna. Tap the handle against your finger to create gentle, random splatters around the neck and lower antlers for an artistic, loose finish. -
Mounting:
Once fully dry, center your painted paper on a larger sheet of heavy, textured paper to frame it, creating a professional gallery look.
Step back and admire the calm, woodland character you’ve brought to life on paper


Have a question or want to share your own experience? I'd love to hear from you in the comments below!