When I need a project that feels both meditative and punchy, I reach for relief printmaking—it’s all about carving shapes and letting positive/negative space do the talking. Here are my favorite relief printmaking ideas that carve cleanly, ink beautifully, and shine in high contrast.
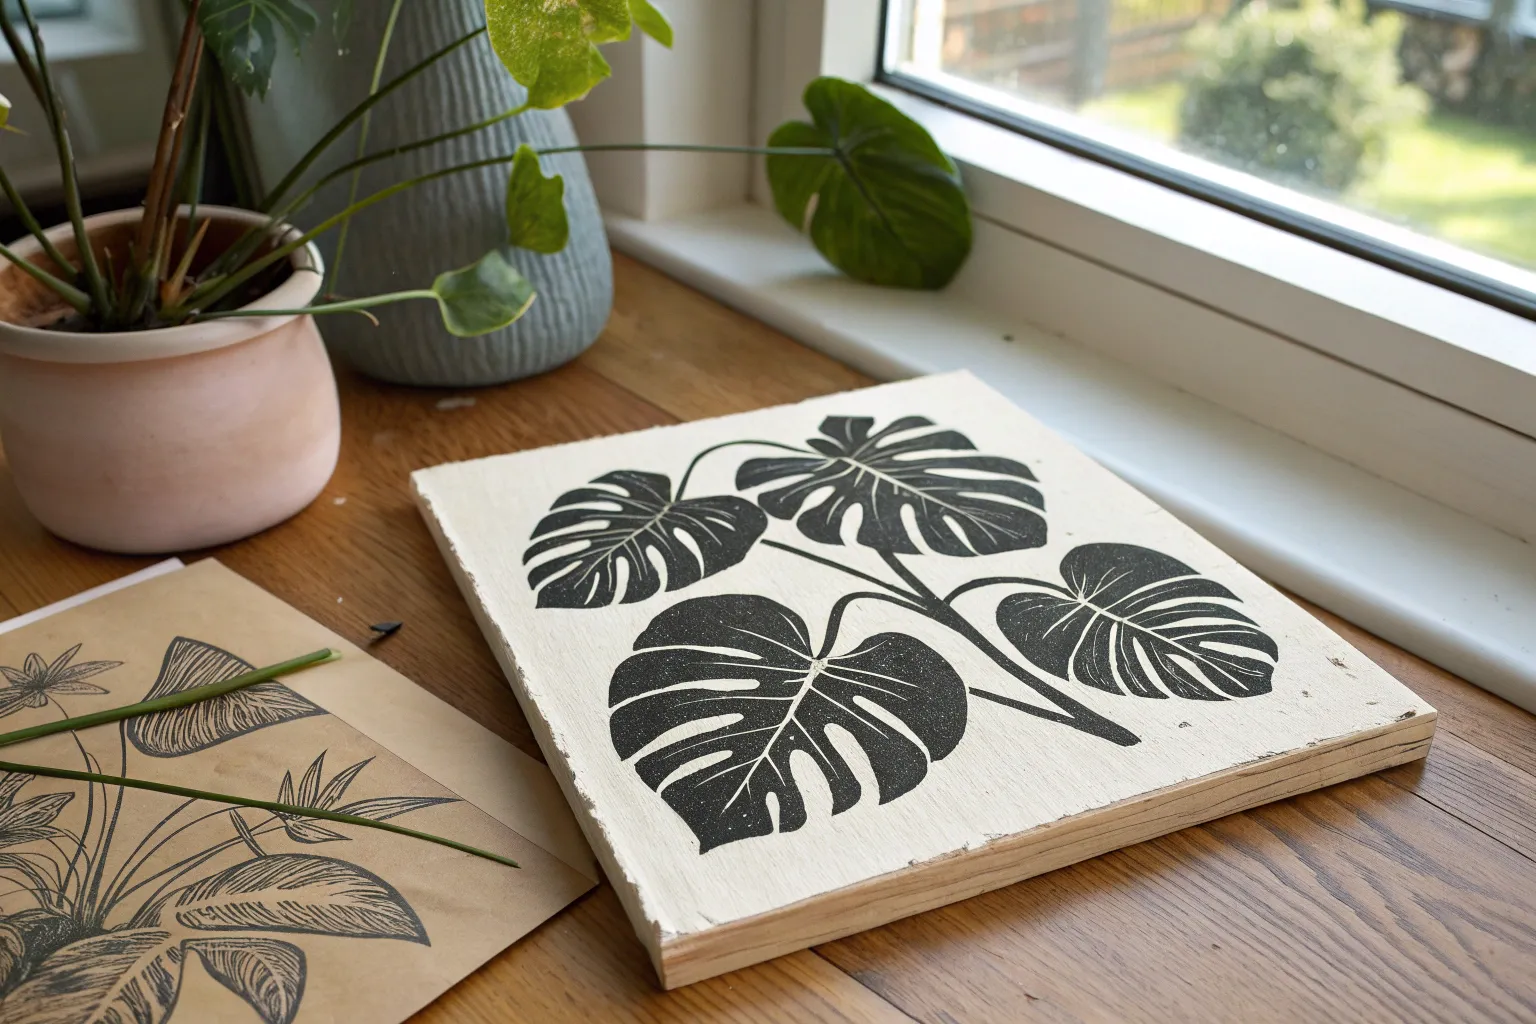
Leaf Silhouettes With Bold Veins

Capture the stark beauty of nature with this high-contrast relief print featuring a bold leaf silhouette. The striking white veins against black ink create a dramatic graphic effect, while the frayed fabric mounting adds a lovely tactile, organic finish.
Step-by-Step Tutorial
Materials
- Soft-cut lino block (at least 8×10 inches)
- Linoleum carving tools (V-gouge and U-gouge)
- Black water-soluble block printing ink
- Rubber brayer (roller)
- Off-white or cream cotton fabric (medium weave)
- Wooden canvas stretcher frame or wooden panel
- PVA glue or heavy body acrylic gel medium
- Pencil and tracing paper
- Pressing tool (baren or smooth wooden spoon)
- Inking plate or glass pane
- Reference photo of a chestnut or maple leaf
Step 1: Designing and Carving
-
Prepare your reference:
Begin by sketching a large, five-pointed leaf shape onto your tracing paper. A horse chestnut or buckeye leaf works perfectly for this project due to its distinct leaflets. Ensure the design fits comfortably within the dimensions of your lino block. -
Transfer the image:
Flip your tracing paper graphite-side down onto the lino block. Rub the back firmly to transfer the outline. If needed, go over the lines on the block with a permanent marker to make them easier to see while carving. -
Carve the main veins:
Using a fine V-gouge tool, carve the central spine and the primary veins of each leaf section. These should be clean, continuous lines that will remain white (un-inked) in the final print. -
Detail the secondary veins:
Switch to an even finer blade if you have one, branching out smaller veins from your main lines. Keep these lines purposeful and relatively symmetrical to mimic nature’s structure. -
outline the leaf:
Carefully carve around the exterior perimeter of the leaf. Create a small ‘ditch’ around the shape first to stop your tool from slipping into the leaf area later. -
Clear the background:
Use a wide U-gouge to clear away all the material outside the leaf shape. You want the background to be completely negative space, so carve deep enough that the roller won’t catch the bottom. -
Create texture (optional):
Inside the black areas of the leaf, you can create subtle texture by gently stippling or scratching the surface with a tool, which results in the slightly speckled look seen in the photo.
Clean Lines Pro Tip
Before printing, do a test print on scrap paper. If you see ‘chatter’ (unwanted ink marks in the background), carve those high spots down further before printing on your final fabric.
Step 2: Printing on Fabric
-
Prepare the fabric:
Cut a piece of your cream cotton fabric slightly smaller than your wooden mount. I like to tear the fabric rather than cut it with scissors to create those soft, frayed edges shown in the example. -
Charge the ink:
Squeeze a line of black block printing ink onto your inking plate. Roll the brayer back and forth and lift it occasionally until you hear a sticky, velcro-like sound and the texture looks like orange peel. -
Ink the block:
Roll the ink onto your carved block in thin, even layers. Apply ink in multiple directions to ensure the leaf surface is fully coated, but be careful not to flood the fine carved vein lines. -
Position the fabric:
Carefully lay your frayed fabric piece on top of the inked block (or place the block face down onto the fabric if you find that easier for alignment). Center it well. -
Transfer the print:
Using a baren or the back of a wooden spoon, rub firmly in circular motions over the back of the fabric. Apply extra pressure to the solid black areas to get that deep, dark coverage. -
Peel and inspect:
Slowly peel back one corner to check the ink density. If it looks patchy, lay it back down carefully and rub more. Once happy, remove the fabric completely and let the ink cure fully (usually 24-48 hours depending on humidity).
Step 3: Mounting and Finishing
-
Prepare the mount:
Take your wooden panel or canvas stretcher. Ensure the surface is clean and dust-free. -
Apply adhesive:
Brush an even layer of PVA glue or heavy gel medium onto the face of the wooden mount. Don’t go all the way to the very edge if you want the frayed fabric edges to lift slightly. -
Mount the artwork:
Center your dry fabric print onto the glued surface. Smooth it out gently from the center moving outward to remove any air bubbles. -
Fray the edges:
Use a needle or pin to gently tease out horizontal threads from the fabric perimeter, enhancing the raw edge effect.
Level Up: Gallery Feel
Float mount the finished wood block inside a larger, deep shadow box frame. The gap between the frayed fabric and the frame edge adds sophisticated depth.
Hang your botanical relief print in a well-lit spot to highlight the beautiful contrast between organic textures and graphic lines


Wildflower Sprigs and Stems
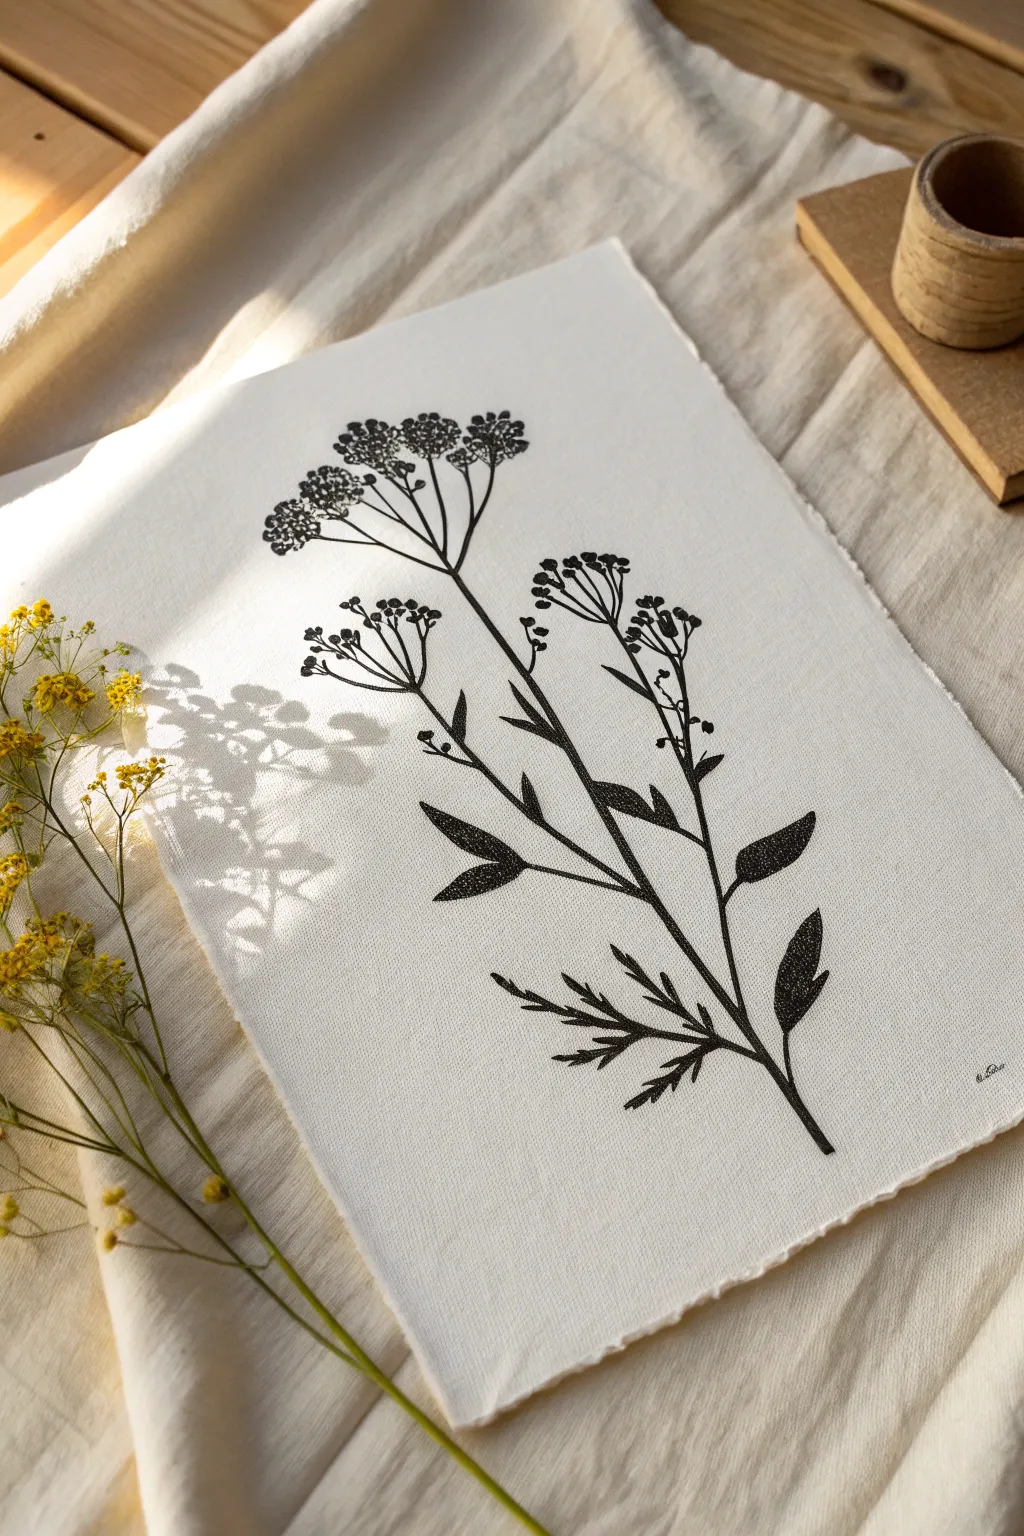
Capture the delicate structure of blooming wildflowers with this elegant relief print project. Using a single block and rich black ink, you will create a botanical study that celebrates the organic beauty of stems and clusters on textured paper.
Detailed Instructions
Materials
- Soft-cut linoleum block (approx. 5×7 or 8×10 inch)
- Linocut carving tools (V-gouge, U-gouge, knife)
- Black block printing ink (water-soluble or oil-based)
- Brayer (rubber roller)
- Heavyweight printmaking paper (preferably with deckled edges)
- Pencil and tracing paper
- Baren or wooden spoon for burnishing
- Glass or acrylic sheet for inking
- Real wildflower stems (optional, for reference)
Step 1: Designing and Carving
-
Source your inspiration:
Begin by sketching a tall, branching wildflower. Focus on the distinct ‘umbel’ shape—stems radiating from a central point to form flat-topped flower clusters—similar to Queen Anne’s Lace or Dill. -
Refine the line drawing:
Simplify your sketch into high-contrast black and white shapes. Remember that in relief printing, the lines you leave raised will print black, and the areas you carve away will stay white. -
Transfer to the block:
Trace your design onto tracing paper with a soft pencil. Flip the paper face-down onto your lino block and rub firmly to transfer the graphite, ensuring the image is reversed. -
Outline delicate stems:
Using your finest V-gouge or a knife tool, carefully carve along the outer edges of the thinnest stems first. This establishes your boundaries before removing larger background areas. -
Carve the flower clusters:
For the flower heads, use small, stippling-like gouges to create texture rather than distinct petals. This mimics the dense, tiny blooms found on wildflowers. -
Detail the leaves:
Carve veins into the larger leaf shapes by removing thin lines of lino, leaving the leaf itself as a solid raised mass. -
Clear the negative space:
Switch to a wider U-gouge to clear away the large background areas. I find it helpful to carve directions away from the plant stems to avoid accidental slips. -
Clean the edges:
Ensure the non-printing areas around the main image are carved deep enough so they won’t pick up stray ink.
Pro Tip: Deckle Edges
To match the photo beautifully, tear your paper against a heavy ruler instead of cutting it with scissors. This creates that soft, fibrous deckled edge that complements natural subjects.
Step 2: Inking and Printing
-
Prepare the workspace:
Set up a clean, flat surface. Squeeze a line of black block printing ink onto your glass slab or inking tray. -
Charge the brayer:
Roll the brayer into the ink, lifting and rolling repeatedly. You are looking for a smooth, velvety texture on the roller with a distinct ‘hissing’ sound. -
Apply ink to the block:
Roll the inked brayer over your carved block. Apply thin, even layers, rolling in multiple directions to ensure every raised stem and leaf is fully coated. -
Inspect the coverage:
Check the block for any carved areas that accidentally picked up ink. Wipe these stray spots clean with a rag or carve them deeper if necessary. -
Position the paper:
Carefully align your textured paper over the inked block. Once the paper touches the ink, do not shift it, or the image will smudge. -
Burnish the print:
Using a baren or the back of a wooden spoon, rub firmly in small circles across the back of the paper. Apply extra pressure over the solid black areas like the leaves. -
Check progress:
Holding one corner of the paper down firmly, gently peel back the opposite corner to peek at the transfer. If the black looks patchy, lay it back down and rub that specific area more. -
Reveal the artwork:
Slowly peel the paper entirely off the block to reveal your wildflower print. Place it in a safe, flat area to dry completely.
Troubleshooting: Chatter
If you see random unwanted lines in the background (called ‘chatter’), carve those background areas deeper or use a paper mask over the background areas before printing the main image.
Once dry, frame your botanical print to bring a permanent touch of the meadow into your home


Single Bloom With Overlapping Petals
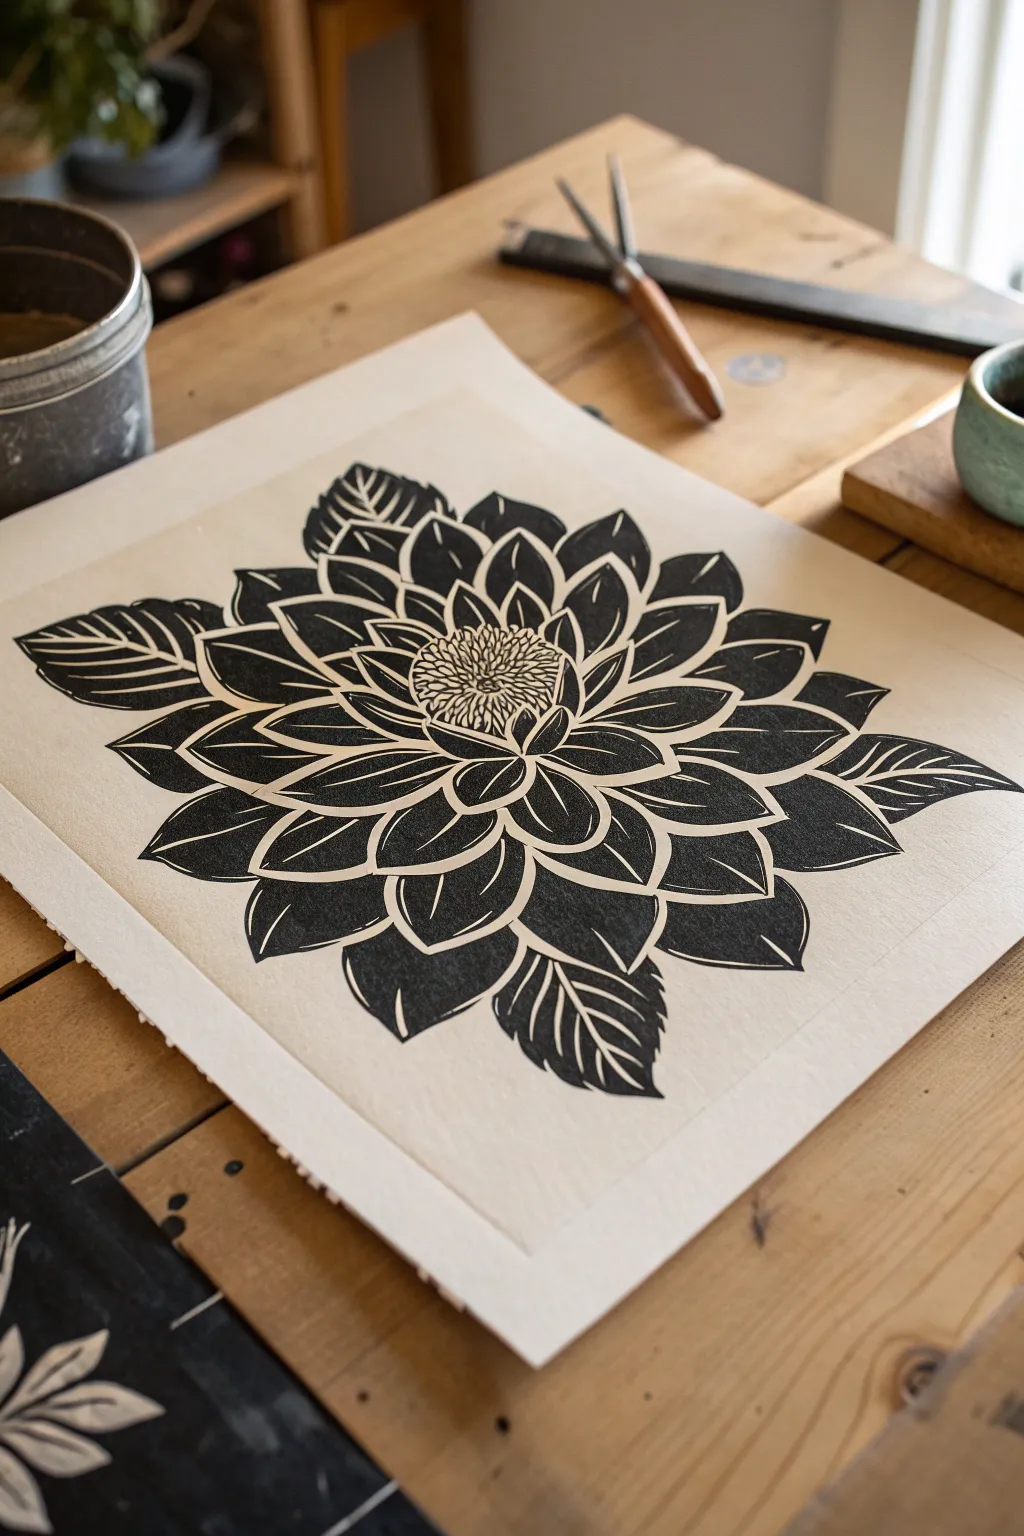
Capture the bold contrast and delicate lines of nature with this striking relief print project. Focusing on a single, oversized bloom allows you to explore the rhythm of overlapping petals and the satisfying precision of negative space carving.
How-To Guide
Materials
- Soft-cut lino block (at least 8×10 inches)
- Set of lino cutters (U-gouge and V-gouge)
- Black oil-based relief ink
- Brayer (rubber roller)
- Baren or wooden spoon for burnishing
- Tracing paper and pencil (soft lead, 2B or higher)
- Printmaking paper (smooth, heavyweight, off-white)
- Inking plate or glass slab
- Bone folder (optional)
- Permanent marker or India ink (optional for block toning)
Step 1: Planning and Transferring
-
Sketch the bloom:
Begin by sketching a large dahlia or chrysanthemum on tracing paper. Start with the textured center circle, then radiate outward with layers of slightly pointed oval petals. Ensure the petals overlap naturally to create depth. -
Refine the lines:
Go over your pencil sketch to clearly define the negative space. Remember, in relief printing, the lines you carve away will be white, and the remaining surface will be black. It helps to shade in the parts you want to remain black so you don’t get confused later. -
Prepare the block:
Lightly sand your lino block with fine-grit sandpaper to remove any manufacturing sheen, which helps the ink stick better later. Wipe it clean with a damp cloth. -
Transfer the image:
Place your tracing paper sketch face-down onto the lino block. Rub the back firmly with a bone folder or the back of a spoon to transfer the graphite onto the linoleum surface. The image will appear reversed on the block. -
Lock in the design:
Trace over the faint graphite lines on your block with a permanent marker. This prevents the design from smudging while your hand rests on the block during carving.
Step 2: Carving the Block
-
Outline fine details:
Using your smallest V-gouge tool, carefully carve the outline of every petal and leaf. Use shallow, consistent pressure. Also, carve the tiny stippled dots in the flower’s center cluster. -
Define the petal veins:
Switch back to the small V-gouge to create the central vein lines inside the larger petals. These should be thin and taper off towards the tip of the petal. -
Clear large negative spaces:
Switch to a wider U-gouge to remove the background material surrounding the flower. Carve away from the flower toward the edges of the block. -
Refine the petal edges:
Using a medium gouge, clear the spaces between the overlapping petals. Be careful not to undercut the printing surface; keep your tool angle shallow to support the linoleum ridges. -
Clean up chatter:
Inspect the background areas. You can leave some texture marks (chatter) for visual interest, or smooth them down flat if you want a pristine white background. Brush away all loose crumbs.
Reductive Carving Idea
Warm your lino block with a hairdryer or on a sunny windowsill for just a minute before carving. The subtle heat softens the material, making your gouge glide like butter for smoother curves.
Step 3: Inking and Printing
-
Charge the roller:
Squeeze a small amount of black oil-based ink onto your inking slab. Roll the brayer back and forth and lift it frequently to create a thin, even layer of ink with a velvety ‘hissing’ texture. -
Ink the block:
Roll the inked brayer over your carved block. Apply ink in multiple directions—vertically, then horizontally—to ensure the entire surface is coated evenly without filling in the fine carved lines. -
Paper registration:
Carefully lower your printmaking paper onto the inked block. Once the paper touches the ink, do not shift it, or the image will smear. -
Burnish the print:
Using a baren or the back of a wooden spoon, apply firm, circular pressure over the entire back of the paper. I like to work from the center outward to ensure no air bubbles are trapped. -
Focus on edges:
Pay special attention to the edges of the petals and the detailed center. Press firmly in these areas to transfer the ink fully into the paper fibers. -
The reveal:
Pick up one corner of the paper and slowly peel it back to reveal your print. If the ink looks patchy, you can carefully lay it back down and burnish more, provided the paper hasn’t moved. -
Dry the print:
Place the finished print on a drying rack or hang it up. Oil-based inks can take several days to cure completely, so create a safe space where it won’t be touched.
Patchy Ink Fix
If your prints look salty (white speckles in black areas), your ink is likely too thin. Add a tiny bit more ink to the slab, or ensure you aren’t rolling too fast and effectively stripping the block.
Once dry, frame your bold floral print to add a touch of dramatic contrast to your wall art collection


Butterfly or Moth in High Contrast
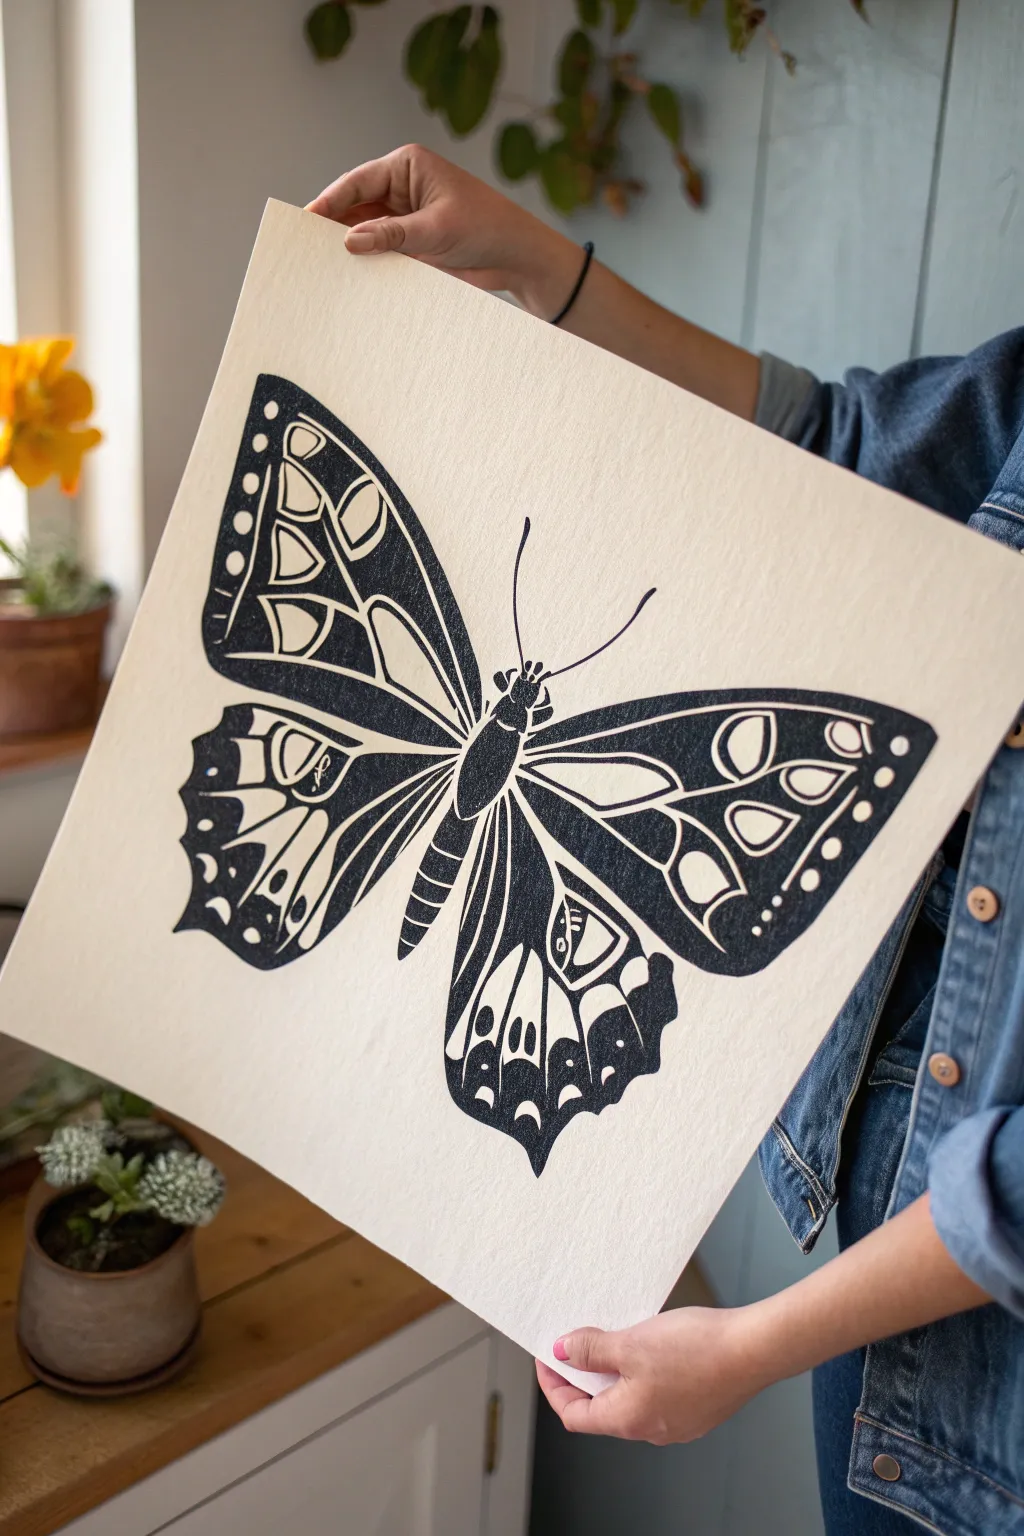
Embrace the drama of high-contrast design with this striking butterfly relief print. By simplifying intricate natural patterns into bold black and white shapes, you’ll create a large-scale artwork that feels both graphic and organic.
Step-by-Step Tutorial
Materials
- Large block of soft-cut linoleum (e.g., Soft-Kut or similar carving material)
- V-gouge carving tool (fine)
- U-gouge carving tool (wide)
- Paper for sketching and transfer
- Soft pencil (4B or 6B)
- Black oil-based or water-soluble block printing ink
- Brayer (rubber roller)
- Barren or large wooden spoon
- High-quality printmaking paper (smooth texture, cotton rag is ideal)
- Glass or acrylic slab for inking
Step 1: Design & Transfer
-
Sketch the silhouette:
Start by drawing a large butterfly outline on your sketch paper. Focus on symmetry; if you struggle with freehand drawing, draw one wing, fold the paper, and trace it to the other side to ensure it perfectly mirrors itself. -
Simplify the details:
Butterflies are complex, but relief printing loves simplicity. Convert the intricate wing veins into thick, solid lines and the colored patches into bold geometric shapes. Think in purely positive and negative space—what will be black, and what will be paper white? -
Prepare the transfer:
Go over your final lines heavily with a soft 4B or 6B pencil. The graphite needs to be thick and loose for the transfer process to work effectively. -
Transfer to the block:
Place your drawing face down onto your linoleum block. Rub the back of the paper firmly with a barren or the back of a spoon to transfer the graphite image onto the rubbery surface. If the lines are faint, go over them directly on the block with a permanent marker so you don’t lose your guide while carving.
Step 2: Carving the Block
-
Outline the shapes:
Using your fine V-gouge tool, carve along the outlines of your design. Carve away from your body for safety. This initial thin channel creates a ‘stop cut’ that prevents you from accidentally slipping into the black areas later. -
Clear large negative spaces:
Switch to your wider U-gouge to clear away the large white areas around the butterfly and inside the wing patterns. You don’t need to dig too deep; just remove the surface layer so it won’t pick up ink. -
Refine the edges:
Go back in with your smaller tools to clean up any jagged edges. High-contrast prints rely on crisp transitions between black and white, so take a moment to tidy up curves and points. -
Texturizing (Optional):
If you want a bit of visual noise in the black areas (like the subtle speckling seen in the photo), you can leave tiny bits of material uncarved or lightly scratch the surface, though a solid black usually looks more graphic.
Unwanted Ink Spots?
If ‘chatter’ (lines from carved areas) appears on your print, use a paper mask. Cut a stencil of your butterfly shape and lay it over the block, covering the background areas before printing the final paper.
Step 3: Inking & Printing
-
Charge the roller:
Squeeze a line of black ink onto your glass slab. Roll the brayer back and forth—and lift it occasionally—until the ink sounds like ‘velcro’ (a sticky hissing noise) and has a satin texture. -
Ink the block:
Roll the ink onto your carved block. Apply thin, even layers. Roll in multiple directions to ensure intricate areas distinct coverage without flooding the fine carved lines. -
Position the paper:
Gently lay your printmaking paper on top of the inked block. Once it touches the ink, do not shift or slide it, as this will smudge the crisp edges. -
Burnish the print:
Using a barren or a wooden spoon, rub the back of the paper in circular motions. Apply firm, consistent pressure. I like to start from the center of the butterfly body and work my way out to the wingtips to prevent paper buckling. -
Check your progress:
Carefully lift one corner of the paper while holding the rest down to check ink transfer. If it looks spotty, lay it back down carefully and rub that area again. -
The reveal:
Slowly peel the paper off the block from one side to the other. Lay the wet print flat to dry. Oil-based inks may take a few days, while water-based inks will be dry to the touch much sooner.
Go Metallic
Swap the black ink for gold or copper on dark navy paper. The high contrast remains, but the result feels like a vintage scientific illustration or luxury wallpaper.
Hang your bold insect specimen proudly, knowing no butterflies were harmed in the making of this art
BRUSH GUIDE
The Right Brush for Every Stroke
From clean lines to bold texture — master brush choice, stroke control, and essential techniques.
Explore the Full Guide
Bird on a Branch Silhouette
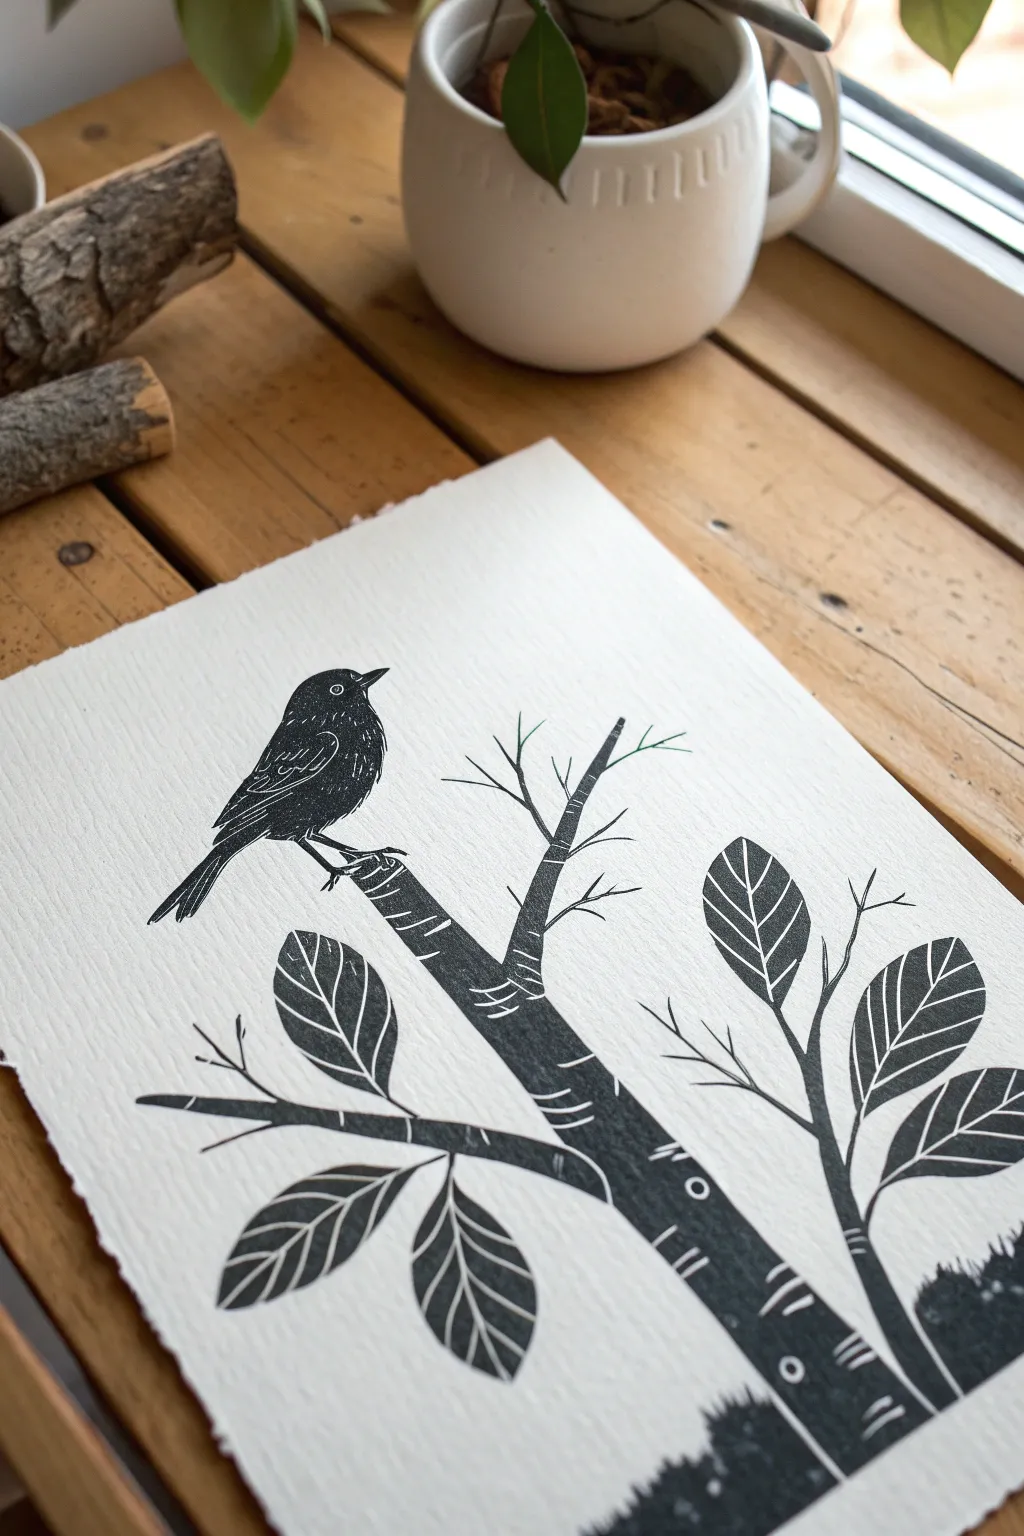
Capture the stillness of nature with this striking black-and-white relief print featuring a perched songbird on a birch branch. The high-contrast silhouette style utilizes simple linework to create texture, making for an elegant piece of handmade art.
Step-by-Step
Materials
- Soft linoleum block (at least 5×7 inches)
- Linoleum carving tools (V-gouge and key U-gouge)
- Black oil-based or water-soluble block printing ink
- Soft rubber brayer (roller)
- Heavyweight printmaking paper (e.g., Stonehenge or Rives BFK)
- Baren or wooden spoon for burnishing
- Pencil and tracing paper
- Carbon transfer paper (optional)
- Inking plate or glass pane
- Craft knife
Step 1: Design and Transfer
-
Sketch your composition:
Begin by sketching your design on paper. Focus on the main diagonal line of the birch branch and the vertical trunk section on the right. Draw a simple songbird silhouette, like a robin or thrush, perched near the left side. -
Refine the details:
Add the smaller twigs branching upward and the oval-shaped leaves. Don’t worry about shading; think in terms of positive space (black) and negative space (white). -
Transfer to the block:
Place carbon paper face down on your linoleum block, then tape your sketch on top. Trace over your lines firmly with a pencil to transfer the image. Remember, the final print will be a mirror image of your carving. -
Reinforce the lines:
Once transferred, go over the faint carbon lines on the block with a permanent marker so they don’t smudge while you work.
Step 2: Carving the Block
-
Outline the main shapes:
Using a fine V-gouge, carefully carve along the outer edges of the bird, the branches, and the leaves. This creates a safety channel that protects your design when removing larger areas later. -
Create bird textures:
Switch to your finest tool to add detail inside the bird’s silhouette. Carve small, distinct dashes to suggest wing feathers, an eye ring, and a beak line. These white lines will bring the black silhouette to life. -
Carve the birch bark:
The birch tree texture is crucial here. Carve short, horizontal dashes and slightly curved lines across the width of the branches and trunk to mimic the lenticels characteristic of birch bark. -
Define the leaves:
For the leaves, carve a thin central vein and diagonal veins branching out. Keep these lines delicate to maintain the bold leaf shape. -
Clear the background:
Using a wider U-gouge, clear away all the linoleum surrounding your design. Carve away from the safety channels you created earlier. -
Create the rough border:
If you look at the bottom right corner, there’s a textured, grassy edge. Carve this irregularly rather than in a straight line to ground the tree trunk organically. -
Final cleanup:
Check for any high ridges in the background areas that might catch ink. Shave these down flat so your white space remains pristine.
Clean Lines Pro Tip
Before printing, do a ‘rubbing’ of the un-inked block with crayon and thin paper. This reveals stray ridges in the negative space without wasting ink or good paper.
Step 3: Inking and Printing
-
Prepare the paper:
If using a thick printmaking paper with deckled edges, tear it down to size now. Ensure your hands are clean before handling the paper. -
Charge the ink:
Squeeze a small line of black ink onto your inking plate. Roll the brayer back and forth and lift it occasionally to create a smooth, velvety texture often called the ‘orange peel’ look. -
Ink the block:
Roll the ink onto your carved block in multiple directions. I find that rolling diagonally ensures the ink gets into the texture of the bird without flooding the fine lines. -
Register the paper:
Carefully align your paper over the inked block and lower it down gently. Once it touches the ink, do not shift or drag it. -
Burnish the print:
Using a baren or the back of a wooden spoon, rub the back of the paper in small circles. Apply firm, even pressure, paying speical attention to the solid black areas of the bird and trunk. -
The reveal:
Slowly peel one corner of the paper up to peek at the transfer. If the black looks patchy, lay it back down carefully and burnish more. When satisfied, peel the paper entirely off the block. -
Dry and sign:
Place your print on a drying rack or flat surface. Oil-based inks can take several days to cure, while water-based ones dry quickly. Sign your edition in pencil at the bottom once dry.
Try a Gradient
Make a second print using a ‘rainbow roll.’ Put blue and black ink side-by-side on your palette and blend them with the roller to give the bird a moody, twilight effect.
Hang your finished print near a window to connect your art with the outdoors
Pet Portrait Profile in Two Values
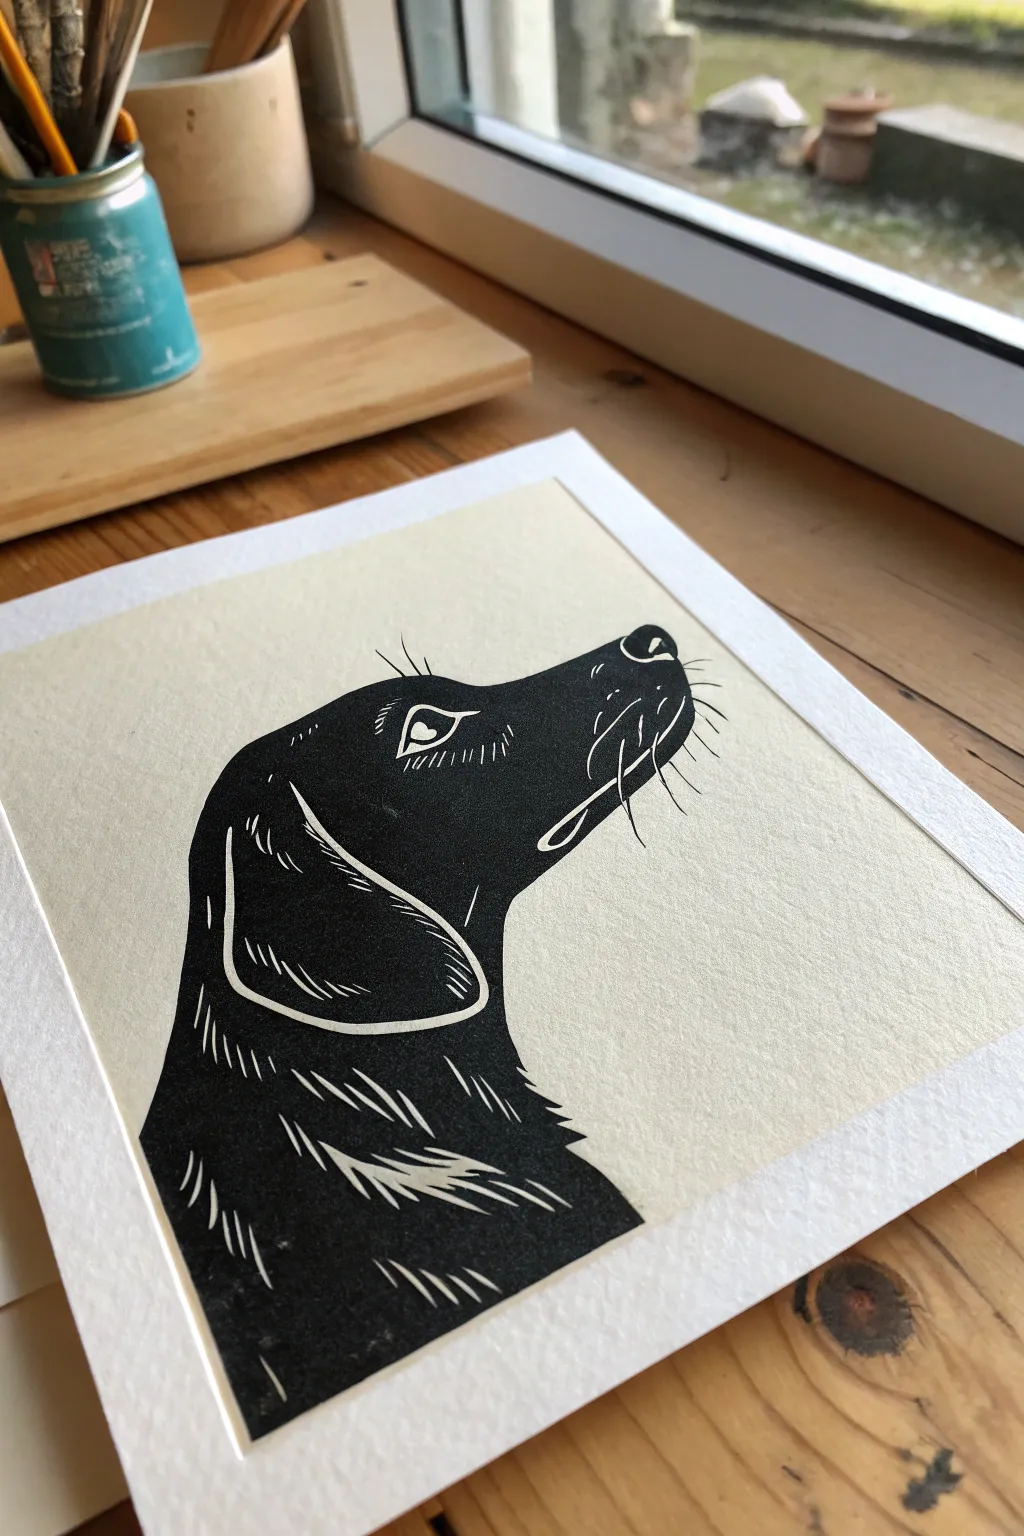
Capture the soulful gaze of a canine companion with this striking high-contrast relief print. By simplifying a pet profile into just inked shadows and untouched paper highlights, you create a bold, graphical portrait that balances solid black forms with delicate carved details.
How-To Guide
Materials
- Soft-cut lino block (4×6 inch or similar)
- Lino carving tools (V-gouge and U-gouge)
- Black water-based block printing ink
- Brayer (rubber roller)
- Printmaking paper (smooth, heavyweight, off-white or cream)
- Tracing paper
- Pencil (soft lead like 4B)
- Baren or wooden spoon for burnishing
- Inking plate or piece of glass
- Photos of a dog in profile
Step 1: Designing the Image
-
Select your reference:
Choose a side-profile photo of a dog where the head is lifted slightly. Look for a strong silhouette; the outline is the most crucial part of this design. -
Simplify the shapes:
On a piece of scrap paper, sketch the dog’s outline. Instead of drawing individual hairs, look for blocks of shadow. The entire dog will be black, except for specific white highlights like the eye, whiskers, ear definition, and chest fur texture. -
Refine the lines:
Clean up your drawing. Use thicker lines to indicate where you will carve. Remember, what you draw in pencil will become the white (un-inked) paper, and the untouched surface will print black. -
Transfer to block:
Trace your final design onto tracing paper using a soft pencil. Flip the tracing paper over (graphite side down) onto your lino block. Rub the back firmly to transfer the image; this ensures the print won’t be a mirror image of your dog.
Step 2: Carving the Block
-
Outline the silhouette:
Start with a fine V-gouge tool. Carefully carve away the lino around the very outside edge of the dog’s profile. This separates your subject from the background. -
Clear the background:
Switch to a wider U-gouge to clear away the large negative space around the dog. You want the background to be completely clean, so carve fairly deep here to avoid picking up stray ink marks later. -
Carve the eye detail:
Return to your finest V-tool for the eye. Carve the white catchlight (the reflection) and the lower rim of the eye. This breathes life into the portrait immediately. -
Define the ear:
Carve a sweeping, curved line to suggest the heavy flop of the ear. Add a few short, hatched strokes inside the ear shape to suggest volume without outlining it completely. -
Add fur texture:
At the base of the neck and chest, use quick, flicking motions with the V-tool. These tapering marks mimic tufts of fur where the light hits. Don’t overdo it; keep the black mass solid. -
Whiskers and nose:
Carve very thin, confident lines for the whiskers extending from the muzzle. Add a small highlight on the top of the nose leather to give it dimension. -
Clean up edges:
Check the perimeter of your design for any loose bits of lino or rough edges that might catch ink. Brush away all carving debris.
Chatter Marks
Don’t stress if the background isn’t perfectly flat. Small carved ridges that pick up ink are called ‘chatter.’ They add handmade charm, but if unwanted, wipe them with a rag before printing.
Step 3: Printing the Edition
-
Prepare the paper:
Tear or cut your printmaking paper to size. Leave a generous border around where the image will sit to frame the profile nicely. -
Roll out ink:
Squeeze a small line of black block printing ink onto your inking plate. Roll the brayer back and forth and lift it occasionally to create a smooth, velvety texture—listen for a sticky ‘hissing’ sound. -
Ink the block:
Pass the inked brayer over the carved block. Roll in multiple directions to ensure even coverage on the solid black areas of the dog’s head and neck. Be careful not to let ink flood into your fine whisker lines. -
Register the paper:
Carefully align your paper over the inked block. Once the paper touches the ink, commit to that position and drop it gently so it doesn’t smudge. -
Burnish the print:
Using a baren or the back of a wooden spoon, rub the back of the paper in small circles. Apply firm pressure, focusing especially on the large solid black areas to get a dense, dark tone. -
Check visibility:
I like to gently lift one corner of the paper while holding the rest down to peek at the transfer. If the black looks patchy, lay it back down and burnish that spot again. -
The reveal:
Slowly peel the paper off the block from one corner to reveal your crisp, high-contrast pet portrait.
Ink Patchiness
If your large black areas look ‘salty’ (white specks showing through), your paper might be too textured or you need more ink. Try a slightly smoother paper or another pass with the brayer.
Allow the ink to dry fully before framing your loyal friend’s profile in a simple mat board.

PENCIL GUIDE
Understanding Pencil Grades from H to B
From first sketch to finished drawing — learn pencil grades, line control, and shading techniques.
Explore the Full Guide
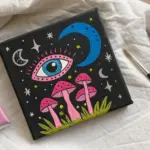
Mushrooms Under a Starry Sky
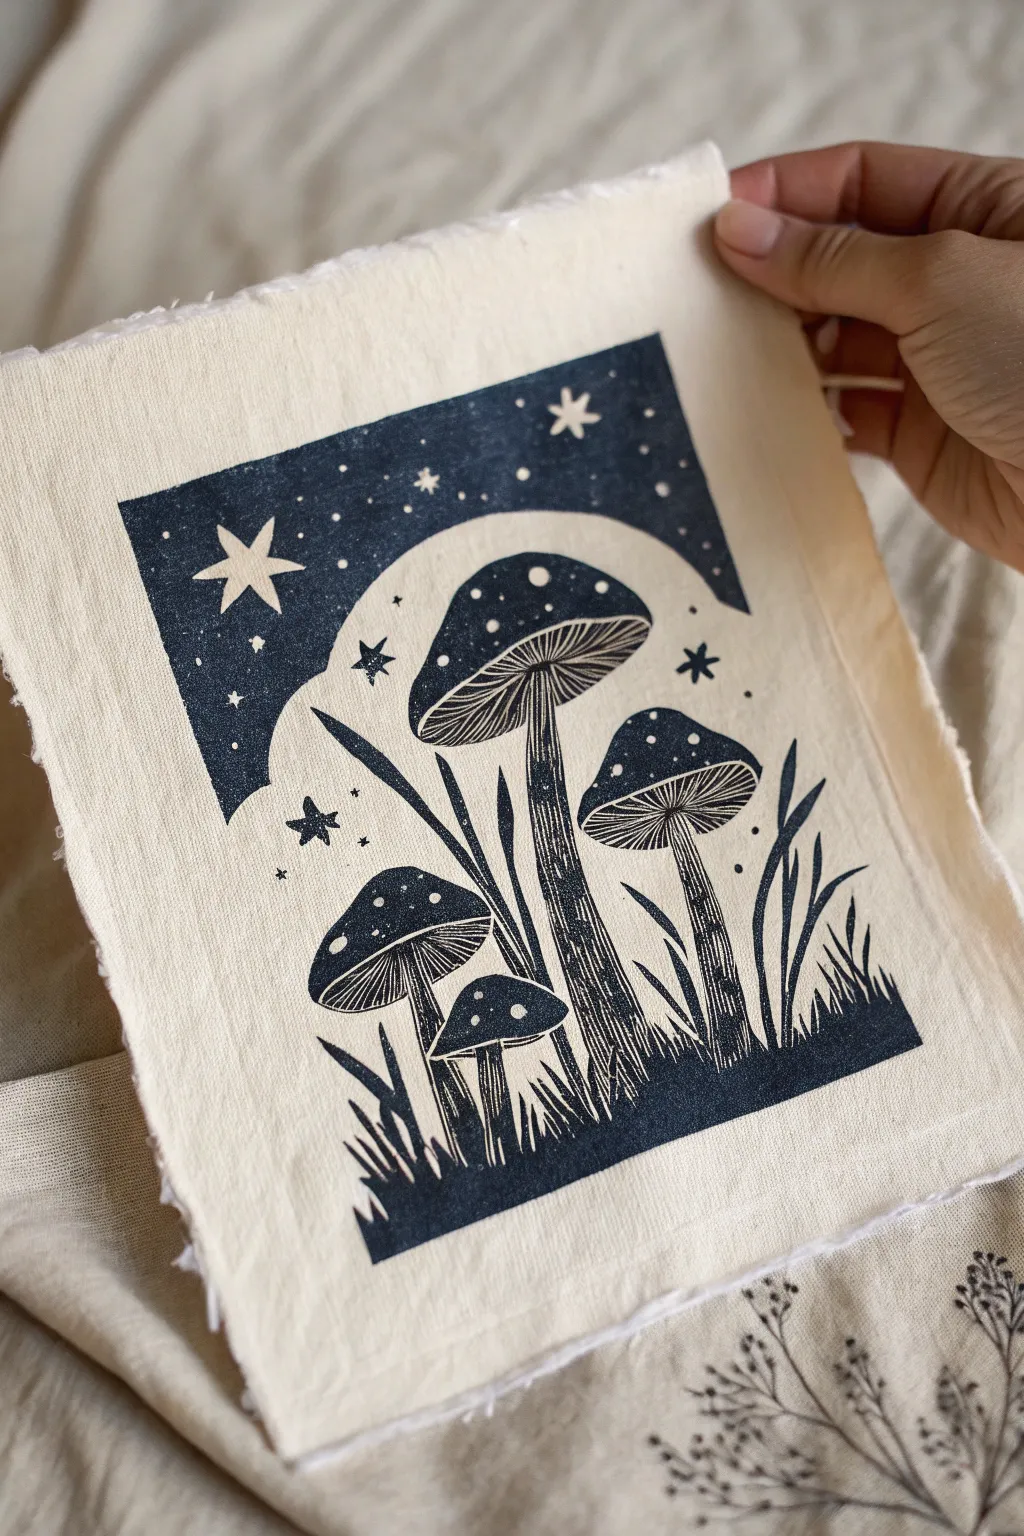
This detailed relief print features a whimsical arrangement of four spotted mushrooms framed by a crescent moon window and a starry night sky. The high contrast of dark ink on textured fabric creates a rustic yet magical piece of art.
Step-by-Step
Materials
- Soft linoleum block (approx. 5×7 inches)
- Linocut carving tools (V-gouge and U-gouge)
- Block printing ink (Prussian Blue or Oil-based Black)
- Rubber brayer
- Pencil and tracing paper
- Unbleached cotton or linen fabric (cut slightly larger than the block)
- Baren or a wooden spoon
- Inking plate or piece of glass
- Fine grit sandpaper
Step 1: Design and Transfer
-
Draft the composition:
Sketch your design on paper first. Draw a central arch shape first to define the negative space. Inside the arch, draw four mushrooms of varying heights: one tall central mushroom, a medium one to its right, and two smaller ones clustering to the left. -
Add celestial details:
Above the arch, draw a rectangular border that frames the top. Fill this upper section with scattered stars—a mix of small dots and larger four-point or five-point stars. -
Refine the textures:
Detail the underside of the mushroom caps with fine lines for gills. Add spots to the caps and create grass blades at the very bottom to ground the stems. -
Transfer to the block:
Trace the final drawing onto tracing paper. Flip the tracing paper over (graphite side down) onto your linoleum block and rub the back with a spoon or fingernail to transfer the image in reverse.
Step 2: Carving the Block
-
Outline the positive space:
Using your finest V-gouge tool, carefully carve along the outlines of the mushrooms, the grass, and the distinct arch shape. Remember, you are carving away the parts that will remain white (the background). -
Carve the sky:
In the upper rectangular section, carefully carve around the star shapes. The stars need to remain raised (uncarved). Use a U-gouge to clear away the large flat area inside the arch, leaving the sky section solid. -
Detail the gills:
Switch back to the fine V-gouge to carve the gills under the mushroom caps. These should be very thin, delicate lines radiating from the stem. -
Create the spots:
For the spots on the mushroom caps, use a small U-gouge to scoop out little circles. These carved circles will appear as white spots on the dark inked caps. -
Texture the stems:
Run vertical texture lines down the stems to give them a fibrous look, leaving some areas solid for contrast. -
Clear the negative space:
Use a wide U-gouge to clear away all the unneeded linoleum outside the main rectangular border and inside the arch shape (the background behind the mushrooms). Keep your tool strokes directional if possible, as they might pick up a little ink.
Clearer Carving
Before you start carving, stain your linoleum block with a thin wash of acrylic paint or ink. This makes your shallow cuts highly visible against the dark surface.
Step 3: Printing on Fabric
-
Prepare the fabric:
Cut your unbleached cotton or linen into a rectangle slightly larger than your block. I like to manually fray the edges by pulling loose threads for a raw, vintage look. -
Prepare the ink:
Squeeze a small line of ink onto your inking plate. Roll out the ink with your brayer, moving in different directions until you hear a consistent tacky, sizzling sound. -
Ink the block:
Roll the brayer over your carved block. Apply several thin layers rather than one thick gloop to ensure the fine gill details don’t get flooded with ink. -
Position the print:
Carefully place your fabric face-down onto the inked block. Once it makes contact, do not shift or slide the fabric. -
Burnish the image:
Using a baren or the back of a wooden spoon, rub firmly in small circles over the entire back of the fabric. Press harder than you would for paper to ensure the ink transfers into the fabric weave. -
Reveal the print:
Gently peel back one corner to check the coverage. If it looks spotty, lay it back down and rub that specific area again. Once satisfied, slowly peel the fabric entirely off the block. -
Final drying:
Hang the fabric or lay it flat to dry. Oil-based inks can take several days to cure fully on fabric, so be patient before handling it excessively.
Patchy Prints?
If your fabric print looks too faded or textured, you may need more pressure. Try placing a piece of baking parchment over the fabric and rubbing harder with a spoon.
Frame your botanical print simply or sew it onto a tote bag for a custom accessory
Kitchen Still Life With Strong Shadows
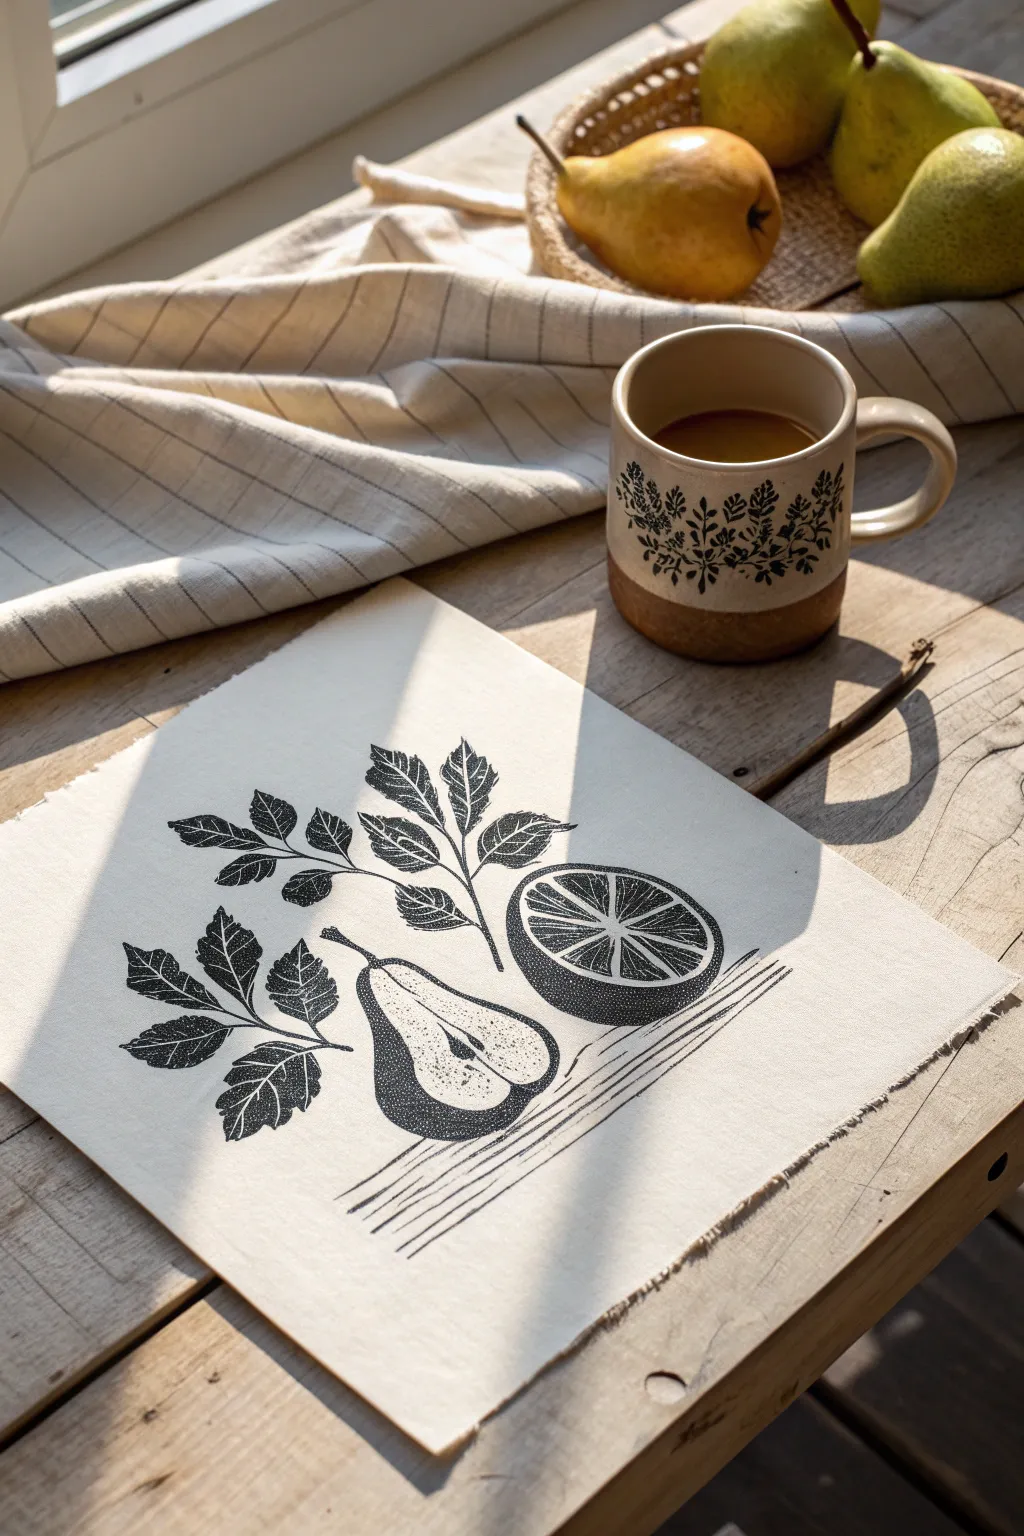
Capture the warmth of a morning kitchen with this elegant still life relief print. Featuring stylized branches, a halved pear, and a citrus slice, the design uses clever texture work like stippling and hatching to create depth without needing multiple colors.
How-To Guide
Materials
- Soft-cut lino block (approx. 6×8 inches)
- Linocut carving tools (V-gouge, U-gouge, and knife)
- Black water-based block printing ink
- Soft rubber brayer (roller)
- Printmaking paper (smooth, off-white or cream, approx. 120gsm)
- Pencil and tracing paper
- Barren or wooden spoon for burnishing
- Ink slab or glass pane for rolling ink
Step 1: Design and Transfer
-
Sketch your composition:
Begin by sketching the design on paper. Draw a central vertical branch with leaves, a pear situated at the bottom left, and a circular citrus slice to its right. Add a few horizontal lines beneath the fruits to ground them. -
Refine the details:
Simplify your drawing into high-contrast shapes. Remember that everything you carve away will be the paper color (white), and what remains raised will be black. Mark the areas you want to keep black with darker pencil shading to avoid confusion later. -
Transfer to the block:
Place tracing paper over your sketch and trace the outlines with a soft lead pencil. Flip the tracing paper graphite-side down onto your lino block. Rub the back firmly to transfer the image; remember, the printed image will be a mirror reflection of the block. -
Seal the sketch:
Go over the faint pencil lines on the block with a permanent marker. This prevents the design from smudging while you work and helps visualize the final positive space.
Step 2: Carving the Block
-
Outline the main shapes:
Using a fine V-gouge tool, carefully carve along the outer edges of your marker lines. Keep the blade angle shallow to avoid digging too deep too quickly. This creates a safety channel for the wider tools later. -
Carve the leaves:
Use the V-gouge to create the veins inside the leaves first by removing thin lines. Then switch to a small U-gouge to clear away the negative space around the leaves, leaving the leaf shapes raised. -
Detail the citrus slice:
For the citrus, carve out the ‘spokes’ or segments. You want the white pith lines to be recessed. Leave the outer rind as a solid thin line and the segment triangles as solid shapes, or vice versa depending on your preference. -
Texture the pear:
I love adding texture here. Instead of carving smooth lines, use the tip of a small gouge to pick out tiny specks (stippling) on the pear’s skin. This creates a shading effect that suggests roundness without solid black. -
Grounding lines:
Carve the straight horizontal lines beneath the fruit. These don’t need to be perfectly straight; a little hand-carved wobble adds organic charm. -
Clear the background:
Switch to your widest U-gouge. Remove all the large background areas around your design. Carve in varying directions or follow the contours of the fruit to add subtle energy to the negative space.
Fixing Chatter
If you see unwanted background lines (chatter) in your test print, use a wide flat gouge to shave down high spots in the negative space.
Step 3: Inking and Printing
-
Prepare the ink:
Squeeze a small line of black ink onto your glass slab. Use the brayer to roll it out, lifting and rolling in different directions until you hear a consistent ‘zzzz’ tacky sound and the texture looks velvety. -
Ink the block:
Roll the inked brayer over your carved block. Apply thin, even layers. Don’t press down too hard, or ink will flood into the fine carved lines of the pear texture. Reload the roller and pass over 2-3 times. -
Position the paper:
Place your paper gently on top of the inked block. Once it touches the ink, try not to shift it. If you have registration tabs, use them now to ensure the print is centered. -
Burnish the print:
Using a barren or the back of a wooden spoon, rub the back of the paper in small circles. Start from the center and spiral outwards. Apply firm pressure, focusing especially on the dense black areas of the leaves. -
The reveal:
Pick up one corner of the paper and slowly peel it back to reveal your print. Check if the ink coverage is solid; if it looks spotty, layout the paper again and burnish more (if you haven’t moved it fully). -
Drying:
Place the wet print on a flat drying rack or hang it up with clips. Allow at least 24 hours for water-based ink to cure fully before handling or framing.
Chine-collé Accent
Glue thin, colored tissue paper specifically under the pear shape before printing to add a subtle pop of yellow or green to the fruit area.
Once dry, frame your print in natural wood to echo the organic feel of your kitchen still life.


Have a question or want to share your own experience? I'd love to hear from you in the comments below!