
I love how a spring mural instantly flips the mood of a room from sleepy to sparkling—like someone cracked a window and let the season rush in. If you’re craving bright colors, easy group-friendly steps, and lots of blooming energy, these ideas will keep your wall busy in the best way.
Big Sun With Handprint Rays
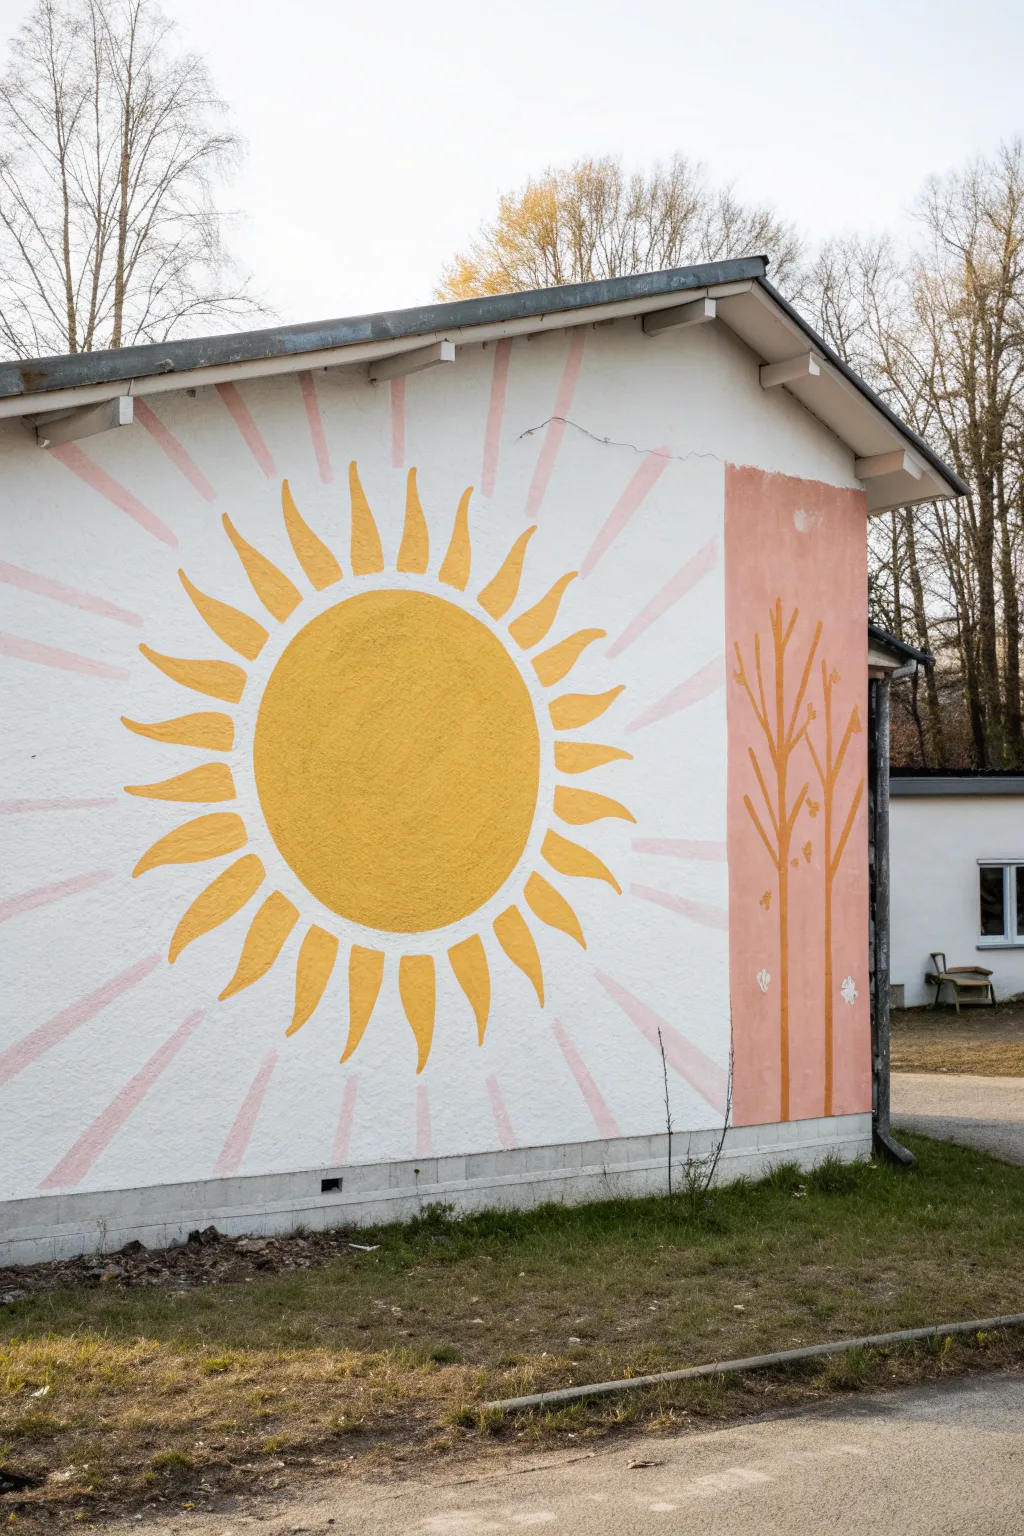
Brighten up any drab exterior wall with this massive, cheerful sun mural that feels like a permanent spring day. The design features a bold central sun with wavy, organic rays overlapping a background of soft pink sunbursts and a stylized nature panel.
Step-by-Step
Materials
- Exterior masonry paint or primer (white)
- Exterior paint (bright yellow, golden yellow, soft pink, coral/terracotta)
- Wide paint rollers and handles
- Assorted paintbrushes (2-inch sash brush, smaller detail brushes)
- Chalk snap line
- Pencil or sidewalk chalk
- String and a nail (for the compass trick)
- Painter’s tape
- Ladder or sturdy step stool
- Drop cloth
Step 1: Preparation and Base Coat
-
Clean the surface:
Before dipping a single brush, thoroughly wash the wall to remove dirt, moss, or spiderwebs. A pressure washer is ideal for textured stucco, but a stiff scrub brush and soapy water work wonders too. Let the wall dry completely. -
Prime the wall:
Roll on a fresh coat of white exterior primer or paint. This creates a blank canvas that will make your yellow and pink colors pop vibrantly rather than getting absorbed by the gray concrete.
Rough Texture Troubles?
If the stucco is tearing up your brushes, switch to a high-nap roller (3/4 inch or thicker). It holds more paint and pushes it into crevices.
Step 2: Mapping Out the Design
-
Draw the central circle:
Determine the center point of your sun. Anchor a string there (using a nail or having a friend hold it), tie a piece of chalk to the other end, and swing it around to draw a perfect large circle. -
Mark the background rays:
Using the same center point, use a chalk snap line or a long straightedge to mark radiating lines extending outward to the roofline and ground. Space them widely to create the ‘burst’ effect. -
Sketch the wavy sun rays:
Freehand draw the wavy, organic triangles coming off the central yellow circle. Don’t worry about perfect symmetry here; the organic shape gives the mural its playful character. -
Mark the side panel:
On the right side of the wall, measure and mark a vertical rectangle. This block will house the tree silhouettes later.
Step 3: Painting the Background Layers
-
Paint the pink bursts:
Using your soft pink exterior paint, fill in the radiating lines you snapped earlier. A 2-inch sash brush is great here for getting crisp edges without needing tape for every single line. -
Fill the side panel:
Roll or brush the vertical rectangular section with a coral or terracotta pink paint. This needs to be solid and opaque, so apply a second coat if the white shows through. -
Let it dry:
Allow these background elements to dry completely. If you paint the yellow sun too soon, you risk smudging the wet pink lines.
Clean Lines on Stucco
Tape rarely seals perfectly on bumps. Paint over the tape edge with your base color first to seal gaps before applying the new color.
Step 4: Bringing the Sun to Life
-
Cut in the sun’s edge:
Using a smaller brush and bright yellow paint, carefully outline the central circle and the wavy rays. This ‘cutting in’ process ensures a sharp boundary against the white and pink background. -
Fill the center:
Once the outline is established, use a small roller or a large brush to fill in the massive central circle with yellow paint. I find stippling the brush slightly helps get paint into the deep texture of stucco. -
Paint the wavy rays:
Move outward to fill the wavy triangular rays. Ensure the yellow paint is thick enough to cover the underlying pink burst lines where they overlap. -
Add dimension (optional):
For a subtle 3D effect, mix a tiny bit of orange into your yellow paint and add a slight shadow along the bottom edge of the central circle.
Step 5: The Nature Panel Details
-
Sketch the trees:
On the dry coral side panel, lightly sketch simple, vertical tree trunks and branches using chalk. -
Paint the silhouettes:
Using a golden-yellow or light orange paint (slightly darker than the sun), paint the thin tree trunks and branches over the coral background. -
Add leaf details:
Dab small spots of the same golden paint along the branches to suggest budding leaves. -
Include floor details:
Add a few small flower shapes or simple geometric nature symbols near the bottom of the panel for extra interest. -
Final touch-ups:
Step back and check for any rough edges or spots where the textured wall needs more paint coverage. Use a small artist’s brush to tidy up any lines.
Step back and bask in the glow of your permanent sunshine, ready to warm up the garden all year round


Wildflower Meadow Horizon
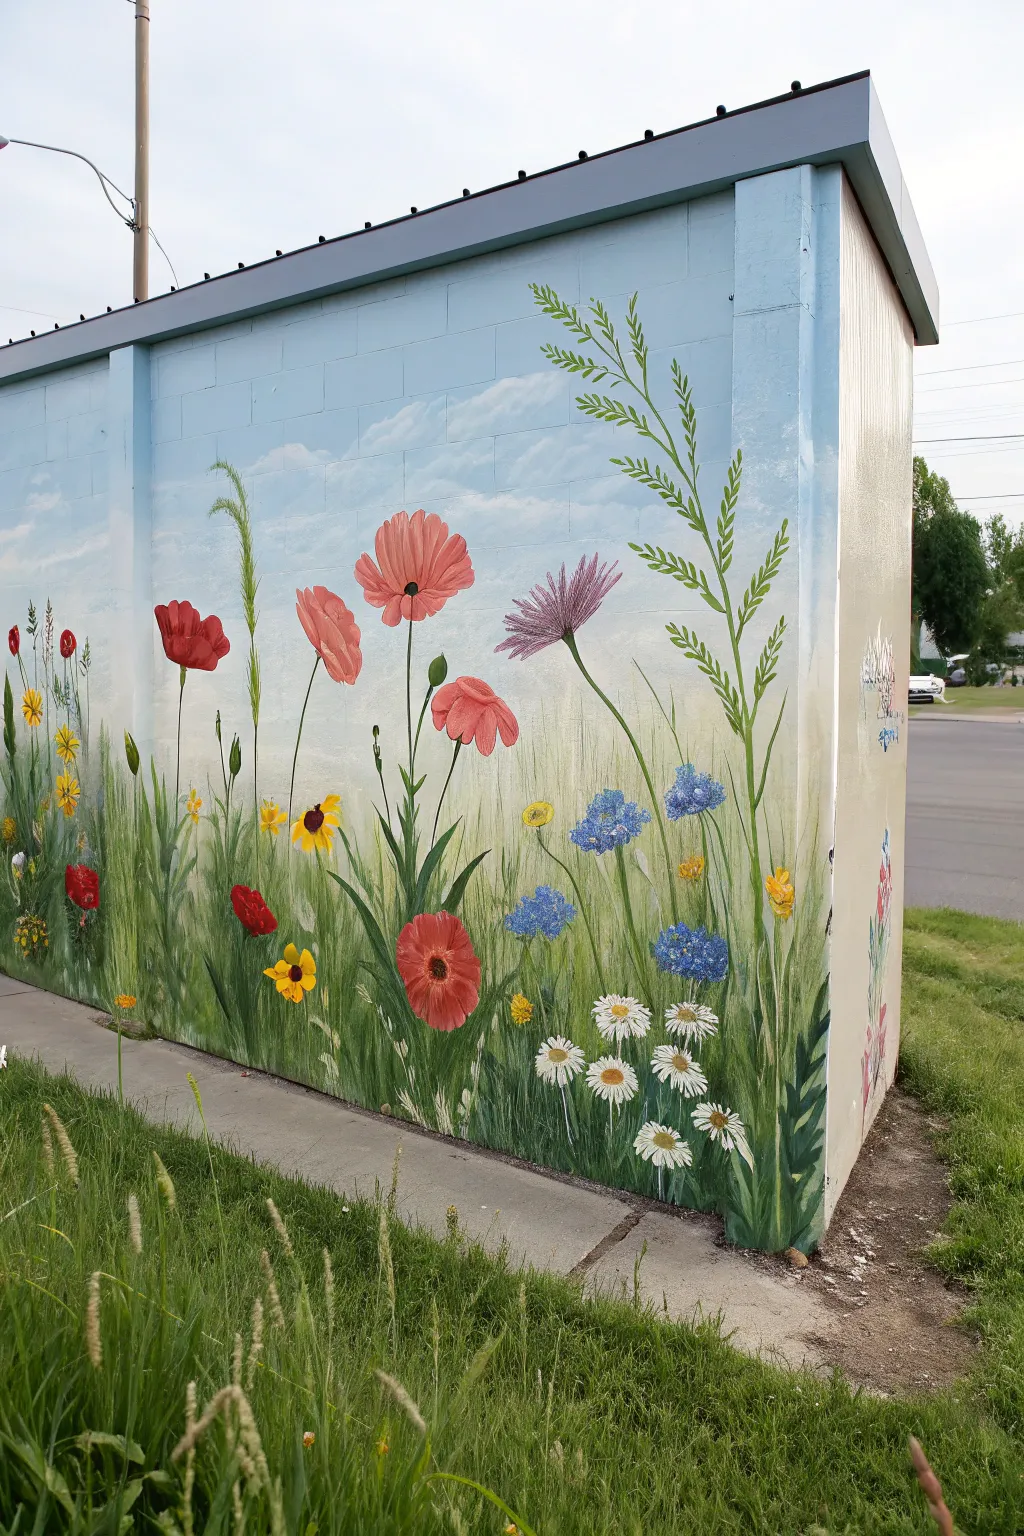
Transform a plain concrete block wall into a perpetual spring day with this cheerful wildflower mural. Featuring poppies, daisies, and swaying grasses set against a soft blue sky, this project brings vibrant color and nature-inspired beauty to any outdoor space.
Step-by-Step Guide
Materials
- Exterior masonry primer
- Exterior latex paint (Sky Blue, White, Leaf Green, Olive Green, Red, Pink, Yellow, Purple, Blue)
- Wide roller and tray (for background)
- Assorted synthetic brushes (2-inch flat, 1-inch flat, liner brush, filbert brush)
- Chalk or pastel crayons (for sketching)
- Small mixing cups or palette
- Drop cloth
- Painters tape
- Clear UV-resistant topcoat (optional)
Step 1: Prepping and Sky
-
Clean and Prime:
Begin by thoroughly cleaning the concrete wall with a stiff brush and water to remove dirt or moss. Once dry, apply a solid coat of exterior masonry primer to ensure your colors pop and adhere properly. -
Roll the Sky:
Mix your Sky Blue paint with a touch of White to get a soft, airy hue. Use the wide roller to cover the top two-thirds of the wall. Don’t worry about perfect coverage near the bottom, as the grass will cover it. -
Add Cloud Textures:
While the blue is still slightly tacky, use a rag or a dry brush with a small amount of White paint to scumble in soft, wispy clouds. Focus these in the upper half to create depth. -
Base the Meadow:
For the bottom third, roll on a base layer of pale, creamy yellow or beige. This acts as the background ‘haze’ of the field and helps bridge the gap between the sky and the dark grass foreground.
Step 2: Painting the Foliage
-
Establish Low Grasses:
Using a 2-inch flat brush and your Olive Green, paint vertical strokes starting from the very bottom edge up to about knee-height. Vary the height and angle slightly to look organic. -
Layering Greens:
Mix a lighter Leaf Green and add a second layer of grass blades over the olive base. I like to use quick, upward flicking motions here to taper the tips of the grass naturally. -
Tall Wheat and Stems:
Switch to a smaller round brush. Paint long, slender stems reaching high up into the sky area. These will be the anchors for your tallest flowers and wheat stalks. -
Create Depth:
Mix a very dark green (Green + a touch of Blue or Black) and paint short, dense clumps of grass right at the bottom edge to ground the mural and create a sense of deep shadow.
Natural Perspectives
Paint flowers at different angles—some facing up, some drooping, and some in profile—to make the meadow look realistic rather than like a flat pattern.
Step 3: Blooming Details
-
Sketch Flower Placement:
Use chalk to lightly mark where your main flower heads will go. Create a balanced composition by varying heights—place poppies high and daisies lower down. -
Paint Wide Poppies:
For the large red and pink poppies, use a filbert brush. Paint broad, open petal shapes. Don’t make them perfect circles; let the petals act like cups catching the light. -
Add Purple Cornflowers:
Using a thin liner brush and purple paint, create the spiky cornflowers. Start from a center point and flick outward to create the distinct, thin petals. -
Detail the Daisies:
Group clusters of daisies near the bottom right. Use a small round brush with White paint for the petals, radiating from a central point. Keep the paint thick for texture. -
Bluebonnets and Accents:
Dab clusters of blue paint to create the texture of bluebonnets or hydrangeas. Stipple lighter blue on top of dark blue to give them a fluffy, 3D appearance. -
Centers and Highlights:
Go back to your flowers. add black or dark brown centers to the poppies and bright yellow centers to the daisies and smaller wildflowers. -
Wheat Accents:
Using a liner brush and pale beige or yellow, adding little ‘V’ shapes along the tall stalks to mimic seed heads or wheat textures. -
Final Touches:
Step back and look for gaps. Add a few floating petals or extra tall grass blades in the foreground to tie it all together.
Rough Surface Help
On cinder blocks, use a ‘stippling’ or dabbing motion with your brush rather than long strokes to get paint into the deep crevices and pores of the concrete.
Once the paint has fully cured, your vibrant meadow will be ready to brighten even the greyest days


Butterfly Bloom Trail
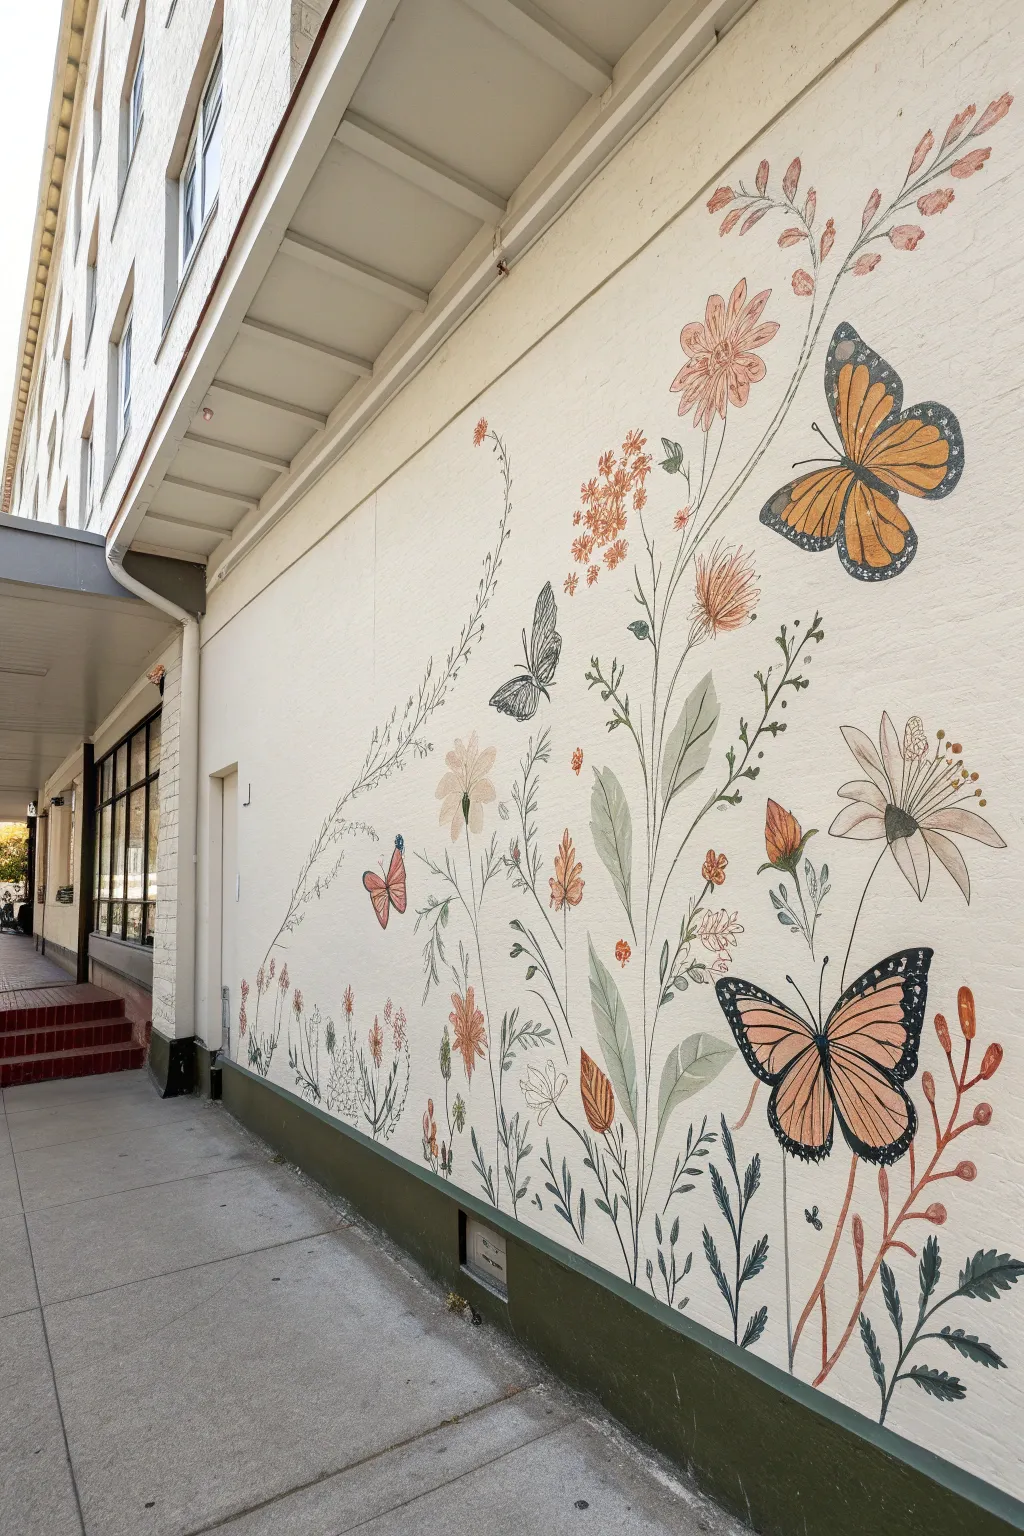
Transform a plain exterior wall into a scientific notebook page come to life with this delicate wildflower and butterfly design. The vintage illustrative style uses muted earth tones and fine linework to create an elegant, airy composition that feels timeless rather than cartoonish.
Step-by-Step
Materials
- Exterior masonry primer (white or off-white)
- Exterior latex paint (creamy off-white for base)
- Exterior acrylic paints (sage green, forest green, muted orange, terra cotta, charcoal black, pale yellow, cream)
- Assorted brush sizes: 2-inch angled sash brush, filbert brushes (various sizes), and fine liner brushes (00 and 1)
- Chalk or pastel pencils for sketching
- Painter’s tape and drop cloths
- Ladder or sturdy step stool
- Projector (optional but recommended for scale)
- Clear exterior sealant (matte finish)
Step 1: Preparation and Base Layer
-
Prepare the surface:
Begin by thoroughly cleaning the wall surface to remove dust, dirt, and any loose paint. If the stucco or brick is rough, use a stiff bristle brush to ensure all crevices are clean. -
Prime the area:
Apply a high-quality exterior masonry primer to the entire section you plan to paint. This ensures your artwork adheres properly and lasts through the seasons. -
Apply the background color:
Roll on two coats of creamy off-white exterior paint. Let the first coat dry completely before applying the second to achieve a solid, consistent canvas that mimics the look of old paper. -
Mask the borders:
Use painter’s tape to define the bottom edge, especially where the wall meets the dark green foundation trim shown in the reference. Ensure a crisp, straight line here.
Uneven Bricks?
If the wall texture makes straight lines impossible, embrace it! Wobbly lines actually enhance the hand-drawn, organic sketchbook aesthetic of this particular style.
Step 2: Sketching the Composition
-
Plan the flow:
Visualize a diagonal flow starting low on the left and reaching high on the right. This asymmetry gives the mural its natural, growing energy. -
Sketch main stems:
Using a light-colored chalk or pastel pencil, lightly draw the sweeping curves of the main flower stems. Focus on long, elegant lines rather than stiff, straight ones. -
Place the butterflies:
Mark the positions of the butterflies. Place the large monarch-style butterfly prominently in the lower right and the others further up and to the left to guide the viewer’s eye upward.
Step 3: Painting the Foliage
-
Block in leaves:
Mix a muted sage green and use a filbert brush to block in the larger leaves. Keep the paint somewhat thin to allow the texture of the wall to show through slightly, adding to the vintage feel. -
Add grassy elements:
Switch to a darker forest green and a thinner round brush to add the fern-like fronds and thin grass blades near the bottom. Vary your pressure to make the tips of the grasses taper naturally. -
Layer foliage colors:
Introduce a blue-grey green for some of the background stems. Creating depth with slightly different green temperatures prevents the mural from looking flat.
Add Metallic Flair
Mix a tiny amount of gold mica powder or metallic exterior paint into the butterfly wings. It won’t read as shiny from afar, but adds a magical sheen up close in the sunlight.
Step 4: Floral Details
-
Paint main blooms:
Use muted orange and terrazzo cotta shades for the small cluster flowers and buds. Dab the paint gently to suggest petals without painting every single detailed outline. -
Create the white daisy:
For the large daisy-like lower flower, use a cream or pale white paint. Make the petals semi-translucent, overlapping them slightly, and add a dark charcoal center. -
Add translucent effects:
I like to water down the paint just a touch for the background flowers, like the pale beige bloom on the left, to make them recede visually.
Step 5: Butterflies and Fine Lines
-
Block in butterfly wings:
Fill the butterfly wing shapes with a gradient of muted orange to pale yellow. Don’t worry about the black veins yet; just get the background color smooth. -
Detail the veins:
Once the orange is bone dry, use your finest liner brush and charcoal black paint to draw the veins. Keep your hand steady and use your pinky finger against the wall for balance. -
Add white spots:
Dot tiny specks of white on the black edges of the butterfly wings. This small detail brings the insects to life instantly. -
Outline the botanicals:
This step is crucial for the ‘illustration’ style: Use a very thin liner brush and watered-down black or dark grey paint to loosely outline some leaves and stems. Don’t outline everything perfectly—broken lines look more artistic. -
Add stamens and pollen:
Paint fine lines extending from the flower centers and add tiny dots of yellow or brown for pollen.
Step 6: Finishing Touches
-
Review contrast:
Step back about ten feet. If any leaves blend too much into the background, darken their edges or add a touch more shadow. -
Seal the mural:
Once the paint has cured (check your paint can for duration, usually 24-48 hours), apply a clear, matte exterior sealant to protect your work from UV rays and rain.
Step back and enjoy the permanent springtime you’ve added to your architecture


Bee and Pollinator Parade
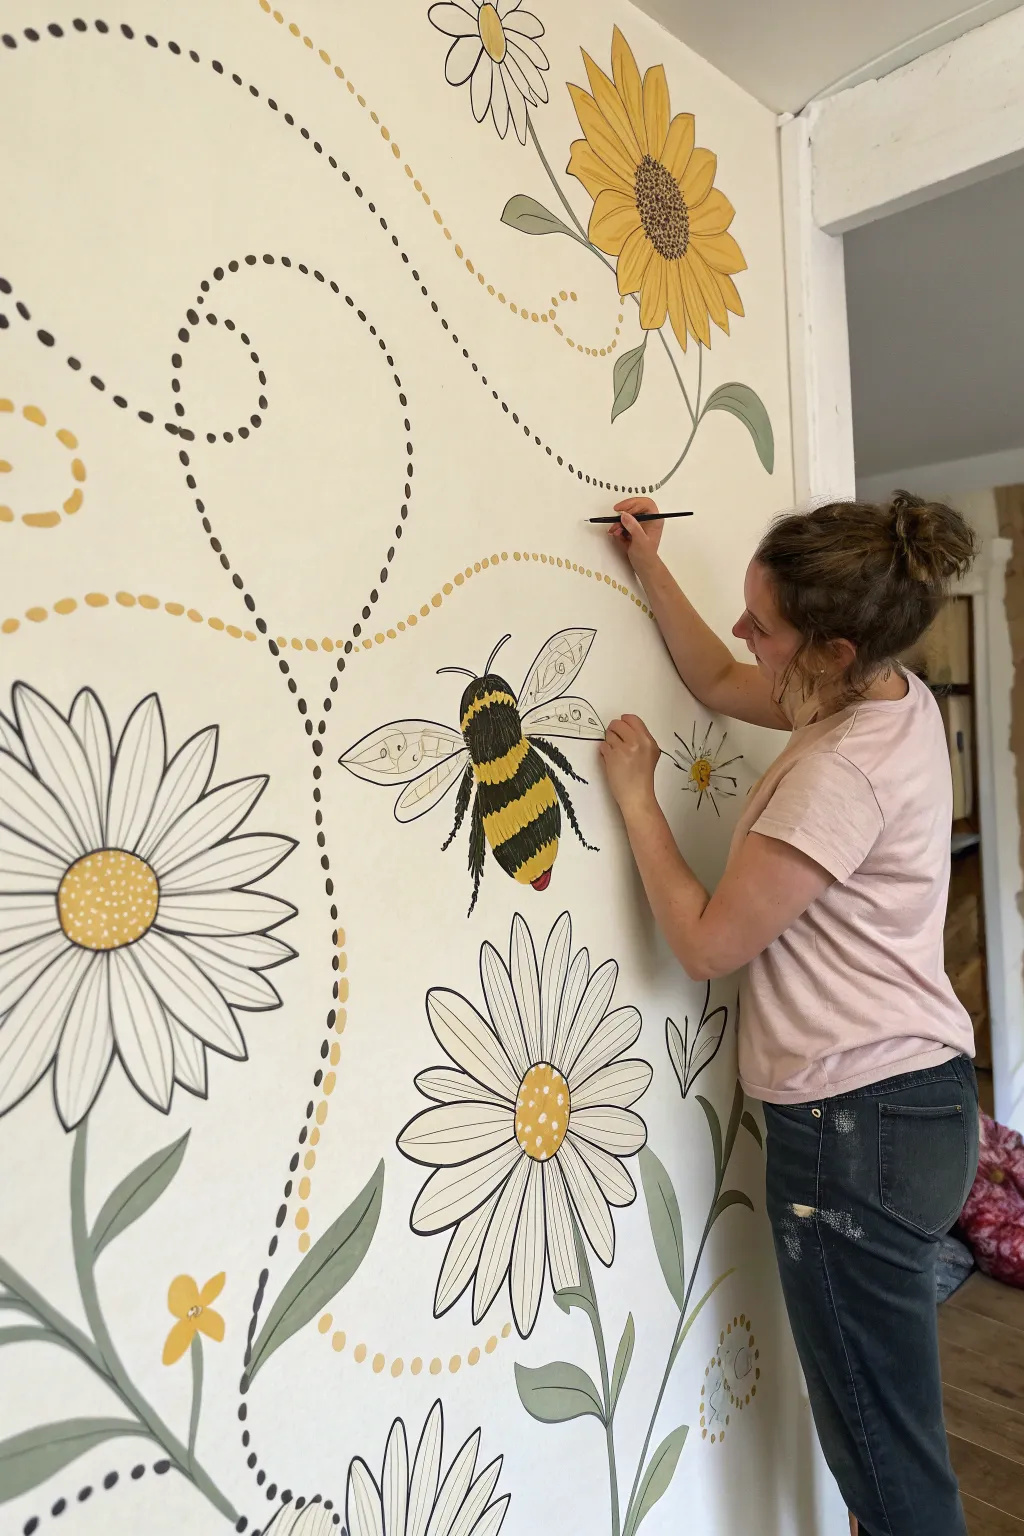
Bring the buzz of a summer garden indoors with this charming illustrative mural featuring oversized daisies, a sunflower, and a detailed bumblebee. The design uses playful dotted trails to connect the elements, creating a sense of movement and whimsy across your wall.
How-To Guide
Materials
- Interior latex paint (Eggshell or Satin finish) in white/cream for base
- Acrylic mural paints or interior sample pots: Bright Yellow, Golden Ochre, Sage Green, Deep Green, Charcoal Black, White
- Round synthetic brushes (sizes #2, #6, and #10)
- Fine liner brush (size #0 or #1) for details
- Pencils and eraser
- Painter’s tape
- Long ruler or yardstick
- Paper plate or palette
- Cup of water and rag
Step 1: Preparation & Sketching
-
Prepare the Surface:
Begin with a clean, dry wall. If you are changing the background color, apply two coats of a warm cream or off-white interior latex paint and let it cure for at least 24 hours. This neutral backdrop makes the illustrative style pop. -
Plan the Flowers:
Lightly sketch the placement of your main flowers using a pencil. Draw large circles to represent the centers of the daisies and sunflowers. aim for an organic, staggered arrangement—some lower near the floor, others reaching high up the wall. -
Draft the Petals:
Around your center circles, sketch long, elongated oval shapes for petals. For the daisies, keep them simple and separated. For the sunflower, layer shorter, wider petals in two rows to create depth. Don’t worry about perfection; a hand-drawn look is part of the charm. -
Add the Bee:
Decide where your star pollinator will go. Sketch a large oval for the abdomen and a smaller round shape for the thorax. Add the wing outlines spreading outward, making sure they are large enough to show off the vein details later. -
Map the Flight Paths:
Draw sweeping, loopy lines connecting the flowers and the bee. These guide lines will eventually become your dotted trails. Make them swirl and cross over each other to create energy and flow.
Wobbly Lines?
If you struggle with steady outlines using a brush, try using a high-quality, water-based black acrylic paint marker. It gives you drawing-like control for those crisp edges.
Step 2: Painting the Blooms
-
Base Coat the Daisies:
Using a #10 round brush, fill in the daisy petals with white acrylic paint. You may need two coats to get a solid opacity against the cream wall. Let the first coat dry completely before adding the second. -
Paint the Sunflower:
Mix a Golden Ochre with a touch of Bright Yellow. Fill in the sunflower petals. Once dry, you can add a slightly lighter yellow highlight to the tips of the petals for dimension. -
Leaf Accents:
Using Sage Green, paint the stems and long, lance-shaped leaves. Keep your strokes fluid, starting at the base and lifting pressure as you reach the leaf tip to create a tapered point. -
Flower Centers:
Fill the center of the daisies with a Bright Yellow dot. Then, use a mix of Golden Ochre and brown to stipple (tap repeatedly) the center of the sunflower, giving it a seeded texture.
Step 3: The Bee & Details
-
Bee Stripes:
Paint the bee’s body with alternating stripes of Bright Yellow and Charcoal Black. Use a smaller #6 brush for better control here. -
Wing Translucency:
For the wings, mix a tiny amount of white with water to create a milky glaze. Paint the inside of the wings with this wash so they look transparent but distinct. -
Outline the Flowers:
Once all base colors are bone dry, switch to your fine liner brush and thinned black paint (or a black paint pen). Carefully outline every petal and leaf. Add a center line down the middle of each daisy petal for detail. -
Detail the Bee:
Use the liner brush to add fuzzy texture to the black stripes of the bee by making tiny, quick hash marks. Draw the delicate veins inside the wings and outline the legs and antennae. -
Dotted Flight Paths:
Load a #2 or #6 round brush with Charcoal Black or Golden Ochre (alternating colors adds interest). Following your pencil guides, press and lift the brush to create uniform dots. Space them evenly for a polished look. -
Final Touches:
Add small white dots inside the yellow centers of the daisies for a pollen effect. Step back to check for any smudges or uneven lines and touch up with the wall color if necessary.
Add Some sparkle
Mix a pinch of gold mica powder into the yellow paint for the bee’s stripes or the flower centers. It catches the light beautifully when the sun hits the wall.
Enjoy your vibrant new garden view that stays in bloom all year round
BRUSH GUIDE
The Right Brush for Every Stroke
From clean lines to bold texture — master brush choice, stroke control, and essential techniques.
Explore the Full Guide
Ladybug Leaf Path
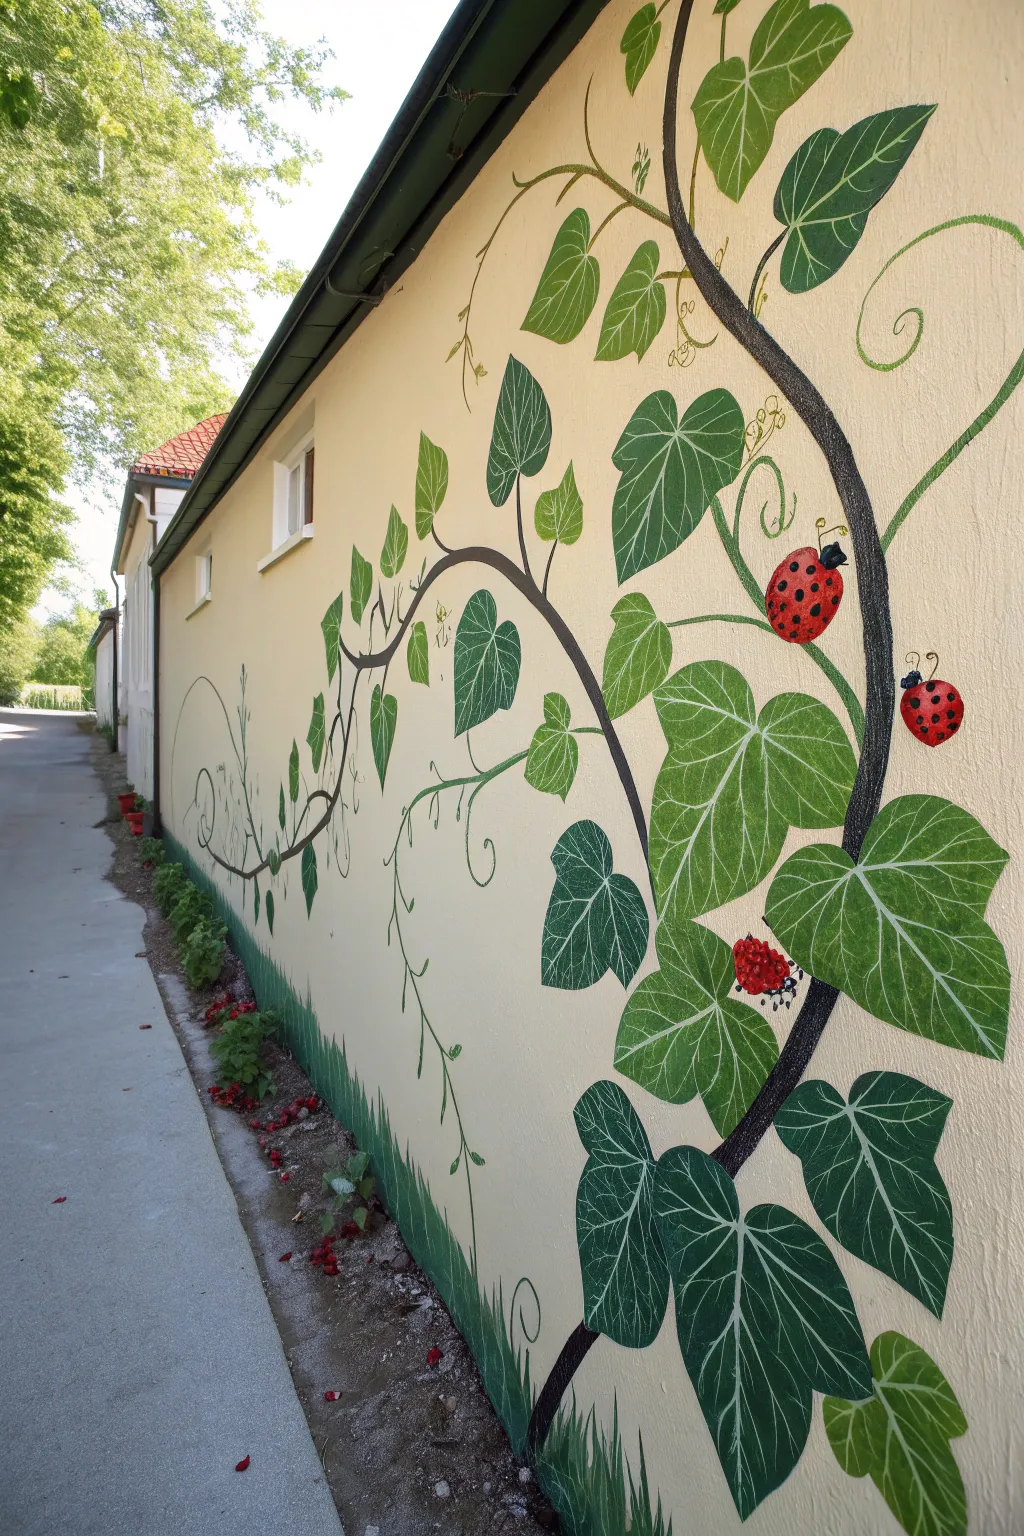
Transform a plain exterior wall into a storybook scene with this charming winding vine mural. Featuring oversized, vein-detailed leaves and cheerful ladybugs, this project brings a permanent splash of spring to your outdoor space.
Step-by-Step Guide
Materials
- Exterior masonry primer (white or cream)
- Exterior latex or acrylic paints (Dark Brown, Deep Green, Lime Green, vibrant Red, Black, White)
- Assorted paintbrushes (2-inch sash brush, various angled brushes, fine liner brush)
- Chalk or pencil for sketching
- Painter’s tape
- Drop cloth
- Ladder or sturdy step stool
- Small roller and tray (for base coat)
Step 1: Preparation & Base
-
Clean the Surface:
Begin by thoroughly cleaning the wall surface to remove dust, dirt, and cobwebs. A stiff bristle brush or a gentle power wash works best, but ensure the wall is completely dry before painting. -
Protect the Area:
Lay down a drop cloth along the base of the wall to catch drips. If your wall borders pavement or a walkway, you might want to use painter’s tape to create a crisp bottom edge. -
Prime the Wall:
Even on an existing painted wall, apply a fresh coat of cream or off-white exterior paint to serve as your canvas. This ensures your vine colors will pop true to life.
Uneven Texture?
If painting on rough stucco, use a daubing motion rather than long strokes to force paint into the crevices for solid coverage.
Step 2: Sketching the Design
-
Map the Main Vine:
Using chalk, lightly sketch the main thick vine. Start low on the left and curve it upwards and across to the right, creating a gentle, meandering ‘S’ curve or arch shape. -
Add Branching Offshoots:
Draw thinner lines branching off perfectly from the main stem. These should curve naturally, some twisting into curly tendrils for that playful, artistic look. -
Position the Leaves:
Sketch large heart-shaped or spade-shaped leaves attached to the branches. Vary their sizes and angles so they don’t look like a repeating stamp pattern. -
Place the Ladybugs:
Decide where your ladybugs will live. Draw simple oval shapes resting on the vine or leaves. Odd numbers typically look best, so try placing three or five along the path.
Steady Hand Trick
Rest your pinky finger on a dry part of the wall while painting the fine veins. It acts as a stabilizer for shaky hands.
Step 3: Painting the Vine and Leaves
-
Paint the Main Vine:
Load a medium brush with Dark Brown paint. Follow your chalk line for the thick main stem. I like to twist the brush slightly as I pull to create a natural, organic edge rather than a perfect line. -
Paint Secondary Stems:
Switch to a thinner round brush to paint the smaller offshoots and curly tendrils in the same Dark Brown, tapering them to a fine point at the ends. -
Block in Dark Leaves:
Select your Deep Green paint. Fill in about half of the leaves with this darker shade, focusing on the ones that represent the older, mature growth. -
Block in Light Leaves:
Mix your Lime Green with a tiny touch of the Deep Green to bridge the colors. Paint the remaining leaves. This variation adds depth and makes the mural feel lush. -
Add Leaf Veins:
Once the green leaves are dry to the touch, use a fine liner brush with white or very pale green paint. details. Paint a central line down each leaf, then add V-shaped veins branching outward. -
Add Grass Details:
At the very bottom of the wall, use your green paints to flick upward strokes, creating a simple grass border that grounds the vine.
Step 4: Adding the Ladybugs
-
Base Coat the Bodies:
Fill in your oval ladybug sketches with vibrant Red outdoor paint. You may need two coats here to ensure good coverage over the wall texture. -
Paint Heads and Legs:
Use a small brush and Black paint to add a semi-circle for the head at one end of the red oval. Add tiny, delicate lines for legs gripping the vine. -
Add the Spots:
Dip the handle end of a paintbrush into Black paint and dot it onto the red bodies. This creates perfectly round spots without the hassle of painting circles. -
Add Highlights:
For a 3D effect, add a tiny curved line of White on the red shell and a small dot on the black head to simulate reflected light. -
Final Touches:
Step back and look for any sparse areas. You can add tiny white flower buds or extra curly green tendrils to fill gaps and balance the composition.
Enjoy the view of your everlasting garden path every time you step outside
Rainbow After the Rain
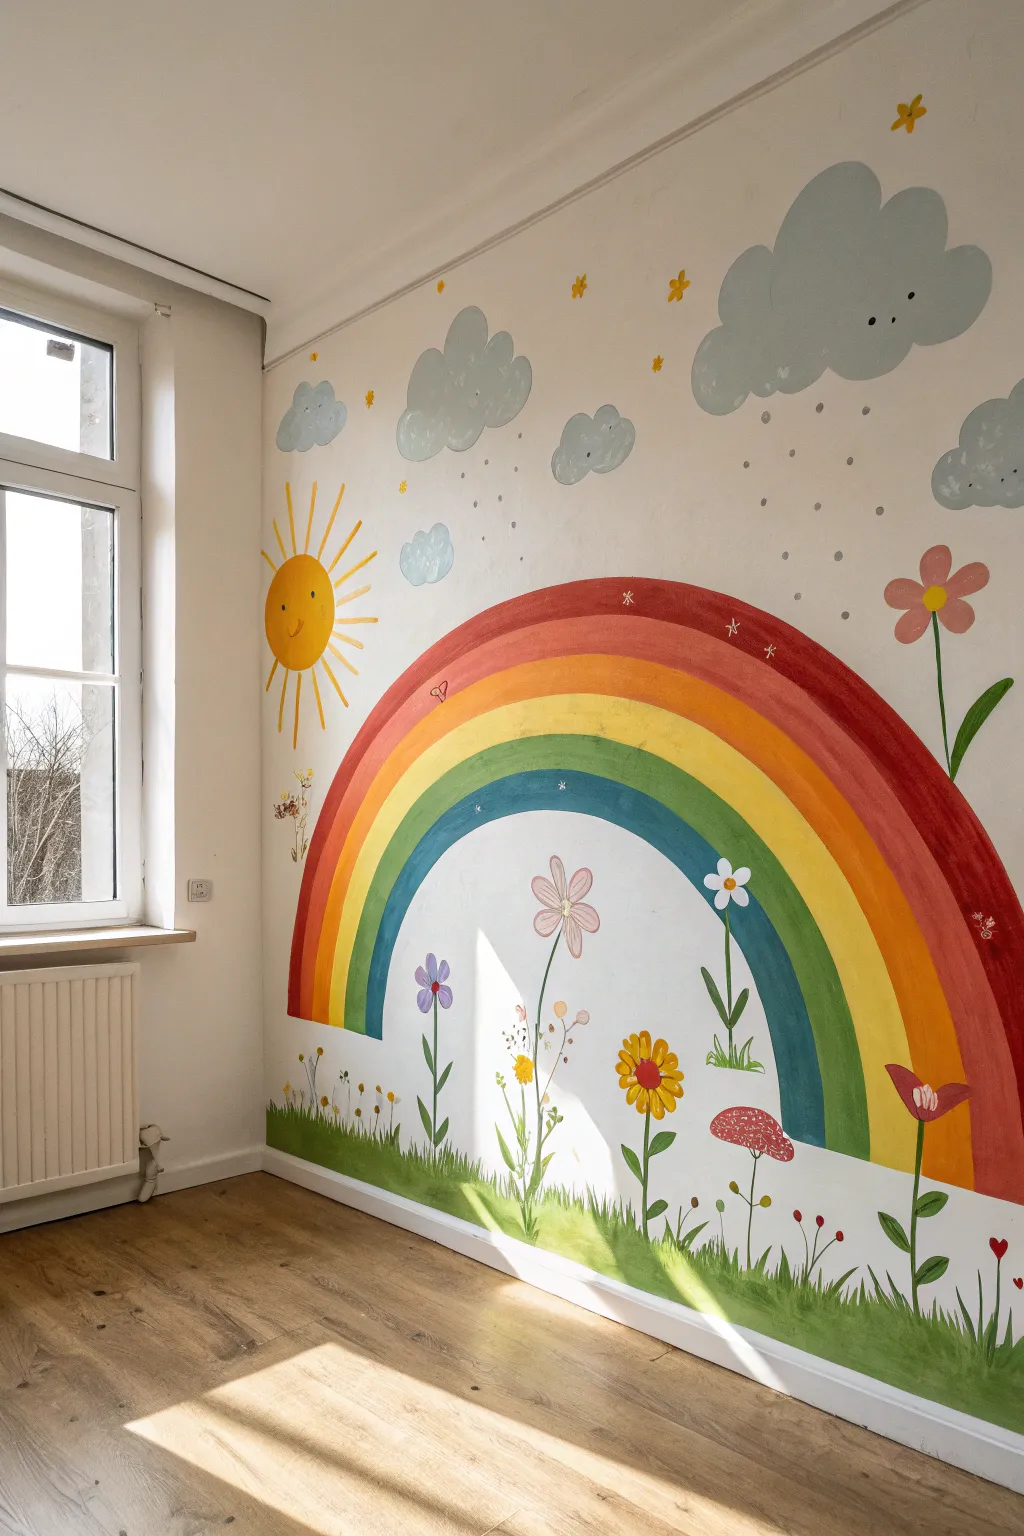
Bring a burst of joy into any room with this sweeping, hand-painted rainbow mural. The playful mix of a grand arch, friendly weather elements, and a blooming meadow creates a storybook atmosphere that feels both cozy and expansive.
Step-by-Step Guide
Materials
- Interior latex wall paint (white base)
- Acrylic craft paints (red, orange, yellow, green, blue, dark blue, white, gray)
- Painter’s tape
- Pencil and eraser
- String and thumb tack (for the compass trick)
- Assorted paintbrushes (2-inch flat brush, various round detail brushes)
- Drop cloth
- Step ladder
- Mixing palette or paper plates
Step 1: Planning and Sketching
-
Prepare the workspace:
Clear the area against the wall and lay down a drop cloth to protect your flooring. Wipe the wall down with a damp cloth to remove any dust, ensuring the paint adheres properly. -
Create a compass:
To get that perfect arch, cut a piece of non-stretchy string slightly longer than the radius of your largest rainbow band. Tie one end to a pencil and the other to a thumb tack or tape it firmly at the bottom center of the wall. -
Sketch the arches:
Hold the string taut and lightly trace the outermost curve of your rainbow. Shorten the string by about 4-6 inches for each subsequent color band and repeat the process until you have six distinct bands. -
Draft the elements:
Lightly sketch the sun in the upper left corner, changing the string length to draw the circle if needed. Freehand the fluffy clouds, rain droplets, and the rough outline of the grassy meadow at the base.
Fixing Wobbly Arches
If your rainbow edges look too messy, wait for the paint to fully cure. Then, carefully use a small angled brush and your original white wall paint to ‘cut in’ and tidy up the boundaries.
Step 2: Painting the Rainbow
-
Mix your palette:
Prepare your acrylic colors. For this specific look, the colors aren’t neon bright but slightly muted; try mixing a tiny drop of white or gray into your primary colors to soften them. -
Paint the red arch:
Using a 1-inch or 2-inch flat brush, fill in the top arch with red. Don’t worry about razor-sharp edges; the hand-painted charm comes from a slightly organic line. -
Complete the warm tones:
Rinse your brush thoroughly and paint the orange band next, followed by the yellow band. If the paint feels too transparent, let it dry for 20 minutes and add a second coat. -
Fill the cool tones:
Continue downward with green, light blue, and finally a deeper teal or indigo for the innermost arch. I like to keep a steady hand here, but remember that minor overlaps can be touched up later. -
Add texture details:
Once the rainbow creates a solid base, use a small detail brush with white paint to add tiny starbursts or hearts onto the red band for extra whimsy, as seen in the inspiration photo.
Add 3D Texture
Glue small wooden craft stars or felt clouds onto the wall within the painted areas. This adds a tactile pop-up book element that looks fantastic in kids’ rooms.
Step 3: Sky and Meadow Details
-
Paint the sun:
Fill in your sun circle with a bright, sunny yellow. Extend the rays outward using quick, confident strokes with a flat brush. -
Add the sun’s face:
Once the yellow is completely dry, use a fine round brush and brown or dark orange paint to add the simple smiling face and small cheek circles. -
Create the clouds:
Mix a soft gray using white and a touch of black. Paint the cloud shapes fluffy and rounded. For dimension, you can paint a lighter gray on top and outline the bottom edges in a slightly darker shade. -
Paint the rain:
Using the tip of a small brush or the back end of a paintbrush handle, dip into gray paint and dot the wall beneath the clouds to create falling rain and small stars. -
Establish the grass:
Mix a fresh meadow green. Use upward, flicking strokes along the bottom of the wall to create the grassy texture, varying the height of the blades for a natural look. -
Plant the flowers:
Paint variety of flower stems rising from the grass. Top them with simple shapes: daisies with white petals, yellow centers, and red tulip shapes. -
Final touches:
Review the mural for any patchy areas. Use a small brush with your wall’s original base color to clean up any accidental drips or smudges outside the lines.
Step back and admire how a few pots of paint have completely transformed the energy of the room

PENCIL GUIDE
Understanding Pencil Grades from H to B
From first sketch to finished drawing — learn pencil grades, line control, and shading techniques.
Explore the Full Guide
Class Quilt of Spring Squares
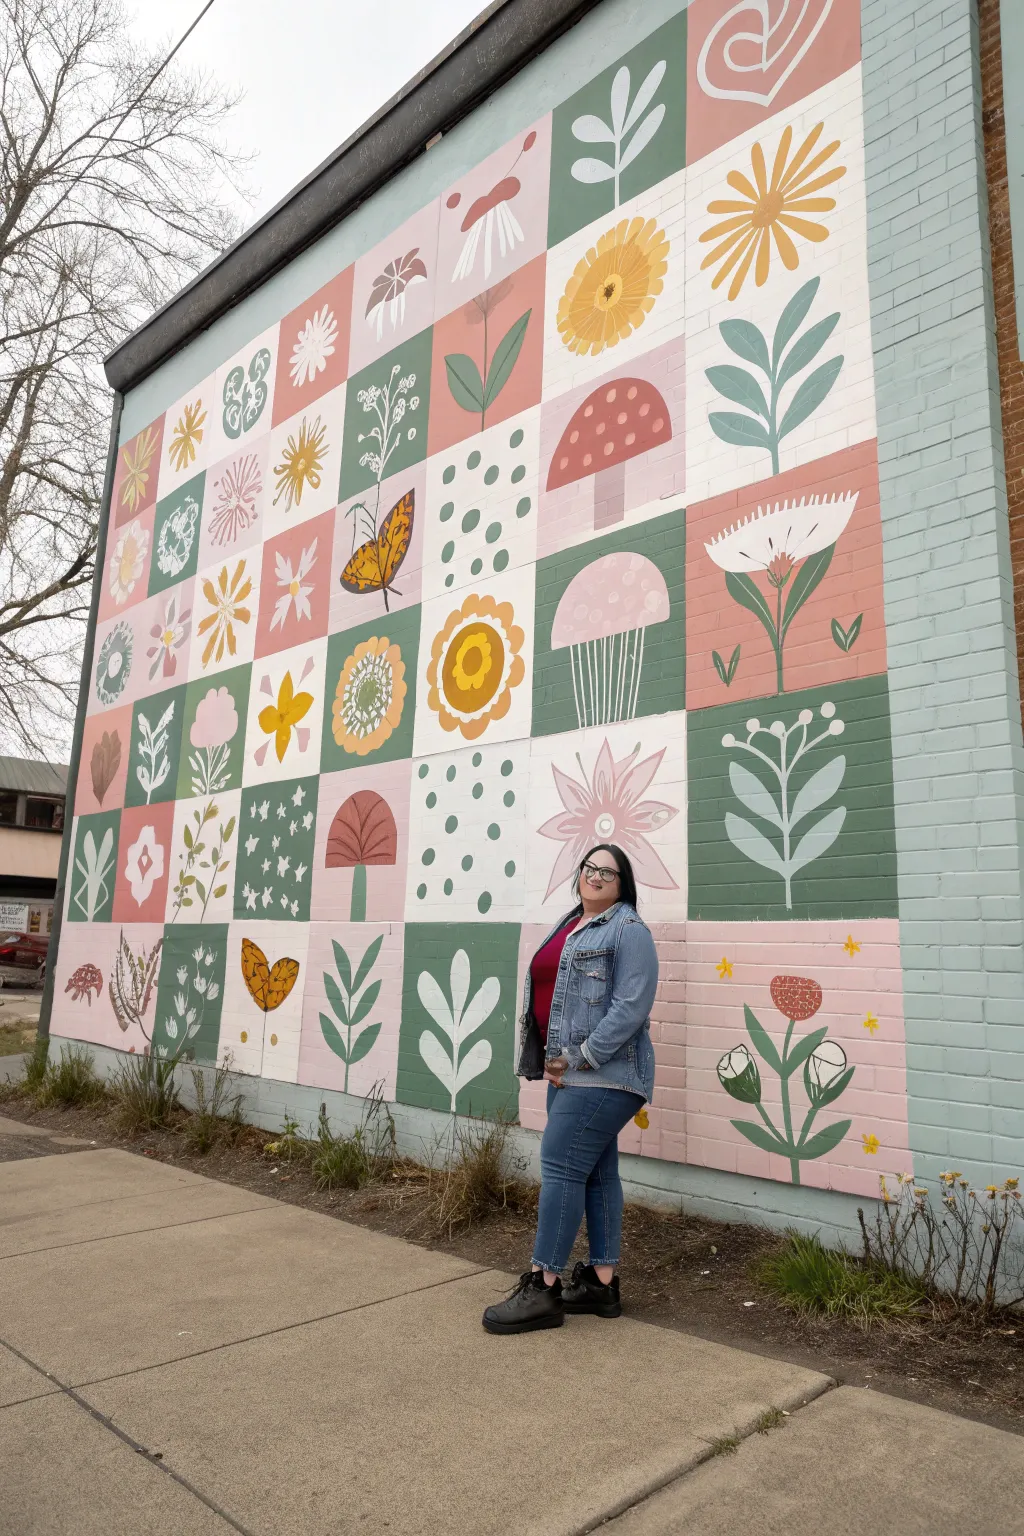
This large-scale mural project transforms a blank brick wall into a charming quilt of floral vignettes and botanical illustrations. With its soothing palette of sage, blush, and mustard, the grid layout allows for collaboration while creating a cohesive, eye-catching masterpiece.
Step-by-Step
Materials
- Exterior masonry primer (white)
- Exterior acrylic latex paint (eggshell or satin finish: sage green, dark green, blush pink, dusty rose, mustard yellow, cream, white)
- Chalk line or laser level
- Painters tape (2-inch wide)
- Assorted paint brushes (2-inch sash brushes for edging, diverse round and flat artist brushes for details)
- Small roller covers and frames (4-inch)
- Digital projector (optional)
- Graph paper and pencil
- Sidewalk chalk
Step 1: Planning and Preparation
-
Design the grid:
Begin by sketching your quilt design on graph paper. Divide your overall space into a grid of squares. For this specific look, aim for a mix of solid colored backgrounds—alternating between light cream, sage green, and soft pink to establish a checkerboard rhythm. -
Assign the artwork:
Assign specific botanical graphics for each square on your paper grid. Balance heavy elements like large mushrooms or sunflowers with lighter elements like simple leaf sprigs or polka dots. Ensure no two identical colors touch directly if possible. -
Clean the surface:
Pressure wash the brick wall to remove dirt, moss, and loose debris. Allow the masonry to dry completely for at least 24 to 48 hours before applying any paint. -
Prime the wall:
Apply a coat of high-quality masonry primer over the entire mural area. Using a thick-nap roller helps get the primer into the detailed grout lines of the brick.
Step 2: Creating the Grid
-
Measure and mark:
Measure the total width and height of your primed area. Divide these dimensions by the number of squares in your design to find the size of each block. Mark these intervals along the top and side of the wall. -
Snap the lines:
Using a chalk line (and a friend to hold the other end), snap vertical and horizontal lines to create your visible grid. A laser level is also helpful here to ensure your lines stay perfectly straight over uneven brick texture. -
Tape the boundaries:
Apply painter’s tape along the outside edges of your chalk lines. It is crucial to tape carefully to keep your squares crisp, pressing the tape firmly into the brick indentations.
Bleeding Lines?
Brick texture makes clean lines hard. After taping, paint over the tape edge with the *base* wall color first to seal gaps. Then apply your square color.
Step 3: Blocking in Backgrounds
-
Paint the base colors:
Using 4-inch rollers or sash brushes, paint the background color for every other square first (e.g., all the pinks). Let them dry, then move to the next color group. This prevents wet paint from smudging across lines. -
Second coats:
Brick is porous and often needs a second coat to achieve opacity. Apply a second layer of your background colors once the first is dry to the touch. -
Remove tape:
Once the base squares are dry, carefully peel back the painter’s tape. You should now have a clean grid of colored blocks ready for detail work.
Creative Twist
Make it a class project by assigning one square to each student. Give them a limited color palette to ensure the final quilt looks cohesive.
Step 4: Painting the Botanicals
-
Sketch the motifs:
Use sidewalk chalk to lightly sketch the floral designs into each square. If you aren’t confident freehanding, project your digital design onto the wall at night and trace the outlines. -
Paint large shapes:
Fill in the largest shapes first—the caps of mushrooms, the petals of sunflowers, and the bodies of butterflies. Use a medium flat brush for these areas. -
Add stems and lines:
Switch to a thinner round brush to paint the stems, veins, and cleaner lines. Use a steady hand and long strokes to keep the lines fluid. -
Layer details:
Add secondary colors for dimension, such as the white spots on the mushroom caps or the darker centers of flowers. I find that contrasting colors—like white ink on a green background—really make the designs pop from a distance. -
Refine edges:
Go back with your background colors and a small angle brush to clean up any floral edges that look messy or uneven against the block color. -
Seal (Optional):
If the mural is in a high-exposure area, apply a clear, non-yellowing UV-resistant sealer over the finished work to protect the colors from fading.
Step back and admire how the individual squares come together to form a beautiful celebration of the season
Pastel Chalk Garden on the Wall
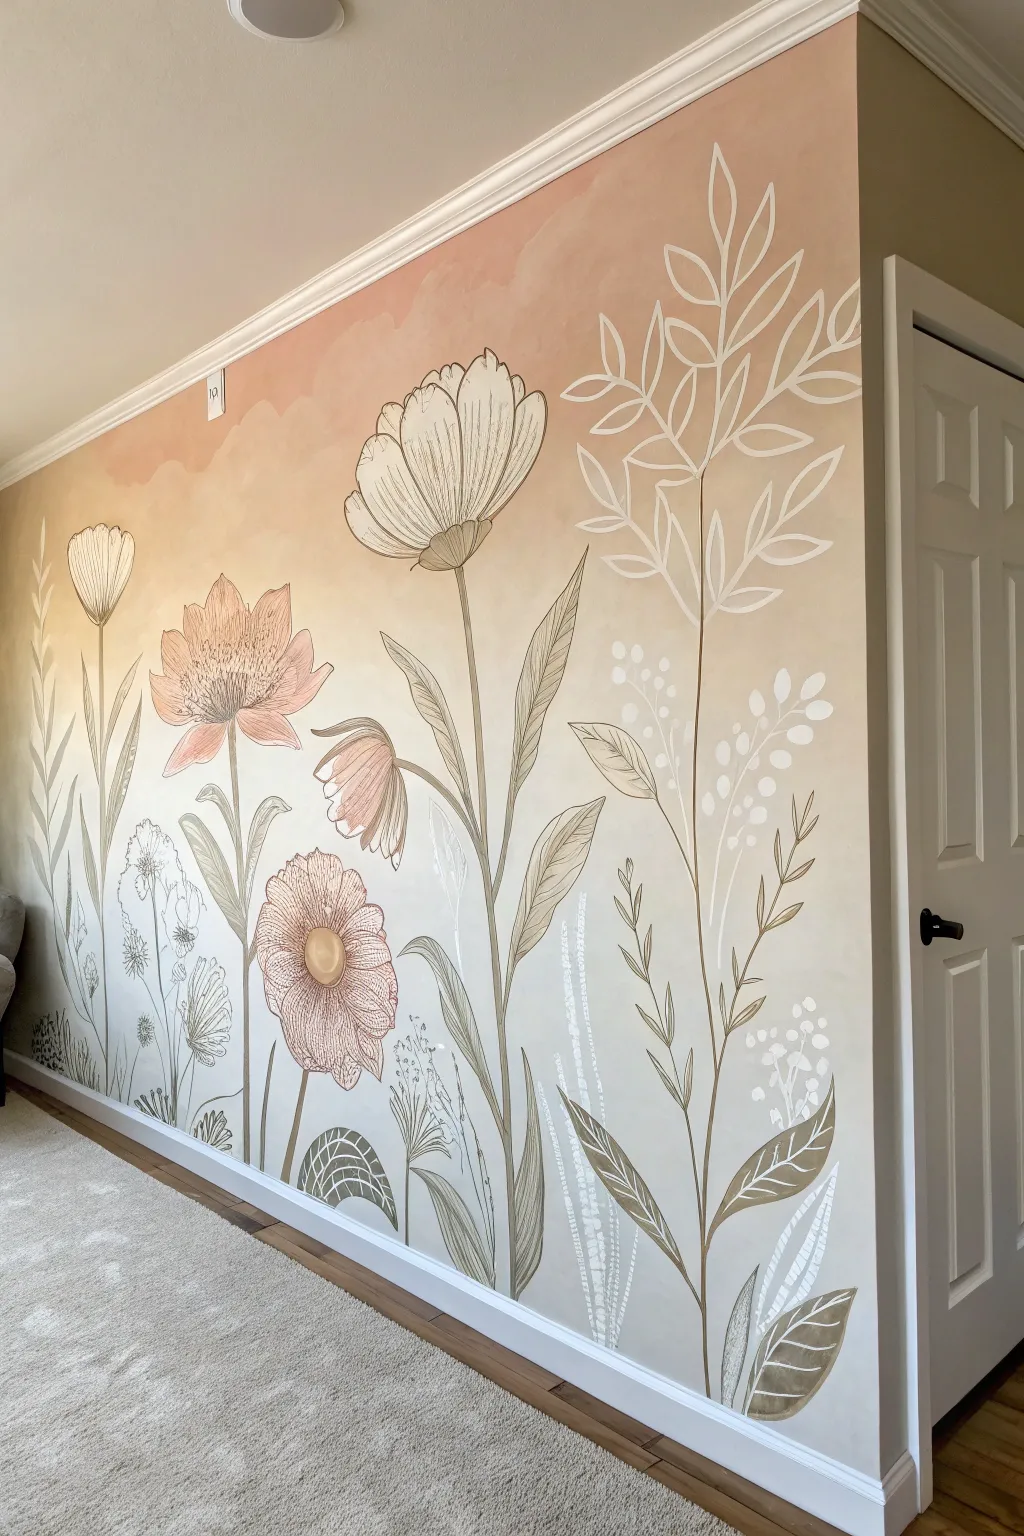
Transform a blank wall into a soft, dreamy garden with this large-scale mural project. By combining an ombre watercolor-style background with delicate, illustrative line work, you’ll create a statement piece that feels both modern and timeless.
Step-by-Step
Materials
- Interior latex wall paint (Cream/Off-white base coat)
- Interior latex paint (soft peach, blush pink, light tan)
- Glazing medium or water (for thinning paint)
- Large sponge or color-washing brush
- Paint rollers and trays
- Pencil for sketching
- Acrylic paint markers (brown, tan, white) – various nib sizes
- Small round paint brushes (sizes 2, 4, and 6)
- Projector (optional, but helpful for scaling)
- Painter’s tape and drop cloth
- Eraser
- Ladder or step stool
Step 1: Creating the Ombre Backdrop
-
Prep the surface:
Begin by cleaning the wall thoroughly to remove dust and grease. Apply painter’s tape to the baseboards, ceiling line, and adjacent walls or door frames to protect them. Lay down your drop cloth. -
Apply the base color:
Roll on two coats of your lightest cream or off-white base color. Let this dry completely—usually at least 4 hours—before starting the decorative painting. -
Mix your glazes:
Mix your peach and blush paints with a glazing medium (or dilute with water, about 1 part water to 4 parts paint). This transparency is crucial for that soft, ‘watercolor’ look seen in the reference. -
Start the gradient:
Using a sponge or large brush, start applying the blush/peach glaze near the ceiling. Work in irregular, cloud-like patches rather than straight lines. -
Blend downward:
While the top section is still wet, introduce a slightly lighter tan or peach tone as you move down the wall. Use a damp sponge to blur the edges where the colors meet the cream base, fading the color out entirely around the midpoint of the wall. -
Add texture:
Dab a dry rag or clean sponge over wet areas to lift slight amounts of paint. This creates the subtle mottling that mimics clouds or watercolor paper texture. Allow the background to cure for 24 hours.
Step 2: Sketching the Garden
-
Plan your composition:
Look at the wall as a whole. You want a variety of heights—some tall stalks reaching almost to the ceiling, and thicker clusters near the floor. -
Sketch tall stalks:
Using a pencil, lightly outline the main stems first. Draw long, sweeping curves that fan out slightly; avoid stiff, straight lines. -
Place the blooms:
Sketch the flower heads. I find it easiest to just draw simple circles or ovals as placeholders for the blossoms to ensure the spacing feels balanced before adding details. -
Refine the shapes:
Flesh out the flower shapes. Draw large poppy-like petals, rounded ranunculus shapes, and long, fern-like leaves. Keep the pencil lines very light so they are easy to cover or erase later.
Paint Bleeding?
If your glaze is dripping, your mix is too watery or your brush is overloaded. Keep a barely damp rag handy to quickly dab drips and blend them into the ‘cloud’ texture.
Step 3: Painting the Florals
-
Block in soft color:
Identify a few focal flowers (like the large pink ones on the left). Mix a sheer wash of pink and lightly fill in the petal shapes. Don’t worry about staying perfectly in the lines; a loose fill looks more artistic. -
Outline main stems:
Using a thin brush and brownish-grey acrylic paint (or a large paint marker), trace over your main stem lines. Use varying pressure: push down for the base of the stem and lift up for whispy tops. -
Detail the petals:
With a fine brush or marker, draw the intricate petal details over your color washes. Use shaky, organic lines to suggest texture, adding plenty of hatching lines inside the petals for shading. -
Add white accents:
Switch to a white paint marker or small brush with white acrylic. Draw the delicate fern-like shapes and ghost leaves in the background. These white elements should overlap the darker stems slightly to create depth. -
Create botanical filler:
Paint small clusters of berries and tiny sprigs near the base and in empty gaps. Use solid white dots for berries to make them pop against the cream background. -
Final touches:
Step back to view the whole wall. Erase any visible pencil marks and touch up the baseboard tape line before peeling it off.
Use a Projector
Don’t trust your freehand drawing? Project a floral clipart image onto the wall and trace the outlines lightly with pencil before you start painting.
Now you have a serene, custom art piece that brings the softness of spring indoors year-round


Leaf Stencil Ombre Canopy
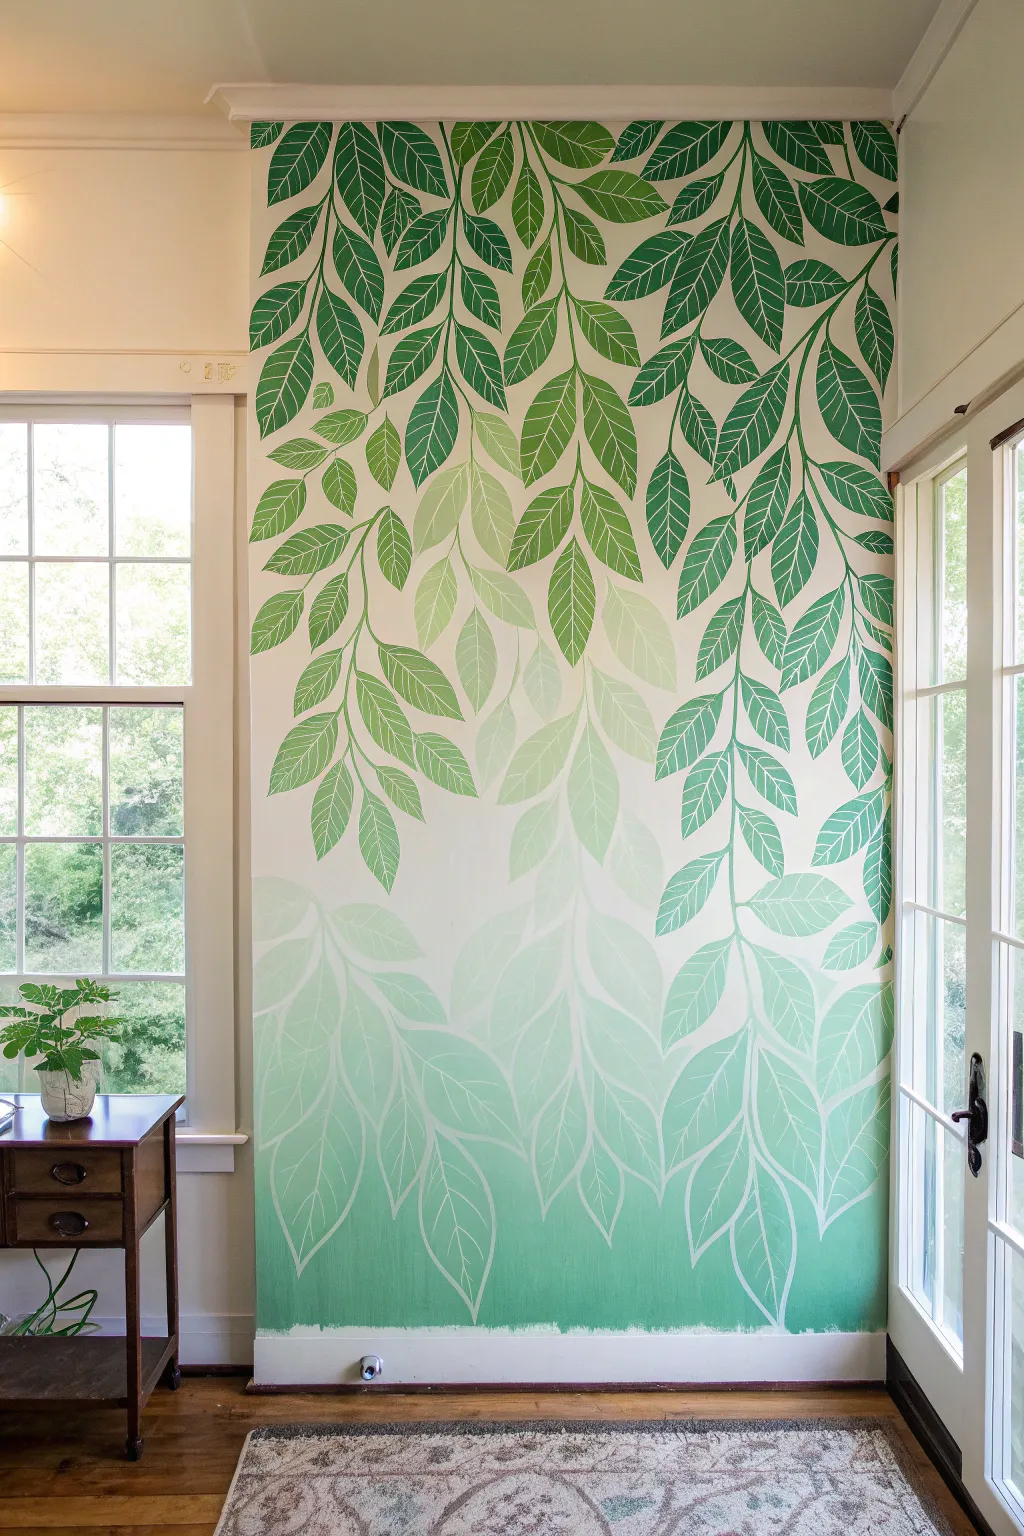
Bring the refreshing tranquility of a forest canopy indoors with this stunning statement wall. This project combines a stencil technique with a two-way gradient, transitioning from solid, dark leaves at the top to delicate, negative-space outlines at the bottom.
Detailed Instructions
Materials
- Large leaf stencil (hanging vine/branch style)
- Painter’s tape
- Drop cloth
- Base wall paint (creamy white or very pale off-white)
- Dark forest green acrylic or latex paint
- Medium sage green acrylic or latex paint
- Mint green acrylic or latex paint
- White paint (matches base wall color)
- High-density foam roller and tray
- Stencil brushes (various sizes)
- Paper towels
- Bubble level or laser level
- Spray adhesive (repositionable)
Step 1: Preparation and Base
-
Prepare the surface:
Clear the area and lay down a drop cloth strictly along the baseboards. Ensure the wall is clean, dry, and free of dust. If your wall isn’t already a creamy white, apply two coats of your base color and let it cure fully for at least 24 hours. -
Map the gradient:
Visualize the wall in thirds. The top third will be solid leaves on a white background. The middle is a transition zone. The bottom third involves painting the wall green and having white leaf outlines. Lightly mark these zones with a pencil if it helps guide you. -
Create the bottom gradient:
On the bottom third of the wall, you need to create the ombre background first. Mix your mint green with a little white to soften it. Using a roller, paint the bottom section solid mint green. -
Blend the wall transition:
While the mint paint is still wet, use a dry brush or a second roller with your base white color to feather the top edge of the green section up into the white wall. You want a soft, hazy horizon line where the green fades into the white, roughly at waist or chest height.
Bleed Patrol
Paint bled under the stencil? Don’t panic. Wait for it to dry completely, then use a small angled artist brush and your base wall color to carefully touch up the edges and sharpen the leaf shapes.
Step 2: Stenciling the Canopy
-
Position the first stencil:
Start at the very top ceiling edge. Spray the back of your stencil with repositionable adhesive and let it get tacky for a moment. Press it firmly against the wall, using a level to ensure the vines hang straight down. -
Paint the dark leaves:
Load your stencil brush or small foam roller with the darkest forest green. Offload almost all the paint onto a paper towel until the brush feels dry. This is crucial to prevent bleeding. -
Apply the top layer:
Stipple or roll over the stencil openings at the top of the wall. Build up the color in thin layers until opaque. I find a swirling motion with a stiff brush works best for getting crisp edges on textured walls. -
Move and repeat:
Lift the stencil carefully. Realign it next to the first section to continue the pattern across the entire top border of the wall. Wash the stencil periodically if paint buildup occurs.
Level Up: depth
For a 3D effect, slightly offset the stencil and paint a very faint, light grey layer first. Let dry, then stencil the green layer slightly to the side to create a subtle drop shadow.
Step 3: The Mid-Wall Transition
-
Shift to medium tones:
As you move your stencil placement lower (creating the second tier of hanging vines), switch to your medium sage green paint. You want these leaves to look like they are receding or catching more light. -
Mix on the wall:
For a natural look, dip your brush in a tiny bit of the dark green and the sage green simultaneously for the leaves that sit between the top and middle sections. -
Fade the leaf opacity:
As you reach the middle ‘hazy’ zone of the wall, apply less paint to the stencil. Let the leaves become slightly translucent, allowing the wall color to peek through just a bit.
Step 4: Negative Space Bottom
-
Placement for the bottom:
Now you are working over the green gradient background you painted in the first phase. Position your stencil over this green area. -
Reverse stenciling technique:
Instead of using green paint, load your roller with the *white base wall color*. You are now painting the leaves white, which will make them look like outlines against the green background. -
Create the ghost leaves:
Roll the white paint over the stencil openings located on the green wall section. Apply it lightly; you don’t need full opacity here. A semi-transparent white creates a dreamy, ethereal look. -
Detail the veins:
If your stencil has intricate vein details, use a small artist’s brush with the white paint to sharpen these lines inside the ghost leaves, ensuring they stand out against the mint background. -
Connect the vines:
Use a fine liner brush and the appropriate green shade to hand-paint thin vine connections between the stencil repeats if any gaps look unnatural. -
Final touches:
Step back and assess the overall flow. If the transition from solid dark leaves to white ghost leaves feels abrupt, dry brush a little diluted mint green over the lower dark leaves to soften them into the mist.
Enjoy the peaceful, garden-like atmosphere you have created in your home
Spring Night With Fireflies
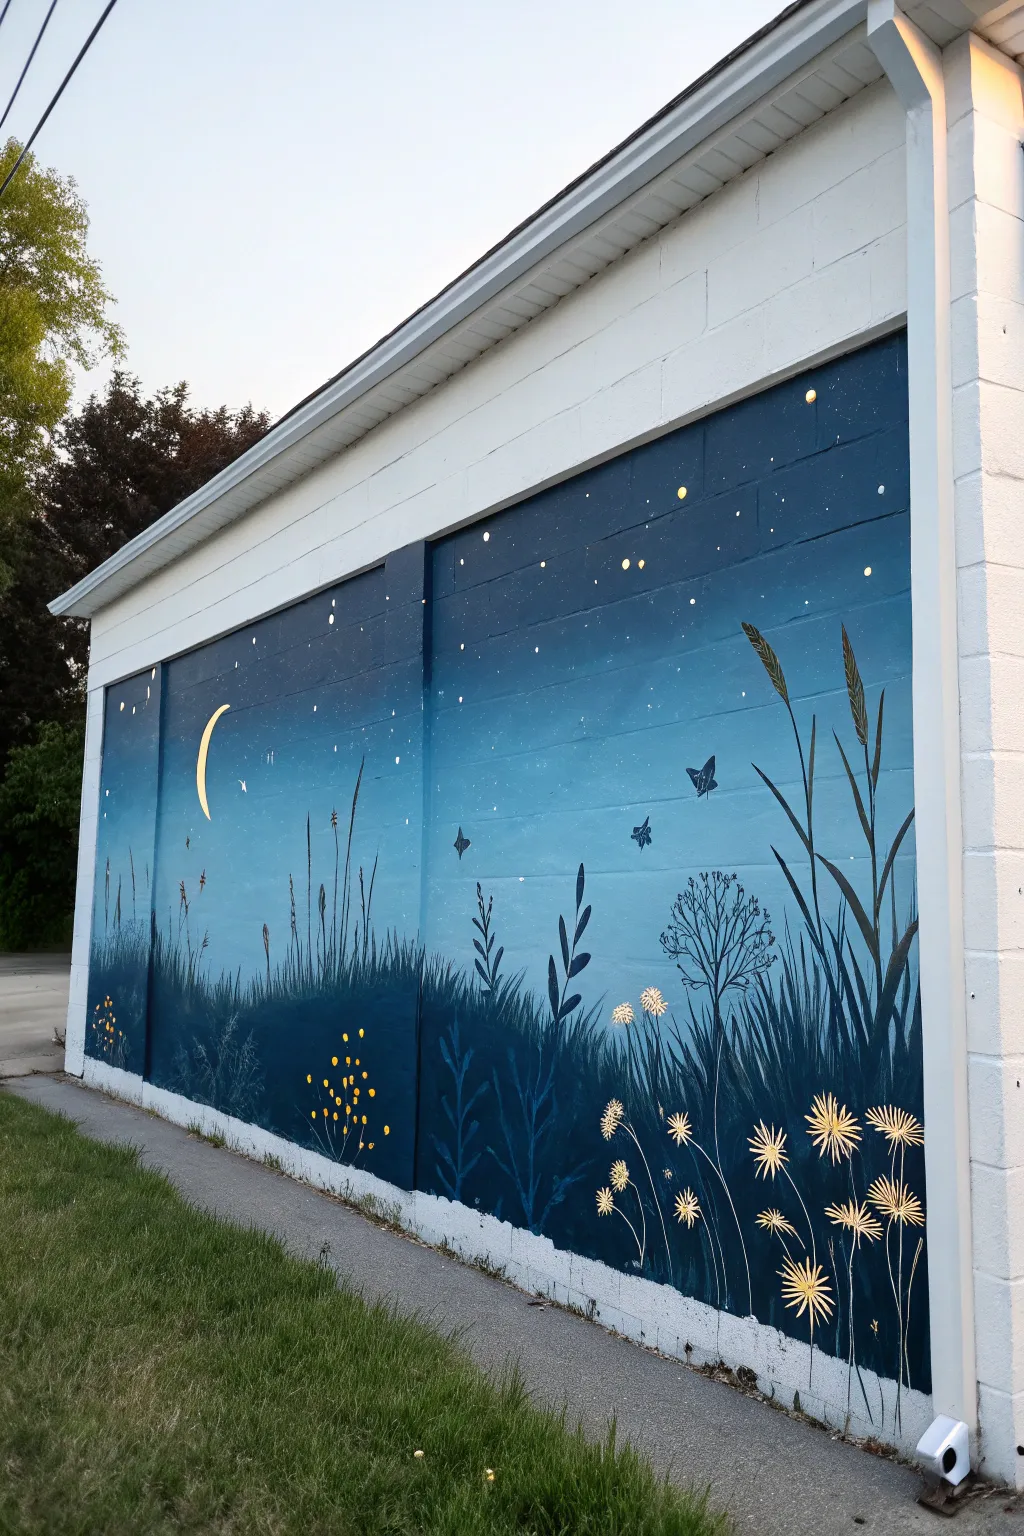
Transform a plain exterior wall into an enchanting evening scene with this deep blue mural. Featuring a gradient night sky, delicate grass silhouettes, and glowing golden accents, this design brings a serene touch of nature to any outdoor space.
Step-by-Step
Materials
- Exterior acrylic latex paint (Dark Navy Blue, Medium Blue, Light Slate Blue)
- White exterior primer (if painting bare masonry)
- Black or very dark navy exterior paint (for silhouettes)
- Metallic gold or soft yellow exterior paint (for stars and flowers)
- Wide rollers and paint trays
- Assorted synthetic brushes (2-inch sash, 1-inch flat, fine liner)
- Painter’s tape
- Drop cloths
- Chalk for sketching
- Extension pole (optional, for height)
Step 1: Preparation and Base Coat
-
Clean the Surface:
Begin by thoroughly cleaning the wall surface to remove dirt, dust, and loose debris. A power washer works best on brick or concrete block, but a stiff scrub brush and hose will suffice for smaller areas. Let the wall dry completely for at least 24 hours. -
Protect Surroundings:
Lay down heavy-duty drop cloths along the base of the wall to catch drips. Use painter’s tape to mask off any adjacent trim, gutters, or areas you want to keep paint-free, pressing the edges down firmly. -
Apply Primer:
If you are painting over bare masonry or a drastically different color, roll on a coat of high-quality exterior primer. This ensures your beautiful blues will show up true to color and adhere properly.
Step 2: Painting the Ombré Sky
-
Roll the Top Dark Section:
Start at the very top of the wall with your darkest navy blue paint. Use a roller to cover the upper third of the mural area, ensuring you get paint into the mortar grooves if working on cinder block. -
Apply the Mid-Tone:
In the middle third of the wall, roll on the medium blue shade. While the paint is still wet, gently roll upward into the dark navy section to begin blending the transition line. -
Finish with the Light Base:
Apply the lightest slate blue to the bottom third of the wall. Roll upward into the wet medium blue to soften the gradient. I find that working quickly while the paint is fresh is the secret to a smooth fade. -
Blend the Transitions:
Use a dry or slightly damp brush to feather out any harsh lines between the blue zones. Step back frequently to check that the gradient looks soft and atmospheric from a distance.
Rough Texture Trouble
If painting on deep grout lines or rough cinder block, a standard roller might miss spots. Use a thick-nap roller (3/4 inch or higher) and keep a cheap chip brush handy to jam paint into deep crevices.
Step 3: Creating the Silhouettes
-
Sketch the Horizon:
Once the sky involves is dry to the touch, use chalk to lightly sketch a wavy, organic horizon line about one-quarter of the way up the wall. Vary the height to make it look like natural rolling hills. -
Paint the Deep Grass Layer:
Fill in the area below your chalk line with the black or darkest navy paint. Use a large brush to create upward, flicking strokes along the top edge to mimic blades of grass breaking the horizon. -
Sketch Tall Plants:
Chalk out the placement of larger foreground elements like tall reeds, wheat stalks, and wild carrot flowers. Place them asymmetrically—some clustered on the right, some on the left—for a natural composition. -
Paint Detailed Stalks:
Using a smaller round brush and your dark silhouette color, paint the stems of the taller plants. Vary the thickness of the lines, making them slightly wider at the base and tapering toward the top. -
Add Leaf Details:
Switch to a finer brush to add leaves to your stalks. For the grassy reeds, use long, sweeping strokes. For other plants, dab on small leaf shapes. Keep the edges crisp against the lighter sky. -
Stencil or Freehand Butterflies:
Add a few butterfly silhouettes hovering above the grass. You can use a stencil or simply paint two triangular wing shapes meeting at a small body.
Pro Tip: Glowing Effect
To make the fireflies or stars appear to glow, mix a tiny drop of your star color with a clear glazing medium. Paint a faint, translucent halo around the bright center dot for a radiant look.
Step 4: Illuminating with Details
-
Paint the Golden Moon:
In the upper left quadrant, paint a thin, C-shaped crescent moon using the metallic gold or yellow paint. A steady hand and a small flat brush work best here to get a sharp curve. -
Add Flower Heads:
Using a fine liner brush and the gold paint, create the flower heads on your dark stalks. For the dandelion-style flowers, paint small lines radiating outward from a center point like fireworks. -
Create Depth with Yellow Dots:
Add clusters of small yellow dots low in the dark grass to suggest fireflies resting or small wildflowers catching the moonlight. Group them in threes or fives for a pleasing look. -
scatter the Stars:
Dip the handle end of a small paintbrush into the gold or white paint and dot it onto the sky to create stars. Vary the size of the dots, and concentrate a few brighter ones near the moon. -
Highlight the Butterflies:
Add tiny touches of gold to the edges of the butterfly wings or the tips of the tallest shimmering grass blades to catch the light. -
Final Touch-Ups:
Step back and review the entire mural. Fill in any patches where the block texture missed paint and tidy up any silhouette edges with the background sky color if needed.
Enjoy the peaceful ambiance your customized nightscape brings to your garden or patio
Interactive Bloom Wall of Kind Notes
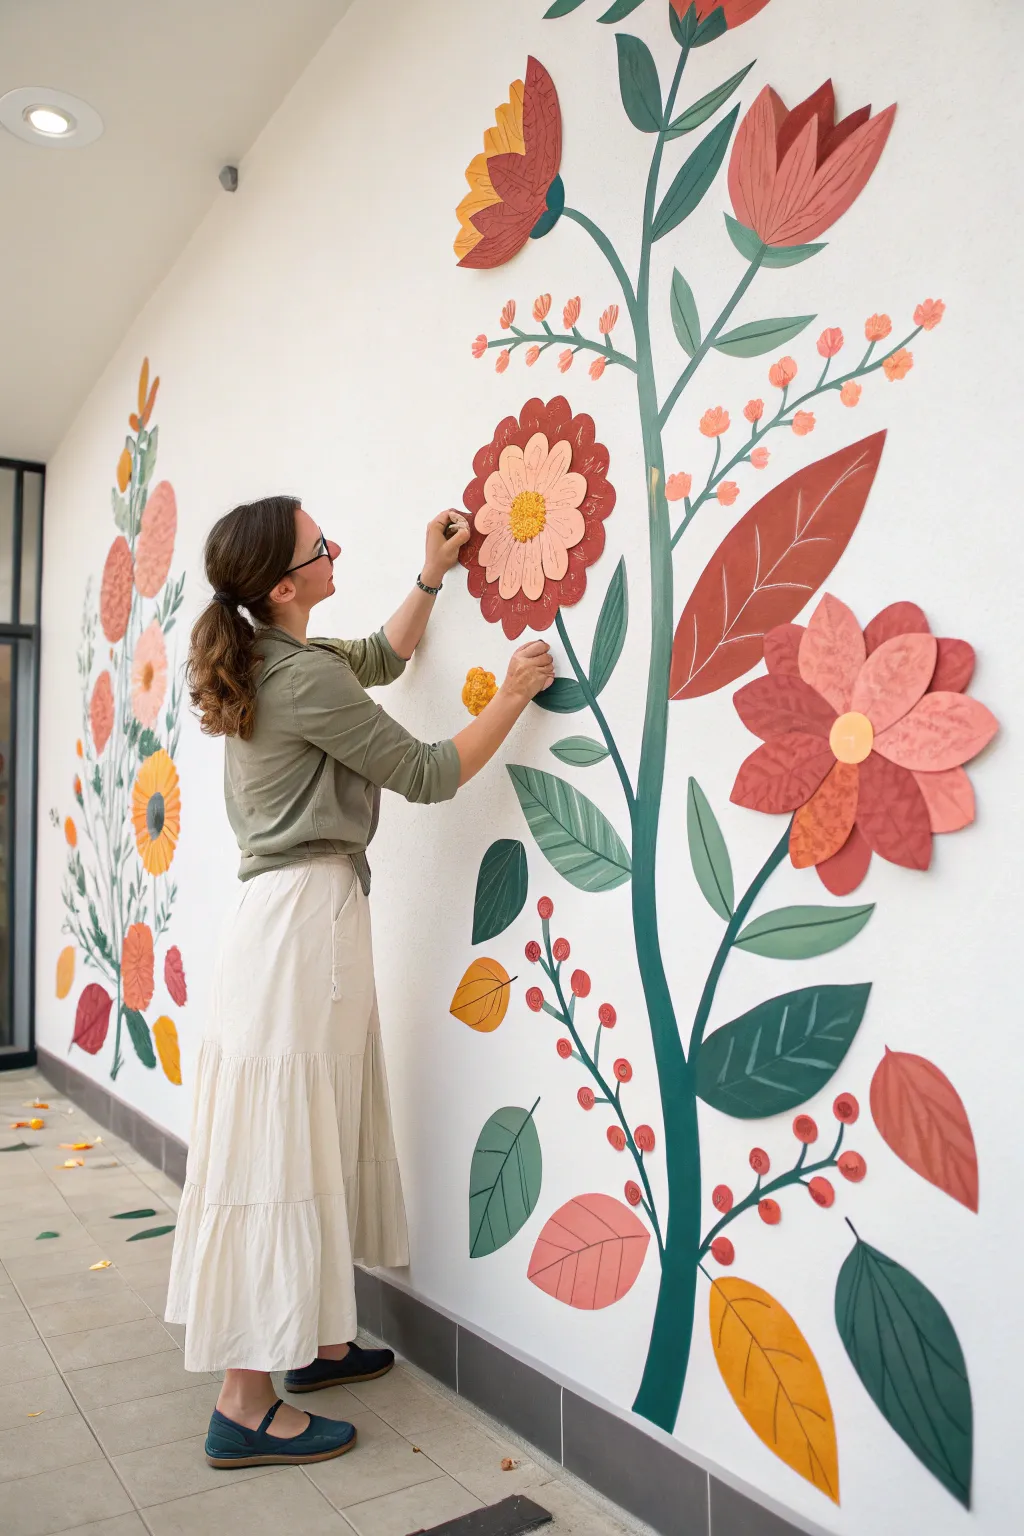
Transform a blank hallway or feature wall into a vibrant garden with this mixed-media mural technique. By combining painted stems with layered, dimensional cardstock blossoms, you create a tactile art piece that pops right off the surface.
Step-by-Step Guide
Materials
- Interior acrylic wall paint (various greens for stems/leaves)
- Heavyweight cardstock or poster board (red, pink, orange, yellow, rust)
- Pencil (for sketching)
- Painter’s tape or removable mounting putty
- Scissors and craft knife
- Assorted paintbrushes (flat 1-inch, round medium, and fine liner)
- Strong craft glue or double-sided foam tape
- Yellow yarn or pom-poms (optional for flower centers)
- White gel pen or chalk marker (for leaf details)
Step 1: Planning and Painting the Base
-
Sketch the skeleton:
Begin by lightly sketching the main vertical stems on your wall with a pencil. Create a flowing, organic shape that curves gently rather than standing perfectly straight, reaching from the floor almost to the ceiling. -
Draft the leaves:
Along the main stems, sketch outline shapes for large, alternating leaves. Vary the sizes, placing larger leaves near the bottom and smaller, more delicate ones toward the top tips. -
Paint the main stem:
Using a 1-inch flat brush and a deep forest green acrylic paint, fill in the main stem lines. Keep the edges smooth but allow for slight variations in line width to mimic natural growth. -
Block in green leaves:
Fill in your leaf sketches with different shades of green. I like to use a slightly lighter olive green for some leaves and a blue-green for others to create depth and visual interest. -
Add painted details:
Once the green base coats are dry, use a fine liner brush with a lighter green or teal shade to paint the central veins and ribbing on the painted leaves. -
Create berry clusters:
Paint small stems branching off the main stalk, capping them with small red or orange circles to represent berries. These add a nice filler between the larger elements.
Pro Tip: Hidden Dimensions
Use double layers of thick foam tape behind the largest flowers. This pushes them further off the wall, creating dramatic shadows that change throughout the day as the light shifts.
Step 2: Crafting the Dimensional Flowers
-
Design petal templates:
On scrap paper, draw three sizes of teardrop-shaped petals (large, medium, and small) to serve as your templates. -
Cut the cardstock:
Trace these templates onto your colored heavyweight cardstock or poster board. You will need roughly 8-12 petals per flower layer. Mix and match colors like rust, salmon, and deep red. -
Add texture to petals:
Before assembling, create texture on the paper petals. You can use a white chalk marker to draw vein lines, or gently score the cardstock down the center and fold it slightly to give it a 3D crease. -
Assemble the base layer:
Cut a small circle of cardstock as a base. Glue the largest petals around the edge of this circle, overlapping them slightly so no gaps show. -
Build the inner layers:
Glue the medium petals in a second ring inside the first, followed by the smallest petals in the center. Alternating colors between layers creates a beautiful, poppy-like effect. -
Create the center connection:
For the pollen center, cut a small yellow circle or use a cluster of yellow yarn/pom-poms. Glue this securely into the very middle of your paper flower. -
Make standalone leaves:
Cut large leaf shapes from green and rust-colored cardstock. Draw vein details on them with your white marker or paint pen to match the style of the painted wall leaves.
Step 3: Installation and Finishing Touches
-
Test placement:
Using removable painter’s tape or putty, temporarily stick your large paper flowers onto the wall at the tips of your painted stems to ensure the balance feels right. -
Secure the blooms:
Once satisfied with the positioning, secure the flowers using strong double-sided foam tape or adhesive strips. The foam tape adds extra height, enhancing the shadow and depth. -
Mount paper leaves:
Attach your cut-out paper leaves near the base of the stems or in gaps where the mural feels sparse. Overlap some paper leaves over the painted stems for a realistic layered look. -
Add loose petals:
Scatter a few single paper petals or small leaves near the floor or drifting down the wall. This ‘falling’ effect gives the mural movement and life. -
Final inspection:
Step back and check for any loose edges. Gently curl the tips of the paper petals outward with your fingers to maximize the 3D blooming effect.
Troubleshooting: Curling Paper
If humidity makes your large cardstock petals droop or curl too much, reinforce the back of each petal with a strip of stiff cardboard or a popsicle stick before gluing.
Now step back and enjoy your everlasting garden that brings spring indoors year-round


Have a question or want to share your own experience? I'd love to hear from you in the comments below!