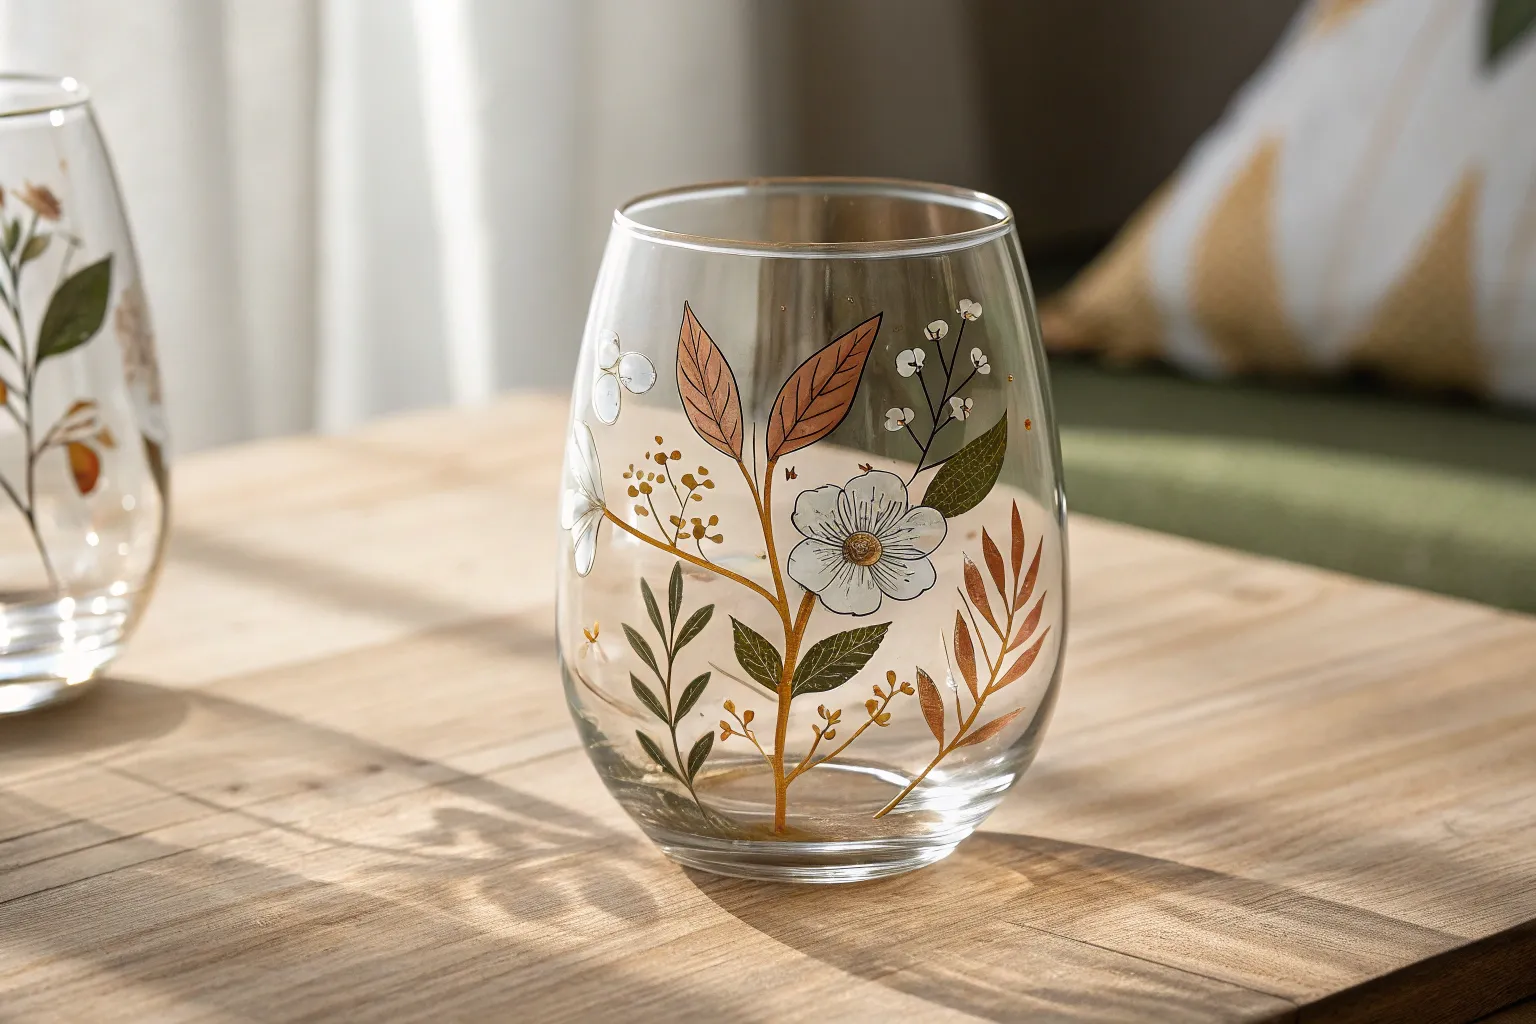
Painting stemless wine glasses is one of my favorite ways to turn an everyday object into something personal, giftable, and genuinely pretty on a shelf. The rounded shape is super forgiving, and once you lean into negative space and wraparound designs, the glass practically helps you compose the art.
Wildflower Wraparound Meadow
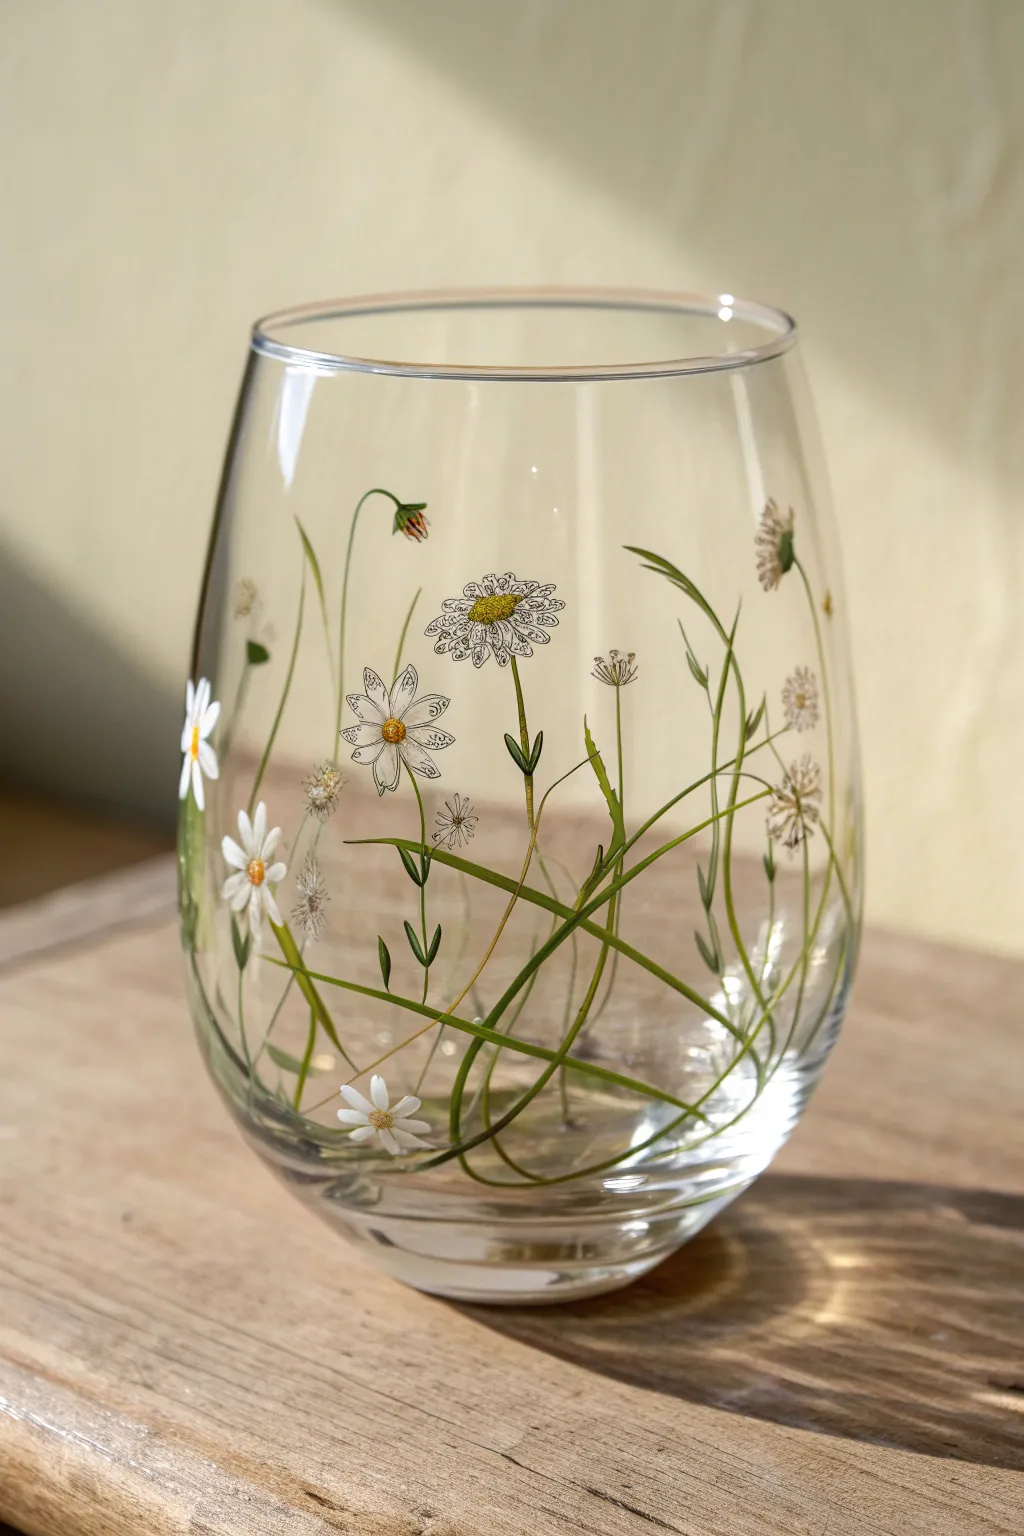
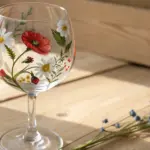
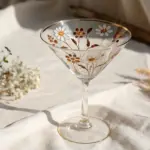
Transform a plain stemless glass into a delicate botanical garden with this wraparound design featuring fine-lined daisies and swaying grasses. The combination of opaque white petals and translucent, sketched-style outlines creates an elegant, airy look perfect for spring gatherings.
Step-by-Step
Materials
- Stemless wine glass (clear, smooth glass)
- Rubbing alcohol
- Cotton rounds or paper towel
- Glass paint markers (ultra-fine point: black, olive green, moss green)
- Glass paint (opaque white, yellow/gold)
- Fine detail paintbrush (size 0 or 00)
- Paper plate or palette
- Oven (for curing, if required by paint manufacturing)
Step 1: Preparation & Planning
-
Clean surface:
Begin by thoroughly wiping down the entire exterior of the wine glass with rubbing alcohol and a cotton round. This removes fingerprints and oils that prevent paint adhesion. -
Avoid the rim:
Mentally mark or use a piece of painter’s tape to block off the top 3/4 inch of the glass. You want to keep the painting area away from where lips will touch. -
Sketch placement:
Before painting, you can sketch a loose plan on a scrap piece of paper to decide where your tallest grasses will sit versus the smaller ground cover flowers.
Step 2: Painting the Greenery
-
Draw main stems:
Using your olive green paint marker, draw long, sweeping lines starting from the very bottom curve of the glass and reaching upward. Vary the height and curve direction to mimic natural movement. -
Add grass blades:
Intersperse thinner, shorter strokes using the moss green marker. I like to let some of these lines cross over the main stems to create depth and a ‘tangled’ meadow effect. -
Draw buds and sepals:
At the tops of some stems, draw small oval shapes or little ‘cups’ in green where future flower heads will sit. -
Allow to set:
Let this greenery layer dry for about 15-20 minutes so you don’t smudge the lines while adding flowers.
Steal This Trick
To paint inside the glass without smudging the outside, put a crumbled white napkin inside the cup. It gives you a white background to see your lines clearly.
Step 3: Adding the Floral details
-
Outline the daisies:
Take the ultra-fine black paint marker. Select a few spots for the main flowers and gently draw small, varied petal shapes radiating from a center point. Keep the lines wiggly and imperfect for that hand-sketched botanical illustration look. -
Create ‘ghost’ flowers:
Draw a few flowers using *only* the black outline marker (petals and centers) without filling them in. This transparency adds a lovely lightness to the design. -
Fill white petals:
Dip your fine paintbrush into opaque white glass paint. Carefully fill in the petals of about half the outlined flowers, leaving the others as simple line drawings. -
Add solid white blooms:
Paint a few small, solid white daisies directly without a black outline first. These softer shapes contrast nicely with the sharp ink lines. -
Detail the centers:
Once the white paint is tacky or dry, use a dot of yellow or gold paint for the centers of all the daisies. -
Texture the centers:
For extra realism, wait for the yellow centers to dry, then use the black fine-point marker to stipple tiny dots over the yellow area, creating a textured, pollen-like appearance.
Make It Yours
Add a tiny painted ladybug or bumblebee on one of the stems for a hidden surprise that guests will notice while sipping.
Step 4: Finishing Touches
-
Add seed heads:
Draw spindly, dandelion-like seed heads using the black marker. Draw a straight stem, then add tiny ‘V’ shapes or lines radiating from the top. -
Fill the gaps:
Look for empty spaces near the bottom of the glass. Add tiny leaves or extra blades of grass to make the ‘meadow’ feel lush and full. -
Clean up:
If you made any mistakes or smudges, use a cotton swab dipped in rubbing alcohol to wipe them away before curing. -
Curing:
Follow the instructions on your specific paint brand to cure the glass. This usually involves baking the glass in a cool oven that heats up to 350°F for 30 minutes to make it dishwasher safe.
Once baked and cooled, your custom wildflower glass is ready to hold your favorite vintage or serve as a stunning votive holder


Polka Dot Confetti Scatter
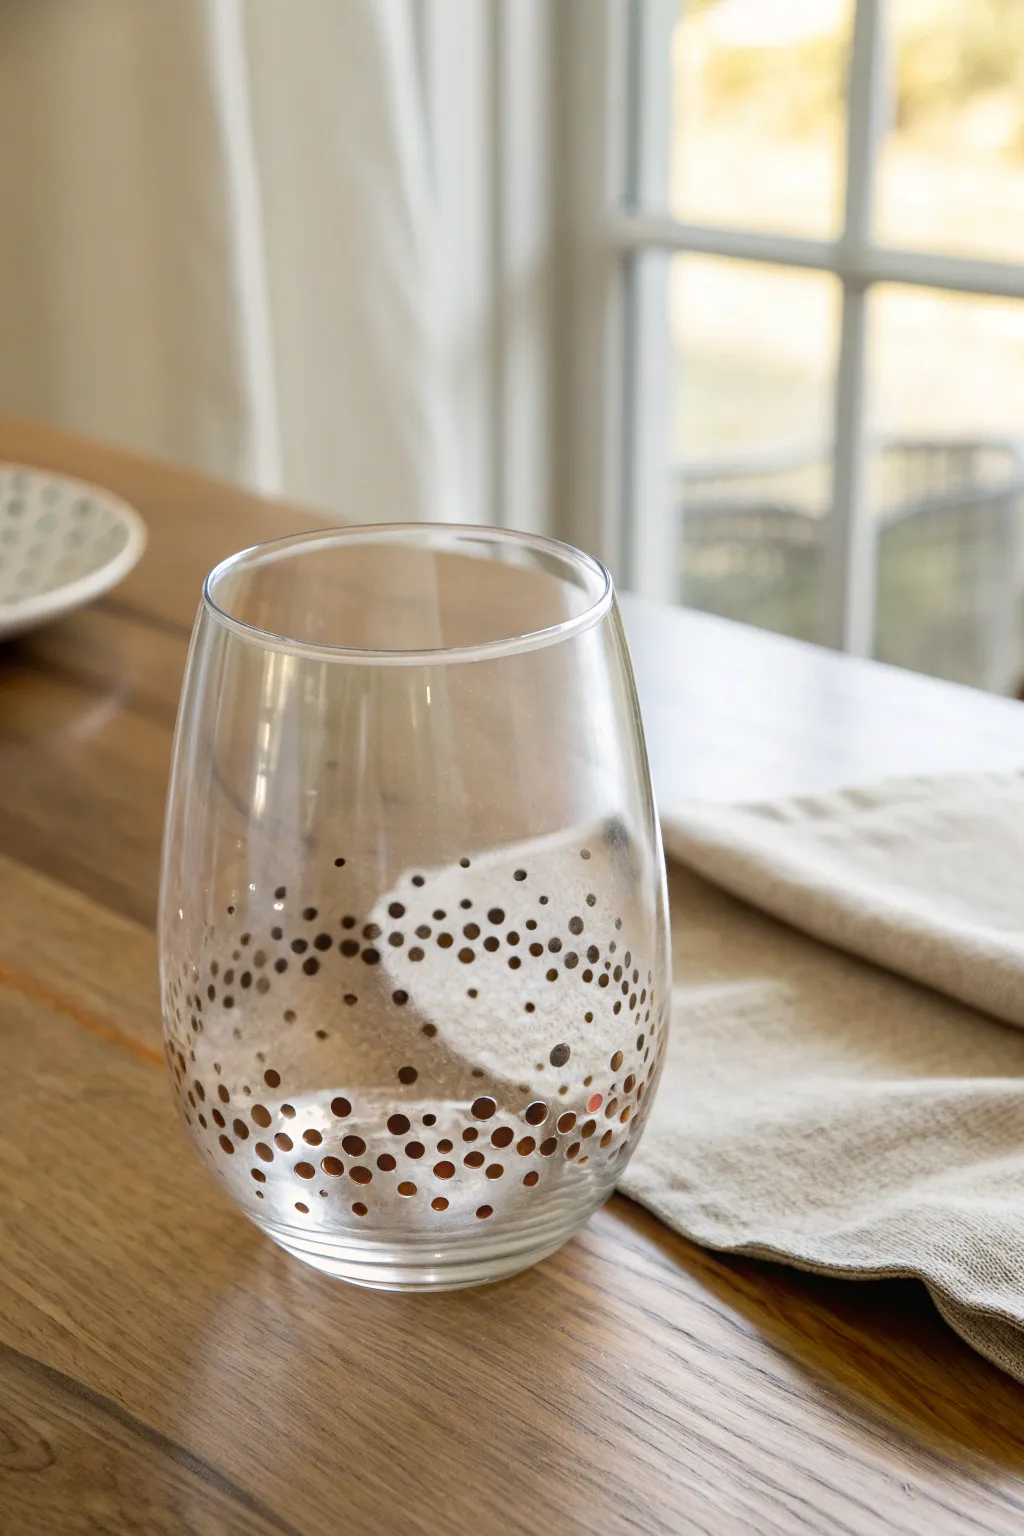
Transform a plain stemless wine glass into stylish drinkware with this elegant gradient dot design. Using metallic glass paint, you’ll create a confetti-like scatter that looks sophisticated yet is wonderfully simple to execute.
Detailed Instructions
Materials
- Stemless wine glass (washed and dried)
- Rubbing alcohol
- Cotton pads or paper towel
- Metallic glass paint (copper or bronze)
- Cotton swabs (Q-tips)
- Small round paintbrush (optional, for variation)
- Small palette or paper plate
- A clean, quiet workspace
Step 1: Preparation
-
Clean surface:
Before you begin, wipe down the entire exterior of the glass with rubbing alcohol using a cotton pad. This removes oils and fingerprints that prevent paint adhesion. -
Dry thoroughly:
Allow the alcohol to evaporate completely for a few moments so you have a pristine, dry canvas. -
Prepare paint:
Shake your metallic glass paint bottle well to mix the pigment. Squeeze a dime-sized amount onto your palette or paper plate.
Consistent Dots
To keep your dots round and uniform, hold the Q-tip perpendicular to the glass surface when pressing down, rather than at an angle.
Step 2: Base Density
-
Load the tool:
Dip a cotton swab directly into the paint. Ensure the tip is fully saturated but not dripping. -
Start at the bottom:
Begin dotting around the very bottom curve of the glass. Place these initial dots very close together, but try not to let them touch or merge. -
Rotate and repeat:
Slowly rotate the glass as you work, creating a solid band of dense dots near the base. -
Refill paint:
Reload your cotton swab frequently. I find that a freshly loaded swab makes a nice, round dot, while a drier one creates a faded look. -
Build the foundation:
Continue this dense pattern up for about half an inch to create a heavy ‘confetti’ base.
Step 3: Creating the Scatter
-
Space it out:
As you move upward past the base layer, begin increasing the distance between your dots. -
Vary position:
Place dots randomly rather than in rows. The goal is an organic look, like bubbles rising in champagne. -
Thin the herd:
Move up another inch, placing significantly fewer dots here. This is the transition zone. -
Add strays:
Place a few solitary dots higher up on the glass, perhaps two or three inches from the bottom, to complete the fading effect. -
Check density:
Step back and look at the glass from a distance. If the gradient looks too abrupt, add intermediate dots in the middle section to smooth the transition.
Two-Tone Effect
Use two different metallic shades, like gold and copper. Mix them randomly in the scatter pattern for added depth and sparkle.
Step 4: Finishing Touches
-
Fix imperfections:
If any dots are smudged or misshapen, quickly wipe them away with a clean, damp Q-tip while the paint is still wet. -
Initial dry:
Let the glass sit undisturbed for at least one hour until the paint is dry to the touch. -
Curing process:
Follow the specific instructions on your paint bottle for curing. Some require 21 days of air drying, while others need to be baked in a home oven. -
Baking (if applicable):
If baking, place the glass in a cold oven, heat to 350°F (175°C), bake for 30 minutes, then turn the oven off and let the glass cool down inside the oven entirely.
Once fully cured, your custom glassware is ready for your next dinner party or a relaxing evening at home


Metallic Rim and Double Band
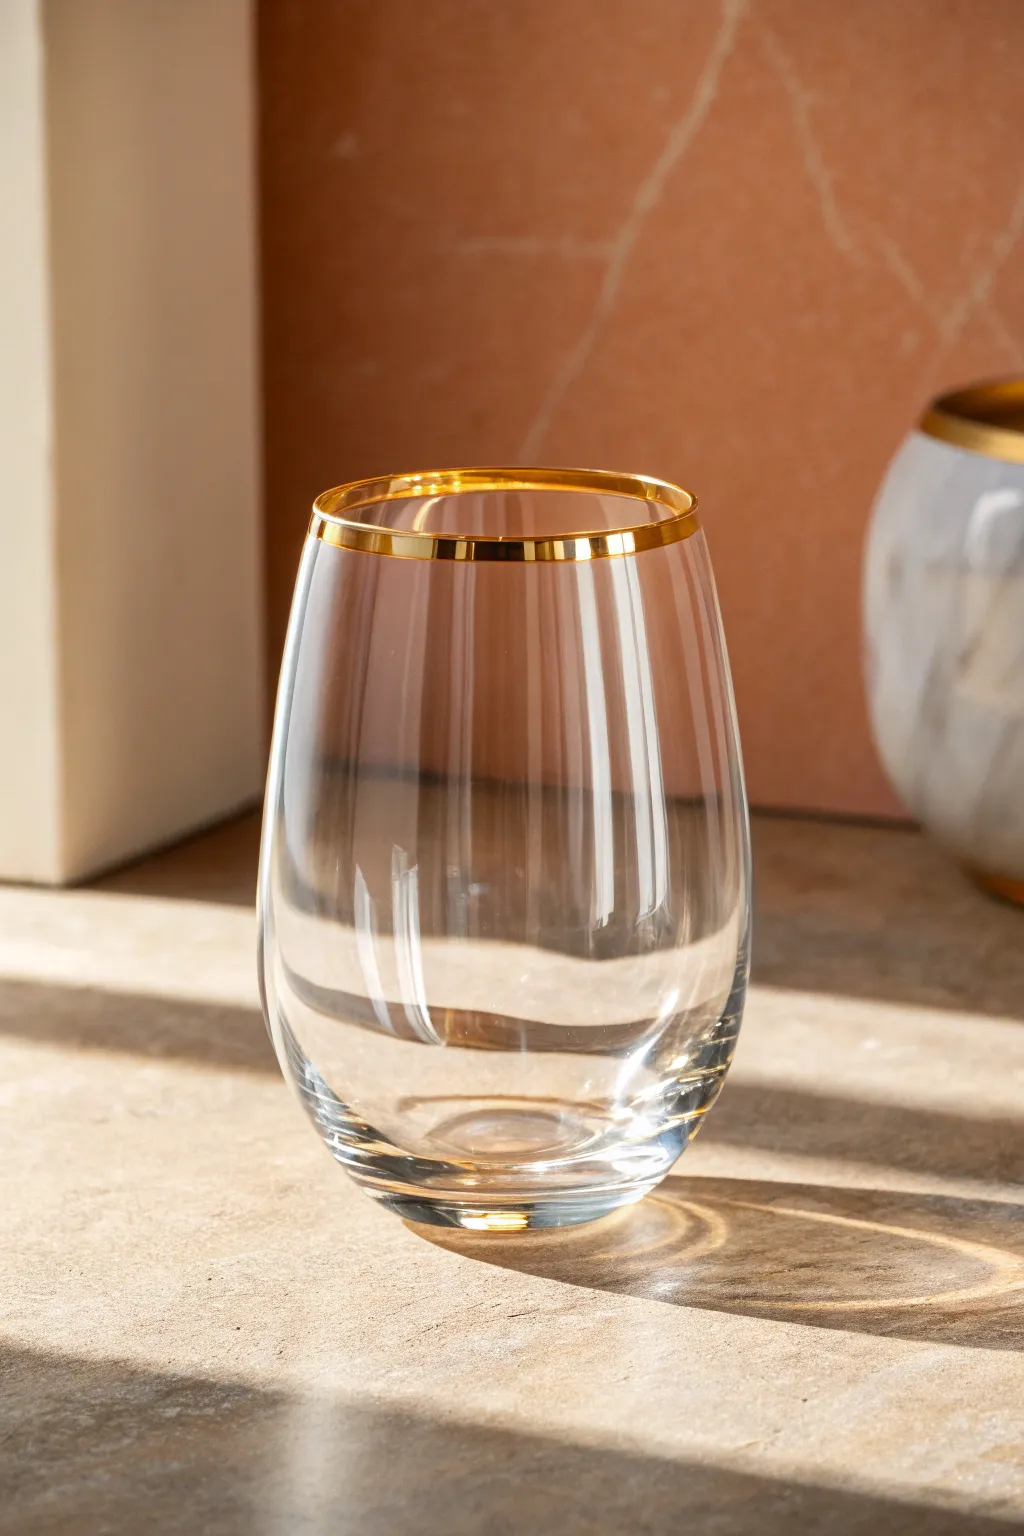
Elevate simple glassware into sophisticated drinkware with nothing but a steady hand and a touch of metallic shine. This project focuses on achieving that timeless, high-end look of a dipped gold rim, perfect for dinner parties or elegant gifts.
How-To Guide
Materials
- Stemless wine glass (thoroughly cleaned)
- Pebeo Porcelaine 150 paint in ‘Gold’ (or high-quality metallic glass enamel)
- Rubbing alcohol
- Cotton pads or lint-free cloth
- Fine flat artist brush (size 2 or 4)
- Pencil with an eraser on the end (optional prop)
- Paper towels
- Painter’s tape or masking tape (approx 1/4 inch width)
- Oven (for curing)
Step 1: Preparation & Surface Cleaning
-
Wash the glass:
Start by washing your wine glass with warm, soapy water to remove any factory dust or sticker residue. Dry it completely with a clean towel. -
De-grease the rim:
This step is crucial for paint adhesion. Moisten a cotton pad with rubbing alcohol and wipe the rim of the glass thoroughly, focusing on the top inch inside and out. -
Avoid fingerprints:
From this point on, handle the glass by the base or body, avoiding the rim area you just cleaned so oils from your fingers don’t interfere with the paint.
Pro Tip: Liquid Gold
For an even richer finish, consider using ‘Liquid Gold’ leafing paint instead of standard enamel. Note that leafing paints usually cannot be baked and will require gentle hand-washing only.
Step 2: Creating the Guideline
-
Position the tape:
Take your painter’s tape and carefully apply it horizontally around the upper portion of the glass. -
Adjust the gap:
Ensure there is a small gap—about an eighth to a quarter of an inch—between the top edge of the tape and the actual rim of the glass. This exposed strip will become your gold band. -
Seal the edges:
Run your fingernail or a credit card firmly along the top edge of the tape. You need a tight seal here to prevent the gold paint from seeping underneath and creating jagged lines. -
Check for level:
Spin the glass slowly on a flat surface to eye-ball whether the tape line is straight. Adjust if it looks wonky, as the tape is your primary guide.
Step 3: Painting the Gold Rim
-
Load the brush:
Stir your gold metallic enamel paint gently but thoroughly. Load a moderate amount onto your flat brush—too much will cause drips, too little will streak. -
Apply the first pass:
Painting horizontally, fill in the exposed glass area above the tape. Don’t forget to paint the very top lip of the rim itself for a finished look. -
Smooth the strokes:
I find using long, continuous strokes works best here. Try to connect your brushstrokes to minimize visible start and stop points. -
Let it tack up:
Allow the first coat to dry slightly for about 15-20 minutes. It shouldn’t be fully dry, just tacky to the touch. -
Apply second coat:
If the gold looks translucent or streaky, apply a second thin coat over the first. Be gentle so you don’t lift the previous layer.
Troubleshooting: Bleeding Lines
If you see paint bleeding under the tape, your tape seal wasn’t tight enough, or the paint was too thin. Let it dry slightly, then use a craft knife to gently scrape the line straight.
Step 4: Finishing Touches & Curing
-
Remove tape promptly:
Carefully peel off the painter’s tape while the paint is still slightly wet. If you wait until it’s fully dry, you risk peeling the paint off with the tape. -
Clean up edges:
If any paint bled under the tape, use a damp cotton swab or a toothpick to gently scrape away the excess while it’s still fresh. -
Air dry first:
Place the glass in a dust-free area and let it air dry for at least 24 hours. This allows the solvents to evaporate before heat setting. -
Bake to cure:
Place the glass in a cold oven. Set the temperature to 300°F (150°C) or the manufacturer’s specific instruction. Once the oven creates heat, bake for 35 minutes. -
Cool down slowly:
Turn the oven off and leave the glass inside until the oven is completely cool. This prevents the glass from cracking due to thermal shock.
Enjoy your beautifully gilded glass with a favorite vintage or give it as a stunning handmade gift


Ombré Fade From the Base
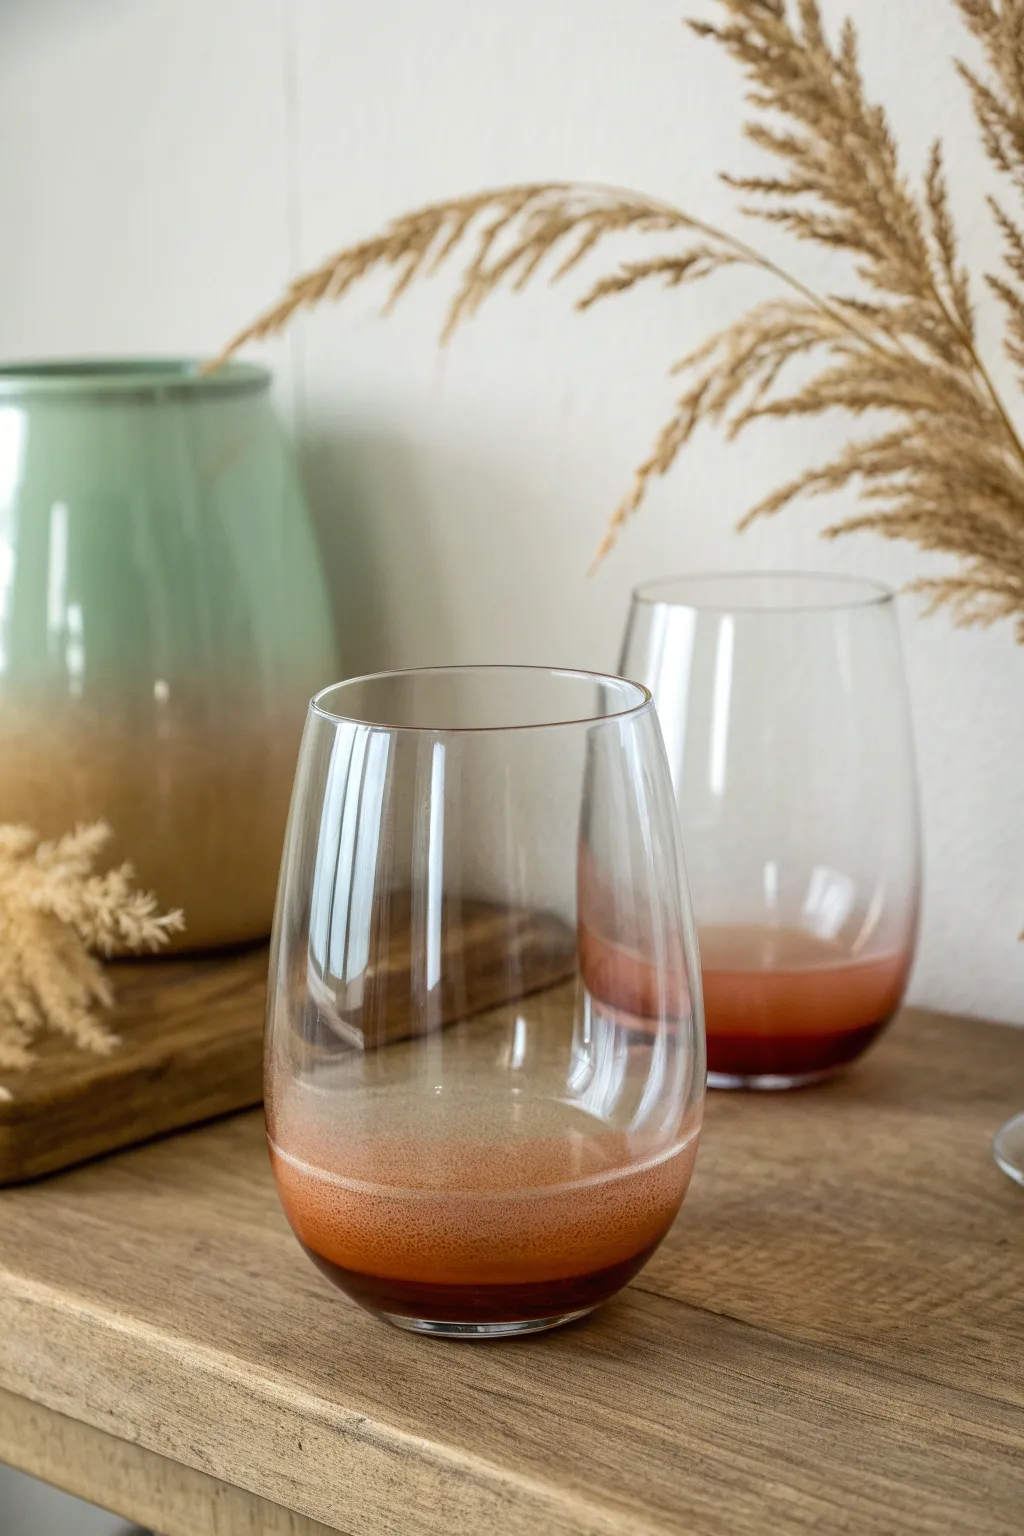
Capture the warmth of a desert sunset with these elegant stemless wine glasses featuring a smooth terracotta gradient. The rich, reddish-brown hue at the base gently fades into clear glass, creating a sophisticated look perfect for modern rustic decor.
Step-by-Step Guide
Materials
- Clear stemless wine glasses
- Rubbing alcohol and cotton pads
- Painter’s tape
- Terracotta or burnt orange variety spray paint (glass-compatible)
- Clean, dry cardboard box (for a spray booth)
- Protective gloves
- Mask for ventilation
- Small plastic bag or cling wrap
Step 1: Preparation
-
Clean the surface:
Begin by thoroughly cleaning your stemless wine glasses. Wipe the exterior surface with rubbing alcohol on a cotton pad to remove any oils, fingerprints, or dust, ensuring the paint adheres perfectly. -
Dry completely:
Allow the alcohol to evaporate completely and the glass to dry. Avoid touching the area you intend to paint with your bare hands, as oils can cause the paint to separate. -
Protect the rim:
Since you want the top portion of the glass to remain perfectly clear for drinking, tape off the top rim. Place a strip of painter’s tape about an inch or two down from the lip, ensuring the edge is pressed down firmly. -
Cover the bowl:
To protect the rest of the glass from stray wayward mist, cover the upper portion (above your tape line) with a small plastic bag or cling wrap, taping it securely to your initial tape line.
Splotchy Mist?
If the fade looks blotchy instead of smooth, your nozzle might be clogged or held too close. Clean the nozzle and spray from further away.
Step 2: Creating the Ombré Fade
-
Set up a spray booth:
Place your prepared glasses upside down inside a cardboard box. This box will catch overspray and protect your surrounding area. Make sure you are in a well-ventilated space, ideally outdoors. -
Shake the paint:
Shake your can of terracotta spray paint vigorously for at least one minute after the mixing ball begins to rattle. This ensures the pigment is evenly distributed for a smooth finish. -
Target the base:
Hold the spray can about 8-10 inches away from the glasses. Aim the nozzle directly at the flat bottom of the glass, rather than the sides. -
Apply the first burst:
Spray a short, controlled burst of paint onto the upturned base. By aiming at the bottom, the paint will naturally wrap around the curve of the glass, creating a concentrated color at the base that naturally feathers out up the sides. -
Check the fade:
Pause and inspect the mist on the sides of the glass. The overspray from hitting the bottom should have created a very light, speckled dusting near the middle. Do not spray the sides directly if you want a subtle transition. -
Layer for depth:
Wait about 2-3 minutes for the first light coat to become tacky. Then, apply a second coat, again focusing strictly on the flat bottom and the very lowest curve of the glass. -
Intensify the bottom:
I like to add a third, slightly heavier pass just on the very center of the base. This ensures the color is opaque and rich at the anchor point, while the fade remains translucent and misty. -
Dry partially:
Allow the paint to dry to the touch, generally about 15-20 minutes, before attempting to move the glasses.
Step 3: Finishing Touches
-
Remove the tape:
Carefully peel away the painter’s tape and plastic wrap. Pull the tape slowly at a 45-degree angle away from the painted area to ensure a crisp clean line if any paint reached that high, though ideally, your fade stopped before the tape. -
Cure the paint:
Let the glasses sit undisturbed for at least 24 hours to allow the paint to fully cure and harden. Check your specific paint can instructions, as some glass paints require baking in an oven for permanence. -
Optional baking:
If your paint permits baking, place the glasses in a cool oven, set the temperature to 350°F (or as directed), and bake for 30 minutes. Turn the oven off and let them cool completely inside before removing. -
Review the look:
Inspect your gradient. It should look speckled and airy near the middle and solid at the bottom, giving that lovely dipped effect shown in the image. -
Hand wash only:
Even with cured paint, it is best to gently hand wash these glasses to preserve the delicate mist of the fade over time.
Metallic sheen
For an upscale twist, lightly dust the very bottom with gold spray paint after the terracotta layer dries for a subtle metallic glow.
Enjoy your beautiful, custom-tinted glassware at your next gathering.
BRUSH GUIDE
The Right Brush for Every Stroke
From clean lines to bold texture — master brush choice, stroke control, and essential techniques.
Explore the Full Guide
Marble-Dipped Bottom
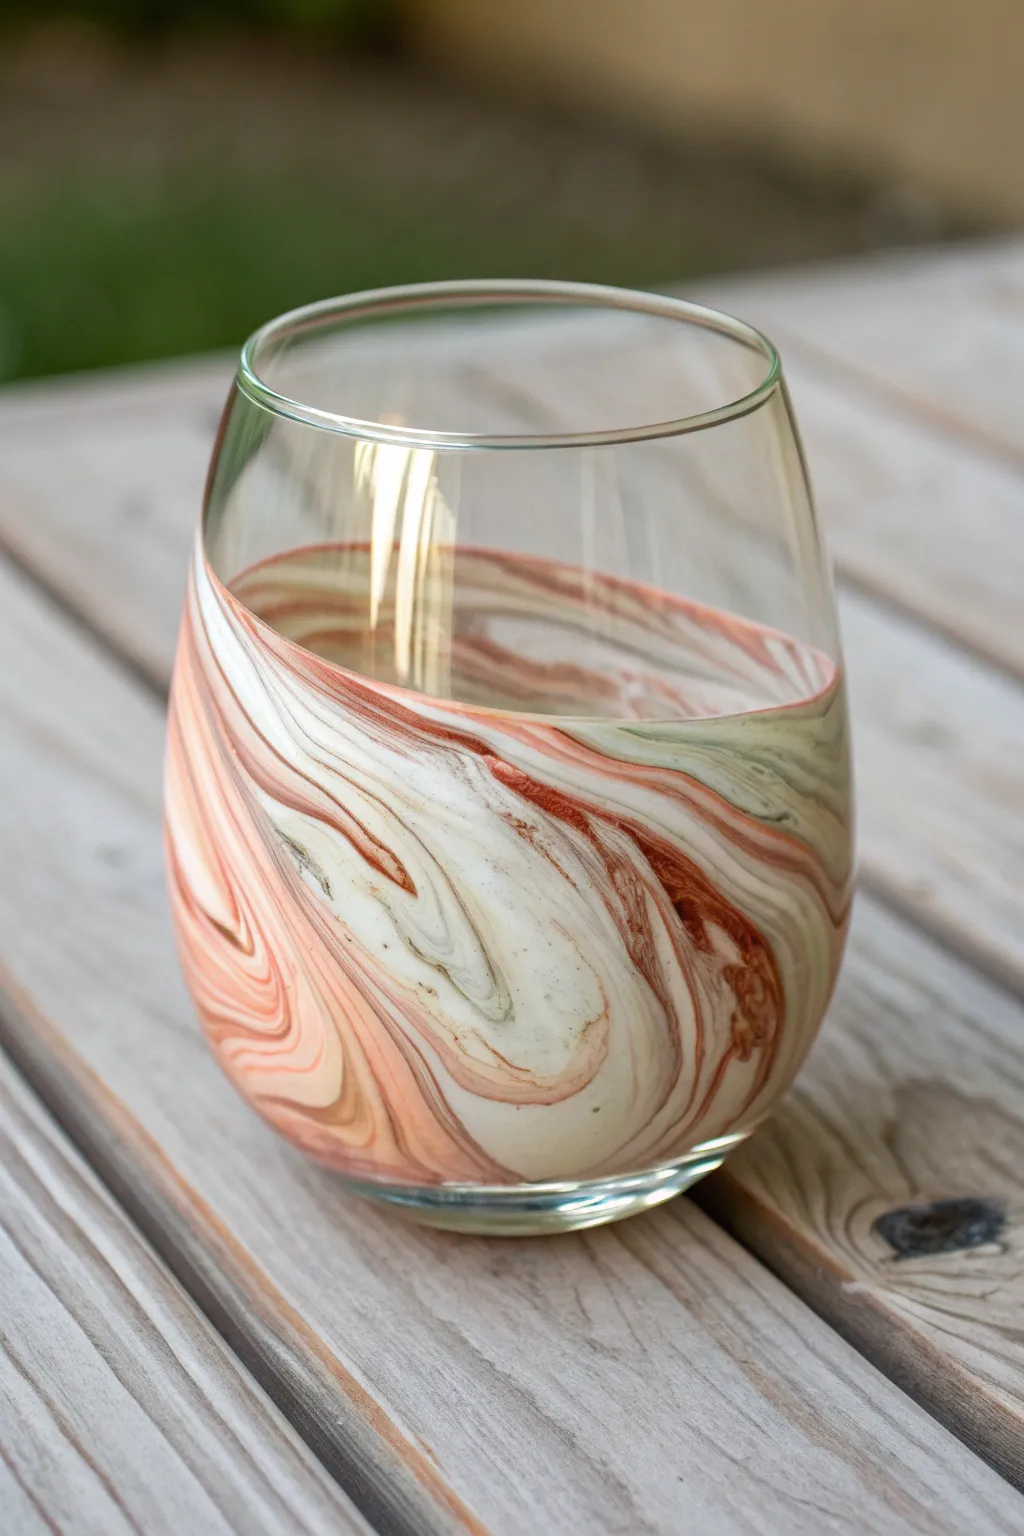
Transform a simple stemless wine glass into a sophisticated statement piece with swirling patterns of terracotta, cream, and sage. This marble-dipped effect creates a unique, fluid design on every glass, ensuring no two are exactly alike.
How-To Guide
Materials
- Stemless wine glass
- Nail polish (opaque white or cream)
- Nail polish (terracotta or reddish-brown)
- Nail polish (grey or sage green)
- Nail polish (metallic copper – optional)
- Deep disposable container (large enough to fit the glass width)
- Room temperature water
- Toothpicks or wooden skewers
- Painter’s tape or electrical tape
- Paper towels
- Nail polish remover and cotton swabs (for cleanup)
- Clear acrylic sealant spray (glossy finish)
Step 1: Preparation & Setup
-
Clean the Glass:
Begin by thoroughly washing your stemless wine glass with soap and water. Dry it completely and wipe the exterior with rubbing alcohol to remove any oils or fingerprints. -
Tape the Boundary:
Decide how high you want the marble effect to go. Apply a strip of painter’s tape or electrical tape horizontally around the glass to create a crisp line. Press down specifically on the bottom edge of the tape to prevent leaks. -
Prepare the Water Bath:
Fill your disposable container about three-quarters full with room temperature water. The temperature is crucial; if it’s too cold or hot, the polish will skin over too quickly. -
Open Your Polishes:
Unscrew the caps of all your chosen nail polish colors. You need to work quickly once you start pouring, so having them ready to go is vital.
Temperature Matters
Use room temperature water. Cold water makes polish harden instantly, while hot water creates clumps. If the polish sinks, your water is too old or dirty.
Step 2: Creating the Marble Pattern
-
Drop the Base Color:
Hold the brush of your first color (creating the most coverage, like the white or cream) close to the water surface and let a drop fall. It should spread outward into a thin circle. -
Layer the Colors:
Immediately drop your next color (terracotta) into the center of the first ring. Follow with your grey or sage, and then repeated layers or metallic accents. Continue alternating colors until you have a ‘bullseye’ pattern. -
Swirl the Design:
Take a toothpick and gently drag it through the polish rings to create the marble pattern. Start from the center and pull outward, or drag sporadically for a more chaotic look. Be gentle to avoid breaking the surface film. -
Check Density:
Ensure there is enough polish on the surface to cover the bottom portion of your glass. If the film looks too thin, add a few more drops before swirling.
Metallic Touch
Add a thin line of liquid gold leaf along the top edge of the marbling after removing the tape. It creates a luxe transition between the glass and paint.
Step 3: Dipping & Finishing
-
The Dip:
Hold the glass by the rim, ensuring your grip is secure. Slowly and steadily dip the bottom of the glass into the water at a slight angle, submerging it up to the tape line. -
Clear the Excess:
While the glass is still submerged, quickly use a toothpick or skewer to swirl and gather up the remaining polish on the water’s surface. This prevents double-dipping the design when you pull the glass out. -
Lift and Dry:
Once the water surface is clear, lift the glass out. Turn it upside down and set it on a paper towel or drying rack. Let it dry completely, ideally for at least an hour. -
Remove the Tape:
Carefully peel away the painter’s tape. Pull slowly at a 45-degree angle away from the painted area to ensure a sharp, clean edge. -
Cleanup Edges:
If any polish seeped under the tape or ended up on the rim, dampen a cotton swab with nail polish remover and gently wipe it away for a pristine finish. -
Seal the Design:
To make your glass hand-wash safe, spray a light coat of clear acrylic sealant over the painted area. I prefer doing two light coats rather than one heavy one to avoid drips. -
Final Cure:
Allow the sealant to cure fully according to the manufacturer’s instructions (usually 24 hours) before using the glass.
Now you have a stunning, custom piece of drinkware perfect for your next gathering
Leafy Vine Border Around the Bowl
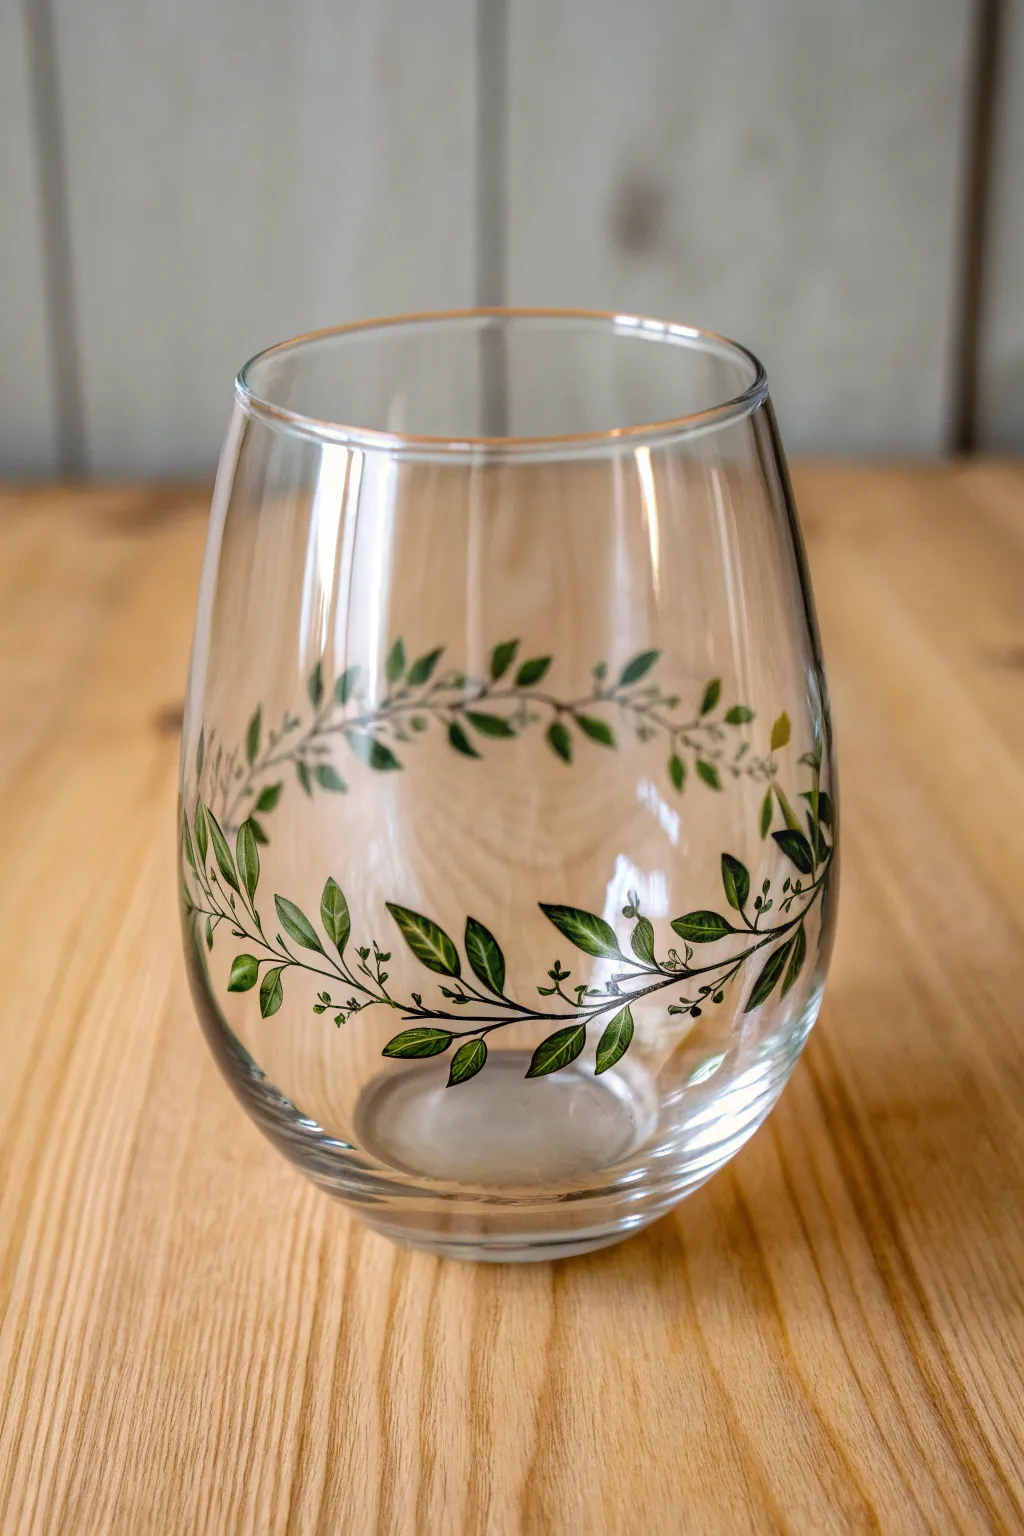
Bring a touch of the garden to your glassware with this delicate leafy vine pattern. This project uses translucent layers of green and fine line work to create an elegant, nature-inspired wreath that circles the entire glass.
Step-by-Step
Materials
- Stemless wine glass
- Rubbing alcohol and cotton pads
- Enamel glass craft paint (Dark Green, Light Olive Green, Deep Brown)
- Fine liner brush (size 00 or 000)
- Small round brush (size 1 or 2)
- Paper palette or foil
- Water cup and paper towels
- Oven for curing (optional, depending on paint)
Step 1: Preparation and Planning
-
Clean surface:
Begin by thoroughly wiping down the exterior of the wine glass with rubbing alcohol on a cotton pad. This step is crucial because it removes oils and fingerprints that prevent the paint from adhering properly. -
Determine placement:
Hold the glass and visualize where the widest part of the bowl is. This is typically the best spot for your vine wreath to sit, about midway up the glass. -
Mark specific points:
If you’re worried about keeping the line straight, you can use a tiny dot of brown paint or a washable marker to mark four equidistant points around the circumference of the glass as guideposts.
Pro Tip: Translucency
For a watercolor look, mix a tiny drop of painting medium or water into the green paint. This makes the leaves sees-through and delicate.
Step 2: Painting the Stem Structure
-
Load the liner brush:
Squeeze a small amount of Deep Brown enamel paint onto your palette. Dip your fine liner brush in, rolling it slightly to keep the tip sharp and pointed. -
Start the main vine:
Starting at one side, paint a thin, meandering line horizontally across the glass. Keep your hand loose; the line shouldn’t be perfectly straight but should have a gentle, organic wave to it. -
Connect the circle:
Continue the line all the way around the glass until you meet your starting point. Don’t worry if the connection isn’t invisible; leaves will cover it later. -
Add secondary branches:
Using the same brown paint, add small, short offshoots coming off the main vine. Alternate painting them facing upward and downward to create a balanced, natural look.
Level Up: Gold Accents
Once the green leaves are fully dry, add a thin metallic gold line down the center of several leaves for a sophisticated, high-end finish.
Step 3: Adding Foliage
-
Mix your greens:
Prepare your greens on the palette. I like to have a dark green and a lighter olive shade ready next to each other so I can dip into both for variation. -
Paint base leaves:
Switch to your small round brush. Dip it into the Dark Green paint. Press the belly of the brush down gently near a branch tip and lift up as you pull away to create a tapered leaf shape. -
Vary the direction:
Repeat this press-and-lift motion along the vine, placing leaves on the small offshoots you painted earlier. Ensure some leaves point up and some point down. -
Add lighter accents:
While the dark green is still slightly wet or tacky, dip your brush into the Light Olive Green without fully cleaning it. Paint smaller leaves interspersed among the dark ones to create depth. -
Highlight the leaves:
Go back over a few of the larger dark leaves with a tiny streak of the lighter green on just one side of the leaf. This mimics light hitting the foliage.
Step 4: Detailing and Finishing
-
Add tiny buds:
Using the very tip of your fine liner brush and the Dark Green paint, add tiny little dots or clusters of three dots at the very ends of the finest vine tendrils. -
Refine the stems:
Check where the leaves meet the brown stem. If there is a gap, use your liner brush and brown paint to connect the leaf base to the main vine. -
Clean up edges:
If any paint went where it shouldn’t, use a damp cotton swab or a toothpick to gently scrape away the excess before it dries completely. -
Let it cure:
Allow the glass to air dry for at least one hour before handling. For permanent results, follow the manufacturer’s instructions on your paint bottle, which usually involves air curing for 21 days or baking in a cool oven.
Enjoy your beautiful new botanical glass at your next dinner party or wrap it as a thoughtful handmade gift

PENCIL GUIDE
Understanding Pencil Grades from H to B
From first sketch to finished drawing — learn pencil grades, line control, and shading techniques.
Explore the Full Guide
Lavender Stalks Climbing Up
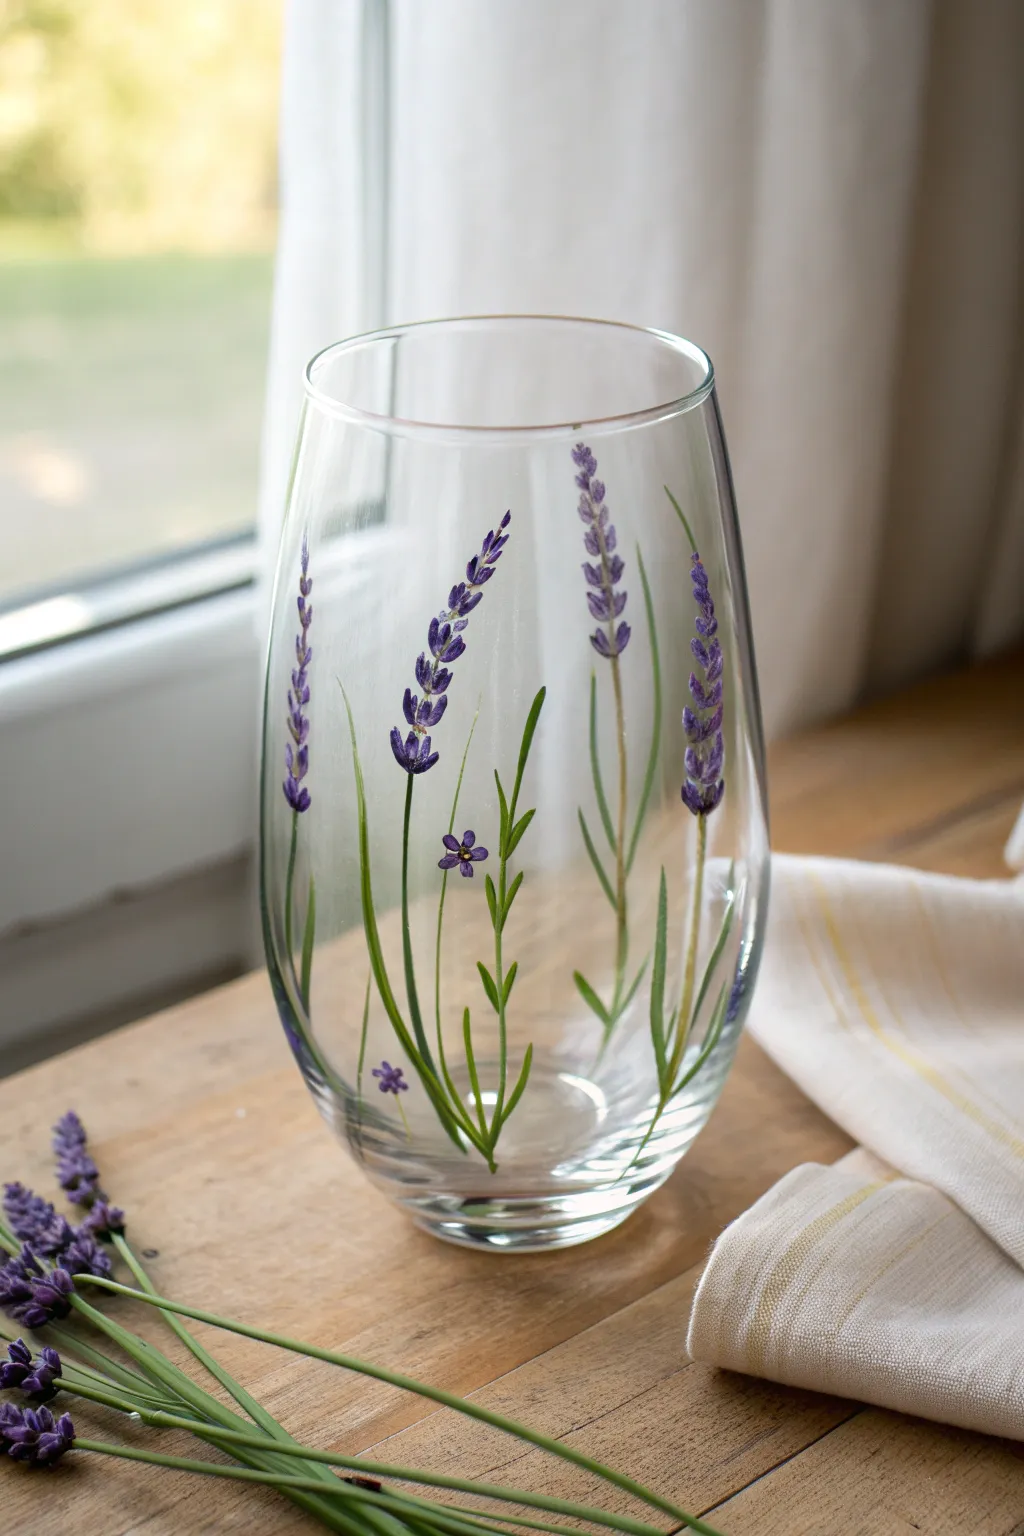
Bring the calming beauty of a French garden to your glassware with this delicate project. Long, slender lavender stalks climb gracefully up the sides of a stemless wine glass, creating an elegant botanical look that is surprisingly simple to achieve.
Step-by-Step Tutorial
Materials
- Stemless wine glass (washed with soap and water)
- Rubbing alcohol
- Cotton pads
- Enamel glass paint (opaque violet or lavender)
- Enamel glass paint (dark purple/eggplant)
- Enamel glass paint (olive green)
- Enamel glass paint (moss green or lighter shade)
- Fine liner brush (size 0 or 00)
- Small round brush (size 1 or 2)
- Paper plate or palette
- Paper towels
- Oven for curing (optional, depending on paint)
Step 1: Preparation & Stems
-
Clean surface:
Before painting, wipe down the entire exterior surface of the wine glass with rubbing alcohol on a cotton pad to remove any oils or fingerprints. -
Mix green shades:
Squeeze a small amount of olive green and moss green onto your palette. I like to slightly mix them in the middle to create a third, mid-tone green for variety. -
Paint main stems:
Load your fine liner brush with the olive green paint. Starting near the bottom curve of the glass, pull the brush upward in a long, confident stroke. -
Vary the heights:
Repeat the previous step to create 4-5 main stems around the glass. Make sure they end at different heights to keep the composition natural. -
Add side shoots:
Paint shorter stems branching off slightly from the base or standing independently between the taller stalks. Keep lines very thin. -
Dry briefly:
Allow the green stems to dry to the touch for about 10-15 minutes before adding leaves to prevent smudging.
Clean Lines Tip
If you make a mistake or a line gets too thick, quickly wipe it away with a damp Q-tip or a toothpick heavily dipped in rubbing alcohol.
Step 2: Adding Foliage
-
Paint long leaves:
Using the liner brush and moss green, paint long, grass-like leaves starting from the base of the stems. -
Detail stem leaves:
Add small, pairs of tiny leaves higher up on the stems. Press the brush down lightly and lift it quickly to create a tapered leaf shape. -
Layering greens:
Go back over a few leaves with the darker olive green to add depth and shadow where the stems overlap. -
Final drying:
Let all green elements dry completely for at least an hour. The purple flowers will overlap the stems, so the base needs to be solid.
Step 3: The Lavender Blooms
-
Load purple paint:
Squeeze out your violet and dark purple paints. Use the small round brush, but don’t overload it. -
Start the clusters:
At the very top of a stem, dab small, tear-drop shapes using the violet paint. These should be stacked vertically to form the flower spike. -
Build the shape:
Add more dabbed petals working downward about an inch or two from the tip. Keep the cluster narrow at the top and slightly wider at the bottom. -
Leave gaps:
Don’t paint a solid block of purple; leave tiny spaces between the dabs so the green stem peeks through occasionally. -
Add depth:
While the violet is still wet, dip your brush tip into the dark purple and add tiny dots near the bottom of each flower cluster for shading. -
Create floating blooms:
Paint one or two small, five-petaled flowers distinct from the stalks, floating on a thin stem near the middle of the design for variety. -
Add tiny centers:
For the distinct five-petal flowers, use the very tip of your brush handle to dot a tiny amount of yellow or gold in the center if desired. -
Curing:
Allow the glass to dry for 21 days for air curing, or follow the manufacturer’s instructions for baking the glass in the oven to make it dishwasher safe.
Bee Garden Twist
Paint tiny bumblebees buzzing around the lavender using small ovals of yellow and black for a lively, buzzing garden scene.
Pour your favorite vintage into your new masterpiece and enjoy the handcrafted elegance
Citrus Slices Garden
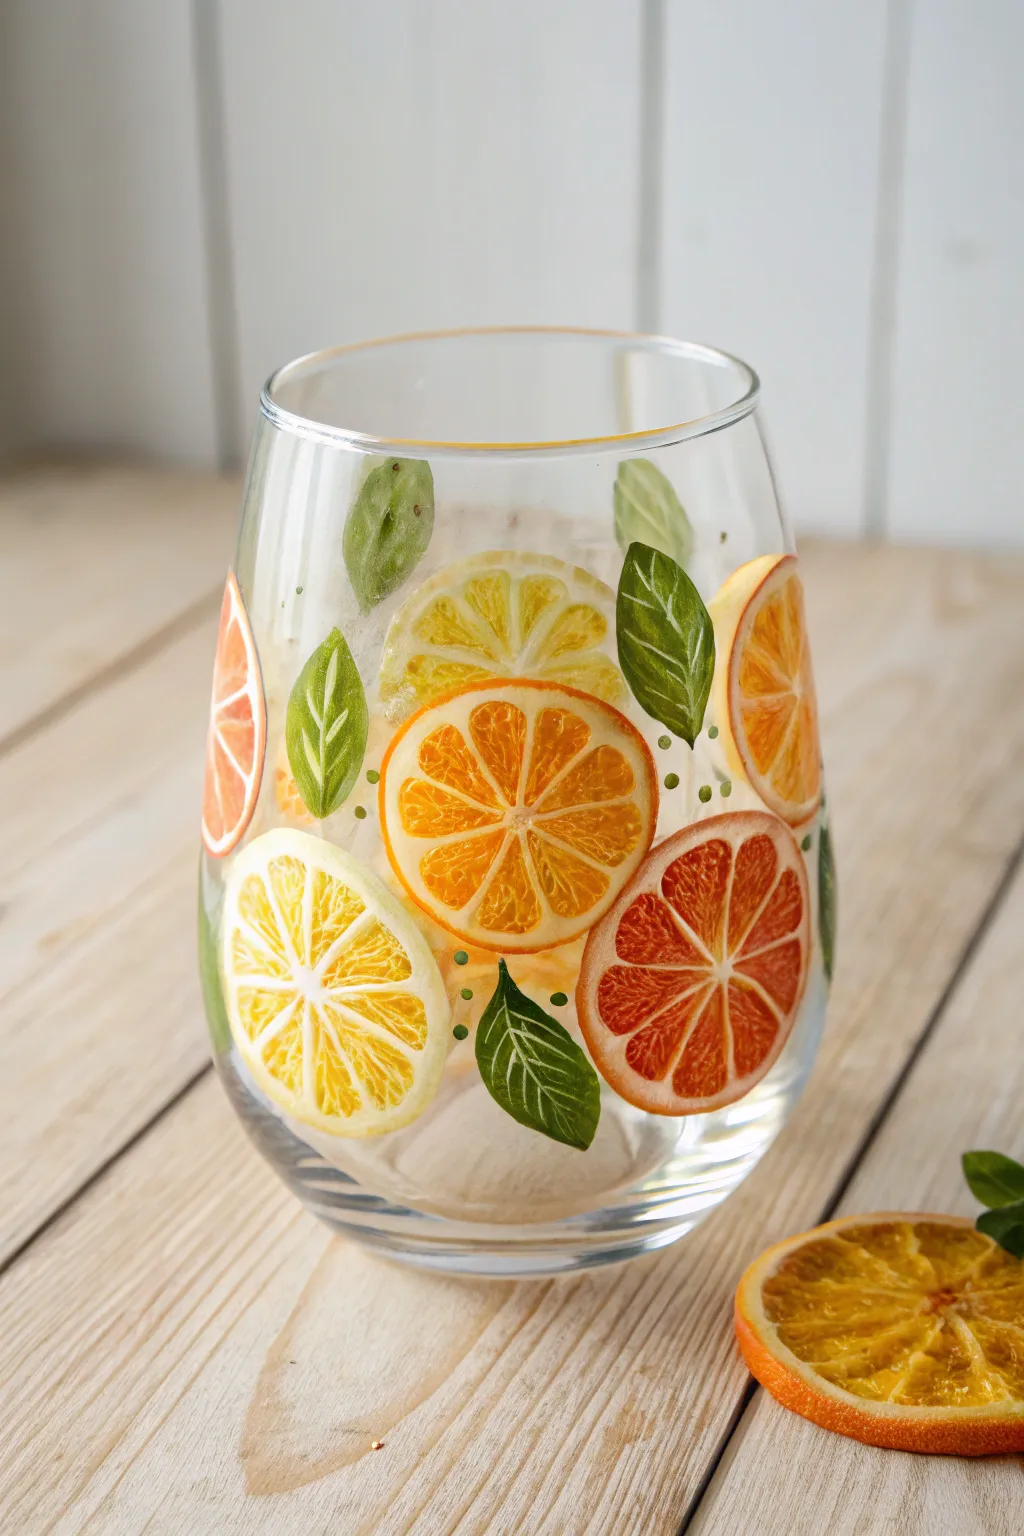
Bring the refreshing vibe of a Mediterranean orchard to your glassware with this vibrant citrus-themed project. Translucent layers of orange, yellow, and coral paint create juicy, realistic-looking fruit slices paired with crisp green foliage.
How-To Guide
Materials
- Stemless wine glass (washed and dried)
- Rubbing alcohol
- Enamel glass paints (bright orange, golden yellow, ruby red/coral, lime green, forest green, white)
- Fine liner brushes (size 00 or 000)
- Small round brushes (size 2 or 3)
- Parchment paper or paint palette
- Paper towels
- Cotton swabs (for clean up)
- Oven (for curing)
Step 1: Preparation & Base Shapes
-
Clean surface:
Before dipping your brush, wipe the entire outer surface of the glass with rubbing alcohol to remove oils and fingerprints, ensuring crisp paint adhesion. -
Plan placement:
Visualize where your main citrus slices will go. Aim for a scattered, organic pattern rather than perfect rows, leaving space in between for leaves. -
Outline the rinds:
Using a fine liner brush and your primary fruit colors (orange, yellow, coral), paint thin circles of varying sizes. These will be the outer rinds of your fruit slices. -
Build the pith:
Mix a tiny drop of white into your fruit color to make a pale version. Paint a slightly thicker circle immediately inside the first one to create the pith layer. -
Define the segments:
With your fine liner brush and the base fruit color, paint the ‘spokes’ of the wheel. Draw 8-10 lines radiance from a small central point out to the pith edge.
Step 2: Adding Juicy Details
-
Fill the segments:
Using a small round brush, fill in the triangular segments with a translucent wash of your fruit color. Don’t make it solid; letting some glass show through mimics juicy pulp. -
Create texture:
While the paint is wet, dab tiny dots of a slightly darker shade (or unthinned paint) into the segments to create that textured citrus look. -
Highlight the pulp:
Once the base layer is tacky but not fully dry, add extremely fine streaks of white or pale yellow within the segments to represent the juice sacs. -
Paint the leaves:
Load a round brush with lime green. Press the brush down and pull up to create teardrop-shaped leaves floating between the fruit slices. -
Add leaf depth:
While the lime green is wet, blend a touch user of forest green at the base of the leaf and along one edge for a natural shadow effect. -
Veining details:
Switch back to your liner brush. With white or very pale green paint, draw a central vein down each leaf and small v-shaped veins branching off.
Pro Tip: Translucency
Mix a tiny amount of clear gloss medium with your paint for the inner fruit segments. This increases transparency, making the citrus look incredibly juicy when held to light.
Step 3: Finishing Touches & Curing
-
Add floating dots:
Dip the non-brush end of your paintbrush into green or yellow paint and dot small accents in the empty spaces to connect the composition. -
Refine the edges:
Check your circles. If any rinds look messy, use a clean, damp brush or a cotton swab to gently reshape the edges before they dry. -
Paint the rim (optional):
For an elegant finish, run a very thin line of gold or yellow paint along the very top rim of the glass. -
Air drying:
Allow the glass to dry undisturbed for at least 1 hour (often up to 24 hours depending on brand instructions) before handling. -
Heat set:
Place the glass in a cool oven. Turn the heat to 350°F (176°C) and bake for 30 minutes. Turn the oven off and let the glass cool completely inside.
Troubleshooting: Drips
If paint is dripping down the curve, your application is too thick. Work in thin layers, letting each dry briefly. Wipe drips immediately with a damp Q-tip.
Enjoy your refreshing new glassware at your next summer brunch or garden party


Geometric Tape Stripes and Chevrons
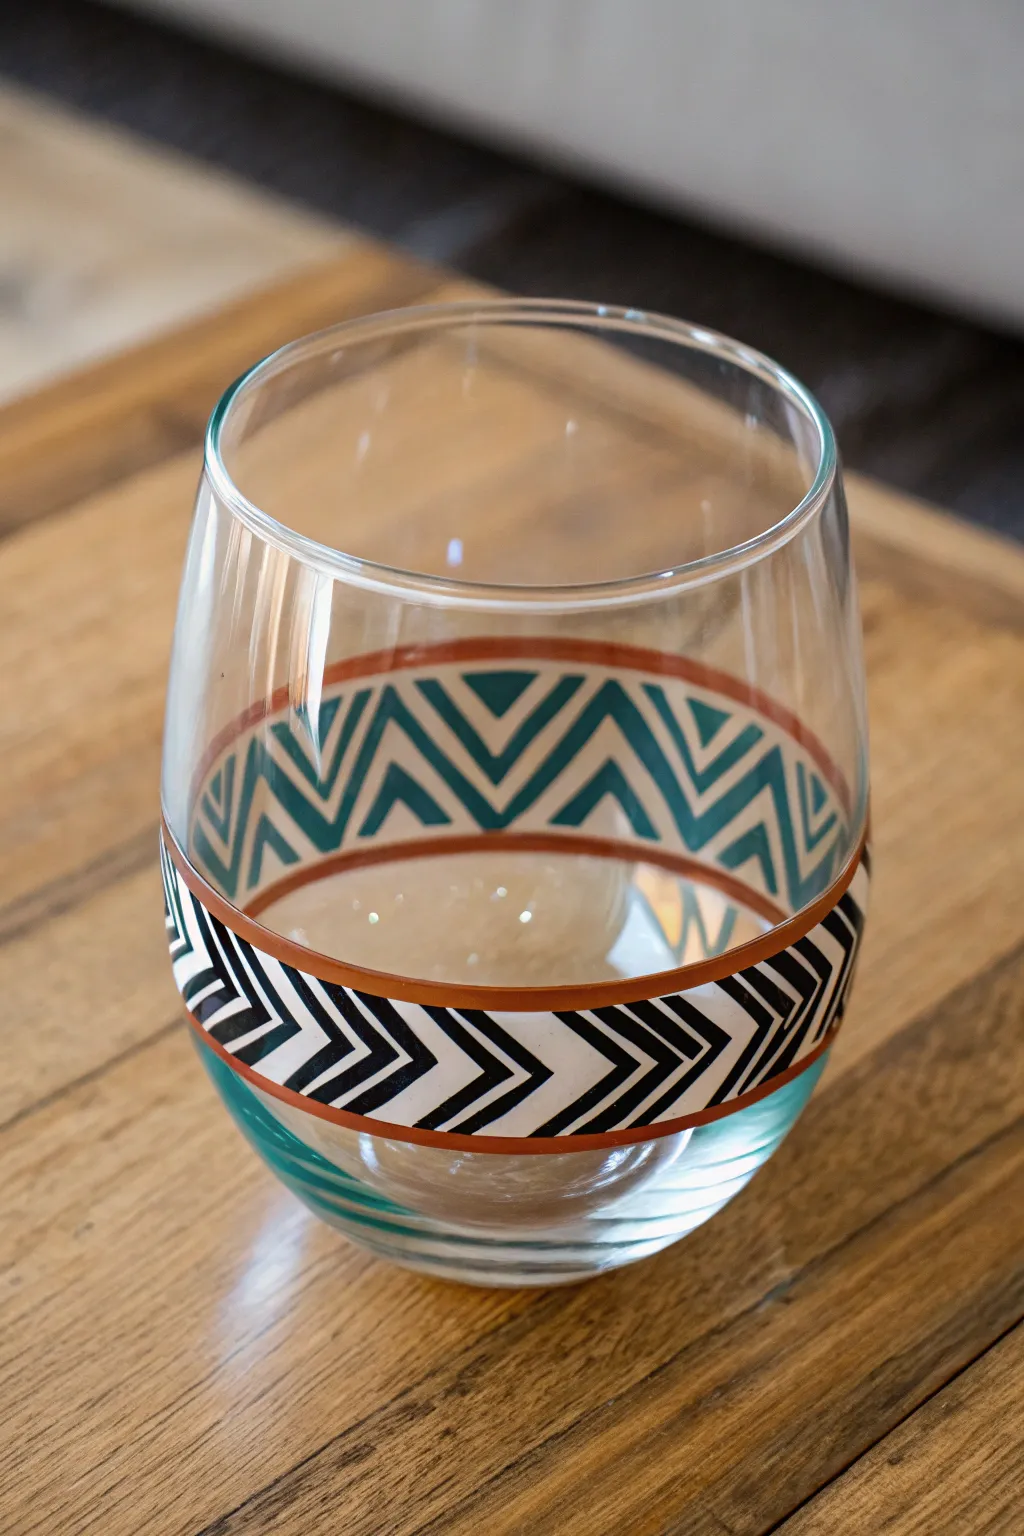
Transform a plain stemless vessel into a bold statement piece with this geometric design featuring striking teal and black patterns. The crisp lines and warm copper accents give it a sophisticated, modern Aztec vibe that looks professionally printed rather than hand-painted.
Step-by-Step Tutorial
Materials
- Stemless wine glass (cleaned with rubbing alcohol)
- Enamel craft paint (Teal/Turquoise)
- Enamel craft paint (Black)
- Enamel craft paint (Copper or Burnt Orange)
- Fine detail paintbrush (liner brush)
- Flat shader paintbrush (small)
- Rubbing alcohol and cotton pads
- Paper towels
- Palette or paper plate
- Oven for curing (unless using air-dry only paints)
Step 1: Preparation and Base Bands
-
Prepare the surface:
Before dipping your brush into any paint, thoroughly wipe down the exterior of the glass with rubbing alcohol. This removes invisible oils from your fingers that can prevent paint adhesion. -
Mix the copper hue:
If you don’t have a pre-mixed copper, blend a touch of orange with brown and a tiny bit of metallic gold. You want a warm, earthy tone that contrasts well with the teal. -
Paint the top border:
Using a steady hand and a small flat brush, paint a horizontal band of copper around the upper-middle section of the glass. I find it easiest to rest my pinky on the glass for stability while rotating the glass with my other hand rather than moving the brush. -
Paint the lower border:
Paint a second, identical copper band parallel to the first one, leaving about a 1.5-inch gap between them. This gap will house your main chevron pattern. -
Create the bottom stripe:
Add a third copper band below the second one, creating a slightly narrower channel (about 0.75 inches) for the bottom black-and-white pattern. -
Let it set:
Allow these base lines to dry to the touch so you don’t accidentally smudge them while working on the detailed patterns.
Use a Lazy Susan
Place the glass on a small turntable or Lazy Susan. Spinning the object while holding your brush still creates much straighter horizontal bands than moving your hand around the glass.
Step 2: Painting the Teal Chevrons
-
Load the teal paint:
Squeeze out your teal enamel paint. You want a consistency that flows easily but isn’t drippy. -
Establish the zig-zag:
In the wide upper channel between the first two copper bands, paint a continuous zig-zag line. The points of the zig-zag should touch the copper borders. -
Thicken the lines:
Go back over your initial zig-zag with the flat brush to thicken the lines into bold stripes. Ensure the angles are sharp and the paint is opaque. -
Add the inner V-shapes:
Using your fine liner brush, paint a smaller V-shape nested inside each larger teal V. This creates that concentric, echoing pattern characteristic of Aztec designs. -
Refine the edges:
Check your edges where the teal meets the clear glass. Use a slightly damp brush or a toothpick to clean up any wobbles while the paint is still wet.
Step 3: Adding the Black Details
-
Switch to black:
Clean your liner brush thoroughly and load it with black enamel paint. -
Start the lower pattern:
Move to the narrower bottom channel. Similar to the top, paint a zig-zag line, but create more frequency—meaning the V-shapes should be tighter and closer together. -
Fill the pattern:
Instead of leaving these as lines, fill in alternating sections to create solid black chevrons against the clear glass background. -
Add nested lines:
For the sections you didn’t fill in, paint sharp, thin black V-lines that echo the shape of the solid blocks. -
The base accent:
Finish the design by painting the very bottom curve of the glass in a solid wash of teal. This grounds the design and adds a pop of color to the base.
Tape Hack
Struggling with freehand lines? Use thin graphic chart tape (1/8 inch) to mask off your zig-zags before painting. Peel the tape away slowly while the paint is still slightly wet.
Step 4: Curing
-
Dry time:
Let the glass sit undisturbed for at least 1 hour until the paint is dry to the touch, and ideally 24 hours before baking. -
Bake to set:
To make the glass top-rack dishwasher safe, place it in a cool oven. Turn the heat to 350°F (175°C) and bake for 30 minutes. Turn off the oven and let the glass cool completely inside before removing.
Once baked and cooled, your custom glassware is ready to hold your favorite vintage or serve as stunning decor
Night Sky Galaxy Wrap
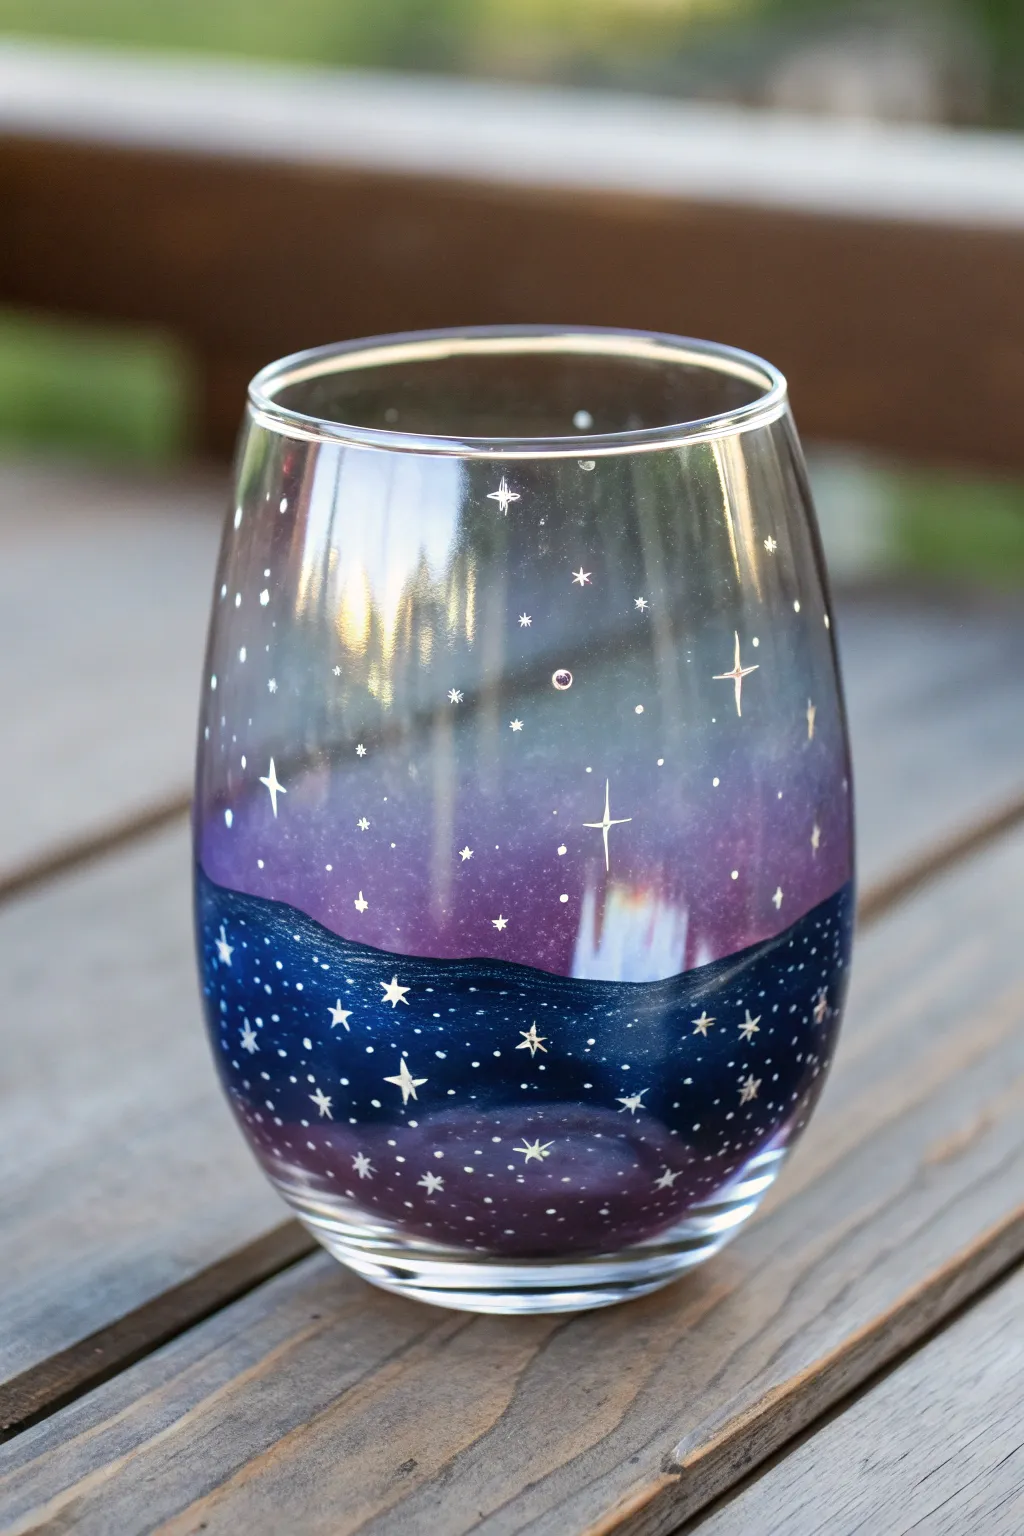
Transform a plain stemless vessel into a dreamy, star-filled universe that glows with deep indigo and soft violet hues. This gradient galaxy wrap captures the magic of a clear night sky, featuring hand-painted constellations and silvery starlight.
Detailed Instructions
Materials
- Stemless wine glass
- Rubbing alcohol
- Cotton rounds
- Enamel craft paints (Deep Navy, Violet, White, Black, Purple Shimmer)
- Pouncer sponges or cosmetic wedges
- Small liner brush (size 0 or 00)
- Small flat brush
- Oven for curing (optional)
Step 1: Prepping the Surface
-
Clean the glass:
Before touching any paint, wipe down the entire exterior of your wine glass with rubbing alcohol on a cotton round. This removes oils and fingerprints that prevent paint adhesion. -
Map out your horizon:
Visualize where your dark mountain line will sit. This design covers roughly the bottom two-thirds of the glass, leaving the top rim clear for sipping.
Sponge Texture Issues?
If sponging creates bubbles, dab lighter! Too much pressure traps air. If paint lifts off, let the bottom layer dry fully before adding a second coat.
Step 2: Creating the Galaxy Gradient
-
Mix the base darks:
On your palette, mix a Deep Navy enamel with a tiny drop of Black to create a midnight blue tone for the very bottom section. -
Sponge the bottom layer:
Using a cosmetic wedge or pouncer sponge, dab this midnight blue mixture heavily around the bottom curve of the glass, extending up about an inch. -
Transition to violet:
Load a clean area of your sponge with Violet paint. Dab this directly above the midnight blue, slightly overlapping the wet edges to blur them together. -
Blend the gradient:
While both paints are wet, use the sponge to pat the seam between the navy and violet repeatedly until the line disappears into a soft, smoky transition. -
Add the upper sky:
Mix a little White into your Violet or use a Purple Shimmer paint for the topmost section of the sky. Sponge this lightly above the violet layer, letting it fade out irregularly near the top. -
Refine the opacity:
Glass paint can be translucent. If the coverage looks streaky, let the first coat dry for about 15 minutes, then sponge a second layer using the same gradient steps for richer color.
Pro Tip: Glowing Effect
Mix a tiny drop of white into the center of your galaxy swirl while the purple paint is wet. It creates a luminous ‘nebula’ look behind the stars.
Step 3: Painting the Landscape
-
Define the hills:
Using your medium blue or the midnight blue mix and a flat brush, paint a wavy, uneven horizon line right over the dried gradient. This creates the silhouette of rolling hills in the foreground. -
Fill the silhouette:
Fill in the area below your wavy line with solid dark blue paint, covering the bottom gradient. This grounds the artwork and adds depth.
Step 4: Details & Stars
-
Create distant stars:
The secret to depth is varying star sizes. Dip the handle end of a small brush into White enamel paint and dot it randomly across the purple sky area. -
Add tiny speckles:
For the smallest, most distant stars, use the very tip of a toothpick dipped in white paint. Cluster some together to mimic the Milky Way. -
Paint bright stars:
Switch to your fine liner brush (size 00). Paint a tiny vertical line intersected by a tiny horizontal line to create a four-point star. I like to place 3-5 of these prominently in the sky. -
Highlight the hills:
Clean your liner brush and pick up more White paint. Carefully paint larger five-point or four-point stars directly over the dark mountain silhouette to make them pop against the dark background. -
Add reflection dots:
Scatter a few white dots over the dark hill section as well, giving the illusion that the starry sky wraps completely around the viewer. -
Clean up edges:
If any paint strayed too close to the drinking rim, wipe it away with a damp cotton swab or a bit of alcohol before the paint sets.
Step 5: Curing Process
-
Air dry first:
Allow the painted glass to sit undisturbed for at least 1 hour to ensure the surface is dry to the touch, or accord to your specific paint’s instructions (often 21 days for air cure). -
Oven cure (optional):
For durability, place the glass in a cool oven. Set heat to 350°F (175°C). Once it reaches temp, bake for 30 mins. Turn oven off and let glass cool completely inside before removing.
Now you can pour your favorite vintage and sip beneath your own personal constellation
Coastal Waves and Sail Lines
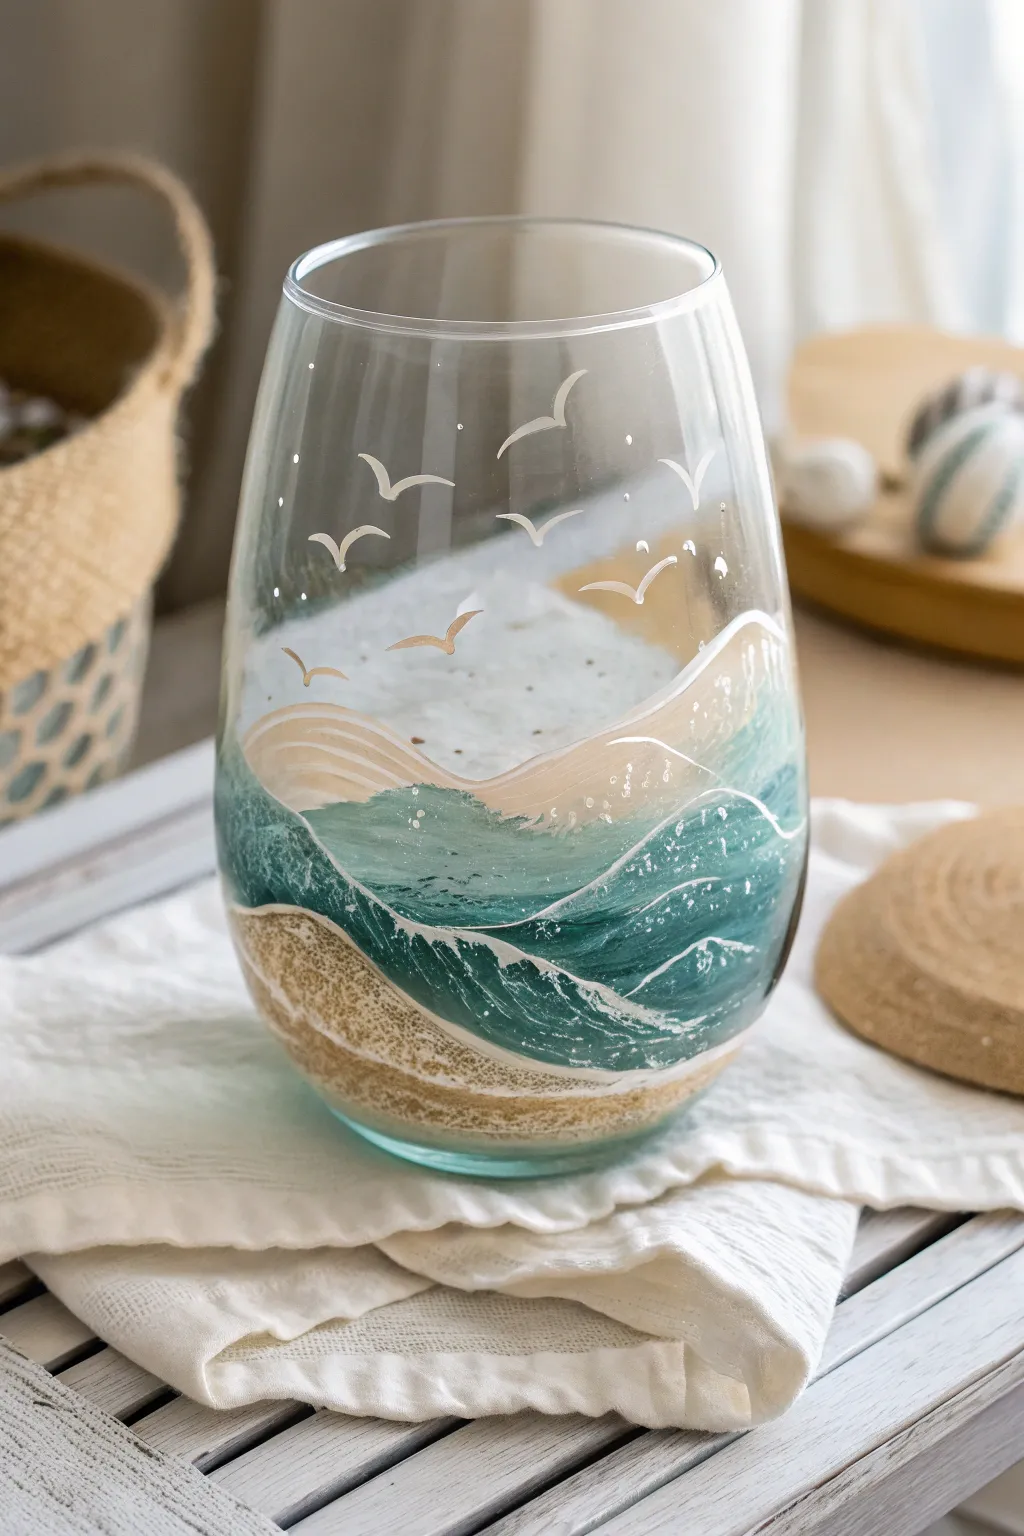
Bring the calming rhythm of the ocean to your stemware with this breezy, coastal-inspired design. Featuring layered waves, sandy dunes, and soaring gulls, this painted glass captures the essence of a perfect beach day in soothing teal and sandy tones.
Step-by-Step
Materials
- Stemless wine glass
- Rubbing alcohol and cotton pads
- Enamel glass paints (Sand/Beige, Teal/Sea Green, White, Light Grey)
- Fine detail brush (liner brush)
- Small flat brush
- Sponge dauber or cosmetic wedge
- Palette or small plate
- Oven (for curing)
Step 1: Preparation and Base Layers
-
Clean the Surface:
Begin by wiping down the entire exterior of the wine glass with rubbing alcohol on a cotton pad. This removes oils and fingerprints, ensuring your paint adheres perfectly for a lasting finish. -
Mix the Sand Turn:
On your palette, mix a warm beige paint with a tiny speck of white to create a soft sand color. You want it opaque enough to cover the glass but light enough to look sun-bleached. -
Paint the Dunes:
Using the sponge dauber or a small flat brush, apply the sand color to the very bottom of the glass. Create a sweeping, uneven curve that rises slightly higher on one side to mimic a natural dune shape. -
Add Texture:
While the sand paint is still wet, gently tap it with the dry side of your sponge. This stippling technique creates a realistic, grainy texture instead of a flat wash of color. -
Lay the First Wave:
Switch to your teal or sea green paint. Using a flat brush, paint a wide, undulating band directly above the sand layer, allowing the bottom edge to slightly overlap the sand. -
Create Depth:
While the teal layer is fresh, mix a drop of white into a small portion of teal. Swipe this lighter shade near the top of the wave band to suggest sunlight hitting the water’s surface.
Step 2: Distant Shores and Details
-
Paint the Distant Hills:
Mix a very pale, creamy beige—lighter than your sand color. Above the teal waves, paint smooth, rolling hill shapes that fade off toward the sides of the glass. -
Soften the Edges:
Use a clean, slightly damp brush to feather out the top edges of these hills. This makes them look distant and atmospheric rather than stark and heavy. -
Let it Set:
Allow these base layers to dry for about 15–20 minutes. The paint should be dry to the touch so you can add crisp details without smearing. -
Define the Whitecaps:
Load your fine liner brush with pure white paint. With a shaky, organic hand, paint thin lines along the top edges of your teal waves to create foaming whitecaps. -
Add Sea Spray:
Dip the tip of a toothpick or the handle end of a brush into white paint. Dot tiny specks of ‘spray’ near the crests of the waves and where the water meets the sand. -
Outline the Hills:
Using the liner brush and a diluted white or very light cream, add thin, elegant contour lines along the top of your distant beige hills to define their shape clearly. -
Texture the Sand:
Return to the bottom sand section. Mix a slightly darker shade of beige and stipple it sparingly over the dry base layer to add depth and shadow to the grains.
Keep it fluid
When painting waves, don’t try to make straight lines. Let your hand wobble slightly as you drag the brush. This natural tremor creates the perfect organic movement of water.
Step 3: The Sky and Finishing
-
Practice Your Birds:
Before painting on the curved glass, practice drawing simple ‘V’ and ‘M’ shapes on a piece of paper to get the motion of flying seagulls right. -
Paint Flight Lines:
With your finest liner brush and white or pale cream paint, add a flock of birds in the upper clear portion of the glass. Vary their sizes to show perspective—smaller birds look further away. -
Add Golden Accents (Optional):
If you want a sun-kissed look, I like to add incredibly thin strokes of metallic gold paint over the whitecaps and bird wings for a subtle shimmer. -
Final Cleanup:
Once all painting is done, check for any accidental smudges on the clear glass. Remove them carefully with a cotton swab dipped in rubbing alcohol. -
Cure the Glass:
Follow the instructions on your specific enamel paint bottle. Usually, this involves air-drying for 24 hours, then baking the glass in a cool oven heated to 350°F (175°C) for 30 minutes to make it dishwasher safe.
Make it a set
Paint a set of four glasses, but change the time of day for each. Use pinks and oranges for sunrise, bright blues for noon, golden hues for sunset, and dark indigos for night.
Enjoy sipping your favorite vintage while admiring your personal slice of the coastline
Minimalist Line-Art Faces
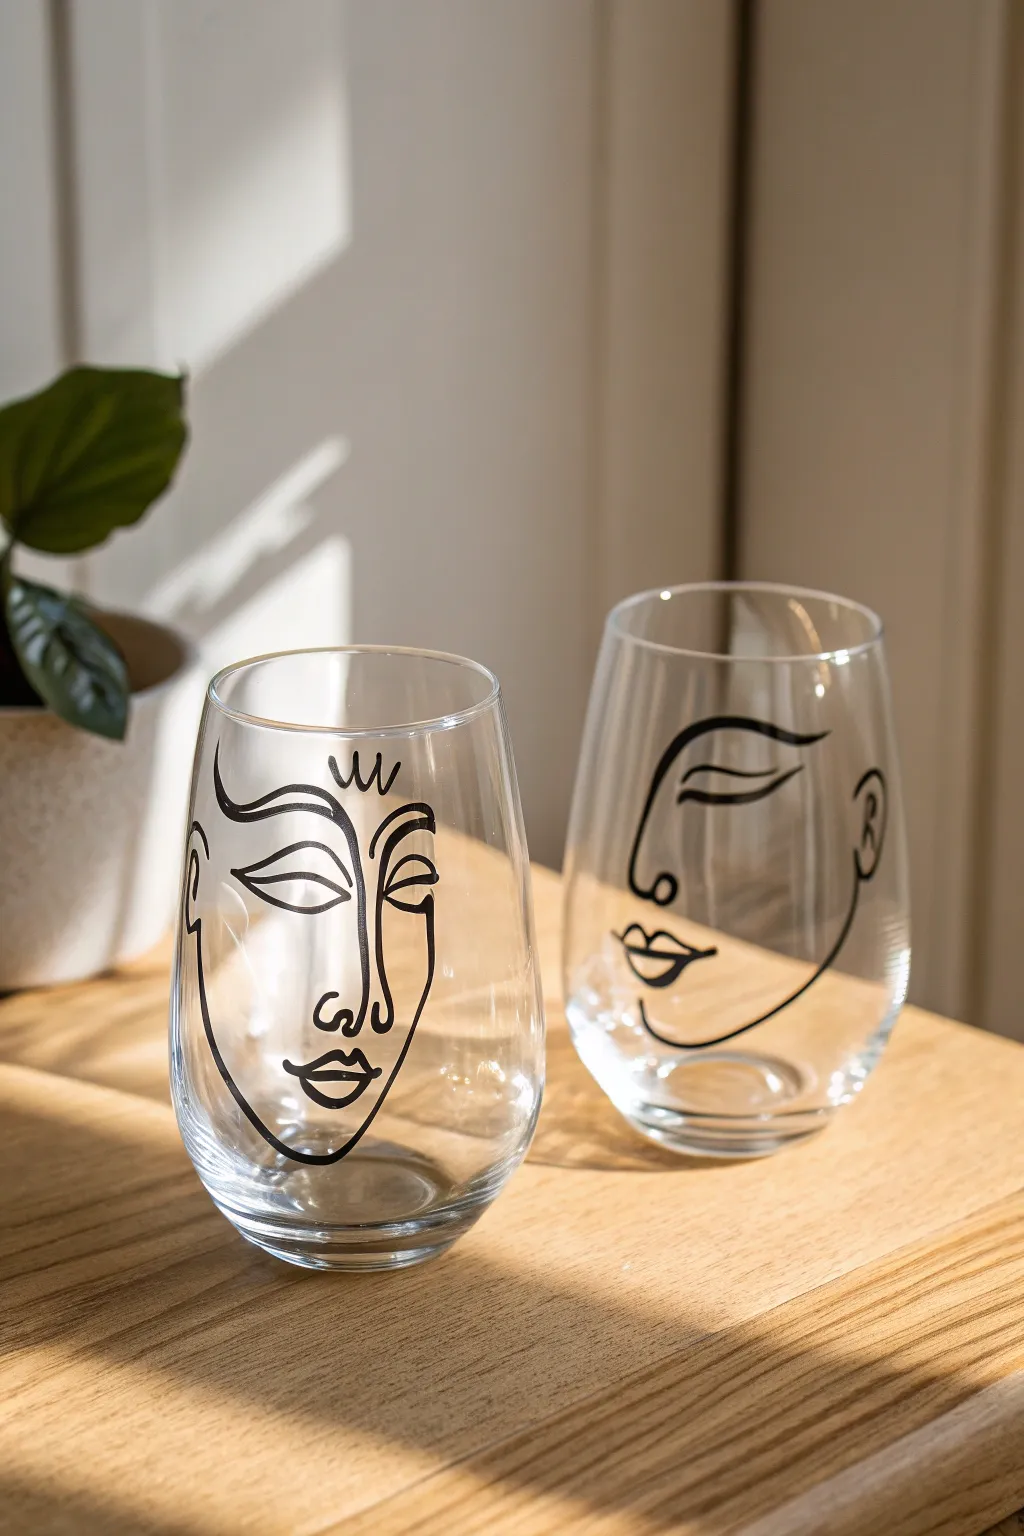
Bring a touch of modern gallery chic to your bar cart with these minimalist line-art tumblers. Using simple continuous lines, you create evocative, abstract faces that turn ordinary glassware into conversation pieces.
Step-by-Step Tutorial
Materials
- Two clear stemless wine glasses
- Rubbing alcohol
- Cotton pads or paper towel
- Black oil-based paint marker (medium tip)
- Black oil-based paint marker (fine tip)
- Paper and pencil
- Masking tape
- Cotton swabs
- Nail polish remover (for clean-up)
- Oven (for curing)
Step 1: Preparation & Planning
-
Clean surface:
Before you even think about painting, clean the exterior of your wine glasses thoroughly with rubbing alcohol and a cotton pad. This removes invisible oils that prevent paint adhesion. -
Draft your design:
Sketch your face designs on a piece of paper first. Look at the reference image: one face is a full frontal view with a central nose and two eyes, while the other is a profile view. -
Test the size:
Cut your sketched paper to fit inside the glass. Curl it up and place it inside the tumbler to check if the scale of the face feels right for the vessel. -
Secure the template:
Once satisfied with the placement, tape the paper sketch to the *inside* of the glass facing outward. This will act as your tracing guide.
Step 2: Drawing the Lines
-
Prime the marker:
Shake your medium-tip oil-based sharpie or paint pen well and depress the nib on a scrap piece of paper until the ink flows smoothly and black. -
Trace major features:
Starting with the frontal face glass, carefully trace the boldest lines first. Start with the long line that forms the nose and connects to the eyebrow. -
Add definition:
Draw the lips. Notice the style is abstract—the lips don’t need to close perfectly. A slight gap adds to the artistic flair. -
Draw the eyes:
Move to the eyes. Use a confident, steady hand to draw the almond shapes. Don’t worry if lines overlap slightly; it adds to the hasty sketch aesthetic. -
Refine line weight:
Go back over certain curves—like the arch of the eyebrow or the curve of the cheek—to thicken the line slightly. This mimics the look of a calligraphy brush. -
Start the profile glass:
Switch to your second glass. Trace the long swooping line that starts at the forehead, dips for the nose, and curves under for the chin. -
Add the ear detail:
Draw the ear on the side. Keep it simple; a ‘C’ shape with a small inner squiggle is plenty of detail for this style. -
Fine details:
If you want sharper ends to your lines, like the eyelashes or the corners of the lips, switch to your fine-tip marker for just those specific endpoints.
Continuous Line Trick
Practice drawing the face on paper without lifting your pen once. Even if you lift the marker on the glass, maintaining that ‘single fluid motion’ mindset helps the art flow better.
Step 3: Finishing Touches
-
Clean mistakes:
If your hand slips, don’t panic. Dip a cotton swab in nail polish remover and gently wipe away the wet paint. Wait for the alcohol to dry before redrawing. -
Remove template:
Carefully peel the tape off and remove the paper sketch from inside the glass. -
Inspect from outside:
Look at the glass from a distance. Fill in any patches where the black marker looks streaky or translucent with a second thin coat. -
Air dry:
Let the glasses sit undisturbed for at least 24 hours. The paint needs to off-gas and settle before it is durable enough for curing. -
Baking preparation:
Place the glasses upright on a baking sheet. Put them into a *cold* oven. Do not preheat the oven, as sudden temperature changes can shatter the glass. -
Cure the paint:
Turn the oven to 350°F (175°C). Once it reaches temperature, set a timer for 30 minutes. After the timer goes off, turn the oven off but leave the glasses inside until completely cool.
Add a Pop of Color
Once the black outline is dry, add a single abstract blob of color behind the lips or cheek using gold or pastel pink glass paint for a trendy, layered look.
Now you have a stunning set of custom glassware that looks like it came straight from a boutique design shop
Bumblebees and Honeycomb Dots
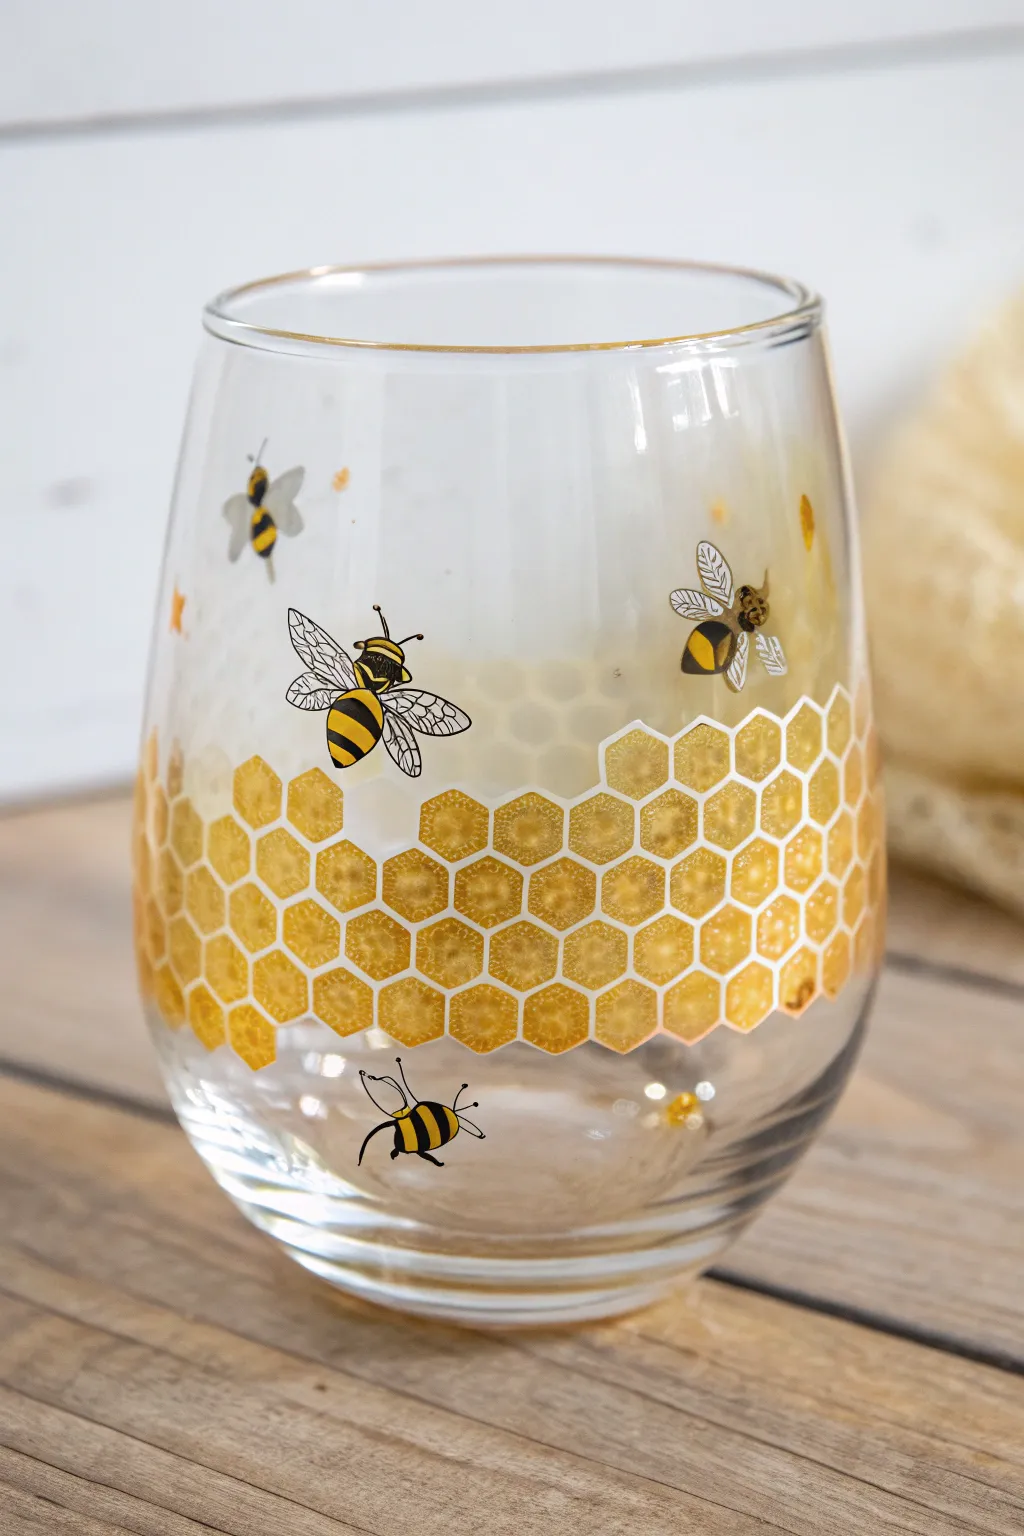
Transform a plain stemless wine glass into a buzzing hive of activity with this elegant design. Featuring a geometric honeycomb pattern in rich amber tones and whimsical bumblebees, this project mimics the look of high-end glassware with simple painting techniques.
Step-by-Step
Materials
- Stemless wine glass (washed with soap and water)
- Rubbing alcohol
- Cotton pads or paper towels
- Honeycomb stencil (adhesive vinyl or flexible stencil recommended)
- Peel-and-stick bumblebee decals or glass transfers (alternative: enamel paints for hand-painting)
- Gold or amber metallic glass paint
- Small sponge dabber or cosmetic sponge
- Detail liner brush (size 0 or 00)
- Black glass liner paint (optional, for bee details)
- White or translucent glass paint (optional, for wings)
- Oven or sealant (depending on paint manufacturer instructions)
Step 1: Preparation & Honeycomb Base
-
Clean surface:
Begin by thoroughly wiping down the exterior of your stemless wine glass with rubbing alcohol. This removes any oils or fingerprints that could prevent the paint from adhering properly. -
Position stencil:
Apply your adhesive honeycomb stencil around the lower third of the glass. The pattern doesn’t need to be perfectly straight; an organic, wrap-around look works best. Ensure all edges of the hexagons are pressed down firmly to avoid paint bleeding. -
Load sponge:
Dip your small sponge dabber into the amber or gold metallic glass paint. Offload excess paint onto a paper towel—you want the sponge to be damp with color, not soaking wet, to prevent seepage under the stencil. -
Stipple the pattern:
Gently dab or ‘stipple’ the paint over the stencil openings. Use an up-and-down motion rather than a wiping motion to keep the lines crisp. I like to vary the pressure slightly to create a textured, natural wax look. -
Remove stencil:
Carefully peel away the stencil while the paint is still slightly wet. If you wait until it dries completely, you risk peeling the paint up with the plastic. If you smear a line, quickly wipe it away with a Q-tip dipped in alcohol or water. -
Dry partially:
Let the honeycomb layer dry for about 15-20 minutes, or until it is dry to the touch, before handling the glass extensively again.
Clean Lines Pro-Tip
If you don’t have a stencil, cut hexagons from painter’s tape. Place them on the glass leaving gaps between them, paint the gaps gold, then peel the tape to reveal negative-space hexagons.
Step 2: Adding the Bees
-
Plan placement:
Visualize where you want your bees to land. Place one or two sitting directly on the honeycomb, and let a few ‘fly’ in the clear space above. Varying angles makes the scene look dynamic. -
Apply transfers:
If using glass decals or transfers like those in the reference photo, cut them out individually. Soak or stick them onto the glass according to the package instructions, smoothing out any air bubbles gently with your finger. -
Hand-painting option: Bodies:
If you prefer painting the bees yourself, use a small round brush to paint almond-shaped yellow ovals for the bodies. Let this base layer dry completely before adding stripes. -
Hand-painting option: Stripes:
Using your fine liner brush and black glass paint, carefully drag curved stripes across the yellow bodies. Add a small black head at one end of the oval. -
Hand-painting option: Wings:
Mix a tiny drop of white paint with a clear medium or water to make it translucent. Paint teardrop-shaped wings extending from the creature’s back. Outline them very faintly with black or grey for definition. -
Adding legs:
For the final touch on painted bees, use the very tip of your liner brush to add six delicate legs and two antennae. Keep these lines extremely thin.
Level Up: Pollen Power
Add tiny dots of yellow or orange glass paint around the bees’ legs to simulate pollen grains being carried back to the hive.
Step 3: Finishing Touches
-
Check details:
Look closely at your honeycomb. If you want added dimension, you can use a gold relief liner to outline a few individual hexagons, making them pop against the glass. -
Clean up:
Check the rim of the glass and underneath the base for any wayward smudges of paint. Clean these up with alcohol before curing. -
Cure the paint:
Allow the glass to air dry for at least 24 hours. To make it top-rack dishwasher safe (if your paint allows), place the glass in a cool oven, heat to 350°F (175°C), bake for 30 minutes, and let it cool down inside the oven.
Once baked and cooled, your custom glassware is ready to hold your favorite drink as you relax
Alcohol-Ink Swirl Stained-Glass Look
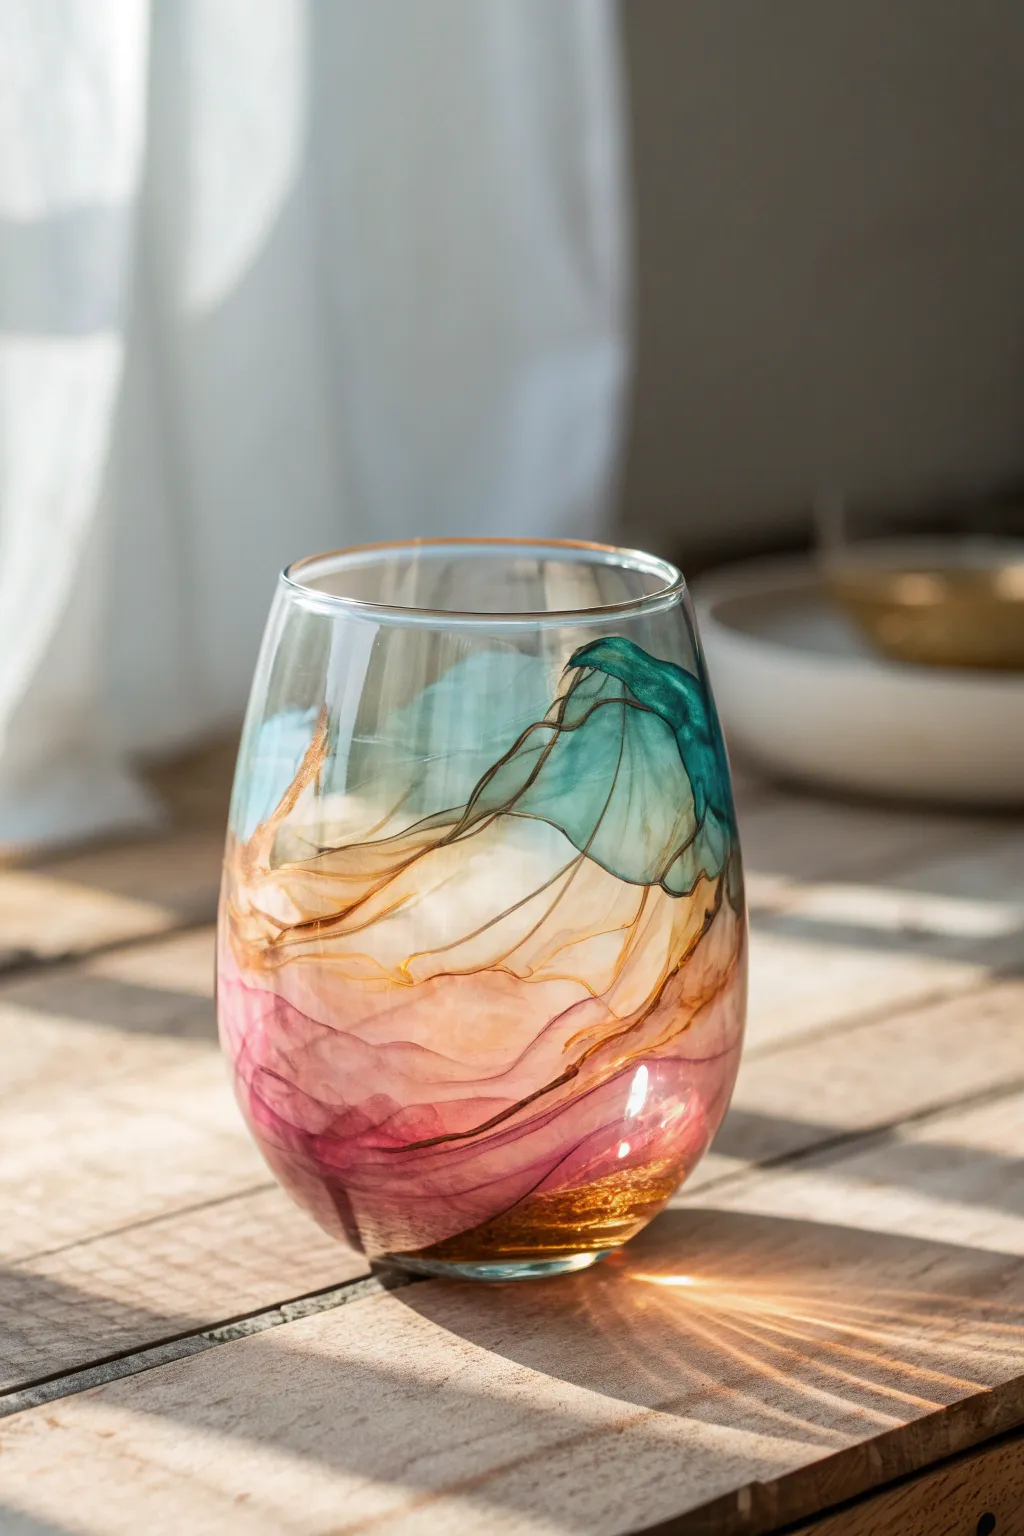
Transform a plain glass tumbler into a piece of functional art with the mesmerizing, translucent colors of alcohol ink. This project mimics the elegance of stained glass using flowing organic shapes and metallic accents to catch the light beautifully.
Step-by-Step Tutorial
Materials
- Stemless wine glass (smooth surface)
- Alcohol inks (Magenta/Plum, Amber/Gold, Teal/Turquoise)
- Metals alcohol ink or mixative (Brass or Copper)
- Rubbing alcohol (91% or higher) or blending solution
- Small fine-point paintbrush
- Straw or air blower (optional)
- Glossy spray sealant (clear acrylic) or resin (for food safety on rim)
- Painter’s tape
- Disposable gloves
- Glass cleaner and lint-free cloth
Step 1: Preparation & Foundation
-
Clean surface:
Begin by thoroughly cleaning the wine glass with glass cleaner or vinegar water to remove any oils or fingerprints. Dry it completely with a lint-free cloth. -
Tape the rim:
Apply a strip of painter’s tape around the top rim of the glass (about 1 inch down). This ensures the area your lips touch remains ink-free, which is safer for use. -
Set up workspace:
Alcohol inks are messy and stain easily. Cover your table with a plastic drop cloth or cardboard, and put on your disposable gloves before opening any bottles. -
Prepare the bottom layer:
Tilt the glass slightly on its side on a stable surface (like a crumpled towel to hold it in place) so you can work on one quadrant at a time.
Muddy Colors?
If colors mix into brown sludge, you’re layering too quickly. Let the bottom layer dry completely, then re-wet just the edge with alcohol before adding the next color.
Step 2: Layering Colors
-
Apply base pinks:
Drop a small amount of the magenta or plum ink near the bottom curve of the glass. Add a drop of blending solution or rubbing alcohol right next to it. -
Create movement:
Gently tilt the glass or use a straw to blow air softly, encouraging the pink ink to spread upwards in wispy, organic waves. I like to let this dry briefly to establish a solid color foundation before adding more. -
Introduce amber tones:
Once the pink is tacky but not fully dry, apply the amber or gold ink in the middle section, slightly overlapping the pink edge. -
Blend transitions:
Add a tiny drop of alcohol at the intersection of the pink and amber. Swirl the glass gently so they bleed together softly without becoming muddy. -
Add the teal top:
Apply the teal or turquoise ink to the upper section (below the tape line). Use the blowing technique to push the teal downwards into the amber, creating ‘fingers’ of color. -
Repeat around the glass:
Rotate the glass and repeat this three-tier color process until the entire circumference is covered. Don’t worry about gaps yet; negative space can look intentional.
Step 3: Detailing & Sealing
-
Define the veins:
Pour a small amount of metallic brass or copper mixative onto a palette or piece of foil. -
Paint metallic lines:
Dip your fine-point brush into the metallic ink. Trace the edges where colors meet or where the ink has dried in interesting ridges. -
Create stained-glass effect:
Paint fine, wandering lines through the translucent color blocks to simulate lead lines. Let these lines flow organically rather than making them straight. -
Let it cure:
Allow the glass to sit untouched for at least 24 hours. This ensures all alcohol has evaporated and the pigments have settled. -
Remove tape:
Carefully peel off the painter’s tape from the rim. -
Seal the artwork:
Take the glass outside or to a well-ventilated area. Apply 2-3 light coats of clear gloss acrylic spray, focusing on the painted area. -
Final cure:
Let the sealant cure according to the manufacturer’s instructions. Hand wash only to preserve the finish.
Gilded Edges
Instead of painted lines, use liquid gold leaf for thicker, more textured veins. It sits on top of the ink and catches the light creating a true 3D effect.
Enjoy sipping from your custom glass as the light plays beautifully through your new translucent design

Have a question or want to share your own experience? I'd love to hear from you in the comments below!