When I want clean lines and instant “wow,” I reach for painter’s tape and let it do the drawing for me. These tape painting ideas range from classic geometric favorites to playful, unexpected twists you can totally pull off at your kitchen table.
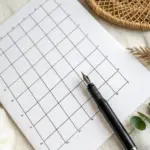
Classic Tape Resist Geometric Grid
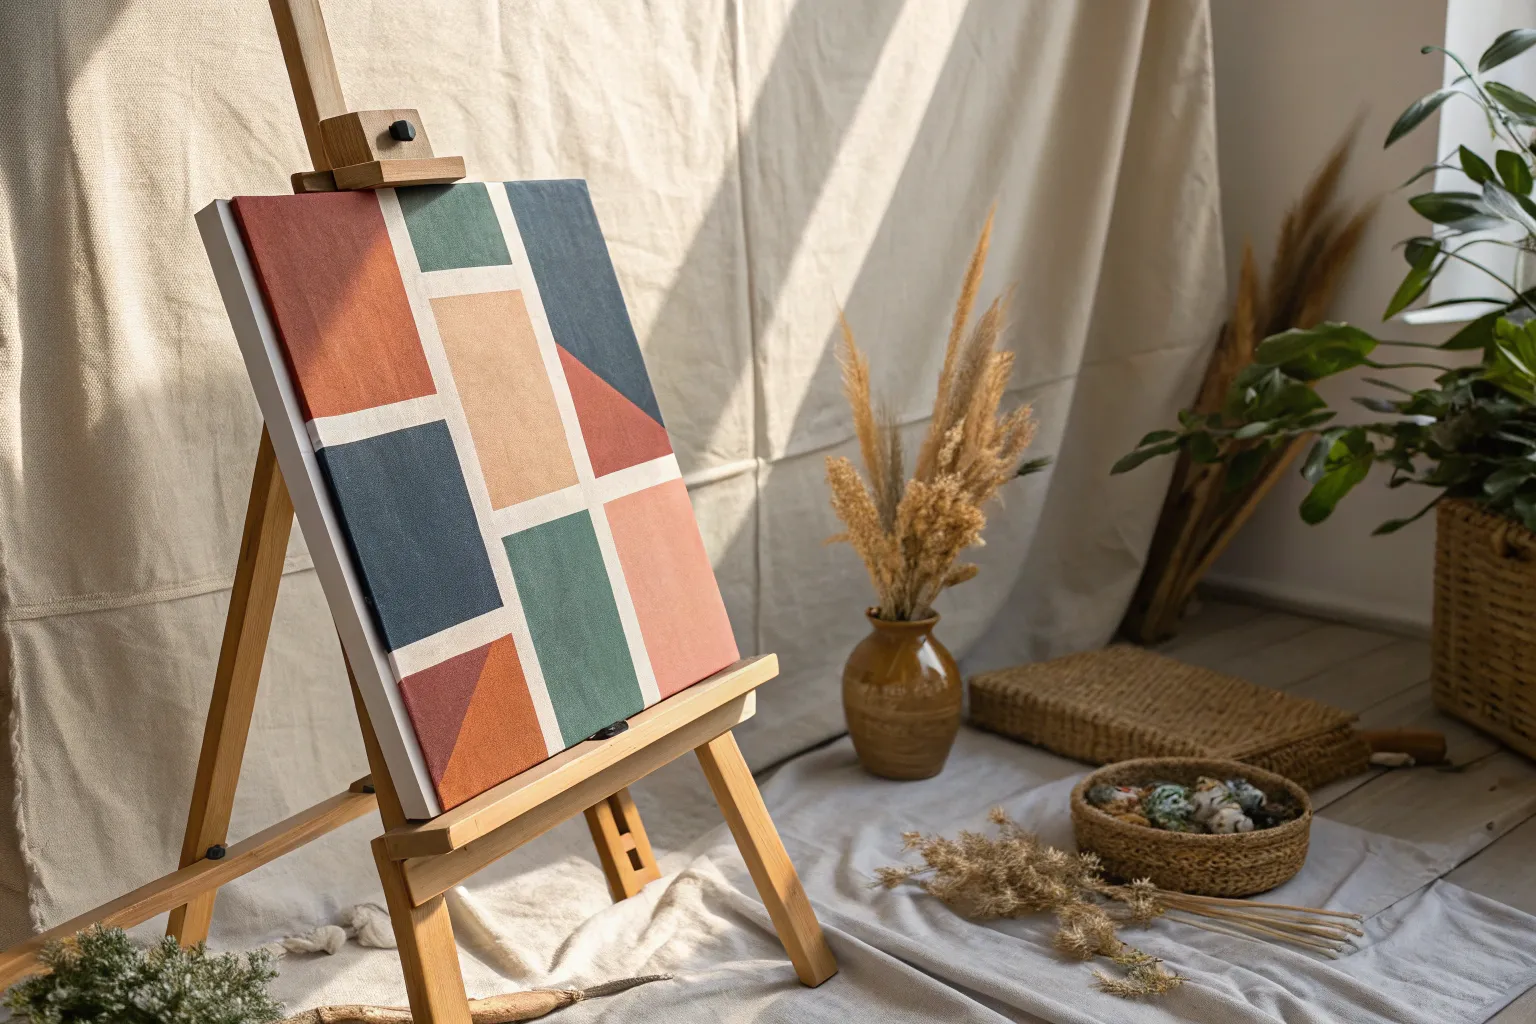
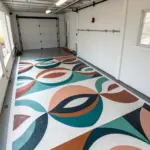
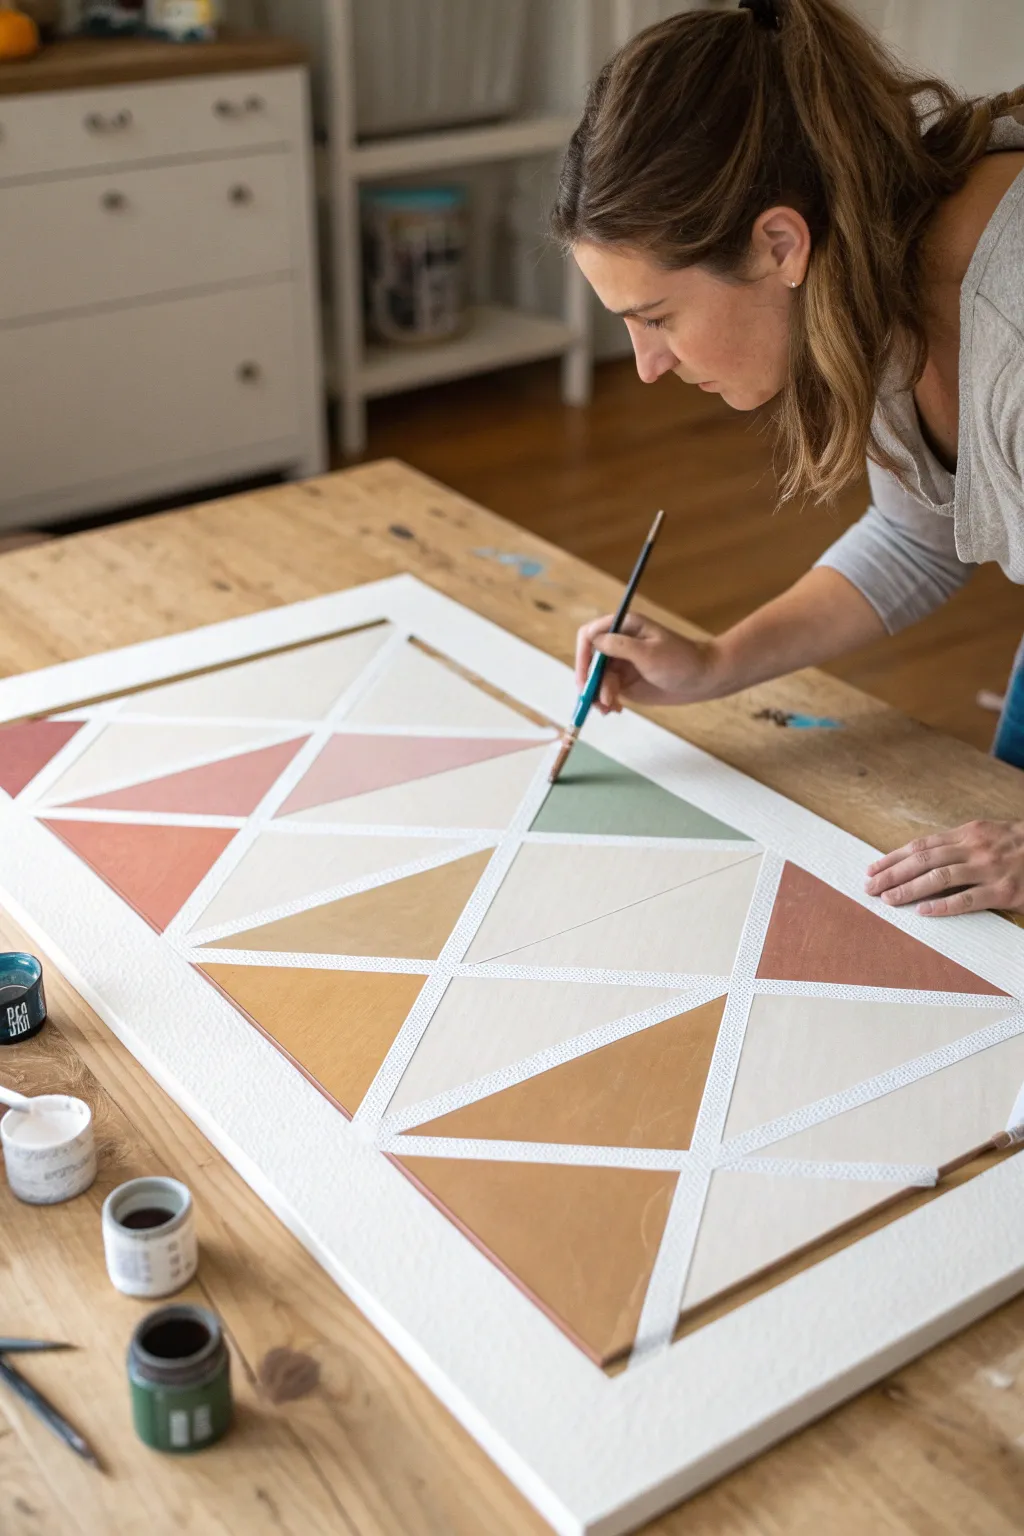
Embrace the beauty of muted tones with this sophisticated take on a classic tape resist art project. Sharp white lines cut through earthy terracotta, sage, and mustard shapes, creating a modern piece that feels organic and structured all at once.
Step-by-Step
Materials
- Square stretched canvas (e.g., 12×12 or 16×16 inches)
- Painter’s tape or wash tape (approx. 1/4 inch width)
- Acrylic paints (terracotta, sage green, mustard yellow, beige, burnt sienna, peach)
- Flat paintbrushes (medium and small)
- White acrylic paint (optional, for touch-ups)
- Palette or paper plate
- Newsprint or drop cloth
Step 1: Design & Prepping
-
Prepare the surface:
Lay down your newsprint or drop cloth to protect your workspace. Ensure your canvas is clean and free of dust. If your canvas isn’t pre-primed white, give it a coat of white gesso or acrylic paint first so the lines will be crisp and bright later. -
Create the grid structure:
Start by applying strips of tape across the canvas. You don’t need to measure perfectly; aim for random, intersecting straight lines that travel from edge to edge. -
Form the triangles:
Add diagonal lines of tape to crisscross the first set. The goal is to break the canvas down into various triangular shapes. Try to vary the sizes—some large, some small—to keep the composition dynamic. -
Seal the tape edges:
Once your design is laid out, run your finger or a bone folder firmly over every piece of tape. This is crucial for preventing paint from bleeding underneath. I like to do a double-check on all the intersections where tapes overlap. -
Optional sealing coat:
For razor-sharp lines, paint a very thin layer of white paint (or clear matte medium) over the tape edges. This seals any tiny gaps so that if bleed occurs, it’s clear or white, not the colored paint.
Bleed-Proof Lines
Paint a layer of white over the tape before adding color. This seals the tape edges so any seepage is invisible, leaving your colored borders perfect.
Step 2: Applying Color
-
Plan your palette:
Squeeze your earth-toned colors onto your palette. You’ll want a balance of warm tones (terracotta, mustard, peach) and cool or neutral tones (sage, beige). -
Paint the first section:
Dip your flat brush into your first color, perhaps the terracotta. Select 3-4 non-adjacent triangles scattered across the canvas and fill them in. -
Rotate through colors:
Clean your brush thoroughly and switch to the next shade, like mustard yellow. Paint another set of scattered triangles. Working systematically like this ensures a balanced distribution of color. -
Add lighter tones:
Use your lighter shades like beige and peach next. These act as ‘breathing room’ within the design, preventing the darker colors from feeling too heavy. -
Fill the gaps:
Finish up with your accent colors, such as the sage green and burnt sienna, filling in the remaining white canvas triangles. -
Apply a second coat:
Acrylics can sometimes look streaky on the first pass. Once the first layer is dry to the touch, apply a second coat to make the colors opaque and rich. -
Check for coverage:
Look closely at the edges near the tape. Ensure you’ve painted fully up to and slightly over the tape line to avoid any unpainted gaps when the tape is removed.
Step 3: The Reveal
-
Let it dry… mostly:
Allow the paint to set until it is tacky but not fully hardened. If the paint is bone dry, it can form a skin that peels up with the tape. -
Peel the tape:
Choose a tape end at the edge of the canvas. Pull the tape slowly at a sharp 45-degree angle away from the paint area. Resist the urge to rip it off quickly. -
Continue removing tape:
Work your way through the layers of tape. You’ll see your crisp white grid emerging. Be careful not to let the sticky, paint-covered tape touch the clean parts of the canvas. -
Touch up:
If a little paint bled through, don’t worry. Use a tiny detail brush and some white paint to tidy up the lines.
Level Up: Texture
Mix a little baking soda or modeling paste into 1-2 of your paint colors. This adds a raised, gritty texture to specific triangles for a subtle 3D effect.
Once dry, hang your geometric masterpiece to bring a touch of structured calm to your wall

Simple Diagonal Stripes in Two Colors
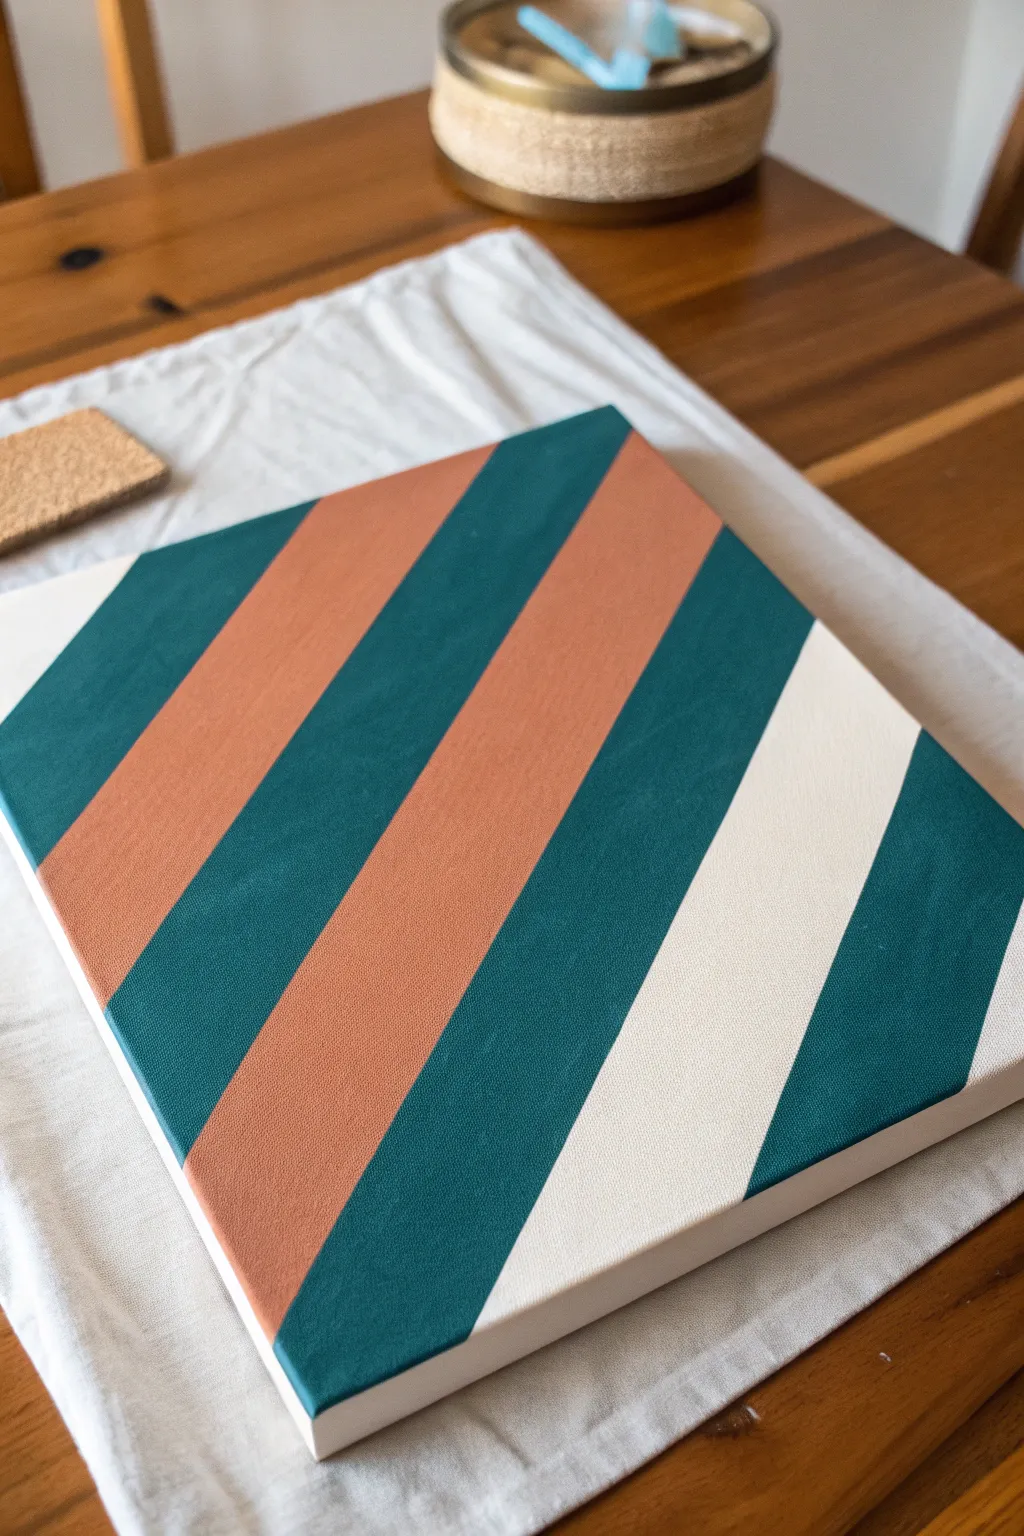
This project creates a striking modern focal point using bold diagonal stripes in a sophisticated palette of deep teal, terracotta, and crisp white. The clean lines and alternating widths give the piece a dynamic rhythm that looks far more complex than the simple taping technique actually requires.
Step-by-Step Guide
Materials
- Rectangular stretched canvas (e.g., 11×14 or similar)
- Painter’s tape (around 1-inch width works best)
- Acrylic paints: Deep Teal/Emerald Green, Terracotta/Burnt Orange, and Titanium White
- Flat paint brushes (medium and large sizes)
- Palette or paper plate
- Ruler or straight edge
- Pencil
- Credit card or burnishing tool
- Surface protection (newspaper or drop cloth)
Step 1: Preparation and Base
-
Prepare your workspace:
Lay down your protective covering on a flat, sturdy table. Ensure your canvas is clean and free of dust or lint. -
Apply the base coat:
Although parts of the design are white, it is best to paint the entire canvas with two coats of Titanium White acrylic paint. This ensures an even texture and brightness across the whole piece. -
Let it cure:
Allow the base coat to dry completely. This is crucial—if the base is even slightly tacky, the tape will pull it up later. I usually give this at least an hour or two.
Step 2: Taping the Design
-
Visualize the pattern:
Study the reference image. Notice the diagonal rhythm: a wide teal stripe, a terracotta stripe, a teal stripe, a terracotta stripe, a teal stripe, and finally a white stripe. -
Mark your angles:
Lightly use a ruler and pencil to mark the starting points for your diagonal lines on the edges of the canvas if you want perfect precision, or eyeball it for a more organic feel. -
Apply the first tape strips:
Stretch your painter’s tape diagonally across the canvas. Remember, the tape masks the areas that will remain *white* or define the boundaries between colors. -
Define the color zones:
Place strips of tape to create the barriers between your intended colored stripes. To replicate the image exactly, you are taping off the ‘white’ stripe areas and the boundaries between the teal and terracotta learning sections. -
Wrap the edges:
Don’t stop at the front face of the canvas; wrap the tape firmly around the sides and back. This ensures the design bleeds beautifully over the edges for a finished, gallery-wrapped look. -
Seal the deal:
Run a credit card or a burnishing tool firmly along every edge of the tape. This is the secret to crisp lines and prevents paint from seeping underneath. -
The white seal trick:
For razor-sharp lines, paint a very thin layer of your base white color over the tape edges first. This fills any microscopic gaps with white paint rather than color.
Tape Removal Timing
Don’t wait until the paint is bone dry to peel the tape! Removing it while the acrylic is slightly damp prevents the dried paint ‘skin’ from lifting up with the tape.
Step 3: Painting and Finishing
-
Mix your terracotta:
Pour out your terracotta paint. If you need to mix it, try combining orange with a touch of brown and a tiny dot of white to soften it. -
Paint the terracotta stripes:
Identify the two specific stripes that should be terracotta (based on the image, there are two distinct bands). Apply an even coat using a flat brush. -
Mix your teal:
Prepare the deep teal color. A mix of phthalo green and blue with a touch of black or grey can achieve this rich, moody hue. -
Paint the teal stripes:
Fill in the alternating sections with the teal paint. Be careful not to accidentally paint into the reserved white zones. -
Apply second coats:
Acrylics often dry darker or slightly transparent. Apply a second coat to all colored sections to ensure opaque, solid coverage. -
Remove the tape:
Here comes the satisfying part. While the paint is still slightly tacky (not fully cured, but not wet), slowly peel the tape back at a steep 45-degree angle. Pulling while slightly damp prevents the paint skin from cracking. -
Touch ups:
Inspect your lines. If any paint bled through, use a tiny detailed brush and some white paint to gently correct the edge. -
Final drying:
Let the entire piece dry completely overnight before hanging or framing.
Bleeding Lines?
If color seeped under the tape, wait for it to dry fully. Then, place a piece of tape over the colored part and touch up the white line precisely with a small brush.
You now have a chic geometric artwork ready to hang


Chevron Pattern Made From Short Tape Pieces
Create a striking, modern wall piece using a surprisingly simple technique that mimics the look of layered tape. Soft, muted earth tones and sage greens come together in a rhythmic chevron pattern, separated by delicate dotted lines for a stitched effect.
Step-by-Step Tutorial
Materials
- Large sheet of thick watercolor paper or mixed media paper (A2 or similar)
- Washi tape or low-tack painter’s tape (for guidelines)
- Pencil and long ruler
- Watercolor or gouache paints (sage green, terracotta, mustard, pale beige, brown)
- Flat shader brush (approx. 1 inch width)
- Fine liner pen (black or dark grey)
- Eraser
Step 1: Setting the Grid
-
Measure your columns:
Lay your large paper on a flat surface. Using your ruler and pencil, lightly mark out vertical columns across the entire width of the paper. These columns will determine the width of each chevron ‘V’ shape. -
Draw vertical guides:
Draw faint vertical lines down the full length of the paper at each mark you measured. These will serve as the center points and edges for your chevron zig-zags. -
Mark horizontal intervals:
Along one of your vertical lines, make small tick marks every 1.5 to 2 inches. Repeat this on all vertical lines, ensuring the marks align horizontally across the page so your chevrons will be level.
Brush Control
For crisp edges without tape, load your flat brush fully but wipe the excess. Press firmly at the start of the stroke and lift gently at the end.
Step 2: Painting the Pattern
-
Prepare your palette:
Mix your watercolor or gouache paints. Aim for a muted, earthy palette: sage green, rusty terracotta, mustard yellow, and a soft beige. Dilute them slightly so they have a watercolor transparency but still hold vibrant color. -
Start the first stripe:
Using your 1-inch flat brush, load it with your first color inter. Place the brush at a 45-degree angle starting from a vertical guideline and pull it downwards towards the next vertical line to create the left side of a ‘V’. -
Complete the ‘V’:
Reload the brush with the same color. From the center point where you just ended, paint an upward stroke (or downward stroke mirroring the first) to the next vertical line to complete the chevron shape. -
Vary the colors:
Switch to a different color for the next chevron directly below the first one. Leave a small, consistent gap of white space between this new stroke and the one above it. -
Build the column:
Continue painting chevrons down the entire column, rotating through your color palette randomly or in a repeating sequence. I usually keep the white gaps consistent, about 1/4 inch wide. -
Create texture:
Don’t worry if the paint coverage isn’t perfectly solid. The slight variations and brush textures add to the organic, tape-like aesthetic of the piece. -
Repeat across the page:
Move to the next column and repeat the process. Ensure the points of these ‘V’s align horizontally with the points in the previous column. -
Checking alignment:
Step back occasionally to ensure your overall pattern isn’t drifting. The pencil guidelines are crucial here for keeping the zig-zag rhythm strict. -
Let it dry completely:
Allow the entire painting to dry thoroughly. Unlike acrylics, watercolor needs to be bone dry before you add ink, or it will bleed.
Metallic Accent
Swap one of your earth tones for a gold or copper metallic watercolor paint. It catches the light beautifully and adds a luxe touch.
Step 3: The Final Details
-
Stitching lines:
Take your fine liner pen. In the vertical white spaces between the columns of chevrons, draw a straight, vertical line of small dots or dashes. -
Stitching the gaps:
Similarly, add a dotted line in the diagonal white gaps between each colored chevron strip. This enhances the ‘sewn’ or patchwork look. -
Erase guidelines:
Once the ink is totally dry, gently erase any visible pencil marks from your initial grid. Be gentle to avoid rubbing away the pigment.
Hang your new geometric masterpiece in a simple wooden frame to complement those earthy tones


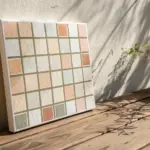
Checkerboard Blocks With Crisp Negative Space

Create a striking geometric statement piece with this modern take on a classic checkerboard pattern. By using a warm palette of terracotta, ochre, and navy alongside crisp white squares, you get a clean, architectural look that feels both retro and contemporary.
Detailed Instructions
Materials
- Square stretched canvas or canvas board
- Painter’s tape or masking tape (1-inch width works best)
- Acrylic paints: Navy Blue, Terracotta (Burnt Sienna), Ochre (Mustard Yellow), and Titanium White
- Flat shader brushes (medium and small sizes)
- Ruler or straight edge
- Pencil
- Palette or paper plate
- Cup of water and paper towels
Step 1: Preparing the Grid
-
Prime the canvas:
Begin by painting your entire canvas with a solid coat of Titanium White acrylic paint. This ensures your ‘negative space’ squares are uniform and bright. Don’t forget to paint the sides of the canvas as well. -
Let it cure:
Allow the white base coat to dry completely. It must be bone dry before you apply any tape, or you risk peeling the paint off later. -
Measure your grid:
Using a ruler and a light pencil touch, mark out a grid of equal squares across the canvas. For a standard look, 2-inch or 3-inch squares work well depending on your canvas size. -
Tape the horizontal lines:
Apply strips of painter’s tape along your horizontal pencil lines. Press the edges down firmly with your thumbnail or a credit card to create a tight seal. -
Tape the vertical lines:
Apply tape along the vertical lines. You now have a grid covered in tape. However, to paint individual squares without gaps, we need to work in stages or use a specific taping method. -
Isolate the first set:
A common checkerboard trick is to tape off every *other* row or column to start, but for this specific multi-color block style, I prefer to tape off the boundaries of specific color blocks first. Place tape to mask off the squares that will remain white.
Step 2: Painting the Colors
-
Seal the edges:
Before adding color, brush a very thin layer of white paint over the edges of the tape. This seals the gap; any bleed-under will be white and invisible, resulting in razor-sharp lines for your colors. -
Mix your palette:
Squeeze out your Navy, Terracotta, and Ochre paints. Ensure they are a thick, creamy consistency to reduce the number of coats needed. -
Apply the Navy Blue:
Select the squares designated for Navy Blue. Use a flat shader brush to fill them in, painting from the tape inward to avoid pushing paint under the edge. Extend the paint down the sides of the canvas if the square touches the edge. -
Apply the Terracotta:
Rinse your brush thoroughly and move to the Terracotta squares. Apply the paint smoothly, aiming for even coverage without heavy brush texturing. -
Apply the Ochre:
Finally, fill in the Ochre/Mustard squares. This lighter color might need a second coat to be fully opaque. -
Wait for tacky dryness:
Let the paint dry until it is tacky but not fully hardened. Removing tape while the paint is slightly flexible helps prevent chipping. -
The reveal:
Gently peel back the tape at a 45-degree angle. Pull slowly to reveal your crisp lines.
Bleeding Lines?
If paint seeps under the tape, wait for it to dry completely. Then, use a small, stiff brush with a tiny bit of white paint to ‘erase’ the mistake and straighten the line.
Step 3: Refining and Finishing
-
Touch up gaps:
Since tape grids can be tricky, you might have remaining colored squares to fill that were covered by tape intersections. Hand-paint these carefully using your pencil lines as guides, or re-tape the dried painted areas to fill the missing gaps. -
Clean up edges:
If any paint bled through, use a small angled brush with white paint to tidy up the lines. You can can also scrape away tiny bleed marks gently with a craft knife once dry. -
Seal the work:
Once the entire piece is fully dry (give it overnight to be safe), you can apply a clear matte or satin varnish to protect the surface and unify the sheen of the different colors.
Add Texture
Mix a little modeling paste or baking soda into your acrylics before painting the colored squares. This adds a raised, tactile dimension to the artwork.
Enjoy the clean geometry of your new wall art once you hang it up
BRUSH GUIDE
The Right Brush for Every Stroke
From clean lines to bold texture — master brush choice, stroke control, and essential techniques.
Explore the Full Guide
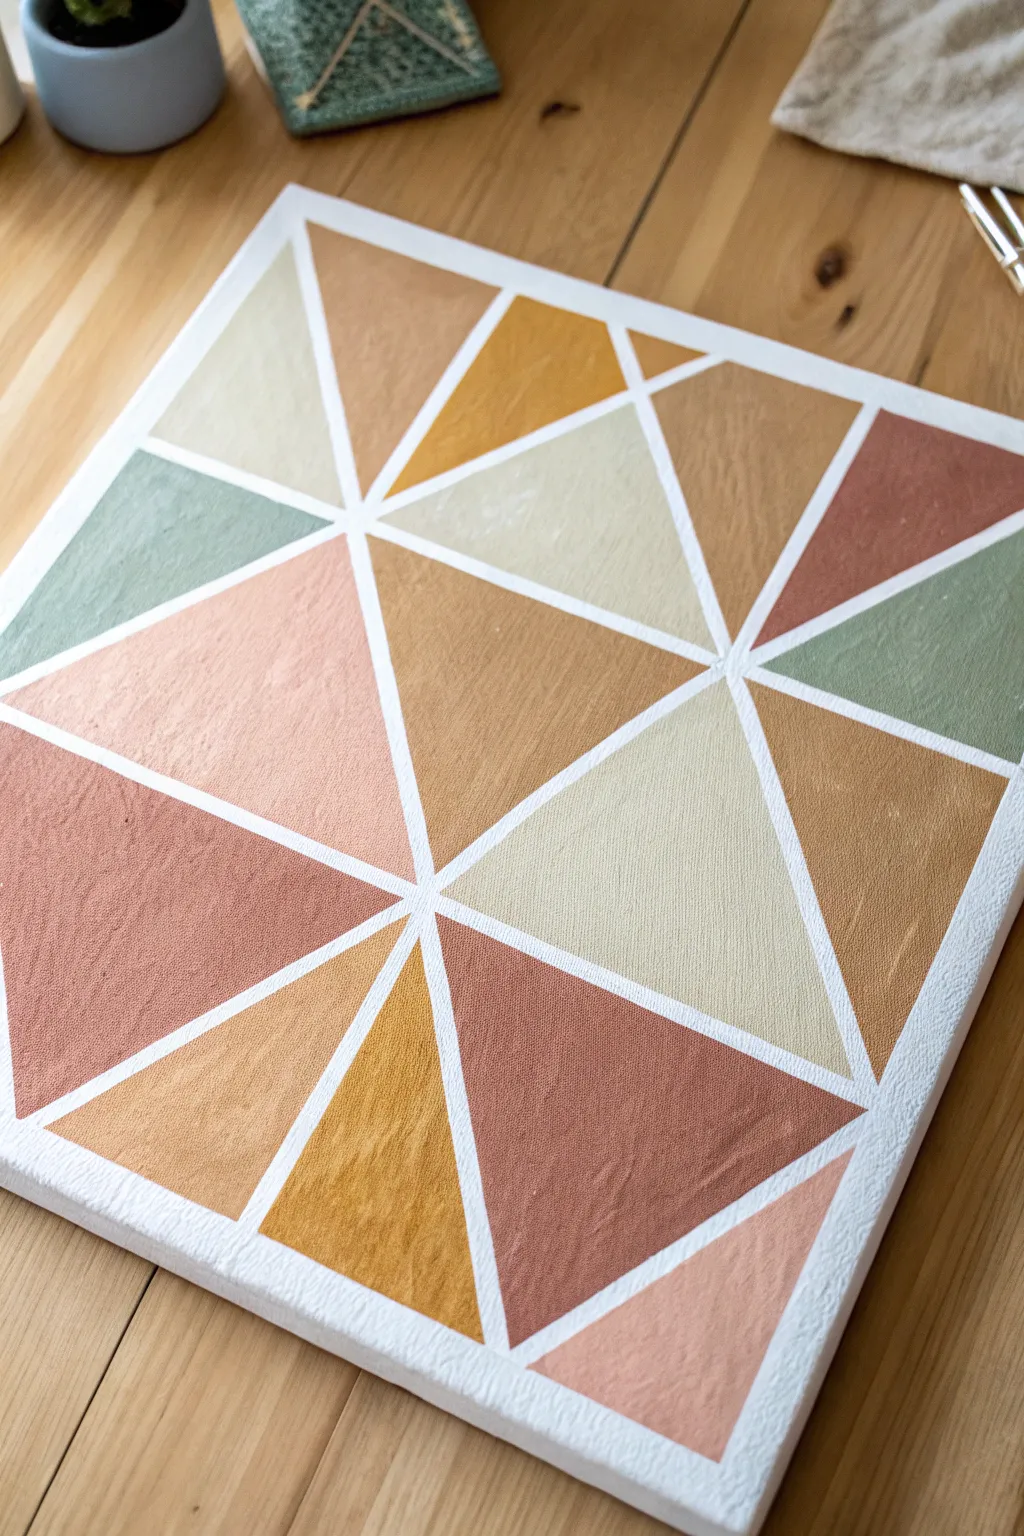
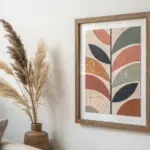
Triangle Color-Block Tape Painting
Bring earthy warmth to your walls with this large-scale geometric tape painting. Featuring a soothing palette of terracotta, mustard, and sage, this project uses simple masking tape to create crisp, professional-looking negative space lines between bold blocks of color.
Step-by-Step Tutorial
Materials
- Large rectangular canvas or wood panel (approx. 24×36 inches)
- Painter’s tape (1/4 inch or 1/2 inch width)
- Acrylic paints (terracotta, mustard yellow, sage green, blush pink, cream/white)
- Flat shader brushes (medium and large sizes)
- Palette or disposable plates for mixing
- Ruler or straight edge
- Pencil
- Jar of water
- Paper towels
Step 1: Preparation & Taping
-
Prepare the surface:
Start with a clean, white canvas. If your canvas isn’t pre-primed or you want a brighter base, apply a coat of white gesso or heavy body white acrylic paint and let it dry completely. -
Visualize the grid:
Before taping, lightly sketch a rough plan. This specific design relies on a series of intersecting diagonal lines that create triangles of various sizes. You don’t need perfect symmetry, but balance is key. -
Tape the border:
Apply a strip of painter’s tape around the entire perimeter of the canvas to create a crisp white frame when finished. -
Create primary diagonals:
Lay down two or three long strips of tape diagonally across the entire length of the canvas. These will serve as the main ‘spines’ of your design. -
Add intersecting lines:
Place shorter strips of tape connecting the main diagonals to the edges or crossing them to fracture the large shapes into smaller triangles. -
Press and seal:
Firmly run your finger or a credit card edge along every strip of tape. This is crucial to prevent paint from bleeding underneath the tape edges. -
Seal the tape (Optional):
For razor-sharp lines, I sometimes lightly brush a thin layer of white paint (the base color) over the tape edges. This seals any tiny gaps so the colored paint sits perfectly on top later.
Step 2: Painting the Color Blocks
-
Plan your palette:
Squeeze out your acrylics: terracotta, mustard, sage green, a soft blush, and a creamy off-white. You want a mix of deep, saturated tones and lighter neutrals. -
Start with the darkest tones:
Begin painting the triangles you want to be terracotta or rusty red. Choose scatter spots across the canvas so the color isn’t clumped in one area. -
Apply the painting technique:
Use a flat shader brush. Paint *away* from the tape edge toward the center of the shape rather than pushing paint under the tape. -
Add the mustard yellow:
Fill in several prominent triangles with the mustard yellow shade. This adds a nice sunny warmth that contrasts well with the white lines. -
Incorporate sage green:
Paint one or two shapes in the sage green. In the image, this is used sparingly as an accent color to break up the warm tones. -
Fill with neutrals:
Paint the remaining shapes with your blush pink and cream colors. Using closely related light shades adds depth without overwhelming the design. -
Check for opacity:
Let the first coat dry for about 20 minutes. If the canvas texture shows through too much, apply a second coat to ensure solid, opaque blocks of color.
Bleeding Lines?
If you peel the tape and see fuzzy edges, use a small flat brush with titanium white paint (or your base color) to ‘cut in’ and tidy up the lines.
Step 3: The Reveal
-
Wait for the right moment:
Allow the paint to be dry to the touch but not fully cured (usually about 1 hour). Peeling tape off fully hardened paint can sometimes chip the edges. -
Peel the tape:
Slowly peel the tape away at a 45-degree angle. Pull gently and steadily to reveal the crisp white geometric lines underneath. -
Touch ups:
If any paint bled through, don’t worry. Use a tiny detail brush and white paint to tidy up the lines once everything is completely dry.
Add Texture
Mix a small amount of baking soda into your acrylic paints before applying. This creates a matte, plaster-like texture that makes the art feel high-end.
Hang your new geometric masterpiece in a spot that needs a modern splash of color and enjoy the crisp lines you created
Mountain Peaks Masked With Tape Edges

Capture the serene beauty of a mountain range with this geometric watercolor project. By layering cool blues and teal greens against a soft peach sky, you’ll create a modern, minimalist landscape with crisp, satisfying edges.
Step-by-Step
Materials
- High-quality watercolor paper (hot press for smoothness, or cold press for texture)
- Painter’s tape or artist’s masking tape
- Watercolor paints (Indigo, Phthalo Blue, Emerald Green, Burnt Sienna, Yellow Ochre)
- Flat shader brush (medium size)
- Round detail brush
- Pencil and ruler
- Two jars of water
- Paper towels
- Palette
Step 1: Preparation and Sketching
-
Secure the paper:
Begin by taping down all four edges of your watercolor paper to a drawing board or flat work surface. This creates a clean white border and prevents the paper from buckling when wet. -
Establish the horizon:
Lightly sketch a horizontal line about two-thirds of the way down the page to separate the sky from the mountain range. -
Design the peaks:
Use your ruler to draw a series of intersecting triangles to represent the mountains. Vary the heights and widths, ensuring some triangles overlap others to create depth. Keep the pencil lines very faint so they don’t show through lighter paint layers.
Bleeding Edges?
If paint seeps under the tape, wait until it’s 100% dry. Then, gently scrape the excess paint away with a craft knife or cover it with opaque white gouache.
Step 2: Applying the Masking
-
Mask the first layer:
Identify the non-touching triangles you want to paint first. Apply painter’s tape along the outside edges of these specific shapes. Press the tape edges down firmly with your fingernail or a bone folder to prevent paint bleed. -
Check the intersections:
Be particularly careful where tape strips cross; ensure there are no tiny gaps where liquid could seep underneath.
Step 3: Painting phases
-
Mix the sky wash:
Combine a touch of Yellow Ochre with a tiny amount of Burnt Sienna and plenty of water to create a very pale, warm peach tone. -
Paint the sky:
Apply the peach wash to the top of the paper, using a large brush. Start at the top edge and work your way down to the mountain line. You can dilute the wash as you go down for a gradient effect. -
Let the sky dry:
Allow the sky area to dry completely before moving near the mountain peaks. It should feel room temperature to the touch, not cool. -
Mix your mountain palette:
Prepare three or four distinct shades of blue-green. Start with a pale, icy blue for the distant peaks, a medium teal for the middle ground, and a deep, saturated teal-green for the foreground. -
Paint the first set of peaks:
Fill in the masked-off triangles with your chosen colors. I like to use the lightest blue for the peaks that appear furthest back in the composition. -
Apply an even wash:
Work quickly to fill each shape, keeping a ‘wet edge’ to avoid streaks. Use flat, consistent strokes. -
Wait and peel:
Once the paint is thoroughly dry, carefully peel away the tape. Pull it slowly at a 45-degree angle away from the painted area to avoid tearing the paper. -
Mask the second layer:
Now, apply fresh tape around the next set of triangles (the ones that are adjacent to the painted ones). The tape will go over the dry paint you just finished, which is why complete drying is crucial. -
Paint the middle ground:
Fill these new shapes with your medium teal shades. The contrast between the light and medium tones will start to build the 3D effect of the range. -
Repeat for the foreground:
Repeat the masking, painting, drying, and peeling process for the final foreground peaks, using the darkest, most saturated green-blue mix. -
Final touch-ups:
Inspect the edges. If there are any tiny white gaps between mountains where the tape was too thick, use a fine round brush and the appropriate color to carefully bridge the gap.
Add Texture
Before the paint dries on the darkest peaks, sprinkle a tiny pinch of salt into the wet wash. Brush it off when dry for a rustic, granite-like texture.
Peel off the final border tape to reveal your crisp, modern landscape masterpiece

PENCIL GUIDE
Understanding Pencil Grades from H to B
From first sketch to finished drawing — learn pencil grades, line control, and shading techniques.
Explore the Full Guide
Radial Burst From a Center Tape Star
Create a mesmerizing radial design that bursts with soft color and geometric charm. This watercolor project combines precision masking techniques with loose, translucent washes to form a nostalgic circus-style pattern radiating from a golden center.
Detailed Instructions
Materials
- Heavyweight watercolor paper (300gsm cold press recommended)
- Painter’s tape or dedicated masking tape
- Watercolor paints (Payne’s grey, muted teal, dusty rose, peach)
- Metallic gold watercolor or gouache
- Pencil and rule
- Hobby knife or precision detail knife
- Medium round brush (size 6 or 8)
- Fine detail brush (size 0 or 1)
- Jar of clean water
- Paper towels
Step 1: Planning and Taping
-
Mark the center:
Begin by finding the exact center of your watercolor paper using a ruler. Make a very light pencil dot to serve as your anchor point. -
Define the boundary:
Lightly draw a large square around your center point to define the outer limits of your painting area. This ensures your burst doesn’t just trail off unevenly. -
Create the star mask:
To get that crisp white space in the center, you need a star-shaped mask. Stick a strip of wide painter’s tape onto a cutting mat or clean surface. -
Cut the star:
Draw a 5-point star on the tape and carefully cut it out with your hobby knife. Peel it up and place it directly over your center dot on the paper. -
Tape the rays:
This step requires patience. Apply strips of tape radiating outward from the points of your center star to the edge of your square border. -
Mask the gaps:
Apply additional strips radiating from the inner ‘V’ angles of the star. You are essentially blocking off the white spaces between the colored rays. Press all edges down firmly with a bone folder or fingernail.
Step 2: Painting the Rays
-
Mix your palette:
Prepare watery puddles of your chosen colors. I recommend a muted palette: teal, soft indigo, dusty pink, and burnt orange keep it vintage-feeling. -
First color application:
Load your medium round brush with the teal mixture. Paint every fourth ray, starting near the center and sweeping outward. -
Alternating colors:
Switch to your dusty pink. Paint the next set of available rays, being careful not to let the paint pool too heavily against the tape edges. -
Complete the cycle:
Continue filling in the remaining exposed wedges with your indigo and orange tones until every unmasked section is filled with color. -
Let it dry completely:
This is crucial. Walk away until the paper is bone dry. If it feels cool to the touch, it’s still damp.
Seal the Edges
Before painting color, brush a tiny amount of clear water or white paint over the tape edges. This seals the seal and prevents color bleed.
Step 3: The Big Reveal and Details
-
Remove the tape:
Very slowly peel back your tape strips at a 45-degree angle. This gentle motion prevents the paper from tearing. Remove the center star mask last. -
Paint the central star:
Using your fine detail brush and the metallic gold paint, carefully fill in the white star shape left in the center. Paint right up to the crisp edges created by the tape. -
Add floating stars:
Dip your fine brush into the gold again. Paint a tiny, delicate star in the outer third of each colored ray. -
Refine the edges:
If your square border looks a bit ragged where the paint stopped, you can use a very sharp colored pencil to lightly define the outer perimeter for a cleaner finish. -
Final drying:
Allow the metallic accents to dry completely before framing or displaying your work.
Cosmic Spatter
For a magical galaxy touch, cover the central star and flick white gouache or gold paint over the rays using an old toothbrush.
Now you have a striking geometric piece that looks complex but relies on simple masking magic
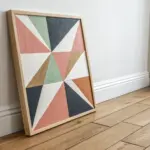
Torn Tape Edges for Organic Meets Geometric
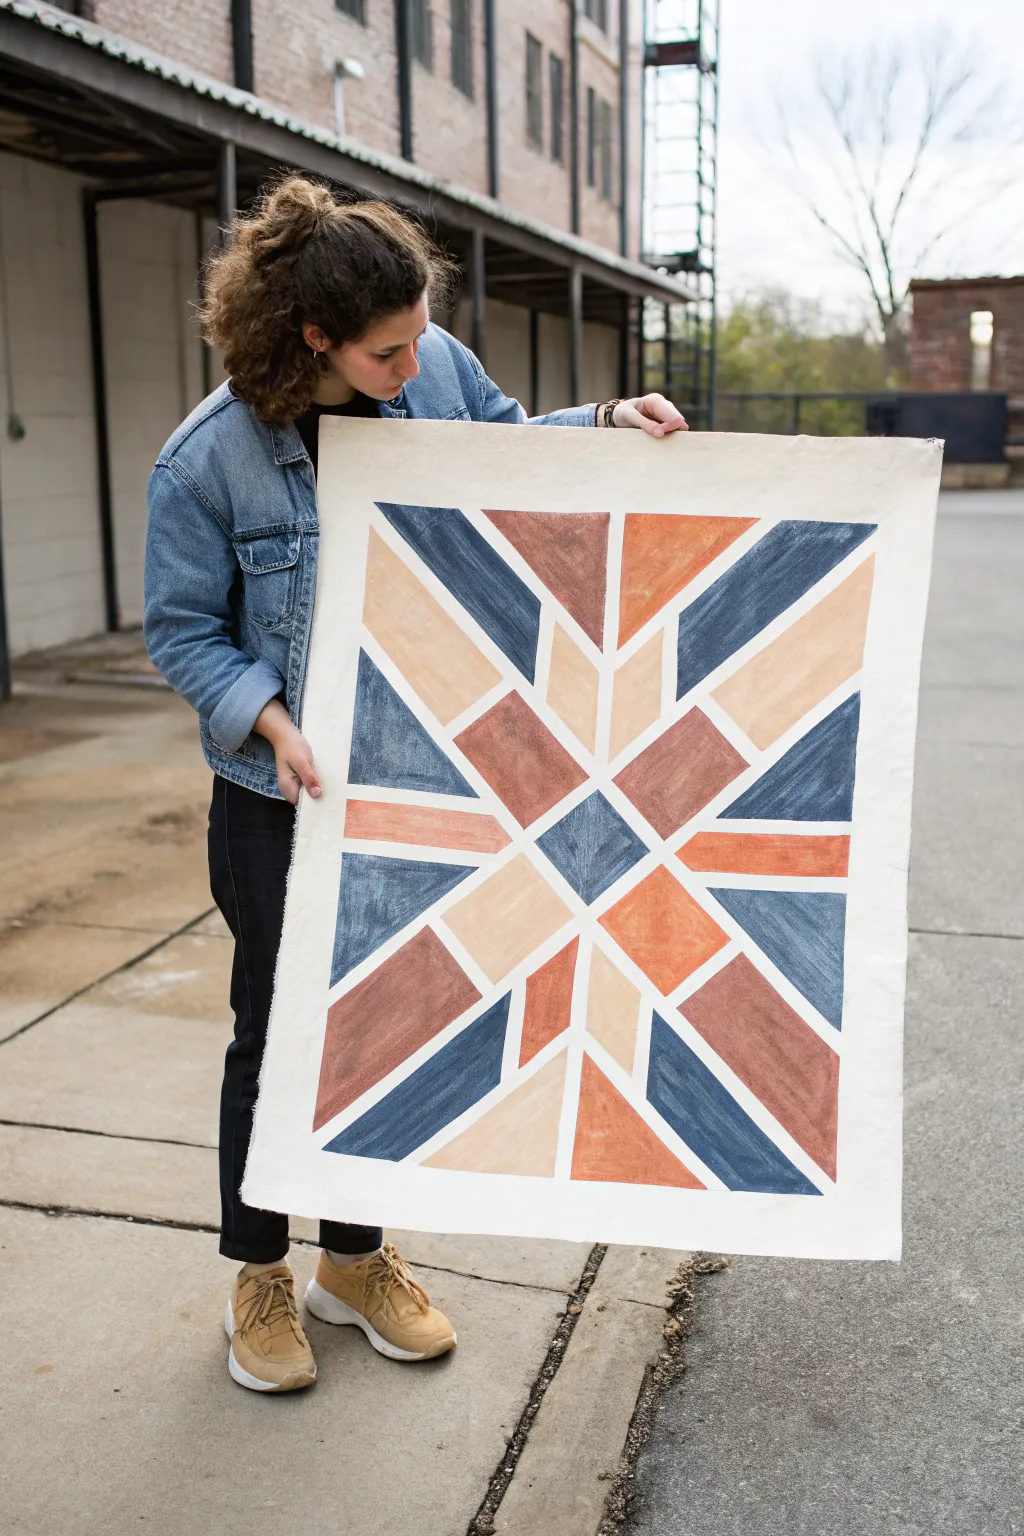
Bring the cozy, structured beauty of a geometric quilt to your walls without sewing a single stitch. This large-scale canvas project uses painting tape to create crisp negative space between bold, earthy shapes, resulting in a modern statement piece with a handcrafted feel.
Step-by-Step Guide
Materials
- Large heavy-weight raw canvas piece (approx. 24×36 inches)
- Acrylic paints (Navy Blue, Rust Orange, Burnt Sienna, Warm Beige)
- Painter’s tape (0.75-inch or 1-inch width)
- Flat shader brushes (various sizes)
- Ruler or straight edge
- Pencil
- Palette or paper plate
- Drop cloth or protective paper
Step 1: Preparing the Pattern
-
Prepare the canvas:
Lay your large piece of raw canvas flat on a protected work surface. If it has deep creases from being folded, iron it on a low setting or lay huge books on it overnight to flatten it out. -
Mark the center:
Using a ruler and a light pencil, find the exact center of your canvas. Mark this point lightly; this will be the anchor for your radiating design. -
Map the primary diagonals:
Draw two large diagonal lines forming an ‘X’ that crosses through your center point, extending all the way to the corners of your planned design area. -
Create the grid structure:
Lightly sketch a large diamond shape in the center, and additional lines radiating outward to mimic the ‘Union Jack’ style geometry seen in the example. Don’t worry about perfection; the tape will finalize the lines.
Step 2: Taping the Resist
-
Apply the main diagonal tape:
Start applying your painter’s tape along the pencil lines of that large ‘X’. Press the tape down firmly to ensure a tight seal against the canvas texture. -
Tape the diamond borders:
Create the central diamond shapes by applying tape. This project relies on the negative space (the unpainted canvas) to create the white lines. -
Tape the radiating sections:
Add strips of tape to segment the larger triangles into smaller bars and geometric shards. Refer to the image to see how the shapes fan out from the center. -
Secure edges:
Run your fingernail or a credit card along the edges of every piece of tape. On raw canvas, paint likes to bleed under tape if it isn’t burnished down really well. -
Add torn accents (Optional):
For a more organic look referenced in the article title, you can gently tear the edges of the tape strips before applying them, though the example image uses straight cuts for a cleaner quilt look.
Seal the Deal
Before adding color, paint a thin layer of clear matte medium over the tape edges. This seals the gap and prevents colored paint from bleeding under.
Step 3: Painting the Design
-
Mix your palette:
Squeeze out your four main colors: Navy Blue, Rust, Burnt Sienna, and Beige. I like to add a tiny drop of water to acrylics on raw canvas to help the pigment soak in slightly rather than sitting on top. -
Paint the central square:
Start with the very center diamond/square. In the example, this is a deep Navy Blue. Apply the paint carefully within the taped boundaries. -
Fill the inner star:
Moving outward, paint the shapes surrounding the center. Alternate between your Beige and Rust colors to create contrast. -
Paint the large rays:
Work on the larger radiating bars. Use the Navy Blue for the outer horizontal and vertical triangles to ground the design. -
Balance the colors:
As you move to the outer edges, ensure you aren’t placing two of the same colors right next to each other. Use the Burnt Sienna and Rust colors on opposing sides for symmetry. -
Apply a second coat:
Depending on the opacity of your paint, the rough texture of the canvas might show through. Apply a second coat to any areas that look patchy.
Textural Twist
Mix a textural additive like sand or modeling paste into your acrylics before painting. This gives the geometric shapes a raised, tactile quality.
Step 4: The Reveal
-
Let it dry partially:
Wait until the paint is dry to the touch but not fully cured (about 20-30 minutes). Removing tape too late can sometimes peel up dried acrylic skin. -
Peel the tape:
Slowly peel back the tape at a sharp 45-degree angle. This is the most satisfying part, revealing the crisp raw canvas lines beneath. -
Touch up:
If any paint bled under the tape, use a tiny amount of white acrylic or gesso on a detail brush to clean up the lines, or simply embrace the handmade imperfection. -
Frame or hang:
You can now hem the edges for a tapestry look, secure it between two wooden magnetic rails, or stretch it over a wooden frame for a traditional gallery finish.
Once hung, the earthy tones and striking geometry will add a sophisticated warmth to any room in your home


Have a question or want to share your own experience? I'd love to hear from you in the comments below!