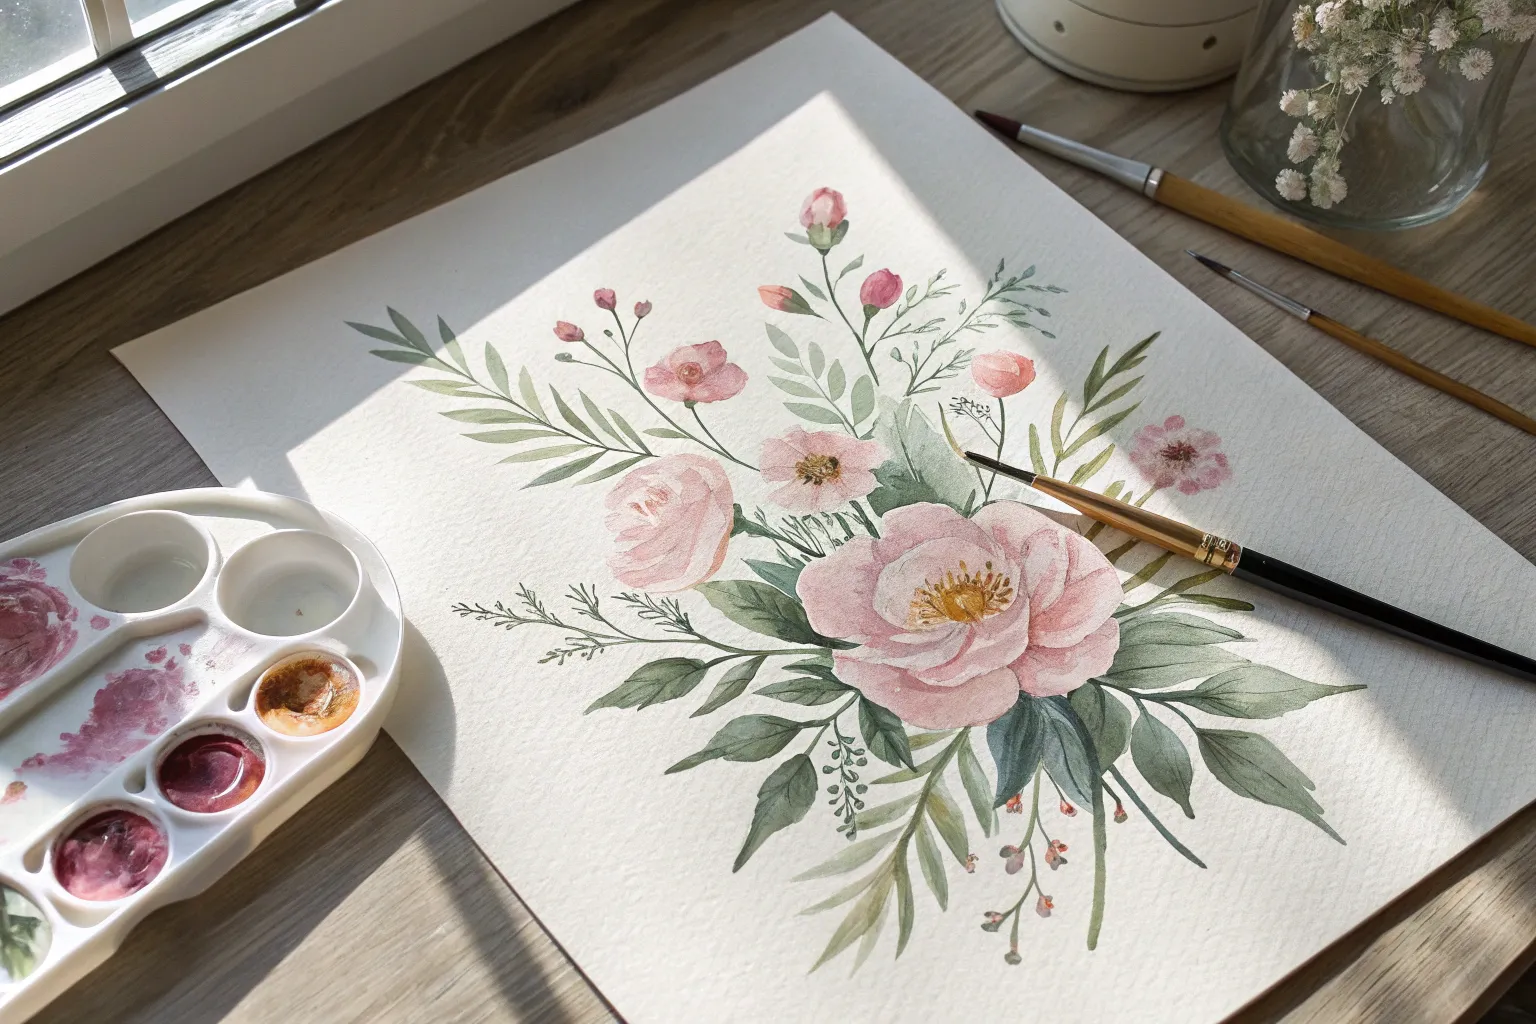
Whenever I’m not sure what to paint, I circle right back to watercolor flowers—they’re relaxing, forgiving, and always look a little magical. Here are my favorite watercolor flower ideas you can try right away, from classic blooms to playful techniques that’ll keep your sketchbook buzzing.
Loose Peonies With Soft Ruffled Edges
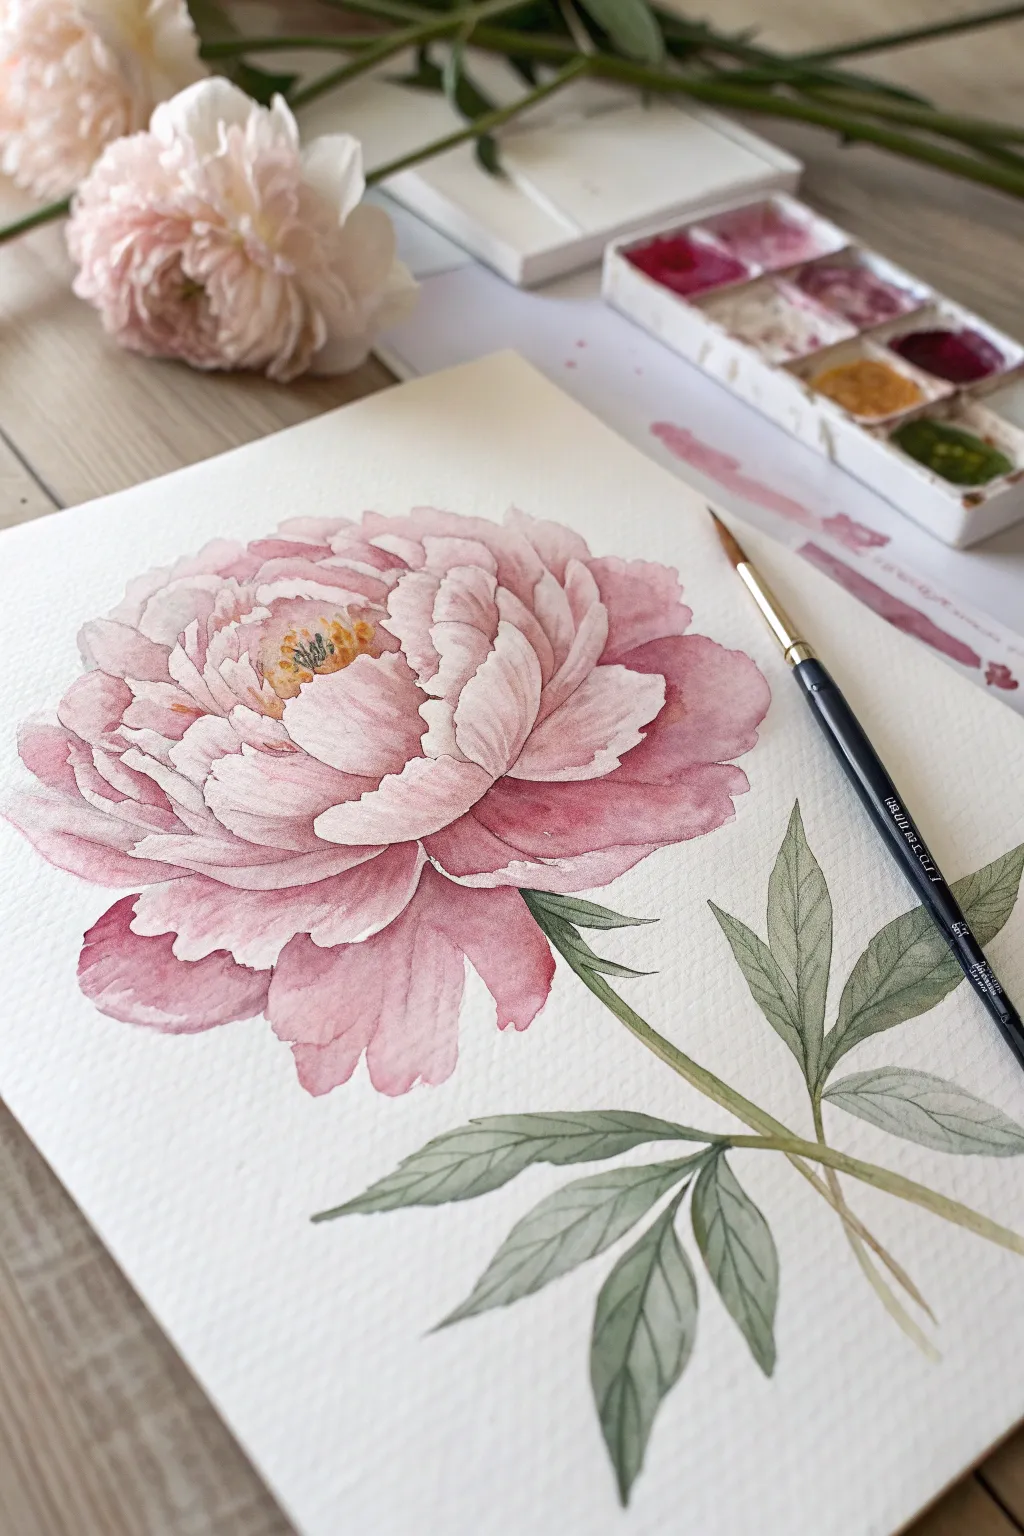
This project captures the delicate, billowing layers of a pink peony using translucent watercolor washes. The result is a romantic, botanical focal piece characterized by soft ruffled edges and controlled color bleeds.
Detailed Instructions
Materials
- Cold press watercolor paper (300 gsm / 140 lb)
- Round watercolor brush (size 6 or 8)
- Small detail brush (size 2)
- Watercolor paints: Rose Madder, Quinacridone Magenta, Sap Green, Olive Green, Yellow Ochre
- Pencil (HB or 2H)
- Kneaded eraser
- Clean water jar
- Paper towels
Step 1: Sketching the Structure
-
Outline the bowl shape:
Begin by lightly sketching a large, open bowl shape in the center of your paper. This will serve as the outer boundary for the main petals. -
Define the center:
Draw an irregular, smaller circle slightly off-center within the bowl shape to mark where the stamens and tightly packed inner petals will go. -
Draft the petals:
Sketch the large, scalloped petals radiating outward. Keep your lines very faint so they won’t show through the transparent paint later. Focus on creating distinct, ruffled edges rather than perfect circles. -
Add the stem and leaves:
Draw a sturdy stem extending downward and to the right. Add two groupings of pointed, lance-shaped leaves branching off the main stem.
Step 2: Inner Petal Layers
-
Base wash for center:
Mix a very pale wash of Rose Madder. Paint the innermost petals surrounding the center, keeping the fluid edges wet to allow for soft blending. -
Deepen the shadows:
While the first layer is still damp, drop in a slightly concentrated mix of Quinacridone Magenta into the crevices where the petals overlap. This wet-in-wet technique creates natural depth. -
Leave white highlights:
As you move outward, carefully paint around the top edges of the inner petals. Leaving the white of the paper untouched here is crucial for that ruffled, sunlit effect. -
Paint the stamens:
Once the center is dry, use your smallest brush with Yellow Ochre to dab in tiny dots for the stamens. Add tiny touches of brown or deep pink at their base for dimension.
Too much blooming?
If your petal edges remain too fuzzy, your paper is too wet. Let the paper lose its sheen before painting adjacent sections to keep shapes crisp.
Step 3: Outer Petals and ruffles
-
Wash the large petals:
Work on one large outer petal at a time. Apply a water glaze first, then drop in your pink mix, letting the color bloom outward toward the edges. -
Create hard edges:
Unlike the soft center, allow the very outer edges of the large petals to dry with a distinct line. This defines the silhouette of the flower against the white paper. -
Layering for separation:
Paint adjacent petals only after the previous one is dry to prevent them from merging into a single blob. This ‘glazing’ technique builds distinct layers. -
Intensify the bottom:
Add a stronger mix of Quinacridone Magenta to the bottom petals. These are usually in shadow, so they should appear visually heavier than the top petals. -
Refine the ruffles:
I like to use a barely damp brush to lift a tiny bit of color from the center of the larger petals, enhancing the 3D ‘cupped’ look.
Add some sparkle
For a magical finish, mix a tiny amount of iridescent medium into your final glaze on the petal tips to make the flower shimmer in the light.
Step 4: Stem and Greenery
-
Base green layer:
Mix Sap Green with a touch of Yellow Ochre. Paint the stem and leaves with a single, confident stroke to keep the look fresh. -
Shadow veins:
While the leaves are drying but no longer soaking wet, use the tip of your brush and a darker Olive Green mix to suggest a central vein. -
Connect to the bloom:
Ensure the green stem meets the base of the flower seamlessly. Add a few small, darker green sepals hugging the bottom of the pink petals. -
Final assessment:
Step back and look at the overall balance. If any shadows inside the flower look too pale, add a final glaze of cool pink to deepen the contrast.
Now you have a stunning botanical study that captures the elegance of a blooming peony


Simple Tulips With Two-Stroke Petals
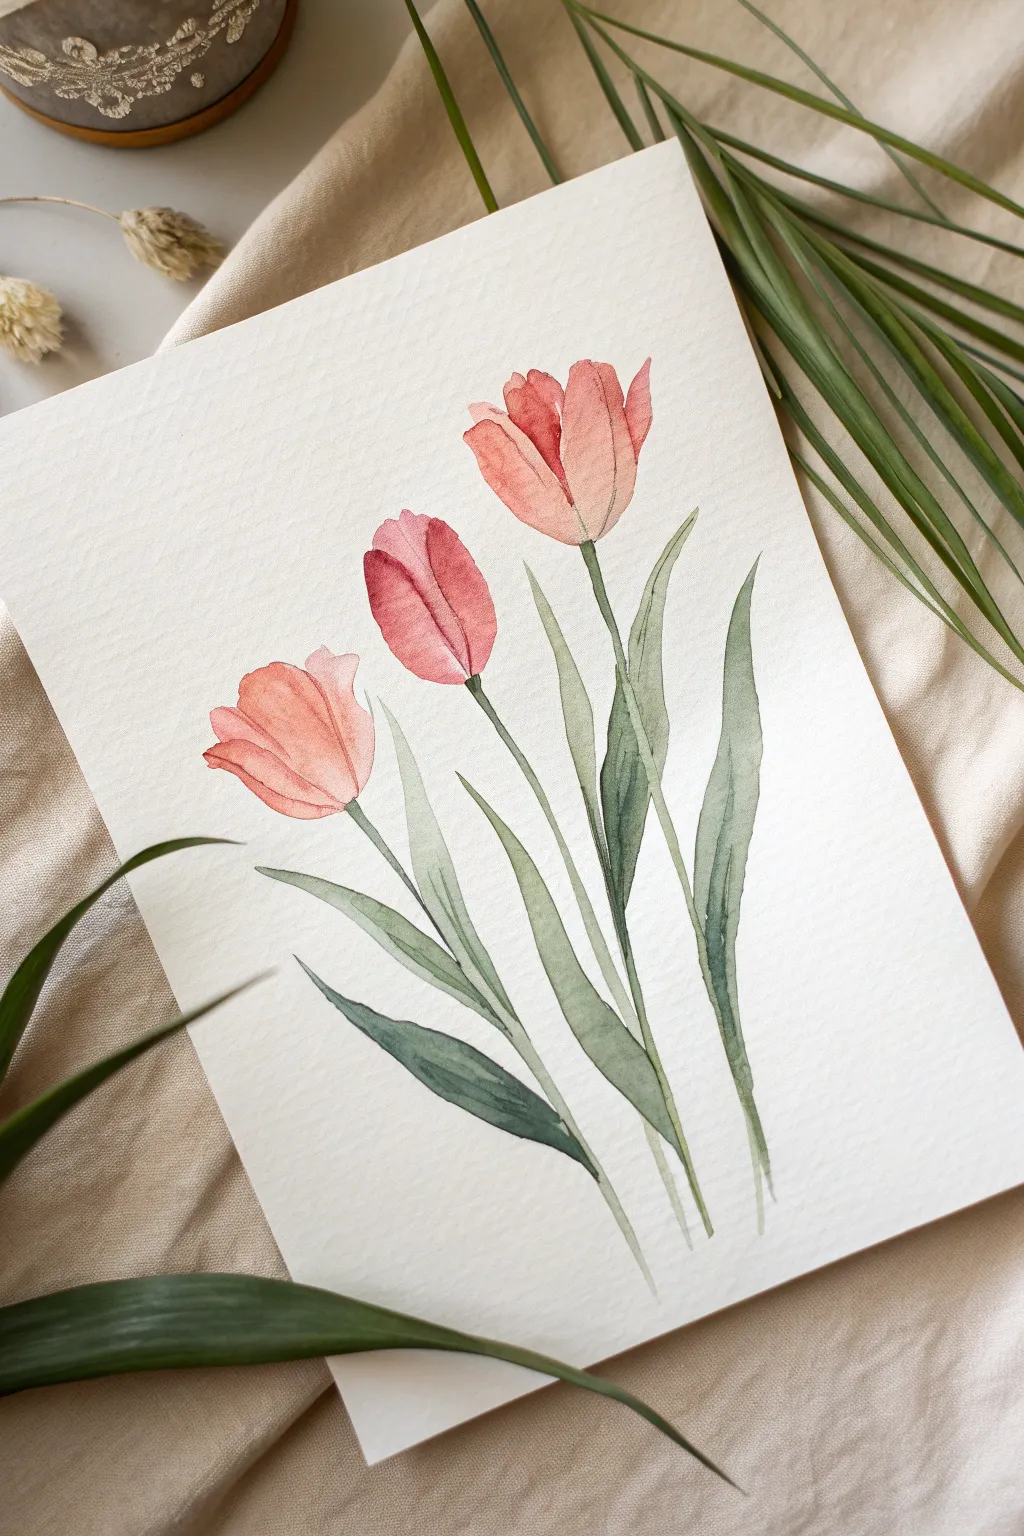
These graceful tulips capture the delicate nature of spring with a deceptively simple technique. Using layers of translucent coral and soft green, this project focuses on capturing the essence of the flower rather than photorealistic detail.
Step-by-Step
Materials
- Cold press watercolor paper (300 gsm)
- Round watercolor brush (size 6 or 8)
- Round watercolor brush (size 2 or 4 for details)
- Watercolor paints (Coral, Alizarin Crimson, Sap Green, Olive Green)
- Palette for mixing
- Jar of clean water
- Paper towels
Step 1: Painting the Blooms
-
Mix your petal colors:
Create a watery mix of coral with a touch of alizarin crimson. You want a color that is punchy but soft—think of a summer sunset. Prepare enough wash for all three flowers to ensure consistency. -
Paint the first petal shape:
Start with the highest tulip on the right. Using your larger round brush, press the belly of the brush down and sweep upward in a curve to create the left side of the cup shape. Lift the brush as you reach the top to create a fine tip. -
Complete the main cup:
Repeat the stroke on the right side, mirroring the first curve so they almost meet at the bottom but flare out slightly at the top. This two-stroke method forms the base of the tulip head. -
Add the central petal:
While the paint is still damp but not soaking wet, add a slightly darker, more concentrated stroke in the middle, filling the gap between your first two strokes. This adds depth and suggests the inner petals. -
Paint the middle bloom:
Move to the center tulip, placing it slightly lower than the first. Use a redder mix here to add variety. Paint your two main curved strokes, but keep this flower slightly more closed and tighter in shape. -
Paint the lowest bloom:
For the leftmost flower, angle the head slightly outward to the left. Paint the petals using a lighter, more watered-down version of your coral mix to suggest it catchin the light. -
Refine the edges:
Before the blossoms dry completely, use your smaller brush to gently sharpen the tips of the petals if they look too rounded. We want that distinctive tulip point.
Step 2: Adding Stems and Leaves
-
Mix the greenery tones:
Prepare two green mixtures: a light, yellowish Sap Green for the stems and new growth, and a darker Olive Green mixture for the shadowed parts of the leaves. -
Draw the stems:
Starting from the base of the highest tulip head, use the tip of your size 6 brush to pull a long, slender line all the way to the bottom of the page. Repeat for the other two flowers, letting the lines cross naturally closer to the bottom. -
Start the main foliage:
Load your brush with the lighter Sap Green. Start near the bottom of the stems and press firmly to widen your stroke, then pull upward and lift off to create a tapering point. This creates the classic sword-shaped tulip leaf. -
Layer the leaves:
While the first leaf is drying, add a second leaf curving in the opposite direction. I find that varying the height of the leaf tips helps the composition feel organic and less stiff. -
Add depth with shadows:
Switch to your darker Olive Green mix. Paint a few leaves behind the stems or tucking under the front leaves. This darker value pushes these shapes into the background. -
Connect flowers to stems:
Use the very tip of your small brush with a tiny amount of green to reinforce the connection point where the stem meets the flower head, blending it slightly into the base of the pink petals if they are still damp. -
Add dry brush texture:
Once the main green washes are dry, take a slightly drier brush with dark green and add subtle linear veins or shadows to one side of the largest leaves to suggest folding.
Control Your Water
Blot your brush on a paper towel after rinsing but before picking up paint. This prevents a puddle from forming at the bottom of your petal strokes.
Step 3: Final Touches
-
Evaluate the composition:
Step back and look at the negative space. If the bottom feels too empty, you can add a small, partial leaf shape entering from the bottom or side edge. -
Enhance the blooms:
If the flowers look too flat after drying, glaze a very thin, watery layer of alizarin crimson over the bottom third of the petals to enhance their roundness.
Fixing “Cauliflowers”
If jagged watermarks form as paint dries, soften them with a slightly damp, clean brush. Gently scrub the hard edge to blend it back into the petal.
Allow your painting to dry flat completely before framing or gifting this piece of botanical art


Bright Sunflowers With Textured Centers
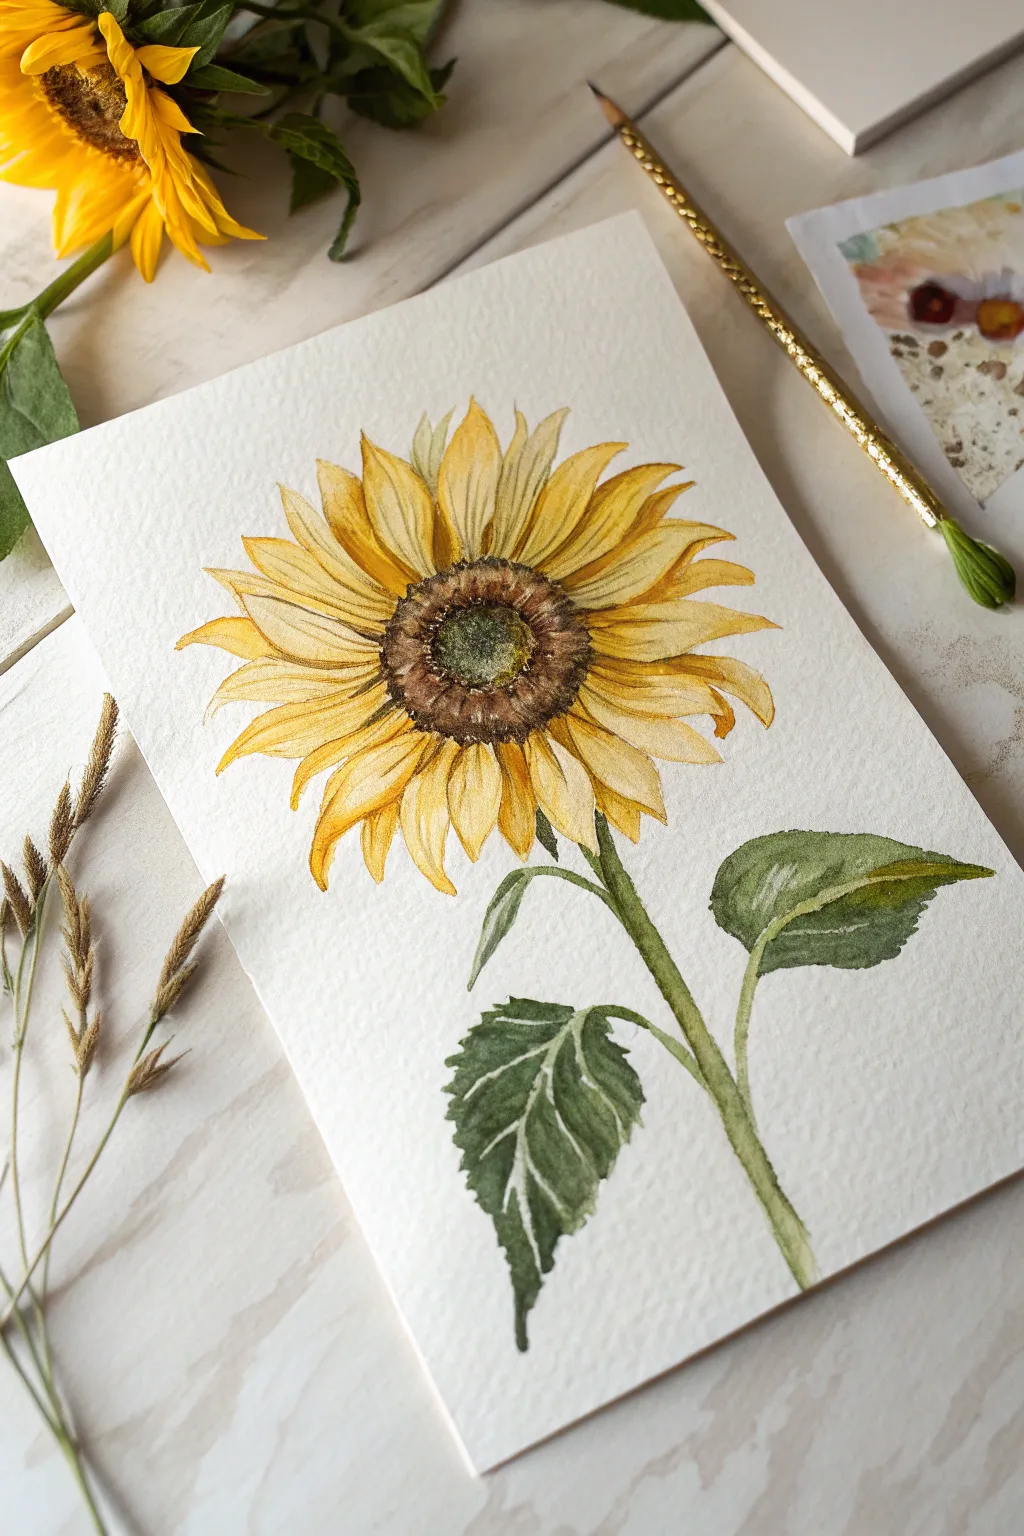
Capture the warmth of a summer day with this bright watercolor sunflower featuring a beautifully textured center. The loose yet defined petals and realistic greenery make this a standout piece that balances detail with flowing color.
How-To Guide
Materials
- Cold press watercolor paper (300 gsm)
- Watercolor paints (Cadmium Yellow, Yellow Ochre, Burnt Sienna, Burnt Umber, Sap Green)
- Round brushes (size 4 and 8)
- Fine liner brush (size 0 or 1)
- Pencil (HB or H)
- Kneaded eraser
- Clean water jar
- Paper towels
- Salt (optional for texture)
Step 1: Sketching the Outline
-
Establish the center:
Begin by lightly sketching a slightly flattened oval or circle in the upper middle section of your paper to represent the flower’s center. Keep your pencil lines very faint so they don’t show through the yellow paint later. -
Draft the petals:
Draw the petals radiating outward from the center. Create two rows: a front row of larger, broader petals and a back row of smaller petals peeking through the gaps. Give the tips a slight curve or wave so they don’t look too stiff. -
Add the stem and leaves:
Sketch a sturdy stem curving slightly downward towards the bottom right. Attach two large, heart-shaped leaves to the stem—one higher on the right and one lower on the left—adding a central vein line to each. -
Refine and lighten:
Review your sketch to ensure the proportions feel natural. Use a kneaded eraser to gently lift up excess graphite until only a ghost of the image remains.
Step 2: Painting the Flower Head
-
First petal wash:
Load your size 8 brush with a watery mix of Cadmium Yellow. Paint the entire shape of the petals with a light, even wash. Let the yellow be vibrant but transparent. -
Adding depth to petals:
While the first layer is still slightly damp, drop some Yellow Ochre into the base of the petals near the center. This creates a natural shadow where the petals attach. -
Painting the center base:
Mix Burnt Sienna with a touch of Burnt Umber. Use the size 4 brush to fill in the center disk. Leave a very small, irregular highlight unpainted in the middle to suggest the domed shape. -
Creating center texture:
While the brown center is wet, drop in concentrated dots of Burnt Umber and a tiny bit of dark green near the very middle. This wet-on-wet technique will bloom and create a fuzzy texture. -
Defining the petals:
Once the first yellow layer is completely dry, use a slightly thicker mix of Yellow Ochre and Cadmium Yellow to paint thin lines (veins) on the petals. Start from the base and flick the brush outward, lifting pressure as you reach the tip. -
Shadows and separation:
Use a diluted pale brown or grey-yellow to add shadows on the petals that sit ‘underneath’ the top layer. This separates the front and back rows, adding dimension to the flower head.
Pro Tip: Better Centers
Add drama to the flower center by sprinkling a tiny pinch of table salt onto the wet brown paint. Brush it off once dry for an instant, organic seed texture.
Step 3: Stem and Foliage
-
Base green layer:
Paint the stem and leaves with a light wash of Sap Green. Keep the edges relatively crisp. -
Adding leafy shadows:
While the leaves are wet, drop a darker green mix (Sap Green plus a touch of brown or blue) into the shadowed areas, such as the underside of the leaves or where the leaf meets the stem. -
Defining leaf veins:
I like to wait for the green to dry fully, then use a rigger or fine liner brush to paint the white veins. Actually, in watercolor, we paint *around* the veins—use a darker green glaze to paint the leaf sections, leaving thin lines of the lighter base color visible as the veins. -
Stem texture:
Run a line of darker green down one side of the stem to give it a cylindrical volume.
Level Up: Gold Accents
For a magical finish, use metallic gold watercolor to trace a few petal edges or add tiny gold dots to the center, making the sunflower shimmer in the light.
Step 4: Final Details
-
Deepening the center:
Return to the flower center with a nearly dry brush and dark brown paint. Stipple (dot) the outer ring where the seeds meet the petals to create a rough, seeded texture. -
Petal highlights:
Check your petals for contrast. If the painting looks flat, deepen the crevices between petals with a concise mix of Yellow Ochre and brown. -
Final assessment:
Step back and look at the overall balance. If any edges are too hard, you can soften them with a clean, damp brush.
Allow your painting to dry completely before framing it to preserve those delicate petal textures


Poppy Blooms Using Wet-on-Wet
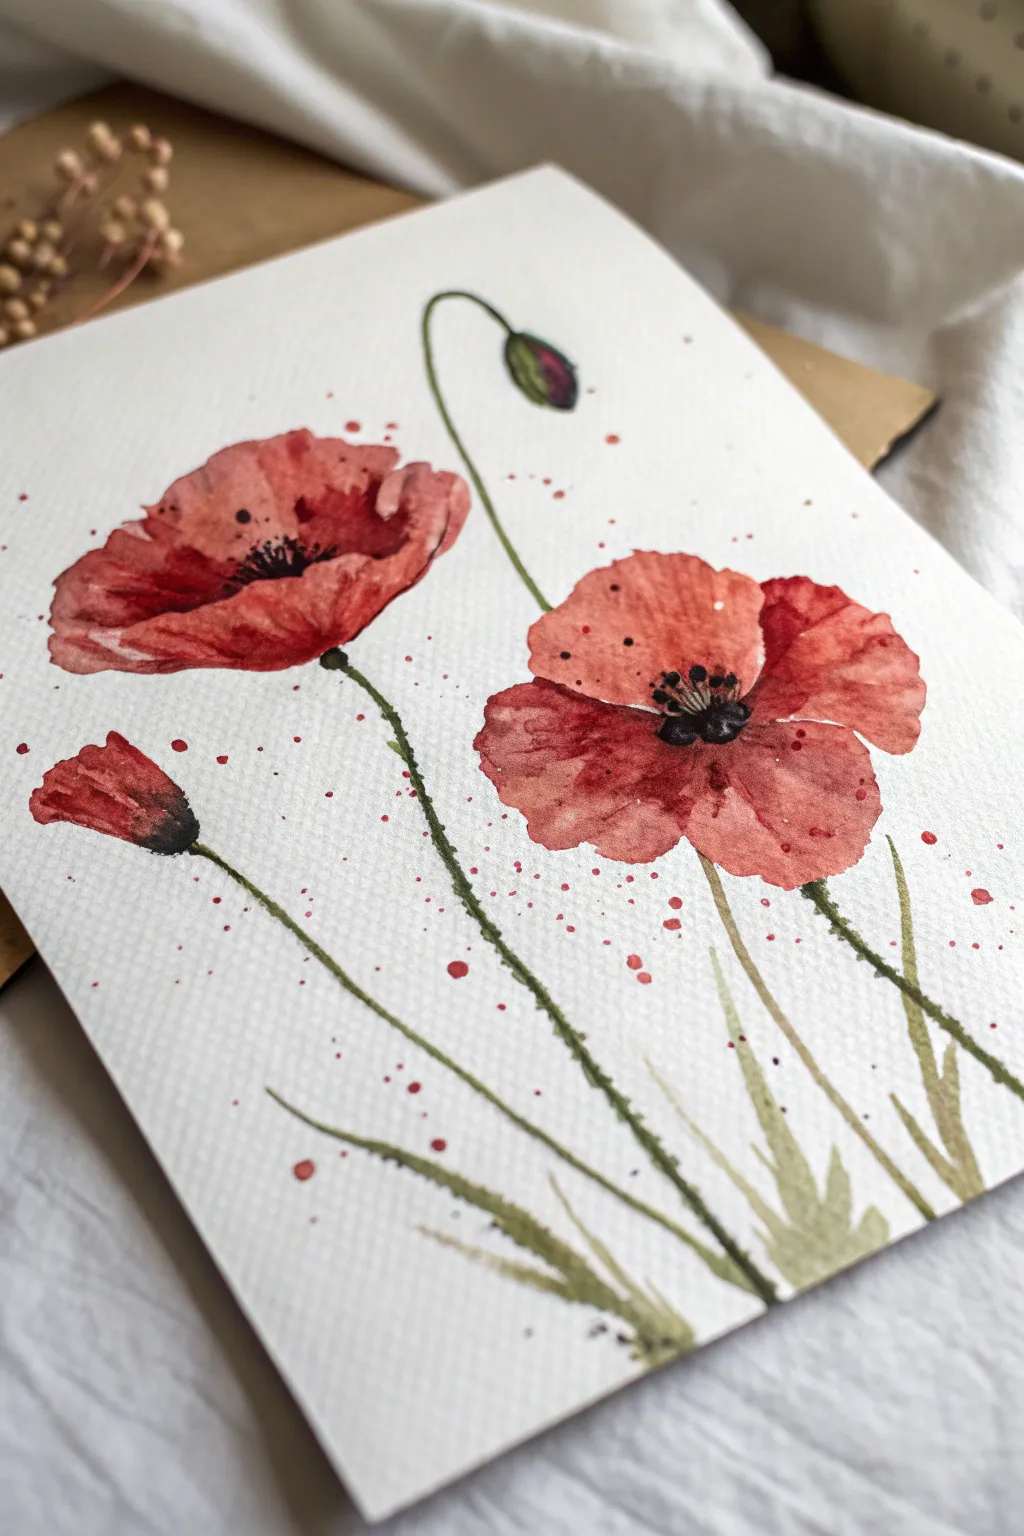
Capture the delicate, translucent beauty of red poppies with this loose and expressive watercolor tutorial. By letting the pigments flow and blend naturally on wet paper, you’ll create soft, organic petals that feel alive with movement.
Step-by-Step Guide
Materials
- Cold press watercolor paper (300 gsm)
- Watercolor paints: Alizarin Crimson, Cadmium Red, Sap Green, Burnt Umber, Lamp Black
- Round brushes (sizing 4 and 8)
- Rigger or liner brush for stems
- Clean water jar
- Paper towels
- Pencil for light sketching
Step 1: Sketching and Preparation
-
Light Sketch:
Begin with a very faint pencil sketch. Draw two large ovals for the main blooms, a smaller teardrop shape for the side bud, and a tiny oval for the unopened seed head high up. Sketch curved lines for the stems to establish the composition. -
Prepare Your Palette:
Mix a generous amount of watery red using a blend of Alizarin Crimson and Cadmium Red. Having this ready prevents the paper from drying out while you mix colors later.
Muddy Bloom Fix
If your red and green bleed into each other, stop immediately. Blot the mistake gently with a clean tissue to lift the pigment, let it dry completely, and then repaint the edge.
Step 2: Painting the Blooms
-
First Wet Layer:
Start with the left-hand flower. Use clean water to wet the shape of the petals, leaving a small dry gap in the center for the dark stamens later. The paper should glisten but not have puddles. -
Dropping in Color:
Load your size 8 brush with the red mix and touch it to the wet area. Watch the color bloom and spread. Tilt the paper slightly to encourage the pigment to move toward the petal edges. -
Softening Edges:
While still wet, rinse your brush and use it damp to soften the outer edges of the petals, pulling the color out slightly to create that delicate, papery poppy look. -
Second Flower:
Repeat the wet-on-wet process for the right-hand flower. Vary the red intensity here; I like to add a touch more crimson to the center while the paper is wet to create depth. -
Painting the Bud:
For the small bud on the lower left, paint a tight teardrop shape with concentrated red. Don’t wet the paper first; use a wet-on-dry technique here to keep the edges sharper. -
Adding the Seed Pod:
Paint the top curving seed pod using a mix of Sap Green and a touch of red to muddy it slightly. Add a tiny touch of crimson near the tip where the petals are just peeking through.
Level Up: Salt Texture
While the red petal wash is still wet, sprinkle a few grains of table salt onto the paint. Let it dry completely before brushing it off to create unique, star-burst textures.
Step 3: Details and Stems
-
Dry Time:
Let the flower heads dry completely. If you paint the stems now and touch the wet petals, the green will bleed into the red, ruining the definition. -
Painting Stems:
Using a rigger or a thin round brush loaded with Sap Green and a little Burnt Umber, paint the stems. Use a shaky hand intentionally to mimic the hairy, organic texture of poppy stems. -
Connecting the Blooms:
Attach the stems carefully to the base of each flower. For the open blooms, thicken the stem slightly right where it meets the petals. -
Adding Leaves:
At the bottom of the composition, flick your brush upward to create jagged, grass-like leaves. Keep these loose and transparent, fading them out at the bottom. -
Defining Centers:
Once the red petals are bone dry, mix a strong black using Lamp Black and Burnt Umber. Paint the center dark circle dry-on-dry for a crisp look. -
Stamen Detail:
Using your smallest brush, pull tiny, fine lines outward from the black center. Add tiny dots at the ends of these lines to represent distinct pollen.
Step 4: Final Touches
-
Splattering:
Load a brush with watery red paint. Tap the handle against your finger over the painting to create random splatters. This adds energy and breaks up the white space. -
Green Texture:
Repeat the splatter technique sparingly with the green mix, focusing mostly near the bottom leaves and stems. -
The Final Check:
Step back and assess. If the poppy centers look too stark, soften the black edge slightly with a damp brush, but be careful not to muddy the red.
Allow your beautiful poppy field to dry fully before framing or gifting this cheerful piece of art
BRUSH GUIDE
The Right Brush for Every Stroke
From clean lines to bold texture — master brush choice, stroke control, and essential techniques.
Explore the Full Guide
Anemones With Bold Dark Centers
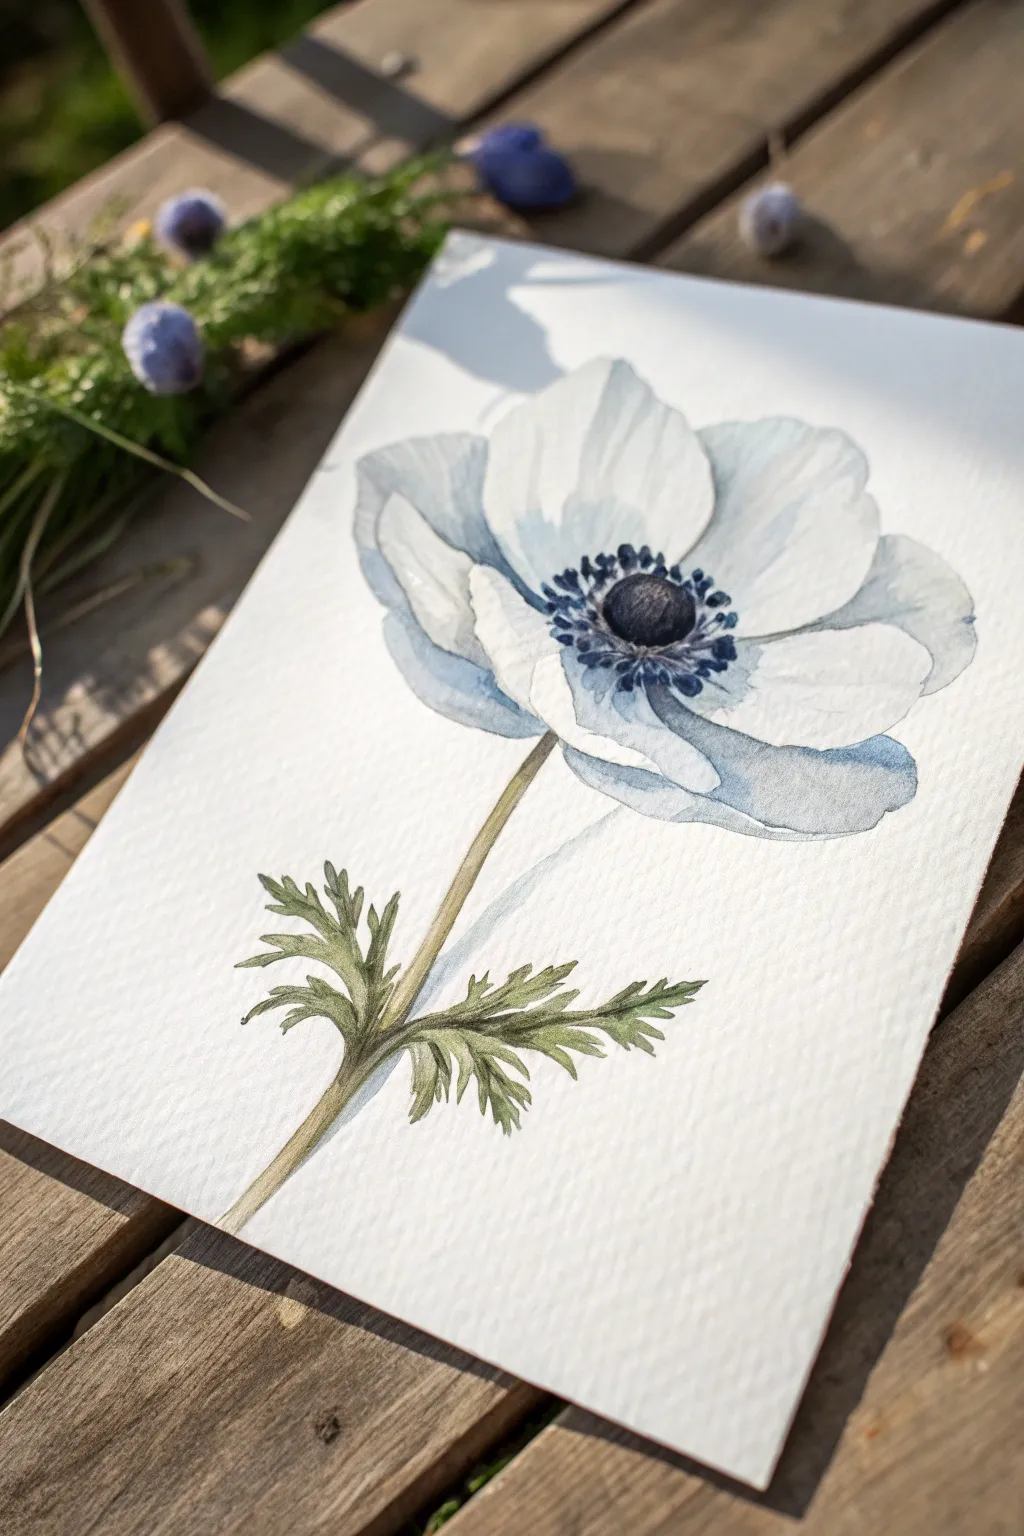
Capture the delicate beauty of a white anemone with this watercolor study, focusing on the contrast between translucent petals and a bold, dark center. The soft blue-grey shadows bring the white flower to life on the textured paper.
Step-by-Step Tutorial
Materials
- Cold press watercolor paper (300 gsm)
- Round watercolor brushes (sizes 4, 6, and 0 for details)
- Watercolor paints: Indigo, Paynes Grey, Sap Green, Burnt Umber, Ultramarine Blue
- Pencil (HB or 2H) and kneaded eraser
- Two jars of water
- Palette for mixing
- Paper towels
Step 1: Sketching the Outline
-
Outline the flower head:
Begin by lightly sketching the large, oval shape of the flower head in the upper center of your paper. Keep your pencil pressure very light so the graphite doesn’t show through the transparent petals later. -
Define the petals:
Draw the individual petals radiating from the center. Anemones have overlapping, slightly ruffled petals, so vary the shapes—some should be broad and fully visible, while others peek out from behind. Let the edges be a little organic and wavy. -
Add the center and stem:
Sketch a circular area for the dark center. Draw the stem extending downwards with a slight curve, and add the jagged, parsley-like leaves branching out near the bottom of the stem.
Step 2: Painting the Petals
-
Mix a shadow color:
Create a very watery, pale wash of blue-grey. I like to mix a tiny touch of Ultramarine Blue with a lot of water and a speck of Payne’s Grey to get a cool, airy shadow tone. -
Wet-on-wet technique:
Working one petal at a time, wet the paper inside the pencil line with clean water. The paper should glisten but not have puddles. -
Drop in shadows:
Touch your brush loaded with the pale shadow mix to the base of the petal (near the center) and along the edges where petals overlap. Let the paint bloom naturally into the wet area to create soft gradients. -
Preserve the white:
Leave the majority of the petal unpainted to represent the bright white areas. The white of the paper is your brightest highlight. -
Refine edges:
Move to adjacent petals only after the first ones are dry to prevent them from bleeding into each other. For some petals, add a slightly darker line of blue-grey on the underside to suggest curling.
Clean Water Is Key
For pristine white flowers, change your water frequently. Any muddy residue in your water jar will dull the white paper and make your petals look dirty.
Step 3: The Bold Center
-
Base layer for the center:
Mix a dense, dark color using Indigo and a touch of Burnt Umber. Paint the central button of the flower, leaving a tiny sliver of white or lighter tone on top for a highlight. -
Deepen the darks:
While the center is still damp, drop in pure Indigo or concentrated Payne’s Grey at the bottom edge to give the button dimension and roundness. -
Paint the stamens:
Once the center is dry, switch to your size 0 detail brush. Using the dark Indigo mix, paint a ring of tiny dots and fine lines radiating outward from the center button onto the base of the petals. -
Soften the transition:
If the stamen ring looks too harsh, soften the outer edge slightly with a damp brush to blend it gently into the white petals.
Add Subtle Warmth
Mix a tiny amount of yellow ochre into your shadow grey for the petals. Just a drop makes the white feel creamy and sunlit rather than cold.
Step 4: Stem and Foliage
-
Mix greens:
Prepare two green mixes: a lighter, yellowish-green using Sap Green and water, and a darker shadow green by adding a touch of Indigo or Brown to the Sap Green. -
Paint the stem:
Using a size 4 brush, paint the stem with the lighter green mix. While it’s wet, touch the darker green to the shadowed side (usually the right or bottom side) to create volume. -
Detail the leaves:
Paint the jagged leaves with the lighter green first. Anemone leaves are deeply lobed and textured, so use the tip of your brush to flick out the pointed ends. -
Add leaf shadows:
Before the leaves dry completely, drop the darker green mix into the center of the leaf clusters where they join the stem. This adds depth and anchors the foliage. -
Dry texture:
Once the green layer is dry, you can use a mostly dry brush with dark green to add subtle veins or texture to the leaves.
Step 5: Final Touches
-
Review contrast:
Step back and look at your painting. If the petals look too flat, glaze a very faint layer of your shadow blue over the darkest shadow areas to deepen the contrast against the white. -
Cast shadow:
Paint a soft, diagonal cast shadow across the lower petals or leaves if you want to mimic the lighting in the reference image, using a very diluted grey-blue mix.
Allow your beautiful botanical study to dry completely before framing it to preserve the delicate textures.
Bluebells in a Cool Monochrome Wash
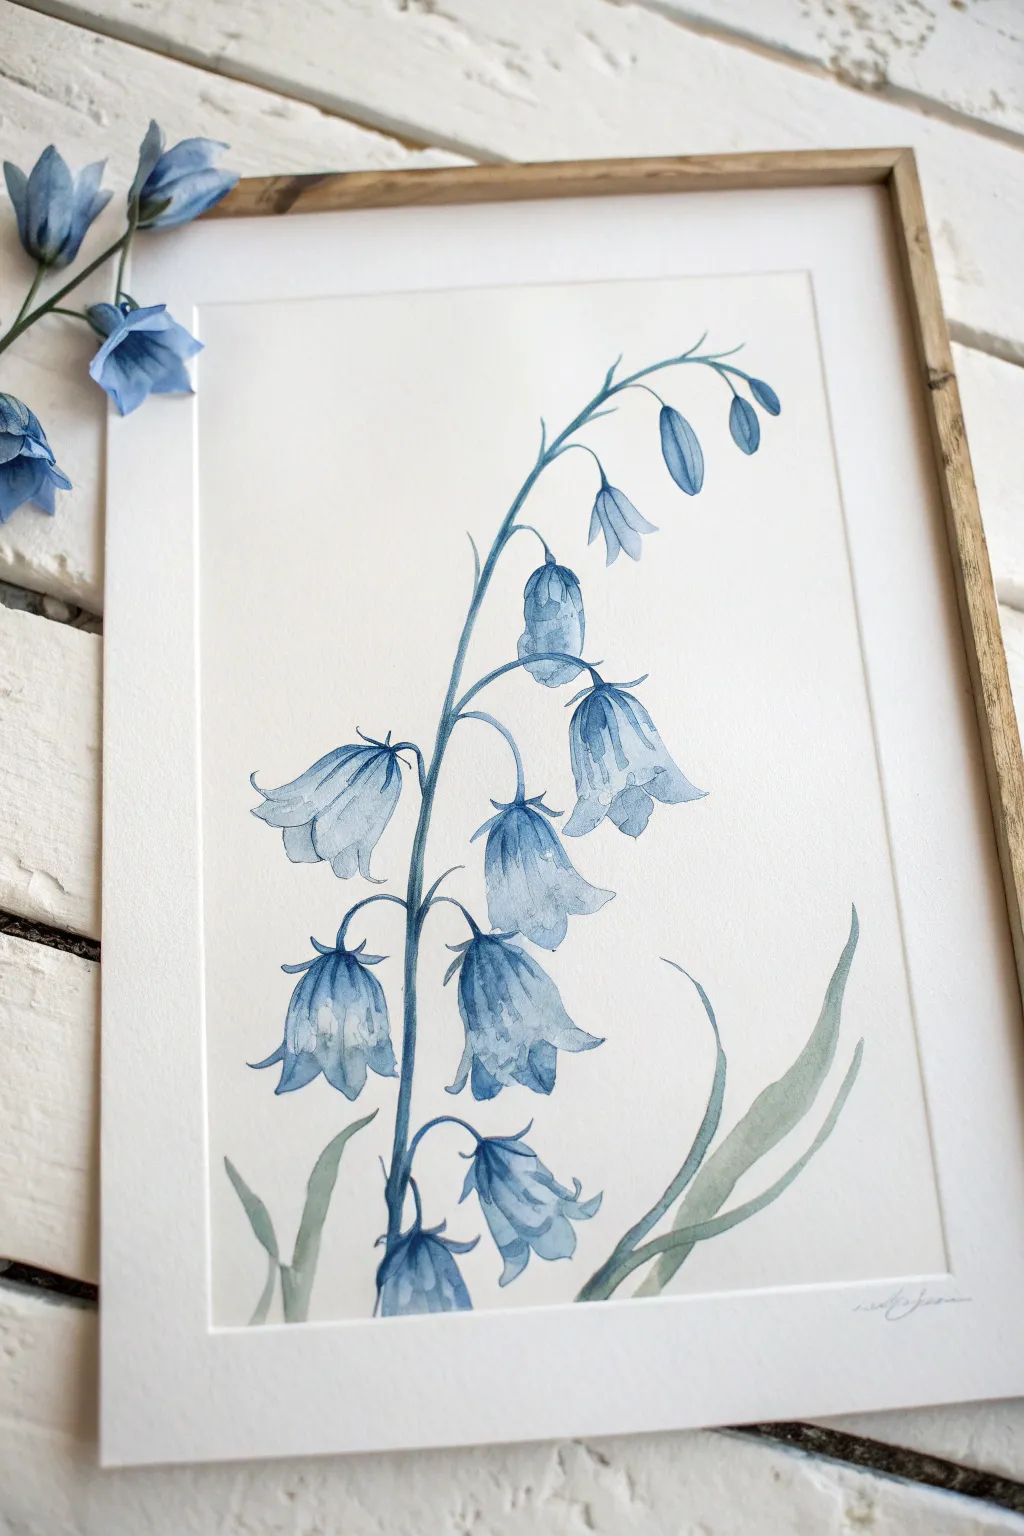
This elegant watercolor study captures the delicate drooping form of wild bluebells using a restricted palette of cool indigo and denim blues. The result is a soft, airy botanical illustration that feels vintage yet fresh, perfect for framing in natural wood.
Step-by-Step
Materials
- Cold press watercolor paper (300 gsm)
- Watercolor paints (Indigo, Prussian Blue, Cobalt Blue, Sap Green or light olive)
- Round watercolor brushes (Size 2, 4, and 6)
- Pencil (HB or H for light lines)
- Kneaded eraser
- Clean water jar
- Paper towel
Step 1: Sketching the Composition
-
Map the stem:
Begin by lightly sketching the main stem. Start from the bottom center and draw a gentle arch that curves elegantly to the right near the top. This central line dictates the ‘posture’ of your flower. -
Position the blooms:
Mark the positions of the flowers along the stem. The lower flowers should be larger and fully open, hanging downwards, while the upper ones become progressively smaller buddies. -
Refine the bells:
Sketch the bell shapes. Draw the characteristic curled-up tips on the petals of the open flowers. Keep your pencil pressure extremely light so the graphite doesn’t show through the transparent watercolor later. -
Add leaves:
Draw long, slender lance-shaped leaves at the base. They should curvature naturally, perhaps overlapping slightly, to ground the composition. -
Clean up lines:
Use your kneaded eraser to gently lift excess graphite. You want a faint ‘ghost’ image that guides you but remains invisible under the paint.
Uneven Watermarks?
If you get hard edges or ‘cauliflowers’ in the petals, your brush was too wet when adding the second color. Let the paper dry fully, then gently scrub the edge with a damp, clean brush to soften.
Step 2: Painting the Blooms
-
Mix your blues:
Create a watery mix of Cobalt Blue with a touch of Indigo. You want a very pale, transparent wash for the first layer. -
Apply the first wash:
Using a size 4 brush, paint the body of the largest bluebells. Use wet-on-dry technique, filling the shape but leaving tiny slivers of white paper at the petal edges for highlights. -
Add wet-in-wet depth:
While the first layer is still damp, drop a slightly more concentrated Indigo mix into the top of the bell (near where it connects to the stem) and along the shadowed sides. Watch the color bleed naturally. -
Paint the buds:
For the upper, smaller buds, use a slightly darker mix of Prussian Blue. These are tighter shapes, so they hold more concentrated color than the open, airy blooms below. -
Define the petal curls:
Once the main bell shapes are dry, use your smallest brush (size 2) to carefully paint the curled-up tips of the petals. I like to keep these slightly darker to emphasize the form. -
Layering details:
Mix a semi-transparent Indigo. Paint delicate lines or stripes primarily on the lower bells to simulate the flower’s natural texture and veining.
Vintage Look
For an antique botanical scientific illustration vibe, outline your finished, dried painting very loosely with a superfine 0.1mm sepia or gray waterproof ink pen.
Step 3: Stems and Foliage
-
Mix a muted green:
Prepare a desaturated green. Mix Sap Green with a tiny bit of your blue mixture to harmonize the palette. It should look cool and soft, not vibrant. -
Paint the main stem:
Using the tip of a size 4 brush, paint the main stem in a single, confident stroke if possible. If you need to stop, lift the brush gently to taper the line. -
Connect the flowers:
Draw the tiny, curved pedicels (the small stems) connecting each bluebell to the main stalk. Ensure these lines flow smoothly into the top of the flower heads. -
Base wash for leaves:
Paint the long leaves with a very watery, pale green wash. Start from the bottom and sweep upward, lifting the brush at the tip to create a sharp point. -
Shadowing the leaves:
Once the base green is dry, add a second layer of slightly darker green to areas where leaves overlap or twist, creating dimension without overpowering the delicate flowers.
Step 4: Final Touches
-
Add deepest contrast:
Mix a concentrated Indigo. With your smallest brush, add tiny accents in the deepest crevices—under the petal curls or where the stem meets the flower. -
Evaluate the balance:
Step back and look at the whole piece. If the top feels too light, you can glaze a very sheer layer of blue over the buds to unify the tone.
Allow your painting to dry completely flat before mounting it in a simple frame to highlight its vertical elegance

PENCIL GUIDE
Understanding Pencil Grades from H to B
From first sketch to finished drawing — learn pencil grades, line control, and shading techniques.
Explore the Full Guide
Hydrangea Clusters Built From Tiny Four-Petal Shapes
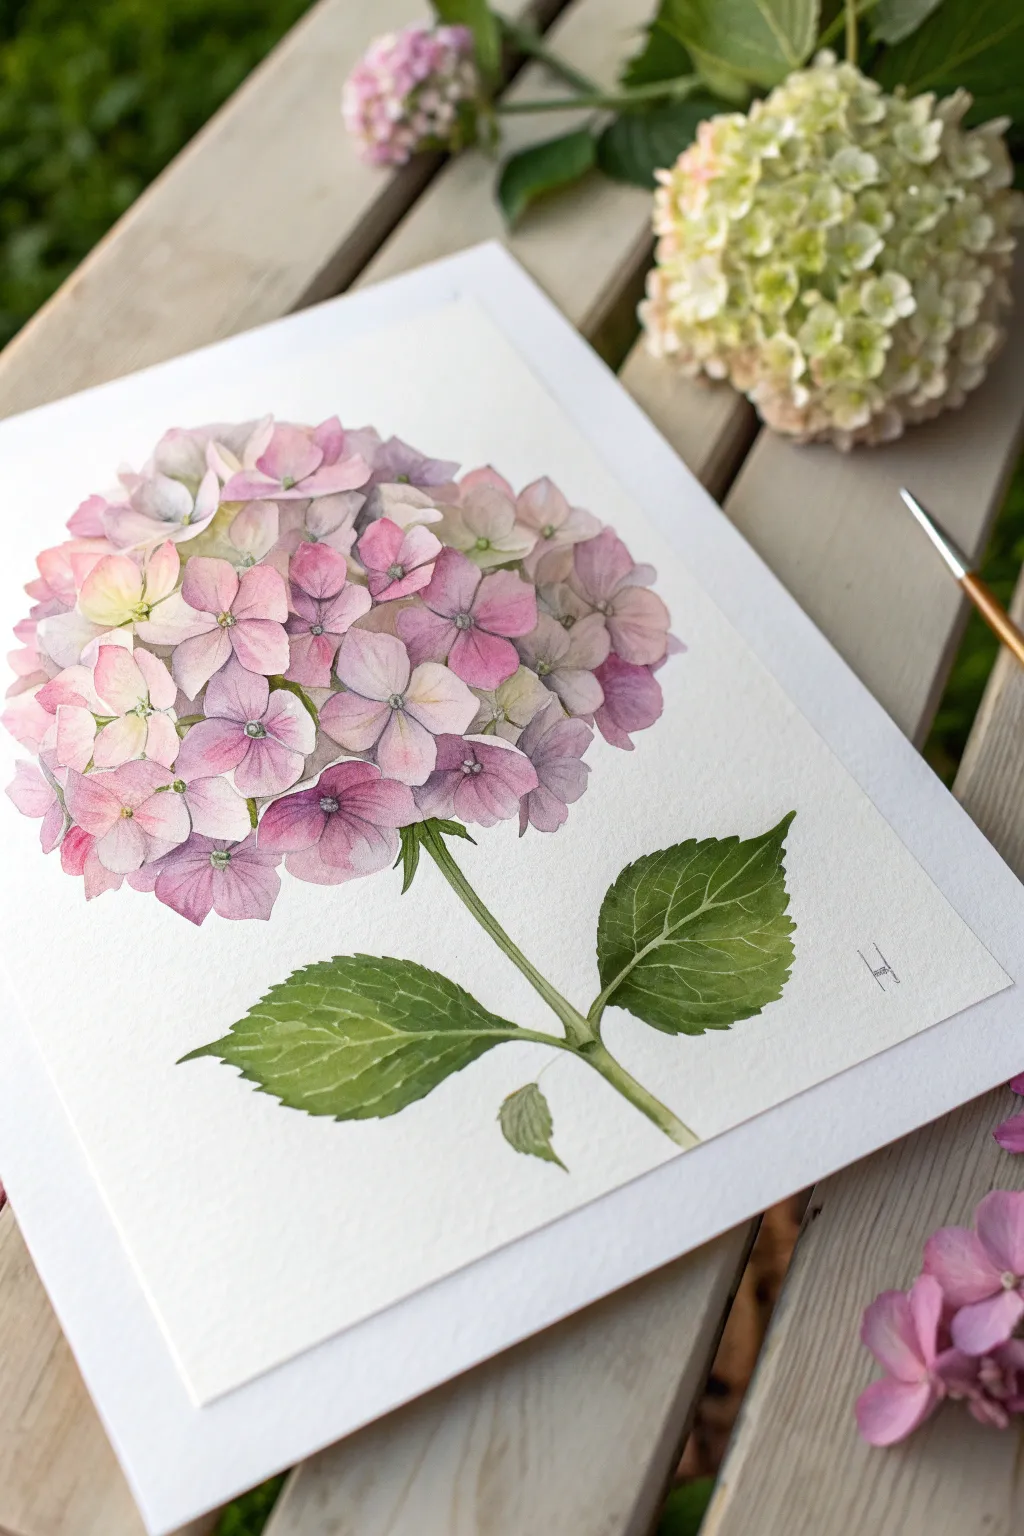
Capture the romantic charm of a blooming hydrangea with this detailed watercolor tutorial. By building the complex flower head from individual florets, you’ll create a stunningly realistic botanical illustration full of depth and soft color transitions.
Step-by-Step Guide
Materials
- Cold-pressed watercolor paper (140lb/300gsm)
- Watercolor paints (Alizarin Crimson, Ultramarine Blue, Sap Green, Lemon Yellow, Paynes Grey)
- Round watercolor brushes (Size 2, 4, and 6)
- HB pencil for sketching
- Kneaded eraser
- Two jars of water
- Paper towels or cotton rag
- Masking fluid (optional)
Step 1: The Sketch
-
Outline the main shape:
Begin by lightly drawing a large, slightly irregular circle in the upper center of your paper to define the overall size of the flower head. Add a curved line extending downwards for the stem. -
Map the florets:
Inside your circle, start drawing the individual four-petal florets. Don’t worry about drawing every single one perfectly; focus on the ones in the foreground and leave the background ones less defined. Vary their sizes slightly for realism. -
Refine the centers:
Mark the tiny center point of each floret with a small circle. This will be crucial later for adding depth. -
Add leaves:
Draw two large, serrated leaves branching off the stem near the bottom. Add a smaller, third leaf budding lower down. Sketch the central veins of the leaves lightly. -
Clean up:
Use your kneaded eraser to roll over the sketch, lifting the graphite until the lines are faint guidelines that won’t show through the transparent watercolor.
Step 2: Painting the Florets
-
Mix your base colors:
Prepare watery puddles of three main mixes: a soft pink (Alizarin Crimson with plenty of water), a violet (Alizarin Crimson + Ultramarine Blue), and a pale yellow-green for the younger florets. -
First wash on petals:
Starting with a size 4 brush, paint the petals of the central florets. Use the wet-on-dry technique, dampening a petal and dropping in pink on the edges, letting it fade to white or pale yellow towards the center. -
Varying hues:
As you move to adjacent florets, shift your color mix slightly. Add a touch more blue for some petals to create that classic hydrangea purple, or deeper pink for others. This variation prevents the flower from looking flat. -
Negative painting:
For the gaps between the defined florets, paint darker shapes using a concentrated violet mix. This negative space defines the edges of the petals and suggests shadowed florets deeper inside the cluster. -
Building layers:
Once the first layer is dry, glaze over some petals with a second, slightly stronger wash to deepen the color, especially on the petals that would be in shadow. -
Detailed centers:
Switch to your size 2 brush. Mix a concentrated dark purple or Payne’s Grey. Paint tiny, detailed dots and stars in the very center of each floret to act as the reproductive parts. -
Veining:
With an extremely pale, watery pink and your smallest brush, paint very fine veins on a few detailed foreground petals. Don’t overdo this; subtle suggestion is key.
Clean Water Is Key
Keep two water jars: one for rinsing dirty brushes and one for clean water. Dirty water will muddy your delicate pinks and purples instantly.
Step 3: Leaves and Stem
-
Base green wash:
Mix Sap Green with a touch of Lemon Yellow for a fresh look. Paint the entire stem and leaf shapes with a light, even wash. -
Adding shadows to the stem:
While the stem is still slightly damp, drop in a darker green (Sap Green + tiny bit of Ultramarine) along one side to create a cylindrical 3D form. -
Leaf texture foundation:
I like to let the first green layer dry completely on the leaves. Then, using a size 4 brush and a darker green mix, carefully paint around the vein lines you sketched, leaving the veins the lighter base green color. -
Deepening leaf contrast:
Add another layer of dark green near the central vein and the base of the leaf, fading it out towards the serrated edges. This creates undulation and depth. -
Crisping the edges:
Use the tip of your brush to sharpen the serrated edges of the leaves with a pigmented green mix, ensuring they look crisp against the white paper.
Level Up: Dew Drops
Lift a tiny circle of paint with a clean, damp brush. Add a dark crescent shadow on the bottom and a tiny white gouache dot on top for a dew drop.
Step 4: Final Touches
-
Evaluate values:
Step back and look at the whole painting. Are the shadowed areas between florets dark enough? If not, carefully add small touches of dark purple to increase contrast. -
Cast shadows:
Add a very faint, cool grey shadow underneath where the flower head meets the stem to anchor the heavy bloom.
Frame your beautiful botanical study and enjoy the everlasting bloom of your hydrangea.
Wildflower Meadow Mini Studies
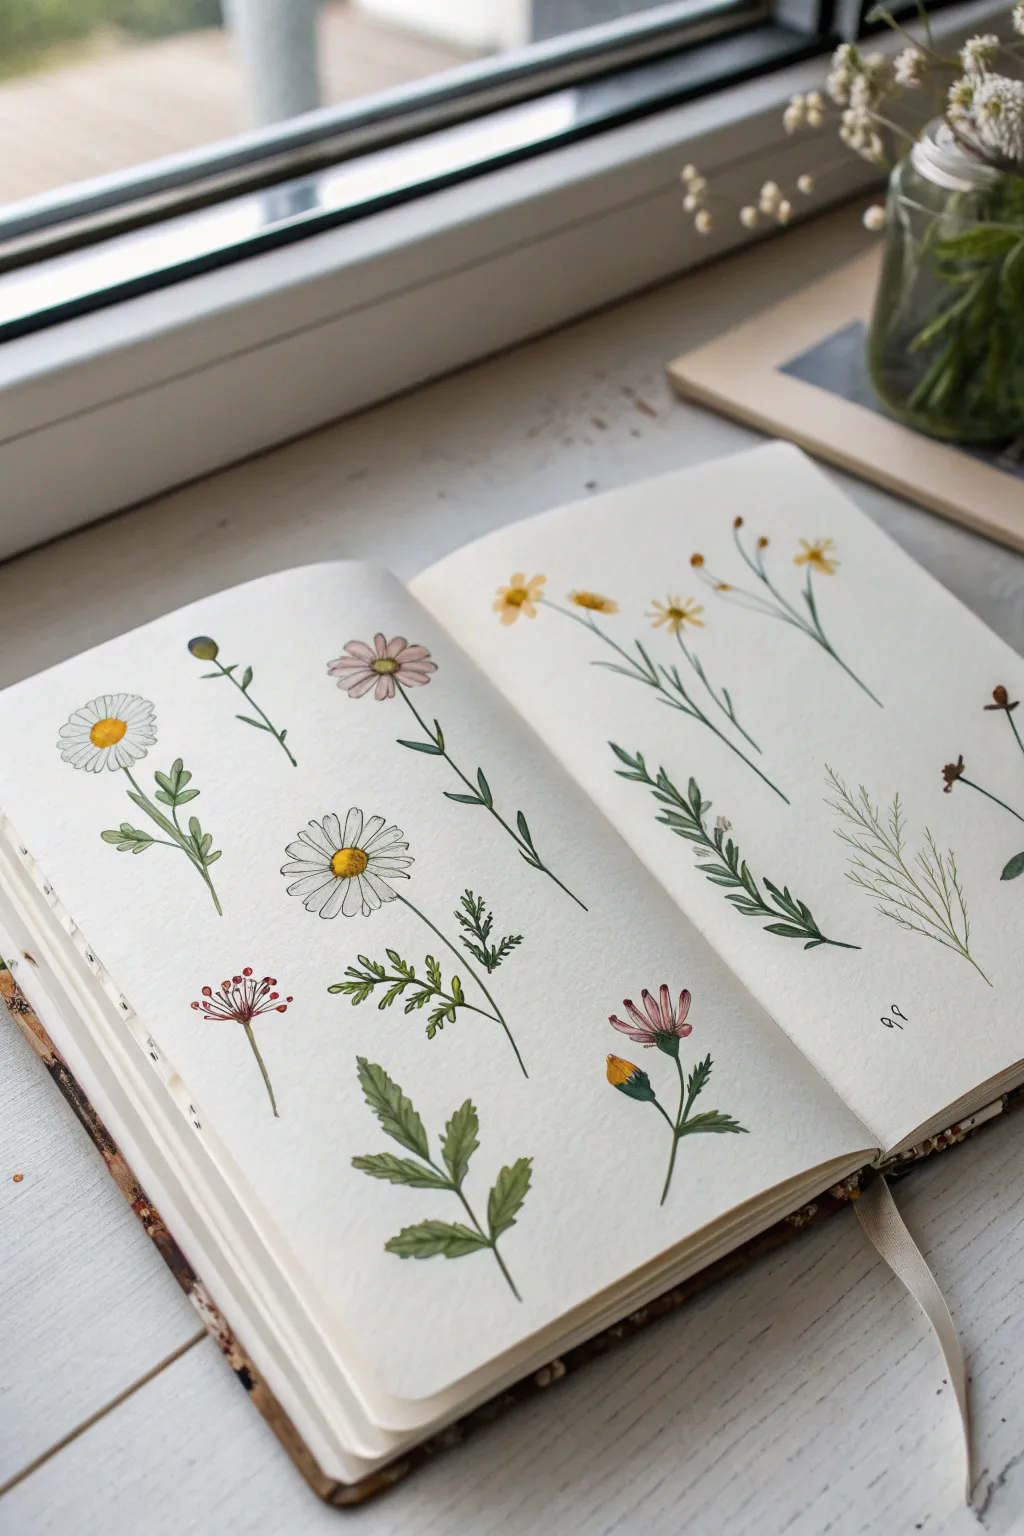
This project captures the delicate charm of a summer meadow through a series of loose, botanical mini-studies. By isolating individual stems and varying their stages of bloom, you’ll create a naturalist-style spread that feels both studious and serene.
Detailed Instructions
Materials
- Cold press watercolor sketchbook (shown: A5 size)
- Watercolor paints (Yellow Ochre, Sap Green, Alizarin Crimson, Cerulean Blue, Burnt Umber)
- Small round brushes (size 0, 2, and 4)
- Fine liner pen (waterproof sepia or black, size 0.1 or 0.3)
- Pencil (HB) and kneaded eraser
- Jar of clean water
- Paper towel
Step 1: Planning the Composition
-
Lightly pencil the layout:
Begin by lightly sketching the stems’ positions across the open spread. Notice how the original artwork staggers heights and angles to avoid a rigid look. Place about five main specimens on each page, leaving plenty of negative space between them to let the paper ‘breathe’. -
Sketch flower heads:
Add simple circles or ovals to mark where the flower heads will go. Don’t worry about petal details yet; just establish the general size and direction (some facing up, some nodding down) of each bloom. -
Refine leaf structures:
Draw the basic shapes of the leaves. For the chamomile-style flowers on the left, sketch jagged, fern-like leaves. For the stems on the right, use long, slender lance-shaped leaves. Keep your pencil lines faint so they won’t show through the transparent watercolor later.
Step 2: Painting the Left Page
-
Paint the white daisy centers:
Mix a warm yellow (Yellow Ochre with a touch of lemon). Using your size 2 brush, paint the domed centers of the daisies. While wet, drop a tiny dot of Burnt Umber at the bottom edge of the dome for shadow. -
Add the white petals:
Ensure your brush is very clean. Dilute a tiny amount of Cerulean Blue or grey until it is barely visible. Paint the petals of the white daisies, leaving the paper white for the highlights and only using the pale blue mix for the shadowed sides of the petals. -
Paint the pink cosmos:
Mix a watery Alizarin Crimson. Paint delicate, radiating petals for the pink flowers near the top. Allow the paint to pool slightly at the pet tips for a natural variation in tone. -
Detail the red buds:
For the small cluster of red berries or buds on the thin stem, use a more concentrated red mix. Dot them onto the paper with the tip of your size 0 brush, varying the size slightly for realism. -
Create the greenery:
Mix Sap Green with a little yellow for a fresh, spring look. Paint the stems and jagged leaves. For the lower large leaves, I like to use two shades of green—wet-on-wet—to suggest light hitting the leaf surface.
Keep it Loose
Don’t connect every single ink line. Leaving small gaps in your outlines—especially on white petals—allows the viewer’s eye to fill in the rest, creating a lighter, airier feel.
Step 3: Painting the Right Page
-
Paint yellow wildflowers:
Use a warm yellow mix for the small flowers on the right page. Keep these shapes loose and impressionistic, dabbing the brush rather than drawing precise outlines. -
Layer the green vine:
For the climbing plant with many small leaves, use a darker green (Sap Green mixed with a touch of Umber). Paint the leaves in pairs along the stem, making the ones at the tip smaller and lighter in color. -
Add the feathery grass:
Switch to your smallest brush (size 0) or use a rigger brush if you have one. Mix a very pale, watery green-brown. Use quick, flicking motions to create the fine, wispy grass texture seen on the bottom right. -
Paint dry seed heads:
Using Burnt Umber, paint the small brown seed pods or dried flower heads on the far right edge. Keep these quite distinct and silhouette-like.
Date Stamp It
Use a vintage date stamp or hand-letter specifically when and where you found these flowers (e.g., “June 12, Roadside”) to turn this artistic study into a true botanical diary entry.
Step 4: Finishing Touches
-
Outline with ink:
Once everything is completely bone-dry, take your waterproof fine liner. Add very selective outlines. Don’t trace every painted edge; broken lines on the petals and stems look more artistic and organic. -
Add center details:
Stipple (dot) ink into the centers of the yellow daisies to create texture. Draw the tiny stamens on the pink flowers with fine, radiating lines. -
Deepen shadows:
If any leaves look too flat, glaze a second transparent layer of darker green over the bottom half of the leaf to add dimension. -
Erase pencil marks:
Gently gently use the kneaded eraser to lift any visible graphite lines that haven’t been covered by paint or ink, cleaning up the white space around your specimens.
Now you have a breezy, beautiful spread that captures the essence of a summer walk.


Mixed Bouquet With Big-First Composition
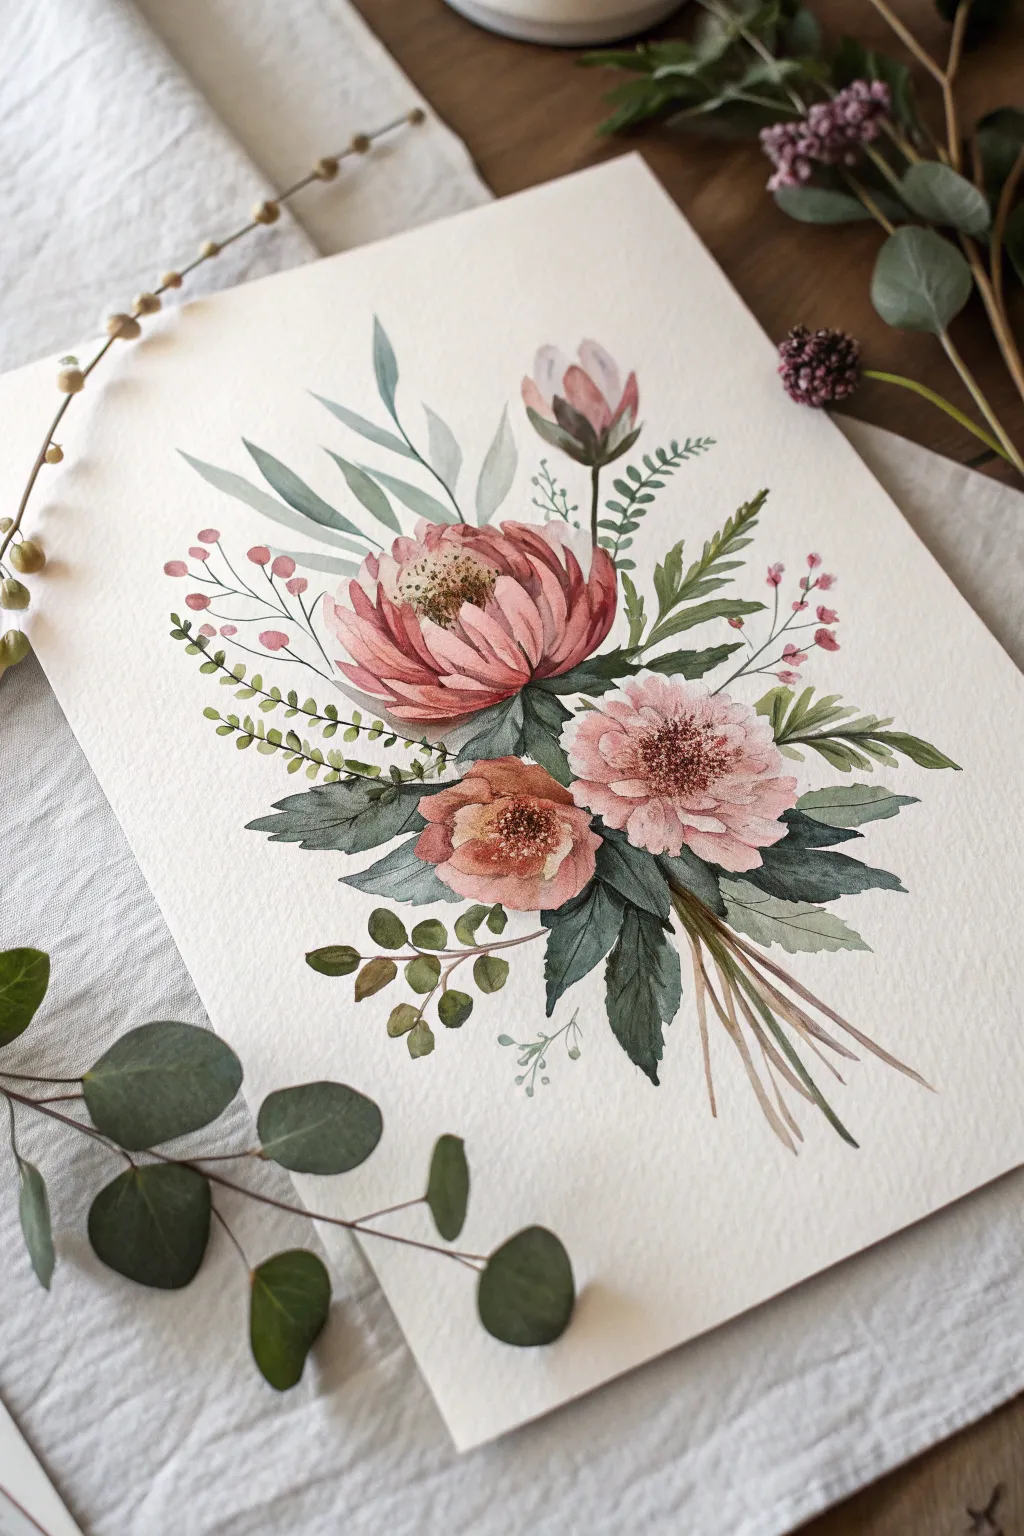
This tutorial guides you through painting a lush, textured bouquet by anchoring the composition with large statement blooms first. The soft watercolor palette of dusty pinks, sages, and deep greens creates a timeless botanical illustration perfect for framing.
Step-by-Step Guide
Materials
- Cold press watercolor paper (300 gsm)
- Round watercolor brushes (sizes 2, 6, and 10)
- Watercolor paints (Alizarin Crimson, Sap Green, Burnt Umber, Yellow Ochre, Indigo, White Gouache or Bleed Proof White)
- Pencil (HB) and kneaded eraser
- Two jars of water
- Paper towels
- Flow improver (optional)
Step 1: Sketching the Framework
-
Map the focal points:
Begin by lightly sketching three circles in the center of your paper to represent the main flowers. Make the top-left circle largest for the protea-style bloom, a slightly smaller one below to the right for the peony-style flower, and a small one tucked between them for the wild rose. -
Add stem lines:
Draw faint lines converging at the bottom right to establish the direction of the stems. This binding point is crucial for making the bouquet look gathered and natural. -
Outline foliage shapes:
Sketch broad, sweeping shapes for the eucalyptus leaves extending top-left and the fern-like fronds reaching top-right. Keep these pencil lines extremely light so they don’t show through the transparent paint later.
Wet-on-Dry Precision
For the petals, let each layer dry completely before painting an adjacent petal. This ‘glazing’ technique creates crisp edges rather than a blurry wash.
Step 2: Painting the Blooms
-
Base wash for the Protea:
Mix a watery blend of Alizarin Crimson and a touch of Burnt Umber to create a dusty rose color. Using your size 10 brush, paint the broad, upward-curving petals of the top-left flower, leaving thin white gaps between petals to define them. -
Deepen the Protea shadows:
While the first layer is still slightly damp, drop a more concentrated mix of the dusty rose into the base of the petals where they meet the center. This creates immediate volume. -
Paint the Peony:
For the middle-right flower, use a paler pink wash. Paint rounded petal shapes radiating from a center point. Keep the edges soft and ruffled. -
Add the Wild Rose:
Paint the smallest, lowest flower with a mix of Yellow Ochre and a hint of pink. Keep this bloom simpler with just 5-6 broad, open petals. -
Detail centers:
Once the flower petals are dry, use a size 2 brush and a thick mix of Burnt Umber and Yellow Ochre to stipple small dots in the centers of all three flowers, simulating pollen and stamens.
Muddy Greens?
If your foliage looks dull, stop mixing excessive colors. Clean your water jar and mix fresh Sap Green with either just blue (cool) or just yellow (warm).
Step 3: Adding Foliage and Filler
-
Base greens:
Mix Sap Green with a little Indigo for a cool, deep green. Paint the jagged, darker leaves tucking directly under the main flowers. These dark values will make the pinks pop. -
Eucalyptus stems:
Dilute your green mix heavily or add a touch of white gouache for a sage tone. Paint the tall, smooth leaves extending to the upper left. Use a single, continuous stroke for each leaf to keep them fluid. -
Fern fronds:
Using the tip of your size 6 brush, paint the fern-like leaves on the right side. Use short, rhythmic dabs along a central stem line. -
Add the bud:
Paint the single bud rising above the flowers using the same dusty pink as the protea, enclosing it with small green sepals at the base. -
Berry sprigs:
Mix a coral-pink shade. Using the size 2 brush, paint delicate stems with tiny round berries on the far left and far right edges of the bouquet to balance the composition.
Step 4: Final Details
-
Lower foliage:
Add the trailing round leaves at the bottom left using an olive green mix (Sap Green + Yellow Ochre). Vary the pressure on your brush to make some leaves look turned or transparent. -
Stem cluster:
Paint the gathered stems at the bottom right using a translucent brown wash. Keep lines loose and overlapping; you don’t need to trace every single stem back to a specific flower. -
Refine textures:
With a dry brush technique and dark brown paint, add tiny texture lines to the center of the protea and the peony to give them a fuzzy appearance. -
Final assessment:
Step back and look for empty spaces. I like to add tiny, faint green sprigs or ‘ghost leaves’ with very watery paint to fill gaps without adding visual weight.
Allow your painting to dry flat completely before erasing any remaining visible pencil lines
Floral Wreath With Leafy C Shape Layout
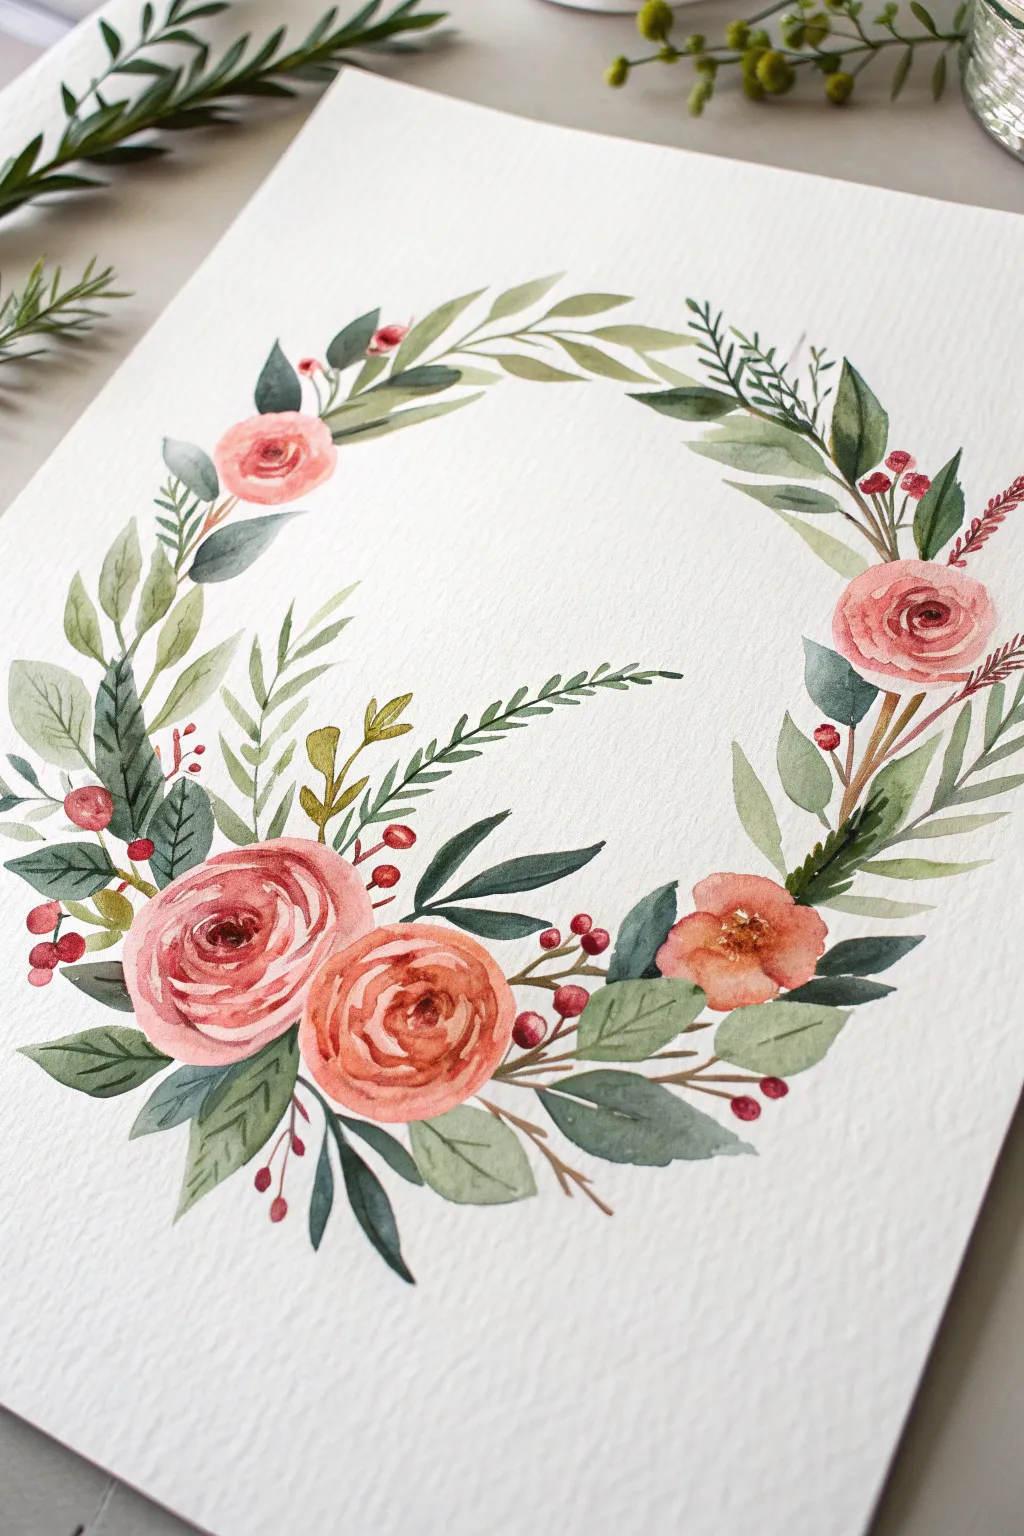
This elegant watercolor wreath features a unique asymmetrical layout, where a central leafy branch curves inward like the letter ‘C’ to frame the negative space. With its dusty rose blooms and varied foliage textures, it creates a romantic, vintage-inspired composition perfect for wedding stationery or wall art.
Step-by-Step
Materials
- Cold press watercolor paper (300 gsm)
- Watercolor paints (Alizarin Crimson, Burnt Sienna, Sap Green, Hooker’s Green, Paynes Grey, Yellow Ochre)
- Round brushes (sizes 2, 4, and 6)
- Pencil and eraser
- Jar of water
- Paper towels
- Mixing palette
Step 1: Sketching the Framework
-
Draw the main circle:
Lightly sketch a large circle on your paper to serve as the main guide for the wreath. It doesn’t need to be perfectly round; a slight oval shape works well too. -
Mark the C-shape:
Inside the lower left quadrant of your circle, sketch a curved line that sweeps inward towards the center, creating the spine for the distinctive C-shaped fern branch. -
Placement of blooms:
Mark small circles where the main flowers will sit. Place a cluster of two large roses in the bottom left, a solitary rose at the top left, and another single rose on the right side to balance the weight.
Muddied Colors?
If your greens are bleeding into the pink roses and turning brown, ensure the flowers are completely dry before painting adjacent leaves. Patience creates clean edges.
Step 2: Painting the Roses
-
Mix the rose color:
Create a soft dusty pink by mixing Alizarin Crimson with a tiny touch of Burnt Sienna and plenty of water. -
Start the center:
Using a size 4 brush, paint the tight center of the main bottom-left rose with a darker, more concentrated mix of the pink. Make small C-shaped strokes that interlock. -
Expand the petals:
Clean your brush slightly to dilute the pigment. Paint larger, looser C-curves around the center, leaving thin white gaps between strokes to define the petal edges. -
Add a peachy tone:
For the second rose in the cluster, mix a bit more Yellow Ochre into your pink for a peachy-coral hue. Paint this flower slightly smaller and nestled against the first one. -
Paint the accent roses:
Repeat the loose rose technique for the top-left and right-side flowers. I like to keep these slightly lighter and airier to prevent the wreath from looking too heavy. -
Add depth:
While the roses are still slightly damp, drop a tiny amount of concentrated crimson into the deepest crevices of the centers to add dimension.
Vary Your Greens
To make the wreath look organic, never use just one shade of green. Mix different ratios of blue and yellow into your green base for every few leaves you paint.
Step 3: Layering the Foliage
-
Mix leaf greens:
Prepare two green mixtures: a light, warm olive green (Sap Green + Yellow Ochre) and a cool, dark blue-green (Hooker’s Green + Paynes Grey). -
Paint the main leaves:
Using the size 6 brush and the warm olive mix, paint broad, rounded leaves tucking under the rose clusters. Press the belly of the brush down and lift to create a tapered tip. -
Create the C-curve fern:
Switch to your size 2 brush and the dark cool green. Paint small, rhythmic leaflets along the C-curved spine you sketched earlier, extending into the center of the wreath. -
Add flowing vines:
Using the tip of your size 4 brush, paint long, slender stems flowing upwards from the roses along the circle guide. Add elongated, narrow leaves to these stems using the cool green mix. -
Fill gaps with eucalyptus:
Mix a muted, milky blue-green. Paint rounded eucalyptus-style leaves particularly on the right side and top left, layering them behind the darker foliage for contrast.
Step 4: Details and Berry Accents
-
Paint the berries:
Mix a reddish-brown color. Add clusters of small round berries on fine stems poking out from the main floral clusters. -
Add filler sprigs:
Taking a very pale green, add faint, ghost-like fernsprigs in the background to create a sense of fullness without adding visual weight. -
Darken the shadows:
Once the main leaves are dry, use your darkest green mix to paint thin veins or add glazed shadows where leaves overlap. -
Final assessment:
Step back and look at the composition. If there are awkward white spaces, fill them with tiny buds or single leaves to unify the circle.
Allow your painting to dry completely before erasing any visible pencil lines to reveal your delicate floral artwork
Transparent Layering for Realistic Petal Depth
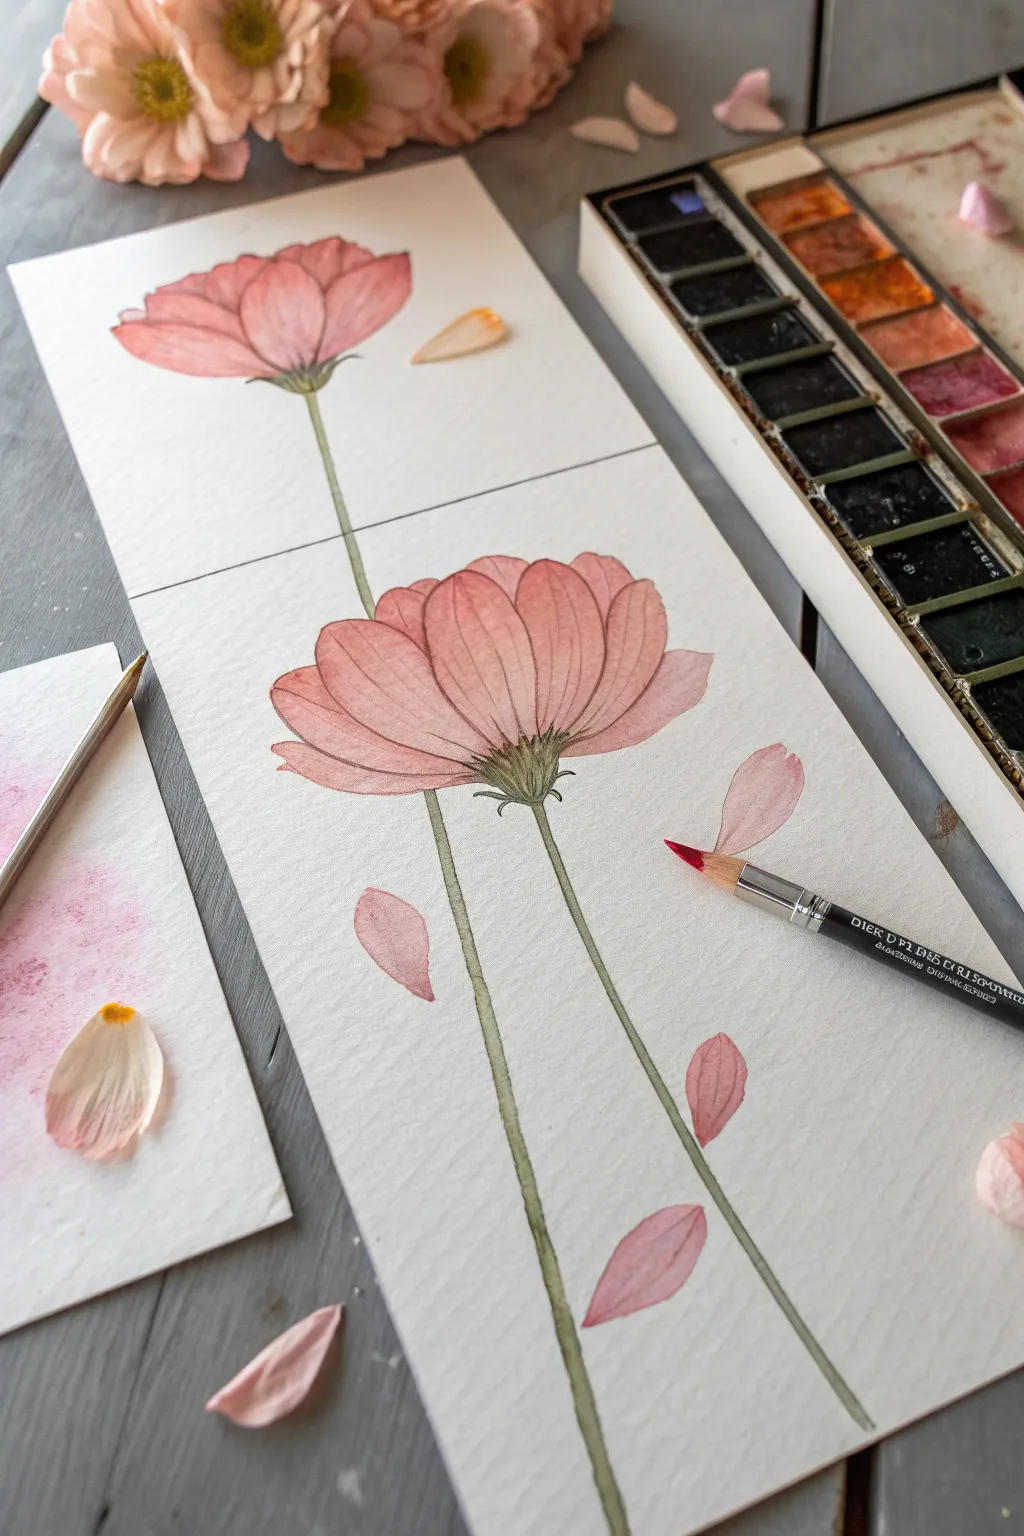
Master the delicate art of transparent watercolor layering with this study of pink cosmos flowers. By building up thin washes of color, you will create petals that look light, airy, and beautifully realistic.
Step-by-Step
Materials
- Cold press watercolor paper (block or taped sheet)
- Watercolor paints: Rose madder, burnt sienna, sap green, and Payne’s gray
- Synthetic round brush (size 4 or 6)
- Small fine liner brush (size 0 or 00)
- Pencil (HB or 2H)
- Kneaded eraser
- Clean water and paper towels
Step 1: Sketching the Composition
-
Draft the stems:
Begin by lightly sketching two long, slender stems rising from the bottom of the page. Curve them slightly to avoid stiffness; make one stem reach higher than the other for a balanced vertical layout. -
Outline the blooms:
At the top of the shorter stem, sketch an oval shape for the main flower center. Draw large, slightly ruffled petals radiating outward. For the taller stem, draw a smaller, upward-facing bloom. -
Add falling petals:
To create a sense of movement, lightly outline three or four loose petals floating downwards around the main stems. -
Lighten the lines:
Gently roll a kneaded eraser over your sketch. You want the graphite lines to be barely visible so they don’t show through the transparent watercolor layers later.
Water Control Tip
For the finest veins, blot your liner brush on a paper towel just once after loading it. This removes excess water, ensuring sharp, crisp lines that won’t puddle.
Step 2: First Wash: Establishing the Glow
-
Mix a pale wash:
Dilute your rose madder with plenty of water to create a very pale, transparent pink tea-consistency wash. -
Paint the first layer:
Apply this pale wash to the entire petal area of the main flower. Don’t worry about petal separation yet; focus on getting a smooth, even base color. Repeat for the upper flower and loose petals. -
Initial stem wash:
Mix sap green with a tiny touch of burnt sienna to desaturate it. Paint a thin, continuous line for both stems using the tip of your round brush. -
Complete drying:
Let this initial layer dry completely. The paper must be bone dry before you add the next layer, or the details will bleed.
Make it Shimmer
Once fully dry, mix a tiny amount of iridescent or pearl medium into your final glaze for petals that catch the light like real silk flowers.
Step 3: Second Layer: Defining Petals
-
Darken the mixture:
Add a bit more pigment to your pink mixture to create a slightly stronger value. -
Glaze individual petals:
Paint over only *some* of the petals, leaving others untouched to create depth. Focus on the areas where petals might overlap or curve. -
Intensify the tips:
While the petal wash is still damp, drop a tiny concentrated dot of rose madder at the very outer edge of a few petals. This creates a soft, natural gradient. -
Bloom centers:
Where the petals meet the center, add a touch of darker pink to suggest the shadow of the flower’s cup.
Step 4: Detailing: Texture and Veins
-
Mix the liner color:
Prepare a mixture of rose madder with a tiny hint of Payne’s gray. This should be a milky consistency, darker than your previous layers. -
Paint delicate veins:
Using your fine liner brush, paint extremely thin lines radiating from the flower center outward to the petal tips. Keep your hand loose so the lines are slightly shaky and organic, not ruler-straight. -
Define the edges:
Use the very tip of the brush to outline the petals with a broken, delicate line. This separates the petals clearly without making them look like a cartoon. -
Falling petal details:
Repeat the veining process on the loose falling petals, keeping the details subtle to show they are consistent with the main flower.
Step 5: Finishing Touches
-
Paint the calyx:
Using a slightly darker green mix, paint the small leafy cup (calyx) at the base of the flower heads. Add small, spiky sepals extending upward. -
Shadow the stems:
Run a thin line of darker green down the shadowed side (usually the right side) of the stems to give them roundness. -
Final assessment:
Step back and look at the overall contrast. If the center feels too light, add a tiny dab of yellow ochre or burnt sienna right in the middle for warmth.
Allow your painting to dry flat completely before framing this delicate botanical study.
Two-Tone Leaf Mixes to Support Your Flowers
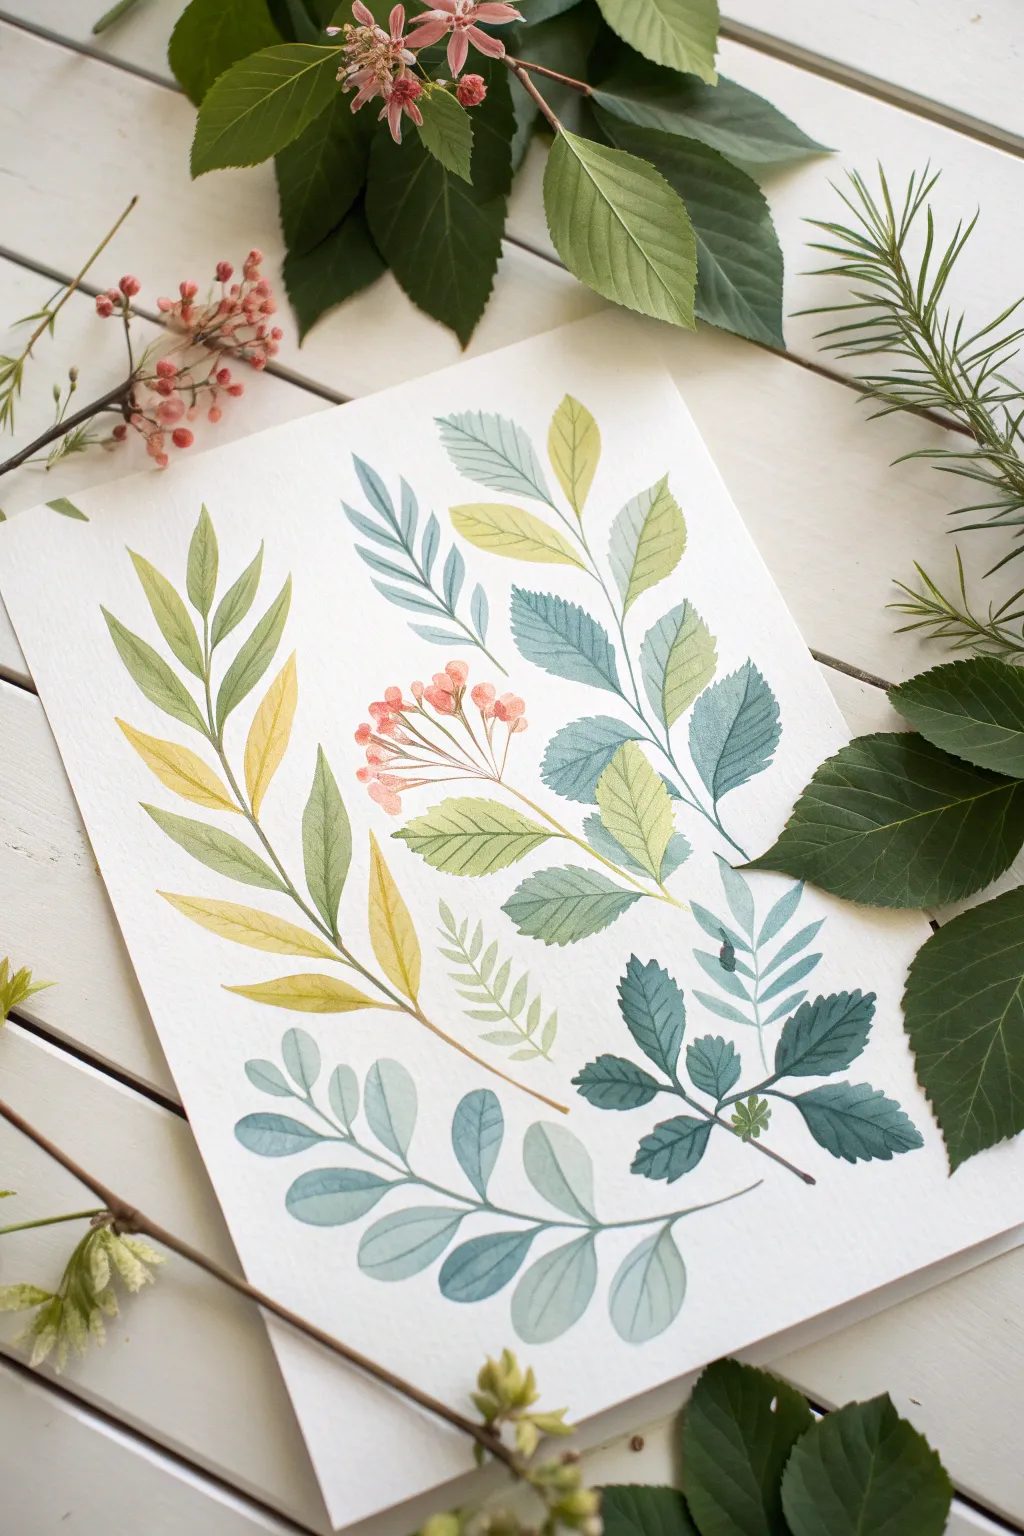
This refreshing watercolor study focuses on the subtle beauty of two-tone gradients, seamlessly blending warm ochres into cool teals. It’s a perfect practice piece for mastering wet-on-wet transitions and creating a cohesive, nature-inspired palette.
Step-by-Step Guide
Materials
- Cold press watercolor paper (300 gsm)
- Round watercolor brushes (size 2 and 6)
- Watercolor paints: Sap Green, Yellow Ochre, Indigo, Burnt Sienna, and a cool Turquoise
- Two jars of water (clean and rinse)
- Paper towels
- Pencil (HB or H) for light sketching
Step 1: Sketching the Layout
-
Map the stems:
Lightly sketch the main skeletal structure of your composition using an H pencil. Draw a long, curved stem rising on the left, a central diagonal sprig, and a few shorter stems branching out on the right and bottom. -
Outline leaf shapes:
Flesh out the stems by drawing the leaf shapes. Vary the species: make the left branch have long, lance-shaped leaves, while the bottom branch should have rounded, oval leaflets. Keep your pencil pressure extremely light so it won’t show through the transparency of the paint.
Muddy Gradients?
If colors turn brown where they meet, you’re overworking the blend. Place the two colors next to each other and let the water do the moving, rather than stirring them on the paper.
Step 2: Painting the Left Branch (Warm Tones)
-
Mix your gradients:
Prepare two puddles on your palette: a watery Yellow Ochre and a muted Sap Green (mix with a tiny touch of brown to desaturate it). -
Start the top leaf:
Using your size 6 brush, load it with the green mix and paint the tip of the top leaf on the left branch. -
Drop in color:
While the green is still wet, rinse your brush quickly, pick up the Yellow Ochre, and touch it to the base of the leaf. Let the yellow bleed upward into the green naturally. -
Continue down the stem:
Repeat this process for the lower leaves on this branch, occasionally reversing the gradient so the tips are yellow and bases are green for variety.
Step 3: The Central Floral Sprig
-
Paint the berries:
Mix a watery coral pink using Burnt Sienna and a lot of water (or a touch of red if you have it). Paint small, clustered circles near the center of the page. -
Add delicate stems:
Switch to your size 2 brush. Mix a thin brown line and connect these berries to the main green stem with very fine, quick strokes. -
Leaf details:
Add two medium-sized serrated leaves below the berries using a lime green mix, ensuring you leave a crisp center vein unpainted for a highlight.
Mastering Veins
For razor-thin veins, switch to a rigger brush or barely touch the paper with the very tip of your round brush. Exhale slowly as you pull the stroke for steadier lines.
Step 4: Cool Toned Branches
-
Mixing teal and blue:
Create a cool palette by mixing Turquoise with a little Indigo for a deep dusty blue, and a lighter watery Turquoise for the highlights. -
Bottom rounded leaves:
Paint the large, rounded leaves at the bottom of the page. Start with the lighter blue wash for the entire shape, then drop slightly darker pigment near the stem connection points while it’s still damp. -
Serrated blue leaves:
For the leaves on the right side, use the darker Indigo mix. Paint one half of the leaf first, leave a tiny sliver of white paper for the vein, and painting the other half. -
Add the feathery fern:
Tucked between the warm and cool branches, paint a small fern-like sprig using a very pale, watered-down green to make it look like it is engaging with the background.
Step 5: Refining and Veining
-
Wait for dryness:
Ensure the base layers are completely bone dry. If the paper feels cool to the touch, it is still wet. -
Add central veins:
Using the size 2 brush and a slightly more concentrated mix of the leaf’s base color, paint a thin central line down the leaves that don’t already have white space veins. -
Painting lateral veins:
For the large yellow-green leaves on the left, gently curve thin lines outward from the center vein. Keep these strokes very faint and delicate. -
Darker accents:
For the dark blue serrated leaves on the bottom right, add deeper indigo veins to enhance the contrast and texture. -
Connect the stems:
Double-check that all leaves are connected to their main branches. Extend the brown stem lines where necessary to ground the floating leaves.
Once dried, erase any visible pencil marks to leave your botanical study looking crisp and professional
Bubble-Texture Hydrangeas for a Playful Effect
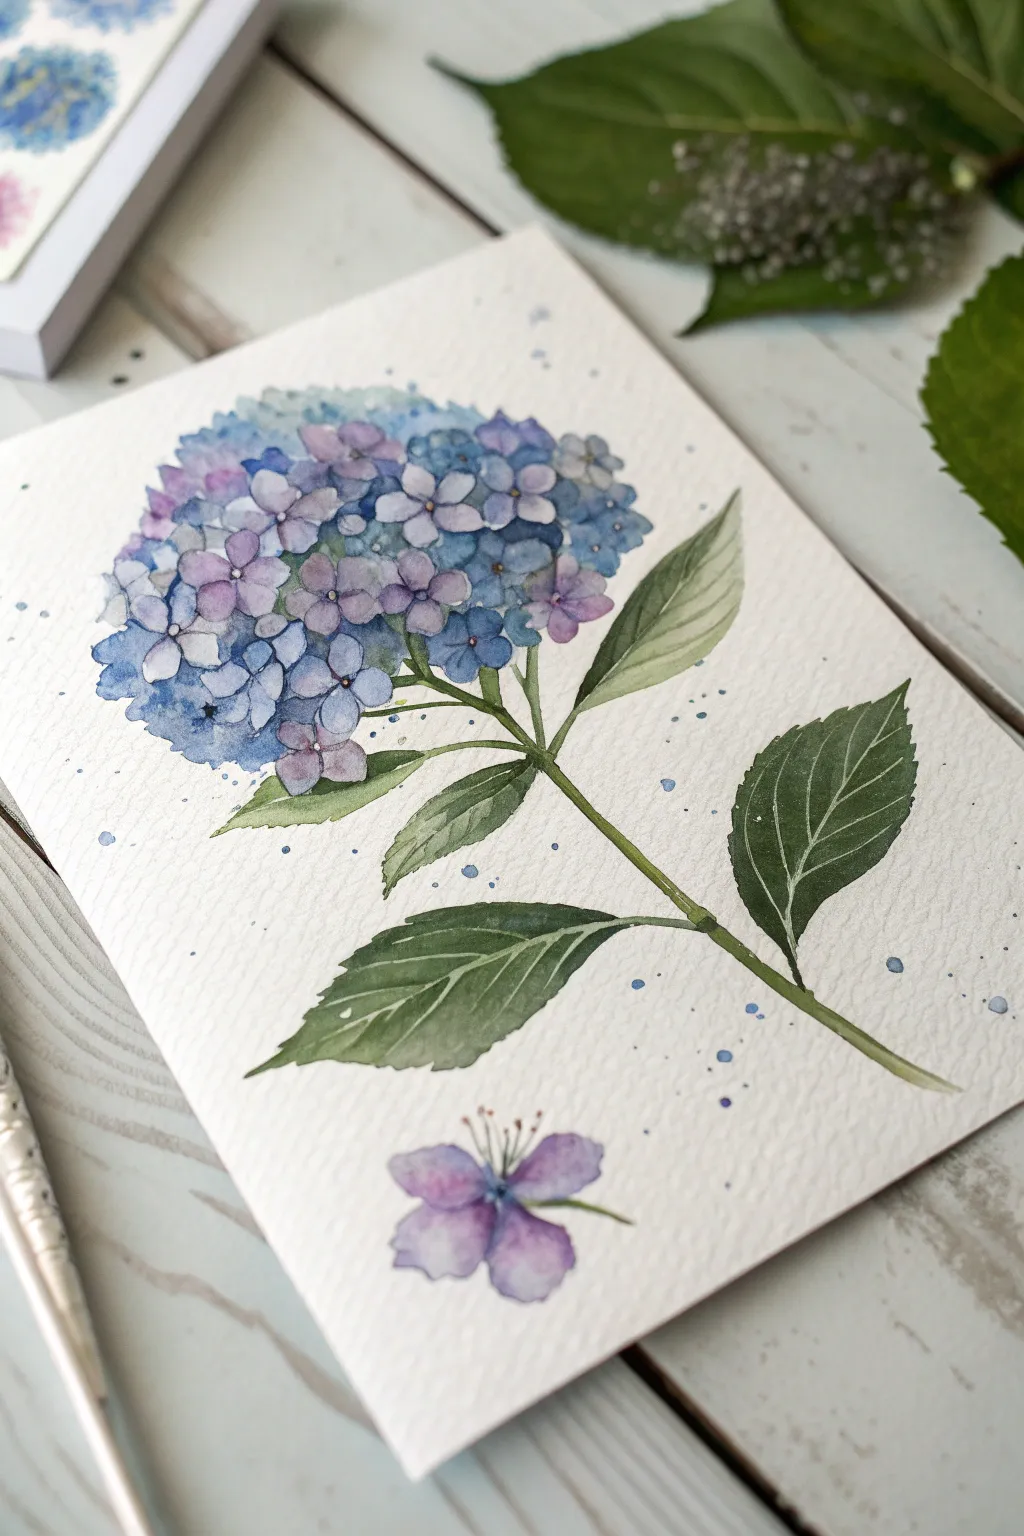
Capture the charm of summer with this delicate watercolor hydrangea, which uses a loose, playful technique to mimic the cluster of tiny petals. The blend of soft lilacs and cool blues creates a soothing effect that pairs perfectly with the crisp, defined leaves.
How-To Guide
Materials
- Cold press watercolor paper (300 gsm)
- Watercolor paints: Ultramarine Blue, Cobalt Blue, Purple Lake, Sap Green, Deep Hookers Green, Burnt Umber
- Round watercolor brushes (Size 2, 4, and 8)
- Pencil (HB or H)
- Kneadable eraser
- Palette
- Two jars of water
- Paper towels
Step 1: Sketching and Base Layer
-
Outline the shape:
Begin by lightly sketching a large, rounded globe shape for the flower head using an HB pencil. Don’t make it a perfect circle; let the edges be slightly bumpy to suggest petal clusters. -
Add stem and leaves:
Draw a central stem extending downwards from the flower head. Add three large leaves branching off the stem—one on the left, one on the right, and one lower down facing left. -
Define individual petals:
Within the main globe shape, lightly sketch several small, four-petaled florets. You don’t need to draw every single one; just focus on a few distinct ones near the center and edges to guide your painting. -
Lighten the sketch:
Roll your kneadable eraser over the entire drawing to lift excess graphite, leaving only a faint guide that won’t show through the transparent watercolor. -
Prepare the flower wash:
Mix a very watery puddle of Cobalt Blue and another of Purple Lake on your palette. You want these to be pale and transparent. I like to keep them separate but close enough to pull from both easily.
Step 2: Building the Hydrangea Head
-
Moisten the paper:
With a clean size 8 brush, dab clean water randomly onto the area of the flower head. Don’t soak the whole shape; leave some dry gaps between wet patches. -
Drop in the first color:
Load your size 4 brush with the pale Cobalt Blue mix and touch it to the wet areas. Watch the pigment spread softly. -
Introduce the purple:
While the blue is still damp, drop in touches of the pale Purple Lake. Allow the colors to bleed into each other naturally, creating soft transitions. -
Painting defined florets:
Switch to a size 2 brush and thicker pigment (less water). Paint specific four-petal shapes on the dry areas of paper you left earlier. This creates a contrast between soft background washes and crisp foreground petals. -
Add depth:
Mix a stronger version of Ultramarine Blue and a touch of Purple. Paint small, dark negative shapes in the gaps between the florets to create shadow and depth within the cluster. -
Add falling petal:
Paint a single, loose four-petal floret falling below the main stem to balance the composition. Use the purple mix for this accent. -
Splatter effect:
Load a brush with watery blue paint and tap it against another brush handle over the paper to create fine splatters around the bloom. This mimics pollen or a loose, artistic vibe.
Don’t Overwork It
Step away regularly! Hydrangeas rely on the chaotic blend of colors. If you manipulate the wet paint too much, you’ll get a muddy gray instead of vibrant separation.
Step 3: Painting the Foliage
-
Stem base color:
Mix Sap Green with a tiny touch of Burnt Umber. using a size 4 brush, paint the main stem with a single, confident stroke. -
Leaf wash:
Paint the leaves with a watery wash of Sap Green. While wet, drop in hints of Hookers Green near the base and center vein for dimension. -
Vein details:
Allow the leaves to dry completely. This is crucial for crisp veins. Use your smallest brush (size 0 or 2) and a very pale, watery green (or even white gouache if you prefer opacity) to paint the fine veins on top of the dry leaves. -
Final leaf shadows:
If painting veins negatively (painting around them), use a dark green mix to fill in the leaf segments, leaving thin lines of the lighter base wash visible as the veins. -
Add the stamen:
Using a tiny brush and dark blue or grey, add tiny dots to the centers of the defined florets. -
Falling petal details:
Add fine stamens to the floating purple flower at the bottom using a dark, thin line to finish the piece.
Muddy Centers?
If your floret centers are bleeding into the petals, the paper is too wet. Wait for the petal layer to be bone dry before adding the tiny center dots.
Once specific details are dry, frame your botanical art to bring a touch of the garden indoors


Have a question or want to share your own experience? I'd love to hear from you in the comments below!