If you’ve got a plain pot and an itch to draw, you’re already halfway to something adorable. These pot drawing ideas are made for that curved little canvas—easy to start, satisfying to finish, and extra cute once a plant moves in.
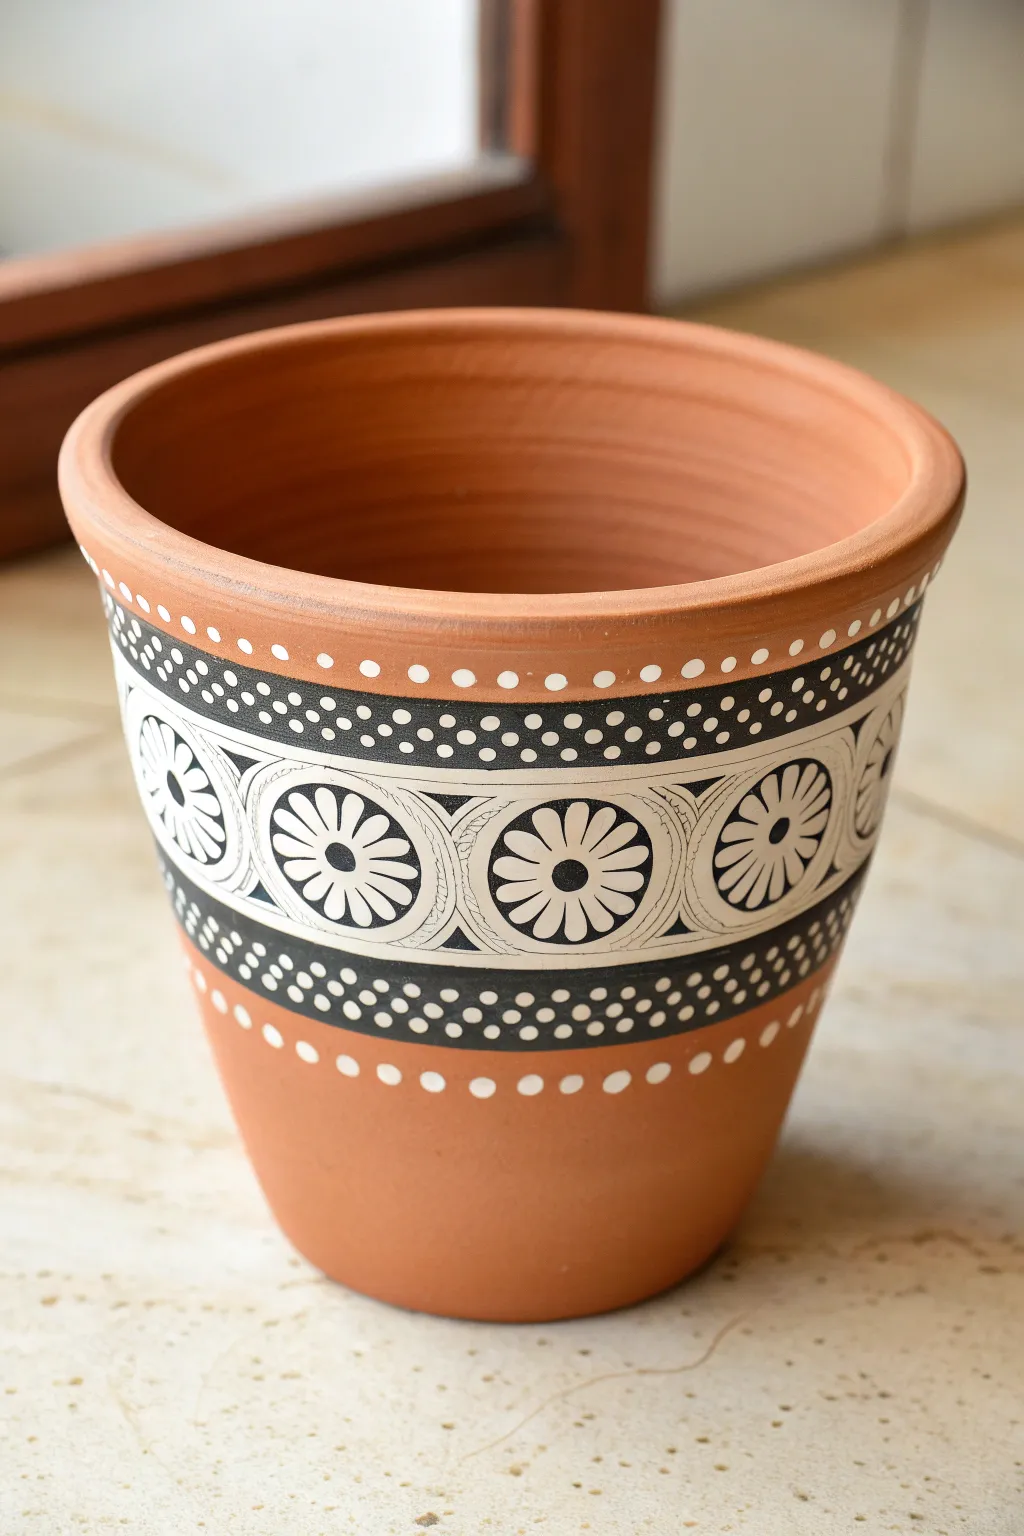
Classic Daisy Pattern
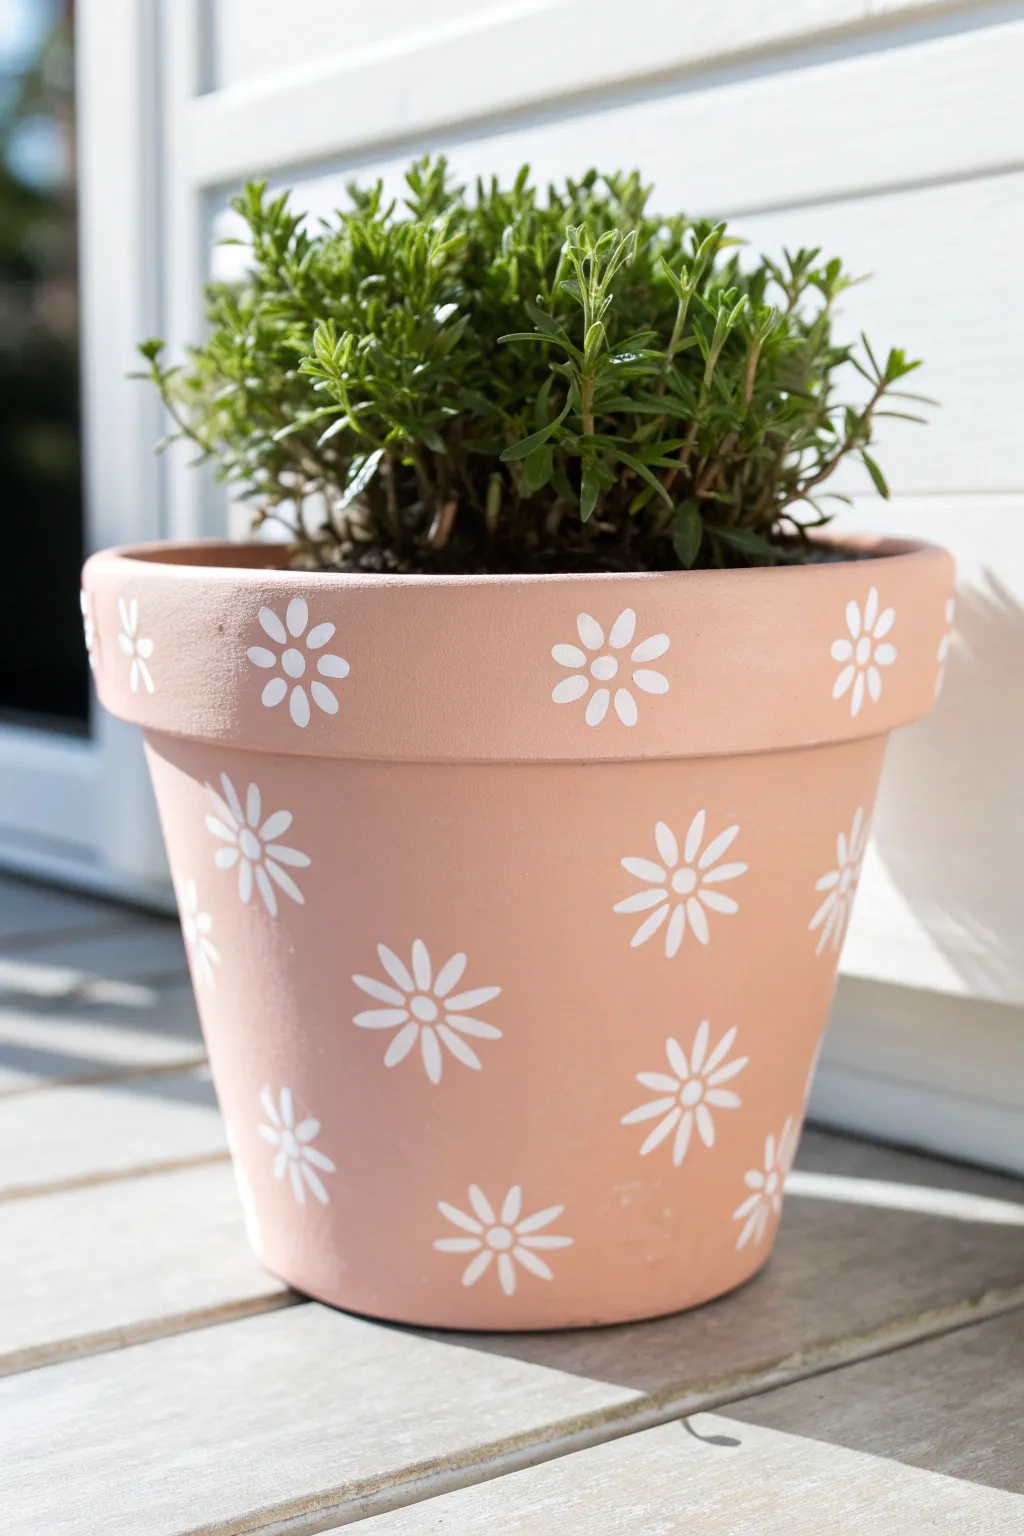
Transform a plain terracotta staple into a sweet, summer-ready accent with this soft peach and white daisy design. The gentle salmon-pink base coat provides a warm, modern backdrop for simple, cheerful florals that pop without overwhelming your space.
How-To Guide
Materials
- Terracotta pot (medium size)
- Acrylic paint (Peach/Salmon color)
- Acrylic paint (Titanium White)
- Flat paintbrush (1-inch width)
- Small round paintbrush (size 2 or 4)
- Pencil with a fresh eraser (or a round foam pouncer)
- Water cup and paper towels
- Clear acrylic sealer (matte or satin spray)
Step 1: Base Preparation
-
Clean the surface:
Before painting, wipe down your terracotta pot with a damp cloth to remove any dust or debris. Let it dry completely so the paint adheres properly. -
Mix your base color:
Squeeze out a generous amount of your peach or salmon-colored acrylic paint. If the shade feels too bright, you can tone it down by mixing in a tiny drop of white or tan. -
First coat application:
Using the flat 1-inch brush, apply the first layer of peach paint. Cover the entire exterior, including the rim. Don’t worry if it looks streaky; terracotta is porous and drinks up the first layer. -
Paint the inner rim:
Paint the inside of the pot just down to the soil line (about 1-2 inches deep). This ensures a finished look once your plant is potted. -
Dry and repeat:
Allow the first coat to dry for about 20 minutes. Apply a second coat to ensure an opaque, solid color finish. If you can still see the clay color, a third thin coat might be necessary.
Step 2: Designing the Deconstructed Daisies
-
Test your technique:
Practice your flower shape on a piece of scrap paper first. We are aiming for a simple, stylized daisy with roughly eight petals and a distinct center. -
Paint the flower centers:
Start with the rim. Dip the eraser end of a pencil into your white paint. Press it gently onto the center of the rim to create a perfect circle. Repeat this around the rim, spacing them about 2 inches apart. -
Add lower centers:
Move to the main body of the pot. Stamp more white circles in a staggered pattern—so a flower sits in the gap between the two flowers above it. -
Create the petals:
Switch to your small round brush (size 2 or 4). Load it with white paint. Starting near the center dot (but not touching it), press the brush down and pull outward creating a small tear-drop or oval shape. -
Complete the first flower:
Continue painting petals around the center dot. Aim for about 7 or 8 petals per flower. Keep them loose and slightly separated for that hand-painted charm. -
Paint the rim flowers:
Work your way around the rim first. I find it easiest to rotate the pot on a lazy Susan or a piece of cardboard so I don’t smudge wet paint. -
Paint the body flowers:
Move down to the staggered centers on the main pot body and add their petals. If a flower falls near the bottom edge, it’s okay to paint only half of the petals as if it’s wrapping fast under the pot. -
Add partial blooms:
Look for large empty spaces between your main flowers. Using just the small brush, add a few floating petals or half-flowers to fill the gaps and create a continuous pattern. -
Touch up the centers:
Once the white centers are dry, you can leave them white for a monochromatic look (as seen in the photo) or add a tiny dot of yellow if you want a traditional daisy vibe. For this specific look, re-dot the centers with fresh white paint if the peach is showing through.
Petal Perfection
For uniform petals without drawing, try using a Q-tip! Dip the cotton tip in white paint and press down firmly to create instant, rounded petal shapes around your center dot.
Step 3: Finishing Touches
-
Check for consistency:
Spin the pot around and look for any petals that need a second coat of white to stand out against the peach background. -
Final cure:
Let the entire design dry for at least 24 hours to ensure the paint is fully set. -
Seal the deal:
Take the pot to a well-ventilated area and spray it with a clear matte or satin acrylic sealer. This protects your artwork from water damage when you water your plants.
Oops, Smudged It?
If you smudge a white petal onto the peach base, don’t wipe it! Let it dry completely, then paint over the mistake with your peach base color before trying the petal again.
Once dry and potted, this cheerful creation brings a gentle warmth to any windowsill or patio table

Simple Botanical Vines
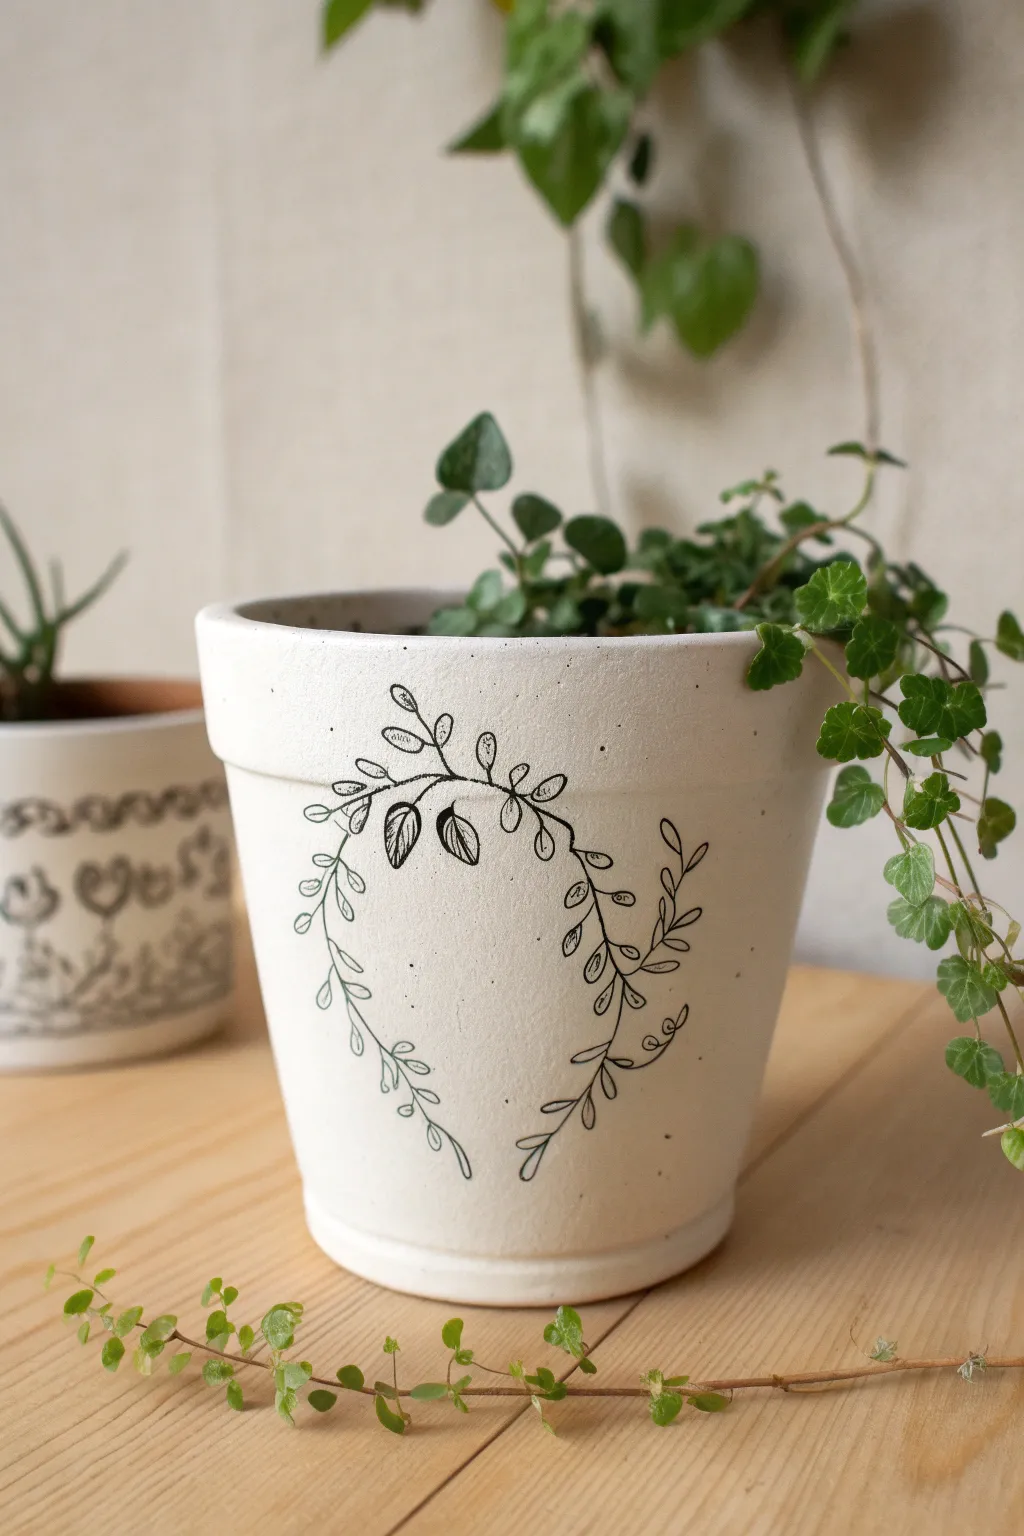
Transform a plain terracotta pot into a chic, modern planter with this delicate black-and-white design. The simple, drooping vine illustration adds an elegant touch without overwhelming your greenery, making it perfect for trailing plants.
Detailed Instructions
Materials
- Terra cotta pot (clean and dry)
- White acrylic paint (matte finish)
- Foam brush or wide flat paintbrush
- Pencil
- Black permanent marker (fine tip) or black paint pen
- Clear matte sealant spray (optional)
- Eraser
Step 1: Preparing the Base
-
Clean the surface:
Before you begin, ensure your terra cotta pot is free of dust and dirt. Wipe it down with a damp cloth and let it dry completely to ensure the paint adheres well. -
Apply the first coat:
Using a foam brush or wide flat brush, apply a smooth layer of white acrylic paint. Start from the top rim and work your way down to avoid drips. -
Dry and repeat:
Let the first coat dry for about 20-30 minutes. If the terracotta color is still peeking through, apply a second or third coat until you have a solid, opaque white finish. -
Paint the rim:
Don’t forget to paint the inside of the rim, going down just an inch or two, so the clay doesn’t show when the pot is filled with soil.
Ink Smudging?
If your marker tip gets clogged with white paint, scribble on a scrap piece of paper until the ink flows black again. Always let the white base dry fully first.
Step 2: Sketching the Design
-
Find the center:
Identify the ‘front’ of your pot. Lightly mark a central point with your pencil where the main stem of the vine will originate. -
Draw the main arch:
Sketch a gentle, curved line arching upwards slightly and then splitting. Visualize how gravity would pull a real vine downwards. -
Create the two drooping stems:
Extend two long, flowing lines downwards from your central point, curving them inward slightly at the bottom to create a horseshoe-like shape. -
Add leaf placements:
Along these stems, sketch small ticks or tiny circles where you want your leaves to go. Spacing them irregularly makes the vine look more organic. -
Detail the larger leaves:
Near the top center where the vines split, sketch two slightly larger leaves with a central vein line, as shown in the reference image.
Step 3: Inking the Vines
-
Start the permanent lines:
Take your black permanent marker or paint pen. I find it easiest to start at the top center and work my way down one side to avoid smudging. -
Trace the stems:
Go over your pencil lines for the main stems first. Keep your hand steady but don’t worry about perfection; a little wobble adds character. -
Draw the leaves:
Draw the small leaves attached to the stem. Use a simple teardrop or oval shape. vary the angles so they look natural. -
Add leaf details:
For the two larger central leaves, draw the outline and add a single line down the middle for the vein. Leave the smaller leaves as simple outlines. -
Include tiny buds:
Add a few tiny circles on short stems interspersed among the leaves to represent buds or berries. -
Review and refine:
Step back and look at the pot. If a section looks too empty, draw in an extra leaf or a small curling tendril.
Pro Tip
Use your pinky finger as a stabilizer against the dry surface of the pot while drawing. This helps keep your hand steady on the curved surface.
Step 4: Finishing Touches
-
Erase pencil marks:
Wait at least 15 minutes for the ink to fully set. Gently erase any visible pencil sketch lines. -
Seal the artwork:
To protect your design from water damage when watering your plants, spray the pot with a clear matte sealant. Do this in a well-ventilated area.
Now your custom planter is ready to house your favorite ivy or trailing succulent


Geometric Color Blocks With Tape
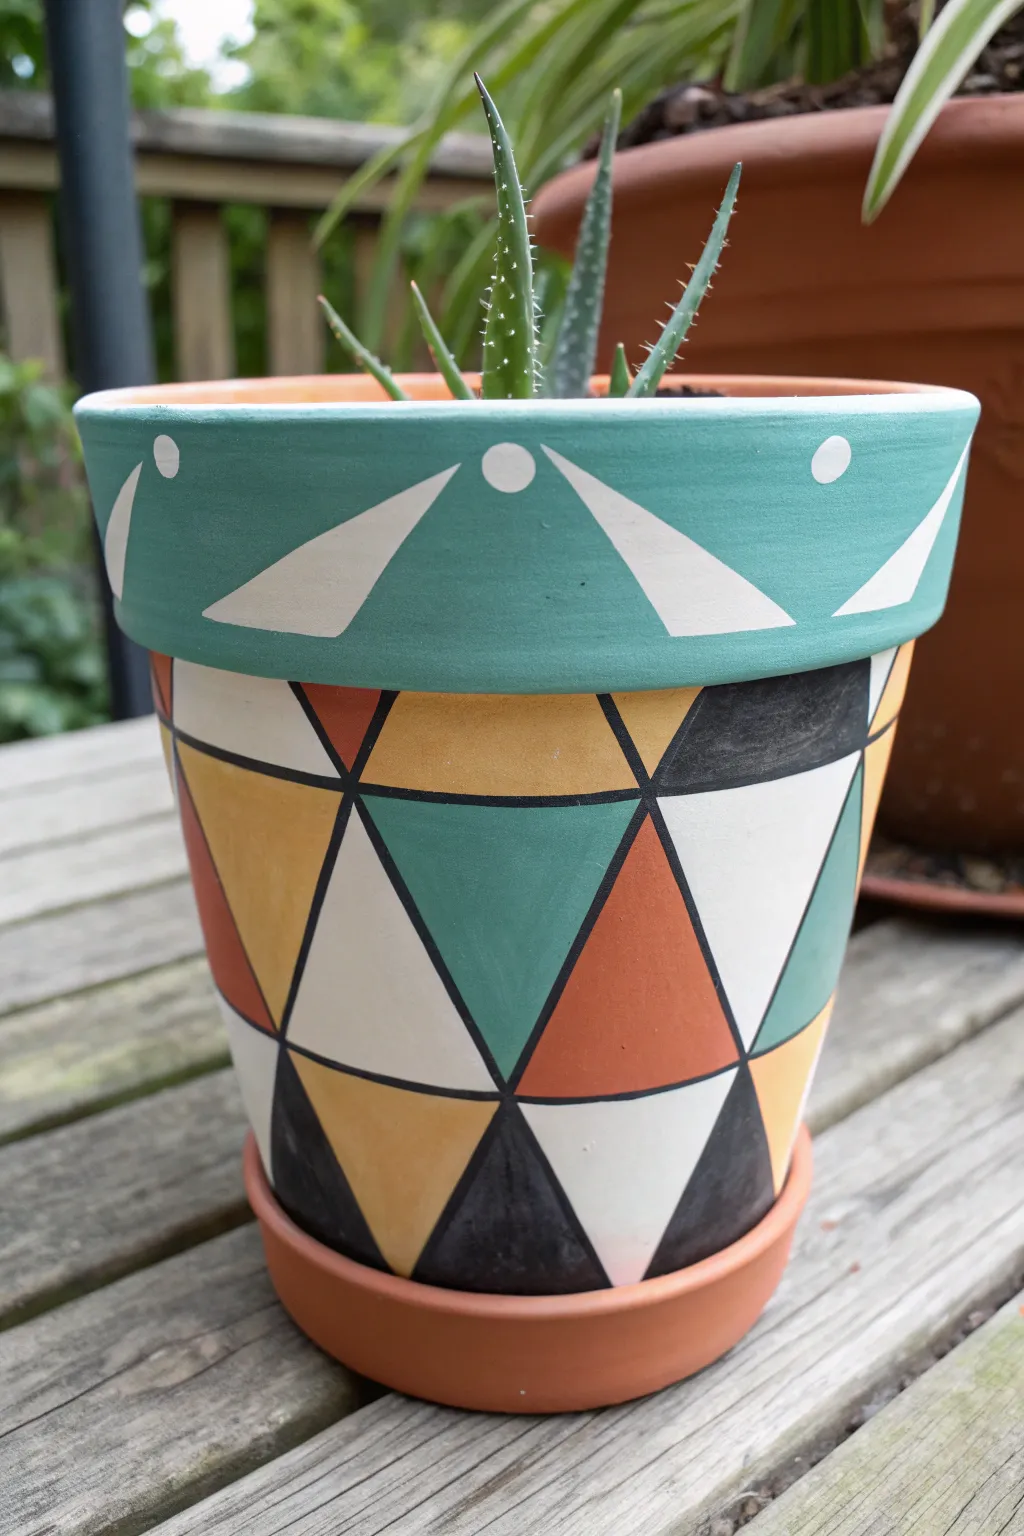
Transform a plain clay pot into a stylish home for your succulents with this crisp, geometric design. Using a simple triangle pattern and an earthy color palette including sage, mustard, and rust, you can create a modern planter that looks professionally finished.
Step-by-Step
Materials
- Terracotta pot with saucer
- Acrylic paints (teal/sage, mustard yellow, rust orange, white, black/charcoal)
- Painter’s tape or masking tape (narrow width is best)
- Flat paintbrushes (various sizes)
- Fine detail liner brush
- Pencil and eraser
- Ruler or straight edge
- Acrylic sealer spray (matte or satin)
- Cup of water and paper towels
Step 1: Preparation & Rim Design
-
Prep the surface:
Wipe down your terracotta pot with a damp cloth to remove any dust or debris. Ensure it is completely dry before starting, as moisture will prevent the paint from adhering properly. -
Paint the rim base:
Using a flat brush, paint the entire rim of the pot with your chosen teal or sage green shade. You may need two coats for full opacity, allowing the first to dry before adding the second. -
Add rim details:
Once the green base is dry, load a smaller brush with white paint. Paint simple, elongated triangles pointing downward from the top edge, spacing them evenly around the circumference. -
Add dots:
Place a small white dot between each white triangle along the top edge of the rim. You can use the back end of a paintbrush handle dipped in paint to make perfectly round dots.
Clean Lines Hack
For the crispest outlines, try a black paint marker or permanent oil-based marker instead of a brush. It offers steadier control than liquid paint.
Step 2: Drafting the Pattern
-
Establish the grid:
Using a pencil and a flexible ruler or tape measure, mark even intervals around the circumference of the pot’s body. These marks will determine the width of your triangles. -
Sketch the triangles:
Connect your marks to create a grid of interlocking triangles. You don’t need to be perfect, but keeping the lines relatively straight will make the painting phase much easier. -
Plan your colors:
Lightly mark inside each triangle with a letter (e.g., ‘W’ for white, ‘Y’ for yellow) to designate which color goes where. This prevents two of the same color from touching and helps balance the overall composition.
Step 3: Painting the Color Blocks
-
Start with the lightest color:
Begin by painting all the white triangles first to avoid muddying your brighter colors later. Use a flat brush that fits comfortably inside the triangle lines. -
Refine the edges:
If you want ultra-sharp lines, you can apply painter’s tape along the pencil lines of the triangles you are currently painting. However, since we are adding black outlines later, freehand painting is perfectly fine and often faster. -
Fill the yellow sections:
Next, move on to the mustard yellow triangles. Apply paint smoothly, working from the center of the shape outward toward the pencil lines. -
Apply the rust tones:
Paint the designated terracotta or rust-orange sections. I like to let this dry briefly between coats if the clay color is showing through too much. -
Add the dark accents:
Fill in the remaining triangles with dark charcoal or black paint. Be extra careful near the edges of other colors to keep the shapes distinct. -
Paint the saucer:
If your saucer needs a refresh or color match, paint the rim a solid rust color to complement the design, or leave it natural terracotta for texture.
Paint Peeling?
If paint lifts off the clay, the terracotta was too dusty or damp. Sand the spot lightly, wipe clean, prime with gesso, and repaint the affected area.
Step 4: Outlining & Sealing
-
Mix the outline color:
Prepare your black paint for lining. If it feels too thick, add a tiny drop of water to improve the flow; it should have an inky consistency for smooth lines. -
Outline the shapes:
Using a fine liner brush, carefully paint black lines over all the boundaries where the colors meet. This step hides any uneven edges and gives the clear ‘stained glass’ effect. -
Add the rim border:
Paint a clean black line separating the green rim section from the main body pattern to distinctly separate the two designs. -
Let it cure:
Allow the pot to dry completely overnight. This ensures all layers of paint have fully set before you apply any protective coating. -
Seal the project:
Take the pot outdoors or to a well-ventilated area and spray it with a matte or satin acrylic sealer. This protects the paint from water damage and UV fading.
Once dry, pot your favorite aloe or cactus and enjoy your custom decor piece


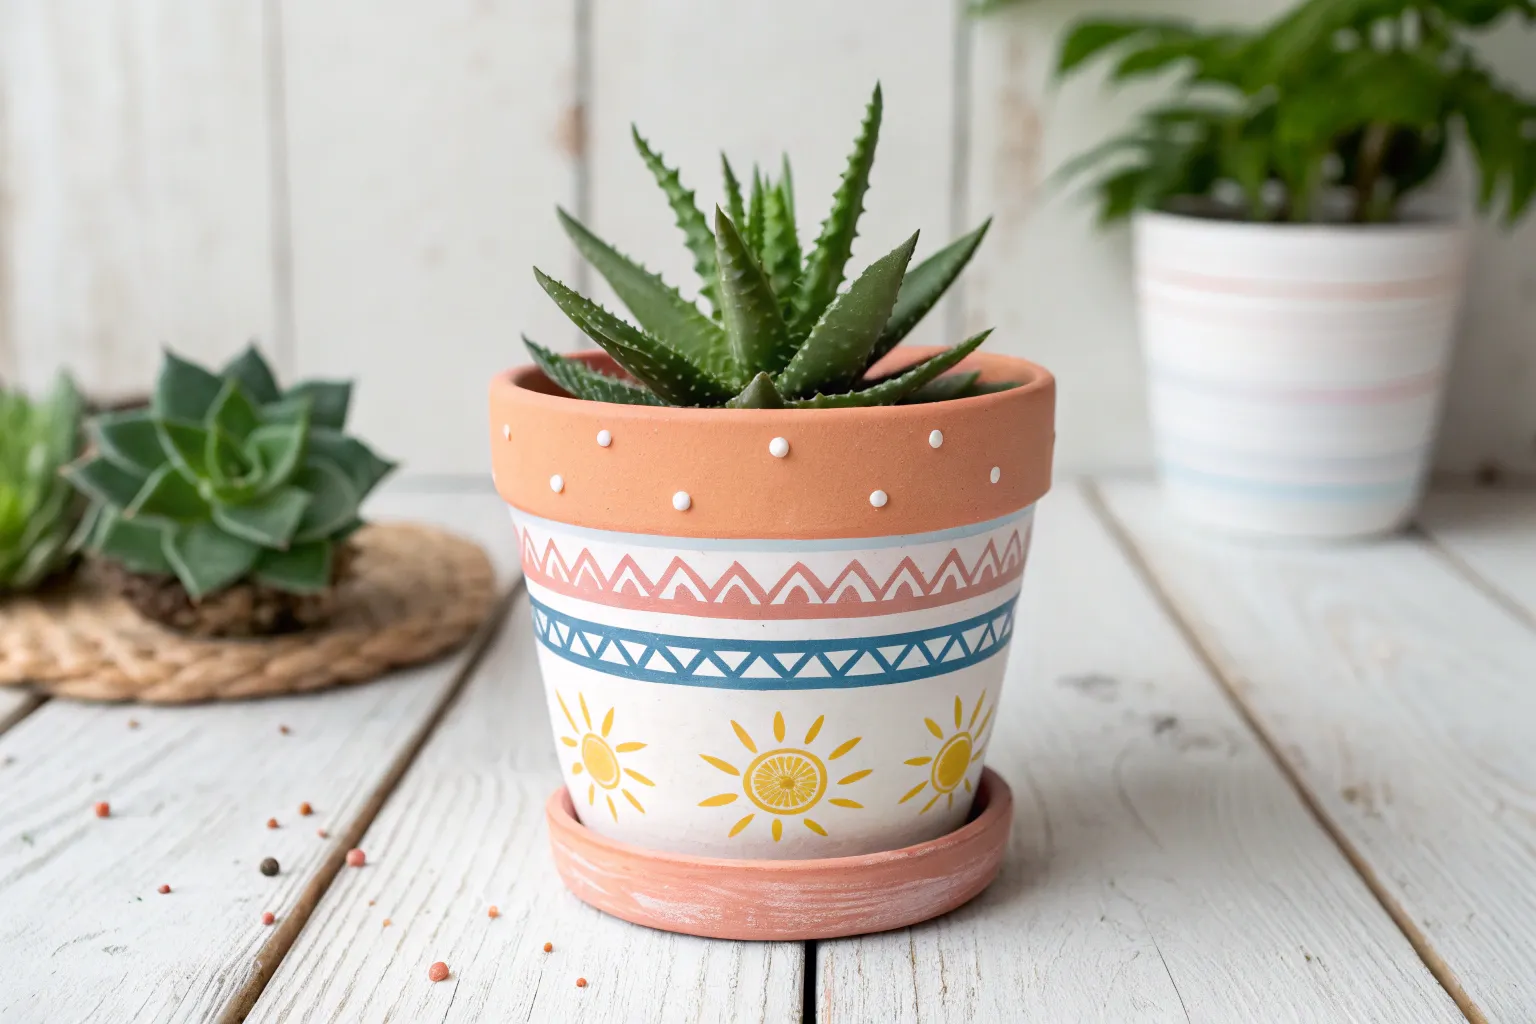
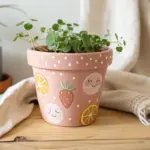
Polka Dot Confetti
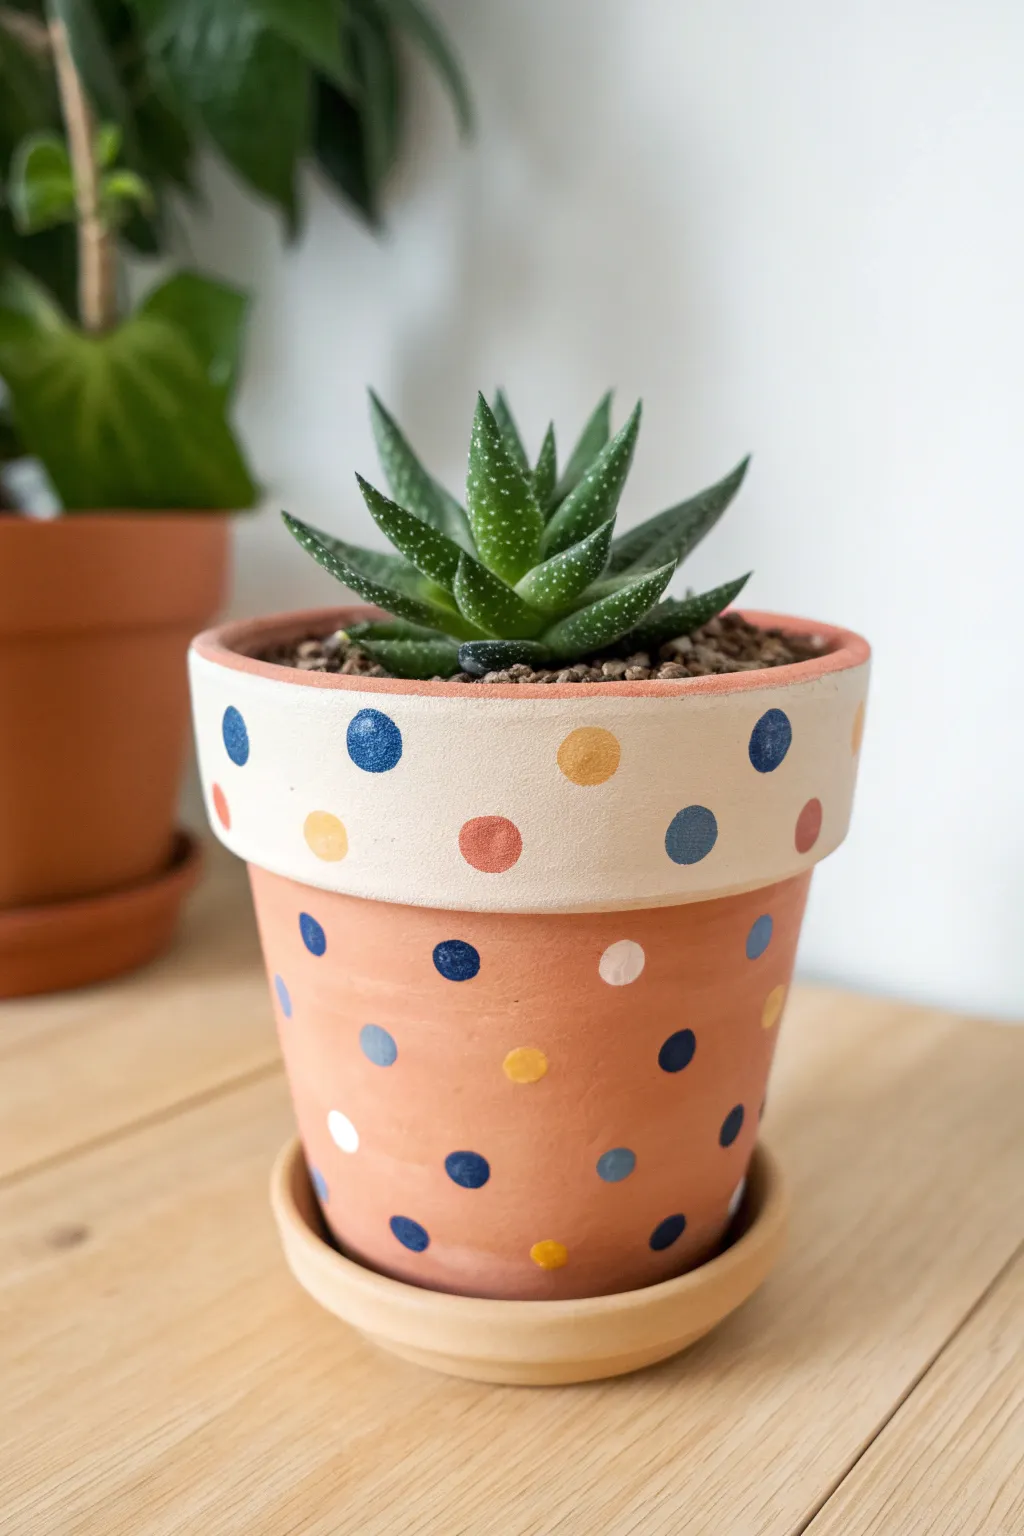
Transform a plain terracotta pot into a playful home for your succulents with this confetti-style design. The contrast between the creamy rim and the natural clay base creates a modern, airy look that brightens up any windowsill.
How-To Guide
Materials
- Terracotta pot with matching saucer
- Acrylic craft paints (Cream/Beige, Navy Blue, Light Blue, Mustard Yellow, Rust Red, White)
- Medium flat paintbrush (for the rim)
- Small round paintbrush or dotting tool
- Pencil
- Sponge or cotton swab (for cleanup)
- Clear acrylic sealer (matte or satin finish)
Step 1: Preparation & Base Coat
-
Clean surface:
Begin by wiping down your terracotta pot with a damp sponge or cloth to remove any dust or loose clay particles. Let it dry completely before painting. -
Define the rim area:
The unique feature of this design is the separation between the rim and the body. Inspect the natural groove where the rim meets the pot body to ensure it’s clean. -
Paint the rim base:
Using a medium flat paintbrush, apply a coat of cream or beige acrylic paint to the entire rim of the pot. Don’t worry if it looks streaky at first. -
Apply second coat:
Once the first layer is dry to the touch, apply a second coat of the cream paint. I always like to ensure this layer is completely opaque so the terracotta doesn’t peek through. -
Clean the edges:
If any cream paint slipped below the rim onto the main body, quickly wipe it away with a damp cotton swab or wait for it to dry and gently scrape it off.
Uneven Circles?
If painting perfect circles is tough, dip the eraser end of a standard pencil into the paint and stamp it onto the pot for uniform dots.
Step 2: Rim Decoration
-
Plan rim dots:
Visualize where the larger dots will go on the painted rim. You want a spaced-out pattern using your three accent colors: Navy Blue, Mustard Yellow, and Rust Red. -
Paint the navy accents:
Using a small round brush, paint a few large circular dots in Navy Blue on the cream rim. Space them widely apart. -
Add yellow and rust:
Fill in the gaps with the Mustard Yellow and Rust Red dots. These should be roughly the same size as the navy ones, creating a balanced, chunky row. -
Refine the shapes:
Go back over your circles to smooth out the edges. If they aren’t perfect circles, that just adds to the hand-painted charm.
Step 3: Body Confetti
-
Switch paint consistency:
For the main body, you’ll be painting directly on the raw terracotta. Make sure your paints aren’t too watery, or they might bleed into the porous clay. -
Start with navy dots:
Dip your small round brush or a dotting tool into the Navy Blue paint. Dab small, scattered dots randomly all over the terracotta section. -
Add white highlights:
Clean your brush and switch to White paint. Add several white dots dispersed among the blue ones to create brightness. -
Incorporate light blue:
Using Light Blue paint, fill in empty spaces with more dots. These soft blue accents bridge the gap between the navy and white. -
Finish with warm tones:
Finally, add the Mustard Yellow dots. This warm color ties the bottom half of the pot back to the design on the rim. -
Check for balance:
Step back and look at the confetti spacing. If there are any large empty patches of terracotta, add a small dot there to even it out.
Waterproofing Tip
If you plan to plant directly inside, seal the INSIDE of the pot first. This stops moisture from seeping through and bubbling your exterior paint design.
Step 4: Sealing & Finishing
-
Paint the saucer:
For a cohesive look, you can leave the saucer plain or paint the very outer rim in the same cream color used on the pot’s top. -
Let everything cure:
Allow the paint to dry completely. For terracotta, waiting a few hours or overnight ensures all moisture has evaporated. -
Apply sealer:
Protect your artwork by spraying or brushing on a clear acrylic sealer. A matte finish looks best to maintain the natural pottery vibe.
Once sealed and dry, pot your favorite succulent and enjoy the splash of color it brings to your space
BRUSH GUIDE
The Right Brush for Every Stroke
From clean lines to bold texture — master brush choice, stroke control, and essential techniques.
Explore the Full Guide
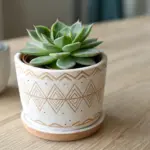
Mandala Dot Art Bands
Transform a plain terracotta pot into a striking piece of decor with this high-contrast design featuring bold floral motifs and delicate dot work. The combination of raw terracotta warmth with crisp black and white acrylics creates a timeless look perfect for any plant.
Step-by-Step Guide
Materials
- Terracotta pot (clean and dry)
- Black acrylic paint
- White acrylic paint
- Flat paintbrush (medium width)
- Fine detail brush (liner brush)
- Dotting tools (various sizes)
- Pencil
- Flexible measuring tape
- Clear acrylic sealer (spray or brush-on)
Step 1: Planning and Base Layers
-
Clean the surface:
Ensure your terracotta pot is completely free of dust and dirt. Wipe it down with a slightly damp cloth and let it dry fully before starting. -
Measure the bands:
Using a flexible measuring tape and a pencil, lightly mark horizontal guidelines around the pot. You will need a wide central band for the flowers, flanked by two thinner bands above and below for the black borders. -
Paint the background:
Paint the wide central band with white acrylic paint. Apply two to three coats to ensure it’s opaque and the terracotta doesn’t show through. Let each coat dry completely. -
Create the geometric borders:
Paint the bands immediately above and below the white section with black acrylic paint. These should be about an inch wide. Use a steady hand or masking tape to get crisp edges.
Step 2: Drawing the Floral Motif
-
Outline the circles:
Once the white paint is bone dry, use a pencil or a compass to lightly draw a row of evenly spaced circles within the white band. These will house your flowers. -
Sketch the flower centers:
Mark the center of each circle with a small dot to guide your petal placement. -
Deatiling the petals:
Lightly sketch simple, rounded petals radiating from the center of each circle. Aim for about 10-12 petals per flower. -
Paint outlines:
Using your fine detail brush and black paint, carefully trace over your pencil circles including the outer rim and the petal shapes. I like to rest my pinky on the pot for better stability here. -
Fill the negative space:
Paint the background area inside the circle (around the petals) black. This makes the white petals pop brilliantly against the dark center. -
Add connecting lines:
Draw delicate curved lines connecting the main flower circles to each other, creating a continuous flow around the pot.
Clean Lines Secret
For perfectly straight horizontal bands, put your pot on a lazy susan or turntable. Hold your brush steady in one spot and slowly spin the pot against the brush.
Step 3: Adding Dot Details
-
Upper black band dots:
Dip a medium-sized dotting tool into white paint. Create a row of dots along the top edge of the upper black band. Try to keep spacing consistent. -
Lower black band dots:
Repeat the process on the bottom edge of the lower black band, mirroring the design above. -
Detailed inner dots:
Switch to a smaller dotting tool. Inside both black bands (closer to the white flower section), add two rows of smaller, tightly packed white dots for a texture reminiscent of beadwork. -
Terracotta accents:
directly on the raw terracotta surface, just above the top black band and below the bottom black band, add a spaced-out row of medium white dots. This integrates the painted section with the natural clay. -
Flower centers:
Place a solid black dot in the very center of each white flower using a large dotting tool or the back of a brush handle.
Level Up: Color Pop
Keep the black and white bands, but paint the petals in a single bright color like turquoise or mustard yellow for a modern, vibrant twist on the classic style.
Step 4: Finishing Touches
-
Clean up edges:
If any black lines look shaky or uneven, specific touch-ups can be made with a tiny bit of white paint once the black is dry. -
Erase guidelines:
Check for any visible pencil acts. If the paint is completely cured, gently erase them. -
Seal the artwork:
Apply a coat of clear acrylic sealer over the painted areas. This protects your hard work from water damage and fading, especially if the pot will be used outdoors.
Now your stunning handcrafted pot is ready to be the new home for your favorite greenery
Smooth Ombre Dip Gradient
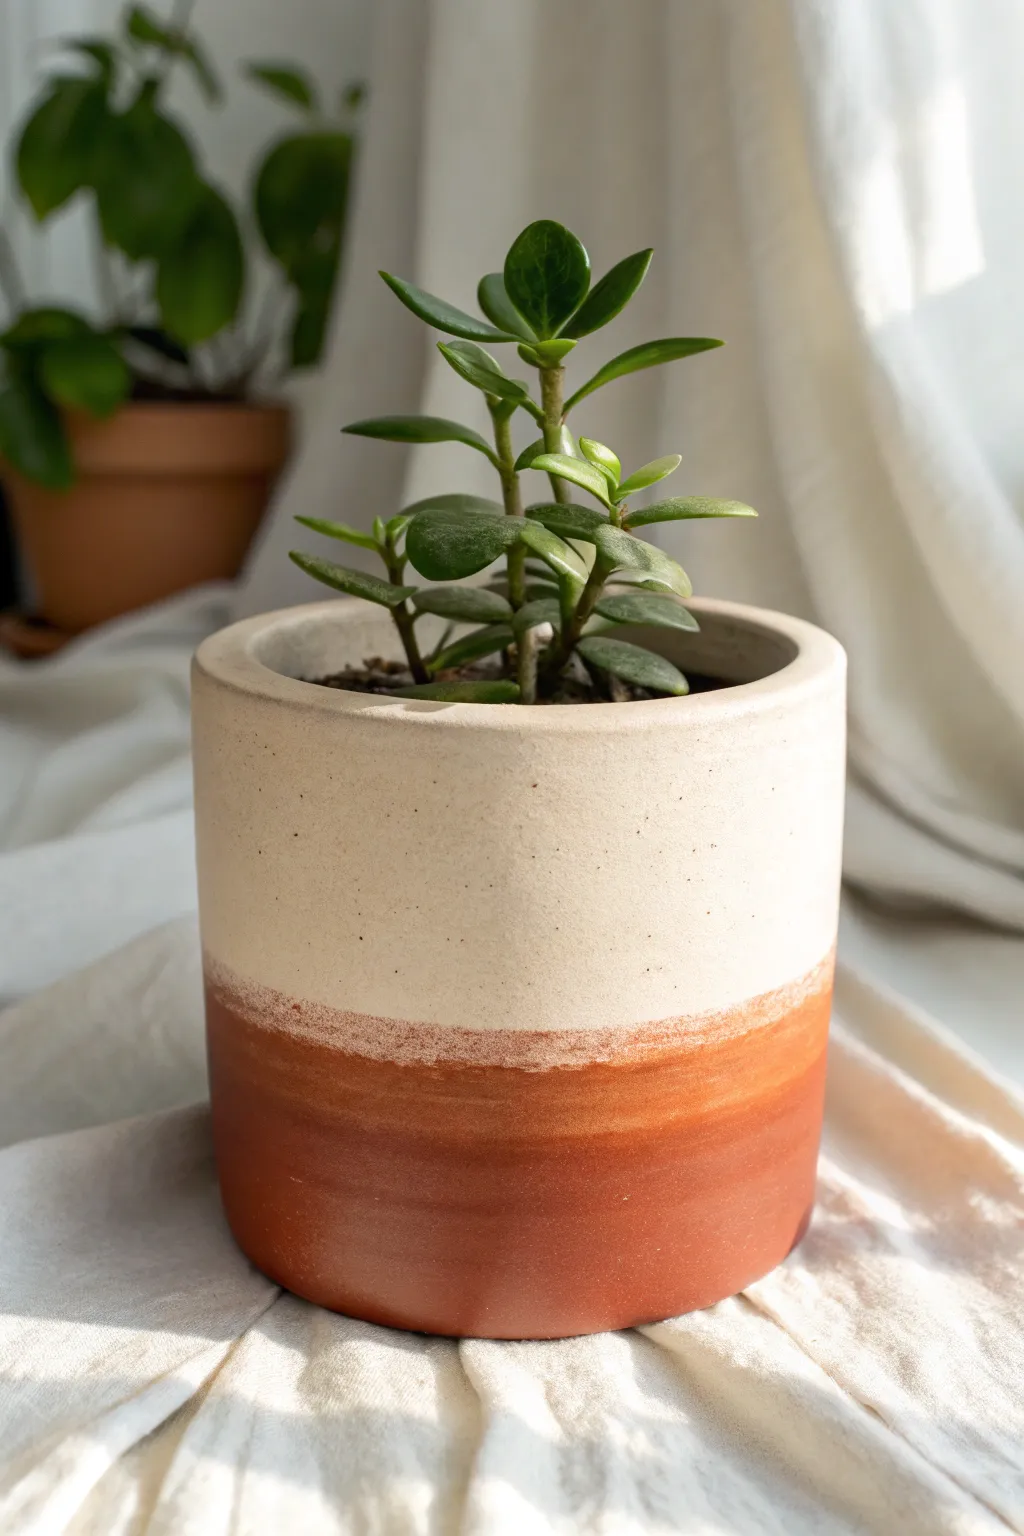
Capture the warmth of golden hour with this elegant two-tone planter design. By layering a rich terracotta hue over a creamy base, you’ll create a soft, transitional gradient that feels both modern and handmade.
Step-by-Step Tutorial
Materials
- Cylindrical ceramic or concrete planter (smooth surface)
- Cream or off-white acrylic craft paint
- Terracotta or rust-orange acrylic craft paint
- Burnt sienna acrylic craft paint (optional for depth)
- Wide flat paintbrush (1.5 – 2 inches)
- Medium soft-bristle brush
- Palette or paper plate
- Water cup
- Paper towels
- Clear matte sealer spray
Step 1: Base Preparation
-
Clean surface:
Begin by wiping down your planter with a damp cloth to remove any dust or oils. Let it dry completely so the paint adheres properly. -
Base coat application:
Squeeze out a generous amount of cream acrylic paint. Using your wide flat brush, apply a smooth, even coat over the entire exterior of the pot. -
Smooth the texture:
While the paint is still wet, run the brush horizontally around the pot to minimize vertical brushstrokes. This creates a uniform canvas. -
Second coat:
Allow the first layer to dry for about 20 minutes. Apply a second coat of cream paint to ensure full opacity, especially if your pot was originally a dark color. -
Dry completely:
Let the base layer cure fully. It should be dry to the touch and not tacky before you proceed to the gradient work.
Uneven Blending?
If the gradient looks too streak, use a slightly damp sponge to dab the line where the colors meet while the paint is still wet. This softens the transition immediately.
Step 2: Creating the Dip Effect
-
Mix the shadow tone:
On your palette, mix a small amount of burnt sienna into your main terracotta color. This creates a deeper, earthier shade for the very bottom of the pot. -
Paint the bottom section:
Using the medium brush, paint the bottom third of the pot with your terracotta mix. Don’t worry about the top edge being perfect yet. -
Feather the edge:
Before the terracotta paint dries, rinse your brush and blot it until it’s just damp. Gently drag the wet brush upward from the terracotta line into the cream section. -
Create the transition:
Dip just the tip of your brush into a tiny bit of fresh terracotta paint. Use quick, light horizontal strokes along the transition line to create a scratchy, uneven border. -
Blend downward:
I like to work the paint downward as well to ensure the color is solid at the base but breaks up as it rises. This mimics a natural dip dye. -
Add texture:
Using a nearly dry brush, stipple or dab the transition line softly. This softens any harsh streaks and enhances that blurry, ombre aesthetic. -
Refine the height:
Step back and check the height of the colored section. If you want it higher, slowly work the paint up, keeping that irregular, feathered edge. -
Rim check:
If you painted the bottom of the pot, insure the bottom rim is clean or fully coated so it sits flat.
Step 3: Finishing Touches
-
Dry time:
Allow the gradient section to dry completely. Acrylics dry fast, but giving it an hour ensures the layers are set. -
Seal the deal:
Take the pot to a well-ventilated area. Apply a light, even coat of aerosol matte sealer spray to protect the paint from moisture and scratches. -
Second seal:
Once the first coat of sealer is dry, apply a second coat for extra durability, especially if this pot will live near a window. -
Pot your plant:
Wait 24 hours for the sealer to fully cure before adding soil and your favorite plant.
Texture Trick
Mix a teaspoon of baking soda into your base cream paint before applying. This gives the pot a gritty, ceramic-like texture that looks very high-end.
Now you have a beautifully custom vessel that adds a touch of artisan charm to your shelf

PENCIL GUIDE
Understanding Pencil Grades from H to B
From first sketch to finished drawing — learn pencil grades, line control, and shading techniques.
Explore the Full Guide
Crisp Black-and-White Floral Doodles
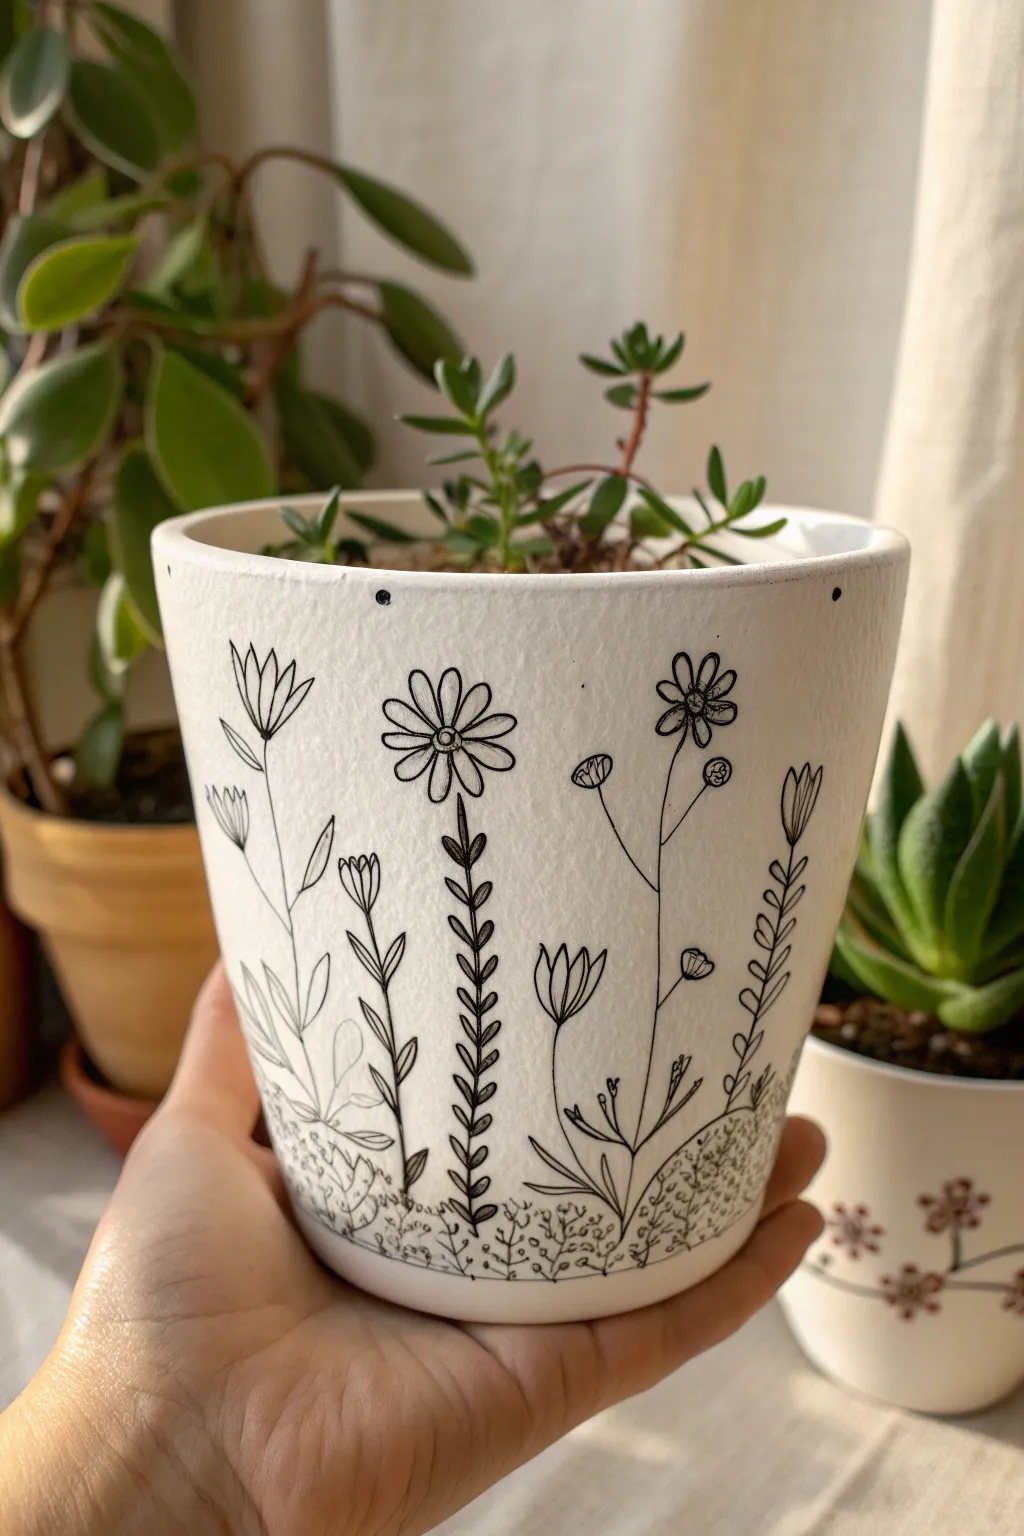
Transform a plain white planter into a delicate meadow scene with nothing more than a steady hand and a fine-point marker. This crisp black-and-white design relies on simple lines and varying textures to create an elegant, minimalist home for your succulents.
Detailed Instructions
Materials
- White ceramic planter (matte or unglazed preferred)
- Black permanent marker or paint pen (extra-fine tip)
- Pencil (HB or lighter)
- White eraser
- Rubbing alcohol and cotton pad
- Spray sealant (matte finish)
Step 1: Preparation & Sketching
-
Clean surface:
Wipe down the entire outer surface of your pot with rubbing alcohol and a cotton pad. This removes oils and dust that could interfere with the ink adhesion. -
Plan the horizon:
Using your pencil, lightly sketch a faint line about 1 inch from the bottom edge. This doesn’t need to be perfectly straight; a slightly wavy organic line works best for the ground level. -
Map the stems:
Lightly draw vertical lines rising from your ground line to varying heights. Space them out irregularly to mimic a natural garden, leaving room for leaves and flower heads. -
Rough in the flowers:
Sketch simple circles or ovals at the top of your stems to indicate where the main blooms will go. This helps you visualize the composition before committing to ink.
Ink Smearing?
If ink smears while erasing pencil, your pen wasn’t fully dry. Wait longer, or if the ceramic is glossy, bake the pot in an oven at 350°F for 30 mins to set paint pens.
Step 2: Inking the Flora
-
Start the daisy:
Choose a central stem and draw a small circle for the flower center. Carefully ink elongated loops radiating outward for petals. I like to add a tiny line inside each petal for depth. -
Add leafy vines:
For the taller, vine-like plants, draw small, paired leaves all the way up the stem. Make the leaves smaller as you reach the top to simulate growth. -
Draw the tulip shapes:
Create the cup-shaped flowers by drawing a gentle U-shape, then adding two or three pointed peaks at the top to suggest closed petals. -
Detail the fern:
On the stems with many leaves, draw short, angled strokes downward from the main stem, creating a fern or herringbone pattern. -
Incorporate buds:
Draw thin, branching lines off main stems and cap them with small circles or teardrops to represent unopened flower buds. -
Vary line weights:
Go over the main stems a second time if needed to make them slightly bolder than the delicate veins in the leaves or petals.
Pro Tip: Vary Heights
Avoid drawing all flower heads at the same level. Staggering the heights creates a more dynamic, natural look and helps fill empty negative space effectively.
Step 3: Grounding & Details
-
Create the soil texture:
Below your horizon line, begin stippling. Use your pen to tap hundreds of tiny dots in the bottom section. -
Add grass tufts:
Intersperse the dots with tiny ‘V’ or ‘M’ shapes to look like small tufts of grass or moss growing near the soil line. -
Blend the transition:
Make the dots denser at the very bottom of the pot and sparser as they get closer to the flower stems, fading the texture out gently. -
Rim accents:
Add a few solitary black dots just below the top rim of the pot to frame the design without cluttering it.
Step 4: Finishing Touches
-
Let ink cure:
Allow the ink to dry completely for at least an hour to prevent smudging during the cleanup phase. -
Erase guidelines:
Gently erase any visible pencil marks with a white eraser. Be careful near the inked areas, though permanent marker is usually resilient once dry. -
Seal the work:
Take the pot to a well-ventilated area and apply a light coat of matte spray sealant. This protects your drawing from water damage when you water your plants.
Place your favorite succulent inside and enjoy your custom hand-illustrated garden piece
Scalloped Rim Border
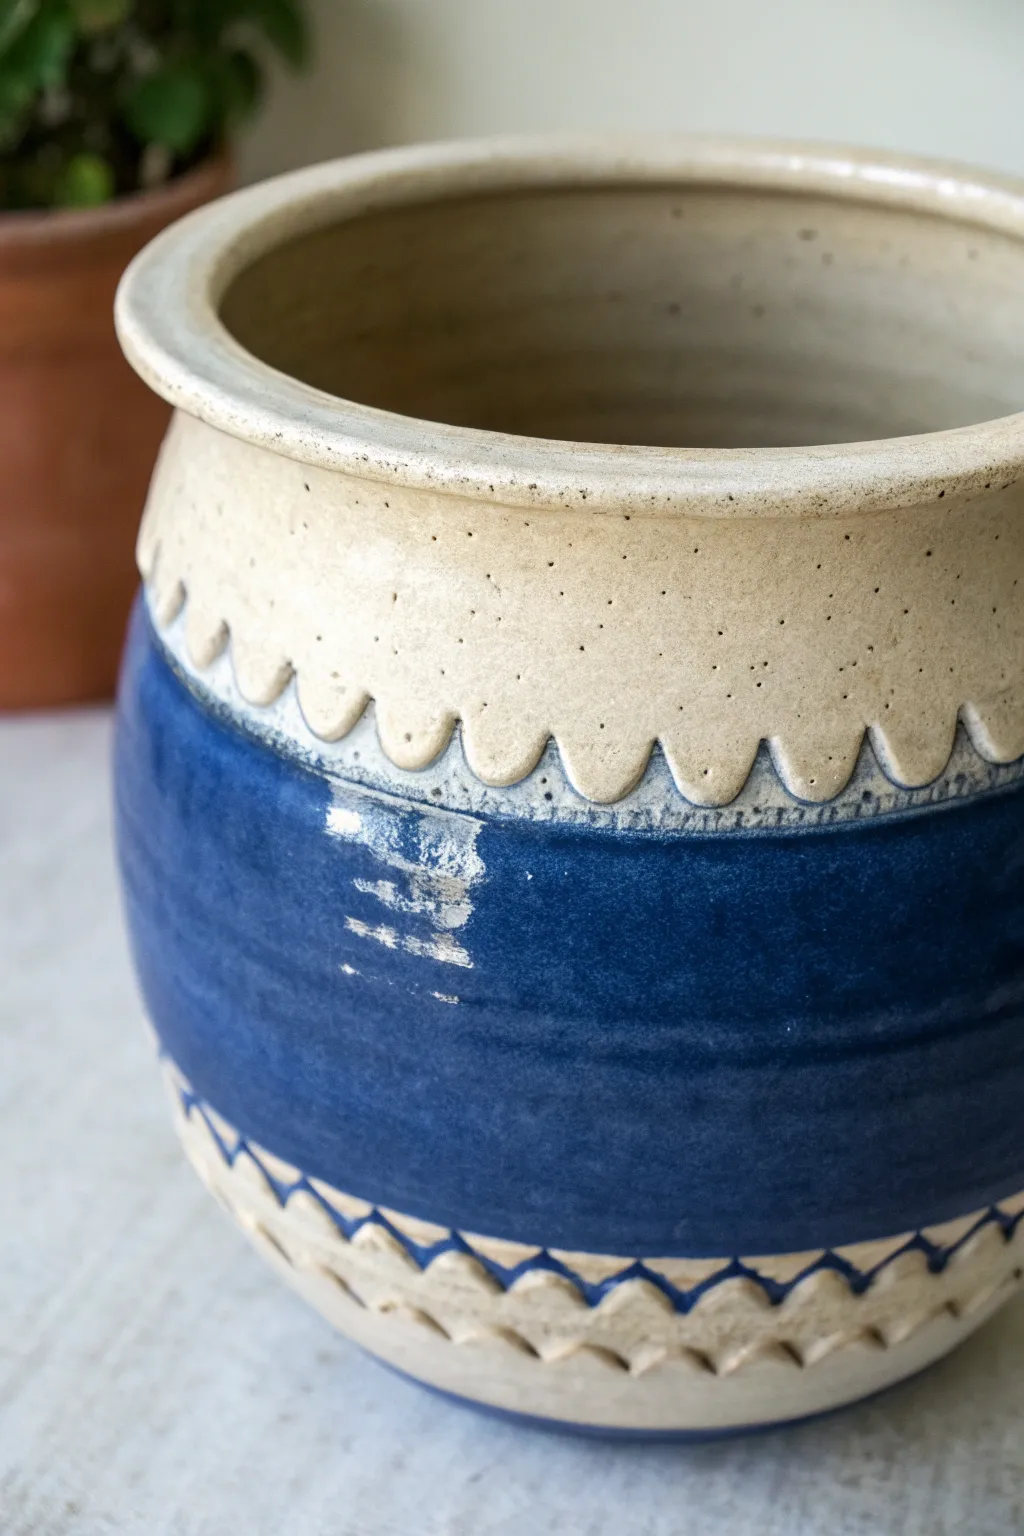
This project transforms a simple wheel-thrown or hand-built pot into a textural masterpiece using varied carving techniques and bold color blocking. The contrast between the raw, speckled clay and the glossy, deep blue glaze creates a timeless, artisanal look perfect for housing your favorite houseplants.
Step-by-Step Guide
Materials
- Leather-hard clay vessel (wheel-thrown or coil-built)
- Needle tool
- Loop tool (small U-shaped)
- Ribbon tool or triangular carving tool
- Sponge
- Cobalt blue ceramic glaze
- Clear transparent glaze (optional)
- Wide glazing brush
- Wax resist
- Kiln for firing
Step 1: Forming and Prepping
-
Shape the vessel:
Begin by creating your base vessel, either on the wheel or using a coil method. Aim for a rounded belly shape that tapers slightly at the top and bottom, with a distinct, slightly flared rim. -
Let it firm up:
Allow the clay to dry to a ‘leather-hard’ stage. This is crucial; if the clay is too wet, it will smudge when you carve, but if it is too dry, it will chip. -
Smooth the surface:
Use a damp sponge or a smooth rib tool to ensure the exterior surface is even and free of unwanted texture before you begin the decorative work.
Step 2: Carving the Scallops
-
Mark the top border:
Using a needle tool, lightly score a horizontal guideline around the pot, approximately 2-3 inches down from the rim. This will mark the bottom of your scallop design. -
Sketch the curves:
Lightly draw the scallop curves along your guideline. Try to keep them evenly spaced, looking like a series of half-circles. -
Carve the relief:
Use a small U-shaped loop tool to carve away the clay *below* the scallop line. I prefer to carve downwards, creating a slight shelf or ridge where the scallop serves as an overhang. -
Refine the edge:
Go back with a modeling tool or your finger to smooth the edges of the scallops so they look soft and undulating rather than sharp. -
Add texture (optional):
If your clay doesn’t have natural speckles, you can gently stipple the area above the scallops with a stiff brush to mimic the stone-like texture shown in the reference.
Keep it Clean
Wipe your carving tools frequently on a damp cloth. Built-up clay on the tool dulls the blade and creates drag marks, ruining the crisp lines of your scallops.
Step 3: Carving the Base
-
Define the bottom band:
Create another horizontal guideline near the foot of the pot, creating a band similar in width to the top scallop section. -
Mark the zigzag:
Lightly sketch a zigzag or triangular pattern around this bottom band. -
Carve the triangles:
Using a ribbon tool or a triangular carving tool, gouge out the negative space within the triangles. Vary the depth slightly to create shadow and dimension. -
Clean up burrs:
Once all carving is complete, gently brush away any clay crumbs or ‘burrs’ with a soft, dry brush or a slightly damp sponge.
Add Stains
Before glazing, rub a red iron oxide wash into the raw clay sections and wipe it back. This highlights the texture and accentuates the speckles in the clay body.
Step 4: Glazing and Firing
-
Bisque fire:
Load the pot into the kiln for a bisque firing to harden the clay and prepare it for glazing. -
Wax the clear zones:
Apply wax resist to the top scallop section, the rim, and the bottom carved band. This prevents the blue glaze from adhering to these areas, preserving the raw clay look. -
Apply the blue glaze:
Using a wide glazing brush, apply 2-3 coats of deep cobalt blue glaze to the central band of the pot. Be careful cutting in near the carved edges, let the wax resist help guide you. -
Check the wax lines:
If any blue glaze splashed onto the waxed areas, wipe it away immediately with a damp sponge. -
Glaze the interior:
Pour a liner glaze (often white or clear) inside the pot, roll it around to coat the interior fully, and pour out the excess. -
Rim coating (optional):
If you want the inside rim to be glossy while keeping the outside raw, apply a clear transparent glaze carefully just to the top edge. -
Final Fire:
Fire the pot again to the temperature required by your specific clay and glaze (likely Cone 5 or 6 for stoneware).
Place your finished pot on a sunny windowsill where the light can catch the ridges of your carving work


Modern Stripes and Bands
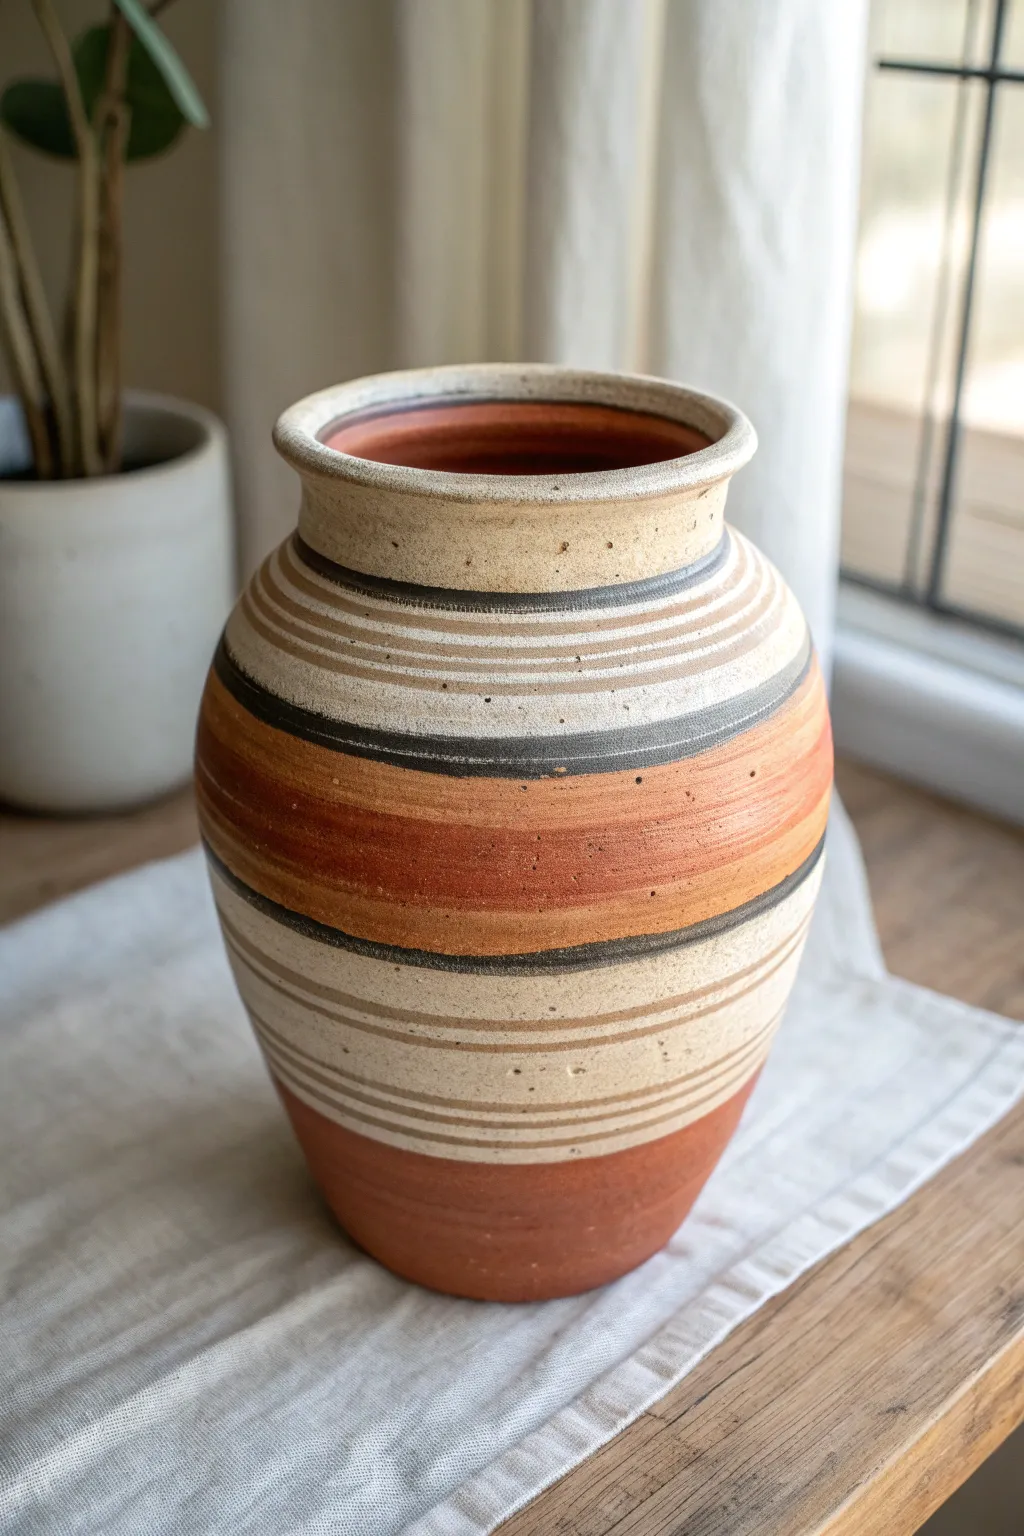
Learn how to transform a plain ceramic vessel into a stunning piece of modern decor using varied horizontal bands. This project mimics the organic look of wheel-thrown clay with meticulously painted stripes in earthy terracotta, cream, and charcoal tones.
Step-by-Step Tutorial
Materials
- Bisque-fired ceramic vase (or a smooth faux-ceramic pot)
- Acrylic paints (Terracotta, Warm White/Cream, Black, Grey, Beige)
- Matte varnish or sealant
- Various flat brushes (small to medium widths)
- Painter’s tape (optional, for crisp lines)
- Fine-grit sandpaper
- Palette for mixing
- Lazy Susan or turntable (highly recommended)
- Small sea sponge
Step 1: Base Preparation
-
Clean surface:
Begin by wiping down your vase with a damp cloth to remove any dust or oils. A clean surface is crucial for paint adhesion. -
Create the base texture:
Mix your beige and cream paint. Instead of brushing perfectly smooth, dab this mixture over the entire pot using a sea sponge to create a ‘stoneware’ speckled texture. Let this dry completely.
Pro Tip: Steady Hands
Rest your painting hand on a stack of books or a stable object at the right height. Turn the pot instead of moving your hand for straighter lines.
Step 2: Mapping the Design
-
Visualize the zones:
Look at the vase in three main sections: the neck area, the central belly, and the base. You’ll want to keep the heaviest, darkest band separate from the wide terracotta band. -
Set up your station:
Place the vase on a Lazy Susan. This allows you to spin the pot while holding your brush steady, creating consistent bands around the circumference.
Level Up: Faux Texture
Mix a teaspoon of baking soda into your acrylic paint for the terracotta sections. This creates a gritty, grainy physical texture like real clay.
Step 3: Painting the Bands
-
Start with the base:
Load a medium flat brush with pure terracotta paint. Spin the pot slowly and paint the bottom quarter of the vase, allowing the upper edge to be slightly imperfect for an organic feel. -
Establish the neck:
Using a beige-cream mix, paint the neck rim. I like to add a tiny drop of brown to this mix to make it look like unglazed clay. -
The bold center stripe:
Mix terracotta with a touch of orange and beige for a warm, dusty sunset hue. Paint a thick band right across the widest part of the belly. -
Adding texture to the center:
While the center band is still slightly tacky, stipple just a little bit of darker brown into it to give it that gritty, earthen appearance. -
The charcoal accents:
Use a small flat brush and dark charcoal grey paint. Carefully paint a thin line framing the top and bottom of that central terracotta band. -
Create thin cream stripes:
Between the large central band and the neck, paint several thin, parallel lines in cream. Let the spacing vary slightly to keep it looking hand-thrown rather than manufactured. -
Lower section blending:
Repeat the thin cream stripes in the area between the central belly and the solid terracotta base. These lines help transition the eye downward. -
Refining lines:
Go back in with your smallest brush to sharpen up any edges where colors meet. If you want a softer look, you can gently lightly sand distinct ridges once dry.
Step 4: Finishing Touches
-
Splatter texture:
Dilute a tiny amount of black or dark brown paint with water. Dip an old toothbrush in it and flick very fine specks over the lighter cream areas to simulate clay impurities. -
Interior shading:
Paint the inside of the rim with a darker terracotta or brown to give the pot depth and make it look hollow and substantial. -
Seal the work:
Once absolutely dry, apply a coat of matte varnish. Avoid glossy finishes, as the matte look mimics the natural stoneware texture shown in the reference.
Place your completed vase near a window where natural light can highlight the subtle textures of your handiwork
Terrazzo Speckle Mix
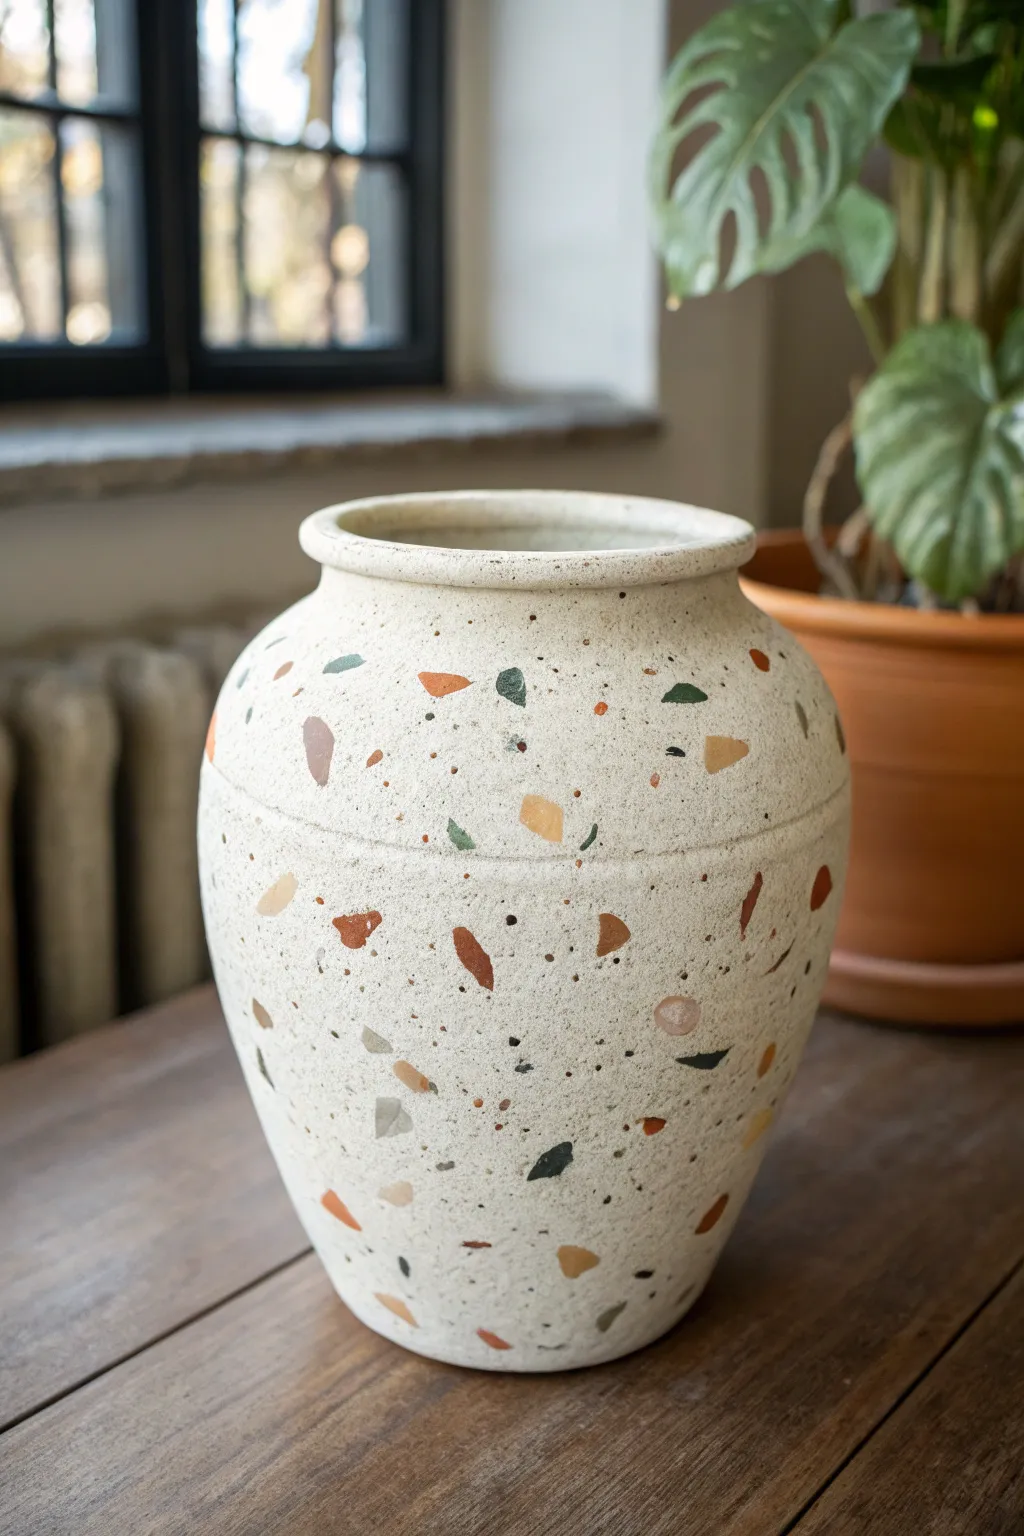
Transform a plain ceramic or terracotta planter into a trendy, modern decor piece with this surprisingly simple faux finishing technique. This project mimics the timeless look of real terrazzo using just acrylic paints and a bit of patience.
Step-by-Step
Materials
- Plain ceramic or terracotta pot
- White or cream spray primer
- Acrylic paints (black, terracotta, forest green, mustard yellow, beige, grey)
- Small flat tip paintbrush (size 2-4)
- Detail round paintbrush (size 0-1)
- Toothbrush (for spatter)
- Matte clear sealant spray
- Paper plate or palette
- Cardboard box (for spray painting)
- Water cup and paper towels
Step 1: Base Preparation
-
Clean surface:
Begin by wiping down your pot with a damp cloth to remove any dust, oils, or sticker residue. If you are using a terracotta pot, ensure it is completely dry before moving to the next step. -
Prime the pot:
Set up your cardboard box in a well-ventilated area. Apply a coat of white or cream spray primer to the entire exterior of the pot. Primer is essential here because it stops porous surfaces from soaking up your paint too quickly. -
Check coverage:
Inspect the pot after the first coat dries (usually 15-20 minutes). If you can still see the original color peeking through, apply a second light coat for a solid, opaque base. -
Base coat texturing:
To give the pot that slightly stony, grainy look of real terrazzo concrete, mix a tiny drop of grey paint into a large dollop of white acrylic. Use a sponge or a stippling brush to dab this onto the pot rather than brushing it, creating a subtle texture.
Step 2: Creating the Terrazzo Chips
-
Plan your palette:
Pour dime-sized amounts of your ‘chip’ colors—terracotta, forest green, mustard yellow, and beige—onto your palette. You want a mix of earthy tones to match the example image. -
Paint large chips:
Using your small flat tip brush, paint jagged, irregular shapes scattered randomly around the pot. Aim for variety: some shapes should look like triangles with clipped corners, others like trapezoids. -
Rotate and space:
Constantly rotate the pot as you work to ensure even distribution. Avoid clustering too many large shapes together; leave comfortable ‘white space’ between them. -
Medium chips:
Switch colors and paint slightly smaller shapes. If your first layer was mostly terracotta, add your mustard yellow and forest green shapes now. Keep the edges crisp; real terrazzo chips are shards of stone, not blobs. -
Layering strategy:
Don’t be afraid to let the shapes touch or get very close, but generally keep them separate. I find it helpful to step back every few minutes to see the overall balance of color. -
Add tiny fragments:
Using the detail round brush, add much smaller irregular specks in between the larger shapes. Use your darkest color (like a dark grey or black) sparingly for these to create depth.
Uneven Chips?
If your painted chips look too round or blob-like, wait for them to dry, then use the base color (white/cream) to ‘cut’ into them and sharpen the edges into angular shapes.
Step 3: The Fine Speckle Effect
-
Prepare splatter paint:
Mix a small amount of black or dark grey paint with a few drops of water. You want a consistency similar to ink or heavy cream—runny enough to fly, but thick enough to be opaque. -
Test the splatter:
Dip an old toothbrush into the thinned paint. hold it over a piece of scrap paper and run your thumb across the bristles to flick the paint. Practice controlling the spray before moving to the pot. -
Apply fine speckles:
Hold the toothbrush about 6-8 inches from the pot and flick the bristles to create a fine mist of dots. This mimics the sand and aggregate found in cement. -
Repeat with second color:
Clean the toothbrush and repeat the splatter process with a second color, perhaps a thinned-down beige or light brown, to add dimension to the ‘concrete’ background. -
Cleanup drips:
If you accidentally create a large glob or a drip while splattering, quickly dab it gently with the corner of a paper towel to lift it, or turn it into a deliberate ‘chip’ shape once dry.
Add Metallic Flair
For a luxe modern twist, mix in a few chips painted with gold or copper leaf paint. The metallic shine contrasts beautifully against the matte stone texture.
Step 4: Sealing and Finishing
-
Dry completely:
Allow the pot to sit undisturbed for at least 2-4 hours. Acrylic paint dries fast, but the thicker layers of the ‘chips’ need to be fully cured before sealing. -
Apply sealant:
In your ventilated area, spray the entire pot with a matte clear coat. A matte finish is crucial to maintaining the realistic look of stone or concrete; a glossy finish will make it look like plastic. -
Second seal:
Once dry, apply a second coat of sealant for durability, especially if you plan to water a real plant inside this pot.
Place your favorite leafy plant inside and enjoy your custom piece of stoneware art
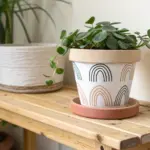
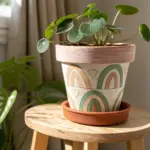
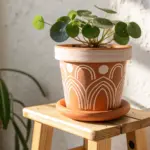
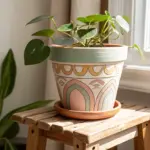
Soft Rainbow Arches
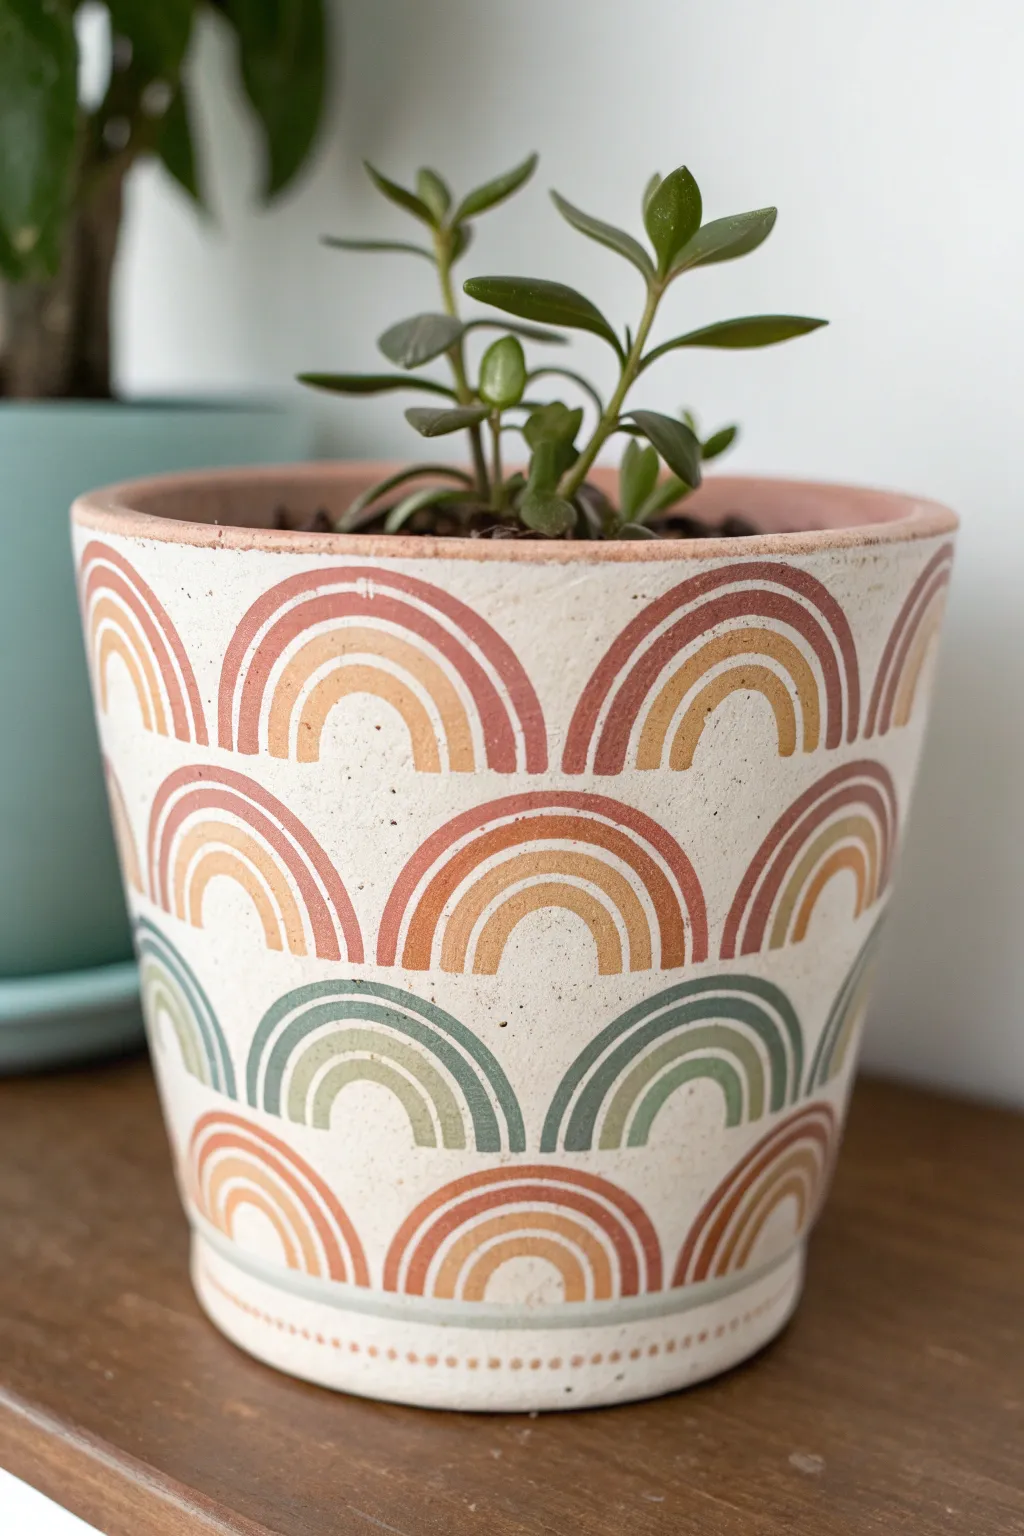
Transform a plain terra cotta planter into a trendy boho décor piece with this soft, earthy rainbow arch design. Using warm, muted tones and clean lines, this project creates a calming and organized pattern that perfectly complements succulents or small houseplants.
Step-by-Step Guide
Materials
- Terra cotta pot (clean and dry)
- White or cream acrylic paint (matte finish)
- Acrylic paints in muted boho colors: terracotta/rust, mustard yellow, sage green, dusty pink
- Small flat paintbrushes (sizes 2-4)
- Fine liner brush (size 0 or 00)
- Pencil
- Small round object or compass for tracing (optional)
- Clear matte sealer spray
Step 1: Preparation & Base Coat
-
Clean the surface:
Ensure your terra cotta pot is thoroughly clean and dry. Wipe away any dust or debris with a damp cloth and let it air dry completely before painting. -
Apply the base color:
Paint the entire exterior of the pot with your white or cream acrylic paint. I like to use a sponge brush here to avoid streaky bristle marks, aiming for a smooth, matte finish. -
Build opacity:
Terra cotta is porous and dark, so you will likely need 2-3 coats of the base color. Allow the paint to dry fully between layers until you have a solid, opaque background. -
Optional speckling:
To mimic the stone-like texture seen in the photo, you can flick a tiny amount of watered-down brown or grey paint onto the dry white surface using an old toothbrush. Let this dry completely.
Wobbly Arches?
Don’t stress about perfect symmetry. If an arch looks lopsided, thicken the line slightly on the thinner side to correct the balance rather than trying to erase it.
Step 2: Drafting the Design
-
Plan the rows:
Mentally divide your pot into horizontal sections. The design features alternating rows of arches. Lightly mark horizontal guide lines with a pencil around the circumference if you need help keeping the rows straight. -
Sketch the top row:
Using a pencil, lightly sketch the first row of arches along the top rim. You can freehand these for an organic look or trace a small circular object like a bottle cap to get the curve started. -
Stagger the middle row:
Sketch the next row of arches directly below the first, but offset them so the peak of the new arch sits between the two arches above it (like a brick pattern). -
Fill the bottom:
Continue sketching rows down to the bottom. For the final row at the base, you might need smaller arches or just a simple decorative band like the dots shown in the image.
Step 3: Painting the Rainbows
-
Start with the outer arch:
Choose your first color (e.g., rust or terracotta) for the outermost band of the top row rainbows. Use a small flat brush to paint a consistent, curved stripe following your pencil line. -
Paint the middle band:
Switch to a second color (e.g., mustard yellow) and paint a slightly smaller arch nestled inside the first one. Leave a very thin gap of white space between the colors if you want distinct separation, or paint them touching for a solid look. -
Add the inner arch:
Using a finer brush, paint the smallest innermost arch with a lighter shade (like a soft peach or lighter yellow). This creates the core of the rainbow. -
Repeat for the top row:
Continue this pattern for all rainbows in the top row. Keeping the color order consistent helps create a cohesive pattern. -
Switch palettes for the next row:
For the second row (the offset row), choose a different color palette if desired, or stick to the warm tones. In the photo, the middle row uses similar warm tones, while the third row introduces sage greens. -
Execute the green row:
Paint the third row of arches using cool tones—mixing sage green and a muted teal. Follow the same outer-middle-inner arch structure. -
Maintain clean edges:
If your lines get wobbly, wait for the paint to dry and use your base cream color and a fine liner brush to ‘erase’ and tidy up the edges.
Mix It Up
Vary the finish by using a metallic gold paint for just one band in every rainbow. This adds a subtle shimmer that catches the sunlight beautifully.
Step 4: Finishing Touches
-
Add the bottom detail:
Paint a thin horizontal stripe near the very bottom base of the pot. Below this stripe, use the back end of your paintbrush dipped in paint to dot a row of small circles. -
Add final stripe:
Paint one final thin stripe near the rim or base if there is empty space that feels unbalanced. Grounding the design with straight lines helps frame the curves. -
Let it cure:
Allow the pot to sit for at least 24 hours to ensure all layers of paint are thoroughly dry and hardened. -
Seal the deal:
Spray the entire pot (inside and out, if you painted the inside rim) with a clear matte sealer. This protects your hard work from water damage when you water your plant.
Pop in your favorite succulent or leafy plant and enjoy the warm, creative vibe this custom pot adds to your shelf
Hand-Lettered Names and Quotes
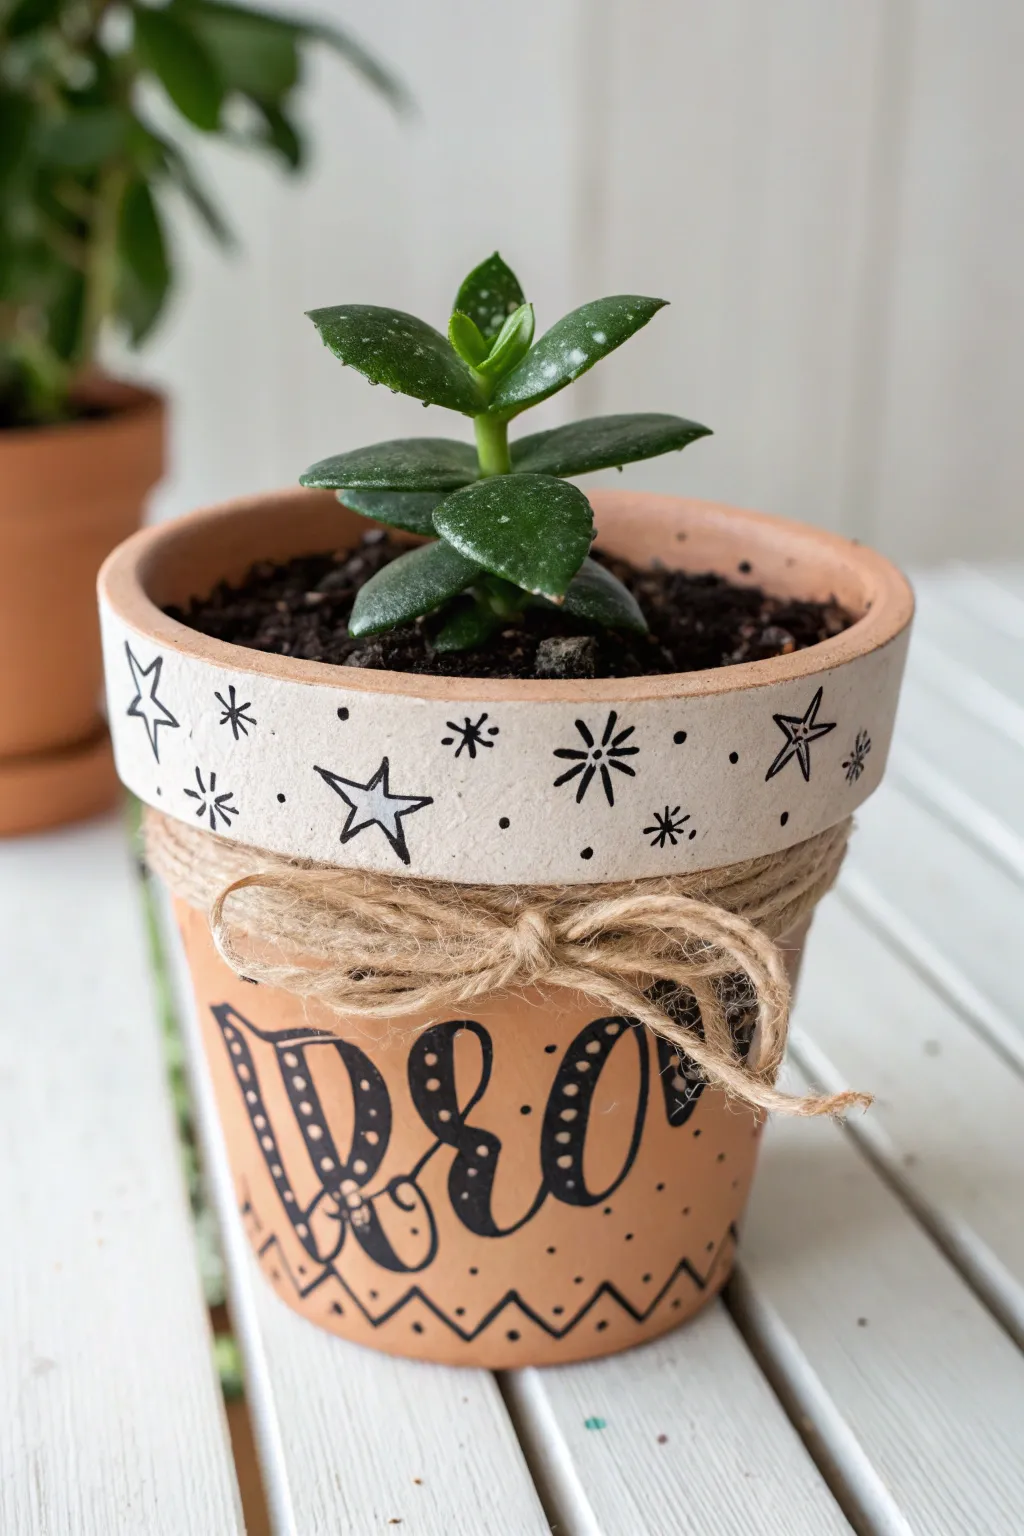
Transform a plain terracotta pot into a charming, personalized planter with just a few simple touches. This project combines crisp white accents, playful star doodles, and bold hand-lettering tied together with rustic twine for a look that’s both modern and whimsical.
Step-by-Step
Materials
- Small terracotta pot (approx 4-5 inches)
- White acrylic paint
- Flat paintbrush (medium size)
- Black permanent marker or paint pen (fine tip)
- Black permanent marker or paint pen (bullet tip)
- Pencil and eraser
- Jute twine
- Scissors
- Matte spray sealer (optional)
- Small succulent or Jade plant
- Potting soil
Step 1: Painting the Rim
-
Clean the surface:
Before starting, wipe down your terracotta pot with a damp cloth to remove any dust or loose clay particles. Let it dry completely so the paint adheres properly. -
Base coat application:
Dip your flat paintbrush into white acrylic paint. Carefully paint the entire rim of the pot, extending the color just slightly over the top lip. -
Refining the edge:
Ensure the bottom edge of the white rim is relatively straight where it meets the raw terracotta. You can use a piece of painter’s tape if you want a razor-sharp line, but a steady hand works fine for this rustic look. -
Apply a second coat:
Terracotta is very porous and soaks up paint quickly. Once the first layer is dry to the touch (usually 15-20 minutes), apply a second coat of white for a solid, opaque finish.
Ink Bleeding Prevention
Terracotta is extremely absorbent. To stop ink from spreading, seal the raw clay with a clear matte spray or a thin layer of Mod Podge BEFORE you start writing.
Step 2: Doodling the Details
-
Draw primary stars:
Using your fine-tip black marker or paint pen, draw several five-pointed stars around the white rim. Keep them unevenly spaced and slightly different sizes for a playful feel. -
Add radial bursts:
In the spaces between the outlined stars, draw simple ‘burst’ shapes—essentially an asterisk symbol with 6 to 8 lines radiating from a center point. -
Fill with dots:
Look for empty white spaces and add small black dots. This stippling effect fills the gaps without making the design look cluttered. -
Clean up lines:
Go back over any faint lines on your stars to make sure the black ink is bold and consistent against the white background.
Add Some Sparkle
For extra magic, paint over the black stars on the rim with a glow-in-the-dark medium or a clear glitter varnish so the pot shimmers in the evening light.
Step 3: Lettering the Body
-
Sketch the letters:
Lightly sketch your chosen word (like ‘Grow’ or a name) on the main terracotta body using a pencil. Use a cursive, bubbly style where the downstrokes are significantly thicker. -
Outline the text:
With your bullet-tip marker, trace over your pencil lines to create the main skeleton of the letters. -
Thicken the downstrokes:
Add weight to the left side of your letters (the downstrokes) to create a faux-calligraphy look. Fill these thick areas in with solid black ink. -
Add decorative dots:
Inside the thick black parts of your letters, create a pattern of small negative-space circles or use a white gel pen over the black ink if you prefer. Then, add black decorative dots around the outside of the letters on the terracotta. -
Draw bottom border:
Near the base of the pot, draw a zigzag line all the way around. Add a small dot inside each upward-pointing triangle created by the zigzag.
Step 4: Finishing Touches
-
Seal the art (optional):
If this plant will live outdoors or get wet often, I recommend spraying the outside of the pot with a clear matte sealer to protect your drawings. -
Prepare the twine:
Cut a long piece of jute twine, roughly three times the circumference of the pot’s neck. -
Wrap the neck:
Wrap the twine around the indented neck of the pot multiple times. You want a thick, textured band of rope right below the white rim. -
Secure the bow:
Tie the ends of the twine into a simple shoelace bow at the front, centered above your lettering. Trim the tails so they don’t drag too low. -
Plant your greenery:
Fill the pot with soil and gently nestle your Jade plant or succulent inside, pressing the soil down firmly around the base.
Now you have a custom home for your favorite succulent that looks great on any windowsill
Minimal Abstract Line Face
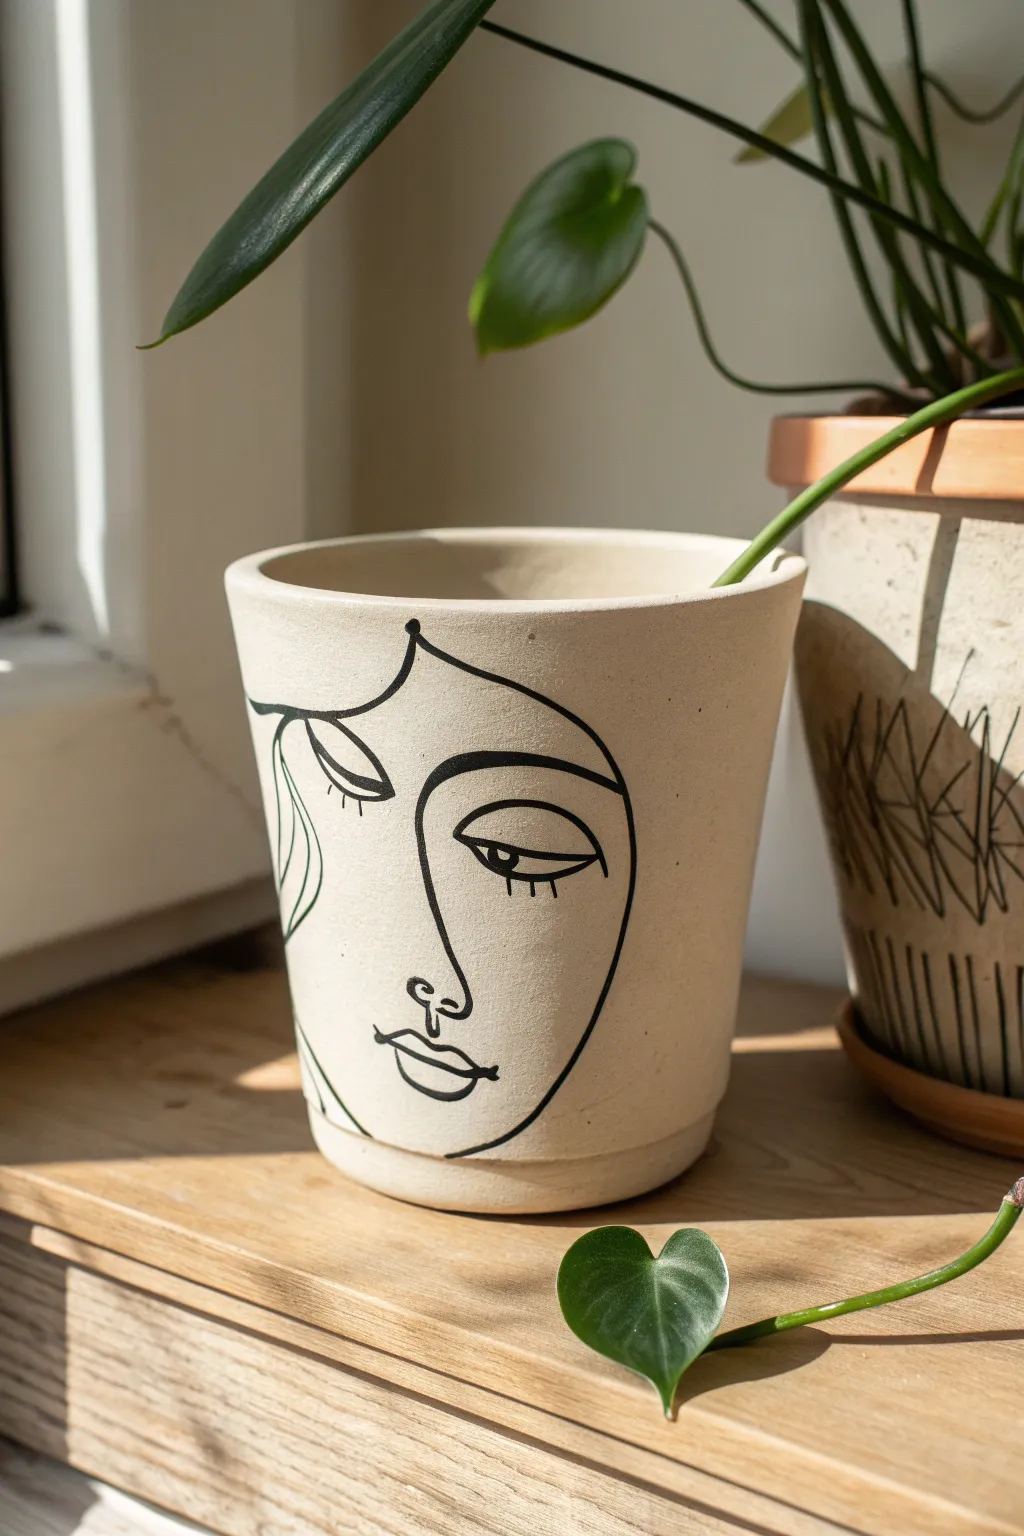
Transform a plain planter into a piece of modern art with this simple yet striking line drawing. The continuous-line style creates an elegant abstract face that adds personality to your plant shelf without overwhelming your decor.
How-To Guide
Materials
- Clean terracotta or ceramic pot (unglazed beige/cream preferred)
- Black oil-based paint marker (medium tip) or acrylic paint & liner brush
- Pencil (HB or H)
- White eraser
- Matte spray sealer (optional)
- Damp cloth
Step 1: Preparation and Sketching
-
Clean the surface:
Before starting, wipe down your pot with a damp cloth to remove any dust or oils that might interfere with the marker or paint. Let it dry completely. -
Plan the placement:
Visualize where the face will sit. The design in the image wraps slightly, so identify the center point for the nose and eyes. -
Sketch the nose and philtrum:
Using your pencil lightly, draw a vertical line that curves slightly for the nose bridge, ending in a small loop or ‘U’ shape for the nostril. Add a small vertical dip underneath for the philtrum. -
Outline the lips:
Directly below the philtrum, sketch the lips. Draw a fuller bottom lip and a slightly thinner top lip, keeping the shapes simple and connected. -
Draft the left eye:
To the left of the nose bridge, draw a closed eye shape. Use two curved lines meeting at points, with a few downward strokes for eyelashes. -
Draft the right eye:
On the right side, draw an open eye. This eye is more almond-shaped with a circle detailed inside for the iris and pupil. Add a distinct crease line above it. -
Shape the face outline:
Start a sweeping line from the left side (near the closed eye/hair area), bringing it down past the cheek, curving under the chin, and sweeping up the right side to frame the face. -
Add hair details:
On the left side, sketch a few wavy, organic lines coming down from the top rim to suggest hair falling over the ‘closed eye’ side of the face. -
Check symmetry and flow:
Take a step back. The beauty of this style is imperfection, but ensure the proportions feel balanced.
Step 2: Inking and Finishing
-
Prepare your marker:
Shake your oil-based paint marker well and test the flow on a scrap piece of paper to ensure smooth, opaque lines. -
Trace the main contour:
Begin tracing your pencil lines. I usually find it easiest to start with the main face outline to establish the boundaries. -
Ink the nose and mouth:
Carefully trace the nose and mouth lines. Use confident, steady strokes rather than short, sketchy ones to maintain that ‘continuous line’ aesthetic. -
Detail the eyes:
Trace the eyes. For the open eye on the right, you can thicken the upper lash line slightly to add weight and expression. -
Fill in the pupil:
Carefully color in the small half-circle pupil on the open eye. Leave a tiny speck uncolored if you want a highlight, or keep it solid black for a graphic look. -
Trace hair accents:
Go over the wavy hair lines on the left side. Let these lines trail off naturally towards the bottom. -
Let the ink cure:
Allow the marker to dry fully. Oil-based markers can take a bit longer than water-based ones, so give it at least 20-30 minutes. -
Erase pencil marks:
Once you are absolutely certain the ink is dry, gently erase any visible pencil guidelines with a clean white eraser. -
Seal the design:
To protect your drawing from water damage when watering your plant, finish by applying a light coat of matte spray sealer suitable for ceramics.
Steady Hand Trick
Rest your pinky finger against the pot surface as you draw to stabilize your hand. This acts as a pivot point and prevents shaky lines on curved surfaces.
Oops, Smudged It!
If you make a mistake with an oil marker on ceramic, wipe it away immediately with a Q-tip dipped in rubbing alcohol before it sets permanently.
Pop in your favorite leafy plant to complete this chic, gallery-worthy look
Cute Character Pot With Plant Hair
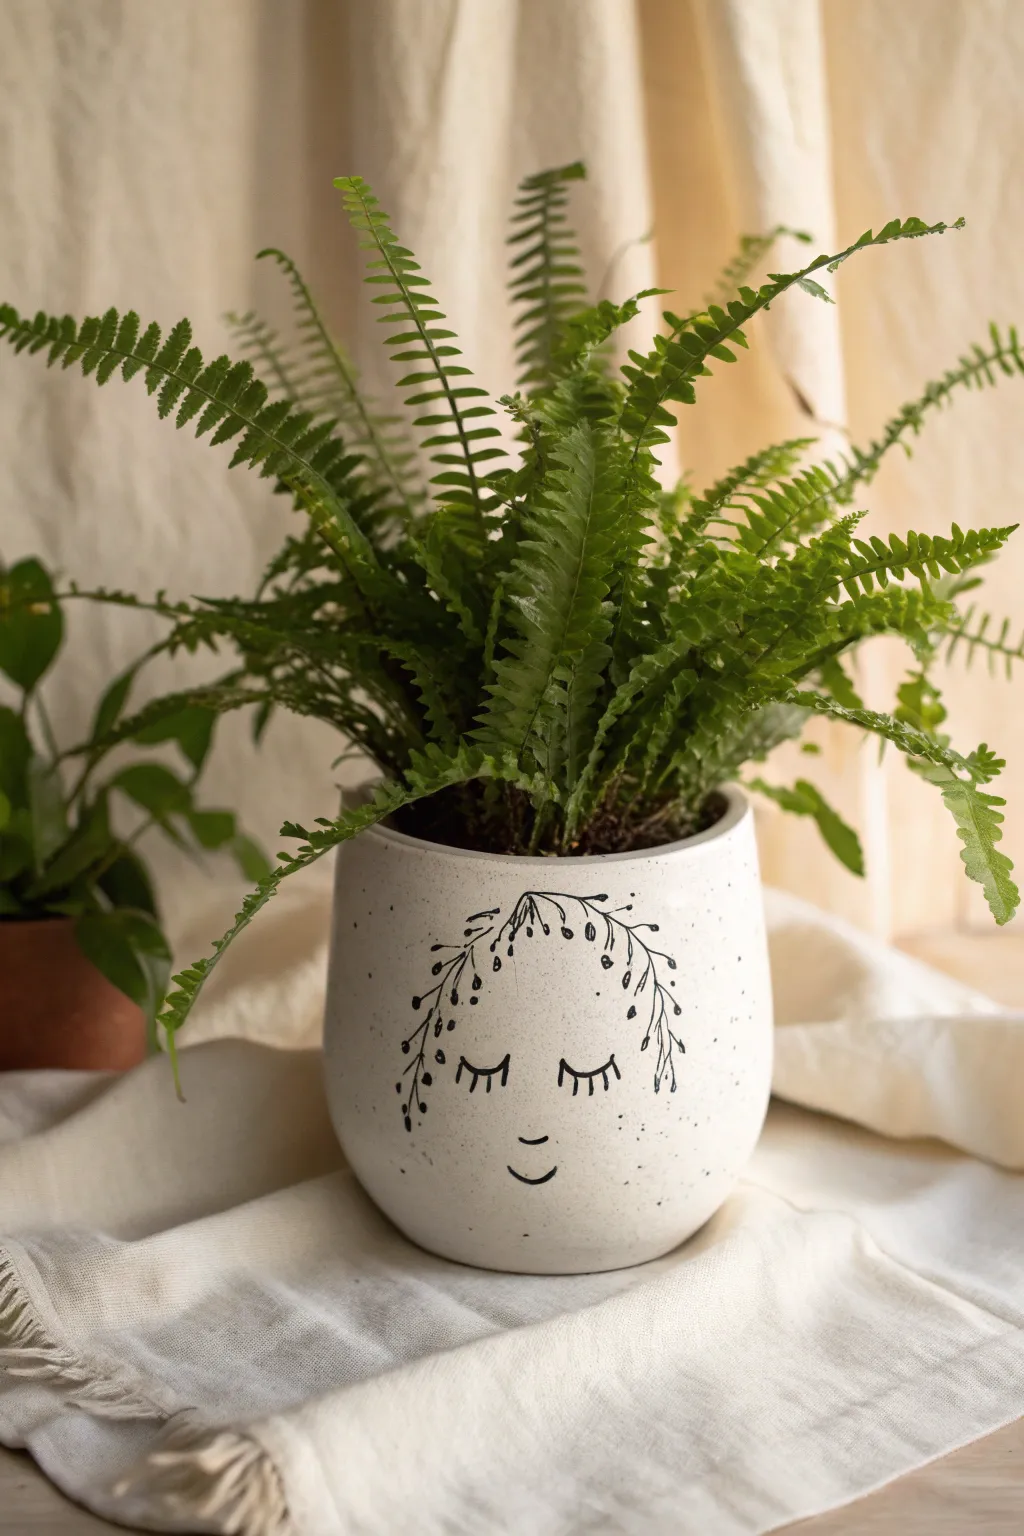
Transform a plain white ceramic pot into a charming character with this simple line-drawing project. By sketching a peaceful face and botanical details, the plant itself becomes the wild, flowing hair of your new friend.
Step-by-Step Guide
Materials
- White ceramic planter (matte finish preferred for better ink adhesion)
- Black oil-based paint marker (fine tip) or permanent marker (like Sharpie)
- Pencil (HB or lighter)
- Soft eraser
- Rubbing alcohol
- Cotton pads or paper towel
- Clear acrylic sealant spray (matte or satin)
- Fern or trailing plant (e.g., Boston Fern)
Step 1: Preparation
-
Clean the surface:
Before you begin drawing, it is crucial to remove any dust, oils, or price tag residue from the pot. I like to wipe the entire exterior surface down with rubbing alcohol on a cotton pad to ensure a perfectly clean canvas. -
Dry completely:
Allow the alcohol to evaporate fully. The surface must be bone dry, or the marker ink might bleed or not adhere properly. -
Find the center:
Visualize where the face will sit. Locate the center of the pot’s front curve, keeping in mind that the plant will hang over the top edge.
Choosing the Marker
For ceramic, oil-based paint markers (like Sharpie Oil-Based or Pebeo) last much longer than standard permanent markers, which can fade to purple over time.
Step 2: Sketching the Design
-
Pencil the eyes:
Using a light touch with your pencil, sketch two downward-curving arcs for the closed eyes. Place them slightly below the halfway vertical point of the pot for a cute proportion. -
Add the lashes:
Draw three to four small, vertical ticks coming down from each eye arc to represent eyelashes. -
Draft the smile:
Sketch a small, gentle upward curve centered below the eyes. Also, add a tiny curved line slightly above the smile to suggest a nose. -
Outline the floral crown:
Starting from the top rim above the left eye, lightly draw a curved vine shape that frames the forehead and drapes down the side of the face. Repeat this on the right side. -
Detail the vines:
Add small leaves or berries along your pencil vines. These decorative elements frame the face and transition visually into the real plant on top. -
Review alignment:
Step back and look at your pencil sketch. Ensure the symmetry feels balanced, though it doesn’t need to be mathematically perfect.
Fixing Mistakes
If you smudge the ink while wet, use a Q-tip dipped in rubbing alcohol to quickly wipe away the error before it sets. Dry the spot fully before redrawing.
Step 3: Inking the Design
-
Prime the marker:
Shake your paint marker well and press the nib on a scrap piece of paper until the ink flows smoothly and consistently. -
Trace the eyes:
Carefully trace over your pencil lines for the eyes. Use a steady hand and consistent pressure to keep the line weight even. -
Ink the lashes:
Add the eyelashes with quick, decisive strokes so the ends taper naturally. -
Define the mouth:
Trace the nose and mouth curves. Keep these lines fairly thin to maintain a delicate expression. -
Draw the main vines:
Trace the main stems of your floral crown. It helps to pull the pen toward you rather than pushing it away for smoother curves. -
Add botanical details:
Ink the small leaves and berries along the vines. Vary the pressure slightly; fill in the berries to make them solid black dots. -
Add texture dots:
For a speckled, artistic look, gently tap the tip of the marker around the cheeks and hair area to create random stippling.
Step 4: Finishing Touches
-
Let ink cure:
Allow the marker ink to dry completely. Oil-based markers may need 15-30 minutes to be safe to touch without smearing. -
Erase guidelines:
Once the ink is fully cured, very gently use your soft eraser to remove any visible pencil marks. Be careful not to scrub hard over the ink. -
Seal the artwork:
Take the pot to a well-ventilated area and spray a light, even coat of clear acrylic sealant over the drawing. This protects the design from water drips when watering the plant. -
Add the plant:
Once the sealant is dry, pot your fern inside. Fluff the fronds so they spill over the rim, completing the ‘hair’ effect.
Enjoy the peaceful presence this little character brings to your indoor garden shelf
Sleepy Cat Silhouette Pot
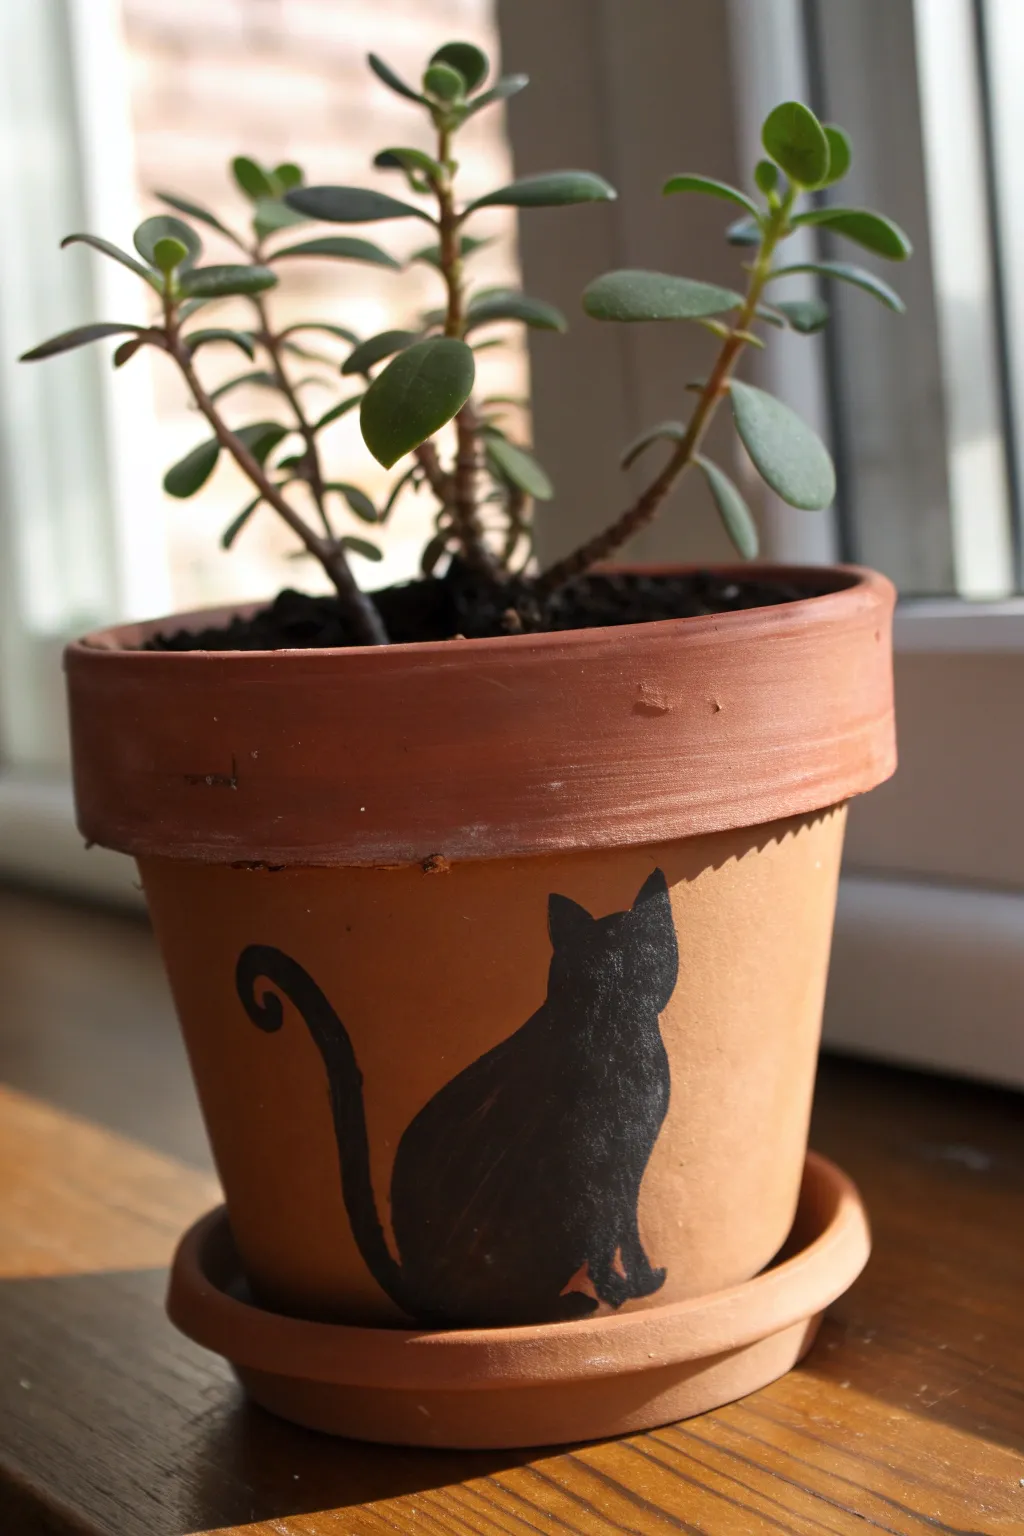
Transform a plain terracotta pot into a charming home for your plants with this simple yet striking silhouette design. The stark contrast of the matte black cat against the natural clay creates a modern, minimalist look perfect for any windowsill.
Step-by-Step Tutorial
Materials
- Clean terracotta pot (standard size)
- Black acrylic paint (outdoor/multi-surface preferred)
- Pencil
- Small flat paintbrush
- Fine liner or detail paintbrush
- Paper towel
- Water cup
- Clear spray sealer (matte or satin finish)
Step 1: Preparing the Pot
-
Surface Prep:
Begin by wiping down your terracotta pot with a damp cloth to remove any dust or loose clay particles. Let it dry completely. -
Rough Sketching:
Using a pencil, very lightly sketch an oval shape near the bottom third of the pot for the cat’s body. Don’t press too hard, as graphite can be tricky to erase from porous clay. -
Adding the Head:
Draw a smaller circle slightly overlapping the top of the body oval to represent the head. -
Ears and Tail:
Sketch two small triangles on top of the head circle. Then, draw a long, curved line extending from the bottom left of the body, curving upward into a spiral shape for the tail.
Step 2: Painting the Silhouette
-
First Outline:
Load your fine liner brush with black acrylic paint. Carefully trace over your pencil lines to define the outer shape of the cat. -
Filling the Base:
Switch to your small flat brush. Start filling in the main body area with black paint, working from the center outwards toward your outline. -
Refining the Shape:
As you fill, smooth out the connection point between the head and body so it looks like one solid silhouette rather than two separate shapes. -
Tail Details:
Switch back to the fine liner brush. Carefully paint the tail, starting thick at the base and tapering slightly as you reach the curled tip. -
Ear Precision:
Use the very tip of your liner brush to fill in the ears, ensuring the points remain sharp and distinct. -
Drying Time:
Let this first coat of paint dry for about 15-20 minutes. Terracotta absorbs paint quickly, so it might look streaky at first.
Smooth Moves
Terracotta is thirsty! If your paint drags, mix a drop of water into your acrylics to help the brush glide smoothly over the rough surface.
Step 3: Finishing Touches
-
Second Coat:
Apply a second layer of black paint over the entire silhouette. This ensures a solid, opaque black that really pops against the orange clay. -
Clean Up:
If you made any small mistakes or smudges outside the lines, wait for the paint to dry completely, then gently scrape it away with a craft knife or sand it off with fine-grit sandpaper. -
Sealing:
Once the paint is fully cured (I usually wait a few hours to be safe), take the pot to a well-ventilated area. -
Applying Protection:
Spray a light, even coat of clear sealer over the outside of the pot. This protects the design from water damage when you water your plant. -
Final Cure:
Allow the sealer to dry according to the can’s instructions before potting your plant.
Wobbly Lines?
If you struggle with freehand painting, print a cat silhouette, cut it out, and trace around it with your pencil for a perfect guide.
Now you have a purr-fectly painted pot ready to showcase your favorite succulent
Woodland Mushroom Wraparound Scene
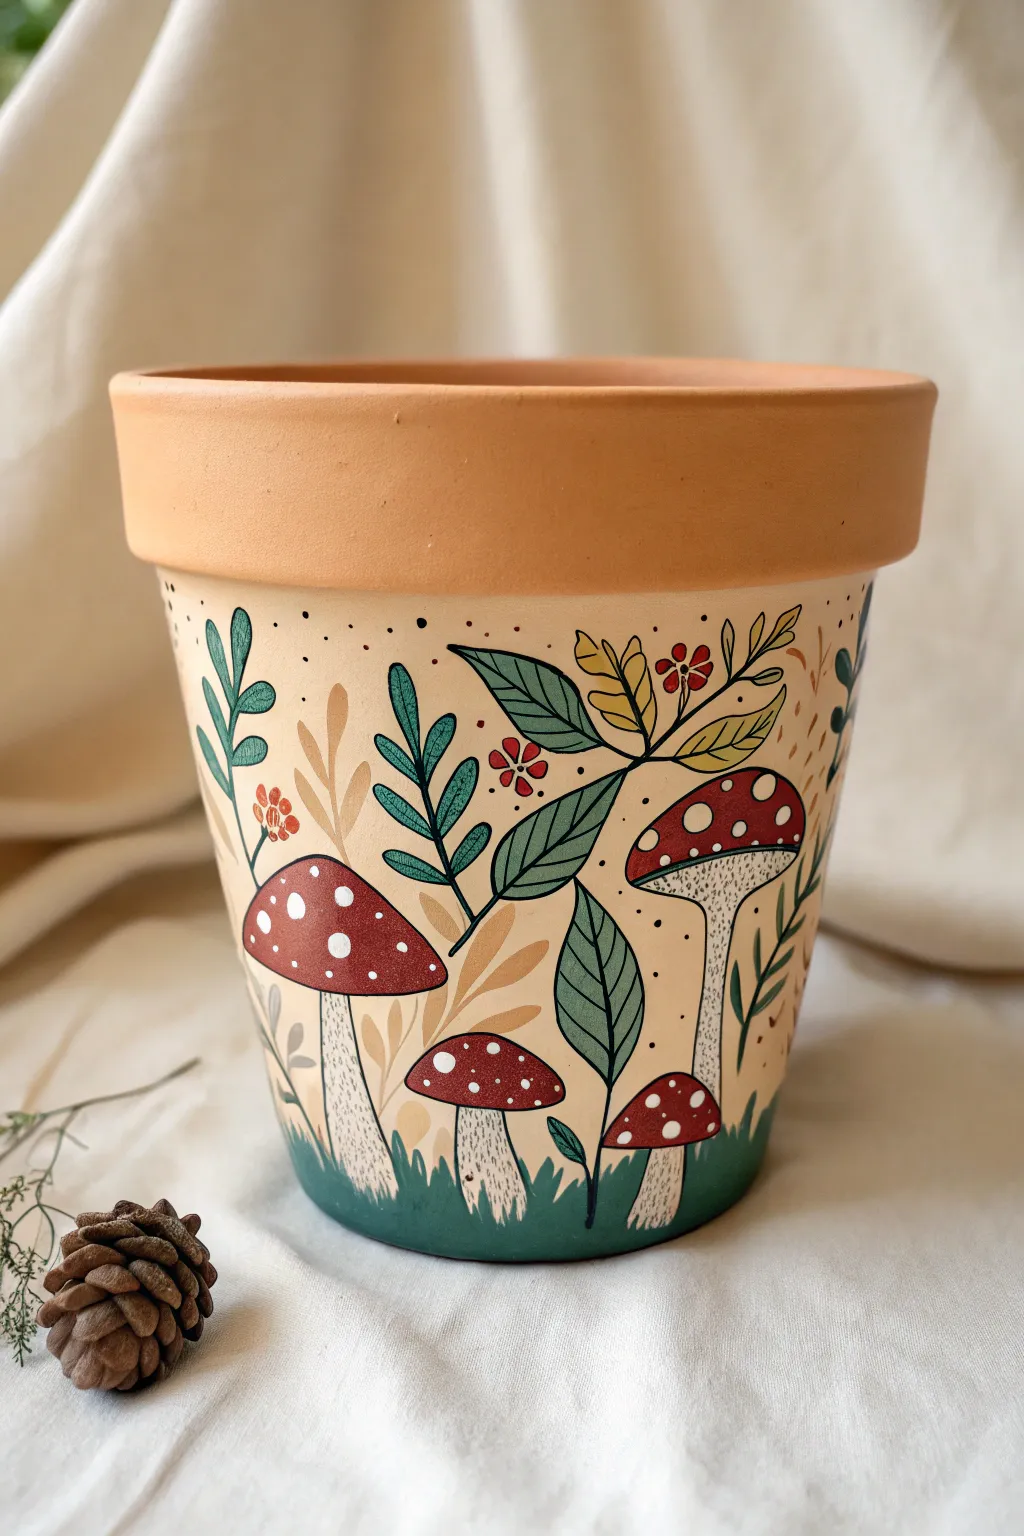
Transform a plain terracotta pot into an enchanted forest floor with this charming wraparound design. Featuring vibrant red fly agaric mushrooms, delicate ferns, and earthy foliage, this project uses a creamy base to make the colors pop beautifully.
Detailed Instructions
Materials
- Standard terracotta pot (approx 6-inch)
- Acrylic paints (Titanium White, Cream/Light Beige, Deep Red, Forest Green, Lime Green, Golden Ochre, Dark Brown)
- Flat paintbrush (1-inch width)
- Round paintbrushes (sizes 2 and 6)
- Fine liner brush (size 0 or 00)
- Black waterproof fine-tip paint pen or micron pen
- Matte or satin sealant spray
- Palette
- Water cup and paper towels
- Pencil and eraser
Step 1: Base Preparation
-
Clean and Dry:
Ensure your terracotta pot is completely clean and dust-free. If you washed it, let it dry for at least 24 hours to prevent moisture from bubbling your paint later. -
Tape the Rim:
If you want that crisp line between the painted body and the natural rim seen in the photo, apply painter’s tape just below the rim’s lip. Press it down firmly to seal the edge. -
Apply the Base Coat:
Mix a generous amount of Titanium White with a touch of Cream or Light Beige. Using the large flat brush, paint the entire body of the pot below the rim. You will likely need 2-3 coats for opaque coverage, letting each layer dry completely in between.
Paint Pen Skip?
If your fine-tip pen stops flowing over the acrylic, the paint surface might be too rough. Lightly sand the dried paint with a brown paper bag to smooth it out without removing color, then try again.
Step 2: Sketching and Blocking
-
Light Sketching:
Using a pencil very lightly, sketch the main elements. Start with three or four large mushroom caps at varying heights around the pot. Add stems curving down to the base. -
Add Foliage guides:
Sketch broad lines for where your major leaves will go. Don’t worry about tiny details yet; just map out where the fern-like leaves and the broader leaves will sit to balance the negative space. -
Painting Mushroom Caps:
Load your size 6 round brush with Deep Red. Carefully fill in the mushroom cap shapes. I find that doing two thin layers of red is better than one thick, gloppy layer. -
Painting Stems:
Mix a tiny drop of brown into your white paint to make an off-white/grey tone. Paint the mushroom stems, letting them flare out slightly at the bottom. -
Grounding with Grass:
At the very bottom of the pot, use Forest Green to paint jagged, grass-like strokes that overlap the bottom of the mushroom stems. This grounds your scene so the mushrooms aren’t floating.
Pro Tip: Opacity Hack
Terracotta is very porous and ‘drinks’ paint. To save paint and get smoother strokes, seal the inside of the pot with a clear spray sealer before you ever start painting the outside base coat.
Step 3: Detailing the Flora
-
Dark Green Leaves:
Using Forest Green and a size 2 brush, paint the solid, pointed leaves. Imagine a central vein and pull your brush stroke from the stem outward to the tip. -
Teal or Blue-Green Sprigs:
Mix Forest Green with a little white (or use a sage green) to paint the fern-like branches that have small, rounded leaflets. -
Golden Foliage:
Use Golden Ochre or a muted yellow to add the contrasting warm-toned leaves. These look great tucked behind the green leaves to add depth to your woodland thicket. -
Tiny Flowers:
With a small brush, dab small clusters of red dots or simple five-petal flower shapes near the leafy branches. Add a tiny yellow or white center to each.
Step 4: Fine Lines and Finishing
-
Outline Work:
Once all paint is absolutely dry, use your black paint pen or fine liner brush with thinned black paint. Carefully outline the mushroom caps, stems, and all leaves. Keep your hand steady and loose. -
Leaf Veins:
Draw the central veins and branching veins inside your leaves using the black pen. This line art style gives the pot its distinct illustrative look. -
Mushroom Details:
Using the fine liner brush and pure White paint, add the iconic dots to the red mushroom caps. Vary the sizes—some large, some tiny. -
Texture Shading:
Use the black pen to add small vertical hatch marks or stippling on the mushroom stems (just under the cap) and on the stems near the ground to suggest shadow and texture. -
Background Filler:
To fill empty beige spaces, use your black pen to add tiny floating dots and speckles. This ‘dust’ effect makes the scene feel magical. -
Seal the Deal:
Remove the tape from the rim. Take the pot to a ventilated area and apply two light coats of matte sealant spray to protect your artwork from water and soil.
Fill your new woodland vessel with a fern or pilea to complete the forest floor aesthetic
Starry Galaxy Night Sky
Transform a standard terracotta planter into a piece of the night sky with this layered galaxy design. Featuring distinct bands of deep blue, purple, and copper topped with delicate shimmering stars, this project brings cosmic charm to your indoor garden.
Step-by-Step Guide
Materials
- Terracotta pot (6-8 inch diameter)
- Acrylic craft paints (Navy Blue, Deep Purple, Lilac, Copper/Brown)
- Metallic gold paint pen (fine tip)
- Flat paintbrush (0.5 inch width)
- Small round paintbrush
- Painter’s tape or masking tape
- Matte or satin clear sealant spray
- Water cup and paper towels
Step 1: Preparation and Base Layer
-
Clean the Surface:
Begin by wiping down your terracotta pot with a damp cloth to remove any dust or oils. Let it dry completely so the paint adheres properly. -
Tape the Rim:
Apply a strip of painter’s tape just under the lip of the pot to protect the main body while you work on the top section first. -
Paint the Rim:
Load your flat brush with navy blue acrylic paint. Apply an opaque coat to the entire rim of the pot, ensuring you cover the very top edge as well. -
Second Coat:
Allow the first layer to dry for about 15 minutes. Apply a second coat of navy blue if your terracotta is still showing through, then carefully peel off the tape while the paint is slightly tacky.
Use a Sponge
For a softer, cloud-like galaxy effect between the color bands, try dabbing the paint on with a cosmetic sponge rather than brushing it. This blends color boundaries naturally.
Step 2: Creating the Color Bands
-
Mark Guidelines:
Lightly sketch horizontal rings around the pot with a pencil to mark where each color transition will happen, or apply new tape lines if you want very sharp edges. -
Paint the Bottom Band:
Using the same navy blue from the rim, paint the bottom-most band of the pot. I usually go up about an inch from the base. -
Add the Purple Band:
Above the navy bottom, paint a band about 1.5 inches wide using deep purple acrylic paint. -
Paint the Copper Glow:
For the middle section, mix a touch of brown with a little purple or use a pure copper metallic paint to create that warm, earthy band seen in the middle. -
Paint the Gradient Transition:
For the section just below the rim, use a lilac or light lavender shade. To soften the look, use a slightly damp brush to gently feather the bottom edge of this lilac band into the copper band below it. -
Refine the Lines:
Go back with a small round brush and touch up the edges between your color bands so they look clean and intentional.
Step 3: Adding the Stars
-
Prime the Pen:
Shake your metallic gold paint pen well and press the nib on a scrap piece of paper until the ink flows smoothly. -
Draw Large Starbursts:
Start on the dark blue rim. Draw a few eight-pointed stars by making a cross, then adding a smaller ‘x’ through the center. -
Add Medium Stars:
Scatter four-pointed stars (simple crosses that taper at the ends) randomly around the larger ones. -
Create Distant Stars:
Fill in the empty negative space on the rim with small dots. Vary the pressure so some dots are tiny and others are slightly bolder. -
Detail the Lower Bands:
Extend the star pattern onto the lilac band just under the rim, drawing a large starburst right at the transition line for visual interest. -
Subtle Speckling:
For the purple and blue bands at the bottom, switch to white or very light gray paint on an old toothbrush. Flick the bristles to create a tiny, subtle spray of ‘distant galaxy’ specks over the lower colors.
Constellation Customization
Look up your zodiac sign’s constellation and faithfully recreate it on the dark blue rim using the gold paint pen for a personalized astrological touch.
Step 4: Finishing Touches
-
Assess the Design:
Step back and look at your pot. Add any extra gold dots if an area looks too empty. -
Sealing:
Once all paint and ink are completely dry (give it at least an hour), take the pot outside and spray it with a clear matte sealant. This protects your artwork from water damage when you water your plant.
Now your potted plant has a stunning new home among the stars
Dripping Frosting Illusion
Transform a plain terracotta pot into a sweet-looking vessel with this dripping frosting illusion. By using a creamy off-white paint and a clever drip technique, you can mimic the organic, uneven look of glaze drizzling down the sides of handmade pottery.
Step-by-Step Tutorial
Materials
- Terracotta pot (4-6 inch diameter)
- Matching terracotta saucer
- Sandpaper (fine grit)
- Creamy off-white acrylic paint
- Light beige or warm yellow acrylic paint (for tinting)
- Small flat brush
- Detail round brush
- Disposable palette or plate
- Water cup
- Clear matte sealer spray
Step 1: Preparation & Base Coat
-
Clean surface:
Start by ensuring your terracotta pot is completely clean and dry. If it’s a new pot, give it a quick wipe with a damp cloth to remove any clay dust. -
Sand imperfections:
Lightly sand any rough bumps on the exterior of the pot using fine-grit sandpaper to create a smoother canvas for your paint. -
Mix the frosting color:
On your palette, squeeze out a generous amount of creamy off-white paint. Add a tiny drop of beige or warm yellow to warm it up; we want a “vanilla frosting” tone rather than stark white. -
Paint the rim:
Using your flat brush, paint the entire top rim of the pot. Coat the top edge and about half an inch down the inside of the pot so the raw clay doesn’t show when soil is added. -
Paint the base body:
Continue painting the main body of the pot with your off-white mixture. Don’t worry about being perfectly opaque yet; a slightly translucent first layer helps the paint bond. -
Add texture to the rim:
While the rim paint is still wet, dab the brush gently along the very top edge to create a slightly stippled texture, mimicking raised ceramic bumps.
Paint Too Thin?
If your acrylic is too runny to hold a ‘drip’ shape, mix in a pinch of baking soda or cornstarch. This thickens the texture for a realistic 3D effect.
Step 2: Creating the Drips
-
Visualize the drip line:
Imagine a line running around the pot about 1.5 inches below the rim. This is where your “glaze” will stop, but it shouldn’t be a straight line. -
Sketch the drips:
Load your round detail brush with the paint mixture. Start painting vertical lines downwards from the painted rim area. -
Vary the lengths:
Make some drips long and others short. The longest drips should reach about halfway down the pot. -
Round the bottoms:
At the bottom of each vertical line, press the brush down slightly to create a rounded, teardrop shape. This mimics gravity pulling heavy fluid down. -
Connect the drips:
Paint curved lines connecting the tops of your drips just under the rim, creating a scalloped edge that looks like fluid overflowing. -
Second coat for opacity:
Once the first layer is dry to the touch, apply a second coat over your painted areas. This is crucial for that thick, ceramic glaze appearance. -
Add raised dots:
Using the handle end of your paintbrush or a toothpick, dip it into the thickest part of your paint blobs on the palette. -
Dot the rim:
Gently press dots of paint along the upper rim band. Space them out irregularly to enhance the handmade pottery vibe.
Pro Tip: Gravity Assist
Turn the pot upside down while painting the connecting arches between drips. This helps you get a smooth, natural curve that looks like gravity did the work.
Step 3: Finishing Touches
-
Create the faded effect:
Mix a very watery wash of the beige paint. Lightly brush this over the dried white paint, specifically near the bottom of the drips, to create an aged, slightly translucent look where the ‘glaze’ thins out. -
Speckling:
To mimic stoneware clay, dip an old toothbrush or stiff brush into diluted brown or black paint. Run your thumb across the bristles to flick tiny specks onto the white painted areas. -
Dry completely:
Let the pot sit for at least 24 hours to ensure the acrylic is fully cured. -
Seal the work:
Spray the entire exterior with a clear matte sealer. This protects your artwork from water damage when you water your plants.
Now your pot has a delightful artisan finish that pairs perfectly with spiky cacti or soft succulents


Have a question or want to share your own experience? I'd love to hear from you in the comments below!