
If you’re craving easy Halloween painting ideas that look bold without feeling complicated, you’re in the right place. I love leaning on classic Halloween symbols and high-contrast color palettes so you can get a spooky vibe fast—no perfection required.
Classic Jack-o’-Lantern Face
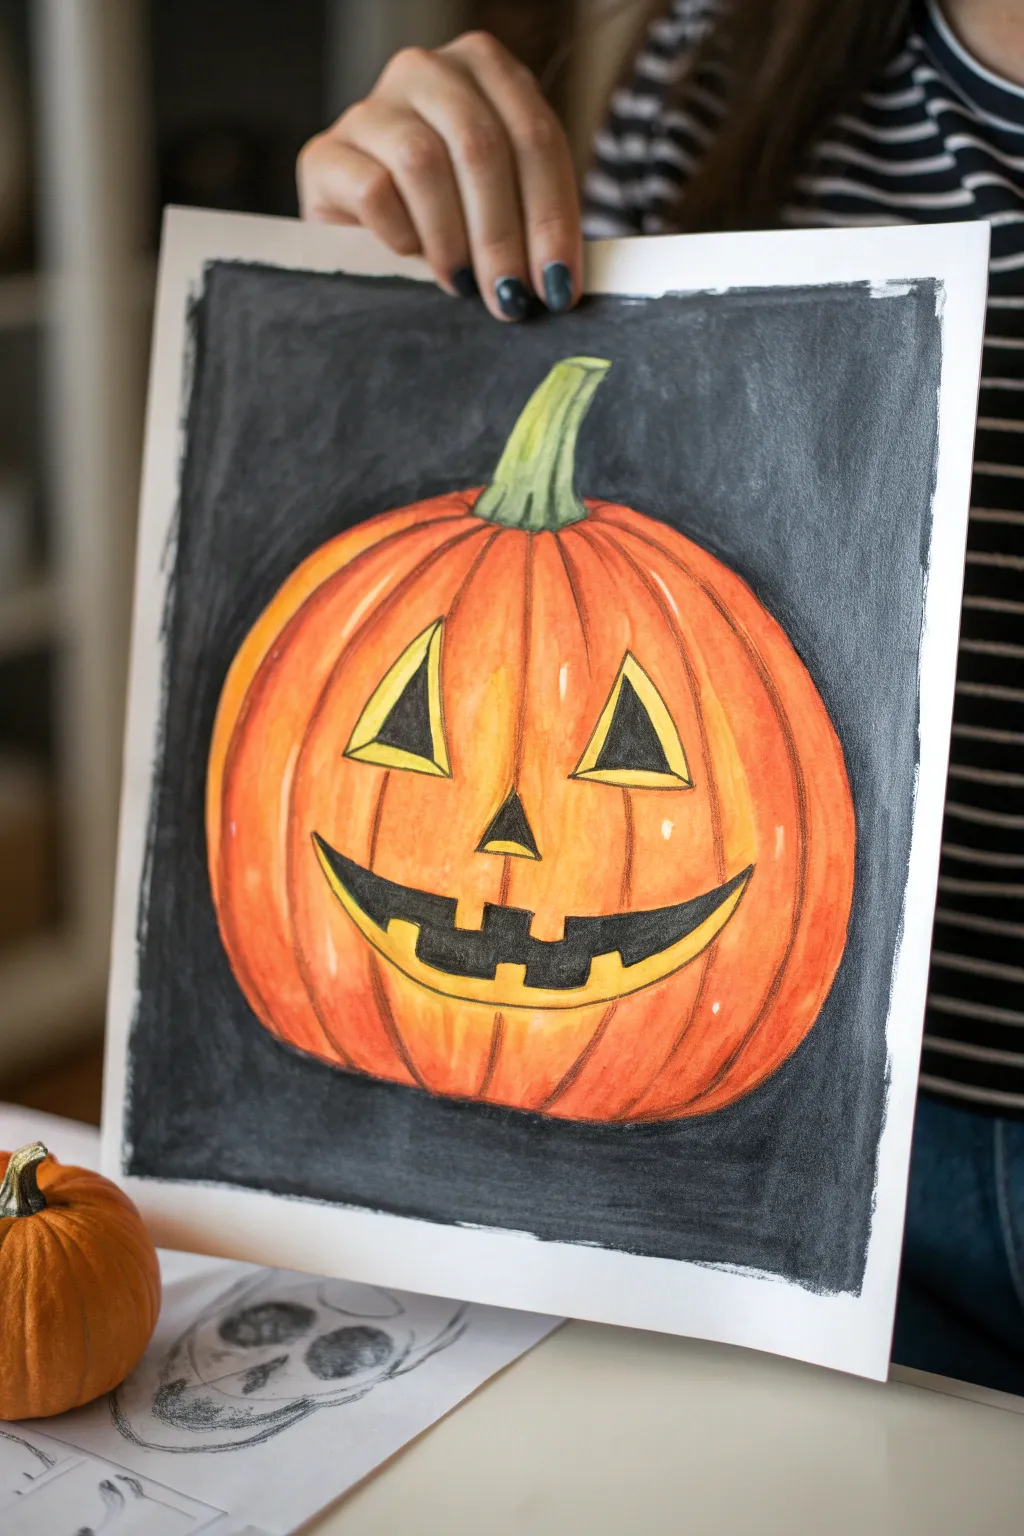
Capture the iconic spirit of Halloween with this bold, mixed-media Jack-o’-Lantern painting. This project combines vibrant watercolor washes with sharp colored pencil details to create a pumpkin that pops against a dramatic chalkboard-style black background.
Step-by-Step Guide
Materials
- Heavyweight mixed-media or watercolor paper (9×12 inch)
- Pencil and eraser for sketching
- Watercolor paints (orange, yellow, green)
- Black acrylic or gouache paint (matte finish)
- Colored pencils (dark orange, brown, black, yellow, white)
- Round watercolor brushes (medium and small)
- Flat brush (medium) for background
- Painter’s tape or artist tape
- Paper towels and water cup
Step 1: Sketching the Pumpkin Structure
-
Define the Center:
Lightly sketch a large oval shape in the center of your paper using a pencil. Leave plenty of room around the edges for the background. -
Create the Ribs:
Starting from the top center where the stem will be, draw curved lines radiating down to the bottom to create the pumpkin’s ribs. The lines in the center should be straighter, while the side lines curve more dramatically to show roundness. -
Add the Stem:
Draw a sturdy, slightly twisted stem emerging from the top center indentation, tapering slightly as it goes up. -
Carve the Face:
Sketch two triangles for eyes, a smaller triangle for the nose, and a wide, jagged smile. Give the shapes a slight 3D effect by drawing a second line inside the cutouts to show the thickness of the pumpkin rind.
Clean Contrast
If you struggle with painting the black background right up to the orange edge, use a fine-tip black marker to outline the pumpkin first, then fill the rest with paint.
Step 2: Adding Vibrant Color
-
Base Orange Wash:
Load your round brush with watered-down orange watercolor. Paint the entire pumpkin body, carefully skipping the eyes, nose, and mouth areas. -
Highlighting:
While the paint is still wet, lift a little pigment from the center of each rib section with a clean, damp brush or dab of paper towel to create highlights. -
Stem and Face Base:
Paint the stem with a light wash of green. Then, fill in the thickness of the rind (the inner lines of the face) with a pale yellow paint. -
Deepening Shadows:
Once the first layer is dry, mix a slightly darker orange-red. Paint along the rib lines to deepen the grooves and create volume.
Step 3: Defining the Face and Background
-
Fill the Features:
Using a smaller brush and black paint (or very concentrated watercolor), carefully fill in the eyes, nose, and mouth. Leave the yellow ‘rind’ border untouched. -
Outline the Background Area:
Use a pencil or tape to mark off a rectangular border around the pumpkin if you want straight edges, or freehand it for a painterly look. -
Paint the Black Backdrop:
Using opaque black acrylic or gouache and a flat brush, paint the background surrounding the pumpkin. I like to leave the edges slightly rough and uneven to give it a hand-painted, rustic feel. -
Refine the Edges:
Carefully paint right up to the orange edge of the pumpkin, ensuring the contrast is crisp. Let the black paint dry completely.
Glow Up
Make the Jack-o’-Lantern look lit up by lightly shading the center of the pumpkin around the nose with a soft layer of yellow pastel or chalk.
Step 4: Detailing with Colored Pencils
-
Enhance the Ribs:
Once all paint is bone dry, take a dark orange or red-brown colored pencil and trace over the vertical rib lines to sharpen them. -
Shade the Bottom:
Use the brown pencil to add shading at the very bottom curve of the pumpkin where it meets the black background. -
Detail the Stem:
Add texture to the green stem using short strokes of brown or dark green colored pencil. -
Pop the Bevels:
Use a yellow or light orange pencil to outline the cut edges of the face features, making them look illuminated from within. -
Final Highlights:
Add small touches of white colored pencil or white gel pen on the upper curves of the pumpkin cheeks to simulate a glossy skin texture.
Display your cheerful artwork in a frame or on the mantel for immediate spooky vibes


Black Cat Silhouette on a Fence
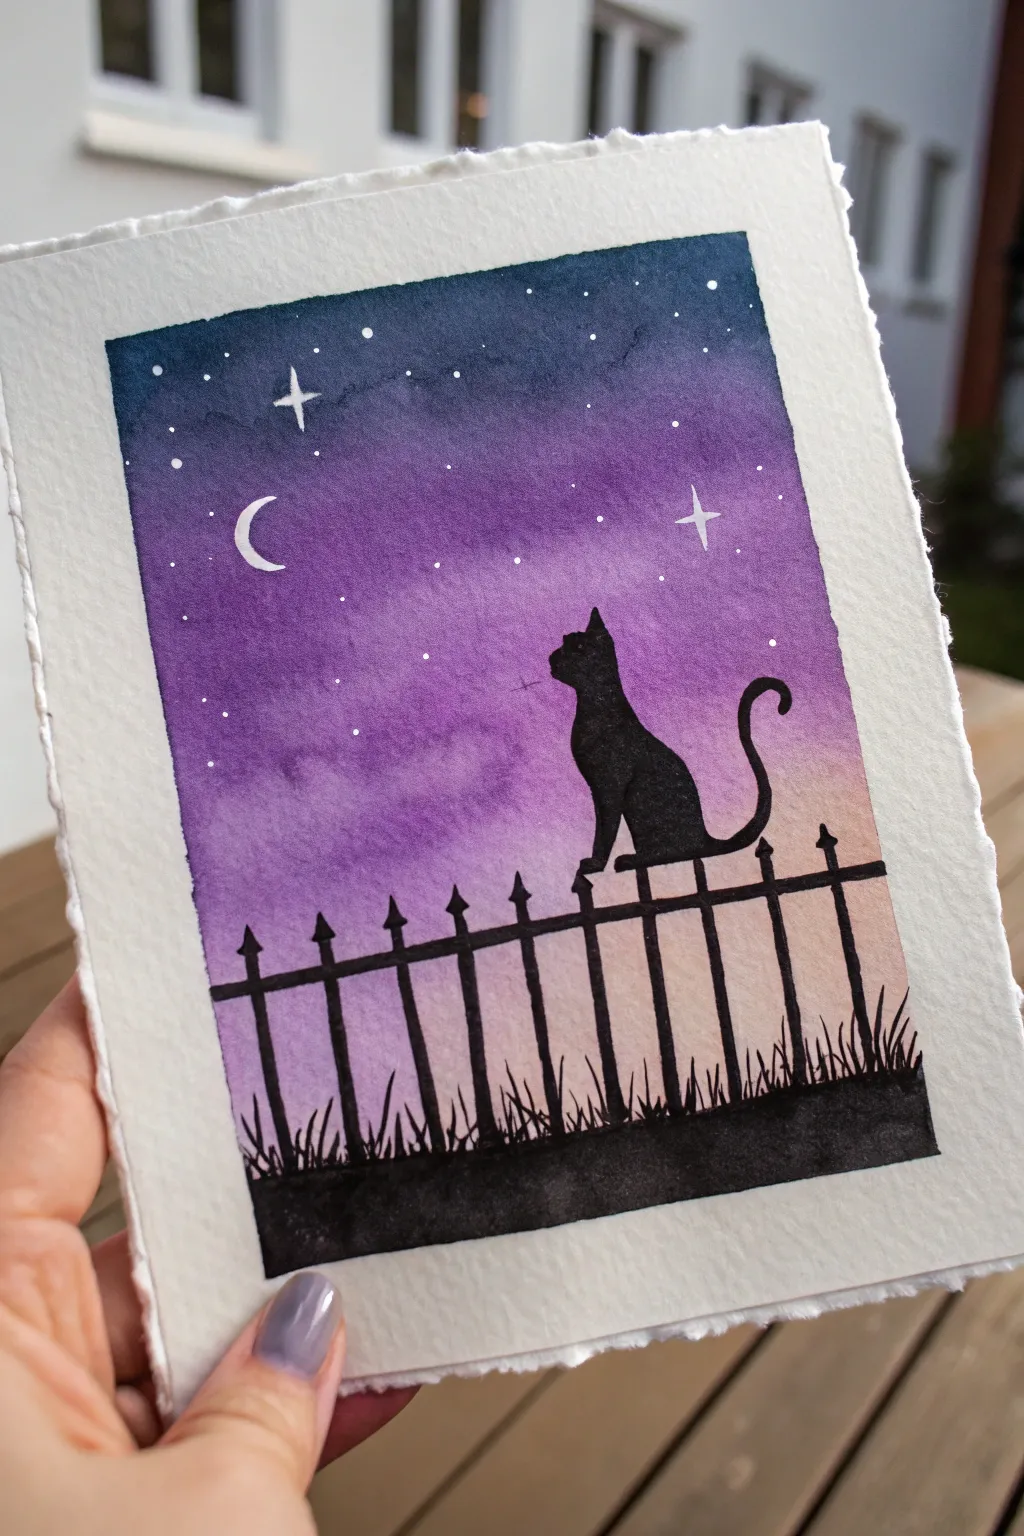
This whimsical watercolor painting captures the magic of a Halloween night with a simple silhouette technique. The gradient sky transitions from twilight peach to deep midnight blue, creating a perfect backdrop for the serene black cat.
How-To Guide
Materials
- Cold press watercolor paper (deckle-edge optional)
- Watercolor paints (Indigo, Purple, Magenta, Peach/Orange)
- Black gouache or black acrylic paint
- White gel pen or white gouache
- Flat wash brush (3/4 inch or similar)
- Round detail brush (size 2 or 4)
- Painter’s tape and drawing board
- Pencil and eraser
- Jars of water
- Paper towels
Step 1: Painting the Gradient Sky
-
Prepare your paper:
Tape your watercolor paper down to a board to prevent buckling. If you’re using deckle-edge paper like in the example, you might just tape the back or very lightly tape the corners to preserve the texture. -
Wet the surface:
Using your flat wash brush and clean water, apply an even coat of water to the entire paper surface. It should cling to the surface and glisten, but not pool. -
Apply the base color:
Start at the bottom third of the paper with a very watered-down peach or soft orange. Let this color bleed upwards naturally into the wet paper. -
Add the mid-tones:
While the paper is still wet, mix a vibrant magenta or purple. Apply this across the middle section, gently blending the lower edge into the peach tone you just laid down. -
Deepen the night sky:
Mix a deep indigo or dark blue. Apply this heavily at the very top of the paper, pulling it down to meet the purple. The wet-on-wet technique will help these colors blend seamlessly without harsh lines. -
Refine the blend:
Clean your brush, damp it slightly, and gently run it horizontally across any areas where the color transition looks too abrupt. I prefer to do this quickly so the paper doesn’t dry out while I’m working. -
Let it dry completely:
This is crucial. The paper must be bone-dry before moving to the next phase. You can use a hairdryer on a low setting to speed this process up.
Fixing “Blooms”
If water drops create cauliflower-like textures in the sky, don’t panic. Once dry, lightly dampen the area and lift color with a clean brush, or just paint a few extra stars over the texture to hide it.
Step 2: Creating the Silhouette
-
Sketch the outlines:
Lightly sketch the horizontal fence line, the vertical spikes, and the cat using a pencil. Place the cat off-center for a balanced composition. -
Paint the fence base:
Switch to your black gouache or acrylic paint. These are more opaque than watercolor, which creates a solid silhouette. Paint the solid ground area at the very bottom first. -
Add the grass texture:
Using your smallest round brush, flick tiny, quick upward strokes from the solid ground area to simulate jagged grass blades. -
Paint the horizontal rail:
Carefully paint the horizontal bar of the fence. Use a steady hand or a ruler to guide your brush if needed. -
Add vertical posts:
Paint the vertical posts, topping each one with a small triangle or spade shape for that classic wrought-iron look. -
Outline the cat:
Carefully trace the outline of your cat sketch with the fine brush. Focus on getting the ears sharp and the tail curve smooth. -
Fill in the silhouette:
Fill the inside of the cat shape with solid black paint. Ensure the coverage is even so no background sky shows through the body.
Add Some Magic
Mix a tiny amount of iridescent or glitter watercolor medium into your white paint for the stars. When the light hits your painting, the night sky will actually sparkle.
Step 3: Adding Celestial Details
-
Paint the moon:
Using a white gel pen or fine brush with white gouache, draw a thin crescent moon in the upper left section. -
Draw major stars:
Create one or two larger stars by drawing a small cross shape with the white pen. -
Add star clusters:
Dot tiny points of white throughout the blue and purple sections of the sky. Vary the pressure to make some stars larger than others. -
Final touches:
Check your black silhouette. If it dried looking slightly grey or patchy, apply a second coat of black for a true, deep shadow effect.
Now you have a moody, atmospheric piece of art perfect for the spooky season


Floating Sheet Ghosts
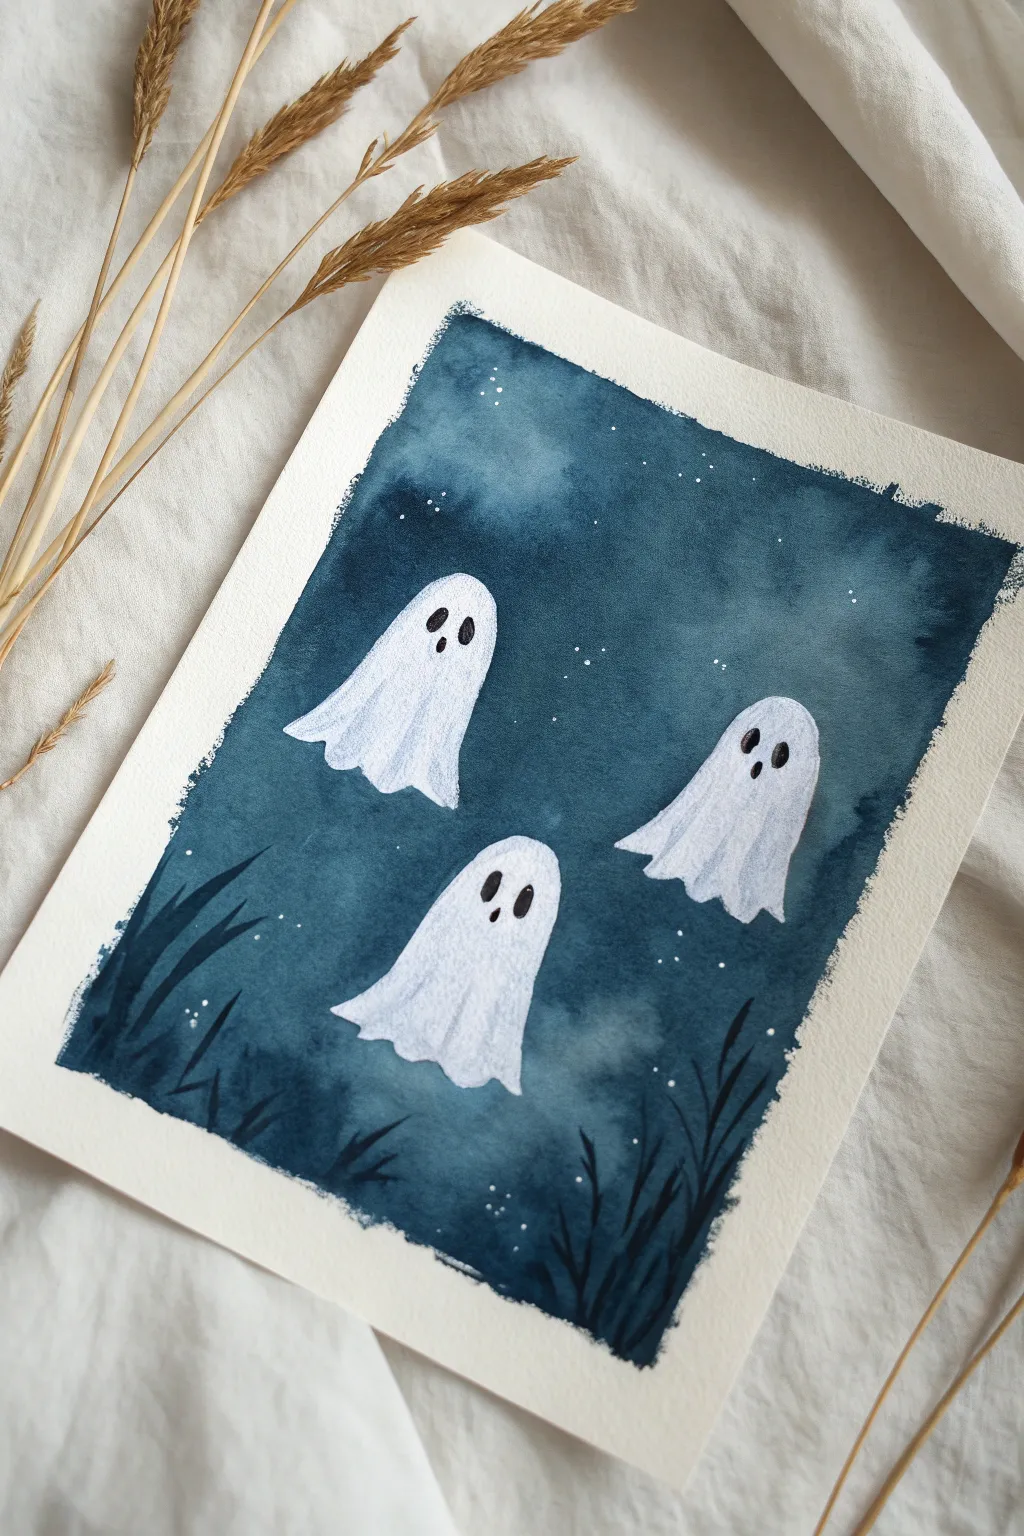
Capture the spooky charm of Halloween with this moody watercolor painting featuring three ghostly friends drifting through a midnight sky. The deep indigo background and bright white figures create a striking contrast that is both eerie and adorable.
Step-by-Step Tutorial
Materials
- Cold press watercolor paper (140lb/300gsm)
- Painter’s tape or masking tape
- Watercolor paints: Indigo/Payne’s Grey and a dark Phthalo Blue
- White opacity medium (white gouache or opaque white watercolor)
- Black ink pen or fine liner brush
- Round brushes: Size 6 or 8 (for wash) and Size 2 (for details)
- Rigger brush or liner brush (optional for grass)
- Jar of clean water
- Paper towels
- Pencil and kneaded eraser
Step 1: Preparation & Sketching
-
Secure the paper:
Begin by taping down all four edges of your watercolor paper to a board or table. This creates that crisp, professional white border seen in the example and prevents the paper from buckling under heavy washes. -
Outline the ghosts:
Lightly sketch three ghost shapes using a pencil. Aim for a classic ‘sheet over the head’ look with ruffled bottoms. Place one high on the left, one low in the center, and one to the right for a balanced composition. -
Refine the shapes:
Keep your pencil lines faint so they won’t show through later. I find it helpful to gently dab the sketch with a kneaded eraser to lift excess graphite before painting.
Step 2: Painting the Night Sky
-
Mix your background color:
Create a deep, moody night sky mixture. Combine Indigo or Payne’s Grey with a touch of Phthalo Blue or Turquoise to get that rich teal-black hue. -
Start the wash:
Using your larger round brush, carefully paint around the ghost outlines first. This negative painting technique defines their shapes without using white paint yet. -
Fill the background:
Work quickly outward from the ghosts to fill the rest of the rectangular background. Don’t worry about making it perfectly smooth; some patchiness adds to the misty, atmospheric effect. -
Create rough edges:
Allow your brushstrokes to be naturally uneven at the taped borders. This creates a charming, illustrative deckled edge rather than a perfect rectangle. -
Add misty depth:
While the sky is still damp, drop in slightly more saturated pigment near the bottom corners and darker areas to suggest depth and shadows. -
Wait for drying:
Let this background layer dry completely. If the paper feels cool to the touch, it’s still wet.
Keep it Clean
Use two water jars: one for rinsing dirty dark paint and one for picking up clean water. This keeps your white ghosts bright and prevents muddy colors.
Step 3: Bringing the Ghosts to Life
-
First ghost layer:
Mix a very watery, pale grey wash (water down your sky color significantly). Paint shadow lines on the ghosts to show the folds in the fabric, mostly focusing on the bottom ruffles and sides. -
Brighten the whites:
Using opaque white gouache or undiluted white watercolor, paint over the main body of the ghosts. This makes them pop against the dark background and covers any stray background paint. -
Blend the fabric:
Use a damp brush to soften the transition between the bright white gouache and the pale grey shadows you painted earlier, giving the sheets volume.
Glow Effect
After the background dries, lightly glaze very watered-down white gouache around the edges of the ghosts to make them look like they are faintly glowing.
Step 4: Atmospheric Details
-
Adding grass:
With a thin liner brush and your darkest indigo mix, paint grass blades rising from the bottom edge. Use quick, flicking upward motions to taper the tips naturally. -
Create stars:
Dip a brush or toothbrush into white gouache. Tap the handle against another brush over the painting to splatter tiny stars across the sky. Keep some splatter fainter than others for depth. -
Larger stars:
Hand-paint a few slightly larger white dots in empty areas to represent brighter stars or distant planets. -
Paint the faces:
Once the white body paint is totally dry, use black ink or thick black paint to add the eyes and mouths. Simple ovals vary the expressions—try making one look surprised and another spooky. -
Final reveal:
Wait until the entire painting is bone dry, then carefully peel away the tape at a 45-degree angle to reveal your crisp borders.
Frame your spooky masterpiece or gift it to a friend who loves all things haunted

Bat Swarm Across a Full Moon
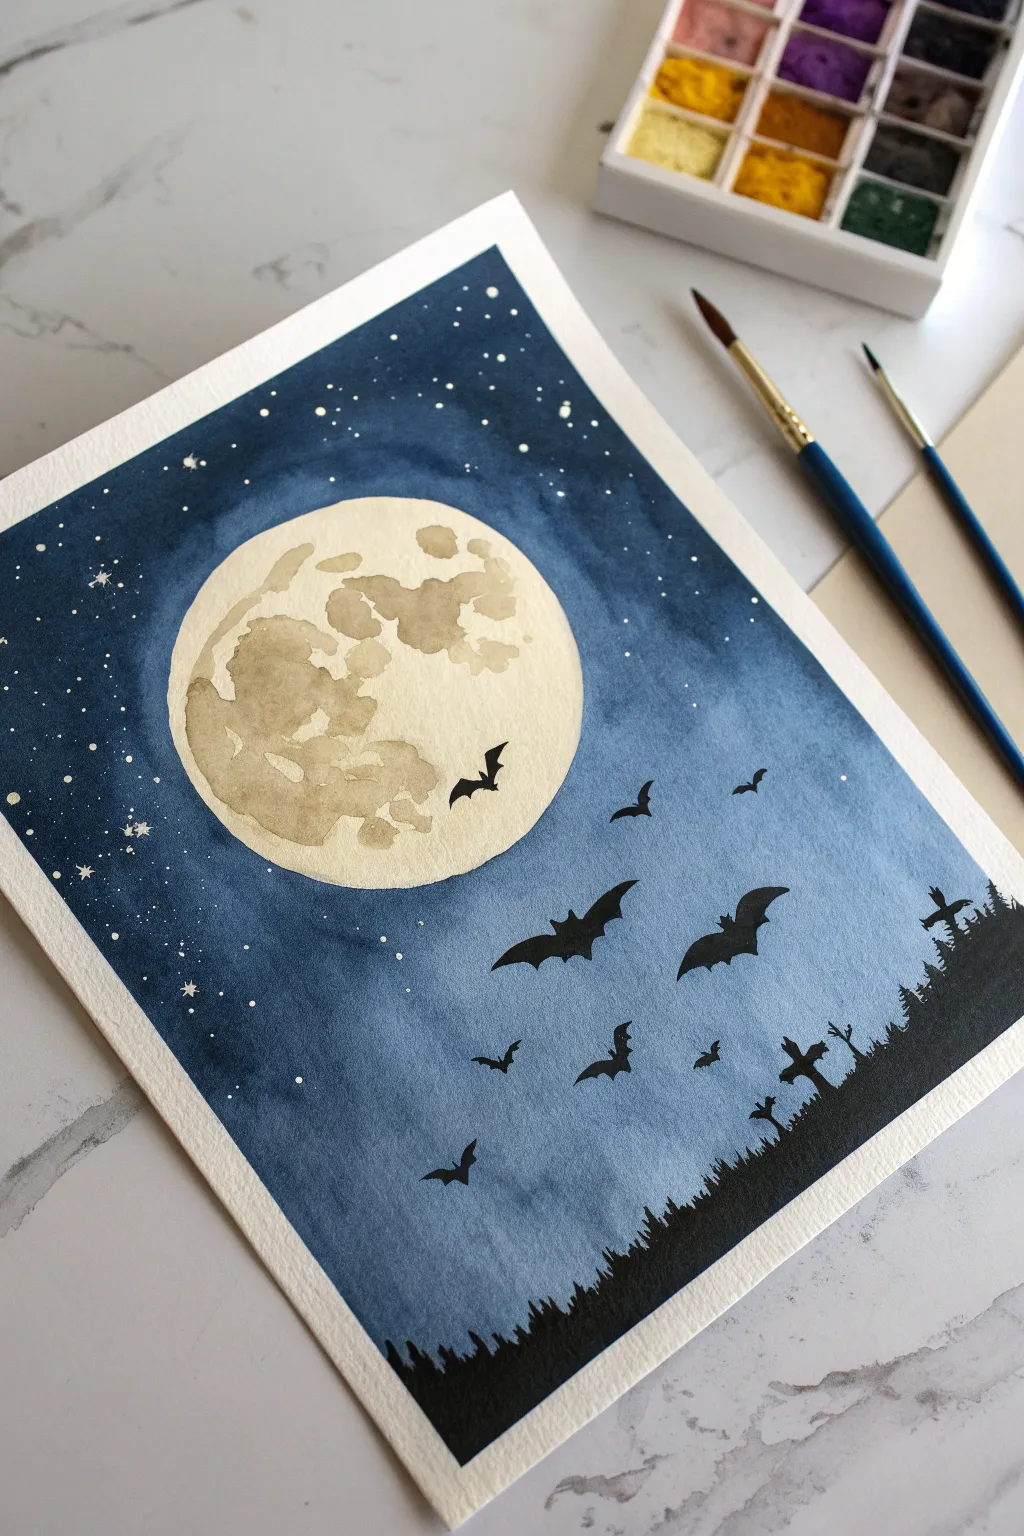
Capture the spooky serenity of Halloween night with this striking watercolor scene featuring a glowing moon and a swarm of bats. The contrast between the deep night sky and the pale lunar craters creates an atmospheric backdrop for your silhouettes.
Step-by-Step Guide
Materials
- Cold press watercolor paper (taped down)
- Pencil and a circular object (like a jar lid) for tracing
- Watercolor paints: Indigo (or Prussian Blue), Payne’s Grey, Yellow Ochre, Burnt Umber
- Black gouache or black acrylic paint
- Round brushes (size 6 or 8 for washes, size 0 or 1 for details)
- White gel pen or white gouache for stars
- Paper towels and water jars
Step 1: Sketching and Masking
-
Trace the moon:
Place your circular object slightly off-center on the upper left side of your paper. Lightly trace around it with a pencil to define your moon shape. Keep the lines faint so they don’t show through the final paint. -
Sketch the horizon:
Lightly draw an uneven, jagged line near the bottom of the page to represent the tops of the trees. This doesn’t need to be perfect; random bumps make the forest look more natural.
Bleeding Edges?
If blue paint seeped into your moon, don’t panic. Gently lift the mistake with a clean, damp brush or cover it later with a strategically placed black bat.
Step 2: Painting the Night Sky
-
Prepare the wash:
Pre-mix a generous amount of your night sky color. I like to use a heavy concentration of Indigo mixed with a touch of Payne’s Grey to get that deep, mysterious midnight blue. -
Wet the sky area:
With a clean, wet brush, apply clear water to the sky area outside the moon circle. Be very careful to paint right up to the pencil edge without going inside the moon. -
Apply the first layer:
While the paper is glistening wet, drop in your blue mix starting from the edges and corners. The paint will flow into the wet areas naturally. Keep the color darkest at the outer edges to create a vignette effect. -
Soften the edges:
As you move closer to the moon, dilute your paint slightly with water. This creates a subtle glow effect around the celestial body rather than a harsh cutout look. -
Let it dry:
Allow this sky layer to dry completely. If the paper feels cool to the touch, it’s still damp. If you paint the next step too soon, the colors will bleed into your clean moon.
Step 3: Creating the Moon
-
Base moon color:
Dilute a tiny bit of Yellow Ochre so it is very watery and pale. Paint the entire circle with this wash to give the moon a warm, off-white glow. -
Painting craters:
While the yellow wash is still slightly damp, mix a watery Burnt Umber or grey. Dab this onto the moon in random blotches to create textured craters. -
Refining texture:
Add a few smaller, darker spots inside the larger craters for depth. The ‘wet-on-wet’ technique here helps the craters look soft and dusty rather than sharp. -
Dry completely:
Wait for the moon to dry fully before moving on to the silhouettes.
Pro Tip: Depth of Field
Make the distant bats slightly grey instead of pitch black. This ‘atmospheric perspective’ makes them look much further away than the bold black foreground bats.
Step 4: Silhouettes and Stars
-
Paint the tree line:
Using black gouache or acrylic (which is more opaque than watercolor), fill in the bottom section below your horizon line. Use vertical brush strokes at the top edge to mimic pine tree tips. -
Add larger trees:
Extend a few jagged shapes upward from the main black mass to suggest taller trees or gravestones sticking out of the forest. -
Start the bats:
Switch to your smallest detail brush. Paint the largest bats first, placing one or two crossing in front of the moon for dramatic contrast. -
Bat shapes:
Remember that bats are essentially ‘M’ shapes with scalloped bottom wings. Vary their sizes to show distance; larger bats are closer, tiny specks are far away. -
Create the swarm:
Fill the diagonal space across the paper with more bats. Group them slightly so they look like they are flying together, rather than evenly spacing them like polka dots. -
Add stars:
Once the blue sky is bone dry, use a white gel pen or a fine brush with white gouache to dot small stars into the background. -
Twinkle effect:
Add tiny crosses to a few select stars to make them twinkle, and vary the size of your dots to create realistic depth in your galaxy.
Peel off your tape to reveal a crisp border and enjoy your hauntingly beautiful night scene
BRUSH GUIDE
The Right Brush for Every Stroke
From clean lines to bold texture — master brush choice, stroke control, and essential techniques.
Explore the Full Guide
Haunted House Silhouette Hill
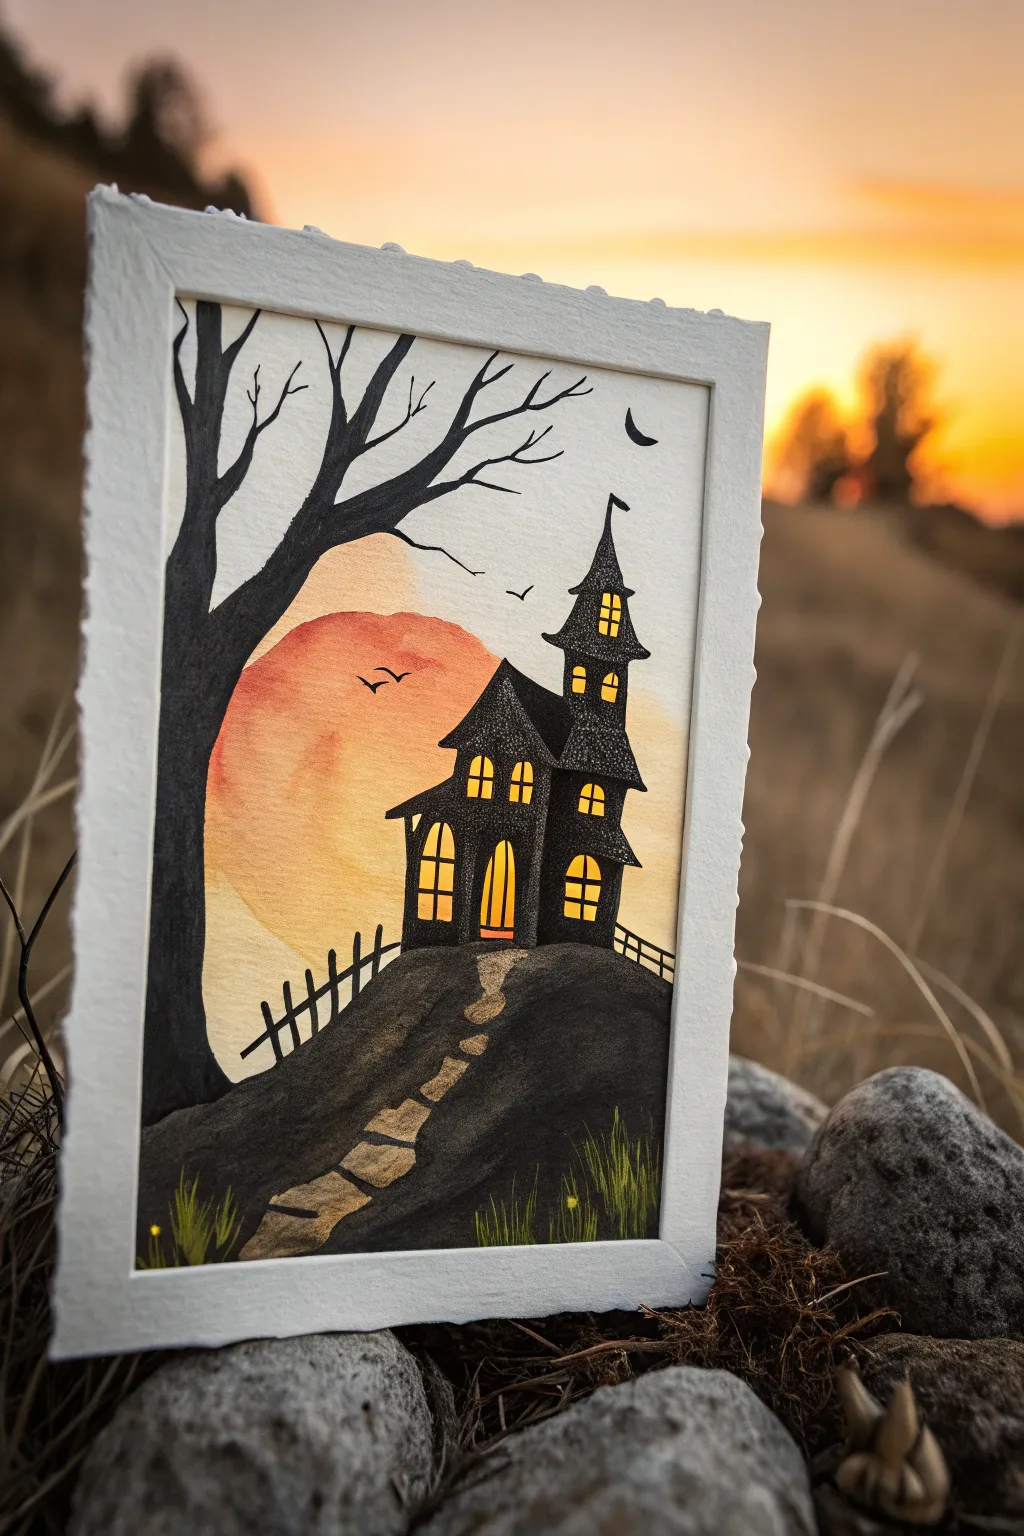
Capture the eerie magic of Halloween with this glowing haunted house silhouette. Using a blend of warm watercolor washes and sharp black ink, this piece creates a striking contrast between the radiant sunset and the mysterious shadows.
Detailed Instructions
Materials
- Cold-press watercolor paper (medium texture)
- Watercolor paints (Yellow, Orange, Red)
- Black waterproof pen (fine liner) or India ink
- Small round brush (size 2 or 4)
- Medium flat brush (for washes)
- Gold or yellow gel pen (optional, for windows)
- White cardstock or heavy paper for framing
- Pencil and eraser
- Scissors and glue (for the frame)
Step 1: Setting the Scene
-
Sketch the silhouette:
Begin by lightly sketching the outline of your composition with a pencil. Draw a sloping hill in the foreground, a winding path leading up, and the jagged shape of a tall haunted house. Don’t forget the gnarled tree on the left side stretching its branches across the sky. -
Outline the sun:
Lightly draw a large circle behind the house to represent the setting sun. This will be your guide for where the brightest colors should be concentrated. -
Frame prep:
Before painting, measure a border around your paper or prepare a separate piece of white cardstock with a rectangular cutout to serve as the white ‘mat’ shown in the image. I like to check the fit now so I know exactly where my painting edges will be.
Step 2: The Glowing Sky
-
Wet-on-wet technique:
Using your flat brush, wet the sky area of your paper with clean water. You want it damp but not soaking wet. -
Apply the sun’s core:
Drop a diluted wash of bright yellow paint into the center of your sun circle. Let the water carry the pigment naturally. -
Blend the sunset:
While the yellow is still damp, introduce orange paint around the edges of the sun. Gently blend it outwards into the rest of the sky. -
Add dusky tones:
For the outer edges of the sky, mix a touch of light wash red or diluted warm brown to create a dusky atmosphere. Keep the area inside the house and hill outline mostly unpainted to keep your blacks crisp later. -
Dry completely:
This is crucial: allow the background wash to dry 100%. If the paper is cool to the touch, it’s still wet.
Sharper Silhouettes
If your black marker looks streaky on the textured paper, go over the large black areas (like the hill and tree) with black acrylic paint for a truly opaque, matte finish.
Step 3: Inking the Shadows
-
Paint the tree trunk:
Using black India ink or a black brush pen, fill in the large tree trunk on the left. Make the base thick and rooted, tapering as you move up. -
Detail the branches:
Switch to a finer liner pen to draw the spindly branches reaching out. Add small, sharp twigs to give it that creepy, dead-tree look. -
Fill the hill:
Paint the foreground hill solid black. Leave the winding path unpainted for now so it stands out against the dark ground. -
Define the path:
Using a diluted black wash or grey paint, fill in the stepping stones on the path. You want them darker than the sky but lighter than the silhouette. -
House silhouette:
Carefully fill in the haunted house shape with solid black. Use a fine tip to get sharp points on the roof peaks and chimney.
3D Pop-Up Effect
Cut out the black house and tree separately from black construction paper and glue them onto the watercolor background with foam tape for cool dimensional shadows.
Step 4: Haunting Details
-
Glowing windows:
Once the black ink is dry, use a yellow paint, opaque gouache, or a gold gel pen to fill in the window shapes. This makes it look like there’s light inside. -
Fence posts:
Draw a small, crooked fence along the ridge of the hill using your fine liner. Imperfection makes it look spookier. -
The bats and moon:
Add tiny ‘v’ shapes in the sky for distant bats and a small crescent moon in the upper right corner. -
Grassy textures:
At the very bottom of the hill, use quick, upward flicks of a green or greenish-black mix to suggest wild grass growing in the dark. -
Final assembly:
Attach your white cardstock frame over the painting to give it that polished, finished look.
Place your framed masterpiece near a light source to watch those glowing windows really shine
Corner Spider Web Lines
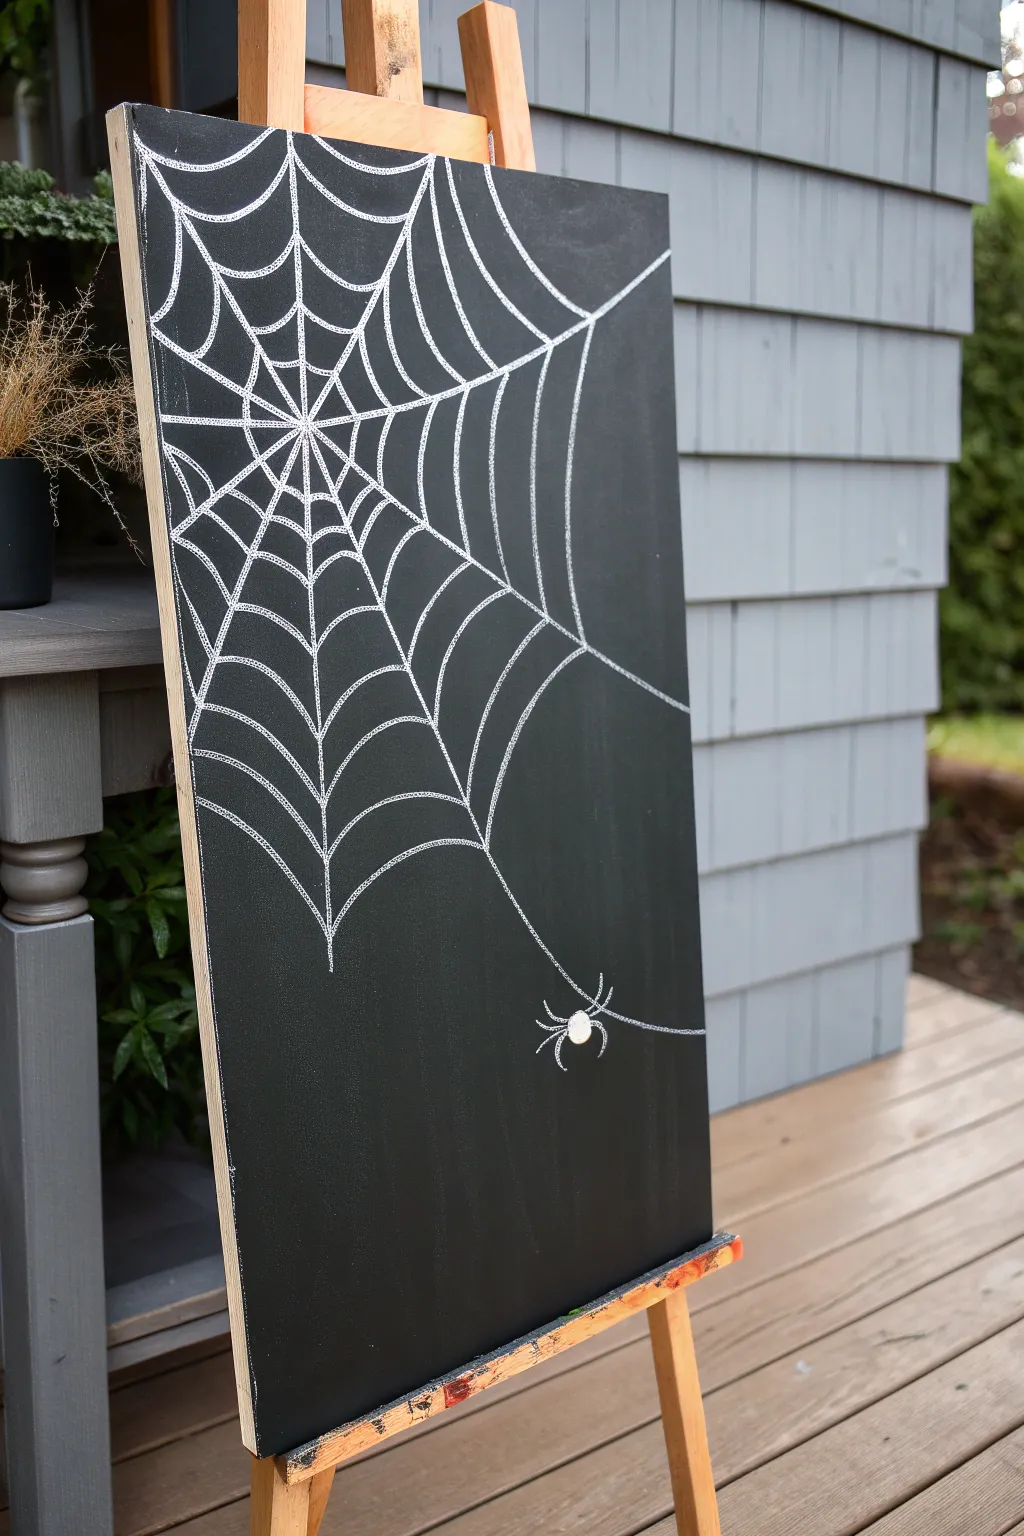
Transform a simple black canvas or chalkboard into a striking piece of Halloween decor with this minimalist spider web design. The sharp white lines against the dark background create a high-contrast look that is both elegant and eerie.
Step-by-Step Tutorial
Materials
- Large rectangular canvas or wooden board
- Matte black acrylic paint or chalkboard paint
- Wide flat paintbrush or foam roller
- White paint marker (medium tip) or white chalk marker
- Kneaded eraser (if using chalk)
- Ruler or straight edge (optional)
- Small round paintbrush (optional, for touch-ups)
Step 1: Preparing the Surface
-
Prime the board:
Start by ensuring your wooden board or canvas is clean and dust-free. If you are using a raw wood board, you might want to give it a quick sanding. -
Apply the base coat:
Cover the entire front surface and sides with matte black acrylic paint or chalkboard paint. Use a wide flat brush or a foam roller to get a smooth, consistent finish. -
Let it dry completely:
Allow the black paint to dry thoroughly. Applying white markers over wet paint will ruin your tip and muddy the lines. I usually give this at least an hour.
Uneven Lines?
If your hand is shaky, rest your palm on a dry section of the board or use a ruler to guide the straight anchor lines before free-handing the curves.
Step 2: Drawing the Web Structure
-
Establish the focal point:
Identify a spot near the upper left edge of the board. This doesn’t have to be the exact corner; moving it slightly inward creates a more dynamic composition. -
Draw the main anchor lines:
Using your white paint marker, draw straight lines radiating outward from your focal point. Draw one line going straight up, one going left, and several fanning out diagonally toward the bottom right. -
Extend the reach:
Make sure the diagonal lines vary in length. Some should extend almost to the middle of the board, while the lowest line should reach far down toward the bottom right corner to support the spider later. -
Begin the inner webbing:
Starting close to the center focal point, draw curved lines connecting the straight anchor spokes. These little scallops should curve inward toward the center point. -
Work outward:
Continue adding rows of curved connecting lines, moving further away from the center. Space them slightly further apart as the web gets larger. -
Keep lines organic:
Don’t worry about making the scalloped lines perfect geometric arcs. A slight wobble or hand-drawn feel adds to the spooky charm. -
Fill the canvas:
Keep building rows until your web covers the top left portion of the board. Leave plenty of negative black space at the bottom for balance.
Step 3: Adding the Spider
-
Extend the silk line:
Find the longest anchor line you drew earlier that points toward the bottom right. Extend this line further down, letting it curve slightly as if under weight. -
Paint the body:
At the end of your extended line, draw a small white oval or circle to form the spider’s body. Fill it in completely so it stands out bright white. -
Add the legs:
Draw eight thin, creepy legs coming from the body. Make the front legs reach forward and the back legs trail behind to simulate gravity pulling it down. -
Highlight the form:
If your marker is translucent, wait for the first layer to dry and add a second coat to the spider’s body to make it pop. -
Refine the lines:
Step back and look at your web. If any lines look too faint, retrace them gently with the marker to brighten them up. -
Clean up edges:
If you used a chalkboard surface and real chalk, use a damp Q-tip to clean up any smudges. If using paint, touch up mistakes with a dab of black paint.
Make It Glow
Trace over your white lines with glow-in-the-dark paint using a fine detail brush. It will look ordinary by day but terrifyingly awesome when the lights go out
Set your easel on the porch or in the entryway to greet guests with this classic Halloween motif

PENCIL GUIDE
Understanding Pencil Grades from H to B
From first sketch to finished drawing — learn pencil grades, line control, and shading techniques.
Explore the Full Guide
Spooky Night Sky Gradient
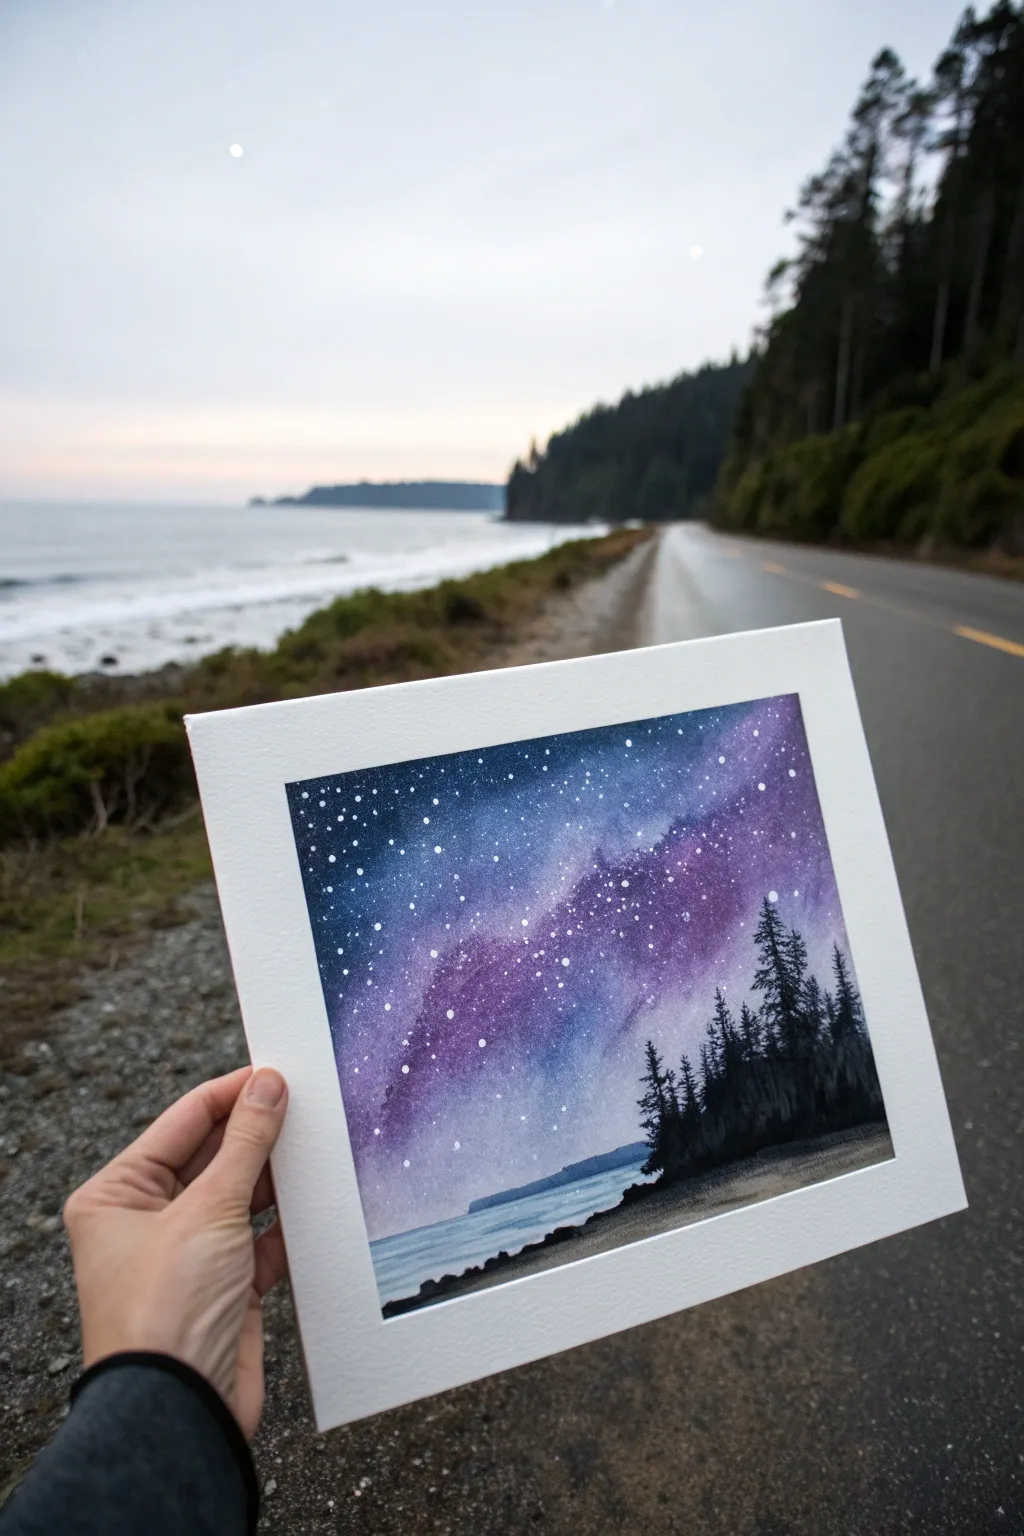
Capture the ethereal beauty of a starry night meeting the rugged coast with this atmospheric watercolor painting. The vibrant purple and blue galaxy sky creates a stunning backdrop for silhouette pine trees and a calm sea.
Step-by-Step
Materials
- Watercolor paper (cold press, 140lb/300gsm recommended)
- White mat board or precut painting mat
- Watercolor paints (Indigo, Prussian Blue, Violet, Magenta, Black)
- White gouache or white ink
- Flat wash brush (1-inch width)
- Round brushes (size 4 and 8)
- Fine liner brush or rigger brush
- Masking tape
- Paper towels
- Two jars of water
Step 1: Preparation and Base Layer
-
Secure the paper:
Tape down all four edges of your watercolor paper to a board or table. This prevents buckling and creates a clean white border when finished. -
Wet the sky area:
Using your large flat brush and clean water, thoroughly wet the top two-thirds of the paper where your sky will be. Leave the bottom third dry for the ocean and land. -
Lay down the violet:
While the paper is still wet, load a round brush with a vibrant Violet or Magenta mix. Drop this color diagonally across the center of the wet sky area in irregular cloud-like shapes. -
Add the deep blues:
Immediately introduce Prussian Blue around the violet patches. Let the wet paint mingle naturally on the paper, but try not to overwork the transition areas to keep the colors distinct. -
Darken the corners:
Mix a strong Indigo or a touch of Black into your blue. Apply this concentrated dark mix to the upper corners and top edge of the sky to create depth and frame the galaxy.
Bleeding Lines?
If your horizon line bleeds into the sky, it means the sky wasn’t dry enough. Use a clean, damp brush or paper towel to gently lift the excess paint immediately.
Step 2: Creating the Stars and Sea
-
Dry partially:
Allow the sky to dry until it has lost its glossy sheen but feels cool to the touch. This stage is crucial for the next steps. -
Splatter the stars:
Dilute a small amount of white gouache or white ink with water. Load a brush, hold it over the sky area, and tap the handle against another brush to spray fine white specks across the purple and blue gradient. -
Add larger stars:
Use a fine liner brush dipped in undiluted white gouache to manually dot a few larger, brighter stars in the darkest parts of the sky for variety. -
Paint the water base:
Wet the ocean area below the sky. Apply a very pale, watered-down wash of Prussian Blue horizontally. Ensure the horizon line is straight and touches the bottom of your sky gradient. -
Define the distant land:
While the water is drying, mix a medium-tone blue-grey. Paint a low, flat shape for the distant peninsula on the left side of the horizon line.
Shooting Star Upgrade
Drag a barely-wet liner brush with white gouache quickly across the sky to create a faint tail, then dot the head of the comet for a magical dynamic element.
Step 3: Final Details
-
Paint the foreground land:
Once the water layer is completely dry, use a dark grey or black mix to paint the sloping shoreline in the bottom right corner. Make the edge uneven to mimic rocks. -
Draft the tree trunks:
Using a liner brush and black watercolor (mixed with very little water for opacity), paint vertical lines rising from the dark shoreline. Vary their heights, making the ones on the right taller. -
Add pine branches:
Switch to a small round brush. Stipple or dab short, irregular strokes extending outward and slightly downward from the trunks to create the texture of pine needles. -
Thicken the forest:
Fill in the gaps between the main trees with varying heights of black silhouettes to make the forest look dense and lush. -
Add water reflections:
With a slightly damp brush and very pale grey paint, add a few subtle horizontal streaks in the water directly below the dark landmass to suggest reflection. -
Reveal the border:
Wait for the entire painting to be bone dry. Carefully peel away the masking tape at a 45-degree angle to reveal your crisp white edges. -
Mat the artwork:
Place your finished piece behind a white mat board to give it a professional gallery look, just like in the photo.
Step back and admire your serene cosmic landscape before framing it for display
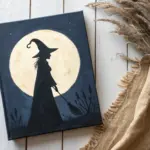
Simple Witch Hat on a Pumpkin
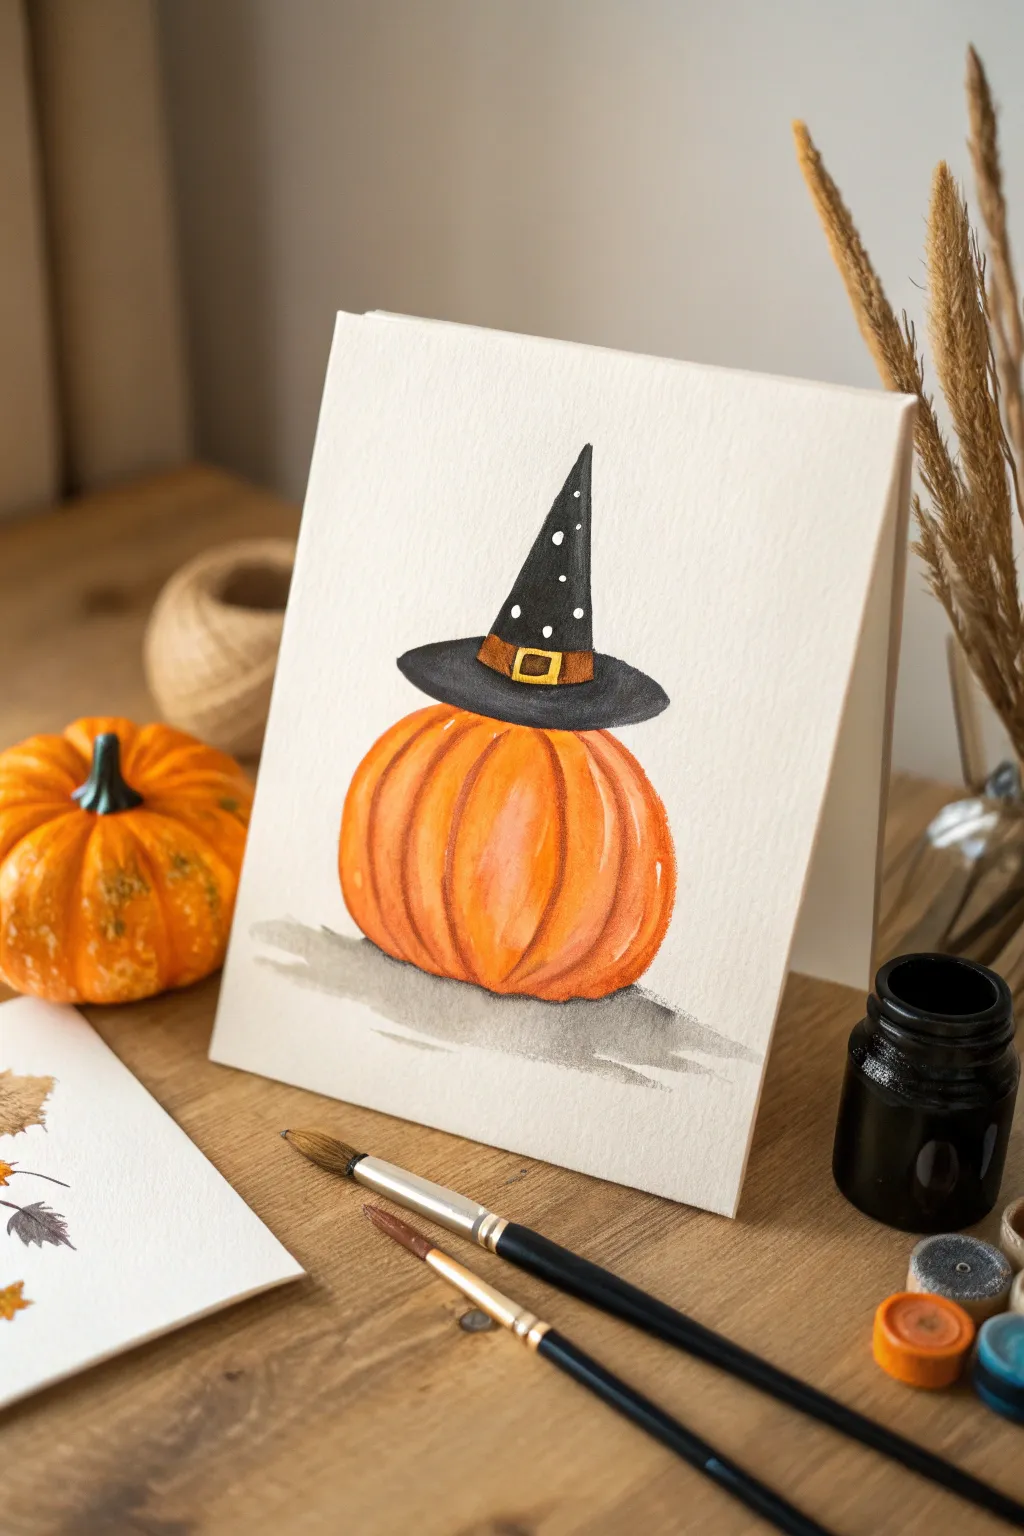
Capture the playful side of Halloween with this charming watercolor illustration features a classic orange pumpkin donning a speckled witch’s hat. The clean, minimalist style makes it perfect for handmade greeting cards or seasonal wall art.
Detailed Instructions
Materials
- Cold-press watercolor paper (300 gsm)
- Pencil (HB or H) and kneaded eraser
- Watercolor paints (Orange, Burnt Sienna, Yellow Ochre, Black, Brown)
- Round brushes (sizes 4 and 8)
- Fine liner brush or white gouache/gel pen
- Jar of water
- Paper towels
Step 1: Sketching the Outline
-
Draw the pumpkin shape:
Start by lightly sketching a wide oval shape for the pumpkin’s body. Don’t make it a perfect circle; let it be slightly flattened at the bottom to give it weight. -
Add the ribs:
Draw curved markings descending from the top center to the bottom, dividing the pumpkin into vertical sections. These lines give the gourd its characteristic volume. -
Position the hat brim:
Directly on top of the pumpkin, sketch a wide, flattened oval for the brim of the witch’s hat. It should slightly overhang the top of the pumpkin on both sides. -
Form the hat cone:
Draw a triangle rising from the center of the brim. Give the tip a slight curve or tilt to the side for character, rather than making it perfectly straight. -
detail the band:
Sketch a small band across the base of the cone, just above the brim, and add a small square buckle in the center.
Control Your Saturation
For a vibrant pumpkin, mix a little styling red into your orange. If you want a more vintage, muted look, add a tiny dot of blue to dull the orange down slightly.
Step 2: Painting the Pumpkin
-
Base wash:
Load your size 8 brush with a watery mix of orange paint. Fill in the pumpkin sections, leaving tiny slivers of white paper between some ribs to create natural highlights. -
Deepen the shadows:
While the paint is still slightly damp, drop a concentrated orange or burnt sienna into the bottom curves and the crevices between the ribs to build dimension. -
Soften the edges:
Use a clean, damp brush to blend the darker pigment upwards, ensuring a smooth transition from shadow to the lighter top area. -
Dry completely:
Let the pumpkin layer dry fully before moving on. This prevents the black hat paint from bleeding into your nice orange tones.
Bleeding Colors?
If the black hat starts bleeding into the orange pumpkin, stop immediately! Blot the leak with a corner of a paper towel and wait for the orange section to be completely dry.
Step 3: Painting the Hat
-
Paint the brim:
Using black watercolor, carefully fill in the oval brim. I like to keep the paint fairly opaque here so it contrasts boldly with the pumpkin. -
Fill the cone:
Continue with the black paint up into the cone shape, leaving the band area unpainted for now. -
Color the band:
Once the black is dry, paint the hat band with a warm brown. Use a touch of yellow ochre for the buckle to make it look like gold or brass. -
Add details:
Outline the buckle with a fine tip dipped in dark brown or black to define the shape clearly.
Step 4: Final Touches
-
Ground the subject:
Mix a very watery grey wash. Use horizontal strokes underneath the pumpkin to create a simple cast shadow, grounding the object so it doesn’t look like it’s floating. -
Add patterns:
Using white gouache or a white gel pen, add small dots or stars onto the black part of the hat for a magical texture. -
Highlight the form:
Add a few thin white highlights on the right side of the pumpkin ribs to emphasize the glossy skin texture. -
Erase guidelines:
Check that all paint is bone dry, then gently use your kneaded eraser to lift any visible pencil lines that weren’t covered by paint.
Now you have a festive piece of art ready to frame or gift to a friend


Candy Corn Pattern Background
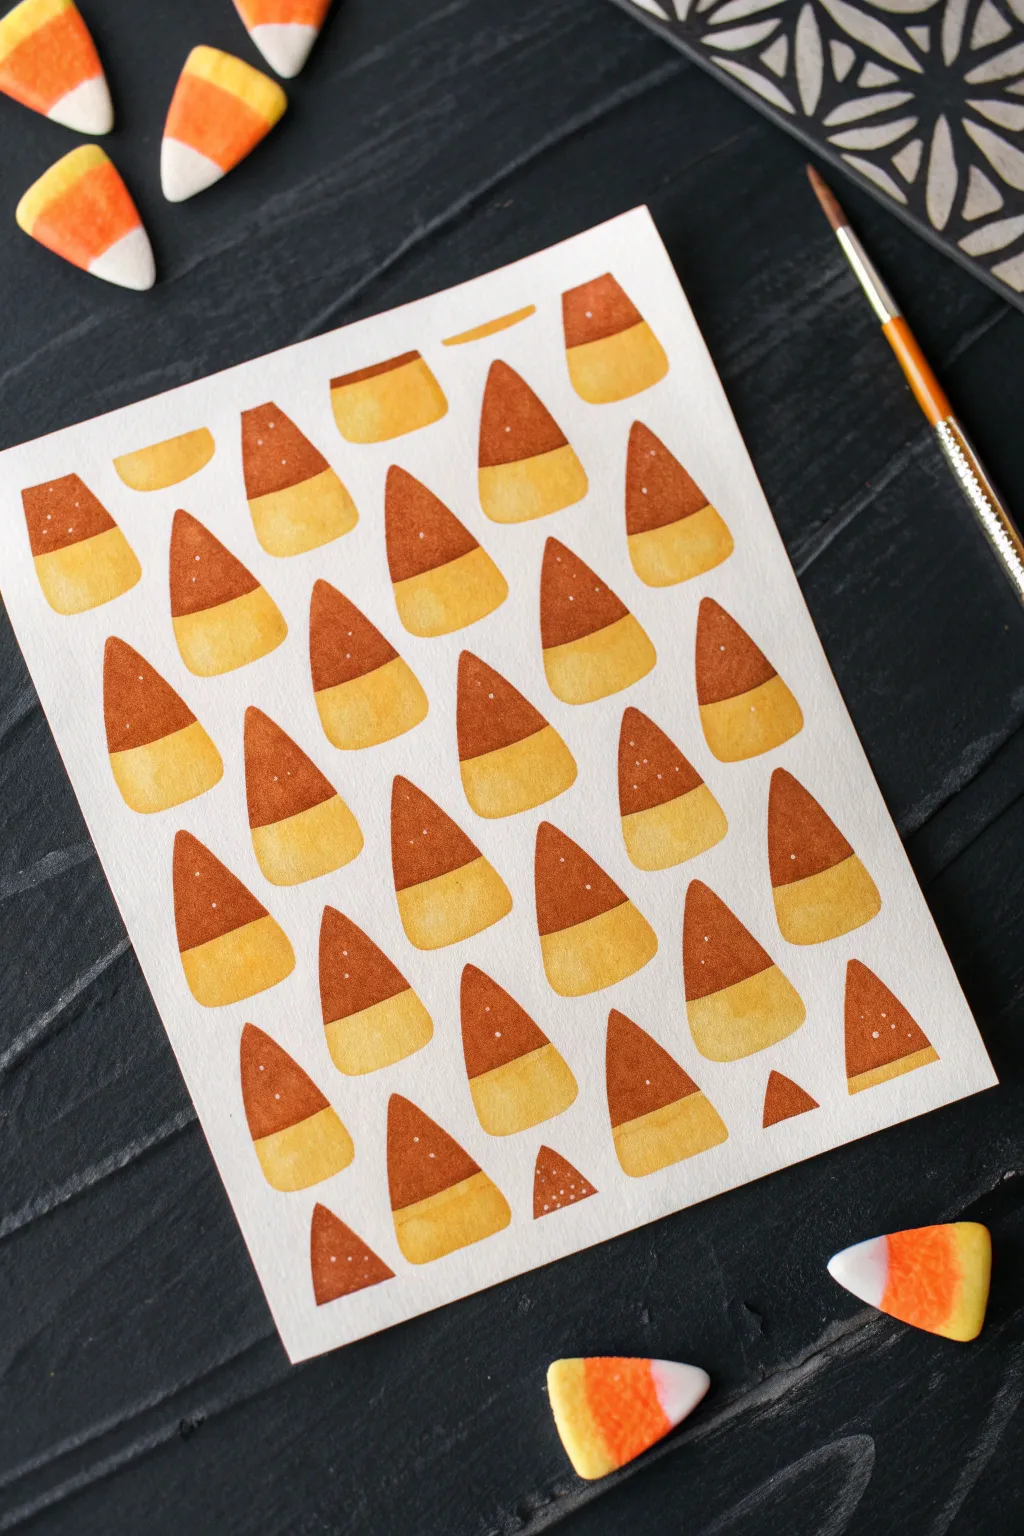
Capture the sweetness of Halloween with this charming, pattern-based watercolor project. The repeating candy corn motif creates a rhythmic, modern design that is perfect for cards or festive wall art.
Step-by-Step
Materials
- Cold press watercolor paper (cut to desired size)
- Watercolor paints (burnt sienna/rust brown and golden yellow/ochre)
- Round watercolor brush (size 4 or 6)
- White gel pen or gouache
- Pencil and eraser (optional for sketching)
- Jar of clean water
- Paper towels
Step 1: Preparation & Layout
-
Plan your pattern:
Decide on the flow of your candy corn pieces. In this artwork, the candies are arranged in loose, staggered rows, mostly pointing upwards but with slight tilts to keep it organic and playful. -
Optional sketching:
If you’re nervous about freehanding, use a pencil to very lightly mark out small triangles where each candy will go. Keep these marks faint so they disappear under the paint later. -
Mix your palette:
Prepare two distinct puddles of paint. For the bottom section of the candy, mix a warm golden yellow or yellow-ochre. For the middle section, mix a reddish-brown or burnt sienna. You want the colors to be saturated but still transparent.
Uneven Drying?
If you get ‘cauliflower’ blooms in your paint, you likely added wet paint into a drying area. Wait for layers to be 100% dry or work strictly wet-on-wet.
Step 2: Painting the Base Layer
-
Start the bottom tier:
Beginning at the top left of your paper, paint the bottom, widest stripe of the first candy corn using your yellow mix. It should look like a rounded trapezoid. -
Complete the first row:
Work your way across the paper, painting only the yellow bottom sections for the first row of candies. Leave generous white space between them. -
Stagger the next row:
Move down to the imaginary second row. Paint the yellow bottoms positioned in the gaps below the first row’s candies, creating a brick-lay pattern. -
Fill the page:
Continue painting these yellow trapezoids all the way down the page. Don’t worry if they aren’t perfectly identical; slight variation adds character. -
Add partial shapes:
Along the edges of the paper, paint partial shapes to suggest the pattern continues off the page. This makes the composition feel professional and intentional. -
Let it dry:
Wait for the yellow layer to be completely dry to the touch. If you proceed too quickly, the next color will explore the wet paper and bleed, losing that crisp candy stripe look.
Step 3: Adding the Middle Tier
-
Apply the darker tone:
Load your brush with the rust-brown paint. Paint the middle triangular section right on top of the yellow base for your first candy. -
Touch and overlap:
Ensure the bottom edge of the brown shape touches the top edge of the yellow shape perfectly. It’s okay if they overlap slightly, as watercolor translucency creates a nice depth there. -
Form the tip:
Unlike real candy corn which has a white tip, this stylized version uses the negative space of the paper as the tip. Simply paint your brown triangle to a point, or leave the very top unpainted if you prefer a three-stripe look. -
Repeat the process:
Work through your pattern, adding the brown tops to every yellow base you painted earlier. I find it meditative to work row by row to ensure I don’t miss any. -
Refine the edges:
While the paint is wet, you can smooth out any jagged edges with the tip of your brush to keep the candy shapes rounded and soft.
Level Up: Spooky Twist
Instead of white dots, use a black fine-liner pen to draw tiny playful faces on a few random candy corns to turn them into little characters.
Step 4: Finishing Details
-
Dry completely:
Allow the entire painting to dry thoroughly. The paper should feel room temperature, not cool to the touch. -
Add texture:
Using a white gel pen or a fine brush with white gouache, add tiny dots to the brown sections of the candy corn. This mimics the sugary texture or light highlights. -
Vary the dots:
Keep the dots random and sparse—just two or three specks per candy is enough to bring the pattern to life without overwhelming it.
Once dry, your delightful candy corn pattern is ready to be framed or scanned for your seasonal projects
Graveyard Crosses and Fog
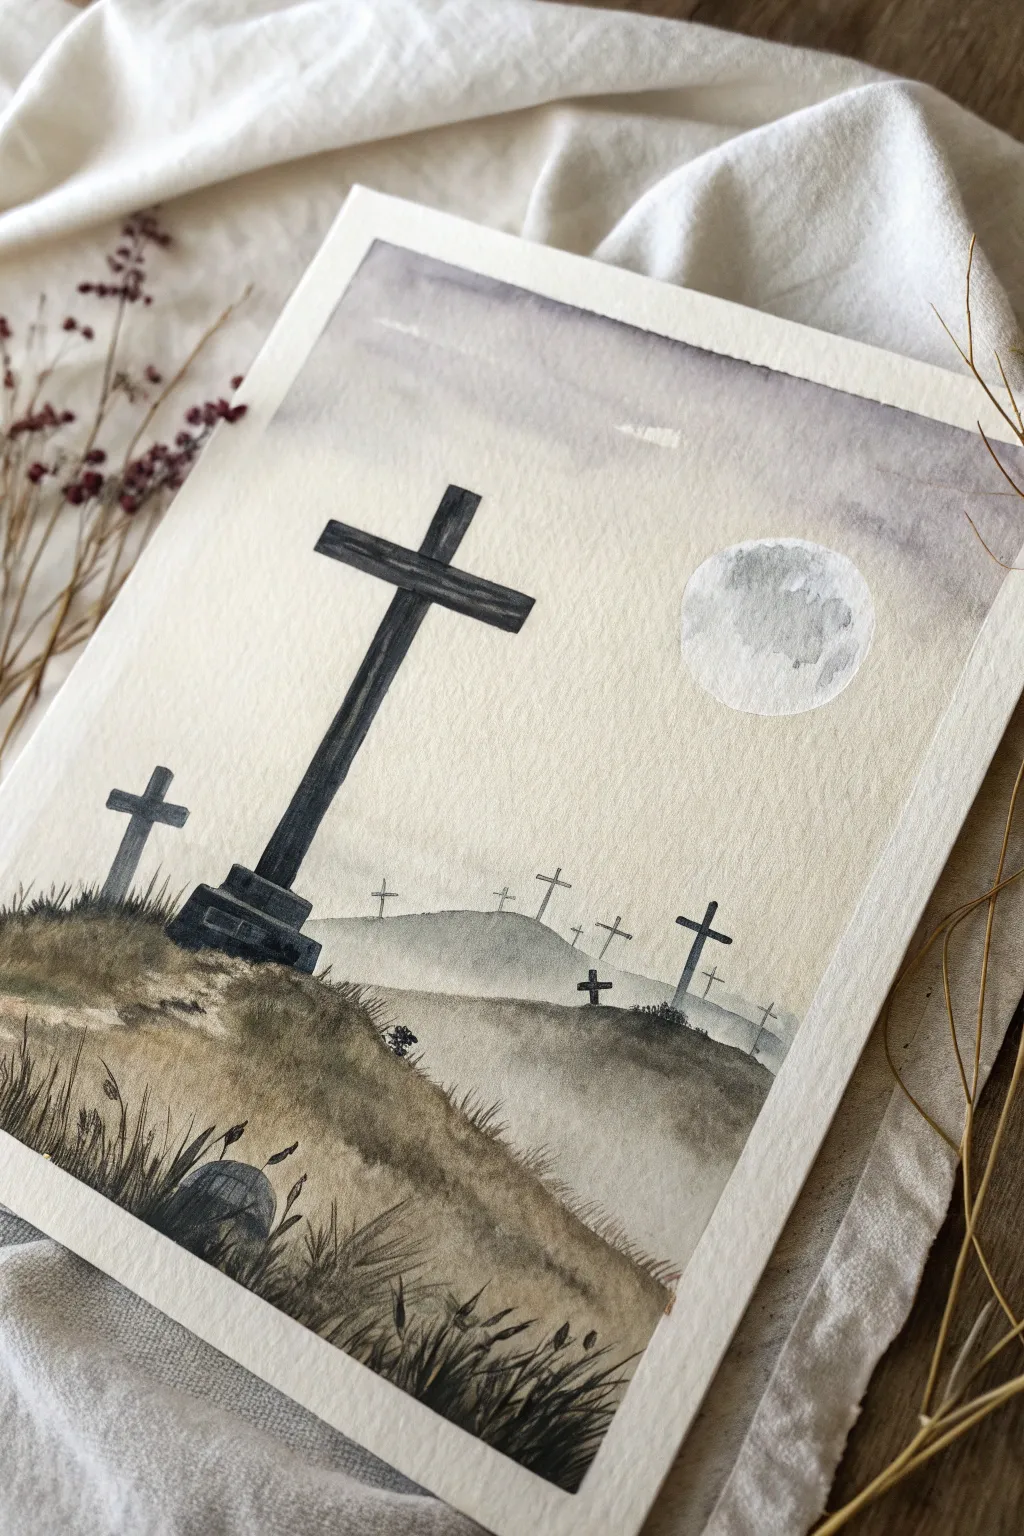
Capture a hauntingly quiet atmosphere with this watercolor graveyard scene, featuring rolling hills shrouded in fog and silhouetted crosses. Using a monochromatic palette of blacks and browns creates a vintage, spooky mood perfect for Halloween decor.
Detailed Instructions
Materials
- Cold press watercolor paper (A4 or similar)
- Watercolor paints: black, sepia/dark brown, white gouache (optional)
- Flat wash brush (1/2 inch or larger)
- Round brush (size 4 or 6)
- Detail brush (size 0 or 1)
- Masking tape or painter’s tape
- Pencil and eraser
- Jar of clean water
- Palette for mixing
- Paper towels
Step 1: Planning and Sky
-
Secure the paper:
Begin by taping down all four edges of your watercolor paper to a hard board or table. This creates a clean white border and prevents the paper from buckling when wet. -
Sketch the composition:
Lightly sketch the placement of the large foreground cross on the left. Draw a faint circle for the moon on the right side and outline a few rolling hill lines receding into the background. -
Wet the sky area:
Using your large flat brush and clean water, brush a thin layer of water over the entire sky area, going right over the moon circle but avoiding the large cross shape. -
Paint the background wash:
Mix a very watery, pale gray-purple using a tiny dot of black and lots of water. Apply this to the top of the wet sky, letting it naturally fade out as you move down towards the horizon. -
Lift out the moon:
While the sky wash is still damp, take a clean, thirsty paper towel or a dry brush and gently dab the circle area to lift the pigment, revealing the bright paper for the moon.
Step 2: Rolling Hills
-
Paint the distant hills:
Once the sky is dry to the touch, mix a pale gray wash. Paint the furthest hill silhouette. Keep the edges soft or let the bottom fade into nothingness to suggest distant fog. -
Add middle ground hills:
Mix a slightly darker gray-brown. Paint the next hill closer to the viewer. This layer should overlap the distant hill slightly. Adding a little more pigment here creates atmospheric perspective. -
Define the moon texture:
With a diluted gray paint and your round brush, dab hazy, irregular spots inside the moon circle to create craters and texture. Keep these very subtle. -
Paint the foreground hill:
Load your brush with a mix of sepia and black. Paint the large hill in the immediate foreground. Use short, flicking strokes at the top edge to simulate tufts of grass. -
Create earthy texture:
While the foreground hill is still wet, drop in hints of darker black or concentrated brown in random spots. This wet-on-wet technique adds an uneven, soil-like texture.
Muddy Hills?
If your hills bleed into each other, you didn’t let the previous layer dry enough. Use a hair dryer on a low, cool setting between hill layers to ensure crisp separation.
Step 3: Crosses and Details
-
Paint the main cross:
Using a smaller brush and concentrated black paint (creamy consistency), carefully fill in the large cross shape you sketched earlier. Ensure the edges are sharp. -
Add dimensions to the cross:
If you want a 3D effect, I like to leave a tiny sliver of lighter paper on the top or side edges, or add a second coat of black to just the shadow side after the first layer dries. -
Paint the base:
Paint the stone tiers at the base of the cross using the same dark black mix, blending it slightly into the grassy ground so it looks firmly planted. -
Add distant markers:
Switch to your detail brush. Paint small, thin crosses on the distant gray hills. These should be much lighter in color (gray, not solid black) and smaller than the main subject. -
Detail the foreground grass:
Using the detail brush and thick black paint, flick quick, upward strokes at the bottom of the paper and along the ridge of the foreground hill to create wild, overgrown grass blades. -
Add final touches:
Paint a small, rounded tombstone peeking out of the grass in the bottom left corner. Add a few tiny dots or V-shapes in the distance to suggest birds or debris. -
Let it dry completely:
Wait until the painting is bone dry before carefully peeling off the masking tape to reveal your crisp white border.
Mist Effect
After painting the distant hills, lightly run a clean, damp brush along the bottom edge of the hill while the paint is still wet. This softens the line into a foggy blur.
Step back and admire the moody, atmospheric depth you have created in this simple landscape
Crescent Moon and Bare Tree
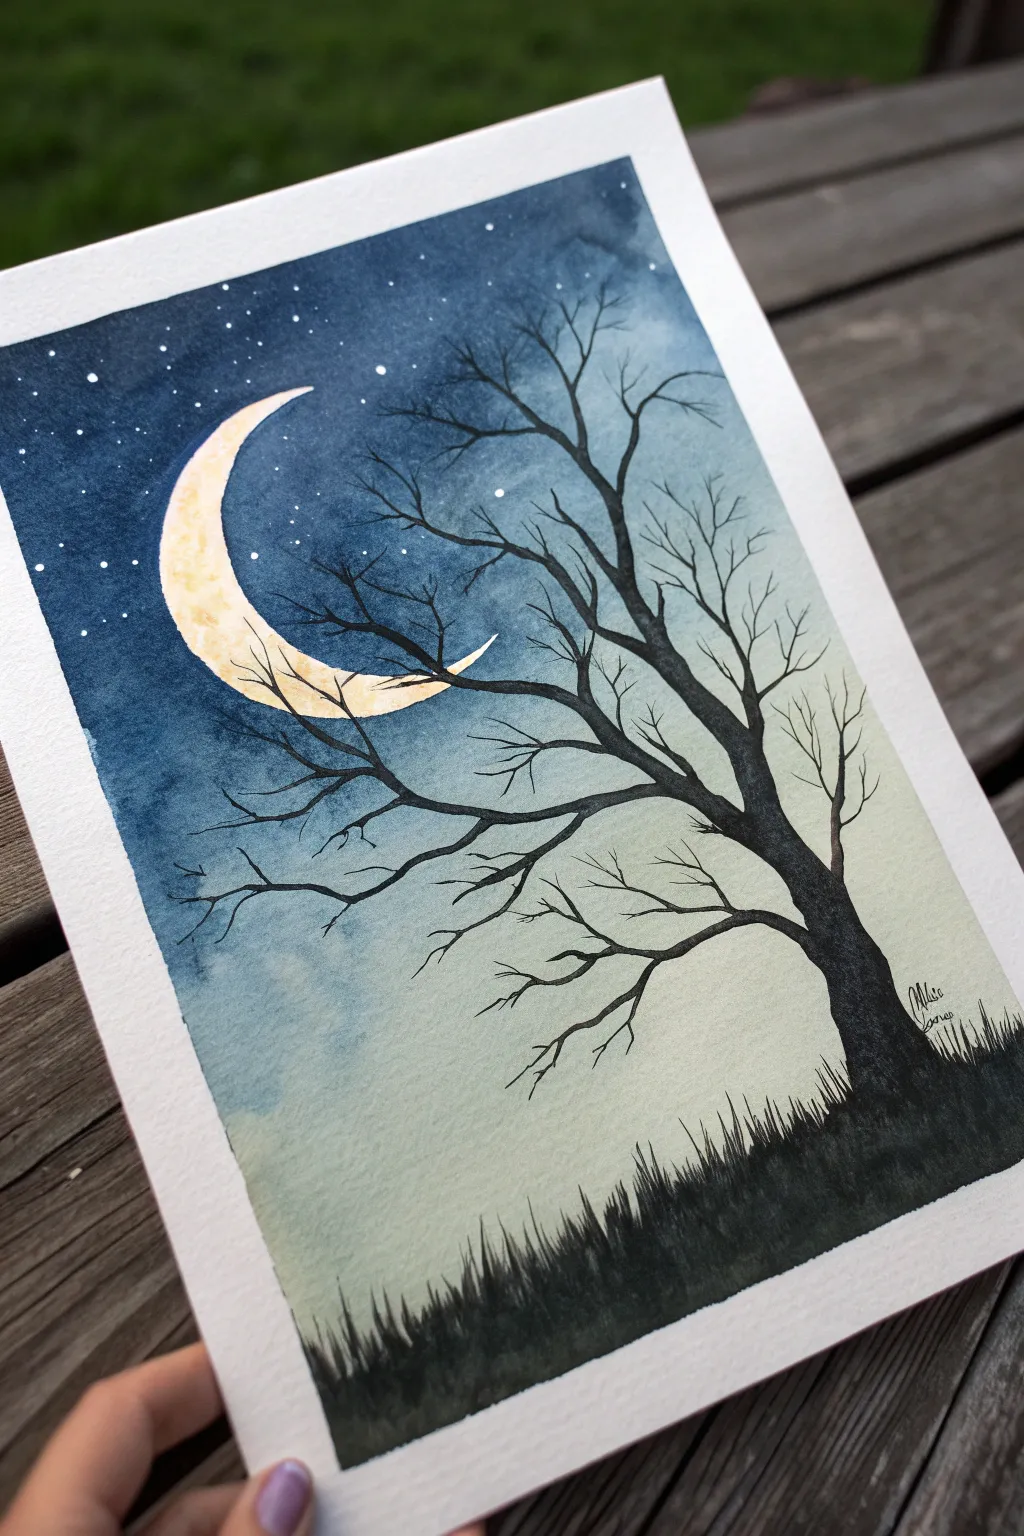
Capture the eerie beauty of a calm Halloween night with this watercolor painting featuring a bright crescent moon and a stark, spindly tree silhouette. This project uses wet-on-wet techniques to create a dreamy, gradient sky that contrasts perfectly with the crisp black details.
How-To Guide
Materials
- Watercolor paper (cold press, 300gsm suggested)
- Painter’s tape or masking tape
- Pencil and eraser
- Watercolor paints (Indigo, Prussian Blue, Sap Green, Lemon Yellow)
- Black ink or black gouache (for opacity)
- White gel pen or white gouache
- Round brushes (large size 10-12 for washes, small size 0-2 for details)
- Clean water and paper towels
- Palette for mixing
Step 1: Preparation and Sketching
-
Secure the paper:
Tape down all four edges of your watercolor paper to a board or table. This creates a clean white border and prevents the paper from buckling when it gets wet. -
Sketch the moon:
Lightly draw a large crescent moon shape in the upper left quadrant. Keep your pencil lines very faint so they won’t show through the yellow paint later. -
Outline the ground:
Sketch a gentle, uneven horizon line near the bottom of the page where the grass will eventually go.
Better Branches Tip
To get thin, natural-looking branches, hold your brush near the end of the handle. This loosens your grip and allows for more organic, less rigid lines.
Step 2: Painting the Sky
-
Paint the moon base:
Using a clean brush, fill in the crescent moon shape with a bright Lemon Yellow. It’s okay if it’s not perfectly even; slight variation adds texture. -
Prepare the sky wash:
Wet the entire sky area around the moon with clean water. Be careful to paint *around* your yellow moon, leaving a tiny dry gap if possible to prevent colors from bleeding into it immediately. -
Apply dark blue:
Load your large brush with a concentrated mix of Indigo and Prussian Blue. Start painting at the very top of the paper, letting the dark pigment flow into the wet paper. -
Create the gradient:
As you move down the page, gradually add more water to your brush or mix in a touch of Sap Green. The goal is for the sky to fade from a deep night blue at the top to a misty, greenish-grey near the horizon. -
Soften the edges:
Use a damp, clean brush to gently blend near the moon if you want a soft glow, or keep the edge crisp depending on your preference. -
Let it dry completely:
This is crucial. The paper must be bone dry before adding the silhouette, otherwise the black ink will feather and ruin the crisp lines. I usually check the temperature with the back of my hand; if it feels cold, it’s still damp.
Add a Glow
Before the black tree paint dries, lift a tiny bit of color on the moon-facing side of the trunk with a damp brush to create subtle rim lighting.
Step 3: Detailed Silhouettes
-
Start the tree trunk:
Using black ink or black gouache and a medium brush, paint the base of the tree on the right side. Make the trunk thick and slightly angled as it rises. -
Add main branches:
Switch to a smaller brush. Extend thick branches out from the trunk, reaching them across the moon and into the empty sky space. -
Create fine twigs:
With your smallest detail brush (size 0 or fine liner), paint delicate, spindly twigs growing off the main branches. A shaky hand actually helps here to make the tree look gnarled and natural. -
Establish the grass:
Fill in the bottom area with solid black. Use quick, upward flicking motions with the tip of your brush to simulate uneven, wild blades of grass along the horizon line. -
Refine the tree base:
Ensure the tree trunk merges seamlessly into the dark grassy ground, perhaps adding a few extra tufts of grass around the roots for texture.
Step 4: Starry Details
-
Add the stars:
Once the sky is dry, use a white gel pen or a fine brush with white gouache to dot small stars into the dark blue areas at the top. -
Vary star sizes:
Make some dots slightly larger than others to create depth in your starry night sky. -
Final reveal:
Wait for all paint and ink to be thoroughly dry, then carefully peel away the masking tape at a 45-degree angle to reveal your crisp white border.
You now have a moody, atmospheric landscape ready to frame or gift
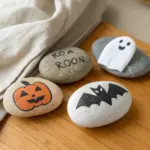
“BOO” Letters With Halloween Icons
This minimalist Halloween art piece relies on bold typography and classic color choices to make a statement. With its charmingly imperfect, hand-painted texture, the graphic lettering adds a sophisticated yet spooky touch to your seasonal decor.
How-To Guide
Materials
- Cold press watercolor paper (8×10 or 9×12 inches)
- Black watercolor or gouache paint
- Orange watercolor or gouache paint
- Round paintbrush (size 6 or 8)
- Fine liner brush (size 0 or 1)
- Pencil and eraser
- Ruler
- Jar of water
- Paper towels
Step 1: Drafting the Design
-
Set your boundaries:
Begin by placing your watercolor paper on a flat surface. Using your ruler, lightly mark a horizontal guideline across the middle of the page where you want the letters to sit. This ensures your text stays straight. -
Determine letter size:
Decide how large you want the word “BOO” to be. Aim for letters that are about 2 to 3 inches tall. Sketch faint top and bottom boundary lines to keep the height consistent across all three letters. -
Sketch the ‘B’:
Using a light hand, sketch a bold serif ‘B’. Focus on creating thick vertical strokes and slightly thinner curved strokes to mimic a classic typeface. -
Add the first ‘O’:
Draw the first ‘O’ slightly spaced apart from the ‘B’. Sketch it as a thick, donut-like circle rather than a perfect geometric shape; this hand-drawn quality adds character. -
Finish with the second ‘O’:
Sketch the final ‘O’ to match the proportions of the first one. Step back and look at your spacing to ensure the word looks balanced in the center of the page. -
Refine the lines:
Go over your sketch to clearly define the thickest parts of the letters versus the thinner areas. Once happy, gently erase any heavy graphite lines until they are just barely visible guide marks.
Step 2: Painting the Typography
-
Prepare the black paint:
Load your round brush with black watercolor or gouache. You want a consistency that is opaque but flows smoothly, like melted ice cream. If the paint is too watery, the edges won’t be crisp. -
Fill the ‘B’:
Carefully fill in the ‘B’ starting with the main vertical stem. Use the tip of your brush for the serifs (the little feet) and the belly of the brush for the wider curves. -
Create texture:
Don’t worry about perfectly solid coverage. I like to let the natural texture of the paper show through slightly, giving it that authentic hand-painted look. -
Paint the final ‘O’:
Skip the middle ‘O’ for now to avoid accidental smudging. Paint the last ‘O’ in black, keeping your wrist loose to form the circular shape. -
Switch to orange:
Rinse your brush thoroughly or switch to a clean one. Mix a vibrant, warm orange hue. It should be bold enough to stand out against the black. -
Fill the middle ‘O’:
Paint the center ‘O’ with your orange mix. Follow the curve carefully, ensuring the paint doesn’t bleed into the neighboring letters. -
Enhance the edges:
Once the base geometric shapes are filled, use your fine liner brush with slightly more concentrated paint to sharpen any fuzzy edges on all three letters. -
Add highlights:
While the paint is just starting to dry but still slightly damp, lift a tiny amount of pigment with a thirsty, clean brush to create subtle highlights on the curves of the ‘B’ and ‘O’s.
Uneven Edges?
If your letter edges look too shaky, wait for the paint to dry fully. Then, use a fine-tip black marker or pen to carefully outline the shapes for a crisp finish.
Step 3: Final Details
-
Dry styling marks:
For a stylized illustrative look, take a very small amount of nearly dry black paint on your fine liner brush. Add tiny, sketchy accent lines inside the orange ‘O’ or along the curves of the black letters to suggest volume. -
Final drying time:
Allow the painting to dry completely flat for at least an hour. Using a hairdryer can speed this up, but keep it on a low setting to prevent the paper from buckling. -
Clean up:
Once totally dry, erase any remaining visible pencil guidelines very gently, being careful not to rub over the painted areas.
Pro Tip: Highlight Hack
Add a tiny dot of white gouache or a white gel pen to the upper left curve of each letter after the paint dries. This creates a shiny, dimensional “balloon” effect.
Now you have a bold, festive print ready to frame or display on your mantel for the spooky season
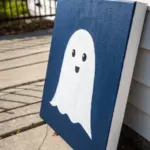
Paint Splatter Ghosts and Cats
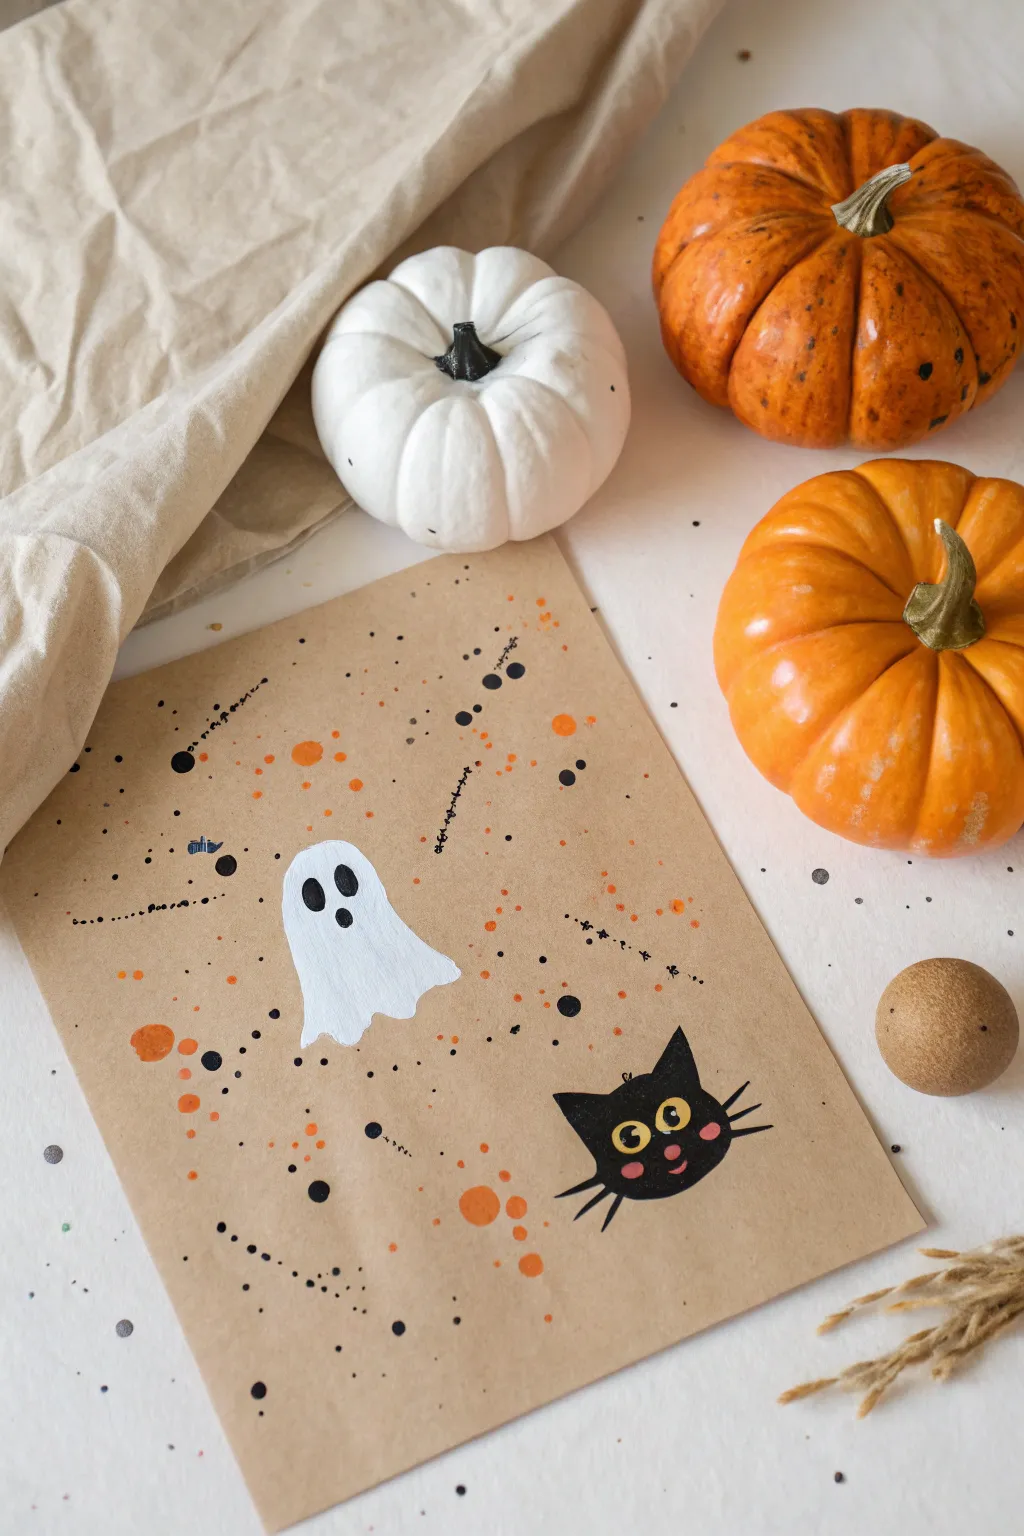
Embrace the chaos of creativity with this charmingly messy art project that combines simple character painting with dynamic splatters. The contrast of white and black paint on rustic kraft paper gives this piece a classic, cozy autumn vibe.
Step-by-Step Tutorial
Materials
- Heavyweight brown kraft paper or cardstock
- Acrylic paint (white, black, orange, pink)
- Round paintbrush (medium size)
- Fine detail brush
- Old toothbrush or stiff bristle brush
- Cup of water
- Paper towels or placemat for splatter protection
Step 1: Setting the Scene
-
Prepare your workspace:
Since this project involves intentional splattering, lay down plenty of newspaper or a placemat to protect your table surface. -
Cut the paper:
Trim your brown kraft paper to your desired size. A simple 8×10 inch rectangle works beautifully for framing later. -
Mix the splatter paint:
On a palette, water down a small amount of black acrylic paint. You want it to be the consistency of heavy cream or ink—runny enough to fly off bristles, but opaque enough to show up.
Splatter Control
If splatters are landing too lightly, add a drop more water. If they are large globs, dab the brush on a paper towel first.
Step 2: Creating the Background
-
Base layer splatters:
Dip your toothbrush or stiff brush into the watered-down black paint. hold it over the paper and run your thumb across the bristles to flick tiny specks across the entire surface. -
Add larger drops:
Load a regular round brush with the same runny black paint and tap the handle against your other hand over the paper to create larger, more distinct dots. -
Introduce orange:
Clean your brushes thoroughly. Repeat the splatter process using watered-down orange paint, filling in the gaps between the black speckles. -
Add directional streaks:
For a bit of movement, take a mostly dry brush with very little black paint and drag it quickly in short, diagonal dashes in a few random spots. -
Let it dry:
Allow the background to dry completely before moving on. I like to give it at least 15 minutes so the ghost doesn’t turn gray from wet background paint.
Add Some Sparkle
Mix a little metallic gold paint into your orange splatter mix to give the background a festive, magical shimmer.
Step 3: Painting the Characters
-
Outline the ghost:
Using a medium round brush and undiluted white paint, sketch a simple arch shape slightly to the left of the center. Give the bottom a wavy, scalloped edge. -
Fill in the ghost:
Paint inside your outline with solid white. Depending on your paint quality, you might need a second coat after the first one dries to make it bright and opaque against the brown paper. -
Shape the cat head:
In the bottom right corner, paint a black oval shape. Add two small triangles on top for ears, keeping the edges slightly soft and rounded for a cute look. -
Add ghost features:
Once the white paint is fully dry, use a detail brush to paint two black ovals for eyes and a slightly larger oval for a surprised mouth.
Step 4: Final Details
-
Paint cat eyes:
On the dried black cat head, paint two medium yellow circles. Once dry, add vertical black slits for pupils and a tiny white highlight dot in each. -
Add cat nose and cheeks:
Use a tiny dab of pink paint to create a small triangular nose and two round rosy cheeks on the cat. -
Define the whiskers:
Using your finest detail brush or a black pen, draw three thin whiskers extending from each side of the cat’s face.
Allow your spooky masterpiece to dry flat overnight before displaying it with your pumpkins
Masking-Tape Spider Web Resist
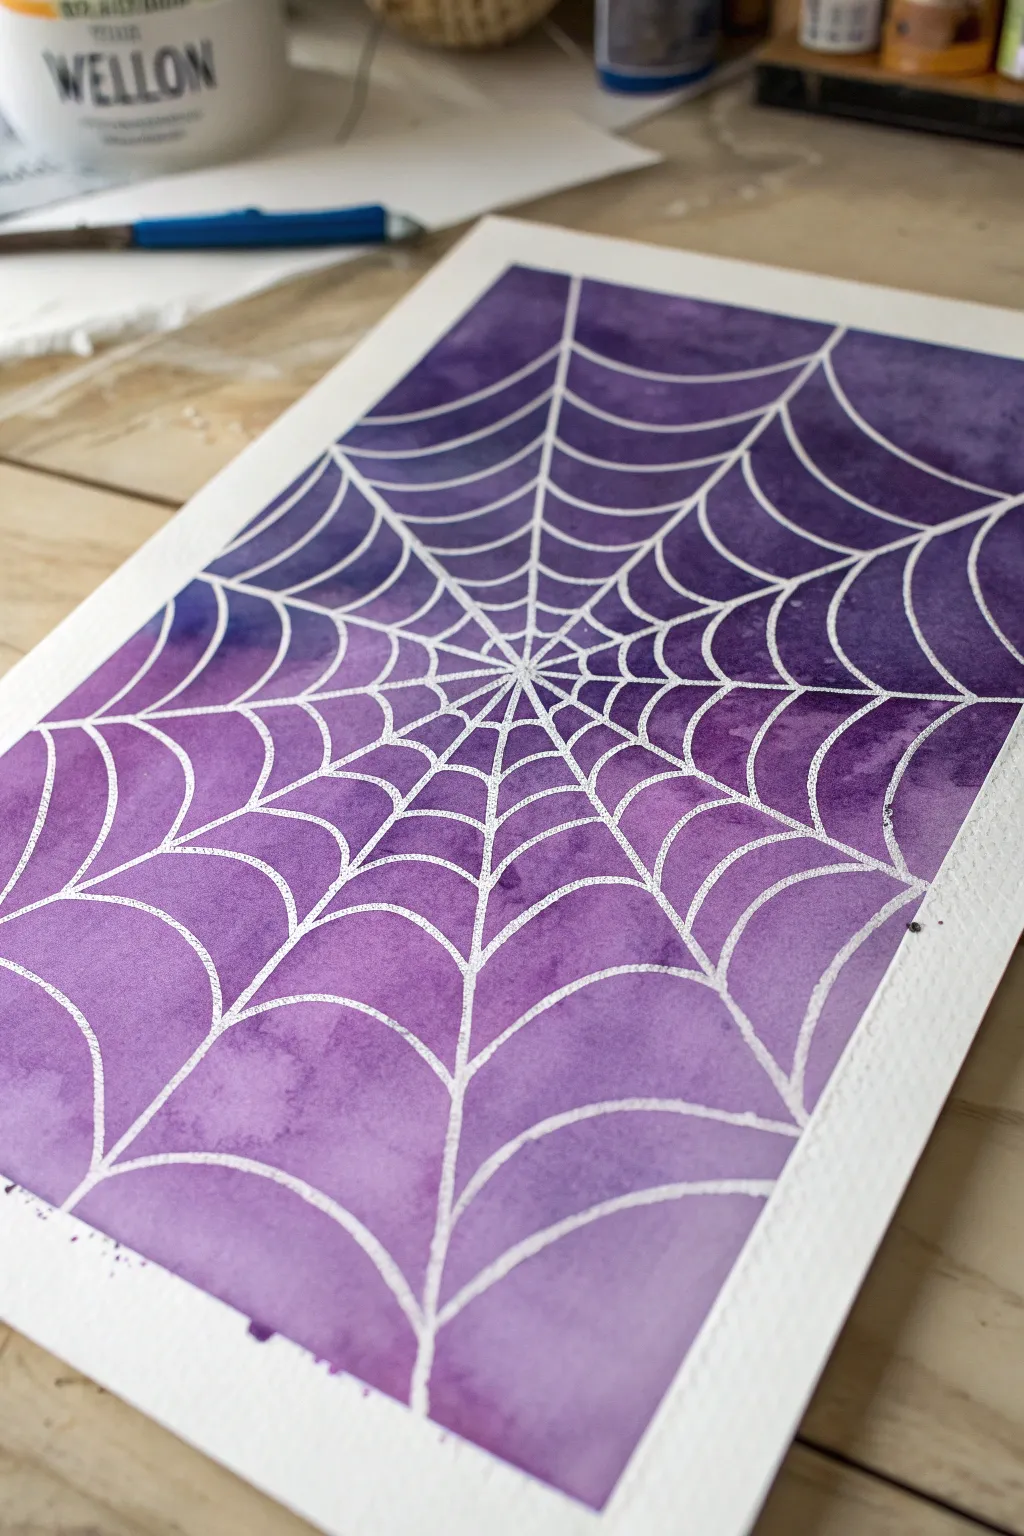
Capture the spooky elegance of a spider’s web with this vibrant resist painting technique. By masking off your design first, you create crisp white lines that pop dramatically against a moody purple watercolor wash.
Step-by-Step Tutorial
Materials
- Watercolor paper (cold press recommended)
- Masking fluid (drawing gum) or white crayon/oil pastel
- Fine-point applicator or specialized brush for masking fluid
- Watercolor paints (purple and violet shades)
- Medium round paintbrush
- Painter’s tape or stencil tape
- Board or flat surface for mounting
- Rubber cement pick-up (eraser) or clean fingers
Step 1: Preparation & Masking
-
Secure the paper:
Begin by taping down all four edges of your watercolor paper to a hard board or table surface. This creates a clean white border and prevents the paper from buckling when wet. -
Map the center:
Visualize where the center of your web will be. It doesn’t have to be perfectly in the middle; slightly off-center often looks more dynamic. -
Draw radial lines:
Using your masking fluid applicator or a white wax crayon, draw straight lines radiating outward from your center point like spokes on a bicycle wheel. Extend them all the way to the taped edges. -
Start the spiral:
Beginning near the center hub, draw small curved lines connecting the radial spokes. These little scallops should curve inward toward the center. -
Expand the web:
Continue adding rows of these curved connecting lines, moving outward. Space the rows wider apart as you get closer to the edge of the paper to mimic a real web’s structure. -
Refine the edges:
Ensure your masking lines meet firmly. If you are using masking fluid, let it dry completely (usually 15-20 minutes). It will feel tacky but solid when ready.
Torn Paper Trouble?
If removing tape tears your paper, heat the tape briefly with a hair dryer first. This softens the adhesive for a smoother release.
Step 2: The Watercolor Wash
-
Prepare your palette:
Mix a generous amount of purple watercolor paint. I like to prepare two puddles: one deep, saturated violet and one slightly watered-down lavender for variety. -
Wet the paper:
Lightly brush clean water over the entire paper surface, going right over your masked web design. The paper should be damp and shiny, but not holding pools of water. -
Apply the first wash:
Load your brush with the lighter purple mix. Dab and sweep it onto the wet paper, letting the color spread naturally. -
Deepen the shadows:
While the paper is still wet, drop in the darker violet paint. Focus this darker color near the corners and edges to create a vignette effect. -
Add variation:
Touch the tip of your brush into random sections of the web to let pigment bloom. The resist lines will stay white, repelling the paint. -
Let it dry completely:
Allow the painting to dry fully. The paper must be bone-dry and flat before moving to the next step, or you risk tearing the surface.
Step 3: The Reveal
-
Test the dryness:
Touch the back of your hand to the paper. If it feels cool to the touch, it still holds moisture. Wait a bit longer. -
Remove the masking fluid:
If you used masking fluid, gently rub it away using a rubber cement pick-up tool or your clean finger. Rub in small circles to lift the rubbery material. -
Polish the lines:
Continue until all masking residue is gone, revealing the crisp white paper underneath. -
Remove the tape:
Peel away the painter’s tape slowly, pulling it away from the painting at a 45-degree angle to keep the border clean.
Level Up: Cosmic Web
While the purple paint is wet, sprinkle coarse salt on it. As it dries, the salt pushes pigment away, creating a starry, galactic texture.
Once the tape is removed, you are left with a striking geometric design that captures the spooky spirit of the season
Glow-in-the-Dark Style Skull Shapes
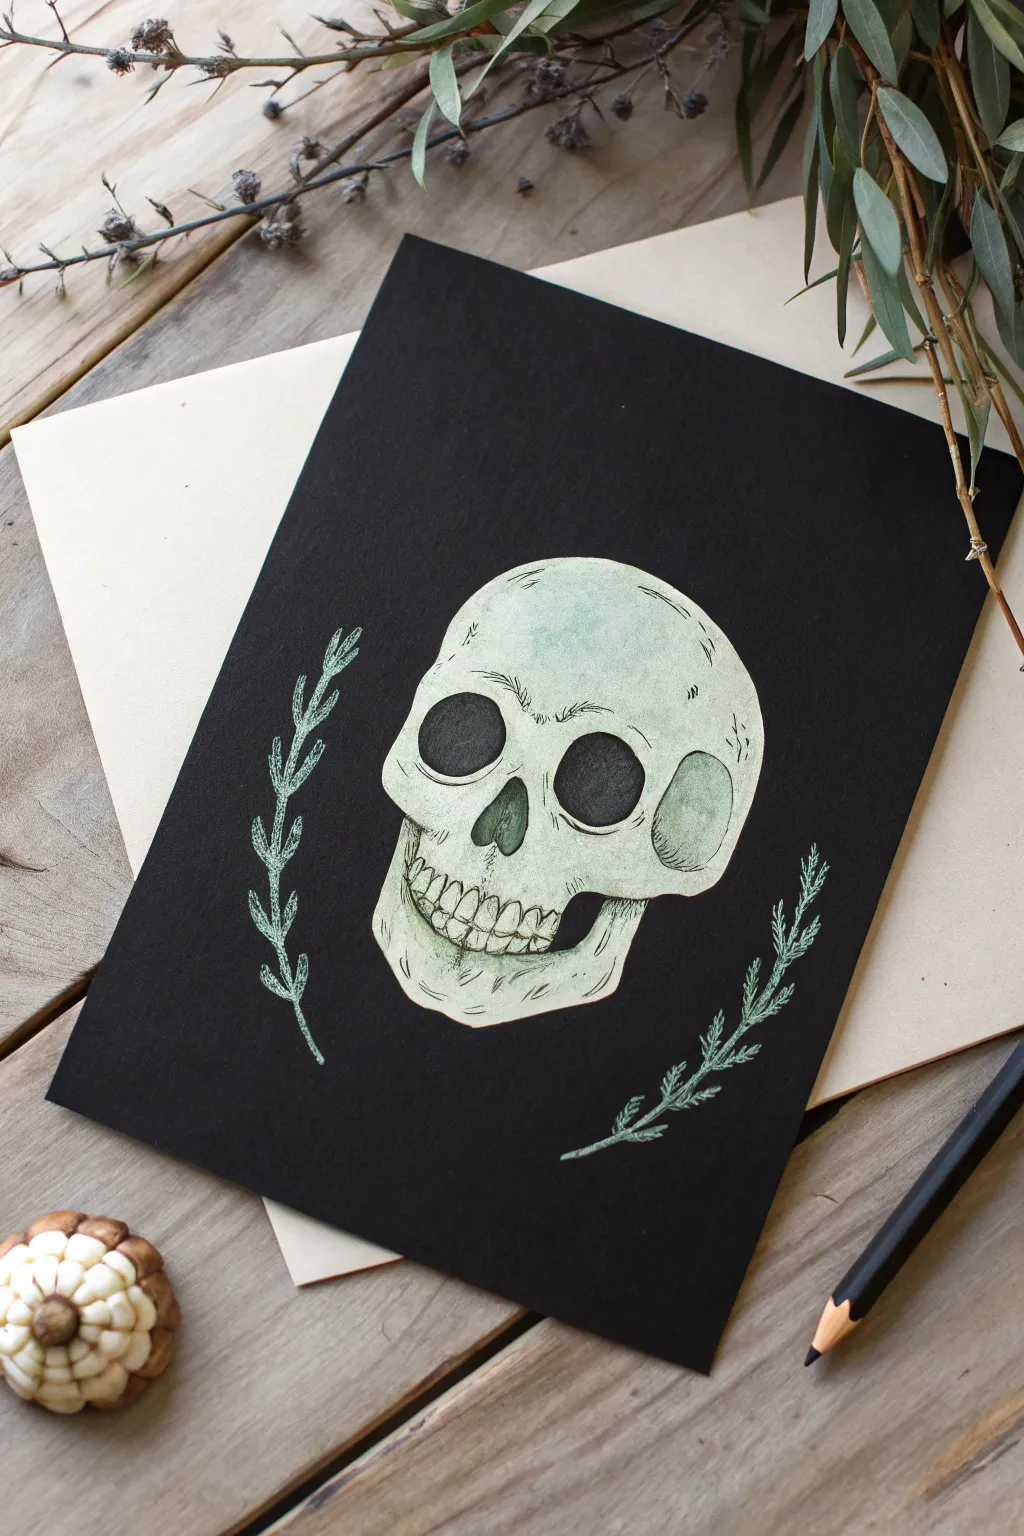
This eerie yet elegant project features a meticulously shaded skull that seems to emerge from the darkness. By working on black paper, you can create striking high-contrast highlights and moody shadows for a perfect Halloween atmosphere.
How-To Guide
Materials
- Heavyweight black cardstock or mixed media paper
- Light beige or cream backing paper
- Pencil (HB or H for sketching)
- White colored pencil or white charcoal pencil
- Light sage green colored pencil (or pastel pencil)
- Dark green colored pencil
- Fine tip black ink pen or micron pen (0.3 or 0.5mm)
- Eraser
- Ruler (optional for centering)
- Black colored pencil (for deepening shadows)
Step 1: Planning the Composition
-
Prepare your surface:
Cut your black cardstock to your desired size, ensuring it’s slightly smaller than your cream backing paper if you plan to mount it later like in the reference. -
Center the skull:
Lightly mark the center of your paper. Sketch a rough oval shape to define the boundaries of the cranium and jaw. This prevents the drawing from running off the edge. -
Block in facial features:
Using a very light touch with a regular pencil or white pencil, map out the large eye sockets, the triangular nose cavity, and the line where the teeth will sit.
Ghostly Glow Tip
Layer a tiny bit of pale blue mixed with the white pencil on the highest domed part of the skull. This creates a cool, spectral highlight effect.
Step 2: Drawing the Base Structure
-
Define the cranial shape:
Refine the outline of the head. Notice the bump above the brow ridge and the curve of the cheekbone (zygomatic arch) on the right side. -
Detail the eye sockets:
Draw the eye sockets not as perfect circles, but as slightly irregular, organic shapes. The right socket should look slightly narrower due to the angle of the skull. -
Sketch the nasal cavity:
Create the upside-down heart shape for the nose. I like to add a small vertical bone fragment inside the bottom of the cavity for realism. -
Outline the teeth:
Draw the individual teeth. Start from the center two front teeth and work your way outward, making them slightly smaller as they recede back.
Level Up: Antique Vibe
Use coffee-stained paper instead of plain cream backing. Simply brush strong coffee on watercolor paper, let it dry, and mount your black drawing on top.
Step 3: Coloring and Shading
-
Apply the base tone:
Using your light sage green or pale bone-colored pencil, gently color in the entire skull shape. Keep the pressure light to medium so the texture of the paper still shows through slightly. -
Build opaque highlights:
Go back over the brightest areas—the forehead, the bridge of the nose, and the chin—with the white pencil to build up opacity and make those areas pop against the black background. -
Fill the voids:
Use a black pencil or simply leave the black paper bare for the deepest shadows inside the eyes, nose, and the gap behind the jawbone. Ensure these edges are crisp. -
Contour the bone:
Use a darker green or grey pencil to add shadows around the temples, under the cheekbones, and between the teeth roots. This gives the skull volume.
Step 4: Inking and Details
-
Add fine ink lines:
With your fine tip black pen, verify line work details. Add tiny cracks (sutures) to the skull, particularly around the temples and forehead. -
Define the teeth separation:
Carefully outline the separation between teeth with the ink pen, implying roots extending upward into the maxilla. -
Cross-hatching shadows:
For a vintage illustration look, use very fine hatching marks with the pen in the shadowed areas, such as the curved inset of the cheekbone.
Step 5: Floral Accents
-
Sketch the sprigs:
Lightly sketch two curved stems flanking the bottom of the skull, creating a subtle U-shape frame. -
Add leaves:
Draw small, narrow leaves extending from the stems. Keep them simple and stylized. -
Color the greenery:
Fill in the leaves with the sage green pencil. Use the white pencil to highlight just the tips of the leaves for dimension. -
Final touches:
Clean up any stray pencil dust and mount the black art on the cream backing paper to finish the vintage specimen look.
Now you have a hauntingly beautiful piece of art ready to display on a mantel or shelf

Have a question or want to share your own experience? I'd love to hear from you in the comments below!