
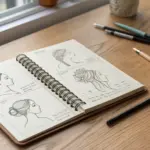
Respect can feel like a big, abstract word—until you turn it into a simple picture that anyone can understand at a glance. Here are my favorite respect drawing ideas that use clear symbols, relatable scenes, and easy layouts you can recreate for posters, school projects, or just practice sketches.
Classic Handshake Sketch
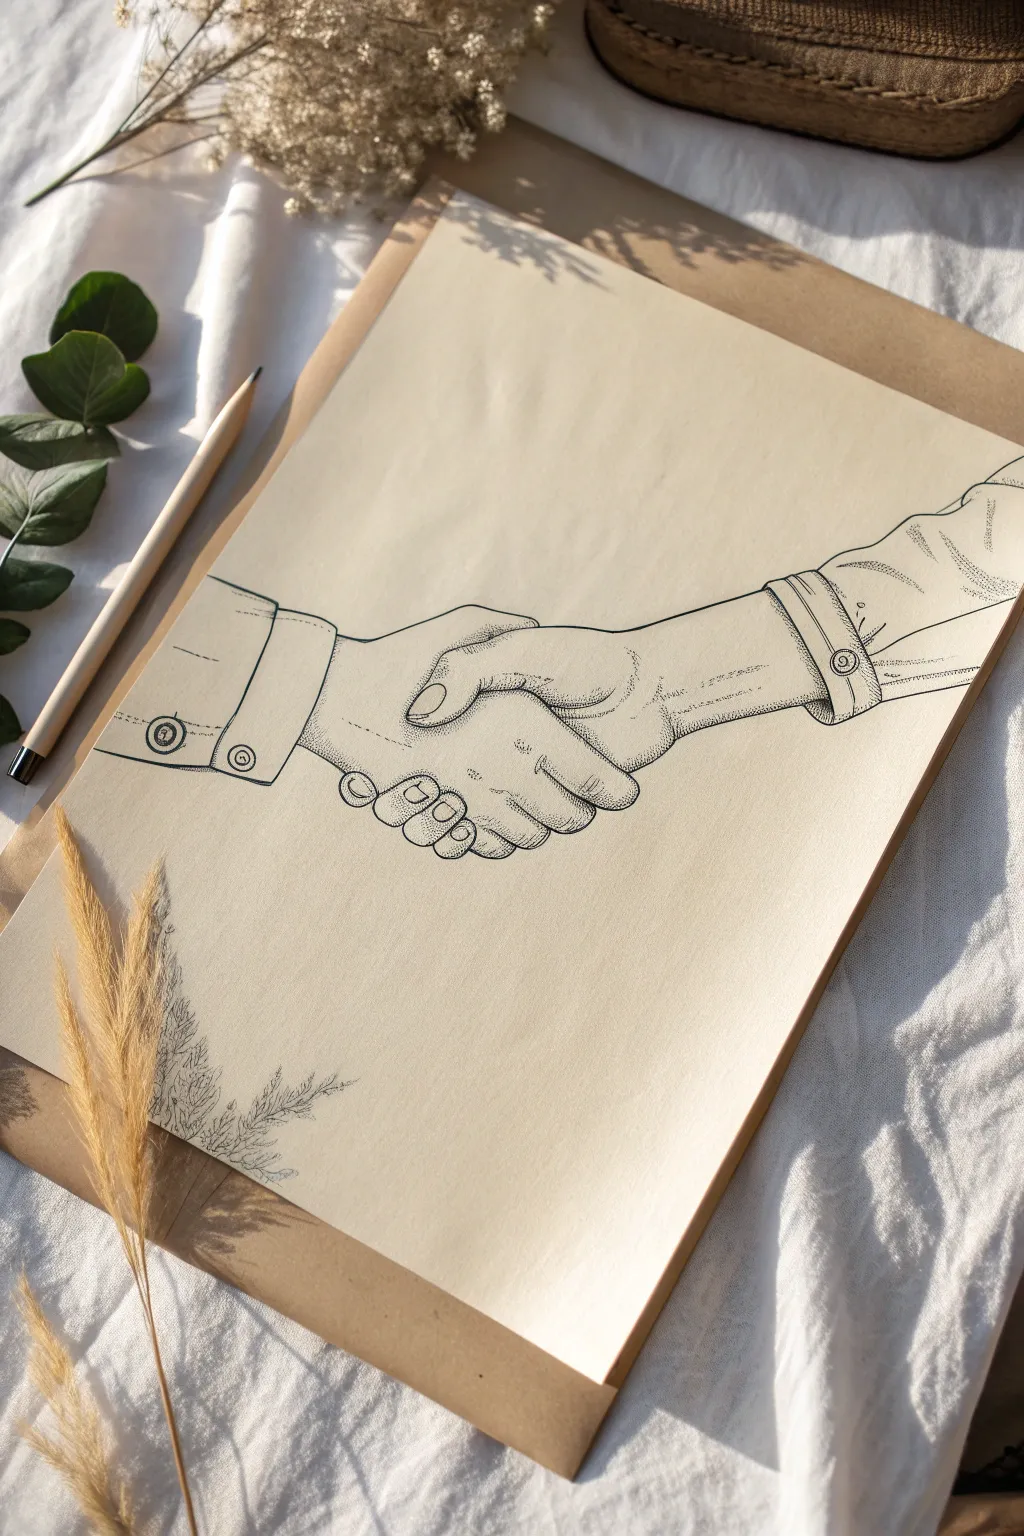
This elegant pen-and-ink drawing features two hands clasped in a handshake, symbolizing respect and agreement. The artwork relies on clean contour lines and subtle stippling techniques to create depth and texture on warm-toned paper.
Step-by-Step Tutorial
Materials
- Cream or beige smooth drawing paper (A4 or A5)
- Pencil (HB or 2H for sketching)
- Kneaded eraser
- Fine liner pens (0.1mm and 0.5mm, black)
- Brown kraft paper envelope or backing sheet
- Ruler (optional)
- Dried flowers (for styling, optional)
Step 1: Sketching the Foundations
-
Establish the composition:
Begin by lightly marking the center of your cream paper. Draw a faint diagonal line sloping upwards from left to right; this will be the general axis where the hands meet. -
Block in the left hand:
On the left side of the axis, sketch a rectangular shape for the sleeve cuff. Extending from that, draw the back of the hand as a simplified wedge shape. -
Block in the right hand:
Sketch the opposing hand entering from the right. Focus on the wrist area first, then the thumb grasping over the left hand’s knuckles. -
Refine the fingers:
Add the details of the fingers. For the left hand, you’ll see the curled fingers underneath. For the right hand, the thumb presses down on top, while the other fingers wrap around the palm unseen. Keep your pencil strokes very light here. -
Add clothing details:
Sketch the cuffs of the shirts. The left sleeve should have a straight, stitched appearance with a button. The right sleeve appears slightly softer with a visible seam and button detail.
Step 2: Inking the Contours
-
Outline the hands:
Using a 0.5mm fine liner, carefully trace over your pencil lines for the main outlines of the hands and fingers. Focus on smooth, confident strokes rather than jagged lines. -
Define the fingernails:
Switch to a 0.1mm pen to draw the fingernails. Keep these lines delicate; you don’t need to close the shape of the nail completely to suggest form. -
Ink the clothing:
Go back to the 0.5mm pen for the shirt sleeves. Add the buttons and the stitching lines on the cuffs. I find that breaking the line slightly on the fabric folds makes the cloth look more natural. -
Erase pencil marks:
Wait at least 10 minutes for the ink to fully dry to prevent smudging. Gently rub a kneaded eraser over the entire drawing to lift the initial graphite sketch.
Dot Control
Make sure to lift your pen straight up after each dot. If you drag it, you’ll create tiny dashes or commas instead of clean points, which changes the texture.
Step 3: Shading with Stippling
-
Start the stippling process:
Using your 0.1mm pen, begin adding tiny dots (stippling) to area where shadows naturally fall. Start where the fingers overlap and underneath the thumb. -
Build density slowly:
Increase the density of dots in the deepest shadow areas—specifically between the fingers and under the cuff lines. The closer the dots, the darker the shadow. -
Shade the hands:
Add a gradient of dots along the bottom curve of the hands to give them roundness. The top edges where light hits should be left mostly plain paper. -
Texture the fabric:
Add lighter, sparser stippling to the shirt sleeves, particularly near the seams and folds, to differentiate the fabric texture from the skin. -
Final assessment:
Step back and look at your contrast. Add a few finishing dots to the corners of the fingernails and the buttonholes for extra definition.
Vintage Vibe
Tea-stain your paper before drawing for an antique look. Let a tea bag sit on the paper for 5 mins, dry flat, and iron on low heat before starting.
Step 4: Mounting and Presentation
-
Prepare the backing:
Take your brown kraft envelope or paper and slide the finished drawing partially inside or mount it on top to create a framed effect. -
Add decorative elements:
For the finished aesthetic shown in the reference, sketch faint botanical sprigs in lower corner using the 0.1mm pen, keeping them loose and illustrative.
Now you have a timeless piece of art that perfectly captures the gesture of respect and connection


Respect for Elders Scene
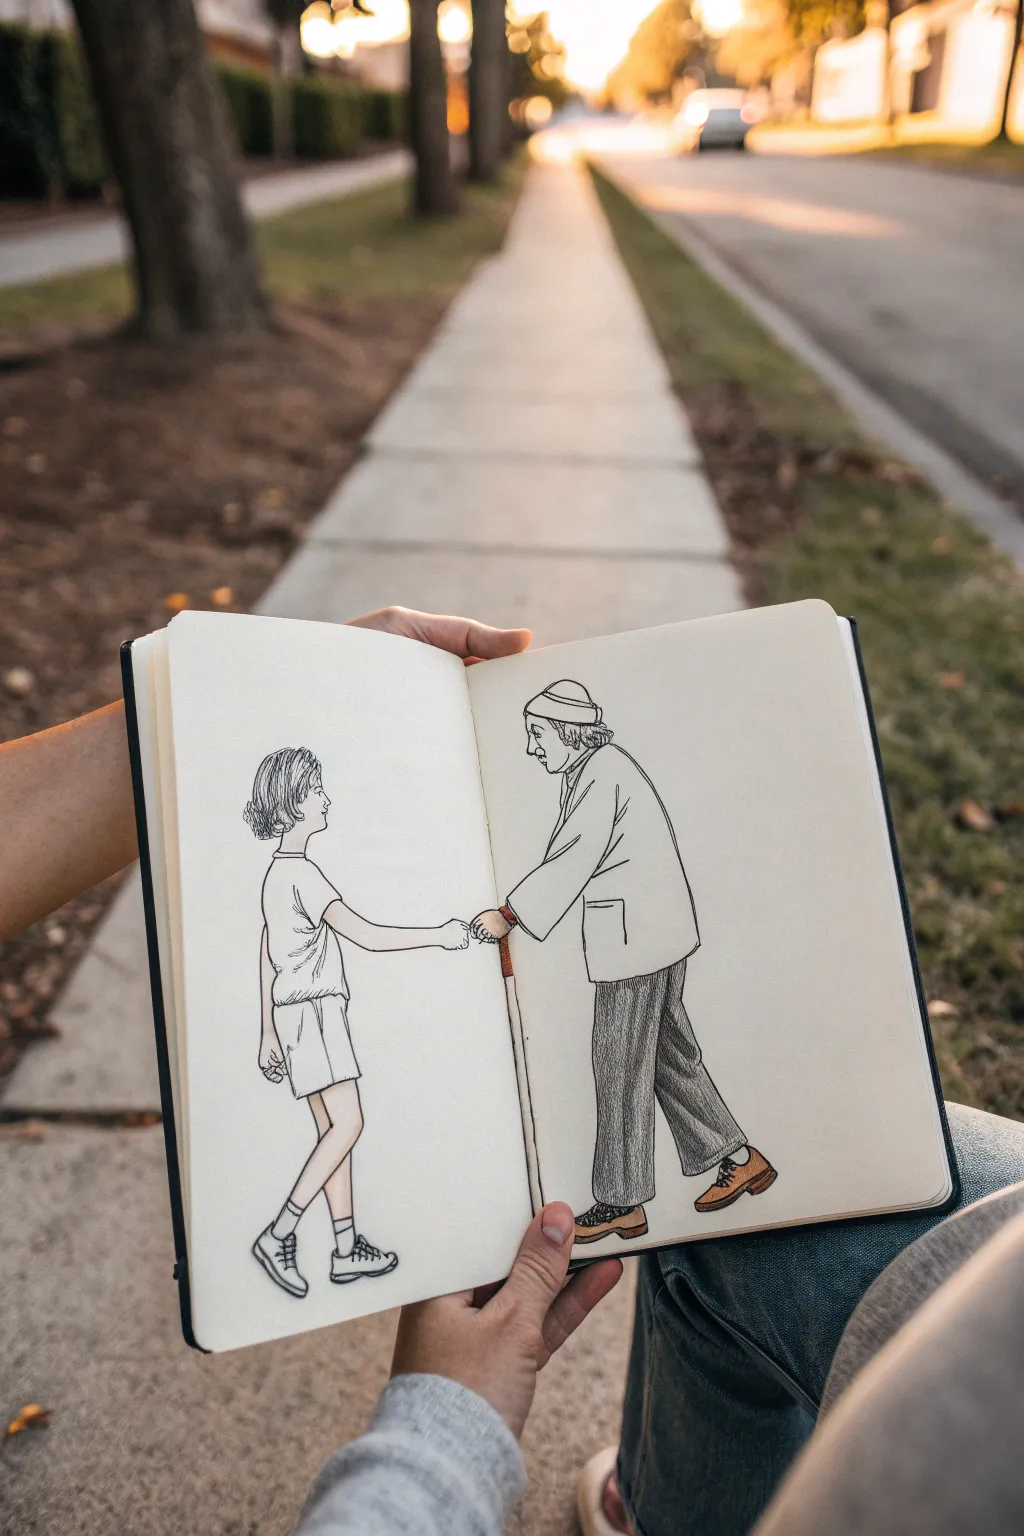
Capture a poignant moment of respect and connection with this dual-page sketchbook illustration. Using clean ink lines and subtle pencil shading, you will create a heartwarming scene where a young child and an elder reach across the page divide to hold hands.
Step-by-Step
Materials
- Hardcover sketchbook (A5 or similar size)
- Graphite pencil (HB or 2B)
- Fine liner pen (black, 0.3mm and 0.5mm)
- Colored pencils (grey, brown, beige/skin tones)
- Eraser
- Ruler (optional for proportions)
Step 1: Conceptual Layout
-
Establish the horizon line:
Open your sketchbook flat. Lightly visualize or draw a very faint horizon line across both pages to ensure the figures stand on the same plane, roughly corresponding to the bottom third of the page. -
Position the figures:
On the left page, mark the height of the child figure. On the right page, mark the height of the elder. The elder should be visibly taller but hunched slightly to show age. -
Map the connection point:
This is crucial: draw a small circle right at the spine (the middle crack) where the hands will meet. This anchor point ensures the gesture connects seamlessly across the pages.
Uneven Hands?
If the hands don’t line up perfectly across the spine, draw a small object (like a flower or toy) being passed between them to mask the misalignment.
Step 2: Penciling the Figures
-
Sketch the child’s structure:
Start with a simple circle for the head on the left. Draw a stick figure frame for the body, with one arm extending straight toward that central anchor point. -
Flesh out the child’s form:
Add volume to the stick figure. Sketch loose shorts, a t-shirt, and sneakers. Keep the hair short and slightly messy. The posture should be upright and energetic. -
Sketch the elder’s structure:
On the right page, draw the elder’s head slightly lower than their full standing height would be, indicating a stoop. Sketch the body frame, leaning forward. -
Detail the elder’s clothing:
Draw loose, baggy trousers and a large jacket. Add a beanie or cap on the head. One arm reaches for the child, while the other holds a cane for support. -
Refine the hand clasp:
Zoom in on the center spine area. Carefully sketch the hands interacting. The elder’s hand might envelop the child’s smaller hand. I find it helpful to draw simple mitten shapes first before adding fingers.
Step 3: Inking the Outlines
-
Outline the child’s profile:
Using your 0.3mm fine liner, carefully trace the pencil lines for the child’s face and hair. Use short, wispy strokes for the hair texture. -
Ink the child’s clothes:
Continue inking the t-shirt and shorts. Add small wrinkle lines at the armpits and waist to show fabric movement. -
Outline the elder’s face:
Move to the right page. Use the fine liner to capture the elder’s profile, perhaps adding a few lines for wrinkles or glasses to emphasize age. -
Ink the elder’s attire:
Trace the jacket and trousers. The lines here can be slightly heavier or more textured to suggest thicker fabric compared to the child’s clothes. -
Detail the cane and shoes:
Ink the cane with straight, deliberate lines. Outline the shoes on both figures—sneakers for the child, sturdy dress shoes for the elder. -
Erase pencil marks:
Once the ink is completely dry (wait at least a few minutes), gently erase all underlying graphite sketches to leave a clean black-and-white drawing.
Add Atmosphere
Use a light wash of watercolor or soft pastel in the background to suggest a park setting, or add falling autumn leaves for a seasonal mood.
Step 4: Shading and Texture
-
Shade the trousers:
Take a grey or charcoal colored pencil. Use vertical hatching strokes on the elder’s trousers to create a textured, fabric look. Don’t fill it in solidly; let the paper show through. -
Color the shoes and cane:
Use a brown colored pencil for the elder’s shoes and the cane. Apply slightly more pressure on the soles of the shoes for depth. -
Add skin tones:
Very lightly apply a beige or light brown pencil to the faces, hands, and the child’s legs. Keep this extremely subtle—just a hint of warmth. -
Final touches:
Add small grey shading accents under the sneaker soles and the cane tip to ground the figures so they aren’t floating in space.
Close your sketchbook with the satisfaction of having captured a beautiful human connection just waiting to be reopened


High-Five for Team Respect
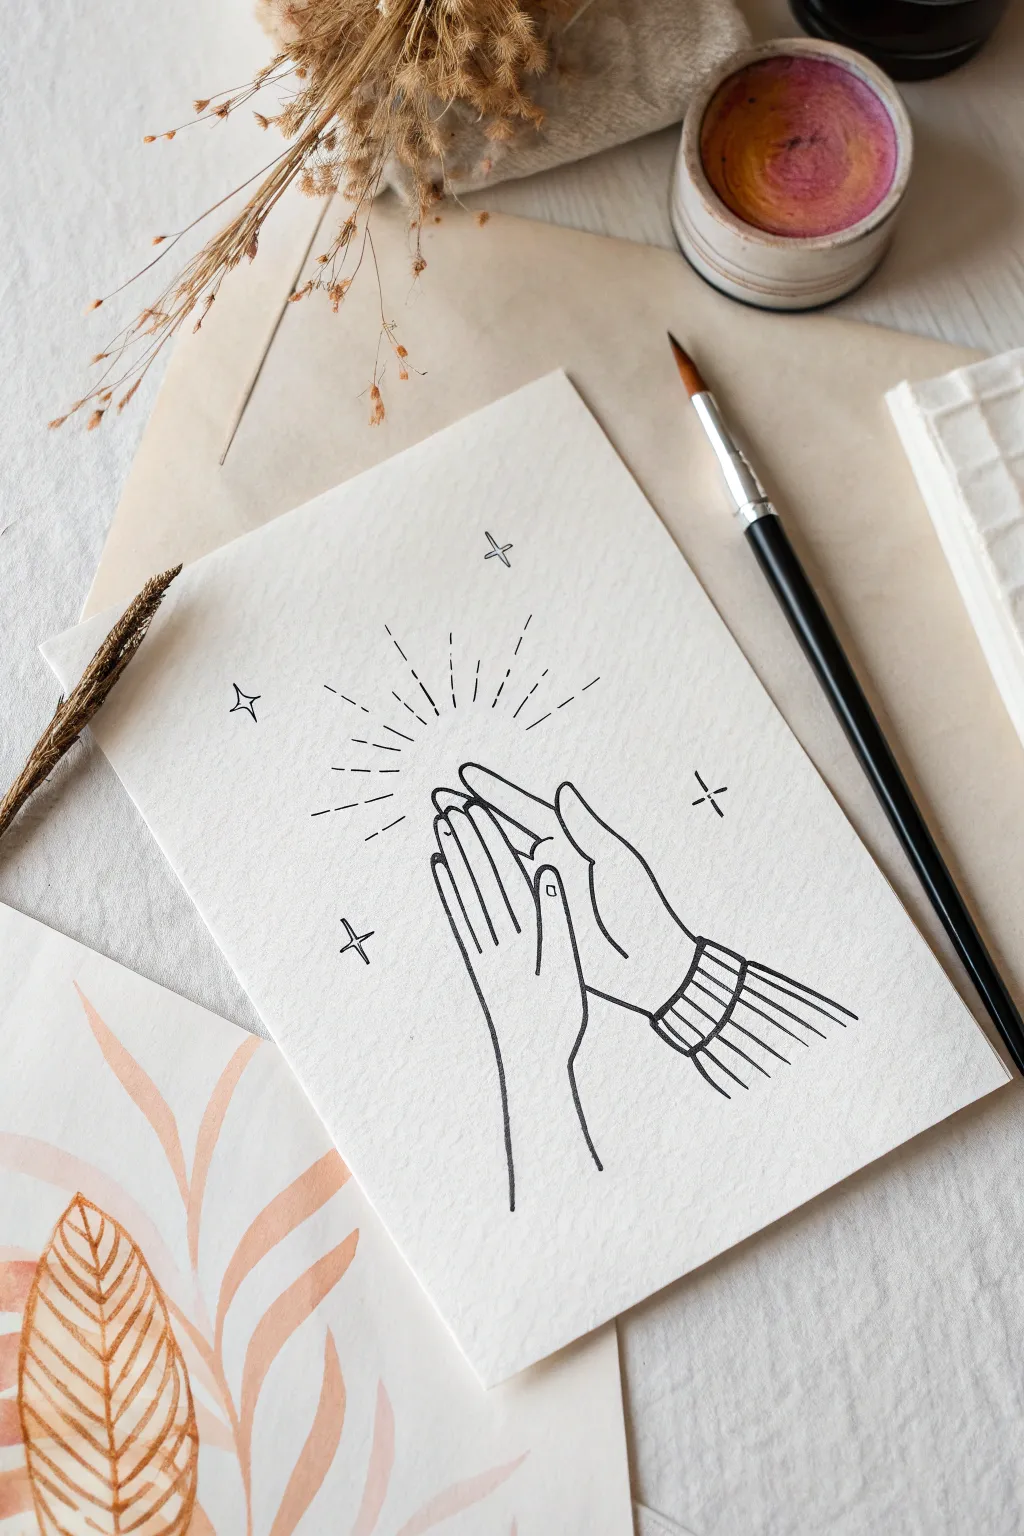
Capture the simple joy of connection with this minimalist illustration of two hands meeting in a high-five. This project focuses on clean line work and precise composition to create a piece that feels both celebratory and respectful.
Detailed Instructions
Materials
- Textured watercolor paper or heavy cardstock (creamy white)
- Fine-liner pen (black, 0.3mm or 0.5mm)
- Pencil (HB or H for light sketching)
- Soft eraser
- Ruler (optional)
- Reference photo of hands (optional)
Step 1: Sketching the Composition
-
Paper placement:
Begin by positioning your textured paper on a flat surface. Angle the paper slightly or plan to draw on a gentle diagonal to give the artwork a dynamic feel. Find the center point where the hands will meet. -
Basic shapes:
Using your pencil very lightly, sketch two oval shapes overlapping slightly at the palms. These will serve as the base for the hands. Keep your pressure minimal so erasing later is easy. -
Defining the left hand:
Outline the hand on the left first. Focus on the elongated shape of the fingers pointing upward. The fingers should be grouped together, creating a sleek silhouette rather than splayed apart. -
Drawing the right hand:
Sketch the opposing hand on the right. Notice how the thumb tucks slightly in front or interacts with the palm. This hand appears to be the one receiving the impact, so angle the wrist slightly differently to show action. -
Adding the sleeve detail:
On the right hand’s wrist, sketch the cuff of a sweater or shirt. Draw a rectangular band around the wrist area to define the ribbed cuff. -
Refining the contours:
Go back over your pencil lines to define the exact interaction point of the palms. Ensure the wrists taper naturally into the forearms. I like to double-check the proportions here before committing to ink.
Star Placement Tip
Don’t align your stars perfectly symmetrically. Placing them at slightly different heights and distances creates a more whimsical, organic feeling.
Step 2: Inking the Lines
-
Tracing the hands:
Take your fine-liner pen and carefully trace over the final pencil lines of the hands. Use a steady, continuous stroke for the long lines of the fingers to avoid a shaky look. -
Inking the cuff:
Ink the outline of the sleeve cuff on the right wrist. Add the internal ribbing lines, keeping them parallel and following the slight curve of the wrist to show volume. -
Detailing the fingernail:
Add a small, simple square or U-shape on the visible thumb to represent the fingernail. This tiny detail adds just enough realism to the stylized drawing. -
Erasing sketch lines:
Once the ink is completely dry—give it a full minute—gently erase all the underlying pencil marks. Be careful not to scuff the textured paper surface.
Step 3: Adding Radiance and Stars
-
Planning the burst:
Imagine a semi-circle radiating upward from where the fingertips meet. This is where your ‘impact’ lines will go to symbolize the sound or energy of the high-five. -
Drawing the long rays:
Draw the main radiating lines first. These are the longer dashes extending outward. Keep the spacing roughly even, fanning out like a sunrise. -
Adding short dashes:
In between the longer rays, add shorter floating dashes. This variation in line length creates a sparkling, energetic effect. -
Drawing the stars:
Place four simple four-pointed stars around the hands. Put two near the top corners and one on each side of the hands. Draw them like a thinly drawn ‘plus’ sign, perhaps slightly elongated. -
Final assessment:
Step back and look at the balance of the composition. If any specific area looks too empty, add a very small dot or a tiny extra dash to balance the negative space.
Add a Flash of Gold
For a magical touch, re-trace the impact lines or the stars with a metallic gold gel pen. It catches the light beautifully on textured paper.
Now you have a charming piece of art that perfectly symbolizes partnership and mutual respect


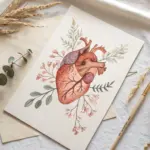
Heart Held in Gentle Hands
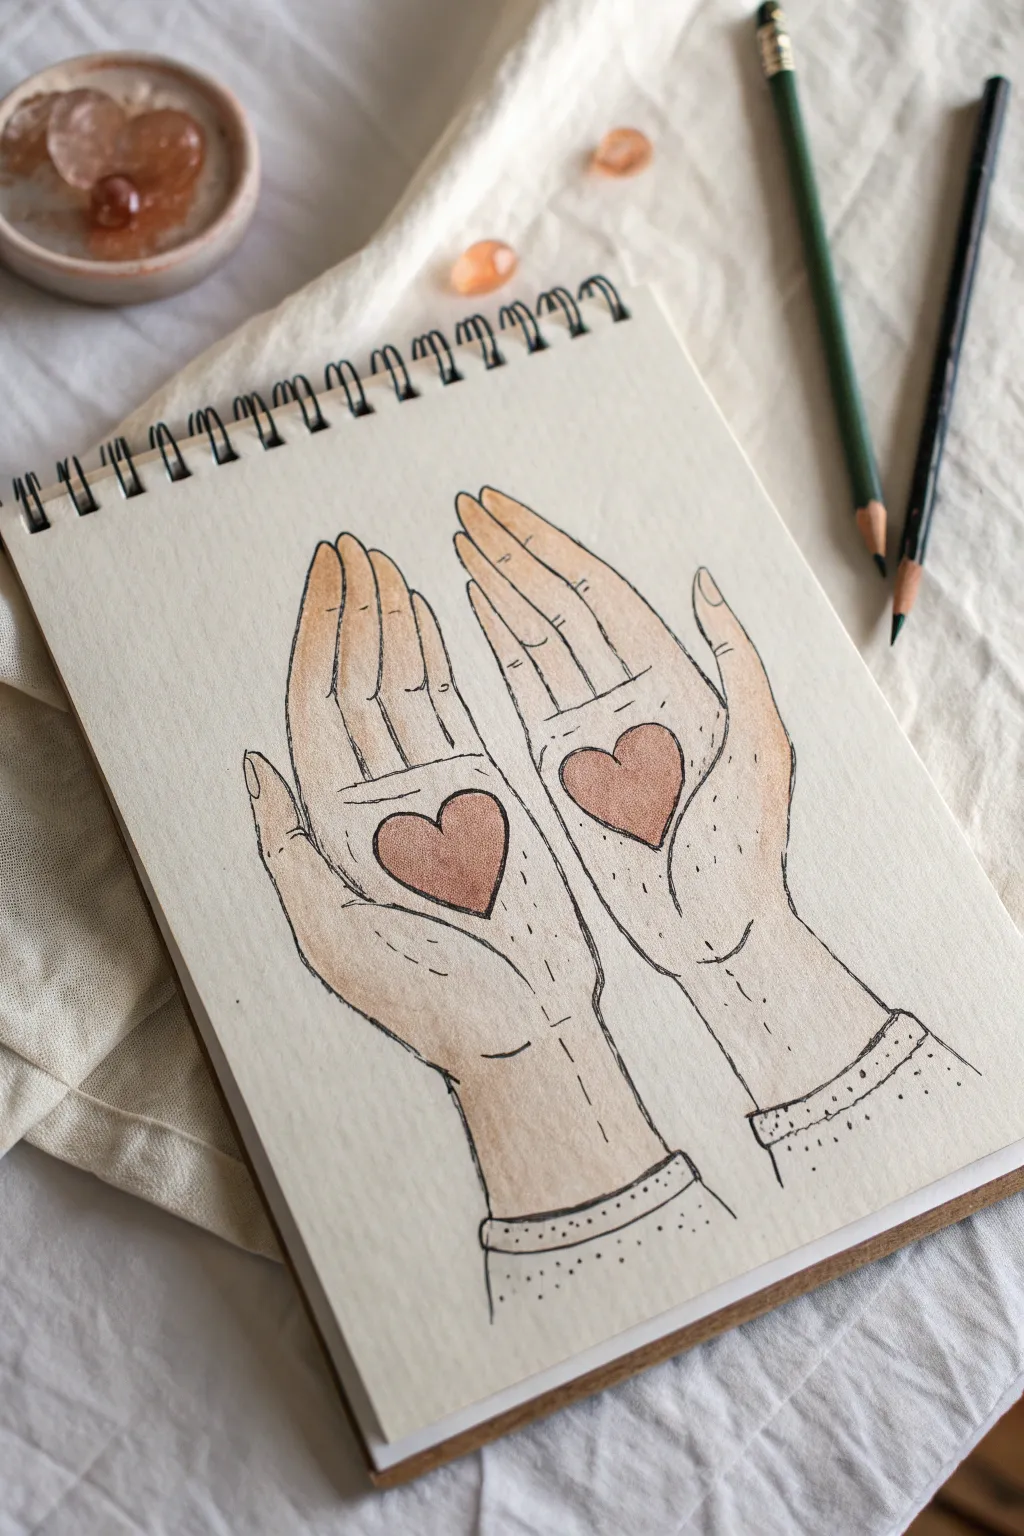
This illustration captures the essence of care and respect through a simple yet powerful composition of two hands cradling warmth. Using fine liners and soft watercolor washes, you will create a piece that feels both organic and deeply symbolic.
Step-by-Step Guide
Materials
- Spiral-bound sketchbook (heavyweight paper preferred)
- Black fine liner pen (01 or 03 size)
- Watercolor paints or water-based markers (peach, tan, warm brown/terra cotta)
- Small round paintbrush (size 2 or 4)
- pencil (HB)
- Eraser
- Jar of water and paper towels
Step 1: Sketching the Composition
-
Establish the angles:
Begin by lightly drawing the wrists at the bottom center of the page. They should be angled slightly outward, creating a V-shape negative space between them. I find it helps to visualize the hands blooming upward like a flower. -
Draft the palms:
Sketch two oval shapes for the palms above the wrists. Keep them relatively long and slender, tilting away from each other so the fingers will fan out. -
Add the fingers:
Draw the fingers extending upwards. The pinky fingers should be on the outside edges, shorter than the rest. The middle and ring fingers are the longest, creating a gentle curve at the top. -
Place the thumbs:
Draw the thumbs resting on the outside edges of the hands, tucked slightly lower than the index fingers. Their placement is key to making the hands look open and receptive. -
Insert the hearts:
In the center of each palm, lightly sketch a heart shape. These act as the focal points, so center them well within the palm lines.
Use Reference Photos
Take a photo of your own hands in this pose to understand the proportions. It’s much easier to draw from a reference than from imagination.
Step 2: Inking the Details
-
Outline the main shapes:
Using your black fine liner, go over your pencil lines for the hands and hearts. Use a confident, slightly broken line in places to give it that sketched, organic feel rather than a rigid vector look. -
Add fingernails:
Draw small, curved arch shapes near the tips of the fingers to indicate fingernails. Keep them simple and unadorned for a clean aesthetic. -
Detail the wrinkles:
Add small creases at the knuckles and where the thumb meets the palm. Two or three small horizontal lines at the finger joints add necessary realism without cluttering the drawing. -
Draw the cuffs:
At the base of the wrists, draw a simple cuff line. Add a second parallel line just below it to suggest the hem of a sleeve or sweater. -
Incorporate texture dots:
Stipple tiny dots specifically around the hearts and near the wrist cuffs. This adds texture and guides the eye toward the center of the image. -
Erase guidelines:
Once the ink is completely dry—give it a full minute—gently erase all underlying pencil marks to reveal a clean line drawing.
Add Metallic Accents
Use gold watercolor or a metallic gel pen for the hearts. It adds a beautiful shimmer that represents the preciousness of respect.
Step 3: Adding Color and Warmth
-
Mix your skin tone:
Dilute a peach or tan watercolor paint with plenty of water. You want a very transparent wash, not opaque color. Test it on a scrap piece of paper first. -
Wash the hands:
Carefully paint the hands, avoiding the heart shapes. Let the color pool slightly at the edges (like the sides of the fingers) to create natural-looking shadows as it dries. -
Color the hearts:
Using a slightly darker, warmer brown or terra cotta shade, fill in the two heart shapes. This contrast makes them pop against the lighter skin tone. -
Shade the fingers:
Once the first layer is dry, add a tiny bit more pigment to the tips of the fingers and the shadowed side of the thumbs to give the hands dimension. -
Detail the cuffs:
Add faint dots or a very light wash to the sweater cuffs at the bottom, keeping them lighter than the hands to maintain focus on the palms.
Step back and admire the gentle simplicity of your finished illustration

PENCIL GUIDE
Understanding Pencil Grades from H to B
From first sketch to finished drawing — learn pencil grades, line control, and shading techniques.
Explore the Full Guide
Namaste Hands With Simple Halo
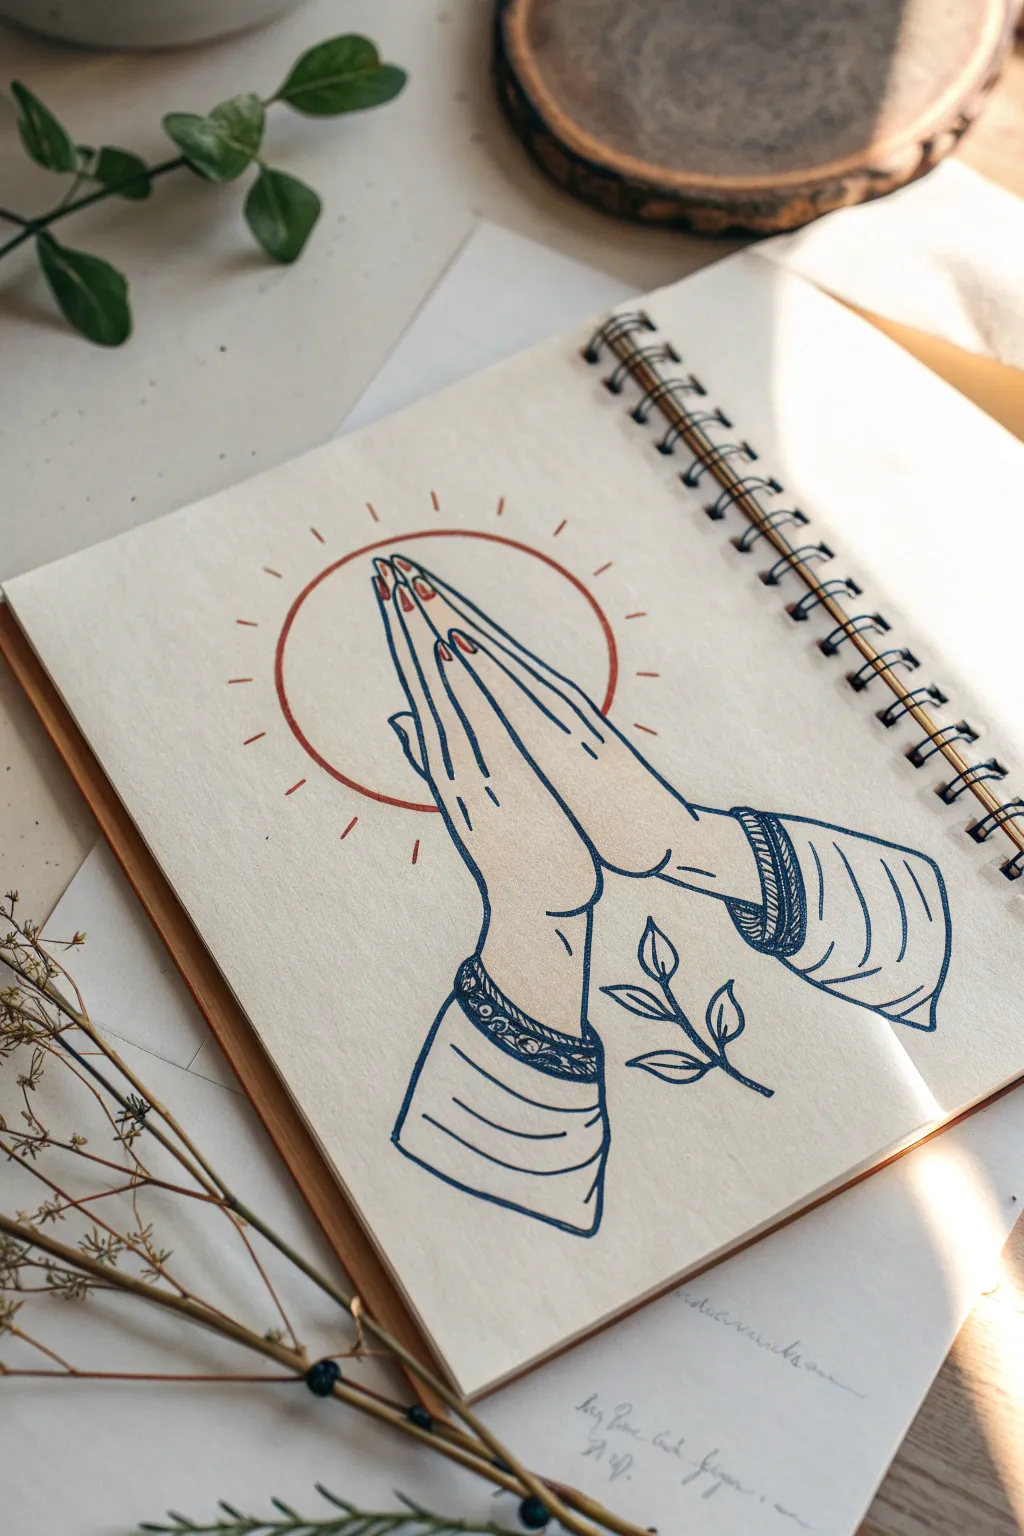
This serene sketch captures the universal gesture of respect and greeting, enhanced by a minimalist sun halo. The clean blue linework pairs beautifully with subtle touches of rust red for a modern, spiritual aesthetic.
Detailed Instructions
Materials
- Cream or off-white sketchbook paper (smooth texture)
- Fine liner pen (Navy Blue or Dark Indigo, 0.5mm)
- Fine liner pen (Rust or Burnt Orange, 0.5mm)
- Pencil (HB for sketching)
- Eraser
- Compass or circle template (optional)
Step 1: Planning and Sketching
-
Construct the hand shapes:
Begin with a faint pencil sketch. Draw two elongated ovals that lean towards each other, meeting at a point near the top. These will serve as the palms and fingers. Keep the base of the ovals wider for the wrists. -
Refine the fingers:
Within your ovals, sketch the individual fingers. The middle fingers should meet at the highest point. Ensure the thumbs are resting against the side of the hands, slightly separated from the main finger grouping. -
Add the wrist cuffs:
Draw curved lines at the base of each hand to define where the sleeves begin. Sketch the fabric shapes extending downwards and outwards, simulating a loose garment cuff. -
Position the halo:
Use a compass or trace a circular object to lightly pencil a perfect circle. Position it so the fingertips overlap the top center of the circle, creating a framing effect. -
Sketch the sprig:
In the negative space between the wrists, lightly draw a simple stem with four or five small leaves floating freely.
Step 2: Inking the Hands
-
Outline the left hand:
Switch to your navy blue fine liner. Trace the outer contour of the left hand, paying attention to the slight indentation at the wrist bone and the gentle curve of the thumb. -
Outline the right hand:
mirror the process for the right hand. The palms should press together firmly, so ensure the line where they meet is clean and singular. -
Detail the fingers:
Draw the separation lines between the fingers. Don’t draw these lines all the way down to the palm; stopping them halfway keeps the drawing looking stylized and elegant. -
Add knuckle details:
Add tiny, minimal curved lines at the knuckles and thumb joints to suggest movement and skin folds without overcrowding the design. -
Ink the nails:
Carefully draw small U-shapes at the tip of each finger for the nails. -
Draw the sleeves:
Ink the cuffs with fluid, somewhat loose lines to suggest fabric creases. Add horizonal curved lines across the sleeves to show folds. -
Pattern the cuffs:
Create a decorative band on the edge of each sleeve. I like to use a simple scribble or hatching pattern inside a thin double border to mimic embroidery texture.
Trembling Lines?
If your circle or long straight lines are shaky, try drawing from your shoulder rather than your wrist, or ghost the motion in the air a few times before touching paper.
Step 3: Adding Color and Final Details
-
Ink the halo:
Using the rust/orange pen, carefully trace your pencil circle. Break the line where it passes behind the hands so it appears as a background element. -
Add sun rays:
With the same rust pen, draw short, evenly spaced dashes radiating outward around the circle’s perimeter. -
Color the nails:
Fill in the fingernail shapes with the rust pen. This pop of color ties the hands visually to the halo. -
Ink the botanical sprig:
Go back to your navy blue pen and trace the small leaf sprig at the bottom right. Keep the lines simple and unshaded. -
Let it set:
Allow the ink to dry completely for at least five minutes to prevent smudging. -
Clean up:
Gently erase all underlying pencil marks, leaving only the crisp ink lines behind.
Metallic Touch
For a magical upgrade, re-trace the orange halo and sun rays with a gold gel pen or metallic marker to make the ‘divine’ aspect truly shine.
Enjoy the peaceful feeling of this completed gesture study
Have a question or want to share your own experience? I'd love to hear from you in the comments below!