A good cornhole board paint job is the sweet spot between playable and gorgeous—like functional art you actually get to toss stuff at. I’m sharing my favorite cornhole board paint ideas that range from super simple tape lines to “how did you do that?” designs you can still pull off at home.
Classic Two-Tone Border
These cornhole boards feature a crisp, modern aesthetic by combining opaque white paint with the natural warmth of wood stain. The sharp diagonal lines create a dynamic look that elevates a simple backyard game into a stylish feature.
How-To Guide
Materials
- Unfinished cornhole boards (sanded)
- White exterior semi-gloss latex paint
- Reddish-brown wood stain (e.g., Red Oak or Cognac)
- Painter’s tape (high quality, 1-inch width)
- Polycrylic protective finish (clear gloss or semi-gloss)
- Foam brushes
- Synthetic bristle brush
- Rags or staining sponge
- Sandpaper (220 grit)
- Tack cloth
- Pencil
- Ruler or straight edge
Step 1: Platform Preparation
-
Sand the Surface:
Begin by giving the entire top surface and sides of your cornhole boards a light sanding with 220-grit sandpaper. This ensures a smooth base for both the stain and the paint. -
Clean the Dust:
Wipe away every speck of sawdust using a tack cloth or a slightly damp rag. Any leftover dust will get trapped in your finish and feel rough later. -
Mark the Border:
Using a ruler and pencil, lightly measure and mark a 1-inch border around the entire perimeter of the board surface. Do not tape yet; these marks are just for your reference.
Bleed Blocker
To get razor-sharp lines, brush a tiny amount of clear Polycrylic over the tape edge BEFORE painting the white. This seals the gap so no white paint can sneak under.
Step 2: Staining the Accents
-
Apply Stain All Over:
It is actually easier to stain the areas first rather than trying to paint white first. Apply your reddish-brown stain to the bottom third of the board, the 1-inch border area you marked, and inside the hole. -
Extend the Stain:
Don’t worry about being perfectly neat with the inner edge of the stain yet. I prefer to stain a little past where my lines will be to ensure full coverage under the future tape line. -
Wipe Excess:
Let the stain penetrate for about 5-10 minutes (check your can’s instructions), then wipe off any excess liquid with a clean rag. Let this dry completely, ideally overnight.
Step 3: Taping the Design
-
Mask the Border:
Once the stain is 100% dry, apply painter’s tape to cover the 1-inch stained border. You want to align the outer edge of the tape perfectly with the edge of the board. -
Create the Diagonal:
Determine the angle for the bottom geometric shape. Run a long strip of tape diagonally across the board, starting low on one side and ending higher on the other, covering the stained section you want to keep. -
Mask the Hole:
Carefully place tape inside the hole or create a paper plug to protect the stained inner rim from incoming white paint. -
Seal the Tape:
Press down firmly on all tape edges with your fingernail or a credit card. This is crucial to prevent the white paint from bleeding onto your nice stained wood.
Custom Decals
Before the final clear coat layers, add a vinyl decal logo or team name in the large white space to personalize the set for a wedding or tailgate.
Step 4: Painting and Finishing
-
Prime the Surface:
Apply a thin layer of primer or your first coat of white paint to the exposed wood area. Brush away from the tape edge initially to avoid forcing paint under it. -
Paint the Upper Section:
Apply 2-3 coats of white exterior latex paint to the main upper section. Use a synthetic brush for smooth strokes, allowing proper drying time between each coat. -
Paint the Sides:
While the top dries, paint the sides and legs of the board white to match the top design, giving the project a cohesive, finished look. -
Remove Tape:
The moment of truth: carefully peel off the tape while the final coat of white paint is still slightly tacky. Pull the tape slowly at a 45-degree angle away from the painted area. -
Touch Up:
If any white paint bled onto the stain, use a tiny scraping tool or a bit of sandpaper to gently remove it. If stain is missing, use a Q-tip to dab a little back in. -
Apply Clear Coat:
Once everything is cured, brush on a coat of Polycrylic over the entire board. This protects the wood and makes the bags slide correctly. -
Sand and Repeat:
Lightly sand the clear coat with high-grit sandpaper, wipe clean, and apply a 2nd and 3rd coat of Polycrylic for maximum durability.
Allow the boards to cure for 48 hours before tossing your first bag to ensure the finish is rock hard


Bold Center Stripe
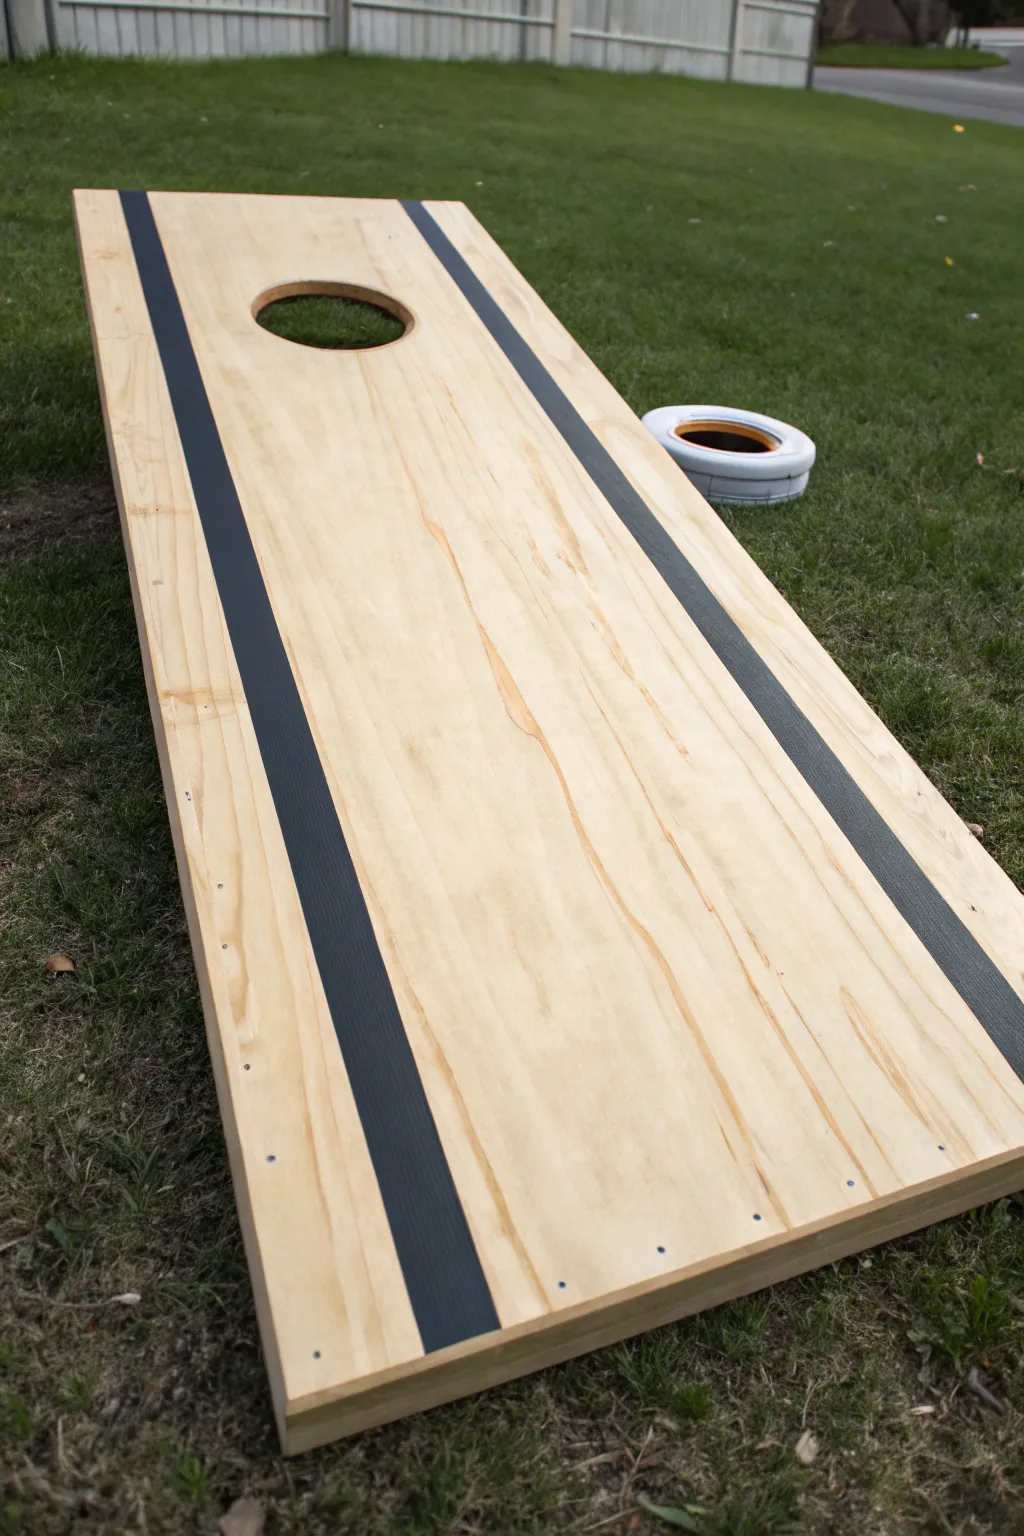
This cornhole board design proves that simplicity often makes the boldest statement, featuring the natural beauty of wood grain framed by two clean, modern racing stripes. The contrast between the warm timber and the crisp dark bands creates a professional look that stands out on any lawn.
Detailed Instructions
Materials
- Unfinished cornhole board (plywood top on frame)
- Sandpaper (120 and 220 grit)
- Painter’s tape (high-quality edging tape)
- Black or dark charcoal exterior paint
- Polyurethane sealer (satin or gloss)
- Ruler or tape measure
- Pencil
- Foam roller or high-quality paint brush
- Tack cloth or clean rag
- Utility knife or razor blade
Step 1: Preparation and Surface Work
-
Sand the surface:
Begin by sanding the entire plywood face of your cornhole board. Start with 120-grit sandpaper to remove any rough patches or splinters, then switch to 220-grit for a furniture-smooth finish. -
Clean dust thoroughly:
Vacuum up the bulk of the sawdust immediately to keep your workspace clean. Wipe the board down with a tack cloth or a slightly damp rag to remove every last speck of fine dust, ensuring adherence for your tape and finish. -
Measure the stripes:
Decide on your stripe width—three to four inches works well for this look. Mark this distance from both vertical edges at the top, bottom, and center of the board using your tape measure and pencil.
Step 2: Taping and Painting
-
Apply painter’s tape:
Carefully run a long strip of high-quality painter’s tape down the length of the board, connecting your pencil marks. Press down firmly along the entire edge. -
Seal the tape edge:
Here I prefer to run a credit card or a putty knife firmly over the tape edge to ensure a perfect seal. This prevents paint from bleeding under the tape and ruining that crisp line. -
Paint the first coat:
Using a small foam roller or brush, apply your black or charcoal paint to the outer edges of the tape. Paint inward from the tape toward the edge of the board to minimize the chance of pushing paint underneath the tape. -
Allow to dry:
Let the first coat dry according to the manufacturer’s instructions. Usually, this takes about an hour, but check the can to be sure. -
Apply the second coat:
Roll on a second coat of paint to ensure a solid, opaque color. The wood grain shouldn’t show through the stripes at all unless you are aiming for a distressed look. -
Remove tape while wet:
Carefully peel back the painter’s tape while the second coat is still slightly tacky. Pulling at a 45-degree angle away from the fresh paint offers the sharpest line.
Bleed Blocker
Before painting black, paint a thin layer of clear poly sealant over the tape edge. This seals any tiny gaps so if anything bleeds under, it’s clear—not black.
Step 3: Sealing and Finishing
-
Initial sand of the paint ridge:
Once the stripes are fully cured, you might feel a tiny ridge where the paint creates a lip. Very lightly run some 220-grit sandpaper over this transition to smooth it out without scuffing the paint. -
Clean the surface again:
Wipe the board down once more with your tack cloth to ensure no sanding residue remains. -
Apply first coat of poly:
Apply a clear coat of polyurethane over the entire board, including the painted stripes and the raw wood center. Use long, even strokes to avoid bubbles. -
Sand between coats:
After the first coat of poly dries completely, lightly sand the entire surface with fine-grit paper. This gives the next layer something to grip and ensures a super smooth slide for the bags. -
Apply final coats:
Apply at least two to four more coats of polyurethane, sanding lightly between each one. You want a durable build-up that protects the wood and the painted design from the elements. -
Final cure:
Let the boards cure for a full 24 to 48 hours before playing your first game. This hardening period prevents the bags from sticking to or denting the new finish.
Make it Yours
Add a personal touch by applying a vinyl decal of a family name, logo, or favorite team mascot in the wood center before the final polyurethane coats.
Now you have a sleek, tournament-ready set that looks as good as it plays


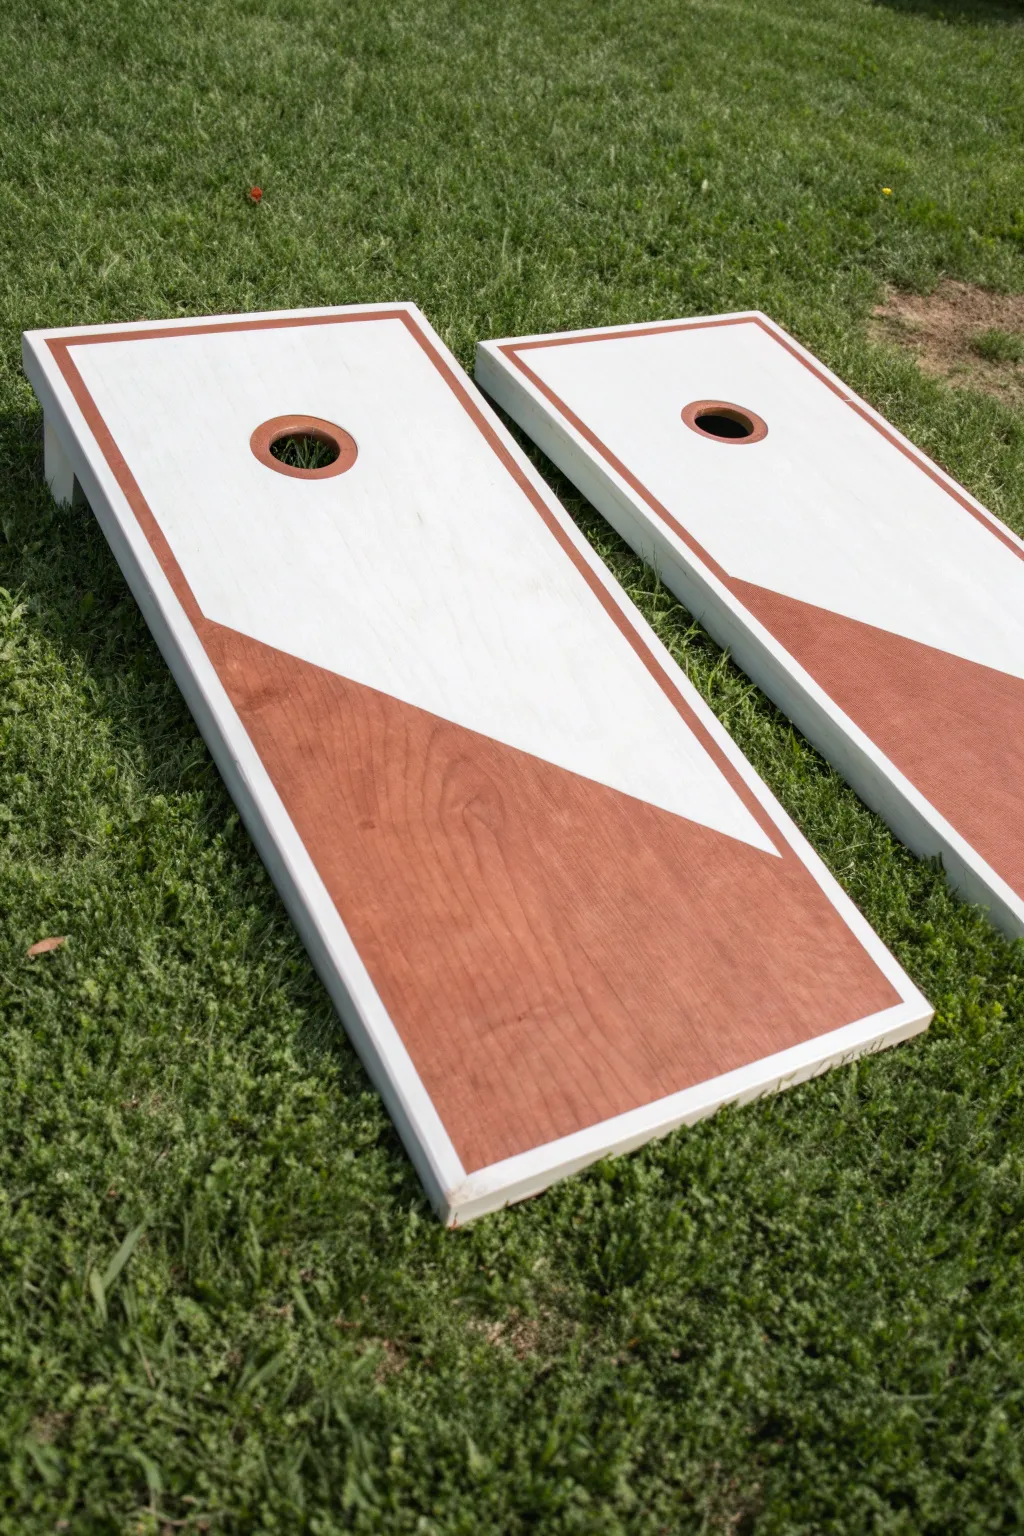
Diagonal Split Color Block
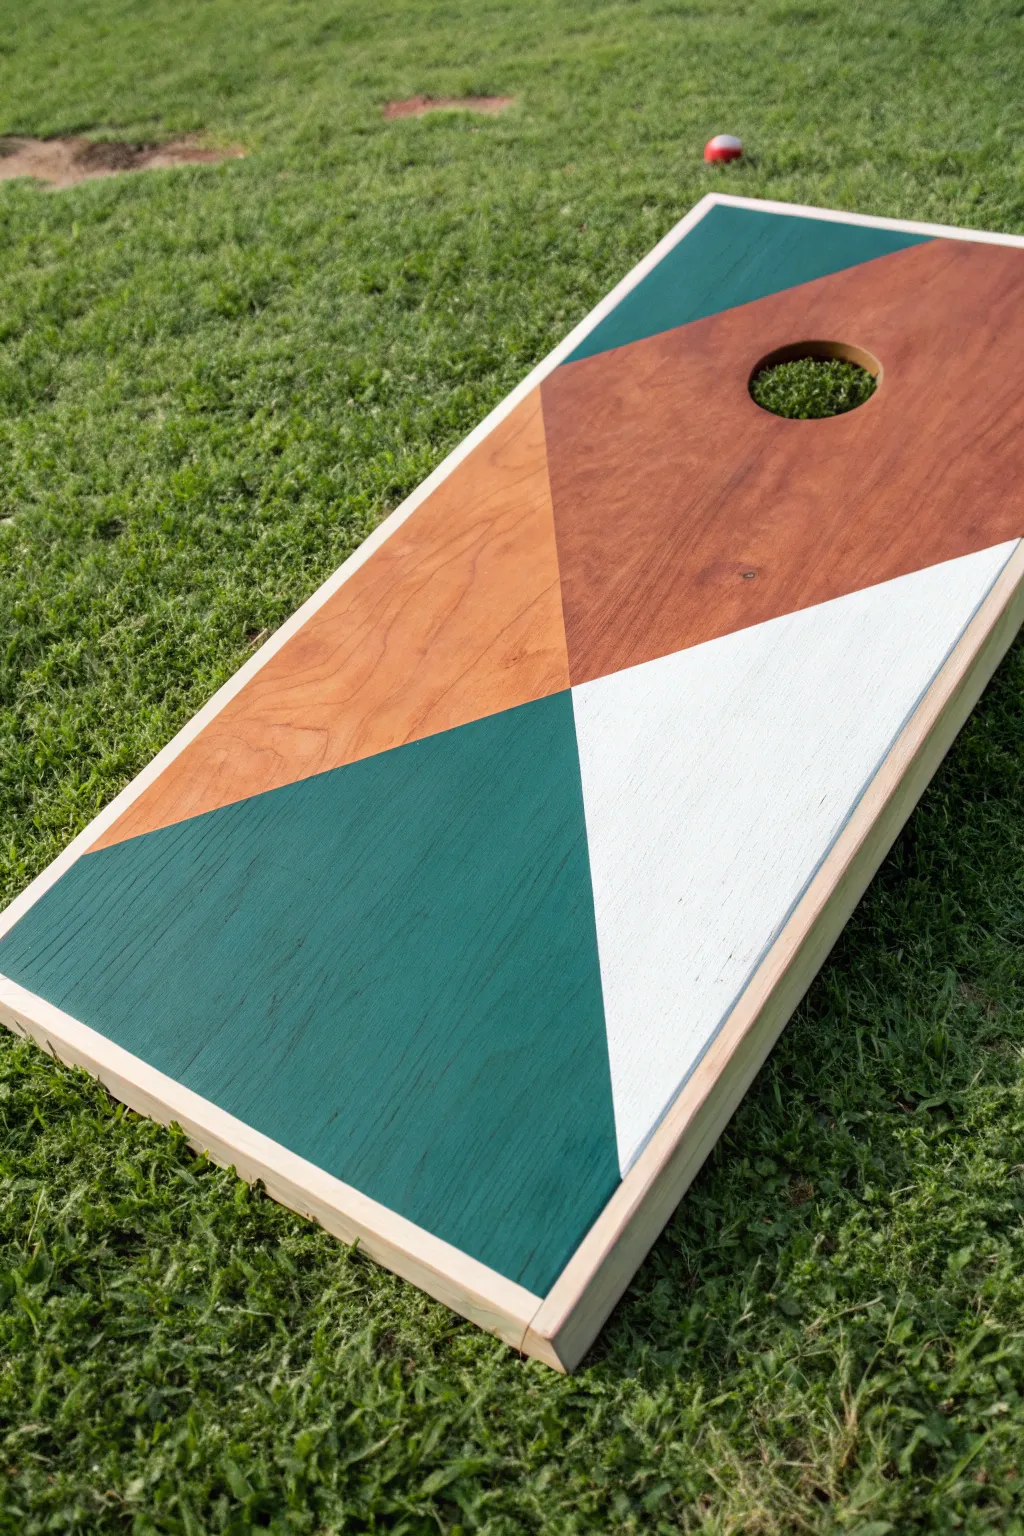
Elevate your backyard games with this modern, geometric cornhole board featuring a striking diagonal split design. By combining deep emerald paint, crisp white accents, and two tones of natural wood stain, this project creates a sophisticated look that stands out on the lawn.
How-To Guide
Materials
- Unfinished wooden cornhole board
- Painter’s tape (high quality, like FrogTape)
- Emerald green exterior paint
- White exterior paint
- Light wood stain (e.g., Golden Pecan or Ipswitch Pine)
- Dark wood stain (e.g., Red Mahogany or Dark Walnut)
- Polycrylic protective finish (gloss or semi-gloss)
- Sanding block (220 grit)
- Clean rags or staining pads
- Foam brushes or synthetic bristled brushes
- Pencil
- Straight edge or ruler
- Tack cloth
Step 1: Preparation & Mapping
-
Sand the surface:
Begin by sanding the entire face of the cornhole board with 220-grit sandpaper to ensure a smooth base. Pay special attention to the hole area to remove any splinters. -
Clean dust:
Wipe away all sanding dust using a tack cloth or a slightly damp rag. A clean surface is crucial for crisp lines. -
Plan the geometry:
Using a straight edge and a pencil, lightly mark your intersecting diagonal lines. Start from corners and draw towards the opposite side, creating four distinct geometric zones as seen in the reference image.
Step 2: Staining the Wood Sections
-
Tape the first boundaries:
Apply painter’s tape along the pencil lines that border the intended wood stain sections. Press the edges of the tape down firmly with a credit card or fingernail to prevent bleed-under. -
Apply the light stain:
Dip a rag or foam brush into the lighter wood stain. Apply it to the triangular section on the left, following the grain of the wood. Wipe off excess stain after a minute or two. -
Apply the dark stain:
Using a fresh rag, apply the darker, reddish-brown stain to the large upper section surrounding the hole. Ensure you get stain inside the hole’s inner rim for a cohesive look. -
Remove tape and dry:
carefully peel back the tape while the stain is still slightly damp. Allow these stained sections to dry completely according to the manufacturer’s instructions, usually overnight.
Bleeding Lines?
If paint bled under the tape onto the stained wood, gently scrape it away with an X-Acto knife or razor blade before the clear coat is applied.
Step 3: Painting the Color Blocks
-
Mask the stained areas:
Once the stain is fully cured, apply fresh painter’s tape exactly over the edge of the stained wood to protect it. This creates the crisp line for your paint. -
Seal the tape edge:
I like to lightly brush a tiny amount of the clear decorative finish or matte medium along the tape edge first. This creates a barrier so any bleed is clear, not colored. -
Paint the green section:
Apply the emerald green exterior paint to the large bottom-left triangular section. Use smooth strokes in the direction of the wood grain. -
Paint the white section:
Apply the white exterior paint to the smaller triangular section on the right side. You may need two coats for full opacity over the wood. -
Let dry and reveal:
Allow the paint to dry to the touch, then slowly peel away the tape at a 45-degree angle to reveal your crisp geometric lines.
Pro Tip: Slickness Control
Want more slide? Use a gloss finish. Want bags to stick more? Opt for semi-gloss. The more coats of poly you add, the slicker the board becomes.
Step 4: Finishing Touches
-
Light sanding:
Once everything is bone dry, strictly only if you feel raised grain, pass a 320-grit sandpaper very lightly over the surface, being careful not to scratch the paint. -
Apply first clear coat:
Apply a coat of Polycrylic over the entire board to seal the design. Use long, even strokes to avoid bubbles. -
Sand between coats:
After the first coat dries, specifically lightly sand with fine-grit paper to smooth out any nibs. -
Build up protection:
Apply 3-4 more coats of Polycrylic. This thick layer is essential not just for protection, but to create a slick surface for the bags to slide on. -
Final cure:
Let the board cure for at least 24 hours before playing your first game to ensure the finish hardens completely.
Now you have a stunning, custom lawn game that looks professional and is ready for tournament play


Clean Chevron Tape Pattern
Elevate your backyard games with this crisp, modern take on the classic chevron pattern. By combining natural wood stain with bold paint colors in an alternating arrow design, you create a sophisticated look that is surprisingly achievable for beginners.
Detailed Instructions
Materials
- Unfinished wooden cornhole board
- Painter’s tape (1-inch width)
- White semi-gloss exterior paint
- Teal or deep turquoise exterior paint
- Dark walnut or mahogany wood stain
- Polyurathane sealant (water-based)
- Measuring tape and pencil
- X-Acto knife or utility blade
- Foam brushes and small rollers
- Rags for staining
- Sandpaper (220 grit)
Step 1: Preparation & Base Coat
-
Prepare the surface:
Before laying down any color, sand the entire face of the cornhole board with 220-grit sandpaper to ensure it is perfectly smooth. Wipe away all dust with a tack cloth or slightly damp rag. -
Apply the white base:
Since the white stripes are the lightest color, paint the entire board white first. This acts as a primer and ensures your white lines are bright and crisp later. -
First sanding between coats:
Once the first coat of white is dry, give it a very light hand-sanding to knock down any raised grain. Apply a second coat of white for full, opaque coverage. -
Dry time is key:
Allow the white base coat to cure completely—I recommend letting it sit overnight. If the paint is even slightly tacky, the tape in the next step might peel it up.
Step 2: Measuring & Taping
-
Find the center line:
Measure the width of your board and lightly mark the precise vertical center line from the top edge to the bottom edge with a pencil. -
Establish the chevron peak:
Decide on the angle of your chevron. A standard approach is to mark points every 4-6 inches down the center line, then mark corresponding points on the left and right edges, but shifted upwards by about 3 inches. -
Apply the tape pattern:
Connect your center marks to your edge marks using painter’s tape to form the arrow shapes. The tape itself will become the white stripes in the final design. -
Trim the center intersection:
Where the two pieces of tape meet in the middle to form the ‘V’, use an X-Acto knife to cut a clean, sharp point. Remove the excess tape overlap so the lines meet perfectly. -
Seal the tape edges:
To prevent bleeding, lightly brush a tiny amount of the white base paint over the edges of your tape. This seals the seam.
Bleed-Through Blues?
If paint bled under the tape, wait for it to dry fully. Then, use a small craft knife to gently scrape away the excess paint, revealing the crisp white line underneath.
Step 3: Applying Color & Stain
-
Map your colors:
Lightly mark each chevron section with ‘T’ (Teal) or ‘S’ (Stain) in pencil so you don’t accidentally paint the wrong stripe. -
Apply the teal paint:
Using a small roller or foam brush, fill in the sections designated for the teal color. Apply two thin coats rather than one thick one for the smoothest finish. -
Apply the wood stain:
Carefully apply your dark wood stain to the remaining exposed sections using a rag or foam brush. Gel stain works particularly well here as it is less likely to run under the tape. -
Wipe the stain:
After letting the stain penetrate for a few minutes, gently wipe off the excess specifically from that section to reveal the wood grain. -
The exciting reveal:
While the paint is still slightly tacky (but not wet), carefully peel back the painter’s tape at a 45-degree angle. This ensures the clean lines stay sharp.
Add a Logo
Before the final sealing phase, use a stencil to paint a family initial or team logo in the center of the largest chevron stripe for a personalized touch.
Step 4: Finishing
-
Sand the hole:
Wrap a piece of sandpaper around your finger or a dowel and smooth out the inside of the hole to remove any paint drips. -
Apply the first clear coat:
Using a water-based polyurethane (to prevent yellowing over the white paint), apply a generous topcoat over the entire board. -
Final buffing:
Once the sealer is dry, do a final, very light sand with high-grit paper (300+) to make the surface distinctively slick for gameplay. -
Final sealant layers:
Apply 2-3 more coats of polyurethane, allowing proper drying time between each, to protect your design from bags and weather.
Now you have a stunning, geometric board ready for your next tournament.
BRUSH GUIDE
The Right Brush for Every Stroke
From clean lines to bold texture — master brush choice, stroke control, and essential techniques.
Explore the Full Guide
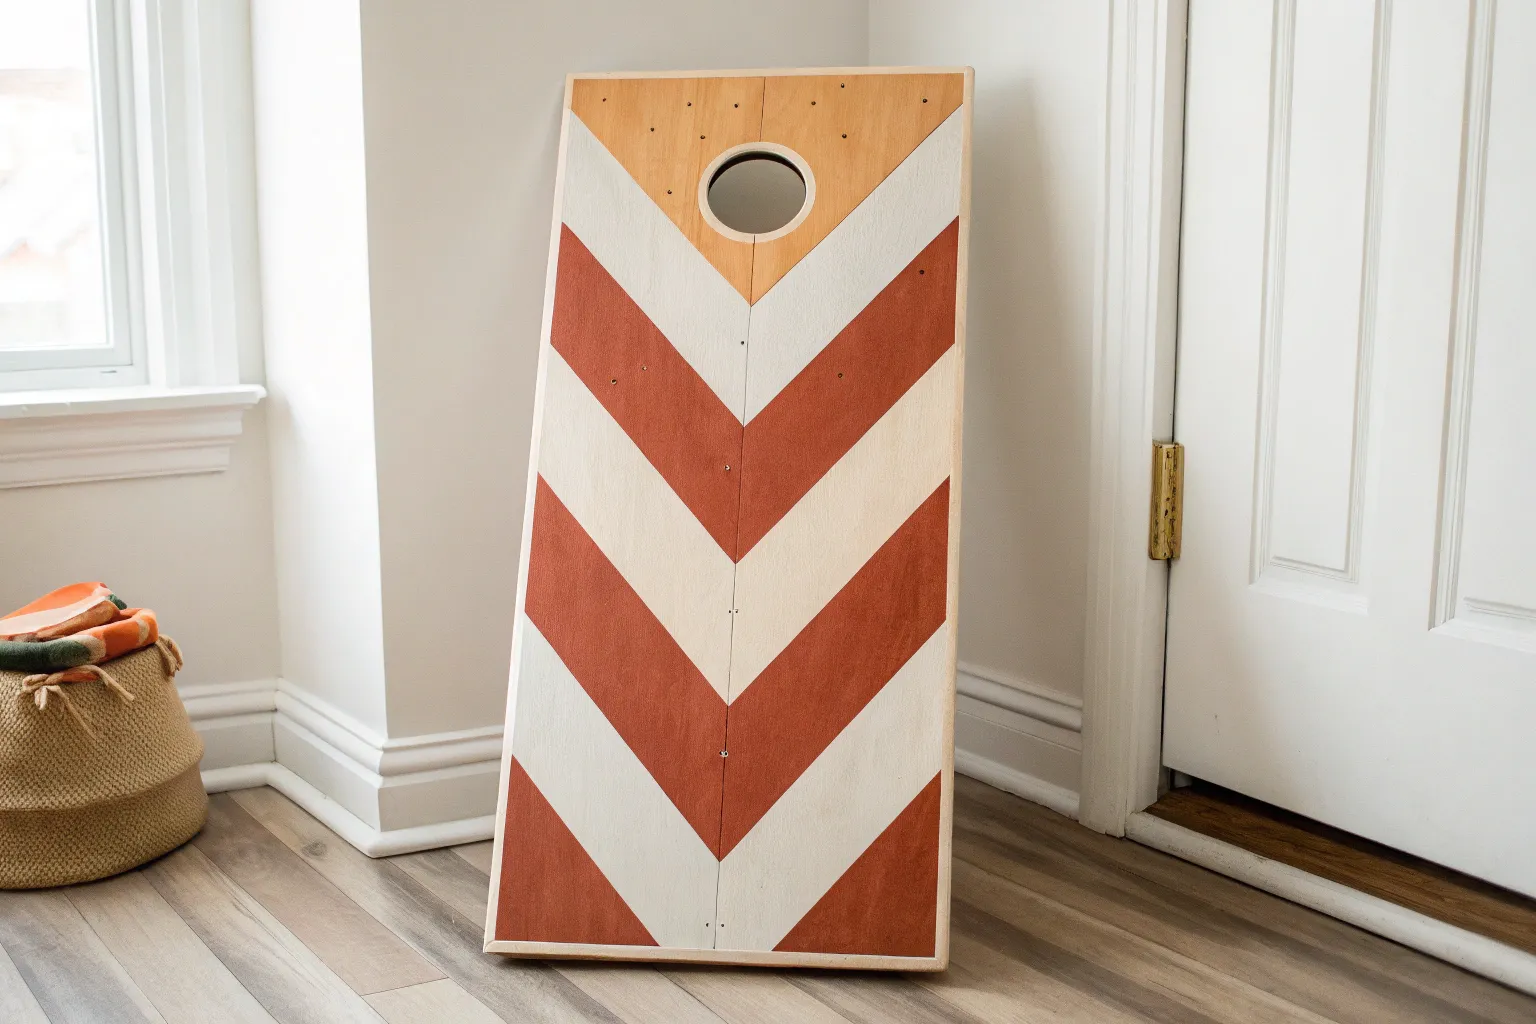
Triangle Target Pointing to the Hole
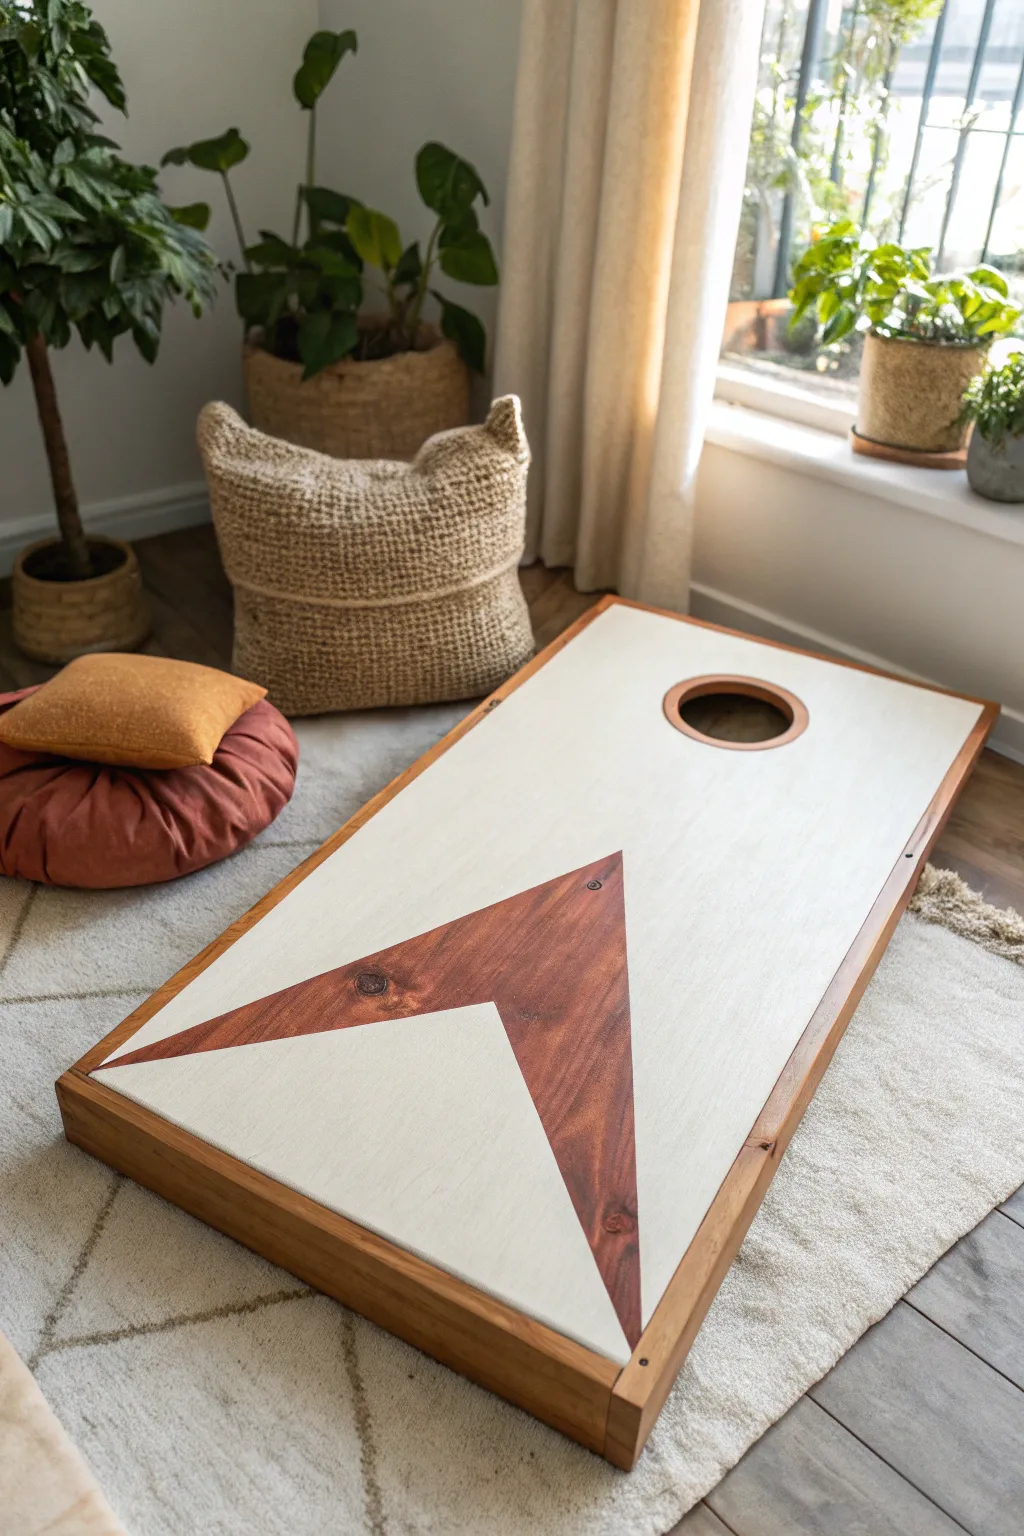
This project combines the clean look of painted wood with the natural warmth of exposed grain for a sophisticated, modern finish. By using a negative space technique with painters tape, you’ll create a striking geometric focal point that aims straight for the target.
Step-by-Step
Materials
- Unfinished wooden cornhole board set
- High-quality painters tape (frog tape works well for crisp lines)
- Wood stain (medium walnut or similar warm tone)
- White exterior semi-gloss paint or heavy body acrylic
- Polycrylic clear coat or exterior varnish
- Foam brushes or staining pads
- Medium synthetic paint brush (2 inch)
- Fine grit sandpaper (220 grit)
- Tack cloth or clean rag
- Ruler or measuring tape
- Pencil
Step 1: Preparation & Staining
-
Sand the surface:
Begin by sanding the entire face of the cornhole board with 220-grit sandpaper to ensure a smooth, professional base. Wipe away all dust thoroughly with a tack cloth. -
Stain the entire board:
Apply your chosen wood stain to the entire top surface, sides, and inside the hole using a foam brush or rag. Don’t worry about the parts that will eventually be white; staining everything creates the base for our triangle design. -
Wipe and dry:
Wipe off any excess stain after a few minutes to reveal the wood grain pattern. Allow this layer to dry completely according to the manufacturer’s instructions, usually overnight. -
Seal the stain (Optional):
For razor-sharp lines later, I strongly suggest applying a very thin layer of clear polycrylic over the stain. This prevents the white paint from creeping under the tape in the next phase.
Bleed-Through Blues?
If paint sneaks under the tape onto the stained wood, dampen a Q-tip with mineral spirits (if stain holds up to it) or gently scrape with an X-Acto knife.
Step 2: Mapping the Geometric Design
-
Find the center:
Measure the width of the board at the bottom edge and mark the exact center point with a light pencil mark. -
Determine triangle height:
Decide how far up the board you want the triangle point to reach. In this design, the tip stops several inches below the hole. Make a mark at this central target point. -
Mark the base width:
Measure outward from your bottom center mark to determine the width of the triangle legs. Ensure both sides are equal distances from the center. -
Apply the triangle tape lines:
Run long strips of painters tape from your bottom width marks up to the central target point. Press the tape down firmly, especially along the inner edges where the paint will meet the stain. -
Cut the chevron shape:
To create the inner ‘V’ shape (the bottom of the arrow), measure up from the bottom edge about 6-8 inches. Place tape connecting the bottom corners to this new central point. -
Mask off the hole:
Carefully place tape over the hole opening. You can lay strips across it and use a craft knife or razor blade to trace the circle perfectly, leaving the stained rim exposed or covered depending on your preference. In the photo, a small rim of wood is visible, so cut your tape slightly larger than the hole itself. -
Protect the frame edges:
Apply tape along the outer perimeter of the board’s top face if you want the wooden sides to remain unpainted.
Level Up: Wood Inlay Look
Use a dark walnut gel stain for the triangle and a lighter oak stain for the rim of the hole to create a beautiful, high-contrast ‘inlay’ effect.
Step 3: Painting & Finishing
-
Seal the tape edges:
Brush a tiny amount of clear sealer or your base stain along the edge of the tape where you will be painting white. This locks the tape and ensures zero bleed-through. -
Apply first coat of white:
Using your synthetic brush, apply the white paint to the ‘field’ area outside the triangle. Paint in the direction of the wood grain for a smooth look. -
Apply subsequent coats:
Let the first coat dry to the touch, then apply a second or third coat until you have solid, opaque coverage without brushstrokes showing. -
Remove tape while damp:
Carefully peel back the painters tape while the final coat of paint is still slightly tacky. Pull at a 45-degree angle away from the paint line. -
Touch up:
Check for any minor imperfections. If paint bled onto the wood triangle, carefully scrape it away with a razor blade or sanding block once fully dry. -
Apply topcoat:
Once the paint has cured for at least 24 hours, apply 3-4 coats of polycrylic over the entire board to protect it from game bags and weather. -
Sand between topcoats:
Lightly sand with high-grit sandpaper between clear coats to ensure the board is slick enough for bags to slide properly.
Now you have a sleek, modern game set ready for your next backyard gathering
Racing Stripes With Thin Pinlines
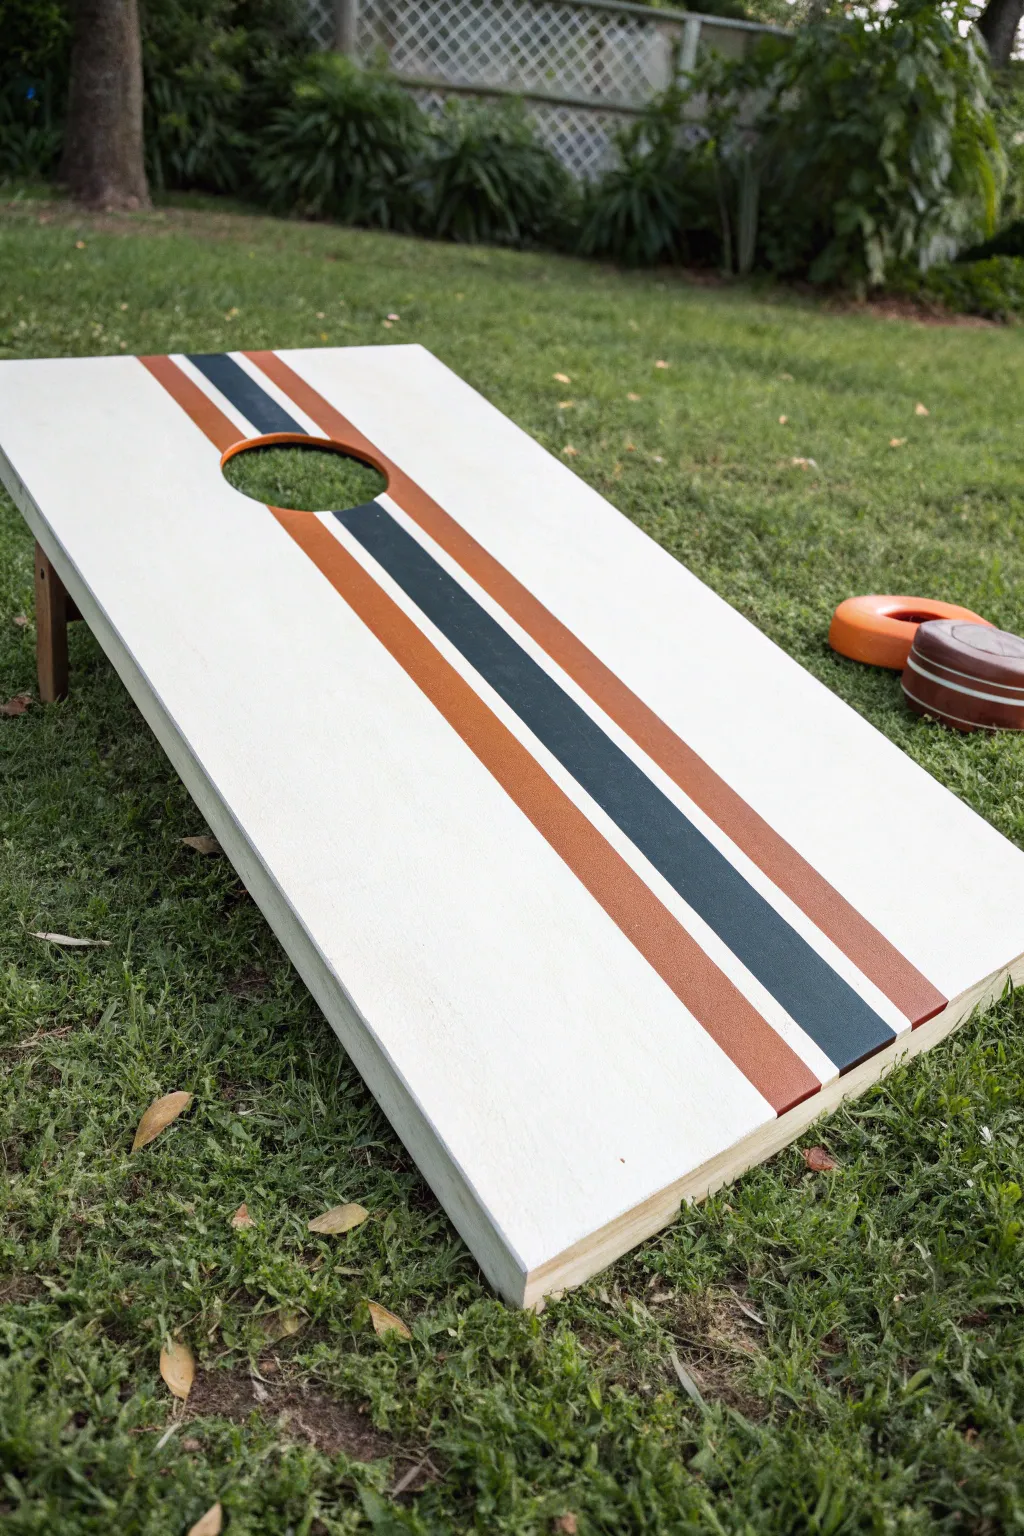
Give your cornhole set a timeless, sporty look with this crisp racing stripe design. The combination of a bright white background with bold burnt orange and dark slate blue angled lines creates a professional finish that stands out on any lawn.
Step-by-Step Guide
Materials
- Unfinished cornhole board
- Sandpaper (120 and 220 grit)
- White semi-gloss exterior latex paint or primer
- Paint rollers (foam or low nap)
- Painter’s tape (high-quality, specifically for sharp lines)
- Burnt orange exterior paint
- Dark slate blue or charcoal exterior paint
- Ruler or straight edge
- Pencil
- Measuring tape
- Polyurethane sealer (water-based for non-yellowing)
Step 1: Preparation and Base Coat
-
Sand the Surface:
Begin by sanding the entire top surface of the cornhole board with 120-grit sandpaper to remove any rough patches or splinters. Follow up with 220-grit sandpaper to create a super-smooth finish ideal for painting. -
Clean the Dust:
Wipe down the entire board with a tack cloth or a slightly damp rag to remove all sanding dust. -
Apply Primer/Base Layer 1:
Using a foam roller, apply the first coat of white paint (or primer) to the entire top surface and the sides. Work in smooth, even strokes to avoid texture buildup. -
Allow to Dry:
Let this first coat dry completely according to the manufacturer’s instructions. If grain raises, lightly sand with fine-grit paper. -
Apply Base Layer 2:
Apply a second coat of white paint to ensure solid, opaque coverage. Let this cure fully—ideally overnight—before attempting any taping, as soft paint will peel.
Laser Precise Lines
Before painting color, paint a layer of your BASE white over the tape edges. This seals the tape, preventing color bleed.
Step 2: Taping the Design
-
Mark Center Points:
Decide on the angle of your stripe. A good rule of thumb is to measure about 4 inches in from the top right corner and 4 inches in from the bottom left corner to establish your centerline angle. -
Extend the Lines:
These stripes are wide. Measure out a 2-inch wide center band and mark lightly with a pencil. Then, measure a 1/4-inch gap on either side of that center band. -
Mark Outer Stripes:
Finally, measure two outer stripes (I usually make these slightly wider, around 2.5 to 3 inches) flanking those narrow gaps. -
Apply Tape for Gaps:
Apply long strips of painter’s tape to cover the white ‘gap’ areas you measured. You are taping over the parts that should remain white. -
Tape the Outside Boundaries:
Apply tape along the outer edges of your orange stripes to define the full width of the design. -
Seal the Tape Edges:
Press the tape down firmly with a credit card or putty knife. Paint a very thin layer of your *white base color* over the tape edges. This bleeds white under the tape, ensuring the colored lines will be razor-sharp later.
Step 3: Painting the Stripes
-
Paint the Center Stripe:
Using a small roller or brush, fill in the center stripe area with the dark slate blue paint. Be careful not to drip into the other planned stripe zones. -
Paint the Outer Stripes:
Fill in the two outer stripe sections with the burnt orange paint. You may need two coats for these colors to look rich and vibrant. -
Peel Wet Tape:
Remove the tape while the final coat of colored paint is still slightly tacky, not fully dry. Pull the tape slowly at a 45-degree angle away from the wet paint. -
Wait for Cure:
Allow the stripes to dry completely. Since you’ve added multiple layers, give this plenty of time.
Tearing Tape?
If the tape is pulling up your base coat, the white paint wasn’t cured enough. Use a heat gun on low to gently warm tape during removal.
Step 4: Finishing Touches
-
Clean Up the Hole:
If paint dripped into the hole cutout, use a small piece of sandpaper to clean the inner rim. -
Apply Sealer:
Apply a coat of water-based polyurethane over the entire top surface. This protects the paint and provides the right amount of ‘slide’ for the bags. -
Sand and Repeat:
Once dry, lightly sand with high-grit sandpaper (like 320 or 400) and apply a second coat of poly for a durable, glass-like finish.
Now you have a stunning, custom board ready for your next backyard tournament

PENCIL GUIDE
Understanding Pencil Grades from H to B
From first sketch to finished drawing — learn pencil grades, line control, and shading techniques.
Explore the Full Guide
Minimal Monogram Circle
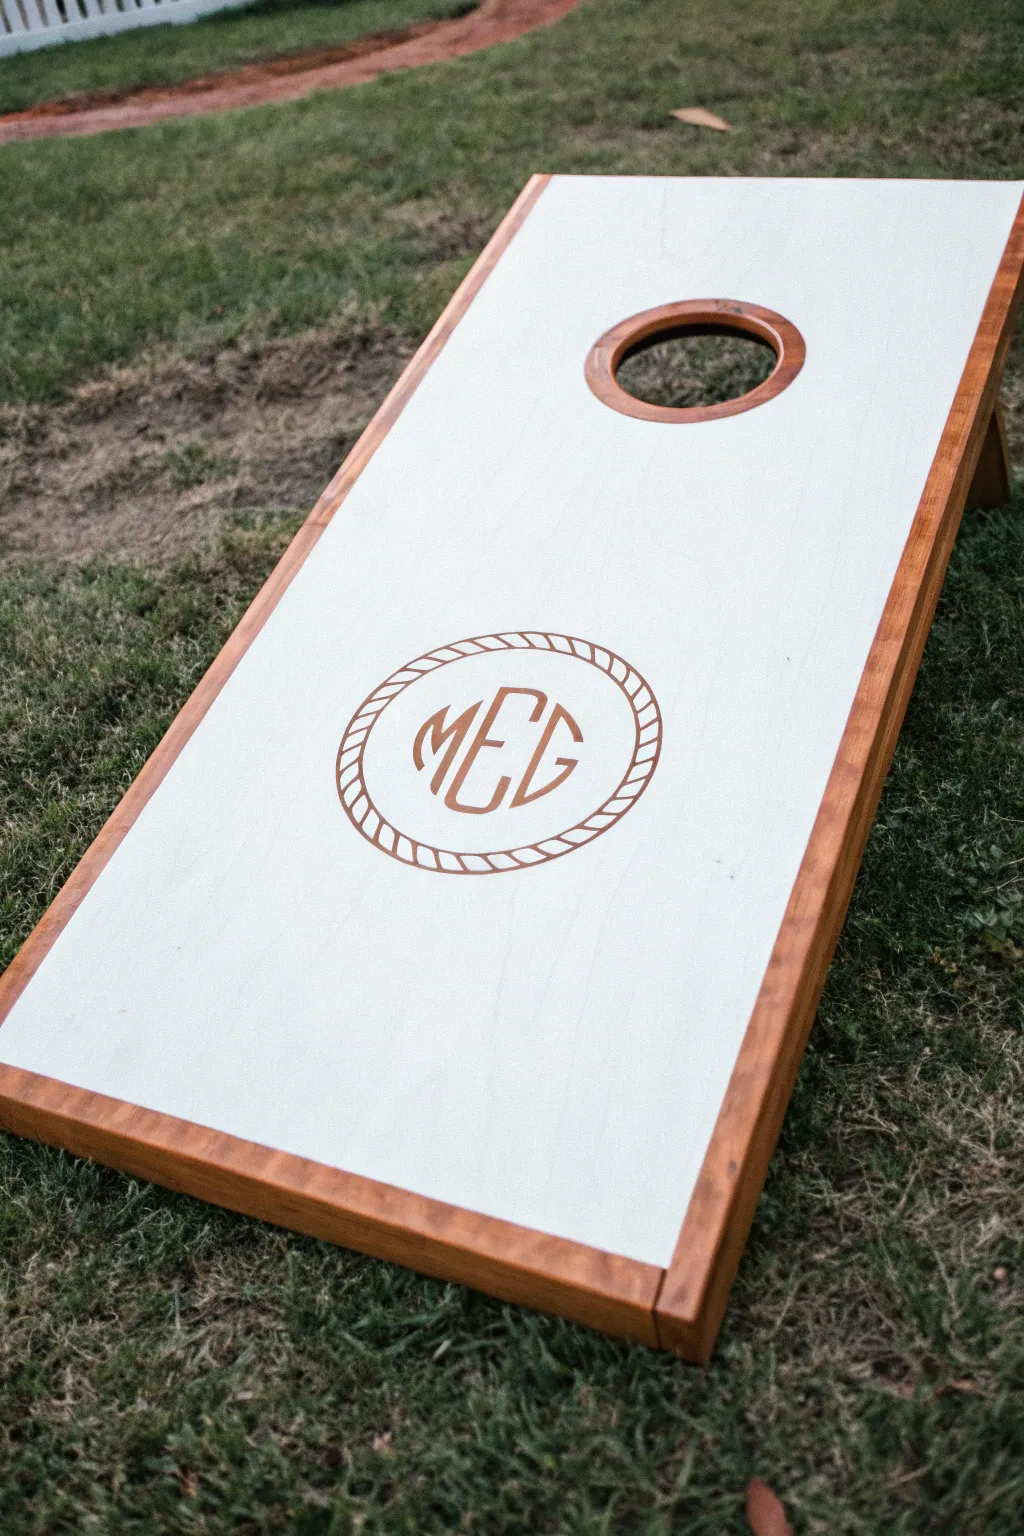
Bring a touch of preppy sophistication to your backyard games with this crisp, personalized cornhole design. The combination of clean white paint against a rich, warm wood stain creates a timeless look that highlights a classic rope-bordered monogram.
Step-by-Step Tutorial
Materials
- Unfinished wooden cornhole board
- Medium-grit sandpaper (120-150 grit)
- Fine-grit sandpaper (220 grit)
- Painter’s tape (high quality)
- White primer
- White exterior semi-gloss latex paint
- Warm brown wood stain (e.g., Early American or Cognac)
- Polycrylic protective finish (clear semi-gloss)
- Vinyl cutter (like Cricut or Silhouette) or pre-cut vinyl stencil
- Oracal 631 or stencil vinyl
- Transfer tape
- Foam brushes and high-density foam roller
- Small artist detail brush
- Clean rag or tack cloth
- Measuring tape
Step 1: Preparing the Surface
-
Sand the Wood:
Begin by sanding the entire cornhole board with medium-grit sandpaper to remove any rough patches or splinters. Follow up with fine-grit sandpaper until the surface feels completely smooth to the touch. -
Clean and Dust:
Ensure all sawdust is removed. I like to use a tack cloth or a slightly damp rag to wipe down the board thoroughly, as dust significantly impacts paint adhesion. -
Tape Off the Frame:
Carefully apply painter’s tape along the inner edge of the frame where the playing surface meets the side rails. Press the tape down firmly to prevent stain from bleeding onto the area you intend to paint white later.
Step 2: Staining the Frame and Hole
-
Apply Stain to Frame:
Using a clean rag or foam brush, apply your chosen wood stain to the side rails, legs, and outer frame of the board. Work in the direction of the wood grain for the best finish. -
Stain the Hole Rim:
Carefully stain the inside edge of the hole and a small rim around the top surface of the hole. You don’t need to be perfect on the top surface yet, as the white paint will cover the excess, but ensure the inner circle is fully coated. -
Wipe and Dry:
Let the stain sit for a few minutes to absorb, then wipe away any excess with a clean cloth. Allow the stain to dry completely according to the manufacturer’s instructions, usually overnight.
Bleed Prevention
Always seal your stencil with a layer of the base color (white) before applying the contrast color. This blocks gaps and ensures crisp lines.
Step 3: Painting the Playing Surface
-
Tape the Stained Areas:
Once the stain is fully cured, reverse your taping. Tape off the stained frame and cover the stained rim of the hole to protect them from the white paint. -
Prime the Surface:
Apply a coat of white primer to the main playing field using a high-density foam roller. This seals the wood and ensures the white topcoat looks bright and opaque. -
Sand Lightly:
After the primer drives, give it a very light sanding with fine-grit paper to knock down any raised grain, then wipe away the dust. -
Apply White Topcoats:
Roll on your white exterior latex paint. Apply thin, even layers rather than one thick one. You will likely need 2-3 coats for full coverage, letting each coat dry completely in between.
Sticker Shock
If the vinyl pulls up white paint when removing the stencil, your base coat wasn’t cured long enough. Wait longer or decrease vinyl tackiness on fabric first.
Step 4: Applying the Monogram
-
Create the Stencil:
Design your monogram inside a rope circle using design software. Cut this design out of stencil vinyl using a vinyl cutter. Be sure to weed out the letters and rope details where you want the stain to show through. -
Sand for Adhesion:
Ensure the white paint has cured for at least 24 hours. Lightly sand the center area where the decal will go to ensure the vinyl sticks well and prevents paint peel-up. -
Position the Stencil:
Measure to find the exact center of the board. Use transfer tape to apply your vinyl stencil to the white surface, ensuring it is perfectly centered and level. -
Seal the Stencil Edges:
Here is a crucial trick: lightly dab a tiny amount of your *white* base paint over the stencil cutouts first. This seals the edges of the vinyl so that if any paint bleeds underneath, it matches the background and stays invisible. -
Paint the Monogram:
Once the white seal is dry, use a small detail brush or foam dabber to apply paint that matches your wood stain color (or a specialized brown paint) into the stencil openings. -
Reveal the Design:
While the monogram paint is still slightly tacky (not fully dry), carefully peel away the vinyl stencil at a 45-degree angle. Use a weeding tool or pin to remove the small inner pieces of the rope design.
Step 5: Finishing Touches
-
Remove Tape:
Gently remove all painter’s tape from the frame and hole area. -
Protective Clear Coat:
Apply a coat of Polycrylic over the entire board, including the frame and painted surface. Use a high-quality synthetic brush to avoid brush strokes. -
sand and Repeat:
Let the first coat dry, sand very lightly with fine paper, and apply a second coat. For cornhole boards, 3-5 coats of Polycrylic are recommended to create the perfect ‘slide’ for the bags.
Now you have a stunning, tailor-made board ready for seasons of backyard fun
Stained Wood With Painted Frame
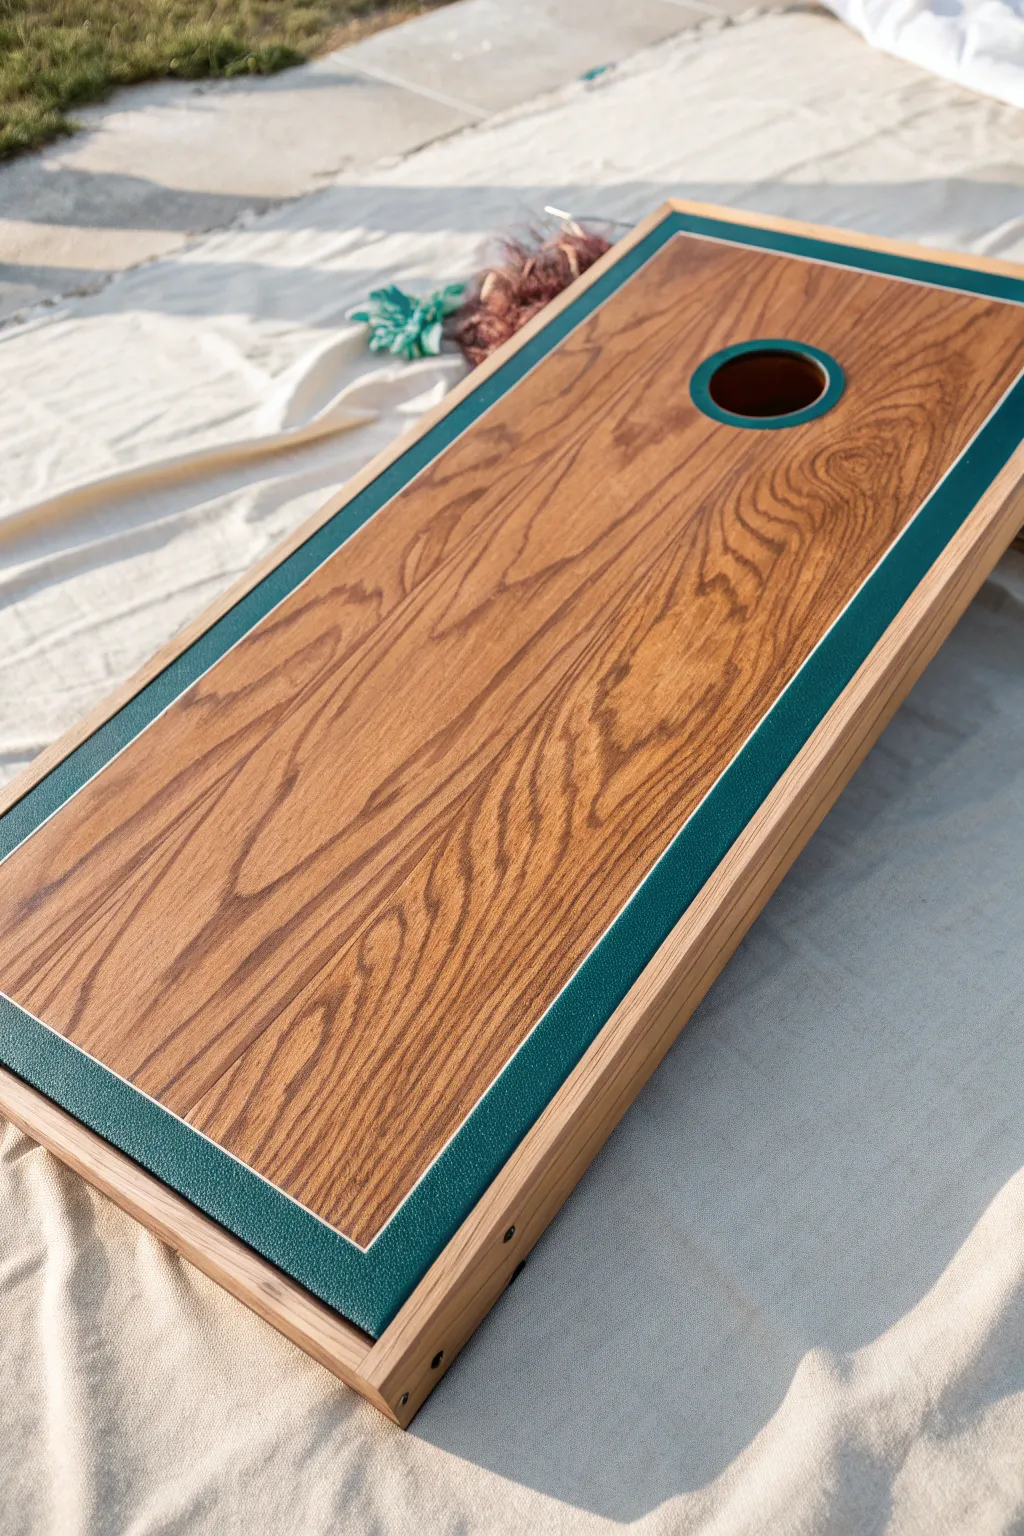
For a refined, professional look that highlights natural wood grain, this design pairs a rich honey stain with a bold, teal border. The magic is in the ultra-crisp pinstripe detail that separates the painted edge from the stained center, giving the entire board a custom furniture feel.
Detailed Instructions
Materials
- Unfinished wooden cornhole board (oak or birch plywood top preferred)
- Orbital sander with 120 and 220 grit discs
- Tack cloth
- Painter’s tape (high-quality, specifically for delicate surfaces)
- Gel stain (honey or medium oak tone)
- Teal or forest green exterior paint (satin or semi-gloss)
- Stain applicator pads or lint-free rags
- Small foam roller and tray
- Polycrylic topcoat (clear gloss or semi-gloss)
- Synthetic bristle brush (2-inch)
- Utility knife or razor blade
- Ruler or tape measure
Step 1: Preparation & Staining
-
Initial Sanding:
Start by sanding the entire surface of your cornhole board with 120-grit sandpaper to remove any rough patches or splinters. Switch to 220-grit for a second pass to create a buttery smooth surface ready for staining. -
Clean the Surface:
Remove every speck of sawdust using a tack cloth or a vacuum with a brush attachment. Any lingering dust will create bumps in your finish, so be thorough here. -
Apply the Base Stain:
Using a stain applicator pad or lint-free rag, apply a generous coat of honey-toned gel stain to the entire top surface. Wipe with the grain to ensure even coverage. -
Wipe Excess & Dry:
After letting the stain penetrate for about 5-10 minutes (check your can’s specific instructions), wipe away all excess stain with a clean rag. Let the board dry completely, preferably overnight. -
Apply Sealer Coat:
Apply one thin layer of Polycrylic over the dried stain. This step is crucial because it seals the wood grain and prevents the tape you’ll use later from pulling up the stain or letting paint bleed underneath. Let this dry for at least 2 hours.
Step 2: Taping the Design
-
Measure the Border:
Measure about 2 inches in from the edge of the board on all four sides. Place a strip of high-quality painter’s tape along this line. This tape creates the inner edge of your painted border. -
Create the Pinstripe Gap:
Place a second strip of tape directly against the outer edge of the first tape strip. Then, place a *third* strip directly against the second one. -
Expose the Paint Zone:
Now, carefully peel away the first tape strip (the one closest to the center) and the third strip (closest to the edge). You should be left with just that middle strip of tape, isolating what will remain wood-colored as a pinstripe. -
Tape the Hole:
Carefully apply tape around the hole depending on your preference. For the look in the photo, you want to paint the rim, so you need to tape off the inner circle of the main board surface, leaving about a 1-inch border of exposed wood around the hole itself. -
Seal the Tape Edges:
I like to take a tiny bit of the clear Polycrylic and brush it along the edges of the tape where the paint will go. This creates a clear barrier that locks the tape down and guarantees a razor-sharp line.
Bleeding Lines?
If paint bleeds under the tape, wait for it to fully dry. Then, gently scrape the excess paint away with a razor blade or craft knife held at a low angle.
Step 3: Painting & Finishing
-
Paint the Borders:
Using a small foam roller, apply your teal paint to the outer border area and the ring around the hole. Use a light touch to avoid pushing paint under the tape. -
Second Coat:
Allow the first coat to dry to the touch, then apply a second coat for rich, opaque color coverage. -
Remove Tape:
While the second coat of paint is still slightly tacky, slowly peel up your painter’s tape at a 45-degree angle. This prevents the dried paint from bridging and chipping. -
Final Cure:
Let the paint cure fully for 24 hours. You don’t want to trap moisture under the final topcoat. -
Topcoat Application:
Apply a coat of Polycrylic over the entire board, covering both the stained wood and the painted sections. Use long, even strokes with your synthetic brush. -
Sand and Repeat:
Once dry, lightly hand-sand with 320-grit sandpaper to knock down any nibs. Wipe clean, and apply a final heavy coat of Polycrylic for a glass-smooth playing surface.
Add a Logo
Before the final topcoat, apply a vinyl decal or logo in the center of the board. The final layers of Polycrylic will seal it in permanently.
Now you have a stunning, furniture-grade set that is ready for the backyard


Patriotic Stars-and-Stripes-Inspired Layout
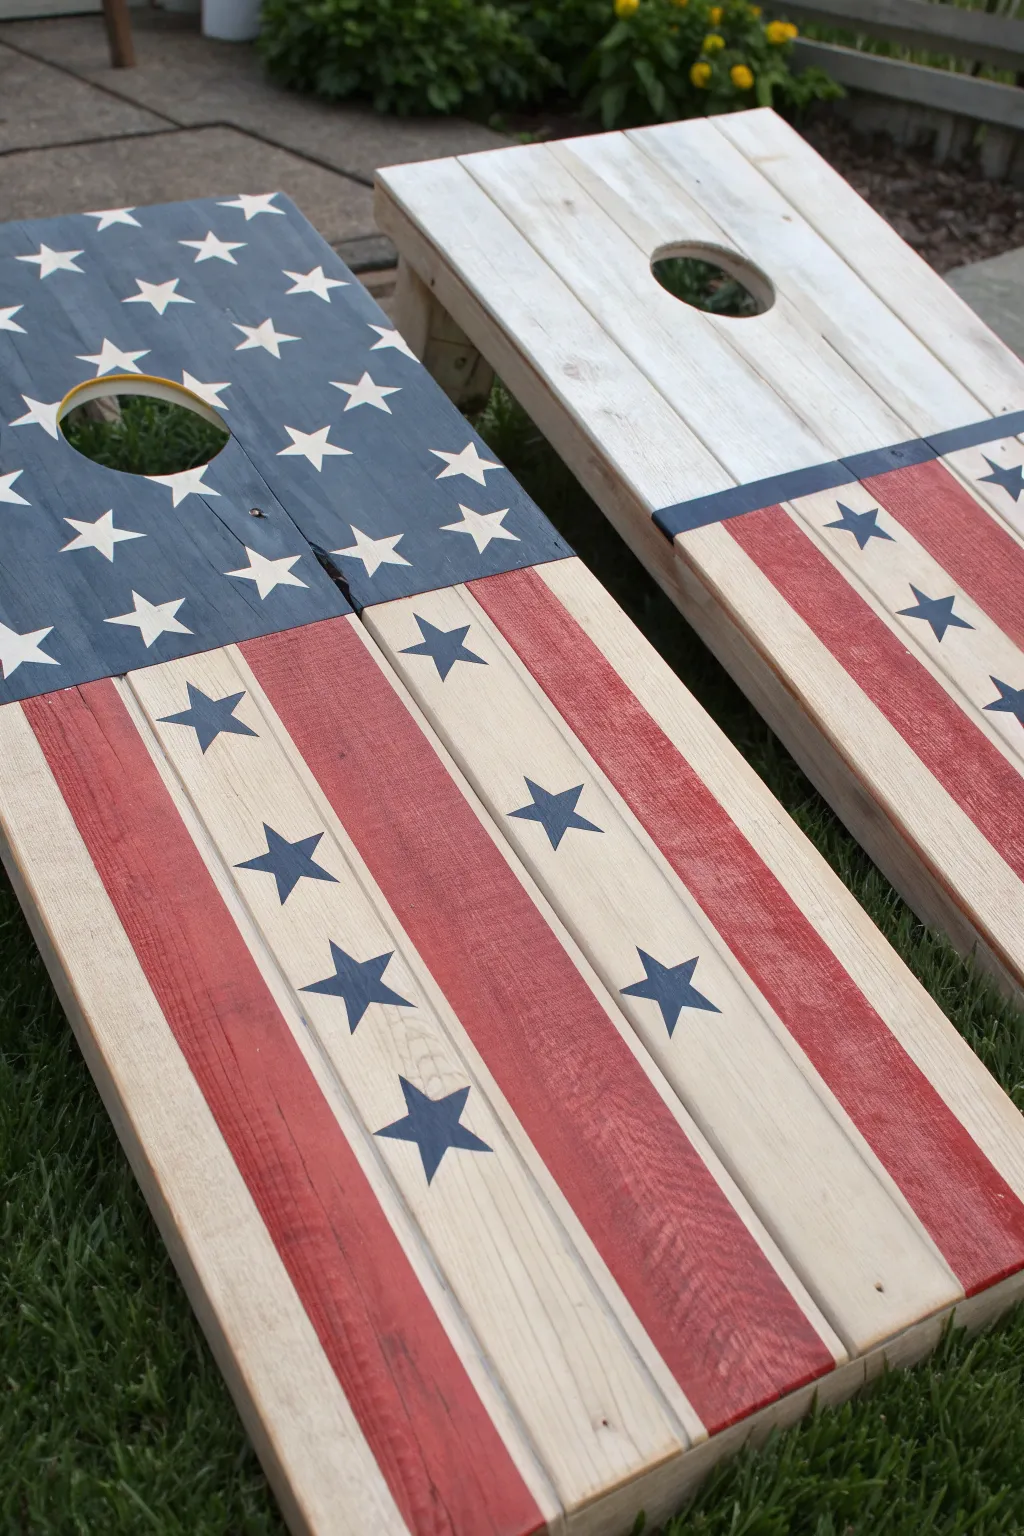
Celebrate national pride with this stunning set of patriotic cornhole boards that play with positive and negative space. One board features a classic flag layout with a deep blue field, while the companion board inverts the concept with white wood grain taking center stage accented by red stripes and blue star details.
Step-by-Step
Materials
- Two premium unfinished wooden cornhole boards
- Painter’s tape (1-inch and 2-inch widths)
- Sandpaper (120 and 220 grit)
- Tack cloth
- Deep Navy Blue exterior wood stain or paint
- Barn Red exterior wood stain or paint
- White/Whitewash exterior wood stain
- Star stencil (vinyl or reusable plastic)
- Foam brushes and small detail brushes
- Polycrylic protective finish (gloss or semi-gloss)
- Rags for staining
- Utility knife
Step 1: Preparation & Base Work
-
Sand for smoothness:
Begin by sanding the entire surface of both boards with 120-grit sandpaper to remove any rough patches or splinters. Follow up with 220-grit for a silky finish that accepts stain evenly. -
Clean the surface:
Wipe down every inch of the boards with a tack cloth to remove all sanding dust. -
Apply the whitewash base:
For this rustic look, apply a whitewash stain to the entirety of the second board (the one with the white top) and the stripe areas of the first board. Wipe it back with a rag so the wood grain still peeks through. Let this dry completely according to the can’s instructions.
Bleed-Proof Lines
Use a credit card or a putty knife to burnish the edge of your painter’s tape aggressively. This presses the adhesive deep into the wood grain texture.
Step 2: Taping & Layout
-
Mark the blue field (Board 1):
On the primary flag board, measure a rectangle in the top left corner for the blue union. Use painter’s tape to block off the rest of the board to protect it. -
Tape the stripes (Board 1):
Below the blue field area and on the right side, layout your stripes using 2-inch painter’s tape. Remember, you are taping over the areas you want to keep white/natural. Press the edges down firmly to prevent bleed. -
Design the inverse board (Board 2):
On the second board, tape off the top section completely to keep it white. Tape vertical stripes on the lower half, similar to the first board, but leave space to create the red accents shown in the image. -
Seal the tape edges:
I always like to lightly brush a tiny amount of the base color (or clear matte medium) over the tape edges. This creates a barrier that stops the darker colors from creeping underneath.
Distressed Aesthetic
After the paint dries but before sealing, lightly sand the edges of the board and over the stars with 220-grit paper to give it a vintage, weathered look.
Step 3: Adding Color
-
Stain the blue field:
Using a foam brush or rag, apply the Deep Navy Blue stain to the top-left section of the first board. Work in the direction of the wood grain for the best look. -
Paint the dividing line:
On the second board, carefully paint or stain the thin blue dividing line that separates the white top from the striped bottom. -
Apply the red stripes:
Apply the Barn Red stain to the exposed wood strips on both boards. Ensure you get consistent coverage without pooling the liquid. -
Remove tape carefully:
While the stain is tacky but not fully wet, slowly peel back the painter’s tape at a 45-degree angle. This reveals crisp, clean lines.
Step 4: Star Details & Finishing
-
Position the stencils:
Once the blue field on Board 1 is bone dry, arrange your star stencils. Refer to the image for the staggered pattern around the hole. -
Stencil the white stars:
Using a very dry brush and white paint (or the whitewash), dab the stars onto the blue field. Less paint is better here to avoid smudging. -
Add stars to the stripes:
On the second board (the inverse design), place star stencils randomly along the white or red stripes as shown in the photo. Use blue stain for these stars to tie the color palette together. -
Paint the hole interior:
Don’t forget the inside of the hole! Paint the inner rim of the hole yellow or a contrasting neutral color to make it pop and look finished. -
Allow full cure:
Let all paint and stain cure for at least 24 hours before moving to the clear coat. -
Apply protective finish:
Apply a coat of Polycrylic for protection. Let it dry, lightly sand with fine paper, and apply a second (and even third) coat to ensure the bags slide perfectly.
Once the final coat is dry, you have a tournament-ready set that looks great in any backyard
Sunburst Rays From the Hole
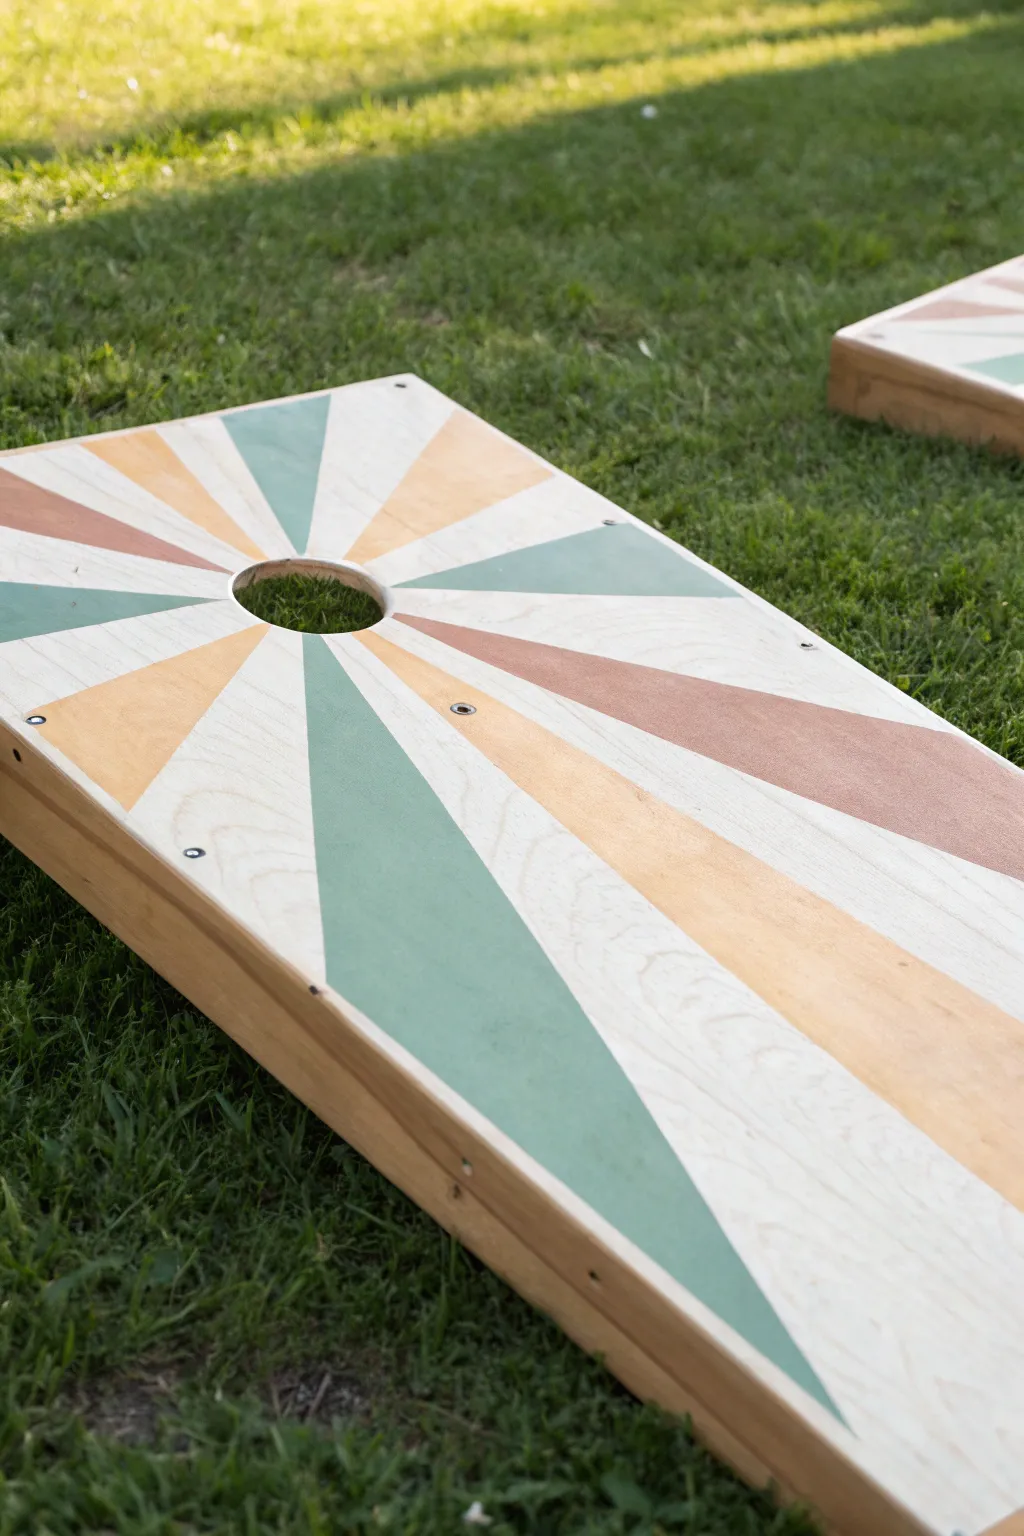
Transform a plain cornhole set into a vintage-inspired lawn game masterpiece with this geometric sunburst design. The muted palette of sage, terracotta, and mustard creates a sophisticated look that radiates energy directly from the target hole.
Step-by-Step Guide
Materials
- Unfinished wooden cornhole boards
- Sandpaper (120 and 220 grit)
- Painter’s tape (high quality, 1-inch width)
- Exterior semi-gloss or satin paint (Cream/Off-White)
- Exterior paint (Sage Green)
- Exterior paint (Mustard or Light Gold)
- Exterior paint (Terracotta or Dusty Rose)
- Pencil
- Ruler or straight edge
- String and thumb tack (optional for layout)
- Small foam rollers or high-quality paint brushes
- Polycrylic protective clear coat
Step 1: Preparation & Base Coat
-
Sand the Surface:
Begin by sanding the entire face of the board with 120-grit sandpaper to remove any rough patches or splinters. Follow up with 220-grit for a smooth, paint-ready finish. -
Wipe Clean:
Use a tack cloth or a slightly damp rag to remove all sawdust. The surface needs to be completely dust-free for the tape to stick properly. -
Apply Base Color:
Paint the entire face of the board with your cream or off-white base color. This will serve as the lightest ‘rays’ in the design. -
Let it Cure:
Allow this base coat to dry completely. I prefer to let it sit overnight to ensure the painter’s tape won’t peel it up later.
Clean Line Secret
Before painting colors, paint the tape edge with your BASE white color first. This seals any gaps so your colored lines come out razor sharp.
Step 2: Mapping the Sunburst
-
Find the Center:
The design radiates from the hole, so the center of the hole is your anchor point. If you need a reference, place a piece of scrap wood under the hole and push a thumbtack into the exact center. -
Mark the Edges:
Along the outer rectangle edges of the board, make small pencil marks where you want each ray to end. Spacing them unevenly creates the dynamic look seen in the photo. -
Draw the Rays:
Using a long straight edge, lightly draw pencil lines connecting your center point (the hole) to the marks on the outer edges. -
Review the Pattern:
Step back and look at your pencil lines. Ensure there is an alternating pattern of wide and narrow rays for visual interest.
Avoiding Peel-Ups
If your base paint peels up when removing tape, the base wasn’t cured enough or your tape is too aggressive. Use ‘delicate surface’ yellow tape.
Step 3: Taping & Painting
-
Tape the Lines:
Apply painter’s tape along your pencil lines. Important: Decide which sections are being painted and place the tape on the *outside* of those sections (in the ‘cream’ zones) to preserve the full width of your colored rays. -
Seal the Tape:
Press the edges of the tape down firmly with a credit card or proper burnishing tool. This is crucial for crisp lines. -
The Bleed Trick:
Brush a very light layer of your *base cream color* over the tape edges. This seals the tape; if any paint bleeds under, it will match the background, not the colored ray. -
Paint the Green Rays:
Select specific sections for your sage green. Apply the paint carefully within the taped lines, using a foam roller or brush. -
Apply Terracotta and Mustard:
Continue painting the remaining sections with your terracotta and mustard colors, following the pattern shown in the photo or creating your own alternating rhythm. -
Second Coat:
Once the first coat is dry to the touch, apply a second coat to ensure the colors are opaque and vibrant. -
Remove Tape:
While the final coat is still slightly tacky, carefully peel off the painter’s tape at a 45-degree angle. Pulling while wet helps prevent the paint from chipping.
Step 4: Finishing Touches
-
Touch Up:
Inspect your lines. If there are any small bleeds or mistakes, use a small artist’s brush and the base cream paint to correct them. -
Paint the Inside Hole:
Don’t forget the inside rim of the hole. Painting this a solid color makes the craftsmanship look professional. -
Protective Coat:
Finish with at least 3-4 coats of Polycrylic. This provides the ‘slide’ factor crucial for gameplay and protects your artwork from grass stains. -
Final Sanding:
Between the dried clear coats, lightly sand with very fine sandpaper (320 grit or higher) to ensure the board is slick and smooth.
With your boards sealed and cured, you are ready to toss some bags on a truly custom court
Offset Geometric Blocks
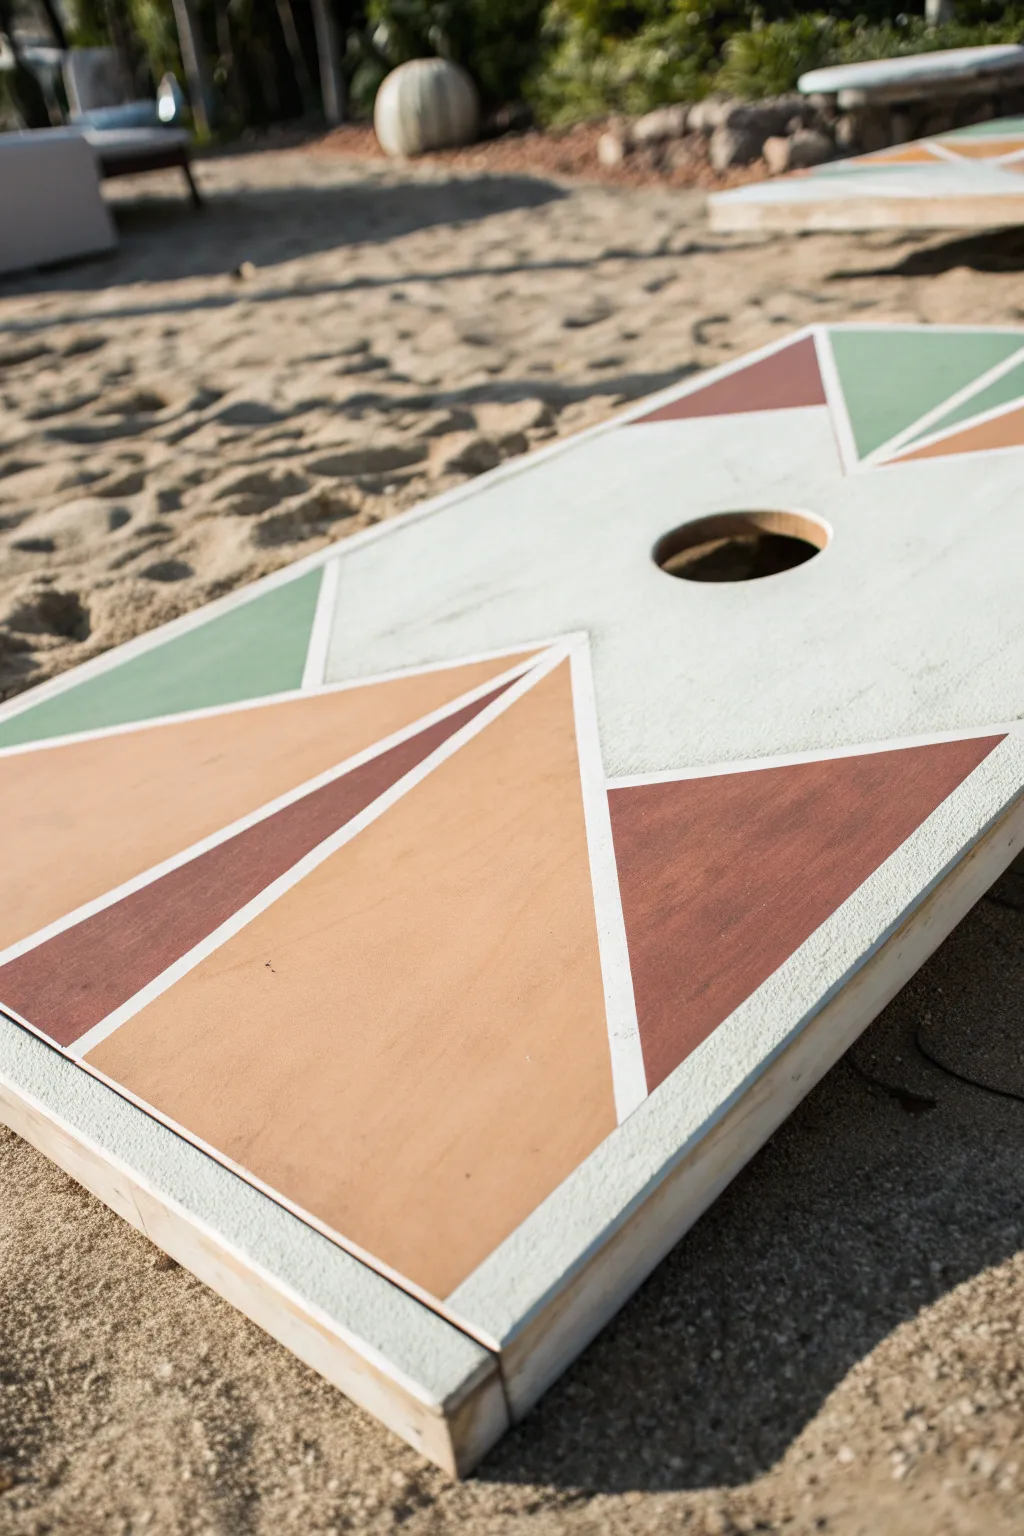
Bring a touch of modern desert style to your backyard games with this geometric cornhole board design. Featuring sharp angles and a soothing palette of sage green, terracotta, and rust against a crisp white background, this project turns a simple lawn game into a statement piece.
Detailed Instructions
Materials
- Unfinished wooden cornhole board
- Sandpaper (120 and 220 grit)
- White or off-white primer
- Outdoor acrylic latex paint (White/Cream base)
- Outdoor acrylic latex paint (Sage Green)
- Outdoor acrylic latex paint (Terracotta/Light Peach)
- Outdoor acrylic latex paint (Deep Rust/Brown)
- High-quality painter’s tape (1-inch width)
- Pencil and straightedge ruler
- Small foam roller
- Assorted distinct paint brushes (angled sash brush recommended)
- Polycrilic protective finish (clear semi-gloss or satin)
- Tack cloth or damp rag
Step 1: Preparation & Base Coat
-
Sand the Surface:
Begin by sanding the entire top surface of the board with 120-grit sandpaper to remove any rough spots or splinters. Follow up with 220-grit for a super smooth finish that will accept paint perfectly. -
Clean the Dust:
Wipe away all sawdust using a tack cloth or a slightly damp rag. It is crucial the surface is completely dust-free before any liquid hits it. -
Prime the Board:
Apply a coat of primer to the entire top and sides of the board. This seals the wood and ensures your colors pop without soaking into the grain. -
Apply Base Color:
Once the primer is dry, use a foam roller to apply your white or off-white base color. Two thin coats are usually better than one thick one to avoid drips. -
Let it Cure:
Allow the base coat to dry completely, preferably overnight. If the paint is even slightly tacky, the tape in the next steps might peel it off.
Bleeding Lines?
If paint bleeds under the tape, wait for it to dry fully. Then, place a fresh piece of tape over the colored area and touch up the bleed with your original base white paint.
Step 2: Mapping the Geometry
-
Mark Key Points:
Using a pencil, mark the center of the board’s width at the very top and bottom edges. Lightly sketch a vertical line down the center if you need a guide, or trust your eye for the asymmetry seen in the photo. -
Tape the Main Triangles:
Start applying your painter’s tape to create the large, central geometric shapes. In the design shown, focus on creating large triangles that radiate from the sides toward the central lane of the board. -
Create the Offset Look:
Instead of mirroring the sides perfectly, offset the angles slightly. Notice how the large peach triangle on the left takes up a huge portion of the lower board, while the right side features a smaller rust-colored triangle. -
Define the Upper Zones:
Tape off the upper corners. The design features a sage green triangle on the upper left and a split design on the upper right. Use the straightedge to ensure your tape lines are perfectly crisp. -
Seal the Tape Edges:
Here is a trick I always use: brush a very light layer of your *base* white paint over the edges of the tape. This fills any tiny gaps and prevents the colored paint from bleeding underneath.
Glow in the Dark
Mix a small amount of fine glow-in-the-dark powder into your clear Polycrilic topcoat for the final layer. It won’t change the daylight look but makes night games awesome.
Step 3: Adding Color
-
Paint the Peach Sections:
Identify the largest triangular section on the bottom left and apply the Terracotta/Light Peach paint. Use a small roller for the large areas and a brush for corners. -
Apply the Rust Accents:
Paint the darker geometric shapes, specifically the wedge on the bottom right and the thin stripe bordering the large peach triangle, using the Deep Rust color. -
Fill in the Sage Green:
Apply the Sage Green paint to the upper left corner triangle and the corresponding geometric shape on the upper right side. -
Repeat for Coverage:
Let the first coat of colors dry to the touch, then apply a second coat to ensure rich, opaque coverage with no streaks. -
Remove Tape:
While the second coat is still slightly damp (not wet, but not fully cured), carefully peel away the painter’s tape at a 45-degree angle to reveal your sharp white lines.
Step 4: Finishing and Protection
-
Touch Up:
inspect the lines once the paint is fully dry. If any bleed-through occurred, use a tiny artist’s brush and the base white paint to tidy up the edges. -
Paint the Hole Interior:
Don’t forget the inside of the cornhole circle. You can leave it bare wood for contrast as seen in the photo, or paint it a solid color to match the design. -
Apply Protective Finish:
Apply 3-4 coats of Polycrilic protective finish. This is essential for cornhole boards as it provides the ‘slide’ for the bags and protects your art from sun and sand. -
Final Sanding (Optional):
Between coats of Polycrilic, lightly sand with very fine grit sandpaper (300+) to ensure the playing surface is perfectly slick and professional.
Once the sealant has cured completely, your custom board is ready for the beach or backyard
Half-and-Half Gradient Fade
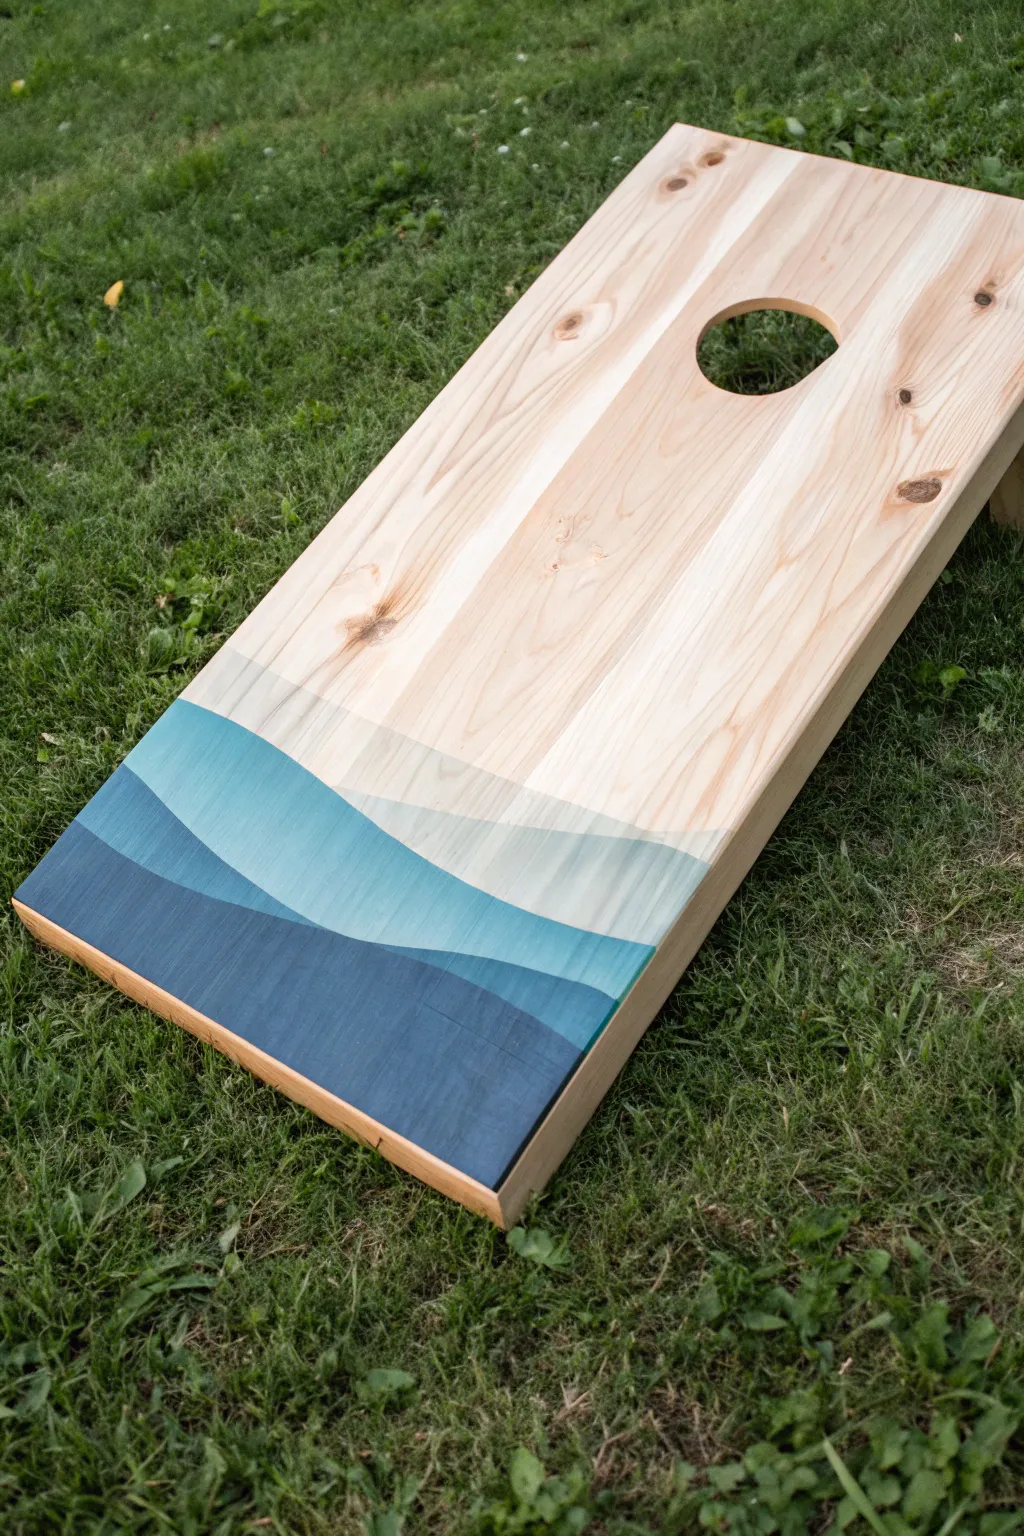
Embrace the natural beauty of wood grain while adding a touch of modern art with this overlapping mountainscape design. By using watered-down paints, you can achieve a watercolor-like transparency that lets the wood’s character shine through the gradient layers.
Step-by-Step
Materials
- Unfinished wooden cornhole board
- Sandpaper (120 and 220 grit)
- Tack cloth
- Painter’s tape
- Acrylic paints (Dark navy, teal, light blue, white)
- Mixing cups or palette
- Water used for thinning paint
- Medium-sized flat synthetic brush
- Pencil
- Clear polyurethane sealant (water-based recommended)
Step 1: Preparation and Planning
-
Sand the surface:
Begin by sanding the entire face of the cornhole board. Start with 120-grit sandpaper to remove any rough patches, then follow up with 220-grit for a silky smooth finish. This ensures the paint glides on rather than soaking into scratches. -
Clean the dust:
Wipe the board down thoroughly with a tack cloth to remove every speck of sawdust. Any remaining dust will get trapped in the transparent paint layers and ruin the smooth effect. -
Sketch the mountains:
Lightly sketch three wavy lines across the bottom third of the board using a pencil. These don’t need to be perfect; organic, rolling curves look best. Ensure the lines overlap to create distinct sections for your gradient layers.
Step 2: Mixing and Painting Required Layers
-
Mix the darkest shade:
In your first mixing cup, combine dark navy paint with a very small amount of water. You want this bottom layer to be mostly opaque but thin enough to lay flat without brush strokes. -
Paint the bottom section:
Apply the dark navy mix to the lowest section of the board, following your bottom pencil line. Keep a wet edge to avoid streaking. -
Mix the middle shade:
For the middle mountain range, mix a teal color. This time, dilute it with more water than the navy—roughly a 2:1 paint-to-water ratio. I like to test the transparency on a scrap piece of wood first to ensure the grain will show through slightly. -
Apply the middle layer:
Paint the section directly above the navy layer. Carefully cut in along the wavy line where it meets the navy. Because the paint is thinned, don’t overload your brush, or it might bleed under the line. -
Mix the lightest shade:
Create a very light blue or pale teal for the top mountain shape. Dilute this heavily with water, aiming for a 1:1 ratio or even thinner, creating a ‘wash’ rather than a solid coat. -
Paint the top wash:
Apply this lightest wash to the top mountain section. This layer should be very transparent, appearing almost like a stain that deeply reveals the wood grain underneath. -
Let it dry:
Allow these base layers to dry completely. Since the paint is watered down, the wood may raise its grain slightly; if it feels rough, do a very light pass with 320-grit sandpaper, but be gentle to avoid removing color.
Bleeding Lines?
If your watery paint runs, score the pencil line lightly with an X-Acto knife before painting. The tiny cut acts as a barrier, stopping the wash from spreading past the line.
Step 3: Creating the Overlap Effect
-
Identify overlap zones:
Look at where your pencil lines crossed. To get that ‘transparent overlay’ look seen in the photo, you need to darken specific areas where the ‘mountains’ intersect. -
Glaze the intersections:
Mix a very thin glaze of your middle teal color. Apply this selectively where the middle mountain shape overlaps the top mountain shape. This creates the illusion that the layers are transparent sheets of glass. -
Refine the edges:
Use a small detail brush to crisp up the edges of your wavy lines if the wash spread too much. A clean, sharp line is key to the modern aesthetic. -
Erase pencil marks:
Once the paint is bone dry, carefully erase any visible pencil lines that weren’t covered by the paint. A white vinyl eraser works best here to avoid smudging.
Pro Tip: Wood Conditioner
Apply a pre-stain wood conditioner to the raw wood before painting. This prevents blotchiness and helps watered-down acrylics absorb evenly without unexpected dark spots.
Step 4: Sealing and Protection
-
First coat of sealer:
Stir your water-based polyurethane gently to avoid bubbles. Apply a thin, even coat over the entire board face, covering both the raw wood and the painted design. -
Sand the sealer:
After the first coat is dry (check the can for times), lightly sand with 220-grit or higher sandpaper. This is crucial for creating the slick surface needed for cornhole bags to slide properly. -
Final coats:
Apply 3-4 more coats of polyurethane, sanding lightly between each one. You want a thick, protective build-up so the painted ridge doesn’t affect gameplay. -
Cure time:
Let the board cure for at least 24 to 48 hours before tossing any bags. This ensures the finish hardens completely and won’t dent on impact.
Now you have a stunning, minimal art piece that is ready for your next backyard party
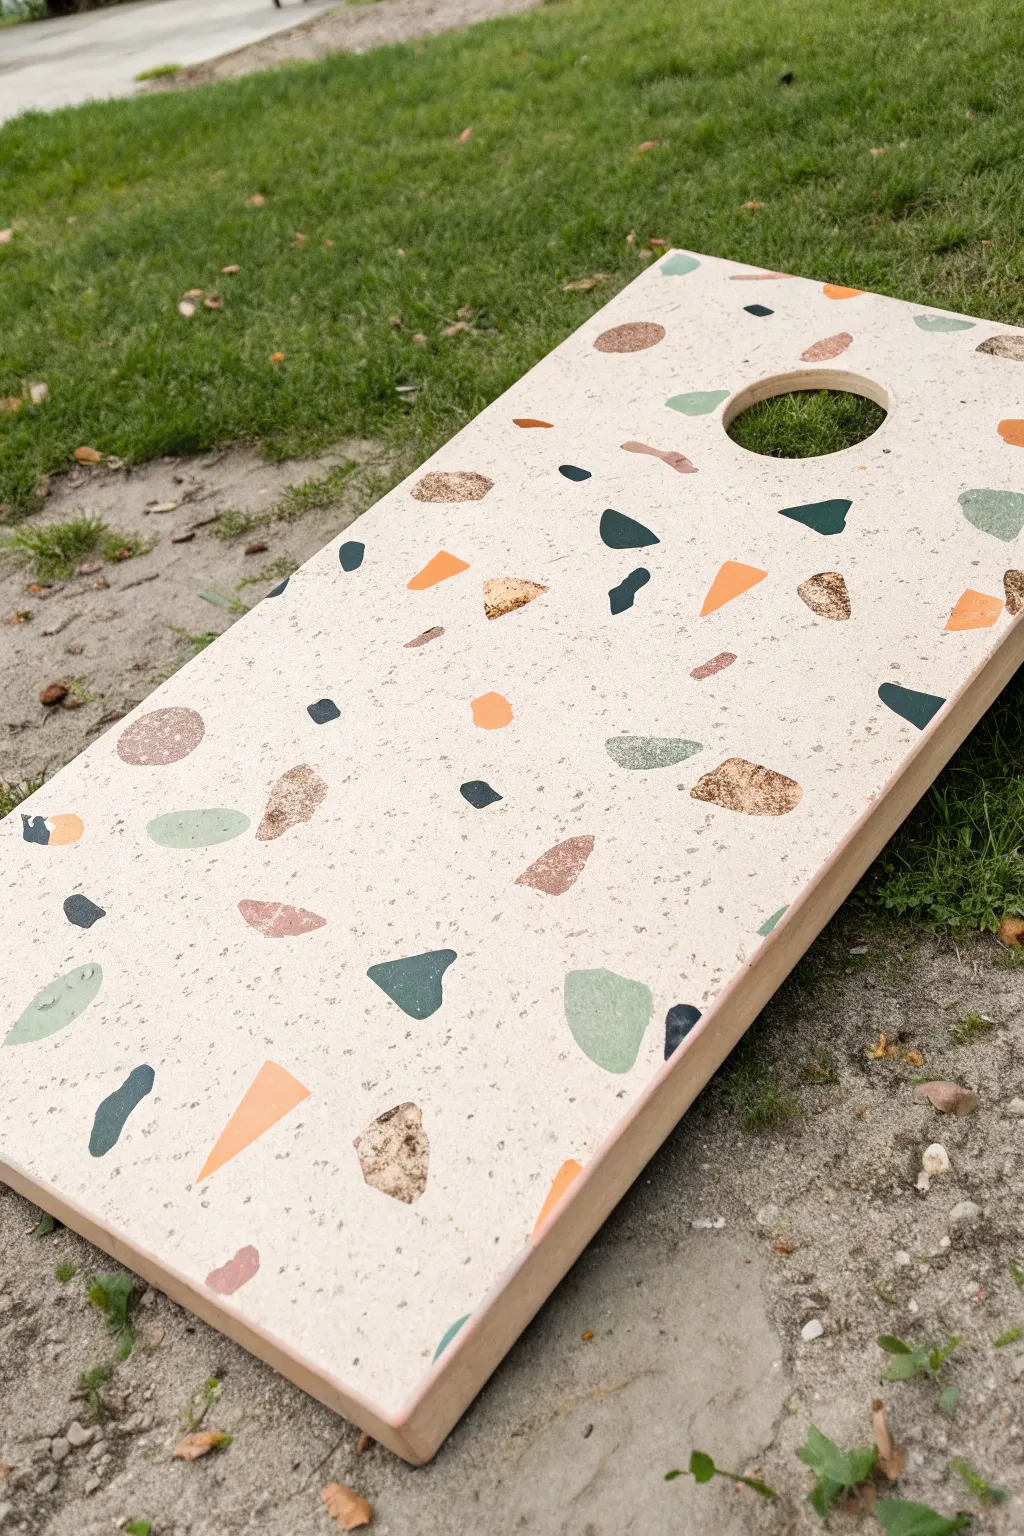
Speckled Confetti Splash
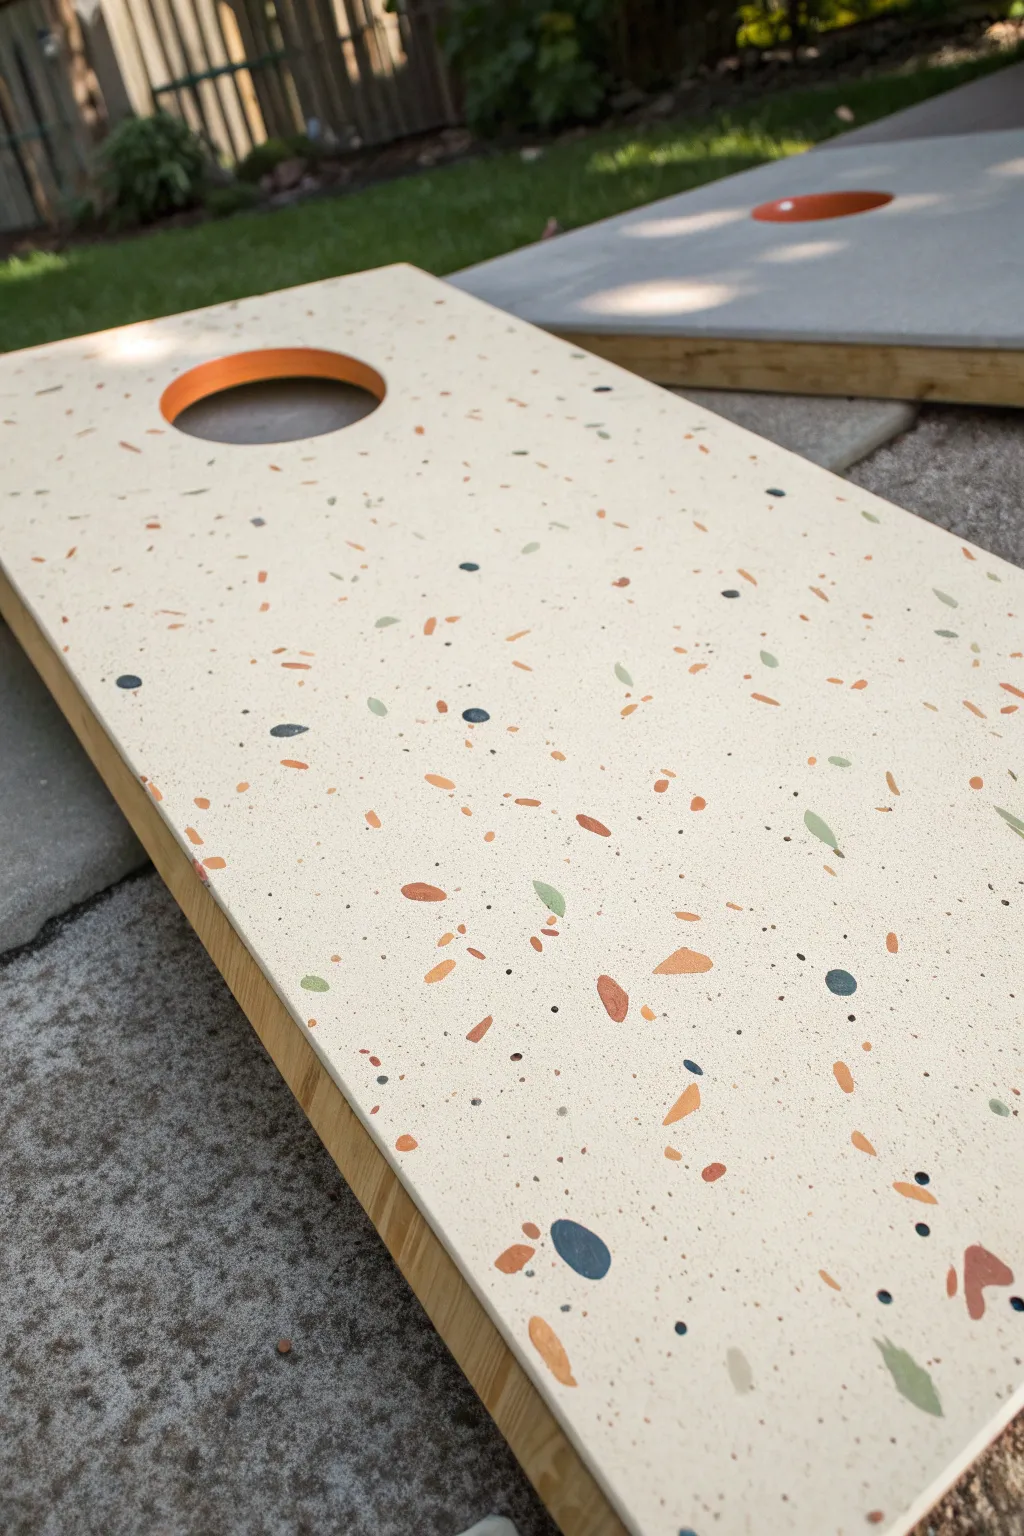
Bring a trendy, modern vibe to your backyard games with this playful terrazzo-inspired cornhole board. This design mimics the look of composite stone with scattered confetti-like shapes in earthy tones against a creamy background.
Step-by-Step Guide
Materials
- Unfinished wooden cornhole boards
- Sandpaper (120 and 220 grit)
- Primer spray paint
- Cream or off-white exterior semi-gloss latex paint
- Acrylic craft paints in muted terracotta, sage green, dark teal, charcoal, and mustard yellow
- Small flat brushes (various sizes)
- Old toothbrush or stiff bristle brush
- Polycrylic protective finish (gloss or semi-gloss)
- Painters tape
- Tack cloth
Step 1: Preparation and Base Coat
-
Sand the surface:
Start by giving your cornhole boards a thorough sanding with 120-grit sandpaper to remove any rough patches or splinters. -
Refine the finish:
Switch to 220-grit sandpaper for a final pass to ensure the wood is ultra-smooth, which helps the paint lay flat. -
Clean the dust:
Wipe the entire board down with a tack cloth to remove every bit of sawdust. -
Prime the wood:
Apply a coat of primer to the top and sides of the board. This seals the wood and ensures your base color is true. -
Light sanding:
Once the primer is dry, quickly scuff sand it with fine grit paper to knock down any raised grain. -
Apply the base color:
Roll on two coats of your cream or off-white exterior latex paint, allowing full drying time between coats. -
Paint the hole rim:
Carefully paint the inside rim of the hole with a contrasting color like bright orange or terracotta for a professional pop.
Uneven Splatter?
If your toothbrush splatter creates huge blobs, dab them immediately with a damp paper towel. You can also paint over mistakes with a dab of the cream base color.
Step 2: Creating the Terrazzo Effect
-
Plan your palette:
Pour small amounts of your acrylic craft paint colors onto a paper plate or palette. -
Paint large shards:
Using a small flat brush, paint irregular, angular shapes (triangles, trapazoids, shards) in your terracotta color randomly across the board. -
Add secondary colors:
Repeat the previous step with your sage green and mustard yellow paints, overlapping nothing and keeping spacing random. -
Add dark accents:
Switch to a smaller brush and add tiny, dark teal or charcoal geometric chips to create depth and contrast. -
Create the speckle:
Dip an old toothbrush into slightly watered-down charcoal paint. -
Flick the paint:
Hold the toothbrush over the board and run your thumb across the bristles to flick a fine mist of speckles across the surface. I find doing a test spray on cardboard first helps gauge the splatter. -
Layer the splatter:
Repeat the flicking process with a little bit of the terracotta paint for varied texture. -
Micro-details:
Go back in with your tiniest brush and add a few manual dots near the larger shard shapes to mimic broken stone.
Step 3: Sealing and Finishing
-
Dry thoroughly:
Let the artwork cure completely for at least 24 hours so moisture doesn’t get trapped. -
Apply first topcoat:
Apply a thin layer of Polycrylic sealer using a high-quality synthetic brush or foam roller. -
Sand between coats:
Lightly sand with very fine sandpaper once dry to ensure a slick surface for bags to slide. -
Final coats:
Apply 2-3 more coats of Polycrylic, sanding lightly in between each, until the surface feels glass-smooth.
Level Up The Look
Add metallic gold or copper leaf flakes into the wet sealer for a luxe, shimmering version of the terrazzo style that catches the sunlight.
Enjoy the satisfaction of playing on a unique board that looks more like art than lawn equipment
Large-Scale Polka Dots
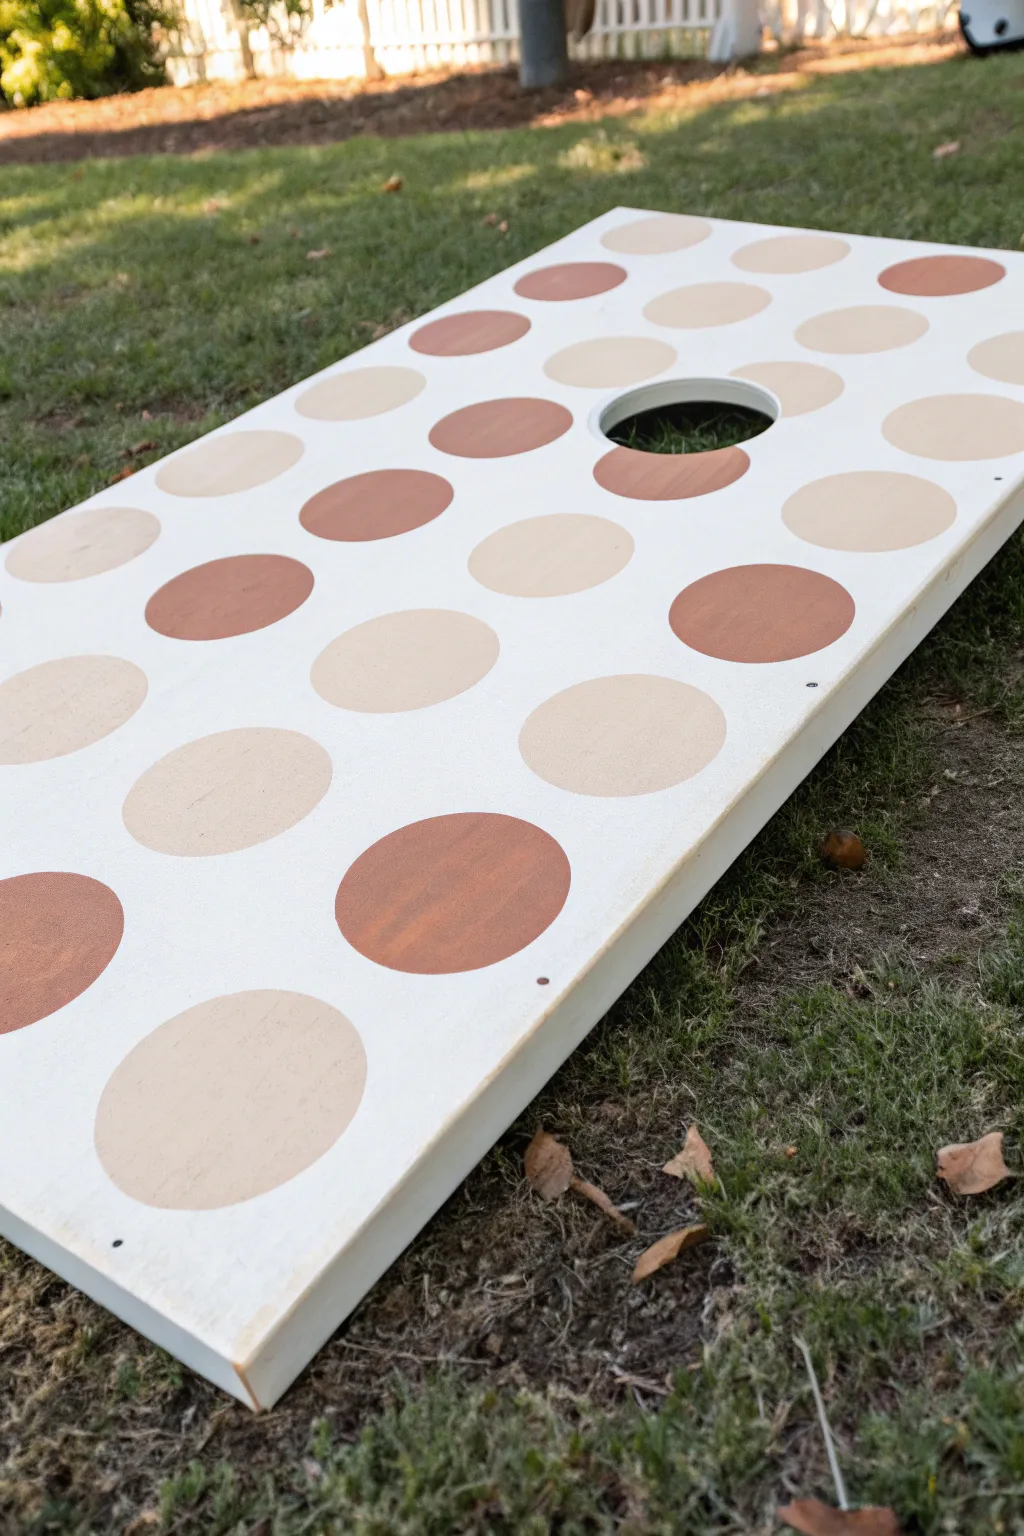
Give your cornhole set a soft, modern makeover with this oversized polka dot design featuring warm earth tones. The combination of terracotta and beige circles against a crisp white background creates a stylish, minimal aesthetic that looks great in any backyard.
Step-by-Step Tutorial
Materials
- Unfinished wooden cornhole board set
- High-grit sandpaper (220-grit)
- Tack cloth or slightly damp rag
- Primer (water-based or latex)
- Exterior semi-gloss paint: White (Base)
- Exterior paint: Terracotta/Burnt Orange
- Exterior paint: Beige/Sand
- Polycrylic topcoat or exterior polyurethane
- 4-inch foam roller and tray
- 2-inch synthetic paintbrush
- Cardstock or thick paper (for stencil)
- Pencil
- Scissors or compass cutter
- Painter’s tape (optional)
- Small artist brush (for touch-ups)
Step 1: Preparation & Base Coat
-
Sand the surface:
Begin by giving the wooden cornhole board a thorough sanding with 220-grit sandpaper to smooth out any rough patches or splinters. -
Clean the dust:
Wipe the entire surface down with a tack cloth or a slightly damp rag to remove all sanding dust, ensuring a clean surface for paint adhesion. -
Prime the wood:
Apply a coat of primer over the entire top surface and sides using your roller. Allow this to dry completely according to the can’s instructions. -
Roll the base color:
Pour your white exterior paint into the tray and use the foam roller to apply a smooth, even base coat across the entire face of the board. -
Paint the sides:
While the top is drying, use your brush or roller to paint the side rails white to match the surface. -
Establish opacity:
Once the first coat is dry, apply a second coat of white paint. You want a solid, opaque background so the wood grain doesn’t peek through the lighter dots later. -
Dry completely:
Let the white base coat cure fully, preferably overnight, so it is hard enough to withstand stencil work without peeling.
Step 2: Creating the Dots
-
Make a circle stencil:
Create a circular template using cardstock. Trace a bowl or use a compass to draw a circle approximately 3-4 inches in diameter, then cut it out carefully. -
Plan the layout:
Place your stencil on the board to visualize the spacing. I like to start a row centered near the bottom and work my way up, arranging them in a staggered brick pattern. -
Trace the circles:
Lightly trace your circle template onto the white painted surface with a pencil. Make sure to space them evenly, leaving about 1-2 inches of white space between each dot. -
Outline in terracotta:
Select the circles that will be the darker color. Using a small, high-quality detailed brush, carefully paint the outline of these circles with the terracotta paint. -
Fill the terracotta dots:
Fill in the rest of the terracotta circles. Using a slightly larger brush here can speed up the process, but keep a steady hand near the edges. -
Outline in beige:
Repeat the outlining process for the alternating circles using your beige or sand-colored paint. -
Fill the beige dots:
Fill in the centers of the beige circles. If the paint looks streaky, let it dry briefly and apply a second coat for solid coverage. -
Handle the hole:
For dots that overlap the cornhole opening, paint right up to the edge of the hole, keeping the curve smooth and consistent with the rest of the circle. -
Clean up edges:
Once dry, inspect your circles. If any pencil marks are still visible, you can carefully erase them or touch up the edges with a tiny bit of white paint.
Pro Tip: Perfect Circles
Instead of freehand painting, use a circle foam pouncer brush dipped lightly in paint. Press straight down and twist slightly for an instant, crisp dot.
Step 3: Sealing and Finishing
-
Apply sealer:
Once your dots are fully cured, apply a thin coat of Polycrylic or exterior polyurethane over the entire board to protect the design from bags and weather. -
Sand lightly:
After the first clear coat dries, very lightly sand with fine sandpaper to knock down any bumps, then wipe clean. -
Final coat:
Apply at least 2-3 more coats of sealer, allowing sufficient drying time between each, to create that classic slick cornhole surface.
Level Up: Texture Match
Mix a small amount of sand texture additive into the paint for the dots only. This adds a tactile element and can help slightly with bag grip.
Let the final clear coat cure for a full 24 hours before your first game to ensure the finish stays pristine
Checkerboard Modern Grid
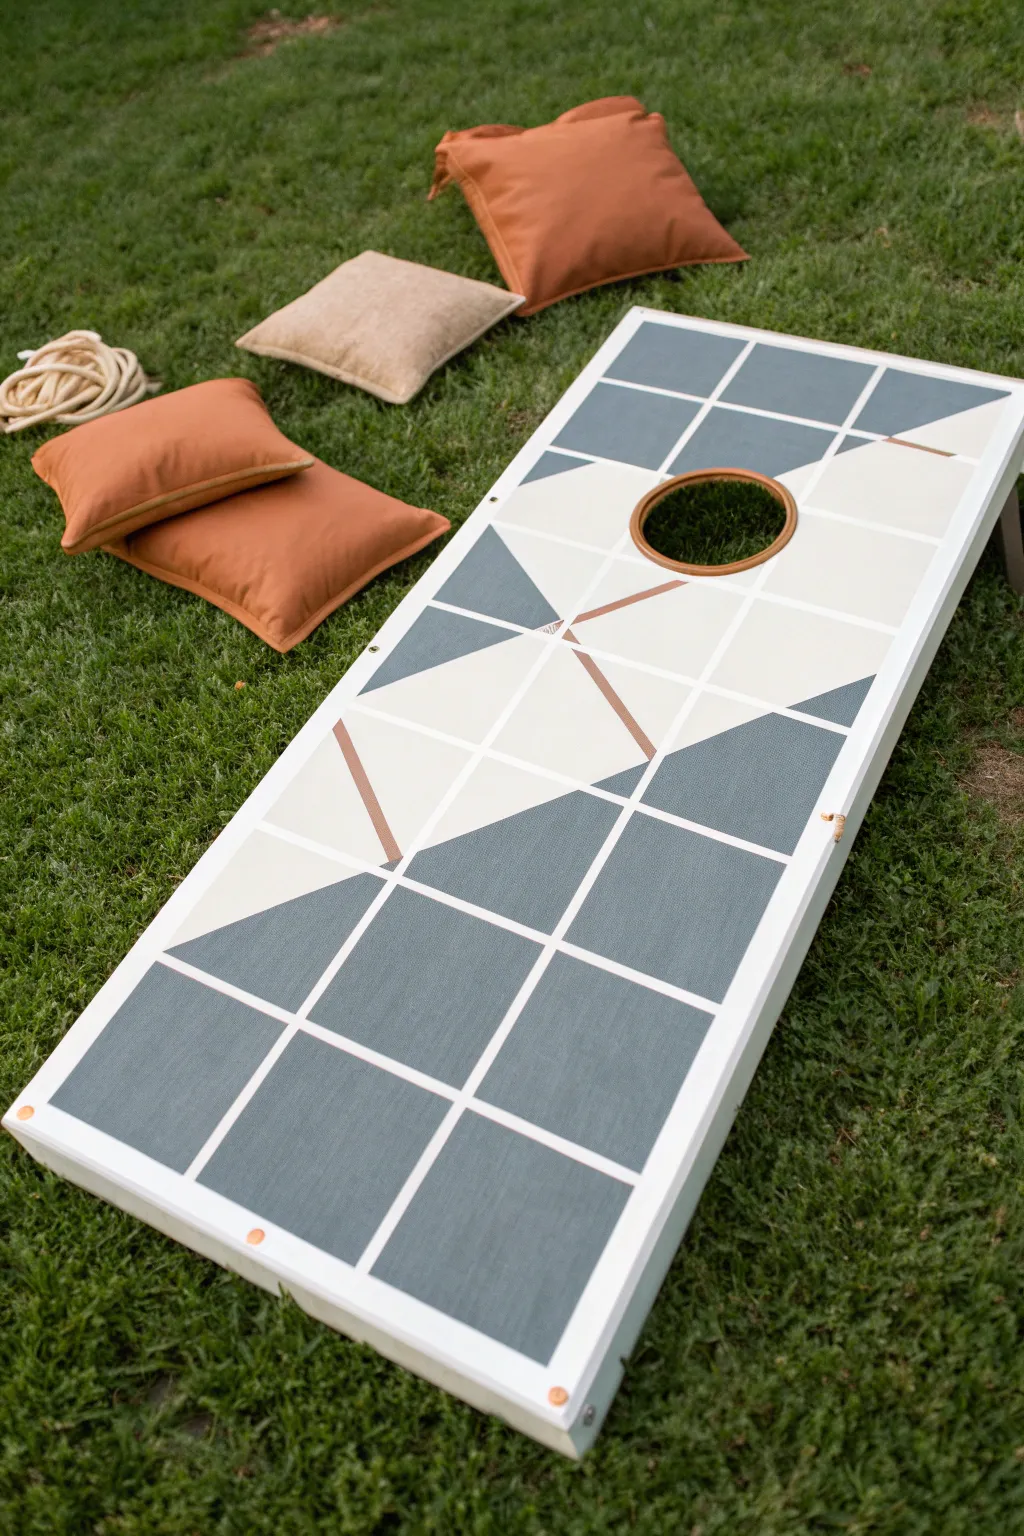
Elevate your backyard games with this sophisticated take on a classic cornhole board, featuring a crisp slate blue and cream palette disrupted by bold geometric angles. The addition of a subtle metallic accent line adds a touch of high-end design to an otherwise simple grid pattern.
Detailed Instructions
Materials
- Unfinished wooden cornhole board
- Sandpaper (220-grit)
- Painter’s tape (1-inch width)
- Painter’s tape (1/4-inch width for accents)
- Primer (white water-based)
- Exterior semi-gloss triangle paint (Slate Blue)
- Exterior semi-gloss triangle paint (Cream/Off-White)
- Metallic acrylic paint (Copper or Gold)
- High-density foam roller and tray
- Small angled detail brush
- Polycrylic protective clear coat
- Ruler and pencil
- X-Acto knife or utility blade
Step 1: Preparation & Base Coat
-
Prepare the surface:
Before you even open a paint can, give your cornhole board a quick sanding with 220-grit sandpaper. This smooths out any rough grain that could catch your bags later. -
Wipe it down:
Remove all sanding dust with a tack cloth or a slightly damp rag to ensure perfect adhesion. -
Prime the board:
Apply a solid coat of white primer over the entire face of the board using your foam roller. This ensures your light cream colors will pop and your dark slate won’t soak into the wood. -
Let it cure:
Allow the primer to dry completely according to the manufacturer’s instructions before moving on to taping.
Step 2: Creating the Grid
-
Measure the grid:
Using a ruler and pencil, lightly mark out a grid of squares. For a standard 2×4 foot board, a 6-inch grid works perfectly to create 8 rows and 4 columns. -
Tape the horizontal lines:
Apply 1-inch painter’s tape across your horizontal pencil marks first, smoothing the edges down firmly with a credit card or your fingernail. -
Tape the vertical lines:
Place tape along your vertical marks. You should now have a distinct grid of open wood squares separated by tape. -
Seal the tape edges:
I like to lightly brush a tiny bit of the base primer over the tape edges. This locks the tape down and prevents color bleed later.
Seal the Tape
Before adding color, paint a thin layer of your base white over the tape edges. This prevents color bleed and ensures razor-sharp lines.
Step 3: The Geometric Design
-
Plan the diagonal split:
Referencing the photo, identify which squares need to be bisected diagonally to create the large triangle effect. Use a strip of tape to cut diagonally across the specific squares near the center and top. -
Modify tape for diagonals:
Where the diagonal line intersects the grid, use an X-Acto knife to carefully trim the tape so the diagonal line is clean and sharp. -
Add the metallic accent:
Place a strip of the 1/4-inch tape parallel to your main diagonal line in the central cream section, leaving a small gap for the copper stripe. -
Paint the slate sections:
Roller the Slate Blue paint onto the sections shown in the dark areas of the design. You may need two thin coats for full opacity. -
Paint the cream sections:
Using a clean roller or brush, fill in the lighter triangular and square sections with your Off-White paint. -
Paint the metallic stripe:
Using the small detail brush, carefully paint the gap you left for the copper accent line.
Glow Up
Mix glow-in-the-dark powder into the white paint for the grid lines. By day it looks standard, but at night the grid illuminates the game.
Step 4: Finishing Touches
-
Reveal the design:
Once the paint is dry to the touch (but not fully cured), slowly peel back the tape at a 45-degree angle. This reveals the crisp white lines of the original primer beneath the tape grid. -
Touch up:
Inspect your lines. If any paint bled under the tape, carefully scrape it away with a blade or touch it up with a tiny bit of white primer. -
Paint the hole rim:
Use your copper or a wood stain to carefully paint the interior rim of the cornhole circle for a finished look. -
Apply clear coat:
Finish with 3-4 coats of Polycrylic, sanding lightly with very fine grit sandpaper between coats to ensure the surface is slick enough for gameplay.
Let the board cure for a full 24 hours before your first toss to keep that finish pristine
Topographic Contour Lines
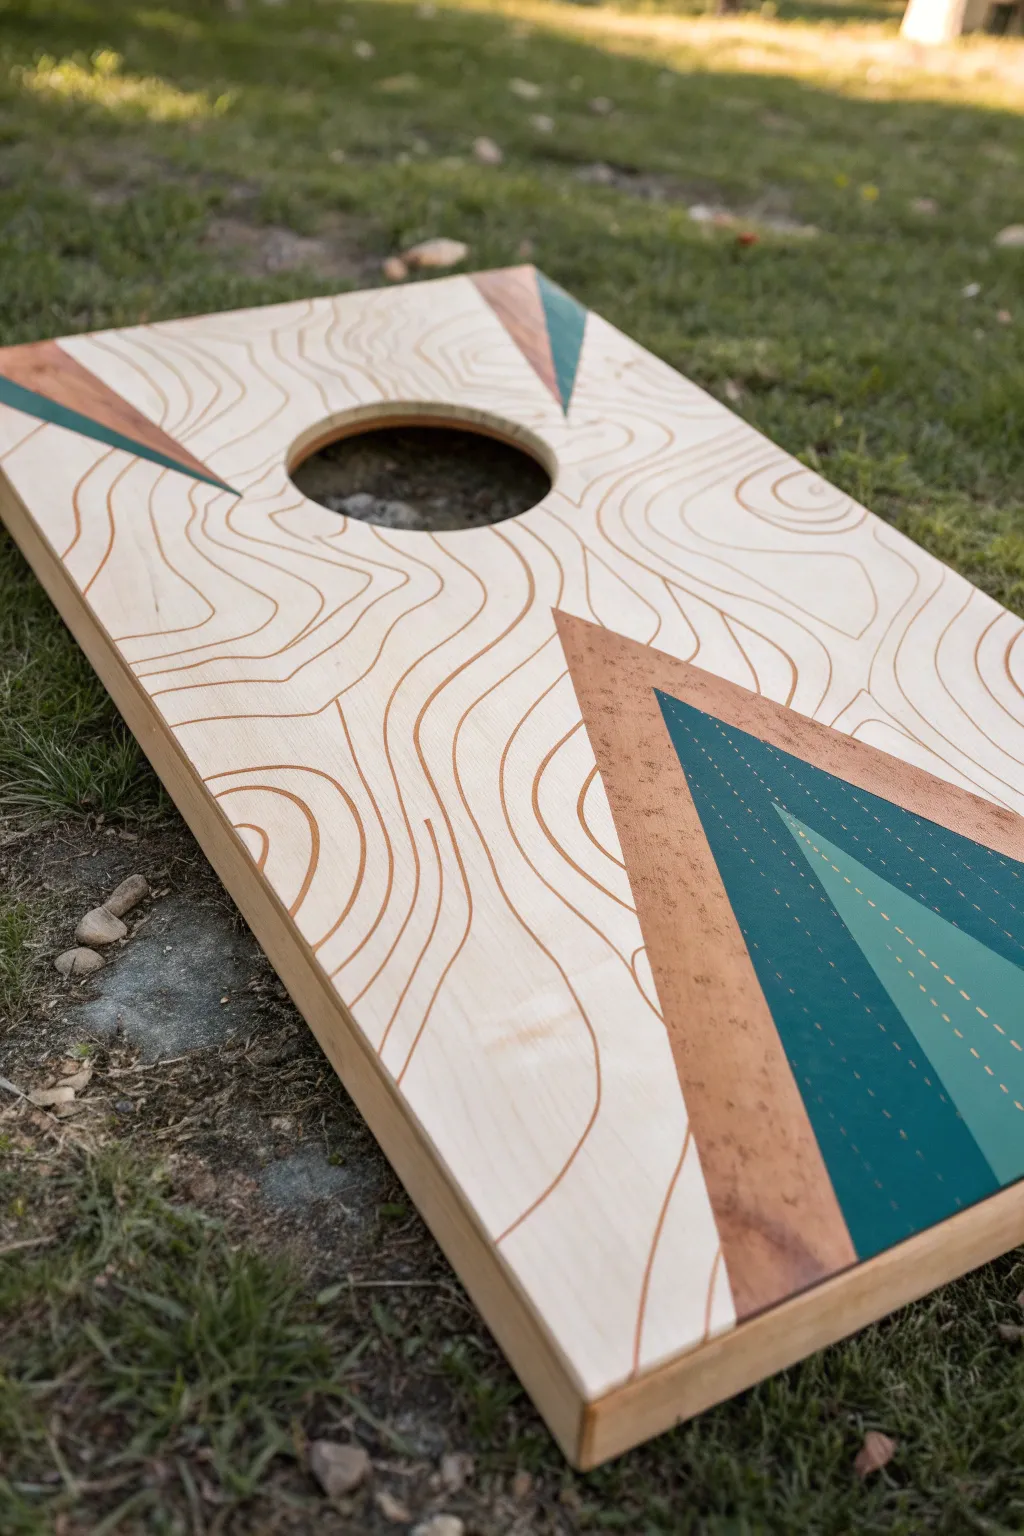
This modern cornhole design combines the organic flow of topographic contour lines with sharp, geometric mountain shapes for a striking contrast. By using natural wood stains alongside bold paint colors, you achieve a sophisticated look that feels perfectly at home in the great outdoors.
Step-by-Step Guide
Materials
- Unfinished wooden cornhole board
- Pencil
- Painter’s tape (high quality, for sharp lines)
- Wood stain (medium-dark tone like Pecan or Walnut)
- Acrylic exterior paint (Dark Teal/Forest Green)
- Acrylic exterior paint (Lighter Teal/Seafoam)
- Fine-point permanent marker or paint pen (Brown or Copper)
- Ruler or straight edge
- Sandpaper (220 grit)
- Polyurethane sealer (clear satin or semi-gloss)
- Rag or staining cloth
- Fine detail paintbrush
- Foam brush
Step 1: Preparation & Geometric Layout
-
Sand the Surface:
Begin with a perfectly smooth canvas by sanding the entire face of the cornhole board with 220-grit sandpaper. Wipe away all dust with a tack cloth or clean rag. -
Draft the Triangles:
Using your ruler and pencil, lightly sketch the large triangular ‘mountain’ shapes coming from the sides and bottom. In the inspiration image, there is a large triangle on the right side and smaller ones near the top left. -
Tape the Boundaries:
Apply painter’s tape firmly along the pencil lines of your triangles. Press the edges of the tape down hard with your fingernail or a credit card to prevent bleed-through. -
Stain the Triangle Borders:
Inside the taped-off triangle areas, apply your wood stain using a rag. You only need to stain the outer border of the triangle shapes (about 2-3 inches wide), as the centers will be painted. Let the stain dry completely.
Step 2: Painting the Peaks
-
Tape the Inner Triangles:
Once the stain is dry, apply new tape over the stained wood to create the inner geometric shapes. You are masking off the stained border to protect it while you paint the center. -
Paint the Base Color:
Paint the large inner triangle section with your Dark Teal paint. Use a foam brush for a smooth finish. This may require two coats for solid opacity. -
Add the Accent Triangle:
For the smaller, lighter teal triangle nested inside the dark one (as seen on the right), mask off a smaller V-shape within the dark teal area once it’s dry. Paint this section with the Lighter Teal shade. -
Detail the Dashes:
Using a fine detail brush and the Lighter Teal paint (or a paint pen), carefully add the dashed lines running down the center of the dark teal section. Use a ruler to keep them perfectly straight. -
Remove Tape:
Carefully peel back all the tape revealing the sharp stained borders and the painted interiors. I find pulling the tape at a 45-degree angle while the paint is slightly tacky gives the crispest line.
Bleeding Lines?
If stain bleeds under your tape, use a craft knife to gently scrape the excess pigment off the surface, or lightly sand that specific spot before sealing.
Step 3: Topographic Line Art
-
Sketch Contour Lines:
Now for the organic part. Lightly sketch wavy, topographic lines across the remaining raw wood sections with a pencil. Vary the spacing—some lines should be close together (steep terrain) and others wide apart. -
Navigate the Obstacles:
When sketching, let your lines flow around the geometric triangles and the hole, treating them like natural obstacles on a map. Do not draw over your painted or stained areas. -
Trace with Ink:
Go over your pencil sketches with a brown or copper paint pen. A steady hand is key here; try to pull the pen towards you in long, fluid strokes rather than short, sketchy ones. -
Vary Line Weight:
To add depth, you can thicken specific sections of the contour lines, particularly where curves interact with the board edges or the hole. -
Erase Guide Lines:
Once the ink is fully dry, gently erase any visible pencil marks. Be careful not to smudge the ink or the stain.
Level Up: Metallic Pop
Swap the brown map lines for a gold or metallic copper paint pen. The shimmer will catch the sunlight during afternoon games and elevate the look.
Step 4: Finishing
-
Seal the Deal:
Apply a coat of clear polyurethane sealer over the entire board. This protects the raw wood, the design, and ensures bags slide correctly. -
Sand lightly between coats:
After the first coat of poly dries, lightly sand with fine-grit paper to remove any raised grain, then wipe clean. -
Final Coat:
Apply at least 2-3 more thin coats of polyurethane for a durable, weather-resistant finish.
Your guests will be admiring the landscape of your game just as much as their toss technique
Terrazzo-Style Color Chips
Elevate your backyard game setup with this trendy, modern take on a classic cornhole board. Featuring a sophisticated terrazzo pattern with faux stone textures and earthy tones, this design turns a simple lawn game into a stylish piece of outdoor decor.
Detailed Instructions
Materials
- Unfinished cornhole board
- Sandpaper (220-grit)
- Primer (white or light grey)
- Cream or off-white exterior acrylic latex paint (base)
- Acrylic craft paints (rust orange, teal, sage green, blush pink, charcoal)
- Metallic acrylic paint (gold or bronze)
- Small sea sponge or stiff bristle brush (for speckling)
- Variety of small flat brushes
- Pencil
- Painter’s tape
- Clear polycrylic sealer (outdoor rated, matte or satin finish)
- Drop cloth
Step 1: Prep and Base Coat
-
Sand the Surface:
Begin by lightly sanding the face of your cornhole board with 220-grit sandpaper to remove any rough patches or splinters. -
Wipe Clean:
Use a tack cloth or a slightly damp rag to remove all sawdust. The surface needs to be perfectly clean for the paint to adhere properly. -
Apply Primer:
Coat the entire top surface with a high-quality wood primer. Let this dry completely according to the manufacturer’s instructions. -
Paint the Base Color:
Apply your cream or off-white exterior paint. You will likely need two coats to get full, opaque coverage. Allow sufficient drying time between coats.
Uneven Coverage?
If your shape colors look streaky, don’t just load on thick paint. Instead, apply multiple thin layers, letting each dry fully to avoid brush marks.
Step 2: Creating the Terrazzo Effect
-
Mix the Speckle Paint:
Thicken a small amount of charcoal or dark grey paint on a palette. You want it slightly fluid but not watery. -
Apply the Speckles:
Dip a stiff bristle brush or an old toothbrush into the dark paint. Run your thumb over the bristles to flick tiny specks across the entire cream background. Keep the spray random and relatively sparse. -
Let Speckles Set:
Allow these tiny droplets to dry fully. If you smear them while adding the larger shapes, it will muddy the clear background. -
Sketch the Shards:
Lightly sketch irregular geometric shapes onto the board with a pencil. Mimic the look of broken tile—triangles, trapezoids, and jagged polygons. Keep them spaced out comfortably. -
Paint the Warm Tones:
Start with your rust orange and blush pink paints. Fill in scattered shapes using a small flat brush to keep edges crisp. -
Add Cool Tones:
Move on to the teal, charcoal, and sage green shapes. Try to balance the distribution so no single color dominates one area. -
Apply Metallic Accents:
Select a few specific shapes to paint with the metallic gold or bronze. This adds that realistic ‘mineral’ vein look found in real terrazzo. -
Create Texture:
For the ‘stone’ shapes (like the bronze ones), dab a slightly lighter or darker shade over the wet paint with a small sponge to create uneven, rocky dimension. -
Refine Edges:
Once dry, inspect the shapes. If the pencil lines are visible or edges are shaky, do a second careful pass of paint to sharpen them up.
Texture Pop
Mix a tiny pinch of fine sand into the paint for just the metallic or stone-colored shapes. This adds real tactile texture that mimics embedded rock.
Step 3: Sealing and Protection
-
Clear Coat Application:
Stir your polycrylic sealer gently (don’t shake, or bubbles will form). Apply a thin layer across the entire board using a high-quality synthetic brush. -
Sand Between Coats:
Once the first coat is dry, very lightly sand with fine-grit sandpaper to knock down any raised grain or dust nibs. -
Final Coats:
Apply at least 3-4 more coats of sealer. Cornhole boards take a beating from bags landing on them, so thick protection is vital. -
Cure Time:
Let the board cure for at least 24-48 hours before playing your first game.
Now you have a stunning, durable game set ready for endless summer entertainment.
Faux Marble Veining
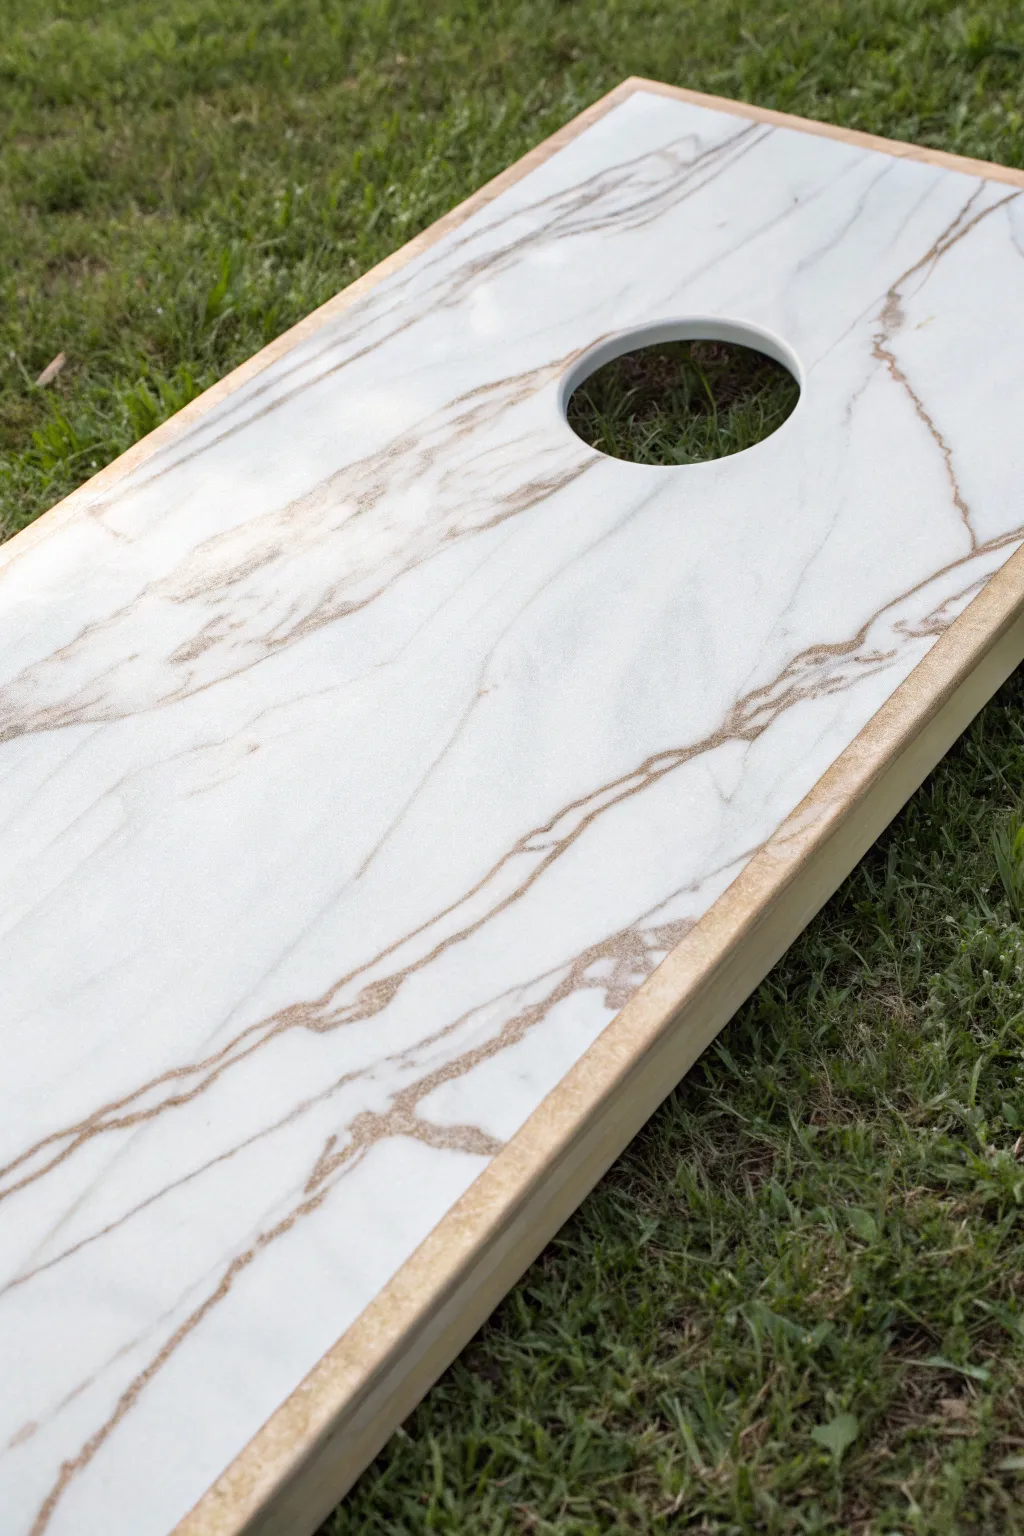
Transform a plain wooden cornhole board into an upscale piece of patio art with this faux marble technique. This method captures the elegance of Carrara marble, accented by striking gold leaf-style veining for a sophisticated finish that looks heavy but plays light.
Step-by-Step Tutorial
Materials
- Cornhole board (unfinished or primed)
- High-quality white latex or acrylic paint (satin finish)
- Grey acrylic craft paint
- Metallic gold paint
- Metallic bronze or copper paint (optional for depth)
- Sea sponge or specialized faux finish sponge
- Feather tool (often found in faux finish kits) or a very fine detail brush
- Soft blending brush
- Water spray bottle
- Glazing medium
- Polycrylic topcoat (semi-gloss or gloss)
- Sandpaper (220 grit)
- Tack cloth
Step 1: Base Preparation
-
Sand the surface:
Begin by ensuring your cornhole board is perfectly smooth. Typically, I sand the entire face with 220-grit sandpaper to remove any rough grain that might ruin the marble illusion. Wipe away all dust with a tack cloth. -
Apply base coats:
Apply two to three coats of bright white satin paint. This needs to be opaque and solid. Allow the paint to dry completely between coats to ensure a durable foundation for your artwork. -
Prepare your glaze:
Mix a small amount of grey paint with glazing medium. The ratio usually works best at about one part paint to four parts glaze. You want a translucent mixture that will slide easily across the surface.
Veins look too painted?
If your lines look too stiff, spray with more water immediately. Let the water run a bit, then blot with a rag. This creates natural-looking mineral deposits.
Step 2: Creating the Marble Cloud
-
Apply the grey wash:
Dampen your sea sponge lightly. Dip it into the grey glaze mixture and blot off the excess on a paper towel. Gently dapple the sponge across the board in diagonal clusters. Avoid making uniform patterns; nature is random. -
Softening the edges:
While the glaze is still wet, use a soft, dry blending brush to gently feather out the sponged areas. This creates that foggy, indistinct background characteristic of real stone. -
Review and refine:
Step back and look at the board from a distance. If an area looks too heavy, mist it lightly with water and dab with a clean cloth to lift some pigment. Let this layer dry completely.
Add Glitter Accent
Mix ultrafine holographic glitter into your second-to-last clear coat. In the sun, the ‘stone’ will sparkle subtly like real quartz deposits.
Step 3: Veining Technique
-
Mix the vein colors:
Prepare your metallic gold paint. For extra realism, I like to mix a tiny drop of bronze into a separate puddle of gold to offer color variation in the deepest parts of the cracks. -
Load the feather or liner brush:
Dip your feather tip or fine liner brush into the gold paint. You typically want the paint to be slightly thinned with water so it flows like ink rather than dragging like paste. -
Draw primary veins:
Holding the brush loosely, drag it across the board following the diagonal ‘grain’ of your grey clouds. Twist the brush in your fingers as you pull to create jagged, unpredictable organic lines. -
Soften the hard lines:
Immediately after drawing a vein, lightly mist it with water or tap it with your dry blending brush to feather the edges slightly into the white background. Marble veins usually aren’t sharp lines all the way through. -
Add secondary veins:
Create smaller, whisper-thin veins that branch off from your main gold arteries. These should fade in and out, disappearing into the white background.
Step 4: Sealing the finish
-
Let the artwork cure:
Allow the painted veins to dry for at least 24 hours. Metallic paints can sometimes re-wet if sealed too quickly. -
First clear coat layer:
Apply a thin layer of Polycrylic using a synthetic brush. Move quickly and avoid over-brushing, which can create bubbles. -
Sand between coats:
Once dry, very lightly hand-sand with 320-grit sandpaper to knock down any nibs. This step is crucial for the slick surface needed for cornhole bags to slide. -
Final seal:
Apply 3-5 more coats of Polycrylic, sanding lightly between each one. You want a glass-smooth finish that protects your faux finish from heavy bean bags.
Enjoy the satisfying slide of the bags on your new, sophisticated game board
Optical Illusion 3D Cubes
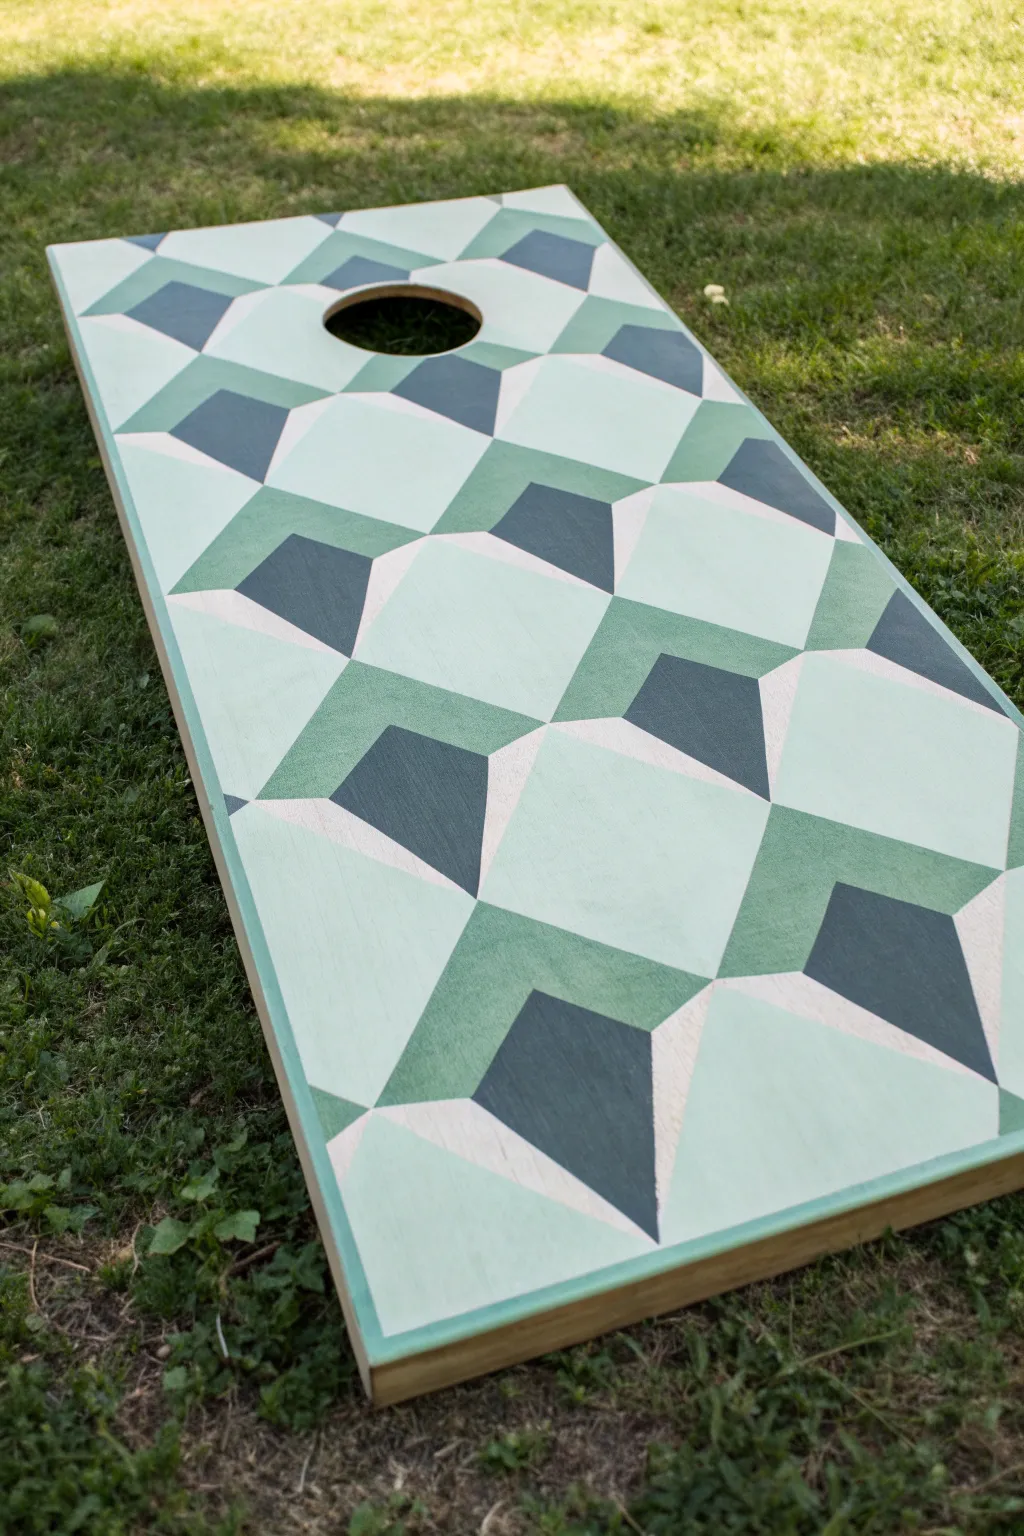
Transform a plain wooden cornhole board into a stunning piece of modern art with this optical illusion design. By strategically taping off sections and using three distinct shades of teal and green, you’ll create a mesmerizing 3D cube effect that pops right off the surface.
Detailed Instructions
Materials
- Unfinished cornhole board
- Sandpaper (220 grit)
- Painter’s tape (high quality, 1-inch width)
- Ruler or straight edge
- Pencil
- Exacto knife or craft blade
- Exterior latex or acrylic paint in three shades: Dark Teal, Sage Green, and Mint Green
- Small foam rollers or high-quality paint brushes
- Polycrylic clear coat sealant
Step 1: Preparation and Mapping
-
Surface Prep:
Start by giving your cornhole board a light sanding with 220-grit sandpaper to ensure a smooth painting surface. Wipe away all dust with a tack cloth or damp rag. -
Grid Layout:
To establish the pattern, you need a grid. Use a ruler and pencil to lightly draw a grid across the entire board. I find that 4-inch or 6-inch squares work best for standard boards, but measure to see what divides evenly into your board’s width. -
Diagonal Guidelines:
Within each grid square, draw a diagonal line connecting opposite corners. Maintain the same direction for every square to ensure the cubes will align correctly later. -
Define the Cube Faces:
From the center of each square, draw a vertical line straight down to the bottom edge of that square. You should now see the ‘Y’ shape inside each box that forms the three faces of a cube.
Bleeding Lines?
If paint seeps under the tape, wait for it to dry fully. Then, re-tape along the correct line and paint over the mistake with the correct color for a crisp edge.
Step 2: Taping the Design
-
Tape Phase One:
You cannot paint adjacent shapes simultaneously, so we work in phases. Apply painter’s tape along the grid lines to isolate the ‘top’ diamond shapes of the cubes first. Press the tape edges down firmly to prevent bleed. -
Trim Excess Tape:
Use an Exacto knife to carefully trim overlapping tape bits where lines intersect. This ensures clean, sharp corners for your geometric shapes. -
Seal the Tape Edges:
For razor-sharp lines, brush a very thin layer of your base wood color or clear matte medium over the tape edges. This blocks paint from seeping underneath.
Step 3: Painting the Colors
-
Paint the Tops (Lightest Color):
Using the Mint Green (or your lightest shade), paint the diamond shapes you masked off. Apply two thin coats rather than one thick one for better durability. -
Remove and Dry:
Peel the tape while the second coat is still slightly wet to avoid pulling up dried paint. Let these shapes dry completely—usually about an hour—before re-taping. -
Tape Phase Two:
Once the top diamonds are dry, apply new tape over their edges to protect them. Now mask off the left-hand faces of the ‘Y’ shapes you drew earlier. -
Paint the Left Sides (Medium Color):
Fill these sections with your Sage Green (medium shade). Be careful near the previously painted areas. Again, remove tape carefully and let dry completely. -
Tape Phase Three:
Mask off the final set of shapes—the right-hand faces of the cubes. Ensure your fresh tape protects the Mint and Sage sections fully. -
Paint the Right Sides (Darkest Color):
Apply your Dark Teal paint here to create the ‘shadow’ side of the cubes. This contrast is what really drives the 3D effect home.
Add Wood Grain
Instead of a light paint color for the ‘top’ of the cubes, leave the wood restricted and unpainted. The natural grain adds a beautiful organic contrast.
Step 4: Finishing Touches
-
Reveal and Touch Up:
Remove all remaining tape to reveal the full pattern. If any paint bled, use a small artist’s brush to tidy up the lines or carefully scrape excess away with your blade. -
Handle the Hole:
Paint the inside rim of the cornhole circle in the darkest teal color. This gives the board a finished, professional look and hides plywood layers. -
Protective Coat:
Apply 3-4 coats of Polycrylic sealant over the entire top surface. Sand lightly with high-grit sandpaper between coats to ensure the bags slide perfectly during gameplay.
Allow the final clear coat to cure for at least 24 hours before your first game
Constellation Night-Sky Board

Transform ordinary cornhole boards into a dreamy, stargazing experience with this sophisticated celestial design. Featuring deep navy backgrounds accented by metallic copper constellations and geometric star trails, this look strikes the perfect balance between modern art and rustic charm.
Step-by-Step Tutorial
Materials
- Unfinished wooden cornhole boards
- Sandpaper (220-grit)
- Painter’s tape (high quality)
- Deep navy blue outdoor acrylic paint (matte or satin finish)
- Metallic copper or rose gold paint pen (medium tip)
- Metallic copper or rose gold paint pen (fine tip)
- Metallic copper outdoor acrylic paint
- Small flat tip paintbrush
- Large compass or string and pencil
- Pencil and eraser
- Ruler or straight edge
- Clear polycrylic sealer (spray or brush-on)
Step 1: Preparation & Base Coat
-
Prep the surface:
Begin by sanding the top surface of your cornhole boards with 220-grit sandpaper until they are perfectly smooth to the touch. This ensures your paint lines will be crisp and prevents paint bleed. -
Clean deeply:
Wipe away every speck of sanding dust with a tacky cloth or a slightly damp rag. Any dust left behind will create bumps in your dark night sky. -
Protect the edges:
Apply painter’s tape carefully along the outer edges of the board. The goal is to keep the beautiful natural wood frame visible, contrasting with the dark painted top. -
Apply the midnight hue:
Using a roller or large brush, apply the deep navy blue paint to the entire top face of the board. I find that painting in the direction of the wood grain helps hide brush strokes. -
Second coat:
Allow the first coat to dry completely according to the manufacturer’s instructions. Apply a second coat to ensure a rich, opaque coverage with no wood showing through.
Uneven Metallic Lines?
If your paint pen skips or creates inconsistent lines, press the tip onto a scrap piece of cardboard to re-saturate it before returning to the board.
Step 2: Mapping the Cosmos
-
Plan the orbits:
Once the blue paint is fully cured, use a pencil to lightly sketch your design. Start by drawing large, sweeping arcs around the hole using a compass or a string pinned to the center. -
Add intersecting trails:
Use a ruler to lightly sketch straight intersecting lines across the bottom half of the board, creating the framework for your star trails. -
Draft the stars:
Mark the positions for your largest stars with small pencil ‘x’ marks. Vary their placement so they look random but balanced. -
Draw the solid arcs:
Take your medium-tip metallic copper paint pen and carefully trace the large curved orbits around the hole. Go slowly to maintain a steady, solid line. -
Create dotted trails:
Switch to the fine-tip paint pen for the dotted swoops. Instead of solid lines, gently tap the pen tip along your pencil guides to create trails of stardust dots.
Step 3: Stars & Sealing
-
Paint main stars:
Using a small flat brush and metallic copper paint (or the medium pen), fill in your largest 5-point stars. Using a stencil here can help if you aren’t confident freehanding them. -
Add micro-stars:
Create tiny distant stars by dipping the end of a paintbrush handle or a toothpick into the copper paint and dotting it onto empty blue spaces. -
Layering details:
For extra dimension, draw a few tiny 4-point shimmer stars using the fine-tip pen near the larger constellations. -
Cleanup:
Once the metallic paint is dry, gently erase any visible pencil marks. Be sure the paint is truly cured so you don’t smudge the copper. -
Peel the tape:
Carefully peel away the painter’s tape from the edges. Pull at a 45-degree angle away from the paint to ensure a clean, sharp line. -
Seal the galaxy:
Apply 2-3 coats of clear polycrylic sealer over the entire top surface. This protects your artwork from bean bags and weather without yellowing the blue paint.
Glow Up
Mix glow-in-the-dark powder into your white or light grey paint and add tiny dots among the copper stars for a board that lights up when the sun sets.
Now you have a stunning set of boards ready for your next backyard gathering


Have a question or want to share your own experience? I'd love to hear from you in the comments below!