
When I’m stuck creatively, designing a maze is one of my favorite ways to get my hands moving and my brain quietly problem-solving. Here are 20 maze design ideas you can draw, paint, collage, or build into your next art piece—starting simple and getting delightfully weird.
Classic Square Grid Maze
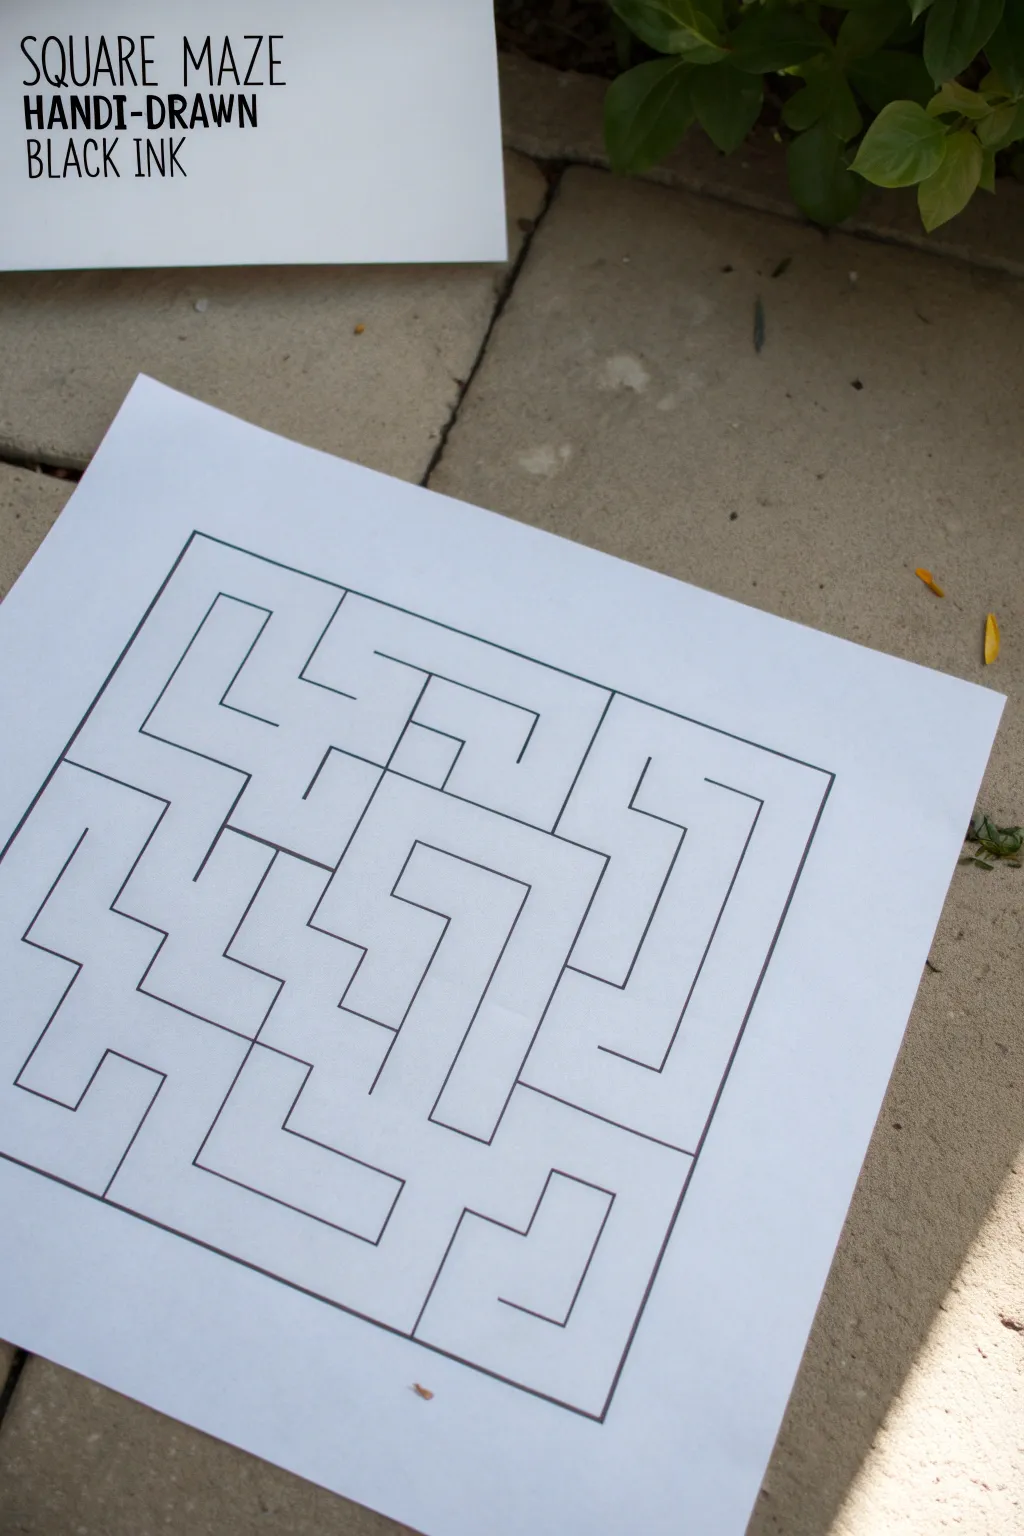
Go back to basics with this crisp, minimal hand-drawn maze that proves simplicity is often best. Using just ink and paper, you’ll create a satisfyingly clean puzzle perfect for game nights or thoughtful gifts.
Step-by-Step
Materials
- High-quality white paper or cardstock
- Pencil (HB or H)
- Eraser (kneaded or vinyl)
- Ruler (straight edge)
- Fine-point black permanent marker or drawing pen (0.5mm or 0.8mm)
- Graph paper (optional, for planning)
Step 1: Planning the Layout
-
Defining the Perimeter:
Start by lightly sketching a large, perfect square on your paper using your pencil and ruler. This will be the outer boundary of your maze. If you want specific dimensions, 8×8 inches works well on standard letter paper. -
Creating the Entry and Exit:
Decide where your maze will begin and end. Erase a small section of the top line for the entrance and a corresponding section on the bottom or side for the exit. Keep these openings roughly half an inch wide. -
Sketching the Grid:
To ensure your paths remain consistent, lightly draw a faint grid inside your square. You don’t need to draw every line perfectly, but marking off inch-wide intervals along the perimeter helps guide your internal walls.
Uneven Lines?
If your ruler slips, don’t panic. Thicken the affected wall slightly to hide the wobble. A slightly varied line weight can actually add hand-drawn charm.
Step 2: Drawing the Maze Path
-
Drafting the Main Path:
With your pencil, lightly sketch a winding path connecting the start to the finish. This is the ‘solution’ line. Make it twist and turn unexpectedly so the puzzle isn’t too easy. -
Adding Dead Ends:
Now, branch off from your main path to create dead ends. Sketch lines that look promising but eventually hit a wall or loop back on themselves. Fill as much empty space as possible. -
Refining the Walls:
Go back over your path lines and turn them into ‘walls’. Instead of a single line representing the path, draw the barriers. Ensure the corridor width stays relatively uniform throughout the design. -
Checking Connectivity:
Before you commit to ink, trace the route with your finger one last time. Make sure the solution is actually solvable and that no walls accidentally block off the grid completely.
Level Up: Isometric
Instead of a flat grid, draw your walls at 30-degree angles to create a 3D isometric block maze. Add shading to one side of the walls for depth.
Step 3: Inking and Finishing
-
Inking the Frame:
Take your black fine-point marker and ruler. Carefully trace the outer perimeter square first. Lift the pen cleanly at the corners to avoid ink bleeding. -
Inking Internal Walls:
Systematically ink the internal walls. I find it helpful to ink all horizontal lines first, then rotate the paper 90 degrees to ink the vertical ones, as this reduces ruler slipping. -
Closing Loop Patterns:
Pay close attention to where lines meet. Ensure the corners are sharp 90-degree angles. If a line ends in the middle of a corridor (a dead end wall), make sure the corner is distinct. -
Drying Time:
Let the ink sit for at least 10–15 minutes. Heavy black markers can smear easily if erased too soon, destroying the crisp look. -
Erasing Guidelines:
Gently erase all underlying pencil sketch marks. Use a soft vinyl eraser and hold the paper taut with your other hand to prevent wrinkling. -
Touch-ups:
Inspect your lines for any gaps or faint areas. Go over any weak spots with your pen to ensure a solid, deep black contrast against the white paper.
Now you have a custom puzzle ready to challenge your friends or frame as geometric art


Start-and-Finish Icon Maze
This project transforms a simple sketchbook page into an engaging puzzle with bold linework and clear directional icons. The hand-drawn aesthetic gives it a charming, organic feel while the structured layout keeps the challenge satisfying to solve.
Step-by-Step Guide
Materials
- Sketchbook with cream or off-white paper (textured paper works well)
- Pencil (HB or H for light sketching)
- Eraser (kneaded eraser preferred)
- Black brush pen or thick felt-tip marker
- Fine-point black liner pen (0.5mm)
- Ruler (optional, if you prefer straighter lines)
Step 1: Planning the Layout
-
Define the boundaries:
Start by lightly sketching a large rectangle in pencil on your sketchbook page. Leave a generous margin on all sides to frame the maze nicely. -
Mark the entrance and exit:
Decide where your maze begins and ends. For this design, sketch a small gap in the top left corner for ‘Start’ and a gap in the bottom right for the finish. -
Draft the ‘START’ banner:
At the top entry gap, sketch a small ribbon banner. Inside the ribbon, lightly letter the word ‘START’ to ensure spacing is correct before inking. -
Grid out the path:
Lightly draw a grid inside your rectangle to help guide your walls later. A 1cm or 0.5 inch grid works well for this scale. -
Sketch the solution path:
Using your pencil, draw a single winding line from the start to the finish. This is your ‘correct’ path; make it meander around the page to increase difficulty.
Pro Tip
Use a jagged, ‘rough’ texture on the outer edges of your lines to simulate a stamp or woodblock print effect.
Step 2: Constructing the Walls
-
Build the first walls:
Now, sketch walls around your solution path. Think of this as drawing a tube around the line you just created. -
Add dead ends:
Fill the remaining empty spaces in your grid with blocking walls and false paths. I like to create T-junctions and U-turns to confuse the solver. -
Include distinctive icons:
Sketch a small circle near the start of the maze path and another circle near the end. These act as visual anchors for the player. -
Refine the wall thickness:
Go over your pencil sketches and double up the lines where walls should be thick. This style relies on chunky, bold barriers.
Step 3: Inking and Finishing
-
Outline the main structure:
Switch to your thick black marker or brush pen. Carefully trace over the outer boundary lines first to establish the frame. -
Ink the internal walls:
Trace the internal maze walls. Don’t worry about using a ruler here; the slight wobble of a hand-drawn line adds character to this specific style. -
Fill the start banner:
Use a finer liner pen for the ‘START’ text inside the banner to keep it legible, then outline the banner itself with the thicker marker. -
Add the directional arrows:
Draw a bold arrow pointing into the maze at the start, and another arrow pointing out at the finish line. -
Detail the entry points:
Thicken the lines specifically around the opening and closing gaps to make them visually distinct from the dead ends. -
Let the ink set:
Allow the ink to dry completely for at least 5-10 minutes. Smudging heavy black marker is a common mishap at this stage. -
Erase guidelines:
Gently erase all visible pencil marks, including your initial grid and solution path sketch. Be careful not to lift the ink if it isn’t fully dry. -
Final touches:
Inspect your lines. If any black areas look patchy or thin, go over them one last time to ensure a solid, deep black finish.
Level Up
Add small traps or ‘teleport’ symbols (like matching shapes) that require the player to jump to a different section.
Now you have a custom, hand-crafted puzzle ready to challenge a friend or keep for yourself


Solved-and-Unsolved Pair Maze
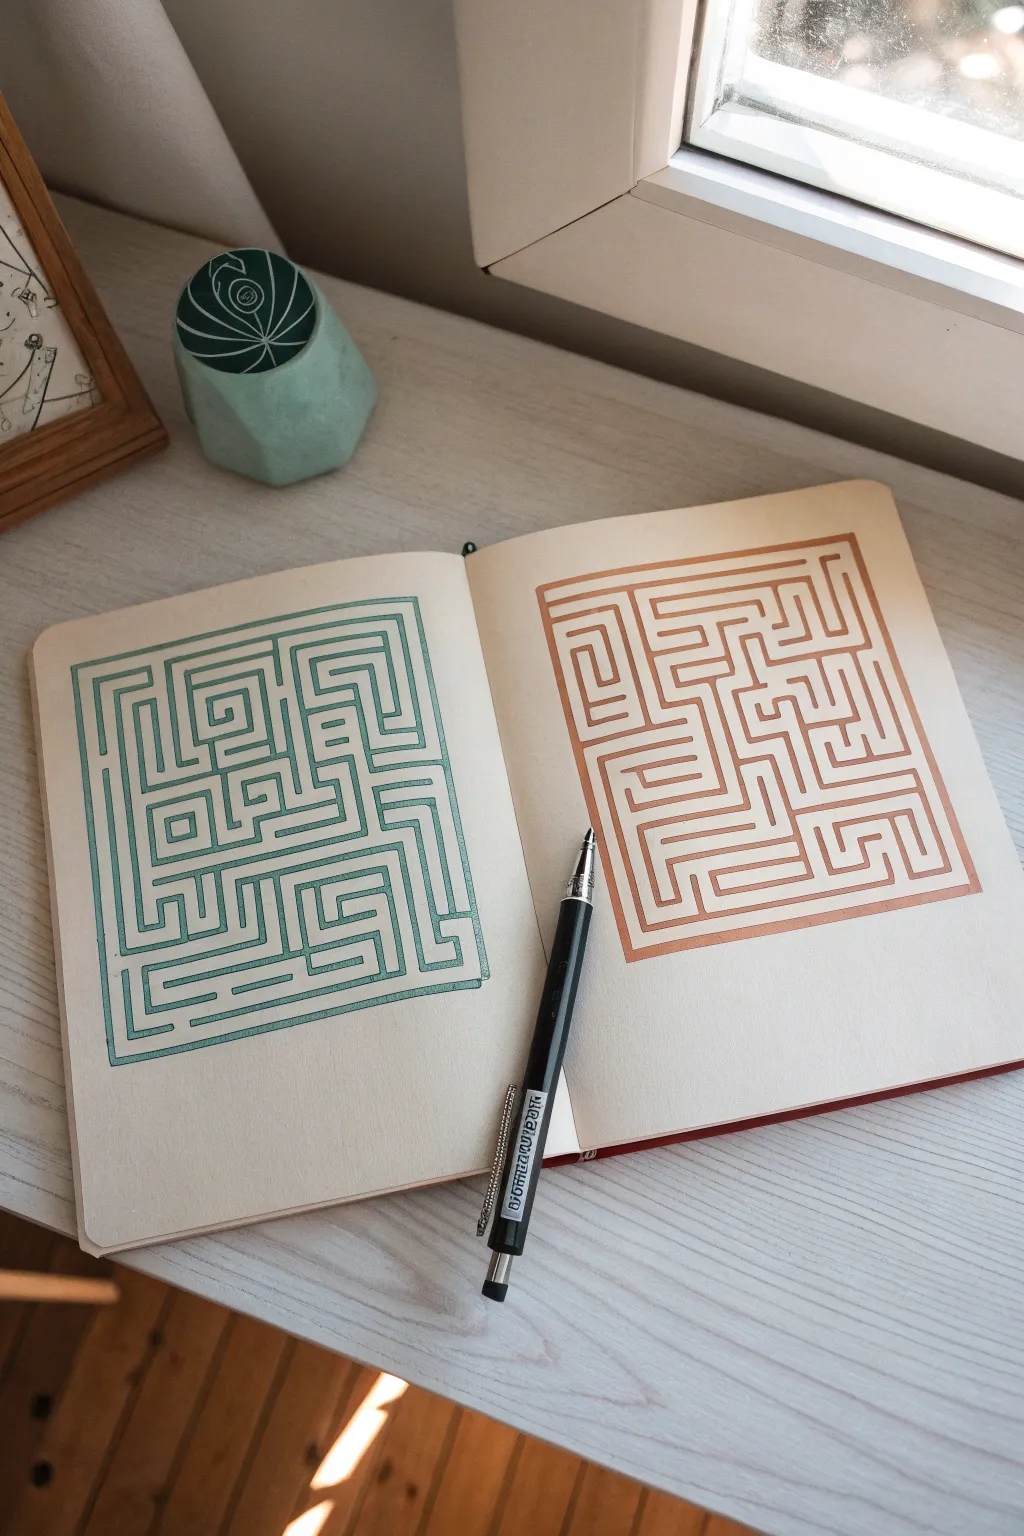
This elegant sketchbook spread features a pair of geometrically precise square mazes, rendered in shimmering metallic inks. The contrasting teal and copper tones create a sophisticated look that turns a simple puzzle into a piece of meditative art.
Detailed Instructions
Materials
- A5 Sketchbook or notebook with smooth, cream-colored paper
- Metallic gel pens or paint markers (Teal/Emerald and Copper/Bronze)
- Fine-point black liner pen or pencil (for drafting)
- Ruler or straight edge
- Graph paper (optional, for planning)
- Pencil eraser
Step 1: Planning and Grid Layout
-
Sketch the boundaries:
Begin by lightly marking out two identical squares on facing pages of your sketchbook using a pencil and ruler. Leave a comfortable margin around the edges, centering each square on its respective page. -
Draft the grid structure:
Lightly draw a grid inside your main squares. For this specific design, try a 10×10 or 12×12 grid. This invisible structure will help you keep the maze paths uniform in width. -
Design the path:
Using your pencil, draft the actual maze walls. Start from the outer edge and work inward, creating winding paths, dead ends, and twisting corridors. You don’t need to draw double lines yet; just draw a single line where the wall will be. -
Refine the thickness:
Once satisfied with the route, go back over your single pencil lines and thicken them into distinct walls. The aesthetic here relies on the walls and the empty paths being roughly the same width.
Smudge Alert
If you smudge the metallic ink, don’t wipe it! Let it dry completely, then use a white gel pen or gouache to carefully paint over the mistake.
Step 2: Inking the Teal Maze
-
Outline the walls:
Take your metallic teal or emerald green pen. Carefully trace the outer edges of your penciled wall shapes. Use the ruler if you have a shaky hand, but freehand drawing adds a nice organic touch. -
Fill the structure:
Color inside the outlines you just created. For the most solid finish, use small, circular strokes to saturate the paper with ink without tearing it. -
Check for gaps:
Look closely at your fill. Metallic inks can sometimes streak; if you see light patches, wait a moment for the first layer to dry and then add a light second coat. -
Clean up edges:
If any corners look rounded or soft, use the fine tip of your pen to sharpen them into crisp 90-degree angles.
Level Up: Foil Finish
For extreme shine, use a ‘glue pen’ to draw the maze instead of ink. Once tacky, press transfer foil onto the glue for a mirror-like chrome finish.
Step 3: Inking the Copper Maze
-
Mirror the process:
Switch to your copper or bronze metallic pen for the right-hand page. Just like before, outline the walls of your drafted maze first. -
Strategic filling:
I find it helpful to work from the top left to the bottom right (if you are right-handed) to avoid smudging the metallic ink with your palm as it dries. -
Define the entrance and exit:
Make sure your start and end points are clearly defined gaps in the outer wall. You can subtly emphasize them by making the wall terminals slightly bolder. -
Final drying time:
Metallic pens often stay wet longer than standard ballpoints. Leave the book open flat for at least 10–15 minutes to prevent the pages from sticking together.
Step 4: Finishing Touches
-
Erase guidelines:
Once you are absolutely certain the ink is bone dry, gently run a soft eraser over the entire design to remove any visible pencil grit from the drafting phase. -
Add depth (Optional):
If you want a 3D effect, you can use a fine gray marker to add a tiny drop shadow to one side of the maze walls, though the flat metallic look is striking on its own.
Close your sketchbook knowing you’ve created a beautiful geometric puzzle that catches the light from every angle


High-Contrast Bold Line Maze
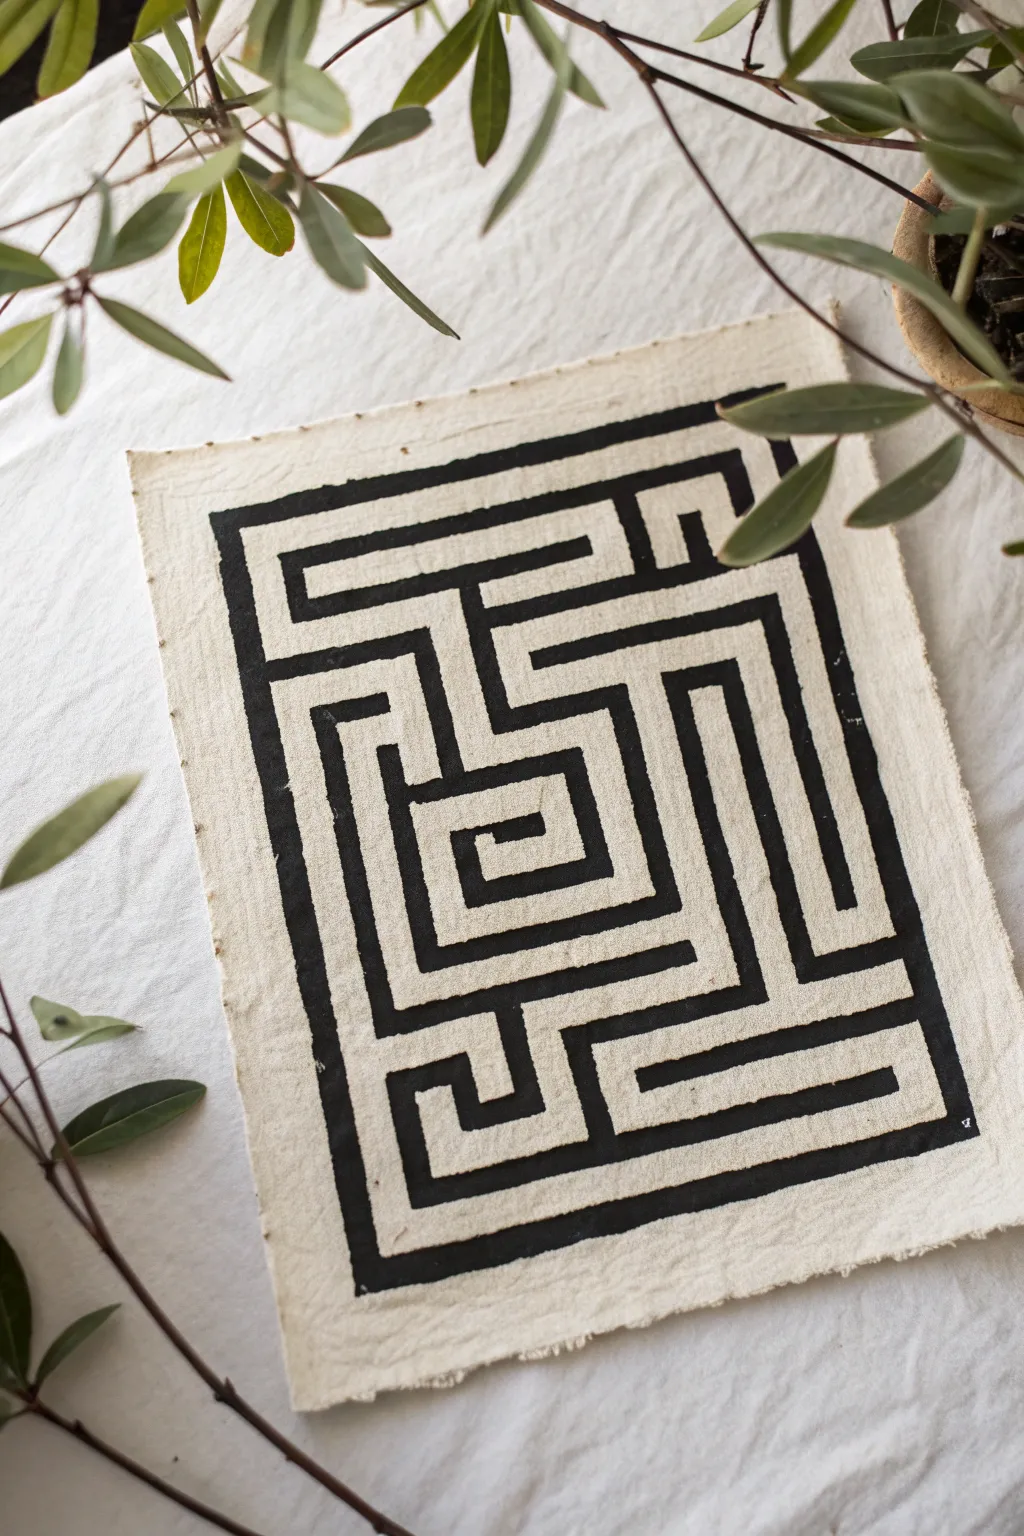
This striking project combines the ancient intrigue of labyrinths with modern, minimalist aesthetics. Using raw, deckled-edge canvas or heavy handmade paper, you’ll create a bold black maze that serves as a captivating wall hanging or table centerpiece.
Step-by-Step Tutorial
Materials
- Heavyweight cream canvas or handmade cotton rag paper (approx. 8×10 inches)
- Black fabric paint or high-quality black gouache
- Flat shader brush (size 6 or 8)
- Pencil (HB or lighter)
- Ruler or straight edge
- Eraser (kneaded preferred)
- Masking tape or painter’s tape (optional)
- Scrap paper for sketching
- Palette or small dish for paint
Step 1: Preparation & Design
-
Select your surface:
Choose a piece of unprimed canvas or thick, textured paper. The rough edges are key to this look, so if you are cutting fabric, pull a few threads from the sides to create a frayed, raw fringe. -
Plan the grid:
On a separate piece of scrap paper, sketch out a rough grid. A simple 5×7 or 6×8 grid works well for a rectangular maze. This preliminary step saves you from getting stuck in a dead end on your final piece. -
Determine the path:
Draw your maze path on the scrap paper first. Start with a spiral or a central destination and work your way outwards, creating T-junctions and dead ends to fill the space. -
Mark the borders:
Lightly mark the four outer corners of your design on the final canvas with a pencil. Leave a generous margin of about 1-1.5 inches of negative space around the edge to frame the bold black lines. -
Create guide points:
Instead of drawing full grid lines which can be hard to erase from fabric, lightly mark small dots with your pencil where the major corners and intersections of your maze walls will be.
Steady Hand Trick
Rest your pinky finger on a dry area of the surface while painting. This anchors your hand, giving you significantly more control for painting long, straight lines without a ruler.
Step 2: Sketching
-
Outline the outer boundary:
Using your ruler and pencil, very faintly draw the main rectangular outline that contains the maze. This ensures your final design stays square and centered. -
Draw the internal walls:
Begin sketching the internal structure of the maze based on your scrap drawing. Use the ruler to keep lines straight, but don’t worry about perfection; the handmade feel is part of the charm. -
Check the spacing:
Step back and look at your pencil sketch. Ensure the ‘channels’ (the white space between lines) are roughly the same width as the walls you intend to paint. -
Refine the lines:
Go over your sketch one last time to darken the lines slightly so they are visible through the first coat of paint, but keep them light enough that they won’t show through if you miss a spot.
Step 3: Painting
-
Prepare the paint:
Squeeze a dollop of black fabric paint or gouache onto your palette. I prefer adding a tiny drop of water to improve flow, ensuring smooth, crisp lines without bleeding. -
Start with the border:
Load your flat brush and carefully paint the thick outer rectangle first. This frames your work and gives you a solid boundary to work within. -
Master the straight line:
To paint the internal walls, hold the brush perpendicular to the paper and pull it towards you. Use the width of the flat brush to your advantage to create lines of consistent thickness in one stroke. -
Sharpen the corners:
When you reach a corner, stop and lift the brush straight up. Rotate your hand or the paper, place the brush back down precisely at the corner, and paint the new direction to get a crisp 90-degree angle. -
Work inwards:
Systematically fill in the internal maze structure. Be mindful of where you rest your hand; placing a clean sheet of paper under your painting hand prevents smudging wet ink. -
Touch ups:
Once the main lines are down, inspect the work for any thin spots or jagged edges. Carefully smooth these out with the tip of your brush for a bolder, more graphic appearance.
Add Color Accents
Once the black paint is bone dry, use a fine-tip gold paint pen to outline just one side of the maze path, creating a faux shadow or a ‘golden thread’ guide.
Step 4: Finishing
-
Let it dry:
Allow the piece to dry completely flat. If using heavy paint, this might take a few hours. Resist the urge to touch it to check for dryness. -
Erase guidelines:
Once fully dry, gently use a kneaded eraser to lift any visible pencil marks. Be extremely gentle on fabric or textured paper to avoid damaging the surface fibers. -
Final inspection:
Check for any grey spots where the canvas shows through the black paint. A second coat on just the black areas can make the design pop with intense contrast.
Hang your stunning monochromatic maze on the wall and enjoy the calm focus it brings to your space.

PENCIL GUIDE
Understanding Pencil Grades from H to B
From first sketch to finished drawing — learn pencil grades, line control, and shading techniques.
Explore the Full Guide
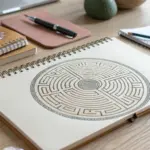
Single-Path Spiral Labyrinth
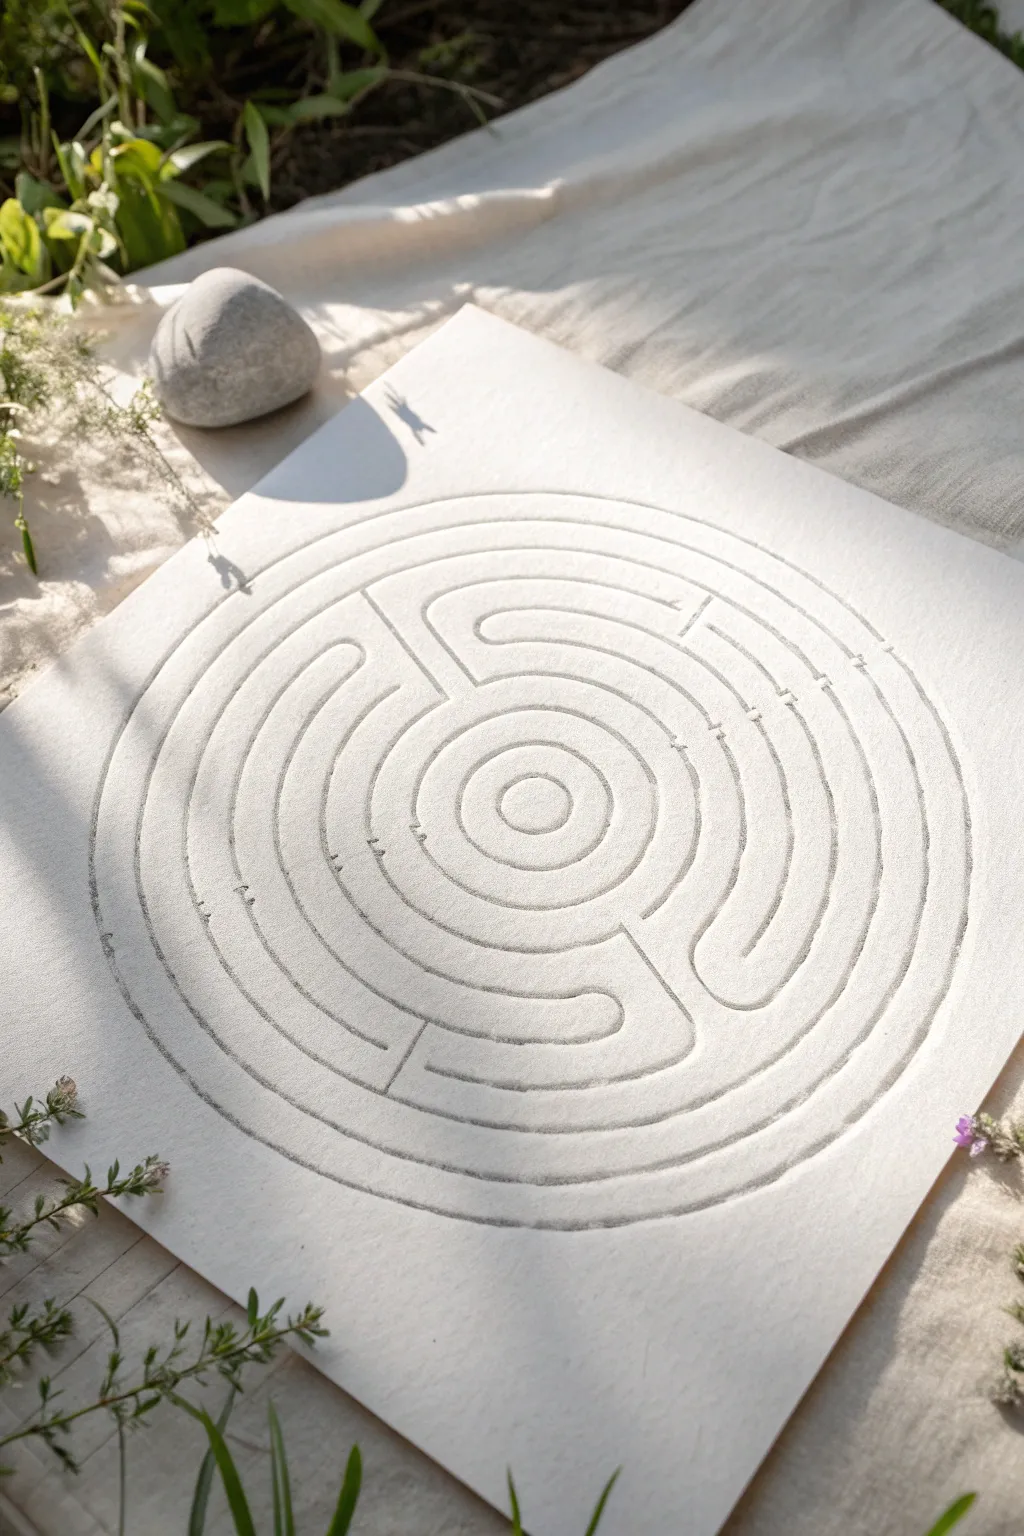
Capture the meditative calm of a classical labyrinth with this deceptively simple embossed paper art project. Using nothing but pressure and precision, you will create a tactile, shadow-catching design that looks beautiful in filtered sunlight.
Detailed Instructions
Materials
- Heavyweight cotton rag paper (300gsm or higher)
- Stylus embossing tool or an empty ballpoint pen
- Compass with a pencil holder
- Pencil (light H grade)
- Standard ruler
- Kneaded eraser
- Light box or sunny window (optional)
- Mousepad or craft foam sheet (for cushioning)
- Paper tape
Step 1: Preparation & Mapping
-
Select your paper:
Choose a thick, soft paper like cotton rag or watercolor paper. The fibers need to be flexible enough to compress without tearing, which creates that lovely deep shadow effect. -
Prepare the workspace:
Place your craft foam or a smooth mousepad on your table. This soft surface underneath is the secret to getting deep, crisp embossed lines later on. -
Establish the center:
Tape your paper corners down lightly so it doesn’t shift. Measure and mark the exact center point on your paper with a very faint pencil dot. -
Draw the seed pattern:
Lightly sketch a small cross in the center. Then, draw four right angles in the corners of that cross, and a dot in the center of each quadrant. This ‘seed’ is the foundation of a classical 7-circuit labyrinth. -
Draft the concentric circles:
The image shows a circular adaptation of the labyrinth. Using your compass, lightly draw 7 concentric circles radiating from your center point to guide your path width.
Fixing Shallow Lines
If your lines aren’t showing up well, your surface is too hard. Stack two pieces of felt or a folded towel under the paper to allow for deeper indentations.
Step 2: Creating the Path
-
Connect the central seed:
Using your faint pencil lines as a guide, begin connecting the points of your seed pattern. Connect the top of the vertical crossline to the top-right corner angle with a smooth arc. -
Extend the arcs:
Move to the next point available to the left (top of the left angle) and draw a larger arc to connect it to the corresponding point on the right side. -
Complete the sketched layout:
Continue spiraling outward, connecting left-side points to right-side points using your concentric guide circles to keep the spacing even. Don’t press hard; these are just guides. -
Check for errors:
Before embossing, trace the path with your finger. A proper unicursal labyrinth has one single path leading to the center with no dead ends.
Make It Glow
Flip the paper over and rub a tiny amount of white wax crayon over the raised lines on the back. When backlit, the labyrinth will appear to glow softly.
Step 3: Embossing the Labyrinth
-
Switch to the stylus:
Place your paper back onto the foam mat if you moved it. Select a medium-sized ball stylus tool. If you don’t have one, an empty ballpoint pen works surprisingly well. -
Begin the primary indentation:
Start tracing over your pencil lines with firm, even pressure. I prefer to pull the tool toward me rather than pushing it, which gives me more control over curves. -
Maintain consistent depth:
Go slowly around the curves. The goal is to compress the paper fibers down into the foam mat, creating a deep groove. -
Refine the center:
Pay special attention to the central goal. Use a smaller stylus tip here if needed to keep the tight inner circles distinct and sharp. -
Clean up the guides:
Once the entire design is embossed, take your kneaded eraser and gently dab or roll it over the paper to lift the graphite guide lines. Don’t rub, as this might roughen the paper surface. -
Deepen the lines:
For a more dramatic effect, go over the lines a second time with your stylus. This second pass polishes the groove floor, making it catch the light better.
Place your finished labyrinth near a window where the shifting daylight will animate the shadows throughout the day
Mirror-Symmetry Maze
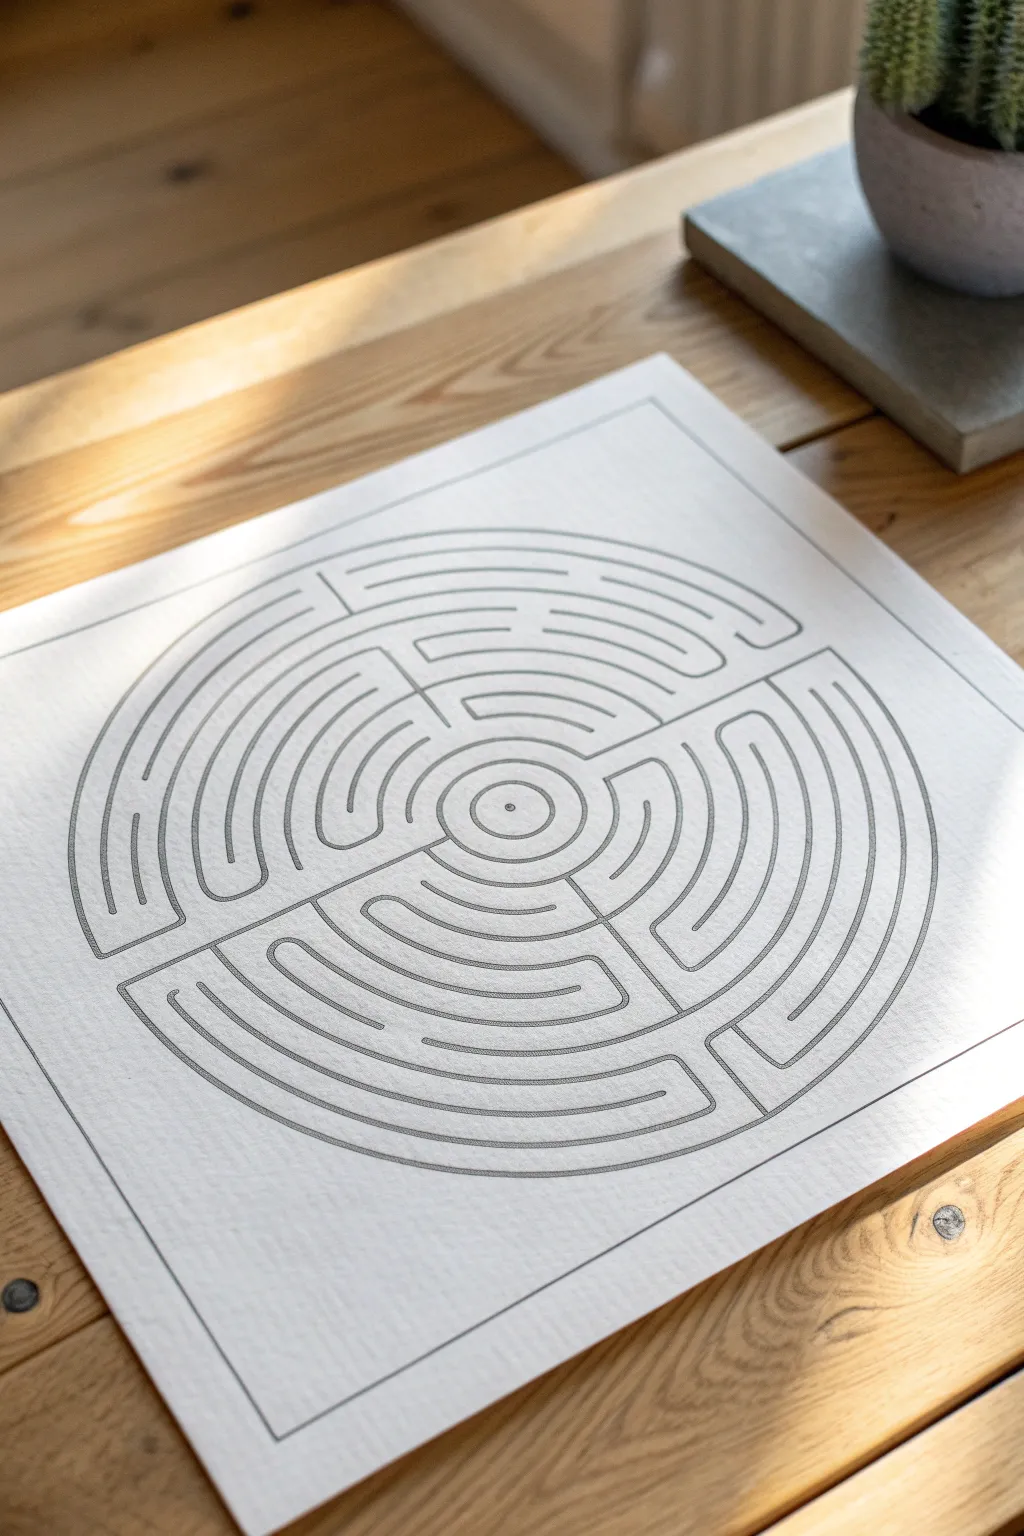
This elegant project features a classical circular maze design composed of four symmetrical quadrants, drawn with precise ink lines on high-quality textured paper. By mastering geometric construction and steady line work, you will create a meditative piece of art that invites the eye to wander.
Step-by-Step
Materials
- Square sheet of heavy textured paper (e.g., watercolor or mixed media paper, approx. 12×12 inches)
- Pencil (HB or 2H)
- Large compass with extension arm
- Fine-point black drawing pen (0.3mm or 0.5mm)
- Thicker black drawing pen (0.8mm or 1.0mm) for borders
- Long ruler (18 inches)
- Protractor
- Eraser (kneaded preferred)
Step 1: Setting the Geometry
-
Finding the center:
Begin by placing your square paper on a flat surface. Use your ruler to lightly draw diagonal lines from corner to corner to pinpoint the exact center of the page. -
Establish the outer boundary:
Using your compass set to the center point, draw a large outer circle that leaves about a 1.5-inch margin from the edge of the paper. This will define the maximum size of your maze. -
Define the quadrants:
Draw a vertical line and a horizontal line through the center point, dividing your circle into four equal pie-shaped quadrants. Keep these pencil lines extremely light, as they are guides only. -
Drafting concentric rings:
Adjust your compass to create a series of concentric circles moving inward from the outer boundary. Space them evenly—about 1cm or 1/2 inch apart depending on your paper size—until you reach a small central open area. -
The central goal:
In the very center, draw three small concentric circles to form the ‘target’ or end goal of the maze.
Uneven Circles?
If your compass slips, don’t panic. Thicken the specific line segment slightly to hide the wobble. Organic variations often look intentional in hand-drawn art.
Step 2: Designing the Path
-
Marking the entrance:
On the left side of the vertical axis, at the outermost ring, erase a small segment to create the entry point. I find marking this clearly right away prevents confusion later. -
Drafting the barriers:
This style of maze relies on ‘walls’ that block the circular paths. Lightly sketch short radial lines that connect two ring layers at a time, staggering them across different quadrants. -
Checking the symmetry:
Ensure that the barriers in the top-left quadrant mirror those in the bottom-left, and similarly for the right side. The design works best if it feels balanced but not perfectly identical on all four sides. -
Connecting the flow:
Trace the path with your finger or a dry paintbrush. Make sure there is a continuous single line solution that travels through all quadrants before reaching the center, adjusting your pencil barriers if you hit a dead end prematurely.
Step 3: Inking the Maze
-
Inking the center:
Switch to your fine-point pen. Start by carefully tracing the small central target circles. A steady hand is crucial here, so breathe slowly as you curve the pen. -
Tracing the path walls:
Begin inking the main circular paths. Do not ink the entire circle at once; stop whenever you hit a ‘barrier’ mark you drafted earlier. -
Adding the turns:
At the barriers, draw the U-turns that connect one ring to the next. Keep these curves smooth and rounded rather than sharp right angles to maintain the fluid aesthetic. -
Thickening the perimeter:
Once the internal maze is inked, switch to your thicker pen to trace the outermost circle, giving the labyrinth a solid container. -
Drawing the square border:
Use your ruler and the thicker pen to draw a square frame around the entire maze, parallel to the paper’s edges.
Go Golden
For a luxurious twist, trace the single ‘correct’ solution path with a metallic gold gel pen or gold leaf paint after the black ink is dry.
Step 4: Finishing Touches
-
Adding the inner frame:
Draw a second, slightly smaller square frame inside the first one, creating a double-line border effect that adds elegance to the composition. -
Erasing guidelines:
Wait at least 15 minutes for the ink to fully cure. Then, gently erase all pencil marks using a kneaded eraser to lift the graphite without damaging the paper texture. -
Checking line weight:
Inspect your lines. If any sections look thin or uneven, go over them carefully designed to make the path walls look consistent and bold.
Display your finished labyrinth flat on a table or framed on a wall to encourage a moment of mindfulness for anyone who passes by
BRUSH GUIDE
The Right Brush for Every Stroke
From clean lines to bold texture — master brush choice, stroke control, and essential techniques.
Explore the Full Guide
Isometric 3D Block Maze
This striking isometric maze creates a mesmerizing 3D optical illusion using interlocking block pathways. The muted color palette of ochre, teal, and terracotta gives it a sophisticated, retro-modern feel against the textured handmade paper.
How-To Guide
Materials
- Heavyweight handmade cotton rag paper (rough texture)
- Pencil (HB or H for light lines)
- Fine liner pen (0.3mm or 0.5mm, black)
- Ruler or triangle set square
- Colored pencils or fine-tip markers (ochre yellow, terra-cotta red, slate green/teal)
- Eraser (kneaded preferred)
- Isometric grid paper (optional, for drafting)
Step 1: Planning and Drafting
-
Draft your concept:
Before touching your final paper, sketch out the maze design on scratch paper or graph paper. This specific design relies on a 4×4 or 5×5 isometric grid structure. Map out the interlocking ‘C’ and ‘L’ shapes so you know exactly where the overlaps occur. -
Prepare the paper:
Tape down the corners of your handmade paper to a flat surface. Handmade paper often has a ‘deckle’ edge and an uneven surface, so securing it ensures your lines stay straight. -
Establish the isometric grid:
Using a ruler and a hard pencil (like an H grade), very lightly draw a faint isometric dot or line grid on your paper. If you don’t want to draw a full grid, mark the three main axes: one vertical, two diagonal at 30 degrees from horizontal. -
Outline the outer boundaries:
Draw the large diamond shape that defines the overall footprint of the block. This will act as the container for your maze. -
Sketch the primary pathways:
Lightly sketch the top faces of the maze walls first. These are the diamond and parallelogram shapes that sit on the ‘roof’ of the structure. -
Add vertical dimensions:
Drop vertical lines down from the corners of your top faces to create the illusion of height. Connect these vertical lines to form the side walls. -
Create the interlocks:
This is the tricky part—erase lines where one block passes ‘under’ another to create the weaving effect. Double-check your draft sketch to ensure the logic of the maze holds up.
Step 2: Inking the Design
-
Trace the structural lines:
Once you are happy with the pencil sketch, take your fine liner pen and carefully trace over the final lines. Use a ruler for every single stroke to maintain that crisp, architectural look. -
Check line weights:
Keep the line weight consistent. If you make a small error, don’t try to thicken the line too much to hide it, as the geometric precision is key to the aesthetic. -
Erase guide lines:
Wait at least 10-15 minutes for the ink to fully dry. Then, gently use a kneaded eraser to lift the graphite grid and sketch lines. Be gentle to avoid rubbing away the paper’s unique texture.
Use an Under-Grid
Since drawing grid lines on rough paper is hard to erase, print a bold isometric grid on plain paper and place it UNDER your handmade paper. Use a light box or window to trace the guide structure.
Step 3: Adding Color and Depth
-
Select your palette:
Choose three distinct colors. I find that a triad of warm yellow-orange, muted red, and cool blue-green works perfectly for a vintage diagram look. -
Color the top faces:
Use the yellow/ochre tone for all the horizontal ‘top’ surfaces. Apply the color lightly and evenly, letting the texture of the paper show through slightly. -
Shade the left-facing walls:
Take your terra-cotta or red pencil and color all vertical surfaces that face toward the left. Consistent lighting direction is crucial for the 3D effect. -
Shade the right-facing walls:
Use the slate green or teal color for all vertical surfaces facing the right. This establishes the ‘shadow’ side and makes the structure pop. -
Deepen the shadows:
Review your coloring. You can go back over the teal and red sections with a second layer of pressure to darken them, increasing the contrast against the lighter yellow tops. -
Final touches:
Inspect the edges where colors meet the black ink lines. If the ink looks a bit faded from the colored pencil wax going over it, carefully re-trace those specific lines to make them crisp again.
Hide Hidden Messages
Design the maze walls to form chunky block letters. You can hide a name or a short word like ‘LOVE’ or ‘EXIT’ within the twists and turns of the isometric blocks.
Step back and admire how the simple colors and geometry transform into a complex structure on the page
Negative-Space Picture Maze
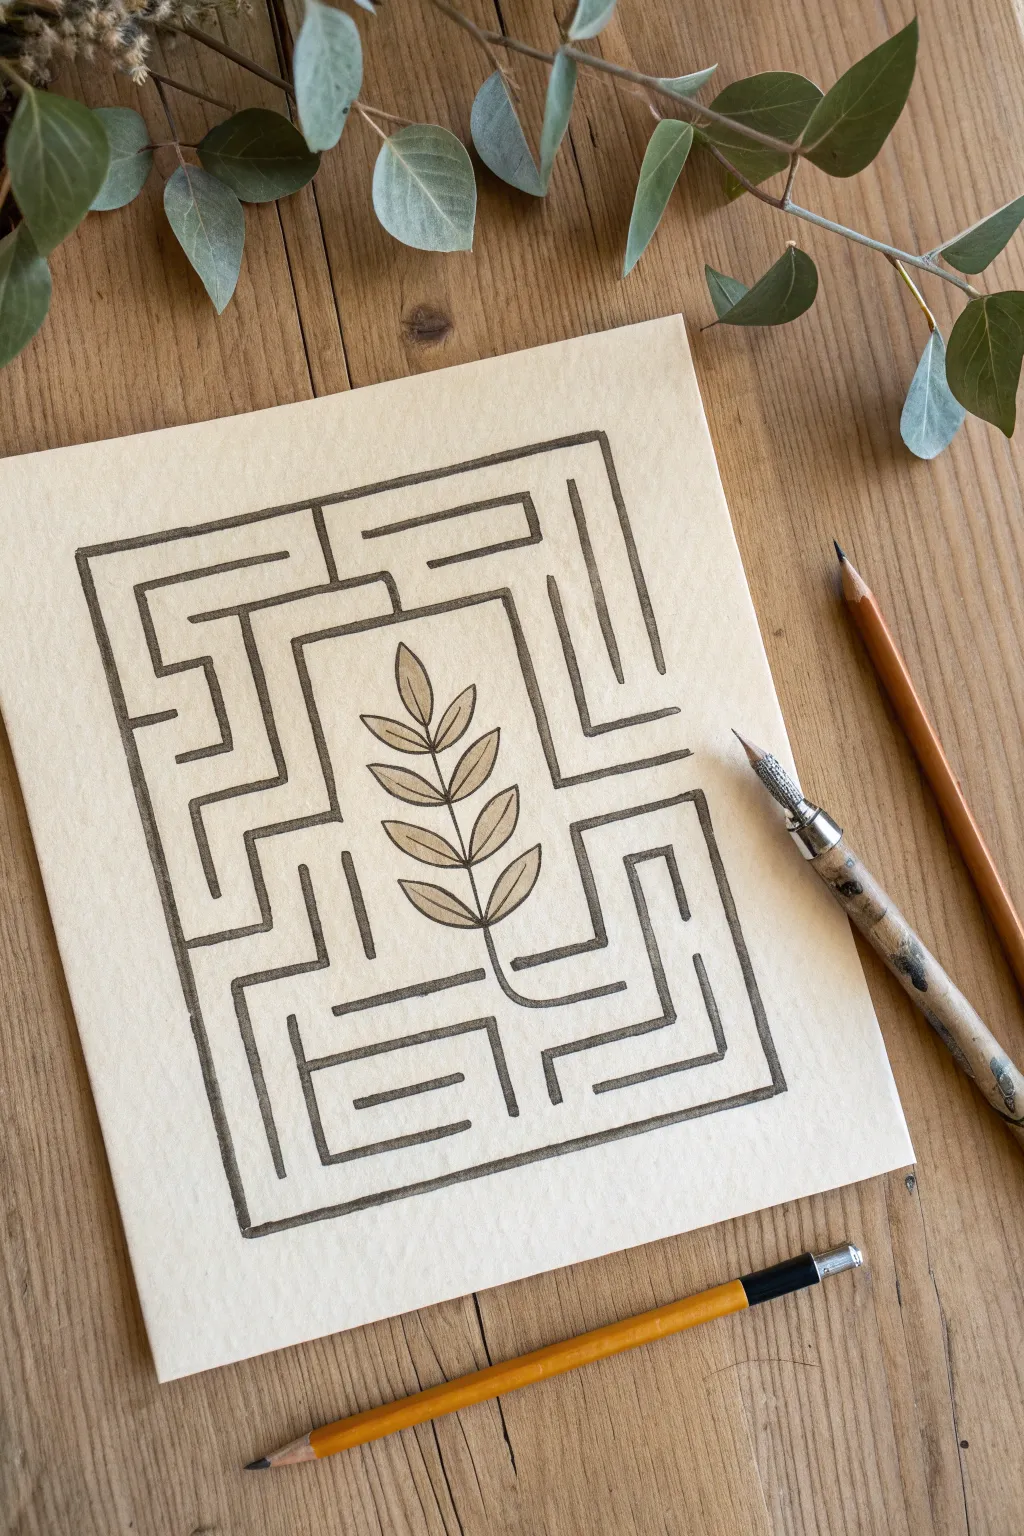
This elegant project combines the structured logic of a maze with organic botanical elements, creating a piece that feels both grounded and growing. By using negative space effectively, the central leaf motif becomes the heart of the puzzle rather than just an decoration.
Detailed Instructions
Materials
- High-quality textured paper (illustration board or heavy watercolor paper)
- HB or 2B graphite pencil
- Ruler or straight edge
- Rubber eraser
- Dip pen (nib holder and nib) or fine liner pen (sizes 05 and 08)
- Black India ink or acrylic ink
- Beige or tan watercolor paint (optional for leaf fill)
Step 1: Planning the Layout
-
Paper preparation:
Begin by selecting a piece of heavy, textured paper. The texture adds character to the ink lines. Cut it to your desired size, perhaps a standard 5×7 or 8×10 inch rectangle. -
Define the boundary:
Using your pencil and ruler, lightly draw a simple rectangular border about an inch from the edge of the paper. This will be the outer limit of your maze. -
Sketch the central motif:
In the center of your rectangle, lightly sketch a vertical stem with paired leaves branching off. This botanical element needs to be prominent, as it will anchor the entire design. -
Connect the stem:
Extend the bottom of the stem so it connects to where you want a maze wall to begin. In this design, the plant isn’t floating; it grows out of the maze structure.
Ink Bleeding?
If ink feathers on textured paper, switch to a pigment-based fineliner or seal the paper with a thin layer of matte medium before drawing.
Step 2: Drafting the Maze
-
Establish the pathways:
Still working lightly with pencil, start drawing the ‘walls’ of the maze. Instead of single lines, draw double lines to create thick walls. Keep the spacing consistent. -
Work from the center out:
Start drafting walls around the leaf motif first. Create a boxy enclosure around the leaves, leaving gaps for the ‘path’ to travel through. -
Create dead ends and turns:
As you expand outward toward the border, purposely add dead ends and complex turns. Use right angles to maintain a geometric feel that contrasts with the organic leaves. -
Check the solution:
Before you commit to ink, trace the path with your eye to ensure there is actually a solvable route from the start point to the center leaf. -
Refine the wall thickness:
Go back over your sketch and ensure the walls are uniform in thickness. I find that walls about 1/8th of an inch thick provide a good visual weight.
Make It Gold
Use metallic gold ink for the central leaf motif or the maze walls. It catches the light beautifully against the matte paper texture.
Step 3: Inking and Finishing
-
Outline the walls:
Dip your pen into the ink (or use your fine liner) and carefully trace the outer edges of your maze walls. Keep your hand steady and move slowly to account for the paper’s texture. -
Outline the leaves:
Ink the outline of the central botanical design. Use a slightly lighter touch here if possible to keep the leaves looking delicate compared to the heavy walls. -
Let the outlines dry:
Allow the outlines to dry completely to avoid smudging the next step. -
Shade the walls:
Instead of filling the walls with solid black, use a shading technique like hatching or stippling if you want texture, or use a slightly diluted ink wash for a grey tone. The example shows a textured, semi-transparent grey fill. -
Add leaf color:
If desired, mix a very watery beige or tan watercolor. carefully paint inside the leaf shapes to give them a subtle warmth that stands out from the grey maze walls. -
Erase pencil marks:
Once the ink and paint are bone dry—wait at least an hour to be safe—gently erase all the underlying pencil graphite. -
Final inspection:
Look for any gaps in your ink lines or areas that need a little more definition and touch them up carefully.
Frame this piece behind glass to protect the delicate paper texture and display your solvable art with pride


Skyline Architecture Maze
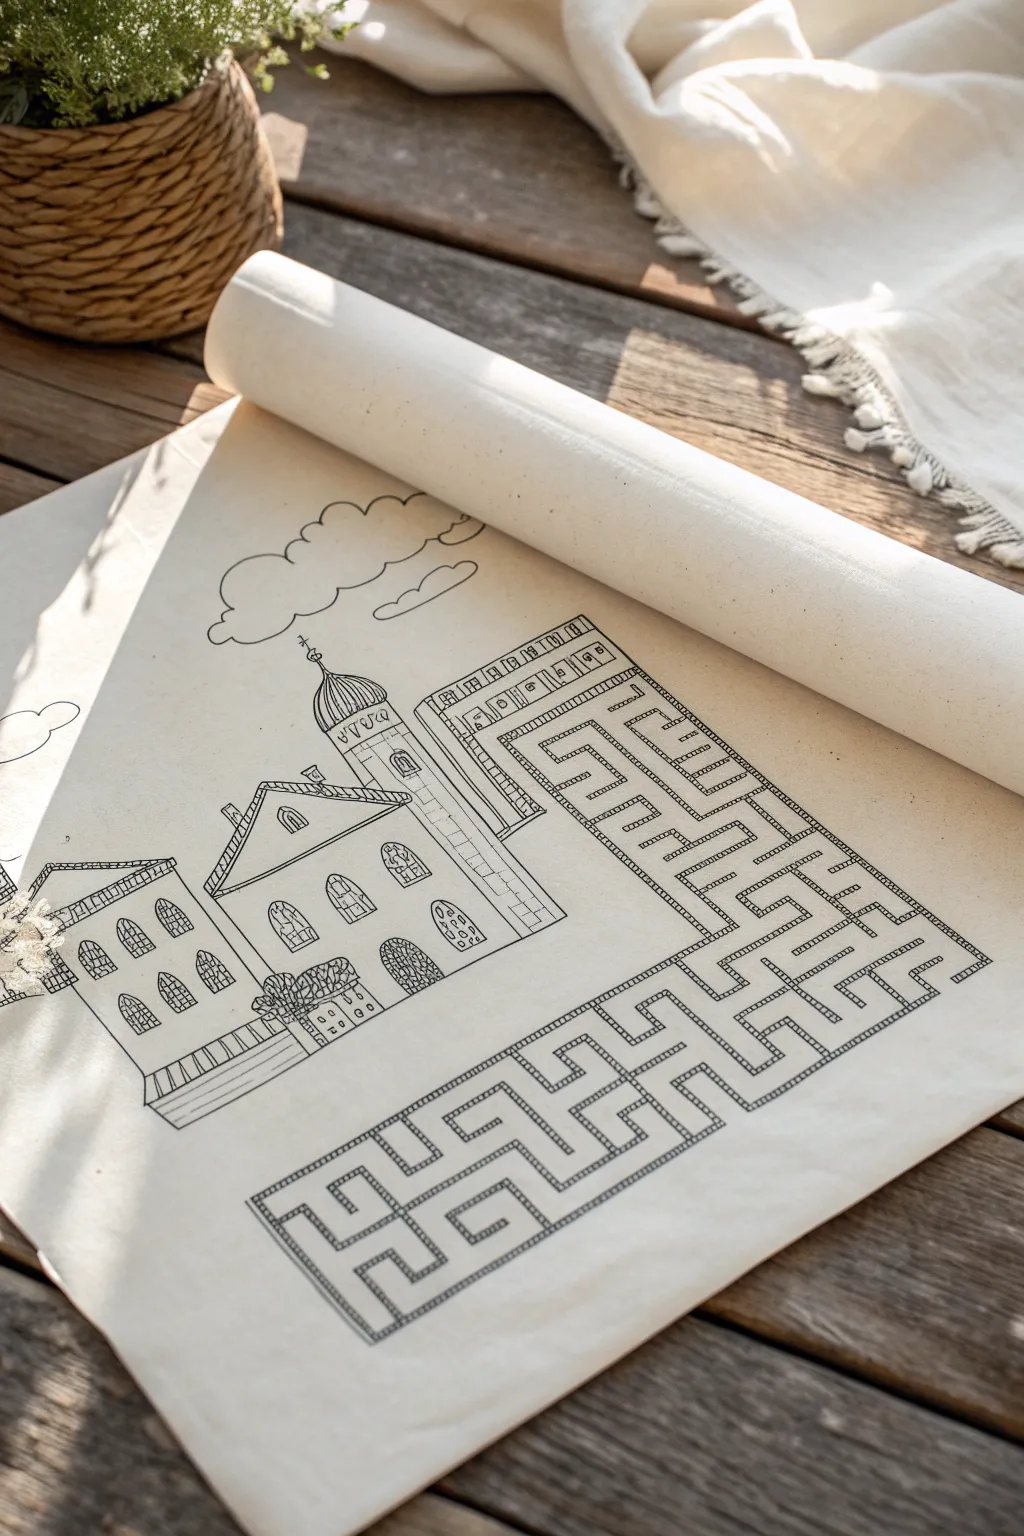
Combine the charm of architectural sketching with the engaging fun of a puzzle in this roll-out maze project. Using a long scroll of heavy paper or canvas, you’ll draft a classic European cityscape where the streets transform into a playable labyrinth.
Step-by-Step Guide
Materials
- Wide roll of mixed-media paper or unprimed canvas (approx. 18-24 inches wide)
- Pencil (HB or H for light sketching)
- Fine-point permanent black marker (0.3mm or 0.5mm)
- Medium-point permanent black marker (0.8mm or 1.0mm)
- Long ruler or T-square
- Eraser (kneaded preferred)
- Reference photos of European architecture (optional)
Step 1: Planning the Layout
-
Prepare your surface:
Unroll a generous length of your paper or canvas on a flat, clean table. You’ll want at least 2-3 feet of length to work with comfortably. I like to weigh down the corners with books to keep it flat while drafting. -
Draft the horizon line:
Using your pencil and ruler, lightly draw a horizon line about one-third of the way up from the bottom edge. This won’t be a straight line in the final art, but it serves as a guide for where the buildings sit. -
Sketch the main buildings:
Lightly sketch the outlines of your Skyline. Focus on simple geometric shapes first: a large rectangle with a triangle roof for the main hall, and a tall, slender tower next to it. Don’t worry about windows yet. -
Outline the maze path:
This is the most critical step. Instead of a normal street in front of the buildings, sketch a wide, winding path that turns into a grid. Extend this grid into an ‘L’ shape that wraps around the side of your buildings. -
Define the maze walls:
Within your maze grid, lightly pencil in the internal walls. Ensure there is a clear ‘Start’ and ‘Finish’ point. The path shown here uses a right-angled, geometric style, distinct from the organic shapes of the clouds.
Clear the Path
Before inking, trace the ‘solution’ path lightly with a colored pencil. This ensures you don’t accidentally draw a wall that blocks the only way out
Step 2: Inking the Architecture
-
Ink the roofs:
Switch to your medium-point black marker. Trace the rooflines of your church and surrounding buildings. Add small details like a cross or weathervane on the highest tower. -
Add architectural details:
Use the fine-point marker to draw the windows. Arched windows work well for the church; rectangular ones suit other buildings. Add cross-hatching or simple grid lines inside some windows to suggest stained glass or panes. -
Texture the facade:
Add bricks and stonework. Don’t draw every single brick; instead, draw small clusters of rectangles near corners and edges to suggest texture without cluttering the page. -
Draw the clouds:
Above the towers, use the medium marker to draw fluffy, scalloped cloud shapes. Keep the lines continuous and smooth to contrast with the rigid lines of the buildings below.
Hidden Treasures
Hide tiny symbols or items within the maze corridors (like keys, cats, or coins) for players to find as they solve the puzzle
Step 3: Constructing the Maze
-
Ink the puzzle border:
Using the ruler and the medium marker, trace the outer boundary of your maze. Ensure straight, crisp lines to define the playing area. -
Create the track style:
To mimic the style in the photo, draw the maze walls as ‘tracks’—meaning two parallel lines with small perpendicular hatches between them, resembling a railroad track or film strip. This adds visual weight to the maze walls. -
Fill in the maze walls:
Systematically go through your pencil sketch, inking the double lines for every wall. Be very careful not to accidentally close off the solution path. -
Add the hatching:
This step requires patience. Go back through your double-lined walls and draw the small hatch marks inside them. This texture makes the maze pop off the page.
Step 4: Finishing Touches
-
Clean up the sketch:
Allow the ink to dry completely to prevent smudging. Take your kneaded eraser and gently remove all remaining graphite lines from the paper or canvas. -
Check for gaps:
Inspect your maze walls. If any hatched lines are too faint, darken them now to ensure the path is easy for the player to see. -
Roll it up:
Once finished, roll the artwork back up loosely. This format makes it easy to store or gift as a portable activity scroll.
Now you have a beautiful, interactive piece of art ready to be unrolled and solved


Have a question or want to share your own experience? I'd love to hear from you in the comments below!