Lanterns are one of my favorite things to draw because you get to mix cozy design details with that magical light and shadow moment. Grab your sketchbook—these lantern drawing ideas will give you plenty of options, from super simple line art to more “wow” lighting studies.
Simple Hanging Lantern Line Art
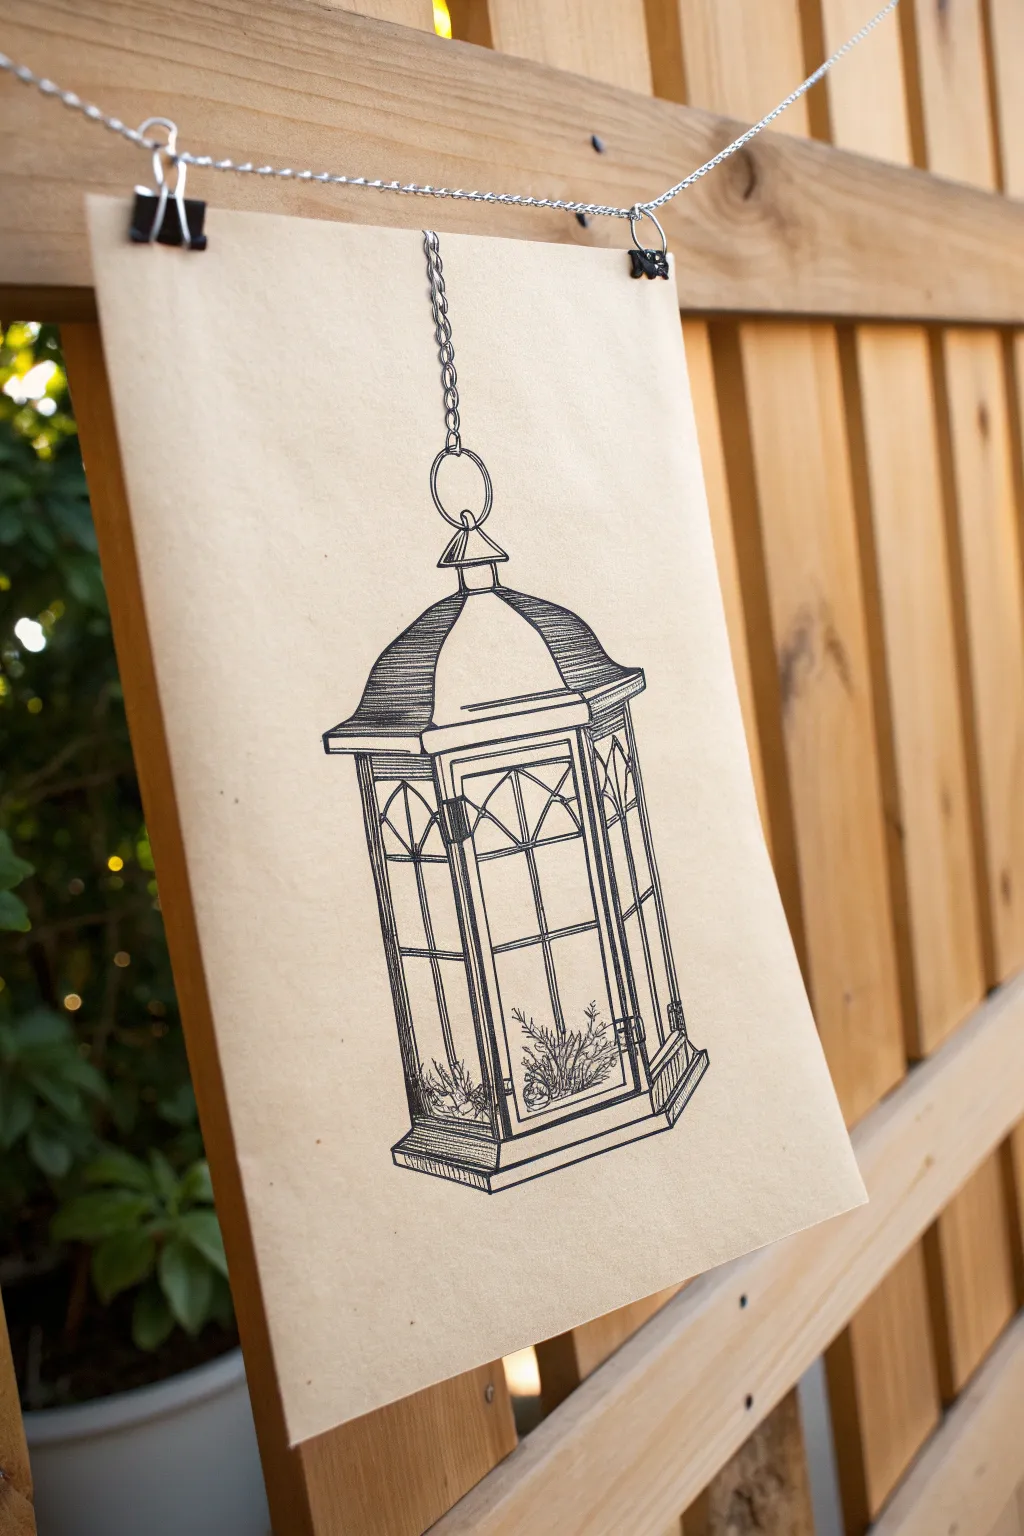
This project captures the charm of a vintage outdoor lantern with crisp black line art on warm, earthy paper. The contrast between the fine ink details and the tan background creates a cozy, rustic aesthetic perfect for seasonal decor.
Step-by-Step
Materials
- Tan toning paper or Kraft paper cardstock
- Fine liner pens (sizes 01, 03, and 05)
- Pencil (HB or H)
- Eraser
- Ruler
- Bulldog clips
- String or twine
Step 1: Drafting the Structure
-
Establish the centerline:
Begin by lightly drawing a vertical centerline down the middle of your paper using a ruler. This will ensure your lantern hangs straight and stays symmetrical. -
Block in the main sections:
Mark horizontal lines to define the top of the roof, the bottom of the roof, the base of the glass panels, and the very bottom foot of the lantern. -
Sketch the roof geometry:
Draw the domed top section first, then flare out the eaves of the roof. The roof has a tiered look, so sketch a wider, flat brim below the dome shape. -
Define the lantern body:
Draw the main vertical beams of the lantern box. Since it’s a hexagonal or multi-sided lantern, draw the front two corners slightly wider apart than the back corners to create perspective.
Wobbly Lines?
If your straight lines aren’t perfect, embrace it! A slightly shaky line adds to the vintage, hand-sketched character. Go over the line again loosely to make it look intentional.
Step 2: Inking the Outline
-
Start with the chain:
Using an 03 pen, draw the chain links coming down from the top edge of the paper. Connect the last link to a sturdy ring loop on top of the lantern’s finial. -
Outline the roof details:
Go over your pencil sketches for the roof. Use the 05 pen for the main outer contours to give them weight, and switch to an 01 pen for the delicate horizontal ridges. -
Ink the structural frame:
Carefully trace the vertical pillars and the horizontal base with the 03 pen. Creating double lines for each pillar adds a realistic sense of thickness to the metal frame. -
Add window panes:
Draw the internal grid of the windows. Sketch the distinctive arched tops within the rectangular frames using a steady hand or a French curve tool if you have one.
Glow Up
Use a white gel pen or white charcoal pencil to add highlights on the glass panes and metal edges. This makes the lantern pop against the tan paper.
Step 3: Shading and Texture
-
Hatch the roof:
To give the roof dimension, use the 01 pen to draw closely spaced horizontal or slightly curved hatching lines on the side panels of the roof roof structure. -
Detail the interior plants:
At the bottom of the glass enclosure, sketch small, grassy sprigs or succulents using quick, upward strokes. Keep these loose and organic to contrast with the rigid metal frame. -
Add depth lines:
Draw vertical hatch marks along the side pillars to suggest shadow and roundness. I find that concentrating these lines on the left side of each pillar implies a consistent light source. -
Strengthen the base:
Use cross-hatching (lines crossing perpendicularly) on the bottom plinth of the lantern to make it look heavy and solid. -
Clean up the drawing:
Wait at least 15 minutes for the ink to fully cure, then gently erase all visible pencil guidelines to reveal the clean artwork.
Step 4: Display
-
Prepare the hanging mechanism:
Attach two black bulldog clips to the top corners of your paper. -
Thread the chain:
Run a silver jewelry chain or rustic twine through the handles of the bulldog clips. -
Hang the piece:
Allow the chain to slack slightly in the middle for a relaxed look, and mount it against a wooden backdrop or wall to complete the rustic presentation.
Now you have a charming piece of hand-drawn decor that brings a little light to any corner of your room

Rustic Camping Lantern Sketch
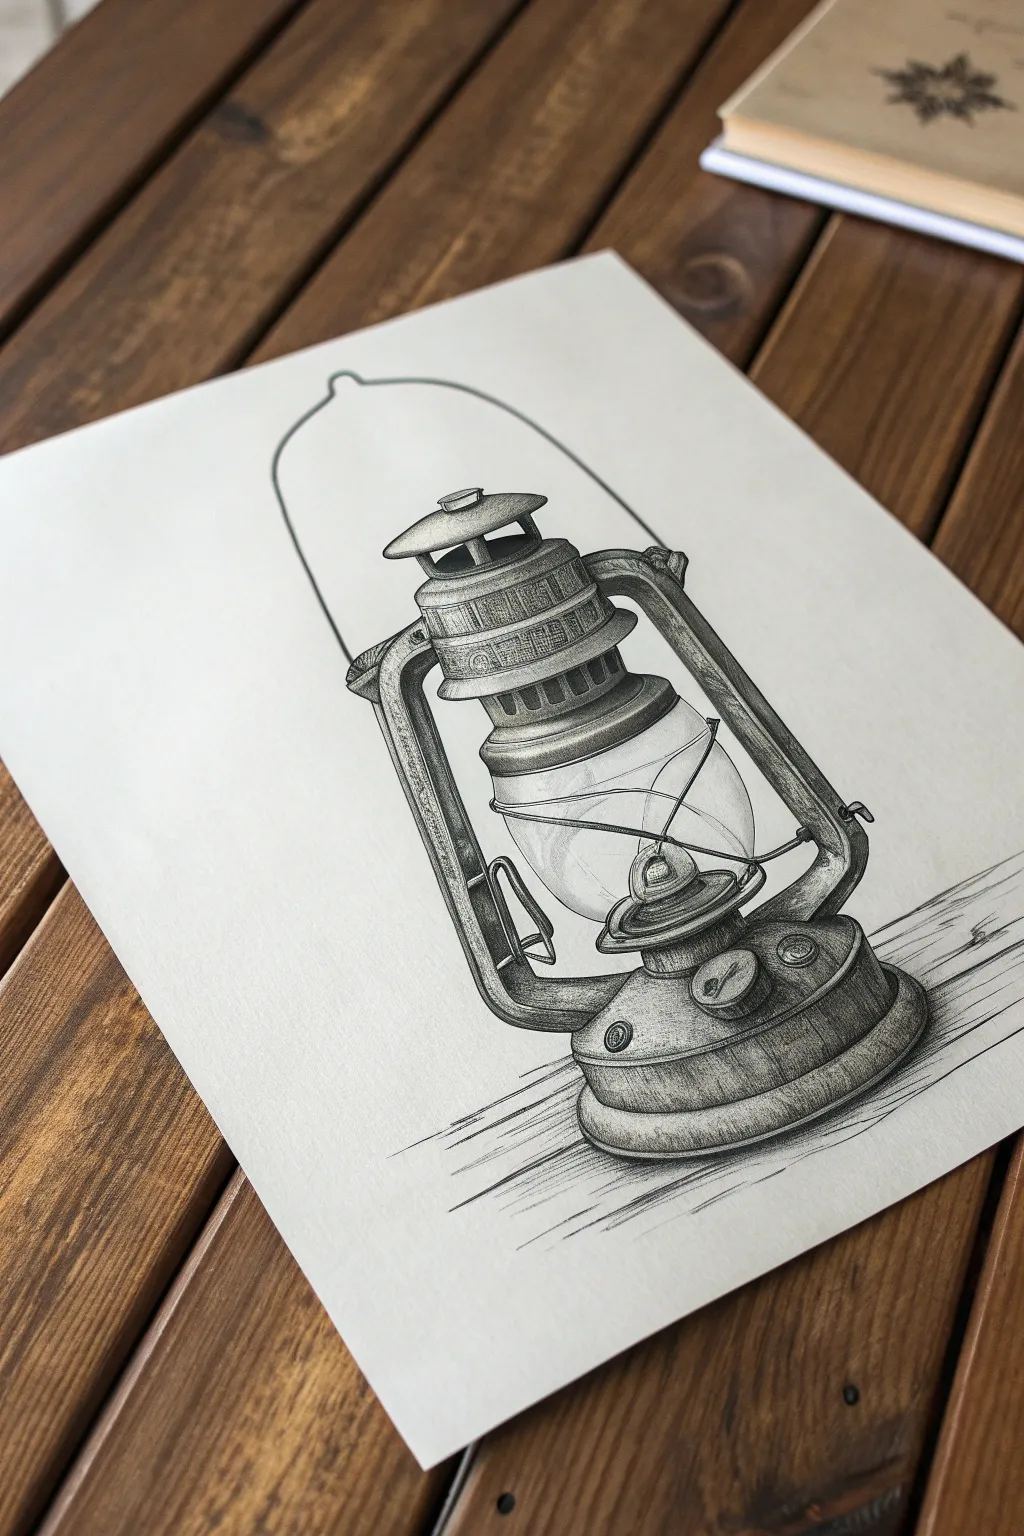
Capture the nostalgic glow of camping with this detailed graphite sketch of a classic kerosene lantern. The artwork features rich shading and realistic textures, creating a striking contrast between the sturdy metal frame and delicate glass globe.
How-To Guide
Materials
- High-quality drawing paper (smooth or vellum finish)
- Graphite pencils (HB for initial lines, 2B and 4B for shading, 6B for deepest shadows)
- Mechanical pencil (0.5mm HB) for fine details
- Kneaded eraser
- Blending stump or tortillon
- Ruler (optional)
Step 1: Constructing the Framework
-
Establish the centerline:
Begin by lightly sketching a vertical centerline down the middle of your page. This is crucial for symmetry. Mark the top and bottom limits of the lantern to establish the overall height. -
Block in major shapes:
Sketch a large oval near the bottom for the fuel tank base. Above that, draw a slightly smaller circle for the glass globe area. At the top, sketch a flattened oval for the chimney cap. Use very light pressure with an HB pencil here. -
Connect the frame arms:
Draw the two side tubes that connect the base to the top assembly. These should curve slightly outwards and angle inwards as they go up, following perspective. Keep them symmetrical around your centerline. -
Add the wire handle:
Sketch a large, sweeping arch for the carrying handle. It should start from the sides of the frame and loop high above the top cap. Note the slight perspective shift where the wire hooks into the frame.
Step 2: Defining the Components
-
Detail the top assembly:
Refine the top section by adding the layers of the ventilation cap. Draw the small horizontal vents or slots. I find it helpful to think of these as stacked, flattened cylinders of varying widths. -
Refine the glass globe:
Outline the permanent shape of the glass bulb. It bulges in the middle and tapers at the top and bottom. Add the thin wire guard that wraps horizontally around the belly of the glass. -
Shape the base tank:
Flesh out the fuel tank at the bottom. It consists of stepped layers—a wider base platform and a slightly narrower upper section. Draw the circular fuel cap on the right side of the tank’s shoulder. -
Sketch the lift lever:
On the left side of the frame, draw the small lever mechanism used to lift the glass. This adds a nice technical detail to the piece.
Symmetry Struggles?
If the lantern looks lopsided, measure the distance from the centerline to the outer edge on both sides at several points (top, middle, base) to ensure they match perfectly.
Step 3: Shading and Texture
-
Establish light source:
Decide on a light source coming from the upper left. This means your darkest shadows will fall on the right side of the lantern and underneath the prominent rims. -
Shade the metal top:
Using a 2B pencil, begin shading the metal cap. Use vertical strokes to mimic the curvature. Leave thin strips of white paper as highlights on the left edges of the cylindrical shapes to show metallic reflection. -
Render the glass:
Keep the glass globe very light. Only darken the very edges where the glass is thickest. Draw faint, curving reflections across the surface to suggest transparency rather than solidity. -
Darken the frame arms:
Apply heavy shading to the side tubes. Use a 4B pencil to get dark values on the inside edges and shadow side. Create a slightly grainy texture here to suggest aged iron or stamped steel. -
Detail the base:
Shade the fuel tank using curved hatching strokes that follow the round form. Build up the tone gradually, making the bottom right edge the darkest area to weigh the object down. -
Enhance contrast:
Switch to your 6B pencil. Look for the deepest crevices—under the cap, inside vents, and beneath the wire guard. Darken these spots significantly to make the drawing pop.
Make It Antique
Add tiny patches of stippling (dots) or irregular cross-hatching to the metal parts to mimic rust spots and heavy patina. This adds character to the ‘rustic’ theme.
Step 4: Final Touches
-
Ground the lantern:
Sketch some rough, directional lines underneath the base to suggest a wooden table surface. These don’t need to be perfect; they just give the lantern a place to sit. -
Clean up highlights:
Use your kneaded eraser to lift off graphite in specific areas, creating sharp highlights on the metal rim of the fuel tank and the top cap. This is what makes the metal look convincing. -
Sharpen the outlines:
Go over the main structural lines with a mechanical pencil or a freshly sharpened HB to give the drawing a crisp, finished look.
Now step back and admire the rugged, metallic weight of your finished lantern sketch


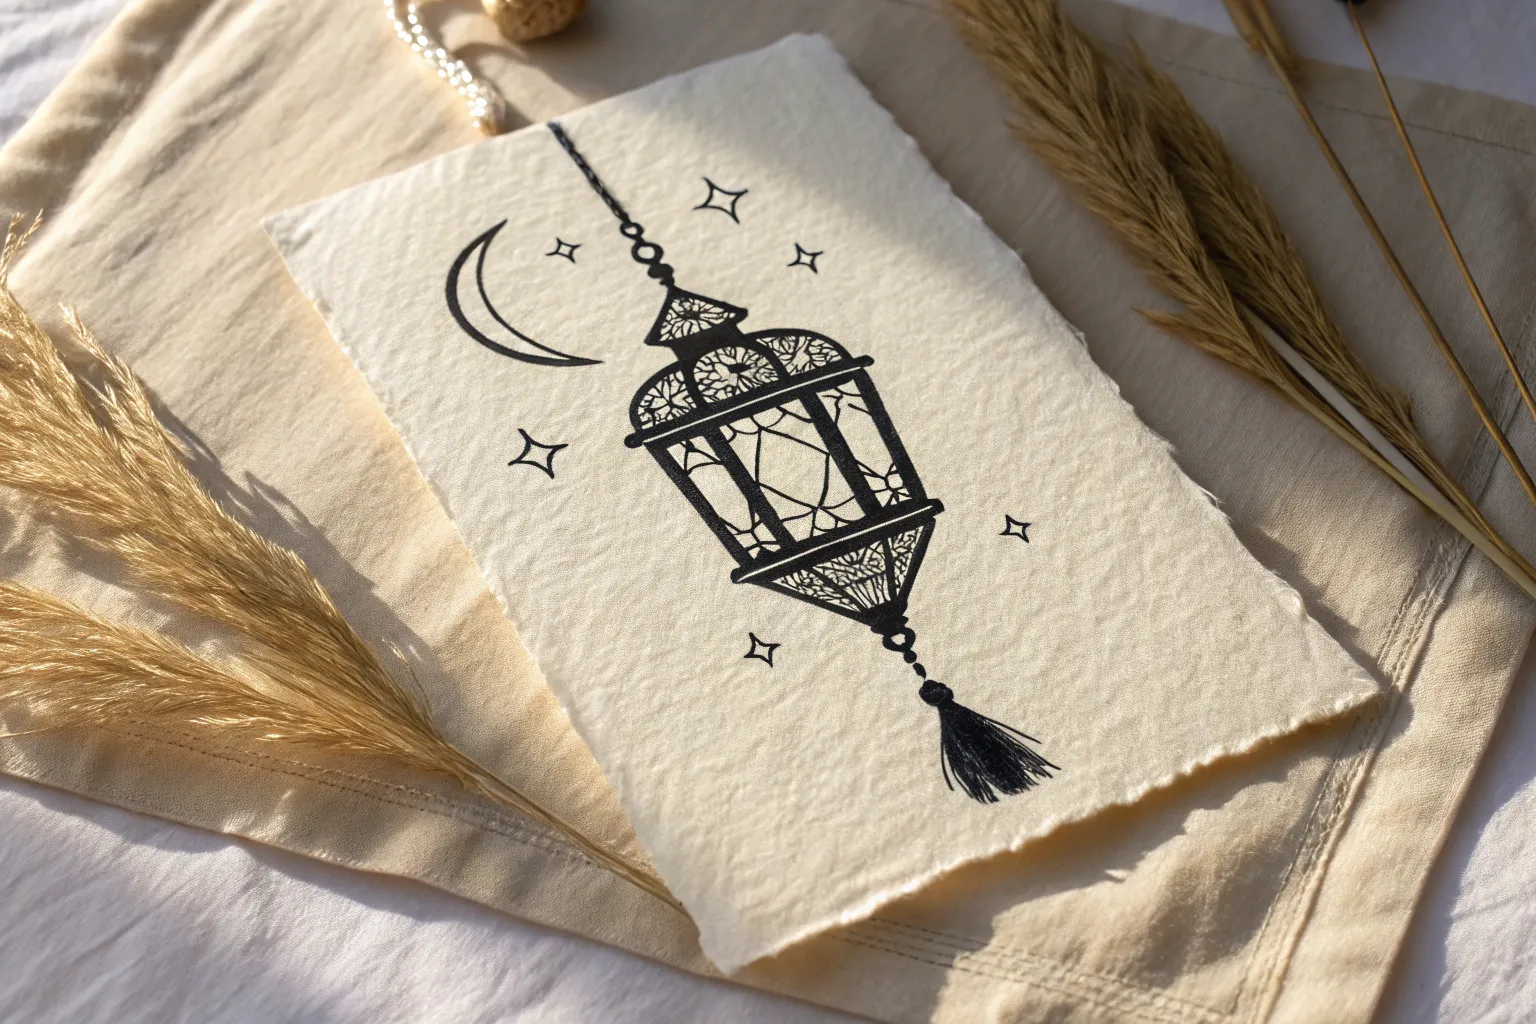
Ornate Ramadan-Style Lantern Scene
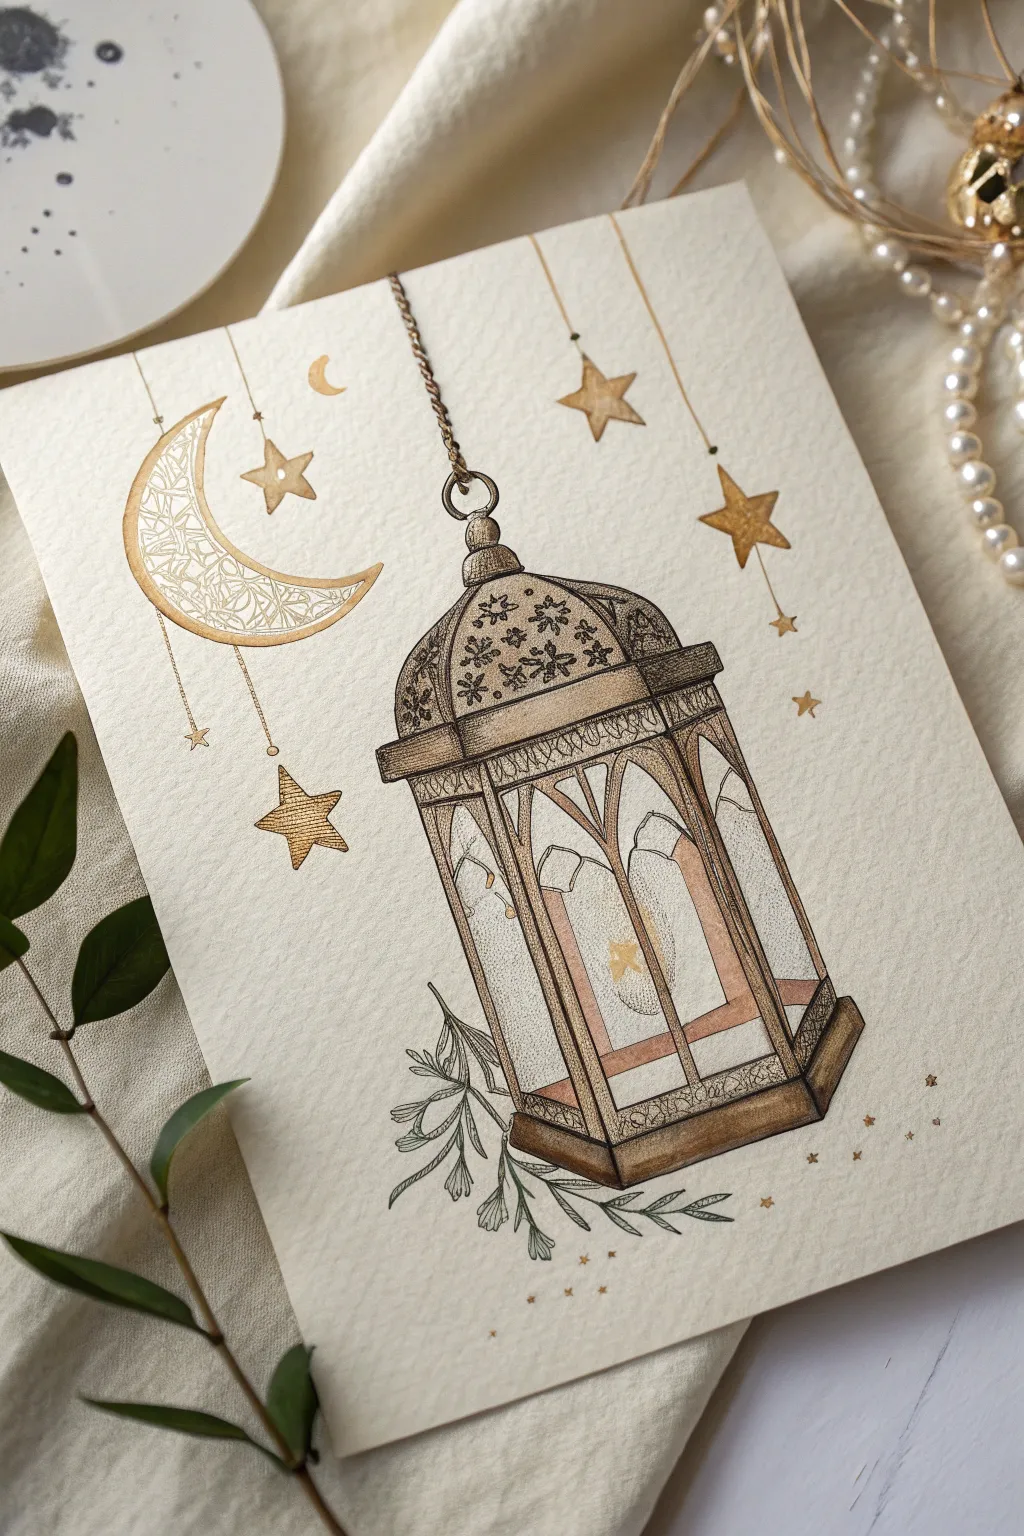
This elegant artwork captures the spirit of Ramadan with a beautifully detailed lantern hanging amidst celestial charms and delicate foliage. Using fine liners and a touch of gold, you’ll create a piece that feels both vintage and magical.
Step-by-Step Tutorial
Materials
- Cold press watercolor paper or heavy drawing paper (A5 or similar)
- Fine liner pens (sizes 0.05, 0.1, and 0.3, black or dark sepia)
- Pencils (HB for sketching)
- Gold watercolor paint or gold metallic marker
- Brown/Sepia colored pencils or watercolor markers
- Ruler
- Eraser
Step 1: Planning and Sketching
-
Establish the composition:
Begin by lightly sketching a central vertical line to anchor your lantern. To the left, sketch a large crescent curve for the moon. Scatter a few small star shapes around the moon and to the right of the lantern. -
Structure the lantern box:
Sketch the main body of the lantern as a tall, hexagonal structure. Use perspective lines that converge slightly downward to give it dimension. Divide the body into glass panels with vertical beams. -
Add the dome and base:
Draw a rounded dome shape on top of the main body, topped with a small finial and a ring. Sketch a wider base at the bottom to ground the structure. -
Sketch hanging elements:
Using a ruler, draw straight vertical lines coming down from the top edge of the paper to hold the lantern, moon, and stars. Add a few sprigs of leaves curling up from underneath the lantern’s base.
Uneven Ink Lines?
Don’t panic if your straight lines wobble. Going over the line a second time with a slightly thicker weight can mask the error and add character to the drawing.
Step 2: Inking the Details
-
Outline the main shapes:
Switch to a 0.3 fine liner to ink the main structural lines of the lantern, the crescent moon, and the larger stars. Keep your hand steady but allow for slight organic variations to maintain the hand-drawn feel. -
Detail the dome:
Use a 0.05 fine liner to draw intricate floral or geometric patterns on the dome. Small flower motifs work beautifully here. Keep the lines very delicate. -
Texture the moon:
Inside the crescent shape, draw a complex mosaic or cracked-glass pattern. I like to use irregular geometric shapes that fit together like a puzzle, leaving a thin border around the edge. -
Add chain details:
Ink the hanging chain for the lantern by drawing small, interlocking oval loops along your pencil guide line. For the stars and moon, draw simpler straight strings with tiny beads or knots at intervals.
Step 3: Shading and Coloring
-
Stipple shading:
Using your finest pen (0.05), add stippling (tiny dots) to the shadowed areas of the lantern—specifically under the rim of the dome and along the sides of the vertical pillars. This creates depth without heavy lines. -
Color the antique metal:
Use a sepia or light brown colored pencil to shade the metal parts of the lantern. Apply more pressure at the edges to create a rounded, cylindrical effect on the pillars and dome. -
Create the glass effect:
Lightly shade inside the window panels with a very pale grey or cream pencil, leaving the center mostly white to represent light reflecting off glass. Draw faint reflections of inner arches to suggest transparency. -
Add the inner glow:
In the center of the lantern, draw a small candle shape or a simple starburst of light. Color this area gently with a warm yellow or gold pencil to suggest a soft glow from within.
Add Real Sparkle
For a magical 3D effect, glue tiny rhinestones or sequins onto the center of the stars or the lantern’s hanging points after the drawing is complete.
Step 4: Finishing Touches
-
Apply gold accents:
Using gold watercolor or a metallic marker, carefully fill in the moon’s mosaic pattern, the stars, and selected highlights on the lantern’s metalwork. This brings a festive twinkle to the piece. -
Ink the foliage:
Go over your leaf sketches at the bottom with a 0.1 pen. Use quick, confident strokes for the stems and add vein details to the leaves. You can leave them monochrome or add a very subtle wash of desaturated green. -
Refine the background:
Scatter tiny dots or minuscule star shapes around the main elements to fill empty space and balance the composition. -
Clean up:
Wait until you are absolutely certain all ink and paint is dry, then gently erase your initial pencil guidelines to reveal the clean artwork.
Hang your finished illustration or gift it to bring a touch of warm light to someone’s home


Festival Round Lanterns on Branches
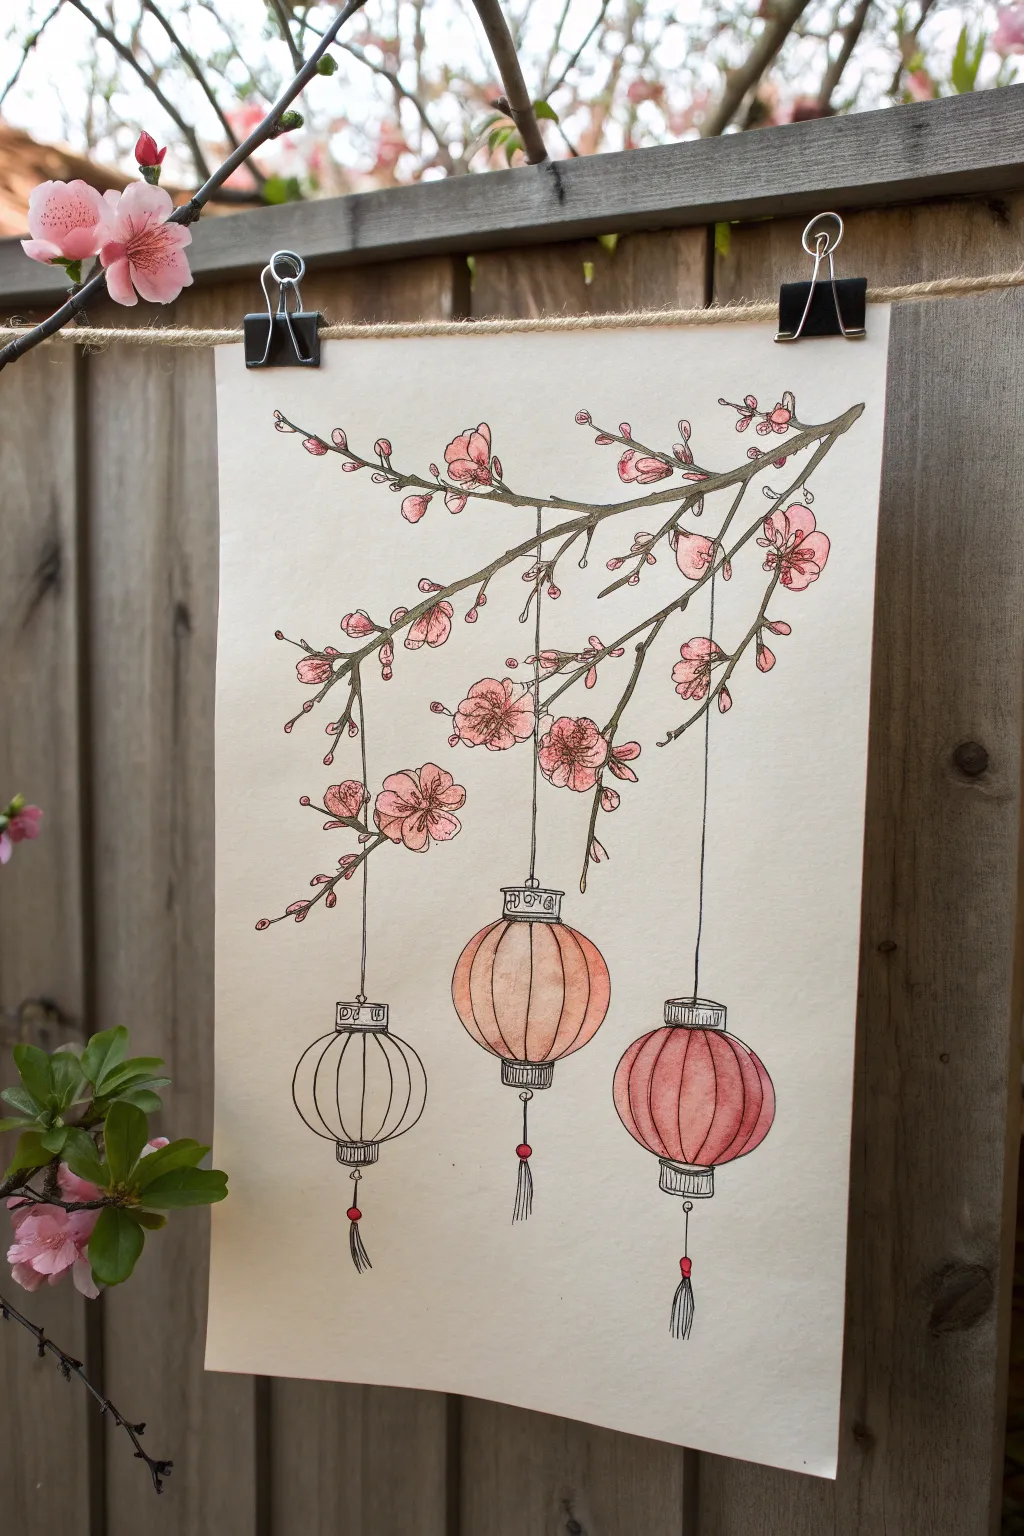
Capture the graceful beauty of the Lunar New Year with this delicate ink and watercolor illustration. This project combines flowing botanical branches with structured paper lanterns for a balanced, festive composition.
Step-by-Step
Materials
- Hot press watercolor paper (smooth texture)
- Fine liner pens (black, sizes 0.1 and 0.3)
- Watercolor paints (pink, peach, warm brown, red)
- Round watercolor brushes (size 2 and 4)
- Pencil (HB or 2H)
- Kneaded eraser
- Ruler
Step 1: Planning the Composition
-
Map out the branch:
Begin with a very light pencil sketch. Draw a main branch sweeping down from the top right corner towards the middle left. Add secondary twigs branching off in jagged, natural angles. -
Place the lanterns:
Use a ruler to draw three vertical lines dropping down from different points on the branch. These will be the strings. At the end of each string, lightly sketch a circle for the lantern body. -
Sketch the flowers:
Along the branches, sketch small circles and ovals to represent where the cherry blossoms and buds will go. Group them in clusters of two or three for a natural look.
Step 2: Inking the Details
-
Outline the blossoms:
Switch to your 0.1 fine liner. Carefully trace your flower sketches, adding five petals to the open blooms and detailing the centers with tiny stamens. Keep your lines slightly broken for a delicate feel. -
Define the branches:
Outline the wooden branches using a slightly shaky hand to imitate the rough texture of bark. Add small knots and bumps where the twigs diverge. -
Structure the lanterns:
Draw the lanterns more firmly. Create the top and bottom caps with small rectangles. Draw curved vertical lines connecting the top to the bottom to create the ribbed paper effect. -
Add the tassels:
At the bottom of each lantern, draw a small bead and a flowing tassel. Use quick, downward flicks of the pen to mimic the thread texture. -
Erase pencil marks:
Wait for the ink to dry completely to avoid smearing. Gently lift all your initial pencil guidelines with a kneaded eraser.
Bleeding Ink?
If your black lines smear when you paint over them, your pen isn’t waterproof. Check the label for ‘archival’ or ‘pigment’ ink. If unsure, do the watercolor first, let it dry, then ink over it.
Step 3: Watercolor Application
-
Paint the branches:
Mix a watery grey-brown. Using your size 2 brush, paint the branches. Let the color fade out near the tips to keep it airy. -
First wash on lanterns:
Choose a warm peach or coral color for the lanterns. Paint curved strokes following the ribbed lines you drew, leaving the center of each segment slightly lighter to create volume. -
Deepen the lantern shadows:
While the first layer is damp, drop a slightly darker red or orange into the sides of the lanterns to make them look rounder and three-dimensional. -
Color the blossoms:
Using a very pale pink, wash over the flower petals. I prefer to keep this quite loose, sometimes coloring outside the lines slightly for an artistic effect. -
Define flower centers:
Once the pale pink is dry, maximize contrast by dabbing a tiny dot of darker pink or magenta into the center of each open bloom. -
Unfinished aesthetic:
To match the reference image exactly, leave the leftmost lantern uncolored (just ink). This creates a striking artistic choice that highlights your drawing skills. -
Final tassel details:
Use a pop of bright red for the small bead above the tassel strings. Keep the tassel threads mostly white or very faintly grey to separate them from the vibrant bead.
Add Metallic Flair
Use gold watercolor or a gold gel pen to trace the rims of the lantern caps or add tiny dots to the flower centers. It adds a subtle shimmer that catches the light beautifully.
Hang your finished illustration with clips to admire the way the lanterns seem to sway in the breeze
BRUSH GUIDE
The Right Brush for Every Stroke
From clean lines to bold texture — master brush choice, stroke control, and essential techniques.
Explore the Full Guide
Garden Stone Lantern in Ink
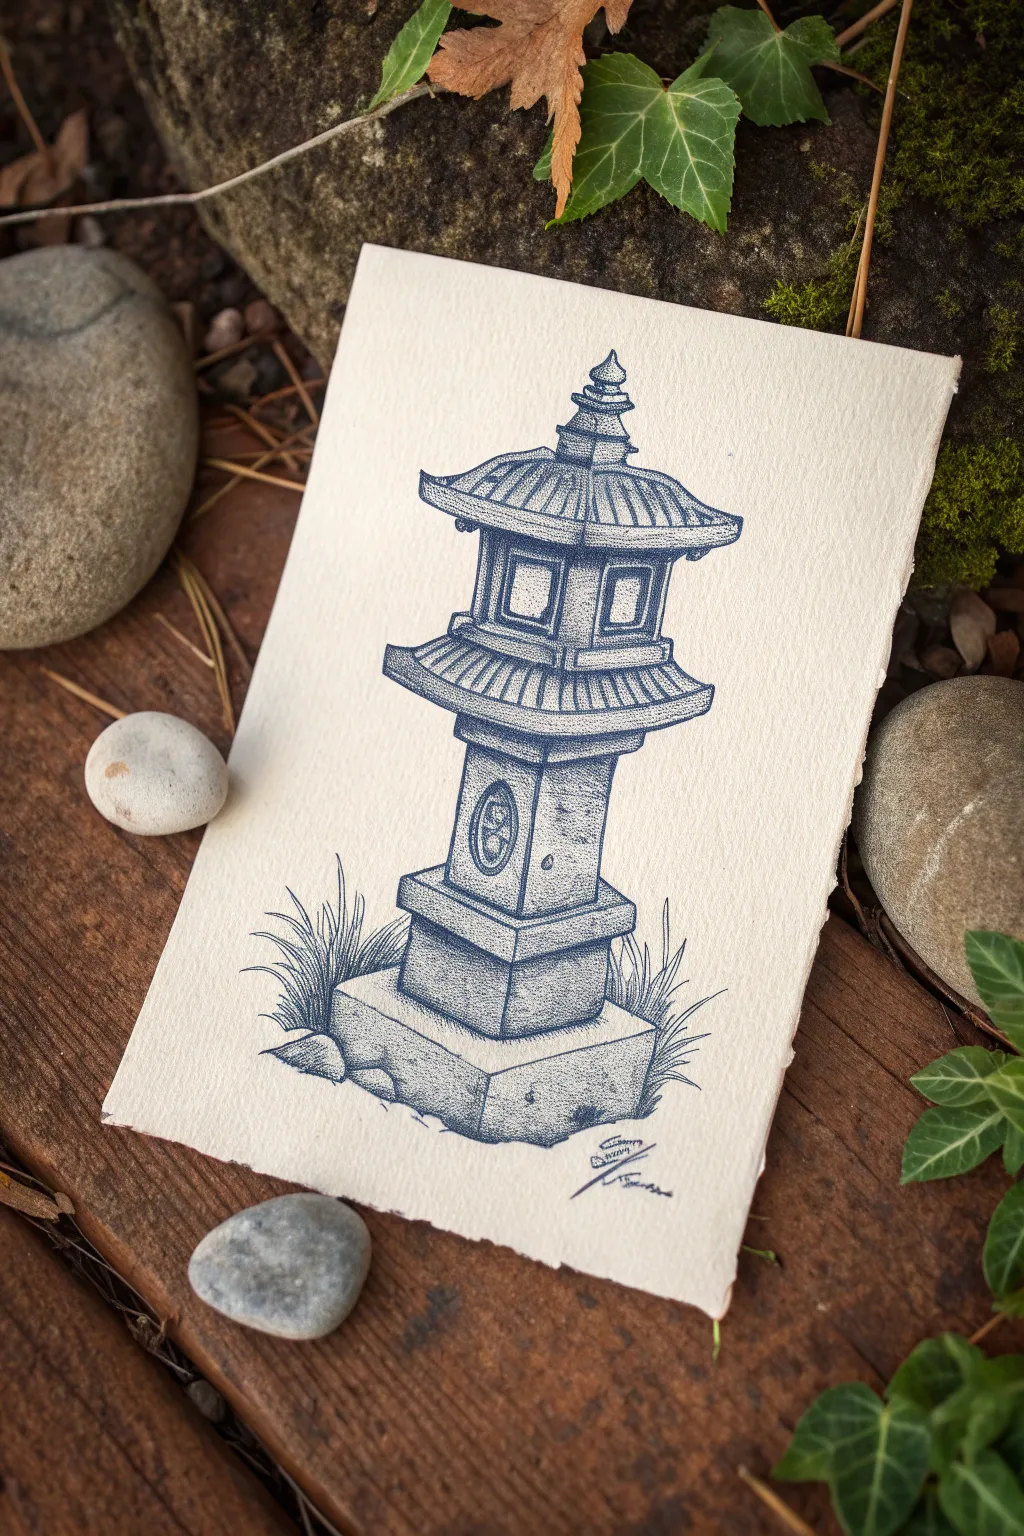
Capture the stillness of a Japanese garden with this meticulous ink drawing, utilizing the stippling technique to build depth and texture dot by dot. The result is a beautifully detailed stone lantern rendered in calming indigo tones on textured paper.
Detailed Instructions
Materials
- Fine liner pens (Indigo/Dark Blue – sizes 0.1, 0.3, and 0.5)
- Heavyweight textured paper (cold press watercolor or cotton rag)
- HB pencil
- Kneaded eraser
- Ruler (clear grid ruler works best)
- Compass or circle template (optional)
Step 1: Sketching the Structural Framework
-
Center Line:
Begin by drawing a faint vertical line down the center of your page to ensure symmetry. This lantern is highly geometric, so this guide is crucial. -
Base Foundations:
Draw the bottommost base as a wide, flattened rectangle in perspective. Stack a slightly smaller, taller block on top of it for the pedestal. -
The Shaft:
Above the base, sketch the central shaft. This section is rectangular with beveled corners, slightly tapering inward as it goes up. -
The Platform and Light Box:
Sketch the middle platform that overhangs the shaft. On top of this, draw the light box (hibukuro), creating spaces for the windows. Use your ruler to keep the vertical lines straight and parallel. -
Roof and Finial:
Add the sweeping roof, curving the corners upward slightly. Top the structure with the decorative finial (宝珠 hōju), which looks like a small spire with a teardrop shape at the peak. -
Grass and Details:
Lightly sketch tufts of grass around the foundation stones to ground the object. Add the round detail on the shaft’s face.
Step 2: Inking Outlines
-
Primary Contours:
Switch to your 0.3 indigo pen. Carefully trace the main structural lines of the lantern. I prefer to use a ruler for the vertical edges but freehand the curved roof lines to keep them organic. -
Window Details:
Define the window openings in the light box. Draw the inner frames to show the thickness of the stone. -
Roof Texture Lines:
Using the 0.1 pen, draw faint, curved lines radiating from the center of the roof to the edges, indicating the ridges or tiles. -
Organic Elements:
Ink the grass with quick, upward flicking motions to mimic blades. Outline the small rocks at the base with irregular, bumpy lines. -
Erase Guides:
Once the ink is completely dry, gently remove all pencil lines with the kneaded eraser so only the clean blue lines remain.
Patience is Key
Stippling takes time. Don’t rush or turn your dots into dashes. Maintain a vertical pen angle and consistent tapping rhythm for perfect, round dots.
Step 3: Shading with Stippling
-
Establishing Light Source:
Decide on a light source (in this image, it’s coming from the top left). This means shadows will fall heavily on the right sides and underneath overhangs. -
Base Tone Stippling:
Using the 0.1 pen, start adding dots to the shadowed areas. Keep the dots relatively spaced out initially to create a light mid-tone grey. -
Deepening Shadows:
Switch to the 0.3 pen for darker areas. Concentrate dots densely under the roof eaves and on the right-hand face of the central shaft. The more dots you overlap, the darker the value becomes. -
Texture on the Stone:
Scatter random dots across the illuminated (left) sides of the lantern. Stone is porous, so these sparse dots prevent the lit areas from looking too smooth or manufactured. -
Roof Gradients:
On the roof sections, apply heavy stippling near the center spire, gradually fading out as you move toward the edges. This enhances the conical, customized shape. -
Window Depth:
If the windows are empty, stipple the interior heavily to suggest deep shadow inside the hollow light box. -
Grounding Shadows:
Use your 0.5 pen to create the darkest shadows right where the stone meets the ground and underneath the grass blades. This anchors the drawing so the lantern doesn’t feel like it’s floating. -
Final Adjustments:
Step back and squint at your drawing to check the contrast. Fill in any areas that look too washed out with a few more clusters of dots until the form feels solid and heavy.
Level Up: Aged Stone
Add ‘cracks’ by leaving thin squiggly lines free of dots within shadowed areas, or add tiny patches of moss using a muted green fine liner mixed with the blue.
Sign your work with a flourish near the base and admire the timeless elegance of your stone lantern
Lantern Garland Across the Page
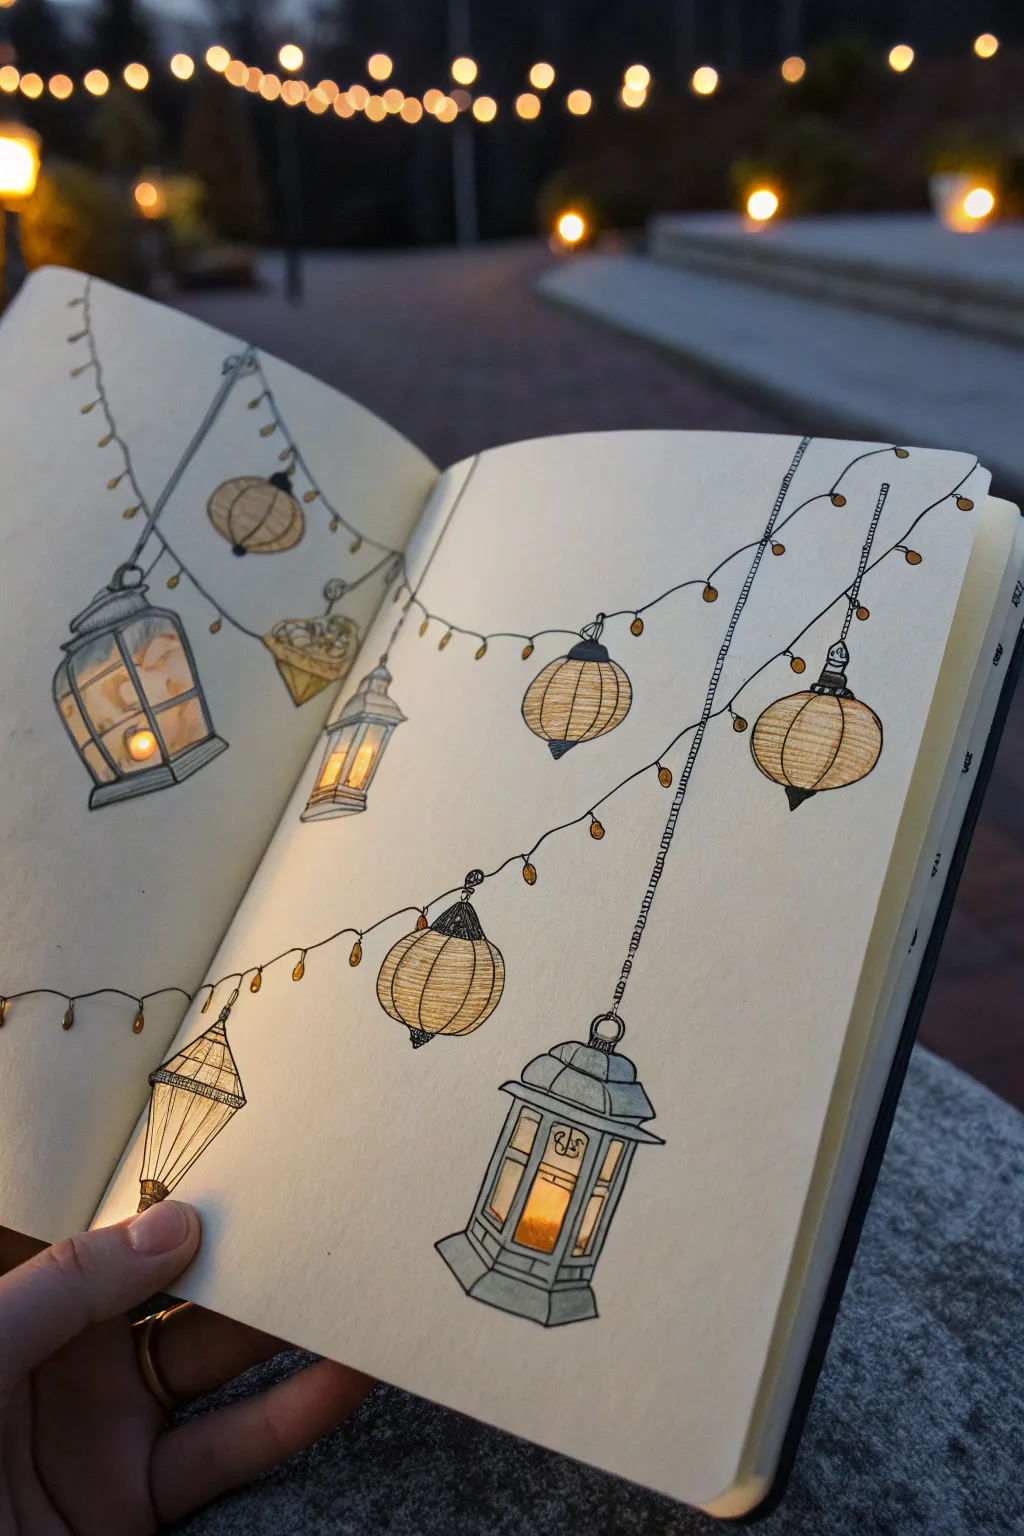
Capture the cozy ambiance of an evening garden party with this illustrative sketchbook spread featuring hanging lanterns. The mix of precise pen lines and warm, glowing colors creates a delightful contrast that seemingly lights up the page.
Step-by-Step Guide
Materials
- Sketchbook with smooth, heavy paper
- Pencil (HB or H)
- Eraser
- Fine liner pens (sizes 0.1, 0.3, and 0.5)
- Colored pencils (yellows, oranges, muted blues/greys)
- Optional: White gel pen for highlights
Step 1: Drafting the Layout
-
Plot the string lines:
Begin by lightly sketching loose, draping lines across both pages of your open sketchbook. Let them swoop down from the top corners and crisscross gently, mimicking how real string lights hang. -
Place the lanterns:
Sketch simple geometric shapes along the lines to represent your lanterns. Use a mix of circles, ovals, and rectangles to vary the lantern styles. Space them out so the composition feels balanced but not rigid. -
Sketch the bulb details:
Add small circles along the main string lines in between the large lanterns to represent tiny fairy light bulbs. Keep these quite small compared to the main fixtures. -
Refine the lantern shapes:
Go back over your geometric placeholders and add structural details. Give the round lanterns ribbed texture, add roofs and bases to the rectangular lanterns, and draw the hooks connecting them to the wire.
Uneven Glow?
If your gradient looks choppy, use a white colored pencil or a colorless blender marketing to smooth the transition between the yellow center and the orange edges.
Step 2: Inking the Outlines
-
Ink the main wires:
Using a 0.3 fine liner, trace over your pencil wire lines. Don’t worry if the line is slightly shaky; it adds to the organic look of a twisted wire. -
Detail the round lanterns:
Switch to a 0.1 pen for the delicate paper lanterns. Draw horizontal lines across the spheres to create the ribbed paper effect, and use vertical hatching near the bottom for shadow. -
Structure the metal lanterns:
Use a 0.5 pen for the heavier metal/glass lanterns to give them weight. Outline the frames clearly, then switch back to the 0.1 pen to draw the inner candle details and glass panes. -
Draw the hanging chains:
For the lower lanterns that hang further down, draw tiny continuous loops or hatched lines to simulate chains, connecting them securely to the main wire. -
Erase pencil marks:
Wait until the ink is completely dry to avoid smudging, then gently erase all the underlying graphite sketches to leave a clean black-and-white foundation.
Background ambiance
To mimic the photo deeply, lightly shade the entire background in a very dark, cool blue, working carefully around your light sources to make the lanterns truly shine.
Step 3: Adding Color and Light
-
Base layer for glass lanterns:
Take a pale grey or muted blue colored pencil and lightly shade the glass areas of the rectangular lanterns. Leave the center uncolored to represent transparency. -
Color the paper lanterns:
Use a warm beige or light ochre pencil to fill in the round paper lanterns. I like to press harder near the edges and leave the center lighter to suggest roundness. -
Create the inner glow:
Using a bright yellow pencil, color the ‘flame’ area inside the metal lanterns and the very center of the paper lanterns. Press firmly to make this the brightest point. -
Radiate the warmth:
Switch to an orange pencil and blend it outwards from the yellow centers. This gradient from yellow to orange mimics the diffusion of candlelight. -
Shade the metal frames:
Use a cool grey or slate blue pencil to shade the metal roofs and bases of the lanterns, adding contrast to the warm light within. -
Color the fairy lights:
Dab small spots of yellow and orange on the tiny bulbs along the string. You might add a tiny halo of yellow around them on the paper to show they are glowing.
Step 4: Final Touches
-
Deepen the shadows:
Go back with your fine liner (0.1) and add extra hatching on the shadowed side of the lanterns (usually the bottom or sides) to make them pop off the page. -
Add reflected light:
If you have a white gel pen, add tiny dots or lines on the metal frames or glass panes to suggest shiny, reflective surfaces catching the light.
Now you have a permanently lit garden party captured right in your notebook to enjoy anytime

PENCIL GUIDE
Understanding Pencil Grades from H to B
From first sketch to finished drawing — learn pencil grades, line control, and shading techniques.
Explore the Full Guide
Stained Glass Pane Lantern Colors

Capture the charm of an antique lantern with this clean, vibrant illustration that mimics the look of stained glass. Using strong outlines and bright, gem-like colors, you’ll create a dimensional piece that glows even without a real flame.
Detailed Instructions
Materials
- Heavyweight white cardstock or mixed media paper
- Pencil (HB) and eraser
- Ruler
- Fine liner pens (0.3mm and 0.8mm, black waterproof)
- Alcohol markers (Warm grays, yellow, red, teal, purple)
- White gel pen or white gouache
- Colored pencils (black and white for shading)
Step 1: Drafting the Structure
-
Establish the central axis:
Start by drawing a light vertical line down the center of your paper using a ruler. This will act as your anchor to ensure the lantern remains symmetrical. -
Box out the main shape:
Draw the main rectangular body of the lantern first. Since we are viewing it from a slight angle, the top and bottom lines of the rectangle should slant slightly downward to the right and left to create a 3D perspective. -
Add the roof and base:
Sketch a trapezoid shape on top for the roof, followed by a smaller box for the chimney vent, and finally a small loop for the handle. Add a slightly wider, flat rectangular base at the bottom for the lantern to sit on. -
Grid the glass panels:
Divide the main body into three vertical sections to represent the glass panes. Within each pane, mark an ‘X’ to find the center, then draw a diamond shape in the middle of each section.
Step 2: Inking and Definition
-
Outline the frame:
Using your thicker 0.8mm fine liner, trace the main structural lines of the lantern—the roof, base, and vertical pillars. Make these lines deliberate and bold to represent heavy metal. -
Detail the glass divisions:
Switch to the thinner 0.3mm pen to outline the diamonds and the triangular sections of glass around them. These lines represent the lead came in stained glass, so they can be slightly delicate. -
Add texture to the metal:
Draw small circles or rivets along the vertical metal bars and the base of the lantern. This simple detail instantly adds industrial character. -
Erase guidelines:
Once the ink is completely dry, thoroughly erase all your pencil sketches and the central axis line to reveal a clean framework.
Uneven marker streaks?
Work quickly while the marker ink is still wet on the paper. This helps layers blend seamlessly. If streaks dry, add texture like dots or cross-hatching to hide them.
Step 3: Coloring the Glass
-
Base coat the yellow glass:
Use a light yellow alcohol marker to fill in the background triangular pieces of the glass panes. Apply the ink smoothly to avoid streaks. -
Color the central diamonds:
Choose vivid distinct colors for the diamonds to make them pop. I like to use purple for the left, red for the center, and teal for the right pane. Leave a tiny sliver of white paper uncolored in the center of each diamond for a highlight. -
Add depth to the glass:
Go over the edges of each colored section with the same marker again to darken the borders, making the glass look like it’s seated deep inside the frame.
Make it glow
Use a white colored pencil to lightly buff the center of the yellow glass panels. This creates a soft, hazy effect that mimics internal candlelight.
Step 4: Shading the Metal
-
Apply base grey tones:
Color the roof, chimney, and base using a medium warm grey marker. Don’t worry about being perfectly even; a little texture looks like weathered metal. -
Darken the shadows:
Use a darker grey marker to shade the right side of the roof curve and underneath the eaves of the lid. This establishes a light source coming from the left. -
Detail the texture:
Take a black colored pencil and lightly scribble over the grey marker on the roof to create a mottled, rusty iron texture. -
Deepen the metal frame:
Color the vertical bars and base frame dark grey or black, being careful not to color over your rivet details. -
Highlight the rivets:
If your rivets got lost in the darkness, use a white gel pen to tap a small dot onto each one, making them look metallic and raised.
Prop your finished lantern illustration on a shelf or windowsill to catch the light
Extreme Close-Up of Handle and Chain
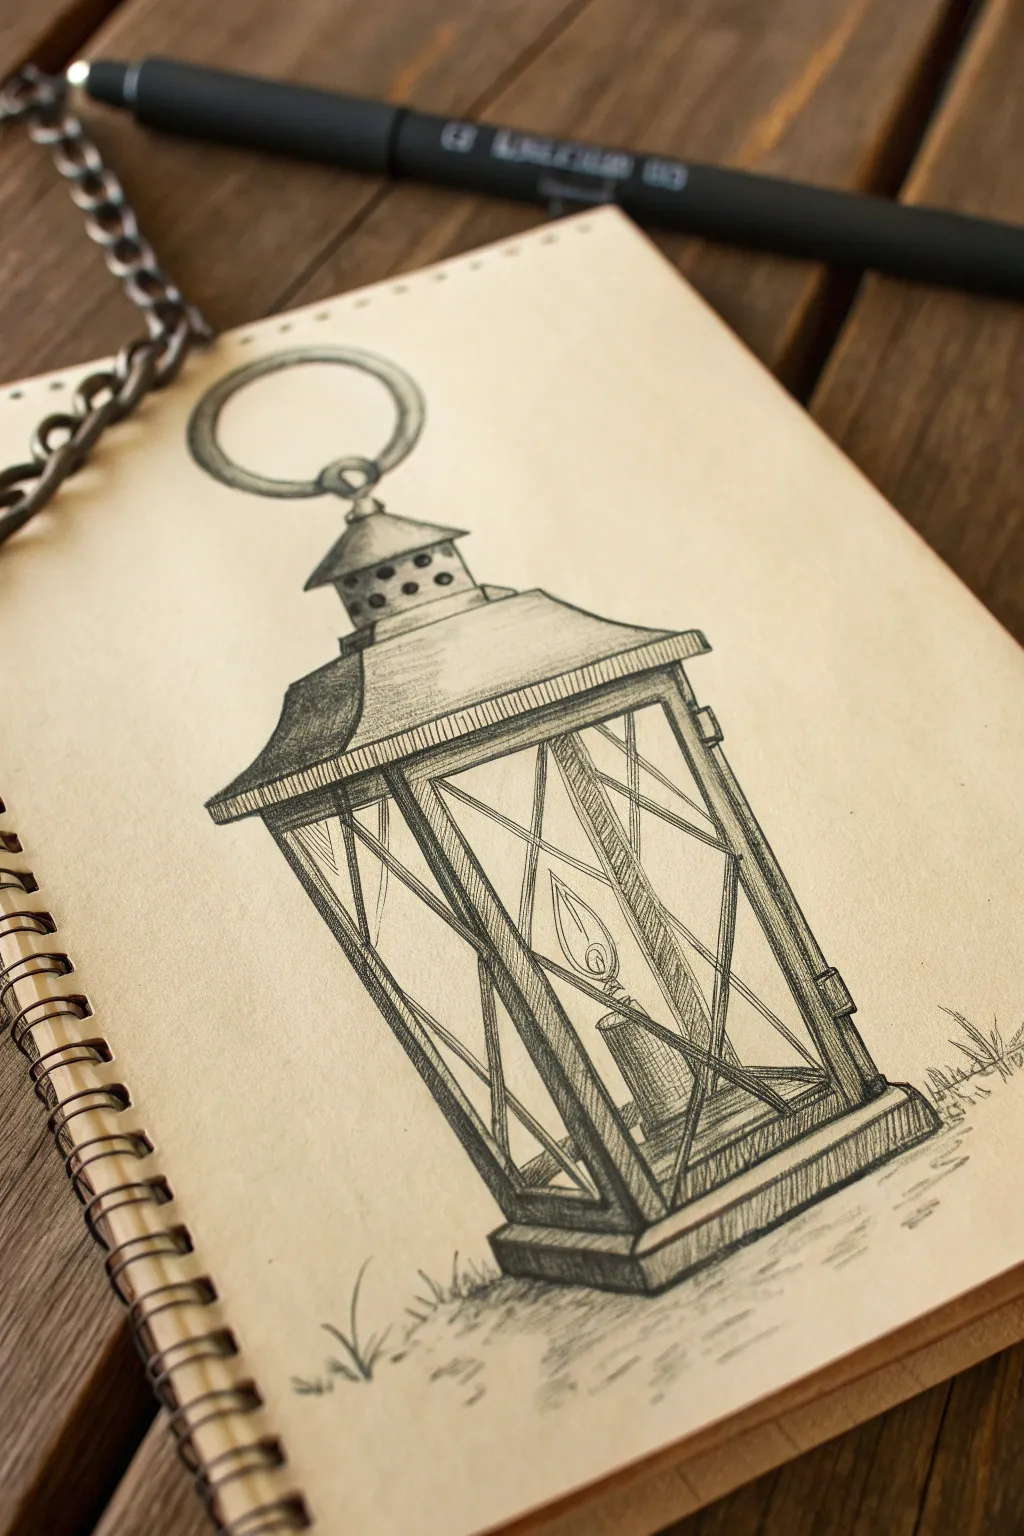
This project captures the nostalgic charm of an old-world lantern using simple graphite techniques on toned paper. The warm background of the paper gives the drawing an immediate antique feel, while the strong vertical lines and cross-hatching bring the metal and glass textures to life.
Step-by-Step Tutorial
Materials
- Tan or beige toned sketchbook paper
- HB graphite pencil (for initial sketch)
- 2B and 4B graphite pencils (for shading)
- Fine-liner pen (black, 0.3mm or 0.5mm)
- Kneaded eraser
- Ruler (optional)
- Blending stump or tortillon
Step 1: Constructing the Framework
-
Establish the centerline:
Begin by drawing a faint vertical line down the center of your page. This axis is crucial for keeping the lantern symmetrical. -
Draft the main box:
Sketch a simple rectangular prism shape for the lantern’s body. Don’t worry about details yet; just focus on getting the perspective right, slightly angling the bottom and top lines to suggest a 3D form. -
Add the roof and base:
Draw a trapezoid sitting on top of your rectangle for the lid or ‘roof’ of the lantern. Add a slightly wider, flat rectangle at the bottom for the sturdy base. -
Sketch the chimney cap:
On top of the roof section, draw a smaller cylindrical shape capped with a cone. This is the ventilation area for the flame. -
Draw the handle ring:
At the very top, sketch a large, open circle attached to the peak of the lantern. Make sure the ring looks like it has thickness by drawing an inner circle close to the outer edge.
Step 2: Defining the Structure
-
Frame the glass panels:
Inside the main rectangular body, draw vertical lines to represent the metal struts that hold the glass. These should be thick and sturdy. -
Add the X-bracing:
Lightly sketch the crisscrossing wire guards over the glass panels. These thin ‘X’ shapes add visual interest and realism to the lantern’s anatomy. -
Refine the roof overhang:
Darken the edge where the roof meets the main body, extending it slightly past the walls to create a lip or overhang. -
Place the candle:
Inside the glass area, draw a short cylinder for the candle stick. Add a teardrop shape floating just above it for the flame.
Mastering Toned Paper
Since the paper is tan, your darker graphite lines will pop more. You can also use a white charcoal pencil to add bright highlights to flame or glass for extra dimension.
Step 3: Shading and Texture
-
Clean up guidelines:
Take your kneaded eraser and gently lift away the initial centerline and any construction lines that aren’t part of the final form. -
Start shading the darks:
Switch to your 2B pencil. Begin shading the underside of the roof and the side panels that are facing away from the light source. Use firm, vertical strokes. -
Cross-hatching technique:
To create the look of weathered metal, use cross-hatching (overlapping lines) on the frame struts. I find that varying the pressure here creates a really nice rustic texture. -
Detail the chimney vents:
Fill in the small circular vent holes on the top chimney section with a dark 4B pencil to make them look like deep recesses. -
Shadow the candle:
Shade the side of the candle cylinder, leaving the side facing the flame lighter. Sketch a faint wick connecting the wax to the flame. -
Add ground details:
scribble some loose, grassy tufts near the base of the lantern. This grounds the object so it doesn’t look like it’s floating in space. -
Enhance contrast:
Go back over your darkest shadows—like the corners of the frame and the bottom base—with the 4B pencil or even a fine-liner pen for crisp emphasis. -
Create cast shadows:
Add a horizontal shadow stretching out from the base to the right side, consistent with the shading on the lantern itself. -
Final highlights:
Use a sharp eraser edge to pull out highlights on the glass and the metal rim of the handle, simulating reflected light.
Wonky Perspective?
If the lantern looks twisted, double-check that all your vertical lines are parallel to the side of the paper. Only the horizontal lines should be angled.
Now you have a charming, rustic lantern study that perfectly utilizes the warmth of the toned paper


Spring Lantern With Florals and Vines
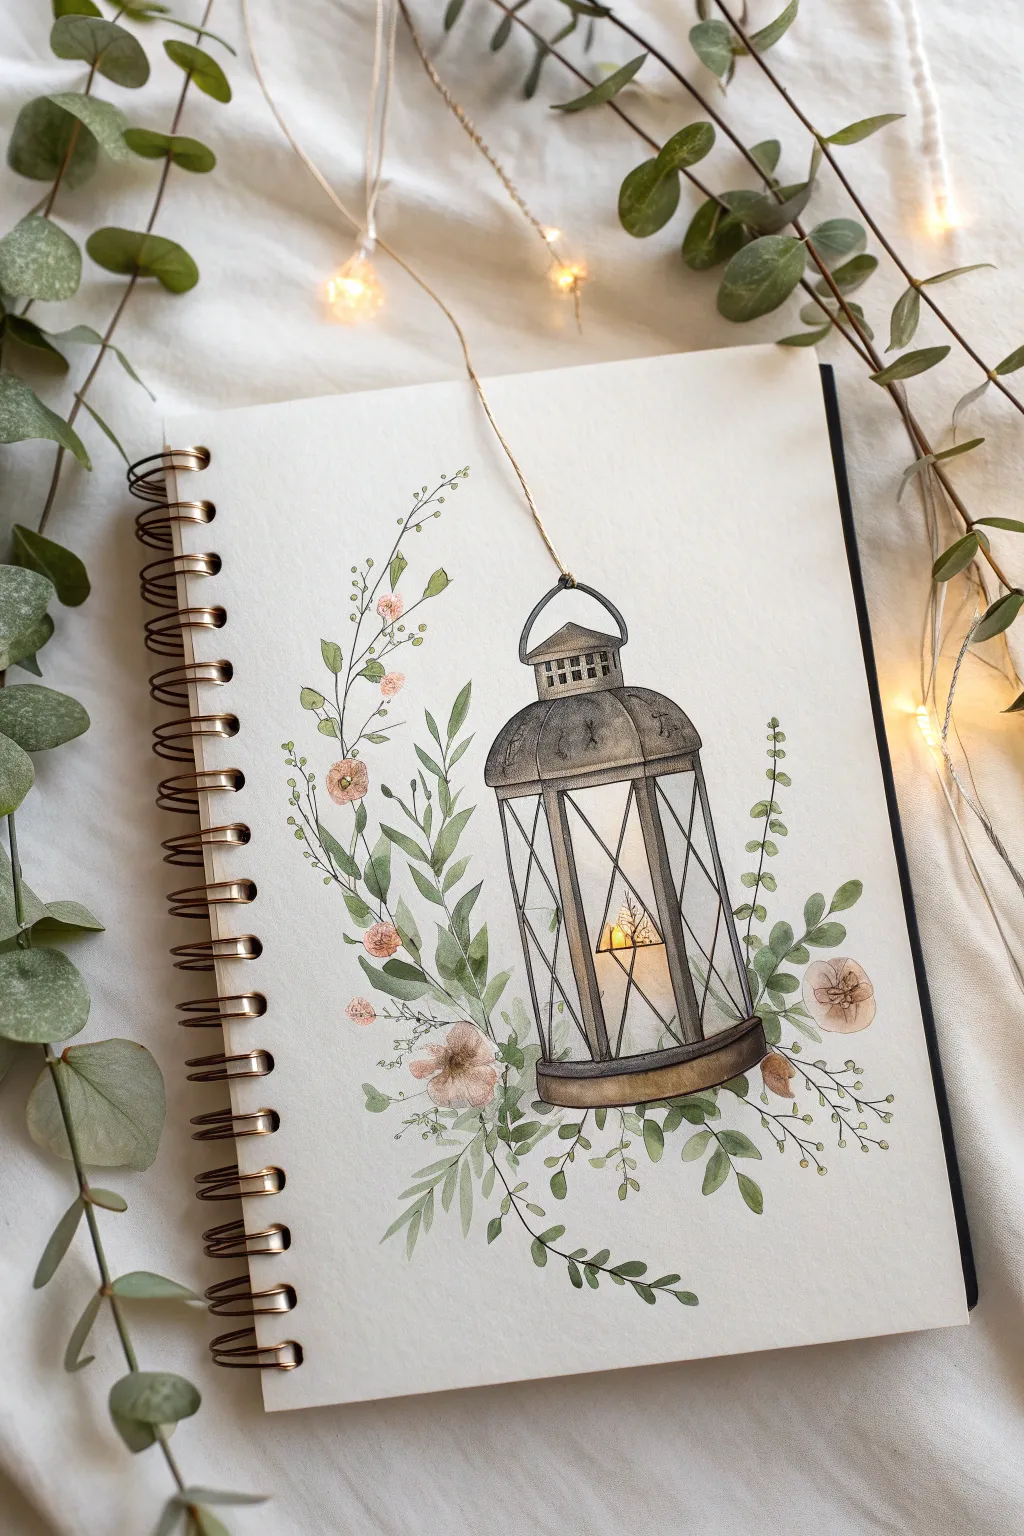
Capture the magic of a cozy evening with this delicate illustration of an old-fashioned lantern nestled among spring greenery. This project combines precise pen work with soft, layered watercolors to create a glowing, ethereal effect on your sketchbook page.
Step-by-Step Guide
Materials
- Cold press watercolor paper or sketchbook (approx. 300gsm)
- Pencil (HB or H) and kneaded eraser
- Waterproof fine liner pens (sizes 0.1 and 0.3, black and sepia)
- Watercolor paints (Payne’s Grey, Burnt Umber, Sap Green, Olive Green, Yellow Ochre, Alizarin Crimson)
- Round watercolor brushes (size 2 and 4)
- White gouache or white gel pen
- Water jar and paper towels
Step 1: Sketching the Structure
-
Establish the centerline:
Begin by lightly drawing a vertical line down the center of where you want your lantern to hang. This will act as your anchor point to ensure the lantern remains symmetrical. -
Block in the lantern shape:
Sketch a simplified cylinder for the main body of the lantern. Add a slightly wider, flat oval for the base and a domed shape for the top roof section. Don’t worry about details yet; just focus on proportions. -
Add the frame details:
Draw the vertical struts that hold the glass panes. Notice how the struts in the back should appear slightly closer together than the ones in the front due to perspective. Add the small ventilation cap at the very top. -
Place the candle:
Inside the glass area, sketch a short, stout cylinder for the candle. Place it squarely on the bottom interior platform. Draw a small, teardrop-shaped flame floating just above the wick. -
Draft the botanical elements:
Lightly trace flowing, curved lines extending from behind and around the lantern. These are the stems for your greenery. Sketch small teardrop leaf shapes and tiny circles where the flowers will go, keeping the arrangement loose and airy.
Step 2: Inking and Definition
-
Outline the lantern:
Using a 0.3 waterproof pen, carefully trace over your lantern pencil lines. Use a steady hand for the metal frame but allow for slight imperfections to give it a vintage, rustic feel. -
Detail the floras:
Switch to a finer 0.1 pen for the delicate leaves and flowers. Don’t outline every single leaf completely; broken lines can suggest lightness and transparency. -
Clean up:
Once the ink is completely dry, gently erase all pencil marks with your kneaded eraser to reveal a clean, crisp drawing.
Glow Control
Keep the area directly around the flame completely white (unpainted paper). The brightness comes from the contrast between the white paper and the yellow paint around it.
Step 3: Watercolor Painting
-
First wash on the lantern:
Mix a very watery wash of Payne’s Grey with a touch of Burnt Umber. Apply this loosely to the metal parts of the lantern. I like to leave small slivers of white paper exposed as highlights on the edges of the metal. -
Deepening the shadows:
While the first layer is still damp, drop in more concentrated dark grey/brown mix into the underside of the roof and the bottom base rim to create volume. -
Painting the candle glow:
Using clean water, wet the area around the candle flame. Drop in a bright Yellow Ochre, letting it bleed softly outward to create a glowing halo effect. -
Base layer for leaves:
Mix a pale Sap Green with plenty of water. Paint the leaves using quick, light strokes. Vary the intensity slightly between leaves to creating depth. -
Adding floral color:
Dilute Alizarin Crimson until it’s a soft blush pink. Dab this onto your flower circles, keeping the color concentrated in the centers and fading out toward the petals’ edges. -
Building contrast in greenery:
Mix a darker Olive Green. Once your first green layer is dry, paint a few leaves behind the main ones or darken the stems to push them into the background. -
Glass reflections:
Mix a very faint blue-grey wash. Paint vertical stripes on the ‘glass’ panels, avoiding the yellow glow area. This suggests the reflective surface of the panes.
Sparkle Effect
For a magical finish, add tiny dots of gold metallic watercolor or gold ink scattered among the leaves to mimic fireflies or fairy lights.
Step 4: Final Touches
-
Add the string:
Paint a thin line of brown paint extending from the top loop of the lantern upwards, fading it out as it goes off the page to show how it hangs. -
Highlights:
Using a white gel pen or a tiny brush with white gouache, add sharp highlights to the metal frame and the center of the candle flame to make it sparkle.
Now you have a charming, glowing lantern illustration that brings a warm light to your sketchbook pages
Lantern With a Tiny World Inside
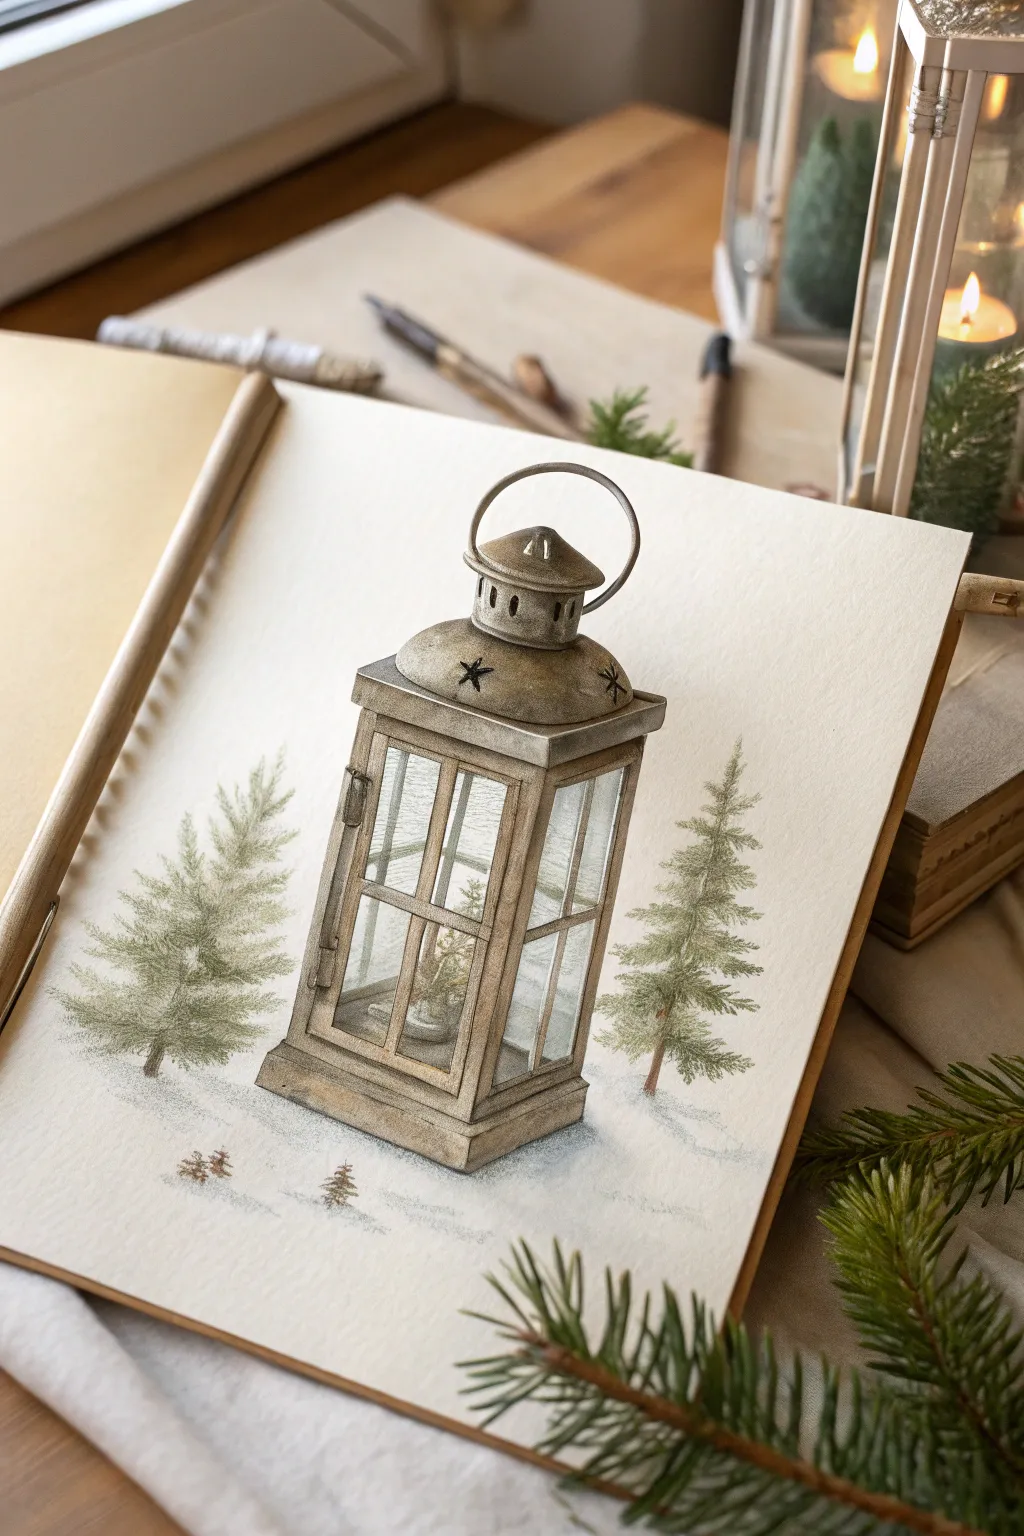
This charming illustration captures the cozy magic of a rustic lantern resting in a snowy landscape, complete with miniature evergreen trees. The soft shading and textured paper background give it a nostalgic, storybook quality perfect for holiday cards or winter journals.
How-To Guide
Materials
- Heavyweight mixed-media or watercolor paper (cream or off-white)
- H or HB pencil for initial sketching
- Fine liner pens (sepia or dark brown, 0.1mm and 0.3mm)
- Colored pencils (warm greys, browns, sap green, olive green, white)
- White gel pen or white gouache
- Blending stump or tortillon
- Kneaded eraser
Step 1: Drafting the Structure
-
Establish the horizon:
Begin by lightly sketching a very faint horizon line about one-third of the way up your page to ground your composition. -
Block in the lantern shape:
Draw a central vertical rectangle for the main body of the lantern. Add a smaller, wider rectangle at the base for the footing and a trapezoid shape on top for the lid. -
Perspective lines:
Refine the lantern’s shape by angling the top and bottom lines of your rectangles slightly downward towards the sides, creating a subtle 3D perspective. -
Detailed framing:
Sketch the inner frames of the glass panels. Remember to draw the back frames visible through the glass to establish depth. -
Lid and handle:
Add the domed tier on top of the lid with small ventilation slots. Crown the structure with a large, circular wire handle loop.
Uneven Perspective?
If your lantern looks wonky, use a ruler to check vertical lines. The verticals should be perfectly straight up and down, while horizontal lines should angle slightly.
Step 2: Adding the Environment
-
Tree placement:
On either side of the lantern, lightly sketch triangular guides for your evergreen trees. Keep them slightly shorter than the lantern to maintain the focal point. -
Tree texture:
Using short, jagged strokes, fill in your tree guides to suggest pine branches, leaving the edges uneven and natural. -
Inner details:
Inside the lantern, sketch a faint suggestion of a tiny tree or candle holder. It doesn’t need to be perfect, just a hint of an object. -
Refine and erase:
Go over your pencil lines to finalized the shapes, then gently roll a kneaded eraser over the page to lift excess graphite, leaving only faint guides.
Step 3: Color and Definition
-
Base layer shading:
Using a warm grey colored pencil, lightly shade the metal parts of the lantern. I like to keep the pressure very light here to build layers slowly. -
Deepening the metal tones:
Layer a medium brown over the grey in the shadowed areas—under the lid rim, the corners of the frame, and the base—to create an aged metal look. -
Glass transparency:
Use a very pale blue or cool grey to add vertical streaks on the glass panels. Leave plenty of white space to suggest clear glass. -
Coloring the trees:
Fill in the trees using sap green for the light areas and olive green for the shadows near the trunk. Use distinct, short strokes to mimic needles. -
Final outlines:
Trace over your main structural lines with a sepia fine liner. Use a broken, sketchy line rather than a solid one to keep the rustic feel. -
Snowy accents:
Using a white colored pencil or white gouache, add ‘accumulation’ on the lantern’s lid, the base, and the tops of the tree branches. -
Grounding shadows:
Add a soft cast shadow underneath the lantern and trees using a cool grey pencil to settle the objects into the ‘snow’.
Pro Tip: Rustic Texture
When coloring the metal frame, let the paper’s texture show through. Don’t burnish (press hard) until the very end; the graininess mimics old iron.
Step back and admire your quiet winter scene, ready to warm up any sketchbook page


Have a question or want to share your own experience? I'd love to hear from you in the comments below!