When I’m handing out prizes at an event, I want it to feel like a tiny burst of creative magic—not a boring transaction. Here are my favorite ways to give away prizes that keep the energy up, look great on camera, and feel super fair for everyone in the room.
Classic Ticket Raffle Draw
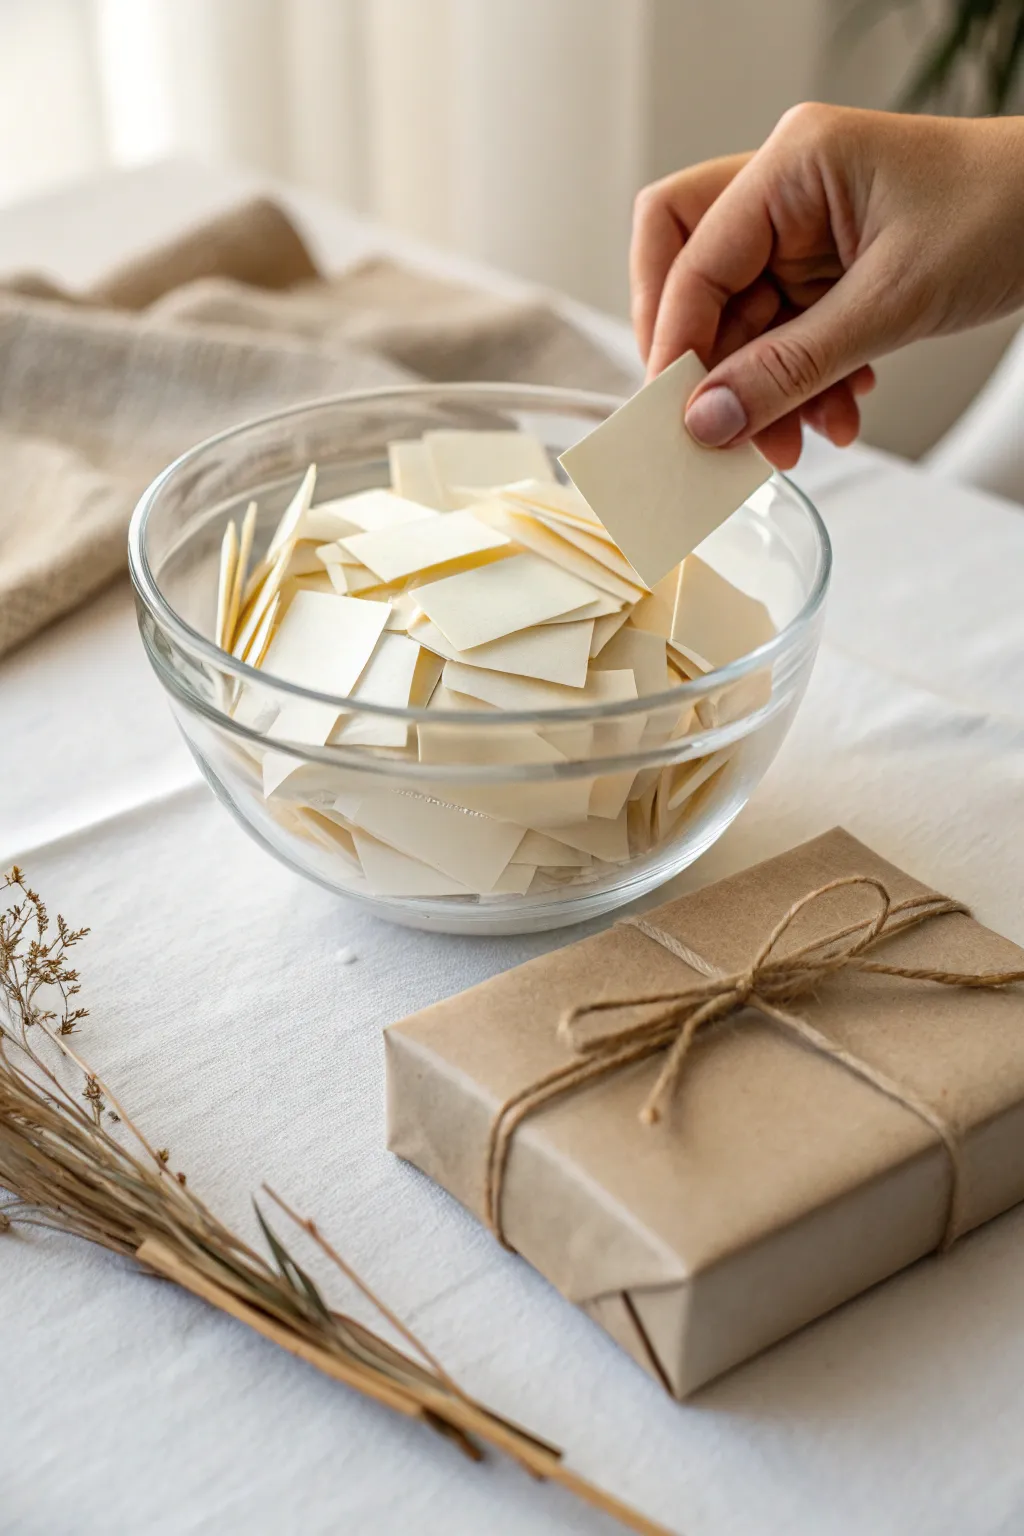
Create an inviting and tangible raffle experience with this classic, tactile setup featuring thick cardstock tickets and charming rustic gift wrapping. This project moves away from flimsy generic rolls of tickets, opting instead for a substantial, handmade feel that elevates the anticipation of the draw.
Step-by-Step Guide
Materials
- Heavyweight cream or off-white cardstock (100lb or similar)
- Glass salad bowl (medium size, clear)
- Kraft wrapping paper
- Natural jute twine (thin gauge)
- Small cardboard box (for the gift)
- Paper trimmer or guillotine cutter
- Scissors
- Ruler
- Dried wheat or bunny tail grass stems (for styling)
- Pen or marker (optional, for numbering inside)
Step 1: Crafting the Raffle Tickets
-
Select your paper:
Begin with high-quality cream cardstock. The paper needs to be stiff enough to hold its shape in the bowl but flexible enough to be folded once. I prefer a slightly textured paper for that premium feel. -
Measure your grid:
Using a ruler, mark out a grid of rectangles on your cardstock sheet. Aim for rectangles that act as double-squares, approximately 2 inches by 4 inches, so they become 2×2 inch squares when folded. -
Cut the strips:
Use a paper trimmer or guillotine cutter to slice your cardstock into long vertical strips first. A guillotine gives the cleanest edge for bulk cutting. -
Cut individual tickets:
Cross-cut the strips into your individual rectangular pieces. Ensure they are uniform in size so they look professional when mixed together. -
Add the content:
If you are running a specific draw, write numbers or winner/loser text on the inside face of each rectangle now. Keep the outside blank to maintain the mystery. -
Create the fold:
Take each rectangle and fold it perfectly in half to create a square. Press the crease firmly with your thumbnail or a bone folder so the ticket tends to stay slightly closed but not clamped shut. -
Fill the vessel:
Toss the folded squares loosely into your clear glass bowl. Shake the bowl gently to mix them up and create that abundant, chaotic look of a raffle ready to be drawn.
Step 2: wrapping the Display Gift
-
Prepare the box:
Place your prize inside a sturdy cardboard box. If the box has bright logos, you might want to tape them over, though the kraft paper usually covers well. -
Measure the kraft paper:
Roll out your brown kraft paper. Measure enough to cover the box with about 2 inches of overlap on the sides. -
Wrap the base:
Wrap the paper around the width of the box, securing the seam at the bottom with a small piece of clear tape or double-sided tape for an invisible finish. -
Fold the ends:
Push the paper down on the sides to create crisp triangular flaps. Fold these flaps inward against the box, creasing the edges sharply to get that neat, professional package look. -
Secure the wrapping:
Tape the final flaps down securely. The key to the look in the photo is tight, crisp paper, so pull it taut as you tape. -
Measure the twine:
Cut a length of natural jute twine roughly four times the lengthy of the box. -
Tie the ribbon:
Slide the twine under the box, bring it to the top, cross it over itself, and wrap it around the perpendicular sides (the classic cross wrap). -
Knot the bow:
Flip the box right-side up and tie a simple shoelace bow in the center. Don’t worry about it being perfect; a slightly organic, loose bow fits the rustic theme. -
Trim the ends:
Snip the ends of the twine bow at an angle, leaving tails about 1-2 inches long.
Clean Creases
For ultra-crisp folded tickets, lightly score the fold line with a ruler and a dull butter knife before bending the cardstock.
Step 3: Setting the Scene
-
Arrange the elements:
Place the glass bowl full of tickets on a neutral tablecloth (white linen works best). Position the wrapped gift slightly in front and to the side. -
Add botanical accents:
Lay a small bundle of dried wheat or bunny tails diagonally next to the gift to frame the composition and add a natural texture that complements the kraft paper.
Twine Slipping?
If the jute twine slides off the smooth kraft paper, use a tiny dot of hot glue under the central knot to anchor it permanently in place.
Now your raffle station is ready to draw a crowd with its surprisingly elegant and handcrafted appeal

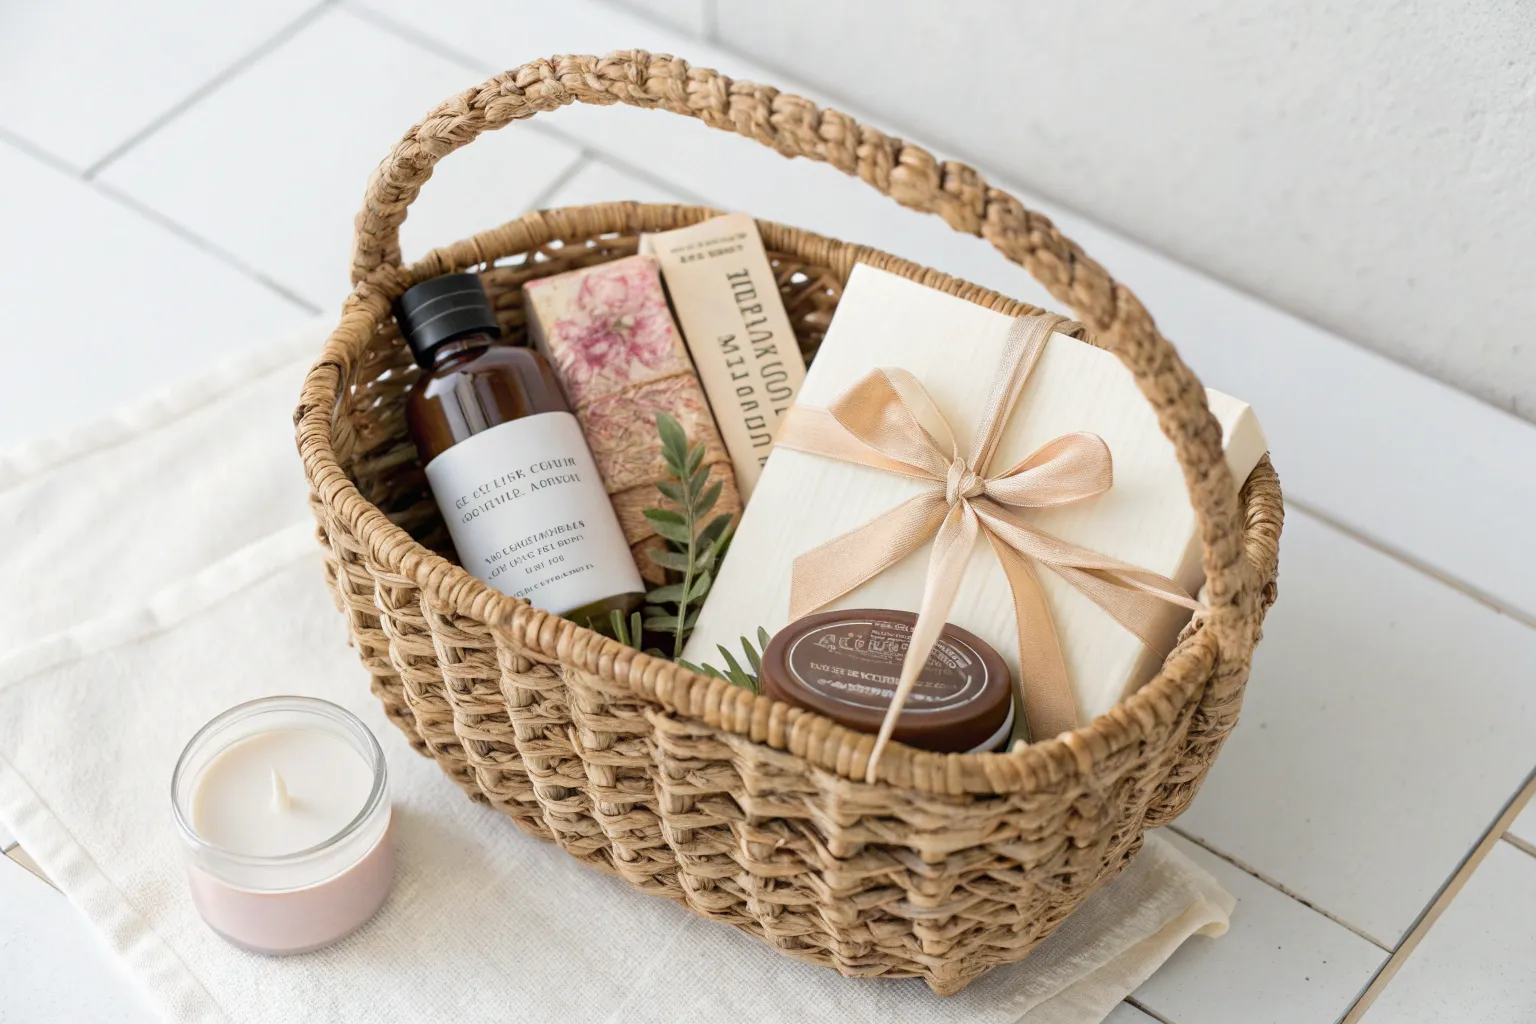
Names-in-a-Jar Prize Pull
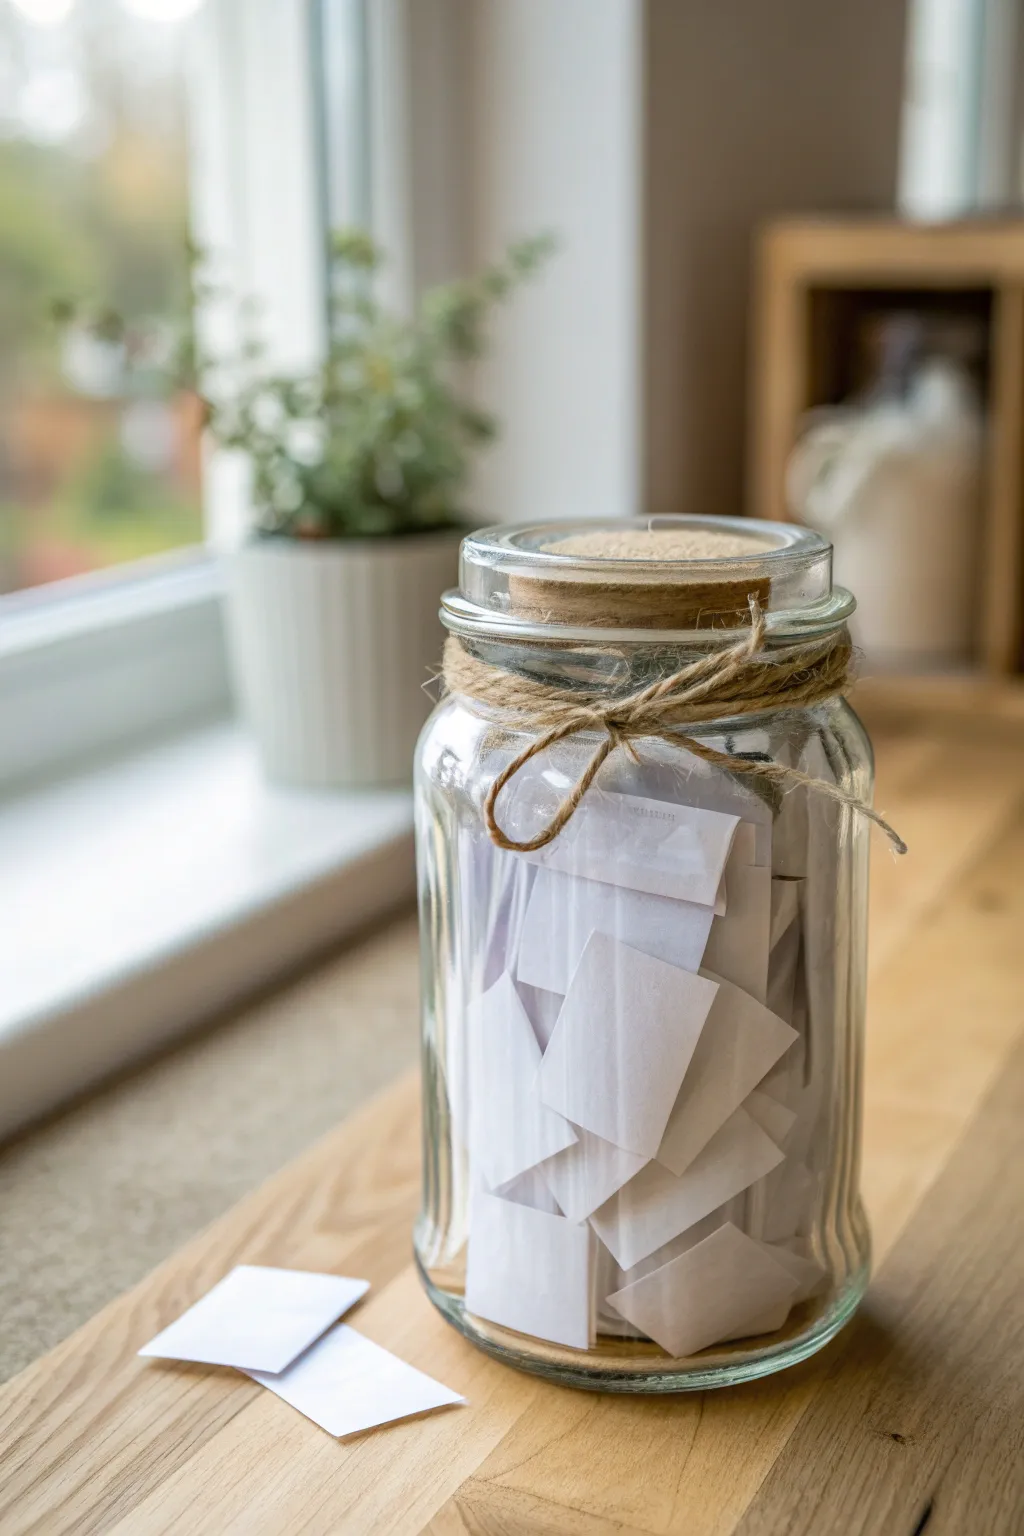
Create a simple yet charming centerpiece for your prize drawing with this rustic name-in-a-jar project. The combination of glass, cork, and natural twine gives a timeless, handmade feel that elevates the suspense of the draw.
Step-by-Step
Materials
- Large clear glass jar (approximately 1-1.5 liters) with a wide mouth
- Natural cork stopper (sized to fit the jar mouth)
- Natural jute twine
- High-quality white printer paper or cardstock (A4 or Letter size)
- Paper cutter or scissors
- Pen or thin marker
- Ruler
Step 1: Preparing the Container
-
Clean the jar:
Start by thoroughly washing your glass jar with warm soapy water to remove any grease or fingerprints. Dry it completely inside and out with a lint-free cloth to ensure the glass is sparkling clear. -
Measure the twine:
Unspool a generous length of natural jute twine. You’ll want enough to wrap around the neck of the jar at least three to four times, plus extra length for tying a bow. -
Wrap the jar neck:
Grasp one end of the twine against the back of the jar’s neck. Begin wrapping the long end around the neck, keeping the strands relatively close together but not perfectly aligned—a little overlap adds rustic character. -
Tie the bow:
Once you have built up a nice texture with several loops, bring the ends to the front center. Tie a simple shoelace bow, adjusting the loops so they are even and stick out slightly. -
Trim the ends:
Snip the tails of the bow so they hang down just a bit, but not so long that they obscure the view of the contents inside.
Natural Texture
If the twine won’t stay in place on the slippery glass, use a tiny dab of hot glue on the back of the jar neck to anchor the very first loop before wrapping the rest.
Step 2: Creating the Tickets
-
Decide on ticket size:
For the look in the photo, you want uniform rectangles. Aim for strips that are roughly 1.5 inches by 4 inches before folding. -
Mark your paper:
Using a ruler and a pencil, lightly mark a grid on your sheets of white paper to guide your cuts. Precision here makes the final jar look much more professional. -
Cut the strips:
Use a paper cutter for the straightest lines, slicing your paper into the pre-measured strips. If you don’t have a cutter, steady scissor work will do fine. -
Write the names:
Before folding, write the names of the participants or the prize labels on the center of each strip. Use a pen that won’t bleed through to the other side. -
Fold the slips:
Fold each strip in half crosswise. Make the crease sharp by running your fingernail along the fold. This uniformity is key to the aesthetic. -
Fill the jar:
Drop the folded slips into the jar one by one. I like to shake the jar gently every so often to let them settle randomly, which creates those nice organic layers visible through the glass.
Make it Colorful
Instead of plain white paper, use cardstock in your event’s color theme, or mix two colors of paper to represent different tiers of prizes inside the jar.
Step 3: Final Assembly
-
Insert the cork:
Press the cork stopper firmly into the mouth of the jar. It should sit snug but not be impossible to remove. -
Stage for display:
For the final touch, take two or three of your folded slips and place them casually on the table next to the jar base. This suggestive styling invites people to participate.
Now your prize jar is ready to be the center of attention at your next gathering


Under-the-Chair Hidden Winners
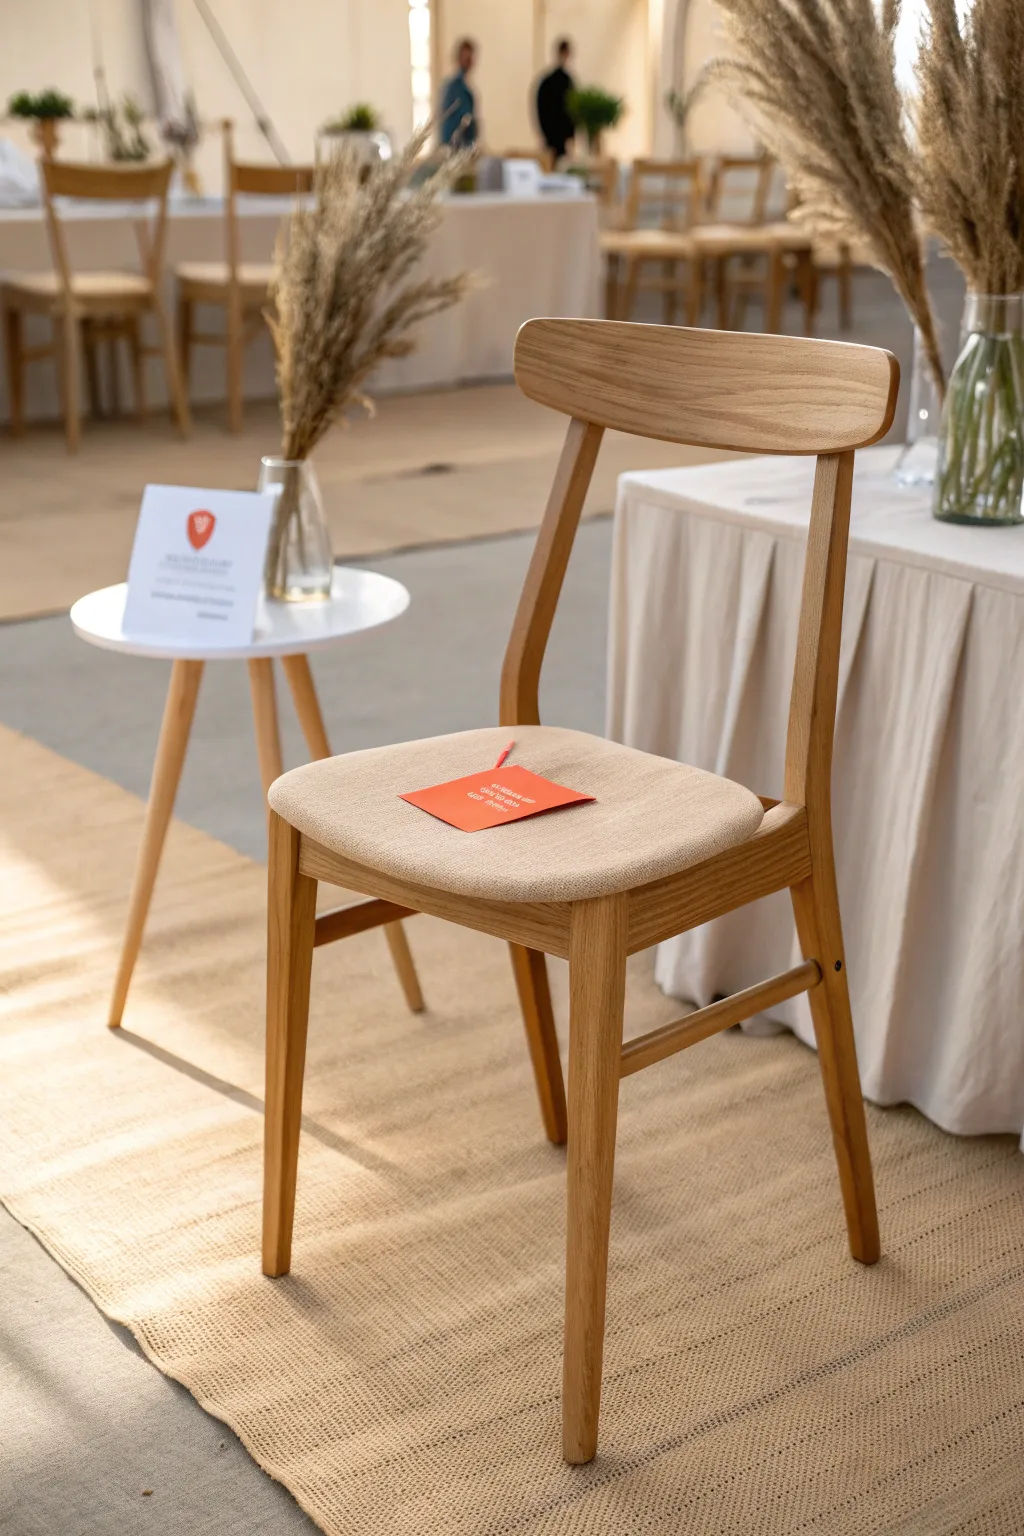
Create a moment of delightful discovery with this simple yet elegant hidden prize setup. By placing a vibrant red envelope on neutral seating, you create an inviting focal point that signals a special reward for lucky guests without cluttering your event design.
How-To Guide
Materials
- Red cardstock or heavy paper (A5 size)
- White paint pen or white gel pen (medium tip)
- Ruler
- Pencil
- Scissors or craft knife
- Bone folder (optional but recommended)
- Small piece of red satin ribbon or string (approx. 4 inches)
- Glue stick or double-sided tape
Step 1: Crafting the Prize Envelope
-
Measure and mark:
Start with your red cardstock. Measure a rectangle that is roughly 4 inches wide by 6 inches tall. This will be the main body of your envelope-card hybrid. -
Cut the shape:
Using your scissors or craft knife and a ruler for straight lines, carefully cut out the rectangle you just measured. -
Create the fold:
Fold the card in half width-wise to create a standard greeting card shape. If you have a bone folder, use it here to ensure the crease is crisp and professional looking. -
Draft the message:
Lightly sketch your winner message on the front of the card with a pencil. A simple phrase like ‘You are a winner!’ or event-specific text works best. -
Lettering:
Trace over your pencil lines with the white paint pen. I prefer to do the downstrokes a bit thicker to mimic modern calligraphy. -
Add detail text:
Underneath the main headline, write smaller instructions such as ‘Check inside for details’ or ‘Redeem at the front desk’ using a finer tip if available. -
Let it dry:
Allow the white ink to dry completely to avoid smudging. This usually takes about 5-10 minutes depending on the brand of pen.
Step 2: Adding the Decorative Accent
-
Prepare the ribbon:
Cut a thin strip of red ribbon or string, about 3 to 4 inches long. This adds a tactile element that makes the card easier to pick up. -
Attach the ribbon:
Place a small dot of glue or a piece of double-sided tape inside the top fold of the card. -
Secure the decorative tail:
Press one end of the ribbon into the adhesive so that the rest trails out from the top like a bookmark. -
Verify the prize:
Write the specific prize details on the inside of the card or slip a printed voucher inside before closing it up.
Ink Smearing?
If your white ink is soaking into the paper or smearing, switch to an opaque acrylic paint marker. Shake it well before use to get solid coverage on dark paper.
Step 3: The Setup
-
Identify the chair:
Select a chair with a neutral cushion, like the beige one shown, to ensure the red card pops visually. -
Position the card:
Place the card directly in the center of the seat cushion. Depending on your ‘hidden’ strategy, you can leave it face up as a welcome gift or tape it underneath. -
Secure for underneath (Optional):
If you are strictly following the ‘Under-the-Chair’ concept, flip the card over and use masking tape to adhere it to the bottom of the seat so it isn’t visible until the guest searches. -
Final check:
Stand back to ensure the placement looks intentional and inviting if visible, or completely concealed if hidden.
Level Up: Wax Seal
Add a gold wax seal to the envelope flap or the front corner. It adds weight and a premium texture that makes the prize feel much more valuable.
Now your event seating holds a secret spark of excitement waiting to be found


Hot Potato Prize Pass

This classic, understated gift wrapping style evokes a sense of warmth and anticipation, perfect for a passing game. The combination of rich matte red paper and natural jute twine creates a timeless, handmade aesthetic.
Step-by-Step Guide
Materials
- Rectangular box (to hold the prize)
- Matte red wrapping paper (kraft paper texture preferred)
- Natural jute twine or hemp cord
- Clear tape or double-sided craft tape
- Scissors
- Ruler (optional)
Step 1: Creating the Base Wrap
-
Measure the Paper:
Roll out your matte red wrapping paper on a flat surface, placing your box in the center. Pull up the sides to ensure they overlap slightly on top and cover the ends about halfway up the box’s height. -
Cut to Size:
Once measured, use your scissors to cut a clean, straight sheet from the roll. I find that using the grid often printed on the back of wrapping paper helps keep lines straight. -
Secure the First Side:
Place the box upside down on the paper. Bring one long edge of the paper up and over the bottom of the box, securing it to the box surface with a small piece of tape. -
Create a Clean Seam:
Fold the raw edge of the remaining long side inward about half an inch to create a crisp, finished hem. Pull this side tight over the box, overlapping the first side. -
Tape the Seam:
Secure the hemmed edge with either double-sided tape hidden underneath or neat pieces of clear tape along the seam. -
Fold the Top Flap:
Move to one end of the box. Push the top section of the paper down against the box side, creating sharp diagonal creases at the corners. -
Crease the Side Flaps:
Fold the resulting side triangles inward, hugging the box tightly. Run your finger along the edges to sharpen the creases. -
Secure the Bottom Flap:
Fold the remaining bottom flap up. If it goes past the top edge of the box, fold the tip inward for a clean edge before taping it securely in place. -
Repeat for Second End:
Turn the box around and repeat the folding and taping process on the opposite end, ensuring the paper remains taut throughout.
Step 2: The Rustic Twine Detail
-
Measure the Twine:
Unspool a generous length of jute twine—approximately four to five times the length of the box. -
Start the Wrap:
Center the twine on top of the box. Flip the box over, bringing the two ends of the twine underneath. -
Cross and twist:
Cross the two pieces of twine at the bottom center of the box. Twist them once around each other so they are now running perpendicular to their original direction. -
Bring to Top:
Bring the ends up the sides of the box and back to the top center. Turn the box right-side up. -
Knot the Center:
Tie a simple overhand knot at the center junction where all the twine meets, pulling it tight to secure the cross shape. -
Form the Loops:
Make two loops with the twine ends, just like tying a shoelace. Keep the loops relatively small and proportional to the box size. -
Tie the Bow:
Cross the loops and pull one through the hole, tightening carefully. Adjust the size of the loops by pulling the tails gently until you achieve the desired rustic look. -
Trim the Ends:
Snip the excess tails of the twine at an angle. Leave them slightly long to enhance the organic, textured feel of the hemp.
Loose Twine?
If the twine slips around too much, place a tiny dot of hot glue or a small piece of double-sided tape under the center knot to anchor it to the paper.
Add a Tag
Before tying the final bow, thread a small kraft paper tag onto one of the twine ends to label the prize or add a mystery hint.
Your charmingly wrapped parcel is now ready for the excitement of the hot potato game
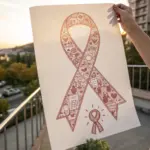
BRUSH GUIDE
The Right Brush for Every Stroke
From clean lines to bold texture — master brush choice, stroke control, and essential techniques.
Explore the Full Guide
Pass-the-Package Unwrap Game
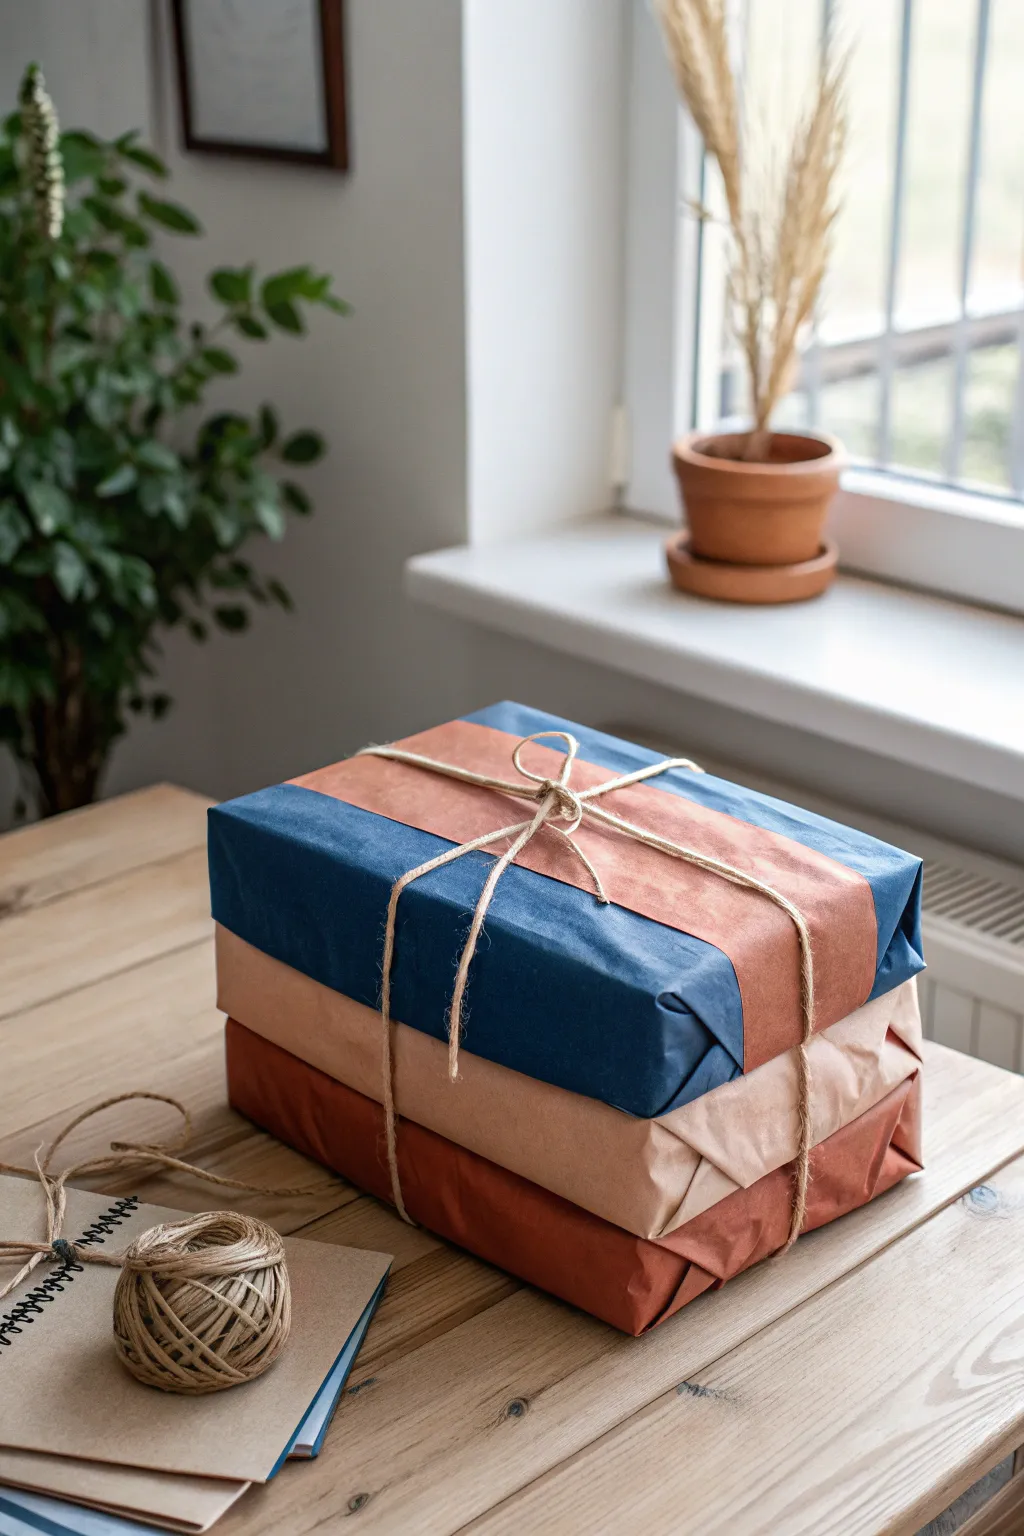
Elevate your prize presentation with this charming, earth-toned gift stack that combines rich colors with natural textures. This method turns individual boxes into a cohesive, visually striking tower using matte papers and simple jute twine finishing.
How-To Guide
Materials
- Three gift boxes (graduated sizes: large, medium, small)
- Navy blue kraft paper
- Rust/Terracotta kraft paper
- Light tan/beige kraft paper
- Natural jute twine
- Double-sided tape
- Scissors
- Bone folder (optional)
Step 1: Wrapping the Base Layers
-
Prepare the paper:
Clear a large workspace and unroll your rust-colored kraft paper first, as this will cover the largest box at the bottom of the stack. -
Measure the coverage:
Place the largest box on the paper, ensuring you have enough material to wrap around the width with a one-inch overlap, and enough on the ends to cover three-quarters of the box’s height. -
Secure the main wrap:
Pull the paper taut around the box and secure the seam with double-sided tape; I prefer placing the seam on precisely the bottom edge so it remains invisible. -
Crease the ends:
Refine the look by running your fingers or a bone folder along the edges of the box to create sharp, professional creases before folding in the sides. -
Fold the flaps:
Fold the short ends of the paper inward first to create triangular flaps on the top and bottom, then fold those flat against the box and tape securely. -
Wrap the middle tier:
Repeat the previous wrapping, taping, and creasing steps using the light tan paper for the medium-sized box. -
Check the edges:
Inspect the tan box to ensure your corners are crisp; soft, rounded corners can make the stack look unstable later.
Step 2: creating the Top Tier
-
Wrap the final box:
Wrap the smallest box using the navy blue paper, maintaining the same sharp creasing technique used for the previous layers. -
Cut the accent strip:
Cut a strip of the rust-colored paper roughly 3 to 4 inches wide, depending on the size of your top box. -
Attach the accent:
Wrap this rust strip horizontally around the center of the blue box to create a contrasting ‘belly band’ or runner, securing it with tape on the underside.
Sliding Stack?
If the boxes keep shifting while you tie the twine, place a tiny loop of masking tape between the layers. It holds them steady while you work but peels off easily without ripping the paper later.
Step 3: Assembly and Binding
-
Stack the boxes:
Place the boxes on top of one another, aligning them centrally so the tower feels balanced and sturdy. -
Anchor the stack:
Apply a small loop of double-sided tape between the center of each box lid and the bottom of the box above it to prevent sliding while you tie them. -
Measure the twine:
Unspool a very generous length of jute twine; you will need roughly four times the height of the stack plus extra for the bow. -
Begin the tie:
Center the twine underneath the bottom rust box, bringing the two ends up strictly vertical along the center of the long sides. -
Cross at the top:
Bring the strings to the center of the top blue box, twist them around each other once to create a cross, and pull them perpendicularly down the short sides. -
Secure the underside:
Flip the entire stack carefully (or work by feel) to cross the strings underneath the bottom box, interlocking them with the original starting strand for tension. -
Final surfacing:
Bring the string ends back up to the top center, ensuring the twine lines are straight and taut on all four sides of the stack. -
Tie the knot:
Tie a firm double knot exactly over the intersection where you twisted the twine earlier to lock everything in place. -
Form the bow:
Create a simple bunny-ear bow with the remaining length, adjusting the loops until they are symmetrical. -
Trim the tails:
Snip the ends of the twine at an angle, leaving them long enough to drape slightly over the side for a relaxed, rustic finish.
Pro Tip: Rustic Texture
Crumple the kraft paper into a ball and smoothen it out before wrapping. This breaks the stiff fibers and adds a soft, vintage texture that looks amazing with the jute twine.
Now your gift tower is ready to serve as a stunning centerpiece or reward.
Early Bird Door Prize Moment
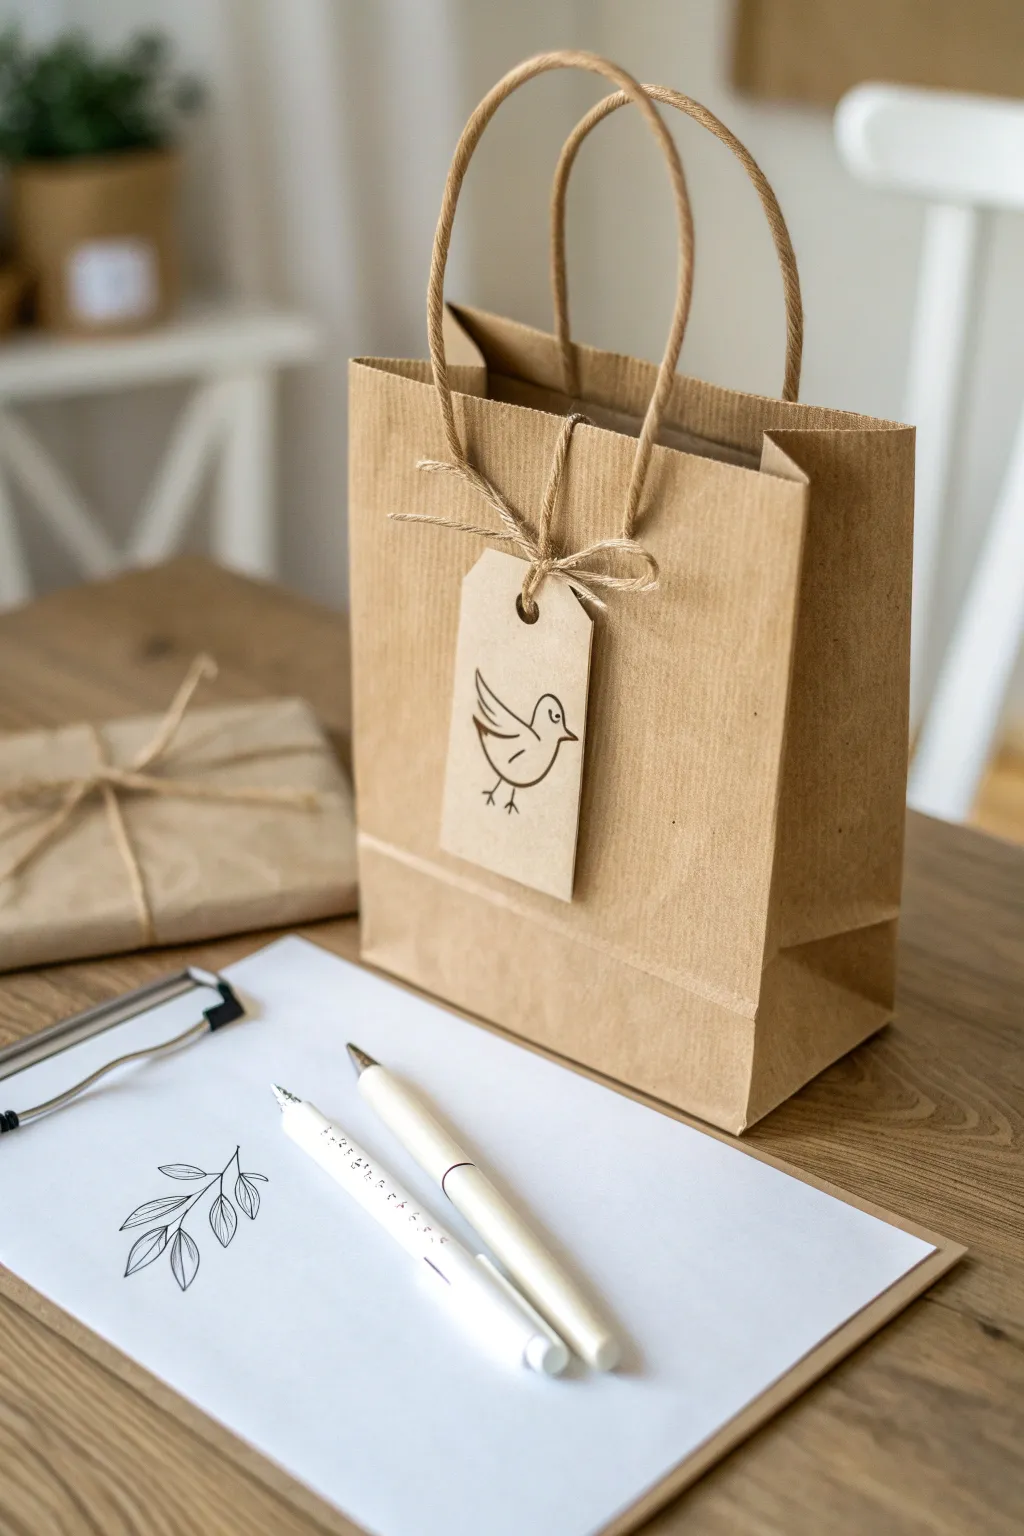
Embrace the charm of simplicity with this customizable kraft paper gift bag. Featuring a hand-drawn bird tag and rustic twine accents, it’s the perfect understated packaging for your early bird giveaways.
Detailed Instructions
Materials
- Small kraft paper gift bag with twisted paper or rope handles
- Kraft paper cardstock (or pre-cut tags)
- Black fine-liner pen (0.3mm or 0.5mm)
- Jute twine (natural brown)
- Hole punch (standard single hole)
- Scissors
- Pencil and eraser (optional for sketching)
Step 1: Creating the Bird Tag
-
Prepare the tag shape:
Cut a rectangle from your kraft cardstock, approximately 2 inches wide by 3.5 inches tall. Snip off the top two corners at a 45-degree angle to create the classic luggage tag shape. -
Punch the hole:
Center your hole punch near the top edge of the tag, leaving about a half-inch of space from the top, and punch a clean hole. -
Start the bird drawing:
Using your black fine-liner, begin by drawing the bird’s body. Start with a smooth curve for the back, dipping down for the tail, and curving back up for the belly. -
Add the head and beak:
Continue the body line upward to form a round head, closing the shape. Add a small triangle for the beak pointing to the right. -
Detail the wing:
Inside the body shape, draw an almond-shaped wing. Add two simple lines inside the wing to suggest feathers. -
Give it personality:
Draw a small dot for the eye just behind the beak. I like to keep the eye simple to maintain that minimalist look. -
Draw the legs:
Draw two stick legs extending downward from the belly. At the end of each leg, add three small spreading lines for the feet.
Step 2: Assembly and Decoration
-
Cut the twine:
Cut a piece of jute twine approximately 12 inches long. This generous length makes tying the bow much easier later on. -
Thread the tag:
Fold the twine in half to find the center. Push the folded loop through the hole in your tag from front to back. -
Secure the tag:
Pull the loose ends of the twine through the loop you just created and tighten it gently against the tag. -
Attach to the bag:
Position the tag against the front of the kraft bag. Take the two loose ends of the twine and pass them behind the front handle of the bag. -
Tie the knot:
Bring the ends back to the front of the handle and tie a simple overhand knot to secure the vertical position of the tag. -
Create the bow:
Tie a standard bow with the remaining twine loops. Adjust the size of the loops so they are proportional to the tag size. -
Trim the ends:
Snip the ends of the twine at an angle for a clean finish. Leave about an inch of tail hanging from the bow. -
Final adjustment:
Rotate the tag slightly so it hangs naturally and ensure the bird drawing is facing forward.
Clean Lines
If you are nervous about drawing directly with ink, lightly sketch the bird with a pencil first, trace it with the pen, and erase the pencil lines only after the ink is fully dry.
Stamp It Up
Don’t want to draw? Use a rubber stamp with a bird or leaf motif and black ink pad for a uniform look across many bags.
Now your charmingly rustic gift bags are ready to delight your early bird guests

PENCIL GUIDE
Understanding Pencil Grades from H to B
From first sketch to finished drawing — learn pencil grades, line control, and shading techniques.
Explore the Full Guide
Winner’s Choice Prize Draft
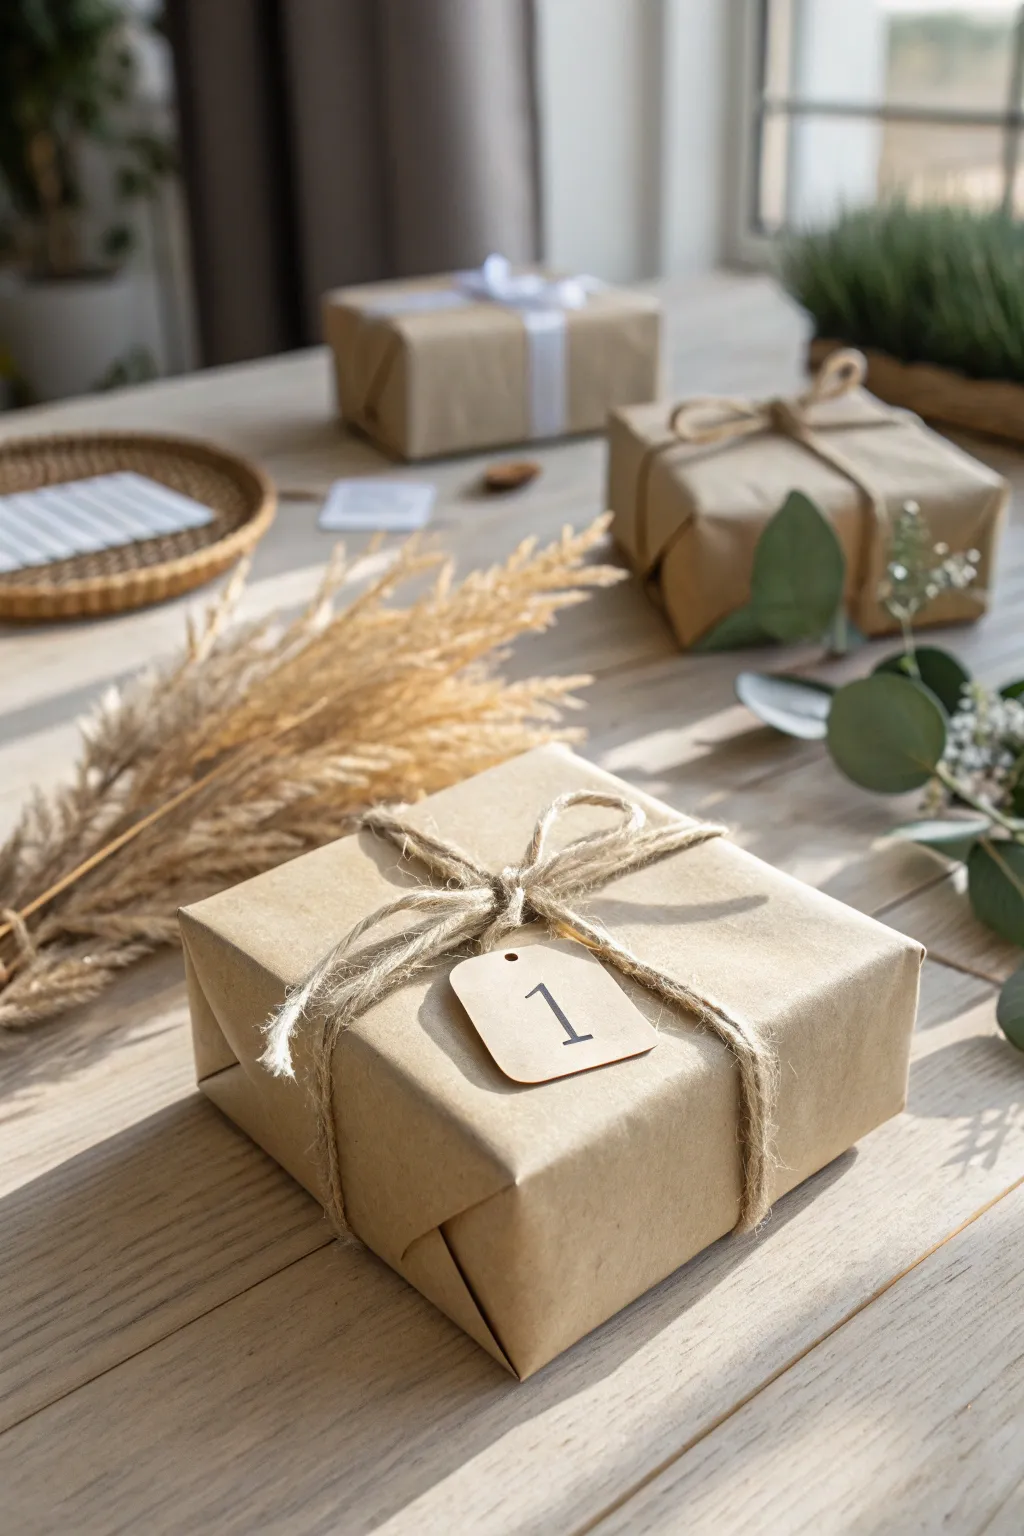
Create a charming and uniform look for your event prizes with this natural wrapping style. Utilizing simple brown kraft paper and jute twine, these numbered packages add an element of mystery and rustic elegance to any prize draft table.
Step-by-Step
Materials
- Boxed items to be wrapped
- Heavyweight brown kraft paper roll
- Natural jute twine (medium thickness)
- Small rectangular gift tags (kraft or cream colored)
- Black fine-point marker or number stamp set
- Clear tape
- Scissors
- Dried pampas grass stems (optional for styling)
- Fresh or dried seeded eucalyptus (optional for styling)
Step 1: Preparing the Base
-
Measure the paper:
Roll out your brown kraft paper on a clean, flat surface. Place your boxed prize in the center to estimate the amount needed. You want enough paper to wrap around the box with about two inches of overlap, and enough on the ends to cover about two-thirds of the box’s height. -
Cut to size:
Using sharp scissors, cut the paper cleanly. I find that sliding the scissors through the paper rather than snipping repeatedly creates the smoothest edge. -
Wrap the cylinder:
Fold one long side of the paper over the top of the box. Bring the other side up and pull it taut so the paper hugs the box tightly. Secure this seam with a piece of clear tape in the center. -
Crease the edges:
Run your thumb and forefinger along the edges of the box to sharpen the creases. This step is crucial for that professional, crisp box shape seen in the photo.
Double Wrapping
If your kraft paper is thin or slightly translucent, wrap the box twice before taping. This ensures the colorful branding of the box inside doesn’t show through.
Step 2: Securing the Ends
-
Fold the top flap:
On one end of the box, push the top flap of paper down against the side of the box. Crease the diagonal folds that form on the left and right sides. -
Create side wings:
Fold the left and right ‘wings’ in toward the center. Ensure the paper lies flat against the box specifically at the corners. -
Fold the bottom flap:
Bring the remaining bottom flap up. Depending on the size of your box, you may need to fold the very edge of this flap inward slightly to create a clean line that meets the center. -
Tape securely:
Secure the flap with a small piece of clear tape. Repeat the entire folding process on the opposite end of the box.
Natural Scents
Tuck a small cinnamon stick or a dried orange slice directly under the bow alongside the tag for a decorative element that adds a pleasant aroma.
Step 3: Adding the Twine & Tag
-
Prepare the twine:
Cut a generous length of jute twine. It needs to be long enough to wrap around the box twice (if doing a cross wrap) or once, plus ample length for tying a bow. -
Wrap the box:
Place the center of the twine on top of the box. Flipping the box over, cross the twine ends perpendicular to each other on the bottom, and bring them back exactly to the top center. Pull tight. -
Create the knot base:
Tie a simple overhand knot at the center top of the package to secure the tension. Don’t make the bow yet. -
Prepare the number tag:
Take a small rectangular tag. Using a fine-point black marker or a rubber stamp, clearly mark the number ‘1’ (or subsequent numbers for other prizes) in the center. -
Thread the tag:
Thread one of the loose twine ends through the hole of your numbered tag. Slide the tag down until it rests against the central knot. -
Tie the bow:
Tie a standard shoelace bow directly over the knot and tag hole. This keeps the tag facing upward. -
Adjust loops:
Pull the loops of the bow until they are symmetrical and roughly the width of the box. The loops should look full, not flat. -
Trim the tails:
Trim the excess twine tails. For a casual look, leave them slightly longer than the loops; roughly 2-3 inches is usually perfect.
Step 4: Final Presentation
-
Fluff the twine:
Gently fray the very ends of the cut twine tails with your fingers to enhance the rustic texture. -
Check the tag position:
Ensure the number tag is laying flat and is legible. If it twists, you can secure it subtly with a tiny loop of double-sided tape underneath. -
Style with botanicals:
For the finishing touch shown in the background, tuck a sprig of dried pampas grass or fresh eucalyptus under the twine on adjacent packages or arrange them loosely on the table around your prize.
Your prize table will now look coordinated and inviting, ready for the winners to make their selection
Mystery Envelope Prize Wall
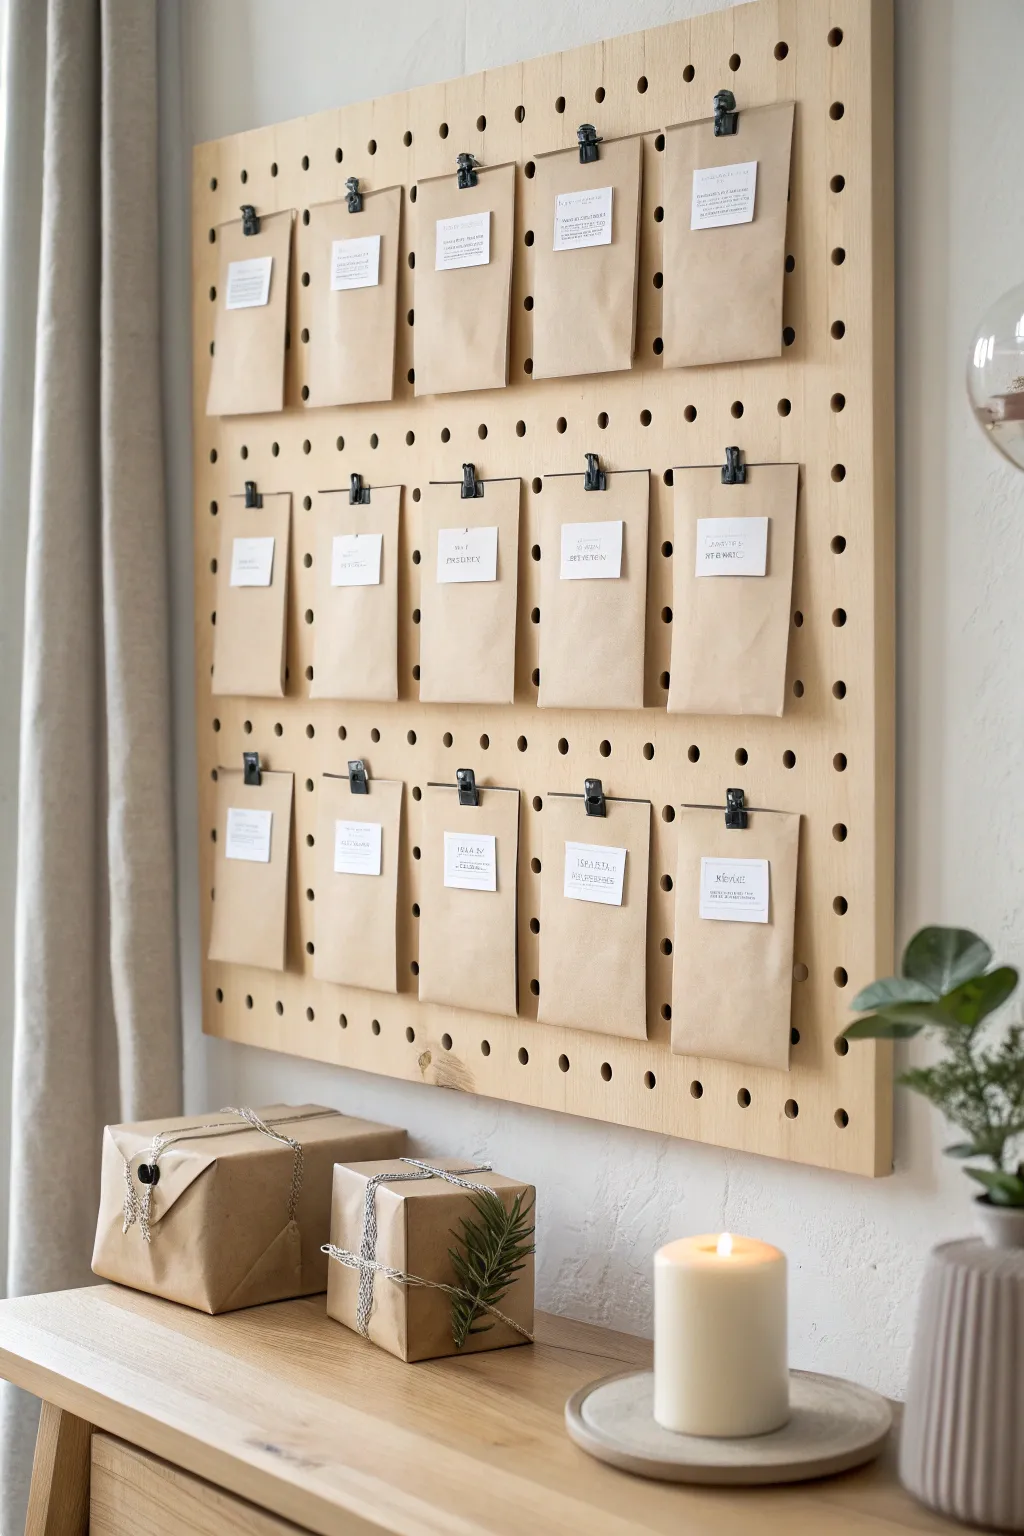
Transform a simple wooden pegboard into an elegant display of mystery and anticipation with this easy DIY project. By combining natural textures like kraft paper and unfinished wood with stark black accents, you create a prize wall that feels both rustic and modern.
How-To Guide
Materials
- Large wooden pegboard sheet (unfinished pine or plywood)
- Small kraft paper treat bags or envelopes (approx. 4×6 inches)
- Black metal bulldog clips or binder clips (small size)
- White cardstock paper
- Printer (or black fine-tip pen for hand lettering)
- Glue stick or double-sided tape
- Wall mounting hardware (screws and anchors appropriate for your wall type)
- Drill and level
- Measuring tape
- Wooden spacer blocks (optional, for mounting)
- Prizes or vouchers to fill the envelopes
Step 1: Preparing the Base
-
Measure your space:
Before buying your pegboard, measure the wall area where you intend to hang the display. A standard 2×4 foot board works well, but you can cut one down to size if needed. -
Sand the board:
Even if pre-cut, pegboards can have rough edges. Lightly sand the face and edges of the board with fine-grit sandpaper to remove any splinters for a polished look. -
Plan the mounting:
Mark the wall where you will mount the board. Use a level to ensure your marks are perfectly straight. -
Create clearance:
Pegboards need a little space behind them for hooks, even though we are using clips here. It’s best to mount the board on thin wooden spacer blocks or 1×2 furring strips so it floats slightly off the wall. -
Secure the board:
Drill through the pegboard holes into your spacers and the wall anchors. Secure the board firmly in place.
Uneven Hanging?
If bags twist or won’t hang flat, stick a small loop of rolled masking tape or a glue dot on the back bottom center of the envelope to tac it lightly to the board.
Step 2: Creating the Mystery Envelopes
-
Select your bags:
Choose opaque kraft paper bags. Ensure they are flat-bottomed or simple envelopes so they lie flush against the board. -
Design the labels:
On your computer, design simple square or rectangular labels. Use a serif font for a classic look, typing out prize categories, numbers, or names. -
Print the labels:
Print your designs onto bright white cardstock. The white creates a striking contrast against the brown paper. -
Cut carefully:
Cut out each label precisely. I find using a craft knife and a metal ruler gives much cleaner lines than scissors. -
Fill the bags:
Place your gift cards, vouchers, or small flat prizes inside the kraft bags. Fold the top flap of the bag down neatly. -
Seal and label:
Stick the white label on the front center of the bag using a glue stick. Ensure the edges are fully adhered so they don’t curl up.
Step 3: Assembly and Styling
-
Calculate spacing:
Count your peg holes to determine the grid pattern. You want equal spacing between each bag—typically skipping 2-3 holes horizontally and 3-4 holes vertically. -
Clip the bags:
Take a black bulldog clip and clamp it over the folded top of a bag. The clip keeps the prize secure and acts as the hanger. -
Attach to board:
There are two ways to hang these: you can use standard pegboard hooks and hang the clip on them, or, for this specific flush look, use tiny S-hooks or wire threaded through the clip handle and the peg hole. -
Align the rows:
Start with the top row and work your way down. Step back frequently to ensure your rows are level and the bags are hanging straight. -
Create the vignette:
Place a low console table or bench underneath the pegboard. -
Wrap floor prizes:
Wrap larger box prizes in matching kraft paper. Use natural cotton twine or baker’s twine for ribbons. -
Add greenery:
Tuck a small sprig of fresh rosemary or pine under the twine of the wrapped gifts for a pop of organic color. -
Final touches:
Place the wrapped gifts on the surface below along with a simple pillar candle to complete the warm, inviting atmosphere.
Level Up: Hidden Clues
Make it a game by printing riddles on the white labels instead of numbers. Guests must solve the riddle to choose the right envelope for their prize.
Now you have a stylish, interactive focal point ready to surprise your guests


Scavenger Hunt With Art Clues
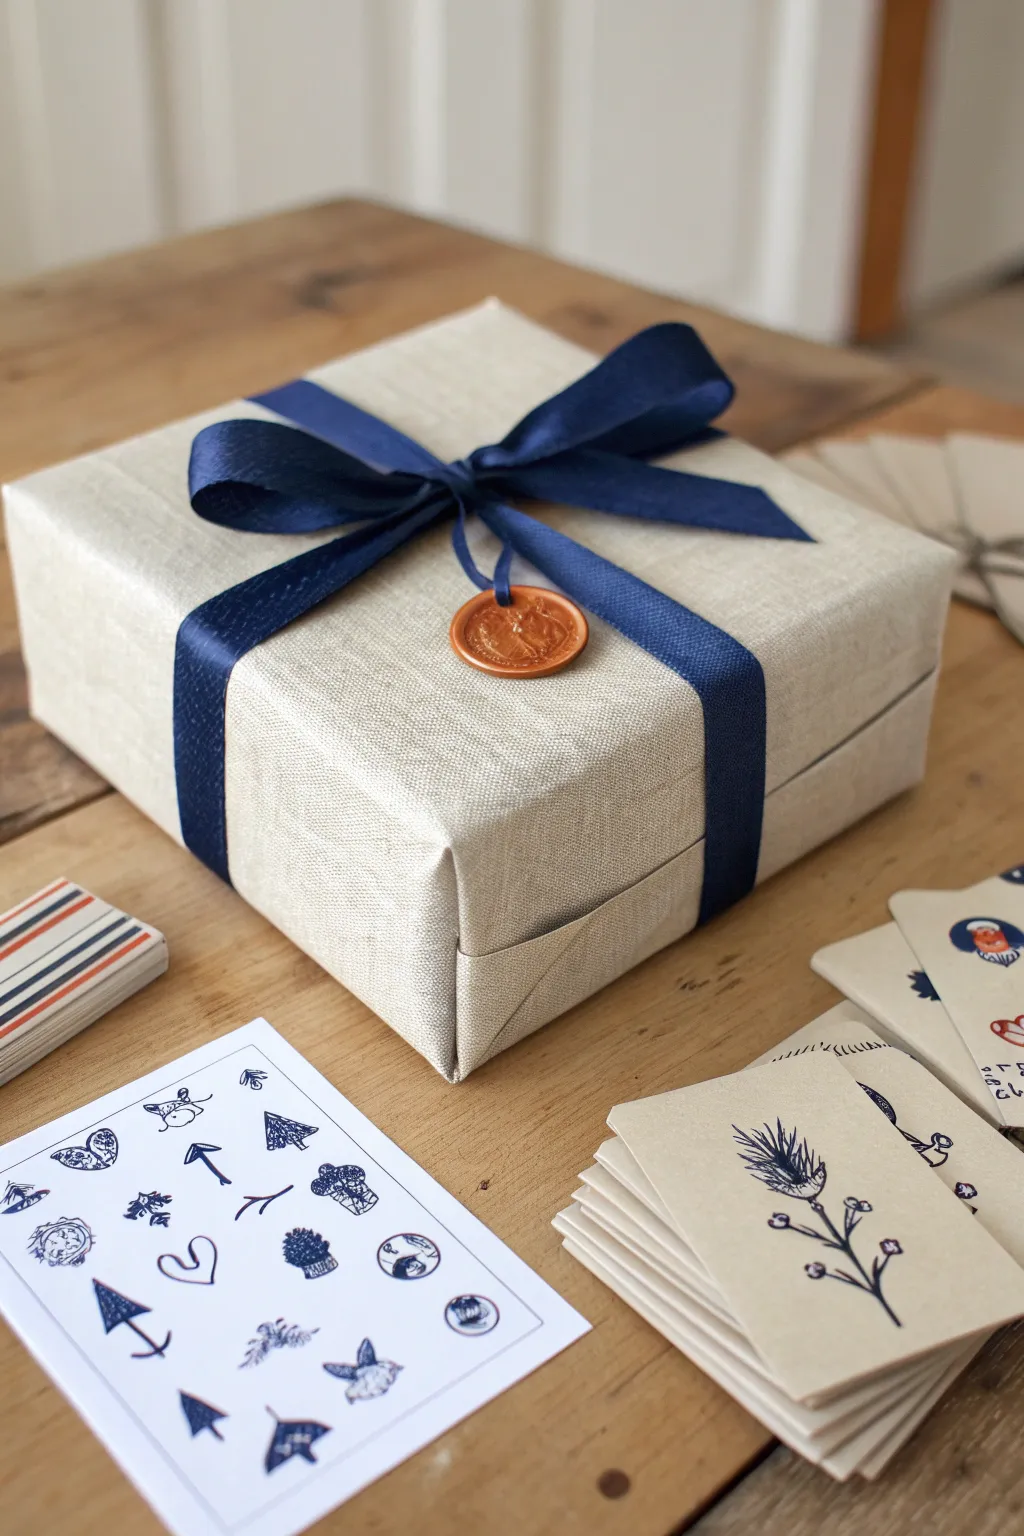
Elevate your scavenger hunt prizes with this sophisticated packaging that hints at an artistic adventure inside. Using a tactile linen-texture wrap, a classic wax seal, and custom-stamped clue cards, this project creates a cohesive and mysterious aesthetic perfect for an event reveal.
Step-by-Step
Materials
- Medium-sized sturdy gift box (approx. 8×8 inches)
- Beige linen fabric or high-quality linen-textured wrapping paper
- Navy blue satin ribbon (1 inch wide)
- Sealing wax in copper or bronze color
- Wax seal stamp (custom design or generic motif)
- Heavyweight cream cardstock
- Navy blue ink pad or permanent marker
- Fine-point black pen
- Fabric scissors or sharp paper shears
- Double-sided tape or hot glue gun
- Small baker’s twine
- A small hole punch
Step 1: Preparing the Premium Wrap
-
Measure the material:
Place your gift box in the center of your linen fabric or textured paper. Measure enough material to cover the box completely, leaving about two inches of overlap on all sides to ensure full coverage without bulk. -
Cut to size:
Carefully cut your material using sharp scissors. If using actual linen fabric, iron it flat first to remove any creases; if using paper, gently roll it in the opposite direction of the curl to flatten it. -
Start the main fold:
Center the box on the material. Bring the long sides up over the top of the box. Pull the material taut to showcase the texture, then secure the overlapping seam with double-sided tape or a thin line of hot glue. -
Create crisp corners:
Fold the short ends. Push the sides of the material inward against the box corners to create triangular flaps on the top and bottom. Crease these folds sharply with your fingers. -
Secure the ends:
Fold the bottom flap up and the top flap down. Secure tightly with your adhesive of choice. For fabric, hot glue works best to keep the heavy weave in place.
Step 2: Ribbon and Seal Detailing
-
Measure the ribbon:
Cut a length of navy satin ribbon approximately four times the width of your box. You want generous tails for the bow. -
Center the ribbon:
Lay the ribbon flat on your workspace. Place the box face down on the center of the ribbon. Bring the two ends up around the sides. -
Cross and turn:
Cross the ribbon ends at the center of the box bottom, pull tight, and turn the box 90 degrees. Bring the ends up around the remaining two sides to the top. -
Tie the bow:
Bring the ribbon ends under the existing strip on the top of the box. Tie a classic bow, adjusting the loops until they are symmetrical and voluminous. -
Trim the tails:
Cut the ribbon ends at a sharp angle or in a ‘V’ shape to prevent fraying and add a polished look. -
Prepare the wax seal tag:
Cut a small circle or tag shape from your cream cardstock, about 1.5 inches in diameter. Punch a small hole near the top edge. -
Melt the wax:
Heat your copper sealing wax until it is fully liquid. Carefully pour a dollop about the size of a quarter onto the center of your cardstock tag. -
Stamp the seal:
Press your seal stamp firmly into the hot wax. Let it sit undisturbed for 15-30 seconds until the wax cools and hardens completely before lifting the stamp. -
Attach the seal:
Thread a small piece of blue twine through the tag’s hole and tie it securely to the center knot of your navy bow.
Use Fabric Wrap
Using real linen fabric instead of paper makes corners bulkier but adds an unmatched luxury feel. Use fabric glue or safety pins for a secure hold.
Step 3: Crafting the Clue Cards
-
Cut the cards:
Cut your cream cardstock into uniform playing card sizes (approx. 2.5 x 3.5 inches). You will need a small deck, perhaps 10-15 cards. -
Design the motifs:
Using a fine pen or thin marker, sketch small, simplified icons related to your scavenger hunt (arrows, trees, mushrooms, leaves) onto one card to serve as a ‘sticker sheet’ reference. -
Draw the main clues:
On the individual playing cards, draw singular, larger illustrations in navy blue ink. I find that keeping the line work simple and somewhat rustic matches the linen texture perfectly. -
Add cryptic details:
In the corners of the clue cards, add small numbers or symbols that correspond to locations in your event. -
Stack and stage:
Once dry, stack your clue cards neatly. You can place them alongside the box or tuck one partially under the ribbon as a teaser.
Aged Effect
Lightly distress the edges of your clue cards with brown ink or coffee staining to give the scavenger hunt an old-world, treasure map vibe.
Now you have a mysterious and tactilly pleasing prize package that is sure to intrigue your guests from the moment they spot it
Mini Sketch Challenge Pick-and-Win
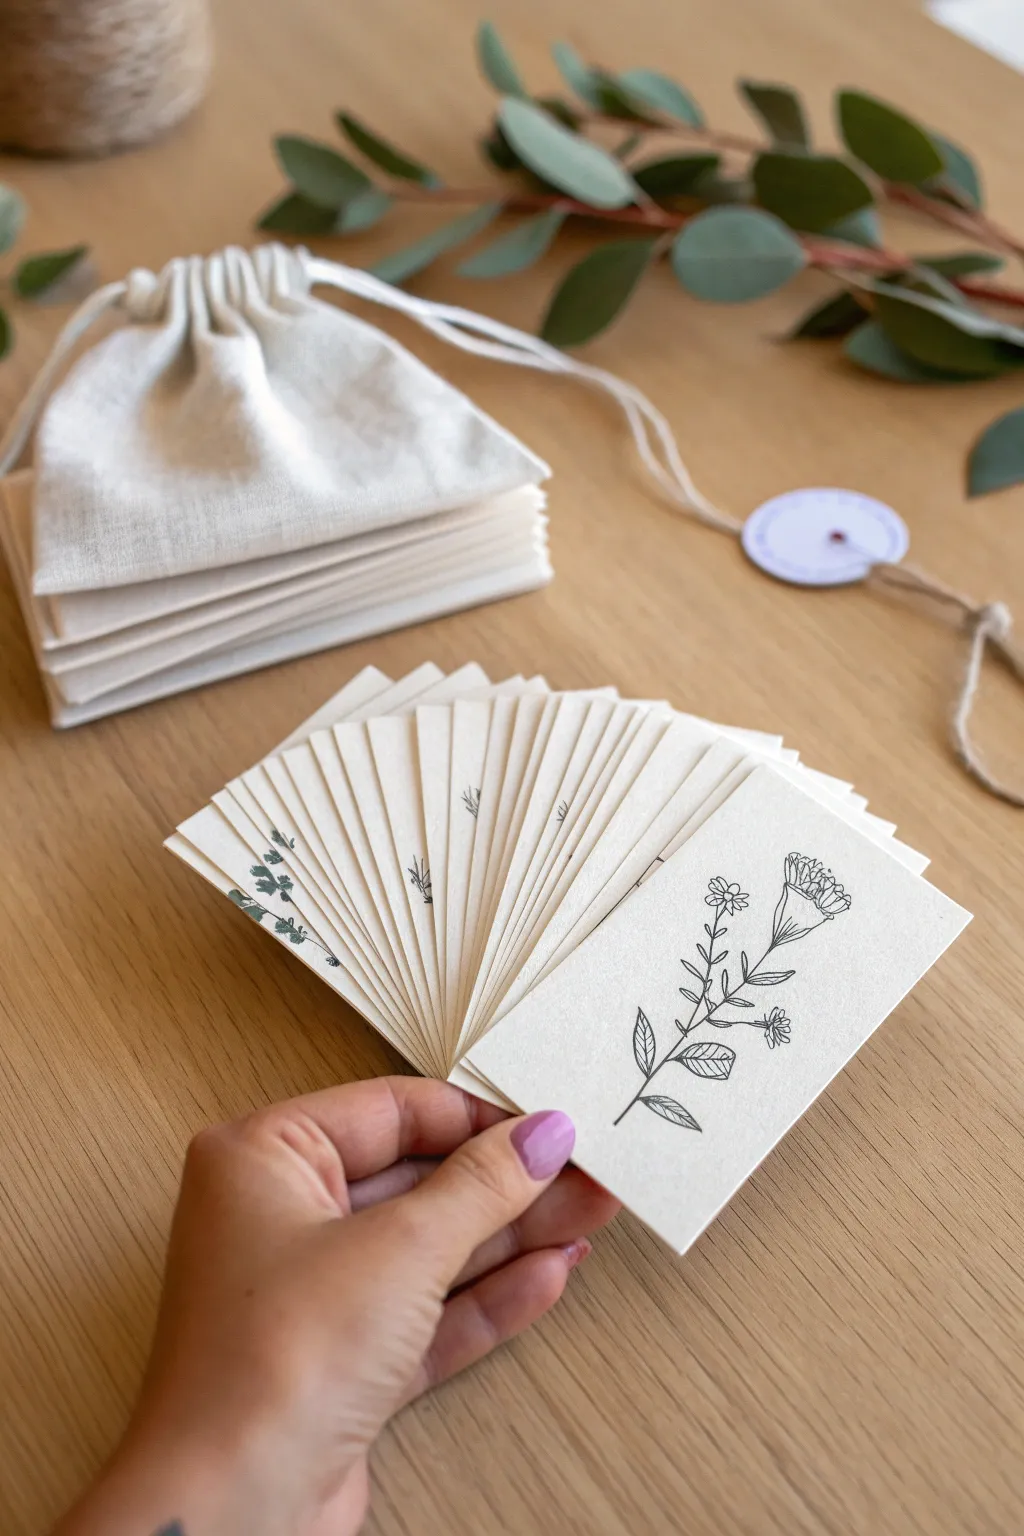
Create a charming, minimalist set of hand-drawn cards perfect for a creative prize draw or a nature-themed memory game. This project focuses on simple line art botanicals on quality cardstock, paired with a rustic pouch for a tactile and organic presentation.
How-To Guide
Materials
- Heavyweight cream or off-white cardstock (300gsm or similar)
- Fine liner pens (black, sizes 0.1, 0.3, and 0.5)
- Pencil and eraser
- Ruler
- Paper cutter or craft knife and cutting mat
- Small muslin or linen drawstring bag
- Botanical reference images (leaves, wildflowers, stems)
Step 1: Preparing the Card Base
-
Select your paper:
Choose a heavyweight cardstock with a bit of texture. A cold-press watercolor paper or a slight linen-finish cardstock works beautifully to give that organic feel seen in the example. -
Measure the dimensions:
Determine the size of your cards. A standard playing card size (2.5 x 3.5 inches) is a great reference, though slightly narrower dimensions (like 2 x 3.5 inches) create an elegant, bookmark-style look. -
Mark your cutting lines:
Using a sharp pencil and ruler, lightly mark out a grid on your large sheet of cardstock for as many cards as you need. -
Cut the cards:
Use a paper trimmer for the straightest lines. If using a craft knife and ruler, make multiple light passes rather than one heavy cut to avoid tearing the paper fibers. -
Check the edges:
Inspect the cut edges. If there are any burrs or rough spots, gently sand them down with a very fine-grit sanding block or just rub them with your finger to smooth them out.
Ink Confidence
Don’t stress about shaky lines. In botanical art, a slightly wavering line mimics natural growth better than a ruler-straight one.
Step 2: Drawing the Botanicals
-
Sketch the composition:
On your first card, use a pencil to very lightly sketch the main stem and flower shape. Keep it centered but allow the design to breathe with plenty of white space. -
Outline the main stems:
Switch to your 0.3 fineliner pen. Trace over your pencil line for the main stem. Use a steady hand, but remember that organic lines in nature aren’t perfectly straight. -
Add leaves and petals:
Draw the basic outlines of leaves and petals using the same 0.3 pen. Ensure leaves attach naturally to the stem. -
Add fine details:
Switch to your finer 0.1 pen for the delicate details. Add veins inside the leaves and texture lines on the petals. This creates depth without cluttering the image. -
Create darker accents:
Use the 0.5 pen sparingly to darken the base of the stem or shadows where leaves overlap, giving the drawing a little visual weight. -
Repeat for the deck:
Continue this process for the remaining cards. Vary the designs—some can be simple ferns, others complex wildflowers. I find it helpful to work in batches, sketching all pencils lines first before inking. -
Erase pencil marks:
Wait until the ink is completely dry (give it at least 15 minutes to be safe) before erasing your pencil guidelines. Use a quality white eraser to avoid smudging.
Step 3: Finishing Presentation
-
Prepare the pouch:
Take your small muslin bag. If it’s wrinkled, give it a quick press with an iron to make it look crisp and professional. -
Create a matching tag:
Cut a small circle or tag from your leftover cardstock scraps. Punch a small hole near the edge. -
Tie the tag:
Thread a piece of natural twine or jute through the tag and tie it to the drawstring of the bag. You can add a tiny matching doodle on this tag as a preview. -
Load the deck:
Stack your finished cards neatly. If desired, you can create duplicates for a matching game or number them on the back for a raffle system. -
Final assembly:
Place the stack of cards into the pouch and cinch the drawstring. Your custom pick-and-win set is ready for the event.
Smudge Prevention
Place a piece of scrap paper under your hand while you draw. This prevents oils from your skin transferring to the cardstock.
You now have a beautiful, handcrafted set of cards that adds a personal artistic touch to your event activities
Finale Reveal With Wrapped Grand Prize
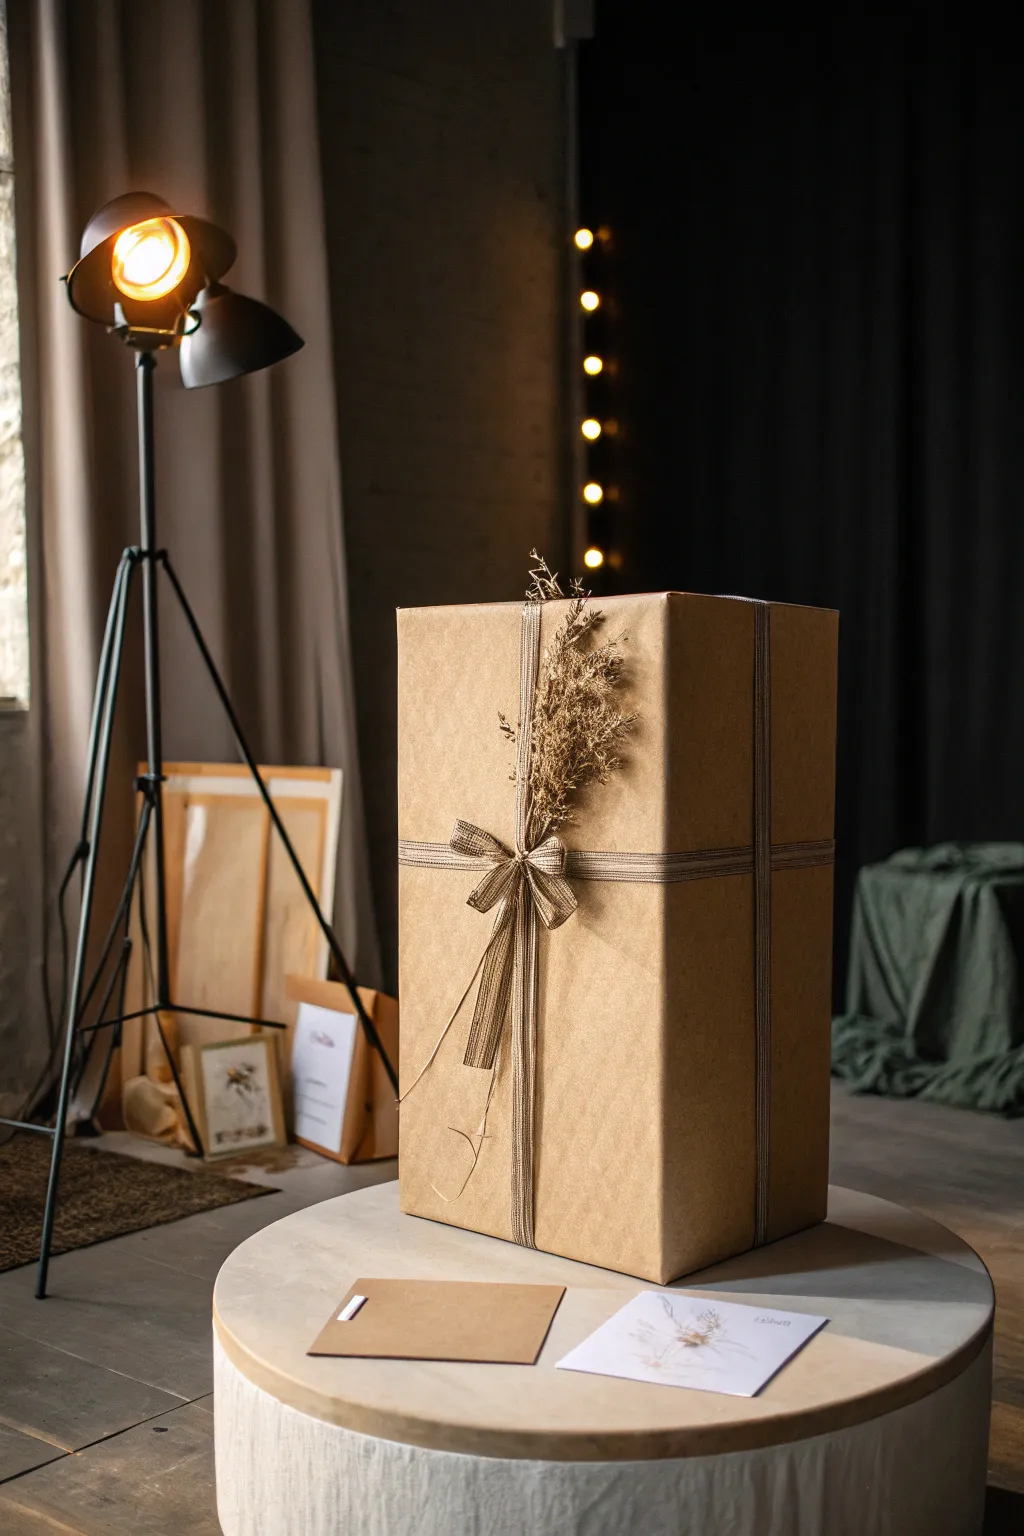
This elegant wrapping style transforms a large box into a statement piece using simple kraft paper and natural elements. The combination of earthy textures with a subtle metallic ribbon creates a sophisticated, organic look perfect for a grand prize reveal.
Step-by-Step
Materials
- Large cardboard box (to fit your prize)
- Roll of heavy-duty kraft paper
- Wide metallic taupe or bronze fabric ribbon (approx. 1-1.5 inches wide)
- Dried florals (pampas grass, wheat, or dried wild grasses)
- Clear packing tape
- Double-sided tape
- Sharp scissors
- Measuring tape
Step 1: Base Wrapping
-
Prepare the workspace:
Clear a large, flat surface like a floor or a large table. Since grand prize boxes can be bulky, you’ll need ample room to maneuver the paper without wrinkling it. -
Measure the paper:
Roll out the kraft paper. Place your box in the center. Pull the paper up the sides to ensure it covers the height of the box completely, plus an extra 2-3 inches for overlap. -
Cut to size:
Once measured, cut the kraft paper from the roll. It’s better to have slightly too much paper than too little, as you can always trim the excess later. -
Secure the long seam:
Bring the two long sides of the paper up to meet in the center of the box’s top (or back, depending on your preference). Pull tightly to remove slack. -
Tape the seam:
Fold one edge under slightly for a clean line, then secure it over the other edge using clear packing tape. For a seamless look, I sometimes use double-sided tape hidden underneath the flap. -
Fold the ends:
On one end of the box, push the top flap of paper down against the box surface. Crease the side triangles sharply so they angle inward. -
Close the ends:
Fold the side triangles in, then pull the bottom flap up. Secure tightly with tape. Repeat this entire folding process on the opposite end of the box.
Step 2: Ribbon & Adornments
-
Measure the vertical ribbon:
Unspool your metallic ribbon. Wrap it vertically around the entire length of the box to gauge the length needed, leaving an extra 2 feet for knotting. -
Position the cross:
Center the ribbon flat against the box. If you are doing a traditional cross wrap, twist the ribbon 90 degrees on the bottom of the box and bring the ends up perpendicular to the first wrap. -
Tie the center knot:
Bring the ribbon ends together at the front center of the box (about 2/3rds of the way up the height looks most elegant for tall boxes) and tie a single tight knot. -
Form the bow loops:
Create two classic loops with the ribbon ends. Adjust them so they are symmetrical but somewhat relaxed, rather than stiff and perky. -
Secure the bow:
Tie the loops together firmly. Tug on the tails to ensure they hang down straight. Trim the ends at an angle or a swallowtail cut for a polished finish. -
Prepare the dried florals:
Take a small handful of dried grasses or wheat. Trim the stems so they are about 4-6 inches long, removing any lower leaves that might add bulk. -
Arrange the bouquet:
Group the stems together so the fluffy tops are staggered slightly for a natural, unforced appearance. -
Insert the greenery:
Gently slide the stems of your mini bouquet behind the center knot of the bow. They should sit vertically, pointing upwards. -
Final adjustments:
Fan out the dried grass heads slightly so they look full. If the stems feel loose, you can use a tiny hidden dot of hot glue or a piece of wire to anchor them to the knot.
Wrinkled Paper?
If the kraft paper gets creases while wrapping a large box, graze a warm iron (no steam!) quickly over the paper to smooth it out before taping.
Level Up: Wax Seal
Add a wax seal directly over the center of the bow knot or on the paper seam. It adds an old-world charm that matches the kraft aesthetic.
Now your grand prize is ready to create a memorable moment at the event finale


Have a question or want to share your own experience? I'd love to hear from you in the comments below!