Your foyer paint is the very first brushstroke of your home’s story, so it’s worth choosing something that feels like you. I pulled together my favorite foyer paint ideas—from classic, light-loving choices to artsy, unexpected moves that still feel livable.
Soft White for an Airy Foyer
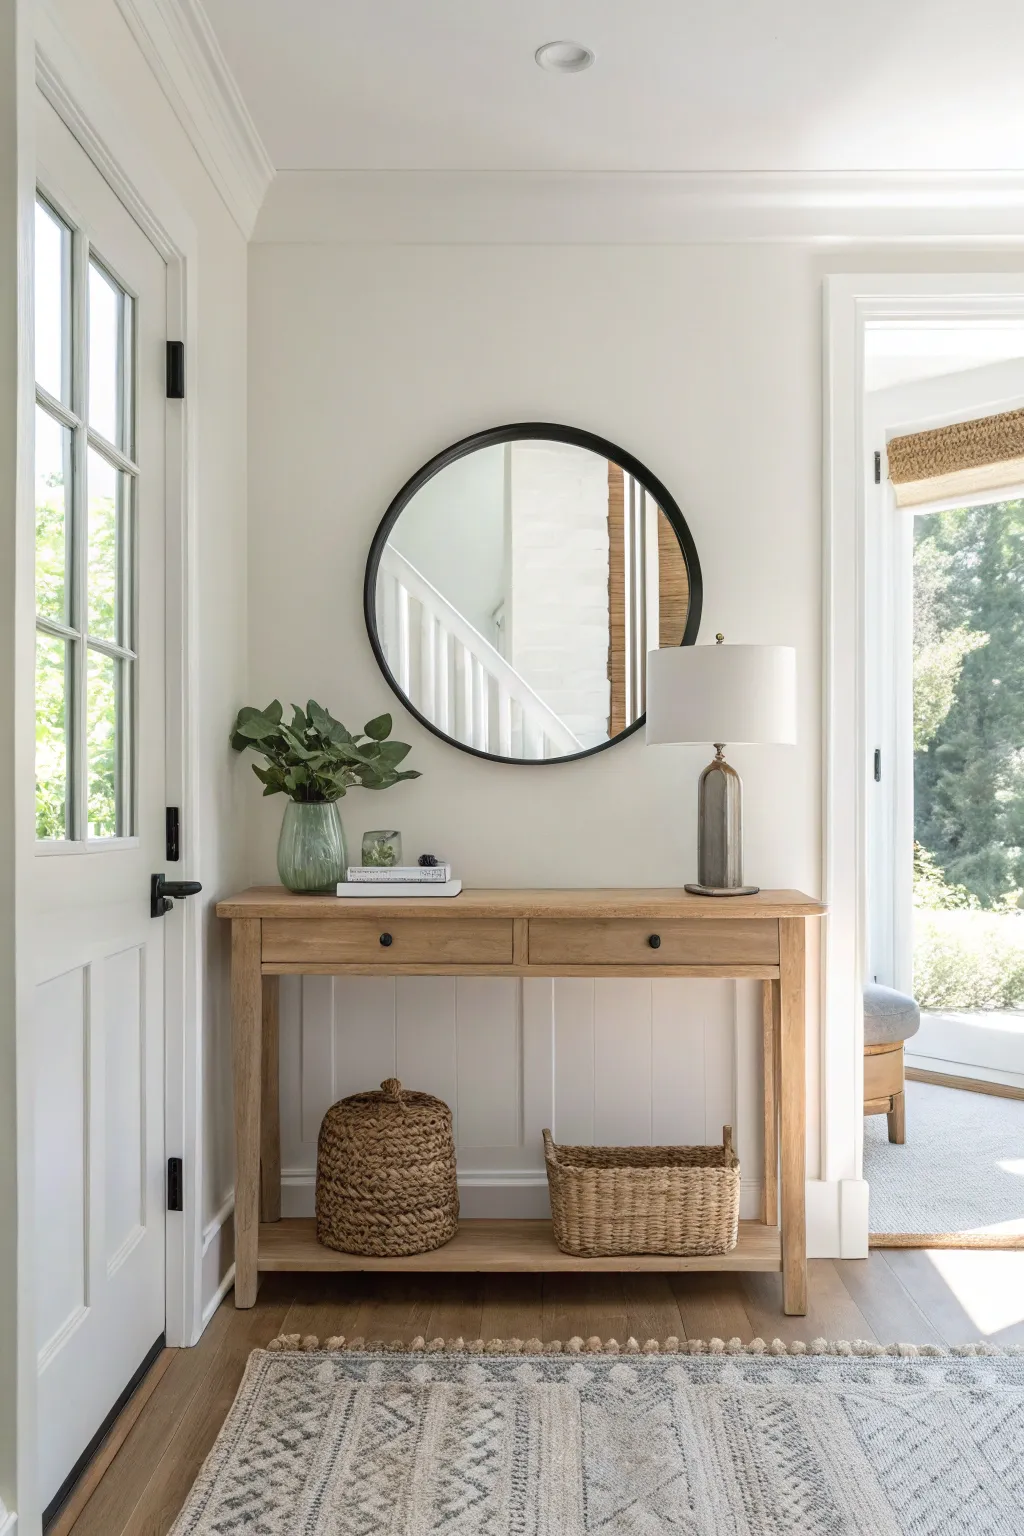
Create a welcoming first impression with this airy, soft white foyer setup that balances rustic warmth with modern clean lines. This project focuses on assembling and styling a key focal point using a console table, mirror, and carefully curated accessories.
How-To Guide
Materials
- Light wood console table (two drawers, bottom shelf)
- Round black metal mirror (approx. 30-36 inch diameter)
- Table lamp with dark metallic/ceramic base and linen drum shade
- Large green glass vase
- Faux or fresh eucalyptus stems
- Woven lidded basket (round)
- Woven rectangular storage basket
- Coffee table books
- Soft white wall paint (e.g., Benjamin Moore White Dove)
- Patterned area rug (neutral tones)
- Measuring tape
- Drill and wall anchors
- Level
Step 1: The Foundation: Paint & Furniture
-
Prep the Walls:
Before bringing in furniture, ensure your canvas is ready. Paint the walls in a soft, creamy white. A satin or eggshell finish works beautifully to reflect light without too much shine. -
Place the Console:
Position your light wood console table against the main wall. Center it relative to the wall space or adjacent doorways to create symmetry. -
Lay the Rug:
Roll out a neutral, patterned area rug in front of the console. Leave a few inches of wood floor visible between the rug and the baseboards for a custom, high-end look.
Loose Aesthetics
If the arrangement feels too stiff, try angling the books slightly or draping a branch lower than the rest.
Step 2: The Focal Point: Mirror Installation
-
Measure for Placement:
Find the horizontal center of your console table and mark it on the wall with a pencil. This ensures your mirror hangs perfectly aligned with the furniture below. -
Determine Height:
Aim to hang the mirror so the bottom edge is 6 to 8 inches above the tabletop. This connects the mirror to the vignette without cramping the accessories. -
Install Hardware:
Using your drill and appropriate wall anchors for your wall type, install the hanging hardware. Double-check your work with a level before hanging the weighty round mirror. -
Hang and Clean:
Carefully hang the black-framed mirror. Give the glass a quick wipe with glass cleaner to remove any fingerprints from the installation process.
Step 3: Styling the Surface
-
Anchor with Lighting:
Place the table lamp on the right side of the console. The height of the lamp should overlap slightly with the mirror’s frame visually, adding depth to the arrangement. -
Add Greenery:
On the opposite side (the left), place your green glass vase. Fill it generously with eucalyptus stems. I like to fluff the leaves outward so they feel organic and not too stiff. -
Layer the Center:
Bridge the gap between the lamp and vase with a small stack of two hardcover books. Place them slightly off-center, leaning closer to the vase. -
Top with Detail:
Set a small decorative object, like a glass votive or a small stone bowl, on top of the book stack to act as a paperweight and add texture.
Seasonal Swap
Change the vase stems seasonally: try cherry blossoms in spring or dried wheat bundles in autumn.
Step 4: Balancing the Bottom Shelf
-
Add Visual Weight Left:
On the bottom shelf, place a large, round woven basket with a lid on the left side. This mimics the round shape of the mirror above and grounds the design. -
Add Texture Right:
On the right side of the shelf, place a rectangular woven basket. This is perfect for catching mail or shoes and balances the visual weight of the round basket. -
Check Spacing:
Step back and ensure there is breathing room between the two baskets. They shouldn’t be touching; negative space is key to that ‘airy’ feel. -
Final Twists:
Adjust the lamp shade so the seam faces the wall. Tweak the eucalyptus branches one last time to ensure they don’t block the mirror’s reflection too much.
Enjoy the calm and organized atmosphere every time you walk through your door


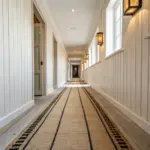
Light Greige to Bridge Rooms
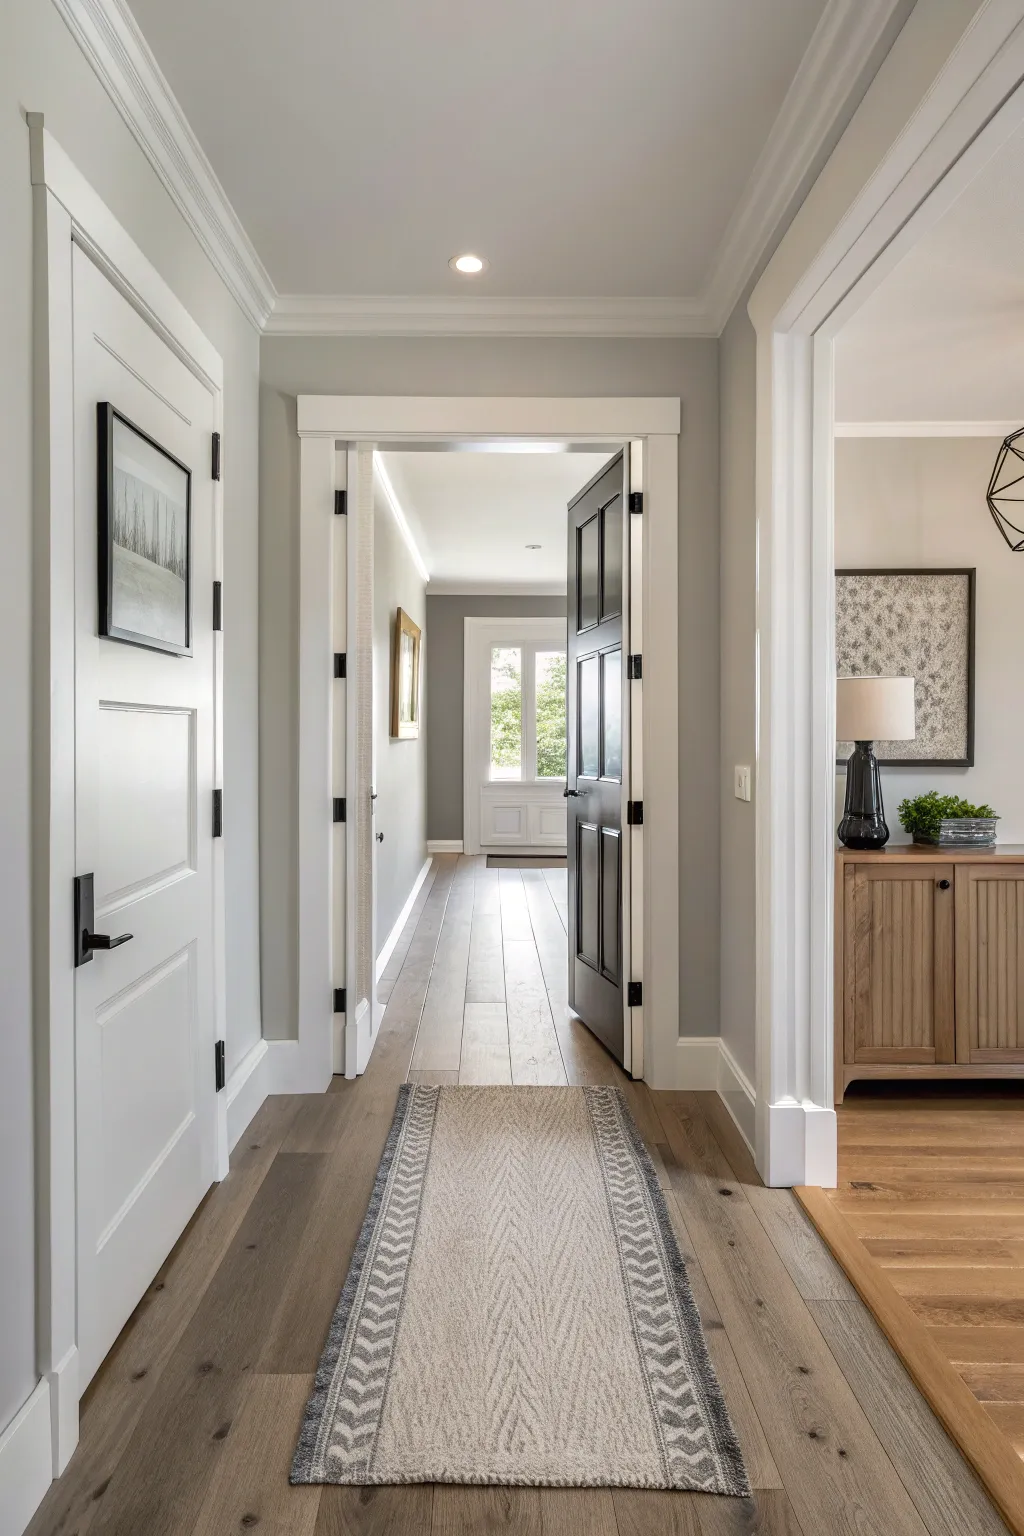
Achieve a seamless and airy transition between spaces with this light greige hallway makeover. By combining soft, neutral walls with crisp white trim and thoughtful black accents, you can create a sophisticated thoroughfare that feels both modern and timeless.
Step-by-Step Tutorial
Materials
- Light greige paint (satin or eggshell finish)
- Pure white trim paint (semi-gloss)
- Black paint (satin finish for interior door)
- Painter’s tape (multi-surface)
- Drop cloths
- Spackle and putty knife
- Sandpaper (120 and 220 grit)
- Angled sash brush (2.5 inch)
- Paint rollers (smooth surface) and roller tray
- Black matte door hardware (levers and hinges)
- Decorative runner rug (geometric pattern)
- Screwdriver or drill
Step 1: Preparation & Trim
-
Clear and clean:
Remove all furniture, rugs, and wall art from the hallway. Wipe down the walls and baseboards with a mild detergent solution to remove dust and grime, ensuring a clean surface for paint adhesion. -
Patch imperfections:
Inspect the walls for nail holes or dents. Fill them with spackle, let dry completely, and sand smooth with 120-grit sandpaper until flush with the wall. -
Protect the floors:
Lay down heavy-duty drop cloths over your hardwood flooring to catch drips. Secure the edges with painter’s tape if necessary to prevent sliding. -
Paint the trim first:
I find it easiest to start with the trim. Apply pure white semi-gloss paint to baseboards, door casings, and crown molding. Don’t worry about getting paint on the adjacent wall area, as you will cut in over it later. -
Let trim cure:
Allow the trim paint to dry fully, usually 24 hours just to be safe. Once dry, tape off the trim edges carefully with high-quality painter’s tape to prepare for the wall color.
Step 2: Painting the Walls
-
Cut in the edges:
Using an angled sash brush, carefully paint a 2-3 inch border of your light greige paint along the ceiling line, corners, and against the taped trim. -
Roll the walls:
Pour your greige paint into a tray. Load a smooth-surface roller and apply the paint in ‘W’ patterns, working in manageable sections to keep a wet edge. This color relies on even coverage, so avoid pressing too hard on the roller. -
Apply second coat:
Wait for the first coat to dry according to the can’s instructions (usually 2-4 hours). Apply a second coat to ensure the true depth of the greige tone comes through without streakiness. -
Remove tape:
While the second coat is still slightly tacky, carefully peel away the painter’s tape at a 45-degree angle to reveal crisp, clean lines between the greige wall and white trim.
Uneven Edges?
If paint bleeds under the tape, wait for it to dry fully. Then, use a small artist’s brush and the trim color to carefully touch up the line for a perfect finish.
Step 3: The Contrast Door
-
Prep the door:
Identify the door you want to feature as an accent (like the one leading to the next room). Lightly sand the surface to scuff the previous finish for better grip. -
Paint the accent door:
Using a small foam roller or high-quality brush, apply satin black paint to the door. Paint the panels first, then the rails and stiles. This creates a stunning focal point against the lighter walls. -
Dry and repeat:
Let the black paint dry completely before adding a second coat if needed for full opacity.
Level Up: Gallery Wall
Instead of a single art piece, create a linear gallery wall along the hallway using matching black frames to emphasize the length and directional flow of the space.
Step 4: Finishing Touches
-
Update hardware:
Swap out old doorknobs and hinges for matte black levers. This ties the white doors and the black accent door together seamlessly. -
Hang artwork:
Choose a framed piece with a black frame to echo the accent door. Hang it at eye level in the adjacent space or hallway wall to draw the eye through the corridor. -
Lay the runner:
Place a long runner rug with a subtle geometric pattern down the center of the hallway. This adds texture and softens the acoustics of the space. -
Adjust lighting:
Ensure your overhead recessed lighting or fixtures have warm-white bulbs (around 2700K-3000K) to keep the greige looking cozy rather than sterile.
Now step back and enjoy how this calming palette connects your home’s spaces with elegant simplicity


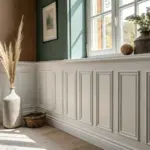
Two-Tone Wainscoting Contrast
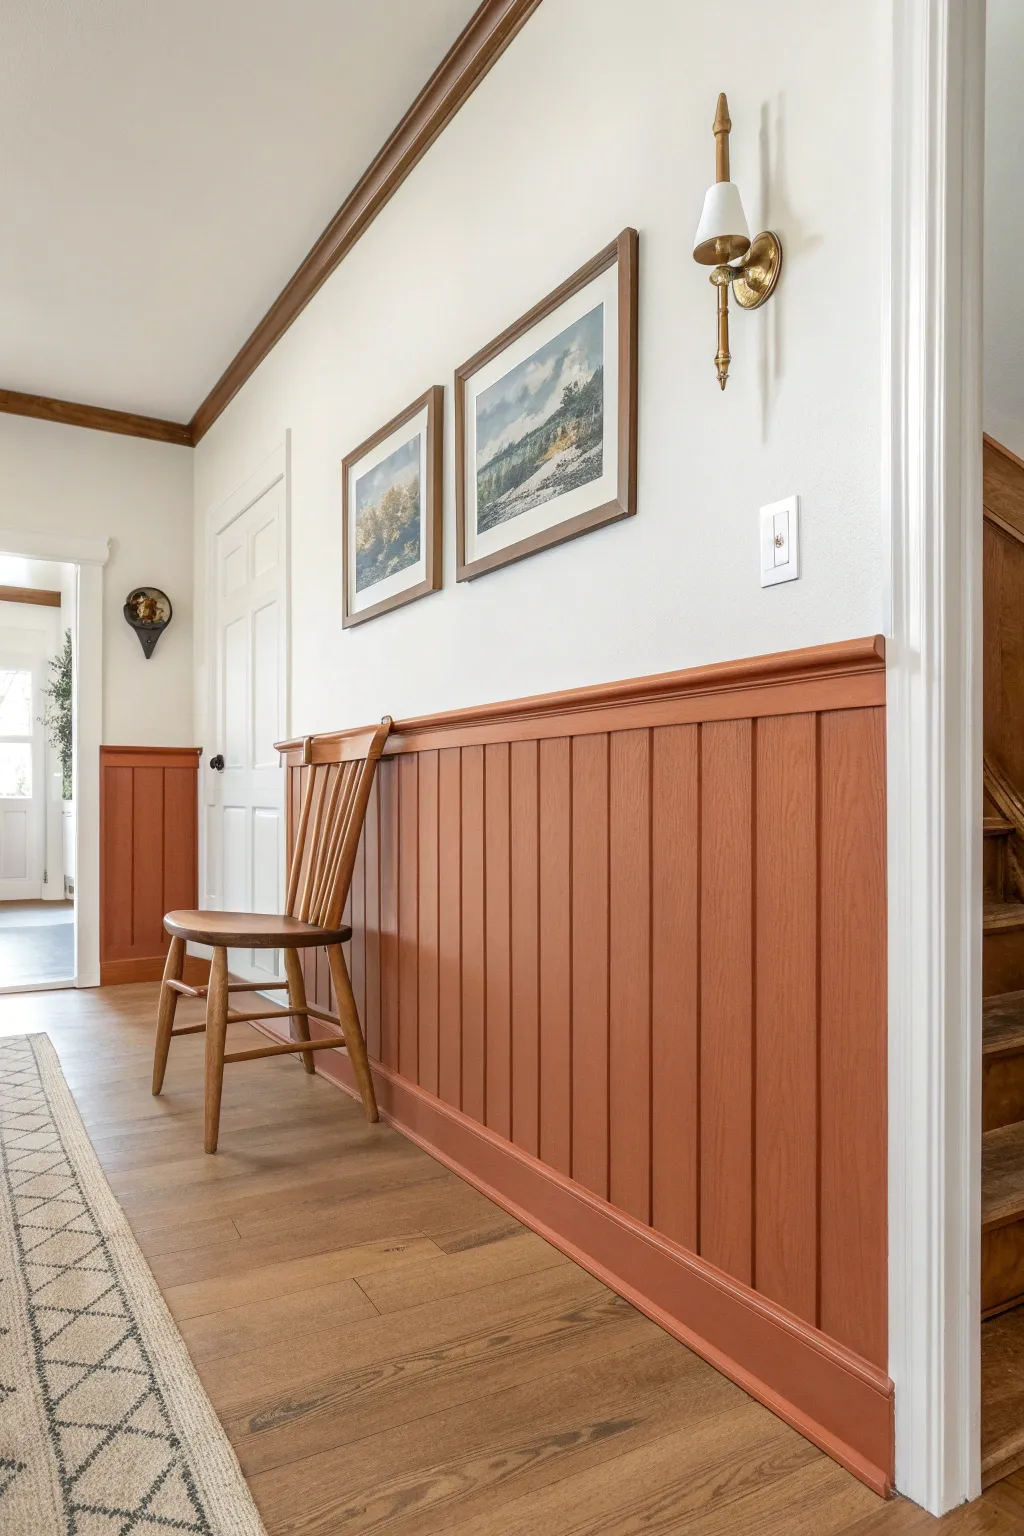
Bring warmth and character to your entryway with this classic beadboard wainscoting project. The striking contrast between creamy white walls and rich, earthy terracotta paneling creates an inviting atmosphere that feels both historic and fresh.
Step-by-Step
Materials
- 4×8 Beadboard panels (MDF or wood)
- Chair rail molding
- Baseboard molding
- Construction adhesive
- Finishing nails
- Nail gun or hammer
- Miter saw
- Jigsaw (for cutouts)
- Wood filler
- Caulk and caulk gun
- Sandpaper (120 and 220 grit)
- Primer (if using bare wood)
- Semigloss interior paint (terracotta color)
- Satin interior paint (creamy white)
- Paint rollers and angled brushes
- Level
- Stud finder
- Measuring tape
Step 1: Wall Prep & Upper Painting
-
Clear and clean:
Begin by removing any existing baseboards along the hallway. Score the top edge with a utility knife first to prevent peeling the drywall paper, then gently pry them off. -
Patch and smooth:
Fill any holes from the old trim with spackle. Once dry, sand the areas smooth to ensure your new wainscoting sits flush against the wall. -
Mark the height:
Decide on the height of your wainscoting. A standard height is about 32-36 inches, or roughly one-third up the wall. Using a level, draw a faint horizontal reference line around the room at your chosen height. -
Paint the upper wall:
It is much easier to paint the upper section before installing trim. apply two coats of your creamy white satin paint to the upper wall, extending slightly below your reference line so you don’t have to cut in perfectly later.
Gapping Issues?
If corners aren’t perfectly square, cuts might leave gaps. Don’t force the wood. Instead, use a paintable acrylic caulk to fill the corner gaps before painting for a seamless, flexible seal.
Step 2: Wainscoting Installation
-
Measure and cut panels:
Measure the length of your walls and cut your beadboard panels to size. For the vertical height, cut them about 1/4 inch shorter than your total desired height to allow room for leveling adjustments. -
Locate studs:
Use a stud finder to mark the location of wall studs along your installation area. These marks will be crucial for nailing the panels securely. -
Handle outlets:
If you encounter electrical outlets, measure their exact position carefully. Transfer these measurements to your beadboard sheet and use a jigsaw to cut out the openings before installation. -
Install the first panel:
Apply construction adhesive to the back of your first panel in a zig-zag pattern. Press it onto the wall, ensuring the top edge is level with your reference line. Use a few nails to hold it in place while the glue sets. -
Continue installation:
Butt the next panel tightly against the first and repeat the gluing and nailing process. I like to check for level every couple of panels to ensure the lines remain vertical.
Level Up: Picture Ledge
Swap the standard chair rail for a deeper molding profile or build a narrow shelf (1-2 inches deep). This creates a functional picture ledge for displaying small art frames or trinkets.
Step 3: Trim & Finish Work
-
Install baseboards:
Measure and cut your new baseboard molding. Secure it over the bottom edge of the beadboard using finishing nails driven into the studs. -
Cap with chair rail:
Measure and cut the chair rail molding for the top edge. This piece hides the raw edge of the beadboard paneling. Nail it securely into the studs, ensuring a tight fit against the paneling. -
Fill and caulk:
Fill all nail holes with wood filler. Use paintable caulk to seal the gaps where the trim meets the wall, where panels meet each other, and all corners for a seamless professional look. -
Sand smooth:
Once the filler is dry, lightly sand the nail holes and joints with 220-grit sandpaper until completely smooth to the touch. -
Prime the surface:
If your materials are unprimed, apply a coat of high-quality primer to the beadboard, baseboard, and chair rail. Let it dry completely according to the can’s instructions. -
Applying the color:
Stir your terracotta semi-gloss paint thoroughly. Use an angled sash brush to paint the grooves of the beadboard and the detailed edges of the molding first. -
Roll the flat surfaces:
While the brushed areas are still wet, use a small foam roller or low-nap roller to paint the flat faces of the panels and trim. This helps smooth out brush marks. -
Final coat:
Allow the first coat to dry for at least 4 hours. Lightly sand any bumps if necessary, wipe away dust, and apply a second coat for a rich, durable finish.
Step back and enjoy the rich, grounding color your new wainscoting brings to the space


Crisp Trim and Millwork Outline
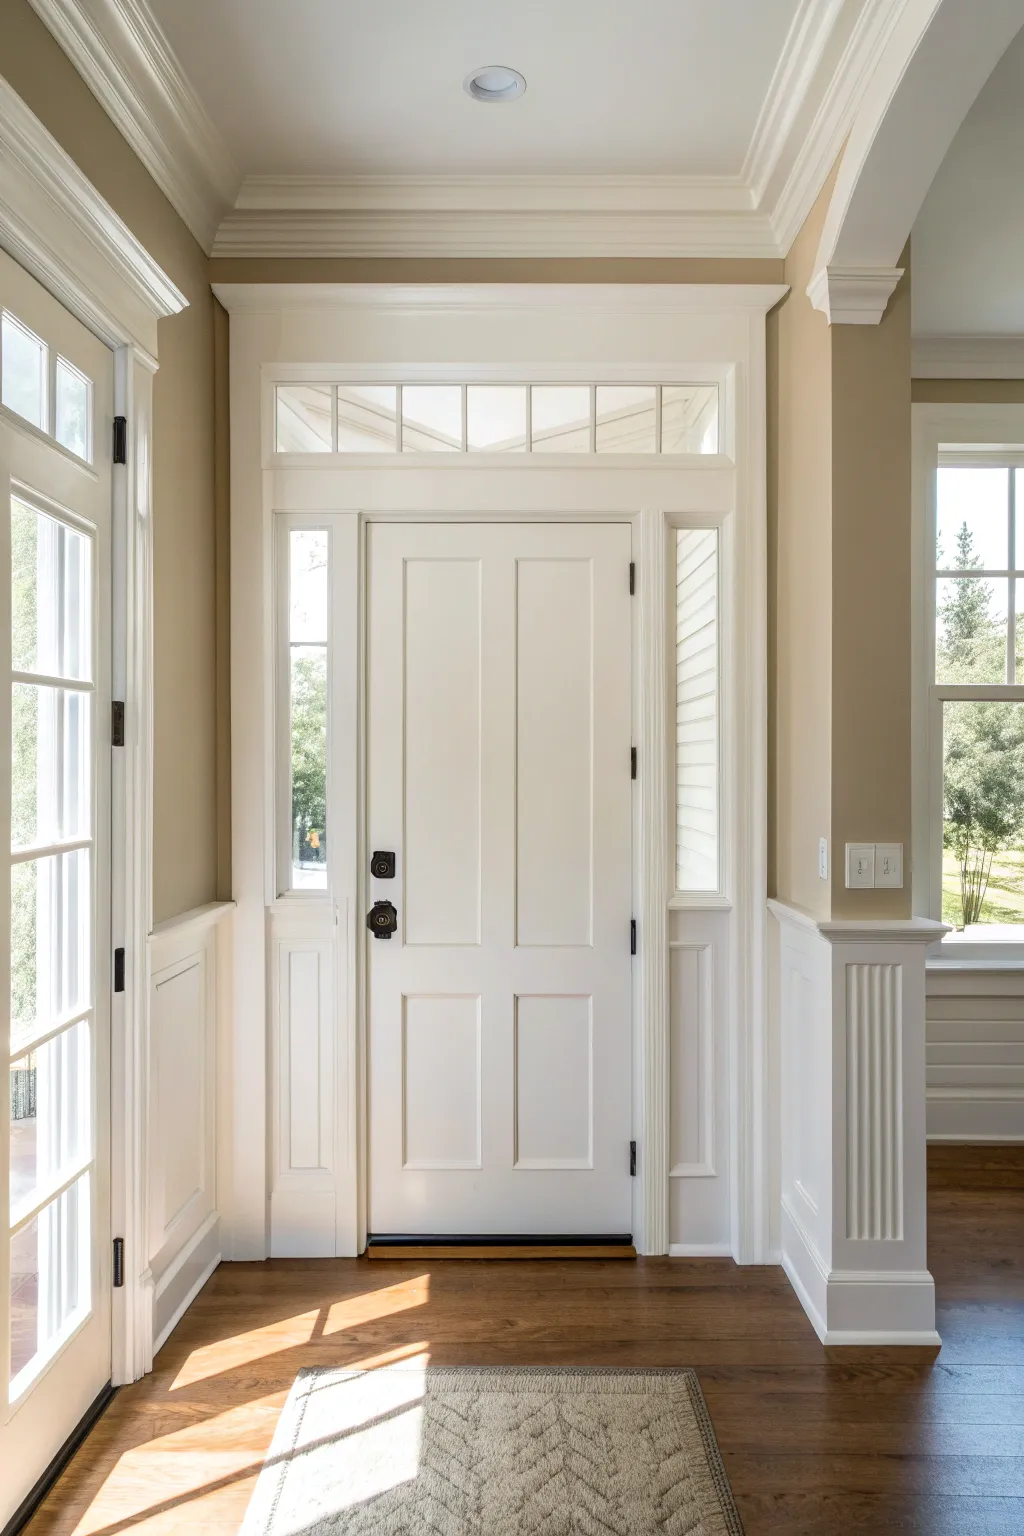
Transform your entryway into a bright, welcoming statement with this guide to crafting and finishing crisp millwork. By combining classic wainscoting with a fresh coat of high-gloss white, you’ll achieve a sophisticated look that dramatically frames your front door.
Step-by-Step Tutorial
Materials
- Semi-gloss or high-gloss white interior paint
- Beige or tan wall paint (satin finish)
- Primed 1×4 and 1×6 MDF or wood boards
- Baseboard molding
- Chair rail molding
- Crown molding
- Construction adhesive
- Wood filler and spackle
- Caulk (paintable)
- Sandpaper (120 and 220 grit)
- Miter saw
- Brad nailer with 2-inch nails
- Level and tape measure
- High-quality 2.5-inch angled sash brush
- Small foam roller
- Blue painter’s tape
Step 1: Preparation and Planning
-
Measure and Map:
Begin by measuring the total wall length and height. Plan your wainscoting height—typically about 32 to 36 inches from the floor—and mark this line around the room using a level and pencil. -
Determine Stile Spacing:
Calculate the spacing for your vertical ‘stiles’ (the upright boards). Aim for consistent spacing, usually between 24 and 30 inches apart, ensuring they don’t awkwardly intersect with outlets or corners. -
Prep the Walls:
Clean the walls thoroughly with a mild detergent solution. Repair any existing holes or dents with spackle and sand smooth once dry, ensuring a flat surface for your new woodwork.
Seamless Caulk Lines
Keep a damp rag handy while caulking. Wipe your finger frequently to keep the bead smooth and prevent buildup on adjacent walls.
Step 2: Installing the Millwork
-
Install Baseboards:
Remove old baseboards if present. Cut your new baseboard molding to length with a miter saw and secure it to the wall studs using construction adhesive and your brad nailer. -
Attach the Top Rail:
Install a horizontal 1×4 or 1×6 board along the level line you marked earlier. This serves as the top rail of your wainscoting structure. -
Place Vertical Stiles:
Cut your vertical boards to fit snugly between the baseboard and the top rail. Apply adhesive to the back of each board, position them according to your spacing plan, and nail them into place. -
Cap with Chair Rail:
Finish the top of the wainscoting by installing a decorative chair rail molding on top of the upper horizontal board. This adds a polished transition and a small shelf-like detail. -
Install Crown Molding:
Measure and cut crown molding for the ceiling perimeter. Cutting crown requires precise compound angles, so test on scrap pieces first. Secure it firmly into ceiling joists and wall studs.
Add Inside Panel Trim
For extra depth, install small picture-frame molding inside the rectangular boxes created by your stiles and rails before painting.
Step 3: Finishing and Painting
-
Fill Nail Holes:
Go over every board and fill all nail holes with wood filler. Overfill slightly to account for shrinkage, then let it dry fast. -
Caulk Seams:
Run a bead of paintable caulk along every seam where wood meets wall or wood meets wood. Smooth the bead with a wet finger for a seamless, built-in appearance. This step is crucial for that ‘crisp’ look. -
Sand Everything Smooth:
Once the filler is dry, sand the wood surfaces with 220-grit sandpaper until they feel silky to the touch. wipes away all dust with a tack cloth. -
Tape Off Areas:
Apply painter’s tape to the floor and the upper wall areas that won’t be painted white. Press the tape edges down firmly to prevent bleed-through. -
Prime the Woodwork:
Apply a high-quality primer to all raw wood and MDF surfaces. I like to let this dry fully before lightly sanding again to knock down any raised grain. -
Paint the Upper Walls:
Paint the wall space above the wainscoting with your chosen beige or tan color first. Cut in carefully around the crown molding and new chair rail. -
Brush the Trim:
Using your angled sash brush, paint the detailed profiles of the molding and corners where the roller can’t reach. Use long, smooth strokes. -
Roll the Flat Surfaces:
Use a small foam roller to apply the semi-gloss or high-gloss white paint to the flat panels and boards. This minimizes brush marks and creates a factory-like finish. -
Apply Second Coat:
After the first coat is fully dry, apply a second coat to ensure solid, bright white coverage. Remove the painter’s tape slowly while the paint is still slightly tacky to avoid peeling.
Enjoy the commanding elegance your new bright entryway brings to your home
BRUSH GUIDE
The Right Brush for Every Stroke
From clean lines to bold texture — master brush choice, stroke control, and essential techniques.
Explore the Full Guide
Single Accent Wall Behind the Console
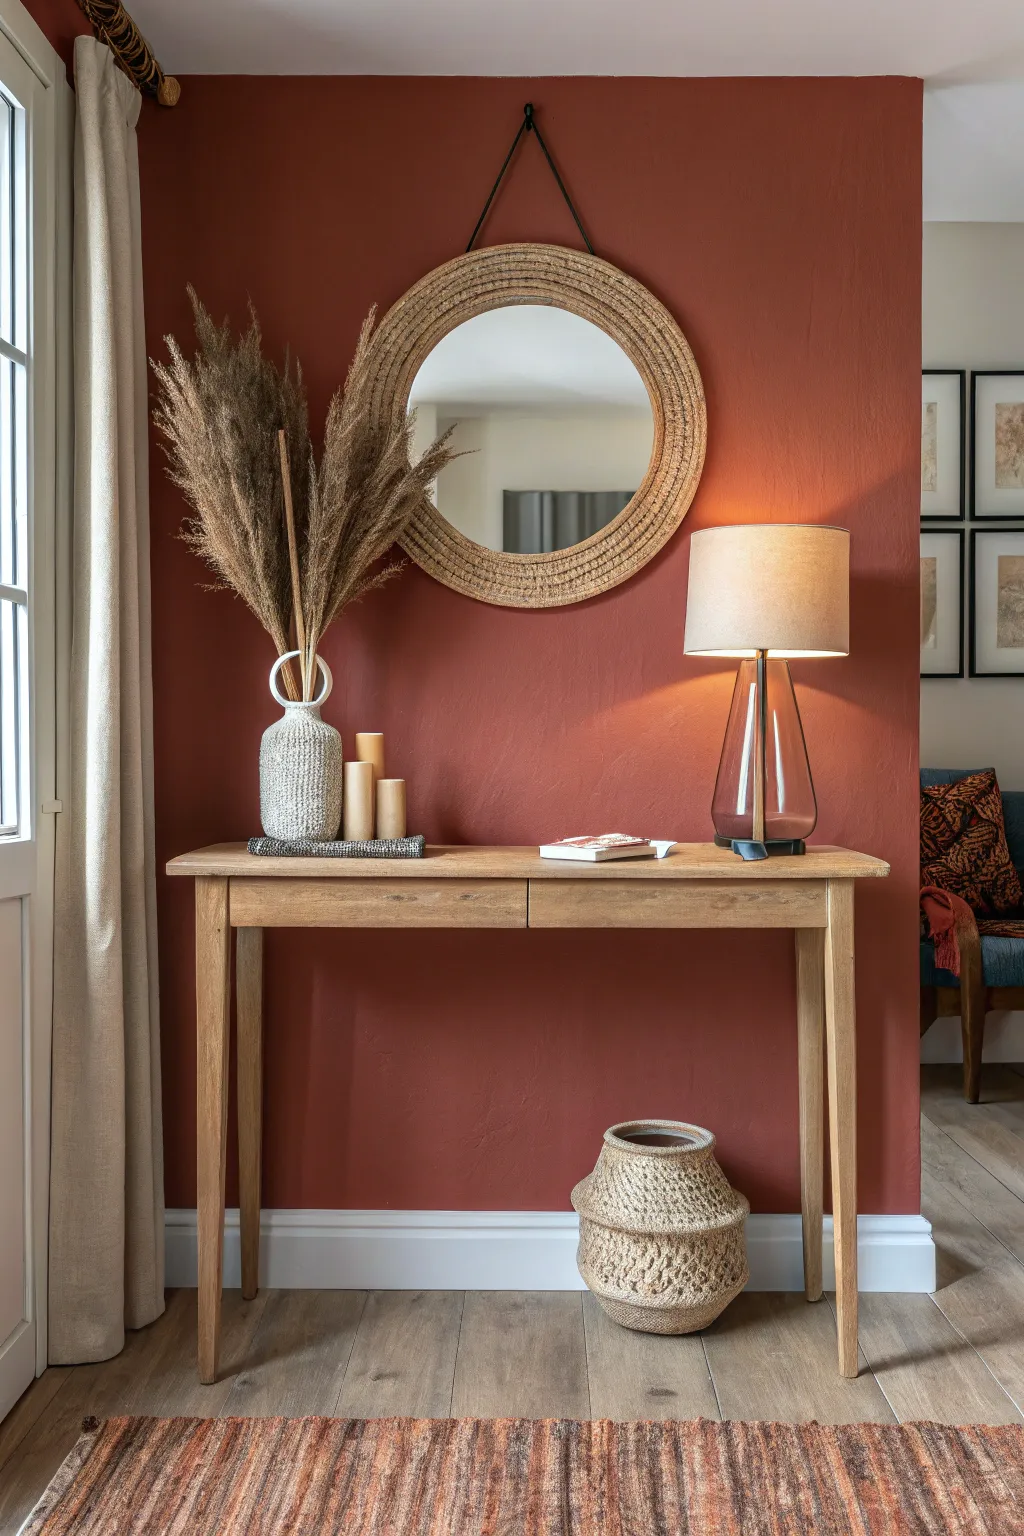
Transform a plain hallway into a cozy, earthy focal point with this single-wall makeover. The deep rust tone instantly grounds the space, providing a rich, matte backdrop that makes natural wood and woven textures pop.
Detailed Instructions
Materials
- Interior latex paint (Deep Terracotta/Rust color, Matte finish)
- 2-inch angled sash brush
- 9-inch roller frame
- 3/8-inch nap roller cover (microfiber preferred)
- Painter’s tape (high adhesion)
- Drop cloth or canvas
- Mild detergent and sponge
- Spackle (if needed)
- Fine-grit sandpaper (220)
- Paint tray and liner
Step 1: Preparation
-
Clear the area:
Move the console table and any accessories completely out of the hallway to give yourself ample working room. -
Prep the surface:
Wash the wall thoroughly with a mild detergent and water solution to remove any dust or oils that might repel paint. -
Patch imperfections:
Fill any old nail holes or dents with lightweight spackle, pressing it firmly into the void. -
Sand smooth:
Once the spackle is fully dry, lightly sand the patched areas with 220-grit sandpaper until flush with the wall. -
Protect the floor:
Lay down your drop cloth, ensuring it is pushed right up against the baseboard to catch potential splatters.
Crisp Lines Trick
To guarantee zero bleeding, paint a thin line of your EXISTING wall color over the tape edge first. This seals the gap, so any paint that seeps under is invisible.
Step 2: Taping and Edging
-
Tape the perimeter:
Apply painter’s tape along the baseboards, ceiling line, and the adjacent walls where they meet your accent wall. -
Seal the tape:
Run a putty knife or your finger firmly along the edge of the tape to ensure a tight seal and prevent color bleed. -
Mix the paint:
Open your terracotta paint and stir extensively with a stir stick, lifting pigment from the bottom of the can. -
Load the brush:
Dip your angled sash brush about one inch into the paint, tapping the excess off against the side of the can. -
Cut in the edges:
Paint a 2-to-3 inch border along the ceiling, corners, and baseboards. I like to feather out the inner edge of this border so it blends easier with the roller later.
Step 3: Rolling and Finishing
-
Load the roller:
Pour paint into your tray and saturate the roller cover, ensuring it is evenly coated but not dripping. -
Apply the first coat:
Start near a corner and roll a large ‘W’ shape on the wall, then fill it in with vertical strokes. -
Maintain a wet edge:
Work in small sections, overlapping your previous strokes slightly while the paint is still wet to avoid lap marks. -
Let it dry:
Allow the first coat to dry completely according to the manufacturer’s instructions (usually 2-4 hours). -
Apply second coat:
Repeat the rolling process with a second coat to ensure the deep red pigment is fully opaque and rich. -
Remove tape:
While the second coat is still slightly tacky (not fully cured), slowly peel off the painter’s tape at a 45-degree angle. -
Restyle the vignette:
Once fully cured (wait at least 24 hours), move your console back, hang a round mirror, and add warm lighting to complete the look.
Level Up: Texture
For an old-world aesthetic, swap standard latex for Limewash or Roman Clay paint. These create a velvety, cloudy movement that mimics plaster walls.
Enjoy the dramatic, cozy welcome your new foyer wall provides every time you walk through the door.
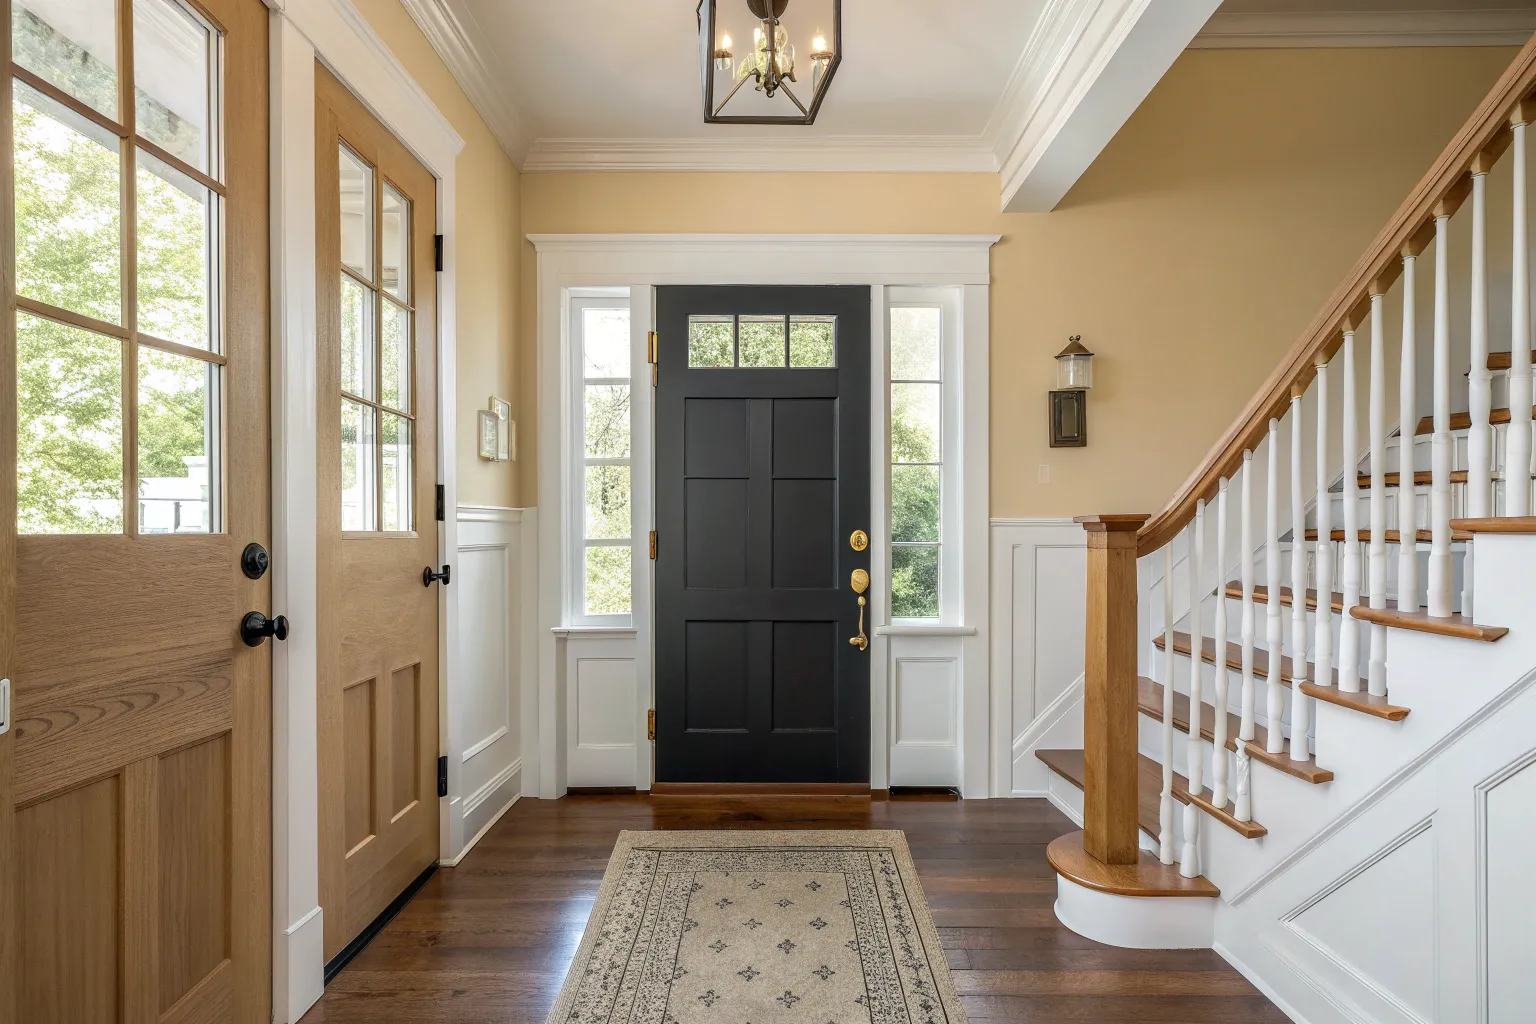
Paint the Inside of the Front Door
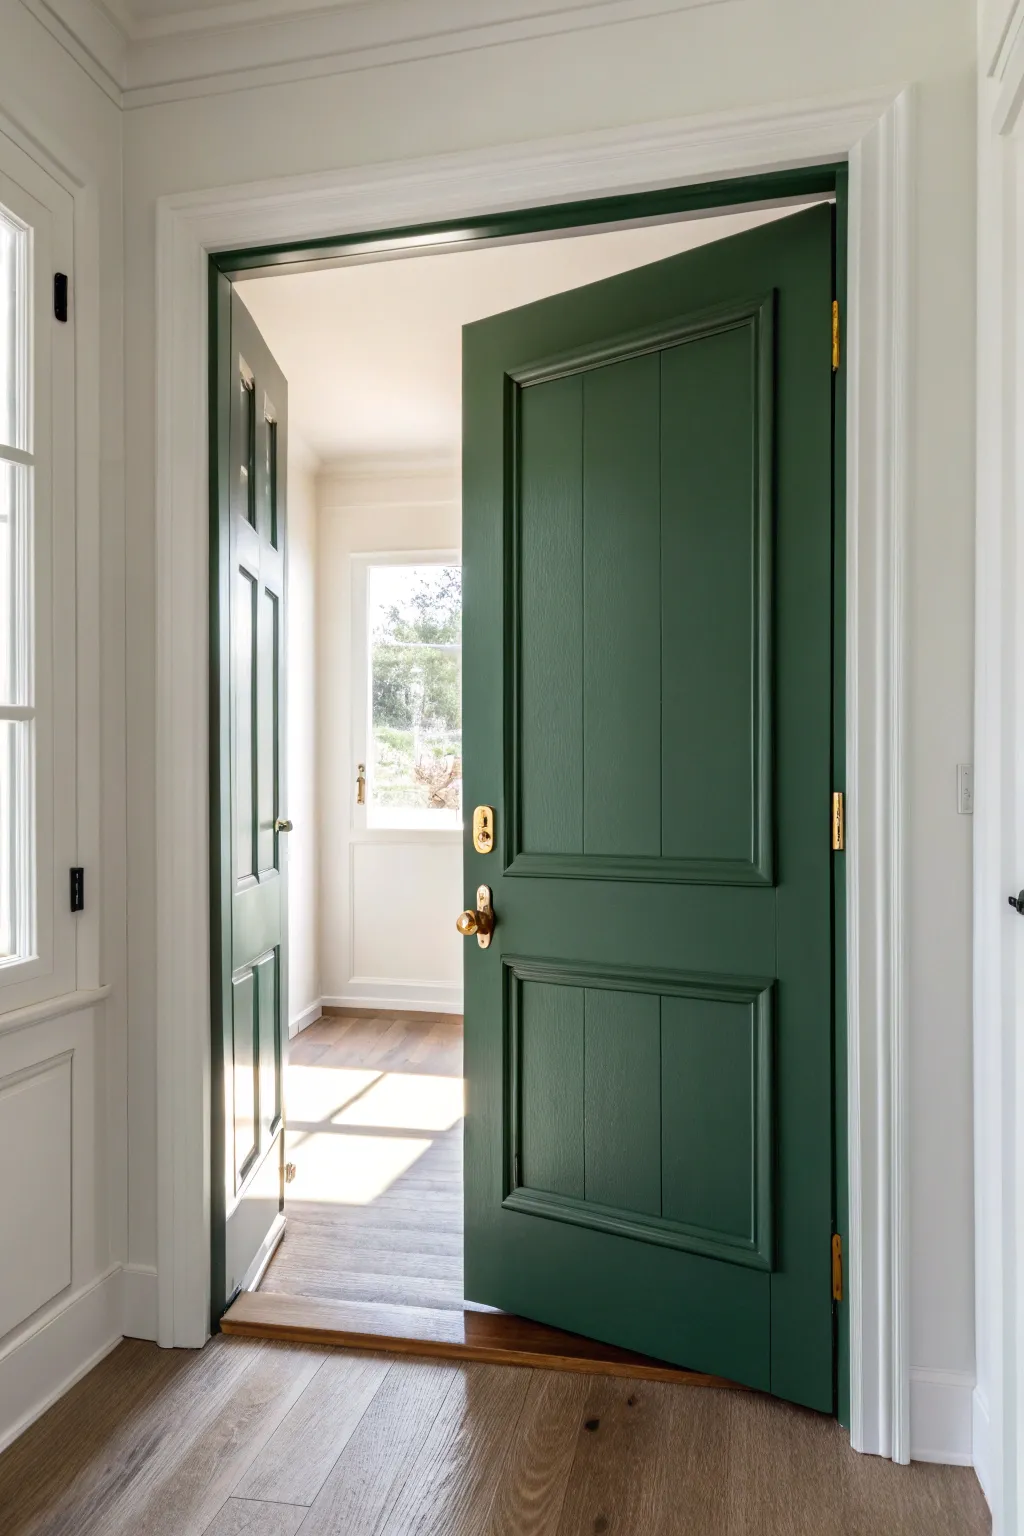
Transform your entryway by painting the interior of your front door a deep, sophisticated green. This project creates a striking contrast against white trim and adds instant character to an otherwise neutral foyer.
Step-by-Step Guide
Materials
- High-quality interior paint (satin or semi-gloss finish) in deep forest green
- Primer (tinted gray recommended for dark topcoats)
- Sandpaper (120-grit and 220-grit)
- Painter’s tape (1.5 to 2 inch width)
- Liquid deglosser or TSP substitute
- Clean lint-free rags
- Angled sash brush (2 inch)
- Mini foam roller or tight-nap woven roller (4 inch)
- Paint tray and liners
- Screwdriver
- Drop cloth
Step 1: Preparation
-
Clear the area:
Begin by opening your doors wide and securing them if necessary. Lay down a drop cloth to protect your floors, ensuring it tucks right up under the door threshold. -
Remove hardware:
Using a screwdriver, carefully remove all door hardware, including handles, deadbolts, and kickplates. While it’s tempting to tape around them, removing them guarantees a professional, seamless finish. -
Clean thoroughly:
Wipe down the entire surface with a TSP substitute or liquid deglosser. This removes years of hand oils and grime, which is critical for paint adhesion. -
Sand the surface:
Once dry, scuff sand the entire door with 120-grit sandpaper. You aren’t trying to strip the paint, just taking the shine off the previous finish to give the new paint ‘teeth’. -
Clear the dust:
Vacuum up any sanding dust, then wipe the door with a tack cloth or a damp rag. Let it dry completely before moving to the next step. -
Tape the edges:
Apply painter’s tape carefully along the hinges (if you didn’t remove the door), the sweep at the bottom, and any glass panes. Press the edges of the tape firmly with a putty knife to prevent bleed-through.
Step 2: Priming
-
Apply the primer:
Since you are transitioning to a dark green, use a gray-tinted primer. Start by brushing primer into the recessed corners of the panels and molding details. -
Roll the flat surfaces:
Switch to your mini roller for the flat panels and vertical stiles. Apply a thin, even coat and let the primer dry according to the manufacturer’s instructions. -
Light sanding:
I always give the primed surface a very quick pass with fine 220-grit sandpaper to knock down any bumps, then wipe away the dust.
Sticky Situation?
Doors sticking? Rub a colorless candle or paraffin wax along the edges where the door creates friction with the jamb. This lubricates the contact point without damaging your new paint job.
Step 3: Painting
-
Paint the panels first:
Open your forest green paint. Using the angled sash brush, paint the recessed molding profiles first, then use the roller to fill in the center panels. Work on one panel at a time to keep a wet edge. -
Paint vertical center stile:
Roll the vertical strip of wood that runs down the center of the door (between the panels). Smooth out any brush marks or roller stipple immediately. -
Paint horizontal rails:
Next, paint the horizontal rails (top, middle, and bottom) that run across the door. Feather the edges slightly where they meet the vertical stiles you haven’t painted yet. -
Paint outer vertical stiles:
Finish by painting the long vertical stiles on the far left and right sides of the door. This order follows the construction of the door and helps minimize visible lap marks. -
Check for drips:
Inspect corners and edges for any paint pooling or drips while the coat is still wet and correct them gently with your brush. -
Dry and recoat:
Allow the first coat to dry fully (usually 4-6 hours). Apply a second coat following the exact same order: panels, center stile, rails, then outer stiles. -
Remove tape:
Carefully score the edge of the painter’s tape with a utility knife before peeling it off, preferably while the final coat is slightly tacky but not wet. -
Reinstall hardware:
Wait at least 24 hours for the paint to cure sufficiently before screwing your brass hardware back into place to avoid denting the fresh finish.
Pro Tip: Weather Matters
Paint on a day with moderate humidity. High humidity keeps paint soft too long, while very dry, hot air dries it too fast, causing brush strokes. 50-70 degrees F is the sweet spot.
Step back and admire how a simple coat of paint has redefined your home’s entrance with elegance and depth

PENCIL GUIDE
Understanding Pencil Grades from H to B
From first sketch to finished drawing — learn pencil grades, line control, and shading techniques.
Explore the Full Guide
Moody Dark Foyer for Drama
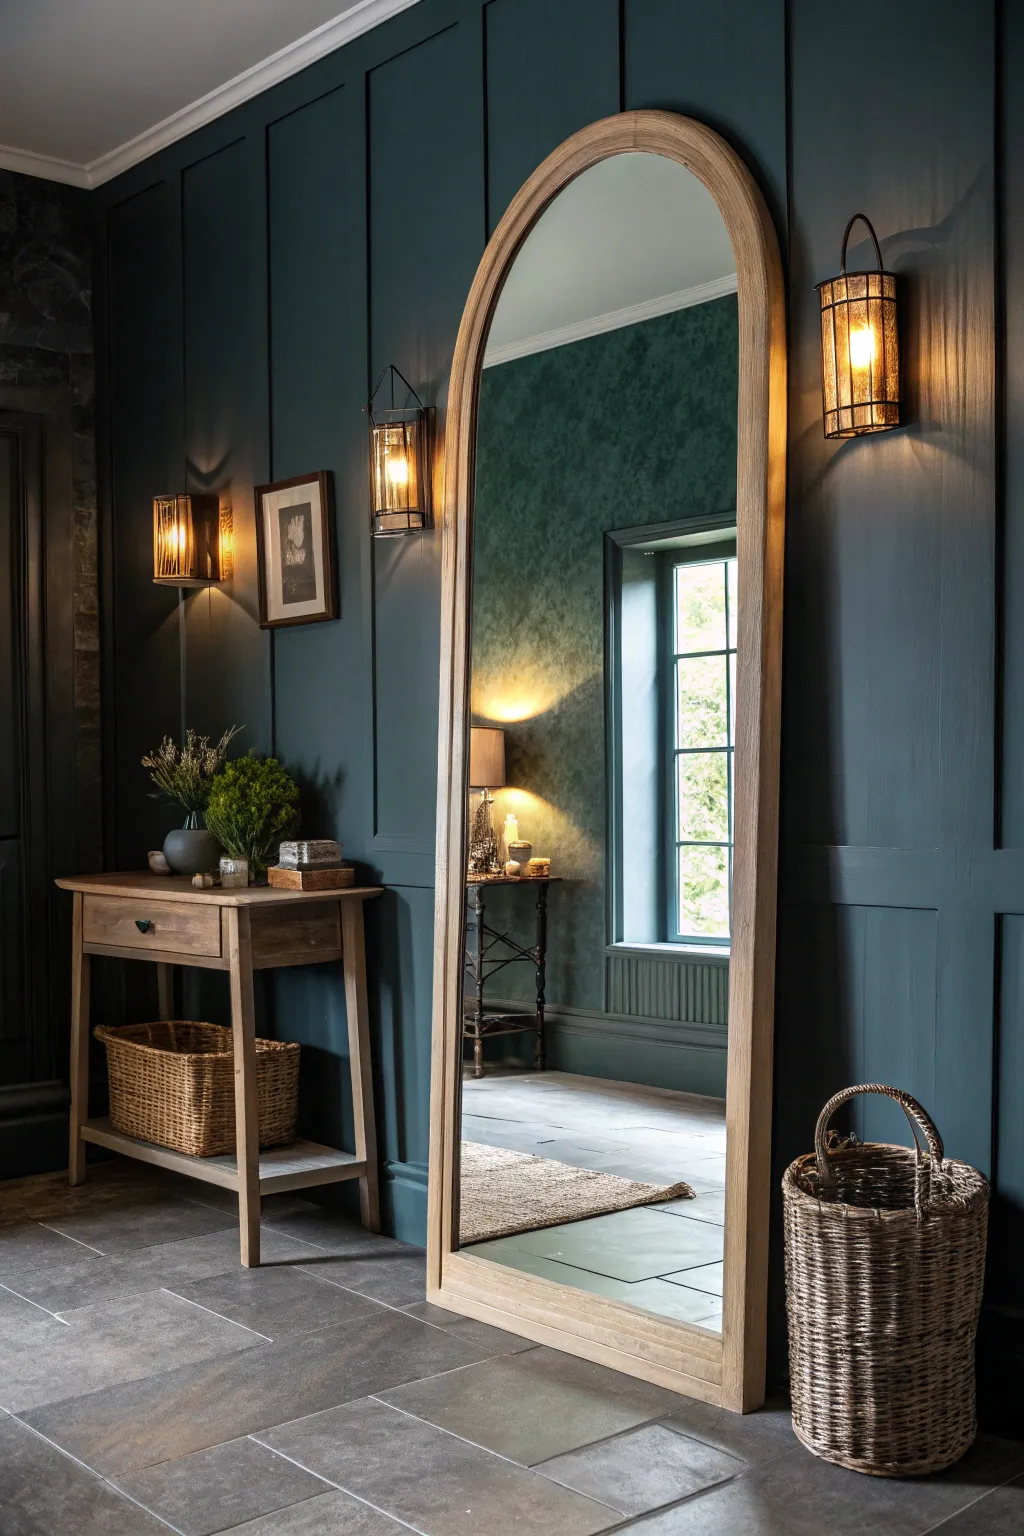
Capture the moody elegance of a dark green foyer in this atmospheric oil painting tutorial. You will learn to render deep shadows, glowing warm light, and the reflective complexity of a large mirror to create a sophisticated interior scene.
Step-by-Step Tutorial
Materials
- Oil paints (Phthalo Green, Burnt Umber, Yellow Ochre, Titanium White, Lamp Black, Alizarin Crimson)
- Canvas board or stretched canvas (16×20 inches recommended)
- Hog bristle brushes (flats sizes 4, 8, 12; filbert size 6)
- Fine detail brush (synthetic round size 0 or 1)
- Palette knife
- Odorless mineral spirits
- Linseed oil or painting medium
- Wooden palette
- Rag or paper towels
Step 1: Blocking the Composition
-
Sketch the layout:
Begin with a thin wash of Burnt Umber and mineral spirits on your brush. Sketch the main vertical lines of the wall paneling first, ensuring they are straight. Then, draw the large arch shape of the mirror slightly right of center, letting it become the focal anchor. -
Establish perspective:
Lightly mark the floor lines and the console table on the left. Pay attention to the perspective of the table legs and the basket; the floor tiles should recede gently towards the reflection in the mirror. -
Block in darks:
Mix a dark base using Phthalo Green and Burnt Umber. Apply this mixture thinly to the wall areas, scrubbing it into the canvas to establish the deepest shadows, especially in the corners and behind the furniture.
Straight Lines Matter
If your paneling lines look shaky, use the edge of a piece of cardstock or masking tape as a guide. Straight architectural lines are crucial for realistic interiors.
Step 2: Painting the Walls and Floor
-
Create the teal wall tone:
Mix Phthalo Green with a touch of Lamp Black and a tiny bit of White to create a rich, deep teal. Paint the wall panels, using vertical strokes to mimic the wood grain direction. Leave space for the sconces. -
Define panel molding:
Use a smaller flat brush with a slightly darker version of your wall color to paint the recessed lines of the paneling. Add a thin highlight on the right side of each molding strip using the wall color mixed with a little more White to show the light direction. -
Lay the floor foundation:
Mix Titanium White, Black, and a hint of Burnt Umber for a cool grey. Paint the floor tiles with horizontal strokes. Vary the grey tone slightly between tiles to suggest natural stone texture. -
Add grout lines:
With the edge of a flat brush or a detail round, paint thin, light grey lines to separate the tiles. Keep these lines soft so they don’t look like a grid overlay.
Pro Tip: Glowing Effects
To make the lights truly glow, glaze a transparent layer of Alizarin Crimson mixed with medium around the yellow light source once the underlayer is dry.
Step 3: Rendering Furniture and Decor
-
Paint the table structure:
Use Yellow Ochre mixed with Burnt Umber for the wooden console table. Paint the basic box shape of the drawer and the thin legs. I like to keep the paint slightly thicker here to differentiate the wood texture from the walls. -
Add wood grain details:
While the table paint is tacky, streak in darker brown lines for grain. Add a small dark dot for the drawer knob and a cast shadow underneath the table to ground it. -
render the baskets:
For the wicker baskets, start with a dark brown silhouette. Once dry to the touch, scumble lighter ochre and tan tones over the top using a dry brush technique to create the woven texture without painting every strand. -
Paint the mirror frame:
Use a mix of White, Yellow Ochre, and a touch of Burnt Umber for the light wood frame. Paint the arch carefully with a steady hand or a mahl stick for support. Add subtle vertical streaks to suggest the wood grain.
Step 4: The Mirror Reflection & Lighting
-
Establish reflection depth:
The reflection needs to look further away. Paint the reflected wall in the mirror slightly softer and hazier than the main wall. Use the same green mix but add a touch of medium to glaze it slightly. -
Paint the reflected window:
Inside the mirror, paint the window frame and the bright daylight coming through. The light from the window should be the brightest value in your painting (pure Titanium White with a tiny touch of yellow). This contrast creates the glowing effect. -
Add the sconces:
Paint the black metal frames of the wall sconces. Inside the glass area, scumble a warm yellow-orange mix. Keep the edges soft to suggest glowing light rather than a solid object. -
Intensify the glow:
Place a dot of almost pure White in the center of the sconce bulbs. Then, dry brush a faint warm halo around the sconces on the dark teal wall to show the light illuminating the paint. -
Final highlights:
Using your smallest brush, add sharp highlights to the rim of the mirror, the top of the glass vase, and the edges of the floor tiles where the light hits. These small sparkles bring the scene to life.
Step back and admire how the interplay of deep shadows and warm lights creates a silent, dramatic atmosphere on your canvas
Paint the Foyer Ceiling a Whisper Color
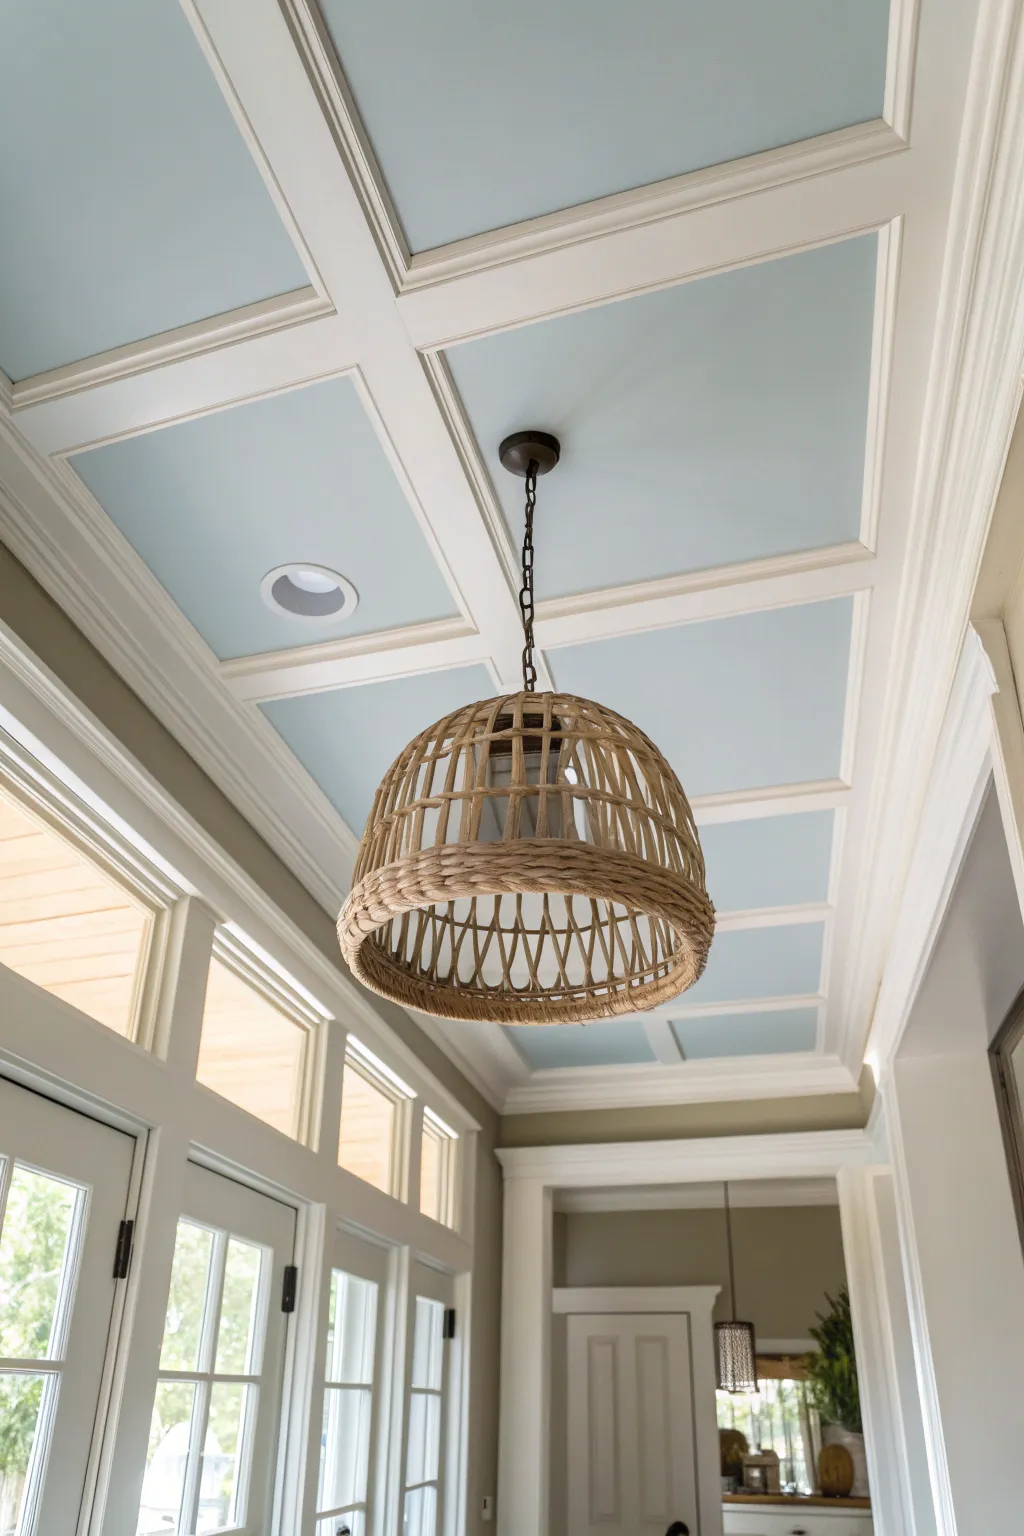
Transform your foyer by drawing the eye upward with a soft, whisper-blue ceiling framed by crisp white coffered beams. This project adds architectural interest and a breezy, coastal elegance that makes even small entryways feel airy and expensive.
Step-by-Step Tutorial
Materials
- Interior latex paint (Satin sheen, light aqua/whisper blue)
- Interior trim paint (Semi-gloss, bright white)
- Painter’s tape (1.5 inch and 2 inch widths)
- Drop cloths
- Ladder or scaffolding
- Sanding sponge (medium grit)
- Tack cloth
- Angled sash brush (2.5 inch)
- Mini roller frame and covers (Short nap, 4 inch)
- Extension pole
- Caulk and caulk gun
- Spackle and putty knife
- Rags
Step 1: Preparation
-
Clear and Protect:
Remove any hallway furniture and lay down heavy-duty drop cloths to protect your flooring. Cover adjacent walls with plastic sheeting if you aren’t planning to repaint them. -
Light Fixture Removal:
Turn off the power at the breaker. Carefully lower the canopy of your hanging light fixture and wrap the entire fixture in a plastic bag to protect it from splatters, or better yet, remove it completely for easier access. -
Inspect the Beams:
Look closely at your existing coffered beams. If there are any nail holes, dents, or gaps between the molding and the ceiling, fill them now with spackle or paintable caulk. -
Sand for Adhesion:
Once your repairs are dry, lightly scuff the flat ceiling panels and the trim beams with a sanding sponge. This helps the new paint grip better. Wipe everything down with a tack cloth to remove dust.
Bleeding Lines?
If paint bleeds under tape, wait for it to dry fully. Then, dampen a small, stiff brush with paint remover or rubbing alcohol and gently scrub the stray mark away.
Step 2: Painting the Beams
-
Tape the Ceiling Panels:
Apply painter’s tape along the inner edges of the ceiling panels where they meet the beams. Press the tape edges down firmly to prevent bleed-through. -
Cut in the Trim:
Using your angled sash brush and the bright white semi-gloss paint, carefully paint the intricate edges and corners of the coffered beams. Painting the trim first is generally easier than trying to cut in the ceiling color later. -
Roll the Beams:
Use a mini foam roller or short nap roller to paint the flat bottom and side surfaces of the beams. This ensures a smooth, brush-mark-free finish. -
Second Coat:
Checking the manufacturer’s drying time, wait until the first coat is dry to touch before applying a second coat of white for full, opaque coverage. -
Remove Tape:
While the second coat is still slightly tacky, carefully peel away the painter’s tape from the ceiling panels. Pulling it off at a sharp angle helps keep a clean line.
Step 3: Painting the Ceiling Panels
-
Tape the Beams:
Allow the white beam paint to cure for at least 24 hours. Once fully dry, apply fresh delicate-surface painter’s tape onto the beams, right up against the edge of the ceiling panels. -
Cut in the Blue:
Stir your whisper blue paint thoroughly. Using a clean angled brush, paint a 2-inch border around the perimeter of each recessed square panel. -
Roll the Centers:
Attach your mini roller to an extension pole. Roll the whisper blue paint onto the center of each panel, blending carefully into your wet cut-in lines. I like to work one square at a time to keep a wet edge. -
Check for Holidays:
Verify coverage under good lighting. Light blues can sometimes look patchy over white primer. If needed, apply a second coat to the blue squares once the first is dry. -
Final Reveal:
Remove the tape from the beams slowly. If any paint seeped under, use a tiny artist’s brush for touch-ups. Reinstall your light fixture to complete the look.
Raise the Roof
Install a ceiling medallion around your light fixture painted in the trim white color. It adds an extra layer of formality and draws attention to your pendant light.
Step back and not how the soft blue hue instantly lifts the ceiling height and brightens your entry


Geometric Color Blocking in the Foyer
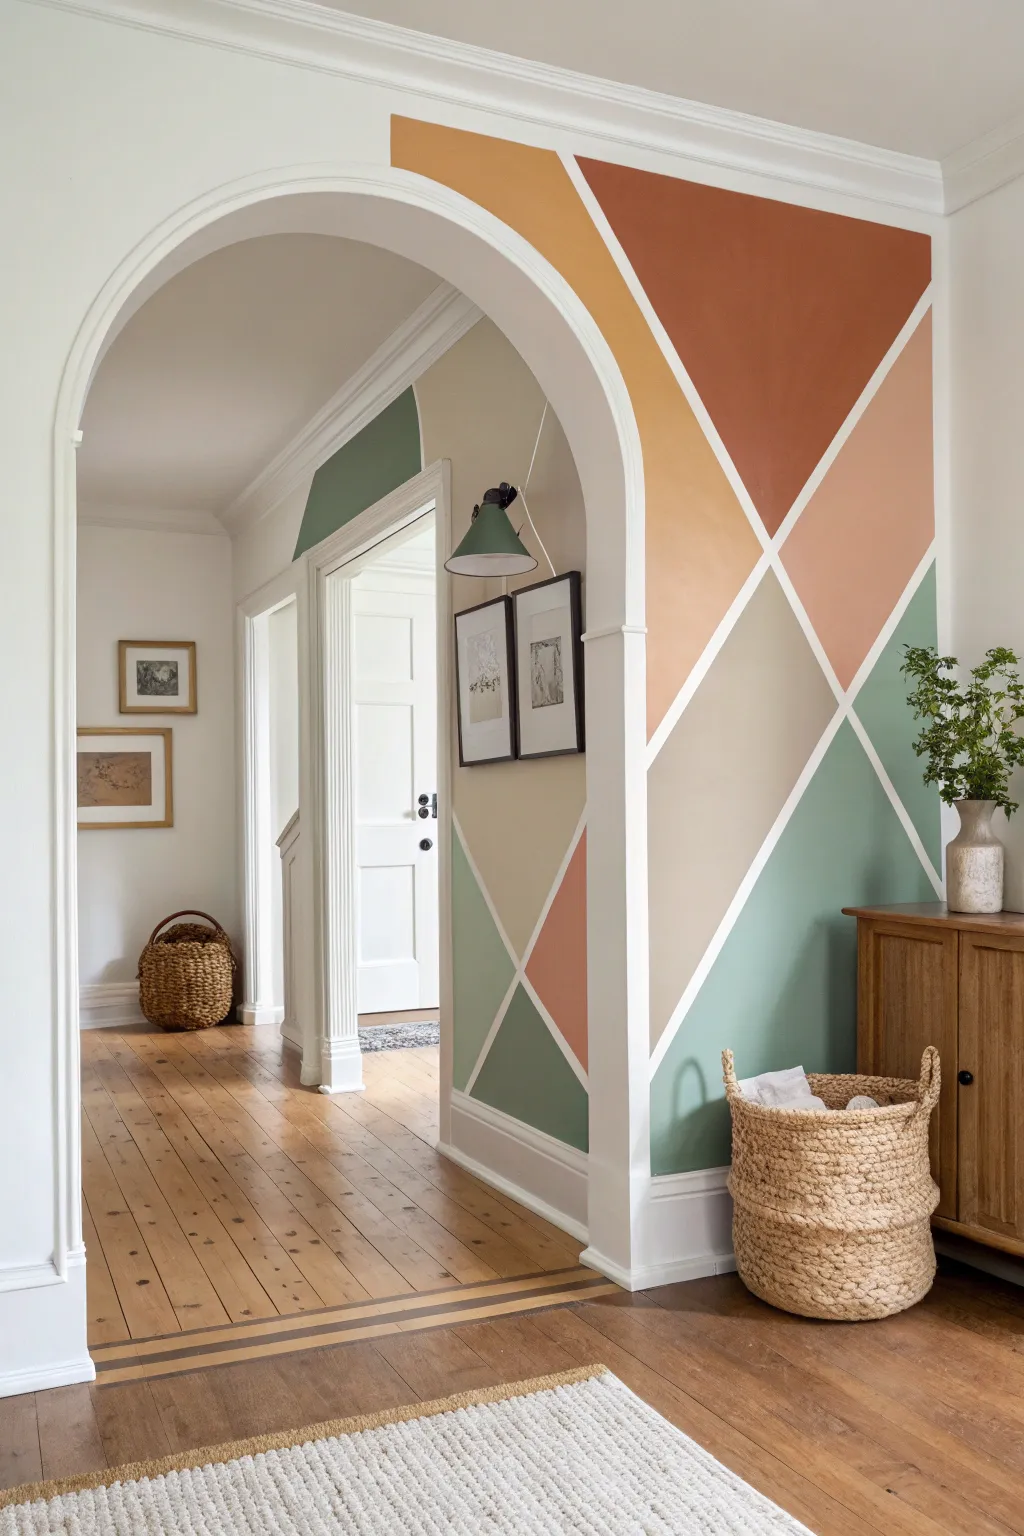
Transform a plain entryway arch or wall into a stunning focal point with this bold, color-blocked geometric mural. Using a palette of warm terracotta, mustard, sage, and beige separated by crisp white lines, this design adds architectural interest and a modern creative touch to traditional spaces.
Step-by-Step Tutorial
Materials
- Interior latex paint (Eggshell finish): Terracotta, Mustard Yellow, Sage Green, Blush Pink, Beige/Greige
- Base coat paint (White or Cream)
- Painter’s tape (High quality, 1-inch and 2-inch widths)
- Level (2-foot or 4-foot)
- Pencil and eraser
- Measuring tape
- Small paint rollers (4-inch foam or microfiber)
- Paint tray and liners
- Angled sash brush (2-inch)
- Drop cloths
- Utility knife or razor blade
- Damp rag
Step 1: Preparation and Base
-
Prepare the area:
Clear the foyer area of furniture and laid-down rugs. Cover the floors entirely with drop cloths to protect wood surfaces from splatter, and wipe down the walls with a damp rag to remove dust or grime for better paint adhesion. -
Apply base coat:
If your wall isn’t already the desired color for the separating lines (white, in this case), paint the entire wall surface with your base color. This white background will eventually become the crisp lines between your geometric shapes. -
Allow cure time:
Let the base coat dry completely. I prefer to wait at least 24 to 48 hours before applying tape; if the paint is too fresh, the tape might pull it up later, ruining your hard work.
Tape Sealing Trick
Always paint over your tape edge with the BASE wall color first. This fills air pockets with the background color, guaranteeing your colored topcoat has a perfect, crisp line.
Step 2: Design and Taping
-
Plan your layout:
Sketch a rough plan of your geometric shapes on paper first. Note how the diagonal lines intersect. In the reference image, lines often cross at 45-degree angles, creating a balanced, diamond-like structure. -
Mark anchor points:
Using a pencil and measuring tape, mark key intersection points on the wall. Measure from the ceiling or floor to ensure consistent height for horizontal vertices. -
Apply the first tape lines:
Start by laying down the longest diagonal strips of painter’s tape to connect your marked points. Use a standard 1-inch tape for the lines. Press the edges of the tape down firmly with your fingertip or a putty knife to seal them. -
Create the geometric web:
Continue adding tape strips to form the triangles and quadrilaterals. Pay attention to corners and edges, especially around the archway trim. The tape itself represents the white negative space, so ensure intersecting tapes overlap cleanly. -
Seal the tape edges:
To ensure razor-sharp lines, perform a ‘blocking’ step. Paint a very light layer of your *base* wall color (white) over the edges of the tape. This seals any tiny gaps; if paint bleeds, it will be white-on-white, leaving the color coat perfect.
Texture Play
For a subtle high-end look, use a high-gloss finish for the white dividing lines and a matte or flat finish for the colored geometric shapes to add depth.
Step 3: Painting the Shapes
-
Map your colors:
Stick small pieces of tape with color names written on them into each section. This visualization step prevents you from accidentally painting two adjacent shapes the same color. -
Cut in the edges:
Starting with your first color (e.g., Terracotta), use an angled brush to carefully paint along the taped edges and the wall trim. Don’t overload the brush to avoid ridges forming against the tape. -
Roll the fill:
Use a small 4-inch roller to fill in the center of the shape. Roll gently to create a smooth, eggshell finish without distinct roller marks. Rinse your roller or use fresh heads when switching colors. -
Repeat for all colors:
Work systematically through your palette—Mustard, Sage, Blush, and Beige. It helps to paint all sections of one color at time to minimize cleanup, just be careful not to lean against wet paint in neighboring sections. -
Apply a second coat:
Once the first coat is dry to the touch (usually 1-2 hours), assess the coverage. Darker colors like the terracotta and sage usually require a second coat for full opacity.
Step 4: The Reveal
-
Score the corners:
Before removing tape, check corners where tape strips overlapped heavily. You may need to lightly score these intersections with a utility knife so the dried paint film doesn’t lift. -
Peel the tape:
Remove the tape while the final coat of paint is still slightly tacky—don’t let it cure completely hard. Pull the tape slowly at a 45-degree angle away from the painted edge for the cleanest line. -
Touch up:
Inevitably, there may be a tiny bleed or a rough spot. Use a small artist’s brush to touch up the white lines or the colored shapes as needed. -
Style the space:
Once fully cured, replace your furniture. The earthy tones pair beautifully with natural wood floors, woven baskets, and greenery.
You now have a sophisticated, custom feature wall that greets guests with warmth and modern style
Hand-Painted Mini Foyer Mural Moment
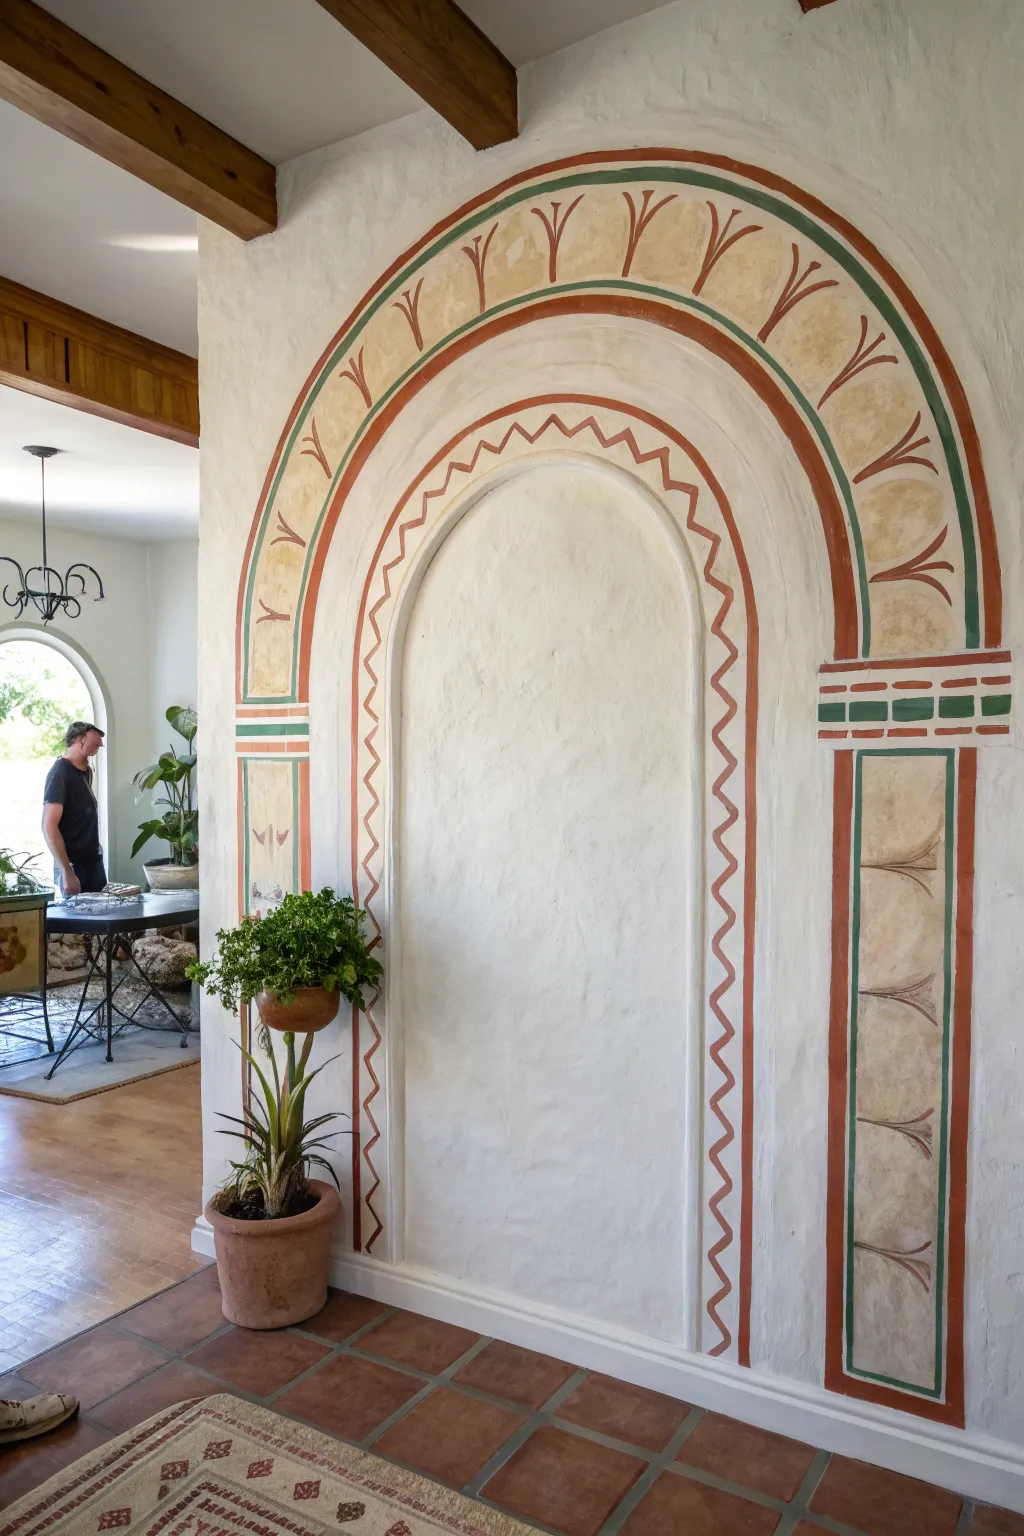
Transform a plain wall niche or create a faux architectural feature with this charming, Mediterranean-inspired mural. Using warm earth tones and simple geometric patterns, this hand-painted design adds depth and a touch of rustic elegance to any foyer.
Detailed Instructions
Materials
- Interior latex wall paint (Creamy white base)
- Acrylic craft paints (Terracotta/Burnt Orange, Deep Sage Green, Golden Ochre/Beige)
- Glazing medium
- Painter’s tape (various widths: 1-inch and 1/4-inch)
- Pencil and large eraser
- String and thumb tack (or large compass)
- Level and measuring tape
- Assorted brushes: 1-inch angled sash brush, medium flat artist brush, fine liner brush
- Small roller and tray
Step 1: Preparation and Base Layout
-
Prepare the surface:
Ensure your wall area is clean and dry. If you are painting over a dark color, apply a primer first to ensure the lighter mural colors pop. -
Establish the center point:
Measure the width of your desired archway area. Mark the center point at the height where the curve of the arch will begin. -
Draw the guide arches:
Create a makeshift compass by tying a string to a pencil and a thumb tack. Secure the tack at your center mark. Adjust the string length to draw three distinct concentric semi-circles lightly in pencil: the inner arch, the middle zig-zag channel, and the outer decorative band. -
Extend vertical lines:
Use a long level to extend straight vertical lines down from the ends of your semi-circles to the floor (or baseboard), creating the ‘pillars’ for the design. -
Block out horizontal breaks:
Draw faint horizontal guidelines where the intricate ‘capital’ detail (the brick-like section) will connect the arch to the pillars.
Step 2: Painting the Structure
-
Mix the faux-texture glaze:
Mix your Golden Ochre paint with a generous amount of glazing medium. This creates a translucent, textured look rather than a flat, solid color. -
Apply the background wash:
Using a brush or rag, apply the glaze mixture inside the widest outer band and the vertical pillar sections. Allow natural streakiness to remain to mimic old plaster or parchment. -
Tape the solid bands:
Once the glaze is fully dry, use painter’s tape to mask off the crisp borders for the terracotta and green bands. Taking time to burnish the tape edges prevents bleed-under. -
Paint the terracotta outline:
Fill in the outermost and innermost distinct lines with Terracotta paint. I find two thin coats work better than one thick one for crisp lines. -
Add the green accent band:
Paint the thinner Sage Green stripe that hugs the outer curve of the main archway. -
Create the brick capital detail:
At the junction where the arch meets the pillar, paint the horizontal brick-like pattern using freedom strokes or tape for guidance. Alternate terracotta lines with small green blocks.
Wobbly Arches?
If your hand-painted curves look uneven, don’t stress. Use a thin 1/4-inch painter’s tape designed for curves to mask the edges before painting solid stripes.
Step 3: Detailing the Patterns
-
Sketch the zig-zag:
Lightly pencil a continuous zig-zag pattern inside the inner channel (closest to the niche opening). -
Paint the zig-zag:
Using a fine liner brush and slightly watered-down Terracotta paint, carefully trace over your pencil zig-zags. Keep the pressure even for a consistent line width. -
Plan the wheat motifs:
In the wide glazed sections (on both the arch and pillars), lightly mark equidistant points where the stylized plant motifs will go. -
Paint the central stem:
Using the flat artist brush and Terracotta paint, create a simple ‘V’ shape or single flared stroke at each marked point to form the base of the plant. -
Add the upper tendrils:
Switch to a smaller brush to add the two outer curved lines for each plant motif, giving them that classic wheat-sheaf appearance. -
Clean up edges:
Once all paint is dry, use a small angled brush and your original wall color to touch up any smudges or shaky lines along the outer perimeter. -
Erase guidelines:
Gently erase any remaining visible pencil marks from the unpainted areas.
Pattern Spacing
Make a small cardboard template of the V-shaped plant motif. Use this to trace the shape onto the wall ensuring every motif is identical in size/angle.
Step back and admire how this simple paint technique adds instant architectural character to your space


Have a question or want to share your own experience? I'd love to hear from you in the comments below!