When I’m stuck on what to draw, I love switching to clothing ideas—it’s instantly relaxing and still teaches you so much about shape, folds, and style. Here are my favorite clothing drawing prompts that feel like ready-made outfit boards you can sketch fast and remix forever.
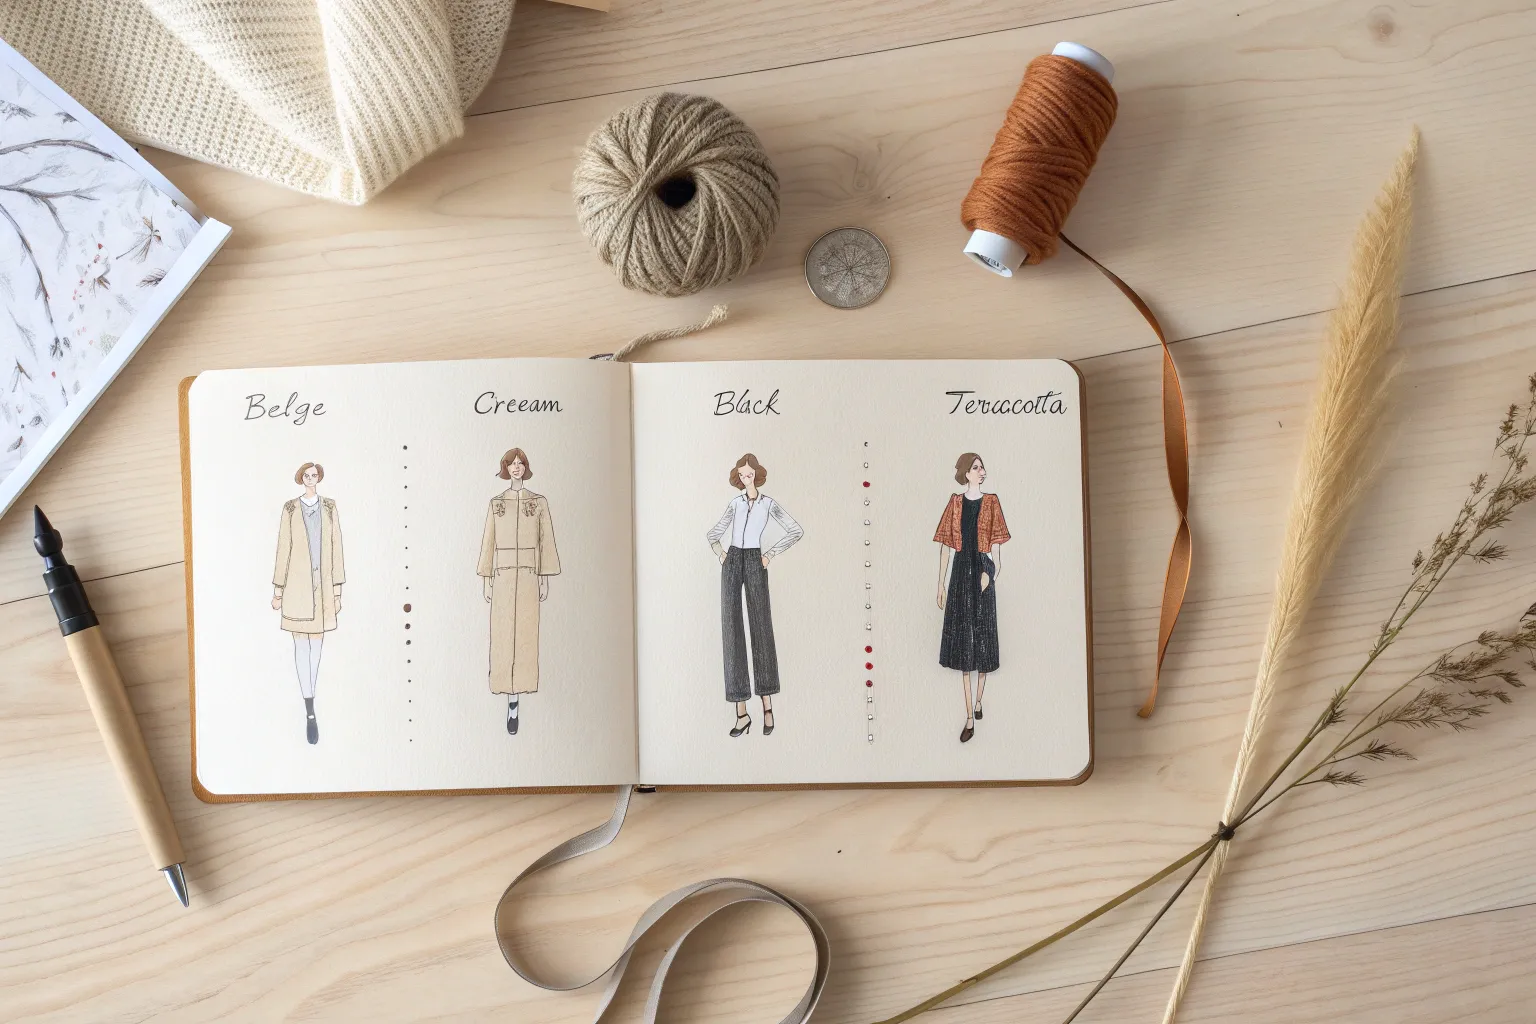
Classic Casual Outfit Grid
Learn to sketch a stylish set of outfit concepts using clean line art and subtle coloring techniques. This tutorial guides you through creating a balanced layout in your sketchbook featuring three distinct casual looks.
Step-by-Step Tutorial
Materials
- Spiral-bound sketchbook (heavyweight cream or off-white paper recommended)
- Fine liner drawing pens (sizes 0.1, 0.3, and 0.5)
- Pencil (HB or 2B) for sketching
- Kneaded eraser
- Colored pencils or alcohol markers (mustard yellow, terracotta/rust, light denim blue)
- White gel pen (optional for highlights)
Step 1: Planning the Layout
-
Establish the composition:
Visualize your page divided into three invisible columns. The left and center columns will hold full-body figures, while the right column will feature a ‘flat lay’ style outfit without a body. -
Sketch the croquis:
Using your HB pencil, lightly draw the basic stick figures or ‘croquis’ for the first two models. For the left figure, pose the legs slightly apart. For the center figure, have the legs straight but relaxed. -
Outline the flat lay:
In the third column on the right, sketch the floating outline of a boxy top and a pair of straight-leg jeans below it. Keep the proportions realistic relative to the full figures.
Clean Lines Only
If your ink smudges when erasing, wait longer for it to dry. If lines look shaky, try ghosting the stroke in the air before touching the paper to build muscle memory.
Step 2: Drafting the Outfits
-
Draft the jumpsuit (Left Figure):
Sketch a sleeveless V-neck jumpsuit on the first figure. Draw a defined waistband and wide-leg culottes that end mid-calf. Add faint lines for the collarbones and a simple oval head shape with a bob hairstyle. -
Draft the layered look (Center Figure):
On the middle figure, draw a boxy denim jacket over a simple tee. Below the jacket, sketch a midi-length skirt. Add facial contours, a short bob similar to the first figure, and simple sneakers on the feet. -
Refine the flat lay details:
For the right-side outfit, draw a wide, folded collar on the top. Sketch the jeans with classic details like belt loops, pockets, and a fly. Suggest a cuffed hem at the bottom of the pant legs.
Step 3: Inking the Lines
-
Ink the main contours:
Switch to a 0.5 fine liner pen. Go over the main outlines of the clothing and body shapes. Use confident, continuous strokes rather than sketchy, broken lines. -
Add detailing weight:
Use a finer 0.1 pen for delicate details like facial curves, hair strands, and seams on the denim. This line weight variation adds sophistication. -
Erase pencil marks:
Once the ink is completely dry—give it a minute or two—take your kneaded eraser and gently remove all the underlying pencil graphite so the page looks crisp.
Fabric Swatches
Tape small squares of actual fabric or washi tape next to your sketches to create a mixed-media mood board effect.
Step 4: Adding Patterns and Textures
-
Stripe the skirt:
On the center figure’s skirt, use a rust-colored pencil or fine liner to draw vertical stripes. Leave alternating white spaces to create a high-contrast pattern. -
Texture the jacket:
Use your 0.1 pen to add tiny, broken hatching lines on the jacket collar and cuffs to suggest a rougher denim or corduroy texture. -
Suggest fabric folds:
Add small, hooked lines at the elbows, knees, and waistlines to show where the fabric naturally crinkles.
Step 5: Coloring and Finishing
-
Color the flat lay top:
Fill in the top on the right with a flat layer of mustard yellow. Keep the color solid but light enough that the ink lines show through. -
Shade the denim:
Use a very light grey or pale blue pencil to shade the jeans on the right and the jacket in the center. Focus the shading on the sides of the garments to create volume. -
Add warmth to the skirt:
Reinforce the stripes on the center skirt with a terracotta or rust color, ensuring the white gaps remain clean. -
Final shading touches:
Add a very light wash of gray or cream to the jumpsuit on the left to distinguish it from the paper background. I like to add a tiny bit of shadow under the shoes to ground the figures.
Your sketchbook now features a cohesive fashion collection ready to inspire your next wardrobe update


Oversized Hoodie Comfort Looks
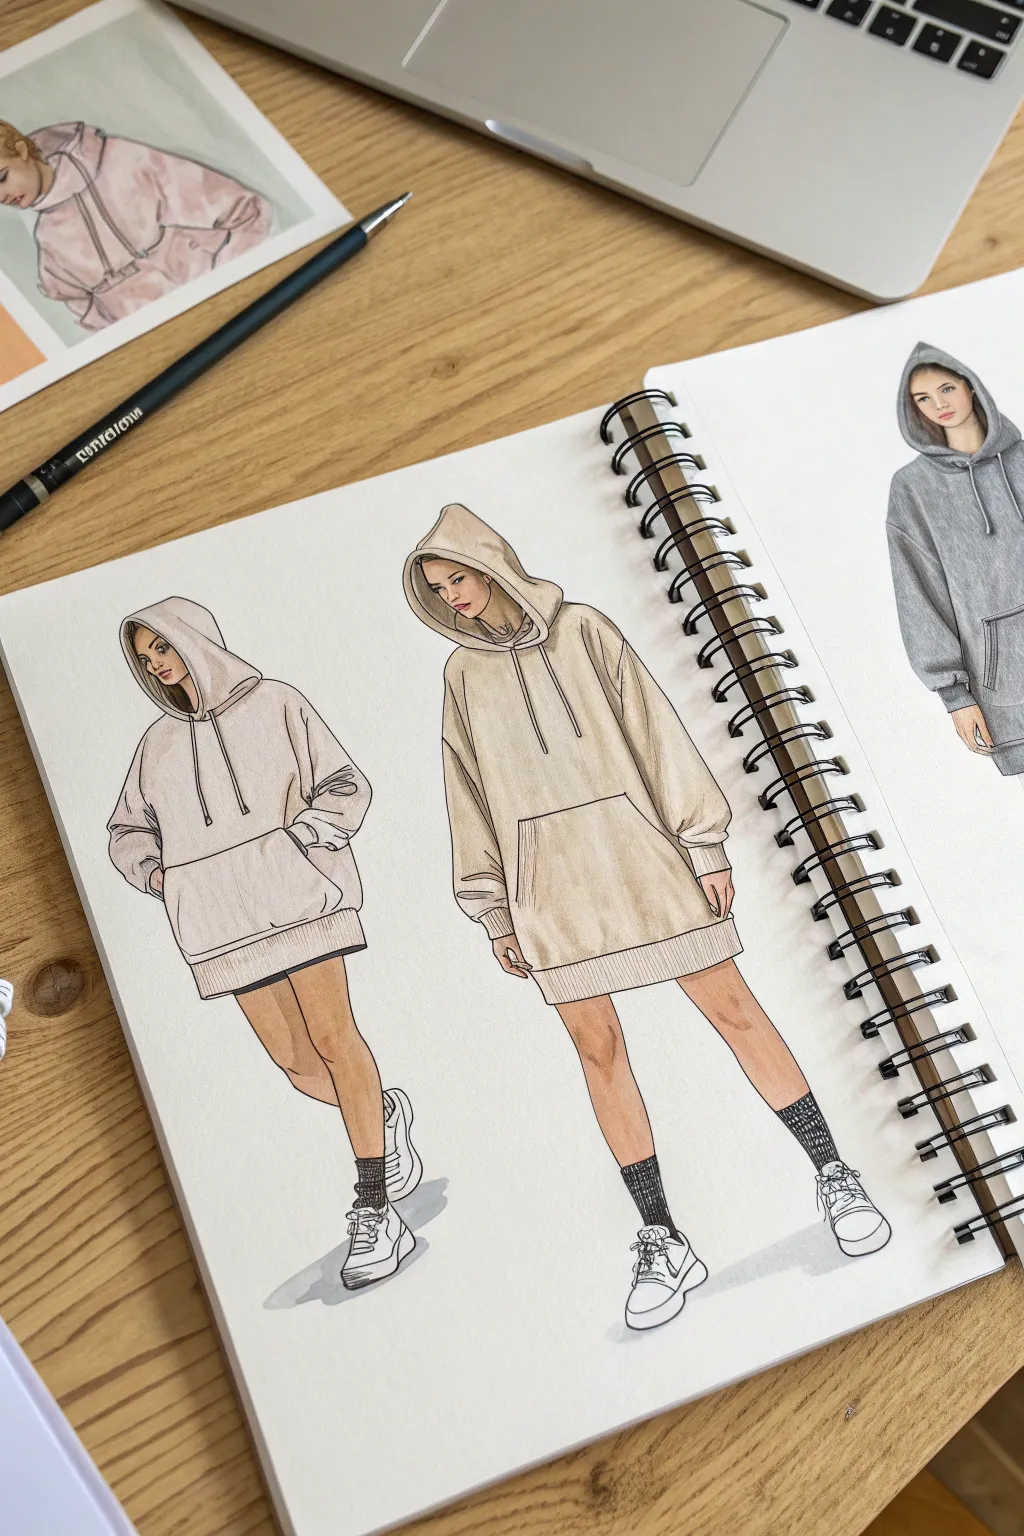
Master the art of fashion illustration with this tutorial focusing on relaxed, oversized silhouettes. You’ll learn how to capture the drape of fabric and subtle shading using markers and pencils to create a chic, comfortable aesthetic.
How-To Guide
Materials
- Spiral-bound sketchbook (heavyweight mixed-media paper)
- H or HB graphite pencil for initial sketching
- Fine liner pens (0.1mm and 0.3mm in black)
- Alcohol-based markers (beige, sand, warm grey, taupe skin tones)
- Colored pencils (dark grey, black, brown for details)
- White gel pen (optional for highlights)
- Kneaded eraser
Step 1: Constructing the Figures
-
Establish the pose:
Begin by lightly sketching a stick figure to determine the posture. For the left figure, create a slight lean with one leg crossed over the other. For the right figure, draw a more standard walking pose with legs slightly apart. -
Flesh out the body:
Add geometric shapes to build the body volume. Since the hoodies are oversized, focus primarily on the head shape and leg positioning, as the torso will be largely concealed. -
Map the hoodie silhouette:
Sketch a large, rectangular shape over the torso that extends down to mid-thigh. Keep the lines loose to suggest heavy fabric. -
Draft the hood and sleeves:
Draw the hood framing the face, making sure it sits loosely rather than tight to the head. Add voluminous sleeves that bunch slightly at the wrist cuffs. -
Refine the details:
Lightly mark the placement of the kangaroo pockets on the front and the ribbed hemlines at the bottom of the hoodie.
Gravity is Key
For realistic oversized clothes, ensure your fold lines all point downward. Gravity pulls heavy jersey fabric down, creating long, drooping drapes rather than stiff horizontal creases.
Step 2: Inking the Outlines
-
Outline the main shapes:
Using a 0.3mm fine liner, go over your pencil lines with confident, smooth strokes. Focus on the outer silhouette of the hoodie and legs. -
Create fold lines:
Switch to a thinner 0.1mm pen to add wrinkle lines. Place these where fabric gathers: inside the elbows, near the armpits, and around the pocket edges. -
Draw the drawstrings:
Carefullyink two parallel lines coming from the hood neck area for the drawstrings. Add small toggles or knots at the ends. -
Ink the face and hair:
Use the finest point pen for facial features. Avoid heavy outlines here; just suggest the eyes, nose, and lips. Ink the hair strands peeking out from the hood. -
Clean up the sketch:
Once the ink is completely dry, gently erase all underlying graphite pencil marks with a kneaded eraser to keep the paper surface clean.
Muddy Marker Colors?
If your shadows look muddy, you’re likely layering wet ink too quickly. Let the base layer of alcohol marker dry completely (about 30-60 seconds) before adding darker shading layers.
Step 3: Adding Color and Depth
-
Base skin tones:
Apply a base layer of skin tone marker to the legs and face. Keep the application even to avoid streakiness. -
Shade the legs:
Once the base is dry, use a slightly darker skin tone marker to add shadows along the inner thighs and under the hoodie hem line. -
Base coat the hoodie:
Select a light beige or sand-colored marker for the hoodie. Fill in the entire garment, using long vertical strokes to mimic the weave of the fabric. -
Add fabric shadows:
I like to use a cool grey or taupe marker to deepen the folds. Apply this color inside the hood, under the sleeves, and along the sides of the kangaroo pocket. -
Detail the ribs:
On the cuffs and bottom hem, use fine vertical strokes with a darker beige marker or pencil to indicate the ribbed texture. -
Color the socks and shoes:
Use a dark grey marker for the scrunched socks, adding texture lines. Leave the sneakers mostly white, shading only the soles and laces with light grey for dimension. -
Ground the figure:
Add a simple wash of light grey marker beneath the shoes to create a cast shadow, anchoring the figures to the page.
Now you have a stylish fashion illustration that perfectly captures casual oversized comfort


Layering With A Collared Shirt
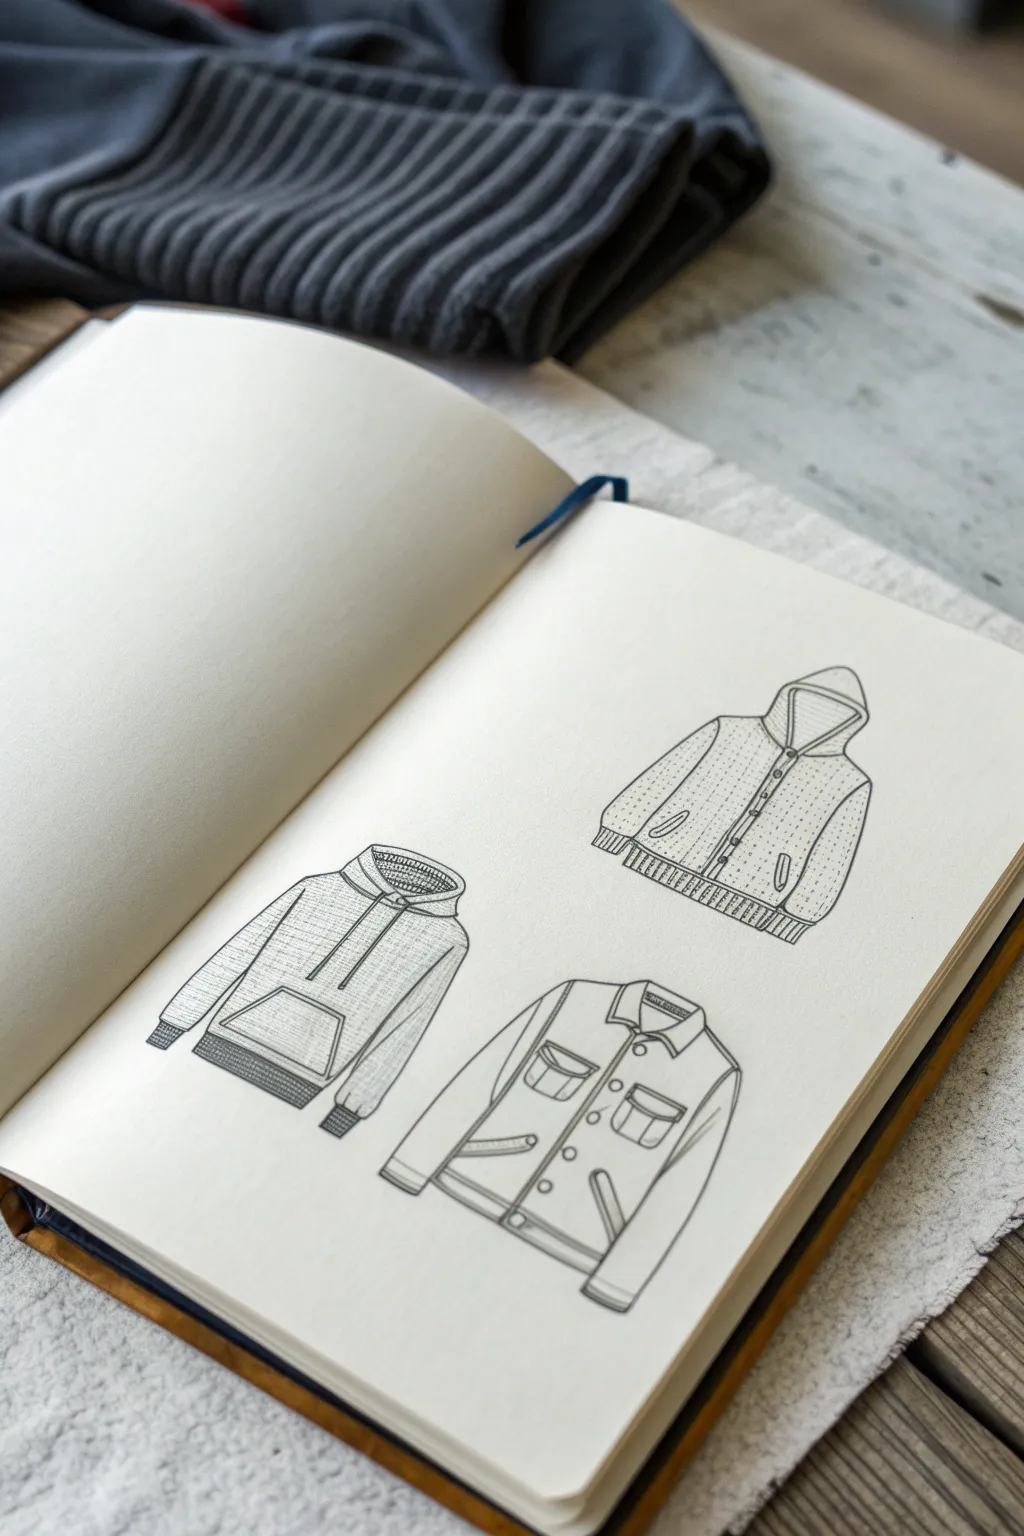
Capture the distinct textures and silhouettes of three classic jacket styles with this clean line art tutorial. Using fine liners to build structure and texture, you’ll create a beautifully detailed spread perfect for a fashion design sketchbook or planning your own wardrobe.
Step-by-Step Tutorial
Materials
- Smooth sketchbook paper (A4 or A5)
- HB or 2H graphite pencil
- Kneaded eraser
- Fine liner pens (sizes 005, 01, and 03)
- Ruler (optional)
- Reference photos of clothing (optional)
Step 1: Conceptual Layout
-
Define the composition:
Visualize the placement of the three garments on your page. Aim for a balanced triangle formation: place the button-up hooded sweater in the top right, the pullover hoodie in the bottom left, and the structured jacket in the bottom center-right. -
Draft the button-up hoodie silhouette:
Start with the top-right garment. Use your HB pencil to lightly sketch a rounded torso shape. Add a generous hood shape resting on the shoulders and sketch basic rectangle shapes for the sleeves extending slightly outward. -
Draft the pullover hoodie silhouette:
Move to the bottom left. Draw a boxier torso shape for the standard hoodie. Sketch the hood collapsing slightly forward and define the kangaroo pocket area with a trapezoid near the bottom hem. -
Draft the chore jacket silhouette:
For the final garment in the bottom center, sketch a more structured, rectangular body. Add a crisp collar shape at the neck and mark out placement for two chest pockets and two lower slash pockets.
Fabric Weight Tip
Use varied line weights: heavy lines (03) for heavy denim, wavy/broken lines for knits, and crisp thin lines for lightweight cotton.
Step 2: Inking the Outlines
-
Outline the top sweater:
Switch to an 03 fine liner for the main contours. Trace the outer edges of the button-up sweater, giving the lines a slight wobble to suggest a soft, knitted fabric rather than rigid cloth. -
Define the sweater details:
Draw the central placket (the button strip) down the middle. Ink the hood opening and draw the ribbed cuffs and hem using short, parallel vertical lines. -
Outline the pullover hoodie:
Using the 03 pen, ink the perimeter of the bottom-left hoodie. Pay attention to where the fabric bunches at the wrist cuffs and the bottom hem. -
Detail the pullover features:
Ink the drawstrings hanging from the neck. Carefully outline the kangaroo pocket, ensuring it looks stitched onto the fabric. Add the ribbing detail to the cuffs and hem with precise vertical hatching. -
Outline the chore jacket:
Ink the structural jacket with confident, straighter lines to indicate stiffer material like denim or canvas. Clearly define the sharp collar points and the button placket.
Add a Pop of Color
Use a single light watercolor wash or alcohol marker in a neutral tone (like grey or tan) behind just one jacket to create a focal point.
Step 3: Texturing and Refinement
-
Texture the knit sweater:
Switch to your finest pen (005). On the top-right garment, add rows of tiny stippling dots or very short dashes to mimic a textured knit pattern. -
Add sweater buttons and pockets:
Draw small circles for the buttons on the placket. Add the small welt pockets near the bottom with simple curved lines. -
Shade the pullover hoodie:
Use the 01 pen to add hatching lines on the pullover hoodie, specifically inside the hood and beneath the sleeves to create depth. I find that cross-hatching slightly on the pocket helps separate it from the body. -
Detail the chore jacket pockets:
Draw the flap pockets on the chest and the angled welt pockets near the waist. Add small circles for rivets or buttons on the pocket flaps. -
Add stitching lines:
Using the 005 pen, draw dashed lines along the seams of the chore jacket—shoulders, armholes, and pockets—to replicate heavy-duty topstitching. -
Final clean up:
Once the ink is completely dry, gently erase the underlying graphite pencil lines with your kneaded eraser to leave a crisp, professional finish.
Now you have a trio of stylish, hand-drawn garments ready to inspire your next outfit combination


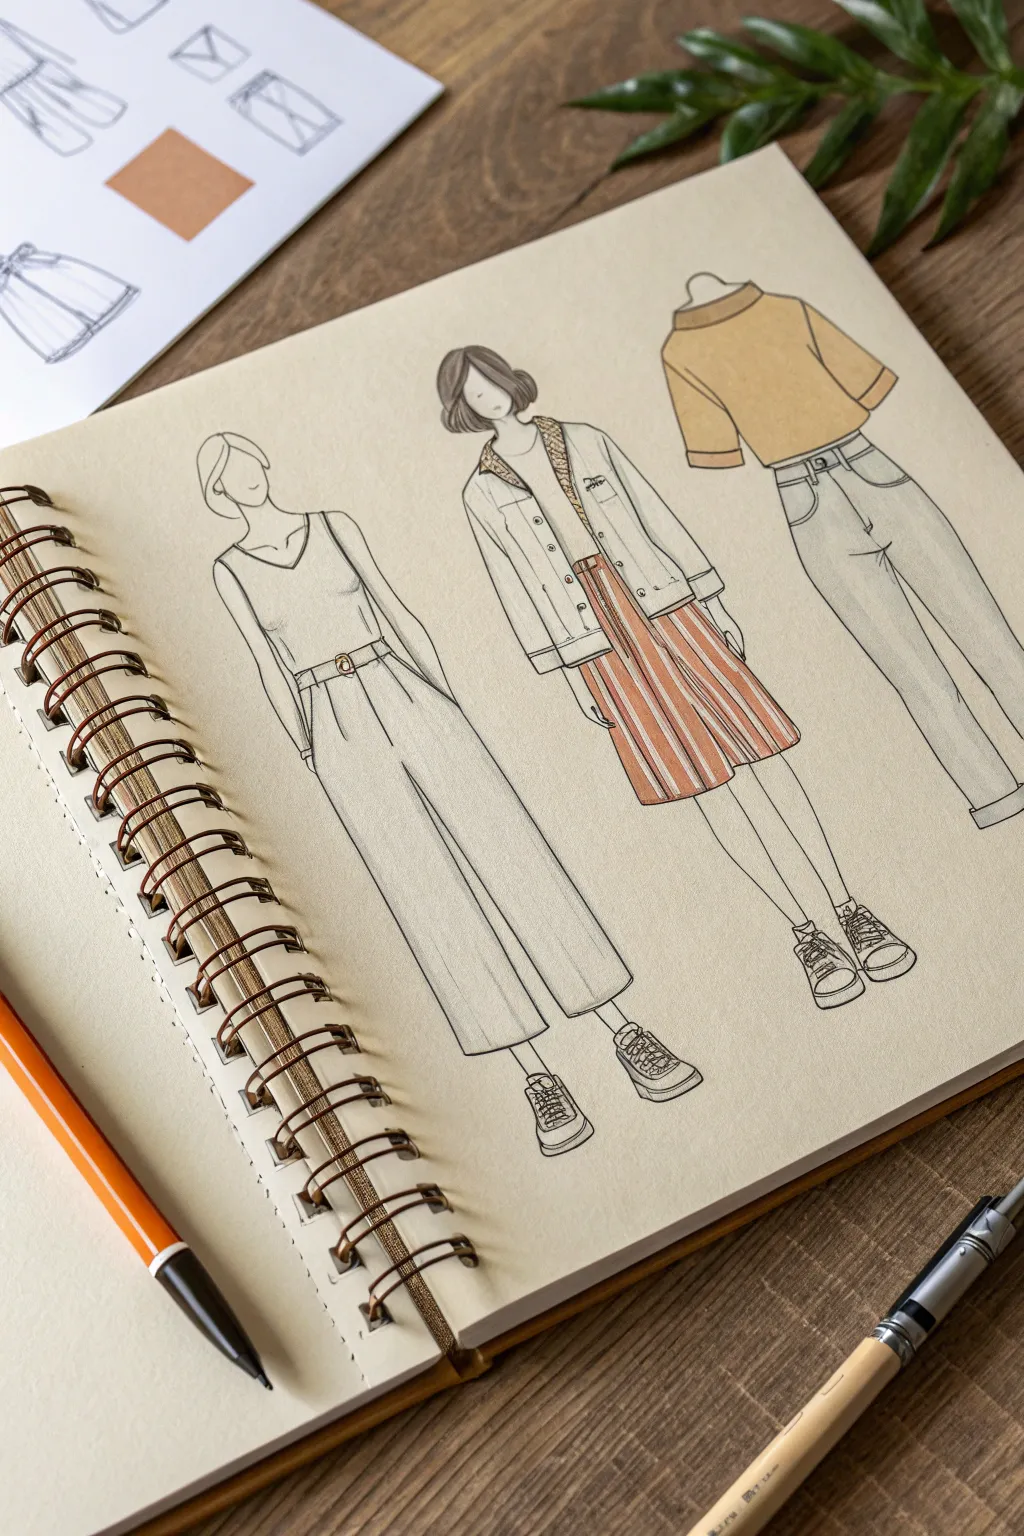
Street Style Hoodie And Joggers Set
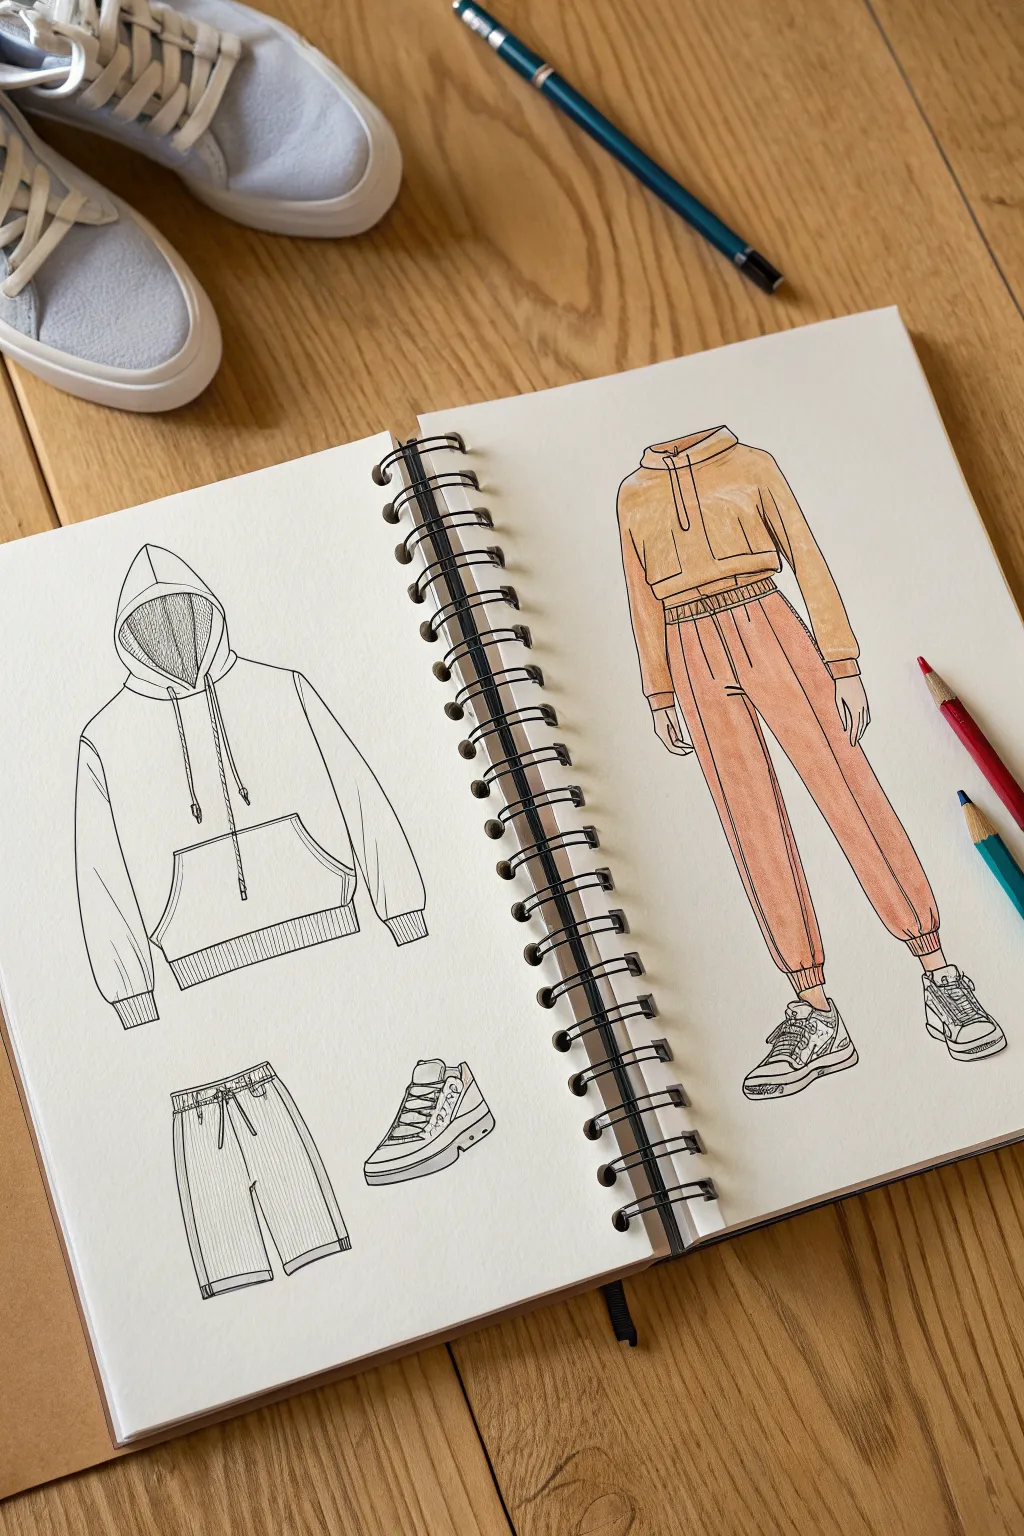
Learn to capture the relaxed vibe of street style with this mixed-media sketching tutorial. You will create a technical flat lay drawing on one page and a fully rendered fashion illustration on the facing page, showcasing a trendy hoodie and jogger combination.
Detailed Instructions
Materials
- Spiral-bound sketchbook (heavyweight paper recommended)
- H or HB pencil for initial sketching
- Fine liner pens (0.1mm, 0.3mm, and 0.5mm black)
- Colored pencils (peach/terracotta tones, warm beige)
- Eraser (kneaded preferred)
- Ruler (optional for straight lines)
Step 1: Planning the Layout
-
Define the composition:
Begin by opening your sketchbook to a fresh spread. Visualize the left page for your technical ‘flat’ drawings (the individual garments) and the right page for the styled figure illustration. -
Block in the figure:
On the right page, lightly sketch a standing figure using simple geometric shapes. Since the head is omitted in the reference, focus on the shoulder line and torso down to the feet. Keep the pose relaxed with feet slightly apart. -
Draft the flat lay shapes:
On the left page, lightly block out the positions for three items: a large hoodie at the top, shorts on the bottom left, and a sneaker on the bottom right.
Step 2: Drawing the Technical Flats (Left Page)
-
Outline the hoodie:
Using your pencil, refine the hoodie shape. Draw a large hood opening, long sleeves that bunch slightly at the cuffs, and a kangaroo pocket on the lower torso. -
Add detail to the hoodie:
Draw the drawstrings hanging down from the hood. Add stitching lines around the pocket and ribbing details on the cuffs and bottom hem using vertical hash marks. -
Sketch the shorts:
Below the hoodie, draw a pair of relaxed-fit shorts. Include a drawstring waistband and hem cuffs similar to the hoodie’s style. -
Draw the single sneaker:
Sketch the side profile of a chunky sneaker. Focus on the main panels of the shoe and the thick sole. Accurate proportions are key here, but don’t worry about tiny textures yet. -
Ink the technical drawings:
Switch to your 0.3mm fine liner. Carefully go over your pencil lines. Use a steady hand for the long curves of the sleeves and the straight lines of the hems. -
Add texture with hatching:
Use a 0.1mm pen to add delicate hatching inside the hood to show depth. Add vertical lines to the cuffs and waistband to simulate ribbed fabric texture.
Creating Fabric Texture
Keep catch-lights (white paper) on the ‘highest’ points of the fabric folds, like the knees and shoulders. This contrast makes the material look soft and real.
Step 3: Illustrating the Fashion Figure (Right Page)
-
Draft the clothing on the figure:
Back on the right page, draw the hoodie and joggers over your figure sketch. The hoodie should look cropped, sitting just above the waist band. The joggers should taper at the ankle. -
Refine fabric folds:
Add realistic wrinkles where the fabric bends—specifically at the elbows, knees, and where the joggers gather at the ankles. This weight gives the drawing life. -
Draw the hands and shoes:
Sketch simple, relaxed hands hanging by the sides. Then, draw the front-facing view of the sneakers on the feet, mirroring the style of the single shoe on the left page. -
Ink the figure:
Go over the main outline of the figure and clothing with your 0.5mm pen for a bold look. Use the thinner 0.1mm pen for interior details like pockets, drawstrings, and shoe laces. -
Erase pencil guides:
Once the ink is completely dry, gently erase all underlying pencil sketch lines from both pages to clean up the artwork.
Smudgy Ink Lines?
Wait at least 5 minutes before erasing pencil lines over ink. If ink smears, incorporate it into a shadow or cover it with opaque white gel pen later.
Step 4: Adding Color
-
Base layer for the hoodie:
Take a warm beige or light yellow-ochre colored pencil. Lightly shade the entire hoodie on the figure, applying even pressure to create a smooth base tone. -
Deepen the hoodie shadows:
Press slightly harder with the same pencil in the shadow areas—under the arms, inside the hood, and beneath the chest seam—to create dimension. -
Color the joggers:
Switch to a terracotta or peach-colored pencil for the pants. Fill in the shape with long, consistent strokes following the direction of the legs. -
Add dimension to the pants:
Layer a second coat of color on the sides of the legs and within the fold lines to make the legs look cylindrical rather than flat. -
Shade the skin:
If your drawing shows ankles or hands, lightly shade them with a skin-tone pencil suitable for your design. -
Final shading touches:
I like to use a grey pencil to add very subtle shadows to the white sneakers, giving them volume without coloring them in fully.
Start a new page for your next outfit idea to build your own personal fashion portfolio

PENCIL GUIDE
Understanding Pencil Grades from H to B
From first sketch to finished drawing — learn pencil grades, line control, and shading techniques.
Explore the Full Guide
Button-Up And Trousers Smart Casual
These clean, illustrative line drawings capture two variations of a classic smart-casual look featuring button-up shirts and trousers. The project focuses on getting proportions right and using simple linework to suggest fabric texture and drape.
Step-by-Step
Materials
- Sketchbook (heavyweight paper preferred)
- H lead pencil for under-drawing
- Fine liner pens (0.1mm, 0.3mm, and 0.5mm)
- Kneadable eraser
- Ruling pen or straight edge (optional)
Step 1: Planning the Figures
-
Establish the skeleton:
Begin with your H pencil, lightly sketching a stick figure to establish the pose. For both figures, keep the stance relaxed with feet shoulder-width apart. Aim for a standard fashion proportion where the head fits into the body height about 7.5 to 8 times. -
Block in the torso:
Draw a rectangular shape for the torso. For the left figure, keep it slightly slimmer; for the right figure, broaden the shoulders slightly to accommodate the short-sleeve shirt silhouette. -
Map out the limbs:
Flesh out the arms and legs using cylindrical shapes. Pay attention to the joints—knees and elbows should align naturally. Draw the hands casually tucked into pockets or hanging loosely.
Step 2: Drafting the Clothing
-
Sketch the left outfit: Shirt:
Draw the long-sleeve shirt on the left figure. Indicate the collar sitting high on the neck and sketch the sleeves rolling slightly at the wrist. Add a center placket line for the buttons. -
Sketch the left outfit: Trousers:
Define the waistline just below the ribs. Draw the trousers with a straight leg cut, ending just at the ankle to reveal the shoe. Add faint lines for belt loops. -
Sketch the right outfit:
For the figure on the right page, draw a short-sleeved button-up. Keep the sleeves wide and structured. Sketch the trousers slightly slimmer than the first pair, tapering toward the ankle. -
Add footwear outlines:
Sketch simple outlines for shoes. I prefer classic loafers or simple sneakers for this style. Keep the shapes basic for now.
Pro Tip: Fabric Weight
Use angular, sharp lines for stiff fabrics like denim or starched cotton, and softer, curved lines for silk or wool. This visual language tells the viewer what the material feels like.
Step 3: Inking the Lines
-
Define the silhouette:
Switch to your 0.5mm fine liner. Carefully trace the outer contours of the clothing. Don’t simply trace the straight lines; add slight wrinkles at the elbows, knees, and waist to suggest fabric folding. -
Detail the shirts:
Use a 0.3mm pen for interior details like collars, pockets, and button plackets. Draw the buttons as small, clean circles. For the left shirt, add a belt detail with vertical stripes. -
Detail the trousers:
Ink the trouser legs. On the left figure, add a distinct crease line down the center of each leg. On the right figure, prepare for texturing by keeping the outline uninterrupted. -
Refine the faces:
Using your finest 0.1mm pen, ink the facial features and hair. Keep the expressions neutral and the hair stylized with simple, sweeping strokes. -
Erase pencil marks:
Once the ink is completely dry (give it a few minutes to avoid smudging), gently use the kneadable eraser to lift away all initial pencil guidelines.
Level Up: Pattern Play
Instead of solid shading, try adding a pattern to the shirt on the left figure. A subtle vertical stripe or a micro-dot pattern adds complexity without overwhelming the clean lines.
Step 4: Texturing and Shading
-
Add shading to the left figure:
Use the 0.1mm pen to add very minimal hatching in deep shadow areas, like under the collar, inside the sleeve cuffs, or beneath the hem of the trousers. -
Texture the right trousers:
For the trousers on the right, create a darker fabric effect. Use close, vertical hatching lines to fill the pants. Keep the lines incredibly straight and parallel. -
Cross-hatch for depth:
Overlay the vertical hatching on the right trousers with diagonal hatching in the darker areas (inner thighs and sides) to build contrast. -
Final shoework:
Add details to the shoes, such as laces or stitching. On the right figure’s shoes, mimic the hatching technique used on the pants but with slightly wider spacing. -
Review and refine:
Scan the drawing for any disconnected lines or areas that lack weight. I like to thicken the bottom-most lines of the feet to ground the figures.
You now have a crisp fashion illustration ready to serve as inspiration for your next wardrobe combination
Simple Dress And Cardigan Pairings

Capture the essence of street style with this trio of elegantly sketched fashion figures. Using fine liner pens and subtle shading, you’ll create a layout that feels both casual and designer-chic.
Step-by-Step Tutorial
Materials
- Hardbound sketchbook (heavyweight paper)
- Fine liner pens (sizes 0.1, 0.3, and 0.5)
- Graphite pencil (HB or 2B)
- Soft detailed eraser
- Colored pencils or light markers (muted pink/terracotta)
- Ruler (optional)
Step 1: Drafting the Forms
-
Establish the croquis:
Start by lightly sketching the stick-figure framework for three standing models using your graphite pencil. Place one figure centrally on the left page and two figures side-by-side on the right page. -
Elongate the proportions:
To achieve that classic fashion illustration look, lengthen the legs slightly more than natural proportions. Keep the heads relatively small and the necks graceful. -
Outline the body shapes:
Flesh out the stick figures with gentle cylindrical shapes for limbs and torsos. Don’t worry about perfect anatomy; focus on the flow and stance. -
Sketch the garments: Left page:
On the left figure, draft a mid-length dress with a belted waist and short sleeves. Add boxy pleats to the skirt section. -
Sketch the garments: Right page:
For the middle figure, outline a long skirt or dress paired with an open, hip-length cardigan. For the far-right figure, sketch a long, flowing maxi dress with long sleeves.
Step 2: Inking and Details
-
Define the faces and hair:
Using a 0.1 fine liner, carefully ink the facial features. Give the left and middle figures textured, curly hair with short, scribbled strokes. The right figure gets an elegant up-do. -
Ink the left outfit:
Use a 0.3 pen to go over the dress lines. Add vertical shading lines on the skirt to suggest pleats and fabric weight. -
Detail the boots:
Draw combat-style boots on the left figure, emphasizing the laces and thick soles with darker ink strokes. -
Ink the middle cardigan:
Outline the cardigan on the middle figure. Use broken lines near the edges to suggest a softer knit texture compared to the skirt. -
Ink the right figure:
Use fluid, long strokes for the maxi dress on the far right. Add minimal details, focusing on the drape of the fabric near the hemline. -
Add footwear to the right page:
Sketch simple boots for the middle figure and casual platform sneakers for the figure on the far right.
Clean Lines
If you smudge ink while erasing, wait longer for drying next time. You can fix small mistakes by applying white gel pen or gouache over the smudge.
Step 3: Shading and Finishing
-
Erase pencil marks:
Once the ink is completely dry, gently erase all the graphite guidelines to leave a clean, crisp illustration. -
Apply texture shading:
Using your 0.1 pen, add cross-hatching to the belt on the left figure and stippling to the shadowed areas of the dresses. -
Add a touch of color:
Take a muted pink or terracotta colored pencil and lightly shade the cardigan on the middle figure. Keep the stroke direction consistent. -
Enhance the left dress:
Apply very light gray shading (or faint vertical pencil strokes) to the dress on the left to distinguish it from the white paper background. -
Final contrast check:
Deepen the darkest areas, like the shoes and hair, with a 0.5 pen to make the figures pop off the page.
Adding Atmosphere
Sketch a very faint horizon line or suggestion of a sidewalk beneath the feet. It grounds the figures so they aren’t floating in void space.
Your sketchbook now hosts a stylish collection of custom fashion designs ready for the runway
BRUSH GUIDE
The Right Brush for Every Stroke
From clean lines to bold texture — master brush choice, stroke control, and essential techniques.
Explore the Full Guide
Outerwear Drapes And Big Shapes
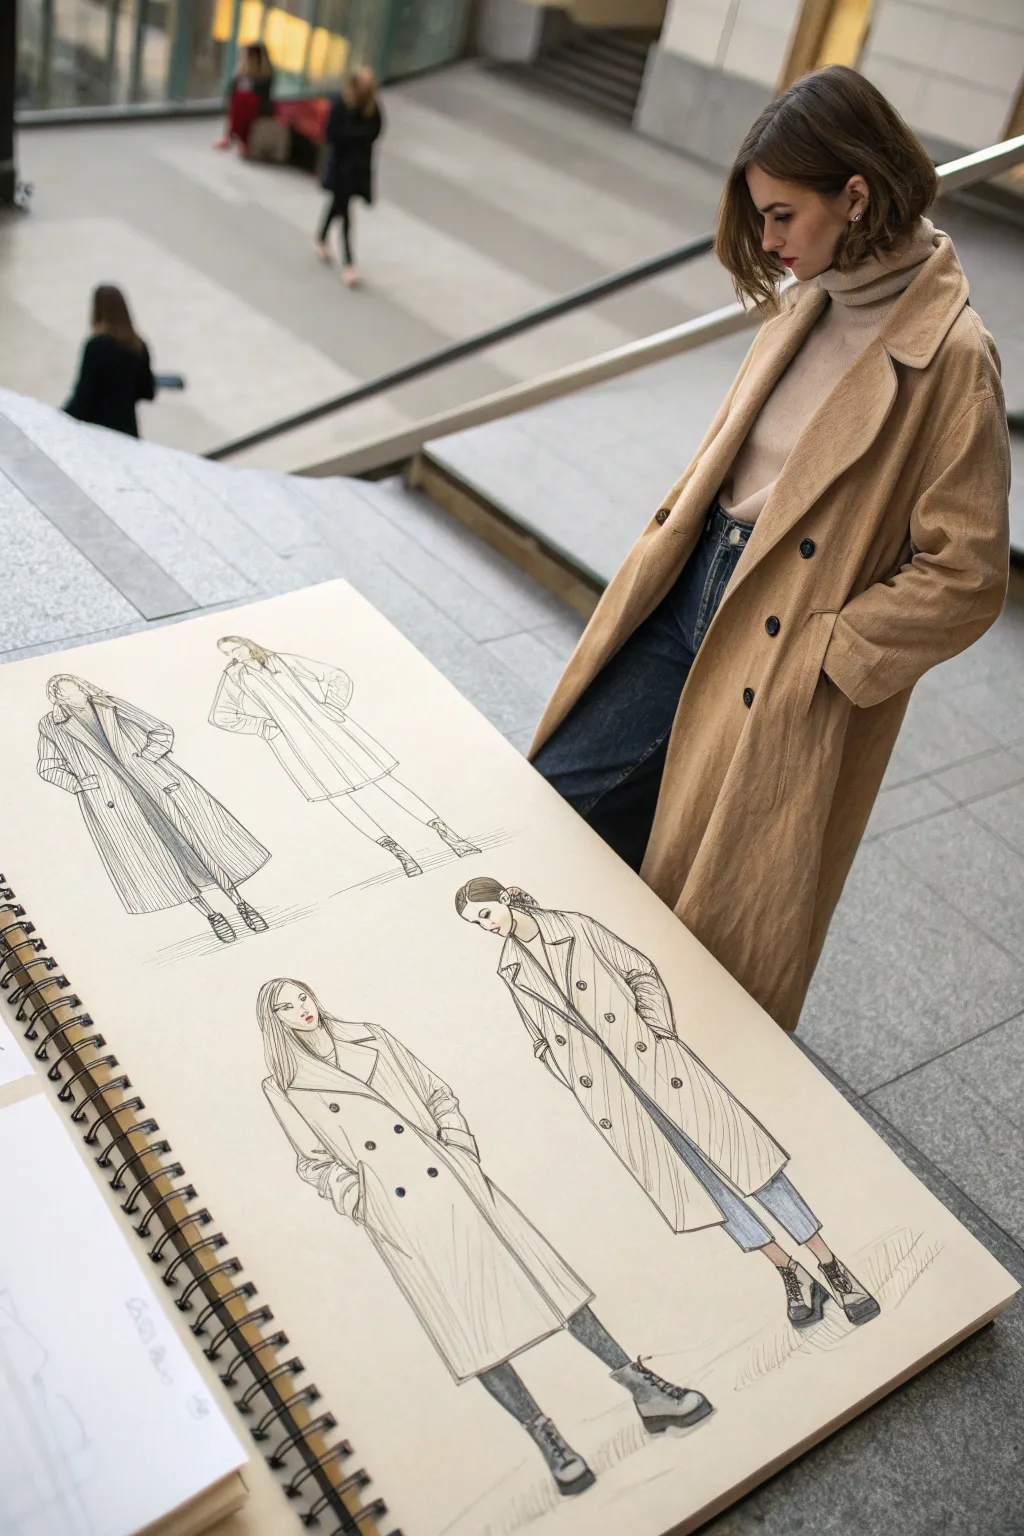
Capture the flow and structure of trendy oversized coats with this fashion illustration tutorial. You will create a dynamic sketchbook spread featuring four distinct outerwear designs, focusing on draping, folds, and clean linework.
Step-by-Step
Materials
- Large spiral-bound sketchbook with cream or off-white paper
- HB or 2B graphite pencil
- Kneaded eraser
- Fine liner pens (sizes 0.1, 0.3, and 0.5)
- Alcohol-based markers (cool greys, warm beiges, light browns)
- Colored pencils (black, charcoal, white for highlights)
Step 1: Laying the Groundwork
-
Establish the croquis:
Start by lightly sketching four elongated fashion figures (croquis) on your page. Arrange them dynamically: place two slightly higher in the upper left and center, and two larger, more prominent figures in the foreground at the bottom. Keep the poses simple—standing straight or with one hip cocked—to let the coats be the focus. -
Map the garment shapes:
Using your HB pencil, draw the basic silhouette of the coats over your figures. Focus on the ‘big shapes’ first—large trapezoids for the body of the coat and rectangles for sleeves. Don’t worry about details yet; just get the proportions of the oversized fit correct. -
Refine the collars and lapels:
For the bottom-left figure, sketch a wide, double-breasted lapel. For the bottom-right figure, draft a classic trench coat collar. Ensure the lapels wrap naturally around the neck and chest area, indicating form. -
Add structural details:
Lightly mark the placement of buttons, pockets, and belts. On the trench coat designs, draw the belt loops and the angle of the pockets. I find it helpful to draw a light centerline down the garment to ensure buttons align correctly.
Step 2: Inking the Outline
-
Start the fine line work:
Switch to your 0.3 fine liner. Begin tracing your pencil lines with confident, swift strokes. Outline the main silhouette of the coats. Use a slightly broken line in areas where the fabric folds to keep the drawing feeling lively and not stiff. -
Detailing the features:
Use a finer 0.1 pen for delicate details like the facial features, hair strands, and intricate stitching on the lapels. Keep facial features minimal—just a hint of eyes, nose, and lips is enough for this style. -
Emphasize weight with line variations:
Go back with a 0.5 pen to darken the shadow side of the coats (usually the right side and under the arms). This line weight variation instantly adds depth and suggests heavy fabric. -
Erase pencil marks:
Once the ink is completely dry, gently erase all graphite guidelines with your kneaded eraser to leave a clean, crisp illustration.
Wonky Proportions?
If figures look stiff, check the ‘plumb line’—a vertical line from the pit of the neck to the weight-bearing foot. The hips and shoulders should tilt in opposition.
Step 3: Shading and Texture
-
Apply base shadows:
Using a light cool grey or beige marker, make quick sweeping strokes to indicate shadows. Focus on the folds of the fabric—under the collar, inside the sleeve cuffs, and where the coat overlaps. Leave the main body of the coat the color of the paper to suggest light. -
Define the folds:
Add a second layer of marker to the deepest shadow areas, such as the space between the legs or deep creases at the elbows. This builds contrast and dimension. -
Texture with hatching:
Take your 0.1 drawing pen again and add vertical hatching lines to the coats. On the top-left coat, use long, straight vertical lines to suggest a ribbed or heavy wool texture. For the bottom figures, use sparser hatching to suggest smooth gabardine. -
Render the denim:
For the legs peeking out from the coats, use a blue-grey marker or pencil to color the jeans. Use vertical strokes to mimic the denim weave, leaving the center of the thigh lighter for a highlight. -
Ground the figures:
Sketch quick, scratchy lines under the shoes to create a shadow on the floor. This grounds your figures so they don’t look like they are floating in space.
Fabric Swatches
Glue small squares of actual fabric (wool, denim, silk) next to each sketch. It adds a tactile element and transforms your drawing into a professional design board.
Step 4: Final Touches
-
Pop of color:
Use a muted red or coral pencil to add a tiny touch of color to the lips of the figures. This draws the eye to the faces without overwhelming the monochromatic outfit sketches. -
Enhancing buttons:
Fill in the buttons with solid black ink or dark charcoal pencil. Leave a tiny speck of white paper in each button to represent a shine or reflection. -
Highlighting:
If you have a white gel pen or white charcoal pencil, add subtle highlights to the top of the shoulders and the hair to simulate studio lighting.
Now you have a chic, professional-looking fashion spread ready to inspire your next wardrobe update
Print Practice Outfit Board
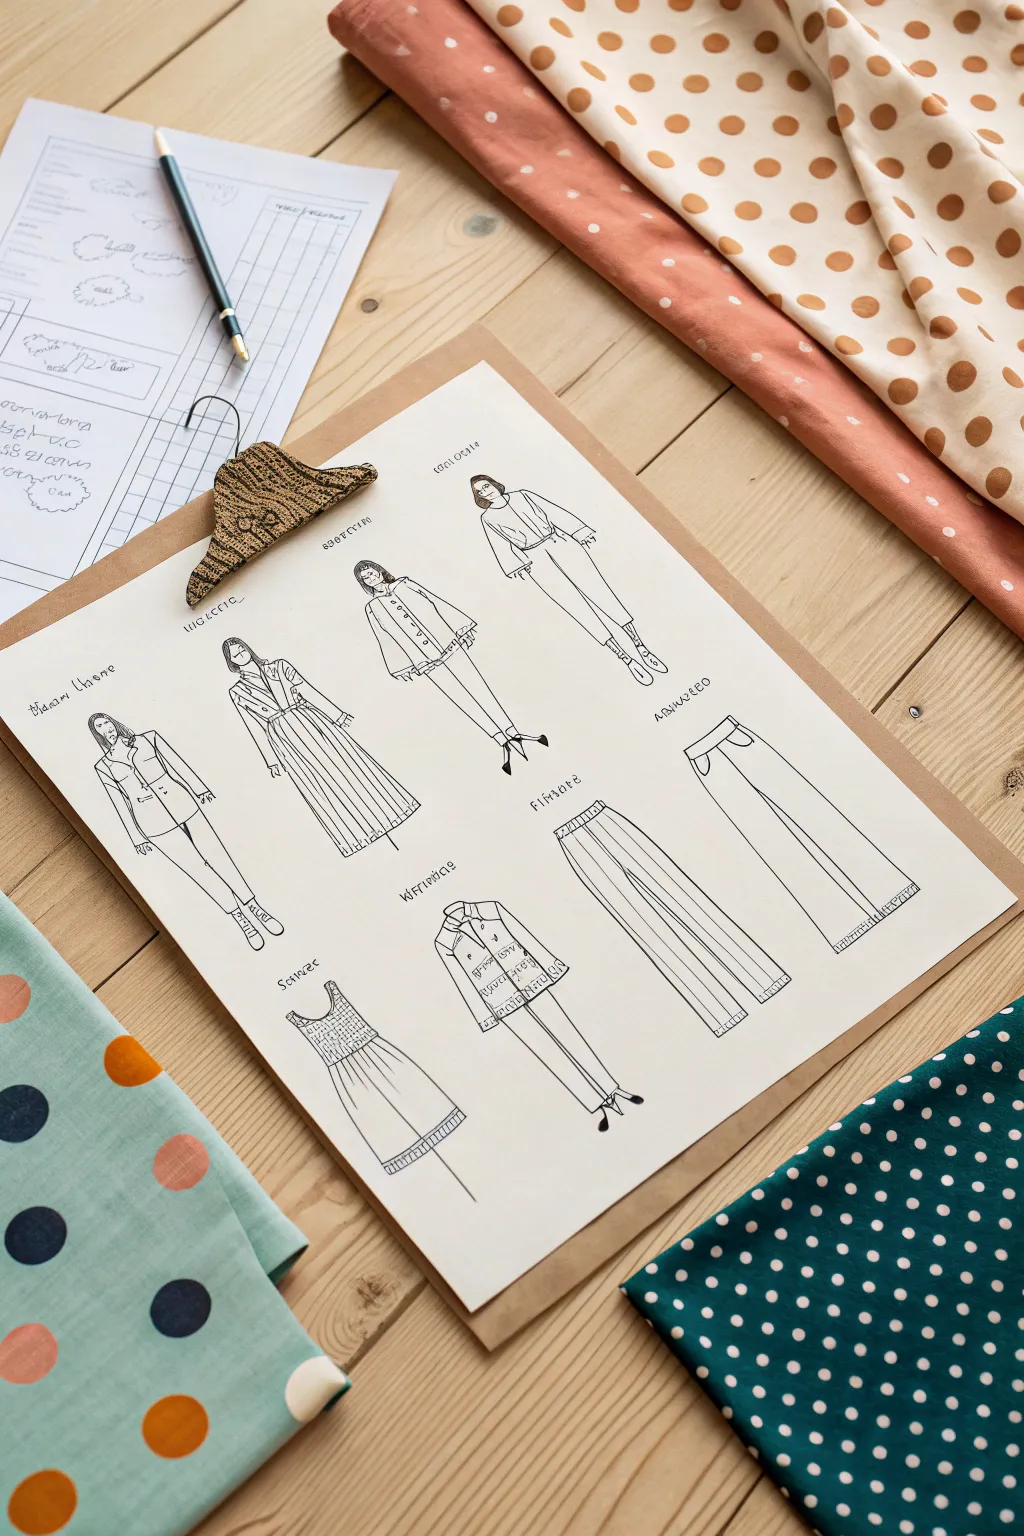
Step into the role of a fashion designer with this charming illustration board project. You’ll create a professional-looking layout featuring hand-drawn outfit concepts surrounded by inspiring fabric swatches, perfect for visualizing a mini collection.
Step-by-Step Guide
Materials
- Heavyweight drawing paper or mixed media paper (A4 or A3)
- Wooden clipboard or stiff backing board
- Fine liner pens (black, sizes 0.1, 0.3, and 0.5)
- Pencil (HB or 2B) and eraser
- Ruler
- Patterned fabric scraps (polka dots in rust/cream and teal/white)
- Additional planning paper (grid or lined)
- Drafting tape or washi tape
- Decorative wooden ornament or clip (optional)
Step 1: Conceptualizing the Collection
-
Set the scene:
Begin by clearing a workspace, ideally a light wood table to match the aesthetic. Lay out your clipboard or backing board in the center. -
Select your paper:
Choose a high-quality, heavyweight paper that can handle ink without bleeding. Secure it to your clipboard. If you want that rustic look, you can clip a decorative wooden shape at the top. -
Plan the layout:
Lightly pencil in a grid or imaginary columns on your main paper. You’ll need space for roughly eight distinct garment sketches arranged in two rows.
Clean Lines Tip
Don’t connect every single line. Leave small gaps in outlines (like at shoulders or hems) to make sketches feel more fluid and less like a coloring book.
Step 2: Sketching the Outfits
-
Outline the mannequins:
Using your pencil, lightly draw elongated fashion croquis (figure templates). Keep the poses simple—standing straight or with one leg slightly forward—to focus attention on the clothes. -
Draft the first row:
Sketch the top row of designs. Incorporate a mix of structured jackets and flowy pants. Focus on a tailored coat for the left figure and a looser, blouse-and-trouser combination for the right. -
Draft the second row:
Move to the bottom row. Here, include variations like a sleeveless dress, a detailed tunic, and standalone garment pieces like wide-leg trousers to show construction details. -
Add garment details:
Refine your pencil sketches by adding seams, collars, cuffs, and buttons. Visualizing where the fabric would naturally fold or drape adds realism to the drawings.
Step 3: Inking the Designs
-
Outline main lines:
Switch to a 0.5mm fine liner pen. I like to start with the confident, outer lines of the clothing to define the silhouette. -
Add fine details:
Use a finer 0.1mm pen for delicate details like facial features (if including them), buttons, stitching lines, and fabric folds. -
Text and labels:
Hand-letter small titles or code numbers next to each outfit. Use a quirky, handwritten font style to give it that authentic ‘designer’s sketchbook’ feel. -
Erase pencil marks:
Wait for the ink to dry completely to avoid smudging. Once dry, gently erase all underlying pencil guidelines.
Add Texture
Glue actual tiny snippets of the fabric directly onto the paper next to the corresponding sketch to create a true mixed-media swatch board.
Step 4: Styling the Flat Lay
-
Prepare the planning sheet:
On a separate piece of paper, sketch a rough grid or chart. Add a pen on top to suggest work in progress. -
Arrange the fabrics:
Gather your fabric swatches. Fold the rust-colored polka dot fabric loosely and place it at the top right corner, letting it drape naturally. -
Place the accent fabric:
Position the teal polka dot fabric or paper at the bottom right corner to balance the composition. The color contrast brings the black and white sketches to life. -
Add final touches:
Scatter a few extra swatches or a matching color palette card if you have one on the left side to frame the central artwork.
Now you have a chic, professional-looking fashion board ready to inspire your next sewing project


Texture Sampler Wardrobe Sheet

This project involves creating a clean, organized sketchbook spread featuring four distinct menswear garments, focusing heavily on rendering different fabric textures with graphite. The result is a professional-looking wardrobe plan that feels both technical and artistic.
Step-by-Step
Materials
- Spiral-bound sketchbook (medium textured paper)
- Mechanical pencil (0.5mm, HB lead)
- Fine liner pen (black, 0.1mm)
- Ruler or straight edge
- Eraser (kneaded preferred)
- Blending stump (tortillon) or cotton swab
Step 1: Setting Up the Grid
-
Plan the Layout:
Begin by deciding the placement of your four main illustrations on the right-hand page. Visualize a 2×2 grid that leaves generous margins around the edges. -
Draw the Frames:
Using your ruler and mechanical pencil, lightly draw four identical squares. Keep the lines very faint initially so they can be inked later without smudging. -
Add the Empty Frames:
On the left facing page, repeat the process by drawing two matching square frames. These are intentionally left blank in this project to suggest a work-in-progress feel or space for fabric swatches.
Clean Lines
Rotate your sketchbook while drawing the hatched lines. It is much easier to pull the pencil toward you consistently than to push it away.
Step 2: Outlining the Garments
-
Sketch the Jacket Structure:
In the top-left square of the right page, sketch the basic outline of a collared jacket. Focus on the lapels and large front pockets. Don’t worry about texture yet; just get the proportions right. -
Draft the Cardigan:
In the bottom-left square, draw a shawl-collar cardigan. Sketch the center opening and add a row of small circles for buttons, ensuring the sleeves hang naturally. -
Outline the Sweaters:
In the remaining two squares (top-right and bottom-right), sketch a mock-neck sweater and a turtleneck. Keep the silhouettes simple, focusing on the shoulder slope and ribbed cuffs. -
Ink the Borders:
Once you are happy with the placement, use your fine liner and ruler to trace over the square border frames. Use a steady hand for clean, crisp lines. -
Ink the Garments:
Trace the main outlines of your clothing sketches with the fine liner. Keep the lines continuous but slightly organic to mimic the softness of fabric.
Add Realism
Glue actual tiny snippets of fabric next to the drawings within the frames. This transforms the sketch into a true mixed-media swatch book.
Step 3: Rendering Textures
-
Shade the Jacket:
Using the mechanical pencil, add diagonal hatching lines across the jacket body. I find that varying the pressure slightly helps suggest a heavier wool or tweed material. -
Detail the Cardigan Ribs:
For the shawl cardigan, draw horizontal lines across the main body to mimic a knit pattern. On the collar and cuffs, switch to tight vertical lines to represent ribbing. -
Create Sweater Texture:
Lightly shade the mock-neck sweater with vertical strokes. These should be softer and less defined than the cardigan to suggest a finer gauge knit. -
Render the Turtleneck:
For the final sweater, use a tight cross-hatching technique—diagonal lines going one way, then the other—to create a dense, darker fabric look. -
Add Dimension:
Return to all four sketches and darken the areas where shadows would naturally fall, such as under the collars, inside the sleeves, and along the side seams. -
Clean Up:
Allow the ink to dry completely, then gently erase all remaining pencil guidelines, leaving only your graphite shading and ink outlines.
Your finished spread now serves as a stylish and organized reference guide for clothing textures and shapes
Accessories That Finish The Outfit
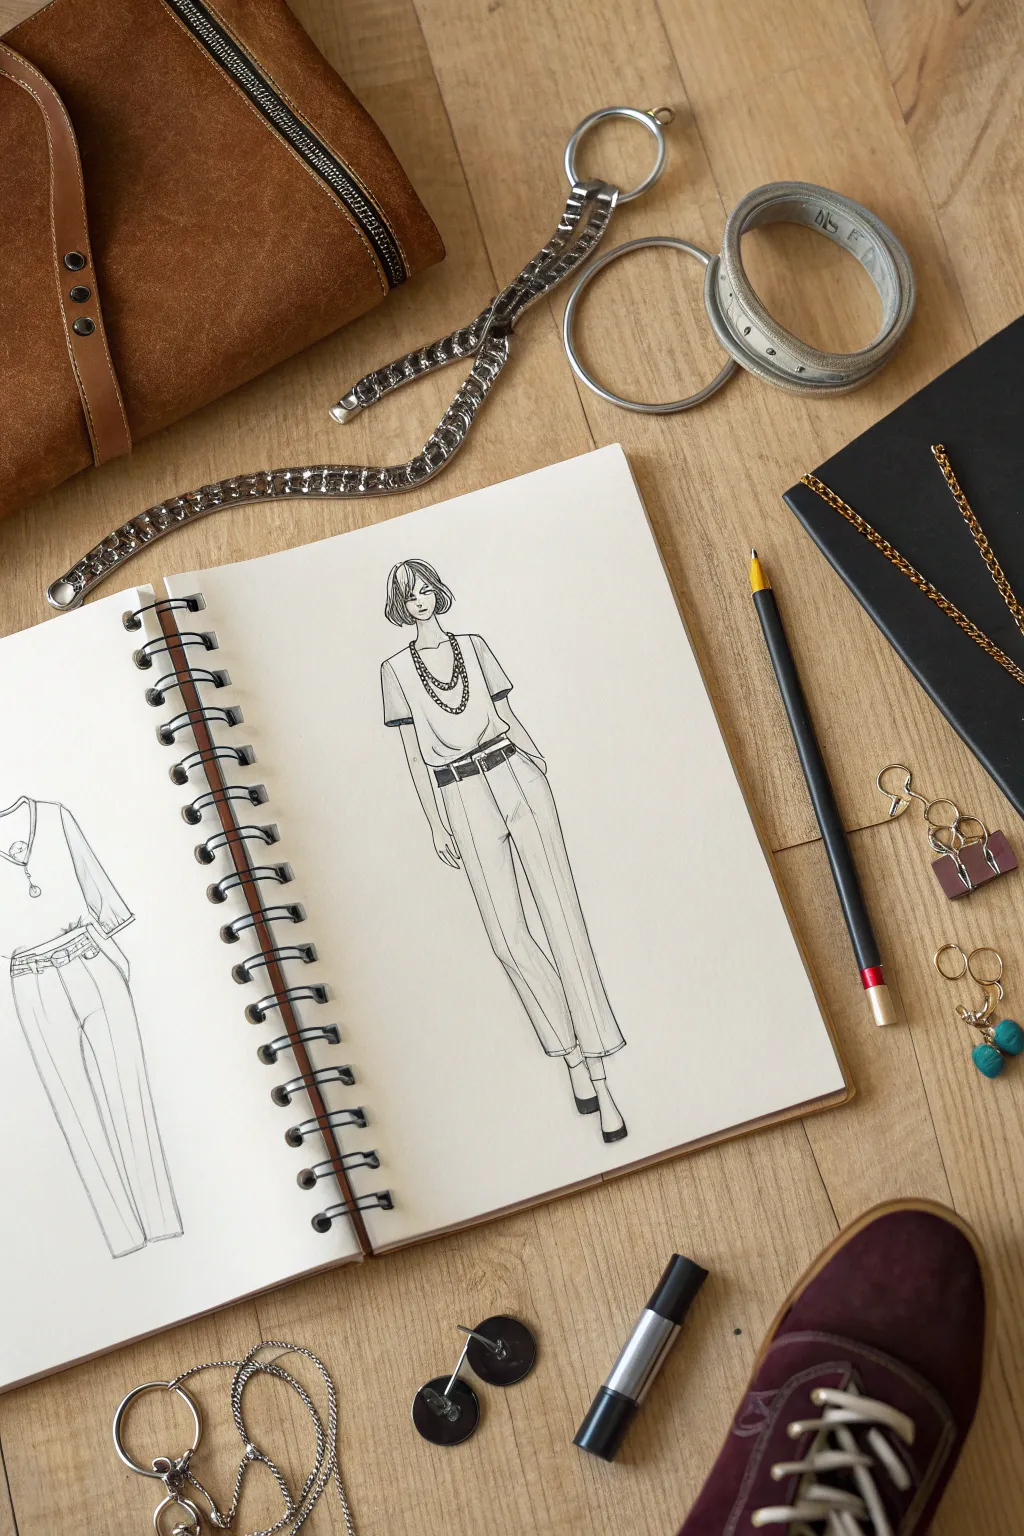
This elegant fashion illustration focuses on capturing a relaxed yet polished silhouette, emphasized by carefully drawn accessories. The simple ink lines bring attention to the drape of the fabric and the layered details that complete the outfit.
Step-by-Step Guide
Materials
- Spiral-bound sketchbook (medium weight paper)
- H or HB pencil for initial sketching
- Fine liner pen (0.3mm or 0.5mm, black ink)
- Kneaded eraser
- Ruler (optional, for trouser lines)
Step 1: Constructing the Croquis
-
Establish the vertical axis:
Begin by drawing a faint vertical line down the center of your page with your pencil. This balance line will help align the figure’s posture from head to toe. -
Mark major proportions:
Divide your line to mark the head, shoulders, waist, hips, and ankles. Since this is a fashion sketch, you can elongate the legs slightly for a more stylized look. -
Sketch the head and neck:
Draw an oval for the head at the top of your axis. Add a slender cylinder for the neck, keeping it relatively long to accommodate the detailed necklaces later. -
Rough in the torso and hips:
Lightly sketch a trapezoid for the torso and a rounded shape for the hips. The pose is fairly static, so keep the shoulders and hips relatively level, perhaps with a slight tilt to the right hip for naturalism. -
Define the limbs:
Sketch the arms hanging naturally at the sides. For the legs, outline straight lines flaring slightly at the bottom to indicate the wide-leg cut of the trousers.
Step 2: Draping the Clothing
-
Outline the T-shirt:
Draw the short sleeves and the scooped neckline. Keep the lines around the shoulders soft. I like to add slight wrinkles near the armpits to show the fabric isn’t rigid. -
Draw the waistband and belt:
Define the waist just above the hip line. Draw a distinct belt with a rectangular buckle, making sure it sits snugly to show the tuck of the shirt. -
Shape the trousers:
Extend lines down from the waist, widening them as they reach the ankle. Add a center crease line down the front of each leg to suggest tailored pleats. -
Detail the hem:
Stop the trousers just above the ankle bone. Keep the hemline fairly straight but soft to indicate movement. -
Sketch the shoes:
Draw classic pointed pumps or heels at the bottom. The feet should be angled slightly outward.
Pro Tip: Line Weight
Use a thicker pen (0.5mm) for the outer silhouette and the belt, and a thinner pen (0.1mm or 0.3mm) for delicate interior details like fabric folds and necklace chains.
Step 3: Inking and Details
-
Refine the face and hair:
Switch to your fine liner. Outline a sleek, chin-length bob haircut with bangs. Keep facial features minimal—just eyes, a hint of a nose, and mouth—to maintain the stylized fashion look. -
Ink the main contours:
Go over your pencil lines for the clothing. Use confident, single strokes rather than feathery lines. Vary your pressure: press harder on the shadow side (usually the right) and lighter on the highlighted side. -
Add the statement necklaces:
Carefully draw two distinct chains. One shorter chain closer to the neck, and a second, heavier chain draping lower. Draw small circles or links to give them texture. -
Emphasize the belt:
Fill in the belt strap with solid black ink or heavy hatching, leaving the buckle white for contrast. This anchors the drawing visually. -
Create fabric texture:
Add subtle vertical hatch marks along the trouser creases and near the crotch area to suggest shadows and folds in the material. -
Erase and clean up:
Once the ink is completely dry, gently erase all underlying pencil guidelines with your kneaded eraser. -
Final touches:
Add a few quick dashes near the hands to suggest fingers, and darken the shoe outlines to ground the figure.
Level Up: Pattern Mix
Instead of leaving the t-shirt plain, use your fine liner to add faint horizontal stripes or a small graphic logo to make the outfit feel more contemporary and authentic.
Now you have a chic, minimalistic fashion illustration ready to be expanded into a full collection across the page
One Base Outfit, Five Remixes
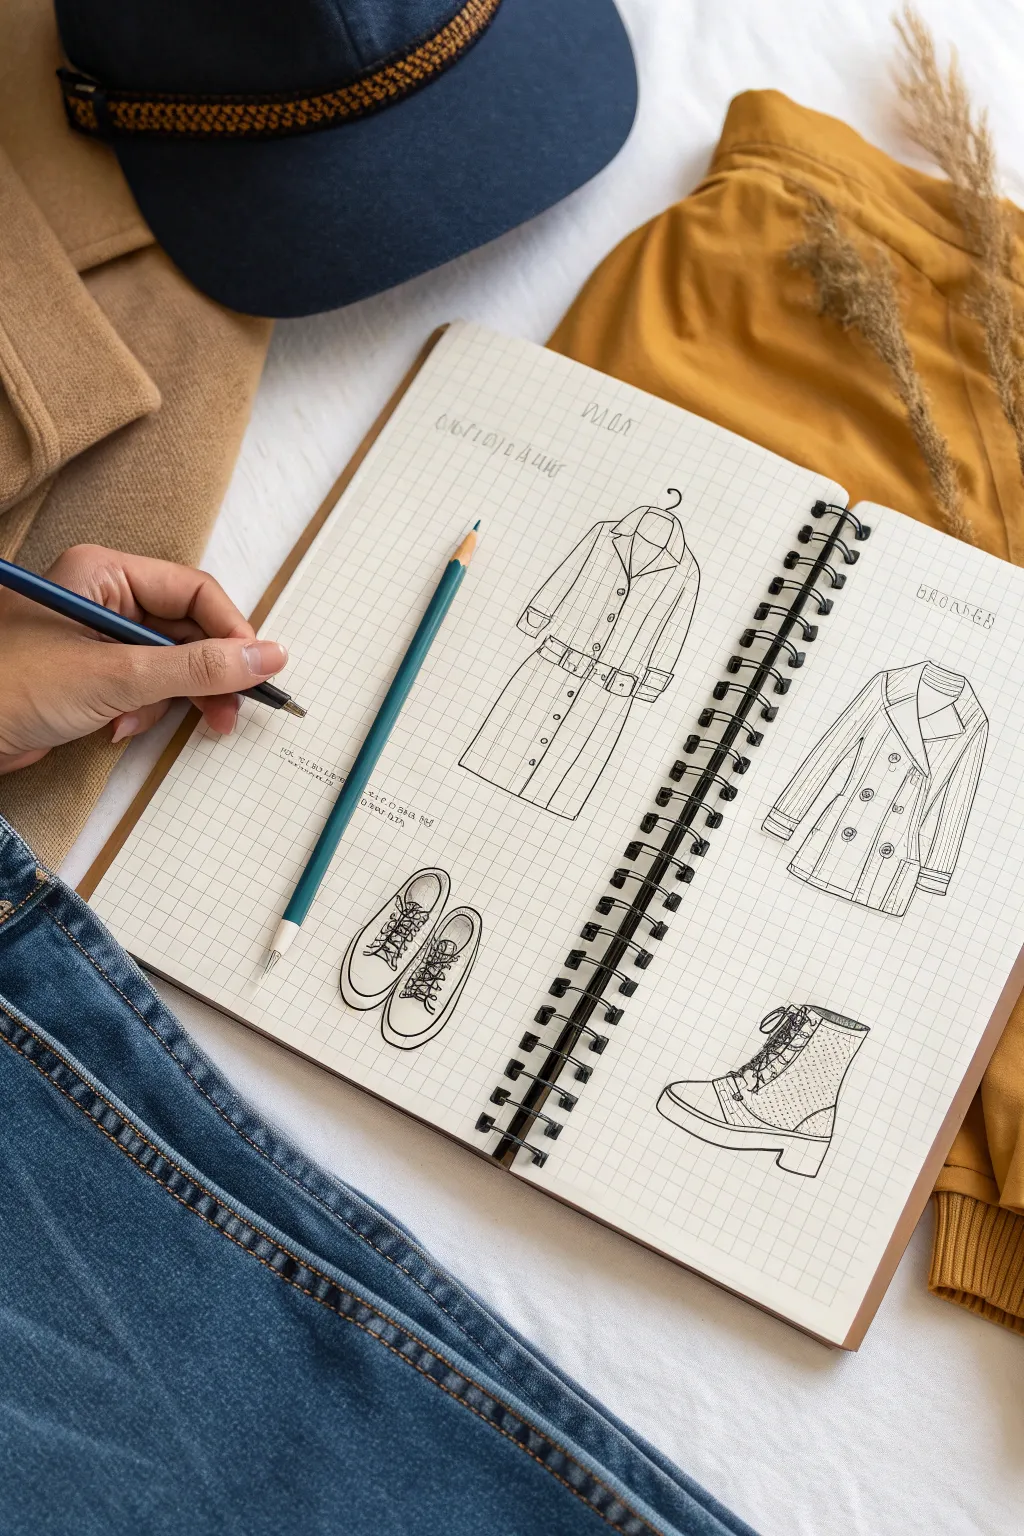
Capture the essence of fashion design with this clean, grid-based sketchbook layout featuring two distinct outfit variations. This project combines precise line work with a relaxed, hand-drawn aesthetic to showcase a coat, jacket, and footwear options side-by-side.
Step-by-Step Tutorial
Materials
- Wire-bound sketchbook with grid paper (A4 or A5)
- Mechanical pencil or fine graphite pencil (HB or 2B)
- Fine liner pen (black, 0.3mm or 0.5mm)
- Teal or cyan colored pencil
- Eraser
- Ruler (optional, for guidelines)
Step 1: Setting the Layout
-
Define the grid structure:
Open your sketchbook to a fresh two-page spread. The grid paper already provides a structure, but visualize where your four main elements will go: a long coat on the top left, a shorter jacket on the top right, sneakers on the bottom left, and boots on the bottom right. -
Draft the left page coat:
Start on the left page. Lightly sketch a vertical centerline for the coat. Mark the shoulders, waist, and hemline to establish the proportions of a long trench coat. -
Draft the right page jacket:
On the opposite page, create a similar centerline but shorter. This will be a double-breasted pea coat style, so mark the hemline near the hip area.
Style Tip
Keep your pen lifted slightly at the end of seam lines. This ‘tapered’ line look mimics professional fashion illustration and keeps drawings from looking stiff.
Step 2: Sketching the Garments
-
Outline the trench coat silhouette:
Refine the left coat’s shape. Draw the collar lapels first, then extend lines down for the sleeves and the main body. Add a slight flare at the bottom for movement. -
Add trench details:
Sketch a belt across the waist area with a simple buckle. Add a row of buttons down the front center and detail the cuffs on the sleeves. Don’t forget the pockets just below the belt line. -
Outline the pea coat silhouette:
Move to the right page. Draw wider, more angular lapels for the pea coat. Bring the sides down straighter than the trench coat for a boxier fit. -
Add pea coat details:
Draw a double row of buttons designated for the double-breasted look. Sketch angled welt pockets near the waist and add stitching lines near the cuffs and hem.
Creative Twist
Instead of leaving the clothes black and white, use a single accent color (like mustard or navy) to fill in just the coats, leaving the details inked on top.
Step 3: Drawing the Footwear
-
Position the sneakers:
On the bottom left page, sketch two oval shapes side-by-side to represent the opening of the shoes. Draw the rounded toe caps and the general outline of the soles. -
Detail the laces:
Draw crisscross patterns for the laces. I find it helpful to draw the eyelets first so the laces have a logical place to connect. -
Draft the boot:
On the bottom right page, sketch a single boot profile. Start with the sole, adding a slight heel, then draw the ankle shaft rising up. -
Detail the boot texture:
Add the lacing system up the front. Use tiny dots or small hatching marks on the side panel of the boot to suggest a textured material like suede or perforated leather.
Step 4: Inking and Refining
-
Ink the main outlines:
Take your black fine liner. Go over your pencil lines with confident, continuous strokes. Focus on the outer silhouettes first. -
Add weight to the lines:
Thicken the lines slightly on the shadow side of the garments (usually the right side and bottom) to give the drawing some depth. -
Detail stitching and buttons:
Use a lighter touch or a thinner pen to draw the internal details like pocket flaps, buttonholes, and topstitching seams. -
Inking the shoes:
Carefully ink the sneakers and boot. Pay attention to the sole treads and the delicate texture dots on the boot panel. -
Erase pencil marks:
Once the ink is completely dry, gently erase all graphite guidelines to reveal a clean, professional look.
Step 5: Final Touches
-
Add text labels:
At the top of the pages, hand-letter the titles (like ‘OUTFIT’ or specific month names) in a loose, architectural block font. -
Include technical notes:
Add tiny, illegible scribbles or small measurements near the hem of the coat or the side of the page to mimic designer construction notes. -
Prop the scene:
Place your teal pencil diagonally across the left page for that ‘work in progress’ aesthetic shown in the reference.
You now have a chic, organized fashion spread ready for your next design ideas
Unexpected Mashup Style Experiments
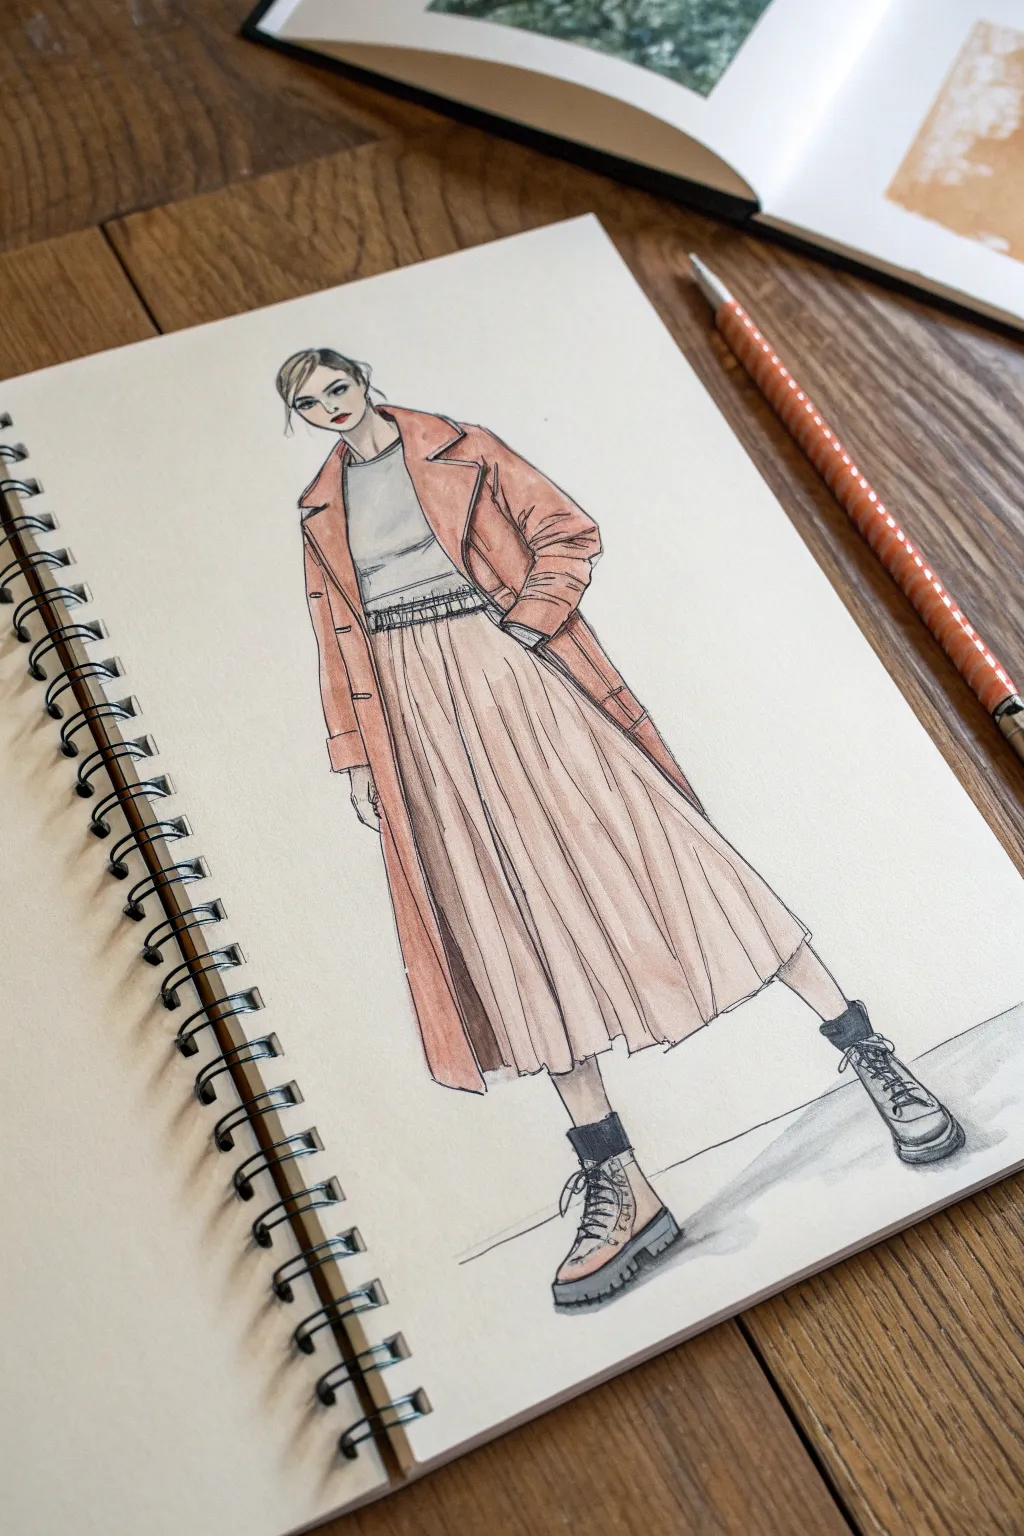
Capture the essence of street style with this dynamic fashion illustration, blending soft pastels with edgy footwear. This tutorial guides you through sketching a loose, confident figure and bringing it to life with marker rendering and fine-line details.
Detailed Instructions
Materials
- Spiral-bound sketchbook (heavyweight mixed-media paper recommended)
- HB or 2B graphite pencil
- Kneaded eraser
- Fine liner pens (0.1mm, 0.3mm, 0.5mm in black)
- Alcohol-based markers (Peach/Coral, Warm Grey, Cream, Charcoal/Black)
- White gel pen (optional for highlights)
Step 1: Constructing the Figure
-
Establish the pose:
Start with a light graphite pencil to draw the ‘croquis’ or figure template. Draw a vertical line for balance, then angle the hips slightly to suggest a relaxed stance with one leg stepping out. -
Head and shoulders:
Sketch an oval for the head, tilting it slightly. Draw the shoulder line wider than the head, keeping one shoulder slightly lower to match the relaxed hip pose. -
Torso and limbs:
Block in the torso shape, tapering at the waist. Sketch cylinders for the arms, noting that the hands will be tucked into pockets or hidden by the coat. Outline the legs, focusing on the wide stance. -
Map out the clothing:
Lightly draw the oversized coat shape over the shoulders. Add the waistband of the skirt just below the natural waistline and sketch vertical guidelines for the pleats. -
Refining the boots:
Draw the chunky boot shapes at the feet. Focus on the thick sole and the ankle height, ensuring they look grounded and heavy compared to the lighter clothing.
Bleeding Lines?
If your ink smudges when coloring, switch to pigment-based waterproof liners. Alternatively, do the marker coloring first and add the black outlines last.
Step 2: Inking the Outline
-
Facial features:
Switch to a 0.1mm fine liner. Carefully ink the eyes, eyebrows, and lips. Keep the lines minimal—a few strokes define the nose and jawline effectively. -
Hair details:
Use fluid, sweeping strokes to ink the hair, pulling the strands back into a low bun or messy style. Leave some gaps in the lines to suggest shine. -
Clothing contours:
Use a 0.3mm pen for the main clothing lines. Outline the coat’s lapels and cuffs with confident strokes. For the skirt, draw long, slightly shaky vertical lines to mimic the soft draped fabric of the pleats. -
Defining the boots:
Switch to a 0.5mm pen to give the boots more weight. Outline the soles and the laces, adding small horizontal lines for the tread pattern. -
Erase pencil marks:
Once the ink is completely dry, gently run your kneaded eraser over the entire drawing to lift the graphite guidelines, leaving a clean ink drawing.
Fabric Movement
Don’t draw straight ruler lines for pleats. Let lines wobble slightly and break near the bottom to show the fabric’s softness and movement as she walks.
Step 3: Adding Color and Texture
-
Base coat color:
Using a peach or coral alcohol marker, fill in the coat. Use broad strokes and work quickly to avoid streakiness. Leave small white gaps near edges for highlights. -
Shadowing the coat:
Layer the same peach marker again (or a slightly darker shade) under the lapels, inside the sleeves, and along the side of the coat to create depth and dimension. -
Rendering the skirt:
Use a cream or very pale warm grey marker for the skirt. Stroke vertically following the pleat lines. Add a second layer of color in the valleys of the pleats to deepen the folds. -
Top and skin tone:
Color the shirt with a light cool grey. Fill in the face, neck, and exposed legs with a skin-tone marker suitable for your subject, adding a touch of pink to the cheeks. -
Detailing the boots:
Use a charcoal or black marker for the socks peeking out of the boots. For the boots themselves, mix warm grey and a touch of the peach tone to tie the outfit together. -
Grounding shadow:
I prefer to use a cool grey marker to add a cast shadow on the ground stretching away from the feet. This anchors the figure so she doesn’t look like she is floating. -
Final touches:
Use a fine black pen to re-emphasize the boot laces and the gathering at the skirt’s waistband. If desired, use a white gel pen to add tiny highlights to the eyes and boot toes.
Now you have a stylish, runway-ready illustration to add to your portfolio


Have a question or want to share your own experience? I'd love to hear from you in the comments below!