A plain ceramic bowl is basically a tiny curved canvas just waiting for your brush. Here are my favorite ceramic bowl painting ideas—starting with classic, foolproof designs and drifting into more playful, unexpected looks once you’re warmed up.
Classic Blue-and-White Rim Pattern
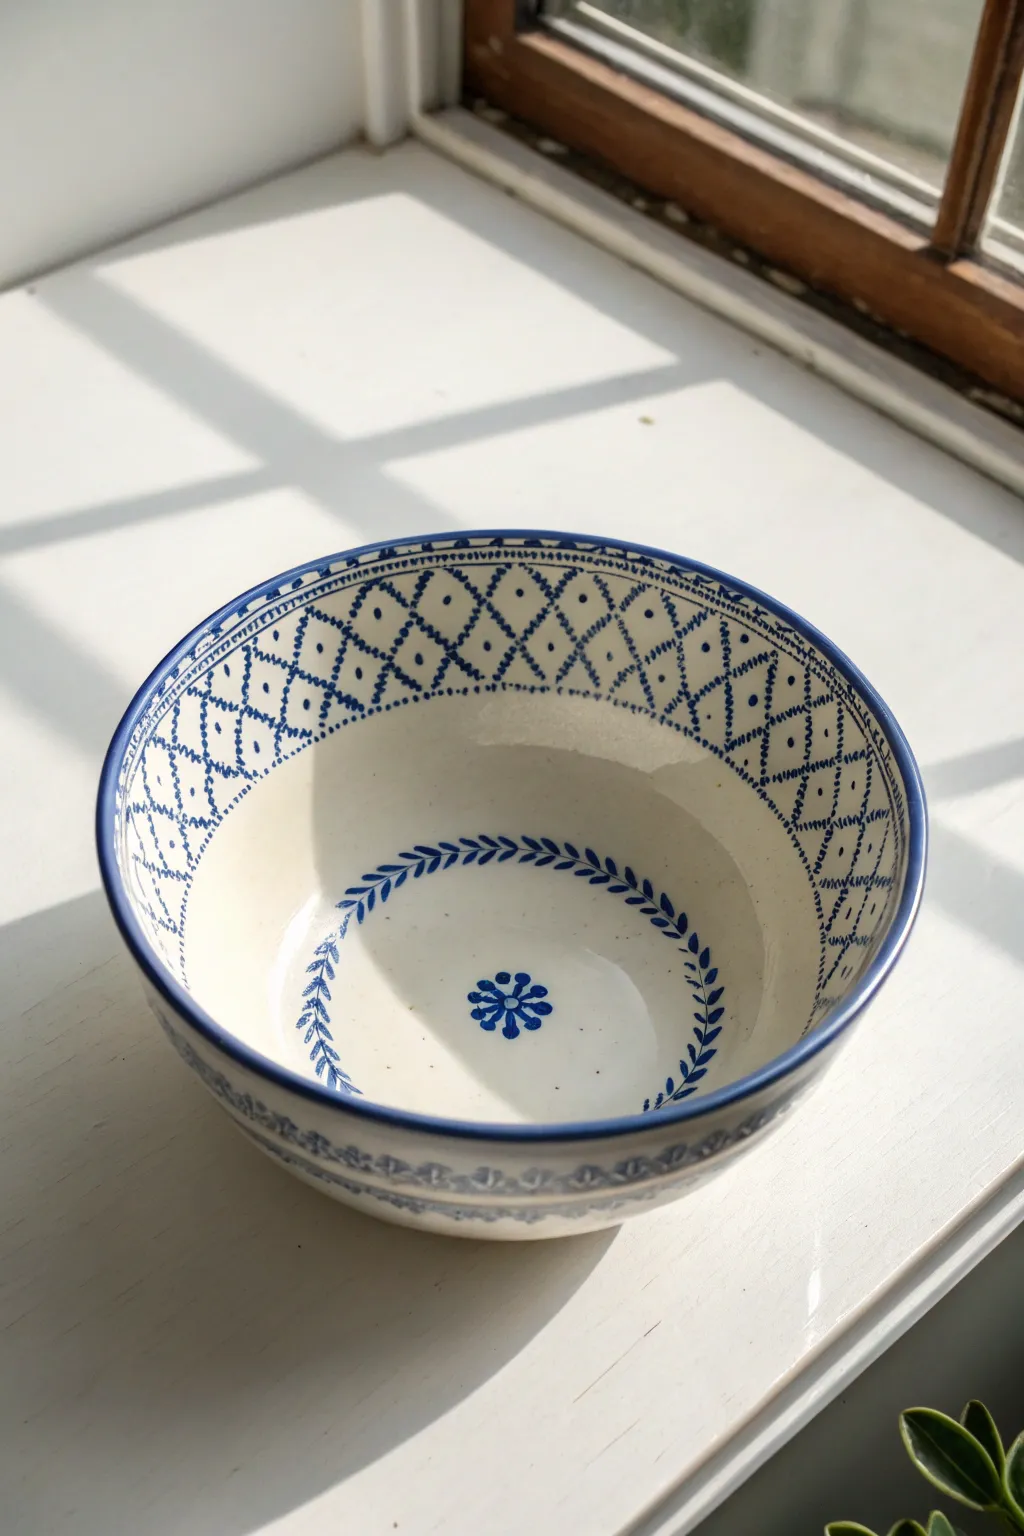
Emulate the charm of traditional European pottery with this elegant blue-and-white design. Featuring a distinct diamond lattice grid and delicate botanical motifs, this project transforms a plain bisque bowl into a stunning functional centerpiece.
Step-by-Step Guide
Materials
- Bisque ceramic bowl (white or off-white)
- Cobalt blue ceramic underglaze
- Clear dipping glaze
- Fine liner brush (size 0 or 00)
- Small round brush (size 2)
- Pencil
- Flexible measuring tape
- Sponge
- Water container
- Palette or small dish
Step 1: Preparation & Mapping
-
Clean the bisque:
Start by wiping down your bisque bowl with a damp sponge. This removes any dust or oils from handling that might repel the glaze. -
Mark the horizons:
Using a pencil, lightly draw a horizontal guideline about 1.5 inches down from the rim on the inside of the bowl. This will be the bottom boundary for your lattice pattern. -
Create the grid spacing:
Use a flexible measuring tape to mark even intervals along the rim and along your bottom guideline. I find marks about 0.75 inches apart work best for a balanced diamond shape. -
Sketch the lattice:
Connect your top and bottom marks diagonally with the pencil to form a crisscross diamond grid. Don’t worry about perfection; pencil marks will burn off in the kiln.
Step 2: Painting the Lattice
-
Load your liner brush:
Thin your cobalt blue underglaze slightly with water until it has an inky consistency. Load your fine liner brush, ensuring it comes to a sharp point. -
Paint the diagonal lines:
Carefully trace over your pencil grid lines. Keep your hand steady and try to maintain a consistent line thickness. -
Add the dots:
Once the grid lines are dry, dip the handle end of a paintbrush into the blue underglaze. Dot the center of each diamond shape created by the grid. -
Refine the grid intersections:
Using the very tip of your liner brush, add tiny, dashed ‘stitch’ marks or small beads of glaze at the intersections where your grid lines cross. This adds texture and mimics traditional stamping.
Uneven Lines?
If your hand shakes, try resting your pinky finger on the dried surface of the bowl to anchor your hand while painting detail work.
Step 3: Adding the Central Motifs
-
Draft the inner wreath:
Lightly sketch a circle in the bottom of the bowl, leaving enough negative space in the very center for the flower. -
Paint the leaves:
Using the small round brush, press down and lift up to create teardrop-shaped leaves along your sketched circle. Arrange them in opposing pairs to create a laurel wreath effect. -
Detail the wreath stem:
Connect the leaves with a very thin, delicate stem line using your liner brush. -
Paint the central flower:
In the exact center, paint a simple 8-petaled flower. Start with a central dot, then radiate small teardrop strokes outward.
Stamp It Out
Carve a small eraser into a leaf or diamond shape to stamp the repeating patterns instead of hand-painting for a more uniform look.
Step 4: Rim & Finishing Touches
-
Band the rim:
Load a larger brush with blue underglaze. Spin the bowl on a banding wheel if you have one, or steady your hand against the table, to paint a solid blue line along the very top edge of the rim. -
Add exterior details:
Locate the slight ridge or foot on the outside of the bowl. Replicate a simple version of the vine or leaf pattern here to tie the inside and outside together. -
Check for consistency:
Inspect your lines. If any areas look transparent, carefully apply a second coat of blue. Underglaze often fires lighter than it looks wet. -
Clear glaze application:
Allow the underglaze to dry completely (at least 30 minutes). Dip the entire bowl into a clear glaze to seal your design. -
The final fire:
Fire the piece in a kiln according to the clay and glaze specifications (typically cone 06 or cone 6).
Once fired, fill your beautiful new bowl with fresh fruit or simply display it to enjoy the classic pattern


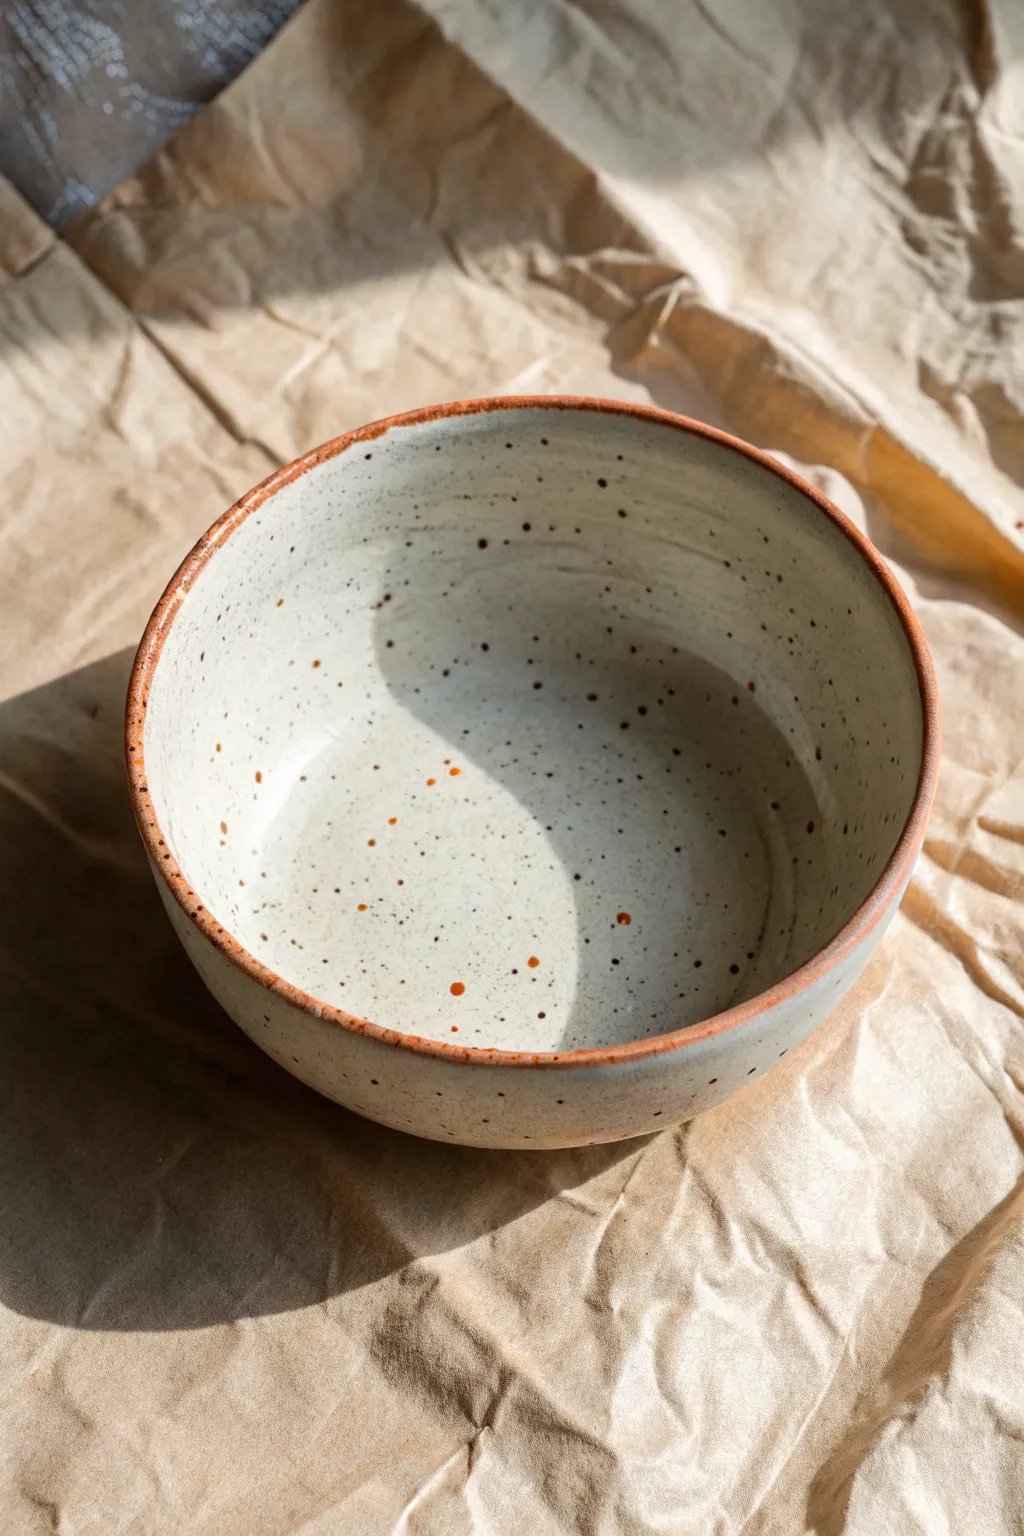
Simple Polka Dots Inside the Bowl
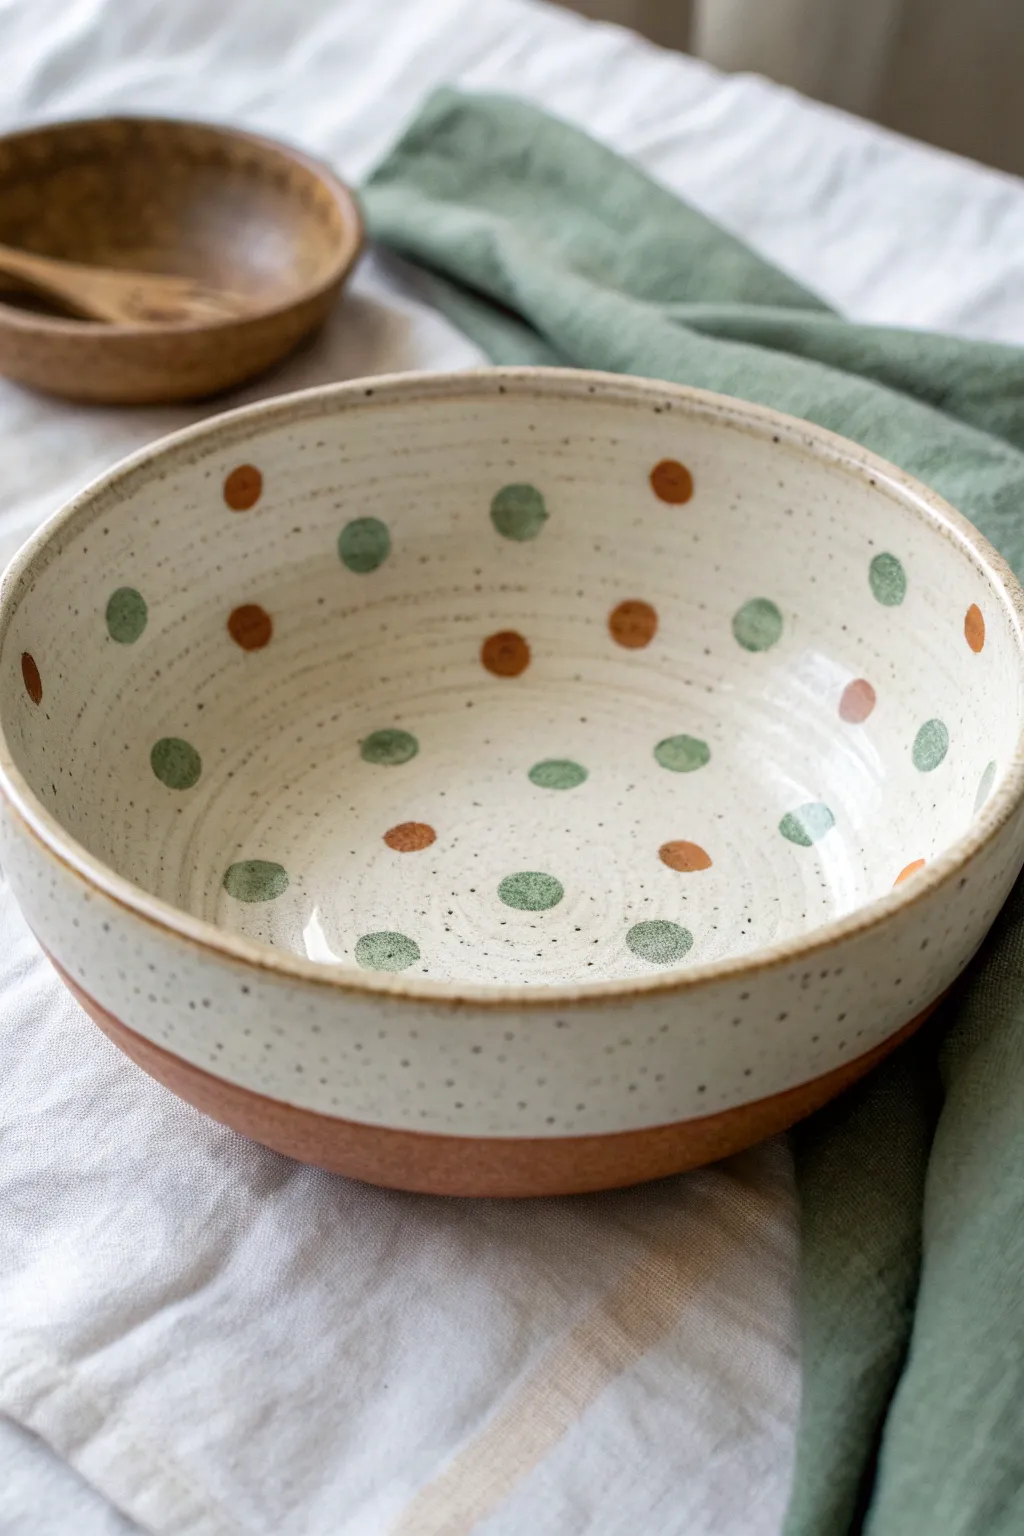
This project embraces the beauty of imperfection with hand-painted polka dots scattered across a creamy, speckled surface. The combination of sage green and burnt orange dots against the natural texture creates a cozy, modern rustic feel perfect for your favorite soups or cereals.
Detailed Instructions
Materials
- Bisque-fired ceramic bowl (red or smooth stoneware body)
- Creamy matte white underglaze or glaze (speckled variety)
- Sage green underglaze
- Burnt orange or terracotta underglaze
- Clear transparent glaze (if using underglazes for all)
- Round sponge applicator or circular foam pouncer (medium size)
- Small round bristle brush
- Wax resist (optional)
- Damp sponge for cleaning
- Kiln for firing (cone 5/6 typically)
Step 1: Preparation & Base Glaze
-
Clean the bisque:
Start by wiping down your bisque-fired bowl with a barely damp sponge. This removes any kiln dust or oils from your hands that might resist the glaze application. -
Mask the bottom:
To achieve that stylish exposed clay bottom, brush a layer of wax resist onto the bottom third of the bowl’s exterior and the foot ring. Let this dry completely before moving on. -
Apply the base coat:
Pour a speckled creamy white glaze inside the bowl. Roll the bowl around to coat the entire interior evenly, then pour the excess back into your container. -
Glaze the exterior rim:
Dip the top rim of the bowl into the same creamy glaze, allowing it to cover the top two-thirds of the outside while avoiding the waxed bottom section. Clean up any drips with a sponge immediately. -
Dry time:
Allow the base glaze to dry until it is powdery to the touch. It shouldn’t feel cool or damp, as wet glaze can cause your painted dots to run.
Stamp Smartly
Rotate your wrist slightly each time you stamp a dot. This simple movement prevents the pattern from looking too stiff or manufactured.
Step 2: Painting the Polka Dots
-
Prepare your palette:
Pour a small amount of sage green and burnt orange underglaze onto a tile or palette. You want a consistency similar to heavy cream. -
Load the sponge applicator:
Dip a round foam pouncer or sponge applicator into the sage green underglaze. Dab it once on your palette to remove excess paint so it doesn’t gloop. -
Stamping the green dots:
Press the sponge gently against the interior wall of the bowl. Start near the rim and work your way down in a random, scattered pattern. -
Varying placement:
Make sure to leave plenty of negative space for the second color. I find that spacing them irregularly rather than in a perfect grid makes the final piece look more organic and artisanal. -
Switching colors:
Wash your applicator thoroughly or switch to a fresh one. Load it with the burnt orange underglaze just as you did before. -
Adding orange accents:
Stamp the orange dots into the empty spaces between the green ones. Aim for a ratio of about two green dots for every one orange dot to keep the palette balanced. -
Populating the center:
Don’t forget the very bottom center of the bowl! Place a few dots here so the design reveals itself as you finish your meal. -
Refining edges:
If your sponge marks look a little too rough or transparent, use a small detail brush to gently fill in the center of the dots, smoothing out the color opacity.
Step 3: Finishing & Firing
-
Final drying:
Let the underglaze dots dry completely. They should look matte and chalky. -
Clear glaze application:
Since we applied the dots *over* a base glaze (majolica style) or used underglaze on top, you may need a clear coat depending on your materials. If using standard underglaze on top of raw unfired glaze, carefully dap a thin layer of clear glaze over just the dots, or dip the whole piece if your base was underglaze. -
Clean the foot:
Double-check the bottom exterior. Even with wax resist, little droplets can stick. Wipe the exposed clay section clean with a damp sponge. -
Fire the kiln:
Load the bowl into the kiln and fire to the temperature recommended by your clay and glaze manufacturer (usually Cone 5 or 6 for stoneware). -
Cooling:
Allow the kiln to cool naturally before opening. The seemingly dull colors will emerge bright and the speckles will pop through the creamy white surface.
Vintage Vibes
For a retro look, lightly sand the dots after they dry but before firing. This creates a distressed texture that reveals more speckles.
Once cooled, your bowl is ready to bring a touch of handcrafted warmth to your table setting


Striped Bowls With Clean Masked Lines
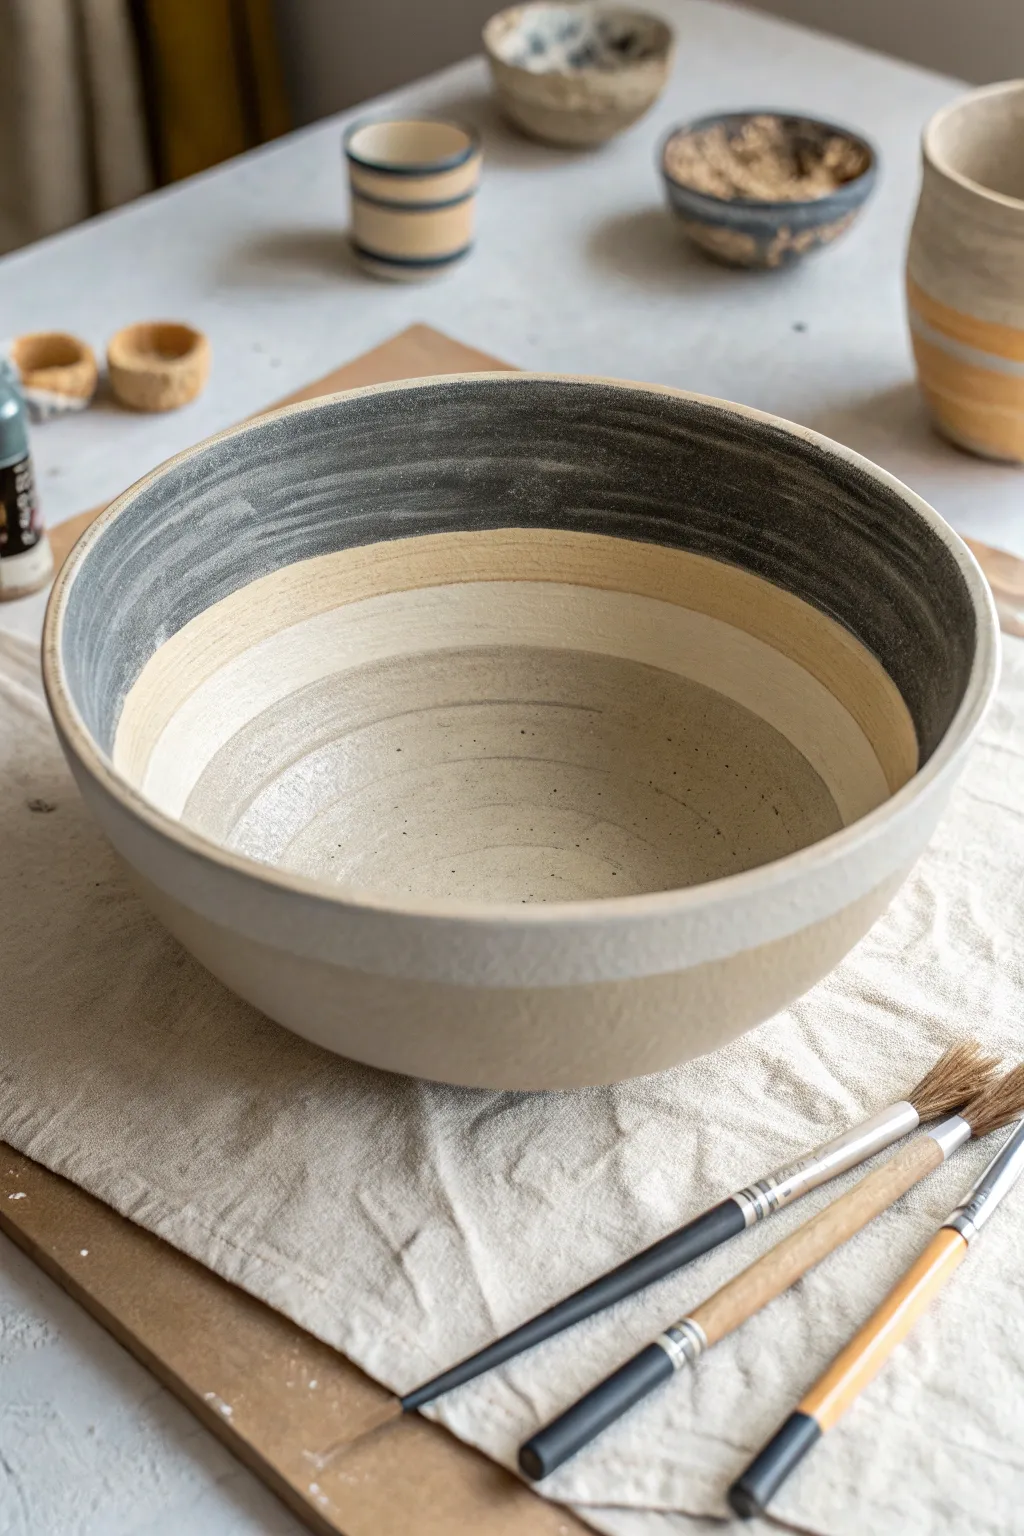
Transform a plain ceramic bowl into a piece of modern rustic decor with distinct interior striping. This project focuses on layering subtle, earthy tones like charcoal, cream, and warm beige to create depth and texture inside the vessel.
How-To Guide
Materials
- Bisque-fired ceramic bowl (wide, shallow shape works best)
- Underglazes (Charcoal/Dark Grey, Warm Beige/Ochre, Cream/White)
- Wide, flat soft-bristle brushes (hake or shader style)
- Potter’s wheel or banding wheel
- Clear matte or satin glaze
- Sponge and water bucket
- Pencil (optional for marking bands)
Step 1: Preparation & Planning
-
Clean surface:
Begin by wiping down your bisque-fired bowl with a damp sponge. This removes any kiln dust or oils from handling that could resist the underglaze. -
Center the piece:
Place your bowl securely in the center of your banding wheel. Give it a gentle spin to ensure it isn’t wobbling, which is crucial for painting straight, even bands. -
Map the bands:
Visualize three main zones for the interior: a dark rim, a warm middle band, and a lighter center well. You can lightly mark these transition points with a pencil while spinning the wheel if you want precise guides.
Uneven Lines?
If your hand is shaky, rest your elbow on the table or steady your painting hand with your other hand. Using a banding wheel does most of the work for you.
Step 2: Applying the Dark Rim
-
Load the brush:
Load a wide, flat brush generously with your Charcoal or Dark Grey underglaze. You want enough pigment for solid coverage but not so much that it drips. -
Paint the top band:
Spin the banding wheel at a moderate, steady pace. Hold your brush steady against the inside upper rim of the bowl, allowing the motion of the wheel to pull the paint off the bristles. -
Feather the edge:
As you move slightly downward to create a band about 2 inches wide, ease up on the pressure. Let the bottom edge of this grey band be slightly organic or textured rather than a hard line. -
Second coat:
Once the first layer loses its sheen (is touch-dry), apply a second coat to the dark band to ensure the color is rich and opaque.
Add Speckles
For more texture, flick a stiff toothbrush loaded with iron oxide or dark underglaze over the dried bands before clear glazing to create a speckled clay effect.
Step 3: Adding the Warm Middle Tone
-
Select the middle color:
Switch to a clean brush and your Warm Beige or Ochre underglaze. This color bridges the gap between the dark rim and the pale center. -
Apply the middle band:
Spin the wheel again and apply this color directly below the grey band. Overlap the bottom edge of the grey slightly; mixing a tiny bit wet-on-wet can create a nice transition. -
Define the width:
Make this band roughly 1.5 to 2 inches wide. I find that varying the band widths slightly makes the bowl look more handmade and less manufactured. -
Create texture:
Don’t worry if brushstrokes are visible horizontally. These streaks add to the rustic pottery aesthetic shown in the reference image.
Step 4: The Light Center & Finishing
-
Paint the well:
Use your Cream or White underglaze for the bottom center of the bowl (the well). Start from the very center point and work your way outward. -
Blend the transition:
As you paint outward, meet the bottom edge of the beige band. A soft, clean brush can help feather these two lighter colors together for a softer gradient. -
Check the exterior:
For this specific look, leave the exterior raw bisque or paint it a solid neutral tone. The reference image shows a simple cream exterior that mimics the interior bottom. -
Dry thoroughly:
Allow all underglaze layers to dry completely. The surface should feel chalky and look matte before you proceed to glazing. -
Apply clear glaze:
Dip or brush on a clear matte or satin glaze over the entire interior. A glossy finish works too, but a matte finish better preserves that stony, organic feel. -
Final wipe:
Wipe the foot of the bowl clean with a sponge to prevent it from fusing to the kiln shelf, then fire according to your clay body and glaze specifications.
Once fired, fill your bowl with fruit or display it on a shelf to show off those beautiful concentric layers


Scallop or Fish-Scale Repeat on the Outside
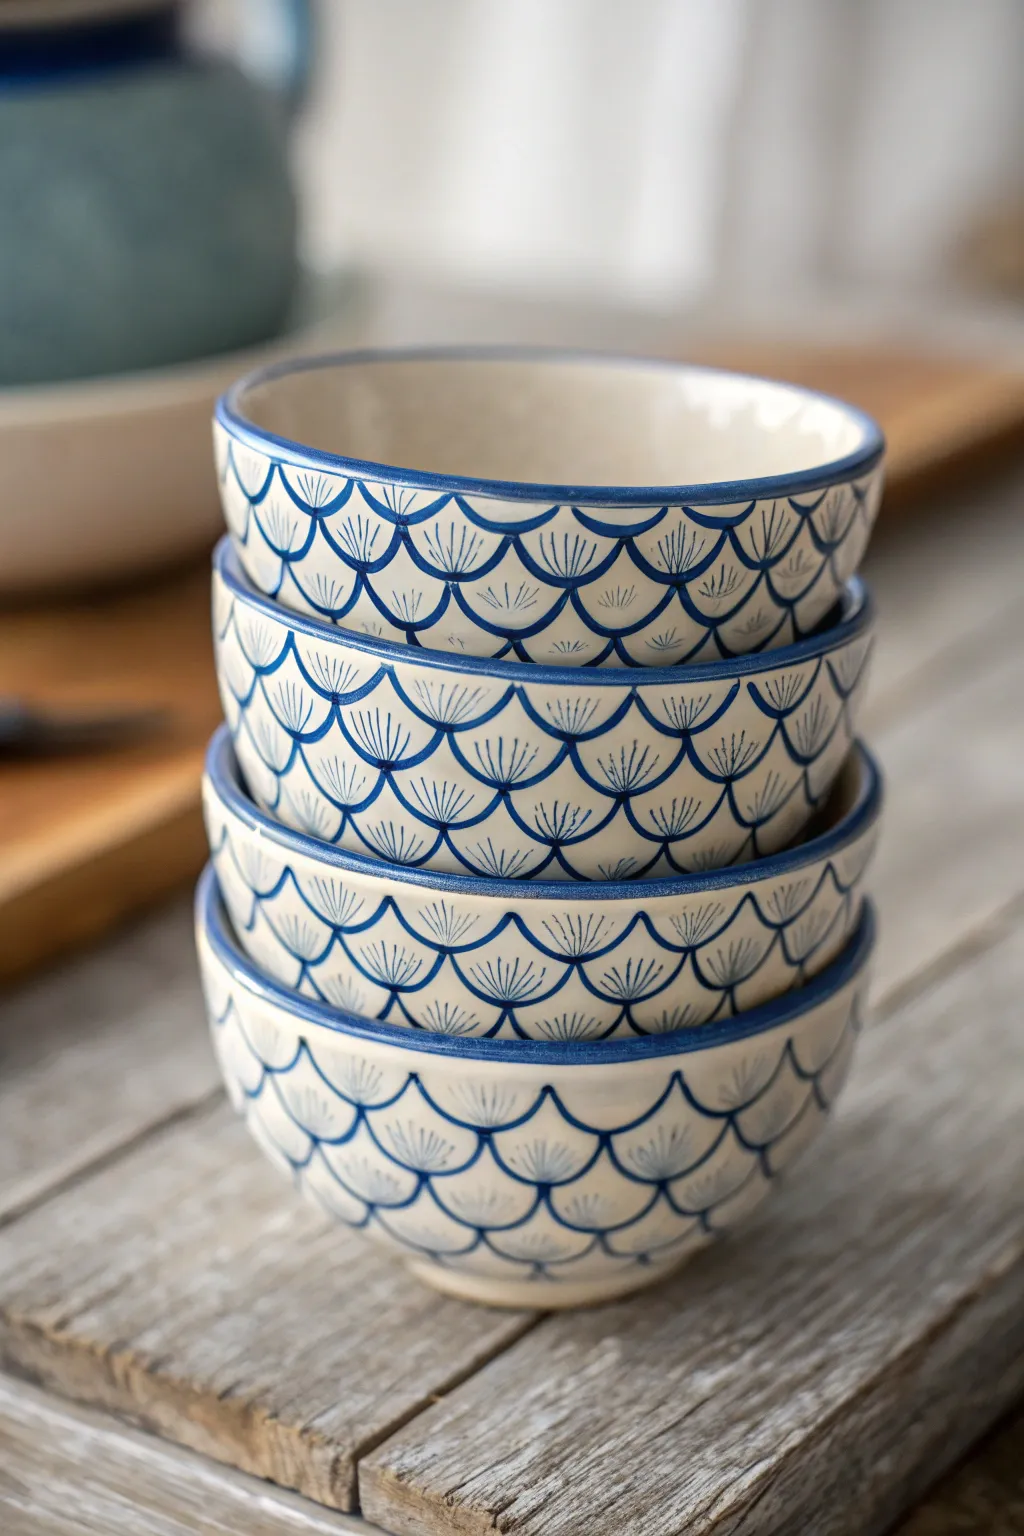
These charming bowls feature a classic fish-scale or scallop motif that feels both nautical and timelessly elegant. The deep indigo lines on the creamy ceramic base create a striking contrast that looks complicated but is built from simple, repeating curves.
Step-by-Step Guide
Materials
- Bisque-fired ceramic bowl (white or cream clay body)
- Underglaze pencil (blue or graphite) for sketching
- Deep blue underglaze (like cobalt)
- Fine liner brush (size 0 or 00)
- Small round brush (size 2)
- Clear dipping glaze
- Damp sponge
- Palette or small dish
- Paper towel
Step 1: Preparation & Mapping
-
Clean the bisque:
Start by wiping down your bisque-fired bowl with a barely damp sponge. This removes any kiln dust or oils from your hands that might resist the underglaze. -
Establish the rim:
Before starting the scales, define the top edge. Load a small round brush with deep blue underglaze and carefully paint the very rim of the bowl. If you want a thicker band like the example, bring the color just slightly over the lip onto the outside. -
Mark the first row guide:
Using a faint underglaze pencil or graphite (which burns off in the kiln), lightly mark a horizontal line about half an inch below the rim. This ensures your first row of scales stays level.
Wobbly Lines?
Steady your hand by resting your pinky finger against the bowl surface as you paint. This acts as an anchor while your thumb and forefinger control the brush.
Step 2: Painting the Scales
-
Practice the stroke:
Before touching the bowl, practice the scallop shape on paper. It’s a wide ‘U’ shape. I find it helpful to think of it as a hanging garland. -
Paint the first row:
Using your fine liner brush loaded with blue underglaze, paint a row of connecting ‘U’ shapes right along the rim line you established. The top points of the ‘U’ should touch the blue rim band. -
Start the second row:
For the defined scale effect, the next row must offset the first. Start the center of your new ‘U’ directly below the point where two scallops joined in the row above. -
Complete the outline pattern:
Continue painting rows of scallops down the exterior of the bowl. Don’t worry if the curves aren’t mechanically perfect; the hand-painted variation adds to the charm. -
Adjust for the curve:
As the bowl tapers toward the bottom, you’ll naturally need to make your ‘U’ shapes slightly narrower to fit the diminishing circumference.
Ombré Effect
Mix a lighter blue underglaze and use it for the bottom rows of scales. The gradient from dark rim to light base adds beautiful visual depth.
Step 3: Adding the Detail
-
Load a drier brush:
For the interior lines (the ‘fanning’ effect), you want slightly less paint on your liner brush so the lines remain crisp and distinct. -
Add the center spike:
Inside each scallop, paint a single straight line from the bottom curve pointing straight up toward the middle. Use a quick, flicking motion. -
Fan the sides:
Add two or three slightly curved lines on either side of that center mark, radiating outward like a fan or a sunburst. -
Check consistency:
Repeat this fanning texture inside every scallop. Keep the lines delicate; they shouldn’t touch the outer blue borders of the scales. -
Clean up:
If you smudged any blue, carefully scratch it off with a clean detail tool, or use a stiff, damp brush to wipe away the mistake.
Step 4: Finishing
-
Dry thoroughly:
Let the underglaze dry completely. It will look chalky and matte at this stage. -
Glaze application:
Dip the entire bowl into a clear transparent glaze. Hold it by the foot for a few seconds to ensure an even coat. -
Clean the foot:
Wipe the bottom foot ring of the bowl with a sponge so no glaze touches the kiln shelf. -
Final fire:
Fire the piece according to your clay and glaze specifications (usually cone 06 or cone 6 depending on your materials).
Once fired, these bowls are perfect for stacking on open shelving to show off your steady handwork
BRUSH GUIDE
The Right Brush for Every Stroke
From clean lines to bold texture — master brush choice, stroke control, and essential techniques.
Explore the Full Guide
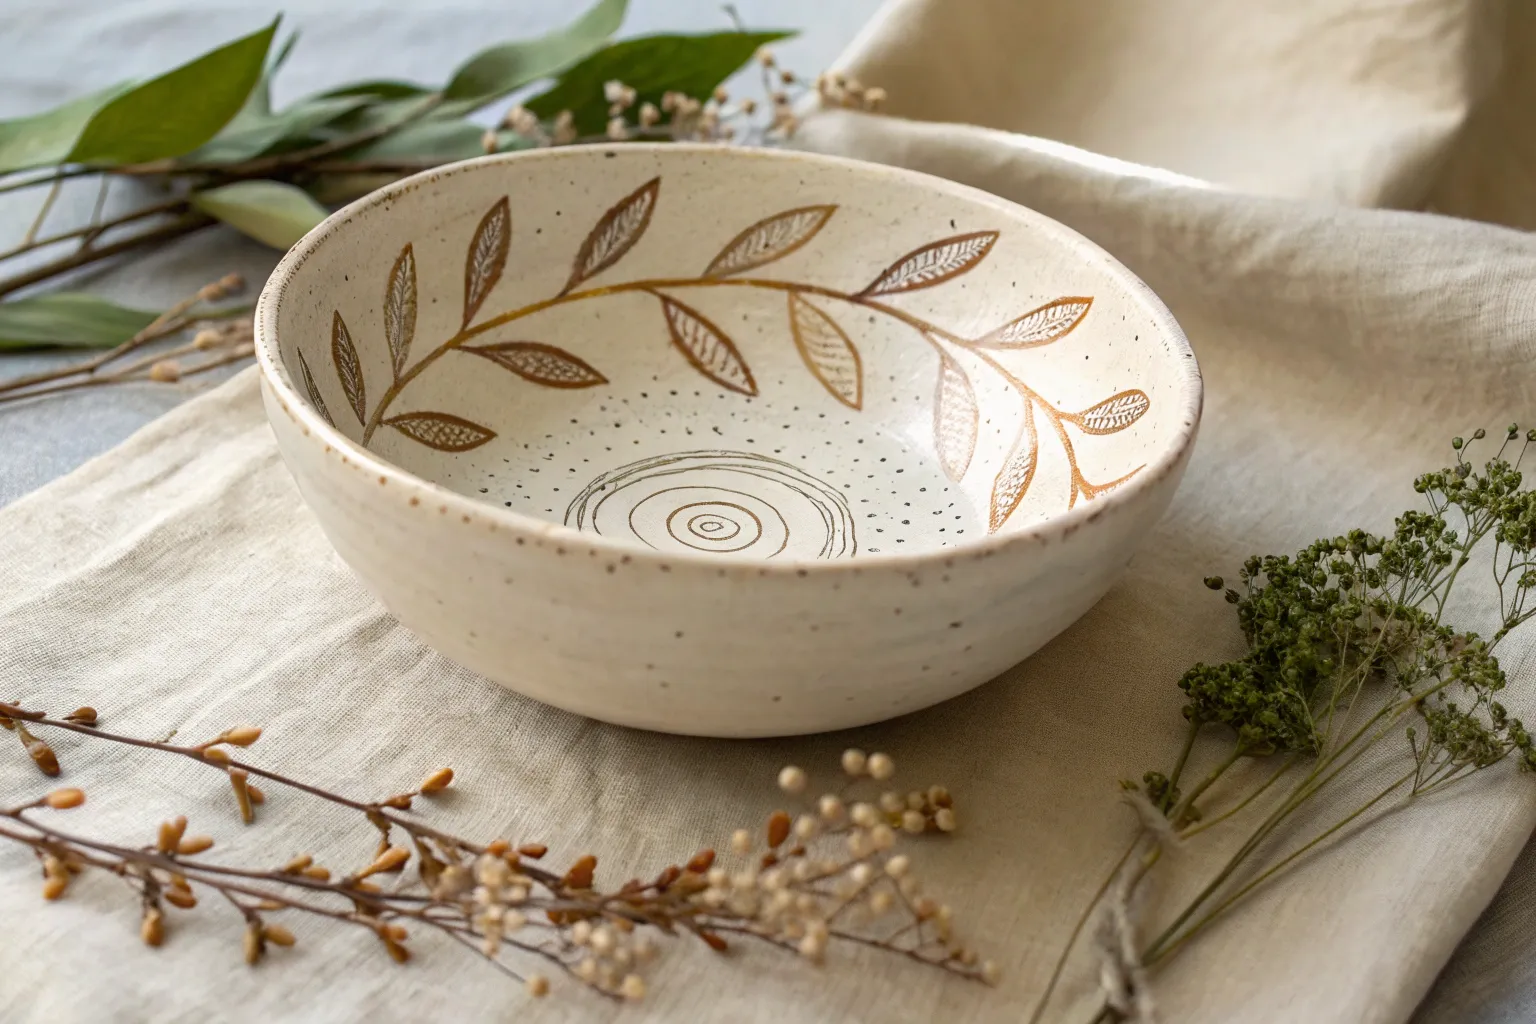
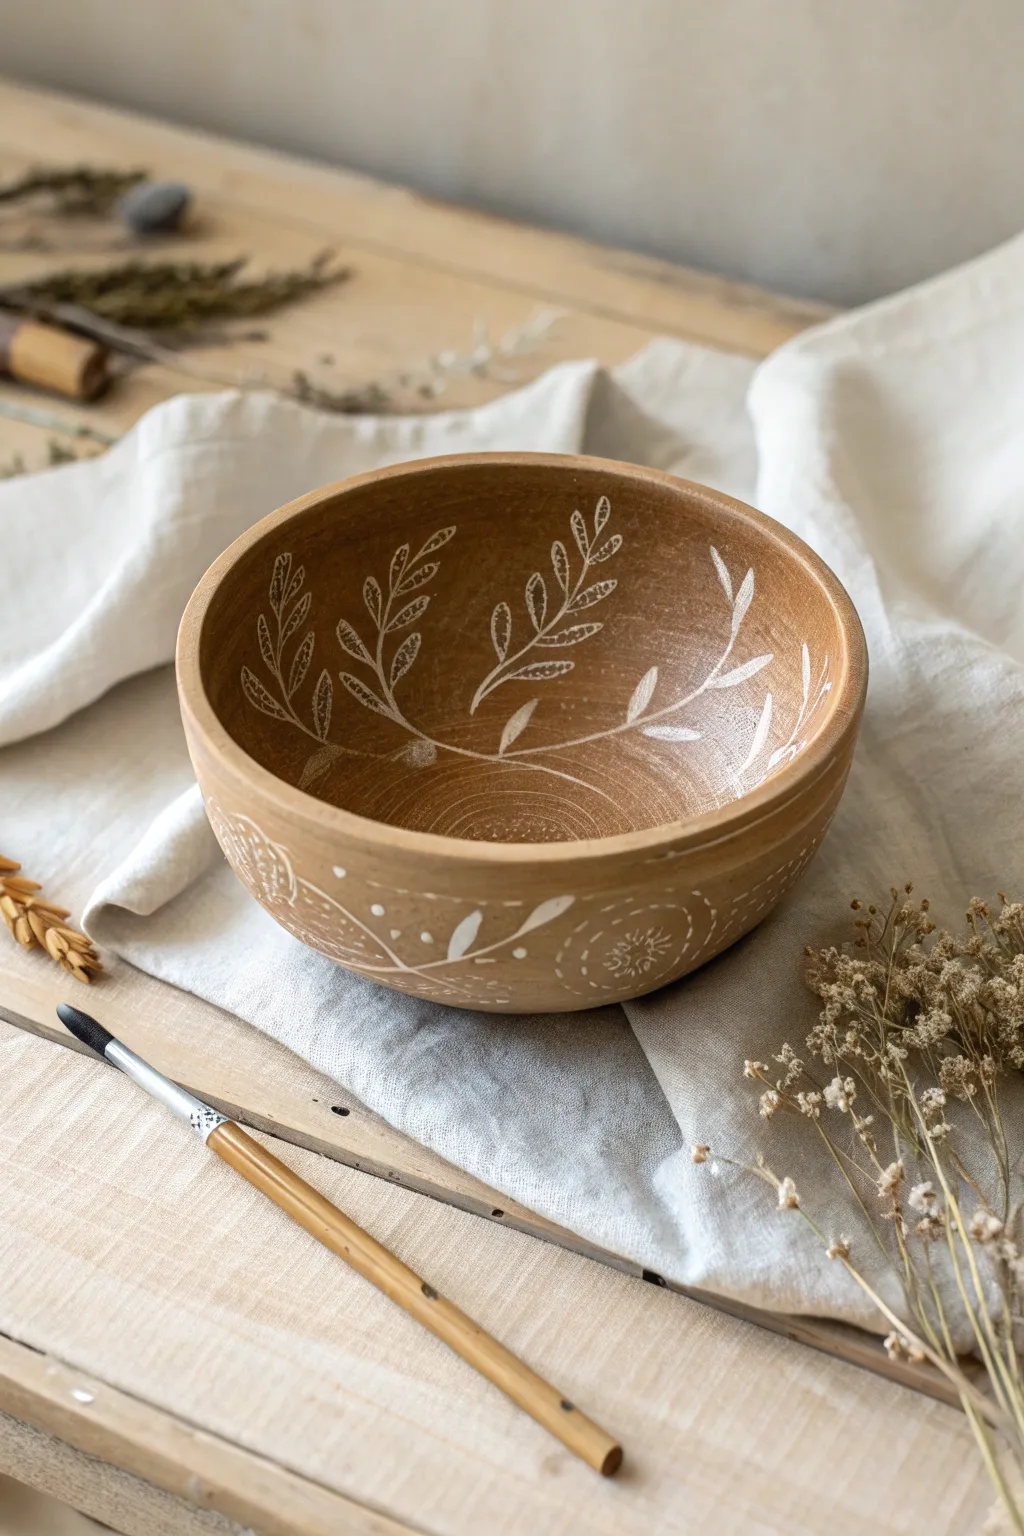
Easy Leafy Sprigs Around the Rim
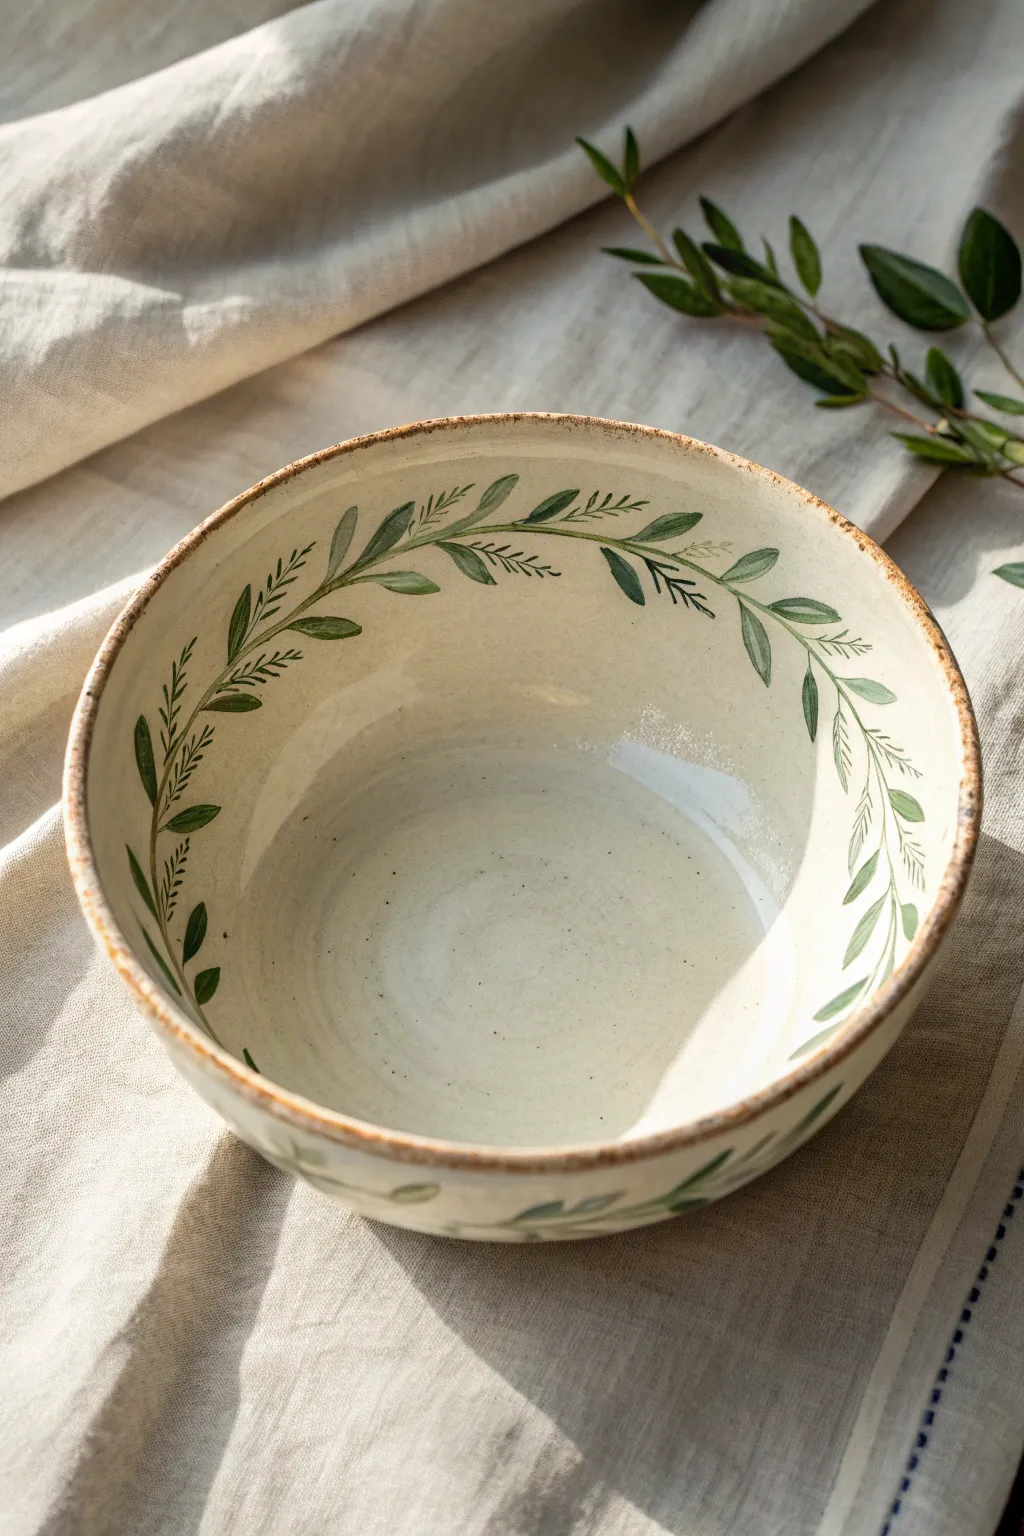
Bring a touch of the outdoors to your table with this charming botanical bowl design. Featuring a continuous vine of delicately painted leaves and tiny sprigs, this project transforms a simple ceramic vessel into an elegant display piece.
Step-by-Step
Materials
- Bisque-fired ceramic bowl (medium size)
- Cream or off-white underglaze (for the base)
- Sage green underglaze
- Forest green underglaze
- Brown ‘iron wash’ or oxide wash
- Fine liner brush (size 0 or 00)
- Round brush (size 4 or 6)
- Fan brush (for glazing)
- Clear transparent glaze
- Pencil
- Sponge and water bowl
Step 1: Base Preparation
-
Clean the Bisque:
Start by wiping your bisque-fired bowl with a damp sponge. This removes any dust that might resist the glaze and ensures a smooth application surface. -
Apply Base Underglaze:
Using a soft fan brush, apply three even coats of cream or off-white underglaze to the entire interior and exterior of the bowl. Allow each coat to dry until it’s chalky and matte before applying the next directionally (horizontal, then vertical, then diagonal). -
Initial Sketching:
Once the base coat is fully dry to the touch, lightly sketch a meandering, wavy line around the interior rim with a pencil. This will serve as the spine for your vine. Don’t worry about pencil marks; they burn off in the kiln.
Smudged Lines?
If you smudge a leaf while applying clear glaze, let it dry instantly. Once dry, gently scrape the smudge off with an X-Acto knife or needle tool, then dab fresh clear glaze over the spot.
Step 2: Painting the Foliage
-
Mix Your Greens:
On a palette, squeeze out your sage green and forest green underglazes. I like to slightly water down the forest green just a touch to make it flow better for the fine lines. -
Paint the Vine Spine:
Load your fine liner brush with the forest green. Carefully trace over your pencil line with a very thin stroke. It doesn’t need to be perfectly solid; a slightly broken line adds to the rustic feel. -
Add Main Leaves:
Using the round brush size 4, dip into the sage green. Press down and lift up to create teardrop-shaped leaves extending from the spine. Vary the angle of the leaves so they look natural and wind-swept. -
Layering Colors:
While the sage leaves are still slightly damp, take your liner brush with a tiny bit of forest green and add a vein or a shadow to the base of a few leaves. This wet-on-wet blending creates depth. -
Create Fern Sprigs:
Switch back to the fine liner brush and the forest green. In the empty spaces between the larger leaves, paint delicate, feathery fern-like sprigs. Use quick, short flicks of the brush to mimic pine needles or dill. -
Detail the Exterior:
Don’t forget the outside! Repeat a simpler version of this pattern on the lower exterior of the bowl, painting a few floating leaves or a small sprig near the base to tie the design together.
Add Texture
Before the first firing, use a carving tool to gently incise the veins of the leaves into the clay. The glaze will pool in these recesses for a beautiful tactile effect.
Step 3: Finishing Touches & Glazing
-
Mixing the Iron Wash:
Mix a small amount of iron oxide or brown underglaze with plenty of water. You want a consistency similar to watercolor paint or weak tea. -
Rim Antiquing:
Dip a sponge lightly into the iron wash and dab it gently along the very edge of the rim. This creates that toasted, earthy brown lip that frames the design beautifully. -
Speckling (Optional):
If you want an even more rustic look, flick the bristles of a toothbrush dipped in the iron wash over the bowl interior to create tiny speckles, though this is optional. -
Drying Time:
Let all your underglaze work dry completely. This usually takes at least 20-30 minutes depending on humidity. The surface should feel room temperature, not cold. -
Clear Glaze Application:
Apply two coats of clear transparent glaze over the entire piece. Be gentle so you don’t smear your detailed leaf work. Pat the glaze on rather than dragging the brush if you are worried about smudging. -
Check the Foot:
Wipe the bottom foot of the bowl clean with a sponge to ensure no glaze is left there, preventing it from sticking to the kiln shelf. -
Final Fire:
Fire the piece in the kiln according to the clay and glaze manufacturer’s instructions (typically Cone 06 or Cone 6 depending on your materials).
Once fired, fill your new bowl with fruit or simply display it to admire your handiwork
Loose Florals in the Bowl Center
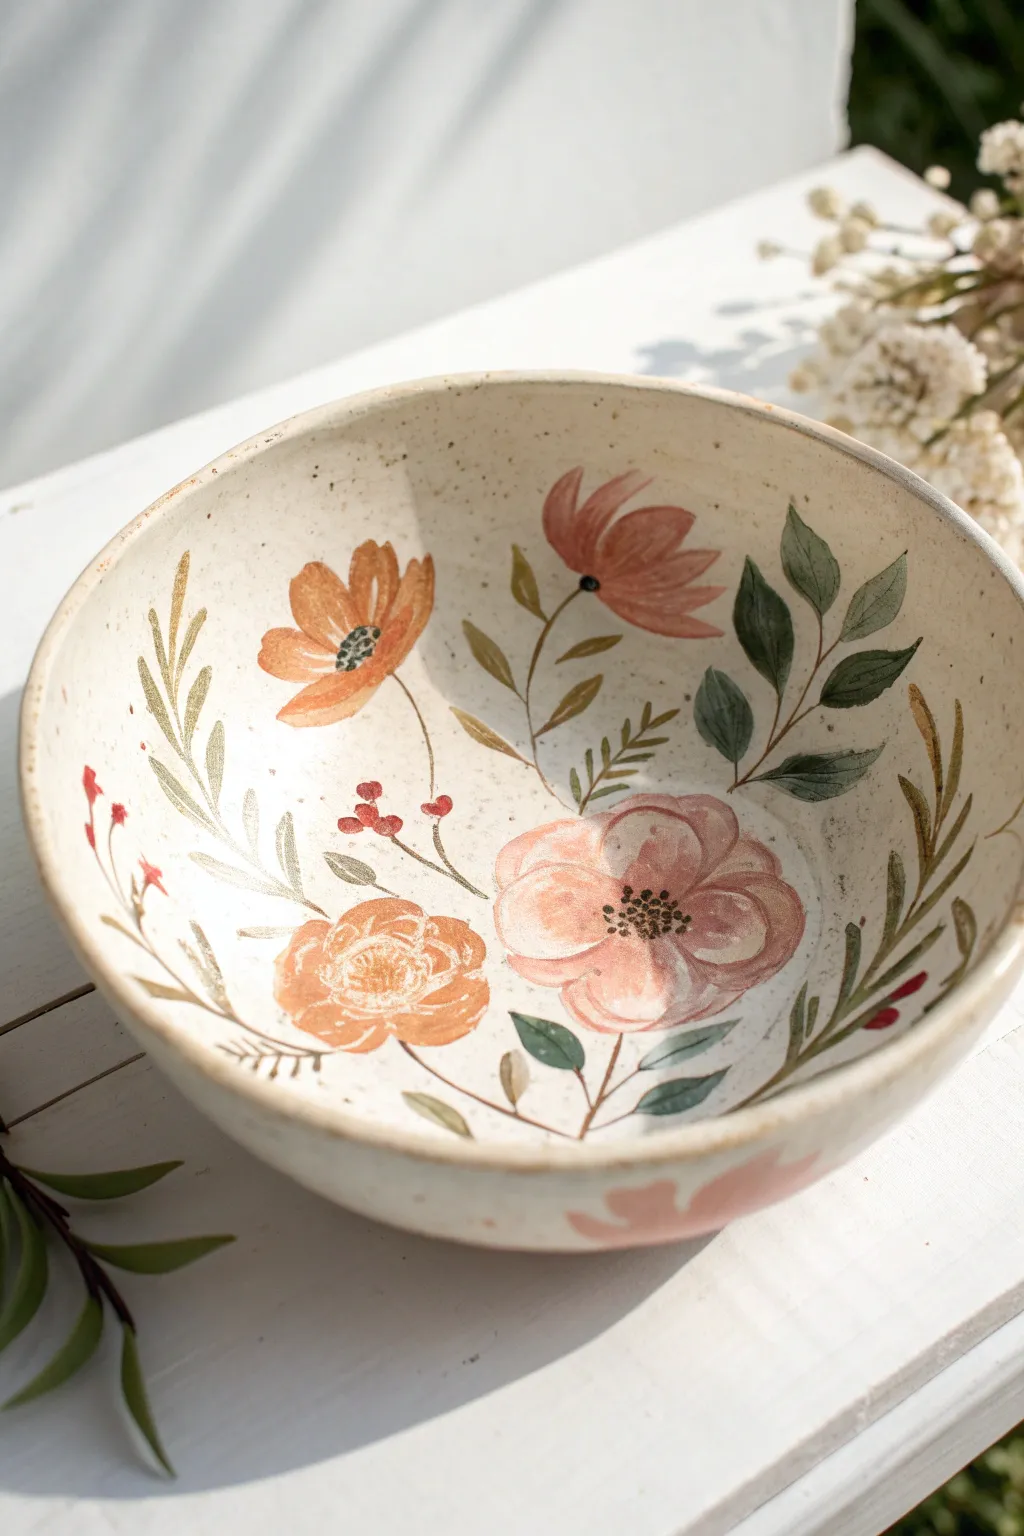
Transform a plain ceramic bisque bowl into a delightful garden scene with this loose floral painting technique. Using soft peaches, warm terracottas, and sage greens, the design feels organic and hand-painted rather than rigidly patterned.
Step-by-Step Tutorial
Materials
- Bisque ceramic bowl (already fired once)
- Underglazes: Peach pink, Terracotta orange, Sage green, Dark forest green, Crimson red, Black
- Round brushes (sizes 2, 4, and 6)
- Small detail brush (size 0 or 00)
- Palette for mixing
- Water cup and sponge
- Clear dipping glaze
- Pencil (optional for sketching)
Step 1: Planning and Base Coats
-
Clean surface:
Before starting, wipe your bisque bowl with a slightly damp sponge. This removes any dust that might resist the underglaze. -
Sketch placement:
Lightly sketch the general placement of your three main flowers using a regular pencil. Don’t worry about erasing; the graphite will burn off in the kiln. Place one large bloom low and center, one to the left, and one floating towards the upper right. -
Mix your base pink:
Water down your peach pink underglaze slightly to create a watercolor consistency. This helps achieve that translucent, loose look. -
Paint the main rose:
Using a size 6 round brush, lay down the large, loose petals of the central rose-like flower. Keep your strokes curved and separate, leaving small gaps of the raw clay showing between petals to define the flower’s structure. -
Paint the orange bloom:
Switch to the terracotta orange color. On the left side, paint the poppy-style flower. Use broad strokes that fan out from a central point, keeping the edges soft and slightly uneven. -
Add the tulip shape:
Paint the upper-right flower with a dusty pink or mix your peach and terracotta. Form a cup or tulip shape with two or three sweeping upward strokes.
Step 2: Adding Foliage
-
Mix foliage greens:
Prepare two shades of green on your palette: a lighter sage and a deeper forest green. I like to have these ready to dip into interchangeably for variety. -
Paint structural stems:
With a size 2 brush and thinned sage green, paint thin, curving stems connecting your loose flower heads. Let them meander naturally across the bowl’s curve. -
Add dark leaves:
Using the dark forest green and a size 4 brush, press and lift to create almond-shaped leaves. Place a cluster of these near the upper right tulip and under the main rose. -
Add wispy sprigs:
With the lighter sage color, paint delicate, fern-like fronds and long, grassy leaves on the left side. These should sweep upwards, following the contour of the bowl. -
Layer leaves:
Wherever there is empty white space that feels unbalanced, add small single leaves or tiny clusters. Vary the pressure on your brush to get thick-and-thin lines.
Watercolor Effect
To get that translucent look with underglaze, treat it like watercolor. Water it down significantly and let the bristles pool the pigment at the end of the stroke.
Step 3: Details and Finishing
-
Deepen flower centers:
Once the base flower layers are dry to the touch, mix a slightly darker version of your peach and orange. Add a few definition lines in the center of the blooms to suggest depth. -
Add berry accents:
Dip a small brush into crimson red. Dot small clusters of berries on thin stems near the orange flower and lower right side. These small pops of red tie the warm palette together. -
Paint stamens:
Using your smallest detail brush (size 0) and black underglaze, add tiny dots to the center of the large rose and the orange poppy. A centralized cluster of dots makes the flowers look finished. -
Speckle effect (optional):
If your clay body isn’t naturally speckled, you can flick a toothbrush with watered-down brown underglaze over the bowl to mimic the pottery speckle seen in the image. -
Let dry completely:
Allow the underglaze to dry fully, usually 24 hours just to be safe, before dipping in clear glaze. -
Glaze and fire:
Dip the entire bowl into a clear, food-safe glaze and fire it according to the clay and glaze specifications (usually Cone 5 or 6).
Rim Detail
Use a nearly dry sponge with a tiny bit of terracotta underglaze and lightly wipe the rim of the bowl to create a rustic, defined edge.
Once fired, fill your new bowl with fruit or simply display it to enjoy your everlasting garden

PENCIL GUIDE
Understanding Pencil Grades from H to B
From first sketch to finished drawing — learn pencil grades, line control, and shading techniques.
Explore the Full Guide
Tiny Wildflower Meadow Band

Transform a plain ceramic bowl into a charming piece of rustic decor with this wildflower meadow design. The soft, botanical-style band encircles the vessel with daisies, cornflowers, and fine grasses, creating a timeless, airy look perfect for cottage-core aesthetics.
Step-by-Step Guide
Materials
- Bisque-fired ceramic bowl (creamy white or speckled clay body recommended)
- Underglazes in soft colors: dusty pink, cornflower blue, golden yellow, sage green, forest green, maroon
- Fine liner brush (size 0 or 00)
- Small round brush (size 2)
- Bandia wheel or lazy susan (optional but helpful)
- Pencil (HB or lighter)
- Clear dipping or brushing glaze
- Kiln (or access to a firing service)
Step 1: Planning the Layout
-
Mark the horizon line:
Place your bowl on a table or banding wheel. Using a pencil, lightly sketch a horizontal line around the circumference where you want the bottom of your flower stems to rest. This doesn’t need to be perfectly straight; a slight organic wave adds character. -
Sketch the anchor flowers:
Lightly pencil in the positions of your largest blooms first. Space out 3-4 larger daisy-like shapes unevenly around the bowl to prevent the pattern from looking too rigid or manufactured. -
Fill in the gaps:
Sketch smaller filler flowers and different types of foliage in the spaces between your main blooms. Aim for variety in height—some stems should be tall and wispy, others short and leafy.
Step 2: Painting the Blooms
-
Base coat the daisies:
Using the size 2 round brush, mix a dusty pink underglaze with a tiny drop of water to improve flow. Paint the petals of the daisy shapes, pulling the brush from the tip of the petal toward the center. -
Add the cornflowers:
Switch to your cornflower blue underglaze. For these, use short, choppy strokes to create jagged petal edges that fan out from a central point, mimicking the texture of a bachelor’s button flower. -
Paint the yellow accents:
Use golden yellow to paint small, simple five-petal flowers scattered throughout the design. Keep these quite small to act as bright pops of color among the greenery. -
Detail the centers:
Once the petal layers are dry to the touch, use the fine liner brush to dab textured centers into the flowers. Use yellow for the pink daisies and a mix of maroon and dark blue for the cornflowers to give them depth. -
Add secondary colors to petals:
I like to dilute a tiny bit of darker pink or blue and add faint streaks near the base of the petals. This adds a watercolor-like dimension so the flowers don’t look like flat stickers.
Uneven Coverage?
If underglaze looks sheer after one coat, let it dry and apply a second. However, for this watercolor style, slight transparency is actually desirable and adds charm.
Step 3: Adding Greenery and Stems
-
Paint the main stems:
Using the sage green and your finest liner brush, connect your floating flower heads to the pencil line at the bottom. Keep your hand loose to allow for natural curves in the stems. -
Add broad leaves:
At the base of the pink daisies, paint broader, textured leaves in sage green. While the paint is wet, you can scratch small veins into the underglaze with a needle tool or toothpick for extra texture. -
Create wispy grasses:
Mix forest green with a little water until it’s inky. Using the very tip of your liner brush, flick quick, upward strokes between the flowers to resemble tall meadow grasses. -
Incorporate seed heads:
Draw tiny thin stems topped with small brown or maroon clusters. These represent dried seed pods or buds and help to fill any awkward empty spaces in your composition.
Add a speckled effect
Before the clear glaze, gently flick a brush loaded with diluted brown iron oxide over the bowl to mimic the look of vintage speckled stoneware clay.
Step 4: Refining and Finishing
-
Define the bottom border:
Go back to your initial pencil line at the bottom. Using a dark grey or black underglaze on your finest brush, paint a very broken, stippled line to ground the artwork. It should look like soil or shadow rather than a solid hard outline. -
Clean up:
Check for any smudges of underglaze on the plain white areas of the bowl. Gently scrape them away with a craft knife or wipe with a damp sponge corner. -
Bisque fire:
Fire the piece to bisque temperature (usually Cone 04) to set the underglaze so it won’t smudge during glazing. -
Apply clear glaze:
Dip the entire bowl into a clear gloss or satin glaze. Ensure the coat is even, as a cloudy application can obscure your fine line work. -
Final firing:
Fire the bowl again to the maturity temperature of your clay and glaze (often Cone 5 or 6). This will reveal the true vibrancy of your wildflower colors.
Your finished bowl will hold a permanent slice of a summer meadow, perfect for serving salads or simply displaying on a shelf
Citrus Slices That Match the Bowl Shape
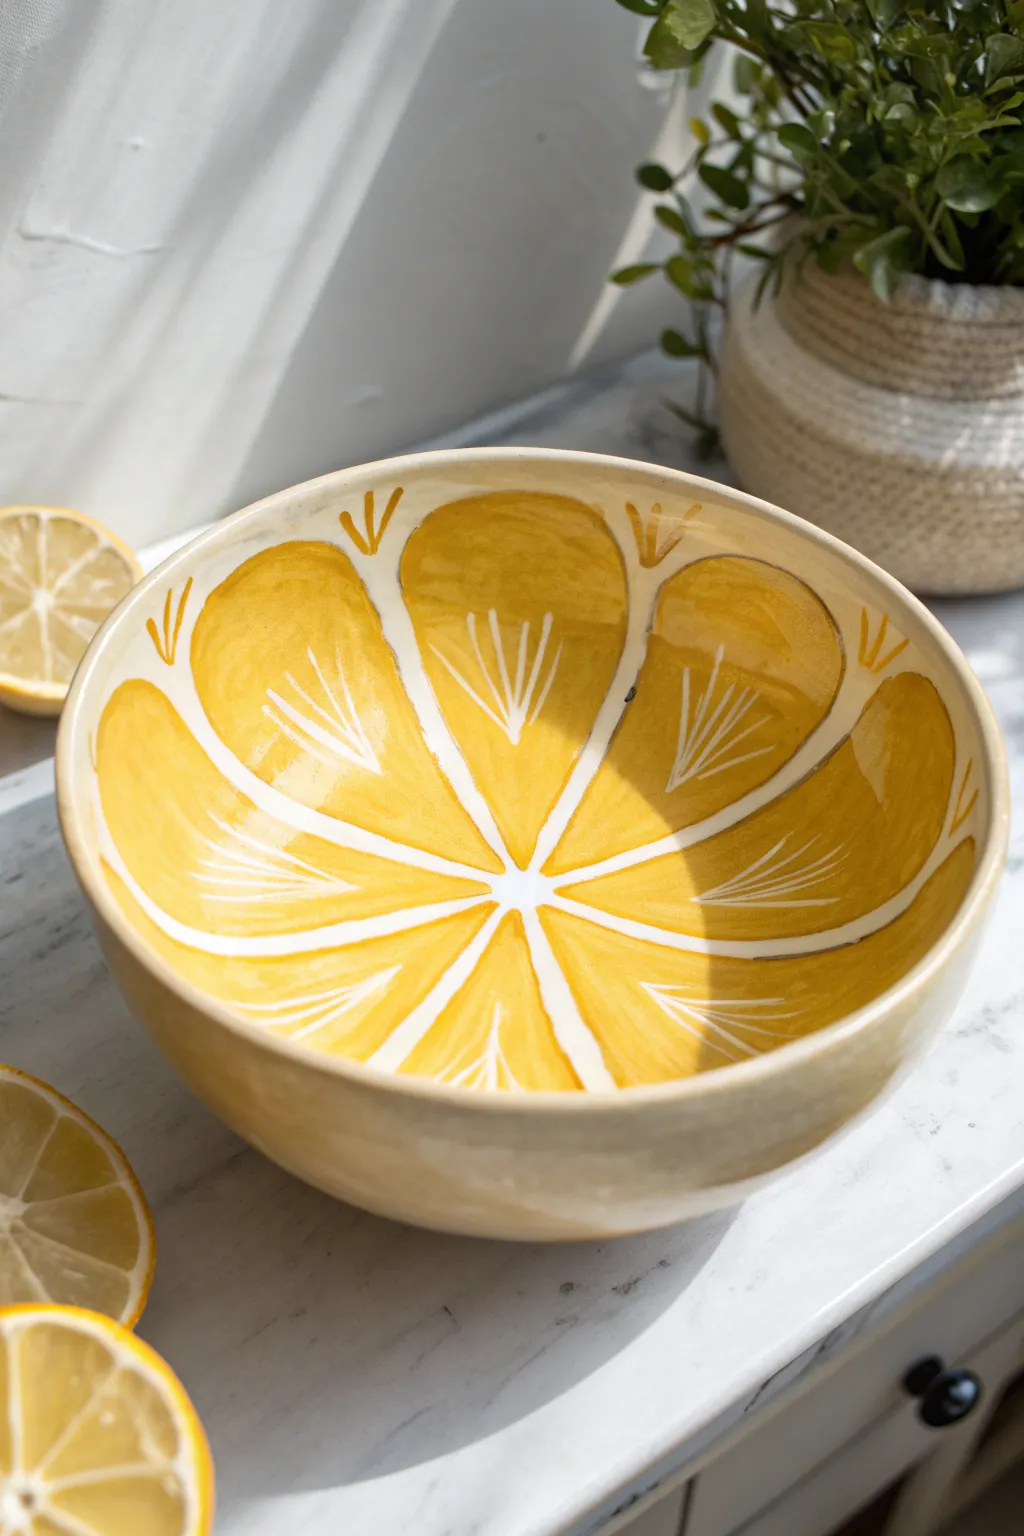
Transform a plain bowl into a burst of sunshine with this clever design that uses the vessel’s natural curve to mimic a juicy lemon slice. By painting the segments radiating from the center, you create an eye-catching 3D effect that looks fresh enough to squeeze.
How-To Guide
Materials
- Bisque-fired ceramic bowl (medium size, rounded shape ideal)
- Underglaze (Lemon Yellow or Canary Yellow)
- Underglaze (White)
- Small round brush (size 4 or 6)
- Fine liner brush (size 0 or 00)
- Pencil for sketching
- Clear dipping glaze
- Sponge and water
- Turn table (banding wheel) – optional but helpful
Step 1: Preparation and Mapping
-
Clean the Surface:
Before you begin, gently wipe down your bisque bowl with a slightly damp sponge to remove any kiln dust or oils from your hands. This ensures the underglaze adheres perfectly. -
Find the Center:
Place your bowl on a table (or banding wheel if you have one). Using your pencil, make a small dot at the very bottom center of the inside of the bowl. This will be the anchor point for all your citrus segments. -
Divide the Sections:
Lightly sketch lines radiating outward from the center dot to the rim, dividing the bowl into 8 to 10 equal ‘pie slices.’ Don’t worry about being mathematically perfect; a little organic variation looks more natural. -
Round the Corners:
At the top of each slice near the rim, sketch a rounded curve to create the top of the fruit segment, leaving a gap of about half an inch between the segment top and the actual rim of the bowl. -
Define the Pith Lines:
Go back over your radiating lines and thicken them into channels. You want to create a gap of unpainted space between each yellow segment to represent the white pith of the lemon.
Clean Lines Trick
If you struggle with shaky hands, use thin automotive masking tape (pinstriping tape) to mask off the ‘pith’ lines before painting the yellow segments.
Step 2: Painting the Fruit
-
First Coat of Yellow:
Load your round brush with the yellow underglaze. Fill in the fruit segments, being careful to stay inside your pencil lines. The pencil marks will burn off in the kiln. -
Smooth Strokes:
Paint in the direction of the segment—from the center outward—to keep brushstrokes aligned with the ‘grain’ of the fruit. -
Layering for Opacity:
Allow the first coat to dry until it’s chalky to the touch. Apply a second coat of yellow to ensure vibrant, solid color coverage. Three coats is usually the magic number for solid coverage. -
Check the Edges:
Use a damp brush to tidy up any yellow edges that smeared into the pith area. Keeping these lines crisp is key to the design’s effectiveness.
Texture Twist
Mix a tiny bit of clear glaze into your yellow underglaze for the final coat. It creates a slightly raised, juicy texture that feels real to the touch.
Step 3: Adding Details and Finishing
-
Painting the Pith:
Using your fine liner brush and white underglaze, carefully paint the empty channels between the yellow segments. I find it easiest to start from the center and pull the brush upward. -
Rim Detail:
Continue painting white around the curved tops of the fruit segments, connecting the radiating lines so the yellow is completely surrounded by white. -
Center Pulp Burst:
Paint a small, irregular star shape in pure white at the very bottom center where all the segments meet. -
Adding Pulp Texture:
With the liner brush and white underglaze, paint delicate ‘V’ shapes or thin lines inside each yellow segment. These should radiate from the center outward, mimicking the juice vesicles. -
The Seeds (Optional):
If you want extra detail, add tiny teardrop shapes in the wider part of the segment with a lighter yellow or white to suggest seeds. -
Upper Detail Accents:
Add small, simple three-pronged marks (like little bird feet) in the negative space between the top of the fruit segment and the bowl rim using a darker ochre or thin orange line for interest. -
Final Glazing:
Once the underglaze is bone dry, carefully dip the bowl into a clear transparent glaze. Ensure an even coat and wipe off any glaze from the foot of the bowl before firing.
Now your bowl is ready to be fired and filled with fresh fruit to match its sunny disposition


Cherries or Berries Scattered Across the Interior
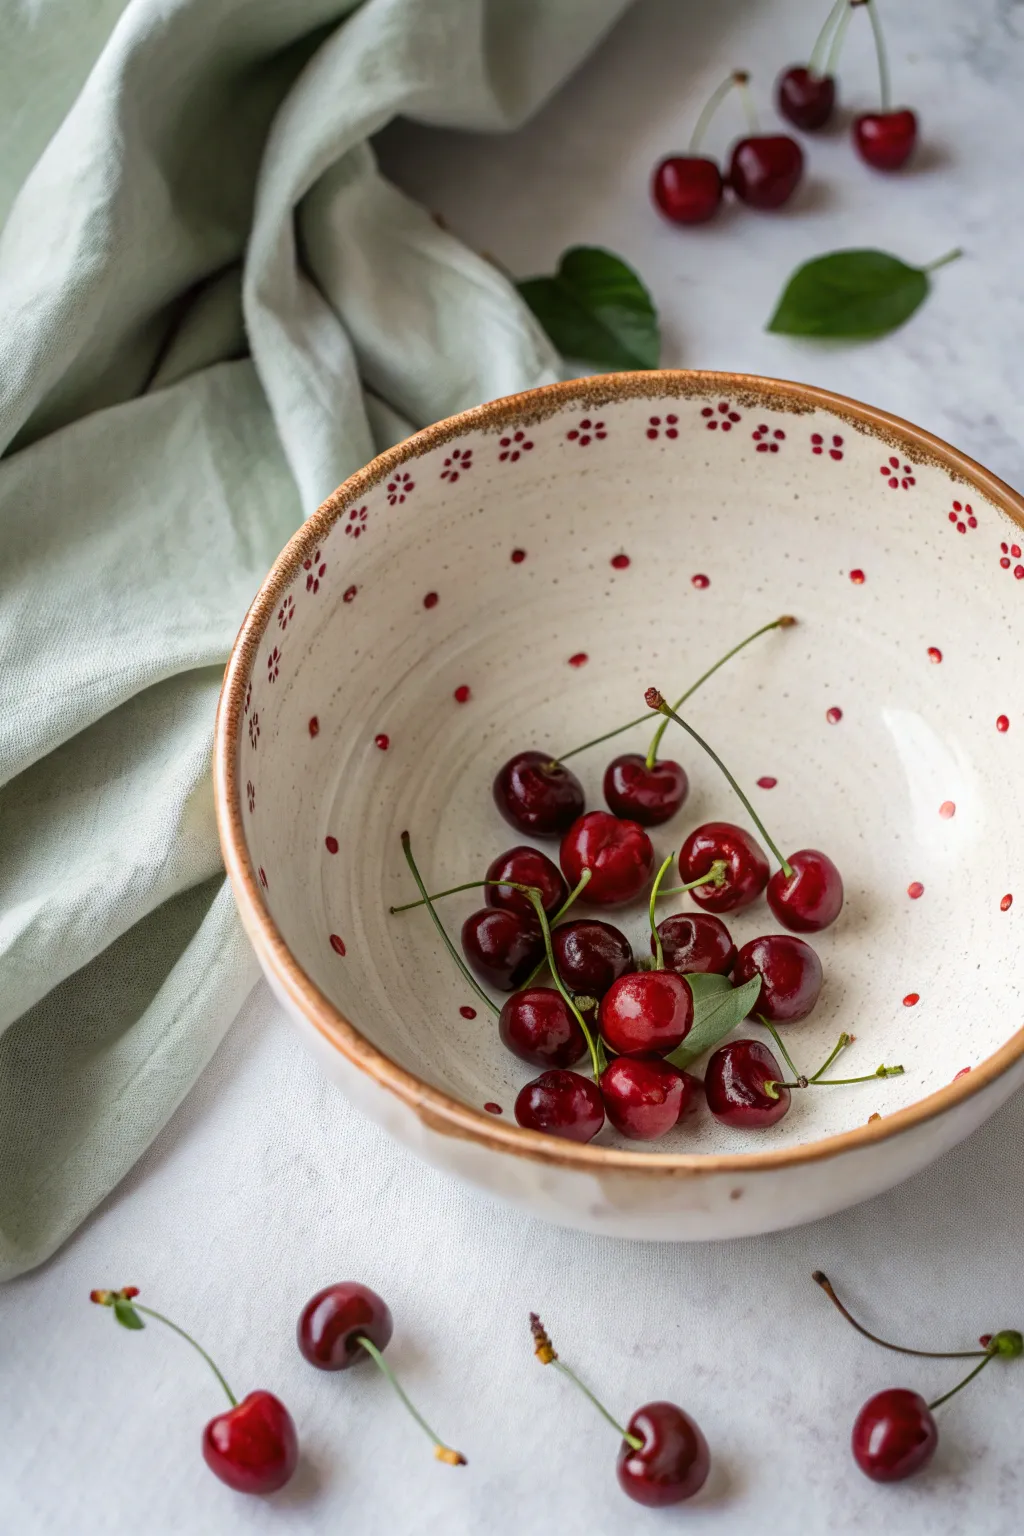
Embrace a rustic, farmhouse aesthetic with this charming ceramic bowl design featuring delicate berry clusters. The natural speckling of the clay combined with hand-painted red accents creates a piece that feels both vintage and fresh.
Step-by-Step
Materials
- Bisque-fired ceramic bowl (creamy or speckled clay body)
- Underglaze (Deep Red or Cherry Red)
- Underglaze (Burnt Umber or Dark Brown)
- Clear dipping glaze (food safe)
- Small round detail brush (size 0 or 1)
- Medium round brush (size 4)
- Sponge
- Water cup
- Clean cloth
Step 1: Preparation & Base
-
Clean the bisque:
Start by wiping down your bisque-fired bowl with a damp sponge. This removes any kiln dust or oils from your hands that might resist the glaze. -
Assess the surface:
If your chosen bowl is already a lovely speckled clay, you can leave the background unpainted. If it’s plain white bisque and you want that creamy look, apply 2-3 coats of a translucent cream underglaze now, letting each coat dry fully.
Step 2: Painting the Rim Pattern
-
Plan the clusters:
Visualize the spacing for the flower-like berry clusters along the inside rim. They should be roughly equidistant, about an inch or so apart. -
Paint the first dot:
Load your small round brush with red underglaze. For each cluster, start by painting a single central dot near the rim edge. -
Complete the cluster:
Surround that central dot with 4-5 additional dots to create a small flower or berry bunch shape. Keep the paint application slightly thick so the red remains opaque. -
Rotate and repeat:
Continue this pattern around the entire inner circumference of the bowl. I find rotating the bowl as I work helps keep my hand steady and the spacing consistent. -
Add floating pairs:
Between the main clusters, randomly interspersed slightly lower down, paint tiny pairs of red dots. This adds variety and breaks up the rigidity of the pattern.
Smudged dots?
If you smudge a red dot, don’t wipe it while wet! Let it dry completely, then gently scratch the mistake off with a toothpick or craft knife before re-painting.
Step 3: Scattering the Interior
-
Start the scatter:
Now, move deeper into the bowl. Begin painting single red dots randomly below the rim pattern. -
Vary the density:
As you move toward the bottom center of the bowl, space the dots further apart. This ‘falling’ effect mimics berries tumbling into the bowl. -
Check balance:
Step back and look at the interior. Add a stray dot here or there to fill any awkward empty spaces, but remember that negative space is important for this airy look.
Add some depth
For a juicer look, add a tiny speck of white underglaze on top of each red berry dot to create a highlight before applying the clear glaze.
Step 4: The Rustic Rim
-
Prepare the brown:
Switch to your burnt umber or dark brown underglaze. Ensure the consistency is fluid but not watery. -
Paint the edge:
Using the side of your medium round brush, carefully run pigment along the very top edge of the rim. It doesn’t need to be a perfect line. -
Create a distressed look:
Intentionally wobble the brush slightly or vary the pressure as you go around. This creates a hand-thrown, vintage enamelware appearance rather than a factory-made line. -
Feather the brown:
If the line looks too stark, you can use a slightly damp clean brush to feather the bottom edge of the brown rim just a tiny bit downward into the bowl.
Step 5: Finishing
-
Dry completely:
Let all your underglaze work dry until it is chalky and creating no sheen. This usually takes at least 20-30 minutes. -
Clear glaze application:
Dip the entire bowl into a clear, food-safe glaze. Ensure you shake off excess drips gently before turning it right-side up. -
Check the foot:
Wipe the bottom foot of the bowl completely clean with a wet sponge to prevent it from sticking to the kiln shelf. -
Final fire:
Fire the piece in the kiln according to the specific temperature instructions of your clay and glaze (usually Cone 5 or 6 for stoneware).
Once fired, you will have a delightful bowl perfect for serving fresh fruit or breakfast cereal
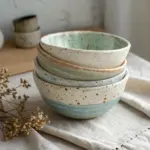
Minimal Line Art Face at the Bottom
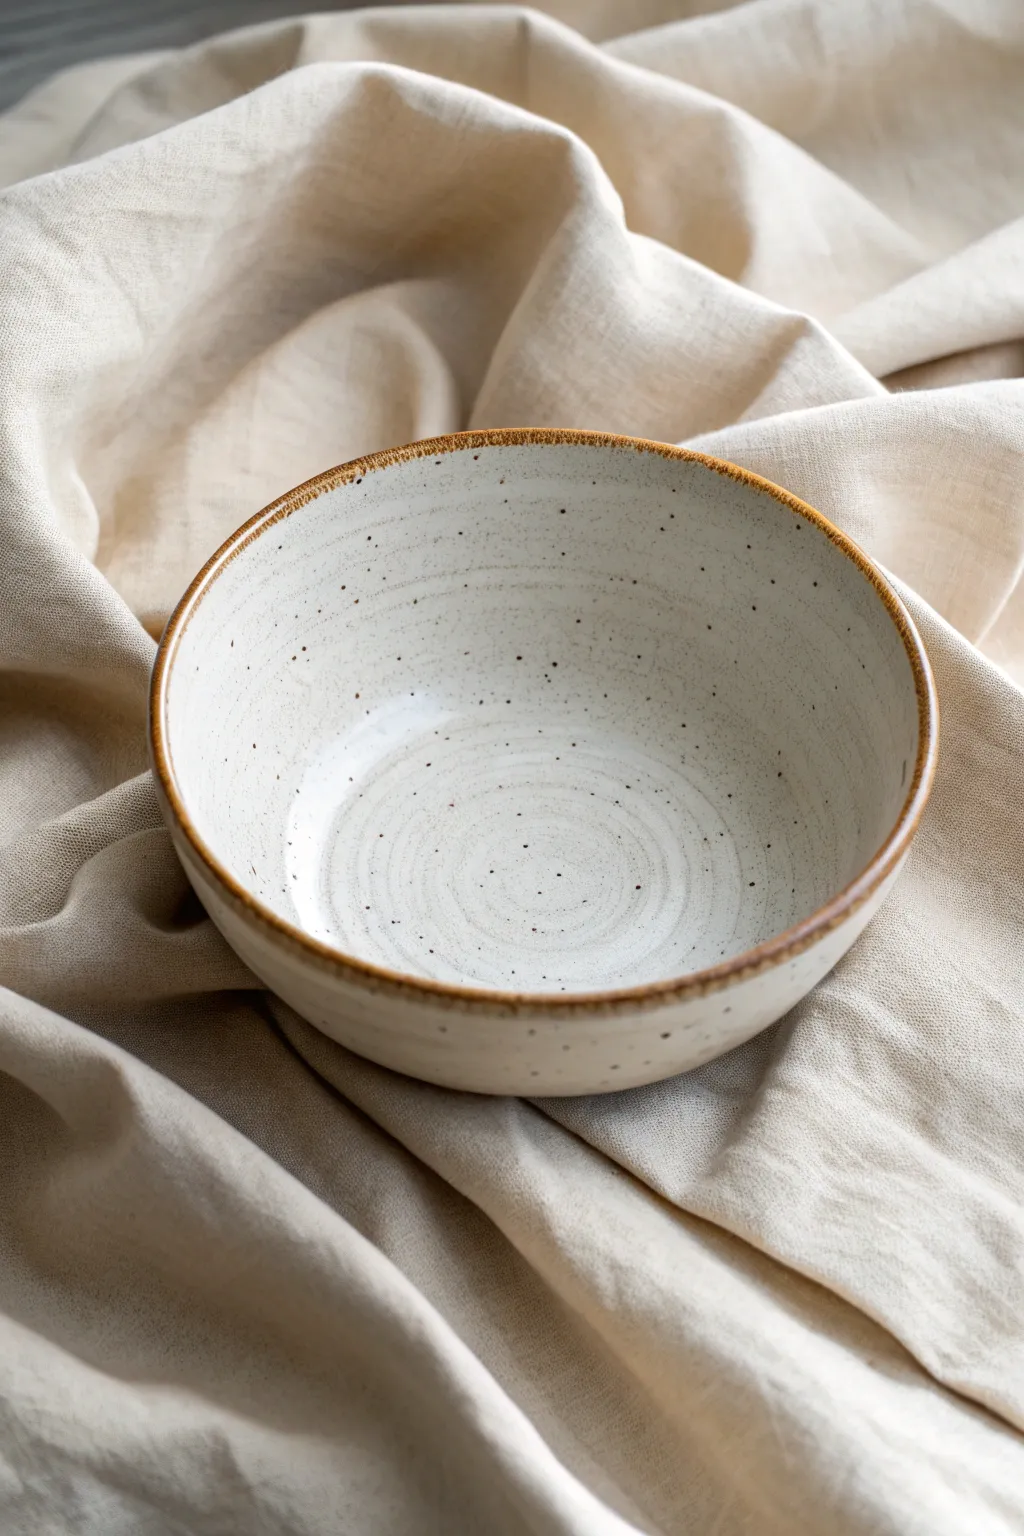
Capture the essence of rustic pottery with this understated yet elegant ceramic project. The design focuses on a natural, speckled off-white glaze finished with a defining earthy brown rim that frames the piece beautifully.
Step-by-Step Guide
Materials
- Bisque-fired ceramic bowl
- Cream or off-white glaze
- Speckled glaze additive (or a pre-mixed speckled white glaze)
- Warm brown underglaze or glaze (for rim)
- Fan brush
- Small round detail brush (size 2 or 4)
- Damp sponge
- Clear transparent glaze (optional, depending on base glaze)
Step 1: Preparation and Base Coat
-
Surface Prep:
Begin by wiping down your bisque-fired bowl with a damp sponge. This removes any dust that could prevent the glaze from adhering properly. -
Mixing the Base:
If you are using a standard white glaze and adding speckles manually, mix the additive in now according to the package instructions. If using a pre-mixed speckled glaze, stir it thoroughly to ensure the flecks are evenly distributed. -
First Interior Coat:
Pour a small amount of glaze into the bowl. Roll it around to coat the entire interior surface evenly, then pour the excess back into your container. -
Cleaning the Rim:
While the interior is drying to the touch, use your damp sponge to wipe away any white glaze that may have dripped onto the very top edge or rim of the bowl. -
Exterior Application:
Turn the bowl over and rest it on a turntable or stilt. Apply the first coat of the speckled white glaze to the exterior using a fan brush for broad, smooth strokes. -
Second Coat:
Once the first layer is dry (it should lose its sheen), apply a second coat to the exterior. For the interior, you can either pour again or brush on a second layer to ensure opacity. -
Check Consistency:
Inspect the bowl for any thin spots or pinholes. Dab a little extra glaze on these areas to ensure a smooth, uniform surface after firing.
Rim Technique
Don’t stress about a perfect line. A slightly wobbly or uneven rim adds to the rustic, wabi-sabi aesthetic of this style.
Step 2: Detailing the Rim
-
Rim Preparation:
Before painting the rim, ensure the white base glaze is completely dry. This prevents the colors from bleeding into each other during application. -
Loading the Brush:
Load your small round detail brush with the warm brown glaze. You want enough pigment to create a solid line, but not so much that it drips. -
Positioning:
Place the bowl on a banding wheel if you have one. If not, finding a comfortable, steady hand position on a table is key. -
Applying the Rim Color:
Gently touch the brush to the rim of the bowl. Spin the banding wheel slowly while holding your brush steady to create a continuous line. If painting by hand, use short, connecting strokes. -
Refining the Edge:
I like to let the brown glaze overlap just slightly onto the interior and exterior walls—about 1-2 millimeters—to create that charming, handmade framed look. -
Creating Variation:
For a more organic feel, slightly vary the pressure on your brush as you go around. This creates subtle changes in line thickness that mimics natural pottery. -
Cleanup:
Use a small, clean brush or a damp Q-tip to tidy up any brown smudges that strayed too far down the sides of the bowl.
Step 3: Firing and Finishing
-
Final Drying:
Allow the entire piece to dry completely. The glaze should be chalky and cool to the touch. -
Foot check:
Double-check the bottom foot of the bowl. It must be completely free of glaze so it doesn’t fuse to the kiln shelf. Wipe it clean with a sponge. -
Loading:
Load the bowl into the kiln carefully, ensuring it doesn’t touch other pieces. -
Firing:
Fire the piece according to the glaze manufacturer’s instructions (usually Cone 5 or 6 for stoneware glazes).
Add Texture
Before glazing, gently tap the rim with a coarse sponge. The glaze will pool in the divots, creating deeper color variance.
Enjoy using your beautifully understated bowl for morning cereal or serving sides at dinner
Mandala Dot Painting for a Calm Center
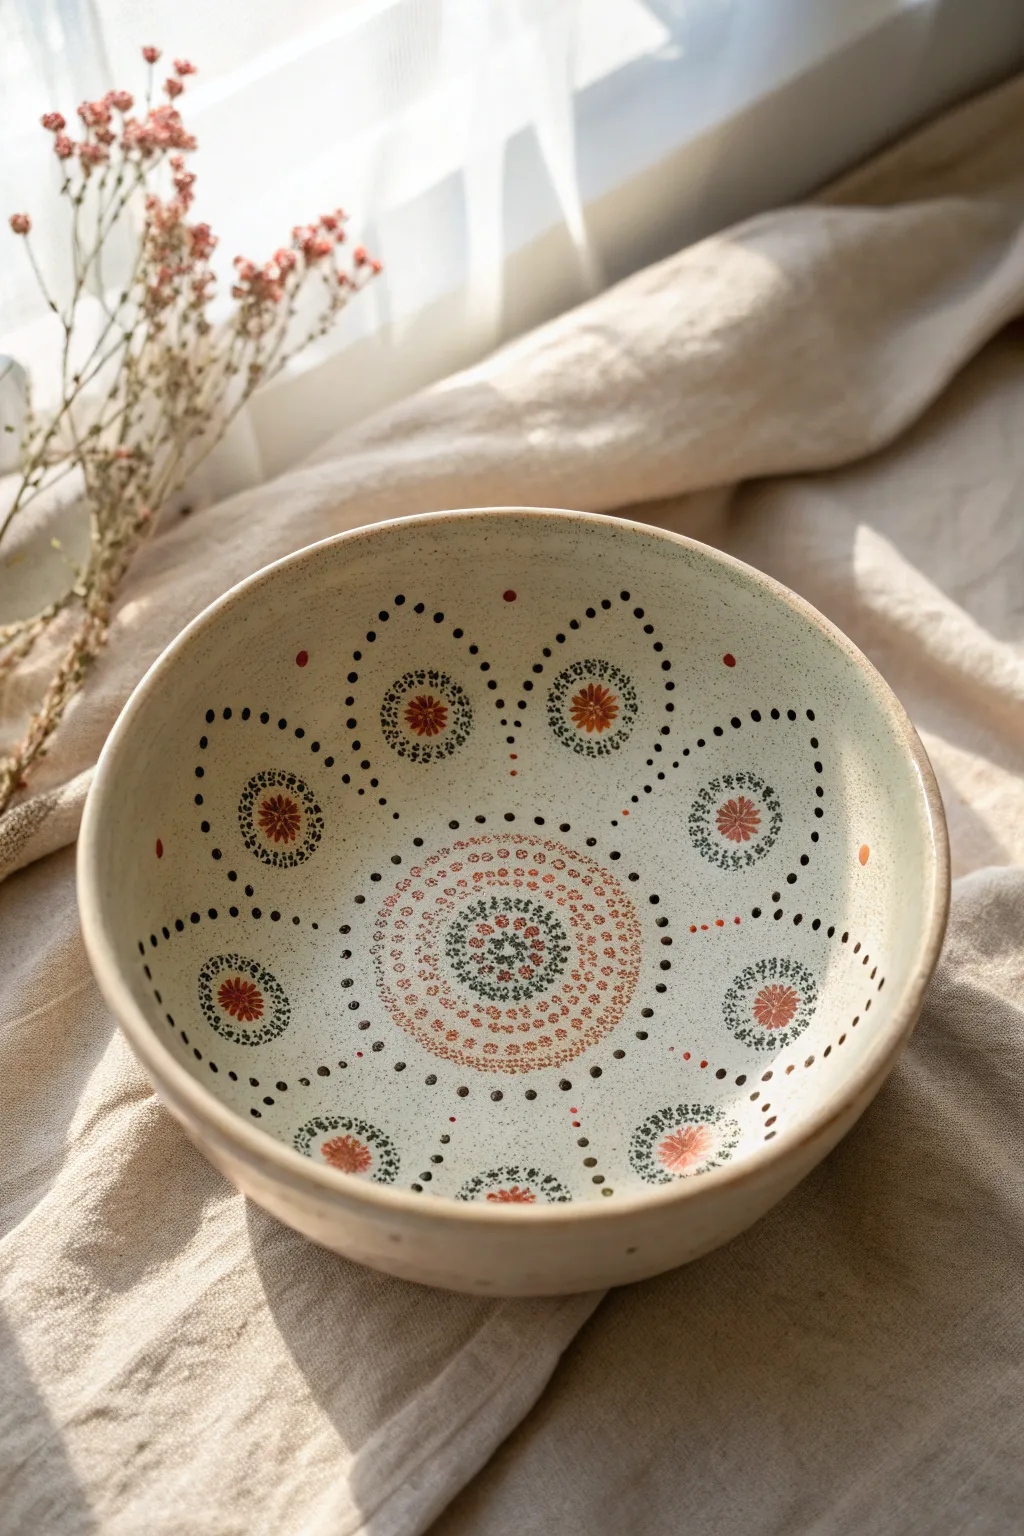
This project transforms a simple ceramic bowl into a meditation on symmetry and color, featuring a calming radial pattern in earthy terracotta and sage hues. The design radiates from a delicate central mandala outward into petal-like arches, creating a piece that feels both grounded and spirited.
How-To Guide
Materials
- Light-colored ceramic bowl (bisque or glazed cream/off-white)
- Acrylic paints for ceramics (terracotta/rust red, dark sage green, black)
- Clear acrylic gloss sealer (optional, if using non-fired paints)
- Dotting tools (various sizes, from fine point to 3mm)
- Fine detail paintbrush (size 00 or 0)
- Palette or small plate for mixing
- Damp cloth and paper towels
Step 1: Setting the Center
-
Clean surface:
Begin by wiping the inside of your bowl with a damp cloth to remove any dust or oils. A clean surface ensures your dots adhere perfectly and stay round. -
Establish the center point:
Locate the absolute center of the bowl’s bottom. Place a single, small dot of rust-red paint here using a medium-sized dotting tool. This anchor point guides the entire radial symmetry. -
Inner ring creation:
Using a smaller tool, dot a tight circle of tiny sage green dots immediately around the central red dot. -
Building the core mandala:
Create three concentric rings expanding outward. Alternate between rust red and sage green dots. I like to slightly increase the dot size as the circles get larger to fill the expanding space naturally. -
Adding texture:
For the fourth ring, use a very fine brush or tool to stipple tiny clusters of dots rather than single solid dots, creating a ‘dusty’ or textured look in the mandala’s core.
Pro Tip: Consistency
Keep your paint consistency like heavy cream. If it’s too thick, dots will peak; too thin, they’ll run. Test a few dots on a piece of paper before touching the bowl.
Step 2: Designing the Petal Arches
-
Marking the petals:
Visualize eight evenly spaced points around your central mandala. Using black paint and a medium dotting tool, place dots at these eight points to serve as the tips of your petal shapes. -
Creating the guidelines:
From each black tip, walk lines of smaller black dots down toward the center mandala, creating curved teardrop or petal outlines. These should connect the outer tips back to the central design. -
Varying dot size:
As you dot the outlines, gradually decrease the size of your dots as you get closer to the center. This tapering effect adds elegance to the flow.
Troubleshooting: Smudges
Smudged a wet dot? Don’t wipe immediately! Let it dry completely, scrape it off gently with a craft knife or fingernail, then re-dot the area perfectly.
Step 3: Filling the Petals
-
Painting the flower centers:
In the open middle space of each petal outline, paint a small starburst or flower shape using rust red paint. You can do this with a fine brush or by dragging a dotting tool outward from a center point. -
Detailing the flowers:
Surround each rust flower with a ring of tiny sage green dots. This mimics the core mandala design and ties the whole piece together. -
Adding outer accents:
Between the peaks of the main black petal arches, add a single, isolated red dot floating in the negative space. This fills the visual gap near the rim. -
Rim detailing:
Depending on your bowl’s depth, you may have space for one final ring of very spaced-out tiny black dots near the upper rim to frame the artwork.
Step 4: Finishing Touches
-
Correction and cleanup:
Inspect your symmetry. If a dot looks uneven, quickly wipe it away with a damp Q-tip while the paint is wet, or scrape it off gently with a toothpick if it has started to dry. -
Drying:
Allow the paint to cure completely according to the manufacturer’s instructions. Air drying usually takes 24 hours. -
Sealing the work:
If your bowl is for decorative use only, apply a coat of clear acrylic gloss sealer to protect the dots and give them a shine similar to fired glaze. -
Baking (Optional):
If using oven-bake ceramic paints, place the bowl in a cold oven, set to the recommended temperature (usually 300-350°F), bake for 30 minutes, and let it cool completely in the oven.
Now your bowl is ready to display its harmonious pattern on your table or shelf
Soft Ombre Wash From Rim to Base
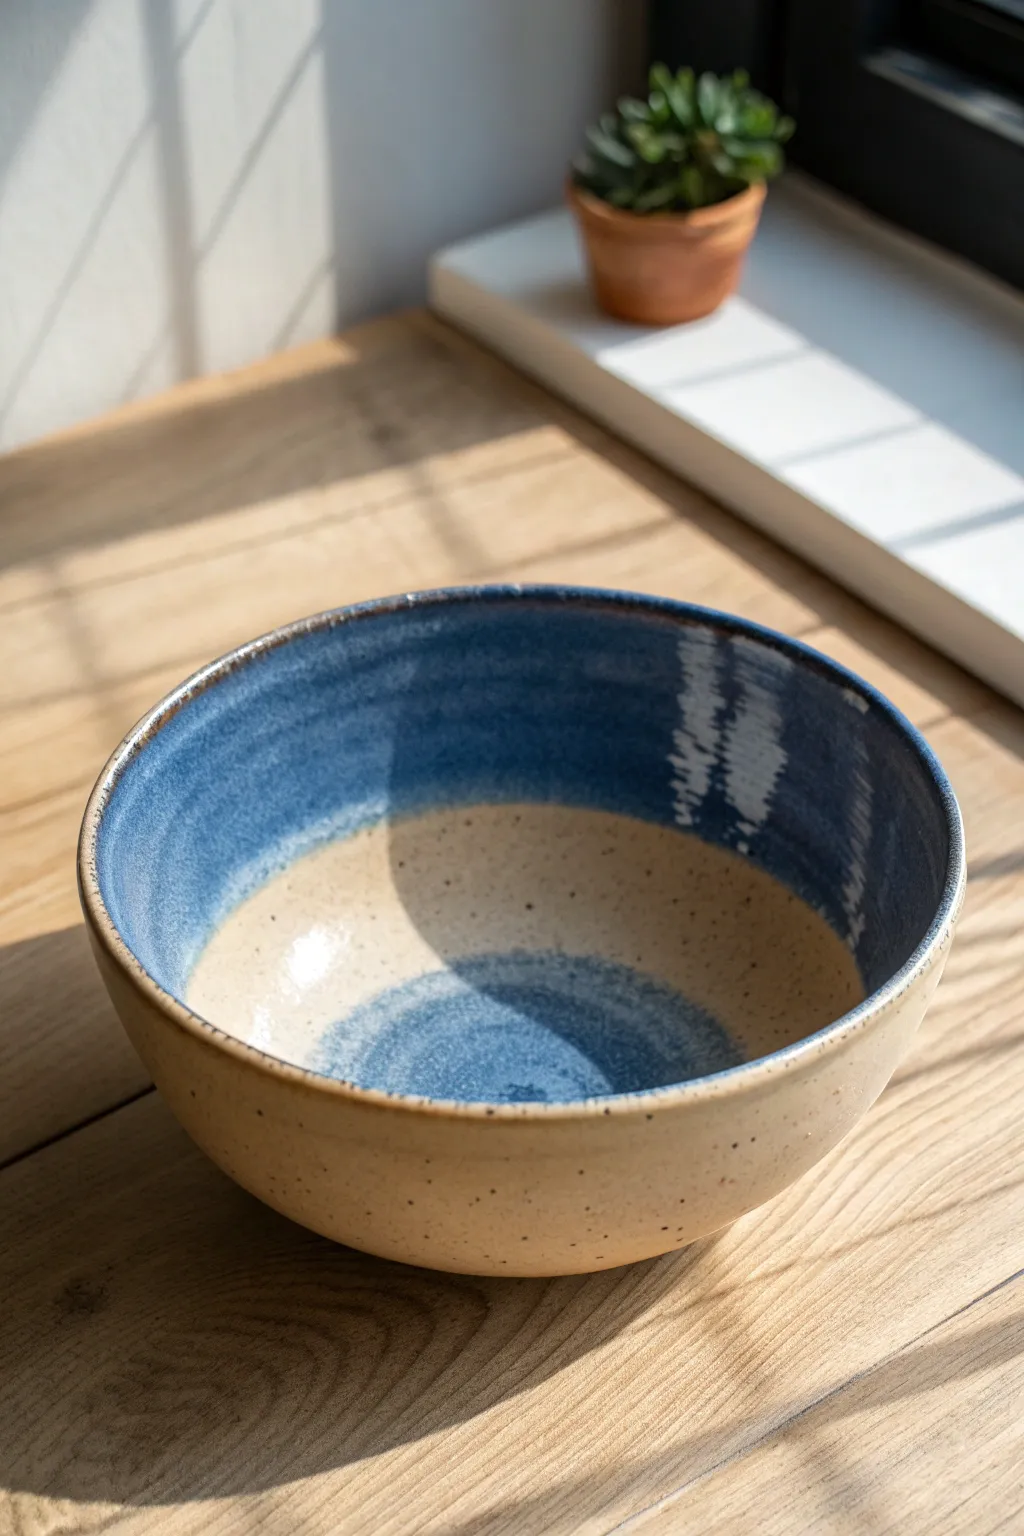
This project captures the serene feeling of a shoreline, featuring a deep ocean blue that gently fades into a speckled sandy base. The technique uses a layering effect to create a soft transition, playing with the natural texture of speckled clay or glaze to add organic warmth.
Detailed Instructions
Materials
- Bisque-fired ceramic bowl (preferably speckled clay body)
- Deep blue underglaze (Cobalt or Navy)
- Speckled tan/beige clay body or a speckled glaze (if using white clay)
- Clear transparent glaze
- Wide hake brush or fan brush
- Medium round brush
- Sponge
- Water container
- Potter’s wheel or turntable (optional but helpful)
Step 1: Preparation & Base
-
Clean the Bisque:
Start by wiping down your bisque-fired bowl with a damp sponge. This removes any kiln dust or oils from your hands that might resist the glaze. -
Assess the Clay Body:
If your bowl is made of speckled clay, you can leave the bottom half unglazed or use a clear glaze later. If using white clay, apply a layer of speckled tan underglaze or glaze to the entire interior now and let it dry.
Step 2: Creating the Blue Ombre
-
Mix the Wash:
Dilute your deep blue underglaze with a little water. You want a consistency similar to heavy cream—thick enough to be opaque but fluid enough to drip slightly. -
Apply the Rim Color:
Using a wide hake or fan brush, load up the blue mixture. Holding the brush horizontally, apply a thick band of blue around the top 2-3 inches of the inside rim. -
Feather the Edge:
While the blue band is still wet, rinse your brush and leave it damp. Gently drag the bottom edge of the blue paint downward, feathering it out so it doesn’t leave a hard line. -
Add the Center Pool:
Dip your medium round brush into the blue underglaze. Paint a circular pool of blue at the very bottom center of the bowl. -
Soften the Center:
Just like the rim, use a damp, clean brush to soften the outer edges of this center circle, blending it slightly outward towards the beige section. -
Enhance the Texture:
I find that adding a second, slightly more watery coat to just the upper rim creates that lovely dripping, washed effect. Let gravity pull a few streaks down naturally.
Natural Speckle Tip
Can’t find speckled clay? Mix granular manganese or iron filings into your plain clay body before throwing to create those natural dark spots.
Step 3: Glazing & Firing
-
Dry Completely:
Allow the underglaze layers to dry fully. The surface should look chalky and matte before moving on. -
Clean the Foot:
Ensure the very bottom foot of the bowl is free of any glaze or underglaze. Wipe it with a sponge if necessary to prevent sticking to the kiln shelf. -
Apply Clear Glaze:
Dip the entire bowl into a clear transparent glaze, or brush it on evenly. This will seal the porous clay and make the blue pop vibrantly. -
Inspect for Drips:
Check the rim for any thick drips of clear glaze that might run too much during firing. Smooth them out with a finger if needed. -
Final Fire:
Fire the bowl in the kiln according to the specific temperature requirements of your clay and glaze (usually Cone 5 or 6 for stoneware).
Fixing Hard Lines
If your ombre transition looks too harsh, lightly dab the drying edge with a very slightly damp natural sponge to blur the line.
Once cooled, your bowl will hold the depth of the ocean contrasting beautifully against the sandy shore
Color-Blocked Geometrics on the Exterior
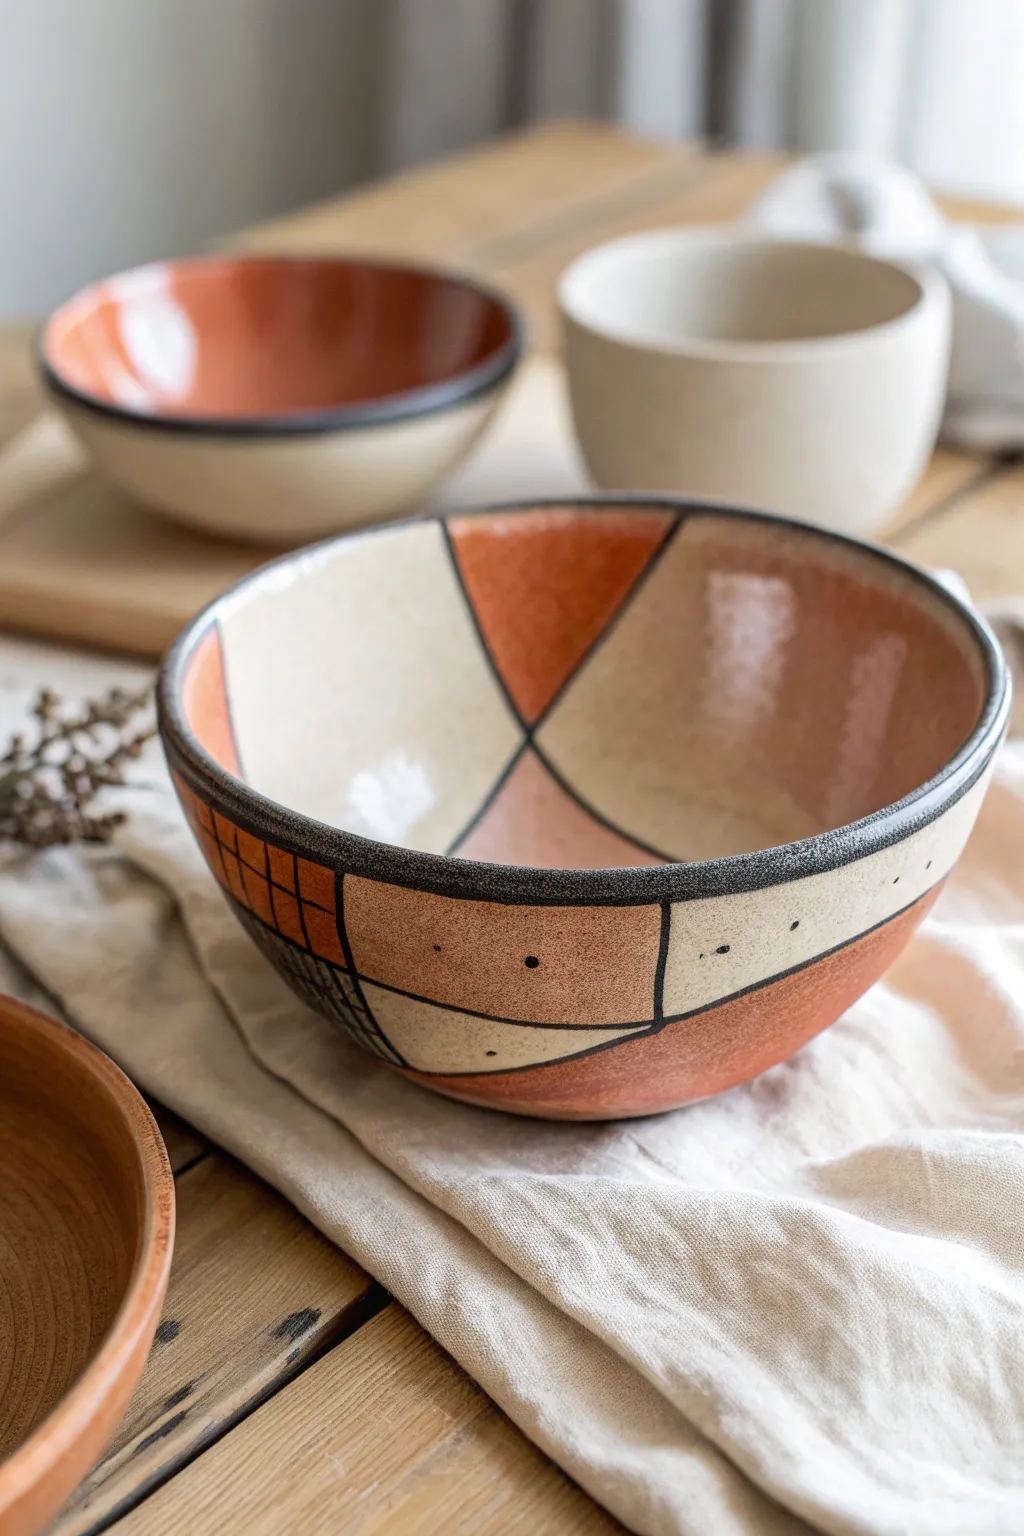
Embrace the warmth of terracotta and cream tones with this bold, color-blocked ceramic bowl. The design combines large geometric shapes with delicate grid details and speckles for a modern, handcrafted look.
Step-by-Step Guide
Materials
- Bisque-fired ceramic bowl (medium size)
- Underglazes: Burnt Orange/Terracotta, Cream/Warm White, Black
- Various paintbrushes: Medium flat brush, small detail liner brush
- Pencil (HB or lighter)
- Damp sponge
- Clear dipping glaze
- Kiln access
Step 1: Preparation & Mapping
-
Clean the surface:
Start by wiping down your bisque bowl with a damp sponge. This removes any dust that could prevent the underglaze from adhering properly. -
Map the primary shapes:
Using a light pencil, sketch large, sweeping geometric shapes directly onto the bowl’s exterior. Focus on creating intersecting curves and straight lines that divide the bowl into distinct sections. -
Extend inside the rim:
Don’t stop at the edge; continue your main lines over the lip and onto the upper interior surface, creating triangular sections on the inside wall.
Step 2: Color Blocking
-
Apply the cream base:
Select specific sections for your cream color, aiming for an even balance around the bowl. Using a medium flat brush, apply your first coat of cream underglaze. -
Layer the cream:
Let the first coat dry until it’s matte, then apply two more coats. Three coats total usually ensures a solid, opaque finish. -
Paint the terracotta sections:
Switch to the burnt orange or terracotta underglaze. Fill in the remaining large geometric sections, carefully painting up to your pencil lines without going over. -
Build opaque color:
Just like the cream sections, build up three layers of the terracotta color, allowing brief drying time between each application to prevent lifting the previous stroke. -
Address the interior:
Repeat the color-blocking process on the interior rim sections you mapped out earlier, mirroring the color logic used on the exterior.
Clean Lines
If you struggle with steady hand-painting, use thin automotive masking tape to block off your shapes. Remove the tape before the paint is fully dry.
Step 3: Line Work & Details
-
Outline the shapes:
Using a small detail liner brush and black underglaze, paint thick, confident black lines over the boundaries where your colors meet. A slightly shaky or organic line adds to the handmade charm here. -
Define the rim:
Run the black brush along the very edge of the bowl’s rim to frame the entire piece. I find resting my pinky on the bowl for stability helps keep this steady. -
Create the grid pattern:
Choose one specific terracotta section on the lower exterior. Paint a simple grid using thin black vertical and horizontal lines to add texture to the composition. -
Add dots and speckles:
In the cream sections, use the tip of your smallest brush to dab tiny black dots. Vary the spacing—some clustered, some sparse—to mimic natural stone speckling. -
Review and touch up:
Check your black lines for transparency. If they look thin, go over them a second time to ensure they fire to a deep, solid black.
Sgraffito Texture
Instead of painting the black grid, paint a solid black patch, then scratch through it with a needle tool to reveal the clay underneath.
Step 4: Glazing & Firing
-
Final drying:
Allow the bowl to dry completely. The underglaze should feel chalky and room temperature, not cool to the touch. -
Apply clear glaze:
Dip the entire bowl into a clear transparent glaze. Ensure an even coat and shake off any excess drips gently. -
Clean the foot:
Wipe the bottom foot of the bowl completely clean with a wet sponge so it doesn’t fuse to the kiln shelf. -
Fire the piece:
Load the bowl into the kiln and fire according to your clay and glaze specifications (typically Cone 5 or 6 for stoneware).
Now you have a stunning, modern serving bowl ready for your next gathering
Sgraffito-Style Scratch Details Through Paint
This project embraces the raw beauty of terracotta by using a sgraffito-inspired technique to create delicate white botanical illustrations. By painting slip or underglaze over the clay and carving through it, you achieve a stunning contrast that feels both rustic and refined.
Step-by-Step
Materials
- Bisque-fired terracotta bowl or leather-hard clay bowl
- White underglaze (or white engobe slip)
- Small round paintbrush (size 2 or 4)
- Sgraffito tool or needle tool
- Loop tool (small)
- Fine grit sandpaper (optional)
- Clear matte glaze
- Damp sponge
Step 1: Preparation and Base Layer
-
Clean the surface:
Before you begin, wipe down your bowl with a slightly damp sponge. This removes any dust that might prevent the underglaze from adhering properly to the clay surface. -
Assess your design strategy:
Decide on your pattern flow. The example uses sweeping, vine-like structures that curve naturally with the bowl’s shape. You can sketch this lightly with a pencil first; the graphite will burn off in the kiln. -
Paint the exterior band:
Using your brush, apply a band of diluted white underglaze around the lower third of the bowl’s exterior. You don’t need solid coverage here; a wash that allows the terracotta warmth to show through works best for this organic look. -
Paint the interior leaves:
Instead of coating the entire inside, paint the leaf shapes directly with white underglaze. Use a loaded brush to create the main stems and the general silhouette of the leaves. I like to keep the paint slightly thick here so the white stands out against the dark clay. -
Let it dry to leather hard:
Allow the underglaze to dry until it is no longer wet to the touch but still holds a tiny bit of moisture. If it’s bone dry, it may chip when you scratch it; if it’s too wet, the lines won’t be crisp.
Chipped Lines?
If your carving lines look jagged, the underglaze is likely too dry. Mist it lightly with water, wait a minute for absorption, and try carving again for smoother strokes.
Step 2: Carving the Details
-
Begin the sgraffito process:
Take your needle tool or a fine sgraffito tool. You are going to scratch *through* the white paint you just applied to reveal the terracotta clay underneath. -
Detail the interior leaves:
Inside the white leaf silhouettes you painted, scratch out the veins. Draw a central line down each leaf, and then add delicate V-shaped veins branching off. Use light pressure; you only want to remove the paint, not gouge the clay deeply. -
Define the stems:
Refine the edges of your painted stems by scratching along their borders if they look too messy. This sharpens the design and adds a illustrative quality. -
Add exterior motifs:
Move to the outside of the bowl where you applied the white wash. Using your tool, scratch freehand circular floral patterns and simple leaves. The scratching here removes the white wash to show the dark clay lines. -
Create dotted accents:
Use the very tip of your tool to poke or drill tiny dots around the exterior floral shapes. This adds texture and visual interest to the negative space. -
Work on the rim:
If any paint got onto the very top lip of the bowl, gently scrape it away with a fettling knife or sponge to frame the artwork with a clean clay edge.
Pro Tip: Line Variation
Vary your pressure. Press harder for main stem lines to reveal more clay, and use a whisper-light touch for the tiny leaf veins to create varied visual weight.
Step 3: Finishing Touches
-
Clean up burrs:
Carving often leaves little crumbs of clay or paint (burrs). Don’t brush them off with your hand, or you might smear the design. Instead, use a large, soft, dry makeup brush to gently sweep the crumbs away. -
Bisque fire:
Once your design is complete and the bowl is bone dry, fire it to cone 04 (or according to your clay body’s instructions) to set the design. -
Apply clear glaze:
After the first firing, dip or brush a clear matte glaze over the entire piece. A matte finish preserves the earthy, rustic feel better than a high gloss would. -
Final wipe:
Clean the foot of the bowl (the bottom ring it sits on) with a wet sponge to ensure no glaze is left there, preventing it from sticking to the kiln shelf. -
Glaze fire:
Fire the bowl a final time to the temperature required by your clear glaze and clay body.
Place your finished bowl on a linen cloth to highlight its natural textures and enjoy your handcrafted centerpiece
Splatter Speckles for a Studio-Worn Look
Recreate the charm of hand-thrown pottery with this simple splatter technique. Using layers of fine mist and deliberate droplets, you’ll transform a plain ceramic bisque bowl into a piece that feels warm, rustic, and effortlessly artistic.
Detailed Instructions
Materials
- Bisque ceramic bowl (fired and clean)
- Cream or off-white ceramic glaze (for the base)
- Dark brown or iron oxide underglaze (for speckles)
- Red-orange or terracotta underglaze (for larger spots and rim)
- Wide glazing brush (fan brush recommended)
- Stiff-bristled toothbrush
- Small round detail brush
- Sponge
- Bucket of water
- Clear dipping glaze (optional, depending on your base glaze)
Step 1: Base Coat Application
-
Clean surface:
Begin by wiping down your bisque bowl with a slightly damp sponge to remove any kiln dust or oils from your hands. -
Stir glaze:
Thoroughly mix your cream-colored base glaze to ensure a smooth consistency without lumps. -
First layer:
Using a wide fan brush, apply a smooth, even coat of the cream glaze to the entire interior of the bowl. -
Dry and repeat:
Let the first coat dry until it loses its sheen, then apply a second coat to ensure solid opacity. -
Exterior glaze:
Repeat the process on the exterior of the bowl, applying two to three coats depending on the manufacturer’s recommendation for coverage. -
Final dry:
Allow the base glaze to dry completely to the touch before moving on to the splatter phase.
Blob Control
If a large, unwanted droplet lands on your glaze, don’t wipe it! Let it dry completely, then gently scrape it off with a needle tool or craft knife before refiring.
Step 2: Splatter Technique
-
Prep the dark splatters:
Water down a small amount of dark brown underglaze on a palette until it reaches a fluid, ink-like consistency. -
Load the tool:
Dip the tips of a stiff toothbrush into the thinned dark underglaze. -
Test spray:
Hold the brush over a scrap piece of paper and run your thumb across the bristles to test the spray pattern. -
Mist the bowl:
Flick the bristles over the bowl to create a fine mist of dark speckles, focusing on the interior curve. -
Prep the warm spots:
Clean your brush or grab a second one, and dilute the red-orange underglaze slightly less than the dark brown for heavier droplets. -
Add larger spots:
Use the toothbrush again, but this time hold it closer to the surface and flick harder to create larger, more distinct terracotta-colored spots. -
Manual placement:
For specific emphasis, I sometimes use a small detail brush to manually place a few larger orange dots near the bottom of the bowl.
Raw Clay Look
To enhance the rustic feel, leave the exterior unglazed (raw clay) and only glaze the interior and rim. This creates a beautiful textural contrast.
Step 3: Rim and Finish
-
Load the detail brush:
Load a small round brush with the undiluted red-orange underglaze. -
Paint the rim:
Carefully run the brush along the very edge of the bowl’s rim. Don’t worry about making it perfectly straight; a slightly uneven line mimics the clay body showing through. -
Wipe the foot:
Use a damp sponge to wipe any glaze off the foot ring (the bottom rim that touches the shelf) to prevent it from sticking to the kiln shelf. -
Final Clear Glaze (If Paint Used):
If you used ceramic paint instead of glaze, apply a food-safe clear coat over the entire piece once dry. -
Fire:
Fire the bowl in the kiln according to the specific cone temperature required by your clay and glaze combination.
Once fired, fill your bowl with something fresh and enjoy the handmade warmth of your new speckled creation
Drip Rim Effect That Flows Down the Sides
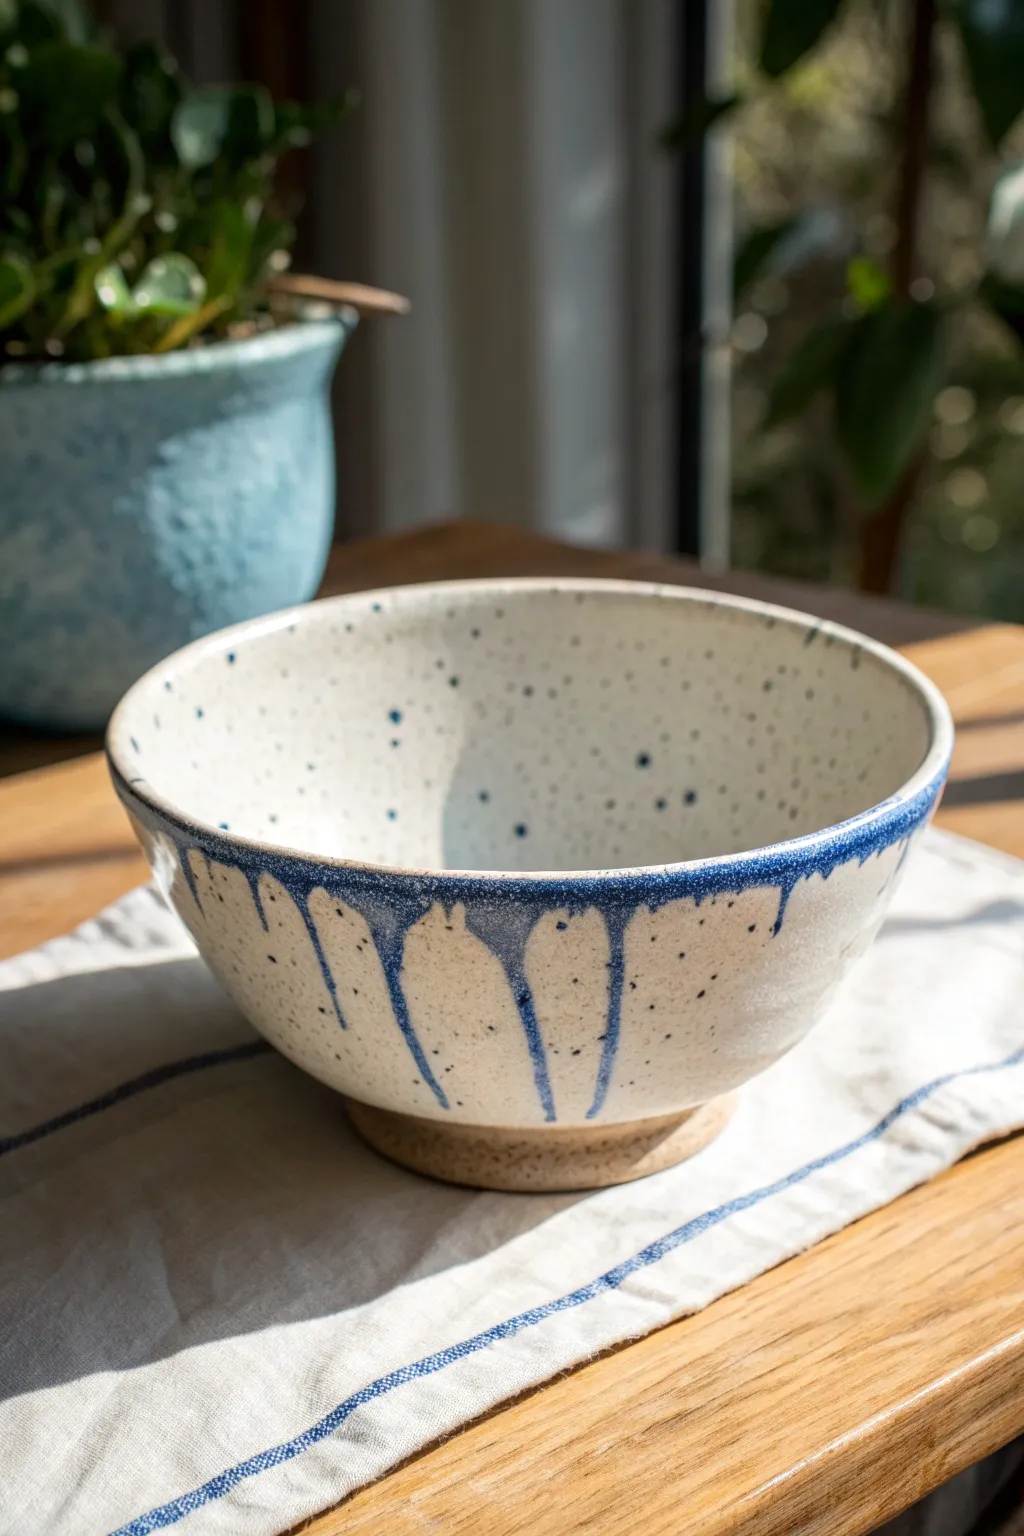
Embrace the organic beauty of gravity with this stunning drip-rim effect, where deep cobalt blue glaze cascades down a speckled cream surface. This technique creates a dynamic contrast between the controlled base glaze and the free-flowing accent, perfect for adding artistic flair to simple forms.
Step-by-Step Tutorial
Materials
- Bisque-fired stoneware bowl
- Wax resist emulsion
- Sponge or waxing brush
- Speckled Cream/White dipping glaze
- Cobalt Blue glaze (brush-on or dipping consistency)
- Small round bamboo brush or bulb syringe
- Glaze tongs
- Damp sponge for cleanup
- Kiln (fired to Cone 6 or glaze specific temp)
Step 1: Preparation & Waxing
-
Clean the bisque:
Start by wiping down your bisque-fired bowl with a damp sponge to remove any kiln dust or oils from your hands, ensuring the glaze will adhere properly. -
Define the foot:
Flip the bowl over and apply a coat of wax resist to the very bottom foot ring and about 1/4 inch up the side of the foot. This prevents glaze from fusing your bowl to the kiln shelf. -
Safety check:
Double-check that the wax coverage is solid; any missed spot on the foot will need to be wiped clean later, so accuracy here saves time.
Step 2: Base Glazing
-
Mix the base glaze:
Thoroughly stir your speckled cream dipping glaze. It should have the consistency of heavy cream to ensure an opaque but not overly thick coat. -
Dip the bowl:
Using glaze tongs, grip the bowl securely and submerge it fully into the cream glaze for about 3 seconds. -
Drain and dry:
Lift the bowl out, letting excess glaze drain off one side, then give it a gentle shake to level the surface. Set it aside until the glaze is dry to the touch. -
Clean the foot:
Even with wax, some glaze droplets might cling to the foot. Use a damp sponge to wipe the waxed area completely clean.
Drips Stopped Short?
If your drips didn’t run during firing, your cobalt glaze layer was likely too thin or the kiln didn’t reach peak heat. Next time, mound the glaze thicker on the rim.
Step 3: Creating the Drip Rim
-
Prepare the accent color:
Stir your cobalt blue glaze. For the best drips, I prefer the glaze to be slightly fluid, so you may need to add a tiny amount of water if it feels too stiff. -
Load the brush:
Saturate a small bamboo brush or a bulb syringe with the blue glaze. Ensure you have a heavy load of material. -
Apply the rim:
Run the brush along the very top edge of the rim, pressing down enough that the glaze pools slightly. -
Initiate the outside drips:
Where you want a long drip, press the brush head against the outer edge of the rim and hold it there for a second to deposit extra glaze. -
Create variation:
Vary the pressure and the amount of glaze deposited; make some drips heavy so they run far down, and keep others light for just a hint of color. -
Add inside speckles:
Flick the bristles of your brush over the inside of the bowl to create random blue spatters that echo the rim color. -
Gravity assistance:
If the drips aren’t moving enough, tap the bowl gently on the table while the blue glaze is still wet to encourage downward movement.
Layer for Depth
Apply a second color, like a reactive green, right on top of the blue rim. During the melt, the two glazes will interact for a complex, multi-toned drip.
Step 4: Firing
-
Final inspection:
Check that none of your blue drips have run all the way down to the waxed foot. If they have, wipe the bottom edge back slightly to prevent shelf-sticking. -
Load the kiln:
Place the bowl in the kiln, ensuring it has clearance from other pieces since the glaze is mobile. -
Fire to temperature:
Fire the piece to the recommended cone for your clay and glaze body (typically Cone 6 for this stoneware look). -
Cooling:
Allow the kiln to cool completely before opening to prevent thermal shock and crazing.
Once cooled, your bowl will feature a stunning, glossy rim that feels wonderfully unpredictable and unique to your hand
Night Sky Galaxy Inside the Bowl
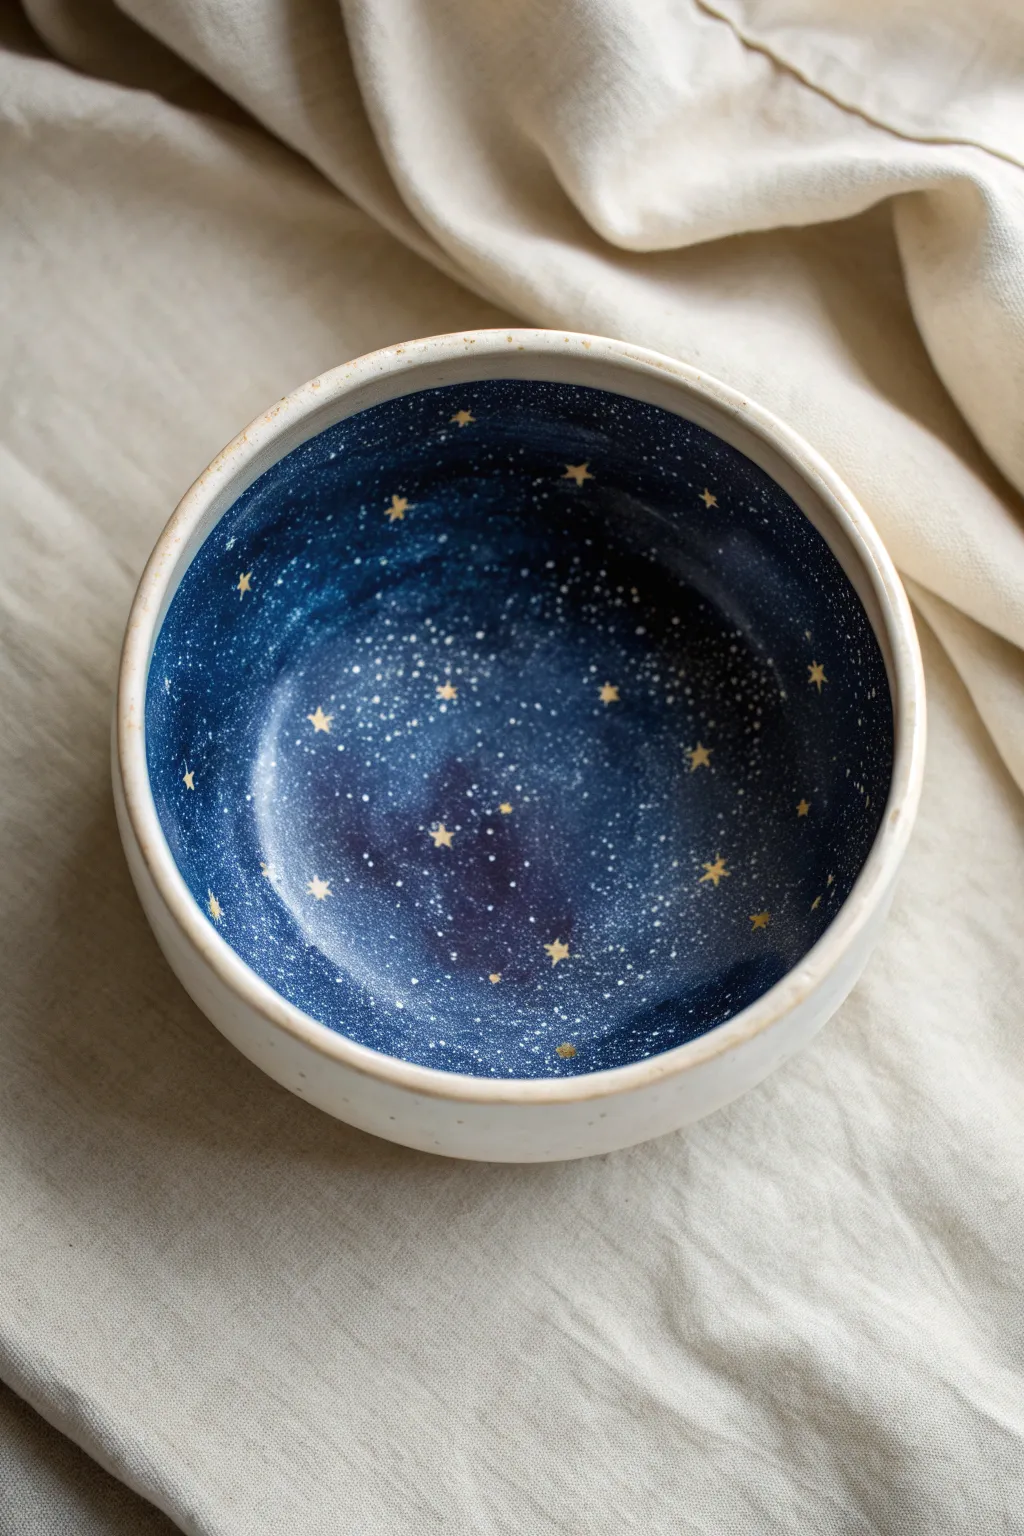
Transform a simple ceramic bowl into a stunning piece of galaxy art with this immersive painting project. The deep indigo interior contrasts beautifully with the plain exterior, creating a hidden universe full of twinkling stars every time you peer inside.
Detailed Instructions
Materials
- Bisque-fired ceramic bowl (plain exterior ideal)
- Underglaze (Dark Blue, Indigo, and Black)
- Underglaze (White)
- Gold luster or gold overglaze (for star accents)
- Fan brush (medium)
- Stiff bristle brush or toothbrush (for splattering)
- Fine detail liner brush (size 0 or 00)
- Sponge
- Clear glossy glaze
- Kiln (or access to a firing service)
Step 1: Preparing the Canvas
-
Clean the bisque:
Before you begin, wipe down your bisque-fired bowl with a damp sponge. This removes any kiln dust or oils from your hands that might resist the glaze application. -
Mask the rim:
If you want a crisp line between the interior and the plain exterior, run a thin line of wax resist along the very top edge of the rim, or simply use a steady hand later. The natural look in the photo suggests a slightly organic edge, so I often skip the tape for a softer feel.
Step 2: Creating the Galaxy Depth
-
Base coat application:
Using a fan brush, apply a generous coat of dark blue underglaze to the entire interior of the bowl. Ensure full coverage, working from the center bottom up to the rim. -
Adding dimension:
While the first layer is still slightly damp, dab a small amount of black underglaze into the very bottom center and sporadically along the sides. Blend this gently into the blue to create shadowy depth. -
Creating nebulae:
Dip a sponge lightly into a slightly lighter indigo or violet shade. Gently texture the deep blue base, creating subtle, cloud-like swirls that suggest distant nebulae. -
Dry the base:
Let these base layers dry completely until the surface is chalky and no longer shiny. This is crucial before adding the stars.
Muddy Galaxy?
If your blue and black backgrounds are blending into a gray mess, let the base blue layer dry longer before sponging on the darker shadows. Distinct layers help color clarity.
Step 3: Stars and Constellations
-
Splatter technique:
Dilute a small amount of white underglaze with water until it has a milky consistency. Dip a stiff bristle brush or toothbrush into this mixture. -
Flicking the stars:
Hold the brush inside the bowl and run your thumb across the bristles to flick tiny speckles onto the dark background. Vary the distance to create different sizes of ‘stars’. -
Specific star placement:
Use your fine detail liner brush and undiluted white underglaze to dot a few larger, more distinct stars in empty areas. -
First firing:
Once the underglaze is fully dry, bisque fire the piece again if required by your specific materials, or proceed to glazing if using a one-fire schedule.
Cosmic Variation
Instead of just gold 5-point stars, try painting faint gold lines connecting specific stars to create actual zodiac constellations hidden in the bowl.
Step 4: Glazing and Gold Accents
-
Clear coat:
Pour clear glossy glaze into the bowl, swirl it to coat the entire interior, and pour out the excess. This will seal the galaxy and give it a wet, glass-like depth. -
Exterior glazing:
Dip the exterior or brush on a clear matte or satin glaze to maintain that simple, contrasting pottery texture shown in the image. -
Glaze firing:
Fire the bowl in the kiln according to the clear glaze instructions (usually Cone 5 or 6) to vitrify the piece. -
Applying gold luster:
Once the fired piece is cool, clean it with alcohol. Using a dedicated script liner brush, paint small 5-point stars using gold luster over selected white dots or in new spots. -
Final firing:
Place the bowl back in the kiln for a low-fire luster firing (usually Cone 018). This fuses the gold permanently to the surface.
Now you have a functional piece of art that holds soup, cereal, or simply the wonder of the cosmos
Faux Marble Swirls for a Luxe Finish
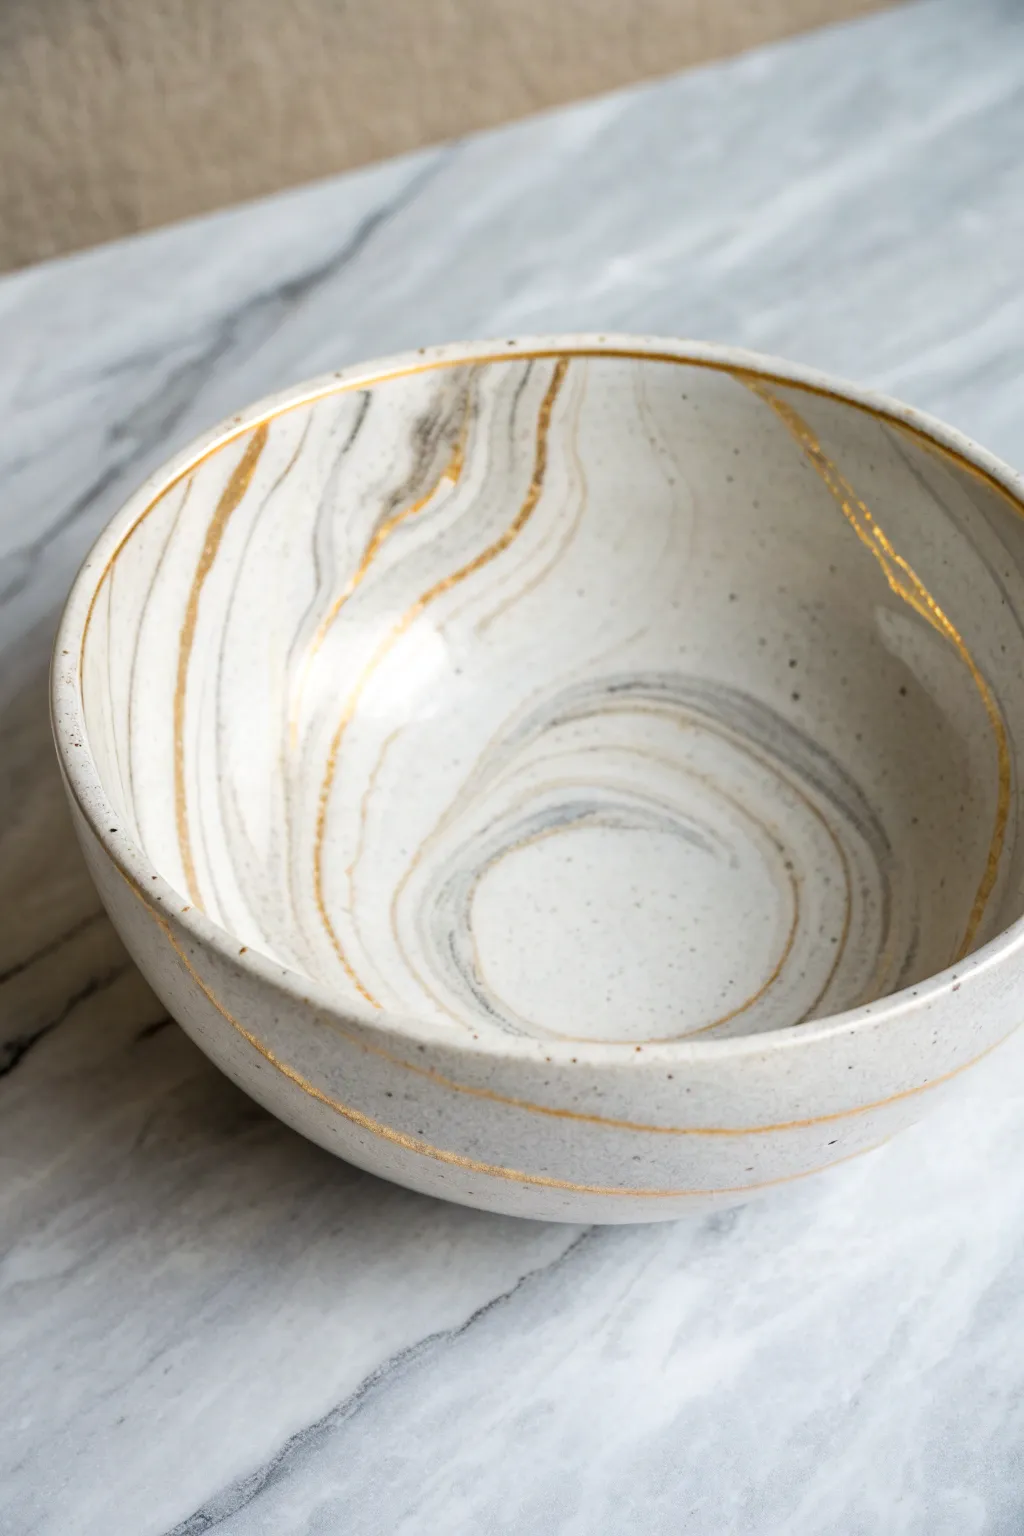
Transform a plain white bowl into a high-end statement piece using simple painting techniques to mimic the organic flow of natural stone. This faux marble finish combines soft grey veining with striking gold accents for a luxurious, modern aesthetic.
Step-by-Step Tutorial
Materials
- Plain white ceramic bowl (glazed or unglazed bisque)
- Grey acrylic paint (or ceramic paint)
- Metallic gold paint or liquid gold leaf
- Glazing medium or water (for thinning)
- Fine liner brush
- Small flat brush
- Feather or fan brush (optional)
- Palette or paper plate
- Paper towels
- Clear ceramic sealant or glossy varnish
Step 1: Creating the Marble Haze
-
Prepare your palette:
Start by placing a small amount of grey paint on your palette. Mix in a generous amount of glazing medium or water until the paint is very fluid and translucent, almost like a watercolor wash. -
Lay the first vein:
Using a fine liner brush tailored for detail, pick up some of your watery grey mixture. Touch the brush to the inside of the bowl and drag it gently to create a wandering line. Tremble your hand slightly as you pull to create the natural jitter found in real stone veins. -
Soften the edges:
While the grey line is still wet, take a damp flat brush or a soft feather and gently feather out one side of the line. This creates a smoky, blurred effect that mimics how mineral veins bleed into white marble. -
Build the pattern:
Continue adding these ghostly grey lines freely around the bowl’s interior. Create some longer, sweeping curves and some smaller, tighter swirls to vary the visual texture. -
Layering depth:
Once your first pale layer is semi-dry, go back in with a slightly less diluted grey paint. Accentuate parts of the existing veins to create areas of darker emphasis, giving the ‘stone’ a sense of depth. -
Connect to the exterior:
Don’t stop at the rim. Carry your paint lines over the edge and down the outside of the bowl. This continuity is key to making the object look like a solid chunk of carved stone rather than just a painted surface. -
Dry thoroughly:
Let the grey marble layer dry completely before moving on to the metallics. This prevents the gold from muddying into the grey.
Step 2: Gilding the Veins
-
Prepare the gold:
Shake your liquid gold leaf or metallic paint well to ensure the pigments are rich and reflective. Pour a small amount onto a fresh spot on your palette. -
Select detail brush:
Switch to your finest liner brush. You want sharp, crisp lines here to contrast with the soft, blurry grey undertones you just painted. -
Trace major pathways:
Look for the darkest or most prominent grey veins you created. Using the gold paint, trace along the edge or right through the center of these veins. -
Vary line weight:
As you paint the gold lines, alternate between pressing down for a thicker line and lifting up for a hairline fracture. I find that varying pressure creates a much more organic look than a uniform line. -
Add floating fractures:
Paint a few gold cracks that branch off from the main veins into the white space. These independent gold fissures add complexity and elegance to the overall design. -
Rim detailing:
Run a thin line of gold along sections of the bowl’s rim where the marble pattern crosses over. You don’t need a solid gold rim; broken segments look more natural. -
Review and refine:
Step back and look at the bowl as a whole. If any area looks too empty, add a tiny, faint gold vein to balance the composition.
Feather Light Touch
For the softest grey marbling, create a ‘mop’ brush by tearing the tip of a makeup sponge. Roughly dabbing the wet paint blurs harsh lines instantly.
Step 3: Sealing and Finish
-
Full cure:
Allow the metallic paint to dry completely. Liquid gold leaf can sometimes take longer to set than acrylics, so be patient. -
Apply varnish:
Apply a coat of clear, glossy ceramic sealant or varnish over the entire painted area. A high-gloss finish will simulate polished stone beautifully. -
Second coat:
For durability, especially if the bowl will hold trinkets or keys, apply a second coat of sealant once the first is dry.
Too Much Paint?
If your grey lines look too heavy or dark, quickly dab them with a crumpled damp paper towel. This lifts pigment and leaves a perfect mottled texture behind.
Your finished bowl now captures the timeless elegance of marble with a unique golden flair
Mini Story Scene Wrapped Around the Bowl
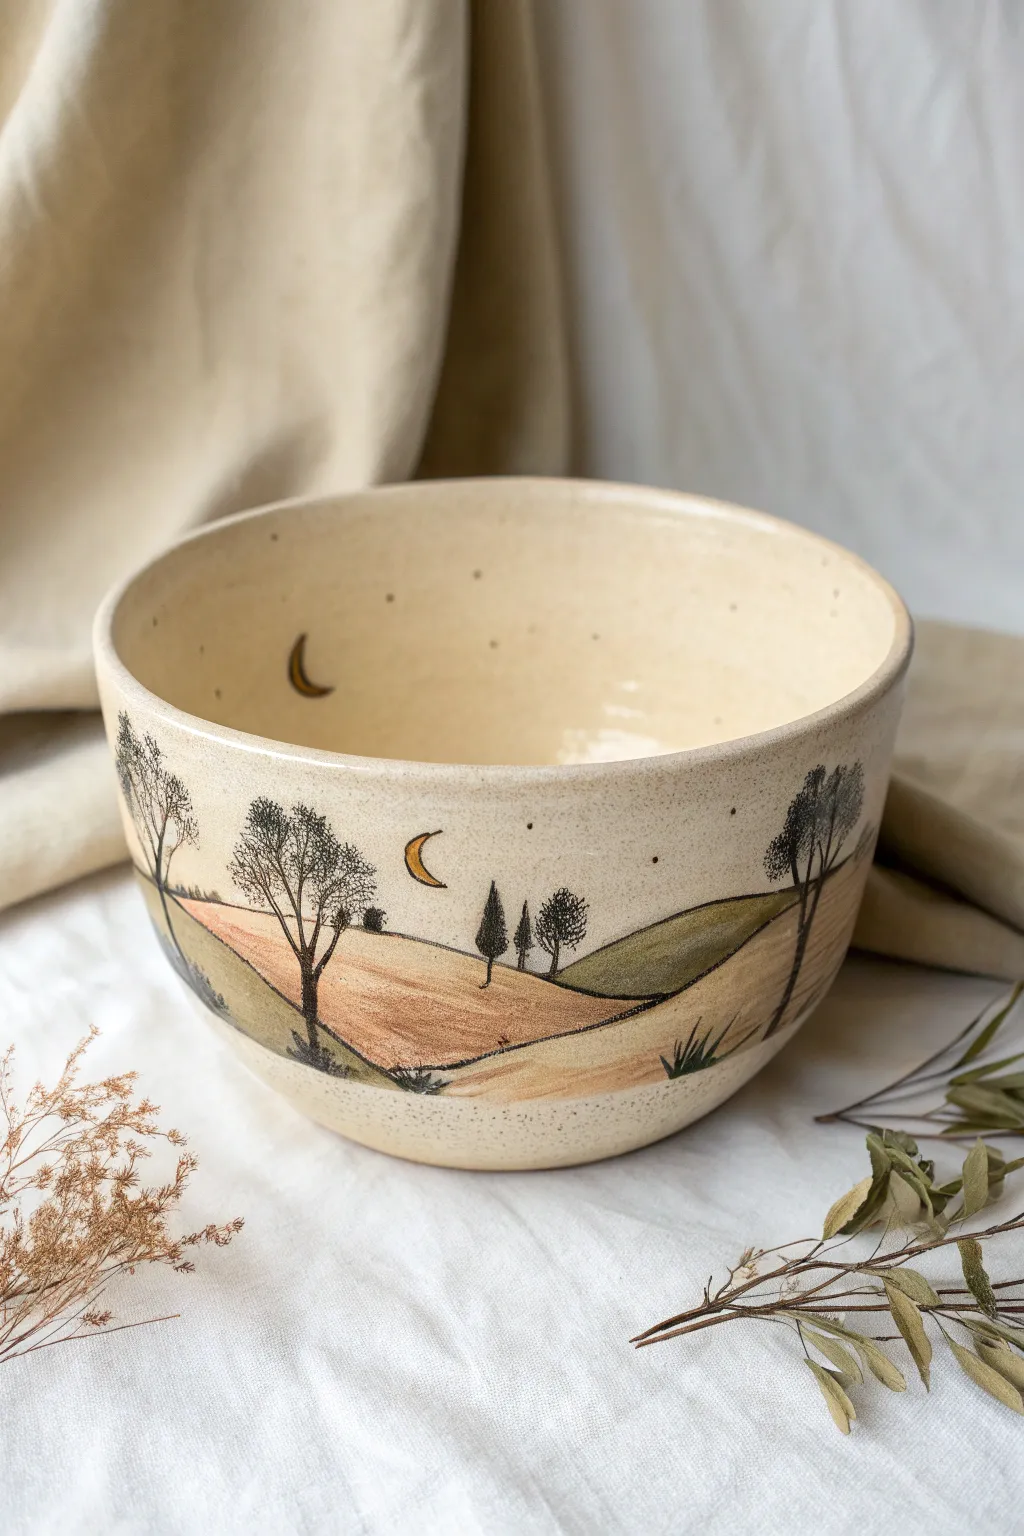
Transform a plain bisque bowl into a dreamy, wraparound storybook scene featuring rolling hills and starry skies. This project combines delicate line work with soft washes of underglaze to create a serene, folk-art inspired landscape that looks beautiful from every angle.
Detailed Instructions
Materials
- Bisque-fired ceramic bowl (light stoneware or white clay body)
- Black underglaze pencil or fine liner brush with black underglaze
- Underglazes in earthy tones: mustard yellow, sage green, terracotta, soft brown
- Small round brushes (sizes 0 and 2)
- Clear dipping or brushing glaze
- Sponge and water bowl
- Pencil (standard graphite)
Step 1: Sketching the Landscape
-
Clean surface:
Begin by wiping your bisque bowl with a damp sponge to remove any kiln dust or oils from your hands, ensuring the underglaze adheres properly. -
Map the horizon:
Using a standard graphite pencil, lightly sketch a rolling horizon line that undulates gently around the entire exterior of the bowl. Don’t worry about mistakes; the graphite will burn off in the kiln. -
Layer the hills:
Add a second and third set of rolling lines behind and in front of your main horizon to create depth and distinct ‘fields’ for your landscape. -
Position the trees:
Lightly mark vertical lines where your trees will stand. Group a few distinct, taller deciduous trees on the sides and a cluster of smaller, cypress-style trees in the distance. -
Add celestial details:
Sketch a small crescent moon on the exterior upper sky and a second matching moon on the interior wall of the bowl for a hidden surprise.
Step 2: Applying Color Washes
-
Dilute the underglaze:
On a palette, water down your earth-tone underglazes slightly. You want a watercolor consistency that allows the clay’s natural speckle to show through. -
Paint the foreground:
Fill the lowest hill sections with the terracotta or soft brown wash. Use varied brushstrokes to mimic the texture of a field. -
Color the middle ground:
Paint the next layer of rolling hills with mustard yellow. I like to let the edges of the colors touch but not heavily blend, keeping distinct zones. -
Add grassy hills:
Use the sage green for the distant or side hills. Keep the application semi-transparent to maintain that rustic, illustrated look. -
Paint the moons:
Carefully fill in both the exterior and interior crescent moons with a slightly more opaque layer of mustard yellow so they pop against the cream clay. -
Dry completely:
Allow the color washes to bone dry before moving on to the line work to prevent smudging.
Smudged Pencil Lines?
If your contour lines smear while glazing, dab the glaze on gently with a sponge for the first coat instead of dragging a brush across the surface.
Step 3: Detailing and Glazing
-
Outline the hills:
Using a sharpened black underglaze pencil (or a very fine liner brush with black underglaze), trace over your horizon lines to define the separation between fields. -
Draw deciduous trees:
Sketch the large trees using loose, scribbly motions for the leaves. Create thin, branching trunks that extend down into the colored fields. -
Draw cypress trees:
For the distance trees, draw simple, solid triangular or cone shapes with the black pencil to represent evergreens or cypress trees. -
Add texture:
Add tiny clusters of grass blades in the foreground and small dots or dashes in the fields to suggest vegetation. -
Create the starry sky:
Dot the sky area on both the outside and inside of the bowl with the black pencil to create tiny stars. Vary the spacing for a natural look. -
Outline the moons:
Give your yellow moons a crisp black outline to match the illustrative style of the trees. -
Clear glaze application:
Once all underglaze is completely dry, dip the bowl into a clear glaze (or apply three even brushed coats). If brushing, be careful not to smear the pencil lines. -
Final fire:
Fire the piece to the temperature recommended for your specific clay and clear glaze combination.
Sharpen Up
Keep a sandpaper pad nearby to sharpen your underglaze pencil frequently. A dull point makes it hard to draw delicate tree branches and stars.
Now you have a functional piece of art that reveals a quiet little world every time you sit down for a meal


Have a question or want to share your own experience? I'd love to hear from you in the comments below!