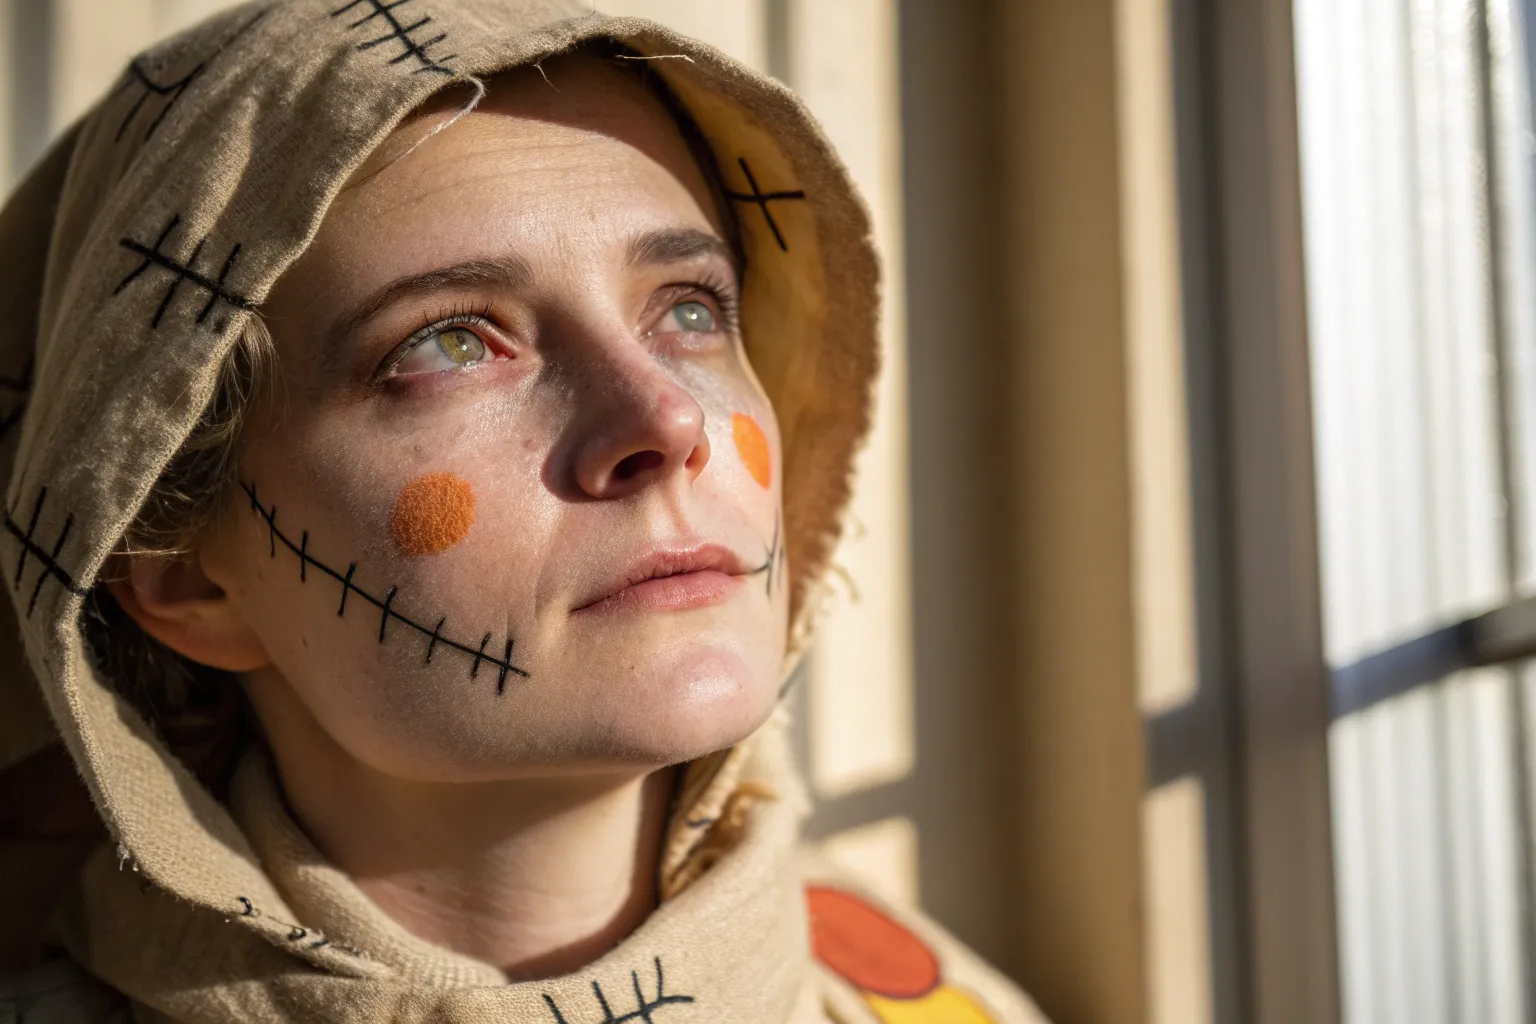
If you’re craving a face paint look that’s equal parts cozy harvest and Halloween fun, a scarecrow face paint design is such a satisfying transformation. Here are my favorite scarecrow face paint ideas—starting with the classics and drifting into more artsy, unexpected twists.
Orange Triangle Nose With Black Outline

This charming scarecrow look centers around bold geometric shapes and a classic stitched smile, perfect for fall festivals or Halloween. The design balances a dusting of white face paint with vibrant orange accents for a sweet, not-so-scary appearance.
How-To Guide
Materials
- White face paint (water-activated or cream)
- Orange face paint
- Black face paint or eyeliner pencil
- Makeup sponge
- Small round brush (size 2 or 3)
- Fine liner brush (size 0 or 1)
- Cup of water
- Paper towels
Step 1: Base and Cheeks
-
Apply the white base:
Dampen a makeup sponge and load it with white face paint. Gently sponge the color across the forehead, down the bridge of the nose, and onto the tops of the cheeks. -
Fade the edges:
As you move toward the hairline and jawline, create a transparent, feathery effect by using less paint and tapping lightly, so the skin tone shows through naturally. -
Outline cheek triangles:
Using a small round brush and light strokes of orange paint mixed with a tiny bit of brown (or just a darker orange), draw an inverted triangle on each cheek. -
Fill the cheeks:
Switch back to your sponge or a larger brush to fill in these cheek triangles with bright orange paint. -
Outline in brown:
Mix a small amount of black into your orange to create a warm brown tone. Use a fine brush to carefully outline the orange triangles on the cheeks. -
Add the forehead detail:
Repeat the previous process on the center of the forehead: paint a larger inverted orange triangle, filling it in solidly. -
Outline the forehead:
Using your fine brush and the custom brown mix, outline the forehead triangle to match the cheeks.
Step 2: The Nose
-
Shape the nose:
Load a round brush with bright orange paint. Paint a rounded triangle shape over the tip of the nose, extending slightly up the bridge. -
Saturate the color:
Apply a second coat of orange to the nose if needed to ensure it completely covers the skin tone and stands out against the white background. -
Outline the nose shape:
Take your brown mixture (or a dedicated brown paint) and outline the sides and top of the orange nose shape. -
Create the black tip:
Using pure black paint and a small brush, paint a smaller, sharp triangle right in the center of the orange nose section, pointing upward.
Smudged Lines?
If your black lines bleed into the orange, wait for the orange base to fully dry first. Use a slightly drier brush for the black details to keep lines crisp.
Step 3: Stitches and Details
-
Draw the mouth line:
With black paint and a thin liner brush, draw a horizontal line extending from the corners of the mouth outward toward the jawline. -
Add vertical stitches:
Along the painted mouth line and across the lips themselves, paint short, vertical hatch marks to create the classic sewn-mouth look. -
Vary stitch length:
I prefer to make the stitches slightly longer in the middle of the lips and shorter as they move outward for a more organic feel. -
Dot the cheeks:
Dip quite a bit of black paint onto the end of a brush handle or use a dotting tool. Press a line of dots originating from the end of the mouth line, curving slightly upward onto the cheek. -
Repeat on the other side:
Mirror the dotted line on the opposite cheek to balance the design. -
Chin detail:
Paint a few vertical dash marks on the center of the chin to simulate extra stitching. -
Final dots:
Finish the look by adding a small trail of three or four black dots descending from the chin stitching.
Add Texture
To make the scarecrow look worn, use a dry sponge with a tiny bit of brown paint to dab light ‘dirt’ patches on the nose and forehead.
Now you have a wonderful, handcrafted scarecrow face ready for harvest celebrations


Glam Scarecrow Eyes With Warm Sparkle
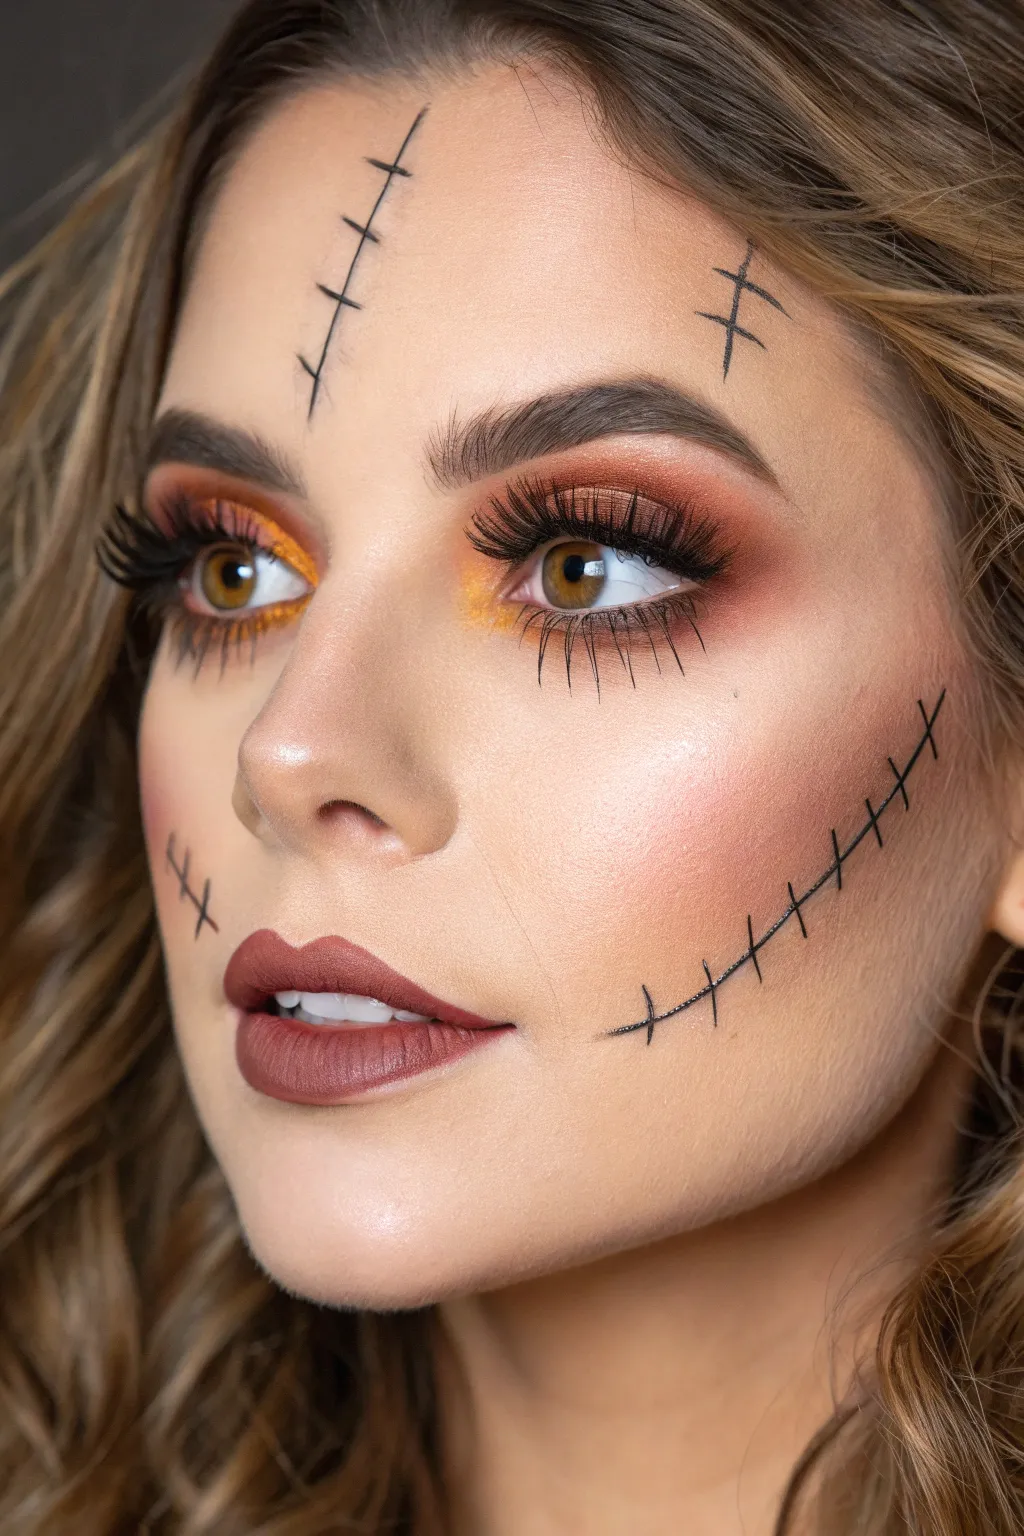
Elevate your Halloween look with this sophisticated take on a classic scarecrow design, featuring warm, sunset-hued eyes and precise stitch detailing. This makeup balances festive fun with genuine beauty, proving that spooky season can still be incredibly chic.
Step-by-Step Guide
Materials
- Full coverage foundation
- Concealer
- Setting powder
- Warm orange matte eyeshadow
- Dark chocolate brown eyeshadow
- Gold shimmer or loose pigment
- Black gel or liquid eyeliner
- Orange blush
- Matte terracotta or brick-red lipstick
- False eyelashes (voluminous style)
- Small detailing brush
- Fluffy blending brushes
- Mascara
Step 1: Flawless Base & Warm Glow
-
Prep and prime:
Start with a clean, moisturized face. Apply a full-coverage foundation to create a blank canvas, ensuring any redness is neutralized so the orange tones pop. -
Conceal and brighten:
Apply a brightening concealer under the eyes and set the entire face with a translucent powder to prevent the eyeliner stitches from bleeding later. -
Orange flush:
Instead of a traditional contour, sweep a generous amount of orange blush across the apples of your cheeks and blend it upwards toward your temples for a warm, autumnal flush. -
Nose emphasis:
Lightly dust the same orange blush over the tip of your nose to subtly mimic the ‘button nose’ scarecrow trope without needing a full painted patch.
Step 2: Sunset Eyes
-
Crease definition:
Using a fluffy blending brush, buff a warm matte orange eyeshadow through the crease, diffusing the edges high up toward the brow bone. -
Deepen the outer corner:
Pack a dark chocolate brown shadow onto the outer third of the eyelid, blending it into the orange crease shade to create dimension and depth. -
Add the sparkle:
Press a metallic gold shimmer or loose pigment onto the center and inner third of the eyelid. Wetting your brush with setting spray first will intensify the metallic foil effect. -
Lower lash line:
Run the matte orange shadow along your lower lash line from corner to corner. I like to smoke this out quite a low for a dramatic, wide-eyed look. -
Inner corner highlight:
Pop a bright yellow-gold shimmer into the inner tear duct to open up the eyes.
Stay Steady
Rest your pinky finger on your cheek while drawing the fine stitch lines. This anchors your hand and prevents shakiness, giving you much cleaner, sharper lines.
Step 3: Lash Drama
-
Apply mascara:
Coat your natural top and bottom lashes with black mascara to create a base for the falsies. -
Upper lashes:
Apply a strip of voluminous, fluffy false lashes to the upper lash line. Look for a style that is longer in the center to create a ‘doll-eye’ effect. -
Drawn-on lower lashes:
Using a fine-tip liquid liner, draw exaggerated straight lines extending straight down from your lower lash line. Make the center ones longest and shorten them as you move outward.
Level Up: Patchwork
Use a white eyeliner pencil to highlight slightly next to the black stitch lines. This creates a 3D illusion, making the skin look slightly raised or pinched.
Step 4: Stitches & Lips
-
Forehead stitch:
With your black liquid liner or a detail brush dipped in gel liner, draw a thin, vertical wavy line down the center of your forehead. Add 4-5 small horizontal tick marks across it. -
Temple detail:
Draw another smaller stitch set on one side of your forehead near the hairline. -
Cheek stitches:
Start at the corner of your mouth and draw a curved line extending up toward your ear on both cheeks, following the natural shadow of your cheekbone. -
Cross-hatching:
Add the ‘thread’ marks by drawing short cross-lines along the main cheek line. Vary the angles slightly so it looks hand-stitched rather than perfectly uniform. -
Chin accents:
For balance, create a small ‘X’ or a tiny stitched line on one side of your chin. -
Lip application:
Apply a matte terracotta or brick-red liquid lipstick. Clean up the edges with concealer for a crisp finish that contrasts with the rough stitch lines.
Finish with a generous mist of setting spray to lock your golden glamour in place for the whole night


Half-Face Scarecrow for Quick Results
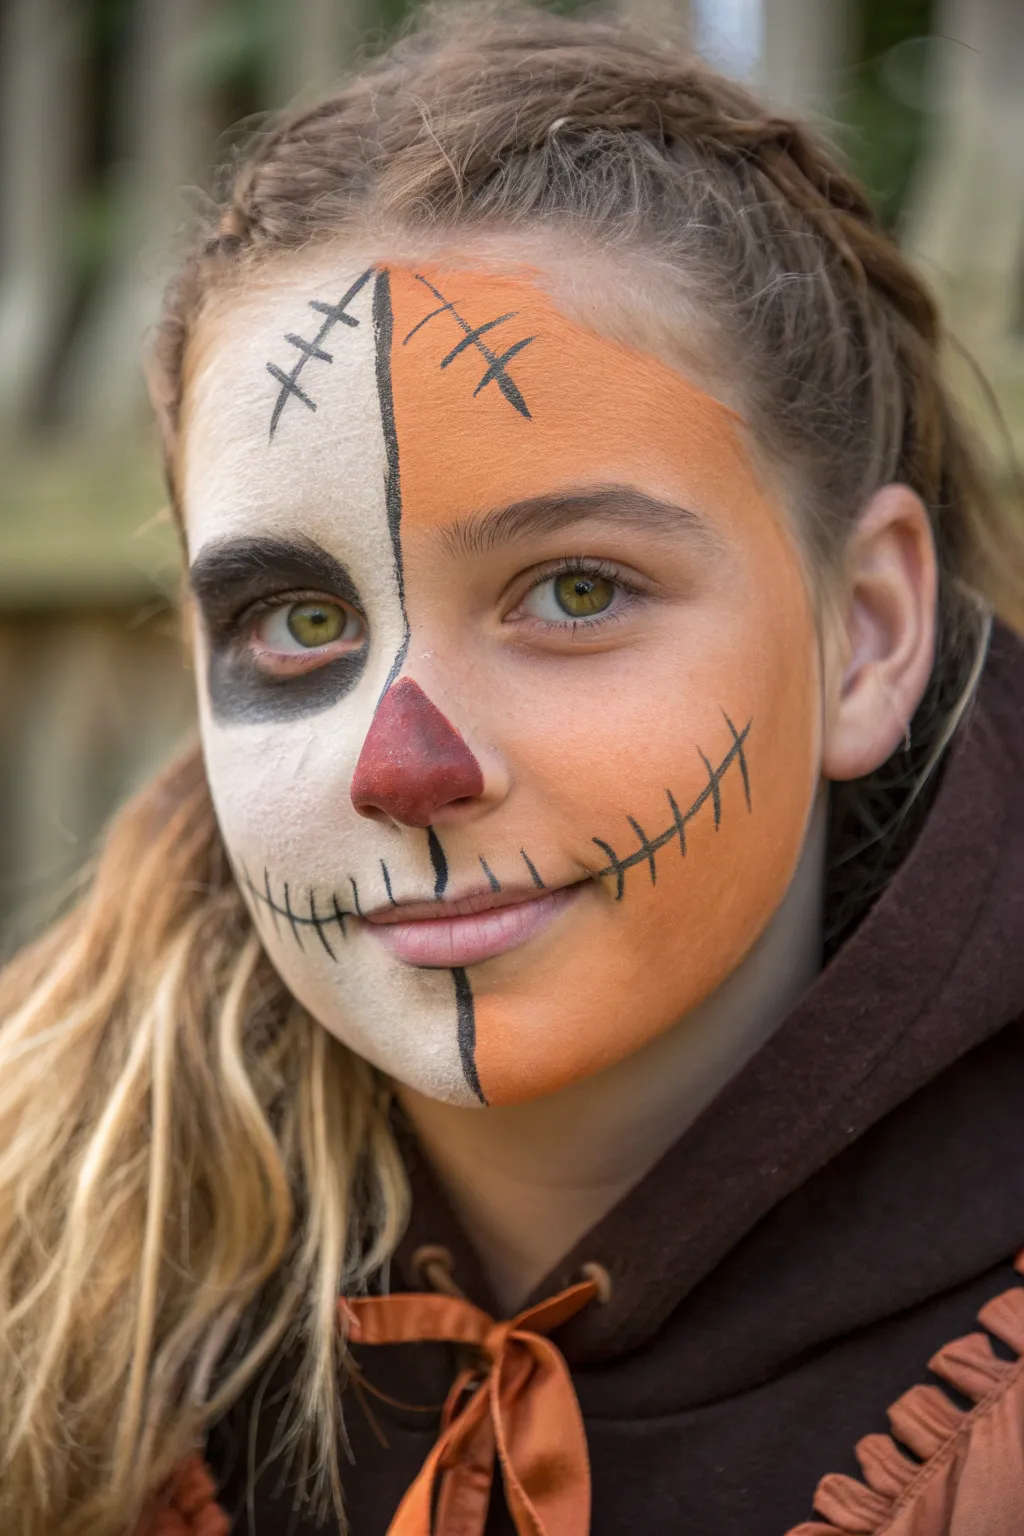
Achieve a striking Halloween look with this split-face scarecrow design that balances spooky and sweet. This design cleverly divides the face into distinct orange and white sections, connected by a classic stitched mouth and a cute patchwork nose.
Step-by-Step
Materials
- White cream face paint or water-activated cake makeup
- Orange cream face paint or water-activated cake makeup
- Black face paint (detail consistency)
- Red or maroon face paint
- High-density makeup sponge (cut in half)
- Flat foundation brush
- Fine liner brush (size 1 or 2)
- Small round brush (size 4)
- Setting powder
- Powder puff or soft brush
Step 1: Laying the Base
-
Divide the canvas:
Visualize a vertical line running straight down the center of the face. This imaginary line will guide your color application, splitting the forehead, nose, and chin evenly. -
Apply the white base:
Load a slightly damp sponge or flat foundation brush with opaque white face paint. Cover the entire right side of the face (the subject’s right), stopping precisely at that center line. Ensure smooth, even coverage, especially around the eye area, but leave the tip of the nose bare. -
Apply the orange base:
Switch to a fresh sponge or brush and load it with bright orange paint. Fill in the entire left side of the face (the subject’s left), creating a sharp vertical border where it meets the white paint down the center. -
Set the foundation:
Once the base colors are touch-dry, lightly dust translucent setting powder over the entire face. This prevents the colors from bleeding into each other during the detailing phase.
Step 2: Creating the Features
-
Paint the eye background:
On the white side of the face, use a round brush with black paint to create a dark, recessed eye socket. Outline a rough circle or soft triangle shape around the eye, extending just above the eyebrow and below the lower lid. -
Fill the eye patch:
Fill in this shape with solid black. Feather the edges slightly outward with a dry brush or sponge edge to make it look a bit worn rather than perfectly geometric. -
Shape the nose:
Using a small brush and deep red or maroon paint, draw a classic triangle on the tip of the nose. The top point should sit on the bridge, and the base should cover the nostrils. -
Fill the nose patch:
Fill the triangle with the red paint. Because the nose can be oily, I like to dab this on rather than swipe to build better opacity.
Smudge Control
If the black line work smudges into the white base, wait for it to dry completely, then carefully dab a tiny amount of white paint over the mistake to erase it.
Step 3: Stitching it Together
-
Draw the center seam:
Load a fine liner brush with black paint. Carefully draw a thin vertical line right down the center of the face where the orange and white paints meet, running from the hairline to the nose, and from the nose to the chin. -
Extend the smile:
Starting from the corners of the mouth, draw thin black lines extending outward towards the ears on both cheeks. Curve them slightly upward to create a wide, stitched grin. -
Add mouth stitches:
Along the smile lines and across the lips themselves, paint short, vertical hatch marks. Make them slightly uneven in length and spacing to mimic rough, hand-sewn thread. -
Outline the nose:
Use the liner brush to outline the red nose triangle with a thin black line, giving it that distinct ‘patch’ appearance. -
Detail the forehead:
On the upper forehead, paint two angled distinct black lines that look like loose threads or cracks. Add small hash marks across these lines to turn them into stitches. -
Add final stitch details:
Add a few small cross-hatch stitches on the white side, perhaps near the temple or cheek, to balance any empty space. -
Define the brows:
On the orange side, use a brown or black brow pencil to gently fill in the natural eyebrow so it doesn’t get lost against the bright background color.
Fabric Texture
Press a piece of burlap or fishnet stocking against the wet paint on the orange side to lift a little color and create an authentic fabric-like texture.
Pair this look with a flannel shirt or a burlap hood and you are ready for the cornfield


Patchwork Jawline Stitch Border
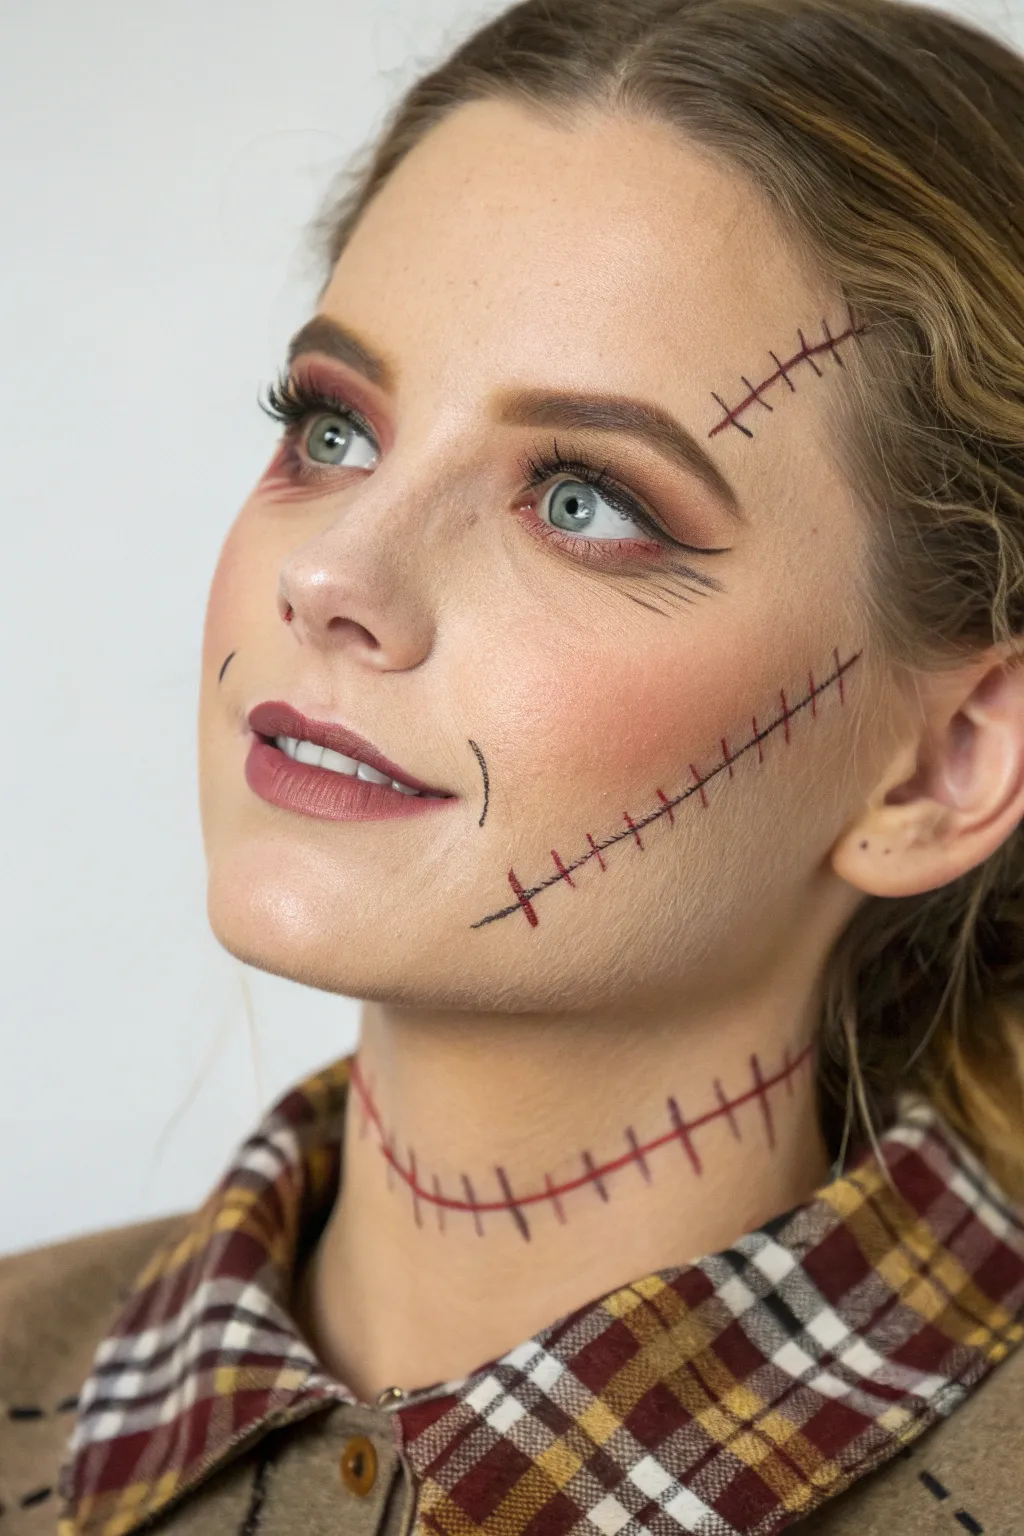
This classic scarecrow look balances beauty with a touch of the rustic, featuring bold stitch lines that frame the face and neck. The makeup uses warm, autumnal tones and crisp black detailing to create an illusion of fabric-like skin that looks great for Halloween or fall festivals.
Detailed Instructions
Materials
- Matte foundation (match your skin tone)
- Black liquid eyeliner (fine tip)
- Black pencil eyeliner
- Deep red or burgundy lip liner
- Matte lipstick (mauve or dusty rose shade)
- Warm brown eyeshadow palette
- Angled eyeliner brush
- Blush (peach or coral)
- Red face paint or body crayon
- Setting spray
Step 1: Base and Eyes
-
Prep the canvas:
Start with a clean, moisturized face. Apply a matte foundation all over to create an even, doll-like base. Since scarecrows are made of cloth, avoid dewy finishes; a powder set can help achieve that dry fabric look. -
Defined brows:
Using a brow pencil or powder that matches your hair color, fill in your eyebrows. Define the arch clearly, making them look structured but not overly harsh. -
Warm shadow wash:
In the crease of your eyelid, blend a warm, reddish-brown eyeshadow. This adds depth and ties into the overall autumnal color palette. -
Lid highlight:
Pat a lighter, champagne or soft peach shadow onto the center of the movable eyelid to brighten the eyes. -
Upper lash line:
Draw a sleek line of black liquid eyeliner along your upper lash line. Extend it slightly at the outer corner for a very subtle, clean wing. -
Lower detailed lashes:
Instead of lining the waterline completely, use your fine-tip liquid liner to draw three to five distinct, individual ‘lashes’ extending downward from the outer lower lash line. This mimics a doll or stitched toy aesthetic.
Shadow for Depth
Add a thin line of white eyeliner right next to the black stitch lines. This highlight creates a 3D effect, making the ‘stitches’ look raised against the skin.
Step 2: Cheeks and Lips
-
Rosy flush:
Apply a generous amount of peach or coral blush to the apples of your cheeks. Blend it upward slightly, but keep the focus on the round part of the cheek for that fresh-faced scarecrow charm. -
Lip contouring:
Outline your lips with a deep red or burgundy lip liner. Fill in the corners slightly to create dimension. -
Lip color:
Apply a mauve or dusty rose matte lipstick to the center of the lips, blending it into the liner for a soft gradient. -
Corner accents:
Using your black liquid liner, draw thin, curved lines extending outward from both corners of your mouth. Add small hash marks across these lines to create a stitched smile effect.
Fabric Texture
Use a piece of fishnet stocking as a stencil. Hold it against your forehead or cheek and pat brown eyeshadow over it to create a burlap fabric texture on your skin.
Step 3: Stitch Detailing
-
Jawline stitch placement:
For the main feature, take the black liquid liner and draw a long, slightly curved line starting from the jawline and moving diagonally up toward the cheekbone on one side of the face. -
Crossing the stitches:
Along this black line, draw short perpendicular hash marks. I find it works best to spacing them unevenly to make it look like hand-sewn fabric. -
Adding the red thread:
Take a red face paint crayon or a fine brush with red paint. Very carefully, trace over the black stitch lines you just made. You want the black to peek through slightly as a shadow, making the red ‘thread’ pop. -
Forehead detail:
Repeat the stitching process on the opposite side of your forehead. Draw a diagonal line near the hairline, add the hash marks in black, and then trace over with red. -
Neck border:
Draw a horizontal stitch line across the middle of your neck. Curve it slightly upwards at the ends to follow the natural contour. -
Neck coloring:
Just like the face, add the cross-hatches in black first, then layer the red paint on top. This creates the illusion that your head is sewn onto your body. -
Final touches:
Check for any smudges. If you want added texture, you can add tiny faux freckles across the nose and cheeks using a brown brow pencil. -
Set the look:
Mist your entire face with a setting spray to lock the design in place, ensuring your stitches stay sharp all day.
Now you are ready to head out with a look that is equal parts charming and crafty
BRUSH GUIDE
The Right Brush for Every Stroke
From clean lines to bold texture — master brush choice, stroke control, and essential techniques.
Explore the Full Guide
Scarecrow Doll Look With Overlined Lips
This charming makeup look bridges the gap between a classic scarecrow and a porcelain doll, focusing on warm sunset tones and dramatic stitching details. It creates a soft yet spooky character perfect for Halloween or costume parties.
How-To Guide
Materials
- Matte pale foundation
- Setting powder
- Warm red eyeshadow
- Bright orange eyeshadow
- Yellow or gold eyeshadow
- Black liquid eyeliner (fine tip)
- Black pencil liner
- Deep berry or burgundy liquid lipstick
- Pinkish-red powder blush
- False eyelashes (top)
- Small detail brush
- Blending brushes
Step 1: Base and Cheeks
-
Prep the canvas:
Begin with a clean, moisturized face. Apply a full-coverage matte foundation that is one to two shades lighter than your natural skin tone to create that doll-like porcelain effect. -
Set the base:
Generously powder your face with a translucent setting powder to lock the foundation in place and create a completely shine-free surface. -
Apply the blush:
Take a fluffy blush brush and load it with a pigmented pinkish-red blush. Apply it heavily to the apples of your cheeks, blending it outward in large circles. Don’t be shy; you want a very exaggerated, flushed look. -
Add faux freckles:
Using your liquid eyeliner or a brown brow pencil, gently dot a few freckles on your upper cheeks. Keep them sparse and deliberate, including a slightly larger ‘beauty mark’ style dot if desired.
Clean Lines
For the stitches, rest your pinky finger on your cheek as an anchor. This steadies your hand, ensuring the thin lines stay straight and precise.
Step 2: Sunset Eyes
-
Prime the lids:
Apply an eyeshadow primer to ensure the bright colors pop and stay vibrant. -
Apply red crease shade:
Using a blending brush, sweep the warm red eyeshadow through your crease, extending it slightly upward toward the brow bone. -
Build the gradient:
Pack the bright orange eyeshadow onto the center of the lid, blending it seamlessly into the red crease color. -
Highlight inner corner:
Apply the yellow or gold eyeshadow to the inner corner of the eye and blend it slightly toward the center to complete the sunset gradient effect. -
Define the lash line:
Draw a thin line of black liquid liner across your upper lash line. You can add a small wing at the outer corner to elongate the eye shape. -
Apply lashes:
Attach a pair of voluminous false lashes to your upper lash line using lash glue. Once dry, coat your natural lashes with mascara to blend them in.
Smudging Eyeliner?
If your liquid liner smudges while drawing the stitches, wait for it to dry completely, then use a tiny detail brush with concealer to clean up the edges.
Step 3: Lips and Stitching Details
-
Outline the lips:
Using your deep berry liquid lipstick or a matching lip liner, trace the shape of your lips. Overline the cupid’s bow and bottom lip slightly to create a fuller, doll-like pout. -
Fill in the lips:
Fill in the rest of your lips with the matte berry lipstick, ensuring the edges are crisp and clean. -
Extend the smile:
Take your fine-tip black liquid eyeliner and draw a thin line extending from the corners of your mouth outward toward your ears, following the natural curve of a smile. -
Add mouth stitches:
Draw small vertical hatch marks along the extended smile lines and a few directly over your lips near the corners to create the stitched appearance. -
Stitch the forehead:
Draw a curved line on one side of your forehead. Add the same vertical cross-hatch marks along this line to mimic a sewn-on patch of fabric. -
Detail the brow:
Intensify your natural brows with a dark brow pomade or pencil to frame the face and balance the heavy eye makeup.
Now you are ready to head out with a look that is equal parts adorable and autumnal
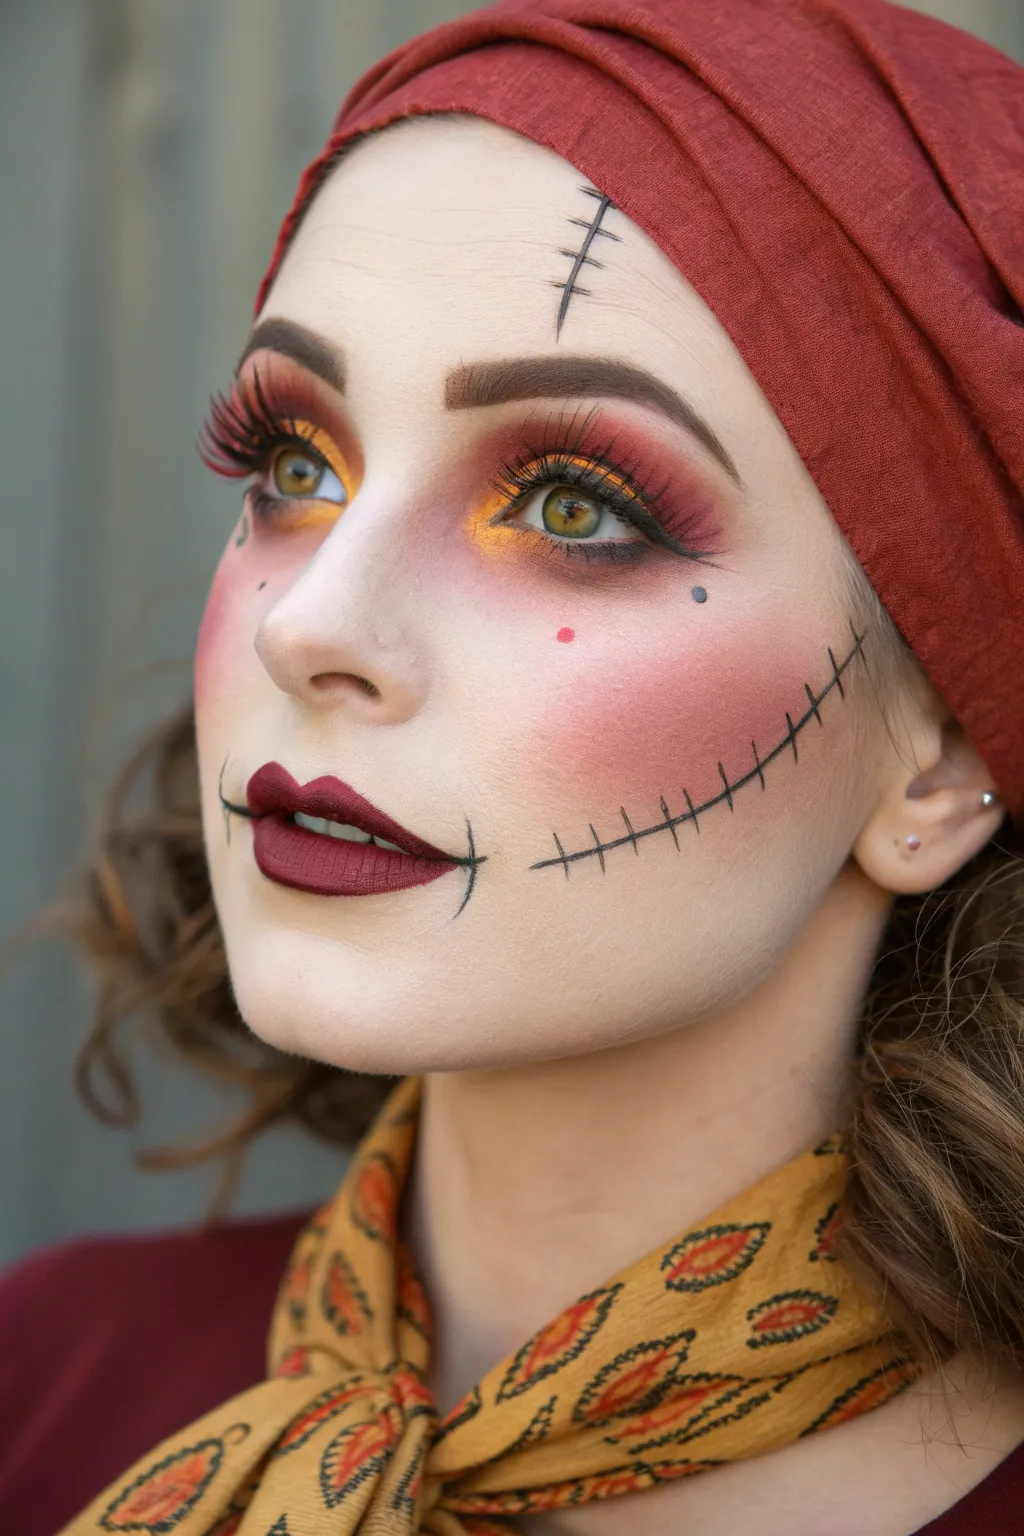
Rotting Burlap and Torn Seams Effect
Transform into an eerie harvest figure with this detailed scarecrow makeup tutorial, featuring realistic stitched details and a textured burlap finish. The look balances spooky hollow eyes with soft, earthy tones for a costume that is both haunting and beautiful.
How-To Guide
Materials
- Light cream makeup or very pale foundation
- Translucent setting powder
- Brown, black, and red cream face paints
- Eyeshadow palette (matte browns, black, and deep red)
- Black liquid eyeliner or fine tip face paint brush
- Makeup sponge or beauty blender
- Stipple sponge
- Large burlap fabric strip (for headband)
- Small blending brushes
- Lip balm
Step 1: Base and Texture
-
Prep the skin:
Start with a clean, moisturized face. Apply a thin layer of primer to ensure the heavy makeup sits comfortably and lasts all night. -
Apply the pale base:
Using a movement sponge, sponge on a light cream makeup or a very pale foundation all over the face. You don’t need perfect opacity; a slightly uneven application adds to the worn, fabric-like effect. -
Create burlap texture:
To mimic the weave of burlap, verify your base is slightly tacky. Take a stipple sponge with a tiny amount of light brown paint and gently dab it across the forehead, cheeks, and chin to create a subtle, cross-hatched texture. -
Set the base:
Dust the entire face generously with translucent setting powder to lock in the cream makeup and create a matte, dry fabric finish.
Smudging Lines?
If your black stitch lines are smudging into the base, switch to a waterproof liquid eyeliner pen instead of cream paint for the fine details. It dries instantly.
Step 2: Eyes and Nose
-
Darken the sockets:
Apply dark brown shadow or cream paint all over the eyelids, extending slightly above the crease and under the lower lash line. This creates the hollowed-out look. -
Deepen the shadows:
Blend black eyeshadow into the very center of the lids and tightly along the lash line to add depth. -
Add irritation details:
Using a small brush, blend a reddish-pink shadow or cream paint just beneath the lower lash line and at the tear ducts. This makes the eyes look raw and spooky. -
Define the nose:
Paint the tip of the nose with a dusty pink or soft red cream paint. I always blend the edges outward slightly so it doesn’t look like a clown nose, but rather like a stained patch of fabric. -
Outline the patch (optional):
If you want a more defined nose patch, use a thin brown line to encircle the pink area, but keeping it soft looks more realistic for this specific style.
Step 3: Stitching and Details
-
Draw the mouth extension:
Using black liquid liner or black face paint on a fine brush, draw a thin line extending from the corners of your mouth out toward your ears. -
Add mouth stitches:
Paint short, vertical hash marks across the mouth extension line. Vary the length and angle slightly so they look hand-sewn and jagged. -
Create the forehead seam:
Draw a diagonal line across your forehead. Make it slightly wavy to resemble a tear in the fabric. -
Stitch the forehead:
Add perpendicular distinct hash marks across the forehead line, making these stitches larger and bolder than the ones on the mouth. -
Cheek stitches:
Create a curved line of small, vertical dash marks (without a connecting horizontal line) horizontally across the cheekbones to simulate a hemline. -
Highlight the thread:
Take a tiny amount of white or light cream paint and add a minuscule highlight next to each black stitch mark to give the ‘thread’ 3D dimension.
Textured Skin Hack
Press a piece of dried sea sponge or coarse gauze onto the wet base paint before powdering. This imitates the rough weave of burlap fabric perfectly.
Step 4: Finishing Touches
-
Enhance shading:
Use a fluffy brush and matte brown eyeshadow to contour heavily under the cheekbones, temples, and jawline, simulating dirt and shadows on the mask face. -
Prep the headband:
Take a strip of raw burlap fabric. Pull at the edges to fray them intentionally, creating loose strands and a rugged look. -
Wrap the head:
Tie the burlap strip around the forehead, covering the hairline. Ensure some stray hairs poke through or around it for a messy, unkempt vibe.
You are now ready to head out into the fields with a beautifully terrifying look that captures the spirit of the season

PENCIL GUIDE
Understanding Pencil Grades from H to B
From first sketch to finished drawing — learn pencil grades, line control, and shading techniques.
Explore the Full Guide
Harvest Palette Ombré Patchwork Face
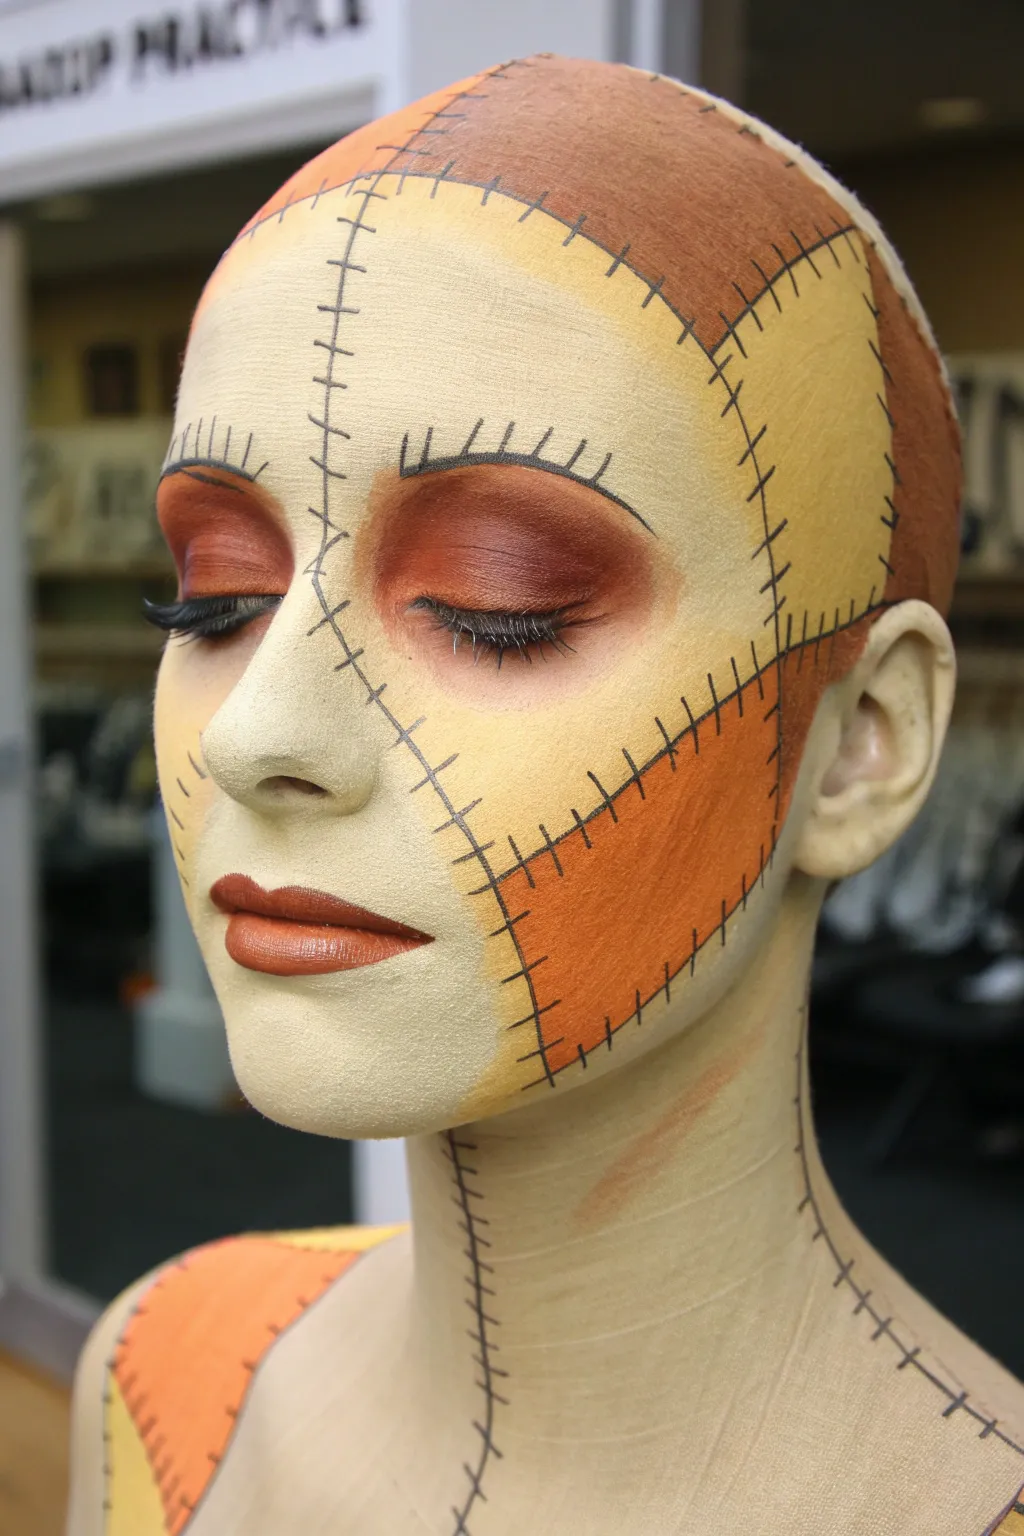
Embrace the rustic charm of autumn with this sophisticated take on a classic scarecrow look, featuring soft cream and burnt orange hues. This design uses color blocking and precise stitch work to create a beautiful, fabric-like illusion that feels more high-fashion than spooky.
How-To Guide
Materials
- Cream or ivory face paint (water-activated or cream)
- Burnt orange face paint
- Warm brown face paint
- Mustard yellow face paint
- Black liquid eyeliner or fine detail brush with black aquacolor
- Flat foundation brush
- Medium eyeshadow blending brush
- Matte setting powder (translucent)
- Burnt orange matte eyeshadow
- Dark brown matte eyeshadow
- False eyelashes and lash glue
- Lipstick in a warm terracotta or brick shade
- Makeup sponge/beauty blender
Step 1: Planning the Patchwork
-
Map out the sections:
Visualize your face as pieces of fabric sewn together. Using a very light eyeliner pencil or a pale brush stroke, faintly sketch dividing lines across the face: one down the center of the forehead curving past the nose, one across the cheek, and large sections on the neck and chest. -
Base layer application:
Start with your lightest color, the cream or ivory. Fill in the center panel of the face, covering the nose, chin, and the center of the forehead. Use a sponge for an even, opaque finish. -
Apply the orange panels:
Fill in the cheek area and sections of the shoulder with the burnt orange paint. Use a flat brush to keep the edges relatively crisp where they meet the cream sections. -
Add darker accents:
Paint the remaining sections—like the top sides of the forehead or parts of the neck—with the warm brown or mustard yellow paints to create variety in your patchwork quilt. -
Set the base:
Once the paint is dry to the touch, gently press translucent setting powder over the entire face to prevent smudging and create a fabric-like matte texture.
Uneven Patches?
Don’t worry if your color blocks overlap or look messy at the edges. The thick black stitch lines you add at the end will cover the seams and hide any imperfections perfectly.
Step 2: Eye and Lip Detail
-
Lay down base shadow:
Load a fluffy blending brush with burnt orange eyeshadow. Pack this color onto the entire eyelid, extending it up past the crease towards the brow bone. -
Deepen the crease:
Taking the dark brown matte eyeshadow, blend it into the outer corners and the crease of the eye to add dimension and a slightly hollowed, dolly look. -
Define the brows:
Instead of a natural brow, draw short, vertical hatch lines directly over your eyebrows using black liner to mimic rough stitching or straw poking through. -
Apply false lashes:
Apply a strip of dramatic false lashes to the upper lid. Because this is a doll-like look, you don’t need to blend them perfectly with natural lashes; the artificiality works in your favor here. -
Paint the lips:
Fill in the lips with a terracotta or brick-colored lipstick. Keep the shape defined but classic.
Detail Pro Tip
Vary the length and angle of your stitch marks slightly.
Step 3: Stitching the Look Together
-
Draw the main seams:
Using a fine liner brush with black face paint or a liquid eyeliner pen, trace over the boundaries where your different colors meet. Keep the line thickness consistent. -
Create the stitches:
Along every black seam line, draw small perpendicular hash marks about a half-centimeter apart. Make them look slightly irregular to mimic hand-sewn fabric. -
Add floating stitches:
On the forehead and cheeks, add a few ‘floating’ stitch lines that curve independently, as if a patch was sewn on top of another patch in the same color. -
Detail the neck:
Continue the black seam lines down the neck and onto the decolletage, separating the cream, brown, and orange sections on your body. -
Refine the patchwork:
Check the intersections where lines cross. I find it helpful to make the hash marks slightly bolder at these junctions to visualize the tension in the ‘fabric’. -
Add fabric texture (optional):
If you want extra realism, take a dry stipple sponge with a tiny amount of brown paint and very lightly texture the cream sections to look like burlap.
Now you are ready with a whimsical, hand-crafted appearance.
Avant-Garde Scarecrow With Exaggerated Seams
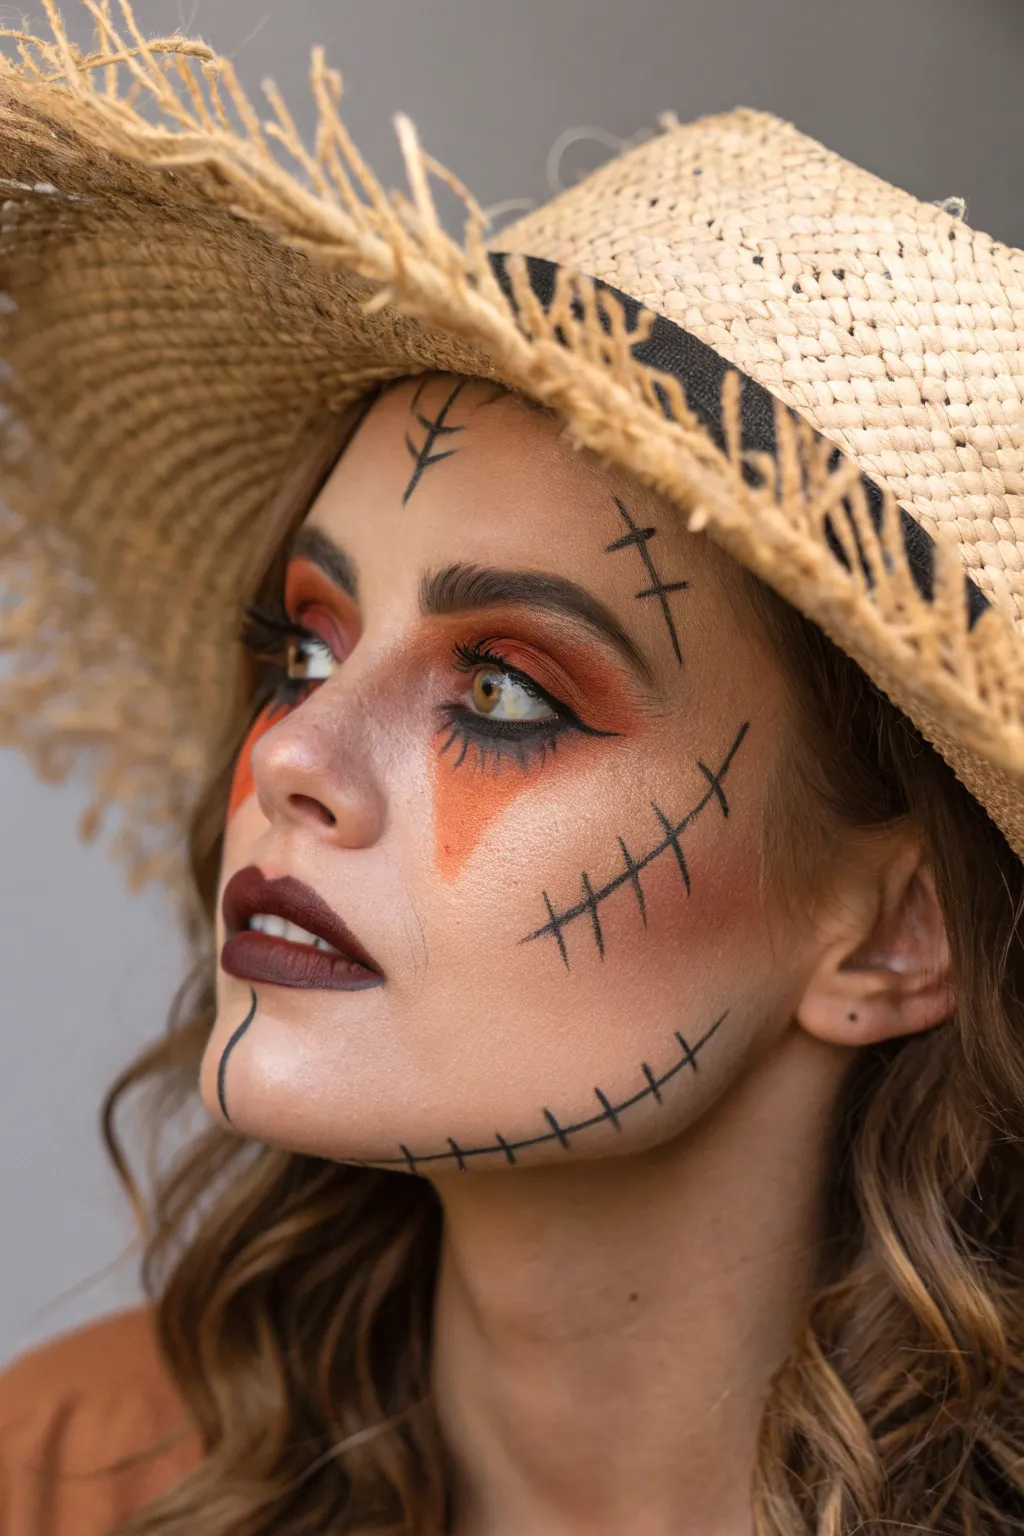
Elevate the classic scarecrow concept into high-fashion territory with this polished, avant-garde makeup look. Featuring warm autumnal tones, precise stitching details, and a flawless base, this design balances spooky and chic perfectly.
Step-by-Step Guide
Materials
- Full-coverage liquid foundation
- Concealer
- Setting powder
- Warm bronzer or contour powder
- Orange cream paint or highly pigmented eyeshadow
- Rust/burnt orange eyeshadow
- Black gel liner or liquid eyeliner pen
- Dark burgundy or brown matte lipstick
- Dark brown eyebrow pencil
- Mascara
- Small detail brush
- Fluffy blending brush
- Flat shader brush
- Straw hat (accessory)
Step 1: The Flawless Base & Warmth
-
Even out the canvas:
Begin with a clean, moisturized face. Apply your full-coverage foundation using a damp beauty sponge or buffing brush to create a smooth, unified complexion that will let the details pop. -
Conceal and brighten:
Apply concealer under the eyes and on any blemishes. Blend it out well, ensuring there are no harsh lines, and set your base lightly with a translucent powder to prevent creasing. -
Sculpt the face:
Using a matte bronzer, contour heavily under the cheekbones, along the temples, and under the jawline. We want a defined, slightly angular look to mimic the structure of a burlap face.
Step 2: Sunset Eyes & Patches
-
Lay down the eyeshadow base:
Take a fluffy blending brush and sweep a rust or burnt orange eyeshadow all over the lid, diffusing it high up toward the brow bone and outward toward the temples. -
Create the orange triangles:
Switch to a flat shader brush and dip into your vivid orange cream paint or packed eyeshadow. Draw an inverted triangle shape beneath each eye, extending halfway down the cheek. -
Soften the edges:
Gently buff the edges of these orange triangles into your skin so they don’t look like stickers, but rather like stained or painted fabric patches. -
Deepen the crease:
Add dimension by blending a darker brown shade into the outer V of the eyelid, merging it seamlessly into the orange tones. -
Define the lash line:
Draw a sharp, classic winged liner using black gel or liquid liner. Keep the wing extending parallel to the orange shading for a fierce, lifted effect. -
Brighten the waterline:
Run a nude or white pencil through your lower waterline to open up the eyes, giving the doll-like scarecrow wide-eyed appeal. -
Lashes and brows:
Apply generous mascara to upper and lower lashes. Fill in brows definitively with a dark brown pencil; brush the hairs upward for a feathery, modern texture.
Smudged lines?
If your liquid liner bleeds, wait for it to dry completely, then use a tiny flat brush with concealer to crisp up the edges.
Step 3: Stitching & Lips
-
Map the stitches:
Using a fine-tip liquid liner or a detail brush with black face paint, lightly mark where your ‘seams’ will go. I like to place one stitch mark on the forehead, one on the cheek, and a line extending from the mouth. -
Draw the main threads:
Draw the main black lines. Create a small cross-stitch pattern on the forehead and the upper cheekbone area. Keep the lines thin and precise. -
Create the mouth extension:
Extend a thin black line from the corners of your mouth outward across the cheeks, following the natural curve of your jaw. -
Cross-stitch the mouth:
Add small vertical hash marks along the mouth extension line you just drew. Vary their lengths slightly to make it feel hand-sewn rather than mechanically perfect. -
Paint the lips:
Fill in your lips with a deep burgundy or dark brown matte lipstick. Ensure the edges are crisp. -
Chin detail:
Draw a single vertical line from the center of your bottom lip down to the chin, curving it slightly to one side. -
Final forehead details:
Add a small, abstract branch-like stitch symbol on the center of the forehead, just above the brows, for an extra occult touch. -
Set the look:
Mist the face with a setting spray to lock the details in place, ensuring your stitches don’t smudge throughout the night. -
Accessorize:
Finish by placing a frayed straw hat on your head, framing the face and completing the rustic character.
Texture It
Use a stipple sponge with a tiny bit of darker brown paint lightly over the orange patches to mimic rough burlap fabric texture.
Now you are ready to haunt the harvest festival with style

Have a question or want to share your own experience? I'd love to hear from you in the comments below!