If you’ve never tried a purple pumpkin, you’re in for such a fun shift from the usual fall palette. Purple can look spooky, sweet, modern, or downright magical—depending on what you layer on top.
Glossy Purple Ombre
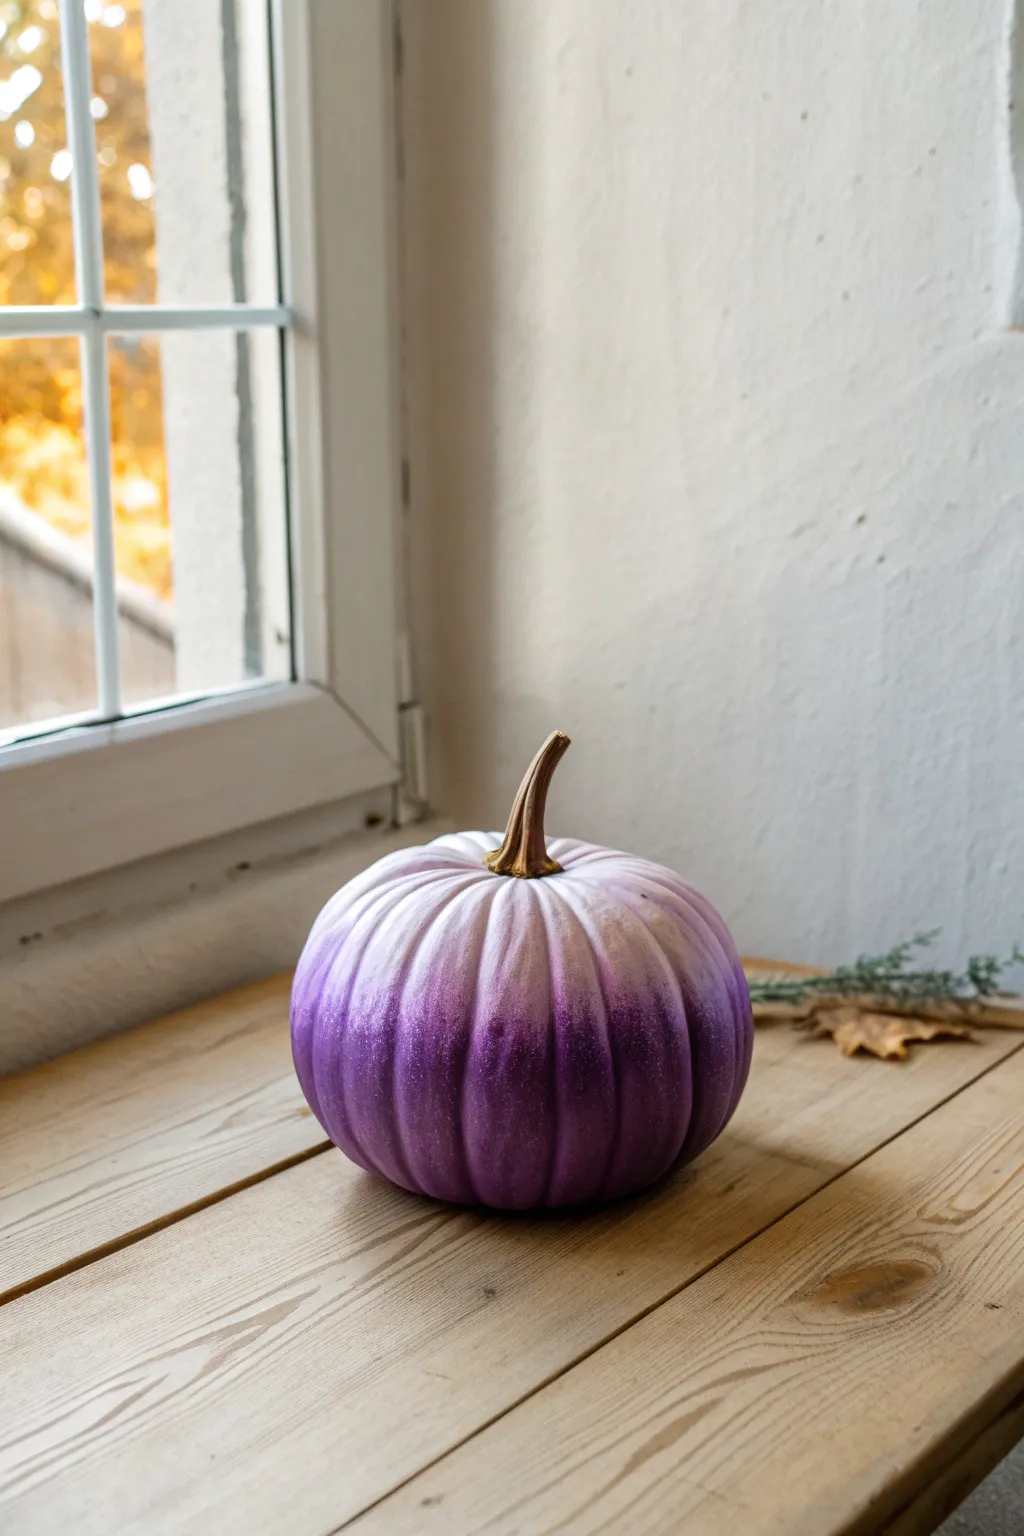
Transform a plain pumpkin into an elegant autumn centerpiece with this seamless ombre technique. The gradient flows from a deep, royal purple at the base into a soft, snowy peak, creating a sophisticated look that fits modern decor perfectly.
Step-by-Step Guide
Materials
- Faux pumpkin (white or cream)
- Deep purple acrylic paint
- Lilac or lavender acrylic paint
- White acrylic paint
- Synthetic sponge or blending wedges
- Soft bristle paintbrush
- Gloss varnish or clear spray sealant
- Gold metallic paint (optional for stem)
- Small fine-tipped brush
- Palette or parchment paper
- Protective table covering
Step 1: Preparation and Base Coat
-
Clean the Surface:
Begin by wiping down your faux pumpkin with a slightly damp cloth to remove any manufacturing dust or oils that might prevent the paint from sticking. -
Prime the White:
Even if your pumpkin is already white, apply a thin coat of white acrylic paint to the top third of the pumpkin, including the area around the stem. This ensures a uniform, bright base for the fade. -
Let it Set:
Allow this white base layer to dry completely before moving on to the color application to prevent muddiness.
Smooth Blending Trick
Keep a spray bottle of water nearby. A tiny mist over the paint while blending keeps acrylics wet longer, allowing for a much smoother, seamless gradient.
Step 2: Creating the Ombre Effect
-
Apply the Base Purple:
Using your soft bristle brush, paint the bottom third of the pumpkin with your deepest purple shade. Don’t worry about a perfect upper edge just yet. -
Mix the Mid-Tone:
On your palette, mix equal parts of the deep purple and your lavender paint to create a rich transition shade. -
Paint the Middle Section:
Apply this mixed mid-tone to the center section of the pumpkin, slightly overlapping the wet dark purple at the bottom. -
Blend the Lower Transition:
While the paint is still wet, take a damp sponge and lightly dab along the line where the dark purple meets the mid-tone. Use up-and-down motions to blur the line. -
Apply the Lightest Shade:
Paint the upper section (just below the white top) with pure lavender paint. -
Fade to White:
Using a clean sponge, blend the top edge of the lavender paint upwards into the dry white section. I find that using a very dry sponge helps feather the color out softly without leaving hard lines. -
Refine the Gradient:
Step back and look at the gradient. If any lines look harsh, use a slightly damp sponge with a tiny bit of the appropriate color to soften the transition. -
Dry Completely:
Let the ombre layers dry fully. This usually takes about an hour depending on how thickly the paint was applied.
Step 3: Finishing Touches
-
Paint the Stem:
Using a small fine-tipped brush, carefully paint the stem. A metallic gold contrasts beautifully with the purple, though a realistic brown works too. -
Clean Up Edges:
If any stem paint got onto the pumpkin flesh, quickly wipe it away or touch it up with a bit of white paint. -
Apply Varnish:
Once all paint is bone dry, apply a coat of gloss varnish. You can brush this on or use a clear gloss spray sealant outdoors. -
Check for Sheen:
Ensure the varnish covers the entire surface evenly for that high-end glossy ceramic look. -
Final Cure:
Allow the varnish to cure overnight before handling or displaying the pumpkin.
Add Subtle Sparkle
Mix a small amount of fine iridescent purple glitter into your gloss varnish before applying. It adds a magical shimmer without overpowering the color.
Now you have a stunning custom pumpkin ready to grace your windowsill or table setting


Lavender-to-Plum Gradient Stripes
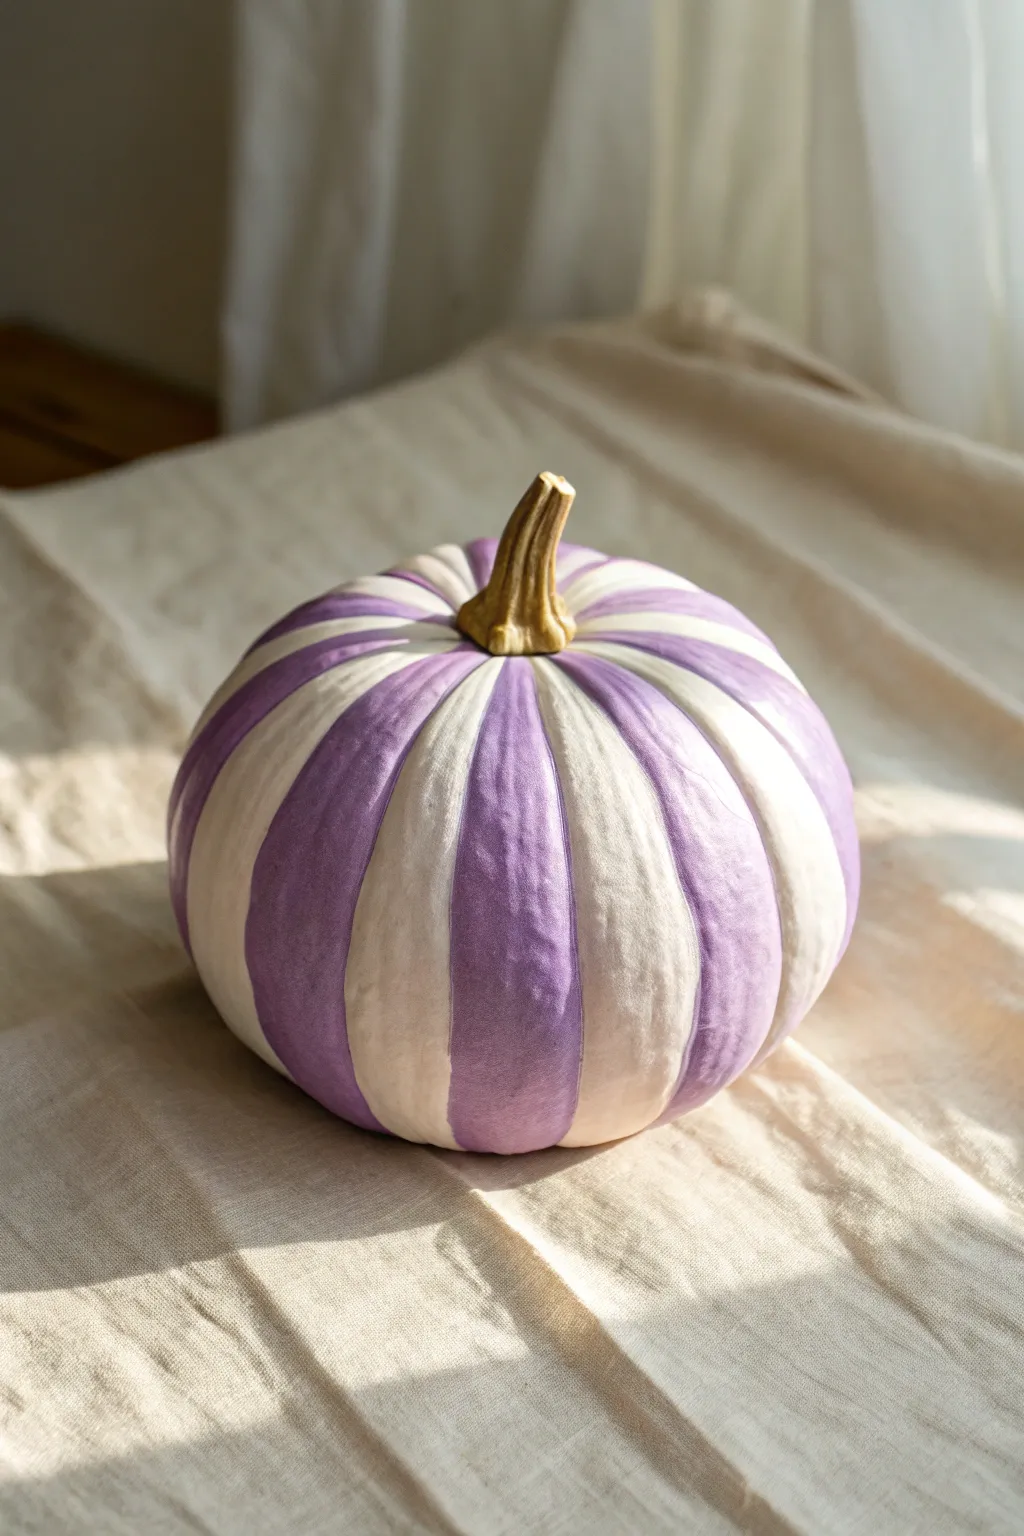
Transform a simple pumpkin into a sophisticated piece of autumn decor with this striped lavender and cream design. The soft, matte finish highlights the natural ridges of the pumpkin, creating a playful yet elegant centerpiece.
Step-by-Step Tutorial
Materials
- Faux craft pumpkin (white or cream base preferred)
- Matte acrylic craft paint (lavender or lilac)
- Matte acrylic craft paint (creamy white)
- Medium flat paintbrush
- Small round paintbrush (for edges)
- Painter’s tape or Washi tape (optional)
- Palette or paper plate
- Paper towels
- Water cup
- Clear matte sealer spray (optional)
Step 1: Preparation
-
Clean the Surface:
Before laying down any color, ensure your pumpkin is free of dust and oils. Wipe the entire surface gently with a damp paper towel and let it dry completely. -
Plan Your Stripes:
Study the natural anatomy of your pumpkin. The deep vertical grooves naturally divide the pumpkin into sections. Decide which ridges will be cream and which will be lavender. -
Base Coat (Optional):
If your pumpkin is orange or a dark color, apply a full coat of creamy white primer or paint first. Since my pumpkin was already white, I skipped straight to the stripes, but a solid base ensures the colors pop.
Step 2: Painting the Colors
-
Mix Your Lavender:
Squeeze a generous amount of lavender acrylic paint onto your palette. If the shade feels too vibrant, mix in a tiny drop of white to soften it into a pastel tone. -
Start the First Purple Stripe:
Dip your medium flat brush into the lavender paint. Select a ridge section and paint from the top (near the stem) down to the bottom center. -
Follow the Ridge Lines:
Use the natural indentation of the pumpkin’s groove as your guide. Let the brush naturally glide along the curve, keeping the paint within the ‘valley’ of that specific section. -
Refine the Edges:
Switch to your small round brush to tidy up the vertical edges of the stripe. You want a relatively clean line, but don’t worry about perfection; a slightly organic edge adds to the painted charm. -
Skip a Section:
Leave the immediate next ridge unpainted. This will be your cream stripe later. -
Continue the Pattern:
Move to the third ridge and paint it lavender. Repeat this process around the entire pumpkin until you have alternating purple and blank sections. -
Dry Time:
Let the lavender stripes dry for about 20-30 minutes. The matte paint usually sets quickly, but you don’t want to accidentally smudge wet purple into your white sections. -
Paint the Cream Stripes:
Once the purple is dry to the touch, load your cleaned flat brush with creamy white paint. Fill in the alternating empty sections. -
Careful at the Borders:
When painting the cream sections, slow down near the purple edges. I like to brace my pinky finger against the pumpkin for stability to keep the lines crisp. -
Second Coat Coverage:
Depending on the opacity of your paint, the first coat might look streaky. Apply a second coat to both the lavender and cream sections to achieve that solid, velvety finish. -
Detailing the Stem:
Be careful not to get paint on the stem. If you do, quickly wipe it away with a damp cloth or touch it up with a bit of brown paint later. -
Stem Enhancement (Optional):
If your stem looks too plastic, dry brush a little tan or light brown paint over the ridges of the stem to give it a more realistic, woody texture.
Use Nature’s Lines
Don’t fight the pumpkin’s shape! The grooves are rarely perfectly straight. Let your brush follow the natural wibbly-wobbly curve of the ridge for the most organic look.
Step 3: Finishing Touches
-
Check for Gaps:
Rotate the pumpkin and look for any missed spots, especially near the very bottom or tucking under the stem curve. -
Seal the Deal:
To protect your handiwork, take the pumpkin outside and apply a light mist of clear matte sealer. This prevents scratches and keeps that lovely flat finish intact.
Gilded Glamour
For a luxe twist, paint a very thin line of liquid gold leaf in the deep groove between every color change. The metallic accent makes the pastel colors really sing.
Place your lovely striped creation on a mantel or table linen to enjoy the soft pop of color


White Polka Dots on Purple
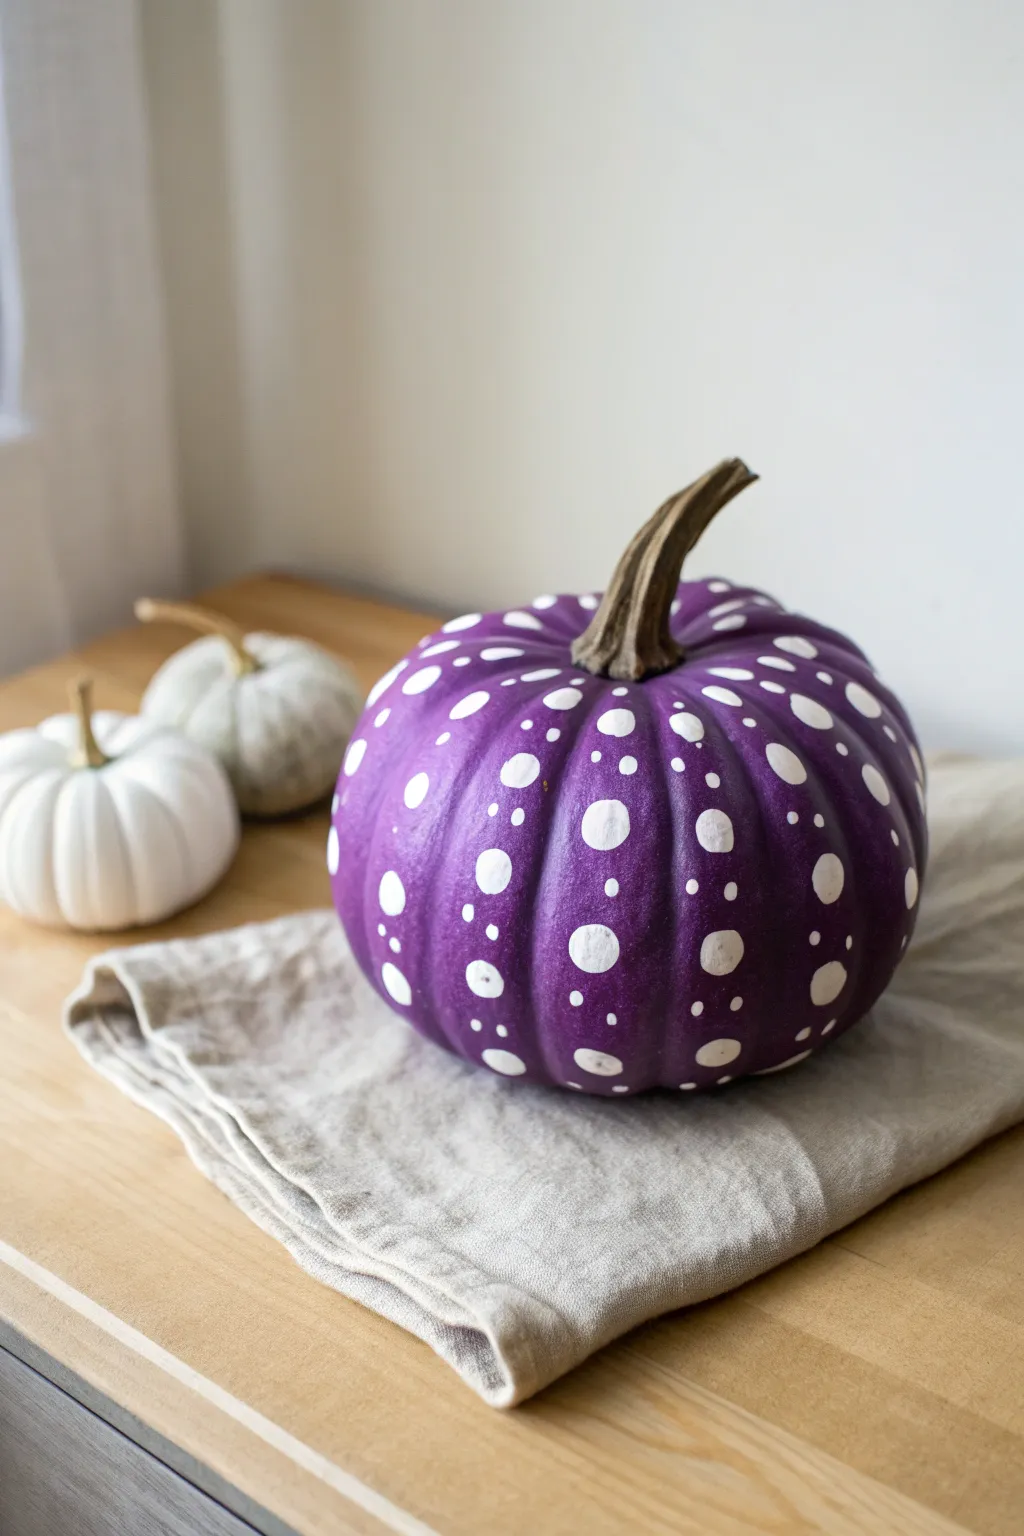
Transform a standard pumpkin into a vibrant statement piece with this bold purple and white polka dot design. The alternating dot sizes create a playful, rhythmic pattern that feels modern yet festive.
Detailed Instructions
Materials
- Medium-sized pumpkin (real or faux)
- Acrylic craft paint: Bright violet/purple
- Acrylic craft paint: Titanium white
- Foam crafting brush or wide flat brush
- Round foam pouncer (medium size, approx. 1/2 inch)
- Small round paintbrush (size 2 or 4)
- Paper plate or paint palette
- Clean rag or paper towels
- Clear matte sealant spray (optional)
Step 1: Base Coat Application
-
Clean surface:
Begin by wiping down your pumpkin with a damp cloth to remove any dirt or oils, ensuring the paint adheres properly. -
Dry completely:
Let the surface dry fully before you start painting; moisture can cause the acrylics to bubble or peel later. -
First purple coat:
Squeeze a generous amount of bright violet paint onto your palette. Using the foam brush or wide flat brush, apply a smooth, even layer over the entire pumpkin. -
Mind the stem:
Paint carefully around the base of the stem, but try to keep the stem itself natural for a nice contrast. -
Let it dry:
Allow this first coat to dry for about 20-30 minutes. It might look streaky at this stage, but that is normal. -
Second coat:
Apply a second coat of purple paint to achieve full opacity. If the underlying orange is still visible, I usually add a third coat after another drying period. -
Final dry:
Ensure the purple base is completely dry to the touch before moving on to the detail work.
Uneven Coverage?
If the white dots look translucent against the dark purple, let them dry fully and then carefully dab a second layer of white paint directly on top.
Step 2: Dot Pattern Design
-
Prepare white paint:
Pour a small puddle of titanium white paint onto your palette. It shouldn’t be too watery, as you want the dots to be crisp. -
Plan the columns:
Visualize the vertical ribs of the pumpkin as your guide. You will be painting columns of dots following these natural indentations. -
Stamping large dots:
Dip your round foam pouncer into the white paint. Press straight down onto the pumpkin skin to create the larger, primary dots. -
Spacing large dots:
Place these large dots vertically along a rib, leaving roughly 1.5 to 2 inches of space between them. -
Create variation:
Repeat this on every other rib, or scatter them randomly depending on how symmetric you want the final look to be. -
Painting small dots:
Switch to your small round paintbrush. Dip the tip into the white paint to create smaller satellite dots. -
Fill the gaps:
Paint one or two smaller dots in the spaces between the large stamped dots, maintaining that vertical alignment. -
Grouping dots:
For a more organic feel, try placing a tiny dot right next to a medium one, or clustering them slightly as shown in the inspiration image. -
Refine edges:
If the foam pouncer didn’t leave a perfect circle, use your small brush to carefully smooth out the edges of the large white dots. -
Clean up splatters:
If you accidentally drip paint, quickly wipe it away with a damp Q-tip before it sets on the purple base. -
Dry the details:
Let the white dots dry completely, which may take longer than the base coat due to the thicker application. -
Seal the work:
Once everything is bone dry, take the pumpkin to a ventilated area and apply a light coat of matte sealant to protect the finish.
Perfect Circles
Don’t have a foam pouncer? The flat eraser end of a standard pencil makes an excellent stamp for creating uniform, medium-sized polka dots.
Place your finished masterpiece on a table or porch for a pop of playful color this season


Dainty White Floral Clusters
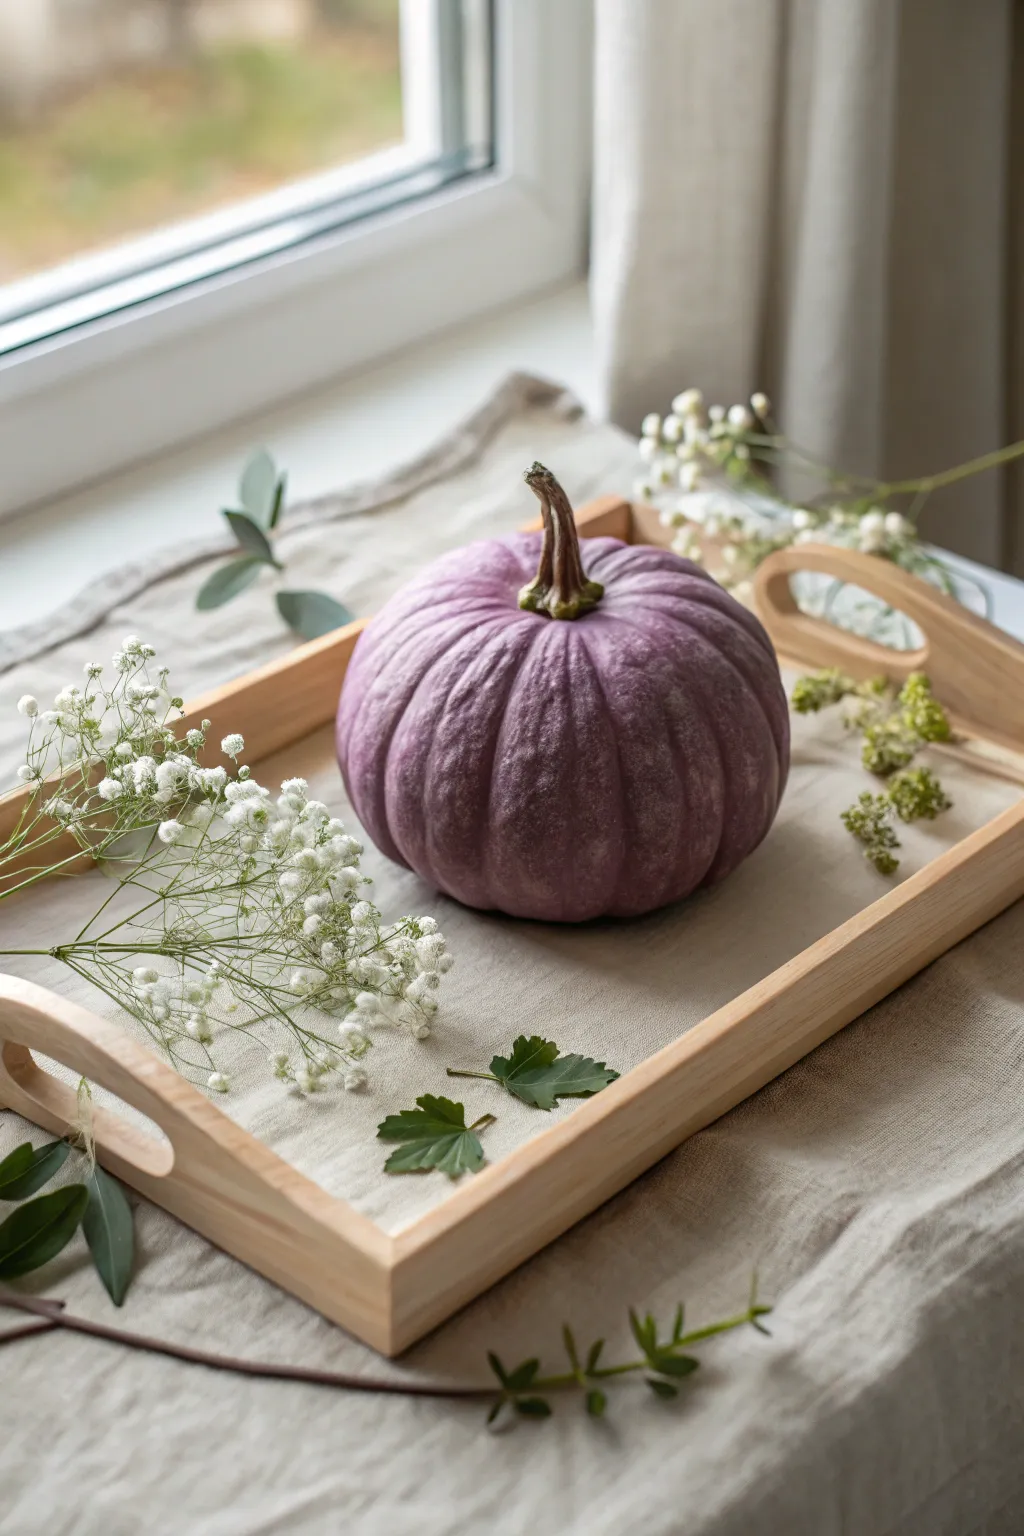
Soft and dreamy, this centerpiece combines a uniquely painted pumpkin with the delicate texture of baby’s breath. The dusty lavender hue creates a sophisticated, unexpected twist on traditional autumn decor, perfect for minimal or cottage-style homes.
How-To Guide
Materials
- Medium-sized faux pumpkin (white or cream base)
- Matte acrylic paint (Lavender/Lilac)
- Matte acrylic paint (Grey or Taupe)
- Matte acrylic paint (White)
- Textured medium or baking soda (optional)
- Soft bristle paintbrush (1 inch)
- Dry brush or sponge
- Brown and green acrylic paint (for the stem)
- Light wooden serving tray
- Beige linen runner or napkin
- Fresh or dried Gypsophila (Baby’s Breath)
- Small green sprigs (like geranium leaves or eucalyptus)
- Matte spray sealer
Step 1: Painting the Pumpkin
-
Prepare the base:
Start by wiping down your faux pumpkin to remove any dust or manufacturing residue. If the pumpkin has a shiny plastic finish, give it a light sanding with fine-grit sandpaper to help the paint adhere better. -
Mix the custom color:
To achieve that muted, dusty purple look, mix your lavender acrylic paint with a small drop of grey and a touch of white. You want a color that looks organic and soft, not neon or vibrant. -
Add texture (optional):
I like to mix a teaspoon of baking soda into the paint mixture for a more realistic, matte gourd texture. This helps hide the plastic look of faux pumpkins. -
Apply the first coat:
Paint the entire surface of the pumpkin using vertical strokes that follow the natural grooves (ribs) of the pumpkin. Don’t worry about full coverage yet; thin layers are best. -
Let it dry completely:
Allow the first coat to dry for at least 20-30 minutes. The baking soda mix might dry a bit faster and feel chalky, which is perfect. -
Apply the second coat:
Add a second layer of your dusty lavender mix. Ensure you get coverage deep into the crevices where the ribs meet the stem. -
Highlight the ribs:
While the paint is dry, take a dry brush with a tiny amount of white paint. Lightly whisk it over the raised parts of the pumpkin ribs to create a sun-faded, three-dimensional effect. -
Paint the stem:
Mix a dark brown with a hint of olive green. Paint the stem carefully. For extra realism, dry brush a lighter tan color on the very tips and ridges of the stem once the base coat is dry. -
Seal the finish:
Once fully dry, spray the pumpkin with a matte sealer. This protects the paint and unifies the sheen, making it look much more like a real heirloom variety.
Paint Peeling Off?
If acrylic peels off the plastic pumpkin, apply a coat of spray primer first. This gives the slick surface ‘tooth’ for the paint to grab onto.
Step 2: Styling the Arrangement
-
Line the tray:
Take your light wooden tray and lay the beige linen cloth inside. Don’t press it flat; allow it to bunch and wrinkle slightly for a relaxed, lived-in feel. -
Position the pumpkin:
Place your painted pumpkin in the center of the tray, but slightly off-kilter or tilted so the stem faces the viewer comfortably. -
Prepare the Baby’s Breath:
I find it helpful to snip the Gypsophila into small, manageable sprigs about 4-6 inches long. Remove any lower leaves that might clutter the look. -
Lay the floral foundation:
Tuck the larger sprigs of Baby’s Breath along the left side of the pumpkin, letting the delicate white heads spill over the linen. -
Add greenery accents:
Place a few individual green leaves or small sprigs (like geranium or eucalyptus) near the base of the pumpkin and scattered toward the tray handles to break up the white. -
Fill the gaps:
Sprinkle smaller bits of Baby’s Breath on the right side of the tray for balance, keeping the arrangement asymmetrical and airy. -
Final adjustment:
Step back and adjust the linen folds or floral stems to ensure nothing looks too rigid; the goal is effortless elegance.
Scented Touch
Add a few drops of lavender essential oil to the dried stems or underneath the linen cloth for a centerpiece that smells as calming as it looks.
Now you have a serene, custom-painted centerpiece that brings a gentle touch of color to your seasonal decor
BRUSH GUIDE
The Right Brush for Every Stroke
From clean lines to bold texture — master brush choice, stroke control, and essential techniques.
Explore the Full Guide
White Vines and Leaves
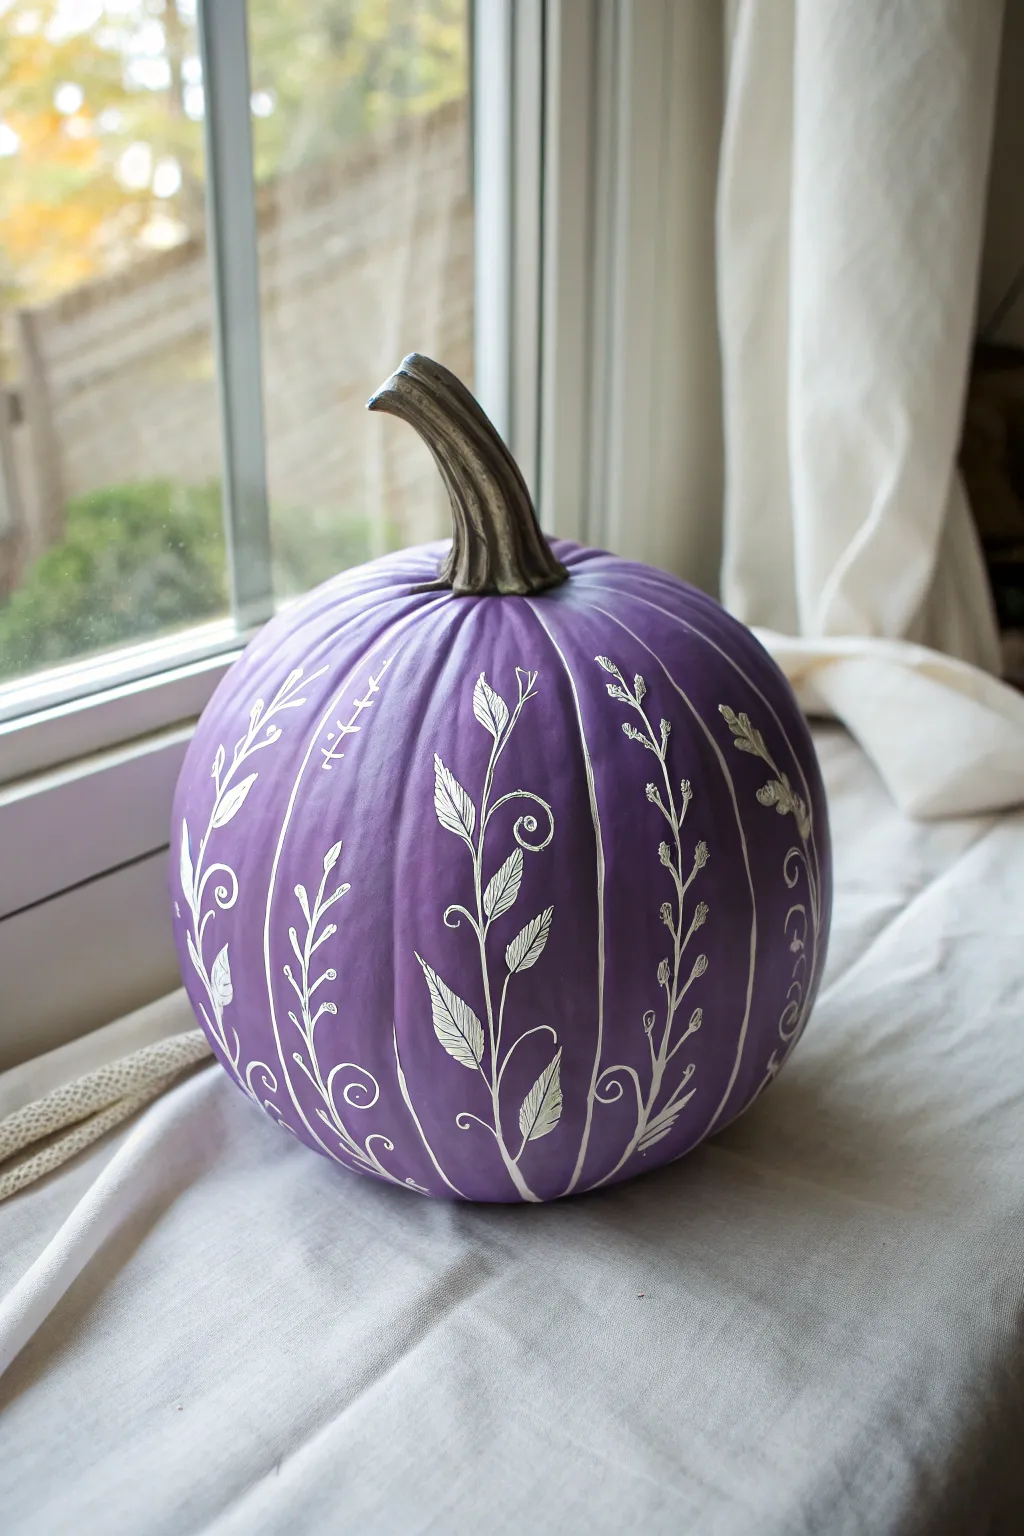
Transform a simple pumpkin into an elegant centerpiece with a coat of deep lavender paint and delicate botanical illustrations. The contrast between the rich purple base and the crisp white vines creates a sophisticated look perfect for autumn decor.
Step-by-Step
Materials
- Faux or real pumpkin
- Purple satin or matte acrylic paint (lavender or plum shade)
- White paint pen (fine point) or white acrylic paint with size 0 liner brush
- Wide flat paintbrush
- Pencil (optional)
- Matte sealer spray (optional)
- Damp cloth
Step 1: Preparing the Base
-
Clean the surface:
Before you begin, wipe down your pumpkin with a damp cloth to remove any dust or oils. This ensures the paint adheres smoothly and prevents peeling later on. -
Apply the first coat:
Using a wide flat paintbrush, apply an even layer of purple acrylic paint over the entire pumpkin. Brush in vertical strokes, following the pumpkin’s natural ribs to maintain texture. -
Let it dry completely:
Allow the first coat to dry for at least 30 minutes. The surface needs to be dry to the touch so the next layer doesn’t lift the previous paint. -
Add a second coat:
Apply a second coat of purple paint to ensure full, opaque coverage. If you can still see the original orange or white underneath, a third thin coat might be necessary. -
Protect the stem:
Be careful around the stem area. I like to use a smaller brush here to get crisp edges without accidentally painting the textured brown stem.
Paint Pen Struggles?
If your paint pen flow is inconsistent, test it on a scrap piece of cardboard first. Press the tip down several times to saturate it before touching the pumpkin.
Step 2: Designing the Vines
-
Plan your placement:
Visualize where your vines will grow. Aim for the valleys between the pumpkin’s ribs, as these naturally vertical spaces frame the designs perfectly. -
Sketch lightly:
If you aren’t confident freehanding, use a pencil to very lightly sketch the main S-curve spines of your vines. Don’t press too hard, or you’ll dent the paint. -
Draw the main stems:
Using your white paint pen or a liner brush, draw long, flowing lines starting from the bottom of the pumpkin and reaching upward. Vary the height of each vine for a natural look. -
Add side branches:
From your main stem lines, draw smaller, shorter offshoots. Curve them gently outward to create a base for your leaves. -
Outline the leaves:
Draw simple teardrop shapes at the ends of your branches. Keep them open and airy, focusing on the outline rather than filling them in initially. -
Detail the leaf veins:
Inside each leaf outline, draw a very fine central line and tiny diagonal veins. This small detail adds a lot of realism to the illustration. -
Create variation:
Mix up your foliage styles. On alternating ribs, draw different botanical styles—try some vines with small rounded buds or others that look like ferns or wheat stalks. -
Add whimsical curls:
Fill empty spaces near the bottom with small, decorative swirls or tendrils. These curlicues soften the design and add a bit of fairytale charm. -
Refine the lines:
Go back over any areas where the white paint looks translucent. A second pass on the main stems makes the design pop more vibrantly against the purple. -
Seal the artwork:
Once the white paint is fully cured (give it a few hours), lightly mist the entire pumpkin with a matte sealer to protect your handiwork from scratches.
Pro Tip: Stem Realism
If your pumpkin’s stem looks too plastic, dry-brush a little dark brown and black paint over it to add instant texture and an aged, realistic appearance.
Place your lovely lilac creation near a sunny window to let the delicate white lines shine
Freeform White Swirls
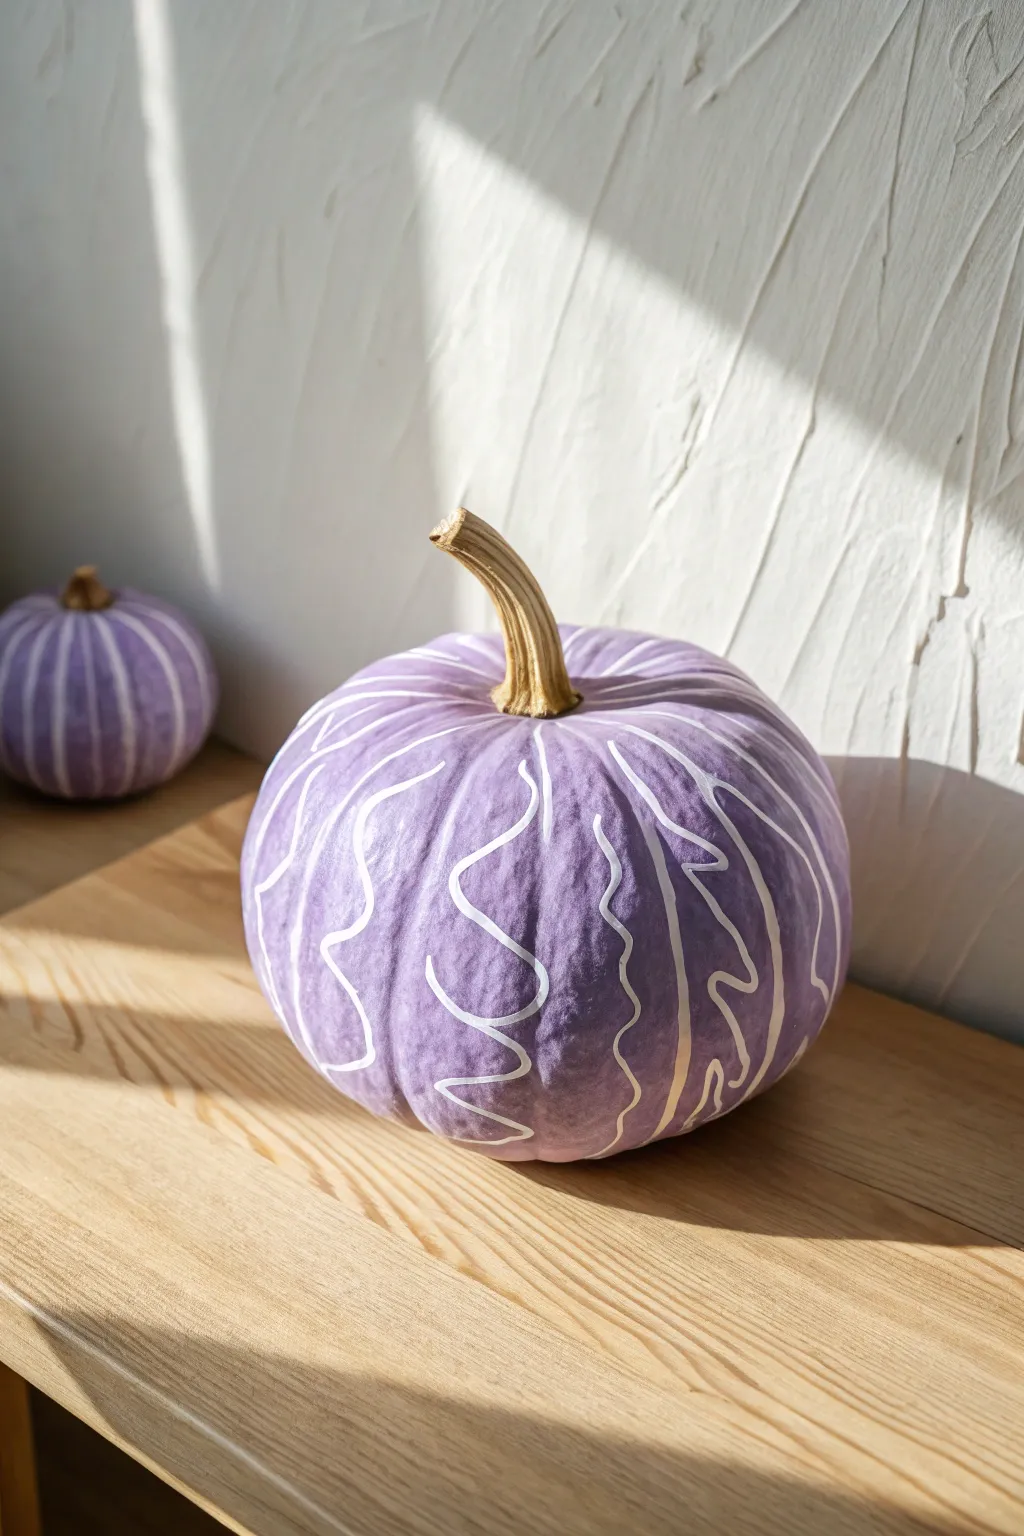
Transform a classic autumn gourd into a dreamy piece of decor with this soft lavender and abstract white line design. The interplay of pastel purple and crisp, freeform swirls creates a modern, calming aesthetic perfect for a chic fall entryway.
Step-by-Step Tutorial
Materials
- Medium-sized pumpkin (real or faux)
- White primer spray paint (optional but recommended)
- Lilac or lavender acrylic paint (matte finish)
- White paint pen (fine or medium tip) or thin liner brush with white acrylic paint
- Medium flat paintbrush
- Painter’s tape (for the stem)
- Damp cloth
- Paper palette or plate
- Clear matte sealant spray
Step 1: Preparation & Base Coat
-
Clean the surface:
Begin by thoroughly wiping down your pumpkin with a damp cloth to remove any dirt, dust, or oils. If using a real pumpkin, ensure it is completely dry before painting. -
Protect the stem:
Carefully wrap the stem in painter’s tape to keep it natural and clean. Press the edges of the tape firmly against the base of the stem to prevent paint bleeding. -
Prime the surface:
For the most vibrant purple, apply a coat of white primer. If you are using a dark orange pumpkin, this step is crucial to prevent the orange from dulling your pastel shade. -
Initial purple layer:
Squeeze your lilac acrylic paint onto a palette. Using a medium flat brush, apply the first coat of purple paint, working in vertical strokes from the top to the bottom. -
Let it dry completely:
Allow the first coat to dry for at least 20-30 minutes. The surface should be dry to the touch before proceeding. -
Build opacity:
Apply a second coat of lilac paint to ensure full coverage. I find that dabbing the paint into the deeper crevices helps hide any remaining orange spots. -
Final drying time:
Let this second layer cure for about an hour. It is vital that the base is completely dry so your white swirls don’t blend and turn muddy.
Paint Pen Won’t Flow?
If the tip clogs over the textured pumpkin skin, scribble vigorously on cardboard to dislodge dried paint and get the ink flowing again.
Step 2: Adding the Swirls
-
Prepare the pen:
Shake your white paint pen vigorously to mix the pigment. Press the nib down on a scrap piece of paper until the white ink flows smoothly and consistently. -
Identify the ribs:
Observe the natural ribs and indentations of your pumpkin. You will typically be drawing your lines along the raised sections (the ribs), not the valleys. -
Start the first swirl:
Starting near the top stem area, place your pen tip on a rib. Slowly drag the pen downward in a loose, wavy motion. -
Focus on freeform movement:
Don’t try to make perfect S-curves. Instead, let your hand tremble slightly or change direction unpredictably to create an organic, abstract squiggle. -
Vary the line width:
Occasionally press a little harder on the pen to thicken the line, then ease up for a thinner stroke. This adds visual interest and keeps the pattern from looking too uniform. -
Complete the vertical sections:
Continue this process around the entire pumpkin, drawing roughly one wavy line per rib segment. Keep some spacing irregular for a more artistic feel. -
Add secondary details:
Look for large gaps between your main lines. In these wider spaces, add smaller, disconnected squiggles or short wavy dashes to fill the creative negative space. -
Check for consistency:
Stand back and look at the pumpkin from a distance. If any lines look too faint, carefully trace over them a second time to brighten the white pop.
Pro Tip: Custom Purple
Mix a tiny drop of white into your purple paint for the second coat. This subtle highlight adds dimension before you even start drawing.
Step 3: Finishing Touches
-
Remove the tape:
Once the white lines are dry (which should be quick with a paint pen), gently peel away the painter’s tape from the stem. -
Clean up edges:
If any purple paint seeped onto the stem, use a damp Q-tip or a small knife to gently scrape it away. -
Seal the artwork:
Take the pumpkin to a well-ventilated area and apply a light coat of clear matte sealant spray. This protects the finish and prevents the acrylic from chipping.
Place your lovely lavender creation in a sunlit spot to let those white swirls really shine

PENCIL GUIDE
Understanding Pencil Grades from H to B
From first sketch to finished drawing — learn pencil grades, line control, and shading techniques.
Explore the Full Guide
Metallic Gold Drip Details
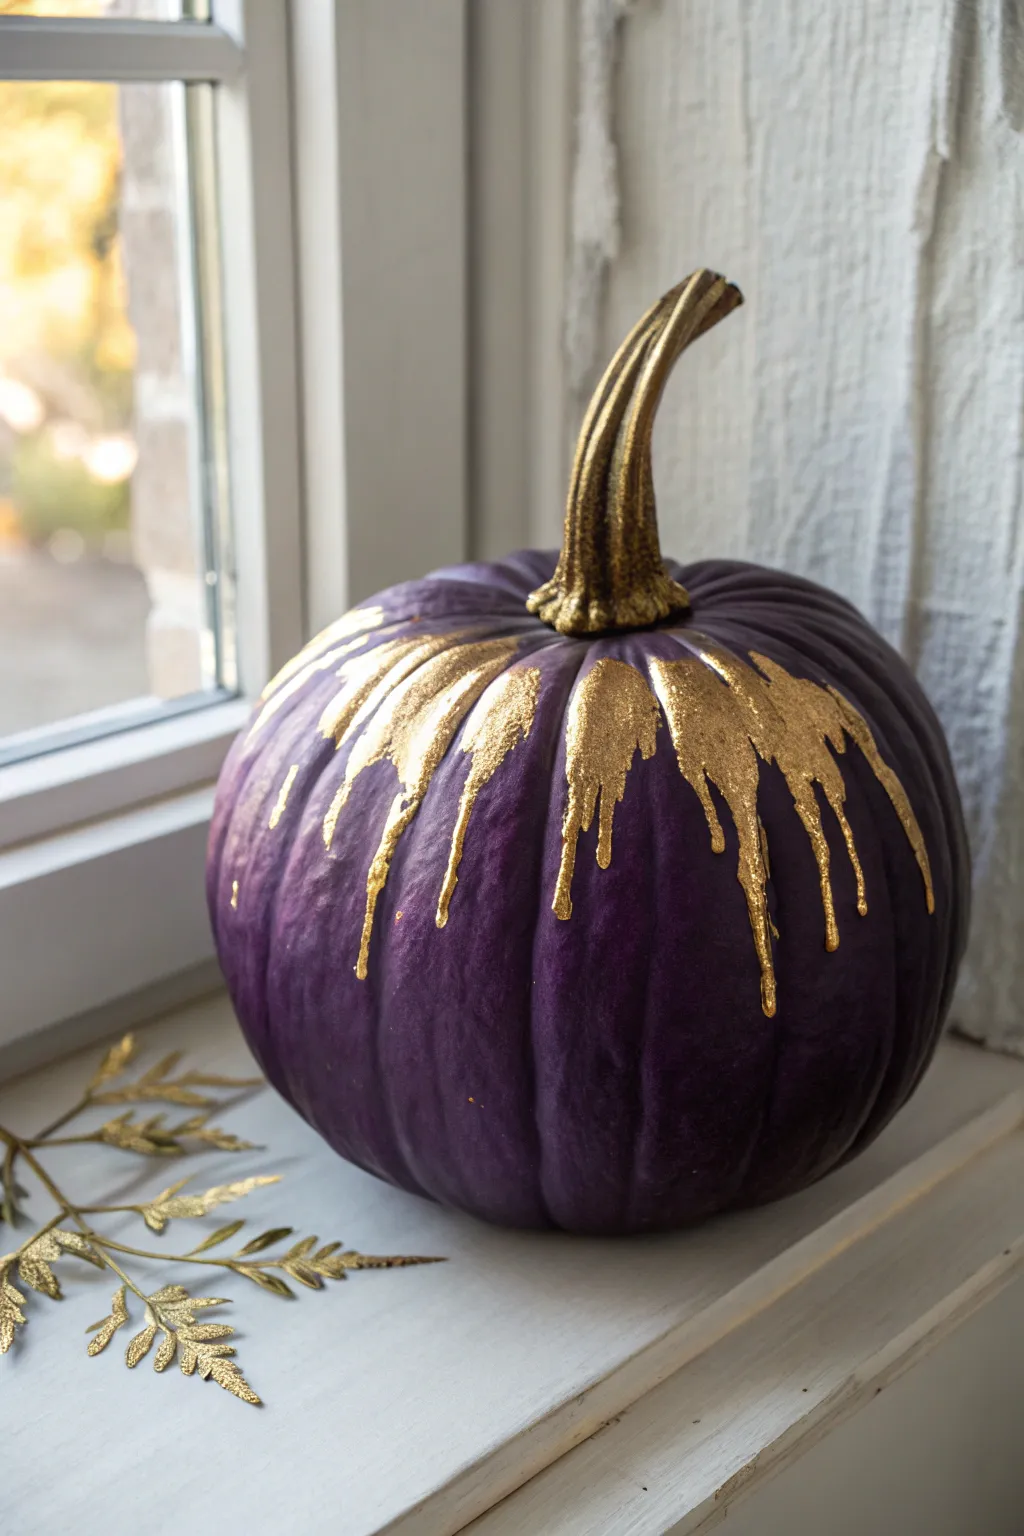
Transform a standard pumpkin into a regal centerpiece featuring a deep aubergine base and luxurious gilded accents. The striking contrast between matte purple and shimmering metallic gold creates an sophisticated, moody aesthetic perfect for an elegant autumn display.
Detailed Instructions
Materials
- Faux craft pumpkin (or real pumpkin, cleaned and dried)
- Matte dark purple acrylic paint (or chalk paint)
- Wide flat paintbrush (1-inch width)
- Metallic gold craft paint (high-viscosity or heavy body)
- Metallic gold paint marker or fine detail brush
- Gilding wax or gold liquid leaf (for the stem)
- Small round paintbrush
- Plastic cup or palette
- Water spray bottle (optional)
- Disposable table covering or drop cloth
Step 1: Base Coat Preparation
-
Clean the surface:
Before you begin, wipe down your pumpkin with a damp cloth to remove any dust or oils, ensuring the paint adheres properly to the skin. -
Apply the first purple layer:
Using your wide flat paintbrush, apply a generous coat of matte dark purple paint. Work the brush into the vertical crevices of the pumpkin’s ridges. -
Let it dry completely:
Allow the first coat to dry for at least 30 minutes. Dark colors often streak on the first pass, so patience is key here. -
Add a second coat:
Apply a second layer of purple paint to achieve a solid, opaque finish. Brush in long, vertical strokes from top to bottom to minimize visible texture. -
Inspect coverage:
Check closely for any orange or white spots showing through, especially near the bottom, and touch them up as needed.
Step 2: Creating the Golden Drip
-
Prepare the gold paint:
Pour a generous amount of metallic gold paint into a cup. If it’s too thick to run, mix in a few drops of water until it has the consistency of heavy cream. -
Apply the crown layer:
Load a round brush heavily with gold paint and dab it thickly around the immediate base of the stem, creating a pool of paint. -
Initiate the main drips:
Push the pooled paint over the edge of the pumpkin’s shoulder with your brush, manipulating it so gravity takes over and pulls the paint down the ridges. -
Vary the lengths:
Encourage some drips to run longer than others by adding extra paint to specific rivulets. I find that varied lengths look much more organic and natural. -
Thicken the coverage:
Go back over the top section (the shoulder of the pumpkin) to ensure the gold is solid and opaque, covering any purple showing through the starting points of the drips. -
Refine drip edges:
If surface tension breaks the paint flow, use a smaller brush to gently guide the tip of the drip further down, keeping the shape rounded at the bottom. -
Add floating droplets:
For a realistic effect, paint a few tiny, isolated gold dots right below the longest drips to look like paint that has splashed or separated tailored.
Smoother Drips
Mix a tiny amount of pouring medium into your acrylic gold paint. This improves flow without diluting the pigment, creating smoother, more cohesive drips that don’t break apart.
Step 3: The Midas Touch Stem
-
Paint the stem base:
While the drips are drying, clean your brush and switch to the stem. Paint the entire stem with the heavy body metallic gold paint. -
Apply gilding wax:
Once the gold base is tacky or dry, rub gold gilding wax or liquid leaf over the high points of the stem creates an intense, reflective shine that pops against the matte pumpkin. -
Blend the transition:
Use a small brush to ensure there is no gap between the gold stem and the gold puddle on the pumpkin’s shoulders; the transition should be seamless. -
Seal the artwork:
If you plan to place this outdoors, spray the entire pumpkin with a clear matte sealant, being careful to use gloss sealant only on the drip areas if you want to maintain the contrast.
Level Up: Glitter Glaze
While the gold drip paint is still wet, sprinkle very fine gold glitter onto the thickest parts of the drip for an extra dimension of sparkle that catches candlelight beautifully.
Place your gilded creation near a window or candlelight to watch the metallic accents shimmer against the deep purple base
Gold Glitter Dots and Stripes
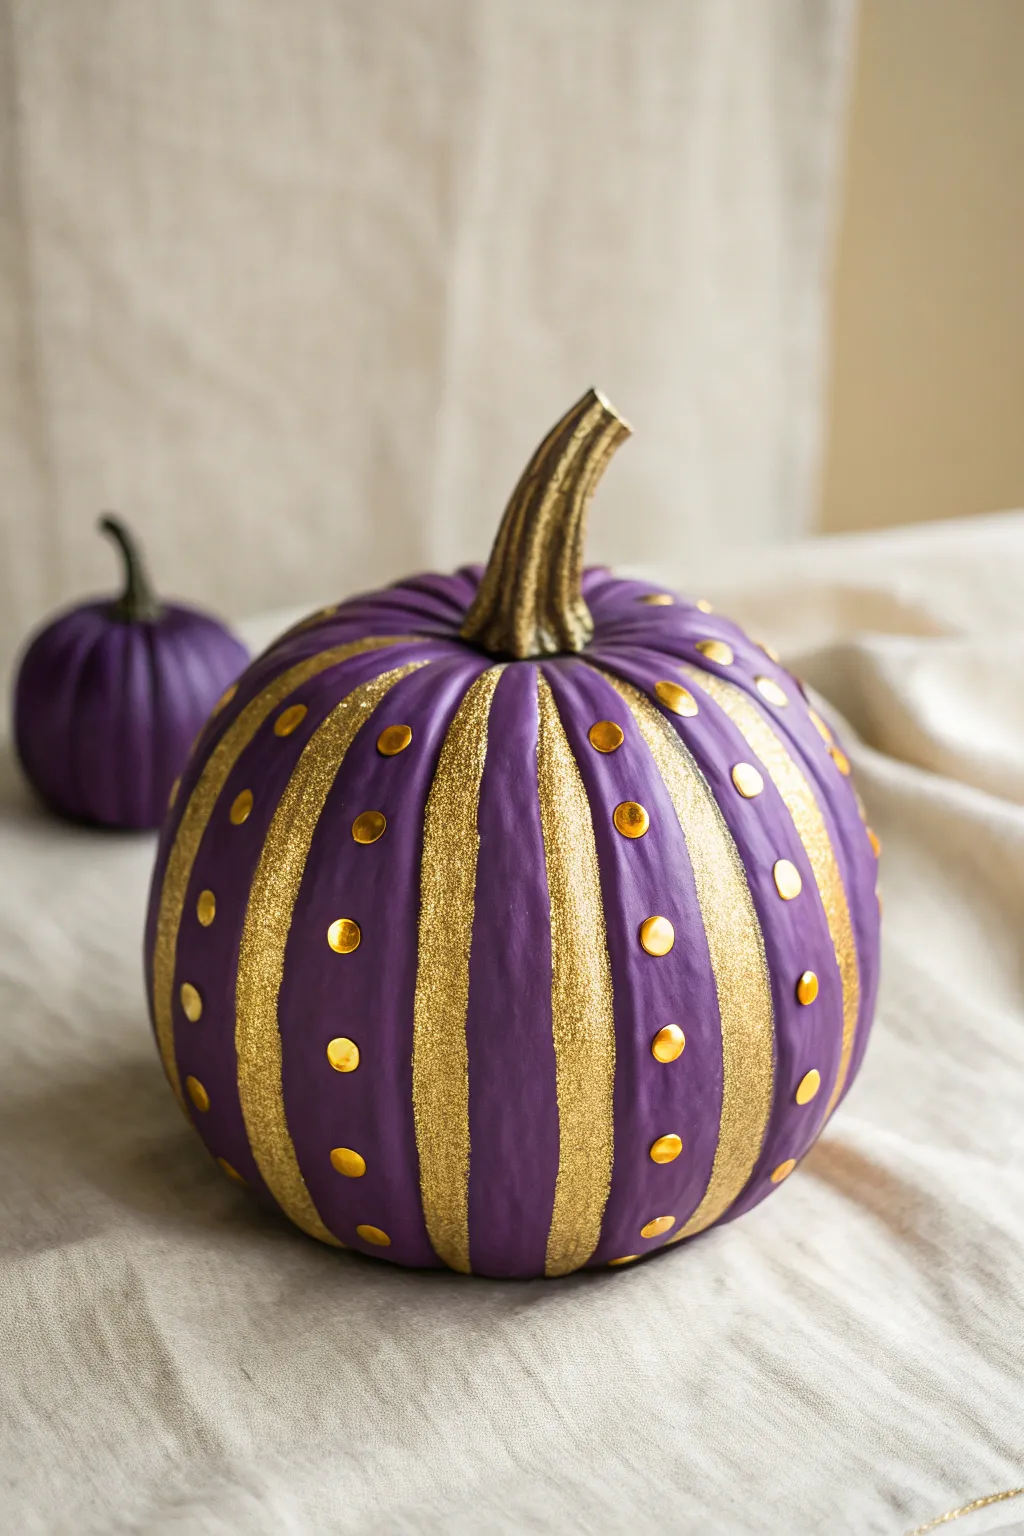
Transform a standard pumpkin into a regal centerpiece with this striking combination of deep purple paint and shimmering gold accents. The alternating glitter stripes and metallic studs create a sophisticated texture that looks far more expensive than it actually is.
Step-by-Step Tutorial
Materials
- Faux pumpkin (medium size)
- Deep purple acrylic craft paint (matte finish)
- Gold metallic acrylic paint
- Gold glitter (fine or extra fine)
- Decoupage glue (like Mod Podge)
- Medium flat paintbrush
- Small fine-tip paintbrush
- Gold flat-back studs or large sequins
- Strong craft glue (e.g., E6000 or tacky glue)
- Washi tape or masking tape (optional)
- Paper plate or palette
- Newspaper or drop cloth
Step 1: Base Coating
-
Prep workspace:
Begin by covering your work surface with newspaper or a drop cloth to catch loose glitter and drips. -
Clean the pumpkin:
Wipe down your faux pumpkin with a damp cloth to remove any dust or oils that might prevent the paint from sticking, then let it dry completely. -
Apply base purple:
Paint the entire pumpkin, excluding the stem, with the deep purple acrylic paint. Use long, vertical strokes following the natural ribs of the pumpkin. -
Dry and repeat:
Allow the first coat to dry for about 20 minutes. If the original color is showing through, apply a second coat of purple for a rich, opaque finish. -
Paint the stem:
While the purple body dries, carefully paint the stem with metallic gold paint. You may need a smaller brush to get close to the base without touching the purple.
Clean Lines Hack
If you struggle to paint straight glue lines for the glitter stripes, use flexible washi tape to mask off the edges of the purple sections before applying the decoupage glue.
Step 2: Creating Glitter Stripes
-
Identify sections:
Look at the natural vertical ribs or sections of your pumpkin. You will be alternating between a plain purple section and a glittered section. -
Apply adhesive:
Working on one section at a time, paint a layer of decoupage glue down the entire length of a vertical rib you want to be gold. -
Sprinkle glitter:
Immediately pour gold glitter generously over the wet glue. I like to do this over a folded piece of paper so I can funnel excess glitter back into the jar later. -
Shake off excess:
Gently tap the pumpkin to remove loose glitter. Don’t touch the wet area yet. -
Continue the pattern:
Skip the next vertical section to leave it purple, then move to the following one. Repeat the glue and glitter process until you have alternating stripes around the whole pumpkin. -
Dry time:
Let the glitter stripes dry completely, preferably for at least an hour, so the glue hardens and the lines stay crisp. -
Seal (optional):
For less mess later, you can gently dab a thin coat of glossy decoupage glue over the dried glitter to seal it in, though this dulls the sparkle slightly.
Step 3: Adding Stud Detail
-
Plan stud placement:
On the purple sections that remain, you will be gluing gold studs. Visualize a vertical line running down the center of each purple strip. -
Apply glue dots:
Using a toothpick or fine applicator, place small dots of strong craft glue down the center of a purple section, spacing them about 1 to 1.5 inches apart. -
Attach studs:
Press a gold flat-back stud or large sequin onto each glue dot. Tweezers can be very helpful here for precise placement. -
Check alignment:
Before the glue sets, step back and ensure your line of studs looks straight relative to the pumpkin’s curve. -
Complete all sections:
Repeat this process for every purple panel on the pumpkin. -
Final dry:
Allow the project to sit undisturbed overnight to ensure the heavy studs are fully adhered and the paint is cured.
Studs Keep Sliding?
If the gold studs slide down vertical surfaces while drying, lay the pumpkin on its side, propped with a towel. Do one section at a time, letting it dry before rotating.
Place your shimmering creation on a mantel or dining table to add instant glamour to your autumn decor


Purple Leopard Spot Pattern
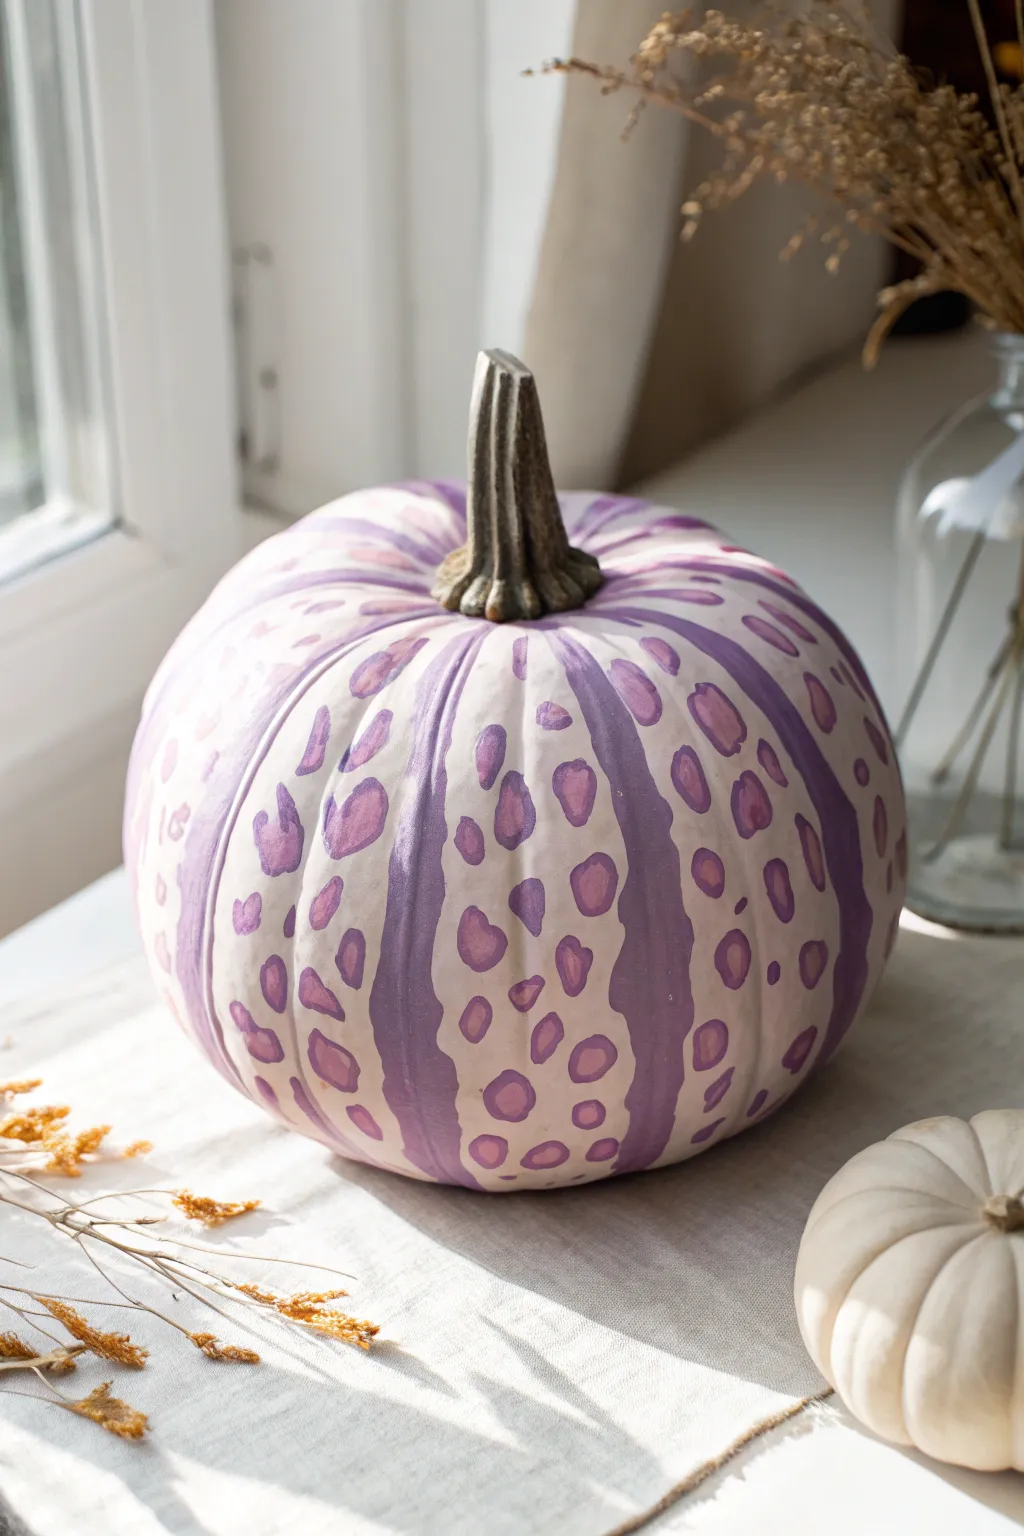
Transform a simple white pumpkin into a statement piece with this playful, fashion-forward design. The combination of lavender spots and bold violet stripes creates a chic animal print effect that feels fresh and modern.
Step-by-Step Guide
Materials
- Medium-sized white pumpkin (real or faux)
- Light lavender acrylic paint
- Dark violet or purple acrylic paint
- Small round paintbrush (size 2 or 4)
- Medium flat paintbrush (size 6 or 8)
- Matte finish sealer (spray or brush-on)
- Water cup and paper towels
- Palette or paper plate
Step 1: Base Preparation
-
Clean surface:
Begin by wiping down your pumpkin with a slightly damp cloth to remove any dirt or oils. If you are using a real pumpkin, ensure it is completely dry before painting. -
Optional base coat:
If your pumpkin isn’t a pure, bright white, you may want to apply a single coat of white acrylic paint all over. Let this dry completely to create a clean canvas for your colors to pop against.
Smudged Paint?
If you accidentally smear wet paint, wait for it to dry completely, then touch it up with white paint before reapplying the correct color.
Step 2: Defining the Structure
-
Identify ridges:
Examine the natural vertical ridges of your pumpkin. The low points (valleys) will house your leopard spots, while the high points (ridges) will feature solid stripes. -
Paint vertical stripes:
I like to start with the solid stripes to anchor the design. Using your medium flat brush and the dark violet paint, carefully paint broad vertical lines down every other ridge. -
Feather the edges:
Don’t worry about making these lines ruler-straight. A slightly organic, wavy edge looks more natural and complements the animal print theme we will add later. -
Allow to set:
Let these dark stripes dry to the touch, which usually takes about 15-20 minutes, so you don’t accidentally smudge them while working on the spots.
Step 3: Creating the Leopard Spots
-
Paint base spots:
In the white spaces between your violet stripes, apply irregular blotches using the light lavender paint and your small round brush. -
Vary shapes and sizes:
Keep these shapes organic—some oval, some kidney-bean shaped, and varying in size. Avoid perfect circles to maintain that authentic leopard look. -
Spacing matters:
Leave a little bit of white space between the lavender blotches. You don’t want them touching each other. -
Dry the lavender:
Wait for these light purple spots to dry completely. If the paint is still wet, the darker outline step will turn muddy.
Gilded Glamour
Make it extra luxurious by using metallic gold paint for the spot centers instead of lavender, or add gold leaf flecks to the violet stripes.
Step 4: Adding Detail and Finishing
-
Outline the spots:
Load your small round brush with the dark violet paint again. Carefully paint bracket-like shapes around the edges of your dried lavender spots. -
Partial coverage:
Do not fully circle the spots. Instead, paint two or three broken lines around the perimeter of each spot (like parentheses), leaving gaps. -
Add filler spots:
To fill in any large white gaps, paint tiny solid dots or small dashes of dark violet among the larger leopard spots. -
Painting the stem:
For a cohesive look, lightly dry-brush the stem with a tiny bit of dark brown or grey mixed with a drop of violet, or leave it natural for contrast as seen in the photo. -
Final dry time:
Allow the entire pumpkin to dry for at least an hour to ensure all thick layers of paint are set. -
Seal the deal:
Apply a coat of matte sealer spray over the pumpkin. This protects the acrylic paint from chipping and gives it a professional, finished appearance.
Place your chic creation near a window to let natural light show off the crisp purple details
Swirled Purple Marble Effect
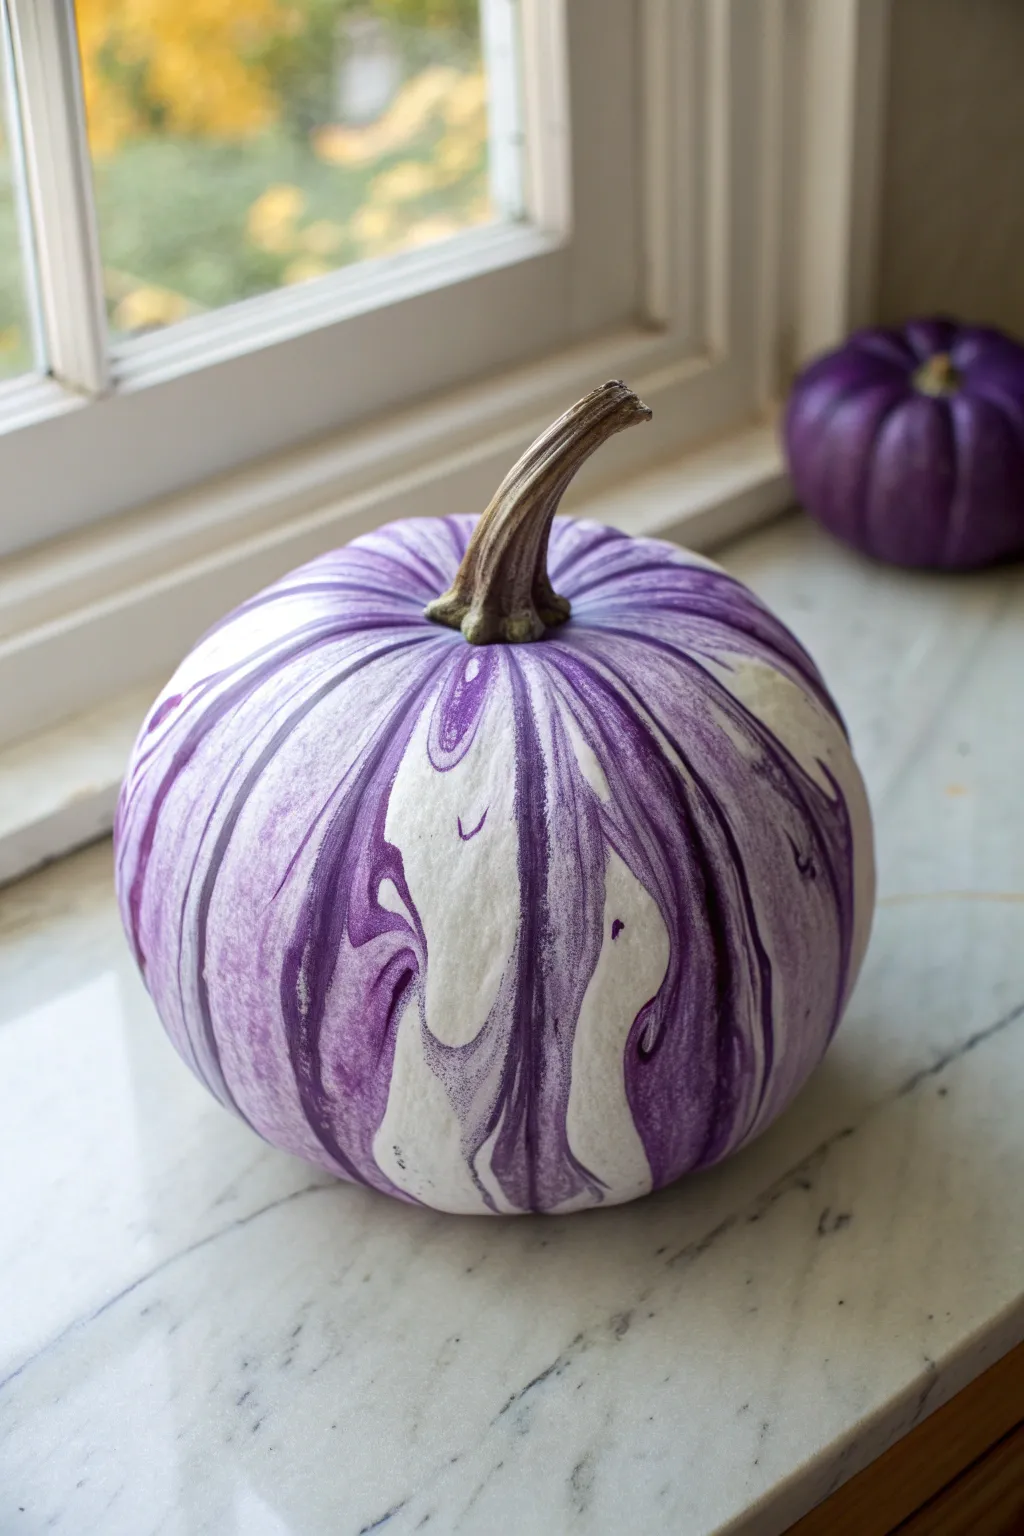
Transform a standard pumpkin into a sophisticated piece of art using nothing more than water and nail polish or marbling paint. This technique creates mesmerizing, one-of-a-kind swirls of deep grape and violet against a crisp white background.
Detailed Instructions
Materials
- Faux white pumpkin (or real white pumpkin)
- Purple nail polish (dark plum and lighter lavender shades)
- Deep plastic container (bucket or large bowl)
- Room temperature water
- Toothpick or skewer
- Painter’s tape
- Spray gloss sealer (clear)
- Paper towels
- Disposable gloves
Step 1: Preparation
-
Clean surface:
Begin by wiping down your pumpkin with a damp cloth to remove any dust or oils that might prevent the color from adhering properly. -
Protect the stem:
Carefully wrap painter’s tape around the entire stem. Since the swirling process is messy, looking at the clean, natural stem later provides a beautiful contrast. -
Prepare the water bath:
Fill your deep plastic container with room temperature water. It’s crucial the water isn’t too cold or too hot, as extreme temperatures make the polish set too quickly or sink. -
Safety check:
Put on your disposable gloves and make sure you are working in a well-ventilated area, as the fumes can be strong.
Use Room Temp Water
Water temperature is key! If it’s too cold, the polish hardens instantly. If too hot, it stays goopy. Room temp creates the perfect film.
Step 2: Creating the Swirls
-
First drop:
Unscrew the lids of your purple nail polish bottles to have them ready. Pour a few drops of the darker plum shade directly onto the water’s surface. -
Layering colors:
Immediately add drops of the lighter lavender polish inside or next to the dark drops. I like to alternate quickly between shades to build up color density. -
Expanding the pattern:
Observe how the polish spreads into a thin film. If it clumps, your water might be too cold, so you may need to start fresh. -
Marbling action:
Take your toothpick or skewer and gently drag it through the floating polish. Move slowly to create swirls rather than mixing it into a muddy mess. -
Checking coverage:
Ensure there is enough surface area of paint to cover the sides of the pumpkin you intend to dip.
Step 3: The Dip
-
Initial plunge:
Hold the pumpkin by the bottom or the taped stem. In one smooth, continuous motion, slowly dip the pumpkin into the water. -
Rolling gesture:
As you submerge it, gently rotate the pumpkin so the floating film of paint wraps around the curves naturally. -
Breaking the surface:
Before pulling the pumpkin back out, blow gently on the remaining water surface to dry the excess film, or sweep it away with a paper towel so it doesn’t double-coat the design. -
Removal:
Lift the pumpkin out of the water carefully and verify that the marble pattern has adhered smoothly. -
Drying setup:
Place the pumpkin on a covered surface or a drying rack. It needs to sit undisturbed for at least an hour to fully harden.
Add Metallic Flare
Mix a few drops of metallic gold or silver nail polish into your purple swirl. The metallic flecks will catch the light beautifully.
Step 4: Finishing Touches
-
Remove tape:
Once the paint is dry to the touch, gently peel away the painter’s tape from the stem. -
Clean up edges:
If there are any stray drops or smudges on the stem or areas you wanted to keep white, use a cotton swab dipped in acetone to clean them up. -
Sealing:
Take the pumpkin outside and apply a light coat of clear spray gloss sealer. This protects the design and gives it that high-end ceramic look. -
Final cure:
Let the sealer cure completely according to the can’s instructions before displaying your masterpiece.
Now you have a stunning, marble-effect pumpkin that brings a touch of elegance to your seasonal decor
Raised White Spiderweb Texture
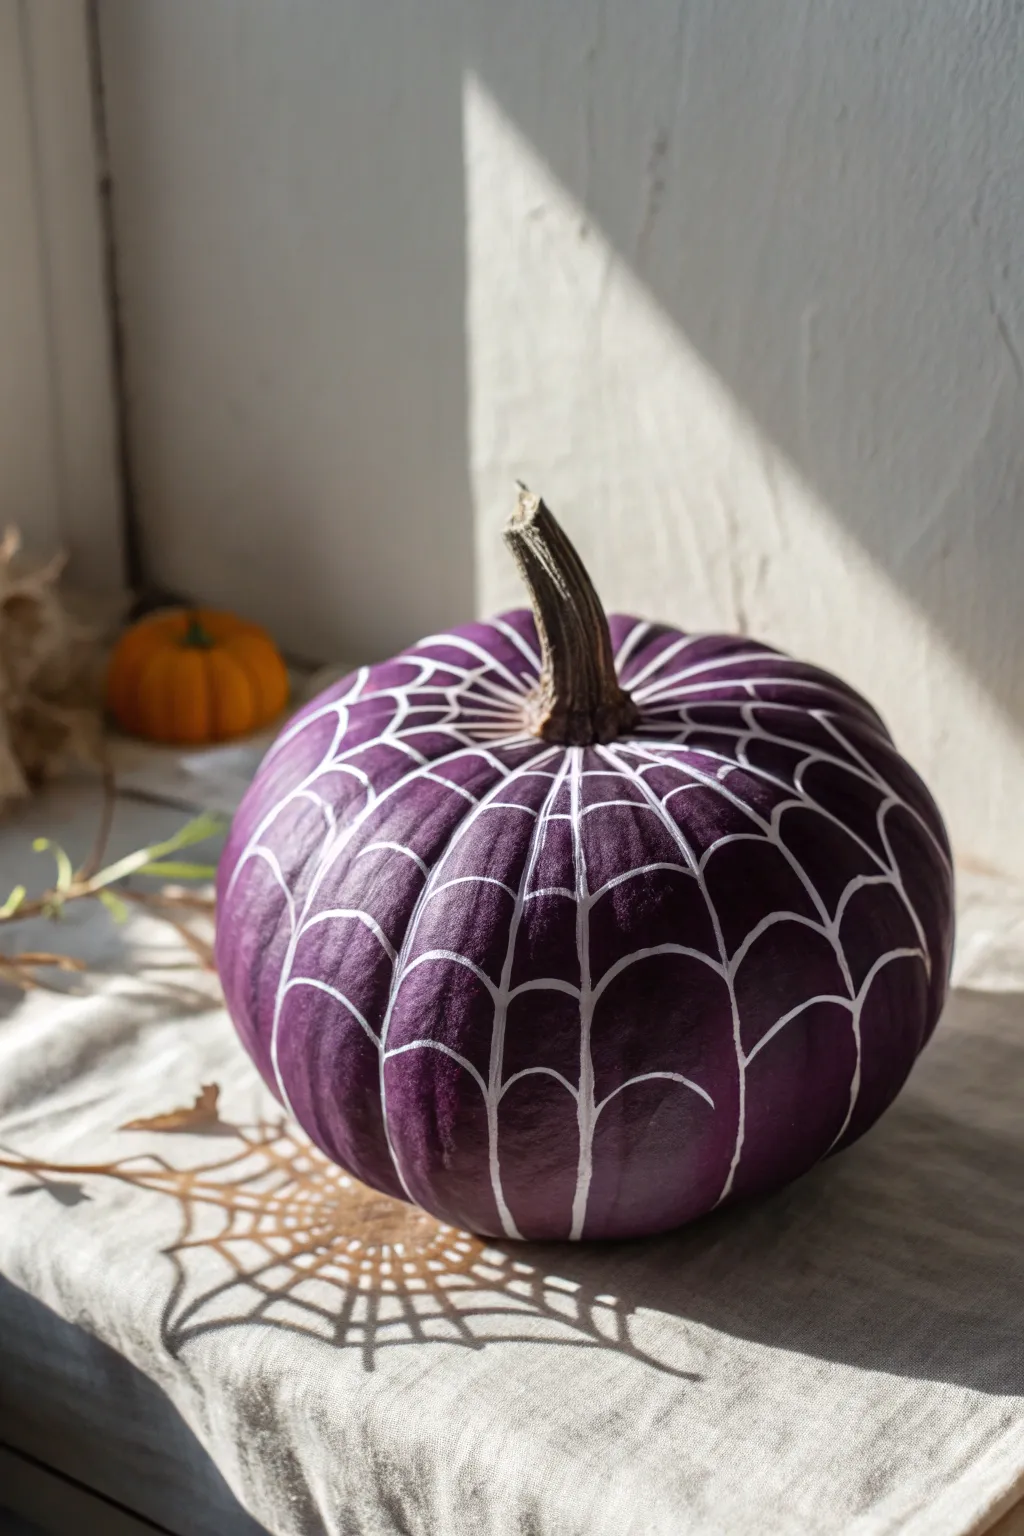
Transform a classic gourd into a spooky, sophisticated centerpiece with this deep violet pumpkin featuring a striking, raised spiderweb design. The high-contrast white webbing creates a tactile 3D effect that pops beautifully against the matte purple base.
Step-by-Step Tutorial
Materials
- Medium-sized pumpkin (real or faux)
- Deep purple acrylic craft paint (matte finish)
- White 3D fabric paint (puff paint) in a squeeze bottle with a fine tip
- Medium flat synthetic paintbrush
- Foam sponge brush (optional for base coating)
- Pencil or white chalk pencil
- Damp cloth or paper towels
- Clear matte sealer spray (optional)
- Masking tape (optional for protecting the stem)
Step 1: Base Preparation
-
Clean surface:
Begin by wiping down your pumpkin with a damp cloth to remove any dirt, dust, or oils. If you are using a real pumpkin, ensure it is completely dry before proceeding. -
Protect the stem:
Wrap the stem carefully with masking tape. This keeps the stem its natural color while you paint the body of the pumpkin, creating a clean, professional finish. -
First coat application:
Using your foam sponge brush or flat paintbrush, apply the first layer of deep purple acrylic paint. Brush in vertical strokes, following the pumpkin’s natural ribs from top to bottom. -
Let it dry:
Allow the first coat to dry completely. This usually takes about 20-30 minutes depending on the thickness of the paint and humidity. -
Second coat application:
Apply a second coat of purple paint to ensure full opacity. If the original orange is still peeking through, a third thin coat might be necessary to get that rich, deep violet hue. -
Final drying time:
Let the base color cure fully for at least an hour. The surface must be completely dry and non-tacky before you start the intricate web design.
Step 2: Web Design Framework
-
Mark the center:
Using a white chalk pencil, lightly mark a circle around the base of the stem. This will serve as the anchor point for your vertical web lines. -
Sketch vertical guides:
Lightly sketch vertical lines radiating from the stem down to the base of the pumpkin. The natural grooves of the pumpkin are perfect guides for these main structural lines. -
Sketch horizontal connections:
Draw curved, scalloped lines connecting the vertical spokes. Start near the top and work your way down in concentric rings. The curves should dip downward slightly to mimic a hanging web.
Pro Tip: Gravity Assist
When piping vertical lines down the sides, gravity can make the paint run. Keep the bottle moving steadily, or lay the pumpkin on its side (on a towel) and rotate it as you work.
Step 3: Creating the Raised Texture
-
Test the flow:
Before touching the pumpkin, squeeze a small amount of the white 3D puff paint onto a scrap piece of paper. Ensure the flow is smooth and consistent without air bubbles. -
Pipe the vertical lines:
Starting at the stem, slowly trace over your vertical chalk guides with the puff paint. Hold the bottle tip slightly above the surface, letting the paint lay down gently rather than dragging the tip. -
Pause for stability:
I find it helpful to let these main vertical lines set for about 10-15 minutes. This prevents accidental smudging when you move on to the horizontal webbing. -
Pipe the first ring:
Begin the horizontal webbing at the top, closest to the stem. Connect two vertical lines with a U-shaped swoop of paint. Continue this pattern all the way around the pumpkin. -
Work your way down:
Move to the next section down and repeat the scalloped piping. Ensure your swoops are varied slightly in width to give the web an organic, non-uniform look. -
Refine the lines:
If a line ends up too thin, go back over it carefully while it’s still wet to build up the volume. The goal is a tangible, raised texture. -
Clean up mistakes:
If you make a major error, quickly use a damp Q-tip to wipe away the wet puff paint, let the spot dry, and then re-pipe the line. -
Final cure:
Allow the 3D paint to dry completely undisturbed. This creates that hard, raised shell effect. It usually requires 4-6 hours, or overnight for best results. -
Remove tape:
Once everything is fully dry, gently peel off the masking tape from the stem.
Troubleshooting: Clogged Tips
If the 3D paint creates sputtering lines, the nozzle is likely partially dried. Use a sewing pin or opened paperclip to clear the blockage immediately for smooth flow.
Now you have a stunning, tactile decoration that brings a touch of elegant gothic charm to your seasonal display
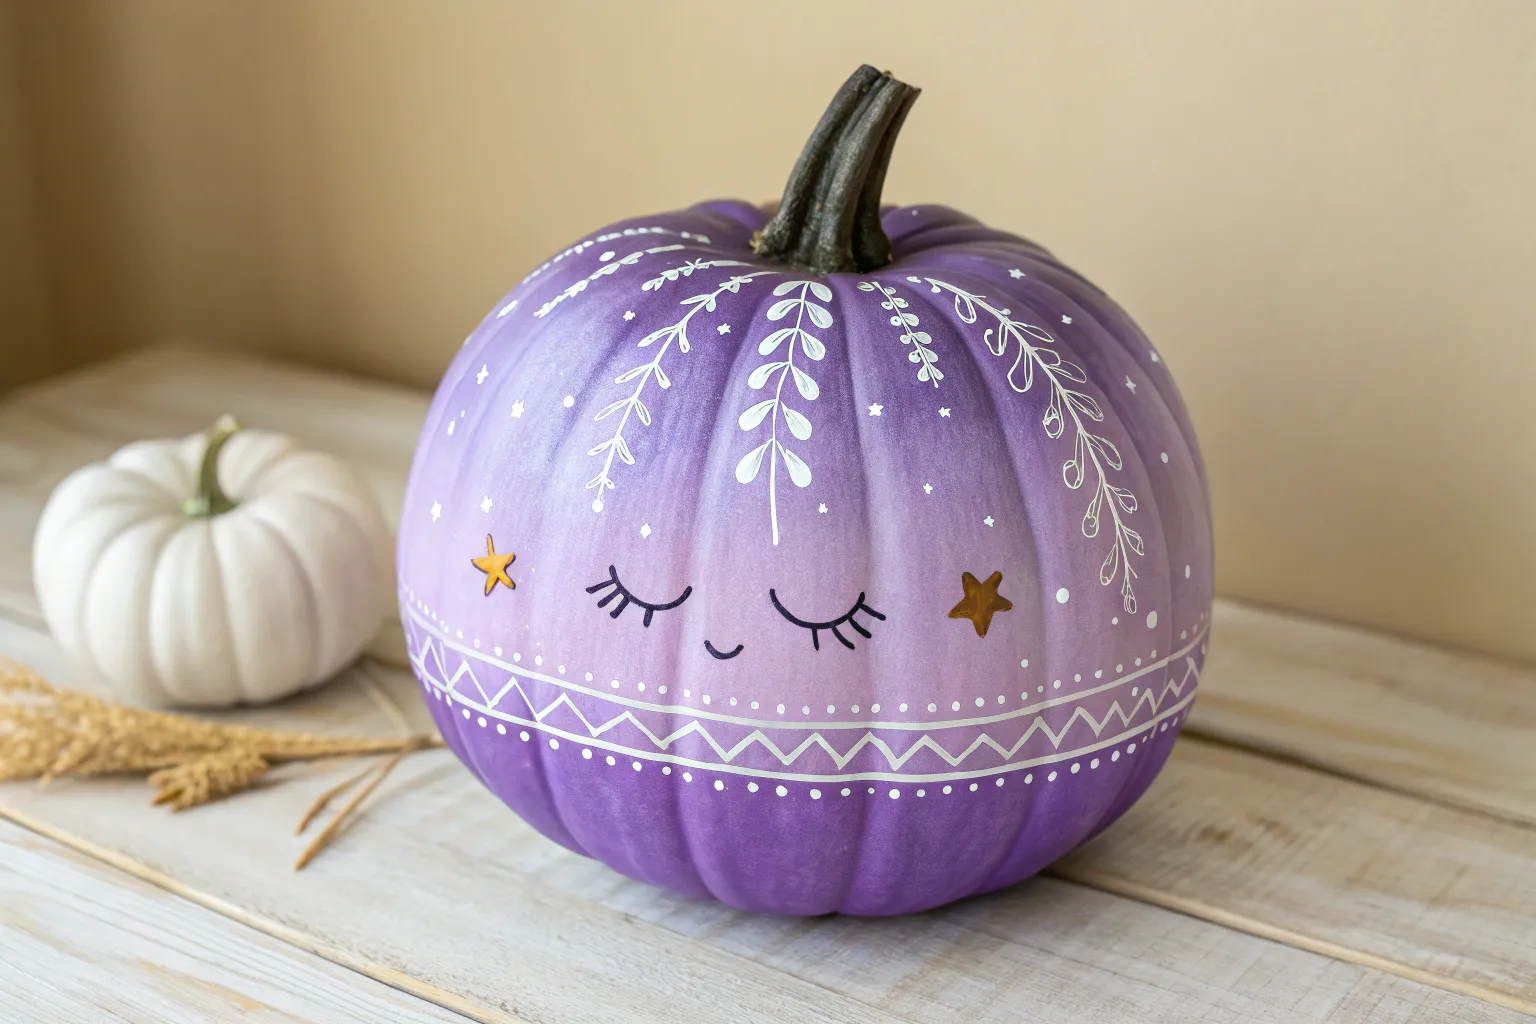
Black Cat on a Purple Pumpkin
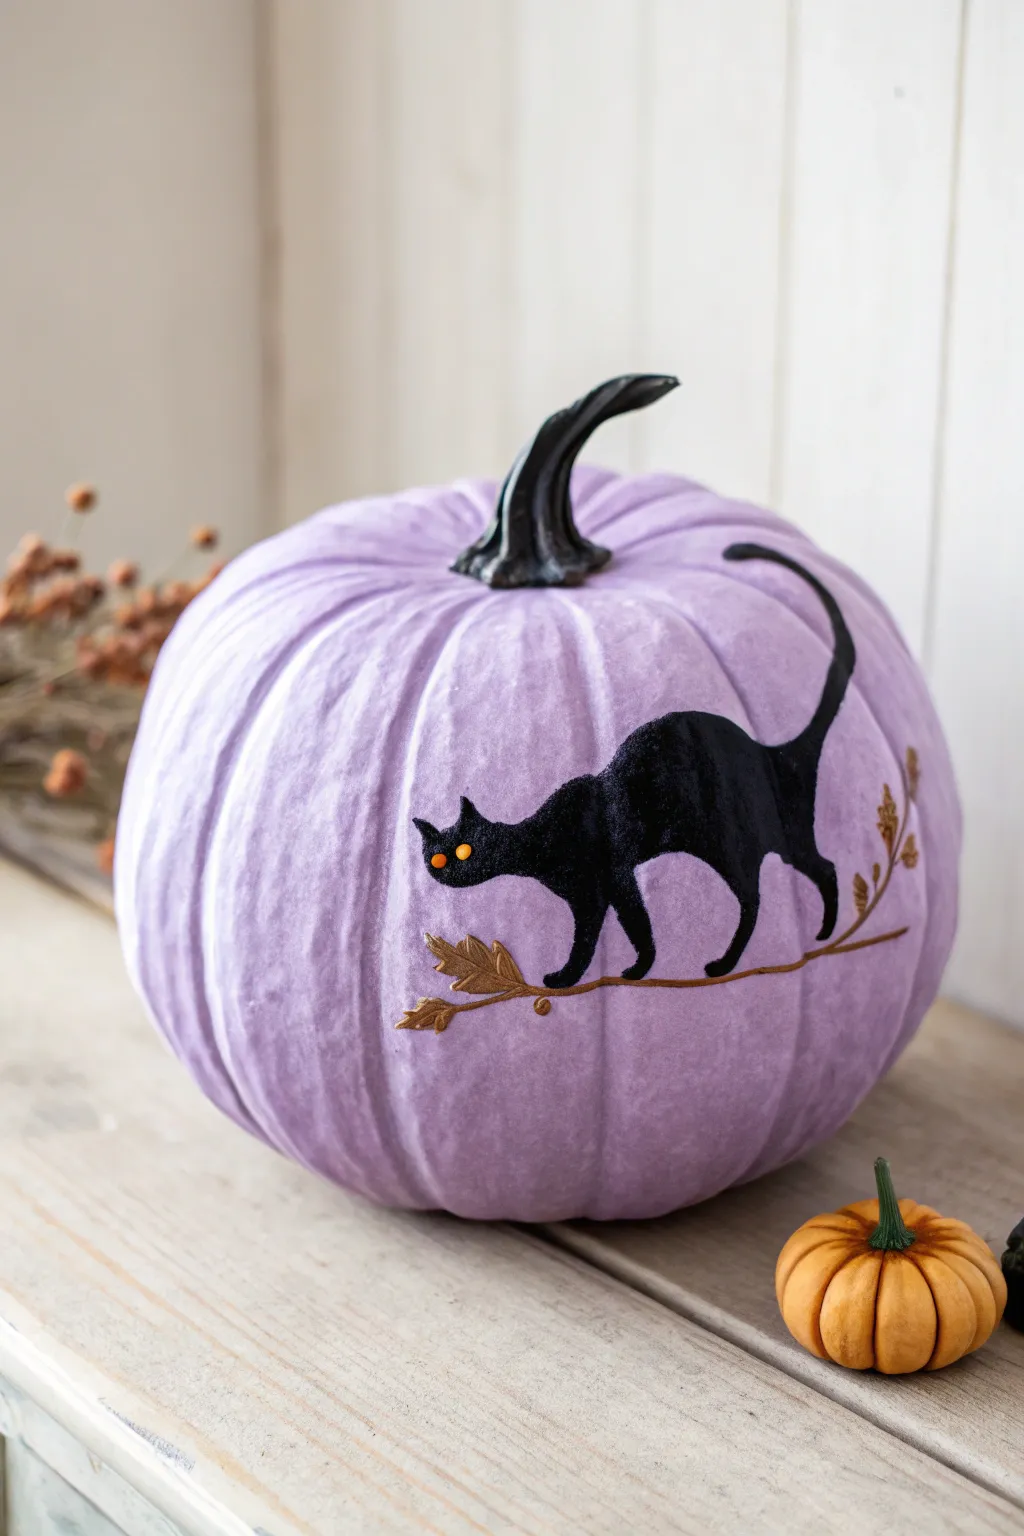
Transform a standard pumpkin into a magical autumn centerpiece with this stunning project featuring a sleek black cat prowling along a delicate branch. The soft pastel purple base creates a uniquely modern backdrop that makes the traditional Halloween motif pop with enchanting contrast.
Step-by-Step Guide
Materials
- Medium-sized faux pumpkin (or real pumpkin)
- Light lavender or lilac acrylic paint
- Glossy black acrylic paint
- Metallic gold or bronze acrylic paint
- Bright yellow acrylic paint
- Medium flat paintbrush
- Small round detail brush (size 0 or 1)
- Pencil
- Carbon transfer paper (optional)
- Matte or satin sealant spray
Step 1: Preparing the Canvas
-
Clean surface:
Begin by thoroughly wiping down your pumpkin with a damp cloth to remove any dust or waxy residue, ensuring a smooth surface for painting. -
Base coat application:
Using your medium flat brush, apply the light lavender acrylic paint to the entire pumpkin. Paint in vertical strokes following the natural ribs of the gourd for a realistic texture. -
Build coverage:
Let the first coat dry completely. Apply a second or even third coat until you have opaque, solid purple coverage without any streaks showing through. -
Stem transformation:
While the body dries, carefully paint the pumpkin stem with glossy black paint. Ensure you get into all the twists and crevices of the stem for a dramatic look.
Step 2: Sketching the Silhouette
-
Draft the design:
Lightly sketch the outline of a cat walking along a curved branch directly onto the dry purple surface using a pencil. -
Posing the cat:
Draw an arched back and a long, sinuous tail that curls upward. Make sure the legs are positioned as if it is carefully stepping along the branch line. -
Adding the branch:
Extend a thin, slightly wavy line beneath the cat’s feet to represent the branch. Add small leaf shapes sprouting from the ends and randomly along the length.
Smooth Operator
If using a plastic pumpkin with a very slick surface, lightly sand it with fine-grit sandpaper before painting. This gives the acrylics something to grip onto.
Step 3: Painting the Details
-
Fill the silhouette:
Switch to your small round brush and load it with black paint. Carefully outline the cat’s body first to get crisp edges. -
Solidify the black:
Fill in the rest of the cat’s body. I find that dabbing the paint slightly rather than long strokes can give the illusion of fur texture. -
Paint the branch:
Clean your brush and pick up the metallic gold or bronze paint. Carefully trace over your pencil lines for the branch and the small leaves. -
Refine the tail:
Go back to the black paint if necessary to sharpen the tip of the tail, making it taper elegantly to a point. -
Create the eyes:
Dip the very tip of a clean detail brush (or the back end of a paintbrush handle) into bright yellow paint. Dot two small circles onto the cat’s face for glowing eyes. -
Pupil details:
Once the yellow dots are fully dry, add tiny vertical slits of black inside them to create distinct cat pupils. -
Leaf definition:
Add a tiny touch of darker bronze or brown to the veins of the gold leaves to give them a bit more dimension against the purple background.
Glow Up
Use glow-in-the-dark paint for the yellow eyes. During the day they look normal, but at night, a floating pair of glowing eyes will appear on your porch.
Step 4: Finishing Touches
-
Clean up edges:
Inspect the edges of your painting. If any purple paint has been accidentally covered, use a tiny bit of lavender to touch up the outline. -
Dry time:
Allow the entire painted design to dry undisturbed for at least 2-3 hours to prevent smudging. -
Seal the work:
In a well-ventilated area, spray a light, even coat of matte or satin sealant over the pumpkin to protect the paint from chipping and fading.
Place your sophisticated purple pumpkin on a mantel or porch step to enjoy a modern twist on Halloween decor
Twilight Graveyard Silhouette Scene
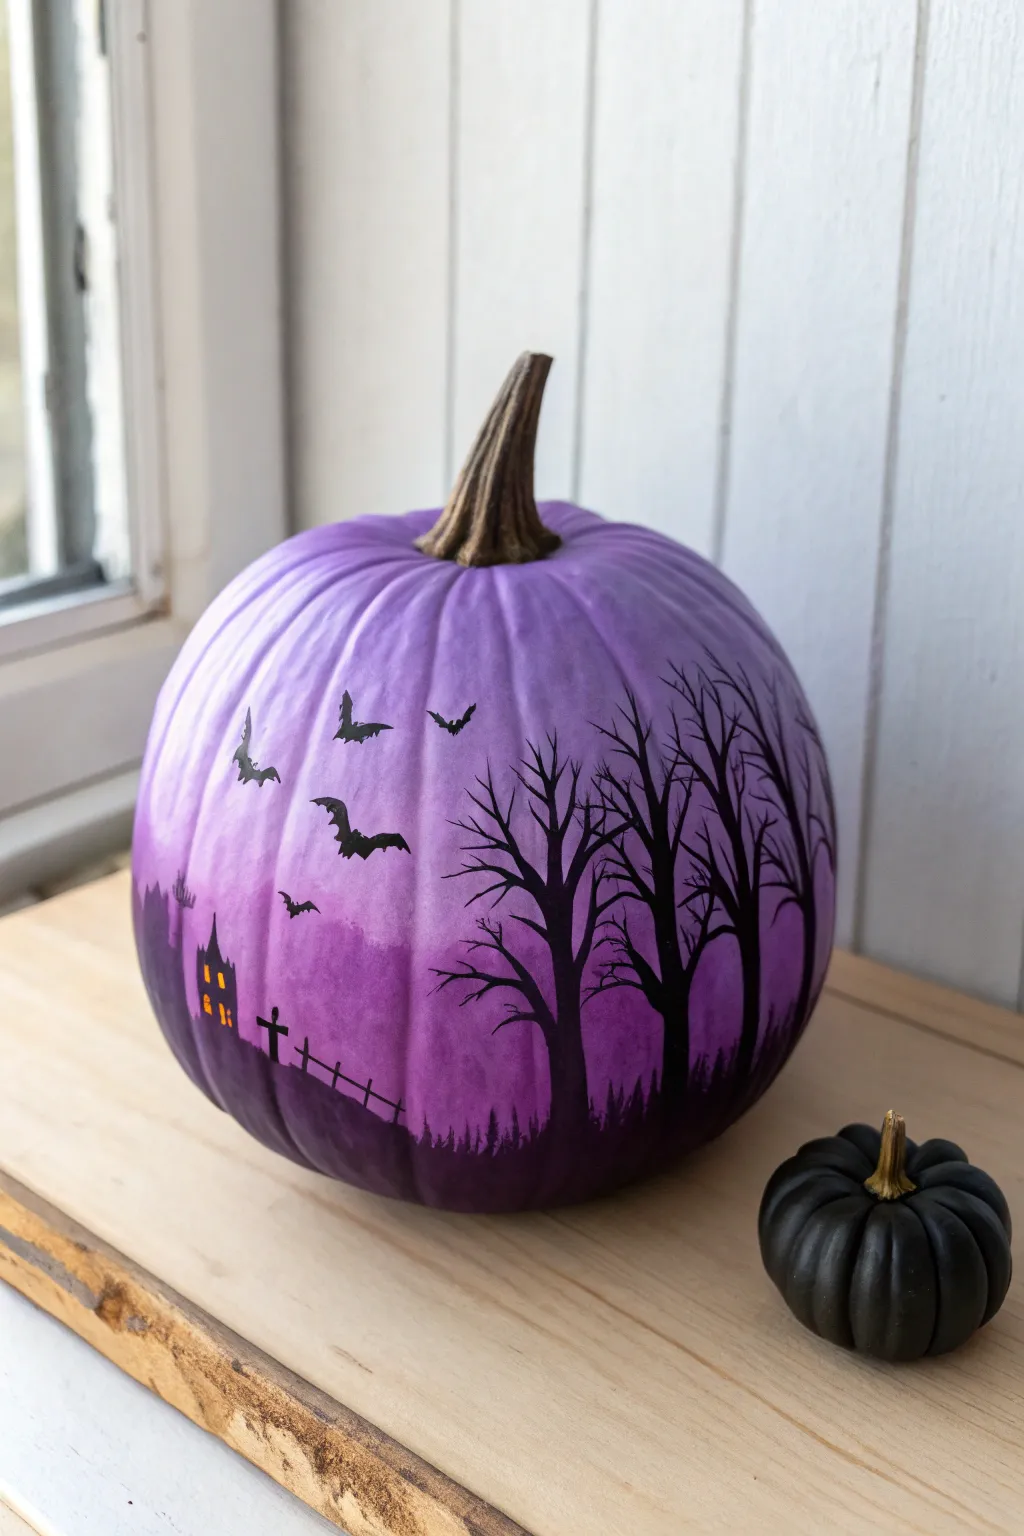
Transform a standard pumpkin into a haunting landscape with this moody, atmospheric design. Using a beautiful purple ombre technique as your canvas, you’ll paint a spooky silhouette scene complete with bare trees, bats, and a distant haunted house.
Step-by-Step
Materials
- Large craft pumpkin or real pumpkin (white or orange)
- Acrylic paints: White, Lavender, Dark Purple, Black, Yellow
- Medium flat brush (for base coating)
- Small round brush (size 1 or 2)
- Fine liner brush (size 0 or 00)
- Makeup sponge or foam pouncer
- Matte finish spray sealant
- Cup of water and paper towels
- Masking tape (optional for stem)
Step 1: Creating the Ombre Sky
-
Prime the surface:
If you are using a real orange pumpkin, start by giving the entire surface a coat of white acrylic paint or gesso to ensure your purples pop. Let this dry completely before moving on. -
Paint the light top:
Mix a generous amount of white with a little lavender paint. Apply this very pale shade to the top third of the pumpkin, brushing horizontally around the curve. -
Transition to mid-tone:
While the top layer is still slightly wet, paint the middle section with your standard lavender shade. Use your brush to gently blend the meeting point between the pale top and this middle section for a soft transition. -
Add the deep purple base:
Apply the darkest purple paint to the bottom third of the pumpkin. Blend the upper edge of this dark section into the middle lavender band. I find using a slightly damp makeup sponge helps smoothen out any harsh lines between the gradient layers. -
Dry thoroughly:
This step is crucial—allow the entire pumpkin to dry completely. The ombre background needs to be solid so your black silhouettes don’t muddy the colors.
Uneven Gradients?
If brush strokes are too visible in the ombre sky, wait for it to dry, dampen a makeup sponge, and lightly dab a thin layer of color over the transition zones to soften the look.
Step 2: Painting the Landscape
-
Establish the ground line:
Using the medium flat brush and black acrylic paint, create an uneven, rolling horizon line along the very bottom of the pumpkin to serve as the ground. -
Outline the haunted house:
On the left side, switch to a small round brush to paint the basic shape of a building. Create a tall, narrow structure with a pointed roof. -
Add architectural details:
Refine the house shape by adding a smaller jagged annex to the side and perhaps a chimney. Keep it loose and silhouetted. -
Illuminate the windows:
Once the black house shape is dry to the touch, use your smallest brush to dab tiny rectangles of yellow paint onto the house for glowing windows. -
Paint the fence posts:
Moving right from the house, paint a series of small, uneven vertical lines for the fence posts. Make them descend slightly as if going down a hill. -
Connect the fence:
Use your fine liner brush to draw thin horizontal lines connecting the posts, creating a rickety rail fence appearance. -
Add the grave marker:
Near the house and fence, paint a simple cross shape to suggest a graveyard setting.
Add a Moon
Before painting the bats, use a circular foam pouncer with white paint to add a full moon behind the tree branches for extra eerie atmosphere and lighting contrast.
Step 3: Trees and Final Details
-
Draft the main trees:
On the right side of the pumpkin, paint three or four thick vertical trunks rising from the ground layer. Vary their thickness to create depth. -
Branch out:
Using the fine liner brush, pull branches upward and outward from the trunks. Remember that tree branches generally get thinner as they move away from the trunk. -
Create fine twigs:
Add tiny, spindly twigs to the ends of your branches. Let them reach high up into the lighter purple sections of the sky for high contrast. -
Paint the bats:
In the open sky area above the house, paint small black ‘V’ and ‘M’ shapes to represent bats. Vary their sizes to make some look closer and others further away. -
Add distant texture:
Along the horizon line between the trees and house, use a fairly dry brush to tap in tiny vertical strokes, suggesting a distant forest line or tall grass. -
Seal the artwork:
Once all paint is fully dry, take the pumpkin outside and apply a coat of matte clear spray sealant to protect your spooky scene from scratches.
Your moody twilight pumpkin is now ready to set a perfectly spooky tone for your Halloween display
Cosmic Purple Galaxy Night
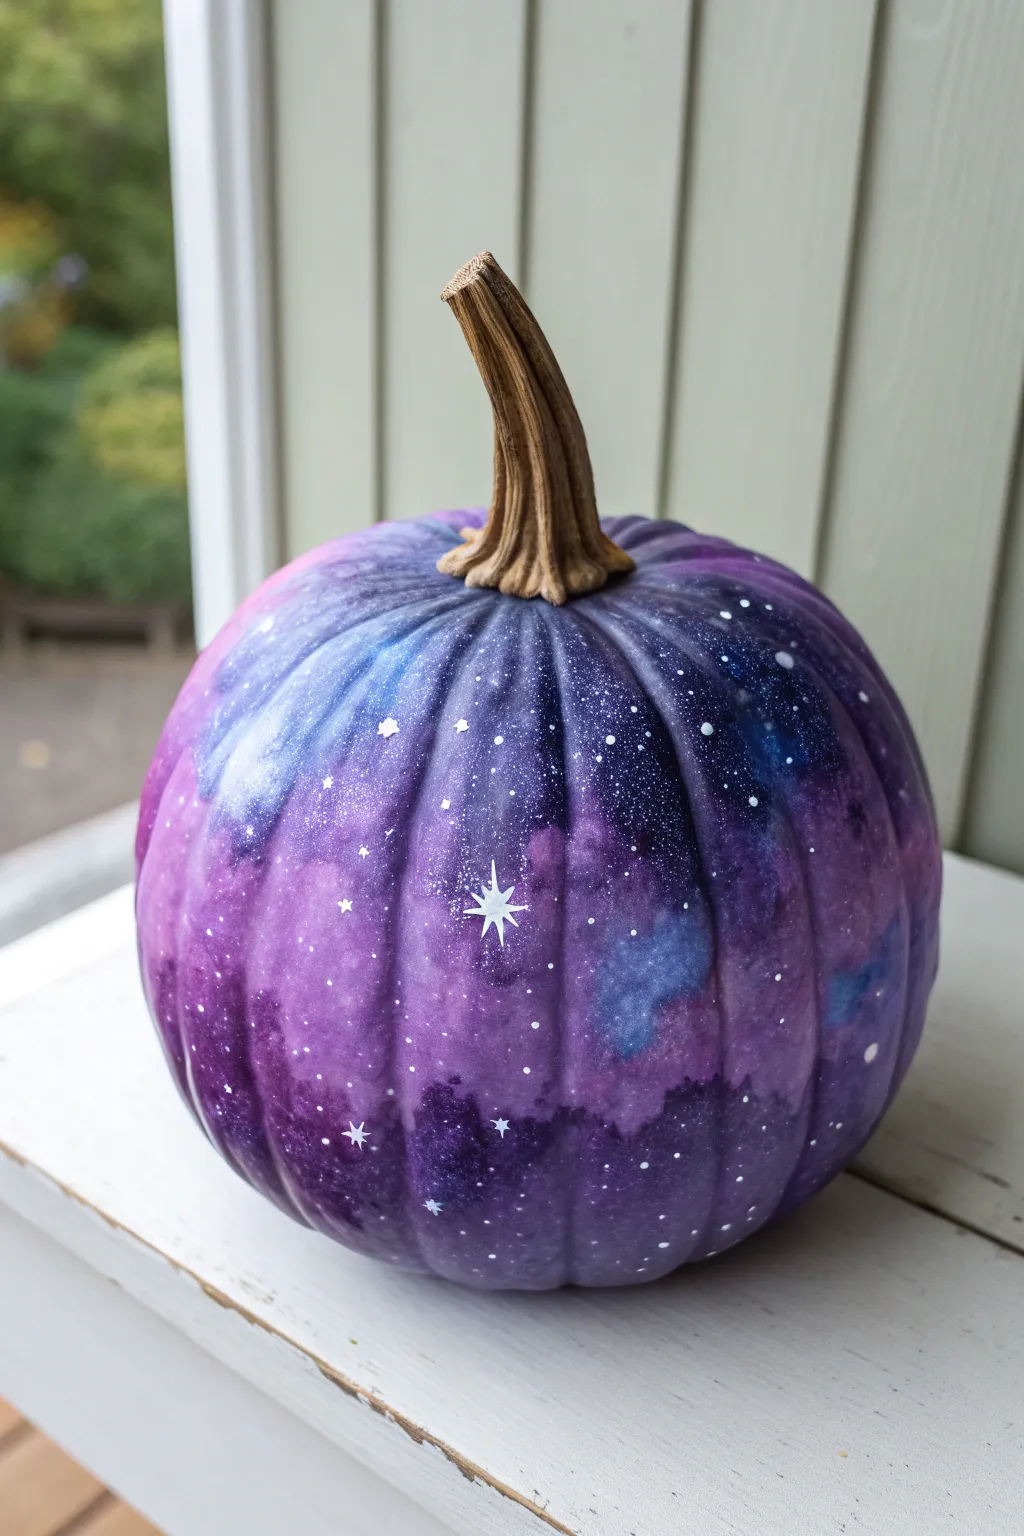
Transform a simple pumpkin into a mesmerizing piece of the cosmos with this stunning galaxy painting technique. By blending deep purples, dreamy blues, and bright starlight, you’ll create a celestial centerpiece that feels infinitely deep and magical.
How-To Guide
Materials
- Faux or real pumpkin (white works best, or prime a standard one white)
- Acrylic craft paints: Deep violet, plum, indigo, cerulean blue, black, and white
- Sponge applicators or kitchen sponge pieces
- Fine-point detail paintbrush
- Medium flat paintbrush
- Stiff-bristle toothbrush (for splattering)
- Cup of water and paper towels
- Matte or satin sealant spray (optional)
Step 1: Setting the Stage
-
Prepare the surface:
Wipe down your pumpkin with a damp cloth to remove any dust or dirt. If you are using an orange pumpkin, paint the entire surface with a coat or two of white acrylic paint. This primer layer is crucial because it makes colors like purple and blue pop vibrantly rather than looking muddy against the orange skin. -
Protect the stem:
Carefully wrap the stem in painter’s tape to keep it clean, or just be mindful as you paint near it. Keeping the natural brown stem provides a nice grounding contrast to the space colors.
Step 2: Creating the Galaxy Base
-
Start with light blues:
Squeeze out your cerulean and lighter blue paints. Dampen a sponge slightly—you want it moist but not dripping. Dip it into the blue and dab random cloud-like patches onto the pumpkin’s surface. Don’t cover the whole thing; aim for about 30% coverage. -
Introduce the purples:
Switch to a fresh section of your sponge (or a new sponge) and pick up your brighter violet or plum shade. Dab this color around the edges of the blue patches, overlapping them slightly to create a soft, blended transition. -
Deepen the cosmos:
While the paint is still tacky, use a sponge with deep indigo or dark purple. Fill in the remaining white spaces and work this dark color into the creases of the pumpkin. The goal is to create depth, so don’t be afraid to go dark. -
Blend the transitions:
Take a clean, slightly damp sponge and gently dab over the areas where colors meet. This softens any harsh lines, mimicking the gaseous look of a nebula. If you accidentally cover too much light blue, just dab a little fresh light paint back on top. -
Add shadows:
Use a tiny amount of black paint on a sponge and lightly tap it into the deepest recesses between the pumpkin ribs or around the bottom. Just a hint of black makes the galaxy feel vast.
Muddy colors?
If blending colors creates a brown mess, let the layers dry completely between applications. Sponge dry layers over one another for a layered look rather than a wet-on-wet blend.
Step 3: Stars and Details
-
Create the milky way dust:
Mix a very small amount of white paint with a drop of water so it becomes translucent. Lightly sponge this milky glaze over a few select blue areas to make them look like glowing gas clouds. -
Prepare for splattering:
Thicken your white paint slightly with water until it has an ink-like consistency. It needs to be fluid enough to fly off a brush but opaque enough to show up. -
Splatter the stars:
Dip an old stiff toothbrush into the thinned white paint.Point the bristles toward the pumpkin and run your thumb across them to flick a fine spray of white specks onto the surface. Rotate the pumpkin to get even coverage. -
Paint major stars:
Using your finest detail brush, dip the tip into pure white paint. Choose a few spots to paint larger, specific dots. These act as the brighter, closer stars in your galaxy. -
Add starbursts:
Find a few of your larger white dots. Carefully paint tiny intersecting lines through them to create a four-point starburst or cross shape. I like to make one vertical line slightly longer than the horizontal for a classic twinkle effect. -
Final highlights:
Look for areas that dried a bit dull. You can dot a few tiny clusters of bright white stars in the darker purple zones to create high contrast.
Glow Up
Mix a small amount of fine silver or iridescent glitter into your final sealant spray, or dust it on while the sealer is wet for a literal sparkling finish.
Step 4: Sealing
-
Let it dry completely:
Acrylic paint dries fast, but give the pumpkin at least an hour to ensure the thickest layers are set. -
Seal the magic:
Take the pumpkin outside or to a well-ventilated area. Remove the tape from the stem. Spray the painted surface with a clear matte or satin sealant. This protects the paint from chipping and unifies the sheen of the different colors.
Place your finished pumpkin near a light source to let those white stars really shine against the deep purple background
Peacock Feather Jewel Tones
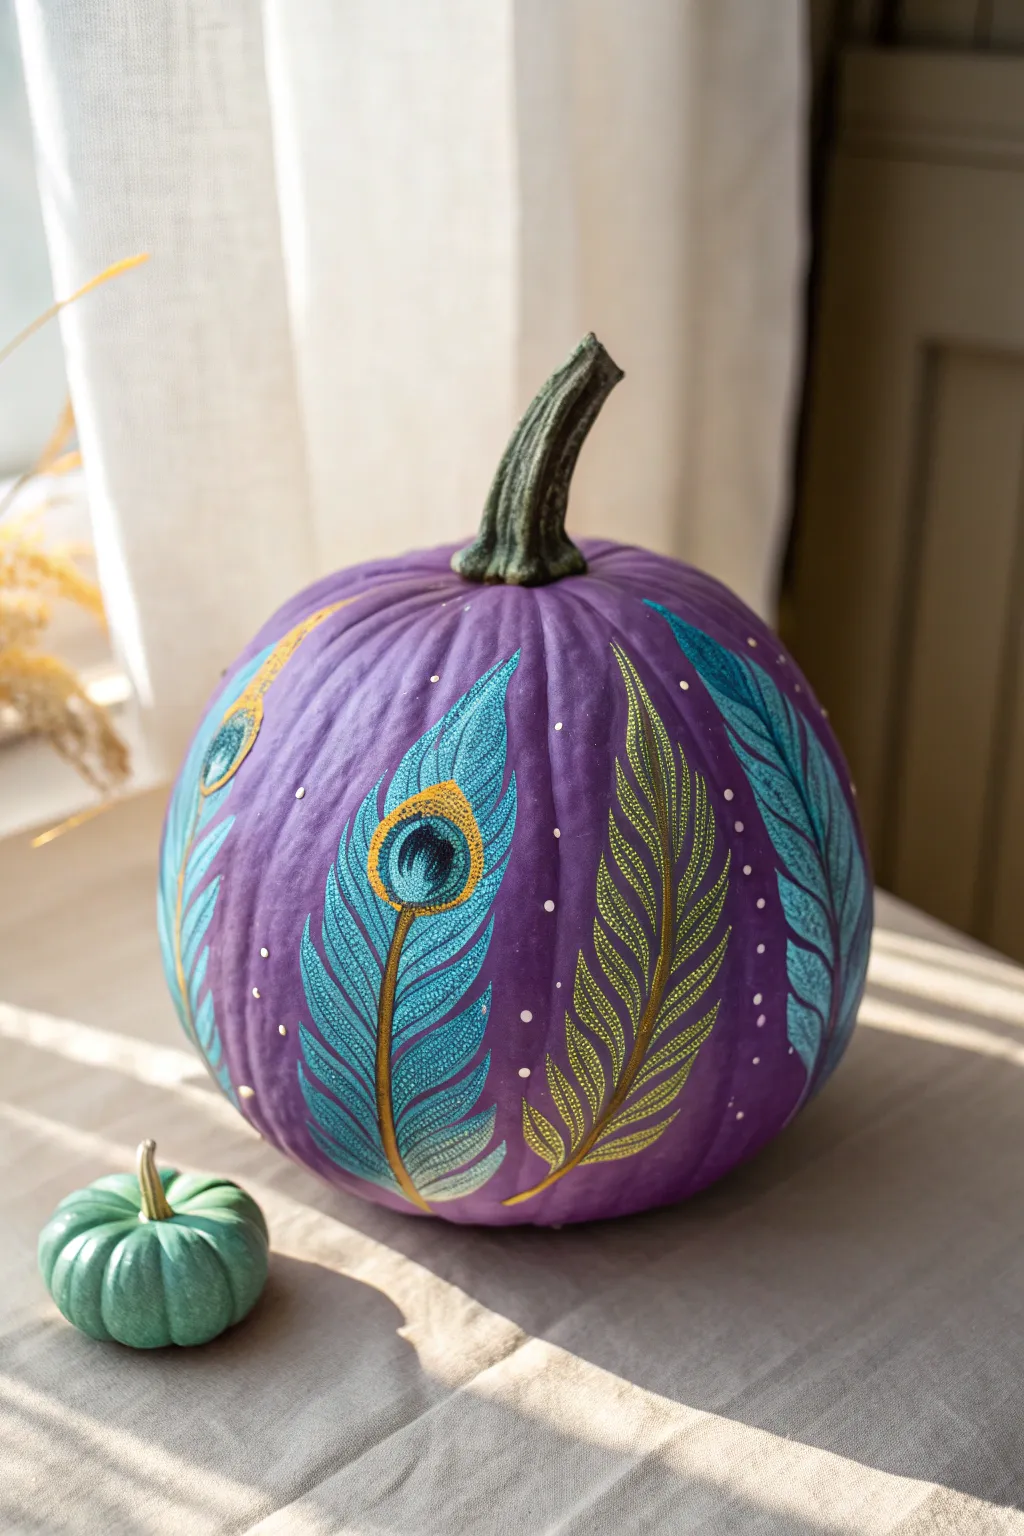
Transform a simple pumpkin into a showstopping centerpiece with this elegant painted design featuring stylized peacock feathers on a rich purple base. The combination of brilliant jewel tones and metallic gold accents creates a luxurious look perfect for sophisticated autumn decor.
Step-by-Step
Materials
- Faux craft pumpkin (medium size)
- Matte purple acrylic craft paint (plum or violet)
- Acrylic paints: turquoise, teal, metallic gold, dark navy blue, light sage green, white
- Medium flat brush (for base coat)
- Fine liner brush (size 0 or 00)
- Small round brush (size 2)
- Gold paint pen (fine tip) or metallic gold paint
- Dotting tool or toothpick
- Palette or paper plate
- Clear matte sealer spray (optional)
Step 1: Setting the Stage
-
Clean surface:
Begin by wiping down your pumpkin with a slightly damp cloth to remove any dust or manufacturing residue. Let it dry completely. -
Apply base coat:
Using the medium flat brush, apply a layer of matte purple paint over the entire pumpkin, stopping at the base of the stem. Don’t paint the stem just yet. -
Second coat:
Once the first layer is dry to the touch, apply a second coat of purple to ensure opaque, solid coverage. Let this cure fully for at least an hour.
Clean Lines
If your fine lines look shaky or thick, thin your acrylic paint with a tiny drop of water. Ink-consistency paint flows much smoother from a liner brush.
Step 2: Planning the Plumes
-
Outline the quills:
I like to start by sketching the main flow of the feathers. Using a very thinned-down gold paint or a light pencil, draw curved lines stemming from the bottom of the pumpkin upward to act as the central quills. -
Vary the heights:
Draw about 4-6 large feather spines around the pumpkin, varying their heights and curvature so they don’t look too uniform.
Jeweled Finish
Glue actual small rhinestones or sequins into the center of the painted peacock ‘eyes’ for a 3D effect that catches the light beautifully.
Step 3: Painting the Eye Feathers
-
Create the eye shape:
On your main feathers, paint an almond or tear-drop shape near the top of the quill using gold paint. This forms the outer rim of the peacock ‘eye’. -
Fill the center:
Inside the gold almond, paint a smaller oval of bright turquoise. -
Add the pupil:
While the turquoise is drying, mix a dark navy blue. Paint a small, dark circle inside the turquoise oval. Add a tiny comma-shape of lighter blue or white inside the navy for a highlight. -
Feather structure:
Switch to your fine liner brush and turquoise paint. Paint thin, hair-like strokes extending outward from both sides of the central quill. Keep the strokes angled upward. -
Layering details:
Once the turquoise base strokes are dry, go back over them with fewer, selective strokes of a lighter teal or metallic blue to add dimension and sheen. -
Gold outlining:
Use your gold paint pen or fine brush to carefully outline the main ‘eye’ of the feather again, making the gold pop against the purple background.
Step 4: Creating the Fern Feathers
-
Fern base:
For the alternative feather style shown (the fern-like leaves), use light sage green paint. Creating small, repetitive V-shapes all the way up the central gold quill. -
Add texture:
Using a very fine brush and darker olive green or gold, add tiny veins or stippling inside the sage leaves to give them a textured, organic appearance. -
Highlighting:
Touch the tips of these fern-style feathers with a bit of metallic gold paint to tie them into the jewel-tone theme.
Step 5: Magical Details
-
Atmospheric dots:
Dip a dotting tool or the non-brush end of a paintbrush into white or light gold paint. -
Scatter the stars:
gently tap dots into the empty purple spaces between the feathers. Vary the size slightly and keep the placement random for a whimsical effect. -
Stem finish:
Paint the pumpkin stem. A dark, natural green works well, but you can dry-brush a little metallic gold over the ridges of the stem to coordinate with the feathers. -
Seal (Optional):
If you plan to place this outdoors or want to protect the fine lines, mist the entire pumpkin with a clear matte sealer once the paint is fully cured (usually 24 hours).
Place your jewel-toned masterpiece on a mantel or table runner for an instantly sophisticated seasonal display
Purple Pumpkin for Epilepsy Awareness
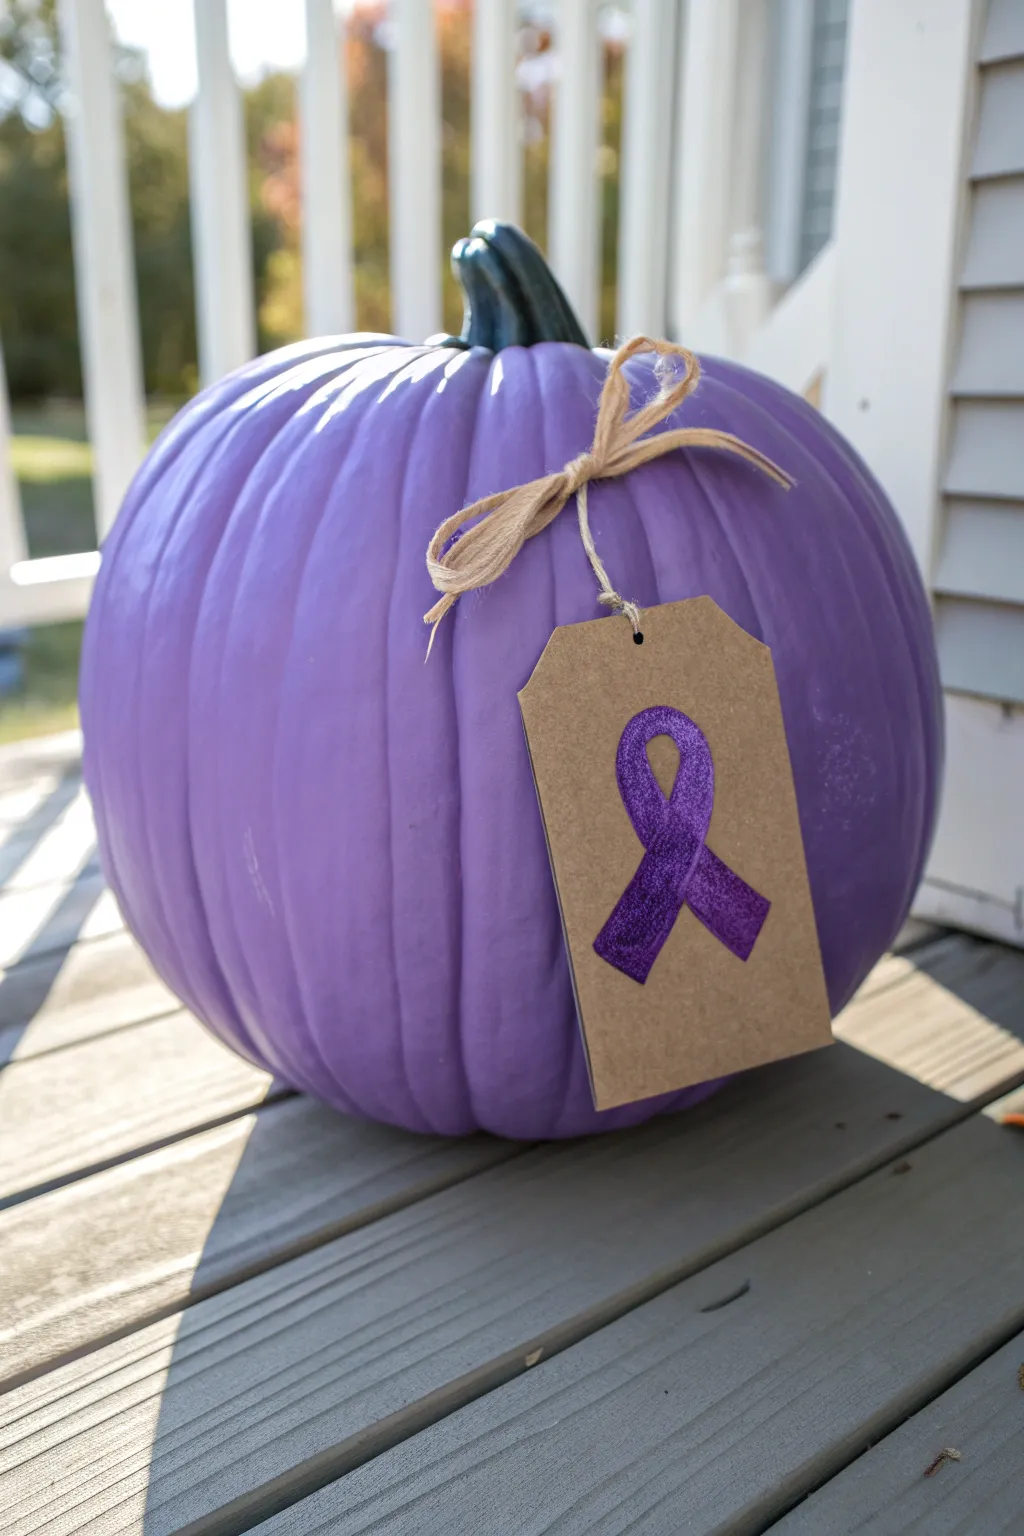
Transform a classic autumn gourd into a meaningful beacon of support with this elegant purple design. The matte lilac finish contrasts beautifully with a rustic tag bearing a sparkling awareness ribbon, creating a sophisticated tribute.
Step-by-Step Tutorial
Materials
- Medium-sized pumpkin (real or faux)
- Lavender or light purple acrylic craft paint (matte finish)
- Dark green acrylic paint (for the stem)
- Foam sponge brush
- Small detail paintbrush
- Kraft paper shipping tag
- Purple glitter adhesive vinyl OR purple glitter paper
- Natural raffia ribbon or jute twine
- Scissors
- Hole punch (if tag is unpunched)
- Pencil (optional)
Step 1: Painting the Base
-
Clean the Surface:
Begin by wiping down your pumpkin with a damp cloth to remove any dirt or oils. If you are using a real pumpkin, ensure it is completely dry before painting to help the color adhere. -
First Coat Application:
Squeeze a generous amount of lavender acrylic paint onto a palette or paper plate. Using a foam sponge brush, apply the first layer of paint, stroking from the top near the stem down to the base in smooth vertical motions. -
Let it Dry:
Allow this initial coat to dry completely. This usually takes about 20-30 minutes, but it’s crucial for preventing streaks when you add the next layer. -
Build Opacity:
Apply a second coat of purple paint using the same vertical technique. Depending on your paint’s thickness, a third coat might be necessary to fully cover the orange rind and achieve that solid, matte look. -
Paint the Stem:
While the body finishes drying, switch to your small detail brush. Carefully paint the stem with dark green acrylic paint to define it against the purple body. I find two thin coats work better here than one thick glob.
Step 2: Creating the Awareness Tag
-
Prepare the Glitter Ribbon:
Take your purple glitter adhesive vinyl or glitter paper. On the backing side, sketch a simple awareness ribbon shape about 2 to 3 inches tall. -
Cut Out the Shape:
Using sharp scissors, carefully cut out your ribbon shape. If you have a digital cutting machine, you can use that for a perfectly symmetrical cut, but hand-cutting adds a nice personal touch. -
Position the Ribbon:
Place your kraft paper tag on a flat surface. Peel the backing off your vinyl ribbon (or apply glue to the back of glitter paper) and position it diagonally in the center of the tag. -
Secure the Ribbon:
Press down firmly on the glitter shape to ensure it adheres fully to the textured kraft paper, smoothing out any edges that might try to lift.
Sticky Situation
If the vinyl ribbon won’t stick to the fuzzy kraft paper, add a tiny dot of hot glue or craft glue to the back of the vinyl for a permanent hold.
Step 3: Assembly and Finishing
-
Prepare the Tie:
Cut a length of natural raffia or jute twine, approximately 12 to 15 inches long. The natural fiber complements the kraft paper perfectly. -
Thread the Tag:
Thread one end of the raffia through the hole at the top of your tag. -
Position on Pumpkin:
Hold the tag against the upper shoulder of the pumpkin where it will be most visible. -
Tie the Bow:
Wrap the raffia strands around the base of the pumpkin’s painted stem. Tie a simple shoelace bow, ensuring it’s tight enough to hold the tag in place but loose enough to drape naturally. -
Adjust the Loops:
Fluff the bow loops and trim the tails of the raffia if they are too long, aiming for an organic, slightly rustic look.
Make it Sparkle
For extra impact, coat the pumpkin stem in a layer of decoupage glue and sprinkle silver or purple glitter over it while wet.
Place your finished pumpkin on the porch or near a window to proudly spread awareness this season


Have a question or want to share your own experience? I'd love to hear from you in the comments below!