A plain lampshade is basically a blank canvas that gets to glow from the inside, which makes acrylic paint look extra magical. Here are my favorite lampshade painting ideas—starting with the classics and drifting into the fun, unexpected stuff once you’re warmed up.
Loose Floral Bouquet Wrap
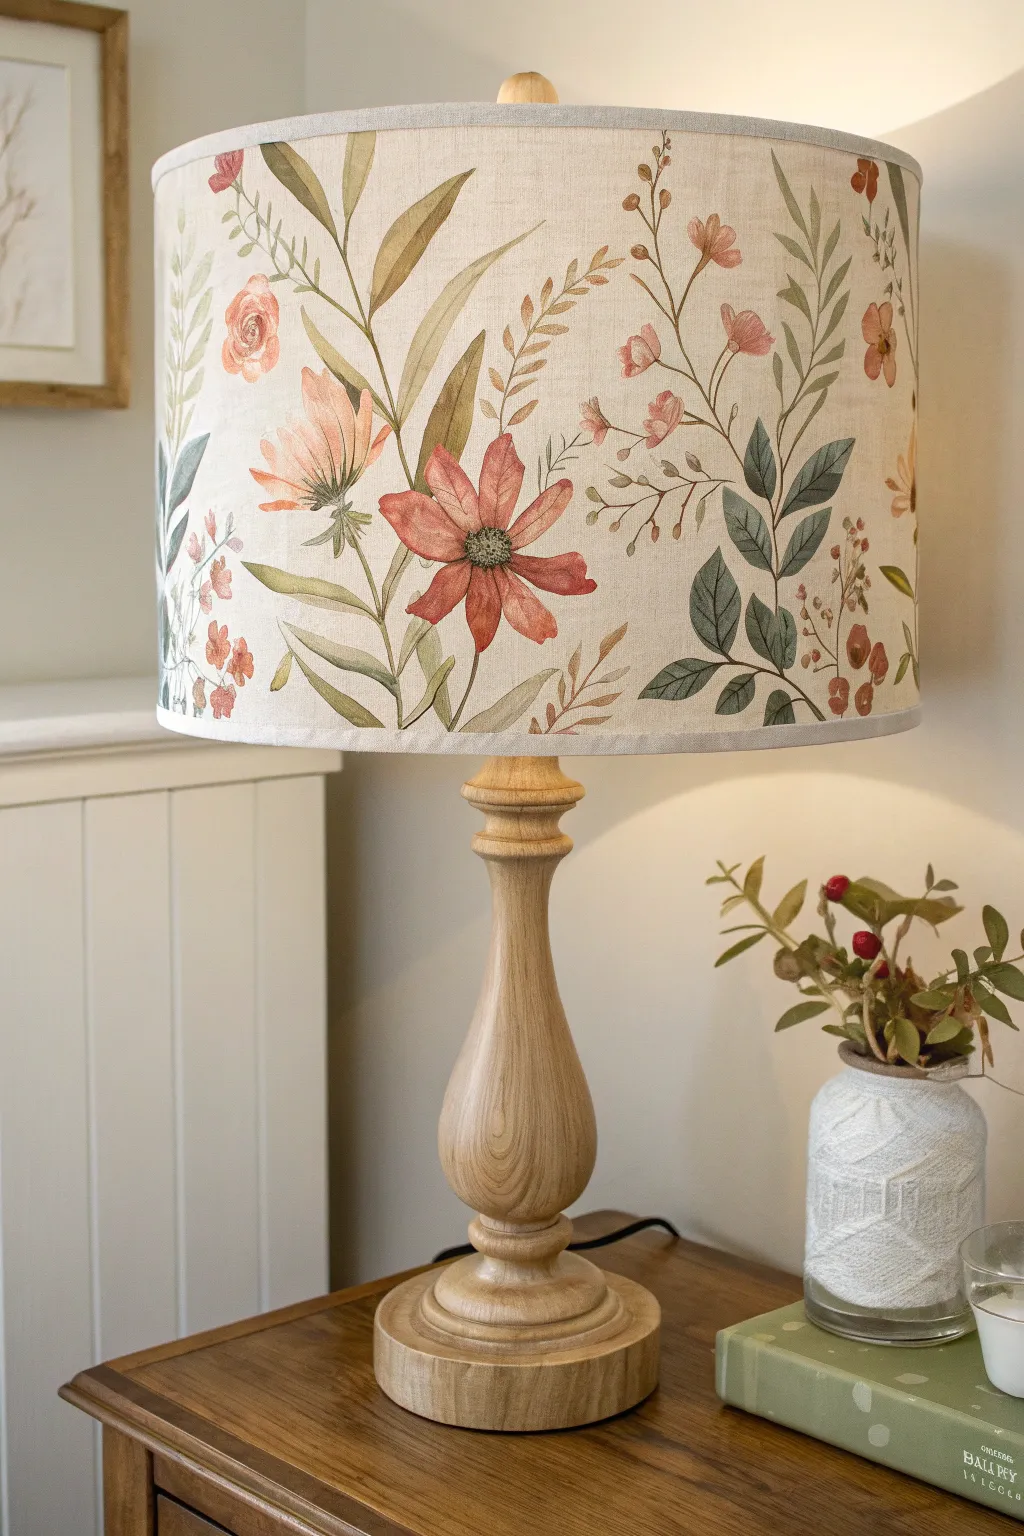
Transform a plain drum shade into a stunning piece of nature-inspired decor with this botanical painting tutorial. This project uses thinned acrylics to mimic the soft, transparent look of watercolor, creating a loose floral bouquet that feels both vintage and fresh.
Step-by-Step
Materials
- Plain fabric drum lampshade (linen or cotton blend works best)
- Acrylic paints: Terra cotta, deep red, sage green, olive green, warm yellow, burnt umber, cream
- Textile medium (fabric medium)
- Assorted brushes: Round #4 and #6, Liner #1, Flat 1/2 inch
- Water container and mixing palette
- Paper towels
- Pencil (light H or HB)
- Clear matte acrylic sealer spray (optional)
Step 1: Preparation and Design
-
Clean surface:
Ensure your lampshade is free of dust or lint. Use a lint roller to quickly clean the surface. -
Plan composition:
Sketch your design very lightly directly onto the shade using a pencil. Aim for an organic flow where stems curve upwards from the bottom edge, creating negative space between clusters. Don’t press hard; you just want faint guidelines. -
Mix your medium:
Mix your acrylic paints with textile medium according to the bottle’s instructions (usually 1:1 or 2:1). This is crucial for keeping the fabric soft and preventing the paint from cracking when the lamp heats up.
Step 2: Painting the Foliage
-
Base stems:
Using the #4 round brush and your olive green mix, paint the main stems following your pencil lines. Keep your hand loose and let the pressure vary to create natural thick-and-thin lines. -
Create large leaves:
For the broad, sweeping leaves shown in the reference, mix sage green with a touch of cream. Use the flat brush or large round brush, pressing down at the base of the leaf and lifting as you pull outward to create a sharp tip. -
Add darker foliage:
With a deeper green mix (olive + tiny dot of umber), add clusters of smaller, darker leaves. These help ground the lighter leaves and add depth to the bouquet. -
Paint fern details:
Switch to your liner brush. Using a brownish-green mix, paint delicate fern-like sprigs. Use quick, short strokes for the individual fronds coming off the main stem.
Paint Bleeding?
If paint bleeds into the fabric weave, your mix is too watery. Let it dry, then paint over the mistake with a bit of white or cream paint to act as an eraser before retrying.
Step 3: Adding the Blooms
-
Large focal flowers:
Mix terra cotta and cream for the main large petals. Using the #6 round brush, paint loose, tear-drop shaped petals radiating from a center point. Don’t worry about full coverage; a little transparency looks lovely here. -
Layering petals:
While the first layer is still slightly damp, add a second layer of slightly darker red near the center of the flower to create a shadow effect. -
Adding peach accents:
Mix a soft peach color (yellow + tiny bit of red + cream). Paint the smaller, cup-shaped flowers scattered throughout the design. -
Detailing the centers:
Once the flower petals are dry, use the liner brush and a dark brown or green to stipple small dots in the center of the large flowers. -
Small filler buds:
Using the tip of your round brush, dab small clusters of red or pink dots at the ends of the wispy stems to represent berries or tiny buds.
Vintage Patina
Once dry, lightly dry-brush a very pale, watered-down brown ‘tea stain’ wash over random patches of the white background to give the fabric an aged, antique parchment look.
Step 4: Refining and Sealing
-
Connect the elements:
Use your liner brush with a very watered-down brown to draw thin, connecting twigs or stems to attach any floating flowers to the main bouquet structure. -
Check transparency:
Turn the lamp on briefly. This reveals any spots where the paint might be too thick or uneven. Use a damp brush to blend out any harsh edges if desired. -
Final drying:
Allow the lampshade to dry completely for at least 24 hours. I usually place it in a dust-free area during this time. -
Protect the work:
If your fabric medium doesn’t heat-set, apply a light coat of clear matte acrylic sealer spray to protect the artwork from dust and fading.
With your beautiful new botanical shade in place, enjoy the warm, custom glow it brings to your reading nook


Simple Vertical Stripes
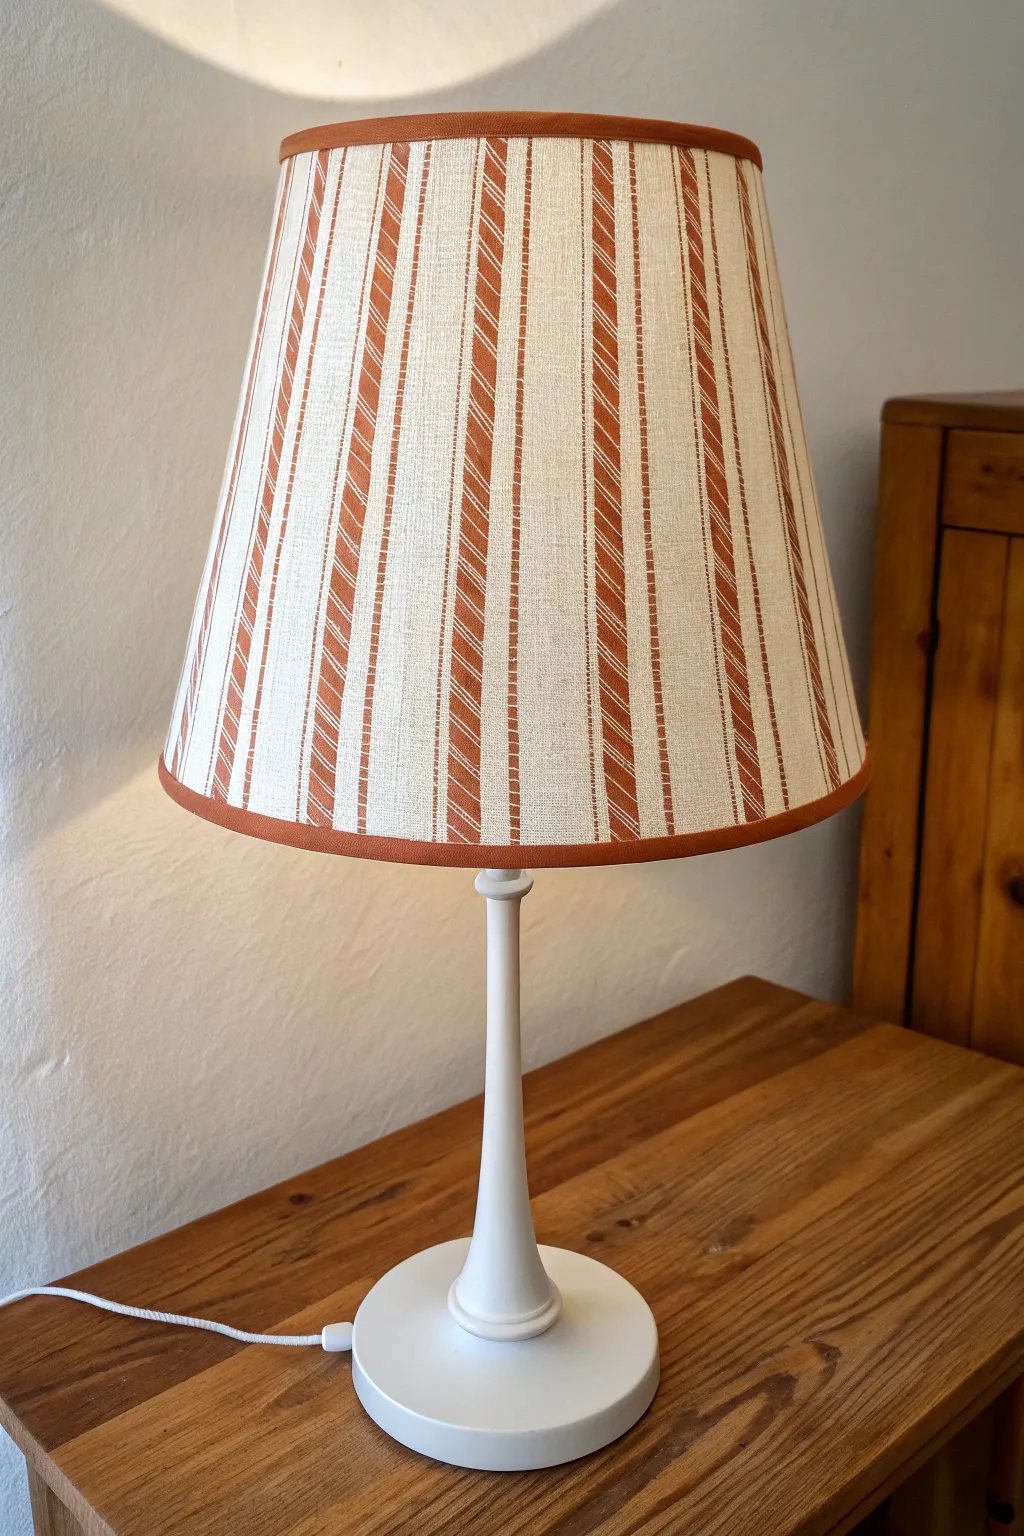
Transform a plain lampshade into a cozy, cottage-style statement piece with this textured stripe tutorial. By combining vertical lines with a unique diagonal hatching technique, you’ll create a sophisticated pattern that looks woven rather than just painted.
Detailed Instructions
Materials
- Plain, tapered drum lampshade (light beige or cream canvas/linen texture works best)
- Rust orange or terracotta acrylic paint
- Textile medium (mix with acrylics for better adhesion)
- Painter’s tape (multi-width pack recommended)
- Flat shader brush (approx. 1/2 inch wide)
- Fine liner brush (size 0 or 00 for details)
- Ruler or soft measuring tape
- Pencil
- Paper plate or palette
- Bias tape or fabric ribbon (matching rust color)
- Fabric glue or hot glue gun
Step 1: Preparation & Planning
-
Clean and prep:
Begin by ensuring your lampshade is free of dust or lint. A quick roll with a lint roller is usually sufficient to prep the fabric surface. -
Mix your medium:
On your palette, mix your terracotta acrylic paint with textile medium according to the bottle’s instructions. This creates a flexible paint that won’t crack when the lamp heats up. -
Measure the circumference:
Measure the bottom circumference of your shade. Divide this number by how many total stripe sections you want (even numbers are usually easier for spacing) to determine the width of each section. -
Mark vertical guides:
Using a pencil and your flexible measuring tape, lightly mark the vertical lines where your stripes will go. Ensure these lines run straight from the top rim to the bottom rim.
Bleeding Lines?
If paint bleeds under the tape due to heavy fabric texture, use a craft knife to gently scrape away excess dry paint, or touch up with a tiny bit of cream paint.
Step 2: Painting the Textured Stripes
-
Tape the main stripes:
Apply painter’s tape to define the edges of your wide vertical stripes. Press the edges of the tape down firmly to prevent paint bleed on the textured fabric. -
Paint the diagonal texture:
Instead of filling the stripe solidly, use your fine liner brush to paint diagonal hatch marks inside the taped area. Keep the lines close together but visible individually to mimic a woven thread look. -
Consistent angle:
Try to keep your diagonal angle consistent as you work your way down the stripe. I find it helpful to work in 3-inch sections at a time. -
Remove tape carefully:
Peel back the tape while the paint is still slightly tacky. This helps ensure a crisp line, though the diagonal hatching inherently gives it a softer, more fabric-like edge. -
Paint the thin borders:
Once the main diagonal stripes are dry, freehand (or tape off) the very thin vertical lines on either side of the main stripe using your liner brush. These should be solid lines, contrasting with the hatched center. -
Add separation lines:
Paint a thin, dashed or ‘stitched’ vertical line in the center of the blank space between your main stripes. This adds extra visual interest and mimics the look of ticking fabric. -
Repeat around the shade:
Continue this pattern around the entire circumference. Allow the paint to dry completely, usually for a few hours.
Step 3: Finishing Touches
-
Prepare the trim:
Measure the top and bottom rims of your lampshade. Cut two lengths of your rust-colored bias tape or ribbon, adding an inch of overlap for each. -
Glue the top trim:
Apply a thin bead of fabric glue to the top rim. Carefully press your bias tape over the edge, folding it over nicely to cover the raw edge of the shade. -
Secure the ends:
Fold the end of the ribbon under itself before gluing down the final overlap to create a clean, finished seam. -
Glue the bottom trim:
Repeat the gluing process for the bottom rim. Ensure the ribbon covers the start and end points of your painted vertical stripes for a professional look. -
Final smooth out:
Run your finger along the glued trim to ensure it is bonded smoothly without bubbles or gaps. Let the glue set fully before placing the shade back on the lamp base.
Mix Up the Texture
Vary the direction of your diagonal hatching! Alternate the slant (left-to-right, then right-to-left) on every other stripe for a dynamic herringbone effect.
Enjoy the warm glow of your custom-designed lampshade in your favorite reading corner


Scalloped Border Trim
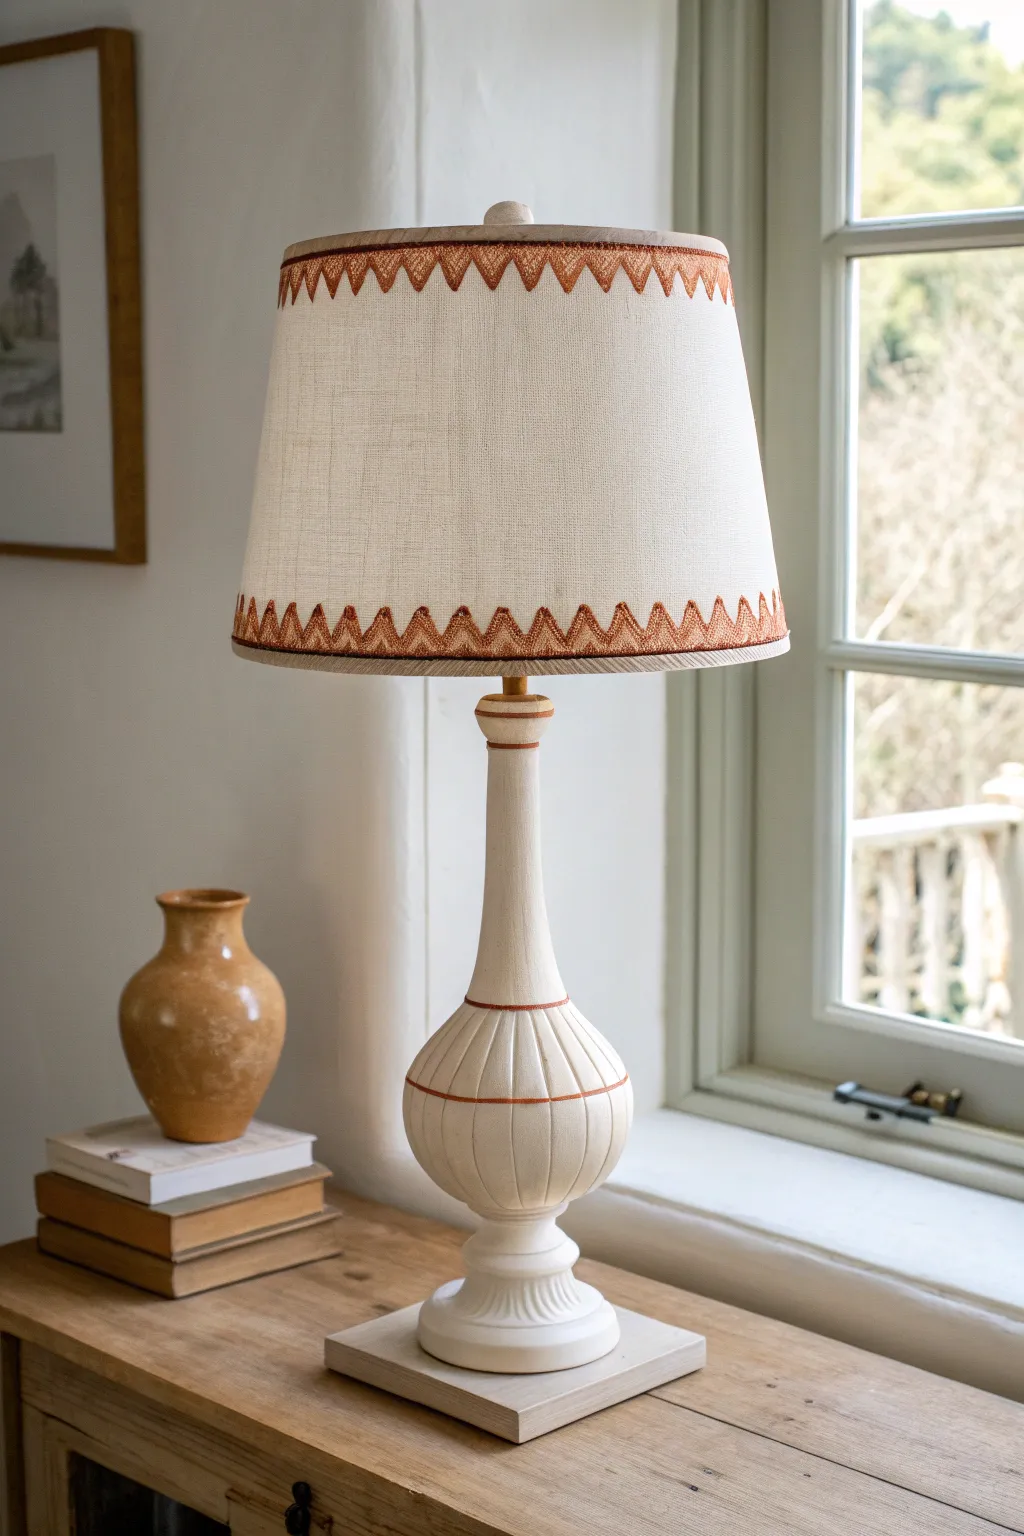
Give a plain linen lampshade a high-end custom look with this simple yet striking painted border technique. By using careful brushstrokes to mimic thread, you can create a warm, textured zigzag pattern that adds architectural interest to any room.
How-To Guide
Materials
- Plain linen or cotton tapered drum lampshade
- Burnt orange or terracotta acrylic paint
- Textile medium (optional but recommended)
- Small flat brush (size 4 or 6)
- Fine liner brush (size 0 or 1)
- Pencil
- Ruler or measuring tape
- Cardstock or thin cardboard for stencil
- Painters tape
- Scissors
Step 1: Planning and Stenciling
-
Prepare your workspace:
Set up a clean, well-lit area. If your lampshade is dusty, gently use a lint roller on the fabric surface to ensure the paint adheres properly. -
Mix your paint:
Squeeze out your terracotta acrylic paint. If you want the paint to move more smoothly on the fabric and feel softer when dry, mix it with a textile medium according to the bottle’s instructions. -
Create a triangle template:
Cut a small triangle from cardstock. The base should be about 1 inch wide and the height about 1.5 inches, though you can adjust this scale to fit your specific shade. -
Mark the bottom guide:
Measure about half an inch up from the bottom rim of the shade. Lightly mark this height with a pencil at several points around the circumference to keep your border straight. -
Trace the pattern:
Place your cardstock triangle template against the shade so the points touch your guide marks. Lightly trace the outline with a pencil, repeating the shape continuously around the entire bottom rim. -
Repeat for the top:
Do the same for the top rim. I prefer to have the triangles pointing downward from the top edge, mirroring the bottom border, for a cohesive look. -
Check the spacing:
When you get close to the start, you might need to slightly cheat the spacing of the last few triangles to make the pattern meet seamlessly.
Brush Control Tip
Load your brush sparingly. A ‘dry brush’ technique prevents paint from bleeding into the linen fibers and helps achieve that authentic, textured-thread appearance.
Step 2: Painting the Faux-Thread Effect
-
Outline the triangles:
Using your fine liner brush and the terracotta paint, carefully paint over your pencil outlines. Keep the line weight consistent but not too perfect; a little irregularity adds to the hand-stitched look. -
Start the hatching:
The key to this look is the vertical hatching. Instead of filling the triangles with solid color, paint small, vertical lines close together inside each triangle shape. -
Create variation:
Vary the length of your vertical strokes slightly to follow the slope of the triangle. The lines should be densest near the base and taper off or shorten as they reach the point. -
Add the connecting line:
Paint a continued horizontal line connecting the bases of all the triangles. This acts as a grounding ‘stitch’ for your pattern. -
Detail the negative space:
For extra depth, add a second, smaller zigzag line floating just above the main pattern (or below, for the top rim). This echoes the shape without needing to be filled in. -
Simulate texture:
Go back over your vertical hatching with a fairly dry brush. Lightly dab or drag the brush to create a scratchy texture that mimics the weave of embroidery thread. -
Complete the circumference:
Work your way around the entire shade. I find it helpful to rotate the lamp base or hold the shade on my lap to keep my hand steady at a comfortable angle. -
Clean up edges:
If any pencil marks are still visible after the paint dries, gently erase them. Be careful not to rub off your fresh paint.
Texture Twist
Mix a tiny amount of baking soda into your acrylic paint before applying. This creates a grainy, raised texture that feels even more like real embroidery floss.
Step 3: Finishing Touches
-
Paint the rim binding:
For a polished finish, use a small flat brush to paint the actual fabric binding at the very top and bottom edges of the shade in the same terracotta color. -
Add a stripe (optional):
If you have a lamp base like the one pictured, you can carry the theme downwards by painting thin horizontal stripes on the ceramic base to match the shade. -
Let it cure:
Allow the lampshade to dry completely for at least 24 hours before using it with a bulb, just to ensure no heat affects the curing process.
Once dry, place your shade on its base and enjoy the warmth of your custom, artisan-style lighting.


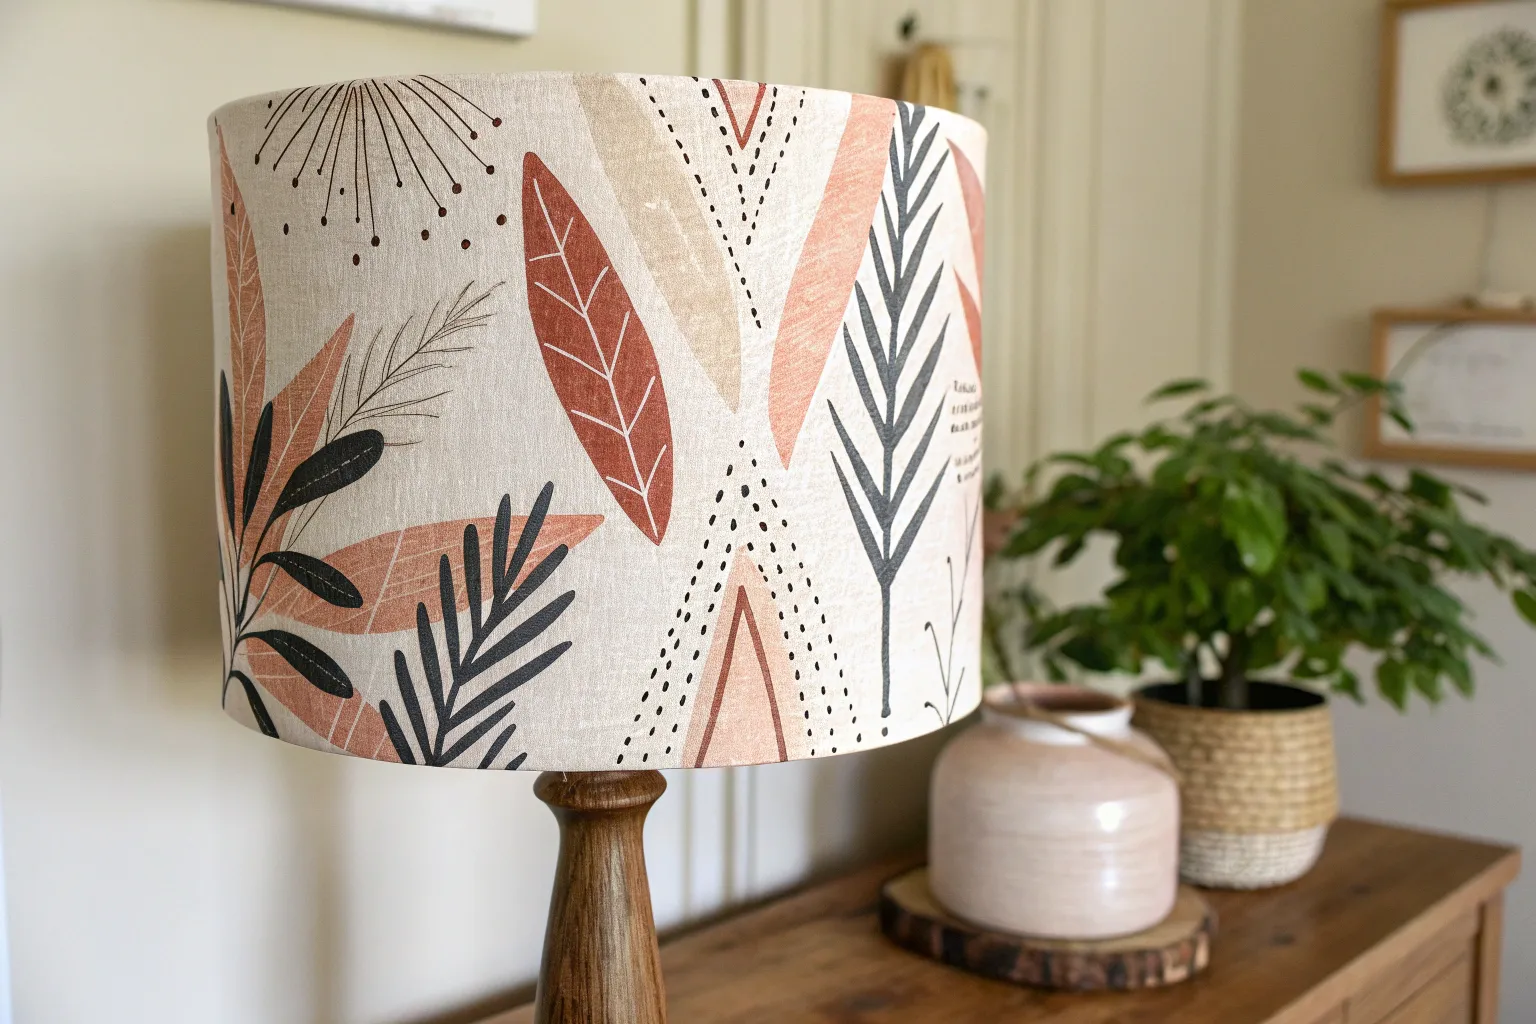
Geometric Tape Pattern Blocks
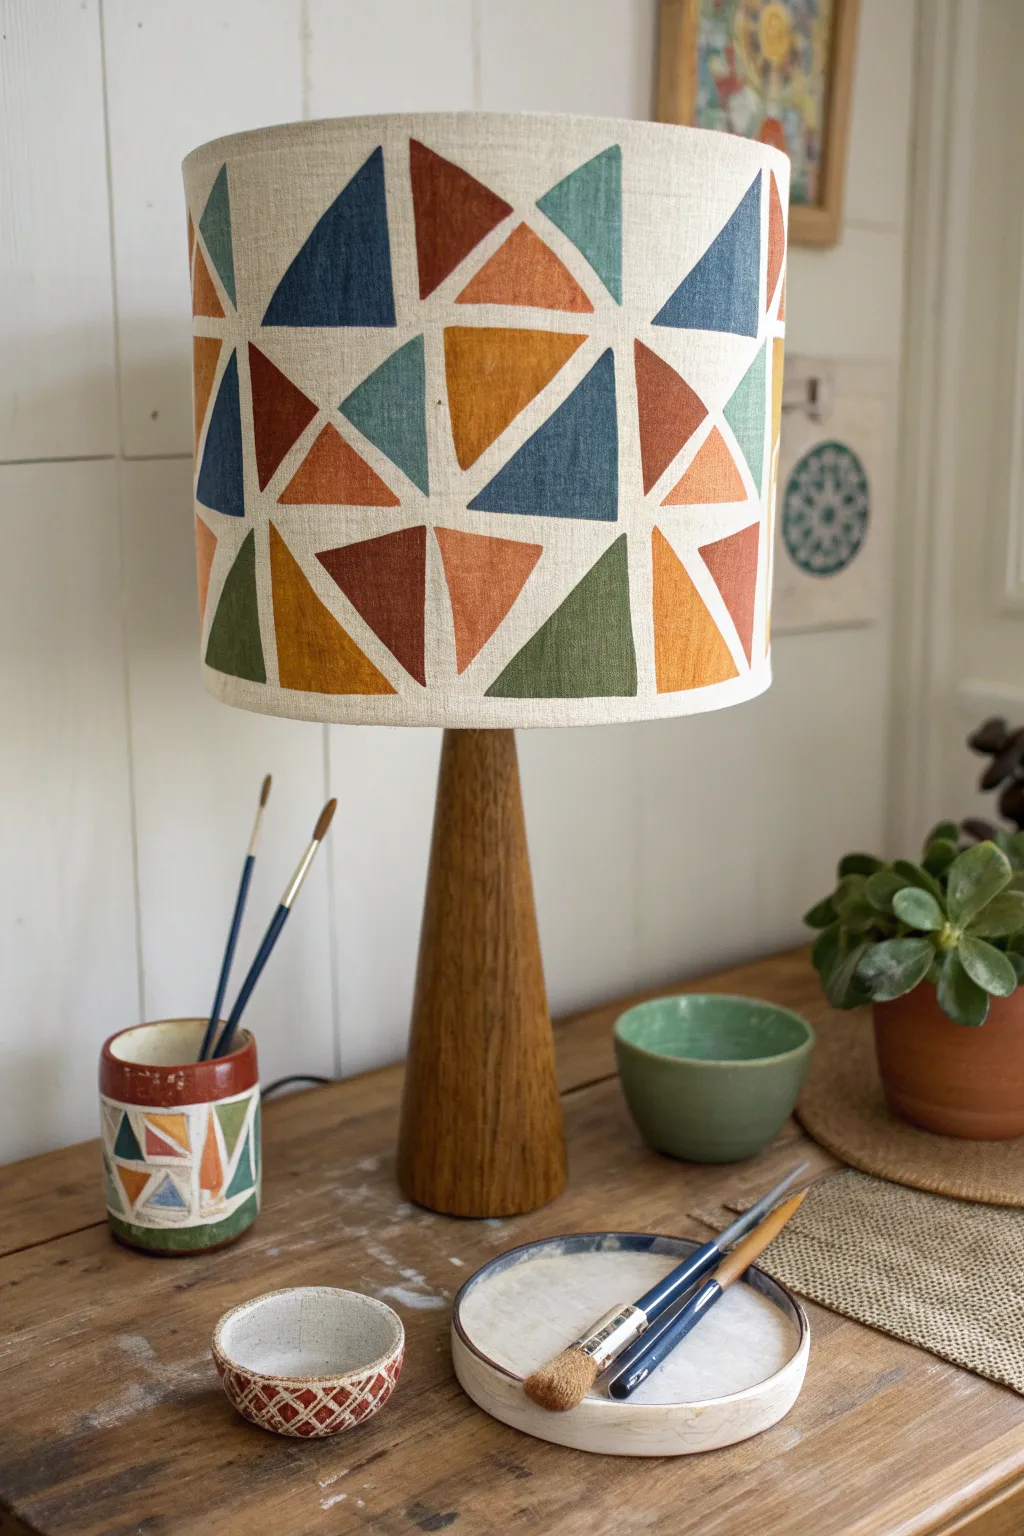
Transform a plain fabric lampshade into a cozy, mid-century modern statement piece with simple geometric shapes. This project uses a warm, earthy color palette and basic masking techniques to create a clean yet hand-painted look that adds instant character to any room.
Detailed Instructions
Materials
- Plain drum or cylinder lampshade (linen or cotton works best)
- Acrylic paints (rust, mustard yellow, olive green, teal, navy blue)
- Fabric medium (mixed 1:1 with acrylics)
- Painter’s tape or masking tape (various widths)
- Flat shader paintbrushes (size 4 and 8)
- Ruler
- Pencil
- Paper plate or palette
- Cardstock or scrap paper (for templates)
Step 1: Preparation & Planning
-
Clean surface:
Ensure your lampshade is free of dust or lint. Use a lint roller over the fabric surface before you begin. -
Mix your medium:
Mix your acrylic paints with fabric medium in a 1:1 ratio. This crucial step prevents the paint from cracking when the lamp heats up and keeps the fabric properly flexible. -
Create a template:
Cut a right-angled triangle out of cardstock to serve as your main size guide. Aim for a triangle where the two shorter sides are about 2-3 inches long. -
Test placement:
Hold your template against the shade to visualize the spacing. You generally want about 0.5 to 1 inch of negative space between your shapes.
Step 2: Masking the Design
-
Mark loose guides:
Using a pencil very lightly, mark horizontal rows around the circumference of the shade to keep your pattern height consistent. -
Tape the first triangle:
Place three strips of painter’s tape to form your first triangle shape. Press the edges of the tape down firmly with your fingernail to prevent paint bleed. -
Continue taping the row:
Move horizontally along the shade. You can either tape off all triangles at once or work in small clusters. I find it easier to tape a few, paint them, and then move on. -
Vary the orientation:
As you create your taped outlines, alternate the direction of the triangles. Have some pointing up, some pointing down, and some rotated 90 degrees. -
Check spacing:
Ensure the gaps between taped areas are relatively consistent, creating that white ‘grouted’ look between the colorful shapes.
Bleeding Edges?
If you have textured linen, seal the tape edges first with a tiny bit of clear acrylic medium paint to block gaps before applying color.
Step 3: Painting
-
Load the brush:
Dip your flat shader brush into your first color mixture (e.g., navy blue). Don’t overload it; too much paint can seep under the tape. -
Paint inward:
Stroke from the tape inward toward the center of the triangle. This technique helps seal the tape edge and keeps lines crisp. -
Apply thin layers:
Apply the paint in a thin, even layer. Two thin coats are better than one thick, gloopy coat. -
Switch colors:
Rinse your brush thoroughly and switch to the next earth tone—perhaps the rust orange—painting neighboring triangles. -
Distribute color:
Step back occasionally to ensure you aren’t clustering too much of one color in a single spot. Aim for a random, balanced distribution. -
Fill remaining shapes:
Continue until all taped triangles in your current section are filled with mustard, olive, and teal.
Pro Tip: Batch Painting
Mix enough of each color in small airtight containers or cups beforehand so you don’t have to rematch mixed hues halfway through the lamp.
Step 4: Finishing Touches
-
Let it set slightly:
Allow the paint to dry until it is tacky to the touch, but not completely hardened. -
Remove tape carefully:
Peel the tape away slowly at a 45-degree angle. Pulling while the paint is slightly tacky helps ensure a sharp edge without chipping. -
Touch up edges:
If any paint bled under the tape, use a tiny amount of white paint (or the color of your lampshade) on a fine detail brush to correct it. -
Full cure:
Let the lampshade dry completely for 24-48 hours before turning on the bulb to ensure the fabric medium sets properly. -
Heat set (optional):
Check your fabric medium instructions; some brands recommend running a hair dryer over the design to permanently heat-set the pigments.
Enjoy the cozy ambiance your new custom lampshade brings to your space
BRUSH GUIDE
The Right Brush for Every Stroke
From clean lines to bold texture — master brush choice, stroke control, and essential techniques.
Explore the Full Guide
Soft Ombre Fade
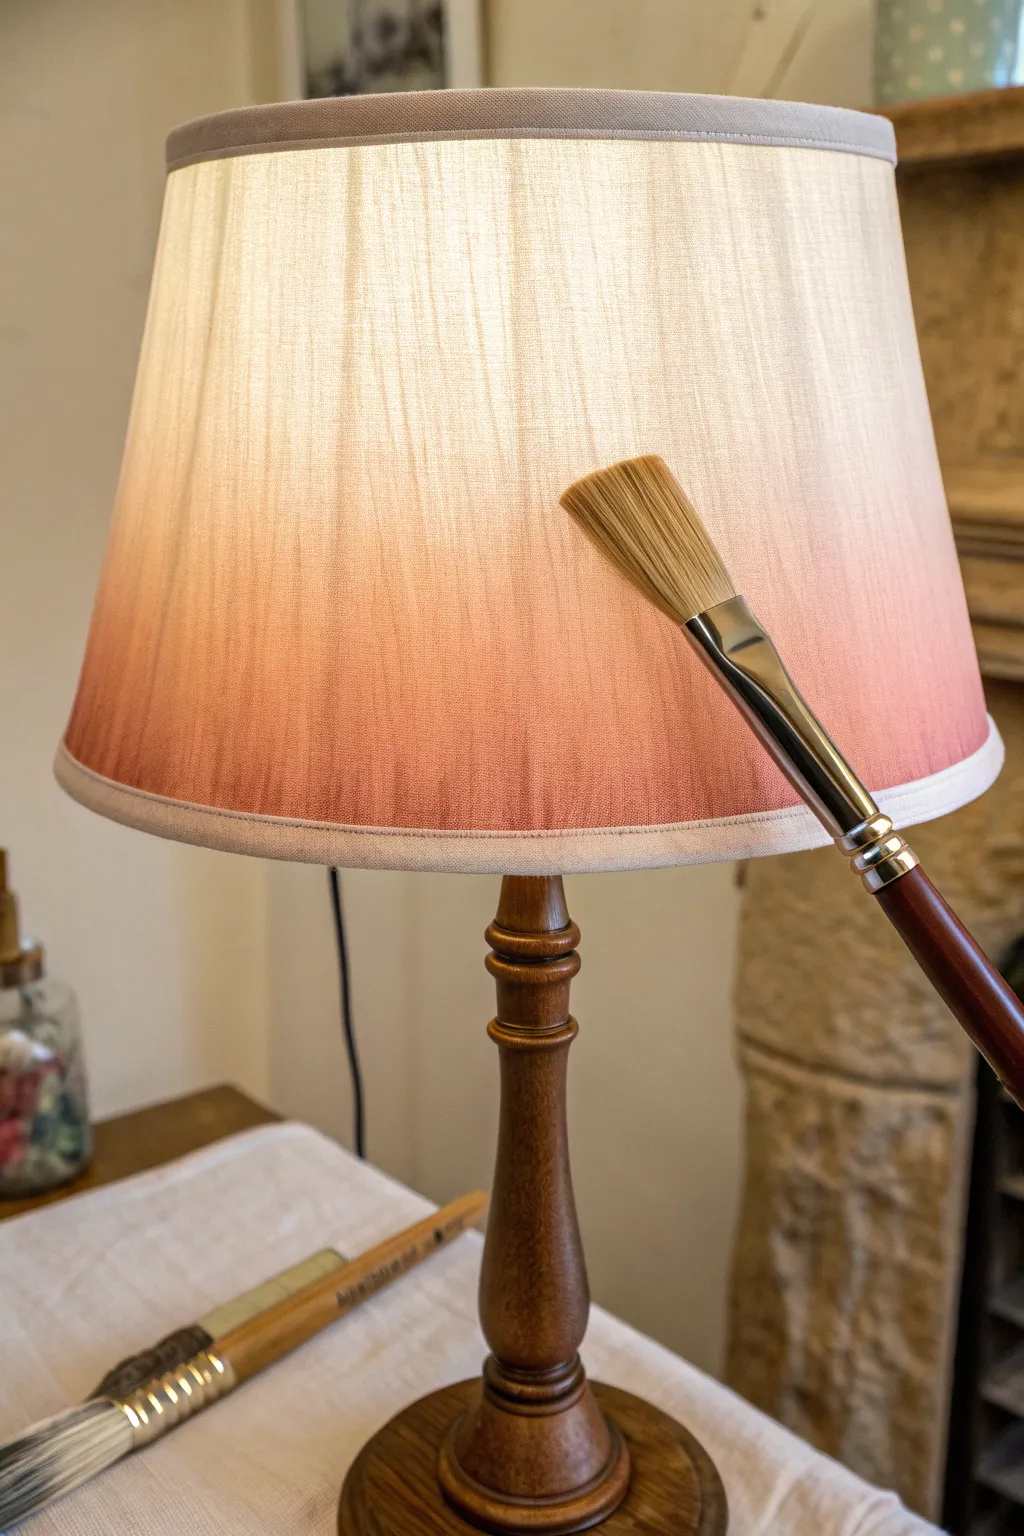
Transform a plain fabric lampshade into a cozy statement piece with this gentle gradient technique. By fading a warm terracotta pink into the natural linen, you create a soft, glowing effect that looks beautiful both lit and unlit.
Step-by-Step Guide
Materials
- Plain fabric lampshade (light-colored linen or cotton works best)
- Acrylic paint (terracotta, soft pink, or burnt sienna)
- Textile medium (essential for blending)
- Large flat paintbrush (1-2 inch)
- Medium soft-bristle brush for blending
- Water spray bottle (misting setting)
- Palette or mixing plate
- Painter’s tape or masking tape
- Drop cloth or newspapers
Step 1: Preparation
-
Set up your workspace:
Begin by covering your table with a drop cloth. Remove the lampshade from the lamp base to ensure accidental splashes don’t ruin the stand. -
Clean the shade:
Pass a lint roller over the fabric surface to remove any dust or stray fibers which could get caught in the paint later. -
Protect the trim:
Carefully apply painter’s tape along the bottom fabric trim and the top rim of the shade if you wish to keep these areas unpainted. Press the edges down firmly to prevent bleeding. -
Mix your medium:
On your palette, mix your chosen acrylic paint color with textile medium in a 1:1 ratio. This medium thins the paint without breaking down pigments, keeping the fabric soft rather than stiff.
Uneven Blotches?
If water rings form during blending, your brush was too wet. Let it dry completely, then lightly dry-brush a thin layer of paint over the harsh line to mask it.
Step 2: Applying the Base Gradient
-
Prepare the fabric dampness:
Lightly mist the bottom third of the lampshade with water. You don’t want it soaking wet, just slightly damp to encourage the paint to travel. -
Start the saturation line:
Load your large flat brush with the paint mixture. Apply a solid, consistent band of color right at the bottom edge of the shade, painting about two inches up. -
Extend the color upward:
Without reloading your brush, continue painting upward from that initial band. The color will naturally start to look a bit sheerer as you run out of pigment. -
Work in sections:
Rotate the shade as you work, ensuring you maintain an even horizon line around the entire circumference before moving higher up the shade. -
Initial fade:
Dip your brush into a little plain water (watered down slightly with textile medium ideally) and use this to pull the paint edge further up the shade.
Go Geometric
Before painting, use thin washi tape to mask off vertical stripes or triangles. When you remove the tape after fading, you’ll have a modern negative-space pattern.
Step 3: Perfecting the Ombre Effect
-
Dry brush transition:
Switch to your clean, soft-bristle blending brush. While the paint line is still wet, gently stroke upward from the painted area into the unpainted area. -
Feather the edge:
I like to use a rapid, light flicking motion here. Imagine you are dusting the surface rather than painting it; this creates that seamless airy fade. -
Correcting the bottom:
Inspect the very bottom edge. If it looks uneven or pale compared to the rest, add a second coat of the undiluted paint mixture just to the bottom inch for depth. -
Smooth the middle:
If you see harsh lines where the water met the paint, dampen your brush slightly and lightly buff that area in circular motions to soften the transition. -
Check transparency:
Hold the shade up to a light source temporarily. This will reveal any brushstrokes or patchy areas that might look different when the lamp is turned on. -
Final adjustment:
Apply very diluted paint (almost just tinted water) to fill any patchy areas identified in the light test, blending it out immediately.
Step 4: Finishing
-
Dry thoroughly:
Allow the lampshade to dry completely for at least 24 hours. Acrylics on fabric can feel dry to the touch quickly but need time to cure. -
Remove tape:
Once fully dry, slowly peel away the painter’s tape at a 45-degree angle to reveal crisp, clean edges on the trim. -
Review consistency:
Check the fabric texture. If it feels a bit rough, you can lightly sand it with a very fine-grit sanding sponge, though the textile medium usually prevents this. -
Reassemble:
Place the shade back onto your lamp base and turn it on to enjoy the warm, diffused glow of your new ombre design.
Enjoy the relaxing ambiance your customized lamp brings to the room
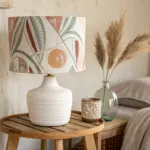
Abstract Color Patchwork
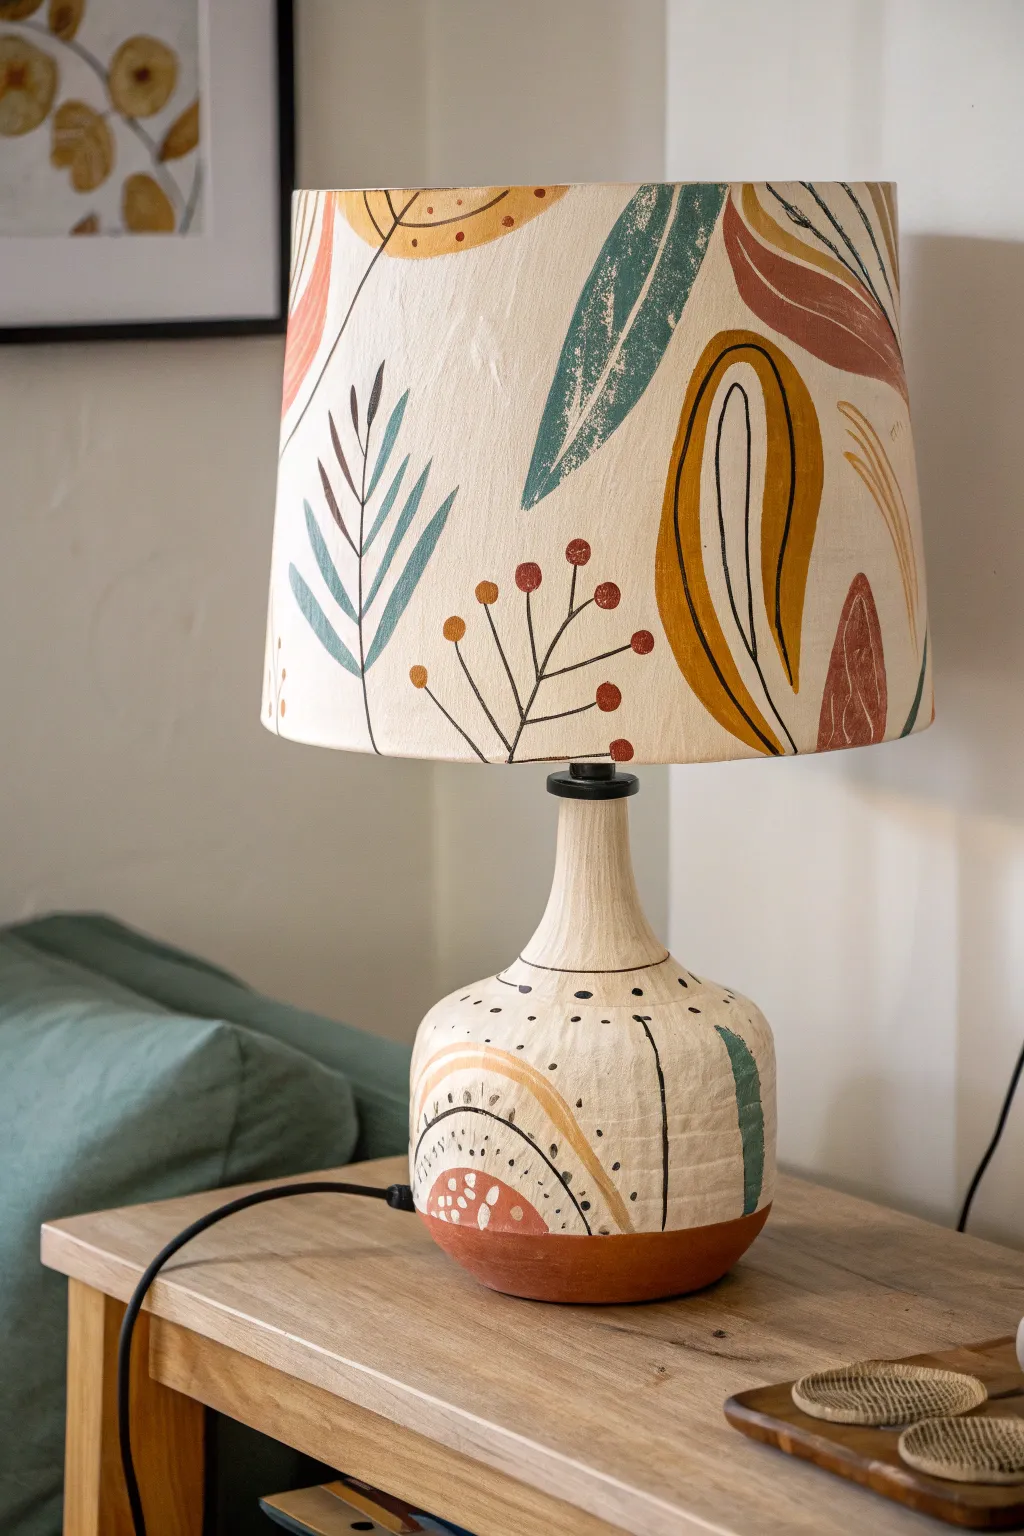
Transform a plain lamp into a stunning statement piece with organic shapes and earthy tones. This project combines loose, abstract botanical painting on a fabric shade with bold, geometric patterning on the ceramic base for a cohesive, hand-crafted look.
How-To Guide
Materials
- Plain white or cream fabric drum lampshade
- Ceramic lamp base (matte white or cream)
- Acrylic paints (terracotta, mustard yellow, sage green, teal, forest green, burnt orange, black)
- Fabric medium (essential for the shade)
- Assorted paintbrushes (flat 1-inch, round sizes 4 and 8, fine liner)
- Pencil for sketching
- Palette or paper plate
- Cup of water and paper towels
- Painter’s tape (optional)
Step 1: Painting the Lampshade
-
Prepare the fabric paint mixture:
Mix your acrylic paints with fabric medium according to the bottle instructions—usually a 1:1 or 2:1 ratio. This prevents the paint from cracking when the lamp heats up and helps it glide on the fabric. -
Sketch the large leaves:
Lightly sketch large, sweeping leaf shapes onto the shade with a pencil. Aim for variety: draw some broad, solid leaves and some long, slender fronds. -
Paint the solid leaves:
Fill in the largest leaf shapes using your flat brush and the teal and sage green mixed paints. Create a slightly distressed look by allowing the bristles to create texture rather than aiming for perfect opacity. -
Add the berry stems:
Using a thin round brush and black paint, draw fine, branching stems rising from the bottom edge. Add small circular ‘berries’ at the tips using mixed terracotta or burnt orange paint. -
Create the abstract shapes:
Paint large, curving abstract shapes in mustard yellow. For the looped shape seen in the image, outline a thick curve and leave the center negative space unpainted. -
Add linear details:
Use a liner brush with black paint to add veins to the leaves and definition lines inside the yellow abstract loops. Keep your hand loose; these lines look better when they aren’t perfectly straight. -
Create fern fronds:
With a teal or light blue mix, paint a fern-like stem. Instead of painting a solid shape, use single, quick brushstrokes for each leaflet coming off the main stem. -
Fill empty spaces:
Step back and look for large gaps. Add smaller floating leaves or abstract dots in burnt orange to balance the composition without overcrowding it.
Opacity Secret
For the “stamped” look seen on the green leaves, don’t overload your brush. A slightly dry brush drags across the fabric weave, creating lovely vintage texture.
Step 2: Customizing the Base
-
Clean the surface:
Wipe down your ceramic lamp base with rubbing alcohol or soapy water to ensure it is free of dust and oils. -
Paint the bottom band:
Paint the bottom 1-2 inches of the base with solid terracotta paint. I like to do two thin coats here for solid coverage. -
Sketch base designs:
Lightly trace arched rainbow shapes and vertical lines on the main body of the lamp base using a pencil. -
Paint the main arches:
Fill in the sketched arches with mustard yellow. Use a dry-brush technique (very little paint on the brush) to let some of the ceramic texture show through for a rustic feel. -
Add decorative dots:
Dip the back end of a paintbrush into black paint to create uniform dots following the curve of the arches and around the neck of the lamp. -
Draw vertical dividers:
Use your liner brush and black paint to draw vertical lines separating the different design sections. These act as borders between your patterned areas. -
Incorporate matching colors:
Bring the lampshade colors down to the base by adding a vertical stripe of teal or sage green on one side of the base. -
Add final base details:
Paint small semi-circles within the terracotta band or add white dots on top of darker painted areas for extra contrast and detail. -
Final assembly:
Allow both the shade and base to dry for at least 24 hours. Once fully cured, screw the bulb in, attach the shade, and light it up to see your handiwork glow.
Paint Bleeding?
If paint bleeds into the fabric, your mix is too watery. Add more acrylic paint to thicken it. If you mess up, dab immediately with a wet cloth, do not wipe.
Enjoy the warm, artistic ambiance this custom lamp brings to your living space

PENCIL GUIDE
Understanding Pencil Grades from H to B
From first sketch to finished drawing — learn pencil grades, line control, and shading techniques.
Explore the Full Guide
Classic Polka Dots in Mixed Sizes
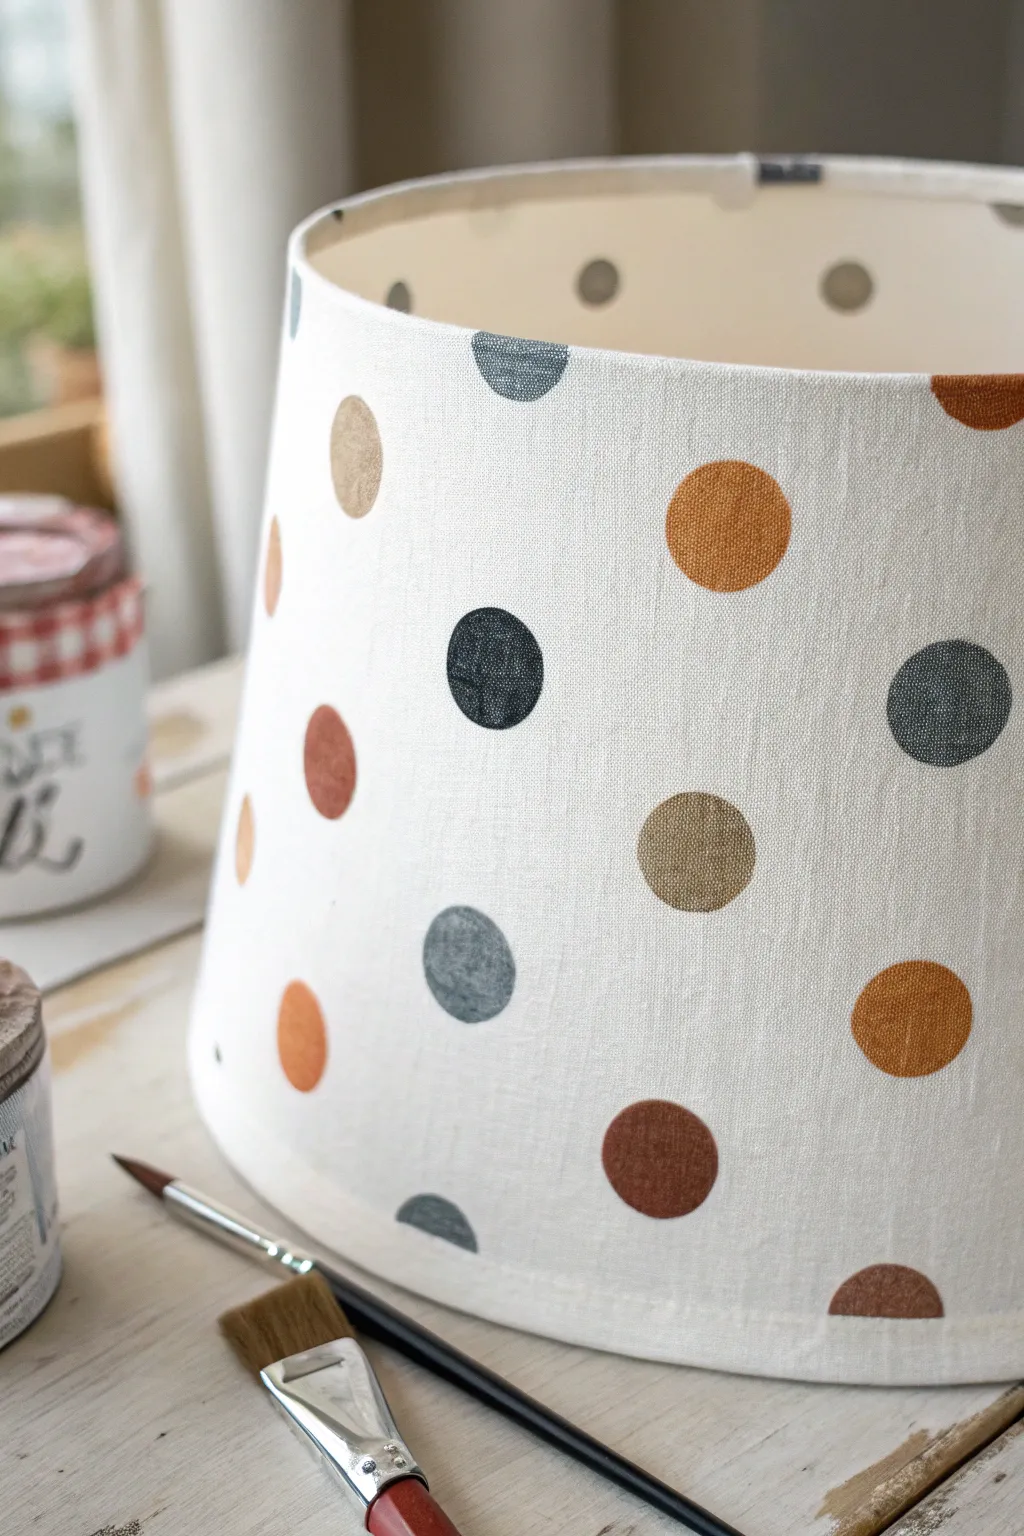
Bring warmth and texture to a plain lampshade with this charmingly imperfect polka dot design. Using a palette of earth tones like mustard, rust, and slate grey, you’ll create a cozy, modern-rustic look that adds instant character to any room.
Step-by-Step Guide
Materials
- White or cream linen/cotton drum lampshade
- Fabric medium
- Acrylic paints (Colors needed: mustard yellow, deep rust/terracotta, slate grey/charcoal, khaki/taupe, chocolate brown)
- Small round paintbrush (size 4 or 6)
- Flat shader brush (optional, for edges)
- Round foam pouncers or stencil sponge (approx. 1-1.5 inch diameter)
- Paper plate or palette
- Clean cloth or rag
- Water cup
Step 1: Preparation and Mixing
-
Prepare the workspace:
Clear a flat table and lay down newspaper or a drop cloth to protect the surface. Place your lampshade in the center. -
Clean shades:
Use a lint roller over the fabric surface of the lampshade to remove any dust or loose fibers that might interfere with the paint adhesion. -
Mix the paint medium:
On your palette, mix your acrylic paints with the fabric medium according to the bottle instructions (usually a 2:1 ratio of paint to medium). This ensures the paint flexes with the fabric and doesn’t crack. -
Create your palette:
Set up individual puddles for your five key colors: mustard, rust, slate grey, khaki, and brown. I like to keep them spaced out so I don’t accidentally blend them.
Bleeding edges?
If paint bleeds into the linen weave, your paint is too watery. Use less water on your brush and dab the pouncer on paper first to remove excess moisture.
Step 2: Planning the Layout
-
Visualize the pattern:
Look at the lampshade and mentally divide it into sections. The goal is a random, scattered look rather than a strict grid. -
Test spacing:
If you are nervous about placement, you can lightly mark circle centers with a pencil, spacing them about 2-3 inches apart in a staggered formation.
Step 3: Painting the Dots
-
Load the tool:
Dip your round foam pouncer or stencil sponge into the first color (let’s start with mustard). Dab off excess paint on the paper plate to prevent bleeding. -
Apply the first color:
Press the pouncer firmly onto the fabric surface. Rotate your wrist slightly while maintaining pressure to ensure the paint penetrates the linen weave. -
Clean up edges:
Lift the sponge straight up. If the edges are too fuzzy, use your small round paintbrush to carefully smooth the perimeter of the circle. -
Repeat with first color:
Place 4-5 more mustard dots randomly around the shade, turning the lamp as you go. Leave plenty of empty space for the other four colors. -
Switch colors:
Wash your sponge thoroughly and squeeze it dry, or switch to a fresh sponge. Load up your rust/terracotta mixed paint. -
Fill in gaps:
Apply the rust dots in the empty spaces. Try to avoid placing two dots of the same color right next to each other. -
Add neutrals:
Continue the process with the slate grey and khaki paints. Observe how the fabric texture shows through faintly; this adds to the hand-painted charm. -
Complete the pattern:
Finish with the darkest brown color. Step back occasionally to look for any large uneven gaps in the pattern. -
Refine the circles:
Go back over any dots that look too transparent with a second thin coat using your brush, but keep the application light.
Level Up: Texture
Mix a tiny amount of baking soda into your acrylic paint before applying. This creates a raised, matte texture for the dots reminiscent of block printing.
Step 4: Finishing Touches
-
Check the seams:
Pay attention to where the lampshade fabric overlaps at the back seam. Decide if you want a dot crossing over the seam or if you prefer to leave that area clear. -
Dry time:
Allow the lampshade to dry completely for at least 24 hours. The fabric medium may need heat setting with an iron or hair dryer depending on the brand, so check your bottle.
Place your newly refreshed shade on a lamp base and enjoy the soft glow through the colorful pattern
Trailing Leafy Vine
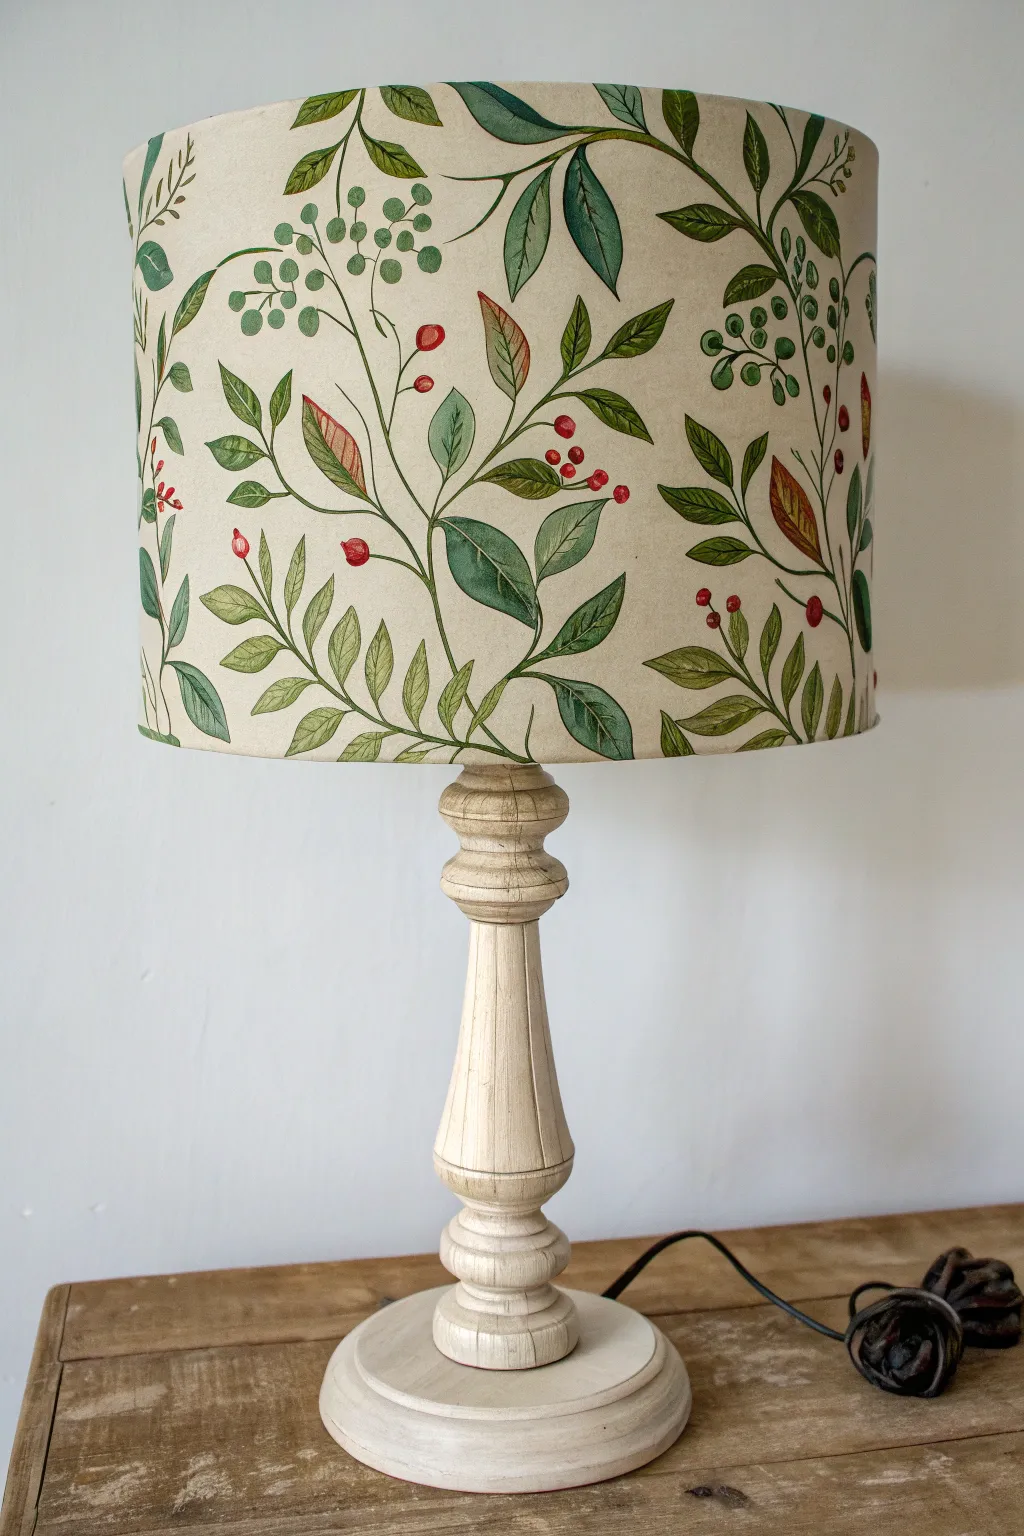
Transform a plain drum shade into a botanical masterpiece with this delicate trailing vine design. The soft greens and pops of red berries create a nature-inspired look that feels both vintage and fresh.
Step-by-Step Tutorial
Materials
- Plain fabric drum lampshade (cream or off-white)
- Acrylic paints (olive green, forest green, hunter green, deep red, brown, white)
- Fabric medium (optional but recommended for softer texture)
- Round synthetic brushes (sizes 2, 4, and 6)
- Detail liner brush (size 0 or 00)
- Palette for mixing
- Water cup and paper towels
- Pencil for sketching (lightly)
- Clear acrylic sealer spray (matte finish)
Step 1: Planning the Flow
-
Prepare the fabric:
Ensure your lampshade is clean and free of dust. If you are using old fabric shade, use a lint roller to pick up any debris. -
Mix your base vine color:
On your palette, mix a medium brown with a touch of olive green to create a woody, natural vine color. I find adding a drop of water or fabric medium helps the paint flow smoothly over the fabric weave without skipping. -
Sketch the main stems:
Very lightly sketch the flowing curves of your vines directly onto the shade with a pencil. Aim for ‘S’ curves that meander up and down the height of the shade, overlapping slightly to create depth. Don’t worry about being perfect; clear lines will guide your brush. -
Paint the primary vines:
Using your size 2 round brush and the brown-green mix, paint over your pencil lines. Keep the pressure light to create thin, elegant stems rather than thick branches. Let these dry for about 10 minutes.
Fabric Paint Hack
Use a textile medium with your acrylics! It keeps paint flexible so it won’t crack when the lamp heats up or the shade flexes.
Step 2: Adding Foliage Diversity
-
Mix leaf greens:
Create three distinct green mixtures: a light yellow-green (olive + white), a medium true green (forest green), and a deep shadow green (hunter green + touch of brown). Variety is key to realism here. -
Paint the first leaf style:
Start with the medium green mix and a size 4 brush. Paint simple, almond-shaped leaves attached to the main vines. Press down at the base of the leaf and lift up as you reach the tip to create a point. -
Add elongated leaves:
Using the light yellow-green mix, paint clusters of longer, narrower leaves. These mimic willow or eucalyptus shapes. I like to group these in threes or fives near the ends of vine offshoots. -
Create berry clusters:
Switch to the deep green mix to add the small stems that will hold the berries. These should be very fine lines coming off the main vines, often in clusters of two or three. -
Layering transparent leaves:
To get that watercolor effect seen in the photo, thin your dark green paint significantly with water. Paint larger, broader leaves that appear to sit “behind” the main vines. The transparency adds beautiful depth. -
Add distinctive veining:
Once the base leaves are dry to the touch, use your 00 liner brush and a diluted darker green paint to add delicate central veins to the larger leaves. Keep the lines incredibly thin. -
Specialty autumn leaves:
Mix a muted brownish-red. Paint just a few scattered leaves with this color to suggest turning seasons or dried foliage, as seen in the reference image. This breaks up the monotony of the green.
Step 3: Berries and Finishing Details
-
Paint the berries:
Load a small round brush (size 2) with deep red paint. Dot small, round berries onto the fine stems you painted earlier. Vary the sizes slightly—some tiny, some plump. -
Add berry highlights:
While the red paint is still wet, mix a tiny dot of white into one side of each berry to create a highlight, making them look spherical and shiny. -
Paint green berry clusters:
Using a muted blue-green or sage color, add clusters of small, unripe berries. These are just simple dots grouped together, often near the larger leaves. -
Refine the composition:
Step back and rotate the lamp. Look for any large empty spaces. Fill these gaps with small springing tendrils or single floating leaves to balance the design. -
Dry completely:
Let the lampshade dry for at least 24 hours. Because fabric absorbs moisture, it needs plenty of time for the acrylics to cure fully. -
Seal the work:
Take the shade to a well-ventilated area and spray it lightly with a matte clear acrylic sealer. This protects your painting from dust and makes it easier to clean later.
Glow Up
Paint the inside of the leaves with a thin coat of gold metallic paint for a secret shimmer that reveals itself only when the lamp is lit.
Now you have a custom piece of illuminated art that brings the tranquility of a garden into your home


Minimal Line Art Faces
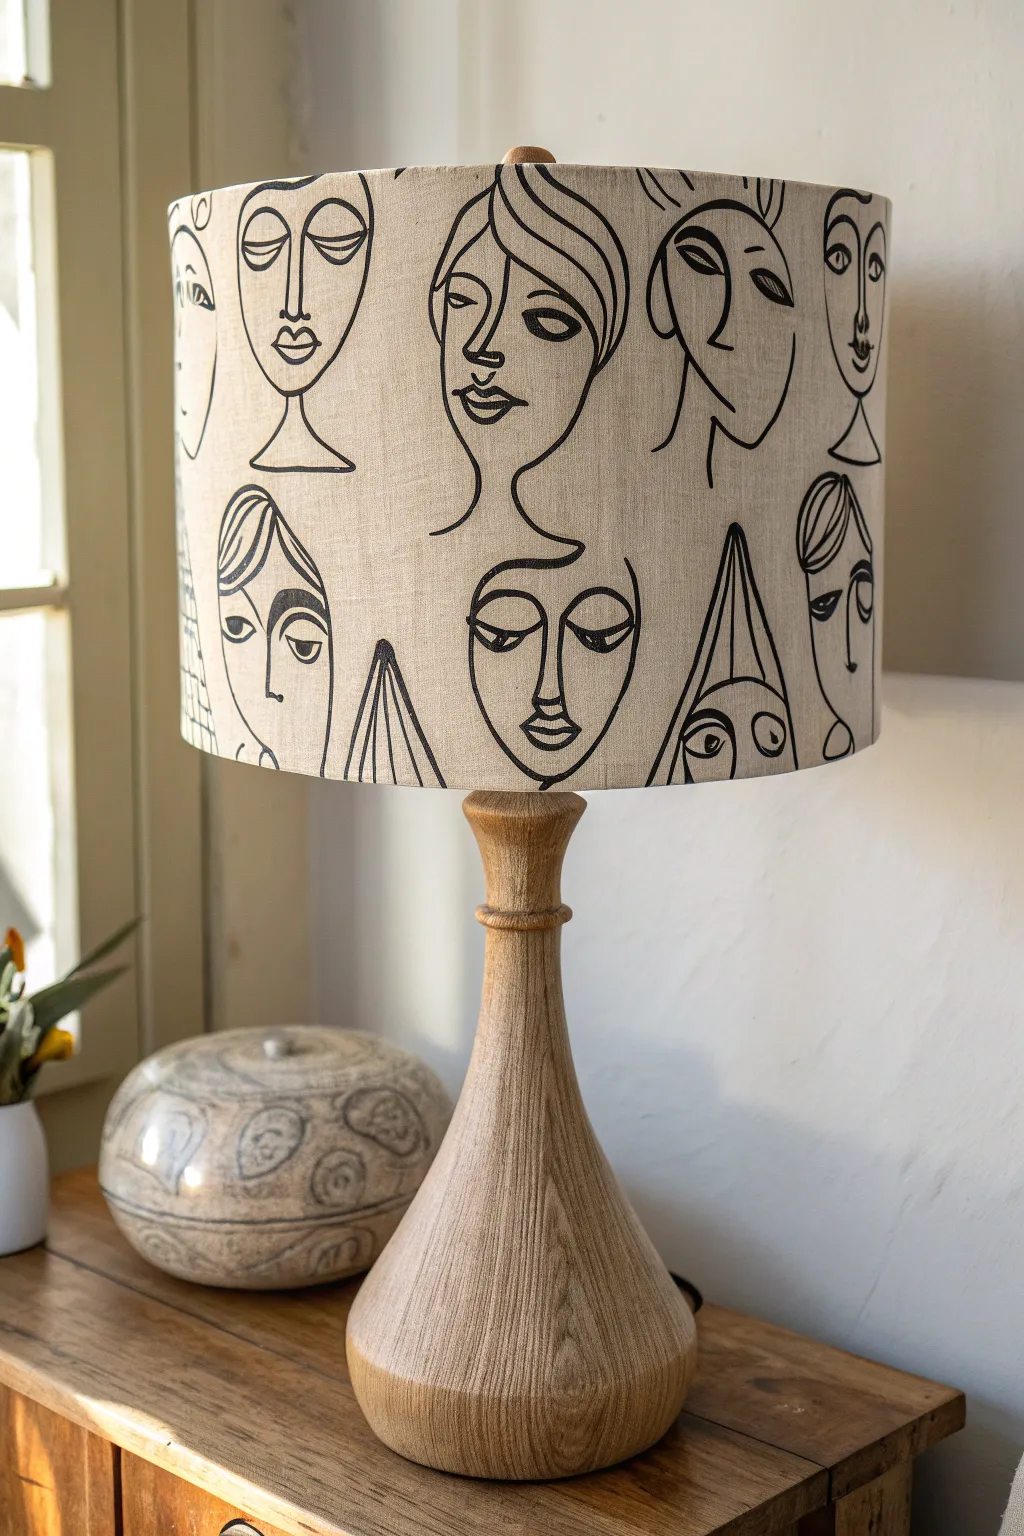
Transform a plain fabric lampshade into a gallery-worthy statement piece with this Picasso-inspired line art project. The continuous line style creates a sophisticated, modern look that perfectly complements natural wood and neutral tones.
How-To Guide
Materials
- Cylindrical fabric lampshade (linen or cotton blend preferred)
- Black acrylic paint (fluid or soft body)
- Fine round brush (size 0 or 1) OR fabric paint marker
- Fabric medium (if using standard acrylics)
- Pencil (H or HB)
- Eraser
- Scrap paper
- Masking tape
- Jar of water and paper towels
Step 1: Planning and Preparation
-
Prepare your workspace:
Clear a large, flat surface and cover it if necessary. Remove the lampshade from the base so you can rotate it freely while you work. -
Practice your faces:
Before touching the fabric, sketch various face designs on scrap paper. Focus on abstract shapes—elongated noses, almond eyes, and flowing hair. Try to keep your hand loose to achieve that fluid, continuous-line aesthetic seen in the photo. -
Clean the surface:
Use a lint roller on the lampshade to remove any dust or fuzz. This ensures your paint or ink lines will be sharp and uninterrupted.
Uneven Lines?
If your brush drags or skips on the fabric texture, thin your paint slightly with a drop of water or more medium. It should be the consistency of heavy cream.
Step 2: Drafting the Design
-
Sketch the layout lightly:
Using your pencil, very lightly map out where the faces will go. You want a staggered grouping—some higher, some lower—to create a dynamic pattern rather than a rigid grid. -
Scale your drawings:
Draw the basic outlines of the faces onto the shade. Keep them large; in the example, the faces take up about 1/3 to 1/2 of the shade’s height. Don’t worry about perfect details yet, just get the positioning right. -
Interlock the designs:
Notice how the hair of one figure might almost touch the chin of another. Aim for this closeness to minimize large empty gaps, creating a cohesive ‘wallpaper’ effect around the drum.
Add a Pop of Color
Make it bolder by filling in just the lips with red or painting abstract colored shapes behind the faces before adding the black line work.
Step 3: Painting the Lines
-
Mix your medium:
If you are using acrylic paint, mix it with a fabric medium according to the bottle’s instructions (usually 1:1 or 2:1). This prevents the paint from cracking when the lamp heats up and helps it flow smoothly into the fabric weave. -
Test line thickness:
On a scrap piece of similar fabric or inside the bottom hem of the shade, test your brush or marker. You want a consistent, medium-weight line—not hairline thin, but bold enough to be seen from across the room. -
Start the main contours:
Begin painting over your pencil lines, starting with the main face shapes (jawlines and foreheads). Use confident, sweeping strokes. If you hesitate, the line can get shaky. -
Add facial features:
Paint the eyes, noses, and lips. In this style, the eyes are often almond-shaped with a simple circle for the pupil, and noses connect directly to eyebrows. -
Detail the hair:
Add the hair lines. Use simple curves or waves. I find it helpful to vary the hair styles—some with buns, some with flowing locks—to give each ‘character’ personality. -
Fill the small accents:
Look at the example image and notice the bold, filled-in areas like pupils and lips. Carefully fill these small shapes with solid black paint to add contrast and anchor the design.
Step 4: Finishing Touches
-
Check for consistency:
Rotate the shade slowly. Look for any faint spots in your black lines and go over them gently to ensure a solid, opaque black color throughout. -
Erase guidelines:
Once the paint is completely dry (wait at least 4-6 hours), gently erase any visible pencil marks. Be careful not to rub the paint itself too vigorously. -
Heat set (optional):
If your fabric medium requires heat setting, use a hair dryer on high heat or an iron on a low setting (with a cloth between the iron and the paint) to cure the design. -
Reassemble:
Place the lampshade back onto your lamp base and turn it on to see how the light illuminates your new art.
Enjoy the warm, artistic glow your new custom lamp brings to the room
Nature Silhouette Band
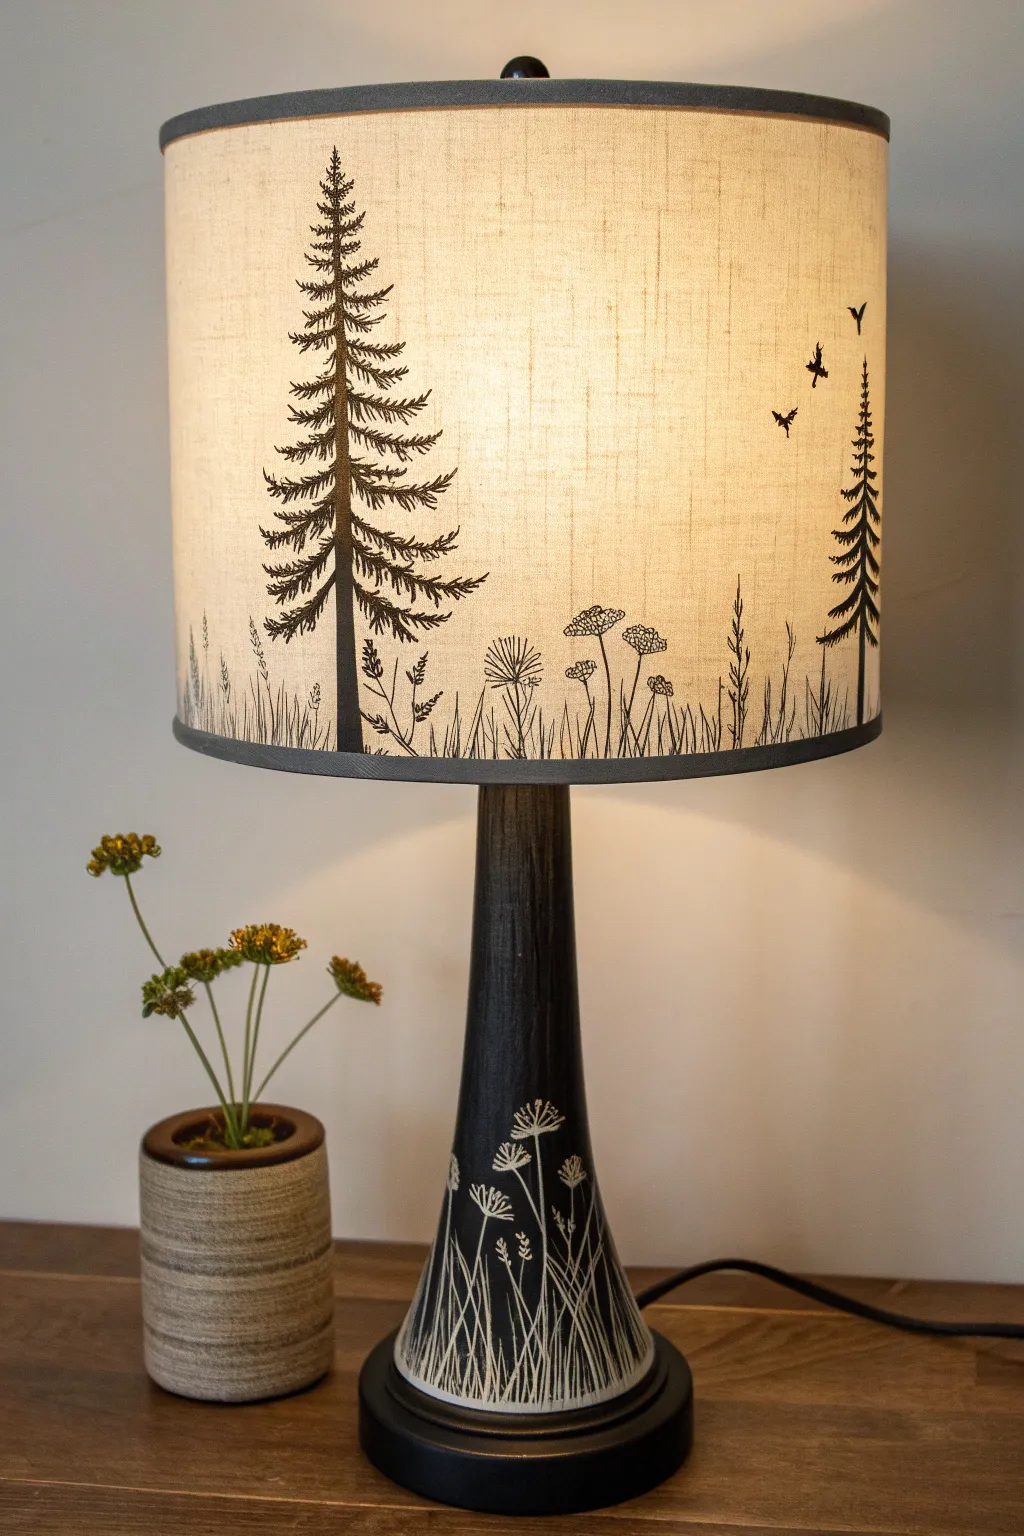
Bring the serene beauty of the woods indoors with this stunning lamp makeover, featuring delicate pine trees and wildflowers. By combining a nature-inspired design on the shade with a reverse-technique on the base, you’ll create a cohesive and sophisticated accent piece.
Step-by-Step Tutorial
Materials
- Table lamp with a smooth, dark base (wood or ceramic)
- Light-colored drum lampshade (linen or cotton blend)
- Black acrylic paint (soft body or fabric medium mix)
- White or cream acrylic paint (for the base)
- Fine liner brushes (sizes 0, 00, and 1)
- Pencil (H or HB hardness)
- Painter’s tape or masking tape
- Carbon transfer paper (optional)
- Reference images of pine trees and wildflowers
- Matte spray varnish or sealant
- Ruler
Step 1: Preparing the Canvas
-
Clean surfaces:
Before you begin, ensure your lampshade is dust-free by using a lint roller. Wipe down the lamp base with a damp cloth and mild soap to remove any oils or grime, then let it dry completely. -
Plan the composition:
Roughly sketch your design on a piece of paper first. Decide where your tallest pine trees will go—usually one or two focal trees work best—and how the ‘horizon line’ of grasses will flow around the bottom. -
Sketch on the shade:
Using a very light hand and your pencil, draw the horizon line about 1-2 inches from the bottom edge of the shade. This doesn’t need to be perfectly straight; a slight organic wave looks more natural. -
Outline the trees:
Lightly mark vertical lines where your tree trunks will be. Sketch the triangular general shape of the foliage, but don’t worry about individual needles yet.
Bleeding Lines?
If paint bleeds into the fabric weave, your paint is too watery. Switch to a ‘dry brush’ technique with undiluted heavy body acrylic, or mix in a fabric painting medium for better control.
Step 2: Painting the Shade
-
Paint the trunks:
Load your size 1 brush with black acrylic paint. If the paint feels too thick, thin it slightly with water or flow medium. Paint the central vertical line for the main pine tree, tapering it slightly as you go up. -
Create the branches:
Using a smaller liner brush, paint the branches extending outward from the trunk. Start wider at the trunk and flick the brush outward to create sharp tips. Remember that pine branches often droop slightly before curving up at the ends. -
Add texture:
Fill in the branches with quick, short strokes to mimic pine needles. Keep the top sparse and get denser towards the bottom of the tree for a realistic silhouette. -
Paint the meadow:
Along your bottom horizon line, paint varying heights of grass blades using upward flicking motions. I find that varying the pressure—heavy at the bottom, lifting off at the top—creates the most natural grass look. -
Detail the wildflowers:
Intersperse the grass with wildflower silhouettes like Queen Anne’s Lace or dandelions. Use the smallest 00 brush to dot tiny clusters for seed heads or flower petals. -
Add flying birds:
Near the upper right or left quadrant, paint two or three small ‘V’ or ‘M’ shapes to represent birds in flight. -
Define the rims:
Use painter’s tape to mask off the fabric just inside the existing metal rings of the shade. Paint the top and bottom fabric trim (or binding tape) black to frame the artwork.
Step 3: Designing the Base
-
Sketch the base design:
The base mirrors the shade but in reverse (white on black). Lightly pencil in tall grasses and a few feature flowers, like the cow parsley seen in the image, rising from the bottom edge of the base. -
Paint the stems:
Using your cream or white paint and a liner brush, paint long, fluid lines upward from the base. Make sure these lines curve slightly to match the contour of the lamp base. -
Add floral details:
Paint the delicate flower heads at the top of the stems. Use small dots and short dashes to create the umbrella-shaped blooms typical of wild parsley or dill flowers. -
Layer the grass:
Add density by painting thinner, shorter blades of grass at the very bottom, overlapping the longer stems to create depth. -
Seal the work:
Once both the shade and base are fully dry (give it at least 24 hours), take the lamp base outside and give it a light coat of clear matte spray varnish to protect the paint from chipping.
Backlight Test
Periodically turn the lamp ON while painting. The backlight reveals thin spots in your black silhouettes that might look solid when the lamp is off. Fill these in for a solid contrast.
Reassemble your lamp, switch it on, and enjoy the calming atmosphere of your custom forest scene
Ocean Waves and Foam
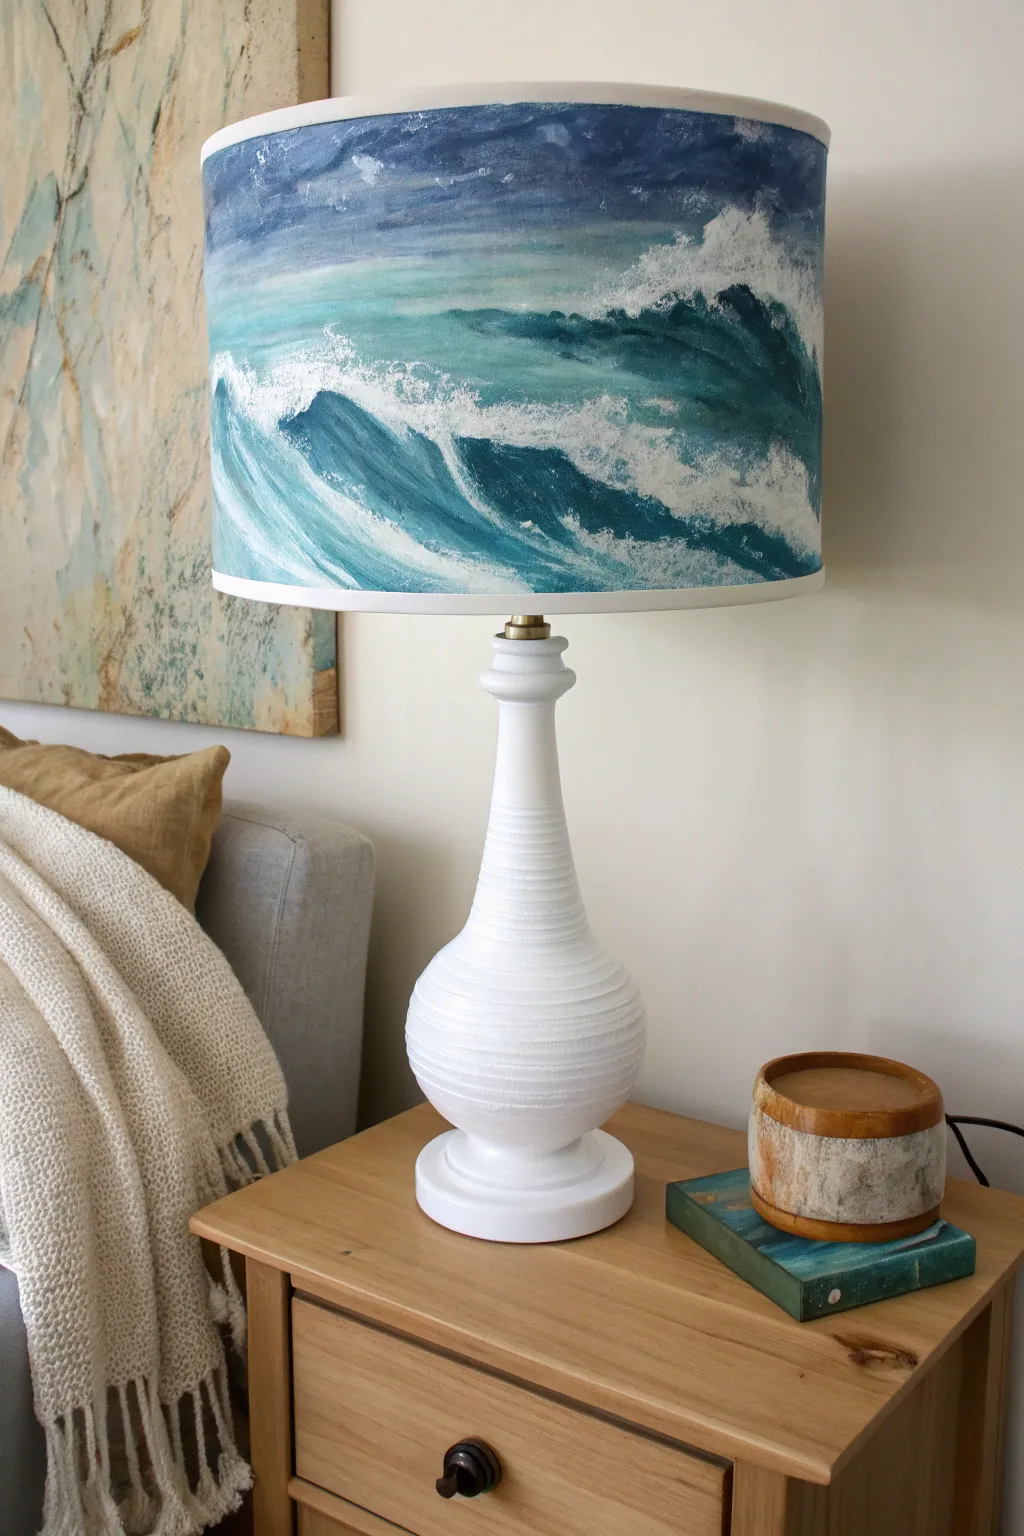
Bring the calming energy of the ocean right into your bedroom with this stunning painted lampshade. Using simple acrylic techniques, you will transform a plain white shade into a dynamic seascape featuring rolling waves and crashing foam.
Detailed Instructions
Materials
- Plain drum lampshade (white or cream fabric)
- Acrylic paints (Phthalo Blue, Ultramarine Blue, Teal, Titanium White)
- Fabric medium (optional but recommended for longevity)
- Flat brushes (1-inch and 1/2-inch)
- Round brush (medium size)
- Sea sponge or old stiff bristle brush
- Palette or paper plate
- Water cup and paper towels
- Painter’s tape
Step 1: Preparation and Base Colors
-
Prepare the workspace and lampshade:
Set up your painting area with a drop cloth. Use painter’s tape to mask off the top and bottom rims of the lampshade if they are a different material or if you want to keep them clean. Mix your acrylic paints with fabric medium according to the bottle’s instructions if you are using it; this helps the paint move on the fabric without cracking later. -
Establish the horizon:
Decide where you want your horizon line to be. In the example, the sky takes up the top third. Using a very light wash of blue and white, paint a soft, horizontal strip near the top. Keep it hazy and indistinct, as this is the distant sky. -
Block in the deep water:
Mix a dark navy using Ultramarine Blue and a touch of black or dark teal. With your larger flat brush, paint the area just below the horizon line. Apply the paint in horizontal strokes, but allow the edges to be a bit uneven to suggest distant movement. -
Create the mid-tone waves:
Transition into a teal or turquoise color as you move down the shade. Mix Phthalo Blue with Titanium White and a bit of Teal. Paint wide, sweeping curves that mimic the rolling swell of a wave coming toward the shore. -
Add the foreground water:
At the bottom of the shade, use a lighter mix of teal and plenty of white. Paint this area with more energetic, diagonal strokes that follow the curve of the ‘crashing’ wave you are about to build. Leave some white space where the biggest foam splashes will go.
Uneven Blending?
If your gradient looks choppy, lightly mist the fabric with water before blending. This keeps the acrylics
Step 2: Painting the Wave Structure
-
Define the main wave shape:
Using a medium contrast blue, paint the dark underside of the main crashing wave. This shadow area gives the water volume. The shape should act like a curled ‘lip’ running diagonally across the shade. -
Blend the transitions:
Before the paint fully dries, use a slightly damp, clean brush to soften the edges between your dark blues and teals. You want a smooth gradient where the water deepens, not harsh stripes. -
Add movement lines:
With a thinner round brush and a fluid mix of white and light teal, paint thin, flowing lines inside the wave face. Follow the curve of the water to show the pull and direction of the current. -
Darken the shadows:
Go back into the deepest part of the wave—right under the crest—with your darkest blue mix. Deepening this contrast is key to making the bright white foam pop later.
Add Sparkle
Mix a tiny amount of iridescent medium or fine silver glitter into your final white highlights to make the water glisten when the lamp is turned on.
Step 3: Adding Foam and Texture
-
Start the sea foam base:
Load a stiff brush or a small piece of sea sponge with pure Titanium White. Dabbing lightly, start creating the chaotic foam at the crest of the wave. Keep the texture rough and random. -
Create the crashing spray:
Use a dry-brush technique to drag white paint upwards and backwards from the wave crest. This simulates the spray being blown back by the wind. I like to keep my brush very dry here so the texture of the fabric helps break up the paint. -
Paint the rolling foam:
Add patches of white foam on the face of the wave and in the foreground water. These shouldn’t be solid white blocks; use scumbling (scrubbing with a dry brush) to make them look airy and broken up. -
Refine the details:
Using a small round brush, add tiny dots and flecks of white around the main crash zone to represent water droplets caught in the air. -
Add reflected light:
Mix a very watery, translucent glaze of teal. Lightly brush over some of the lower foam areas. This makes the foam look wet and integrated into the water, rather than just sitting on top of it. -
Final highlights:
Once the previous layers are dry, add a final layer of thick, opaque white to the very brightest points of the breaking wave for maximum impact. -
Remove tape and finish:
Carefully peel off your painter’s tape. If any paint bled under the tape, you can tidy it up with a small brush and a bit of white paint or by carefully scraping it if the rim is metal.
Turn on your new lamp and enjoy the soothing coastal atmosphere you’ve created.
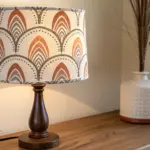
Radiating Sunburst Rays
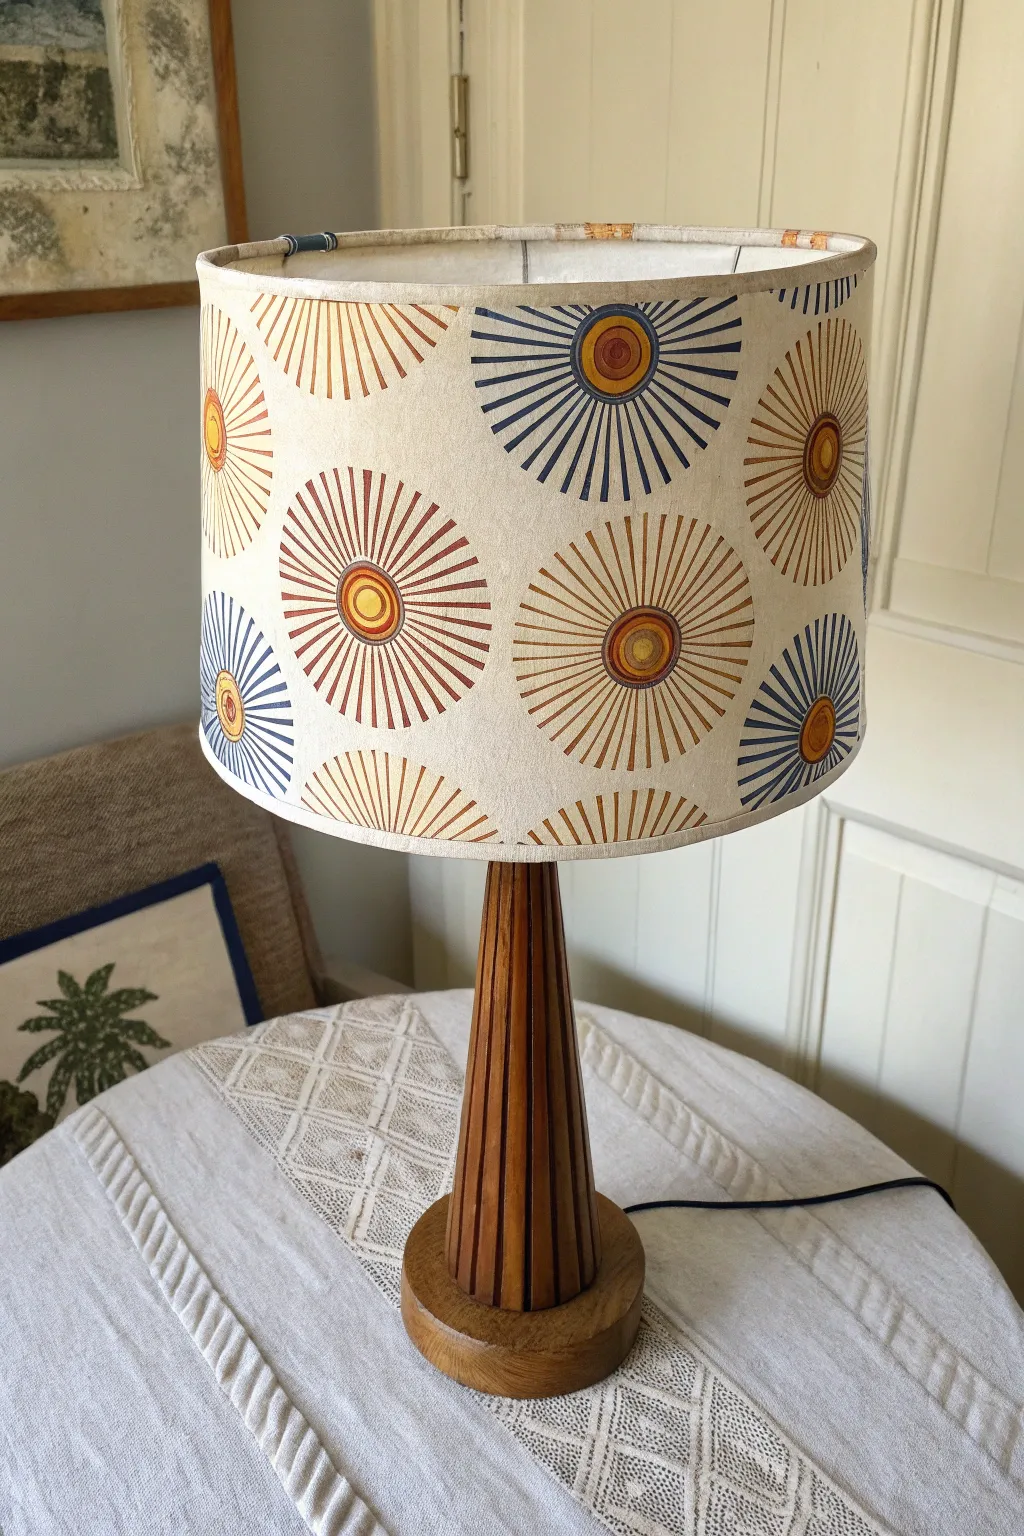
Bring a touch of mid-century modern flair to your lighting with this striking sunburst motif. The repeating pattern of concentric circles and energetic rays creates a warm, artisanal glow that transforms a plain shade into a statement piece.
Step-by-Step Guide
Materials
- Plain fabric lampshade (cream or white linen works best)
- Acrylic paint (Rust Orange, Mustard Yellow, Navy Blue)
- Fabric painting medium
- Small round sponge dobbers (various sizes)
- Fine liner brush (size 0 or 1)
- Small flat brush (size 2 or 4)
- Pencil
- Ruler or measuring tape
- Paper plate or palette
- Jar of water and paper towels
Step 1: Planning the Layout
-
Mix the Medium:
Before starting, mix your acrylic paints with fabric medium according to the bottle instructions. This ensures the paint remains flexible on the lampshade and doesn’t crack when the fabric flexes. -
Create a Grid:
Lightly mark vertical reference lines around the circumference of your shade using a pencil and ruler. Space these evenly based on how large you want your sunbursts to be. -
Stagger the Centers:
Mark the center points for your sunbursts. I find it looks best to create a staggered ‘brick’ pattern, where the second row of suns sits in the gaps of the first row.
Uneven Spacing?
If your rays look uneven, don’t panic. Add shorter ‘intermediate’ rays between the longer ones to fill gaps and make the stylistic choice look intentional.
Step 2: Painting the Cores
-
Stamp the Centers:
Load a small round sponge dobber with your darkest core color (like the rust orange). Press it firmly onto a marked center point to create a perfect circle. -
Repeat the Pattern:
Continue stamping these central dots across the shade, alternating colors if you desire a multi-colored effect. -
Add Inner Rings:
Once the centers are dry to the touch, use a fine liner brush to paint a contrasting ring directly around the central dot. For example, add a yellow ring around an orange center. -
Create Outer Rings:
Paint a second, slightly thicker ring outside the first one. Keep your hand steady and use the curvature of the shade to guide your brush stroke. -
Let it Set:
Allow these central ‘eyes’ to dry completely before starting the rays to prevent smudging.
Make it Shine
Mix a tiny amount of gold metallic fabric paint into your yellow or orange mixture. It won’t sparkle loudly, but will catch the light beautifully when the lamp is on.
Step 3: Adding the Rays
-
Practice Your Stroke:
Practice painting long, thin tapered lines on a scrap piece of paper first. You want the line to be slightly thicker near the center and taper off to a point. -
Mark Guidelines:
Lightly pencil four cardinal points (North, South, East, West) around one sunburst center to help keep your rays evenly spaced. -
Paint Cardinal Rays:
Using your mixed paint and liner brush, paint the four main rays first, extending them outwards from the outer ring. -
Fill the Gaps:
Paint a ray directly in the middle of each quarter section. Then, fill the remaining spaces with evenly spaced rays until the circle is full. -
Vary the Colors:
Switch colors for different sunbursts. Try a blue sunburst with yellow centers, or a rust sunburst with blue centers, to create visual interest. -
Handle the Edges:
For sunbursts that fall on the top or bottom edge of the shade, simply paint the rays until they run off the fabric, giving the pattern a continuous, wallpaper-like feel. -
Clean Up:
Check for any uneven lines. You can carefully tidy up wobbly edges with a very slightly damp clean brush while the paint is still wet. -
Final Dry:
Let the lamp shade dry for at least 24 hours before attaching it to the base and turning on the light.
Now you have a custom, retro-inspired piece that warms up the room even when the bulb is off
Terrazzo Speckle Confetti
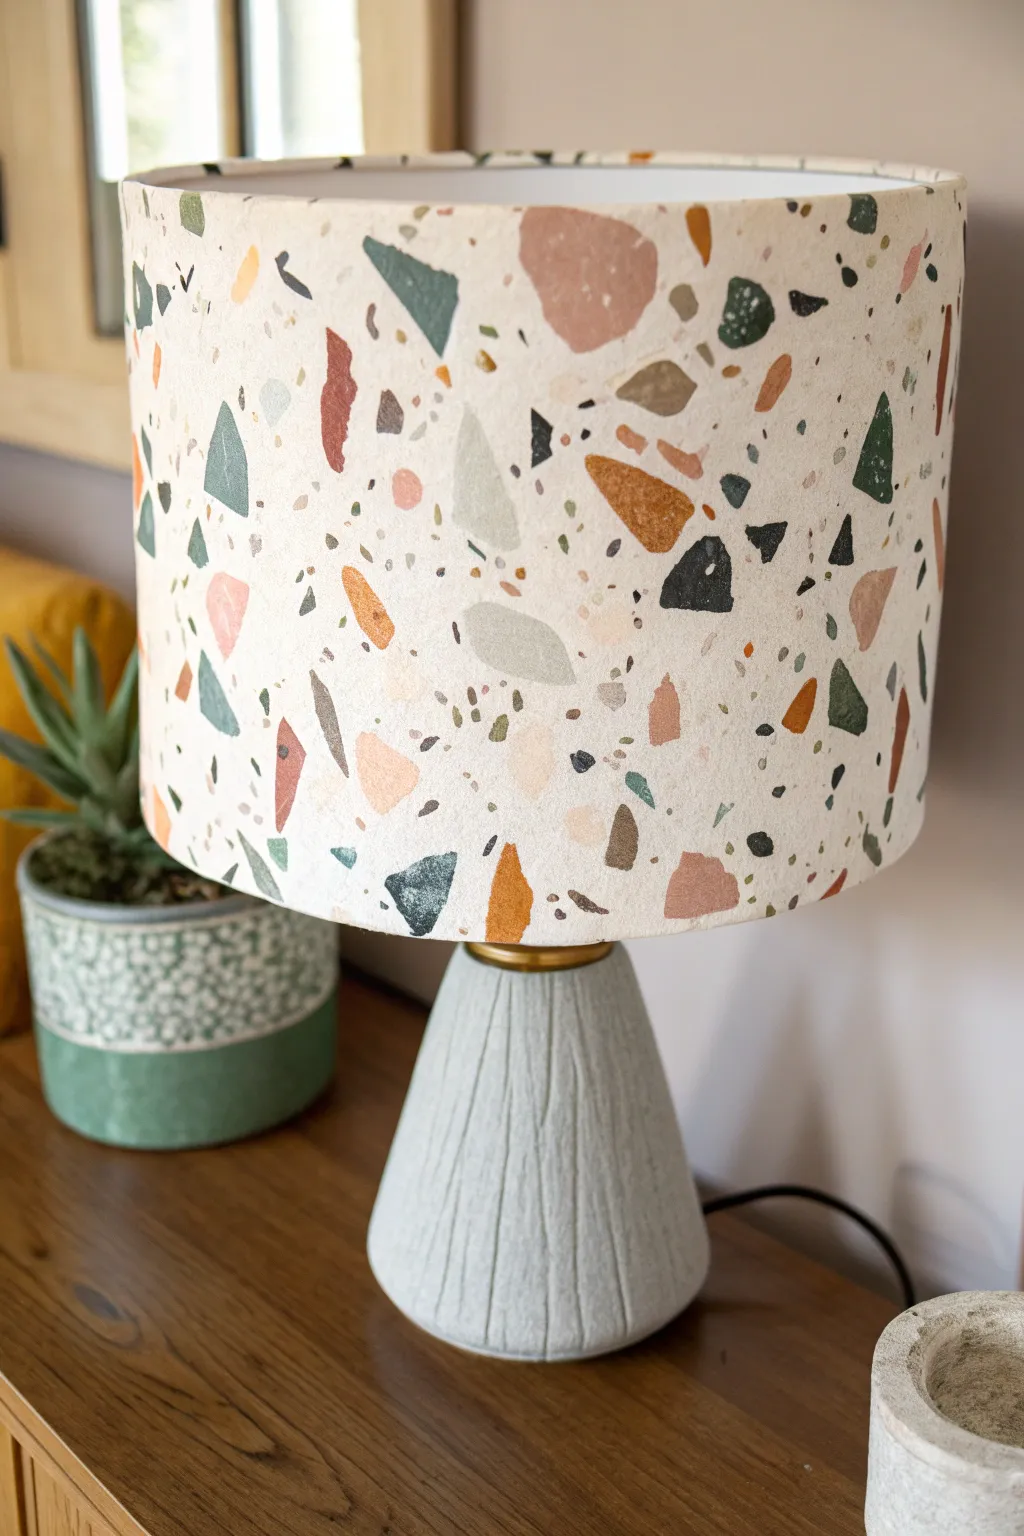
Transform a plain drum shade into a high-end designer piece with this loose, playful terrazzo pattern. Using earthy tones like terracotta, sage, and slate gray, you’ll create a sophisticated confetti effect that looks organic and modern.
Step-by-Step Tutorial
Materials
- Plain fabric drum lampshade (cream or white)
- Acrylic paints (rust, ochre, sage green, forest green, dark grey, blush pink, light grey)
- Textile medium (mix with acrylics for fabric)
- Small flat paintbrushes (various sizes)
- Fine detail brush
- Palette or small dishes for mixing
- Paper towels
- Pencil (optional)
- Scrap paper for practice
Step 1: Preparation & Color Mixing
-
Prep your workspace:
Set up a clean, well-lit area. If your lampshade is on a lamp base, remove it to make painting easier. Dust off the fabric surface with a lint roller to ensure the paint adheres smoothly. -
Mix the textile medium:
For each color you plan to use, mix your acrylic paint with a textile medium according to the bottle’s instructions. This prevents the paint from cracking when the lampshade flexes and helps it soak into the fabric fibers rather than sitting on top. -
Develop your palette:
This look relies on muted, earthy tones. Mix a deep rust red, a mustard yellow ochre, a soft sage, a deep forest green, and a charcoal grey. Don’t forget lighter accents like blush pink and pale grey to add dimension. -
Practice your shapes:
On a piece of scrap paper, practice making irregular polygons. Terrazzo isn’t about perfect circles or squares; aim for shards, jagged rocks, and soft blobs. I like to experiment with different brush pressures here to see what shapes emerge naturally.
Natural Edges Tip
Don’t overthink the shapes. If your hand shakes or makes a mistake, just turn that smudge into a larger jagged rock. Imperfection makes it look real.
Step 2: Painting the Large Shards
-
Start with the ‘hero’ colors:
Begin with your boldest colors, like the rust red and dark grey. Using a medium flat brush, paint scattered, irregular shapes around the shade. Keep them spaced out widely to leave room for other colors. -
Create angular shapes:
For a realistic stone look, give some shapes sharp corners, resembling broken tiles. Vary the sizes significantly—some should be the size of a thumbprint, others smaller. -
Rotate constantly:
Turn the lampshade frequently as you work. This ensures you don’t accidentally create a repeating pattern or cluster too many of one color in a single spot. -
Add secondary tones:
Rinse your brush and switch to your mid-tones—the ochre and forest green. Fill in the large gaps between your first set of shapes, painting more faceted rock-like forms. -
Layer in light shades:
Introduce the pale grey, sage, and blush pink shapes. These lighter colors act as a visual bridge between the dark ‘chips’ and the cream background, softening the overall contrast.
Translucent Paint?
If your lighter colors (like the pink or sage) look streaky or see-through on the fabric, let the first coat dry and apply a second layer for full opacity.
Step 3: Detailing & Filling
-
Switch to a smaller brush:
Now that the large pieces are placed, grab a smaller flat brush or a round brush. You need to fill the empty negative space with medium-sized fragments. -
Add directional variety:
Ensure your shapes are ‘pointing’ in different directions. If all your triangles point up, it will look like a pattern rather than random aggregate stone. -
Create tiny speckles:
Using your finest detail brush, dip into the dark charcoal or black paint. Add very small dots, flecks, and dashes in the spaces between the larger shapes. -
Sprinkle the confetti:
Continue adding tiny speckles using your other colors as well. A tiny dot of rust or a small dash of ochre adds wonderful texture and makes the surface look like genuine composite material. -
Check density:
Step back and look at the shade from a distance. Look for any unintended ‘bald spots’ of plain fabric and fill them with a small irregular shape or a cluster of dots. -
Refine edges:
If any of your larger shapes look too fuzzy or uneven, go back with a little fresh paint to sharpen the edges. Crisp edges sell the illusion of hard stone chips. -
Dry thoroughly:
Let the lampshade dry completely, preferably overnight. Textural unevenness in the paint is fine; it adds to the stone effect. -
Heat set (optional):
If your textile medium requires heat setting, use a hair dryer on a high heat setting or an iron (if the shade shape allows) to cure the paint permanently.
Once illuminated, your new terrazzo shade will cast a warm, artistic glow across the room
Night Sky With Star Splatter
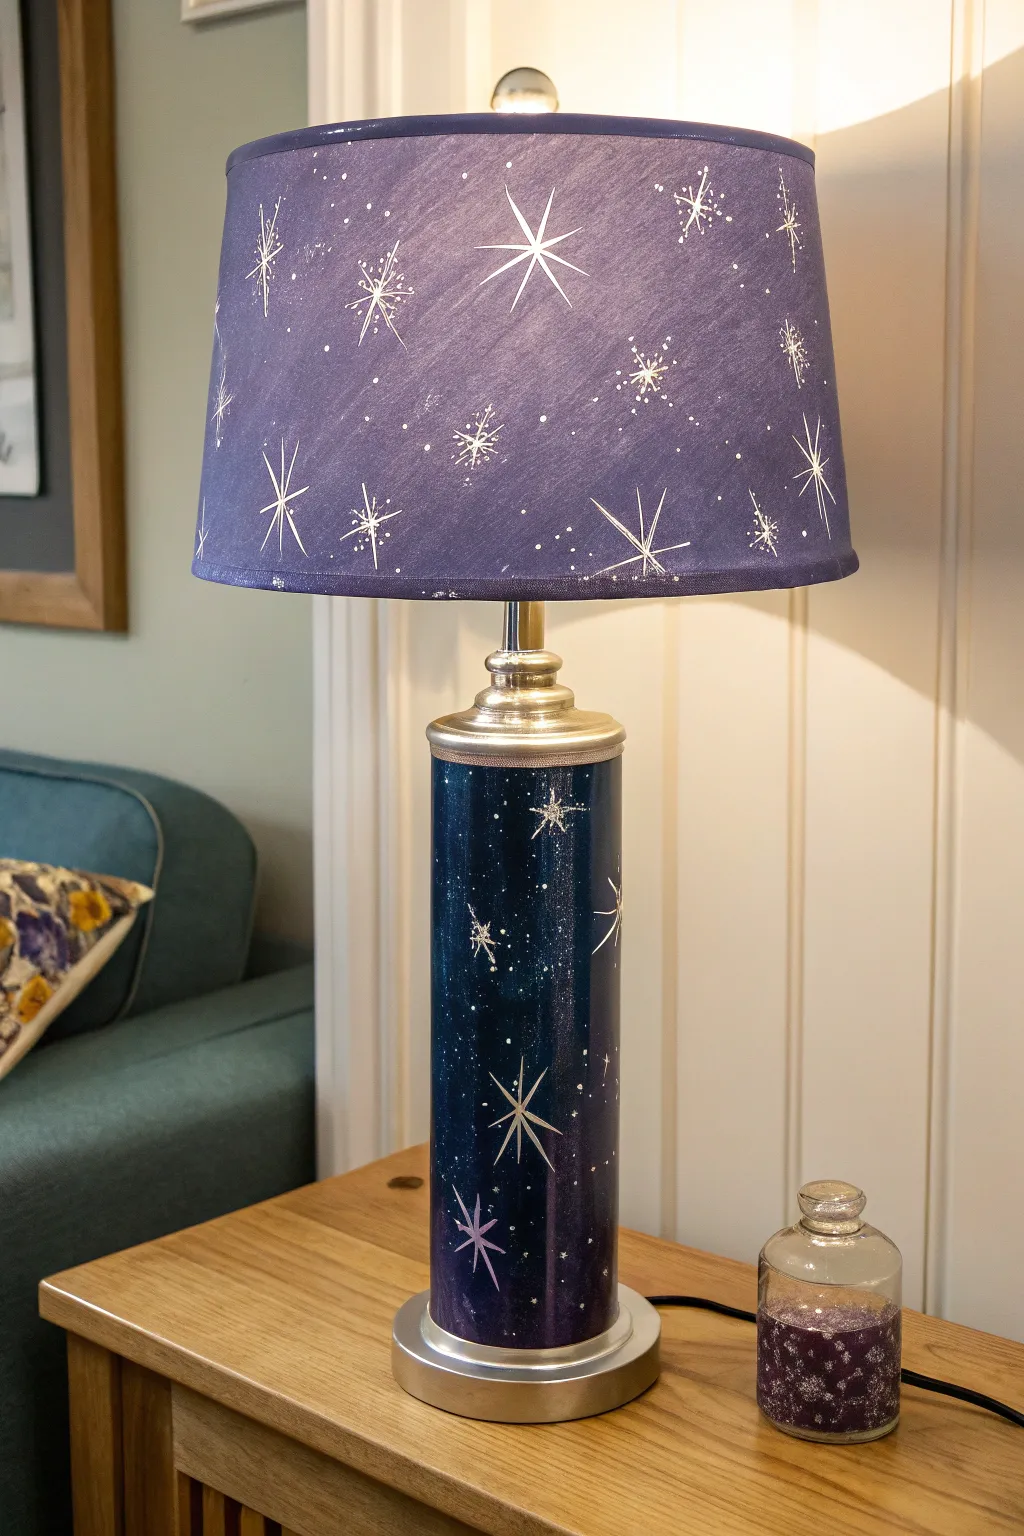
Transform a plain lamp into a dreamy piece of decor with this night sky project that covers both the shade and the base. The deep blues and purples create a moody backdrop for delicate, hand-painted stars that seem to glow when the light is switched on.
Detailed Instructions
Materials
- Fabric lampshade (drum style)
- Pringles can or similar cylindrical container (for the base form)
- Lamp kit (socket, cord, and hardware)
- Silver paint or silver spray paint
- Deep blue acrylic paint (e.g., Navy or Prussian Blue)
- Purple acrylic paint (e.g., Violet or Deep Plum)
- White acrylic paint
- Textile medium (for the lampshade paint)
- Various paintbrushes (wide flat brush, fine liner brush)
- Old toothbrush (for splattering)
- Mod Podge or craft glue
- Small glass bottle with cork (optional accessory)
Step 1: Preparing the Base and Shade
-
Prepare the base cylinder:
If you are upcycling a container like a Pringles can for the column, wipe it down thoroughly. If using an existing metal or ceramic lamp base, lightly sand the surface to help the paint adhere. -
Paint the hardware accents:
Before working on the night sky design, paint the top and bottom rims of your base column with silver paint. You may need two coats for a solid, metallic finish that mimics chrome hardware. -
Mix the textile paint:
For the fabric lampshade, mix your deep blue and purple acrylic paints with a textile medium according to the bottle instructions. This prevents the fabric from becoming too stiff or cracking later.
Starry precision
For the sharpest stars, thin your white acrylic paint with a tiny drop of water. Ink-like consistency flows better from a liner brush than thick paint.
Step 2: Painting the Midnight Background
-
Apply the base coat to the shade:
Using a wide flat brush, apply the purple-blue mixture to the lampshade. Use horizontal strokes for a smooth finish, or criss-cross strokes for a bit of texture. -
Paint the lamp column:
While the shade dries, paint the main body of the lamp base with a very dark blue acrylic paint. You want this to be slightly darker than the shade to ground the piece. -
Add depth with sponging:
To give the base a cosmic nebula effect, lightly sponge a small amount of dark purple onto random areas of the wet blue paint, blending softly so there are no harsh lines. -
Let everything dry:
Allow both the lampshade and the base to dry completely. This is crucial before moving on to the star details to ensure the white paint stays crisp.
Step 3: Creating the Constellations
-
Practice your stars:
Before painting on the actual lamp, practice painting 8-point stars on a scrap piece of paper using a fine liner brush and white acrylic paint. -
Paint large North Stars:
Start with the largest stars. Paint a long vertical line crossed by a long horizontal line. Then, add shorter diagonal lines in between the main axes. Place 3-5 of these large stars randomly on the shade. -
Add medium stars:
Fill in some gaps with simpler 4-point stars or 6-point stars. Vary the pressure on your brush to make the tips of the star rays sharp and tapered. -
Create the splatter galaxy:
Dip an old toothbrush into slightly watered-down white paint. Hold it near the lampshade and run your thumb across the bristles to flick tiny specks of ‘stardust’ across the fabric. -
Repeat on the base:
Use the same technique to paint a few large and medium stars on the dark blue lamp base. Add the splatter effect here as well to unify the top and bottom. -
Add purple accents:
For a magical touch, mix a little white into your purple paint to make a lavender shade. Trace over just one or two stars on the base or add a subtle lavender star to add dimension.
Splatter gone wrong?
If you accidentally splatter a blob that’s too big, don’t wipe it! Let it dry, then paint over it with your background color before trying again.
Step 4: Assembly and Finishing
-
Seal the base:
Once the paint on the base is fully dry, apply a coat of glossy Mod Podge or clear acrylic sealer to protect the paint and give it a polished, ceramic-like shine. -
Assemble the hardware:
If you built the base creatively using a container, install the lamp kit by threading the cord through the center and securing the socket at the top. -
Attach the shade:
Place the finished lampshade onto the base. Screw in a bulb and switch it on to see how the light illuminates your hand-painted galaxy. -
Create a matching accessory:
I love using leftover paint for small details, so try filling a small glass bottle with layers of purple sand or glitter to sit beside your new lamp as a matching nightstand accessory.
Now you have a custom lighting piece that brings the magic of a clear night sky right into your room
Layered Mountain Horizon
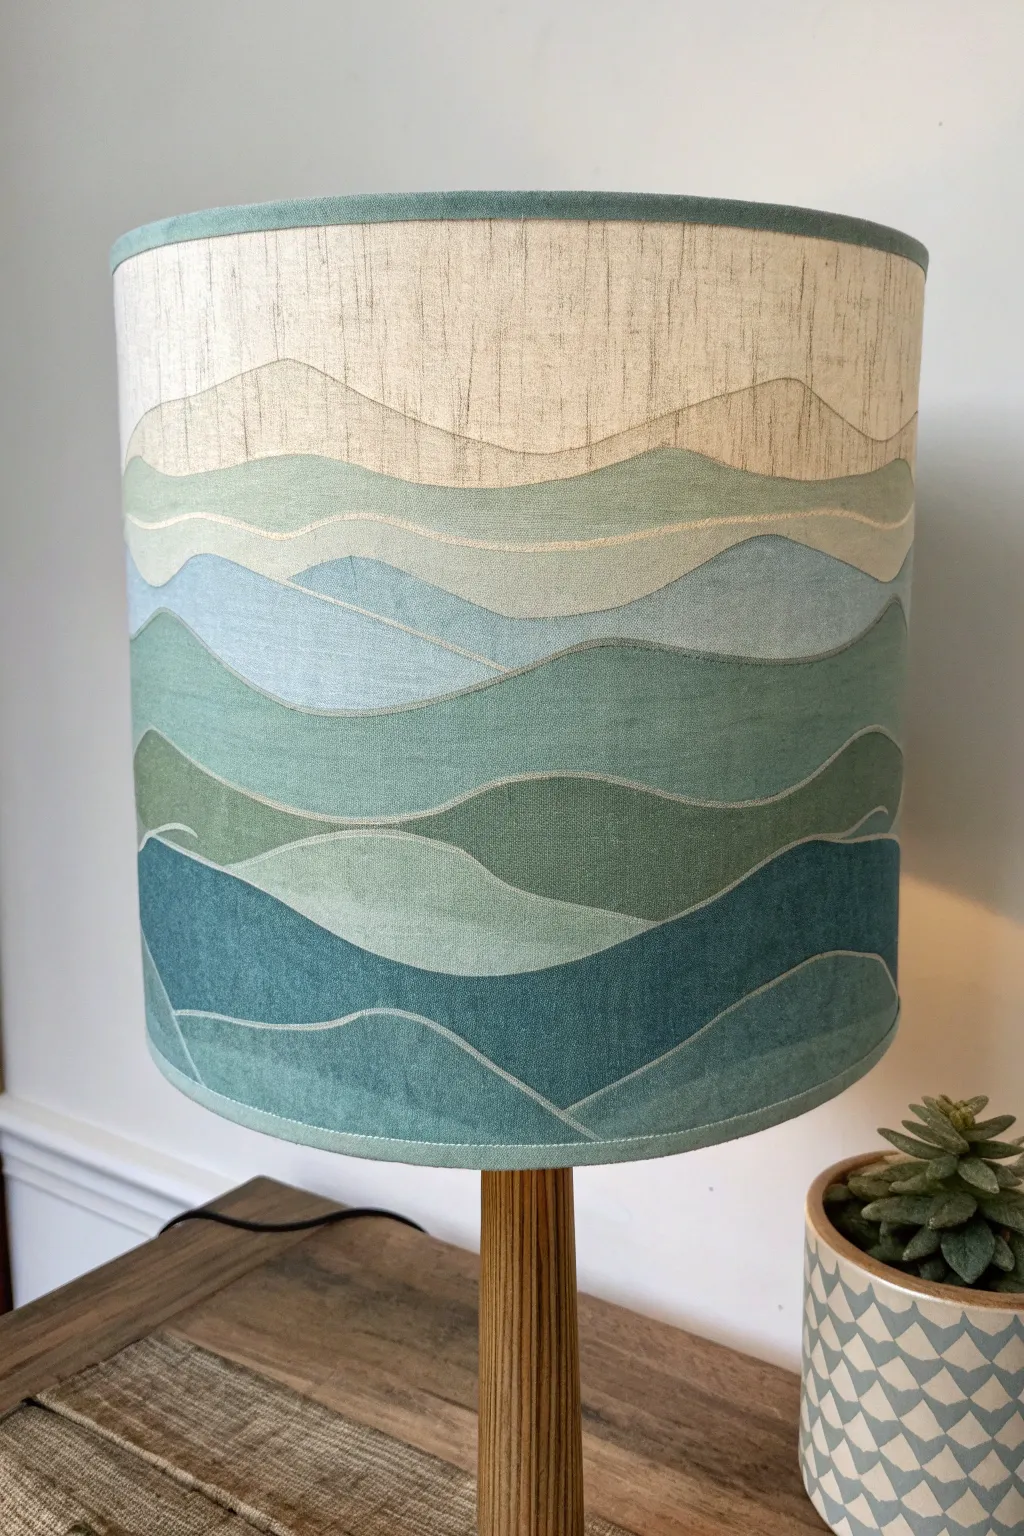
Transform a plain drum shade into a calming piece of functional art with this layered landscape design. The soft, overlapping hills in soothing blues, greens, and creams create a peaceful atmosphere reminiscent of a misty mountain range.
Step-by-Step
Materials
- Fabric drum lampshade (light color preferred)
- Acrylic paints (Cream/Beige, Sage Green, Teal, Navy Blue, Light Blue)
- Textile medium (mixing medium for fabric)
- Fine liner brush
- Flat shader brushes (medium and large)
- Pencil or disappearing fabric marker
- Palette for mixing
- Cup of water
- Paper towels
Step 1: Preparation & Sketching
-
Prepare your space:
Set up a clean, well-lit workspace. Remove the lampshade from the base to make it easier to maneuver. If your shade is dusty, give it a quick pass with a lint roller. -
Mix your first color:
Start by mixing your textile medium with the acrylic paints. This is crucial as it prevents the paint from cracking when the lamp heats up and helps it adhere to the fabric fibers. -
Plan the horizon:
Using a pencil or a disappearing fabric ink pen, lightly sketch your first undulating line about one-quarter of the way down from the top rim. This will be your most distant mountain range. -
Sketch the layers:
Continue drawing wavy, organic lines down the shade. Create about 5-6 distinct layers, varying the height and curve of each wave so they don’t look too uniform. The lines should wrap all the way around the drum.
Uneven Lines?
If your hand shakes while painting the delicate ridge lines, rest your pinky finger on a dry part of the shade for balance, or use thin masking tape for guidance.
Step 2: Painting the Layers
-
Paint the sky:
Begin at the very top. Mix a warm cream or beige color with your medium and fill in the space above your first pencil line using a large flat brush. -
First mountain range:
For the first set of hills below the sky, mix a very pale sage green or a diluted beige-green. Apply this color directly below the sky line, ensuring you maintain a crisp edge. -
Define the separation:
To mimic the distinct lines seen in the example, leave a tiny, unpainted hairline gap between colors, or go back later with a fine liner brush and a lighter tint to outline the ridge. -
Deepen the tones:
Move to the next section down. Mix a slightly darker, cooler green. As you paint this section, follow the curves of your sketch carefully. I find that using a flat brush turned on its side helps carve out those smooth curves. -
Introduce blue tones:
For the middle layers, start blending teal into your green mix. You want a soft, muted teal color here. Paint the entire band, keeping the consistency smooth and even. -
Create the darkest depths:
The bottom-most layers should represent the foreground and heavier shadows. specific mix of navy blue and teal will create that deep ocean-blue look. Apply this to the widest sections near the bottom. -
Review coverage:
Fabric absorbs paint quickly. detailed check under a bright light might reveal patchy spots; apply a second coat to any areas that look uneven or translucent.
Step 3: Detailing & Finishing
-
Add the highlights:
Using a fine liner brush and a very pale, almost white mixture of your sky color, carefully trace the top edge of each mountain ridgeline. This ‘halo’ effect separates the layers and adds dimension. -
Clean up edges:
Check the top and bottom rims of the lampshade. If any paint strayed onto the bias tape trim, carefully wipe it away or paint over the trim with a consistent color if desired. -
Let it cure:
Allow the lampshade to dry completely—usually 24 hours—before reattaching it to the lamp base. The textile medium needs time to set properly.
Add Texture
Mix a tiny amount of baking soda into the paint for the lower mountains to give the foreground a subtle, grainy stone texture.
Reattach your beautiful new shade and enjoy the warm, landscape glow it casts across the room
Storybook Scene Silhouettes
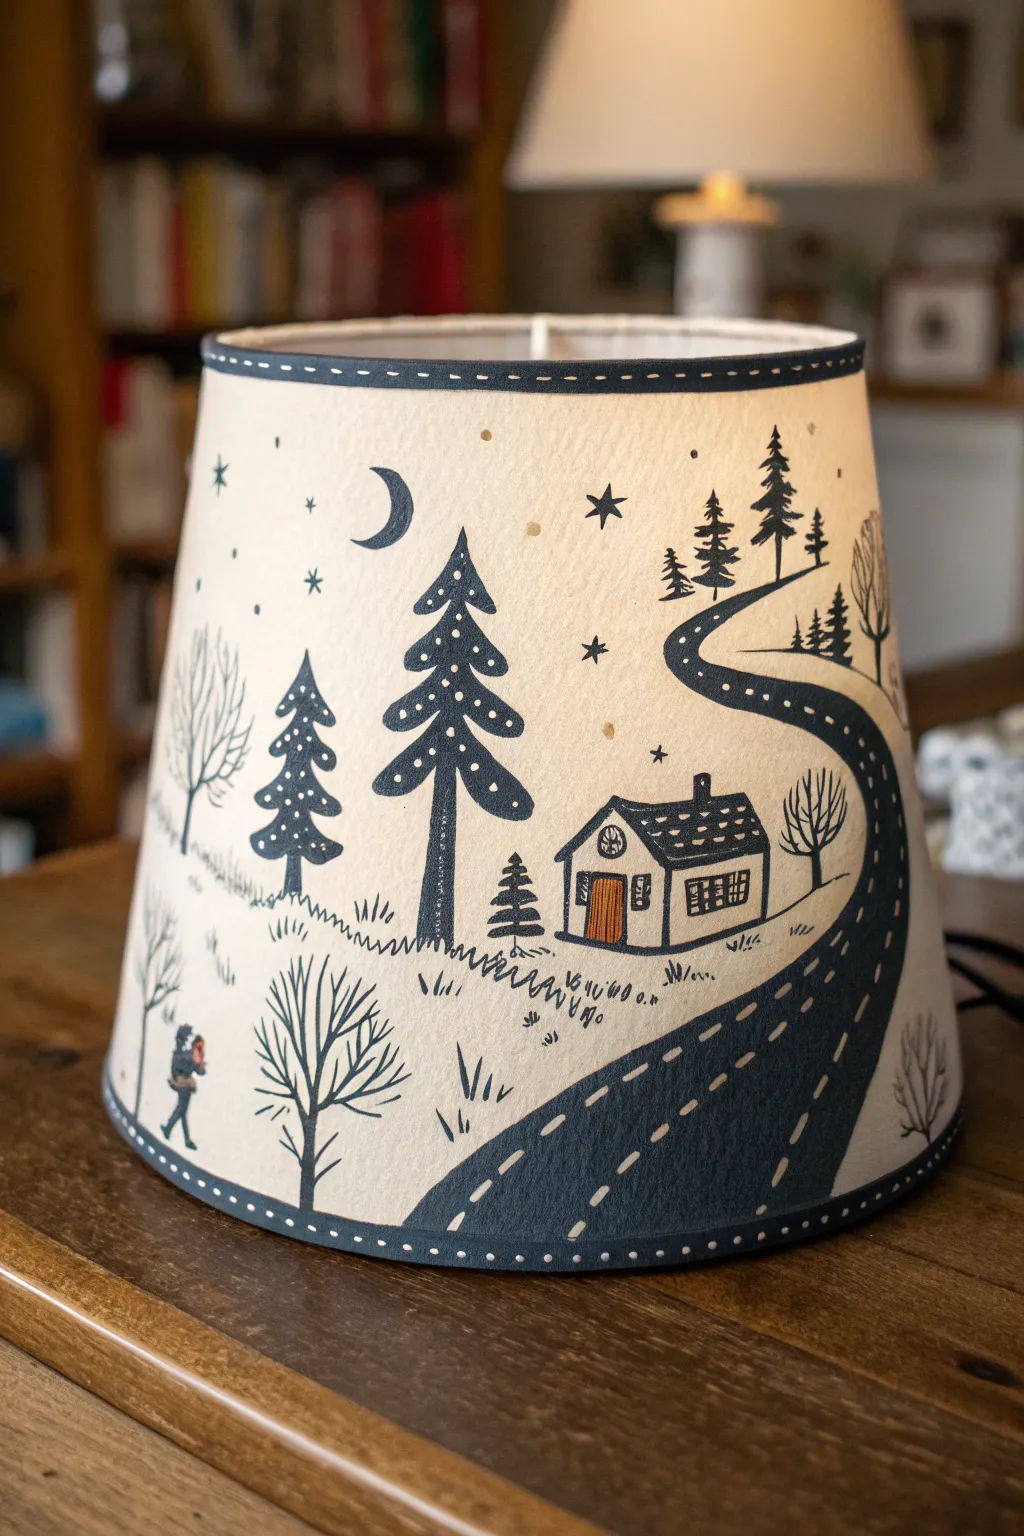
Transform a plain cream lampshade into a dreamy, illustrated world with this charming midnight scene. Using deep navy acrylics, you will paint swirling roads, cozy cottages, and starlit forests to create a storybook silhouette effect that glows warmly when lit.
Step-by-Step Guide
Materials
- Plain cream or off-white fabric drum shade
- High-flow or soft-body acrylic paint (Deep Navy/Indigo)
- Acrylic paint (Burnt Orange or Copper)
- Fabric medium (optional, but recommended for smoother blending)
- Round synthetic brushes (sizes 0, 2, and 4)
- Fine liner brush (size 00 or 000)
- Chalk or a vanishing fabric marker
- Pencil and paper for sketching
- Palette for mixing
- Cup of water and paper towels
Step 1: Planning and Sketching
-
Map out the landscape:
Before touching the shade with paint, lightly sketch your winding road design on a piece of paper. The road should be the main anchor, starting wide at the bottom and curving upward, getting narrower to create perspective. -
Transfer the guide lines:
Using a piece of chalk or a very light pencil touch, draw the main S-curve of the road directly onto the lampshade. Mark the horizon line where the hills will meet the sky. -
Place the key elements:
Lightly mark the positions for the cottage on the right, the large pine trees on the left, and the smaller distant trees. Don’t worry about details yet; just get the composition balanced.
Step 2: Painting the Foreground
-
Mix your navy shade:
Prepare your Deep Navy paint. I like to mix in a tiny drop of fabric medium here, as it helps the paint glide over the fabric weave without skipping. -
Fill the road:
Using a size 4 round brush, carefully paint the solid navy winding road. Keep your edges crisp. Leave the dashes inside unpainted for now, or paint over them and add them later with white—though painting around the cream background looks more natural. -
Add the road dashes:
If you painted the road solid, use a fine brush with cream or white opaque paint to add the dashed center lines. If you left negative space, tidy up the edges of your dashes with the navy paint. -
Paint the cottage structure:
Switch to a size 2 brush to outline the house. Fill in the roof with rows of small dots or dashes to mimic shingles. Leave windows as negative space (unpainted cream fabric). -
Add the warm accents:
Using the Burnt Orange or Copper paint, carefully fill in the front door of the cottage. This small pop of color draws the eye and makes the scene feel inviting.
Bleeding Paint?
If paint bleeds into the fabric grain, your paint is too watery. Use heavier body acrylics or mix distinct ‘lining’ paint slightly thicker than your fill paint to create dams.
Step 3: Creating the Forest
-
Paint the large pine tree:
On the left side, paint the large focal pine tree. Use the navy paint to create tiered, swooping branches. To give it the ‘snowy’ or textured look seen in the photo, leave small dots of negative space within the foliage. -
Add smooth deciduous trees:
Using a size 0 brush, paint the bare, branching trees near the bottom left and right. Keep the trunks thin and the branches wispy, extending upwards like veins. -
Create the distant forest:
Paint smaller, simpler triangular shapes for the pine trees near the top of the road. These should be much smaller than the foreground trees to enhance the depth of the scene. -
Add landscape textures:
Use your finest liner brush to add small tick-marks and grassy tufts along the side of the road and the base of the trees. This grounds the illustrations so they don’t look like they are floating.
Add Magic
Poke tiny holes through the center of the painted stars with a needle. When you turn the lamp on, actual light will pinprick through the design for a real starry night effect.
Step 4: Sky and Borders
-
Paint the celestial elements:
In the upper open spaces, paint a crescent moon and several five-pointed stars. Scatter tiny dots around them to represent distant starlight. -
Add the tiny wanderer:
If you wish to include the figure, paint a tiny silhouette of a person on the lower left, perhaps carrying a lantern (a tiny orange dot). -
Create the faux-stitched border:
Paint a solid band of navy blue around the very top and bottom rim of the shade, about 1cm thick. -
Detail the border:
Once the rim bands are dry, use a cream or white paint pen (or a very steady hand with a liner brush) to add small dashes along the blue bands, simulating a stitched thread look. -
Final touches:
Erase any visible chalk marks gently. Check for any patchy areas in the navy paint and apply a second coat if necessary for complete opacity.
Enjoy the cozy, storybook atmosphere your new lamp brings to the room every evening
Marbled Swirl Color Pour Look
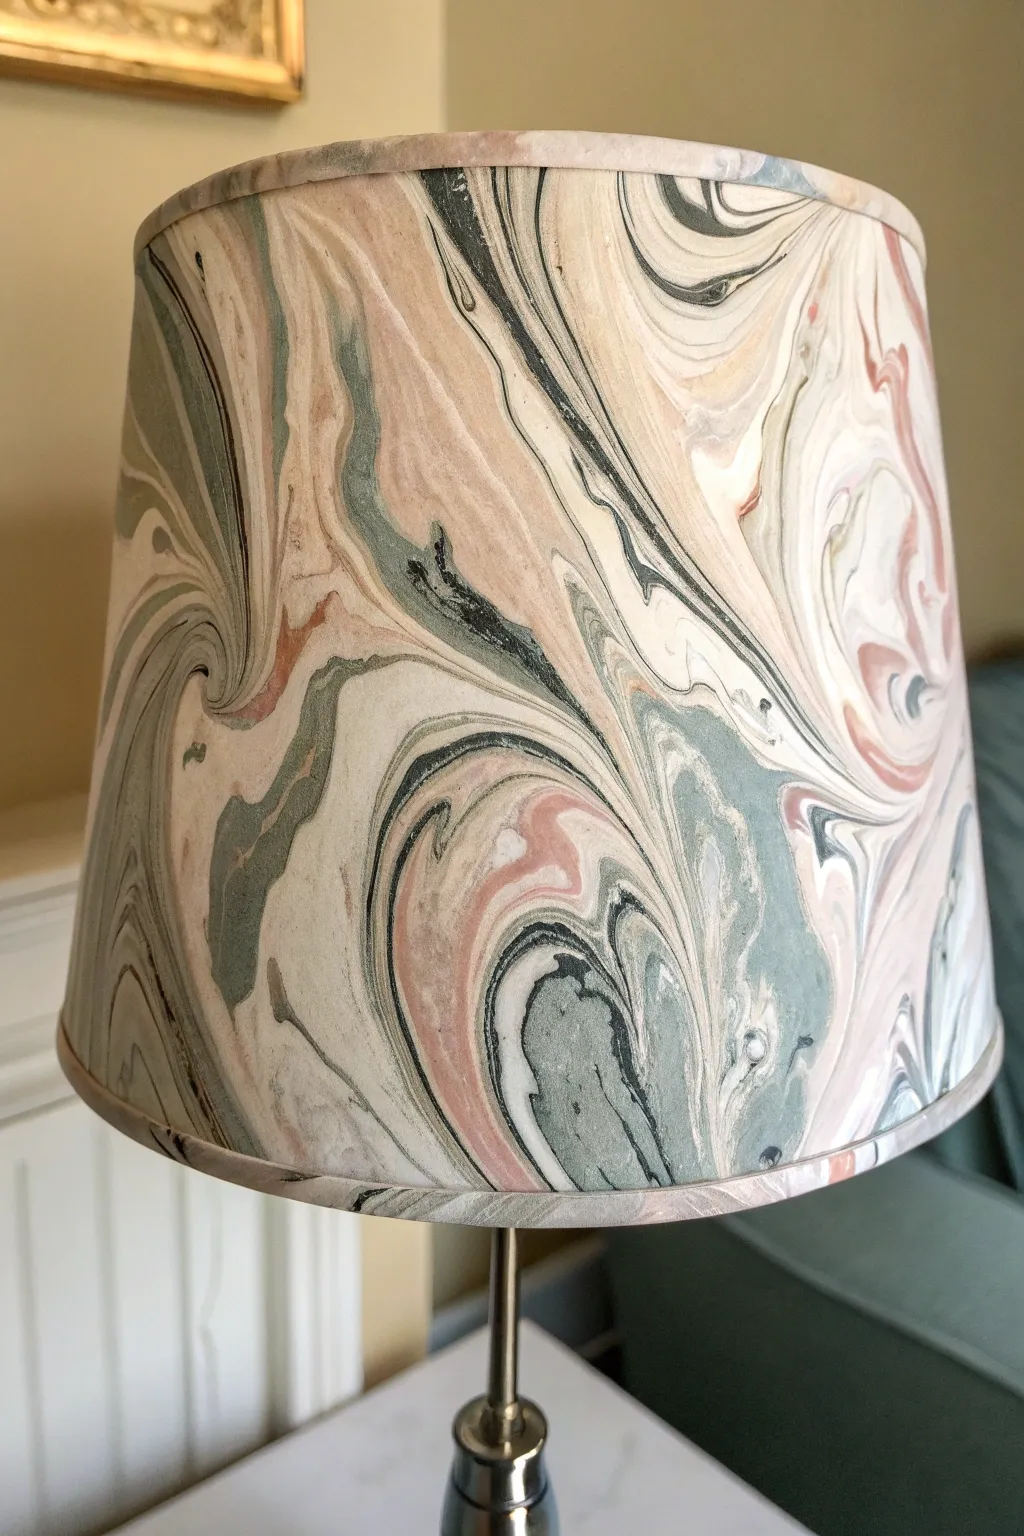
Transform a plain lampshade into a stunning piece of modern art using the captivating technique of hydro-dipping. This project creates organic, flowing swirls of sage, terracotta, and cream that look like sophisticated stone marble but are surprisingly simple to achieve.
Step-by-Step
Materials
- White or cream fabric drum lampshade
- Large plastic tub (deep enough to submerge the shade)
- Acrylic craft paints (creamy white, sage green, dusty pink/terracotta, black)
- Liquid marbling medium or water
- Floetrol or acrylic pouring medium (optional but recommended)
- Painter’s tape
- Plastic drop cloth
- Stir sticks or skewers
- Clear acrylic sealer spray (matte finish)
Step 1: Preparation
-
Prep the workspace:
Marbling can get messy, so lay down a plastic drop cloth on a large table or the floor. Ensure your tub is clean and placed securely in the center. -
Protect the hardware:
Use painter’s tape to completely cover the metal spider fitting and any other hardware on the inside of the lampshade. You only want the fabric to catch the paint. -
Mix your paints:
In separate cups, mix your acrylic paints with water (ratio roughly 1:1) or a pouring medium until they reach the consistency of whole milk. The paint needs to float, not sink immediately. -
Fill the basin:
Fill your large plastic tub with room-temperature water. Leave a few inches at the top to account for displacement when you dip the shade.
Step 2: Creating the Swirls
-
Drop the first color:
Gently drip your lightest color (likely the cream or white) onto the surface of the water. It should spread out into a thin film. -
Layer the accent colors:
Add drops of sage green and dusty pink randomly across the surface. Do not dump the paint; gently drip or flick it so it sits on top. -
Add definition:
Sparingly add drops of the black or dark grey paint. This high-contrast color creates the dramatic veins seen in the example image, so a little goes a long way. -
Swirl the pattern:
Take a skewer or the end of a stir stick and very gently drag it through the floating paint. Create s-curves and wide loops to mimic the natural veining of stone. -
Check the density:
If I notice gaps that are too large, I’ll lightly flick a bit more color into those open water spaces to ensure full coverage.
Sinking Paint?
If paint sinks to the bottom, it’s too heavy. Add a teaspoon of water or Floetrol to thin it out. The water in the tub might also be too warm; room temp is best.
Step 3: The Dip
-
Position the shade:
Hold the lampshade by the inner metal ring. Orient it so the side seam will enter the water last or in a less conspicuous spot. -
Roll and submerge:
Instead of plunging it straight down, slowly roll the lampshade across the surface of the water. Start at one side and rotate it evenly so the fabric picks up the paint film as it turns. -
Complete the rotation:
Continue rolling until the entire circumference has touched the water. This rolling method prevents air bubbles and warp lines. -
Lift and drain:
Once coated, quickly lift the shade out of the water. Give it a gentle shake to remove excess water droplets.
Gilded Edges
For a luxe look, paint the top and bottom fabric binding rims with liquid gold leaf or metallic brass paint after the marbling has fully dried.
Step 4: Finishing Touches
-
Initial dry:
Set the lampshade on a clean, protected surface to dry. Keep it upright to prevent the wet paint from smearing. -
Check for drips:
Inspect the shade for any heavy drips of water or paint running down. Gently dab them with the corner of a paper towel if necessary. -
Full cure:
Allow the lampshade to dry completely, which usually takes about 24 hours. The fabric needs to be bone dry before sealing. -
Seal the design:
Take the shade outdoors or to a well-ventilated area and spray a light, even coat of clear matte acrylic sealer. This protects the paint from chipping and makes dusting easier later. -
Remove tape:
Once the sealer is dry, carefully peel off the painter’s tape from the inner hardware.
Now illuminate your room and enjoy the warm glow filtering through your custom stone-effect masterpiece
Glow-Through Negative Space Pattern
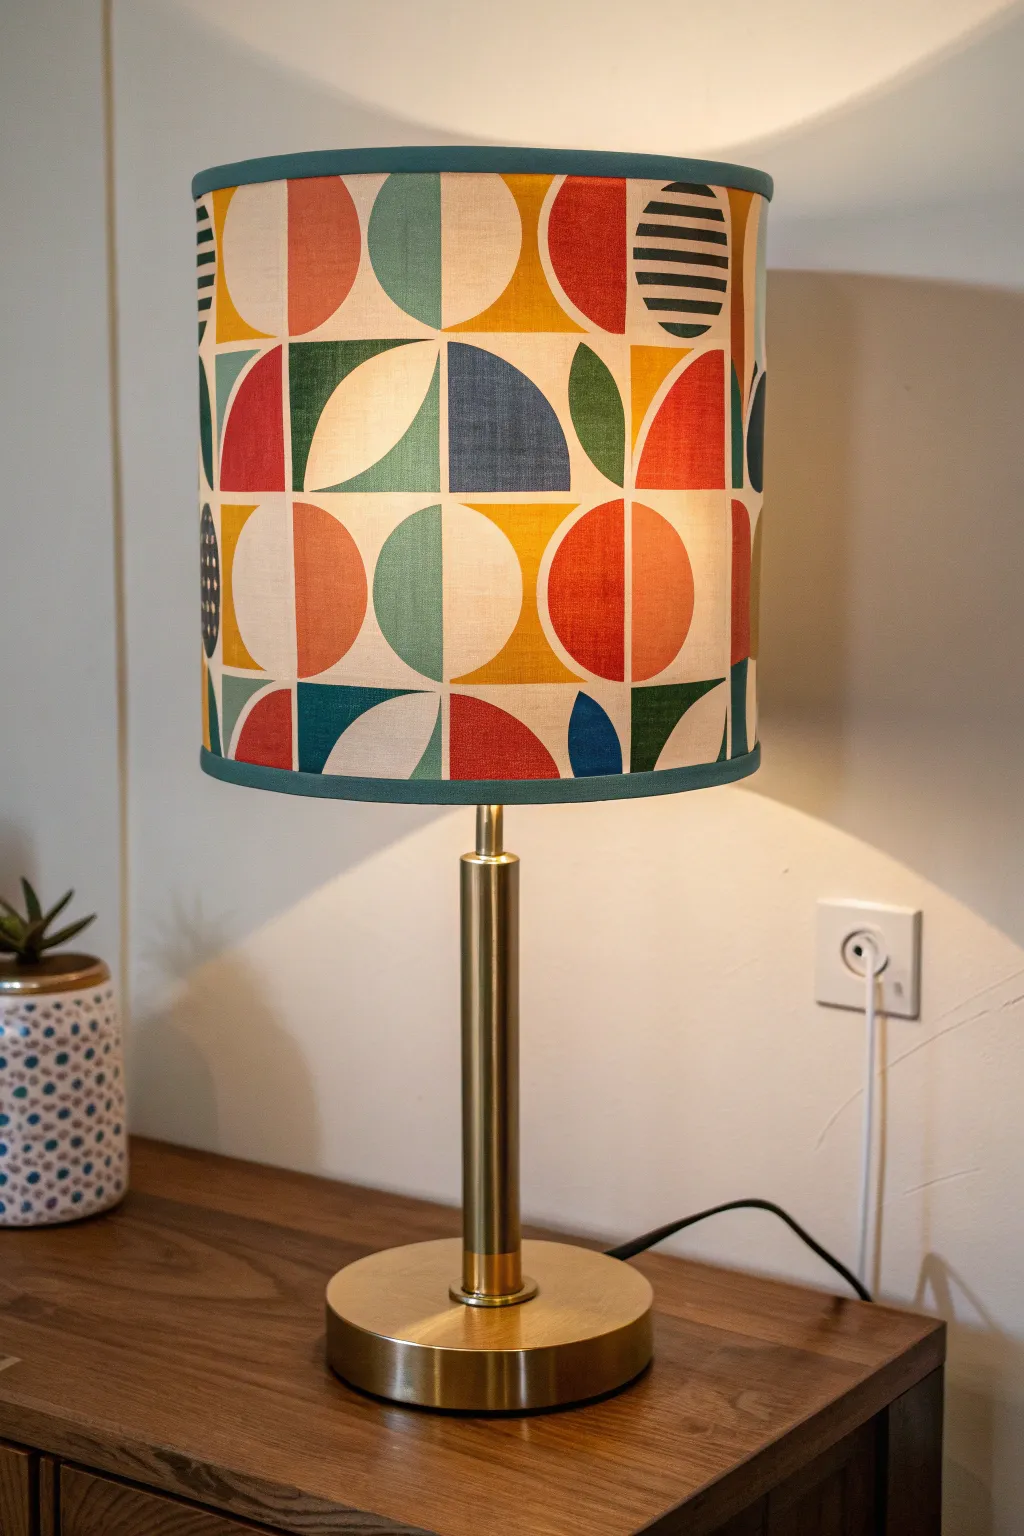
Transform a plain fabric lampshade into a stunning retro focal point using this negative space technique, where unpainted areas allow the warm light to glow through. The design features bold, mid-century modern shapes like semicircles and quadrants in earthy mustard, terracotta, and teal tones.
How-To Guide
Materials
- Plain drum lampshade (light-colored fabric like linen or cotton)
- Acrylic paints (mustard yellow, terracotta, deep teal, sage green, navy blue)
- Textile medium (mix with acrylics)
- Graphite transfer paper or soft pencil
- Ruler and protractor
- Painter’s tape (low tack)
- Flat shader brushes (various widths)
- Fine liner brush
- Palette for mixing
- Hairdryer (optional for speeding up drying)
Step 1: Planning and Layout
-
Measure the circumference:
Begin by measuring the total circumference of your lampshade. Divide this number by an even number (like 4, 6, or 8) to determine how many vertical columns your pattern will have. -
Create a grid template:
On a large strip of paper the same height as your shade, draw a grid based on your column measurements. Divide the height into equal rows (about 3-4 inches high) to create square or rectangular blocks. -
Sketch the geometric shapes:
Fill each block on your paper template with simple geometric forms. Focus on large semicircles, quarter-circles, and rectangles. Alternating the orientation of these shapes creates that dynamic mid-century rhythm. -
Transfer the grid onto the shade:
You can lightly draw the main grid lines directly onto the fabric shade using a soft pencil and a flexible ruler. -
Transfer the shapes:
Using graphite transfer paper or freehand sketching if you’re confident, transfer your geometric designs into the grid blocks on the shade. Keep your lines purely minimal, just enough to guide your brush.
Bleeding Edges?
If paint bleeds on the fabric, don’t scrub. Let it dry, then carefully paint over the mistake with a color that matches the fabric, or turn the mistake into a slightly larger geometric shape to cover it.
Step 2: Painting the Design
-
Prepare the paint:
Mix your acrylic paints with textile medium according to the bottle’s instructions (usually a 1:1 or 2:1 ratio). This prevents the paint from cracking when the lamp heats up and ensures a smooth application on fabric. -
Start with the lightest colors:
Begin painting the mustard yellow shapes first. Use a flat brush to carefully fill in the semicircles and quadrants, keeping your edges crisp against the pencil lines. -
Apply the warm tones:
Move on to the terracotta or warm orange sections. I find painting non-adjacent sections helps prevent wet edges from accidentally bleeding into each other. -
Paint the cool tones:
Fill in the sage green and teal shapes next. Be mindful of the negative space—the unpainted fabric between the shapes effectively becomes part of the pattern, so keep those gaps consistent. -
Add dark accents:
Use the navy blue for the darkest geometric blocks. These strong dark values anchor the design and make the lighter colors pop when the lamp is lit. -
Detail work:
For the specific patterned elements (like the striped circle or the dotted quadrant seen in the photo), switch to a fine liner brush. Paint these delicate lines slowly to maintain precision. -
Dry thoroughly:
Allow the entire shade to dry completely. A hairdryer on a cool/low setting can help speed this up if the fabric is thick.
Step 3: Finishing Touches
-
Paint the trim (optional):
For a polished look similar to the inspiration image, paint the top and bottom fabric trim of the lampshade in a coordinating dark teal or blue color. -
Clean up edges:
Inspect your painted shapes. If any edges look fuzzy, you can carefully refine them with a very small angled brush and a tiny bit of fresh paint. -
Heat set the paint:
Once fully dry (give it 24 hours to be safe), you can heat set the paint by running a hairdryer on high heat over the surface for a few minutes, or carefully ironing from the inside if accessible.
Add Texture
Instead of solid fill colors, use a dry-brush technique on some shapes to create a linen-like texture, or use a sponge for a stippled effect that diffuses the light differently when turned on.
Now you have a custom, gallery-worthy lighting fixture that warms up any room with its colorful glow


Have a question or want to share your own experience? I'd love to hear from you in the comments below!