Whenever I’m craving a cheerful, feel-good painting session, I reach for a rock and a juicy range of pink shades. These pink rock painting ideas are a mix of sweet classics and playful twists, so you can pick what matches your mood and your stone’s shape.
Pink Ombre Heart Rock
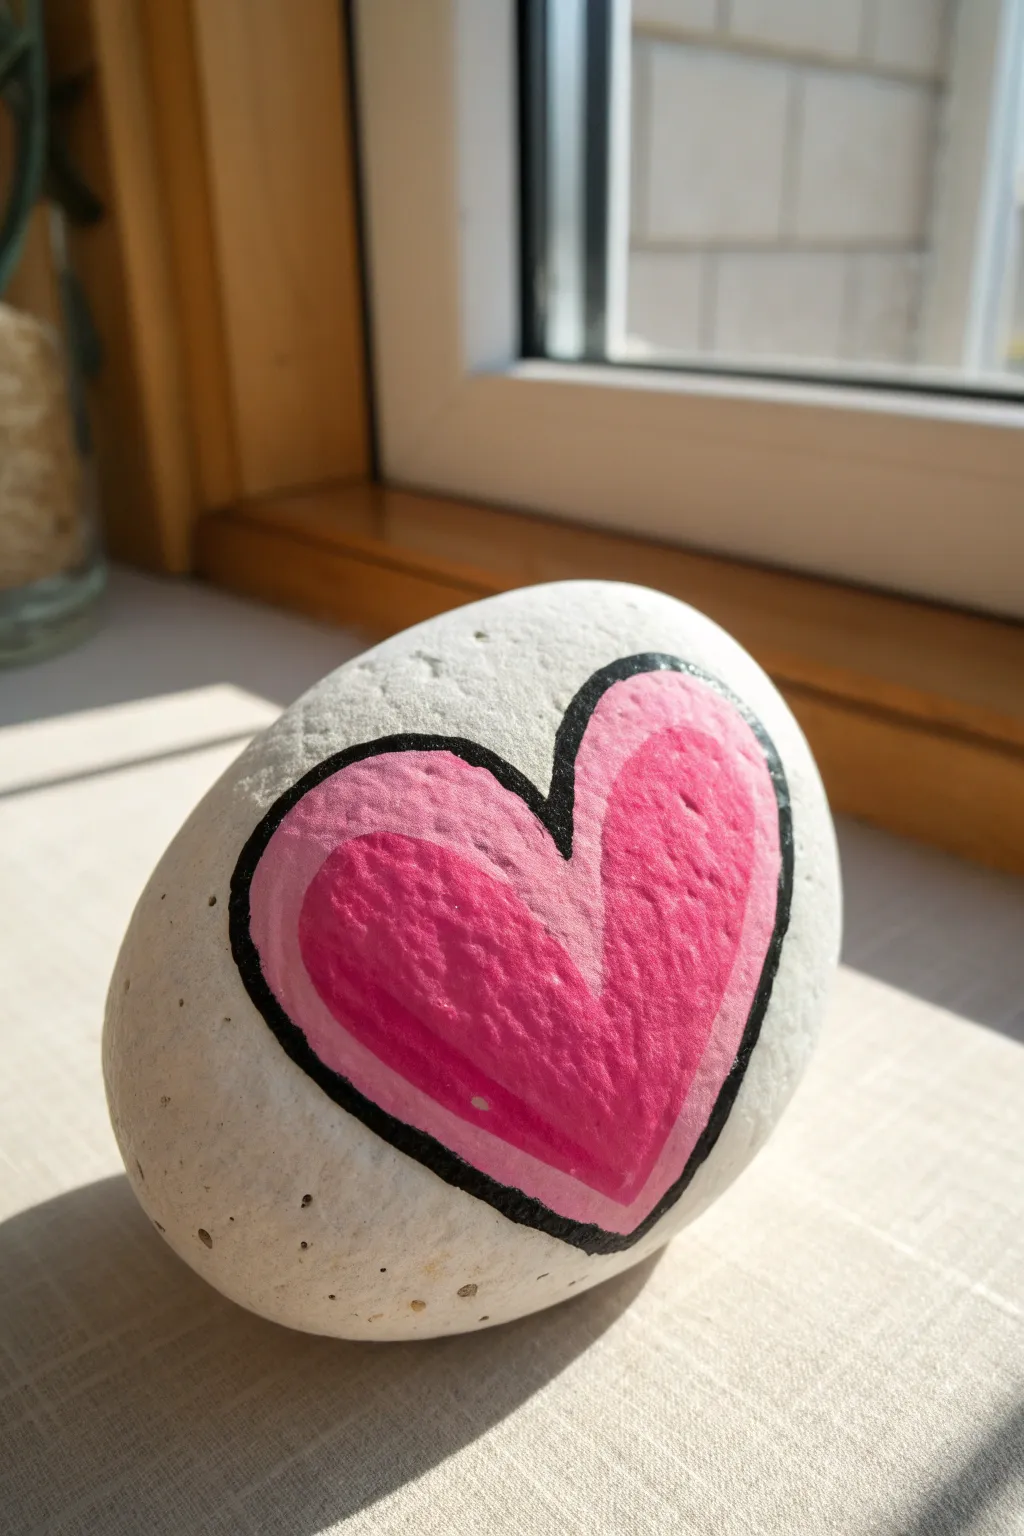
This charming little rock painting project features a bold, graphic heart design that layers two shades of pink for a pseudo-ombre effect. It’s a clean and lovely way to decorate a smooth river stone, perfect for leaving as a kindness rock or brightening up a windowsill.
Step-by-Step Guide
Materials
- Smooth, round river rock (white or light-colored preferred)
- Acrylic paint: Bright magenta/hot pink
- Acrylic paint: Light baby pink
- Acrylic paint: Black
- Small flat paintbrush
- Fine liner brush or black paint marker (medium tip)
- Palette or paper plate
- Cup of water and paper towels
- Clear glossy sealant (spray or brush-on)
- Pencil (optional)
Step 1: Preparation & Base shapes
-
Clean your canvas:
Start by washing your rock with warm, soapy water to remove any dirt or oils. Let it dry completely before starting, as moisture can trap bubbles under your paint. -
Assess the surface:
Examine your stone to find the flattest or smoothest side. This will be the face of your heart. If the rock is naturally dark, you might want to paint a white oval as a base first, but for light rocks, the natural background is perfect. -
Draft the outline:
Take a pencil and very lightly sketch the shape of a large heart on the rock. It doesn’t need to be perfectly symmetrical; a slight tilt adds character. -
Paint the outer heart:
Load your flat brush with the light baby pink paint. Fill in the entire heart shape you just sketched. -
Build opacity:
Acrylics can sometimes be translucent, especially light pinks. Allow the first coat to dry to the touch, then add a second coat to ensure a solid, opaque background color.
Uneven Lines?
If your hand is shaky while painting the black outline, rest your pinky finger on the table or the rock itself to stabilize your brush strokes.
Step 2: Creating the Ombre Effect
-
Sketch the inner heart:
Once dry, visualize a smaller heart sitting inside the larger pink one. It should be offset slightly to the right or bottom, leaving a thicker border of light pink on one side for a stylized look. -
Apply the darker pink:
Using your bright magenta or hot pink paint, carefully paint this smaller inner heart shape directly on top of the dry light pink layer. -
Refine the edges:
Use the edge of your brush to make the curves of the magenta heart nice and crisp against the light pink background. -
Let it cure:
This step requires patience. Let the pink layers dry completely. If the paint is still tacky, the black outline in the next phase might smear or bleed into the pinks.
Add Sparkle
Mix a tiny amount of iridescent glitter medium into your top coat sealant to make the heart shimmy and shine in the sunlight.
Step 3: Outlining & Finishing
-
Load the liner brush:
Using a very fine liner brush dipped in black acrylic paint, or a medium-tip black paint pen, prepare to outline the main shape. -
Trace the outer edge:
Carefully draw a bold black line around the very outside edge of the light pink heart. Keep your hand steady and try to keep the line thickness consistent. -
Connect the peaks:
Ensure the dip in the center of the heart (the cleavage) is sharp and defined with the black outline. -
Check for gaps:
Look closely at your outline. If the black paint skipped over any pitted areas of the rock texture, go back and dab a little extra paint into those dents. -
Seal the deal:
Once the black paint is bone dry, apply a layer of clear glossy sealant. This protects the stone from weather if placed outside and makes the pink colors pop beautifully.
Enjoy your lovely creation and finding the perfect sunny spot to display it


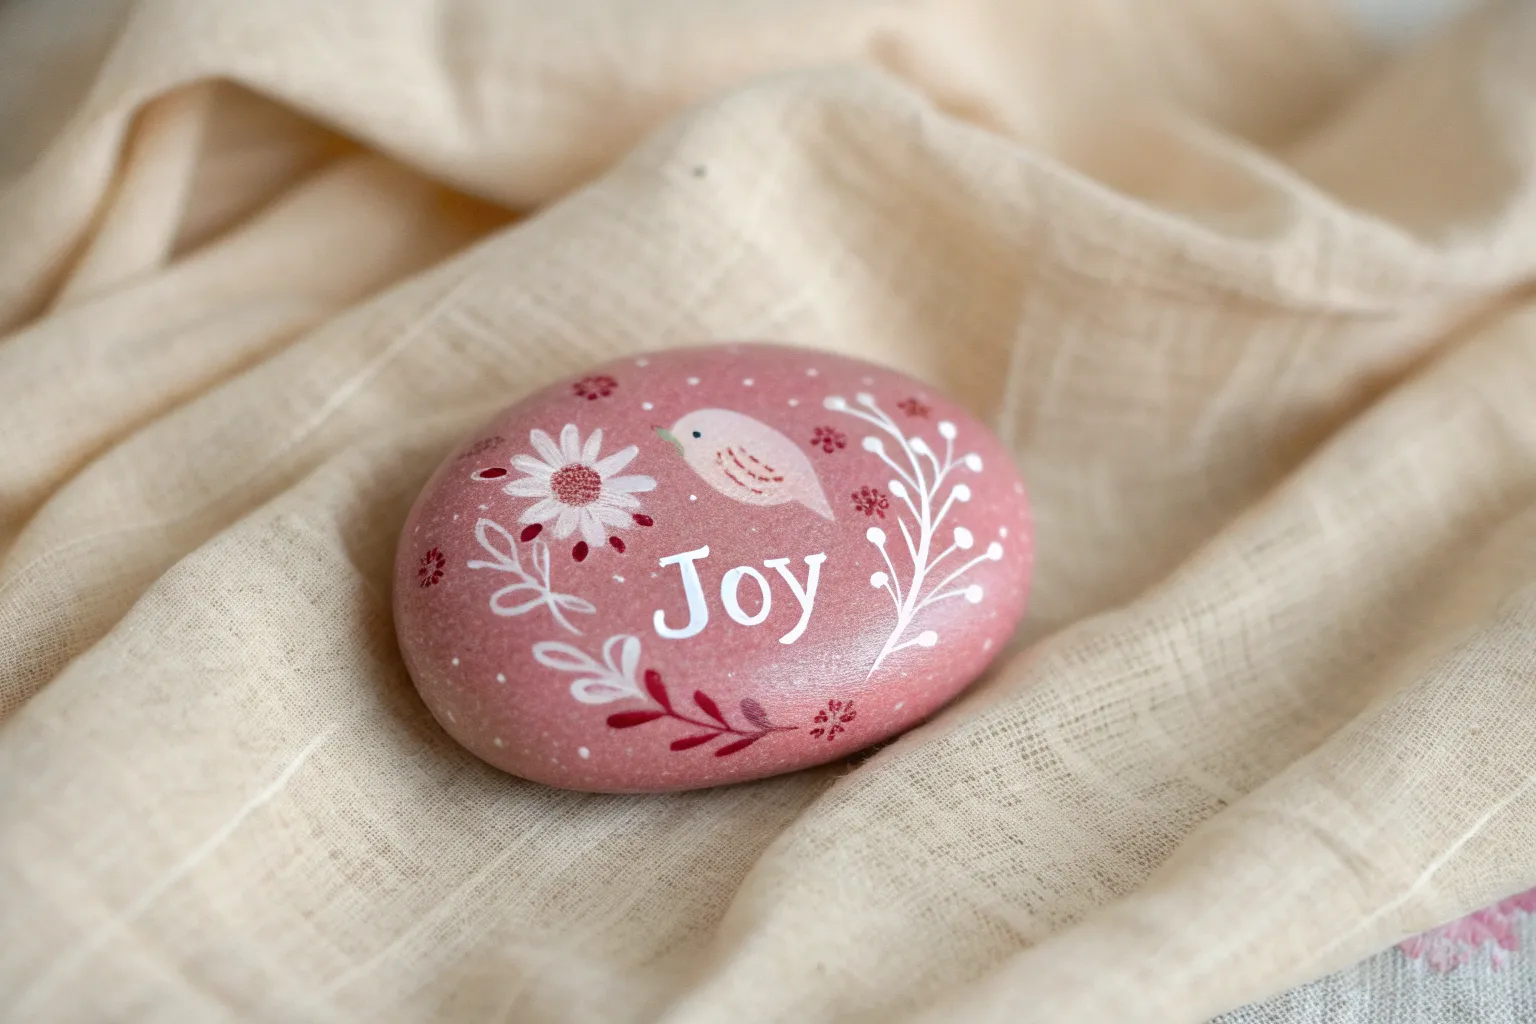
Conversation Heart Message Rock

Transform a simple stone into a sugary-sweet token of affection with this conversation heart rock painting project. The key to this look is achieving that soft, chalky matte finish and a delicate ombre effect that mimics real candy.
Step-by-Step
Materials
- Smooth, heart-shaped river rock
- White acrylic paint (essential for priming)
- Pale blush pink acrylic paint
- Hot pink or magenta acrylic paint
- Red acrylic paint (for text)
- Fine grit sandpaper
- Small flat paintbrush
- Ultra-fine lining brush or detail brush
- Sponge dabber or cosmetic sponge wedge
- Matte sealant spray
Step 1: Preparation & Base Coat
-
Clean Your Canvas:
Begin by thoroughly washing your heart-shaped rock with soap and water to remove any dirt or oils. Let it dry completely before starting, as moisture trapped inside can ruin the paint later. -
Sand for Texture:
If your rock has any rough bumps, gently buff them with fine-grit sandpaper. You want a surface that feels as smooth as a pressed sugar hanging. -
Prime with White:
Apply a solid coat of white acrylic paint to the entire top surface of the rock. This step is crucial because it ensures your pinks will look bright and pastel rather than muddy against the grey stone. -
Let it Dry:
Allow the white base coat to dry fully. If the rock’s natural color is still showing through, add a second thin coat of white.
Step 2: Creating the Candy Gradient
-
Apply the Main Color:
Paint the entire heart in a soft, pale blush pink. This mimics the classic ‘chalky’ look of conversation heart candies. Don’t worry about the bottom edge just yet. -
Prepare the Gradient:
While the base pink is still slightly wet, place a small amount of hot pink or magenta paint on your palette. -
Start the Ombre:
Load a cosmetic sponge or dabber with a tiny bit of the hot pink paint. Gently tap this color onto the very bottom tip of the heart. -
Blend Upward:
Using a light dabbing motion, work the darker pink upward into the pale pink. I find that using a dry, clean brush to feather the edge where the two colors meet creates the smoothest transition. -
Check the Blend:
The goal is a soft fade, not a hard line. Continue tapping until the bottom third of the rock has a deeper, rosy saturation that fades seamlessly into the pale top. -
Dry Completely:
Let this gradient layer cure completely. The paint needs to be 100% dry before we attempt lettering to prevent smudging.
Chalky Texture Tip
Mix a tiny pinch of cornstarch into your pale pink acrylic paint. This thickens the paint slightly and dries to a powdery, ultra-matte texture that feels just like real candy
Step 3: Lettering & Finishing
-
Practice Your Text:
Before painting the rock, practice writing ‘XOXO’ on a scrap piece of paper to gauge the size. The letters should be centered and relatively small. -
Block Letters:
Using your ultra-fine liner brush and red acrylic paint, carefully paint the ‘XOXO’ in the upper center of the heart. Use classic serif block letters to mimic the stamp style of real candy. -
Clean Up Edges:
If your lines get a little wobbly, wait for the red to dry, then use a tiny bit of the pale pink on a detail brush to tidy up the edges of the letters. -
Seal the Finish:
To maintain that authentic candy look, finish with a matte spray sealant. Avoid glossy sprays, as they will make the rock look like plastic rather than pressed sugar.
Stamped Effect
Instead of a brush, use tiny rubber letter stamps. Dip them lightly in red paint and press gently. A slightly imperfect impression actually looks more realistic
Place your finished conversation heart on a desk or shelf for a permanent reminder of sweetness


XOXO Pink Doodle Rock
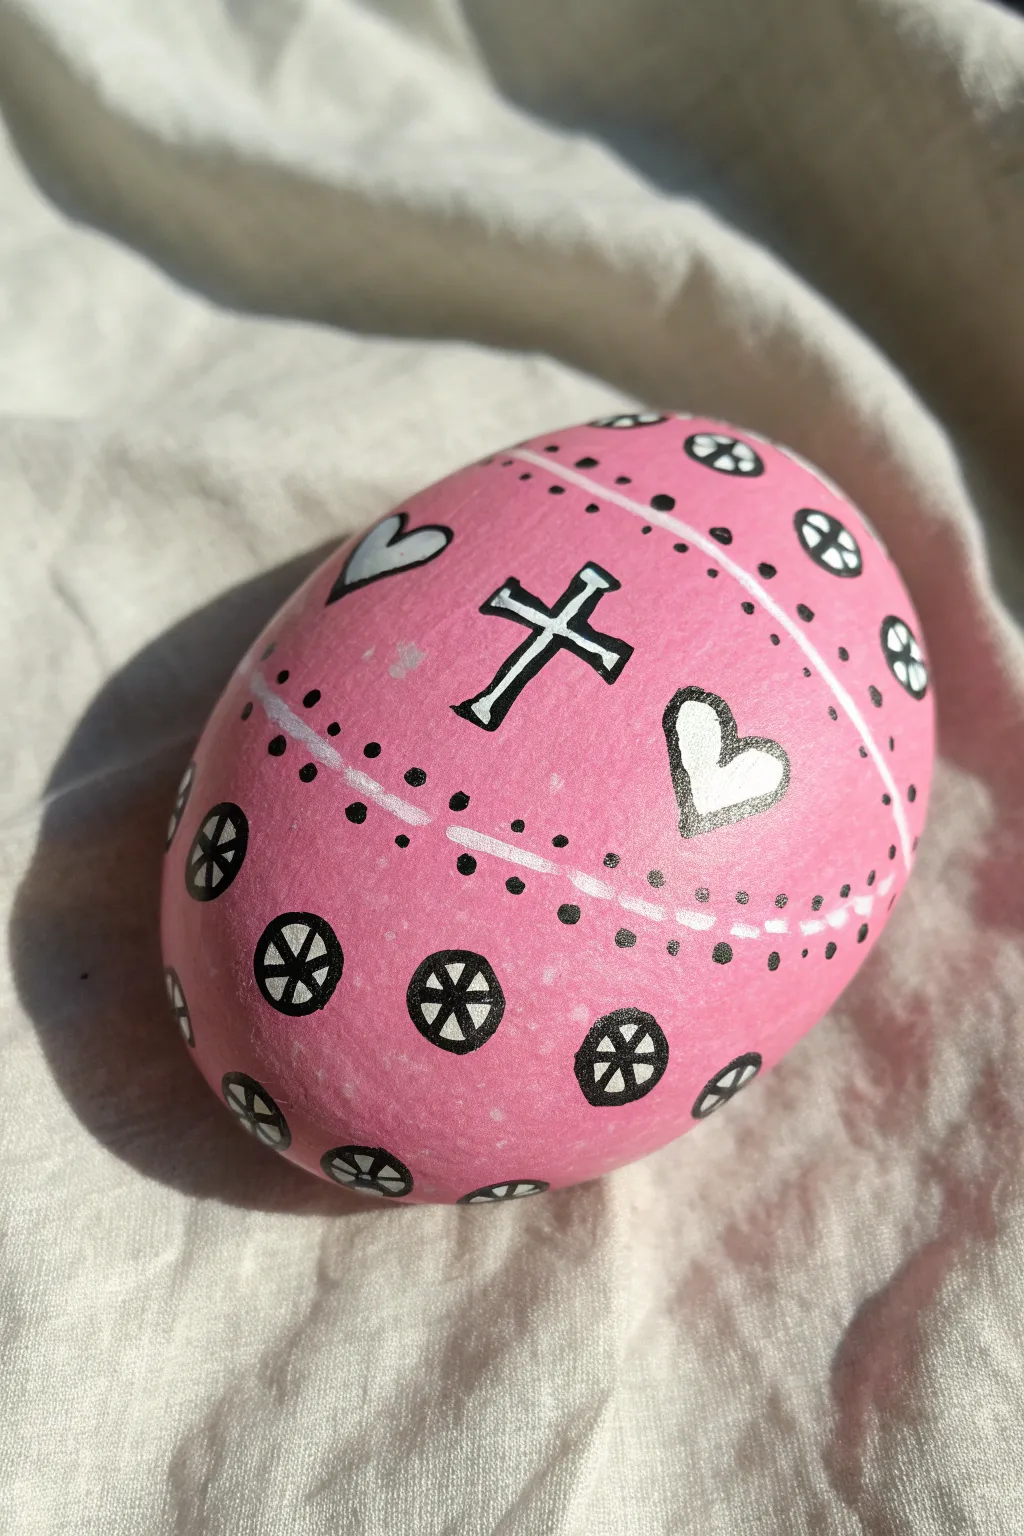
For a thoughtful and decorative piece, this rock design combines sweet pastel pink with bold black and white accents. Featuring a central cross and heart motifs surrounded by a delicate dotted pattern, it makes a lovely keepsake or a small gift.
How-To Guide
Materials
- Smooth, oval-shaped river rock
- Pastel pink acrylic paint
- White acrylic paint or white paint pen (fine tip)
- Black paint pen (extra fine 0.5mm tip)
- Flat paintbrush (medium size)
- Small round paintbrush
- Matte or glossy spray varnish (optional)
Step 1: Base Coat
-
Clean the canvas:
Start by washing your rock with warm soapy water to remove any dirt or oils. Dry it thoroughly with a towel or let it air dry completely. -
Apply the first layer:
Using your medium flat brush, paint the entire top surface of the rock with the pastel pink acrylic paint. Use long, smooth strokes to avoid brush marks. -
Build opacity:
Let the first coat dry fully. If the rock’s natural color is showing through, apply a second coat of pink. Depending on your paint quality, a third coat might be necessary for a solid, opaque finish.
Paint Pen Flow
If your white paint pen is streaky over the pink, dab the tip on a scrap piece of paper to get the ink flowing, then apply gently without pressing down hard.
Step 2: Creating the Layout
-
Draw divider lines:
Visualize the rock divided into horizontal bands. Using a white paint pen or a small round brush with white paint, draw two gently curved horizontal lines across the rock. These will frame your central design. -
Outline the central cross:
In the center space between your two white lines, use the black extra-fine paint pen to draw the outline of a simple cross. I like to slant mine slightly for a stylized look. -
Add flanking hearts:
On either side of the cross, draw a simple heart outline using the black pen. Try to keep them roughly symmetrical in size. -
Fill the motifs:
Carefully fill in the inside of the cross and both hearts with white paint. A white paint pen gives you the best control here, but a very small brush works too. You may need two coats of white to cover the pink background completely.
Step 3: Decorative Details
-
Outline the filled shapes:
Once the white fill is completely dry, re-trace the black outlines of the cross and hearts to make them crisp and bold. -
Add wheel dividers:
In the open pink spaces above and below your horizontal lines, draw small circles with your black paint pen. Space them out evenly. -
Detail the wheels:
Turn these black circles into wheel-like designs. First, fill the circles with white paint. Once dry, draw a black ‘X’ and a vertical line through each one to create six segments. -
Create the dotted borders:
Follow the two horizontal white lines you drew earlier. Using the black paint pen, add a row of small, evenly spaced dots just above the top line and just below the bottom line. -
Add secondary dots:
Add a second row of black dots on the opposite side of each white line—below the top line and above the bottom line—creating a decorative border effect. -
Fill empty spaces:
Look for any large empty pink areas around your wheel designs. Add single black dots or tiny clusters of three dots to balance the composition without overcrowding it.
Metallic Accent
Swap the white paint inside the cross and hearts for metallic gold or silver for an elegant, shimmering variation.
Step 4: Finishing Touches
-
Check your work:
Scan the rock for any smudges or lines that need tidying. You can touch up mistakes with a dab of pink paint. -
Seal the design:
Allow the paint to cure for at least 24 hours. Once fully dry, spray with a clear varnish to protect your artwork from chipping and fading.
Place your finished rock in a spot where it catches the light to show off those crisp details


Pink Polka Dot Heart Rock
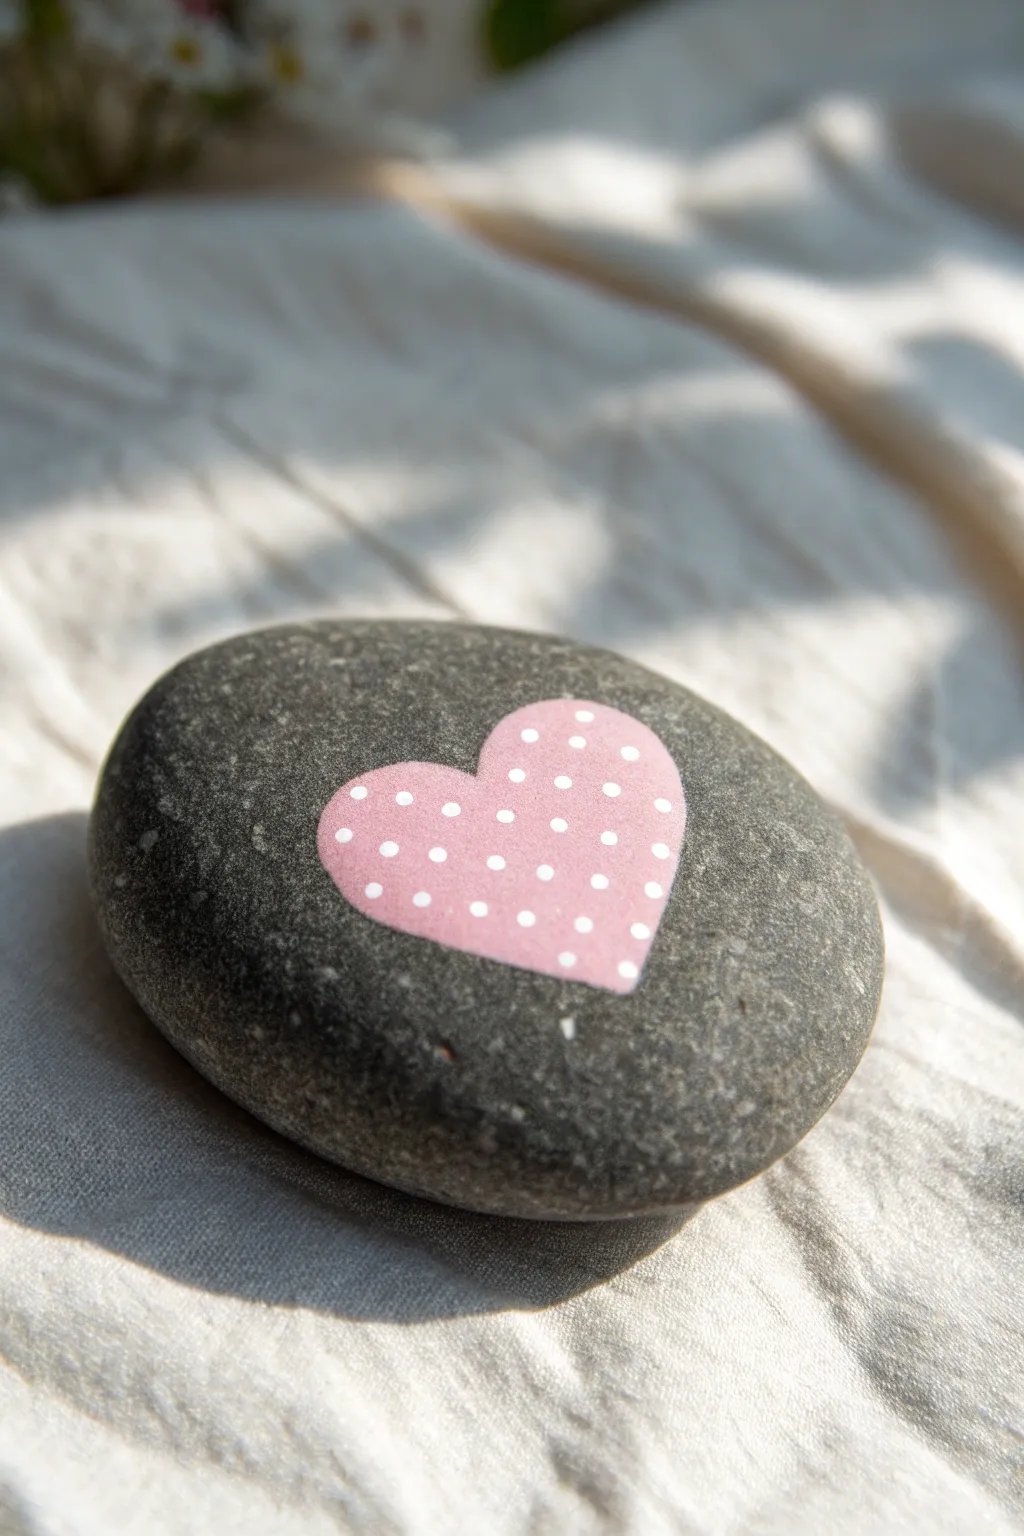
Simple yet striking, this design features a soft pink heart adorned with tiny white polka dots on a natural dark river rock. The contrast between the smooth, matte stone and the bright, playful heart makes for a lovely little keepsake or garden decoration.
Detailed Instructions
Materials
- Smooth, dark grey river rock (flat surface preferred)
- Pink acrylic paint (matte or satin finish)
- White acrylic paint
- Small flat paintbrush
- Fine detail paintbrush or dotting tool
- Pencil or white chalk pencil
- Clear acrylic sealer spray (optional)
- Palette or small dish for mixing
- Water cup and paper towels
Step 1: Preparation
-
Clean the stone:
Begin by washing your river rock with warm, soapy water to remove any dirt or oils that might prevent the paint from adhering properly. -
Dry thoroughly:
Pat the stone dry with a towel and let it sit for a few minutes to ensure all moisture has evaporated from the porous surface. -
Assess the surface:
Examine the rock to find the flattest, smoothest area. This will be your ‘canvas’ for the heart shape.
Step 2: Painting the Heart
-
Sketch the outline:
Using a pencil or a white chalk pencil, lightly draw a simple heart shape in the center of the stone. Don’t press too hard; you just need a faint guide. -
Load the brush:
Squeeze a small amount of pink acrylic paint onto your palette. Load your small flat brush, ensuring the bristles are coated evenly but not dripping. -
Paint the first layer:
Carefully fill in the heart shape with the pink paint. Start from the center and work your way out to the edges to keep the outline crisp. -
Smooth the edges:
Use the edge of your brush to tidy up the curves of the heart, making them as symmetrical as possible. -
Let it dry:
Allow the first coat of pink to dry completely. This usually takes about 10-15 minutes depending on how thick the paint is. -
Apply a second coat:
For a solid, opaque look that pops against the dark stone, paint a second layer of pink directly over the first. I find this second pass really makes the color vibrant. -
Final dry:
Let the pink heart dry thoroughly before moving on. The surface must be 100% dry so the dots don’t smear.
Perfect Circles
If you don’t have a dotting tool, dip the flat end of a toothpick or a bobby pin into the paint. Touch it straight down onto the stone and lift straight up for a crisp circle.
Step 3: Adding Details
-
Prepare white paint:
Put a small dab of white acrylic paint on your palette. You want a creamy consistency for the best dots. -
Choose your tool:
Select a fine detail brush, a specialized dotting tool, or even the back end of a paintbrush handle to create the dots. -
Test spacing:
Practice a few dots on a piece of scrap paper to get a feel for how much pressure creates the size dot you want. -
Start dotting:
Begin placing small white dots inside the pink heart. Start near the center to establish your spacing pattern. -
Fill the shape:
Continue adding dots in loosely organized rows, working your way toward the edges of the heart. -
Check density:
Ensure the dots are evenly spaced but not too crowded; you want the pink background to remain the dominant color. -
Dry the details:
Allow the white dots to dry completely. Since they are small raised bumps of paint, they may take a little longer than the base coat. -
Seal the work (Optional):
If you plan to place this rock outside, spray it lightly with a clear acrylic sealer to protect it from the elements.
Make it Shine
Once the paint is fully cured, apply a layer of glossy Mod Podge or resin over just the heart shape. This creates a beautiful 3D ‘sticker’ effect while keeping the stone matte.
Enjoy your charming hand-painted stone as a desk companion or a thoughtful gift to a friend
BRUSH GUIDE
The Right Brush for Every Stroke
From clean lines to bold texture — master brush choice, stroke control, and essential techniques.
Explore the Full Guide
Pink Roses In a Heart
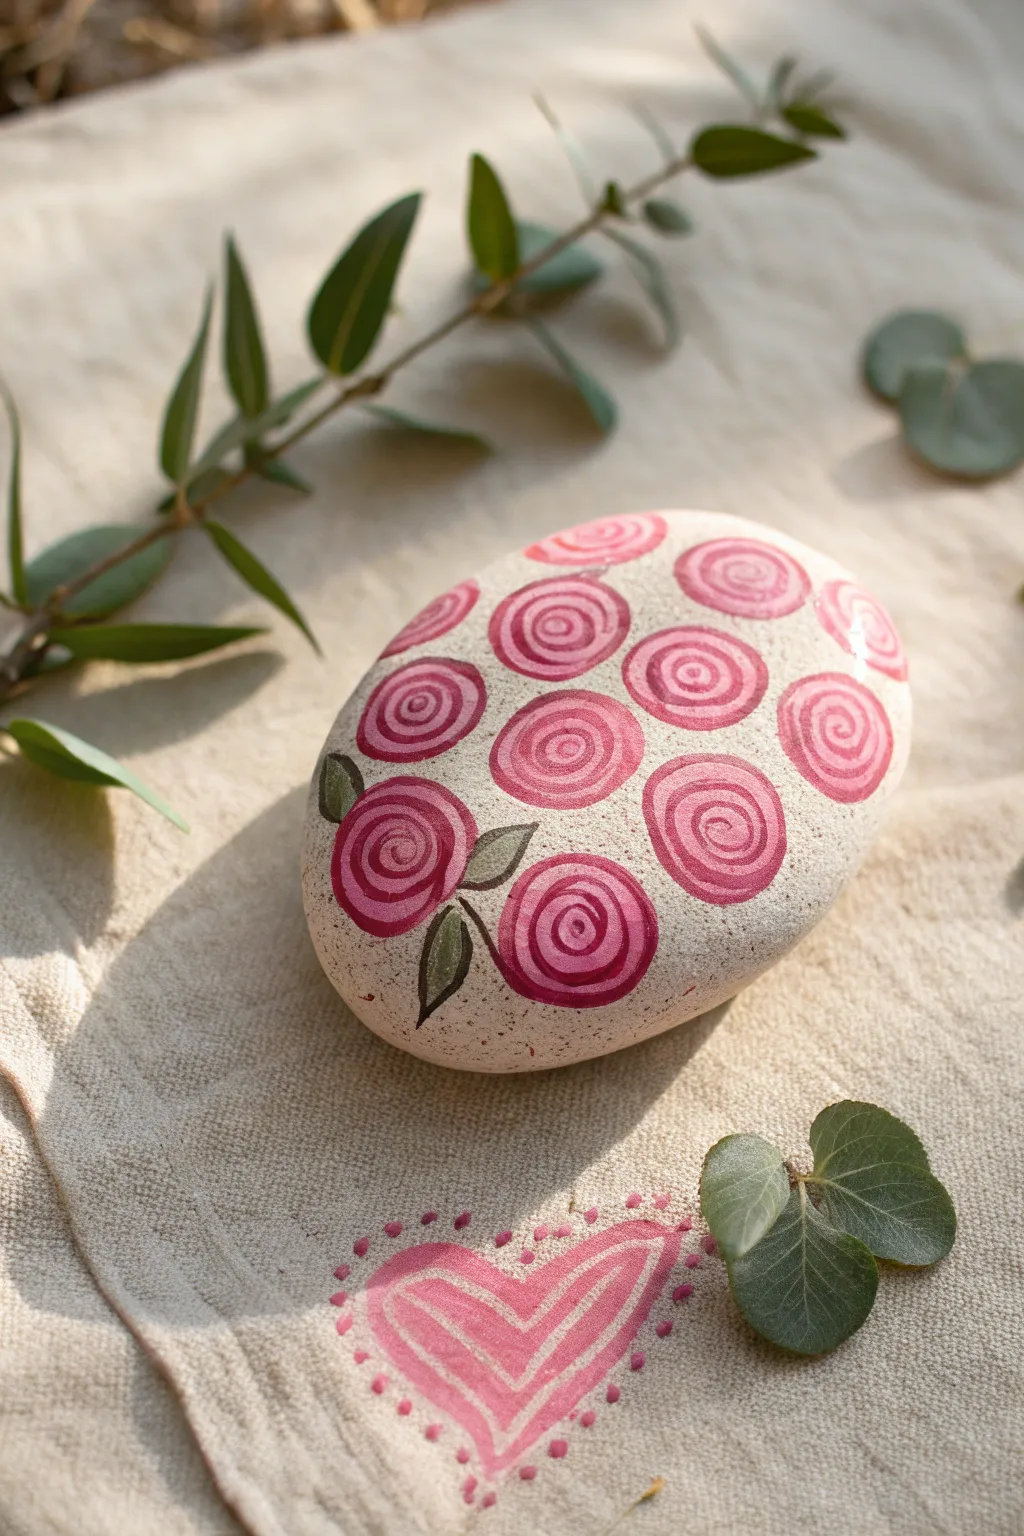
Transform a simple garden stone into a blooming keepsake with this charming design featuring stylized pink roses. The spiral technique used here creates a lovely, whimsical floral pattern that looks intricate but is surprisingly easy for beginners to master.
Step-by-Step Guide
Materials
- Smooth, light-colored river rock (oval or heart-shaped)
- Acrylic paints: Dark pink/magenta, light pink, white, olive green
- Fine detail paintbrush (size 0 or 00)
- Medium round paintbrush (size 2 or 4)
- Water bonding primer or clear gesso (optional)
- Matte or satin sealant spray
- Pencil and eraser
Step 1: Preparation and Base
-
Clean your canvas:
Start by scrubbing your rock with warm soapy water to remove any dirt or oils that might prevent the paint from sticking. Let it dry completely in the sun or with a hair dryer. -
Prime the surface:
If your rock is very porous or dark, apply a thin coat of white acrylic paint or gesso to create a neutral base. For the natural look shown in the photo, you can skip this if you have a light-colored beige stone. -
Sketch the layout:
Using a pencil very lightly, draw a faint oval or heart outline on the rock’s surface. This will guide where your rose cluster sits so you don’t run out of room.
Spiral Smoothness
Add a drop of water to your dark pink paint before painting the spirals. Thinner paint flows off the liner brush much smoother for continuous curves.
Step 2: Painting the Roses
-
Mix your base pink:
Create a medium pink shade by mixing your magenta with a little white. You want a tone that stands out against the beige rock but isn’t too dark. -
Paint the rose silhouettes:
Using your medium round brush, paint simple solid circles within your penciled boundary. They don’t need to be perfect circles; slightly organic, bumpy shapes look more like real flowers. -
Vary the sizes:
Make some circles larger (like the one at the bottom center) and some smaller near the edges to create visual interest. Let this base layer dry until it’s just tacky. -
Prepare the spiral color:
While the base dries, mix a darker version of your pink for the detailing. You can use straight magenta or mix just a tiny dot of black or purple into your pink to deepen it. -
Start the spirals:
Load your fine detail brush with the darker pink. Starting from the absolute center of a pink circle, paint a small dot. -
Create the swirl:
From that center dot, slowly drag your brush outward in a spiral motion, like drawing a snail shell. Keep the line thickness consistent. -
Finish the petals:
Continue the spiral until you reach the edge of the pink circle. If the line breaks, that’s okay—it actually adds to the petal effect. Repeat this for all the roses. -
Add white highlights:
Wash your detail brush thoroughly. I like to pick up a tiny bit of pure white paint and add very thin, short curved lines on top of the lightest parts of the spiral for a ‘shiny’ petal look.
Step 3: Leaves and Finishing Touches
-
Mix the green:
Combine olive green with a touch of brown or dark pink to create a muted, earthy green that complements the roses. -
Paint the leaf shapes:
Find the gaps between the outer roses. Using the fine brush, paint small almond or teardrop shapes tucked underneath the flowers. -
Detail the leaves:
Once the green shapes are dry, mix a lighter green (add yellow or white) and paint a very thin line down the center of each leaf for a vein. -
Clean up edges:
If you have any pencil marks still visible around the outside of the cluster, gently erase them now that the paint is fully dry. -
Seal the artwork:
Protect your beautiful bouquet by applying a coat of clear matte or satin sealant. This prevents chipping and keeps the colors vibrant.
Fabric Stamp Idea
Don’t stop at the rock! Replicate this pattern on fabric napkins using fabric paint and a round sponge process to create a matching picnic set.
This lovely floral stone makes a perfect paperweight or a sweet surprise to leave in a neighbor’s garden
Pink Cherry Blossom Branch
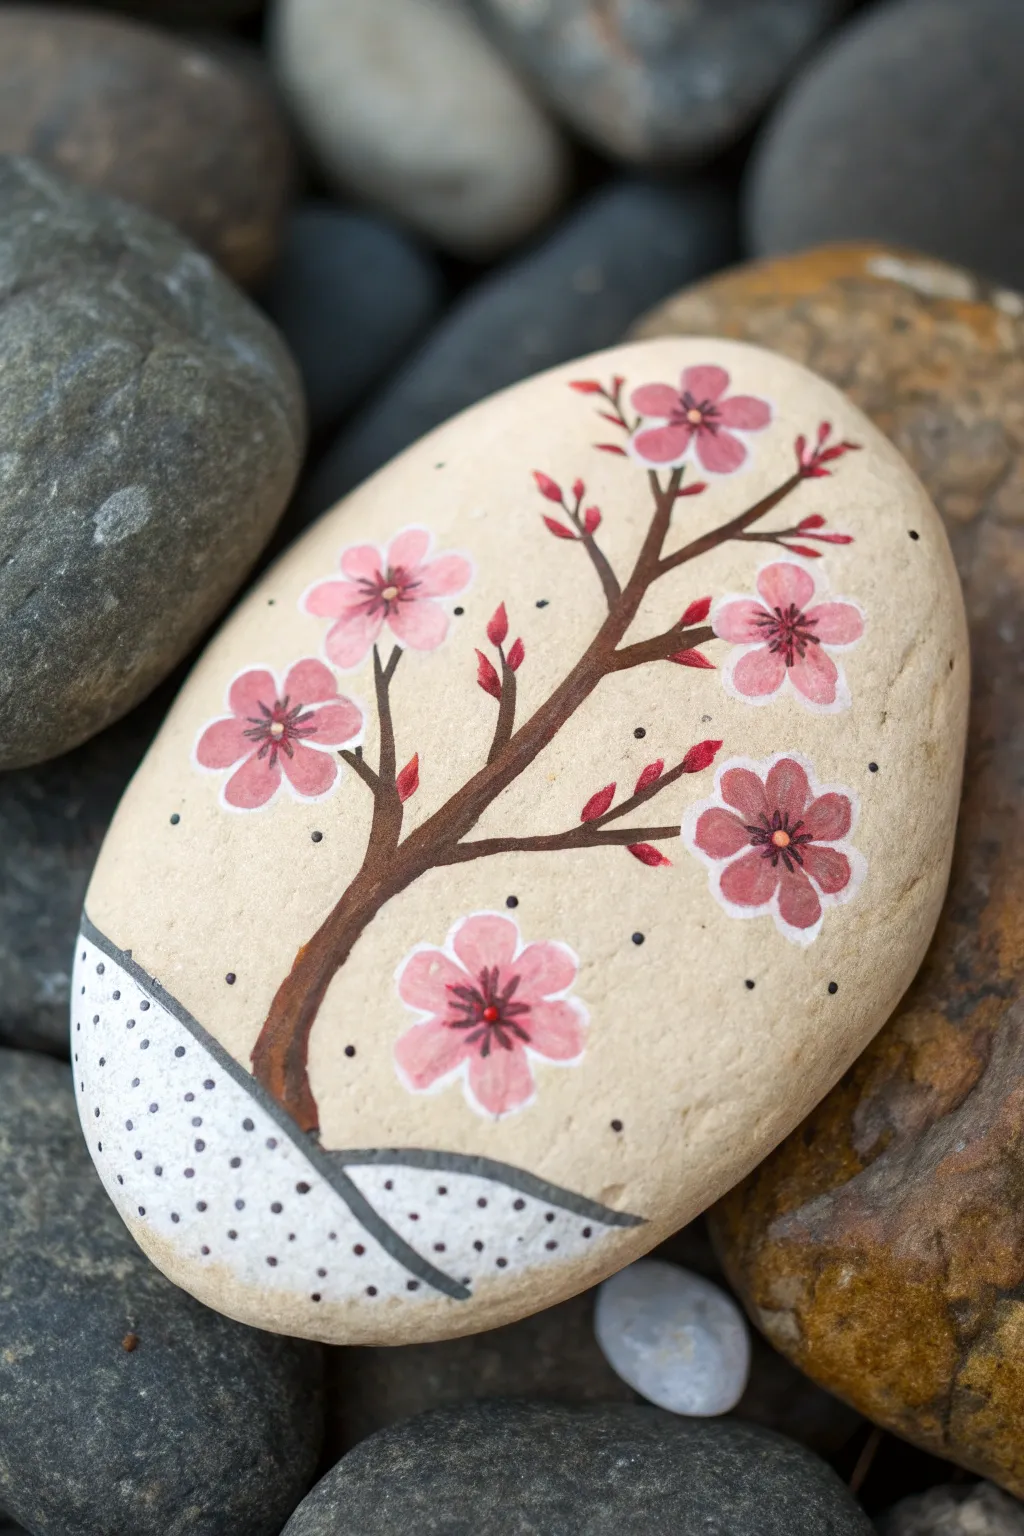
This elegant rock painting project captures the delicate beauty of spring with a stylized cherry blossom tree stretching across a smooth stone surface. The design features soft pink petals, deep brown branches, and subtle black accents against a creamy beige background for a serene, balanced composition.
Step-by-Step Tutorial
Materials
- Smooth, oval-shaped river rock (approx. 4-6 inches)
- Acrylic paints: beige/cream, dark brown, burnt sienna, titanium white, rose pink, bright red
- Paint brushes: medium flat brush, fine liner brush (size 0 or 00), small round brush
- Dotting tool or toothpick
- Black fine-tip acrylic paint pen or permanent marker
- Pencil for sketching
- Matte or satin sealant spray
Step 1: Base Preparation
-
Clean the Stone:
Begin by thoroughly washing your stone with warm soapy water to remove any dirt or oils, then let it dry completely to ensure the paint adheres properly. -
Paint the Background:
Using a wide flat brush, coat the entire upper three-quarters of the rock with a creamy beige acrylic paint. You may need two coats for full opacity. -
Base Layer Drying:
Allow the beige background to dry fully before moving on. I like to let this dry for about 20 minutes to prevent colors from muddying. -
Section the Bottom:
Sketch a gentle, curved line near the bottom of the rock to separate the ground area from the sky. -
Paint the Lower Section:
Fill in the bottom separated area with titanium white paint. This section represents a stylized snowy ground or decorative base. -
Define the Border:
Once the white section is dry, use a dark grey or black paint pen to draw a crisp line over your initial pencil curve, separating the beige and white zones.
Flow Control
Add a drop of water to your brown paint for the branches. Paint with an inky consistency allows for smoother, longer lines without the brush dragging.
Step 2: Painting the Tree
-
Sketch the Branch Structure:
Lightly sketch the main branch shape with a pencil, starting from the border line and stretching diagonally upward towards the right. -
Paint the Main Trunk:
Load your fine liner brush with dark brown paint. Start at the base (where the ground meets the sky) and paint the thickest part of the branch, tapering it as you move up. -
Add Secondary Branches:
extend smaller, thinner branches off the main trunk. Keep your wrist loose to create natural-looking, slightly jagged curves rather than straight lines. -
Add Warmth to the Wood:
While the brown is still slightly tacky, blend in a tiny amount of burnt sienna on the upper side of the main branch to create a subtle highlight and dimensionality. -
Create Tiny Bud Stems:
Using the very tip of your liner brush, add tiny, short stems sprouting from the branches where you plan to place your flowers and buds.
Step 3: Adding Blossoms & Details
-
Paint Flower Bases:
Mix titanium white with a drop of rose pink to create a very pale pink. Use a small round brush to paint five-petal flower shapes scattered along the branches. -
Add Flower Centers:
Once the pale pink is dry, add a darker pink hue to the center of each flower, blending it outward slightly into the petals for a soft gradient effect. -
Paint Closed Buds:
Use a brighter red or deep pink to paint small teardrop shapes at the ends of the finest twigs to represent un-opened buds. -
Detail the Stamens:
With your finest liner brush or a black pen, draw tiny radiating lines from the center of each open flower. -
Add Pollen Dots:
Dip a toothpick into yellow or orange paint and place tiny dots at the ends of the black stamen lines you just drew. -
Detail the White Base:
Return to the white bottom section. Use your black fine-tip pen or a dotting tool to add random speckles and dots, giving the base a textured, terrazzo-like look. -
Final Atmosphere Dots:
Add a few very tiny black dots floating in the creamy background space around the branches to balance the composition. -
Seal the Artwork:
Once absolutely everything is dry (give it a few hours), spray the rock with a matte or satin clear coat to protect your cherry blossoms from chipping.
Fixing Shaky Lines
If your branch lines look too wobbly, thicken them slightly or turn the wobble into a ‘knot’ in the wood. Nature isn’t perfectly straight anyway.
Now you have a peaceful piece of spring nature that will last all year round

PENCIL GUIDE
Understanding Pencil Grades from H to B
From first sketch to finished drawing — learn pencil grades, line control, and shading techniques.
Explore the Full Guide
Pink Daisy Dot Flowers
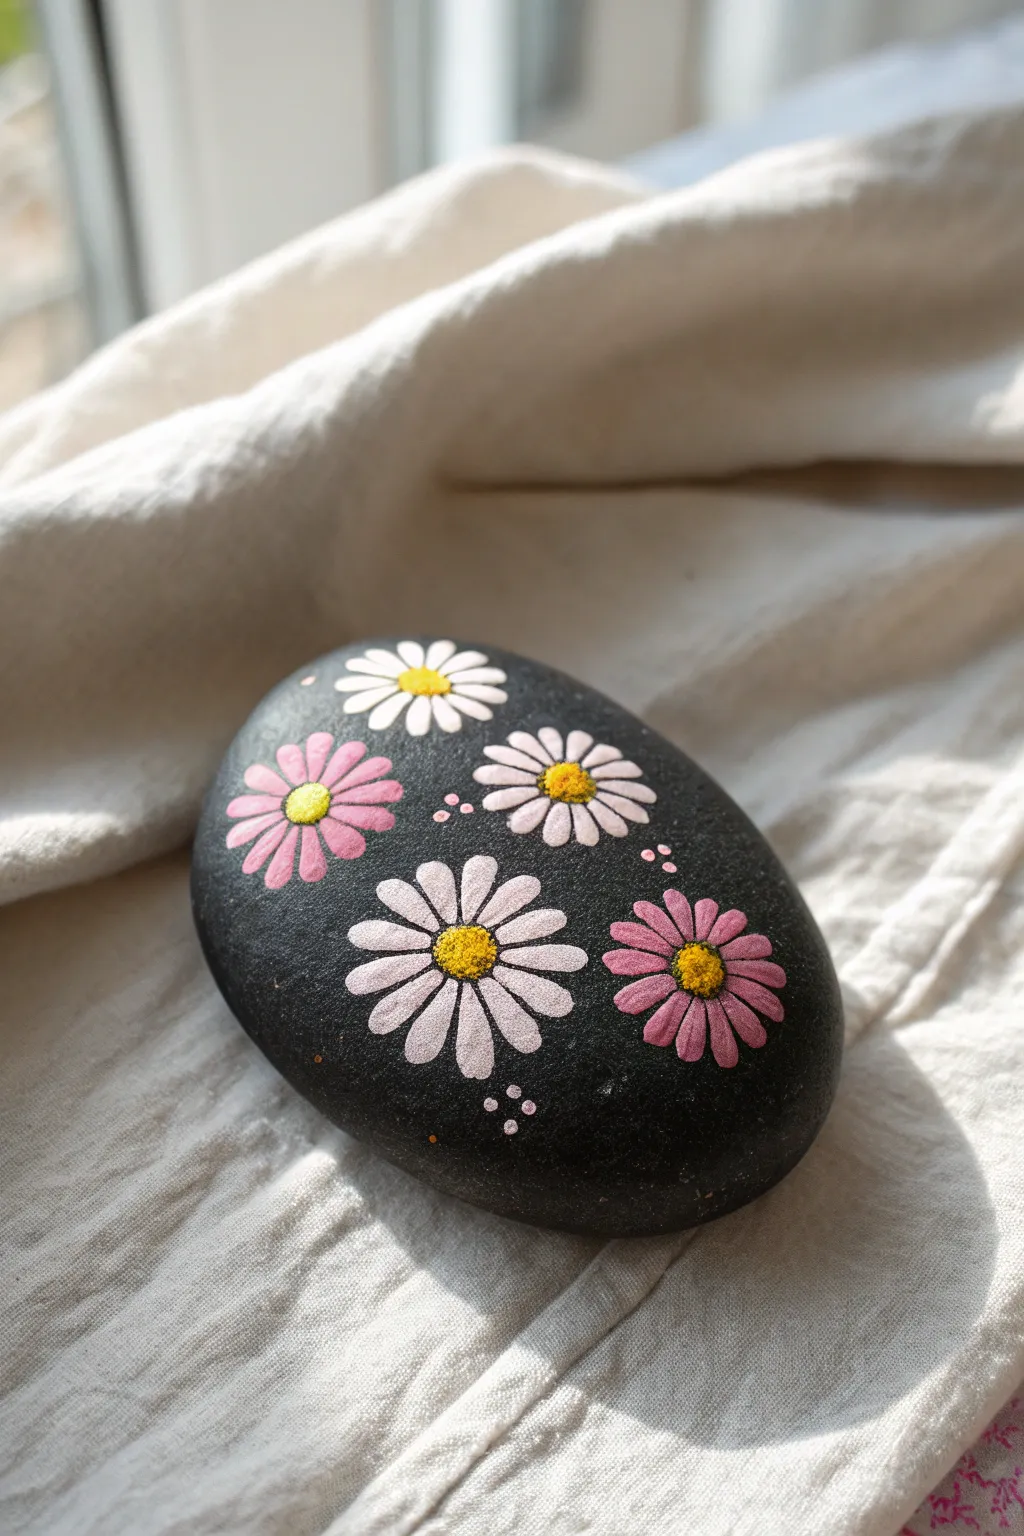
Transform a simple, dark river stone into a blooming garden with this delicate floral design. The contrast between the matte black background and the soft pink and white petals creates a striking, elegant finish perfect for paperweights or garden decor.
Step-by-Step Guide
Materials
- Smooth oval river rock (medium size, dark greys work best)
- Black acrylic paint (matte finish)
- White acrylic paint
- Light pink acrylic paint
- Darker rose-pink acrylic paint
- Yellow ochre or golden yellow acrylic paint
- Fine detail paintbrush (size 0 or 00)
- Small round fluted paintbrush (size 2)
- Dotting tools (assorted sizes)
- Acrylic sealer or varnish (matte or satin spray)
Step 1: Base Preparation
-
Clean the surface:
Begin by washing your stone thoroughly with warm soapy water to remove any dirt or oils. Scrub it gently and let it dry completely before starting. -
Apply the background:
Paint the entire top surface of the rock with matte black acrylic paint. Even if the rock is naturally dark, this black base coat ensures your colors will really pop. I like to bring the black paint just slightly down the sides for a finished look. -
Second coat:
Once the first layer is dry to the touch, apply a second coat of black to ensure full opacity and hide any natural grain of the stone. Let this dry completely.
Uneven Petals?
If your petals look uneven, imagine a clock face. Paint petals at 12, 6, 3, and 9 o’clock first, then fill in the gaps evenly.
Step 2: Painting the Large Daisies
-
Plan placement:
Visualize where your five main flowers will go. You want a mix of large and medium sizes scattered across the surface, leaving some negative space between them. -
Start the white flower:
Load your small round brush with white paint. To create the first petal, press the tip down gently and pull inward toward a central point, lifting as you go to taper the end. -
Complete the white circle:
Continue painting petals in a circle around an invisible center point. Aim for about 10-12 petals per flower. Don’t worry if they overlap slightly; it adds dimension. -
Paint the second white flower:
Repeat this process for a second white daisy, perhaps angling it slightly differently or making it a touch smaller than the first. -
Add light pink flowers:
Clean your brush thoroughly. Using the light blush pink paint, create two more flowers using the same ‘press and pull’ petal technique.
Texture Pro-Tip
Mix a tiny pinch of baking soda into your yellow paint for the flower centers. It creates a gritty, realistic 3D pollen texture instantly.
Step 3: Adding Depth and Detail
-
Paint the rose accent:
Use your darker rose-pink paint to create the final fifth flower. This darker color adds a beautiful visual anchor to the composition. -
Second layer of petals:
Acrylics can be translucent on black. Once your first layer of petals is dry, go back over just the white petals with a second coat to make them bright and crisp. -
Create the heavy centers:
Dip a medium-sized dotting tool or the back end of a paintbrush into your yellow ochre paint. You want a thick dollop. -
Apply texture:
Place a large dot in the center of each flower. While the paint is still wet, gently tap it with a toothpick or a clean, dry brush tip to give it a fuzzy, pollen-like texture. -
Highlight the centers:
Mix a tiny bit of white into your yellow. Add a microscopic dot of this lighter yellow to the top of slightly textured centers to simulate sunlight hitting the pollen.
Step 4: Final Flourishes
-
Add tiny filler dots:
Dip a small dotting tool or toothpick into light pink paint. Place clusters of three tiny dots in the empty black spaces between flowers. -
Add white accents:
Repeat the previous step with white paint, adding groupings of barely-there dots near the petals to look like floating pollen or distant buds. -
Dry time:
Allow the entire stone to sit undisturbed for at least 24 hours. The thick yellow centers will take the longest to cure. -
Seal the artwork:
Finish by applying a clear matte or satin spray sealer. This protects the paint from chipping and unifies the sheen of the different colors.
Now you have a charming floral stone that captures the gentle beauty of a summer garden forever
Pink Ribbon Hope Rock
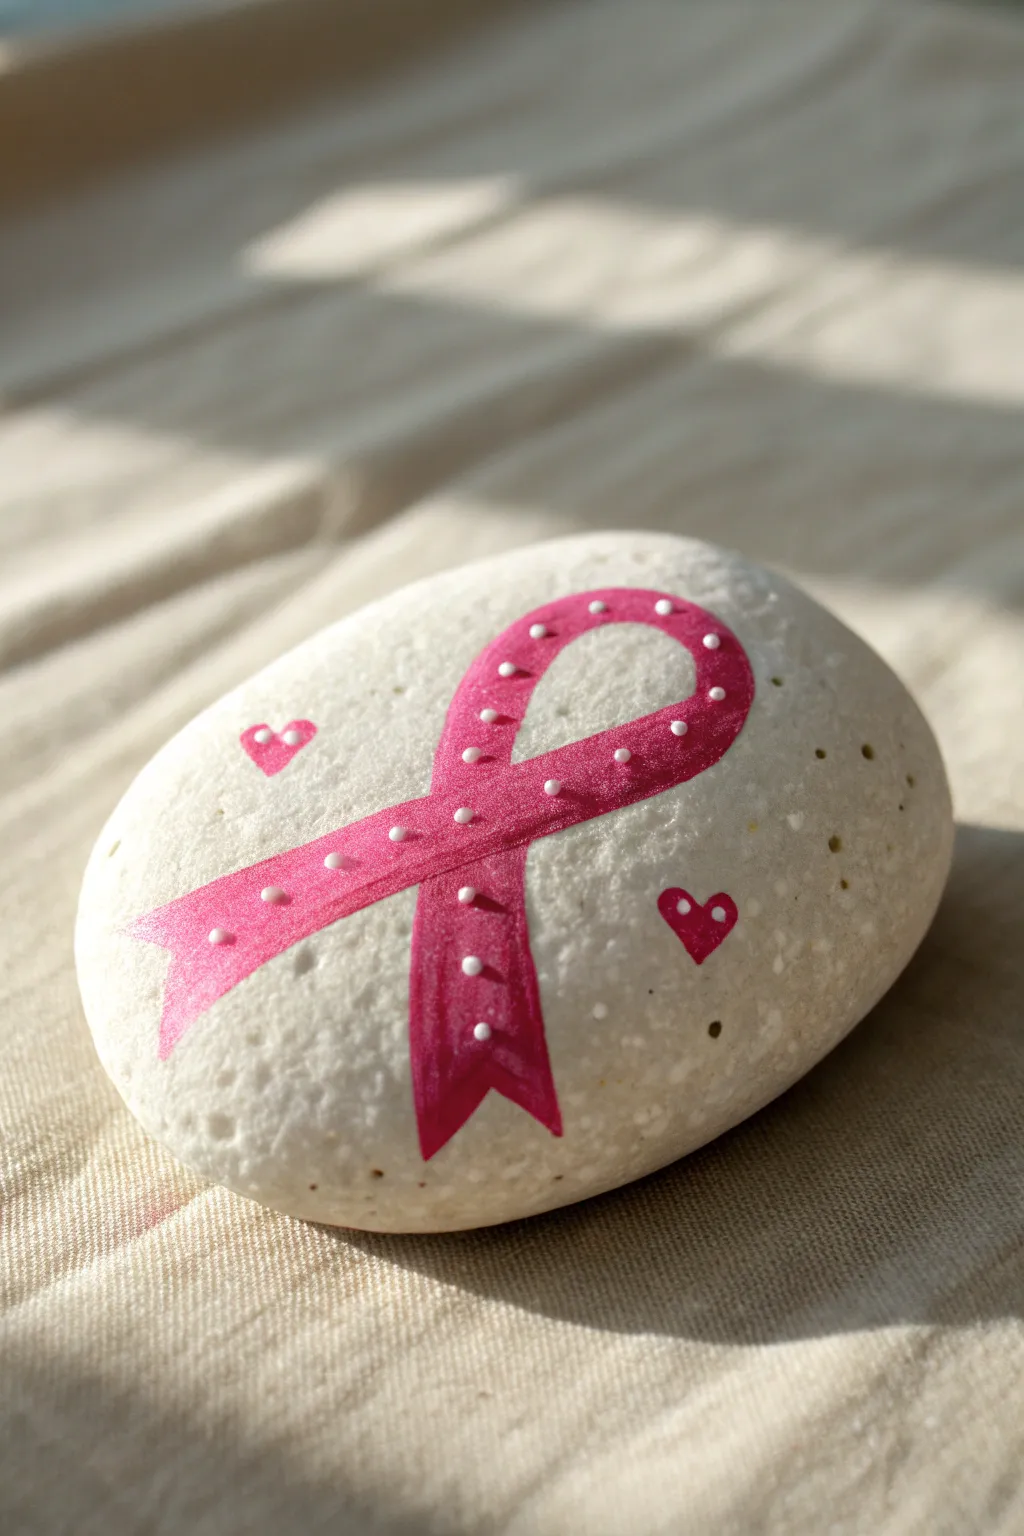
This simple yet powerful design features a vibrant pink awareness ribbon on a naturally textured white stone. With delicate white accent dots and sweet hearts, it serves as a beautiful token of support and hope.
How-To Guide
Materials
- Smooth, rounded white or light-colored rock
- Pink acrylic paint (medium shade)
- White acrylic paint or a white paint pen (fine tip)
- Red (or darker pink) acrylic paint for hearts
- Fine detail paintbrush (size 0 or 00)
- Small round paintbrush (size 2)
- Pencil for sketching
- Sealing spray (matte or glossy)
Step 1: Preparation & Sketching
-
Clean Your Stone:
Before starting, ensure your rock is clean and dry. Wash it with mild soapy water and let it dry completely to ensure the paint adheres properly. -
Draw the Outline:
Using a light pencil, gently sketch the outline of the awareness ribbon in the center of the rock. Draw a loop at the top with two tails crossing over each other at the bottom. -
Shape the Ribbon:
Refine your sketch to make the ribbon look like a continuous strip of fabric. Ensure the crossover point looks natural, with one ‘leg’ of the ribbon appearing to pass over the other. -
Add the Hearts:
Lightly sketch two small hearts on either side of the ribbon—one slightly higher on the left and one lower on the right—to balance the composition.
Rough Rock Trouble?
If your rock is too porous and absorbs the first layer of paint, apply a coat of white acrylic paint or gesso first. This primes the surface.
Step 2: Painting the Design
-
Base Coat the Ribbon:
Using your size 2 brush and pink acrylic paint, carefully fill in the ribbon shape. You may need two coats to get a solid, opaque color, especially if the rock is porous. -
Create Depth:
While the pink paint is still slightly wet, add a tiny touch of darker pink or red to the areas where the ribbon folds or overlaps to create a subtle shadow effect. -
Let it Dry:
Allow the pink paint to dry completely. Since rocks can be cold, I like to give this step a little extra time to prevent smudging later. -
Paint the Hearts:
Using the same pink or a slightly redder shade, fill in the two small heart outlines you sketched earlier.
Step 3: Detailing & Finishing
-
Add the Dot Accents:
Dip the handle end of a small paintbrush or a dotting tool into white paint. Gently press small, evenly spaced dots along the center line of the entire pink ribbon. -
Dot Consistency:
Try to keep the pressure consistent so all the white dots remain roughly the same size. Follow the curve of the ribbon as you go. -
Highlight the Hearts:
If you wish, add a tiny white speck to the corner of each heart to mimic a light reflection, giving them a little bit of dimension. -
Clean Up Edges:
Inspect the edges of your ribbon. If any pink paint bled into the rock’s texture, use a very fine brush with white paint (or the rock’s base color) to touch up and sharpen the lines. -
Seal the Artwork:
Once all paint is thoroughly dry (give it at least an hour), spray the rock with a clear acrylic sealer. A matte finish looks very natural, while gloss will make the pink pop more.
Making Dots Easier
Don’t have a dotting tool? A toothpick with the tip cut off or the head of a sewing pin makes perfect, tiny dots every time.
Place this lovely creation in your garden or gift it to a friend to spread a message of awareness and love


Pink Strength Affirmation Rock

This project combines the softness of pastel pink with a bold, grounding message, perfect for a pocket worry stone or a thoughtful gift. The elegant script and minimalist botanical flourish create a balanced, peaceful design that is surprisingly simple to achieve.
Step-by-Step Tutorial
Materials
- Smooth, oval river rock (approximately 2-3 inches wide)
- Matte acrylic craft paint (pastel pink/blush)
- Black fine-point paint pen (0.7mm or similar)
- Black extra-fine point paint pen (0.5mm) for details
- Flat synthetic paintbrush (medium size)
- Graphite transfer paper or soft pencil (optional for sketching)
- Matte clear sealant spray or varnish
- Paper plate or palette
- Water cup and paper towels
Step 1: Base Preparation
-
Clean the surface:
Begin by scrubbing your rock with warm soapy water to remove any dirt or oils. Rinse it thoroughly and let it dry deeply in the sun or on a warm surface. -
Mix your pink:
Squeeze a dollop of pastel pink acrylic paint onto your palette. If the shade is too bright, you can mute it slightly by mixing in a tiny drop of white or a speck of warm beige. -
Apply the first coat:
Using your flat synthetic brush, apply a smooth, even layer of pink paint over the top surface of the rock. Don’t worry about full opacity yet; thin, even layers are key to a smooth finish. -
Dry and repeat:
Allow the first coat to dry completely for about 15-20 minutes. It should be dry to the touch before adding a second coat to ensure a solid, opaque background. -
Check coverage:
If you can still see the dark color of the stone through the pink, add a third thin layer. I usually find three thin coats look much smoother than two thick ones. -
Final drying time:
Let the painted stone cure for at least an hour. The base needs to be perfectly dry so the paint pen nibs don’t scratch through the surface later.
Step 2: Lettering the Affirmation
-
Draft lightly:
If you aren’t confident with freehand lettering, lightly sketch the word ‘Strength’ in pencil first. Aim for the center-upper portion of the rock to leave room for the design below. -
Start the script:
Shake your fine-point black paint pen well and test the flow on a scrap paper. Begin lettering the word ‘Strength’ using a serif-style font with slight cursive connections. -
Faux calligraphy technique:
Write the word normally first. Then, go back and thicken the ‘downstrokes’ (the parts of the letters where your pen moved downward) to create a lovely calligraphy effect without specialized tools. -
Define the S:
Pay special attention to the capital ‘S’, giving it a nice curl at the bottom. Ensure the spacing between letters is relatively tight but legible. -
Let the ink set:
Allow the lettering to dry for 5-10 minutes. This prevents smearing when your hand rests on the rock for the next steps.
Ink Flow Tip
Store your paint pens horizontally when not in use. Before drawing on the rock, press the nib on paper a few times to get a bold, solid black line without streaks.
Step 3: Adding Botanical Details
-
Center the heart:
Directly below the word ‘Strength’, draw a small, filled-in black heart using the paint pen. This will serve as the center anchor for your vine design. -
Draw the main stems:
From the center heart, draw a curved line extending out to the left and another mirroring it to the right. These lines should curve slightly upward, hugging the bottom curve of the text. -
Add leave pairs:
Starting near the center heart, add small, teardrop-shaped leaves along the stem. Place them in pairs or alternating sides, angling them outward. -
Fill the leaves:
Color in each small leaf carefully. Keep the tips pointed for a crisp look. Use the extra-fine point pen here if your leaves are very small. -
Add accent dots:
Place a single small dot at the far left end of the vine and another at the far right end. Add a tiny heart or dot floating on the right side of the rock for balance.
Gold Highlighting
For a touch of elegance, use a metallic gold paint pen to add tiny dots between the black leaves or trace a thin shadow line along one side of the text.
Step 4: Finishing Touches
-
Clean up:
Check your design for any stray pencil marks. If the paint is fully dry, gently erase visible pencil lines with a soft white eraser. -
Seal the artwork:
Once the black ink is 100% dry (give it at least an hour), take the rock outside or to a well-ventilated area. Hold the sealant spray can about 10-12 inches away. -
Apply varnish:
Spray a light, misty coat of matte sealer over the top. Avoid heavy spraying, which can cause the black ink to run. Let it dry, then apply a second coat for durability.
Place your finished affirmation stone on your desk or carry it with you as a reminder of your resilience
Pink Butterfly Rock
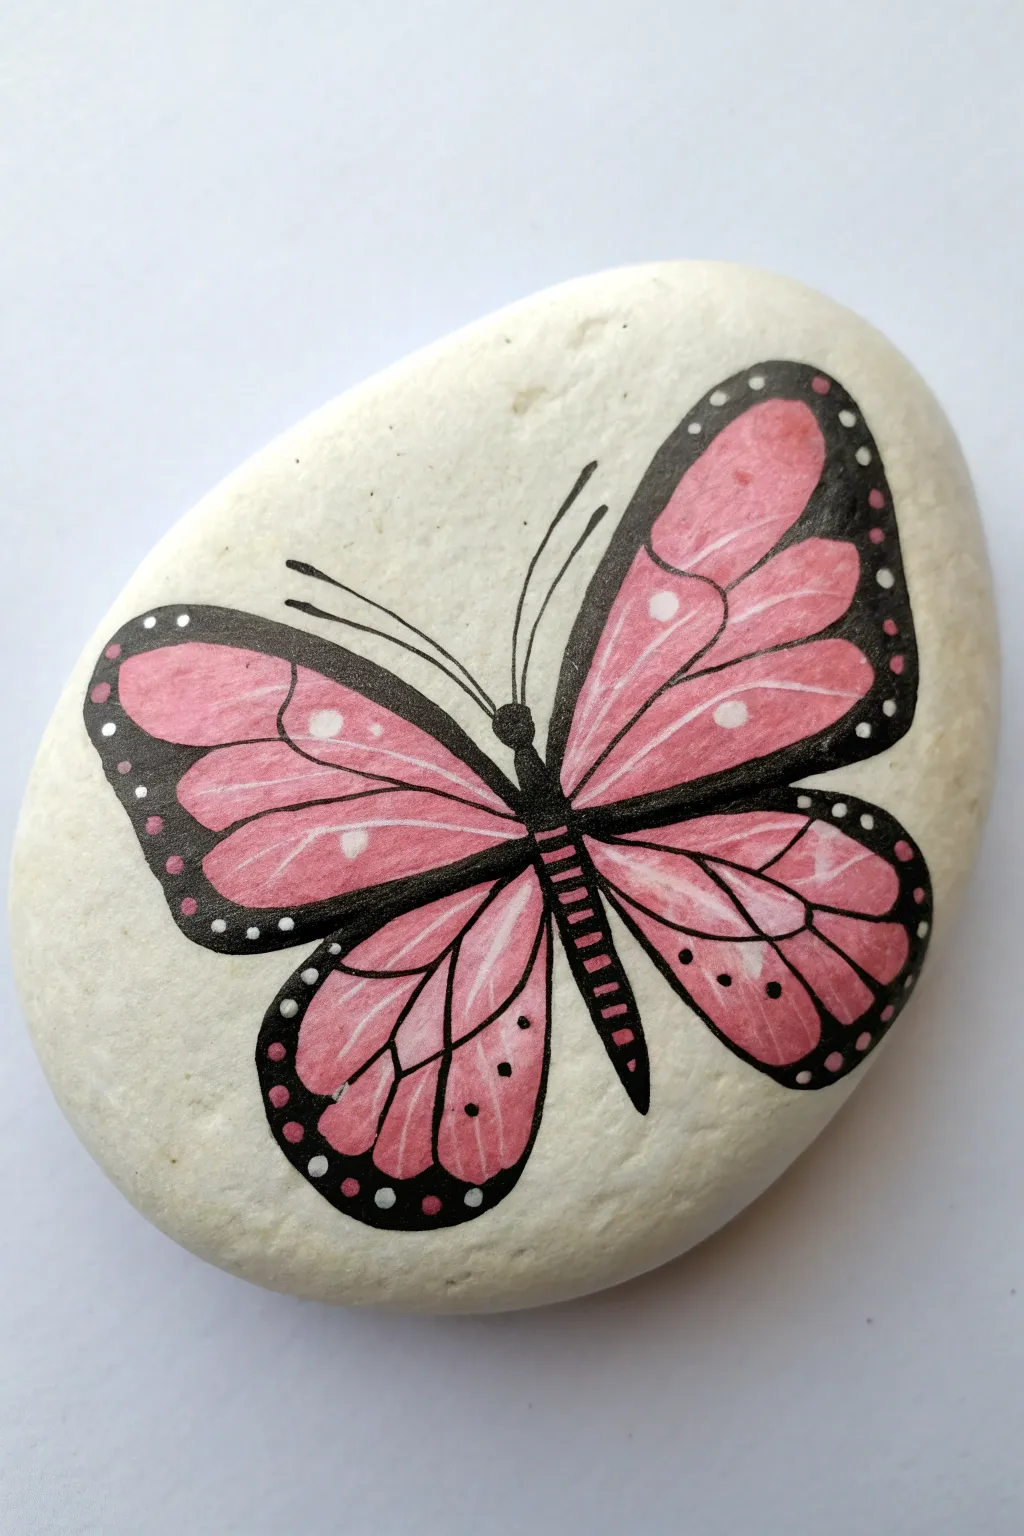
Capture the delicate beauty of a monarch-style butterfly using soft pink hues against a clean white stone background. This project combines smooth gradients with crisp black lining to create a piece that feels both whimsical and elegant.
How-To Guide
Materials
- Smooth, flat river stone (preferably white or very light grey)
- Titanium White acrylic paint
- Light Pink acrylic paint
- Darker Pink or Magenta acrylic paint
- Black acrylic paint or fine-tip black paint pen (0.7mm)
- Small round detail brushes (sizes 0 and 00)
- White gel pen or extra fine white paint pen
- Spray sealer or varnish (matte or gloss)
Step 1: Base and Sketch
-
Prep the surface:
Begin by washing your stone with soap and water to remove any dirt or oils, and let it dry completely. If your stone isn’t naturally white, apply two thin coats of white acrylic paint to create a bright, clean canvas. -
Light pencil outline:
Using a very light touch with a pencil, sketch the butterfly’s central body axis down the middle of the rock. It should be slightly tilted. -
Map the wings:
Draw the two large upper forewings and the smaller, rounded hindwings. Keep the shapes organic—the top wings should be somewhat triangular with rounded tips, while the bottom wings are softer teardrops.
Smooth Gradients
To get a seamless fade between pinks, use a ‘wet-on-wet’ technique or a glaze medium. This slows drying time, allowing colors to blend softly without harsh lines.
Step 2: Pink Foundation
-
Fill the base color:
Mix a soft, bubblegum pink. Fill in all four wing sections completely with this color, leaving a small gap in the center for the body later. -
Add dimension:
While the base pink is still slightly damp, take your darker pink or magenta on a small brush. Gently sweep this darker color from the outer edges of the wings inward toward the center to create a subtle gradient. -
Highlight the center:
I like to blend a tiny bit of white paint into the inner sections of the wings (closest to the body) to make them appear translucent and luminous. -
Let it cure:
Allow the pink layers to dry completely. This is crucial before adding any black lines to prevent muddying the colors.
Paint Pen Clogging?
If your fine liner skips over the painted surface, the base paint might be too rough. Lightly sand the dry pink layer with 1000-grit sandpaper before lining.
Step 3: Defining Structures
-
Paint the body:
Using black paint or a black paint pen, draw the long, segmented abdomen in the center. It should taper at the bottom and have a small, rounded thorax at the top. -
Create the heavy outlines:
Outline the entire perimeter of the wings with a thick black line. The outer edges of the forewings should be the thickest part, creating that classic butterfly frame. -
Veining the wings:
Switch to your finest brush or a fine-tip pen. Draw thin, delicate veins radiating from the body outward to the black edges. Use a light hand here; shaky lines actually look more natural. -
Detail the abdomen:
Add small horizontal stripes of pink or white across the black abdomen to give it a segmented, 3D appearance.
Step 4: Finishing Touches
-
Add the antennae:
Draw two long, slender antennae curving outward from the head. Make the lines extremely thin. -
Outer wing spots:
Using a dotting tool or a toothpick dipped in white paint, place small dots inside the thick black border of the wings. Vary their sizes for interest. -
Inner wing accents:
Add a few larger, softer white spots directly onto the pink sections of the upper wings to mimic light reflection. -
Black dots detail:
Place tiny black dots near the bottom edges of the lower wings for extra texture. -
Seal the work:
Once everything is bone dry, apply a clear spray sealer to protect your painting from chipping and UV damage.
Now you have a charming piece of nature art that will never fly away
Pink Ladybug Twist Rock
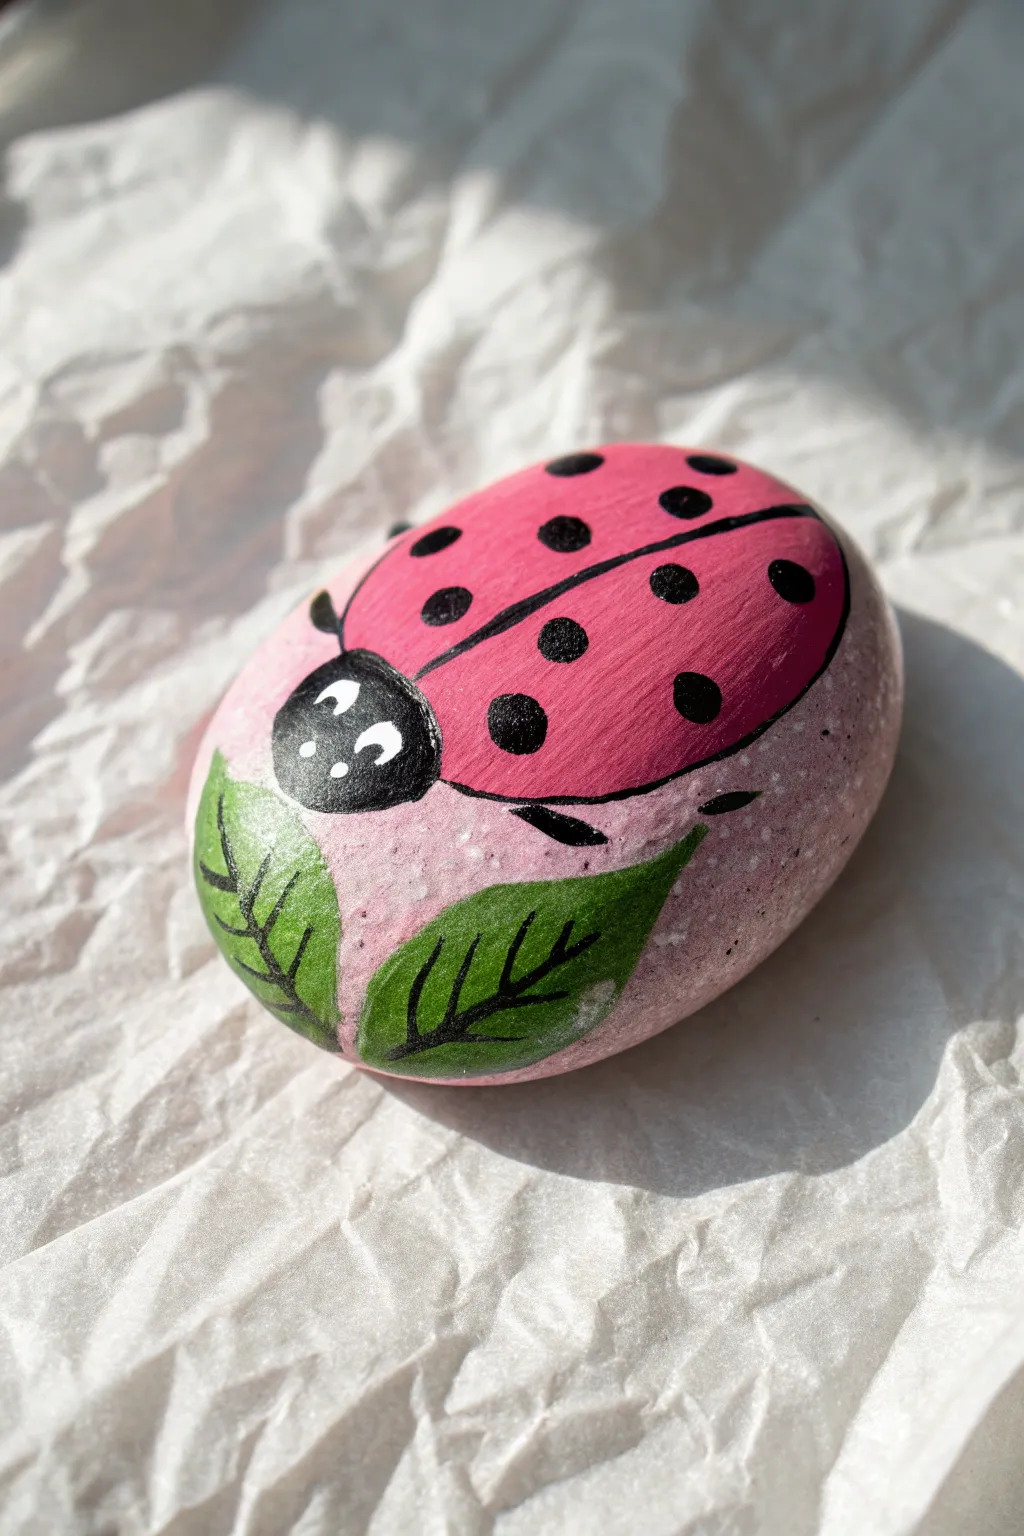
Transform a simple garden stone into a charming decorative piece with this vibrant pink ladybug design. Featuring a unique stippled background and bold, graphic leaves, this project offers a playful twist on traditional rock painting.
Step-by-Step Tutorial
Materials
- Smooth, oval river rock (palm-sized)
- Acrylic paints (pale purple/pink, hot pink, black, white, leaf green, dark green)
- Old toothbrush or stiff bristle brush
- Fine liner brush
- Medium flat brush
- Pencil and eraser
- Clear acrylic sealer (matte or gloss)
- Palette or paper plate
- Cup of water and paper towels
Step 1: Preparation & Background
-
Clean and Prep:
Begin by washing your rock with soap and water to remove any dirt or oils. Let it dry completely in the sun or use a hair dryer to speed up the process. -
Stipple Base Coat:
Mix a very pale pink or lilac acrylic paint. Using an old toothbrush or a stiff, dry brush, load a small amount of paint and dab it repeatedly over the entire top surface of the rock. This creates the speckled, textured background you see in the image. -
Second Stipple Layer:
While the first layer is still slightly tacky, add a tiny drop of white to your mix and stipple a few highlights near the center to give the rock dimension. Let the background dry fully.
Paint looking transparent?
If your hot pink looks streaky over the textured background, mix a tiny bit of white into the first coat of pink. This acts as a primer, making the second coat of pure pink pop vividly.
Step 2: Drafting & Blocking Color
-
Sketch the Outline:
With a light pencil touch, draw a large oval shape for the ladybug’s body in the upper 2/3 of the rock. Below it, sketch two pointed leaves curving outward. -
Paint the Body:
Fill in the large oval shape with a bright, hot pink acrylic paint. You may need two coats to ensure it looks solid against the speckled background. -
Paint the Leaves:
Using a leaf green shade and a medium flat brush, fill in the two leaf shapes at the bottom. I find painting from the base of the leaf outward helps follow the natural curve. -
Add the Head:
Paint a semi-circle in black overlapping the top-left edge of the hot pink oval to create the ladybug’s head.
Add some sparkle
Before sealing, brush a very light layer of glitter glaze over just the pink wings. This adds a magical shimmer when the sun hits your garden rock.
Step 3: Details & Definition
-
Divide the Wings:
Using your fine liner brush and black paint, draw a curved line down the center of the pink body to separate the wings. -
Outline the Body:
Carefully outline the entire hot pink shape with a thin black line to sharpen the edges. -
Create Spots:
Dip the handle end of a paintbrush into black paint to dot perfect circles onto the pink wings. Vary the sizes slightly for a natural look. -
Add Legs:
With your finest brush, paint tiny, curved strokes coming out from underneath the body to suggest legs. -
Leaf Veins:
Switch to black paint again and draw a central vein down each green leaf, adding small V-shaped veins branching off to the sides. -
Adding the Eyes:
Dip a smaller tool or brush handle into white paint and place two dots on the black head area. Once dry, add tiny black pupils if you wish, or leave them as bright highlights.
Step 4: The Final Touch
-
Highlight the Eyes:
Add a microscopic dot of white to the black pupils if you painted them, giving the ladybug a bright, alert expression. -
Clean Up:
Check for any stray smudges on your stippled background. You can touch these up by stippling a bit of your original background color over the mistake. -
Seal the Rock:
Once the paint is completely cured (wait at least 24 hours), apply a coat of clear acrylic sealer to protect your artwork from the elements.
Now you have a delightful little garden friend ready to hide among your plants
Cute Pink Pig Face Rock
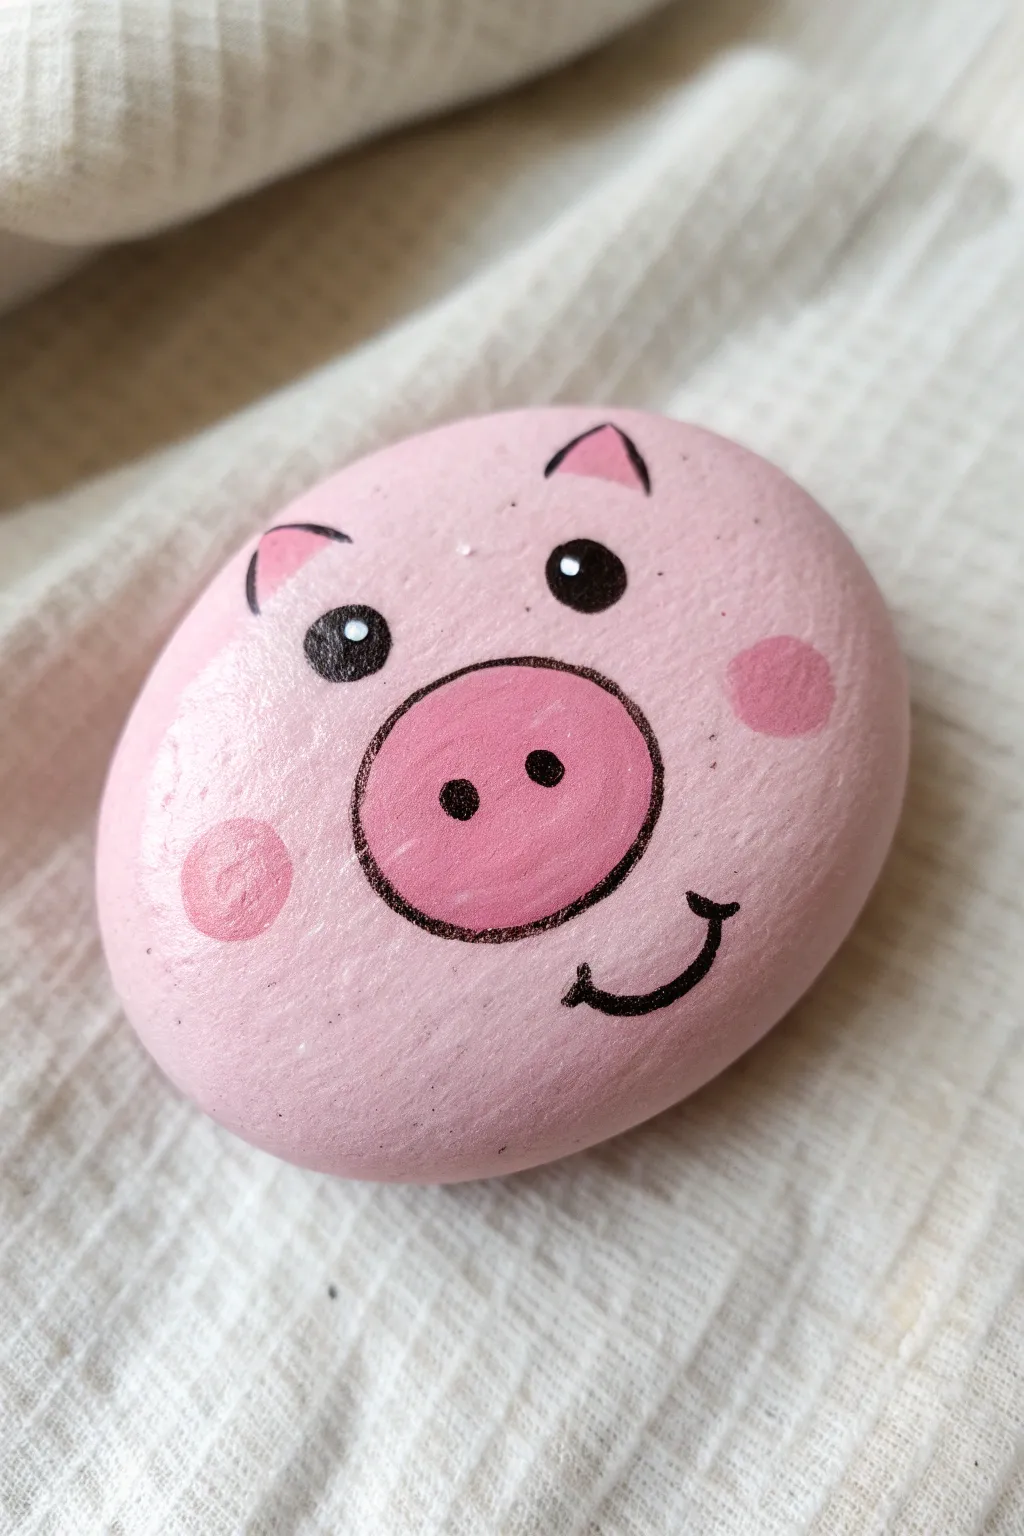
Transform a simple smooth stone into this cheerful, rosy-pink character that’s bound to make you smile. With just a few shades of pink and some bold black lines, you’ll capture an adorable pig face complete with blushing cheeks and a friendly snout.
Step-by-Step
Materials
- Smooth, oval-shaped river rock
- Acrylic paint: light pink, medium pink, dark pink/magenta
- Acrylic paint: black and white
- Paintbrushes: medium flat brush, fine liner brush
- Dotting tool or toothpick
- Pencil (optional)
- Spray sealant or Mod Podge (glossy)
Step 1: Base Coat and Shape
-
Clean your canvas:
Start by washing your rock with warm soapy water to remove any dirt or oils, and dry it completely so the paint adheres properly. -
Mix the perfect pink:
Mix a small amount of white with your medium pink to create a soft, bubblegum base color. If you already have a pastel pink, you can use it straight from the bottle. -
Apply the first layer:
Using your medium flat brush, paint the entire top surface of the rock with your base pink color. -
Let it dry completely:
Wait for the first coat to dry fully; if the rock’s natural color shows through, I usually add a second coat for a solid, opaque finish. -
Draft the features (optional):
If you are nervous about freehanding, lightly sketch a large oval in the center for the snout and two smaller triangles near the top for ears using a pencil.
Step 2: Painting the Features
-
Create the snout:
Mix a slightly darker, rosier pink shade. Paint a prominent oval shape in the center of the rock face to form the snout. -
Add blushing cheeks:
Using a similar or slightly lighter rosy pink than the snout, paint two soft circles on either side of the face. -
Paint the inner ears:
Paint two small, rounded triangles near the top edge of the rock using the same pink you used for the cheeks or snout. -
Highlight the cheeks:
While the cheek paint is still slightly wet, you can blend the edges gently, or wait for them to dry for a bold ‘sticker’ look like the reference photo. -
Outline the snout:
Load your fine liner brush with black paint (or use a black paint pen) and carefully trace the entire oval snout. -
Draw the nostrils:
Inside the pink snout oval, paint two black dots or small vertical dashes for the nostrils, spacing them evenly in the center. -
Add the mouth:
Painted directly below the snout, draw a curved black line that kicks up at the end for a smirk. Start the line from the center bottom of the snout. -
Detail the mouth:
Add a tiny perpendicular tick mark at the left end of the smile line to give the expression more character.
Paint Pen Precision
Struggling with the thin outlines? Use an extra-fine tip black acrylic paint marker instead of a brush for steadier control on the snout and smile.
Step 3: Eyes and Final Touches
-
Outline the ears:
Using your black liner brush, draw thin V-shapes around the top of your pink ear triangles to define them. -
Position the eyes:
Place two solid black oval shapes above the snout. Make sure they are spaced wide enough so the pig doesn’t look cross-eyed. -
Add the sparkle:
Once the black eye paint is totally dry, use a dotting tool or the tip of a toothpick dipped in white paint to add a small reflection dot in the upper corner of each eye. -
Check your lines:
Look over your black outlines. If any lines look shaky, you can tidy them up with a little bit of the base pink paint on a small brush. -
Seal the artwork:
Protect your piglet with a coat of glossy spray sealer or Mod Podge to make the colors pop and keep the paint from chipping.
Curly Tail Addition
Flip the rock over and paint a cute, spiral curly tail on the back so your piglet looks adorable from every angle.
Now you have a charming little piggy companion perfect for hiding in a garden or brightening up a desk
Pink Bunny With Heart Nose
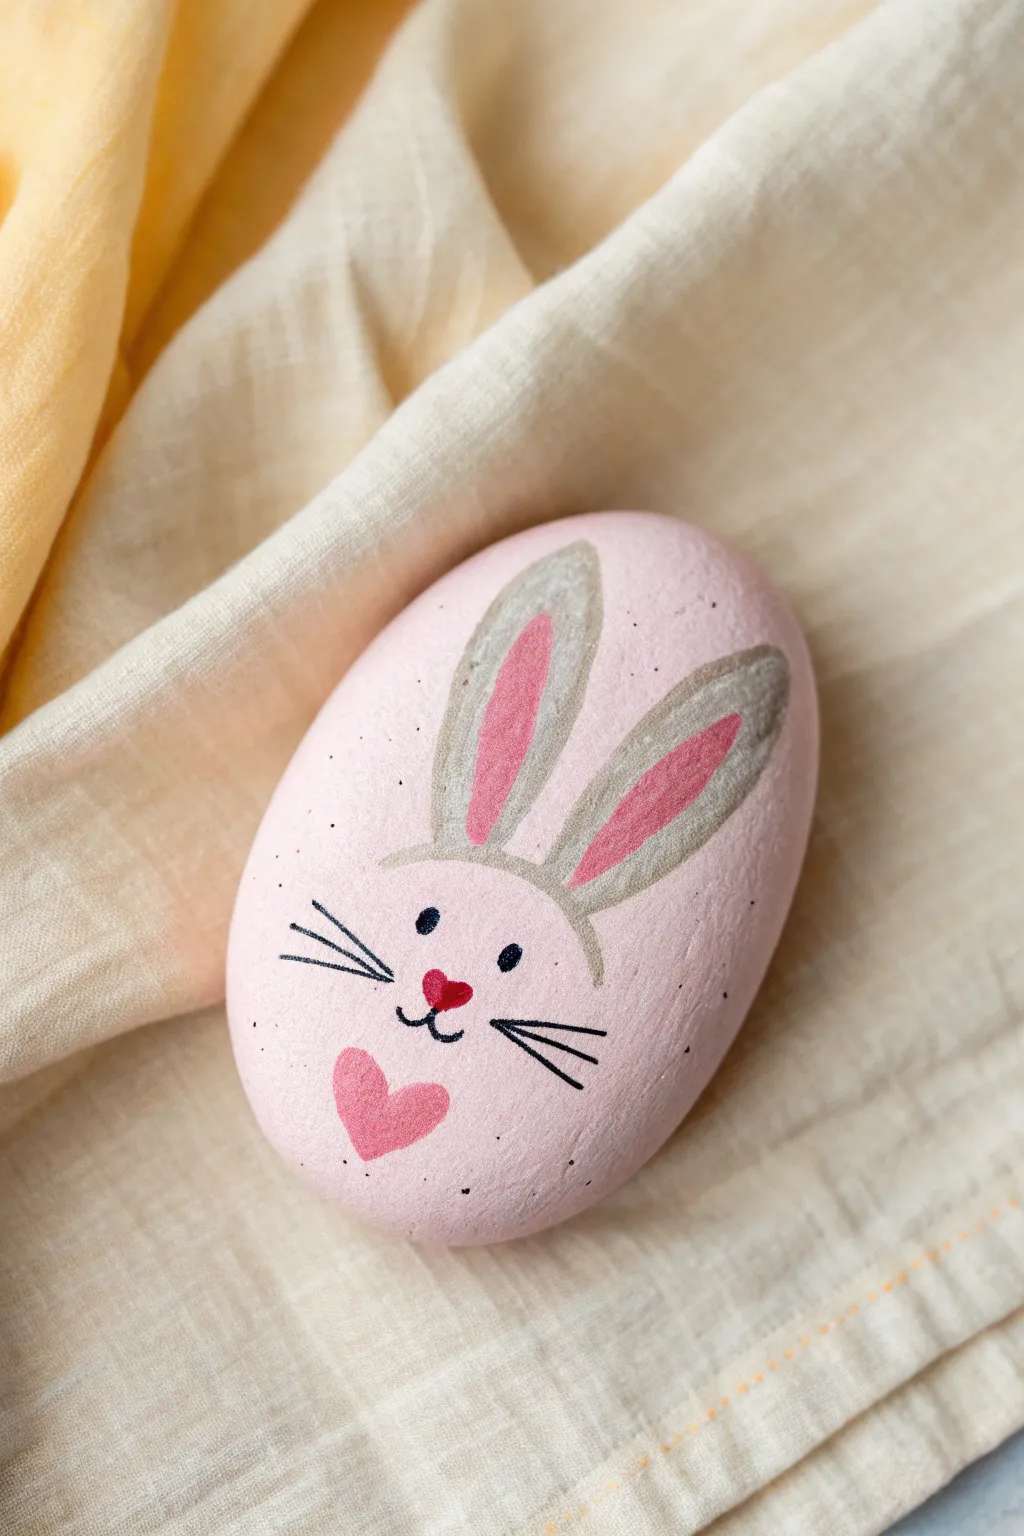
Transform a smooth garden stone into an adorable keepsake with just a few strokes of paint and a lot of charm. This soft pink bunny features sweet grey ears and a heart-shaped nose, making it a perfect little gift or springtime pocket pal.
Detailed Instructions
Materials
- Smooth, oval river rock (palm-sized)
- Acrylic matte paint: Light pink (base)
- Acrylic matte paint: Medium grey (ears)
- Acrylic matte paint: Darker pink (inner ears)
- Acrylic matte paint: Bubblegum pink (chest heart)
- Acrylic matte paint: Black (features)
- Acrylic matte paint: Red (nose heart)
- Wide flat paintbrush
- Fine detail paintbrush (liner brush)
- Small round paintbrush
- Old toothbrush (for speckling)
- Matte spray sealer or varnish
Step 1: Base Coat & Prep
-
Clean the stone:
Before creating any art, wash your stone with soapy water and scrub away any dirt or grit. Let it dry completely in the sun or with a hair dryer. -
Apply the first pink layer:
Load a wide flat brush with your light pink base paint. Cover the entire top surface of the rock smoothly. Don’t worry about the bottom yet. -
Let it dry:
Allow the first coat to dry until it’s matte and not tacky to the touch. This usually takes 10-15 minutes. -
Add a second coat:
For a solid, opaque finish, apply a second layer of light pink. Brush in the opposite direction of your first coat to minimize texture marks. Let this dry fully.
Step 2: Painting the Bunny Features
-
Outline the ears:
Using a small round brush and your medium grey paint, draw two long, leaf-shaped bunny ears near the top of the stone. They should angle slightly outward. -
Fill the ears:
Fill in the outlines you just created with the grey paint. I like to do two thin coats here rather than one thick one to effectively cover the pink base. -
Connect the headband:
Paint a very thin, curved grey line connecting the bottom of the two ears, creating a subtle ‘headband’ effect on the bunny’s forehead. -
Paint inner ears:
Once the grey is dry, switch to a smaller brush and the darker pink paint. Add a smaller elongated oval inside each grey ear shape. -
Add the chest heart:
Near the bottom center of the rock, paint a simple heart using the bubblegum pink shade. This adds a lovely pop of color below where the face will be.
Clean Lines Tip
If your hand feels shaky detailing the whiskers, rest your pinky finger on the dry part of the rock to stabilize your hand while painting.
Step 3: Fine Details & Finish
-
Dot the eyes:
Use the handle end of a paintbrush dipped in black paint to stamp two small, round eyes widely spaced on the face. -
Paint the nose:
With a fine detail brush and red paint, create a tiny heart shape right between and slightly below the eyes. -
Draw the mouth:
Using your thinnest liner brush and black paint (slightly thinned with water helps the paint flow), draw a small vertical line down from the nose, curving into a tiny anchor shape for the mouth. -
Add whiskers:
Ideally using the very tip of your liner brush, flick three thin black lines outward from each cheek area. Quick, confident strokes make the best whiskers. -
Create speckles:
Dip an old toothbrush into slightly watered-down black paint. Run your thumb across the bristles to flick tiny speckles sporadically across the rock for texture. -
Seal the artwork:
Once absolutely everything is bone dry (wait at least an hour), spray the stone with a matte clear coat to protect your handiwork from scratches.
Make It Glossy
For a candy-like finish, swap the matte spray for a high-gloss resin or triple-thick glaze. It makes the pink pop and feels great to hold.
Now you have a charming little bunny friend ready to brighten up a garden corner or a desk drawer
Kawaii Pink Cat Rock
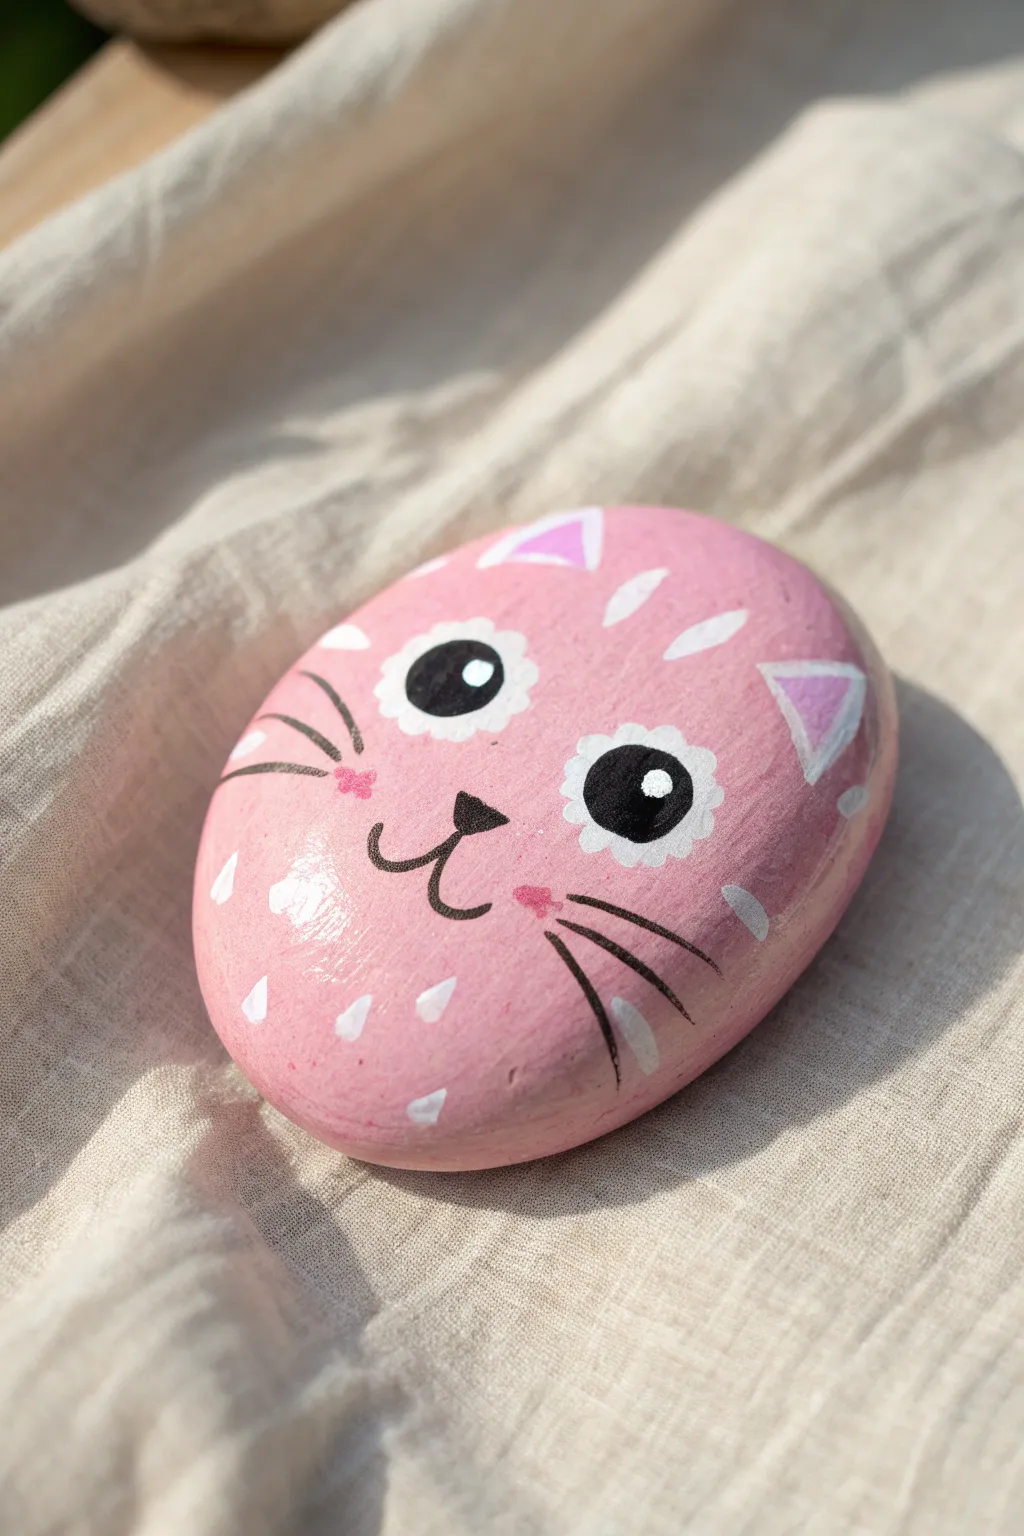
Transform a smooth garden pebble into an adorable feline friend with this simple yet striking design. Featuring wide eyes framed by flower petals and a soft pink base, this painted rock brings a touch of kawaii charm to any desk or planter.
Step-by-Step
Materials
- Smooth, oval river rock (medium size)
- Acrylic paints: bubblegum pink, white, black, light purple/lilac
- Large flat paintbrush
- Small fine-detail paintbrush
- Dotting tool or toothpick
- Acrylic sealer or varnish (glossy)
Step 1: Base Preparation
-
Clean surface:
Scrub your rock with warm soapy water and a brush to remove any dirt or grit, then let it dry completely in the sun. -
Base coat:
Paint the entire top surface of the rock with bubblegum pink acrylic paint. Use broad strokes for even coverage. -
Full opacity:
Once the first layer is dry, apply a second coat of pink. I find this creates a much richer background color and hides the stone’s natural texture.
Step 2: Face Features
-
Paint eye shapes:
Using white paint and a small round brush, paint two medium-sized circles in the upper center of the rock. Leave a gap between them for the nose. -
Add scalloped edges:
Carefully add small semicircles all around the edge of your white circles to create a scallop or flower petal effect. -
Inner eye:
Switch to black paint and fill in the center of the white flower shapes, leaving just the white scalloped border visible. -
Eye highlights:
Add life to the eyes by placing a small white dot in the upper-right corner of each black pupil. -
Nose basics:
Paint a small, inverted black triangle between and slightly below the eyes for the nose. -
Mouth lines:
Using your finest detail brush, draw a classic ‘w’ shape extending down from the nose tip to create the mouth smile.
Wobbly Lines?
If your fine lines are too thick, try thinning your black paint slightly with a drop of water. Ink-consistency paint flows smoother from the brush.
Step 3: Details & Decor
-
Cheek blush:
Mix a tiny bit of darker pink or red into your base pink and dab small oval blush spots on either cheek, right next to the mouth lines. -
Whiskers:
With black paint and a steady hand, paint three quick, thin lines extending outward from each cheek area. -
Ear outlines:
At the top of the rock, paint two white triangles pointing upward to suggest ears. -
Inner ears:
Fill the center of slightly smaller triangles inside the white ones using lilac or light purple paint. -
Forehead pattern:
Paint small white teardrop or petal shapes around the forehead area to add texture. -
Chin accents:
Add a few more small white teardrop shapes near the bottom chin area for balance. -
Final seal:
Allow the paint to cure for 24 hours, then brush on a coat of glossy varnish to protect your artwork.
Expression Fun
Change the eye shape! Painting closed semicircles with eyelashes (instead of open eyes) creates a sleepy or happy squinting cat.
Now you have a sweet little pocket companion to brighten up your shelf
Pink Unicorn Silhouette Rock
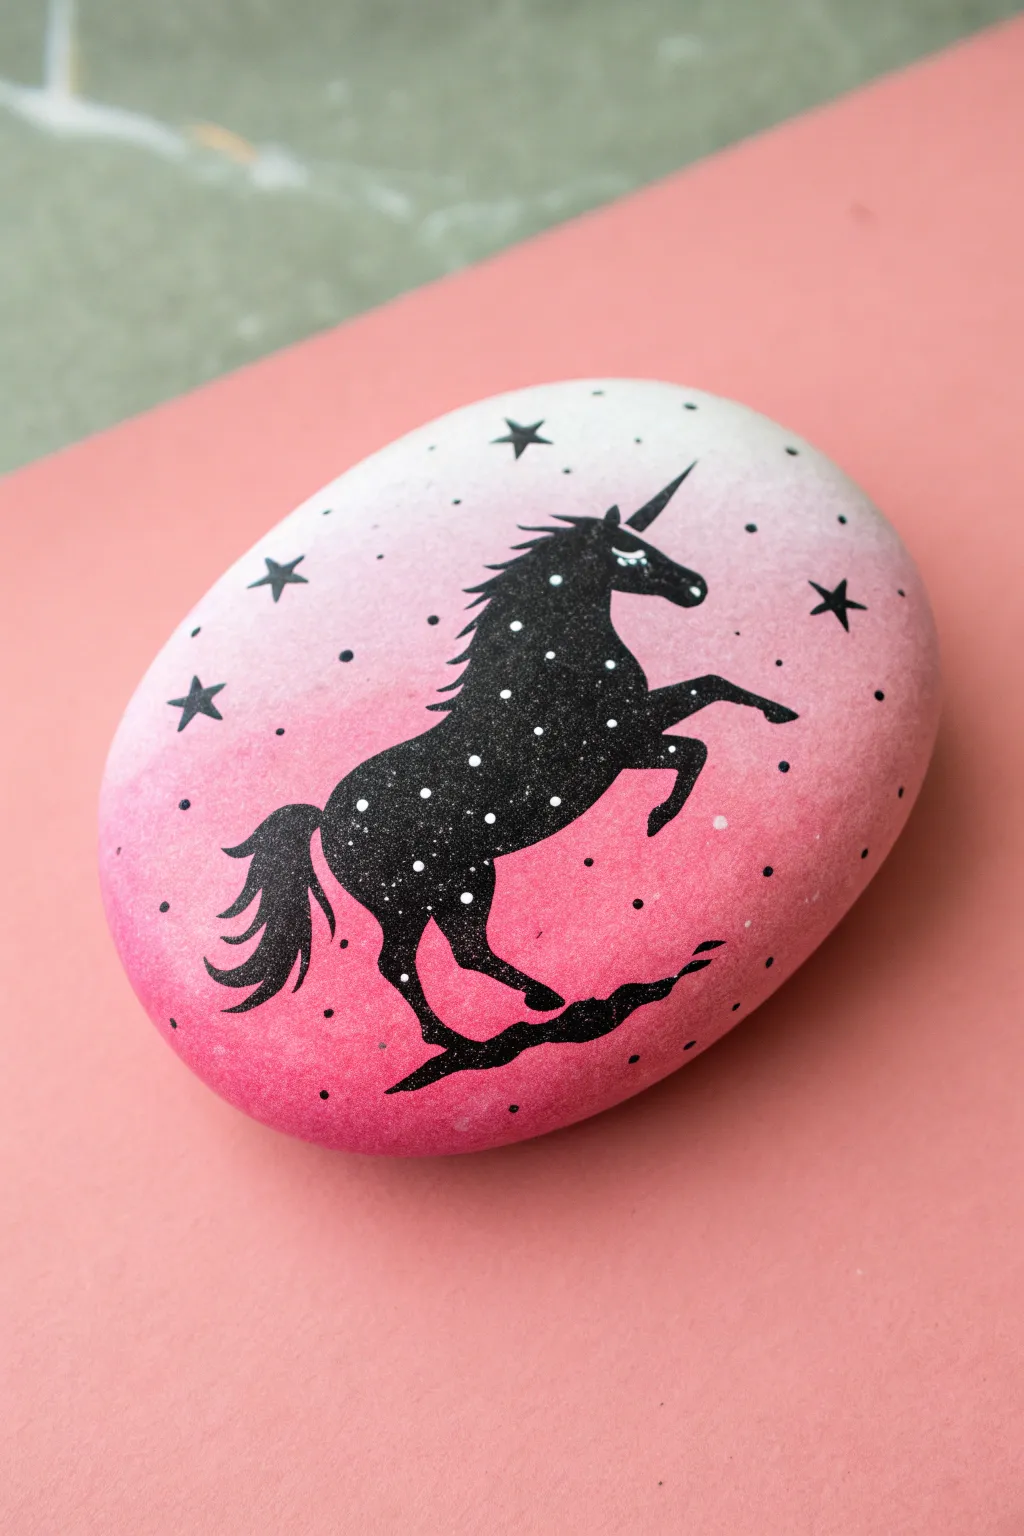
Capture the magic of starry night skies with this stunning unicorn silhouette set against a dreamy pink gradient. The stark black figure pops against the soft, ombre background, while tiny white stars add a touch of celestial wonder.
How-To Guide
Materials
- Smooth, oval river rock
- White acrylic paint (base coat)
- Pink acrylic paint (medium shade)
- Light pink acrylic paint (or mix white + pink)
- Black acrylic paint or extra-fine Posca paint pen
- White gel pen or fine liner brush
- Sponge dabber or makeup sponge
- Fine detail paintbrush (size 0 or 00)
- Pencil (for sketching)
- Spray sealer (glossy or matte)
Step 1: Setting the Celestial Stage
-
Prepare the Base:
Start with a clean, dry rock. Apply a solid coat of white acrylic paint over the entire top surface to ensure your colors will show up vividly. Let this layer dry completely. -
Create the Gradient:
Pour a small amount of medium pink paint and white paint onto your palette. Using a sponge dabber, apply the darker pink at the bottom third of the rock. -
Blend Upward:
While the bottom pink is still wet, mix a lighter pink (or use your pre-mixed light pink) and sponge the middle section. Blend the wet edge where it meets the darker pink by lightly tapping over the transition line. -
Fade to White:
For the top third, switch to pure white (or the very palest pink) on your sponge. Blend it downwards into the light pink section to create a smooth, upward fade. Allow the gradient background to dry fully, perhaps for 20 minutes.
Step 2: Sketching the Outline
-
Rough Sketch:
Using a pencil, very lightly sketch the unicorn’s silhouette. Start with the oval shape of the body in the center. -
Leg Placement:
Draw the bent front legs and the back legs. One front leg should be raised high in a rearing position, while the back legs anchor the figure. -
Head and Horn:
Sketch the neck curving upwards, leading to the head. Add the pointed horn angled forward from the forehead. -
Refining the Details:
Outline the flowing mane down the neck and the tail sweeping behind the back legs. Don’t worry about perfection; paint will cover lines.
Uneven Gradient?
If your paint dries too fast while blending, add a tiny drop of retarding medium or water to the sponge. This keeps acrylics workable longer for smoother fades.
Step 3: Painting the Silhouette
-
Fill in the Body:
Using black acrylic paint and a fine detail brush (or a black paint pen for better control), carefully fill in the main body, neck, and head of the unicorn. -
Define the Legs:
Paint the legs with precision. Use the very tip of your brush to get sharp hooves and joints. Ensuring the rearing pose looks balanced is key here. -
Manes and Tails:
Fill in the tail and mane. Use purposeful, flicking brushstrokes at the ends to mimic hair texture rather than a solid block shape. -
The Grounding Shadow:
Paint a thin, jagged, irregular black shape beneath the back hooves. This acts as a stylized shadow or ground, grounding the unicorn so it doesn’t look like it’s floating aimlessly. -
Touch Ups:
Go back over your black areas. If the pink shows through, apply a second thin coat of black for solid opacity. Let the black paint dry completely before moving to the next step.
Add Sparkle
For a truly magical finish, paint a layer of clear glitter glaze over just the unicorn’s body before sealing. It makes the galaxy effect shimmer in the sun.
Step 4: Adding the magic
-
Galaxy Effect:
Dip a toothbrush or stiff brush into slightly watered-down white paint. Flick the bristles with your thumb to spray tiny speckles specifically over the black body of the unicorn to create a ‘galaxy’ texture. -
Adding Stars:
Using a fine liner brush or black pen, draw a few five-pointed stars scattered in the pink sky area. Keep them simple and classic. -
Background Specs:
Add tiny black dots around the larger stars in the background to simulate distant planets or stardust. -
Facial Detail:
With a white gel pen or a 00 brush with white paint, carefully draw a small, closed eye with lashes on the unicorn’s face to give it expression. -
Seal the Rock:
Once absolutely everything is dry (give it an hour just to be safe), take the rock outside and spray it with a clear sealer to protect your cosmic creation.
Display your majestic unicorn rock on a desk or shelf as a reminder to always dream big
Pink Mermaid Scale Rock
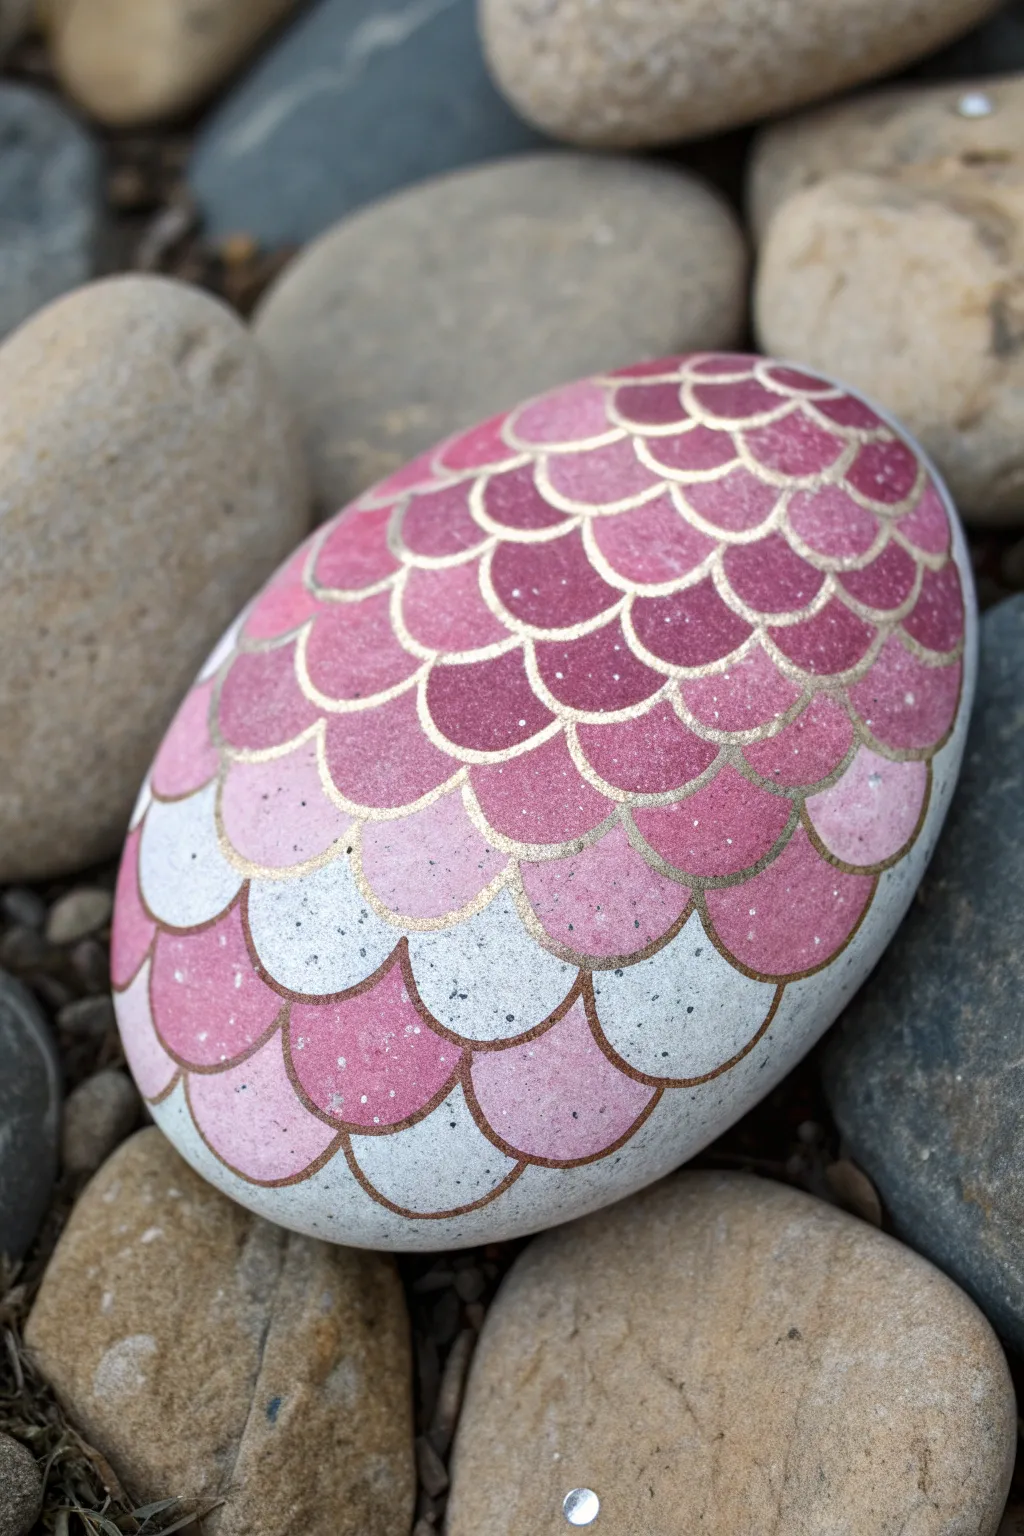
Transform a smooth river stone into a mystical dragon egg or mermaid treasure with this elegant gradient design. The soft transition from deep raspberry to creamy white, accented by crisp gold outlines, creates a sophisticated look that is easier to achieve than it appears.
Detailed Instructions
Materials
- Smooth oval river rock (clean and dry)
- Acrylic paints: White, Pale Pink, Magenta/Deep Raspberry
- Gold metallic paint pen (fine tip) or gold liner paint
- Paint palette or mixing plate
- Flat shader brush (size 4 or 6)
- Detail round brush (size 0 or 1, optional)
- Pencil (light H grade)
- Spray sealer (glossy)
Step 1: Preparation and Base
-
Rock Selection:
Choose a rock that is naturally smooth and egg-shaped for the best result. Wash it thoroughly with soap and water to remove any oils or dirt, then let it dry completely. -
Base Coat:
Apply a coat of white acrylic paint over the entire top surface of the rock. This primes the surface and ensures your pinks will pop, especially if your rock is originally dark gray. -
Drying Time:
Allow the base coat to dry fully. If the coverage looks streaky, apply a second thin coat of white for a smooth, opaque canvas.
Steady Hand Trick
Rest your wrist on the table or a separate block while lining the scales. This stabilizes your hand for those smooth gold curves.
Step 2: Drafting the Design
-
Establish the Grid:
Using a light pencil, sketch faint horizontal curved lines across the rock. These will act as the guidelines for your rows of scales. -
Sketching Scales:
Draw the scalloped scale shapes along your guidelines. Start the first row at the top. For the second row, offset the scales so the peak of each new scale sits in the valley between the two above it, creating a brick-like pattern. -
Refining Shapes:
Continue the pattern down the rock. Don’t worry if your pencil lines are a bit messy; the paint will cover them later. Focus on keeping the size of the scales relatively consistent.
Add Some Magic
Before sealing, dab a tiny amount of iridescent glitter glue onto the center of the darkest scales for a wet, shimmering mermaid tail look.
Step 3: The Gradient Painting
-
Mixing Palette:
Prepare your palette with white, pale pink, and magenta. You will need to mix intermediate shades to create a smooth ombre effect. -
Darkest Layer:
Start at the very top or narrowest end of the rock. Paint the first few rows of scales using your darkest magenta color. Use a small flat brush to stay neatly inside your penciled scallops. -
Transition Shade 1:
Mix a little of the pale pink into your magenta. Paint the next band of scales with this slightly lighter hue. -
Mid-Tone Pink:
Switch to pure pale pink for the middle section of the rock. Apply this to two or three rows of scales. -
Transition Shade 2:
Mix a significant amount of white into your pale pink to create a very soft blush color. Paint the next few rows below the mid-section. -
White Base:
Leave the bottom-most scales pure white, or paint them white if you covered your base coat. This completes the gradient from dark to light. -
Touch Ups:
Let the paint dry. If any scales look transparent, carefully add a second layer of the matching color.
Step 4: The Metallic Finish
-
Shaking the Pen:
Take your gold metallic paint pen and shake it well to mix the pigments. Test the flow on a scrap piece of paper first to prevent blobs. -
Outlining:
Carefully trace over the curved edges of every scale with the gold pen. I find it easiest to work from top to bottom so my hand doesn’t smudge the wet ink. -
Refining Edges:
Make sure the gold lines meet neatly at the corners where the scales overlap. This crisp outlining is what really defines the mermaid effect. -
Speckle Effect:
For added texture, you can gently tap a dry brush with a tiny bit of white paint over the darker pink areas to create a subtle stone-like texture, though this is optional. -
Sealing:
Once the gold ink is completely dry (give it at least an hour), spray the rock with a glossy sealer. This protects the paint and makes the metallic gold shine brilliantly.
Enjoy displaying your beautiful gradient stone in a sunny spot where the gold can catch the light
Pink Flamingo One-Line Rock
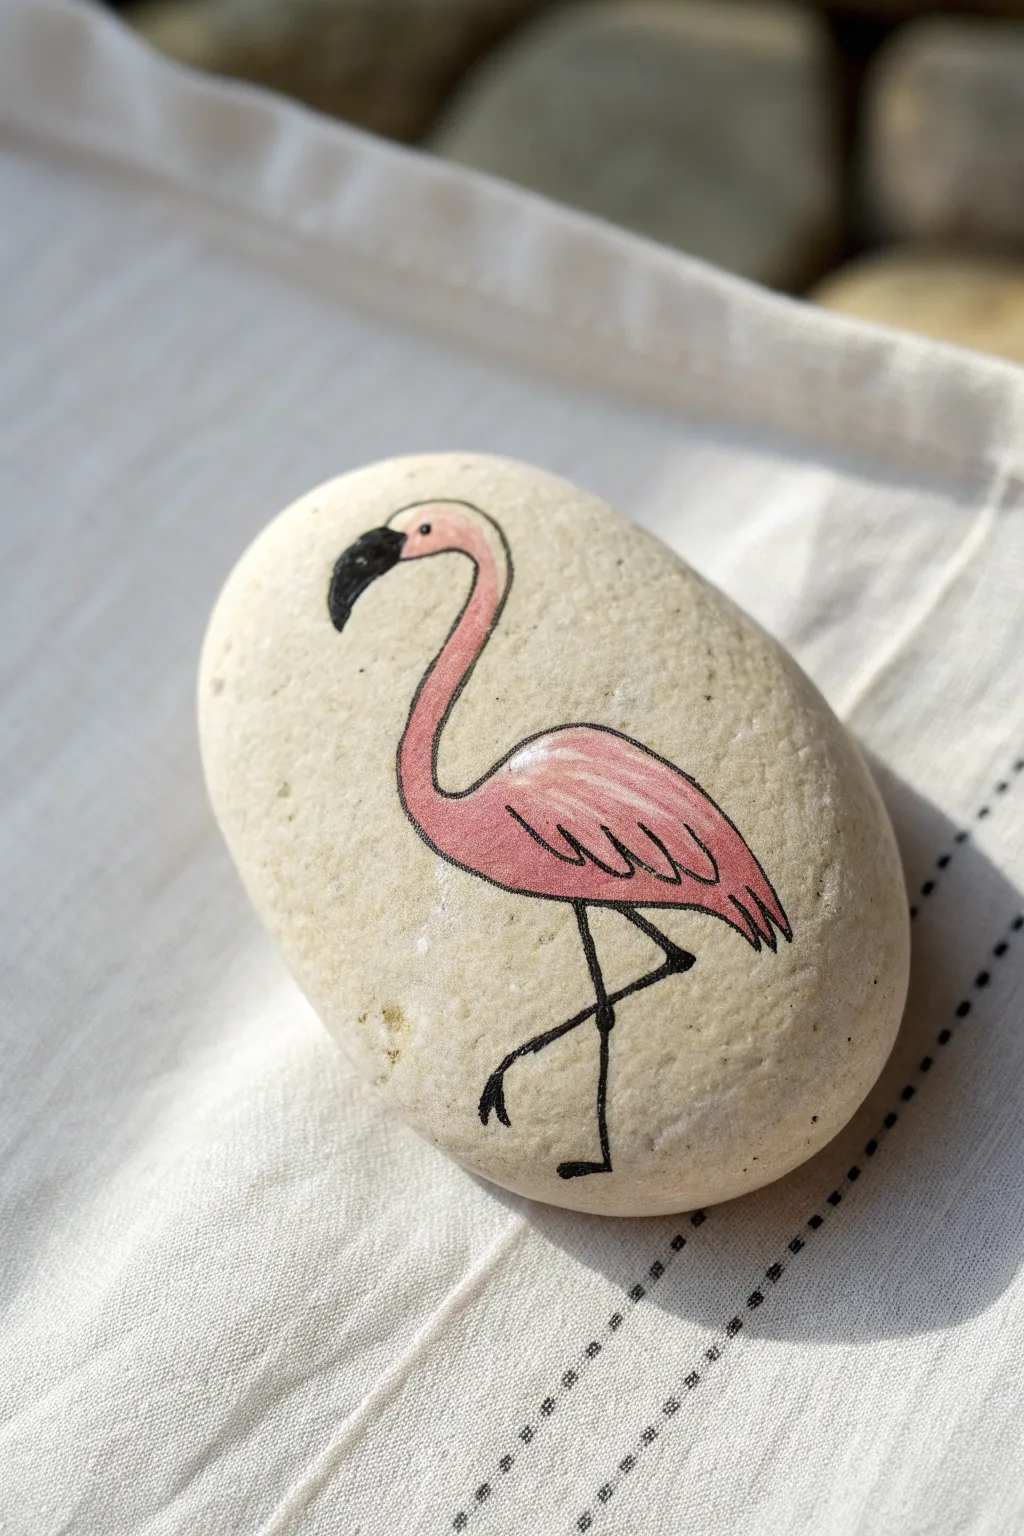
Transform a simple beige river stone into a piece of tropical art with this elegant flamingo design. Using smooth, oval stones provides the perfect organic canvas for the bird’s naturally curved neck and body.
Step-by-Step
Materials
- Smooth, oval river rock (beige or light tan)
- Pencil and eraser
- Light pink acrylic paint (pastel shade)
- Medium pink acrylic paint (slightly darker shade)
- White acrylic paint
- Black Posca paint pen or fine liner pen (ultra-fine tip)
- Small round paintbrush (size 0 or 1)
- Matter sealer or varnish
Step 1: Sketching the Shape
-
Clean your canvas:
Begin created by scrubbing your rock with soap and water to remove any dirt or oils, then let it dry completely. -
Draft the body:
Using a pencil very lightly, sketch an oval shape slightly to the right of the center for the flamingo’s body. -
Add the neck:
Draw a curved ‘S’ shape extending upward from the left side of the oval body to form the graceful neck. -
Shape the head:
At the top of the neck curve, draw a small rounded shape for the head, ensuring it flows smoothly into the neck line. -
Refine the beak:
Sketch a downward-curved beak attached to the head, giving it a sharp point at the end.
Fixing Shaky Lines
If your black outline gets wobbly, wait for it to dry completely. Then, use a toothpick dipped in a tiny bit of paint to gently scratch away or paint over the mistake.
Step 2: Applying Color
-
Base coat the body:
Mix a small amount of white into your light pink paint to create a soft pastel tone. Fill in the body oval and the neck area with your small brush. -
Paint the wing:
While the base is drying, mix a slightly darker, medium pink. Paint a teardrop shape inside the body oval to represent the folded wing. -
Layer the feathers:
Using the medium pink, add delicate strokes near the tail end of the wing to suggest individual feathers. -
Highlighting:
Take a tiny amount of pure white paint and add a subtle highlight to the top curve of the wing for dimension. -
Let it cure:
Allow the paint to dry completely. If the stone surface feels cold to the touch, it likely needs a few more minutes.
Step 3: Outlining and Details
-
Outline the body:
With your black fine-tip paint pen, carefully trace the outer edge of the pink body, neck, and head. Keep your hand steady and rest your wrist on the table for stability. -
Define the beak:
Color in the tip of the beak entirely black, leaving a tiny sliver of the stone unpainted near the face if desired, or paint that sliver white. -
Add the eye:
Place a single small black dot on the head for the eye. -
Outline the wing:
Trace the teardrop wing shape inside the body, adding a few curved lines on the interior to emphasize the feathers. -
Draw the legs:
Draw the legs using the black pen. Create one straight leg extending down, and one bent leg crossing behind it to form a ‘4’ shape. -
Add the feet:
Finish the legs by drawing small, webbed feet at the bottom. -
Seal the artwork:
Once the ink is fully dry, apply a coat of matte varnish to protect your design.
Level Up: Backgrounds
Before painting the bird, sponge a very light gradient of blue or teal behind where the flamingo will stand to create a soft, out-of-focus water effect.
Now you have a charming piece of pocket-sized art perfect for decorating a plant pot or desk
Pink Terrazzo Speckle Rock
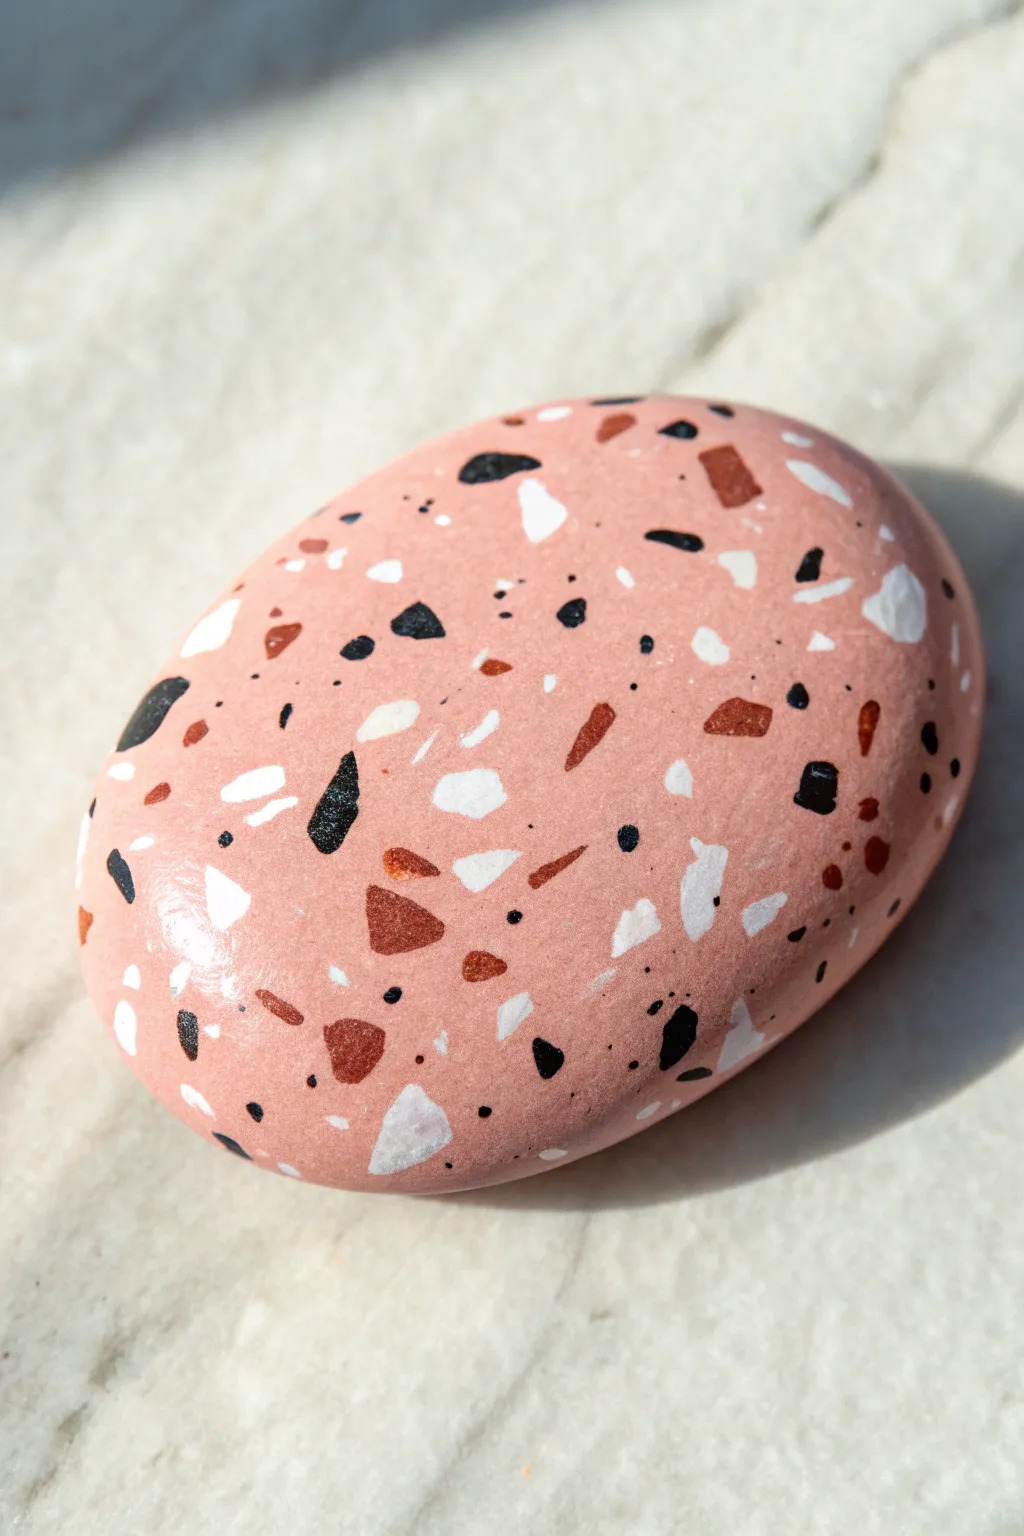
Transform a simple river rock into a piece of modern art with this faux terrazzo technique. The soft pink base provides a warm canvas for geometric shards of color, creating a sophisticated speckle effect that looks incredibly realistic.
How-To Guide
Materials
- Smooth oval river rock
- Acrylic paint (Dusty Pink/Terracotta)
- Acrylic paint (White)
- Acrylic paint (Black)
- Acrylic paint (Burnt Sienna/Rust Brown)
- Acrylic paint (Metallic Copper or Bronze)
- Fine detail paintbrush (size 0 or 00)
- Small flat paintbrush
- Paint palette or mixing plate
- Gloss varnish or sealant
Step 1: Base Preparation
-
Clean the surface:
Begin by washing your rock thoroughly with soap and water to remove any dirt or oils. Let it dry completely before starting. -
Mix the base color:
If you don’t have the perfect dusty pink shade, mix a drop of burnt sienna into a standard pink, or lighten a terracotta shade with white to achieve that muted, earthen pink tone. -
Apply the first coat:
Using your flat brush, paint the entire top surface of the rock with your pink base color. -
Build opacity:
Allow the first layer to dry to the touch. Apply a second or third coat until the natural rock color is completely covered and the finish is smooth.
Shape Tip
Avoid perfect circles or squares. Real terrazzo is made of broken stone chips, so keep your painted shapes angular, jagged, and random for the most authentic look.
Step 2: Creating the Chips
-
Start with white shapes:
Load a fine detail brush with white paint. Paint random, irregular polygon shapes scattered across the surface. These should look like broken shards of tile. -
Vary the sizes:
Make sure some white shapes are large and blocky, while others are tiny slivers. Variety is key to the terrazzo look. -
Add black accents:
Clean your brush and switch to black paint. Add fewer black shapes compared to the white ones, focusing on sharp angles and irregular edges. -
Distribute the black:
Place the black shards in the empty spaces, but avoid creating a uniform pattern. Let them cluster slightly in some areas. -
Introduce the brown:
Using the burnt sienna or rust brown paint, add warmth to the design. Paint distinct, medium-sized chunks near the other colors. -
Layering strategy:
Don’t be afraid to let a couple of shapes nearly touch or slightly overlap, as real terrazzo is a compressed aggregate.
Level Up: Texture
Mix a tiny pinch of baking soda into your base pink paint before applying it. This creates a subtle gritty texture that makes the stone feel even more like real concrete.
Step 3: Detailing & Finishing
-
Add metallic flair:
For a touch of elegance, use your metallic copper paint to add small, gem-like shapes. The shimmer adds depth to the matte colors. -
Create micro-speckles:
Dip the very tip of your smallest brush into black paint. Dot tiny, almost invisible specks in the large open pink areas to simulate grit. -
Repeat with white:
Add a few tiny white micro-dots as well. This fills the visual gaps without overcrowding the main design. -
Check balance:
Step back and look at the rock. If any area looks too empty, add a small shard of whichever color is lacking in that quadrant. -
Detailed drying:
Let the speckles dry completely. Since the paint is applied somewhat thickly for the chips, I usually give this at least an hour. -
seal the deal:
Apply a coat of gloss varnish. The glossy finish mimics the polished look of real terrazzo flooring.
Place your stylish stone on a desk or shelf as a trendy, minimalist decoration
Pink Marble Swirl Rock
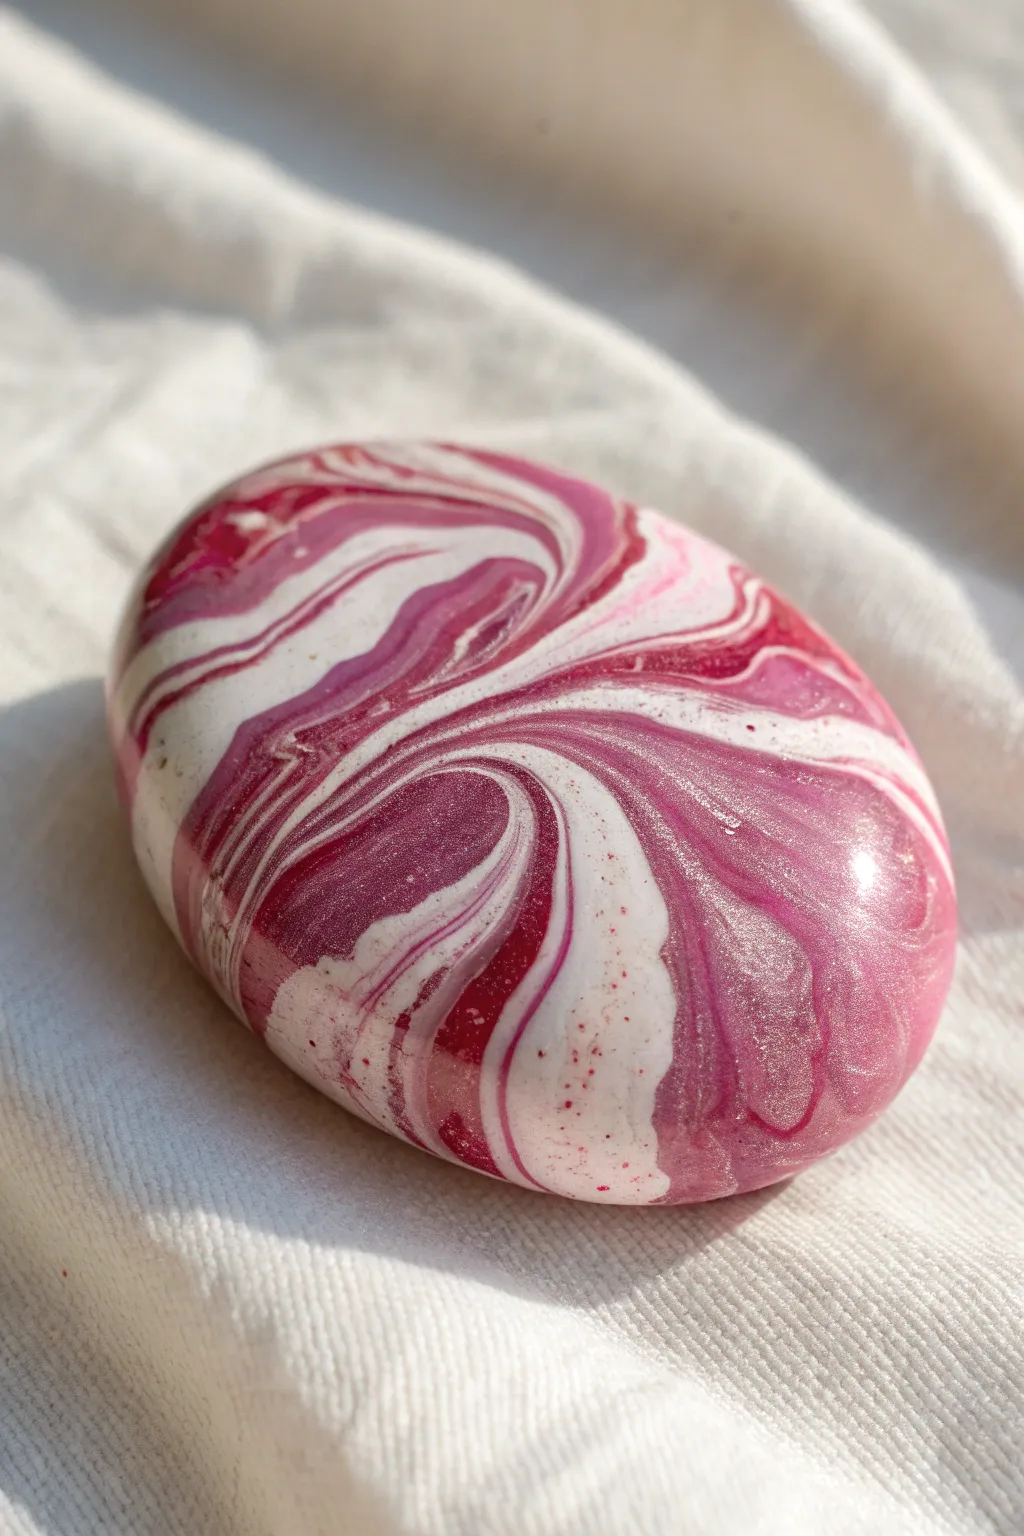
Transform an ordinary smooth stone into a stunning faux-marble showpiece using the acrylic pouring technique. This project captures the elegant, organic swirls of cream, magenta, and berry pink for a high-end glossy finish.
Step-by-Step Tutorial
Materials
- Smooth, oval-shaped river rock
- White acrylic paint
- Magenta or berry pink acrylic paint
- Darker red-purple or burgundy acrylic paint
- Clear pouring medium
- Small plastic cups (e.g., disposable shot glasses)
- Wooden craft sticks for stirring
- High-gloss varnish or resin
- A clean cardboard box or deep tray (catch basin)
- Drying rack or small elevated cups (to hold the rock up)
- Disposable gloves
Step 1: Preparation & Mixing
-
Clean the canvas:
Begin by scrubbing your rock thoroughly with soap and water to remove any dirt or oils. Let it dry completely. -
Prepare the workspace:
Set up your catch basin (cardboard box) and place your drying rack or elevated platform inside it. This mess-free zone is crucial for the pouring stage. -
Mix the base white:
In the first small cup, mix white acrylic paint with pouring medium. Aim for a consistency similar to warm honey—it should flow off the stick in a continuous stream without breaking. -
Mix the colors:
Repeat the mixing process in separate cups for your magenta and burgundy paints. Ensure all paints have the same fluidity to prevent them from sinking into each other too quickly. -
Check consistency:
I always test the mixtures by dripping them back into the cup; the drip should sit on the surface for a fleeting second before disappearing.
Silicone Secrets
Add 1-2 drops of silicone oil to your paint cups before layering. This creates ‘cells’ or circular lace-like patterns within the swirls.
Step 2: Creating the Dirty Pour
-
Layer the dirty cup:
Take a fresh empty cup. Pour a small amount of white into the bottom. -
Add the first color:
Gently pour a layer of magenta directly into the center of the white puddle. -
Create contrast:
Add a layer of the darker burgundy contrasting color. Don’t stir these layers; simply stack them one on top of another. -
Repeat layering:
Continue alternating white, magenta, and burgundy until the cup is about half full. Vary the amounts slightly to create organic unpredictability.
Step 3: Pouring & Curling
-
Position the rock:
Place your rock securely on the elevated platform inside your catch basin. -
The initial pour:
With a steady hand, start pouring the layered paint mix slowly over the center of the rock. -
Create movement:
Move your hand in a gentle circular or figure-eight motion while pouring to encourage the swirls to stretch and warp across the surface, mimicking natural marble veins. -
Cover the edges:
Ensure the paint flows over all sides. If there are bare spots near the bottom, use a gloved finger or craft stick to gently guide the runoff paint to cover the stone completely. -
Watch for bubbles:
Inspect the surface immediately. If you see tiny air bubbles, gently blow on them or use a quick pass with a kitchen torch (if available) to pop them.
Gilded Edges
Once the pour is dry, use a fine liner brush and metallic gold leaf paint to trace a few of the marble veins for an elegant geode look.
Step 4: Drying & Sealing
-
Let it settle:
Allow the rock to sit undisturbed. The paint will continue to move slightly as it settles, creating those delicate, feathery edges seen in the photo. -
Long drying time:
Let the rock dry for at least 24 to 48 hours. Acrylic pours are thick and take much longer to cure than standard painting. -
Apply the gloss:
Once fully cured, brush on a high-gloss varnish. For that ultra-wet, glass-like look in the image, you might want to consider a thin layer of art resin instead of standard varnish. -
Final cure:
Allow the topcoat to dry completely according to the manufacturer’s instructions before handling the rock.
Now you have a sophisticated piece of stone art perfect for a paperweight or garden accent
Pink Sunset Silhouette Rock
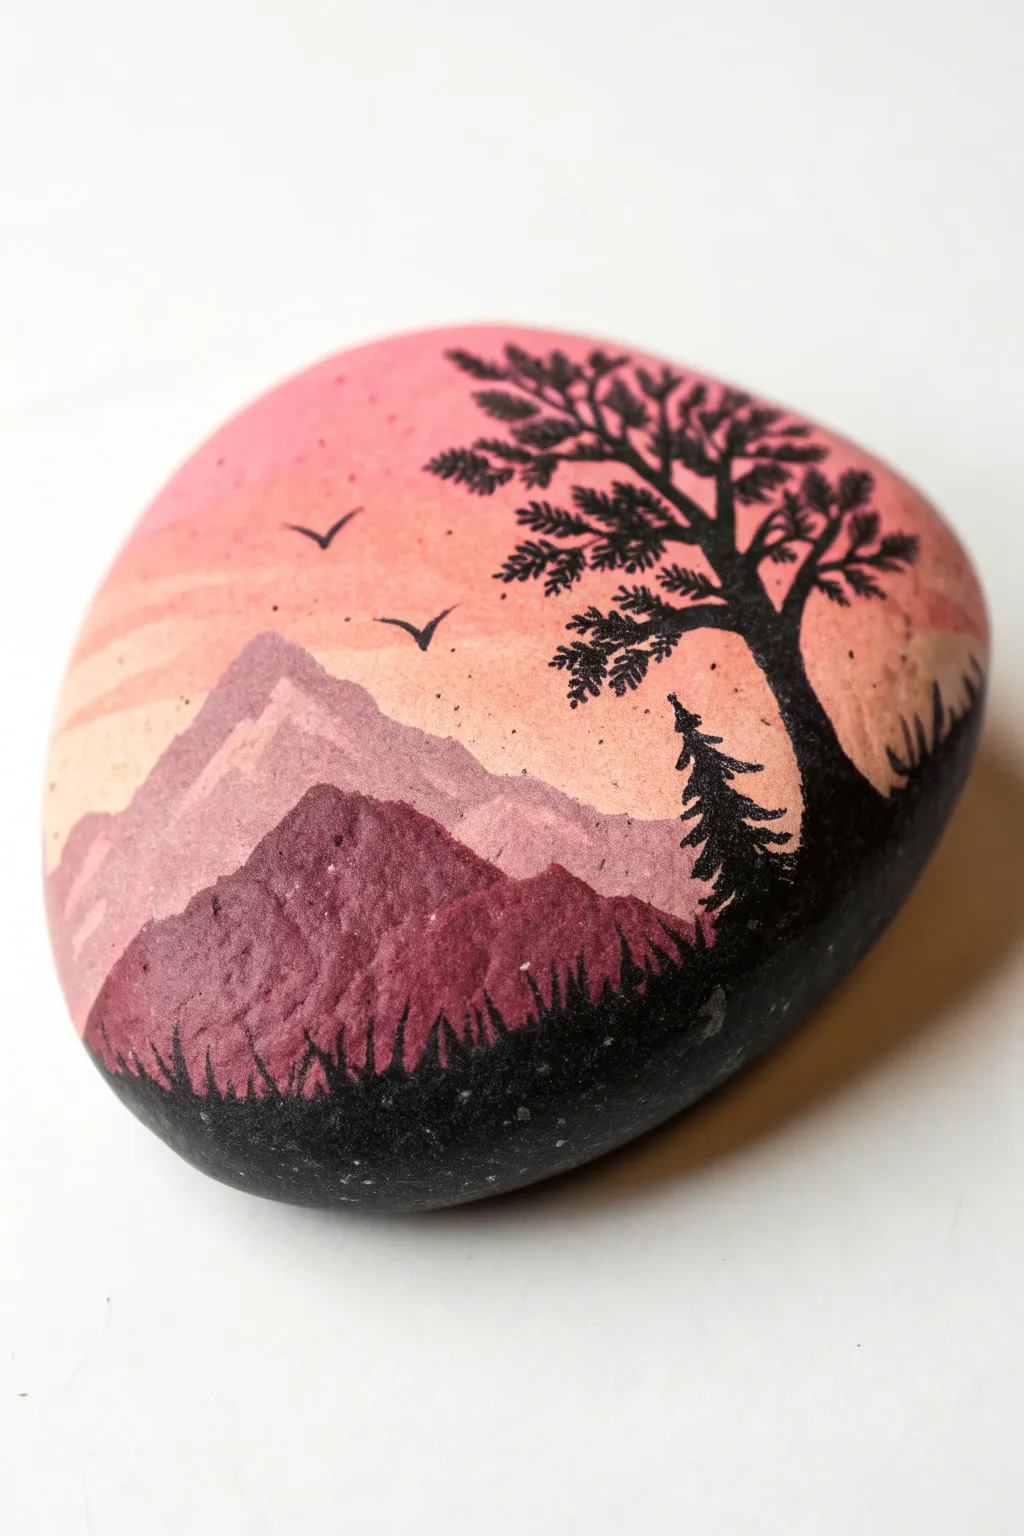
Capture the serene beauty of twilight with this painted stone, featuring a gradient pink sky and a stark black silhouette of pine trees. This project transforms a simple smooth rock into a miniature window overlooking a mountain sunset.
How-To Guide
Materials
- Smooth river rock (oval or round)
- Acrylic paints: Titanium White, Light Pink, Peach/Coral, Mauve (light purple), Deep Burgundy/Purple, Black
- Flat brush (medium size)
- Fine liner brush (size 00 or 000)
- Small round brush
- Palette for mixing
- Cup of water and paper towel
- Clear spray sealant (matte or glossy)
Step 1: Setting the Sky
-
Base coat prep:
Clean and dry your rock thoroughly. Apply a coat of white acrylic paint over the entire top surface to prime it; this ensures your pinks will show up bright and vibrant rather than dull. -
Mixing the sky gradient:
Prepare a gradient on your palette: put a dollop of Light Pink and a dollop of Peach side-by-side, blending them slightly in the middle. -
Painting the upper sky:
Using a flat brush, paint the top third of the rock with the Light Pink. While the paint is still wet, start blending downwards. -
Blending the horizon:
Load your brush with the Peach color and paint the middle section, blending it upwards into the wet pink to create a seamless transition. The goal is a soft ombré effect where the colors melt into each other. -
Adding texture:
While the sky is damp, you can lightly dab a dry brush across the transition line to create faint, wispy cloud textures.
Step 2: Layering the Mountains
-
First mountain range:
Mix a small amount of Mauve with White to get a hazy, distant purple. Using a small round brush, paint a jagged mountain shape roughly across the middle of the rock. Let the peaks vary in height. -
Mountain details:
While the mauve layer is wet, you can add tiny touches of white on one side of the peaks to suggest snow or light reflection, but keep it subtle. -
Second mountain range:
Once the first range is dry, mix a Deep Burgundy color. Paint a second, larger mountain range in front of the first one, positioning it slightly lower so the first range peeks out from behind. -
Let it dry completely:
It is crucial to let these layers dry fully before moving to the black silhouette, otherwise the colors will muddy together.
Sticky Brush?
If your fine lines are dragging or breaking, your black paint might be too thick. Add just a single drop of water to the black paint to make it flow like ink for smoother branches.
Step 3: Creating the Silhouette
-
Roughing in the foreground:
Take your black acrylic paint. Paint a solid black wavy line at the very bottom of the rock to establish the ground. Fill in everything below this line with solid black. -
Adding grass texture:
Using your fine liner brush or the very tip of a small brush, flick short, quick strokes upward from the black ground to create the look of grassy vegetation. -
The main tree trunk:
Choose a spot on the right side for your focal tree. Paint a slightly curved line reaching up towards the top of the rock. Make the base thicker and taper it as you go up. -
Branch structure:
Paint main branches extending outward from the trunk. Remember that nature isn’t perfect; make some crooked or reaching in different directions. -
Pine needle details:
I like to use a stippling motion for this part. Use the very tip of your smallest brush to dab tiny clusters of leaves or needles along the branches. Keep them somewhat see-through to maintain the silhouette feel. -
Small pine tree:
Paint a smaller, triangular pine tree shape on the right side, lower down near the main trunk base. Use small horizontal dashes getting wider at the bottom. -
Birds in the distance:
With the finest point of your liner brush, add two or three tiny ‘V’ shapes in the sky to represent birds flying in the distance.
Depth Trick
For the distant mauve mountains, mix in a tiny bit of the sky color (peach/pink) into the purple mix. This ‘atmospheric perspective’ makes them look further away than the dark foreground.
Step 4: Finishing Touches
-
Clean up:
Check the edges of your rock. If you want a framed look, you can leave the natural stone showing on the sides, or wrap the painting around the edges. -
Seal the artwork:
Once absolutely dry (give it at least an hour), spray with a clear acrylic sealer to protect your painting from scratches and weather.
Place your finished sunset stone on a shelf or in a garden pot to add a touch of peaceful scenery to your space


Have a question or want to share your own experience? I'd love to hear from you in the comments below!