Santa rocks are one of those feel-good projects that look adorable even when you keep them super simple. I love how a smooth little stone can turn into Santa’s face, Santa’s belly, or a whole tiny holiday scene with just a few confident brushstrokes.
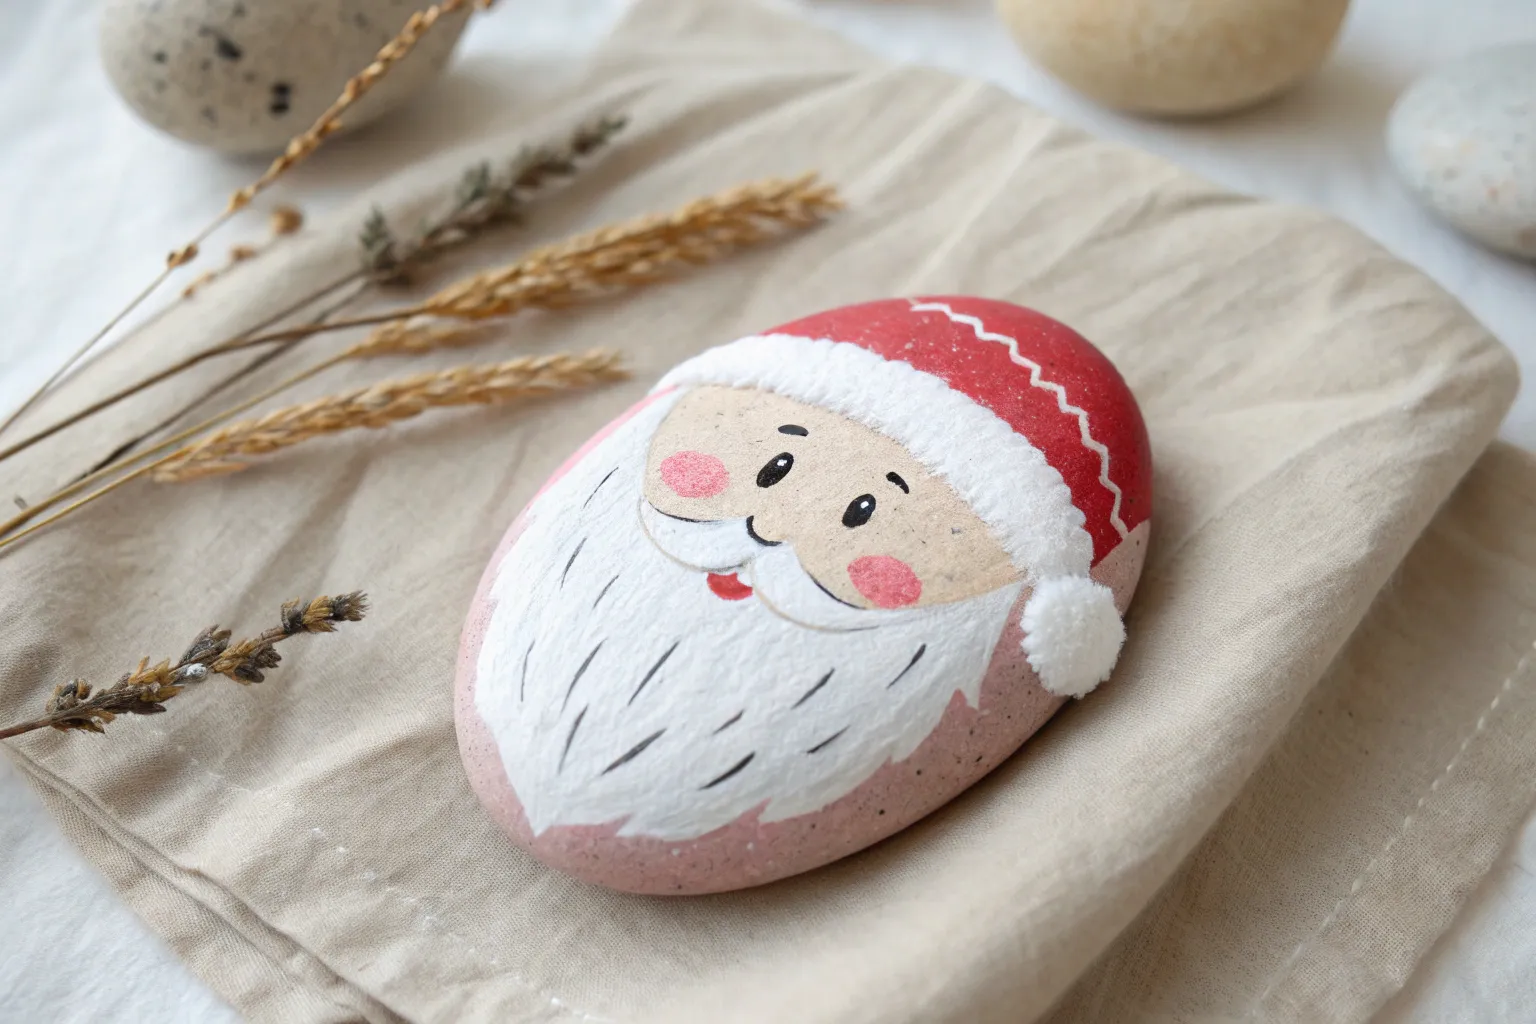
Classic Santa Face Rock
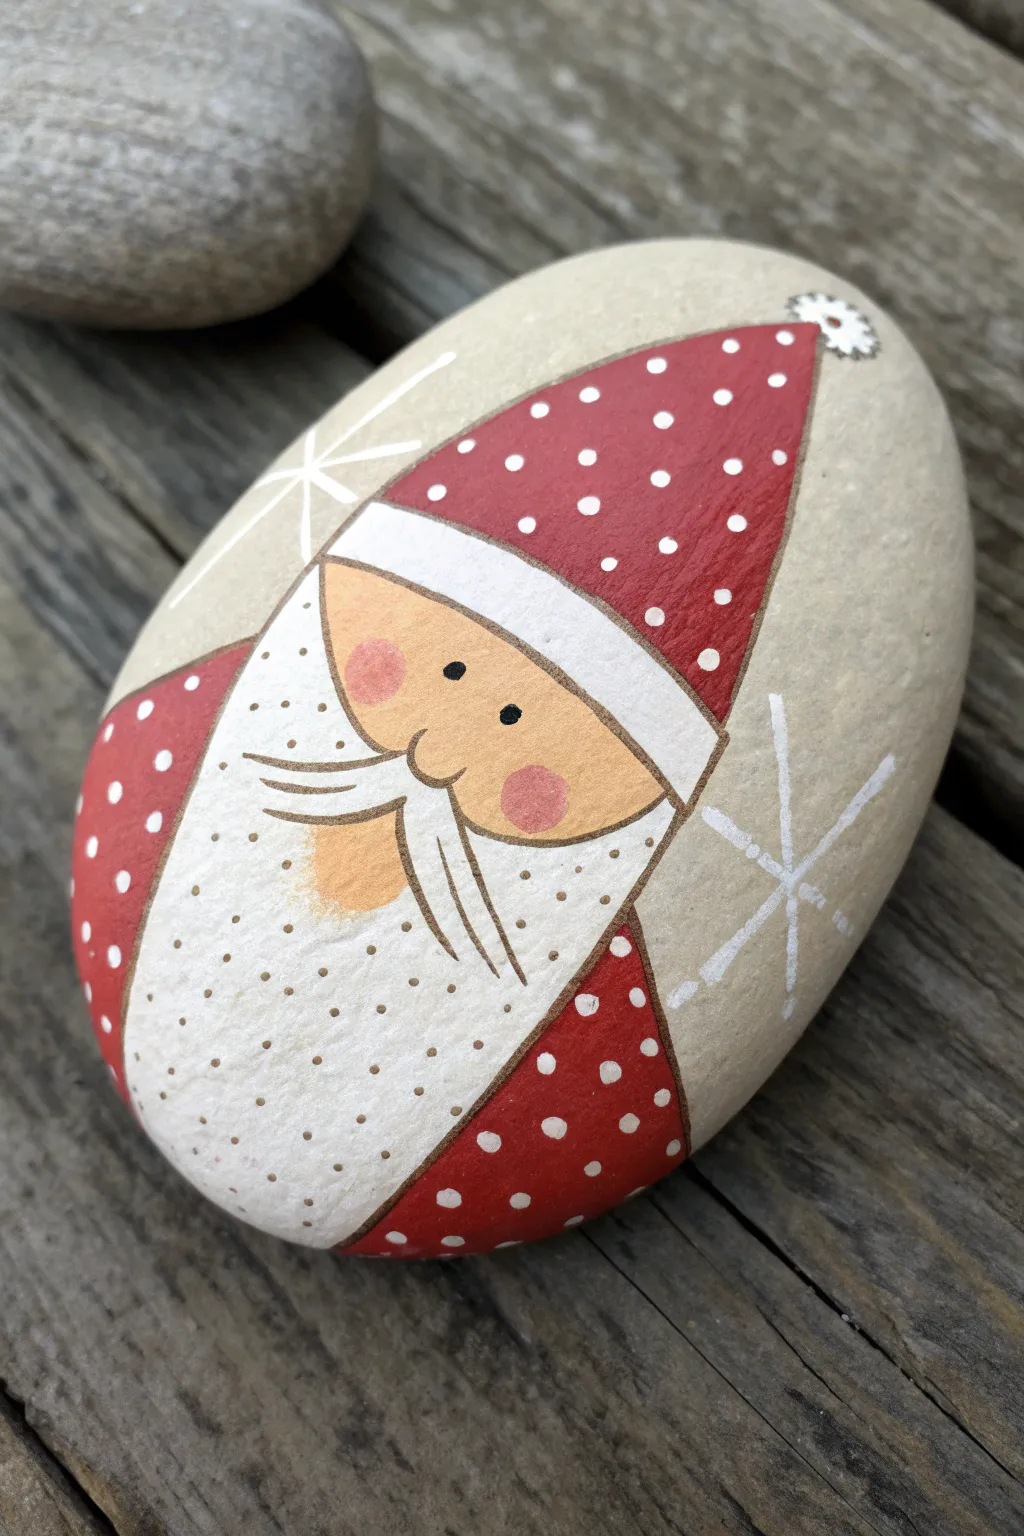
This rustic Santa design lets the natural texture of the stone shine through, using a soft, illustrative style rather than heavy layers of acrylic. With its gentle lines and rosy cheeks, this project captures a classic, storybook St. Nick perfect for holiday decorating.
Step-by-Step
Materials
- Smooth, oval-shaped river rock (clean and dry)
- Flesh-tone acrylic paint (peach or beige)
- White acrylic paint or paint pen (fine tip)
- Red acrylic paint
- Fine-point black permanent marker or liner pen
- Small detail paintbrush
- Flat shader brush
- Matte spray sealer or varnish
- Pencil (optional)
Step 1: Planning and Base Colors
-
Find the right canvas:
Begin by selecting a smooth, grey stone. The natural grey will serve as the background color, so you don’t need to base coat the entire rock. -
Sketch the outline:
Lightly sketch the Santa shape with a pencil. Draw a large curved shape for the beard, an oval for the face area, and the drooping curve of his hat. -
Block in the face:
Using a flat shader brush and flesh-tone acrylic paint, fill in the central oval area where Santa’s eyes and nose will go. You may need two thin coats for opacity. -
Paint the beard base:
Fill in the beard area with white acrylic paint. Instead of a solid block of color, use brushstrokes that follow the direction of hair growth—down and outward—leaving the edges slightly feathered. -
Add the hat brim:
Paint a thick white band across the top of the face for the hat’s fur trim. Curve the ends down slightly to hug the face.
Step 2: Adding Character and Details
-
Paint the red hat:
Fill in the hat shape above the white brim with bright red paint. Extend the tail of the hat down the right side of his face. -
Add the pom-pom:
Dab a messy circle of white at the very tip of the red hat tail. Don’t make it a perfect circle; a slightly irregular shape looks fluffier. -
Create the nose:
Mix a tiny bit of orange or brown into your flesh tone to make a slightly darker shade. Paint a small, horizontal oval in the center of the face for a button nose. -
Add rosy cheeks:
Dilute a tiny drop of red paint with water to make a glaze, or use a very sheer pink. Gently dab two circles on either side of the nose. I find using a fingertip creates the softest blush effect. -
Paint the mouth:
Just under the nose, paint a small red shape for the mouth. It should look like a small ‘D’ on its side or a cherry.
Ink Smearing?
If your black outline pen smears when you apply varnish, switch to a permanent marker specifically labeled ‘archival’ or mist the specific sealer very lightly at first.
Step 3: Fine Lining and Texture
-
Outline the face:
Once the paint is completely dry, use your fine-point black liner pen. Outline the top of the nose and the bottom of the mustache curves. -
Draw the eyes:
Use the black pen or a very fine brush to draw two solid black ovals for eyes. Leave a tiny white speck in each, or add it later with a white paint pen, for a sparkle. -
Define the beard:
Use the black pen to sketch loose, jagged lines along the outer edge of the white beard paint. This creates that illustrative, hand-drawn look. -
Detail the mustache:
Draw the mustache shape over the white beard area. Start from the nose and swoop out and up on both sides, outlining neatly with black. -
Add hat textures:
Draw short, vertical hatch marks inside the white hat brim to mimic fur. Add small white polka dots to the red part of the hat for extra charm. -
Adding texture to the pom-pom:
Using a diluted pink or dirty white wash, dab small dots onto the pom-pom to give it shadow and depth. -
Seal the rock:
Once all ink and paint are fully cured, spray the rock with a matte sealer to protect your artwork from chipping.
Softer Beard Edges
Dry brush a little grey paint at the very bottom tips of the beard before outlining. It helps transition the white beard into the grey stone more naturally.
Place your finished Santa on a mantelpiece or hide it in the garden for a festive surprise


Santa Belly Belt Buckle Rock
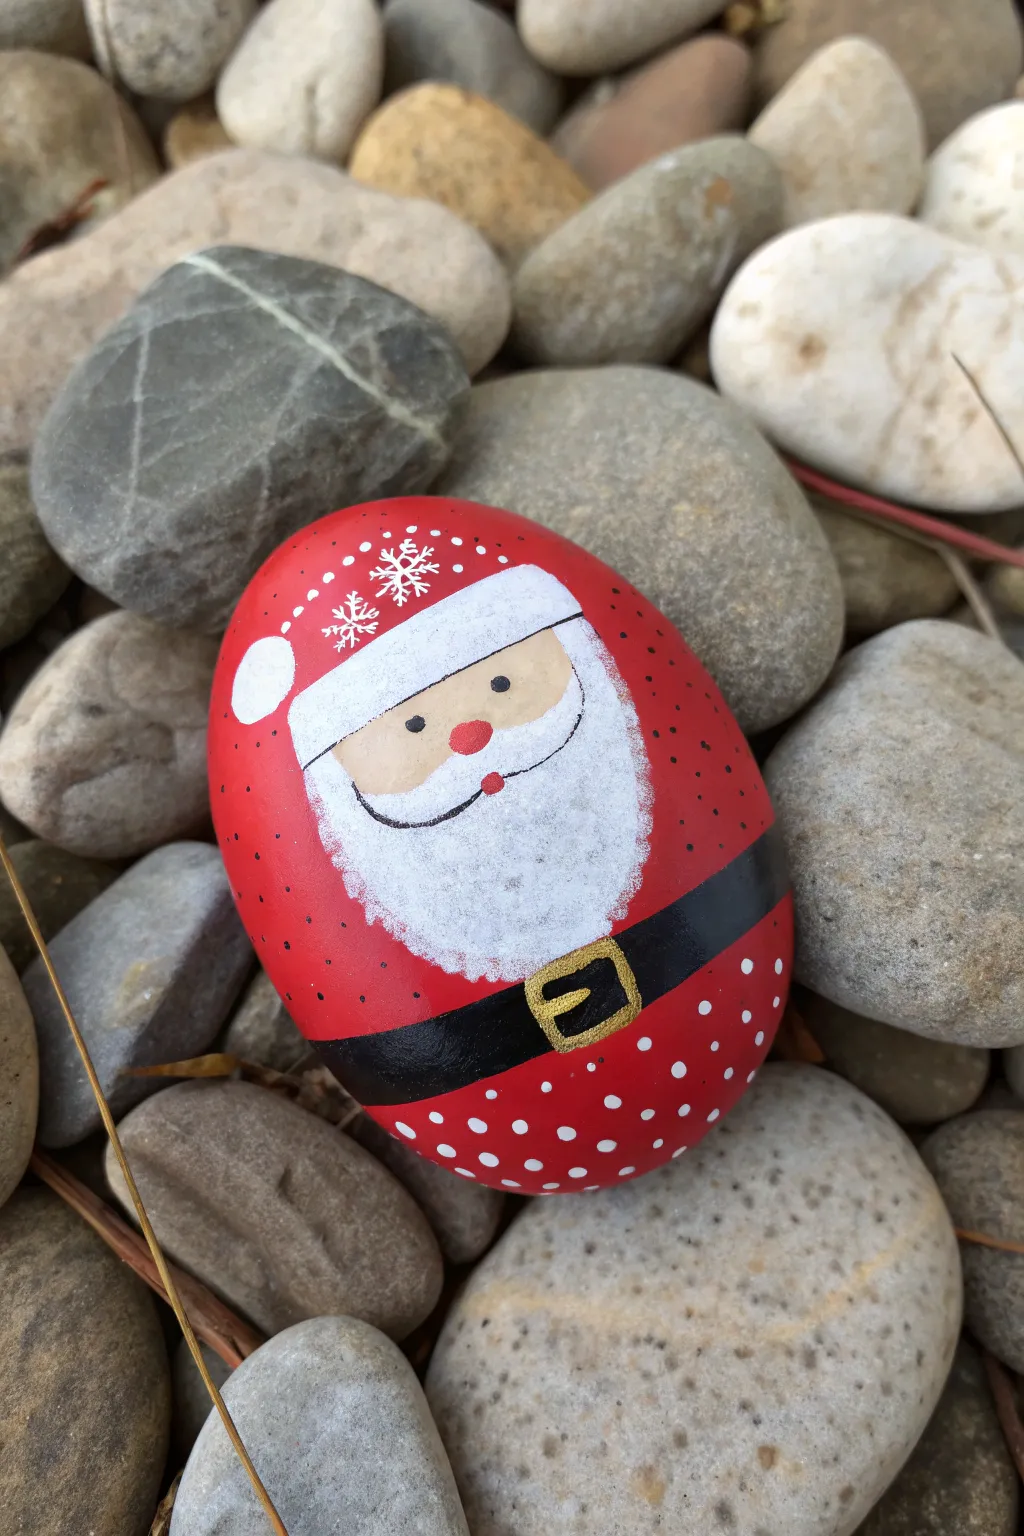
Transform a smooth stone into Santa’s jolly midsection with this simple yet iconic design. The bright red coat, fuzzy white trim, and shiny gold buckle make for perfect holiday décor or a festive hidden rock.
Detailed Instructions
Materials
- Smooth, oval-shaped river rock
- Acrylic paints: Bright Red, Black, White, Gold Metallic
- Flat paintbrushes (medium and small)
- Fine liner or detail brush
- Sealer (spray or brush-on varnish)
- Pencil for sketching
- Water cup and paper towels
Step 1: Base Coat and Sketching
-
Clean surface:
Begin by washing your rock with soap and water to remove any dirt or oils, then let it dry completely. -
Paint the red base:
Coat the entire front surface of the rock with bright red acrylic paint. You typically need two coats for solid opacity; let the first coat dry before applying the second. -
Sketch the belt:
Once the red paint is fully dry, us a pencil to lightly sketch a horizontal band across the middle for the belt. -
Outline the trim:
Above your belt line, sketch a slightly thinner wavy line where the white fur trim will go. -
Draw the buckle:
In the center of the belt band, sketch a square or rectangle for the buckle, adding a smaller square inside it to create the frame shape.
Textured Fur Trick
Mix a tiny bit of baking soda into your white paint before applying the trim. It creates a gritty, fluffy 3D texture perfect for Santa’s coat.
Step 2: Painting the Belt
-
Fill the belt area:
using a small flat brush and black acrylic paint carefully fill in the horizontal band you sketched for the belt. -
Avoid the buckle:
Paint around your sketched buckle square carefully. Don’t worry if it’s not perfect; we will paint over the edges later with the gold. -
Paint the center hole:
Fill the small inner square of the buckle with black paint as well, leaving a tiny gap on the left side for the buckle prong. -
Let it dry:
Allow the black paint to dry completely. This is crucial so the metallic gold paint doesn’t mix with wet black paint and turn muddy.
Uneven Lines?
If your belt lines look shaky, use a fine-tip black paint pen or permanent marker to outline the edges of the belt and buckle for a crisp finish.
Step 3: Adding Details and Gold
-
Paint the fur trim:
Use white acrylic paint to fill in the band above the belt. -
Create texture:
Instead of smooth strokes, I like to use a stippling motion (dabbing the brush tip up and down) with the white paint to mimic the texture of fluffy fur. -
Paint the buckle:
Using a small detail brush and metallic gold paint, fill in the square frame of the buckle. -
Add the prong:
Paint a small gold horizontal line inside the black center of the buckle to represent the prong holding the belt tight. -
Second gold coat:
Metallic paints can be translucent, so apply a second layer of gold once the first is dry to make it really shine. -
Add belt holes:
On the right side of the belt, use the handle end of a paintbrush dipped in gold to dot two vertical pairs of small circles.
Step 4: Finishing Touches
-
Clean up lines:
If any gold or white went outside the lines, use a fine liner brush with red paint to tidy up the edges. -
Add highlights:
For extra dimension, you can add a tiny white reflection line on the black belt or a speck of white on the gold buckle. -
Seal the rock:
Once all paint is perfectly dry (wait at least 24 hours to be safe), apply a clear sealer to protect your artwork from the elements.
Hide your finished rock in the garden or place it under the tree for a touch of handmade holiday magic


Chubby Full-Body Cartoon Santa
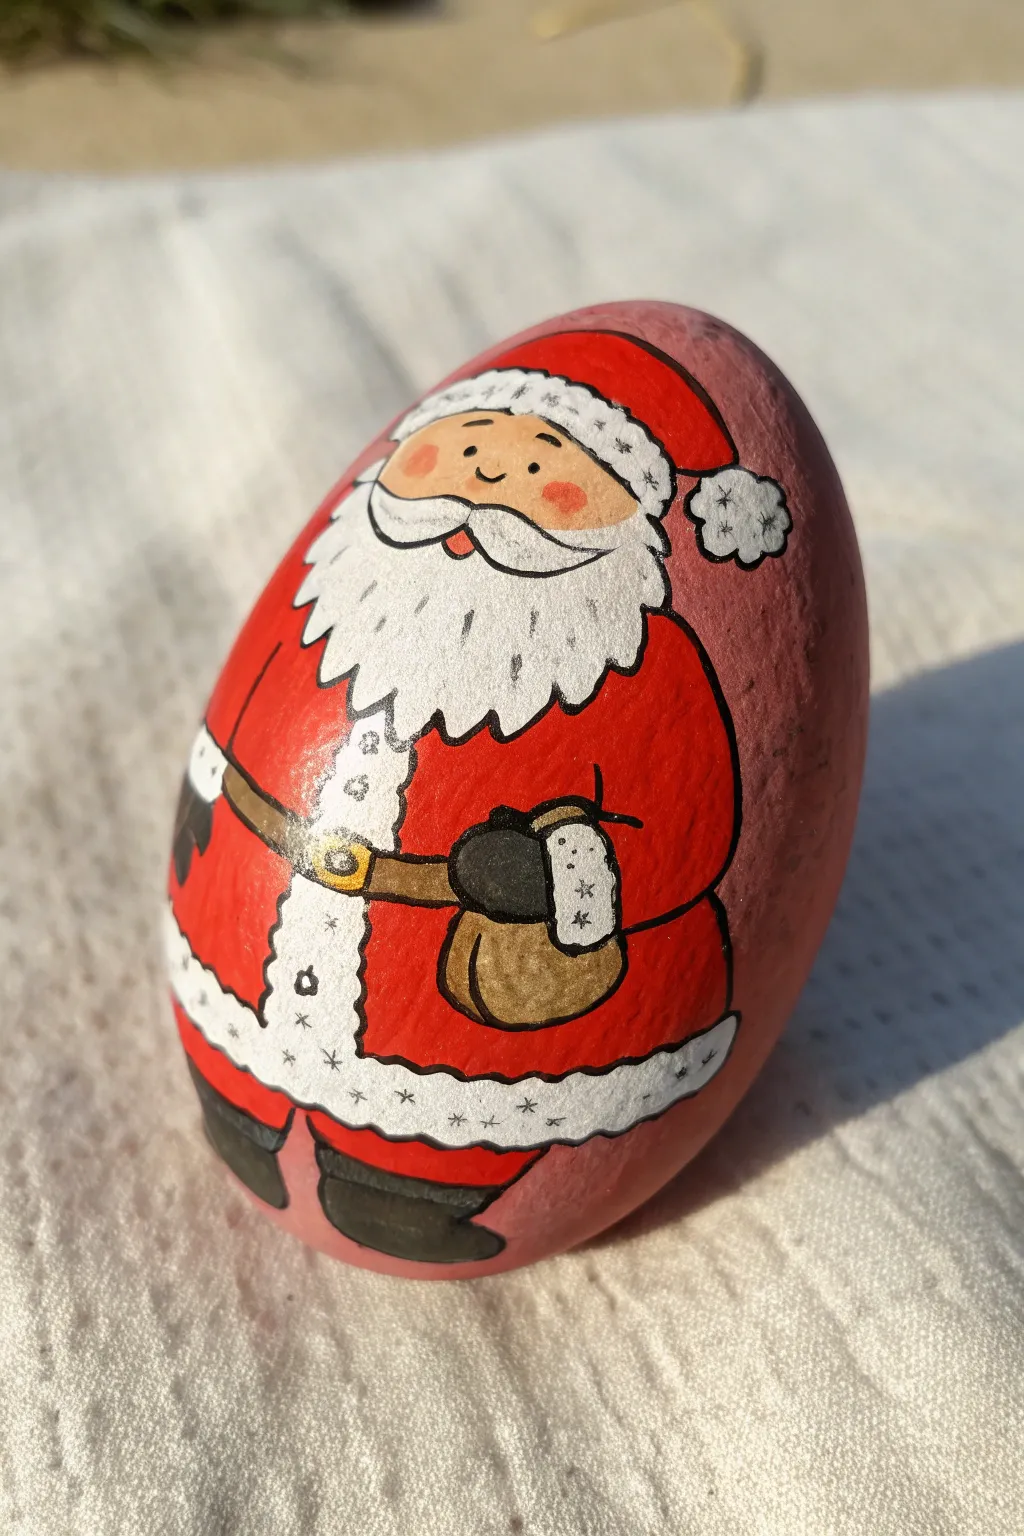
Transform a smooth, oval stone into a cheerful, chubby Santa Claus complete with his sack of toys. This full-body cartoon design uses the natural shape of the rock to emphasize Santa’s round belly, creating a delightful holiday decoration.
Step-by-Step
Materials
- Smooth, oval-shaped river rock (egg-shaped is best)
- Acrylic paints (Red, White, Black, Peach/Flesh tone, Gold/Ochre, Brown)
- Fine liner brushes (sizes 00 and 0)
- Small flat brush
- Pencil and eraser
- Black fine-point paint pen or permanent marker (optional but recommended for outlining)
- Clear sealant (matte or gloss spray)
Step 1: Base Coating & Sketching
-
Prime the surface:
Start by cleaning your rock thoroughly. Once dry, paint the entire surface with a base coat. A soft, muted mauve or light dusky pink works beautifully as a background color, as seen in the photo, though you could also choose a simple solid color. -
Sketch the silhouette:
Using a pencil very lightly, draw the main outline of Santa. Start with a large oval for the body. Add a smaller curved line near the top for the hat brim and define where his feet will go at the bottom. -
Define the features:
Sketch the beard shape—it should be wide and fluffy, coming down over the chest. Draw the belt line across the widest part of the ‘belly’ and add the sack on his right side (your left).
Steady Hand Trick
When doing the fine black outlines, rest your pinky finger on a dry part of the rock to stabilize your hand. This acts as an anchor for smoother lines.
Step 2: Blocking in Colors
-
Paint the red suit:
Using a small flat brush, fill in the hat, the arms, and the large body area with bright red acrylic paint. You may need two coats for a solid, opaque look. -
Add the face:
Fill in the face area between the hat brim and the beard with a peach or flesh-tone paint. Don’t worry about the eyes or nose yet; just work on getting smooth coverage. -
White details:
Paint the beard, the hat’s brim and pom-pom, the cuffs on the sleeves, and the trim at the bottom of the coat with white paint. Let the white texture look a bit fluffy by dabbing the paint rather than smoothing it perfectly. -
Boots and belt:
Paint the gloves and boots with black acrylic. Paint the belt strap brown or black, leaving a small square open for the buckle. -
The toy sack:
Fill in the sack shape with a light brown or ochre color. I usually mix a tiny bit of white into the brown to make sure it stands out against the red suit.
Glitter Upgrade
While the white paint on the hat trim is still wet, sprinkle a pinch of iridescent white glitter on it. It adds a magical, snowy sparkle!
Step 3: Defining & Detailing
-
Outline the figure:
This is the most crucial step for the cartoon look. Using a very fine liner brush with thinned black paint (or a black paint pen), carefully outline every section: the suit, the beard, the sack, and the hat. -
Paint the face features:
With your fine liner, add two small black dots for eyes and a small curved line for the nose. Paint a small pink oval for the mouth if visible, or just a simple line. -
Rosy cheeks:
Dilute a tiny bit of red or dark pink paint with water to create a glaze. Gently dab this onto the cheeks to give Santa a warm, frosty glow. -
The mustache:
Paint a white handlebar mustache over the beard, right under the nose. Outline it in black to make it pop against the white beard background. -
Belt buckle gold:
Use gold or yellow ochre paint to fill in the belt buckle square. Once dry, give it a thin black outline.
Step 4: Final Touches
-
Fur texture:
On the white trim of the hat, coat, and cuffs, add tiny ‘asterisk’ or star shapes using a very fine tipped pen or brush with grey or thinned black paint. This mimics the look of fur texture. -
Beard details:
Draw small vertical lines inside the beard area to suggest hair texture. Keep these lines thin and slightly broken so they don’t look rigid. -
Sack patch:
Paint a small white rectangle on the sack to look like a patch. Outline it in black and add tiny stitch marks around the edges. -
Seal the artwork:
Allow the rock to dry overnight to ensure no moisture is trapped. Finish with a clear spray sealant to protect your handiwork from chipping.
Enjoy displaying your jolly little Santa rock on a mantelpiece or giving it as a festive handmade gift


Santa Hat and Beard Only
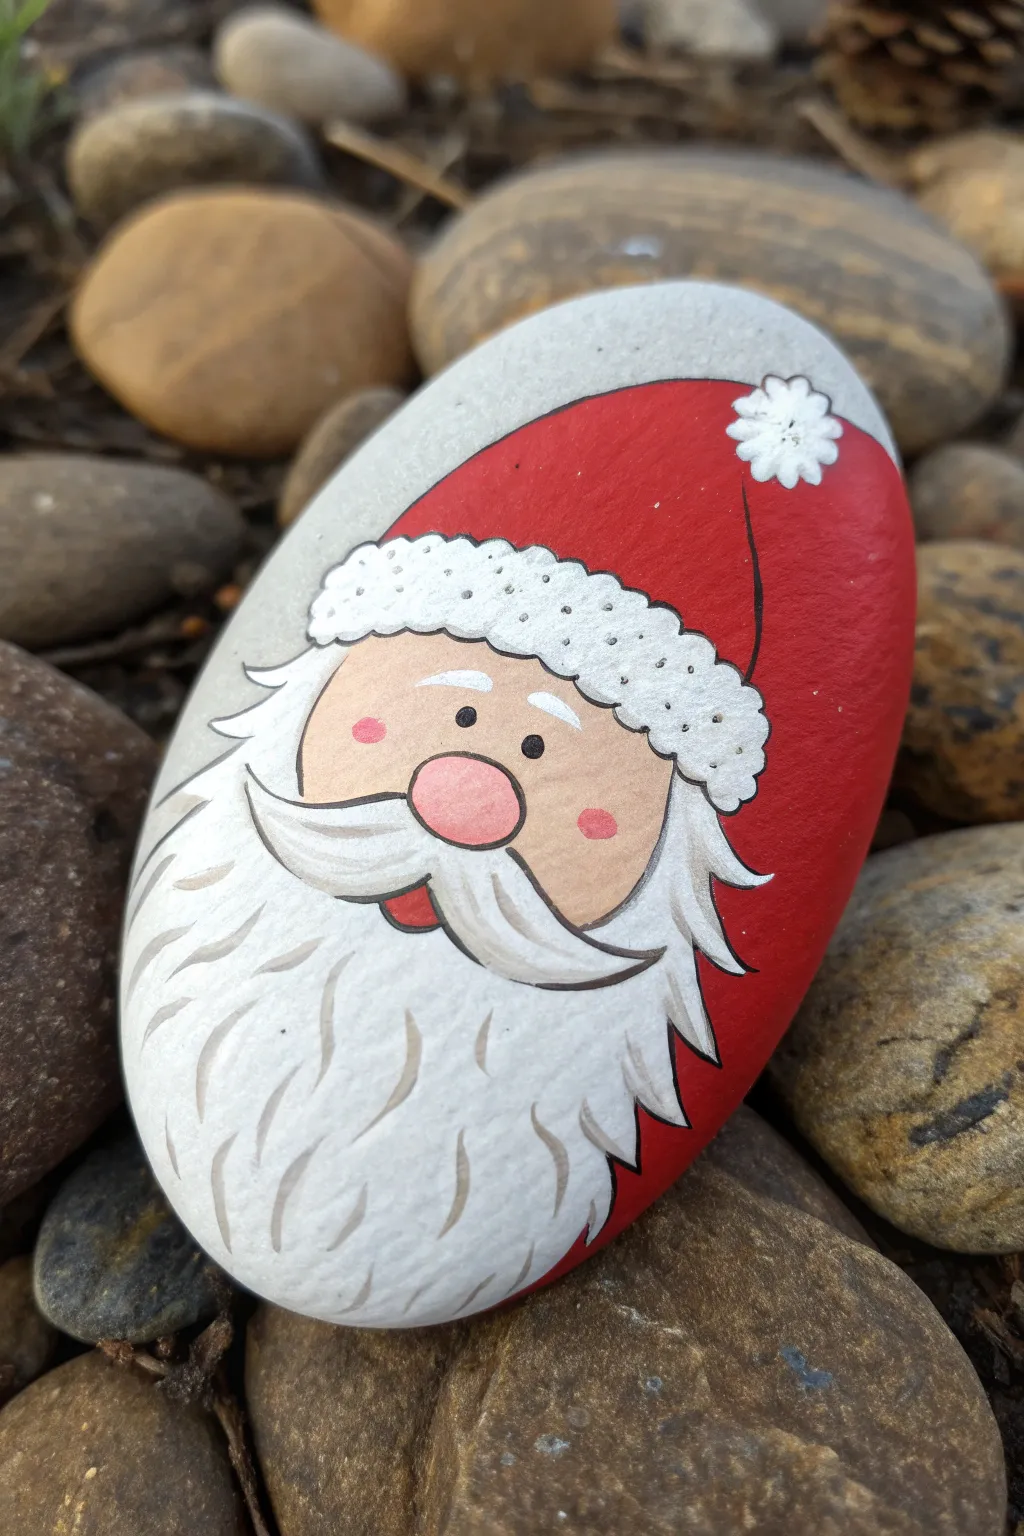
Transform an ordinary river rock into a festive keepsake with this delightful Santa face design. This project captures St. Nick’s jolly expression with clean lines, soft shading, and a bright pop of holiday red that stands out beautifully against the natural stone background.
How-To Guide
Materials
- Smooth, flat river rock (oval shape works best)
- Acrylic paints: Bright Red, Titanium White, Peach/Flesh tone, Black, Grey
- Paintbrushes: Flat brush (medium), Round brush (small), Liner brush (fine detail)
- Pencil and eraser
- Dotting tool or toothpick
- Spray sealer or varnish (matte or gloss)
Step 1: Base Sketch & Blocking
-
Prepare the stone:
Begin by washing your rock with soap and water to remove any dirt or oils. Let it dry completely before starting your work. -
Sketch the outline:
Using a pencil, lightly draw the main shapes on the rock. Start with a curved line for the hat trim across the forehead, then outline the beard shape flowing down to the bottom. Sketch the large circle for the nose right in the center. -
Paint the face:
Load a small flat brush with peach or flesh-toned acrylic paint. Fill in the area between the hat line and the beard line. You might need two coats to get solid coverage. -
Block in the hat:
Paint the entire upper portion of the rock with bright red acrylic paint. Ensure the paint wraps slightly around the sides of the rock for a finished look. -
Create the white base:
Fill in the beard area, the hat’s brim, and the pom-pom circle with titanium white paint. Don’t worry about texture yet; just aim for a solid, opaque white base.
Step 2: Adding Features & Details
-
Paint the nose:
Mix a tiny bit of red into your peach paint to make a slightly darker pink shade. Paint the round nose in the center of the face. -
Add rosy cheeks:
Using that same pink mixture (or perhaps a slightly lighter version), dab two small circles on the cheeks on either side of the nose. -
Paint the mouth:
Paint a small semi-circle or crescent shape in red or dark pink directly under the nose area to create a smiling mouth peeking through the beard. -
Outline the mustache:
Once the white base is dry, recreate the swooping mustache shape using white paint again if needed to define it, or simply prepare to outline it. The mustache should start from the nose and curve outward and slightly up. -
Texture the hat trim:
Using a very small brush or a dotting tool, dab white paint along the hat’s brim and the pom-pom to create a fluffy, textured look. You can tap the brush repeatedly to build up this ‘fur’ effect.
Uneven Coverage?
If your white paint looks streaky over the dark rock, don’t rush. Apply thin layers, letting each dry fully. It’s better to do 3 thin coats than one thick, gloppy one.
Step 3: Linework & Shading
-
Outline the major shapes:
Switch to your finest liner brush and black paint (or a fine-tip paint pen). Carefully outline the hat, the face, the nose, and the main shape of the beard. -
Define the trim:
Outline the fluffy hat brim and the pom-pom with a bumpy, scalloped line to emphasize the texture we created earlier. -
Add facial features:
Use a dotting tool or the back of a paintbrush dipped in black to stamp two dots for the eyes. Add thin, curved eyebrows above them with white paint. -
Detail the beard flow:
Using watered-down grey paint and a liner brush, paint curved strokes inside the white beard area. These lines should mimic the flow of hair effectively. -
Refine the mustache:
Outline the mustache in black, and add a few grey strokes inside it as well to show volume. -
Add highlights:
Place a tiny white dot reflecting light on the upper right side of each black eye. Add a small white curved line on the nose. -
Final hat shadow:
Paint a very thin black line curving up from the brim into the red part of the hat to suggest a fold in the fabric. -
Seal the artwork:
Allow the rock to dry overnight. Finish by spraying a clear varnish over the surface to protect the paint from chipping and weather.
Liner Brush Control
For the crisp black outlines, I find that thinning the black paint with a drop of water helps the paint flow much smoother off the liner brush for long, continuous strokes.
Place your jolly masterpiece on a doorstep or in a garden bed to spread holiday cheer to everyone who passes by
BRUSH GUIDE
The Right Brush for Every Stroke
From clean lines to bold texture — master brush choice, stroke control, and essential techniques.
Explore the Full Guide
Santa With Rosy Cheeks and Dot Eyes
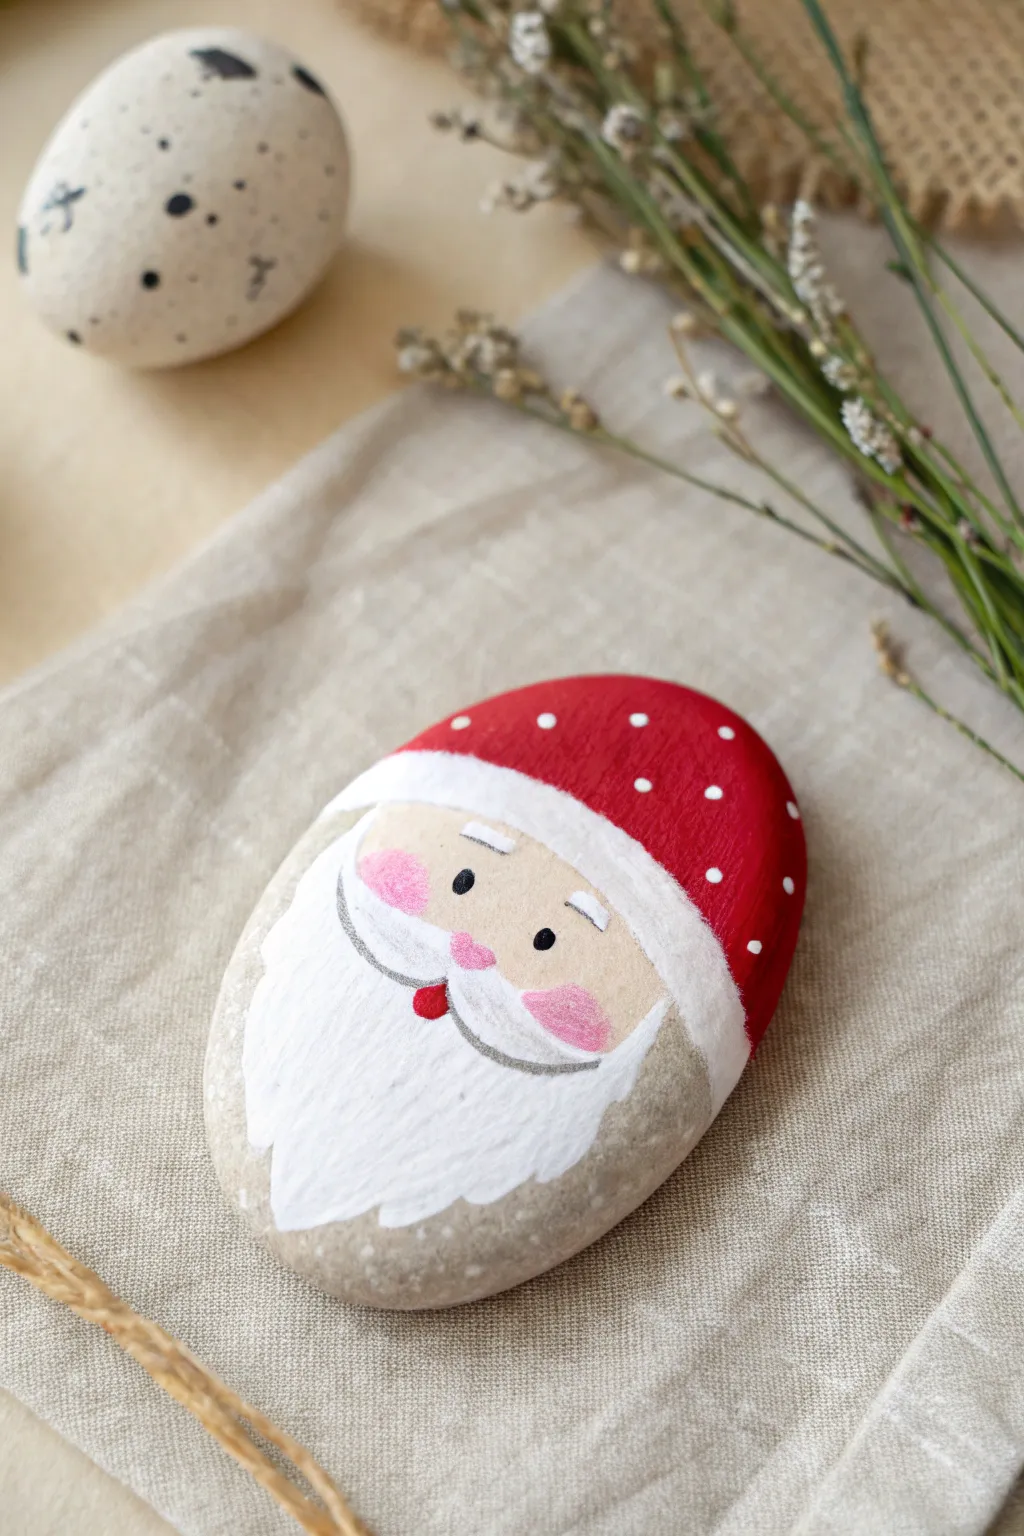
Transform a smooth, oval-shaped stone into a jolly Santa face featuring distinctively soft, rosy cheeks and a classic red hat dusted with snow. The natural grey of the stone is cleverly used as a festive background, reducing the amount of painting required.
Step-by-Step Tutorial
Materials
- Smooth oval river rock (medium size)
- Acrylic craft paints (Red, White, Black, Beige/Flesh Tone, Pink)
- Pencil for sketching
- Small flat brush
- Fine detail liner brush (size 0 or 00)
- Medium round brush
- Matte or sealant spray (optional)
Step 1: Planning and Base Colors
-
Clean your canvas:
Begin by washing your rock with soap and water to remove any dirt or oils. Let it dry completely so the paint adheres properly. -
Sketch the outline:
Using a pencil, lightly draw the curve for the bottom of Santa’s hat about one-third of the way down the rock. Sketch a large U-shape below that for the beard area. -
Paint the hat base:
With your medium round brush and bright red acrylic paint, fill in the entire top section above your pencil line. You may need two coats for a solid, opaque red. -
Create the face shape:
Mix a gentle beige or flesh tone. Paint a wide oval shape in the center, just below the red hat area, leaving space on the sides and bottom for the beard hair later.
Natural Texture
Don’t paint the background! Leaving the raw stone visible around the Santa face adds a beautiful, organic contrast to the bright acrylics.
Step 2: Adding the Beard and Trim
-
Paint the hat trim:
Once the red paint is dry, use white paint to create the fluffy trim of the hat. Paint a thick, slightly curved band that overlaps slightly onto the red and the top of the face area. -
Texture the trim:
Before the white band dries, you can dab it lightly with a dry brush to give it a fuzzy, fabric-like texture. -
Establish the beard base:
Using white paint and a flat brush, fill in the large U-shape for the beard. Don’t worry about texture yet; just get a solid white base down. -
Detail the beard hair:
Switch to a smaller brush. Add directional strokes of white paint at the edges and surface of the beard to simulate hair flowing downward and outward. -
Add the mustache:
Paint a curved, heavy mustache in white directly over the beige face area, ensuring it connects seamlessly to the beard below.
Shaky Lines?
If your fine lines for the mustache or eyes feel shaky, dilute the paint with a tiny drop of water. Inky paint flows smoother than thick paint.
Step 3: Facial Features & Details
-
Add the rosy cheeks:
Dip a brush lightly into pink paint and dab off most of the excess. Gently dry-brush two large, soft pink ovals on the cheeks, blending the edges so they look naturally flushed. -
Paint the nose:
Place a small dab of pink right in the center, slightly overlapping the mustache, to create a cute button nose. -
Dot the eyes:
Using the handle end of a paintbrush or a dotting tool, place two solid black dots wide apart for the eyes. -
Outline the mustache:
With your finest liner brush and grey paint (or slightly watered-down black), carefully outline the bottom curve of the mustache to define it against the beard. -
Add eyebrows:
Paint two tiny, curved white lines floating above the eyes for the eyebrows. -
Whimsical mouth:
Paint a tiny red tongue or open mouth shape right at the center point where the mustache curls meet. -
Polka dot hat:
Using a small brush tip or a toothpick, add random white polka dots all over the red hat to look like falling snow.
Allow your jovial stone Santa to dry completely before placing him on a mantel or in a garden pot
Winking Santa Expression Rock
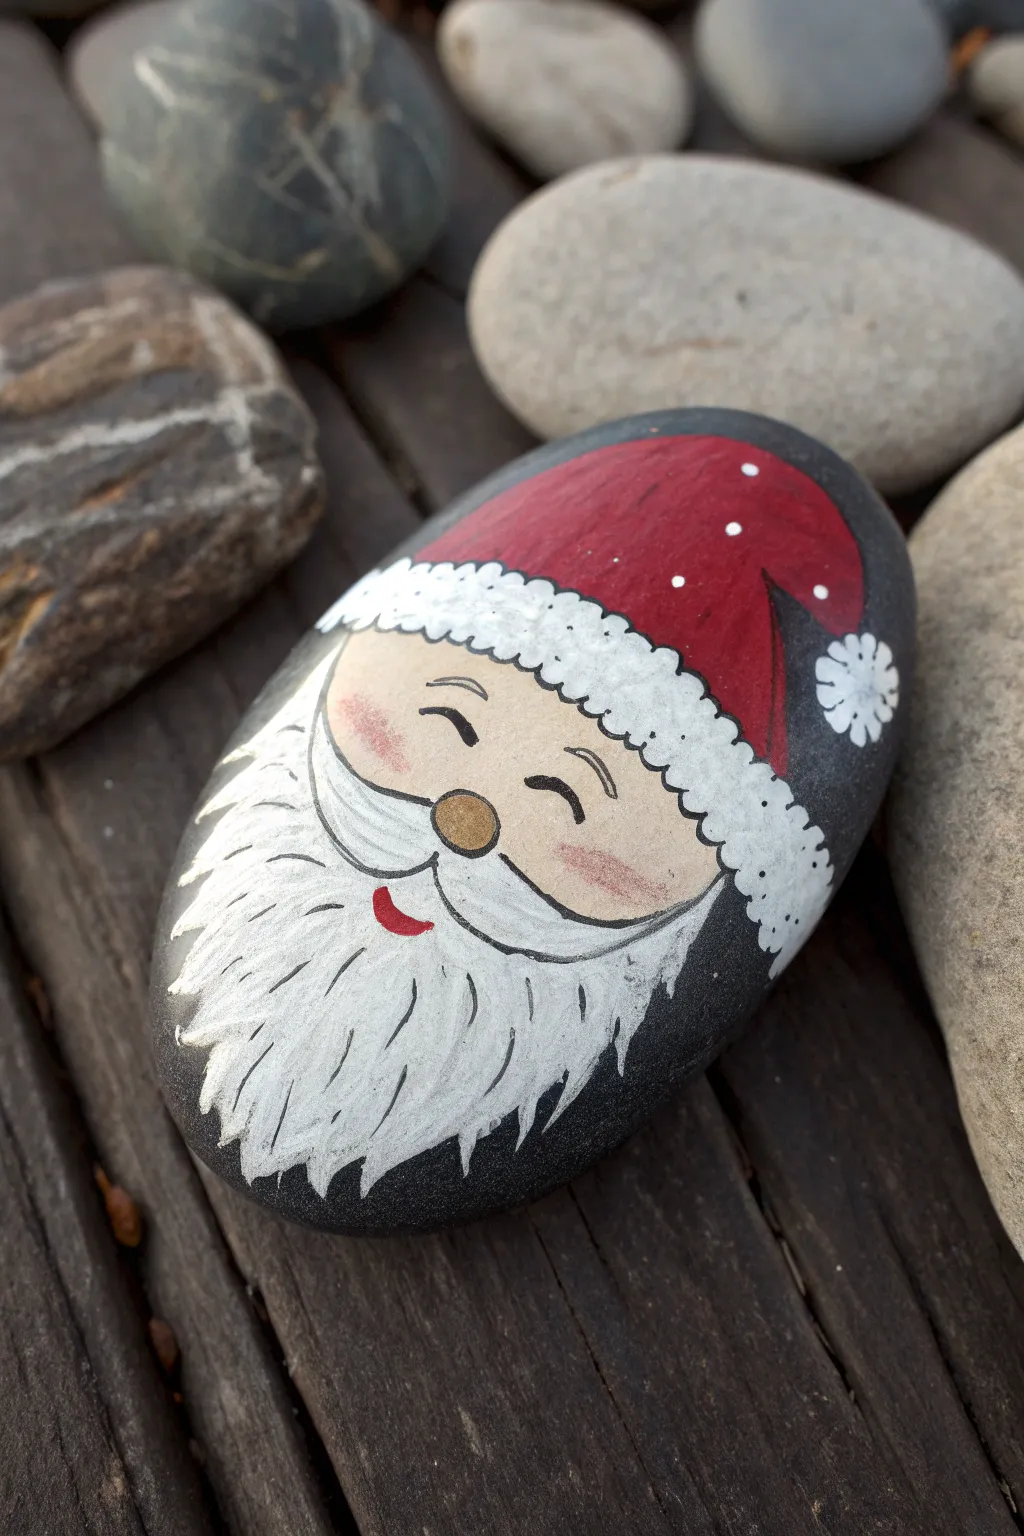
Capture the merry spirit of Christmas with this adorable winking Santa painted on a smooth river stone. The natural grey of the rock serves as a perfect backdrop for his bright red hat and snowy white beard.
Detailed Instructions
Materials
- Smooth, oval river rock (dark grey preferred)
- Acrylic paints: Bright Red, Titanium White, Black, Beige/Skin tone, Gold/Ochre (for nose)
- Paintbrushes: Flat shader brush, small round brush, fine liner brush
- Pencil and eraser
- Paint markers (black and white fine tip) – optional but helpful
- Matte or glossy sealer/varnish
Step 1: Sketching and Base Layers
-
Clean your canvas:
Before starting, scrub your rock with soap and water to remove any dirt or oils. Let it dry completely so the paint adheres properly. -
Map out the face:
Using a light pencil, sketch a large oval shape for the face area in the bottom half of the rock. Leave enough space at the top for his hat. -
Outline the beard and hat:
Draw the fluffy trim of the hat resting right on top of the face oval. Extend the hat shape upward to the right, adding a pom-pom circle at the tip. Then, sketch the beard outline flowing down from the cheeks to the bottom of the rock. -
Paint the face:
Fill in the face oval with a beige or skin-tone acrylic paint. You may need two coats for opaque coverage. -
Block in the hat:
Use your bright red paint to fill in the main body of the hat. Be careful to paint around the white pom-pom area and the white brim area. -
Create the white elements:
Using titanium white, fill in the beard area, the hat’s brim, and the pom-pom. Apply this thickly or in multiple layers so the dark rock doesn’t show through.
Step 2: Adding Details and Features
-
Paint the nose:
Mix a little gold or ochre with beige to paint a small circle for the nose, placed centrally just above the beard line. -
Add rosy cheeks:
While the skin tone is dry, create a very watery wash of red or pink. Gently dab this onto the cheek areas to give him a rosy glow. I prefer using a dry brush technique here for a softer look. -
Texture the trim:
Once the white brim is dry, use a fine liner brush with slightly watered-down grey or a very light blue to paint small ‘C’ curve scallops along the bottom edge of the hat trim to simulate fluffy fur. -
Define the beard:
Using a fine liner brush with black paint (or a black paint pen), outline the mustache shape—it should look like two swoops coming from the nose. -
Draw the mouth:
Paint a small, red crescent shape under the mustache for his smiling mouth. -
Detail the beard hair:
With your fine black liner, draw vertical, slightly curved lines through the white beard to create texture. Keep the lines thin and varying in length. -
Add the facial features:
Paint two curved arches for the winking eyes using black paint. Add small eyebrows above them. -
Finish the hat details:
Outline the hat and the pom-pom with black. Add little white dots scattered on the red part of the hat for a snowy effect, and paint distinct lines on the pom-pom to make it look puffy. -
Seal the rock:
Allow the entire rock to dry for at least 24 hours. Apply a coat of clear sealer to protect your artwork from chipping and weather.
Paint looking streaky?
If the white paint looks transparent against the dark rock, don’t rush. Let the first layer dry completely, then apply a second or third thin coat.
Pro Tip: Fluffy Texture
For the hat brim, dab the wet white paint with an old sponge or a stiff brush instead of stroking it. This creates real texture that looks like wool.
Place this cheerful rock on your porch or under the tree to spread holiday joy

PENCIL GUIDE
Understanding Pencil Grades from H to B
From first sketch to finished drawing — learn pencil grades, line control, and shading techniques.
Explore the Full Guide
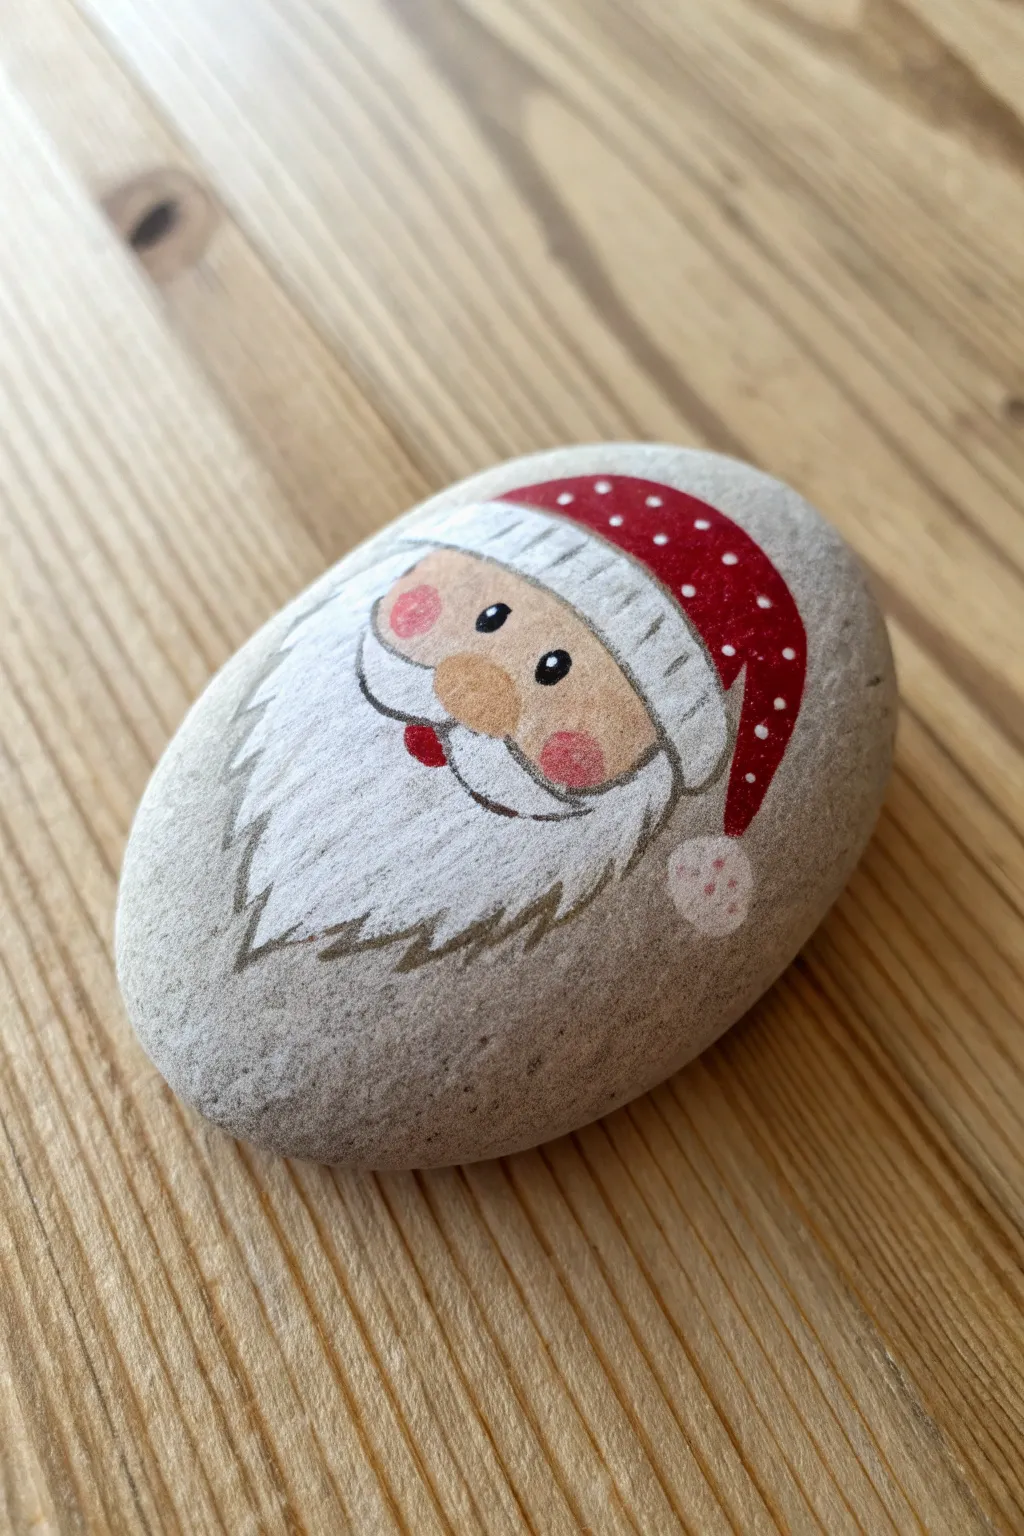
Stippled Fluffy Beard Texture Santa
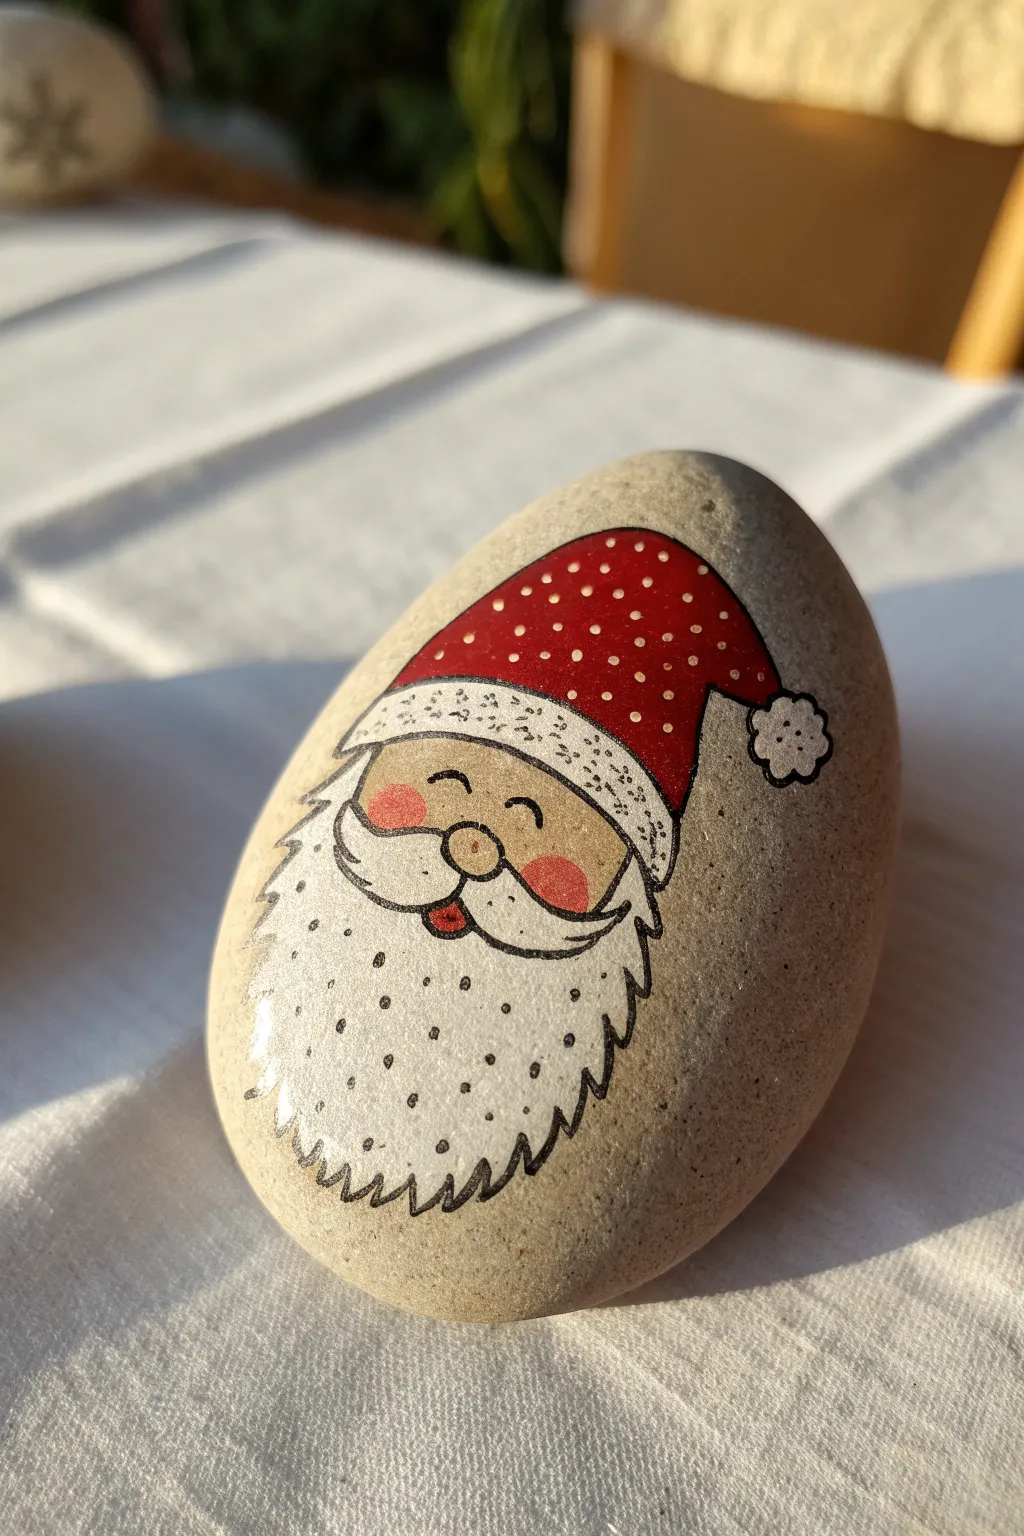
This charming rock painting features a cheerful Santa with a delightfully textured beard created through simple stippling. The design uses natural stone space creatively, making it a perfect project for beginners looking for a cute, rustic holiday decoration.
Step-by-Step Tutorial
Materials
- Smooth, oval-shaped river rock (cleaned and dried)
- Pencil and eraser
- Red acrylic paint (matte)
- White acrylic paint (matte)
- Beige or skin-tone acrylic paint
- Fine point black permanent marker or liner pen (0.3mm or 0.5mm)
- Small round paintbrush (size 1 or 2)
- Very fine detail brush (size 0 or 00)
- Clear matte varnish or sealant
Step 1: Sketching the Layout
-
Prepare the surface:
Ensure your rock is completely clean and dry. A smooth surface works best for the fine pen details we will be adding later. -
Outline the hat:
Using a light pencil, draw the drooping triangle shape of Santa’s hat near the top third of the rock. Let the tip of the hat curve over to the right side. -
Draw the brim and pom-pom:
Sketch a thick, curved band for the hat’s brim. Add a small, flower-like cloud shape at the tip of the hat for the pom-pom. -
Define the face shape:
Draw a semi-circle underneath the hat for the face. It should be wide enough to accommodate his cheeks and nose. -
Sketch the beard:
Lightly outline the large, U-shaped beard area. Keep the lines loose, as the final texture will be defined by paint and ink.
Ink Smearing?
If your black marker smears when sealing, the ink wasn’t dry enough. Let it sit overnight, or spray the first coat of sealer very lightly rather than brushing it on.
Step 2: Blocking in Color
-
Paint the hat red:
Fill in the main body of the hat with red acrylic paint. Apply two thin coats for opaque coverage, letting the first Coat dry completely before adding the second. -
Paint the face:
Fill the semi-circle face area with your beige or skin-tone paint. Be careful to stay within your pencil lines. -
Paint the white elements:
Paint the hat brim, the pom-pom, and the large beard area with white acrylic paint. You might need 2-3 coats here to ensure the dark rock color doesn’t show through. -
Add rosy cheeks:
Once the skin tone is dry, mix a tiny bit of red with your beige (or use watered-down pink) to paint two soft oval circles for cheeks on either side of the face.
Sparkle Upgrade
Mix a small amount of fine iridescent glitter into your white paint for the brim and pom-pom, or use a glitter varnish specifically on the red hat for extra festive magic.
Step 3: Details & Texture
-
Outline the hat:
Once all paint is 100% dry, use your fine black marker to outline the red hat. Add small white dots inside the red area using a fine brush tip or toothpick for a snowy texture. -
Detail the brim and pom-pom:
Outline the white brim and pom-pom with the black marker. Inside the white brim, create a texture by stippling tiny black dots and small ‘c’ curves. -
Draw the facial features:
Using the black marker, draw two arched lines for squinting happy eyes. Draw a circle for the nose (you can leave this unpainted or fill it with a slightly darker beige). -
Create the mustache:
Draw the mustache shape using the marker directly over the white beard area, right under the nose. Outline it and add a tiny red tongue peeking out from the bottom center. -
Outline the beard:
Trace the outer edge of the beard with the black pen. Instead of a smooth line, use jagged, scallop-like points to suggest furriness. -
Stipple the beard shadow:
This is the key step: create depth in the beard by adding stippled dots. Concentrate the dots heavily just under the mustache and near the edges, fading them out as you move toward the center. -
Final highlights:
I like to add a tiny white highlight dot to the nose and the tongue to bring the character to life. -
Seal the artwork:
Allow the ink to cure for at least an hour to prevent smearing. Apply a clear matte varnish to protect your Santa for years to come.
Now you have a jolly, pocket-sized Santa ready to spread holiday cheer from your garden or centerpiece
Curly Beard Swirl Santa Rock
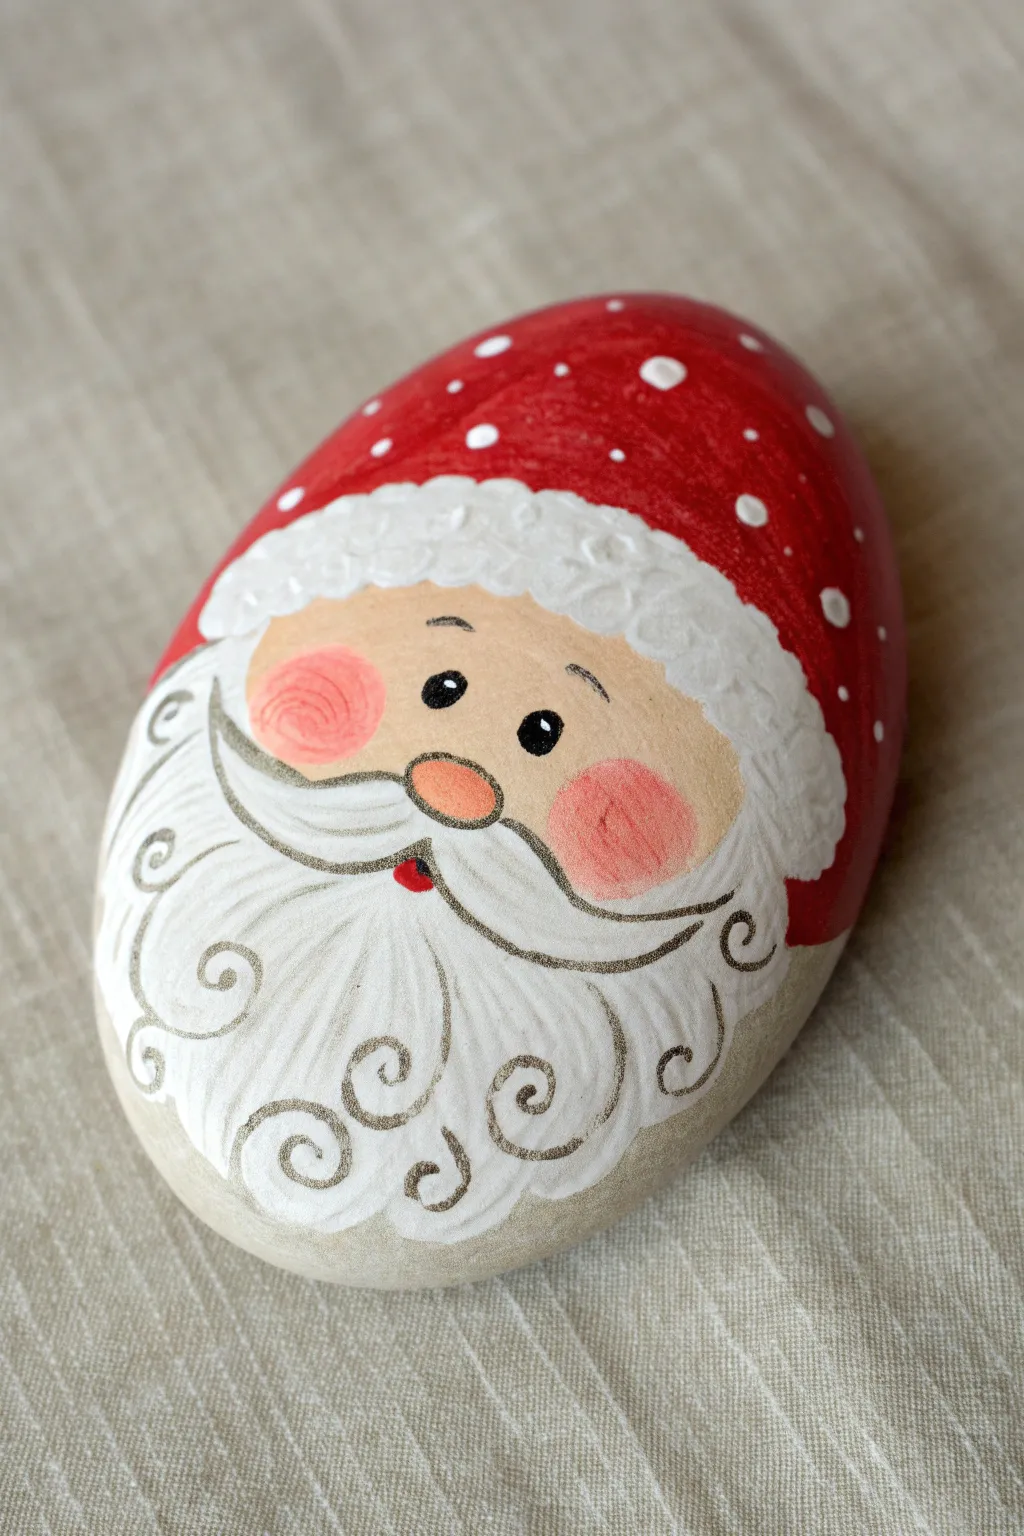
Transform a smooth, oval river rock into a festive Santa decoration featuring an iconic curly beard. This design embraces soft, rounded shapes and delicate filigree-style line work for a charming, folk-art finish.
Step-by-Step
Materials
- Smooth, oval-shaped river rock (palm-sized)
- Acrylic paints: Bright Red, Titanium White, Peach/Flesh Tone, Black, Metallic Silver or Grey
- Paintbrushes: Flat shader brush (medium), thin liner brush (0 or 00), small round brush
- Pencil and eraser
- Matte or satin acrylic varnish/sealer
- Dotting tool or toothpick
- Water cup and paper towels
Step 1: Base Layers & Face
-
Clean the canvas:
Wash your rock thoroughly with soap and water to remove any dirt or grease. Dry it completely before starting. -
Draft the design:
Using a pencil, lightly sketch the main outline. Draw a curved line across the top third for the hat brim, an oval shape for the face area below it, and define the large beard area filling the bottom half. -
Paint the face:
Fill in the central oval face area with your peach or flesh-toned acrylic paint. You may need two coats for opaque coverage. -
Create the hat base:
Paint the entire top portion of the rock (above the face line) with bright red. Extend the paint around the sides of the rock for a finished look. -
Block in the beard:
Paint the beard area (the bottom half of the rock) and the mustache shape with titanium white. Don’t worry about texture yet; just get a solid white base down.
Step 2: Facial Features
-
Add rosy cheeks:
Mix a tiny bit of red into your peach paint or use a watered-down pink. Gently sponge or dry-brush two soft circles on the cheeks. -
Paint the nose:
With a slightly darker peach or orange-tinted tone, paint a small oval nose right in the center, overlapping the top of the mustache slightly based on your sketch. -
Draw the eyes:
Using the handle end of a brush or a large dotting tool, place two solid black dots for the eyes. Add small, thin eyebrows above them using your liner brush and black paint. -
Add the mouth detail:
Paint a very small, rounded triangle in red or black directly under the mustache center to suggest an open, singing mouth.
Smoother Swirls
Thin your grey or silver paint slightly with a drop of water. Inky paint flows much better from a liner brush, helping you create confident, unbroken swirls.
Step 3: Hat & Beard Texture
-
Texture the hat brim:
Dip a stiff brush or a sponge into thick white paint. Dab it repeatedly along the line where the red hat meets the face to create a fluffy, cloud-like fur texture. -
Outline the mustache:
Using your thinnest liner brush and thinned black or dark grey paint, carefully outline the mustache shape. Add a swooping line in the middle to define the two sides. -
Start the beard swirls:
This is the signature step. With the liner brush and metallic silver or grey paint, paint large spiral curls at the bottom edges of the beard. -
Fill the beard:
Continue painting decorative swirls and curved lines throughout the white beard area, connecting them loosely to mimic flowing hair. -
Refine lines:
I like to go back with a very fine black line to accentuate the silver swirls, giving them more depth and definition. -
Decorate the hat:
Use a dotting tool or toothpick to add snowy white polka dots of varying sizes all over the red part of the hat.
Sparkle Upgrade
While the white paint on the hat brim is still wet, sprinkle a pinch of iridescent glitter over it. It mimics the glistening look of fresh snow perfectly.
Step 4: Finishing Touches
-
Add eye highlights:
Place a teeny-tiny white dot near the top edge of each black eye pupil to bring Santa to life. -
Seal the stone:
Once absolutely dry (give it at least an hour), apply a coat of matte or satin varnish to protect your artwork from chipping.
Place your jolly creation on a mantelpiece or hide it in the garden for a neighbor to find


Santa Side Profile on a Rock
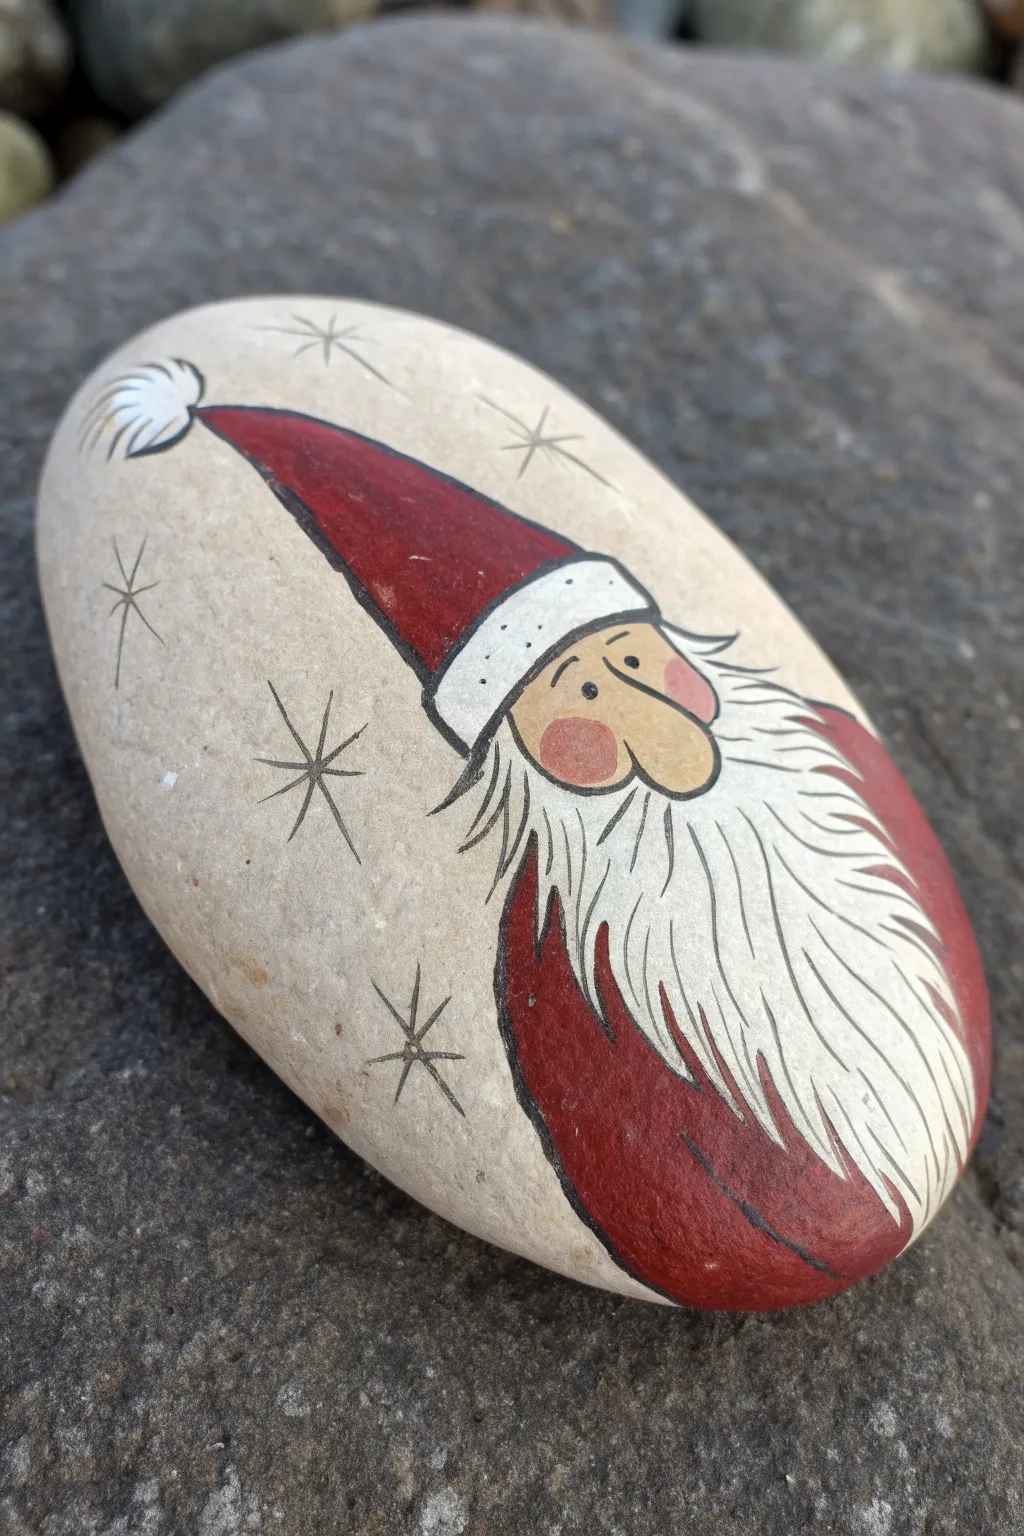
This charming holiday rock features a folk-art style Santa captured in profile against a natural stone background. The design embraces the elongated shape of the rock to showcase his iconic red hat and flowing white beard.
Step-by-Step Tutorial
Materials
- Smooth, elongated river rock (cleaned and dried)
- Acrylic paints (Red, White, Black, Peach/Flesh tone, Pink)
- Pencil for sketching
- Fine liner brush (size 00 or 0)
- Small flat brush
- Small round brush
- Water cup and paper towels
- Clear acrylic sealer (spray or brush-on)
Step 1: Planning and Sketching
-
Choose the right rock:
Begin by selecting a smooth stone that is longer than it is wide. An oval or kidney bean shape works perfectly to accommodate Santa’s long beard and tall hat. -
Sketch the nose:
Start your pencil sketch slightly right of the center. Draw a prominent, rounded nose that points toward the right edge of the rock. -
Add the face outline:
Connect the forehead curve above the nose and add a cheek line below it. Keep the face area relatively small, as the beard and hat will dominate the composition. -
Outline the hat and body:
Draw the brim of the hat angled back from the forehead. Extend a long, curved triangle backwards for the hat’s body, ending with a pom-pom. Below the face, sketch a curved line representing his shoulder and back. -
Map out the flow:
Lightly sketch the general shape of the beard flowing down and to the right, covering the rest of the rock’s lower half. Don’t worry about individual hairs yet, just the main mass.
Step 2: Painting the Base Colors
-
Paint the face:
Using a small round brush, fill in the face area (forehead, nose, and upper cheek) with a peach or flesh-tone acrylic paint. You may need two coats for opaque coverage. -
Color the hat:
Paint the main triangle of the hat with a deep, rich red. Extend this red color down to the shoulder area at the bottom of the rock to form his coat. -
Add the white base:
Once the face is dry, paint the hat’s brim and the pom-pom white. Then, block in the entire beard area with white paint. Don’t worry about texture yet; just get a solid white base down. -
Rosy cheeks:
Mix a little pink with your flesh tone or use a diluted pink. Dab a soft circle onto the cheek area and a tiny bit on the nose to make him look consistently cold and jolly.
Ink Instead of Paint
Struggling with brush control? Use a super-fine tip black permanent marker or acrylic paint pen for the intricate beard lines and stars. It’s much easier to control.
Step 3: Detailing and Outlining
-
Outline the features:
Switch to your finest detail brush or a black paint pen. Carefully outline the nose, forehead, and cheek. This cartoon-style outline gives the character distinct crispness. -
Add the eye and brow:
Place a small black dot for the eye near the bridge of the nose. Add a tiny, floating eyebrow line just above it to give him a gentle expression. -
Detail the hat brim:
Outline the white brim of the hat. Add a few tiny black dots inside the white area to simulate a furry texture. -
Define the beard:
This is the most critical step. Using your fine liner brush and thinned black paint, draw long, flowing lines starting from the face and hat brim, sweeping down towards the tip of the beard. -
Create beard volume:
Continue adding these sweeping lines, ensuring they curve with the shape of the rock. Group some lines together to look like clumps of hair, rather than individual strands. -
Final hat touches:
Outline the red hat and the shoulder. Add a few small strokes on the white pom-pom to show movement and fluffiness.
Add Subtle Sparkle
While the white paint on the brim and pom-pom is still wet, sprinkle a tiny pinch of iridescent glitter over it for a magical, snowy shimmer.
Step 4: Background and Finish
-
Paint the stars:
In the negative space around Santa (the unpainted rock), use your fine brush or a black pen to draw simple asterisks. These represent twinkling stars in the night sky. -
Vary the star sizes:
Make some stars larger with longer lines and others tiny. I like to keep the lines thin and delicate so they don’t distract from the main figure. -
Check for gaps:
Look over your work. If the black outlines look patchy, go over them one last time to make them bold and solid. -
Seal the deal:
Allow the rock to dry completely, preferably overnight. Finish with a coat of spray sealer to protect your festive artwork from the elements.
Place your finished Santa rock near the fireplace or on a stack of books to add a touch of handcrafted cheer to your home
Santa Peeking Over the Rock Edge
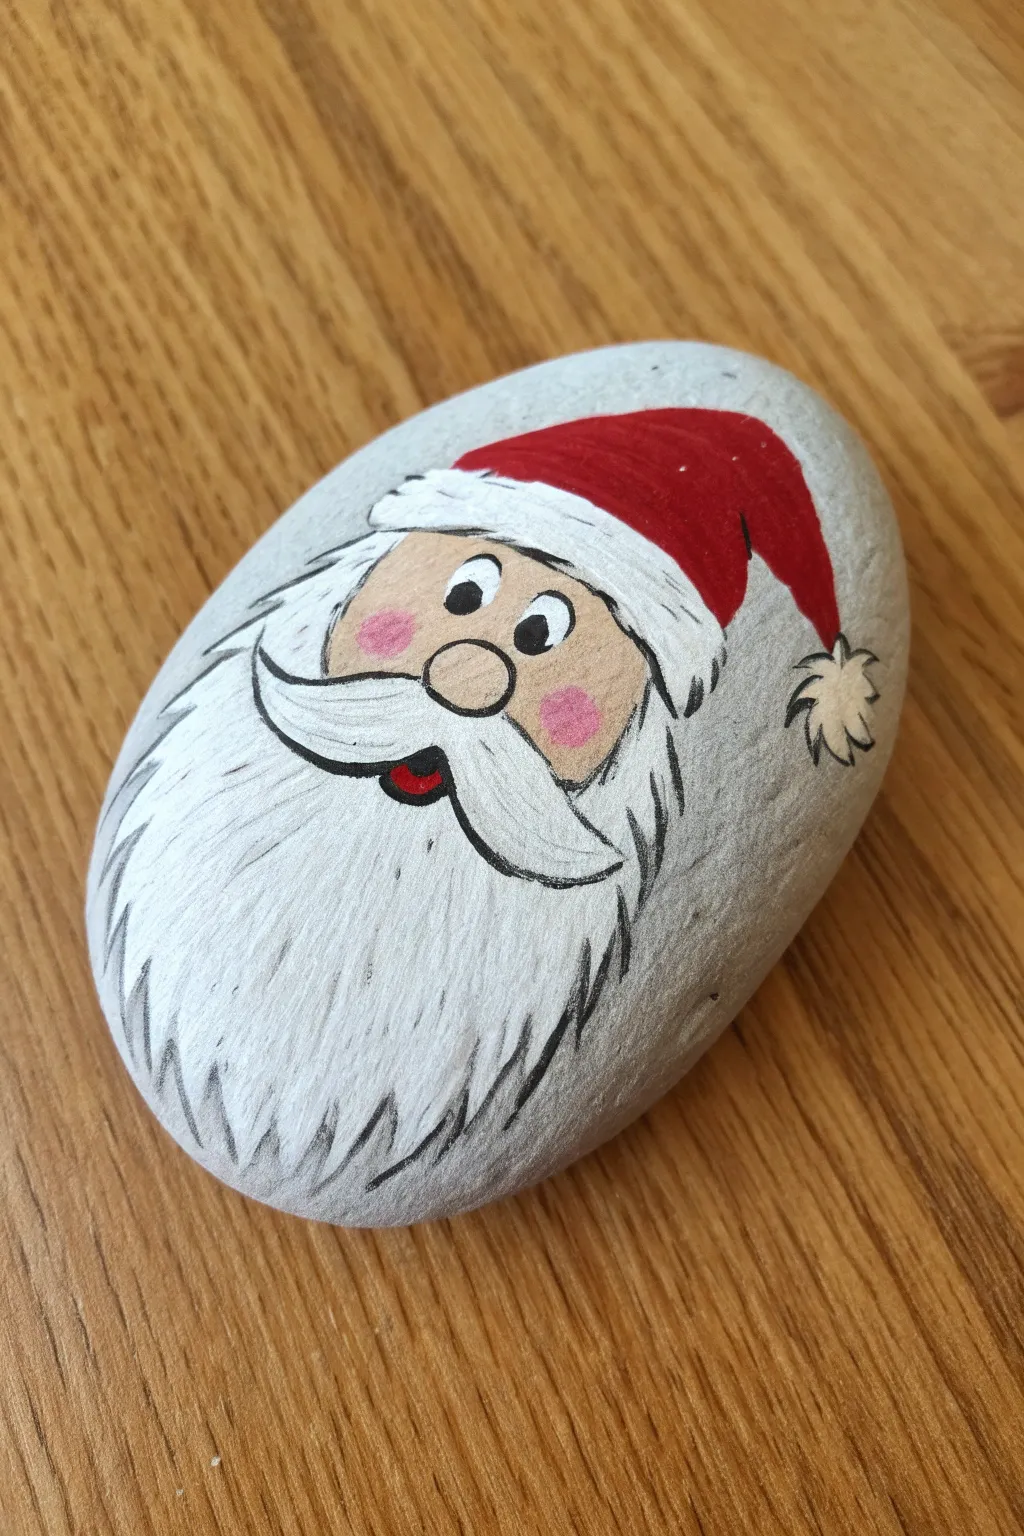
Transform an ordinary grey river stone into a jolly Christmas decoration with this detailed Santa portrait. This design features a crisp, graphic style with bright eyes and a flowing white beard that stands out beautifully against the natural stone background.
Step-by-Step Guide
Materials
- Smooth, oval river rock (medium size)
- Acrylic paints: White, Red, Black, Flesh/Peach tone, Pink
- Fine liner brush (0 or 00 size)
- Small flat brush
- Medium round brush
- Pencil and eraser
- Matte or satin spray sealer (optional)
Step 1: Preparation and Sketching
-
Select and clean the stone:
Choose a smooth, oval-shaped rock that feels nice in the hand. Scrub it thoroughly with soapy water and let it dry completely to ensure the paint adheres properly. -
Sketch the outline:
Using a light pencil, gently sketch the main shapes of Santa’s face. Start with the circular nose in the center, then add the oval eyes, the mustache curves, and the outline of the hat and beard.
Shaky hands?
If you struggle with fine black outlines using a brush, let the paint dry completely and use an ultra-fine tip permanent black marker instead.
Step 2: Painting the Base Colors
-
Paint the face:
Use a small flat brush to fill in the face area around the eyes and nose with your flesh or peach tone paint. It might need two thin coats for full opacity. -
Block in the hat:
Fill the hat shape with bright red acrylic paint. Be careful near the edges of the white trim area you sketched earlier. -
Add the white base:
Using white paint, block in the beard, the mustache, the hat’s trim, and the pom-pom. Don’t worry about texture details yet; just get solid white coverage. Let this layer dry completely.
Pro Tip: Layering White
White paint is often translucent. Paint the beard area grey first, let it dry, and then paint white on top. This creates instant depth and better coverage.
Step 3: Adding Details and Features
-
Paint the nose and cheeks:
Mix a tiny bit of red with your flesh tone to make a slightly darker shade for the nose. Paint the nose, then add soft pink circles on the cheeks for a rosy glow. -
Fill the eyes:
Paint the oval eye shapes with solid white first if the stone color is showing through, then add the black pupils, leaving a tiny bit of white visible. -
Add the mouth:
Paint a small, dark shape (black or dark red) just under the mustache for the open mouth, adding a tiny dot of red for the tongue.
Step 4: Refining and Outlining
-
Outline the features:
Switch to your finest liner brush and black paint. Carefully outline the nose, eyes, and the connection between the face and the beard. -
Define the mustache:
Outline the mustache with smooth, confident strokes. I find it helpful to anchor my pinky finger on the table to keep my hand steady for these curves. -
Detail the eyes:
Add small black eyebrows above the eyes. Then, using a toothpick or the very tip of a brush, add a tiny white dot in each black pupil to bring Santa to life.
Step 5: Texture and Finishing Touches
-
Create beard texture:
With the fine liner brush and thinned black paint (ink consistency), flick quick, short lines through the white beard area to simulate hair strands. -
Add hat textures:
Use the same flicking motion to add texture lines to the white trim of the hat and the pom-pom, giving them a fluffy fur appearance. -
Final clean up:
Check your outlines and touch up any shaky lines. If you made mistakes on the stone background, you can gently scrape them off or paint over them with a grey mix if needed. -
Seal the artwork:
Once fully dry (give it at least 24 hours), spray the rock with a matte or satin sealer to protect your painting from chipping and fading.
Now you have a charming, hand-painted Santa stone ready to bring holiday cheer to your home or garden
Santa With Tiny Present Details
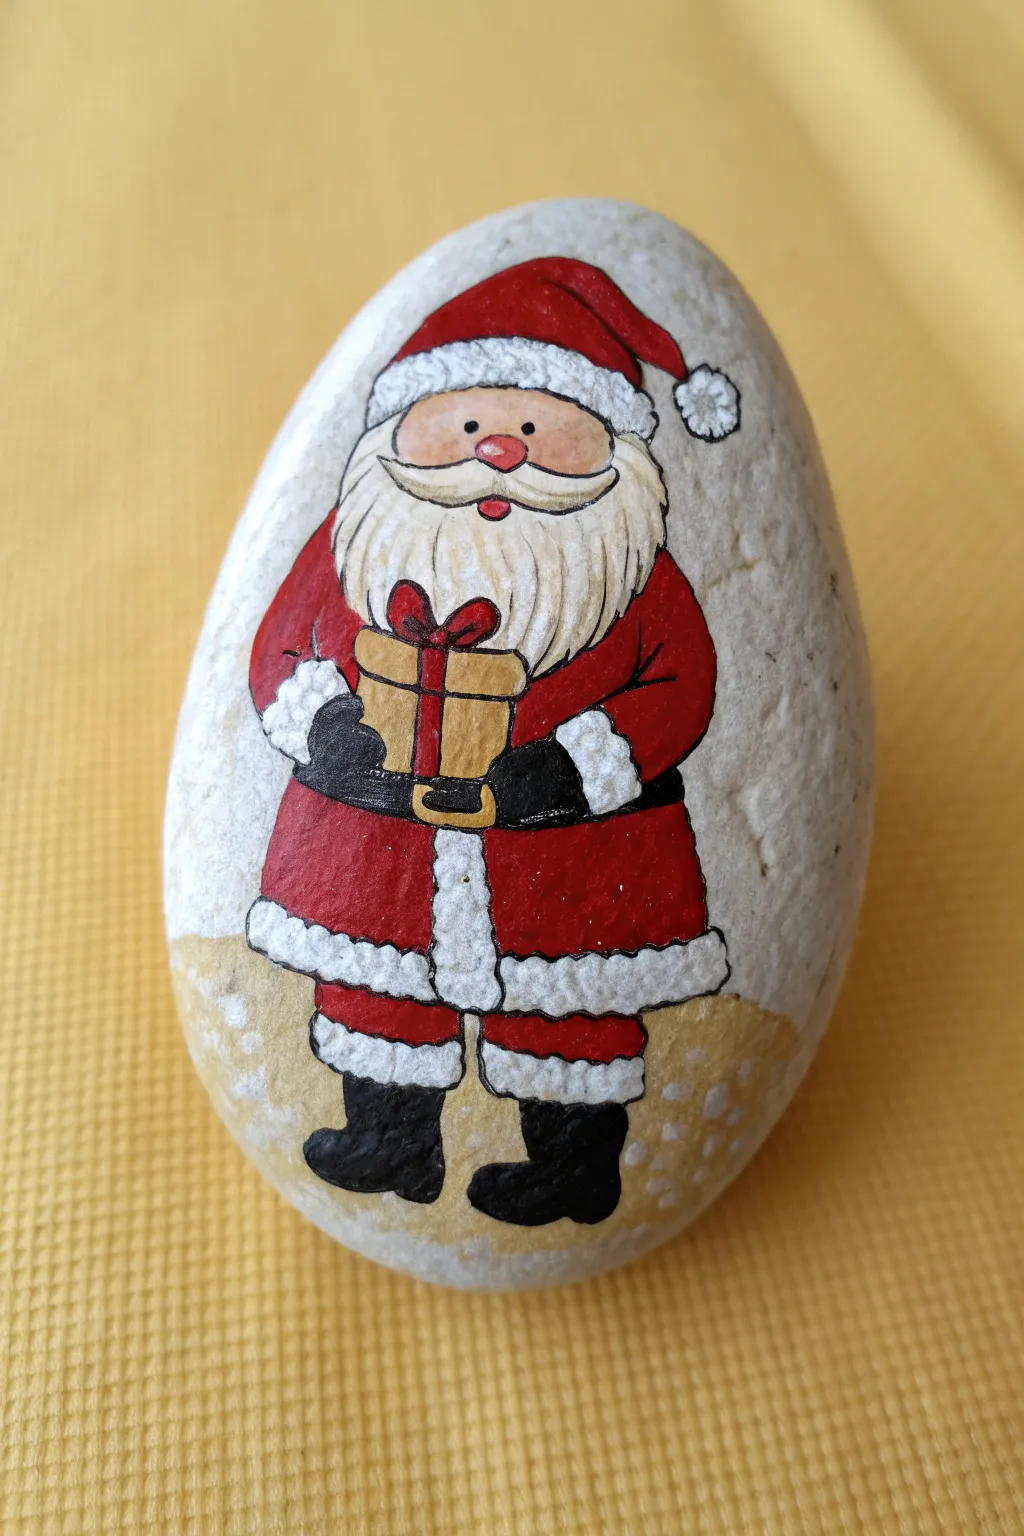
Capture the magic of holiday giving with this charming Santa rock painting featuring a classic red-suited St. Nick clutching a tiny golden present. This design uses a vertical orientation on a smooth, white stone to create a standing figure perfect for holiday decor.
How-To Guide
Materials
- Smooth, oval-shaped river rock (cleaned and dried)
- White acrylic paint or white gesso
- Acrylic paints (Red, Black, Tan/Beige, Gold/Yellow Ochre, Skin tone)
- Fine liner brushes (00 or 000 size)
- Small flat brush
- Black ultra-fine paint pen or micron pen
- Gloss varnish or sealer
Step 1: Base and Sketch
-
Prepare the canvas:
Begin by painting the entire front surface of your rock with white acrylic paint. Depending on your paint’s opacity, you might need two coats to hide the natural stone color. Let this dry completely. -
Lightly sketch the outline:
Using a pencil very lightly, draw Santa’s shape. Start with the round face area near the top, then outline the hat flopping over to the right. Draw the general body shape below, ensuring the feet are at the bottom curve.
Fixing Shaky Lines
If your black outlines look jittery, don’t stress. Wait for the black ink to dry fully, then use a tiny brush with the original color (like red or white) to paint over and tidy up the edges.
Step 2: Blocking Colors
-
Paint the red suit:
Load your brush with bright red paint. Carefully fill in the hat (leaving the brim and pom-pom white), the arms, and the lower coat section. Leave a strip empty down the middle for the white trim. -
Fill in the face:
Mix a light skin tone using white with a touch of orange or brown. Paint the semi-circle of his face peeking out from under the hat brim. -
Add the belt and boots:
Switch to black paint. Fill in the thick belt area right at the waistline and the two sturdy boots at the bottom of the rock. -
Paint the present:
In the center of the chest area, paint a square shape using a golden-tan or yellow ochre color. This will be the gift box Santa is holding.
Step 3: Defining Features
-
Add the beard and trims:
Return to your white paint. Stipple or dab paint to create fluffy textures for the hat’s pom-pom, the hat brim, the cuffs on the sleeves, and the fur trim at the bottom of the coat. -
Create the beard flow:
Paint the large, flowing beard using downward strokes of white. Start just under the face and bring it down over the chest, tucking it behind the present. -
Draw the mittens:
With black paint, carefully add the mittens holding the sides of the present box. Their shape should be simple and rounded. -
Detail the belt:
Once the black belt is dry, paint a small gold or yellow rectangle in the center for the buckle.
Add Some Sparkle
Before the sealer dries, sprinkle extra-fine iridescent glitter over the white fur trim of the hat and coat. This makes the texture look frosty and magical under holiday lights.
Step 4: Fine Details and Outlining
-
Outline the figure:
This is where the character really pops. Using your ultra-fine black paint pen or a liner brush with watered-down black paint, outline the entire figure, the beard, and the hat. -
Add facial features:
Paint two small black dots for eyes. Add a rosy red circle for the nose and a tiny tongue shape for the mouth. Using the fine pen, draw the mustache curving out from the nose. -
Decorate the gift:
Paint a thin red cross over the tan box to represent the ribbon, adding two small loops on top for the bow. -
Texture the beard:
Use extremely thin gray or diluted tan lines within the white beard area to suggest individual strands of hair. -
Ground the figure:
Mix a very light tan or diluted ochre. Paint a wavy, uneven ground line around Santa’s boots so he isn’t floating in space. You can add faint white dots here for falling snow.
Step 5: Finishing
-
Check for gaps:
Look over the rock for any accidental smudges or spots where the white base coat shows through unintentionally and touch them up. -
Seal the artwork:
Allow the paint to cure for at least 24 hours. Apply a coat of gloss varnish to protect the design and give it a polished, ceramic-like shine.
Now you have a festive painted stone ready to be hidden for a neighbor or displayed on your mantel
Santa Holding a Cocoa Mug Rock
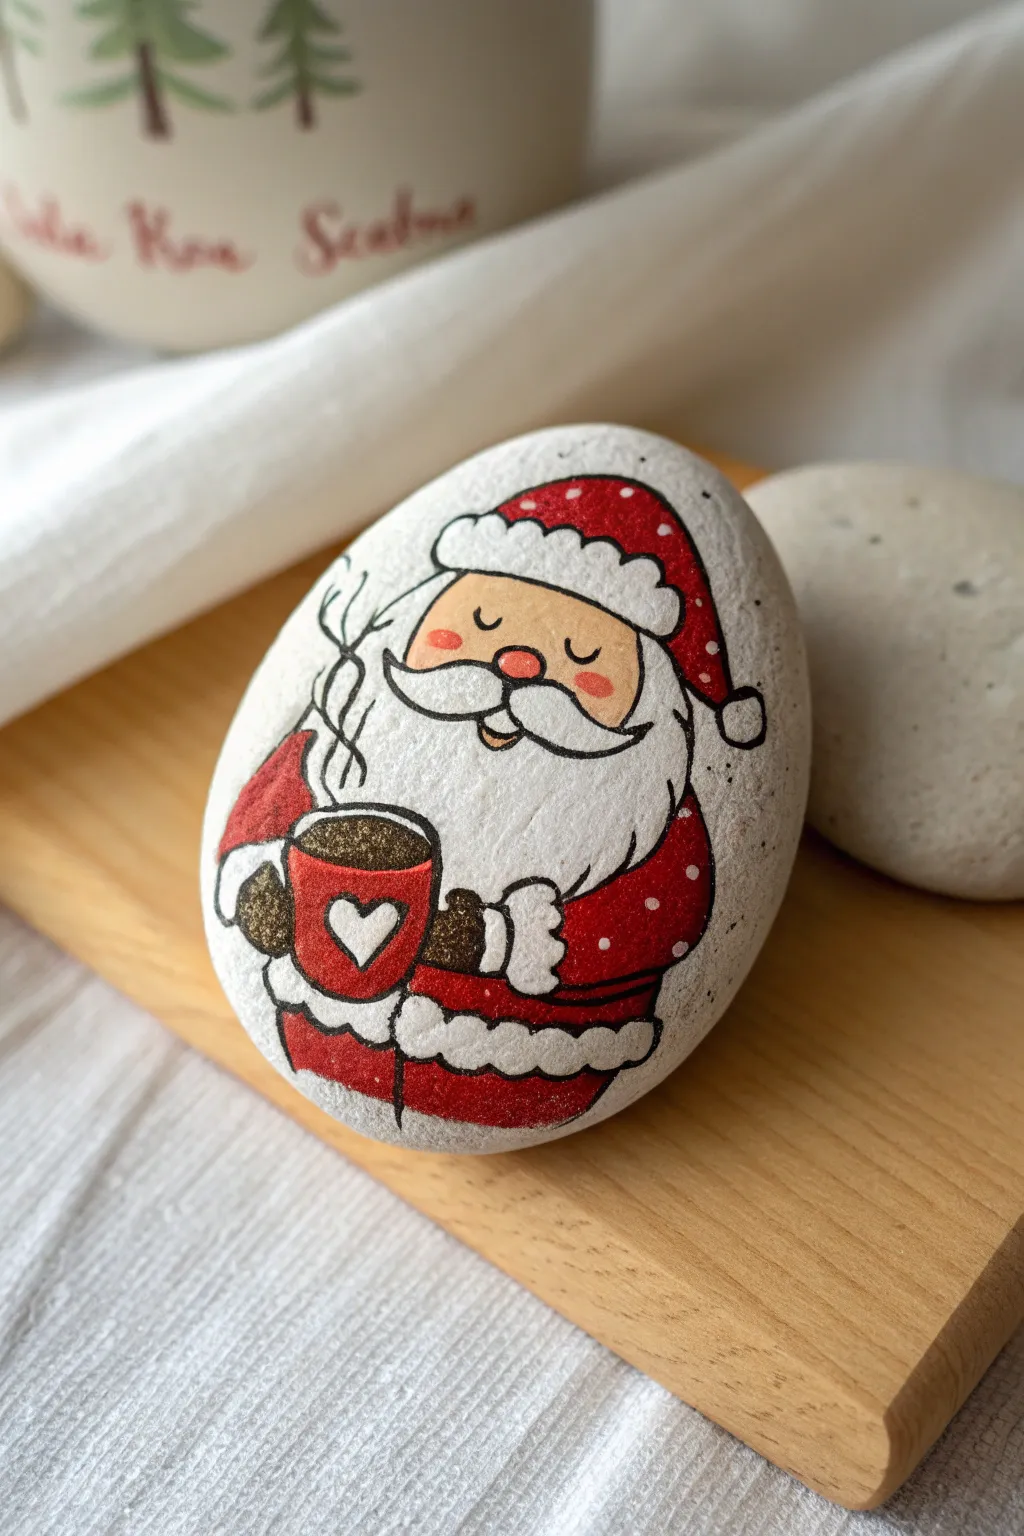
Capture the peaceful warmth of the season with this adorable Santa rock, featuring cheerful red accents and a steaming mug of cocoa. This design uses clean black outlines and soft blushing details to create a serene, minimalist holiday decoration perfect for gifting.
Step-by-Step Guide
Materials
- Smooth oval river rock (light-colored or white)
- White acrylic paint (matte)
- Red acrylic paint (bright Christmas red)
- Black fine-point paint pen (0.5mm or 0.7mm)
- Gold glitter paint or metallic gold pen
- Peach or light beige acrylic paint (for skin tone)
- Tiny detail brushes
- Pencil and eraser
- Matte spray varnish
Step 1: Preparing the Canvas
-
Select the base:
Choose a smooth, oval-shaped rock. If your rock isn’t naturally white like the one in the photo, apply two to three base coats of matte white acrylic paint to create a clean background canvas. Let this dry completely overnight. -
Sketch the outline:
Lightly sketch Santa’s shape using a pencil. Start with a large oval for his body and beard, and a smaller semicircle on top for the hat. Don’t press too hard, as graphite can sometimes smudge into white paint.
Smudged Ink?
If your black outline smudges, wait for it to fully dry. Then, paint over the mistake with opaque white or red paint and re-draw the line.
Step 2: Blocking in Color
-
Paint the face:
Mix a small amount of peach or beige paint. Fill in the semicircular area directly under the hat brim for Santa’s face. Leave space for where his mustache will go. -
Create the hat and coat:
Using your bright red paint, fill in the main body of his coat on the left and right sides. Leave a white gap down the center for his beard. Paint the main part of the hat in red as well. -
Paint the mug:
In the center of the white beard section, paint a rounded cylinder shape for the mug using red. I find it easiest to paint the whole mug red first and add the white heart later once it’s dry. -
Add sleeves and gloves:
Paint small red shapes extending from the coat towards the mug for arms. For the mittens holding the cup, use a dark brown or black paint, positioning them on either side of the mug.
Step 3: Character Details
-
Define the trim:
The white base coat serves as the fur trim, but you can add a fresh layer of white paint to the hat brim, the pom-pom, and the cuffs to make them pop against the red. -
Paint the nose and cheeks:
Use a slightly darker coral or pink shade to paint a small circle for the nose and two soft ovals for rosy cheeks. -
Detail the mug:
Once the red mug is fully dry, paint a small white heart in the center. Fill the top opening of the mug with dark brown paint to represent the cocoa. -
Add sparkly touches:
Using gold glitter paint or a metallic pen, add a layer over the cocoa liquid and lightly dab the mittens to give them a festive glimmer.
Create Texture
For a fluffy look, dab thick white paint onto the hat brim and beard edges with a dry sponge instead of brushing it flat.
Step 4: The Refined Outline
-
Outline the hat:
Take your black fine-point paint pen. Carefully outline the red hat, the white brim, and the pom-pom. Keep your hand steady and rest your wrist on the table for stability. -
Draw the face features:
Use the pen to draw two small downward curves for tranquil, closed eyes. Outline the nose and the mustache, giving the mustache curled tips. -
Define the beard:
Draw the outline of the flowing beard, ensuring it curves around the mug. Add the mouth as a small semi-circle visible just beneath the mustache. -
Outline the body:
Trace the outer edges of the red coat, the arms, and the mittens. Add small polka dots to the red sections of the coat and hat using a white gel pen or a tiny dot of white paint. -
Add steam:
Draw three wavy lines rising from the cocoa cup to represent steam. You can add tiny branching lines to make it look wispy.
Step 5: Finishing Touches
-
Clean up:
Check for any pencil marks that are still visible and gently erase them once you are certain the ink is 100% dry. -
Seal the stone:
Spray the rock with a matte varnish to protect your artwork from chipping while maintaining that soft, non-glossy illustrated look.
Place this serene little Santa on your mantle or gift it to a friend to spread some quiet holiday joy
Santa With a Toy Sack Silhouette
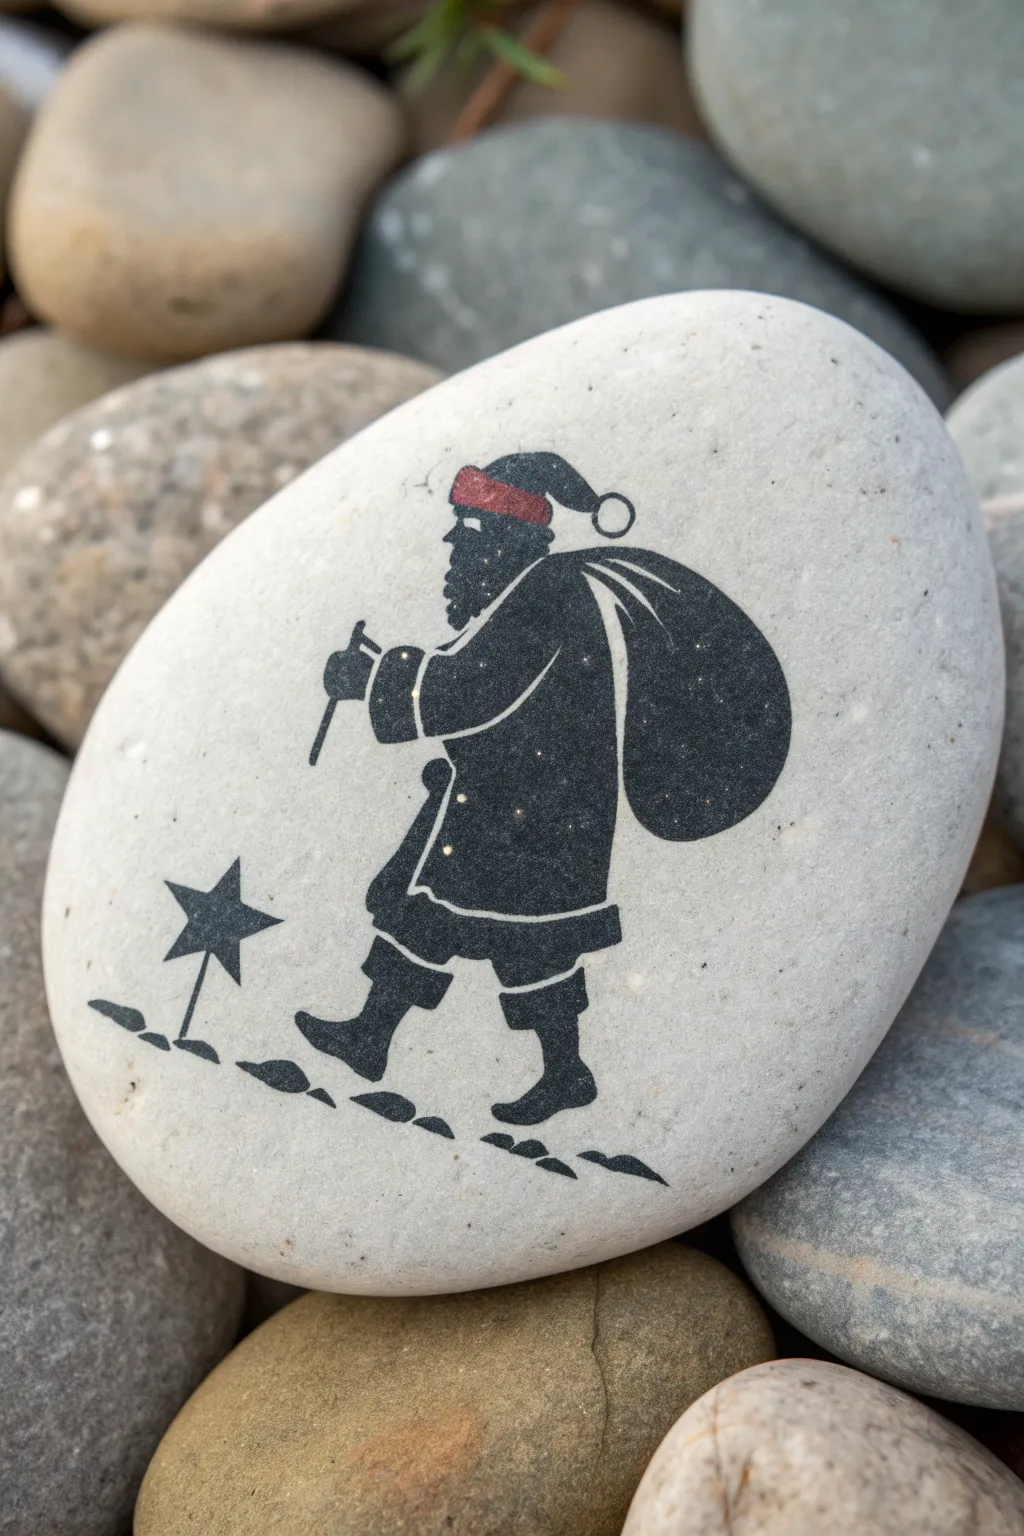
Capture the magic of Christmas Eve with this crisp, classic silhouette design featuring Santa on his journey. The striking contrast of black ink against a smooth white stone creates a timeless look, highlighted by just a single pop of festive red.
Step-by-Step
Materials
- Smooth, flat white or light-grey river rock
- Pencil and eraser
- Fine-grit sandpaper (optional)
- Black acrylic paint or black paint pen (extra fine tip)
- Red acrylic paint or red paint pen
- Fine detail paintbrush (00 or 000 size)
- Matte spray sealant or clear varnish
Step 1: Preparation and Sketching
-
Prepare the surface:
Begin by washing your stone with warm soapy water to remove any dirt or oils. If the surface feels rough, lightly sand it with fine-grit sandpaper to create a smooth canvas, then rinse and let it dry completely. -
Plan the composition:
Visualize where Santa will stand. The figure should be centered but slightly shifted to the right to leave room for the star on the left. Lightly mark a baseline for the ground. -
Sketch the outline:
Using a pencil, lightly draw the outline of Santa. Start with the round shape of the sack on his back, then the curve of his coat, and finally his boots. Keep the lines faint so they are easy to cover later. -
Add details:
Sketch the smaller details, like the walking stick in his hand, the bobble on his hat, and the star on the ground in front of him. Don’t worry about shading; we just need the outer shape.
Fixing Smudges
If black paint bleeds into the white gaps, wait for it to dry completely. Then, use a white gel pen or white acrylic paint on a fine brush to re-draw the separation lines.
Step 2: Painting the Silhouette
-
Outline the figure:
Using an extra-fine black paint pen or a liner brush with black acrylic vertical paint, carefully trace over your pencil lines. I find it helpful to start from the top of the hat and work downwards to avoid smudging. -
Fill in the main block:
Once the outline is dry, begin filling in the main body of Santa and the large sack. Use smooth, even strokes. If you are using a pen, be careful not to scrub back and forth too aggressively, or you might lift the previous layer. -
Create definition:
Notice the white lines that separate his arm from his body and the sack from his coat? Leave these gaps unpainted. If you accidentally paint over them, you can touch them up with white paint later. -
Paint the boots and legs:
Fill in the boots and legs, ensuring the silhouette shape is sharp. The distinct shape of the boots gives the figure its sense of movement. -
Adding the ground:
Paint the small, broken dashes beneath Santa’s feet to represent snowy ground. These shouldn’t be a solid line; irregular shapes look more like rocks or snow clumps. -
The walking stick:
Carefully draw the thin line for the walking stick. Ensure it connects convincingly with his hand. -
The star:
Fill in the five-pointed star on the left. Depending on your preference, you can leave a tiny white dot in the center or paint it solid black.
Step 3: Details and Finishing
-
The red accent:
Now for the pop of color. Locate the band of Santa’s hat in your sketch. Using a bright red paint pen or small brush, fill in just this rectangular area. -
Clean up edges:
Inspect your silhouette. If any edges look fuzzy, use a tiny bit of white paint (or the stone’s background color) to sharpen them up once the black paint is fully dry. -
Initial drying:
Let the rock sit for at least an hour to ensure the paint is fully cured. Silhouette designs can smear easily if handled too soon. -
Seal the artwork:
To protect your Santa from chipping, apply a coat of matte spray sealant. Hold the can about 12 inches away and spray in light, even sweeping motions. -
Final cure:
Allow the sealant to dry according to the manufacturer’s instructions, usually 24 hours, before placing your rock outside or gifting it.
Add Sparkle
Mix a tiny amount of glitter into clear varnish and paint it only over the black sack area to make it look like a magical bag of toys glistening in the moonlight.
Now you have a striking, minimalist holiday decoration perfect for a mantelpiece display or a hidden garden treasure
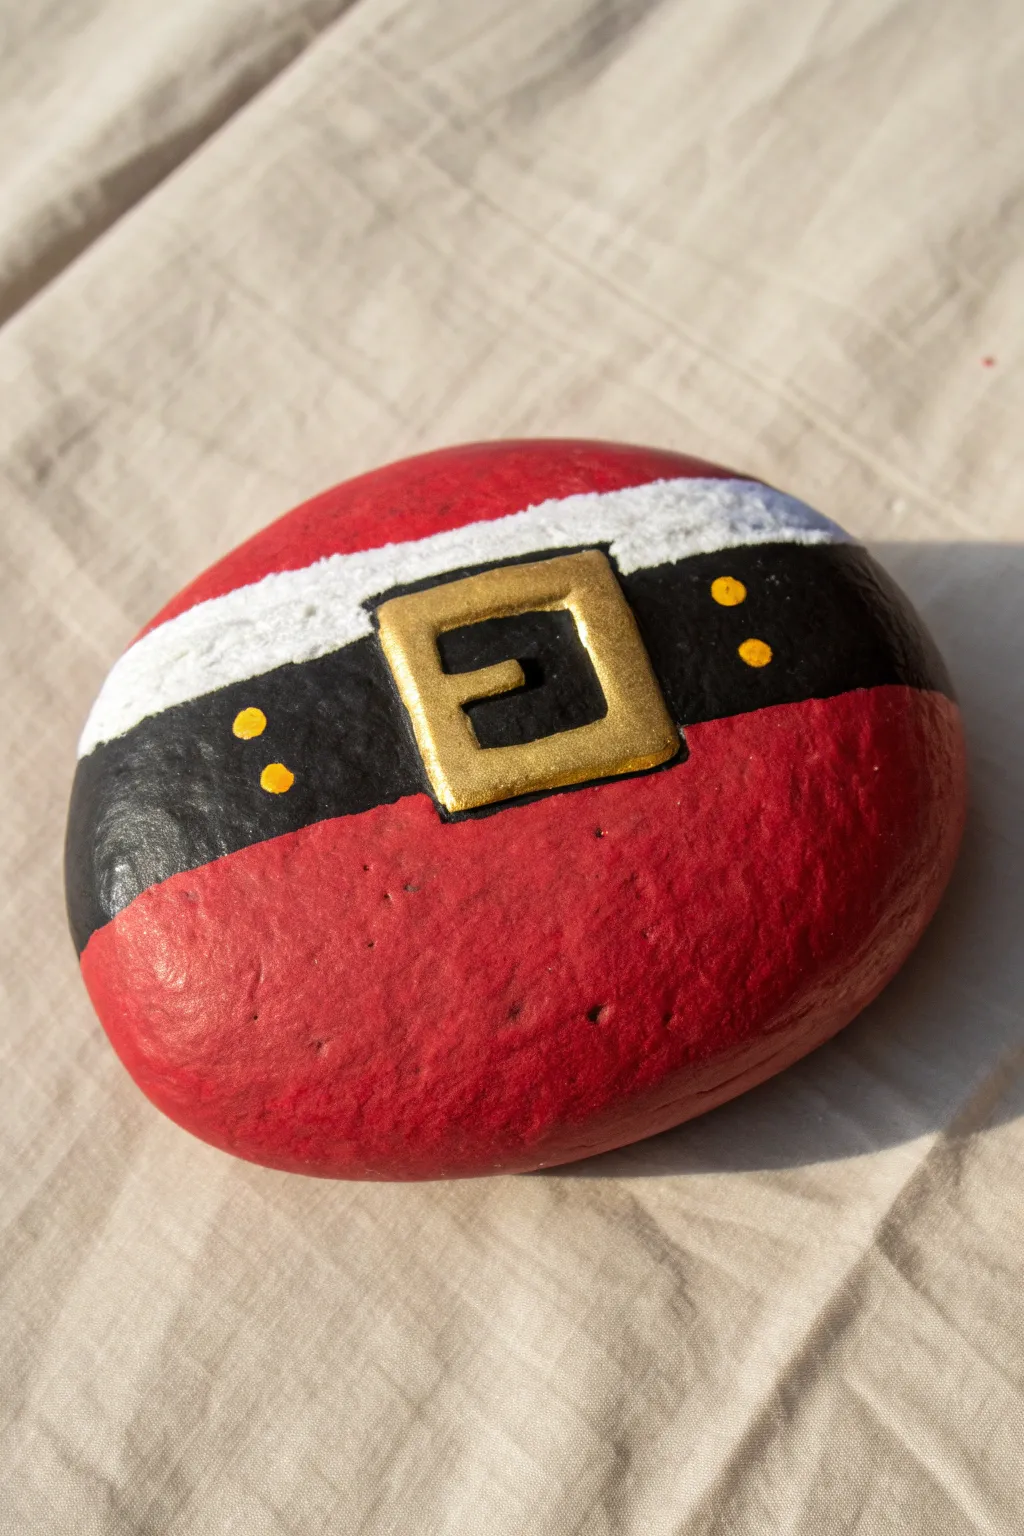
Santa Suit Pattern Rock
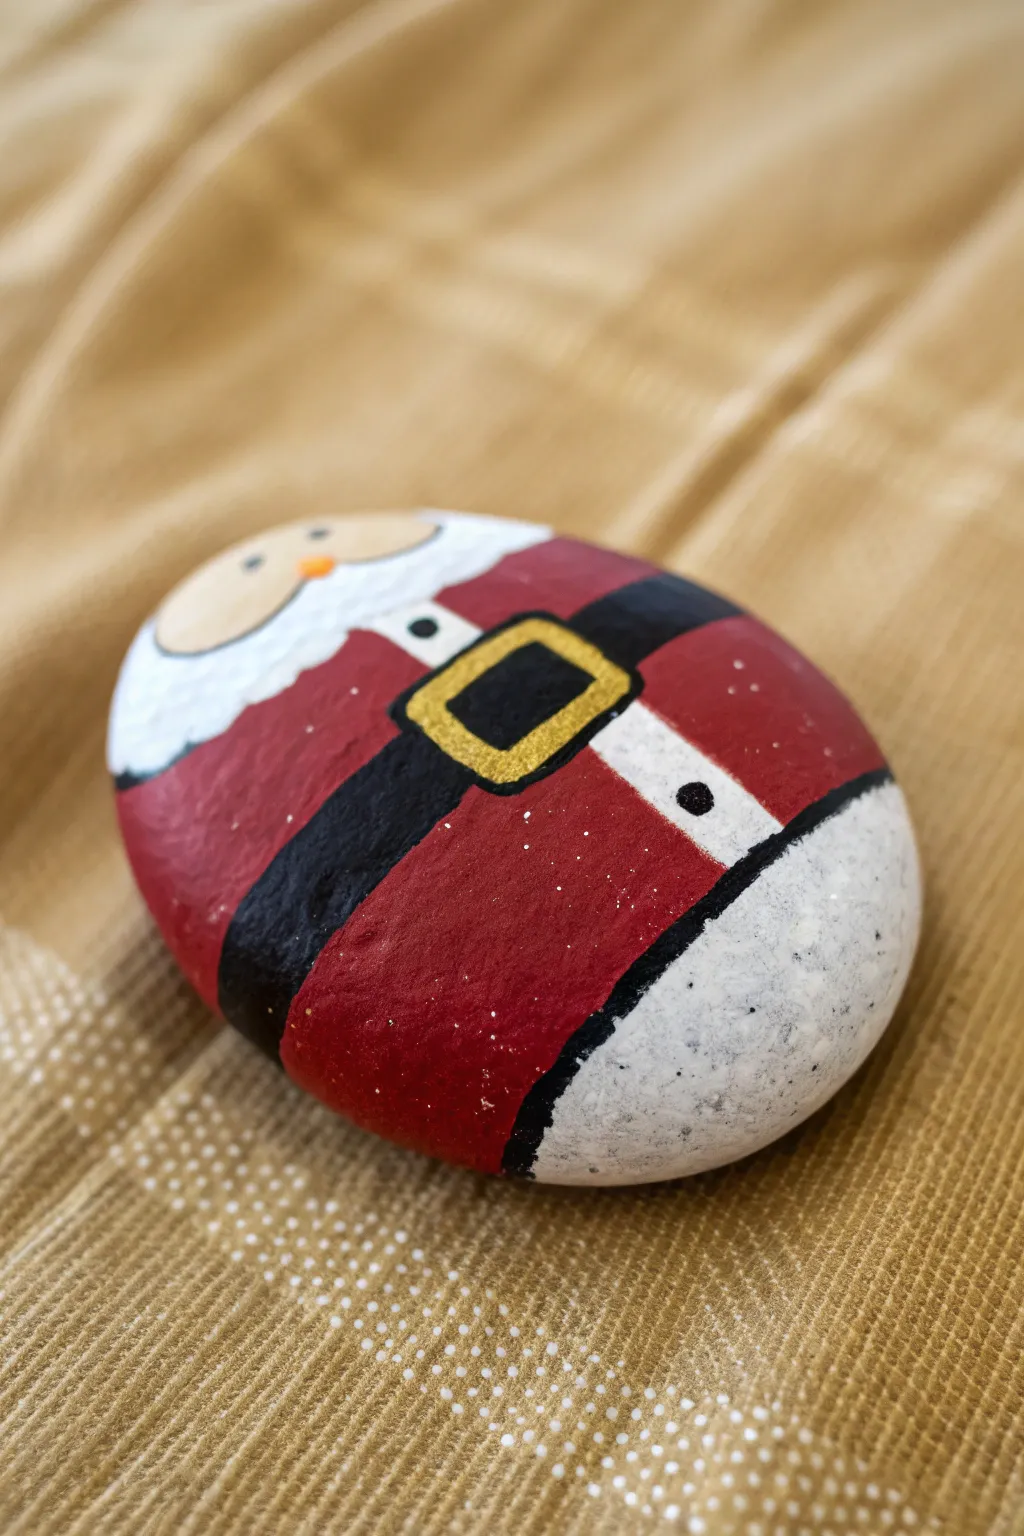
Transform a smooth, oval stone into a charming miniature of Santa’s classic red suit. This design focuses on clean lines and bold colors, creating a polished holiday decoration perfect for hiding or gifting.
Step-by-Step
Materials
- Smooth, oval-shaped rock (roughly palm-sized)
- Acrylic paint pens (Red, Black, White, Gold, Beige/Skin tone)
- White acrylic paint (tube or bottle)
- Flat paint brush
- Pencil
- Spray sealant (gloss or matte)
- Small round detail brush (optional)
Step 1: Base Sketch & Laying Foundation
-
Clean the canvas:
Begin by scrubbing your rock with soap and warm water to remove any dirt or oils. Let it dry completely in the sun or with a hair dryer, as paint won’t stick to a damp surface. -
Sketch the zones:
Using a pencil, lightly map out the main sections of the design. Draw a curve near the top for the face, followed by a wavy line below it for the beard trim. Draw two parallel lines across the middle for the belt, and a line near the bottom to separate the red coat from the white fur trim. -
Paint the bottom trim:
Start at the very bottom of the rock. Use white acrylic paint and a flat brush to fill in the bottom section solid white. You may need two coats here to cover the rock’s natural color completely. -
Establish the red suit:
Fill in the large middle section of the rock with bright red paint, carefully painting around the belt area you sketched. Don’t worry about the belt strip being perfect yet; we will cover the edges later. -
Paint the face area:
At the very top of the rock, paint the semi-circle face area with a beige or skin-tone paint. This usually dries quickly, so you can do a second coat almost immediately if needed to make it opaque.
Clean Lines Hack
If you struggle with shaky hands, use thin washi tape or painter’s tape to mask off the belt area before painting the red suit. Peel it off when dry for a perfect edge.
Step 2: Defining the Suit Details
-
Create the belt:
Once the red paint is dry to the touch, use a black paint pen or a steady brush with black paint to fill in the belt. Extend the black line all the way to the edges of the rock so it looks like it wraps around. -
Outline the coat:
To make the red section pop, draw a vertical white line down the center of the red paint (above the belt). This represents the white fur trim where the coat buttons up. -
Add the beard trim:
Paint the wavy white collar section between the face and the red suit. I like to use a dabbing motion here to give it a slightly fluffy texture compared to the smooth suit. -
Paint the gold buckle:
In the center of the black belt, paint a rectangular gold buckle using a gold paint pen or metallic paint. Make the rectangle thick enough to stand out against the black background. -
Fill the buckle center:
Paint a smaller black square inside the gold rectangle to create the illusion of the belt passing through the buckle.
Step 3: Fine Tuning & Sealing
-
Add facial features:
Using a fine-tip black paint pen or a toothpick dipped in paint, add two small dots for eyes on the beige face. Place a small orange or pink oval between them for the nose. -
Add coat buttons:
On the white vertical stripe above the belt, add two small black dots to represent buttons. Add one more black dot on the white section below the belt if space allows. -
Clean up the lines:
Use a fine black paint pen to outline the bottom edge of the red coat where it meets the white trim. This sharp separation makes the design look much crispier. -
Add subtle sparkle:
For a magical touch, flicker a tiny bit of white paint or glitter over the red sections to mimic fresh snow, though this is optional. -
Seal the rock:
Once absolutely everything is dry, take the rock outside and spray it with a clear acrylic sealer. This protects your hard work from weather and chipping.
Level Up: 3D Texture
Mix a little baking soda into your white paint for the beard and bottom trim. It creates a puffy, snow-like texture that feels amazing when dry.
Now you have a festive little character ready to brighten up a garden path or holiday display
Abstract Polka Dot Santa Rock
This charming project transforms a smooth, oval stone into a stylized Santa Claus using simple geometric shapes and festive polka dots. The design features a clean, abstract aesthetic with wonderful textures created by delicate stippling and precise linework.
How-To Guide
Materials
- Smooth, oval river rock (palm-sized)
- Acrylic paints: Bright red, titanium white, skin tone (peach/beige), light brown
- Pencil and eraser
- Fine liner brush (size 0 or 00)
- Flat shader brush (size 4 or 6)
- Dotting tools (or toothpicks/paintbrush ends)
- Spray sealer or varnish (matte finish recommended)
Step 1: Preparation and Sketching
-
Clean the canvas:
Begin by scrubbing your rock with warm, soapy water to remove any dirt or oils. Let it dry completely in the sun or with a hairdryer before starting. -
Map out the shapes:
Using a pencil, lightly sketch the main outlines. Start with a large triangle for the hat that curves slightly at the top. Below that, draw a wide, curved ‘U’ shape for the beard that takes up most of the bottom half. -
Define the face:
Inside the beard shape, draw a smaller, elongated oval for Santa’s face. Leave a band across the forehead for the hat’s brim. Sketch angled lines for the shoulders on either side of the beard.
Clean Lines
If your hand shakes while outlining, rest your pinky finger on a dry part of the rock for stability. You can also use a superfine brown paint pen instead of a brush.
Step 2: Blocking in Color
-
Paint the hat and shoulders:
Using your flat brush and bright red paint, fill in the large hat triangle and the shoulder sections. Apply two thin coats rather than one thick one for the smoothest opaque coverage, letting the first coat dry fully. -
Base the beard:
Fill in the large beard area with titanium white acrylic. Because white can be translucent, you might need 2-3 coats to ensure the gray of the rock doesn’t show through. -
Paint the face:
Fill the face oval with your chosen skin tone paint. I find that mixing a tiny dot of white into the pure skin tone helps it cover the rock better. -
Add the brim:
Paint the band between the hat and face with white paint to create the fluffy brim.
Step 3: Adding Details and Texture
-
Outline with brown:
Switch to your finest liner brush and thinned light brown paint. Very carefully outline all the sections: around the hat, the face, the shoulders, and the beard. -
Draw the nose and mouth:
In the center of the face, paint a small, rounded ‘w’ shape for the mustache/nose area using the same light brown. Add vertical lines flowing down from the mustache to suggest beard hairs. -
Rosy cheeks:
Mix a little red with your skin tone (or use pink) and paint two soft circles on the cheeks. You can water this down slightly for a watercolor effect. -
The eyes:
Use a small dotting tool or the tip of a brush handle dipped in black paint to place two small, solid dots for the eyes just above the mustache line.
Sparkle Finish
Mix a pinch of iridescent glitter into your white paint for the beard and hat brim. It adds a magical, frosty shimmer that looks amazing under holiday lights.
Step 4: Polka Dots and Final Touches
-
Hat and suit dots:
Dip a medium-sized dotting tool into white paint. Create a random pattern of polka dots all over the red hat and the red shoulder areas. Try not to crowd them too much. -
Beard texture:
For the beard, use a very fine tool (like a toothpick) and light brown paint. Add tiny, sparse speckles all over the white beard area to give it a textured, sandy look. -
Hat pom-pom:
Paint a small white circle at the very tip of the hat. Once dry, use a fine liner to add tiny brown spokes radiating from it, making it look like a stitched button or star. -
Snowflakes:
On the bare stone background to the right of the Santa, paint a simple white cross, then add an ‘X’ over it to create a stylized snowflake. -
Seal the rock:
Allow the paint to cure for at least 24 hours. Finish by spraying the rock with a matte clear coat to protect your work from chipping.
Now you have a festive, hand-painted decoration perfect for a holiday centerpiece or a thoughtful gift
Metallic Accents Santa Rock Details
Transform a smooth river rock into a festive holiday keepsake with this charming Santa Claus design. The bright red suit and textured beard are perfectly complemented by a gleaming metallic gold belt buckle that catches the light.
Step-by-Step Guide
Materials
- Smooth, oval river rock (palm-sized)
- Acrylic paints (bright red, skin tone/beige, white, black, metallic gold)
- Flat paint brushes (small and medium)
- Fine detail liner brush (size 0 or 00)
- Dotting tool or toothpick
- Pencil for sketching
- Clear acrylic sealer (gloss or matte)
Step 1: Base and Sketch
-
Clean the surface:
Begin by scrubbing your rock with warm soapy water to remove any dirt or grit. Let it dry completely before starting, as moisture can trap under the paint. -
Apply the red base:
Paint the entire top surface of the rock with bright red acrylic paint. You may need two or three coats to get a solid, opaque coverage, letting each layer dry fully in between. -
Sketch the outline:
Once the red base is bone dry, lightly sketch a large U-shape for the beard and a rectangle above it for the face using a pencil. Don’t press too hard to avoid scratching the paint.
Step 2: Face and Beard
-
Paint the face:
Fill in the rectangular face area with a skin-tone or beige acrylic paint. Use a small flat brush to keep the edges crisp against the red background. -
Create the beard base:
Paint the large U-shape below the face with white paint. Bring the white paint up around the sides of the face to connect with where the hat trim will go. -
Add texture to the beard:
While the white beard paint is still slightly wet, I like to stipple it with a dry, stiff brush or a sponge to create a fluffy texture. Extend this textured white area above the face to create the hat’s brim. -
Paint the pom-pom:
Add a round white circle to the left side of the hat for the pom-pom, using the same stippling technique to make it look fuzzy.
Uneven Dots?
If your polka dots look messy, try reloading your tool with fresh paint for every single dot. This ensures they stay round and consistent in size.
Step 3: Belt and Details
-
Paint the belt:
Using a medium flat brush and black paint, create a curved band across the lower third of the rock. The curve should follow the rounded shape of the stone to give Santa a little belly. -
Add the gold buckle:
Dip a fine detail brush into metallic gold paint. Paint a square outline in the center of the black belt, slightly overlapping the red suit. Paint a small horizontal line inside the square for the prong. -
Define the beard:
Use a very thin liner brush and watered-down black paint to outline the smile. Draw a curved line for the mouth, connecting the mustache area. -
Add facial features:
Use a dotting tool or the handle end of a brush to place two black dots for eyes. Add a bright red oval for the nose right in the center, and a tiny red dot for the mouth.
Pro Tip
For the crispest snowflakes, mix a tiny drop of water into your white paint. This helps the paint flow smoothly off the liner brush for thin, sharp lines.
Step 4: Snowy Accents
-
Paint snowflakes:
Using your finest liner brush and white paint, carefully draw two or three delicate snowflakes on the red hat area above the white brim. -
Add polka dots:
Dip a dotting tool or toothpick into white paint and scatter small dots across the red background of the suit and hat to mimic falling snow. -
Dot the belt area:
Continue the pattern by adding white dots to the lower red portion of the suit, under the black belt. -
Seal the artwork:
Allow the rock to dry overnight to ensure all thick paint layers are set. Finish by applying a coat of clear acrylic sealer to protect your Santa from scratches and weathering.
Now you have a jolly little decoration perfect for hiding in the garden or gifting to a friend


Have a question or want to share your own experience? I'd love to hear from you in the comments below!