Mini canvases are my favorite little playgrounds because you can finish something satisfying in one sitting. When the surface is tiny, bold shapes, simple silhouettes, and punchy color combos do all the heavy lifting for you.
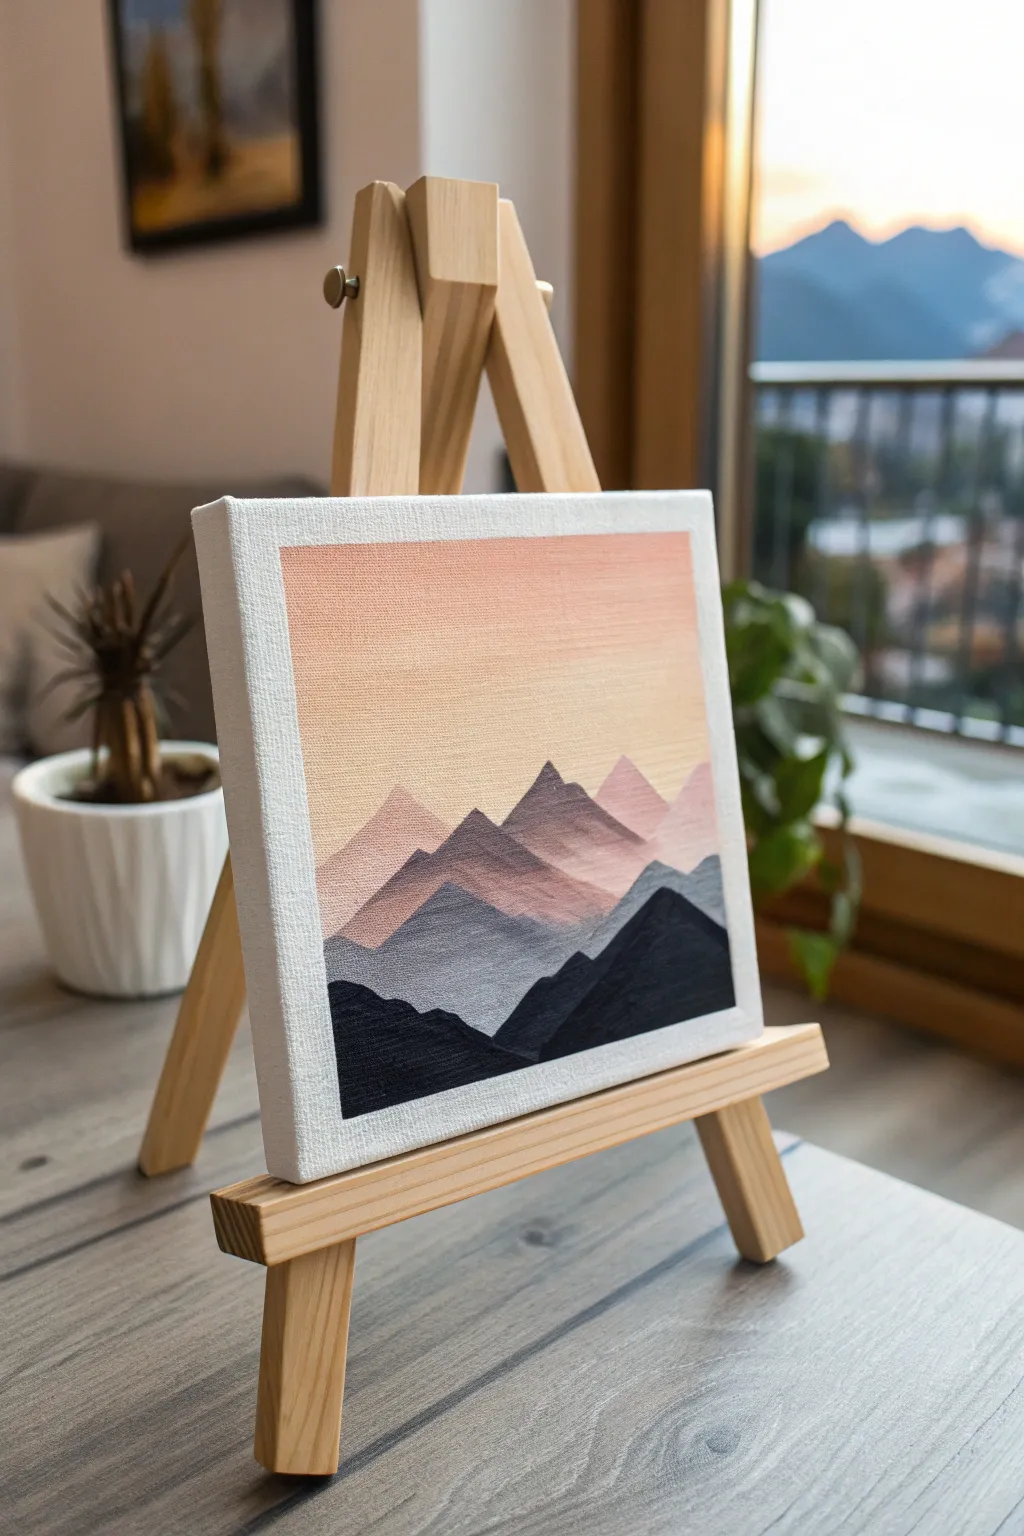
Sunset Gradient Sky
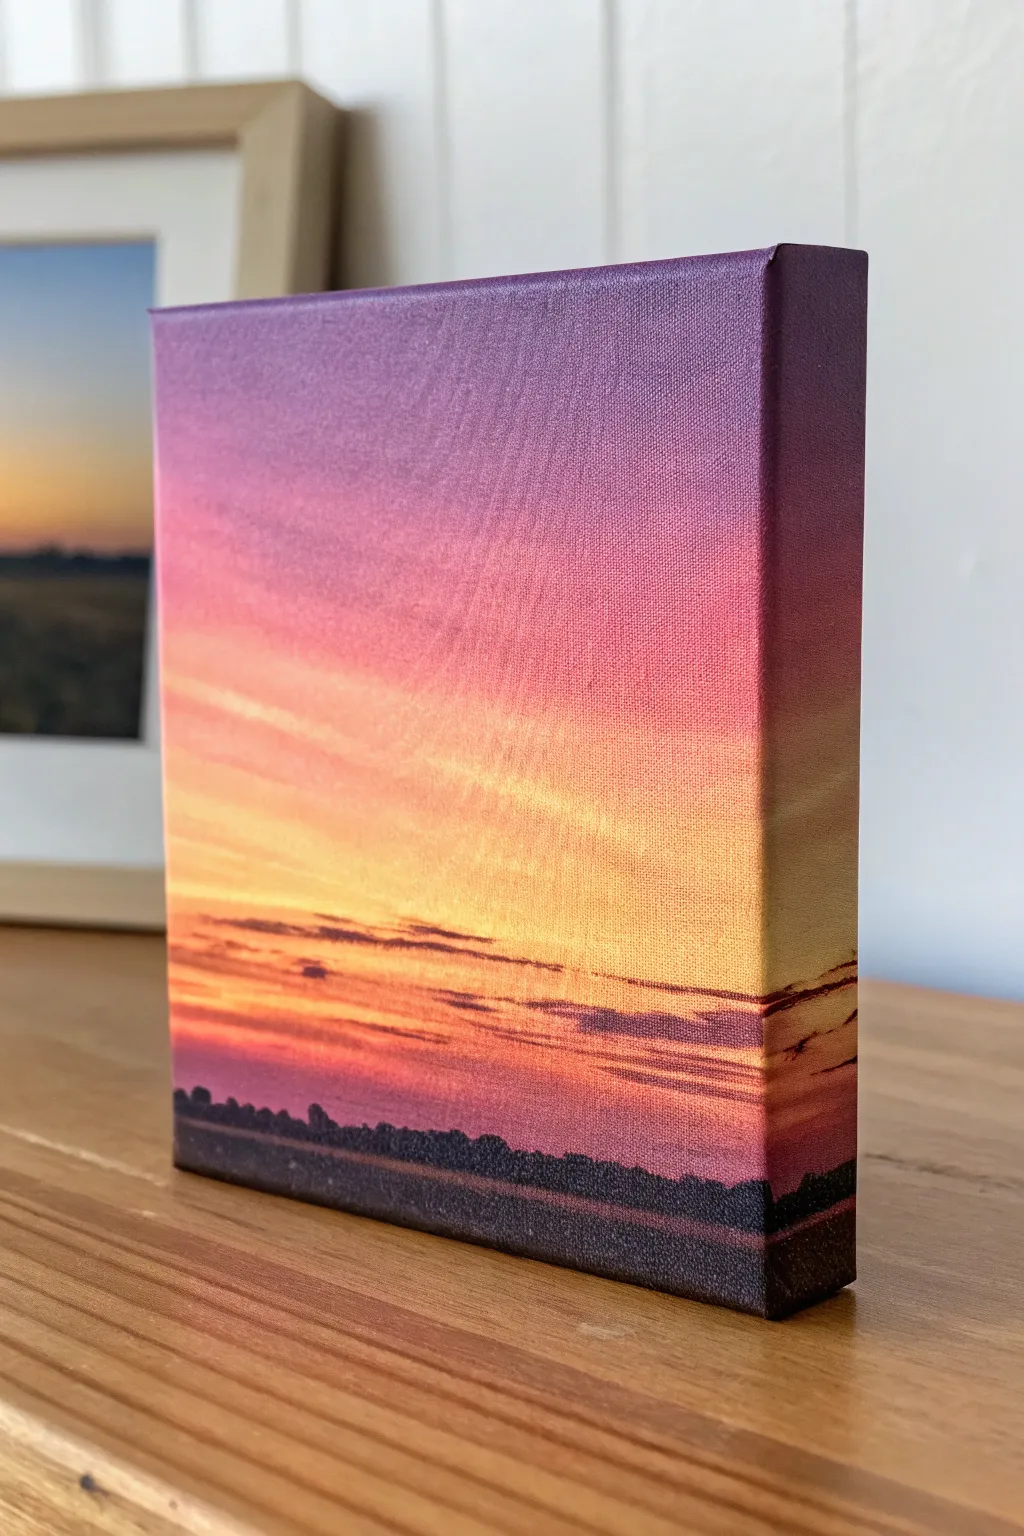
Capture the fleeting beauty of twilight on a small scale with this seamless gradient painting. The result is a vibrant, dimensional piece that mimics the smooth transition of a real sunset, perfect for adding a pop of color to a shelf or desk.
Detailed Instructions
Materials
- Small square gallery-wrapped canvas (4×4 or 6×6 inch)
- Acrylic paints (Titanium White, Cadmium Yellow, Napthol Crimson, Dioxazine Purple, Mars Black)
- Slow-drying medium or retarder (essential for blending)
- Soft synthetic flat brushes (1 inch and 1/2 inch)
- Small round detail brush (size 0 or 1)
- Clean water jar
- Paper towels
- Palette or paper plate
Step 1: Creating the Gradient Base
-
Prime the Surface:
Even if your canvas comes pre-primed, apply a fresh thin coat of Titanium White over the entire front and sides. This ensures your colors will pop and glide smoothly. -
Prepare Your Palette:
Squeeze out your yellow, crimson, purple, and white paints. Mix a small amount of slow-drying medium into each pile; this is the secret to getting that photographic, streak-free look. -
Apply the Yellow Horizon:
Start about one-third of the way up the canvas. Using the 1-inch flat brush, paint a horizontal band of Cadmium Yellow mixed with a touch of white. Don’t worry about hard edges yet. -
Add the Orange Transition:
Directly above the yellow, apply a mixture of yellow and a tiny dot of crimson to create a vibrant orange. While the paint is wet, gently brush downwards into the yellow to blur the line. -
Paint the Pink Zone:
Above the orange, paint a band of pure crimson mixed with white (pink). Use long, horizontal strokes to blend the bottom of this pink band into the top of the orange band. -
Finish with Purple:
Paint the top third of the canvas with Dioxazine Purple. Blend this downwards into the pink layer. I like to keep my brush slightly damp here to help the purple fade naturally into the lighter colors below. -
Wrap the Edges:
Don’t forget the sides! Extend each color band around the thick edges of the canvas so the gradient wraps fully around the object. -
Smoothing the Blend:
Take a clean, dry, soft brush. Very lightly sweep it horizontally across the entire canvas from top to bottom, wiping the brush on a paper towel after every few strokes to avoid muddying the colors.
Step 2: Adding Clouds and Details
-
Mix Cloud Colors:
Create a dark purple-grey by mixing purple with a tiny touch of black and crimson. You want a color that is darker than the sky but not fully black. -
Paint Wispy Clouds:
Using a smaller flat brush, add horizontal streaks across the lower yellow/orange section. Use a very light touch to make them look like distant stratus clouds. -
Softening Clouds:
Before the cloud paint dries, use a clean finger or a dry brush to gently smudge the edges of these clouds so they don’t look like solid lines. -
Establish the Horizon Line:
Mix Mars Black with a little purple. Use the 1/2 inch flat brush to paint a solid, straight line near the bottom edge of the canvas (about 1/2 inch from the bottom). -
Fill the Foreground:
Fill in the area below your horizon line with this dark mixture. Ensure you cover the bottom edge of the canvas as well. -
Add Silhouette Details:
Switch to your small round detail brush. paints tiny bumps and irregularities along the top of the black horizon line to simulate distant trees or a treeline. -
Create Depth:
Mix a slightly lighter grey-purple. Gently glaze a horizontal strip right at the bottom of the black area to suggest a reflection or water surface, though keep it very subtle. -
Final Varnish:
Allow the painting to cure for at least 24 hours. Finish with a coat of satin or matte varnish to unify the sheen and protect the deep colors.
Blending Blues?
If your gradient looks choppy or striped, your paint is drying too fast. Mist the canvas lightly with water or add more retarder medium, then use a very soft, dry brush to whisk across the transition zones.
Glow Up
Make the sunset glow by glazing a very thin, transparent layer of neon pink or fluorescent orange over the middle section once the base layer is completely dry.
Set your mini canvas on a ledge and enjoy the permanent golden hour you’ve created

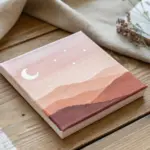
Night Sky With a Big Moon
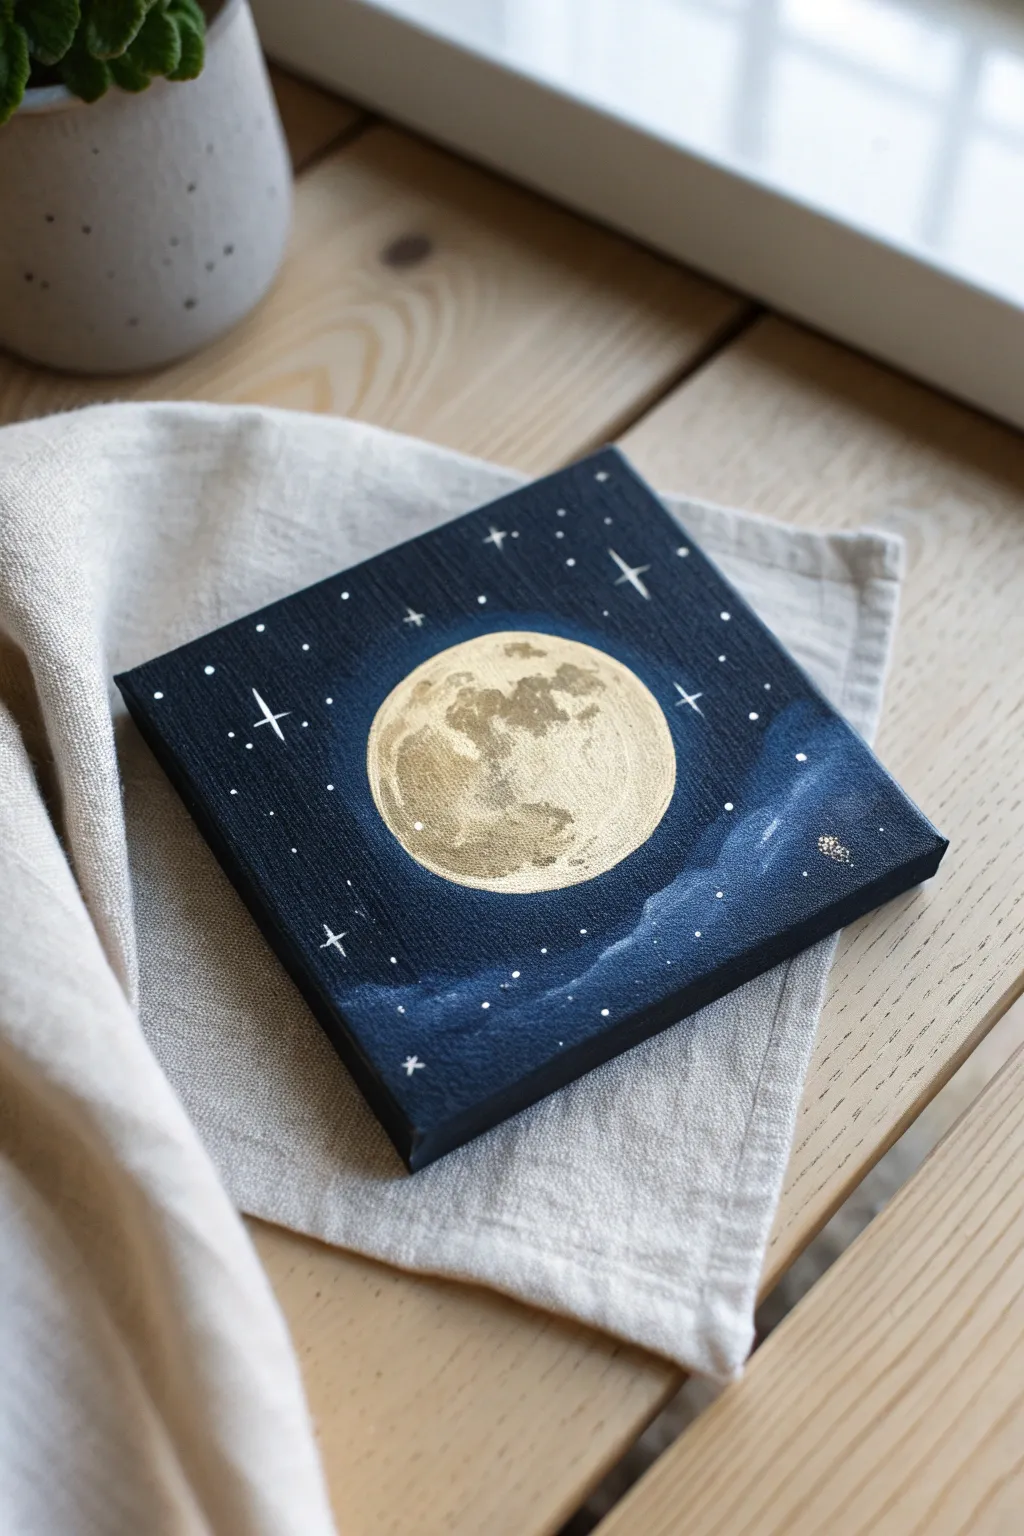
Capture the magic of a clear evening with this striking mini canvas project featuring a luminous, golden moon set against a deep indigo sky. The contrast between the metallic paint and the matte dark background creates a stunning focal point perfect for any small space.
How-To Guide
Materials
- Mini square canvas (approx. 4×4 or 6×6 inches)
- Acrylic paints: Black, Phthalo Blue (or Navy), Titanium White
- Metallic gold acrylic paint
- Flat shader brush (medium size)
- Small round detail brush (size 0 or 00)
- Round object for tracing (like a jar lid or roll of tape)
- Pencil
- Palette for mixing
Step 1: Setting the Scene
-
Map out the moon:
Begin by placing your round object in the center of the canvas. Use a pencil to lightly trace the circle. This ensures your moon is perfectly round before you start painting. -
Mix the night sky color:
On your palette, mix a generous amount of Phthalo Blue (or Navy) with a touch of Black. You want a very deep, rich midnight blue that is almost black but still retains a blue hue. -
Paint the background:
Using the flat shader brush, carefully paint around the pencil circle, filling in the rest of the canvas with your dark blue mixture. Don’t forget to paint the sides of the canvas for a finished, professional look. -
Smooth the edges:
While painting near the circle, slow down and use the edge of the brush to keep the line crisp. If you paint slightly inside the line, it’s okay, as the moon will cover it, but try to keep the shape circular. -
Create gradients:
Before the background dries completely, mix a tiny bit of white into your blue mixture to create a slightly lighter shade. Blend this vaguely around the lower right corner to suggest soft atmospheric light. -
Let it dry:
Allow the background layer to dry completely. Acrylics dry fast, but this dark layer needs to be solid so it doesn’t muddy the gold paint later.
Circle Secret
If you struggle with painting a perfect circle freehand, paint the gold moon first. Then, place your jar lid over the dried gold paint and paint the dark background around it as a mask.
Step 2: The Golden Moon
-
Base coat for the moon:
Once the sky is dry, use your clean flat brush to fill in the circle with metallic gold paint. You may need two thin coats to get full opaque coverage. -
Adding craters and texture:
While the gold is still slightly tacky, mix a tiny dot of black or brown into a separate dollop of gold to create a shadowed bronze color. -
Dabbing details:
Using the tip of a smaller brush, dab this darker gold mixture onto the moon in irregular patches to simulate craters and ‘seas.’ Focus these shapes on the left side and top area, leaving the bottom right brighter. -
Highlighting:
Mix a tiny bit of white into pure gold paint. Apply this highlight to the bottom right edge of the moon to make it look spherical and glowing.
Step 3: Stars and Atmosphere
-
Painting wispy clouds:
Mix a light blue-grey shade (mostly white with a speck of blue). Wipe most of the paint off your brush so it’s ‘dry.’ -
Scumbling technique:
Gently scumble (scrub lightly) this dry brush across the bottom right corner of the canvas, creating semi-transparent, wispy clouds that drift upwards slightly. -
Preparing the stars:
Switch to your smallest detail brush (size 0 or 00) and load it with pure Titanium White paint. You may need to add a drop of water to the paint so it flows smoothly like ink. -
Dotting the sky:
Gently touch the tip of the brush to the canvas to create stars. Vary the pressure to create different sizes—some should be tiny specks, others distinct dots. -
Creating twinkle stars:
Choose 3 or 4 larger dots to turn into twinkling stars. Paint a thin vertical line through the dot, followed by a shorter horizontal line, creating a cross shape. -
Final touches:
Add a few tiny white dots over the wispy cloud area to suggest stars shining through the mist. Step back and check if the distribution looks balanced.
Make It 3D
Mix a little texture paste or heavy gel medium into your gold paint before applying the moon. This creates physical craters and ridges that will catch the light beautifully.
Now you have a serene piece of celestial art ready to brighten up any corner of your room


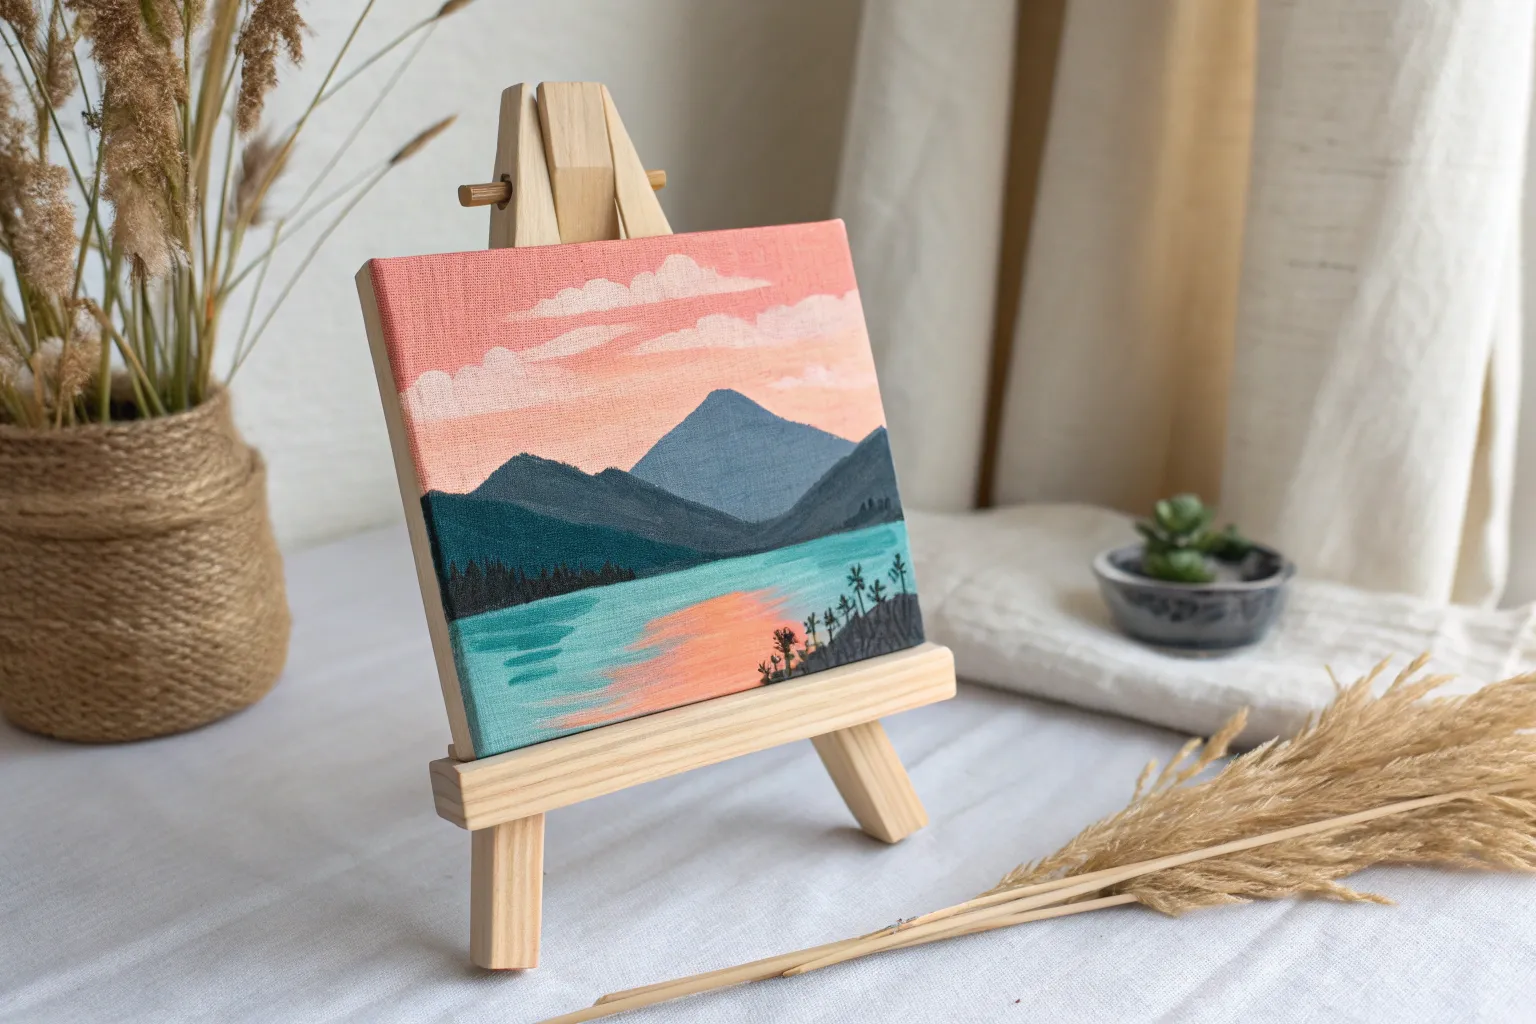
Pine Tree Silhouette Scene
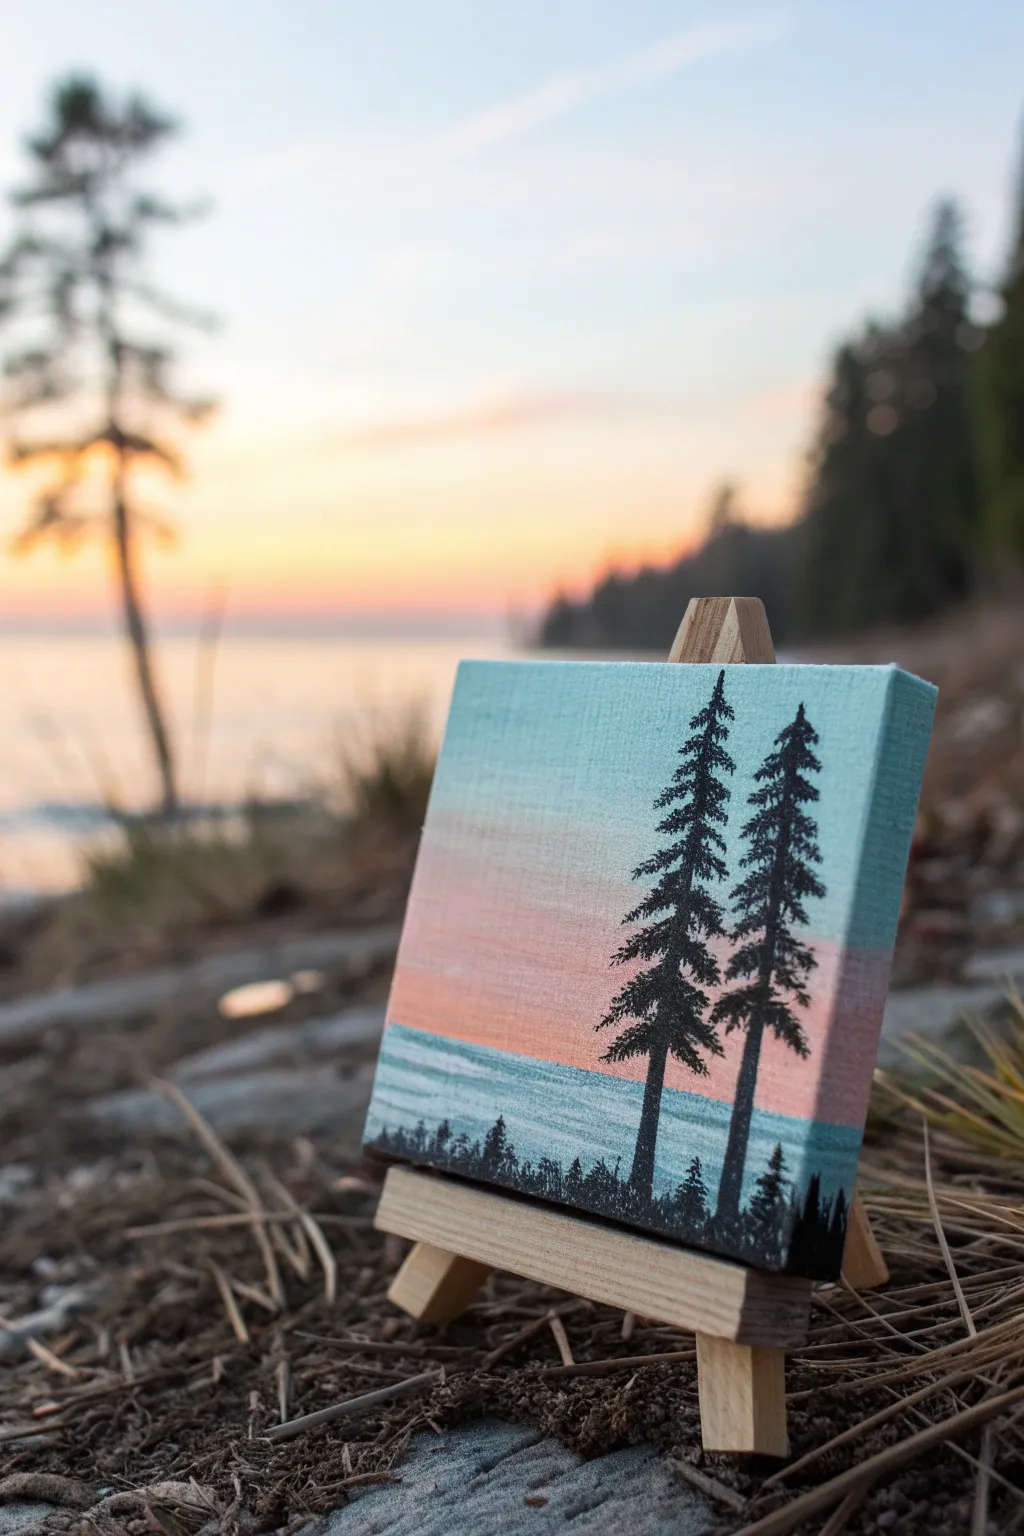
Capture the serenity of a lakeside evening on a tiny scale with this gradient landscape painting. Using simple blending techniques and careful brushwork, you’ll create a striking silhouette scene that perfectly mimics the golden hour.
Step-by-Step Guide
Materials
- Mini canvas (3×3 or 4×4 inch)
- Mini wooden easel
- Acrylic paints: Teal/Sky Blue, Pale Pink, White, Black
- Flat shader brush (small, size 4 or 6)
- Detail liner brush (size 0 or 00)
- Palette or paper plate
- Cup of water and paper towels
Step 1: Painting the Gradient Sky
-
Establish the horizon:
Decide where your water line will be. For this composition, place it just below the halfway point of the canvas. You can draw a faint pencil line or just eyeball it. -
Mix the sky blue:
On your palette, mix a touch of white with your teal or sky blue paint to create a soft, airy blue. Load your flat brush with this color. -
Apply the top sky layer:
Paint the top third of the canvas with horizontal strokes using the light blue mixture. Ensure the paint goes all the way around the edges of the canvas for a finished look. -
Transition color:
While the blue is still slightly wet, wipe your brush (don’t rinse completely) and pick up some plain white paint. Blend this into the bottom edge of the blue section to create a fade. -
Add the sunset pink:
Clean your flat brush thoroughly. Load it with pale pink paint. Start strictly at the horizon line and paint upwards, meeting the faded white/blue section in the middle. -
Create the blend:
Where the pink meets the faded blue/white, use gentle back-and-forth horizontal strokes to marry the colors. If it gets muddy, wipe your brush and dry blend the intricate seam.
Step 2: Creating the Water
-
Block in the water:
Mix a slightly darker version of your sky blue or use pure teal. Paint the area below the pink sky down to the bottom edge of the canvas. -
Add water texture:
Using a very small amount of white paint on the dirty blue brush, create horizontal streaks across the water area. This implies waves and light reflection. -
Enhance the horizon:
I like to use a clean, sharp edge of the flat brush to redefine the horizon line where the pink sky meets the water, ensuring it is perfectly straight. -
Let it dry entirely:
Allow the background to dry completely before starting the silhouettes. If the background is wet, the black paint will bleed and turn gray.
Muddy Sky Fix
If blue and pink mix into purple or gray, stop! Let the first layer dry completely, then glaze a thin layer of white over the middle before re-attempting the blend.
Step 3: The Pine Tree Silhouettes
-
Paint the distant tree line:
Switch to your fine detail liner brush and black paint. Along the very bottom edge of the canvas, dab in a jagged, uneven line to represent distant bushes and small trees. -
Establish the main trunks:
Decide on the placement of your two main trees on the right side. Paint two thin, vertical lines extending from the bottom almost to the top edge. -
Start the tapering tops:
At the very top of your vertical lines, use the absolute tip of the liner brush to create tiny, short dashes for the pointed tops of the pines. -
Build the branches:
Work your way down the trunk, using a stippling or tapping motion. Make the branches wider as you descend. Leave small gaps between branches so the sky peeks through. -
Detail the second tree:
Repeat the process for the second tree. Varying the branch patterns slightly makes the scene look more organic and natural. -
Ground the trees:
Thicken the foliage at the very base of the trees where they merge with the distant tree line, adding weight to the bottom of the composition.
Sharper Bristles
For crisp pine needles, slightly thin your black paint with a drop of water. Ink-like consistency flows better from the liner brush than thick tube paint.
Place your finished masterpiece on its mini easel and enjoy the view


Ocean Horizon at Dusk
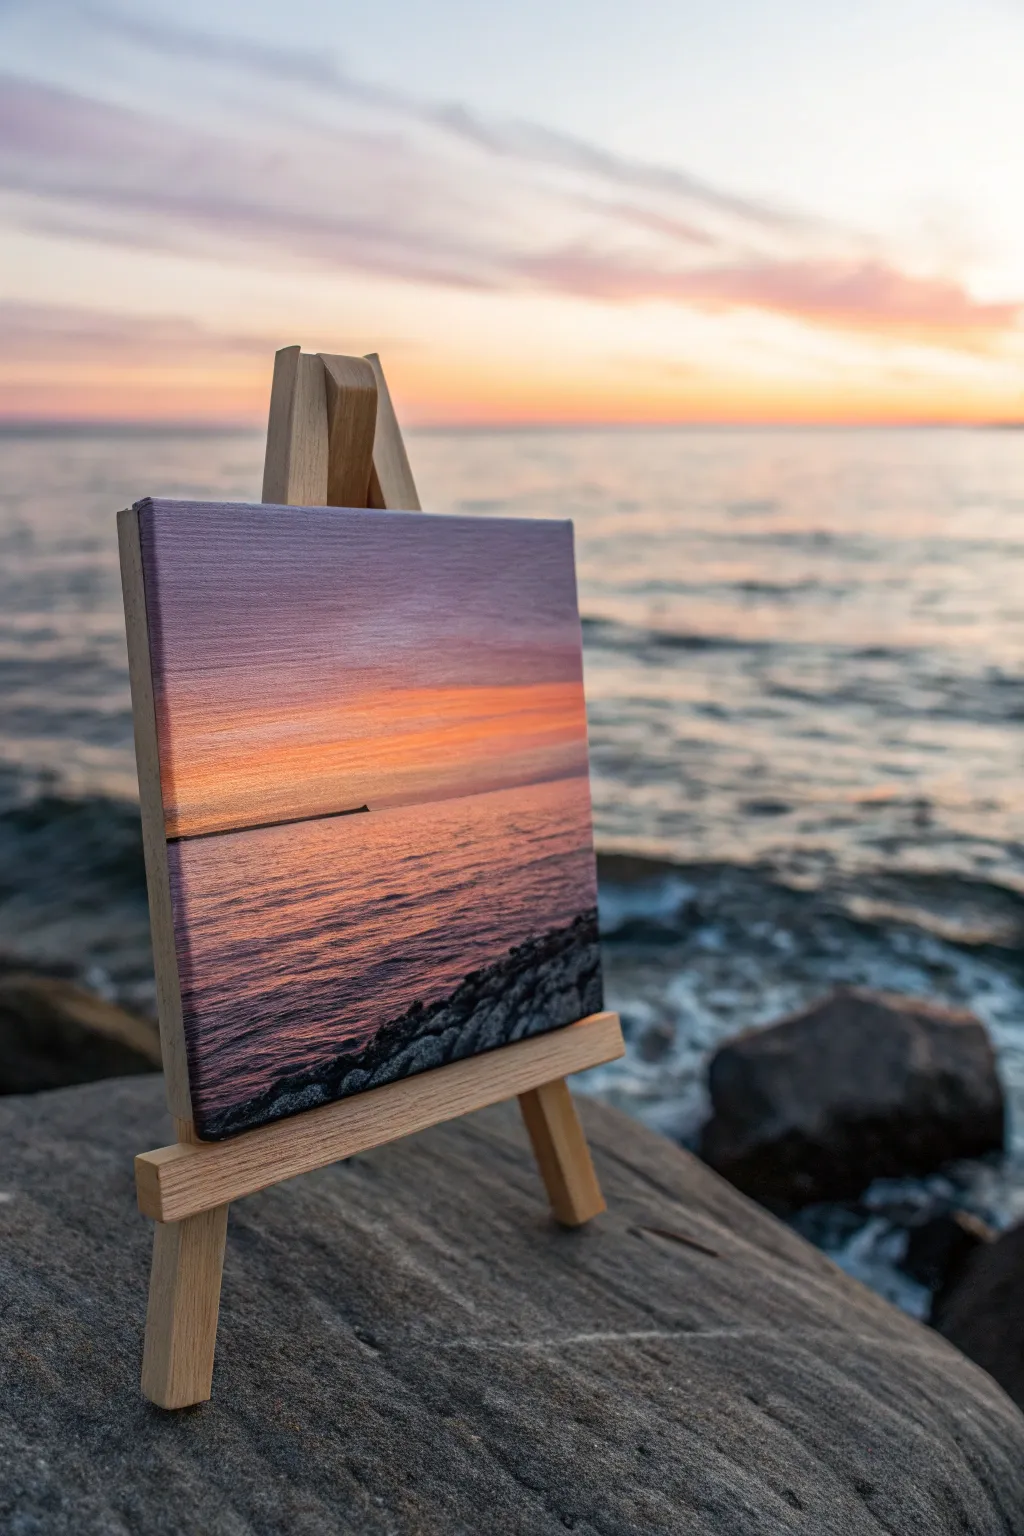
Capture the serene beauty of a coastal twilight with this charming miniature painting. Using soft blending techniques, you’ll mirror the tranquil transition from a purple sky to the rhythmic waves below.
Step-by-Step
Materials
- Mini stretched canvas (4×4 or 5×5 inch)
- Mini wooden easel
- Acrylic paints (Titanium White, Ultramarine Blue, Cadmium Orange, Alizarin Crimson, Black)
- Flat synthetic brush (size 6 or 8)
- Small round detail brush (size 0 or 1)
- Palette or paper plate
- Cup of water and paper towels
Step 1: Painting the Sky
-
Prepare the Horizon:
Visualize a line slightly below the center of your canvas. This will be your horizon line. It is helpful to sketch this lightly with a pencil if you feel unsteady, but keeping it freehand adds a natural feel. -
Mix the Upper Sky Color:
On your palette, mix a soft lavender shade using Ultramarine Blue, a touch of Alizarin Crimson, and plenty of Titanium White. This creates the cool, upper dusky portion of the sky. -
Apply the Top Layer:
Using your flat brush, paint horizontal strokes across the top third of the canvas. Ensure the strokes are smooth and fully cover the canvas weave. -
Create the Sunset Glow:
Wipe your brush but don’t rinse it fully. Pick up some Cadmium Orange and mix it with a little White. Blend this warm peach tone seamlessly into the bottom edge of your purple sky while the paint is still wet. -
Deepen the Horizon:
For the area just above the sea line, mix a slightly more intense orange with a tiny dot of Crimson. Paint this horizontal strip right at the horizon, blending upward into the peach tone to create a glowing gradient. -
Add Cloud Textures:
Using a mostly dry brush with a tiny amount of the purple-grey mix, streak very faint, wispy horizontal lines across the orange sky to suggest distant clouds.
Muddy colors?
If your orange and blue blend into a muddy brown, let the first layer dry completely before glazing the second color over it, or clean your brush more thoroughly between color changes.
Step 2: Creating the Ocean
-
Establish the Water Base:
Mix a muted violet-blue tone using Ultramarine Blue, Alizarin Crimson, and a touch of black to desaturate it. Add white until it matches the darker tones of the water in the reference. -
Paint the Water Surface:
Cover the remaining canvas below the horizon line with this base water color. Keep your strokes strictly horizontal to mimic the flatness of the sea. -
Reflect the Sky:
I like to take a bit of the peach/orange mix from the sky step and glaze it lightly over the left side of the water. This mimics the sun’s reflection hitting the ripples. -
Add Wave Movement:
Switch to your small round brush. Mix a dark purple-black shade. Paint thin, broken horizontal lines across the water to represent the shadows of small waves. -
Highlight the Ripples:
Clean your small brush and pick up pure White mixed with a tiny bit of orange. Paint thin highlights on the crests of the waves, focusing primarily on the left side where the light is strongest. -
Define the Horizon Line:
Use the darkest purple mix to carefully paint a very thin, straight line along the horizon. You can add a tiny bump on the left side to represent a distant landmass or pier.
Step 3: Foreground Rocks
-
Block in Rock Shapes:
Mix Black with a little Blue for a deep, cool dark tone. At the bottom right corner, dab in irregular shapes to form the silhouette of the rocky shoreline. -
Create Rock Texture:
The rocks shouldn’t be flat black. Mix a medium grey and dab it onto the top edges of your rock shapes to show where the ambient light hits the rough stone. -
Anchor the Painting:
Ensure the bottom edge of the canvas is painted black or dark grey so it looks finished when sitting on the easel. -
Final Adjustments:
Step back and look at your contrast. If the water highlights have faded while drying, add one final touch of bright white to the sharpest wave crests.
Add a silhouette
Customize your horizon by painting a tiny silhouette of a lighthouse or a single sailboat using your smallest brush and black paint for a storytelling element.
Place your finished masterpiece on its mini easel and enjoy the permanent sunset view
BRUSH GUIDE
The Right Brush for Every Stroke
From clean lines to bold texture — master brush choice, stroke control, and essential techniques.
Explore the Full Guide
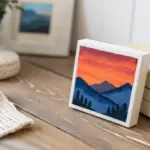
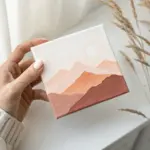
Simple Mountain Layers
Capture the serenity of a sunset mountain range with this easy-to-master layered landscape. Using a soothing palette of warm peaches and cool indigos, you’ll build depth simply by overlapping shapes from lightest to darkest.
Step-by-Step Tutorial
Materials
- Mini stretched canvas (4×4 or 5×5 inch)
- Acrylic paints (Titanium White, Peach, Blush Pink, Payne’s Grey, Black)
- Flat brush (small, approx. size 4 or 6)
- Detail round brush (size 0 or 1)
- Palette or paper plate
- Cup of water and paper towels
- Pencil (optional)
Step 1: Setting the Sky
-
Mix the base sky color:
Start by mixing a generous amount of Titanium White with just a tiny drop of Peach paint. You want a very pale, creamy off-white color that covers the top third of your canvas. -
Paint the upper gradient:
Apply this pale mixture to the top section of the canvas using your flat brush. Use horizontal strokes for a smooth finish. -
Deepen the sky tone:
While the paint is still wet, add a little more pure Peach to your brush. Blend this into the lower part of your sky section, creating a soft transition from the pale top to a slightly warmer horizon line. -
Let it dry completely:
Allow the sky layer to dry fully before starting the mountains. This ensures your crisp mountain edges won’t muddy into the background.
Clean Lines Hack
If your hand is shaky, use small strips of painter’s tape or washi tape to mask off the mountain edges. Peel carefully while paint is slightly wet!
Step 2: Layering the Mountains
-
Mix the first mountain color:
Create a soft, dusty pink by mixing White, a touch of Blush Pink, and the tiniest speck of Payne’s Grey to desaturate it. It should be just slightly darker than your sky. -
Paint the furthest range:
Paint two or three triangular peaks about halfway down the canvas. Keep the bottoms of these shapes imprecise, as they will be covered by the next layer. -
Mix a mid-tone mauve:
Darken your previous mixture by adding a bit more Payne’s Grey and a touch of Peach. You are aiming for a muted mauve or brownish-purple tone. -
Add the middle range:
Paint a new set of peaks below and slightly overlapping the first set. Offset the peaks so they sit in the valleys of the previous layer to create a natural rhythm. -
Create a slate grey tone:
For the next layer down, mix Payne’s Grey with White until you have a medium slate blue-grey. It should be distinctly cooler and darker than the previous warmer tones. -
Paint the lower jagged peaks:
Apply this slate color, creating a more jagged, irregular mountain line that spans the width of the canvas. Make sure the paint is opaque enough to cover the layers underneath. -
Mix the darkest shadow color:
Finally, mix Black with a small amount of Payne’s Grey. Avoid using pure black straight from the tube; mixing it gives it richness. -
Paint the foreground:
Fill in the bottom-most section of the canvas with this dark mixture. Create large, sweeping slopes that anchor the composition at the bottom corners.
Step 3: Refining Details
-
Check opacity:
Look closely at your layers. If the canvas texture shows through too much on the darker mountains, apply a second coat to make the silhouettes solid. -
Sharpen the edges:
I find using a small detail brush with a tiny bit of water helps to clean up the ridge lines if they look a bit fuzzy. -
Paint the sides:
Don’t forget the edges of the canvas! Extend your horizontal color bands and mountain shapes around the sides for a professional, gallery-wrapped look. -
Final varnish (optional):
Once fully dry (give it at least 24 hours), apply a satin or matte varnish to protect the paint and unify the sheen.
Level Up: Starry Night
Once the sky is dry, use an old toothbrush to flick tiny specks of white paint onto the top section for a subtle starry effect.
Place your finished mini masterpiece on its easel and enjoy the view
Single Flower Close-Up
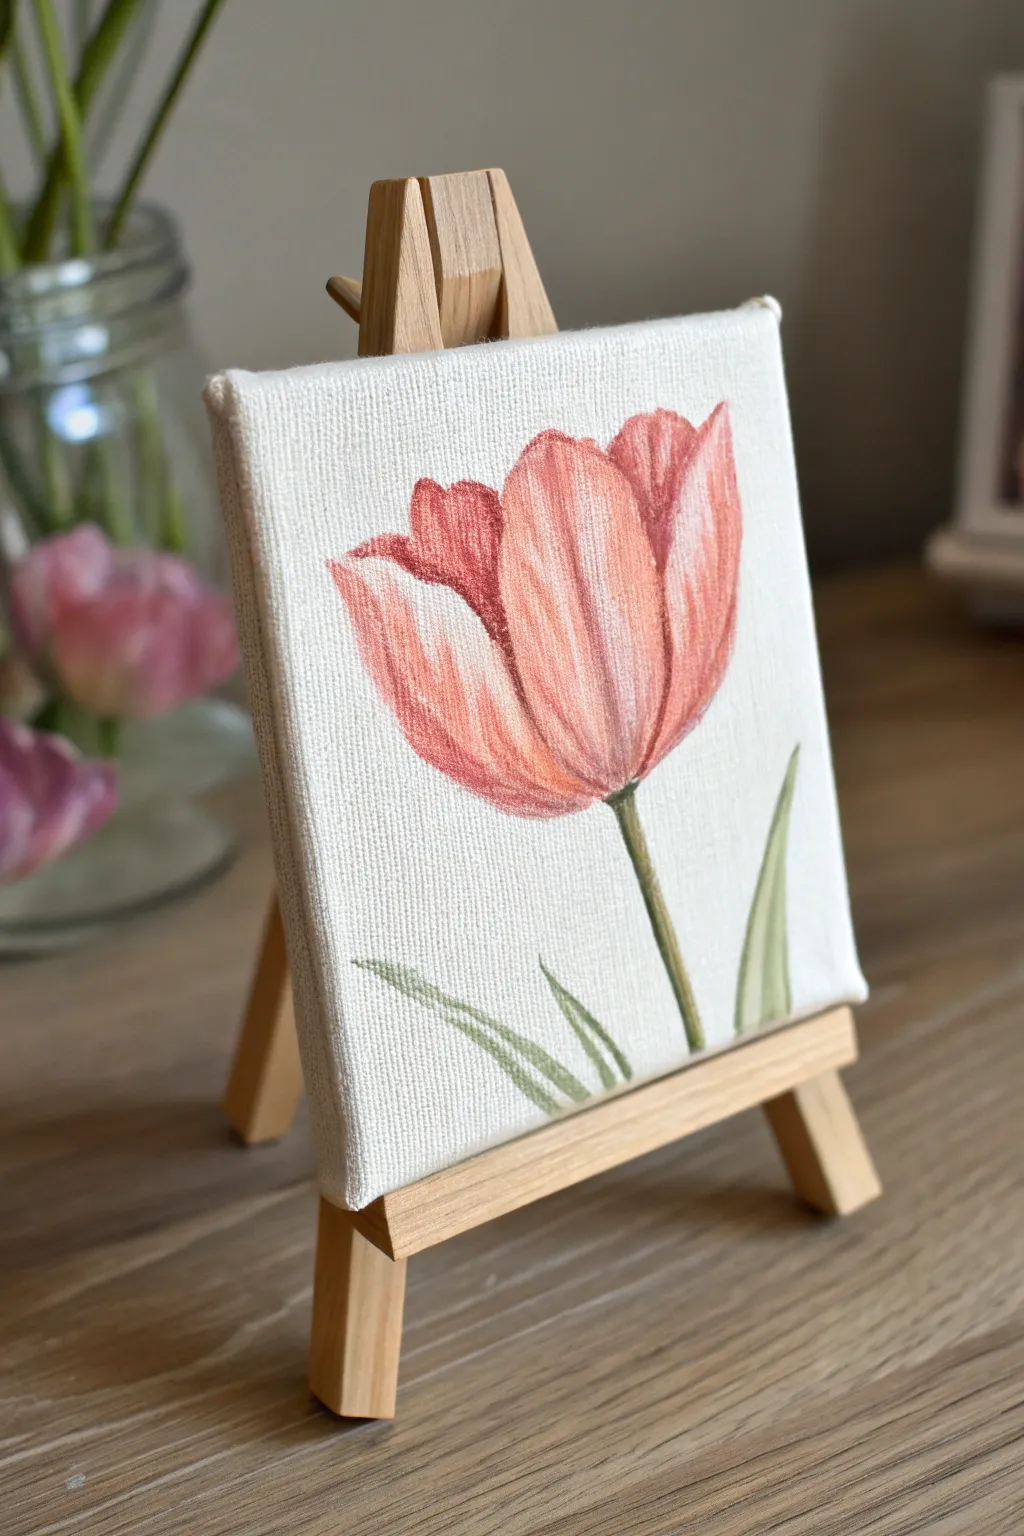
This delicate project captures the soft elegance of a single tulip bloom on a miniature canvas, making it a perfect quick-study for floral painting. The piece features gentle shading and texture that mimics the look of colored pencil or pastel on a canvas grain.
Detailed Instructions
Materials
- Mini stretched canvas (approx. 4×4 inches)
- Mini wooden easel
- Soft body acrylic paints or gouache (Titanium White, Vermilion Red, Alizarin Crimson, Sap Green, Yellow Ochre)
- Small round paintbrushes (sizes 0, 2, and 4)
- Pencil (HB or H) for sketching
- Palette or mixing plate
- Paper towels
- Water cup
Step 1: Sketching the Composition
-
Analyze the shapes:
Visualize the tulip head as a u-shape or cup shape that is slightly tilted to the right. -
Outline the flower:
Using your HB pencil, lightly sketch the main outline of the tulip petals. Start with the large central petal, then add the side petals hugging it. -
Add the stem:
Draw a slender stem extending from the bottom center of the flower head, slightly curving to the right. -
Sketch the leaves:
Place one leaf rising from the bottom right corner and a smaller hint of greenery on the left side to balance the composition. -
Refine the lines:
Lightly indicate the folds and separation between the petals, keeping your pencil pressure very soft so graphite doesn’t smudge later.
Step 2: Blocking in Color
-
Mix the base pink:
Combine a generous amount of Titanium White with a touch of Vermilion Red and Alizarin Crimson to create a soft, peachy-pink salmon color. -
Apply the base coat:
Using a size 4 brush, fill in the petal shapes with this light pink mixture. It’s okay if the canvas texture shows through slightly; this adds to the organic feel. -
Mix the green:
Create a muted green by mixing Sap Green with a tiny dot of Yellow Ochre and White to soften it. -
Paint the stem and leaves:
Carefully paint the stem and the leaves with your green mix using the size 2 brush. Keep the strokes fluid.
Too much graphite?
If your pencil sketch is too dark and showing through the pale pink paint, gently dab it with a kneaded eraser before painting to lift excess graphite.
Step 3: Adding Depth and Texture
-
Mix a shadow shade:
Take your initial pink mix and add more Alizarin Crimson and a touch of Red to create a deeper, richer dusty rose color. -
Define the petals:
Using the size 2 brush, paint vertical strokes starting from the base of the flower upward. This mimics the natural veining of a tulip. -
Darken the overlaps:
Apply this darker red shade where the petals overlap and at the very bottom where the flower meets the stem. -
Dry brushing technique:
I prefer to wipe most of the paint off my brush for this part gently drag the almost-dry brush over the lighter areas to blend the transition between light and dark without losing the texture. -
Highlighting:
Mix a very pale pink, almost white. Add highlights to the upper edges of the petals where the light would naturally hit. -
Refining the stem:
Mix a slightly darker green (add a touch of red to your green mix) and paint a thin shadow line down one side of the stem for dimensionality. -
Connect the greenery:
Ensure the stem connects seamlessly to the flower head, perhaps blending a tiny bit of green into the base of the pink petals. -
Clean up edges:
If any paint went outside the lines, use a small brush with Titanium White to tidy up the background canvas. -
Final assessment:
Step back and look at your mini canvas. Add any final tiny strokes of deep red for contrast or white for brightness.
Use the texture
Don’t over-blend! Let the rough weave of the canvas grab the paint. This creates that lovely, sketchbook-style textured look seen in the photo.
Display your charming mini masterpiece on its easel to bring a spot of botanical joy to any small shelf

PENCIL GUIDE
Understanding Pencil Grades from H to B
From first sketch to finished drawing — learn pencil grades, line control, and shading techniques.
Explore the Full Guide
Tiny Cactus in a Pot
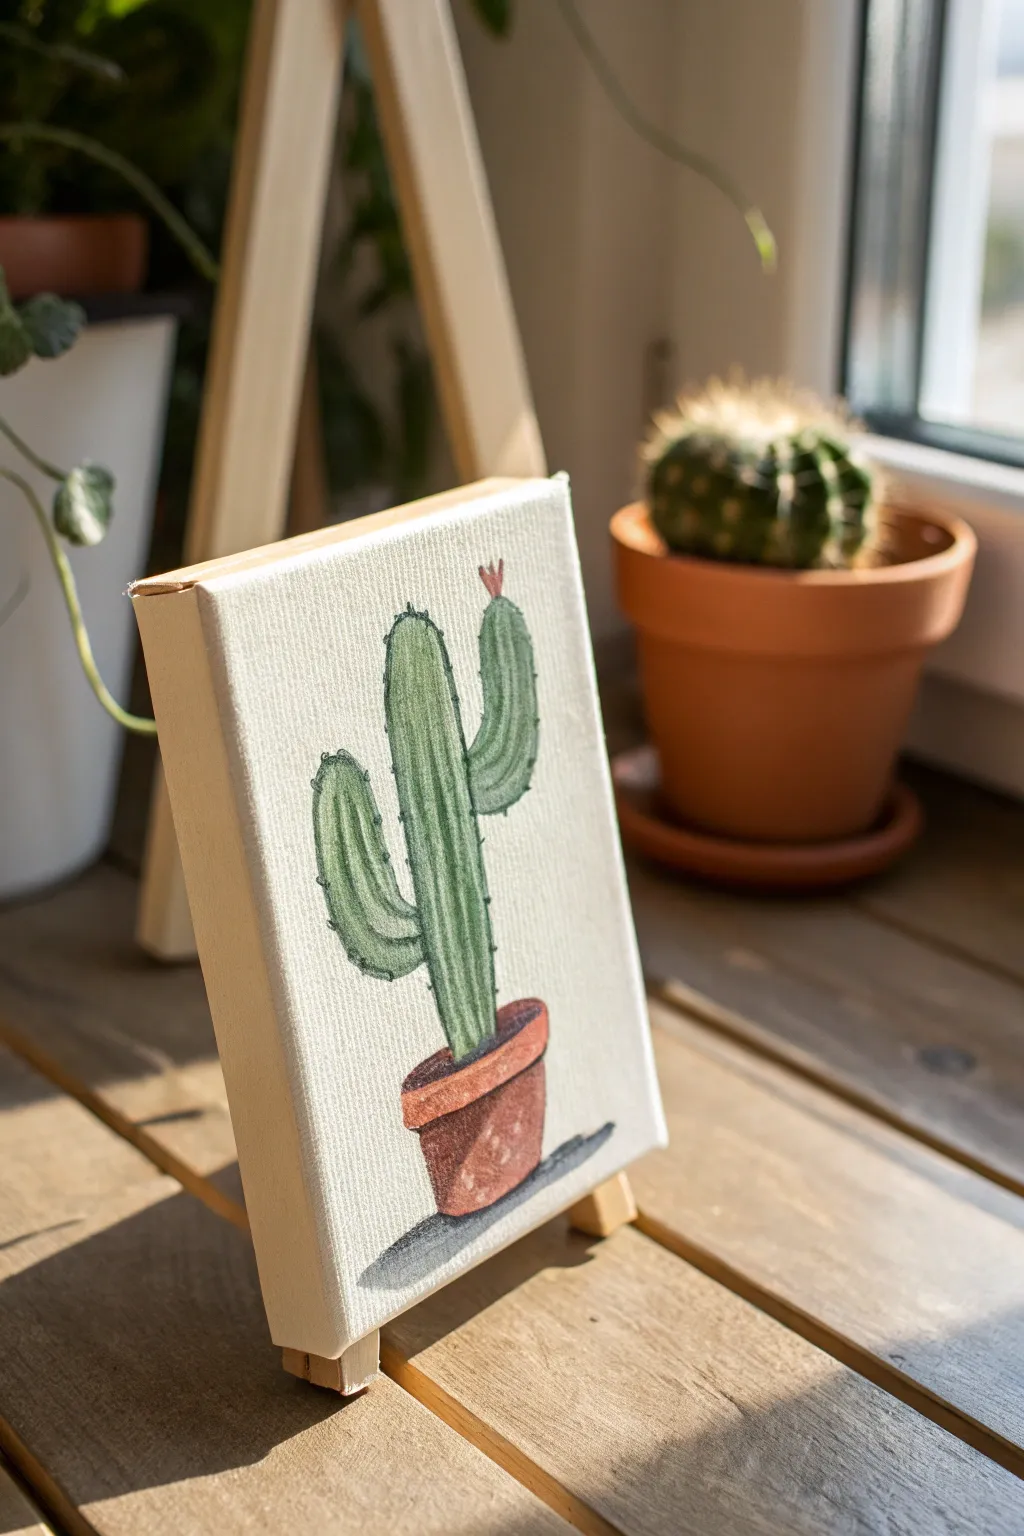
This adorable mini canvas features a classic saguaro cactus sitting comfortably in a terracotta pot. Because the paint is applied lightly, the texture of the canvas shines through, giving the piece a charming, sketched-illustration vibe.
Step-by-Step
Materials
- Mini canvas (approx. 4×6 or 5×7 inches)
- Mini wooden easel
- Pencil and eraser
- Green acrylic paint or fabric markers (light and dark green)
- Terracotta/brown acrylic paint
- Black fine-tip marker or pen
- Grey acrylic paint (for shadow)
- Small round paintbrush
- Water cup and paper towels
Step 1: Sketching the Shape
-
Position the pot:
Start near the bottom center of your canvas. Lightly sketch a simple trapezoid shape for the pot’s base, wider at the top and narrower at the bottom. -
Add the rim:
Draw a thin, horizontal rectangle directly on top of your trapezoid to create the rim of the flower pot. It should overhang the base slightly on both sides. -
Draw the main stem:
For the cactus body, draw a tall, rounded column rising from the center of the pot’s rim. Make it slightly taller than you might expect, leaving a little room at the top edges. -
Add the arms:
Sketch two arms. Place the left arm lower, curving upward in a ‘U’ shape. Place the right arm higher up the stem, also curving upward but slightly shorter. -
Tiny bloom:
Add a tiny, three-pointed flower detail on the very top of the right cactus arm.
Pro Tip: Texture Trick
If you don’t have markers, dilute your acrylic paint with a tiny bit of water. This creates a semi-transparent ‘watercolor’ look that matches the photo perfectly.
Step 2: Adding Color
-
Paint the cactus base:
Using a light green paint or marker, fill in the entire shape of the cactus. Keep the layer thin so the canvas texture remains visible. -
Create ridges:
Take a slightly darker green shade. Draw vertical stripes following the curve of the cactus body and arms to simulate the ribbed texture of the plant. -
Color the pot:
Fill in the pot rim and base with a terracotta or reddish-brown color. I prefer to dab the paint a bit unevenly here to mimic the rough texture of clay. -
Add soil detail:
Paint a thin sliver of dark brown right where the green cactus meets the rim of the pot to show the soil inside. -
Paint the flower:
Use a tiny dab of red or pink for the small bloom on the right arm.
Step 3: Defining Details
-
Outline the pot:
Once dry, use your black fine-tip marker to loosely outline the flower pot rim and base. Don’t worry about perfect straight lines; a shaky hand adds character. -
Outline the cactus:
Outline the main stem and arms of the cactus with the black pen. Add little tick marks along the edges to suggest spines without drawing every single needle. -
Highlight the ridges:
Go over your vertical dark green stripes with the black pen using broken, dashed lines. This reinforces the 3D shape. -
Ground the object:
Mix a watery grey paint. Paint an oval shadow stretching out to the right side of the pot base to ground your object so it doesn’t look like it’s floating. -
Final touches:
Erase any visible pencil marks that weren’t covered by paint or ink.
Troubleshooting: Bleeding?
If your black outline ink bleeds into the green paint, the paint wasn’t fully dry. Wait another 10-15 minutes or use a hair dryer on low heat to set it.
Set your mini masterpiece on its easel and enjoy a plant that never needs watering
Fruit With Clean Shapes
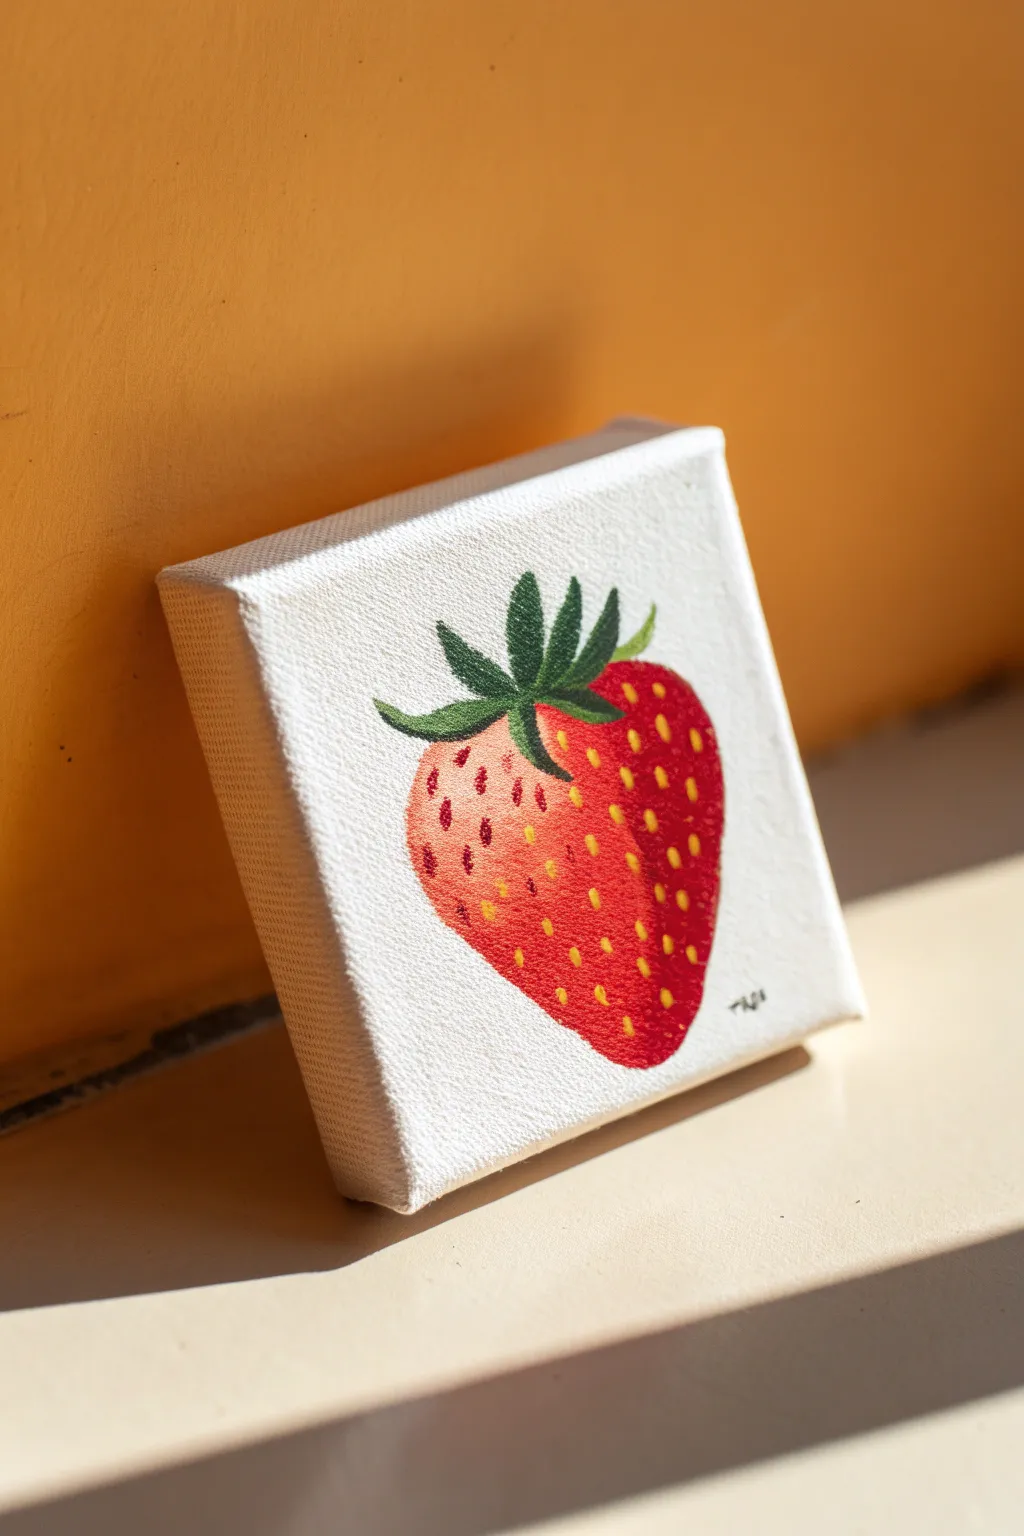
This miniature masterpiece captures the vibrant essence of a fresh strawberry using bold reds and subtle shading. The clean white background makes the fruit pop, creating a charming and modern piece of art perfect for a kitchen shelf.
Detailed Instructions
Materials
- Mini stretched canvas (4×4 inch / 10×10 cm)
- Acrylic paints: Bright red, deep red (or crimson), yellow ochre, sap green, dark green, titanium white, lemon yellow
- Small flat brush (size 4 or 6)
- Fine detail brush (size 0 or 00)
- Pencil for sketching
- Palette for mixing
- Cup of water and paper towels
Step 1: Preparation & Base Coating
-
Prime the Surface:
Even though your mini canvas likely came primed, applying a fresh coat of titanium white gives you a smoother, brighter surface. Brush on a thin, even layer across the entire face and sides of the canvas and let it dry completely. -
Sketch the Outline:
Using a pencil, lightly draw the strawberry shape in the center of the canvas. Start with a rounded heart shape that tapers at the bottom, but keep it slightly asymmetrical for a natural look. Leave enough room at the top for the leafy crown. -
Add the Leaves:
Draw the star-shaped calyx (leaves) at the top of your fruit. Sketch about five or six jagged leaves radiating outward from the center stem, curving them slightly to hug the top of the berry.
Seed Placement
Don’t paint seeds randomly! Arrange them in diagonal rows that curve with the shape of the berry. This simple trick instantly makes your flat painting look rounded and 3D.
Step 2: Painting the Fruit Body
-
Base Red Layer:
Mix a bright red with a tiny touch of water to improve flow. Fill in the main body of the strawberry, carefully cutting in around your pencil lines. Don’t worry about shading yet; just get a solid, opaque red down. -
Side Check:
While you have the red paint out, decide if you want the image to wrap around the edges. For this clean look, I prefer to keep the sides crisp white, so be careful not to smudge paint onto the canvas edges. -
Establish Shadow:
Mix a deeper red by adding a speck of green or a touch of crimson to your bright red. Apply this darker shade along the right side and bottom curve of the berry to create a sense of roundness. -
Create the Highlight Zone:
While the paint is still slightly workable, blend a lighter red (mix red with a tiny bit of yellow or orange) on the upper left side. This suggests where the light is hitting the fruit. -
Dry Time:
Let this red layer dry completely. Acrylics dry darker, so you want to see the true color before adding details.
Step 3: Adding the Crown
-
Base Green:
Take your sap green and fill in the leaf shapes you sketched earlier. Use the tip of your small flat brush or switch to a detail brush to get sharp points on the leaves. -
Leaf Shadows:
Mix a dark green by adding a little blue or black to your sap green. Paint thin lines down the center of each leaf and along the bottom edges where the leaves cast a shadow on the berry. -
Leaf Highlights:
Add a touch of yellow to your green to make a lime shade. lightly brush this onto the tips and top edges of the leaves to make them look dimensional and fresh. -
Connecting Stem:
Paint the small stem nub at the very center of the leaves, using a mid-tone green.
Make it Pop
Once dry, apply a coat of gloss varnish only to the red strawberry part, leaving the white background matte. This makes the fruit look juicy and freshly washed.
Step 4: Seeds & Fine Details
-
Create Seed Indents:
To make the seeds look embedded, mix a darker, brownish-red shade. Using your finest detail brush, paint tiny, short, vertical teardrop shapes scattered across the berry. Follow the curvature of the fruit—seeds on the sides should appear more compressed. -
Paint the Seeds:
Mix a yellow ochre or a warm creamy yellow. Carefully place a small dot or dash inside each of the dark red indents you just painted. Leave a tiny sliver of the dark red showing around the edge to act as a shadow. -
Refine the Light:
Take your lemon yellow or a very pale peach mix. Add tiny highlights to the upper-left side of specific seeds in the ‘light zone’ to make them glisten. -
Final Cleanup:
If any red or green strayed outside the lines, use titanium white to touch up the background, ensuring a crisp, clean silhouette against the canvas. -
Signature:
Sign your initials in the bottom right corner using a fine brush and black or dark paint to complete your work.
Place your finished mini canvas on a small easel or shelf to add a permanent splash of summer to your room


Butterfly With Bold Wings
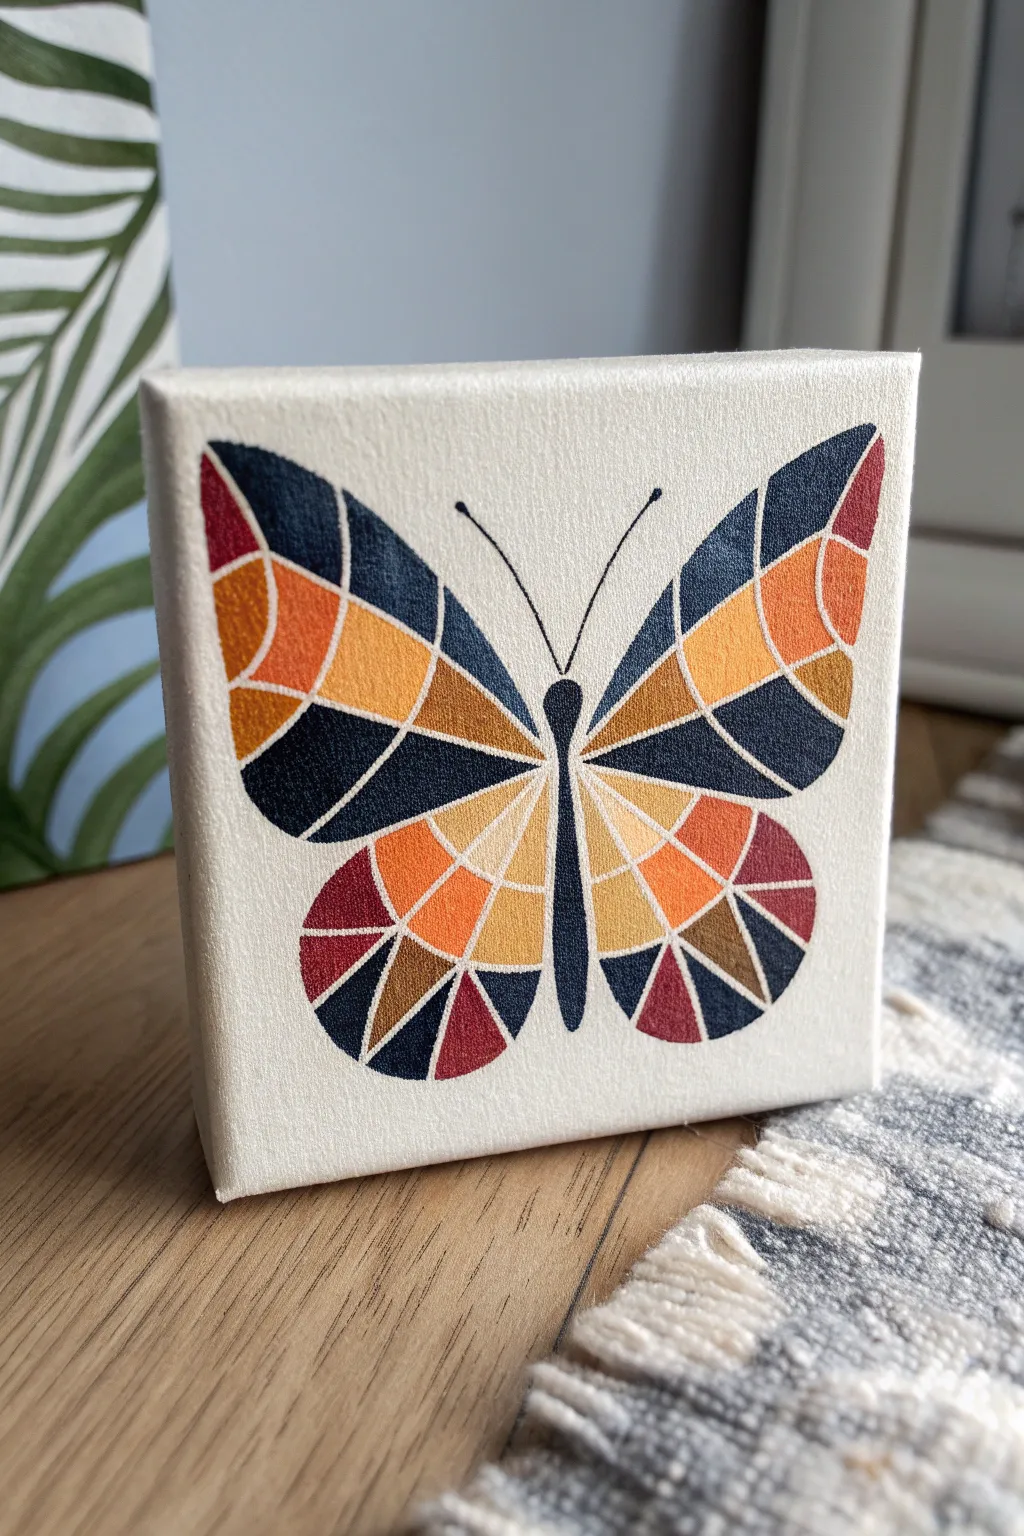
This mini canvas project transforms a simple insect motif into a striking piece of modern art using geometric segmentation. The contrast between deep navy, warm spices, and crisp white lines creates a stained-glass effect that looks incredibly professional yet is surprisingly easy to achieve.
Step-by-Step
Materials
- Mini stretched canvas (4×4 or 5×5 inch)
- Pencil and eraser
- Ruler
- Fine tip black acrylic paint pen (or 00 brush and black acrylic paint)
- Acrylic paints: Navy blue, burnt orange, mustard yellow, deep red
- Small flat brush (size 2 or 4)
- Small round detail brush (size 0 or 1)
- Palette for mixing paint
- Cup of water and paper towels
- White gel pen (optional for clean-up)
Step 1: Sketching the Framework
-
Horizontal symmetry:
Start by finding the exact center of your mini canvas. Lightly draw a vertical line down the middle with your pencil to act as an axis of symmetry. -
Wing outline:
Sketch the outer silhouette of the butterfly wings. Aim for a classic shape where the top wings fan out widely and curve upward, while the bottom wings are rounder and slightly smaller. -
Body placement:
Draw the slender body along your center line. The head should be a small circle at the top, flowing into a slightly thicker thorax and tapering down to a pointed abdomen. -
Segmenting the design:
Using your ruler or a steady freehand, draw lines inside the wings to create the geometric shards. Start with main veins radiating from the body, then add cross-lines to create the mosaic ‘panes.’ Keep the shapes angular rather than organic.
Bleeding Lines?
If your paint bleeds under tape or into the canvas weave, wait for it to dry fully, then sharpen the line using a white opaque paint pen or heavy body white acrylic.
Step 2: Painting the Mosaic
-
Planning the palette:
Before painting, I sometimes put tiny dot markings in each segment to plan which color goes where, ensuring no two blocks of the same color touch directly. -
Applying the dark hues:
Start with your navy blue paint. Use your small flat brush to fill in the largest outer segments of the wings. The sharp edge of a flat brush is perfect for getting into corners. -
Adding warmth:
Next, fill in the segments designated for burnt orange. This mid-tone acts as a bridge between the dark blue and the lighter yellows. -
Brightening with yellow:
Paint the mustard yellow sections, focusing on the areas closer to the butterfly’s body to create a sense of inner light radiating outward. -
Pops of red:
Use the deep red selectively on the tips of the wings or small lower segments to add dramatic flair and anchor the design. -
Drying time:
Let the colors dry completely. Acrylics on canvas dry fast, but thick layers might need 15-20 minutes.
Step 3: Defining the Lines
-
Masking the gaps:
You will notice white canvas showing between your color blocks. This is actually part of the design aesthetic, as it mimics grout lines. -
Detailing the dividers:
Take your white gel pen or a very fine brush with white paint and carefully trace over the gaps between the colors. This cleans up any messy edges and makes the colors pop. -
Painting the body:
Fill in the central body shape with solid black acrylic paint or a black paint pen. Ensure the edges are smooth and distinct. -
Adding antennae:
Draw two delicate, curved lines extending from the head for antennae. A paint pen gives the best control here for a fine, consistent line. -
Optional texture:
If you want a slight fabric texture look like the image, verify your paint isn’t too thick. A thin application allows the canvas weave to show through. -
Final touches:
Inspect your edges. If any color bled over the intended white lines, touch it up with white paint for that crisp, printed look.
Gold Leaf Accents
Replace the mustard yellow segments with gold leaf or metallic gold paint. The shine adds a luxurious, jewelry-like quality to the geometric wings.
Set your finished canvas on a small easel or shelf to add a modern, colorful touch to your space
Planets on a Starry Backdrop
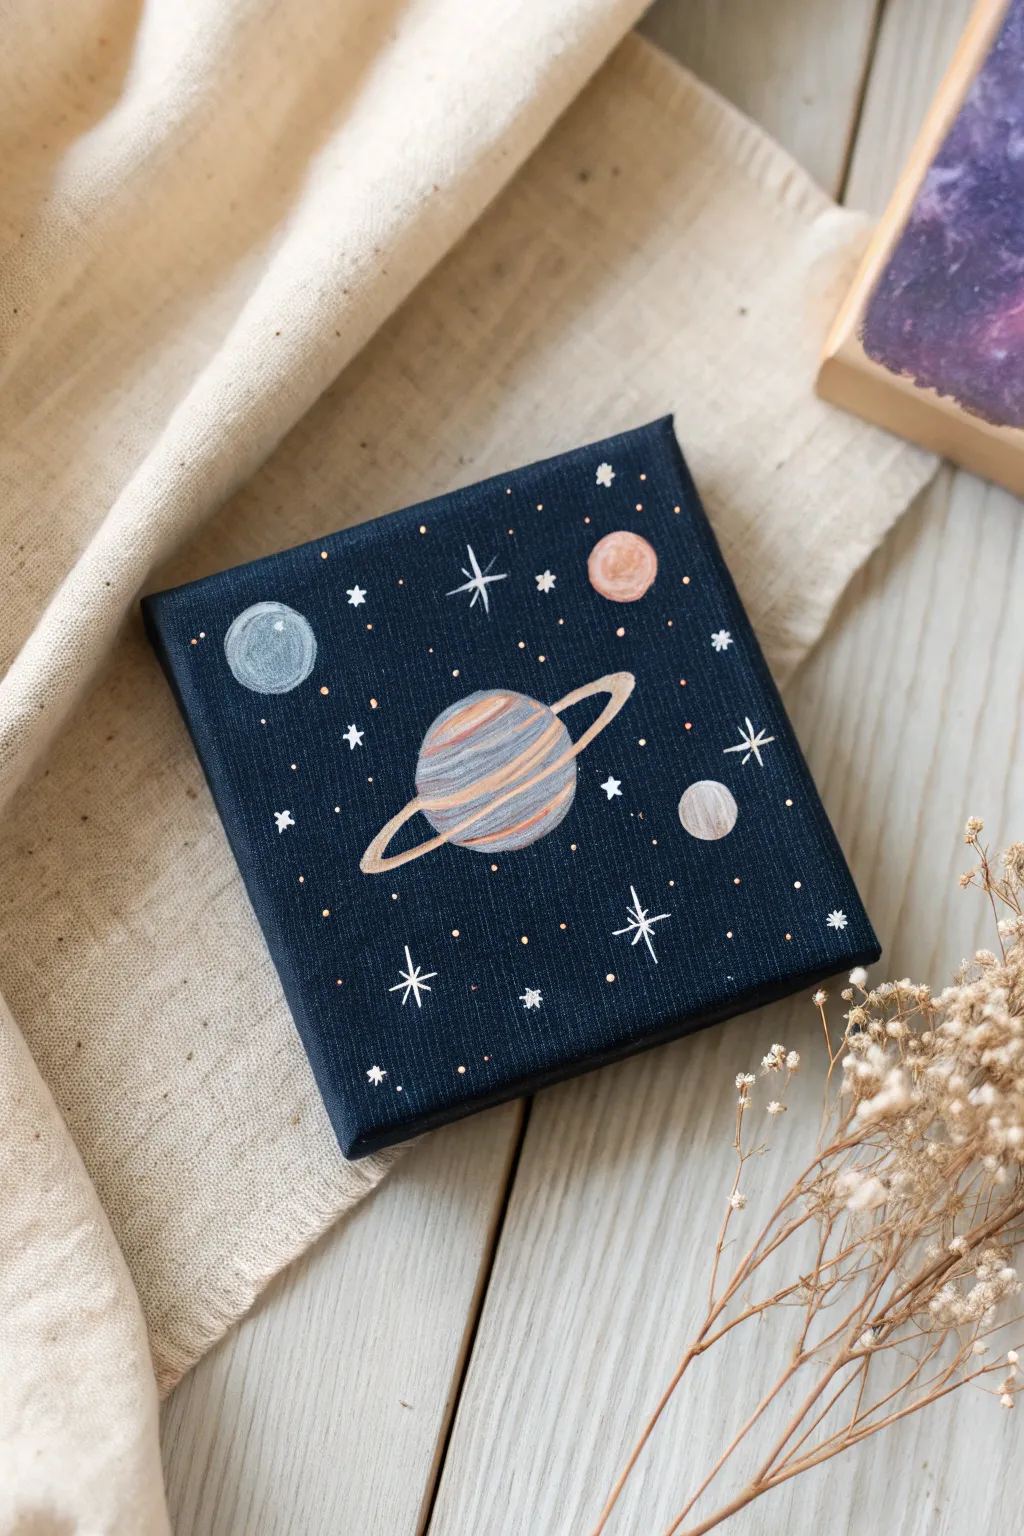
Capture the vast beauty of the cosmos on a tiny scale with this charming planetary study. The deep navy backdrop contrasts beautifully with soft metallic accents and delicate white stars, making it a perfect quick project for an afternoon.
Detailed Instructions
Materials
- Mini square canvas (approx. 4×4 or 5×5 inches)
- Acrylic paints: Navy blue, black, white, light blue, terracotta/peach, grey
- Metallic acrylic paint: Gold or copper/rose gold
- Flat paintbrushes (medium and small)
- Fine liner brush (00 or 000 size)
- Dotting tool or toothpick
- Palette
- Cup of water and paper towels
Step 1: Setting the Stage
-
Mix the background color:
Start by squeezing out a generous amount of navy blue acrylic paint onto your palette. Mix in a very small touch of black to deepen the hue without losing the blue tone completely; you want a rich, midnight sky color. -
Base coat application:
Using your medium flat brush, apply this dark navy mixture over the entire front surface of the canvas. Ensure your brushstrokes are smooth and run in one direction for a clean finish. -
Paint the edges:
Don’t forget the sides! Continue the navy paint around all four edges of the deep canvas for a professional, gallery-wrapped look. -
Let it dry completely:
Allow the base coat to dry fully. Since acrylics dry quickly, this should take about 15-20 minutes. If the white canvas texture is still showing through too much, apply a second coat.
Smooth Circles
Struggling to paint perfect circles freehand? Lightly trace a coin or large button with a white charcoal pencil or chalk before painting. The chalk wipes away easily if you make a mistake.
Step 2: Painting the Planets
-
Outline the central planet:
Mix a soft grey-blue using white and a tiny dot of navy. Using a small round brush, paint a circle slightly off-center in the middle of your canvas. This will be the body of the ringed planet. -
Add secondary planets:
Paint three smaller circles scattered around the main planet. Use light blue for the top left, a terracotta/peach shade for the top right, and a soft grey for the bottom right. -
Detail the main planet:
Once the central circle is dry, mix a little white into your peach color. Paint subtle, curved horizontal stripes across the planet’s surface to give it texture and spherical dimension. -
Create the rings:
Here is where I like to switch to a fine liner brush. Using your metallic gold or copper paint, carefully draw an elliptical ring around the central planet. Start the line thin, widen it slightly as it wraps around the front, and break the line where it goes behind the planet. -
Enhance with metallic stripes:
While you have the metallic paint out, add thin accent stripes directly onto the body of the central planet, layering them between the peach stripes. -
Detail the smaller planets:
Add simple highlights to the smaller surrounding planets. A tiny crescent of lighter paint on one side of each circle helps suggest a light source and 3D form.
Level Up: 3D Texture
Mix a tiny amount of modeling paste into your planet colors before applying them. This builds actual physical texture on the canvas, making the planets pop slightly off the surface.
Step 3: Bringing the Galaxy to Life
-
Paint the major stars:
Using white paint and your finest liner brush, paint a few ‘plus sign’ shapes (+). Add a diagonal cross (x) over the center of each to create classic 8-point twinkling stars. Place roughly 4-5 of these around the empty space. -
Add smaller twinkling stars:
Paint a few smaller, simple 4-point stars (just a cross shape) scattered between the planets and larger stars. -
Dot the background:
Dip a dotting tool or the tip of a toothpick into white paint. Gently dot the canvas to fill the empty dark blue void with distant stars. Vary the pressure to create different sized dots. -
Add metallic star accents:
Clean your dotting tool and dip it into the metallic copper/gold paint. Add a scattering of metallic dots amongst the white ones to give the galaxy a warm shimmer. -
Refine the rings:
If your planet’s rings need more opacity, carefully go over the metallic line one more time with the liner brush. -
Final check:
Step back and look at the composition. If any area looks too empty, add a tiny white star or dot to balance it out.
Place your little masterpiece on a mini easel or hang it as part of a celestial gallery wall to enjoy your handiwork
Mini Abstract Color Blocks
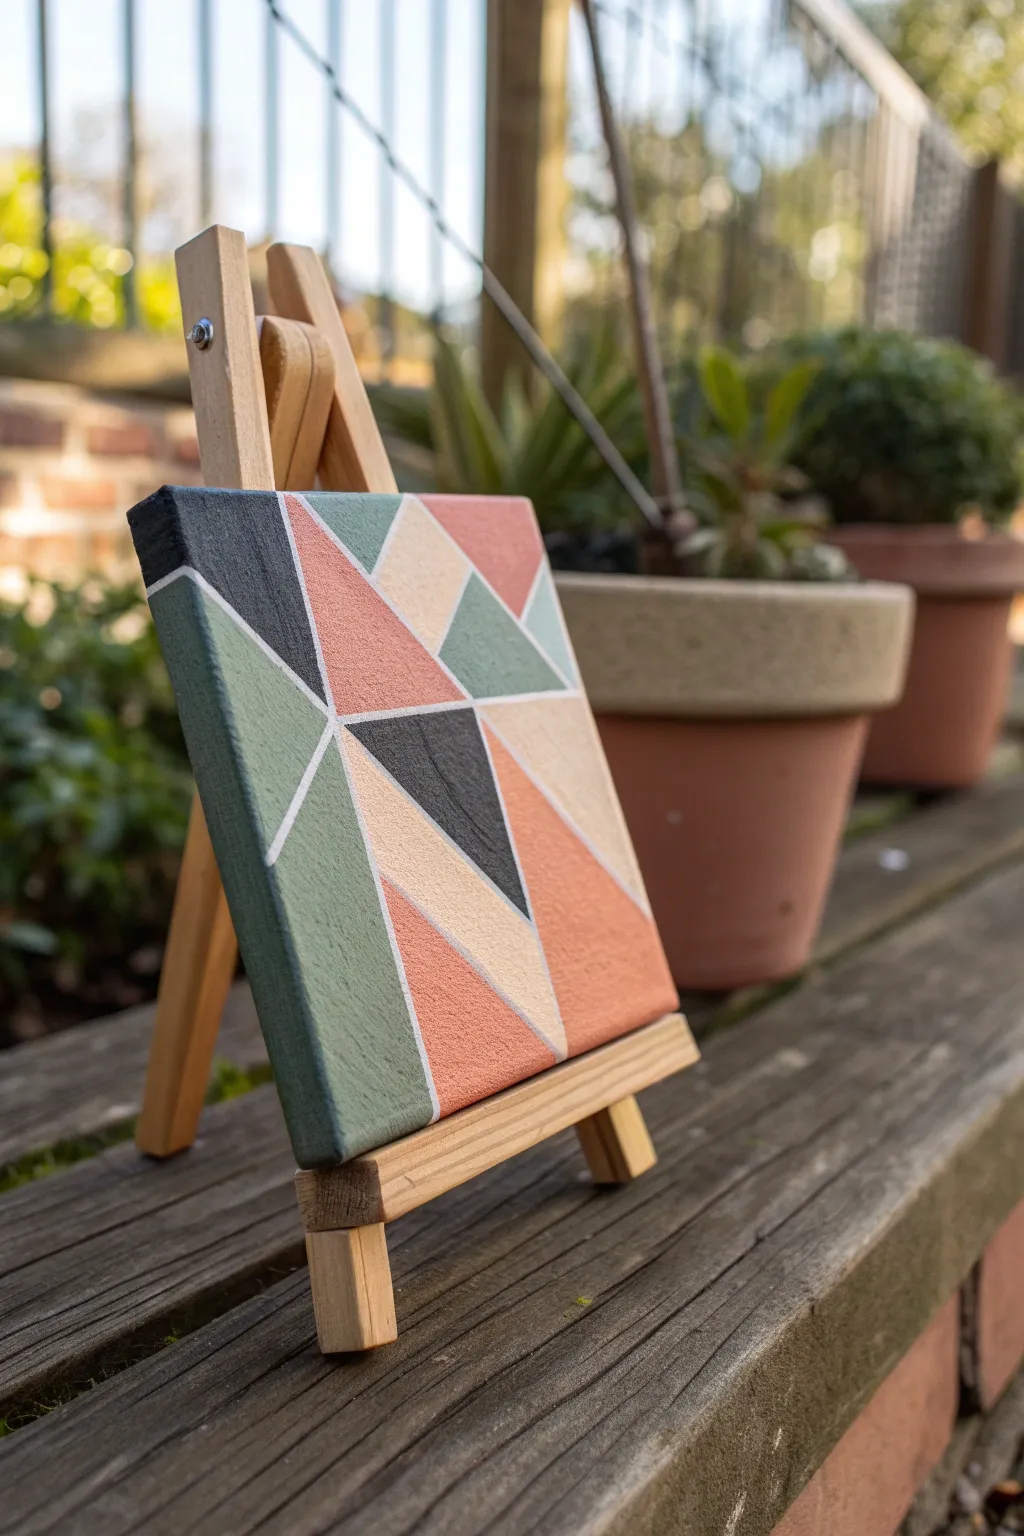
Transform a tiny canvas into a modern art piece with this crisp, geometric color block design. The interplay of muted earth tones—sage green, terracotta, charcoal, and cream—separated by sharp white lines creates a sophisticated look that punches above its weight class.
Step-by-Step Guide
Materials
- Mini stretched canvas (4×4 or 3×3 inches)
- Acrylic paints (Sage Green, Terracotta/Coral, Charcoal Black, Cream/Beige)
- White acrylic paint or a white paint pen (for touch-ups)
- Thin painter’s tape or wash tape (1/4 inch width is ideal)
- Flat shader brush (small size, e.g., #4 or #6)
- Linear or detail brush (size #0 or #1)
- Palette or paper plate
- Pencil and ruler
- Mini wooden easel (optional, for display)
Step 1: Preparation & Mapping
-
Prime the Surface:
Even though most canvases come primed, I prefer to give the mini canvas a solid base coat of white acrylic paint. This ensures your dividing lines will be bright and clean later. Let this base coat dry completely. -
Plan the Geometry:
Using a ruler and a light pencil, sketch out your geometric design directly onto the canvas. Start with a few large diagonal lines that crisscross the square surface. -
Create Sub-Sections:
Break those large shapes down further by drawing intersecting lines to create smaller triangles and quadrilaterals. Reference the image to mimic the specific layout of triangles nesting against each other. -
Extend to Edges:
Don’t stop your pencil lines at the front face; wrap the design around the sides of the canvas. This gallery-wrap effect makes the finished piece look professional from every angle.
Step 2: Taping & Blocking
-
Tape the Lines:
Apply your thin painter’s tape (or washi tape) over your penciled lines. The tape will act as a stencil, preserving the white lines between your colors. -
Seal the Tape Edges:
To prevent paint bleed, lightly brush a tiny amount of white paint over the edges of the tape. This seals the gap so your colored paint won’t sneak underneath. -
Mix Your Palette:
Prepare your four main colors on the palette. Aim for a cohesive, earthy look: a muted sage, a warm terracotta rose, a soft cream, and a deep charcoal grey. -
First Color Application:
Identified scattered shapes for your first color, Sage Green. Use your small flat shader brush to fill in these specific triangles, applying the paint smoothly. -
Apply Terracotta:
Rinse your brush well and move on to the terracotta/coral sections. Apply this warm tone to shapes adjacent to the green ones to create contrast. -
Dark Accents:
Fill in the select geometric shapes with the Charcoal Black paint. This dark value anchors the design and makes the lighter colors pop. -
Cream Highlights:
Finally, paint the remaining shapes with your Cream or Beige tone. Ensure the paint is opaque; you may need a second coat for lighter colors to cover fully. -
Paint the Sides:
Remember to carry each color over the edge to paint the sides of the canvas, matching the shapes you drew earlier.
Tape Hack
If you don’t have thin artist tape, lay a strip of regular painter’s tape on a cutting mat and use a ruler and craft knife to slice it into thin 1/8″ strips.
Step 3: Finishing Touches
-
Let it Set:
Allow the paint to dry until it is tacky but not fully hardened—usually about 10-15 minutes. Removing tape too late can sometimes peel up dry paint. -
The Reveal:
Carefully peel back the painter’s tape at a 45-degree angle. Reveal the crisp white lines underneath that separate your colorful shapes. -
Clean Up Lines:
If any paint bled through, don’t worry. Use a fine detail brush and a bit of white paint (or a white paint marker) to tidy up the dividing lines. -
Varnish (Optional):
For longevity, you can apply a layer of matte or satin varnish over the entire piece once it is bone dry to protect it from dust. -
Display:
Place your finished mini masterpiece on its wooden easel.
Bleed Control
Paint bleeding under the tape? Next time, burnish the tape edges down firmly with a credit card or fingernail before sealing with the base color.
Step back and admire how a customized palette and simple geometry can turn a tiny canvas into a striking decor element
Easy Geometric Pattern Tiles
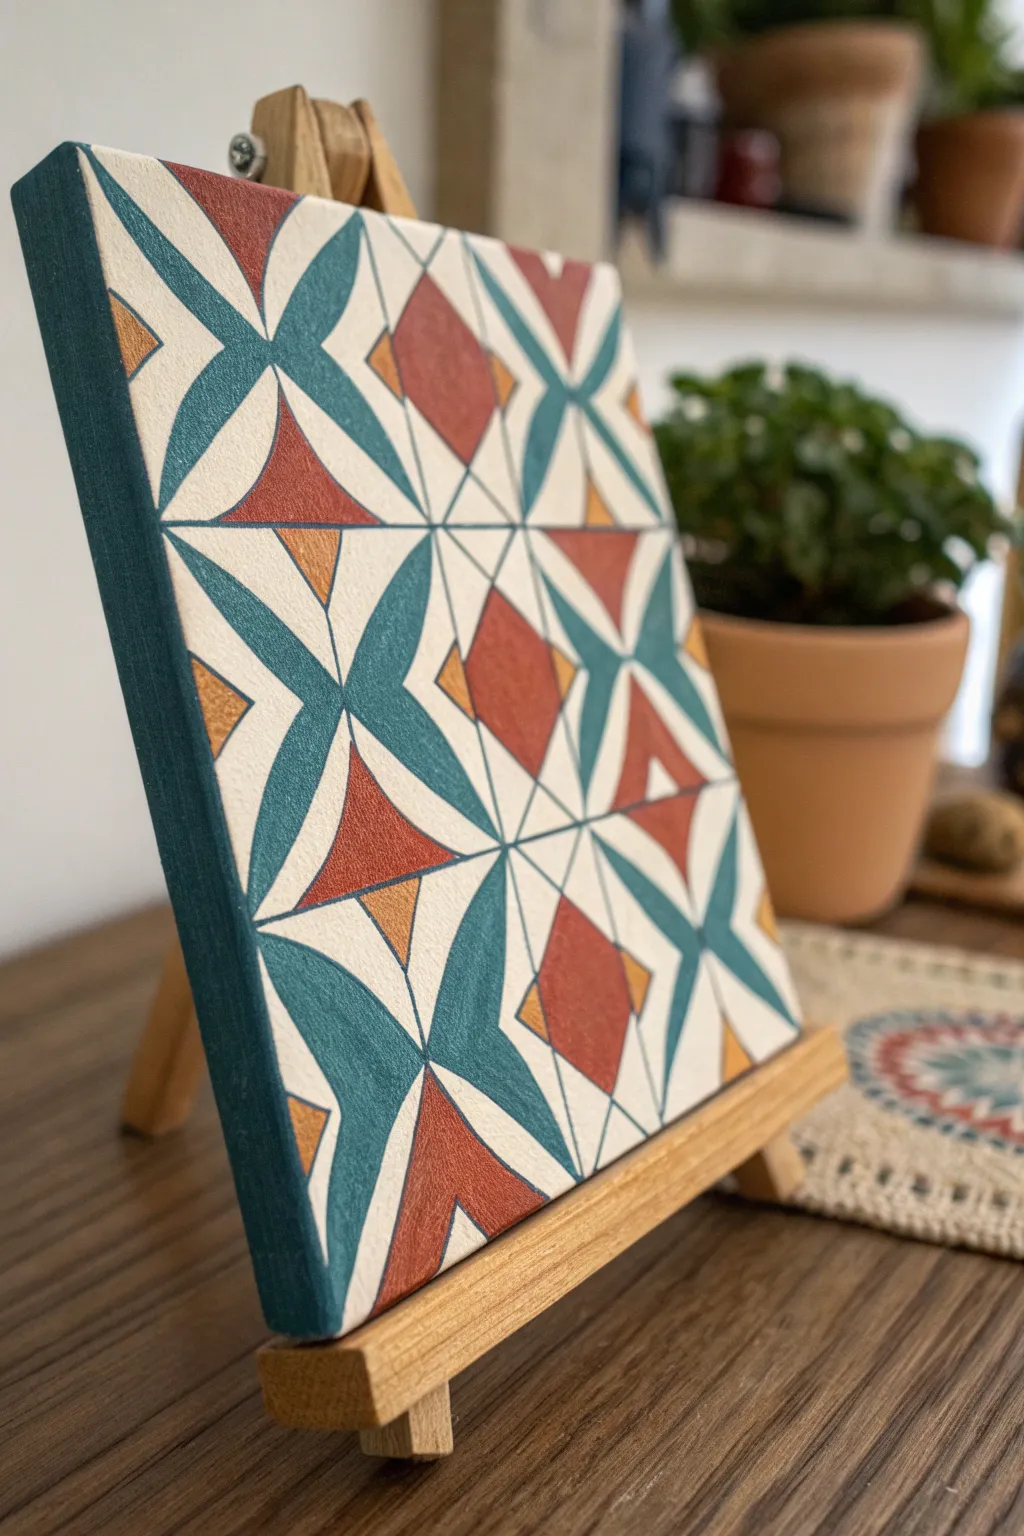
Transform a blank mini canvas into a sophisticated piece of faux-tile art that mimics the look of high-end ceramic. This geometric design uses a striking combination of teal, terracotta, and mustard yellow to create a balanced, modern pattern that looks far more complex than it actually is.
How-To Guide
Materials
- Mini canvas (approx. 4×4 or 5×5 inches)
- Small wooden easel
- Acrylic paints (Teal/Dark Turquoise, Terracotta/Burnt Sienna, Mustard/Ochre, Titanium White)
- Pencil (HB or H)
- Ruler or straight edge
- Fine liner brush (size 0 or 00)
- Small flat shader brush (size 2 or 4)
- Compass (optional, for circles)
- Palette or small plate
- Water cup and paper towels
Step 1: Drafting the Grid
-
Prime your canvas:
Even if your canvas is pre-primed, apply fresh coat of Titanium White over the entire surface, including the deep sides. This ensures a crisp, bright background for your geometric lines. -
Establish the center:
Using your ruler and a light pencil touch, measure and mark the exact horizontal and vertical center lines to divide the canvas into four equal quadrants. -
Draw the diagonals:
Connect opposite corners with diagonal lines, creating an ‘X’ across the entire canvas. You should now have eight triangular sections radiating from the middle. -
Create the diamond grid:
In the center of each of the four main quadrants, mark a point halfway between the center and the corner. Connect these four points to form a large diamond shape in the middle of your canvas.
Step 2: Sketching the Shapes
-
Draw the petal curves:
Focus on the vertical and horizontal center lines. Sketch curved lines extending from the center point out toward the edges, creating four large, pointy petal shapes that anchor the design. -
Outline the central diamonds:
Within the negative spaces between your petals, sketch the diamond shapes. These should sit centered on the diagonal lines you drew earlier. -
Add the triangular accents:
Near the outer edges of the canvas, between the teal petal tips, sketch small triangles that point inward toward the center. -
Detail the corner accents:
Don’t forget the very corners. Sketch small triangular slivers or diamond fragments that look like they are ‘running off’ the edge of the canvas. -
Refine lines:
Double-check that your shapes are symmetrical. I find it helpful to turn the canvas upside down here to spot any lopsided areas before committing to paint.
Clean Edges Only
Wobbly lines ruining the effect? Don’t stress. Use thin washing tape or artist tape to mask off sections before painting to get razor-sharp geometric lines.
Step 3: Painting the Design
-
Paint the teal petals:
Load your flat shader brush with the teal paint. Carefully fill in the four main petal shapes. Use the fine liner brush to get sharp points at the center and edges. -
extend to the sides:
Continue the teal paint over the edge of the canvas. This ‘gallery wrap’ effect makes the mini canvas look like a solid block or tile. -
Fill the terracotta shapes:
Using the terracotta or burnt sienna paint, fill in the large diamond shapes that sit between the teal petals. Apply two coats if the white canvas shows through. -
Add mustard accents:
Identify the remaining small triangular zones—often tucked near the terracotta diamonds or at the very edges—and fill them with mustard yellow for a pop of brightness. -
Clean up the white lines:
The thin white lines between your shapes are formed by the background color. If you accidentally painted over them, use a clean liner brush with Titanium White to re-establish those crisp boundaries. -
Paint the full side edges:
Paint the remaining sides of the canvas with the teal color to create a solid frame, or continue the pattern over the edge if you’re feeling ambitious. A solid color usually looks cleanest. -
Final touches:
Inspect your work for any pencil marks still visible in the white gaps. Once the paint is bone dry, gently erase these marks. -
Varnish (optional):
Apply a satin or matte varnish to seal the acrylics and give the piece a unified sheen, mimicking the glaze of a real ceramic tile.
Paint Consistency
Add a single drop of water to your acrylics. Heavy body paint leaves texture, but slightly thinned paint lays flat like a printed ceramic glaze.
Place your finished mini masterpiece on its easel to add a touch of architectural elegance to your shelf or desk
Minimal Line Art Over Wash
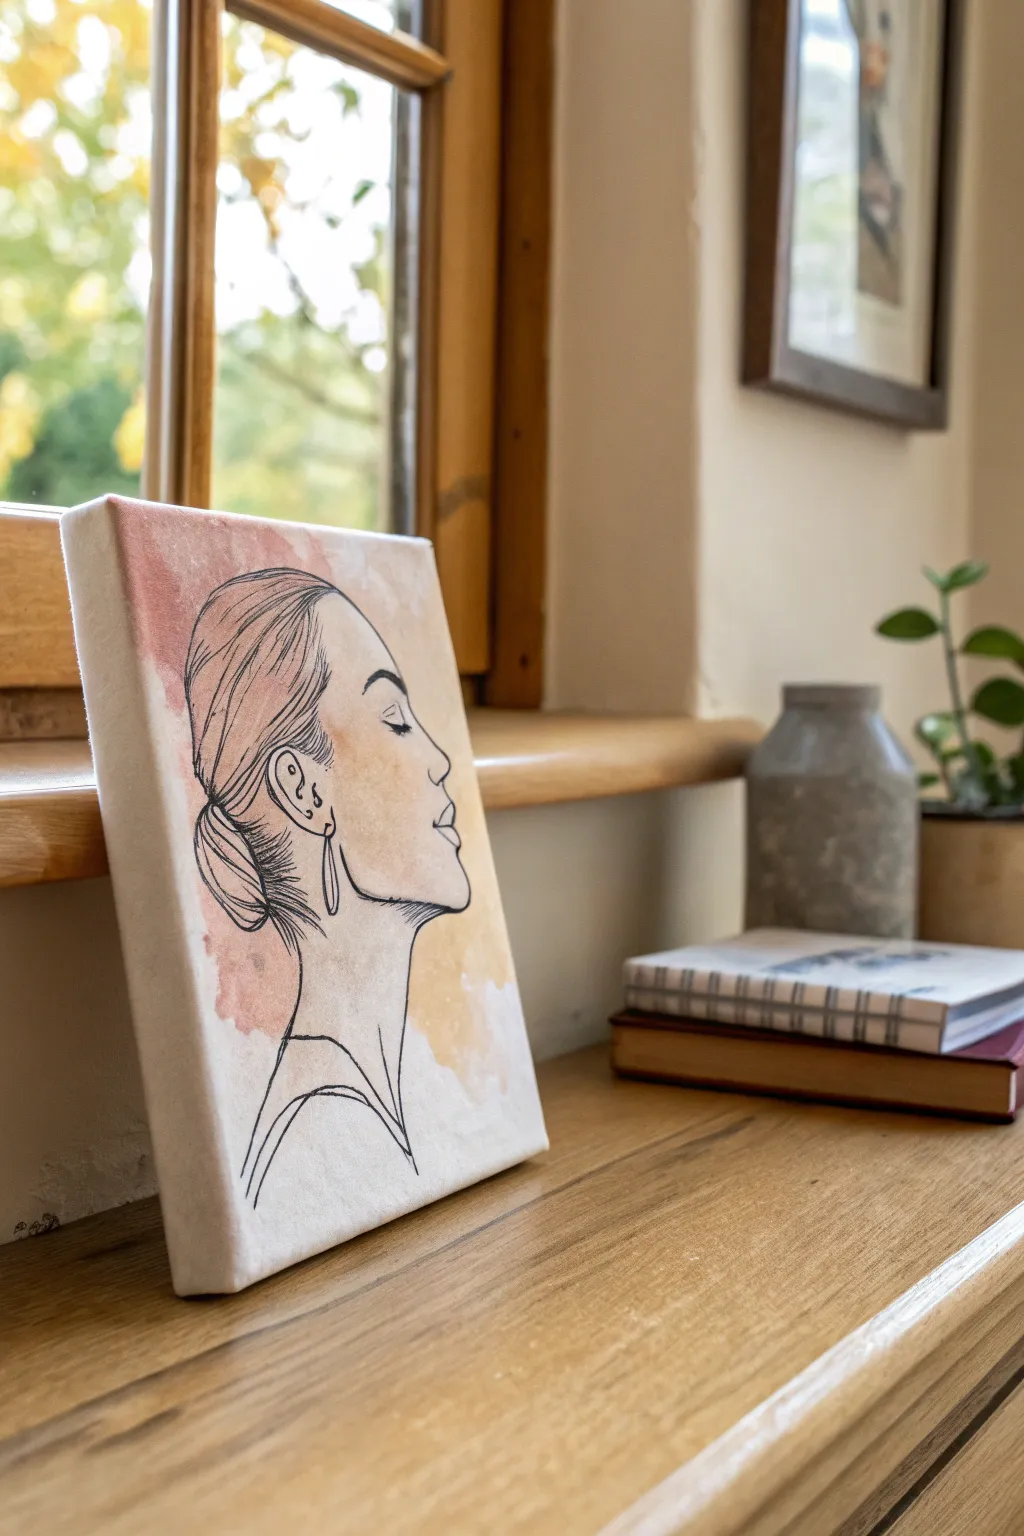
Capture the delicate balance between structure and fluidity with this elegant mixed media piece. By combining loose watercolor-style washes with precise ink lines, you’ll create a serene profile portrait perfect for a shelf display.
Step-by-Step Tutorial
Materials
- Small stretched canvas (approx. 5×7″ or 6×8″)
- Acrylic paints (Burnt Sienna, Yellow Ochre, White, Pink or Red Oxide)
- Water container and mixing palette
- Soft round paintbrush (size 6-8)
- Permanent fine-point marker or waterproof brush pen (black)
- Pencil (HB or H)
- Eraser
- Clear matte varnish (spray or brush-on)
- Paper towels
Step 1: Creating the Backdrop
-
Prepare the wash colors:
Since we are working on canvas, traditional watercolor won’t adhere well. Instead, create a ‘faux watercolor’ consistency by diluting your acrylics. Squeeze tiny dots of Burnt Sienna, Yellow Ochre, and a touch of Pink onto your palette. -
Thin the paint:
Mix a generous amount of water into each color until they are very transparent and runny, almost like tinted water. -
Apply the first wash:
Load your round brush with the watery pink-brown mix. Gently dab it onto the canvas where the back of the head and hair will be. Don’t worry about shapes; let the edges bloom naturally. -
Add warmth:
Clean your brush quickly and pick up the diluted Yellow Ochre. Touch this color into the lower right area where the neck and chest will sit. Allow the wet edges of the two colors to touch and bleed into each other slightly. -
Soften edges:
If a paint edge looks too harsh, dip a clean brush in plain water and run it along the perimeter to feather it out into the white canvas. -
Dry completely:
This step is crucial. The canvas must be 100% bone dry before sketching. You can use a hairdryer on a low, cool setting if you are impatient, but air drying is safest.
Water Control
Don’t soak the canvas! Use just enough water to make the paint flow. Too much water on a standard canvas can cause the gesso to lift or the fabric to sag.
Step 2: Sketching the Profile
-
Rough placement:
Using an HB pencil, very lightly sketch an oval shape to represent the head. Position the face looking toward the right side of the canvas. -
Define the features:
Lightly mark the eye level halfway down the oval. Sketch the curve of the forehead, dipping in for the bridge of the nose, and extending out for the nose tip. -
Refine the lips and chin:
Draw the upper lip slightly protruding over the lower lip, then sweep back into a soft, rounded chin and jawline. -
Sketch the hair and neck:
Outline the sleek hair bun at the nape of the neck. Add the long, elegant curve of the neck down to the collarbone area. Keep your pencil pressure extremely light so it doesn’t indentation the canvas.
Gold Highlighting
Once the black ink is dry, trace over the earring or add hair highlights using a metallic gold paint pen for a touch of luxury.
Step 3: Inking the Lines
-
Test your pen:
I always scribble on a scrap piece of canvas or paper first to ensure the ink is flowing smoothly and is truly waterproof. -
Start with the face:
Begin inking at the forehead. Use a confident, single stroke to trace the profile down to the chin. Avoid ‘petting’ the line with short scratches. -
Detailed features:
Draw the closed eye with a simple curved line and a few lashes. Add the small nostril curve and define the lips. -
Hair texture:
For the hair, use quicker, sweeping strokes to suggest strands pulled back. Use lighter pressure here to capture the texture of the hair gathered into the bun. -
Ear and accessories:
Ink the ear shape. Draw a long, thin oval shape dangling from the earlobe to represent the earring. -
Neck and shoulders:
Complete the drawing by tracing the long neck line and the suggestion of the shoulder and clothing neckline. -
Erasure:
Wait at least 15 minutes for the ink to cure fully. Gently erase any visible pencil marks, being careful not to scrub the wash layer underneath. -
Seal the work:
To protect your delicate wash and ink from fading or moisture, apply a light coat of matte spray varnish in a well-ventilated area.
Place your finished canvas on a window sill where natural light can highlight the subtle transparency of your work
Cozy Campsite Silhouette
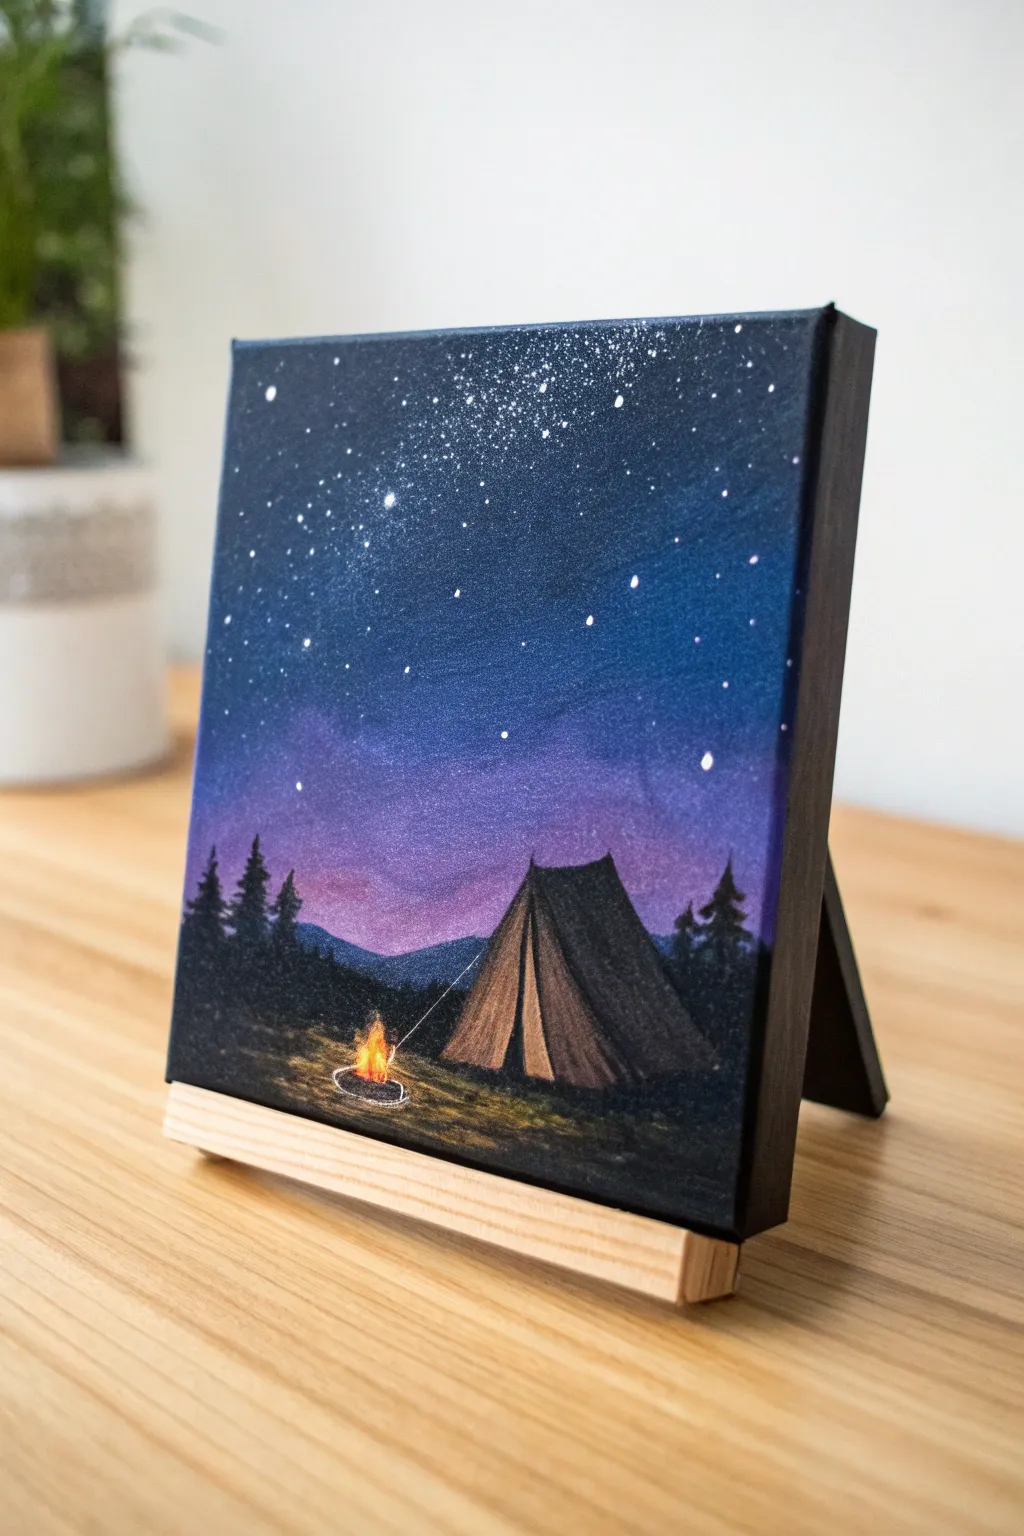
Capture the serenity of a night under the stars with this charming mini canvas painting. It features a glowing tent and crackling campfire set against a stunning galaxy gradient, making it a perfect piece for nature lovers.
Step-by-Step Guide
Materials
- Mini square canvas (approx. 4×4 or 5×5 inches)
- Acrylic paints (Phthalo Blue, Dioxazine Purple, Black, Titanium White, Burnt Umber, Cadmium Yellow, Orange)
- Flat shader brush (size 6 or 8)
- Small round brush (size 0 or 1)
- Detail liner brush (size 00)
- Old toothbrush (for stars)
- Cup of water and paper towels
- Mini wooden easel for display
Step 1: Creating the Galaxy Sky
-
Base gradient:
Start at the very top of the canvas with a mix of Phthalo Blue and a tiny touch of black to create a deep midnight blue. -
Blending down:
As you move about a third of the way down, switch to pure Phthalo Blue, blending it seamlessly into the darker top section while the paint is still wet. -
Adding purple hues:
Around the middle of the canvas, introduce Dioxazine Purple. Blend this upward into the blue, creating a soft transition where the colors meet. -
Horizon glow:
Near the bottom third, mix a little Titanium White with the purple to create a lighter, hazy twilight color. This simulates the last light of the sun fading behind the mountains. -
Starry night:
Once the background is barely damp or dry, water down some Titanium White paint until it has an inky consistency. Dip an old toothbrush into it and flick the bristles to spray tiny stars across the top blue section. -
Brighter stars:
Use your detail liner brush to add a few larger, specific stars by dotting pure white in the darkest parts of the sky.
Step 2: The Landscape & Tent
-
Distant mountains:
Mix a dark grey-purple using blue, purple, and a hint of white. Paint a low, rolling mountain range silhouette just below your lightest purple sky area. -
Pine trees:
Using black paint and a small round brush, dab in the shapes of pine trees on the left and right sides. Use an uneven, stippling motion to mimic the texture of branches. -
Foreground base:
Fill the bottom area with black to establish the ground, blending it slightly into the base of your tree line. -
Tent outline:
With a fine liner brush and thinned Burnt Umber or diluted black, sketch a simple triangular tent shape slightly off-center to the right. -
Tent panels:
Fill in the front flaps of the tent with a mix of Burnt Umber and a touch of white to make it visible against the dark background. Keep the side panel of the tent darker. -
Tent shadows:
Paint the inside triangle of the open tent flaps pitch black to show the dark interior.
Stars Too Big?
If your toothbrush splatter creates huge blobs, dab them instantly with a damp paper towel. Test the spray on scrap paper first to get the right consistency.
Step 3: Fire & Illumination
-
Campfire base:
Paint a very small dark oval where the fire will sit. Use the liner brush to create tiny white or light grey stones in a ring around this oval. -
The flames:
Start with a tiny blob of Orange in the center of the ring. While wet, add a dot of Cadmium Yellow to the very center and streak it upward slightly to form flames. -
Fire glow:
Dry brush a tiny amount of orange and yellow onto the ground immediately surrounding the fire pit to create a reflected glow on the grass. -
Highlighting the tent:
Mix a little yellow with white and paint a thin highlight on the edge of the tent flap facing the fire. This sells the illusion that the fire is illuminating the canvas. -
Rope detail:
Using your thinnest liner brush and watered-down white, paint a very fine line from the top of the tent pole down to the ground near the fire. -
Final touches:
I like to add barely-there highlights of dark green or brown under the fire glow to suggest patches of grass before letting the whole piece dry completely.
Add a Moon
For extra magic, paint a tiny crescent moon in the blue section or add a shooting star using a quick flick of white paint across the sky.
Place your dried masterpiece on its mini easel and enjoy your personal little getaway scene
Power Lines and Birds at Sunset
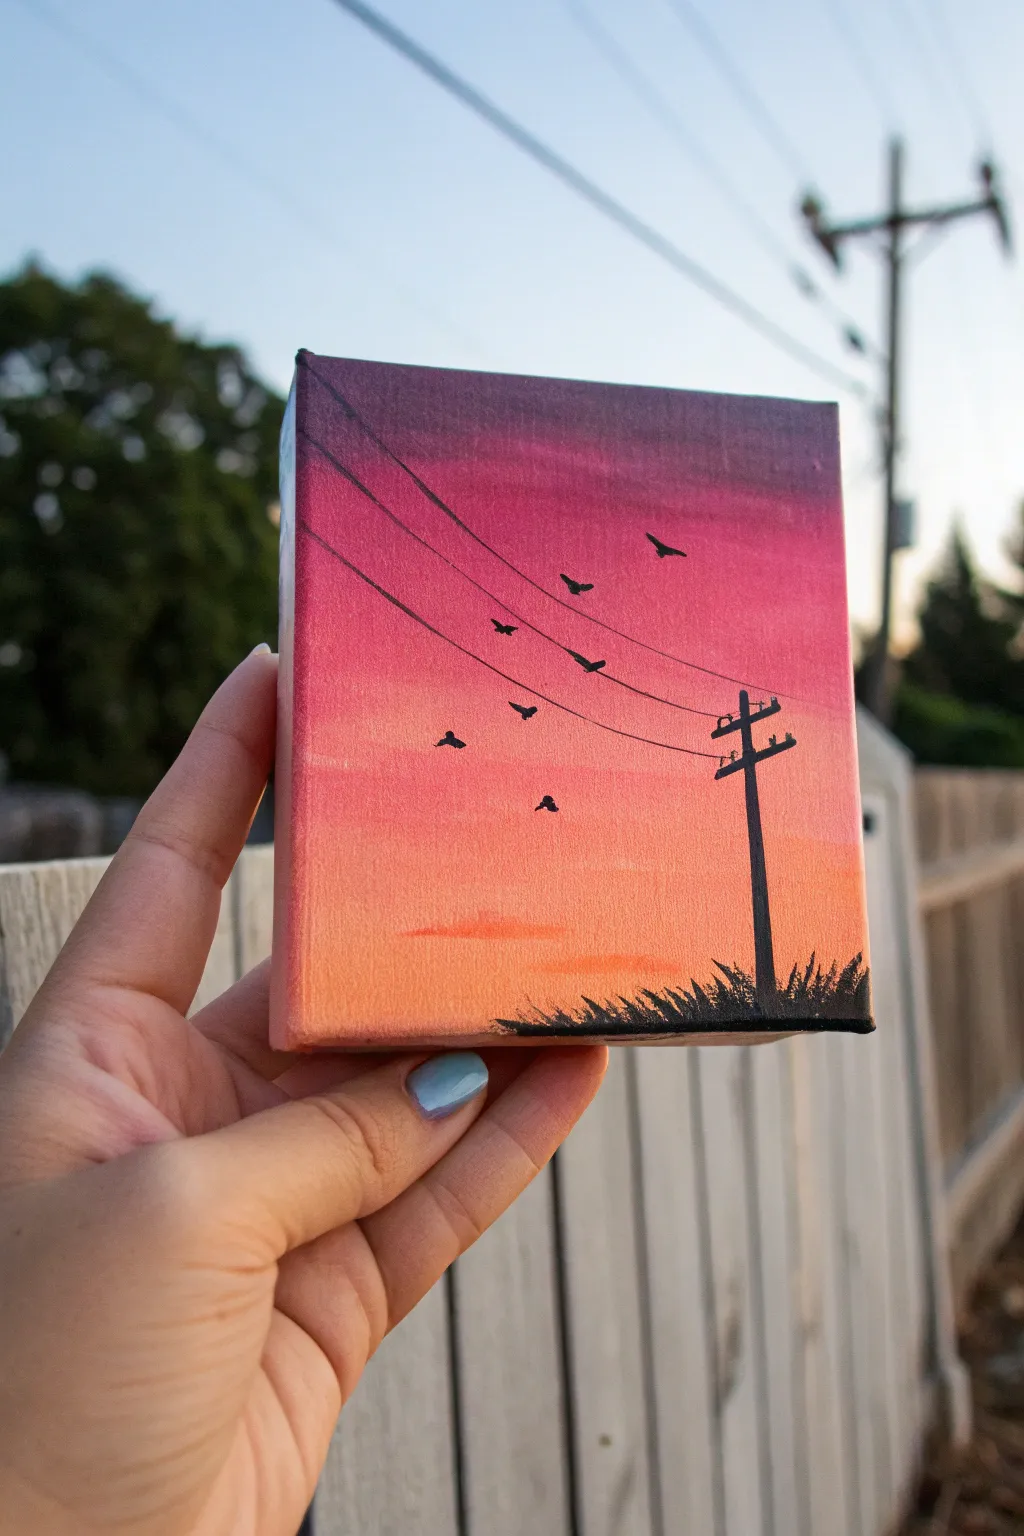
Capture the surprisingly nostalgic beauty of urban silhouettes against a vibrant sky with this mini canvas project. Using smooth blending techniques, you’ll create a glowing sunset gradient that perfectly frames the stark black details of power lines and birds.
Step-by-Step
Materials
- Mini canvas (3×3 or 4×4 inch)
- Acrylic paints: Deep violet, magenta/hot pink, bright orange, white, and black
- Flat shader brush (small)
- Detail liner brush (size 0 or 00)
- Cup of water
- Paper towels
- Palette or paper plate
Step 1: Painting the Sunset Gradient
-
Prepare your palette:
Squeeze out small amounts of deep violet, magenta, orange, and white onto your palette. Keep the black paint aside for later. -
Start at the top:
Using your flat brush, pick up the deep violet paint. Apply a horizontal stripe across the top 1/4 of the canvas, ensuring you paint the top edge of the canvas as well for a finished look. -
Add the middle tone:
Without cleaning your brush thoroughly (just wipe it slightly), pick up the magenta paint. Apply this directly below the violet, blending the two colors where they meet while the paint is still wet to create a smooth transition. -
Blend downwards:
Continue painting down the canvas, gradually mixing more magenta into the violet area, and then transitioning into pure magenta in the middle section. -
Introduce the orange:
Wipe your brush clean. Pick up the bright orange paint and apply it below the pink section. Use horizontal strokes to blend the orange up into the pink, creating a soft, peachy hue where they overlap. -
Brighten the horizon:
Mix a tiny bit of white into your orange paint to make a pale peach color. Apply this to the very bottom quarter of the canvas, blending it upwards into the brighter orange. -
Let it dry completely:
Allow the gradient background to dry fully. This is crucial because painting black details on wet paint will result in muddy gray smears. I usually wait about 15-20 minutes.
Flow Like Ink
For the crispest thin lines, thin your black acrylic paint with a few drops of water until it has the consistency of heavy cream. This prevents brush drag.
Step 2: Adding the Silhouettes
-
Establish the pole:
Switch to your fine liner brush and load it with black paint. Add a drop of water to the paint to make it flow like ink. Paint a vertical line on the right side of the canvas for the utility pole. -
Add the crossarms:
Paint two or three short, horizontal lines across the top of your vertical pole to create the crossarms where the wires attach. -
Draw the wires:
Start from the top left edge of the canvas and paint thin, swooping lines that connect to the crossarms on the right. Let your hand relax to get a natural curve. -
Connect the lines:
Continue the lines from the pole off the right edge of the canvas. Vary the spacing slightly between the wires so they don’t look too uniform. -
Paint the ground texture:
At the very bottom right corner, tap your small brush to create jagged, grass-like textures in black. Make the grass taller near the pole and shorter as it moves left, fading out before the middle. -
Add distant clouds:
Clean your brush and mix a very faint, slightly darker orange (using a speck of the magenta). Paint a few subtle, horizontal streaks in the orange section to suggest low-hanging clouds. -
Paint the birds:
Using the very tip of your detail brush and black paint, add small ‘V’ shapes in the sky. Vary their sizes to show depth—larger birds are closer, tiny specks are further away. -
Detail the birds:
thicken the center of the ‘V’ slightly on the larger birds to give them bodies, rather than just simple lines. -
Final touches:
Check your black lines. If the paint was too thin, go over the main pole one more time to make it solid opaque black.
Starry Night Twist
Before painting the black silhouette, flick a toothbrush loaded with watered-down white paint over the top purple section to add a field of stars.
Now you have a stunning piece of miniature art that captures the peaceful transition from day to night
Street Lamp Glow Scene
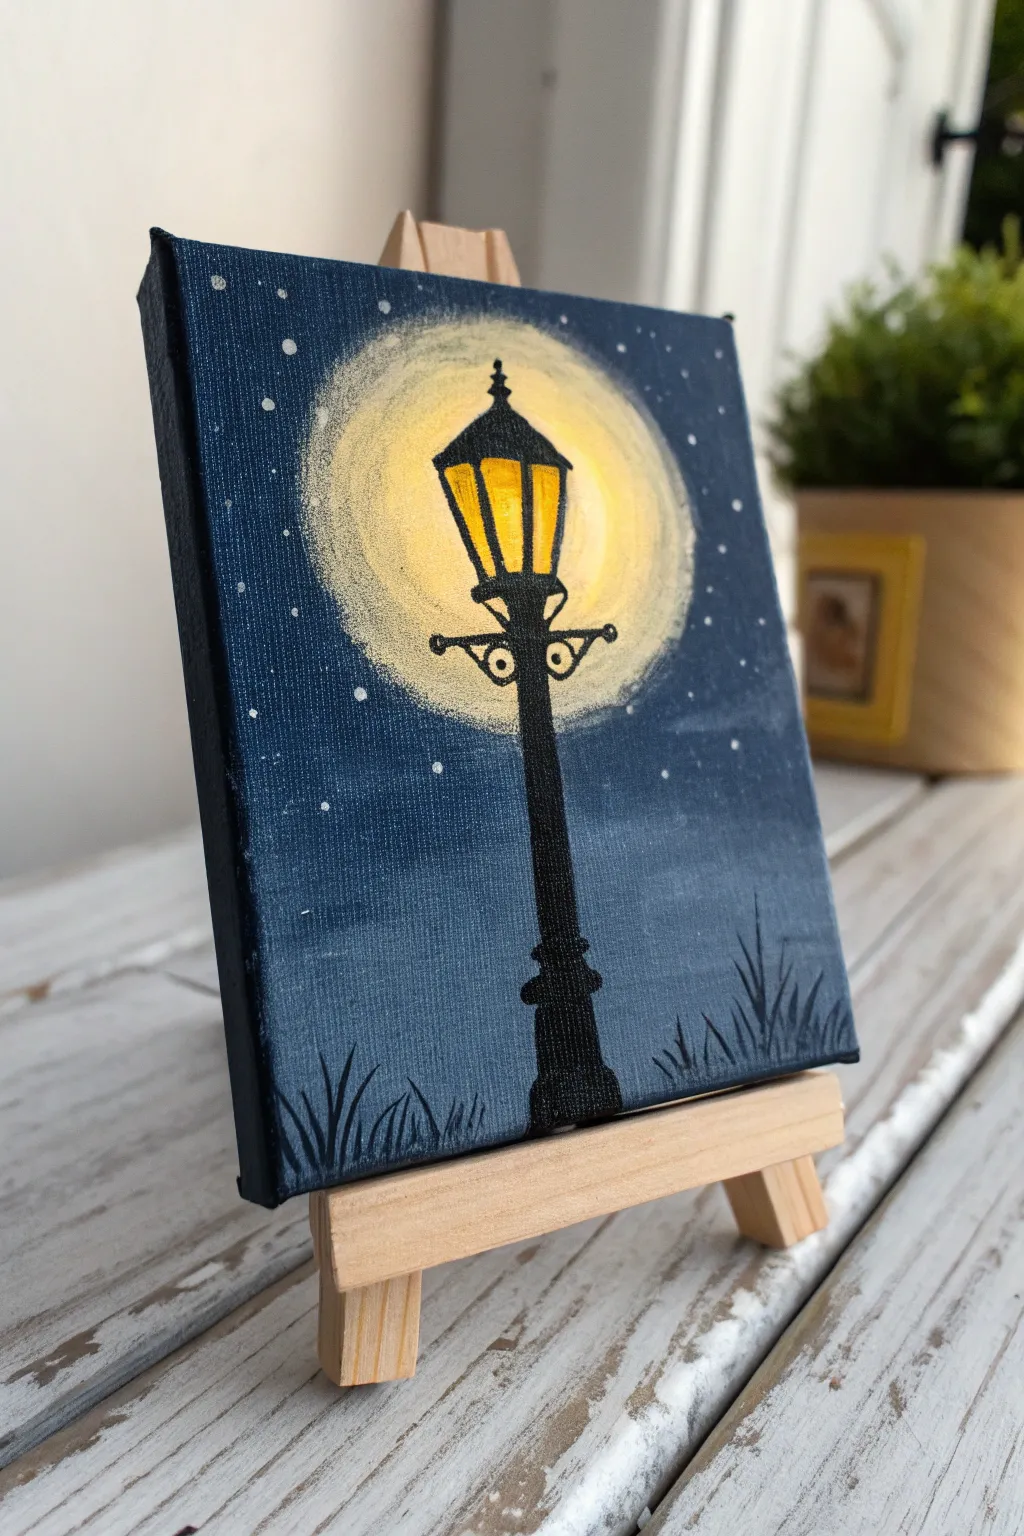
Capture the magic of a quiet evening with this charming mini canvas painting. Using simple silhouette techniques and a clever dry-brush glow effect, you’ll create a cozy streetlamp scene that lights up any small corner of your home.
Step-by-Step Tutorial
Materials
- Mini stretched canvas (approx. 4×4 or 3×3 inches)
- Mini wooden easel
- Acrylic paints: Navy Blue, Black, White, Bright Yellow, Yellow Ochre
- Flat brush (small/medium)
- Detail round brush (size 0 or 00)
- Old scruffy brush or stencil brush (for the glow)
- Cup of water
- Palette or paper plate
- Pencil (optional)
Step 1: Setting the Night Scene
-
Base Coat:
Begin by covering the entire canvas with a solid coat of Navy Blue acrylic paint. Don’t forget to paint the sides of the canvas wrapper for a polished, professional look. -
Gradient Effect:
While the navy paint is still slightly wet, mix a tiny drop of white into your blue. Lightly blend this lighter shade towards the center of the canvas where the light will be, creating a subtle transition. -
Drying Time:
Let this background layer dry completely. If you’re impatient like me, a hair dryer on a cool setting speeds this up significantly. -
Adding Stars:
Dilute a small mount of white paint with water until it’s milky. Load a small brush or toothbrush and gently flick the bristles to create a spray of tiny stars across the sky. -
Detailing Stars:
Use your smallest detail brush to manually add a few larger, distinct dots for brighter stars, placing them randomly around the outer edges.
Dry Brush Secret
For the perfect fuzzy glow, wipe almost all paint off your brush onto a paper towel first. Minimal paint creates that soft, misty texture best.
Step 2: Creating the Glow
-
The White Center:
Mix a pale yellow (mostly white with a touch of yellow). Using a scruffy, dry brush, dab a circle in the upper center of the canvas. Keep the edges soft and fuzzy. -
Expanding the Light:
Wipe your brush but don’t rinse it. Pick up some Bright Yellow. Dab around the white center, blending outwards in a circular motion to create a halo effect. -
Softening Edges:
Use a clean, dry brush to gently buff the outer edges of the yellow circle into the blue background. You want a dusty, diffused look, not a hard line. -
Final Glow Layer:
Add a translucent layer of thinned-down white right in the very center of your glow circle to make it look intensely bright. Let this dry completely before starting the lamp.
Step 3: Painting the Silhouette
-
Drafting the Shape:
Lightly sketch the vertical line of the lamp post and the lantern shape with a pencil if you feel unsure about freehand painting. -
The Post:
Using black paint and your flat brush held vertically (or a steady round brush), paint the main pole starting from the bottom and narrowing slightly as it goes up. -
The Lantern Base:
Switch to your detail brush. Paint the horizontal crossbar and decorative scrolls just below where the light will start. -
Lantern Outline:
Carefully outline the lantern head shape over your yellow glow. Create the roof, the bottom rim, and the vertical bars that hold the glass panes. -
Filling the Glass:
The ‘glass’ panes should remain yellow (showing the background glow), but if you accidentally covered them, paint them back in now with bright yellow mixed with a touch of white. -
Top Finial:
Add the tiny decorative spike or ball at the very top of the lantern roof using the very tip of your brush. -
Base Details:
thicken the bottom of the post to create a sturdy base. Add a few horizontal ridges to simulate cast iron molding. -
Grassy Texture:
At the very bottom edge of the canvas, use the tip of your detail brush to flick short, quick strokes of black paint upward. These represent grass blades in silhouette. -
Final Touches:
Check for any gaps in your black silhouette. If the yellow glow is too dim inside the lamp panes, dab a tiny bit of concentrated bright yellow right in the middle of each pane.
Wobbly Lines?
If your straight lines for the post are shaky, use the edge of a piece of thick cardstock or a ruler as a guide to run your brush against.
Set your finished masterpiece on its mini easel and enjoy the warm atmosphere it brings to the room
Negative Space Silhouette Shape
Capture the magic of a clear night sky with this striking lunar painting. By utilizing negative space and careful layering, you’ll create a glowing, textured moon that stands out beautifully against a deep, star-dusted background.
Step-by-Step Guide
Materials
- Mini box canvas (approx 4×4 or 6×6 inches)
- Acrylic paints (Titanium White, Mars Black, Phthalo Blue, Neutral Grey)
- Flat brush (medium)
- Small round detail brush
- Old toothbrush (for stars)
- Circular object or compass (for tracing)
- Pencil
- Palette for mixing paint
- Cup of water and paper towels
Step 1: Planning and Foundation
-
Prepare the canvas:
Start with a clean, dry mini canvas. If the surface feels too rough, you can apply a thin coat of gesso and sand it lightly once dry for a smoother painting experience. -
Trace the moon:
Find a circular object that fits well within your canvas size, leaving a comfortable border of negative space around it. Place it in the center and lightly trace the circle with a pencil. -
Block in the background:
Mix Mars Black with a touch of Phthalo Blue to create a deep, midnight blue. Using your flat brush, carefully paint the entire area *outside* the pencil circle. Don’t forget to paint the thick sides of the canvas to give it a finished, gallery-wrapped look. -
Refine the edge:
Switch to a smaller brush to tidy up the edge of the circle where the dark sky meets the moon. A crisp line here is crucial for the final effect.
Fixing “Blobs”
If your star splatter created large blobs instead of mist, wait for them to dry, then paint over them with your background dark blue. Try again with less paint on the brush.
Step 2: Creating Lunar Texture
-
Base coat the moon:
Mix a light grey using Titanium White and a tiny drop of Black. Fill in the entire moon circle with this base color. It doesn’t need to be perfectly opaque; some translucency adds depth. -
Map the maria:
Look at a reference photo of the moon. Mix a darker, charcoal grey. With your round brush, roughly block in the major dark patches (maria) or ‘seas’ of the moon. Keep these shapes organic and uneven. -
Sponging technique:
If you don’t have a sponge, a mesmerizing texture can be achieved by using a scrunched-up piece of paper towel or a stiff, dry brush. Dab your darker grey gently over the maria areas to soften the edges and create a crater-like appearance. -
Adding mid-tones:
Blend a medium grey tone. Apply this transition shade between the dark patches and the lighter areas. Use a stippling motion (tapping the brush tip) rather than long strokes to maintain that rocky texture. -
Highlighting craters:
Take pure Titanium White on your smallest brush. Identify where the light hits the edges of craters and the brightest highlands. Dab small highlights onto the lightest parts of your moon, particularly on the right side if you want a directional light source. -
Dry brush the surface:
Wipe most of the white paint off your brush until it’s almost dry. Lightly sweep it over the darker grey areas. This catches the texture of the canvas, mimicking the rugged lunar surface.
Glow Up
Mix a tiny amount of iridescent or metallic pearl medium into your white paint for the final highlights. This gives the moon a subtle, magical shimmer when viewed from an angle.
Step 3: The Starry Finish
-
Protect the moon:
Before creating stars, cut a paper circle the exact size of your moon and place it over the painted area to shield it, or simply be very careful with your aim. -
Mix star paint:
Water down a small amount of Titanium White paint until it has an inky consistency. It needs to be fluid enough to fly off the bristles. -
Splatter stars:
Dip an old toothbrush into the watered-down white. Point the bristles toward the dark background and run your thumb across them to flick tiny droplets of paint. Test on a scrap paper first to control the spray. -
Add hero stars:
Use your smallest detail brush to manually paint a few slightly larger, brighter stars in the empty negative space to balance the composition. -
Glow effect (optional):
For an atmospheric touch, create a very watery wash of white paint (glaze). Paint a thin, transparent line just inside the perimeter of the moon to make it look like it’s glowing. -
Final smooth out:
Check the dark background for any accidental white smudges near the moon’s edge and touch them up with your midnight blue mix.
Place your finished canvas on a desk or shelf to add a peaceful, cosmic touch to your room
Mini Canvas Series That Connects
Transform a single breathtaking sunset view into a modern, fragmented masterpiece with this multi-canvas technique. By splitting a harmonious gradient across five separate panels, you create an expansive sense of horizon that adds depth and movement to any shelf or mantel.
Detailed Instructions
Materials
- 5 mini square canvases (approx. 4×4 or 5×5 inches)
- Acrylic paints (Titanium White, Ultramarine Blue, Alizarin Crimson, Cadmium Yellow, Payne’s Grey or Black)
- Flat synthetic brushes (1-inch width for blending, smaller size for details)
- Palette knife
- Mixing palette or disposable plate
- Masking tape or painter’s tape
- Small cup of water
- Paper towels
- Easel or flat work surface
Step 1: Preparation & Layout
-
Arrange the canvases:
Line up your five mini canvases side-by-side on your work surface. They should be touching each other exactly as they will be displayed. This closeness is crucial for painting a continuous image across the gaps. -
Secure the arrangement:
Run a long strip of masking tape across the back of the canvases to hold them temporarily together. This prevents them from shifting while you sketch and base coat. -
Sketch the horizon:
Using a pencil very lightly, draw a straight horizon line across the bottom third of all five canvases. This ensures your ocean or land level remains consistent across the split.
Step 2: Painting the Sky Gradient
-
Mix the upper sky color:
On your palette, mix a soft violet-blue using Ultramarine Blue, a touch of Alizarin Crimson, and plenty of Titanium White. This will serve as the cool tone at the very top. -
Create the mid-sky pinks:
Prepare a vibrant pink-peach hue by mixing Alizarin Crimson with Cadmium Yellow and White. You want this color to be warm and glowing. -
Mix the horizon glow:
For the area just above the horizon line, mix a bright, pale orange using mostly Yellow, a tiny bit of Red, and White. -
Apply the top layer:
Using your 1-inch flat brush, paint the violet-blue mixture across the top edge of all five canvases. Use long, horizontal strokes that span across the gaps between the canvases. -
Apply the middle layer:
While the top strip is still wet, introduce the pink mixture directly below it. Brush back and forth where the colors meet to create a soft, seamless blend. -
Finish the sky base:
Paint the pale orange glow just above your pencil horizon line, blending it upward into the pink. Do not paint below the horizon line yet.
Uneven Horizon Line?
If your horizon line wobbles, place a strip of painter’s tape perfectly straight across the dry sky layer. Paint the dark bottom section, then peel the tape for a razor-sharp edge.
Step 3: Adding Details & Clouds
-
Paint the cloud shadows:
Mix a dark purple-grey using Ultramarine Blue, Alizarin Crimson, and a tiny dot of Payne’s Grey. Using a smaller flat brush, dab in a horizontal band of clouds right near the horizon, seemingly floating in the orange glow. -
Soften the edges:
Wipe your brush dry and gently feather the edges of your dark clouds so they don’t look like solid blocks. I find that a dry brush technique works best here to keep the clouds looking wispy. -
Add upper atmosphere streaks:
Using a very diluted pink or white, add faint diagonal streaks in the upper corners (especially on the 4th and 5th canvas) to mimic high-altitude cirrus clouds catching the light.
Level Up: Gold Leaf
Add a touch of metallic gold leaf along the very edge where the sun meets the horizon or on the bottom of the clouds. It catches the light beautifully on a shelf display.
Step 4: The Horizon & Edges
-
Paint the water/land:
Below the horizon line, fill the remaining space with a dark, cool tone—Payne’s Grey mixed with a little Blue is perfect. Ensure a crisp, straight line where it meets the sky. -
Separate the canvases:
Once the front is touch-dry, carefully remove the tape from the back and separate the canvases. Do this gently to avoid peeling paint at the seams. -
Paint the side edges:
This is the ‘wrap’ effect. Paint the exposed side edges of each canvas. You have two options: paint them solid white for a clean look, or wrap the image around by continuing the colors onto the sides. Wrapping the image makes the gap effect more convincing. -
Varnish and seal:
Once fully dry (give it at least 24 hours), apply a coat of gloss or satin varnish to deepen the colors and protect the gradient from dust.
Arranging these tiny panels creates a window into a serene evening that feels much larger than its parts


Have a question or want to share your own experience? I'd love to hear from you in the comments below!